#✂challenges-feedback
1 messages · Page 35 of 1
Gave +1 Creative Carma to YAGPDB.xyz
Where do we post our projects to?
Hello @mortal solar you can use #✂challenges-feedback channel to post your works for the current challenge that will start tomorrow. If you are working on the past challenges you can use #💎past-challenge 🙂
@bleak halo I thought you were congratulating me on my work for that I thanked you
@bleak halo @ivory void don't worry guys, Creative Carma is a point system that everytime someone 'thanks someone' for a feedback or advice, the person who gave the feedback/advice wins 1 creative carma (1 point) 🙂
@coral stone Ok👍
Challenge #9 A little late from the holiday weekend
@tribal gate I like the boosted orange colors and the increased contrast. The blues look a bit oversaturated though. Especially around this area here
I think you could either use Camera Raw to target the blues or you could create a Hue/Saturation layer, select the blues and reduce the saturation that way
@young karma Nice composition 🙂 ! The night version looks a bit too dark and I would probably remove these branches 👍
@tribal gate Really liking this contrast! Gives me the image a much more striking impression. I agree with Tim, it’s subtle, but I think toning down the saturation of the bluest part of the water just a touch might help the image. Nice work, the edits give this a nice cinematic quality!
@young karma Looking good! Love the edits on Version 1, really gives it some great contrast and readability. I think version 2 could use a bit more brightness overall. Even at night it’s better to have a bit more brightness so everything reads better, which you usually see in night photography due to a longer exposure. Especially in the sky to separate the shape of the rocks. Good job on these!
Is the new challenge series starting today?
@high mesa Ooh, I like this one. Almost gives me a bit of retro sci-fi feel. I think it might help if you increase the contrast of the background just a bit. The water is such a deep dark tone, it might help if the darkness of the background was increased a little to closer fit. Especially near the top where it might look like it's fading into dark space. Great idea!
@remote narwhal It is already live: https://www.behance.net/live/videos/3201/Photoshop-Daily-Creative-Challenge-Retouch-a-Photograph?tracking_source=to_replay

Join your host each morning at 9:00am PT to learn how to approach each challenge using Photoshop. Complete 9 challenges by Friday, September 13th and you’ll be on your way to sharpening your skills. Get your questions answered, see what the community is creating and get fee...
@smoky comet Nice work, the contrast really makes everything pop. Some really nice sharpness on this one as well!
Hello! Its my first time here and im not sure how it works :/
Mixer Brush / 01😀
Hi @near sky you can register for the challenge here: http://behance.net/challenge/photoshop Also feel free to watch the replay of Day 1 here: https://www.behance.net/live/videos/3193/Photoshop-Daily-Creative-Challenge-Welcome-Day-01

Daily Creative Challenge
Join your host each morning at 9:00am PT to learn how to approach each challenge using Photoshop. Complete 9 challenges by Friday, September 13th and you’ll be on your way to sharpening your skills. Get your questions answered, see what the community is creating and get fee...
More close
@near sky of course! Here's the link for the starter file https://www.dropbox.com/sh/jvx73nb15do9anu/AACbYb6ptZfHRRxav2-G0scqa?dl=0
Thank you! 🙂
@thick vale EPICC
@thick vale looks pretty sweet! I can smell the oil paints if I get close to my monitor. 😄
Day 1 - mixer brush, never knew I had it in me!!! 😀
@digital pollen Wow that really looks like a painting! Well done!
Thanks @jolly quest
Gave +1 Creative Carma to VooDoo_Val
@thick vale Very cool! Was curious if someone was going to do that sort of cracked texture, nice touch! I like the sort of Rembrandt lighting you added in on the right cheek. It’s a tiny nitpick, but it might help to tone down the light on that right cheek eeeever so slightly. In Rembrandt lighting it’s usually a bit darker than the other cheek. Really liking the frame mock-up too!
Hi Everyone! I have never used the Mixer Brush and it is a pretty cool tool.
Day 1 - Mixer Brush
@unkempt field This is awesome! I also love that you have added the before and after! Really helps get the full impact of the effect! NICE!
In progress
Yes @bleak fossil I was thinking in a Rembrandt thank you for your comment
Gave +1 Creative Carma to SamPetersonArt
Here's my entry
@candid chasm Great Job! I love the look and feel of the brush strokes!
@digital pollen Great job! I love the brushstrokes in the backgrond
thanks @lethal mural I think that if i take more time of my time to be more detail it could be much better (like in the eyes)
Gave +1 Creative Carma to Jesús Ramirez
thanks @lethal mural
Gave +1 Creative Carma to Jesús Ramirez
Happy with everything except face. Tried a couple of different brushes and brush sizes but it keeps coming up too realistic compared to rest of canvas. Might try a smudge brush.
Original
I realized after submitting for live feedback, I didn't add texture and a darker color layer. Here's my update.
Just a quick version for challenge #1 cause I am out of time today 😉
Hi , here is my post as a Day 1.
I really like the result of your painting @candid chasm
@untold saddle thanks u 😁😊
Gave +1 Creative Carma to aperture lux
Challenge#1
@digital pollen so cute 😍 🐶
Daily Challenge #1... Ronnie. Using only a mouse unfortunately. Before and After
Found a brush that works better for me. Added a little painterly effect on the face to decrease some of the realism.
This is my first photoshop challenge! 😺 Here's a before/after of my cat, Ahri!
First time using my new Wacom as well so it's a little rough but it was fun! Never used paint before like this in photoshop. I left the labels clear on purpose so they could be read.
Before
Ta-Dahhhhh 😄
day 1
Day 1: I didn't know where the idea was going, but I went anyway.
Hello everyone 🙃 let me know what you think about it, I appreciate every criticism! 🤓
Day 01 Challenge - Mixer Brush
Day 1 - Loved learning how to use this tool (using only a trackpad 😀 )
Day !, part 1: painted rose from several years ago.. I did the background with the oil paint filter and painted the petals and stem with a cotton blender.
Mixer Brush 2: Made another one, more rough so the effect is more visible and modified curves.
@forest aspen great job! I loved the texture, it seems like I can touch it 😍
Day 1
Day 1 - I couldn't get rid of the Adobe stock print, so made my brush a bit wetter and let myself go 😬
Day 1
Photo Credit: Roksolana Zasiadko
Mixer brush
I painted over the whole thing, then thought of adding this cool effect! Does it look good?
@sturdy flare It does!
Day 1: Mixer brush. This was a lot of fun! Photo was a composite of several photos from Unsplash and Pexels.
Original:
Challenge #1 Never knew this brush even existed! Will definitely need to practice with it!
Challenge #1 | Mixer Brush
And here's one showing the original vs the edited one. I decided to only edit the Pelicans (so you will probably need to zoom in to see the changes) and only changed the "wetness" percentage by 20 as I moved from one bird to the next. I have never done anything like this in Photoshop before so I wanted to really get a feel for the tool at different “strengths.” I also took a picture of my set up using the iPad Pro, Apple Pencil and Luna Display. This image is one I took last week at the Bolsa Chica Wetlands
@gilded pelican Nice work on these! It’s cool to see how little tweaks and changes in contrast can change an image. Looking good!
@hidden pendant Cool changes on Challenge 9! I like how the bottom one Looks like a vintage photograph. For the top right image I think it might be nice to keep that more orange hue in the sand to make for a nice contrast with the blue sky. Might unify it a bit better. Nice work on these!
I've been out for a while - good to be back... And what a great one come back to - love the mixer brush! I do a lot of work with 3D apps like Poser and DAZ Studio. Both can give you very realistic renders, and sometimes it's fun to just 'mix' things up (pun intended). This is the original straight out of Poser Pro 2014.
And here's the mixer brush version after about 15 minutes of playing..
@ivory void Wow, really awesome changes on this one, totally transformed the image. Especially that sky swap. Really impressive job on the way you cropped the left mountain, looks very convincing. Nice job on the soft lighting on the mountains as well, might be nice to see a little of that in the foreground around the house on the right side to give the eye a nice “S” curve path throughout the image. Very nicely done!
@atomic turtle Really solid work on Challenges 7-9! Very convincing effects on 7 and 9, really love the idea for 7, very nicely executed as well. Maybe a little bit of faint/low down smoke on the left and right could balance out the image a bit more? Really love what you did with Challenge 8, great mood and lighting to the whole thing. My only suggestion would be to add a bit of shadow around the bottom of the boat with a multiply layer since the lighting around the grass and water looks like the side of the boat might be a bit more in shadow, or at least around the front of the boat. Great work on these!
@blazing quail Hah, very cool. Yeah, it’s a really neat effect. Nice work on this Ant! My only suggestion might be to lighten up the wrinkles above and below the eyes. Maybe just lighten the contrast overall so the shadows aren’t quite as deep, it doesn’t seem to fit in with the rest of the image as much. Good work!
@digital pollen Great work on the dog, definitely has that painting quality to it! Was this all with the mixer brush technique? Really nice color contrast as well!
@vale vale Looks good! You can definitely get some really cool textures and looks with this technique. I like the texture you added as well.
Next time I'll work on more pronounced brush strokes
my problem is that I gotta sleep but I just want to keep going with painting in all the things
@unborn raptor Nice work! Liking that canvas texture. I think something that really helps with the more obvious brush strokes is using a fairly large brush size, softening key edges, and using a textured brush.
@unkempt field Nice work! The texture and saturation change definitely give it a lot of intensity. The way you used the brush strokes in the background gives the whole thing a sense of movement as well. Cool effect!
@simple lance Fantastic job on this! Very strong painted look, especially with how you handled the soft edges. Very cool to see how you used the technique on this one. Looks great!
@reef idol Really nice work on getting some of those soft edges on this piece. Really pushes that painted feel nicely. One small suggestion would be to soften the edge between the black and light brown fur in the middle of the face on the right side. It looks a little out of place being a noticeably harder edge than the rest. Also it might help to more up and down strokes on the shadow in the background to avoid such dramatic sharp edges. Either way this came out really nicely!
My first time doing a challenge I always just watch but here I am so thank you Jesus Ramirez ...I see I need to work more on this and I will.
Ok, so this is my first time doing this challenge thing, but here's what I made
PsDCC1 Mixer Brush. Thanks @lethal mural for a great way to spend my evening using my tablet most of the time instead of my trackpad.
Gave +1 Creative Carma to Jesús Ramirez
@candid chasm Seeing how lovely this is makes me wish I had chosen one of my flowers. Maybe I'll do one in the future.
@forest aspen So Lovely!
@idle cairn Really looks like a painting!
He're what I've done. Thanks for the challenge! I would have never even thought to use the mixer brush in a million years! 😊
The mixer brush was so relaxing and similar to real painting! Thanks for the challenge!
original forgot I flipped the image
@digital pollen Wow, awesome effect on the flower! Really great look to it. I think getting a little more texture/brush strokes in the background might make it look like a painting more overall, but I think this is a unique look on its own. Very cool!
@lunar mango You got some nice texture on this! Really great photo for this challenge too! I think you could push the brushstrokes even further to really push that painterly feeling. I like the way the edges seem fairly soft in the top left of the dogs head, it might be nice to see that more on the right side of the dog as well. Nicely done!
@fallow bough Nice work, I think the face is looking pretty good. I think one thing that might help would be to make the rest of the image a little more painterly. Especially the edges around her body, if you soften some of those up, especially towards the bottom it might help draw the attention to the tighter edges around the face, which is often how painters control focal point in an image. RonnieOakland ‘s image is a nice example of getting some really convincing painterly edges. Always great to see what you’re producing Ken!
@unborn raptor Nice work! Liking that canvas texture. I think something that really helps with the more obvious brush strokes is using a fairly large brush size, softening key edges, and using a textured brush.
@candid chasm Wow, you really pushed the brush strokes on this one, nice work! I especially love the painterly feeling you got on the hair on the right side. My only suggestion would be that it might look nice to brighten up the whole image a touch, and maybe give a little extra lightening to the shadow around the nose. It’s a really dramatic dark contrast and lightening it might fit with the soft/delicate feeling of the rest of the image. Maybe something like this? Great work!
@kindred kernel Very nice Gerard! Some nice texture going on there. I think one of the major elements that adds to the painterly effect is edges that aren't too crisp, especially in the hair. I think getting a more painterly look on some of the edges could really push that painted feel. Just a thought. Nice work!
Day 1 Version 2! I added some more textures and a solid colour layer to make it look more like a painting!🖌 🎨
Probably should have done something a little more complicated, but it works as I'm running behind today.
hope im not too late for the first one, just heard about these challenges. Let me know what you think of this, i dont do this type of edit very often. was alot of fun
Challenge #1
Hi everyone. Here is my piece for challenge #1. I mostly used the wet mixer brush for this project-heavy mix for painting/blending the outlines and light mix for the inner lines of the flower. I also added more yellow to the stamen using the brush tool, hoping to get a "fuzzy" texture :D. I saved my file as a JPG, so I hope my image quality is okay 😀 !
This is my original photo.
Varied brush sizes. Fair amount of blur to speed things up. Technique works well with pastoral scenes I think.
@bleak fossil I was thinking about it haha thank u 😊
Gave +1 Creative Carma to SamPetersonArt
@vague lantern amazing job! I loved the way you folowed the lines of the elements, especially on the trees and the river! My only suggestion is to work a little bit more on the stones, there are some spots where the original is revealed. 🙂
Thanks very much. will post again if i get time to revisit it. 😀
My day 1 painting
@vague lantern How did manage to do the trees. I was working on a similar image.
you*
@glossy dove I guess, for the ones in the foreground, started with a stroke straight down the centre of each tree and then horizontal (ish) strokes outwards. Middle ground - 'A' shaped strokes. Background - just vertical strokes and then just a block with a larger brush. the white trees got too much blur, would stick those on a different layer if i was doing it again.
Alright. Thanks for the tips. 😊
@grand void It looks like the doggo is on the moon! pretty neat
I gave it another try 🙂
Great first day challenge 🙂
#1 Challenge 🐕 (It's tough to use the mouse)
Day 1 Portrait of my Dad. Used my own brushes I had previously created for fur and combined with a soft round and an Oil to smooth out a bit.
Original photo.
@smoky scaffold I like it!
Gave +1 Creative Carma to Hilde
Day 1 revised, with thanks to @bleak fossil for the feedback
Gave +1 Creative Carma to SamPetersonArt
@bleak fossil thank you for a feedback!
Gave +1 Creative Carma to SamPetersonArt
@forest ivy i love what you did!
oh right... here is the one edited, following Sam feedback :)
Day one
Mixing brush
Creative Challenge 1
PSdailychallenge day 01 - making painting with mixer brushes, I used the gauze pattern for the canvas.
original for mixer brushes
I changed this image a good bit...
Before Retouch
After retouch! ✨
Check out all the final retouches here: https://www.behance.net/gallery/84065725/Portrait-Photo-Retouching

Day 2 Retouch a Photograph
Here's my 2nd challenge! I think I've went a little too overzealous. Lol🙃
I'd love to know how to remove the glare from her glasses.
Here's my first challenge! I'll have to go back to yesterdays and check it out as well.
PS Challenge 1 - Mixer Brush
Thanks, I didn´t know how to make that effect, great!!
Day 2, dodge and burn with bokeh!
My Image retouch for Day 2 of the challenge.🙂
Still trying to get a decent result from Day 1 mixer brush. Seems that animal fur submissions show effect best.
Original
Little Late on Challenge #1 but got a bit busy before I could post. Here's the mixer brush version:
Challenge Day 2
Mixer Brush Challenge
- Mixer Brush Challenge
day one
Challenge #2
Original Photo by rawkkim on Unsplash
Day 2 Retouch. Reversed light source and added bokeh. Finished by adding color to bokeh.
Original
Use the starter file, now trying the skills with one of my own
@lone hare Awesome effect! It's cool seeing someone take this challenge in a slightly abstract direction. I like the contrast between the heavily painted areas and the face that you kept more in tact. If you're pushing a fully painted look it might help to get a little bit more of the brushstroke effect in the face, back of the hair, and shoulder area to unify it all a bit more. Unless you're going for that heavier contrast in the two styles which is pretty cool on it's own. Always great to see what you're coming up with Ryan!
@upbeat laurel Looking good Dianne! This definitely looks like a digital painting or something illustrated with all the brush work you added. Some cool textures going on as well!
@unborn nimbus Ooh, this is a great idea for this challenge. I really like some of those key soft edges you got, really adds to the painterly effect. Nice composition with the shapes too, it has a good balance.
@vagrant sorrel This turned out great Ghosty! The background and texture really adds a lot to the effect. I like how you kind of muted the highlights ever so slightly and gave it a slight warm tint, adds nicely to the effect. Great job on this!
@tawdry fossil Very cool! The texture is definitely a nice touch for this effect. I think if you wanted to push the painted look even more you could do a bit more on the hair, and perhaps on the left side of the hair to break up the crisp edge a bit. It also might help to do the same just a touch to the right side of the jaw where it meets the hair to break up that crisp edge. Might help the balance of the whole thing. Looking good!
@bleak fossil Is this what you were suggesting for improvement?
Photoshop Daily Creative Challenge - Retouch a Photograph
Challenge #2 | Retouch a Photograph
& here's the original for comparison:
Not edits I think I would normally do here 🤔 but it was fun to play with what we learned
Day 2. Challenges are fun.
@vague lantern I love ur image 😍
Cheers🔥
@edgy idol wow, well done!
@willow nebula thank you 😊
Gave +1 Creative Carma to Hilde
Day 2 - Used the New York Skyline to create the bokeh!
@thorn geyser Wow, really?! That's sooo cool! I was having a hard time finding the right picture for the bokeh
Challenge 2
@edgy idol Yeah 😄 had to try a few different ones though. If the lights were too bright it ruined the bokeh!
here is the first day challenge of mine)))
@bleak fossil Thank you for the feedback
Gave +1 Creative Carma to SamPetersonArt
Last pass at Day 1. Mixer Brush plus blend of Dry Brush Filter applied to result . Candlelight LUT used at end.
Okay - first time here..
Day 1 challenge original
Day 1 challenge edit
Day 2 challenge original
Day 2 challenge edit
@mild fulcrum Is that Mardi Gras in New Orleans or Mobile, AL?
@frosty root Looking a little ghostly!
@timber flame Very nice!
@thorn geyser New York skyline bokeh. Cool. Sweet image, too.
Day 2 - Now this was a challenge alright! Not really my cup of tea but tried to make the best of it
@willow nebula I loved the teal tone contrasting to the red lights!
Gave +1 Creative Carma to Valdair Leonardo
Retouch a Photograph - Challenge 2
@autumn vapor Well done! I love the high-key look with all the glowing assets! The border on the right looks a bit off though. I think you could just crop off this part unless you want to have a pronounced frame. If that is the case, I would add the same look to the left side to keep the design in symmetry 🙂
@vagrant sorrel Just wow!
@candid chasm wow! I'm super impressed with the look - especially the purple/magenta color wash in the shadows just transports the otherwise almost monochromatic photo into a whole different color space!

@celest temple That looks awesome 😄 The tiny imperfections add a lot of realism. I think you could have a more prominent canvas texture 👍
@edgy idol Yes! The brightened underside of the bridge has some great details just waiting to be uncovered 🙂 You could probably think about removing this piece of seaweed
lol I thought that was someone's head or a wig
@edgy idol did you add a lens flare?
@glacial path I did, I didn’t love it, but added it for the sake of learning
@mint mesa of course that's a thing... thanks internet
Gave +1 Creative Carma to April
@glacial path I just realized that lens flare and fake bokeh are different. I didn’t add a lens flare but rather faked bokeh
@glacial path thank u 😊😊😊😊
Gave +1 Creative Carma to evil
@vague lantern wow! This is a great edit 😄 You should totally go even further with the saturation and flames. Maybe even put some of the flames in the foreground.
you probably don't want to go this extreme, but you could 😉
I mean, there is a Photoshop filter for flames
@thorn geyser Awesome job and great photo 👍 I love the dreamy look and the soft colors. I think you could totally try out bolder color filters to feel out what works and what doesnt. You can add a new layer and use the gradient tool to create a color overlay. Then you can set the blending mode of said layer to "soft light" and adjust the opacity
depending on the overlay, you can achieve a virtually unlimited number of variations
could be warm
or colder
@timber flame Great job on the colors and the increased contrast 🙂
@timber flame maybe you can also apply a less saturated version of the same colors to the floor of the background
@fallow bough Ok, you have picked a pretty difficult image to retouch! Just look at all that hair 😮
@fallow bough I think you could improve the mask by using the Select & Mask workspace
and then paint over the hair using this tool
that's how you can get every last strand of hair
@willow nebula Thank you
Gave +1 Creative Carma to Hilde
Original Adobe stock before using mixer brush
After painting with mixer brush And other effects
PSDaily Challenge Day one
@glacial path Used Select and Mask as described. I think my problem was adding mask to color filled layer instead of masking subject with color in layer below. Started as Darken blend but abandoned and dropped back to normal. Going to redo and mask subject like I should have done in first place.
@mild fulcrum This is a cool image for this challenge! I really like how you pushed the painterly feel around the image to focus attention on the figure in the middle. I think you could push this a bit more on the pants area by breaking up the crisp edges of the pants that are drawing a good amount of focus due to their sharpness. Just a little softening should pull all the focus into the face. Well done!
@magic rampart Very cool, the background texture and painterly quality does a lot to add to that painted feel. Brings the focus in on the figure nicely as well. My only suggestion is to maybe go lighter on the effect around the hands, or at least to use smaller horizontal brush strokes around the fingers. Currently the structure seems like it was shifted/broken a bit and the skin tone at the tip of the fingers being dragged down draws a lot of visual attention. Great work with this Jmada!
@icy dew Really solid adjustments on this image! The color and value adjustments really bring these to life. Great images in this photoshoot, very professional looking!
@compact anvil Nice work! The background change makes such a difference. If you wanted to push that painted look even more it might help to soften the edge around the outside edge of the hair here and there, and where it meets the forehead. Sometimes softened edges in key areas can really add to that look.
@raven meadow Some really cool edits going on here! The colors add a lot of interest to the image. One suggestion I'd have is to maybe tone down the intensity of the red light on the right side of her neck a little bit. Currently it's intense enough that it seems like there should be a light right by her ear for it to appear that way. Really cool effects, looks like she's at a carnival or something.
@fast moth Ooh, interesting image. Would be cool to see the original. Not sure if the original had a black background, but it could be nice to get a slightly lighter tone in the background to pop out her silhouette and give that bigger shape more of a read. Currently the staff, face and the red designs are really the only readable shapes. Kind of reminds me of black light theater a little bit. Nice work with the bokeh effect!
@honest gorge Nice work with the red cast light! It might be cool to see just a tiiiiny bit of that red cast on her front right side as well. Currently the drop off from red to 0 red seems a bit odd, like there should still be a tiny bit of it showing. Looks good!
@desert anvil Hah, definitely a pretty heavy effect but gives it a really interesting stylized look. The only suggestion I'd have is to maybe tone down the brightness and intensity of her shirt. Currently the bright white is overpowering the rest of her as a focal point. Maybe darken it down slightly with a multiply layer with a slightly red tint? Nice work!
day 2
Another shot at the painting — inspired by the folks on Discord, I tried to take my "painting" skills to a new level, or perhaps a new view: more paint, less photo. Let me know what you think.
messed with the lighting abit in this one, hoping to edit another image with the colours and filters you showed us . let me know what you think
@mild fulcrum For that I think you'd have to use the spot healing brush or clone stamp tool to sample the areas right next to the glare. Might take a bit of work. Might also look a bit odd without them unless you remove the background with all the lights too.
@dark rose Nice work on the glare/bokeh effect. It makes her silhouette pop out even more, though maybe the one in the bottom left corner could be toned down ever so slightly as to not create too much contrast in the corner. Colors are looking really solid too!
@tacit condor You got some really nice texture going on here! It would be nice to see the original image to compare, but the cheek area around the corner of the mouth seems like either the shadow or highlight might be pushed in an odd way? You got some really nice texture going but it might help to add a few softened edges around the outside of the arms or face, just a little here and there to soften it up in some key areas. Looking good!
@proud hornet Nice work Cemi, the colors are looking really cool! Though it might help to tone down their saturation ever so slightly just to look a bit more natural. It might also help to move the bokeh spot on her wrist to the left a tad so it’s overlapping a bit of her arm and the background at the same time. It’s almost a bit too distracting the way it’s covering a key part of the image right now. Just some thoughts, really nice job on this!
My own image taken in Luang Prabang Laos. Little boy waiting for Monks to pass
@blazing quail The bokeh is a nice touch, makes it seem a bit more festive! Nice work :D
@fallow bough Oooh, very cool on the money image. Yeah, I definitely think the effect works extremely well on fur. That really soft quality definitely has a painterly feel, and the texture is looking good as well! I think toning down the saturation of the green in the background just a touch might help that effect as well. Looks great, Ken!
@onyx mortar Very cool!You did a nice job going over the whole image with this, definitely a nice uniform painted look. The canvas texture adds a nice dimension as well, looking good!
@olive cosmos James Hetfield! Very cool. Really nice brushstroke quality in this! If you want to push that look even more it might help to soften up the outside edges just a touch in some key areas. Just so everything isn’t quite so perfectly crisp. Also it looks like you lost some definition and contrast in the eye on the right (his left eye), might help to bring that back to match the other one. Very nicely done Marcin!
@bleak fossil Thank you, you're right, it does look like her hands melted 😆 is this better?
Gave +1 Creative Carma to SamPetersonArt
PsDCC2 Photo re-touching - Here it is. Comments welcome.
@cold cedar great job on the dodging and burning! Especially on the face 👍
Thanks @fringe thicket.
Gave +1 Creative Carma to Chocolita
wet paint
it s a veery long process, I couldn't get it to the end!! also, i found it time consuming to find a good brush!
Hi, everybody, better later, than never...
Struggled with the shadow on the face, but an awesome technique.
Day 2
Day 1
/Daily Challenge Day 2
PLaying catch up here...not sure about the curtains, another great technique, thanks Adobe Crew
black and white seascape 😀
Day 2!! 🙂
Day 2. Great lesson.
#2 challenge 😄 Before and after...
@crisp ermine Yes, finding brush is a challenge 🙂
Challenge #2: Was fun to play around with this one! Only ever used the Burn tool before, fun to learn the others too!
Here is Challenge #2 retouched photograph. I couldn't get the bokeh effect working, even so... here it is
The result
Images I used
Image 02
@bleak fossil Thank you again sir! I was going for the contrast between the painted look and the photograph as if she was melting. It was a lot of fun to mess around with.
Gave +1 Creative Carma to SamPetersonArt
@glacial path Thanks for the feedback. I redid the masking but the results were worse. Instead, since I put pink highlights on the hair, I was able to hide the hair fringing by using the same color as a Darken blend.
Gave +1 Creative Carma to evil
Here's the final result.
@bleak fossil Thanks for the suggestion. Along with desaturating green, I also darkened it a bit. Definitely helps.
Gave +1 Creative Carma to SamPetersonArt
02 Touch up, I really enjoyed learning this technique. Now, I have to watch the video again to write everything down.
@fast moth that's a great cosplay or costume! nice work on the bokeh
Day 2 Photo Edit
Hi , here is my post . Day 2.
@lone hare Making it Black and White was a great idea!
@crisp ermine Fantastic work! Having an "uncompleted" painting makes it seem so real!
First attempt at making it painterly.
Thanks @lethal mural I focusing more on the light and dark contrast the photo had....I over did it with the high pass though
Gave +1 Creative Carma to Jesús Ramirez
@bleak fossil - forgot to thank u for your feedback the other day, thx 😀
Gave +1 Creative Carma to SamPetersonArt
Day 2 / Retouch photo
@fallow bough Very nice, those changes really make a difference!
Made the background look more painterly.
I didn't apply the dodge and burn because I didn't have a lot of time with this one but I'll definitely work on the technique for future projects
Great job @distant pike 🙂
Love dodging and burning, never tried this 50%grey technique before. It's a cool way to do a really quick stylized dodge and burn. love it
@thick vale your work really gave a nice mood to the photo! Loved the bokeh, Amazing job 🙂
original
@crisp ermine It does require patience to do the painting but I think you nailed it. You captured the essence of the image, the look on her face.
late Day 1 Challenge - didn't get quite the effect I wanted on the face, but overall happy with the rest of it. Advice / feedback?
before photo below
cool!
@tender glacier I love the photo choice! It really looks great as a painting! I would suggest putting more shadows on the woman, she could look a bit more intimidating. It's really cool!
@cold cedar thank you ! :) really appreciate ;)
Gave +1 Creative Carma to ValentinePierce
@lethal mural thank you ! :) i stopped because it was painfully long, but at least instopped at the right point :p
Hi Guys ! I present you my first painting 🙂 I hope you’ll enjoy 😊❤️
From Nice, France with love 💕
First is before
And after 💕
Select and Mask Hair
Day 3
Got lost in possibilities for creating and warping hair brushes. Day three with an illustration.
Original 🙂 Challenge #3
Edited Challenge #3 (i took a difficult picture haha)
and i think that i can take off some hair from her right... but i dont have anymore free time for now haha
@candid chasm I love the way you added extra hair so naturally!
My late Day 2 submission! How do you all like it? Anything I could make better?
Original Day 2 photo
Regretting that I purposely selected a difficult image to challenge myself. 3 and a half hours later and the result is not what I was hoping for.
Original plus brush sources
Thank u @sturdy flare and I like ur picture from ur second challenge. If I were u, i'd try to do a litte less heavy the white part over the girl and take off that blue line (I'm just saying it cuz it got all my attention haha)... But it is just my perspective, let's see what the professionals say 😋
Gave +1 Creative Carma to KandyKittens
Day 3 Original:
Masked:
Edited Masked:
also for the LOLs:
Thank you @lethal mural ! Good stuff learned today!
Gave +1 Creative Carma to Jesús Ramirez
@hearty bolt I got the LOLs a lot with my work.😂
@coral stone Same here.....when I worked for the promotional company whoever opened my art files got a good giggle.
I reused my challenge 2 pic for the challenge 3 so I gave her longer hair by using the sample pic from the challenge 3 app and adjuster her white tank! So this is technicly challenge 3. lol
Ok, seems like I'll be a day behind due to the European time, but still, really enjoying this! Here is the before pic of my boy sleeping.
Now he seems to be sleeping somewhere in a disco 🙂
Day 3
Original Photo by Aljoscha Laschgari on Unsplash
@deft jewel I really love it! The sunset was the perfect thing to turn into a painting, and you did it wonderfully!
@fast moth I like it, and I'd love to see what background you pick for the lady!
@thorn geyser That looks really cool!
Oh and @candid chasm thanks for the advice! 😄
Gave +1 Creative Carma to Meer
Day 3. I tried to use Photoshop hair brush which Jesus showed us today, but I couldn't make it work on blond hair, so I decided just to draw hair using my tablet
@reef idol nice work 🥰
@candid chasm thank you😊
Gave +1 Creative Carma to Meer
@reef idol and you did a fantastic job! The hair looks 100% real 😄 Maybe remove a couple percents from the hardness to make it ever so slightly softer (you could also blur the hair a bit. 0.1px max)
@glacial path thanks for advice!
Gave +1 Creative Carma to evil
@thorn geyser Epic costume! I think you could make the castle slightly brighter and warmer 🙂
@jolly canyon I really liked it. I totally have this blonde hair trouble too.
@fast moth wow, that's a pretty difficult background to remove! I think you're almost there! I see you've painted in some hair? I think you could add some shading or use real hair as a texture 🙂
@neon oracle pretty impressive! The only thing I would change is the edge of the layer. You can still see some of the background. Luckily there is an easy fix in Photoshop 😄
@deft jewel I love the sun rays 😄 The clouds look wonderful and you did the right thing - you cropped the image so you can only see the sky and the forest.
I think you could improve the painting if you let the brush strokes "hug" the contours of the clouds
think Starry Night by Van Gogh
Well done!
@sturdy vault Nice work! The softened details and edges seem to really help the effect. If you wanted to push it even further towards that painted look I think using a bigger brush and desaturation the green in the background just a bit might help. And of course a paper or canvas texture of some kinda always helps as well. Looking good!
@distant pike For sure, dodge and burn can really help tweak the lighting even more after adding some color to make it fit. Nice work, the colors and bokeh effect give it a nice feel. I think you could even do a quick stroke of color dodge over the green and yellow lights to make the brightness of the bulbs pop more since it seems like the colors muted the brightness a bit. Might give it a bit more of a realistic pop. Looking good!
@bleak fossil thanks. I forgot about the texture. I will work on it.
Gave +1 Creative Carma to SamPetersonArt
@hasty coral Really liking those colors in the background! Adds some really nice interest to the whole image. I wonder if a tiny boost of brightness on the girl might help balance the focus of the image a bit? Either way really nice work!
@tender glacier Really solid work! You got a nice uniform feel with the painterly effect, the way you softened everything in a controlled way definitely adds to that. It looks really good to me so I’m hard pressed to find any changes to suggest, but I wonder if lightening the deepest darks ever so slightly might help make it look even more painted. Not sure if that would actually help, but just a thought. I recall Brooke Shaden who was on Adobe some time back did that to her photo manipulations to give them a more painterly feel which I found very interesting.
@unborn nimbus Wow, really strong painted feel on this one, very nicely done! Some cool edits with the teeth too. The only suggestion I have is that the hair seems like it could use a little more of the effect, specifically the edge of the hair. Softening up the crisp edge might help that a bit. Well done!
@reef idol nice work. I really like the ending picture, it looks very natural.
@runic pendant Very cool change! I’d just try softening the hard line of the color layer so it looks a bit more natural of a transition. It might also help to cool down the hair color a bit. It’s orange hair, but the scene of this photo is in a very cool color environment. I’d maybe try adding a cooling photo filter to just the hair, and maybe masking it to erase the areas you want to ease off the effect. It’s good to note when using color layers that not everything will be the exact same hue. Colors shift a little between the shadows and highlights. But I think cooling down the orange may fit it in with the lighting of the image a bit more. Just a thought, nice work!
@young karma Really nice brushstrokes going on here! Really helps that painterly look. I think it might help to try and make your brushstrokes going in the same direction of the objects to give it a more natural feel. For example, so keep that soft fluffy look in the clouds I think horizontal brushstrokes might work a little better to avoid the spikey look. Though that’s kind of a cool effect on its own. Nice work!
@frosty root Cool idea with the highlights! I think it might help to have a slightly softer transition in some of the areas of the color of the hair. Usually there’s a bit more of a fade with colored hair, and edges of hair are usually pretty soft. It also might help to ease up the effect on the left outside edge of the hair. Since the hair there gets thinner and more wispy the pink effect would be a lot more faint. Might help it look more natural. Looking good!
@bleak fossil thanks! I'll try to boost up the brightness later tonight and see how it goes.
Gave +1 Creative Carma to SamPetersonArt
@silver trench Oh wow, you totally transformed the hair, really cool! I think it looks great, the only thing that stands out to me is the top edge of the hair. Hair typically has a soft edge, but I think you could tighten it up just a bit, to better match the edge we’re seeing on the area near her forehead. It also might help to add some subtle bits of hair and strands to that top edge to make it look a little more natural. Looks great!
@zenith warren Really nice work on this, it’s cool to see the photos you used as well! I like how you handled the edges of the hair, my only suggestion would be to maybe use a multiply layer and color dodge layer to add a little bit of variation to the shapes you added. Specifically a color dodge layer or something similar on a clipping mask to airbrush a little more light onto those outside strands of hair. Usually hair on the edge like that is brighter due to being thinner and having more light that’s passing through it. Just a thought! Well done 😄
@fallow bough Very cool Ken! This is a great photo for this challenge. I think you could maybe even push the strands of hair around the edge even further. In the original photos the thinner strands of hair extend pretty far off the main area of hair, and gives it a lot more softness. I think you could go even bigger and further off the surface with some of the extra hair. Nice work!
@unkempt field Nice job separating this! My only suggestions would be to soften up the bottom left edge of the hair a bit, and maybe sample some hair like Jesus did in the stream for the right edge of her hair for a more natural looking edge. Something where we can see some strands of hair coming off to get that more realistic edge. Nice work on this!
@kindred kernel Nice work Gerard, this is definitely a good image for this challenge. Definitely challenging to isolate all that hair. I think if you are able to layer the hair brush you made even more at a slightly lower opacity it might help you build up a softer edge that looks more natural. Might add to that soft wispy look we see around the edge of hair, and usually seems to be from a lot of soft, lighter forms. Well done!
Day 3 - Bad hair day! Lost a lot of time hiding the watermark, so the girl has a bit of a silly grin now and she also will probably run to another hairdresser straight away!
@lunar bay Night adjustments Rebecca! The brightness really adds a cheery peaceful feeling. The color shifts are a nice touch as well. This is more of a nitpick than anything, but I think it could be helpful to mask the lightening effect and ease it off towards the bottom half of the girl. Particularly the back of the legs and back of the arm on the left. The brightness with the deep shadow next to it draws a lot of contrast, and easing off it in those areas with a soft brush should help strengthen the focal point around her head. Really nice work on this!
I am working on yesterdays challenge and I must have dodged the shadow to much and now I'm pixelated. HELP how can I fix this ?
@tacit condor Looking good! Some simple adjustments can really add a lot. The contrast really helps the overall interest of the image, nicely done!
@severe flame Really cool effect with the halftone pattern and muted colors you got in this! I like the semi-retro feel it seems to have. My only suggestion would be to maybe use a masked levels layer or color dodge layer to boost the lighting a bit on the girls face and upper body region to strengthen the focal point just a touch. Nice work Kai!
@uncut valley since you are working on an 50% gray layer you can use the Brush Tool with 50% Gray (#808080) as the Foreground color and paint on the areas you want to restore
@thick vale Very cool, loving that stage light look! It definitely transforms the mood of the image. I think getting a little more of that colorful brightness in the face might help. The side of his face seems a bit heavily shadowed for the added lighting. Maybe something like this?
Cool, thanks @coral stone , i will go do this
Gave +1 Creative Carma to Valdair Leonardo
Fixed the rough edges - Thanks Sam for your critique
@blazing quail Really cool take on this challenge! I like the color adjustments you made to fit them into the new environment as well. I think you could try creating a clipping mask on the girls/hair and using a soft brush with a multiply and color dodge layer to add a little shadow and lighting variation into the hair so the edited bits aren’t just a single, flat color. Might also be cool to add a little pinkish lighting falling on their backs to fit them even more into the scene. Maybe something like this? Really nice work!
PSDAILYCHALLENGE Day 3 - Hair Retouch
I love working with the hair brush but I am struggling with the mask itself. When I tired to edit the mask to be tighter I got a weird fuzzy almost opaque appearance. How do I fix the current mask without having to go back and start with a different mask? I am working on a PC
Original
PsDCC3 Hair Brush: Hmm, the brush did not work well for me so I used cloning, copying, distorting and opacity.
Challenge #3 ....with 😹 hair. This gif goes between the initial selection vs added on "hair"
...and dropped on top of another image just for fun 🙂
....& just because I can now stick the cat everywhere. 🐱 🌻
Gave +1 Creative Carma to SamPetersonArt
It's an extremely subtle change but I like it more, thanks @bleak fossil for the help
Gave +1 Creative Carma to SamPetersonArt
@glacial path Thanks for the feedback! I have made the castle warmer and brighter! Looks much better! 😄
Gave +1 Creative Carma to evil
Day 3: Masking Hair. This one was a challenge. Photos by Hosein Shirvani and Laura Vinck on Unsplash.
Original
This one was really difficult. I struggled to find photos to make the hair brushes with. I used a lot of other images for those.
Gave +1 Creative Carma to SamPetersonArt
Nothing is Written! Day 1 Challenge #VixPS
@bleak fossil Thank you so much for the feedback!! 😄 I felt at the time if I leave the original texture of the hair would help with the realism since the second challenge is to touch-up a photo 😂 but alas...when I think about it, I was already past of no return once I start sharpening the teeth 😅. I have smoothen the edges and soften the hair as per your suggestion. I'm glad I tried this out, this was such a happy accident, who knew crappy photos are great bases for a nice painting,....all it needs is a little dodge, burn and some dentistry. ☺
Gave +1 Creative Carma to SamPetersonArt
Took a portrait and used two brushes to mask and replace on top of a new image
This is the transfer image
Challenge 3 - Close look at original when masking and also editing revealed it appeared to be a vector image, with some hair already painted in. Images by darksouls1 and Joanna 12 on Pixabay. Hopefully I have managed to match lighting and perspective ok.
Challenge 3 - Select and Mask / Creating a Hair Brush. I was struggling with this woman's hair for a banner creation and then the challenge came by the right time. i hope she isn't frustrated with what i just did with her hair. Thanks team. #VixPS
@hidden pendant Warm archer stands out nicely in cool background.
Challenge#2
So I decided to combine the day 2 & 3 challenges. Here are the before and after images.
Day 3 revised with thanks to @bleak fossil for the feedback
Gave +1 Creative Carma to SamPetersonArt
Far from perfect but this was a very informative challenge for me, I never knew you could make your own brushes! Will have to practice with this a lot to get a more realistic effect!! 🙂 feedback is always appreciated! 🙂
@bleak fossil thanks for the suggestion. I changed and I like it better.
Gave +1 Creative Carma to SamPetersonArt
Second attempt to Day #2 of this challenge, this time I could do the bokeh effect. 😀 not great, but at least I could make it.
@sturdy vault thank you so much!
Gave +1 Creative Carma to pfordie
I made 12 hair brushes today and none seem to work....
Sorry, first one is the finished project.
It's looking awesome @ruby panther! Great job placing her on the scene 🙂
Thanks @coral stone It was challenging. I think I made the brushes too big.
Gave +1 Creative Carma to Valdair Leonardo
@ruby panther I'm struggling with that same issue, I'll adjust mine later. It's not easy to find an image that matches the hair
Hiya! I had a difficult time trying to get the bright white from the background out of her curls, but did my best with the burn tool in the short amount of time I worked on it - any suggestions would be great. I'm having such a great time with these challenges and the videos are so helpful and informative! Unfortunately, I'm in Florida and I don't get to watch them in real time. Thanks so much!
@civic zealot Swapping any background is very hard with backlighting on the subject.
@civic zealot Looks like you did a good job here!
@ruby panther Thank you!
Gave +1 Creative Carma to Shawn K
First try to day #2 of the chellenge, im really behind with the days, but i'm on it! This is the after. I used the 50% grey efect, i also tried the one with the curves but I thought that the first one fits better with the intensity of the photo. The photo is mine, I took it near where I live in Concepción, Chile.
This one is the original.
This was amazing! This is a photo I took and the results of the challenge. It did take awhile (especially with all this costume detail) but the results were amazing.
Here is a close-up...
Here is my Day 3 entry
@young karma Great Job on the hair!
@lethal mural Thanks
Gave +1 Creative Carma to Jesús Ramirez
Hello buddies i'm smoking for an image of thaïs peuple on the design my i can not fond anyone could help please
original Challenge #3
First try Challenge #3
And finally, I fix the hair and i tried to fit here in this new background 🙂 challenge #3
Day 4 Day 4 Cut Out an Object
Day 4 - masking with shadows
Challenge#03 late, but completed 🙈
cropped further...
This was my first practice with mixer brush using sample photo from Day 1 . I was locked out Discord kept saying claim account finally today thanks to chat on behance live suggested to sign out and in to Discord fixed the problem in case anyone else stumbles across this.
Day 1 mixer brush using IG photo of my niece Kate I did a light and dark version then got carried away away and put her in a flower
version 2 mixer brush Day 1. Curious which version people are drawn to
DAY 4
Original Photo by Jakub Dziubak on Unsplash
Challenge #4 -- Mask w/ Shadow
😃
Masking was a bear and then spent forever finding a background image with same perspective. Had to skew the background a bit to make it work.
Day 3 challenge - this was hard. Trying to use my own images but could not find "the right one" for the project. Very fun learning new stuff!!!!
Missed that skewing background had tree leaning to right. Fixed here.
originals
The best i can do for now... i will try to work on it later (challenge #4)
Challenge#3
I was never happy with yesterday's results so started over. Much happier with outcome.
Original plus hair brush source.
Great job with the shadow @timber flame!
Day 4 : I'm excited to finally learn a way to include shadows in masked objects. I think the hardest part was matching the color of the cut out object to the background image.
Originals
Retouch a Photograph
day 4 challenge
courtesy of Jonathan Petersson on Pexels
photo credit Two Dreamers on pexels
It took all week to find the time to do some of the challenges, so thy will all be posted today. This is Day 1 painting.
Day 2: Define shadows and highlights
Day 3: mask fluffy hair
Day 4: retain original shadows
Original photo by Markus Spiske via Pixabay
My edit - challenge 4: maintain the shadows (or try to)
Took Day 3 (mask hair and use brushes to add digital hair) a different direction.
@fallow bough ooh i am loving this direction, she's really starting to look like a fantasy creature and that texture for hair works really well 😍
@unborn nimbus Thanks. Am planning to take photo of granddaughter to create a similar composition. This gave me a chance to see if concept works.
Gave +1 Creative Carma to paperwifu
@fallow bough It works alright, I love it!
@fallow bough Awesome, it be great to see how it turns out ! 😃
I used her for a number of challenge compositions (https://www.behance.net/gallery/82730453/April-29-May-10-2019-Ps-Daily-Creative-Challenge) but need to take some more photos. Have used the same 2 photos for too many comps.

Behance
April 29 - May 10, 2019 Ps Daily Creative Challenge
Oh right! I did my last changes! 🙂 Challenge #4 😄
@honest gorge beautiful! 😍 Did you use Bevel & Emboss for "Spring"?
@coral stone Yes and I also used the overlay effect 😊 😉
Great job! I loved it 💯
#challenge2
Painting.
Sorry to use Stock photos. Day 4.
teacups in the harber 😀
Super creative @trail field! About the reflections you can apply a subtle wave effect (filter > distort > Wave) and adjust the opacity a little bit 🙂 . If you want the wave effect to be non destructive you can convert the layer to Smart Filter
thank you for the tip I will uses that next time but thank you
No problem 🙂
Just snapped some garlic and some ground on an iPhone....
Original garlic 🙂
Original ground
Few days behind since I just got my laptop the other day but here is Day 1!
original image
How cute @neat shale 😍
heres the link to my day 1 https://www.behance.net/gallery/85173909/Photoshop-Daily-Creative-Challenge-Day-1-9319

Behance
I haven't been online in a while because my old laptop messed up photoshop so I couldn't do anything. But now I am back and doing the creative challenges again! I'm really proud of how this came out on my first try!
also need advice for my day 2 real quick before i upload, does this look ok?
vs original image
PsDCC4 Masking. No matter what I think I know, I always learn something new. Here's the guitar masking and I will try to do it with some of my images later. Happy Birthday @lethal mural
Late Day 1 submission 😁
Second challenge. The original photo first. A lot of fun with these so far!
Retouched version...
I like the colors of the bokeh effect @chrome glacier 😃
@hallow crown wow, amazing job! It really feels like a painting, I loved it 💯
The select and mask hair challenge was really helpful. It works on fur too and now I know what to do with those thin, wispy, whiskers!
Original photo
Challenge #4
More masking
@coral stone Glad you like it! ☺
Challenge #4, Learned a lot of techniques I never knew about before!!
Amazing @young karma!
I love the color balance @last gull !!!!!!
@sturdy flare thank you)
Gave +1 Creative Carma to KandyKittens
Rushed the masking but the shadows seem ok; tried to keep it in a guitar theme though!
@neat shale like me I have late
OK so I had trouble getting images to match a background to get the shadow to work. I did get one working but could not get it to blend to background (shadow) correctly. Also got a bit carried away with a story in mind from a couple of backgrounds I had. Have used skills used from a number of the last 3 challenges and used drop shadow tool instead. Took some textures I had to age the Teddy, the picture and the VW Beetle toy. Masking the tricycle was a challenge as well.
The cup looks slightly stretched did you not hold shift when expanding because in the newer photoshop you dont need to hold shift for it to keep it equal
That's a great point @thorny sedge Sometimes I still forget about the Shift key, but I'll get used to it 😂
Hello, here is my entry for day 5 on my instagram : https://www.instagram.com/p/B2MqMkei-xn/.
I used my own photos of a trip to Tenerife in 2003

Instagram
0 Likes, 0 Comments - Laurence Collard (@elauza) on Instagram: “Daily Creative Challenge September 3-13 Day 5 created An Instagram seamless panorama. These are my…”
My challenge #5 and my instagram https://www.instagram.com/p/B2MruWTl7DC/

Instagram
0 Likes, 0 Comments - MMG (@grossenbacherdesigner) on Instagram: “So here we are again... Daily creative challenge ps: Create a Panorama Use the slice tools to cut…”
Day 5 Create a panorama
challenge 5
challenge 5
challenge 5
challenge 5
instagram.com/kresna_rama
challenge 5
instagram.com/kresna_rama
challenge 5
instagram.com/kresna_rama
Challenge #5 - here's my pano
Challenge 5. https://www.instagram.com/p/B2MwPmsFkQW/
challenge 5
instagram.com/kresna_rama
 LeahMichelle, this command is disabled in this channel
Let's try this again - not sure what happened
Day 5: Alaska. Photo worked better as 3x panorama
Currently trying to make it work right in Adobe XD but this is my Day 5!
Day 5: San Francisco Skyline - https://www.instagram.com/p/B2MzE8CAgi-/?utm_source=ig_web_button_share_sheet
@cosmic hawk so cool! this is a nice photo. did you edit any of it yourself?
my first try for todays challenge!
@glacial path Thank you for the feedback! I am still learning how to use Discord and am just seeing the mention for the first time
Gave +1 Creative Carma to evil
Day 5
Photo by v2osk on Unsplash
slice tool
Challenge #05
That's going to be a good one to use! Thanks 🙂
Catching up - here's Challenge #4
On a stormy November day near the Manistee , Michigan Pierhead.
@autumn vapor lovely! I think you don't need the middle part of the banner unless you want to add text 🙂
@forest aspen I love the epic wall of clouds! You should totally make them even more dramatic! Just watch out for the noise - if you overdo it, you will end up with too much noise
@young karma I think you could add a touch of dehaze to this panorama 🙂
I love the second photo! Maybe you can straighten the shot unless there's an artistic reason against that ^^
@unkempt field You did a great job cutting out the burger 🙂 Maybe you can pick a background with a table or a surface on which you can put the plate
@compact anvil I like how the panorama keeps the foreground and the background in focus. I would just straighten the panorama
if you're using the crop tool, you can simply use the straighten feature
make sure to check the Content-Aware checkbox, if Photoshop should automatically fill in the missing areas
and maybe you can edit your shadow out 😉
paint over the area using the Healing Brush tool
(or the spot healing brush tool if you don't want to sample an area first)
@honest gorge the slices look a bit wide - make sure to use the right dimensions 🙂 If possible, I would reveal more of the water
@glacial path Thanks so much for the feedback, I didn't even know this filter existed! There's still some haziness where the sun hits the hotel that I don't know how to fix really but overall it made it much clearer!
Gave +1 Creative Carma to evil
@young karma a bit of haze is absolutely fine 🙂
@glacial path and now it is aligned how it should be...I should really pay closer attention to these details lol! Thank You! 🙂
@distant pike Woah! I wonder... how saturated was the scene before somebody cranked the saturation slider to 11 😛 - of course if that's the look you're after, more power to you! It could even be a cool poster
PS Challenge 4 - Cut Out An Object
@neon oracle Love it! If you like you could add some text to the first and last frame 🙂
@tacit condor Well done, the mask looks clean and the shadows are realistic 👍
I think you could add some grain to the background to match the foreground https://www.behance.net/gallery/78746469/Photoshop-Protip-Realistic-Grain-in-Camera-Raw

Behance
original Photoshop Protips, shared on the official Photoshop Discord Server
@fringe thicket Epic drone shot! You could play with the colors a bit to give it a custom look. Here's how you can do that https://www.youtube.com/watch?v=As1Mg9l939I

Here's how to use super vibrant mesh gradients as overlays. The link is http://gradient.moebest.de . You can either download the gradients one by one or you ...
@zenith warren Great presentation 😄
PS Challenge 5 - Create a Panorama
@fallow bough you could probably apply a Dehaze filter via Camera Raw to remove some of the haze 🙂 I like the cool colors and the cloudy sky - cool panorama
@distant pike I love the new background! The warm tones of the bricks work well with the orange of the pumpkin 👍 . But I feel like there's something missing above the pumpkin. I would either add some text or crop the shot
@hallow crown I like how you removed some of the shadows below the eyes to create a smooth look. The new eye color also looks great ^^ Just be careful not to overexpose the image or your will lose detail in the texure 🙂
@unkempt field I love the angle and the trees! And yes, like they said on stream, the boat and parts of the trees look a bit oversharpened and you could add some blue to the water - maybe even do a sky replacement to really get those deep blues in the sky 🙂
@cosmic hawk Dude! Your work is epic! This panorama is so good! I also looked at your Behance profile and wow! You are really good!
@glacial path Thanks. Applied Dehaze to both SF and Alaska photos but could probably use a bit more.
Gave +1 Creative Carma to evil
@glacial path Thanks for the feedback!
Gave +1 Creative Carma to evil
Here's the hamburger on a table ready to eat!
@glacial path I fixed the proportions and until I can make more water appear 😁 Thanks for the feedback 😉
Gave +1 Creative Carma to evil
awesome 😄 Thank you for posting the updated version @honest gorge
Gave +1 Creative Carma to Carla

@glacial path Added a gradient! Thanks for the feedback!
Gave +1 Creative Carma to evil
I took this panoramic photo on the coast of Paraná State, I never had the oportunity to play with it, now I know how I can post it on Instagram 😁
Oh. I'll make an adjustment on the sky, it created a pattern 😂
@glacial path thank you
Gave +1 Creative Carma to evil
Pano Before Slice
Masking - PSDAILY CHALLENGE Day 4
@coral stone Very nice, perfect time for this challenge to come up then, hah. I’m sure I have a bunch of unstiched panoramas sitting deep within my phone. Looking good!
@fringe thicket Ooh, great image, very cool flow to it. Gradient is looking good!
@fallow bough Contrast changes are looking good! I like the punch up in the pinkish tones as well, adds some color interest.
@tacit condor Very clean job on Challenge #4! Looks really nice and natural, I like how you got some of the cast shadow in too. Very well done!
Behind....as usual. Day 4 cut out objects. I had a bit of trouble finding free stock with the white backgrounds
@unkempt field Nice work on these for Day 4! I really like the one with the paint splatters in the background, the burger fits interestingly quite well stylistically into that. For the image with it on the table it might help to clean up the dark edge/line at the top, and putting a soft cast shadow below the dish might help set it in the scene a bit better. Looking good!
@neon oracle This is a really great image for a panorama! Has some great colors and shapes shifting throughout the 4 images. Very cool!
@unborn nimbus Nice work on the cutout for Challenge #4! The grass is looking pretty nice, that definitely seems like a tricky one to get right. Cool depth of field as well. Nice work on this image!
@last gull Great work on Challenge 1! Really nice job pushing the brush effect, really makes it look more painted. The color adjustment is a nice touch as well since the photo is so saturated and high contrast originally. I think adding a canvas texture or something similar could really help push this one to that next level of a painted feel.
@lunar bay Great work on the strawberry image for Day 4! The images are very cleanly composited together and the perspective effect on the burlap material looks great. If I had any suggestion it might be to add a slight gradient of shadow to the table/burlap texture, maybe a slight slur effect to add some depth and focus on the strawberries, or even just a simple vignette on the image. Something to make the background a little less uniform in its detail and focus.
@hallow crown Nice work, very subtle changes but sometimes that's all you need. Nice edits to strengthen the focal point around the eyes.
@keen granite Well done on Challenge #4, nice job keeping the cast shadows in tact with the background swap, that definitely makes a difference. Very clean work! My only suggestion would be to perhaps use a perspective transform on the background texture to make it match the one. The phone is at a slight angle, whereas the ground plane seems straight down. The perspective different makes it look just a little out of place. Nice work on this one!
@keen granite Nice work on #3 as well! My main suggestion would be to try and get the same lights and darks we see in the hair in the original image. It looks like the values have been flattened a bit, so deepening the shadows and punching up the lights might help a bit. Also being careful of too many hard edges around where the hair falls across the head. Here’s a quick example.
@gilded pelican Nice work, liking that background swap! Kind of reminds me of 90s colors. A couple suggestions I have would be to see if you could get the drop shadow back in with a multiply layer or something, might help ground the coffee cup a bit more. It also seems like perhaps the cup and bag were scaled up too much? The background looks a bit more crisp than the cup and bag which throws the image off a bit. Perhaps making them the same sharpness again might help. Good job Iggy!
Challenge 5 completed, if only I had an instagram account to show of my new skills. 😆 😂
@hidden pendant Wow, you really challenges yourself with this one (challenge 4)! Lots of images to fit together. Very nice compositing of everything. I think the most challenging aspect of these is finding images with a consistent perspective. I think they’re all fairly close actually, maybe aside from the toy car. My only real suggestion from an image making standpoint would perhaps be to have a stronger focal point, and visual hierarchy between large, medium, and small objects. Perhaps this would be stronger if the bear and chair were larger in the foreground. Really great work overall!
@last gull Challenge 4 with the bread is looking really nice! Great work with the masking. I think maybe the background directly behind the bread could be brightened up a bit to really make the value of the bread pop out. Currently they're around the same value. Lightening up that area of the background could give the bread a stronger silhouette. Well done!
pano, this is cool. I had no idea what the slice tool was for. Thanks. I am not sure that i'll ever use it but i'm glad I know now.
Always wanted to know how slices worked, thanks Jesús
Screenshot of slice tool.
@bleak fossil thank you so much for your comments
Gave +1 Creative Carma to SamPetersonArt
@ruby panther Beautiful!
Thank you so much @bleak fossil 😃
Gave +1 Creative Carma to SamPetersonArt
Day 5 - Not the best quality however
@coral stone Thank you.
Gave +1 Creative Carma to Valdair Leonardo
Here's the panorama, the edit chopped off a lot of sea
Creative Challenge 5- Create a Panorama. Used my own painting, can't wait to make some more 🙂
@bleak fossil Thank you for the feedback, I would have liked to have had the Bear in the Chair closer as well, but was trying to get the legs on the ground plain, and I got confused in regards to what background I had to practice the shadows. (working on two at once LOL).
Gave +1 Creative Carma to SamPetersonArt
Decided to revisit Challenge 4 and found a couple of simpler images to practice with, instead of complicating things.
PsDCC5 Panorama
Not exactly how I was thinking these would load. Here's a screenshot.
I did the hair and change the background to the eiffel tower. Hair is so difficult for me. Challenge 3 and 4. Thank you
The original
@thorny sedge I guess I did, I will try again. Thank you
Gave +1 Creative Carma to urboisteve
@gilded pelican - cool work, maybe consider the contrast on the new image with the contrast on the old, . The light on the original is much more diffused, this would really help in merging the masked cut out on the new image. But the masking itself is good.
@wet thistle - which part of Espana is this taken in? Great panorama
Thank you for your advice. Is this better?
Thank you @high mesa This is taken in Malaga some years ago. It is my favorite place. In fact, I am on holiday there now....😀
Gave +1 Creative Carma to Mykul
Thank you @bleak fossil for the suggestions, yes the cup was stretch, I fixed it and added a shadow, hope it is looking better.
Gave +1 Creative Carma to SamPetersonArt
@bleak fossil Thank you for your comments. Is this better?
Gave +1 Creative Carma to SamPetersonArt
@high mesa Thank for the suggestion, I hope it improved. I added a field blur, as in challenge 02, day 3 or 4 I don't remember.
Gave +1 Creative Carma to Mykul
@gilded pelican - awesome man, much more believable
@magic hedge Looks great! I'm glad you had fun doing it!
Day 5 - Evening walk sliced up
I decided to go with a pattern overlay and blend it. Now I really want this backpack. ^_^
Awesome @unkempt comet! Loved your work 😍
this is my version of it but with a twist 😀
Before
After
Really small edit, but I've been working on this image and needed this to finish it!
Changing the color from the challenge PSD
My entry for Day 6
Finally completed a PSD challenge on same day as class dark blue to white woo hoo funny Dicord has new light theme too
Thank you Jesus for teaching all the things I'm struggle with
before far left after pink and blue
Day 6
Original Photo by Tamara Bellis on Unsplash
**I struggled with the edges of the mask on this one. I tried to feather the mask edges, but I could not eliminate the over-exposed edges without having the red show through.
Here's my late Day 4! I'm eating some lovely dinner, made of many different delicious objects 😄
Here's Day 5's Panorama. The photo's not that great. It was take from my phone during the 2017 eclipse in Nashville but I like learning this technique!
today's challenge changed the color of the pumpkin
Challenge #6 Adjust Colors - Purple Frumpet 😊
Awesome job @keen granite! The colors look so realistic 😄
I use these in After Effects to animate our kite team manuvers. The orange one is the applied challenge color. I love amount of control this technique offers.
@lofty willow I like the added logos and the bird 🙂 The color masks looks very clean and I love the new green tone 👍 Well done!
@shadow mural The new golden/yellow color looks epic! I wish we could change the color in real life, huh 😄 ?
To bring your work to the next level, why not add a sky as a background to show them in their natural habitat 😛
I messed up yesterday's challenge. I thought I could create a vertical panorama on instagram (fairly new to instagram BTW) and I don't think you could. 😦 But I like the pic I've created so it's all good.
@autumn vapor Ha! I don't think I have ever seen a "Purple Frumpet" in real life 😉 The effect looks 100% believable. Maybe just tone down the saturation in these areas so it looks less purple and more silver
This is what happens instead. The slices stay horizontal instead of vertical. So...only horizontal guys.
Thanks @woven bane Mobest, the golden/yellow color. I am trying to duplicate the real life color it's called mango. I'll work on a background for this.
Gave +1 Creative Carma to TIM
@last gull Yes! I like the new background color! It makes all the other colors on her face look more vibrant. I think I would change the blue hue so it looks more like this blue tone. 🙂
@hasty coral just watch out for the resolution of the pumpkin 🙂 It looks like you have scaled it up because the edges look slightly blurry. It's probably ok for this context but just a thing to keep in mind
A different background.
@forest ivy That's a cool panorama! You're right, the quality is not super good but it works just fine to practice the slice technique 🙂

Blue sky background.
I think the beach background looks better because of the matching warm tones 🙂
Lamo @woven bane😂
you have a lot of oranges and yellows in the foreground and background
Thanks @woven bane that helps!!
Gave +1 Creative Carma to TIM
@fast moth Awesome job! The orange & blue color combination is a great way to increase the color contrast. Maybe you could match the yellow of the hockey stick to the orange of his uniform? 🙂
@sturdy flare mhhh! Those pens look... uh... appetizing? Just remember to add shadows to the objects or they will look like they're hovering 🙂
The lighting looks solid and the colors do match the scene 👍
@neon oracle I think the red is barely noticeable at all! Her left shoulder looks a bit bright but that's it! I'm a big fan of the mustard color - it goes really well with the deep red and it complements her skin tones! Great work, seriously 😄
@keen granite Well done! The new colors look very realistic and they could even be a part of the same collection 😄 - Just make sure to include the shadows in the mask, there are a couple of spots left where the original color is still showing through 😉
@silver trench Woah! Now those are some bold colors 😮 I think you did a great job with the color adjustments - maybe tighten the mask around his neck slightly but that's it 😄
@fallow bough as always, I'm super impressed with the quality of your work! The colors look absolutely believable and they work great together. 10 points for Gryffindor!
@glacial path Thanks
Gave +1 Creative Carma to evil
lol
@glacial path thank you. Yes I noticed it and if I were using it for something I would have started over. I haven't had as much time to work on this week's challenge (look for good stock and work) but thank you much. I will keep it in mind.
Gave +1 Creative Carma to evil
Day 6
Day 6 Changing Color. I wonder if you could do this with hair. I always wanted to be a blonde...😀
Original
Challenge#06
Loved the pattern @honest gorge 😍
@coral stone I love the ethnic style 😊
@zenith warren I like the toned down red tones! Now the focus is on the person wearing the shirt instead on the shirt itself 🙂 - Invisible edits are often the most important effects and you did a great job 🙂
@thorn geyser Nicely done! The shadows aren't quite perfect but they are super tough to get right. You could use a curves adjustment layer and pull down the red channel to reduce the redness a bit (in combination with a layer mask to only target the shadows). And if you want to get super fancy, you can even play with the Blend If sliders to refine the mask ^^
@bold valley Love the muted color! Did you add an overlay over the entire image? I think I can see some shapes 😮
@forest ivy yes! you can apply the same technique to hair! Just make sure not to oversaturate it unless you're going for that specific neon look 😄 . I like the yellow doors, they help separate the gate from the otherwise blue door 🙂
@honest gorge Wow! The pattern looks cool - and very realistic! If you want to go the extra mile, apply a displacement map to the pattern 🙂 . Like this: https://www.behance.net/gallery/81965679/Photoshop-Protip-Displacement-Map
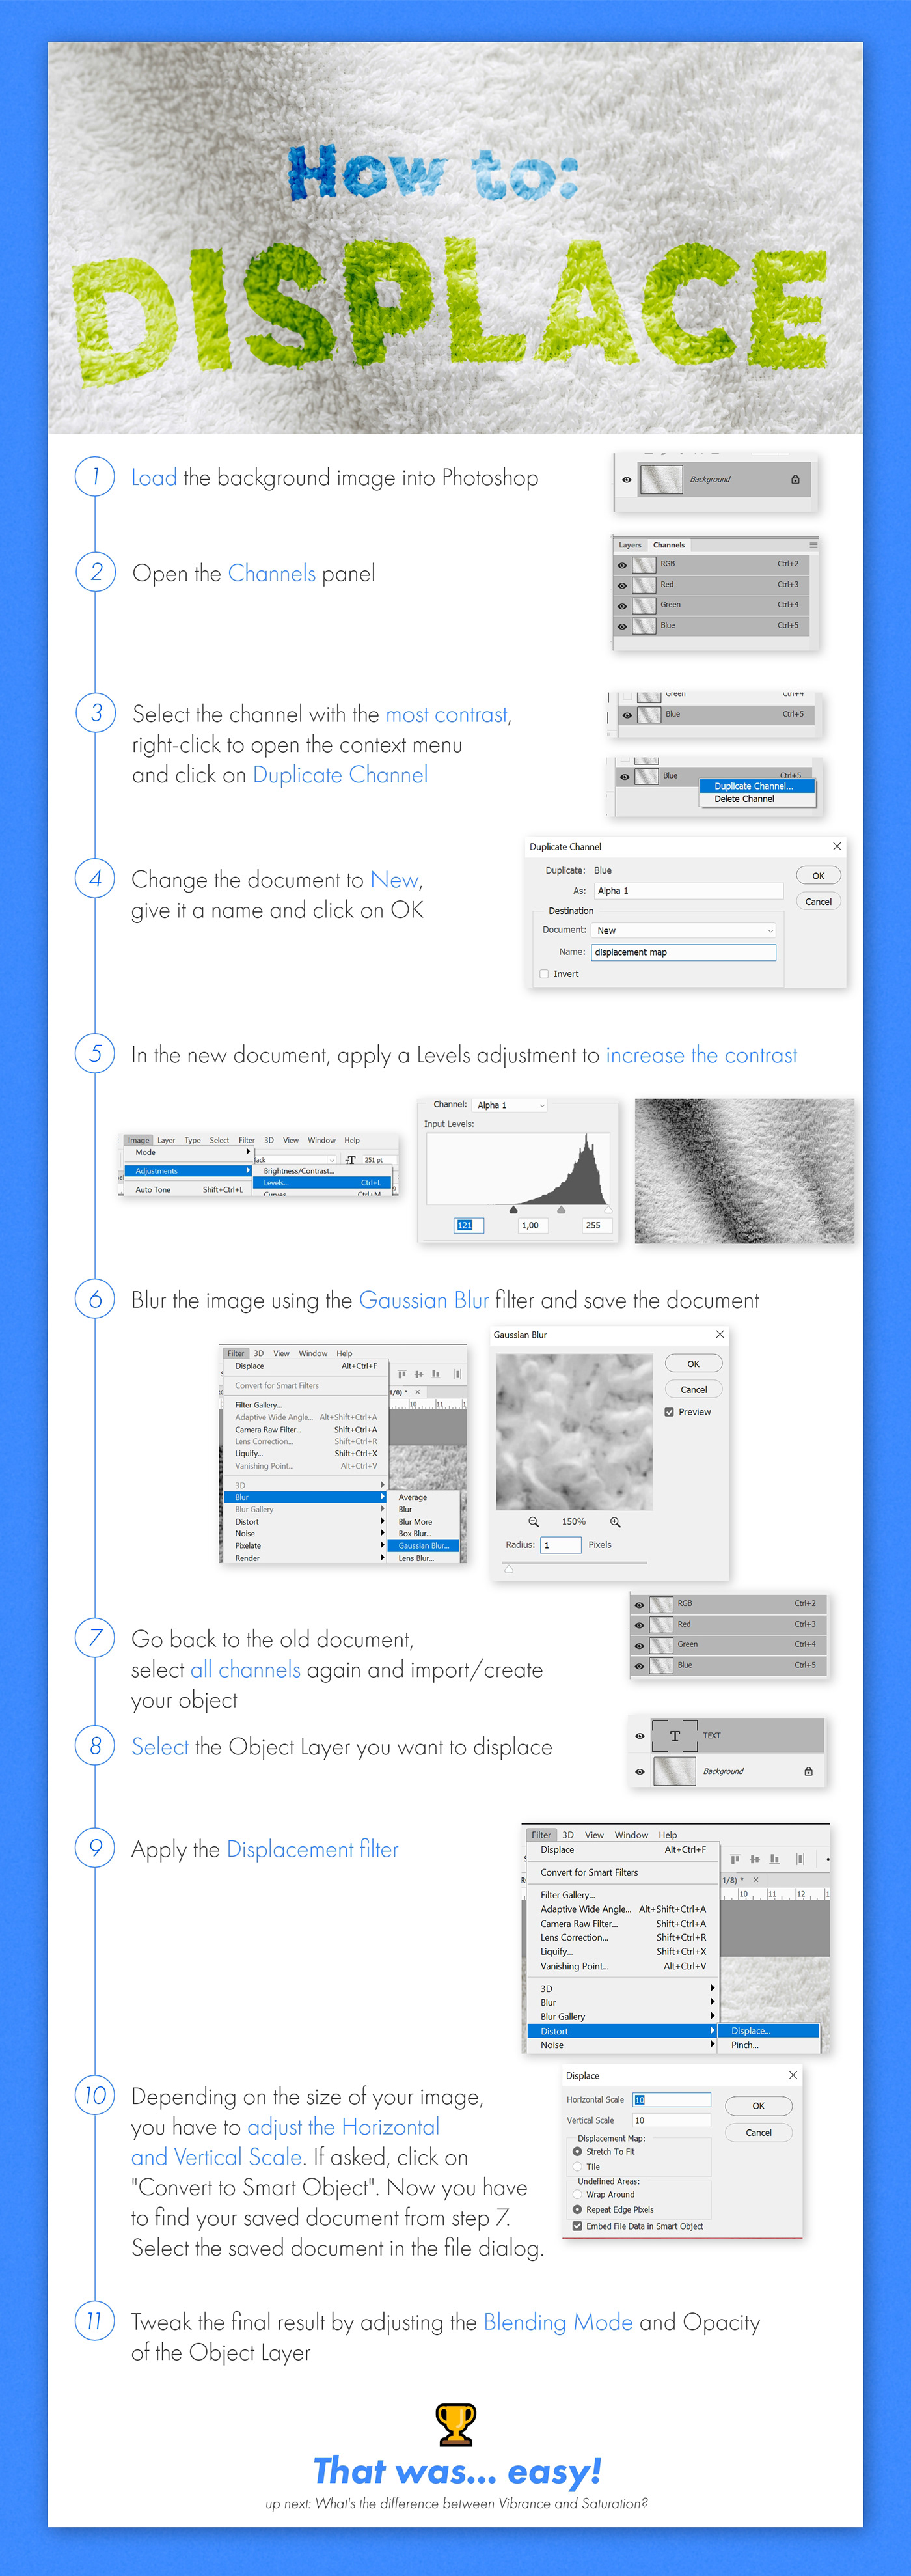
Behance
How to fuse an object to a material using the Displacement Map filter.
@zealous stratus the shadow, placement and lighting looks great! I think you should add a tilt-shift blur to the rose. The table is out of focus where the rose is. Here's how: https://www.youtube.com/watch?v=IAAvg8GhFwM
In this tutorial, I explain the differences between the three new blurs that have been added to Photoshop CS6; Field Blur, Iris Blur, Tilt-Shift. Make sure t...
Day 6 - a backpack with a brighter colour
Day 6 Challenge
Thanks for the feedback @glacial path and the link. It made a difference.
Gave +1 Creative Carma to evil
@glacial path Thanks, Tim. Yes I did an overlay of leafs. The color is the color of my girlfriend/wife's skin, sampled from another photo.
Gave +1 Creative Carma to evil
good lesson!
Thank you, @nova swan
Gave +1 Creative Carma to Patti McCoven
@lethal mural Thank you)
Gave +1 Creative Carma to Jesús Ramirez
Hey everyone, for the day 6 I decided to choose a challenging image, here's the original:
And here's the edited (I used Color Range to select the dress):
@silver trench Looking good Vandam! I think the pants and belt area could perhaps use a little increase in the deepest parts of the shadows. It looks a little washed out in the dark areas. Hair is looking really vibrant while still being convincing. Nice job, masking is looking good on that too!
@fallow bough Ooh, this is a great one! Really nice job on this, very convincing and a great job on the masking! Very impressive
@kindred kernel Great job Gerard! Nice clean job on this color change. It could be cool to retain the yellow color in the center for a nice focal point. Looking good 😄
@potent mesa Oh wow, dark blue to white definitely seems like a challenge but I’d say you nailed it! Very impressive. I think to further push the image you could even darken down the background ever so slightly (in the sky as well) to make the silhouette of the backpack pop a bit more. Really nicely done!
@blazing quail Looking good Ant! The color and masking is looking really solid, I like how you went a step further with the texture as well. Well done!
@young karma Nice work Pieter! Dark blue to yellow definitely seems tricky. I feel like perhaps the saturation in the top region could be slightly toned down, and the hue in the shadowed/dark regions could be slightly shifted towards the yellow/orange range. Might help everything look a bit more natural as highlights are usually less saturated and shadows (in warm lighting) usually shift cooler. That can be especially helpful on yellow objects so the shadows don’t end up looking green or muddy. Nice job on this!
@vivid wraith Small but effective change, took me a second to notice. Of course a lot of times the whole point of photo retouching is to have the changes be subtle. Nice work 😄
@trail field Interesting take on the challenge! The pink water definitely gives it an interesting surreal feel. A couple things I think could help would be to level out the horizon line, add a bit of a shadow under the boat with a multiply layer to set it in the scene a bit more, and perhaps even make the boat a bit bigger to give the scene a stronger focal point. Just some thoughts. Nice work!
@unkempt comet Ahh nice, great idea! Nice take on this challenge. The pattern works really nicely with the yellow/purple color scheme. Very nicely masked as well. You nailed this one!
@candid chasm Great work Meer, simple and effective color change. Looks very natural in the scene! The only thing I’d nitpick if you wanted to clean it up would be a little bit of the marking near the thumb on the right and the top of the pumpkin. But that’s just basic clean up stuff. Looking good!
@keen granite Looking good Leah! Very effective and convincing color changes. Only nitpick would be a could masking cleanups around the backpack and left shoulder on the blue image. Very nicely done!