#🔀┃art-asset-workflow
1 messages · Page 61 of 1
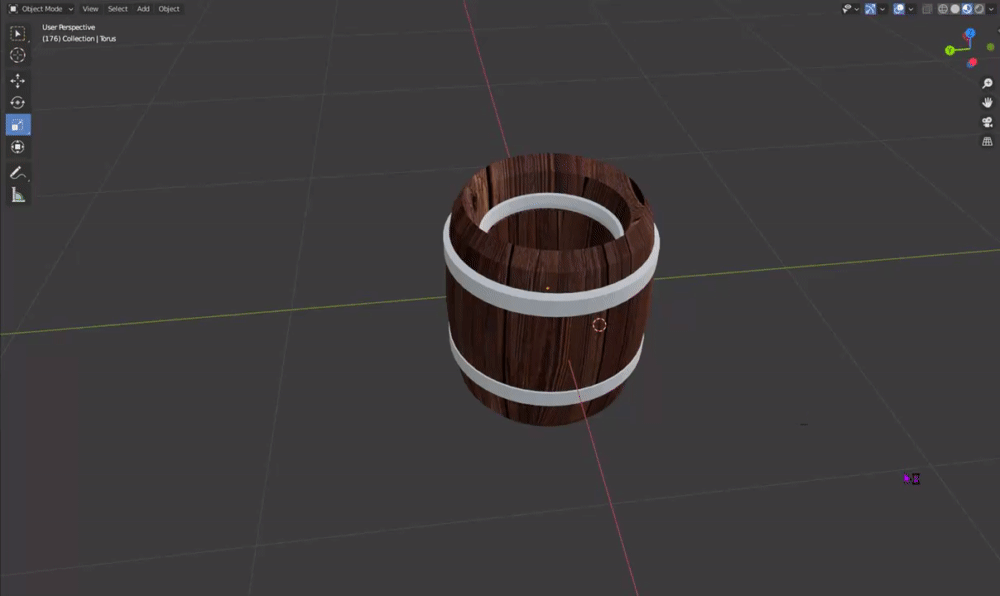
the problem was lining up each and every board on the outside
and i was taught to smart uv map stuff from a youtbue tutorial then I realized it would NOt work for something like that lol
smart uv is usually not good
uv unwraping is easy once you got the hang of it
my rule is to always scale objects in edit mode, so that object mode size remains 1,1,1
it appears to help the uv scaling, if im correct
no idea what that means lol
but yeah, it took me like 6 hours to straighten the planks on the barrel.
i am in blender
i did unwrap it
then i did smart uv map
and it was the worst thing
lol
Does anyone know why my materials are not working in Unity? I am using a .blend file, and blender recognizes the textures fine but Unity pretends they don’t exist
Materials don't transfer between applications in general. You need to remake your materials in Unity
I’ve already done it once and the materials were recognized. The second model I attempted is not recognized
I’ll have to try again tmrw
It's possible to embed the textures in an FBX say, and Unity can generate a basic material from that. But materials themselves don't transfer
Yea Unity may sometimes replicate some values, but the material(shader) systems are indeed completely different
I am trying to create a wood texture for a wooden support/pole but I cant figure out how to create something that does not look clearly repetitive. Do I make it less detailed, much more detailed, stretch it out, or make it 256 L by 512 H (originally at 256x256)?
I want to create some textures being a mixed version of Paper mario TTYD and The legend of Zelda: Windwaker.
Any tips to what I can do? This is my poor semi-attempt until I realized the problem:

Does anyone have any advice for how I can UV unwrap complex objects like these?

Specifically when it comes to parts like its feet and the bars on the front end

Break it down into simpler shapes. If you are a seam at the top of the leg. You break the mesh into a cylinder and a L bracket for UVing. Which is a lot easier.
Hey all, as I‘ve just started out learning 3D art I was wondering: is there a need of low poly 3d artists for hobby projects/game jams? Or is 3D mainly for the industry who make big games?
Do you mean like this? I'm just doing planar-based projections for these and it's taking a very long time (that's just one leg). Do I just have to get really fast at this, or is there a faster way?

3D skills can be used for lots of things... I can't say what the demand is like for game jams, but I can imagine there's always going to be a programmer with an idea who can benefit from an extra set of hands in the art department - especially if it's low poly like you said, because that's pretty big in the "indie" field nowadays.
This is definitely a practice skill, when you have more experience it's faster. Looking at your mesh. I could have it done in a couple minutes. But I've got nearly 10 years of this work.
Thank you! I am just having so much fun with the 3D tools so I was just curious how I could use the skills I learn 🙂 Really looking forward to make some nice assets
A couple minutes for one leg, or all four?
The whole model. Haha.
That's insane. It took me nigh on three hours just to get this done. I don't feel I was working particularly slow either. If you have any suggestions, looking at this image, please let me know. I've used cylinder and planar projections for the whole thing.

Also is it common to "UV as you go" or should you do it when you are done with the mesh modelling?
It depends, it's a bit challenging to make a seamless pattern that does not clearly look like it is repetitive or has areas that when zoomed out tend to be apparent.
Sometimes what looks good in a 9x9 grid may look horrible if you tile it hundreds of time across a surface.
It comes down to testing and testing, with photoshop you can setup smart layers which you can tile in a grid and work your way from there. Changing one smart layer will change all the other ones that are a copy of it.
When a certain feature of your texture becomes apparent, it is then a matter of breaking it down until it is gone (which could introduce other repetitive areas as a result).
And the level of detail and size has nothing to do with it. There are plenty of HD realistic looking textures that tile just fine.
Sometimes creating an alternate texture that can tile with the main one is a good idea, it can help break the repetitiveness
Anybody have an idea what was causing this? I managed to fix the issue by getting rid of a cylinder it spawned on

Check your gameobject and it's parents scaling
hi, i am exporting a model from blender in .obj format to mixamo then .fbx from there to unity, but in unity the scale is very small its -100 time in unity. Is there a way to fix scale in blender to match unity's scale for .obj export formats . Thanks in advance.
You have an option in Unity to re-scale models
oh
could you please share some details i am new to blender

Much better to do this from Blender tho, but I don't know Blender... Search for words like Transform, Scale, Scaling...
ok thanks for the assist
@earnest pagoda Ctrl + a to set scale on blender.

Then these export settings will export well for you.
thank you it worked, but now i realize its scales down when i download the fbx back from mixamo i think its because of mixamo .
Yeah mixamo re-exports if you are using mixamo to rig.
oh
if i import it back to to blender and export it to unity after fixing the scale the bone names wont change right and the animations from mixamo will support
Should be good.
thanks a bunch @stray stone it worked 🙂
👍
This might be the most noobish question I have ever posted here but how do i make a slope in unity out of a default cube?
I have never done any basic 3d modelling inside unity itself, only imported from other programs.
rotate the cube so it's tilted?
Otherwise you need a custom mesh. The default cube is and always will be cube shaped
You can do some rudimentary 3d modelling in Unity itself if you install ProBuilder
yeah, that is one idea i just had
seems to work i guess
so you can't do basic 3d modelling in unity itself without addons
i see
Well, an old paid add-on they assimilated and hired the developer to continue working on. 😅
anyone know of any assets or methods to allow me to use projectors with normal maps?
They do different things. Probuilder was designed to be a blocking tool. To set up a level design and get to testing quickly.
Blender is a modelling software so then you can do more.
You can do like... Everything in blender tbh
Except decent aniamtion. 🥲 Still the one thing Maya has over blender.
Aniamtion tooling.
I have a question. When UV unwrapping, should you "unwrap as you go", unwrap each object as it is finished, or unwrap only when all objects are finished and combined
sounds like the sort of thing that depends a lot on what you're doing and what workflow you like
I'm not very well versed in animation lol, btw our school is getting some MoCap equipment next semester (double Kinects) and i need to know the best software for capturing the data, can you just do it straight in unity?
The best program is usually motion builder. A tool dedicated to it.
Unity is a poor tool to do motion capture with.
I unwrap as I go for big things and wait till the end for small things.
Awesome, hopefully we can convince our teacher to make those 3d printed finger tracker gloves and we can have pretty advanced mocap for under 1k
I wouldn't bet on it.
The thing with motion capture isn't the data capture. It's the cleaning.
The more you capture the more you have to clean and that is a time consuming process.
At my work we capture the body motion, and the finger are animated seperate.
Faces are captured as a seperated process as well, but that gets a lot more cleaning and checks before it's signed off.
Ah i see
Motion capture is good, but it's not good at all when you need something of detail.
The other issue is that Motion capture looks poor in a scene that's not hyper real. There's principals to animation that allow you to create a appealing animation with character. Motion capture does none of it.
Hand animation still looks better in more cases than mocap.
Because mocap lacks character motion. It's realistic which is then uncanny to us because it's not what we usually see in games and aniamtion.
Yeah. It's fine if you use it in the right case.
Which would be a AAA realistic style game. Like Watchdogs or such.
A game like fortnite, it's all hand animated.
Because real motion would look too odd.
What about a game where i want the antagonist to look odd and uncanny, not weird but like something Is off
Does it look like a real person?
It's a wireframe mesh, think pretty much a super hot character but black and red
if you want any sort of responsiveness, you end up giving a lot in terms of animation unless your game is very slow paced (looking at you, red dead 2)
so mocap is great for stuff like cutscenes, but that sword swing ain't going to work without some animators punching it up
Red dead 2 is so bad because of the physics.
Mocap is a good to get some base motion in yeah, but you'll have to clean and then reanimate on top of it.
What about for stuff like just walking anims tho? I gotta be able to use mixamo for that right?
I actually just finished a project at work which we used motion capture in, we had 14 animators clean and tweak on top of it.
yeah, andy serkis is great and all but gollum was really a triumph of animation
you use whatever you can to get the game shipped
Now I'm working on a movie which is all hand animated. No mocap here.
It's not for selling, mostly i just wanna flex on the other schools at our game awards
I'm still a first year in video game graphics (16)
especially if you get bogged down trying to live up to a professional's standards for process and quality 😉
I flexed at my school by building a environment in the old unity rendering system and made it look like Unreal. With full VR.
I am lucky that I am now a professional. Working at a high end Animation studio. 👀
Our school bought 10 Quest 2s for development and I'm super hyped to make a game for them
Design is hard.
VR doesn't follow standard convention.
I got into VR from the very beginning.
I know, I'm a VR fanatic
My first VR project was with Disney. 😅
I know, but i think it's worth a shot
Sure thing!
I'll probably try and get a job or an internship at DICE for a few years first tho. I don't like supporting them but they're the easiest way for me to get some experience
Don't limit yourself.
Remember it's a highly competitive industry.
In other news. The new season of Love Death Robot came out last week, Pay attention to the credits of a certain bad lawn based episode. 👀
I know, but i don't know many other places especially in sweden that are as open to new people as DICE
Then look around the other places. I was applying to places in France, spain and Germany. And I live in the UK.
Should I be looking at those places because it'll be hard to get into DICE or because DICE is a bad place to start?
No, you should be looking at as many options as you can. Cause it's a competitive industry.
Dice wont take all the newcomers. You'll need to plan for not getting the job. Also you might find different things more interesting.
DICE is a AAA studio, so it's 5/6 years of long development which doesn't really change. They make FPS games, so you gotta like making FPS games, if you want to do VR , not a good choice.
Lots of things to consider.
The prospect of moving countries for uncertain work is really scary
I'd love to work at somewhere like Stress level zero but moving to the US is like... Impossible
I wouldn't want to work there. 4 years to make bone works and it looks like a project some of the students at my uni made.
They spend to much time flaffing around. Game isn't even good.
I like them
Nonetheless i want to work at an indie studio but you need to be more experienced to get hired for them
Somewhere like landfall maybe
Indie studios like multiple skilled users.
Which makes me fine as I work as a technical artist. 😎
Yeah i know, that's why I'm trying to learn as much as i can while I'm in school right now
Especially with 3d modelling and working with a team
And 3d animation
And texturing
I'm trying to learn like... Everything i can
And we haven't even started doing 3d stuff in school yet
Btw @stray stone is it fair to say that MoCap is to animation what photoscanning is to hand modelling?
Photoscanning is a different ballgame.
I can talk about it later. I'm gonna watch AoT. 😅
does anyone have any suggestion for a good way in blender to select an edge, then get 2 new edges on either side of it with equal X distance to the original centre line? (preferably creating new faces too)?

or rather, how should I approach a case like this, where I have straight lines, and now want to turn the side edges into something that gives me a thicker outline, like in the right example of that skyscraper?
the centre pic is bevel, but that does not seem to be the best approach. any of you blender pros that can give a noob a hint? :)
Can you not just loop cut vertically on either side?
hmm, maybe I could. I need to learn loop cuts better, I only use it for basic shapes and get confused when I want better precision.
but I know there are more options for it to control cut parts fo an object, right?
maybe bevel is the best way to achieve a simple outline in this case?
I have had other cases where I wondered about duplicating/splitting an edge into more parts and input distance from original
thought there must be some fast way to achieve this
If you want a corner, then bevel sure. You probably want to grab the top and bottom edge you omitted in your screenshot so it goes all the way across.
yeah you're right, that works for this case at least. thanks :)

if you had an edge and wanted 2 new edges and faces on either side of it, with X distance. would you loop cut then too?
I keep forgetting I can use loopcuts then scale or move right after
time to watch an advanced loopcut tutorial I guess. thanks for the advice :)
Yeah loopcut would be the built in way. Not sure if there are addons for more features.
btw been looking for a way to group up faces or verts or edges to make reselecting them later easier, I found the "seperate" and it makes a new group, but when I try to select the group it says this feature is no implemented yet.
do you know of any addon or similar feature to achieve this?
should I start treating parts of my object as seperate objects, and the main object as a parent/collection?
I have seen there are grouping functions for objects
The collection system took over as the grouping system.
And making groups of faces is not really a system that's easy to implement because of something called a vertex order. Every mesh has one, but as soon as you add or delete a vertex, the order will change. So to make it so you can group things with a system , you have to account for that which is currently impossible.
so how do you guys keep track and quick select/edit categories/groups of faces or edges when you are working on models?
assign different materials when creating geometry, then use those to quick select later if you need to edit?
Detach the faces and make it a seperate mesh is pretty much the fastest thing you can do.
but then you cant select them later? well I thought so rather, but now when I tried seperating it made a new object. Im confused as I tried this just the other week 😄
Im pretty sure I made subgroups of meshes for a house I modelled the other week, which I thought was awesome (reminded me of groupig in sketchup)
but when I tried to select it blender said feature not implemented yet
select a group of meshes that is
oh that was vertex groups
so similar can be done with faces, which is implemented?
sorry for pestering you guys but it can be hard to search for these specific things as a rookie, especially when blender has evolved and changed so much, plus I am not that into all the terminology yet. :p
loving blender but its slightly overwhelming
I was supposed to work on my game in Unity but sidetracked, figured It was time I learned basic blender
right, I tried what you said which is basically separating meshes into different objects
it makes sense now, will treat objects like groups. thanks. sometimes it helps just typing it out. :)
Sorry, baby duty. But yes, essentially making the separate objects if you need to be able to easily group them.
Though, I don't know if it'll suit your needs, but you could try looking into:
https://docs.blender.org/manual/en/latest/modeling/meshes/properties/vertex_groups/assigning_vertex_group.html
Vertex group is for things like weight painting. Not used for editing meshes.
Ah right. My limited artistic knowledge. 😆
Here's an interesting thing to note in blender. If you mark some seams and they form a closed panel. When you're in face mode and select one and press ctrl + L (select linked) it'll stop when it hits the seam.
If some 3d artist want to jam, feel free to dm me
@edgy stag Don't crosspost.
Wym i need help with both 3d modeling and animation??
Would be easier to know if you just asked the question
Well i was wondering if someone can help me make a player model?
In what way?
hey there, when i put my model into unity it wont show the mirrored side
Does someone know a fix for this
From blender
Apply the modifiers before exporting.
Best to duplicate it, then apply, so you don't lock your original model.
already applied them
@outer halo made a coppy and tried again
and also didnt work
Your model is literally just one half, after importing, despite applying the modifier? Can you show a screenshot?

Your normals are inverted for one thing. Start by flipping them.

That is way too big a topic to explain right now. Read and do this:
https://www.katsbits.com/codex/flip-normals/#:~:text=To access the option and,– Mesh » Normals » Flip.
Make sure you turn on Face Orientation as explained at the bottom, and make sure all your faces are blue.
@outer halo i have this

i have this but when i invert them the rest changes to red

nvm got it
gonna try it now
@outer halo Thank u bro it work rn !
Hey, i got some lowpoly assets, were 1 asset may consist of multiple meshes. Can i somehow treat them as one? Like changing the shader, and not having to go to mesh for mesh?
If you imagine a tree, with the root, then the tree/bark, and on top the leaf, this is 3 meshes with 3 materials on for colors
i would want this 'tree' to be greenish for a visual effect, and then get the colors back, so like a filter on the material.
Unity supports the use of multiple materials on a single mesh. In Unity this is called "submeshes", where each material on the MeshRenderer corresponds to a submesh.
but, i cannot say gameObject. material is bla bla. because its the children and they are many, i could loop through them. but is there a better way
hmmm


this is the setup @swift estuary
Do you understand how im thinking
No
I don't know what you're asking
if you want to use a single MeshRenderer with multiple materials you need to collapse this all into one mesh in Blender or similar application
I want the whole tree to change material
yea, but then i cannot choose what part of the mesh has what color right
then either loop through the Renderers of the individual objects or merge them all into one object as I described and loop through just the materials in the one renderer
yes you can
as explained - with submeshes
this will set up the mesh to have mutliple submeshes in Unity which youi can apply Unity materials to
Does anyone have Maya (2016 or older) ?
I need a small favor to convert a few .mb to fbx
@sudden coyote Why does it have to be 2016, you can use the more uptodate one. 🤔
Its because i used the 2016 version, idk if its backwards compatible
i also did mention or older
It'll go forwards. 🤔
I have a student version, and LT.
It'll work. DM me it.
and if you would be willing to convert 20 more 😄
I'm having an issue getting my model textures to show up. They're all coming in grey
Hey, not sure if anyone is familiar with VRChat's process, but they do a thing where they create a placeholder targeting dot with a script in the viewpoint
Basically it's like "choose coordinates for your eyes"

It uses this little dot as a targeting example and is controlled with the the script on the object

Anyone know how this is done?
Like how they accomplish a placeholder dot like this?
I need to create something similar for an item script, where a point is used as the place where the item is grabbed
Would help a ton if I was able to create a little "the point is here" type indicator like this dot
Their script is a dll file so I can't really read it
Perfect, exactly what I was looking for. Thank you. :)
That's okay, that's what I wanted
ok cool
Hey guys!
I'm creating a procedural road mesh using Sebastian Lague's Path Creator, but there's something wrong when triangulating the mesh, it results in triangles instead of quads which forms a kind of "bumps" when my rigidbody car runs over it, specially when the mesh generated is some sort of curve mixed with slope, something like in the image.
So, what is the propper way to construct a smooth road from a curve spline?

Why does parenting an object to another make the parent take on the child's pivot point?
It doesn't
Make sure this is set to "Pivot" not "Center"
Are you using the Road Creator thingy from the examples?
I'm using a self made one, i think that the concept is the same, but instead I create a quaternion from the path forward and the global up vector (0, 1, 0) to transform the vertice
Oh thank God
I thought I would have to go back to Blender and change its empty
hey I'm doing pretty much the same thing haha
I pretty much just modified his code like this in that relevant place:

I'm doing this because I provide a polygon array to the script that shapes the road
So I just transform each polygon point with the quaternion to create the mesh
I've created a material/texture for a rectangle with a scale of 1024px width x 2048px height as I wanted the material/texture to cover the tile in full rather than repeat. Just wondering whether this is a good idea or am I going to experience issues? Probably matters to state that this is also for mobile


hello i dont know where to post it so excuse me if i miss the category :)
I wanted to know how much vertices and face can show unity with a rrandom graphic card
Thanks for the help
You need to bake the textures and export those images as well
Can anyone please help me understand why this is not UV unwrapping nicely?

Specifically this part

I have 3d text but I want them to be unable to see them from behind a wall I have a universal render pipeline
isn't that the default?
sorry text mesh pro
isn't that the default
no
You can't see TextMesh or TextMeshPro through walls normally
I want it to stop going through walls
I have universal render pipeline does that make a difference
no
Show screenshot of wht you mean?
Are you sure you're using the 3d/game world version and not the UI version?
3d game version
here this is the other sign of the sign

Why do your signs look like that?
Are you using an unlit shader?
Or are the normals just all messed up
Also you can control whether the back side of the textMeshPro is shown with this setting:

that's part of the material, which is part of the font asset
This is what happens when you set culling to "Back"
Find your font asset (it's linked in your TMP component), and the material is a child asset of it

I modeled a character in blender. How can I now texture this and then generate maps for the various textures?
and when I have a texture painted on the object, how can I make the maps for that? so that I can determine, for example, that a certain area should reflect more than the rest, or that a normal map is particularly strong in one area?
it all depends on the shader you're using. but essentially it's the same strategy of texture painting
You can texture paint and create a mettalic or smoothness map for example
do I have to draw them over again?
draw what
There must be a way that I can take the finished textured object and then have maps calculated in another program, where I can then use masks to determine where and how strong the rendered map should be and then calculate the whole thing use a new one. I hope I have not explained that too cumbersome now
calculate it based on what though?
Like in shadermap for Exemple, but i can devide the texture in parts
Anyone familiar with blender materials that can help me? I've applied a image texture via materials but I can't seem to find the x/y repeat scales, so it isn't just a single image stretched to fit the face.
@woven tide Scale the UV up. The texture will auto repeat.
Thank you! 🙂
I go to ask, is the scale of your object 1?
Hello guys in having extreme drift assest I'm getting error some one can help me dm I can pay also
Any idea what the problem is for this tree material?


I'm having an issue while trying to create an avatar for beat saber. I've got it set up in Blender and it looks good when I export, but when I try to put the atlas png on in Unity the eyes and face look all wrong. Does anyone know what is causing this?
Should look like this

Unity makes it this

I assume the eyelash material needs to be transparent
As for the pupils, it might be from shader/material color isntead of texture
It all comes in as a single atlas.png that cats creates in blender by merging the materials though. So not sure how to change the materials to work like that.

In the material settings there should be a setting that dictates it's rendering mode.
If you change that to one of the alpha types you'll be able to get transparency.
Probably Cutout being teh choice you want.
I'm having a big problem here and i have no idea how to fix it... i am trying to export to unity using the blender file, but it gets all destroyed and with no materials, can anyone tell me why this is and hot to fix it???
Is Blender good for making whole maps?
Yeah
Still, use Blender and create collision models using primitive tools like boxes and whatnot, when you import them to Unity and add primitive colliders, they will have the exact size you used in Blender
You can then just delete their mesh renderers
Much better than wasting a lot of time trying to align colliders inside Unity
Alright
Hey there,
So let's break it down, The models aren't broken. What's happening is that you have normals facing the wrong way.
In a game engine a polygon faces one way, if you look at it from the back then you will see through it, so you have a mix of correctly facing and not correctly facing polygons.

Blender has a way to visualise these, The blue is the front facing side, the red is the back side. You can also turn on backface culling in blender to see the results of what the game engine would see.

To fix this, you can flip the faces, this is the menu location for it. After you select the polygons in edit mode.

You can also use Shift + N with all the polygons selected to "Recalculate Normals", which will run an automated system to detect and flip models from facing inside to out.
Alt + N Will also bring up the normal editing menu.
And now Second with your materials, all 3D engine have there own way of reading and writing materials and shaders, and sadly these aren't compatible.
There are initiatives that are working on this to try and make this less of a problem, That's called the Universal Scene Description (USD for short)
The only thing you can do is recreate your material in unity right now.
Hope all this information helps. :)
@snow salmon
I would also recommend exporting 3D models into FBX, Just because when you use blend files in unity, your computer requires blender to be installed, which can pose a problem if you are on a different computer that doesn't have it. Under the hood, when you use a blender file in unity. Unity opens blender to do edits and such to keep that information.
If you export to FBX then the data is easier to share and update, and then also removes a lot of the redundant data that comes in a blender file.
Think of a blend file as a zip folder, it holds more data than just the 3D model. This includes things like custom brushes, and even teh layout of the saved file.
These are my recommended Export settings that I have been using for the better part of 7 years now with blender to unity exports. :)
@snow salmon

Thanks a lot my guy, some other people helped me with figuring out the inverted faces thing, but about the materials...i saw a vid on yt where they exported as .blend but the objects got all their materials...
https://youtu.be/NjflKgMepQs?t=345
Quick and easy import from Blender 2.8 and 2.9 to Unity. Import an FBX or import the Blend file directly into Unity with the new(ish) prefab workflow.
Become A Channel Member: https://www.youtube.com/channel/UCkr9CPPqT9VWUjkpo3HcACg/join
Discord: http://discord.onewheelstudio.com
Patreon: https://www.patreon.com/onewheelstudio
Twitter: https...
Those look to just be basic coloured materials, You look to have an image texture with yours.
tru...
I would recommend not using blender files, It's bloat to use.
Also, if you import a blender file with materials, You can't actually edit those materials in unity. The settings are locked.
You would only be able to make changes in blender.
but the file would update on unity if i decided to edit the model later... that was what i was going for
You could just re-export the file.
The challenge with blender files for unity. Is that blender is opened in the background while you use unity.
You can't see it, but it's doing this.
It's the same as if you were to use a Maya or other 3D programs file format, the original program is open in the background.
And then also that file contains all the additional blender specific data that you don't need in your unity files.
As i said, Layouts of the blender window (It saves the layout to the file), The unused materials, The orphan data, the brushes, there's a lot of data.
So if you use a FBX file, it strips all of that data out and only gives you what you want. The 3D model, and it's material assignments, Any rigging an aniamtions you have made.
And then this also makes it easier to share your files, cause you then don't require the other people opening your project to have blender installed. Which is useful if you are working with a team, or have another computer that doesn't have blender installed.
Yheaa, i realize that now, did not think of it that deeply😅 thanks for the great advice 🙂
👍
so i just ported a model i made in blender to unity
and the textures went all weird
blender

unity

what format did you export them in?
ah im not sure, this is my first time exporting stuff
i exported the model as an fbx
the textures are just pngs


try setting path mode to copy

weird, you may just have to manually reassign them then
the ones that are not working are the ones that have more than one connection to them

oh, that makes sense
blender materials aren't 1-1 to unity materials
you'll have to recreate them in unity
ah i see
@civic knot Maybe a bit old but there's some good infos here :
https://www.edy.es/dev/docs/materials-and-textures-from-blender-to-unity-3d/
I'm working on terrain inspired by the terrain seen in the PS2 version of Shadow of the Colossus and could use some pointers on how to get it to feel like SOTC or improve the geometry in general.
Is blender optimized? Can it be used on potato laptops?
Yep it can, i run it on celeron and 2gb ram, but idk about rendering
Havent tried
@blissful relic
k


Nice @vestal hazel :) seems like you shared the photos twice
Is this the same environment as from a while ago?
@reef cave What does the mesh look like?
i can show you
Well post a screenshot here? :)

And the wireframe?

Yeah, Ok, I can see some of the things you can improve.
If you feel we can go in a call and it will be better
Well if you wait a couple hours, I'm at work right now.
m... then we can try text
The cylinders for your rigging, can be reduced.
I assume you've just used default ones scaled up and rotated.
You can actually reduce this significantly.

Both of these are different numbers of polygons around, One is 10 the other is the default at 32.
You can go way lower than that.
When things are smooth you can get tiny, Especially if it's for small cylinders like that.
I've used ones as low as 4 for things, and it's looked fine.
Then your sofa's are pretty high, Looks like you sculpted them a bit.
So it's one of those things do you want to keep all that detail or do you want to reduce it.
Everything else doesn't look to bad.
But overall 45% CPU and 60% is actually fine, It's when you go beyond 100% then you start to worry cause that'll freeze/crash drivers and such.
But when you use very bad game like VRC you need less ahah
ah yes RTX sofa
so that's why i'm trying to go lower than that
That's not what RTX is. 🙃
ik
@reef cave Then you can go low poly and then bake the details/normals into textures.
Extremly common in games, Almost every 3D game uses normals. It's essentially free detail.
i never did something like that hahah i'm very new to stuff like that
Ah, this is a very common approach for getting lots of detail and keeping it optimised.
High poly sculpt on the left, Low poly retopology on the right.

So i don't even know how to do textures on blender i just know that all my stuff are cubes
Well I would reccomend taking some tutorial, I assume you've done the blender guru donut one?
never
If not, I would recommend that, then when you finish that, do his anvil one. That will teach the basics of high to low poly baking.
i learn all by myself never used any tutorials or something ahah
Time to change that then
i don't think i need something that basic 😛
Sometimes you gotta do it, Especially with technical skills like this.
and i can't follow a tutorial, i hate tutorials because they let thing on the air like you know how to use it... stuff like that
for example
He is implying that the people teaching these tutorials assume that you know some things
"use this tool and do something like this"
The blender guru donut and anvil tutorials are for people learning new things, and he explains each tool and what it's use is.
It doesn't have any assumptions that you have used the program before.
I wish I had those when I started doing 3D.
Sure, but do you know how to then sculpt detail, unwrap it, then use that to bake the high poly detail down into a texture.
Then use that texture and additional textures to create a realsitic PBR shader?
Can you create a donut without a torus, though?
i know how to unwrap it
The donut tutorial covers, Sculpting, Materials, Masking systems, Particle placement,
Lighting, Rendering, modelling techniques.
i think i can with a cube
You are getting hung up on the subject of the tutorial, rather than the content.
It sounds like you already know a lot of the basics then, I don't see how you could get lost on beginner level tutorials
i get lost on tutorials that's why i hate them 😛
🤔
How about articles?
There are a few articles / tutorials on mesh optimization
Are you wanting to be a 3D artist?
i was thinking but everyone is too good at blender haha
But then I ask you to explore, How do you think they got so good?
Cause I can tell you with very pretty good knowledge as someone who teaches blender and other Art programs.
It's because they sat through tutorials,
They did the sequence of learning to make it easier and faster for them.
What you are doing, is guessing and testing lots things, and then hoping they work. It's slow and clunky, especially as a beginner.
A blender course is still just a tutorial.
When I teach, it's a tutorial, Just in a different way.
The tutorials will let you see a more standard and simple approach from what are most of the time, experienced people.
You can't ask something
so you will get stuck
That is when you research on the topic
Most tutorials are designed so you don't get stuck, if you follow what happens.
And then if you do, look at the comments, see if others have the same problem.
And I'll tell you, When you do enter the working field, and a studio. You will be expected to be able to do this.
You will be told you have to learn a new tool or program, and you get less than a week to learn it most of the time.
I can say this, because It's something I am currently doing at work.
I've actually had to learn 2 new tools over the last 2 weeks. Ontop of doing my task list. XD
I aint got any time.
i don't know but i can learn by my self i think
You think you can, But I can assure you. You can't.
I made the same mistakes as you, but I was doing this at a time when the wealth of information that is out there was significantly less.
i will be fine with what i'm doing
Question, I'm making a horror fps game and needing to make a character (human) and other human type characters. what software do you guys recommend if this is the right channel to ask
I'm tried working with daz3d but it's really shitty in my opinion
i've* \
@eager mist Depends on what you want to achieve, and what skills you have just now.
If you want to go from scratch, you can use blender and sculpt/model a character there.
You can use a software like MakeHuman(Free)
or Character Creator(Costs money but you can get a free trial)
@pastel steppe am I able to make good looking 4k type characters
don't want a garrys mod / hl2 source looking character you know
Character Creator gives high quality results. Make Human gives the shape but not good looking clothes or textures
ahh okay well thank you!!
Default Make Human character

The clothes in my opinion look bad but you can get rid of them
I've been given character that I now know have been made with this software.
They aint great at all. XD
I'll stick to sculpting mine.

They are good from far away
Very far away
So far away they look like the spiderman boat people. :P

Yep
Looks very nice
I wonder if when Metahumans comes out of beta if it can be used with Unity?
I have played with it, It can be. But looking at the models, They aren't gonna be ground breaking.
It's just clever work, but still uncanny in some areas.
But also note, It's Epic.
So unless you are using unreal engine, you are gonna have to pay for use with other engines. (If you don't know how to make the changes needed in maya).
It's funny, They are fighting as court case about Apple Monopolisation. But people aren't picking up on Epic doing exactly that. They bought mega scans, made it free for unreal but then still charge everyone else, that's the definition of monopolisation. ;)
I always found it ironic they were fighting a company for a monopoly over selling games while trying to monopolize the game engine industry
I hate how in that case in kind of seems like they are trying to pass themselves off as a small indie company that is severely affected by the 30% cut
No no, This is a crusade for the little guy!
Sorry I forgot
https://www.eurogamer.net/articles/2021-05-11-epic-v-apple-trial-debates-the-appropriateness-of-fortnites-naked-banana-man-peely
But we have great articles like this from it.
They discussed the nature of a banana wearing clothes, yes.
What does that have to do with anything? Also to me both companies seem extremely petty.
This is a learning opportunity for the public as well to see how secretive the games company is.
There's already been several games leaked because they didn't know it was still secret.
Nice
To make a tilemap with 3d blocks, would it be enough to just make a ton of blocks or would it lag
You would want to make different sized blocks that allow you to use less models.
Says you know a section is gonna be 10 blocks long, and then know other areas are 10blocks long.
Then make a block that actually 10 blocks long, instead of 10, 1 long blocks.
Alright, is that all?
I mean, it's hard to quintify.


hey! am I allowed to post questions here? Im struggling with my UV and setting it up in unity :p
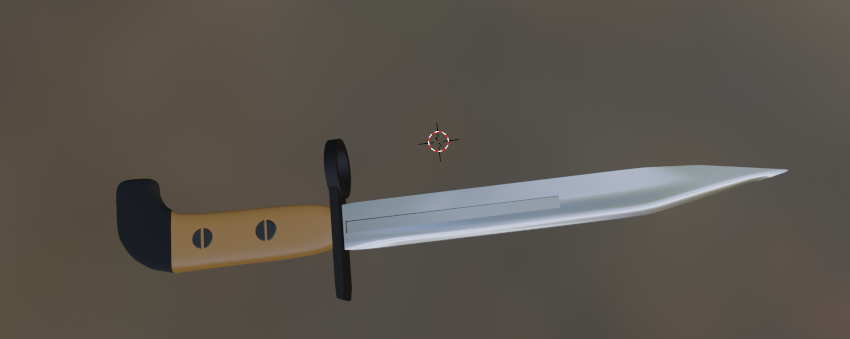
I made this rapier in blender:

but a) my uv fills the gold and blue steel with black and b) the uv is misaligned in unity. Does anyone know a fix or what I'm doing wrong? Thanks


- make sure your export settings are correct (see pins)
- check your texture import settings. if you have alpha values in your texture you need to check alpha is transparency
Thanks. I'll give those a look
I imported my model made in blender. But why there is hole? help pls

@fluid fiber because you dont have backface culling turned on in blender, which makes backwards faces turn invisible in blender so you can tell when a mesh is inside out
Do these seem like 'game ready' models to you guys?


nope
Yep
I'm trying to make a mesh in blender for muzzle flash to use in Unity but I don't know how to make normals on both sides of a circle and plane
heads up to anybody looking for something to put on their resume, Looking for a 3d modeller for my horror game, Non-profitable but it is something you can show off to future employers.. etc!
Is it possible in Blender to swap controls so I can rotate camera with RMB instead of MMB?
holy shit
is that a model or?
that's really cool lol
still a work in progress... the white part too wide im re rendering it a bit thinner

What program do you use to model?
Judging by the picture, blender
There's a popular tutorial on YouTube on how to make a donut in Blender so I assume that's the one
I was just thinking of that.
I remember watching that a while back
Is there any where in here i can post jobs?
Like work i need doing in return for pay, for example?
i guess?
hey everyone, I started learning how to use probuilder yesterday and created this lamp thing

my question is, how can I make the lamp kind of bend if I bend it in the middle


like how would I do it so that when I bend it the whole lamp bends? Im very new to probuilder and have been using unity for only around 4 months so any help would be appreciated
This would require you to do something like rigging if you want to keep it as a single mesh.
If you just want to bend shapes, you can break it into smaller shapes and then animate those singularly.
Pro builder was designed to be a mockup tool for level design, but many have used it for more.
There is a point in which you have to migrate over to a dedicated 3D tooling program.
Anyway, rigging mechanical objects are quite easy, just parent their individual pieces properly and position their pivots voilá!
Yep, That makes it easy to animate most mechanical things. 👍
thank you for the answer, now atleast I have an idea of what I have to do and know what to google and look up on youtube 😄
no? have you not heard of low poly games.. ? You can't be that new
love the top one, great choice in colors
I made my first try at 3d trees

Still trying to go for a look that blends with the 2d characters
@past thicket Don't crosspost.
doesnt look ready even for a lowpoly game
You are entitled to your opinion which may be wrong.
art may be subjective, but in my perspective low poly is as low as you wish it to be.. I don't see any rules regarding what is ready and what is not so I have no idea where you're pulling from
unturned.. 433,812 reviews on steam

card style is really neat. I like how the trees look hand painted (irl) and put in a game
definitely check out blender, it'll make your life a lot easier!
Thanks! For the moment the foliage is cards, while the trunks are 3d
he asked for opinions
Care to elaborate? This doesn't help him improve
I tried learning from some blender toturials but for some reason whenever trying to use the brushes it didnt work ( with mouse and with a drawing tablet ) so after around of week with 0 progress I kind of.. gave up :/
a lot of weird angles, some texture overlap issues
It's not possible.
But there are some double-sided shaders on the Unity market :)
How do I rotate a mesh? If I rotate the mesh in blender it doesn't change in unity


it's always facing down
no matter what I do
I found out what I needed. For what I wanted I had to use solidify modification to the meshes. Gives it a back side. Even if the normals don't show, but it's visible
Are you using it in vfx graph? You can just alter the direction by setting the angle
What's VFX graph?
There are also some double-sided shaders.
In case you don't want to add geometry
I just searched it up. I don't use it
What are you using to create your muzzle flash? Particle system I don't have experience with but I wouldn't be surprised if it can rotate too
Will those add performance hit as well? I actually have a model same as brinch. So I couldn't see from all sides and I assumed it was because of the normals
@fringe hearth I'm using a particle system
Btw I'm using the unlit particle shader for my muzzle flash. Ive turned on "Two-sided" so I can see both sides because of the normals
What a coincidence that we both are trying to make muzzle flashes lol
I'm using vfx graph instead of the particle system
You need to apply the rotation. Press Ctrl A when the object is selected. @valid mantle
Ah ok. I just exported it as an .obj instead of .fbx which worked too
@valid mantle when exporting an FBX you can also check apply transforms in the export settings
Yes I tried that, but something was wrong about the scale in Unity
I really like your art style!
Thanks 😄


Hi, any idea why the roughness detail is not showing up in HDRP Unity?
I know its inverted roughness
@acoustic river : use the HDRP > Autodesk material settings and click the boxes for metallic and roughness
HDRP sun shaft test

change HDRP/Lit to HDRP/Autodeskinteractive
Yup its working
Thank you! @light pier
Maybe it was working before since i have to zoom in
YW

depends on your texture sizes and environment settings
i am trying to get an answer on my problem
regarding this exact issue
I think different shader is fine, but having too many texture set for render would affect the performance of the game
say if you have a modular environment with couple UV sets then it renders smoothly
im having issues rendering terrain and Vegetation Studio Pro on a simple 1000 x 260 terrain @ 4k
cant get answers on it which is holding back production
Not really sure what the issue is
90% sure its user error
screenshot?


Free to download store
Credit me pls
Follow for more quality models
if there is any problem, comment down below
Unity 3d ready
Note : the black brick is actually red - Store Small (Game Ready) - Download Free 3D model by Monstr 3d (@monstranim) [dda5629]
its free to download
can someone help me with blender? I downloaded a human model, the head was just like a puppet (no eyes / nose / ears) so I modelled a nose and it worked quite fine, but now I have very bad shadow / shading / lightning problems. Like the vertices are connected wrong or something

this looks good, the nose is modelled
but this is the light:

and in Unity:

I may be wrong but it may be the normals, the way some "faces", well, face
Look up fixing normals, theres a display which showa which way it's facing, and tool I think that fixes it on its own by making all faces face outwards
I'm not sure exactly when it happens, but it's good to check every once in a while if there are some normals that are wrong. You'll see with show-normals the faces which dont point outwards
What is happening here is that lighting section is because of what is called N-Gon's.
An N-gon is a face with more than 4 edges, One of those polygons there is 7 edges, which makes it harder for the computer to cut into triangles. (all rendering is in triangles.) So it's trying to guess the best solution which generally doesn't work out very well in any 3D package and gives a different result to the lighting.
normals look fine
so what to do? trying to split more so i have more vertices? Or is the whole way I try to model a nose here wrong
You can add cuts into the mesh to get the results you want, But given the shape of the nose and everything I would look into remodelling it.
You want to keep all the edges as quads (4 edges) or Tris (3 Edges).
@hushed lynx Select all vertices in Blender and press Shift + N
Yea, if that won't help need to fix orphaned/disconnected vertices
sorry. I dont get it.... when i have a quite "rough" mesh and the nose needs to be more detailed so i need finer mesh / higher vertices in there it automatically looks that way that the mesh, where the low-detail mesh touches a high detailed mesh i have multiple vertices
not 4 vertices building a face but 6-7

what would be the way to go here
It looks like it decided for you where to put triangles the ugly way. Make surrounding area more complex as well.
and decide how it should triangulate (or do it more cleanly like this)

Good morning/Night. Im Looking for a job (idc about payment)
My Portfolio https://docs.google.com/document/d/1PkfrMV-KRun3fK9OH8fXG5nKbau1UaiQ4m_RURqJ_Us/edit?usp=sharing

Google Docs
Skriptek Portfolio Boeing 757-200 Date: April/May 2021 Airbus A350-900XWB Date: January 2021 Boeing 737 MAX 8 Date: March 2021 Others
That portfolio looks a bit tiny, honestly you need to have way more models than that if you want someone to hire you.
And try to also display your models with wireframe, potential employers want to know how clean your meshes are too.
You need to make a proper portfolio, or use something like Art Station. Google docs isn't how you share works.
Also, this Discord isn't for job posting. Unity has a place for that on the forums. You can find links in #💻┃unity-talk.
THANKS
is mesh combining usually done runtime or in editor, then saved and loaded
the latter had some insane sizes if i remember well
Any tips for better roads? tiling too much visible

Add other crap. Old newspapers, a trash can, a parked car, street lights, etc.
hello, im adding coliders for all the elements of the house, but my first person character does not recognize it, any tips?

I'd say remove the details/cracks, and add them using decal (or using 2nd uv set)

You object is falling, it's not the camera
This should go in #💻┃code-beginner probably
You are totally right, I deleted it as a result.
hey i want to make a monkey but i dont know how to use blander any tips on were to start
Thank you for the help.
i dont know anything
You should start here https://youtu.be/TPrnSACiTJ4
Blender tutorial for beginners! The long awaited reboot of the popular donut tutorial, completely remade for Blender 2.8x. New videos will be uploaded every other day to this channel.
Get the shortcut pdf: https://mailchi.mp/ef5b15a32043/subscribe-to-the-newsletter
Follow me:
Twitter: https://...
Y-you're welcome?

im working on mine rn :D

Hey artists, I am a poor lost programmer and I need your help. I posted this on the shaders channel but maybe you have seen this before in Unity.
The model someone sent me render like this in Unity (2021.1.7) with standard (transparent) shader.
Have you ever seen this problem ?

I don't know if it's a model problem, or anything else
thanks
Trying to improve the visuals/design of my marble run game. Currently I'm using a HDRI for lighting but with the background type being solid color since I wasn't a big fan of the HDRI being visible.
I tried experimenting with different shaders(including one given to me by someone in this server but I can't remember their username RIP) to distort the HDRI and project it differently in such a way that it created a floor that you built on which looked kind of nice but all of them had annoying distortions that looked hella ugly.

I liked the idea of having a floor that you built on. Something like the carpet of a living room because it made it feel like you were a kid building with the blocks which I feel fits with the games overall aesthetic

Add some bevelling with your blocks, If you look at toy wooden blocks they all have rounded corners so it doesn't have a chance to cut kids.
But it'll also add a more natural looking line that hides things not being perfeclty close to each other and seems more deliberate.
Looks like you have flipped normals. In 3D faces only face one direction.
So if they are facing the wrong way you'll see right through them. There are ways to fix this in almost every 3D modelling program.
In blender, you can select a face and press Shift + N, and it'll use automated methods, but you can also go to the menu and select Mesh > Normals > Flip to manually flip normals.
If you want to visualise the way faces are looking in Blender, you can select the overlay dropdown and turn on "Face orientation", this will colour the mesh red and blue, red being the back, and blue being the front.
And in the shading mode drop down, you can toggle Backface Culling to see what would happen in a game engine.
Hope this helps.
Thanks, they verified the model, everything seems alright with the faces. Seems to be a z fighting problem. Thank you for the answer by the way !
If it's to do with transparency, then you'll have to look into the rendering mode.
You want the back stuff to render first, then the front stuff.
The problem could be that you'rs is rendering the front stuff first, then the back stuff.
I'll try to look at that
Try whacking on a regular shader and see if it's fine, then you'll know it's a shader issue.
this is the standard shader
oh yes, all is well in opaque
Okay, then yeah it's a shader mode. Check what alpha settings you are using.
Then look at the other options.
Yes, thank you, i'm looking at it
I have a stable version, but too much transparent
It's been too long since I've used the standard stuff, I'm a HDRP boy now.

haha, I'm not in HDRP at the moment
A bit lost in HDRP
you think it could be better in HDRP ?
Nah, It won't matter.
ok
Yeah, I've exhausted all my known options.
Only other thing I could think of is turn the shader to debug mode and put in a custom render queue number.
thank you for the help
Someone help me, this is a ragdoll I wanna make, but it just keeps stretching.

they already have bevelling.
Check you're skinning.
Do they? It's far to subtle if so.
The weights of the rig.
So then how did you skin the mesh?
What does skin the mesh mean?
I have gone through three tutorials on rigging, but never came across this term.
You have bones - You then weight the mesh to the bones. This is referred to as skinning.
Yes, I did that by selecting the mesh and the bones and Ctrl+P...doing that stuff.
Ctrl + P > Then used the auto skinning?
Yes.
Yeah, so then you need to go into the weights and tweak them, so that the elbow it looks like, follows the right bones.
The wrong bones are influencing the mesh.
If I send you the Blend file, can you show me?
I am confused right now.
(Not a virus, I promise!)
This is still confusing me...
Your bones aren't weighted correctly.
The part of the eblow that is staying put is being influenced by another one.
You then need to edit your weights to make sure that the right bones are being controlling the right part of the mesh.
I suspect that, that part of the elbow is being controlled by a root bone.
If you had gone through 3 rigging tutorials, it should have shown you how to adjust the weights of your mesh.
Rigging is complex and that's why there aren't many professional riggers in teh world.
It's very hard to find people who rig for a job, I'm one of the few.
I work professionally as a rigger at a high end animation studio.
It won't. Just go in an edit the weights.
You just have to paint some stuff to fix it. It's a really easy fix.

You just told me you watched 3 Tutorials, So you should know how to do this.
OOOOR, did you only watch how to get the parenting set up with auto weighting and call it a day.
Yeah, no, You never trust the auto system. You should always check it after the fact.
'k.
Guess I'll give it a try again.
well damn me
Are you gonna ask the same thing? XD
i tried impostors and theyre fine for gpu stuff but they dont allow mesh combining
and mesh combining would greatly save my cpu
I ask, If CG geek was confusing you with meshes, how much experience do you have with blender?
1-2 months.
Like, he was confusing me with the naming.
What do you mean?
He was going too fast, barey explaining stuff clearly, and went through weight painting in less than a minute.
Try looking on the asset store for alternatives:
https://assetstore.unity.com/packages/3d/characters/hyper-casual-characters-2-170063?q=hyper casual&orderBy=1
CG geek is a tutorial channel with people who have some experiance, you should have swapped to someone else.
Or you could have rewatched parts of it till you go a look.
Hmm.
what are you looking for?
just reply to yourself the main point of what you're asking
like this ^
.
He's got elbows that havn't been skinned right.
I've advised him to go and adjust them, but he doens't know how. Despite saying he's watched 3 tutorials.
And I've also given a demo video.
Retek, looks like theres a point thats in another
try going into edit mode and see if theres a dot in those two spots

a dot like that
@knotty barn
Hmmm.
like go into edit mode and take a pic of that area again
It's a skinning issue. 🙃
Edit mode of the mesh or the bones?
i'd say the mesh

So select the mesh, go into weight mode, and select the arm joint.

Check both of these bones.
In edit mode of the mesh?
In weight mode of the mesh.

Then you can select the influences of different bones in this menu.
'k.
This is what I was telling you to check, The arm joints aren't influencing the elbow of the mesh.
Like this?

You need to have the mesh in weight paint mode.
It would be blue with a gradient to red for the different joints.
How to enter Weight Paint mode?
Same way you enter edit mode.
Oh, there it is!

This, right?

There we go, now you can see that the elbow isn't being influenced. So you just have to paint some in there.
How can you see?
I wish I could do this type of stuff lol
I can't understand.

Blue means = 0% influence.
red means = 100% Influence.
You want the right bone to effect the right parts of the mesh.
So go through all the other bones, and see what is affecting the elbow.
Lower arm.

Yes.
It is.
I feel like there's more to it than that one.

Quick intro and guide to skinning/weight painting.
this video is meant for those with a basic understanding of Blender
Also, here's a tutorial.
It's in blender 2.79. But the method hasn't changed.
Anyway - Check out something I helped work on.
Love Death Robot Volume 2 - The tall Grass. 😏
and here I thought you were above advertisement :C
So, I need to paint it red or blue?
red
Gimmie this one,. XD
xD
thumbnail dude looks like titan from aot
Yeah. XD
@stray stone Is this okay?

Which bone is that?
also yall may want to come up with a new name, that name sounds ridiculous
that would explain alot
Upper arm.

i dont have netflix LOL
Yeah, that looks better.
Professional aniamtion studio worker here. :P
lol
Also how is this leg?

damn i think dots rendering is even worse than mono
I made it to full influence?
Will it work now?
It should do.
Let's see.

Weheey, What's happening here.
Even the legs aren't moving. 🤔
What are you using for your ragdoll?
Unity's Ragdoll maker.
Send me the blend file.
You have 2 sets of arm bones.
?

Wow, how did it happen?
And some is waited to one set, and the other is weighted to another.
So then yes, this is still a skinning issue, but now there is a fundimental rigging issue.
Can you fix it?
Yes, but then You won't learn.
So I'm not going to, but now you know one of the problems.
So i suspect if you check your rag doll bone assignements, you'll have used one set of arm bones, and not the other.
Bro I have been learning this the whole day, it's just a simple mistake.
It shoulnd't be hard to fix.
Remove the double bones, Check names.
Then remove the skinning from the mesh and re-parent it.
Then check over it all.
faints

To delete all skin groups.,

Then don't forget to remove the modifier.
Then you can reskin no bother. :)
You mean painting all that again?
Use the auto to get a bulk of it done, then just check and make sure it all looks right.


Yeah, now reparent the rig to the mesh.
Yeah.

That will do all the assignments, all you have to do is check to make sure it's what you want.
And make adjustments that you need.
Sure. :)
BTW, if I just apply the bones without Inverse Kinematics, will the ragdolls still work?
Should do, I'm not sure. I've never used it. ¯_(ツ)_/¯
This is the closest i've gotten with ragdollls. xD
Uhhh, you just put a Rigidbody...on a capsule...
FINALLY!
GOT IT WORKING!
Yes!
Though it kinda behaves weirdly, but at least it works!

can anyone explain texture compression high quality vs low quality
so low quality means the texture is more compressed?
and faster
@eager mist texture compression will make the texture maps lower in resolution so pretty much they become more pixelated/blurry, the reason you would want to do this is that your game can run faster but also to reduce the game's build file size, most modern AAA games have a huge file size that is caused by HD textures so you may want to reduce it if that's what you're going for (and yeah low quality = more compressed = smaller file size)
Nice looking scene
It's just a rough one, I've actually gotten mad because I was building out some grid pieces to make roads with and was unsatisfied so here I am breaking into houdini to generate custom shaped roads.
But I don't half ass my learning, so I'm gonna learn all of houdini so I don't have to struggle later.
does anyone know a good character modelling tutorial for blender
Look up CG Geek low poly character.
No, you'll likely get rejected because its a pretty basic object that plenty of people can replicate
Not everything should just be an "Let's put this on the store", type of deal.
You dilute your quality, and also if you do it to often, people will see your stuff as flips.
Hello, I've been developing my roguelite 3d mobile game for some time and now I'm on the process of wanted to make my 3D character for my game but I'm a blender noob
is there a tutorial where I can easily create a mobile friendly 3d character similar to the pictures below?
even better would be a software that easily generates one for noobs like me, as i dont want to take too much time in making character and a few NPCs as there is still a lot to develop in my game.
Thanks!


flips?
that second image reminds mea bit of SAO but with like pokemon diamond pearl kind of models
Asset flipping, is when you make a lot of the same assets and tweak them ever so much so they can be sold as somthing else.
It's a common term for games that will use the smae free/cheap store bought assets to make basically the same game over and over.
i mean
I just want to make a lot of different game assets
i made a barrel using like 3 toruses
Why not just one cylinder?
you're thinking of a metal drum
No?

something like this
gimme a sec i can post mine, blenders just being slow to load

Tip : The rings don't appear on the inside, they are on the outside only.
You contaminate the drink inside if you add the metal inside, because it rusts.
i was gonna say how are you so good, then i remembered you're a professional, then I was gonna say what but then I realized that makes a lot of sense LOL
i'm just very new to blender
I'm not thinking about making money