#🔀┃art-asset-workflow
1 messages · Page 60 of 1
Hey, is there somebody that could please help me to figure out how to approach this task: I want to be able to Pet my characters. like ruffle through hair / over body... for example kinda like in Nintendogs
@deft mountain We don't do collab posting on this server. There's a dedicated section on the Unity Forum.
Oh fr
Can anyone here create a simple character for me? I am struggling with a model. I have one already, I just need it to be changed.
anyone making things for mobile games 3D
what are optimization u need to know
i was watching this

Before we make the map, it's extremely important to prepare the object properly. With these three simple guidelines, you'll be able to clear up 75% of all the wasted space on your UV map. Hope it helps!
If you enjoyed this video, please don't forget to like and subscribe for more content!
You can find my entire Blender 2.8 Speed Tutorial serie...
how can i get my props and models as low file size it gets w/o that much loss of quality?
is substance painter or designer suited for mobile games?
Is anyone savvy in rigging a model for Unity? Im using Maya. but it should be the same workflow i guess.
Wym "savvy"??
Does anyone here make models and rig them??? I have a model, that I need s to be re-shaped?


Hello ! Sorry to bother people but I don't know where to post this question and I supposed it was the best place to ! In a project I'm planning to use Draco 3D mesh format to store meshes, and I need these mesh to be stored in the browser cache. I've seen that Unity works well with Draco, except I cant create an asset bundle using a draco file, so I can't store my meshes in the browser cache. Anyone know if it's possible and I missed a step somewhere, or if Unity plan to add draco files to asset bundle supported formats ?
savvy means that you have knowledge about stuff. tech savvy, book savvy etc.
I'm savvy for being savvy😏
Hey friends, I'm curious if anyone has some thoughts on working with really big environmental assets. Large buildings and what not. I'm blocking out a level design for a small game I am making. The main focal point is this large floating tower which is about 250m tall. The space itself is about half a mile wide.
My immediate thought is I should build it out of chunks which their own LODs and what not. I would love any input here
probably a good idea, and use occlusion culling as well if possible
that will give Unity the best opportunity to cull as much of it as possible
of course on the flipside of that, the more unique meshes and materials you have, the more draw calls that will be. SO you'll need to find the right balance
reuse pieces wherever possible to take advantage of GPU instancing

I finally fixed the weird 'shading' issue I was having
for some reason, Unity was assigning different materials to those specific road pieces. I checked in Blender, and they all had the same material, but in Unity they either had a different road or asphalt texture
Hi! am a beginner in unity and i watch some brakeys video tutorial to make my first game BUT why my 4k cube is in 360p on my Pc??

your game scale is scaled at 1.2, try to set it back to 1
It might also have "Low Resolution" checked under that pulldown that says "Free Aspect"
Anybody know how to transfer a UV from one object to another in unity?
Hi guys, I am a beginner in unity, when I tried making a transition between two animations from pistol idle to walk backward from maximo, this happened:

I am confused here, are there any clues?
what is "this"
what are we looking at?
What were you expecting to happen instead?
I am expecting a transition between two animations instead of it stuck in the ground
Okay, not sure where else to put this, for the artists here, especially character artists, can you please send me your best/favourite tutorials on character creation? I'm needing to make a 3D human character for use in Unity. I've spent weeks looking at assets and creator tools for making human creators and none get me even close to what I need so I need to (attempt to) make myself from scratch. Thanks!
That's just the "Humanoid Avatar" binding pose. It means no animation is currently active, but there is an animator.
At a guess, maybe the animation you're transitioning to needs to be looped, or it needs to transition to yet another thing when it's done.
yeah, grabbed one or two from there so far...
If it's not in T-Pose you'd get that error in the avatar editor.
I am having an issue with probuilder and this was the best channel i could see to put it in. the drag select rectangle is completely horked. if i drag a box some random ammount down from the object it may or may not select pieces of what I want. it is an empty project, with just probuilder imported, and a single PB cube. unity: 2020.2.3f1 PB: 4.4.0
does anyone have any tips on how to start with game dev
i have basic info
though want to get into much more deeper topics
as a note it was just 4.4.0 that had the issue... 4.5.0 is better with the rect selection, but the griding of the buttons in the menu doesn't work unless they are a horizontal line... but that is solvable by docking it to the top of the window
@next sundial darrin lite ones are good
also the character creation v2 by game dev tv
but you need go step by step
why this code work when play it but its does work in full screne

(its on brakeys video)


@opal sinew #💻┃code-beginner
ok
Should I be creating a scene for a single character and then add that scene to another scene or should a player just be in a scene
Because what I am doing is putting my player components in a gameobject inside of a test scene
But I'm not sure If it would be better to give the player it's own scene and then just put the player inside of any scene.
Is that even how it works?
Idk, godot did something like that
It sounds like what you're really looking for is a Prefab of your character
hey i need help, for some reason, my box collider isnt working..
Is there box colliders on the other objects?
Are the colliders the right scale
What doesn't work?
Is it on strike? What do you mean?
guys i am making a 3d platformer thingy game... i need someone know how to model i need character model
Thanks! I'll check those out!
Ok so here's my problem
I have a mesh I made in probuilder

I want to add vertices in the middle of that face
in order to make a lake
similar to the polygon shape

There's apparently this cut tool which seems like exactly what I want but I have no clue how to get to it. https://docs.unity3d.com/Packages/com.unity.probuilder@5.0/manual/cut-tool.html

wait
theres a different probuilder version
wtf
why is 4.5.0 default
5.0 doesnt even seem to be a preview version?
Newer unity versions have more options
How do i access a gameobject i created in a coroutine.
void Upate(){
 StartCoroutine(spawnEnemy());

//I want to access what was created in "spawnEnemy" here
}

   IEnumerator spawnEnemy(){
 GameObject clone = Instantiate(Enemy1, Enemy1.transform.position, Enemy1.transform.rotation);
 yield return new WaitForSeconds(5f);
}
use a member variable
however the way your code is written, I don't think you understand how coroutines work
The code with the comment will not wait for 5 seconds, or any time at all, before running
i changed it when i put it here
GameObject clone;

void Upate(){
  StartCoroutine(spawnEnemy());

//I want to access what was created in "spawnEnemy" here
  Debug.Log(clone.name);
}

IEnumerator spawnEnemy(){
  clone = Instantiate(Enemy1, Enemy1.transform.position, Enemy1.transform.rotation);
  yield return new WaitForSeconds(5f);
}```Anyway, something like this^
ok
its creating multiple clones of a gameobject, and this only allows for one at a time
you need a List or other collection then
List<GameObject> enemies = new List<GameObject>(); // outside the method
enemies.Add(clone); < when spawning a new enemy
Ok
When i import for some reason the face goes all weird, ive checked and its not an issue with the FBX, the thing is, it was fine beforehand until i needed to reimport it.

Sorry for dumb question but In blender with the automirror addon, if I use auto mirror to make an edit symmetrical, how can I then turn off that mode?


@ivory dove You need to configure VS properly, then it will tell you what's wrong. The guide is pinned in #💻┃code-beginner . Also where you should ask code questions.
@sullen plank thanks
Hi I'm new and doing the HelloWorld Program but they tell me something is wrong
It tells me "Assets\Scripts\HelloWorldManager.cs(20,1): error CS1529: A using clause must precede all other elements defined in the namespace except extern alias declarations"

What should I do?
May be wring channel sorry
*wrong
#💻┃code-beginner would be the right place and that error doesn't seem to correspond to the code you've shared. Make sure you've saved the changes to your file
and that this is the file mentioned in the error message
@eager mist No crossposting please.
@void thicket Please don't crosspost. You can drop your assets in #archived-resources in addition to some question related to them in some other channel.
not a great model but it's my first 3d hand, making a vr game

quickly redid something, looks more decent

I have been trying to import a 3d model into unity but in unity as well as in blender the eyes looked weird
https://media.discordapp.net/attachments/285639647567282179/838576675884761179/unknown.png

I have been able to fix this in blender by doing this
for all materials i set blend mode and shadow mode to alpha clip

now my question is how can i do the same for my model in unity?
i want it to look like this

but this is what it looks like in unity

i am on the built-in render pipeline btw
The pose is just the Humanoid Avatar's bind position, so that's probably fine. Dunno what's up with this textures though
in blender using alpha clip on all the materials fixes it
i am currently trying to somehow export that changed setting
Materials and their settings don't really export/import between 3D apps
that's what i thought
You'll need to see if you can find a similar setting on the Unity materials
i have no idea where to look though
Well, it's using some kind of material already or you wouldn't be seeing anything on the model
so what should i do?
take a look at the materials unity generated?
Yup
oh, i found the settting but unity does not let me change it

it forces it on opaque
@brave ravine any idea why it forces me to use opaque?
i guess i will have to make my own shader?

I'm not sure why it won't let you
maybe you can ask around why this happens?
i need to go to bed, it's really late in my time zone
i would really appreciate that
i will try out other servers as well
it doesn't let me change any other settings of the materials as well
the materials were generated automatically when i imported the 3d model
Maybe that's why. Try creating your own material instead and then telling it to use that on import
I've never used/trusted auto created/imported materials
Yo when i import the model for some reason the bones import moved and looks all weird. How i fix?

Anyone know how to change the opacity of overlay camera in unity
are you able to rig meshes inside unity

Unity Learn
Animation and rigging is a specialized craft in the development process. Creating animation rigs is a time consuming process and sometimes it takes several people to create a rig that meets all of the needs of a project. With Unity’s Animation Rigging tools, the amount of time and manpower is reduced because of the flexibility and robustness of ...
or it already needs to come with the skeleton or bones
i was wondering fi u can create the bones in unity itself
just like 2D skeletal animations
Quick fundamental question to which I don't seem to find an answer for on google, so Imma ask it here:
A face makes up three indices referring to vertices. Right? How do I know in which side the face is pointing at? Do I have to specify normals additionally? What about culling then? Is it front or back sided? Does the order of the indices for a face matter / impact the side its facing?
Sorry for potentially confusing gibberish, I am seeking for clarification..
Connecting clockwise creates a face normal looking at your general direction.
i just experimented with that and I added a face with indices [9, 10, 11] however unlike the other faces (also clockwise) this one was back sided.
A Unity C# scripting tutorial in which we'll create a simple grid of vertices and triangles.
thanks for the link, i ll read it 🙂
Anyone have experience with distance functions? I'm trying to calculate the points inside an sdf box however i feel i maybe be using the sdf incorrectly
or i'm using the wrong implmentation.
Those materials are from the Model file, right?
All the assets inside a Model are Read-Only, you cannot edit them directly on Unity. In this case, you can either create a new material and assign the textures or you can just try Extracting this Material on the Model Import Settings > Material tab
Somebody else on this server already helped me. But still, thank you.
Yeah, extracting the materials helped
But interesting that opaque has this weird behavior on the model
Dont know if it could help. But note that SDF works on 0.5 Alpha being the mid point. So if you want to reduce the shapes it goes to 0 and to increase it goes to 1. On Catlike Coding there is some more info about SDF, even a SDF Toolkit: https://catlikecoding.com/sdf-toolkit/docs/texture-generator/
How to use the SDF Texture Generator for Unity.
I'd have never found that out without help from the blender discord
changing it to literally anything else like cutout fixes it
Thanks I was requiring help understanding the SDF returns from some shaders (math shape functions), i think i get it now.
For reference this helped https://www.alanzucconi.com/2016/07/01/signed-distance-functions/#part3

This tutorial explains how to create complex 3D shapes in a volumetric shader, using signed distance functions. Unity tutorial and code provided.
Going from sketchup to Blender makes me feel like there has to be some tool or way in Blender to draw vertices simple like in Sketchup. Like draw vert lines, or a square (then you can extrude the face with E etc) or arcs and such.
Is it all done via select vertex or edge then extrude? Cant find any "draw/pen" tools. Anyone have any advice?
same with easy snapping, or like use the ctrl + R loop cut, get 2 lines then input space between them and how far away from edge or such
I am getting slightly overwhelmed trying to find out how to do these pretty simple things. :)
should I look into addons?
Can anyone explain (or point me at something that does a good job of explaining) how Models with multiple materials work? As in, how is it determined which materials applies to which part of the model? I have a prefab here that represents a "Wall" and you can give it two materials to have the inside and outside of the wall look differently. Both materials are using UV0, so I don't think it's to do with the UV mapping?
It's not causing me a problem and it's useful, but I'd like to understand how it works. Doesn't fit in with my current understanding of texturing 🙂
It's based on submeshes
the first material applies to the first submesh
and so on
If you look at the Mesh API when you assign triangles, you do so with a submesh index:
https://docs.unity3d.com/ScriptReference/Mesh.SetTriangles.html
that means those triangles describe that specific submesh. And submeshes map 1:1 with materials
I don't know how Maya works but I don't think so
Is it something you can see in the inspector?
Unity is the ultimate game development platform. Use Unity to build high-quality 3D and 2D games, deploy them across mobile, desktop, VR/AR, consoles or the Web, and connect with loyal and enthusiastic players and customers.
not really it's part of the mesh data
that's for blender
Interesting.
for maya it's probably something similar
it might be called something different - like material ID or something in Maya
I struggled with this concept for a long time as well until Unity released this free materials pack:
https://www.youtube.com/watch?v=mHSZv75EQyA
I saw this and was like "How on earth do they get different parts of the model to use different materials"?
By downloading an investigating that pack I eventually figured it out haha
Yeah, I have "Sub meshes" with different materials in my characters, but they literally show up as a child that also is a mesh in both Maya and Unity
yeah that's not the right thing then
see if you can assign different materials to different parts of the mesh in Maya
that should get the mesh to have different submeshes
Sounds like you can assign as "Shading group ID" to individual faces
Which can then have different materials
So it sounds like this "Submesh" concept (that isn't a literal child mesh in the usual sense) is a Unity importer concept and there's just strategies you can use in various application to produce a condition that the importer will create a submesh out of
Sounds about right
Thanks for pointing that out. I guess that makes me feel less bad about missing some concept along the way too if it's largely a Unity invention
what would you expect a low poly tree face count to be?
Under 200
If its a wizard of oz type tree... then one, norse mythology or other spiritual... more maybe 😉 But “low poly” more depends on if its an artistic choice, or a hardware limitation driving the need for low poly
Do the best you can. Id worry more about texture size.
so I'm guessing textures pose a problem
If you over do it, yea. Stick to 512x512. A 2048x2048 texture will take up four times more ram than four 512x512 textures.

atm im suffering with fps fluctuation
it's decreasing/increasing between 30-150
for such a basic scene
Ahh, you'll need to run the debugger. Could be anything.
Safe to say its not your models.
well I think it's the " scenery " ( the plane on the left and right with trees ) because if I remove those it runs at 400-500 fps
I am on a mac though which ofc is terrible for games
That's weird. I would open the debugger so you can see whats actually going on.
I'm relatively new to Unity, which debugger are you referring to?
maybe my approach to a endless runner is bad practice?
2041 batches is quite high, even for pc games, and I assume this is for mobile?

this is my model in unity

and this is the model in game
anyone know why?
I thought it was the model but the model is triangulated
yall can check for yourself
so I have no idea why its doing this
@woven tide you can go to Window > Analysis > Profiler. Then play around with/click on the things on the side and see whats taking up all your CPU or causing spikes. Probably best to look up a tutorial on youtube for it. As for the game being an endless runner, I can already think of spawning and despawning your models as being a performance issue.
@raven reef something is up with the mesh. There is like a lot of unnecessary geometry. Trying to fix it now.
I don't know. I can't fix it. I'll need to go over the whole thing by hand. It's almost like someone ran a decimate on a higher resolution mesh and called it a day. Also not sure why its such a big difference once in game mode.
@errant plover I'm pooling my objects to prevent instantiating and destroying reusable tiles, essentially I just spawn for example 10 tiles to begin with and then change there position to be ahead of my player upon passing the object.
Sounds like the best way to do it.
is it animated in this one and not in the previous one? might be some vertex weight problem
Yea, I didnt check all the bones.
hmm I'm just not sure whether replicating that process for the environment/scenery is ideal?
Example -
I have | which is a path tile
I then have [] which is a environment chunk
my process to create this scene is to spawn and/or reposition [] alongside | and [], resulting in []|[] x 10
if that makes sense?
this process is then just repeated based on distance from last tile
Well its pretty much pointless to figure out whats wrong when you can use the profiler.
That'll tell you exactly whats wrong.
hmm I guess I'll have to watch a tutorial on profiling as it seems as though the layout is different to the ones I've watched previously
maybe i can get some advice in here, hello i'm new to unity, i make vtube models and having an issue with exporting a vrm file to vrm file might have worded it wrong lol
in unity

exported out of unity

Does anyone know if there's a way /asset on the store to blend the textures of 2 intersecting meshes like shown on this video?
https://www.youtube.com/watch?v=cOBApMeeJEc
Note: this vid shows terrain + mesh blending. My goal is to do this with mesh + mesh
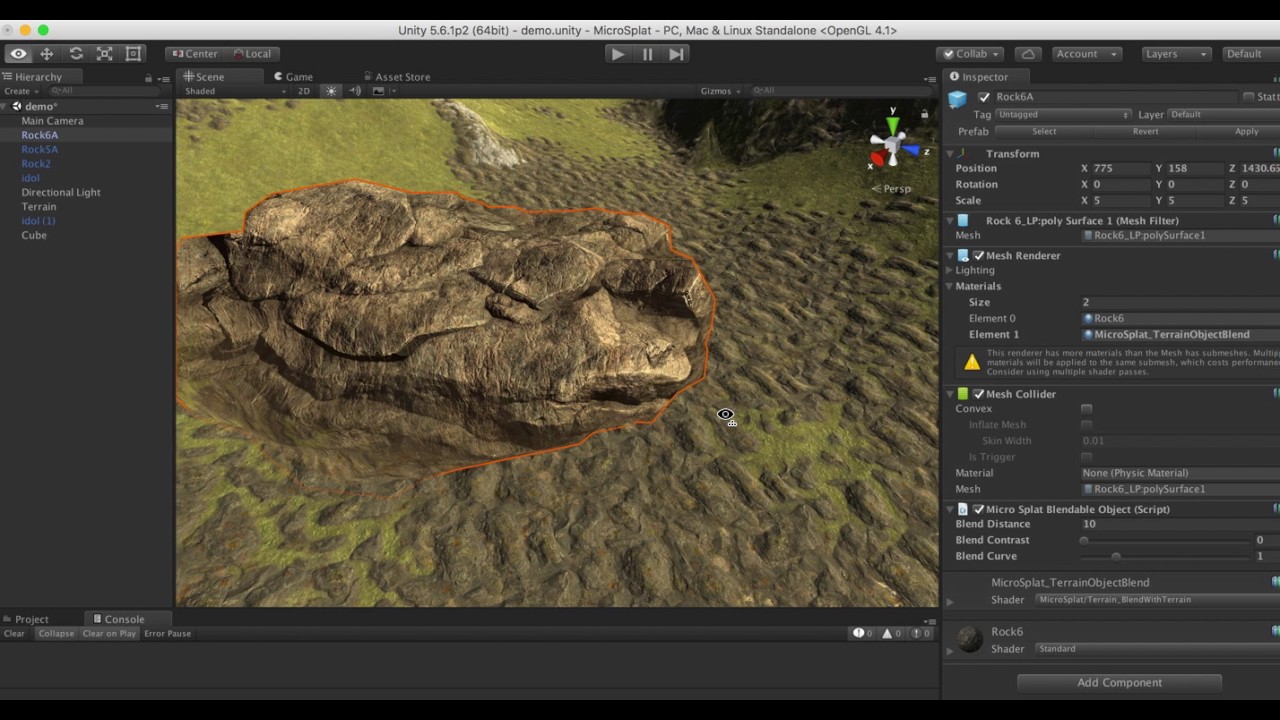
MicroSplat Demo showing of the Terrain Blending module, that allows you to easily blend meshes with the terrain.
Hi! which sculpting program is the best for beginners, Zbrush or Blender(let's leave the money on the side) Greets!
Hey if anyone is using Armor Paint please pm me
hello, sorry to ask, I'm trying to study materials;
do you happen to have an example mesh object of a curtain, a cloth, something similar to share, or info where could i find a free one ?
any idea why there's so many batches?
it's not like I have a ton of objects to draw
Might be a dumb question but let's say you have a character model with a close up on their face. If I wanted to hide the jagged looking geometry created by vertices of the mesh, what would be the best method to smooth it out? A combination of having a higher polly mesh wish, normals map and smoothshading? Is there any other feature or technique that could be taken advantage of?
could also use a higher LOD face model for the closeup
That's true. If the camera is going to transition or zoom in I can see that being pretty feasible to pull off
I guess would apply to textures as well.
I'm probably overthinking things though. Most character models do just fine.
If I have a mesh and I want to render is as a point cloud how do I go about that ? Wanna do something like this. https://youtu.be/A8QPFtS2_fE

Listen to the full album: http://bit.ly/38tkHvS
"Clove Cigarette" by Andy Shauf from the album 'The Neon Skyline,' available now
Order here: https://andyshauf.ffm.to/theneonskyline
Directed by Colin Medley and Jared Raab
Animation and Technical Direction by Luca Tarantini (AOK)
VFX Supervision by Tristan Zerafa with Cosette Schulz
Special Than...
Microsplat has a "Mesh workflow" add-on that I believe allows nearly all of its features to work on meshes, not just terrain. I don't know for sure it'll do what you're looking for, but maybe shoot the author a quick note to ask
Hi i want to learn how i can combine some armature and make a new humanoid armature in unity ?
i want combine cloths with my character as a new humanoid character ( that i make in blender )
Not sure where's the best place to ask this question - I have an FPS with multiple players. Players need to see each other, but I'm trying to stop the player's camera from seeing their own head. Is there a way to do it without putting each player on a different layer?
How about, show head = isLocalPlayer?
or if player is local player, show fps hand model, else show full body
@opaque cloud I don't understand what you mean by combine. Do you mean you have a piece of clothing as a mesh that you'd also like controlled by the skeleton?
please ping me if any1 has any ideas!!
does anyone have this addon https://blendermarket.com/products/b2u and could he tell me if it still work ?

Blender Market
B2U is a Addon to Export Prefabs and Scenes from Blender To Unity
i can make characters with humanoid rig for unity
but i want make every part of cloths with uniqe bones and i want in unity combine those bones as same selection so every humanoid animation that exsit in unity and all unitypackage can work on my character even i change my mesh and cloths .
You can't change what a humanoid rig is. It exists to be a lowest-common-denominator. If you map your existing character to Humanoid Avatar then it already CAN use any animation setup against Humanoid, that's the point. But your extra joints will be stationary unless you animate them yourself, probably in a different layer.
so how other games make it ? how they import new cloth for characters like gta v or any other games ?
There's a few approaches to clothes depending on how many you intend to have and how much you care about clipping
If the item is weighted against the same skeleton as the character, all you should need to do it parent it appropriately
how so ?
Well like, in my case I don't have a lot of outfits, so I just has submeshes:

I turn on of off streetClothes or clothes_C depending on what they're wearing. They're just child meshes, but they're skinned to the same bones as the character is so they animate with her
You could also look into UMA, they have a whole system for doing extensive clothing sets
Whoah, why did I not hear about Maya getting this?

I've been TRYING to figure out "Animation only" forever
hmm
so you put all your cloths to your model as different mesh and then export it . thanks for answering my question .
i still want to know how they made pubg like that 🥲
Yeah, that's how I'm doing it, but mostly because I only plan to have 2-3 outfits per character, and I wanted a lot of control to prevent clipping.
i made a custom texture and material and dropped it onto a 3d object, but it's not displayed correctly at the sides as you can see here, what should I do?

It's supposed to be grid like
i want the tiny stripes at the sides to disappear
Anybody up for some 3d modeling here?
what do you need @eager mist
my cube falls down the map
what's it falling through

and it gets stuck on air
no

now i just falls though the ground without being stuck in the air
oh wait my bad
remove box collider, add mesh collider leave convex unchecked
so basically ignore what i said previously
I meant does the dice have a collider
box collider

hmm

have you asked in #💻┃unity-talk and/or #archived-code-general
no
probably best asking in there since this is the 3d section and unfortunately I'm not sure what the issue is, I assumed it would be colliders as that's the go-to but obviously you have that covered
whenever i see 3D games first thing its an another FPS game with mindless shooting xD
is it easier to make and hence everyone makes one?
its what is popular
and easiest to make, since almost anything else requires heavy scripting it seems
for events and other things
Can bugs be reduced at high altitudes?
is there an algorithm that extracts the shape/outline vertices from a (flat/planar) mesh?
as well as the holes?
Anyone do low poly pixel models? Would you recommend blender over Maya for it?
Did you added a Rigidbody for your falling object?
You mean voxels?
Check out MagicaVoxel
@long dragon fixed that already, new problem is my fixed timestamp is slow
Generally the Fixed Timestamp is 0.0667 and it works fine for almost anything. What type of issue you are experiencing?
it's slow
If you are having a slow collision detection, you could check the rigidbody. By default it comes up with the Discrete one, with doesnt check for collision every frame.

0.6 is not the default.* It is 0.0667, 10 times faster hauha
still to slow
That is it, change you fixed timestep to 0.0667 in order to have a more frequent Fixed Update.
it is showing 0.6 in your screen
BTW, your Time Scale is 0.2
change it for 1 to get normal speed results
thanks
now when i run it it works but the dice jitters when hitting the bottom my code that makes it have Randomize Rotation https://pastebin.com/jvH2ugd3
Probably the Bounce Physics Material is causing that

First thing to try is to remove the material and see if it stop jittering. If it stops, then you will need to make some experiments with the bounciness and Friction values
until you find the ideal result
This channel is for 3D art, please go back to #⚛️┃physics. I'm not sure why you moved here.
Not exactly, I mean low poly models with pixel art textures
Hey just wondering whether anyone can help/direct me in the right path. I have a plane which is 1,1,2 - (x,y,z) in scale, I want to create a custom material that'll fill the base mesh, but I'm not sure how I would achieve my expectations.
Example of expectation -

rather than being a single base color, I wanted the effect of grass transitioning into dirt from the left/right of the tile
@woven tide Hi!,
Your question seems more related to #archived-shaders channel. But what you are asking might be a Vertical Scrolling shader.
Maybe with a GIF or a Video reference would be better to make us understand it and give a clear direction.
@long dragon To be honest I have nothing to show, I just have a empty plane atm, I just wanted a material/texture that would fit the base of the plain whilst giving the effect of grass on the sides and mud in the center
I'll ask in #archived-shaders though, thank you 🙂
Cool, by re-reading. I made a misunderstand of the transitioning, I thought you meant movement. But what you need is probably the Terrain Editor
I mean, with the Terrain Editor you can paint different textures on a plane
and it blends automatically
Try checking the Terrain Editor and take a look if it could help you
Thank you, I'll have a look, I'm guessing Terrain Editor is a packet/asset?
No no, it is built-in on Unity

Let's learn some basics of new terrain system in Unity 2020.1. You will also learn how to use New Terrain Tools and Sample Assets for quick terrain creation.
👉Note :- Terrain Tools are only available for Unity 2019.1 and later.
👉No Preview Packages(Unity 2020)? Solution - https://youtu.be/sJIfWbrnahI?t=72
👉A,S,D Shortcut not working.Try this h...
I'm guessing that would also work on a plane?
It is a plane, but it is generated and managed by the Terrain component
To try it you can go to the Hierarchy and Create a New Game Object > 3D > Terrain
on Terrain Settings (the last option on the Terrain Component Toolbox), you can set its size. It starts by default with 1000x1000
Thank you for the help 🙂

idk if this is the right channel. i imported a man in a suit from the asset store, drag and dropped the right material on it and know it looks like a stone statue. do you know what i am doing wrong?
Hey, did somebody have an idea how to make something like atmposhere, I mean that on surface of planet (It's just a sphere wiyh mountains etc) we can see sky, but at higher altitudes it will disappear?
Hello I textured a model in substance painter and I exported it as a standard pbr metal (I think the textures were: color, height, metallic, roughness and normals). Then my teacher explained that there's a preset for unity that exports color, normals, ambient occlusion and a special texture that is metallic smoothness. I tried using both my pbr metallic texture and this metallic smoothness thing in a material applied to my model in unity but they look the same to me. Very glossy, to add. I also noticed that there is kinda no direct input of smoothness/glossiness (thats probably why metallic smoothness exists). But, if MS supposedly includes smoothness but the previous metal texture that i used does not how do they look the same? The smoothness is not accurate to what I painted, am I using the MS texture incorrectly?
I do not have much knowledge about Maya. But the characters which were made in Maya worked perfectly fine on it but when I am Importing its FBX on unity there is some skinning issue pop up which I am unable to sort out please help.


If those are meshes clipping through each other because of how close they are, there's not a ton you can do directly. Two diffrent engines aren't going to do that exactly the same way. That's why in like, MMOs where there's a lot of clothing pieces involved they're usually oversized. But one thing you can do is have a cutout version of the body mesh where polys don't exist under where it's covered by clothes.
What inputs are available/needed depends on which shader you're using. Like. the HDRP Lit shader certain does have a direct input for Smoothness, though it's preferred as part of a Maskmap with metalic and some other items in the color channels
So I recently upgraded to 2021 unity after using 2019 for so long, and right after the update was finished and everything was re imported, certain blend files just stopped working and their UV's were completely broken.
I noticed that the models that are broken don't have the UV1 tag at all in their mesh directory

In blender it works fine

but in unity it just becomes this

You need to make materials
The textures aren't exported with the model you need to bake them and then make a material

Did you export from blender?
https://www.fiverr.com/share/l7lgky sharing my services if anyone wants thank you (OwO)/

Something in your behavior has triggered our protection systems - we apologise for any inconvenience this process may have caused.

Timelapse of 3D modeling a Detailed Machine Gun in Blender!
● Instagram: https://www.instagram.com/polygamedev/
● Twitter: https://twitter.com/games_polygon
● Google Play (my games): https://play.google.com/store/apps/de...
#machinegun #blender #timelapse
i downloaded a model and it has an mtl file but im not sure how to put it on the model
hello guys... I have this simple prefab with this mesh and texture:

and then i have this other one

both are made with the same exact mesh
why if i try to set the texture B in the first prefab this happens: ?

its like the texture doesnt fit well the mesh or something
but the mesh they are taken from should be identical
this is made with voxels and i have no idea about graphic stuff so if you would at least guide me with whats happening I would be thankful
I want to put spots on a sphere what should I do
hey all I was wondering if anyone had any resources on modeling interiors for games? I was wondering whether or not it is better to model the interior of a building as part of the whole model, or to make all the walls modular and "build" in unity
Depends on your project @sour summit. Modularity takes longer to set up, but is quicker when building large scenes. If there's room for a lot of reuse, go modular. If it's gonna need to be one set up modules for each interior, might not be wort it (depending on the size)
Both meshes have different UVs. So the texture will be placed different on them
If this doesn’t work try making sure texture b is set to “repeat” in the import settings.?
Hi
For some reason the bones are always importing all weird, anyone know a fix?

Yep
but the designer told me they are taken from the SAME mesh, is that possible?
seems he uses magica voxel and some sort of plugin ccalled magica voxel to unity
to import
@dusk carbon Weird how?
See on the right how the arm is bent? Its meant to be stagith like the other arm. This also happens with facial bones for some characters.
is this a good channel to ask about blender?
I cant send a link apparently, but there is an official Blender discord server if your question doesnt relate to Unity
alright
do u know anything about blender

anybody using magicavoxel ? I have some problems when importing models to unity with the 'magicavoxel to unity' asset
like... sometimes for the same mesh I create different textures and seems the UV aren't the same
idk what happened that the textures are messed up. i copied my whole assets folder from an old normal 3d project in to a 3d project with the extras and this happened

does anyone know a fix for this?
sorry if this isnt the right channel
if you imported from built-in render pipeline example to URP/HDRP you need to swap shaders.
is there a simple solution to fix this?
There's a wizard in the menu that can convert. Won't work for custom shaders though
i dont think i have any custom one
in which menu if im allowed to ask?
@sullen plank ?
@nocturne maple I don't have a project open right now, it takes a few seconds to lookup
okay thx for the help fogsight
My material is distorted (its on a quad) pls help this,, is how it should be:

this is how it is

hi , i've got a mesh (all it is is just a subdivided plane without smoothing on since the default plane is too low poly) and im using polybrush but the plane keeps turning black everytime i try sculpt on it ...... could someone help please ..... and could u ping me if u dont mind .... thanks
Yo I have tried multiple times importing a 3d model to fbx from blender to my unity project and none of my textures have appeared I joined the sever wondering how to fix this issue?
You have to create your own materials in Unity and assign the textures to them and to your model.
Hey real quick, not sure if anyone can help me out here, but I hope the answer is yes
I have created a model with multiple animation keyframes for body shapes using bones

One such shape:

However, Unity is screwing this one up HARD

I really have no clue what could be the issue
It's worth noting that there is a higher density of vertices here, and it's comprised of three separate objects
At least in the chest region
I don't know if anyone would like to take a look and see what they can find out, but here's the FBX file for this mesh
Animation frames are 1-5
Thank you so much man
and will do
I'm looking for some basic spaceship models of varying shapes, sizes and utility classes to be used as a reference.
They don't even need to be textured or anything, and they can (preferably) be rather poly / primitive in overall shape complexity and detail
The only design conformity I'm really looking for is (structurally) something you might expect from ship designs that trend towards near-future realism rather than strictly sci-fi (more expanse, less star wars; more hohmann transfer, less impulse / warp engines)
Does anybody know of any free or low-cost asset bundles that might contain those kinds of models?
anyone use subtance painter here?

Nice
Anybody know how I can select all the vertices in this case like you can in Maya?
In this example I can only select the two vertices facing me, not the ones in the back
Forgot to mention, this is ProBuilder
I tried X-Ray mode, but that only seems to work in the 3D viewport

its good
nice
thank you!
np mate
Hi team. Question. Any way to change the origin point of an FBX in Unity itself? I have two meshes that should be switchable on an object but one 'spawns' way too high so isn't in bounds of the mesh renderer...
The only way to physical change the origin point of an FBX is to do it in a modeling program.
The workaround alternative is to child the model to an empty object in unity, and offset it manually.
Ah ok. Thank you. Since I want the actual mesh, I'll have to do it in blender somehow. Thank you!
help because I accidentally clicked something and the left bar with the teeth will disappear. How to undo it?
help plis
I'm not familiar with Unity's particle system, so I was wondering whether there'd be any change in performance if I used blender models to create particle effects over Unity's inbuilt particle system?
You can use 3d objects in unity’s built in particle system
however if you did the simultaion in blender and exported that it might cause oerformance issues
Yeh I was looking to do simulations in blender, but guess I'm better of learning particles
Thanks for informing me bt
btw*
Any good free arm rigs for unity/blender?
im trying to use a projector, and the image that i get projected onto the ground looks really bad compared to the input map... any idea how to up the quality?
i think you use unity to free arm
just send me problem and i send you arm
Anyone know how to fix this? Its a FBX from Unity. The Triangles have been deleted but the mesh is very distorted


Fix your scale to 1 on all axis ?
Are you in vertex selection mode?
Could it be perhaps because your joints on the chest area seem to have scaling effects. So this is carried through as a skinned mesh change, with the shape key added on top. That could lead to a disorted shape.
Can someone tell me How Export scene with textures ? I use FbX but all White
FBX files don't carry materials. So then you can't use textures, but it will carry the material slots.
So you can re-build your materials in unity and drag them onto the objects in the scene.
It's better to re-build them in unity anyway.
But i need export textures .. i dont understand because… i stream Binary file with 3D objects with textures
Textures are usually images, which are seperate from geometry. So you would have to build a system that can grab the textures and then apply them.
In unity Apply textures to objects?
You need to make a unity material first, put the texture into the right slot within that, and then assign that material to the object.
In what program?
I want whole scéne export with textures
From unity - to another unity project?
Because i not Have 3D models
Man i Have BUN
Thats old stream binary file
With objects
And textures
Where is the object? Is it in a unity scene, or is it like in blender or maya?
And are you wanting to move it to another unity scene/project?
Okay, then no. You will have to rebuild your materials in blender to see them in there.
Materials don't carry between programs.
Man you not understand
Why does the bottom of my object change color? Right is the color it should be and left is the color it changes to. Maybe I have done something to the settings?

I guess I don't, I'm trying to by asking questions.
I Have 2 files
BINARY files
Not 3D
And i stream it
And make 3D objects with Shaders with everythibk
Textures too
Your binary file will not contain any textures or materials.
Because it's just the 3D data.

You want to export that data from unity into blender?
Ye
Using the FBX format, yes?
With textures
Yes
Alredy Have
But without textures
All White
FbX files before if i create race tracks for assetto i Have FBX and Texture folder
I try OBJ scéne exportér and not export
Okay, so here's the thing.
The FBX format can't store image files, it only converts the 3D data into it's format.
This can be read as binary, or ascii.
The textures, will have to be exported separately.
I Have exported manualy with Binary editor but i must be manualy 3000 textures replace in blender scéne
But i want export from unity
I don't know what to tell you man, It can't be done.
You have to manually move the textures over.
You could build a python tool to handle this for you, and assign the textures.
Ye but i thibk with OBJ or other formát can export
OBj can support textures, but only with a MTL file.
and that's just colour data.
Is this the corner of a room or something?
This is just the bottom and the side of an object that has the same material
Yeah, this is just how unity lighting is. It's the same material but it only reflects back one colour unless there is a probe or soemthing.
All is normal.
Is it possible to get rid of the discoloration?
Set up your lighting, and add a texture?
Also depends if this is in scene view with lights disabled or in game view
^
Ok ty
👍
Nah, I figured it out. The issue turned out to be that the project settings were hard limiting the amount of bones that could be weighted to a vertex
Ah makes sense, Good ol 4 bone limits. 😎
Hi, This is a basic question, that I am having hard time dealing with. Can anyone tell me how to import FBX models where the fbx file is on one folder and the texture is on another. is there any way to automatically set the textures to the model after importing?
@normal pasture You should be able to import them seperatly, and then you will need to make a new material to attach the textures to, Then you can attach that material to the object in unity.
Hi sorry for joining just to ask a question but ive been trying to import a rigged character i made in blender onto unity, problem is it always breaks transforms and ends up looking like this: https://forum.unity.com/attachments/capture-png.851474/ I have tried already applying transforms but that doesnt seem to fix it, heres a thread on the forums with more details: https://forum.unity.com/threads/unity-completely-breaks-transforms-of-imported-model.1107653/ , any help please?


Unity Forum
The issue:
Whenever I import this specific model, independently of whether I import it as an FBX or drag-n-drop the .blend, I get the same results of...
Does anyone have a workaround to get CAD stuff into Unity without losing assembly hierarchy and materials but without using PIXYZ plug-in?
i actually designed most of my character in fusion 360 and the hierarchy was kept intact for the most part when exported as fbx with exception of some weird normals @karmic marsh
I see, that's cool. Have you reduced the mesh resolution or did any retopology or any kind of pre-processing before bringing it into Unity? Or just straight away imported the fbx?
Just asking cuz I imported a full car CAD model as an fbx and it lagged the editor like hell.
straight importing worked fine for me plus fusion 360 would act very nasty if i had a high poly object
what software are you using?
I generally use solidworks but I also do some stuff with Fusion.
oh as for solidworks i have no idea what could be causing it
are you importing bare meshes?
like not t splines or objects?
This is what I'm doing:
I have a full actual car assembly made in solidworks. I import the .SLDASM file into 3DS Max to convert it into .fbx and then I import it into Unity.
After importing, I find that assembly hierarchy isn't preserved, material data is lost but I figured that same happens (materials not importing directly) with any fbx and there is a solution for that.
cant you export fbxs directly from solidworks?
Nope
thankful with the sky that i couldnt afford solidworks
okay well let me think
was the hierarchy preserved into 3ds max?
Well, if you say Fusion works well then I'll completely shift to that from now....
Been using solidworks cuz I'm a mech student and our team is sponsored by Dassault lol even I couldn't afford it
Yes 3DS Max can perfectly read every CAD format as if it's native
okay try exporting to .3ds and then into blender then to fbx
or skip 3ds max and work in blender directly
Well Blender doesn't read any CAD format. I think I'll just have to use Fusion now
Which I'm totally fine with
how do i move the camera downward/upwards forward/backward to view my scenes in the editor
of particular interest may be Flythrough Mode
shameless reeepost pls help waaa
:<
In your blender export settings there are a few things you should have enabled, or change so it works better with what unity expects. :)
ive messed with them already
It's generally these settings that should be used to ensure a consistent and correct export.

Also check your rig has applied transforms and such. :)
okay i tried exporting it like you said however in 3d view it looks the same
Hmm.
Does any of your meshes have scales larger or smaller than 1?
From what I read, you are parenting your meshes to bones instead of using skinning?
Yeah, okay so a great tip to keep in mind is that you should always have eveything at a scale of 1 in object mode.
If you want to scale things up, move to edit first.
However if you have irregular scales, when you export, it'll make that larger or smaller because it expects one.
You can fix this by selecting the mesh and pressing Ctrl + A, then select scale.
This will set your mesh scale to 1, which might move it away from it's original position. But once all fixed it'll export as expected. :)
Hope that helps. Let me know if it does. @eager mist

Dimensions you don't have to worry about.
Even if un-parented?
? ehh i dont know how to do that ;-;
other than crtl + a then all transforms i havent done anything else
Select mesh, And then Alt + P .
wouldnt that clear the parents and mess with my rig?
You could then unparent, If you unparent then check the scale might reveal somethings.
I don't know if it'll work, I'm just doing some trouble shooting.
Well your rig is the bones/joints.
The parenting is just telling the mesh to follow said bone transforms.
You can unparent, check then re parent with Ctrl + P, with the bone selected in pose mode.

Do you mind letting me have your file and I can troubleshoot it myself and relay results that I find? :)
In your broken version in unity can you say what meshes are broke?
sorry for using catbox but its what i had at hand ;-;
oh
no meshes are broken just the positions
a sec

Hoo wee that's a lot of polygons. 😅
255k tris.
The biggest games are only just breaking 100k on them now.
oh yea i usually run limited dissolve before exporting
Yikes. 😅
i gave you the cleanest version i had
When you accidently click Zbrush, instead of Unity. 🙃

Do you know what all these are about? 🤔
They are all empties.
oh you can delete those empties
yea
its oart of the hierarchy that fusion 360 exports with
Yeah, Probably be for how they do parenting.
Any idea what that is? 🤔

Only seen when selecting the top shin on the left side.
no idea actually
Okay, I think I have the problem.
Well not a problem, more of a solution.
When you were parenting to the rig, how did you do it?
I assume all the more robotic parts get the ctrl + p?

I've tested it with 2 parts now, so this'll work.
@eager mist Alright, This'll be how to do it.
Unparent the mesh from the rig.
Then in pose mode select a bone, and then go back to object mode.
Select the mesh you want to parent, then the rig and go back into pose mode.
Making sure the bones you want the mesh to follow is selected, Ctrl + P and the parent to Bone, (Not bone relative)
Then it should work.
Bone relative is a blender specific thing so then it kind of doesn't work ouside of it.
I did the hair, but because I didn't unparent first i made an error with it, but it still shows you it working.
unity just killed my gpu
😎
I recommend you retopologize the robotic parts as well.
Not limited dissolve, cause then you can have better toplogy.
Also, if you aren't going to see inside them, which Is what I suspect, They don't need to be hollow.
So you can get rid of the internal polygons. .
These are just some small things you can do to help optimise. :)
oh i guess thats because of the way fusion 360 works
it thinks in an object manner rather than in a mesh manner so it exports everything without any optimization
Yeah so F360 doesn't care about polygons. It's an engineering tool, so it only cares about making sure it looks like what you design.
It's not really designed for games development. 3D printing and manufacturing is it's domain.
But you can still use F360, just gotta make sure to optimise.

I would focus on optimising the mesh first. ;)
I'm really bad at art and want to know where I can find complete assets, so I can focus primarily on coding.+
Sketchfab has a free section, and a paid section.
Unity asset store, Open Game art.
Plenty of places, However, Best focus on your prototype first before art.
You can build a whole game with just cubes and see how it all plays before adding art. and I recommend it. :)
I've made many games that are just cubes to start, cause it's all about getting the game feel and ideas working well first.
Then you make it look pretty. :)
@eager mist How I would suggest optimising. :)
The right is 110 faces (200 tris.)
Vs the Left which is 8262 tries.

And this would make it easier to UV it later, or make any additional model changes.
I've been working on a scene, this all total. (Some stuff offscreen) is 6660 tris.

And looks like this in unity, Still WIP.

Most of the polygons are in the window frames. XD
anyone got an idea, why the animation breaks when it goes into the next loop cycle?
first things first
holy shit thats so fucking cool
second things, the Erlenmeyer flasks and the robotic arm are both in the same mesh?
they are not
maybe the animations desync
separate objects, and the flasks have a bone
oh
hm
I'm using a constraint
and I can't find anything about this when googling 😦
a bone constraint? like the ones in blender?
it does look like a sync issue, although I'm not sure why that would be happening
yeah, pose bone constraint
hmmmm
weight 0, when it's not in the robo hand, then weight 1 when it is etc.
does this show up too in the preview panel?
and again, everything works fine until the animation finishes
well in the preview panel, I can see two different animations
one for the hand, one for the flask
and they do work on their own
oh yeah thats def a sync issue
both have 310 frames too.
perhaps I'm going the wrong way about this?
maybe, I should try a different method then?
definitely, even if you tell the animator to play one animation right after the other you risk desync
can you show us your animator or your code?
yeah sure was about to

I have these two actions in two layers
same weight
but I guess, that's most likely where the downfall is.
does one of the layers have a mask for the Erlenmeyer flask
nope
try adding one
put it in the layer than animates the flask
thanks for the advice, I'll have to look into it, as I'm not really familiar with that concept yet
how do you think masking would solve the sync issue?
i think the two animations may be conflicting with each other
sometimes unity counts the "dont do anything with this bone" as a keyframe
This... could actually be the reason then! 😮
@eager mist so, just opened the animator in parallel and switching between the Animation A and Animation B... looks like the clips are not the same length!
any empty keyframes at the end or start?
nope
so the animation just takes more than you thought it did?
can you show us your keyframes?
Im doing pipes for my game, currently making a three way pipe thing and wanted to ask, how much of a performance issue would be if I kept this like this? As in not connect the faces with the faces of the other way tube?

@stray stone haha it works great! just one issue, the face itself is missing any shape keys which it had in blender even though they do appear in blender
Hmm, I think they are actually on that mesh spefically within unity.
i believe there is

Yeah. Should work then. 🤔
Are the other ones in Japanese as well?
From the working meshes?
all of them are in japanese
This is an odd one.
Not a performance issue
welp at least i can get to work on replacing my old main character, thanks a lot justin!
Plz help, I am looking for a free 3d model of a road, pool, library, school and semi detached houses

Sketchfab
With a community of over one million creators, we are the world’s largest platform to publish, share, and discover 3D content on web, mobile, AR, and VR.
Is this free?
Thanks so much! I have to make a city for a project, I wanna make mine stand out
yeah, so both animations, 310 frames, 24fps... and weirdly enough, one is longer than other... in unity that is.
Can I use the models from thongoverse?

huh if they both have the same fps and frames they should have the same length


and in blender these are like related actions, 310 frames each... I mean it makes sense as I'm manipulating the weight on the constraint
hmmmmm weird
can you show us the timeline of the arm action one?
not the flask one?
as in blender?
no in unity
ah, sure

now the other one?
sec, cant get it on the drop down
snip

hmm, nothing there at the start!
could be the answer*
OHHHHH I KNOW THE ANSWER
try copying the last frame to 12.917 second
or the same position as the last frame of the arm action
it should work now
i hope
indeed
there is nothing at frame 310
you are most likely right
let me see.
we have a winner 😄
that worked! 🙂
YESSSSSSSSSS
LETS GOOO
damn, is there some kind of a commend system here? 😄
you deserve all the points, literally was smashing my head for hours on end with this, now I can sleep in peace 😄
i dunno but if you know why unity decided to collapse some of my faces in a weird way id appreciate it ;-;
what's the problem you're facing?
@eager mist here's the result, I can't believe I wasted 10 hours on something that won't be even that visible! But at least this will save me a lot of headaches in the future I think.
man thats so fucking cool looking
kudos to you
thanks, I'd be lying if I said I'm not putting a lot of effort in this shit. 🙂
share the screens of your problem btw, let's see if we can figure it out
its kinda like yours very subtle but annoys me a lot
the mouth faces do this weird thing

which isnt present in the mesh inside blender

oh it also lacks the shape keys which is weird
ah the line right?
did you triangulate the model?
before importing into unity?
ehhh theres an ever so slight issue with why i dont wanna triangulate
.
its worth a shot at least
ACTUALLY WAIT WOT

you will have to, because otherwise you're going to run into all kinds of problems, e.g. most common one being missing faces alltogether.
i think i can see it too in blender too
ah, was a thing of angles 😄
so i think the reason is that this faces mess this the shape since they are connected to a way bigger shape

usually, when you have crevices like that, indicates that you need more edges
if you do a subdivide here or there and connect
that should flatten out.
subdivide? isnt that for edges?
yeah I mean, whichever process you use, just try do add more edges to that cheek
that should get rid of the dents.
hopefully 🙂
triangulate didnt work
any other ideas?
revert triangulate
as you have the problem in Blender too
and just try to add more edges
as in

something like that
oh so just with the good old knife tool?
you can but dont have to
as in
let me illustrate
well actually the knife tool worked lol
oh it most certainly would
but if you want more precision
and to not create additional verts
subdivide edge
fair enough
or not even
you can connect two existing vertices
I was just using this as an example
if you select vert 1 and then your vert 2
and press J
that will create the slice and connect
so, is the dent gone now? 🙂
did it work?
ehh
sorta
it also creates really flat surfaces

wel at least its less noticeable
maybe you can apply smoothen somehow?
oh good idea
or protrude it out?
then smoothen
as in move it out a bit.
hmm i think i have a workflow
improvement?
eh

a little
now just gotta do the rest for the rest of the weird dents
Be very careful with just grabbing assets from everywhere. There's lots of things to watch out for.
Polygon counts and that aside, gotta keep an eye on them.
The other thing is copyright, If it's CC-BY or any other, you will need to credit the artist.
The only time don't need to credit the artist is if it's CC-0.
actually, can you share the topology of your mesh? Just for the head at least? @eager mist
i shared it already to mdjustin a sec
uhh
There's more poblems with it than just the mouth. 😅
This mesh is not good.

So many N-gons.

spy tf2
You want to have some decent face topology, this will allow you to have some good blend shapes and such as you work on it.
This might be why your shape keys don't work.
They expect a certain mesh, if you change it such as limit dissolve, It'll not work.
oh no they do work
The mesh the shape key is built with is gone.
Another thing to keep in mind with faces, you ideally want to keep the mouth in a neutral pose.
So a stright line, you have a slight smile.

We immediatly send models back to modelling if they don't have the right settings at my work.
mind you it's low-poly, hard edges not soft
but you can clearly see the net
i have a shape key for that so it should be a problem to change the basis to that
i gotta go but yea other than the weird dents, the bad optimisation and the shape keys not appearing everything works
ooh boy its gonna be a long day
good luck, and thanks for the help! 😉

Retopology is a good skill to learn, This isn't as clean as I do because I was being quick to show.
I wish I knew how topology works, I could never figure out how to create 3 or 5 star poles on the fly or get rid of them when I need to
the concept of creating loops is just too much for me

but yeah if you think its bad you just have to see how it was at the start

this is the extent of my 3D modelling lol

It is for a school project and I will credit the maker of course they worked hard
eggs.

alright im editing an avatar for vrchat and i keep getting this error, could someone help me?

this is the avatar btw

Select all faces and go upto mesh > tris to quad. Then you could select edge loops and dissolve the edges. Try and keep it all a consistent size.
I know there are a lot of different ways to achieve this in blender, but I keep running into similar cases. When mirror modifier is not possible (already in use on parent), how can I simply rotate these 2 faces (top/bottom) towards the same axis?

tried a bunch of things and I get confused, feels like I am over-complicating it :p
(I did it by selecting edges instead and scaling on an axis)
when importing obj files i get this weird cut. its not a material

maybe the vertices are not welded
or the smoothing group is different than the rest of the surface
my model looks correct in blender, but consists solely of single colors in unity

the materials have the correct textures and everything
search for the materials, do you see two of the same material? *Use the search bar
no duplicate materials in both unity and blender
alright, after a bit of digging
it turns out, that for some reason, the uvs are way far away from the actual texture, having them render fine in blender, but not in unity
In the N menu. There should be a mirror option I can't remember which tab. But toggle it on, then there will be another toggle that appear you can toggle that on too.
That's a lot of materials for one object. I suggest trying to get as much into 1 as you can. Each material is a new draw call, which redraws the mesh and displays parts with the material.
That is a good idea indeed, I was working on getting them into about 2 textures
How can you change the shape of a mesh collider?
yum
by changing the shape of the mesh (in blender or whatever)

go into edit mode
select all the vertices
and move/rotate the object until it's in the right place/orientation
With the translate/rotate tools
as far as what is the right orientation because Unity and Blender have different coordinate systems? < that's a little bit of a different question
Different people have different settings that work for them, but I could have sworn there was a pinned message in this discord somewhere with some reasonable approach
for me personally I do:
In Blender orient the object such that:
x is right
y is forward
z is up
Then export it with these settings:

hey anyone know why, if I have render queue material at 100 vs 2000 the material with the 100 still wins and shows up over the material with 2000 render queue ? I am expecting it to render material 2000 over that of the 100 material
I double checked the two materials too at runtime just ensure I wasn't crazy
Essentially I have clothing, and inner clothes and I want to render something over it
Regarding UV's and texture maps... I always start with a diffuse map after I have UV unwrapped my mesh. The trouble arises in creating other maps for the mesh. I've found the best solution to be to create the diffuse map, and then run it through Substance B2M3 (which will create normal maps, roughness etc.) and then to use those maps in adding the extra detail. Is there something wrong with this workflow? I've tried using a PSD network, but it's difficult because every time I make one change to any map, I have to -manually- reflect those changes in all of the other maps as well.
Workflow is fine, but you need to go back and combine some of the maps into usable material maps.
You could also use the program called Materiallize that does the same thing for free. :)
How can you change a box colliders sides symmetrically?
I know shift changes the whole box, but I just want two sides to change
hi guys i want to get an unity asset into blender with its textures i am new to blender can someone please help me out ?
You can take the textures from unity and use them to build new shaders in blender. The material system is different for both programs so you'll have to rebuild them anyway.
ok thanks


Textures are not imported with the FBX.
You have to recreate materials in Unity and apply them
No?
dang I remember it being supported before
Unity has their own shaders, Blender has it's own. There's no way it'll know how to convert them.
alr thanks
I literally just said that same info on the message above. 😅
Nope. Shaders are materials.
You'll have to reconstruct them in unity.
Oh wait. I read wrong
Yeah. In the materials tab on the prefab. You can adding materials there.
ok i did it

How do I fix the camera in the scene? Its gone weird after i focused on an object

@eager mist Don't cross-post. Toggle off orthographic view.
I need help importing sketchfab models to Unity
Click the box ☺️👌🏼

anyone knows how to avoid float point errors when importing a 3d model? (e.g. scale at 0.99999 instead than 1)
What are you exporting with?
Is your mesh Scale 1 inside the modelling package.
Have you fixed your settings.
Blender, and yes, i applied all transforms and even checked the !Experimental Apply Transform on export

i set it to FBX units scale
that usually works, and that's what's suggested in mos blender>unity workflow guides... is that wrong? what is the difference?
I don't really know, I just seem to have better results with these settings.
It's always different.
is there any way to make it so this mesh is upright (x -90° relative to now) while also having all rotations be 0°?

kind of like applying rotation in blender
Apply a rotation in blender
or
give it a parent
rotate the mesh itself to be correct, and then just deal with the parent only from then on
applying rotation in blender results in this

what's wrong with that?
also is that the local direction?
If that's local - you need to go back to blender again - it's not right yet
oh i thought that box was the hitbox or something
to be honest i started with unity like 2 days ago i have no idea what i'm doing
the box is the collider, yes
but you can fix the collider
it's just a box collider
you can set the hieght/width/etc to anything you want
alright i'll look into that, thanks
or just remove it/readd it
ah cool, it works now, thanks
Hey, i want items to float pretty realistic on water. Anyone has experience with like boat / items on water shader?
The water shader has waves, so i kinda want the objects to float ontop of that
im not sure if this will show an image... but ill try it, i made a barrel a while back and I had to texture it manually lol
noope

I had to texture each part of it in the uv mapper and it was TEDIOUS
this is the result lol

It looks alright but your unwrapping is a bit of a mess. I see some overlap.
Did you mark any seams?
@frosty cedar i would highly recommend you to take a look qt Armor Paint
Costs like 20$ and is a cheaper alternative to substance painter
It wont help you with UV mapping but its a great painter
You see a LOT of overlapping... hehe
I have absolutely NO budget lol
im forced to use free stuff
Overlapping is fine. Just make sure you don't paint the mesh.
If you are just using image textures like above then. Overlapping is ok, and this is useful if you want to use the same texture across many many assets.
If you are technical, version of Armor Paint is free, but it needs to be compiled by you. A compiled version is given for 20 dollars, buying it from itch.io, you can when a new version is posted.
Haha, yea, just incase you looking for something like that