#3D printing
1 messages · Page 2 of 1
I'd watch it like a hawk for a few prints
For like a fire?
That sounds like a bonfire waiting to happen 😣
Fuck
I could get a new psu
Did you give it too much, or not enough
Idk
Like, set to 220 and you gave it less, should be fine
The other way around... maybe not
What country are you in?
Im in the us i think its 115 here and it was on 230
It worked for a print then stopped idfk what happened if i bumped it or something
Should be fine
Its working on 115
Cool
Idk how it worked for a print though
Its really resessed i dont think i bumped it
Magic pixies
Do you think i could replace the fan in the psu? That seems to be the only sound of the printer i find obnoxious
Also would that be like super dangerous
SOVOL SV06 PLUS POWER SUPPLY BACK MOD FOR EXTERNAL 8MM COOLER FAN:
https://cults3d.com/en/3d-model/tool/sovol-sv06-plus-mod-power-supply-replacement-back-for-8mm-fan
I designed this back plate to accommodate an 8mm fan outside (!) of the power brick of the Sovol SV06 Plus.
I replaced the stock 24V fan with a 80mm silent computer case cooler (...
I wanna do this at some point cause idk if i could sleep through a long print
dont fuck around with power supply internals its a dandy way to kill yourself instantly
You could replace the PSU with a 'smart' power supply which would blow the fan LESS, but no, don't fuck with the magic pixies unless you REALLY know what your doing, and it's one of those "if you have to ask... don't" type of things. It will hurt the entire time.
Also if you go the safe route, you need a multimeter and to be able to use it and tune the PSU output.
sounds like a good idea
Safer to just order a same spec silent PSU, if you are not trained in PSU internals.
Some of those caps can kill you, and some can sit on a shelf for years before fully discharging.
Is there a video showing printing errors and their potential causes
This is generally what I use: https://ellis3dp.com/Print-Tuning-Guide/articles/index_troubleshooting.html
If you are still wanting that mid-range reccomendation, I'll be able to give it on August 1st 🤣👍

Got new filament and all my settings fixed
I know right im really hoping it comes out fully in tact
Like my 3rd print
Its a keycard from doom that holds my keycard for work

Loose belt and doing the calibration steps wrong
Unfortunate
They were small prints
It pissed me off yesterday but i changed like two things today and it worked flawlessly so im happy

That sucks
The prints come out super good but any amount of overhang looks like garbage.
I blame the fillament
Usually i have problems when i buy stuff but so far this has worked great
it was cheap chinese no name brand fillament because I was desparate and couldn't afford better
Ah
It looks great when it prints properly though
Theres an overhang on this thing later tonight 🤞
fingers crossed 🤞
At least you can give half a fuck now
Cant give a single fuck
Can't even do that


Honse
Been using a lego brick separator to remove supports to not damage the print and i feel pretty smart for it
Oh that's clever...
This heat wave is killing me, and tonight it murdered my print via heat creep with only 30 minutes left on the print!🤬

That sucks
Looks cool still

Sovol SV06: https://amzn.to/3rA5fNs
Filament used for my 3D printed projects: https://bit.ly/3ufP1bz
PSR Merch: https://bit.ly/31dg3Ee
Link to all the gear I use: https://kit.co/PrintShootRepeat
Patreon: https://www.patreon.com/printshootrepeat
Moonlight Industries (chest rig I’m wearing) 10% off: “PRINT”
PSR CLIPS: https://bit.ly/3o6AevJ
...
So happy with it totally agree


Forgot to take the supports off the qr code
But everything else looks amazing
Im printing a blade runner blaster now
Thingiverse is awesome
Economists could never predict the miraculous amount of unpaid labor on thingiverse and game modding forums
Ayyyy nice
Fr
I've spent days on my models just to upload them for free online
We are definitely in a golden era for it, though I'm worried it's starting to come to an end 😕
I probably need to replace my hotbed on mine, the cable only works in certain position 
(Most likely 90% my fault though)
That sucks
But everything comes apart so easily from the look of it it seems pretty easy
I have heard about stuff relating to the way back machine is there thingiverse specific stuff?
Fortunately yeah, the only thing stopping me are zipties
Is there a channel or forum that just shows off cool things to print that yall know about? On any playform youtube tiktok etc
Zack freedman has a couple and Makers muse
Know them both will look though

These cool 3D prints don't need anything but filament and junk - perfect for beginners and really lazy experts!
Find all of these models on today's sponsor, Thangs! https://bit.ly/2SngasE
Print anything from this episode, post a pic to Thangs, and enter to win a Box 'o Rocks! (Continental US only, please!) https://gleam.io/NWTQF/win-a-box-o-roc...
Itd be cool if there was an account that just printed the most popular things on thingiverse every week
Oh yeah i could try and print that one guys 3d printed fabric


What are the benefits of the biological (idk what its called) supports and how do you get them
Tree support?
Tree supports and their organic tree support variant are ways of doing supports that use less filament and are easier to remove.
The benefits are any organic shape is typically better supported. The down side is it's bad at supporting some types of geometry, especially large flat parts.
If you're looking for the setting you gotta enable it in cura's preferences menu. It might be under experimental. Not sure about where it is on other slicers since I only really use Cura
It's just in the support type drop-down for Prusa slicer
And in Orca slicer it's call tree supports
For what it's worth, I'd highly recommend taking a look at Orca slicer. Cura has dramatically fallen behind in the past year.
I might take a look later. Ive been using cura with my old printer for so long its become second nature for me
Yeah, I feel that, it was jarring for me when I switched but the results REALLY speak for themselves.
It especially sucks because there's no good 1:1 map for settings, it really is like starting over
But it's also different, because when you want to tune something, it's not 20 dials in 20 different sections
It's just 1-2 settings, in logical groupings
What type of paint should i use for this stuff
Thinking model paint then maybe acrylic for dry brushing
Idk

That or wet filament
Primer then most paints are fine
Also aren’t most model paints acrylics
Does primer go bad ive had a brand new can in my closet for yeats
Yeah I think the cables for the hotbed on my printer is caput, I won't bother and just order a new bed at this point.
Damn
Not that I’m aware of might do if it’s been opened tho
I was printing this again and i was concerned cause my printer was making a weird noise and i figured out it was just blowing air into the holes and whistling

Is there a place i can buy screws in low quantities?
Your dads toolbox
(Get boxes of screws, you'll probably need more at some point anyways)
I know i have a whole list though for this blade runner gun
Trying to get it all in as few places as possible
2x12.5mm pin,2,
3mm green led,2,
3mm red led,4,
3x13mm pin,2,Or use 3mm stud.stl
4x10mm springs,2,ballpoints have these
4x20mm springs,1,ballpoints have these
5mm red led,1,
5x5mm neodymium magnets,8,
M3x3mm grub,2,
M3x6 bolt round head,1,
M3x8mm bolt,4,Flat head
M3x8mm cap,4,
M3x10mm bolt,2,Flat head
M3x12mm bolt,7,Flat head
M3x20mm bolt,2,Flat head
M3x25mm bolt,1,Flat head
M4x4mm Grub,3,
M5x25mm bolt,1,Flat head
M8x28mm rod,N,N = number of bullets
M10x87mm rod,1,Optional
"thin wires, red, black, white",,
I’ll probably figure it out
Hobby stores

Are small infrequent strings between gaps in prints bad
Like does it really matter
I can usually wipe them off but im wondering if theyre causing like supports to be really difficult to remove
It can make supports harder to remove, yes
But it's a sign of wet filament
(assuming your retraction is tuned correctly)
Man never buy Chinese no name fillament. I bought some and before it used to need 217 degree temps to print well. Then I put it in a food dehydrator for a couple hours and then it required 220 degrees. And now, its working at below 170 degrees. Im still in the process of figuring out the proper temp. It prints beautifully but overhangs are shit even at 170

Its super weird stuff

Finally got it right

These might help, I find them MUCH more reliable then other towers
Oh thank you but that's alright I just got all my settings dialed in the way I needed them

The only real issue is the ringing but I can't really do much about that unless I had Klipper, which doesn't work with my motherboard
I could also slow the prints more too but I'd really rather not reduce the speed more than I already have
@pliant nebula Okay, now that the NDA is over with, best printer in your price range would be this I think: https://www.ankermake.com/products/m5c
Ooh that looks pretty good.
I kinda hate that commercial though
Also if thats true thats pretty crazy fast

The commercial is obnoxious
Yes
It really is that fast though
Dang nice
But heres the thing does it only work with the phone app or can you install other software on there like klipper?
I measure volumetric flow differently then Anker does, so I actually clock it at 32mm³/s not the 35 they claim, but that's just a difference in approach.
Well thats still pretty good at least
Officially just the phone app, but it's hardware like any other, you can klipperize it if you have the skill and knowhow.
People have done it
There's also Ankerctl which actually pretends to be an Anker cloud and enables full local control of the printer
Ok thats good at least. Not sure how much of a fan i am of the phone only interface but it does seem promising at least.
I love local control
Honestly the Anker app is extremely good, there's not much more you'd want that it doesn't have.
Hows the ringing on the prints?
The only thing really missing right now is a print history function, which is coming 'soon'
That would be good
There's a ringing test I did
I think it's good for a 3 minuite print
It wasn't full-yeet, only 350mm/s
They don't have resonance compensation working...yet. they say it's coming.
Good to know
They did steal s-curve acceleration from Klipper tho 🤣
Even though it's running marlin
BASTARDS
On final question though hows the replaceability of the parts? Like changing out nozzles or maybe even the potental for upgrating parts?
And they are respecting open-source and the community at large, which I can't really say for Bambu 😕
That's a very good thing
Parts are available, their warranty is insane, nobody needs to buy parts yet so they don't sell them yet.
I didnt even realise bambu wasnt going open source thats sad
They said they will sell parts once warranties start to expire.
Understandable
They even cover hot ends and wheels under the warranty, it's wild
Although they do sell hot ends, nozzles, and plates right now
Well, if they do follow through on their promises I would definitely agree thats probably the best printer you can get in that price range.
The only upgrade I would reccomend is to replace the PTFE wheels it comes with
I run Kevlar wheels and they are way more rigid
(Triangle Lab)
Sounds about right
Oh look at that

I tried 3D printing with REAL 14K Gold Dust, copper, iron and even wood. Get $30/ £30/ €30 off with the code M5CJRE30 on M5C Order on Amazon: https://ankermake.club/8110VDJA Order on Ankermake: https://ankermake.club/8110VwxG AnkerMake M5C is a 3D printer designed to easily customize functions in one click. It is available for purchase for $399...
Probably gonna be a flood of them today 🤣
Honestly I saw him post that and was immediately terrified I was about to see him rip into it with a knife 🤣
lol
ooh resin printer. Fraid I don't have any experience with those.
What's the main issue your having though? some more detail might help if someone's familar with resin printers
I'm crap with it, but I've got a different resin printer, I might be able to help?
@ivory magnet ^


I had to drop the commands
Im mostly having what seems to be firmware issues.
From the resolution of the unit being.. wrong lol
to the screen flipping upside down
Ah thats not good did you modify the software at all? A factory reset may be the best solution. There could also be a software update for it
Creality firmware is legendarily bad on their resin printers when they are new...I have a Halot One and it took them like a year to get firmware out that was usable 😕
If there are specific things going wrong we can try and help?
i do have a ld-002r, not quite the same but close enough
It's an entirely new firmware 😕
can also be wrong printer in the slicer
halot one had shit firmware, dont remmber seeing issues from the ld-006 firmware
mostly because its chitu firmware
Eh, search the reviews...it's out there quite a bunch
They butchered the Chitu firmware
Not that Chitu was ever great in the first place...
yeah i have read the reiviews for the ld-006
Well, the upside-down screen thing is something I've seen multiple people complaining about...but I've seen no real fixes for 😕
that is the only issue i have seen mentioned, not sure which type of resulotion thrill is talking about tho, the touch screen or the main lcd
I would LOVE to go back reset to base firmware/ go to factory reset
but there's no way to actually do that easily
LOL
And Creality support just keeps sending me the damn Eifel tower to print.
IT DON'T WORK FAM lmao
If anybody does have an old version of LD006 or can find an old firmware, let me know

Ooooh clean af
waiting for the hardware to arrive and its gonna be done
debating sanding it cause its gonna take a billion years
might just make two and sand the other one
i bought extras of everything hardware and electronics wise so i can make a few

caded a extension for my chair headrest
its printing now
Any ideas what happened here?


Part works for intended purpose just dont like tge discoloration
taking care of my cousins cat for the week and bro keeps jumping up on my printer

Mans took this image with a 2006 dashcam
96%

Oh man, when they fall out, that's satisfying 🤣
Such a great model especially for free
Looks way better than paid ones ive seen
Think im gonna keep this one unsanded and unpainted then do the electronics then print it again in black cause of the tapping all the screws its gonna cut through the paint then paint that one and buy transparent handles etc
Bullets are weighted with metal
Im impressed someone out there was actually able to make my model

Thatd be fun
Heres the model if you want it

I am very much an amateur watchmaker. I am obviously not the original creator of this mechanism nor am I associated with Rolex in any capacity. I just saw a photo of a waterproofing mechanism used by Rolex and wanted to recreate it to see for myself how it works and how it might be improved.
Due to issues I'm having with my printer I haven't bee...
The parts in red are rubber gaskets btw
we do have a printer that can print in rubber like material actually so i could do that if we have that material

Wow I’m really impressed 🙂 are you in engineering school btw?
nice congrats!
Thank you!
Tree support is fun to look at

3D printer Lego with 2 big pieces o.o


Now you have enough lego to make a floor hazard or two
https://www.youtube.com/watch?v=UQuhLFF-7w8 mhm okay, 1.5k yep that checks out

To try everything Brilliant has to offer—free—for a full 30 days, visit https://brilliant.org/247printing/
The first 200 of you will get 20% off Brilliant’s annual premium subscription.
Yes, some of the stuff I show seems unbelievable.
Doubters call it fake, CGI and some just want more proof about practical speedprinting.
That's reasonable!...
By any chance would anyone here happen to have a copy of Solidworks?
I need to convert a model I made a long time ago into something I can actually edit.
Looks like I got a printer to make
https://www.youtube.com/watch?v=0K9NM08S0IA&ab_channel=MattThePrintingNerd

In this Video I want to give you a brief overview about a 3d printer I've created that I call THE 100. It does Speedboats in 3:03 minutes and is capable of doing high quality prints in 1/12th of the time a Ender 3 would need.
By the time recording THE 100 is at the 5th rank of the leaderboard of the fastest printers in the world and it's the fa...
It's a really fun project
It sounds really fun
Although if you want something a tad bit easier to source the parts for, a Rook is better
There are rook kits you can buy
What's the cost on that?
I'll go grab a link
GitHub
Documentation and configuration as relates to the West 3D rook kit. - GitHub - thunderkeys/West3D-Rook-Kit: Documentation and configuration as relates to the West 3D rook kit.
GitHub
Fabreeko Rook MKI Kit . Contribute to Fabreeko/Rook development by creating an account on GitHub.
Those are the two rook kits so far, and LDO is working on one now
The 100 is based on the Rook originally
interesting
Mostly will come down to what parts you need to source cost wise
Holy shit that's scary

Just a short video of some of the testing Ive done to my Rook.
https://github.com/rolohaun/Rook
All PLA is FormFutura ReFill PLA from https://www.3dp.no/
Check out Rolohaun on youtube!
https://www.youtube.com/@rolohaun
Rook MK1 on Printables!
https://www.printables.com/model/3874...
Rook 2020 on Printables!
https://www.printables.com/model/4...
Understandably so
It really is the fastest printer. Managed to cross the 1 meter dash in 45 seconds
I think I'll wait a little bit. They both look awesome but I'll need to gather up the money first before jumping in
Crazy 6-head FDM printer 🤣


Unless they have some way to retract the hot ends that aren’t in use that’s a nightmare
All 6 hot ends do pop out and in
Just stumbled across this in my reccomended. I think you guys might get a kick out of it
https://www.youtube.com/watch?v=OQyICyo10Ak&ab_channel=Slant3D

The Tangled Filament website is officially live. Filament Coming Late September
https://www.tangledfilament.com/
The team here at Slant 3D has been working hard throughout the year to reach our goal of bringing high-quality $10 filament to the market. And now, we are ready to share our roadmap of exactly how we plan to get there. In this video,...
Saw that! Excited for it 😁
Found another interesting project here

This will change everything! or will it? Depends on how you will use it!
Files can be found here:
https://www.printables.com/model/581766
https://cults3d.com/en/3d-model/tool/infini-z-3d-printer
Thingiverse coming soon
Thank you to CNC Kitchen and Proper Printing:
@CNCKitchen
@properprinting
Music in this video:
Home -We're Finally Landing ...
i bought this
cheap ass hairspray
and holy mother of god it is magic
it just sticks
it works so well
Heh, yep, hairspray used to be my go-to, but then I found nano-adhesive and I'm spoiled 🤣
I just went with garolite sheets and ive been hooked ever since.
Cannot express enough just how good they are
Yeah, I've been trying to convince Anker to produce magnetic Garolite sheets 😭
No luck yet
What you guys dont just gorilla glue the plate and replace the whole thing after each prints? 
More awesome tips!
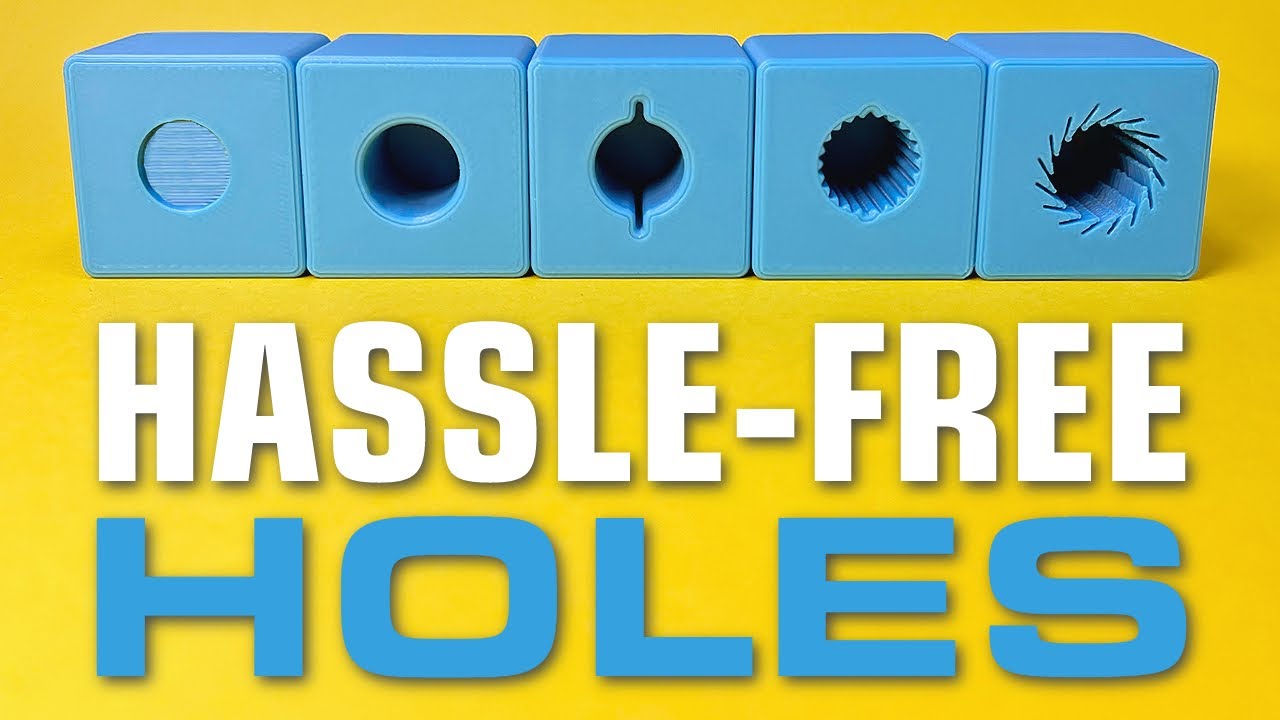
In this episode of Design for Mass Production 3D Printing, we are focusing on improving 3D printed hole design.
Designing 3D printed holes isn't always as straightforward as it seems. So we are diving into the nuances of 3D printed holes, discussing various challenges like rippling and sagging. We cover essential design modifications like addi...
I needed a laugh today, thank you ❤️
This should make for a fun project

Trying to create a DIY Timegrapher but with a twist that might make it better than the professional ones.

Everything will be suspended in the air so outside vibrations and sounds will not affect the readings
Ordered a new bed Sunday of last week and I still haven't received a shipping label also since I'm in Canada I couldn't order from the US warehouse on Sovol's website
New BED or plate? I didn't know you can even order beds from sovol...
Hey check these out btw: https://lightyeardirect.com/collections/composite-g-10-build-plates
They are the magnetic G10 plates I've been dreaming of 👀
Lightyear 3D
Heating bed yeah
Neat, didn't know they sold those individual
They sell pretty much everything but the frame from what I've seen. At least for the SV06
The one thing I hate is that their website has some really sketchy popups 
Aw hell yeah. Little on the pricier side but definitely worth it
I HATE clips, have had too many problems with them. It's magnetic or not at all for me 🤣
Fair enough. I used to use binder clips for my print bed and then I moved to screw down clamps. Not the easiest thing to get on and off but it does the trick
magnetic is way better if I could get my hands on it
Jee wiz
Filament drying really does work
Best print quality ive had
Did the filament box on the bed trick
Gonna do a print with transparent petg do yall think leaving the roll exposed for 24 hours during the print would cause issues? Ive heard petg can have moisture problems
I want max transparency
You need it bone dry, and to go SLOW AF

Head to http://squarespace.com/CNCKITCHEN to save 10% off your first purchase of a website or domain using code CNCKITCHEN.
Using a special parameter, you can't only print transparent FDM 3D prints - this parameter will also make your parts super strong!
Transparent Overture PETG: https://geni.us/rdzE
Check out our CNC Kitchen products at htt...
printed 6 foot long dragonslayer, I wanna repaint it though so the sides are a lil more steel colored rather than a kinda muddled gunmetal. Also currently printing out the berserker armor to go with it


sHEEEEEIT
Thats fuckin sick man

bet that took a shit load of fillament and time
mhm mhm
you planning of having it all done for halloween?
the armor not so much due to it being pretty thin, but I made the sword with way too high density cause it was my first big project and didn't know what I was doing
prob not Halloween, but definitely before our next comicon
understandable
hell yeah
like uhhhh the section with the halfcircle up to the first seam kinda, that took three days cause I just made it way too dense
did you design the models too? or is it just a download somewhere?
alright nice
the thinner sword in front of it though is my own design that I just sketched up in fusion 360
Very nice


das a lever action rifle
That's what I said

Gotten my settings tuned perfectly i get very nice prints now
It is
What filament brands do yall use
local chineaseium brand
Atomic Filament mostly, but trying out the Slant 3D filament right now
Ive only tried polymaker and overture pla so far but i have some esun petg im gonna try soon
I usually use Hatchbox but I'm also trying to switch to Slant 3D
esun my beloved


Also i think I'll have to contact Sovol's support, still no news of my parts getting shipped 

Almost done in picture but its done irl
Not working perfectly yet but working on it
Oof, that sucks
Indeed, I'm apparently not the only one having issues like that. Hopefully I can get this dealt with fast.
Aight got an email about it. Seems like they will try shipping it ASAP. Let's hope it's not 2 weeks from now
I should also start ordering stuff for the Eye trackers I wanna make for my index 
lezzz goooooo
Ah finally got the shipping emaik
yay!

Painted reboot version of Vash's gun from Trigun for a con tomorrow, my coat is going to be more like the anime/manga versions though. So it'll be more of a long duster with multiple coat-tails rather than a parka


Was a rush job so I didn't sand or anything and the outfit isn't gonna be super accurate at all
That click is REALLY satisfying!
Frfr, I do want to see if I can replace the part up there with another neodymium magnet though cause the file I had is missing a part that's meant to snap into place and the fit is a little loose
Hotbed has arrived and I got their updated one  it definitely looks more sturdy when it comes to the cable connecting to the bed
wahoo!
Alright new bed has been installed and temperature seems to work atm. Gonna do a quick calibration to see if out works on all location
Seems to work 
Bed is leveling
Or so I thought..... For some reason one of the motor is grinding on the way down 
Sounds like the end stop sensor is not working. I'd double check to make sure it's still connected.
Well its grinding on the middle of going down it's weird
It's right here. Maybe it's dust?

Cba troubleshooting now I'm so sleepy
At least I got one thing sorted out
I guess it'll be time to properly maintain this thing
yeah could be dust or debris stuck in the gear belt if it's slipping midway through
Or the belts been ground down at that point
Its not the belt I think it's the motor bottom left that's getting stuck. It went up completely to level the z-axis and then got stuck when going back down. Now it doesn't want to go up so
Actually its the Y access that has issues so yeah could be the belt like last time
It was indeed the belt being too tight again
It completed bed leveling this time. I guess the z-alignment was bad which also caused the belt to be too rl tight after realigning
Gonna leave my filaments cooking for a couple hours and do a test print
Makin these 


I think I may leave the canister things off tho since I'm not doing a full cosplay of the character


It ended up being bulkier than expected 


WELP
I think we're fucked bois
the printer is finally cooked after 8 years
Went to clean the end of the nozzle today to try my new fillament and as soon as grill brush touched the heating element the screen went blank and never returned...


my first was an ender 3 v2 with upgrade kit but the settings do need a bit of tinkering beforehand
but for price I'd say it was pretty goo
Oh wait I think I might have found a way to turn this to my advantage
I found this

Biqu Equipment
The SKR mini e3 v3.0 is the upgraded version of v2.0, we made a few major upgrades. It was been built with a more eye-catching industrial design. The PC communication USB interface is upgraded from Mini USB to Micro USB B. Increase SPI output port +3.3V power supply, external SPI sensor power supply voltage +3.3V and +5V are optional. For more f...
If I replace my motherboard with that I could finally use a BL touch sensor and a run out sensor
Might even be able to use kipper finally
The 3d printing sub has a buying guide with some recommendation
Good point. I think I downloaded the spreadsheet somewhere now that I think about it
Prretty sure it's updated quite often
Man I wish I started with PrusaSlicer. Automatic Dovetail creation for large parts and the ability to export the file and all it's changes from the slicer got me geekin out.

It's a great tool box
fr
I'll probably spend a good chunk of time tonight looking through everything and configuring it for my weird printer
Alright new motherboard arrived and has been installed. Sadly though the old endstops use 3 prong jst connectors for some unfathomable reason so i had to order those before I can run it. Even more sad the old screen will not work with the new board so im just going to have to go without a screen for a little while. Hopefully I can just control it with octoprint no problem.

I hate waiting for parts
Every time my prints fail I just think "this wouldn't happen on the Magneto"🤣
Entirely not true
There are SO many things i need to print once i get this thing working
But it's what my brain does
Real
Aa!agh why does this all have to happen near Christmas
AT LAST! She lives once more!

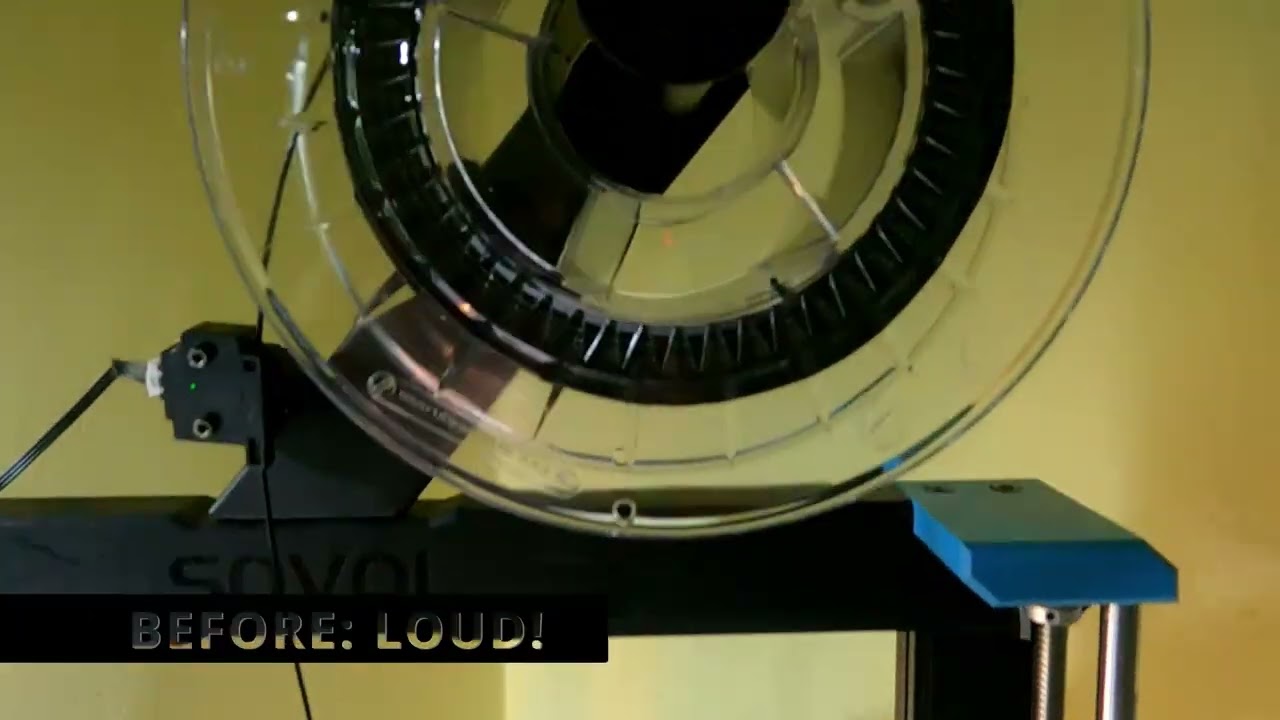
Also holy shit i did not think the new motherboard would have that effect on the stepper motors. They are barely audible when they move now.

iirc the reason why cheap drivers make a lot of noise is bad electrical signal with a lot of noise, smth about it oscillating weird, i can be totally wrong my memory of why is very hazy
Yeah that'd make sense. It was a cheap chinese printer afterall
Now the loudest part is the fans
What do you guys think is better for replacing the fans?
https://www.amazon.com/Premium-Cooling-Plastic-Dissipation-Equipment/dp/B0CD762L9B/ref=sr_1_6
or

5015 Blower Fan 12V 2 Pack, Premium Quiet Cooling Turbo 50mm Fans with 2Pin,Black Plastic Silent Cooler Fan for 3D Printer or Small Heat Dissipation Equipment

Featuring advanced aerodynamic design measures such as Flow Acceleration Channels and Noctua’s AAO frame, the NF-A4x20 is a highly optimised, premium-quality quiet fan in size 40x20mm. The FLX version provides 5000/4400/3700rpm speed settings via the supplied Low-Noise Adaptors and includes the O...
The cheaper 5015 fans claim to be about a full decible quieter at 13.83 db while the noctuas are saying 14.9
I know I can trust the noctua's rating is reliable but I'm not too sure about the other ones
i got myself a blower, if i put it at max it cools my hotend too fast and it goes in to thermal runaway mode
this is my part cooling fan, a bit high up but i dont care about it
Nah for me the issue is not enough cooling. I upgraded to blower fans about a year ago and it fixed the issue for the most part. Although I think the cooling duct got deformed from heat after a while so I gotta remake that.


2 hour long blob of shame

remade a sword I modeled like two years ago in fusion 360, starting print now. Overall length is like 5.5 feet


secret third thing for when my current projects are done :3c


Guh

Oh that's huge

gonna be 5.5 feet long overall when done
the one on avatar's back is gonna be somewhere just over 6 foot I wanna say
Sorry for mess but shippy progress


heeeeeeellllllll yeaaah

has a big sailship style cabin on the back with a lot of filigree that still needs to be printed, as well as turrets and wings
then prime and painty and panel lines
sorry again for mess, my workspaces get kinda cluttered 
I have no idea 
I'll make room on my shelf somewhere next to all the swords and armor


Probably not very
I dont think there are really any advantages fdm printing in space would give
im scared

yeah
Give prusia slicer a try
It's a little more complex but there's a lot more convenient settings and things you can do
Or Orca Slicer, it's even better
hmm
I actually haven't heard about that one much, does it let you save model changes and add split connectors to sliced models?
Yeah that might be an issue. Is that a model you made yourself? or one downloaded from the internet?
its about a day of some very cursed tinkercad usage
ah I see lol
Yep, and it has scarf seams, more accurate walls, as well as a number of other excellent features.
It takes some adjustment from what your used to, but once you get used to it it's phenomenal
i dont like how it does gap infill but so far it's been quite nice
What about it do you not like?
It's the only slicer I'm aware of with gap infill flow rate settings at all...
oh shit there's an option
this is sick
more accurate walls?
god i love when my printer just works
Prepare to get into some nitty-gritty of why slicers kinda suck, but:
https://github.com/SoftFever/OrcaSlicer/wiki/Precise-wall

GitHub
G-code generator for 3D printers (Bambu, Prusa, Voron, VzBot, RatRig, Creality, etc.) - SoftFever/OrcaSlicer
intresting, i get good enough accuracy with my prusa so it doesnt matter but neat concept
and if i want best accuracy I would just print it at school since we have a stratasys, which are kinda known for well accuracy
Nah, those suck for that actually 🤣
At least compared to today's levels of accuracy
Stratasys machines are about 10 years behind the curve at this point.
And besides that, we are talking about issues in slicing, not issues with any one machine.
It's just a problem in how the underlying slicing engine evaluates how to best fulfill the task it's given
these are pretty new stratasys machines, they are very accurate
They still don't hit anywhere close to .003 which is the best you can get from a desktop machine today...
But again...it also basically never comes up
Most of the time you need that sort of precision, FDM isn't the right process for what your doing anyway.
ohh this is my kinda thread
I just printed a Nerf Gun revolver
:D
still working out the kinks
I heard the flywheel but I'm fascinated how the mechanics of that would be possible with a revolver...is there a link to the build guide for that?

Features of the Magpie:
– Semi automatic
– Lipo powered
– 6 shot cylinder
– Powered by Flywheel the Wheel miniwheels and Honeybadger motors
– Flip out cylinder for fast rear loading
– Also rear-loadable from the side
– Cylinder is removable for quick-swapping the cylinder
– Functional hammer action can be used to fire as well
– Primary Color app...
I guess in other news, I got a new printer. It doesn't have belts and I think that's neat 👀
What printer is it?


Looks like some nice ass quality
That is a really cool mechanism, I might have to buy a kit, that looks like fun
you gotta get silicone grease as well as a good solder kit. Beware that the motors sometimes melt the solder on the contacts
How the gun came out
Ay thats sick
yeah, so you see how i was able to just flick my wrist to lock it in?
Yeah, pretty smooth. I know gun enthusasts hate when people do that on real revolvers but it looks cool
i had to modify the peg that locked it in to have more of a slanted entry point so it could be flicked or slapped closed
nice
ive had to do quite a bit of printing just to get it to work properly, still having issues too, gonna have to lube it tomorrow so all the parts can move freely inside
particularly the mechanism that rotates the cylinder
understandable. But that's the nice thing about 3D printing. You can always make changes pretty quickly
if i was using a resing printer, yeah, but i use fdm on a highly modified ender 3
I mean it's still super fast compared to other manufacturing methods
This is bob

hi bob
alot of hard work has gone into making the best printer possible, but some tuning is still required

8 years of hard work has gone into making it one of the the printers of all time.
Nope even worse lol
It's an AnetA6 printer frame with an ender 3 v2 screen
dear god
with a volcano nozzle
and a crap ton of other stuff
If I used these upgrades on like
any other printer frame it would be great
but the AnetA6 is notorious for sucking so I had to do all this just to keep it relevent to current printing tech lol
what firmware? im assuming klipper
I can't afford to get another printer
Nope marlin
I can't figure out klipper yet
I can easily help you
are you busy this moment?
Well it is 1 am so I may be busy with sleep lol
oh, a fellow ESTer i see
Theres also the issue of the cooling fans burnt out on the motherboard and I have no idea how I'm going to fix that
what board are you using?
I can replace a resistor or two easily but I have no idea where the short occured
i can pull us the schematic
it is a Bigtreetech SKR Mini E3 V3.0
super nice motherboard
we can SUPER easily set up klipper for you
best upgrade I ever made to my printer
i bet
but yeah losing the cooling fans is a bit of a bummer for me
Was planning on eventually hooking the printer up with a BL touch sensor
already have the part I just need to design a new extruder to work with it
what buildbplate material do you use
G10 of course
amazing stuff
I can't go back to anything else
except maybe glass, or textured plates
those a still super cool
oh yeah I totally agree, The only reason I ever liked it was for the surface it made
exactly, shiny surfaces
although I know with some g10 build plates you can get a similar shine
if you can keep it stuck to the damn thing
fr. g10 for me was a game changer
i should look into it
mhm
expands slighly when heated so parts stick really well and when they're done they pop off themselves extremely easy
also seems to grip onto the plastics really well too
I just wish I could find a white board, since most of my prints are black fillament
ill have to try it soon, im too lazy to get acetone and clean the surface deeply so thats gonna be the next move
Oh yeah acetone fume print smoothing
neat little process
unless you meant using acetone for the build plate or something
But uh yeah man if you're able to find a schematic and identify where the cooling fans might have been blown out from I would be super grateful. I haven't been able to do any printing for the past couple of months because of this problem.

thats a schematic alright lol
WRONG ONE LMAO

LMFAOOOO MONOS GETTING BANNED AGAIN
lol
still looking btw
All good my man I appreciate you doing that
just to verify, its v3.0, not 3.1?
I think so
cool, here you go


well heres the rest of the files for that board

GitHub
BIGTREETECH SKR-mini-E3 motherboard is a ultra-quiet, low-power, high-quality 3D printing machine control board. It is launched by the 3D printing team of Shenzhen BIGTREE technology co., LTD. This...
so what exactly is not working on your board
Just the two primary cooling fans
everything else works just fine
I put a voltmeter to it and can't get anything
would you be able to get me pictures of your board without the heat syncs?
so I figure it's a blown resistor or something
i can probably see where and what went wrong
I can try, although I'll have to do that tomorrow when I can get some free time. I kinda need to sleep lol
and then tommorow gotta go into town
alrighty, well whenever your available, we can take a peak at your board and get you setup with klipper!
yee, thanks again man I appreciate the help
absolutley, share knowledge wherever possible

get some rest bro, have a great sleep!
you too! Supposing you sleep sometime soon lol
probably gonna drop dead in muh bed in a minute here after this regular show episode
based
@void dove
Alright I went ahead and got the board disconnected before I head into town. Although from what I can see it looks to be in perfect condition, no burst areas as far as I can tell


Sorry lighting in my room isn't exactly the best
Oh wait I forgot I have a microscope bench lemme get some better photos
of this area please


ruh roh
That's an LED
oh ok
looked corroded
can you remove the heat syncs please so i can see the naked board
yeah lol idunno they all have that little bit of green to indicate the positive direction
I have no idea how to remove the heat sync though I'll need to look it up

fan 0 and 1 are for cooling, I never actually tested fan 2 port since thats for an enclosure fan and due to how marlin was set up the option wasn't even there
so with marlin that pcb cooler is ALWAYS on
ah ok
the hotend fan should also always be on
do you still have the project file for when you compiled marlin?
suprisingly it doesn't actually do that. The hot end fan never turned on until I actually gave the command to heat up
well that should be fine
Probably not, likely those files were on my hard drive that exploded about a month ago.
I'll look around though maybe I put them elsewhere
i mean, we caould also use this oppertunity to compile klipper for you
this is how it looks btw
true

looks pretty good to me
this will make your life VERY easy

GitHub
Klipper Installation And Update Helper. Contribute to dw-0/kiauh development by creating an account on GitHub.
im assuming that your use a RP to control it or some other form of mini pc
Yeah I got a raspberry pi 4
and by the way the board looks, and the way you said the fan turn on when it starts to heat up makes me think either you have your slicer wrong and have part cooling off, or its disable in fw
Although I'll have to do the software stuff a bit later, people are starting to get restless so I'll likely be heading into the city pretty soon.
I think I had it set like that in firmware just so I could tinker with the printer without needing to have the noisy fans running constantly
which tbf worked perfectly fine until Ironically I tried to swap the fans for silent ones.
12volts
I made sure everything was fine before adding them
The board supports 12/24v power units as long as the heating element and fans use the same
yeah i see that, yeah we can try klipper when youre around
just found out that this thread exists lol, will post more here
when we getting 4d printers
already got one
i was able to print a micro blackhole that wasnt dangerous and when i poked my head through i saw myself but with GREEN HAIR
The blackhole just showed you california
ohh that checks out
california simulator
also known as day z
yeah so i think i'll try klipper again on my ender 3 pro
mesh visualization is fire
i can help where needed
you have them connected to a pc, yes?
no :3
can you get your hands on a crappy old pc or laptop?
i meannnnnnn
or some RP
i could use a raspberry pi for one and an old macbook for another
you could use 1 for both
what rp is it
pi 4b 2gb
cool
i'll prolly not be able to today bc of school and stuff but tomorrow prolly works fo rme
sounds good
@whole wind you gonna have free time tomorrow?
i can get 2 birds with 1 stone
Oh yeah sure
i've done this once ebfore soo
I'm actually just setting up the raspberry pi now
good shit, let me double check if there is a certain ver of debian you need hold on
raspbian works afaik
looked like it just needed the raspi os light
at least thats what the github page said
I went for the 64 bit
light 32 bit
@slender trail
Seemed like it didn't matter
apparently there are some issues on 64. but let me check something

you should be fine
ive been on 64bit for a while
also make sure yall have sd cards, every board has a different setup, but kiauh makes it really easy to compile
make sure you have winscp installed as we'll need to access its file system when it generates the firmware
Noted
Ok @void dove just got done installing Klipper onto the raspberry pi. Not sure if I should really do anything else from this menu. Maybe Crowsnest?
can you show me what your kiauh looks like atm

Mainsail, Crowsnest
ah alright
i do reccomend mobileraker too
Does it need moonraker with it?
no
alright
Mobileraker is great, if you want remote monitoring OctoEverywhere is also great and integrates with Mobileraker fantastically.
I'm assuming mobileraker is just the same thing as octoeverywhere?

Ah ok then I'll get moonraker installed too
Mobileraker = an app on your phone for local connection
ok gotcha
OctoEverywhere = a cloud backend for connectivity to the printer

OctoEverywhere let's you do stuff like this, where every 10% the printer sends a screenshot to my Telegram

Or you can create a streaming link for others to watch it print
alright I understand
Mobileraker can ALSO talk to OctoEverywhere and control the printer remotely off the local network though.
Thats nice
Alright raspberry pi all set up now.
very nice, we have a few more steps like flashing your board with the right fw and figure out what serial connection its on
of course
Doesn't matter to me whatever works best for you

lol alright
git clone https://github.com/Klipper3d/klipper
then
make menuconfig
here is your boards config
GitHub
Klipper is a 3d-printer firmware. Contribute to Klipper3d/klipper development by creating an account on GitHub.
this is what we care about right now
# E3 v3.0. To use this config, the firmware should be compiled for the
# STM32G0B1 with a "8KiB bootloader" and USB communication.

# The "make flash" command does not work on the SKR mini E3. Instead,
# after running "make", copy the generated "out/klipper.bin" file to a
# file named "firmware.bin" on an SD card and then restart the SKR
# mini E3 with that SD card.```lol
thanks formatting
text
if you get stuck and need help, you can join vc
no
alright coolio
and if its too much i can also compile the fw for ya
should be alright, compiling is part of the learning process afterall
yep yep!

alright gracias

ok good I just need to change the processor model
G0B1
got it
bootloader offset correct?
yup 8KiB
same with communication?
yup!
pog, now hit q
saved
type make
while its doing this, connect to it using winscp
can you show me your layout atm

ok, open klipper
done
now save it to your pc and drop it on an empty sd card
Ok so at this point I just stick that firmware file on an sd and pop it in the motherboard to flash
ah thats unfortunate
ah alright
but for now it wont
yee, I'll need to recconect the board to the printer in a minute, gotta move some wood into the barn rq so I'll brb
ok!
and for now its fine, no need to reconnect just yet, we wanna get you connected and fully setup with klipper, once klipper sees the board and your have your web interface, then youre good to reassemble
thats what she said
lol
allllright
got the firmware on the board I thiiiink
screen isn't displaying anything and neither is the pi so not sure if it's doing anything
YOU TURNED IT OFF AND THEN BACK ON AFTER YOU PUT THE SD CARD IN, YEAH?
caps sorry
i want you to run this command on the pi
ls /dev/serial/by-id/*
well I had it turned off put the sd in and then turned it on and waited for like 3 minutes
ok I ran the command
screenshot plz

yup

can you join vc for a sec? thats new
sure
oh ok close this
/home/pi/printer_data/comms/klippy.sock
sudo nano /etc/systemd/system/klipper.service
KLIPPER_ARGS="/home/pi/klipper/klippy/klippy.py /home/pi/printer_data/config/printer.cfg -I /home/pi/printer_data/comms/klippy.serial -l /home/pi/printer_data/logs/klippy.log -a /home/pi/printer_data/comms/klippy.sock"

ok im back and I've recconected all the mb connections. Unfortunately I'm still getting the refresh printer error @void dove
ok, let me doo a reasearch look
does your mainsail have everything now?
no temperatue things?

oh go to dashboard please
nothing there either


yup
lol
this message is gonna be big
Should I replace it with all this?
GitHub
Klipper is a 3d-printer firmware. Contribute to Klipper3d/klipper development by creating an account on GitHub.
step_pin: PB13
dir_pin: !PB12
enable_pin: !PB14
microsteps: 16
rotation_distance: 40
endstop_pin: ^PC0
position_endstop: 0
position_max: 235
homing_speed: 50

[tmc2209 stepper_x]
uart_pin: PC11
tx_pin: PC10
uart_address: 0
run_current: 0.580
stealthchop_threshold: 999999

[stepper_y]
step_pin: PB10
dir_pin: !PB2
enable_pin: !PB11
microsteps: 16
rotation_distance: 40
endstop_pin: ^PC1
position_endstop: 0
position_max: 235
homing_speed: 50

[tmc2209 stepper_y]
uart_pin: PC11
tx_pin: PC10
uart_address: 2
run_current: 0.580
stealthchop_threshold: 999999

[stepper_z]
step_pin: PB0
dir_pin: PC5
enable_pin: !PB1
microsteps: 16
rotation_distance: 8
endstop_pin: ^PC2
position_endstop: 0.0
position_max: 250

[tmc2209 stepper_z]
uart_pin: PC11
tx_pin: PC10
uart_address: 1
run_current: 0.580
stealthchop_threshold: 999999

[extruder]
step_pin: PB3
dir_pin: !PB4
enable_pin: !PD1
microsteps: 16
rotation_distance: 33.500
nozzle_diameter: 0.400
filament_diameter: 1.750
heater_pin: PC8
sensor_type: EPCOS 100K B57560G104F
sensor_pin: PA0
control: pid
pid_Kp: 21.527
pid_Ki: 1.063
pid_Kd: 108.982
min_temp: 0
max_temp: 250

[tmc2209 extruder]
uart_pin: PC11
tx_pin: PC10
uart_address: 3
run_current: 0.650
stealthchop_threshold: 999999

[heater_bed]
heater_pin: PC9
sensor_type: ATC Semitec 104GT-2
sensor_pin: PC4
control: pid
pid_Kp: 54.027
pid_Ki: 0.770
pid_Kd: 948.182
min_temp: 0
max_temp: 130

[heater_fan heatbreak_cooling_fan]
pin: PC7

[heater_fan controller_fan]
pin: PB15

[fan]
pin: PC6

[mcu]
serial: /dev/serial/by-id/usb-Klipper_Klipper_firmware_12345-if00

[printer]
kinematics: cartesian
max_velocity: 300
max_accel: 3000
max_z_velocity: 5
max_z_accel: 100

[board_pins]
aliases:
    # EXP1 header
    EXP1_1=PB5,  EXP1_3=PA9,   EXP1_5=PA10, EXP1_7=PB8, EXP1_9=<GND>,
    EXP1_2=PA15, EXP1_4=<RST>, EXP1_6=PB9,  EXP1_8=PD6, EXP1_10=<5V>

# See the sample-lcd.cfg file for definitions of common LCD displays.```ok thats different
no its the same
ah ok

Oh am I replacing or just adding this on to the end?
adding it below

should go away
Printer is on so thats a little odd
is it plugged in?
yup yup
do firmware restart


got time for vc again?? lmaoo
sure lol
sensor_type: temperature_host
min_temp: 10
max_temp: 100

[temperature_sensor E3V3]
sensor_type: temperature_mcu
min_temp: 10
max_temp: 100```wow
yall started without me
its ok, i can't setup klipper today lol
schoolwork to be done
ill still help you!