#Nitro Voron 2.4
1 messages · Page 3 of 1
I don't wanna bring down working printers lol
I really don't know why this isn't working right
Do you happen to have an adapter to access a serial console?
Like I have one somewhere that just sticks onto the gpio
can I set wifi info in the armbian files?
How were you setting it before?
Oh wait NVM
There should be a config somewhere for wifi yeah
At this point you can't carry the printer over to an access point?
probably not the greatest idea right now
No?
uhhh, do you have the other SD card, the small one, inserted to the m8p?
I mean if we can rule out WiFi that makes things somewhat easier
The one straight from armbisn did the same
It's not no.
Does it...need to be..?

probably not, im not sure
Fix it that way
Lol
is it possible you could try screwing down the cb1 any further?
No
It needed to be screwed tighter than I was comfortable with, although you've got a green light on the manta so I'm not sure it's that's the issue
Wouldn't hurt though
I mean you can try pushing down on the board where the connectors are while booting too
fucking rats...

so, as a recap our current thoughts are:
very long ethernet cable
new SD card

Hence why I recommended replacing it lol
I did say you could move the printer
Yes. I know. But another $70 on top of an already expensive purchase wasn't really tingling my fancy
That's fair
Are u gonna re stitch me hernia closed
I did not realize they were that expensive now
I expected like $40
$100 for a 4gb pi4b... Jeez
Glad I had an extra on hand I guess
@odd dew you said you have two printers using one pi each right now correct?
Just some enders or something?
A voxelab and a qidi plus4. The voxelab is a pi 3
Argh
I ran 3 of my old printers of a single pi3b+ but they were slow (like 50mm/s slow)
I don't think that'll work for you either...
What SHOULD the lights look like when it's running properly..
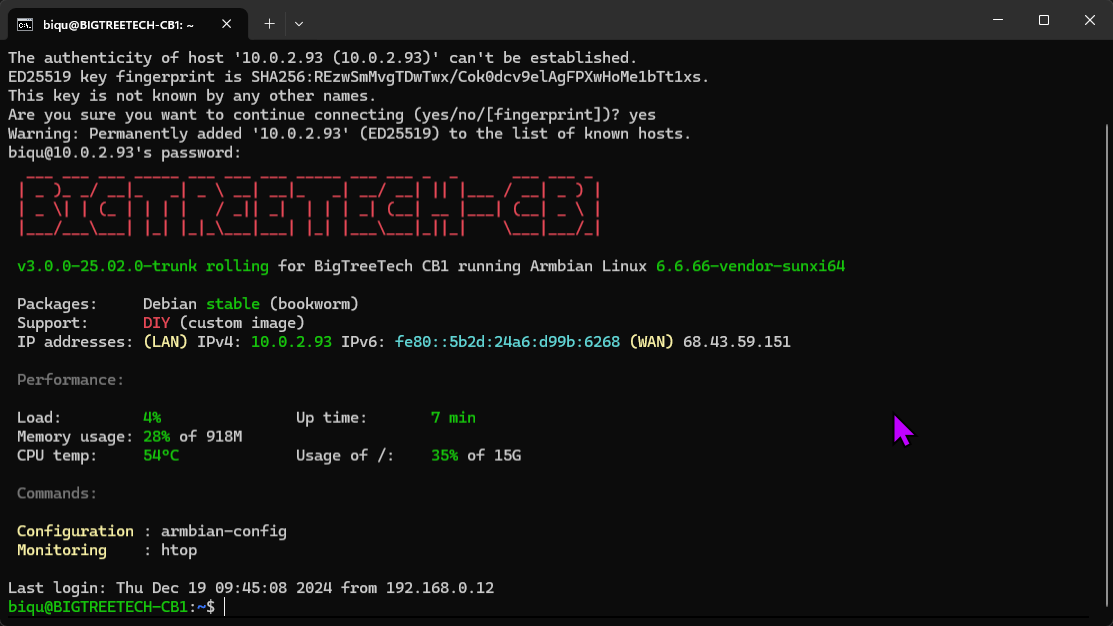
did u guys use raspberry pi imager or balena?
i used raspi imager.
i see on my cm1, a red light, and the green light flashes with two green blinks, a pause, repeat.
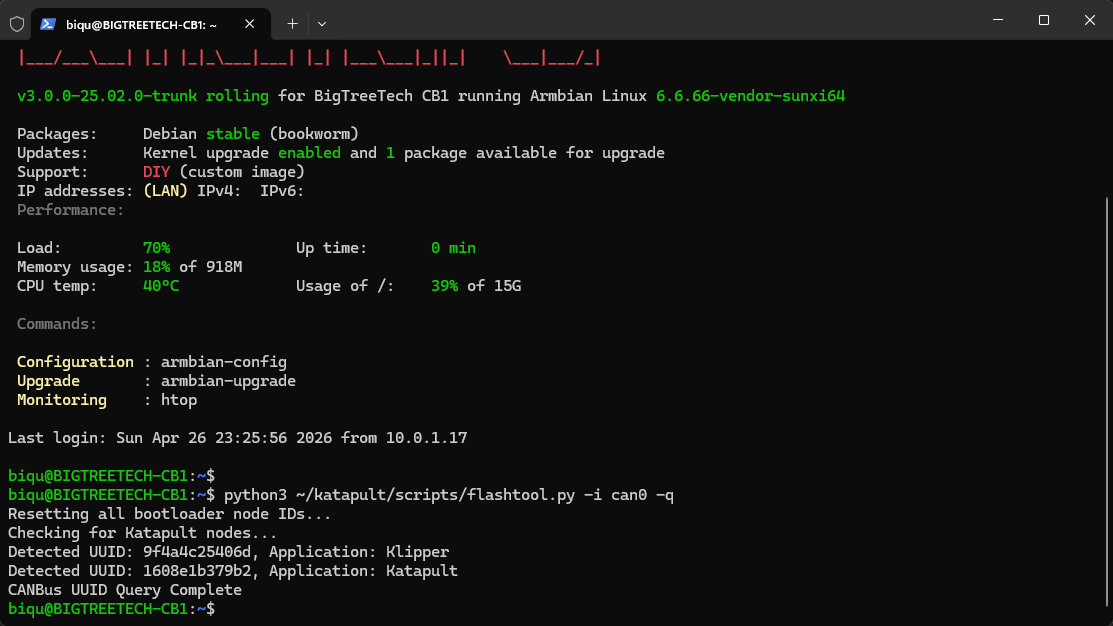
the one from github, the one i flashed was CB1_Debian12_Klipper_kernel6.6_20241219.img.xz
Neither, I forget the program name but I'm on linux anyways
https://rufus.ie/en/
Is supposed to also be good, but I don't think it'll do better than etcher in this case
Rufus: Create bootable USB drives the easy way
the next chance you get to look at the SD card and its folders in the computer
could you show the file list
I saw above that when you connected the sd card to your computer windows popped up saying there’s something wrong with the card. You didn’t click it and tell it to repair did you?
No. I've re-flashed this card 50 times
That’s the heartbeat btw. It gets faster when under a higher load. It’s one of the many status indicator options.
Gotcha.
You are always welcome to open a #request_help ticket for more in depth help if you’d like
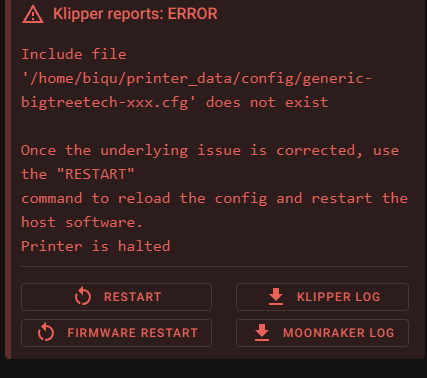
did you edit a file that looks like this?

should be in the same folder as the other config file
Am I supposed to edit it?
To put your WiFi details in it yes.
apparently i can jump 2 pins and power the board from a usb c then could plug it into my switch with ethernet..
they're set in settings.json
There is a VUSB jumper for that yes.
Not for CB1 OS…

GitHub
OS System image for CB1. Contribute to bigtreetech/CB1 development by creating an account on GitHub.
sysem.cfg is the one i edited
had the name wrong.
GitHub
OS System image for CB1. Contribute to bigtreetech/CB1 development by creating an account on GitHub.
Gotcha. The file above that @ashen agate is showing is the armbianEnv.txt file. I had them flipped in my head. 😅
(I was trying to link to that section on the GitHub but my phone didn’t like me. Lol)
clay showed config.txt
Different name in different OS systems
which looks completely different
so no i didnt edit something like that lol
should I have an image on the screen during setup or no
cause maybe it doesnt like the & sign in my wifi password or something stupid
So my suggestion for testing this would be the following: Flash the image from the GitHub above to the SD card, Only edit the system.cfg file to enable klipperscreen, then install the sd card in the SOC slot and attempt boot. If everything’s working you should get an output on the display and the LEDs on the Manta by the CB1 flashing. You can log into your WiFi via klipperscreen if comes up.
Even if you use minimal (which doesn't have klipper screen or any display server whatsoever installed) you should at least get a terminal output on the screen
i think what i posted was a much older config.
^ and LEDs on.
Do I turn on btt pad 7?
Nope. Leave that setting alone. Just uncomment the KS rotation and output lines.
Green led on CB1, red led on the manta board to the left of that and a flashing green ack light on the manta. No display output.
The red light went away?
That’s normal. Move the display connection to hdmi0
You are booted up btw.
My config file is set to HDMI-1
(still no display on 0)
It's also not on my wifi
Yes. But the cb1 only has 1 hdmi output. Which is on the port labeled hdmi0. It’s hdmi1 to the OS.
May have to unsafely reboot (just turn off power and back on) for it to detect.
(Unsafe because have no button to hit shutdown properly atm)
It wont connect to wifi still though so either it doesnt like SSIDs with periods, passwords with & signs..or the wifi antenna range sucks.
Afaik it works better on 2.4Ghz networks. For now though we should try and get Klipperscreen to show because if we can we can just its network manager to connect.
it is a 2.4
Something strange to try. Plug the display into your computer to verify it works then plug it back into the printer. This has worked for others before when the screen didn’t work on the manta, tested it on computer, then put it back on the manta only for it to start working again.
Ughhhh

This time when rebooting I didn't even get a red light it went straight to flashing green
That’s fine
The flashing green indicates the cb1 is alive and booted/booting.
In theory. You can do what you suggested earlier. VUSB jumper for powering via USB (need at least 2-3A on 5v for that) and Ethernet to your network switch.
That would get it online, you ssh into it, and then run sudo nmtui to connect it to WiFi.


Probably something in that config file just wasn’t happy. It’s BTT, this is kinda expected sometimes.

Hooray!

Perhaps go partake of a small shot of adult courage fluid and take a nap. Lol
so...now what..
Voron docs should guide you through the config setup.
now i gotta do something with the 128mb card..and the toolhead board..
You don’t need the 128mb card. You can flash the manta via DFU mode and the toolhead board will be flashed via RP2 boot mode.
Im in dreamland for the next 8h.
the manta can be flashed by...the cb1..?
or..
Yes
how
Yes. On the manta the STM32 is connected to the CB1 via USB.
I couldn't get mine to flash over DFU, but perhaps that was just me
I’ve always flashed mine with DFU. Lol
is there a guide for this
Even the first time?
i dont see it
Following esotericals guide for flashing it as a can bus bridge. Since you’ll need that anyways.
Yeah I probably should be too lol
Make sure to do every step in the guide.
Well... If you have issues flashing over DFU @odd dew you can use the SD card. I just used filezilla over ssh to transfer the firmware file to my laptop then to my SD card. Possibly could have been more efficient by copying it directly from the cb1 to the SD card but 🤷 . Regardless, I should probably go, good luck with the rest of the build.
I dont have to worry about resistors right..
Nope
Not until a little later
Well. Other than the jumper on the manta and sb2209 for the 120ohm on can bus. But that’s easy
Yes. The can is connected up to the manta already, but not the toolhead (yet)
Yes.
So. The CB1 runs Linux and controls the printer. The Manta (which holds the CB1) has a STM32 MCU on board which controls all the motors and other things connected to it. And the SB2209 which controls the toolhead components.
The STM32 has a CAN transceiver onboard to talk to the toolhead board via a CANbus. You will flash the STM32 in with CANbus bridge firmware which will allow the CB1 to use the CAN transceiver connected to the STM32 to talk to any board on the CANbus.
Genuinely… no idea. I’ve never seen that asked before. 😅
Well hopefully not casue I tried to screenshot it and it went away lmao
Lmao. Fair
No, not needed.
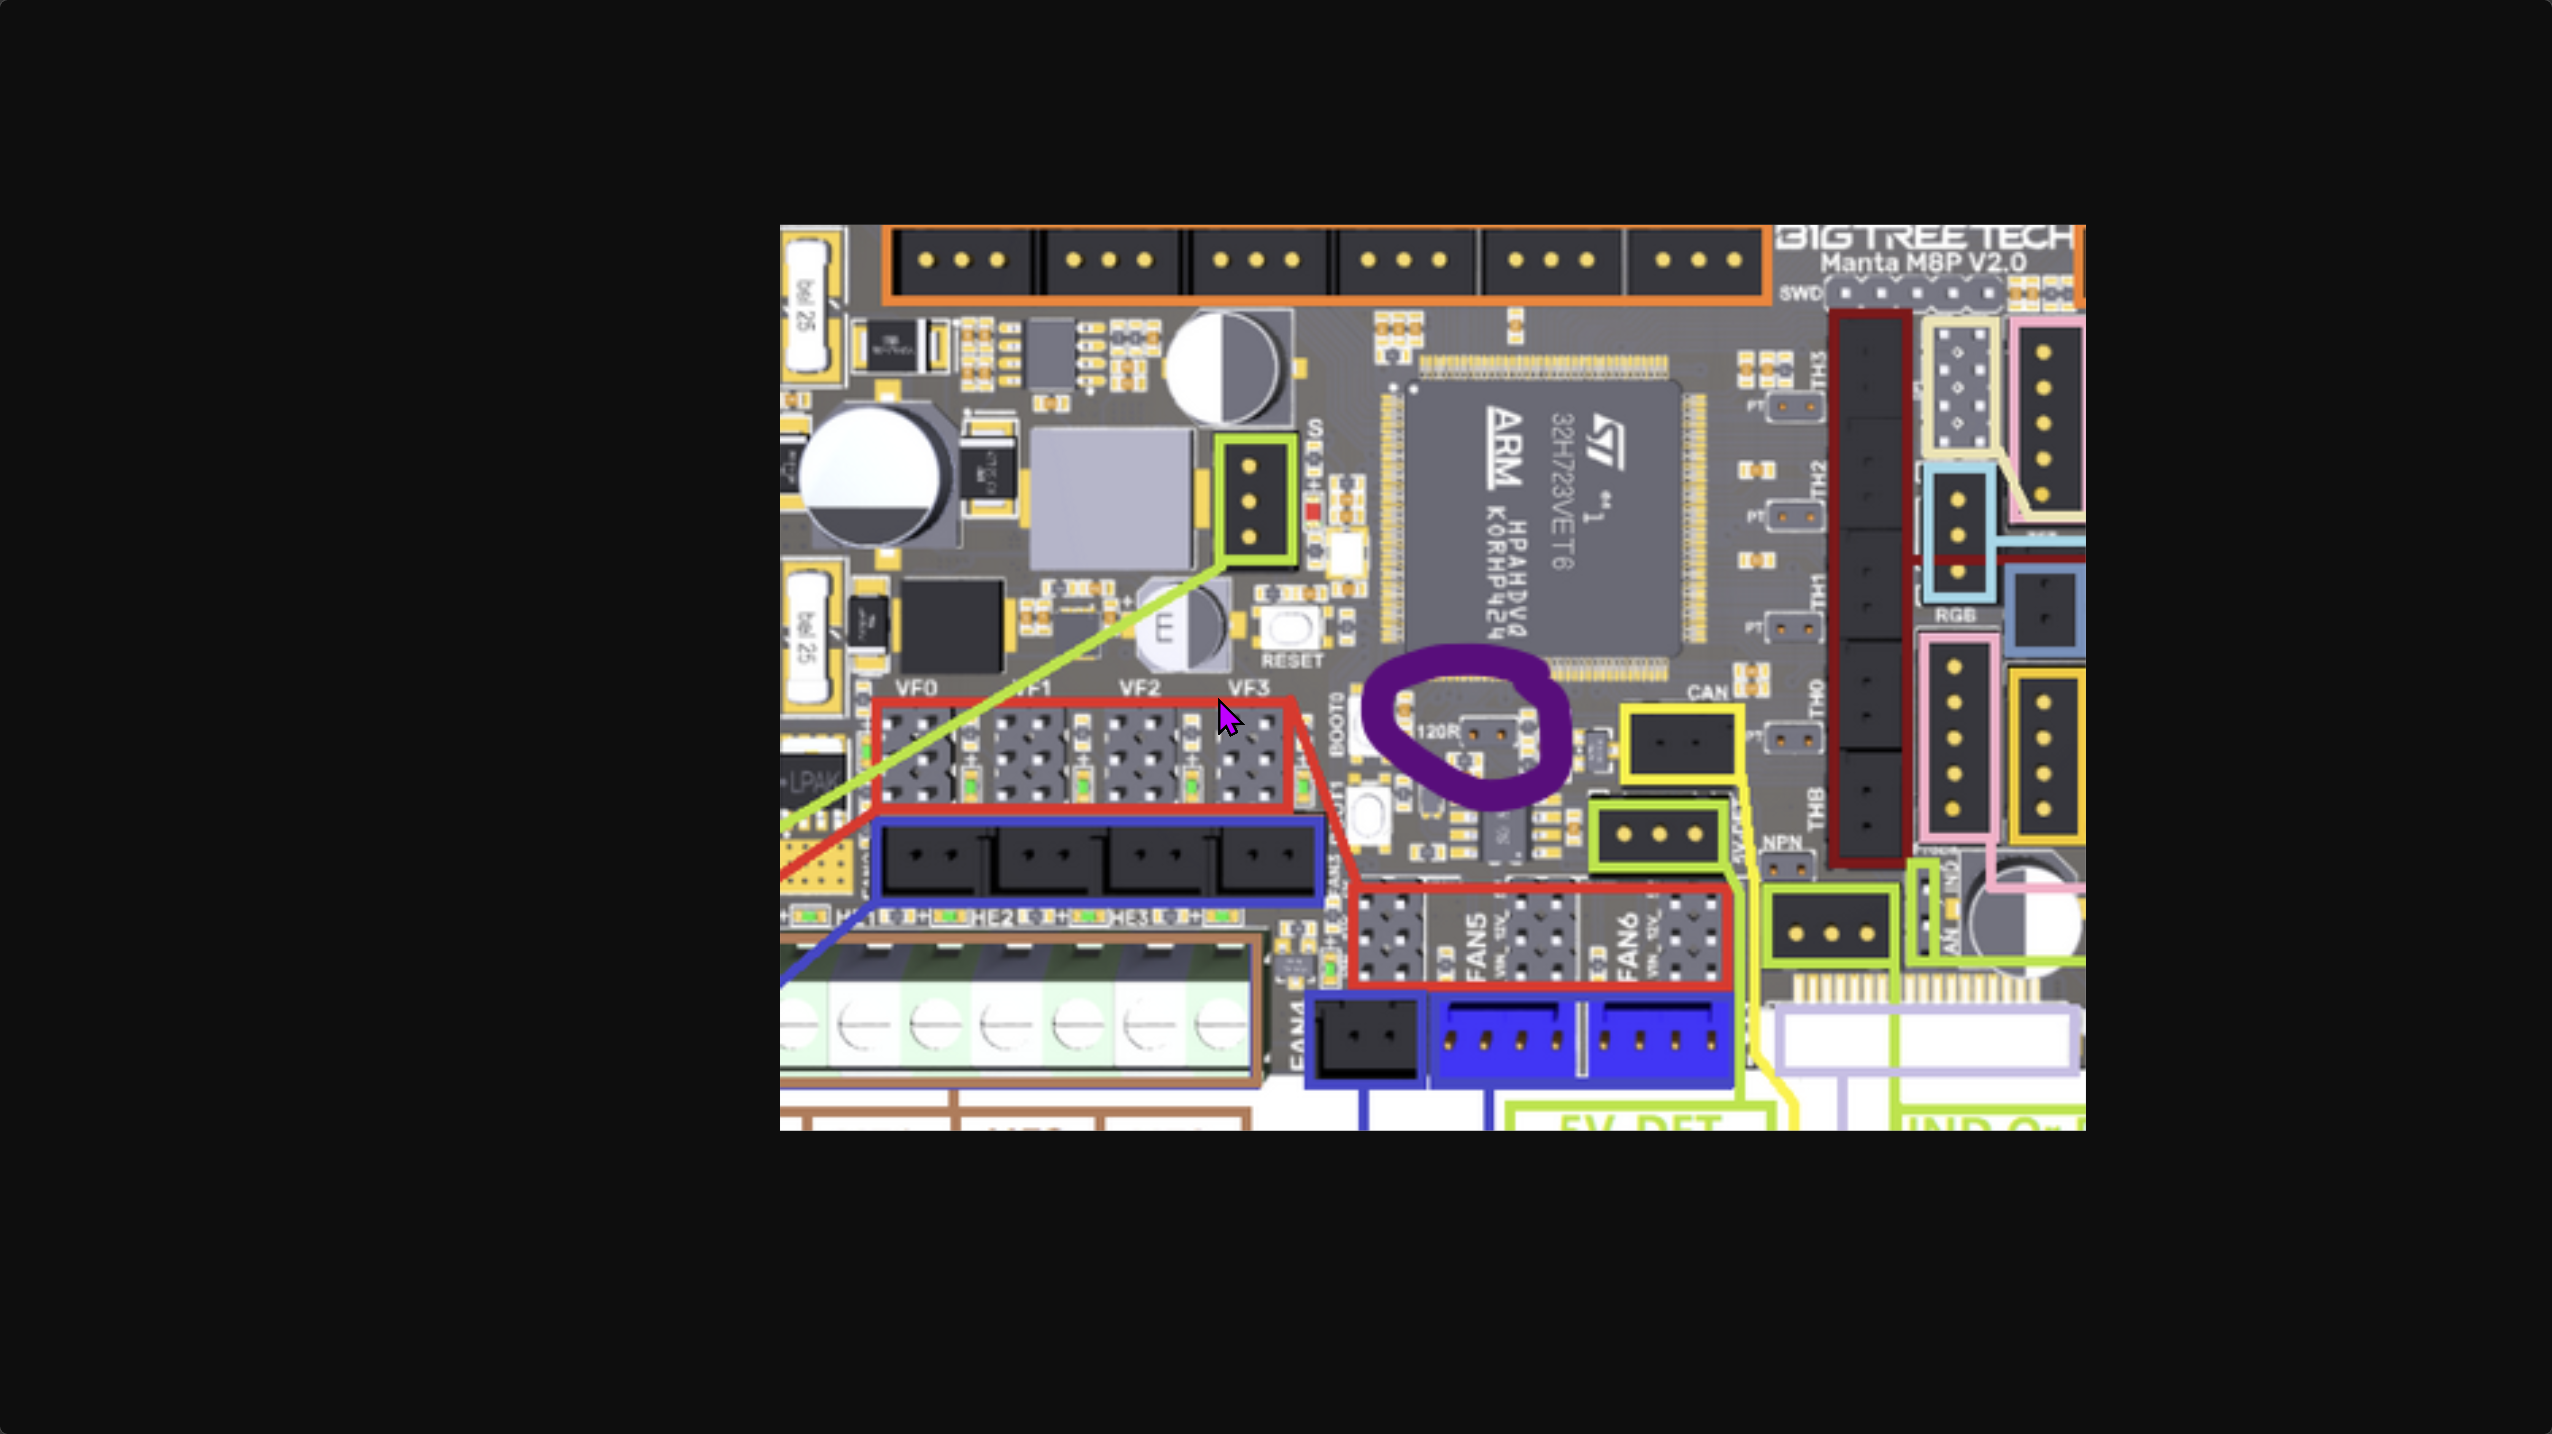
https://i.imgur.com/x5dyitV.png this jumper is rleady in place
https://canbus.esoterical.online/mainboard_flashing/common_hardware/BigTreeTech Manta M8P v2.0/README.html these steps arent in order right?
Esoterical’s CANBus Guide
A guide for setting up CANBus hardware on 3D printers
I make the config FIRST, then plug in the can cable, dfu mode..?
I thought I didnt want to connect the can cable for a while
You dont need to plug in the can cable until after you get through flashing the mainboard
And, iirc, the first flash of the toolhead board is over usb. Then the rest through the cable .
The common hardware page is the information required for you to go through the main page instructions
when it says this does it mean it wants me to set it now? or keep track of for later..
toolhead board is next
cant wait to redo all this once i get the cm4 😢
You will not need to redo the firmware flashing that you are doing now when you switch. Just the OS an the getting started for the CAN setup.
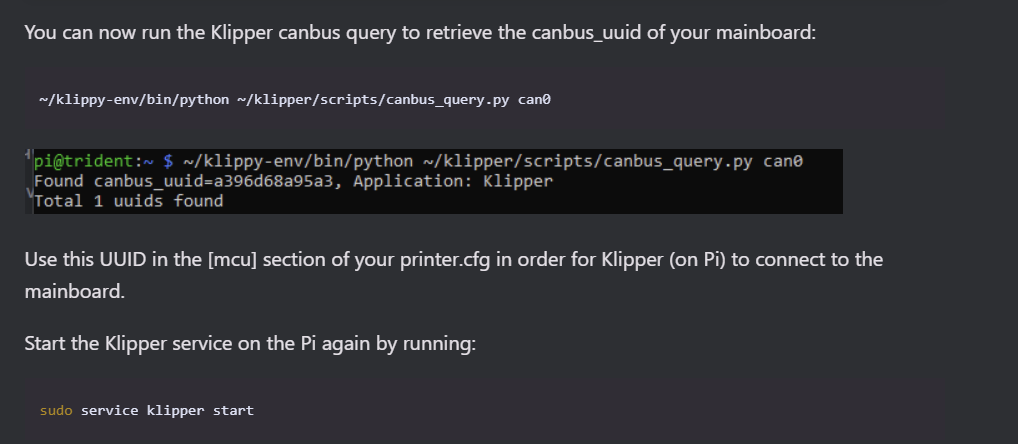
Do I just note this uuid for later?
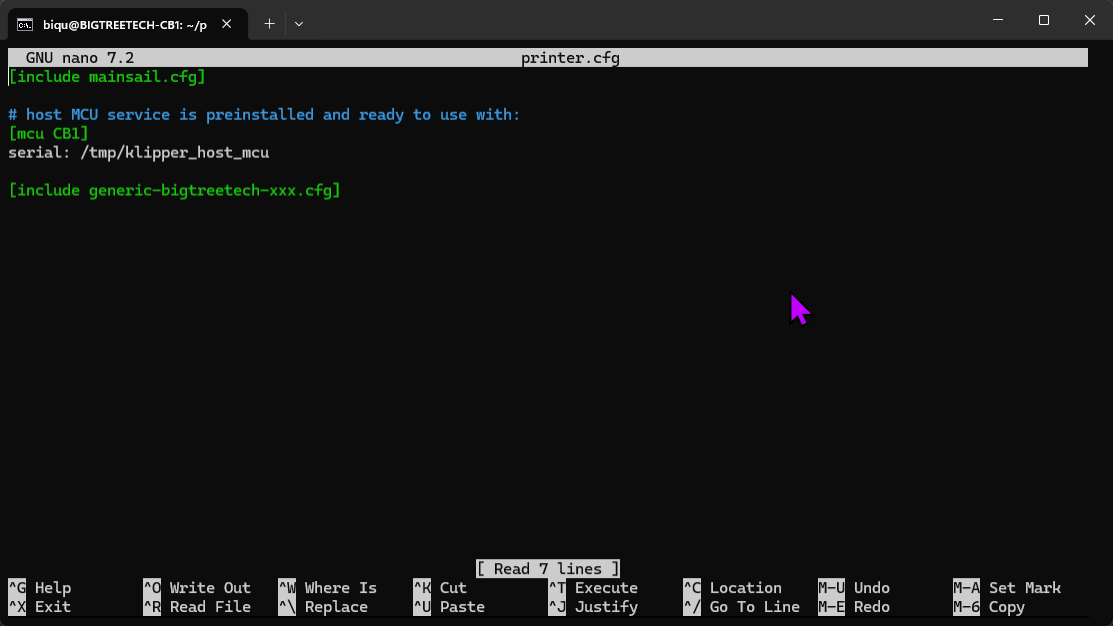
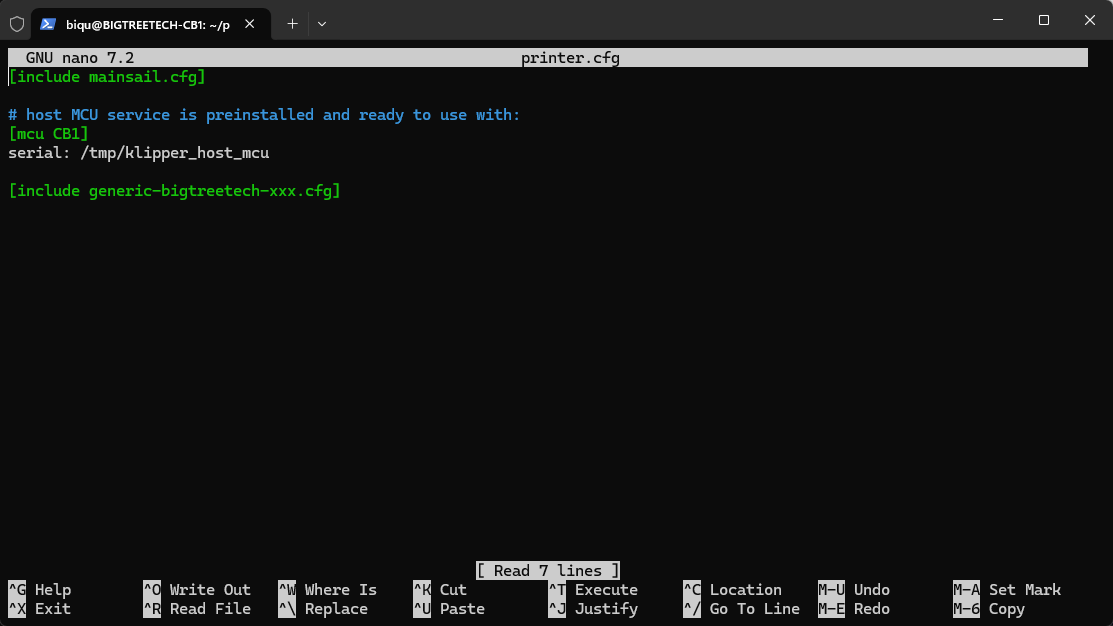
https://i.imgur.com/EhxeFzm.png all my printer.cfg has right now is this
You can add it to your printer.cfg if you want. I'd grab the one from the formbot kit repo and fill in the two UUID's.
You will need to update the tool head temp sensor config.
do I?
It is expecting the the PT1000 and you are changing to NTC 100K.
ah..
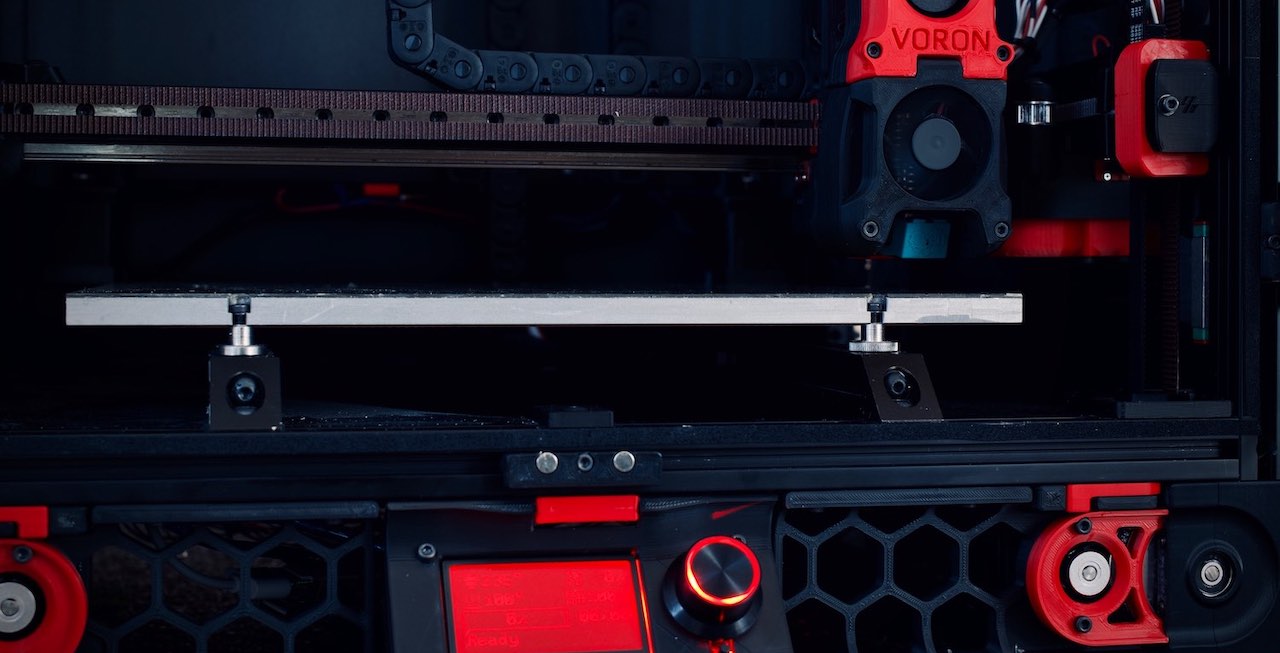
So...its safe to connect the toolhead now..? not gonna go into max overdrive and blow up?
I still gotta put in my y endstop
Boys
Where the hell does the y end stop go
I assume on the gantry
I don't see this in my printed pieces :/

Those also require cable chains to be used. Is there specific mod to put it on the A motor linked in the kit?
Uhhhh...

Says y end stop gets mounted on the a motor mount
Did you print the Voron on or the Formbot one?

Yes, that woudl be the spot.
Thank god
Would it make sense for the wire to come up through the hole on the top of the motor mount?

Edit: no
The small one of for the manta board, the other one is for the cb1

Wire needs to go down the chain eventually.
So since the toolhead board is next to flash is it now safe to connect to power and data? I know before it said to keep it disconnected..
But it kinda has to be powered to interact with it
Glad I took this picture

what said that?
The formbot guide and people in here said to disconnect anything that heats up
bed, hotend, can board..
can board isn't "something that can heat up"
the hotend heater is
but that's not the same thing

I don't really keep up on what formbot is telling people to do, (their guides suck) but if you're following esoterical's guide, there's a specific step where it tells you to hook up the canbus toolhead board by USB for flashing, and then another specific step later where it tells you to switch it to canbus
meh
you referenced it back here
thanks
Is it legit just connecting it with a usb c to A cable straight to the board..? not using the can cable/power combo
For uploading Katapult, yes. Then you use CAN for kipper.
The microcontroller doesn’t inherently know how to receive firmware over canbus. It does inherently know how to receive it over usb
And yes, usb power is sufficient for that purpose. It’s not like you need to turn on any 24v fans or heaters 😛
yes, that sounds right
I think there's a jumper right next to the canbus & usb connectors
Does the board INSIDE the front cover of the SB that controls the fans and LEDs also have to be flashed? or just the 2209 (long boi)
Just the main board.
So the SB2209 is the one mounted to the side of the SB (long one with the thick cable) and that is what the RP2040 plugs into?
RP2040 being the one mounted inside the front cover of the SB with the leds/fans plugged in
cant find the right jumper for that tiny terminal 🥴
No, the RP2040 is the MCU on the 2209 board as there is version with a STM32 MCU
im trying to find the bag of jumpers for that module
just power it up over usb for flashing, esotoricals walke through the process and tells you when to hook up 24v
Yeah I'm trying to find the jumper that jumps the 5v from USB lol
theyre tiny
mine where in the little box the board came in
I know that sounds obvious but with a shot

Worst case, you could borrow the 120ohm resister jumper to power it up on 5v
These are too big..


Found it

She's alive
My laptop did a GPU driver update last night now it keeps crashing 💀🙃
F u windows
Grrrrr

well the good news is the computer is just connecting to the pi, its not stored on the pc
bad news is it need to connect
This is making me want to do violent things
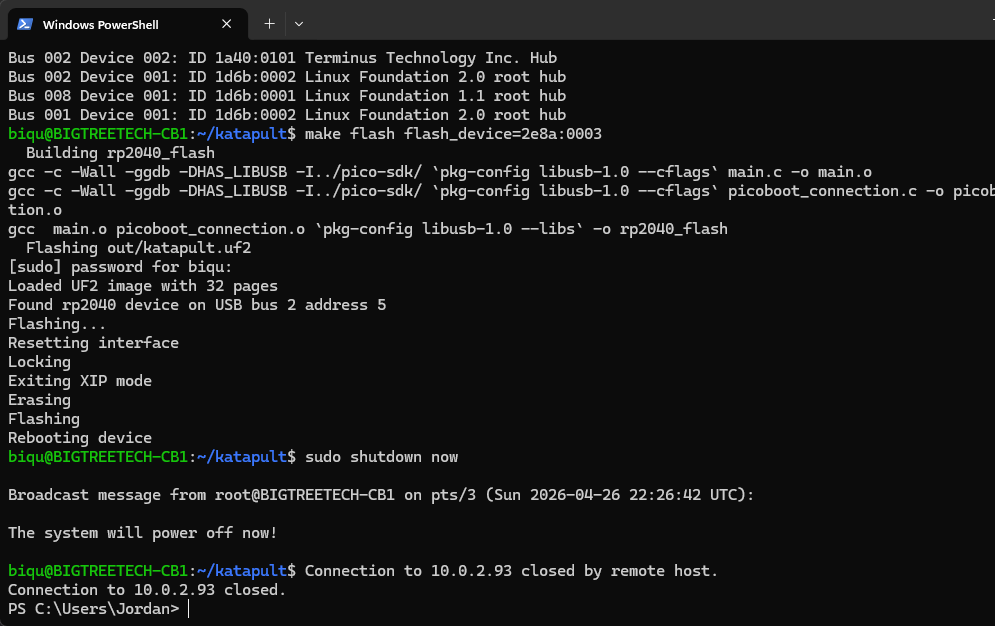
https://i.imgur.com/9Sa2SrX.png toolhead flashed
Now I gotta crimp some connectors on the 24v cable. Do I just use some spade terminals? The kit came with some ferrules but...the formbot guide says it connects straight to the psu which doesnt have a spot for ferrules
Yeah, spade terminals are perfered. Also, remove the solder if you are crimping.
roger
Stripping the insulation back on this cable is scary trying not to damage the wires

Think I actually got it


ffffff
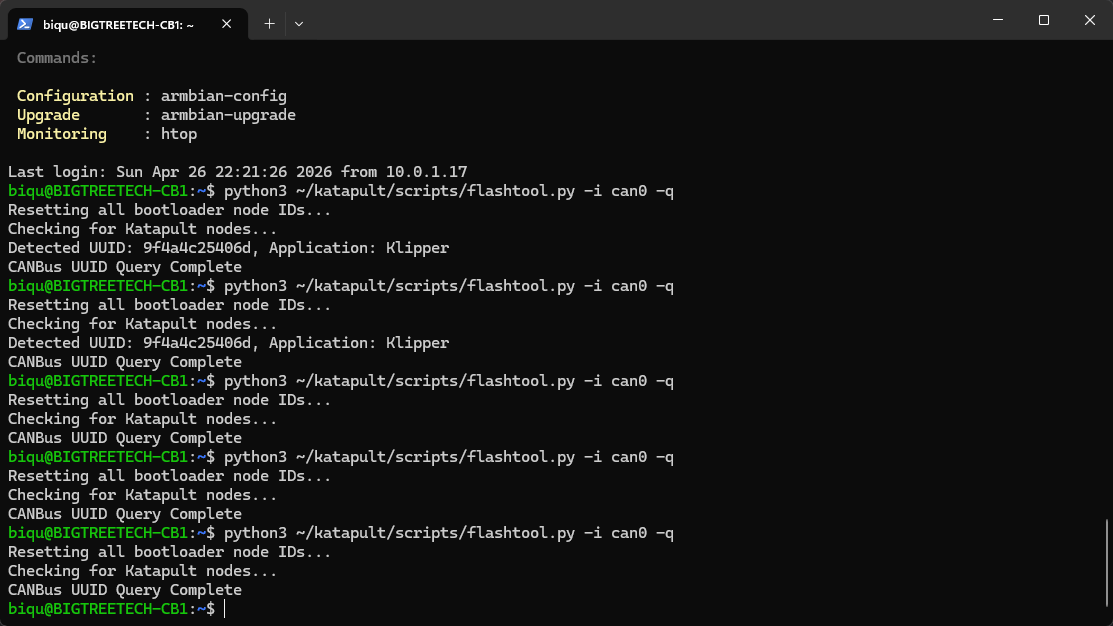
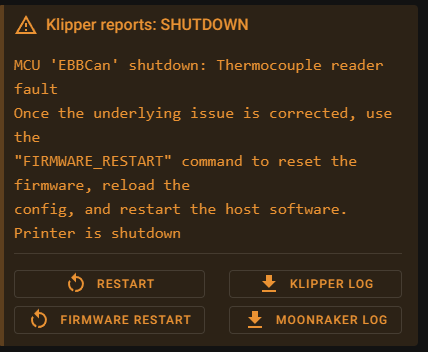
It should be showing up in katapult mode. I double clicked reset on the toolhead board now it's not showing up at all
ok the one its picking up is the mainboard
Are the termination resistors installed on both devices.
I put the resistor on the toolhead board during flash for the USB then removed it as instructed before hooking up the can cable
This keeps alternating red/green

Oh...I need that too huh..

That is also just a regular jumper right?
Also I know I have to change these dip switches to work with my new thermistor on the hotend instead of the pt1000
WOOOO

So do I now just override my printer.cfg with the one from formbot's github? https://github.com/FORMBOT/Voron-2.4/blob/main/Config/printer.cfg

GitHub
Contribute to FORMBOT/Voron-2.4 development by creating an account on GitHub.
https://i.imgur.com/SAFWUUg.png im just getting this right now
https://i.imgur.com/l1uVAk2.png which makes sense cause this is all my printer.cfg has in it: https://i.imgur.com/l1uVAk2.png
yes
and then you go through it and start setting up your mcus, and all the other "edit here" points
Thanks, #voron_2_discussion message
Is it safe to hook eveything back up?
You actually don’t. The switches are for the max31865 chip which is connected to the 4 port JST connector. Your new hotend thermistor connects to a ADC (analog to digital converter) in the RP2040 via that 2 pin port right below the 4 pin one.
Yeah the one I've been working on for 2 hours removing the old plug and putting a new plug on 🥴
Pain in the ***
You already had the 2 pin on it. You don't need to change it.
Connector is the wrong type. Much too large.
No fit in hole
OK, XH -> PH
What do I need to set the configs to?
[extruder]
step_pin: EBBCan:gpio18
dir_pin: EBBCan:gpio19
enable_pin: !EBBCan:gpio17
microsteps: 16
rotation_distance: 22.905740611
gear_ratio: 50:10
nozzle_diameter: 0.400
filament_diameter: 1.750
heater_pin: EBBCan:gpio7
control: pid
min_temp: 0
max_extrude_only_distance: 105
max_extrude_cross_section: 2
pid_kp: 57.369
pid_ki: 2.533
pid_kd: 324.854
sensor_type: MAX31865
sensor_pin: EBBCan:gpio9
spi_software_sclk_pin: EBBCan:gpio10
spi_software_mosi_pin: EBBCan:gpio8
spi_software_miso_pin: EBBCan:gpio11
rtd_nominal_r: 100
rtd_reference_r: 430
rtd_num_of_wires: 2
max_temp: 300
Check the example config for the SB2209/RP2040 on the GitHub. It’ll show you what to change.

I changed sensor_pin to gpio27, which is what TH0 would translate to according to this chart...same error.
sensor type is wrong, and NOTHING from spi_software_* onwards should be there (that stuff is all for the max31865)
So all this goes away?
spi_software_sclk_pin: EBBCan:gpio10
spi_software_mosi_pin: EBBCan:gpio8
spi_software_miso_pin: EBBCan:gpio11
rtd_nominal_r: 100
rtd_reference_r: 430
rtd_num_of_wires: 2
max_temp: 300
(oh, except max_temp at the very end. keep that)
if its specifically a ATC Semitec 104NT-4-R025H42G, use that
otherwise, Generic 3950
Where do I even see valid options to enter?
sensor_type:
I mean, its probably the ATC Semitec one then?
excuse me sir, are you aware that your mouse cursor is purple? 😛
eh. they'll turn up when you hit the button, iirc
errrr
I'd say you are here: https://docs.vorondesign.com/build/startup/
the buttons?
the printer is still on its side rn
so i def shouldnt move anything
it shouldnt move on its own at all right?
"use the refresh button to update endstop status"
and if you look just over to the top right of that panel, you do indeed see a refresh button...
oh that refresh button.
i was hitting f5
This is my first diy don't bully me
I'm used to seeing enstops updating in realtime
Ok all 3 end stops update properly
Onto the startup guide. Congratulations BTW!
klipper only really monitors endstops when there's a reason to, such as something trying to home
Still so much to do after this. Gotta mount the light, screen, panels, cable manage....
I should probably plug in the front of the SB now too
With power off!
yes
and i have the misalignment protector installed

The colors dont seem to adjust properly all the time
odd
Can you show what you mean?
my phone does not want to capture the voron logo
Color order is probably wrong for the LEDs. Check your config and verify it’s GRBW
[neopixel toolhead_light]
pin: EBBCan:gpio16
chain_count: 3
color_order: GRBW
OH! Look at that led color selection window again. At the bottom is the controls for the white channel. Turn it off so that it’s just the RGB channels on.
This is the white channel

my hero!
So just to make sure my stuff is wired up right, the bottom fan on the SB is the "part fan" and the top fan is automatically controlled by hotend temp right?
You had the right colors. Just the white was making them look like a different color. Lol
the "part fan" doesnt seem to move much air even at 100%
Top fan is part cooling, bottom fan is hotend temp controlled (aka the HE fan)
Either swap the pin name in the config or turn off and swap where they are plugged in.
Correct. You have them in the right place. But probably swapped where they are plugged in or pin names in config.
Bottom one is for keeping the heatsink on the hotend cold. Top on is for cooling the prints as you print.
this hotend temp climbs QUICK
https://i.imgur.com/l0K7fVO.png definitely needs to be PID tuned

Tiny mass. Lol.
Yeah, it should move 1mm and that looks close.
Sounds like coil whine. Completely normal. And the clicking is just it changing direction.
You won’t notice it while printing. Just be hearing the movement of the printer instead.

That’s why I recommend running it up to the exhaust and down the back of the printer. Then you can zip tie it to the ptfe tube to hold it up.
I don't even have the panels in yet though
There’s a PUG exhaust cover for it as well. (You don’t need the panel for the exhaust cover to mount)
This exhaust?

This is one of those times where you just take a leap of faith as well.
🥴
The exhaust hole in is the panel. Most people end up not using that part in your hand because why would you want to remove hot air from inside the chamber.
The exhaust hole in is the panel?
Yea. There’s cutout on the top of the back panel. That’s the exhaust hole. Most use a cover for it to just run the toolhead umbilical and ptfe tube out.

i actually have this on my qidi

The little umbilical arm?
yep
Pretty sure the one in that pic is https://www.printables.com/model/978123-voron-bowden-ptfe-tube-guide-arm-and-canbus-cable


I run this in both my tridents. Lol. Long for the 350 and short for the 250. Both with bearings cause I love bearings.
I have extra bearings just for that from the first one I made
I had an issue where the steel wire pulled out of the toolhead side
I just don’t use the spring steel wires. Lol. Zip ties and ptfe tube are my support for the umbilical.
Fair enough
Okay. And the 250 might be cheating because it has a CPAP tube to support it as well. Lol

THAT IS SEXYYYY
Thanks. That’s #1406666805249835219 if you ever wanna look more into that printer. Lol
That camera angle is my phone. 🤣. The led bars are custom designed by me. Not posted anywhere yet either. They are just aluminum c channel for LEDs with 144 pixels/m led strips.
That printer is kinda my pride and joy. I spent a ton of time purely on aesthetics for it.
i sleep with a cpap so its funny seeing it in printers...
how fast does that baby go to need cpap??
I bet. Lol
Not very. It’s made to be aesthetically pleasing moreso than fast. Lol. But in theory it is capable of printing upwards of 80³ flow. Lol
How convenient that there’s a Goliath hotend in that printer. 
that means nothing to a normie like me
Goliath hotend is VZBot’s hotend. Lol.
oh
Yea. Lol. I just have it in a Voron.
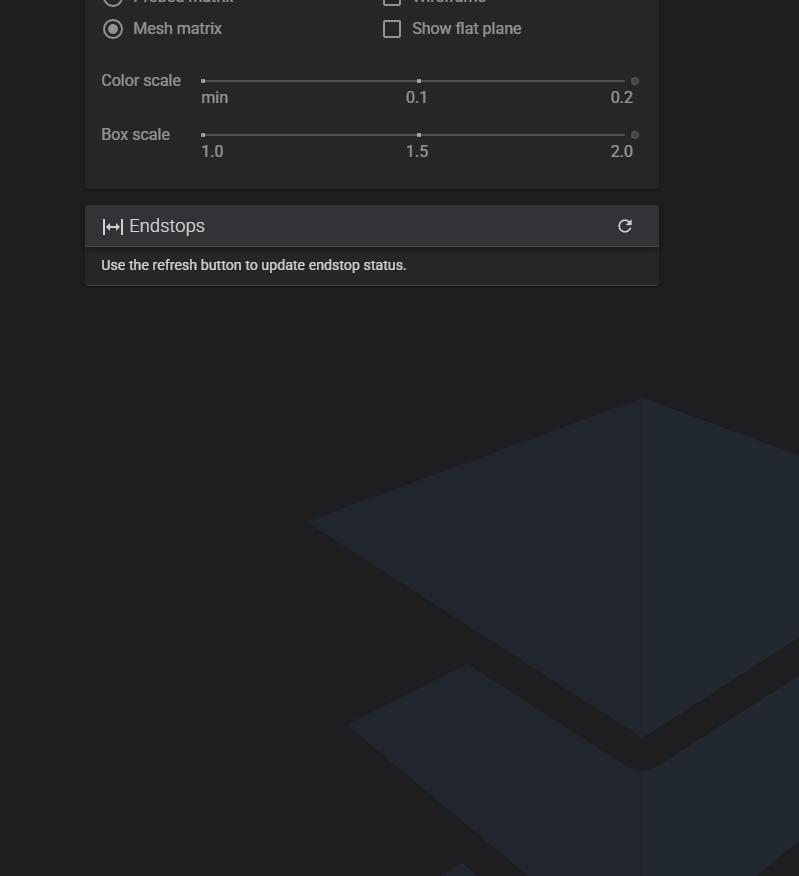
Is there a printable index thing to help line the magnetic sheet up properly?
Search printables for v2.4 and mods and you’ll find everything you want. 😂 https://www.printables.com/model/346782-voron-24-bed-alignment-stop

Goes on the corner but mounts to the bed extrusions.
I’d say M and measure your umbilical thickness for the mm size.
By "umbilical thickness" do you mean the thickness of the cable, or scouting for the braided sleeve? Etc
Thickness of the cable (assuming you aren’t using a braided sleeve you won’t need to size it up any)
I would like to use a braided sleeve but won't be right away
So print one the size (or close to it) of your cable thickness for now and then later on print another for +2mm or so.
Seems big brain
My box turtle thinks there's 47g of filament left, this print is gonna take like 35...
Let's see if we can do it
It’s a tiny bit of plastic. lol. And also this is why Vorons are so awesome. So many mods to be done. 😂
🤞
What is that honeycomb shape? It's not in the files
GitHub
Voron 2 CoreXY 3D Printer design. Contribute to VoronDesign/Voron-2 development by creating an account on GitHub.
How does this thing even mount to the frame?
2 M5 roll in nuts and 2 M5x8 (or x10 I forget for bigger printers).
Alright so I don't HAVE to use the plexiglass panels at all
Not until you wanna enclose it anyways.
I will eventually but I wanna get it up and running before adding even more weight and making it harder to servic
Hows the healing going?
Left inguinal hernia btw if u care to look it up lmao
Got 3 incisions above my belly button where they stuck the davinci robot in
Any chance u can get me more pictures of how ur vent exhaust thingy is mounted
I can't make heads or tails of it
Not really… it’s not something I take pics of often. 😅
Not near it? Lol
So I need to remove the can cable from the z chain
And run the cable...somewhere..
Much better

Now just have to figure out how long I need the PTFE and can cable
Yes my Christmas tree is still up. Sue me
I don't think I actually cut the ptfe on my build
Doesn't really hurt to have a little extra anyways
I needed it too for my stupid routing I have to make the spool easy to reach from where I put the printer
i wouldnt cut the can cable lol
and if you do cut it leave a good bit of extra
Whaaat no I didn't plan on cutting it lmao
Good lol 😭🤣 as with most things I like to leave as much extra as I can untill I can verify that where I cut will leave enough for it's purpose plus the intended extra
I think I'm missing the piece to secure the z chain to the gantry center
https://i.imgur.com/PaKm7Ew.png this mkaes no sense to me. It says there is no physical endstop with tap, then tells me to move the endstop 💀
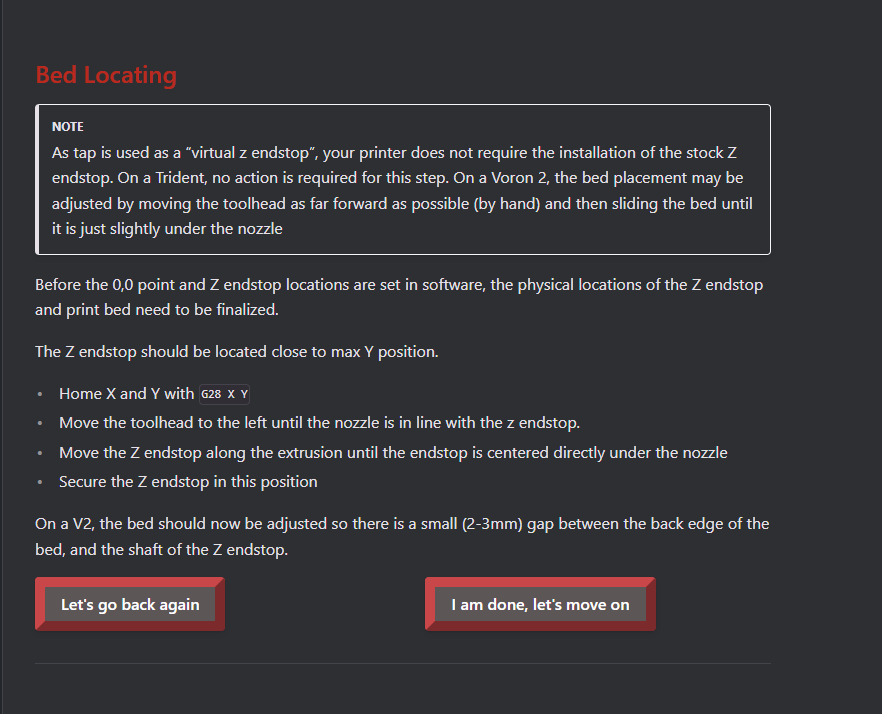
wtf richard
The note basically tells you that the general instructions don’t apply due to your hardware choices
And then the general instructions are there anyway, just for reference
ahhh..ok
well, i think now is a good time to make sure my AB belts are properly tensioned with the phone app?
I did the manual/automatic moves to 350,350 and 0,0 but havent done QGL or adjusted Z yet
You want to leave them a little loose for the first startup. Don't try to be super precise with getting them to match right now. As the machine heats up, the belts also get tighter.
the directions want me to make sure the nozzle isnt over the bed at 0,0 but its hard to tell cause the Z is so far up
I tried doing a z home and one of the corners started making a weird clicking noise so I hit the power switch. No idea why
it was almost all the way down
Hitting the power switch without shutting down the SBC versus a fast way to corrupt your SD card. I would suggest next time using the emergency stop button in the web UI to disable the printer.
I'm used to an emmc which isn't so fragile
I don’t think that is necessarily true and I would treat either the same way.
hmm...
well maybe ive just gotten lucky lmao
so....about the noise..
I should be able to home Z without doing QGL right? it falls first in the startup thing
the steps should be covered in the startup guide. You would need to home Z first though
Can you manually lower the gantry (SLOWLY) any lower than that? The gantrey looks like it is really far off from level as well. Get your gantry close to level. and make sure the Z joints are slightly loose for this one.
And you confirmed motion on each Z stepper in order using stepper buzz?
by turning off the motors and manually just pulling up on a corner or what
and they were all going in the same direction? I would triple check that
It looks like you have one side going up and the other going down. When you buzz the Z all should move in the same direction and back.
All 4 corners first go up then back down.
Well
Well looks can be deceiving I guess
You care about what direction the gantry moved
moves?
yes, when you buzz Z steppers it moves your gantry
Don't care about clockwise or not. Care about the direction the gantry moves. if it goes up in the corner and then down, it should do the same in each corner.
alright then they all go up first then down.
OK. now with the motors off, gently lower the gantry down lower than you have it now to make sure there isn't something stuck in a belt path
by just..pushing on the sides..? or
yep... slowly. do not force anything.
Something isn't happy..
They all kinda seem to stop at the same height
is it possible to be "racked" in this direction too??
Not really. What could be stopping it from moving down? you will need to inspect the Z drives. Have bolts instead of grubscrews or something?
Well if its a z drive issue, it should also have issues going up
cause the motors rotate in a circle..
so what would block them from going down?
ghosts? demons?
it wont let me go up cause its not homed
for testing
it thinks its at Z 10
don't worry about the Z 10. it has no clue where it is until it homes.
Well yeah... Did you test the tap sensor for triggered?
You have to manually move it and check the status turns from red to blue on the sensor.
but yes if i push up on the toolhead, it does change to triggered.
by hand.
i did test that
OK. so now, what could be blocking it from going down? You have stoppers in the z rails still?
Sometimes the answers can be easy 🙂
LOL

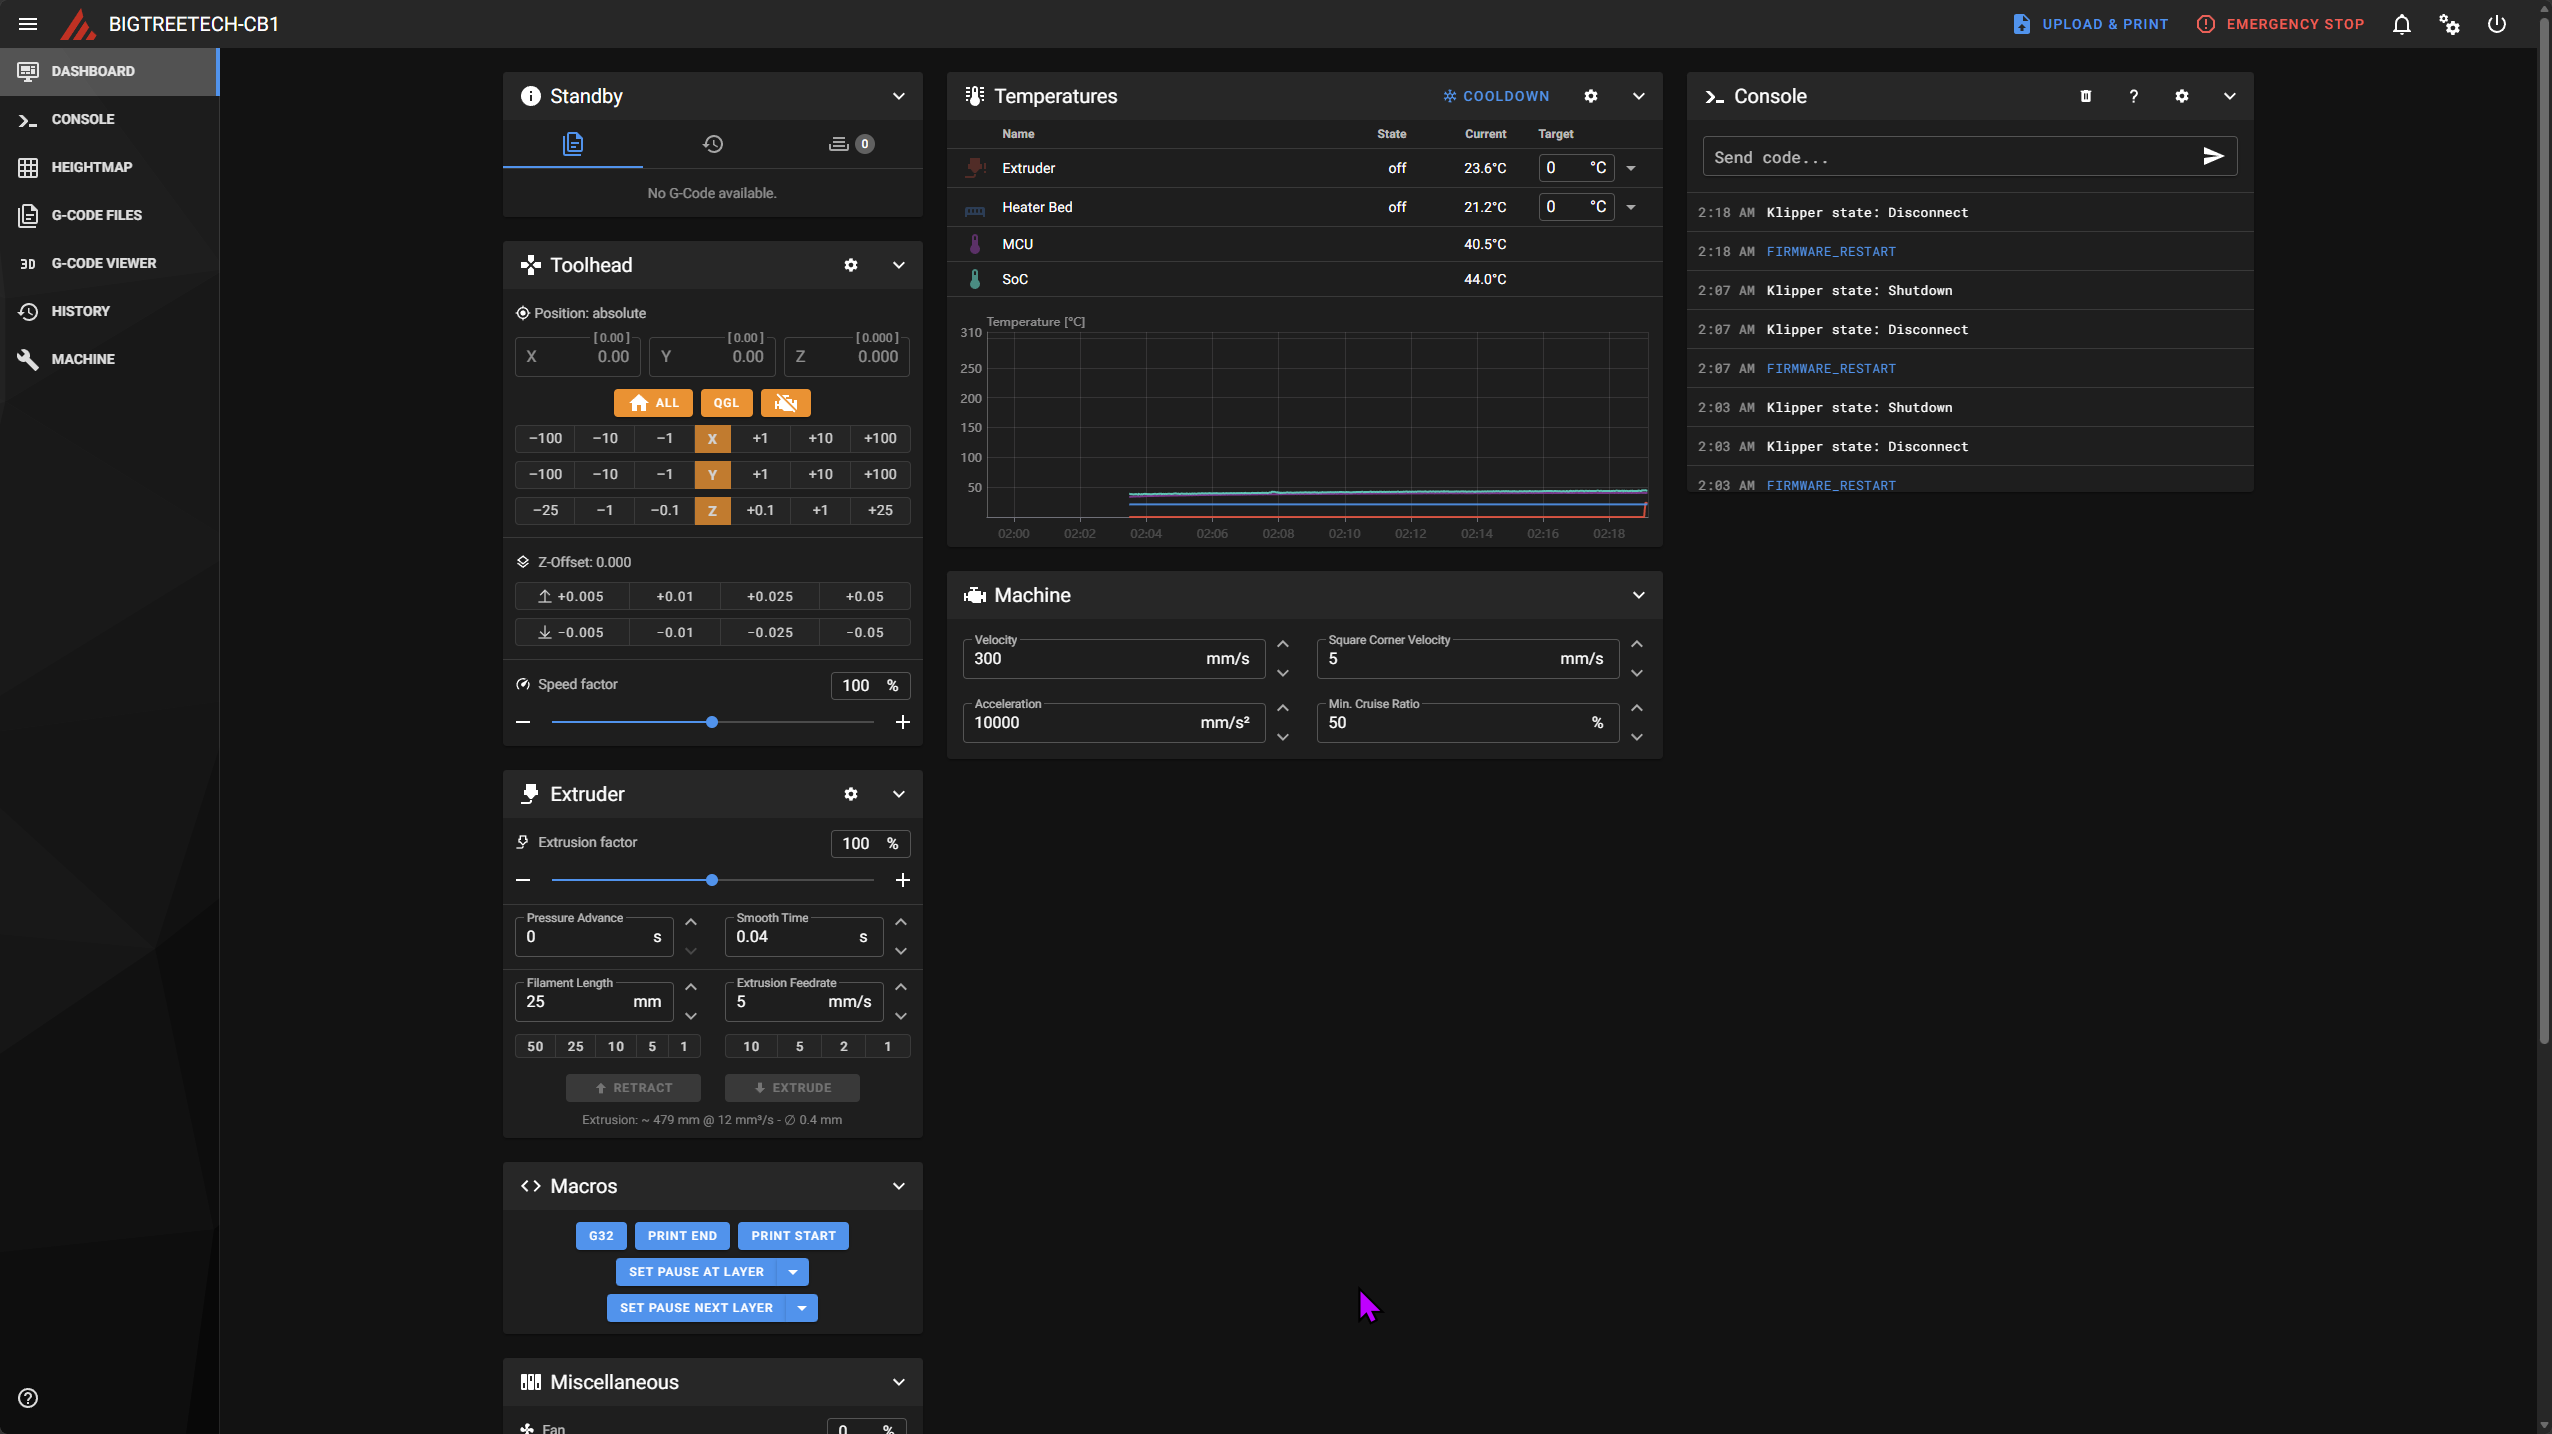
// probe accuracy results: maximum 0.087500, minimum 0.070000, range 0.017500, average 0.082750, median 0.083750, standard deviation 0.004535
ok SD on run 2 is better
// probe accuracy results: maximum 0.080000, minimum 0.067500, range 0.012500, average 0.076750, median 0.077500, standard deviation 0.003363
i wonder if the friction from the extra belts is causing issues on the side of the toolhead
oh..would probably help if i had the screws holding the front cover on too
make sure you adjust the magnets on the tap as discussed in the manual for it
Now check the tension of all of your Z belts. remember that after homing, you should be able to put moderate pressure up and down on the gantry corners without them moving very much
I should probably test my bed heater too
Follow the steps in the guide 🙂

Cut it around here

Then leave them a little longer if you want
You buy new belts.
That will be more than plenty though.
ok ok

I have a ton of extra z beltage
Ok so I home the printer then do probe_accuracy
First result is always higher: // probe accuracy results: maximum 0.110000, minimum 0.090000, range 0.020000, average 0.105750, median 0.107500, standard deviation 0.005706
2nd result is usually better
// probe accuracy results: maximum 0.105000, minimum 0.095000, range 0.010000, average 0.103000, median 0.105000, standard deviation 0.003122
I feel like a QGL would be needed for best results no?
Z belt tension seems good when pressing down on the gantry
Run it a few more times and adjust the magnets again. Get everything settled
And make sure the bed screws are tight.
I tighten 3
the "current" temp jumped MUCH higher than is physically possible lol https://i.imgur.com/dhXPD8A.png

little worrying but..
I have peek screws, I tighten 4 
I have an 18mm thick bed, I tighten 4
well i havent gotten nipped yet touching the printer with the ssr running so...hopefully that means my grounds are decent enough
The grounds are there In case something goes wrong
yes

the bed actually did get hot impressively quick
Might be close to qgl time
have to pid tune hotend first
Yep, but close
yes

we do be getting close
i bave identified a must have...i need the SB lights to come on when FW boots
// probe accuracy results: maximum 0.135000, minimum 0.110000, range 0.025000, average 0.131000, median 0.132500, standard deviation 0.007176 bruhhh 0.07
whattttt
re-homed and re-ran, 0.04 now. Wild
// probe accuracy results: maximum 0.105000, minimum 0.087500, range 0.017500, average 0.100500, median 0.102500, standard deviation 0.004848
17:31:59
// probe at 175.000,175.000 is z=0.087500
17:32:00
// probe at 175.000,175.000 is z=0.097500
17:32:01
// probe at 175.000,175.000 is z=0.100000
17:32:03
// probe at 175.000,175.000 is z=0.102500
17:32:03
// probe at 175.000,175.000 is z=0.100000
17:32:04
// probe at 175.000,175.000 is z=0.102500
17:32:05
// probe at 175.000,175.000 is z=0.102500
17:32:06
// probe at 175.000,175.000 is z=0.102500
17:32:07
// probe at 175.000,175.000 is z=0.105000
17:32:08
// probe at 175.000,175.000 is z=0.105000
Is this the "trending up" that it warns about?
No, those are reasonable
I unscrewed the screws holding the tap magnets, didnt hear anything and re-tightened them, no change
Perfect. Keep trucking
Even though im out of spec for the SD?
Yes
It gets better with being used and the next steps are going to exercise it well
there are ways to speed it up 🙂
First starting yes. You can speed it up as your accuracy goes up
Alright well it stopped so im guessing that means its done
What does the console say?
36:18
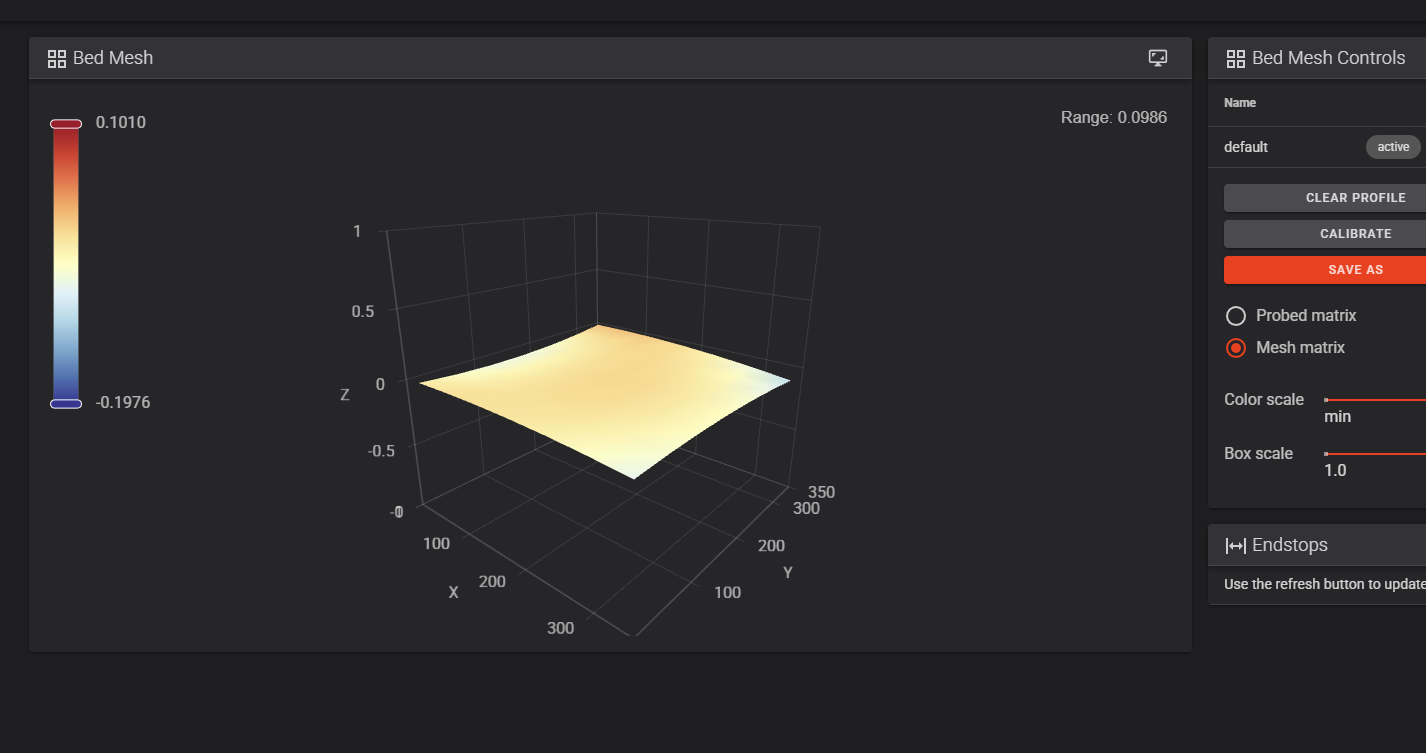
// Making the following Z adjustments:
// stepper_z = 0.004500
// stepper_z1 = 0.000200
// stepper_z2 = -0.004500
// stepper_z3 = -0.000200
17:36:18
// Retries: 4/10 Probed points range: 0.005000 tolerance: 0.007500
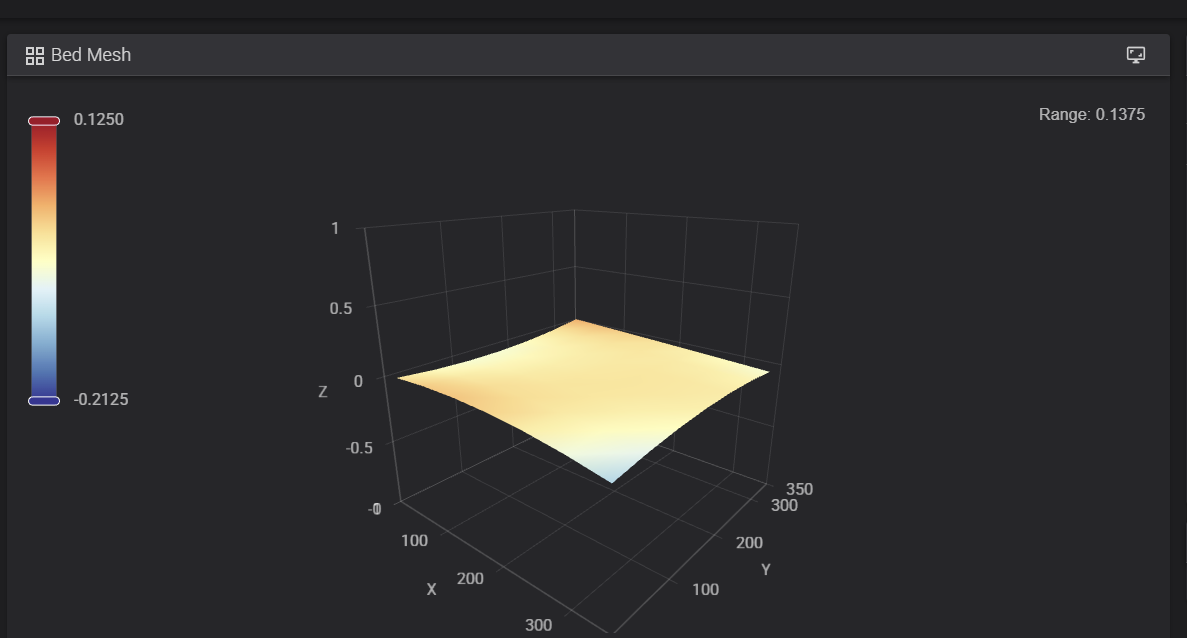
That is an excellent mesh too
Expected. Set them to 0 now
Then re-run mesh? or just continue the steps
Just continue. Should be getting close to slicer setup
ok
Well I guess the "fun part" is over, now I gotta clean up cables, finish securing the z chain, put on the panels...the screen..
ehhh panels can come later lmao
Only a few days past your original deadline. really good actually. LOL
ive been using the printer feet to "roll" the printer on the table so i dont cross my lifting weight limit
I must be missing the slicer setup steps, not seeing those in the startup guide
My original foot mounts crumbled after a few years of doing that, print some spares eventually lol
good to know
they were Polymaker ABS, so take that as you will
I think I have to calibrate rotation distance still
probably print the rock n rolls
im using injection molded ones from formbot
also this thread fixed my leds 🎉
might be fine, idk
huh
i had the stealthburner leds configured wrong so they were always messed up but saw the answer in this thread this morning.
you can set startup values with
initial_GREEN: 0
initial_BLUE: 0
initial_WHITE: 1```
or whatever you need for purplejust put that under whatever LEDs you want on at startup

ope
can i get a red circle too
i thought that was the end

do I actually have to do the e-steps...or can i just use the values from the table lol
im a lazy mf

You must do it
I actually gotta put filament through this puppy 😮
feellin real
With the hotend at temperature, make a mark on the filament between the roll of filament and your extruder, between 120mm and 150mm away from the entrance to the extruder. Measure the distance from the entrance of the extruder to that mark.
Does this mean to stick the filament into the extruder, THEN make the mark
Yes. You want to measure the filament extrusion. It needs to be engaged with the extruder gears before you make the mark
roger
Extruder needs to be hot before you can hit the extrude button too
I just realized I dont HAVE a way of feeding filament into this thing for an actual print, unless i fed it straight from a dry box
Nothing wrong with that. Loop it over the top extrusion

- Calibrate e-steps
- Fit PTFE between toolhead and exhaust thingy
- Strap the PTFE and CAN cable together...
- Screen?
- Cable management
I mean, I would skip the screen personally but that sounds about right
Screens are just one more thing to fiddle with to me. That webpage you are on works from your cell phone too
lmao
Ok so I made a mark 130mm up, extruded 100mm and the mark was now at 37.53mm up
so it extruded 92.47
making my new rotation distance 20.97122608217
does that seem feasible?
The trick is to put that value into the printer config, save and restart button and do it a second time to check your work
makes sense
im using side cutters to make my mark so its hard not to cut straight through the filament lmao
It is one of the most important settings on the machine. Don’t hesitate to do it multiple times
lol. I do it with the extruder off the toolhead. Cut it flush with the bottom of the extruder and then send 100mm, whatever is sticking out is the value extruded. Makes it so you don’t have to make marks
my brain cant comprehend these basic things lmao
Yet
Ok so
I made a mark 120mm up
extruded 100
the mark is now 14.57mm from the top
So the amount it ACTUALLY extruded is... 100 - 14.57 = 85.43??
105.43
heh
as I said
my brain doesnt like having to do inverses
😂
shhhhhiii
i accidentally cut the filament
Got 19.28 this time
but its hard to measure from the EXACT same spot every time
im gonna say its fineeee
For your first run, it will be fine. You will want to revisit it when you have more patience. Then you can do it my way 😉


Yep
One concern I do have is when the toolhead moves, it'll pull the ptfe further into the ECAS coupler and won't be able to come back out
If it is pulling more out, it needs more. You should be able to go to the front corners and maintain a gradual arc
I mean when it goes to the rear it'll push back in
Nah.
Alright lol
That fitting should be screwed in on the other side of the exhaust panel technically but it shouldn’t make a difference


Not bad for the first time. Not like anyone would call @crude storm to check your umbilical
😭💀
A decent retract at the end of a print can eliminate the need for wiping your schnozzberrys
https://youtu.be/IzYNO515-M0?si=qkdnSVj9cRO8PzTb second half of video

How to route your umbilical: Three ways for Trident and three ways for V2.
Special Thanks to Schonclee for asking the question about which umbilical routing is preferred.
V2 starts about at about 6:30
Galvanic Bowden tube Guide (use the short arm for Trident, and the long arm for V2):
https://mods.vorondesign.com/details/8CxQeqS1lXhlGphwkyqh7g...
Is there an easy test I can do to make sure my AB belts are perfectly even before cutting anything
If they are evenly tensioned and the tensioners are similar on each side, they are going to be good to go
https://i.imgur.com/oMDcYGY.png SHEEEEEESHH
thats the lowest ive ever gotten on a printer
Told ya tap was awesome
QGL takes FORRREEVERR tho
You will be able to speed it up soon. Need you to get used to the machine first. Mine take less than 90 seconds. There are a few tricks to make it faster.
And what is 90 seconds when your preheat times are longer? Embrace simplicity. It can only get more complicated if you insist
I mean. I’m more tempted to ignore wheels in the “what is 90 seconds” part even though he’s right.
First.
Add this to your printer config between two macros
[gcode_macro QUAD_GANTRY_LEVEL]
rename_existing: BASE_QUAD_GANTRY_LEVEL
gcode:
    # Pass 1: Initial Coarse Leveling
    BASE_QUAD_GANTRY_LEVEL HORIZONTAL_MOVE_Z=10 RETRY_TOLERANCE=1
    # Pass 2: Fine Leveling and Accuracy
    BASE_QUAD_GANTRY_LEVEL HORIZONTAL_MOVE_Z=2
You youngsters and your zoomies

@odd dew, you see this one?
yes lol
Whats the difference?
It changes the qgl to a coarse and fine adjustment. So when you speed up, it is still accurate. I wanted it in there before you found that setting
oh lmao
First pass just gets them to within 1mm of each other, second pass only moves 2mm in z
https://docs.vorondesign.com/build/slicer/ sending for easy access from my other pc lmao
I do the same. Lol
I have a whole server just for it and other things
I just use whatever channel my pc has open.
Should I be good to just use the default voron 2.4 350^3 profile from orca?
Yup
[gcode_macro PRINT_START]
#   Use PRINT_START for the slicer starting script - please customise for your slicer of choice
gcode:
    G32                            ; home all axes
    G1 Z20 F3000                   ; move nozzle away from bed
this feels..lacking lmao
ahhhh shiiie
I dont have a chamber temp sensor yet..
ill be stealing it from the E3D V6 and extending it to become chamber temp
You can comment out the temperature wait line for now
I do have a nevermore, but was advised to do bed fans instead
Whoever told you that qualifies for genius
Wonder who it couldve been
@lofty oasis?
It does seem kinda weird that I dont wanna detox the air tho
Are you in 240v land?
no
Particulates are the problem, let them settle before opening the door
Nonsense
  ##  Uncomment for bed mesh (1 of 2 for bed mesh)
  #BED_MESH_CLEAR                                       # Clear old saved bed mesh (if any)
dont I want bed mesh...?
By the letter of the spec sheet, no, but this has been gone over for quite a few years now. It is fine
You run the mesh every time in this macro. It clears it when it starts to make way for the new one
so, yes
#voron_electronics message
If you want to mesh, uncomment that one and the second one
Yes, I am aware. I stand by what I said
...why?
Because our duty cycle is so low, it doesn’t actually raise the ssr into de-rating territory
You can always go adjust it. 😂
We have tests in 24p and 120 land and are talking 2-5 degrees above ambient
gcode:
  # This part fetches data from your slicer. Such as bed, extruder, and chamber temps and size of your printer.
  {% set target_bed = params.BED|int %}
  {% set target_extruder = params.EXTRUDER|int %}
  3{% set target_chamber = params.CHAMBER|default("45")|int %}
  #{% set target_chamber_minimal = params.CHAMBER_MINIMAL|default("0")|int %}
  #{% set target_chamber_wait = [target_chamber, target_chamber_minimal]|select(">", 0)|min|default(0) %}
  {% set x_wait = printer.toolhead.axis_maximum.x|float / 2 %}
  {% set y_wait = printer.toolhead.axis_maximum.y|float / 2 %}
Just comment out chamber stuff?
Leave all of that. You will need it later and it isn’t in the way for now
I just dont want it waiting for a temp on a non-existent sensor
Still set chamber parameters in the slicer filament settings just like you had one. Then when you add it, you willl be ready to go
alright cool
Remember when I said comment out the temperature wait line above? Thats the one that makes it wait 😛
oh here
#TEMPERATURE_WAIT SENSOR="temperature_sensor chamber" MINIMUM={target_chamber_wait} # Waits for chamber temp
Its updating the SB LEDs, but I dont have the macros its trying to call such as STATUS_HOMING
Then you can comment out those lines
In the SB Github
In the stealthburner GitHub
oh i figured it was custonm
Mine are messed up too so perhaps I have to try whatever it was
There's also an LED Effects version if you want to be gucci
No animated LEDs on a cb1 methinks
LED effects just shouldn’t be used
Although I have the issue that one of mine is green and the rest are fine
i like my living room dark and mildly noisy
oooh yes pls give me the crashy stuff

Booooo
ok fine..ill wait till i get a cm4
I mean you can try it
You like timer too close errors? Thats how you get them
Just maybe don't use it with a 12h print

I’ll give you a skill issue
No those are my favorite
We should probably shitpost less and start harassing our newest printer for when serial
Is it just using the stock G28? is that why I dont see one defined separately?
No trigger after full movement is a pretty close second though
Yep. Built in
Tighten down your z joints or get the fixed ones
If you can see the LEDs you can see the toolhead 
Oh I haven't gotten it myself, but generally in the x/y that sounds like a bad time
no fun in that
Actually any axis

That’s not a dinoclip
Might be time
I smell catastropic failure incoming
Did you set your z offset?
Skipped a step in the startup guide?
Cool. Full send
and I did it hot so I added an extra 0.01
even though that caused the paper to rip when i pulled it out
It will be ok, you are better off starting a bit too close and then backing off. It’s like a slice in golf. Gotta go the other way and work back to the middle
ok
Can't you do auto calibrate with tap?
Though paper for the first run isn't bad or anything
Yeah but even with beacon you gotta do some manual calibration too
You have beacon?
Beacon sucks

Spend that money on a better bed instead and you are far better off
How’s it going??

Well, you built it from a pile of parts. Everything is common and off the shelf. You can fix it if it goes sideways

Probably. I removed that section from the macro.
I also hate knowing what the printer is doing
They hot glue mold turned out great
That*
It becomes so commonplace that I don’t even watch them start.
Hot glue mold?
For the voron logo in the sb
Dude. Take that out!!!!!!!
The glue will become mobile as the chamber temps start going up. I had it leak down into the fan, the duct, and the tap. Glued them all together and crashed the gantry so hard it broke parts.
Not joking.
💀 wtf
Not a problem with the panels off, but don’t put them on
Whoever recommended that to me needs public execution then
It seemed like a good alternative to spending $20 on a roll of clear filament
I just used white filament
I don't have white ASA or anything higher temp
Well it wouldn't hurt to have white abs on hand
#voron_tap message
Christ
Leave it with no diffuser vs hot glue unless you are only going to run PLA ever
It's fine until I put panels on at least right
Yeah. Past 60 it shouldn’t be there. I would even trust the high temp hot glue
I would assume so, so long as the glue isn't too close to hot parts of the hotend
The B belt keeps slapping against the extrusion during high speeds
Tighten it a little. It can be done while running
See, if you had your Reddit username, discord username and the date on a piece of paper, that could be a serial video
😭💀
It’s still running, right? 😂
Yes
The qidi discord is plotting my downfall

So of a bitch IMMEDIATELY after sending that my print broke free from the build plate
So, it sounds like it is time to tune your z offset and make sure the plate is clean.
Welllll I gave it the IPA wipe down..
Dish soap

Don't actually need discord on the paper
Textured plates are hard mode. Smooth sheets or bare steel and glue are so easy to tune
Supposed to
You just need it in the post title according to the subreddit instructions
I would put it on the paper too for completeness
Doesn't hurt
The other side is smooth
Flip it. So much better
Ehhhh
I went like 50 print hours before I realized I forgot to take the plastic film off that side
You will not be the last
What speeds are you running?
You don’t care about those right now. You still need to work on belt tensions, first layer, and so on
That ^ I was more asking out of curiosity
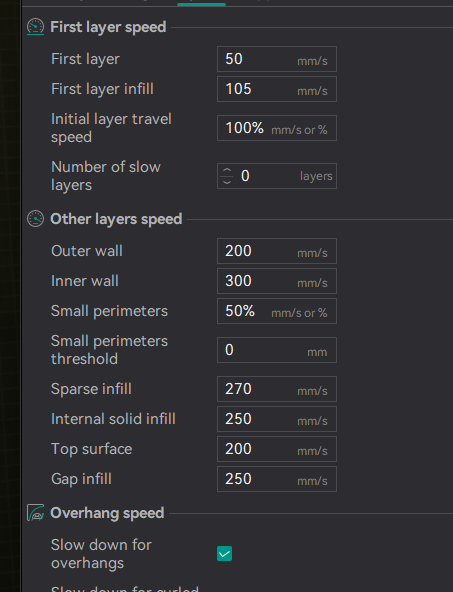
its the same PETG profile from my other printer
Accels?
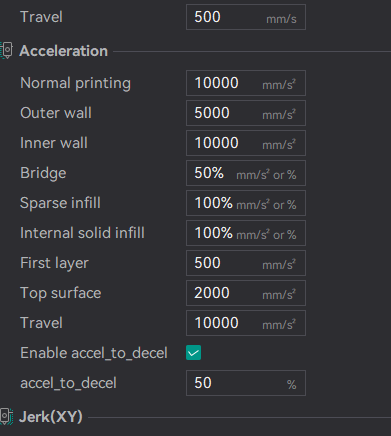
You might want to halve those 10ks for a little bit until you break in the machine
Yeah that's a bit high for now
Though eventually you should be able to get it higher than that by a fair margin
hopefully that for now stands true, i got this thing to go zoom zoom, def dont want it to be SLOWER than my other printer
good good..
My 350 formbot kit runs 25500 accels at 500mm/s (if I can get the flow)
god damn
I have A4T and am running the motors at 1A though so ymmv
Zoom zoom comes quickly. You just don’t want to be frustrated working up to it
Oh I just wipe mine with a paper towel and wave it around a bit lol
I'm too impatient
I usually do too but im waiting for dinner anyway
I try to keep normal runs at 300 for most speeds and 14k. I can always speed it up, but I have to have reliable machines
Oh yeah I should say my outer walls run at 5k accel though
7500 on outer so similar. That is the only place it matters as long as the hardware can handle what you push on the inner parts of the print
So first step is z offset
Search my name and nasa fabric. I walk through a simple way to live tune that forces you to get to close to the bed and creep back up to perfect
on...youtube? xvids? discord?
The hub
Interesting
Discord. lol
Did you pick that from IS or just from printing?

#voronuser_mods message
Outer perimeter is the only thing that is really impacted by IS. Pick whatever you want for everything else. There is some nuance to it but as a general rule
I meant I picked 5k because it was about the max suggested by IS
So should I do 4x4 to start..?
So I was curious if your IS was different
Oh. Yes. That is where my outer number came from
What mods do you have?
8x8. It gives enough movement for the toolhead to get out of the way so you can see
Oh right rigid z is one
Rigid z is the only real mod aside from a ton of insulation, bed fans, A4T and some qol
just the STL right?
Yup
Hrm
Will rigid z make a 2.5k difference?
sheeesh 3 hour print
You only do the first layer. 😂
Your results are your results.
Ok so print it, watch it while its doing the hexagon outlines, babystep it down... 0.01 at a time? until the hexes touch, then come back up..?
Yup until there is about a .5mm gap
Well because our printers are fairly similar otherwise, so it makes me wonder if I have some mechanical issue
As you back away, the hexes separate again.
Or it could be that you just need to run the machine more. I am a firm believer that you run IS once, input the values and run the machine 3-500 hours before looking at it again. Especially on a new machine
You will have that loose screw fall out on its own before you just randomly find it. It’s called 3d printing, not worrying about an acceleration number that limits less than 10% of the print. until you run out of stuff to fix on the other 90%, you have a high probability of chasing your tail instead of unicorns
It would appear I need to enable gcode arcs..
cause its spamming unknown command g2/g3 in console lmao
Disable them in the slicer. There is a greater chance of ttc errors with them on
They get automatically enabled depending on z hop setting too so what z hop do u use
Not near a machine to get a value you for you, but I do know you want to disable the arcs.
Nvm it was my wifi takin a dump
So you know why to disable the arcs, klipper converts them to lines anyway, so you waste the CPU’s power for zero gain. Start doing a lot with the cpu and it can cause errors on low powered devices
It looks so...weird...
Where paper >:(

The nozzle is too close to the bed?
Oh yeah
There should be a gap between them

Looks like it's printing with hot glue lmao
Use coarser moves at first to get it close
Yeah, I know. It can take an attempt or two to get into the reasonable zone. Also helps to slow WAY down, like 20mm/s while you are doing it. Gives more time for your changes to become apparent
I mean (these) 3d printers are essentially glorified hot glue guns
Think we're getting there
Also, it looks like the devils filament