#Yet another first build post - Formbot 2.4 300mm

47 messages · Page 1 of 1 (latest)

hearty vault
#

I've been printing at work for years but mostly on enterprise machines and without the capability to really experiment with materials and processes. I've always been close to getting a printer for home but the incoming INDX release has finally gotten me off the fence.
I've spent a few months trying to figure out all the options and upgrades etc that I might want to start out with and basically decided that I still don't know enough about the system as a whole and how each upgrade really affects the system. Also I ended up looking at $2500 of printer I didn't know if I even needed. Instead I'm going to start at a pretty basic level and upgrade things as I find shortcomings and better understand the system as a whole.
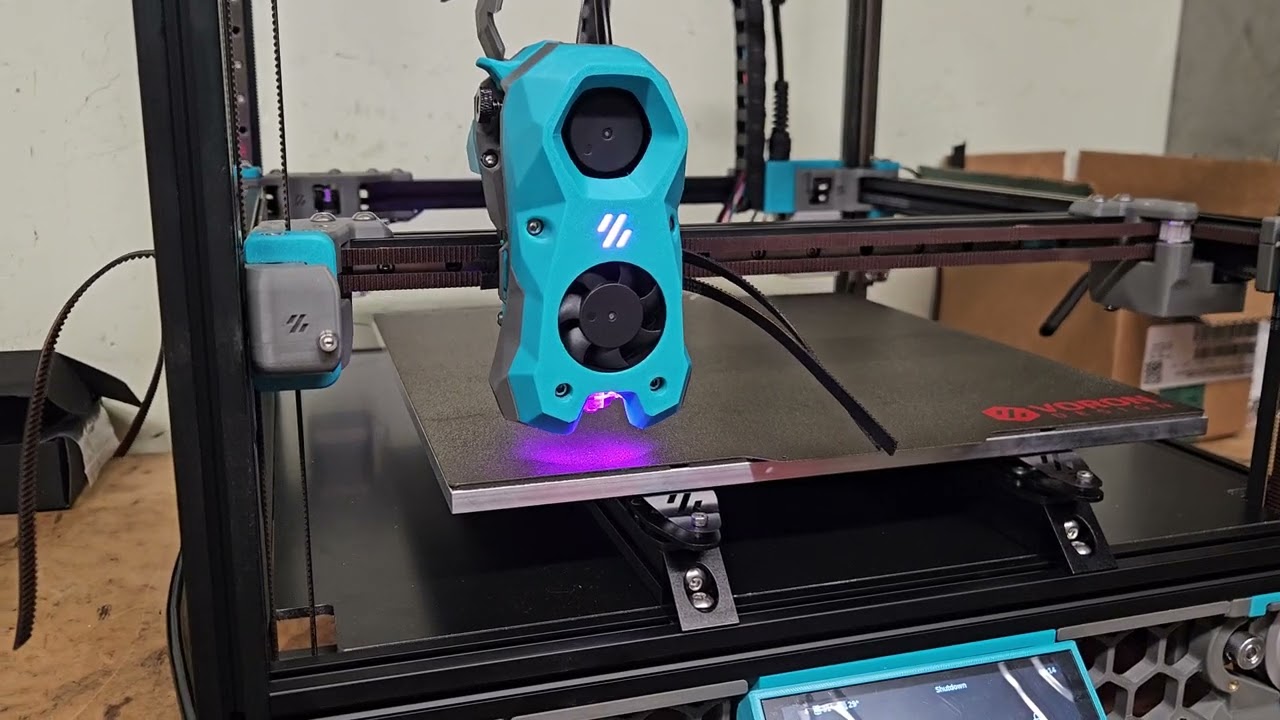
The plan to start:
Formbot 2.4 R2 Pro+ 300
Dragon Standard hotend
Printed parts from West3d, Quadra Teal on Super Grey
CM4 4gb/32gb emmc
Lightweight Labware Kinematic Mount

I work in robotics, design and build custom drones and robots, so I don't expect the assembly and wiring to be any issue. I'm also fairly familiar with having to dig through scattered documentation too. I expect the main challenge will be dealing with all the odd configuration hiccups, which is also why I decided to start fairly simple. I might hold off on the CM4 for a bit since it sounds like there can be some challenges getting the newer hardware working right. But that's why I'm here!

edgy vale
#

Welcome! voronParty

Enjoy the build!

hearty vault
#

Thanks! Got th frame built last night with limited garage flatness and took it to work today to check square on a granite plate and it's pretty darn 💯

hearty vault
#

Printed parts will hopefully be here next week. Doing what I can in the meantime.

hearty vault
#

Pretty happy with the magnet application

edgy vale
#

looks good!

hearty vault
#

This was a week ago or so but I got a sneak peek on my colors from the guy printing my parts over on the west3d discord

Thanks @steady sand!

#

Still working, but been able to make good progress this weekend. Currently building the stealthburner.

#

I've had a few hiccups, but most of them have been solved through RTFM. Only real headscratcher I've had so far has been how to route the y endstop wires, since the hartk1213 ystop relocation is intended to use a connector but the formbot kit comes wirh a long wire. I ended depinning the connector and running the wires through the slot intended for the connector. Hopefully I don't have to undo this later...

steady sand
#

i think that's what is intended there

steady sand
hearty vault
#

Got lots of experience putting things together but the documentation is very detailed and clear so it makes it easy to follow. I really only have a few hours to work on it yesterday, today has been pretty productive. Looks like I'm going to have to print a better strain relief for the can cable, apparently the btt design isn't good enough and ends up with breakages

steady sand
#

probably good enough for you to get up and be able to print your own replacement parts. but if you need a different file for some reason, reach out and let me know what, I can probably pop you over one.

hearty vault
#

Appreciate it, my plan is to get it printing and self-build the improvements. I'm not really a fan of the giant can connector at the toolhead board, they're bulky and notoriously difficult to strain relieve effectively. I'd have been much happier with an xt30 and jst

hearty vault
#

Got mainsail installed on the cm4 last night. Had a bit of trouble loading the image, using the image downloaded from the mainsail github it wouldn't boot. Ended up looking through the pi imager list and loading mainsail through it and that worked. I filled out the network config text file (using notepad++) but it wouldn't connect to the wifi. I had to go in and configure it using ifconfig and now I can log into mainsail!

hearty vault
#

Been a few busy weeks not getting much time to work on the build, but little bit at a time I'm mostly done with the wiring. Powered it on for the first time, going to check a few things like making sure the ssr isn't stuck on or anything silly like that and then start config!

steady sand
#

lookin' good!

hearty vault
#

It's alive! It took a while to understand that you have to flash klipper to both the pi and mainboard even though @strange pebble warned me of such. I eventually got that all working and got can configured.
Bounced around trying to deal with errors on the toolhead board before figuring out that the sample config I had was using the wrong kinds of pin assignments. (ex pb12 instead of gpio0) swapped the whole config over to the one with gpios, commented out some redundancies and klipper finally boots!

Now to make sure all these configs that boot are actually correct. Extruder temp idles at ~150c, I don't think that's quite right...

steady sand
#

likely the wrong sensor type ... looks like I printed you a dragon toolhead which may have a PT1000, is your config set for an ATC 104NT or Generic 3950?

try changing it to PT1000 and removing a pullup_resistor config entry in [extruder] section, if one exists.

hearty vault
#

Yeah that's my assumption. I think I used the generic 3950 setting but that was just going off of other people's builds. Wish I'd taken a picture of it before installing it

strange pebble
#

Check the packaging and/or the product page you ordered it from?

hearty vault
#

That's asking a lot from formbot 😜

hearty vault
#

Haha actually they do list the thermistor as pt1000. It's in an image though so you can't search it 🤦

#

Hokay, thermistors working, heaters working, fans working, motor pins all verified, I guess it's time to start moving things...

hearty vault
#

And we have QGL. Tap stdev 0.001

hearty vault
#

Note to others building a stealthburner, the top fan is the part cooling fan, not the hotend fan. Took clearing 2 fully clogged heat brakes to figure that out but now I'm extruding beautifully.

steady sand
#

indeed so!

hearty vault
#

First print! Got sidetracked with the wife getting home and hadn't washed the build sheet yet. Was trying to deal with the nozzle temp not being reset after doing the tap QGL.

I've got programming and cnc programming in my background so I was trying to solve it myself but ended up just using the jontek print start macro and it did the trick. Halfway didn't expect it to start so I wasn't right there

hearty vault
#

Ran a completely untuned test print. Even still had the toolhead door open. Pretty happy tbh. Now I'll tidy everything up, at least put the back on and get the bowden tube routed properly. I think I'm going to order a fridge door before I get too far.

hearty vault
#

@steady sand I imagine the galactic grey is plenty common and it'd be worth hanging onto, but if you have leftover teal and don't think you'd ever use it I could pay you for it.

steady sand
# hearty vault <@397432363593891872> I imagine the galactic grey is plenty common and it'd be w...

It’s a color on several of my printers so don’t need to get rid of it or anything.

If you need some west3d has it in stock, and with free shipping: https://west3d.com/products/ambrosia-asa-filament-of-the-gods-1kg-bambu-friendly-cardboard-spools-premium-3d-printing-filament?variant=45409297072340

hearty vault
#

Awesome it's a gorgeous color. I was actually about to order and thought to ping you first. They're out of the grey though. My nevermore might just end up being teal lol.

steady sand
#

They’ve got a restock coming soon, I hope.

I need black Asa 🙂

hearty vault
#

Everyone is out of the super grey. I want to print one of the better umbilical / bowden tube handler and z belt covers with channels for wires

#

I have made it through Ellis' tuning guide up to first layer tuning, but getting some of my first things printed. Got a 6 hour print running now printing six Milwaukee battery mounts so I can finally get them off my bench

hearty vault
#

Klicky klack door installed. It's amazing how much quieter these are once enclosed.

#

I just received a spool of Fibreheart ASA GF and got it tuned so I could print the door parts. It's a great material and prints easier than I expected. I do have a little bit of warping on the bottom of the parts, I may need to heat soak a bit longer.

#

I also got honeybadger fans in to replace the part cooling fan and electronics bay fans, including a second pair to blow out the opposite side. I also need to print stops for the pei sheet and a brush holder.

steady sand
hearty vault
#

I ordered as soon as I got the email but thanks for making sure I know! I can finally build matching upgrade parts.

hearty vault
#

@pastel raft