
#inferno-guide
1 messages · Page 1 of 1 (latest)
 autumn canyon


Introduction - #inferno-guide message
Levels, Gear & Preparation
- Levels - #inferno-guide message
- Setups - #inferno-guide message
- Setup Notes - #inferno-guide message
- Preparation - #inferno-guide message
- Tile Markers - #inferno-guide message
- Useful Plugins and Settings - #inferno-guide message
Monster Breakdown - #inferno-guide message
Essential Skills - #inferno-guide message
Waves
- Part 1: Solving Spawns - #inferno-guide message
- Part 2: The Meleer - #inferno-guide message
- Part 3.1: Pathing and Safespotting - #inferno-guide message
- Part 3.2: Pillar Stack Solutions - #inferno-guide message

Bosses
JalTok-Jad - #inferno-guide message
Triple Jads - #inferno-guide message
TzKal-Zuk - #inferno-guide message
Bowfa Tips - #inferno-guide message
ACB Tips - #inferno-guide message
Other Resources
- Combat Achievements - #inferno-guide message
- Speedrunning Beyond Grandmaster - #inferno-guide message
Credits - #inferno-guide message


The Inferno is the abyss over which the largest skill gap in the game was created.
No PvM you have done before will even come close to the challenges that await you here. Whether it be a couple of days, weeks, or even months, the road to your infernal cape is going to be paved with your blood, sweat, and tears. No amount of tips and tricks will get the cape for you - it is your own decision to make and only your own determination will push you through to the end.
That being said, literally anyone can get an infernal cape. It is hard, but it is not impossible. No matter what kind of stigma you have or what others have told you, everybody is capable of getting their own cape as long as they take the right steps towards improvement.
And a good start is by being informed - knowing as much as you can is extremely valuable for your attempts.
Time is precious. This guide is designed to help you obtain a cape as quickly as possible. This will include the best methods for learning and attempt to provide you with every single advantage you can get. This isn’t a perfect guide - not everybody will take away from it the same, but every learner should be as informed as they possibly can be.
This guide is focused primarily on obtaining your first cape, but more advanced strategies are mentioned towards the end of the guide.
With that out of the way, I hope you like reading. Let's begin.

Originally Written by Hai Yo in 2019, Tweaked by the Re-Write team in 2023


Whilst the inferno can be done with much lower stats, it is highly recommended to have at least the following:
 95+ range
 96+ mage
 90+ defence
 77+ prayer (rigour and augury unlocked)

Prices are accurate as of January 1st, 2026
Max Tbow setup:
Cost - 2.78b

Min Tbow setup:
Cost - 1.60b
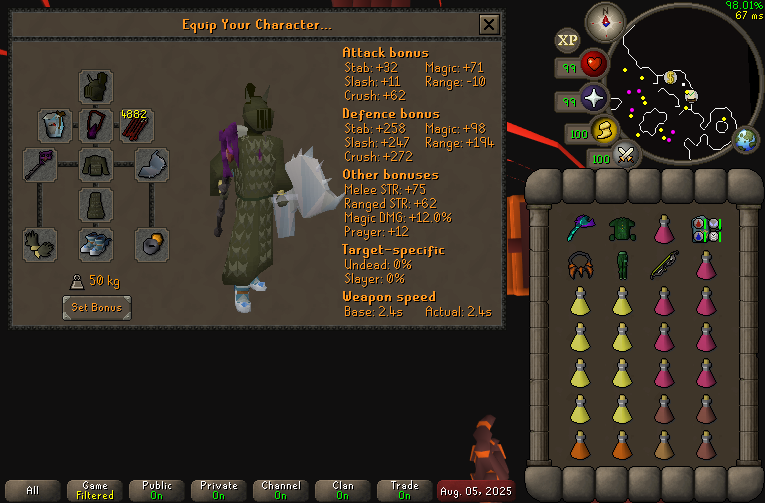
Max Bowfa setup:
Cost - 682m
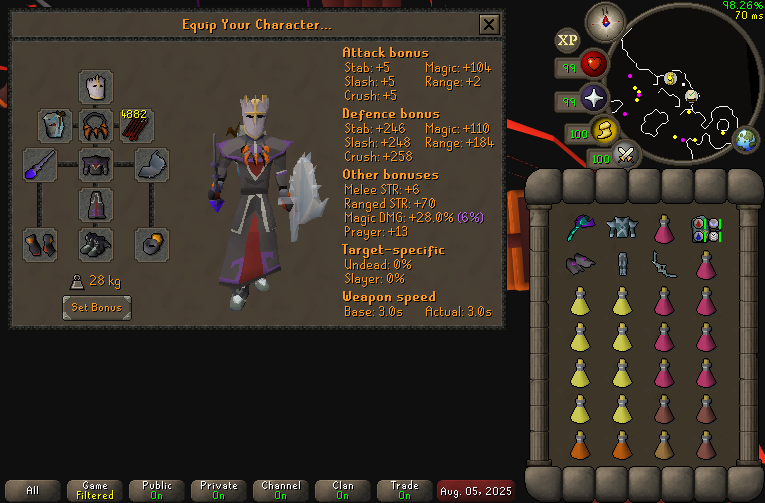
Min Bowfa setup:
Cost - 258m
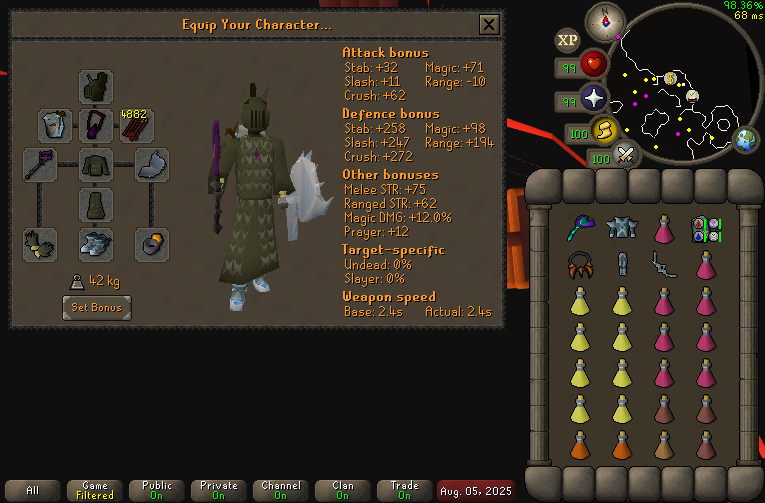
ACB setup:
Cost - 101m
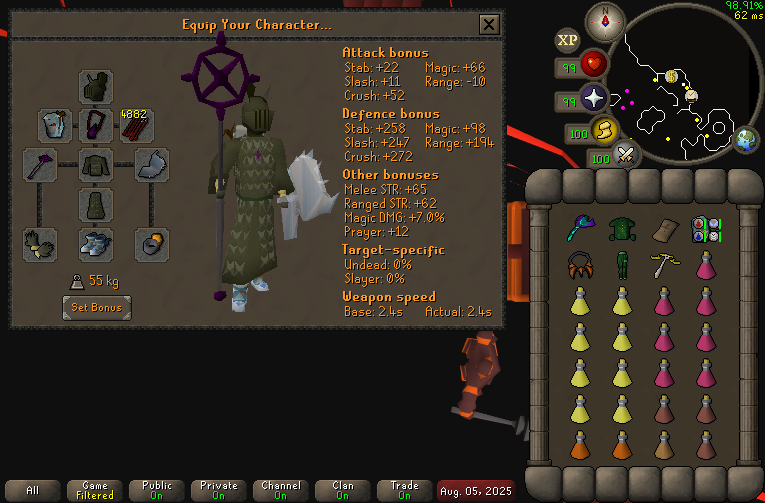
The ACB setup assumes you’re on a tight budget, and is worse than what we’d recommend using for a first cape. The bolt pouch holds both dragon diamond and ruby bolts (e), allowing you to equip a blessing for the waves. If you decide to use this setup, ensure you read the ACB tips section before attempting.


 The brew and restore amounts can be adjusted slightly depending on personal preference. Over time as you reach higher wave personal best thresholds, you will find what works best for you. Some players are able to conserve prayer better, while others may require a bit of extra help. Prayer issues can often be mitigated with a few gear changes and prayer regeneration potions, which will be discussed below.
 Prayer Regeneration potions are a very strong potion that help lessen the need to flick so much, and are highly recommended to bring. However, they are quite expensive, so if you are on a tight budget, hold off on bringing them until you have seen Triple Jads/Zuk.
 With the run energy changes, most learners might not actually need to sip a stamina dose at Zuk, but for those with bad damage output or movement, it is included anyway. Consider your abilities and damage if you want to drop it for an extra brew.


 ⚠️ A strategy you will come across as you watch other guides may be referred to as ‘bruteforcing’ or 'mage tanking'. This entails the use of Justiciar armour + dinh's bulwark or an eye of ayak + confliction gauntlets and usually relies on running between pillars. This guide will not cover such strategies, as it is reliant on RNG in order to clear difficult waves.
Learning the essential skills as early as possible will help enforce good habits, ensuring learners stand the best chance at obtaining their cape in the least amount of time.
You do not need max gear to start attempts! It is recommended to start attempting once you own both Bowfa and crystal armour, following the ‘min Bowfa’ gear. The hardest part about inferno is the waves, and aside from killing magers faster, there isn’t that much of a difference between Bowfa and Tbow. While the Tbow is more noticeable on Zuk, your first Zuk fight will be hampered by your nerves anyway, so it’s not worth delaying to achieve a valuable and permanent upgrade to your account.
If you decide to use a Zaryte crossbow, which is worse than a Bowfa, follow the guide as if you are using an ACB.
If you have spare money to invest in upgrades, this is the optimal order starting from one of the above ‘min setups.’ It's perfectly fine to skip over an upgrade due to lack of funds as some are more expensive than others, but make the best use of your GP.
 Empty Nightmare Staff

 Masori (f) Top/Bottom
Confliction Gauntlets

 Virtus Top/Bottom
 Avernic Treads (Maxed)
 Zaryte Vambraces
Justiciar Faceguard
 Kodai Wand
 Elysian Spirit Shield

Sanfew Serums can be used in place of restores.

If you are not at one of the listed ‘gain’ levels, do not bother with Sanfews. While Sanfews can be a net positive, generally these are overkill and are much more expensive compared to Super Restores. They should only be used if you have the extra cash available to you.

The following section will discuss a few equipment slots and common questions:
Head Gear:
- The Justiciar faceguard is the recommended helmet for a first caper. It has an excellent combination of defence, prayer, and is not too expensive. You can downgrade to a Verac’s helmet and still get comparable coverage if that means buying a more impactful upgrade (i.e. Empty Nightmare Staff or a Masori Piece)

 Masori Mask (f)/Crystal helm is sometimes used in place of a tank helmet. We generally discourage using this as the odds of a first caper having a run with few enough mistakes to justify the marginally increased offensive power is low.
Amulet Slot:

 ABSOLUTELY no negotiation or swaps should be done as a first caper. An occult and anguish are the only equips you will ever need.
- However, if you own Confliction Gauntlets, you can bank your Occult Necklace as they replace it.
Ranged Armour:
- Masori (f) is best in slot, if you don’t have the money for it Armadyl isn’t worth it, downgrade directly to Blessed D’hide and use the gp on other upgrades.
- If possible, sell other minor gear upgrades for a Masori Piece as the range bonus can mean several max hits on your Twisted Bow.

 If you are using a Bowfa, do NOT use any ranged armour other than Crystal Top/Bottom.
Mage Armour:
- Virtus is best in slot and a lot cheaper than Ancestral with the increased damage to Ancient Magicks.


 If you are an ironman or very poor, Ahrims, Blue Moon, or Bloodbark (in order from best to worst) are all okay.
Mage Weapon:
 Learners very often ask whether or not Eldritch Nightmare Staff is worth taking. While it may seem like a good choice at first, it does not benefit you at all when new to the content, as you will almost always die with restore potions leftover, thus making the time used speccing for extra prayer completely pointless. The blowpipe spec is incredibly strong and can help you stay alive in tight situations.
- In order to prevent wasting time, we strongly recommend against taking Eldritch or SGS until you have seen at least Triples/Zuk. Only then, once you have a chance of completing a run is it worth the additional time sunk into attempts in order to secure the kill. If you take this approach, it may also be worthwhile changing your Brew/Restore ratio in favour of some extra brews.
- An empty nightmare staff is essentially equivalent to a Kodai Wand with slightly less magic attack bonus (accuracy only but negligible on nibblers) and no rune save. In terms of mage strength, they are equivalent. With the introduction of the Divine Rune Pouch from Tombs of Amascut, you lose no inventory slots as you can also bring in water runes for Ice Barrage.
 The Blood Ancient Sceptre should only be used if you are an ironman and/or do not have access to a Kodai Wand or Nightmare Staff. The passive effect might seem like a good reason to bring, but the additional 9 hitpoints will NOT save you if you freeze up or make a very big mistake during a wave. Finally, dropping from 15% to 5% mage damage loses several max hits on barrage, drastically lowering your potential to one shot all three nibblers at the start of the wave.
Boots:
The choice will ultimately come down to what stats you want, whether it be damage output, prayer, or defense.
- Maxed Avernic Treads are strongest in terms of damage output, but have no prayer bonus and are lacking in defensive stats.
 Echo boots are a combination of prayer and defense. It should be noted that the "recoil" effect is not useful in the inferno, as it only acts in melee distance of your character, therefore keeping it on is optional.
 If you are an ironman and do not have any of the above options, use your best ranging boots.
Shield Slot:
- An ely is technically best in slot, but incredibly expensive and not much better than a Crystal Shield.
 The Crystal Shield is very good, practically free, and almost equivalent to an Elysian.
 An Elidinis Ward (f) is not recommended as the defensive bonuses of the Crystal Shield will be more beneficial than a max hit on barrage.
Cape Slot:
 Dizana's Quiver is outright BIS, but the Fortis Colosseum is around the same tier of difficulty as the Inferno and therefore is NOT worth taking a detour for if you are already committed to learning. Either way, both capes benefit the other piece of content, so the order does not really matter.
 Assembler is the recommended cape as it provides the most DPS behind Dizana's Quiver.
 If prayer is still an issue, one can opt for either a Max cape or TRIMMED Ranging cape for the benefit of more prayer bonus and some defense if the following is applicable:
- Your personal best is Zuk or Triple Jads
- You are having a serious issue with the number of restores entering the mentioned bosses above
- You have already swapped to Ring of the gods (i) to increase your prayer longevity
Ring Slot:
 Ring of Suffering (ri) is a great choice as it has a combination of defensive stats and prayer bonuses. Ensure recoils are on, as the recoil damage provides a very small, but positive boost to dps in a scenario where you make a mistake.
 Ring of the gods (i) is much worse for your defensive stats and should not be considered UNLESS you are still consistently struggling with prayer later into the run.
Glove Slot:
- Zaryte Vambraces are best in slot.
 Barrows Gloves work well if you are on a tight budget.
- Confliction Gauntlets replace the Occult Necklace.
Ammo:
 At the time of this guide being published, Dragon Darts are less than 1k each. These are the go to darts if you can afford them. However, if you have money issues, using Amethyst Darts is completely fine. Switch to Dragon Darts once you start to see Triple Jads/Zuk.
 Dragon Arrows should always be used since they are extremely cheap and you consume them very slowly.
 If you have a quiver, ensure your arrows are in the quiver's slot. This allows you to bring a blessing alongside it for extra prayer.


Assuming you are using Runelite, you can import the following tiles via following the posted link or type the following command in #inferno.
!infernotiles - Contains Zuk safespots, unsafe attacking tiles at Zuk, bat safespot at north pillar, central nibbler spawn, and Triple Jads starting tile.
Inferno tiles
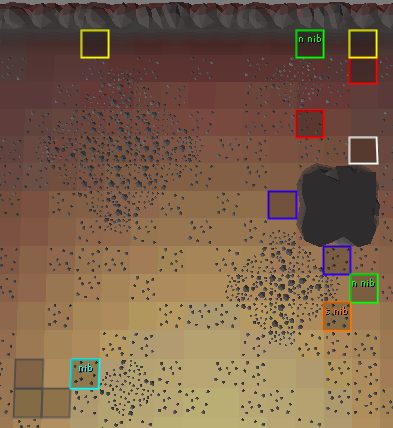
North pillar tiles and breakdown:
https://i.imgur.com/99YMkjI.png
Green = Useful nibbler "safespots"
Orange = South pillar nibbler safespot for meleers
Red = common melee corner traps
Blue = melee safespots
White = corner trap tile for later waves/east melee
Bottom left cyan tile = central nibbler spawn
While tile markers are handy, they can be counterproductive in excess, so try to mark reasonably. If you mark a tile, ensure you have its function memorised.
Starting Tiles
xZact tile: 2 south of bat safespot
- Start on this tile for low waves: 1 through 49.
- Gives good access to nibblers while being exposed to relatively few spawns on wave start.
Kelvino tile: 1 east of bat safespot
- Start on this tile for complicated waves, such as 31, 48, and always for waves 50+.
- Exposed to fewest spawns on wave start, as a tradeoff for having less access to nibblers. You will get dragged out if nibblers go south.
- Any combination of a mager or ranger north + a melee north (W/NW/NE) will automatically be offticked if you stand still on the column kelvino tile is on (be aware a SW mage can see you on Kelvino tile if south pillar is still alive, so take a step south if so).
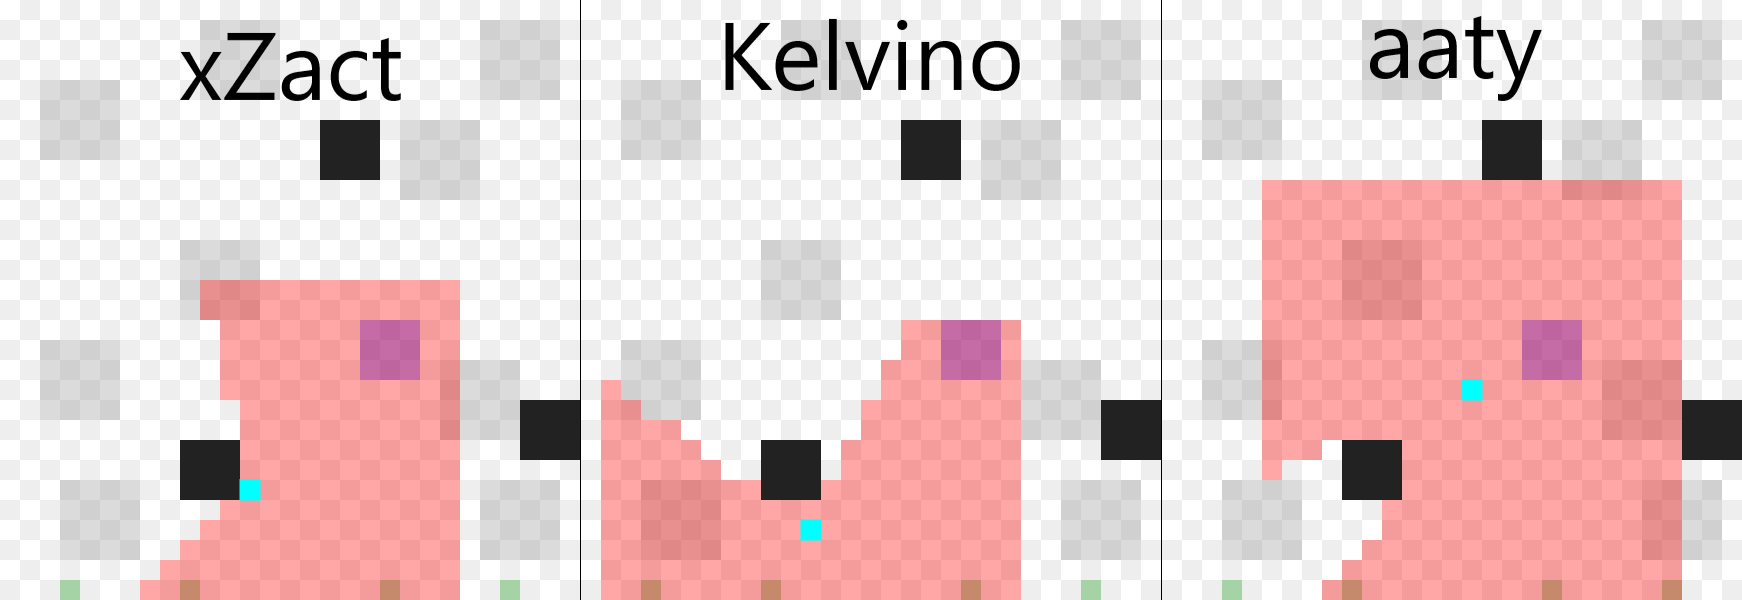
Credits to @smoky pewter (Mousecream)

Remember that none of these are mandatory to beat Zuk, so use what feels most comfortable.
- Ground Markers
Tile marker import can be found in the section above, or type !infernotiles in #inferno chat. - NPC Indicators
Tick “Highlight true tile” option, add“Jal*” and “Yt*”to NPC list -Jal*, Yt*, - Metronome
Set tick count to 1. Helps you get familiar and comfortable on tick timing when starting out. Visual Metronome can also be used but relies on you needing to pay attention to it on screen whilst solving waves. - Entity Hider
Tick “Hide Dead NPCs” option, this will remove the death animation of monsters. - GPU
Increases render distance to enable you to see spawns to the south of the arena. - Anti Drag
Set Drag Delay to 10, untick “On Shift Only”. This prevents you dragging your gear when switching, ensuring your inventory stays organised. Increasing the number makes intentionally moving items more difficult. - Inferno Stats
Select “Line Of Sight” as the preferred Wave Tool setting. Saves the wave spawns with a link to the LoS tool, allowing you to review and share spawns quickly. - Mute the In-game Area Sounds
Muting Area Sounds removes the sound of Zuk attacking the shield as well as Zuk healers which can be distracting for some, some may also choose to mute the in-game music. - Low Detail
Removes unnecessary textures.
LoS Tool
How to use Inferno LoS Tool:
https://ifreedive-osrs.github.io/
Grey tiles: Possible spawn locations
Black tiles: Pillars
Blue tile: Player (you have to manually move around)
Red boxes around NPCs/Player are the range of monsters. Player default range is 10, which is Tbow/barrage range.
Step 1: Select NPCs and place them
Step 2: Use arrow key up+down or scroll wheel to see which ticks each npc attacks and if they are offticked.
-In the left panel, Red is mage, Green is range, and each row constitutes a tick.
-Yellow/blue are blob scans and black is blob attack.
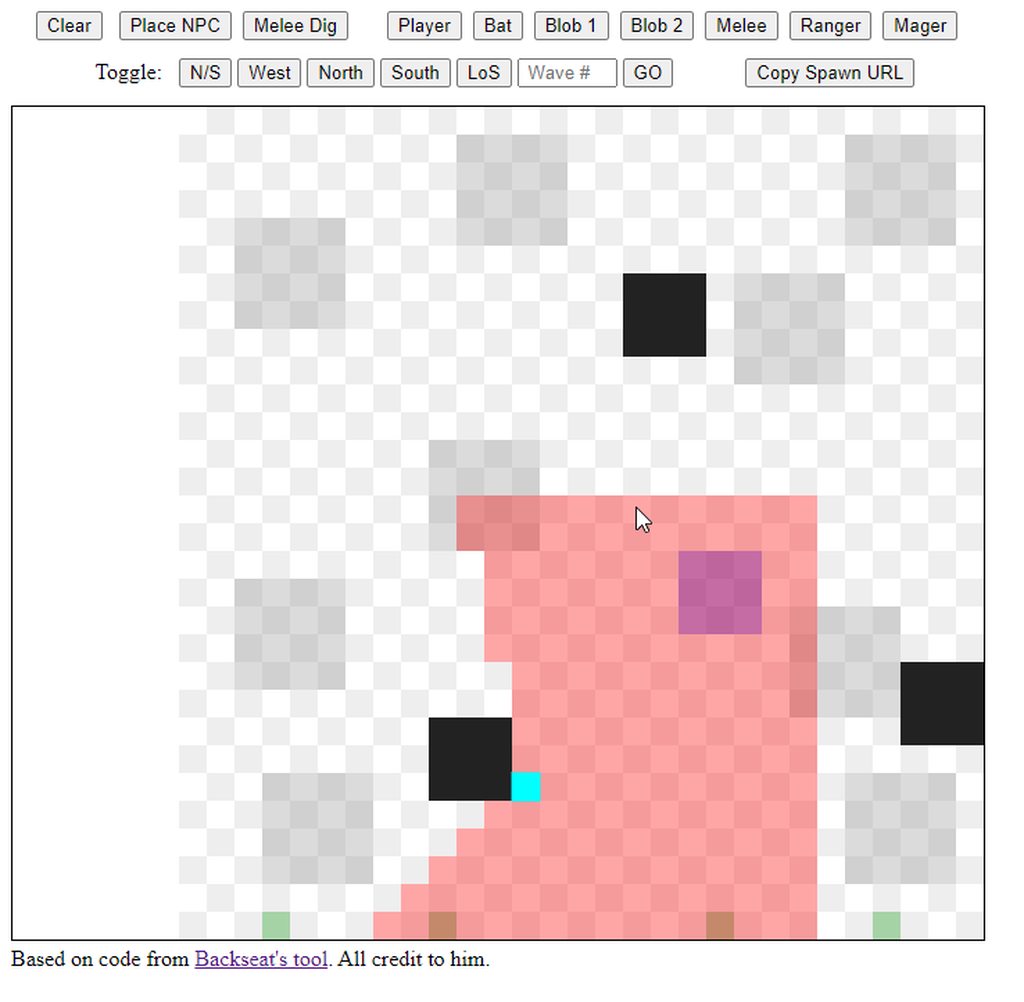
Credits to @void obsidian (ifreedive) for making the tool and @novel bramble (Homer) for writing its guide
Zuk Simulator
While nothing can quite replicate the real game, this simulator is really well made and serves as a strong tool for practising and increasing your confidence before the real Zuk fight.
Credits to @orchid falcon and @latent dock (Tesla Owner) for creating the simulator


As you are probably aware, in the Inferno you will have to make your way through waves of monsters similar to the Fight Caves. Most of these monsters have unique properties that you will have to know in order to defeat them. This section goes over them.

- Three of these will spawn on every wave, with 6 spawning the wave before a new monster is introduced.
- They target one of the three pillars at random, slowly chipping away at its health.

- Protect from Range.
- Max hit is 19, however it may increase if not protected against.
- Attacks on a 3 tick cycle, the fastest of any monster in the Inferno.
- They have an attack range of 4 tiles, one less than a blowpipe.
- They drain 3 run energy with every hit and they have a chance to steal stats with each unprotected hit, including hitpoints.

Blobs are the most versatile of the Inferno mobs, and the Inferno will feel much more doable after you have mastered them. Knowing their mechanics like the back of your hand is fundamental to success.
- Protect from Range AND Magic.
- Max hit is 29.
- Attacks on a 6 tick cycle and has an attack range of 15 tiles.
- They will attack with either mage or range, unless you are in melee range in which case they can also melee.
- They have a unique attack pattern: after coming into line of sight with a blob, your prayer is checked on the first tick to see if it is mage or range.
- The attack itself then happens on the fourth tick (3 ticks later), with the opposite style of what you prayed against.
- They will then read your prayer again three ticks after attacking, and repeat the pattern.
- After a blob dies, three bloblets will spawn in its place, each attacking with a different style and have a max hit of 18.

- Protect from Melee.
- Max hit is 49.
- Attacks on a 4 tick cycle and can only hit you if you’re adjacent to it.
- Meleers have the ability to dig to a spot within melee range of you after they have been out of combat for a while. The first melee dig is always 50 ticks after spawn, the next digs are always between 40 and 60 ticks, and they attack 12 ticks from the moment they dig.

- Protect from Range.
- Range max hit is 46, melee max hit is 19.
- Attacks on a 4 tick cycle and has an attack range of 15 tiles.

- Protect from Magic.
- Max hit is 70, melee max hit is 52.
- Attacks on a 4 tick cycle and has an attack range of 15 tiles.
- Magers have the ability to respawn monsters you have killed before in the wave, with the exception of nibblers.
- The respawn can only happen if the mager has line of sight, it replaces the current attack AND the next attack, and keeps it in cycle.
- Each monster can only be respawned once, and it will be at half health. This does not apply to bloblets when a respawned blob dies.
- The respawn will always happen within a small area south of the north pillar.

- Max hit is 113.
- Attacks on an 8 tick cycle on Single Jad and during Zuk, and a 9 tick cycle during Triples.
- They will attack with either mage or range, unless you are in melee range in which case they can also melee.
- Their attack pattern works exactly the same as Fight Caves Jad.
- Once they reach 50% hitpoints, Yt-HurKots will spawn to heal Jad. You will have to tag the healers.
- Getting meleed messes with their attack cycle, potentially same ticking two Jads on Triple Jads.

- Max hit is 14.
- 5 will spawn on Single Jad, 3 will spawn per Jad on Triples and the Jad at Zuk.
Note that the melee, ranger, and mager all attack on a 4 tick cycle.
This is one of the most important things that will be used to your advantage.


Here’s where all the money you spent on gear goes to use. While your blowpipe is still very strong, the higher defence on Magers, Jads, and Zuk causes the blowpipe to not be as useful, especially in comparison to Tbow and Bowfa.
- Bats, Blobs, Rangers, and Meleers are best killed with a blowpipe.
- Magers, Jad and Zuk are best killed with the Tbow.
- If you are doing a Bowfa cape, use Bowfa the same places you would use a twisted bow.
- If you are doing an Armadyl crossbow cape, use it on Zuk and his respective Jad only.


There are a few essential skills you should master on the road to your infernal cape.
- Not learning them is going to cost you an unearthly amount of wasted time.
While these can be practised outside of the Inferno, you will get a lot of experience simply from trying to do these things while you are inside.
You are expected to know what a game tick is and have some form of previous experience with tick manipulation. If you do not understand how game ticks in OSRS work, you should do some research on it and apply practice to other areas before attempting the Inferno.
https://i.imgur.com/qxFWmIk.png

One tick flicking and lazy flicking a single monster, respectively.
Note: Listening to game sounds is incredibly helpful for learning and using flicking techniques, it’s highly recommended that you turn them on.
One tick flicking is a prayer manipulation method that allows you to maintain your prayers up without using prayer points, either a single one or overheads + offensives with your quick prayers.
You must first click to turn on your prayer, and then double-click every tick after that to keep it active without losing prayer points.
Tick perfect lazy flicking accomplishes the same, but you will only turn on your prayer for the exact tick the monster attacks. It is also much more difficult to use offensive prayers alongside overheads with this method.
The mager attacks on the tick that the light below him flashes. The attack sound also plays on this tick.
The ranger attacks on the tick that he crouches down. The attack sound plays 1 tick after this.

One tick alternating is your bread and butter solution for any wave with a blob in it, this method is foolproof, you will never take any damage if executed correctly.
- Switch your prayer from mage-range or range-mage every tick.
- If you are dealing with a ranger or a mager, make sure you pray against it on the first tick, then begin alternating.
Two tick alternating is also possible, but there are two separate patterns.
- Pattern 1: Pray on the ranger/mager attack tick, and the tick after that.
- Pattern 2: Pray on the tick before the ranger/mager attack, and the attack tick.
One of these patterns will correctly pray against all blobs, while the other will incorrectly pray against all blobs - this depends on which tick the blob gains line of sight on you.
- If the monsters are stuck behind the pillar, they will automatically be set up for pattern 1 since they will gain line of sight on the same tick.
- Two tick alternating will give you more time to click things that are not your prayers, so it is much more comfortable to move and attack while doing it.

The mager, the ranger and the meleer are all capable of dealing devastating amounts of damage, and, unfortunately, there will be situations where you will have to deal with at least two of them at once.
You must be able to identify their specific attack ticks. This will allow you to comfortably flick between them most of the time.
Although you can practise this with any two different monsters that attack equally as frequently, this is a skill you will learn almost entirely from doing the Inferno.
- One way to practise this is by waiting for the meleer to dig to you while you are flicking a ranger or a mager, and flicking between the two.
- If the meleer digs on the same tick as the ranger/mager attacks, they will attack on the same tick. Refer to “The Meleer” section of the guide to handle this situation.

Phantom Barrage is a strategy that allows you to cast an additional barrage on dying enemies, effectively giving more health than what the enemies are actually worth. This can be done on any enemy, but works best on sets of bloblets.
- To do it, you first must be at least 8 tiles away from your target.
- If you are at the north pillar with your target safespotted at the south, you must be hugging the far north wall.
- Your last hit must be a blood barrage.
- As the killing barrage is travelling, manually cast another blood barrage, and then wait for the second barrage to go off.
- This will heal you off the now dead enemies.

Blowpipe walking allows you to output high damage per second while staying with the Zuk shield. You first attack the monster, then click away in the direction you are going, moving two tiles in two ticks, or effectively walking.
You can also use potions and your special attack while doing it, an easy pattern to follow is to click the monster, click your potion/special attack, then click away in the direction you are heading, as you do not need to be precise clicking away.
It is an extremely powerful skill for the Zuk fight, utilised to kill sets and healers, you can learn it in the earlier waves, or even outside the Inferno in many places like the Maiden encounter in Entry mode ToB, or on the zombies in the basement of the Wizards’ guild.

Two bastion potions are recommended once you reach a personal best of around wave 60. Having two bastions allows you to re-potion as necessary during the Zuk fight, as well as have flexible doses for harder waves (i.e. 60s). In general, you want to use a dose at the following critical points:
- Triple Jads (Wave 68).
- Start of Zuk fight (Wave 69).
- Before healers.
- As necessary post healers.
Any time you are using a bastion potion, use the Preserve prayer, as this will maintain your boost as long as possible from stat tick downs.

Do not be afraid to try new things.
Some of these skills may sound daunting at first, and you might take a long time to get used to them, but I promise you that they are invaluable in the Inferno, and I cannot stress how important it is to learn them.
The Inferno is relentless and brutally punishing, but it is also a wonderful playground for tick manipulation and really pushes the limits of the game in ways never seen before. Do not shy away from it. Do not be afraid to experiment and to fail.
https://i.imgur.com/wdz78G0.jpg


The Inferno consists of 69 total waves, with 67, 68 and 69 being the boss fights against Jad, Triple Jads and Zuk.
The first 66 waves will pit you up against several monsters from which you can only safespot at three different pillars.
List of all waves 1-66, from the OSRS wiki:
https://i.imgur.com/N5HZLFW.png
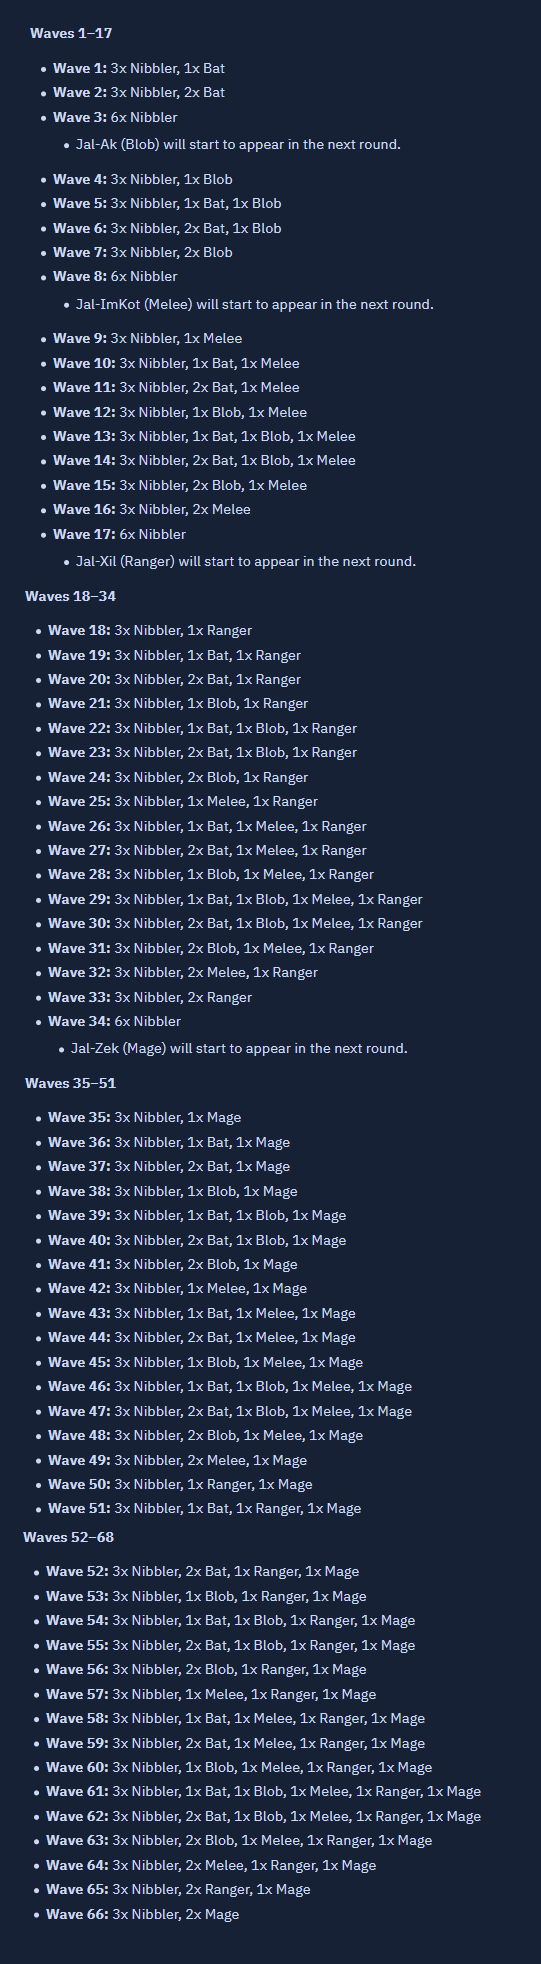
The only important pillar is the north one, as it is going to be your starting point in every wave, and there are fewer possible spawns on the north side of the inferno, making it so that all waves and their combinations can be solved using this pillar alone.

Solving spawns is possibly the hardest part of the Inferno. Master this, and you are golden.
- At the start of waves 1-49, start with your mage gear equipped and get ready to throw an ice barrage on the spawn of nibblers, from wave 50 onwards you want to start in your range top and bottoms for the extra defence against north ranger spawns.
- Start on xZact tile on waves 1-49, and Kelvino tile from wave 50 onwards, you can also start on Kelvino on earlier waves if you are not comfortable.
- Begin by manually casting an ice barrage on the clump of nibblers - just one, if you do not get all of them, it is fine.
- For now, your nibblers are dealt with, you have got to look after yourself.
- To effectively solve a spawn, you will need to identify what the threat is and figure out how to deal with it within a short span of time.

 Blobs first appear on wave 4
- There will be a lot of situations in which you will have to deal with a singular blob: here are two good methods.
Lazy flicking: Pray range or mage the tick the blob sees you, then the opposite prayer 3 ticks after. The blob will then scan 3 ticks after its attack, and the cycle continues.
One tick flicking: Pray range or mage the tick the blob sees you, and then alternate prayer every tick. This has the added benefit of not requiring much thought, but prevents you from freely doing actions while your cursor is hovering over prayer.
Lazy flicking and One tick alternating to nullify a blob, respectively

 The meleer appears on wave 9. Use the pillar to safespot it.
https://cdn.discordapp.com/attachments/1149094359476752525/1149095178834030642/169403603998388056.mp4

-
 Starting from wave 18, the biggest threat is the ranger. It has a high max hit and can attack from a large distance. However, you are going to be praying against it, so it is no longer a problem. The issue now is that you must work out how the other monsters will be dealt with, revolving around having your ranged prayer up for the tick the ranger attacks on.
 -
As mentioned previously, blobs can always be countered with one tick alternating, so they are the lowest priority threat - you can always deal with them alongside a ranger.
-
Bats cannot be properly flicked due to their 3 tick attack speed. They have a very low health pool, so if it is not favourable to safespot them, you should immediately gun them down with a blowpipe when you are able to.
The meleer is going to be the true greatest threat to you.
Because he does not attack with mage or range, he cannot be properly flicked with blobs, which, in turn, makes them a threat as well.
- Proper use of the pillar safespots will solve most situations.
- If not, he still attacks on a 4 tick cycle, so he can be effectively flicked against a single ranger or mager.
There will be a section of the guide dedicated specifically to the meleer and to pillar safespots, so keep in mind these two strategies when we go further into it.

 Mager waves begin on 35.
All the techniques above apply to these waves, simply replace range pray with mage pray.- Keep in mind that as the mager respawns enemies, the wave slows down with you having to kill the same enemy twice. If it is safe to do so, prioritize killing the mager above everything else first.

-

 Waves 50 and above can be a little more complicated.
 -
There is now a mager and a ranger.
-
You are almost guaranteed to have to deal with at least two monsters at once the further you go.
-
This is something you are going to have to be able to deal with by flicking, so the strategy has now changed to revolve around getting rid of things you will not be able to flick against.
The ranger has now become the true greatest threat, and you can get killed very quickly if you are not paying attention.
autumn canyon
-
When dealing with the mager and ranger at the same time, you must offtick them or take massive damage.
-
If a mager and a ranger attack one tick apart from each other, they can be flicked with blobs as well, just make sure you are praying against the mager and ranger’s attacks on the correct ticks and begin the alteration pattern.
https://cdn.discordapp.com/attachments/1149096225258356758/1149391252731723776/range_mage_west_blob.mp4
- If they attack two ticks apart, they can be flicked with two tick alternating against blobs as well. Make sure you are using the correct pattern as described earlier.

As usual, bats should be killed immediately.
In most cases, you will find that your greatest defence is your offence. As it turns out, when things die, they stop attacking you. You can and should kill things as soon as possible - you are going to have to do this a lot with bats, and sometimes even meleers, since they are awkward to flick in most situations, however, most of the time killing the blob early can be bad as they spawn three bloblets which hurt you more than a blob does, so try to resist the urge of killing them first.
To add to this, do not be afraid to use rigour if you need to. Being down a restore dose is miles better than being dead.

Once you are in a comfortable position, it is time to turn your attention back to the nibblers. You should aim to kill the nibblers that have made it to the pillar with blood barrage when all the remaining monsters are flickable:
- Get rid of bats and meleers.
- In higher waves, kill, safespot, or off-tick one of the two greater threats: either the mager or the ranger.
- As long as you flick correctly, it will be completely safe to leave the pillar and kill nibblers, while not taking so much time that they are able to chunk down the pillar in one go.
Do NOT greed for nibblers, only go for them when you are safe to do so, chasing them will get you killed, as you do more attempts and become better you will naturally become better at conserving pillar health.
Nibbler safespot for the north pillar:
From this tile, you will be able to barrage the nibblers without coming into line of sight with anything stuck directly south of the north pillar. The north pillar is the easiest to clear nibblers away from, and it is also the most important to protect.
The same concept applies to a tile near the south side of the pillar. This will naturally be used less often as being on the south side of the north pillar exposes you to more enemies, but it is just as easy to clear nibblers from.
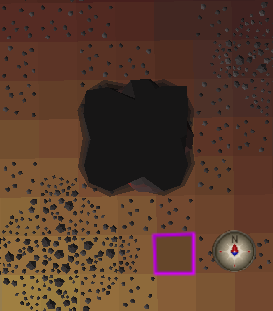
While you should clear the nibblers on the west and south pillars as soon as you can, do not risk your life for them. Treat them merely as nibbler food to distract them from the north pillar.

What most people find so difficult about the waves is personal inconsistency. It is difficult to feel like you are making progress when you do not get a new personal best every attempt or when you find that you are not reaching the higher waves as often.
Because the spawns are random, you will not know how to solve everything the game throws at you until you have a lot of experience.
**This is perfectly normal **- and this is where the practice of doing several attempts really helps you out. Your goal is not to rely on lucky spawns, but it is not to be perfect at it either. It is to play the spawns like a puzzle. Minimise the amount of times you get the solution wrong, even if you cannot get it right every time. Mistakes are, after all, the reason why everyone does not get an infernal cape right away. What you need to worry about is identifying and fixing those mistakes. If you can record your runs, watch them. If you can remember your spawn, discuss it with others. The rest will come naturally.

To make your attempts at the higher waves more forgiving:

 Pray augury at the start of a wave. This increases your chance to one shot all three nibblers, and also increases your defense should you tank something. After the ice barrage cast, pray rigour to kill any nearby dangerous enemies.
- You can pre-brew waves 60-63.
- You can tick-eat as a last resort.


It is time to tackle the unflickable monstrosity that is the meleer.
I mentioned how he is not possible to flick with blobs, but that is not exactly true.
This method will only protect against the meleer and half of the blob hits on average, so being able to safespot one or the other is always a better solution, but, in a pinch, there is an alternation pattern that could prove useful.
- Begin by praying melee on the meleer’s attack tick.
- Switch to range pray on the next tick.
- Switch to mage pray on the following tick.
- Return to range pray.
- Finally, return to melee prayer for the meleer’s next attack. Repeat.
It is highly recommended to put on rigour and kill one or the other as fast as possible when you do this, if possible, it is almost always better to kill the melee first instead of the blob.

When flicking a meleer against a ranger or a mager, you might find yourself in the unfortunate situation where they both attack on the same tick.
- However, you can manually off-tick the meleer by stepping under him. From here, manually click out right as the ranger or mager attacks, and he should now be off-ticked. If this fails, try again.
- You should exercise caution doing this in the later waves as it can path you out into the LoS of other monsters.
Note: The meleer will begin attacking 12 ticks after he begins his digging animation (assuming he can hit you when he appears next to you). This means it will be off-ticked if it did not begin to dig on the same tick that the ranger/mager attacked.
- Pray melee on every single tick other than the ranger/mager’s attack tick - this will help you to notice if they are actually off-ticked.
Note: Standing still on the Kelvino tile and its row mentioned earlier will allow you to offtick any combination of north meleers and north rangers/magers directly after the wave starts.
Note:  ❌ Freezing meleers is advised against as the meleer has an unusually high magic level and you are most likely going to splash, putting you in the worst situation possible when you could have better used that time to move to an advantageous position instead.


After having dealt with your spawn, you have to get things into a favourable position - set up the wave, as it would.
Two important rules of pathing in Runescape are as follows:
- In relation to you, an NPC will always move east and west before moving north or south.
- They will move diagonally whenever they can.
Because of that, you can manipulate line of sight by standing next to the pillar, blocking out the “key tiles” that would have allowed the NPC to see and attack you.
For example, this far southwest spawn mager is not able to attack me only because I am right next to the pillar. If I were one tile further north, it would attack me.
Another practical situation is being able to pull a midwest spawn closer to you and into Tbow range, by moving to the easternmost tile north of the pillar and forcing it into a position where you can reach it.


A very useful application for this mechanic is the use of corner safespots.
Corner safespots on the north pillar:
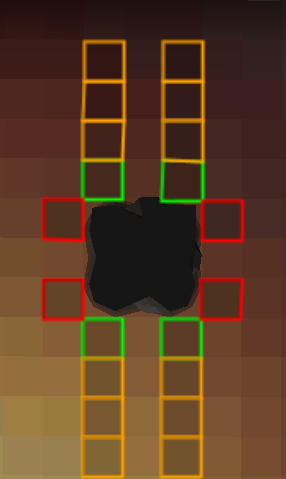
- Green tiles: your position.
- Red tiles: corner safespotted monster - from these tiles, an NPC is unable to attack you, and you are unable to attack it.
- Orange tiles: you can attack a safespotted meleer from any of these.
- You can manually de-safespot a corner by moving one tile in the north or south direction, depending on the side of the pillar.
- You can then move back to the original tile to re-safespot it.
- Moving east or west for any corner safespot will result in the NPC moving and making it so that they cannot be safespotted there again.
Utilizing the "Orange tiles", I cannot be attacked by the meleer.

Utilizing the "Red" and "Green" tiles, the mager cannot attack me until I step off the green tile.


This will cover specific NPC safespots: the bat, the meleer and the bloblets.
The bats and the meleers should be prioritised for killing, but if you can find yourself in one of these positions, you will not take any damage from them.
Monsters will get stuck when you are on the west side and south side of the pillar, in either direction.
- For the meleer, make sure you are at the centre tile of the pillar or further away. You can also use the corner safespots above to move around the pillar while keeping the meleer safespotted.
Because the meleer is stuck here, he digs to me after a certain amount of time.
- For the bat, you will have to be five tiles away to avoid its attacks.
This is a very useful tile for dealing with bats south of the pillar.
- If you kill a blob in one of these positions, the bloblets will spawn clumped up together, as long as you are at least 3 tiles away. Only the range bloblet will be able to see you until you kill it, so prepare to pray ranged.


Before we get into the pillar stacks…
If at any point during the Inferno you have to ask yourself, "Should I brew?", the answer is "Yes."
There is absolutely no point in forcing yourself to conserve supplies. Conserving supplies is a skill you will naturally develop with more experience.
This is part of a greater problem that I must address for the sake of your own success: a lot of people have this twisted notion that time does not matter, that you can spend as long as you want in an attempt because it is better to get a, quote unquote, perfect run. There is no perfect run. You will screw up, several times in fact. And that is completely fine, but you have to recognize that in order to progress.
Sitting behind the pillar waiting for SGS specs for hours on end is doing nothing but rusting yourself for no reason whatsoever. You will be out of your game, you will be more nervous for the next wave and you will be incredibly discouraged from continuing if you fail the attempt.
Time does matter, because in the Inferno, time investment and difficulty are one and the same.
Your cape is waiting for you, but she is impatient. Do not leave her hanging.


Before you start scrolling through these clips, please note that this section is very specific, and is designed for you to come back and look at them when you get the stack. Feel free to take a look now, but you WILL forget what to do when you get a stack. If you have not done any attempts in the inferno, there is no point in looking at this section right now. Skip this section and come back when you start attempting!
The wave has now been solved - you are no longer in immediate danger, the nibblers are dealt with, and now some monsters have stacked up behind the pillar.
- These solutions are for monster stacks south of the pillar, although the same principle applies if they are stacked west of the pillar as well.
- If you are at the south pillar, the stack and direction you run will appear differently than in the clips listed below, but should always path out WEST.

- When a mager respawns fallen monsters, their positions may get a bit janky since they can be respawned inside the hitboxes of other monsters. Be wary of this when coming out from behind the pillar.
- Whenever you find yourself dealing with a stack, try and kill the mager first if you can. It will prevent a lot of monsters from respawning, which will keep the stack clean and shorten the amount of time you spend in the waves.
- This is also when you will want to take the time to heal up with blood barrage - you should not be using it at any point in which you can take damage, since killing the threat faster with pipe or Tbow will save you more hitpoints.
- Do not stand next to pillars on wave 66. They will immediately collapse when the wave ends and deal damage equivalent to half of your current hitpoints. Do not stand next to them if they are about to fall to nibblers either.
------------

- Simple one tick or two tick alternation, start alternating after the mager/ranger attacks.
One tick alternation
Two tick alternation
------------

- Works for mager + ranger as well.
- Stand on the middle tile north of the pillar.
- Turn on your protective prayer against the back monster.
- Click to move out two tiles west.
- They will be off-ticked, switch prayer for the next tick. This cycle will continue, even if the mager revives something.
- If you want to make sure you are on cycle, pay attention to the back monster’s attack animation and switch prayers as soon as it happens.
------------

- Blob can be either in the middle of the stack, in the back, or anywhere else where it has line of sight on you. It cannot be in front of the stack.
- Same procedure as ranger + mager, but begin a one tick alternation pattern instead of praying only when the mager and the ranger attack.
- Make sure you alternate correctly, starting with the prayer against the back monster.
- It is okay to tank a blob hit while setting up the offtick, as you will immediately protect against it for every cycle afterwards. If this is not true, get behind the pillar and try again.
------------

If the bat is NOT in the very front of the stack, treat it as a regular Ranger + Mager stack.
- Stand in the middle.
- Move one tile north.
- Run two tiles west, praying against the back monster.
- If you have a tbow or bowfa, you will always be able to hit the mager from the bat safespot.
------------

If the blob is NOT in the very front of the stack, treat it as a Ranger + Blob + Mager stack.
- Stand in the middle.
- Move one tile north. If you are using a blowpipe on the mager, you will need to be two tiles north.
- Run two tiles west and begin the alternation pattern, praying against the back monster.
------------

- This can only happen on wave 65.
- Stand in the middle.
- Move two tiles north.
- Pray range and run out westwards, moving to tile ‘1’ as illustrated in the clip.
- You will then immediately return to the pillar middle tile, then you will go out west again without any delays, switching to mage prayer as you go out the second time, then switching back to range prayer. This cycle has you doing one action per tick for five ticks in total.
- Continue flicking the stack, praying mage after the back ranger attacks, then switching back to range prayer after the mager attacks.
- An alternate solution is to use the splash off-tick solve.
- By splashing** ONLY on a mager that has not respawned anything**, its attack will be delayed.
- This method has a slight risk, as if you do not splash you will get hit with an off pray mage hit, make sure you are brewed up to full.
- Start on the easternmost tile on the north side of the north pillar.
- Equip your gear with the lowest mage attack stats to get your accuracy as low as possible. Effectively you will be wearing full ranged gear along with a crystal shield if you have it, with no weapon in hand.
- Pray range.
- Manually select the lowest possible spell you can cast, then cast it on the mager. You have about a 90% chance to splash.
- Switch your prayer to mage after the rangers attack.
- Relogging to try and get a different stack is a viable strategy if you do not want to use either of the solutions above.
- Note that relogging does not change spawns, the monsters will spawn in the same locations.
- If you are unsure as to how to handle relogging, feel free to ask for help in #inferno. Be sure to post the spawn locations in the LOS tool, and mention what pillars you have up.
------------

- This can only happen on wave 65.
- Stand in the middle.
- Move one tile north.
- Go out west, praying against the ranger. Pray mage on the next tick.
- Note that this stack is prayed against in reverse to traditional stacks.
------------

- This can only happen on wave 65.
- This stack is functionally identical to the basic mage + range stack. Treat it as such.
------------

- This can only happen on wave 65.
- This stack’s setup is identical to the blob front + mage + range stacks. Treat it as such.
------------
West side of the pillar
- Stacks on the west side of the pillar are treated exactly the same as any stack mentioned above, the only difference is that you run two tiles south (as opposed to moving west when there is a stack south of the pillar).

⚠️ If you have a stack that is NOT mentioned, ask for help in #inferno. Keep in mind that flipping the mager/ranger from the above clips means the prayer order will be different. If you are unsure, ask!


Wave 67
The Inferno Jad does not bring much new to the table besides being stronger and having five healers, which are also stronger.
His max hit is 113.
As usual:
- Pray range when he smashes his front legs on the ground.
- Pray mage when he lifts his legs up in the air dangling,
The animations also play the same distinct sounds as the fight caves Jad.
Tbow is the best weapon to use against it, but unlike in fight caves, your bow is not so strong that it can just melt through Jad. You will have to tag the healers.

NOTE: If using RuneLite, you can mark the healers by typing in “Yt-HurKot’ in “NPC Indicator” or “Better NPC Highlight”.
After having tagged all of them, you can do one of two things:
- Move north and south to have one healer on you and to trap the rest on either Jad or the healer attacking you.
- If all the healers are clumped on you or lined up behind you, you can run through Jad to trap them all on him. The Jad challenges south of Inferno bank are great for practising this.
This uses a healer that is safespotted behind the player to safespot the others. Not all Jads will end up like this.
Moving South here, the Western healer becomes stuck on the Eastern one, causing him to be unable to attack.
https://i.imgur.com/rvF9G4X.png

You should only run through jad on Wave 67, as well as the final jad of Wave 68. This safespots the healers on the other side and is fairly simple to perform:
- Prioritise your prayers against Jad.
- For safety, wait until his attack lands on you if you do not know the exact tick.
- Run through him praying melee afterwards.
- You will have enough time to react to the next attack by the time you have reached the other side.
From here, you can safely blood barrage healers back up to full health if you need to.
I would also recommend hitting the log out button in between Jad’s attacks so that the Inferno is paused after you kill him, and you can take a breather.
This will work for any wave in the Inferno, but you should never pause for extended periods of time as you will come back without that essential warmup and are likely to be slower on your reflexes.


Wave 68
Triple Jads are just Jad but fast.
Before you start the wave, take a moment to stretch your legs. Take a deep breath, I am not kidding when I say pretty much all Triples deaths happen due to nerves.
Relax, stay composed and you will be able to pay attention to everything.

- While you are still paused inside the Inferno, you can brew to 115, restore, and bastion. Since Jad’s max hit is 113, you cannot die to a single missed prayer until you have been hit by healers. Realistically, it does not make a difference, but the insurance can really help you out psychologically.
- Make sure you are standing in the centre when you log out for good.
- You should use the tile marked in the “Preparation” section - it will make it so that only 1 healer from the first Jad attacks you after tagging them.
- When you eventually log back in, you will want to use rigour for the whole wave. If you have 5 or less restores, you will want to be more conservative with your rigour usage, having it on solely for the first jad.

Immediately as the Wave begins, do the following:
- Start by attacking the southern Jad, with your camera facing east.
- The most important step of the fight is to identify which Jad attacked last and whether they are attacking in a clockwise or counterclockwise rotation.
- This is random for each run, but remains the same for the whole wave, so as long as you do not lose track, you can always expect which Jad will attack next.
Example footage of the fight in action. The healers from the first Jad up the intensity by a fair amount.


Triple Jads' healers behave the same, but less spawn and you will have a different procedure until you are down to the final Jad.
- These Jads only have 3 healers each.
- When healers eventually spawn, remember your priority is always prayers.
- Only tag a healer when you are absolutely sure you have prayed against the Jad attacking you and you will be ready to pray against the next Jad.
- There is a 3-tick window between each attack, so do not stress over it, you will have time, just stay in the rhythm.
- Tag one healer at a time, you do not need to rush.
If you need some extra help, Jad challenges south of Inferno bank are great practice.
This is the same clip. Rewatch it and notice the healer tag being in between Jad's attacks. You have plenty of time!

After the first Jad is dead, the wave, ironically, becomes three times easier. You can kill these last two Jads in whichever order you prefer, and you will have plenty of time to brew and restore if you need to.
For the last Jad, I would recommend the run-through strategy described for single Jad, so you can barrage up to full hit points for the final wave. Once again, you should hit the logout button and take the time to sort out your inventory during the pause.
You can get all your mage gear out of the way since you will not be using it. However, keep your shield in an accessible position.
Make sure you drag all your potions into a manageable position and find a comfortable spot for your blowpipe for when you need to switch.


Wave 69
TzKal-Zuk is the final boss of the inferno.
Zuk's max hit is 148, and rolls for damage the same way it would for other enemies (0-148, equal chance for any). Knowing this, at 99 HP, you will have a ~33% chance of dying. Always do your best to avoid tanking a hit.
-------------
At the beginning of the wave, a cutscene will play, and you will be teleported to the north centre of the room, with a shield emerging from the wall. It will protect you from Zuk’s attacks, which cannot conventionally be prayed against or tick eaten.
 Ensure you start the fight by sipping your bastion pot if you haven’t already. Generally, you always want to be bastion potted and you WILL be brewing at some points during the fight.
Zuk can be beaten with very minimal supplies. Do not be discouraged, even if you’re down to only 4 doses of brew/restore!
A great power is starting to shake the cavern…


OVERVIEW:
- Zuk has 1200 hit points.
- The shield has 600 hit points. It has no defence and cannot be healed - its death means your death.
- A set of mager and ranger will spawn 45 seconds (two and a half rotations) into the fight.
- A following set will spawn 3 minutes and 30 seconds after the previous set spawns. This timer repeats itself.
- The timer is paused when Zuk falls below 600 hitpoints.
- The timer is unpaused and 1 minute and 45 seconds are added when Zuk falls below 480 hitpoints.
- When the timer is unpaused, a single Jad will spawn.
- Healers will spawn when Zuk falls below 240 hitpoints. Zuk also becomes enraged, and stays enraged until he is dead.
SETS:
- A set is a spawn of a mager and a ranger, which will always spawn west and east respectively.
- They have the same properties as the ones found in the waves.
- The mager cannot revive monsters.
- They will naturally target the shield, but their aggro will be shifted towards you when you attack them.
The set spawns and instantly targets the shield, ignoring the player until they are attacked.
JAD:
- A single Jad spawns in the north-centre when Zuk falls below 480 hitpoints.
- It will naturally target the shield, but its aggro will be shifted towards you when you attack it.
- It will spawn 3 healers - these always appear north of it.
Jad spawning. Notice how the player takes too long to attack him, so he silently attacks the shield once.
HEALERS
- Four healers spawn when Zuk falls below 240 hit points.
- They will begin healing Zuk, but their aggro will be shifted towards you when you attack them.
- They attack with three fireballs, which hit in a 3x3 area. One will target your current position (if you are in range) and two will fire randomly.
- These attacks cannot be prayed against and each one deals 5-10 damage.
- After healers spawn, Zuk becomes enraged for the rest of the fight, meaning he attacks more frequently.


This strategy guide is geared specifically towards Tbow Zuk.
Although ACB/Bowfa Zuks are mostly the same, there are important changes that are noted down in the “Bowfa” and “ACB” Tips section.
The tiles marked in the “Preparation” section are safespots.
If you are standing on these tiles at the same time the shield is there, you will be safe from every single one of Zuk’s attacks, until he is enraged post healers spawn, in which case you have to always stay with the leading edge of the shield.
You will want to use Rigour for the near entirety of the fight. Exceptions will be noted. If you are very low on restores (<2), you can flick it at the corner safespots.
Use your stamina doses when you are between 60-80 run energy. Try not to fall too low on run energy.
**How to efficiently attack Zuk: **(3-1-1-1-3)
- RIGHT CLICK ZUK DURING THE CUTSCENE. Click the “attack” button after the fight begins and hit him once in the centre.
- Identify which direction the shield is headed towards and move to that corner safespot.
- Do three hits at the corner.
- Run to the nearest safespot and do a single hit.
- Keep running and do another hit somewhere after the middle, in between the two central safespots.
- Move towards the next safespot for another single shot.
- Finally, run to the opposite corner and do another three hits there.
As long as you do not miss ticks, this method is foolproof.
If for some reason you end up falling behind on the shield, always prioritise catching up with it. It is never worth it to greed for an extra hit. Stop attacking and get back into rhythm as soon as you can.
Note: The direction in which the shield travels is random every time, and it cannot be changed by logging out. Logging out after the starting cutscene will change the locations of the safespots, so do NOT log out after the fight has already started.

- This will spawn after 2 and a half rotations of the shield (45 seconds).
- Since the shield may start off by going either west or east, there are different strategies involving each one.
- These strategies assume you will NOT flick sets. It is both unrealistic and unnecessary to pull it off on a first cape.
SHIELD ROTATIONS
The direction the shield moves immediately after the fight starts has a different procedure when the set spawns. They are:
West Rotation
Pray mage. Tag the mager with Tbow ASAP.
- When the shield reaches the middle, switch to blowpipe and tag the ranger.
- Move in between each blowpipe hit on the ranger. Stop at the corner.
- Use blowpipe specs for healing. Brew if you ever fall below 60 hit points.
- Once the shield moves west, follow it and continue attacking until the middle again.
- If the ranger is still alive after leaving blowpipe range, you will have to wait until the shield travels east again.
- Make sure you use your brews to tank it. You should equip your shield until you can reach it.
East Rotation
Pray range. Tag the ranger with blowpipe ASAP.
- Move in between each blowpipe hit on the ranger. Stop attacking once you reach the middle.
- Pray mage, tag the mager, and put on your shield. Do NOT attack anything with it on.
- Keep moving towards the west corner safespot, brewing as necessary.
- When the shield travels east and reaches the middle again, immediately start attacking the ranger again.
- If you are oversupplied with brews (6+), you should tag the mager as early as you can.
For either rotation, the goal is to kill the ranger ASAP and keep the mager alive.
- Continue attacking Zuk using the method from before - pray mage and ignore the mager.
- Get Zuk below 600 hitpoints.
- Afterwards, you can turn off Rigour.
- Kill the mager - the maximum distance you can hit with a Tbow is at the middle-east safespot.
- You can still attack Zuk at the east corner, but do NOT get Zuk below 480 hit points.
After killing the mager, turn on Rigour again.
- Get Zuk below 480 hit points. Jad will spawn.



- Tag Jad instantly so your shield does not take unnecessary damage.
- Attack Jad as you would attack Zuk.
- Jad healers will always clump up north of Jad - tag them using barrage.
- Barrage counts as a hit, so make sure you move to the next safespot after using it.
- ** Do not use barrage from the east corner,** you will get dragged out. West corner is safe.
- Prioritise moving to the next safespot and overhead prayers before anything else.
- After killing Jad, return to attacking Zuk,
- Do NOT get Zuk below 240 hit points.
- Once you can no longer attack Zuk, patiently follow the shield until the second set spawns.

Tag and pray against the monster that spawns closest to you.
Make sure to pray mage by the time you tag the mager.
- Kill the ranger as you did before.
- Leave the mager alive.
- Brew up to 115 afterwards.
- Restore and sip a bastion dose.
- Attack Zuk ONLY at the corners. If you fail to hit him below 240 at a corner, wait to attack until the next corner.
- Get Zuk under 240 hitpoints - equip blowpipe for healers.

- Prioritise being with the leading edge of the shield at all times.
- Tag healers with blowpipe when they spawn.
- Move in between each blowpipe hit on the healers to ensure you are caught up with the shield.
- Try to tag the next healer ASAP - the goal is to get them all off Zuk.
- Move one tile towards the wall near the corner safespots to dodge extra fireballs.
- Use blowpipe specs to heal before you start brewing.
**Start brewing as soon as you fall below 40 hit points.
**
- Kill all the healers.
- Keep in mind that Zuk is now enraged, and your strategy to attack him will have to change to keep up. More info is detailed below.
NOTE: If using RuneLite, you can mark the healers by typing in “Jal-MejJak” in “NPC Indicator” or “Better NPC Highlight”.
Zuk is now Enraged. This will persist until the end of the fight. A few core strategies change. They are:
- The 3-1-1-1-3 method is no longer viable, neither are the middle safespots. Corners are still safe.
- Stay slightly in front of the shield at all times. Never stay near the back.
- Do not attack Zuk between corner safespots and the middle safespots (which are no longer safe) - you will get dragged out in either direction.
It is of upmost importance that you STAY WITH THE SHIELD.
This is the final stretch. Brew up - do not be afraid to use all of them.
Use your bastion doses to remain boosted for the remainder of the fight.
- If you cannot deal enough damage to finish off Zuk, you may encounter a third set.

Tag the mager as soon as you can. You are already praying mage.
- NOTE: You can simply left click the “pile” of magers - the one that has just spawned will be on top, unless the previous mager was moved.
- If you moved the previous mager, barrage the pile instead of left clicking.
- If you have at least 1 brew, kill the ranger as you did before.
- Otherwise, focus on finishing off Zuk. ONLY DO THIS IF HE IS BELOW 100 HP.
- Finish off Zuk.


This section will briefly cover the fundamental changes you should make to your strategy when going for a Bowfa cape.
Unlike the ACB, bringing a Bowfa instead of a Tbow does not actually change much, considering you now Bowfa what you used to Tbow.

 Because the Bowfa does solid damage to enemies of all defence levels in the inferno, it can be used on bats, blobs, meleers, and rangers.
- Keep in mind that your blowpipe is still better DPS, only use it on these monsters when you cannot reach them with your blowpipe.

Just like with a Tbow, use your Bowfa on all Jads.
- Use blood barrage to tag clumps of healers. Use your Bowfa to tag lone healers.

- The same idea from the waves applies to the sets, allowing you to tag and attack long before you can start blowpiping, at least for the ranger.

The tiles in blue indicate the edges of your attack range with Bowfa, with lines drawn to each respective enemy.


This section will briefly cover the fundamental changes you should make to your strategy when going for an Armadyl Crossbow cape.
Dealing with the waves is almost exactly the same, but there are some important things to remember to do during the bosses.
- Zaryte crossbow: The ZCB is strictly worse DPS than a Bowfa, and is much more expensive. Unless you cannot complete SOTE to unlock the Bowfa but still really want an infernal cape, then a ZCB is okay.

 Kill magers with blowpipe - you will often have to try and drag them closer to you.
- Although seemingly unimportant, this is usually what will make ACB runs considerably longer than Tbow runs. The waves are going to feel slower than they should be - be prepared to spend a lot of time here.
- On rare occasions, you might have to use ACB on long range, but dragging the enemy closer is always preferable.

Use blowpipe to Kill all Jads, except the Zuk Jad.
- Tag healers with blood barrage, you can alternatively use your ACB.

- While at the west corner, you must tag the mager in the set with your ACB. If you try to blowpipe at the safespot, you WILL be dragged out of the shield’s protection.
When making your way to and from the corner, always blowpipe the mager.
- While at the West corner safespot only, you MUST be on long range to attack Jad. This does not apply to the east corner.
- Switch to this style manually while only at the corner. In order to win the fight, your ACB must be on rapid outside of the corner.
 You will be using ruby bolts for the majority of the fight.
 You must switch to diamond bolts at specific points throughout the fight.
- Switch to diamonds at 700 HP (prevents triggering timer pause).
- Switch to diamonds at 580 HP (prevents triggering Jad spawn).
- Switch to diamonds at 340 HP (prevents triggering healers spawn).
- Switch to diamonds at 250 HP (becomes better DPS than rubies).
Switch back to your ruby bolts whenever you want to intentionally trigger any of these thresholds.
*If you are using a ZCB, add 10 HP to all of these thresholds.
⚠️ You may encounter 4 sets.
Count your number of ruby specs at the start of the fight. If you hit more than 3 ruby specs, Continue to hit Zuk under 600 hp.
- If not, wait for your second set before pausing the timer. If you are not doing damage to Zuk and waiting for the next set, kill the mager from the first set.
- After dealing with the second set, get zuk below 600 HP. Continue as normal up until healers.
- Wait for your second/third set before spawning healers.
- Depending on how quickly you tagged each healer, and depending on your DPS, you might have a fourth set before finishing Zuk off. As usual, leave the mager alone after tagging and only kill the ranger as quickly as you can.


Tbow full run: https://www.youtube.com/watch?v=9CRjoQfsdeY
ACB full run: https://www.youtube.com/watch?v=PWEMa_SGBi0
If you prefer video guides, I would highly recommend you check out Xzact's guide:
Waves: https://www.youtube.com/watch?v=HnUr5zcF4fU
Jads and Zuk: https://www.youtube.com/watch?v=uaoSaUT4SZc


This section will provide a brief summary on how to complete the Infernal Combat Achievements. If you have a solid baseline and experience within the Inferno, these provide an excellent challenge and learning opportunity. Having access to two or more Zuk tasks via Combat Achievements will make attempting these tasks a lot easier, although not required. You can also attempt some tasks, and if failed you can attempt another task (i.e. if failing the 50 HP task, try a Jad skip).

Generally completed with ‘The Floor is Lava’ task as you can easily hit melees with a Bowfa. Use a Bowfa setup, but you can use a crossbow setup if you do not want to go out of your way to buy one.

Generally completed with ‘Budget Setup’. Use rigour liberally and be potted in order to prioritise killing the melee before it digs.

An example setup is shown below. Blood barrage nibblers on wave starts and during cleanup. Dropping range switches is not recommended but possible if struggling with supplies, when you get to Zuk you want to seal the deal with max DPS.
- The Inquisitor Mace is simply a 4t weapon used for cleaning up straggler nibblers and bloblets, but can be replaced with any other 4t weapon (i.e. Tent Whip).
- The Noxious halberd is useful if you want to afk an enemy or stack while flicking.
- The scythe is used for large monsters (Mager, Ranger, Jads) for DPS.
- Make sure to step back for magers, but you can face tank rangers in melee range as their melee max is only a 19 and they are very inaccurate.
Important: DO NOT equip the Twisted Bow until the Zuk Cutscene ends, otherwise you will fail the task.


An example setup is shown below. You can use Death Charge without failing the task. With Lightbearer, Double Death Charge, BP special attacks, and a sufficient amount of brews, there should be enough HP intake to get through a full run. If you want to use thralls, you may opt to do so; however note this will drain a considerable amount of prayer (flick more or bring prayer gear). Be sure to bring a Book of the Dead if you do opt to bring thralls.
From Waves 50+ start from the standard Kelvino tile with Chins on Medium Fuse, getting ready to click back behind the pillar as you get dragged out depending on the nibbler spawn.


- Getting a task makes this a lot easier as the faster you kill things, the less chance you have of making a mistake in a tougher wave. Prayer gear such as devouts is also recommended as the less you have to flick, there is less chance of a potential misflick.
- Bring a sufficient amount of brews. Blood barrage to full after each wave if needed, overheal with a brew before waves you find difficult (60s, 31 or 48 if needed).
- Due to the way this task actually calculates if you are eligible or not, you can fall under 50 hp through non-enemy damage and not fail the task. This includes pillars falling, drinking a divine potion, and most importantly, Zuk's healer attacks. IF you fall under through any of these means, you will NOT fail so long as:
- You pray correctly against all incoming attacks from regular monsters (if at zuk, all enemies and jads).
- If you fail to pray correctly, the attacks roll a zero.
TLDR: Can safely fall under 50 HP at Zuk healers if you pray correctly against magers/rangers/jad
- Blood sceptre is not recommended to use for this task as a brew is significantly better, and you bring plenty of brews as is.

Considered an easy task. You can be overly aggressive on nibblers on early/safer waves, prioritising nibblers over monsters. Even on difficult waves or tough spawns, you can still let nibblers chomp on the pillar for a bit and go back out when it is safe to do so.

- An example setup is shown below. The main emphasis of this task is to always be bastion potted, to use rigour as much as possible, and to always be attacking something. No fancy solves are needed, as this task is considered to be free for the most part. Try not to log out at any point during the waves as this will lose you time when resuming. The time is VERY doable and even generous for a novice Inferno runner.
- You may need to adjust your brew/restore ratio as you will be consuming more prayer. The ward is nice for better bloblet and nibbler DPS, but not a hard requirement.
- A Jad skip is not needed unless your Zuk entry is grim. Focusing on good boss protocols will definitely help such as good healer tags on Jads and Zuk alongside minimal tick loss. Watching full runs is helpful and recommended, see the two below videos from Aaty:
https://www.youtube.com/watch?v=R743LptzfCw
https://www.youtube.com/watch?v=GmXAwz0-1P8


Example s65 Splits

Lower the health of each Jad, using the blowpipe as necessary as to not kill him by accident. Kill the healers if necessary, then kill all three Jads within 30 seconds (10 tbow shots on two jads). This is a very generous time window and if each Jad is lowered correctly, then this task should pose no issues.

Use a combination of game sounds and good camera angle in order to complete this task, while also still being wary of Zuk and not falling behind the shield. Some players opt to camp range pray and switch to mage as they hear the mage sound, but it is dependent on your preference. The most important thing is to not forget that Jad exists during and after healers, so keep your head in the game.

Speedrunning Beyond Grandmaster
There is a fairly large community filled with individuals who all speedrun the Inferno. They are located at https://discord.gg/93t6Zph . The ‘Grandmaster Speedrun’ is only the tip of the iceberg, and there are a variety of further resources (Gear Setups, Off-tick Examples, Calculations) and help available there to aid you in your Inferno Speedrunning journey. Completing the Grandmaster Combat Achievements is HIGHLY recommended as this gives you access to three Zuk tasks. Good luck!
Additionally, a guide from Hemmiez (iampoop10) serves as a solid introduction to high level inferno speedrunning. While the gear is quite a bit outdated (for example, ~s48 no longer brings mage cape + swamp staff, they camp thrall+death charge runes), the waves and boss procedure described is not. It's quite a long watch as it goes very in-depth, but it's worth learning and taking notes if you decide to go beyond s65. The link is found here. https://youtu.be/V_APzyZjod4?si=UuL2hOgQkW8BcmWw
Special thanks to aatykon, acidhouse, blaser, blowpipe_osrs, giraffes, jonppeli, meerkatphone, rastaman, stuge, unpredictble, as well as many more for providing clips and data for the guide, and special thanks to the Inferno Speedrunning Discord for having resources and providing an environment for the community! You can find them over at disco...


This is your grind now.
Learn, adapt, and improve.
Every failure has something to take away from, even the stupidest death shouldn't be overlooked.
No matter how hard it may seem at times, don't quit. Yes, it's demotivating, yes, it's stressful - and it will all have been worth it when you break through. We've all been there - we're with you.
No matter how many times anybody says they're "done with Inferno'', they'll always come back after their first cape. This is endgame PvM content. It keeps you on your toes, it's engaging and it's something everyone deserves to give it their best at. You're playing a video game: I hope it's as fun and memorable for you as it is for me.

Good luck!


A very big thank you to @dry raptor and others below who put together the initial inferno guide in 2019, helping guide all five of us re-writers to our own infernal capes. If it weren’t for them, we would have had no idea where to start on this project four years later.
Practically the entirety of this guide is down to their efforts, we have just updated some sections that had become slightly inaccurate over time.
Individuals credited on the original guide by Hai:
@silver charm - Reviewed every stage of the process, guide rework help, lengthy (and often fruitless) discussions and a lot of help with experimenting mechanics as well as calcs and exploring different metas
hato - Early and late draft reviews, responsible for many of the things I learned about the inferno myself
@soft canopy - Early draft review and big brain discussion about how NPCs move and why they don't like you
@grim sinew - Zuk review and rework when I was clueless as to how I'd write it
@hybrid vector @vapid salmon - Final draft reviews and feedback
Rech  , @slate sun - Quality assurance and feedback
@median elm - Created that really cool WDR banner at the top
The Re-write Team:
@woven hamlet
@autumn canyon
@golden parcel
@dapper robin
@floral haven
Additionally, thanks to @ancient zodiac for providing clips!
If you have ANY questions, do not hesitate to ask away in #inferno!

Or click this link to go to the top directly:
#inferno-guide message
You can also use the pinned messages to quickly jump to a specific section.