
#tips-n-tricks
1 messages · Page 1 of 1 (latest)
Trick #4
How to get the diagonal variants of any road from the Philippine Road Pack by Hadestia?
(shown in video)One way is to choose the Philippine road of your choice and lay out the diagonal variant of it. Then use the eyedropper to select the diagonal variant.
NOTE: This does not apply to any of the toll roads as they don't have a diagonal variant.

Tip 1: Grid suburbs
KMr06 tip to make an beautiful grid suburbs :)))
S1: make 3x3 or bigger grid roads layouts
S2: add bus station and crossing line
S3: add some 1x1 service buildings and some park, sport one
S4: using zone spamming but with 1x1 template wide, build manually 2x2 or bigger building with the same high-level !!
S5: putting trees over the zone
S6: waiting


Tip 311: Cliffs
⚠️ Plugins required: MBMP (Modular Build Megapack)
Screenshot 1
Start with a hill formation.
Screenshot 2
Place down walls from MBMP, I used dirt wall, tan brick wall, and concrete wall. Protip: One terrain level is 2 floors.
Screenshot 3
Place Grass roof at the top.
Screenshot 4
Go wild with it! There are lots of things you can do. Protip: You may also use the vanilla residential zone decoration as the "roof", but it will need to be properly aligned with the height.


Tip number 312?

Tip number 313:
Want to do cool enter and exit lanes on your highway? Here's my technique in 6 steps.
Plugins used:
- Philippines Roads
- One lane road by Schtanie
- i13 road pack
- white line
- Yellow line and sign (forum)
Step 1:
Make a 3 lanes highway with the "One lane road" (single way) and the "Outer (center) road" from Phillipines Roads
Step 2:
Destroy between 6 and 12 tiles of the One lane road
Step 3:
Fill the holes with between 5 and 11 tiles of Outer Roads from Philippines Roads (depends of how many tiles you destroyed). Don't forget to connect with the one lane road
Step 4:
Add "Sidewalk transition road" from i13 pack in the last hole and diagonal one way road in the connected ending of the Outer road
Step 5:
Add white lanes on the One lane roads and yellow lane on the Outer Roads. Let the tile next the i13 road bland. The ending yellow line (curved line) works only in the enter line
Step 6:
Decorate and add asphalts as you want
I let you my final render
I hope it's clear for you
Good luck!


Tip number 314:
Here's a site for curves for your road layout or terraforming
https://iseenbaas.nl/curve/
It's safe don't worry
Use it on a computer, it doesn't really work properly on phone
Tip number 315:
There is a way to visually get rid of pollution:
Step 1
✓ Go to Settings > Others and turn on Experimental features
Step 2
✓ Once you're done with Step 1, go to Settings > Graphics and turn off Render Pollution
Hope this can help, although I can't tell if this is posted already
Note: Turning off render pollution just removes the brownish looks in your polluted area, but that doesn't mean you can start placing residential zone near it!
Oh, and one more thing.
I won't be able to provide images because of Discord
General facts when building a train for beginners
Fact n°1: Overhead Rail is not allowed. Because it will spam trains everywhere and is not effective (if you like, build with as much distance between stations as possible). (train will take up more space)
Fact n°2: It's better to use the subway.
Fact n°3: railway and station should be built before building the house. (because it is possible to re-plan the surrounding landscape to be beautiful)
Tip 316:
Choosing Shaders
Disclaimer: What looks good and what doesn't is completely up to you and not something I decide. It is all up to personal taste. Those are just recommendations from me!
- Shader differences for cities and nature
Used shaders: [none], Sunshine (HC), Atmosphere (HC)
Natural builds mainly benefit from being bright. I recommend you use Sunshine shaders to get more of a natural color for your landscapes. Atmosphere may work, but it makes the said landscape look more depressing, which sometimes isn't what you want.
Cityscapes are the exact opposite - they benefit from Atmosphere shaders. They get sharper colors and make the city look more realistic. Sunshine shaders don't really work, since they ruin the aesthetic. - Night time
Used shaders: [none], Sunshine (HC), Atmosphere (LC)
At night, I recommend you avoid using any high contrast shaders or any other shaders that may obstruct the view. For example, the middle part, using Sunshine HC, looks bad because a lot of the view was obstructed. It's pretty similar with Atmosphere HC too.
Low contrast shaders, such as Atmosphere LC on the bottom, obstruct the view less, but I'd still recommend you avoid using shaders at night time. - Rain scene
Used shaders: Atmosphere (HC)
For any rain scene I'd recommend you use Atmosphere HC. It makes everything look darker, which works well with rain. I also recommend you use fog as well, but I didn't bother adding it in the preview. - Sunset
Used shaders: Sunshine (S) in combination with Old colors.
If you want a sunset scene, I recommend you use the given combination.
I'll update this tip later once I get more time


Tip 317
so i thought montemarino bridge is too low. and i made this thing,
- build your bridge
- add fake water just on the side of the road
- add the fence ''Stone wall'' to raise the arches
3.5. you can remove fake water (which spoils deep water), with this tip: #tips-n-tricks message didn't need it but ok
Plugins : 2much Water, https://forum.theotown.com/viewtopic.php?p=131641#p131641 the bridge and waterfront, and Stone wall is already in game


Tip 318:
Park Beautification
Tips on how to beautify your park:
• Use mdk813's plugins to make a better and detailed park
• Add some people in the park area if the park is big
• Add trees and fountains for better look
• Add a few decorations just in case for the events that happened in your park
• Get some park inspirations in Google
Hope this helps of making and beautifying your better park!

Hello there, I noticed that some of y'all have been asking for advice on how to make good cities. The problem with that question is that it's too broad. So I've decided to compile all my knowledge as a joe who's played the game as far back as 2017. I'll be publishing my series in a google drive where you can read the google docs files. This is primarily because I don't want my advice to overshadow the other wonderful tips in this chat. Sorry for the long introduction and enjoy reading my series of tips and tricks.
Let me know what topics I should discuss through DMs
You can start here:
Introduction:
https://docs.google.com/document/d/1tmi977hBWziYJEJjFltn-R7AUCvU6aaJvxElWPs7dLE/edit
Chapter 1:
https://docs.google.com/document/d/1w6UGGgehlIf9SBkOedetz5ORXXam7qEPiY8OSIJxIaA/edit
Chapter 2:
https://docs.google.com/document/d/1GNnXkmcZqBubC432VwTHUszkNGaemeUG57jWKkQ0JQk/edit
The drive folder of the series:
[I'll release it when there are 5 chapters]
I'll consider starting a discord server for this if ever this goes on long enough.

Google Docs
INTRODUCTION Welcome to a guide for building cities in TheoTown’s sandbox mode. This series is aimed to give people tips and tricks for what the name suggests: sandbox building. This was done due to high demand for a guide on how to make good cities. To get this straight, the question is pretty ...

Google Docs
DISCUSSION ON CITY LAYOUTS Note: Much of this is from self-study and observation. I may get some things wrong and if ever I did, feel free to let me know via discord Grids are something that I noticed is argued a lot. Some people say that it’s good while others say it’s bad. The truth is, it re...

Google Docs
STREETS and HIGHWAYS Streets are pathways that connects a building to the city Highways are something that is vital to any city as it allows for the connection of the city to another city/area. The best thing to do for highways is to disconnect any buildings from it since that’s the purpose o...
Chapter 3 of my guide is finally out now:
https://docs.google.com/document/d/16_ZStNNILa1H7qQDeXIIPQps2XPehYd5xVARXmTNits/edit?usp=sharing

Google Docs
INTERSECTIONS and INTERCHANGES All roads connect, of course, in one way or another. This can be done as simple as an intersection or something as complex as an interchange. Differences and Uses: How I would decide between making an intersection and interchange or an interchange is based on ...
Hello everyone, I'm here to share a tip with you, which is a list of emojis that work within Theotown. I have tested all the ones listed here.
Some emojis may have a question mark behind them, but that only applies to a few, the majority are working fine.
And in case you're wondering about the purpose of this, I'll show you some photos of my cities where I used some of these emojis in the names of neighborhoods and buildings. So without further ado, here's the complete list of emojis:
Emoticons:
😀😃😄😁😆😅😂😭😉😗😙😚😘😍😊☺️😌😏😴😪😋😛😝😜😔😬🌛🌜🌚🌚🌝🌞☠️👹👺🔥💯💫⭐🌟✨💥💨💦💤🕳️🎉🙈🙉🙉🙊😺😸😹😻😼😽🙀😿😾💛💚💙💜💘💝💖💗💓💞💕💌💟♥️💔❤️🔥💋👥👤👣💀👀👄👅👅👃👂💪👏👍👎🙌👐✊👊👋✋✌️👌👉👈👆👇🙏💅
Peoples:
🙇🙋💁🙆🙅🙍🙎💆💇🛀🚶🏃🚴🏇🏂🏄🚣🏊👼🧑🎄💂🧑🚀👮🧑✈️🧑🔬🧑🔧🧑🏭🧑🚒🧑🌾🧑🎓🧑💼🧑💻🧑🎤🧑🎨🧑🍳👳🧕👲👶👱💃👯🧑🍼👪
Animals and Nature:
💐🌹🌺🌷🌸🌻🌼🍂🍁🍄🌾🌱🌿🍀🌵🌴🌳🌲❄️⛄☃️🔥🌋🌅🌄🌈🌊⚡☔💧☁️⛅☀️🌞🌝🌚🌜🌛⭐🌟✨💫🌙🌠🌌🌍🌎🌏🌑🌒🌓🌔🌕🌖🌗🌘🙈🙉🙊🐵🐯🐱🐶🐺🐻🐻❄️🐨🐼🐹🐭🐰🐮🐷🐽🐗🐴🐲🐉🐢🐊🐍🐸🐇🐁🐀🐈🐩🐕🐖🐎🐄🐂🐃🦬🐏🐑🐐🐘🐆🐅🐒🐫🐦🐓🐔🐣🐤🐥🐧🐬🐋🐳🐟🐠🐡🐙🐚🐌🐜🐝🐞🐛🐾
Tip 319^
Foods and drinks:
🍓🍒🍎🍉🍑🍊🍍🍌🍋🍈🍏🍐🍇🍅🍠🌽🍆🌰🍞🍳🍗🍖🍔🍟🍕🍝🍲🍛🍜🍣🍤🍚🍱🍢🍙🍘🍥🍡🍧🍨🍦🍰🍮🎂🍭🍬🍫🍩🍪🍯🍼🍵☕🍺🍻🍷🍸🍹🍶🍴🔪
Places and travel:
🚧🚨⛽⚓🚏🚇🚥🚦🚲🚙🚗🚐🚚🚛🚜🚒🚑🚓🚕🚌🚈🚝🚅🚄🚂🚃🚋🚎🚞🚊🚉🚍🚔🚘🚖🚆🚢🚤⛵🚟🚠🚡🚁🚀✈️🎢🎡🎠🎪🗼🗽🗿🗻💈⛲⛪💒🏩🏯🏰🏢🏭🏬🏪🏦🏫🏨🏣🏤🏥🏠🏡⛺🌆🌇🌃🌉🗾🌐💺
Actives and events:
🎉🎊🎈🎂🎀🎁🎇🎆🎐🎏🎎🎑🎍🎋🎄🎃🏆📢⚽⚾🏀🏈🏉🎾🎿⛳🎯🎣🎽🎱🎳🎮👾🔫🎲🎰🎴🀄🃏🎩📷🎨🎹🎷🎺🎸🎻🎤🎧📻📺📼📹🎥🎬🎭
Objects:
📱☎️📞📟📠🔌🔋💽💾💿💻💸💵💴💶💷💳💰💡🔦🏮🚪🚿🛁🚽👖👕🎽👚👔👗👘👙🎓🎩👒👑🎒👝👛👜💼☂️🌂💍💎💄👠👟👞👡👢👓💉💊🔭🔬📡🔩🔧🔨📎📏📐✒️✏️📝📖📚📒📔📕📓📗📘📙🔖📃📋📑📂🗄️📊📈📉📇📌📍✂️📰📦📫📪📬📭📭📮✉️📧📩📨💌📤📥🕛🕧🕐🕜🕑🕝🕒🕞🕓🕟🕔🕠🕕🕡🕖🕢🕗🕣🕘🕤🕙🕥🕚🕦⌚⌛⏳⏰📅📆🔔📯📢📣🔍🔎🔮🚬💣📜🔑🔐🔏🔒🔓
Symbols:
🔴🔵⚫⚪⬛⬜❤️💛💚💙💜♥️♦️♣️♠️♈♉♊♋♌♍♎♏♐♑♒♓⛎♀️♂️💭💬❕❗❔❓⁉️‼️⭕❌🚫🚳🚭🚯🚱🚷📵🔞🔕🔇🅰️🆎🅱️🅾️🆑🆘⛔📛♨️💢🔻🔺🉐㊙️㊗️🈴🈵🈹🈲🉑🈶🈚🈸🈺🈷️✴️🔶🔸🔆🔅🆚🎦📶🔁🔂🔀▶️⏩◀️⏪🔼⏫🔽⏬🔙🔛🔝🔚🔜🆕🆓🆙🆗🆒🆖ℹ️🅿️🈁🈂️🈳🔣🔤🔠🔡🔢#️⃣💠🔷🔹🌐🏧Ⓜ️🚾🚻🚹🚺♿🚼🚮🚰🛂🛃🛄🛅💟☯️🔯🆔✖️➕➖➗➰➿〰️©️®️🔘🔳◼️◾▪️🔲◻️◽▫️
Flags: 🏁🚩🎌🏳️🌈
Here are some pictures of mine showcasing the use of some of these emojis.
I hope you enjoyed this list and find inspiration in these photos. Until next time.


Tip 320:
Mini Farm Tutorial (in-game) without using any plugins (For Beginners)
https://imgur.com/a/zcsgdtS
Tip 321:
Here are 5 ways of turning SCARY BORING GRIDS! Into good layouts! For beginners
Plugins:
Non-stopping strips by LeoLeo
Road roundabouts
1st tip: grids of different shapes
-Grids can be boring when they repeat so try to connect small ones with large ones! Exa. : 1st photo
2nd tip: diagonal grids
-now here’s a bit better grid layout variety
Exa. : 2nd photo
3rd tip: roundabouts
-not only are roundabouts great in traffic control, they are also great to look at!
Exa. : 3rd photo
4th tip: half boring grids , half diagonal grids
-now if those grids aren’t still good & still causes you to have PTSD about grids… then why not do BOTH diagonal & normal square grids in a city block
Exa. : 4th photo
5th tip: all of em’ in one!!!
-now with you learning all the previous tips… why not mashup all of them in unique ways?
Exa. : 5th photo
Now that you know all the tips… go ahead beginners! try these tips to spice up your city!


Tip 322:
Roads can service buildings while on slopes
Can be used to build compact elevated rail stations

Tip 323
How to make simple automatic gate.
step 1 : place road
step 2 : add 2 tiles military zone
step 3 : add anything you want to hide the military zone.
done! automatic opened and closed gates.


Goofy tip 324
How to make canal with no plugins
Step 1 make a hill or this aint working
Step 2 put roads on both sides (optional)
Step 3 add fences on the edges so people wont fall
Step 4 Put stripped concrete on slanted sides
Step 5 Put concrete on the bottom
Step 6 Add water (also optional)
And it should look like this when you add a city, impress your friends with this trick and stay strong king 😎😎😎


tip 325
so some peoples asked me to show how to make intersection just like mine, so here it is


(continue of tutorial)


Advanced tip 326-ish?
plugins:
- Road curve (I’m feeling generous today so here… the forum topic link #plugin-discussion message so no one has to find it for hours in the forum store ☺️ )
- Road roundabout ( in-game store )
- Philippine road pack ( in-game & forum store )
- Erin’s road pack ( in-game & forum store )
Here are the different angles of roads you can use
1st road (top) diagonal turn
2nd road (middle-top) shortcut turn
3rd road (middle-bottom) road/highway divider turn
4th road (bottom) tight turn
There will be part 2. Of this teaching how to build these turns & what degrees they are (JK THERE ISNT IM SO LAZY L)

Tip 327
When you use Mew's Advanced Road Network, you can use invisible roads and intersection parts to make new types of roads.
If you want to put markings or any road decorations from other plugins on those roads, place them first, or the intersection parts would be over any decorations
Left- intersection parts placed first
Right- markings placed first


Tip 328 (if not covered)
An late game issue is that the city income is too low to continue expanding/rebuilding
So like any capitalist you should cut down on public spending
Other than power,water,fire,police
Here are the basic needs of different buildings:
Residential
 : health
: health+park+low education
health+park+sport+low education+high education
Commercial
: (none extra)
: park
: park+sport
Industrial
- : (none extra)
Dumping utilities to nearby regions also helps in income

I would like to share this TheoTown Tutorial for all of you.
Tip 329: Custom Bridge Tutorial
https://youtu.be/ivqHkBAlHNc?si=Hz4W9UuBV_gvf_6E
Plugins you need before making:
• HighwayV1.1
• The Railroad Expansion v2.0
• (one way)street light
• Overhead Pillars (V.2)
• Brook Bridge
• Slow Traffic Package 2.6
Thank you Bunny for allowing me to share this. 🙂
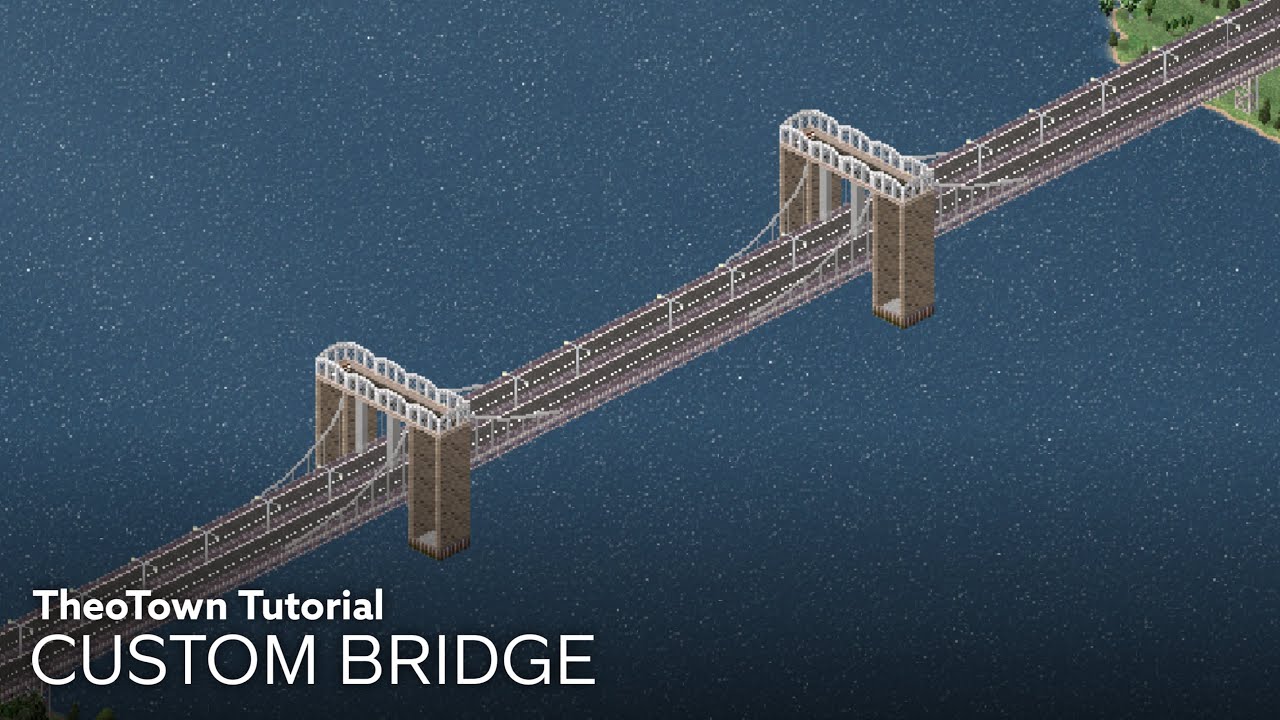
In this video, I will show you how to build a Custom Bridge that no one ever build it in YouTube TheoTown Community! It was pretty a bit hard to make, but some of the ideas might be come in handy...
It may take a few minutes about the tutorial to be completed, so be sure to follow the steps to understand how you build the best customized bridge...
Tip 330: Diagonal Crossing w/ Intersection Tutorial
https://youtu.be/xamqCJsQLYY
Plugins:
- Philippine Road Pack (update)
- Road Medians v2
- Diagonal Crossing
- Road Markings Package 1.7
- Urban Details Set mdk_813 UPDATE [deco props] (FORUM)
- Road Stripes (FORUM)
- one-way Traffic light
Before making this build, you must turn on "Support for Multi Road Decos" into your game settings to make an entrance trick that is found at the beginning of the video.
Steps on how to turn on:
- Go to TheoTown, find the gear icon, then open Settings.
- Next, click or tap the "Other" tab, then enable "Experimental Features".
- And last, click or tap the "Experimental Features", then enable the "Support for Multi Road Decos" option.
Hope this helps!
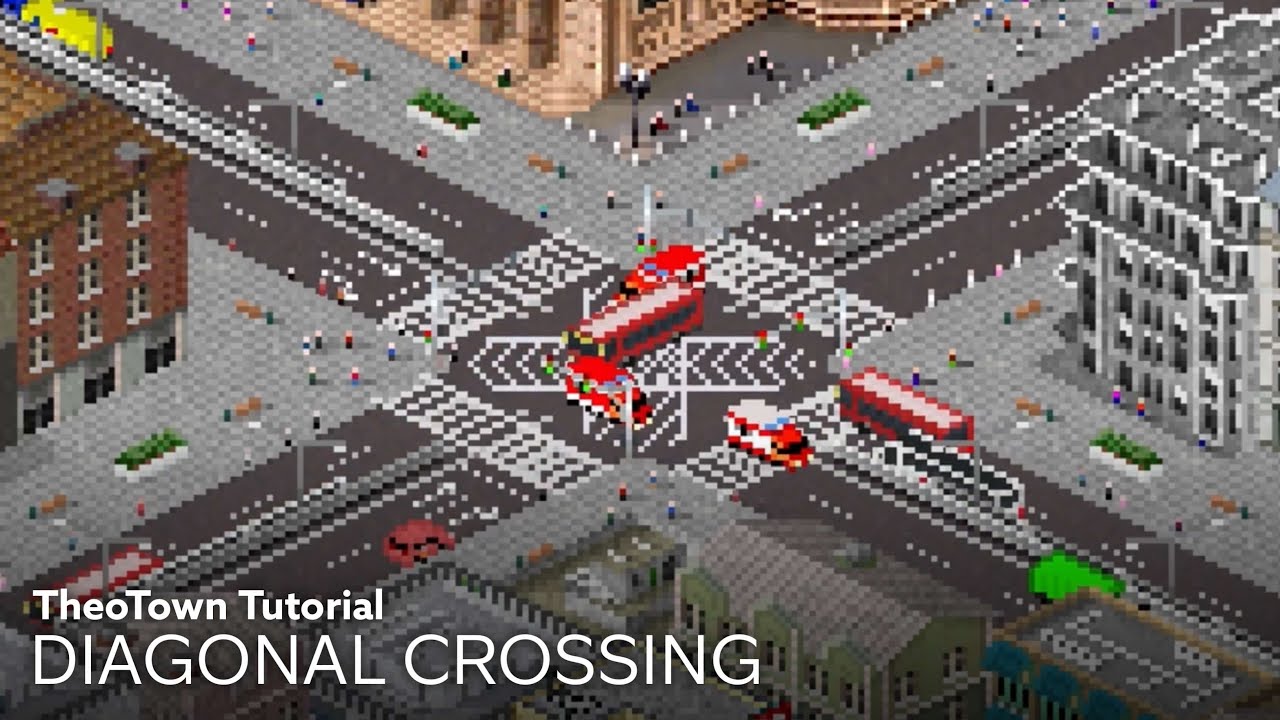
In this video, I will show you how to build a diagonal crosswalk for your intersection! And this tutorial includes the tutorial of intersection too.
This tutorial is like a road intersection hack, so sit back and enjoy the tutorial!
The plugins list will be in the comment section.
What do you think about this tutorial? You like it? Or not?
Le...
Tip 331: Custom Cathedral
https://youtu.be/enFITUtm7Bs
Plugins:
- Victorian Train Station (you can get it in Osterschmirtz's Discord Server)
- Urban Details Set mdk_813 UPDATE [deco props] (FORUM)
- Some SC4 Fan's Trees
- More Fence V.5.0
- People (Trees)
- Central Station | Kyrill
Hope this helps!

In this video, I will show you how to build a customized cathedral for your city and making your city feel religious and comfortable!
Some other modular parts, they are very useful of making this build, so it's not that hard though I believe.
The plugins list will be in the comment section.
What do you think about this tutorial? You like it? ...
Tip 332: Rooftop Constructions with the Modular Buildings Plugin.
-----------------//-----------------
Today, I'll share my second tip: creating unique rooftops using the Modular Buildings plugin. Plugin references will be provided at each section's end.
You can have rooftop restaurants, courts, and more. This adds value and enhances aesthetics.
I'll use my office with a green roof as an example. After the tutorial, I'll show more examples. Let's dive into the tip.
-----------------//-----------------
1- Terrain 🏞️: Elevate terrain for desired height.⛰️ Use terrain elevation tool in hill tools under terrain tools in construction mode.
Flatten elevated terrain for smooth placement. Higher terrain requires a larger base.
Plugins 📝: None extra, Terrain Tool is recommended.
-----------------//-----------------
2- Placing: Choose spot to place construction. If it needs road access, add a pedestrian path or invisible road.
Conceal with decorations.
Plugins 📝: Pedestrian zone for invisible roads, Small football field, Mesopotamic pack, Clover office building.
-----------------//-----------------
3- Decorations 🎄: Align construction with terrain. Add grass tiles matching field surface. Build walls to finish.
Plugins 📝: Modular Panel pack for entrances and window embellishments.
-----------------//-----------------
Feel free to ask questions. Now, I'll showcase constructions using this tip.


Tip 333: Roadway Hierarchy.
This tip is to teach you how road works using Road Hierarchy also how to decrease congested road in your city by watching this video below.

Tip 334 , lesson 1 of 7 : simple non-isometric roads.
Plugins include:
— invisible roads
— mewmew’s advanced road plugin, obviously duh…
ah yes… mewmew’s unbelievably complex & masterpiece of a goddamn plug-in…
Now you might ask your own existence… how the f do i build non-isometric roads? Well I’ve got just the tutorial for you!
This lesson is 1 of 7 lessons in this series that teaches,analyses, & applies the said lesson
Our lesson for today is non-isometric roads, for this lesson I will give you a preview of the roads on the traffic UI so you can see where the markings are placed!, let’s get to it!
We will follow the 3 layers:
- pictures 1 & 2 (base):
This is the most essential part in building these roads! - pictures 3 & 4 (markings)
Adding markings either with or without Center line dividers (yellow & white lines) or adding diagonal intersections,stripes,arrows ETC. are optional - pictures 5,6 & 7 (the main road)
And lastly… these asphalt covers will complete the entire road!
So now you know how to build roads like never before a decade ago!
Also these markings can be found in these categories in mewmew’s advanced road plugins: ( pictures 8 to 10 )
Again thank you for listening & learning! please check #tips-n-tricks channel (this channel) for the next or so lessons!
Thanks for learning with me


tip 335: hate the weird looking junctions? use MewMew's advanced road plugin to get rid of these crappy unsymmetrical junction


Tip 336:
Want to make custom shadows? Follow this
Step one: take the "Cobblestone" asphalt and put it around you building
Step two: take diagonal cobblestone (plugin available on store or forum) and place it as I do
Here you go
Don't forget to respect sizes


Tip 337 , lessons 2 of 7 : non-isometric road principles - markings
Plugins include:
-invisble roads
-advanced road (name changed)
-slow traffic package
-road stripes
welcome back to class! you might not recognise me but its me! extermination! just in an alt account! anyways with that outta the way...
if you dont know how to build non-isometric roads, I ADVICE YOU TO READ MY FIRST LESSON MADE ON MY OLD ACCOUNT → #tips-n-tricks message
anyways with that on the side, we will continue our lesson!
the 1st picture is a view of all the most suitable road markings by using the slow traffic package:
-road bumps
-crossing
-crossroad
-diamond
-arrows (2 variants for 1 way roads)
intercrossing: 2nd picture
- use intercrossings along side traiffic lights, used as marking just before intersections
crossroad: 3rd picture
- use crossroads if they are near sidewalks, used for pedestrians to properly cross roads without using pedestrian bridges/foot bridges
the 3 last can both be used anywhere you like, either that'd be intersections or pedestrian crossings!
thats the 2nd lesson!
again please look at this channel for the next lessons or so!
thats all! thank u! : )


Tip 338
If you wish to make custom taxiways, use the advanced road plugin and the invisible road plugin (parking lot invisible road works too) I used it in this build below.
You can make diagonal taxiways and non isometric ones too.
Helps add more detail

Tip 339
Making setbacks and sidewalks for buildings while still satisfying road need.
Make sure that your buildings are covered by the necessary services to avoid abandonment and fire.
(If you really want to use Uber mode, go ahead. I think it's a waste when you can do it for free.)
Trick #4
Keep in mind this channel is for tips about the game itself, content within the game, and principles to apply while building.
Tip 340
Desiging a Functional Fashionable U-turn by using the following plugins:
Road Side Parking
Road Markings Package 1.7
Tip 341 (as continued by Flammy Oxoa who is no longer in the server)
Road Hierarchy, but applied in the game!
Rule number one: “A beginner’s way to a traffic free city!”
Picture 1 is depicting a series of roads in descending order, the first being Freeways, or Highways! You’ll want to use these as the game describes them: “a fast connection between long distances”. And, used strictly for long distances.
The second being the 3 roads that are together, these are your arterial roads. You’d ideally want to use this to distribute incoming traffic from highways and/or connections from other cities (if they’re on the border) to be then distributed into your collectors.
SIDE NOTE: As tempting as going the American way of adding “one more lane” is, this never usually works in-game.
Thirdly, and as previously mentioned: Collectors, which are the two roads stacked on top of each other, these serve as a way of distributing and/or collecting local traffic into Arterials, and vice versa. You’d usually have your connections local roads connected to these.
Finally, your aforementioned local roads. These serve as many things, but mainly where you are safe to zone all of your residential areas (the why is very self explanatory if you yourself live in a house, and go out to do literally anything)
Rule number 2: “One must have been burdened with the power of Brain”
Please, people, please! Be smart about your road distribution, you don’t want to zone up next to your 3 road arterials, this will cause a lot of traffic and congestion as people leave and enter these areas often, especially in Industrial areas!
Next, please be mindful about your traffic lights, as these greatly influence your traffic flow. And, remember there are no traffic accidents in-game, if we’re not trying to be realistic, let’s not over engineer it!
Picture two depicts good use of Roadway Hierarchy. This is your template, and an example of how you should build your cities.


Tip 342
Better Avenue Tutorial
https://youtu.be/ePIQtaX01RY?si=msuZZ6Tsuu-lFx_l
Plugins you need:
- Advanced Road(Bus Lane Update)
- Some SC4 Fan's Trees (v2)
- road stripes
- (one way)street light
- Diagonal Crossing
- Bus stop decoration updated
- Tree Decoration - As Fence
- People(Trees)
- Curb
- Urban Details Set mdk_813 UPDATE [deco props] (FORUM) https://forum.theotown.com/viewtopic.php?p=66774#p66774

Hello there!
Today, I’m going to show you how to make a better avenue for your downtown and your city!
This video is the enhanced version of the old tutorial, which is this:
TheoTown Tutorial | Avenue
https://youtu.be/TE8AomwJcEM?si=uTFsDB03qC7971i9
Phew. It's been a long time focusing TheoTown stuff, because I was busy in school stuff and clas...
Tip 343
Hello friends!
Today ||I have created a brain and ate it and|| today I'm going to show you how to make a nice roundabout.
Plugins used:
•Advanced Road(Bus Lane Update)
•Invisible Road
•Road Markings Package 1.7
•Erin's Road Additions
All of these are available in the plugin store
(Make sure your volume is off while watching the video💀 idk how to get rid of that damn static sound)
Happy building!
https://youtu.be/qfUqzW1lx7E?si=dNfuhASN4Bx4T1_L

Tip 344...
THE OGs HAVE RETURNED!
Plugins used;
- Fence expansion by gabriel
i was fiddlin' around with some fences on my current project... when i found out that with enough brain power, you can make smaller space saving fences for your city!
it could be used on ANYTHING!!! from making pastures more compact & beautiful to mixing & mashing these 3 different types of fences...
it is truly a revolutionary finding, not a big one but one that could influence even more ingenuity

Tip 345
Sunken Highway Tutorial
https://youtu.be/TJYmCFJ_DF0?si=t9_MMX8GDLngyabx
Plugins you need;
- Terrain Tool ++ (to advance)
- Philippine Road Pack (update)
- (one way)street light
- More Fence V.5.0

Hello there!
In this video, I will show you how to make this sunken highway for your best and detailed city!
Plugins:
- Terrain Tool ++ (to advance)
- Philippine Road Pack (update)
- (one way)street light
- More Fence V.5.0
Do you like this tutorial?
Like and comment if you do!
#TheoTown #TheoTownTutorial
Tip 346
Victorian Train Station
Inspired by @true summit
https://youtu.be/IzKIMOBbWbk?si=XPbJS_YbYvErGjKs
Plugins you need:
- Bremen central station
- Modular Build Megapack
- Urban Details Set mdk_813 UPDATE [deco props] (FORUM) | https://forum.theotown.com/viewtopic.php?t=5030
- Modular Panel Pack (0.3)
- The Railroad Expansion v2.0
- People(trees)
- Wavin’ flags
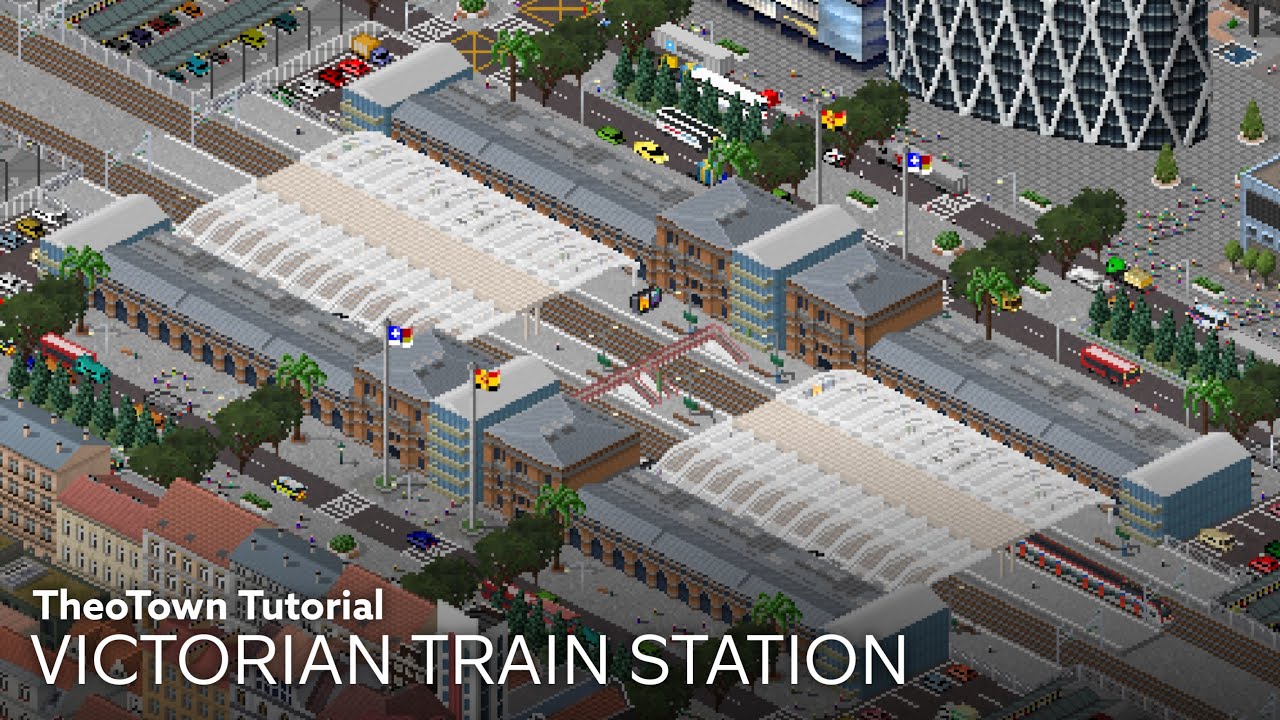
Hello there!
In this video, I will show you how to make this Victorian Train Station for your best and detailed city!
Plugins:
- Bremen central station
- Modular Build Megapack
- Urban Details Set mdk_813 UPDATE [deco props] (FORUM) | https://forum.theotown.com/viewtopic.php?t=5030
- Modular Panel Pack (0.3)
- The Railroad Expansion v2.0
- Peop...
Tip 347
Californian Train Station
https://youtu.be/o8vfvC0gJIo?si=Exb4_kVlN8gQ5nEP
Plugins you need:
- Ferry Building (FORUM) | https://forum.theotown.com/viewtopic.php?t=16803&sid=399aacc8335bc2941caaf372af75174d
- Modular Build Megapack
- Urban Details Set mdk_813 UPDATE [deco props] (FORUM) | https://forum.theotown.com/viewtopic.php?t=5030
- Metropol Station
- The Railroad Expansion v2.0
- People(trees)
- More Fence V.5.0
- Wavin’ flags
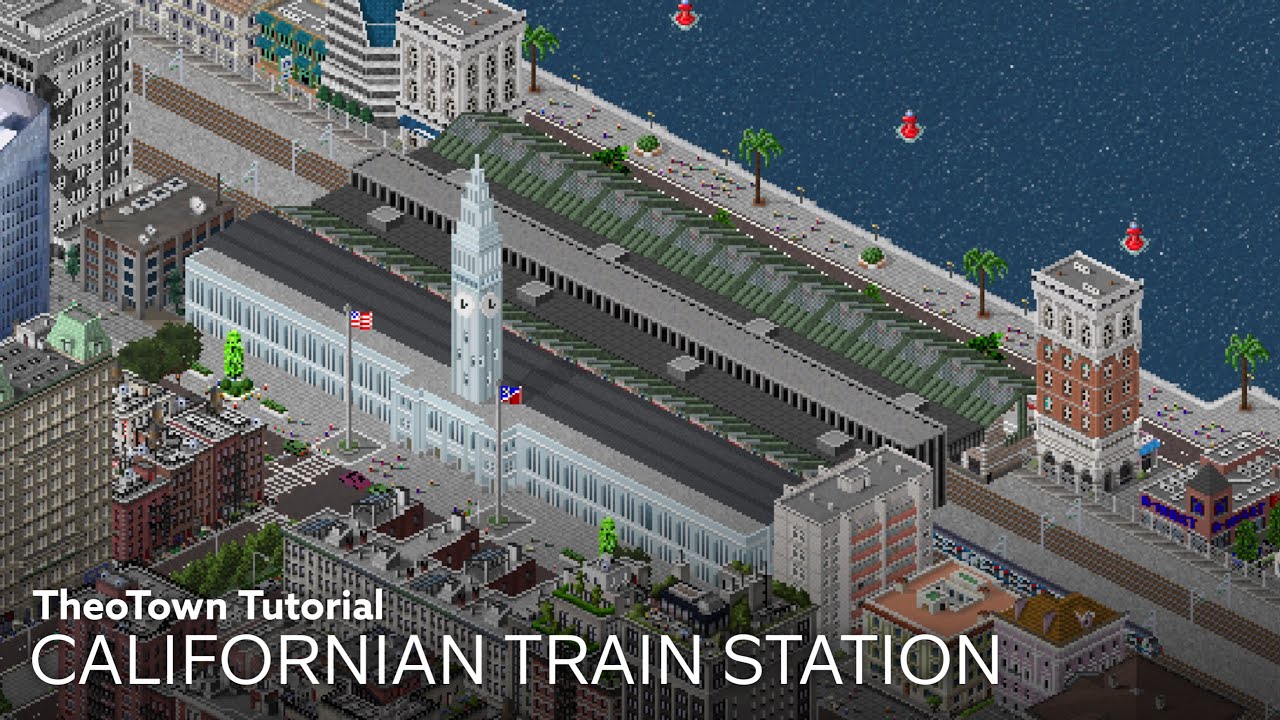
Hello there!
In this video, I will show you how to make this Californian Train Station for your best and detailed city!
Plugins:
- Ferry Building (FORUM) | https://forum.theotown.com/viewtopic.php?t=16803
- Modular Build Megapack
- Urban Details Set mdk_813 UPDATE [deco props] (FORUM) | https://forum.theotown.com/viewtopic.php?t=5030
- Metropol...
Tip 348:
Optical Illusions
Plugins needed:
MBMP (modular build megapack) by Simon142
Curb by Cerrera
Using a really simple technique you can make yourself some custom roofs, rooftop parking, or anything else you can dream of.
#1 Arrange your walls at what size you want, (you may encounter some problems with some heights, It can be fixed with advanced road)
#2 Add white curb
#3 add decal or anything else you'd like.
#4 Let your imagination run wild.
-This effect can be improved with other plugins such as Leaf's factory pack if you have it, I've also provided some extra pictures just to show some things possible with this technique, for more complex bits you may need to make use of decals but overall it's incredibly easy to do and isnt hard at all.


Tip 349:
Traffic congestion
For newbies, you may usually use a cross-intersection (image 1) although this usually leads to gridlock traffic if there are many “stacked”. Instead of creating a mess in a city, I would advise using T intersections (although they also create some traffic).
Another alternative is (image 2) of which I like to call a “double T intersection”. This reduces traffic congestion and you can install 2-4 traffic lights if wanted. You could also make two roads connect together facing different directions (image 3). This is more of a mini-roundabout which therefore leads to… …less traffic! You can remove an arm off the intersection to make a T-intersection but with a roundabout make traffic congestion faster and easier to manage. There are also plugins that ease traffic such choggoba’s traffic circle plugin (roundabout).
Summary: Cross-intersection create more traffic and gridlock traffic. T-intersections are better but there are also alternatives to a cross intersection (also I sent some proof I use these in my city)


Tip 350:
Finding inspiration images for your plugins
Lacking inspiration images for your plugins? Stock image sites such as Alamy, Shutterstock, Adobe Stock or iStock are perfect for finding many inspiration images so you can develop plugins easier. If you ever find Google Images too repetitive, or it's far too tiring to search within Street View, try looking within stock image sites. You don't need to know the exact location of the buildings you want to make, yet you will have a wide variety of inspiration to choose from as each site has its own different images.
Tipe #351
Have Traffic issues with your highways? Are residents not using your highways? I'm here to try and help!
-
On image 1, you will see a good (not perfect lol) clover interchange. these are perfect for any rural area, or city connection where you wanna cross some highways that aren't too busy
-
On image 2, you will find an interchange where one big highway splits into two smaller ones. no cars can exit the upper highway and go left, and no cars can exit the lover highway and go up left. this could potentially help some traffic issues
-
On image 3, you will notice a freeway (White line) interchanging with a regional, or municipal highway (Orange line). for these interchanges you can use the single-point urban interchange (SPUI). A SPUI is designed to allow opposing left turns to proceed simultaneously by compressing the two intersections of a diamond interchange into one single intersection over or under the free-flowing road. It is efficient in areas with high traffic volumes and limited space, as it reduces the number of traffic signal phases and allows more vehicles to move through the intersection in less time.
-
On image 4, if you're from Toronto, you may recognize this method, and may have tried it. if not, here's how it works. You have a wide highway in the middle. this is known as the Express lanes. and on the outermost edge is the Collectors lanes. this is where all roads interchange with the highway. and you can branch it on and off the express where ever you need. in the shown plugin you have an array of different speeds. you shoud make the express lanes faster to get the majority of the cars in there, that way they aren't taking up the area where cars are ramping on and off.
-
On Image 5, Inspired by YouTuber @imkibitz. this is a simple railway interchange. it allows your rails to flow smoothly, without them getting clogged up (note use 1 way rails)
plugins used:
- Ph roads
- Diagonal railway
- Speedmaker


Tip #352
Wanna make a transfer station, but don't wanna cross the rails together? Here's a little tutorial to help
Make this transfer station. it looks nice, and it avoids any rail collisions.
Plugins Used:
- Bus Lane
- Parking Lot Deco
- Diaginal Asphalt
If you want to, you can even add another level, or even an underground access
Songs used:
- The Static Age
- 21 Guns
- American Eulogy: Mass Hysteria / Modern World
All by Green Day
VIdeo Link>>>https://music.youtube.com/watch?v=D0dhTCYAF40&si=j-0cClMhJ8Db70ds<<<

Here's the plugin used:
Bus Lane pack.
Parking Lot Deco
Diagonal Asphalt
that's it, the rest is vanilla!
Songs used:
Static Age
21 Guns
American Eulogy: Mass Hysteria/Modern World
all by @GreenDay on 21st Century Breakdown
Tip #353
How to make a real life sized football (soccer for uhmericans) field
PLUGIN NEEDED:
- Invisble R.R.R
- Advanced Roads
This goes in 6-7 steps, showed by 7 pictures:
Step 1 - Do a rectangle of 12 tiles by 8 (can also work as 11x7)
Step 2 - Place invisible roads as the followed pattern
Step 3 - Place full white middle lines as a big box with advanced roads and use semi-middle lines to close it (lines needed are shown under the field)
Step 4 - Build 2 boxes with the same method and then...
Step 5 - ... build 2 smaller boxes in
Step 6 - Build the middle line and 2 circular lines with non-isometric lines
Step 7 - Place diagonal lines for corner points and build the central circle with semi-lines and diagonal lines
The last picture shows the position of every road deco
Now use any type of grass under and you have a cool life sized football field


Tip #354
Elevated Neighborhood
Do you want to give the rich people in your city a better place to live?
The plugins aren't necessary but I will include it anyway
-Com fences and props pack
If the instructions are unclear there are images below to help you
Step 1- Using the terrain tool, create an elevated rectangle and flatten it using the platform tool
Step 2-Set your road elevation to 1, this won't work if your road has pillars when they're elevated, your best choice is the highway ramp
Step 3-Outline the rectangle with the road this will form a rectangle with no slopes
Step 4-Connect the elevated road with your main road so your citizens can enter and exit
Step 5-decorate the edges with the com fences plugin or use your fences
Step 6-build the houses and enjoy
For those who are wondering what the plugin in the images are:
Rio De Janeiro Pack
Tree decorations-as fence
(easy)parking lot


Tip 355:
How to Improve your Highway
https://youtu.be/20mEfJ8gloA?si=vX5Gcftz5mf_WB5k
Plugins needed:
• Traffic Barriers mdk_813 [deco] | FORUM: https://forum.theotown.com/viewtopic.php?t=4286
• Erin’s Road Additions
• Custom Roads
• (one way)street light
• i13 Road

In this video, I’m going to show you how you make better and improve your highway!
If you don’t really like the old highway designs you’ve built, and some boring highways, you might want to improve by watching this video how!
Plugins needed:
- Traffic Barriers mdk_813 [deco] | FORUM: https://forum.theotown.com/viewtopic.php?t=4286
- Erin’s Roa...
Tip #346
Heres a basic Avenue layout and pedestrian crossing
Plugins Needed
- Tranzit Pack By Androx
- Advanced Roads Pack By Mew
- SC4 fan trees v2 by SC4
- One Way Street lights by Choggoba
Steps
1- Do the road lay out
2- Place the Fences and also the area for crossing
3- Add in decorations and thats just it lol


Tip #347
Have you ever wanted some exposed tunnels in your city? Well here's how to do it!
You Will Need
-
Rails
-
Overhead Line masts
-
Terrain Tool
-
Residential Zones (variant 1)
-
Concrete Pier (More Fence V.5.0)
-
Overhead Pillars
-
Step 1: Lay down your rails
-
Step 2: Place your line masts in your desired location (I do every 3 squares)
-
Step 3: Level up the surrounding terrain by 1 (Or below 1 where the rail is going)
-
Step 4: Place residential zones on the edges, then use the concrete pier to make it look more modern
-
Step 5: There's no step 5, it's as easy as that! :)
Note: You can use the 1x1 concrete parks, or alley trees if you wanna spruce things up! It's your city, make it yours! :)
-# Image 1-Laying down the rails
-# Image 2-The residential zone you should use
-# Image 3-What the end product should look like


Tip #358
You want to make a one laned underground tunnel entrance? It's pretty easy!
Note: This is not functional!!!
Things we need:
-Any fence (optional)
-Advanced Road
-Invisible road
- Polydiagonal decal (optional)
- Any decal plugin that fills half of the tile.
Step 1: Put an invisible road.
Step 2:Chose one of the non-isometric parts from Advanced Road(I put photo) and put it on the invisible road.
Step 3: Put a decal that fills half of the tile ( I put photo) to fill the gap between the side of road and road decoration we've put.
Step 4: Put other road decorations or fences to surround the tunnel entrance.


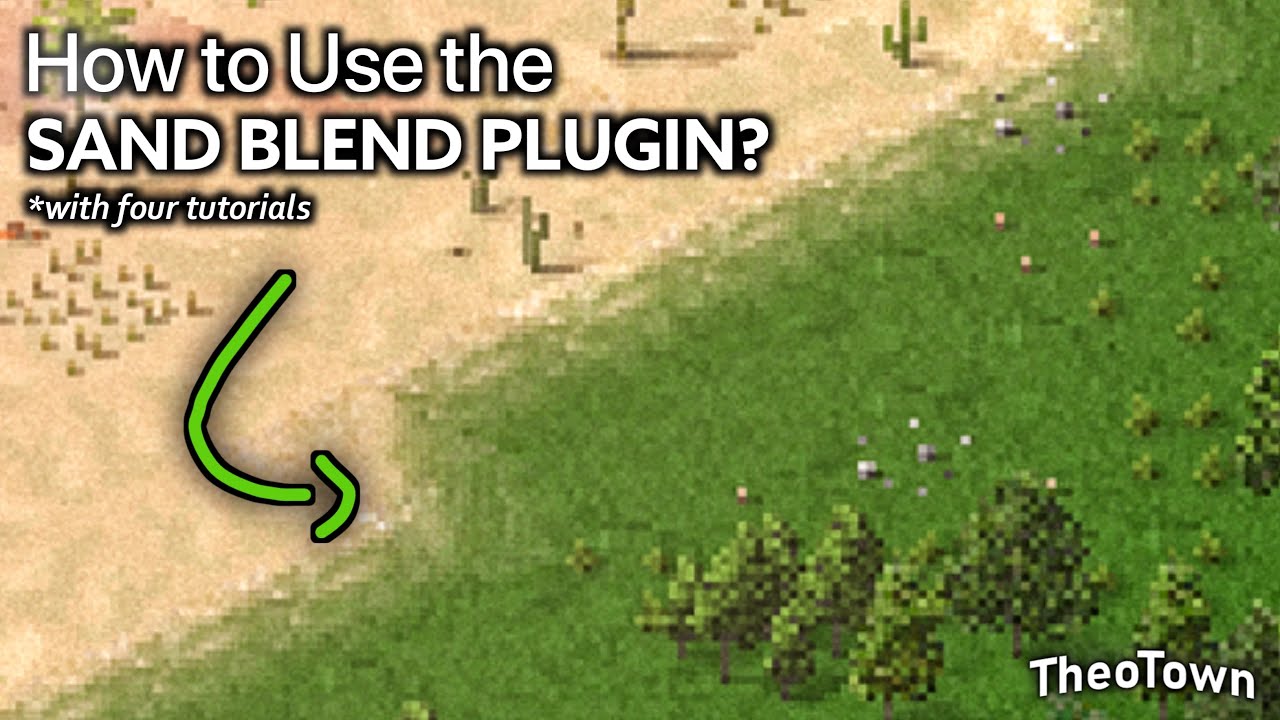
Tip 359:
How to Use the Sand Blend Plugin?
I’ve noticed that no one has featured the plugin of Sand Blend by Chippy in the channel of #city-showcase, so I would try to make the plugin not useless by showing how to use the plugin and show some four tutorials using it.
Yes, you only need one plugin to do it, the Sand Blend plugin.
Plugin name: Sand Blend V2
Credits to Chippy for his amazing plugin and the picture in the thumbnail
It’s been a long time, y’all/Theonians!
For some other reasons, some people think that one plugin might called it “useless”, but I will try to make it not.
In this video, I’m going to show you how you can use the Sand Blend Plugin (plugin made by Chippy), and show you some four tutorials about sand blend layouts for your city!
Yes, you only n...
Tip 360:
Here's a single small non-isometric road tutorial
Well if you don't understand some tutorial here at the #tips-n-tricks here's a short tutorial
- Step one- Make the road plan
(2x2 slots connected) - Step two- add the lines
- Step three- Add median line
- And step four add the asphalt
Make sure to activate support for multiple road decorations in experimental mode
For more tutorials credits to @TheoHarLo watch this https://youtu.be/8xhDJDqem90?si=y9LgsLw6n3VDZxLR


I hope you enjoy it, and thank you for watching :)
#theotown
Credit to the Owner's music:
Windfall - TheFatRat
Sunburst - Tobu & Itro
Tip 361:
Need ideas and/or a solid design for LRT station? Well fear no more, I am here to (try and) help! I've whipped up three designs ranging from no plugins at all to a few plugins.
-
Figure 1: A simple design involving the standard rail, and the original in game train platforms, roofs, as well as the tall wodden fence. this one is easily combined with multiple rails
-
Figure 2: This one uses the Suspension Monorail plugin and is built the same way as the first one, it uses the original rood pieces. plugin access points and on ground platforms. Its easily combined with others. it's like the first one just more modern
-
Figure 3: This is a more advanced version. it uses a few plugins; Berliner Strassenbahn, Rail deco, tram stops, and pretty much all tram platforms. I recommend this plugin as the LRT can be used as a tram on roads too; Advanced Road It adds a cool curve effect, you can get away with using the Philippine Road Pack too. I used orange lines because I'm canadian, anything else is ilegal to me, so you can use white ones if you prefer. I would've added the diagonal lines but i just didn't feel like it. And be sure to add bus lanes! I also used the Bus Lane plugin to get the bus stop shelters. The tile under the bus lanes are from Tranzit: Plazas and Pathways, and the shrubs are from the Com Fences and Props Pack
If you have any questions you can probably DM me (I dont know if i have it allowed and Im too lazy to check XD) And I hope you enjoy!


Tip 362
Here's a basic but cool intersection
Plugins needed-
Advanced roads by mew_uwu
Invisible Road by 1code
Crosswalks by dnswodn
Turn on the support for multiple road decos in the settings for this to work out!
Step 1 is always the road layout
Step 2 add these umm non-isometric edges
And finally step 3 just add any kind of decorations for the lines and road decorations like crosswalks or light posts
And that's it...


Tip 363.
Wanna spice up your highway to street interchanges? Now you can do that with the revolutionary technology of roundabouts! Today I will show you 2 types of interchanges you can make. All of them you can make as underpasses or overpasses. No need for plugins.
Number one:
a dumbbell interchange is a classic (picture 1). In my case first I start by leveling the ground up a level.
Then you place 2 roundabouts on different sides and connect them with a bridge. After that you can add on and off ramps and it’s done.
(picture 2) you can always spice the interchange up with some plugins! Just to note for the traffic circles to work you need to have a flat 5x5 space.
Number two:
a dog bone! (picture 3) dog bone is similar to the dumbbell but larger. Make the roundabouts 3 by 4 but don’t connect them fully, it should look like a C. Then connect it with 2 bridges in different directions (look at the picture 3 if you need some help). And finally add on and off ramps. Remember to spice up with plugins to make it look more presentable. :D


Tip 364.
Just a small trick, but if you're new to the game, you'll find this quite useful
If you have the bus lane plugin, if not, get it Visit Here
Once you have the plugin, you can simply use the "Invisble Bus Stop" to kinda force your bus to go the way you want it to. That way for the show image, you can route it from a specific road and not make it go all the way around in some weird long route lol

Tip 365
(wow, it's been a year lol)
If you're new to [Advanced Roads](https://forum.theotown.com/plugins/list?term=Advanced+Road(Bus+Lane+Update) Then this will be a pretty useful tip. If you have Easy Parking Lot then you're all set. First thing you're going to do is place the Invisible Road. Now this is only really going to work if you raise the road from Advanced Roads up a hill first. Then bridge accross a road, or a highway, or rail, etc. As show in Image 1
Then what you're going to do is add the lines of your choice. I'm from Canada, so I put a yellow line in the middle, in some places that line may be dashed in white or yellow, or just white. You have to do this first, I'll explain why in step 3 (image 2)
And third, I told you to place the lines before this, now you can go into the Intersection Parts category, and use the 2 half road parts, just run them fully along your bridge. If you do this before placing the lines, the lines will not show (image 3)
Now, this bridge will only function as one way, and it will have a small pixel line of grass at the end, you can fix this by just placing asphalt underneath it. But just looking at it, it will be pretty convincing, and there's no way of telling it's one way besides when cars use it. (Note, you can not run bus routes over it either, since the in game buses are not compatible with the parking lot roads)
Hope you found this useful!


Tip 366
Here's a Highway with a separate Bus lane
Plugins needed are Philippine Road Pack By Hadestia
Indonesian Transport Pack By Yakka
One Way Street Lights By Choggoba
Road Medians By Cerrera
Some SC4 Fan's Trees by ur_sc4_guy
Now here are the steps
1- Do the road layout
Use both Outer lanes in the plugin and add 2 one way lane for the bus to move on
2-Add the Bus Depot
Use Bus halt in the plugin and place it somewhere else
3-Now add the decos
Add the in-game bus stops, add the street lights, add the Medians and lastly add the trees
You can use modular build pack by Simon142 if you want to cover the front entrances of the bus depot
And There you have it a Highway bus thingy


mini-tip 367
want to make road tunnels under water visually?, easy!, try to use deeper water to represent the tunnel under!

I'm going to update this real quick, instead of using the invisble roads from the parking lot plugin, use the Invisble R.R.R plugin as it includes no bridge texture roads, bridges, and all vehicles can use it. You can use the same method for the road deco from Advanced Roads
Just a mini tip:
The person who made the songs for theotown is available in YouTube.
Tip 369 (counting that mini fact above me)
Here's a parking lot in road ehh?
Now you need the plugins :)))
Advanced Road
Invisible road
TLCAP(In LPC)
Updated
Here are the steps ;))
step 1 add the road
step 2 add the parking lot •make sure to use one lane road and add that extra road that merges with the road
step 3 add the car decos
•it overlaps if you add the lines first
finally step 4 add the lines
Here you go!


Tip 370
I say this a lot, so I'm gonna explain it here that way if anyone if curious you can just refer to this message !
City Backup
Your cities/regions can be lost for many reasons:
- Factory Reset (If you induce it, or it can sometimes happen on its own when the system detects a virus)
- Switching Devices (This is a common question, not so much lost, but a transfer)
- You deleted TheoTown and reinstalled it
How you can prevent your city from being lost
- The game does have a built in file manager, however I'm going to explain this in the sense of your device's built in files app. Every device has one!
- External storage device, ex a USB drive or an SD card. This ensures the files are always kept on a seperate device and reduces the risk of them getting deleted. However these can easily be lost and a USB drive isn't compatible with phones or tablets (At least natively)
- Google Drive. Google Drive can hold just about all, if not every single file format. This is an easy option as Google Accounts are free so there's no worrying about Drive getting full
- Other file manager app. If you use this option, it's right to assume you fully understand it, hence the reason you chose the specific app, I wont go into detail about every single one of course, that would take up message space
How to back the files up
External Storage Device (USB, SD, etc)
- Simply inseer the ESD into your device that you play TheoTown on. Open the device's built in files app. Locate the TheoTown folder, then head to it's sub-folder "Regions" or "Maps" and simple find which region or map you want to backup, open it, then copy every file from it, then paste it into it's own folder on the ESD. Boom, it's safe, and you can easily transport it to a new device
Google Drive
This can be done 2 ways
-
- Do the same thing from the ESD instructions, only under the "My Drive" folder
-
- Open Google Drive and click upload file and then locate it
I am out of characters as of now XDD
- Open Google Drive and click upload file and then locate it
Tip 371
Have your cities been looking bland? Maybe it just looks meh. Random patches in the middle of your downtown and you don't know what to build? I have a proposal: tree
Using the tree
First go to terrain
Then press plants
Then select the tree you like
What to do?
If you have a bland patch of grass in the middle of your city, maybe a concrete mess? Get the tree. City looks too boring? TREE
Trees are so simple yet so effective, see the new green area of Harmonia and compare from before and after with just trees and simple pathways.


Tip 372
If you want to build a realistic city you need to learn some basic stuff to achieve perfection. It may take time to be a pro, but it is never late to start.
Tip 1 /Proper Road hierarchy and Realistic Roads: If you want ur city realistic, roads play an important role. First, you need to provide better road hierarchy by using the proper road at proper place.( I forgot to leave a photo, u can search more on net.) Take inspiration from real places, u don't need to use advanced road all the time. Even normal roads will look good with small details and atleast some advanced road work on intersections.
Tip 2/ Realistic decoration: I need to tell u may need a lot of decorations for that. There are a lot of decorations plugins that u can download on store and forum. You will need lamps, people(deco), props (phone booth, bollards etc.). Bollards will make your roads seem 2x better. But don't over use it since there shouldnt be bollards everywhere as it is in real. Don't make it stuffed with decos everywhere. Some places are quiet and empty, but some places are loud. Try putting more people (deco) in crowded areas. For industrial areas, u will need some kind of trucks and packages more. I suggest you downloading all the deco plugins possible and check other theotown related servers for more. Once you got them, u may split the area into parts for loading, warehouse for packages, building of the company and more. Of course taking inspiration from real places will help again to make it more realistic.
Tip 3/ Downloading Plugins: Download as much plugins as you can, diversity of plugins u will have while decorating or building a place will help you a lot. Don't stick into a particular plugin(s) unless you really need to. Try using as much plugins as possible that fits to the place.
Tip 4/ Taking inspiration: Taking inspiration from real places is arguably the most important tip. Use Google Earth for better experience.
(This is for the urban side, nature soon ig)
Tip 373:
Did you know? You can effortlessly set up images based on pixel patterns in Ibis Paint using Perspective Form when moving the layer. Just remember to turn off Interpolation; otherwise, the image will blur. This method is far easier than cutting every two columns of the image and moving a pixel down.
Additional Information:
It is important to note that while adjusting the 'Translate Scale' and subsequently the 'Interpolation' settings, the choice of interpolation method can significantly impact image quality. Specifically, if an interpolation method other than Nearest Neighbour (Pixel) is selected, the image may still appear blurred, even if Interpolation is disabled in the Perspective form. This consideration is crucial for achieving optimal clarity in image rendering.


Tip 374:
How to Build Complete Streets
Plugins:
-Advanced Road
-Slow Traffic Package
-TLREP (in LPC)
-TLCAP (in LPC)
-Bus Lane
-Japan Expressway
-Tranzit: Plazas and Pathways
Steps:
-
Road:
Start by using Advanced Road to build bike lanes and main roads with parallel parking.
Use 1-way 1-lane roads for the bike lanes and parking lanes, and 2-way roads for the main road.
Place white straight line deco for parking markings and yellow straight line decals for road center markings. -
Bike Lane:
Use TLREP to add dotted lines along the bike lane.
Add the School Zone marker from Slow Traffic Package as a bike symbol.
Then use green colored road deco from Japan Expressway to highlight the bike lane. -
Sidewalks:
Place Concrete Decal to create the sidewalk.
Add Grass Decal between the sidewalk and bike lane for a more realistic look. -
Decoration:
Place cars from TLCAP for added detail.
Use tree decorations from the Bus Lane plugin along the roadside.
Finally, add bollards from Tranzit: Plazas and Pathways for realism.
I hope this tip helps make your city look more realistic!


Tip 375:
How to play in portrait mode
Steps:
-
Click the gear icon at the bottom left corner
-
Scroll down until you find the Settings button,
-
Go click Graphics and then on Screen orientation click Potrait


Tip 376:
I'm done with people misunderstanding demands and those who fail to explain how they actually work.
The image here clearly illustrates how demands operate. Each category 'demands' something from the next. Residential demands Commercial, Commercial demands Industrial, and Industrial demands Residential—this cycle continues indefinitely.
To clarify further, let’s examine it from another angle. Industrial needs workers from Residential areas, Commercial requires raw products from Industrial, and Residential relies on Commercial to purchase products. Although the order is reversed, the essence remains unchanged.
If a demand is positioned at the bottom of the horizontal line, it indicates that you have an oversupply of it. For instance, if Industrial demand is lower than Commercial and Residential, it's time to invest in the latter and shift your focus from harboring industry. Remember, this is a city-building game, not Factorio.
If a demand is on the line or nearly nonexistent, ignore it completely. You already have it, so direct your efforts towards the other demands.
It's crucial to understand that regardless of whether your zones are low, mid, or high density, the demands remain constant. By providing your zones with parks, low education, health facilities (e.g., hospitals), sports/entertainment, and high education, you elevate demand from low to high. This process transforms poor areas into prosperous ones as long as all are within the zone of influence.
I hope you understood everything because i am pissed. I may delete or edit this later if I'm in a good mood, but for now, these points are essential.

Tip 377: Using this SIO shader's configuation for a gloomy dark old Soviet look


Tip #378 !!
Alright. I'm sure ya'll could use a creative trick to make tram crossings and at grade systems! So here's a couple ways to do it.
You will need:
✅ Advanced Roads(Bus Update)
✅ Berliner Strassenbahn (For the rails)
✅ Advanced Rails
- Start by laying your blank roads, or if you use invisible roads use Invisible R.R.R., then lay your lines and tram rails from advanced rails in your desired location. Mine are in the center, however that's a TTC based line, you can place them on the outer edges too, or even use the curved track parts, just place the Sbahn rails where the tram line will go for functionality
- Then you can place your asphalt pieces, mostly under "Intersection Parts" but you can use the merging parts too depending on the style of road. The red bus lane parts work too. So you can do this to make crossings and at grade systems


Tip #379
Don't focus solely on constructing buildings; be sure to include yards and decorative elements to enhance the overall aesthetic and functionality of your city


Tip #380
Stacking labels
-# for small labels, seperate by 5.
Tip #381
Pro players not satisfied with the metro station? Here is the checklist to build a modular metro station:
Platform
- level 2 (philippines road)
- intersection part (japan expressway)apply to philippines road, serve as the platform ground
- level 0, -1, -2 (advanced decal) apply to philippines road, as the platform body
Platform roof
- station roof CB (cablebus pack)
- modern concrete (railroad expansion pack)
- road pillars pack, serves as the roof support
Pedestrian bridge
- pedestrian bridge (TCPS new railway system pack)
- covered platform 1 (TCPS new railway system pack), serve as covered bus stops
- station roof CB (cablebus pack)
- level 3 white walls(modular houses)
Elevated Railway
- level 2 (invisible road) without bridge texture
- (advanced railway) apply on the invisible road
- level 0 (advanced decal) apply to invisible road
- fences (polydiagonal decal or sidewalk)
Elevated Railway Pillars
- (paris metro station) apply to the level 0 invisible road // or just the pillar from the invisible road itself

Tip #382
Cant build a urban sub-underground railway station?
I’ve got the solution for y’all!
Plugin needed: Railway Expansion 2.0
1.Lower the ground in a (length) x 4
2.Place the tracks and platforms with overpass at the edge
3.Build a road without touching the higher ground
4.Use the roof to cover and station building as entrance.
5.Add concrete asphalt around the station, add fences if you want.
And it’s done!


Tip #383
How to build custom bridges from using Tip 365 #tips-n-tricks message
Step 1, Build the road using the parking lot invisible road, https://forum.theotown.com/plugins/list?term=(easy)+parking+lot (Make sure to join all roads for a future step)
Step 2. Then use the https://forum.theotown.com/plugins/list?term=Advanced+Road(Bus+Lane+Update for using the lines at any way you want them to be.
Step 3. Fill the road using the intersection parts from the advanced road to complete the bridge.
Step 4, Then grab the Guard rails from the road Decorations and place it on both sides of the road.
Step 5, Congratulations, you now have a fully developed custom bridge


Did you ever want to make a cool entrance for your custom building?
I have came up with a good looking entrance that everyone can build.
Plugins needed:
-
"Bridge deco pack(part1)" by michaelbello123
-
"Metropol station" by AndroxArev
-
"Cablebus/Cablecar 1.4" by AndroxArev
-
Any invisible road plugin
So firstly we build an invisible road, you can build it as long as you want but 3 tiles is the recommended length, after that we put any bridge collumn you want on the edges of the road, and then we put cablecar roof (you can also put metrolopis station roof).
Voila!, now you have a cool looking entrance


Tip#385 Wanna improve your cities by looking like it's really populated?
First build a layout any layout and put the buildings
Second mix some tiles and decorate more with some trees
Third decorate the road with some parked cars or bicycles
Fourth put a lot of decors and benches and bending machines etc..
And u can use invincible roads so u can put tents in it
To make it look more good
Fifth u can fences around especially the ones from the "transit" plugin from the store .. and try to make your roads more creative


Tip #386
Are pro players tired of (easy) parking lot plugin just because its too simple?
Make a modular parking lot using mew or leaf advance road and add cars to the parking lot(i use leaf civil automobile)

Tip #387
Simple train stations guide


Tip #388
I highly encourage you to check out an outstanding individual on YouTube who delivers remarkable insights into urban planning, development, and solutions for urban areas. His expertise as an urban planner shines through in his videos, making a compelling case for how we can create safer and more functional communities.
Thanks to Evan for the permission to share
https://youtube.com/@streetcraftshorts
As a fresh start to checking his channel, did you know that you can create an elongated roundabout?
https://youtube.com/shorts/3CoI6dWOG9g

YouTube
The short-form counterpart to the main channel @Streetcraft
Solution-oriented approach to traffic engineering, urban planning, and city design

Tip #389
How to get the train manager?
1.Donload this plugin by lobby.
2.Go to the game setting check this button!
3.Now you can click on the train platform to get this intereface!
I am so surprise this plugin really have a surprise!


Tip #390
Wanna make Taxiway bridge for your airport?
Lemme teach you how to make it
1.prepare the taxiway, use decals of your choice
2.use the invisible road (from easy parking lot plug-in)
3.add an outer layer for the barrier (make sure its all connected)
4.(needs Leaf's road expansion plug-in, you can get it from LPC) add the markings and road fills of your choice)
5.(needs japanese expressway plug-in) use the green fill part
6.add the barrier, you could use the sound barrier(vanilla), or the barrier from japanese expressway
7.add decorations of your choice
And your bridge is done!
[This is my first tip :)]


Tip #391
This is a tip on how to generate demand of the sectors you want not what the citizens Want
So if your demand chart looks like the pic I provided even when all the requirements for the tier of people you want to settle in your city aren't settling there's an easy hack to it
Just build a commercial building of that tier ( for me this has only worked when a commercial building was built )
Even when there's is no demand for it people will start working in it and that will create a demand in the industrial sector and residential sector,successfully making artificial demand of that tier

Tip #392
This is only for members that use pixilart for creating plugins (like me).
These steps are broken down in creating night light only.
- Get a reference photo of the light texture you like and load it into the app.
- Create an empty palette box just to place the colours you want in it.
- Use the colour picker tool and swipe it across the colours within the image. It will automatically place those colours in the palette box that you have created.
- Open back the plugin you were working on and to the right (since I'm using a laptop), add a layer to the plugin.
- After this, switch to the line tool and enable iso lines (or you don't have to if your plugin is not isometric).
- Go to options which will be the option of the selected tool and enable random colours. This makes the job way easier.
- Then start drawing your night animations. I don't recommend doing this for neon lights because they will not look smooth.


How to make a street with a retaining wall
what you need
-retaining walls
-sidewalk decorations
-decoration flyovers
-any road decorations you'd like such as cars
-mews advanced roads
-(easy) parking lot roads
Step one - create elevation
Step two - line the areas you want a road to be with the retaining wall fence
Step three - elevate the invisible parking roads to 1 and place them on the sloped edges, following the retaining wall
Step four - using the sidewalk decorations, use the walls in the paving category ONLY placing walls on the isometric edges facing towards you
Step 5 - add in your road decorations and then AFTER finalising your decorations, place the last few walls facing away from you
Step 6 - fill the invisible road in with mews advanced road
Step 7 - you may notice a gap between the road and the land. I use asphalt from the terrain menu, placing them on the sloped edge to try and hide the gap
Step 8 - your done! This is great for creating elevated suburbs or areas on hills and you can raise it as high as you want. An example is the last 2 pictures.


Tip #394
You can actually gamble diamonds in theotown (pls do not cuz it's bad and haram)
Here is a pic

Tip #395
These are some simple tips for new players:
- For roads, you want "Allow multiple road decos" on. This requires experimental settings
- You can use invisible bus stops from the Bus Lane plugin to create waypoints and force your bus along a certain route, whilst making more tickets
- Always back up your cities. I recommend using an external device, but you can use cloud storage as well. Just simply overwrite the backup file. This is simply in case you lose your city, there's another file
- If people won't move into your homes, build industrial and commercial buildings, as well as provide a route to and from them
- If traffic causes too many issues, you can always turn down the traffic volume
- Vanilla highways, Expressways, and DSA speedroads do not support bus stops. If you for some reason want a bus stop on a highway make a seperate lane, or use a different highway plugin. You can get a speed changer plugin to make it work the same
Tip #396
Wanna make your region to look tropical? Here's some tips:
• You can add some Palm Trees around the map (Its easier to use Tree Planter so you wouldn't have to place all the palm trees individually)
• add some rainforest and redwood trees
• decorate the terrain with the Ground Tool, suggested to use rocky sand at coastal places.

MASTERY ⭐ TIP #397
- THE SOUL OF A CITY -
Plugins: there are no specific plugins, just listen.
Do you want to improve?, do you want to stop disappointing yourself & actually make something that YOU are proud of?
buckle up, because I'm going to teach you how to build like a PRO.
today we will focus on the CORE of it all, this will CHANGE how you think of cities.
Part 1 | The IDEA
- what we find in a detailed city is beauty, dedication, & stability, your city, will always need those qualities, this is the first step of building a detailed city, when you want to build a city, always have your city tie to these qualities, if you want your city to emphasize stability, plan a city representing stability, which is city with a defined & clear skyline.
Part 2 | The APPLICATION
- You've been enlightened on what cities NEED TO BE, now its time to learn what cities CAN BE, what a city can become is shaped by YOUR plans, Always plan ahead, build with your mind, thinking can CHANGE &, so does plans, if you follow your mind in making a detailed city, you will find yourself focusing on individual areas, & streets.
Part: 3 | The EXECUTION of the PLAN
- its time to materialize, this phase has 1 & ONLY 1 factor; always, FOCUS, do NOT start another city, do NOT delete your city, this is what most of all casual players end up doing, do not be the same, even if you're bored, or empty of plans.
Part 4 | The RESULT
-Congratulations!, you've just made the city of your dreams in your mind, & applied it!, however there is one last question...
Final part | The MEANING of it all
-why do we like cities?, its because they are a monument of dedication, even more so a detailed one, we like cities because humans like a challenge, & building grand projects gives us strength & wisdom, so whats better than that?, a city with MEANING.
I hope this frame of planning a city helps you see citybuilding in a completely different way, I will probably write more tips that can help you!
Tip #398
To make better cities :
-Don’t mix to much types of buildings (like European and Asian buildings don’t fit)
-Don’t make boring grids.Your city will not look better. be creative and logical at the same time.
-Ad decorations, thing that exist in real life even know they don’t look very cool (like trash, abandoned buildings…)
-Even know it takes some time, putting all the buildings manually is better for the look of your city.
-Don’t make your cities empty : if there’s an empty place only with trees at least put fences or build a park or other thing.
🙂 hope it’s good
Tip #399
If you feel that your game is laggy check the settings and go to others,here you will find energy saving PLUS,if on turn it off cuz it just sets 30fps as the max,or if its off,check the graphics,
Thanks to starboy for the info
Tip #400 Place animated props such as Waving Trees or Waving Waves to make your city feel alive 
Tip 401
How to make your cities look like an actual city 🎉
Step1: Start out small and make a town first, its usually how major cities were built and made.
Step2: Then, expand the town. Recommended to make the grids and zones larger for a bit larger buildings.
Step3: Once your town is very large, you can make some zones dense.
Step 4: Then you turn the old comercial and residential zones into dense zones.
Step5: You're basically done. for more variety, manually place buildings!
Its a slow process, but it'll make your citizens to react a bit more clearly instead of a giant skycraper in the middle of a plains or desert 😂
As they say, Rome wasn't built in a day


Tip #402
some very simple road
- Build highway like this
- Remove the middle and replace it with british city lane road
- Add crosswalk and pavement
- add trees
- add fences and replace the terrain
that's all
i will scare you to tear if you dislikes


Tip 403
How to make your city have normal development
First:
Start small with residential zone/commercial/industrial, because its ur start and if u put skyscrapers at firsy ur city will look like american dagestan
Second:
Slowly develop by manual building dense zones, in a controlled amount always 🌟
Third
When you think you are ready, never hesitate to build large buildings in a control amount.
Note:
If it looks bad, try positioning it in a good area like places near houses and apartments.
As they say,
mistakes are stepping stones to greatness
TIP 404 : O
Tips with train
Always put stations in crowded areas for max usage, because whats the point of having train stations if you dont use them?
Make efficient train routes by planning it out and using the spaces available. Trust me, it will make your railway so useful and efficient

most people fail because they dont prepare.
-logisitcman
Tip #405
You can make forest a bit more realistic by using different types of trees and make it less dense a bit 

Tip #406
Don’t use too much skyscrapers. It will make your city look boring (I was doing this before too )
Put trees or decorations on empty places
A lot of cities have empty places that make no sense.
Use asphalt , at least, to make the floor of your city. Too much persons are keeping grass.
Tip #407
Give distance from highways to houses.
If you're making a highway within a city, give those roads some distance between buildings and such. Think of it as a clearing around the highways.
- looks neater
- looks more organized
- would actually be safer (if that matters)
- gives you enough distance
- shows where a highway is
Side effect: Dystopia feeling
Tip #409
How to make the balanced skyline without making it look ugly & messy?
If you want to make the city to have balance skyline and fits the city well, see the size of the city if it's small, medium, or big. This is the example of this picture, I'll try to not place supertall skyscrapers since this city isn't a very large city.
Depending on the city size, you could make the skyline have only few stories high or if it's big city, you can put tall buildings but make sure to not put mostly supertall because again it doesn't fit into the city so balance it with high-rise condominiums, high-rise offices, etc.
Btw this is the first tips-n-tricks in this category and I hope this helps. 

Tip #409
Increase traffic volume for higher transportation incomes and make your city traffic a bit more realistic, 4x is the sweet spot
Upgrade from tip 374:
more realistic avenues
Step 1: I use Advanced Roads to create the model from photo 1 for the main base of the avenue. Step
2: Using the Bus Lane plugin, I position it as shown in photo 2, with the white line extending inwards.
Step 3: I add sidewalks to that model (using MEWS Advanced Decals).
Step 4: I use Advanced Roads to begin drawing the avenue markings.
Step 5: Details: Using the plugins shown in the photos, I add fences to divide the bushes and vary the trees to create a more natural look.
Edit: (I'll send the photo of the plugins I forgot to send lol)


Plugins
Advanced roads
Mews advanced decals (in LPC)
(optional)
TLCAP (in LPC)


Tip #410: How to make pretty and realistic European blocks (in my opinion).

MASTERY ⭐ TIP #411
- GROUNDED FOUNDATIONS -
plugins; again, no need for plugins
today we are going to learn the FOUNDATION & SUITABILITY of a city.
before that, there is an important thing about teaching how to build cities, & that is breaking them down & making them understandable, so from now on, we'll split the road map to professional city-building into 5 parts:
- SOUL OF A CITY ( ✓ )
- GROUNDED FOUNDATIONS (the lesson for today)
- INFRASTRUCTURE, & STRUCTURAL STABILITY ( X )
- LOGISTICS, & LAYOUT ( X )
- DEPTH, DETAIL, & COMPLETION ( X )
Part 1 | FOUNDATION:
- In the 1700s-1900s, most city foundations were built under wastelands & plains, so if you want to start easy, choose a wasteland, if you want a challenge, go for mountainous establishments, their elevation poses unique challenges.
Part 2 | REAL WORLD INSPIRATION & STYLE:
- the most commonly said tip, if your city lacks direction, try building with styles since this part is long, heres an oversimplified list:
• COMMON STYLES:
- US (✓✓✓)
- SPANISH (✓✓)
- CARRIBEAN (✓✓)
- LATINO-AMERICAN (✓)
- CENTRAL EUROPE (=)
- MEDITERRAINEAN (!)
- MIDDLE EASTERN (=)
- ASIAN (!!!)
- RURAL-URBAN MIX (!!)
Levels of difficulty:
Friendly (✓-✓✓✓)
Standard (=)
Challenging (!-!!!)
FINAL Part (kinda) | INTEGRATION
- combine these 2 parts & watch your city explode with colour & tone!, exa. ; your city is near a mountain, 1 height lvl above sea lvl. , surrounded by pine or spruce, very ragged, in this case, n. american style fits, if its near water, close to beaches, varied terrain, & has coconuts? try mediterranean, or if its grassy, try asian
EXTRA | LANDMARKS
• kinda explanatory, give your city uniqueness
& thats all of the parts, hope yall listened!
TIP #412
THE TRANSIT HIERARCHY
Similar to roads, your city's public transport system should also operate on a hierarchy of short distance, medium distance, and long distance transit modes. This hierarchy ensures that each mode of transit is able to operate efficiently and can provide the best mobility possible to your citizens.
STOP/STATION SPACING
The spacing of each stop determines how well that mode of transit is able to serve riders throughout the city. You want to make sure the stops are spaced appropriately in accordance with what that particular mode of transit is supposed to serve in the city.
As an example, Image 1 shows how each mode of transit would appropriately be spaced based on their functions. The city blocks used in this example are 4 tiles wide.
Local Transit (Busses): Serves local short distanced transit, should be spaced ~2-3 blocks apart (or within walking distance from each other, credit to theone.z for that).
Collectors (MRT/Metro/Elevated Train/Monorail): Serves medium/long distance transit, and should be spaced ~5 blocks apart or more.
Arterial (Trains): Serves long distance transit, and should be spaced ~9-10 blocks apart or more.
CONNECTING TRANSIT MODES
Your transit modes should ideally be connected between each other to maximize mobility within your city.
As an example, Image 2 depicts a small transit network that combines all three transit modes into a single system.
- The bus on the east serves local traffic and allows people to ride up to the metro station.
- The metro serves medium distance traffic and allows people to reach the train station and the western bus line.
- The train serves long distance traffic throughout the city, allowing people to travel to different parts of the city. Additionally, people getting off the station can now either ride the metro to the east or ride the western bus line.
With this, you can create a fairly realistic and useful transit system.


TIP #413
How did I make this city beautiful if I just put different buildings from Malaysia, Indonesia & Philippines?
Answers listed:
-
Try to pick which building suits - I tried to pick carefully which buildings are represented ASEAN vibe without making it look unfitted by making similar buildings of different countries in SEA and it would blend it all together. You would also put dense housing, different commercial & residential buildings.
-
Practice - this build is one of the most challenging builds I've ever done ever since I was playing so you would need constant practice of using advanced roads, how to execute proper planning as well as looking at realistic scenarios to show proper solutions like the flood control I was making for the first time in game's history because in reality, this city would get constant flooding during rainfalls.
-
Shows ASEAN heritage - when building this city, you should put structures and landmarks that show respect and patriotism of ASEAN heritage and on cherry on top make a greenery spaces next to it or just make it flat grass with pathways.
-
Patience & Don't Give Up - Asian cities are some of the hardest, most demanding build styles for Theotown players because of it's complexity as well as some cities in Asia have bad urban planning that it needs to replicate it without making it ugly. Try to use patience by slowly building the city and look at the progress as time goes on and most importantly don't give up, because after you've seen the build after a few weeks of work, you will be proud of your build and appreciate the ASEAN heritage.
These are 4 answers on how my build is still beautiful even if it's mixed of Malay, Indo & Filipino architecture & heritage.
This tips-n-tricks message is an inspiration for the players who wanted to build this kind of hybrid city and I hope this message kind of helps.

TIP #414 - Another way to import music
In some cases, importing music inside the game does not always result in a successful import. However, there is another way on how to import audio files into the game's music folder.
Android (may also work in other platforms if applicable):
- Locate your audio file. This may be in any format, but .mp3 files are recommended.
- Copy or move the file.
- Find the TheoTown folder. This step may differ in other platforms. In Android, you may use the system's built-in file manager. However, you may need to open it in a different file manager if the built-in software cannot display Android data files due to restrictions.
- In the TheoTown folder, find the folder with the name "music". This will contain all music files used in the game, including the original soundtrack and user-added tracks.
- Once you're in the "music" folder, all you need is to paste the file, and you're done! Congratulations! You have added a custom track in the game.
- If you have the game open, restart the game, and if you have it closed, open the game. By checking the music library, you should be able to see the file name in there. If it does, it means you have successfully completed the process.
If the music file did not add in the music library:
- Check for the file name. Sometimes, the file you may be importing is not in the .mp3 format. .wav is an example of another audio format. To fix this, you may rename the file extension to .mp3, either through the game's file manager or through your built-in file manager. Note that however, this may not always work, so the other option may be finding a format converter that can convert any file audio format to mp3.
I hoped this tip helped you in importing your music files into the game. Enjoy your awesome music listening!
Tip #415
Want to have a better looking railway crossing through roads?
don't use the vanillia version of the railway please get the plugin version
( Reminder This Is For Style Only)
1 - Get the advance road plugin from the store (By Mew_uwu), and Advance Rail (By WhopperMan)
2 - Use invisible road to use the advance road and use the invisible rail that comes with the advance rail plugin
3 - Once the invisible roads is place down and connected to each other, Decorate it and add some of ur small twist of designs
then BOOM u got a good looking railway crossing


Tip #416: For plugin creators, how to draw a Gothic window.

You may share tips and tricks you know with everyone here.
Tip 8
Want your city to look nice and realistic? Try and take some inspiration from outside, it will do wonders if you know how cities look in real life!
- Want a detailed and realistic city without plugins?
Just plop building yourself respecting urbanism technics!
Tip 19
Do you find you don’t have large enough maps to fit everything in?
Turn experimental features on via the settings and you get sizes up to Giant! It is 512x512 tiles so lots of room 2X larger than huge
Tip 36
Want to plan out your roadworks before building your city? Try using decals, sand could be used for roads and snow could be used for housing!
Tip 57
You don't need to cover the map with the waste disposal influence. All it does is just makes the garbage trucks automatically pick up trash in an area! Just keep in mind that you still need waste disposal to collect garbage.
Tip 62
Not rendering pollution seems better.
Pollution render is too overbearing making your industrial areas look like dump sites. Turn it of in setting>graphics. Try it out.
Tip 65
Building a taxi depot is the easiest way to solve the problem of transportation happiness.
Tip 67
Have a suggestion for the game? Go ahead and type in Pysuggest <your suggestion> without the <> in #bot-commands!
Tip 69 ||noice||
If you see a plugin on some screenshot, which you can't find in Plugin Store, try searching it on TheoTown Forum (https://forum.theotown.com/viewforum.php?f=43&sid=ef0fa2804e75b8596e1c6906e7b07625). There you can find a lot of unique plugins, which are not available on Plugin Store.
Tip 71
If you're struggling to get quick TT cash for a realistic city, and you don't wanna make it look massively developped, then go make an easy mode city aside, efficiently grow millions of theones, and use the intercity bank to transfer the funds to your initial city! No sandbox or free mode needed!
now thats ez money 
Trick 2:
If you didn't know or you've forgotten, you can use hexcode to customize labels in a format like this "<hexcode>:<label>". For example: "#ABD2FF: Stuckenborstel Village"
Some mobile players have a feature known as text shortcuts (If you don't know what a text shortcut is, I'll just leave you to look that up.), which can be used to your advantage for hex-coloring labels.
For example I type in "ttccz" to get "#96B5FF:" on my predicted words bar. ("ttccz" means TheoTown Color Commercial Zone if you don't get it)
That way you don't have to remember the hexcode everytime you want a hex-colored label.
tip 87:
default music is too boring? want a custom song?
go to settings, disable download static files, then download some music, copy it, go to theotown > music, and then paste, after that delete the default songs, then make a .nofilecreation file
Tip 95:
Don't be scared to dither in some different trees in your forests! Not only one species should be in your forests. Plus, your forests will look more realistic when you add some tree species (different trees). 🌲 🌳
Tip 97:
I don't know if this is posted but always put your animation json at the top of your main json. Like this picture below
This is for everything to work nicely.
Tips 99:
You have an skyscraper that can accommodate 1000 habitants, but it doesn't fill out. You don't know why? It's because TheoTown habitants only coming to town if you have free space from commercial and industrial building with same level with residential building
Tip 💯 (🎉)
Don't know how to create an online region?
First, log into your forum account, and then create a region.
In the place, where you can delete the region, there should be an option to make the region online. And you get an online region! Just don't forget, it costs diamonds if you are on Android, and region coins if you are on PC/iOS, and there must be no owned cities in there.
Tip 100.1:
Wondering how to get region coins?
Just play TheoTown everyday! You get 25 region coins every day you play the game as of update 1880.
thanks for that correction, ja
Tip 108
For the artists out there who uses PC for their work download AutoSaver. This is a great tool if you tend to forget to save just like me. I lost one the file that I suppose to extract to share for everyone and my computer sometimes kills itself and lost all of my progress.
This is the link: http://www.door2windows.com/autosaver-save-the-file-you-are-working-on-automatically/

door2windows
AutoSaver is a freeware from door2windows that automatically keeps pressing Ctrl + S for you after an interval of time (like every minute). You never have to worry about forgetting to save a file...
Tip 108
Follow road hierarchy on your roads to reduce traffic jams on your city. This is done by doing this:
- Roads should intersect in a manner where you must not intersect a small road to a very large road.
- 2 lane roads (Country road) can only be intersected to 2 to 4 lane roads. Don't intersect them to 6 or 8 lane roads.
- Same applies to all.. 4 lane roads must intersect 2, 6, and 8 lane roads for it is ok.
Tip 109
Industrial Zoning 109 A
Industries are one of the reasons with the large traffic jams in your city. You can fix it by doing or taking inspiration from the following
Centralised Zoning
- This is what most players do when it comes to zoning. They cram all industrials in a preferred place on the map. This is a good strategy since it can place the traffic on the industrials alone. Unless if that area is away from the city then it is ok-ish.
Putting your industrial on a separate landmass or island is a great idea. You'll just have to connect it with a highway. I REPEAT, A HIGHWAY. Not a boulevard, an avenue, or a wide road. And make it elevated to separate the traffic below. The highway should end on another major elevated highway or end it on a major avenue/boulevard where there's less traffic and buildings that can produce traffic.
Also, when connecting the island or a separate landmass, remember to give 2-4 road access to it. Giving it only 1 road will concentrate the traffic onto that certain road and to its entrance and exit. You should also plop a major boulevard between the buildings. And setting the 2 lane roads as one way roads to divert the traffic and organise the movement of cars. Make sure to alternate the direction of the roads. This will help with managing traffic.
Also you might think road decos that slows cars down may induce more traffic jams. Well not in most cases. Especially if the road is a one way road. Placing decos can help control traffic coming to the boulevard as trucks leave the factory to their designated commercial. Place crosswalk on the end of a one way road to help minimise traffic flow and concentrate the traffic in one way roads. So that less cars will flood the boulevard.
Lastly, centralised zoning works for islands and separate landmass. Centralised zoning in land may be ok but if you have an island on the map, utilise it and if no island is present but you have a huge waterfront, make a man made island.
Industrial Zoning 109 B
Scattered Zoning
- This is a different approach for your industrials. This doesn't place the industrial on a certain piece of the map. Instead it places industries everywhere on the map. This approach is good for Theotown cities that are inspired in real life or if you want your traffic to not concentrate in a certain part of the map. To think of it, this is one good strategy if you guys do it well. (This is the approach I use for Metro Malabang)
First, place these industrials on places where there is an open road access that is near to a highway like boulevards and avenues. I also advice that you place these industries near the water. When plopping these industrials, put them inside a compound. And make an entrance for the building so that it would have connections to the outside road. Don't connect all buildings (if ever you have multiple buildings present in the compound) instead connect only 2 or 3 buildings while leaving the others unconnected to the road going outside. (But also place an invisible road near it so that it would function)
2nd, these compound industrials should be positioned properly. Don't put too much entrance into it and instead place one road connecting it to the inside. Make sure that the road connection leads to a large road so that it wouldn't make too much traffic. I advise using most warehouse plugins in both the store and forum since most compound industries found inside cities are warehouses and office storages. For your fully pledged manufacturing factories. Place them near the waterfront.
Lastly, if you are not that anxious about the effects of the environment to your citizens then you can use this. But if are anxious then I advise using Tip A. Also, decorate the industries for it to look good. (So far there are plugins in store that has industrials that don't emit pollution but it cannot fully replace the in game industries)
That's all guys! I hope this is beneficial for you guys.
Tip 115:
What are the benefits of buying TheoTown for PC?
If you buy TheoTown for PC, you will get no microtransactions, which means you don't have to pay real money for landmarks. There are no diamonds () and plugins are free of charge.
Getting TheoTown for free from Android or iOS will not give you any of these benefits. You'll have to pay real money from landmarks, there are diamonds and you will have to pay diamonds to get plugins.
There are more benefits and some downsides to buying TheoTown for PC, which I won't cover.
Tip 120:
If you find a bug, BUT you can still play without problems, please go to #bugs-n-crashes and:
-Leave a screenshot of what happend (If is a graphical bug, please mark the place of the bug)
-Write the steps for replicate it
-If you can, please write TT version, the platform where TT is running and the OpenGL version (TT depends of OpenGL, you can see the OpenGL version by searching your graphics card in internet and search the OpenGL version compatibility)
-DONT ping developers for something like just a little graphical bug, if you can continue playing calmly, it is not necessary
If you find a critical bug (Constant crashes, critical/constant graphical glitches, graphics errors, account errors, etc), go to #bugs-n-crashes and:
-Leave a screenshot of what happend (Please censor personal parts like E-mail), please include the error code
-Write the steps for replicate it (Or where it happends)
-Write the platform and the OpenGL version
-If you cant start the game anymore, the game is unplayable, or you cant start your account, you can ping developers, BUT dont wait an inmediatly response, check germany time, probably devs are sleeping
If you find a ocational crash, please go to #bugs-n-crashes and:
-Leave a screenshot of the error code
- Write the steps for replicate it
-Leave platform and OpenGL version
NOTE: TT requires OpenGL (I recommend 3.0+, minimum around 2.1+) dont ping developers if you cant start the game for something like that (Missing OpenGL version, or OpenGL version incompatible), please check your OpenGL version before write a report
Tip 124:
Here are some Highway Designs
To make more cool your cities.
Tip 126:
Wanna make a tip in #tips-n-tricks ?
- Make sure it hasn't been posted here yet. (we don't want to see the same thing over and over again)
- Make sure it's actually a tip in the game. Suggestions are better off in #suggestions
- Word out your tip as simple and concise as possible. Not too short or too long. Use proper english too.
- Last, but not the least,
ADD THE TIP NUMBER!don't forget to add what tip number it is.
Tip 126.1
Some extra things on how to make a tip in #tips-n-tricks
5. A tip can be about something that a lot of people ask about, or some obscure and helpful feature that is in the game. Maybe you've got some cool designs to show off that could make your city look nicer, or there's just this one question that a lot of people ask and you don't want to paste the same explanation over and over again.
Tip 128 (rewroted 73, and improvement it with some other ideas, T73 will be delet after this.):
If all above tipps/tricks not help you with the issue Traffic, then you should try building Underground, Tram (Plugin), Trains, S-Bahn/U-Bahn (Berlin, Plugin), and other trams, busses or other forms of the infrastructurerial transportations.
But, that this bad issue doesnt go such further, you should do plan your city, and build it step by step. When you start build a city without plan, it will be mostly a big mess, and then this to solving, tja... will be cost xtreme much time and money, and it looks often badlier as one with is planned.
With the plan you'll never need big streets, then with a grid planning, you have a lot crossings, so that the traffic can flow overall same, and dont forget, that the industry make much traffic. Try to get them on a minimum for a.e an tiny map. With an excellent plan you'll need not much Industry for get high inhabitants counts.
Tip 133
If your game takes too long to load or even crashes when starting is probably because of these 2 reason:
-Your device has a really weak CPU and/or has low amount of RAM
-You have a lot of plugin installed
How to solve these issues:
-Uninstall unused plugins, so the came can load faster
-(ONLY FOR PC) Close all other programs in the background so the game can properly load faster
-Get a better device with better specs or upgrade CPU and/or RAM (Viable only for Desktop PCs) (This should be the last resort if any of the tips above didn't work)
Tip 133.1:
TT minimum requirements for mobile in my experience:
+1.5 GB RAM (Recommend 2 GB+)
+1.5 Ghz Cuad-core CPU (Recommend Octa-core)
Minimum 600 Mb space left (Recommend 1GB+)
720p screen (For a readable UI, and a balanced performance)
Stable internet connection (For download plugins and Online mode, this is dont needed for play the offline game)
NOTE: Im NOT counting plugins, plugins need more space in GPU, and will require a little bit more RAM, also, Im counting the current versions of the game, future versions can take a little bit more CPU or RAM
Also, these specs DONT work for big cities, or generation of bigger regions (The game will crash or it will be slow)
Tip 134
Creating a mountain in 4 simple steps
Tip 138
Build airports far away from the city. Leave a lot of distance from the runway to the gates/terminal, connect it with taxyways. Also, for good airports, remove the blue zone. If you want some good plugin to make airports i suggest "MODERN AIRPORT (UPDATE)" and "airport details pack".
Tip 144
If you have a large city with multiple trash incinerator, or multiple corpse arsenal, and they're concentrated on side of a city in array, some of those facilities might overload while others still have empty space. This is caused by coverage area of those facilities, that even thought trash and body beyond the range of them can still be collected, they have a tendency to go to the nearest at range facility when beyond range. Hence, the solution to solve such dilemma is to reduce the budget of those overloaded facilities, such that the of other facilities at the back can take over and serve those further away residents
Tip 145
Want to get to know how to get your DSA supplies? Make sure to build oil based industries near your DSA launchpad that way you can get the supplies as soon as possible. Just note that it will still likely take a bit of time! picture credits to @barren bloom
Tip 154:
TheoTown tends to consume more CPU, usually generating big regions or cities, also, Online mode can have the same effect (Not confirmed yet), if your computer is weak in CPU terms, avoid in every possible way the generations of big regions, big cities and an excessive amount of plugins, BUT, if your computer is powerful in CPU, GPU (Not necessary very powerful, it can run in a Intel HD, but yes a decent iGPU/GPU) and RAM (Minimum 4 GB, 1.8 GB free) and have critical performance problems (Not only bad FPS, game completely unplayable or constant crashes), report it to #bugs-n-crashes, but probably is the Java heap size having problems
Tip 156
If you want to generate a region map using "example.jpg" heightmap, but the forest/desert distribution isn't what you want, you can append some numbers after file name separated with a sharp symbol, like "example.jpg#17728b2" to get alternative distribution
Tip 160
Use Google Earth/Maps for highway inspiration. Highways should go around your downtown and go at least 3-4 directions out of your city. Elevated/sunken highways are great for your downtown and ground level highways are fine for suburbs and rural areas. Highways should connect different areas of the city and shouldn't leave an extremely large amount of space with no connection to a highway. Be aware of intersections too! I use 2 expressways side by side for my highways since they fit my theme more and are great for elevated highways since they have pillars below.
Tip 163
To have a better organize on your plans to build a city, use any Asphalt to make like a blueprint for roads, usually it's useful for normal roads, railway/monorailway, and avenues as such, highways are okay but not fully recommended, you can also use different asphalt for different zones/management/services/etc or different roads/rails. One example (but not perfect because I meant to plan, not trace) is the tip above. ^
Tip 166
Are you making a forest, desert or something else that has to be connected between cities in your region? Mark the ends of your large areas with roads and make sure to connect it to the other city!
Tip 167:
How to make decent curves.
Bigger the number, bigger the curve.
A = 5 Squares
B = 4 Squares
C = 3 Squares
D = 2 Squares
You can see the pattern. The number decreases. You can also do this with any number. So if you start off with 6 Squares then just keep decreasing the numbers till you reach 2.
You don't need to follow the certain pattern. Mess around with it. Just remember what you do for one side, needs to be the exact same for the other.
(I'm very bad at explaining things so if you got a better way to word it please do.)
Edit: Just like Tip: 163 use asphalt to layout the curve.
Example:
Tip 169
On the moon:
- With currently implemented content, city cannot generate anywhere near enough revenue to sustain itself.
- There are mainly two ways to gain money. Mining and researching artifacts
- Mining is the main way to generate money but they'll be exhausted after some series of time
- Meanwhile researching aryifacts is simple direct and infinite.
- You can just do both together
- Mining is done by putting mining machine on ore.
- Researching artifacts is done by clicking artifacts on the moon
- Mining machines on depleted mnes can be removed
- There are no ways to help the pickles yet in the current game version
- With the currently available content on the moon in the game, after starting research of all artifacts and mining everything until depleted, it'll takes about 2000 in-game years to reach the 3.00GT (3000MT) necessary for the certain upgrade.
Tip 173.1:
Don't. Build pipes in lines that are 8 tiles apart from eachother. The first part shows the range of a single pipe, and the other shows how it looks on the lines of pipes that are 8 tiles apart, the color green being the affected radius of the first pipe line, and the blue color shows the affected radius of the other pipe line.
Tip 176:
Harbors aren't being built? See if these tips can help you!
Make sure the road is 1+ tile apart from the water. This will not prevent you from making harbors, but they won't "build on water".
Make sure there is demand for industrial T buildings.
Tip 177:
Only applies to android players
A way to build a city while not switching tabs frequently is to use the split screen feature.
When building a city irl and using google earth, simply go to the tabs icon while playing Theotown then hold down on the google earth icon. Find "Open in Splitscreen View" and tap on it. Once you're on Theotown and Earth, hold down on the blue line seperating the screens and move it as far as you can to the left and there you go!
To select 3D view, move the line once again to the left and select 3D, once you have done so, you can move it back right.
This also works with gallery if referencing off and image to build your city.
Tip 177.5:
Works for IOS Users.
This tip is not as effective as the android but more easier to use. When you want to build some street, airport, harbour, etc, you can do that by having a tab from safari on the side of the screen. How will it work?
Firstly, go to Safari and have at least 2 tabs (it won’t work with one). And pick one of the tab bars, hold one of them and put the tabs, either right or left (edge of the screen). The other tab should be separately apart from the other one. The size should be small, not huge.
If you got those right, you can go to Theotown or any other app, and once it’s loaded in, sweep the far left or right to have the tab out.
Tip 178
A quick way to lay down street lights on your roads is to download the advanced road decoration tool on the forum. Once installed, open the plugin in theotown and press the settings button at the top right of your screen. Click on drafts and select the street lights. Once selected, exit out of drafts and set spacing for both X and Y to "2". Now just exit out of settings and select a road to add the street lights tool. This also works with any road decoration.
Tip 180:
If you want to take a picture of your city without the UI You can go into settings, as you scroll down you will be able to see the option "Hide UI" click it and it will get rid of the UI you can go around your city looking for good shots of it without having to see the UI or buttons. Once you find a good scene you can go into the settings, scroll down and click "Take a Picture" The picture will be sent to your Gallery (If you are on mobile).
Tip 189:
Do you want to figure your TheoTown version? Here's how.
If you CAN open up TheoTown (game opens up normally, has a plugin error):
Method 1:
1. Open up TheoTown
2. The loading screen will show you the game's version above the loading bar.
Method 2 (PC only):
1. Open up TheoTown
2. The window's title bar will show you the game's version.
Method 3 (won't work if it has a plugin error, unless you've disabled the plugin):
1. Open up TheoTown
2. After it's loaded, go to the menu.
3. Scroll down and find the Game ID, where you'll also find the game's version.
Note (for PC users): If the game crashes and shows the red X error, you should still be able to see the version on the title bar.
There are more methods, but for the sake of not flooding this channel with a block of text, I'm only gonna post these three.
If you CANNOT open up TheoTown (it just exits on opening, doesn't open up at all):
Method 4:
1. Find the game files, you can find their directories via Pfaq files (bot command)
2. Find and open up log.txt
3. Scroll down to find your latest startup
4. The version should be seen at the start of each operation.
Method 5:
1. Refer to Method 4, but instead of opening up log.txt, find & open crash.txt
If you ever have an issue with the game, and you're being asked for the game's version, check out the methods, they might help.
If you know more methods on how to find the version of the game while not being able to open TT, please let me know via DMs.
Tip 193: If you want to make colored sidewalks use the game's Dirt Roads and then add a decal on it.
Tip 194:
Wanna space out those pillars on your bridges? It's really easy!
First you need to place some kind of land to mark where you want it to be open, like this!
Second. place any kind of road on top of that concrete you just placed to prevent the pillars from spawning
Like this
Third. you need to make the bridge again Making sure to tap where you want to place your pillar
Finally all you have to do now is remove those roads you made under the bridge! And voila!
Sorry if this have been said
Tip 204
Trenches(similar to tip 199)
Trenches are great decorations for cities, not only do they look nice, they can also be used for embedding railroads or highways through them

1: find elevated land and lower a strip of land

2: add railway(2 squares wide for highway)

3: add overpasses with regular intervals (pedestrian plugin if not for cars)

4: connect the road ends and add decorations (for this: public>decoration>commercial zone)

Tip 206
Long runways for multiple airplanes
The default runway uses a straight strip of runway for a single plane only, segmenting the runway can allow more planes to use it
Requirements: runway at least 25 units long(shortest runway length 12)
2 by 4 space next to runway cut point

1: remove the middle of the runway

2: add runway to fill middle

3: remove runway (part of)

4: fill space with runway (again)

Remove

Fill in missing parts

Now you can see that I used one and the other is open

Done!
Tip 209
The Double stacked bridge
note: idk if someone made this already but imma do it either way
Step one: make a 1 level bridge

Step two: Decorate the bridge (or later. If you know how to use the below option)

also add the ends to connect to the other roads (this will help later)
Step three: Add level 2 roads on top AND At the end of both sides

Step four: decorate, design, and Finnished

Your welcome
Tip 213
Moving a building is cheaper than building another one
Tip 215
Removing disaster scrap is quite expensive but you can use road, decors to remove it (its cheaper)
Tip 216
Here is all the notification you'll get in game and what they mean

Tip 217 "Simple steps of plugin making"
Step 1- Get a template from https://forum.theotown.com/viewtopic.php?f=108&t=3207 and please read what lobby wrote there.
"pay attention on that the base should always touch the bottom edge to pivot point can be calculated correctly."
Step 2-Build the shape of your building, you can use neon colours first than start texturing it but in this GIF I directly used shadows because of building is being small
Step 3- Make a roof or a flat roof. It is up to you. Here is a discord message about roofs #plugin-discussion message
Step 4- Fit the building with roof or other parts you added after...
Step 5- Add details, this might be the place where you should be creative and also the fun part...
Step 6- Important part and usually the step every person fails, it is normal. Add shadows to the sides that are facing right and also add some places you want to add depth too. Like the door I did. (Even in my texture there is a shadow issue with small roof and the wall next to it, you should think about those too)
Step 7- Remove the template and don't forget to add shadow to ground that fits with template ground. You can make your own ground too... With this you have to add "draw ground":"true" to your plugin
Bonus Step- ||cover your house with oil if you want it to fly||
You should crop your image and make it texture space friendly and like what Lobby said in templates topic: "it's a lot of work to create even a 2x2 building and you have limited texture space. So, why not start with a simple 1x1 building?"
This is just the steps, you can have your own art style or any decoration opinions, also don't except every people to like your textures, take some criticism. It is not a bad thing

Tip 218 Making money on early game for Cities on pure water maps
You need only Internet (for ads) and your town. Click on the 15.000 button in the exchange menu. (accessible via the Coin or click on your money.) Choose there instead of Diamonds the Ad option. Then repeat it for the amount you want and then you got your startup help. Besides of this you would help the devs a tiny bit with every watched advertisement. I've used this so far and it worked better as the loans idea, since kinda almost no ingame time got be wasted with it.
If you ask yourself, why is he saying this?
The reason is: Every land tile costs 1.250 or more Theons. With the basic money on Easy, Medium or Hard is it almost impossible to get a good start income. That's why I prefer this solution over the loan one.
-Currently working on Android only, need proofs for Apple and Windows-
tip 219 how to hide pollution
in order to hide pollution head to the setttings,
you'll first need to enable debug mode and experimental features (located in other)
and you should see the option "render pollution" in "graphics"
Tip 220
When making high density zones in your city, i recomend you have walkable and green places around and separating the buildings. Things you may need:
•Invisible road
•pathways or simply decals
•any type of urban tree
Important details:
•to make the building acessible, you need to connect the invisible road to the building
•make the separation based on the building size and the density you want

Tip 228
A tip for that broken river plugin, if you put a tile of water between it, the surroundings fill up.

Tip 229
TheoTown can be a pretty heavy game when it comes to RAM usage, so if you have any lag issues running the game without plugins, it might not be a wise idea to get plugins. According to TheoTown's Steam page, the minimum amount of RAM is 1GB and the recommended is (at least) 2GB.
If you do consider buying the game on Steam, make sure to read the minimum system requirements and have 64-bit Java installed, otherwise you could run into some issues, like constant crashing or the game just straight up refusing to launch. Correct me if I am wrong, but I'm pretty sure that most of the game crashes occur due to running out of memory.
Also, keep in mind that generating big maps or regions requires a lot of RAM.
Tip 239
If you want to take a screenshot of your city, but hate the yellow line or HUD, you can take screenshots with the game screenshoter.
1- Click on "Menu" on the left/right corner of your screen.

2- Then you'll have this options. You can either take a screenshot of just what you have on your screen or of the whole map. You can also upload it to the gallery and/or see what other people uploaded.

3- After pressing on "Take picture" or "Take map picture", the game wi freeze for bit and this messge will show up. Then you can see it or just continue playing.

Yeey- Now you have a clean screenshot of what you want to show

Tip 240
If you can't find a tutorial to make a plugin for a certain type of plugin (such as trees), don't forget that you can always take examples of code from here: https://forum.theotown.com/viewtopic.php?f=108&t=5661
Tip 241
There are several ways to share map in TheoTown, and seed isn't the only of them:
-
(if there is a generated map) - seed🌱 . It's used when generating the landscape while creating the map, so it obviously won't give you builds/edited things. Looks like a bunch of numbers/letters.
There are some premade heightmaps which give you special terrain when you specify the seed.
You can see them in #seeds-n-maps pins. -
Heightmap🏔️ . It's a map which specifies the height of tile by color and you can quickly import maps of real (and not only) locations. Note that all heightmaps are grayscale (white - black) and importing real photos won't give you expected results, but you can use some colors to specify biomes. Use
Pfaq heightmapsto find out more. -
City/region files📁 . The simplest of all, you can get any custom terrain/city/anything built with that but you need to ask the creator. Use
Pfaq filesand use in-game file browser to put your map files in the correct folder. Don't forget to install needed plugins! -
If someone's city is on online region you can just go there (search the name of region if you know it) and go there.
||I'm not sure I explained it well but I hope it'll work as I noticed some newbies confusing it sometimes||
How to make a Japanese Styled Road / Alley-ways !
(Tip 246)
- Put a road then both sides of the road put "Big-park-decals"

- Add the Diamond markings (by Pederont)

- Add the Cross-walks

- Add the Fences
(The 2nd pic is Optional.)


- Decorate till Desired looks.

Here's the Alley-way version. Its the same thing just without the Fences

Here are the Props.
→ https://forum.theotown.com/viewtopic.php?t=5030 ←
Tip 249:
If you want to Seperate Sections of your city add a park in-between It'll make it Interesting!
[Example Coming soon]
Examples


In this Part 1 video no plugin is needed, just vanilla from the game.
Part 2 coming next, but with plugin
#Theotown #TheotownRoad
(Tip 256)
Tips on how to make a South-East-Asian tree's
Acquired plugins.
- Tree Fences by Fitamint
- Grass decals by Mr. X
- Short pines
Cover this land with the Grass decals


Add the Short pines or Sakura tree's on the forum

Add the Palm tree

(the one with Sakura's)

Heres the Sakura tree's
Hope you enjoy em!
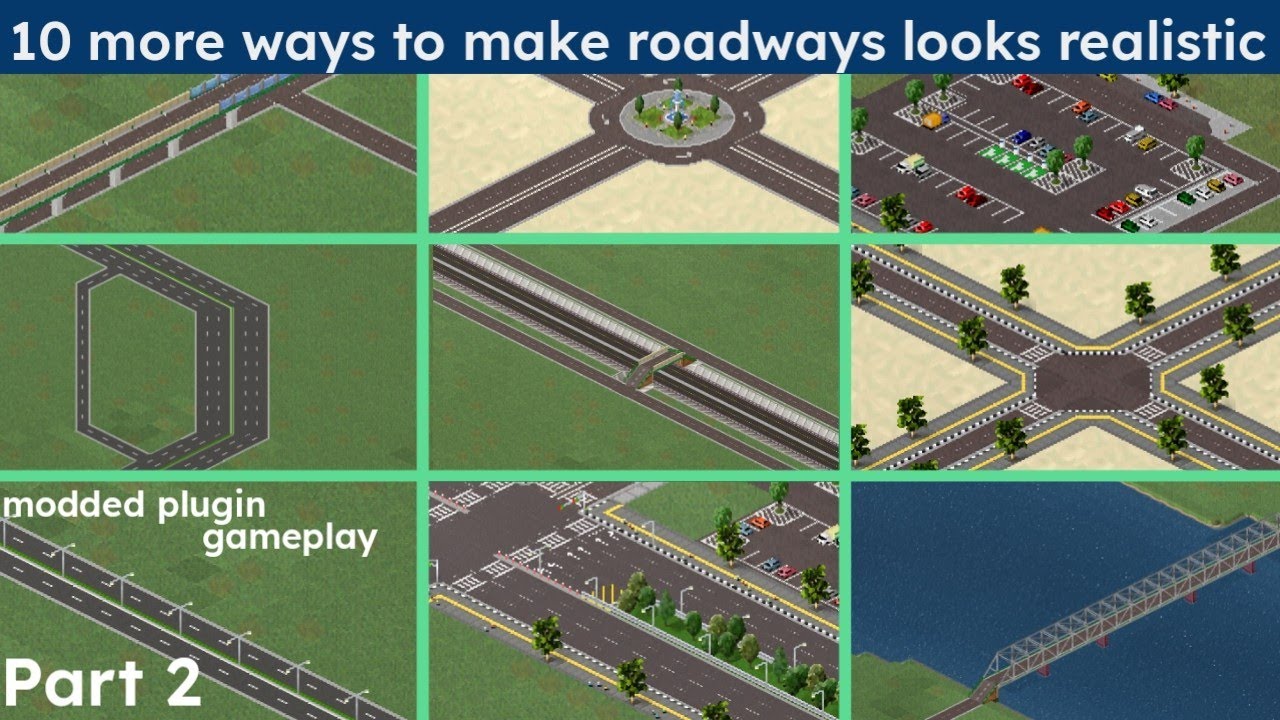
In this part 2 video im using plugin for making the roadways looks better
Download :
Sunken highway walls : https://forum.theotown.com/viewtopic.php?p=58333#p58333
#Theotown #TheotownRoads
Tip 261
( for new players )
When making a residential,commercial or industrial use manual build as it makes your city looks better


Tip 262 - Export and Import
(Important for beginners)
In order to trade something with another city, you need a road connection, electricity connection or water connection. But it depends on what you want to import or export!
** Important: **
Garbage disposal and funeral services require road connection.
Water a water connection and electricity a high-voltage line.
Important 2:
The second city should already have been created so that an import / export can take place
If you want, you can also use plugins for better electricity or water production. But that would be a different matter.
(The same goes for garbage disposal and the funeral service)
Tip 263 - stacking roads
How to stack roads like this?

Step 1: Start with a layout like this:

Step 2:tap(or click) on the edge piece of a level 1 road and then tap on the edge of the road on a higher level while being in the same level

Step 3: repeat Step 2 with the opposite side

Step 4: connect the bottom roads together

And you are done!
Enjoy your stacked road
This trick can be used on any type of road such as rails, monorails, and roads
warning: this trick doesn't work in elevated ground
video demonstration:
Tip 264
Making meteorite crater without breaking anything Note: you must have at least 1 meteorite crater to do this
1.make sure Experimental and Debug mode is on the settings>other
2.find a meteorite crater in your city
-
Click the 'eye dropper' in build menu
-
Click the Meteorite crater and boom!


(Idk if this is a repost or not, but its still useful)
If you ever run out of money, try looking around the map for some rocks, once you do, you should sell them for profit, its a much better option than taking a cringe loan 🤮


Trick #2
The last variant of the flower or the sunflower looks like little military men, useful for putting it in your military base!

Tip #269
Do you want a screenshot of your map but transparent? Then this is for you.
- Go to settings
2.Scroll down and press "others" option
3.Press "expiremental features"
4.Go back and press "expiremental features"
5.Press the one that has the word "transparent" in it, I forgot what it's called😢
And your done. (idk if this was already a tip but if it is then its a repost) also, here is a video demonstration 👍
Tip #271
For those of you who are still confused about the @sweet walrus train system, I will give you the instructions
Each train with the rails it needs
Here's the couple 🚞❤️🛤️


Tip #274
Before we begin I am so sorry for the last time for not giving the actual guide for 'How to make Cull de sac' and just giving a vague instructions on how to build also the guidance that I'm about to say is only a portion of the actual thing. This is because I'm using my phone right now and my laptop's charger died so I can't use it to make a full research on the subject also not sorry because all of you can search on Google or YouTube but I may be harsh on this and I understand that.
On making the Cul de sac I'll give you this link for a quick or a boost on learning Cul de sac.
https://youtu.be/d9vDcfH03gs
But in my experience it's a both yes and no on managing traffic on TT because 1: Every building, as long as they are connected to any road but not pedestrian, has cars even the poorest of poor. 2: I don't think cul de sac would work on urban city but downtown might. 3: If you are using the cul de sac but only has at least two entrance/exit a heavy traffic could build up in front of cul-de-sac and inside as well but this might be my fault 'cus i added a small market inside. 4: You are just plainly using cul de sac without any gaps to main roads.
Using cul de sac only (probably) works on subdivisions, small town, neighborhood, and low level houses.


Get a 2 month FREE trial of Skillshare here: http://skl.sh/citybeautiful10
I'm on Patreon! Consider supporting this channel: https://www.patreon.com/citybeautiful
Resources:
A. This video is based on the book Streets and the Shaping of Towns and Cities by Southworth and Ben-Joseph. https://www.amazon.com/Streets-Shaping-Cities-Michael-Southw...
tip#275
There is a way to hide the elevation difference between buildings using fences
-for the demonstration in pics 1-3, I used the concrete pier from the More Fences Pack by Maximum
-pics 4-5 is another example using the MBMP plugin by @spice turtle


About Tip 145 heres more detailed information about the rocket supplement, yes it's almost all oil
This took me way longer than i thought it would be
Its best to open the full image to properly read it


Tip #281
This probably the most ironic guide that I could give. Before I start everything up you need to be prepared about the consequences on doin these. You need first have DSA containment walls to prepare.
Sometimes it's hard to clean everything up by manually. For trees you can use the tree cutter and place to the dense forest but sometimes tree cutter can't remove some of the props mix in. For example if you have Biome pack which includes 'Dense forest' And 'Rocks' which both are decoration type they can't be removed. So why not using Pink slime and/or the Geliumium. I know this are quite devastating which is why I want you to use it but the thing that they can remove a large area with ease is something. You need to know something about them as well. Pink and/or Green slime cannot climb nor descend tru the slopes unless you intentionally placed them on the slope. Same goes for Geliumium but unlike Pink and/or Green slime, Geliumium can cross the water so be careful when using it. Always prepare some containment walls. You need to know aswell that Green Slime cannot expand tru much of an area while Pink slime can. Worry not about these slimes cus at a certain time they will be devolved once that there is nothing to destroy or I could be wrong, maybe there's a time limit for them. Geliumium however are quite challenging, there's no solution either to kill them however same as thw slime It has it's way on killin itself. The anti virus, that I will not type cus I can't, suddenly popping up however the virus will continually spread if you didn't contain them.


Tip #282
So some of you seems to like medieval houses. So these are medieval houses that I could find in-game. These are not plugins but an in-game buildings. I could be wrong in some of them so feel free to correct me.

Trick #3
Here are some modern road ideas, Plugins required
- More fences pack by maximum
- Brazilian Road
- Roadside parking
- Curb
- PH Roads
- City fences pack
- Concrete road in the forum
- Road markings by leoleo
You can use ingame asphalt for the sidewalks

Tip 284
Ways to get diamonds
-
Entering redeem codes
Freebie: chrs05
Located at the bottom of the diamond shop -
Buying diamonds
Self explanatory, nothing to explain -
Plugin making
Again, self explanatory -
Levelling up busses
Located at transportation>bus
This will take time since it only gives you 2 each level up -
Collecting daily rewards
You know this one already -
Watching ads
After collecting the daily reward, click on it again it will show a comfirmation after that
Tip 285
For better overall performance increase in PC, you should install 64-bit Java and Increase Java Heap Size
https://www.messiahpsychoanalyst.org/wikihow/index.php/How_to_Increase_Java_Memory_in_Windows
tip 286
How to make long underground tunnel entrance (sort of)


Tip #287
Do you want to build diagonal highways, railways or pathways over straight stuff? Learn now with these four easy steps!
• Step 1: ||Throw your hands up
And point them to the floor;|| Start by building the diagonal path.
• Step 2: ||Here's what to do
Now get down on all fours.|| Build electrical wires in the place where you want to run the straight path.
• Step 3: ||Just bounce around
It's easy, follow me;|| Continue making the diagonal path, going over the wires. Important: make sure you build on the wires and not on the posts, otherwise this trick will not work.
• Step 4: ||Go crazy now
And beep beep like a sheep!|| Build the straight path in the same place where the electrical wires were. Your diagonal path just above will stay in place and you will have completed this trick without any problems!
By: @indigo swan


Tip #289
Not sure if anyone done this yet but im doing it anyway lol.
Ever want functional lights for your parking lot?
If so, you come to the right place
- This requires 2 plugins
((Easy) parking lot by Choggoba)
(People and Props (Fences) by Fitamint)
You might realise the parking lot pack includes lights but it's doesn't light up at night.
2.Now you have the plugins. Choose the light pole from the People and Props by Fitamint (Make sure you choose the right one or else it will become invisible)
- The light pole works as fences but you might know how to use fences, once you place them. Enjoy!
Examples:
Plugin Used:
(Easy) parking lot by Choggoba
People and Props (Fences) by Fitamint

Tip #290
How to make a train stop at a station
Full credit goes to Bevise
https://youtu.be/NwPLe-vSzuI

The music in game: Aeon.
You can listen to this song in the game. I found it in the Theotown/Files/Musics folder.)
Tip #291
Disclaimer: This is for those who hasn't realized or scared to demolish research center after researching everything.
Fortunately, you can demolish the research center after researching everything available, it does not restart the progress but the progress saves (only in that city's existence). In this case, you can build containment facilities, containment walls, pollution walls without research centers. Unfortunately you still have to buildthe main headquarters before to be able to do so.
Trick #1 (The reboot)
All the tips that are in this channel have been deemed the most useful and helpful for the community. The rest purged to help readability
Just a few Tips for posting.
- Make sure your post isn't a repeat
- This channel isn't for conversation
- Follow the number formatting
- No shameless self-promotion of plugins
- Thank you all for your help to other players
Tip #292
Budget is decreasing or its on a negative amount? Why did this happen? I had alot of industries and commercials in the city! (second part may come when more researches are done).
2 major factors may cause these situations:
! increased performances
! decreased taxes
1). Increased Performances
Simplified form of explaining:
increased performances (supply / service) = increased worker salaries / operation budget
increased worker salaries / operation budget = increased budget spendings
increased budget spendings = less profit or deccreasing profit
less profit = wreck't economy
2). decreased taxes
Simplified form of explaining:
decreased taxes = decreased profit
decreased profit + spendings = decreasing budget
decreasing budget = wreck't economy
Trick #2
Make sure to manage amount of inhabitants living in your city and the amount of supply and services should be enough for inhabitants, make sure to leave your city idle and let yourself profit until you can expand your city. Don't forget to make more profitting companies while expanding.
Trick #3
You might not know or missed this feature, how to merge multiples region into one or merge everything into one?
- make sures its 2x2
- click the sqaure at the top left or the first square in a 2x2 box
- click merge


Tip #294
You can get This sunshine from the Christmas gifts that appear around the Christmas tree
Then after getting it you can move the building on the hill so that it becomes a beautiful view : 🌄


Tip #295
To create this, watch the video
https://drive.google.com/file/d/1I53H7WeVmF-lEm_MCfGXnGaQTPMFapmE/view?usp=drivesdk
Used plugins: pedestrian zone remastered by KINGTUT10101, But you can use your plugins


Tip #296
If you're a plugin creator, you can make shadows on your buildings slightly blue (sky color) for a bit more realism, some people forget about this

#tip 297
Want to change a 2 lane road to a 1 lane road?
it's simple for that you will need two plugins:
- i13 Road Pack by ian
- One lane road by Pewpewpew
Note: in this example I have build a road from left to right
step 1 build a one lane road (one lane road plugin)
step 2 add a transition road (i13 road pack plugin) (in this case the one circled in red on the image) in this example it goes from left to right (note: you have to build it in 2 squares (the fault of the game))
step 3 destroy the extra road step 4 add a 2-lane road (here it is a country road)
step 5 fill the holes with concrete to make a sidewalk
help yourself with the attached images :


Tip #298
https://youtu.be/yITr127KZtQ
Understanding intersections and inspirations for makin some.
Take note about the video the higher the traffic value, the better flow. There is one that has the lowest that is the simple roundabout with traffic lights. It valued at 8.
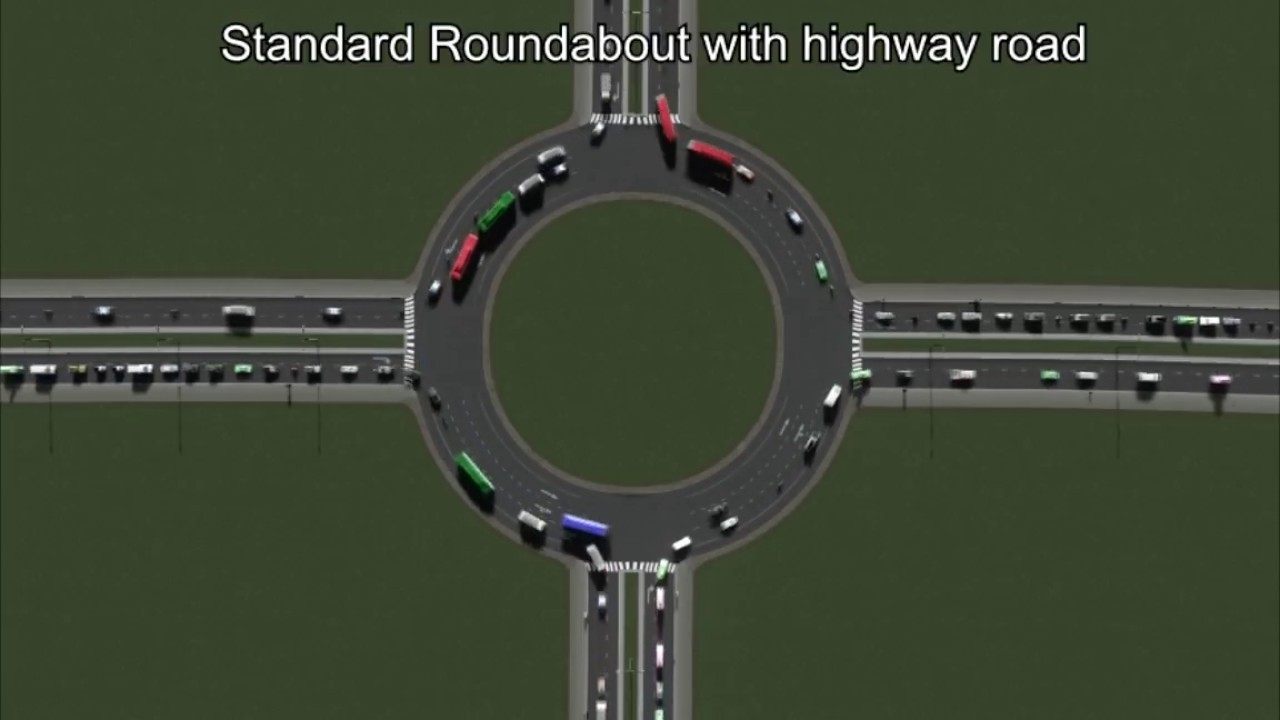
Did you know that there is a option to get a larger zoom out
here is how to get it
|| (taking notes from @tiny relic 👍 👍 ) ||


Tip 300!
How to manipulate the the system with this.
(Note: This can only work in this upwards position.)
-
Place the road like this.
-
Get a Diagonal fence, upwards position of the fence.
-
Inside the marked area, make a Z type pattern until desired area.
-
Enjoy the Output!
------ <> Best used for Urban areas imo <> -----
Plugins used: Diagonal Roads; Street Lights by Choggoba; Road Markings by Leopolis; Filipino Fence by MayorRascalov.


Tip #301:

tip #302
demands explained
+some faqs
||NOTE: This is only my knowledge about "Demands", please correct me if I'm wrong.||
No buildings being built?
No or Low habitats in one building?
Well it may be your "Demands"!
Basically, the higher a bar is, the more buildings or population will be made depending where the bar is.
Ex: The middle(TT) residential bar is up, this means that more Middle class(TT) will be built.
The poor(T) residential bar is negative, this means that citizens will move out poor(T) houses.
All zones (Residential, Commercial and Industrial) works like this.
How do I make the bars/demands go up?
- Build services, sports, education, etc..
- Then, build buildings that have a positive/high demand.
Ex: Demands for Industrial is low while the Residential demands are high, this means that you would need to make Residential buildings to make the Industrial demand higher
What does very low/negative demands mean?
This means that citizens will move out houses depending on what zone it is.
ex: Poor(T) Residentials have very low/negative demands, this means that citizens in some Poor(T) Residentials will move out.
why do some of my cities have +/- buttons in the demands menu while some dont?
Demands can only be adjusted in sandbox mode.
How can I open/check my demands?
The images below may help you!


Tip #303
How to easily get small parts of a roundabout
Note: This only works on the small traffic circle.
-
Use the small traffic circle.
-
Use the Eyedropper tool on the menu, and it'll see it as a road segment, not the whole roundabout itself.
-
And by taking advantage of this, you can place small segments of the roundabout without removing buildings oh you spend so much time on.
-
And enjoy.
By using this hack, 9
It can reduce time, and can make roads appealing.
Note, as stated again. This only works with the Small Roundabout.
Plugins used: Roundabouts by Choggoba on Store.


Tip no 304
How to make a bike lane with only 3 plugins
The plugins you need are :
Philippine Road Pack by Hadestia
Bus Lane by Wikipeder
Ground Decals+ by Marcato (forums)
- build an Outer (center) Lanes road arrow ↘️ or ↗️, you can build it any direction you want.
- Build a bus lane opposite to that direction of the road.
- Place a decal under the bus lane
- You're DONE!


Tip #305:
Saving money on placing wires
This tip could come very handy for people that use underground wires, because let's be honest, they're expensive.

Tip #305:
Plug-ins used:
Bus Lane
Philippine Road Pack
Slow Traffic Package
Credit to @restive badge for the bike lane idea
Edit: Looks like A dutch guy is currently making a road that actually has a bike lane
So go use that once he finishes making it

Tip 306
Realistic aircraft shelters:


Better way
Inspired by this tip ( #306 ) credits to Just Neman#7082 then
- hill
2)dig a little bit - add two pathways
- add terrain instead of the pathways and connect the necessary paths together
- decorations can be placed


Tip 308:
Basic things to remember when designing a good city:
-
Keep residential zones and industrial zones as far away as possible
-
Place commercial zones near avenues, rivers, beaches, and highways
-
Decorate your city, if you're having problems with decorations, google can help with that
-
Try avoiding making a grid road system, since if it's too uniformed/symmetrical it'll look ugly instead of good (unless it's a industrial zone then it's fine)
-
Most important tip, always use plug ins, because they are a massive help on making better looking cities
And those are pretty much the basics on trying to make a good city, since the rest is basically up to you on what type of city you're gonna make.
Added Tips:
-
Highways must look realistic, curves accurate, and some road decorations should make it look good (You can watch YouTube Tutorials on Highway Builds)
-
Add a realistic landscape, make it look random, random trees (that fits the scene and environment), mountains (decorate them with shades of asphalt to make it look good) and water reservoirs make it look perfect.
-
Base it off of a lore, make a story for the building/city, how did it start? When was it constructed? Where is it built?
(These are other tips I can offer, you can add more.)
Tip 309: Terraforming with autoclick help a lot