#help-with-arduino
1 messages · Page 46 of 1
 pine bramble
 wet crystal
> TEXT
pine bramble
let's not forget strikeout ~~strikeout~~
 vocal quail
Are the older ESP8266 Feather HUZZAH supported in the latest Arduino IDE (1.8.x)?
If not, what's a good replacement? Making a simple humidity logger with a very basic web portal.
vocal quail
Derps on me: forgot to add the URL under pref's
wet crystal
Nice one
Yeah the esp behaves something like an input that just activates the phone
But I think it shouldnt be a problem for the esp to make a phonecall since everything is voip now
So what I want to use is call SIP-Call
What I now need to know is do I need an IP telephone and those clients are just for inhome notification, so will it also make a call outside
 proven mauve
I just had the weirdest thing happen. I'm doing some modifications to a program I've been working on and previously I had all my main.ino functions declared after the loop{}... I moved some things to it's own file with an #include "" and now ALL my functions have to be declared before the loop{} where they're used, even if the had nothing to do with the code I moved out. If not, arduino IDE is spitting out not declared in scope errors on all my functions
oh I see... my loop may be broken XD
ha, yeah, was a bracket issue. Once fixed everything is as normal... carry on
 dense kiln
Can I power an Arduino with an official Motor Shield through the Motor Shield Vin pin and 5V? The motors would then be powered with another supply.
dense kiln
I'm unsure if there would be any conflict with the Vin pin on the shield.
 north stream
You may be making this harder than it has to be. The Motor Shield only needs two supply voltages, 5V (for the logic) and the motor supply (for the motors). Are you supplying the motor power supply via Vin or the motor power connector? Or are you trying to connect 5V to the Vin pin? I'm confused.
wet crystal
Can someone help me with arduino serial?
In the sketch I want to try out there is #define USE_SERIAL Serial
But I have no clue how to read that serial connection
At communication it just says this
north stream
Looks like stuff a program is sending via serial
 kind spruce
I could use some assistance as I'm still quite green
Please chime in if you have had any experience with the following:
I have: Nodemcu esp-32s and 2.8 Inch ILI9341 240x320 SPI TFT LCD Display Touch Panel - Goal: to have a touch screen with 3 sections, top section turns on or off lights with a touch, middle section you choose WHITE <- or COLOR ->, bottom section shows the controls associated with WHITE or COLOR
END GOAL: to utilize this as a 'smart switch' in Home Assistant
north stream
How far have you gotten so far?
kind spruce
not very, lol
My ESP32S pinout: https://cdn.instructables.com/FOL/YWLI/JEOILQ5U/FOLYWLIJEOILQ5U.LARGE.jpg?auto=webp&width=1024&fit=bounds
 north stream
Ah, you haven't even hooked anything up yet.
 north stream
Does the screen work?
north stream
This is going to take a while, and unfortunately I have to head out the door.
kind spruce
is the guide I found for esp8266
no worries @north stream I enjoyed the conversation
north stream
That might work, as long as you hook MISO to MISO, MOSI to MOSI, and SCK to SPI CLK
kind spruce
@north stream You know much about ESPHome?
north stream
No, I haven't heard of it
 full bronze
I have a question about a Trinket M0. I am connecting a strand of Skinny Neopixels (30 of them) to it, data wired to port 4, and power wired to Bat and Gnd. The neopixels main.py basic code indicates it should be fine to run 16 pixels... but none of the neopixels light up. Should I be doing something different for the Skinny neopixels? Or should I cut the band to size? Or is there just not enough power to drive them?
 minor solar
anyone know how to set the minimum window width for the Serial Monitor on Arduino IDE 1.8.10?
pine bramble
@minor solar In Linux at least, you don't have to use Serial Monitor .. can use any telcom program you like (such as minicom). In Windows, putty may work independently of Serial Monitor.
@full bronze While that's too many neopixels for Trinket M0, you can reduce the number (from 16, if that's what you have) and it may ignore the others.
Power only matters when they're lit brightly.
minor solar
@pine bramble argh. i neglected to mention that i'm on OSX. i guess i could mess around with screen or something...
i was mostly asking because i have a small-ish display and am running two instances of the IDE (each driving one arduino board) simultaneously.
the default minimum width of the serial monitor is quite a bit wider than half my screen.
pine bramble
I have no idea how/if a window width can be disciplined. ;)
full bronze
@pine bramble thanks. I had tried 4 in code and nothing lit up. I’ll try a small physical strand next
pine bramble
Athena I don't think it's the strand but that's a valid debug if the other strand works. If it doesn't, no worse for wear.
@minor solar Arduino IDE is a modification of Processing iirc.
north stream
You might be able to just use screen or Coolterm or something instead of serial monitor.
minor solar
thanks all
north stream
@kind spruce Did you get anywhere with your ESP/touch screen project?
kind spruce
@north stream Yes, I have a working prototype based on an example in Bodmer's TFT_eSPI library... but still need to figure out if I can port this library into hass.io
north stream
Ah, you've gotten a lot done!
kind spruce
@north stream Kind of... I was able to draw the UI and have it react like it should but no 'hooks' are set yet. Still need to make it actually control a rooms lights. But touch & display are working great so far. I now need to see which would be best... porting the library to ESPHome.io or just making a 'custom component'. The latter seems less functional, but I could be wrong.
 wind drift
Question:
How can I make a step-counter that is power-efficient?
I have an MPU-6050 module.
I assume I would sleep it and wake it up every few seconds to check if there was movement?
proven mauve
@north stream are you keen on voltage references/battery reading?
north stream
A bit, I usually include a voltage divider into an analog input for battery monitoring, but it is possible to get fancier with more accurate references, gas gauge chips, etc.
proven mauve
So it's just something to add a battery gauge to a portable pet, so not ultra critical and %10 flub is fine. So... I'm missing a lot of knowledge on this but I know analog pins read voltage and it's referenced against the sustem voltage. So this is where I'm at.... I have wired:
Battery -> Power Switch -> Boost Board (3.8v constant output) -> VCC
| Analog Pin 4
| -----------Lead carrying battery Voltage---------------^
I hope that displays okay 😓
I put a 10k resistor on the lead carrying the battery voltage
It looks like I need to run a lead from ground to another resistor into that same battery lead in order to make a voltage divider
So... do I still need a voltage divider if I'm staying below 5v? It's a lithium batt that wont go above 4.2v
or will I need one because I need to keep the voltage below my 3.8v reference at all times?
north stream
You don't want the voltage on the analog pins to be any higher than the supply voltage to the chip, so you'll want a voltage divider.
proven mauve
gotcha
north stream
I'm not sure if it's a "boost" board if it's making the voltage go from 4.2V to 3.8V 🙂
proven mauve
haha, so I forgot to write in the charging board
the battery charging board outputs 3.3v or so to the boost board, that bumps it to 3.8
And it's just enough waste to bring it above the threshold of the charging board cutoff lol
Without the boost, the mega doesn't draw enough power to keep the power supply flowing 😦
but it works out, because it should be keeping the clock stable too
north stream
Heh, @inland anvil was having the same trouble of needing enough power draw to keep a supply turned on
proven mauve
so if I run this other 5.1k resistor to ground, it'll divide the voltage almost in half, and it'll always be below my reference... then my readings will make sense. Thank you for the help, I think I got it =DDD again =DDDD
north stream
If I'm understanding what you wrote correctly, it will divide the voltage by about 3, so you'll get about a third the voltage instead of half
proven mauve
Ha, the power thing is annoying. I'm deployed so getting more parts to play with can be problematic, so I work with what I have. Once I got the boost board tuned in and started playing with it I was fairly happy, 2500mAh battery runs the atmega1284 and oled for over 72 hours, and that was before I started putting the screen to sleep, so it should be even higher now... and charging it doesn't cut the power like the all in one 5v boost charging boards I got
hmmm
north stream
I totally understand building with what you can get your hands on
proven mauve
so it's Battery -> 10k resistor -> Analog pin -> 5.1k resistor -> GND
north stream
Yeah, that'll give about 1/3 the battery voltage to the analog pin
To get half the voltage, you'd use equal resistors (like both 10k).
Or you could swap them to get 2/3 voltage: Battery -> 5.1k resistor -> analog pin -> 10k resistor -> ground
proven mauve
I see. 1/3rd will work fine I think. So one more followup...
So usually there wont be a problem, if the unit is on, the battery feeds everything, charging board is active, feeds the ground and vcc to chip and then there's the extra lead feom battery to the chip
but say the battery dies enough to shut off the charging board (at it's 2.65v cutoff)... now the ground is disconnected and while my switch is on I have a lead from the battery to the board....
What are your thoughts on that?
north stream
Depends on how the shutoff works, I suppose. If it really does interrupt the ground lead, it shouldn't be a problem, the whole circuit will float. However, if it interrupts the positive lead, then you have a sneak path around it via the battery sensing lead, which will drive the analog pin higher than the (now zero) supply voltage, which isn't ideal. Additionally, you'll have power draw even when the battery is dead.
proven mauve
right, and that would be super bad news bears, the power draw would kill the lithium so it couldn't be recharged
north stream
If it's a protected cell, then the protection circuitry would avoid that problem, but an unprotected cell would slowly run down to damagingly low voltage
proven mauve
I was playing with the idea of an npn transistor with the boost board signaling it on to turn on the lead from the battery to the analog pin....
It's an unprotected 18650
I was relying on the boards with it lol
I got started with transistors with that HVPP setup and finally figured out a little bit of how an npn works, so that's my hammer and everything looks like a nail now =/
north stream
You could probably use a switching transistor to isolate it, but then the base current would confuse your voltage reading.
A MOSFET would do the job nicely if you had one available
proven mauve
I do not, I don't really understand the difference between transistors and mosfets yet so I haven't picked any up
All I know is people seem to like mosfets for power source control
and when you use cheap ones in your 3d printer they burn your house down
north stream
I wonder if there's a place you can tap the switched battery voltage from the charging board
proven mauve
I'll have to see what it puts out, but think it evens it out to 3.something
north stream
I don't mean the output from the charging board, but presumably there's some circuitry on the board to monitor the battery voltage so it can shut off when it gets too low. I'm wondering if you can safely sample the voltage there.
proven mauve
oh wow, it might actually be putting out the battery voltage
when the battery gets lower I'll have to check again
north stream
Yeah, worth a look.
proven mauve
hmm, I just put in a battery down to 3.5 and that's what it's putting out
that might be the easy solution. And my voltage numbers changed on the screen down from max finally because it's below 3.8 =DDDD
madbodger, thanks again a ton, I really appreciate all the help you've given me. I'm going to run to my office real quick to solder up this resistor and call it a night. I'll see you soon 😄
wind drift
Okay I am stuck at a problem again.
I copied this code from my other sketch where it's WORKING.
I have now put it in my new sketch. It enters the 'measure_oingoing == true' loop just fine. But it only prints 0s somehow.
      Serial.println(scanmode);
      Serial.println("BarcodeID:");
      Serial.println(code);
      code = "";

      measure_ongoing = true;

      scale.tare();


      while (measure_ongoing == true){

        weight = scale.get_units();
        // Serial.println(weight);

        float avgweight = 0;


        Serial.println(weight);
        Serial.println(scale.get_units());


        if (weight > THRESHOLD) { // Takes measures if the weight is greater than the threshold
          Serial.println(weight);
          float weight0 = scale.get_units();

          for (int i = 0; i < NUM_MEASUREMENTS; i++) {  // Takes several measurements
            delay(10);
            Serial.println("below threshhold");
            weight = scale.get_units();
            avgweight = avgweight + weight;

            if (abs(weight - weight0) > THRESHOLD1) {
              avgweight = 0;
              i = 0;
            }

            weight0 = weight;
          }

        avgweight = avgweight / NUM_MEASUREMENTS; // Calculate average weight

        Serial.print("Measured weight: ");
        Serial.print(avgweight, 1);
        Serial.println(" kg");

        myWeight = avgweight;


        while (scale.get_units() > THRESHOLD) {
          Serial.println("Measuring done");
          delay(2000);

          measure_ongoing = false;
          break;
          }
        }
      }

}```This means the measured weight is never over threshhold and is in a stuck loop
proven mauve
what is NUM_MEASURMENTS defined as?
wind drift
#include "HX711.h"


// HX711 circuit wiring
const int LOADCELL_DOUT_PIN = 6;
const int LOADCELL_SCK_PIN = 5;

HX711 scale;

#define calibration_factor 220 //-7050.0 //This value is obtained using the SparkFun_HX711_Calibration sketch
float weight = 0.0;
float prev_weight = 0.0;
float myWeight = 0;

#define NUM_MEASUREMENTS 10 // Number of measurements
#define THRESHOLD 5      // Measures only if the weight is greater than 5 g. Convert this value to pounds if you're not using SI units.
#define THRESHOLD1 0.5 // Restart averaging if the weight changes more than 0.5 g.```It's getting zeroes from the scale, so it's not going over the threshold
wind drift
I thought that too but when I use my old sketch with the same code I get measurements
proven mauve
So... what's different between the two sketches?
wind drift
Ah I just fixed it lol
proven mauve
What was it?
wind drift
I accidentally had 3 sketches open in arduino to test around. And it seems I copied the void setup() part into the wrong sketch. So it never had scale.begin(LOADCELL_DOUT_PIN, LOADCELL_SCK_PIN);
crisis averted
 languid pivot
Question, anyone know how to do a menu for a Arduino compatible screen? I got everything done except doing the menus, and all of the stuff online either doesn’t make sense, isn’t written correctly at all, or they used a screen with more pins (some screens have more than 4 pins)
north stream
Most menu code has abstracted stuff (drawing boxes, text, etc.) and low-level stuff that actually talks to the screen hardware. You should be able to graft the menu stuff onto whatever driver works with the screen you have without too much effort.
It's particularly easy when there's a defined interface between the layers like AdaFruit's GFX library, or SparkFun's HyperDisplay
languid pivot
I use a .96” OLED display from UCTTRONICS, and since the manufacturer is apparently not writing their own code , they took the code off of something else. I also particularly don’t really know how to work with screens
(I worked with them, just not with menus)
proven mauve
Twiggy, I've been getting into them
Is it an SSD1306 screen?
If so, I have had really good luck with adafruit's stuff, if you don't mind the space it takes up. Around 14k I think...
You want to get the overall Adafruit_gfx library and also the one that matches the screen, probably Adafruit SSD1306
Then you need to hook it up to your SLC, SDA, GND, VCC pins
When you install those libraries there is example sketches to test and make sure it is working, in the examples section of the IDE
It's very easy to work with, once you get it going you can use display.print("print words"); and display.println("more words"); or display.print(a_variable); etc....
it also does shapes, lines, etc and can load bitmap images
might take some working with to get the hang of it, but I like using it
@languid pivot in case you missed all that.
Bedtime for me. @north stream everything is working, I have a voltage display tonight now that will be a battery meter tomorrow
languid pivot
I know how to set it up and even have a boot sequence done @proven mauve
proven mauve
For text you need to set the cursor and then print the text
languid pivot
I know that too
proven mauve
I see, I see, you're looking for how to do a menu now
languid pivot
I need to figure out how to select something and “click” it
proven mauve
are you using adafruit's stuff?
languid pivot
I’m using this screen
UCTRONICS 0.96 Inch OLED Module... https://www.amazon.com/dp/B072Q2X2LL?ref=ppx_pop_mob_ap_share
Note
When you try to upload code that they provide
They have the Adafruit_GFX library in the #include
But it wouldn’t compile
If you delete the Adafruit library from #include
Then it compiles and uploads
And it works perfectly
proven mauve
hm, weird.
languid pivot
Yea
I was goin nuts when the code wouldn’t work, and the IDE wouldn’t give me a error
Just said
“Error compiling code to Arduino - board -
proven mauve
I just use those two adafruit libraries for mine. You can switch to them if you want to get away from their janky sounding code. Anyway, so what I'm doing for my menu is I capture button presses depending on the state of the program. If the game mode isn't running, then the menu mode captures them. Each time a button press is captured it uses a milli() timer so that there is a delay between when it will capture another.
I have 3 buttons, one cycles, one selects, and one backs out.
languid pivot
What about scrolling as well.
Since I need
Lol
Nevermind
You said cycling and I didn’t register that
proven mauve
So I have all my menu options loaded into a large array, and i use the logic to cycle through. menu[x][0] locations are menu heading and menu[x][everything except 0] are submenus
#define STRING_SIZE 12

const char mainMenu[MENUSIZE][8][STRING_SIZE] = {
  {"stats","hunger","happiness","health","discipline ","weight","age",NULL},
  {"food","apple","steak","water",NULL},
  {"game",NULL},
  {"sleep",NULL},
  {"clean",NULL},
  // {"doctor",NULL},
  {"discipline",NULL},
  {"settings","sound","LED","screen dim",
    //add a restart option after EEPROM saving is enabled
    NULL
  },
  // comment out next line if not using dev options and set MENUSIZE to 8
  //{"dev opts","evolve",NULL},
};
if it hits a NULL value, it cycles back, but mine gets a little more complicated because the ones with no submenu perform the main menu action if you select them instead of opening a submenu
languid pivot
This all the code for selecting etc?
proven mauve
that's the menu itself
proven mauve
this is my menu module https://pastebin.com/d0R3MqT6

so, to break it down, I have a setting array that picks up what the current selection is. If there's no submenu it's the main menu item. If there's a submenu it's the submenu item selected.
The code below sees the settings and does different renderings depending on which setting is currently loaded into the setting string
if you select a setting it copies it to the action string and it detects the action, performs it, then clears out the string
all the stuff with millis or delay or is just to slow down button imput
languid pivot
What if I have, let’s say 3 lines of text. 1 says “Stats” 2 says Version and 3 says power off, how would I select that, and then go to the page it leads too
proven mauve
put them in an array, capture the input, and use it to cycle through the array depending on what's pressed, and what level of the menu is opened
I gotta get some sleep though, work in a few hours. If you need help tomorrow evening I can probably be round to help some more
mine is just a rewrite of Tamaguino code, you can look there to see how it looks and what the menu does then compare it to the code. His version loads everything to PROGMEM to save space though, and uses pointers and addresses and is a little confusing for me. Mine rewrites it out of PROGMEM and handles it more directly, but essentially it's the same code
But an easy easy way to break it down is you have an array
char simpleMenu[3][8] = {"option 1", "option 2", "option 3"};
button input 1 cycles x through simpleMenu[x], button two copies simple menu like this
//earlier in the code
String menuAction = "";

//button 2 gets pushed here
menuAction = simpleMenu[x];

//program is always watching for actions
if (menuAction != "") {
  if (menuAction == "option 1") {
    //do the action code here
  }
  //clear out the actoon so it doesn't run twice
  menuAction="";
}```To show the stuff on the screen you need a variable that loads with something like the current option of the array, and have it copy every time you cycle the menu ( the simpleMenu[x] cycling). Then you have your program watch what's in that variable and display the menu based off what's in it, the same way it's watching for actions to perform in that code example. Except it's performing it every loop instead of clearing out the variable each time it runs once ( because you want it to keep displaying, unlike an action you only want performed once)
I hope that makes sense. I'll help more tomorrow if not.
 inland anvil
@proven mauve the answer to your question regarding a power supply that stays on no matter what: https://voltaicsystems.com/always-on/
Ideal for IoT and time-lapse applications, Voltaic's signature Always On battery packs are designed to stay on regardless of power draw.
got two of them they are the best!
 still sigil
Hi everyone, can I get some help with a GPS module speedometer to control LED color?
I have an addressable LED strip, an ardrino uno and a GPS module. Need to do speed at 0-2mph (red) 3-6mph (yellow) 7-10(green) 11+ rainbow!
 north kelp
@still sigil If you're using an Adafruit Ultimate GPS module, you can use GPS.speed (Arduino) or gps.speed_knots (CircuitPython), as shown in the examples in the primary guide for those products:

Adafruit Learning System
One GPS to rule them all and in the darkness find them!
still sigil
I see on the tinygps++ the following code printfloat (gps.speed.kmph () gps.speed.isvalid(), 6, 2);
this is a single line running on the full example tinygps++ example, and I used the serial monitor to see it lock onto 4 satalites. Where would I see the speed output at?
ok actually I think I figured that out. The GPS module puts out GPRMC data and the 7th field is the speed. So now I just need to do an if, than for the different speeds I want to monitor and have the addressable LED change based upon that info.
If I looked at the make code output after using the drag and drop to get an idea could I get that to work for what I want or am I bitting off more than I can chew here....lol
north stream
That sounds feasible.
proven mauve
Hey there
madbodger, got the battery all mathed out and the in-program gauge works beautiful now
north stream
Yay! I'm glad that worked out.
minor solar
hi all. this might be a generic C coding question, rather than arduino-specific, but is there a way to see if a particular library's init commands execute successfully?
in the RadioHead RF95 library, i can do
if (!rf95.setFrequency(RF95_FREQ)) {
    Serial.println(F("setFrequency failed; stopped."));
    while (1);
  }
because setFrequency() is defined as bool RH_RF95::setFrequency ( float freq ).
but other settings i need to perform are defined as void, for example void RH_RF95::setSignalBandwidth ( long sbw ).
is there a clean way to catch the case where such commands fail to complete correctly?
north stream
I'm pretty sure the init() methods return a boolean so you can see if they completed successfully
I guess the void ones aren't expected to fail?
minor solar
@north stream i think you're right. was just being paranoid and trying to program defensively, i guess...
north stream
Generally a good idea
 brazen idol
I am a total noob in programming, what is the best way I can learn to use an arduino?
north kelp
@brazen idol I think the best way is to jump right in. We're here to help!
Check out the projects at https://learn.adafruit.com for inspiration!
I'd pick a simple project, and follow the instructions for wiring and coding.
Then, make some creative changes of your own.
brazen idol
Thanks@north kelp
still sigil
ok ....
anyone around to hold my hand on some things with programing if than gps speed to neo pixel strip animations:?
north kelp
@still sigil I'd start with something easy, like this untested loop()
void loop(){
    // add code for putting current speed into speed variable

    if (speed < 5){
        strip.fill(strip.Color(64,0,0));
    } else if (speed < 10){
        strip.fill(strip.Color(32,32,0));
    } else {
        strip.fill(strip.Color(0,64,0));
    }
    strip.show();
}
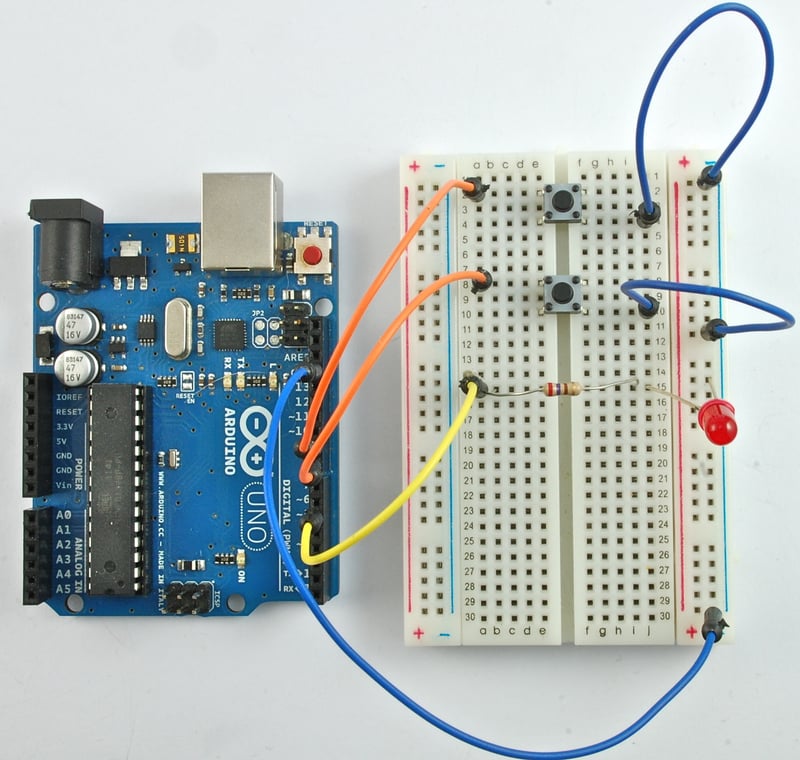
Thanks oesterle, do you have any good recomendations for tutorials for buttons to control if then actions? If I wanted a button push to start "IF/THEN/GPS" then a second button or second button push to start "Musicsimulation" then a third button push to start "light show"....something like that,.
 still sigil
sweet! thanks a bunch. Also just real quick, I am making a lot of bad assumptions for an art student in a new media class. But if I had a git hub code for cycling through a bunch of led string animations using a button push, and those animations were defined in the code (animation1, animation2, etc.) Am I right in assuming that I could snip out the section of the code defining and programming the animations and then use that in my GPS speed code?
north kelp
Possibly. Depends on how the code is structured.
It might be a good start.
But I would start instead with the solid colors in my easy example above.
A lot of NeoPixel animation code you'll find spends 100% of it's time doing a an animation which could take several seconds.
In your case, you want to look at the GPS speed reading much more often than that, and react more quickly as speed changes.
Which means eventually, (not now) you'll want to learn about using millis() to measure elapsed time, and multi-tasking without using delay(). This guide goes through that.
https://learn.adafruit.com/multi-tasking-the-arduino-part-1/overview

Adafruit Learning System
Make your Arduino walk and chew gum at the same time.
I'd not try to do everything at once to start, in one big program.
Instead, I'd write a simple sketch that just does buttons well
Then a simple sketch that just does color changes of NeoPixels
Then a simple sketch that just does GPS speed reading
Only after I got those all working, would I move on to trying to integrate the pieces.
This way, you also have breadcrumbs to go back to working code.
wind drift
Question: I have the nrf52840 Feather Express.
If I want to save sensor data and later send it via BLE to my phone can I save it directly on the chip?
Or do I need to save it on a microsd?
It seems to have 1 MB flash memory
north stream
There are a few ways to do that. One approach is "Little File System" https://github.com/ARMmbed/littlefs

GitHub
A little fail-safe filesystem designed for microcontrollers - ARMmbed/littlefs
wind drift
mhh seems complicated? 😄
Before I used a microSD which worked fine with the SDcard library
Or is there an example sketch somewhere?
north stream
There might be a cleaner approach (avr-gcc offers some flash functions for that architecture, but I don't know as much about the nRF version)
kind spruce
Greetings!
I'm doing my best to learn C++ in a short time. I do have a leg up I think, as I do have a programming background. I'm adept in Powershell, knowledgeable in C#, and so far have been able to hack some simple stuff together in C++. But the inner programmer daemon in me wants to get complicated now. For instance, I want to be able to create an 'array table' with fields... something like:
page[0].Modules (page being the array, 'Modules' being one of several 'fields'... and referencing it would then list the 'Modules' like {Mod_TogBtn,Mod_Sldr,Mod_InfoDisp} ... this is a Powershell example, but I want something like this in C++ ... well, in the Arduino IDE to be more specific
just referencing 'page' by itself would then list out the entire array contents. visualize an excel spreadsheet... [0] is first record, [1] second record, so on
 surreal pawn
which arduino are you running on @kind spruce
the arduino uno for example only has 2KB of ram
 gray crypt
Having some issues with the pro trinket 5v
Can't seem to get that pulsing red LED
It does like 2 flashes then pauses for a little then another 2 quick flashes
I've tried hitting the reset button and pluging and unplugging it and I am not sure what to do
And I think I have the right settings on the IDE but I'm not sure
But I get this error
kind spruce
I'm curious why your Port is set to bluetooth?
shouldn't it be set to a COM port like COM3?
 acoustic nebula
kind spruce
acoustic nebula
kind spruce
then I gracefully bow out, as I know nothing about MAC
gray crypt
Haha.
 marsh forge
Have you tried a different USB cable? I'm constantly being burned by non-data USB cables
gray crypt
I'm pretty sure it is but I will try again when I get home tonight
north stream
Do you have other ports available?
gray crypt
No, just the bluetooth one.
north stream
Does it show up on the USB list?
kind spruce
In case anyone cares... I was attempting to create table arrays with named keys. Unsuccessful. However, I think I can get by with String arrays and int arrays... but then I just need a 'legend' to tell me which [?] is for what variable value
proven mauve
lol, copious //notes
@north stream got eeprom saving/loading working today and I didn't even have to bug you or Nis 😄
and used a flat battery on a new kit, so I got to spread out the parts a little more
and on to tomorrow, lol. Have a good one!
 fierce aurora
hi, can i set a DIO on an arduino HIGH before sleep mode to trigger an interrupt, or will it go to LOW?
north stream
If you set it high, it seems like it would be an output, and you can only trigger interrupts on inputs?
fierce aurora
i want e.g DIO 12 HIGH while sleeping, and when i press a button it should pull interrupt0 (DIO2) HIGH to wake up.
 safe shell
@gray crypt Try other USB cables, other Mac USB port (without hub), reboot Mac. In Terminal, do system_profiler SPUSBDataType, if it's not there, it's not connected.
wind drift
Question: I want to connect my MPU6050 module to my nRF52840 feather express
It seems I have to connect the INT pin somewhere
but not sure
Or does it not matter?
wind drift
Hm and I get 'wire was not declared in this scope'
north stream
Hmm, maybe you need to do something like #include <Wire.h>?
 low ingot
Hey guys, I've been stuck for several hours on this problem. I feel like the answer is obvious I have not been able to find the answer online and experimentation hasn't yielded any positive results.
I'm trying to spawn an object using platformio, I have my class header in /include and the cpp file in /src
For some reason when I try to build it can instantiate the object, returns an undefined reference to it's member methods
Does this sound like a compiler issue?
wind drift
@north stream already has it. I tried to compile on a regular arduino uno and it works fine
north stream
Hmm, I think "wire" is an I2C library, are you using your MPU6050 in I2C or SPI mode?
wind drift
Uhm - I just selected the example sketch for MPU6050_RAW (or any other ones) and click on compile. Then I get the wire error
north stream
I2C support on the nRF52840 is a little dodgy (Nordic calls it "TWI").
You may have better luck running it in SPI mode.
wind drift
Hmm is there an example for that somewhere?
wind drift
Can only find I2C example for it
low ingot
Figured out my problem
 odd fjord
@wind drift what MPU6050 library are you using -- as noted in #general-tech, it works for me with the Adafruit MPU6050 and Adafruit BUSIO libraries installed. use the basic_readings example
Works fine with both Arduino and CircuitPython via I2C
north stream
@low ingot I'm glad you figured it out. Care to share what it was?
low ingot
No comment, basically I'm stupid python programmer
north stream
Oh, we've all made mistakes like that! No worries.
 wraith current
@low ingot just tell us already ! 🙂
low ingot
I had the methods wrapped in a class
wraith current
aha
 proud ridge
I am trying to get an Arduino Uno to accept input from a Nintendo Wii nunchuck. I mostly see tutorials on how to add the Wii adaptor to the Uno, but very few on the code. Does anyone know a good resource for the code for such an input? I would assume something like, for the analog stick, IF X>100 THEN do this command, but I can't find exactly how.
 tender wasp
I have a Feather M0 proto (SAMD21) and I'd like to change the fuses to enable EEPROM emulation for runtime storage. I've never done any ISP/JTAG/SWD work, and I'm having trouble figuring out where to start. it would be great if I could speak SWD from another arduino-compatible, but I don't know how to find info about what sketch to run or how to hook it up. tutorials (like Adafruit's tutorial for burning a bootloader) seem to assume you have dedicated hardware like a J-link. any tips?
north kelp
@tender wasp This might work.
https://github.com/cmaglie/FlashStorage
GitHub
A convenient way to store data into Flash memory on the ATSAMD21 - cmaglie/FlashStorage
Discussed in this Forums thread:
https://forums.adafruit.com/viewtopic.php?f=22&t=88272
tender wasp
yep, that's the one I plan to use. but the feather fuses aren't set up to enable storage by default AFAIK.
north kelp
I don't see mentions of changing the fuses when using this library. I do see, however, that anything you write using it will persist, but loading a sketch will overwrite it.
tender wasp
ugh. yeah, I'll scrutinize the thread. thanks for the link.
I'm just storing compass calibration data, so it's not the end of the world if reloading the program wipes that. it has to be recalibrated periodically anyway.
north kelp
@tender wasp Besides SD storage options, which are probably way overkill, there are also these handy FRAM breakouts:
https://www.adafruit.com/product/1897

FRAM, or Ferroelectric Ram, is the coolest new data storage method that all the fashion magazines are talking about. Oh wait, no that's quilted handbags. But FRAM is pretty damn cool ...
tender wasp
yeah, trying to limit my part count. those look great tho.
that was going to be my solution before I found FlashStorage.
north kelp
What other parts are you using?
Sometimes there's some bits of storage in them that you can utilize.
tender wasp
LSM303 compass/accelerometer and a darlington array IC
I skimmed but didn't see anything along those lines. that'd be cool, tho
north kelp
@tender wasp These might be an option.
https://www.mouser.com/Microchip/Semiconductors/Memory-ICs/EEPROM/_/N-488u2?P=1z0zl2wZ1z0z63x&Keyword=24lc256&FS=True
tender wasp
those look cool, too
north kelp
Could be mounted on the Proto part of your M0.
Adding External I2C EEPROM to Arduino (24LC256)
tender wasp
the proto (plus an extra row!) is holding the 18-pin darlington IC right now, heh
I do think FlashStorage will work best for me, but I also like the FRAM and 6-pin i2c EEPROM options
north kelp
Maybe it mounts on the flip side of the proto, in the unused rows. 🙂
tender wasp
ha, I almost wrote that =D
I might dry-fit that with another IC just to see how it looks
north kelp
I think it could also be mounted so that VCC pin is on M0's pin 6, which enables SCL and SDA to pair up with those pins.
GND would be the only pin needing connection in proto space.
Other pins could be clipped off.
Thanks for listening to my wild hacking down this rabbit hole.
north kelp
It gets powered from digital pin 6 being set to high in code. M0 proto GPIO pins recommend limit of 7mA; that EEPROM uses 5mA max when writing data.
north kelp
Where'd you find that tiny little shelf of 1-row proto?!
tender wasp
heh, snipped from a semi-flex proto
north kelp
Oh nice.
This one?
https://www.adafruit.com/product/1518

Make your next project super-flexy with a prototyping board that can twist and bend. We took our lovely classic perma-proto design and had it made from incredibly thin polyamide film. ...
tender wasp
it was an amazon piece...
north kelp
What's the black connector lead to?
tender wasp
LEDs at the moment for prototyping, will be haptic motors. haptic compass anklet!
north kelp
hence the transistors?
tender wasp
yep
north kelp
Very cool. You're probably within the 3V pin's current limit, even with a few of the https://adafru.it/1201

BZZZZZZZZZZ Feel that? That's your little buzzing motor, and for any haptic feedback project you'll want to pick up a few of them. These vibe motors are tiny discs, completely ...
tender wasp
60mA draw at 3V, though, and the pins are rated for 10mA IIRC
the motors I got are 80mA, I think? and I may be driving 2-4 at the same time. maybe. haven't decided yet.
north kelp
I love using the Adafruit DRV2605L for haptics, but you probably don't want a bunch of them.
https://www.adafruit.com/product/2305

The DRV2605 from TI is a fancy little motor driver. Rather than controlling a stepper motor or DC motor, its designed specifically for controlling haptic motors - buzzers and vibration ...
tender wasp
yeah, that's a lotta cash & physical space for 8 motors. =D
they do look cool though
north kelp
Sounds like you're thinking of 8 compass directions.
tender wasp
I'm looking for a tap feeling, and I think I can get a tap with just binary on/off
yep
you'll get a tap wherever north is, as you're walking around.
I read about a project like this about 10 years ago and have been thinking about it since
north kelp
I think you can, based on my experience driving haptics without a DRV2605L.
tender wasp
I've done a small amount of proto with my motors and yeah, I think so too
north kelp
Try pulses of 100ms, and move down until you don't feel it.
tender wasp
yep, I think I found 40ms was the minimum to feel it, 60 felt like a tap, and 100 was a strong vibe.
north kelp
I think you might be able to get away with 4 motors, by triggering, say north and west at the same time.
tender wasp
maybe? I like the idea of 8, though; the tap strength would be consistent.
north kelp
But 8 is good to start with. I often prototype with more things, then optimize later.
This sounds like it might be useful to people with visual impairment. Or me, with directional impairment.
tender wasp
yeah, I'm interested to see if it feels like another sense
also I'm living in a new city and get confused the first few steps off the train =D
north kelp
I'd encourage you to share it on Show and Tell, even in it's current state as a work in progress. There are frequent demos and interest in assistive technology there.
north kelp
Adafruit has a weekly live Show and Tell on YouTube.
tender wasp
ohhh, gotcha
north kelp

YouTube
Electronics show and tell with G+ On-Air hangouts every Wednesday at 7:30pm ET. Want to show a project on an upcoming show and tell? Leave a comment on the s...
It's a half-hour show, and people take 2 or 3 minutes to show what they're working on.
tender wasp
cool, I'll think about it.
it's currently operating as a compass with LEDs. software needs some fine tuning, but I'm sort of waiting for the motors to tune by feel.
north kelp
Well, if you do show it, the LEDs are that much more valuable, visually. 😄
north kelp
Might be able to series or parallel the LEDs and haptics motors.
tender wasp
north kelp
Yay Pebble!
tender wasp
best smartwatch still
north kelp
I made this back in the day. Pebble controlling disco-ball hat over BLE.
https://twitter.com/ericmigi/status/518875580540788736?s=20

Best hat-related hack at the @PebbleDev retreat from @erico. Disco ball controlled by @Pebble!

 Twitter
tender wasp
Twitter
tender wasp
ooh
north kelp
Tether is to Arduino UNO, BLE nRF8001 breakout, and relay shield. These days I'd likely do it with a Feather with BLE, transistors, and tuck everything into the hat brim.


So happy @erico lives close to us. Congrats again for your winning #PebbleDev2014 disco hat!
 Twitter
tender wasp
Twitter
tender wasp
something to be said for relays, though, when you don't feel like doing transistor math. a relay's always big enough.
north kelp
Yep. Overengineering for hackathon speed.
tender wasp
so watch => phone => app => nrf+arduino?
north kelp
watch => nRF+arduino
tender wasp
oh, cool. didn't know you could connect it to other devices.
north kelp
Watch was running a preview build of Pebble OS that included BLE central functionality.
tender wasp
oh, nice
north kelp
That code never made it to market, but we were given it to play with at the Pebble developer retreat.
 potent helm
okay, I think i missed a line or something in the guide I have the libraries installed for arduino on the CPX , it's connected but I can't compile for it
this is not the ble one
I have the correct com port selected
I'm trying the fidget spinner example btw
odd fjord
@potent helm do you have both the Arduino SAMD and Adafruit SAMD board support packages installed? What errors are you gettting?
potent helm
Error compiling for board Adafruit Circuit Playground Express
let double check on the packages
odd fjord
there should be a "fatal" error reported above that was the '"deal breaker"
potent helm
yep Multiple libraries were found for "Adafruit_CircuitPlayground.h"
odd fjord
that should just have been a warning .. look for "fatal error"
potent helm
i missed it
north kelp
Towards the bottom
potent helm
thank you , i knew it was a before the keyboard error
north kelp
You can paste the last 20 or so lines of compilation message in here, if you want.
potent helm
still the same multi library, i uninstalled the non adafruit one
odd fjord
you need to install both
the multi-library warnings should not be a problem. If you can post the log it would help.
potent helm
c:/users/kate/appdata/local/arduino15/packages/arduino/tools/arm-none-eabi-gcc/7-2017q4/bin/../lib/gcc/arm-none-eabi/7.2.1/../../../../arm-none-eabi/bin/ld.exe: error: libraries\Adafruit_Circuit_Playground\utility\ffft.S.o: Conflicting CPU architectures 12/0

c:/users/kate/appdata/local/arduino15/packages/arduino/tools/arm-none-eabi-gcc/7-2017q4/bin/../lib/gcc/arm-none-eabi/7.2.1/../../../../arm-none-eabi/bin/ld.exe: failed to merge target specific data of file libraries\Adafruit_Circuit_Playground\utility\ffft.S.o

collect2.exe: error: ld returned 1 exit status

Multiple libraries were found for "Adafruit_CircuitPlayground.h"
 Used: C:\Users\Kate\Documents\Arduino\libraries\Adafruit_Circuit_Playground
 Not used: C:\Program Files (x86)\Arduino\libraries\Adafruit_Circuit_Playground
 Not used: C:\Program Files (x86)\Arduino\libraries\Adafruit_Circuit_Playground
 Not used: C:\Program Files (x86)\Arduino\libraries\Adafruit_Circuit_Playground
 Not used: C:\Program Files (x86)\Arduino\libraries\Adafruit_Circuit_Playground
exit status 1
Error compiling for board Adafruit Circuit Playground Express.```it compiles for me -- I guess we need more of the log ... do you have the adafruit_lis3dh library install
potent helm
yes
odd fjord
ok -- post more of the log --
potent helm
that was the whole thing
odd fjord
turn on verbose logging
potent helm
ill have to do it when i get back ride is here
odd fjord
OK -- goo d luck --- it will work!
this appears to be the issue c:/users/kate/appdata/local/arduino15/packages/arduino/tools/arm-none-eabi-gcc/7-2017q4/bin/../lib/gcc/arm-none-eabi/7.2.1/../../../../arm-none-eabi/bin/ld.exe: error: libraries\Adafruit_Circuit_Playground\utility\ffft.S.o: Conflicting CPU architectures 12/0
are you on the CPX or the CPB?
potent helm
It's the cpx
I wanted something fast
Sadly I only have a USB c it my bag, so it will be a few hours to look
odd fjord
hmm-- something is not installed correctly -- that is an odd error
potent helm
I m used to Flora's so...
odd fjord
I suggest removing and re-installing both SAMD board support packages
 rough torrent
Hey there, is there a way to rotate the screen while drawing in Arcada?
I'm making a chess clock, and so I need a way to flip the numbers around for the other player to see it.
Adafruit_ILI9341 tft = Adafruit_ILI9341(TFT_CS, TFT_DC);
tft.setRotation(1);
// Write player 1's time
tft.setRotation(3);
// Write player 2's time
Is there a setRotation(); in Arcada?
pine bramble
@odd fjord I'm thinking incorrect source code. ;) Unless it's from a published example that @potent helm tried to compile, without changes.
odd fjord
@pine bramble I thought it was straight from the example folder but good to check
pine bramble
(an empty arduino sketch created with the 'new sketch'widget should resolve that.
odd fjord
or just blinky
pine bramble
Easy example: old code that uses SPI flashROM will fail badly.
(the Example code used may be out of date to new libs published)
odd fjord
I just comipled it on mine
pine bramble
yeah but you're epic genius ;)
odd fjord
mmm... flattery always helps 😉
pine bramble
haha. easy differential is to roll back everything a few steps, as well. update all libs. all board support packages. If that fails, roll them back to earlier versions.
But of course this shouldn't be necessary.
(btw it was easy to get SPI and QSPI flash working again, once I got over the hurdle)
odd fjord
Hopefully it'll sort out soon -- Unfortunately I have to go offline for a while -- hope you are around to help
pine bramble
Might be! Good to see you.
odd fjord
you too!
potent helm
@pine bramble @odd fjord it was indeed example code with no changes, I'm on my way home now
potent helm
@pine bramble was the consensous to remove a few libraries ?
odd fjord
Remove/ reinstall both SAMD board support packages, not libraries
No consensus. Just my suggestion
potent helm
okay, i'll take a go at it
now that I am home for the night I can switch it to cp i guess as well
gha same error
i must have something extra installed
pine bramble
@potent helm Just create a new empty sketch. Until it compiles without error (and yes you can upload it, though it doesn't do anything very interesting) .. no point in looking elsewhere.
Extra installs generally aren't relevant.
potent helm
I can do that?
pine bramble
Yes definitely and in fact it's a good exercise.
potent helm
I was useing the example to try to fix the id10t error
pine bramble
The CPX has several simple sketches available that don't use external components (that's almost the point of a CPX).
But if a 'new' sketch (just has the setup() and loop() unpopulated) doesn't compile cleanly, nothing else would, either.
If you really want to save time, it may pay to reinstall the Arduino IDE, but that's an extreme measure.
pine bramble
So it compiled and uploaded?
potent helm
yea no uggo orange bar
pine bramble
Great. That should save you lots of time troubleshooting.
See if you can blink D13.
minor solar
hi all
pine bramble
👋
minor solar
possibly dumb question about basic variable definitions... is it considered "correct" (in the sense of coding best practice) to define variables outside of setup() and loop() in general, or only if they will be used in both functions?
potent helm
okay blinking is seeming to work
minor solar
in my case, i'm working with the RadioHead library just now, and there's a pair of lines in the rf95_reliable_datagram_server example sketch that says:
// Dont put this on the stack:
uint8_t buf[RH_RF95_MAX_MESSAGE_LEN];
these appear before setup(), which i think makes buf global. is that right?
pine bramble
If it's outside any function, I think of it as 'global'.
@potent helm I would reinstall all libraries your 'complex' sketch requires.
You can roll them back to a previous version, which will expose some kind of an 'update' button in the Library Manager thing.
@minor solar If you join the Arduino discord, there's a better person to answer this one, there. ;)
minor solar
@pine bramble actually i was slightly imprecise there: those lines appear after setup(), but before loop() in the example sketch. but i'm pretty sure that shouldn't matter.
pine bramble
It usually doesn't matter in the Arduino IDE.
I like to declare them just above the first function that uses them (top to bottom definition of 'first' in the source file).
minor solar
@pine bramble oops, i thought that's where i was posting 😳
pine bramble
When I'm confident, I then move them to the top of the program, for easier human reading.
(I use 'globals' way too much in C++)
minor solar
the thing that confused me about that particular example is that there's another variable declared just above that comment... the sketch actually looks like this:
void setup() {...}

uint8_t data[] = "And hello back to you";
// Dont put this on the stack:
uint8_t buf[RH_RF95_MAX_MESSAGE_LEN];

void loop() {...}
and it seems to me that the comment about the stack would apply to anything declared there (or anywhere else outside setup() and loop().
pine bramble
No I think they meant use a buffer not the stack. ;)
buf there is an unsigned 8-bit integer array.
potent helm
I think i have to find the pin number for the neopixels
potent helm
I was just scanning the image, thanks
the strand test sketch did not like a letter in the pin
pine bramble
No 'D8' is for the human usually. Just '8' in Arduino IDE. ;)
pine bramble
D8 is physicall pin 38 on the package of the ATSAMD21G18A chip. It is assigned to PB_23.
minor solar
BTW, where in Discord.app would i specify the "Arduino discord," per your suggestion? searching for "arduino" in the communities search doesn't turn up anything
pine bramble
ladyada or adafruit posted the link here somewhere which was how I found it.
probably in pinned messages
potent helm
was that for me?
minor solar
never mind, it's up at the top of the window (to the right of "#help-with-arduino"
@potent helm no, @pine bramble suggested i hop over there. sorry for any confusion.
pine bramble
potent helm
now before I go further , should I jump into circuit python instead
potent helm
nekt is adding 20 jewels
pine bramble
minor solar
@pine bramble thanks for the, uh, pointer. looks like the arduino discord is https://discord.gg/p6Hqbvx . heading over there, hoping someone can set my addled brain straight regarding variable scope, etc. (i recently learned that the regulars on #c on freenode IRC don't always treat newbies too kindly...)
pine bramble
coding-help is the right place on that server. ;)
irc has always been a bit of an rtfm culture.
This Discord (Adafruit) explicitly asks for kindness to everyone.
Arduino Discord somewhat more rough-and-tumble. ;)
potent helm
te ble one is a difrent chip right?
potent helm
i get the feeling strand test wont work the same 😉
pine bramble
Well the NRF52 is fast enough. NeoPixel lib isn't all that difficult. Arduino IDE (and CircuitPython) are meant (partially) to abstract-out such differences, for you.
They can't very well sell NeoPixels (or a CPX-like target with NeoPixels) if they hadn't worked all this out.
pine bramble
also it's D8 on both
pine bramble
The NRF is a radio but is also just another microcontroller. Probably ARM M-something.
In 2015 Nordic Semiconductor introduced their newest 2.4 GHz ISM band SoC series, the nRF52 which incorporate the ARM Cortex-M4 as their core. -wikipedia
Most abstractions will work without difficulty.
NeoPixel, blinking D13, and all that are pedestrian and mostly apply equally to any target you can compile for in the Arduino IDE (at least Adafruit-vended targets).
It's always a thrill when a new target comes out and the code still works for that new target. ;)
(Such as the STM32F405).
Really fancy chips often use the term 'core' to refer to basic operations.
potent helm
trying to melt my brain?
pine bramble
So in this case, the NRF52 uses an ARM Cortex M4 as it's core (guts) (haha0
sorry.
<< melter
potent helm
all good
I do need to chose now how it will all work
I could keep it on arduino
or go cp
pine bramble
My mom used to say "I ask you what time is it and you tell me how to build a clock" so this isn't news. ;)
pine bramble
go for it
pine bramble
I usually play Santa for my own desires this time of year but money got squeezed.
Have to wait for January to do it.
potent helm
it cost me that was half the order
i was happy for black friday
and the cheeper price for more then 10
pine bramble
I can certainly 'shop my closet' and have boocoo choices. I have unopened packages from 3 yrs ago. ;)
potent helm
holy crap
pine bramble
I actually misplace brand new stuff all the time.
(I try to stay way ahead of the Out of Stock monster, so that drives unneeded purchases for current uses)
pine bramble
There ya go. I don't have a Pi4 but I have two Pi3's
(neither used very much at all)
pine bramble
(photojournalist)
potent helm
i love how they grew on me
i am tempted to wire them as a matrix but that may not look as good as I think in my head
pine bramble
They're electrically chained (or you drive them on separate port pins).
For speed (DMA) the driver may be limited to a single port pin (dunno).
potent helm
I think I can use 2 difrent pins (1 for each chain)
or I could do 1 azd zig zag
140 led should be okay on 1 strip?
pine bramble
datawise I don't know if there's a limit. I think each chip essentially normalizes the signal and passes it on to the next one in the strip, full amplitude. That's my impression, for reasonably short strands (300? no real idea how many is 'reasonable').
I'm afk for a bit.
 untold quest
Need help with fuse settings for samd21g18.
Is there a way to keep firmware from being read? I read a few things on the internet but nothing specific like the fuse calc for the Uno or Mega.
Is the best practice to use the 'Security Bit' under the 'Security' tab in the device programming window?
Thanks
 random oyster
iirc, yes, the security bit is the only thing that'll help with that - you'd need to issue a chip erase before you can read the device again after setting it
untold quest
Thanks for the feedback.
Do you know if there is a way to lock only the eeprom so the chip can be updated by a uf2 file and not allow read from the eeprom?
I am trying to come up with a key type aproach that would allow users to apply updates but keep the hardware copies at bay.
random oyster
afaik the chip can still read/write to its own memory when the security bit is set, it just can't be read by e.g. an external programmer. I assume there's a bootloader on there that creates a USB device and writes transferred uf2 files to flash or something similar? I wouldn't think there'd be any issues with that. I'm not great w/ security, but out of curiosity what are you trying to achieve? are there specific threat models you're trying to address?
yeah going through the datasheet, it looks like the security bit is mainly for protecting against access from a debugger
untold quest
Wanted to see if there is a way to create a product without it quickly being copied and sold for cheaper.
The old copy protection thing
 delicate pecan
I have a quick question.
Does anyone have any experience using VREF < VCC, and it is safe for me to go above VREF but below VCC on an adc input?
trying to use the 1.1v internal vref with a signal that in some cases may spike above it but always below or at VCC.
(in my case with the attiny85)
marsh forge
I'm working with a Adafruit Huzzah ESP8266 in a solar powered project. When my backup battery dies the board doesn't seem to reboot on it's own, after the battery has recharged. Any ideas how to safely handle the lower power situation and then auto-reboot?
the onboard LED was dimly lit red and the board wasn't connecting to the network, but once I pressed the physical Reset button the powered turned on and connected to the wifi without issue
delicate pecan
maybe this will help @marsh forge
https://www.element14.com/community/thread/63679/l/dealing-with-low-battery?displayFullThread=true
you need to research something called brownout protection
proven mauve
@delicate pecan is your vcc supply constant, or does it change?
delicate pecan
Its a steady 5 volts from a 7805.
I actually am trying to set up a DC amplifier circuit for my "sensor "to calibrate the max output voltage to be right at the max adc voltage (1.1V) via a pot controlled variable gain amplifier.
I need accuracy near and at the max voltage range, and max resolution for the entire range 0-max.
the "sensor" is an in-circuit ESR meter design I'm working on that has a DC output voltage range of aprox 0-1V , I don't have a surplus of needle meters so I am opting to use an attiny85 and a display.
My main worry was that if I would allow the user to calibrate the max voltage of the sensor portion (ESR would be 0 ohms so short probes) to be right at max adc reading(1.1V vref) via a pot, that accidentally pulling the adc above 1.1v during calibration would damage the adc.
But if the adc can handle occasionally going above the vRef during manual calibration then I could go ahead and use this method reliably
marsh forge
@delicate pecan thanks! That look like it'll do the trick
delicate pecan
np! ^.^
pine bramble
@delicate pecan Absolute Maximum Value ;)
The datasheet should say what the ADC input can take and cannot tolerate.
If I'm not totally mistaken, LadyAda took a zener protection approach to a similar issue with the PyPortal.
Ostensibly the zener prevented excursions above 3.6 vdc in a 3.3v regime.
(which protects the ADC input to SAMD51)
There's going to be some hysteresis/backlash from a standard quality potentiometer.
(you are apt to overshoot and then overcorrect when backing off)
Modern audio people seem to prefer very finely switched rotaries and fixed resistors rather than analog potentiometers that are continuously variable.
delicate pecan
Yes overshoot would always happen during the calibration method I was proposing. looking at the data sheet, it was unclear if the special hardware of the adc changed the usual max io voltages, but it seems some have had no problems in the short term with overshooting vref as it’s long as it’s always below vcc.
I’ll look into using zener diodes, thx! ^.^
 wind pond
How can you read. The error codes
 stray obsidian
New to discord. Im trying to get help with Gizmo TFT. Is there a way to search specific topics so im not asking the same questions that has already been answered? My search is only bringing up a user named TFT Ben. Lol
north kelp
@stray obsidian You probably would find it easier to search the Forums for TFT Gizmo:
https://forums.adafruit.com
Also, since Discord is continuous and ephemeral, don’t worry about asking a question that has already been asked; we’re quite happy to answer the same questions here. 😀
stray obsidian
@north kelp Thank you. Headed over to check it out now.
proven mauve
I'm using edited tamaguino code, and the dinosaurs get displayed by loading them into PROGMEM arrays, then the frames are loaded into pointer arrays, and the pointers change what they point to depending on the evolution state. Recently one frame of one dinosaur skin looks like garbage data. The only way I've found to fix it is to edit another skin into having the same data as the broken skin. Then all frames display properly and two skins have the same frames. I thought maybe I was running out of program memory since I recently added a large splash screen, but the IDE doesnt seem to think so, and editing out the spaah art doesn't fix. I don't think it's a conventional typo either since I don't have to change anything having to do with the broken skin to get it to display, but I'm not sure why changing another skin helps...
pine bramble
wall of text
surreal pawn
you're probably calculating your pointer wrong to point outside of the one array into the other one
proven mauve
So, the lines of code making it run are:
#define JUMPSIZE 1
#define ANIMATIONSIZE (WALKSIZE + JUMPSIZE)

const unsigned char* dinoSmallAnimSet[ANIMATIONSIZE] = {
      dinoSmallAnimSet0,dinoSmallAnimSet1,dinoSmallAnimSet2,
      dinoSmallAnimSet3,dinoSmallAnimSet4,dinoSmallAnimSet5,
      dinoSmallAnimSet6
    };

const unsigned char* dinoLongAnimSet[ANIMATIONSIZE] = {
      dinoLongAnimSet0,dinoLongAnimSet1,dinoLongAnimSet2,
      dinoLongAnimSet3,dinoLongAnimSet4,dinoLongAnimSet5,
      dinoLongAnimSet6
    };

const unsigned char* dinoSpikeAnimSet[ANIMATIONSIZE] = {
      dinoSpikeAnimSet0,dinoSpikeAnimSet1,dinoSpikeAnimSet2,
      dinoSpikeAnimSet3,dinoSpikeAnimSet4,dinoSpikeAnimSet5,
      dinoSpikeAnimSet6
    };

const unsigned char* dinoTrikeAnimSet[ANIMATIONSIZE] = {
      dinoTrikeAnimSet0,dinoTrikeAnimSet1,dinoTrikeAnimSet2,
      dinoTrikeAnimSet3,dinoTrikeAnimSet4,dinoTrikeAnimSet5,
      dinoTrikeAnimSet6
    };


const unsigned char* dinoAnimation[ANIMATIONSIZE];


  if (evolution==0){
    for (byte i = 0; i < ANIMATIONSIZE; i++) {
      dinoAnimation[i] = dinoSmallAnimSet[i];
    }
  } else {
    for (byte i=0;i<ANIMATIONSIZE;i++){
      switch (evolution) {
        case 1:
          dinoAnimation[i] = dinoLongAnimSet[i];
          break;
        case 2:
          dinoAnimation[i] = dinoTrikeAnimSet[i];
          break;
        case 3:
          dinoAnimation[i] = dinoSpikeAnimSet[i];
          break;
      }
    }
  }
all the art set arrays with the art data are named properly and have the right data in them...
one frame of spike is garbled, everything else is good
and if I copy all of the spike art into long, then I have two spikes that look fine
been stumping me for a couple days now
proven mauve
So, I commented out the dino spike references (all except the art itself) then the dino long animation broke, one frame would become garbled. So I added a dino Junk 4th skin (without an empty art array) and a case 4: for it (which will never get selected because random goes from 1-3)... and dino spike works fine now. But one frame of dino trike broke....
So I added on a dino junk 2 skin (also with empty art array) and the trike was still broken. Then I assigned it case 5: and all 3 skins were fixed. I assume the first junk 'skin' now has the misdirected frame.
 fluid wagon
Hello all
I am having an issue updating the firmware on my WINC1500 shield.
Anyone able to help?
pine bramble
@fluid wagon What method are you using?
pine bramble
Just narrate a bit what you did and give links to where you found the info.
(general principles will apply here)
fluid wagon
I went to the Wifi 101 reference on arduino.cc
found the check version sketch and ran it
found my firmware out of date
I proceeded to load the flasher sketc
sketch
pine bramble
I don't know why a shield has firmware.
fluid wagon
and then tested the connection
the only firmware version that would ack was the Rev A wifi firmware
which apparently, is no longer supported
pine bramble
Is this shield an Adafruit product, or someone else's?
fluid wagon
It is an adafruit product
pine bramble
Link?
fluid wagon
however, I purchased it from one of their distributors on amazon
pine bramble
That doesn't matter, it's the matter of finding the instructions. ;)
pine bramble
fluid wagon
I agree
I followed the instructions there, but the B revision of the firmware won't load
pine bramble
https://learn.adafruit.com/adafruit-winc1500-wifi-shield-for-arduino/updating-firmware
These links are for other helpers to expedite. ;)
fluid wagon
Ah
pine bramble
We gots the Internet and peoples, may as well leverage both. ;)
If you're running 19.5.2 there is no need to update to 19.5.4, despite what the WiFi101 library says it should work just fine and you could brick your device by updating, it is not perfectly foolproof! Thanks :)
So let's iron that part out. Would a firmware update violate this warning?
fluid wagon
The current is 19.6.1
pine bramble
Okay so there's a sketch you upload (not sure where, just yet) that does the update.
fluid wagon
Yes
the issue is, the revision of the chip on the shield I received
Rev A of the chip, is no longer supported
so there is no 19.6.1 firmware for the chip
pine bramble
The schematic:
https://learn.adafruit.com/assets/48386
fluid wagon
Ok, but is there multiple versions of the board?
pine bramble
Okay so TXD and RXD aren't connected on the WINC1500 module on the shield. That leaves MOSI and MISO and friends, as the only means for the Arduino Uno to talk to this shield.
fluid wagon
I am using a mega
pine bramble
The doco is suggestive that any Arduino target board (in the Uno form factor) is useful here.
fluid wagon
The uno cannot handle the code, per their docs
pine bramble
It's an SPI driven shield, essentially, from what I've gathered so far.
fluid wagon
Yes
pine bramble
So firmware updates work like this:
a) upload a sketch to the target (Uno, whatever .. your mega in this case) using ordinary procedures to update the mega from within the Arduino IDE)
b) run that sketch without the Serial Monitor active.
It'll talk to WINC1500 via SPI bus.
And update it, presumably, with new firmware.
I'm going way out on a limb here, but that's my guess on this.
fluid wagon
I agree
however, again, there is no version of the firmware that matches the library
pine bramble
The pictures suggest 'File > Examples > WiFi 101` as the avenue to finding that sketch.
fluid wagon
and now, I am getting errors trying to flash it
so, I am going to get some sleep, and come back to this
Thank you for trying to help
pine bramble
Understood you commented quite a while ago asking for help. ;)
https://learn.adafruit.com/adafruit-winc1500-wifi-shield-for-arduino/wiring-test#install-the-library-5-2
Looks like this lib is required to follow to a solution.
Points to:
https://github.com/arduino-libraries/WiFi101
Easier to just clone this entire repository:
https://github.com/arduino-libraries/WiFi101.git ;)
I'll leave it there, as I don't yet understand what's going on. ;)
gray crypt
Hey guys. Trying to build the ProTrinketKeyboard using the tutorial online. Everything is going great so far and it uploads and my mac identifies it as a keyboard. The issue is, when I press the button to use it, I get this error.
Anyone have any idea on how to fix this? Should I try on my PC instead?
gray crypt
Fixed it using a 10k resistor
If anyone has the same problem
Doubt anyone trying to fix it will see this but you connect the resistor to the pin where the pull up connects
low ingot
Hi guys, if I'm using a0 on an itsy bitsy m0, should I use analogWriteResolution(16) or no?
proven mauve
I have only really seen analogRead used in most the info I see. What types of objects is analogWrite used for controlling? Even led brightness I just see pwm used
surreal pawn
it's the DAC output. I've used it for audio mostly. it's only 10 bits
fluid wagon
Can the M4 metro express be powered with the powerboost 500 shield?
If it is using an airlift? 😉
 west quarry
I have some neopixel light strips wrapped around the christmas tree at work... works perfectly... I had an idea though. I have two neopixel rings, one smaller than the other. Could they be connected to the end of one of the strips and be controlled via the same data line?
north kelp
@west quarry Probably, if they all share the same RGB ordering.
west quarry
neopixel strip is GRB 🤔 other than "RGB LED", the ring page doesn't say what order it is? https://smile.amazon.co.uk/gp/product/B00K9M3WXG & https://smile.amazon.co.uk/gp/product/B00KAE3R1U
west quarry
Found example code, and indeed the ring is GRB 
north kelp
@west quarry That should work then.
 mild elk
Can I use analog pins on Arduino Micro as digital I/O? I know it's totally possible on 328 based boards, but I don't know about 32u4
north kelp
@mild elk
The Micro is a microcontroller board based on the ATmega32U4 (datasheet), developed in conjunction with Adafruit. It has 20 digital input/output pins (of which 7 can be used as PWM outputs and 12 as analog inputs) …
I found this in the Overview section at https://store.arduino.cc/usa/arduino-micro
The Micro is a microcontroller board based on the ATmega32U4 (datasheet), developed in conjunct
mild elk
So I assume yes, they can be used as digital
surreal pawn
yes you can @mild elk
mild elk
Great, thanks!
gray crypt
Anyone know how to properly throw the trinket PCB into Eagle?
I've been trying to just drag and drop like I do with other libraries but these are just raw schematic files instead of .lbr s
north kelp
@gray crypt The .brd file open fine in my copy of Eagle (v 9.1.0).
fluid wagon
Hello all. Can the M4 Metro Express power motors with the motor shield? or must you use a separate power supply?
surreal pawn
it depends on the motor
fluid wagon
TT Geared Motor with Back Shaft (180rpm 6v L Shape)-DFRobot
surreal pawn
are you intending to power from USB or an external power supply?
surreal pawn

Adafruit Learning System
Stackable, high current DC and Stepper motor shield
fluid wagon
So, the answer is "maybe" though I might see brownouts
surreal pawn
That looks like it would work. You'll need to put the jumper on the input selection part of the shield to power the motor drivers from vin
with 6 AAs I think you'll mostly be fine if you have only two motors
surreal pawn
yeah it might brown out if you stall one or both motors
surreal pawn
those motors will spin too fast or may die sooner than they should if you over-volt them that much
fluid wagon
I was more worried about the metro, it is rated for 7-9v
through the DC jack, so, 6 cells it is
I dont plan to overvolt the motors, in fact, I think the metro only provides 5v
surreal pawn
the vin pin connects to the DC barrel jack input
you don't want to power the motors from the regulated 5V, that will definitely brown out
fluid wagon
Ah
Ok. That was what I was misunderstanding.
So, I can use my 6V AA pack, but if the motors stall I may brown out. Have I got it right now?
(given I jumper the board)
surreal pawn
yeah
fluid wagon
Thank you!
proven mauve
I really like this place 😄
Almost done wrapping up this tamaguino mega project in a good spot for now, only one workaround, and I can live with it till I get back to the project. Now onto MIDI stuff
potent helm
I am still haveing trouble with my 32u4 feather , it's connecting to any computer
I have already tried deing the dfu ground reset from the guide
 pliant totem
right, can anyone help me with stm32duino boot?
im having trouble flashing the boot
this problem kept popping up every single time
i've tried reconnecting the pins, the devices, even tried reinstalling my serial port
pliant totem
nvm, got it
pliant totem
Yesh, now i can program my STM32 with arduino IDE
right
so, are there any ways to read an MPU6050 using an STM32duino?
pliant totem
is it because the MPU doesn't give enough power to the STM32?
north kelp
@pliant totem Difficult to know without seeing how you've wired stuff up. Can you share a picture of your wiring?
north kelp
@pliant totem What happens if you run an I2C scanner on the STM32?
north kelp
pliant totem
darn, no devices found
north kelp
I'd check the MPU6050 connections for continuity, and for shorts across pins, using a multimeter.
Also, how are you powering the MPU6050? I think it wants 3.4V max.
pliant totem
i'm powering it using a 5V
last time it works with an arduino uno
i mean last time i powered it using an arduino uno 5 volt pin and it works
so do i have to power it using 3.3 volts?
ah nvm, thanks, it helped
turns out, there are some wonky wiring on the SCL and SDA
north kelp
@pliant totem Can you link to the MPU6050 breakout you purchased?
pliant totem
uhm
north kelp
It looks like yours has a voltage regulator on it, and ones that look similar support 3-5V operation, so I think you're OK with 5V. Even though the STM32 Blue Pill is apparently 5V tolerant on the I2C pins you're using, I'd still opt to power it from 3.3V.
pliant totem
okay
north kelp
Not to make you resolder though. 😄
pliant totem
ah, finally i can read the MPU6050
now to find a decent code for a reaction wheel
does anyone have a good equation for reaction wheels?
north kelp
@pliant totem I had to look up reaction wheel, so let me know what you find.
pliant totem
darn it's all complicated
might as well settle in with servo arms
does anyone know the library for MPU6050.h but for STM32duino?
north kelp
@pliant totem I think you’re already successfully compiling and running MPU6050 library, right? I mean there are probably a few libraries for that on GitHub.
pliant totem
it's using wire
if i can use the MPU6050 library, i can use other codes from the internet
proven mauve
Hm, Arduino MIDI doesn't seem to like to forward notes from a harware serial to a software serial... but it runs both at the same time as a thru just fine... just independantly
but hardware in sends to the USB MIDI just fine... just not to the software serial MIDI
lol and the software serial will send MIDI to the USB MIDI also...
So yeah... software serial MIDI wont send to hardware serial MIDI, hardware wont send to software, but both send to USB hardware MIDI, lol.
proven mauve
Pretty sure it turns out it was user error lol
odd fjord
@potent helm any progress with your 32U4 Bluefruit?
odd fjord
@potent helm I can finally upload sketches from my Mac -- had to update the OS! it was a known issue.
north stream
Via Bluetooth?
odd fjord
have not tried sketches vis bluetooth -- did update firmware via bluetooth
but catalina could not upload to a 32u4 until the latest OS release
is BLE upload of sketches possible?
north stream
I don't know either! I was having (unrelated) Bluetooth issues with my Mac and wondering if I needed an OS update too, but I'm not running Catalina, so probably not.
odd fjord
This was strictly an arduino 32U4 USB issue. finally found it on google and luckly the OS update was just released -- all good now
@potent helm I was able to start with a firmware update and then load sketches OK -- Still not on Windows, but be happy to go through the steps again with you if you want to give it a shot.
potent helm
I was able he update the firmware via the ble app, but I still can't connect to any computer
odd fjord
great -- did you upload the BLESPIFRIEND 0.8.1 firmware?
potent helm
I'll be at the lab tonight to teach a class, so I will get a shot
yeah
i think let me check
yep, it's 0.8.1
potent helm
yeah
odd fjord
can you connect via BLE now?
potent helm
im in
odd fjord
great - that is progress!
of course you can't do anythiong until you can load a sketch, but it's good to know BLE is working! -- you can look at "info"
does your lab have any non -windows computers? if they are Macs running Catalina, they will have to have been updated very recently to 10.15.2 or they won't work 😦 If they have a linux system -- that may be the best one to try.
potent helm
I can't boot in to ubuntu untill I replace my keyboard, so sadly no , IDE in only installed on the pc's at the lab and not the mac
odd fjord
will -- hopefully it will just work... good luck!
potent helm
I wont know till 17:00 today
potent helm
so @odd fjord I think it's not me for sure
I pluged it in to a make and it turned off insantly
the mac that is
odd fjord
yikes!
potent helm
i am no longer allowed to touch my friends laptop 
odd fjord
It does not make any sense to me -- you may want to post to the forums for official support -- possibly a defective board
potent helm
yeah, I can do that when I get home, i am a little sad now
odd fjord
Did the Mac recover?
odd fjord
At least no damage done....I've never had that happen.
pine bramble
The way I look at it is that you get to say you shutdown a Mac doing that. /badge_of_pride
potent helm
well I know only a few things that can do that
fluid wagon
Good evening! So, does the DMA version of the neopixel library work with the one on a metro m4?
surreal pawn
It doesn't look like the adafruit neopixel library uses DMA on samd51
the adafruit neopixel zerodma library is updated to work on metro m4
fluid wagon
Good morning, is anyone lurking by chance?
odd fjord
@fluid wagon Good morning
fluid wagon
Heya!
I figured out my own issue 😉
Was trying to figure out how to manipulate the LED on the ESP32 airlift shield
I worked it out though, dug through the headers and such. WiFi.setLEDs in case anyone is wondering
north stream
Cool, and thanks for sharing what you found!
 nimble cobalt
Hi, I've been writing some code, Arduino IDE, on a Mac Pro, downloading on to a Flora, and happily debugging for a couple of weeks, then the Flora port stopped appearing, when plugged in, although the Flora was powered & running. Tried a different USB port, the same. Checked the port with an external drive, the laptop port's all working. Tried a different Flora, that communicates fine. So, my hardware is also attached to a Circuit Playground Express, so carried on working on that. After a couple of hours the port stops working on that, too. Have these really died, or (my hope) is there a known fault here, with a nice easy fix?
north stream
Do the devices show up on the USB list?
nimble cobalt
No
north stream
That's a really odd failure mode. When things stop working after a while, I would normally guess a current draw/polyfuse issue, but you've eliminated that by trying different ports and devices.
Since they're not even enumerating, it seems like something pretty basic. Both of those devices have native USB support, but they're different CPUs (Flora is an AVR 32U4, CPX is a SAMD21).
The next thing I'd try is a different USB cable: could be a simple bad connection. Do any lights come on when they're connected?
nimble cobalt
The code that was on the boards runs (Both have strings of NeoPixels attached, so I can see the code running). It can't be a current limiting thing, as the Flora has 25 LEDs attached, and the Circuit Playground Express 273, so it workked with a greater No. of LEDs after the first stopped working.
Trying different cable...
Flora 2 works with cable 1 & 2. Flora 1 & Circuit Playground Express work with neither cable 1 or 2.
north stream
It's starting to look like some sort of hardware damage at this point 😦
I'm guessing either the USB connector has loosened from the board, or some sort of damage has gotten to the D+ and D- pins on the CPUs.
You might try carefully pressing on the USB connector while the board is plugged in and see if it gets recognized at some point.
It used to be, you could open the Console utility and watch the USB detection and enumeration process occur, but the modern versions of MacOS have so much stuff scrolling by that it's hard to see the bits you're looking for.
nimble cobalt
I doesn't look like loose USB connector, and the power to the board via USB isn't intermittent, tried pressing down connector on both iffy Flora & CPE, still no serial connection. So, it could be damage to the D+ & D- pins. What are the possible reasons for that? Could a faulty Mac USB have a failure mode where most things work (USB gets used a lot on my Mac), but it kills off Arduinoie things?
north stream
I'll admit I can't figure out a likely way for that to happen. It seems like the sort of thing that could occur if there's some static discharge, but the USB connector is designed to avoid that by having the power and ground pins connect first, then the data pins.
There could be a weird ground voltage mismatch if you're powering the LEDs from a different supply, or some sort of capacitive coupling issue, or the board touched something conductive, but I'm sort of grasping at straws here. The Mac USB implementation is pretty solid, I'd be more than a little surprised if it damaged anything, unless there was physical damage to the logic board or somesuch.
nimble cobalt
Not supplying from a separate power supply, on this one. Can't see anything conductive in my work area, but that feels a little more possible. Both were sort of mid air, on the LED tape when they went faulty. Them both going faulty within a short space of time seems odd. And also makes me nervous of experimenting with other boards. Might move to a Raspberry Pi environment, just in case.
north stream
When you said you were running 273 LEDs, I figured that's a lot for a USB connection.
 ivory fulcrum
Anyone know of a easy to use and compact voice recognition shield/PCB that is arduino compatible
north stream
There's this one: https://www.sparkfun.com/products/15453

The EasyVR 3 Plus Shield is a voice recognition shield for Arduino boards integrating an EasyVR module.
nimble cobalt
@north stream Er, yes. Did it by accident, seemed to work okay, but avoided it where possible.
When it stopped working, only the first 25 were lit.
ivory fulcrum
@north stream thanks
marsh forge
I'm trying to use the KA75330 voltage detector and a Feather Huzzah ESP8266
Can I connect the KA75330 to the BAT pin on the Huzzah to monitor voltage or does the KA75330 need to be connected to the power source before it touches the Huzzah?
The learn guide's description of the BAT pin leads me to believe I can monitor the voltage on that pin

Adafruit Learning System
WiFi with built-in battery charging for IoT on-the-go!
north stream
The Vbat pin is connected to the battery connector, so you can monitor the battery voltage there.
safe shell
@fluid wagon Haven't heard a peep about such a thing. The Airlift Shield might work.
safe shell
Best bet for upcoming stuff is to watch Top Secret and lookout for leeks here.
 grizzled root
Hi, i have a E-Paper display with WEMOS D1-mini connect, i have an issue with it. i use a mqtt callback to get the temp sensor from another mqtt client , and its work and display the temp. the problem is after a hour maybe couple minutes i got a "0" on display and only a restart make it work again, also i see that he upload a huge data like a 2-4GB...and i can figure what the problem. here is my code https://paste.ofcode.org/m4Q7f99hUKFScE8B3vLdZz
best regards...
pine bramble
I just posted to the forums in two places, wrt STM32F405 from within Arduino IDE (Edit, Compile and Upload, all from within the IDE).
A bit ranty but I covered most of the bases.
 vast cosmos
this may seem like a silly question, but i'm having a hard time getting the neopixel on the stm32f405 feather to do anything at all. has anyone else tried using it in arduino?
i'm using the Adafruit_NeoPixel library, and initializing it with pin 8 (per the stm32f405 feather docs on adafruit's site), but it doesn't seem to light up or do anything with the most basic tests
also, its pretty hit-or-miss if my feather will boot into bootloader mode. i've soldered pins to the feather, and im using female dupont cable connecting B0 to 3v3, so i'm pretty sure the electrical connection is solid. i have to disconnect the USB cable from the feather, wait a few seconds, reconnect the cable, press the reset button, and then wait another 5-6 seconds to cehck if dfu-util detects a bootloader. sometimes it works, sometimes it doesnt and i have to redo these steps
is that normal?
im wondering if my feather's bits all done got goof'd
i mean i think i did a pretty decent job soldering them on, i don't think its an issue with the pins
yeah, the neopixel works fine with circuitpython. but if you use the example sketch that comes with Adafruit_NeoPixel, using pin 8 and 1 neopixel, nothing happens at all
the code is running, i can add serial print statements and see them outputting regularly, but the neopixel stays off
 inland crag
the neopixel code is fairly tempramental, and I wouldn't be surprised if it hasn't been updated for stm yet
it's based on perfectly timed assembly code
pine bramble
No it runs good
Just .. pop that in there:
https://github.com/wa1tnr/Cortex-Forth-STM32F4x/blob/master/Cortex-Forth-STM/Cortex-Forth-STM.ino.bin
It'll turn blue when you connect in Serial Monitor
I don't remember any learning curve at all. ;)
@vast cosmos Did you show or just set up the color without calling show?
My STM32F405 downloads using dfu-util reliably. I just short B0 to 3.3, tap Reset .. then wait any length of time, then call dfu-util.
In Linux, dmesg makes it a bit obvious (eventually) that it just stays in the other mode.
(it has exactly two modes and dmesg announces both modes)
I think a lot of folks aren't going to try to Erase all and that'll be a problem for them.
I don't know if that's necessary when using dfu-util - I uploaded code to this target the other way, first.
Only recently got dfu-util automated.
vast cosmos
yeah sure enough, your .bin turned blue for me @pine bramble
(and some weird forth runtime opened in my serial terminal.......)
what is this wizardry
i used the "simple" example that comes with the neopixel library. it sets the colors and then calls show
im trying the last URL you provided. the feather is behaving normally now that im back home on my linux PC. i was on macos earlier when it was acting so weird, resisting bootloder mode
i wonder if macos was resetting the device on me for some reason
i have been completely spoiled working with STM32Cube so much recently. its really awkward coming back to arduino
trying to port a driver i developed for STM32 HAL to arduino, and im fumbling over every little task
vast cosmos
@pine bramble how should i defined a setup() and loop() to test this code?
hmmm, yep, this code is lighting up my neopixel just fine
pliant totem
hey guys, i know there are a lot of self balancing robot projects on the internet
but a lot of these codes don't have the output or any familiar output signal commands i know of
so does anyone have any vanilla codes for 2 wheeled self balancing robots?
 light prawn
Hello, I am trying to use ItsyBitsy M0 with NeoPixel, it is connected to Pin D10. It works perfectly in CP but in Arduino it does not work at all
Are the Pin number different in CP and Arduino?
pine bramble
@vast cosmos I wasn't here. Sounds like you got it going.
What you can do with that bin is like this:
5 3 * . 15 Ok
You can also
1 13 pinmode 1 13 pinwrite then wait a bit and
0 13 pinwrite
Real simple RPN stack based procedures.
You can also
: led 13 ;
: setup 1 led pinmode ;
: on 1 swap pinwrite ;
: off 0 swap pinwrite ;
: slow 4444333 0 do 1 drop loop ;
: go
  setup
  33 0 do
    led on slow
    led off
    5 0 do slow loop
  loop ;
I don't have a target handy to test that but I think it'll work. Vary the loop count of 'slow' to produce a desired delay (say, 1/3 of a second of wall clock time).
I might already have put in a delay word. I don't remember. ;)
The way Charley set it up, only the first three characters of the word's name are remembered, plus the length of the name.
This is actually pretty annoying in larger programs.
The technique appears to be an artifact of the four bytes that make up a 32 bit word. I'm guessing he stored three bytes and an 8 bit int. ;)
pliant totem
guys, be frank with me here, i need answers quick, can an stm32duino truly be programmed like an arduino or are there things that an stm32duino simply can't do? i've tried reading signal outputs from different pins and they all seem analog to me except for PC13. Can it be programmed normally or are there steps or drawbacks and can it handle multiple signals when programming, let's just say, a 2 wheeled balancing robot, or do i have to use C++ or C using atollic TrueSTUDIO?
my signals are all wonky
it's really not like an arduino
odd fjord
@pine bramble I'll have to admit is took a few minutes to get my brain back into forth mode, but it came back pretty quickly -- it always scares me when I feel like I can read and make sense of forth 😉
pine bramble
haha jerry - I don't know because I'm so used to it, it feels normal. @odd fjord
@pliant totem Not sure what you're asking.
Even three continuous lines of text here is more than I want to physically read, since this Discord client isn't really configurable for a comfortable sized font.
(I already know how to work the UI; it's not suitable for my needs)
@vast cosmos I was in a hurry so I only ported that one program to the STM32F405.
It's not a good one to use as a base, since the stack methods he used are arcane for other reuse of the code.
So push() and pop() are going to be problematic for you, if you just want to reuse the neopixel driver code. ;)
Good news - I did manage to get the flashROM working in that code. That can be reused.
#define PIN_SPI1_SCK  2 // PB_3
#define PIN_SPI1_MISO 3 // PB_4
#define PIN_SPI1_MOSI 4 // PB_5
#define PIN_SPI1_SS   7 // PA_15
#if defined(ARDUINO_FEATHER_F405)
SPIClass SPI_FLASH(PIN_SPI1_MOSI, PIN_SPI1_MISO, PIN_SPI1_SCK, PIN_SPI1_SS);
#endif // #if defined(ARDUINO_FEATHER_F405)
@pine bramble can you tell me about stm32duino programming and its outputs? is it like an arduino or is there a key difference that i should know other than it's an stm32?
i've programmed my stm32-duino and got the bootloader to crash that i have to clean and reinstall the bootloader twice and i don't know why it happened exactly
pine bramble
From a functional point of view, the STM32F405 is just another Arduino IDE target board.
Loading code is slightly odd, though, in that you have two distinct switches to operate.
Short B0 to 3.3 volts (connect the two together). Momentarily short RESET to Ground (to reset the chip).
That puts it into a mode where you can upload code to it.
To run that code, remove the jumper from B0 to 3.3 and press RESET again (or short RESET to Ground momentarily, as before .. either method works and you can just use the RESET button instead of using two real wires to do the RESET bit).
Under some circumstances it's necessary to jumper B0 to 3.3 and in others it helps to remove that jumper, but you can leave the jumper connected as long as you like.
When you run out of options, try one last trick, by removing the jumper from B0 to 3.3.
I can't remember when that's useful, but it is.
pliant totem
hmm, i already managed to upload arduino code
but it seems more sensitive compared to an arduino
like if you were to program a wrong pin with the wrong type of data, you would somehow crash the bootloader or do something that i cannot upload any more data
vast cosmos
@pine bramble right, I just yanked all but the essential neopixel code, and it worked well enough as proof my feather isn't b0rken
vast cosmos
It's strange how different and well behaved it was once I got home and plugged it into my personal pc
You don't own a Teensy 4.0
pine bramble
I only run Linux so I don't experience Mac OS X related issues (anymore; I had an iMac G4 in 2002).
I don't have a teensy anything (am aware of them).
I just have SAMD21 and SAMD51 targets from Adafruit.
Maybe one other .. can't think of one, though. I was C8051F330D developer a long time ago. ;)
(8051)
vast cosmos
The Teensy boards are rock solid, fast as hell, and packed full of pinzzz
But to be honest, I'm completely taken by stm32 nucleo boards at the moment, and the ST HAL environments
They are pure C too, which im a lot more comfortable with than C++, not to mention all of the confusing hand wavy magic it does behind the scenes
"it" being arduino
pine bramble
This is my very first ST micro and the goal was to port it to the mecrisp-stellaris forth ;) I mean that's why I jumped on this when Adafruit offered it: I knew that mecrisp likes the STM32 chips.
Oh I never do C++ that's .. not something I admire at all. At all. ;)
I code in the C programming language, only, when it comes to microcontrollers -- or, of course, in Forth. ;)
vast cosmos
I highly recommend you pick up a nucleo board. They are dirt cheap too
pine bramble
I don't want to deal with other vendors anymore.
vast cosmos
YES YOU DO
pine bramble
adafruit already has a crazy wide variety. ;)
vast cosmos
ST is half the price
I'm not dogging on adafruit, they make wonderful products, I just don't want others to miss out on great opportunities
pine bramble
I'm not buying in quantity. ;)
I like having the schematics and the code from one source (the vendor).
open hardware is a really really big deal with me. so is open source software.
vast cosmos
Their uno/metro footprint boards are $10, and you an get them with cortex M0+, M4,, M7, and they now have some dual chip boards
Yeah ST puts all their board schematics and rigorous datasheets and user manuals uo for every board!
pine bramble
I have worked not on bare metal but outside of Arduino, in an 'Atmel Start' environment.
vast cosmos
I'm not relenting until you cave to my pointless pressure
pine bramble
I'm 59 years old and got my ham license at age 14. ;)