#3D Print Gulag
1 messages · Page 6 of 1
It is a good size 9 by 8 I think. Biggest one that I can afford anyway.
so I just got around to finally watching Picard (I am sure I will regret it) and I saw something very funny... the replicators are unmodified 3d printers. it took me 2 secs to figure out what one it is as well. https://cdn.discordapp.com/attachments/1132869184095780914/1188358219094044784/image.png?ex=659a3bd6&is=6587c6d6&hm=30642c6558c602f318138c531c56dbfd9b548f338aec0241d900e84dfd6ec265&

that is a Monoprice MP Voxel

they didnt do anything to it other then put a sticker over the name. the print head is even there. I am fairly sure its fully functional as a 3d printer still. its probably the one they use to make props for the show!
They also put a sticker over the USB port
That's pretty neat tbh
they used a real replicator for the replicator prop
if you watch closely in sci-fi shows you often find all kinds of interesting things being used as future tech.
Like toilet seats as scifi greebles :p
Star wars uses a lot of regular items as props
Watch as we use this regular gun as.. a scifi gun
It now shoots lasers instead of bullets!
Slow lasers
I know there one or two sci fi shows that used slightly modded nerf guns
there was a really common toy blaster when I was a kid. it wasnt based on any specific IP and it made pew pew sounds when you pulled the trigger. every kid had one. then I saw that same blaster in Andromeda actually being used as a weapon, totally unmodified. was very funny
I remember that toy i think,

Yes some kind of space commander themed thing.
to be fair Space Hercules was very low budget but it was a fun show
Though the story line did get somewhat confusing during the last season.
I want to 3d print up a prop fallout laser rifle, esspecially with the TV show coming up. always wanted one of those. one of my fav sci-fi guns
wiggles eyebrows meanwhile, I have a glock LPK sitting in the mailbox and a slide in the mail on the way here. Guess what I'm going to print?
Merry christmas to me. I need to order some 9mm
Merry freedom 😛
Holy shit, JSD sent me the wrong parts kit. They sent me the complete kit, with slide.
What am I gonna do with a second slide? I only have one lower kit 
AKIMBOOO
should your first layer be printed at higher or lower temps for PLA? I think the default profile was slightly lower
I print mine with the same or a little more extruder heat, and with more bed heat.
I'm experimenting with running the bed hot for the first layer and then cranking it way down for further layers to hopefully prevent curling.
Not really sure how well that is working or if it is a good idea yet.
IIRC, the point of the higher first layer temps is to get the plastic nice and "flowy" so it sticks better.
In general you want to print as hot as possible while still retaining accuracy, as higher temps will result in better layer adhesion.
On my old ender 3 I had terrible adhesion issues until I raised first layer bed temp, and terrible curling if I tried to rais bed temp overall.
interesting, so everyone has told me hotter... why the hell were the default prusa profiles lower?
I asked in another place with allot of 3d printer people as well
I am going to give higher a try but then againt I am already printing hot so maybe just setting it to the same. still having trouble figuring out where I should be printing temp wise.
its so annoying that all the temp tests I have done have shown 0 difference across 20 degrees
the only thing I have seen is that I tend to get burned looking spots in the filament around 215 early in the print. my filament is white so it shows up really well, little spots of what look like chared filament but its like 1 or 2 spots just early on, I think it might just be cleaning the hotend out at those higher temps
not actually burning it
I have been trying to improve my overhangs, logic says print cooler for that but I saw a slight improvement at higher temps not lower mostly because the layer adhesion was better but it was so slight and inconsitant I cant be sure its not just chance causing it.
Overhangs are typically more about cooling than temperature
yeah but that isnt something I can adjust. just trying to improve them a bit if I can
its stupid of me to be trying to dial in temps right now anyway. just going to have to redo it all when I switch to the copper cored nozzles
cooling can be adjusted. it has an entire range between 0 (off) and 100 (max)
White filament has to be printed hotter than many other colors. Something about the pigment used.
yeah, titanium dioxide is a fairly good insulator
its also abrasive. not good for nozzles
hopefully not many white filaments are still using it
Diamond nozzle gang represent!
nearly all use it and its not abrasive enough to be a problem from what I understand. the particle size is tiny
oh its still a problem. more abrasive than other coloured "normal" filament, but not as much as stuff like gitd
you have 2 realistic options for white pigment, titanium or calcium carbonate(chalk). titanium dioxide is a stronger pigment so you dont need very much of it
I am on 15kg for this nozzle, at least half of them have been white. nozzle still looks new
have not needed to adjust the flow or anything to keep my demensional accuracy so I assume its not very worn
but who knows, maybe they are using calcium carbonate. that would probably act more as a lubricant then an abrasive but I think the amount you would need to add to get opaque white would be high enough to make it fairly weak.
Well, I have booted over to linux for the morning. Time to pretend to work while I actually slice this Glock frame...
I bet they use lamp black for black filament, that would also be a lubricant. I wonder if black filament has lower wear then others
I bet you would have to print a ridiculous amount to mesure pigment wear.
lol, probably
one thing I have found about calcium carbonate pigment, at least the micro sphere kind I make. it is the best thickener for coating epoxy there is. see guides using talc or cornstarch. I have tried those but nothing beats this calcite microspheres for a smooth self leveling epoxy coating to smooth a print
I hated using XTC at first but when i started adding this too it, the stuff just works so well
I am better its because its a microsphere that it works so well. it dosnt thicken it hardly at all or change its flow, but it does make if cover more evenly and smoothly. its kinda weird
I think I'm gonna be team rails up.
sniff sniff Isn't it beautiful?

good luck with those supports...
There are roughly two ways to orient a pistol frame: Rails up, and rails down. Rails up (shown) requires more support material. Rails down is more likely to have a rougher inside finish (you know, where all the mechanical bits go and where you can't really sand)
are you printing it out of something that likes to curl/warp?
Polymaker PolyLite PLA+
I roughly halved my normal print speed and the slicer is saying just under 5 hours.
because tall tree supports in prusa are horrible, they curl like hell even in pla and always get knocked over when I use them. boosting zhop can help but even with that I have horrible luck with them
but then your pinter is way more advanced then mine so maybe that makes a difference
I'm gonna send it, and see what happens. I'm still getting used to what this printer can and cannot do (and I'm still dialing in settings), so I'm fully expecting a good 4-5 tries of trial and error.
stupid print needs to hurry up and finish so I can go to the store...
I want faster printing 😦
8hr+ prints piss me off
printing hot does make my top layers look better...
almost like I have ironing on
Reeeeeeee I forgot this is the roll with the filament all snarled up so unless I go pull it free every little bit it jams up hard. I guess even Polymaker have a poorly wound roll every now and then.
Somehow they got layers on top of each other. Must have had some tension problems during winding. Everything looks good, but somehow the filament will periodically have a spot where the adjacent lines popped over it and are holding it like an angry pair of pliers.
Guess i'm gonna have to keep checking and hope the runout sensor is on point for when I forget.
I have this thing tuned to where it is on a bit of a hair trigger, so it should be fine.
What a beautiful felony (for me🥲)
Not only am I printing this, I'm planning to use it as my EDC if it passes my reliability testing.
Isn't Ohio wonderful?
Sounds amazing
I can't even have the files in my possession
1th of January they're passing a law that prohibits even the carrying of non folding blades
Hey, JStark lived in Germany. ||At least until they killed him||
I own a firearm, it'd be in even more trouble than a person who doesn't
But my printed crossbow is perfectly legal, even to carry, just not with bolts
Lots of weird stuff in our laws

I'm kinda surprised, but the second attempt came out nice.
The first attempt died at the base of the trigger guard to the nozzle catching something and ripping it off the bed. I then checked my settings and noticed that z-hop was on, but was 0.1mm, so I boosted it to 0.5
and that went flawlessly
All the bits fit without too much trouble. I put a thin bit of brass shim stock under the front rails to keep them from rocking a little bit, I lightly reamed the trigger pin hole (since that pin is actively retained and is really hard to remove unless it is loose enough to lightly press in/out with a finger once it is otherwise free), and I scraped the sides of the pocket that holds the locking block. Otherwise everything fit perfectly.
Instructions said to print at 0.12mm layer height with an 0.4 nozzle, I printed at 0.3mm with a 0.6mm nozzle.
I honestly expected a lot more problems.
But does it cycle?
Dunno, I don't have any dummy rounds on me, and I still haven't bought any 9mm despite owning several 9mm pistols now.
I need to repair that oversight ASAP
It seems to dryfire ok.
Gonne test it in a vice first right?
anyone ever used clear PLA filament? know if it prints differently or has any big differences I should know about?
I used uncoloured pla filament, printed just fine
If you actually want it to be clearish you need to make sure you don't have any internal voids in the walls (may need to over extrude a little), and you will probably need to smooth the surface somehow (thin coat of resin or thick clear coat works I hear).
IIRC, native PLA is clear.
So it should print like anything else
I dont need it to be truely clear. just enough that I can see what is going on inside the mold. that is why I was thinking of getting some, most of what I print are molds and being able to see inside a bit would be useful to make sure I got a good coating when roto casting
elegoo has expanded there colors a whole bunch recently. tempted to try some other cool looking types. lol, all I have ever used is gray/black/white
What's the price of a box of 50 over there?
I think I paid just over $11 for 115gr
No discount. 27 cents per round after shipping, 23cpr before.
That's pretty decent
$11.89 per box of 50
I pay €14.50 per 50 at the cheapest place around here, thats 125 grain though
Yeah, I need to get some defensive loads too at some point. I'll probably just buy a box at the FLGS for $holyshit
Oh i use it for sport, the 125 hit the steel plates harder, dropping them easier
3d printed gun deserves a 3d printed holster.

This is the main body of a Riptide Mainsail
do they have one for a Beretta 92fs?
Not from Riptide. Dunno about anyone else.
Anyway. I bought an Olfa craft knife a little bit ago because I was tired of my Xacto branded handle constantly coming loose and refusing to hold the blade under any kind of actual stress. This thing is solid.
lot's of files, mostly for other stuff, but some holsters, most kinda suck though
did find a magwell stl, not sure if im allowed to print that but i want one
heh, the desciption: 'this is for air soft...of course.... if it fits the real thing that is just a happy accident.....'
The main body of the handle is plastic, but the collar is brass, and the collet is not just a split bit of metal that doesn't hold for shit (looking at you xacto), but rather a formed piece that holds the blade so it cannot twist or even wiggle before you tighten it.
Basically, this thing seems like it was designed to be used by some monkey who insists on using it to pry support material free.
Not that i would know anyone who does that...
🤔
Hmmmm. I might have something for this channel. How do y'all feel about nerf mods?


My saturn 3 ultra arrived yesterday. Now i have to find a place to put it.
At least you don't have to find a place for a V-Core 3.1 500 
It almost won't fit through a standard door.

Good news, the printer can also make Spaghetti 😛
Did it taste good?
crumch :>
the problem is while it can make the spaghetti its useless for making the sauce
lol, anyone noticed that using gyroid infil gets really noisy because of the air moving over the infill pattern? its got a weird low pitch wooshing sound that always makes me look over at the printer to make sure everything is ok
esspecially as its getting close to closing up a gap
I get that woosh with triangular hex.
yeah, any infill that is going to cause cavities like that is going to do it, especially at higher infill densities
Never noticed it, then again, my fans are quite noisy and it doesn't help that there are six of them
its fairly rare that I use a strong infil. I mostly use either lightning or rectilinear at low infil levels depending on what one will be faster.
I mostly use cubic when I need a strong isotropic infill but sometimes I will use gyroid if it looks like it will support the part I am working on a bit better. printing times for them are very similar but printing gyroid is noisy not just because of the air thing but because of the wiggly print head moves
yeah it gets really shaky on my printer at higher speeds/accels
my desk is wobbly and has lots of tools hanging from hooks so all that shaking gets shit rattling around allot
haha
and I have to imagine its putting more wear on the printer its self. cubic dosnt have that problem and is almost as strong and slightly faster to print, it just dosnt support top layers as well in some cases.
I'm thinking about reinforcing the cabinet mine is in, it shakes quite a lot
I was thinking of getting a concrete paver to set mine on.
bit worried my cheap ass desk will collapse under the weight
I want some kind of enclosure, I was thinking of getting one of those restaurant coolers with a glass door
grow tent 😛
Previous neighbour works in a recycling plant where they often have refrigerators
Grow tents are not a problem to get here, but i want something sturdy
Refrigerator is nice and insulated too
its been... a long time since i've been here.. but...
since then, I've bought a bambulabs a1... and spent days and 7 additional hours leveling out the neptune 4 max...
and started a 68 hour print on it. . . .
it'll be done one day!

Some people's parents are way cooler than mine were
https://fxtwitter.com/3DPrintGeneral/status/1747073939396862181

How awesome!
Printed in my @Polymaker_3D FDE PLA pro by @misspatsycline2
http://bit.ly/3SB1JuW
Funny thing, wife's talking about getting two of those sorts of battery powered cars for our 3 year olds. Might need to mount some nerf weaponry on it now that I've seen that.
Oooo noice xD
Lately I've seen an electric quad that does like up to 30kmh but also limited for children, maybe it might be of interest, if they show much appreciation of drivable things
I have seen some of those that have more featurs than my actual truck
3kmh is probably the more appropriate speed
nope, I mean a kid-sized atv / quad with kid-safety that can be disabled
ok lets be honest here... is it really for the kid?
In the video it was
Like an adult really wouldnt fit and I don't mean like those pocket bikes "dont fit" :P
the car might be for the kid, I am not convinced the cannon is 😛
thinking I am going to print a full sized wearable copy of the Helm of Yngol from Skyrim...
start with this. will need to sculpt in some of the texture its missing like the hammered finish it should have. https://www.printables.com/model/22931-skyrims-yngol-helmet-remix
and its missing the detail on the horns
going to be wishing for a bigger printer
ohh, a hammered finish is really easy to achieve in blenders sculpting mode

... is that a voronoi texture?
I think you could try it with this instead and apply a displacement modifier based on that shader
https://blenderartists.org/t/trying-to-create-hammered-metal-texture/1188167/5

Blender Artists Community
This is perfect @CarlG, thanks! I have one question though- what to you mean by “temporarily” using adaptive displacement? Would it be a problem to keep this node tree intact and keep building upon it? Also, this is my first time posting on any kind of forum and I have a protocol question- I have a few other things I need to figure out with ...
the one in game is done with a voronoi texture and is part of the look of the helm so that is what I went with. it will loose its cell shape and looked more hammered after smoothing anyway. I have found that all details need to be sharp and exadurated for anything that is going to have the layer lines smoothed and the methods I use tend to blur cavity most
I have hammered enough steel to say this looks resonably accurate or will when its smoothed

I need to figure out how to make some size testing samples from this so I can make sure it fits before printing the whole thing
Ahhh alright, just thought it looked weird xD
it looks weird on the inside because blender is strang when sculpting on thin parts, it sculpts both sides. so the pattern got applyed oddly and strongly on the inside
Ohh so this IS sculpted, not voronoi-ed?
yeah its sculpted, used an alpha brush made with voronoi to sculpt it

my first layers have been shit lately and I dont know why. bed is leveled. off set looks good, bed is clean. I just cleaned the damn thing with dish soap then wiped it with IPA. some areas have good first layers some areas its horrible. https://cdn.discordapp.com/attachments/808019008179142676/1198053684186185728/IMG_20240119_175244412.jpg?ex=65bd8171&is=65ab0c71&hm=fce55a3baa113747deaacff37b4ff9fc31da11382e1c50797fb74b8bd123b918&

can you confirm that your hotend isn't loose? just an idea 😶🌫️
checked that the other day, there is no wobble at least.
Z offset value set appopriately based on how you do your levelling? (I must confess to only recently learning I needed to do that...)
Because that looks like about the same problem I was having from not setting z offset to account for the size of the feeler gauge I used for levelling.
At least the bit on the right where it looks like separate vertical lines aren't connecting
yeah, the z offset is set. I stopped that print and started again, dropped it by another 0.02mm to see if I could get a better first layer, it was a little better in the bad spot but still not good and the good spots started showing signs of so much squish out but minor. it sure as hell seems like my mesh is wrong but I dont understand how it can be

thats pretty neat
any protips from hobbyists about getting involved with 3D printing? which is the best beginner printer to get, best CAD software, etc.
If you are price conscious, the Sovol SV06 is cheap, and very capable. Otherwise, go Bambu Labs.
Depends what you're making.
Unless you are really into minis, then you need a resin printer and I don't know shit about that.
Bambu isn't necessarily the default best option and it's loaded with proprietary hardware that's difficult to replace if they stop selling em.
I use fusion 360 as it's available free with a hobbyist license but if you do minis you'll want to just learn blender or one of its many clones
I'm thinking of making rocket parts for my scale model rocketry stuff. also thinking of making stuff for the apartment like holders and mounts for things
If you need stuff that can handle being outside, you can't really use resin without painting it to protect from uv
You'll want a filament printer then. If you have the coin get something that can do high temp, like 300c
Bambu is the option for an out of the box high performance beginner printer. The FOSCAD guys love them.
Especially valuable for rocket parts near the motor
any reccs?
Yes I have experience with them. They are certainly the latest fad.
Name something else that will perform anywhere close out of the box. Enthusiast machines like mine will kick their ass, but at the cost of a hell of a lot of time and tweaking.
If you have the ability to repair and troubleshoot your own printer you can save an assload of money buying something else
Most people don't care about speed. Myself included. That's pretty much the sole value of them over other cheaper options.
Accuracy. Out of the box nylon and such support.
I don't care about speed that much. I would like the prints to take a reasonable amount of time
You can buy a creality k1 for $500 and it's fast as fucc out of the box too.
It is also not nearly as reliable or ready to use.
I use a creality cr5 pro for carbon and glass filled nylon and it's accurate enough for my engineering department to want one. That's hardly an issue.
It's literally ready to use but ok.
Fully enclosed 300c printer.
My only suggestion is to buy a diamondback nozzle for it if you do cf or glass filled materials.
Oh yeah, those things are amazeballs.
Bambu is great but they're not magic nor are they necessarily the best value by any stretch of the imagination
K1 even has anti-ring sensor. It's pretty solid.
Expensive, but they work. And after a few nozzle changes suddenly you made the cost back.
Yeah I tell everyone to buy at least one diamondback
At whatever your typical nozzle size is. You'll literally never replace it.
the bambu labs a1 looks so cool, looks like it was ripped right outta a Sci-Fi movie
Bambu is on maximum hypium right now
K1 and k1 max are the bees tiddies for the price
Whatever you get, spend some time reading about the build volume and laying that out with a tape measure.
bees tiddies? dude I'm ROLLING
I would also accept the bees meow, or the cats knees.
Anything larger than the build volume will need to be made in multiple parts somehow.
Mixing those two up is good for a giggle usually
Doesn't matter what print volume you choose, you want a bigger one quite soon
Not me 😛 Mine is holy shit x oh my god
I need to replace the hot end on my work one though.
(500 x 500 x 500)
Your printer is large enough when "can I fit that through the door" is an actual concern.
Reddit
Explore this post and more from the 3Dprinting community
why is he saying not to get one
There's people like that with every printer in existence
Some people like a certain printer, others hate it
Because it's creality and they aren't 100% on point and one guy has a problem and suddenly they are actively conspiratorial about selling scam products.
Creality traditionally has trash customer support.
That's true of almost every Chinese company
But, like who the hell needs customer support for a printer?
Fun to tinker with, because you will have to tinker with it😝
People who buy a Bambu expecting it to be idiot proof.
Like... 90% of engineers
Anyway, for the budget "no support, figure it out lol" end of things, Sovol makes ok quality printers with all the features you need to print Nylon out of the box.
Most of the cost of commercial printers is in the software and material suite trying to be one button printing.
interesting
yeah I can do basic troubleshooting and tinkering myself
if I was buying a printer right now with what I know, I would be an SV06 plus and the klipper pad for it. when its on sale that is around 400 buck total for what is basically a knockoff oversized prusia but with klipper. but that is a recommendation for someone that likes to tinker.
something that likes to tinker and wants a big printer
just what ever you do dont buy an ender 3
I mean, I've been enjoying my ender 3v2 but it has had its share of issues
with what is avalible today, no one should be buying one anymore. its just far to out of date
Klipper is great. I wish I had klipperized my ender 3v2 years ago. It would have made my life way easier and I had almost all the hardware on hand.
But hey, I got rid of that printer and my new one was klipper from the start. Not my problem anymore.
what's klipper
The SV06 looks a bit too cartoony, with those cyan highlights and that weird gear thing next to the extruder
The Bambu labs however is SO sexy, that thing really gets my jimmies wet
Just don't get your filament wet
Klipper is a firmware for 3d printers. its more advanced and has lots of tricks for printing faster then most other firmwares and I mean allot fast

That is really cool
it actually fits as well.
you gonna share the files somewhere? asking for a friend😝
yeah I probably should. I need to check what permissions are on the original but I think it allows remixes.
Sheesh, wouldn't have thought the hammer-texture would come out that good!
really happy with how that worked
cant wait to get it painted.
I am going to smooth it with a thin epoxy coating then some sandable primer. after that I will make all the helmet part all metalic silver gray using mica paint. then using a saturated iron paint I will do a dry brush pass and then scuff that up to make sure the iron is exposed. then hit it with some salt/acid/hydrogen pereoxide mix to rust it. after that I will give it a wash to dirty it up then seal it all in a matte clear
fairly sure I can make it look like real aged iron that way
debating adding some gouges and deeper scratches and dings into it or not. I would want to do that before epoxy as I think the best way to do it is with a hot knife
sanding 3d prints is so much "fun"
I wish I was better at aligning my parts for gluing so that I dont have so much sanding to do at the joints
design in alignment pins? I think prusaslicer has an option to add them if using it to cut parts
I do when I can. not an option for this mask, parts are too thin
Bah
Hey all, i recently moved and after setting my printer back up this was the best i got out of it. It's a geeetech a20 and 90% of print attempts don't stick to the bed or just instantly clog now. Does anyone know what could be wrong?

The 'thinned out' looking layers, I've had that when my enclosure gets too warm and then the hot end gets all cloggy.
Thank you for the quick reply. I didn't expect enclosure heat to effect it that much since I originally never used one until moving.
Up until it got broke recently, I'd be able to show you a small dragon egg model with a few dozen layers looking thinned out like that, then for the hell of it I opened the enclosure door, and after a layer or two the remainder of it printed fine.
Actually...

Might be missing a few layers in there, but that's both pieces at least, with a fair bit of the thinned out layers inbetween
That is some nasty underextrusion.
Check if you have a clogged nozzle or hotend
Other things to check include your:
- Extruder (if the gear tension is incorrect, it could be failing to keep nozzle pressure up)
- Filament path (look for high friction areas that could result in too much drag on the filament)
- Print temperature (too low of a hotend temperature could result in low flow rate)
Too high of temperature could cause clogs via heat creep (where filament starts melting above the hotend)
late to the party - but bambu has been the EASIEST print experience
i could ever even imagine.
my n4m is a tinker and struggle.. but the bbl a1 is... wow. easy. right out the gate, no tinkering
Yay c: - could sneak another two years of f360 out of my botched university.
I mean I would pay but there aren't any single-payment options 🙄
it's free as long as you make <1000 bucks per year by using it
except for some stuff
not that there is any way for them to find out how much you make
Hmm they should make that more obvious - I read subscription and I'm out as a casual "customer"
the moment when it is cheaper to enroll in the local comunity college than to pay monthly for cad...
Heh - not quite but probably true tbh
considering the version you are likely to get it is likely close
dassault's (Solidworks) Autodesk at home is like 100-150 a year and simens has a similar offering at a simmilar cost
wondering wether there's generative modelling included
I remember back when I was in school they were playing with AI for adding speed holes
you would make the part and then the AI would optimise it
the SAE mini Baha team played with it the most I was on IREC so we played more with rock sim and used the large member base ot abuse the hell out out the free trial causs that program is like 100 a year as well
Yeah F360 is like "I have these surfaces here, make a connection between them that is [slider value]% between strong and weightsaving"
IDK alot about it but I thing you needed to start with a solid part give it a material type then then it would add voids to save weight while keeping as much strength as possible
And it'll generate this natural mesh thats basically the optimum solution for a specific weight / load
does F360 have multiple versions or is it just the one
cause when I used it it was kinda basic
Nah it has like a really crappy version aswell where it basically was just useless, that one's included in my version
It has multiple license levels, with stuff being unlocked. Plus a credit system for some of the simulation stuff
that explains it I had the student free version


came out great!
Just watched this. https://youtu.be/aCGzI-1IiFg?si=AXua6z2mRk5SbiXO

I cant believe this prints without any supports! Star Wars Star Destroyer by Fab365 at 200% Scale!
Thanks to Elegoo for Sponsoring today's video!
Neptune 4 Plus - https://bit.ly/Neptune4Plus
Neptune 4 Max - https://bit.ly/Neptune4Max
New PLA Colors - https://amzn.to/3tKK24A
Neptune 4 Pro $299 ➜ https://bit.ly/Neptune4Pro
Neptune 4 $259 ➜ ...
Update on my issues. New nozzle and not in an enclosure. Left is old gcode at 215° and right is new gcode at 200° but at least it prints again. Just need to fine tune everything

something you might want to do, if your printing from an SD card, try a new one or reformate it. I had some really nasty and strange print problems that turned out to be from a bad card, it was reading the data to slow and that was causing all kinds of weird problem
I dont think that is your problem but its an easy one to check off the list
.. how large are gcode files? I woulda guessed they are entirely loaded into RAM before execution
Looking at the files on my printer, anywhere from nearly 30mb to a few hundred kb
Some of that is a compressed thumbnail image, but that is roughly the same size for all of them.
its not like most printers have allot of ram. and most of my prints are above 10MBs
dont know how much ram they actually have
but I think the amount they have is tiny, like KBs or ram
Ohh, thought it was more like a couple MB but like I guess there is a size of RAM that makes no sense because you can't fit an operating system in there but you also cannot possibly fill that much data without one xD
Many printers only read slightly ahead from the gcode in storage. Ones like Klipper are of course going to need to read more to do things like the acceleration shenaniganry
its why power loss recovery can cause blobby prints. the printer is constantly writing its progress to the SD card so it knows where its at. if the thing your printing has allot of print moves then you can start overloading the whole thing forcing it to slow down and when it slows down you get globbies.
Ohhh that actually makes alot of sense (would have thought it uses something more robust as emmc)
With klipper the printer only has one command at a time on hand. Managing the print is done by a separate control computer.
Which is why klipper is faster. Crappy printer motherboards don't matter, because the printer isn't doing much of the control logic anyway.
And that is why you need a raspberry pi or something when klipperizing a printer. It isn't just there to run a web UI or whatever, it runs the actual control software.
When klipper was young, a lot of budget printers had motherboards that where barely powerful enough to print at all, much less print fast. Klipper allowed you to offload some of the processing so the actual printer firmware could use the motherboards limited processing power to drive the hardware to its limits. And then this unlocked the ability to do advanced processing like input shaping.
Nowadays, more powerful printer motherboards can do a lot of the same kind of processing on-printer. But klipper can still do it better, for pretty much all values of "it".
oh they still matter. they have a command rate limit that is pretty directly correlated with how fast/pwoerful the chip is
I just started a new project today. A really awesome 22lr takedown rifle.
It is an open bolt, autoejecting, single shot.
So you load a round, bang, and then the bolt is open and it is ready to load another round directly.
The hitchhiker has such an absurd level of "okay just a few more shots" energy that I can't explain. Might be how the action just completely deletes any semblance of recoil.
💖 1026 🔁 84
And of course, it is almost fully 3d printed. The only metal is the bolt, barrel, and some minor hardware.
The front trunnion is on the printer now.
The takedown system uses ACME threads. Printing ACME threads kinda sucks. Took a lot of part vs part "tapping" to grind out all the support bits.
AaaaaaAAaaAAaaAaaaaaaAAAAaaaaahhhh
This damn filament sensor. It will go for whole spools flawlessly only triggering on jams and actual runouts, then randomly it will trigger false alarms repeatedly on a single print.
I would much rather have it than not have it, but sometimes I just need to turn the damn thing off to get it to finish a print.
The receiver, and the back half of the barrel housing. This still gets a chunk plastic out at the end to hold the front sight and support the front of the barrel, but that can't be installed until I get the barrel liner. The rear gets a collapsing stock, and of course I still need to mount a pistol grip.

Ever wanted to see a 30mm brim?

Really aggressive fuzzy skin is a great way to catch the nozzle and rip a print off the bed.
So after the first two failures (no brim, and then 10mm brim) I decided I had enough and it was going to work or else
When I went to pull it off the build plate, it took the whole damn bed with it
Nice not knerling
Next time I need to do a grip of some sort I'm gonna try spray on bed liner.
Fuzzy skin is great for cosmetic roughness, but unless you crank it up to crazy levels it isn't gripy, and when you crank it way up failures due to nozzle snagging ensue.
Ladies and gentlemen, I preset: The Warp

The bottom layer is kinked. Never saw a warp quite like this before.
But since this is a mating surface in a fairly precise threaded joint, the part is scrap.
so I would avoid Elegoo's transparent PLA... it prints like shit
get lots of stringing with it and the seams are far more noticable. it seems like it just flows to easly compared to the pigmented kind. its almost like printing PETG
tried lowering the temp quite a bit and it dosnt help much
clear plastics are weird for some reason
I would guess its the pigment powders helping things. kinda like coating with epoxy, its actually much harder to coat things with clear epoxy, the pigments and fillers you can add to it make it level and stay where you put it so much better.
even just a little bit can help allot despite there being almost no change to viscosity
its to bad because the transparent prints for molds is really handy. but I dont think its worth the extra finishing time I have to put in
I've seen that printing clear is harder because the transition from solid to liquid is far less abrupt.
Are there some parameters that control the nozzle temperature depending on the current "action"?
I think (for the best transparent outcome) having the filament be squished on the lower layer also helps and of course afterwards using a propane torch on the surface to get very nice finishs
Welp, Gonna be a busy couple of days for the printer again. Coworker wants a mount thingy to angle his weird ergo keyboard, and I need to reprint the new revision of the Hitchhiker. The sights were apparently off a good bit on revision 1 (too far for the built in adjustment).
I'm gonna have like 3-4 guns worth of rejected parts flying around here eventually
Build some sort of Frankengun
Sadly, while there are not very many of them, the metal parts are a bit critical to actual function.
And I'm not dropping ~$100 of metal on plastic parts that are less than perfect.
Man, I want a second printer now. Something with like 100mm, 150mm build volume, massively overbuilt steppers, mountains of cooling, and a small nozzle. Basically a printer built to print tiny parts, at reasonable accuracy, fast
But with FDM, because resin sucks.
And not a bed slinger, because I have really come to love the part stability that not moving the part side to side all the time brings.
It makes it so much easier to print tall and skinny without perfect bed adhesion.
Also FUCK RATRIG REEEEEEEEEEE
The switched from PETG printed parts to ABS. Why couldn't they do that before I got mine?!?
Oh well, better late than never.
They used to ship the printed parts for the enclosure kit in PETG.
I need to stop buying guns, and use the money to get an enclosure kit. Maybe I'll wait until the new toolhead they have in beta is done.
Print guns and sell em to earn money for an enclosure so you can print better guns
I would need an FFL for that But I'm thinking about getting one so...
It is like $150 a year, and a shit-ton of paperwork.
The process is the punishment here.
The money is no big deal, but that paperwork is obnoxious.
And nearly permanent.
And from my limited understanding they will HAPPILY bend you over for simple mistakes on said paperwork.
Yep
I might pick up a type 03 FFL though, Curio and Relic collector.

hey guys sorry for dropping the camera but tomorrow I will be releasing an even faster benchy using a Bowden extruder. print settings: 1200mm/s 175k accel on x and 300k accel on y limited Cartesian .5mm line width .25mm layer height 2 walls and 3 tops and bottom. speed boat challenge legal. i hope u enjoyed (sorry if you saw this in your feed tw...
World record shattered by a bedslinger
my eyes feel shattered after watching that thing vibrate
My empty spool stack grows, and I can't help but add up how much money was wrapped around that cardboard at one point.
Yeah, but look at the value of the stuff that came off the printer in comparison. Should be easy to feel pretty good about it that way.
so much of what I print is single use molds so I really wish I could recycle it
I live in a studio appartment...
Minor detail!
I would be happy if I could shread the plastic and press it into beams. like 1x2 board size and at least a meter long or so. would be a useful building material, I mean you can never have to many 1x2s
I'm saving it to send to a company in Germany, they pay the shipping and recycle it for you. In return you get a heavy discount on their stuff, i heard it prints pretty good
I have a growing pile of reject and non-current revision parts for the Hitchhiker next to my desk, so $0
Turns out the hazard to being in a beta, is the designer is always making tweaks.
Who knew?
And since the point of being in the beta is that you get to have the fun thing early in exchange for testing...

just be where of mission creep
"Build your own printer" they said. "It will be fun" they said.
The damn mount for the probe must have caught on a failed print, and being made from only the finest plastic it got itself skewed a little bit. Which was enough to slightly throw off my first layer. Which was enough to cause the next print to fail as well. Which caused the probe to get caught in more shit. Which casused it to get a tiny bit more skewed. Which cased the bed to ram into the print head and break the top stabilizers on both front z screws.
They being made from only the finest plastic (read, the cheapest PETG RatRig could find), I can just print new ones in high quality PLA to last until I get around to making an enclosure where they will need to be at least ABS anyway.
I need to drop the cash on the new rear motor mounts with built in tensioners so I can get away from this crappy EVA3 print head.
It is made with decent quality components, but I am not impressed with the design.
It is Fine™️, but just as a completely random example I would prefer if the probe had a sturdier mount.
And now my first layer calibration is fucked again.
You kids and your fancy probes and layer calibration. We had a feeler gauge and were happy to have that!
But seriously, that sounds like a pain. Hopefully not too much effort to get back in operation.
Replacements for the parts that broke just rolled off the printer after a "hmm, that looks a little low I'll bump it up a hair" on the fly calibration (proper one to follow later), so I just need to bolt those on and good as new.
Feeler gauges?! In my time we had a piece of paper🥲
I do have feeler gauges now, and the Neptune does have a probe
does the Neptune 4 do auto z offset?
I have feeler gauges but I dont use them for myz offset... but then I dont need to change my z offset because my bed is hard mounted. once I found the right offset I just left it alone
honestly really thing bed leveling screws/springs should go away. its a horrible system. your trying to tram the bed vs the z axis. the abl system can handle some veriation but to much and your going to have problems. so hard mounted and using some shims if needed to get it in tram makes WAY more sense because that will almost never go out of alignment. not unless screws and shit are comming undone or your extrusions are being warped some how. but those stupid screw/spring setups always work they way loose over time so you have to redo your mesh and eventually re tram the bed. it was totally stupid of Elegoo to add that back.
I redo my leveling mesh about once every 4 months
and almost every time the numbers on it are exactly the same as what they started as
no need to run ABL every print, wasting 5-10 mins depending on your printer.
of course this only applies to bed slingers or deltas. the moving bed on a corexy or cartesian printer would need it
My printer only probes the section of the bed that it is actually going to use.
But you need to run something called "z tilt adjust" as part of homing to make sure the z screws are in sync.
I think the screws are fine, but, what purpose do the springs really serve? Making the build plate have some "give" so if your z-offset / limit switch is off, the damage from a crash is less?
Locking screws. Not entirely unlike adjusting valve lash?
I think the springs are to keep pressure on the screw to keep it from just rattling out? I am not actually sure
Huh. I actually have a small ish granite surface plate. I could probably remove my bed and completely flatten it out.
you know you have gone to far when your scraping your print bed flat
The springs are there so that the slack is taken up when adjusting a bed that isn't hard mounted.
And early beds weren't hard mounted because ABL wasn't standard in days past, and old cheap printers were not made to a high enough precision for hard mounting to be reasonable.
Hard mounting a bed required you to shim it out to be darn flat, and then use ABL to get that last little tiny bit if needed.
the Neptune 3s were hard mounted along with a number of other newer printers and I have never heard anyone compaline that they were not flat enough or need to go at them with shims. a resonable quality bed should be close enough to flat that the ABL can handle it.
why its so odd that they went back to bed leveling screws/springs on the neptune 4
Newer printers are made to higher standards than the OG ender 3 or whatever.
yeah, mostly just talking about newer ones and elegoos strange choice to go back. the SV06 has the option for either, comes with a hard mount and the screws so if you feel your bed is to warped to hard mount it you can use the screws.
Also, with v roller printers it is possible for things to shift over time as the rollers wear. so you either need to relevel, or you need to get people to maintain their rollers. One of those is easier to explain to low information types.
yeah, why i rerun it every few months or so. does still need done but not as often
wish they would just stop using rollers on the bed. of all the places on a bed slinger that should be a rail its that.
Rollers are cheap.
Most companies are not in the business of making good printers, just good enough printers.
speaking of z offset and problems with that. why do I get bed adhesion problems when I try to print fine detail parts with low layer heights? the first layer height is always the same regardless of the profile I am using, its always 0.28mm but that is the layer it fails on
finally ordered my self some TPU, going to give that a try. built up enough projects that could use flexible filament that its worth finally buying a spool
Do you get bed adhesion issues any other time? Is the nozzle catching while laying the second layer?
it seems like the nozzle is catching while laying down the first layer, like shit is sticking to the nozzle or something. this often results in messy first layers or in the case of these finer detail prints, just a failure
like it often drags a string from the purge line into the skirt and then shit from the skirt into the brims and it can build up and make a mess
is that maybe a sign my nozzle is worn out?
it looks cleen buy the way and I always make sure its clean before printing
I have noticed that when the first layer is too short it makes ridges, but if it is too tall it doesn't stick well enough and lines can peel a little here and there and end up with rough patches and holes.

So, on the right this print was way too low
On the left, it was a little too high.
The middle-left was about right, the middle-right was a little low.
Notice the rough patch on the left?
That is where a line moved a little or peeled up or something because it wasn't squished quite well enough.
you mean first layer height?
Dunno if this describes anything you are seeing in your prints or not.
Yeah. Layer adhesion pretty much always comes down to first layer, a good surface, and possibly build plate temperature.
I currently use 0.28, that was the default with my printers stock profile and I have not messed with it much. last time I tried, I wanted to drop it down to 0.2 because I was trying to make a very thin part and it just failed to stick at all. I dont know if i have to drop my z offset when I change my first layer height or what
You generally don't want to mess with your first layer height in the slicer at all. Only the z offset.
I have noticed over time I have to keep dropping my z lower and lower. I started out around 0.52 and I am down to 0.65 now. wonder if that is from the tip of the nozzle wearing
that is how much its dropped over a year
I run .35 first layers with a .6 nozzle, so .28 for a .4 isn't odd.
As for changing z-offset, is your bed manually leveled?
no, it uses a mesh and the bed is hard mounted
and I have never seen my bed mesh change more then like 0.01mm over the entire time I have had it. why I almost never rerun the ABL
I need to change the nozzle anyway.
some day I will install that damn CHT knock off... some day
Something could be slowly wearing, or it could be a part slowly changing position. For example, I had issues with a nozzle walking out once, and most recently the probe mount getting knocked.
had it for like 6 months
yeah but this is going the other direction. I am not having to raise my z offset, I am having to drop it
a little over 0.1mm isnt much, I can see the tip wearing that much in a year of printing, I think I am on like spool 17
might be closer to 20...
I'm building the hitchhiker on stream now if anyone wants to see a cool 3D printed thing 👀
has anyone tried printing TPU using a CHT style nozzle? I want to switch my nozzle out but I am not sure if I should do it now or wait until after I have printed the TPU parts I want. I am worried that using a CHT style nozzle with TPU might be a bad idea because of the more complex geometry of the nozzle passages.
anyone have info about printing modern A95 TPU on a PEI build plate? should I use the textured or smooth side, do I need glue stick? I see to much conflicting information about this to make sense of it. I dont want to ruin my build plate by having this stuff stick to well
rather not go buy glue stick but if I need to I will
?

So: better safe than sorry I guess
And/or try it out on some part outside the build volume
I had no issues, but absolutely had to use a bit of isopropyl alcohol to get it to release on a PEI sheet. It was ON THERE.
I MAY have had an ASA slurry wash on the plate at the time, I do not remember.
IIRC a few drops of 95% isopropyl and it popped right off.

I used a glue stick to be sure and it came off easy. I forgot to turn on infill so I ended up testing bridging abilities of TPU... to no ones supirze its not amazing at bridging. walls came out flawlessly, better then my PLA prints but that probably has more to do with printing them at 20mm/s rather then 60
I think I went down to 25? May have been 20. Definitely slower than the 80 I usually run.
All of my TPU prints have been very small though, so it hasn't hurt too much.
if anyone here has an Anycubic printer. might want to watch this... https://www.youtube.com/watch?v=lNTK41AHE1s

Disconnect your 3D printer from the internet. Especially if it's AnyCubic.
🔴If you would like to support the channel, you can join my main channel here: https://www.youtube.com/channel/UCO9E15IR5AuowkXl2SbHAHQ/join
🎲 My Shop ► https://bit.ly/3mWdr38
Shirts and Clothing ► https://HellstormApparel.com
Main Channel: https://YouTube.com...
Am I going to end up going on a huge rant about always on cloud connected bullshit if I watch that?
Probably
Tho I'm for always on cloud - as long as you are the cloud and there's no central access to all devices
yeah I am all for the cloud as long as its your own private cloud. like a nice little rain cloud that follows you around
that exploit allows people to upload gcode to your printer. think of the damage that could do
an intentionally bad gcode file could even potentially cause a fire if you didnt catch it in time
You can't "catch it in time" though. Just figure out what time zone you're in and most likely to be asleep.
i have a smoke alarm right above my printers, no such thing as too much safety
also they're not connected to the internet (yet)
All done! shown collapsed with the barrel stowed.

The stock rails, two bits of the FCG, the barrel, the bolt, and some misc hardware are the only metal parts. Everything else is 3D printed.
The FCG parts could be printed as well, but would not be as reliable or sturdy.
On the pistol version the barrel, when stowed, sticks out past the receiver just as much as the stock rails do (the pistol version has a "brace" on it by default) making the whole package into a lovely little rectangle.
3D printing is awesome! I needed a propane regulator fixed, but didn’t have time myself.
I tasked my son with grabbing some @Sain_Smart TPU, and using @tinkercad to print a new gasket on the @Elegoo_Official Neptune 4 Plus.
20 minutes later, he texts me the installed pic! 🔥
TPU o ring.
People in the replies are very divided between flipping out and going "oh cool, that should work"
I'm on team "It will be fine, assuming it doesn't get too brittle in the cold"
im on team "dont use it inside"
There is a certain kind of person who seems to think that you cannot 3D print anything except useless trinkets.
It is a grill regulator, so...
because I expect that it will leak, not necessarily a lot, but still some
To quote the guy, "it was leaking before and now it's not. When the tank is empty I'll take it off and see how it held up"
People used to make gas seals out of all kinds of shit. Greased cork for example.
It'll work, but yeah I wouldn't trust it indoors
That person probably hasn't heard that they're already well on their way to printing rocket engines
Anyway. You should never keep propane tanks inside an enclosed space! They often leak a little, and even when they don't they have fun things like pressure release valves built in most of the time.
oring for a carb to intake is the first TPU think I printed, I think.
(aside from maybe a calibration cube?)
If all they did was that oring on the picture, it'll probably be just fine as long or longer than the original rubber one.
If it's an internal part like the regulator's diaphragm, I'd be a bit less trusting.
I was curious, so I did some research on gas seal materials, and TPU is either rated as "no data" or "good" for use with propane (in gas form). Polyurethane has a large enough temperature range and is chemical compatible.
Didn't find any seal rating charts that said it was a bad material pick. So really it comes down to if the "TPU" had anything weird in it that wasn't also compatible.
printing TPU tends to be 95a. that is a bit on the stiff side for a good o-ring
70a might work better but annoying to print
when I need an o-ring I have an near unlimited supply because I made an O-ring mold to put left over silicone in, so every time I cast something I get a new batch of them in a bunch of different sizes and hardnesses... still not figured out what use a 0010 o-ring is, but i have some just in case
I mostly use my molding silicone for that, so either 20a or 30a silicone. that seems like a good firmness for an o-ring
the end of this video is really interesting. most of the stuff he go's over is fairly standard but the idea of adding a damper to the belt is kinda cool https://www.youtube.com/watch?v=N9zc3ECN44g

I got called out in my last video about fuzzy skin for having a bad printer, or at least in desperate need of tune up. Serious ghosting issues in my prints.
So in this video I go through several settings and ways of tuning your printer to get rid of ghosting or ringing with a mix of hardware and software tuning.
This includes belt tightening, ...
stressfull... I just changed my 3d printer's nozzle for the first time. hope I did it right
Can you do much wrong when changing a nozzle? 🤔
It's more or less just a hot screw, aint it?
hopefully, never done it before. removed the front cover to get better acess, removed the silicone sock, heated it up to 200, removed old installed new.
my extruder sounds like its skipping. I am not sure why..
so I installed my CHT knockoff nozzle the other day. at first it printed very nice but then it clogged up on me and ruined a print. full clog and the extruder chewed up the fillament rather then push it in.
tried to unclog it but couldnt get it fully unclogged so I swapped it to another one thinking maybe it had a defect like bur inside it or something. this one is under extruding in places I never get under extrusion and the layer adhesion is horrible... its almost like the nozzels are not getting up to full temp and I am printing a 215 degrees with PLA. it has to be getting hot enough unless that little copper insert isnt tightly connected to the brass outer walls.
I thought I would need to lower not raise my temps for these things, they have a copper core
ffs. after digging deeper it turns out the nockoff CHT nozzles perform WORSE then standard nozzle unless you have a high flow hotend with a larger meltzone. CNC Kitchens tests were on a printer with one of those and he never tested it on a standard hotend
I am never, ever, ever buying a bed probe that doesn't use a physical probe of some sort ever again.
This inductive probe is total shit.
It reads differently if the bed is cold, or hot. As in "Head crash or not" differently
And it isn't a case of the bed expanding and moving after homing.
The probe will not read the bed before the nozzle hits when cold, and the probe is damn close to the bed.
This thing has basically no clearance.
I want something where the trigger point is a physical point in space, and I can visually confirm it is going to work before the damn toolhead runs into the bed.
Fundamentally, it sounds like an inductive probe's operation would be highly dependent on bed material choices and thicknesses.
But head crash vs not for hot vs cold sounds crazy
I'll definitely avoid those then.
I think the adjustment was right on the line already for some reason, but we are talking about machines that work in tiny fractions of a mm regularly. You can't screw something so fundamental up.
Even if the heat change is only half a mm, that is too much when the sensor height is less than 2mm

I am printing a AER9 laser rifle from Fallout.
the one with the crazy complex functional reloading mechanism
That's pretty cool

test
pass

10mm aluminium profile holder. Overengineered? Probably, but that way i know that lamp is gonna stay up there


We saw a lot of repeated misinformation on many forums that:
"PETG is PET with glycol"
PET is already produced with glycol (Ethylene Glycol), but in PETG this glycol is partially replaced by CHDM.
Thus "PET glycol-modified"
███
I knew it already (10.9%)
██████
I was misinformed (19.5%)
██████████████████████
I never looked into it (69.6%)
...
Also, lol:


What kinda proto rifle rail gun is that?
its the laser rifle from Fallout. specifically the Fo3/FNV version, the Fo4 one has a few minor differences

Dang looks good, nearly thought you were gonna blast some aliens or whatever haha
Hmm. This seems like the killer app for an IDEX printer.
Find out more or pick up the Snapmaker J1 here (AFF):
https://snapmaker.sjv.io/xkkka3
Love the channel? Consider supporting me on Patreon:
https://www.patreon.com/user?u=806627
Get Great Filament From PolyMaker & Help Support The Channel:
https://bit.ly/3P5MRD7
ModBot Merch Store is now live! Get yours here:
https://bit.ly/3qhJ8Yl
Join the ...
I plan on designing something to be installed inside a car and I'ts gonna be 3D printed.
Given that it can easily reach 80°C (180F) inside the car while being 40°C outside what is the material I need to order it in?
I do not have a 3D printer myself yet and the high-temp one my friend is building is kinda far from finished.
I've done ASA for parts in cars on a relatively stock Ender 3 pro, and that seems to be acceptable.
Printed at a bed temp of 90C IIRC.
That's inside the passenger compartment, not engine compartment or trunk BTW.
So its a material that does not need heated chamber and has a fast switchover from solid to liquid?
I did print in something of an enclosure, not a dedicated heated one, but the simple act of having the printer in it does raise the temperature. I think it hits 35C or so during longer prints?

The outside has 1/2" fiberglass drop ceiling insulation tiles stuck to it
can't speak to "fast switchover from solid to liquid"
Up to what temp is ASA solid safe?
Some quick looking says anywhere from 93C to 105C.
Much hotter than that and you'll probably need to print something that needs much higher hot end temperatures, and a simple bowden PTFE system won't be sufficient.
I've seen online that the design recommendation is 125C+
given that I'm probably gonna be ordering the (relatively large, single-piece) part anyways I believe choosing the right deposition manufacturing material is not constrained by print-ability but rather price.
Another thought might be figure out what plastics typical OEM internal trim pieces and such are made of, and what their properties are.
What about HTPLA? Or annealing the part after manufactring? Any opinions on that?
Possible major differences between "95% sure this will be fine" and "100% sure this will be fine in the middle of death valley during the hottest day on record".
No personal knowledge of that.
I want something like a "98% sure this will be fine and not melt onto the PCB of my car PC"
Wait ABS seems to be used in cars... ABS is easily printable, right?
What about resin printing? Could that be more heat resistant? A nice surface finish out of the box would be great tbh+
I believe conventional knowledge is that ASA is generally more temperature resistant than ABS.
(And I'll admit, that "ABS is used in cars" bit is exactly what I was maaaaaaybe trying to guide you towards)
Wait according to this website that offers printing parts in germany PA12 is 175°C temp resistant and one of the cheapest options anyway
Ahhhhhh lol
Yeah, well, nylon's a major main in the ass to print from my understanding. And too hot for PTFE bowden tubes.
I have zero personal experience with nylon though, only what I've read.
Elaborating, conventional wisdom seems to be that ASA is slightly superior in every way to ABS except a SLIGHT price premium
Apparently they think its the easiest lol


what will survive in a car seems to depend on a few things. how hot it gets where you are and if the part will be in direct sun light or not. PETG seems fine if its not in direct sunlight and your not in a stupidly hot area but if it is in direct sun or you live in a very hot area you need ABS/ASA or better
if you hit 40c outside then your probably in the stupidly hot camp
Usually its not supidly hot here but things have happened and their likelyhood of happening is currently increasing
aint that the truth... its going to hit 30c in a few days here, it was snowing last week!
Its gonna be replacing the radio and center fascia so it could be in direct sunlight from the side windows
Since all the printing services want an stl for pricing I'm gonna need to design that thing first before further research and partner choosing
ASA has the exact same problem ABS has: It puts off formaldehyde fumes when you print it and tries real hard to kill you.
why I wont print it
Not a problem once its done, right?
Once it is done it is fine, yeah.
really wish I could print it but no good way to vent a printer in my apartment
I should also mention I've got a DIY recirculating carbon filter in that big enclosure, and the enclosure is CLOSE to airtight.
No external venting
But you can't smell SHIT once it's in there
That will help.
I dry spraypainted parts in there by sticking them on paper on the printer's heated bed
a good carbon filiter should be able to deal with most formaldehyde fumes as long as you replace the carbon often enough
Alright thanks for you services already!
I'll be in touch again probably when designing clip systems for holding it in place yet still being able to disassemble lol
I have heard ASA has little smell? but is still not safe
If you start to get a headache and don't know why, open some windows or otherwise get venting 😛
I cant stand the smell of hot abs. even cutting it with a hack saw makes to much smell for me. its so gross!
Just waiting for the JB weld to dry.
This is a .22 caliber pellet pistol, fired with 209 shotgun primers. Or at least it is supposed to be. I don't know if it is going to work yet 😛

The basic design is a 22lr derringer, that someone modified to be a 15mm flare launcher, that I modified into a pellet pistol.
Oh, and I need to install a dime in the breach to serve as a breach face. Where I'm going to find a dime in a house full of credit card users is a really good question
Sovol's printers seem to be ok from what I've heard?
yeah they are fairly good. the SV06 was a knock off of a Prusa mk3
nonplanar is coming, hopefully we start to see it fast/stable soon
https://www.youtube.com/watch?v=cbhWni9f980
Check out my 2nd channel, TT Racing: https://www.youtube.com/@ttracingYT
Non-planar 3D printing is truly mesmerising to watch, and for the right type of model, vastly improves the appearance and surface quality. Thanks to the community, this feature is now available in a recent version of PrusaSlicer. In this video, I take you through the journ...
I printed this to fix a snapped hinge but the small pins sheared after about a month. I printed it with a prusa mini with pla filament with 20% infill. I plan on printing a new one soon. Do you have any suggestions to make it more durable. I can only print with pla
https://www.printables.com/model/167047-audio-technica-ath-m40x-hinge-left-right

Printables.com
Hinge replacement for the Audio-Technica ATH-M40X, both left and right version. | Download free 3D printable STL models
more walls is often better than higher infill percentage
but this looks like a pretty small part so idk how many walls you could have before its basically solid
This is a really small part, the pins seems to have sheared and the other side gave out due to the added stress.
can you reenforce it with a bolt/screw?
printing a hollow pin that is made to take like an m3 caphead screw or some threaded rod can make for a very durable part
What pins exactly sheared? Tried using a piece of a paperclip as a replacement? A piece of filament?
The small pins/legs on the side that go into the earcup. I have to tear them apart to see what exactly happened. I am going to see if I will be able to add something metal to reinforce it
I wanna design a 3D-printed mechanism that lets me "pop out" ("with push-push buttons" at the bottom edge) a display out of a bigger panel where it's recessed in. I have some knowledge in F360 but never done anything moving.
Tips/ideas? Redirects to better suited channels/communities?
Rough sketch that describes my wanted behaviour: (*panels sketch not to scale, display is about 9", recessment is about 15mm but I will design the panel myself)

Its gonna sit in a car so I want it pretty sturdy at best
I'm thinking about 4 (relatively center) sliding pegs on 3D rails that guide each to their end position but I have no idea about the shape of the pegs or if theres far easier ways
I went down this path with these exact headphones a few months (maybe a year) ago. The printed hinge will break after a while, but it will keep you going long enough to buy headphones that don't suck.
Don't buy audio technica headphones! They sound fine (great even), but all of their consumer models have weak, shitty hinges and they will break even if you baby them.
I replaced mine with a pair of DT-990 pros
If you really don't want to replace them, then print a few spare hinges, and just accept that they are a consumable part.
And keep a soldering iron on hand, because the wire going through the hinge isn't going to last
Graphite rub finish on PLA. Bottom is reportedly clear coated, top is not.
Print is a Beach Pigeon (primarily printed 22lr DE lookalike)
As far as I can tell, you paint your print, then rub graphite into the paint when it isn't quite dry. Something like that anyway. Cosplay types use it for armor and other metal highlights, and some people use it for guns 😛

Damn thats not metal?? Convincing!
Yeah, it looks awesome, clear coating dulls it a lot though which means that it isn't terribly durable at peak visual awesome.
I know a few ways to make plastic look like metal but not tried that one. I have tried something similar but it never worked. was trying to get my microsphere pigment to stick to almost dry paint. any idea what clear coat they are using?
it might just work because graphite stains anything and everything where as my microspheres are well spheres so they are easy to rub off
I was really happy with how convincing the "aluminum" looks on this. number of people thought it was actually metal

Very little info was provided, but here is the original reddit post:
https://new.reddit.com/r/fosscad/comments/1cfmumq/enough_people_were_curious_about_sealing_graphic/

Reddit
Explore this post and more from the fosscad community
Hey, I’m wanting to print and paint a few small (1-3 inches tall) models and paint them. I haven’t done any detail painting on prints before. Any advice on paints for detail work on pla? Also, I was thinking of doing a vapor polish with ethyl acetate but I’m not sure if it’s worth the time if I use a primer for the paint. I’d appreciate any advice you’ve got.
don't have much experience painting but there are some primers specifically meant for small models, worked pretty well on my printed PLA parts.
I find that PLA has a fairly horrible surface for taking paint if you dont prime it.

what kind of post processing do you need to do for an upper receiver usually? or is it often fine as-printed?
Maybe a little sanding to get rough spots where supports were smooth, and then reaming out any pin/bolt holes with a drill bit.
So not much really, just the standard stuff you would need to do with any functional print.
Generally if something special needs to be done to a part the build guide will call it out. Most designers do really good documentation, outside of some of the less serious groups.
Deterrence Dispensed/The Gatalog are the gold standard
In this case, nothing special needs to be done.
Yeah, that was the recomended. I have asked the designer if another orientation would be better since I have the build area for it where most people wouldn't.
With stuff like this I almost never use the first set of printed parts anyway except for initial testing and maybe a few rounds.
printing at an angle is often the way to go to make sure that the lines arent in a direction to make the part weaker. laying that flat could for instance make the rail on the top substantially weaker
I it ivan's the troll design? Neat
Tell me it requires metal parts in receiver or it fully polymer?
It is Ivan's design. You need a trunnion, barrel, BCG, and recoil spring. Plus a few other bits and pieces.
I have everything here now waiting to assemble, except MAF forgot to include my recoil spring assembly... So now I'm waiting for their customer service.
I know that cetme needed those I didn't know do upper need to be reinforced by metal(excluding trunnions) or it's just good to go after some sanding?
There is a chunk of allthread that runs the length of the receiver and handguard along the top, otherwise no.
The plastic bits are pretty chunky though. Nice thick walls.
Ok, interesting, thanks
cries in ts100 soldering iron

Oof
Always wondering how to look for extra soldering tips or other equipment because seemingly every iron has its own tips and none of them are compatible xD
Or I have just been always working with off-brand stuff that tries to keep customers in their own eco-system
if you have something offbrand, there is a decent chance it uses the same tips as something branded
I have a kit similar to this (the pen has a digital temperature controller instead) - it's been serving me pretty well tbh and I was able to find 2 (two!) listings of soldering tips that share the same (size-) parameters as the ones included
https://www.ebay.de/itm/403733758754

eBay
19 in 1 Perfekte Lötkolben Set für Reparaturarbeiten, Unser Lötkolben Set kann alle Ihre Schweißanforderungen erfüllen: Lötkolben, 5 Verschiedene Lötspitzen, Lötdraht, Lötkolbenständer mit Schwamm und Entlötpumpe.Löten ist eine der grundlegendsten Fähigkeiten, die man braucht, um im Bereich der Elektronik zu tätigen.

FDM printed 3d mold, to halves. cast then glued together. mold was an eggshell mold so its single use. I dont have a pressure pot so there are some micro bubbles. will see if I can fill them, then I will make silicone molds from them
actually can make a master die without a resin printer, its just allot of extra work
Fyi - post pngs or jpgs if you want responses 🤔
@slender oasis and @tight river thanks for the advice, here’s how my first try turned out

That looks great, well done
Ready to test! 3D printed CETME L

This uses an AR15 lower parts kit instead of the original CETME parts, also a modified AR buffer tube and stock.
Both upper and lower receivers are printed, as are the barrel mounts and just about every other structural part.
The only metal parts are the fire control group, barrel, rear trunnion, bolt, charging handle, recoil spring, buffer tube, and a bunch of random hardware.
I assume buffer tube doesn't contain recoil spring, if I remember right, cetme has it in upper
You remember wrong.
For all in you just need to print magazine) Then you would achieve almost anything printable
It is much thinner than an AR buffer, but it does go in the stock.
There are printable AR mags, but I have a pile of pmags already so not worth it. 😛
Isn't it like paratrooper g3, contained in upper?
Nope.
Oh so it's like in full scale g3 in stock
The AR buffer tube has a liner that shortens it by a couple of inches and reduces the diameter significantly.
The CETME L was developed from the CETME C, the H&K guns were also developed from the CETME C, but they went off in a slightly different direction. For example, in a stock CETME L there is no notch to lock the charging handle back, where that is a feature in all the H&K roller guns.
As for sights, dunno what I'll use yet. Probably just irons for now.
Well, "plastics" 😛 There are some interesting printed sights I want to try.
I saw ATF irons, with front part resembles a dog)
I love internet
Yeah, there are some wild joke irons. I'll probably do something a bit more serious
What interest in dull ones?
Goofier better
XD
Good luck with the project, also what filament did you use, I wonder because someone uses carbon fiber if I recall correctly
I use Polymaker Polylite PLA+ That is pretty much the gold standard for gun printing short of carbon fiber nylon.
Ok, I thought of something like that because this "green buddy" was black
And not so shiny
Do a peace symbol ghost ring 
)
Thanks for having me! I'm going to be getting into 3d printing and don't want to be the girl who buys a dud
For myslef ship models starting with solid ships and to try selling online with equal simplicity to start but I want the prints to be done right
Print guns, you know you want tooooo
Don't you try to get me on a list
Well, he is definitely not from ATF at least)
I'm probably on alllll the lists.
And if I'm not, then I'm disappointed and clearly am doing something wrong.
Hehe
I heard the califlower is currently free for download
The calibration tool yknow
Nvm
Already gone
My first print, I think I made it a little too small and also maybe a different material next time

I thought everyone's first print was our beloved boat)
Well I’m a rule breaker
Boat is essential for the most part, because it has all things that can go wrong in print, it optimized that way to show any limitations of filament or printer
Maybe I’ll set the boat off tomorrow lol
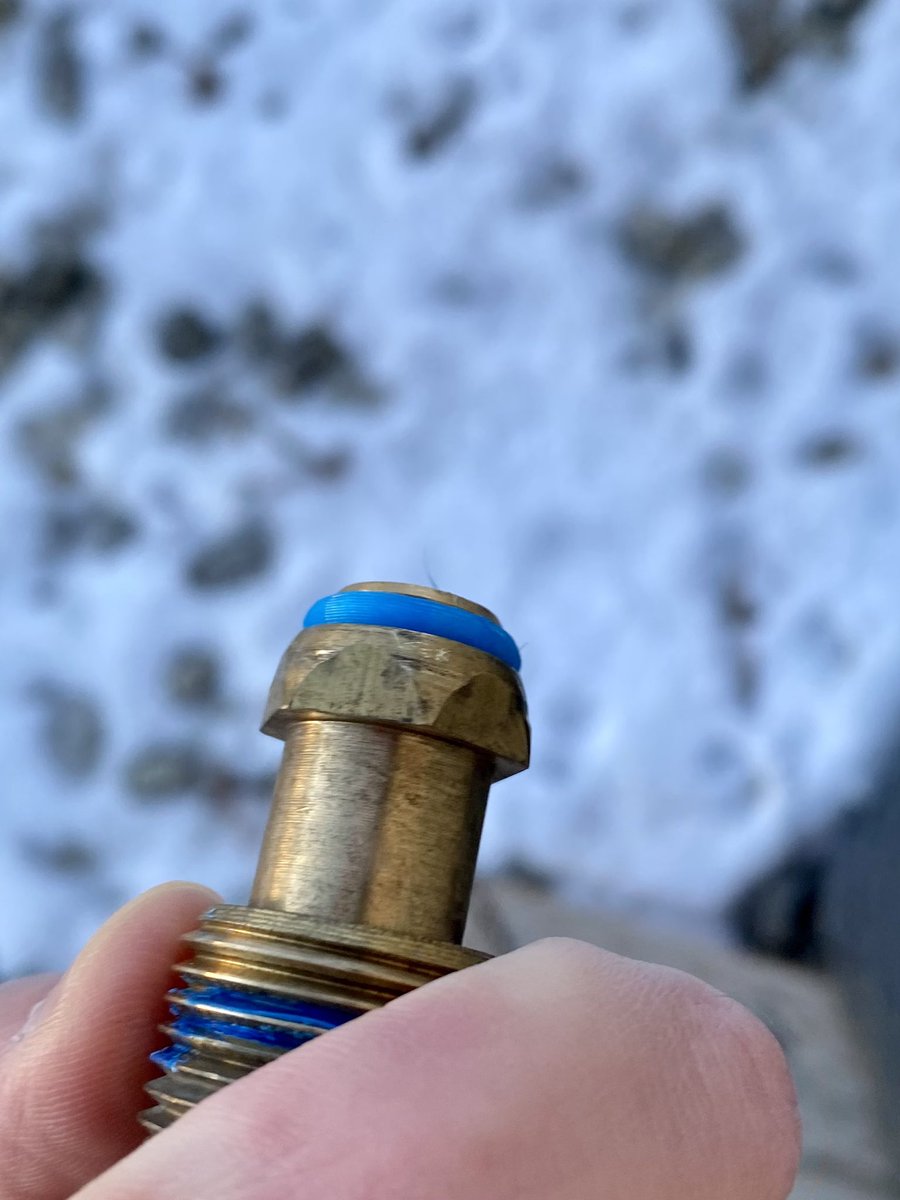
I just printed this https://cdn.discordapp.com/attachments/808019008179142676/1256668043686449183/image.png?ex=66824391&is=6680f211&hm=515e7e25489de0729d00434ba37b7656dc94bd5ef23f8527b7b323ef840dcfa5&

its a replacement shower drain because the landlord/slumlord for my apparment building is saying it will be 2 weeks before he can get a plumber out to fix my shower drain and I cant use the shower until its fixed. I aint waiting that long so this will bypass the leaking section and let me use the shower until then.
Welp. Time to start saving.

We’re unveiling the V-Core 4! Over the weekend, you’ll be able to see show units in person at the V-Core 4 worldwide premiere at both RMRRF in the USA and at the 3D Printer Party in Europe.
I really, really want IDEX. With an IDEX machine you can print in PLA, and use PETG for supports to get really nice support interfaces. The two materials don't stick to each other, so you can print the main items directly onto the support material without any of the gap you would normally leave to allow removal.
And since I print a lot of complex mechanical parts that need support (cough cough guns cough) I am very interested in anything that would give me a better surface finish while still allowing me to remove the supports easily.
apperently cats run Klipper and have input shaping enabled? https://cdn.discordapp.com/attachments/231590159420882945/1260782479875506176/450809413_451055634562863_3053416037956370993_n.png?ex=669092af&is=668f412f&hm=8165a8081d2f1ea0762ac50d91ae8f3db7605fc5dfa36d3851b1f1540a422edf&

Currently on the printer, something that is a bit of a rarity: An item of my own design.

This is a fixed stock for the hitchhiker 22lr takedown rifle. The default design uses a collapsible stock.
Basically, it replaces the end cap in such a way that it butts hard up against the rear of some vertical geometry on the bolt tube, for a firm and mostly wobble free fit.
You can just see the slot on the back and the second pin hole intended to hold the rear stowage lug of the barrel when the rifle is taken down for transport. I was hopping to have this farther back, but the geometry of the sights made it so I had to lower the comb, and that forced me to use the rifle barrel hardware (the pistol stowage hardware would have allowed me to have the barrel farther back, but then there is no way to hold the rear stowage lug).


Is it g3 stock just scaled down?
Nah. Kinda looks like it though now that you mention it..
I just made a stock shaped object that had the properties I needed.
How comfortable is it with a flat end? Always seen concave stocks only
Uh what? Most stocks have a flat or nearly flat butt pad
Some are very slightly concave, but that is mostly on heavy hunting rifles and the like where you need lots of contact.
Anyway, it is exactly as comfortable as it needs to be. The gun is a 22, there is basically no recoil (even less than normal due to the nature of the action), so a hard flat butt "pad" is just fine.
I want to use some 3D printing to modify / fix my HVAC layout controls (fan speed) on my Toyota pickup (from a single 5 position switch to 1 standard switch and 1 3 position switch) what type of printer would be best
I'd guess a resin printer since you probably care about the surface finish. Also because resin is usually temperature resistant
There's relatively easy to print filament that will easily survive car temperature too. I've used ASA for in car prints with no issues.
During summer tho?
ASA has slightly better temperature resistance than ABS, and ABS is commonly used in cars by OEMs.
I have an ASA phone mount that's been in the car a few years. No deformation. I don't live in Arizona though.
ASA/ABS is fine under car temps. PLA is not.
So an enclosed FDM printer would work however if all you want is one part there are print on demand services that can get you things like SLS Nylon for not too much money.
If you are just looking for an excuse to get a printer that is a different story 😛
If you do want a printer, the second thing to ask yourself is if you want a printer because you want to print things, or if you want a printer because you want the things you can print. Subtle difference.
In the first case, grab a cheap piece of shit like an ender 3 and learn a ton while you mod and calibrate it into shape, then in a year or two buy a nice coreXY kit and live out your best life.
In the second case go buy a Bambu Labs printer with the features you want and get nice parts out of the box with only minor learning.
Oh, and if you want to make minatures, get an FDM printer and learn how to use it, then get a resin printer later. Resin printing is a pain in the rear, but a lot of the basic knowledge will transfer.
And the FDM printer will be a lot cheaper to operate and a lot less fuss to use when you inevitably want to print something that doesn't need the detail resin has.
a little bit of both I want the printer for the stuff it makes but also to learn how to do the 3d printing
as for the item I want to make for my car it would likely be to thin for FDM to make safely I will need to design the part first to know
The first barrel segment for the longhiker (27" barrel hitchhiker) is on the printer now. The barrel is styled to look kinda like a PTRD 41

Complete with totally pointless offset sights (you can't really get a good sight picture on them because they are offset)

Annnnd just had one of the weirdest issues yet. Every time the printer went to start the file it would have sudden massive temp drop at the extruder as soon as it started priming the nozzle. Resulting in an error condition and the printer rebooting.
Test extruding worked fine. PID tuning changed nothing.... A file I sliced yesterday worked fine. The Gcode does not look to be corrupted, the preamble with the priming code is identical.
Well, I guess I'll just print the second receiver now (I'm building two nearly identical guns right now, one a 10" pistol and one a 27" rifle. Only difference is the barrel, the bolt tubes, and one gets an encdap instead of a stock), and try the barrel mount again later.
My printer is now sitting with the umbilical torn apart. It seems the heater wire failed. My multimeter has gone missing so I can't 100% confirm yet (new one is arriving later today), but there are some suspiciously soft feeling sections.
im honestly not sure how, but i know some one who lost more multimeters than 10mm sockets...
Fired up the printer yesterday for the first time in months, spool still on there gathering dust and moisture. Didn't even clean the bed, all dusty. Started a benchy to see how bad it had gotten, best benchy print so far
Does anyone know of a good source for long printer cables?
I basically need this cable, but twice as long. I found one place that sold it, in china, but now my package is stuck in new york with "fraudulent postage" yay, and I can't find any other sources for similar cables that go over 1m.

I have a giant printer, and 1m will just get me from the hotend to the umbilical root. I really would rather not have to make my own heater cable if there is any way I can buy one.

making the warpcore model featured on Tested last week.
mostly done exsept for the electronics

Translucent filament or just very thin? Looks awesome
transparent PLA. actually worked REALLY well for this. cant see any hot spots from the LEDs
guess printing defusers with transparent PLA is a good option
the model was a bit of a nightmare mostly because of how you have to rout the LED strips and some of them have to be soldered in place. was really hard for me as was figuring out WLED
the project page for this has basically no instructions
Pronter is prontering again.
Currently it is almost done with a new gunstock.
I finally had to make a new cable myself, and it took abnormally long to get the micro molex connector I needed.
you actually have the crimpers for those things?
someone I know just went threw the fun of trying to get a molex crimper. the prices are insane. he was able to finally find an older style one used for around 100 bucks
Yeah, it was like $20 for a pretty decent one.
I got this thing, and it worked great.
https://www.amazon.com/dp/B01EGPOYYM?ref=ppx_yo2ov_dt_b_fed_asin_title

Molex type 5 barrel cavity crimper. For use on an endless amount of crimp type electrical connectors. Molex, Tyco, Amp, Some Deutsch, Devco,
The only thing I wish was different about it is that the jaws are a bit thicker than I like. You can get similar crimpers with jaws half as wide that will work better for doing other connectors too.
I have a crappy crimper for dupont connectors that has stepped jaws to do both the wire and the insulation in one step, but it suuuuucks. The thin-jawed kind that does one part at a time is way better.
Ive got one like that too. I thought it would be better, but no.. I end up running the insulation crimp through again just to make sure. And because it's fat it gets fiddly to setup for tiny crimps like the small jst ones 😦
Maybe look at this one, really happy with the kit and price:
https://www.amazon.de/-/en/gp/product/B07QX51F3B

Precisiva DuPont Crimping Tool Set + 1550 DuPont Connectors 2.54 mm and Crimping Pin + 460 JST 2.54 mm Connectors and XH 2/3/4/5/6 Pin and Female Connector Note: the length of the shiny copper wire after stripping is usually about 3-5mm. After the cable is inserted into the clamp, the cable shoul...
But the kit is more for breadboards and IC electronics
This is the stock, receiver, barrel mount, and other main structural parts for a hitchhiker. I built this out today on stream (this picture is from before that).

This doesn't have the pistol grip installed.
Anyway, the pistol grip is going to be black. I have a temporary one installed right now and it looks sharp as hell.
I'm putting a 27" barrel on it, for the memes. (27" is ludicrously long for a rifle)
You know, they ARE allowed to be longer than 16.5" 😛
Yeah, but 27" is enough to make even the spiciest 22lr subsonic from friction alone
But yeah, the barrel on a barrett m107 is 29" for example. But that is a whole nother class of beast.
It is finished.

How do you like shooting it?
Had a failed print earlier this week. Now when it tried to home it slammed into the plate. Turned out the sensor somehow got skewed like 40°, which caused it to never register the build plate. Fun thing to figure out as it is behind the hotend and pretty much blocked by the fan case
It's a hitchhiker, just with a really long barrel. So I like it quite a bit. Probably will shoot my regular ones a lot more though since this one is a bit unwieldy and the sights suck.
But it is a great meme
I have had that happen before. Probes suck, all of them. But not having a probe sucks more.
Oh I'm loving the probe, do i trust it with my life? Absolutely not, but it does make things easier
Hey folks. I've got a blaster that I'm looking to print when I get my printer but I forgot how much I am supposed to times my original scale by to make it work with the printer. I'm using blender. I cant remember if it's 10x 100x or 1000x.
Slicers assume the STL files are in units of millimeters if that helps
And said slicers can also be made to show a grid. I believe by default cura has lines at 1cm intervals
Unrelated, I'm annoyed at the available selection of fenders for front wheels on a tadpole style recumbent trike, so I may try modelling and printing some.
Most blender files i imported directly were freaking tiny, had to resize them probably >100 times
Another custom 3d print to the rescue.


You all have to suffer too. OpenSCAD.
// 3/16 automotive copper-nickel brake tubing on one end for a sharp bend,
// a roughly 5.8mm ferrule and shifter cable on the other end
wallThickness=1.5;
centerTransitionThickness=2;
centerTransitionRadius=0.75;
innerRadius_1=4.75/2;
radius_1=innerRadius_1+wallThickness;
length_1=9.5;
sectionLength_1=10;
innerRadius_2=5.9/2;
radius_2=innerRadius_2+wallThickness;
length_2=9.5;
sectionLength_2=10;

$fn=100;

difference(){
    // the solids
    union(){
        color("pink"){
            cylinder(h=sectionLength_1,r1=radius_1,r2=radius_1);
        }
        color("magenta"){
            translate([0,0,sectionLength_1]){
                cylinder(h=centerTransitionThickness,r1=radius_1,r2=radius_2);
            }
        }
        color("blue"){
            translate([0,0,sectionLength_1+centerTransitionThickness]){
                cylinder(h=sectionLength_2,r1=radius_2,r2=radius_2);
            }
        }
    }

    // the holes
    union(){
       color("red"){
            cylinder(h=sectionLength_1,r1=innerRadius_1,r2=innerRadius_1);
        }
        color("green"){
            translate([0,0,sectionLength_1]){
                cylinder(h=centerTransitionThickness,r1=centerTransitionRadius,r2=centerTransitionRadius);
            }
        }
        color("yellow"){
            translate([0,0,sectionLength_1+centerTransitionThickness]){
                cylinder(h=sectionLength_2,r1=innerRadius_2,r2=innerRadius_2);
            }
        }
    }

}
I should have baked in more tolerance for poor adherence to specified dimensions, had to drill both ends out a bit to fit.
Drilling is good. Having the hole be too big is bad.
A lot of gun stuff has deliberately very slightly too small holes with instructions to drill them out to a specific size so everything is perfect.
Quick and easy print for my Pi5 that will arrive today

it has room for an active cooler and NVME expansion board
@hybrid frigate I'm not yet 100% sure i'm allowed to print this, so i won't for now. But if it is, how would you orient this magazine for printing?

Diagonal?
I'm mainly worried about the retaining clips on the top
You can print your AR magazine by laying it down horizontally, which is more difficult; so, as a tip, we recommend you print your AR magazine upright. And not just that, but you can also print the internal parts and their cover. From 3d print site for ar mag I think it will work for it too
So probably if printer has space upright is better
Yeah that's probably top priority)
Upright.
With a brim 😛
But the readme will tell you for sure.
If it is a gatalog product it will have a readme. Otherwise good luck.
Yipee, I got the right answer with Google and some logic now I am proud
TBH, print orientation is a pretty easy question 90% of the time. You just need to know the tradeoffs for each direction and pick the one with the fewest issues.
90% of the time it is "which way prints with less supports?", and the other 10% it is "which way puts less stress on the layer lines?"
Also which way to print to not screw details like with Dutch's clips on mag
Yeah, i wasnt worried about wasting material on supports, this needs to be strong
I got it from some forum
Out of curiosity, which magazine is that?
9x19, 20 round for a saiga 9
they say to print it in petg, but the only petg i have is gold😝
they also say PLA will do fine
We almost achieved perfection)

OK, so magazines the weak point is always the feed lips. They have constant spring pressure on them.
yeah, that's where the original ones are failing, and they're kinda hard to get atm
PETG will (eventually) just pop right off. PLA will creep over time. PC or CF PA is best. PLA+ is ok.
i think i have some PLA+, but still not sure if it's legal😂
(0_0) I thought you already delt with it by quick search
the laws are vague on this point
Got my new toy in today.


Is Cura a good slicer program to use?
Prusa Slicer or one of the other slicers in the Slic3r family (Bambu Slicer, SuperSlicer, or Orcaslicer) is better TBH
Prusa and Orca are the two most actively developed versions.
As for Cura. Meh, it's ok. I wouldn't use it.
Ok. Now I just gotta find one that works with my printer.
They all work with all printers. If yours is an off the shelf model or a common kit build, it doesn't matter what you pick there will probably be a built in profile.
I'm trying to open Orca but it doesnt open. Gets to loading configuration and just closes.
hey does anyone know of any good cad software thats free, (apart from onshape, not a fan of the always public thing lol)
Soooo...should I not have an enclosed pla 3d printer in my bedroom?
I'm a complete sadist / programmer, so end up using OpenSCAD for most models. Do not recommend for normal people.
It lives!
First print done

Your printer appears to have a case of the zoomies
So I think one of my prints in the near future might be a set of front fenders for the trike here
#1058874733610946581 message
I'm completely unwilling to spend a $200 or so for commercial ones...
20" fronts, 26" rear, and the rear is a standard MTB suspension triangle, so I can probably find an existing model, but I fear I might have to create a model for the fronts.
And this is probably something I probably shouldn't try to model in OpenSCAD
Though speaking of OpenSCAD, @hybrid frigate , you need to harass me to publish my Ruger LCR speedloader OpenSCAD file somewhere.
ah lol
Me and my gf mostly use fusion 360, it's free if you make less than 1000 bucks on your hobby (no clue how they would know if you don't tell them😝)
I use Onshape 😛
Ah nice lol
Ah yeah I did like how it worked just wasn’t a fan of the privacy stuff
Thanks guys
Can't really recommend f360 but I would use it over the other options I tried. It's OK great but it sometimes just doesn't do what it should
"I have done nothing but print boxes for three days!..."

Neat but I'd try to design some feature that makes it less notorious to fill mags from it haha
Most people i know load them one at a time, we only shoot like max 100 each range day
It really depends on how many people show up, more people means less shooting
Printed off a can holder for my dad.

Ah, you've fallen into the trap hole of printing trinkets already
But that print quality looks pretty good

Horrific! Give me 14 of 'em!
Bode's blaster from Jedi: Survivor. (Forgot to say this but not my design, I just printed it out)

I like that it has the typical aesthetic of Star Wars, slap random stuff together and call it a gun
In this case, put a scope on a pistol frame, bam! done, and it looks cool
I think it might be time for a faster printer than my Ender 3 Pro.
Somewhat larger build volume would be nice.
Per wife's request multiple color printing would be nice.
I could, for example, probably get over my inner cheap-ass enough to go for a Bambu A1 combo at $490. Getting their P1S combo at $850 I don't think I can justify. (I'm not set on Bambu at all, just happen to be looking at Microcenter stock)
Thoughts?
I do hear a lot of good things about Bambu, no fiddling or tinkering, it just works
what do you consider a large build volume?
well, what I'm working with now is I think nominally 225 x 225 x 250
Both the A1 and P1S are 256^3, so not MUCH different.
Though I see there's quite a few now in the 300mm+
that said, speed for me is the biggest factor.
Additional build volume "would be nice"
Multiple colors makes it an easier sell with the wife.
bigger printers are becoming more common, which is nice.
i think most new Bambu have multicolour support
yeah, their "AMS" setup which looks to be +250 on a combo
I mean, she wants it... so you can justify it
I wonder what the difficulty would be in using the AMS or a system like that on another printer.
not sure how that would work with software, but it could probably be done
I haven't even started looking into how the software angle is handled at all yet
well there are only 2 brands currently offering multi mat printing, exspensive and stupid exspensive so if that is a requirement it makes things easy
unless you want to build a Voron then I guess 3
https://cdn.discordapp.com/attachments/231590159420882945/1292281830245924865/SPOILER_IMG_20241005_191811441.jpg?ex=67032abd&is=6701d93d&hm=94a3dc69ce9057f69b51dce71a6951e3cabf4383257947dae3686cd4b552244b& https://cdn.discordapp.com/attachments/231590159420882945/1292281829264592980/SPOILER_IMG_20241005_191849754.jpg?ex=67032abd&is=6701d93d&hm=50770860449abc2291b4e6726004b864f2faff86e157db442ea627fbdb35b7c3&


painting is mostly finished I think
hey, I actually did something spooky in October!
There are a bunch of toolchangers and IDEX printers. Just not that many are well known.
I'd seen a couple printers before with two extruders, but hadn't yet seen that particular term, so thanks for that useful piece of information!
https://cdn.discordapp.com/attachments/445610544162930699/1294633856711790652/image.png?ex=670bb93c&is=670a67bc&hm=02449f29712fc152981f4120c1ccdb3b050d52c122150504703e5e35fcc5d103& https://cdn.discordapp.com/attachments/445610544162930699/1294633738684071988/image.png?ex=670bb920&is=670a67a0&hm=45b999d9c9dea966fc0e158fcd21b8d663fd9678e1db22fc612a6746151ea15e& https://cdn.discordapp.com/attachments/445610544162930699/1294633588481982576/image.png?ex=670bb8fc&is=670a677c&hm=1f2e0a56ffba3d0b4712311ab84e4400cfdd8ce59358519440b7b28906ad4a8d&


ball vise. mounted a cheap Wen drill vise on it and a helping hand so I can use it as a soldering station.
the ball is epoxy coated. I had allot of printing trouble with it because of shitty filament so I needed to coat it to have a good surface for the rolling action
I designed the mounting plate for the Wen vise and the speed handle, it had one of those horrible floppy bar handles on it originally and I hate those things. I will probably release the speed handle as it turned out really well and I could not find any designs for one of those for this kind of vise handle

Well, wife is not opposed to the P1S combo's $850 price tag. I think I'll wait until black friday, see if a bit can come off. Unless I find something better.

Printables.com
This is a vise speed handle designed for a small Wen drill press vise but it probably works with other similar vises. | Download free 3D printable STL models
first published 3d print
after a long and good break from using my bambu lab P1P as life took prority i decided i wanted to come back swinging and get something printed and i wanted to make the helmet from my pfp but i cant decide which one would be the best model to use
help me decide
https://www.thingiverse.com/thing:1370815/files (1️⃣)
https://www.thingiverse.com/thing:1170253 (2️⃣)
https://www.thingiverse.com/thing:6182308 (3️⃣)
Thingiverse
Disclaimer:The opening for the helmet is very tight, in order to wear it as an adult you will have to keep one of the front sections separate for easy attachment and removal (I used Velcro)Join the rebel alliance by printing your own pilot helmet today. I designed this for the Star Wars secret cinema even in London 2015, it is in no way an offic...
Thingiverse
Star Wars X-Wing Helmet For scale: My head is about 21-1/2" in circumference and left about an inch on both sides for padding. Hope that helps. The visor will be vacuum formed with colored acrylic.I'll probably redesign the visor.This is a work in progress.
Thingiverse
I DID NOT MAKE THIS. The original link that I downloaded it from no longer works. I have uploaded the files so that people can still have the ability to make this. I printed this in one piece and the STL is one piece. Cut the model to fit your printer size. Details below.Original STL: https://www.thingiverse.com/thing:2954265Decals: https://www....
I say option 2
#1 has the benefit of already being pre-split into smaller parts. It also appears to have been converted to STL at a much higher detail level than #2. It might have some scaling issues though? (it looks small!)
#2 seems to be very low detail, lots of flat sections, tesselated at very low detail.
#3 seems decent as well. Single model instead of pre-split.
So my order of preference would be #1, #3, #2.
anyone need a cheap lathe? https://www.youtube.com/watch?v=6Js8erWbsDQ

Want to see more tools like this? Im a finalist in the Prusa awards and winning would fund literally dozens of tools like this and help me keep the files free!
https://www.printables.com/awards
(vote for the ball vise, its bright orange :) )
Parts: https://www.printables.com/model/1048400-open-lathe-v1
Music: Minecraft soundtrack
Like s...
Did see that thumbnail in my feeds, haven't watched it yet.
Still haven't built my gingery lathe, so maybe not on this one?
ok that looks like a return to the old school precision by mass used in the in the 50s
am I interested but will need a printer first
anyone have experience in converting meshes to solid forms?
I found a beamNG model of my car (which seems to be suprisingly accurate!) and I wanna run some CFD sims on it
i tried going the manual way by cleaning up the mesh and converting it to a solid but it seems counter-productive and very error prone

New pistol in front of the machine that made it.

Also, this has the distinction of being the fourth Hitchhiker I have made.
I just love this design.
Also: Yes, that printer is absolutely as big as it looks.
guys any idea why my pc does this?

time has drifter by 2 minutes since then...
I HAD set it to automatically sync...
You sure this is the right channel?
So Prusa released a new upgrade, that turns their mk series which are bed slingers into a core xy, these are also priced competitively with Bambu. My issue is that I would have to spend $100 usd on the mk4 to mk4s upgrade to then buy a mk4s to core one upgrade $449? And what will happen to the parts of the enclosure i had bought for $472. Don’t get me wrong this is a great step for Prusa and they are doing this very rapidly considering how soon the mk4s came out, just that I won’t be buying it for a long time
"Prusa with prices competitive with Bambu" intrigues me, as I've got a Bambu P1S Combo on my wishlist.
Indeed, as much as I love my Prusa mk4, I just built the enclosure for it over the summer, would have to spend $100 for the mk4 to mk4s, and then get the $450 upgrade to the core xy. So I will sit and watch with curiosity to see how it turns out
Question for 3d print people. Are there paints that could melt certain plastics? I was looking at citadel paints
There are. Did not heard that about citadels but all citadel paints users I know use primers.
Do you have any suggestions for primers?
Start from dedicated for paints you are planing to use
BTW, there were some discussion about printing sth for battletech like

lol, comparable? if you ignore the base price of the mk4. so yeah you could pay a similar price to a P1S to upgrade your Mk4... or you cvould just buy a P1S and have 2 printers. Prusa needs to pull its head out of its ass and start making there printers at something aproaching a competative price point because right now its a joke. this isnt the price difference of made in the west vs made in China, this is the price difference of a compact ecconomy car vs a lambo and it sure isnt the same performance difference. I really dont want to see bambu become the 1 good choice for reliable printers so I really hope that Prusa figures this shit out
on the subject of paints. the plastic that would be the most vulnerable to the solvents some of the more agressive paints might have in them is ABS... seeing as most model kits are made from ABS its safe to assume you will be fine unless your letting the parts or models soak in the paint. if your using PLA its even less of a problem because the solvents that damage that quickly are not very common. if you want to be safe just use acrylic paints with a water base, that is what I use.
I also use automotive filler primers before painting. find that works really well and the good ones can work very well to get rid of layer lines
Been following this guy for a while, he tries to make a printer that can do a sub 1 min benchy.
https://youtube.com/playlist?list=PLT7wyh27LmscPT1EZpoS3BTWUJjAOQ5Gf&si=Z702opGlC_YlwA7z

YouTube
It's a lot of engineering challenges
His bad is floating on air?
yes, there's air coming from underneath, like an air-hockey table
Nice idea. No need of any greas or sth and avoiding friction problems.
Yeah, he needs as little friction as possible, as his acceleration is at extreme levels
Don't suppose anybody has any idea what "Two Free Kits with Select Bambu Lab Printers – While Supplies Last" means at Microcenter?
Nevermind. Google can actually still be useful from time to time. Some electronics bits for things you can print. https://www.reddit.com/r/BambuLab/comments/1g9aepp/is_it_worth_getting_the_deal_at_microcenter_vs/
the free kits are very simple and cheap DIY components that bambu includes with there printer. clocks, lights, stuff like that. kinda cool they include them but they are NOT worth buying individually as they are overpriced
Turns out the store was out of them anyway! But oddly, there was one stuffed randomly in the bottom of the printer's box.
I think there is always one in the printer box
at least everyone I know that has gotten a bambu has gotten one of those kits with it
what kit did you get?
