#Pebble 2 cases & buttons
1 messages · Page 3 of 1
sounds good, I should really do housework and that is what I took the ADHD meds to do
but unfortunately, I then fired up onshape
that's good (?) becuase I also didn't start doing housework yet
I didn't really find a material that I'm happy with for the DMLS Ti yet, I might need to start over on that one

let's add in some buttons

so then would it be possible to take this and integrate it into a casing?
delete the lugs, move it into the body
looks like the width might just be about right too
it's an interesting thought experiment at least
Apple Watch Series -2
(since there already exists a Series 0, and the iPod Nano 6G can be called the Series -1)
I really like this
Now with the refraction fixed! And a sharper  . Onshape found the issue in the refraction: there were two translucent surfaces exactly abutting, but they really needed to be slightly overlapping in order to stabilize the model.

That's great
looking sweeeeet
Fantastic
can I share the image?
also can I share this image? 😄
Sure
thanks


shared
Those look so good
these are a dream come true
I'll sell off some 3DS handsets to afford to buy one if I have to lol
I like that the watchface gives the apperance that the bezel does not exist
Is that Underground?
Yeah that effect works really well on the trypophobia one IMO
if there's like an official wait list I need to be on somewhere I'll do it
Oh wait these should work with the Duos too, right?
it sounds like maybe but that they might need modification
so it's best to go slow to find out what the most sustainable solution is
imo
because making these for OG Pebble 2s only... then there's a limited number of innards out there
but supporting the Duo would mean new potentially better availability for guts
Yes, feel free.
ok thanks 😄
I expect these will work with Duo but have not tried yet.
Where did you share?
trmnl discord
I need a week off work to sort out the final tweaks before getting a small number of cases ordered and put up for sale
alright, well, my DMs are open xD
mine are too
Genius or madness? Might have just come up with a new way to post replacement buttons to minimise breakages.


This is a CNC router drill bit holder
thats good idea if you have reliable source of those containers.
Just need to find the right search terms on Ali express, or a UK supplier
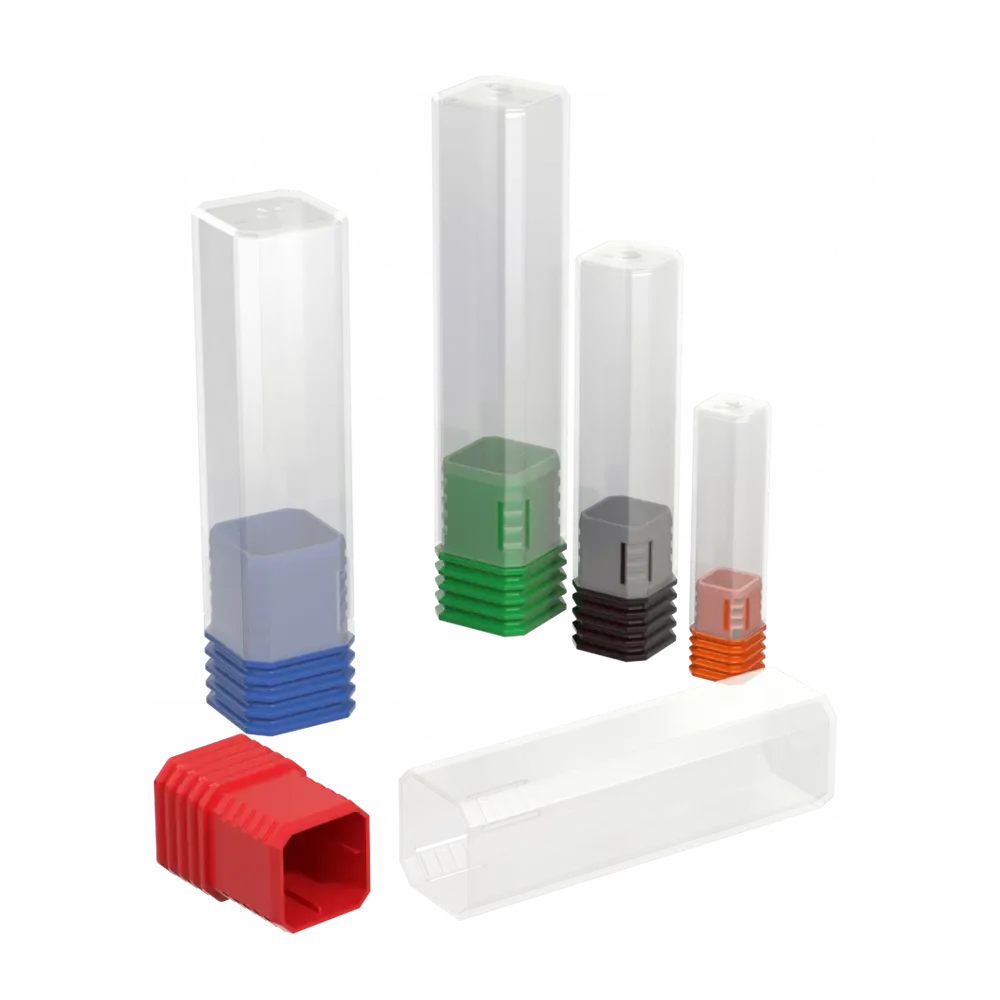
Grip Paks - Cleartec Packaging. Cleartec offers extruded clear plastic tubes for use in retail/POP packaging, industrial products, as well as postal tubes and shipping tubes.
Google picture search for the win
Cardboard boxes are cheaper but a lot are getting broken in the post. The buttons are very snappable
FDM a cheap box?
easy enough to design half of box with ribs that can be interlocked to each other
and only take minutes to print
Ali express will sell me 100 for £12. So 12p each. Time/money trade off time vs a 3D printed FDM case
Plus possibly slightly more reusable than a bespoke case. Who doesn’t want to have an extra bit tube in their life??
I like my current cardboard cases as they are fully recyclable, so if I change it, would have to be non-single use
These arrived today.

Hanboost
Upgrade your finishing precision with the Hanboost Fiber Stone Set — designed exclusively for ultrasonic cutters.
[Hydraulic Press Channel voice] I think that titanium win, and ultrasonic polisher lose.
What grit did you get? Surprised if 180 didn’t make a mark
Also, now I want one of those ultrasonic cutters those fit into
I got 180 up to 800. 180 did make a mark but it is eating the stick much faster than it is eating the watch.
The cutter is good. It’s not as good as the Wondercutter S which was the first such cutter I tried. But it’s not bad
Best thing I’ve found so far is 120 grit, 240 grit and 400 grit dremel flap wheel sanders.
Like these.
https://ebay.us/m/OBeSYc

eBay
10 x Sandpaper Wheel Disc (120 Grit ). Grit : #120. - It can be used for grinding and polishing on a variety of machines such as electric drills, hanging mills, wind mills and electric grinders. Rod length: 40mm.
Yes, I am coming to the conclusion that there is no replacement for just time spent with tools in hand.
I tried these, which worked decently: https://www.amazon.com/Dremel-EZ412SA-Lock-Grit-Sanding/dp/B005JRJHKS?tag=bngsmtphsnus-20&linkCode=df0&hvadid=80882941400099&hvnetw=s&hvqmt=e&hvbmt=be&hvdev=c&hvlocint=&hvlocphy=86250&hvtargid=pla-4584482468139638&th=1

Dremel EZ Lock is the fastest and easiest way to change mandrel-mounted accessories.
I wonder how deep the market is for, say, $1k Tibbles.
I think that is roughly what it would cost to make them.
So, $100 with no polishing, $1k polished??
Was thinking that a case with screen and buttons would be preferable. So I thought about bulk buying a few hundred P2 cases from the VLA store. The lack of bulk pricing put me off somewhat. But £25 per case for a screen is a factor unless the screens are available some other way.
I could easily spend thousands on cases
you can get the screens but without the glass
at least I think you can, I've seen a couple of offers, I'm not sure if the connector would be the same
I assume if you are buying enough bulk, you could also get glass in the right shape to glue it yourself but that seems like quite a bit of effort
https://www.alibaba.com/product-detail/sharp-brand-LS013B7DH05-1-3-inch_1600346130226.html apparently a screen is 20 bucks if you order at least 100 of them
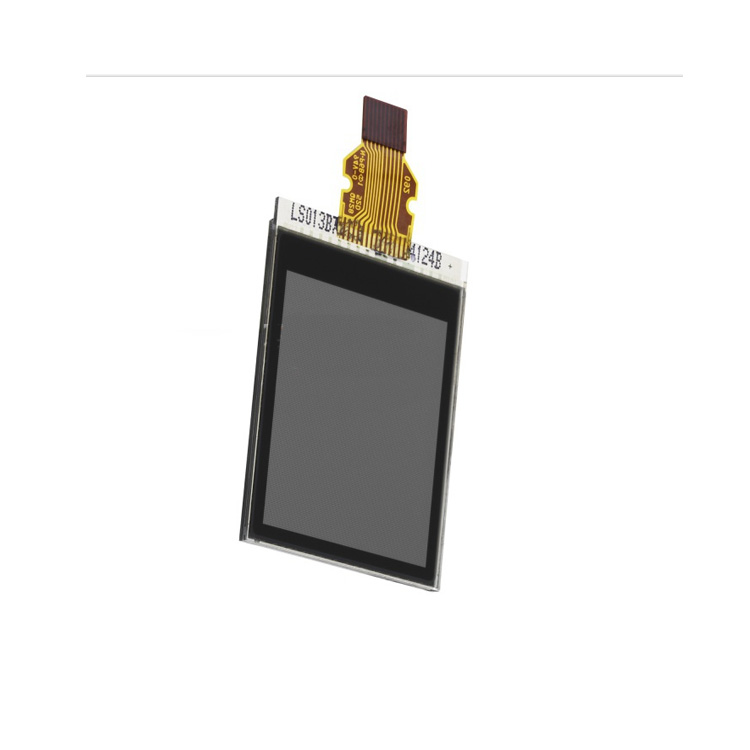
www.alibaba.com
Sharp Brand Ls013b7dh05 1.3 Inch Monochrome Lcd Display Screen With 144x168 Resolution Spi Intterface - Buy 1.3 Inch Sunlight Readable Mono Screen 1.3 Inch 144*168 Resolution Mono Lcd Display Screen 1.3 Inch Mono Screen Panel With Spi,Sharp Monochrome Screen Display Sharp Brand 1.3inch Mono Screen Display Without Backlight Ls013b7dh05 1.3 Inch T...
Maybe they could be $300-$500 polished, with good tools? I dunno, if it takes... two hours to finish them...
Buttons cost £7 each (£28 set of 4), screen £25, unpolished Ti case £30ish plus postage on all of the above. Then time to polish and assemble. Easily over £150 a case or you don’t even cover costs & time
I wouldn't mind polishing it myself, though I'm not exactly a typical client
Build your own pebble kit
Or “pay me my hourly rate and I’ll build it for you”
How do you bond glass to an LCD? Not something I’d considered doing before
Also if the margin is high enough on the rest of the thing, you can sell fewer than your MOQ of various things. So if you have a MOQ of 400 on the LCDs, and the LCDs are cheapish but you only expect to sell 40 of them, you can just eat the other 360...
Liquid optically clear adhesive (LOCA). I think it is doable in a home lab but traditionally you'd get your glass / LCD vendor to do it for you.
Also, the beadblasted finish does not look bad at all.
I've done it to a ptr and it's currently in pieces because I've done it poorly
I will try again soon
I want it polished tbh, I do like the look of that more
Mmm, just checking the finishes you can get in Ti. Getting it polished in the factory would be way cheaper than doing it myself. Min $10 per part for mirror finish, half that for brushed, but would have to order to see what the actual price is above that minimum.
Would it be any good?
Can’t hurt to try it out. Order one in each finish. Compare

A special soft PU Foam adapter Pad has been developed for this Kit, you can easily install the Hook Loop sandpaper on the Black Disc Pad Holder, so that your can do more with die grinder,Time is Money!
✔ 270 PACK – 240Pcs 2 inch H&L Sanding Discs
(P80/120/180/240/320/400/600/800/1000/1500/2000...
the dremel sanding discs seem to have worked pretty well up until now, and I keep wishing that they go finer in grit
I got a pretty nice mirror finish on one face, though with some decently deep scratches
well, the dremel sanding discs then sandpaper so far then a felt polishing wheel with compound on it
I should also try giving it an ano run with the faces having varying surface finishes
Pics?
I'm not an expert, so you can ignore me, but looking through the polishing grief you guys have been going through reminded me that there is an polishing technique via chemical bath. Just a suggestion
New case delivery today. All in plastic. I particularly like the grey nylon P2 “steel”


AAAHHHH IT LOOKS SO GOOD
Ooh, nice!
those is so amazing
Tiny pebble is also working nicely. Just got to make buttons for it this weekend


Think this is the smallest case I can get away with with the current internals
certainly interesting
baby watch doot doo da doot da doo doo
I wonder how tiny eink displays can get, and are existing lol
in other news,

I'm kinda obsessed. the contrast with the screen and band looks so slick!
if it were possible to print black plastic buttons it feels like it would mesh super well
lil nubbins
I really love it, hahah. Nice work!
My plan is to make some PLA buttons, then cave and try out the TPU when PLA doesn’t work well enough. I hate printing in TPU.
Is it just not consistent? I've never 3D printed anything
Annoyingly difficult to get it to stay stuck to the print bed, very hard ti get it to print with a tiny nozzle, and very dimensionally inaccurate.
My favourite sort of material
yeah, 'do you like clogging your machine and getting bubbles everywhere? try printing TPU!'
Oh and hours of drying before even trying to print with it
For a 1 minute print of a tiny button I’ve written off whole days before. So I try to stick to mechanical options
Don't say that. I just ordered some TPU95 for my MK3S
if you find some secret method let me know!
Hopefully I don't have too many issues, my model is pretty simple
But I do need a conductive adhesive that will bond stainless steel and TPU if anyone had experience with it
this is sage advice if I have ever seen it

Brought it up to an 800 grit brushed finish.
I think now it's ready to cut with some black polish.
oh that definitely needs more sandpaper before polish
it's not... bad...
but it's like a scratched polished finish now
brought it up to a 3000# sanded finish which I think is going to take a polish much better
yeah this i sgood
I used some cutting compound on it, maybe I should try some polishing compound also, but this is pretty decent
Going to need to see pictures soon


as always, I am unhappy with the surface finish, and I can only see the imperfections, but maybe also only I can see the imperfections
COGS if I was to do a second one, knowing what I know now, is $40-ish for the shell, probably about 40 minutes - an hour of labor to polish it, and a few $ worth of sanding consumables
I need to get some buttons

it is a bit rough around the edges, it's certainly not as smooth as a machined part
surface finish in the corners is really tricky
on the other hand, probably you have enough information from the size of that screen to compute how wide and deep those scratches are
there is a keyboard there for size comparison too
no matter what, it looks beautiful
I'm thinking of a 18 to 25V ano fade diagonally across it?
70 - 90V would be nice too but I'm kind of too lazy to hook up the power supply to go that high
That is gorgeous
it is beautiful
you don’t even know it yet haha
quick break for dinner then i’ll put the SD card into lightroom
or dxo brand lightroom
Incredible ✨
ok here’s some video that starts to get the point across
this is probably the best ano I have ever done.
amazing
holy cow that's gorgeous
dang!
@fallow tulip ok what is the spec for the buttons that will fit this again?
more photos: https://photos.app.goo.gl/b4Sc6wf9Lg7ZcKhJ8


omg
For buttons, either of these:
P44929 or P44995 on the cousins website. they do steel, gold plated or rose gold plated
Links to stainless steel ones:
https://www.cousinsuk.com/product/classical-drive-in?code=P44929
https://www.cousinsuk.com/product/regular-drive-in?code=P44995
First link (classical drive in) buttons are slightly shorter at 5.45mm, and should be easier to fit.
The regular drive has the same size button, but the surround means it needs the larger hole to be 4mm exactly, so you might need a reamer.
2mm is the case tube diameter. I also had to ream the case tube fixing on the case. If the holes aren’t round or are a bit too small, the button will get slightly squashed and be tough to press
Try not to break a bit in the holes, it’s very annoying to drill out steel which has welded itself to Ti (I did this on my “steel style” Ti case with a 1.5mm bit making the hole large enough for a pebble steel button)
Case photos are the first link


So it truly takes fingerprints like crazy.
(Also if you drop it, it gets dinged.)
I’m thinking of hitting it with some clear coat, and that should provide some protection and keep it from being such a fingerprint magnet. Really 2k clear would be the right thing but I don’t have any.
I masked it and gave it some 1k. It loses a lot of shine with clear coat. We’ll see when the clear dries and I can give it a quick cut and polish. Maybe high voltage ano would make it more resilient to fingerprints.
wonder if can get titanium buttons so it can be adonized
Gold plated buttons might look quite good with it
that could be fun
my people already tried adonizing a gold thing once, it didn’t go so well for them
(that’s a bilingual pun on your typo, I hope you enjoy it.)


that thing looks so good
The problem is that is basically any surface coating at all touches it, it fully dulls. In the third picture you can see that even a small fingerprint residue dulls it. I’m going to continue to experiment with other coatings I can apply.
wax is an oil and will have the problem of oil on the surface
hmm ok
that does give me an idea of a wooden pebble
I am trying some SiO2 spray which is promising in terms of not dulling it but may not be promising in terms of repelling oil
the other thing to try is bringing it up to a higher voltage, which is a thicker oxide and therefore less affected by oils
ok apparently the ano layer is… 20nm thick
that is not much
SiO2 might be the trick
Just stop
You're going to kill me
Lol
ok, I ordered 6x P44929
yes, do not break hardened tool steel bits in holes
if you do, you are fucked
I really need one of those cases
@versed kelp I have a spare Aluminium one if you want to test it out?
here's the problem: my spare p2 is in another country because of course it is
so the best I could do would be to polish it maybe
(if you are curious, the p2 is in poland)
Eric is in SZ this week and I asked if he could find any suppliers of buttons
I need to talk to… these guys

Eric suggested I message Ivan and I sent him that photo to see
I wish they had middle right with a short stem
though I think bottom middle is going to be a good choice for pebbles

www.alibaba.com
Stainless Steel Watch Button Watch Screw Button Factory Customized Watch Accessories Parts - Buy Watch Machines Parts Watch Button
automatic Watch Parts
ceramic Watches Parts Multifunction Watch Button Product on Alibaba.com
This is brilliant, there's contact numbers down the bottom miss kuang and Mr Chen and email. Great find 👌
just saving this link for my reference: https://bellonisrl.com/collections/belloni-pushers?page=3

yow, wait for approval to buy
I think once this round of buttons arrives we should come up with a few specs for buttons we really like, and then get our alibaba on
Pretty sure this is the Italian supplier of the buttons from cousins.
Specs look identical
makes sense
I guess, assuming they're willing to sell to you, you'll soon find out just how massive cousins' cut is
I registered for an account. Let’s see how much the Italians charge direct.
Also I appear to have designed a duck’s head into the tiny pebble
I can’t unsee this now

It is a lovely day in the village, and you are a horrible goose.

lets add it to all corners, and bit more goose head lol

Oh man, I love it 😆 look at that lil guy
Was definitely expecting a honk at the end of that video, haha
hooray


kottke.org
Giles Clement tends to go a little overboard with his hobbies. During the pandemic, he taught himself to repair old watches and th
we need a new ptr
I did this recently and it's fun
I bought two new screens from aliexpress. Plus some adhesive.
And will be cutting some acrylic with the laser and trying to bond the two together. Will probably have to build or buy an autoclave too.
I can see my workshop ending up like his.
I glued together my ptr where I glued the display to glass with loca, and the screen looks nice, but I haaate working with resin oh my god
or well. loca. not really resin
but it regardless gets in everywhere
and getting rid of air bubbles is a pain
(also the backlight broke on that watch for some reason)
I bought an oca sheet, will see how it goes. I’m expecting shed loads of bubbles
I think the Pebble displays had a custom flex connector so you might not be lucky on this one
I also would use LOCA rather than a sheet of OCA
consider vacuum degassing LOCA too
does this require a custom glass?


I would wear that
going to get a couple professionally printed, in yellow and black for now
would have to be an SLA resin for that
these are looking more and more sheek

ohhh
yeah, I kinda wish there was better printing with coloured fillament for transparent cases because the paint chips off overtime in my experience
my p2 buttons are looking a bit worse for wear
Dye won’t work, too patchy


aw
Might try ink next
and cleaning up & polishing the model first. Suspect any finish would wear off though
print the case and then create a silicone mold of it, and cast it in translucent purple resin
ez
I added a purple one to the order

the thought of casting these in resin is not something I fancy taking on. do have purple tint and resin in the house though for river-table woodwork
yeah, that's totally understandable
you can tell I have an impeccable taste
resin casting is not the end of the world to do
I was considering putting together an investment casting / lost PLA casting setup
yeah, I was thinking about it myself since there's a couple of things I would love to cast
The Italians (watch pusher button suppliers) are all on holiday until end of August, so will be September before I find out their prices
I don’t hate the shape of this one


that seems really cool
I do kinda miss the small circular shape under the buttons tbh
Wanted to try the case without them, but yes I also prefer it with the extra frame around the buttons
Direct side by side with a P2


nice indeed
my buttons should come tomorrwo
I ordered some more too since the Italians are on hols
Eric suggests we should just ask Sharp if they have any more displays with the flex we want
and offered to put us in touch with them
it would still be on us to get cover glass + OCA in that case, but it would mean we could get whatever cover glass we want
that would mean we could make completely new watches 👀
that would be awesome also
#1345366437870567516 message
ooo, a vise
Or the diy version
#1345366437870567516 message
yes DIY version is what I want
aha, with channel locks would work
is it possible to remove them with the DIY version? or once they're in, they're in?
You can push them out, you’d need the equivalent of the opposite side of the red vise. A pin to push from the inside (less than 2mm in diameter), and a loop the other side
Plus make sure the hole is as close to 2mm round before even attempting to fit the buttons.
do you use a 2mm drill bit for this, or a reamer, or something else?
I was wondering whether you just press fit them and let the buttons do the work, or whether you clean the hole up first
2mm drill might be ok, reamer would be better, just be very careful and do it by hand, not using an electric drill
Don’t want to block the hole by breaking the bit in it
A 2mm diameter diamond file also works
The holes on the cases I received were slightly not round.
2mm diamond file is a good idea, and is much cheaper than a reamer
if precision is needed, you might want to make holes smaller, but within reamer cut ability
so at end its nice precise bore
well okayyy I guess I don't get to install the button today

-
Fine processing.
-
Diamond needle file that is sharp, high strength, good physical properties and wear resistance.
-
For deburring, fixed broken glass, mirrors, tiles, ceramics and professional applications.
-
Comfortable dip handles provide excellent grip when exposed to fluid o...

0.5-8mm Mini Hand Drill with Keyless Chuck Pin Vise Model Hand Drill
Handle design accord with human body engineering use comfortable.
Non-slip handle.
Sturdy and durable.
Suit for 0.5-8mm mini drill.
1x Hand Drill

- Diamond file is perfect for detail work.It allows precise filing in hard to reach areas on metal, wood, plastic, etc.
- The files are coated with industrial diamonds to create the hardest abrasive surface available.
- The hardest abrasive surface - effectively file and shape steel, glass, t...
oh I do have a pin vise with a 2.0mm bit
but I assume that the bit is made out of extra sharp cheddar cheese
Try just a piece of 1.75mm PLA filament. See how small the holes are. You can also check the button heads will fit upside down into the 4mm outer holes (I had to enlarge one of those too)
the button heads seem to clear well
ok, the pin vise with the 2.0mm bit does seem to clear as well
I think I am going to one more time tear down the finish and clean it up, to fix the spot where I dropped it, before I press any buttons in
I hope the holes aren’t actually too big!
I plan to use a small amount of lithium grease in the holes to assist in any remaining waterproofing problems from uneven holes
I tried pressing the buttons in with my finger and they don't have a hotdog-hallway fit at least
ok I have a plan with the stuff I have here
it is going to involve a C-clamp and some printed stuff
the tolerances on these buttons are insanely impressive
How’s the button fitting going? My new buttons have arrived before my new cases
Button fitting was ok but I decided to tear it down and refinish it one more time before I assemble buttons on it
I spent some time with Mr. Grabby-Throwy and finally got a surface finish I'm decently happy with.


so shiny you have to wear a shirt around it
it does look beautiful
I would love to do that to a titanium case
(for those who do not know the reference)

that it very funny
@fallow tulip I asked my friend who is an Actual Mechanical Engineer Specializing In Manufacturing if it was possible to get some tools cut for stamping a rear case, and, like, stamp some Ti cases at home with a dead blow hammer. The answer is apparently an emphatic no. In the volume one might think about it for this, one would wish to just get them milled.
Fair enough. Milling’s a good option
I was thinking a version with like m1.4 screws holding the rear case on would be cute
oooo yesss a Pebble casing with screw back design would be a nice repairability upgrade
It’s feasible. The pogo pin charger insert is do-able, as is a proper gasket and screws if the case is made a little larger to cater for it
that's very shiny
ok, re-ano'ed it, SiO2 coating is curing up, so it'll be ready for buttons tomorrow
pics or gtfo 😇
I'll take pics once I put buttons in. it looks basically the same as last time I ano'ed it, but slightly less smooth because I learned the ahrd way this time that you really need to always start in the solution when you do a dip to fade
this is the most jive ass button installation jig, but it works


that is such a good looking case
gorgeous thingggg
Yeah for real
ok I've taken a nap on the couch, which is really the most important part. now time for my least favorite part. let's get out the P2 Popper
have you tried a 2 duo in any of these?
this one is going to get a 2 Duo's guts
wow disassembling a 2 Duo is a huge pain in the ass in a bunch of ways
its similiar to pebble 2, glued and all?
here's my recommendation for how to disassemble a 2 Duo:
- The rear adhesive is a lot fresher and stronger than it was on Pebble 2. Use heat, and be patient.
- To avoid blowing anything up, activate the battery's protection circuit -- use a tweezers to short VBAT to ground. (You'll recover it later when you plug it into power for the first time.)
- Desolder the LRM. It's glued into the midframe pretty good and you're not getting it out.
- Bend the tab up on the edge of the LRM; it interferes with the PCBA.
- Use a guitar pick to remove the battery.
- Unscrew the three screws and remove them.
- Use a tweezers to liberate the bottom of the board, where the silver screw was, and then work the rest of the PCBA out. Bend the LRM up as needed.
- The backlight diffuser / antenna assembly may be glued to the screen -- be very careful to avoid delaminating it. The BLDA from a Silk should be compatible, but note that the midframe stamping has changed to support the new LRM. (You could probably use the old midframe/ERM if you want; it would require some firmware changes but I guess we can make those now.)
- The board appears to be fragile in ways that are surprising to me. My first attempt seems to have subtly killed the SPI flash.
battery is removable?
sounds like besides frokm previous steps, its easier to swap batteries
same as before, it's glued down and soldered in
the midframe and BLDA is fighting me a lot more than I am used to though
the BLDA was glued down and I thik I wish I had gone in with some isopropanol first. it might not have survived
I will probably go grab a BLDA from a silk
man do I always hate the 'take a deep breath and believe in yourself' step of using the P2 Popper


'/sneak into Joshua's house'
ifixit guide when?
I’ll make you one if you want
that is insanely good looking
ok, let's put the rest of it together now
@fallow tulip I think the alignment notches for the subframe on the single-butotn side need to move ~0.2mm north on the watch (or, to be safe, be 0.2mm shorter on the south side)
it's alive!
it... might be alive
something really weird seems to have happened to the flash in the transplant
What are these acronyms? Like, what's an LRM and a BLDA?
I'm guessing this is what the new watches have in place of the old vibration motor?
I've heard the new motor is weaker than on older pebbles
yes, the old thing was an eccentric rotating mass
wonder if you could "retrofit" the old style motor for a stronger buzz
or is the arrangement/packaging different?
isnt linear one far stronger vibration?
I'm not sure about the packaging
From Eric's latest blog post:
"The vibrating motor isn't as strong as I'd like it to be. It's quieter than the old motor for sure. We may be able to improve this in software by adjusting the vibration pattern."
hmm ok
I guess quieter as in less vibration, rather than audio (techinically same thing but yeah)
well, the good news is:

oooo I didn't know the logo was different, that's cool
the bad news is that something really weird happened to the flash in the process of the transplant. no idea what. I have one more spare. I might try going in and reflowing it first but who really knows what's going on in there.
it sure does look good standing still, though.

haha the flash is getting quite hot too
I wonder if a capacitor or something got knocked off the board?
I don't see anything visually wrong, I expect it was a short during disassembly
I remember I had this iPod once, long time ago, that had some sort of board issue where it would function fine, but the board would get piping hot during operation
especially the chip/ram area
or potentially ESD but that is less likely given how unbelievably humid it is here
what's ESD stand for?
electrostatic discharge
ahhh
ah well, that's a problem for tomorrow
I think I’ve already done that on most of the models. I’ll check the one for your case
It really does look stunning, but that disassembly sounds awful
it's definitely worse than a normal silk, though now that you know what to look for it's more survivable
taking a silk ERM + midframe might be a reasonable choice
Eccentric rotating motor?
I need to practice my soldering
I like your button fitting jig too
ok, trying again. I'm going to try... being more careful this time.
this time it works!
I think I might have killed the vibe motor though, ugh. or not soldered it well. or shorted it or something. I do have one spare midframe that I can swap through. but boy do I not want to.
ok we're going in for one last swap before I seal it up I guess.
it ohms out correctly...
ok I think I melted the ERM on the old one or something
ERM works this time... and I didn't get the LCD cable hooked up this time...
ok I cannot really seal this up because the bluetooth antenna is absolutely fucked
with the back on, the bluetooth range is about 7 inches
I think the problem is that there isn't the screw in the bottom that applies clamping pressure on the antenna
in the open, sitting right next to my phone, I get about -85 dBm; if I take a guitar pick and press hard on that screw hole, I get about -50 dBm
it might be good enough to add a piece of copper foil there

I wonder if the fact that the case is entirely metal may also be a factor
it definitely does not help
though the big problem is the like 0.2mm gap between the antenna and the antenna contact, if I had to wager.
What’s the antenna and where’s the gap? Is there something slightly off about the case dimensions
It looks gorgeous
the antenna is on the bottom of the backlight assembly. let me highlight it in cad
here is the antenna clip on the mainboard

here is where it touches the antenna, on the backlight diffuser assembly

I think the problem is that the midframe is not fully sitting down
also, this screw is supposed to provide clamping force, but doesn't due to the nut in question not existing

update: I am printing a handful of M1 nuts in a spiral vase mode. let's see if I get away with it.
lol that worked way better than it had any right to
looks for his bottle of cyanoacrylate
I CA'ed one into the chassis that I'm putting together for @oblique moss , let's see whether I also accidentally CA'ed the screw in
if this works I am going to be super stoked
And?
it looks like it’s going to work but i’m letting it cure overnight. tomorrow I’ll disassemble my real one
yeah this will work I think. the printed nut definitely doesn't hold as much torque as the original case, but just be gentle assembling it and don't overtighten it
I’ve modified the model slightly for the plastic ones, so allow the screw to go directly into the case without the tiny brass nut. Also works ok if you don’t over tighten, but it is a one shot deal
Was going to suggest a small piece of plastic instead of the nut, so very happy that worked


I had no idea multicolor printing has gotten so good
certainly looks great
I need a “I’m a little bit proud of that one” emoji
Darker colours are still quite washed out on multi colour prints. This is black and bright red for example

does a clear coat help?
Nope

aw
That’s acrylic airbrush varnish
A clear coat might be a good idea though @gleaming snow
i am thinking about sanding the larger surfaces smoother
is it very porous?
i couldn't tell. it looks like i'd expect an SLS surface to look
it's.. rough textured
It’s Mimaki Full Color Photopolymer. I don’t think the colour goes all the way through, at some point they save on colour by using white inside. Should be ok to sand slightly though
A vapour smooth with acetone would work too (they claimed the part was “too small” for Vapor smoothing but it was available for larger prints)
Shouldn’t be porous as it’s resin
can you add like tendrils to the print in each direction to not waste too much plastic but allow it to be vapour smoothed
I could add a hook to it to allow it to be hung in a vapour chamber yes
That’s what a different company is doing in MJF and SLS for me
Leaves a small witness mark but that shouldn’t be an issue as it’s inside the case
my cheapo digital calipers read a pebble steel button shaft at 0.8mm [diameter]
ugh, the plastic guy did not really do me any favors in the end
I think the answer is that I really do need to grind down the protruding bits on the one-button side to get the midframe to sit down
dejectedly goes downstairs and gets the dremel
next time I say I plan to do something like using a broken-off drill bit in a dremel freehand as an end mill, please tell me to get some less stupid ideas, like punching myself in the balls repeatedly
ok this was... not a triumph
the plastic nut was not sufficient to hold the screw captive
and I think I have murdered another LRA
So conclusion so far is that the P2Duo is less repairable than the P2
if you have to remove the mainboard, yes
battery replacements are roughly the same
a lot of my chaos has been because I am trying to put it in a frame where I don’t have the right fasteners and it doesn’t quite fit, though
sounds like cases will need some tweaks then for 2 Duo

Upgrade your precision projects with this comprehensive metric screw assortment designed for electronics, DIY builds, and intricate repairs! Featuring tiny screws and small machine screws in M1, M1.2, M1.4, M1.6, M2, and M2.5 sizes, this kit includes pan head Phillips machine screws paired with m...
It’s more that metal prints are less forgiving and need tweaking. I had to grind quite a bit of my Ti case too, but the same plastic case fit much better, possibly because the plastic was also in the wrong place, but deformed/broke off
interesting
Tiny M1.2 nuts were my workaround for avoiding tapping a thread in Ti.
oh I have more prototype midframes, woo
Glueing the nut in is fun. You’ll probably find it’s also in slightly the wrong place, maybe .1 or .2mm out. But brass is forgiving

I should do a model diff picture and you can check if I’ve fixed all the slightly wrong inner lugs etc

yeah I found it was in slightly the wrong place also...
I was going to get stainless since it's what I could find
I also figure I'll solve any ... remaining ... problems with https://www.amazon.com/gp/product/B09NSZFHHW?smid=A2YQDKZ9KM2V8X&psc=1

Sworker Carbide Burr Set Compatible with Dremel 1/8" Shank 10PC Die Grinder Rotary Tool Rasp Bits Wood Carving Accessories Attachments Cutting Burrs Metal Grinding Engraving Porting Double Cut
Leaving Eric like

Could I get maybe 10 spares of each part for when I pull apart my P2D?
I have, apparently, three remaining midframe assemblies. But roughly if you have a procedure in advance then I think you can avoid killing them.
i can't wait for "mr wise's ultimate guide to make a titanium pebble 2 duo"
I think the next rev of Ti2 units probably should be designed for screw-on rather than glue-on backs
Reuse the existing backs and cover them, or fully replace? If so, I need to figure out the charging pogo pins
You want an actually waterproof watch
I would like to mostly fully replace, but there are plenty of cheesy options, like milling the pogo assembly out of the existing plastics and embedding it into a Ti2 assembly
I do want a waterproof watch, but mostly, the glue is a huge maintainability problem for how often I seem to fuck up assembling it
it's possible the pogos could be done on a stiffened flex from jlcpcb or something though and recreated or something? or on for that matter a rigid PCB?
I would worry about water having an easy time getting in there through that
I could knock up a more temporary clip on solution, like a reverse bumper
I have just used transparent silicone hair bands for temporary fittings
silicone!
yeah, that would probably work
ordered a bunch of shit from amazon
my favorite past time activity!
oh I should have put some b7000 in my order
cancels entire amazon order, creates new one
why is that usb hub getting the glue treatment 😭

why is the image mirrored
i wish I knew
ok, deez nuts come tomorrow, but in the mean time, a watchband worthy of this chassis has arrived today
stainless steel, PVD blue mesh

I did not tighten it too much yet because the back is not on it yet
so gooooooooooood
I am really excited to seal it up 1) because I want to daily it, and 2) because I want to be fucking done with this project
I really did not expect it to be this much of a fiasco
I am very jealous of that watch

It's absolutely gorgeous! Nice band choice, also
Wow!!!!
well, the good news is that a man with tiny nuts has arrived at my door
unfortunately, his nuts are still too big to fit
also, while holding the fastener in question with my tweezers, it then launched into orbit
the fastener really does seem to have a 1.16mm major diameter, why did it not screw into the M1.2 nut?
it seems to be about 2.35mm long
ok it does thread the 1.2mm nut
so now the chassis has to be modded to accept the 1.2mm nut
my nuts appear to be 2.52mm flat to flat, which appears to be well outside of the 2.15mm range that this thing was designed to take
time for some shrr-shrrr with the carbide burr I guess
yeah 2.5mm is the DIN spec
bluhhhhh
maybe I should try plan B, and model up a solid plastic element that goes in there, and then use a pin drill to clear the space to get the screw in
or plan... Q... at this point
another option: drive in a m1.4 fastener that might have a little more bite on the plastic that's already in there
driving in the m1.4 fastener seems to have made it at least usable
like it seems to pin the antenna in there
maybe use surfical bolt, put nut on it, then grind it down
m1.2 is insanely small haha
hmm you got them priming lines from 3d printer?
may be able to use it as plastic bulk for bolt to bite into
there is no grinding to be done here that can really solve this
anyway, plastic plus m1.4 seems to do the trick
now I just need to figure out the other alignment problems on the thing when I replace the midframe for the fifteenth time, but that also will be solved with the carbide burr
what size nut would fit in that hole, m1?
I cannot fathom m1 because m1.2 is already so tiny from my experience
smallest drill I ever used for production parts was around 0.8 mm. it was drilled 1.4? cm deep
which is very deep for that tiny dia
yes, that is quite an aspect ratio of cut
0.8 is the diameter of ptr springs!
if you drop that thing on the floor, it's fucking gone
its also tapped, and I had to clear chips out of every hole, which is 4 per part
it seems like you would only barely get away with that with a conventional drill bit, it seems like you'd need like an EDM drill for it
yeah a few screws have vacated the premises already
production parts. we made thousands. hand drill? no
screws at least have heads to them
god I'm so mad I killed another midframe. grrrr.
that sucks
I found another three midframes around here with LRAs at least, so I'm not at a dire shortage
oh and I found the prying to do to get a LRA out of a midframe, so also good
I sure hope I don't kill my c2d trying to rehouse it
ok.
I think I am not going to try to mak eanother one with this particular ti design, just because it requires an enormous amount of tol stack fiddling to get it to work. but I think this time I have assembled it with four buttons that press (barely), and an antenna that I think will work.
@fallow tulip it is probably worth taking a look at the Silk step files and adjusting some placements of various features to align things a little tighter; I was thinking of doing some hack-and-slash editing of your step file to move features around and then I realized that, like, you probably could do it better than I given that you have the source
and I think it would be good to design it to take standard DIN size m1.2 nuts in the nut zone
either that or design a back plate for it that screws on using external fasteners and just applies pressure in the right place, which could solve that problem
hopefully it still powers up, and then if it does, I'll go harvest one final LRA and seal it up
22:20:46.854 * * 16:00:00.000 BOOTLOADER:0> Button was pushed on boot. Button counter: 0x00000002
22:20:46.855 * * 16:00:00.000 BOOTLOADER:0> JEDEC ID: 0x00000000
22:20:46.856 * * 16:00:00.000 BOOTLOADER:0> Broken flash
22:20:46.856 * * 16:00:00.000 BOOTLOADER:0> SAD WATCH
22:20:46.857 * * 16:00:00.000 BOOTLOADER:0> 0xfe504502
aaaand the flash has entered the failure state where it just gets hot and otherwise does nothing
throws hands up
these things are insanely fragile
I think I have some spare silk boards here but I am kind of too frustrated for this tonight
but also I don't want to come back to it again later, so maybe I had better do it
the silk went together easily the first time with no issue whatsoever
the tol stack is just so much more finicky on asterix than on silk
ok it's being clamped together to cure. wish me luck.
I’ve updated some/most of the models to match the silk case placement.
The latest batch of plastic cases have the new placement for everything except the nut so I should know in the next day or two how it varies for a few different materials. Then I’ll order another Ti case or two to see if they also print accurately
The brass M1.2 nuts I found are 2.0mm across the flats, so smaller than the DIN ones. Will see if I can either mod the file to fit a DIN nut or change the fixing entirely to a larger plastic one
sorry to hear about your trouble joshua - goood luck!
couldn't resist doing this as a break from modding P2 cases to silk dimensions


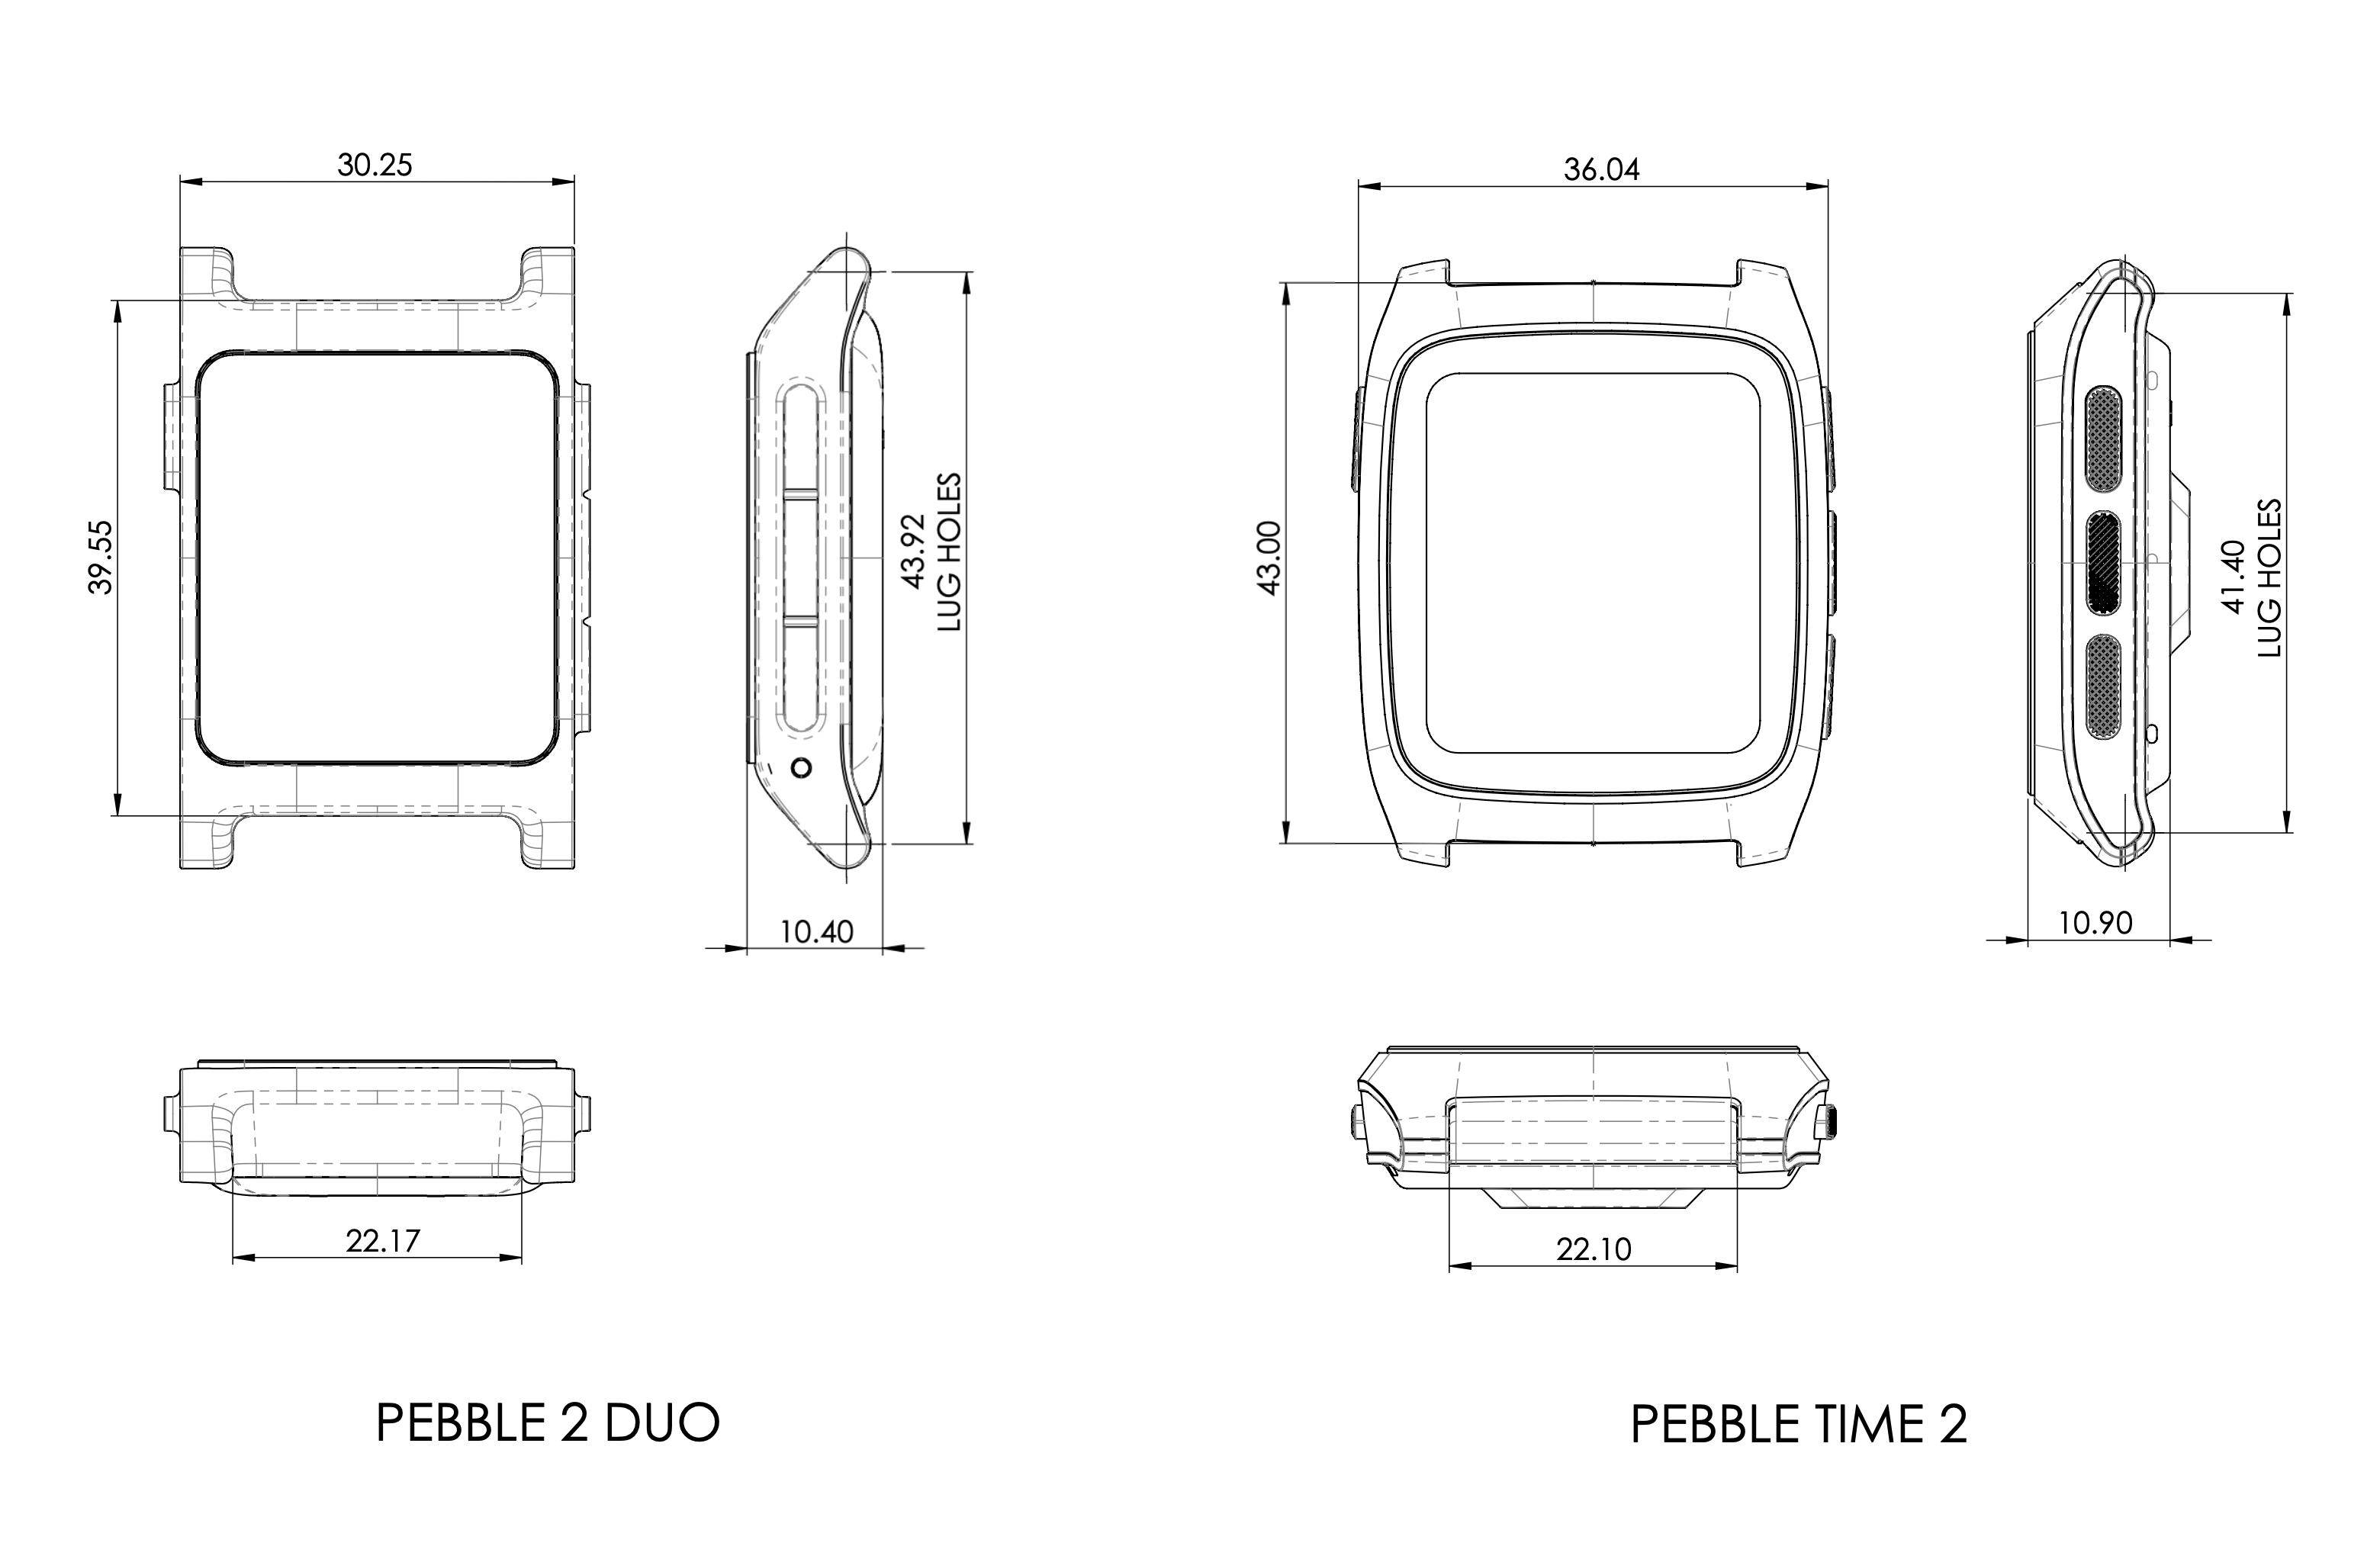
Pebble Time 2 mock up
that looks significantly better than the renders on the official website
here's a few more then


I have the advantage of not having to manufacture it


ayo how you take that photo on the bike 🤨
 keep on rocking
i could not take a photo with one hand whilst on a bike
this geometry is stable enough to get away with no hands but I don’t love playing that game with a phone in one hand
I assumed the bike wasn't in motion but I could totally be wrong about that

I know, I was just glancing at it and couldn't decide if that was focus blur or motion blur
Wasn't an attempt to correct you, certainly
yeah I was doing like 15mph pootling along
Then you're a braver person than I, haha
or I am dumber
Fortune favors the bold, they say

The brave as well
my bike handling skills are good by normal people standards and bad by cyclocross racer standards
this lol
that looks SO good though joshua wow
update: the silk mainboard I put in there has a phantom drain
and gets ~24h of battery life
Noooooooo
Ah man. You’re having zero luck
ah man, the issues don’t sound fun
any idea what the material cost for that is? i’m curious
roughly $25 a case, plus roughly $25 in buttons, plus a Pebble or five
I think the button cost can come way down
oh wow, that was much cheaper than i thought
Could it be due to the metal case messing with the Bluetooth signal?
no, it's just that the silk mainboard I had was bad
it probably had water incursion at some point
Ah, damn
Some of the new cases have arrived
exciting


that purple is beautiful
It is. The pink is quite bright!
pinks are notoriously difficult to photograph, it looks significantly different between three images
Purple too. Looks blue or pink, the colour itself is almost a colour flip. Lovely


All of those are the same case
huh, that's fun
Camera is exaggerating it, but it has a hint of the flip irl
I need to figure out resin because I would love a translucent purple case that glows under uv light
honestly that case kinda looks like my website colour wise
my website has purples and dark blues

it's my colour scheme
Going to test fit a silk and check it fits. If it does, do you want the purple one? (Buttons and tiny brass nut would be included)
hell yeah
Happy with the fit of everything except the buttons. They are slightly loose, will have to see about fixing them
Gold or steel buttons?


Those are gold
hmmm
I am thinking steel
I would be more into gold if it was more yellow, this is pretty brassy I think
that's really cute
Silver is better


yeah, that does look great!


for sure
PT2 mockup vs the new transparent & purple cases


The new PT2 has almost the exact same curve on the case as the OG steel


DM me your info and I’ll post it to you
I hate tiny brass nuts. Trying an alternative

we will see how it works


that is a really cute shape
This is the third time I’ve done this and omg it’s stressful.
Going for a dog walk and will take off the bands and tape later


Thank you. It’s super minimalist
wow those look great
I've been meaning to design a gluing jig for these that actually fits the contour of it to avoid putting too much pressure in any one spot
which could in turn be put into a c-clamp or something
two small pieces of wood and a vise?
Or a scrap of laser cut ply a knipex and a rubber band

But for more than one, agree let’s make a jig
My dream collection is almost complete. All three of my functional P2s have new cases, two Ti and one transparent

When/if I’m brave enough to rehouse the P2Duo, I’ll use a tiny pebble I think. That case needs a few tweaks though
that was gonna be my plan
@teal burrow Let me know if you want a new case (or model of a case) with the fixes in there. I’m pretty happy that this batch is spot on, at least in multiple plastics.
Going to revert to an untapped hole for the plastic cases for the third screw. Got any ideas for the metal cases which might work better than a tiny nut?
I will see if I can get holes tapped by the manufacturer, especially if I make a screw on back
this was my solution to gluing a pebble #pebble message
I like that solution
are you going to do a run of those in Ti first? if so I’ll wait for you
if not I need to ask my friend Riley what he recommends for a tapped hole there. I think drilling and tapping it to m1.2 without the rigidity of a CNC mill is going to result in a case made mostly out of titanium with a little tool steel in it
it might also be worth trying to go to cnc for the whole case
Yeah I was thinking of getting a few milled. Just need to decide which case designs
I LOOVEEE THE TRANSPARENT ONEE🥰🤗
Wow those are pretty vibrant
I think these are all the different cases and most of the materials I’ve tried


I might even get some of these up for sale soon
I cannot wait for titanium tbh
I have a couple of weeks off work so my plan is to sort out all the models to get them to the latest internal cutout, and order a few Ti ones this week. Either milled if they can be or printed if not. Just need to remind myself what I changed between the plastic & Ti one to account for warping & shrinkage if i get them printed
That purple one is pretty fresh honestly
fresh, hot, fly
Got a 24-watch box commission and customer wants larger than available cushions, so have been doing some parametric modelling today. Here’s the first 2 test cushions. PETG & foam interior, turquoise leather outer


I think this is the smallest watch cushion I’ve ever made 🙂
It’s going to take a week to make 24! Time for some jigs
Should probably sort out the print settings with the 0.8mm nozzle too


Not my tidiest print, but good enough
nice
oooo, exciting
These designs for P2 and P2 HR? I really like them. Are the cases a bit more roomy? I changed my battery and now the vibe is really loud as it is hitting something, LOL.
jigzzzz
I can attest that my replacement cases don’t solve that problem. One of my Titanium cases could wake the dead it was so rattley when i got a notification. I solved it by putting a small piece of neoprene on the back plate above the vibration motor, and a dab of glue between the motor and the metal mid-frame.
I think I’ve fixed all the models at least in plastic. New order gone in, in a range of materials. Hoping this is v1 saleable versions. Also ordered one steel printed case to test out revised fit. Figure if it works in steel it’ll work in Ti
Ordered a Tiny pebble, a PT2 style case in two versions, one like Joshua’s and a Pebble steel shaped one.
i am scared to crack open my asterix but sooo excited for it to be in the case haha


Me too, it’s going to be a big scary moment. I’ve broken 1 out of the 4 P2s I’ve transplanted
Definitely need Joshua’s guide
hopefully new order goes well
they really should send you spares haha
@fallow tulip , dunno if you saw that store.repebble.com has dimensions listed on it now
oh cool
there's also .stl files at https://github.com/coredevices/hardware/tree/main/watch
GitHub
Public hardware files related to Core Devices products - coredevices/hardware

woah! cool as hell, wasn't expecting that
Nice to know my model wasn’t far off. I thought I’d made it too thick, turns out it wasn’t thick enough.
In P2 case news, tiny M1.2 standoffs arrived so I can test out a new screw fixing method (when the new prints arrive)
Update: my vibrate motor on my P2 stopped working a few days ago.
I opened it up, and found that it had... vibrated the red wire off the board.
But opening it up did mean that I got to inspect how it did in water resistance, and the answer seems to be pretty good so far.
I see no signs of water intrusion, anyway.
Glad it arrived safe & sound 🙂
Excited to hear how it goes! I would be interested in doing the same if it's relatively easy (assuming there are more metal cases to be attained)
Where can I get one of these?! They're awesome!
Thank you. :). they’ll be available soonish (probably before christmas) on my website if the next batch of test cases is good enough.
Anyone have a recommendation on a glue to use to seal up a pebble Time Steel?
I hear a lot about Sugru
b7000 glue is good
grrr, was due to get my new batch of cases (and new stock of buttons) from shapeways yesterday, but still delayed at the hub less than 30 miles from me. No update yet today. 🙁

lame
Spoke too soon. Looks like it’s their tracking system which is rubbish… look what just arrived!


Only one I’m not totally happy with is the steel one. It’s surprisingly printed oversized (usually steel prints shrink)
overall looking good
Need to test them all with the buttons, but the test in the red one looks good so far.
First two (red and black) are PT2-shaped with sloping sides. Purple one is PT2-esque but with straight sides.
White and steel are P2 style like Joshua’s, and small black one is the latest version of the tiny pebble
Yep. What should I call it? Pebblet?
Very Small Rocks
perfectly geeky
grain
The new steel one does mean I can test out a new way to fix the board down using a small piece of plastic. Job for the weekend (when I’m over the flu which has kept me asleep most of today) is to swap back to a 0.25mm nozzle and print some tests out.
Given myself a notch to capture the plastic to torque the screw next to the microphone hole.

Idea is to end up with a plastic piece like this to screw into

hope it works
Remarkably, the tiny piece of plastic does indeed work well enough to screw the board down inside a metal case


My god is it fiddly to fit though!
awesome that it works tho

DigiKey Electronics
Order today, ships today. EROP7SA – Tweezers Acid Resistant, Anti-Magnetic Pointed Micro 4.50" (114.3mm) from Apex Tool Group. Pricing and Availability on millions of electronic components from Digi-Key Electronics.
Tweezers and a watchstrap pin remover were used.


Hey Astosia I saw your post on Reddit showing off the case above. Looks good. Did you ever do anything with the Steel Classic case? I’ve not heard anything but I also haven’t looked around here. Just jumped into this chat and see your post.


Very nice. Looks like you have made progress since the last time I checked.
A few more of these will be on order now I’ve solved how to fix the board inside the metal cases better
Awesome. Are they already spoken for/taken?
The one in those photos is yes. Swan’s getting it. But there will be others. I’ve run out of donor watches for now though
Donor watches? Are you selling them completely built?
And the voronoi one is likely a one off, just for me
I wish I can afford to comission one that redirects p2 power contacts to side of watch, and looks like pebble steel, possibly using steel band style too
No. I’ve just run out of watches generally. If you wanted a case, you’d have to supply the P2
Using side charging opens up a lot of challenges.
biggest benefit would be a custom backplate that's more uniform
I’m part way through trying to model a replaceable screw on back, but it’s proper fiddly
Yeah, I would’t want one built. I only want a case. Preferably with the middle lug like we talked about a long while back.
currently the P2 backplates end up having like the sides hanging out
best I could figure is pins inside bottom of case with wires to pads on side
but yeah quite challenging

Ah yeah that makes since. I think I remember the Steel being smaller.
Yep, that 3 lug design is my favorite.
wait are you talking about using Steel motherboards?
Nothing has been done with the OG Steel
all these casings are for the Pebble 2
I both love and hate it lol. its amazing, but bespoken and hard to replace lol
Yeah, I know it’s for the P2 board. Astosia and I worked on the replacement case years ago.
I only plan on using Steel bands that were for the Steel Classic. I still have several.
indeed
I have a model which works fine in plastic. Only challenge with three lugs is the thread for the watch pins, which is why I switched it to two lugs. You’re welcome to have one though. You could use a different sort of pin for the strap
They take quite a bit of time to polish though. Here’s what they look like out of the printer:

I’ve got a P2D arriving soon and plan on swapping it into one of the newer cases.
Are you polishing in a rock tumbler?
I’m waiting for Joshua’s guide to that. He’s killed a few P2Duos trying to transplant into one of my cases
Ah yeah I forgot that the pin through the center lug was still an issue.
Seems they’re more fragile than the P2s (and it was an earlier iteration of the case so needed quite a bit of modding to fit anyway)
Into a plastic case, or metal?

If he has broken them trying to get into a plastic case then yeah I’m not sure I want to attempt. If metal case then I’m open to try it in a plastic case.
It’s a titanium case he was transferring into
Ah ok cool. Then yeah I’ll probably attempt a swap into one of the plastic ones I have left from when we were working on them. It’s not a steel classic like I want but at least it gets rid of the rubber buttons.
Remember that old problem of metal prints shrinking. It’s still a thing
Yeah the shrinkage doesn’t sound fun. That was one of the big reasons I never ordered any.
Pretty sure I’ve solved it though. A new set of titanium ones will be on order soon if you wanted me to add one for you onto it
Yes please add me. Send me a pm or email and I’ll pay you.
I tried a tumbler. A dremel was much better for polishing. A bench polisher is even better
I might order a 3 lug Ti one and see if I can get a pin to fit
Good info. I may try a steel brush attachment. It would give the brushed look and sounds like something you have not tried. I also don’t care about shiny anyway.
Getting it to fit wouldn’t be terribly hard, but cutting threads into one side probably would be.
I purchased a tap and die set for this purpose a while back but the threads are sooo small who knows how well it would work.
Did you look into having the middle lug have a slit in it so a normal spring pin slides through that? We briefly talked about it.
Like it is open on the back side
You could use a solid pin or a split pin instead of a threaded one
Like the ones on the strap links
More of a hassle to change, but doable
Yeah but at that point I would just do a spring pin. A split pin (also known as a cotter pin) looks too janky for my taste.
That’s the problem with the internal screw thread for the board too (the longer third screw). I’ve used a plastic insert to solve that
Probably would catch on everything too
Solid pins exist too: https://www.cousinsuk.com/product/0100mm-solid-pins
Yeah I had scrolled up and was reading before you replied. Good solution. I think I have a good chance at tapping threads on the one lug like the classic has but who knows. All it takes is one screw up and that option dies with that case.
Yeah but what holds the solid pin in place?
Oh and I think we talked about instead of printing a slit in the middle lug, doing a solid 3 lug and me cutting a slit in the middle lug.
Friction
you could probably tap the thread from the outer hole, right?
The thread is M1.4 I think. It’s so small and Ti is so hard to cut
I do have some tiny standoff inserts. Might see if there’s enough room to use them in the strap lugs
They are M1.2 though
Yeah driving in a pin with friction isn’t the worst solution. Not like I would ever change a band anyway. And ohhh I did t realize you were doing titanium. Yeah my tap would not cut a thread into that. I was thinking they were aluminum.
Ti is way nicer. Steel is really heavy it turns out (!) and Aluminium works ok but the prints aren’t as nice
Yep, but you have to hold the tap perfectly vertical with no wobbling. So going through the opposite end would keep the tap straight.
Hmmm. Yeah it seems there are some additional negatives I had not thought of. The weight of steel is not a big deal but the hardness of titanium is a big negative. Aluminum would get banged up over time and if the prints are not turning out well then that kind of rules them out. Man, it seemed soooo within reach but now seems so distant.
This is an unpolished aluminium one. I’m underselling the finish I think (I prefer Ti)
If you’re set on a three lug, I’ll sort you one out.
Yeah that’s not bad. Using a steel brush wheel on that would give the brushed look pretty easy.
you should try anodizing that!
An anodized red Pebble would really pop
How did you solve the button issues?
she has some tiny round off the shelf pushers
or use Steel buttons
or use Classic buttons
Still have to harvest buttons from a pebble steel, or use off the shelf round ones
Wow you type fast
benefits of being chronically online
Oh, but the one in the vid has round holes. You have a case with square holes for the steel’s square buttons?
Yep
Very nice.

Yeah I think I remember seeing the one on the right a while back.
My trypophobia watch
Very unique
Steel buttons on the one on the right

I think anodized red aluminum + steel buttons or classic buttons would pop
definitely probably might try that if I go down the case route
if I have money to burn
I have burned a great deal of money already 🙂
I’m about to need to step away for a bit. If you have time, let me know what you have available for that classic steel look. Even if it is a later batch. I’m kind of leaning towards just putting the P2d in one of the plastic cases I have and calling it done.
I'm gonna wait and see how long mine takes to fall apart
Will do. I have a lot of spare plastic cases too
Those square buttons look great. Hopefully your hard work has brought in some money.

They're fidgety. Just be super careful with how you handle the board. I killed the flash chip on two of them.
I love the clear one so much
for printing buttons, is PLA the go to material?
I also have ABS and 95a TPU
need to switch to my 0.2mm nozzle and get that print profile all tuned though
once i get around to getting it swapped and figuring out slicer settings, i'm going to try TPU as well as PLA. Doesn't look like many people have tried yet
Valuable info. Thank you!
yeah TPU is not the move. Way too hard to print, and make it look reasonably ok
PLA is just fine
I’ve been tinkering with the Pebble 2 Bumper model to fit the new thicker P2D back plate slightly better. At the same time, I’ve been pondering extending the top to cover the watch strap a bit. What do you think?
At the moment a dark cover on a white watch or vice versa shows quite a bit of the original colour by the watchstrap lugs
Current bumper


Extending the colour further down & up would I think make the difference less noticeable
would extending create a spot where grime could build up? or am i misreading this visually
Did you ever play with making a bumper that incorporates buttons like we discussed? I still that that is the ultimate protection.
I did but couldn’t get it to work. The flex you need to clip over the lugs means the button bit needs to be separate
TiSilk survivability update: my TiSilk powered off last night and would not power back on, including connecting it to a 5V supply.
I disassembled it and found corrosion not around the buttons but around the upper left corner, indicating a bad seal.
Buttons seemed basically pristine.
did you immerse it in water or something?
wonder where the corrosion came from
The battery was in a protect state: it read 0V until I gave it 50mA to wake up, at which point it came up to 3.65V.

woahhh cool
I spent this weekend racing cross in the rain
c2d nightmare scenario
ok I have one more silk mainboard
it's going in but this time I have a big brain idea
it's going to get some nail polish as a conformal coating
Shiny
I was going to spend some of this weekend on tweaking metal cases & ordering some more Ti ones.
Can’t do that though until I’ve figured out how many more bumpers I need to get printed to fulfill backorders.
(Nice problem to have, being sold out of stock.)
Also need to glue down my own watch case again. I noticed today that one corner was lifted slightly, fortunately before I did anything muddy wearing it.
fingers crossed that I didn't change the dielectric coefficients anywhere that it matters
How much of it are you smothering in nail polish?
Good luck
one potential problem is that I may have had too much caffeine to get the LCD connectors seated again
Yeah, a steady hand, and a small piece of sellotape definitely helps
Also an extra hand would help
it's alive!
what I do to seat LCD connectors: solder in the battery (on silk; can be done afterwards on asterix); stand the PCBA up on end; unlatch connectors; pre-stretch cables; use an EROP7SA to connect the backlight cable, then push it in; use the EROP7SA to close the latch; wiggle the PCBA down as far as I can, and grab the LCD flex with the EROP7SA; insert it; then walk back and forth from side to side on the LCD flex to insert it fully, and then close the latch; pray
the trick as always is to use god's own tweezers
time to absolutely fill it with B7000
this one even has a working HRM
How I seat the LCD…
Same as you for the backlight
For the lcd though, I attach a small piece of sellotape with a folded over loop at one end to the cable. Use tweezers through the loop to help wiggle the connection in. Latch down the connector. Remove sellotape. Pray
if you don't have a pair of EROP7SAs, order some
Gods own tweezers because they’re anti magnetic or really precise? Or both?
Both.
They're the right shape, they are extremely strong for some reason, and they are extremely precise.
They're strong enough to use them as picks, too.
And they're cheap.
I have some curved needlenose brass tweezers which I stole from my lacemaker mother. No idea of the brand
Not super strong through, because brass
Fully encase it in resin
I'm pretty sure I made JP Is Typing buy some EROP7SAs
@fallow tulip Don't delay! They're cheap. Buy 5. https://www.digikey.co.uk/en/products/detail/apex-tool-group/EROP7SA/114194?s=N4IgTCBcDaIKYCcD2AHA7AZwIYgLoF8g
DigiKey Electronics
Order today, ships today. EROP7SA – Tweezers Acid Resistant, Anti-Magnetic Pointed Micro 4.50" (114.3mm) from Apex Tool Group. Pricing and Availability on millions of electronic components from Digi-Key Electronics.
well the connectors still have to connect!
(seriously, though, they are like my #1 tool anywhere in the house)
Mine are similar to these: also not expensive
https://www.cousinsuk.com/product/brass-tweezers?code=T61118
oh yeah, for twice the price you can get like ten times the durability
ok I used a truly unbelievable amount of B7000 on it this time. I am hoping for a full six months of life out of this one