#Pebble 2 cases & buttons
1 messages · Page 2 of 1
it's metal
it protecc the screen glass
it has buttons that won't try to become dino goop in 5 years
and apparently doesn't make the watch too heavy either
at long last, ProtoTi has shipped my guys
Reddit
Explore this post and more from the pebble community
(sorry I know this is only proximally related to this project but figured astosia you'd appreciate it)
In3DTec has shipped my cases. Should be with me by next Monday.
Will have to compare notes with the ProtoTi ones.

@fallow tulip for some reason I have a memory that you have designed a clip on case of the P2. Did I make that up? I'm debating getting the core duo but can't stand the white
Yes, I sell a clip on cover for the P2 which should fit the C2D.
Sweet. I'm glad I asked. Thank you!!
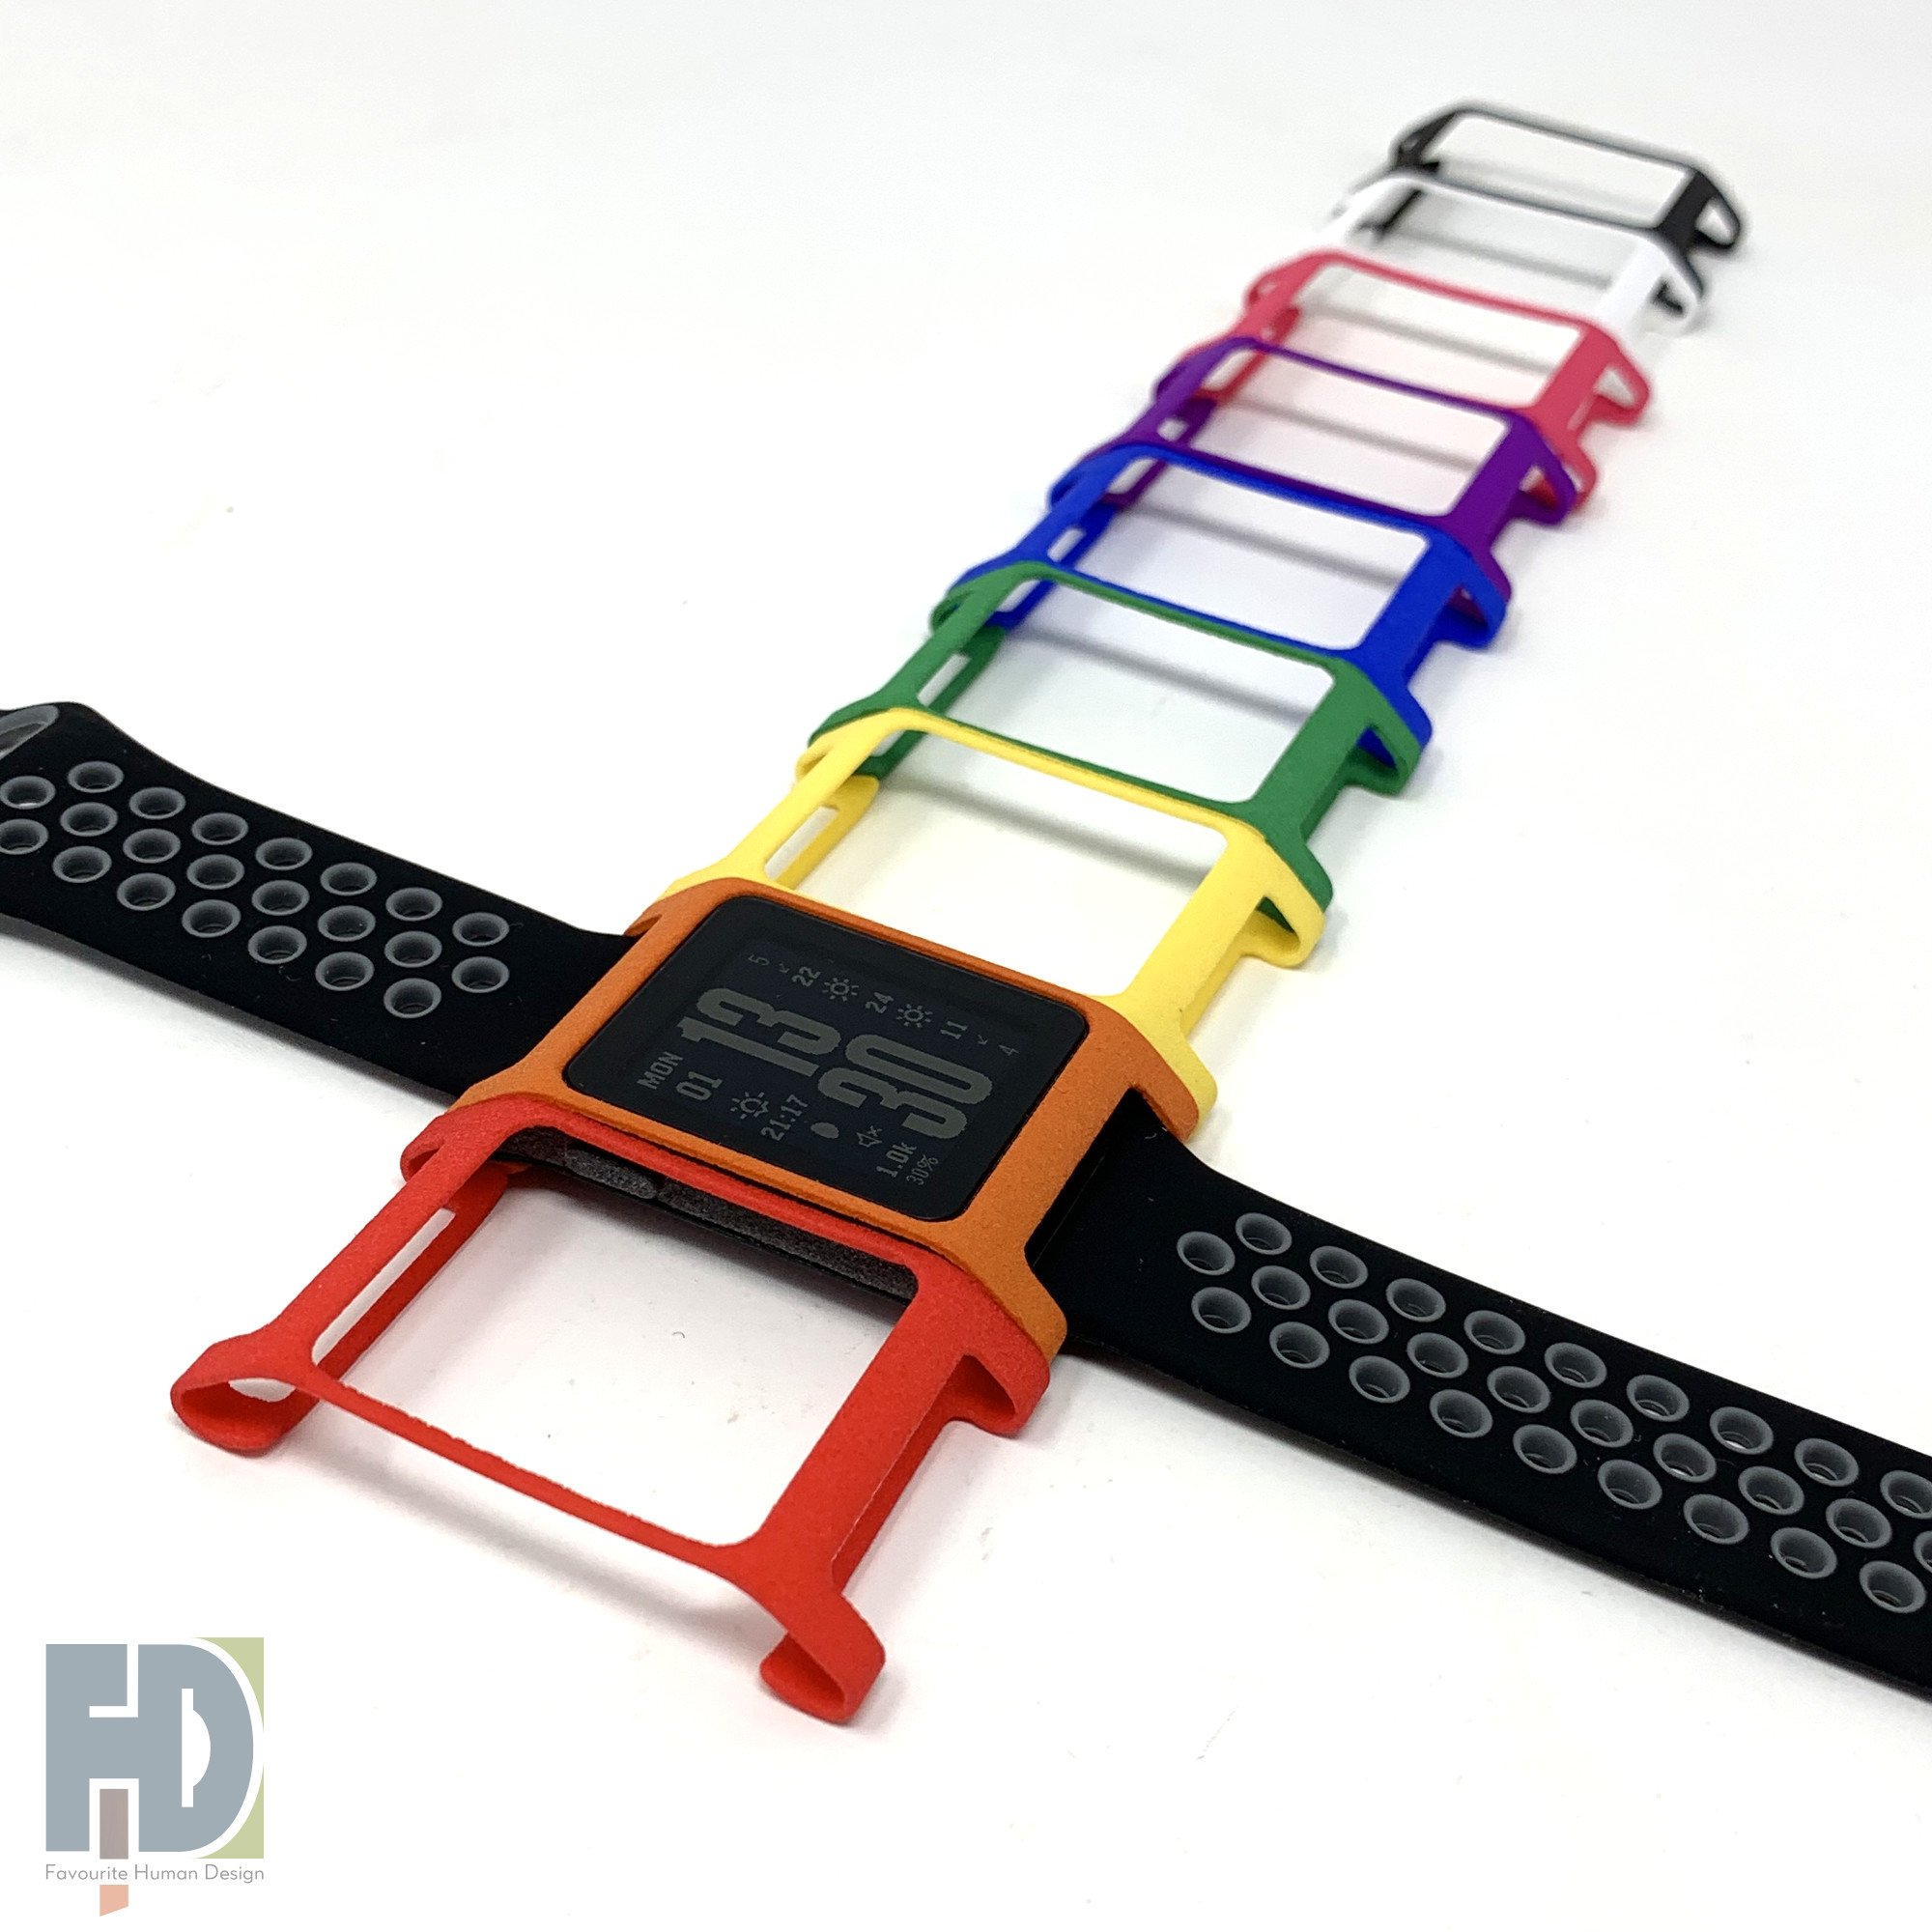
3D printed jewellery & accessories

Exciting times. If the cases work and if you decide you need buttons, let me know.
Also looking forward to seeing cases soon. Including the mad voronoi one.

I didn't know these existed - this is such a great idea!


dont think cat can either


oh yeah
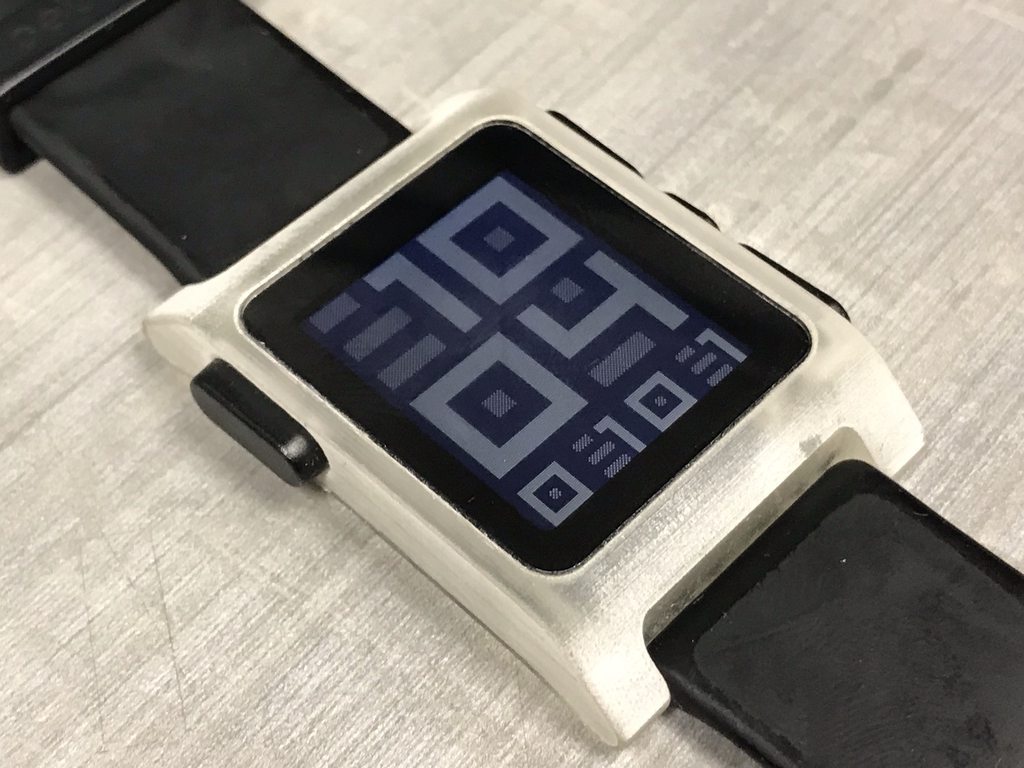
that's a sleek case
the buttons for these are meant to be waterproof no?
definitely looks nice
I killed my time steel display putting it back together, happens to the best of us 🥲
Yeah, according to Astosia
well the case itself is not waterproof either but I could wash a car with my ptr on and not kill it, if these ones have the same performance I'm happy
As long as you take care assembling it, I would assume it should be pretty water resistant
that's the part I'm a tiny bit nervous about but I already see pebble as a casio watch which is smart and these cases just enhance that vibe so they're inevitably what my future c2d will end up in when the buttons poop
It would be great to see one of these cases with a color screen
the finish on those looks significantly better than the earlier ones shared - is it just a better machine or something that produced them?
and maybe better post processing?
there are some odd voids in there
I want to try sanding them some but… when I get back from SZ
Careful dismembering of the case around it. Or print a block to push it out from inside. Definitely don’t try to pry it out from the front.
Yes.
Those prints do look great. Hope mine are as good.
Or in my case, one way to remove the screen is wait until the glue is so bad that the screen just falls out on its own.
These are the buttons that fit the case. They have o-rings inside.

Well, that would explain my results.
Sorry I didn’t read your message earlier. I too though have irreparably damaged multiple screens.
I got impulsive and just sent it, that was on me
I think you were AFK at the time
I have more silks around I think
anyway I want to polish and ano one
hm
JOSHUA used DREMEL
it wasn't very effective.
getting a smooth surface finish on this is going to be really difficult
I think it might be better to just go with a blasted finish
also photographing titanium finishes is really hard
wire brush plus polishing got it to Dyatlov quality at least, I might try giving it an ano to see how it takes that
hm
one reason why I think that these were so difficult to polish
is that I think they are steel, not titanium.
they do not seem to anodize.
if you paid for ti, then they shortcharged you essentally
You can weigh the cases and check their weight against the expected value for titanium and steel
The density of steel and ti are pretty different, so you have a good margin of error
Stainless steel is nearly twice that at ~8 g / cm^3
well, using the volume measurement from onshape. the part weighed 12.1g
it's in the right ballpark... 6061 is 2.70g/cc
Yeah that's pretty good
I mean, titanium isn't going to be easy to polish
How are you anodizing them?
baking soda bath; same process as https://www.youtube.com/watch?v=5J-OmyDBsEQ#t=8m35

two hours of grinding, polishing, anodizing, and more grinding, condensed into 11 minutes -- all shot in 4k, and closely miced for your sanding-ASMR pleasure. I do not claim that this is the most efficient way to do it. I am sure there are better ways to do every single step that I did here. But this is how I made a few more of those little a...
I get vigorous gas formation but no oxide layer
What's your baking soda concentration? What voltage?
'a bunch of baking soda' (not saturated, but certainly higher concentration than I did for the above); right now I'm running 24V open circuit, but at 0.5A current limit I get 8V (and the voltage does not rise, which is an indication that there is no oxide growth)
Hmmm
Well
Have you checked the voltage with a multimeter?
Long shot but it would rule out a power supply issue
Can always try more baking soda lol
ok this is the fault of my polishing process somehow
I just grabbed a fresh one that I did not polish at all, and it very nicely turned purple at 24V
hmm some polishing do depost layer of stuff
Very interesting
ever heard of bronzing process where you use bronze brush on hot metal and it looks bronze after?
Reddit
Explore this post and more from the metalworking community
Uhhmm I'm dumb so let me know if this is stupid.
Aluminum oxidizes quickly with the air to create a coating of aluminum oxide on the surface.
Does titanium do the same? Do you need a titanium oxide coating for the anodizing process? If so, you just sanded it off.
the oxide coating is the anodization process
though I think it is possible that when I wire wheeled it down, I embedded some steel into it or something?
I mean, I'm sure there are steel molecules on it. Doubt it would be enough to interfere
yeah dont know also. I oubt you heated it enough for above process to work, nor do I know if it would work for steel also
heat should not matter, it's just an oxide growth
I mean, there's always heat anodizing 😁
I meant heat is needed for bronze process I linked to, but I dont know if similiar would happen with steel on ti


looks nice indeed. texture is nice also
and I bet the black would hide some minor defects too
the third picture? that is very blue in real life
ah
maybe you can try clean the failed one
yeah I'm going to try sanding it and trying again
with various stuff not too sure what, try see if it removes whatever preventing the adonize
which I had planned to do anyway
hope it will work!
After sanding try a good degreaser and then rinse with the cleanest water you have
Maybe there was some contamination on the surface preventing a good electrical connection?
yes, before I did this one I hit it with an ultrasonic bath of simple green, and then dish soap, and then brake cleaner, which is my usual prep for this
Well I can definitely understand why you were questioning if it was actually titanium lol
I am having more success this time, after sanding it more heavily
it is still very slow for some reason (i.e., taking many more coulombs than I expect)
odd indeed. well in least its working
hm there are parts of it that are somewhat uneven
and I bet that if I use the uneven parts as a guide for a second pass of sanding, then that should do it
presumably the uneven parts are where there are impurities that need to be removed still
So more like this?

I like the colour.
a little more muted than that, but it looks right on my screen in the original, so maybe my color temperature on my monitor is not quite right at this hour
(it is not)
I bought a bench power supply. If you share your settings, I’ll try it on one of mine. The ones I ordered are glass bead blasted.
Assuming uk baking soda and us baking soda are the same (which they might not be)
sodium bicarbonate is what I used, ought be the same
try setting it to 20V at 0.5A or so, and you'll see the voltage slowly rise
I can’t get borax in a supermarket but yes I can get sodium bicarb
Also ordered a couple of aluminium ones.
you can get a nice fade at a couple of different voltages. ideally the current should level off to 0; I think if it does not, that is impurities at work
I ended up with a 27V blue this time, but I think I should have been more patient at waiting for 24V
O-Review Thread Listing for: Anodized titanium color chart 9 thru 90 volts
the impurities in this from trying to polish it with a steel wire wheel is why it has a blotchy look
Have you tried fitting the internals yet? how accurately & consistently did they print?
basically bang on
that is proper dedication to an experiment!
https://triiaxis.com/diy-titanium-acid-etch/ now here is the good shit

Is Etching Worth Your Time? Etching your titanium before anodizing will better prepare the surface of your titanium for anodizing. Using an etch will increase the potential vibrancy and the voltage you can anodize your titanium to. We etch all our titanium before anodizing, and it’s how we are able to consistently hit high voltage […]
I was wondering what acid people etch Ti with before anodizing, and the answer appears to be 'HF', to which my answer is 'NaBrO'


I’ll try to take them out in the sun tomorrow
Pebble 2 Titanium


this is why I want a purple ct2, anodised metal is such a cool look
easy to do in Ti, that'd be 17V or 19V so
(or you could go way up to the high voltage colors)
I hope Ivan can find some buttons for me
Skinny mechanical pencil erasers might work in the meantime as buttons
looking it up, I love that shade of purple, I wonder how hard it would be to anodise a rainbow pattern on it too
there is no good red from what I'm seeing
So the internals of the new core 2 duo should fit here as well, right?
that's the thought - they fit inside original pebble 2 cases, they should fit inside replacement pebble 2 cases
although there wouldn't be a cutout for the speaker
speaker cutout is on the back plate
oh thats not part of the case? my bad
semantics, kinda sorta. astosia's p2 cases reuse the back plate
charger, HR, and whatever else it may have embedded into it
honestly I wonder how muffled that sounds against a wrist
Speaker out is on the case on a P2.
that's a mic in, there's no speaker on a p2
Oops, yes.
@fallow tulip how do you deal with the tapped hole for the midframe screw on the Ti cases? do you have a plastic printed part for that?
also I am wondering if a plastic printed part will do the trick for side buttons, for now
Intended solution is a tiny brass nut glued in place. But a printed plastic version will also work.
The nuts I modelled the space for are M1.2. You might be able to download a suitable model from McMaster Carr or similar
Do you have any pins? Dressmaking ones? Just thinking that sticking a shortened pin into a piece of eraser or a plastic printed part would probably work as temporary buttons.
Or tiny m1.2 or m1.4 screws
The hole should be 2mm diameter on the inside and 4mm diameter on the outside.
both could work, though maybe I will just model up a 4mm x 2mm round thing and print a few of them
if I had more time before leaving for SZ then I would also model up a TPU O-ring
but I don't have time to dry the TPU
You’ve got the model so yep. See what works. If you find a solution that does work, let me know
I can send you a step file of the buttons if you want. But it’s just a few simple cylinders.
yeah, I think I am capable of modeling some cylinders
I'll go look downstairs at my collection of buna O-rings and see if I have something that matches
Really rough cross section of the actual buttons.
The buttons have a sleeve which they move within.
Blue is an o-ring, red is a washer.

So modelling one fully in plastic won’t work. But just a simple cylinder might well if there’s enough push to depress the switch and not enough of a loose fit for it to fall out.
You only need a really small bit of movement to actuate the switch ( like 0.1 or 0.2mm)
Pretty sure I left enough room with the intended buttons to put a second o-ring where the yellow bars are.

wouldnt orings can act as springs by themseolves?
just add them till you can easily get the required travel distance
Yes.
Fab idea.
Now I have to try that myself. It’d be a way cheaper option than fully mechanical metal buttons.
Wonder if making them in TPU would give enough flex without an o-ring.
yeah that was going to be my plan, to just put a TPU o-ring in there
ok I did a classic good idea
the buna-n o-rings I have were not the right size, but not to worry, because I just used an xacto knife to cut them
which is definitely an approved thing to do with o-rings

@fallow tulip do I just watn a block of 'approximately the right size' to press the LCD out from the back, if I'm going to do it that way? is that way basically reliable? or should I not try that?
Pinging @uncut wren he came up with the block method to get P2 screens out.
When I did it, I 3d printed a block that closely matched the size of the lcd.
I felt that it was safer that way so as to spread the pressure across the entire lcd.
I need to find my 3d design.
The screen has an internal lip at the ribbon end, so be careful not to damage that. Needs to be pushed to dislodge the end without the ribbon rather than totally flat.
I have one of those hot pouches you put in the microwave to use while removing glued screens, which seems like it would be a nice way to remove a display, if I had a microwave
yes, I pried from the ribbon side after applying heat and immediately damaged that
maybe I will try to find a pebble with a broken lcd and try pressing it out, just for practice
we'll see how these PLA buttons go
I am a little worried about the extremely thin stems on them and the associated dog shit layer adhesion with PLA but nothing to do about it until I try it

Here is my 3d design for the pusher-outer
Outer
https://www.tinkercad.com/things/lU80VZLNhvO-p2-p-top
Inside
*removed link since it was the wrong one.
Tinkercad
Just get a login on that link.
You should be able to login with your autodesk (fusion360) account at tinkercad
But there are the STL files just in case.
Tinkercad is like a very simple web version of Fusion360
Owned by same company
The inner part should be wedge shaped so it pushes on the proper end first. Been years since I messed with it.
My login did work but I then got a 404

Lemme go see if I need to share it.
The inner isn’t the right part I don’t think.
I had to share them. Which I have done
Yeah sorry. Wrong one. Here is the inside part of it. https://www.tinkercad.com/things/2DfCO5Zu29O-p2-p-bottom?sharecode=L9fYz7yqaz979htyHmfuc6aNnL-zXFjvv4DklLFtHrw
OK I think this button will work, barely
how are you warming it up?
the feel on the button is extremely mediocre
Fab, thank you.
Oh and here is another where I had them both in the same design. https://www.tinkercad.com/things/lbTpzmMin5F-p2-punch?sharecode=2F-PO9RcnFuOXWeqak1lmlz0vot_FgpWzDYTKY0DfiI
Wow, 7 years ago is when I was working on this.
Not sure which is newer. Probably the seperate ones but could be wrong.
Can’t believe the original replacement case design is that old (or probably more correct to say… why did it take me so long to get back to tinkering with more designs).
I confess that I cannot identify how to use it just by looking at it
I verified the seperate ones are a week newer than the combined one.
metal 3d printing seems like a good reason

Time flies. Life also sometimes get in the way of fun stuff
That is the wrong file sorry
That is a opposite of a p2. If you poured something into a p2 and removed the p2 case, you would have that
a negative if you will
ahh, the second file you sent is the same as the first file
can you export an STL of the correct one?
We used it to basicallt cut out that from cases we were playing with to have all the holes like the mike hole

Thanks astosia
cool, I'm printing it. (though I still can't quite figure out how it's supposed to be used.)
Haha, I forgot I gave it a name. "P2 Popper"
Put frame part on desk, put p2 on frame, screen side down. Put wedge inside case. Push?
Do you heat it at all?
They are labeled. Top and bottom. Put bottom on table, put p2 in it, and put top on top of it and press on the higher side
perfect
correct. I didn't heat the ones I pressed out with it. I did like 4~5 of them with no issues
not heating them sounds terrifying, I love it
The glue is at this point quite old though.
was it 7 years ago?
Fair
The one thing I always worried about is when the LCD starts to come out, it could come out quickly and slam into the bottom part. Maybe put a piece of cloth in there to catch the glass?
The chop the case into bits around the screen method is also quite terrifying.
I actually felt that way was the safest since it felt more in control and could peel the case away once you got it going.
I knackered two screens that way.
I did however then use one broken one to test glues in test cases and the other is still my screen size fitting tester, so silver linings.
How are the metal P2 replacement cases coming along? I have not been on here in months.
Waiting for my next set to arrive by the 12th. Joshua is actively trying to anodise his new Ti cases and figure out temporary buttons.
Awesome.
I might ask for one and try to spend a few days polishing it, they really look amazing
As much as I didn't want to, I went ahead and placed an order for both of the new model watches. Felt like a traitor ordering the color one. I figure I can always sell it. I don't expect to like it.
I would need to figure out which still
Lemme guess, 14k gold?
I went mad and made something bonkers. and ordered it in Titanium
Well you can say it is one of a kind!
it seems like it will look amazing
definitely
I’ll share some photos when they arrive. They got to the UK this evening.
Remember all the Gold Nugget jewelry from a few years ago? Maybe the 80s? Not sure when it was. Anyway the case reminds me of that.
This will be wall art at some point. Our original cases through to the hackathon cases.

Worth a fortune as wall art.
do you have an image of the ti case with a screen in it after polishing?
If zthey work and ship, then can’t imagine there won’t be a market for them second hand. I ordered a C2D. Definitely don’t want the big colour one. Fully intend to pull it apart and put it in a Ti case. Just for japes giggles and science.
Don’t think so. Do have the before photos.

And without a screen after some polishing.
hmm, yeah
oh, is that after a ride through your polisher? or hand polished?
Both.
honestly I didn't expect it but I like the raised lip design the most out of all the results this far
I ordered 4 different ones. I still can’t decide which I like most
They’ve all grown on me

I remain jealous of the speed of your machine.
And there's a H2D still in its packing materials downstairs next to it...
oh, are the ones you ordered this time different from the previous batch?
Yes. The bonkers voronoi one, one like Joshua’s (curvy P2 with the raise lip around the screen). One like the first Ti case with modified button holes (the first case printed too small), and a fourth one I’ve now forgotten, but is probably the plain PTS shaped one.
2 are Ti, 2 are Aluminium
interesting
And I ordered some Ti & Aluminium steelconnects too.
hell yeah
Given I only have three functional P2s and one has intact buttons still, might be a tough choice!
I do have a fourth but it is awaiting me learning how to solder in the new battery.
Anyway, I’m off to sleep. Good luck with the case transplant @teal burrow
Hm, this time I didn't kill the whole display, but I did maybe kill a few pixels on it.
I think there was some dirt that left a high point on there? Or I did not insert the popper straight?
certainly an improvement and still usable I guess
Sounds not too bad. The lcds sometimes recover from minor things like that.
I'll give it a gentle massage on the back and let it sit for a little while, and see if it recovers. I nthe mean time, I've got to run to a meeting.
I have... more... sources of displays if needed.
yes I have a few
and of course bare p2 screen/top case, which is apparently still sold.
how many do they still have? did eric buy only 1%?
P2 successfully popped
the question is which one I want to assemble now
I think the non-polished blasted blue one is what I'll do
ok, glued in a screen, time to cut up some more o-rings to make buttons
@oblique moss I think I'm going to use your silk board for this. do you want a Pebble 2 Titanium?
OK I am supposed to be getting on a plane to shenzhen in 15 hours
time to finish disassembling a Pebble

that's so good
dude I would love one lol
I’ll send you one when I get back
that would be amazing... long have I dreamed of such a thing 😇
If I had an infinite money I'd love a black titanium core 2 duo
black is hard to do with titanium, it's not a natural anodization color
you can get a beadblasted titanium, but otherwise, you're in for physical vapor deposition to put some kind of black coating on it
PVD on a core 2 duo shape I would imagine would be annoying to get a consistent result, too
now, that said, titanium nitride, just keep hitting it until it is consistent
no dye andodize like alum can have?
if you wanna do that, just do aluminum
but yeah I think hard anodization with dye is... a thing aluminum does, not titanium
titanium anodization just makes an oxide on there
makes sense. thanks
Cerakote is a really strong ceramic coating that would work well for this
Doing overtop titanium is a bit ridiculous but it would never corrode lol
They market it for guns but its honestly a great product for a variety of things
Not super diy friendly though
If you care enough I'd recommend just shipping the case to a business who does the coatings
True, that's why I've never seen it
But I could go for steel then 😅
The cases have arrived.

The round buttons need cleaning up to fit the off the shelf ones. Other than that they look really good in term of fit.
Here’s the one which used Pebble steel buttons. Couldn’t resist fitting them before even attempting to polish the case.
Voronoi case.
the voronoi case has such an organic look to it due to the imperfections
it's wonderful
are you gonna polish it? it seems pretty impossible
Not sure if I’ll use the magnetic polisher on it. I’d probably be picking bits of steel out of it forever
Might hand wheel polish it on the surface though.
yeah, wire brush sounds like it might help get into the spaces, but you can't possibly get everything out of there
Buttons and strap fit. Had to round out the holes a bit. Haven’t properly seated them, as want to tinker a bit.


that is such a cool looking watch
because of the roundedness it also doesn't look that much larger than the display glass
I have... concerns
Looks like the moon
mostly the holes slowly getting filled with dead skin
Snacks for later
🤔
I regret that I sent that too
do you tho?
I do
amazing look, but yeah holes to hold dead skin isnt too great.
fill them with resin then polish the whole thing 🤔
The aluminium cases.
Much softer metal so way quicker to round out the button holes.
Will be polishing these two.
Those look a fair bit smoother to begin with than the ti ones
I want this for my C2D maybe even before the rubber's inevitable death
Me too. I might even dismantle one before its eventual button demise.
internal frame just about fits into the cases. Glad I made the gap slightly too large


Finish on the aluminium and Ti are quite similar in person

No obvious layers in the Alu ones
are you sure you want them polished?
my thoughts also
I will get a Ti case and polish the hell out of it
(I am polish so it comes with the territory)
you can do what I do with projects (keep em on your desk so they piss you off that you're not finishing them so you chip at it little by little every now and then)
(also seeing them constantly makes you kinder to the defects)
perfect is the enemy of done and all that
I have projects with deadlines, that's always fun
ah.
I'm sewing a dress for a conference for instance: the conference has a date
I need to be done before I leave to the country where the conference happens
I also have some self imposed deadlines, but those can get extended by circumstances
This is a 6 year old project. So yes the bits of it lying around my workshop have been bugging me for quite some time.
I don't think the aluminum necessarily needs to be polished, but it would be nice if it was a little smoother
Looks great though. That with the pebble steel buttons I think would be perfection for me personally
such nice cases
I wonder if stones would do better on polishing those than sandpaper and such
clickspring youtube channel he uses em to make finish so dang shiny mirrorlike finish
be still, my beating heart
They look so good!!!
we should try doing DFM changes to make it possible to machine these parts
There’s someone willing to try to CNC them and see what’s needed in that respect. The internal nubbins for the metal frame, and the various tiny holes on the lugs and microphone will be the biggest issues.
Metal casting or injection molding would be ideal. But £££££
https://www.esslinger.com/copy-of-watch-part-friction-button-pusher-refills-for-chronograph-watches/ this seems actually plausible though

Esslinger.com
Restore a multifunction or chronograph watch to working order using friction fit button pushers or spring loaded push buttons, allowing the wearer to use all of the apps the watch offers.
ooo, there's some rectangular buttons in there
@teal burrow what are your thoughts on the P2 Popper to push the lcd out? It better or worse than destroying the case to get the lcd out?
I killed one LCD with some dust or dirt or something under the Popper
the second one I used a bunch of isopropanol from the inside to try to soften things up and require less force. not sure whether it helped or not
I think it’s definitely a more controlled device than cutting a case up so I prefer it for that reason
Very good thanks.
And sorry to hear about the one that got messed up.
Maybe we recommend a sheet of something between the lcd and the popper. Like masking tape. Just anything that may deform enough around small things like dust particles.
yeah, I was thinking of printing a TPU gasket
83.250.3 or 83.250.4 on the esslinger site should fit (only difference looks like the o-ring). Or 83.250.11 which is slightly longer.
All three look pretty close to the UK one I can get.
I’ll go measure it
Most available buttons are way too long.
One I’m using is
Inner head diameter: Ø3.40mm
Outer head diameter: Ø4.00mm
Case tube diameter: Ø2.00mm
Case tube length: 1.60mm
Travel: 1.60mm
Button diameter: Ø1.50mm
Total pusher length excluding button: 6.00mm

Just a brief update. Been tinkering with tiny nuts today. Fitted the brass nuts to the titanium cases, and tested the fit. They aren’t quite right but they work.


Also had to file out the watch strap gap on three of the cases so I’ve tinkered with the models so I won’t have to do that in future.
Also hand polished the voronoi case today.
nice
Not shiny shiny but I like this finish.
Almost time to sacrifice another P2 to the cause and get at least one of these two fully fitted and working.
Just waiting for my button fitting vice to arrive

Without one of these I’m damaging the off the shelf buttons.
Going to see if I can model a parallel jaw plier add on to do the same job.
(Once I see how hard it is to do properly using the right kit)
Buttons are friction fit so need to be very tight fitting into the case.
nice looking
New toy arrived. Soooo much easier to put buttons in and take them out.
Also found a different button which also fits


P44929, which is also available in rose gold or gold plated https://www.cousinsuk.com/product/classical-drive-in?code=P44929

normal pebble buttons do this
I didn't realize these ones were different either
These ones are press fit yes. Couldn’t get short enough c-clip ones. The Pebble steel buttons are c-clips.
Update too on the watch strap adapters for the pebble steel. Had some time today to tidy up the holes with some new drill bits & files.


two lug is Ti, four lug is Al
Ti is still too snug so off to mod the model again. Also annoying have lost a watch strap screw!
wow interesting
Since I want to make these available to print on demand, started tinkering with a simple add on to a set of mole grips or parallel pliers


They’ll work for one watch I think.
Perhaps more if I used more than 20% infill
In true 3D print style these have embedded magnets


thats great idea.most people wouldnt have specialized vise system
haha yeah I was thinking when I saw the vise you bought that I wondered if I could 3D print a softjaw for a panavise
Hey @fallow tulip have you looked at tumble jewelry polishers? I previously worked for a jewelry store and they used them to polish silver jewelry. They don’t cost a lot either. They use small stainless steel balls that do the polishing. It should be able to make a very shiny finish on the case. Here is an example. https://www.vevor.com/jewelry-polisher-c_11136/vevor-jewelry-polisher-tumbler-6-6lbs-3kg-capacity-mini-rotary-tumbler-machine-with-0-60-minutes-timer-5-speeds-jewelry-rotary-finisher-for-surface-polishing-grinding-buffing-gemstones-jewels-coins-p_010279089812?adp=gmc&srsltid=AfmBOoqIQTu1o5wqQH9xoAnt-HkXuEvZO1k1kLm_wgRemptvoGdOALVZzeY&gPromoCode=google202412&gQT=1

Vevor
VEVOR Jewelry Polisher offers a leak-proof, durable 3kg tumbler for efficient surface polishing with adjustable speeds and timer, perfect for various materials.
the Pebble 2 Titanium antenna is very bad
at Teardown, in a congested RF alignment, sitting in a chair, my Pebble 2 on my left wrist cannot reliably connect to my iPhone 15 if it is in my right pocket
time for a coax socket to be incorporated into the design
watch with an external antenna
exactly
smartstrap!
with the new NimBLE world we could put a BLE UART on the smartstrap interface and have an external BLE unit
is this why the Steel and Time Steel have that plastic ring band around the top edge of the casing?
Where/what is the BT antenna on a P2?
Not sure.
not enough pins for H4 UART there though
Yes 😅


hm also under vibration it keeps powering off
I wonder if the battery is shorting against something and causing the protection circuit to kick in
or if there's a grain of titanium wandering around
I guess I should take it apart again and see
hopefully that is easy fix
Let me know what you find out. I might actually have time to work on my cases this weekend.
also possible is that there is liquid intrusion through my buttons, which I still have not upgraded to real buttons yet
Wish me luck…

Titanium Steel button case is polished nicely.


Buttons are fitted (I hate c-clips)

ooooo

I should get a second one of mine out and hook up a VNA to see just how bad the antenna is


that's polished Ti? it looks gorgeous
amazing
I like the lightly brushed finish. maybe a little more unidirectional brushing from top to bottom could bring that out even more
Looks sick!
Magnetic polisher worked fine but didn’t get near the brushed finish I was after.
I only have so much patience for sanding & polishing
yeah I wonder what the machines are
Going to have dinner while the glue dries before I try the next step
Stunning!
That looks beautful


Definitely Jealous
that is beautiful
beautiful thing
Core 2 Duo version gonna be 🔥
(planning 100% to do this to my C2D at some point
Either before or after the buttons die


I used some of these to hold the back on while gluing https://www.harborfreight.com/1-12-in-spring-clamp-69292.html

Harbor Freight Tools
it created a pressure spot on the LCD but was basically the right thing otherwise. I think I should 3D print a jig for it

yeah, I considered one of those


you sure its not actually prototype of one model of pebble? 😉
I’m really pleased with it
Seems to connect ok too
I did rip the back off and glue it back on again, as the vibration motor was far too loud & clunky. I’ve damped it with a tiny bit of sticky neoprene stuck to the back plate. Much better now.
that looks so good! I always loved the original Pebble Steel except for the off-center screen, this is basically the dream version
yeah, I used some of the same adhesive that I used for the back to adhere the vibe motor
How's the Bluetooth reception?
I want it, hahah
Out of curiosity, did you have to delaminate the glass from the screen?
astosia cases usually take the glass and screen in the top as one assembly
the hard part is getting the glass and display off the P2 case without damaging either part >.>
No, the screen comes out as a single part.


Some of these look brutal, haha.
That is really cool to know. Are you thinking of offering transplants? Or just sending the cad files for diy? Or just enjoying the project for yourself?
I think I’ll leave the transplants to others. I will be selling the cases though.
Unpolished I'm assuming?
Probably. Not sure anyone will want to pay the extra for polishing based on my hourly rate!
Curious how it would look coming out of an automated polisher
Wow.. this is a crime scene lol
The “this watch will be impossible to keep clean and trips some people’s phobia” is built and working


I also appear to have made it very Apple Watch shaped
The two Ti watches next to each other

This is amazing!
I know nothing about the materials to know if this is possible, but I wonder if the holes can be filled with clear resin. That way the crud can't get trapped? Just a thought
Either way, I'd buy one as is
yesss!!! this is amazing!
Alright... how much ya selling them for??? 😇
I haven’t sat down and worked that out yet. Soon though
At normal scale this does not cause my trypophobia... I think
I can picture the ads. "organically designed" and such
Yea, these are phenomenal. This is so incredibly cool
I love the shape, but the holes are a bit polarizing. Will you have a version of this case with no holes and maybe the ability to use Pebble Classic or Steel buttons?
I know you have a version of this casing available to be 3D printed in plastic, but I'm curious about metal
I really like the rounded edges, makes the bezel seem smaller

Here’s the solid metal version of the rounded one in aluminium
The holes one is based directly on that one, but it has ended up rounding the bezels more
oooo that looks nice
I don't have a P2, but I'm eyeing these for whenever my future C2D's buttons disintegrate
I suspect the first thing I’ll do to any C2D I get my hands on is pull it apart and see if it fits
As to buttons, the OG buttons were always a tight fit but yes it’s doable.
wonder if "shallow" version of the cheddar watch would be possible
still same hole pattern, but only small depth
how wide apart are the two outer lugs on ps? I wonder if keeping that overall shape would look nice
I believe the outer faces are either 22mm or 20mm apart
I think the leather strap that comes with the watch is 22mm, but it obvs has cuts in it for the lugs
yeah, I'm curious how significant that cut in is
Yep it’s possible. I’d add a skin to the skeleton version of the case
nice
#1345366437870567516 message
skeleton case being this one.
lol indeed
oh that's thin!
I think a ps with 18mm band would look cool
@fallow tulip so I ordered the polishing kit for the Hanboost C1. I assume it's going to do fuck all nothing on DMLS titanium just like everything else, but we'll see
It does take some effort to polish Ti
The magnetic polisher did not do anywhere near as much on it as on the Aluminium cases. I resorted to a flappy paddle sanding bit on a Dremel
hm I think I tried a flappy paddle and it mostly just ate the flappy paddle
Yep
I did however get them bead blasted by the manufacturer first, which helped
An agate burnisher worked surprisingly well too
hm that's unexpected
well, we'll see how the hanboost stones do
I don't think the ultrasonic should even have enough amplitude to do anything meaningful, but we'll see
these things https://www.hanboost.com/products/hanboost-ceramic-fiber-oil-stone-whetstone-strips?variant=43985206411401

Hanboost
Upgrade your finishing precision with the Hanboost Fiber Stone Set — designed exclusively for ultrasonic cutters.
I was working my way through my woodworking/woodcarving polishing implements, one of which is the agate. It smoothed out a couple of hard to reach areas
yeah, I worked my way through an entire Dremel polishing set
destroying every tool in my path
Let me know how you get on, I could do without also destroying a fortune in files bits and sandpapers
yeah, like... how do real people do this
Does look good though

definitely does look good
Asosia, are you thinking of selling these? I know you said polishing was time consuming, so I wasn't sure if this was just a fun project for yourself.
I'd polish it myself if it was time consuming, real fine sandpaper 😊
Yes I’m going to sell these.
Would a rock tumbler or something similar perhaps help with polishing? I know people have used one before for things other than rocks though I don't remember the application
Yay!
They actually look pretty good before any polishing. These are bead-blasted Al and Ti

Ooh interesting

rugged industral look
I definitely prefer the polished to the unpolished but those do look really cool still
I feel like you could probably even sell both versions if you wanted
Brutalist architecture but watch 😉
Slightly better pre polish photo

Unpolished = £x, polished £x + lots
Magnetic polisher does help the polishing, but didn’t get a finish I liked without the dremel. Don’t think a rock tumbler would be any better
Think a benchtop buffing wheel is the way forward, but I don’t have one (yet)
Oh and some metal-cutting polish of various grits. Just sandpaper takes too long
I'm looking at those and I think I would like the one that has a thin frame that juts out of the bodyin titanium, but with ps buttons and support for 20mm bands
if that's possible at least, that's a bunch of modifications
The one shaped like a P2 with fatter sides?
This one?


The P2 shaped one comes in 2 versions, both with raised frame. One has round buttons like Joshua’s the other has pebble steel buttons.
I wonder how small we coudl go if we optimized for x-y dimensions and had a different PCBA to go with it.
Button depth is a factor. The buttons look comedic on a slimmer body.
I think, like, keeping the same glass assembly, throw everything else out. probably we would end up growing some Z stack height to fit everything in there, but how much?
Slightly wider but shorter like the pebble steel layout is an option.
You can see in this photo that the screen is wider across but shorter top to bottom than the board

I kind of am thinking, like, what would it look like to have the watch constrained to the XY dimensions of the 'lip' around the screen on the unit I'm running
Do you still have an nRF52 based design you own the design for and could use?
Yes.
It would take some design work, but not an intractable amount.
Using stumpy buttons like the PTS ones would help minimise the width, or Apple Watch type buttons.
I assume that the FF-constrained design would probably end up with a small PCBA that does not wrap around, and buttons would live on a flex?
in order to make enough space for a battery
I really feel like the watch that's crying out for a new design is the PTR
It's a gap Eric seemingly isn't trying to fill at the moment, and it really needs a power efficiency bump given the limited battery capacity
The problem is that FGPA for the display
yeah, the specific thing that I wanted to keep out of scope for this project was new glass/lcd
(and the fact that taking them apart without messing up the antenna is hard)
well, ok, so, I think the SiFli chips can drive that display directly
they can, yeah
the sifli stuff is a bit more of a unknown for me right now though
I think the nrf52 stuff will work out just fine
the sifli.... eh
I'm sure something will ship, what that something ends up being and how much you'd want to re-use it I do not know
but also, like, if only we knew someone who professionally did digital logic design and would be happy to write FPGA gateware to shim between a nRF52 and a Spalding display
are the lattice parts originally used not still available?
could you not literally just re-use that
oh they're totally available, it's just ice40
but you would need code running on them
is the gateware that lives on them licensed in a way that can live on?
I mean I think technically Cory wrote all that code so Pebble (and therefore Google) now owns the rights
anyway yeah that part is still easy to get AFAIK
(originally a bunch of contractors wrote a version but I think Cory started from scratch again with it)
it is absolutely not a good choice for power usage, but I mostly for funsies really wanted to do an RP2350 based design
but that means external BT controller/radio etc so even just packaging wise it's also terrible
also RP2350 is colossal, yeah
RP2350 is an interesting choice for non-watch pebbleos devices though
What constraints do you want on any new watch? Round or not, battery size, case size?
My ideal would be a PTR with a PTS battery in it even if it was thicker.
it would end up looking more like those chunky "hackable smartwatches"
I have no particular desire for anything specific, and happened to look down at my wrist and riff on the idea of a P2 but smaller
I was thinking mostly 'what would this look like if we were not constrained by having to shoot injection molds?'
(and, I suppose, 'if we were not constrained by having to use the original PCBA')
Yep. Definitely have to make the internals smaller in xy then
The p2 case is the smallest it could be bar thinning out the lugs.
wonder if NuEnergy has any higher voltage cells off the shelf in molds that would fit
I did find a 3.85v battery around the same size as the P2 one. Will see if I can find the link. MOQ was well above 1 so didn’t buy any
yeah
3.87V High Voltage LiPo Battery 150mAh manufacturer,7.4 11.1 14.8 18.5 22.2 25.9 44.4 V Li poly battery cell pack, we specialize in crafting bespoke products tailored to your precise requirements.
I have some contacts at NuEnergy in specific, not sure how receptive they would be to 'wanna help with my fucking-around project'
0.5C charge current, that's brutal
I know nothing about batteries and electricity. I was looking for approximately the right size.
0.5C means 'you can charge it at the rate of half the capacity' (i.e., 'it takes 2 hours to charge it')
where did you see MOQ info?
if the MOQ was like 400, then actually what you're getting there is even better: they just have that shape of mold lying around, and they'll pack whatever chemistry you like into it
Looking again, I didn’t
P2 battery is 441522. That was the closest >3.7v one I found at 411523
yeah, the correct way to work with such a thing is to be like 'what size molds do you have'
341423 seems to already exist too from my notes, although smaller capacity as well as smaller size
Although those were AliExpress 3.7v batteries
On my late night ramblings into batteries, the other option was something you can buy for other watches, like the Garmin fenix or venu … https://www.365powersupply.com/product/garmin-venu-2-replacement-battery-361-00139-10/

365PowerSupply.com - Replacement Laptop Power Adapters,Desktop Power Supply & Server Workstation PSU.
Garmin Venu 2 replacement battery 361-00139-10 Battery Information: Battery Voltage: 3.85V Battery Capacity: 225mAh Battery Type: Li-ion Condition: new Warranty: 6 months
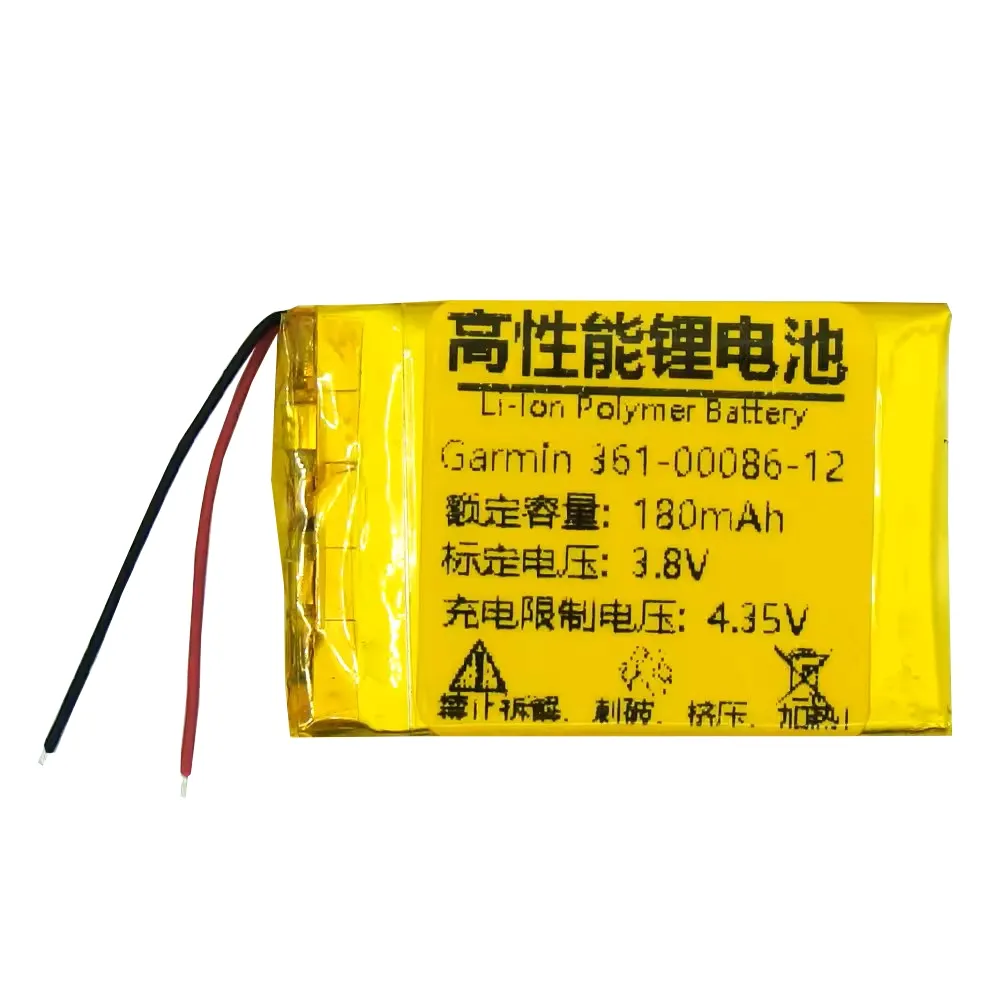
365PowerSupply.com - Replacement Laptop Power Adapters,Desktop Power Supply & Server Workstation PSU.
Garmin Fenix 6S/6S Pro/6S Sapphire replacement battery 361-00086-12 Battery Information: Battery Voltage: 3.8V Battery Capacity: 180mAh Battery Type: Li-ion Condition: new Warranty: 6 months
Since they use 3.85v/3.8v instead of 3.7
yes!
That one uses a 22mm strap. Could be narrowed down to 20mm pretty easily
yeah, I would love that
I keep pulling my arm hair when I press the buttons because they're so close to your skin
But also....I'm not stopping wearing it
yeah, p2 floats away from your wrist while times tend to hug it rather closely
I do prefer hugging because it looks less strange
any design of ptr has to be extremely thin I feel, because that's one of the things that watch does really well and people seem to like
and that does not seem easy to design at all
Yeah the thing I love about it is it just looks like a normal watch. It honestly has an annoying amount of battery. Too little to forget about, but too much to charge every day
even if it's not a week like p2->c2d improvement would suggest, twice the time would be really good already
i find the ptr buttons hard to reach and press with how flush they are to my wrist
Agreed with this ^ and up/down are kind of inherently more fiddly then the other watches since they're at an angle, imo
Down in particular always feels a little awkward to comfortably/confidently press
Guess I could train myself to use my thumb for Down (never really thought about that until just now)
How what
it's on my left wrist
I don't have enough limbs to show this without taking the watch off - I normally hit Down by pinching the watch like in the first photo for stability. But I was saying I could theoretically try anchoring with my pointer and pressing it with my thumb (second photo)


Having tried both now I'm not sure if one feels much more natural than the other
in example two i guess the thumb is at least pressing the button directly in, instead of at an angle?
oh that's interesting
Hadn't really thought too much about it, but yeah, I guess with all my pebbles I do "pinch" the watch to make button presses more consistent
i usually brace with my left thumb underneath the back button, and press with the knuckle of my right middle finger
to press the back button, i'll brace my knuckle underneath the down button, or i'll brace two fingers on the lugs of my Round
ok, so I've been staring at a P2 screen and backlight this morning. To reuse those two parts would put some constraints on the minimum size of a new watch. reusing an approach like in the Steel or OG would only gain about 1mm max in x or y.


the wider (in x) PTS case is actually almost exactly the same height (y)


so I think min y is the existing y dimension of the P2 (39.5mm)
min x is a function of how far the buttons stick out
actually we could reduce y a bit, but the screen would end up offset from the centre like the pebble steel

not sure I like that idea though
so, ignoring the buttons for now, this is the smallest you can get the P2 screen and backlight into a case (I haven't tinkered with the Z height/thickness of the watch)


with the board the way it is, off the shelf buttons stick out this far:


narrowest "traditional" button on an existing pebble watch (with springs & 0-rings) is 5mm (the centre button on a PTS), so let's take that as our min size. That looks something like this with the current internals

moving them to the same depth as the P2 original buttons makes them stick this far into the case:


you then have to support the button on the inside of the case.

I wonder what you can do if you tuck the lugs under the screen
I like the tiny look so far though
which then fouls the screen and backlight. mmm

would have to shift the buttons towards the back a bit to make space... or use a different sort of button
cross section. I'm not even sure how you'd get the backlight piece past the interior nubs for the buttons

min thickness of a case by the buttons on the PTS and the PS (the two I have available in pieces to measure) is 3.5mm. Case above is only 1.65mm, but the distance from the interior of the button to the outside of the case is 3.25mm (so about the same as the PS and PTS). so, either make it wider by 1.6mm on each side (3.2mm overall), or use different style of buttons
22mm lugs just to show what it might look like

20mm looks better

I am thinking unconstrained by buttons available for now, just out of the idea of what is possible at all
making the watch wider to accommodate normal buttons looks quite good, and is narrower than both the PS and PTS.

PTS is 37.6mm, PS is 34.2mm
Ends up being a narrower version of this.

in which case the one just above your message is the thinnest xy you'd get away with, assuming you could make buttons that thin work. anything else to add to the case shape is aesthetics
mmm, not sure if I like this one or not.

was channelling apple watch ultra vibes with that option
so z height
the P2SE is 9.8mm thick
this is what a 9.8mm thick (in the centre) case looks like with a curve to give more space inside, and to enable the lugs to be tucked away.


lug shape is rudimentary, based on using 1.5mm around the pin hole, and a min distance of 2.5mm from the case to the pin holes to accommodate the thickness of a strap
I might print this to even see if it's comfortable at that shape on the back. it's a more extreme curve than the PTS

that's me done for today. I've designed an ugly watch on which the buttons won't fit, but interesting exercise in what could be made to work. I'll work on aesthetics later.
Late evening thought process question. If the screen is so annoying to fit, and putting buttons inbound gets in the way of fitting the backlight… flip it and make the watch the other way up like a PTR or PTS. Screen and backlight fixes to the front as a separate unit
Ribbon cables might be an issue if we reuse the same screen & backlight
the pts has a bit more flatness on the back which means that the overall thickness doesn't have to end up that significant
I do think the most important part is to get the lugs below the back of the watch, p2 is very bad at it
out of curiosity, what is contributing to the z height inside of a p2?
what would have to be thinner to make the sandwich less thick
Battery and vibration motor are the thickest things
I don't think people would be happy with ptr versions of those components
Adding a curve on the back will give us a bit more room for a larger battery. I can make it less extreme
If I assume a particular battery size, screen and backlight, and limit the depth to 10mm, that should give Joshua a size to pack in the other components.
ha, accidentally made a face.

•_____•
I love them
also the two surprised faces on the left one 😲 😲
when you mirror something in CAD and forget you've done so
thought I'd do some printing

minimalist and blocky


3.56mm is the depth of the screen and backlight combined. Case assumes 1mm thickness of material. that leaves about 5.2mm to play with internally while keeping the whole case under 10mm deep.


you can also make the display like 0.5mm proud of the case or so
^ maybe with a protective lip like you did with some of the other designs
well that is the opposite of making the display proud of the case 🙂
i guess i'm not familiar with the term :/ that makes sense
Wanted to see how big it feels without being proud or with a lip around it
It’s still smaller than a P2 and a PTS
would it make a difference if the front display glass was smaller?
finding a display without the glass should be possible
Yes it would, a bit
Ribbon cable position is what dictates the y size (top to bottom of case). It could be off centre but I don’t like the look
(Never liked the off centre look on a PS)
yeah, I agree
I wonder if it was possible to make it even smaller with a zebra strip or something, but that sounds unlikely
oh, that's cool
but I assume that's what also leads to the off center look
there seem to be a couple of versions of that sharp lcd with a couple variants of ribbon cables, I wonder if any of them would be more forgiving for the dimensions

the ribbon is quite wide and curves around the extra piece of very slim glass on the back. blue sketch rectangle shows where ribbon is

wish we have selection of watch kits to buy and design around lol
yeah, I recall the ribbon was the same width as the display more or less, which is wide for a ribbon
or maybe I'm remembering wrong
yeah, looking at a teardown, it is a lot narrower
nvm then
I haven't been inside of a p2 for a few years now
Tiny case


certainly compac

so compact I couldnt fit t in 😉
combined thickness would be nice to see, though it is difficult to tell from a picture how it would actually feel


I like that!
it needs to use ptr components so that it can be a pretty square version of the ptr that is way less practical


is that the 20mm band variant?

wow


pt display is slightly smaller, now I wonder how small that watch could be
how is pts thinner btw?
where's the difference
Layout choices. PTS uses the space around the screen to fit the board in. P2 has the board under the screen, and a separate metal frame inside which adds 1mm

This metal frame

I wonder how much thicker the pt2 was going to be if they didn't have a chance to put the board around the display
major difference is that metal frame, not the display thickness
1mm makes a lot of difference


yeah that does look significant


the buttons look significantly more centered
makes me wonder what it would look like with larger buttons or more square buttons
I haven't moved the buttons, its the screen side being more curved which makes it look like that
yeah, I figured
ok, so, if we wanted to truly go for miniature... here's a concept. this is 2mm larger around than the current screen size. which should just about give enough room for the current screen and backlight


with splitting it in two, and actually fitting in other things, I think a little bit more size is needed, but wanted to put this out there.
internal corners might also need to be smaller )

watchcase is 35.5mm x 31.5mm with 4.16mm of internal depth space below the backlight
I was going for flat fronted mini PTS
it's very pretty
i guess i should actually be picturing it with the buttons added, right? these are all mocked up without them installed
these guys

Yes, or a bespoke version of that with a smaller depth
More like the teeny PTR buttons
I looove the PTR buttons ❤️

oh that looks really cool
@fallow tulip The buying will continue until surface finish improves.

👌 nice. how shiny are you aiming for?
Do you want the teeny-watch model to print out?
I dunno, I happened to be at harbor freight so I wanted to see if the more aggressive polish with a bigger wheel would make any quicker work of it
I am not ready to start in on the teeny watch project yet haha
Good answer. I won’t actually join the model together then
if I end up designing a pcba for it I am officially assigning you to productize it. Expander has been brutal on my soul
You’re really selling the opportunity
no vibration polish device?
also, I bet you could make "polishing holder" for cases
to make holding it much easier when polishing it
I would loooove to help out if there's anything needed at any point, it sounds fun
The magnetic polisher I have is great for aluminium, and the silver & brass things I’ve tried it on. It barely touched the titanium in comparison. I might try a super long spin and see what happens.
I wonder if stone polisher roller is better for that
somehow I feel we had talked about it before
We have. 🙂 I don’t have one to try out
A neighbour did just give us his old bench grinder which I’m now eyeing up as a bench polisher though
If I can find the right adapter for the spindle
yeah, I have a drill that I hope to use for this
are the ti cases above slm? I noticed JLC does binder jetting now, and it's slightly cheaper than slm. how does it compare?
I have some parts I've done done in FDM that I need stronger/with higher temp resistance so I'm gonna send them off to jlcpcb, but not sure which of the two methods I should use
it sounds as though as you'd expect, slm is the better end product given the higher cost
yes, SLM / DMLS
if you need moderately stronger than FDM, consider SLS nylon. I use the Hungarians for my SLS nylon now that there are tariffs on chyyynuh https://additiq.tech
Is SLS nylon stronger/more heat resistant than FDM nylon (eg, PA6-CF)?
Basically I just need it to survive in a car with 0.5kg or so of weight on the part
(android auto screen mount for my Austin Mini)
SLS nylon is pretty strong. Melting point is around 175-180C so you should be fine in a car.
I have an FDM PETG magnetic adapter to fit my Mous phone case (with a mous-specific magnet layout) to a MagSafe charger.
In my Austin mini
I have some petg-cf but I figured it wouldn't take the heat
mine's only thin, and doesn't take any more weight than a phone. Lives permanently in either the car or the van
SLS would be a good bet. I've used 3D Print UK recently, they're good, but not as cheap as the Hungarians
it's a bit random, but how about a clip mount? I have one of these (not bought for my car but to mount a light at an event, and it has one of the strongest clamp springs I've ever used)

EssentialPhoto & Video
The Adjustable Photography Spring Clamp & Mini Ball Head allows you to attach your equipment to it using the 1/4” screw which can open to a width of 4cm.
actually, I can imagine even that clamp rattling free in my mini
iirc the shrinkage on binder jetting is kinda bad if you're looking for precision parts. Something to look into
So I've been trying to get it as close as possible to the upper dash rail, which has meant doing away with the ball mount and repurposing the ash tray slot
For this application the more important property is the glass transition temperature. This is the temperature when the material becomes soft enough to deform.
Depends on the type of nylon used, look under PA
https://www.specialchem.com/plastics/guide/glass-transition-temperature
Find out more on Glass Transition Temperature (Tg), values for different plastics and its significance for making the right selection for your end applications.
I think it's the HDT here given that it's under load?
Screen uses this magnetic mount

Designed this replacement that's 8.5mm thick compared to the original ball mount 29mm


I'm a computer scientist, though I've done a ton of 3D printing, so take this with a big grain of salt.
HDT is a better metric but that depends on the dimensions and shape of the item. Which in actual engineering is super important, but for a "can I use this material and have it not break" for general 3D printing I use the glass transition temperature for a good ball park
The two countersunk screws go into threaded inserts in a piece that replaced the ashtray and has a slight angle to bring the face back to vertical
That piece is a pain to print because of the large area of support underneath but because of the key on the other side I can't really do it any other way
So if I was going to do this, I would epoxy a 3D printed mount to the screen, and then screw that to your mounting point in the ashtray. I don't love magnets for this application. I wouldn't trust it to hold in an accident
The original mount is magnetic, and I don't really want to epoxy to a £200 device
Another option would be to send cut send a simple metal bracket to strengthen your FDM mount
That's totally fair
The magnet is surprisingly strong, and the one I found to replace the original is even stronger than the one it came with
I've ordered some PVA to make removing the support easier at least
Can you add another set of screws to the top of the bracket? Support the top and bottom so it's not cantilevered?
The ashtray is only ~35mm tall
Also sorry to Astosia for hijacking the thread 😅
Heh yeah, I'll make another thread somewhere
More brackets! 😁
It’s fine. I might steal the idea for my mini!
Happy to share f3d files but I'm sure you could come up with something even better..!
@gleaming snow , your case has just been sent to print at Shapeways along with my latest batch of buttons. Should be with me in mid-August

Thank you so so much!!! This is so wonderful
hell yeah
I couldn’t resist tinkering with teeny watch to minimise the case size on the current P2 layout. Here’s the latest attempt.


New one is covered in sellotape. It’s 2mm shorter in Y than a P2, but slightly wider in X. Same z height
Ooh I like the more square shape
it looks really cute, I wish the buttons could be narrower somehow
I’ve found some narrow ones but they are also smaller, and a lot more expensive.
yeeah, I wish making new buttons was a possibility, that would be really cool
So pretty!
narrower as in less diameter, or length?
Length
hmm I wonder if you could use drill as "lathe" and use files to shorten buttons
These are the shortest ones I can find, and yes the one on the right could be made even shorter. OG centre button for comparison. The one on the left is the one used in the latest cases.

Any shorter and there’s not enough space for the spring.
Thinner would look more like my existing mechanical replacement buttons, or a push fit block from the inside (a bit like an Apple Watch button).
Personally I quite like the sticky out buttons. Especially on the voronoi watch

interesting. well I guess it does depend on case
The second one in has potential. It’s lower profile.


That 1mm makes quite a lot of difference
Exciting, just checked the tracking. My new C2D has got to the UK. So how long before I pull it apart??

that does look a lot better (to me) - that's pretty crazy that it's so small a difference!
I've never actually mentally clocked one in person (is that weird?), but someone was just talking in #pebble about how the way an apple watch accepts/accommodates straps means it doesn't have "arms" jutting out above/below the face. Is that something that could theoretically be accomplished/imitated on a custom pebble case? Even if the face itself didn't change in size, it would still presumably look smaller on the wrist
I do think the Pebble Time handled the "arms" pretty well - the default(?) color with the black back/arms (is there a better word than arms for this?) blends pretty seamlessly at a glance with the default black band
lugs?
I would be interested in seeing the smallest possible watch you can build with the ct2 display
that sounds extremely cool
Just sent this one and a slightly different one to get printed professionally.
This is the shortest I can make a case and still fit a strap


Lugs! Thank you, that was driving me crazy
I should actually look at a picture of how an apple watch attaches to its strap
Ahh, okay. Yeah, I was trying to parse that, I see it now
so I guess with a pebble you'd need the internal space to actually accommodate those channels, which I'd imagine is maybe not possible without making the body taller (again)
unless making it thicker helped
I think technically a channel is going to take up less space than lugs
since you are avoiding the need to accommodate the thickness of the strap
Oh, that does make sense
A pebble housing that could accommodate an apple watch band would be pretty neat I bet
It would, but I think the strap release pins would be interesting
wonder if you could design a bolt similiar to steel, but though watch case
having a cutout enough for band
Some decent schematics in there. On watch and strap dimensions

I did think about using strap release pins as buttons
Ooh, I love schematics ✨

Printables.com
Download 3D printable STL models
I have modelled each part but only in enough detail to create an internal cutout
ok. still wish we can easily get pebble kits or something lol
I hope in future there will be small market for that
I have models of Pebble 2 of all of the above
one of things I hope happens is essentally opposite also. lol. electrics and battery kit for classic or steel
so it can be refreshed and upgraded
Cases are the easy bit in a kit
indeed
here is a render I was working on with this CAD

thats cool
@fallow tulip Do you have any STEP files for buttons that go with P2 curved sides with screen bumper and round buttons.step?
I have the off the shelf buttons modelled, but not internally/functionally
anything is better than nothing