#3d-modeling
1 messages · Page 94 of 1
 glad spire
Whenever I change the color of the part up
the part down color get changed too
It should be the bread
I duplicated it and put it up
It's not perfect, but became like this
But my boss approved it xD
Thanks a lot. gonna use both of them! @fickle lion @quaint jasper
 solar fossil
@calm grove you got cute arms now
 spiral sigil
give him a gun
solar fossil
just have a little compartment in the front that opens and has a Glock inside
 devout scroll
do you have a license for that firearm
 calm grove
 solar fossil
saw n8 typing there for a sec
devout scroll
i hope he posts soon
 devout scroll
damn, that'd be incredible
solar fossil
so @vivid crater hows the model going... ahem
devout scroll
so much to learn from it
solar fossil
haha, yeah, but where is the model?
oh, or you want to do speed modeling in the last minute, i see i see
 median pike
soo
uhh
how do you hand claw arms for humanoid rigs?
This is how I have it atm
but that seems like not the way to go
devout scroll
You can try having dummy bones then using constraints to move the claws
median pike
I was hoping I wouldnt have to do that
is there no way to just force the humanoid rig to take them and adjust them somehow?
they dont look very good in t pose
devout scroll
Don't know, #avatar-rigging might know
But I have a feeling you won't get it perfect
median pike
@fickle lion the problem with that is that I dont really know what the desired position is
it would be nice if it just stayed in its default position
I dont think that would give me the same results and even than thats super annoying considering i have to screenshot every position just to copy them
solar fossil
ah the claw problem, the bane of my existence, never managed to get good looking results
median pike
dont even
its the last thing thats holding me from putting this in to vrchat
how am I suppose to give it a shot if its in another server???
I cant make that look good
its hard to untwist something like that
theres stretching everywhere
you cant copy them if you want to do that
you cant copy multiple transform parameters at once
so I just have to take pictures of write them down and than input them manually?
is taht really the only way?
ehh fuck that
there is
jsut foind it
not if I want finger tracking
no idea what that is, how unoptimized it is or how much it desyncs
so would that be rigid bodies and fixed joints? Thats the only constraint I know
 vivid crater
yea, we have actual constraints now, probably dont use rigid body fixed joint for things anymore
median pike
oh, so I wont get a shit ton of desyncs anymore?!
wow
thats the thing
if it gets any kind of desync its useless for me
because you cant use the model for more than a few minutes that way
seems like I got it okay
median pike
thats the only way I knew how to do it
the only time I have ever messed with something like that was over a year ago
and I never wanted to do it again
solar fossil
yeah, rigid bodies were scuffy, but constrains are mega blessed
come, join the constrains, become a god
 gaunt abyss
So does this mean I can attach a particle system to my head and it would actually follow it properly?
 vast oxide
Nice
gaunt abyss
Awesome
This is my first 3.0 avatar so I'm still new to this stuff. Its basically just my usual avatar with its head shoved into a jack o lantern and with a gesture it pukes pumpkin junk, but the particles were only taking the hotizontal rotation of the head into account, not vertical.
Also I have a little question about the particle system. Dont know what channel would be he best one to ask this in, but how do I make it only fire once? Its almost like the particle system loops but I unchecked the loop box.
 inner quiver

Downloads:
Cats Plugin - https://vrcat.club/threads/cats-blender-plugin-0-14-0.6/
Blender 2.79b (old version) - https://www.blender.org/download/releases/2-79/
Blender 2.82 (new version) - https://www.blender.org/download/releases/2-82/
Deviant Art - https://www.deviantart.com...
 white moth
None of my constraints ever desync more than a single frame
Unless you make input feedback yourself with a circular logic of constraints those can have desync
Like chaotic systems
solar fossil
chaotic system best system
white moth
Who needs animations
Chaotic self referential circular logical constraints
Try safety blocking those
devout scroll
Looks great!
Shame you missed the halloween deadline tho
Unless you didn't want it to be public
 radiant moon
Anybody got any links to some good human basemeshes? Royalty-free if possible? I'm looking around but haven't found any i like yet.
spiral sigil
Helloooo, idk but exist any channel or secondary server to request any avatar commissions? I dont know if is allowed talk that here, sorry, if not tell me and i delete this msg X_X
 quaint jasper
There are some very cheap ones on the artstation store @radiant moon
Like 5-10$ with textures
spiral sigil
But i want a custom one, money is not problem haha.
quaint jasper
@spiral sigil check pins in #avatars-2-general
spiral sigil
Oh thanks
radiant moon
I'm broke, can't do anything i have to pay for
spiral sigil
Wait.. i cant remember how check pings in IOS discord version aaah
quaint jasper

VRChat Ask Forum
Post about commissions for avatars in this category. Requests are not permitted, we only permit posts from those providing services.
@radiant moon You searched through sketchfab and CG trader, turbosquid etc ?
spiral sigil
Oh i remember now, thanks.
devout scroll
There's also some addons that generate base meshes
I think there was a thing called makehuman
Those are for realistic base meshes tho
radiant moon
Huh? None of those except a few on sketchfab so far
devout scroll
Don't know about free tho
radiant moon
Just looking at whatever comes up first on google
Can you link me to Makehuman? I'm interested in a realistic basemesh
As long as I don't have to pay for the addon
devout scroll
looks to be here http://www.makehumancommunity.org/wiki/Releases:120b2 at the bottom
I haven't looked into it myself but I heard about it mentioned in passing somewhere
Check youtube
 flint imp
So, I'm looking to get my OC 3d modelled and I'm looking for someone to do it
I could never do it myself, so ping me
quaint jasper
@flint imp Check pinned items in #avatars-2-general
VRChat Ask Forum
Post about commissions for avatars in this category. Requests are not permitted, we only permit posts from those providing services.
quaint jasper
quaint jasper
https://ask.vrchat.com/c/commissions/avatar-commissions/35
might as well
radiant moon
Whenever I move away from my model in Blender, parts of the model start to clip through the shirt. How do i fix this?
Note that the shirt is loose and open-chested, so i need to have the torso and pants modeled behind the shirt
There's plenty of space between them though, i don't understand why they start clipping at a distance
 slender fractal
@radiant moon as you move further away from a model, the distance between the layers is represented by a smaller difference in depth buffer values, until the point where a lack of precision starts to make it ambiguous which is in front of which - the only fix to that is to simply add more space between the layers, or to construct the model in such a way that there is no second layer beneath
notably it's affected by the near and far clipping planes of the camera, so the further the maximum view distance, the more likely this is to happen because a greater range of depths has to be represented by the same value
 timber shale
the clipping shouldn't show up in unity or the game, if its for vrchat
radiant moon
Ah yes, I figured out what was causing it
slender fractal
yeah give it a test in-engine to see if it's ok still
radiant moon
I was doing detail work and my clip start distance was set really low
slender fractal
yup that'd mess with it
 sullen blaze
median pike
sullen blaze
median pike

Broken Shape Keys? It's probably a vertex order problem. This tutorial will demonstrate how to fix the problem in Blender 2.8
Addon by bartoszstyperek: https://gumroad.com/bartoszstyperek#qhrJ
Please Support me on Gumroad: https://gumroad.com/dannymac
My Socials:
Instagram:...
 regal flicker
Interesting
 onyx juniper
Mmm look at the cuties he makes
solar fossil
yeah, he makes some proper cuties
 slender osprey
someone have any tips on uv unwrapping dog heads?
solar fossil
I guess generally like human heads, but the loops around the mouth will be much longer 🤷♂️
 wide vigil
Quick question, I'm looking for a witch broom model, but I don't find anything >.< anyone has one to spare <3 ~?
solar fossil
sounds like the perfect model to make by hand
you could do something like this fairly easy https://www.turbosquid.com/3d-models/broom-witch-3d-model/826464
witch broom 3D Model available on Turbo Squid, the world's leading provider of digital 3D models for visualization, films, television, and games.
good luck and god speed at modelling
 obsidian nova
I love mixamo man, makes my models look amazing.
radiant moon
You've given me an idea
 ashen forge
Something for an avatar world I might make.(The text on the box is a joke)
 frail flint
nice
 lethal relic
Hey folks. Working on making an avatar from scratch. Black markup isn't really censoring anything but discord won't let me send it otherwise
devout scroll
That's weird, I didn't know discord did that
lethal relic
It stops you from uploading pics that it thinks are naughty but this is a null model so... Was it the nips? Lol
 sage hedge
Having a problem with the world I've created. I have a main room and an entrance room. There's a door in between, and when I upload the world to the game, when moving through the door between rooms I momentarily get stuck like a collider is trying to stop me. What causes this and how can it be fixed?
quaint jasper
How did you setup the doors ?
sage hedge
Two holes in the walls with a connection between the two.
I'll get a couple screenshots here in a moment...
sage hedge
It would appear that it is. Exactly 2m tall.
Should I make it a little bit taller and try that?
quaint jasper
yep
sage hedge
It's now taller than 2m but it's still doing it.
quaint jasper
mesh colliders ?
radiant moon
Discord stops you fron sending naughty images? Well that explains why it sometimes keeps me from uploading random images
Not even dirty ones
lethal relic
Depends on room settings and server of course but yeah seems so
 winter plinth
if you have your scan mode set to something it will stop you from sending stuff
radiant moon
How do I keep a Blendshape from moving when editing the Basis?
radiant moon
I mean when I edit the basis, other shapekeys won't be affected
My model has its mouth already opened and I want to close it
But I want to use the already-opened state as a viseme
NMV, I think I got it
 deep dirge
What did you do to make it work?
quaint jasper
you want to close the mouth as the main Basis and use previous basis as shapekey ?
radiant moon
Yes
quaint jasper
Ok then duplicate each
then select duplicate open mouth, option viseme on the right side, set as new basis
radiant moon
This is what im working with
quaint jasper
@lethal relic Make sure there's no other collider in the way using the physics debugger window in unity btw
radiant moon
I'm sorry, I don't understand what you mean
I tried duplicating the viseme, editing it a bit and then setting it as the base but trying to activate other visemes doesn't work
Wait no
 fleet ice
One option is to duplicate the face, close mouth, and transfer the open mouth shape to the new object
radiant moon
I think i'm figuring this out
Excuse my stupidity, it's late at night and i'm tired
Yeah, it works great now
thanks
lethal relic
@quaint jasper what? Lol I think you tagged the wrong person but I'll keep the advice in mind as a total unity noob haha
quaint jasper
@sage hedge Make sure there's no other collider in the way using the physics debugger window in unity btw
Sorry about the ping lothisk !
lethal relic
no worries!
I have a problem though I'm wondering if anyone could help me out with. So I'm in blender and because I wanted to add subsurface smoothing to only certain parts of my mesh I have separated certain parts of the mesh I wanted to keep kinda sharp. The horns, the faceplates. But now for some reason I can't edit the face plates even though I'm in edit mode. in this pic you can see I'm in edit mode with vertices selected but the dots aren't appearing at the vertices. switching to other modes doesn't seem to allow for transformations at all. this is the only part of the mesh that does this. Anyone got any tips?
here's the blend file if that helps, if it'll even upload
well lookit that it did lol anyway, help appreciated!
quaint jasper
Don't use 2.9.1
deep dirge
Don't listen to him
lethal relic
too new and buggy? lol
deep dirge
Use 2.9.1
deep dirge
Lol I don't even know the problem
 latent charm
2.9.x seems to be a weirdly buggy release, if it's being weird check against the 2.8 LTS
deep dirge
2.79 was so good, 2.8 and 2.9 are just broken
quaint jasper
ok, i'm gonna suggest to not talk about stull you don't know in the dev channels
devout scroll
alt+h to unhide in edit mode fixes it
quaint jasper
2.83 is great
It breaks every single time you exit out of edit mode Pumkin
it also makes you unable to use vertex mapping for weight painting
deep dirge
2.8 introduced that bug that crashes the program from undoing and redoing certain things
devout scroll
i haven't had that many issues, it only happened once
lethal relic
that worked. weird! thanks!
deep dirge
It's so infuriating, I have to save all the time
quaint jasper
i've only crashed in 2.83 because of my own stupidity
latent charm
Imagine not having a twitchy ctrl+s reflex 🤣
deep dirge
But sometimes I want to see how something looked before and after using undo and redo, then it just crashes
lethal relic
oof sounds rough yaya
thanks to @devout scroll
blender thought it was hidden I guess lol
devout scroll
blender only crashes for me when using weird addons or undoing stuff
Also that's not how you prevent stuff from being subdivided, you can use a vertex group to choose what to apply a modifier to or mark edges as sharp
regardless, 2.9 is pretty buggy, gotta wait for a fix
but I like the new additions for snapping and the new mutlires
so i don't want to go back
lethal relic
vertex group okay I'll look that up
devout scroll
basically weight painting but instead of painting to bones, you paint a heatmap for a modifier
blue being 0, red being 1
that's what the armature modifier does as well, it links weights to bones by vertex groups
lethal relic
I'm super new lol just started using blender start of this month basically
spiral sigil
is somebody able help me with this nsfw model
quaint jasper
Not in this server no
deep dirge
Help you how
If you wanted help, you'd ask a question, not say you don't know what your doing with a nsfw model
 hardy lake
does anyone know why these vertices became unselectable on my mesh?
deep dirge
Are you on 2.9
hardy lake
yes
deep dirge
Download 2.83
hardy lake
😢 so its a bug?
deep dirge
Yeah, I'd assume, I've had issues with unselectable mesh stuff in 2.9
hardy lake
oof, alright, thank you! somehow i wasnt able to find anyone complaining about this on google, which is very strange
i've had this issue before but i fixed it by exporting that mesh as fbx and importing it back, but i cant do it this time cuz i need to keep my modifiers
deep dirge
Idk how I fixed it for myself, it was the faces being unselectable, I just did other things and it magically started working again
hardy lake
oh god, basically Blender 2.9 randomly hides vertices when you switch from one mode to another. all i had to do to fix it was go edit mode -> ALT + H 😅
deep dirge
Alt H never fixed my issue...
I wish blender stopped development after 2.79
So many issues
devout scroll
Oh shut up
Blender is so much better since 2.8
2.79 deserved to be retired 10 years ago
Yeah 2.9's got issues but 2.8 is still miles better than 2.7
 young vault
I can't even use 2.79 anymore after migrating to 2.8. It feels too clunky.
solar fossil
had to open a 2.79 project a day ago, all i could think was "damn bish you lived like this?"
deep dirge
It's because of undo redo crashes, having to select the armature beforehand to move bones in weight paint mode, the damn tool settings being so screwed over, and other meaningless ui changes.
Other than that it's still blender
quaint jasper
Sounds like you issues 
deep dirge
Have you not experienced the undo redo and armature bullshit?
quaint jasper
Nope, been doing this almost daily since it came out
 cerulean shoal
2.79 is 🤩 2.8 is 🤩
devout scroll
You had to select the armature beforehand as well in 2.7
But if you use right click select you don't have to I believe
But if you shift click the armature then the mesh, you can ctrl+select bones if you don't have masks enabled (v or m) while in weight paint mode
It does crash when undoing for me sometimes tho
deep dirge
In 2.79, I could go into weight paint mode whenever and always be able to select bones, now I need to shift click both the armature and mesh before entering weight paint mode. I have to do that every time going into weight paint mode, it's so stupid.
vivid crater
😐
deep dirge
😶
 stable edge
🟡
 minor wind
Hey guys, hoping you would be able to help me.
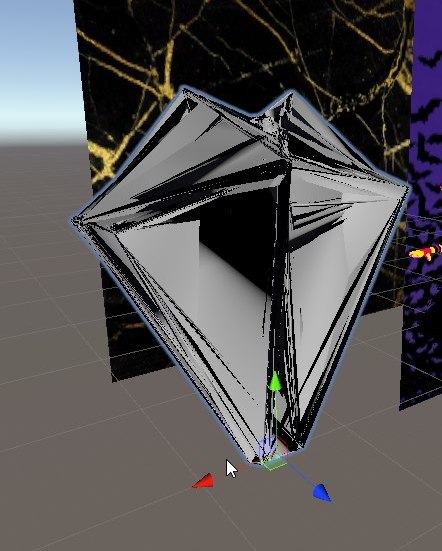
I am trying to edit the mesh of an existing model but when I do, the mesh gets VERY stretched out, flipped UVs, etc. Blend shapes seem to be the issue as sliding them in unity tries to form a working avatar again. In blender the model looks fine, in Unity it does not. Any suggestions?
devout scroll
Export settings are different between them
Or you deleted/added bones maybe
Is the size of your armature 100 or 1 in unity
hardy lake
is there anything i can do about these ugly shadows on the face?
minor wind
Is the size of your armature 100 or 1 in unity
@devout scroll It is 1 in unity, the bones were not changed. 🙂
Any other suggestions? here is a pic of what I am talking about. If any blend shape is touched it goes back to normal
https://i.imgur.com/ArF3hmf.png
This is supposed to be a humanoid looking avatar. Looks fine in Blender, looks garbo in Unity.
 quaint jasper
@hardy lake Try recalculating normals, setting normals from faces, smoothing groups
hardy lake
okay thank you
ashen forge
Just a tip: if you're using 2.8+(I don't know if you can/how to do it in 2.7)
You can click this arrow in the viewport to show which way your normals are facing.
Red means it's the backside, Blue means it's the front side.
 glad steeple
You can also just enable blackface culling, to see how its going to look in engine
ashen forge
Yeah, I just find this way much easier visual-wise
devout scroll
@minor wind try exporting with scaling set to fbx all
minor wind
@devout scroll will do! Thank you!
 violet sand
When I made realistic hair,vertex is 100k over...
hah
obsidian nova
@hardy lake I had that same bug pop up on 2.9 last night.
 autumn badger
@minor wind try exporting it out of blender, into blender, and then exporting it again. Mine was an abomination, I did that, and then it was fine. You can also try "fix model" with CATS.
Also, I think that might just be the lighting.
 clear geyser
@violet sand Use hair cards instead
 teal yoke
Im trying to bone the hair with the head but nothing pops up-? Help?
clear geyser
@teal yoke prntscrn or Windows key + Shift + S takes a screenshot so we can better see what you're talking about
 old robin
im looking for someone to make me my own personal 3d avatar, i have no skill in 3d modeling nor do i have the software. so im kindly asking if anyone could dm me so i can show you the character i want you to make, i hope you take free requests. ill be accepting the first dm, we could become good friends if we get to know eachother a bit.
clear geyser
@old robin You should try the VRCTraders discord. It's the first one under #community-servers-old
 swift quiver
devout scroll
swift quiver
devout scroll
that and this from the pins https://ask.vrchat.com/c/commissions/avatar-commissions/35
VRChat Ask Forum
Post about commissions for avatars in this category. Requests are not permitted, we only permit posts from those providing services.
ashen forge
More progress
teal yoke
The head dosnt move with the body, and im a beginner... what do i do, anyone mind to help?
 vivid nova
Hey guys, working on learning to make an avatar for the first time.
I have the character sculpted (not remeshed yet) and trying to learn to make good looking anime style eyes.
Are there any good/recommended tutorials on how most people do it?
Just from looking at avatars, it looks like it is usually done with a concave white area with a circular mesh for the moving part of the eye. I think I am missing something though, it looks really bad from the side of the face, and it is difficult to make the eyes big enough without the circular part visibly clipping the white part.
 spiral wing
remove doubles @spiral sigil
spiral wing
remove doubles, combines vertices that are in the same spot, just do that.
devout scroll
remove doubles is called merge by distance since 2.8
spiral sigil
I forgot I had a loop cut there
devout scroll
keep in mind that if you cancel an extrusion you still have it extruded, it's just on top
spiral sigil
thanks merge by distance worked
spiral wing
i learned too much in 2.79 for me to move into 2.8+ i've seen it, everything is different
white moth
Only takes about two weeks for you to get over it. Then you’re better off for the rest of your life.
Free to download the newest blender as soon as it comes out or just set it to auto update. And not be confused that all the tutorials look different
Worth imho
Glad I ripped off that bandaid personally
devout scroll
Yeah, at this point 2.7 is a liability
Transition can be painful, but it's smooth sailing after it happens
And don't get 2.9 yet if you're first transitioning as it has some confusing bugs and you want to minimize frustration
In steam, under the betas tab you can select 2.83 lts

This is a video for those wanting to transition from 2.79 - 2.8
It shows where all the important tools and some new ones are located.
I'm sure I have missed some but you can always comment below and if I know I'll let you know.
My website www.gabbitt.co.uk
discord server htt...
spiral sigil
Is there a way to modify my texture as I make changes in UV editor?
For example, would it be possible to have the piece of the texture currently beneath a UV island follow that UV island as I move it in the editor?
Or is that just not possible, and I have to keep doing it externally?
I only ask because I BELIEVE this was a feature in maya, curious if blender supports it
quaint jasper
You'd have to modify the texture
spiral sigil
Externally, you mean?
spiral sigil
Yeah, I know theres a few addons for the UV workflow but I was having trouble finding any that could procedurally do texture editing like that
I'll keep digging, if you know of any please let me know 👍
Ah, I guess adeon mentioned the in-blender workflow that'd work - make a secondary UV and make your changes, then texture bake the texture onto the secondary UV using your first UV. I'll try it, see how the quality is. Not quite realtime, but a good place to start
devout scroll
That's how it's usually done
Keep in mind that baking doesn't support transparent textures so you have to bake it separately
Then combine the alpha map with your texture map
violet sand
I didn't know hair card but I did under 50k vertex.
Maybe this enable to upload.
However, I'm Visitor yet
white moth
Is there a way to modify my texture as I make changes in UV editor?
For example, would it be possible to have the piece of the texture currently beneath a UV island follow that UV island as I move it in the editor?Or is that just not possible, and I have to keep doing it externally?
I only ask because I BELIEVE this was a feature in maya, curious if blender supports it
@spiral sigil duplicate the uv so you have two uv layers, make all your changes to one of them, keeping the original Unmodified. Then bake one uv to the other, and you end up with your modified texture.
No it can’t be done live, baking can take like 4-5 minutes unless you want it very blurry
 dusky parcel
biggest project I've done so far. off to substance painter to texture it.
spiral sigil
Wow, the texture baking works way better than I expected, it even places rims around UV bounds to prevent seaming which I always had to do manually
Thank you both @devout scroll and @white moth , I'm still learning the blender workflow so I'm sure this was a basic thing haha, but incredibly helpful tip
young vault
@vivid nova not sure if too late, but, how I've seen some more detailed ones do it is using a curved plane. Which allows for more movement area. Basically like a hole in your face.
Into a big cave
old robin
would someone please make me an avatar?
quaint jasper
If you want to pay someone to do it https://ask.vrchat.com/c/commissions/avatar-commissions/35 @old robin
VRChat Ask Forum
Post about commissions for avatars in this category. Requests are not permitted, we only permit posts from those providing services.
old robin
i dont have money
quaint jasper
People don't want to work for free 
radiant moon
How do I prevent stuff like this happening
Also yeah, 3D models commissions are some of the most expensive ones
You're better off making your own for free
old robin
do you know anyone that do them for free?
quaint jasper
Fools
radiant moon
Of course not, I don't need to rely on anybody but myself to make models
I've taught myself more things than my whole 12 years of school
old robin
but i cant use blender
radiant moon
Then learn how to
old robin
my computer sucks
winter plinth
bro, my computer died from using blender, yours will at least last as long as mine to learn blender
white moth
Daryl... When you asked me to make an avatar for you a year ago I had only been learning blender for a year. You could have started then and been where I was when you asked...
old robin
its not letting me open it
winter plinth
64-bit hun
old robin
i wonder what happened to you adeon
white moth
I explained to you that doing work for free makes you very low priority and I might not get to you. that turned out to be the case, sorry.
radiant moon
Aaaaanyways... Does anybody know how to fix these weird shadows? They always seem to happen by mouths
radiant moon
Huh? I made this model from scratch
white moth
Make sure you don’t have 3 or more faces sharing an edge. That totally messes up normals
radiant moon
??????
quaint jasper
Did you enable auto smooth for normals ?
did you set normals from faces ?
Knowing what you tried would be good
white moth
Either way... project normals and make em all parallel. That’s how I fix that stuff anyway
white moth
So does it look that way when it’s in unity or is it just blenders studio shader 
radiant moon
I don't know, I literally just started making it
But it does do that when I switch to other shading methods, it actually becomes even more noticeable
white moth
Yeah it’s just bad normals
radiant moon
radiant moon
That just slapped a bunch of sharps all around the mesh without actually fixing it
white moth
Wha
radiant moon
Blue lines, they make sharp edges like when you use the "flat" shader
white moth
Yeah that’s... weird. Check wireframe make sure you don’t have internal faces
I feel like those sharp lines might have internal faces connected
white moth
Oh
That upper lip is a crazy sharp bend
So you are really stretching the limits of vertex lighting
Might as well just mark upper lip as sharp
Remove the shadow on the outside
radiant moon
you mean this?
radiant moon
That's what "Set from faces" did, it didn't fix anything
white moth
Not Set from faces actually just select the edges and then mark them as sharp
The pointy top lip edges
white moth
You can put blender models in unity if that’s what you’re asking
But unity is required to upload
winter plinth
you use blender to import into unity to import into vrchat
 turbid willow
oh
white moth
Unity contains the actual upload dialogue
turbid willow
whats the limit with polys and bones?
winter plinth
idk how one would model something in unity, its too limited lol
white moth
whats the limit with polys and bones?
@turbid willow 70000 triangles. 75 bones
winter plinth
like 70,000 polys and 32 bones?
turbid willow
i will make aang form atla
white moth
Oops it’s 70000 triangles and 400 bones but please don’t actually use more than 75 bones
radiant moon
WHo the hell be using 400 bones
white moth
400 bones is still poor, not very poor. 401 is very poor. It’s crazy lenient lol
radiant moon
But using sharps didn't work, any other suggestions?
white moth
I mean you could just fix it with custom normals but I don’t actually know what’s wrong with it
radiant moon
I don't know hot to do custom normals
white moth
I don’t think I am proficient enough to explain how the normal modifiers work
But they are the goto
radiant moon
Oh wait, i fixed it by accident
turbid willow
how does one import a 3d model form blender into unity
white moth
Use blender to export it as a .fbx file
Not mandatory it’s just a very good format for this
You can also just drag the .blend file into the unity project but it will make every little change in unity very slow
 slim wagon
Does anyone know any cool Oculus avatars
 ashen forge
WHo the hell be using 400 bones
The people who use an insane amount of dynamic bones
gaunt abyss
lol I remember back when the hard limit was 20,000 polys
spiral sigil
Hello! I make 3D models primarily for SecondLife. I am wondering if I would be able to provide them to use in VR Chat in some way. 😮 I don't know how to rig characters or anything though. SL lets me attach static mesh accessories to avatars or place out objects in world freely so if there is something like that, awesome. :)
Example of my work:
https://i.gyazo.com/5c2b49c8a0816df85f4589d094864a00.mp4
timber shale
if you have/buy a rigged avatar, you can add any static item to any bone in unity
spiral sigil

Is there any way to add static items to any avatar? Like making those pistols I made usable by anyone?
Or does something like that require a custom world?
timber shale
it has to be uploaded to a specific avatar
otherwise you can make it a pickup in a world
spiral sigil
I see. I kinda wish the game had an inventory for items! Huh.
 slim perch
@spiral sigil its called a toggle in the avatar 3.0 system 😉
radiant moon
Every time I unwrap this part of the model, the UVs come out all stretched. I've edited the seams and everything, I don't know why it's doing this
 azure rain
try applying the scale of the avatar
azure rain
np
ashen forge
Nearly done
white moth
Every time I unwrap this part of the model, the UVs come out all stretched. I've edited the seams and everything, I don't know why it's doing this
@radiant moon Try "Project from View" ?
radiant moon
Uhhh... i've already fixed it
Project from View wouldn't have worked for this anyways
thanks though
radiant moon
So I'm having a weird issue with Weight painting again...
Whenever I try to paint, it's supposed to mirror over to the other side to match. as in, whatever I paint to one bone, it'll happen with the other bone on the mirror side of the model.
But for some reason, with this model, it correctly mirrors the bones but not the vertex groups? So It'll paint on the exact same side but still be bound to the bone on the opposite end, if that makes sense.
Nevermind, i figured it out
70% of my problems are caused by me not applying transforms
Wait, what the hell?
So now it's mirroring, but it's backwards, for some reason?
Nevermind again
I'm being real big brain today
vivid crater
🤪 ✌️
 tardy flax
Hey, quick Q
Does anyone know how to have an object in Unity attached to a specific point on a cloth object?
i.e. I have a lanyard and I want to attach a badge to the end of it, so that when the cloth simulation happens the badge object follows
I have a cloth constraint on the lanyard but no idea how to get the badge to move with it
quaint jasper
I don't think that's doable with cloth that way 
 ocean matrix
Anyone have robotic wing models they tryna share/sell?
tardy flax
I don't think that's doable with cloth that way :RuuuThunk:
@quaint jasper Thanks, I'll try with dynamic bones instead ^^
quaint jasper
Definitely doable with dynamic bones, you can weight paint the object to a bone parented to another bone that has dynamic bones
tardy flax
Perfect, thanks!
 reef cloak
Could not find a free bifolding door online. Having premade stuff can make your process faster. Like, why reinvent the wheel? 🤷♀️ So I am making mine available to the community. Plz credit me.
quaint jasper
Is it animated/rigged ?
glad steeple
Put it up where you searched for the door too, so people there can find it. Asset store, sketchfab etc!
azure rain
also that's a lot of black space used in the texture by putting it in the center that's not contributing anything
azure rain
thanks for the clarification
 craggy lintel
Anyone know how to mirror mesh and armature
Don’t give me that “oh it’s hard” oh it’ll break a model stuff plz lol I know what I’m doing but I can’t get it to work
Idk what my computer is doing tbh it doesn’t like me mirroring rn
quaint jasper
mirror modifier ?
median pike
@craggy lintel to mirror your mesh you have to use the mirror modifier. To mirror the armature you have to make one side (for example the left) and name the bones so they have "L" or "left" in their names. This way blender knows what to actually mirror
than you can just use "symmetrize" in edit mode of the armature
but to clarify, yes this has a big potential of breaking your weights or UV maps
or shape keys
pretty much a lot can break
onyx juniper
arm_upper.L
then select those bones and in some menu or another select "symmetrize," I forgot which menu
 compact umbra
Hello guys, probably a super stupid question but i cant find an answer to it. Im currently trying to block out a world in blender instead of unity for the first time and i would like to select the faces at the back. What gets selected from my current pov though is the ceiling faces. Is there an option to make this work without tapping into wireframe mode?
for reference this is the face i would like to select from my current camera
compact umbra
Thank youu
craggy lintel
I've done that alot already hahah @median pike

Help would very much be appreciated
deep dirge
Apply transforms?
craggy lintel
I’ve done that too x.x
deep dirge
O fuk
deep dirge
No
craggy lintel
Somethings definitely broken
deep dirge
All I can think of is apply transforms
craggy lintel
This is so broken lol
deep dirge
Because it looks like the origin is not in the center of the scene
 ashen stag
If its posed you need to apply the pose as the resting pose before you can do a lot of other things to it
deep dirge
So you applied all transforms?
craggy lintel
I’m trying to understand what you mean
deep dirge
Ok
Go to object node
Mode
Press space and type apply transforms
Should show you all transforms
I forget what the actual shortcut is
craggy lintel
I’m on 2.8 lol
craggy lintel
that’s cursor controls lolol
deep dirge
Wait
craggy lintel
There’s no transforms I need to apply lol
deep dirge
Cursor to center
craggy lintel
I made this from scratch
deep dirge
Then
craggy lintel
Cursor is center
craggy lintel
I’ve done all of that lmao
deep dirge
Big bruh moment
craggy lintel
Yea I’m fucked x.x
deep dirge
Is the armature weight painted?
craggy lintel
Yes
deep dirge
F
craggy lintel
This is hell
deep dirge
Google time!
winter plinth
what happen?
winter plinth
what it not do?
craggy lintel
It’s just not working lol
Symmetrize breaks the model
All origins are correct, I’ve done everything possible to mirror with every diff setting
This is def broken
deep dirge
Manually symmetrize it
craggy lintel
god
winter plinth
wait, is there 2 armatures on the set?
deep dirge
Like create bones and copy positions with opposite x values
median pike
I’ve done that too x.x
@craggy lintel you havent, your transforms are not applied
winter plinth
apply again
median pike
the gif literally shows the armature transforms not applied
craggy lintel
Yea I did it after that gif
deep dirge
Can we see what happens after?
winter plinth
did you select everything before apply?
median pike
can you show us?
deep dirge
Do you trust people enough to let them check the blend file
craggy lintel
Obj mode correct
median pike
in object mode, select all than ctra+A - all transforms.
median pike
than go in to edit mode on the armature and symmetrize
craggy lintel

 deep dirge
Bruh
craggy lintel
I feel like its the origin causing all of this
median pike
use the Y axis
ashen stag
Honestly I always manually symmetrize stuff
young vault
What Redotix said
young vault
You should be able to?
median pike
symmetrize only supports X axis
craggy lintel
Yeee
median pike
well, You should use the correct axis in the first place tbh
x is left and right
y is front and back
craggy lintel
Mirror does same thung lol
median pike
so move the ears on the right axis and than apply transforms again and than it should work
craggy lintel
I think it should just delete this
median pike
well you can either try to solve it or give up its up to you
spiral sigil
symmetrize only supports X axis
what ?
median pike
yea
craggy lintel
LOL
ashen stag
Just dupe it and scale -1 on the axis you want 🤷♂️
median pike
yeah you can do that too
young vault
The width is on Y axis, symmetrize on X axis will try to do it on the depth. Doesn't do much
deep dirge
Doesn't ctrl m or n let you mirror something on an axis?
craggy lintel
Yeaaaa I was going to do somethung like that
spiral sigil
young vault
Is that 2.9 Svel?
spiral sigil
ye
young vault
2.83 doesn't
craggy lintel
DAMNNN mbn
median pike
yeah fuck 2.9
craggy lintel
I NEED
deep dirge
Lol
deep dirge
Download 2.9
median pike
Id rather just use the correct axis
deep dirge
No no Nkohz NOOO don't USE THe 2.9!!!!1!!1!1!!¹
ashen stag
Whats special about symmetrize? Does it rename bones if the names support it?
deep dirge
Like just download both
latent charm
2.8 can set the axis of symmetrize
white moth
What’s wrong with 2.9? I’m on the LTS so I don’t know
deep dirge
It's okay to need two broken versions of blender
median pike
it renames the bones and symmetrizes weights as well
latent charm
2.9 is unpredictably buggy for some reason
deep dirge
2.9 has a few bugs, and not enough good features I think
ashen stag
Ah mirror does weights but only if the bones are already there, ill keep that in mind. Get rid of some manual work
craggy lintel
 young vault
@latent charm Is that on mesh or armature
craggy lintel
Lol I just duplicated it
craggy lintel
And did Y -1
median pike
but why are you working on the Y axis in the first place?
craggy lintel
is that okay to do
spiral sigil
blender 2.83
deep dirge
I think so
craggy lintel
I have no clue
deep dirge
Just make sure normals are ok
ashen stag
Ear on forehead and back of the head @median pike 😔
spiral sigil
so there you go, you can symmetrize on all axis, both ways
latent charm
@young vault Ah, it was mesh. Armature is only X axis
young vault
2.83 mesh symmetrize has all axis, Armature isn't all axis
white moth
The mirror will mirror weighted IF the bones exist and IF the vert groups already exist AND they are named with the .L and .R standard, unless this is new behavior 
 zealous pond
Ya the X axis should be your right/left
spiral sigil
only with .l and .r ?
median pike
is that okay to do
@craggy lintel yes but apply transforms and recalculate your normals outside because flipping it -1 will flip the normals
craggy lintel
I did all .r .l
spiral sigil
does it work with like _right ?
craggy lintel
didnt work
latent charm
Although if you need to symmetrize youe armature along the Y axis, just rotate the armature into the X axis, symmetrize, then rotate back to original orientation.
white moth
does it work with like _right ?
@spiral sigil haven’t tried in a long while because it didnt when I tried a long time ago
deep dirge
Yeah why not just rotate along z 90 degrees?
spiral sigil
i don't like using dots 😩
median pike
I literally said to move it on the X axis.
young vault
You know, what you could've done is just rotate around z for 90 degrees
white moth
It’s ok marshal you have your looks
young vault
And it'd switch X and Y
deep dirge
Thank you
median pike
yes 3 people saying the same thing is very important lol
young vault
And apply transforms and then symmetrize
deep dirge
I like Peanut more though
young vault
I'm doing the dishes, I didn't notice someone saying it already
craggy lintel
cri
white moth
Old peanut or new peanut? Oh.
deep dirge
Old?
young vault
I wish I could sculpt something other than goblins, tbh.
deep dirge
Like her shirt?
craggy lintel
Shift N for recalc right
deep dirge
Yes
white moth
I wish I could sculpt something other than goblins, tbh.
@young vault I wish I could make pretty much anything besides clothing for pre-existing bases 
zealous pond
Same lmao
ashen stag
Gotta start on something simple and its not as daunting
craggy lintel
Inside or outside I forgot
deep dirge
@white moth what did you mean by old peanut and new
young vault
I make box, I am very original.
craggy lintel
Flip normals?
white moth
Select shirt area of a body, duplicate, fatten, thicken. Add some wrist cuffs. Shirt’s done boss.
young vault
Still haven't done a donut 
craggy lintel
Lol do I flip my normals?
young vault
Just re-calculate them.
deep dirge
Still don't know what this man meant by old and new peanut 😔
young vault
That's the facing of the normal. Do you want the face itself to face outside or inside?
young vault
I don't think a lot of people are inside of ears, so, yes, I'd assume you'd need to do outside.
I do apologize if it comes off as mean. I'm hungry and I write in a weird way when I am.
deep dirge
It's really good
craggy lintel
Thankssss
deep dirge
I want to learn how to do that kind of fluff
craggy lintel
Im only on day 5 of modeling sorry about the rapid fire questions
deep dirge
Holy shit only 5 days
white moth
Some people really pick it up quickly
craggy lintel
Oh yea no I’ve been doing 2D for years
Not just paths tho btw
Bevel circles paths
 deep dirge
Paths...
craggy lintel
its fun lmao
deep dirge
Idk how those work
white moth
Bezier curves are mathematical black magic
deep dirge
How would turn the curves into those strands of fur?
devout scroll
Probably the same way you do hair

A tutorial on how to make hair in Blender 2.8 with curves, a method that is very simple and effective that I have been using for my character sculpts.
▼ Sculpting Uraraka Ochako:
Re-Sculpting My Old Art | Uraraka Ochako in 3D [My Hero Academia] | Can You Improve In Only 1 Yea...
white moth
If you like rapidfire tutorials CGmatter has a really good and extremely short video on procedural fences.
He cuts out all the fluff but you’ll have to constantly pause his videos  https://m.youtube.com/watch?v=cVjXllLHaxo

guess you could also make railroads
patreon and stuff https://patreon.com/cg_matter
website www.cgmatter.com
business inquiries/donations/etc cgmatterofficial@gmail.com
You can see how it would be good for hair as well
hardy lake
guys, does anyone know why my finger bones changed position in unity? it's screwing up all of the hand poses
hardy lake
leaf bones?
quaint jasper
If you look at the hierarchy, the bones are there
hardy lake
yeah but its not showing in the green rig
young vault
They're the same Jorgen
young vault
Unity shows bones by discarding the tail, only showing head + bone length (which is next bone's head position). Therefore, the last bone in a bone chain is invisible since it has no actual bone length to the next bone. If I remember correctly.
Which means the wrist is showing 5 child bones, and each one of those child bones have 1 child bone, which has one child bone, which has none in that green armature. Which is the exact representation on the blender side hierarchically, and each one of them are placed correctly, since they're identical to the blender positions.
hardy lake
alright i got it, thank you
radiant moon
I'm trying to do a Shapekey system that involves a bunch of sliding panels to simulate mouth movement using 2d textures. The one issue I have with it is that it makes a bunch of ugly lines appear where the panel emerges from the face. I don't have any normal maps applied, nor do I know enough about them to make one that would fix it.
What would be a good solution for it?
deep dirge
Make the base shape the head without the mouth texture, shift D part of the face, and add a mouth texture, use transparency in the mouth textures, or cut out the shape. If them for each
You should probably ai upscale those textures anyways
Or manually do so
radiant moon
Yeah, I just didn't want to have to do too much to get it to work
Oh well, back to GIMP i go
deep dirge
Lol
radiant moon
I had to create a whole new texture for an 'Oh' viseme
As well as to add Emission to the eyes
 abstract oxide
hey where do you guys find all the textures for objects like floors and walls? @ me btw
white moth
I'm trying to do a Shapekey system that involves a bunch of sliding panels to simulate mouth movement using 2d textures. The one issue I have with it is that it makes a bunch of ugly lines appear where the panel emerges from the face. I don't have any normal maps applied, nor do I know enough about them to make one that would fix it.
What would be a good solution for it?
@radiant moon I know this is not actually answering your question but if you don’t mind getting into SDK3, it can do texture change visemes now. No more clipping panels needed
radiant moon
I'm already into SDK3. It's just that the textures for the mouth (same with the eyes) are all one image
And i'm too lazy to crop them
white moth
Yeah I kind of know which model you’re using and it’s like that what I did is I just marked the mouth as a separate material so I could change it independently
radiant moon
What about the eyes?
white moth
I just left the eye is the same as the rest of the body
radiant moon
white moth
All that matters is that you can change the eyes and mouth independently so I just let the eyes be part of the body material
I wasn’t using Mr. mime though maybe he’s different
radiant moon
Here's how the textures are set up
white moth
 yeah eyes are definitely their own material already
radiant moon
But how would I animate a UV change? especially with more than 1 frame of animation
white moth
So what you could do is just delete all of those extra mouth and Eye planes and just make alternate materials in unity with the various offsets 
radiant moon
oooh
white moth
Almost all shaders have values called X and y offsets which shift the texture
You shouldn’t animate them directly but you can just make alternate materials and then animate material swapping
radiant moon
Uhhh i'm confused
deep dirge
Do all the extra materials fuck over performance?
deep dirge
Oh damn I never knew that
white moth
You will pump up the file size of the avatar and there is a max there but that’s just how long your avatar takes to download 
deep dirge
I have 4g internet :(
radiant moon
Eeeeeyah i thimk i'm just going to stick to panels
white moth
In this case all of those materials share the same texture so it’s not a lot of extra space anyway
deep dirge
Yeah that makes sense
radiant moon
I don't understand how to animate a blink animation with 3 different states using materials and then get it to work using visemes
is there an option i just never noticed before in the menu?
white moth
is there an option i just never noticed before in the menu?
@radiant moon if you give me about half an hour I can send you a default controller that lets you drop in a bunch of different material swap animations for each mouth sound and it’s also set up with a three frame blink, ready to accept a material swap animations
white moth
Fx layer.
devout scroll
Visemes no longer need to be animations, they can just be used as parameters
white moth
In this case we are doing material change visemes
radiant moon
The more we talk about this the more confused i get
devout scroll
Well you're just using visemes as parameters
Basically, need to look at an example
white moth
I have a controller that just looks at the Visine parameter and plays a different animation for each one.
white moth
Here is the layer i made for Viseeme animation. each block just holds an animation that flips a material.
And here's a 3 frame blink
the arrows just have delays
white moth
It goes on your FX Layer
radiant moon
No setup required?
devout scroll
You still need to slot in your own animation clips
radiant moon
Yeah that, but like anything else?
white moth
To add your animations, click a block, and then add your animation clip on the inspector
radiant moon
I know how to add animations
Is there anything funky i need to do with parameters or anything?
white moth
No, it should be set up.
devout scroll
Default parameters are set by the game so you don't need to do anything, just use them if you need them
white moth
When you make your blink animations, make them 1 second long, that way you can adjust the delays accurately on the controller
the controller i gave you has 6 seconds between blinks and then each blink is like, 0.5 second long
you can change the timing
radiant moon
I see. Thank you!
You should put this somewhere for other people to use, too
I mean, if you haven't already
white moth
it's on discord now :D
radiant moon
Then someone should pin it
spiral sigil
hey
ayona here
can help me
i dont know upload any avatars
like
version of unity
(lol)
if anyone can help me, thank you
 silent grove
look up aggrotard on youtube
he has a great video explaining the process
@spiral sigil
spiral sigil
ok
clear geyser
Vrchat website tells you what version
 rain totem
Anyone got tips for a noobie to Blender on how to separate shoe meshes easily, or another way to make shoes closer together? I am trying to fit my shoes inside my pant legs on an avatar, but they are too far apart X_X
 quaint jasper
In edit mode you can press L on top of a vertex to select the joined vertices, and then press P to make into its own mesh
once you got the two, select them, open search bar, type pull, select the pull push method and limit on X axis
rain totem
The L (holding it and painting over the mesh to select) is working like a charm. These boots have a lot of vertices, so it was such a pain to try and select manually, this has already made it much easier lol
I had no idea of L
XD
radiant moon
You could also just do "Separate by loose parts"
rain totem
tried that, makes a LOT of parts for all the sections. Easier to select via L
Thanks, appreciate the tips!
spiral sigil
Any tips for making the dark parts of this horn texture glow?
Tried my hand at just selecting the dark bits, removing them in one layer, and then having the layer underneath glow but it looks really rough.
ashen forge
Like the outlines between the kinda scaly parts?
spiral sigil
Yup.
ashen forge
You would make those white and the scales black
kind of like this, the white is where you want it to glow and the black is what you don't want to glow(this is a very bad one but for examples sake, you'd do it like this)
Basically, the parts you don't want to glow should be dark and the parts you do should be light, everything else inbetween.
spiral sigil
Okay, and then what after I've made them black and white?
quaint jasper
that's your emission map
ashen forge
You'd apply it to the emission map slot of a material
spiral sigil
Oh.
ashen forge
Like this
spiral sigil
Alrighty.
Quick question: how do I make the image black-and-white like that? Greyscale is close but doesn't seem to be what you used.
spiral sigil
I'm using GIMP btw.
ashen forge
Here's a way to get somewhat decent results, I did grayscale then did binarization then inverted the colors. I don't know if GIMP has binarization but this is the best trick I can think of
Results in something like this
spiral sigil
Thanks for the help. I'll just use what you made until I find out how to do it in GIMP proper.
Follow up question though: how do I adapt the textures for a custom mesh? I know how to get UV layouts and edit them in Blender but not how to get the two to match.
And here's the horn mesh in question.
median pike
@spiral sigil us this as a mask for the emission
oh
I was late
my chat didnt scroll down
sorry
median pike
Follow up question though: how do I adapt the textures for a custom mesh? I know how to get UV layouts and edit them in Blender but not how to get the two to match.
@spiral sigil You can use object projection and bake it down in to a texture. Would probably be the best way to texture that kind of shape
 proven falcon
Huh, so I have an FBX I'm importing into blender - but shape keys don't seem to be importing with it. Shape keys work great in unity, but don't show up at all after the import... and I can import other FBXs with shape keys just fine. The FBX that doesn't work is one made by someone else (and those that do, I've made myself), but if they work in unity I'd expect them to show up in blender... is there some option I may be missing? Or some tool I should be using before import?
craggy lintel
Hey guys what’s the most optimized way of joining two objects together
And making it mega smooth in between so it looks like one object
Apparently boolean is bad to use?
deep dirge
Manually merging vertices
Combine meshes, the press m between two vertices.
And try to use the closest vertices from both meshes, you also might need to create extra vertices to link together, or merge others into each other to get them merged smoothly
At least this is what I do
Might be a better way
young vault
Boolean isn't bad, but, requires a different way of managing and often needs extra work. And is generally destructive to geometry.
rain totem
When making an avatar (humanoid) and you move, and your face doesn't stay attached to your head (neither do your clothes stay firmly attached to your body lol) what is the cause? Lack of weight painting? Bones? If I move, my clothes /face move a little after my character moves and it's hilariously disturbing lol
white moth
Follow up question though: how do I adapt the textures for a custom mesh? I know how to get UV layouts and edit them in Blender but not how to get the two to match.
@spiral sigil it’s called unwrapping Unless I am misunderstanding what you are asking?
spiral sigil
@craggy lintel
You can use the Knife tool to effectively combine meshes if they intersect in favor of one of them at a given point. IE: tube into a cube. If trying to merge them at a given point and want to make it look like they connected naturally, IE: a sleeve to a shirt, you'll want to merge vertexes at the desired spot.
@rain totem Sounds like the weight painting is botched, the rigging, or both.
Did you assemble the avatar yourself from multiple sources? Modify a pre-existing one?
rain totem
@spiral sigil frankenstine; I have done zero weight painting, so I assume that's why. Spent 10 hours yesterday modifying /frankenstining, and forgot the weight painting lol).
My first avi done myself, heh
spiral sigil
You can generally combine various parts of models (clothing, heads, shoes) as most follow the same general layout and proportions, weight painting typically needs minimal tweaking in that case.
However, you wanna make sure that any transplanted stuff is appropriately centered around the relevant parts and that they're actually attached to the main armature.
rain totem
Everything is centered and positioned as perfectly as I can get, and I have merged all meshes into a singular under one armature.
sec, will screenshot

I may entirely have messed this up, I'm not using the normally recommended tutorials; I prefer to learn on my own whenever possible. >.>
spiral sigil
If parts are lagging behind when moving, feel like the weight paint might be less then 100 for the parented bone.
rain totem
Yeah, I haven't done any weight painting at all, so that must be it
I guess that's todays project 😄
spiral sigil
For example, the forearm should be 100% red for the wrist bone so that it moves with your arm accordingly.
rain totem
Understood, I'll keep that in mind. Thanks 🙂
rain totem
Time to test and see if I messed this up or not XD, uploading as I type this.
lol...that was bad....Avatar stuck in T pose seen above. Ah well, time to google. XD
white moth
That’s a can of worms right there
There’s many ways to go about it, some more professional than others..

A Blender 2.8 tutorial showcasing how to properly fuse objects. The two main ways are by the Boolean Union Modifier and the Merge Tools. This skill/concept is incredibly important for any Blender user.
Rerouting Edge Loops Video: https://www.youtube.com/watch?v=Nlf2m2cdGSs
In...
silent grove
thank you
 brittle agate
I'm happy with what I've made so far
Though I didn't make the mushrooms @locustlab did
spiral sigil
Nowhere near complete but here’s a start at my Oni OC Kisura!
onyx juniper
A lot of attention to muscle detail
spiral sigil
gotta use those anatomy studies for something! :)
 real hinge
how much would it cost to get somebody to model an avatar for me
trynna get somebody to make a fishbunjin avatar
 mental glen


 timid python
When using CATS, whats the best way to merge two armetures where one is in a tpose and the other is in an A pose.
trying to merge clothing onto my character, but the clothing came in as an apose, wile my character is in a tpose
quaint jasper
Move in pose mode one or the other
timid python
okay but when I stop posemode, it resets to the origional pose
I tried setting it as reset, or shapekey, and both do the same thing
quaint jasper
there's the button apply pose as rest pose in cats
timid python
this happens, and when I fit model...
it breaks it
Im assuming there is a shape key it is not liking
Hmm, I clicked the mesh and merged all the broken vertex's, thinking maybe that could help. im assuming it glitched out because im not in pose mode anymore, but it stayed. but going into pose mode will reset it to that a pose.
im going to try some things
quaint jasper
apply pose mode for bothfirst then
timid python
its still either resetting the pose to the A pose for the sweater, or stretching the arms up
timid python
Trying that
Figured it out. I had to add a modifer to the mesh, deform armature, then apply it
devout scroll
that helps when you want to manually apply pose
but shouldn't be necessary if with cats

timid python
well, cats wasnt merging the arms together properly, so I needed to force the sweater into a tpose.
im about to try merging it now
Oh well this is annoying now
Fixing the sweater model is putting the weight paints in the completely wrong spot
fixing twice seems to have fixed that 🤔
radiant moon
So in Blender, I'm trying to make a Blinking animation, but for some reason it "merges" with the previous created shapekey?
What I mean by this is that i make a new shapekey for blinking, but it animates the mouth as well despite me not adding the shapekey to it at all (It's a separate mesh)
Any idea on what's causing it and how to fix?
Tried restarting Blender, that doesn't fix it
 ashen phoenix
deep dirge
ashen phoenix
deep dirge
Thicc
 stray tulip
Thought I couldn't make a kemono well, but I think I nailed it ^^
radiant moon
So when I put my model in Unity, one part of it's normals are flipped despite it looking normal in Blender. But when I flip them, they look like this. how do I fix it?
deep dirge
That looks more like sharp edges/separated vertices
radiant moon
Yes, but the lighting goes all wack too
The sharp edges were more of a side effect of flipping it
quaint jasper
normals don't create sharp edges