#3d-modeling
1 messages · Page 66 of 1
 formal wave
 abstract crane
what in the hee haw yee haw is going on?
formal wave
...
 spiral sigil
how do i make it to where it uploads a whole other avatar rather than replacing the existing one?
spiral sigil
Detach the blueprint id on the pipeline component
 glossy tangle
In case anyone wants it... I made jens flute from the Dark Crystal.
https://drive.google.com/open?id=18fwm8qWLgw-4zS6h3x3W7ZLvSM8LQKG0
 proud wadi
3D artist here, (its my dayjob) feel free to ask any questions regarding modeling or texturing (no rigging, lol I suck at that)
I use Blender, Maya, Zbrush, Substance, Photoshop, and Substance Painter.
So if anyone has modeling/texturing questions, hit me up and I'll do my best to answer. People have helped me out, so I wanna help yall out.
 tepid wagon
Is there a way to make a profile in Blender that will follow certain path while having the same crossection everywhere?
glossy tangle
i have a question regarding texturing, when modifying textures, im noticing it appears some models have a "mirror" modifier or symetry set because the UV layout only shows half the models face... how would I go about changing that because i see no "mirror modifier" in the modifier stack so it has me confused as to how symetry is being used for UV layout....
Example, If i want to add a birthmark (green dot for example purposes) its setting on both sides...
spiral sigil
There's two uv islands stacked on top of each other.
Separate them, or if you want you can use cats atlas tool to separate them for you.
proud wadi
oh ok Just saw, if its directed at me don't foregt to tag me!
@tepid wagon yes!
you need a curve, and a profile
what does the crosssection look like?
there is a way to do it with just curves
and theres a way to do it using an array modifier, and a curve modifier
if you describe the shape I might be able to help better
tepid wagon
I already have it modelled with different technique but I really would like to know how to make it quickest way possible, I will sent pics soon
glossy tangle
@spiral sigil im checking for stacked uv's but not seeing any. (thought not really sure how to check for sure - still learning)

 proud wadi
nice! lookds good
make two seperate pieces, grab them in edit mode, convert to curves
then you need to plug one of the curves into the bevel of the other
although honestly, for just a simple curve like that
I would just use the bridge modifier and add cuts in the modifier, it will automatically smooth out the angle
tepid wagon
I see. I tried with converting to curves but it comes out looking wrong, lemme show you
proud wadi
yeah, getting it do do it along the right axis is tricky sometimes
 proud wadi
ahh ok
try freezing transforms
specifically location, rotation and scale
so.. all of them lol
@glossy tangle sorry yeah @spiral sigil is right. The UVs are overlapping
see how only half of the face is in the UVs
 proud wadi
both sides of the head mesh are using the UVs from only the right side @glossy tangle
let me try real quick to make sure I'm telling you the right stuff @tepid wagon
oh sorry
tepid wagon
I converted both meshes to curves, is that how it is done?
proud wadi
yeah thats what you need for this method
I think I mis spoke about freezing location hold on
tepid wagon
I also got 1.0 scale, rotation and location at 0
proud wadi
make sure you're putting the right curve into the right bevel
put the profile (small piece) in the "bevel object" section of the long piece
tepid wagon
I did but it came out funky like I show and if I do it the other way it is also not right
 proud wadi
ack
shoot. idk man, maybe if I was there I could help, its kinda hard without seeing everything.
tepid wagon
I don't get it cos I followed a tutorial thinking I did everything like they said and I only getting those wierd results
proud wadi
Honestly if this were me, I'd use a different method
I usually prefer arraying a mesh along a curve
more steps but more controllable
and it works with more complex shapes
tepid wagon
is there a tut for it?
proud wadi
hmm I'll look
glossy tangle
@proud wadi @tepid wagon i see. Ok so only half is used... but.... is there a way to reverse that and tell it to use the whole face ? or where do i find those settings? I never knew one could do that with UV. seems handy if both sides are to be identical.
proud wadi

This Blender tutorial is show you how to use array modifier to make rectangular, polar and path array, check it out!!!
tepid wagon
@glossy tangle I think you need to hide half of your mesh and than go to your UV and move the island somewhere else to unstack them
proud wadi
here someone's doing it the other way
tepid wagon
@proud wadi Ok, thank you for your help!
proud wadi
no problem! @tepid wagon
@glossy tangle You'll have to select the other half and flip it. Although I should warn, your texture and everything is already set up to be mirrored
if you flip the other side of the head UVs there wont be anywhere on the texture map to put them
so you'll h ave to re do the textures
what's the goal, do you only want to add a mole on one side?
or do you want to learn how to UV and Texture from scratch?
glossy tangle
Thats fine. im not affraid of having to repaint i just dont know how that was done to begin with and trying to wrap my head around it.
Well, im trying to add the mole to just one side.
glossy tangle
but if it means relearning how to uv i dont mind...
the more i knowt he better.
Oh! good idea too. transparent png on it...
 wooden gust
yo I Watch child porn
tepid wagon
@glossy tangle It was modelled with mirror modifier and unwrapped. The UV islands have been stacked on top of one another and they stay that way even after modifier have been applied
proud wadi
unless you hit "mirror U" in the modifier
glossy tangle
Ok im sorry if i seem a little dense at this... so i select the whole face... edit mode, u to unwrap... all over again or what was this about selecting half and unhiding? ?
 daring karma
<@&397642795457970181>
tepid wagon
@glossy tangle If you try moving an island it will move both I believe so to prevent that you need to have only half of the mesh selected for example half of the characters face. It will cause only half of the island to be visible in UV layout and then you will be able to move it independently
by island I mean a part of a mesh that has no seams so it is a single piece on the UV map
glossy tangle
oh! i see what you are saying
managed to get both to show now
but they seem to be the same side.
tepid wagon
Good. I actually just tried it and was able to move them independently even after selecting both though
Just press L to select entire island
glossy tangle
aha
tepid wagon
You may want to leave them stacked however to save up space if both parts will look the same
glossy tangle
true... just trying to find ways that give me more liberty to modify the texture. \
tepid wagon
It depends what texture you want for it. I had to have everything that is in the center of my avatar unstuck on the UV as I was getting visible seams as both skin and cloths have texture to it
proud wadi
Great tips @tepid wagon
tepid wagon
I see so it won't be symmertical I guess
proud wadi
getting rid of seams is tricky, being able to paint in 3d makes it easier
glossy tangle
right. trying to find a way to make it antisimetrical but it seems the best option is just redoing the uvmap...
proud wadi
I love substance painter for that
yeah agreed, if you want it to be drastically asymmetrical. you'll need to start over on the UVs and Texture
tepid wagon
@proud wadi #4987 I made my texture in Substance and used triplanar mode (I think) and the seam wasn't visible on the face but was visible on cloths for some reason so I decided to separate the islands
glossy tangle
Ok one more question about texturing...
lets say I took a model, re-made the breast because I dont like mega-milks-jugs on the model...
The way i did it was delete existing breast, and extrude new shape and form it. then when i went into uv map, it was missing... so i selected the missing mesh section and hit unwrap... it put two circles on the map... but not connected at all to anything.
this is what i ended up with (again same issue of body being 1/2 mesh only...
tepid wagon
Well you created new pieces of mesh that need to be put on the texture somewhere
glossy tangle
but now its a pain if i wanted to paint chest area...
tepid wagon
Can't you just scale them down? I mean the old ones?
If you were to scale them down they would stay on your UV map
glossy tangle
i tried scaling them but they were so huge... DDD didnt look right
tepid wagon
Are they gonna be symmertical?
tepid wagon
I think you can reconnect with "weld" or "stitch" options
glossy tangle
i ended up with two meshes... so i just stacked them.
Weld/stick in the uv map?
i mean as it is its attached to the model... it was extruded from existing mesh
its just not attached in uv
tepid wagon
Yeah, the options are visible if you press T and go to "Tools" and "UV Tools"
glossy tangle
i really appreciate you helping will try. brb
tepid wagon
I think if you select one vert the otherr one should be then highlighted and you may than stitch it, I'm not sure though
daring karma
don't wanna derail, but I ironically have a substance-related question
anyone know why my textures would look alright in substance but warp/get messed up in Unity when they're the same mesh?
tepid wagon
@daring karma Unfortunately I don't remember this happen to me and I don't know what is wrong. That is cool clock btw
daring karma
Dang, I was thinking maybe it has something to do with Unity's triangulation - but I have no clue! It does it in a few other spots too, I'm tryina chase it down 🤔 (Thanks btw!)
tepid wagon
@spiral sigil Idk but I googled: Magenta can mean two things AFAIK, either the shader is broken or you have an unassigned material; The latter is the case here.
spiral sigil
Im new to this whole uploading a model thing so Im not sure what most of that means lol
tepid wagon
Did you create material and put texture to it?
 pulsar kayak
you might want to switch the shader, either the shader is missing or its corrupt
try using standard or Unlit for now
i'd recommend to get a simple toon shader from some kind of website
or whatever look you are aiming for
switching the shader, select both materials (pink spheres), on the top right in your unity there is the inspector
there you can select some built-in shaders, as well shaders that you imported into your project
spiral sigil
thank you so much
formal wave
I need help on how to color this.
Someone mentioned that I need to unwrap the shapes by making seams first, but I don't know how...
 stable edge
Select edges -> edge -> mark seam. Select all of mesh -> UV -> unwrap.
glossy tangle
im having some issues getting dynamic bones working on a model im editing.
I can get it working fine on ears and tail, but not on breast. I can move breast fine using the bone that is weighted, but when assigning dynamic bone, it does nothing even after inputting the settings. It acts as if all Axis are locked.
anyone heard of that behavior ? if so what to check?
looks like i have it weight painted correctly... see anything wrong? Does it have to be two bones?
yet in here... nothing.
 fringe rock
simple
in blender subdivide your bone
so you have 2
dyna need a end bone. sort of
https://youtu.be/xJ9xzCRr0gY?t=456 watch this for a few second @glossy tangle

I show how to work on a king's raid model to work in VRChat but it apply for a lots of game models. 14:31 - Full Body Leg Fix 16:15 - Eye Tracking 22:52 - Vi...
@glossy tangle
glossy tangle
Thanks. Will try that in a moment.
@fringe rock once subdivided do i need to assign the weight to the tip? As it is now, subdivited, the tip has no weight
fringe rock
no need to have weight like i done in the video . 💁 Did you try at least
you can overight the unity file so no need to redo all the components
glossy tangle
well i subdivided, but there are no weights assigned to the tip...
im staring at a purple mesh...
trying to make sense of it for a sec.
fringe rock
If you dont understand what I just say. Cant help you
glossy tangle
fringe rock
I show how to work on a king's raid model to work in VRChat but it apply for a lots of game models. 14:31 - Full Body Leg Fix 16:15 - Eye Tracking 22:52 - Vi...
I never mention weigh paint In my initial explication. why you bring that up. In the video I say boom here you go.
glossy tangle
I mentione it because after subdivide of bone, the tip does nothing. I assumed I have to add weight paint.
fringe rock
boom here you go
 dull canyon
https://i.imgur.com/FTwcBU7.jpg so when you're sculpting a model, how are you supposed to do the cavities for eyes and mouth and such?

I just went in with the draw brush and pushed the mesh in so the eyeballs will fit, but I feel like that's not the way you're supposed to do it
 uneven saffron
anyone here willing to teach a poor fellow or at least know a video for me to learn basic modeling in unity
tepid wagon
Unity isn't really made for modelling. You can put in some basic shapes and scale them but thats it. Use Blender instead, it is free.
uneven saffron
oh ok thx
tepid wagon
Download Blender 2.8 and learn using it. There are more tutorials on 2.79 but 2.8 has more user friendly UI and you should be able to learn it faster
 zenith relic
blender 2.8 is a little easier to use...and helps in some cases to build faster.
but also u need a decent comp for that too..
graphic card required.
dull canyon
https://www.youtube.com/watch?v=gfEyhPXsOCM&list=PLqsAe_7tKzCWqJ0_ZQ1ALUTw80CFmQtk6&index=7&t=0s so if I did my eyes like this in Blender, would there be any way to actually import it into unity to retain all those effects?
Free PDF on Gumroad: https://gumroad.com/dannymac Navigation :- Ch 1 - Intro: 00:00 Ch 2 - How to Watch this Tutorial: 01:25 Ch 3 - Modelling: 02:33 Insertin...
like, the shine and gloss and everything
I guess the actual texture for the iris has to be baked
and for the gloss I guess a roughness map, assuming the shader supports it?
glossy tangle
Hi, so i used cats to try and apply full body fix... but im having some issues im not sure how to resolve. my character ends up looking like this in game...
when it should look like this...
So i switched from humanoid to generic, applied and switched back from generic to humanoid... applied again seems to have fixed it. Old meta-data? Seems to be fine now. I wont know for sure until i get home to try it on full body.
 fresh dragon
Yes that is how u fix that @glossy tangle
 indigo stirrup
What would be the best way to fix this mess of normals? https://bocchi.is-pretty.cool/5bhpdaw.png

 quaint jasper
Select all and make normals consistent
indigo stirrup
like, recalculate normals? cause that aint helpin much
I went the lazy way, duplicated the vertices and flipped them
quaint jasper
Make normals consistent is a blender action
quaint jasper

 hollow radish

 thorny fractal
the antichrist has returned
quaint jasper
You mean our lord and savior Blender Guru
thorny fractal
to each their own
 hallow bough
Why the anti christ xD
 wheat delta
Real-time donuts
 frosty plinth
 quaint jasper
The rotation seems really wrong, isn't the bone tail supposed to be in the center of the eye mesh ? @frosty plinth
frosty plinth
The eye bones were wonky, so i just used it the way it came as... ill fix it later on.. 😄
quaint jasper
Also interesting to use automatic weight paint instead of assigning weight through vertex groups
frosty plinth
Thanks
 vivid crater
Donut maker is back 
 desert crown
@vivid crater do you know if the back-top matters when rigging for the bone "chest" ?
is it both top-back and top-front?
quaint jasper
It's everything around the bone
desert crown
thanks ruubick! just needed to make sure
desert crown
vertex weighting is much more accurate than weight painting, but slowly
quaint jasper
I wasn't aware there was a difference
 glad steeple
I wasn't aware either, can we get a source?
desert crown
well i'm doing it through vertex group as you see there on the screenshot, not sure if thats your meaning of vertex weighting, but it does mean vertex weighting for me if i am not wrong. Based on this video. https://www.youtube.com/watch?v=4mCkZ0ouNz4

How to make custom jiggle avatar??? Tutorial covers: - Creating breast bones - Linking breast bones with vertex group - Applying dynamic bone script to breasts
ofc it all started with this video
ever since then i decided to expand not only the breast, but also other mesh and rig from there.
i do use mixamo to already rig the basics bone from before hand, everything else like hair, clothes, breast are extra added bones and then proceeding as that video described
quaint jasper
Yeah I guess it's a method, but it's rough as hell
desert crown
yeeee
but very accurate
no clipping for 1st result if you do it carefully
@glad steeple was that the source you wanted?
glad steeple
I can't watch it right now but I do appreciate it
desert crown
sure
 copper slate
Does anyone have any advice for how to add decent looking fingers to a model that has none (A knob for hands)? I haven't really done much with models themselves up until this point apart from the usual porting/bone rigging
I'd assume the whole hand would need to be reworked
quaint jasper
You could find a free model, take the hands and add them to your existing model
copper slate
... Why didn't I think of that. Thanks!
 azure rain
https://translate.google.com/translate?sl=ja&tl=en&u=https%3A%2F%2Fbooth.pm%2Fen%2Fitems%2F1381874 this model has some pretty good hands that are very reasonable in their polygon count

■■オキュラスクエストを想定した2A-7の軽量化版です■■ ――――――――――――――――――――――――――― 3Dのキャラ素材としてご使用ください。 ワールドで使ったり、シェーダーで使ったり...
frosty plinth
@desert crown I’ll make a tutorial when I get to it...
desert crown
with the vertex weight group?
its the best rigging by far, it just takes a long time
frosty plinth
DM if you need a push
desert crown
i'll keep that in mind thank you!
 lament pond
hallow bough
lament pond
hallow bough
When doing retopology would you guys recommend using a subdivision modifier or adding as many verts as needed manually?
quaint jasper
You should look into RetopoFlow plugin
 blazing hill
yo, how do i select all the children of a bone in blender? ya boi arion is using blender for a bit ree :S
tepid wagon
Select parent bone -> Shift G -> Children
blazing hill
ty @tepid wagon
 potent pond

ArtStation
I love his designs... rawr
here the process.... I NEED OT LEARN HOW OT USE PROPERLY THE TOOLS LOOK AT THOSE HANDSSSS AHHHH
https://www.twitch.tv/videos/476195205
Hiroki-Art
https://twitter.com/hirokiart
Last model that i did
Video of the process it's on the description :3
OC design it's from Hiroki (Hiroki-art) named Hiroyi-chan~
potent pond
Thankies! (i do really need to do hands better next time lol i was a pain ;_ ; )
quaint jasper
Were you able to turn the previous one into a VRC model ?
potent pond
Not yet, sadly since i'm trying to make some models for a portfolio to move abroad soon as i can
(My country is blowing up economically, Argentina)
But as soon as i have a free time i gonna go back to work in the other one, i need to do like 2/3 more models to have something to show.
;_ ;
The only one that i could make into VRchat (More than my OC Miushy) It's the Death love and robot Cutie

ArtStation
I watch the series on netflix and a friend requested me this model to use it on VRchat,
So i made the model for gaming.
few friends rigged it and another friend made the visemes
quaint jasper
That'ss awesome !
potent pond
So yeah as soon as i finish a few models more i gonna be doing retopo and optimizing it for Vrchat :3 ♥
quaint jasper
Also, what hardware are you working off of ?
Sorry I meant if you were using a tablet to sculpt 
potent pond
LOOL
I cleaned it
No, i sold my Tablet
so i can move abroad
all of that is pure mouse
potent pond
Europe / Spain / Barcelona
I've double citizenship so i can stay legal
😚 the most important fact hahahah!
There is so much stuff i want to model :eyes_shaking:
i've 4 in sight, also i saw in VRC traders a few comissions that even if they pay for it i kinda dont care lol, i gonna do them just for fun when i have free time.
quaint jasper
Better to get paid !
potent pond
That for sure, but if doesnt happen then i just gonna do it anyways (just not telling the owner until it's done and maybe the person do like it ~) I wont mind donations! hahahha
 onyx juniper
@potent pond As soon as I saw him in that episode I thought of VRChat
It was inevitable
potent pond
insert thanos meme
yeah same, but never thought it was going to be me the one who was going to make it
hahahah, but a friend told me "i want that avatar", so then i said, "Wait i can make it", and i did it lol
 slender holly
that is a vey broad question for a very difficult question
are you wanting to modify an existing model or create from scratch
tepid wagon
The easiest way would be to put it together from some primitive shapes, rig and weight paint it
azure rain
but downsides you look like you're from the 80s CGI
which I suppose you can make work
tepid wagon
I just told them what is in my opinion the easiest way to make a 3D character, which is what they asked for, they did not specify any particular type of 3D character
slender holly
Honestly, you dont need anything except blender.
Theres some good courses on Udemy
but you dont need fancy tools or expensive programs if you want to create from scratch, youre just gonna need to start learning the basics of blender, Bevel, modifiers, textures, UV mapping, Rigging anotomy and other things

Udemy
Udemy is an online learning and teaching marketplace with over 100,000 courses and 24 million students. Learn programming, marketing, data science and more.
@void shoal
so in short theres no real easy way of making 3D models by scratch, if you dont want to be just another kitbasher on deviant art, you need to put in the work
azure rain
and even if you were an MMD kit Basher you need to learn blender
azure rain


@Mrdodobird Thanks for letting the world peer into the eyes of the lazy man, How far can we go? What about a single texture for a whole scene? https://t.co/CRirtxyHrW
 Twitter
glad steeple
Twitter
glad steeple
I did this for the Junkyard & Crafty Climbers 😊
 mossy tendon
ah yes
a place for 3d modeling
anyone mind to give me a helping hand with blender?
potent pond
I skip your question , I'm a Maya / zbrush modeler lol, if I knew blender I would tell you 👌
tepid wagon
If you don't mind telling what you need to know than maybe someone will be able to help you with Blender
quaint jasper
Not a modeling question but yes
@potent pond Are you ever going to give blender sculpting a try ?
potent pond
Damn yes i will! ♥ , i've seen videos around of Blender 2.8 and they look damn good. Even Rendering with Eve and Cyclops i think they are called. I've seen retopology tools and even Addons that are kinda Marvelous designer.
I'm prepared to receive in my life Blender, i have a secret mega list of addons for what i actually do, but for me i need to understand first the UI, i'm kinda.. Lost and mostly is the fault of been multi program.
I know 3dMax, Maya, Zbrush, Modo, (almost nothign blender), 3Dcoat, Mudbox, Substance painter, Marvelous designer, Photoshop, Meshmixer, etc etc. And allll those UIs are conflicting in my head all the time.
Tried Blender long time ago when i started playing Vrchat in January 2018, so i could learn how to do proper videogame avatar (I normally do advertisement and it's much different lol, at least the workflow we use here).
But Blender scared me a bit and mostly because it's a new UI to learn and re discover stuff. I want to skip the basic tutorials but i cant :eyes_shaking:
Funny fact is that... many friends know that i support CAT TOOLs, i'm the first button on supporters, i've been there since 15 months .... but i dont know blender so i just support because i know many people use it, and supporting their effort in the tools is giving people the chance create more stuff, and if they create stuff i can enjoy their creations too so we all win lol-
So resume, Yes, i will but first i need to work on this portfolio thing i'm doing to escape from here with my actual knowledge lol.
Gotta go fast @quaint jasper
Time is ticking and i've 2 months left Awooo!
quaint jasper
I believe in you !
 silent tapir
quaint jasper
silent tapir
quaint jasper
@silent tapir if you're making a robot you should look into using the mirror modifier, you only need to make half the model and the otheer side is automatic
and it'll be symmetrical
spiral sigil
for something one starts
 gentle sonnet
Hey, got some issues with blender when i try to fix my model or merge any armatures to it.
Was working completely fine with no problems earlier, then i exported the fbx and put it in unity but had to go back to blender and now it crashes whenever i merge armatures, fix model or join meshes.
 old field

 covert fractal
So I have a model someone made for me for free. It has an auto-blink thing going on.
Problem is, when having an 'Eye Closed' animation (in Unity) and the blink fires, the blink goes through the mouth.
Is there such a thing as being able to do an 'Anti.Blink' BlendShape to counter this, that I can slap into the toggle animation which would disable the blinking (while also achieving the desired effect)?
old field

 open terrace
@covert fractal you can have "empty" shape keyses for vrc blinking, extra Animator on Body with self maded blink animation and disable it with animation on trigger or emote, timecode about how to disable animator https://youtu.be/sbL9k0VA4OY?t=723
also you need to change files from binary to text: Edit > Project Settings > Editor > Asset Serialization Mode > Force Text
covert fractal
Ok, but I do not know how to actually disable the auto blink (in Blender) that he had set up. I don't think it's a ShapeKey. May've come with the eye tracking, I guess?
Where do I look for that?
old field
Empty vrc.blink left and right in blender make sure they stay in same order
dull canyon
so, when sculpting in blender... when should I use relative and when absolute detail for dyntopo?
I'm using relative detail in areas that need more detail but when I then zoom out and work on an area near that high detail area it always produces ugly artefacts
open terrace
@covert fractal yes it's eye tracking that enables with visemes, you can import that model in blender with installed cats addon, remove first 4 shape keyses after selecting Body mesh, then in cats panel in eye tracking tab disable blinking and keep eye tracking enabled, that will create "empty" shape keyses for blinking, after export as .fbx to unity
 wet moss
How to fix this issue?
https://www.youtube.com/watch?v=yNZ5snPpTSg
https://www.youtube.com/watch?v=TsQLIA2peJM
child object transform always in broken state after re parenting or changing child object


 small cloud
@wet moss apply transforms with ctrl+A
 zinc egret
Does someone know why this looks all rippled and not smooth in object mode but looks smooth af in sculpt mode? did i set something weird up?
If i put it into Unity its messing around with the fake shadows etc.
 amber idol
Go into the same meny as shapekeys, there should be a tab called normals, turn off auto smooth
zinc egret
Oh wow
So i accidently activated that ? or is it on by default now?
never used to be activated i think
zinc egret
it never used to activate so i was a bit worried
Thanks a lot for the fast answer!
Appreciated
amber idol
nps 
zinc egret
@amber idol pardon for the ping, i've seen a "Double Sided" checkbox as well there, would it be helpful to have that checked ? I remember people that disabled my shaders in VRC would see partially holes in my hair because it was every now and then a strain was flipped
amber idol
Yea it dosen't hurt to have that checked :> Might not do anything though when you put it in vrc. Try messing with your shader if so
zinc egret
I see, thanks again 🙂
amber idol

wet moss
@small cloud It does not works: it's just applies transforms relative to "virtual" origin, but changing object to object in relations breaks everything
 gritty dagger
So Im a beginner when it comes to modelling, and Im really struggling with how blenders lighting works. Is this object just missing geometry or why does it look so patchy? (Smooth Shading, with Blenders default Mat, Auto Smooth Normals turned off)
spiral sigil
you subdivide?
tepid wagon
It is stretching shading like that because it is lacking an edge loop close to the edges (If it is HP) or it lacks sharp edges (If it is LP)
gritty dagger
Sooo as I assumed its just lacking Geometry?
tepid wagon
If you modelling high poly, yes
Why is it already triangulated?
Triangulating your mesh may be necessary to properly texture it but you can just put a triangulate modifier at the end of modifier stack and tick apply modifiers in your export options
Triangulating mesh like that makes modifing the model more difficult and time consuming, try working with quads
gritty dagger
I imported that model
tepid wagon
Oh, I thought you made it
gritty dagger
So I subdivided it (a lot) and it now has over 2 MILLION vertices (way to many) and it still doesnt really look much better if you ask me... so is that because its triangulated?
tepid wagon
If you intend to use it for VRChat you can ignore those shading issues if you use cartoony shaders but with standard shaders it won't look good
wow xD
I think it should look alright with triangulation let me test something
Shading changes just slightly after triangulation it seem, but not much
gritty dagger
well then is that just how it is? Does it just look awful in Blender, or is there something fundamentally wrong?
tepid wagon
WIth that standard shading in Blender everything looks bad except for flat planes
Try matcap
Press N -> Shading -> Matcap
See if it changes
gritty dagger
Still quite visible seems
tepid wagon
Very first one that is light gray should look much better already
gritty dagger
It does this to a table (better angle)
tepid wagon
The table seem to have normals inversed
Maybe that hook also had it's normals on the wrong side
go to edit mode, press A to select all, than press ctrl+N to recalculate normals
spiral sigil
just don't worry about the end result, you use textures on that and shader
tepid wagon
If it won't change anything press T-> Shading/UV -> Flip Direction
gritty dagger
These are the normals
tepid wagon
Looking good
gritty dagger
Well I know that shaders and textures can do alot
but Its still weird that the lighting is just completely unlike anything you would expect it to be
tepid wagon
Try hitting ctrl+J to untriangulate the mesh
spiral sigil
in blender it looks but in unity not, and VrChat less
tepid wagon
This one is very simple so it should be able to do it
Yeah, like I said - If you intend to use it for VRChat you can ignore those shading issues if you use cartoony shaders but with standard shaders it won't look good
Do you know what shaders you gonna use for these?
gritty dagger
Well I dont intend anything for these models right now. Im mostly just experimenting with different things. But assuming you want a Shader that works correctly with Unitys lighting (or even a PBR shader) then Toon wont do it
Also this is what Cycles Renderer does with the Table
tepid wagon
If you untriangulate this you should have only rectangles
gritty dagger
Ctrl+J does nothing
tepid wagon
I think with this asset you could than just select all with A, ctrl+E -> Mark Sharp, than go to Object Data (Vertex Groups) -> Normals -> Select Auto Smooth -> set angle to 180
gritty dagger
its Alt+J
tepid wagon
oops my bad
gritty dagger
Well alright that worked for the table. Because its a very simple shape
but that is not often the case
tepid wagon
I created a sphere and triangulated it and it still looked alright, idk what is wrong with yours
and I even made quite a low poly one
Try untriangulating these round parts too, see if it helps
than press W -> remove doubles
gritty dagger
Well Im gonna fiddle around with it a bit more, but thanks for helping so far
tepid wagon
If it won't help just redo them, those are very easy to do
Idk exacly how many poly would be reasonable for this hook (hopefully it is a hook) but it should be closer to 100 than a milion, so try to make it around this value
gritty dagger
Well I used those models because they were rather easy. Do you expect me to remake all models that I do have similar problems with? ;P
tepid wagon
All of them have shading problems?
If you place them in a world using soft lights or dim lights may be enought for those faults to not be visible
vivid crater
try turning on auto smooth and tweaking the angle if you have to
if you have it on shade smooth it just assumes everything is smooth, even the parts that are supposed to be sharp edges
potent pond
last model i did today
almost 3 am
@quaint jasper
💋
Spinel from Steven universe movie
quaint jasper
Wonderful !
potent pond
i ahve teh T posed saved just in case
before i fucked up everything for posing lol
now i gonna go sleep
3 am here almost
and i need go work in 5 hs 
quaint jasper
good night and good luck !
potent pond
💋
and funny fact
that's 1/3
THIS is my Original Idea
now i need to model the other spinel
and finish the background
and in them middle of the spinels, 1 spinel crying
 solar fossil
What a madlad 
potent pond
ahahhahah 😘
potent pond
when i do this models i normally sleep 4 hs
Kinda i get excited
and i want to finish it :eyes_shaking:
and normally thart happen around the 3/4 am
but now i gonan take a bath
and go work
this gonna be a loooooooong day
lol
slender holly
when you first started your journey into this art medium, did you have that drive when you were first beginning?
Im kind of in a weird spot between beginner and intermediate, i work on it every day, but its more of a feeling of "I can't miss a day, no matter what i have to keep going" which isnt i feel is a bad feeling, its nice waking up with a purpose in mind.
Im just not at the stage of enjoying it and being able to work on it for hours without focusing hard
I mean i enjoy finishing a project and i have had that euphoria of acomplishment, but i guess it feels like limbo for the past couple of weeks
potent pond
I have been working in advertisement for over 7 years, joined the placed wanting to learn character creation, ask me how much characters I did.. Almost none. Every work I did there I dislike and the things I like will never come, I learned zbrush to show them I could do more, they don't even bought me a simple Wacom or bamboo, I got demotivated and stop my grow, letting myself sleeping. I were like that until I joined vrchat. The moment I knew there was another world and then that I COULD make that world changed my motivation. Start woke up since Jan last year when I first joined. I met wonderful people. I'm rusty and what you feel, I feel the same looking at artstation masters. I don't even know a proper workflow to make my lvl grow up yet, same advertisement for over 7 years same and same for so many time, what is my drive then? I don't wanna go back in that routine limbo of disappointment, I gonna keep pushing even harder, even if that takes my sleep away. The you are not something is already settled if you don't push, that's why I fight for the i'm something, I wanna be.
slender holly
Wow, I needed to hear that.
thank you.
You know, its kind of like going into a dark tunnel, it's hard to see the end result, but i know theres gonna be a light at the end if WE keep pushing forward.
potent pond
Just let you know I dropped a tear typing that, because been able to type that down and acknowledge it, after so many time and finally waking up, somehow feels like I finally accepted me.
slender holly
Yeah im pretty emotional too because you kind of described my feel for VRchat, I want to give people a place to go and a place to be. a place where its disfuntional at times, but the connection with people is unlike anything else i've experienced before.
Can't wait to see what the next few years of virtual realities future, I believe its a bright one.
azure rain
yeah I'm excited for the potential of virtual realities
 opaque jolt
Are there any good tutorials on 3D Modeling in Blender?
And i mean 3D modeling as in taking a sphere and working on it with different tools
 reef lotus
as in sculpting?
there's a few tutorials online, but they generally just go over the tools
quaint jasper
You can give Sculptris a try first
glad steeple
You dont have to start with a sphere also.
potent pond
Spheres are cool b ruh
You can always start from a base
like a MMD base and then do the props to practice
Or you can use a base body and then start modifying it as you want
opaque jolt
I wanted to try making a few character parts from scratch
I mean at least the face
Even if it turns out a bit nightmarish
Most of my avatars up to now were slaughterbits edited together
Like MMD base and adding stuff
Or taking stuff from some and compiling them
Wanted to try and make accesoires or the heac by myself
But for that i need to learn how to sculpture, how to add it to a MMD body and how to add it to the skeleton
Or even try making an avatar from the base up
Although i heard rigging can be difficult
Or rather creating bones
quaint jasper
For a beginner i'd recommend starting off of a sphere really, you need to get used to the tools first
potent pond
Sadly i dont know blender to drop you a hint or make a tutorial but i normally start from a sphere in other program 👀
 potent pond
Listen to Ruuubick~
quaint jasper
Yeah i'm the one with the least experience so i'm closer to him 😄
potent pond
oh i see :3
quaint jasper
At least that's how i started and i loved it
i feel like if i had to start in blender or zbrush i would have felt overwelmed
potent pond
probably
 coarse kestrel
 quaint jasper
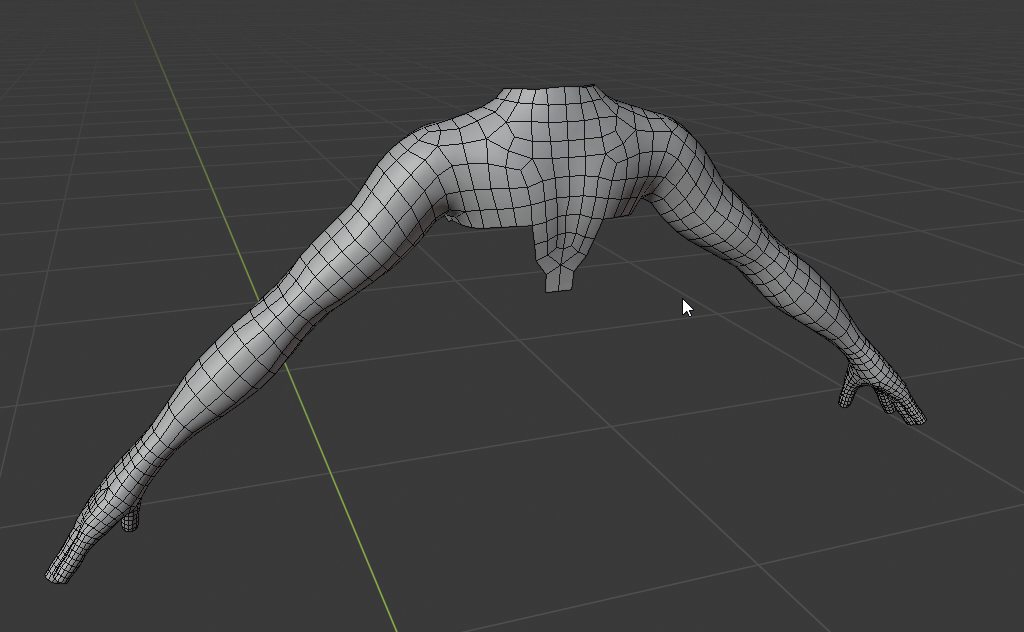
Do you create the edges around bends before or after weight painting ?
coarse kestrel
You mean making tris on the elbow, fingers and knees? yeah. i usually do them right before weight painting. as they're kinda just a minor edit.
I like to keep the retopo process quads only.
opaque jolt
So you would recommend Sculptris over Blender for modeling?
Will try to remember that
slender holly
well its more of a starting point
opaque jolt
Ahh okay
slender holly
remember that "modeling" is a very broad term
saying modeling means like 60+ different things
opaque jolt
That is true
quaint jasper
Sculptris is like a tricycle before a bike
opaque jolt
I want to learn how to create 3d objects by myself.
So you can do stuff easier but not as good?
slender holly
so like Low poly objects?
quaint jasper
Yeah, it's a very simple program to teach you the basics
you only do stuff on a sphere
but you can export that to blender if you want
slender holly
What i would do is research exactly what you would like to do, theres tons of things you can specialize in. Hardsurface, Repto, low poly, Architecture, Texturing, UV mapping ect.
That way you can focus on learning the stuff youre interested in learning.
But i highly suggest getting used to the UI of the program youre using, so look up on some basic blender tutortials and mess around
opaque jolt
Mhh both things i can use in VrChat (so low poly i suppose), but also something i can learn to join in when my high school holds a game jam or month long game team again (not for programming, but just for creating objects and models)
slender holly
Okay, so you most likely will want to learn how to model assets for the game engine unity.
opaque jolt
Won't i need to know that for VrChat avatars aswell?
slender holly
Yeah, Low poly is a great place to start
you'd be suprised on how uncommon it is to make a avatar out of scratch
coarse kestrel
cough
slender holly
so it takes a lot of work and dedication, but if you learn the trade, you'll be able to make a career out of it.
if thats what you want to do
thats my dream someday
I've been modeling for like 8 months and have barely scratched character modeling
coarse kestrel
I'd say learn blender and stick with it, you can do just about everything most other tools can do without costing your arms.
opaque jolt
I am shit at drawing but i am good at 3D thinking and making characters by slice and dice
So even if i won't find a hobby with it, i can at least create characters or ideas i can't draw on paper
slender holly
im shit at drawing too, but im forcing myself to learn because i want to draw logos and concept art
you dont have to learn 2D art
im just stubborn
opaque jolt
So Low Poly Blender, will have fuuuuun searching tutorials xD
quaint jasper
@opaque jolt Try sculptris for a while, try to make something, if you enjoy it, get Blender
opaque jolt
Okay
quaint jasper
If you start right away with blender i'm afraid you'll get overwhelmed
slender holly
http://puu.sh/EfmLT/062f412f60.jpg this is a base mesh for a character i tried making with no scultping whatsoever

Oh god the hands what was i doing
opaque jolt
Hah, i got overwhelmed with the blender tutorial pinned on this discord
quaint jasper
it's very outdated
slender holly
oh yes start on UI tutorials
quaint jasper
blender 2.8 is much much better
tepid wagon
People not making stuff from scratch isn't anything surprising. The amount of work you need to put in isn't worth it if you just want different avatar
slender holly
and make sure to view "blender 2.8 tutorials"
opaque jolt
The problem with that video was that it is not sculpturing, but making things by dragging and adding edges
I updated to 2.8 already i think
slender holly
Eh, Im stubborn Kohi, Im obsessed with doing things on my own.
quaint jasper
uninstall it completeely
slender holly
And yeah mac thats what i did, you can make a very basic avatar and rig it with only edge loops and cylinders
quaint jasper
there isn't, you get it on their website
quaint jasper
you can install it again
opaque jolt
Dont want to have to search them all again x.x
quaint jasper
takes 10 seconds
opaque jolt
Or will plugins be kept?
slender holly
yeah use 2.8, its a lot easier imo
probably not no.
but if you keep on using 2.7 its gonna be harder to find tutorials as time goes on
quaint jasper
tbh there's an immense list of tutorials for 2.7 because it's been there foor so long
but 2.8 has easier workflows to get into, the tutorials are easier to understand
slender holly
i started in 2.8 beta and it was difficult because tutorials were scarce
and im so glad i stuck with it
feels like im ahead of the curve a little
opaque jolt
Could someone please send me the link for blender 2.8? Dont know if its because i am tired, but i cant seem to find it
quaint jasper

GitHub
:smiley_cat: A tool designed to shorten steps needed to import and optimize models into VRChat. Compatible models are: MMD, XNALara, Mixamo, DAZ/Poser, Blender Rigify, Sims 2, Motion Builder, 3DS M...
opaque jolt
Thank you
3D Modeling is a subject that interested me as a child already
I learned most things for the way i made avatars by myself or with help of others
(Watched the creating avatar tutorial, but that is not what i mean. I learned most things related to taking existing 3d models apart, editing them slightly and putting different things together)
I basically frankensteined my way up to now
glad steeple
Kitbash
opaque jolt
But i want to create something by myself
quaint jasper
nice !
opaque jolt
I was known for my stupid ass Pikachu avatars a year or so ago (had to leave VrChat because of university)
The only thing i did up to now that you could really call creating an avatar was taking an existing 3d model of a mimic, splitting it into its basic objects, making it so it would correctly open is mouth while talking, adding 6 pairs of legs to the body and adding them to the bones.
slender holly
Just make sure you get consent from creators when you kitbash
glad steeple
Like theyre going to get permission from nintendo to be a pikachu 😒
slender holly
i've heard of people getting hit by fines by using trademarked textures
Im talking about models created by other people blue
glad steeple
Oh, i guess humans didnt make the pikachu models, eh? 😉
tepid wagon
Got fines by using avatars with said textures or by selling avatars with them?
opaque jolt
If it is ripped from a game, i use them freely
glad steeple
Not specific to VRChat* kohi
slender holly
blue im not sure what youre on about
glad steeple
You said "models made by other people" i was pointing out that theres still a guy or two at nintendo who made those models
it was mostly a joke, 😅
slender holly
@tepid wagon selling them, hasnt happened on VRchat from what i hear, but selling assets on the unity asset store with copyrighted textures is a big nono
you can create a pikachu from scratch
So i was just confused
glad steeple
You can but given the context clues, it was clear it wasnt.
tepid wagon
Oh, I never expect someone to be that well educated
opaque jolt
Or if it is stuff like glasses or hats i either take them from ripped models or from people who dont ask to be credited or who put them out for free usage
slender holly
Yep, I'm just giving you the same warning other creators will give ya
Textures are the main thing to watch out for
don't go into google images and just copy and paste any texture you find on there
glad steeple
check licenses before asking, sometimes they will deny, sometimes they will be open and not require you to ask.
opaque jolt
How difficult is it to create textures btw?
glad steeple
Depends what you mean
opaque jolt
I watched a video by Oney where he showed of flesh textures and renders
slender holly
Texturing is easy, UV mapping is the tricky part.
opaque jolt
UV mapping?
glad steeple
UV mapping is easy, just tedious
If you have an idea of what your texture is going to be its simple enough
slender holly
Think of UV mapping as transfering a 2d image into a 3d object
its about removing seams and adding extra geometry without actually modeling the object.
I know what im speaking is probably gibberish but its real easy once you spend a bit of time learning it.
opaque jolt
I understand a bit what you mean
Quick question for you peeps. Do you tend to make more realistic avatars (MMD level ones) or rather cartoonish looking ones?
tepid wagon
Cartoonish in form with realistic textures in my case
Wait what? Why did you change it so it seem like MMD models are realistic?
They are not
glad steeple
mmd is not realistic 😕
tepid wagon
You could say PuBG models are realistic, while Fortnite are not
opaque jolt
I do not say they are realistic
I mean with cartoonish looking ones stuff like the two-legged coyotes for example
And title those on MMD level as (more) realistic
tepid wagon
so you meant as close to realistic as mmd models?
glad steeple
So not realistic at all
opaque jolt
Or ones on MMD base
I don't think you can do realistic ones on VrChat apart from putting full body photos on models
glad steeple
You absolutely can
tepid wagon
Mkay but please don't use world "realistic" when speaking of mmd models
it was confusing
glad steeple
Its just unity, you can do realism.
opaque jolt
Okay, i should have phrased it as MMD-level or human-ish
tepid wagon
Think the two legged coyote would be called furry although I'm not sure
Correct me if Im wrong
so you could ask do you tend to make human models or other creatures
azure rain
yes a two-legged coyote is furry
tepid wagon
uhh
azure rain
that would be a very unstable coyote if it had no front legs or arms
glad steeple
I feel like id prefer it that way
azure rain
but yeah anime people not realistic in the slightest
vivid crater
I think they just mean human looking in general
glad steeple
even then its a stretch
vivid crater
Vs like a super small chibi
tepid wagon
They are simplyfied so they are easier and faster to draw
We recognize them as humans yet at the same time it's easy to tell they aren't really humans
vivid crater
We recognize non humans as humans a lot too, silly facial recognition 😳
 latent charm
Pareidolia and Apophenia are great
opaque jolt
Okay, then stuff like Ugandan Knuckles, most video game characters in the likes of Mario, Kirby, Bard
Or chibi yes
tepid wagon
I don't like these very much. They keep asking whether I know the way but I don't know
azure rain
yeah the only sort of realistic looking folks around here are folks doing like make human avatars or some of the mixamo avatars
latent charm
Hello Hi my avatar looks realistic (for some people a bit too much, it's great)
azure rain
mind if I see a screenshot
tepid wagon
@latent charm Are you that guy who makes selfies with other ppls butts?
latent charm
Sure hold up a sec, (note didn't model it since I don't enjoy character modeling)
And yes, that's me
Unless there's more
 tepid wagon
Did you make that model yourself?
glad steeple
He just said, no.
latent charm
... LITERALLY the image I was going for Blue
tepid wagon
oops
glad steeple
grate minds fink alike
latent charm
All the shaders I did myself though.
Which when you're dealing with a realistic model are pretty important.
No use making something as realistic as possible and then just slapping a toon shader on it and calling it a day.
tepid wagon
it would look wierd
glad steeple
Awful would be my word of choice
latent charm
Absolutely! Since nothing in the real world has perfectly sharp shadow terminators like toon shaders have
vivid crater
If you're actually going for realistic ye
azure rain
that's why you would use the standard Shader for a realistic person
latent charm
Or in my case the standard model with preintegrated subsurface-scattering
vivid crater
Some cel shaded games have pretty detailed models that would look pretty real if shaded different
vivid crater
Nah, let's talk about the butts gal takes pics with 😳
They look pretty good half the time
latent charm
Well I was about to bring it back around to modeling with how Guilty Gear XRD's setup was heavily dependent on the models themselves and their GDC talk is well worth watching since there's a fair bit in there about the modeling & UV trickery they pulled off.
azure rain
yes It was a very fascinating talk to watch
vivid crater
A lot of people now a days who look for a cel shaded style refer back to that gdc vid
azure rain
even though that's certainly not a good way to do quick and dirty cel shaded as their setup is rather complicated
vivid crater
probably not a task for a single artist like a lot of people here
unless you really wanted it perfect
azure rain
and most folks aren't going to put up that kind of effort as most folks just kitbash MMD models
tepid wagon
It is the best way to make yourself a personal avatar if you take both effect and time spent into consideration though
azure rain
myself I doing mods to the hyena avatars
vivid crater
yea, making an avatar from scratch for the very first time is a daunting task
tepid wagon
or so I think cos I never tried that, I watched some tutorials though
azure rain
yes it is very daunting
tepid wagon
Quite frustrating as well as you correct the same thing over and over again
vivid crater
ive made bodies before, but not hair
and as it turns out, the thing ive never done is giving me the most trouble right now
opaque jolt
The only good thing about Ugandan Knuckles is the creativity it sparked
azure rain
be honest most folks here in probably be slightly more content with a second life type system as far as putting avatars together
opaque jolt
I mean like the dark souls armor that opens up to show a ugandan knuckles behind the helmet
slender holly
Honestly if we had a second life system where we could attatch body parts together instead of having to make an entire model
that would be insane
hell maybe udon will have something like that
it would be so user friendly and would spark creativity for people who dont have modeling experience and would open the floodgates for new users.
latent charm
And for users who have a base body, being able to swap outfits without having to do it in unity would be amazing too.
slender holly
Y E S
I would love to make clothes omg you have no idea how much fun i would have.
pretty much what you can do is make a base mesh of a clothes and sell it on the marketplace and make it modifiable so other users can texture it and make cool patterns
tepid wagon
Wouldn't that only work if your avatar be quite standard sized human though? One of VRChat selling points is that your avatar can be anything
slender holly
Thats why you make the clothes only compatible with a certain base avatar
latent charm
Yeah, from a software side it'd be pretty difficult to do, or be limited to humanoids only.
slender holly
or you can script it so it comforms to your torso
but if your avatar is large it will most likely cause distortions
latent charm
My guess is some way to do it would be you attach a component to your avatar (or a special mesh or something) and that defines where on your model what body areas are, and the software re-fits it to that.
slender holly
yup! basicially how second life does it
where you can attatch an item to a body part
you can also resize and adjust the size of the item in the actual client and adjust it to fit your body
azure rain
and also the trickiness of the way Second Life is kind of the opposite direction of trying to have as few draw calls as possible with texture atlases
latent charm
It's also kinda how I fit clothes in blender.
Duplicate the body mesh (minus un-needed details), add shape key, expand to fit clothes, bind clothes to expanded key mesh with surface deform, set expanded shape key to 0, apply modifier on clothes. Whoosh. Fitted to new body shape.
slender holly
Second life also has this cool thing
where you can drag a texture from your item list and just put it on an item
so you can actually open up about selling Textures on VRchat as well
Say you sell a blank shirt mesh and affiliate it with a brand
somebody can make textures and map it to that specific model
so all a user has to do is drag and drop it into the model
tepid wagon
I saw VRChat is hiring someone to deal with game economy or something
slender holly
Thats what im referring to. I imagine that UDON will hopefully make character creation easier.
azure rain
yes that would be quite Nifty but hopefully vrchat actually bothers to enforce having avatars be optimized and not have the face mesh has more triangles than is in allowed on an avatar on vrchat like second life does
slender holly
Second life has a very outdated but extremely powerful network from what people tell me so they can handle a high polygon count
tepid wagon
uhm they recently made it so that we are no longer limited with tris count, didn't they?
slender holly
I'm not entirely sure, I havent played SL in like 4 years or so
latent charm
In VRC yeah, there's no 'limit' now. I mean, once you go over 70k you instantly get marked as very poor 
azure rain
weighted incentivize not using your entire Avatar budget just on a face
tepid wagon
I find 70k limit to be very high, model with 70k tris can have tons of details with really smooth mesh
slender holly
For newer modelers 70k is extremely low
latent charm
If you're going for realistic your poly budget should definitely be weighted towards the head overall though
azure rain
yes but you shouldn't use more than a triple A video games triangle budget for a face
slender holly
I'd like VRchat to do their own spin on these things
take the good from SL and other user created content platforms
latent charm
I'm just under 70k and I think about 1/3 is on my head 🤣
tepid wagon
I don't like there is no poly limit anymore
slender holly
and maybe do their own spin on it and maybe give us something new
tepid wagon
Think my avatar tris budget is about the same Gallium
azure rain

polycount
Since people are always asking "how many polygons are in next gen games?" and this is a website for making art related to video games, I want to set up a thread keeping count of it all!
latent charm
Kick your safety settings to poor and it'll nuke almost everything because lol performance ranking system
slender holly
I think a lot of features we are missing and isnt being replaced probably is going to be introduced in udon
i dont think VRchat want a broken game.
Sorry, unfinished
but its a early access game so im willing to cut them some slack
tepid wagon
I payed nothing for this game so I won't demand anything from it but obviously making it better will make me visit more often
 small valve
kind of related but i always wanted to know this
i remember like a month ago some peeps talking in vrc-general about how "the vrc team should really just upgrade from tris lol," i think in a joking manner
whichh is to imply that there's other ways of rendering meshes (live) other than through tris, which i did not know about
they named it but i completely forgot what it was, im just wondering why someone would want ot use something other than tris in a video game
maybe im not remembering it correctly and askign a rlly dumb question but i swear i distinctly remember this
'i dont see any other way of going about drawing meshes so...why?
speaking as someone who justbarely knows enougha bout 3d modeling to make shitty low poly quest avatars in blender
slender holly
honestly i dont even know what upgrade from tris means lmao
azure rain
all video game engines rendering tris okay technically voxel engines draw in voxel
tepid wagon
Low poly doesn't equal shitty though
latent charm
Well, kinda, in some contexts yes and also no and sometimes maybe.
They might have been talking about how unity can do some stuff with quads directly?
small valve
i know i know, im calling my first and only quest model shitty cuz it was the first time i ever tried >u>
slender holly
like are they talking about Ngons?
small valve
ah. ehh...maybe?
slender holly
Im confused
small valve
i literally have no idea
azure rain
and a lot of folks are waste triangles cuz they're trying to decimate MMD models
latent charm
At the 3D modeling level, you've got tris, quads and ngons
All of which can be used while modeling but considerations have to be taken based on what you're doing and what you're using.
tepid wagon
The idea of changing meshes of tris to something else...can't imagine and even if you throw in quads and ngons they get changed to tris anyway
azure rain
and in the engine it's all triangles
latent charm
For example if you're using subdivison modeling techniques tris & ngons can make shit go real fucking weird, especially regarding edge loops.
tepid wagon
Well edge loops only travel through quads
latent charm
Exactly
small valve
thats what i was thinking, i just wanted to clarify whether i was right or wrong. i also cant see how a computer could render a mesh in any other way than "ehhh just draw a line from this point to that point uwu"
slender holly
it really sounds like the dude had no idea what he was talking about tbj
tbh
I dont know how you upgrade a shape
latent charm
you'd be shocked at some of the shit people come out with. Accusations of normal maps causing lag 😡
small valve
nomral map
slender holly
jfc
latent charm
Yup.
tepid wagon
There is also that way of rendering CAD software uses, rendering with curves etc
azure rain
that's how you prevent lag by using less triangles? and handing the lighting to the normal map
latent charm
Which still ends up as tris eventually.
slender holly
lmao if you think blender has a learning curve trying to learn a CAD program is yikers, thats what machinists use
latent charm
Triangles are amazing because it's literally impossible to make them nonplanar.
small valve
dude, there's like "i have 20 materials and think tris dont matter" bad, but then there's "i have 200 materials and think normal maps cause lag"
how the fuck
tepid wagon
If normal maps would be causing lag than game devs wouldnt be using them instead of adding more tris
slender holly
"Bake my textures? is that some sort of candy from china?"
azure rain
the joys of user-generated content
small valve
user-generated content by teenagers*
tepid wagon
If I were to import avatar to unity and see 200 materials I would say f**k this and quit this project I think
slender holly
the entire reason normal maps exist is to generate geometry without modeling geometry
azure rain
that's mostly just stolen Japanese models intended for offline rendering & video games
I would say it's more accurate to say it's for having more detailed lighting with less geometry
as you still have to model all of that detailed geometry to bake the normal map from
slender holly
Depends on if its a bump or normal, they are similar but i feel like bump generates a more 3d feel
latent charm
Yeah, normal maps don't create geometry.
small valve
the way i explain normal maps is "its the greatest illusion. they tell the lighting engine how to light a surface in such a specific way that when you look at it, it forms a 3d pattern." then i just show them my hair and thye're like "ohhhh"
azure rain

Support me on Patreon ➜ https://www.patreon.com/DanMoran Follow me on the Twittersphere ➜ https://twitter.com/DanielJMoran Get the Assets for this Video here...
small valve
grossest explanation but hwatever
slender holly
Idk about you guys but i use a normal map generator and that works for me like 99% of the time
idk about you guys tho
small valve
i havent had to use a normal map gen in so long
latent charm
It's not far off. They basically say "hey, I'm pointing ◀ this way 😉" when it comes to shading.
slender holly
or i just do it in Krita
azure rain
that's not going to get you quite as detailed normal Maps compared to baking from a high poly
tepid wagon
Normal maps within each of their pixels save data about the normals which makes them kinda like a great array of tris which you can wrap your model around with
small valve
i only ever see a need for normal maps in like my hair so i have like one tileable map i repeatedly use
latent charm
Awesomebump is great for generating normal maps from textures. Not gonna be 100% accurate but with enough paramater fiddling the results are pretty good.
slender holly
i think i was mixing normal maps and displacement maps as far as explanation goes
whoops
small valve
@galllium im aware uwu, i just prefer to see if people get it intuitively first. then if they want more info i get technical and go "uwu so like this color = this direction" and what not
latent charm
Might be, displacement is intented to change the geometry in some way, combined with a tesselation shader and they can look really nice.
slender holly
only problem with displacement is for it to look REALLY good you have to add tons of subdivions in my experience
i may be doing it wrong though.
tepid wagon
Using "non-technical" description of how something works you came up with means you understand how it works. Memorizing a formula doesn't make you necessarly understand it
latent charm
At least with shaders in unity you can have view-distance based tesselation, so it just subdivides based on how close the camera is, and not on a per-object level but a per-tri level, so the entire object isn't being subdivided evenly.
slender holly
explaining things in a technical aspect is hard for me especially
I try to use euphemism and analogies
or atleast i tend to.
tepid wagon
Does Unity changes LOD on its own or do you need to provide several models of different quality and tell it at what distance use which?
azure rain
you need to provide lod models as it doesn't have an auto generator
tepid wagon
gotta use that decimate modifier
azure rain
there are better ways to make LOD models then that like you can get pretty decent results with Furniture just removing Edge loops
tepid wagon
Removing edge loops takes more time though
or much more time depending on how complex it is
WIth modifier you only move a slider
azure rain
yes and it makes a big mess as it doesn't know what's important or not
considering basically the decimate modifiers completely unusable on faces and hands
as it completely butchers the topology
tepid wagon
I see. To be honest I never used it, just tried it out
Think it connects faces based on angle
azure rain
pretty much which means it's going to end up butchering the loops required for the animations to work
tepid wagon
aye, but how about a furniture? Seem pretty reasonable to use it on those
azure rain
yes but Furniture probably is not going to have such over the top density that you couldn't just remove the loops yourself
tepid wagon
Maybe I should make some furniture first before trying to prove my point :p
azure rain
or you could just try downloading some off of sketchfab
tepid wagon
I want to become 3d artist so I try doing everything myself
azure rain
which is why it's important to learn how to do stuff not half-assed
and using the decimate modifier on everything is half-assed
azure rain
yes there is a place for automatic LOD generation but that's slightly different than using the decimate in blender when it would just take 30 extra seconds to do manual LOD by stripping off some Edge Loops or turning off the bevel modifier
quaint jasper
decimation is faster and easier, the point of LODs is retaining the general shape with a lower poly count
azure rain
 tepid wagon
Why are there so many tris there? For displacement texture to have more breathing room?
azure rain
or vertex painting
as vertex painting is used quite often in the AAA game industry for texture blending
tepid wagon
If that wall was to be visible from that one perspective only than 18 tris would be enough
azure rain
you would require more than 18 to make the part of it that sticks out
and you're not only going to see it from that one perspective so a normal map wouldn't cut it
 tepid wagon
I should have said visible from that side only, so there would be nothing behind it
 tepid wagon
so if other side was flat than 24 tris would suffice
azure rain
okay but the point is being that's not an LOD that was made by decimating
tepid wagon
I just don't understand why is there over 300 tris there
Maybe they are made from modules so to say
azure rain
I don't know all the details about fortnite Works to know if the extra geometry was required
tepid wagon
It would be possible to make them destructable
azure rain
to make the closest LOD as silhouette wise it looks pretty much like the next LOD

Unreal Engine
Learn how the new Proxy LOD tool, which was essential for shipping Fortnite on mobile, provides massive performance advantages by reducing rendering cost due to polycount, draw calls, and material complexity.
here's the article I was grabbing the screenshots from
and no that's not it as they just delete the whole wall piece when you destroy it
vivid crater
a lot of people in blender use the multires modifier since its pretty non destructive so you can go back to a lower poly version by just lowering the subdiv count again
potent pond
@quaint jasper finished finally ♥
slender holly
That looks amazing!
potent pond
Money? i did for love to art lol. What money hahahah
potent pond
buuuuuut today a beautiful person gave me a donation ;_ ;
 gaunt abyss
That looks amazing
 silent acorn
seriously, that's smooth as heck! nicely done!
glad steeple
👀 good
potent pond
Someone posted it on StevenUniverse Subreddit
and oh boi lol i never had so many likes in my life
hahahhahaha
But it was the Character without the Diorama so i posted the diorama
and oh boi
i'm so happy it was so well received ;_ ;
vivid crater
Well deserved, it looks great
vivid crater
Do you have an artstation?
stable edge
^^
 tulip condor
hi
i'm a pretty annoyed because if i want to make some avatar in blender
or import some avatar to blender i get default opened options and i need to delete camera,light and shade target every time i open blender
so is there a any tutorial how i can implement customized saved
___.blend file in context menu in registry so i will be able to open:
.blend, .fbx, .obj, .dae, .pmx etc.etc file's from context menu
so for example if i go to unity project folder
and click on some model file type then to open-up context meny and find
open with ___.blend file (not blender.exe).
btw
if that matter's for modifying registry,
i'm using windows 10
any help ?
small cloud
ctrl+U = save startup file
potent pond
@vivid crater

omg
keeps going up lol
never had such a feedback like that
normally is 10 likes
hahaah
quaint jasper
Now get that money !
tulip condor
wow it work's
thanks a lot 
@small cloud
potent pond
IDK Ruubick i think i gonna get a Copyright problem... BUUUT i think if i make a Gumroad and place it free so people can donate i wont have any trouble.. right?
quaint jasper
Ah fair enough yeah, though individual commissions should be alright, if it's anything like Etsy
hallow bough
Donations for your work are perfectly fine I'd say 😃 Seems to be a gray area as far as selling copyrighted character models. People still do it though but if you want to be safe just do original commissions and accept donations 👍
reef lotus
Patreon is a good choice as well
reef lotus
yeah it's a monthly thing, but lots of people do support artists through patreon
quaint jasper
@potent pond You could release High quality version of your renders for lower tiers and maybe the models or some of the pieces for higher tiers
potent pond
what i dont understand for example is that in turbo squid they sell models from Copyrighted characters
And it's like... what? lol
For example you look for pikachu
and there is stuff with 99 USD price
but Pikachu belongs to Pokemon
game freaks and nintendo
So idk why they are able to sell that then 🤔
reef lotus
yeah fan art is a pretty grey area, but most companies don't seem to mind too much
daring karma
I've seen a straight up game asset rip on TurboSquid before for like 80+ USD 🙃
 rugged mountain
coarse kestrel
rugged mountain
coarse kestrel
Legs aren't bending in the correct direction. make the legs completely straight vertically and then push the knee out a tiny bit @rugged mountain
 coarse kestrel
Mhm, I do. I tried using Zbrushes remesher but it just wasn't giving me good results nor did I trust using it as well, it's real obvious when you use it. @quaint jasper
Also doing it manually is kinda relaxing
quaint jasper
Do you rely on a blender plugin ? Retopoflow or something else ?
coarse kestrel
Nope. I used to use the snap to surface feature the last time i did retopo a couple weeks ago. but this time I tried using just the shrink wrap modifier which I'm pretty sure most retopology addons use heavily? The only addon I actually use that helps with this is Smart Fill that just makes the F key toggle between grid fill and the normal face fill.
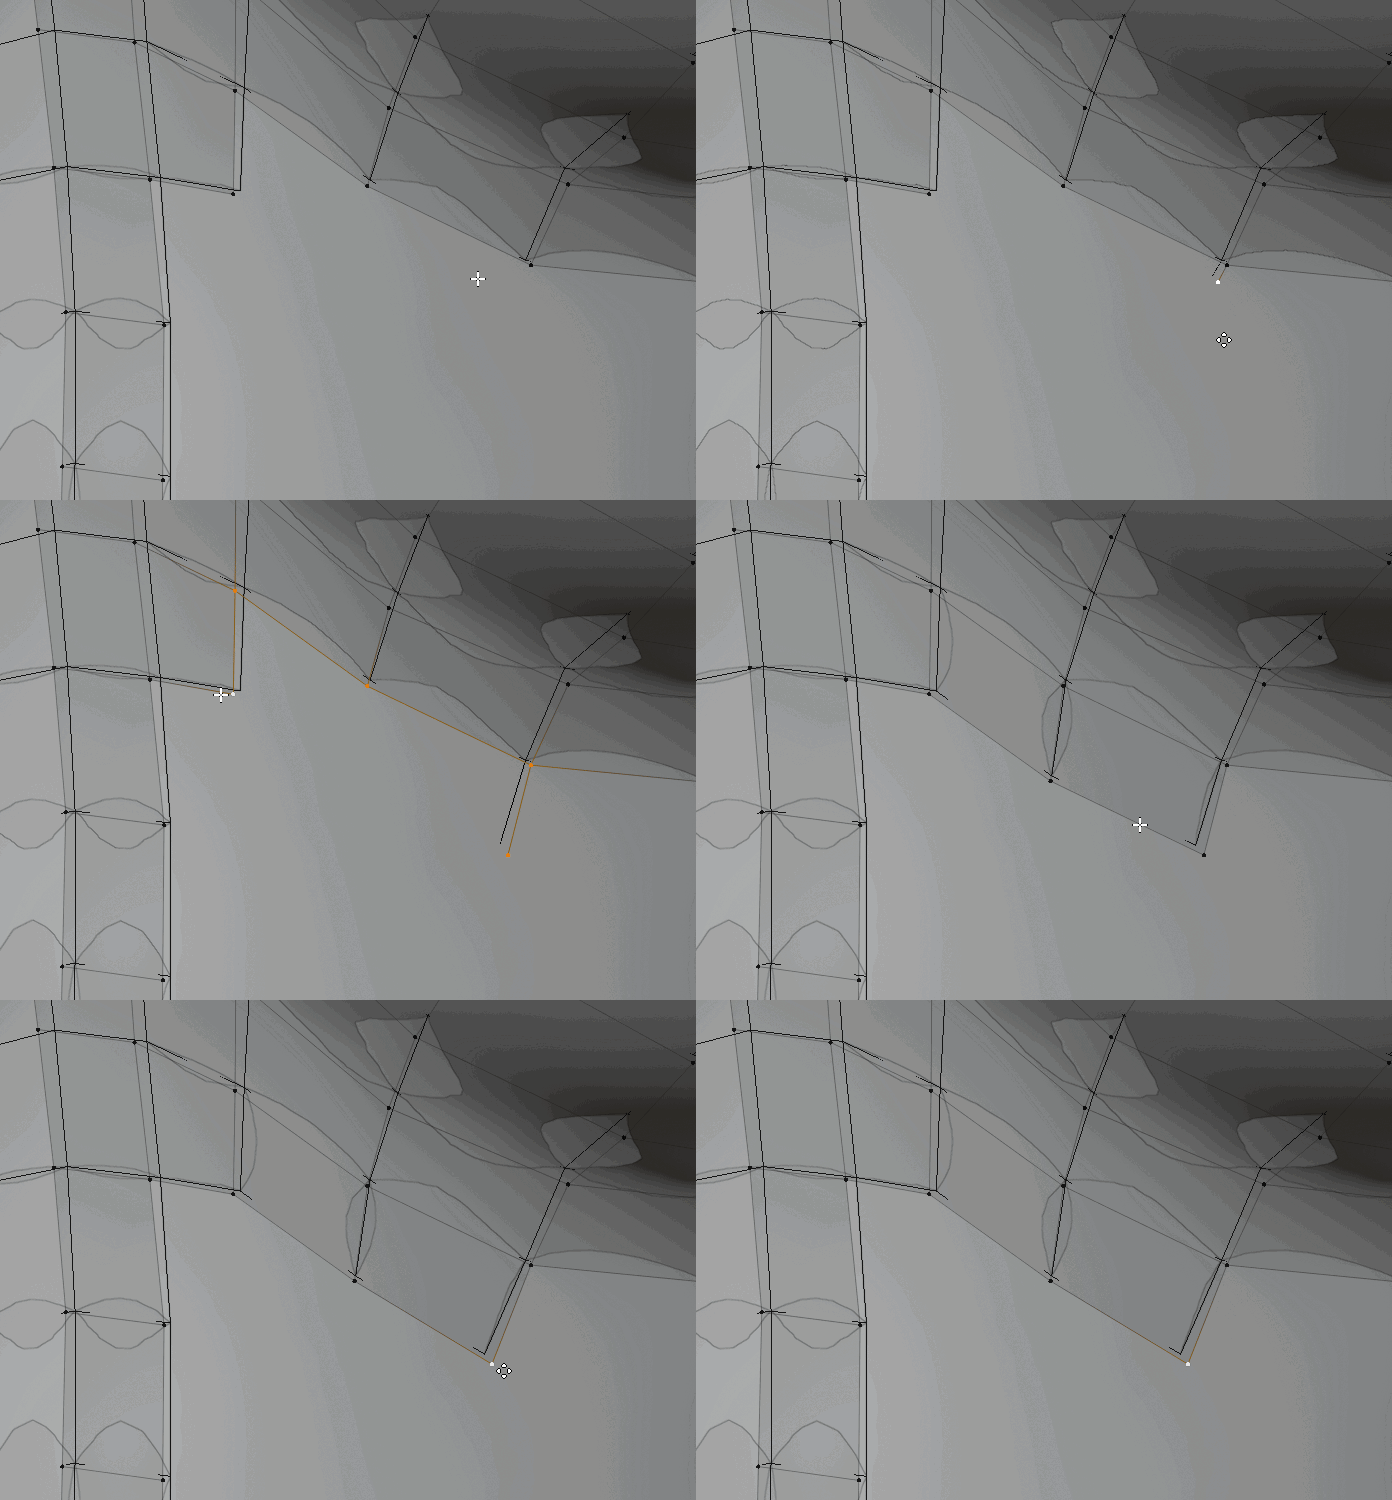
Then after I've done a large section I'll go back over making sure everything flows smoothly
I religiously avoid any tris during this phase besides the comical amount of poles https://i.imgur.com/Z7VMgpl.png
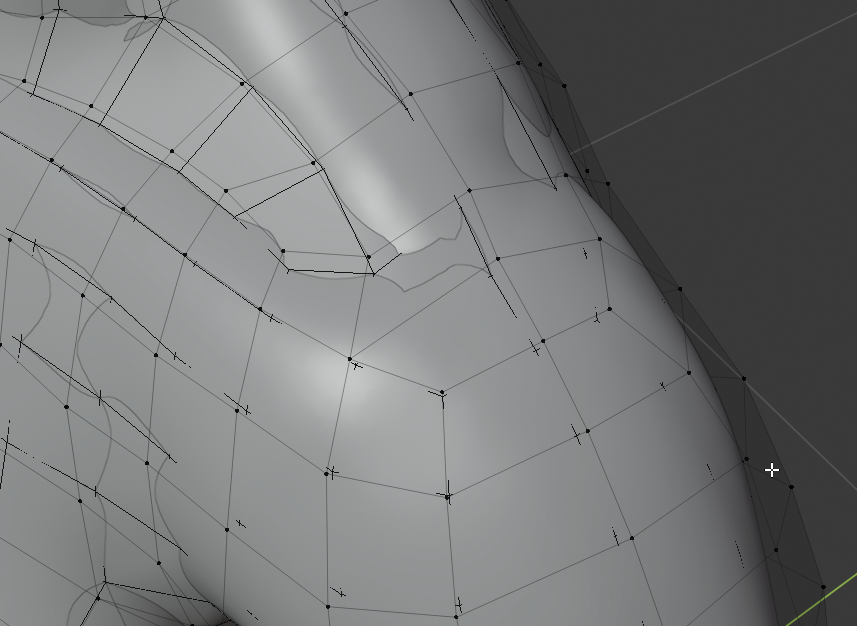
Of course if retopoflow finally comes out for 2.8 I'll be sure to get it. as much as i enjoy retopology it takes a good while.
However when I do this I typically end up with models that are only 12 - 15k tris
spiral sigil
uuuffff
quaint jasper
impressive !
 thin bison
latent charm
thin bison
latent charm
If you really want to you can grab the 2.8 branch of Retopoflow from their github page, best worth just keeping an eye on it to see how development of it is going for a release, since it's unstable as hell right now.
 cold plank
@coarse kestrel ! thank god someone else knows how to do retopology
retoflow in 2.79 is okay, then I go immediately back to 2.8 to bake textures
@latent charm tried that last week and it wouldn't even install
@coarse kestrel look into F2 addon
also, do you use the HQ mesh to do a bump/normal/specmap?
you should
because then your low poly retopo will look almost every bit as good
coarse kestrel
Yup, I bake the AO and the Normals from the HQ to the retopologized model then I go into substance painter to do everything else. though I could probably do all the baking from substance using the HQ model. I'm not all that knowledgeable with substance just yet but I'm learning it. @cold plank
https://sketchfab.com/3d-models/blazo-23175d0af9174a1e9bd3f7711784ae0a This is the last model I made using these techniques

A commission for blaz <3 - BlazO - 3D model by Lexidoll (@ragdollomg)
 dusk turret
You bake AO in blender?
Substance Painter can do AO baking with a normal map and it's bloody fast!
coarse kestrel
Except it doesn't look right at all to me. I can try it out for this model but substance seems to give wacky results sometimes
cold plank
then I would have to use substance painter. 😛
coarse kestrel
substance painter is a god send
dusk turret
Alright, at least you've tried it. :P
coarse kestrel
I was actually thinking of painting the AO myself this time
cold plank
pretty decent results. Do you have a <7k version?
coarse kestrel
7k version of substance? huh?
coarse kestrel
I do not no, I wasn't asked to make a quest version but I doubt I wouldn't be able to get it down that far.
cold plank
and yeah, if you bake normals/AO from the HQ model the bumpy details are godlike
you probably could. It's really easy to look incredible with a normal bake like that
7k is necessary for quest
well, under 10 anyway
coarse kestrel
For my next public base model i do intend to release a quest version of it. But that's gonna take a while.
And I'm not even sure how many people will make use of it
cold plank
this is a poor example, but: https://www.youtube.com/watch?v=p4o-sgp8PSU



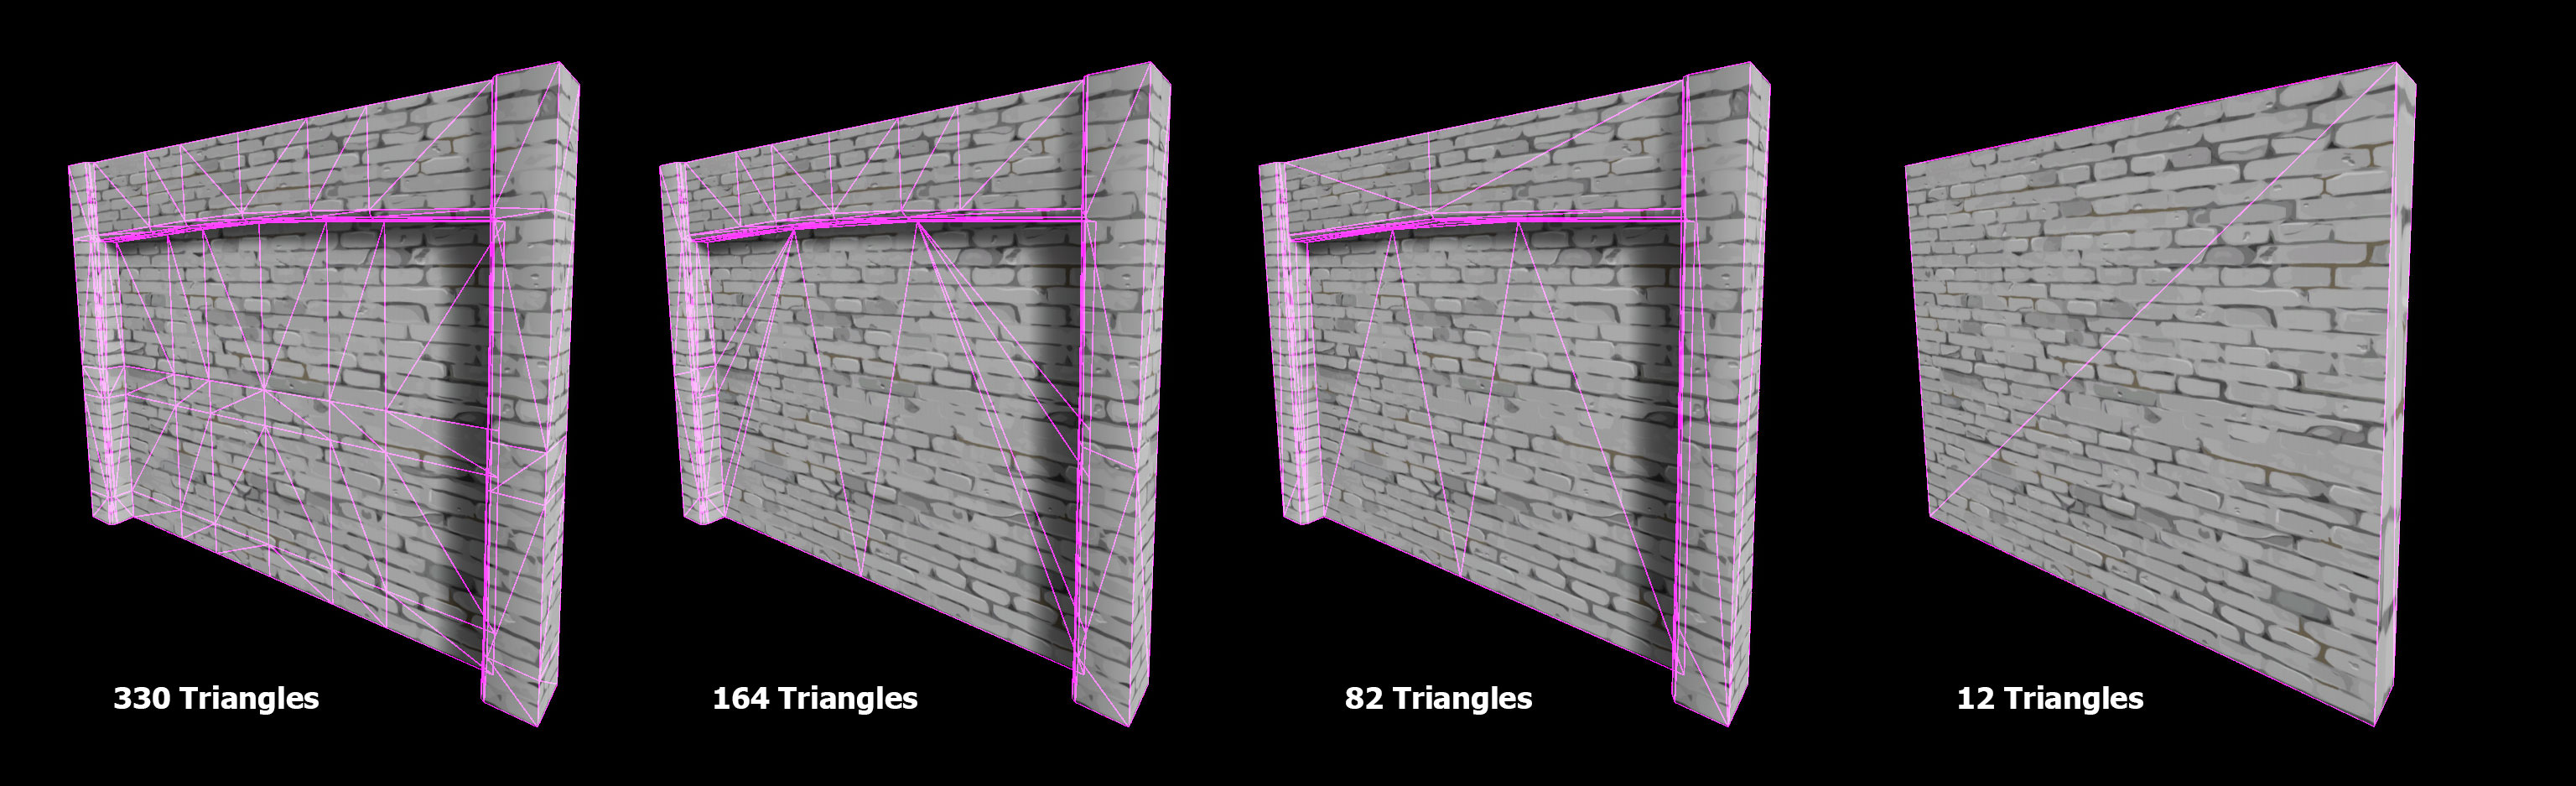


trust me, many many users are on quest
you may not even notice because the look like everyone else unless you check
that model is 5k. It's not one we made, I just did significant mesh edits - but my wife is a god with textures
imagine that with a normal map
coarse kestrel
Fair. But I've yet to really have a need to make one. back when I made the lexichi v4 the quest wasn't even out
cold plank
the thing is, even if it's not up to your standards, they really, really apprecate
it
coarse kestrel
Everything has to be up to my standards :P
cold plank
when you see vrchat through their eyes at a fairly big meetup it's dissapointing most of the time
sea of robots, one or two users with avatars, and those are usually new users still on the default row
coarse kestrel
But I'll see if I can make a quest version of this renamon
cold plank
My group stands out like ketchup stains on a white sheet: usually if you just remove some loops it's just fine
with a smoothing shader you won't even notice the vertex blends
and keep in mind, you won't have to look at it 😛
 toxic zephyr
Im kinda new to this and what im about to ask is kinda unrelated but can you use any assets from the unity store for vr chat or is it specific ones
cold plank
even if it's half decent, you'll be praised for considering them
@toxic zephyr yes, you can. Anything without a script or that doesn't require a script on export to function (like probuilder, standard assets) will work in worlds. Some addons are white listed
all shaders that compile for pc dx11 work on pc worlds including compute shaders and all shaders that compile for android work in worlds
coarse kestrel
Still wonder why more scripts haven't been whitelisted from the asset store like dynamic bones and finalIK was.
Thought the whole idea was that people were untrusted with uploading their own
dusk turret
(Compute shaders?!)
cold plank
@coarse kestrel because of forward compatibility I imagine. Many more things WERE but they also need to consider security being one of if not the largest sandboxy virtual world to exist today
toxic zephyr
Ok so scripts are available just only some ones that are whitelisted?
cold plank
The following is the complete list of scripts usable within worlds. Components that are not in this list will not work. ## Unity Components - WindZone - VideoPlayer - Tilemap - TilemapRenderer - Terrain - Tree - SpriteMask - ParticleEmitter - EllipsoidParticleEmitter - MeshP...
Here is a list of the components you are allowed on avatars VRChat - VRC_AvatarDescriptor - VRC_IKFollower - PipelineManager Unity - Transform - [Animator](ht...
@dusk turret yes, compute #shaders can be an incredible adjunct to custom 3d modelling, though that's a better channel for it
toxic zephyr
Thank you friend i appreciate the help❤ @cold plank
cold plank
anytime! can't wait to see what you create
dusk turret
We can't use them though!
cold plank
I was fairly certain you could use some aspects of them unless that's changed
and if that's not the case, how on earth does the atari 2600 world work
cold plank
many people pay for assets for vrchat, don't worry
dusk turret
@cold plank Custom Render Textures
cold plank
I misspoke, you're correct
toxic zephyr
Ik they do im just saying hopefully i can make something good with the money im spending
cold plank
I bundled them together in my brain my apologies, render textures are one form of arbitrary scriping you can still do in vrchat I suppose
dusk turret
Well, they're more like storage. :P
cold plank
oh, here's something I haven't played with, standard assets are whitelisted, correct?
but on avatars? does the lookattarget script work there too
humm
dusk turret
You linked it yourself. :P
cold plank
lol anyway, way off topic now. 😛
more on topic: https://www.youtube.com/watch?v=xTwOaSSMqAk

See it ingame: https://vrchat.com/home/launch?worldId=wrld_7644eab0-6408-42ab-8088-454c32c08768 Unseen from the world this Community lives within the vast Oc...
Maebbie did a great job, the world looks great.
blazing hill
yo, i selected my nails of my avatar, made that a unique material (left and right hand into one) how would I change the UV mapping to have that a texture like this can apply to the nails in the middle of each nail?
cold plank
@blazing hill I actually did a tutorial on this recently but I'm not entirely satisfied with it