
#3d-modeling
1 messages · Page 1 of 1 (latest)
 spiral sigil
 lone blaze
Just finished modelling this


 lone blaze

 devout scroll
nice
 pearl crystal
Is there a world i can look for to find creators? I am new to VRchat but have years of Blender designing and would lile to find some like minded folk to learn from
 harsh saddle
pearl crystal
Is there a world i can look for to find creators? I am new to VRchat but have y...
harsh saddle
pearl crystal
Is there a world i can look for to find creators? I am new to VRchat but have y...
You can check the top worlds in the world browser to find some skilled world builders but they aren't all going to be willing to show you their process. I'd just start becoming active over at #world-development you can learn a lot there.
spiral sigil
I was following along with a tutorial and switched windows and my cube looks like this when I open it this isn't a sign of future problems right?
 devout scroll
uh oh
spiral sigil
all I can really say is that it disappears once I click something
 odd scaffold
Hey, I'm trying to use Blender Geometry Nodes in 3.2.1 to add fluff to my model. When I use them, the generated geometry seems to lose the weight paint. Does anyone have experience with geo nodes?

I tried using Named Attribute -> Store Named Attribute but it's really hard to even tell what blender is doing
harsh saddle
odd scaffold
Hey, I'm trying to use Blender Geometry Nodes in 3.2.1 to add fluff to my model....
I don't but I would assume you would need to do your weight painting after you convert your geometry nodes to an actual mesh. https://blenderartists.org/t/geometry-nodes-convert-scattered-geometries-to-mesh/1287642

Blender Artists Community
Hi all, I just started checking the new Geometry Nodes addition (great stuff, thanks to developers!), and I cannot find how to convert scattered objects to mesh (I don’t know if this is possible 🤔). If I apply the Geometry nodes modifier, the scattered geometries dissapear. Any help is appreciated, thanks a lot!!
odd scaffold
nope
I mean, sure yeah but that's so error prone
and I already weight painted the source model, so I just want to transfer it
heck, if I'm going to re-weight paint it, I could use Data Transfer to copy the weights from the base geometry, but some of the instances will end up closer to a different part of the mesh and stretch. it's going to look crappy
ike I have a source mesh which has correct weight paint. I'm trying to add something onto each vertex of the source mesh, and copy the vertex groups from the original vertex
harsh saddle
Good luck, for all I know it's possible but I typically think of weight paint as something that is used for meshes and not procedural deformations.
odd scaffold
this is a mesh
the idea is I'm trying to add something onto an existing piece of clothing
so each thing I add to it should be deformed based on the vertex it's attached to
harsh saddle
Well yeah but geometry nodes aren't just a mesh you can edit as you would a normal mesh, it's an entirely different system but hey maybe you can do it, I dunno
odd scaffold
I'm not trying to edit these as a normal mesh. I'm just trying to copy vertex data.
This is what I was doing before using geo nodes:

and it transfers the weights onto the instances perfectly fine
but I wanted to recreate exactly this but with geo nodes
(mainly so I can add some randomness and tweak the rotations slightly
If you don't know, that's fine. nobody on the internet seems to know either. it might be just yet another deficiency of geo nodes.
I'm just hoping someone would have a trick, since the old fixed function "instancing" system did it just fine
 lone bloom
Anyone here with experience in unity that can help wit htwo very surface level things? Ping me if you see this and can help~
harsh saddle
@lone bloom Hard to say without knowing what the question is, lots of people here with Unity experience, though.
lone bloom
fair fair so my questions are
1 - I used a hair piece as a nose ring (From vroid) and essentially want to make it not move in VRChat
2 - my eyes are wildin, they like look so far all over the place on her passive expression and i want to tighten that up
 red glade
lone bloom
fair fair so my questions are
1 - I used a hair piece as a nose ring (From vroi...
red glade
lone bloom
fair fair so my questions are
1 - I used a hair piece as a nose ring (From vroi...
Simple answer to the first, Remove it from the vertex group of the hair and be sure to check if its still part of the Head vertex group
And for the Eyes. Go to the eye sliders and move it to the Calm side it should be in the vrc descriptor
lone bloom
vrc descriptor gotcha, does the hair thing need to be done in VRoid or can i do it somewhere in unity if so where? (Also tysm)
cool calm eyes ez fix!
red glade
Well if you use the new Physbones you can select that hair bone but it wont move the hair bone its parented
Show me what you have made for the nose ring btw?
lone bloom
is there a lobby in which i can stream it to you?
red glade
Sure
lone bloom
pog
red glade
We can go into dm if you d like,
lone bloom
that suits me ya
spiral sigil
working on my first ever model, its actually so much fun! but very time consuming. :))
 quaint jasper
Another timelapse
 brave furnace
how well does auto smooth translate from blender to unity? been using it allot and would be a shame if it got lost on import
quaint jasper
brave furnace
how well does auto smooth translate from blender to unity? been using it allot a...
That is kept 
 unique whale
quaint jasper
Another timelapse
unique whale
quaint jasper
Another timelapse
You make it look so easy
I tried to make an avatar one time it didn’t work out well so I gave up
harsh saddle
I don't get how people can model characters from image planes either, especially when the references aren't t-posed but I find it's much easier to create something using the sculpt tools and then build off of that. You could argue it's more work but only if the 2D reference art already exists, otherwise it's just a question of which you're faster at producing. Once you have a sculpture, building the topology over it is pretty simple, if time-consuming.
 tired lantern

 spare kiln
quaint jasper
Another timelapse
spare kiln
quaint jasper
Another timelapse
yooo nicee
quaint jasper
Thanks 
tired lantern
harsh saddle
I don't get how people can model characters from image planes either, especially...
It easy. You use the reference photos as a guide to get a rough shape of the model. I use them all the time. One very important thing is to get good references and not to be over relaying on them
 tough isle
I'm trying to create a texture atlas. But when i click "Save atlas to..." It doesn't give me a prompt where to save it and just says "duplicate materials combined".
This never happened before
harsh saddle
tired lantern
It easy. You use the reference photos as a guide to get a rough shape of the mod...
But with sculpting, you can get the exact shape of the model
harsh saddle
tough isle
I'm trying to create a texture atlas. But when i click "Save atlas to..." It doe...
Do all your materials have textures on them? I've had issues with just using RGB materials
tired lantern
I use blender and I either paint them or make a Procedural Materials
 prime obsidian
any advice on how to separate materials in blender after accidently combining them together with cats plugin?
accidently done that when importing and noticed too late
harsh saddle
Never used CATS for that but if it's atlasing textures, you would need to assign each part that was originally assigned to its own material and then adjust the UVs back to their original positions. Not impossible but probably a bit time consuming
prime obsidian
is there a way to export uv maps or anything?? i still have the model from before i started editing it
or just like the assigned mats
actually that
since all materials got merged together for each mesh can i just export and import the materials BEFORE i merged them
harsh saddle
The edited model is still going to have its UVs in different places if the textures are atlased and I'm not aware of a quick way of undoing that but it may exist.
prime obsidian
i'm not sure how stuff works but since it was only the mats merged and not materials then it should be fine
i just need to find a way to uhhh replace the merged materials with the unmerged ones
harsh saddle
What it means is that the model is using different parts of the texture space than it was before. If you open the model in edit mode and then go to the uv editor window, you'll probably notice that the whole model is using the same map. Without undoing that, your model will still be using the wrong part of the texture space even if you're separating the materials
tired lantern
prime obsidian
any advice on how to separate materials in blender after accidently combining th...
i don't use cat and there are ton of videos example how to do that
prime obsidian
tired lantern
i don't use cat and there are ton of videos example how to do that
i don't know what you mean by that but that advice doesn't help
prime obsidian
harsh saddle
What it means is that the model is using different parts of the texture space th...
i'll try to figure something out
harsh saddle
You can adjust the UV positions back to where they were once you split the model back up into different materials but you'd need to learn a bit about UV unwrapping.
spiral sigil
yippee, does anyone know how i would put a cartoony outline on this character
 quaint jasper
Solidify modifier with Flip enabled
 pallid apex
so in blender its normal, but in unity im having some issues

the texture is not working for the entire floor
should be like this ⬇️

pls help, ive already uv unwrapped and that didnt help
ok i actually fixed it! turns out i had a funky extra uv map and i just had to delete it
 atomic loom
tryna put piercings to an avatar and i assigned vertex groups to the piercings and merged it to the face, i followed a tutorial but im still not sure why its pulling the face ;-;
 harsh saddle
atomic loom
tryna put piercings to an avatar and i assigned vertex groups to the piercings a...
harsh saddle
atomic loom
tryna put piercings to an avatar and i assigned vertex groups to the piercings a...
Why not just weight it to the head? I don't imagine you want it to move from its position on the head.
harsh saddle
atomic loom
its lower lip piercings
Oh, right, so you need it to move with the visemes. I think you'd just weight it to the head and then move it in the shape key but it might be hard to keep the position on the lip from changing without marking it on the texture with some dots or something. Probably a better way to do that but I'm not sure.
spiral sigil
atomic loom
tryna put piercings to an avatar and i assigned vertex groups to the piercings a...
Hi there, the way I do piercings is like this,
- data transfer piercings onto face.
- merge the meshes.
- click your shapekeys ah, oh, ch (you do this one by one) and what shapekeys you plan on using for facial expressions.
- go into edit mode, the shapekey should activate, click on the piercings, and click ctrl+L then move it to where it would be when that shapekey is activated (EX: piercing is top lip, mouth open shapekey opens wide, you would move the piercing to the top lip as well.
- go back into object mode, turn the shapekey slider up to test it, it should work.
atomic loom
ill try that too lol
harsh saddle
Yeah, it just seems hard to make sure that the piercing will stay at the same point relative to the lip but if you put a little black dot on the texture where it should insert, then it should be close enough.
atomic loom
still seems to be pulling, am i merging them wrong somehow??
im using the ctrl+J hotkey
harsh saddle
atomic loom
still seems to be pulling, am i merging them wrong somehow??
Just to be sure there aren't weighting issues, I'd separate the piercing, then delete all the vertex groups but the head, and then go into edit mode, select all the faces, and assign them to the head vertex group. That will ensure you don't have any weights from other groups so it should stay glued to the head
atomic loom
ill try that as well
i think its just the avatar idk
cuz its still pulling it even though it isnt wieghtpainted and i dont have any other faces selected
its so weird it does it even when it isnt merged or connected to the avi at all, it has no vertex groups at all
maybe im doing it wrong somehow lol
harsh saddle
Yeah, if it's not weighted to any group and it's being affected by the rig, I'm not sure on that.
 little quest
hey i need some help 3d modeling something for an avatar, do you know anyone who could help?
spiral sigil
alright, who wants this model. he comes with clothes that havent been textured yet, ill give him to the first to dm me, i dont want to weight paint him cause i fucked it up somehow

 proven plinth
spiral sigil
alright, who wants this model. he comes with clothes that havent been textured y...
proven plinth
spiral sigil
alright, who wants this model. he comes with clothes that havent been textured y...
Super cute!! If you need help weight painting I’d be more than happy to assist.
spiral sigil
are you sure 😭
 stable vault
spiral sigil
alright, who wants this model. he comes with clothes that havent been textured y...
stable vault
spiral sigil
alright, who wants this model. he comes with clothes that havent been textured y...
nox that looks fucking amazing my guy seriously thats awesome great job i love it bro have fun with that great job really keep it up u have some amazing tallent my friend
spiral sigil
lol thank you
 weary ruin
Does anyone know how to make neko/fox ears?
 lilac crater
How would I UV unwrap this curved pipe?

I tried to add this seam, but the rust is just projected in a straight line like so

 tough plover
lilac crater
I tried to add this seam, but the rust is just projected in a straight line like...
tough plover
lilac crater
I tried to add this seam, but the rust is just projected in a straight line like...
unwrap it into a rectangle
if you cut a seam down a cylinder, you can unroll it into a rectangle
 devout scroll
put a seam on the inside edge

it will unwrap as a straight rectangle
if it doesn't you'll have to straighten it with some addon
uv sqaures, uv tex tools, zen uv
or pin the edges and unwrap but really, if you're doing any unwrapping you want some unwrapping addon
tough plover
you can make it a rectangle using normal blender tools
using the Follow active quads option
lilac crater
devout scroll
put a seam on the inside edge
there technically isn't an inside edge, because I just have a Solidify modifier. I tested also after removing it, same result
lilac crater
tough plover
using the Follow active quads option
with Follow Active Quads
 devout scroll
tough plover
you can make it a rectangle using normal blender tools
devout scroll
tough plover
you can make it a rectangle using normal blender tools
addons easier
because lots more options
tough plover
I know, I use addons too lol
lilac crater
devout scroll
addons easier
what addons do you recommend?
tough plover
lilac crater
with Follow Active Quads
you need to first straighten out one quad, then use it
tough plover
@lilac crater
you basically just find the quad closest to being straight, make it perfectly straight by scaling the edges, then use follow active quads
find one or make one
lilac crater
tough plover
<@621721363752812554>
This worked, thank you!
harsh saddle
If you're looking for commissions, you should consider getting involved with the VRC Traders Discord
If you google it, you'll find it. There's a link in #community-servers-old but I understand it's broken and I'm not sure we can just post links to other discords. If you google VRC Traders, it will be one of the first results.
 dim bay
anyone know how to weight paint properly? i've tried everything i know how to get my model's pants to stop clipping into the avatar (without deleting the mesh underneath ofc) please help T-T
 harsh saddle
dim bay
anyone know how to weight paint properly? i've tried everything i know how to ge...
harsh saddle
dim bay
anyone know how to weight paint properly? i've tried everything i know how to ge...
Select the body, then the pants, go into weight paint mode, then weights -> transfer weight and set the source layers selection to "by name"

It should work pretty well if the topology is the same for the pants and the legs underneath, otherwise you might need to hide the legs with a shape key.
dim bay
harsh saddle
It should work pretty well if the topology is the same for the pants and the leg...
i didn't even think of hiding the legs with the shape keys lmao (am pretty new to blender and 3d stuff in general) tysm
harsh saddle
Just make sure you rip the vertices for the area you want to hide or the surrounding edges are going to be affected as well.
 trail python
harsh saddle
Select the body, then the pants, go into weight paint mode, then weights -> tran...
trail python
harsh saddle
Select the body, then the pants, go into weight paint mode, then weights -> tran...
also worth mentioning that "nearest face interpolated" gives better results
harsh saddle
I wasn't aware of that, good to know
 cerulean shoal
got that zaza‼️‼️‼️

 jade idol
spiral sigil
alright, who wants this model. he comes with clothes that havent been textured y...
jade idol
spiral sigil
alright, who wants this model. he comes with clothes that havent been textured y...
aye that's pretty neat
spiral sigil
Lisowicia
 quaint jasper
Latest creation  https://twitter.com/Ruuubick_/status/1552366579802902529


Here's my final #Artfight2022 submission ! OC is Beerus and belongs to @Azazel06108026. Really loved the design and was super fun to make, and having a timelapse of the process to go back to makes it even more fun !
 Twitter
·
Twitter
·
 broken whale
Don’t like furries that much, but DAMN, the avatar is 🔥
broken whale
I prefer more simplistic ones with good fashion sense, not edgy, just positivity
 heavy turret
I'm very new to blender, and I'm modelling my first avatar at the moment, I was manually creating a few faces to link the fingers to the hand of my model, and oddly, some faces find themselves with a dark gradient on them, does anybody know why ?

I know it's not the normals that are flipped, so I'm confused
 primal narwhal
heavy turret
I'm very new to blender, and I'm modelling my first avatar at the moment, I was ...
primal narwhal
heavy turret
I'm very new to blender, and I'm modelling my first avatar at the moment, I was ...
It's still in issue with the normals. Select the face, then hit Alt+N and reset vector. Should solve the problem. If it doesn't, make sure there's not any duplicated vertices, and make sure it's set to shade flat like the rest of the faces currently are (Ctrl+F -> shade flat)
heavy turret
Thank you so much, I will check all of that tomorrow!
 naive bolt
Do you guys texture or rig first?
quaint jasper
Texture 
 slender vessel
 harsh saddle
naive bolt
Do you guys texture or rig first?
harsh saddle
naive bolt
Do you guys texture or rig first?
It doesn't really matter except it can be hard to check if your eyes are moving properly if they're untextured spheres so texture, I guess.
lone blaze
I'm going to apologize in advance. There's like 8 screenshots because it's huge


I'm am in love with how the engines came out
 wintry cave
Doing a quick test render before finishing and rigging
 brave mantle
Hmm so I'm trying to see how hard it would be to adjust the proportions of an avatar I'd buy, so I'm testing it on a free one. I shapekey'd the waist and pulled it out a bit. Looks fairly alright from what I can tell, but am wondering if I'm missing anything. Like do I need to adjust the bones in some way, or is this even the right way to go about it?
spiral sigil
RAAAH
This is all I have on phone rn

One by one
I'll oost
Post


God I love blender
Damn it I only have my funny sans models I made on here


I'll get on my laptop soon
I can do anything from anthro to human to skeleton to robot
Low or high poly toon or realistic
I got you
 sudden sage
Anyone have commissions open for an avatar
 frosty canopy
Most of them are fucking GODLIKE + ULTRA SUPER FUCKING LEGENDART SS+ tier, in other words: Holy shit thats fuckin amazing
spiral sigil
I charge $80-120 a pop
Most people charge $300+
Do what you will with this info
💪 ♀️ 🐺
VRC team better see this
I'll apply I guess too
I said it as a joke but if they told me to why not
frosty canopy
spiral sigil
I charge $80-120 a pop
Most people charge $300+
I feel like you should be the one charging 300 dollars the detail is chef kees
Also what currency
spiral sigil
Im also proficient in hard surface modeling
USD
frosty canopy
KK
sudden sage
Ahh
frosty canopy
110 to 170 is how much they cost for me because of price conversion
sudden sage
More moving bits would cost more right
 spiral sigil
sudden sage
Well that’s fine
spiral sigil
sudden sage
Well that’s fine
Not yet!
But soonish!
LOL I found this render

It was a joke xd
Gustavo fring
sudden sage
I’ll keep an eye out then
 somber swallow
I'm supposed to write a report for school on the Copyright issues of 3D model assets for Unity, is there anyone well knowing in this subject? It would be a big help thanks!
cerulean shoal
i have misread the text.
 fleet harbor
o
 waxen mist
Created Anubis before all this went down
 quaint jasper
brave mantle
Hmm so I'm trying to see how hard it would be to adjust the proportions of an av...
quaint jasper
brave mantle
Hmm so I'm trying to see how hard it would be to adjust the proportions of an av...
Why does that need to be a shapekey ?
brave mantle
quaint jasper
Why does that need to be a shapekey ?
Mostly so it's easier to keep tweaking it to my liking over time 😅
quaint jasper
Over time as in while you're in vrchat ? If not then that should really just be an edit made in blender
 hazy sail
Mods be like
hazy sail
quaint jasper
Over time as in while you're in vrchat ? If not then that should really just be ...
How does it feel to be a Vr chat admin?
waxen mist
quaint jasper
Over time as in while you're in vrchat ? If not then that should really just be ...
Shape keys are relatively unintrusive if done right. I feel like this is bad advice for them x.x in order to create the shape key you’re still doing the work in edit mode
brave mantle
quaint jasper
Over time as in while you're in vrchat ? If not then that should really just be ...
over time in blender really. I'm not sure how I can keep the same range of motion available with just an edit mode edit? Like I'd always have to select the same exact face and know how much to move them and such?
Wiht a shapekey I can go "hmm okay 0.7 feels a bit too big, lets try 0.68"
quaint jasper
Proportional editing is your friend ! If it's your preferred method then I can't really argue with that, but I can't help finding it a bit limiting
brave mantle
Hmm well maybe I'll try, I don't really have a preferred method hah
I'm just used to sliders to tweak my avatar from other games
quaint jasper
Makes sense
brave mantle
just kinda trying and failing to adjust an avatar to my liking right now 😂 "oh okay, this dress I bought and added isn't animated with the avatar somehow.."
harsh saddle
This is not a good way to request help. Do you require medical assistance?
 trim bobcat
Okay
Ummm
Basically trying to do avatar stuff
But can't get blender and don't know what version to install
harsh saddle
The one on the main page is fine. If you have another operating system, there are options for that as well. Blender isn't like Unity where there's only 1 version VRChat can use, the newer ones just have a few more features. https://www.blender.org/download/
 trim bobcat
Thank you 🥺
 gray hornet
quaint jasper
Why does that need to be a shapekey ?
gray hornet
quaint jasper
Why does that need to be a shapekey ?
I tend to do small proportion edits on a shape key as a way of doing non destructive edits for example, then you can always make a new shape key from mix and remove every other one just before exporting.
 ashen stag
Using shapekeys during production is fine, I've used them as non destructive edits like you've said. Just make sure to apply any that are on by the time you're in unity
lone blaze
I can't seem to make the look realistic but here's a render of them
 quaint jasper
lone blaze
I can't seem to make the look realistic but here's a render of them
quaint jasper
lone blaze
I can't seem to make the look realistic but here's a render of them
Might wanna give this a try https://youtu.be/XJBNQeSR8LQ

A quick run down on how i light up and composite (super reduced node setup though) my space renderings.
Please use "medium high contrast"- I did say it right but captured it incorrectly in the video, sorry for that!
Make sure your albedo values of your surfaces are roughly where they should be (white paper has a value of ~0.65, there should ...
lone blaze
ty!
 onyx juniper
Compare boots
https://cdn.discordapp.com/attachments/858154167032741919/1002720268772462663/unknown.png
https://cdn.discordapp.com/attachments/858154167032741919/1002720268424327289/unknown.png

 quaint jasper
The gloves would need the same styles for it to fit the whole look imo
onyx juniper
Originally I had that trim on top of the dress going around the arms.
fleet harbor
ayy
yeah i've known him for a while
fleet harbor
mmaybe same?
spiral sigil
Were you ever in the dustcord server or lits server back then?
fleet harbor
no but i met him through someone who
i don't necessarily like anymore
spiral sigil
Damn
I mostly hail fron the dusttrust community
But thats because I work on it so im kinda stuck there 💀
fleet harbor
ah
my only real interaction with the utsc was through that friend
and now i've been disconnected from them
which i'm happy about cause that let me let go of horrible ideas
spiral sigil
Yeah the utsc sucks
fleet harbor
yeaaaah
fleet harbor
spiral sigil
Good music but bad people
not even good music tbh
(i got very tired of megalos)
spiral sigil
I listen to homicidal lunacies a lot
You can find good music u just gotta dig
 steady zealot

Baby's first time authoring and using a trimsheet texture!
I'm super happy with how it turned out! Especially for a first attempt! Even with my limited artistic vision!
 heavy parcel


Completely procedural flask potion thing..
Using Geometry nodes and shader nodes
Only thing in scene that isn't procedural is the lights

 azure rain
steady zealot
https://media.discordapp.net/attachments/900346650248245268/1002804766923051098/...
azure rain
steady zealot
https://media.discordapp.net/attachments/900346650248245268/1002804766923051098/...
very nice trim sheet for a first attempt
 azure rain
lots of trim sheets to be found in Game Dev so it's good to learn
like that's basically how the stone buildings work in breath of the Wild
spiral sigil
Updated textures on my papyrus modell


 quaint jasper
Yeah, that's how I know I'm going to keep making toon models lmao
harsh saddle
Luckily, Blender has a lot of materials you can download and bake but yeah, I can't imagine being able to wrap my head around having a specific goal in mind and building that from dozens of nodes, I just experiment and play with stuff until I end up with something that looks cool. Looks great, anyway.
spare kiln
quaint jasper
Yeah, that's how I know I'm going to keep making toon models lmao
its a lot simpler than it looks
part of it is also me being inefficient too
spare kiln
harsh saddle
Luckily, Blender has a lot of materials you can download and bake but yeah, I ca...
thank you!! i was struggled finding a texture that matched what i was going for along with bump maps that worked with them. I had no choice but to make it if i wanted to get the result i was after
 clear furnace
Ok real question i have a new insane level of respect for people who can fucking 3d model
I mean i already did but yesterday i spend 7 and a half fucking hours in blender trying to make a head because i thought it was a good idea to make my own avatar
i couldnt get past making the ears
harsh saddle
Everyone has their own process but I like making models using the sculpting tools and then just laying geometry what is already there but I have a background in sculpting so that's just what comes easiest to me. Trying to make something that looks decent in edit mode by using those tools seems a lot harder.
 hollow ermine
Can I offer you a song in these troubling times?
spiral sigil
Ears...Hands are my kryptonite. You'd think they would be easy, I have them right in front of me, but they just look so uncanny.
Can always buy a base, or 3D scans to practice with making.
Also, Sketchfab is great
 thorn gulch
Retopologized by hand 48k Quads 96k tris

 foggy granite
thorn gulch
Retopologized by hand 48k Quads 96k tris
foggy granite
thorn gulch
Retopologized by hand 48k Quads 96k tris
thats some crisp topo
thorn gulch
foggy granite
thats some crisp topo
Thank you!
waxen mist
That’s beautiful

 atomic hamlet
hollow ermine
`How do I eat this?`
atomic hamlet
hollow ermine
`How do I eat this?`
Add a mouth to your avatar
 spice pewter
 tulip orchid
I got blender a few days ago so I'm learning how to do all this
lone blaze


Still not 100% done but here are some profile shots to see those details I've added
 honest scroll
im trying to apply some leaves i distributed with the realize instances node but it keeps breaking?
in blender geometry nodes
anyone have a fix?

found it
onyx juniper
hollow ermine
Cool character
lone blaze

 junior path
Bro y’all be in this a hell of a lot more than me😂😂😂 guess imma have to learn me some new stuff
lone blaze
junior path
Bro y’all be in this a hell of a lot more than me😂😂😂 guess imma have to learn...
I honestly just followed an old tutorial for the hallway picture but it was for blender 2.8 and I am using the newer version so I had to change a couple things and I changed up the colors and added a different model to make it my own
the venator on the other hand. That's all me and trust me when I say this I am struggling a little bit with it
junior path
Yea I currently make maps for skater xl.. I do tons of modeling but its more everyday things buildings benches random things for the maps.. I’ve been curious on vechat for a while and have had a few people even request I do some I’ve just never looked in here.. y’all be doing some shit here lol
lone blaze
Modeling an avatar in blender is actually a lot harder than modeling objects in my opinion XD
junior path
But I don’t do anything technical in blender just model assign materials and work the uv maps and lightmaps.. the rest for skater xl is almost all unity work with sdk and lightings and such
Yea nah I’ve made a few avatars and it’s wild
I use mostly basic build tools sculpting is not my best asset lolol
lone blaze
Weightpainting and rigging it sucks lol
junior path
Yea dude I tried a project for a on the low help for a dev for skaterxl where we were trying to make an NPC camera man with a follow player action for proper filming and the rigging alone had me ready to punch my pc😂😂 everything worked.. except it would register the rigging😂😂😂 I didn’t even get to weight painting and was like nah I can’t do this at my skill level bro😂
Wouldn’t register** lol
lone blaze
I just made the mistake having a custom avatar as my first blender project XD
harsh saddle
You can get auto-rig pro, it's a plug-in for Blender that does a pretty good job of rigging and weighting models. I tend to much prefer organic vs inorganic models but I've also spent a lot of time sculpting characters.
junior path
But to be fair aside from that in skater xl most of my work is just commissions for real life recreations and some side projects for supporters lol
Is it free.99 though?
😂😂
lone blaze
so I am going through tutorials and following along but at the same time going my own path so I don't copy it you know?
junior path
Yea nah I get you man I started easy as hell just making benches and railings
lone blaze
I will say texturing is hella fun in blender
junior path
The best thing I learned from my friends using blender.. everytime you learn something new or design something new.. build it.. can it… build it and can it 10 more times… lol
harsh saddle
You can get very far by just trying to learn one new trick every day.
junior path
lone blaze
I will say texturing is hella fun in blender
Yea working uv maps is something a lot of people don’t do in xl… dudes just use triplanes for textures and say f it… I like it to look good… brick walkways follow the path when it changes direction lol.. not just weirdly slants and stays at one angle in every place it is😂
junior path
harsh saddle
You can get very far by just trying to learn one new trick every day.
Dude the Boolean tool literally Change the game for me
lone blaze
harsh saddle
You can get very far by just trying to learn one new trick every day.
That's why I'm going through tutorials. I've learned so much even from the older videos
lone blaze
but again I'm not really a fan of following it step by step cause it's not right to fully copy it
junior path
And it was for rigging
junior path
lone blaze
but again I'm not really a fan of following it step by step cause it's not right...
In finished product I agree but step by step helps you hone in how you want to do it.. follow it exactly like 10 times.. then go your own way with it.. that way the steps in doing it just burn into your brain
lone blaze
junior path
Yea working uv maps is something a lot of people don’t do in xl… dudes just use ...
I feel that lol. I'm struggling to make the venator look real
junior path
Again had I actually took the time to watch videos and sort it I’d probably be killing it rn
junior path
lone blaze
I feel that lol. I'm struggling to make the venator look real
Where do you get your textures? And do you apply them in unity or is this 100% just blender practice so it doesn’t go beyond that?
lone blaze
I could send ya a playlist I made with different types of tutorials if ya want it
junior path
I wouldn’t complain about it that’s for sure
lone blaze
junior path
Where do you get your textures? And do you apply them in unity or is this 100% j...
I add the textures in blender 100% I just follow how to create the shader in the node editor
junior path


This is more what I do lol.. these are just a few of them but you get the idea by I don’t really do any of this stuff😂
junior path
lone blaze
I add the textures in blender 100% I just follow how to create the shader in the...
Yea that’s wayy more in depth than what I do.. I use unity for my texturing I just prep everything in blender so it’s drag and drop in unity plus I have a few shader and texture packs them come in handy with the things I do
lone blaze
aye yo that's sick!
red glade
Finally made the Rear end chassis for the 180sx
 spiral sigil
everything from scratch besides coach on middle xD

 amber perch
Can't seem to get into weight paint mode, any help?
harsh saddle
amber perch
Can't seem to get into weight paint mode, any help?
Is your model attached to a rig? You can't weight paint a model without a rig/vertex groups
 wispy hound
can some help me with modeling in blender its my first time
harsh saddle
wispy hound
can some help me with modeling in blender its my first time
Your best bet tis probably just to watch a good beginner tutorial unless you have specific questions. Blender Guru is pretty good. https://www.youtube.com/watch?v=Hf2esGA7vCc

Blender modelling tutorial series! In this series you'll learn the fundamentals of modelling whilst making the designer Søborg Chair by 'Fredericia'.
In Part 1 you'll learn:
-the importance of a good subject
-where to find good reference photos and blueprints
-how to add blueprints to your blender project
References ZIP: https://ezs3ac34a26aa3...
Blender tutorial series showing you how to use the most common features, like modelling, lighting, materials, geometry nodes and rendering - whilst making a donut.
Download the Blender Shortcut Hotkey PDF: https://www.dropbox.com/s/jg4fs4i8zw5bxt7/Blender 3.0 Shortcuts v1.2.pdf?dl=0
Google Doc version: https://docs.google.com/document/d/1...
amber perch
harsh saddle
Is your model attached to a rig? You can't weight paint a model without a rig/ve...
Yeah it was a parenting issue I got it now. However having trouble with the weight painting mirroring properly since it's fine on one side but super messy on the other. ;w;
harsh saddle
Is the geometry symmetrical?
amber perch
harsh saddle
Is the geometry symmetrical?
Yeah it's symmetrical I can video call and show it if you'd like I've been trying to figure this out for hours... Even painting it manually seems to miss some spots.

 wraith dirge
hey does anyone have any tips about where to find models?
or textures
is it possible to convert file types to others?
im trying to use .glb in vroid studio
amber perch
wraith dirge
hey does anyone have any tips about where to find models?
I find a lot of stuff on DeviantArt. Lots of creators there are nice enough to just let you use their stuff for free if you credit them. However I've found that you'd need to do some editing of your own, almost all the time with these.
wraith dirge
do u know if u can use .glb in any 3d program?
amber perch
Not sure. I heard vroid wasn't actually 3D so that may cause some issues.
harsh saddle
Sketchfab is good as well. I don't think you can use glb files natively in Unity but you can open them in Blender and export to FBX or OBJ
wraith dirge
but textures and models are not the same?
models are the shell, while textures are the paint?
if thats a corrent analogy?
harsh saddle
Textures are just pngs or jpegs usually, you can use those in Unity but you generally have to create the materials in Unity
wraith dirge
probably have to find a model that has a texture along
harsh saddle
I guess glb files can have embedded textures so you might need to extract them in Blender but most models will have the textures in a separate folder.
 uneven egret
wraith dirge
do u know if u can use .glb in any 3d program?
uneven egret
wraith dirge
do u know if u can use .glb in any 3d program?
you can use it in blender afaik
wraith dirge
how would i replace the model i want to replace with them in blender?
wraith dirge
i want to replace a model which is already on my avatar
with a model i found, which i like
but i cannot use it in vroid studio, it seems
harsh saddle
I don't know about importing stuff into vroid studio. In Blender, you'd just delete the old item and import the new one.
wraith dirge
okay it seems this is a big subject 😅
not as easy as it seems
it doesnt even seem easy
harsh saddle
Not too complicated but you'd need to learn some Blender fundamentals to use it. You might be able to do it in vroid studio but I don't use that so I don't know.
uneven egret
are you in the vroid server? they have help channels there aswell
wraith dirge
oh ok tysm
 thin shadow
I'm still perplexed in why is this happening
 formal walrus
junior path
formal walrus
junior path
that looks very real to me
spare kiln

 obsidian nova
Wow
 frigid plover
Vrchat fix the easyanticheat software
 manic monolith
:/
lone blaze
still adding some details on the bridge

 steady zealot

working on an RP world. Scratch-made. Currently only 4 materials
only 11ish mbs right now but that's without any baked lights/lightprobes/occlusion data/etc
spare kiln
steady zealot
https://media.discordapp.net/attachments/949125214590095420/1004178439013683340/...
this is cool!


 steady zealot
spare kiln
this is cool!
steady zealot
spare kiln
this is cool!
Thanks!

turned on texture panning for the hell of it. It looks very wacky
 vivid crater
reminds me of that effect they did on the 1st dr strange movie
azure rain
steady zealot
working on an RP world. Scratch-made. Currently only 4 materials
that is off to a very nice start and probably going to be very performant wonder if a wood trim sheet would be helpful for that for furniture?
steady zealot
azure rain
that is off to a very nice start and probably going to be very performant wonder...
what furniture?
azure rain
I don't know because you haven't got there yet as it's all exterior shots
but I suppose some sort of bench would be nice to sit with wherever you put the mirror?
steady zealot
Oh yeah for sure. I'm going to be making quite a few different trimsheets for furniture, interiors, buildings, etc
No mirror though, as it's an RP world. Might have togglable mirrors in bathrooms, or in the changing room of the swimming pool/hot springs
azure rain
and also given portable mirrors will exist when you release it less of a need for mirrors
and honestly it's cool to see more trim sheet usage in vrchat as it's very efficient for vram
steady zealot
There's definitely a good reason it's such a commonplace thing in actual gamedev stuff
And it's actually tons of fun to make and use them. It's pretty therapeutic imo
azure rain
and you could always use like a Shader if you need some worldspace/vertex color dirt to break up the repetition
steady zealot
exactly, or even another UV map layer with mask textures
(I guess that counts as "using a shader" haha)
azure rain
you would already have the light map uvs
steady zealot
Yeah that too
azure rain
but you can probably worried about all that once you got more of your finalized texture sets
so you would know how many draw calls you would be adding by breaking up the repetition
steady zealot
yeah, if I do it, I'll leave it until close to last
I could also do more details with decals
azure rain

In the next version of Filamented, I've added a texture blending shader to Extras. You can assign different textures to each colour channel and add a blend mask to make the transition scruffy instead of linear. You can also set it to use triplanar projected UVs.
 Twitter
·
Twitter
·
not sure if it would be of use but might be helpful for the the ground
and out of curiosity are you using Bakery
steady zealot
Yeah I was probably going to end up using either vertex colours or masking for the ground stuff, but this looks viable too!
I will be using Bakery yeah
when I get to that stage
This is the first world I've made in a long time, and it's the first SDK3 world I've ever made, so it might take me a bit. It's also super super ambitious
azure rain
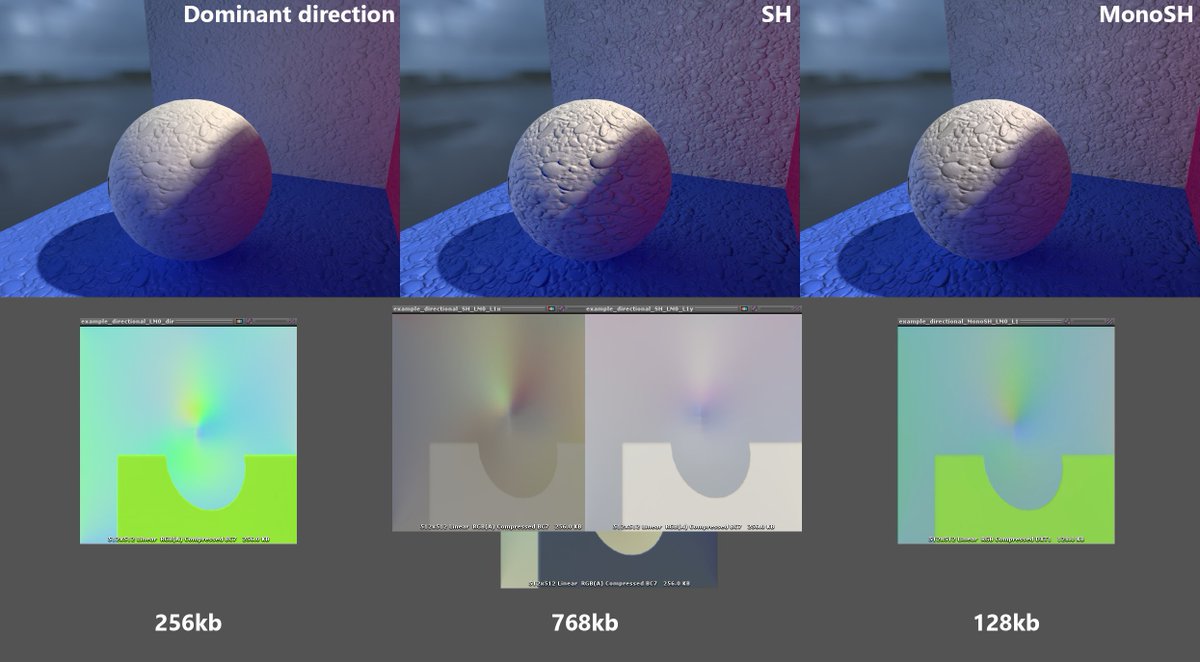
cool was just curious as a new directional lightmap type has came out that uses less memory than the default Unity One https://twitter.com/guycalledfrank/status/1553479909053538305?s=20&t=wejfk1oT0ZEsHtcnXRnPmw

I knew for a long time that I can do it, but today I actually implemented and tested it.
What if we make SH L1 lightmaps grayscale but still sample them using the non-linear Geomerics method instead of using the weird half-lambert solution for directional maps that Unity uses?
Likes
189
 Twitter
·
steady zealot
Twitter
·
steady zealot
oh nice!
azure rain
and also doesn't require a scripting adapter so your normal Maps will look nice
I also went and added Bakery's MonoSH to Filamented! Though, I haven't really tested it much.
You can try it yourself by updating Bakery and getting the latest version of Filamented from the repo.
I baked a super bumpy parallax cube to show it off here.
 Twitter
·
Twitter
·

I've implemented MonoSH into Hekky PBR:
Here are the differences between MonoSH and Dominant Direction:
- MonoSH uses less VRAM, meaning it's more performant
- More accurate lighting
- Batching works, which is perfect for VRChat
- Doesn't require UdonBakeryAdapter to work in VRC
 Twitter
·
Twitter
·
 azure rain
it can also Drive specular from the directional light map
steady zealot
I defaulted to trying to use Poiyomi's because I haven't made a world using any shader that wasn't Autodesk Interactive and I know a lot about Poiyomi's functions. But I'm going to assume that Filamented is probably going to give me much nicer results. Though I'm not certain I'm trying for photorealism just yet, so it's another thing to consider. The entire world is massively inspired by ps2 era JRPGs
azure rain
and given that you have a outdoor scene just having like one Speculator from the sun will do the trick
azure rain
steady zealot
I defaulted to trying to use Poiyomi's because I haven't made a world using any ...
even if it's PS2 jrpg you can still be nice to sell the materials properly with nice normal maps and actual specular highlights
steady zealot
azure rain
even if it's PS2 jrpg you can still be nice to sell the materials properly with ...
Oh yeah for sure. Just not sure if full photorealism is necessary. I am using those extra maps, don't worry
but I guess I'll experiment!
Can't hurt to try different things
azure rain
given that you only have four materials probably very easy to experiment with different shaders


 glacial ore
i'm trying to use blender to edit some avatars, but i need the CATS plugin for it to work. ever since i updated blender to 3.2.1 it hasnt been working. no matter how many times i try to import the blender plugin, it doesn't show up in the preferences menu and i cant use it. does anyone know how to fix this?
thin shadow
glacial ore
i'm trying to use blender to edit some avatars, but i need the CATS plugin for i...
cats is not compatible with 3.2 yet. Latest supported version would be 2.93.x
glacial ore
is there any way i can change my blender back to 2.93?
thin shadow
glacial ore
is there any way i can change my blender back to 2.93?
you can use the beta menu to roll back

 urban flint
not sure if this is the right place to ask but, these faces are invisible in unity (from both sides, it isn't a normals facing issue(I think)) but in blender they're fine


 quaint jasper
urban flint
not sure if this is the right place to ask but, these faces are invisible in uni...
quaint jasper
urban flint
not sure if this is the right place to ask but, these faces are invisible in uni...
Is that a single material/mesh ?
urban flint
quaint jasper
Is that a single material/mesh ?
its multiple materials on a single mesh (ive tried seperating the mesh)
quaint jasper
Make sure the UVMap name is consistent, and that UV islands aren't super far out of bounds, otherwise I'm not sure what it could be
urban flint
ive just tried removing the textures completely just to check and.... still broken
 quaint jasper
Are the logos their own vertices through ?
quaint jasper
Any shapekeys on the mesh ?
urban flint
 urban flint
quaint jasper
Any shapekeys on the mesh ?
urban flint
quaint jasper
Any shapekeys on the mesh ?
nope
quaint jasper
Might want to apply a triangulation modifier then
I suspect it's just the way it triangulates when exporting that shapes the mesh that way
urban flint
quaint jasper
Might want to apply a triangulation modifier then
Ive never used it before, do I just add it?
quaint jasper
Yep
urban flint
Omg, you're a life saver
 urban flint
quaint jasper
Yep
urban flint
quaint jasper
Yep
Ive had this happen to another model aswell, now I can fix it
quaint jasper

cerulean shoal
wip model lol.
 quaint jasper
That looks great !
 molten trellis
Hey! I'm interested in making my own avatars but I have no clue where to start. I already have the necessary software, I was just wondering if anyone had any tips on where to start and what to do. Thank you!
harsh saddle
molten trellis
Hey! I'm interested in making my own avatars but I have no clue where to start. ...
I'd start with basic modeling and then move on to basic character creation or you can go the route of sculpting and retopology and then you'll want to move to rigging and texturing. https://www.youtube.com/watch?v=nIoXOplUvAw
https://www.youtube.com/watch?v=5BfP6uzNCGE
https://www.youtube.com/watch?v=VYuUlQO-kYE
Blender tutorial series showing you how to use the most common features, like modelling, lighting, materials, geometry nodes and rendering - whilst making a donut.
Download the Blender Shortcut Hotkey PDF: https://www.dropbox.com/s/jg4fs4i8zw5bxt7/Blender 3.0 Shortcuts v1.2.pdf?dl=0
Google Doc version: https://docs.google.com/document/d/1...

Hi!
Here is the CCM Course Level 2 Part 1 where i Model the base mesh for our character. its the first step to start your character.
Here are the steps that i done in this video
1.Sitting up the reference image for your character in blender
2. Starting Your character from Cylinder
3. Modeling the base mesh
4. Modeling Hand and mergeing wi...

Welcome to my Blender Beginner Sculpting Tutorial! In this tutorial, you will learn all the basic tools and features you will need to know, to get started with sculpting in Blender.
● Amazon Links:
As an Amazon Associate I earn from qualifying purchases.
• Wacom CTL4100 Intuos Graphics Drawing Tablet:
https://amzn.to/2H2HG9b
• Huion KAMVAS 20 ...
quaint jasper
molten trellis
Hey! I'm interested in making my own avatars but I have no clue where to start. ...
Rainhet has an amazing avatar creation series on YouTube !
 narrow umbra
Did you know that Unity natively supports both Blender and Photoshop files?
I load my worlds and avatars directly from .Blend files, and my textures from .psd files meaning I don't have to re-export an fbx/png every time I make a change; I double click the model/texture in the asset folder (which opens the .blend file), make my change, hit save, and the model automatically re-imports in Unity.
Blend files only work if the .blend file format is associated with blender.exe, but with Photoshop documents, it's so streamlined that you don't even need to own Photoshop or have it installed for Unity to use its documents.
Note: Meshes imported directly from Blender with modifiers still active (with the exception of the armature modifier) will lose their blendshapes, so keep that in mind when loading .blend files for avatars.
Also, most people don't know what Blender's .blend1 files are for, so I'll explain: A .blend1 file is a duplicate of the main file that's saved after Blender confirms that it successfully saved the main .blend file, meaning if the .blend saving process fails or is interrupted, the .blend1 file is not overwriting, making it an effective backup for file loss/corruption protection.
TL;DR If your .blend file corrupts, delete it, and change the .blend1 file's extension to .blend, and you'll have your project back. (Don't save your .blend post-corruption as that will overwrite the .blend1)
 jovial turret
narrow umbra
Did you know that Unity natively supports both Blender and Photoshop files?
I lo...
jovial turret
narrow umbra
Did you know that Unity natively supports both Blender and Photoshop files?
I lo...
I'm pretty that only holds true up to a certain version of blender. Sinec VRChat is on Unity 2019 I think it only natively supports blender 2.79 and lower
narrow umbra
VRChat uses Unity 2019.4.31f1 which is on Long Term Support.
I use Blender 3.2.2 and it works perfectly.

 quaint jasper

 sacred remnant


 spare kiln
 subtle scroll
How the F did you do that
subtle scroll
How the F did you do that
Hair cards! It still needs a lot of work. I’ve only used thick hair cards to get the main shape down before I go in and add less dense pieces to add volume
subtle scroll
what are hair cards @spare kiln
teach meeeee
Im such an novice at this stuff
also, I love the name tired! lol
spare kiln
subtle scroll
also, I love the name tired! lol
yes very tired, haha
hair cards are flat planes of geometry that use texture to create the hair look. it uses opacity to hide away the non-hair area, if that makes sense
subtle scroll
It does
 subtle scroll
oooo okay so it basically is planes with like a png on it? creating a texture
it looks very cool
spare kiln
subtle scroll
oooo okay so it basically is planes with like a png on it? creating a texture
exactly
subtle scroll
well i love it.
spare kiln
its either that or thick geo hair that is also pretty popular in vrchat
subtle scroll
yes! i have seen that in vrc
I like the hair cards better lol if im being honest
I have only been using blender sporadically for about 2 years, I can do basic texture painting and 3d modeling but I find it near to impossible to make human like faces

I really like making game characters
simple ones i can do very well lol like this one
I am looking to do more for vrchat in terms of nodes
lone bloom
Anyone here do much VRoid to VRChat? I have a question about bone placement etc
hollow ermine
 grave aurora
https://cdn.discordapp.com/attachments/567874893237190686/1005222741735133284/un...
grave aurora
https://cdn.discordapp.com/attachments/567874893237190686/1005222741735133284/un...
All caps: yeesss
I’ll throttle Dyno if I ever see em irl


 spiral sigil
Hey was wondering if anyone could either show me or help me create a model of a concept art that my friend made for me into a avatar i’m still new at creation but modeling rn in completely out of my league
spiral sigil
spiral sigil
btw sick model
harsh saddle
spiral sigil
Hey was wondering if anyone could either show me or help me create a model of a ...
There's a fair amount to learn for creating an avatar. You can start with character modeling but if you've never opened Blender before, you might want to start with something more basic that covers navigation and the interface. Then, you need to move on to rigging and texturing and then setting it up inside of Unity. https://www.youtube.com/watch?v=5BfP6uzNCGE
Hi!
Here is the CCM Course Level 2 Part 1 where i Model the base mesh for our character. its the first step to start your character.
Here are the steps that i done in this video
1.Sitting up the reference image for your character in blender
2. Starting Your character from Cylinder
3. Modeling the base mesh
4. Modeling Hand and mergeing wi...
spiral sigil
harsh saddle
There's a fair amount to learn for creating an avatar. You can start with charac...
alright thanks the thing i’m working i won’t be able to do fully on my own so this should help
thin shadow
indian tutorials on youtube is a blessing
spiral sigil
What?
spiral sigil
harsh saddle
There's a fair amount to learn for creating an avatar. You can start with charac...
the only problem is i only have one photo of the art no side view or anything so the video is very helpful but i don’t think it will be able to fix my problem
harsh saddle
spiral sigil
the only problem is i only have one photo of the art no side view or anything so...
You can also start with a sculpture if you don't have enough views to build the model from directly but if this is your first time modeling, you'll likely want to start with something simpler than a character anyway. Avatar creation from scratch is an involved process that is going to require a fairly deep understanding of the tools.
spiral sigil
harsh saddle
You can also start with a sculpture if you don't have enough views to build the ...
Yea but the main reason i’m even trying to make this model is for a group im in and non of them in the group know how to model so i would have to learn it completely by scratch which im trying to get the avatar some point in the next few weeks
 fair oasis
I hope somebody will like this uwu ^^ https://kotyor.gumroad.com/l/ktrsordodek

Gumroad
HelloI made an Odradek Sensor from a game Death Stranding.Textured, Rigged, Animated. - 1 Material- 5 Emotes- 3 Head Stages- MoveableInculde:Unity Package -Animations-Controller-Textures-Materials (Standard and Poiyomi 8+)-Instruction Setup sheet-Expression Parameter Table-Expressions MenusFor Vrchat Setup you need the SDK3https://vrchat.com/hom...


 dawn ice
Thats so good
spiral sigil
spare kiln
that’s hella good
 sharp grove
Wanna try modelling wings for the first time (specifically of a quadruped), but ngl I'm not sure what the best neutral pose for them would be
Should I model them pointing up and entirely splayed out or what
dawn ice
sharp grove
Should I model them pointing up and entirely splayed out or what
I think u should modle them like in a option were you can close and open them
sharp grove
That's not what I'm asking I was gonna do that anyway
harsh saddle
If you're gonna have a closed and opened state then it seems to make sense to have them default to being closed
 sharp grove
Neat, thanks
spare kiln
spiral sigil
that’s hella good
thank you!
 ebon cradle
sharp grove
Wanna try modelling wings for the first time (specifically of a quadruped), but ...
ebon cradle
sharp grove
Wanna try modelling wings for the first time (specifically of a quadruped), but ...
ARK's dragon holds its wings at an angle, its wyvern's wings are perpendicular to the body.


All of its birds, bats, pterosaurs, etc, hold their wings perpendicular in their neutral pose. They literally do a T-pose when viewed from the front.
That dragon model, and any insects, point their wings partially upward, forming a V shape.
All wings, whether avian or bat/dragon or otherwise, are modeled at maximum stretch as normal limbs are, so that way the process of weight painting and rigging and animating matches the process for other body parts.
I acknowledge I risk repeating what you already know on some things, goal is to be totally thorough and explain the reasoning.
spiral sigil
working on a avatar!


 river wadi
making my first scratch asset, hair  I have no idea what I'm doing but it's going places

 shut loom
river wadi
making my first scratch asset, hair <:vrcStoic:585749770102898699> I have no ide...
shut loom
river wadi
making my first scratch asset, hair <:vrcStoic:585749770102898699> I have no ide...
omg i love it
waxen mist
sharp grove
Should I model them pointing up and entirely splayed out or what
Bit late but good practice is to model them in the middle of their range of motion, that allows you to easily create the geometry needed for clean deformation. So the wings wouldn’t be fully closed, or fully open.
Did these like a year ago
 spiral sigil
Can anyone make me a custom avatar?
harsh saddle
spiral sigil
Can anyone make me a custom avatar?
Google VRC Traders, they do commissions. You aren't likely to get a lot of takers for a fully custom avatar for that price but you might get someone willing to modify something existing.


 foggy granite
grave aurora
https://cdn.discordapp.com/attachments/764431020953960468/1006359520378892378/un...
foggy granite
grave aurora
https://cdn.discordapp.com/attachments/764431020953960468/1006359520378892378/un...
Lava lamp backpack that pretty interesting
quaint jasper

lone blaze
took my venator model and made it into a hologram
 spare kiln

 winter palm
Question. Is 25,298 polygons and 50,516 triangles too much for VRchat to process?
harsh saddle
winter palm
Question. Is 25,298 polygons and 50,516 triangles too much for VRchat to process...
No, it's a fair amount and might be higher than it should be depending on the model but I think VRChat can technically handle models in the millions of polygons, they just might not perform well.
 vital grove
so is it possible to use this as a avatar
 obsidian nova
Yes
 weak berry
tiger 2 progress

 flint swallow
hey all, added "焼く・ザ・タバコ | Annoying Cigarette" to my avatar today (really new to making avatars) and now the hand its in has no control. anyone able to help at all?
 unique axle
How do I make hair?
harsh saddle
vital grove
so is it possible to use this as a avatar
Yes but unless there is geometry where the model needs to bend and twist, it likely won't animate well
 lime marlin

 spiral sigil
Can anyone make me a super simple avatar? I cant pay much but i would love for someone to make ine
One
spiral sigil
Also dont dm me whining about the payment
sharp grove
🗿
 exotic flare
vital grove
harsh saddle
Yes but unless there is geometry where the model needs to bend and twist, it lik...
exotic flare
vital grove
harsh saddle
Yes but unless there is geometry where the model needs to bend and twist, it lik...
just to mention this is not blender
so export them to .obj file and move it to unity may not work
as an avatar
harsh saddle
vital grove
just to mention this is not blender
So long as it's a normal polygon model with square or triangular faces, it should be possible to rig it but you need edges where the model is intended to be articulated or it's not going to be able to bend properly.
vital grove
harsh saddle
So long as it's a normal polygon model with square or triangular faces, it shoul...
no it's actually packed in one single shit that you may consider it as "polygon" at some point
 harsh saddle
Unless that program can also rig, you'll need to bring it into a program like Blender for that anyway so you can look at the topology in there but I imagine it probably isn't great for animating.
vital grove
yeah it got rig too
sadly I'm building this from scratch
cause the rig won't fit my idea
harsh saddle
Well, if you get a rig created for it that Unity can assign as humanoid then you can try it. Worst case scenario is it doesn't work.
vital grove
harsh saddle
Well, if you get a rig created for it that Unity can assign as humanoid then you...
ok I think I avoided the worst case you mention
its now basically a rig so
winter palm
Is this suppose to happen with the rig? If not, any way on how I may be able to fix it?
 harsh saddle
winter palm
Is this suppose to happen with the rig? If not, any way on how I may be able to ...
harsh saddle
winter palm
Is this suppose to happen with the rig? If not, any way on how I may be able to ...
Do you mean how it's shaded? That would have more to do with your normals than your rig, the rig just moves vertices around based on weights.
vital grove
harsh saddle
Well, if you get a rig created for it that Unity can assign as humanoid then you...
you mean this?

just to make sure
harsh saddle
vital grove
you mean this?
Maybe? I don't know that program so I don't know whether humanoid means the same thing in that program as it does in Unity.
spiral sigil
Can anyone make me a free avatar?
 uncut imp
spiral sigil
Can anyone make me a free avatar?
uncut imp
spiral sigil
Can anyone make me a free avatar?
No
spiral sigil
Why @ me
 gray geyser


 winter palm
I made a jacket for my model, and have it linked to the armature of my body. But when I went to add weight paint to the sleees, the vertex groups cant be found. Any idea on how I can add weight paints to the jacket?
spare kiln
winter palm
I made a jacket for my model, and have it linked to the armature of my body. But...
when u parent it to the armature, click with empty groups if u want to do them manually
but i would just link/transfer weights from ur body mesh to get good results quickly
hollow ermine
grave aurora
https://cdn.discordapp.com/attachments/764431020953960468/1006359520378892378/un...
Lemme reiterate. All caps yes.
lone bloom
Anyone here know how to implement eye tracking to an avatar? (I use htc Eye Pro if that matters)
spiral sigil
vital grove
no it's actually packed in one single shit that you may consider it as "polygon"...
do you know how to rig in roblox?
spiral sigil
vital grove
no it's actually packed in one single shit that you may consider it as "polygon"...
what i do is export it into blender, (you will prob have to export each part one at a time), then rig it in there
tough plover
lone bloom
Anyone here know how to implement eye tracking to an avatar? (I use htc Eye Pro ...
the vive pro does not have eye tracking. do you have the vive pro eye?
lone bloom
tough plover
the vive pro does not have eye tracking. do you have the vive pro *eye*?
Yeah mbmb
Vive pro eye is the one i got
tough plover
lone bloom
Yeah mbmb
then you need to set up the parameters and the animations on the avatar to drive the eyes, and use the VRCFT application to send the values from SRanipal to vrchat via OSC
more info in the VRCFT discord
setting up gaze tracking is easy, it's just a matter of adding the template Additive layer to your avatar
setting up blendshapes for blinking/expand/squeeze takes a bit more work
lone bloom
Oh god this sounds way beyond my capabilities
tough plover
VRChat does not have native support for eye/face tracking, so there is no better way for now
lone bloom
Hm…
Let me re read this
What do you mean when saying set up the parameters? (Its a VRoid model so would it have those inherently? I use facial tracking via IOS atm that works for the eyes)
tough plover
SRanipal outputs a series of values for different tracked parts of the face. for example, Left eye X, Left eye Y, Right eye squeeze, right eye blink, etc
you need to send those values to vrchat somehow, which you can do via OSC, which is the system you use to send/receive data through vrchat
the way you control stuff on the avatar using osc is by adding parameters to the avatar, and setting them to a value using OSC
that's what VRCFT does
but once you have those numbers at those values on the avatar, that's still not doing anything to the avatar
you then use those values to drive animations which make the avatar look like it's doing the same thing you're doing IRL
lone bloom
Oh ofcourse okay, so in adding the eye tracking file (to the additive which i did) it lacks an actual reception of the data to VRC in itself which is where the VRCFT app comes in
tough plover
yes
lone bloom
Cause i added that additive but now vrc needs to recognize the values okay okay
tough plover
the way the additive layer works is by animating the unity "muscle" values for the eye bones directly
which is basically universal
aka works for basically any avatar
lone bloom
Okay cool cool
tough plover
eyelids is not as easy however
lone bloom
And down the line this VRCFT will work for the blendshapes i have on my model if i choose to get a facial tracked?
tough plover
the model itself needs to have all of the required blendshapes
which vroid models don't
tough plover
not the same as SRanipal
lone bloom
Oh darn
tough plover
a lot are very similar, but some are different
you can use the ARKit blendshapes to make the SRanipal blendshapes, but you'd need to do that in blender
it's possible someone has already made a template for vroid avatars
lone bloom
Oof
Oh a template
Is this plug in and just adjust type thing?
And as someone thar understands this do you by chance take commisions..? I think i can handle the eyes but the face animations sounds to far beyond me
tough plover
normally templates would include the model with the blendshapes, aswell as the parameters file and the FX controller pre-set up
I don't really do commissions sorry, but you can maybe find people in the vrcft discord that can help
there are guides too
 tough plover

GitHub
VRChat OSC App to allow AV3 Avatars to interact with Vive SRanipal Eye and Lip Tracking SDK - Blend Shapes Setup · benaclejames/VRCFaceTracking Wiki
GitHub
VRChat OSC App to allow AV3 Avatars to interact with Vive SRanipal Eye and Lip Tracking SDK - Eye Tracking Setup · benaclejames/VRCFaceTracking Wiki
lone bloom
tough plover
https://github.com/benaclejames/VRCFaceTracking/wiki/Blend-Shapes-Setup
Are you able to invite to the discord?
The link i found is dedge
tough plover
DM'd
lone bloom
You rock tysm
 hollow geyser
Can anyone elaborate on the TOS update about uploading more, Adult content? I was in the process of building my own model, im a legal adult. I want to know if it is safe to upload? If not ill remove the adult bitties..
azure rain
not-safe-for-work content is not allowed on vrchat at all so you'd want to use Barbie doll Anatomy if you having like a body under the avatar for toggling different outfits
lone blaze
just finished a couple more star wars ships both being from the clone wars show


 opal shuttle
thats sick dude
vital grove
spiral sigil
do you know how to rig in roblox?
I'm rigging it by myself using a rig builder, and took reference from it
vital grove
spiral sigil
what i do is export it into blender, (you will prob have to export each part one...
If I run blender and export sth my pc will go boom
harsh saddle
vital grove
If I run blender and export sth my pc will go boom
If you can't run Blender, you definitely can't run VRChat. Unless you're a Quest user.
vital grove
harsh saddle
If you can't run Blender, you definitely can't run VRChat. Unless you're a Quest...
I mean it does do normally like booting amd running up blender
Just
When import sth it always crash
harsh saddle
Are you trying to import something really complex or just anything?
spiral sigil
vital grove
I'm rigging it by myself using a rig builder, and took reference from it
alr

 spare kiln
red glade
New WIP Fit
spare kiln
red glade
New WIP Fit
Nicee
 molten knot
Question, how would one guy make a realistic sky in eevee without using dynamic sky because im figuring out how to make a good sky with clouds that i dont have to manually put without it looking like noise in blender
harsh saddle
||He wants you to make him an avatar||
If you can get a taker, good on ya, but you might as well be forthcoming about what you're looking for.
 exotic obsidian
||Apple Giftcard???||
spiral sigil
Yes
 bronze zenith
spiral sigil
bronze zenith
spiral sigil
B)


 rough pond
Can anyone here help me make an avatar
harsh saddle
Sure, what are you stuck on?
rough pond
So in blender when a put all materials into one my avatar goes black and I have no idea why
 vapid peak
Anyone knows how to fix this error? I'm trying to use the CATs plugin in Blender but this keeps popping up

 acoustic flax
Does anyone know where I could find like videos or anything to learn 3D modeling? I've been lookin to create my own avatar from scratch.


 sturdy quarry
acoustic flax
Does anyone know where I could find like videos or anything to learn 3D modeling...
sturdy quarry
acoustic flax
Does anyone know where I could find like videos or anything to learn 3D modeling...
There are people on YouTube who make models from scratch like shonzo or Gjnko well I recommend those 2
acoustic flax
sturdy quarry
There are people on YouTube who make models from scratch like shonzo or Gjnko we...
😮 awesome! ill check them out
 jovial sandal
lone blaze
just finished a couple more star wars ships both being from the clone wars show
jovial sandal
lone blaze
just finished a couple more star wars ships both being from the clone wars show
Those are cool do you have any Obi Wan avatars from the Kenobi show
lone blaze
jovial sandal
Those are cool do you have any Obi Wan avatars from the Kenobi show
I’m still working on improving my avatars so I haven’t made one yet
spiral sigil
can anyone help with a problem im having? my character is very short and doesnt align with the head so it looks like im way above the avatar
harsh saddle
spiral sigil
can anyone help with a problem im having? my character is very short and doesnt ...
You probably have to bring the rig above the origin in Blender and then apply the transform
spiral sigil
harsh saddle
You probably have to bring the rig above the origin in Blender and then apply th...
i figured it out, thank you!
do you know how i might upload for both pc and quest though?
 azure harness
acoustic flax
Does anyone know where I could find like videos or anything to learn 3D modeling...
azure harness
acoustic flax
Does anyone know where I could find like videos or anything to learn 3D modeling...
1: https://www.youtube.com/watch?v=hHdWZlil0gw
2: https://www.youtube.com/watch?v=_iDQ4fyFBcs
These two videos were the two that helped me get into both world and avatar creation. Granted, I haven't touched Unity for worlds yet, and I have only done one basic avatar. However, Video 1 taught me a lot of basic Blender skills which I used to make fun 3D renders, and then I managed to make a basic avatar from scratch by following Video 2 and have it in VRChat within 3 hours.
harsh saddle
spiral sigil
do you know how i might upload for both pc and quest though?
Just upload for one and then in the builder "switch build target" to the other and publish for that.
spiral sigil
thank you!
azure harness
azure harness
1: <https://www.youtube.com/watch?v=hHdWZlil0gw>
2: <https://www.youtube.com/wat...
A lot of the rest of my Blender skills have been less about trying to hack together avatars and more about having fun making things that I want in Blender, which is giving me more foundational knowledge that I can then apply to things I want to make for VRChat.
For example (I can't send it as an attachment due to "explicit") https://pbs.twimg.com/media/FYhZQFSWQAA0Bb8?format=jpg&name=large
This isn't a great example because there's some things I did incorrectly here, but I was able to sculpt this Nanachi from scratch using reference. Though there's a lot of things I want to change about both the way it looks (way too human-like) and some methods that I wish I knew (remesh, dynotpo, other decimation techniques, using a basic cube shape with subsurface modifier and symmetry for a base, etc.) But ultimately, I was able to do this because I hacked around a bit with learning the basic tools, then was able to more freely use my tool knowledge to bring an idea to life.
The second image (attached below) is a more recent sculpt I did, where the trouble was more about mixing multiple materials and my viewport lagging, but I am relatively happy with the way the sculpt came out, especially since I was able to use remesh and dynotopo to more freely sculpt.


 wicked mirage
Can someone please make a free quest-friendly chitty chitty bang bang avatar with working seats and toggles for the wings? you can find the free model with animations on Google! This is probably a really strange request because the movie is basically forgotten at this point, but it would be so magical to see that classy car fly once again in the skies of VRChat!

 azure rain
nobody is going to make you the avatar for free
 tawny pollen
pretty sure nobody in their right minds would if they didn't have enough time....unless
btw this is about as close as I want it to be
 tawny pollen
btw this is about as close as I want it to be
tawny pollen
tawny pollen
btw this is about as close as I want it to be
it's still a work in progress
tawny pollen
ngl, if you study the topology of the model and start to figure out how these things work, the rest of making this look realistic is gonna be easy

this is gonna be easy lol
fleet harbor
great, i have to deal with this now
and painting on objects that i copied is really hard for no good reason
please help
...please
this video might better explain my issue
 jagged moat
Have you applied the scale of the avatar? Also that brush looks very large for something that small, you could try with a smaller brush with greater strength
fleet harbor
renfrew suggested using uv island margins in avatar 3 help and it's worked fine
ok how do i make this not look like shit

turning anti aliasing off seems to do absolutely nothing
harsh saddle
You might need to increase the resolution of the texture or use multiple textures
 whole zinc
fleet harbor
ok how do i make this not look like shit
whole zinc
fleet harbor
ok how do i make this not look like shit
are you in blender?
often theres a setting in the image node. its called filtering
unless you mean that by antialiasing
tawny pollen
hey guys
wanna know something trippy?
if anybody subdivides 4 times
the model of Geras

it's 2 million
https://cdn.discordapp.com/attachments/921433761420288071/1008541335743123548/unknown.png subdivided 5 times then you get this

hurts your eyes doesn't it?
tawny pollen
tawny pollen
https://cdn.discordapp.com/attachments/921433761420288071/1008541335743123548/un...
never make this an avatar
exotic obsidian
tawny pollen
https://cdn.discordapp.com/attachments/921433761420288071/1008541335743123548/un...
My graphics card hurts just looking at that image.
tough plover
fleet harbor
ok how do i make this not look like shit
you need to set your texture filtering mode in Unity to Point
rather than Bilinear
for pixel art that's what you want to do
 scenic needle
 silk sage
@scenic needle First what did you do to score this amazing piece of text and also is regarding a unity problem with the SDK or a modelling error, if so try reloading the SDK/ delete it all together and import it again. Also wouldn't save thing in the TEMP folder, try saving it locally or to documents. Temp is good for recovering lost or fail data, like crashes but not good for permanent files
proven plinth
Little spooky ghoul fella I'm making rn, still need to rig and add shapekeys


 unkempt crane
Working on a middle eastern / eqyptian inspired outfit

Next up are sandals with some sort of shinguards with ornaments

 unkempt crane
steady zealot
God I love making Trim sheets
unkempt crane
steady zealot
God I love making Trim sheets
Me too, for some reason it's very therapeutic


Here's few I've done just for the sake of it
tawny pollen
exotic obsidian
My graphics card hurts just looking at that image.
that's the idea

 tawny pollen
working on MK11 stuff now
 fleet harbor
tough plover
you need to set your texture filtering mode in Unity to Point
fleet harbor
tough plover
you need to set your texture filtering mode in Unity to Point
sorry for not responding but is there a option like this in blender? cause that's sorta where my model is stuck on currently
steady zealot
 quaint jasper
Can't wait to see it lightbaked !
steady zealot
quaint jasper
Can't wait to see it lightbaked !
Still have a metric fuckton of stuff to do before I even think about baking, but I am super excited!
azure rain
very nice progress
steady zealot
Overly ambitious project to create an entire JRPG hub world style town, and the outlying farmland, mystical forest, sewers, docks, beach, and residential zones!
 azure rain
well you definitely seem to be off to a good start
 night cairn
steady zealot
Overly ambitious project to create an entire JRPG hub world style town, and the ...
night cairn
steady zealot
Overly ambitious project to create an entire JRPG hub world style town, and the ...
will there be cows?
roaming around?

steady zealot
night cairn
will there be cows?
Hmmm, perhaps not. I'm dead set on making everything in the world, but I can't do organic things like animals very well...
But I might see about sourcing them as the only thing I don't make
 azure rain
so how are you going to do the plants as those are organic shapes
steady zealot
I meant more like animals
I can do plants just fine
I suppose I could do slightly stylized animals perhaps
realistic is pretty much out of the question
Just have to find some cute references I guess
something like harvest moon but slightly more realistic
won't get better at it if I don't try, after all
night cairn
i imagine a windmill and a cow would really set the whole farmland theme

cant wait to see when your whole project is completed
heavy parcel
steady zealot
something like harvest moon but slightly more realistic
Get cow.png, place on billboard particles.
Animals
But looking good
 heavy parcel
Actually perfect
tawny pollen
I think I might have figured out how the Corpse head looks if it was properly modeled by Scott


note how I said "if"
I was guessing the topology when I made Toy Bonnie's feet look accurate to FNAF 2
 magic badge


 red glade

Update on the Warcore outfit! This is currently where im at, i hope to get the whole outfit done sooner or later :) #3D #VRChat #Vtuber
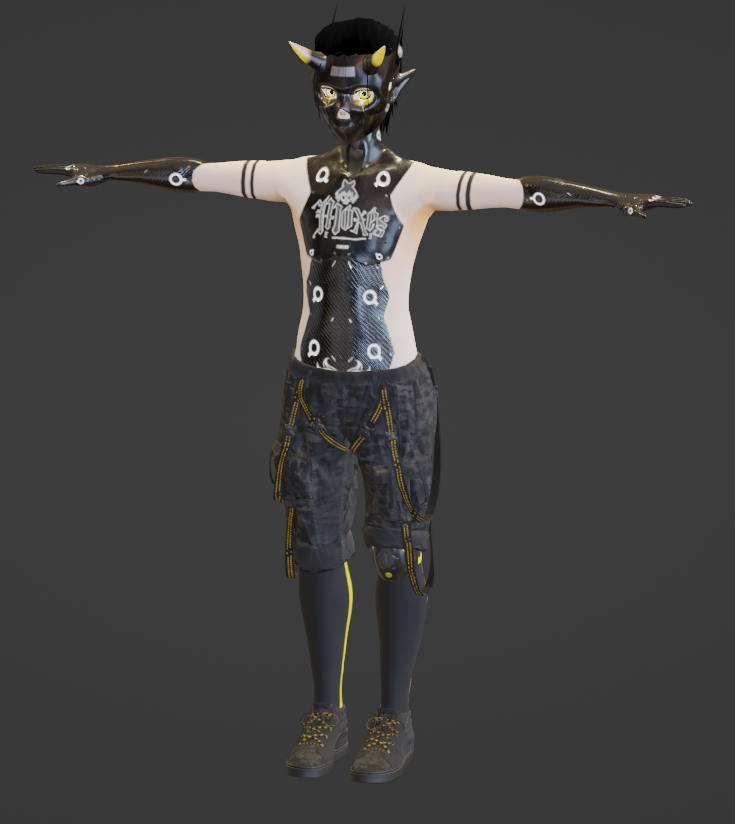 Twitter
·
Twitter
·

 red glade
puffer jacket 🕺

 rough talon
scratch fit i made a bit ago

 versed saddle
rough talon
versed saddle
rough talon
not individually sorry >< only on the full model
 nimble glade
Is anyone here any good with Hand modelling? Trying to make a specific hand however that topology is absolutely garbage


 harsh saddle
Topology on the midpoint of the fingers looks reasonable, maybe just a couple of edge loops where that final bend is. Might be kind of awkward with hand cupping with that circular bit jutting out.


 solar kindle
Hey hey. Didn't know if any of the other channels were best suited for this. So here it is.
I got a problem in blender. I have been working on a model for awhile and have ran into quite an interesting issue. I have set the value of blendshapes above 0 and fit clothes over it. Somewhere along working these blendshapes now say they are at 0. But still retain the shape I put them in. Meaning. If I go into the negatives with them they return to normal. For example.
the first image shows what the blendshape should be at 0. But after the blendshapes are applied this shape is now -.5. The second image shows what should be .5 on the blendshape. But now it is 0. Does anybody know how I have applied blendshapes like any other apply Transform or rotation?

 quaint jasper
solar kindle
Hey hey. Didn't know if any of the other channels were best suited for this. So ...
quaint jasper
solar kindle
Hey hey. Didn't know if any of the other channels were best suited for this. So ...
Did you change anything else but Basis on your main body mesh ?
fleet harbor
currently working on the bones of my model
and i decided to change how the shoulders are on the riggify rig thing
is this good?

oh and why is it that shapes i've cut and sown back together in a way not want to apply the smooth shading

 harsh saddle
fleet harbor
currently working on the bones of my model
and i decided to change how the shoul...
harsh saddle
fleet harbor
currently working on the bones of my model
and i decided to change how the shoul...
The shoulders should be fine but I don't think rigify transfers well to Unity. I'd use Mixamo or get Auto-Rig Pro if you don't want to do it manually. Try this for your shading.
 fleet harbor
for some reason doing a bisect knife merge thing fixed the head, but now the feet
fleet harbor
harsh saddle
The shoulders should be fine but I don't think rigify transfers well to Unity. I...
also that's gonna be hard when i just moved the entire rigging to be in place
like-

 harsh saddle
fleet harbor
like-
harsh saddle
fleet harbor
like-
You can try it but I just haven't heard good things about rigify being compatible with Unity's humanoid system. Mixamo is automatic so you just have to tell it where certain key features are.
harsh saddle
It will probably require some cleanup but so will any auto rigging program. Mixamo.com
fleet harbor
ah ok
oh and
the rigify thing
was moreso just spawning in a basic human bone and editing it to the model's proportions
idk if there's any other use of riggify
harsh saddle
Oh, okay, that's just manual rigging, then. Rigify is a template you move into place that does a bunch of other stuff like adding IK.
 harsh saddle
Yeah, if you used the meta-rig, I don't think that will work well but you can try it. I don't use rigify so that's just what I've heard.
harsh saddle
Rigify takes that skeletal structure and makes this which adds a bunch of stuff I don't think the Humanoid system can work with

It's a good tool for animation in Blender, just not for porting to other programs.
fleet harbor
for one, the skeleton is terrifying
and the mesh ain't moving with it

 fleet harbor
harsh saddle
Rigify takes that skeletal structure and makes this which adds a bunch of stuff ...
fleet harbor
harsh saddle
Rigify takes that skeletal structure and makes this which adds a bunch of stuff ...
well the basic humanoid thing i used doesn't have facial structure stuff
harsh saddle
Hmm, that's unique. Sometimes Mixamo will fail the rigging process but I've never seen it get to the end and then not have the rig attached.
fleet harbor
...maybe the issue is that the model itself had the riggify rig
that's more like it

...oh no
 harsh saddle
Yeah the issue with rigify happens when you press the "generate rig" button but I'm not sure if it works without doing that.
Those hands/wrists are gonna be pretty awkward to use regardless of what you do, I think.
fleet harbor
oh noooo the haaaands

bruh what

oh and the body is twisting around, which is something i do not want
ok i don't think miximo is something i'm wanting to use
turning off fingers makes it look good now

but i don't like the body twist
harsh saddle
It works pretty well with humans but the farther your model is from human, the more it will struggle. No auto-rigging program will rig it without requiring some adjusting of the weighting. I think you're seeing the hips rotating because there is hip rotation in that animation but that won't happen in VRChat unless the person using the avatar has FBT and then there isn't much you can do about it other than turning off hip tracking. You can buy Auto-Rig Pro and might get better results but I don't think Rigify is the way to go. You can also rig it manually but that is a bit more work.
fleet harbor
man
 azure rain
Cool
 novel vigil
Hey everyone I just want to ask if someone know modeling clothes for an avatar if someone can come pv me so I can show what kind of clothes I want and for what model thanks
tawny pollen
who here likes Five Nights at Freddy's models?
spiral sigil
Ported my avi to smash, made renders for the UI

The line is done by coning the geometry and flipping the normals, then adjusting and deleting in areas that the mask is hidden.
 errant osprey
could anyone please kick me a youtube video on how to make a shirt in blender? all i can find in the results are videos about making ones with cloth but im just trying to make a simple shirt
harsh saddle
errant osprey
could anyone please kick me a youtube video on how to make a shirt in blender? a...
Generally, you copy the body and make alterations from there https://youtu.be/XKBONVoHSdA

How To Create & Rig Clothing: Blender 2.93 Tutorial. This tutorial goes over how to quickly create clothing in blender. It also dives into using the Data Transfer function within blender to bind clothes to the character rig.
I also show off my new Character Clothing Library system.
How to bind clothing. Bind clothing to the armature. Blender 2...
errant osprey
harsh saddle
Generally, you copy the body and make alterations from there https://youtu.be/XK...
tyvm!
 harsh willow
how do i apply a pose as rest pose when i cant because a shapekey is preventing it
tough plover
harsh willow
how do i apply a pose as rest pose when i cant because a shapekey is preventing ...
you can do it via the CATS plugin
however, there can be issues where your basis layer of your mesh will not update correctly, and cause weird issue. to see if that's the case, do this:
- after clicking Apply pose as rest pose, create a new shape key on your body mesh in object mode
- set the value of the shape key to 1
- if nothing happens, great! however, if anything moved, then you need to fix your basis. to do that:
- select your Basis shape key in Edit mode
- click on any random vertex, hit G, then 0, then enter. this essentially "updates" the basis layer
- to test if it's fixed, repeat steps 1 to 3
harsh willow
tough plover
you can do it via the CATS plugin
doing the pose in cats fixed all the problems i had doing it with base blender
thanks legend
naive bolt
I received an fbx to work on but im having trouble applying textures. The model is all black and I'm not sure what I need to do
harsh willow
is the material assigned to the faces?
usually editing a mesh in particular ways can overwrite material assignments just make sure of that
your material looks fine itself
naive bolt
I got it now, turning up alpha allows me to see the textures
it's always those low quality videos lol
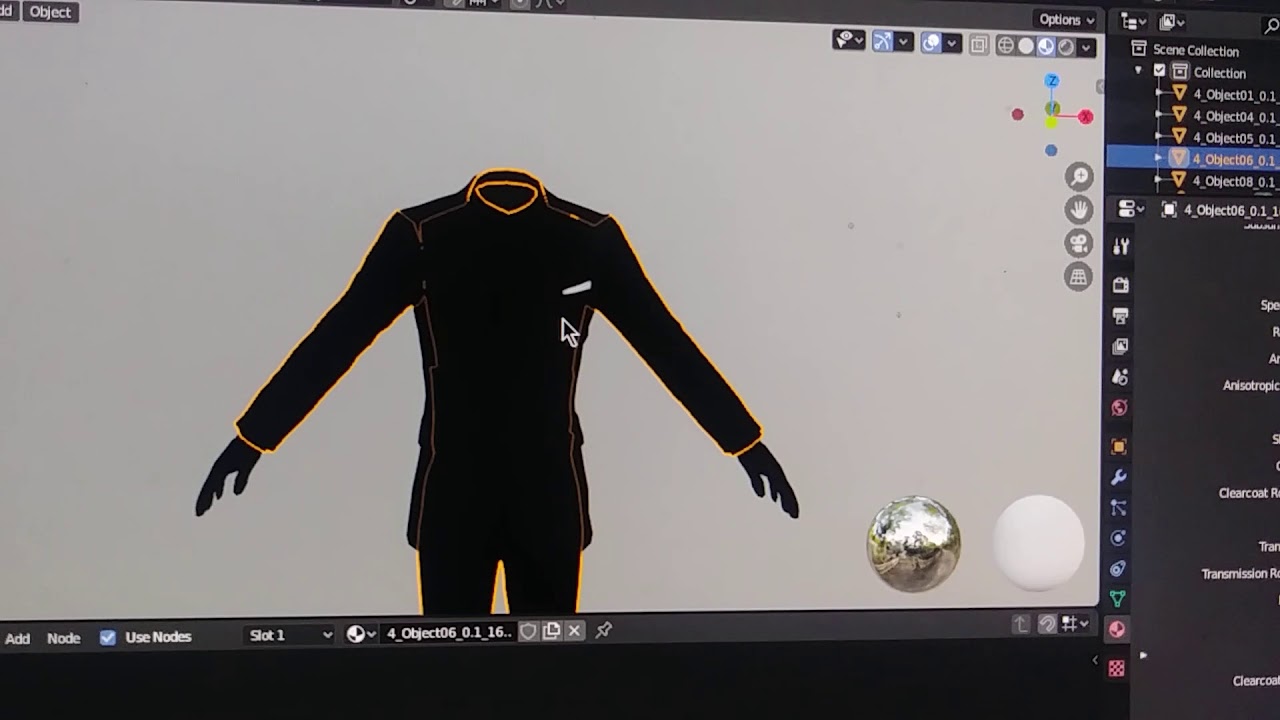
try to save you a little time spending hours scouring the internet for nothing
exotic obsidian
here's a wip of [[Number1 Rated Salesman 1997]]

 pearl swan
I'm trying to atlas the materials for my quest avatar but some of the materials end up all white after saving the atlas. Does anyone know what would cause this?
 rough talon
pearl swan
I'm trying to atlas the materials for my quest avatar but some of the materials ...
rough talon
pearl swan
I'm trying to atlas the materials for my quest avatar but some of the materials ...
if the textures aren’t all the same resolution it could be glitching out
ik it’s possible for it to work but mine only end up working correctly when they are all the same dimensions
pearl swan
rough talon
if the textures aren’t all the same resolution it could be glitching out
Sorry didn't see your message. I found out that I can unpack all files and then atlas and it fixes that problem.
spiral sigil
 spiral sigil
how is he coming along guys

yall think these little details on the greaves worth the polys?
 azure rain
if it affects the silhouette it goes in geometry
azure rain
even by Quest standards that's pretty low poly
spiral sigil
the fauld just werent lookin right idk what to do

he look dumb without it tho
is this triangle gonna mess anything up. i heard i should be using only sqares?
 azure rain
it's not the end of the world if there's occasionally triangles
spiral sigil
so i did these hands but im realizing theres no way theyre gonna bend right

also what the hell is going on here
 spiral sigil
so i did these hands but im realizing theres no way theyre gonna bend right
spiral sigil
spiral sigil
so i did these hands but im realizing theres no way theyre gonna bend right
am i just gonna have 2 spam edge loops all over the joints
 spiral sigil
thank u bro that is super helpful
spiral sigil
update
 spiral sigil
the drip continues
 azure rain
would you mind showing a picture where we can see the hands
spiral sigil
hello people ! its my first time making an avatar and i was wondering why my tail is transparent ? when i making an atlas, its the contrary . my textures on my body are messed up, except for the tail. do you guys have any ideas ? :ccc

 cursive summit
I made this Minecraft Furnace from the original minecraft sonic model
 spiral sigil
hello people ! its my first time making an avatar and i was wondering why my tai...
spiral sigil
spiral sigil
hello people ! its my first time making an avatar and i was wondering why my tai...
UPDATE: i found a way ! :D working fine by now uwu
spiral sigil
textures!
 azure rain
very nice looking
 hoary trail
Hello! So I just joined this sever and I have know idea where to put help stuff, but this came out of know where

 harsh saddle
hoary trail
Hello! So I just joined this sever and I have know idea where to put help stuff,...
harsh saddle
hoary trail
Hello! So I just joined this sever and I have know idea where to put help stuff,...
This channel is for 3D modeling, you want #world-development but the first thing I'd try is just restarting Unity.
 harsh saddle
4.7k tris is pretty low. There's something to be said for good performance but you can get a performance rank of medium on Quest for anything under 15k so long as there isn't anything else pushing you over.
azure rain
10k would be the limit to qualify as a fallback Avatar so that would probably be a good number to be your max
VRChat
The Avatar Performance Ranking System allows you to see how much a user's avatar is affecting performance via analysis of the components on that user's avatar. You can also use it on yourself to see how performant your avatar is. This system is provided to inform users what is likely the most perfor...
harsh saddle
That's true but I guess I don't really see the point in making something a fallback avatar if the Quest version will display by default anyway. I guess it's just if you want to use a different avatar that won't work for Quest, then you can use that as a fallback but if you want to use that avatar, then so long as they haven't manually increased their minimum displayed performance rank, it'll show up without needing to use a fallback.
azure rain
and I guess a good question would be where to spend those extra triangles
harsh saddle
Yeah, if you don't need them then you might as well keep performance as high as possible. Maybe adding more smoothness to the scarf and skirt?
azure rain
https://twitter.com/delaneykingrox/status/1556154787426877440?s=20&t=4iFw7MwnIo2p3g4JHdYLfQ a tweet I saw that might be handy for the skirt?

#gamedev technique. Using verts to round silhouette, allowing lower counts in concave areas.
Likes
3179
Retweets
395
 Twitter
·
Twitter
·

 harsh saddle
That would work well. It won't subdivide well but you aren't gonna want to do that anyway.
azure rain
and it's probably going to be a bit before he would want to tackle like normal map baking from a high poly
spiral sigil
ok gamers my character is finished i think
how am i going to rig him
 spiral sigil
harsh saddle
Yeah, if you don't need them then you might as well keep performance as high as ...
spiral sigil
harsh saddle
Yeah, if you don't need them then you might as well keep performance as high as ...
this is a good idea actually
i was thinking of adding like 2 or three more layers to the scarf so it doesnt look just like a blob
azure rain
spiral sigil
ok gamers my character is finished i think
how am i going to rig him

I've been meaning to update this video for a very VERY long time. But, we're finally here. Everything you need to know in order to start painting weight layers onto your character!!! Hope it helps :)
Female Body Model Link:
https://www.youtube.com/watch?v=_XfvLpLyulI
If you enjoyed this video, please don't forget to like and subscribe!
You ca...
spiral sigil
i desperately need to control my weight
how many spine bones do i need?
and do i need hip bones or can i just go straight to legs
spiral sigil
exotic obsidian
here's a wip of [[Number1 Rated Salesman 1997]]
oh spamton g spamtom im feeling real low
azure rain
VRChat
Export Settings When exporting your rig from your 3D editor of choice, ensure your coordinate settings are correct. Most of the time, the defaults are correct. For Blender, ensure that your rest X rotation is 90 degrees. Unity will flag your humanoid rig configuration if it does not meet the Mecanim...
spiral sigil
ok
so three: pelvis, spine, then chest
 azure rain
spiral sigil
ok
so three: pelvis, spine, then chest
azure rain
spiral sigil
ok
so three: pelvis, spine, then chest
yup
spiral sigil
what is the naming convention for arms
legs would be like
thigh then shin
upper arm and lower arm? or forearm?
azure rain
https://virtualcast.jp/wiki/_media/en/unity/humanoid/avatar.png well here's like the naming convention the unity humanoid uses
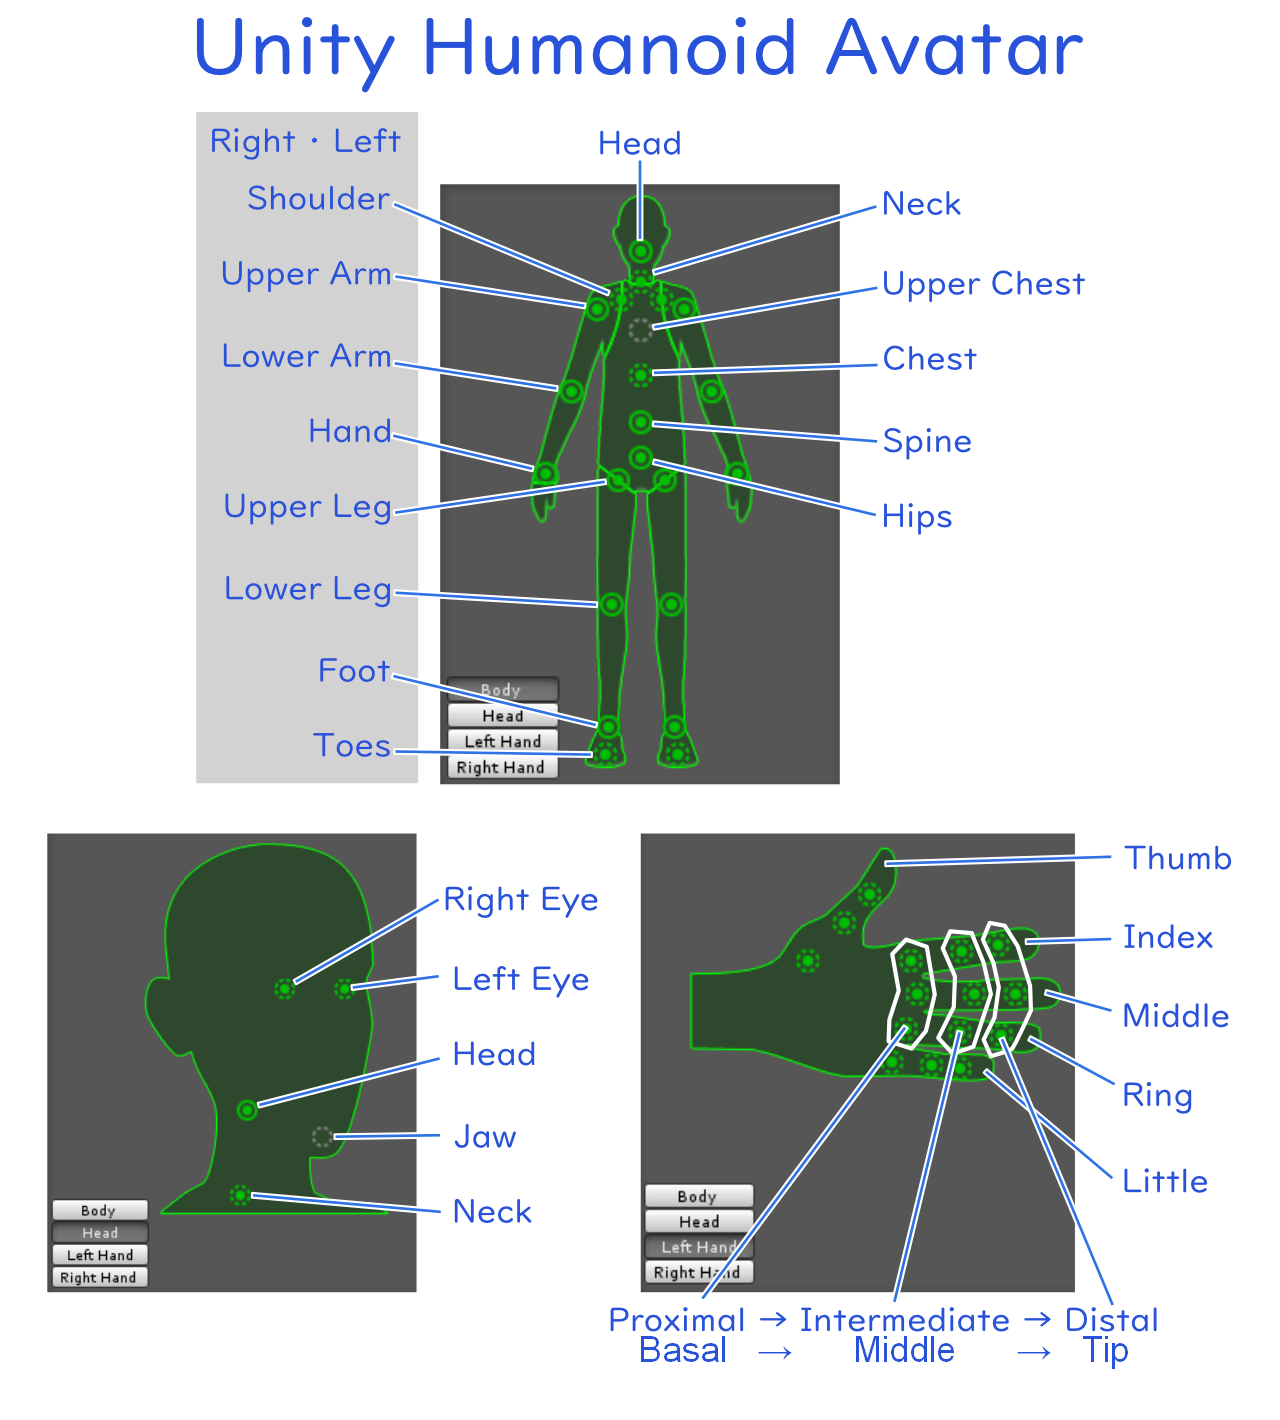 spiral sigil
so thumb_proximal.l, thumb_proximal.r, etc
azure rain
yup
trail python
azure rain
and if it's helpful knowledge the exact naming doesn't affect the rigging process as it's the bone hierarchy itself but figured that might make setting up the unity humanoid easier to have the names match
spiral sigil
trail python
thank u bro this is so helpful
trail python
np gamer
spiral sigil
the leg is clipping through p bad
 azure rain
you would also need to paint the skirt to the leg
spiral sigil
ok i will work on that
bro auto weights did the knee perfectly

thats insane
how did it know the knee pad thingy was sposed to be solid
azure rain
spiral sigil
how did it know the knee pad thingy was sposed to be solid
cool & hope it goes okay when you get to the fingers
spiral sigil
omg its goin crunchy


 exotic obsidian
spiral sigil
oh spamton g spamtom im feeling real low
exotic obsidian
spiral sigil
oh spamton g spamtom im feeling real low
[[I Can Send E-Mail!]]
spiral sigil
oh shit for real?
im just gonna need to delete all of these faces bc they just keep clipping

no point to have them right if theyre not visible?
in that case would it make sense to connect these loops up
 exotic obsidian
Progress
 sharp grove
aight blender users, i'm working on an avi and would love to add some details like the hexagony bits on these robots from hzd, but i'm struggling to think of a nice way to do it https://cdna.artstation.com/p/assets/images/images/024/484/978/4k/daan-meysman-stalker-01.jpg?1582578190&dl=1


i've not had much luck with shrinkwrap
so would love some other options if anyone has anything
 river phoenix
Currently having problems with my model. I’m unable to transfer the model’s textures even after making it a fbx file
Blender to Unity
tough plover
river phoenix
Currently having problems with my model. I’m unable to transfer the model’s text...
that is normal, you are not supposed to see the textures "transfer over"
you're supposed to import them into unity separately
in fact, if you do see textures get imported with the model, that's a bad thing
since it's just bloating the size of the FBX
river phoenix
Is there any other way because I don’t want to separately add the textures especially with this model
tough plover
river phoenix
Is there any other way because I don’t want to separately add the textures espec...
no, materials are done in a completely different manner in unity and blender
waxen mist
You need to bring it through unity
tough plover
river phoenix
So I have to do it completely by hand..
yes, it does not take long
 boreal estuary
Anyone know why this is happening when I shade smooth?

 thin shadow
could be something to do with normals. reset normals.
boreal estuary
yeah i figured out I just had to recalculate the normals
 karmic saddle
 red glade
https://twitter.com/Dxnalt/status/1562101450813149184 Kinda wanna make a few more military pieces any ideas?
Made a jaw piece that connects to the mask, I have some idea's for a more tactiCOOL version of this outfit.
Stay tuned
#3D #Vtuber #VRChat
 Twitter
·
Twitter
·

 river phoenix
I have the textures on blender how do import the textures to unity?
 harsh saddle
river phoenix
I have the textures on blender how do import the textures to unity?
harsh saddle
river phoenix
I have the textures on blender how do import the textures to unity?
You import them or drag them into the project tab and then drag them into the appropriate slots on a material.
winter palm
I am having trouble with the legs on my 3D model. Whenever I move the bones of the thigh, it comes out like this around the hip area. Any way that I may be able to fix it?

 harsh saddle
Blur the edges, you generally don't want to have 100% weight and then immediately 0%.
winter palm
Cannot find blur in my tool bar (not sure if its named differently in 2.9)
azure rain
I've been meaning to update this video for a very VERY long time. But, we're finally here. Everything you need to know in order to start painting weight layers onto your character!!! Hope it helps :)
Female Body Model Link:
https://www.youtube.com/watch?v=_XfvLpLyulI
If you enjoyed this video, please don't forget to like and subscribe!
You ca...