#visual-fx
1 messages · Page 30 of 1
put some dark color behind and around the main shape so the glow pops more
make that white sphere have a bit more texture/visual interest
add 2 more rings, each smaller than the last
dial down the bloom on the main shape and add a central core that's the same hotness as current
it's overall got nice timing and good ideas, i think it's strong and has potential
keep going
really nice work
@indigo jolt ok thanks for the feedback.
The white sphere and the blue rings are just colored that way since I was still working on them and didnt want to focus on color or texture just yet until the shapes were ok.
that's totally fair
I see what you mean about the floating gpu dots
I think I can add some velocity to them and a bit of drag to have them follow the "projectile" a bit then spread out
i can tell they come from a sphere location, you can set sphere location to be a Uniform Range along that X-axis to make it a bit more pill-shaped among other ideas.
ah good call thanks!
ya tinker around on that. sometimes the particles follow, sometimes they wink out, sometimes they suck into the vacuum left by the hot plasma beam and twist and turn a bit with vector field
there's no wrong answers 😃
thats always encouraging haha
ya just throw it all out there, duplicate emitters, mess around on a copy and see what you like
be sure to test things a lot at 0.1 speed in viewport too
ah ok I hadnt thought of that, thanks for the tip!
i think you generally have timing figured out, but this is great for a "super attack" - just keep in mind that if your attack takes 4 seconds to fire, it is the "money shot" of the game so it better be ridiculous
feel free to add some sort of magical shapes or dragons or skulls or something extra to give it a bit of personality
anything this long means you're "flexing" a bit on others
at the moment Im playing with a material to give the rings a bit more movement to simulate some kind of forces pushing them.
Gotcha on the super attack I'll make it a bit flashier and add some bits
looks super fun, you gonna hook it up to like first person bp so you can try it out?
I had it hooked up to a basic FPS template to try, but I was spending a lot of time trying to tweak the BP and not the effect so..
went back to making the effect look better first
lol you'll need to come up with a beam and impact and decals too for max authenticity
plan for more
always do haha
nice, should be super fun
awesome, thanks for the feedback and Im getting back to work.
cool, keep sharing
I'll let you know how the headache progresses haha
ya i love stuff like this
why does love hurt!?
because it's no fun otherwise 😃
fair
Hi , i want to create something like this , and by that i mean i want to wrap a rope like texture over an object , and i want to make it look better then what is in the picture . I need some ideas on how i can do that . thank you
what i have for now is this : i have the object i want to wrap with the rope , i set up a cable segment using the cable plugin from unreal , i set up a material with a displacement map for the rope texture and applied it to the cable segment and it looks ...... well semi-good , now i wanted to turn that cable segment into a spline and wrap it around my object .
Jesus that's expensive. You doing this for cinematics or something?
If I wanted to do this old start with a curve line in 3ds max, wrap around similar size object, convert to poly, adjust poly flow to be spiraling, turbo smooth, pull out rope shapes, smooth more, export to substance painter or use designer and add fiber shapes. Create low poly cylinder shape that matches area of rope to project normal map to, project to that, export out low poly and maps to Unreal
But that's just how I'd do it for games
Tubes are the most poly-dense shapes in games so it's usually best to use normal maps to do most of the visual fakery rather than literally having a ton of hidden half-cylinders underneath your rope shapes
thank you for the info , i will looks for my possibilities , i only have Blender and Zbrush at my disposal for now
@indigo jolt, @placid pawn Could the spline thicken node work for something like this?
Viable as in expensive or it wouldn't work for what he's trying to do? Asking out of curiosity.
I'd say both
He said he wanted results that looked better then the image he posted. You get that by modelling it properly with a good normalmap.
And that way he has a lot more control of both vert and texel density
gotcha
You could probably use thicken to generate it, but that's just asking for trouble wtih bad geo and vert counts.
Also, can you add lods to thicken?
Not to mention that it will be separate drawcalls
Not sure about the lods
I've only played with spline thicken once or twice with mixed results and went back to just a properly sized mesh.
final mesh should look something like corrugated steel roof material but more angular
and wrapped around your main mesh

that's some good "rope mesh" 😃
that should hold a boat to the dock
yup
any free-hanging ropes going from point-to-point can be higher poly but try not to go beyond 5-sided for rope cylinders
you can't see poly sides on cylinders unless you are being stabbed in the eyeball by them
it's not that you can't afford more, it's just that more poly there doesn't give you any rendering perks
you're better off spending those polies on making rope curve along distance rather than length if that's how it's used
@placid pawn I'm not a blender user myself but I've got a few friends that use blender and suggested this: https://www.youtube.com/watch?v=1drRNphACMc hope it helps
How to make a rope in Blender using curves and microdisplacement. Rope Texture: https://www.poliigon.com/texture/2339 Microdisplacement tutorial: https://www...
dat face makes me think he has an disturbingly close relationship with ropes
god he's annoying, but for the high-poly mesh that's a decent way to go forward
just apply that to a lower poly shape
or assume your game will have no characters/gameplay and is instead a "rope sales demo" for use in rope trade shows
and go with that final version
my pa always said I shoulda gone into the rope buisness
good industry there!
just be glad you're not trying to tackle 3d CHAINS
you'll like the answers there even less
ropes are ez by comparison
tried that once...ONCE...decided to mow the lawn instead.
wise move
a lot of info thanks a lot again , i actually watched that video a few days ago myself .
thing is i'm a noob with all of this ( Blender , Unreal Engine 4 ) but i want to keep on going and finish my project , its fun and challenging and i like that
also did i post my question in the right sub channel ? i was a bit confuse and did not know for sure where to post it
so let me get this straight then , i can go make a nice looking mesh , then take its normal map , go ahead make a general low poly mesh and then apply the normal map of the nice one on the low poly mesh . in the end i get a high poly looking mesh even thought is low poly . did i get it right ?
or i just edit my material in unreal using that normal instead of what i have setup for my current one
Ok I moved here because level design isn't the right place anymore
uh
The roughness is 1 on this material
and it is still super reflective
Hey guys. I am playing around with with PP material lately trying to make outline around specific objects. So I would have some meshes with the outline and some without it. I've managed to get pretty close to it by using custom depth and stencil buffers. However there is slight issue that appears as seen on image. When I put mesh without outline in front of the one with outline, you can see some outline on it (left part of cube). Theoretically I know why this happens, but I have no idea how to get around it. Any ideas?

This week we'll be diving into Post Processing in UE4. Tom and Sam will go over some basics of post-processing before building a couple small shaders, one fo...
@plain geyser
@unkempt pivot do you have a roughness map for the material ?
Yeah, I fixed it now
@sterile agate I already did implement outline, what I want to do is make it apply on some objects. Which I did aswell by using custom depth, but putting object without outline in front of one which has it, makes the outline show on it too on overlapping parts
Hey guys I'm just starting to learn how to do materials with unreal and I was thinking about doing something that I clearly don't know if it's possible or not maybe one of you can give me a direction please ? I'm using a box mask in my material to make a hole through my object and I was thinking about trying to fill the hole part that make the interior of the mesh visible plus make some sort of glowing outline on the hole is that even possible ?
not possible. you need additional geometry
@tough granite sounds like what @spare hare said, you'd be better off having a little bit more info there
You could always use parallax occlusion mapping to fake depth but imo seems like an expensive solution for something that could just be done manually
Not impossible, just problematic. Use two sided material. Remove front facing geometry conventionally with opacity mask and box mask. For backface, determine which face of box mask is it behind, and adjust normal and pixel depth offset accordingly.
well, I managed to outline the box mask and give up the part about filling the hole gaps since I don't really need it but thanks anyway 😃
hi, can i ask you something, i still trying to know how and can UE4 do this. i want to make a scene where there are an portal to another place, my scene gonna be midnight, and other side of the portal gonna be daylight, i need to work on level streaming right?. but how do you stream 2 level with 2 light setting at the same time when i just want to see the scene of 2nd world lock inside the portal border. my english isnt good so it may be difficult to explain my ideal
does the Lock Axis module work only in WS ? what if I want to have locked axis but I want to be able to rotate my effect ?
I want my particles to always face"forward" whatever I decide that direction to be
looks like lock axis locks it to world axis, even when using local space
I only manage to orient things the way i want if I map them to a mesh particle plane. Is this the normal way to do things when you want to control orientation ?
@celest birch this is one reason why you might want to use a plane mesh emitter instead
Sometimes a sprite just won't do. Your other best bet is velocity orientation... but all depends on what angle you need
hello guys
my problem is when i set my emitter on gpu sprite, it gaves me this message: Random subuv interpolation is not suppoorted with gpu particles and when i set my set uv on linear my background particle inst transparent anymore but it still works pretty fine with the cpu. how gonna fix that?
guys is any one there?
i set actor collision to my emitter and attached to my projectile. when i drag and drop my projectile into the scene, collision works fine bu when i press play and press left mouse to shoot my projectile my smoke collision ignore the landscape collsion and doenst works
Maya and UE4 users i need your help
I am curious about how i would do a certain thing so i need help from someone or several someones to help me out with some maya and ue4 stuff
I want to create a trail on a mesh
And i have created that trail in maya
But if i want a character i ue4 to habe that while playing how would i do that
I made the trail with mash and added fractal noise to make it look lightning ish
How would i get that result i ue4?
Would it be possible to make it in maya and then make it like a particle thing and tyen add it as a trail?
@static orchid set "collision distance
It's usually too low by default
Increase the value
Max collision distance is usually painfully short
As far r the random UV thing, do that in your material with a particle random node added to your particle time or something on a flip book to get random start with gpu particles
Gpu particles have some limitations in cascade but they can have zany materials
Just no dynamic parameters either or orbit
Has anyone tried to use this material function before? Everything I try with it results just in a distorted mess and I wonder if it even works
I haven't used it, but input names likely tell that you have to supply 4 control points of a spline and a vector, along which you are supposed to deform the model.
Yea, got it now better working. The crucial part is to provide the thickness and height like this which goes against the desciption. Problem left now is that half the polys are missing, the mesh has twice the vertical loops when no spline WPO is applied
Got it, when the mesh has the pivot on the base the height value is correct without the divide. Then it gets distorted with all the polys in the right place
I thought I got it but when I change the tangent to Y instead of X I get messy distortion again. So I guess the function is bugged after all
Figured it out. Thickness needs to be Radius divided by Height. In case anyone can use it as well here is that with the working input
I can't however tell you how to generate the fitting normals from that since transforming all of the normals outputs failled for me. Also, the ends don't rotate with the tangent
I need help with something
So I'm trying to use the skin shader, but it removes a lot of the detail on the texture map.
like a lot of the reds on the texture are missing
@celest birch Seriously, you've been told to ask this in #ue4-general at least twice now. Why do you keep spamming channels?
#ue4-general is the channel you should ask the question in. Not visual-fx or career-chat.
Keep it up and you'll probably get kicked
Up to you
@round fog
@celest birch please use the #cpp channel for code-related questions.
Then learn. Read the #old-rules and #more-resources, and we won’t have any problems
wow I like how he just chose to escalate this until mods got involved....
@indigo jolt yes I ended up using velocity alignment but this feels like a shitty hack rather than a solution
Heya guys, Anybody know if it's possible to have collision match the new position and shape of a mesh being bent with a vertex shader? When I change the position of the vertex the collision remains in the original place.
@normal bolt world position offset in material is visual only I'm afraid. There's no way as far as I know to dynamically change collision shapes in runtime out of the box. You'd have to write your own solution, or maybe there's something out there on the marketplace
If you're wanting to collide particles, I think GPU emitters with depth buffer collision will properly collide on a vertex deformed mesh but I haven't tried it myself
Ah bugger, Thanks for the info
yeah, scene-depth collision should work but distance-field won’t
@normal bolt kinda depends on exact use case and how weird you're willing to get
If you want to chop a tree and make it so the wedge shape area is less collision.... you could give the tree NO collision but make it a bkueprint with a bunch of colliding boxes or something that get destroyed when hit with damage
So you pull in mesh with vertex shader but simply deactivate collision roughly in that area
If you want to make interactive ocean with swells... ah good luck
random but can anyone help me make this?
Material Wizards! I'm wondering if someone can help me with a problem.
I've got a mask that I generate at runtime that feeds into a material for a decal.
However, as the image (texture) is static, I'm wondering if I can feed it into the material of the mesh that it's applied to (always the same mesh).
I know which UV shell it needs to be applied to, but I'm not sure of how to scale the mask and "Stamp" into the material. I know I would want to use a layered material, but the UV positioning is the bit that confuses me
Sharing my tweetorial from the other day: Hit shake!
https://twitter.com/AlanNoon/status/1146233763556483072

1/ Hey #gamedev friends, time for a #UE4 tweetorial.
Let's beef up our attacks! Time to make some HIT SHAKE. https://t.co/3qyCjvt1DM
Retweets
109
Likes
463
@quasi wolf a single mesh with pinched UV / geo and a streaky texture going for example vertically, additive unlit material, add some UV panning in U, add depth fade so intersections with other geo look good. That's the simple/cheap version
now if you need it to project lines on things and have proper shadowing.... more complicated
@vocal harbor can you show pics of what you're trying to do and of your UV ?
@celest birch I can't send a picture of the exact thing, but I can send a mock up
do that
So for example, If I had a render of a screen/monitor, and it's a RT of a canvas widget. and I can currently do that by feeding it into a decal material and projecting it onto the mesh.
However, if I wanted to avoid using mesh decals, and just apply it directly onto the UV space at runtime, for instance on the shell in the bottom right of this mockup, how could I do that? Bare in mind that the image in question cannot be baked into a texture in development as it is generated at runtime.
I'm essentially thinking that it's possible with a layered material, just placing the "rendered widget" which acts like a dynamic mask. I would need to ensure that the RT doesn't wrap (so no tiling) and is lined up with the shell correctly (always the same uv set and same model)
@celest birch
ok so
disclaimer i have never used widgets
but
if what you are trying to do is scale and move your picture to fit in this box
The "Widget" is at this point just a Texture2D near enough (Render texture)
what you need is
1- set it to clamp rather than wrap (and make sure your texture has a few px of padding because edge pixels will stretch / repeat
2- separate your U and V channels after TexCoordinate node (skip this if your image is square)
3 - use ConstantBiasScale OR just multiply node and then add node on your UV or on each separate UV channels
bias (or add) displaces your picture's "starting point" while scale (or multiply) will scale its size
4 - if your channels are separated, append them
feed into your texture
voila
😃
Perfect, you're a star, I'll try this tomorrow and I'll drop you a mention in this channel to let you know how it goes! 😄
👍🏻
thanks @celest birch I just wouldn't know how to do half of that really
then you might want to post in #looking-for-talent rather than here
isn't that channel about trying to get yourself some work?
oh there's looking for work
don't really know what looking for talent is
seeing if other people have the skills you need?
looking for talent is for hiring someone to do a (preferably paid) job
I've been looking at this effect for Death Stranding and wondering how best to create something similar in unreal.
Creating the pulse/sonar effect itself, isn't difficult in a Post Process, or even in the base material itself.
But so far as creating it so that particles are spawned at the point where this sonar interacts with particular objects. This one has me stumped honestly. Has anyone here managed anything remotely similar?
i know that with niagra you can spwan particles on a mesh, not sure if that works for the entire environment tho
the only thing i can think of is simplay add it ontop of you pp with simplay a fresnell like effect and after you did your scan use the deth and then uv destor things close more and thuf farther away less
and use a diiter/noice texture in the beginning to make it look like induvidual particles
Thats more or less the same approach I had in mind actually. I was thinking to use the scene depth and convert it via height to normal so I could use it to displace another texture that I’d use to fake the particles themselves.
That's post process
Howdy smart folks, I am running into some odd errors while trying to use a particle subUV for a mesh particle on plain cascade. It gives me a bunch of niagara errors.
am I missing something here? any help is much appreciated
i think that node doesnt work on mesh particles
from memory
you need to use the flipbook texture sample i think or something
someone pls confirm
interesting I could swear you used to be able ...and it was required to have the particle subuv in the material to get flipbooks to work on meshed particles in cascade.
@strong flint I think the easiest thing to do would be to figure out the world-space speed that your “pulse” travels and then emit particles from the actors—probably using Niagara’s mesh stuff as @main bay said—after a delay of (the actor’s distance from the player) / (the pulse movement speed)
it doesn’t need to be part of the post-process effect, you just need the timing to line up
@lone heart i thought of this too. The issue is that its not a specific location event, it can happen anywhere in the game.
One thought was to have the particles only enable if the blueprint is checked ad if they’re a certain distance from the player. Then start after x timeframe. This way they’ll always be synced up. I haven’t tried this out but it made sense in my head.
sure, it can happen anywhere, but it happens within a particular radius of the player, yeah?
find actors in that radius, figure out the delay, spawn particles on them at the appropriate time

Niagara is Unreal Engine’s powerful new VFX tool for authoring sophisticated real-time particle effects. In this Unreal Engine Learning Theater session by Ep...
@strong flint
Unfortunatly I can't use Niagara for this project.
Guidelines state we have to use the old Ue4 approach.
which seems fair as niagara isn't exactly ready for full production just yet.
You could spawn a wall of particles and add actor collision and have them freeze movement on collision, not exactly what you want but similar
So i have this Snow and Storm Fog emitter, but i want them to not render in specific places, let's say, inside a house. How do i do that?
Hey guys, I'm trying to reproduce the sword swoosh effect from super smash bros, here's a gameplay example https://youtu.be/C7u2_cM8sxE?t=27
I followed this great tutorial here https://vimeo.com/223354261 which answered most of my questions but I'm stucked at the final part : if I want to play this animation everytime I use my attack, do I make the swoosh effect a material animation with matinee or something and then play it using an animation notify or is there a more straightforward way ?

We've got new gameplay of Super Smash Bros. Ultimate for the Nintendo Switch of Chrom! I take the character for a spin against a CPU for 5 stocks on Battlefi...
How do i set an emitter to spawn the particles aligned to the surface normals?
I have them spawning on the mesh using skel vert/surf location, but they're all aligned to camera and whatever options i fiddle with i cant seem to fix it
how would one have a masked material casting its shadow as though it wasn't being masked at all
so, wall with a big opacity hole in it but without casting the shadow with the hole

Actually from a different problem
I was trying to get translucent material with depth fade to still cast shadows
I just remembered this thread initially was concerning masked materials so I replaced the custom node code with the SHADOW_DEPTH_SHADER and it works
To save you typing the custom node code in by hand it's:
#if(SHADOW_DEPTH_SHADER)
return fShdw;
#endif
return fAll;
You just need to supply two inputs of fShdw and fAll
fAll is your opacity mask and fShdw is the shadow casting result you want
And probably best to set your output type to be Float 1
so fAll would be 1?
in your example it seemed like you made the opacity mask go in fAll
fAll is your opacity
fShdw is probably just 1 if you want it to just cast shadow like it was fully opaque everywhere
wow, works like a treat
noice
thank you @zinc remnant
no prob! @analog onyx is the real hero here haha
well then, thank you to the both of you
anyone had a problem spawning attached emitters using a particle system variable instead of hardcoding it?
it fails reliably when i use the variable
yes...
the number and variety of "attach emitter" fails that I've had is rather extensive though...
if you're trying to set Location of a specific emitter via Blueprint at a particle system variable there's a lot of things that could go wrong, like - you could be assigning the location AFTER the particle system has already fired if you're not careful (among other possible fails)
it's a guessing game for us what you've done wrong without a great deal more information about what you're doing, how you're doing it, what specifically is happening, and what specifically you want to happen, and what conceptual problem you're trying to solve
fill us all in and add some screenshots if you can and you'll likely get a good answer
I'll take some ss in a few and send them. It's a pretty simple setup. If I remove the variable from the bp function it works fine. The variable also causes a normal spawn emitter function to fail.
Recreating the variable didn't fix.
Spooky!
Im getting a really funky error
Im playing a effect through BPs
but when ever I change a life time setting
It wont play in the game again
if I export the emitters into another cascade system
it works until I change the life time again
Do you have bake param enabled for life time ?
What are the best practices regarding spawning/destroying particle effects ? Do I need to be careful if I do it a lot ?
hello guys
is anyone there could help me with this problem?
my gpu prticle system not colliding with my landscape
its ok in editor but not colliding in game
my gpu sprite emitter flickering in the scene with my camera movement
how gonna fix it ?
is there any tutorial about linking Paragon character to it's VFX?
Anybody got some good tuts they can recommend for raymarching shaders? i've randomly run into one of those shaders and am totally amazed, but now i wanna expand upon it, and im not really sure how i would control the 'scene' from within UE4 rather then from the shader's code. So bscly looking for a tutorial that can help me call functions inside my shader etc
im aware of a workaround where you take a 'material expression custom' node, include your shader and then return functions of it, but that seems totally wrong approach
this is what i found btw, includes source code in description, been poking at that for a day and learned that it bscly does what i want (subtraction, so i can blow holes in things, even if just visual) but now i want to actually make that functionality controlable from my game, rather then have it just display a neat predefined effect like it does atm

Unreal Engine 4.20.2 All custom shaders are build in through a dirty hack in CustomExpression node, no plugins :-) I don't know how to put it up on the marke...
any help/ideas/links to tuts appreciated 😄
this is what i mean with the 'workaround' btw, or what feels to me like a workaround anyway:
ideally i would like to be able to have some sort of nodes i can add on the fly that add certain type of merging/subtracting/masking primitives to the shader's scene, if such a thing is even possible
also all of this is mostly just for learning lol, im kinda blown away by shaders being able to do this 😛 (not sure if i actually want to end up using this to blow holes in walls, but wanna at least have a go at that hehe)
For our flipbook simulation tool that's coming out in the near future. We just added lighting & shadows.
Okay so I'm designing a game for VR and I'm optimizing everywhere I can so that I can keep my game at 60 FPS per eye which normally would be around 120 FPS. So of course it's expected to have an FPS drop around particle systems but I'm using the P_Fire particle from the starter content but brought down to only have the two fire systems minus the smoke and sparks and stuff but am still dropping to around 35-40 fps per eye. My question is how do I optimize particle systems (for VR) and or what are my alternatives?
Reduce spawn count
Are any of the materials using depth fade
Ive been told that's intensive
Im working on a anime style action combat game and i'm trying to recreate an effect that happens when the player attacks an enemy, the enemy texture will flash for a quick sec to show that the enemy is damage. Any ideas how i would achieve this effect?
@long citrus may be you can attach a fx and activate it on contact .
and make sure the fx is attached to teh sword and it detaches on contact so where ever the sword contacts the fx will be active for a quick second and stays there.
He wants the material of the enemy to flash not a particle system
yeah
On overlap of the weapon you can probably grab the material of the enemy. I'm just not sure if there is parameters for adjusting the material color
Maybe adjusting the textures brightness
Or adjusting a scalar parameter with a multiply
actually found a solution, the ActionRPG template has a feature that im looking for, thanks tho
Np
@limber pulsar creating / destroying objects is expensive yeah. You might want to make same FX activate and deactivate rather than create and kill them if you can avoid
@long citrus I think there is a OnDamageTaken node you can try to use too
@celest birch I see, thanks a lot !
quick question , can i use vertex paint in unreal engine 4 to clean the seams of a mesh that i imported ?
to clean them how exactly ?
i can see a number of ways it can be done but maybe a bit hacky
make them not show up anymore
yes but how would you achieve that ?
paint the material texture over the seam
it goes like this , when you create a mesh you need to make seams to uv unwrapp it , that seam makes a change in the texture like a ugly line , you can fix that in blender for example you can paint the texture you are using for your mesh over the seam and it will make it not show up anymore . i wanted to know if i can do the same thing in unreal egine 4 , since im not making my materials in blender but in unreal
i mean you could have a world aligned material and blend it in with vtx paint
how would i set up that node ?
there is a material node called VertexColor
it has inputs for RGBA
you can use any channel to control a Lerp that blends between materials
then place and paint
yes that i know , the world aligned texture i mean
plug WorldAlignedUVs into your textures instead of default UV channels
i think there is a WorldAligneUVs node
or something
or maybe im confusing with another engine lol. but just use the node you have in your screenshot, should work
play around with texture size to get it to tile right
you can plug WS position input into that if you want to displace it
or something
hey there, i have a beginner question. I'm trying to make a rain particle system and i want to get my rain splashes to work on not only on the ground but also on buildings etc. i already figured out what i have to do but for some reason i cant find where i can get the event generator /event receiver. if i right click and go to event i only get 2 options that don't help me.
what are P_PhasePrimaryCastL and R for?
What would be the proper channel to discuss compute shaders?
ill have a go at tryin in #graphics then, thanks, my questions here got ignored :3 (prolly for beeing to hard/specific tbh, so not complaining or anything)
Is there anyone who can help me solve my HLSL Problem?
maybe! what’ve you got?
tried both still have problem
With a particle ribbon / normal particle trail, is there a way to use "spawn per unit" to extrapolate movement between frames? for example, a fast moving particle emitter which is moving with circular motion creates a jagged trail, straight lines from frame to frame - I understand why spawn per unit just fills in these straight lines
short of rendering a out at 120fps which is our current solution and basically the only solution I can see, short of creating a custom line renderer which can be supplied with an array of calculated points along the desired circular path
is there any built in way to "take into account the transforms on sub frame", which now I write it.. is basically just adding frames between the frames.. which is just using a higher fps..
Make cylindrical mesh emitter, rotate and pan/dissolve
but what if you need a dynamic BUT smooth ribbon though ?
asking cause i suspect im gonna have a similar issue soon lol.
spawn per unit ?
Jack up the tesselation in the ribbon and increase spawn rate. Watch it in wireframe to make sure it gets more dense
Ribbons are finicky. Other option is to drive it with an Anim Trail - you'll need a skeletal mesh animation to drive it but just one or 2 bones should work. Those have pretty good curvature compared to ribbons
That's how sword slashes are usually done
Specify what your use-case scenarios are and other options might make sense too
To have perfect ribbon trails, dynamically you are looking at rolling a custom solution from scratch
It's not happening with Unreal ribbons
In 4.23 Niagara ribbons interpolate along a cubic hermite spline and will approximate the path in your drawing (if desired)
They autotesselate based on screen space or via manual factor
EXCITE Have wanted this literally forever
Wow
hello guys
do u know how gonna make a desert windy sand effect?
or know a video link that learn how to make it?
Heres a little visual of the ribbon linking itself by age and then auto-interpolating itself along the spline created by adjacent points. @cold sorrel
You have complete control over the tightness of the curve (tangents) as well as the tesselation factor, and control over the facing or side vectors which define the ribbon segment orientations. 100% programmable. In fact using this system I was able to write animtrails with complete cascade parity but all in a Niagara module.
NIIIIIIICE!
that’s terrific
yoooow
I am sold
@strong carbon Do the new ribbons support to be always rotated facing the camera everywhere so they don't seem to fade to zero thickness like in the gif?
@sacred temple Somewhat. So in a case like this, to avoid the ribbon torquing and twisting on itself a million times the code does its best to orient itself to the camera while still maintaining a tangent basis for the ribbon so you get smooth transitions between points instead of hitting a moment and "flipping" 180. On simpler less contorted effects you won't see this artifact and it screen aligns as you would expect.
We do have a request in to allow the user to "trade" more twisting and pinches for more screen alignment, but in many cases its a worse tradeoff.
When you use these ribbons in a more sane manner than literally tying them in knots like the above gif, you will see the screen facing do a better job.
So if you would do lots of ribbons instead of a single one and space them so they never go over 90 degrees you would never get any of the twisting?
You wouldn't get nice interpolation in that case but all things are worth experimenting with. Thats the nice thing about Niagara, you can try stuff 😃 Also, if you feed in the camera position as a user parameter in BP, you can define your facing vector or side vector directly to create your own facing algorithm and do it manually, so to speak. That gives you complete control if you're savvy enough to do some cross products and stuff to get your vectors the way you want them
I guess making them seamless together could also be problem and if line/ribbons direction and camera direction is the same/close I imagine there could be a rotation around effect on the ribbon
Yes it's the flip in tangent basis that is a problem with screen alignment, so if you FORCE every segment to a perfect camera face you get a kink in the ribbon at every place where the z up or side vector goes negative. You trade the above effect for that, basically, and the above usually looks better 😃
Ok, it kinda makes sense that there is always a limitation when you try to force something that is essentially still 2d plane based to appear 3d but hard to wrap my head around
Anyone know why our PPM array is greyed out? I cannot add or remove elements either right now
Is this relating to a setting?
Oh
It was just disabled?
Anyone have insight into how I could achieve weapon effects like these in Unreal? https://assetstore.unity.com/packages/vfx/particles/spells/mesh-effects-67803
Seems to be a huge gap in both the marketplace and learning material regarding visual effects. Trying to figure out the shortest path
there’s a lot of different things going on in those. can you be more specific? what have you made so far?
some of those are really expensive, others are reasonable but hmmmm don't really "look" like anything
so yeah....most of that can be made with just particles with location set to "skeletal mesh" vertices - GPU particles in particular
a few are using multiple ribbons, which is pricey
others use GPU particles + vector fields, which is neato but gimmicky and doesn't look like anything in particular so hard to justify
they're more like "check out or graphics card" showcases
Hmm.. thanks for the insight. I haven't started learning visual effects but I'll want magic swords and abilities in my game so I want to start getting an idea of my path to buying/learning those sorts of effects
hey, i have a weird problems with a particle. in editor it always shows up, but when i package the game, some clients see it and other don't. it is a really basic particle which only spawns one material with infinite lifetime. is there something i miss?
try setting the emitter "seconds before inactive" to 0
that usually fixes any weird disappearing issues I have
I'm not sure why that isn't the default tbh.
i think i'm dumb, i can't find that setting. where is it supposed to be?
oh i found it. it's already on 0 though
What compression settings do you use for packed textures in VFX? mine are so badly compressed
i use the Default Compression.
Where the map with the most details needed is in G
you may aswell use the whole range of values instead of just grey values (i.e. histogram stretch)
Okay thanks! i understand G channel has a little more information but my texture just looks awful 😂
show

maybe it's something i did wrong
gradient is certainly better in the green channel though (still some artifacts)
fair enough
when you are not on mobile or console, you could use BC7 Compression
So whats the usual strategy for this sort of stuff?
but that means individual maps right?
or i guess not!
the gradient can be done procedurally btw
it may be faster aswell
you would not see any banding effects this way
true!
i think i need to find the balance between this because a lot of effects done in a shader can surely just be as heavy as a single texture lookup
I usually prefer to use small uncompressed textures when it comes to gradient-like textures packed in channels
lens flares work much better when small and uncompressed too
And what Raildex said is true, if you're doing very basic gradients that don't need a texture it's better to just do it in the material editor. Generally it will be faster than using a texture too, texture lookups are surprisingly expensive.
Thank you for the advice! @zinc remnant
Does anyone know a good tutorial for enemy outlines for a multiplayer game?
I find related tutorials, but not entirely sure i can apply it in a multiplayer context.
Any ideas how can I block snow made by material in buildings?
what do you mean by “made by material”?

hey guys, have a small problem. I have this fire propagation script working for my game, but unfortunately i think my fire particle effect is just too costly. I want to be able to set the whole forest on fire but I'm beginning to believe that might be impossible. Still, I cant really tell whether the fire propagation is slowing it down or if it is the actual particle. Wondering how I could figure that out. Also in VR
it’s likely to be both
that sounds like your CPU is busy updating a jillion emitters and doing entity searches for the propagation and your GPU is busy with an ungodly amount of overdraw and also rendering views for both eyes
kind of a worst case all around
I would look into maybe doing something material / mesh-based for the fires on your trees and setting up some aggressive distance fog so you don’t have as much stuff being drawn
and depending on how your fire propagation stuff works, maybe making a given actor stop looking for more stuff to set on fire once everything it’s found is already on fire
okay awesome, how can i take advantage of the performance monitor to check what exactly might be causing it?
neo.akira that's probably not how you'll find it
i'd suggest disabling elements one at a time until you can find the fewest things that still cause it
the "delete until not broken" method
once you're down to a single broken element you can pinpoint how it's constructed wrong. What are we looking at anyway? VAT?
no its just a regular sprite effect in niagara
the material is a noise fire
has a lot of overdraw
@void blade Looks like z-fighting to me
if you havent found some other solution I'd try lowering the number of particles you use there and adding more randomization to where each particle spawns and what velocity they're given
@lone heart I mean that I creators use Niagara. They used other way.
Good morning everyone!. Im working on some muzzle flashes and I'm gonna take a swing at doing some damage effects using line trace.
In the blueprint, is it better to execute 'Spawn Emitter Attached' BEFORE executing the line trace or after?
shouldn’t make a difference AFAIK
maybe an infinitesimal benefit to before, if it starts some rendering work off the game thread, but in practice the difference shouldn’t be noticeable
ok cool. Just making sure I'm keeping up with the best practices for this. Thanks!
@void blade I would bet you have a divide by zero somewhere in there.
@brittle remnant Where and how? 😄 I think its a rendering bug with ue, it happens some days, some days not
I would look through the math in your material and see if there's any dividing going on and if it could ever be passed a value of 0.
Though if it's intermittent it could be a hardware issue. I would try and repro it on someone else's machine.
@void blade, you can always install RenderDoc and enable the UE4 renderdoc plugin to capture a frame and debug the offending pixel directly.
I'll keep that in mind!
hello guys
my fog posr process doesnt render in my 2d scene capture bu it will render in the scene camera
how gonna solve this??? help
Does it have depth if it's 2d?
hello @void blade i fixed i
jist change Capture source from scene capture 2d from scene color (HDR) to Final Color (LDR)
@void blade impossible to know until you give details
@celest birch not many details to give. Some times I have this sometimes I don't. Seems like a rendering issue or bug from either my graphics card or from ue4
I mean you do not tell anyone whether it is a decal, a particle effect, a mix of the two, neither..... how can anyone debug it?
and need to see the associated logic attached to it, ie material setup, particle parameters etc
Anyone here got any experience with debugging materials on OpenGL?

How could I go about making this material a circle that is filled in
but has more pronounced edges

You want a power node
hey, does tweaking AO values in the pp volume to make it more imposed affect performance? i can't find anything on the internet saying that it does so i believe it doesn't, but i wanna be sure
@dense quest I’ll look into it
I’m assuming I’d raise the upper gradient to the lower? (Sorry not too experienced with this)
Actually you should be able to get the result you want just using the same density for each circle and altering the radius of the inner one.

what are some best practices for vfx optimization when one wants many instances of the same vfx on the screen?
I saw there's a setting for pool size so I'm already using that via manual pooling
for instance, do I have to have a unique particle system component for each and every instance, or can they be combined somehow?
how would i achieve the effect of rendering the mesh multiple times transparent at some small opacity, as it progresses through its animation frames ?
so not motion blur but animation trails
By rendering mesh several times and offseting the animation.
hello guys
@analog onyx does that mean i have to spawn like 20 copies of the mesh component (i even use multiple mesh components to assemble a char) each with a slightly different AnimInstance ?
also with different materials to make it transparent
@warm remnant I don't see any other practicable approaches to this. As alternative, you could accumulate it in offscreen render target.
again this would be so much simpler if UE4 had render groups support, could then mark these meshes to go into the alternative framebuffer, and then when displaying main framebuffer it would blend alternative framebuffer into it
Yeah, but what if camera turns in a way that would reveal part of the screen, where trail should have existed, but it isn't there ?
i might end up having to add rendergroups support to my engine fork for other reasons (transparent realtime 3d map) and the support is already partially kinda there with only owner draw/only editor draw and editor showflags
in my previous game-specific "engine" i just did the dumb thing of re-rendering the meshes couple of times with a hacked up material forced to transaprent in a loop
this is the lame effect that i want https://images.sshnuke.net/2019-07-29_20-27-51_Qen5gLQhd.png
hey guys, any ideas on what is happening here? I have a particle effect that won't always follow the actor. i've tried adding it as a particle component, i've tried spawning attached and now i am just spawning one and manually setting location. but you can see in this vid the effect sometimes follows and sometimes not.... https://giant.gfycat.com/GlassShowyFantail.webm

the particle effect is Jets from the explosion pack that was free on marketplace
Hi all, weird issue I'm facing - a static mesh (not instanced static mesh) is scaled by -1 on an axis and it flips all the faces inside out (so the material displays on the inner face instead of the outer
Why might this be happening?
@calm folio Change your PFX spawn to be local instead of world. If it's world (default) the emitter spawns the particle which then handles it's own transformation in world space. If it's local, it will always be relative to the emitter (so if the emitter moves like here, it will follow the emitter)
but it follows it sometimes...
it's made up of i think 5 emitters, some local some not
as for your inverted faces, i've only seen that happened on instanced static meshes
do you have "build inverted index buffer" checked for that static mesh, its in the import settings so might need a reimport ?
cuz thats needed for -1 scale static meshes
alternatively just make the material double sided
@warm remnant It is checked for that static mesh already.
Can't make the material 2 sided really, it's an instance of a master material - optimizing for VR and all that
It's fine when placing the static mesh in editor and changing the scale, but seems to be an issue when attaching it to the vr hands, with the scale inverted on one axis
Guys need help, how I can save a render target to a save game object and load it properly later ?
while I don't have specific job offering (and thus can't really post in the respective chat), I am working on a budget and wonder what do UE4 VFX artists charge nowadays for mobile-style VFX (to fit low-poly art style, cartoony and with minimum drawcalls/tris count)
Is it possible to make particle vfx work with blendables? so that a line-particle is visible through all terrain or models?
nvm got it working :--)
Anyone know much about getting a decent looking fluid pour particle? Mine is looking pretty sorry so far.
use a lot more of them, combine with a ribbon or an animated mesh. Work with the shading
#graphics is probably better for “this shader isn’t working right”, here is probably better for “here’s a particular look I want, how do”
and weird error messages from the material editor go... where? 😄
guys if i have an object
a lamp, where should i place the light around it
so it feel natural ?
Halp! lol
Any idea why this might be happening. When not playing i can have the viewport camera far away from the particles and they look the way they should. When playing.... not so much. They go white until you get close and the flames vanish
There is nothing that happens on Begin Play as you can see.
NVM. There was LOD settings that was in the particle system base settings.
A bit of a complicated one: Any idea how to store vertex location for an animated mesh? I want to store the vertices and then later morph the mesh back into the same position with a vertex shader. Can't find a way to make step 1 happen tho.
Save it as vertex color
hm, that could work. Any idea how to get the current position of all vertices, though? There isn't anything in BP or in the material editor for that.
Alright, thanks. I guess I have to write some C++ for that.
Hey guys, quick question if you don't mind :)... Ive followed a tutorial on how to use a "outline" material and custom render depth to create those object outlines/highlights on selected objects in my scene at a given time. My issue is that when holding a weapon in FPS the outlines/masking happens through my character hands/weapon as well. Is there a way to prevent this? Like for example a way to always render my character above the outline effect?
@civic onyx can you post a screenshot?
not sure what you mean by "through", but it sounds like it may be an occlusion issue
Shoot okay I'm at work. Will send one as soon as Im at home and got my project open
👌
@gentle path okay incoming:
this is the overall outline/mask effect im doing
this is the incorrect masking im having
the outline/masking should only occur when other regular objects are in front of it, but should not be in front of the player pawn.
Coding is simple, Outline material instance is added to the materials/blendables of my post process volume, and then i use a simple trace to make it render at custom depth.
Thats the only way that keeps popping up when I was looking for a way to do outlines
Guys I got orientation / facing issues again in Cascade -____- posting this in various places in hopes someone actually understand the mess
I am not understanding how all these settings interact with each other
I used a plane because didnt manage to get the result i wanted with a normal sprite
I want my plane to face camera (in the mesh this plane is facing up so I assume that would be = Z + faces camera)
and to rotate in 2D around the plane ---> camera vector according to its velocity
is it just me still getting mindfucked by this ? can someone explain it like I'm 5 ?
and that's not even counting the settings in Required since I ASSUME they are getting overriden when it's a mesh particle ?
Normal (here my plane's Z+) facing camera, and Y+ (or X+ I dont care really) oriented to velocity
@civic onyx okay I am not the best with these but I did a similar tutorial awhile back, http://www.michalorzelek.com/blog/tutorial-creating-outline-effect-around-objects/
i think your problem is in the blueprint
awesome will give it a look thanks. Im busy experimenting with custom depth stencils as well.
👌 good luck!
@civic onyx let me know how that works out for you
I've made an arrow gizmo for debugging the shaders, not sure if there exist one. Colors stored in vertex color. (this one is left handed)
https://www.dropbox.com/s/6hmin2apcb2xx5r/ArrowGizmo_Left.FBX?dl=0
sorry for crossposting in advance
@cold sorrel hey, back to the thing from yesterday. I tried storing the vertex position in the the vertex color of the mesh, but it doesn't work. Vertex colors are clamped between 0.0 and 1.0. So not working for a world position.
I guess I have to fake a an accurate representation of the mesh with niagara
Scale the position down before and scale it up after.
fit(posx, max,min,0,1)
Then store the same values somewhere else and scale it back up
You only need the max and min values of the mesh, not every vert
hm, they get clamped tho, so I have to scale a lot. But I can try. Just not sure if the precision will be enough.
Yeah it's not something I'd do on something in worldspace.
I usually do this on objects as a poor mans blendshape
Well, I am trying to do a sticky residue effect. So I want to "morph" some verts to whatever they are sticking to
and the stick location is in world space
not sure how else to do it
tried to do it in object space, by faking it a bit with a simple heuristic, but it doesn't feel right
@gray inlet Store in UV instead. Vertex colors aren't exactly cool for storing positions.
oh, that sounds like it could work. Can I just write custom data to it like you can with vertex colors?
this stuff is waaay out of my comfort zone, btw 😃
I am going to give niagara skeletal mesh reproduction a go first tho
Not sure about where to put this, but I'm making a sun that's as close to 1:1 scale as possible, currently it's at about a 1:1.5mil scale, but my current issue is with lighting, I'm trying to get it to emit light to properly illuminate the planets, but when I hit build, the planets go dark and aren't illuminated at all and I'm not sure where I'm going wrong
you're using emissive lighting?
Got emissive lighting on it, yeah, but for the actual illumination I'm using a PointLight attached to the sphere
your radius big enough? or if it's not exactly attached and inside the sphere, then you might be having a pass-through problem with your sphere
make sure that the attenuation radius is big enough to reach your planets
and casts shadows is on
Just remade the PointLight component and made sure of it, gonna hit build and see what happens

Nope, still not working
Would the lighting be affected if the other planets are attached to the sun?
Turns out nope, just detached them and it's still not working
Just found that #graphics seems to be the proper channel for this, so I'll take it over there, thank you @gentle path 😃
how can i achieve a material like this. Any help is appreachiated
Google gradient mapping
hello guys
i try to build lightning but shadows doesnt build and still are dynamic
how gonna fix that?
@celest birch part of that looks like the layered domain warping technique described here:
http://www.iquilezles.org/www/articles/warp/warp.htm
Tutorials and articles of Inigo Quilez on computer graphics, fractals, demoscene, shaders and more.
that’ll get you the distortion; the color part you’ll have to experiment with, but gradient mapping as Glad said is probably the right direction
@lone heart thanks
seems to me like just a render of some spinning lights in a tunnel, fed through a flowmap
@winter sigil post screenshots of your scene, lights, and objects
you probablz have the objects set to dynamic and the light set to static
hey guys, I want to spawn a decal where my particles collide, how can I do this in the particle system (cascade)? or do I have to do this outside of the PS?
@cold sorrel didnt seen ur msg thanks
hello guys. my rocket tail render with delay on scene capture 2d component
it seems my particle spawn slower on my scene capture 2d component than in my viewport
I'm bad 😄 how do you stretch the material?
subtract .5 from the texture coordinate’s Y, multiply it by some number less than 1, add 0.5 again
I dont know if this makes any sense, but why is this floor here just black? you can see the light lights the wall and the ground next to it, but not this rail mesh Im using
it has the same material as the wall
this also happens with all the stairs in the map with the same material
well if anyone replies can you ping me please
Hi @quasi wolf There are a various different reasons why your mesh might be black.
1 ) Try Building the Lighting.
2) Try Adding a Skylight to the Scene and then Building the Lighting.
3) Does the Mesh have a Material?
4) Are the Mesh Normals facing the correct direction?
5) If your Point Light is Static - you need a SkyLight or a Reflection Capture for meshes to receive any lighting from Static Point Lights, after light build.
6) Do you have a Skybox in the Scene? If the Mesh's Material has a Metalic Value of 1, and a Roughness value of 0, and the environment around it (sky / background) is Black, it may appear black, due to reflecting the black background.
Hope that helps. 😉
oooohh ok thanks, it could be the last one actually
but I'm sure I changed it to the same material as the wall and built lighting and it stayed like that
I'll see about the other options too
I have another problem, with reflective surfaces, theres always this bright white light which I assume is some non existant sun. how do I get rid of it?
I can turn it up and down but not remove it
and for the life of me I canNOT make lighting thats like all around, I can only make lighting go in one direction its really stressing me out
right is it me or is ue4 actually shit for lighting?
I know people make these incredibly realistic beautiful games whilst Im struggling my ass off here simply trying to remove a non existant sun reflecting off surfaces
there is literally no sun in the world, I just want to remove this
what lights do you have? and have you placed any reflection captures?
I heard this could be replicated using shaders, so that the "green light" would be projected on the ground. How should I go about making that?
@celest birch moving it here - here's an example of how to draw a grid on a material to give you an idea of how it works. your implementation will be a little different since it isn't a grid.
i'm not sure of a better way to make the selection square match the landscape it's on, aside from the light projector trick.
kind of hard to see, but here's what it looks like applied to a landscape-y mesh.
@obtuse path hmm. how should that be implemented, with decals?
decals will match some elevation, slightly stretching but it's not a problem really since there's not g oing to be huge mountains
ah I've never messed with decals. in that case, it shouldn't be too tough to figure out
@celest birch that convo should prob be here :) for drawing lines that are always the same size, you can check out that grid material function and modify it to only draw at the edge, then apply it to your decal.
@obtuse path it was resized so small it's impossible to read
or maybe some other way thats not coming to mind
@obtuse path you have the original link anywhere to that image?
not atm on my phone now
np there might be easier math for drawing only at the edge though
I haven't had to do that yet
i'm really unfamiliar with node scripting but i'll see what i can make out of it
@obtuse path how do you get that output result node?

Learn how to create games using Unreal Engine 4, useful tutorials for beginners, intermediate and experts
the output is just because it's a material function and not a material. I'd suggest looking into the outline material instead, it's probably easier and more reliable
@obtuse path I'd like to test that grid how it works, but i'd have to replicate it first
you can plug what's going into output into emissive or opacity mask instead
probably both
you won't need all those vars too, like location offset
do decals have their own material domain and can't access it?
you probably don't even need it
I think that was to get my location offset working for scrolling the grid around
if you don't have any luck I can try seeing what I can come up with a little later
it's actually pretty late, i've been coding all day
think i have to get back at this tomorrow. i'd love to see if you can find a decal material solution to this
I'm still thinking the outline material might be the best bet, I can look into it tonight
this is what i have in the video i posted
maybe it could be fixed...
@obtuse path thank you a lot. I'll get back at this on the morning
try plugging in world coord to the uv
in the radial gradient. did you want it a circle or rectangle?
it doesn't really matter as long as it looks nice. the selection can be made into a circle or a rectangle anyway
circle looks more nice than a rectangle though
do i put it in the center pos or where?
uvs, top input
i plugged it in both and nothing shows up, maybe only the other one
might have to multiply it by something to get to an appropriate scale
but I'll check it out later if you wanna get out of here ;)
that's a lot appreciated man @obtuse path hopefully we'll have an answer then 😅
looks like it still works for what I need to use it for
Bruh
Hello everyone I was wondering is there some good places to learn fx from scratch the whole process online any ware? ( That's Not A Break Down)
I'm speaking about weather, Ability Effects, Blood ect I can paint but there is hardly any information on the process of FX, In Australia the only way I can learn this is to specialise in it for film 😐

Real Time VFX
Welcome to the Real-Time VFX site! If you’re a student getting into vfx, an indie dev, new enthusiast/hobbiest, or maybe a current dev looking to switch into FX, then this is the thread for you! With more and more people joining the site, there have definitely been an incre...
@cold sorrel Thank you kindly.
does anyone have any ideas on how to fix my mesh particle scaling issue?
the one coming from the bear is the particle and the other one is just a plane mesh ive scaled up. my texture tiling seems to be working on the scaled mesh but not on the particle
im setting the particle system scale to whatever i need it to be in an event, but its not having the same effect as scaling the mesh?
ive got this set up in my material to tile my textures
Have you tried using Texture Coordinate Index 1?
unfortunately seems to make it worse
i assume this is what you meant
am i setting up my tiling wrong?
try to remove Object Scale, I think there is a Tile Distance setting in the beam module
im using a mesh emitter, is there an equivalent to Tile distance here?
Ah, my bad, thought it was a beam emitter
there is a particle size node in the material editor, however when i try to multiply that with my texcoords it causes everything to become invisible
You can try to use local aligned UV's
Something like this https://www.reddit.com/r/unrealengine/comments/70o0js/material_super_cheap_triplanar_mapping_solution/

reddit
59 votes and 37 comments so far on Reddit
mm, that seems to tile my textures along the x-axis properly
however i now have the issue of if i rotate it,
😂
so close, yet so far
I'm out of ideas, good luck 😃
thank you for your help!
I've got an issue for anyone who wants to take a crack at it.
I'm trying to spawn bullet hole decals on the line trace.
But they only happen...occasionally I guess is the word.
I've tried finding a pattern of when they will spawn and when they dont but it appears to be random.
couldnt find a material channel 😃
thats a float3 , can i get mask out for example Z.. idk what node i need here.. too many similar names
well.. yea, but u can get literally "mask" node
i hope XY is still 2D from top
trying to have an object to follow uvs trough worldposition
if i write it in hlsl its add, but here the uvs get scaled up(so texture is tiny, too much tiled)
not sure that u need text coord for it. just divide vo result for someth like 1000
k ^^. i forgot
whats faster dividing it by 1000 or multiplying by .0001?
i guess multiplication
The compiler will do the multiply for you in most cases (edit: If dividing by a constant)
well yea, just mult is a bit better then divide or power 2 thingys..
particle cutouts are not working for me
and for some reason it seams to be better when i remove gpu sprites module
yea.. gpu's can not use it :/
Hey guys!, i have an small question
do the subuv textures for Cascade need to be Power of two? is it advisable? or Pow2 is only needed for mipmapping?
I want to make this lighting more consistent
What can I do to make the image with the light beams look like that from almost every angle?
Not sure what you mean @limpid flame , mind clarifying?
Maybe add a spot light outside each window?
Hi guys, I'm trying to make shotgun bullets effect with beam trails. I made a default particle emitter for bullets and beam emitter. How do I duplicate beam for each particle? Now beam follows just one particle.
@sage gull There is already plenty of light coming in but it doesn't appear unless I'm looking directly at the window.
I'm sure there must be some settings with the Fog that can be fine tuned but I'm not experienced with it yet.
I'll try different lights by the windows though
Oh yeah there's spot light's and you can change the outer cone and inner cone angle @limpid flame
when using a "Point Attractor" in a particle emitter in cascade, with "UseLocalSpace" being disabled in the emitter, and then moving the particle system, it looks like the particles will always move to the world space coordinate where the point attractor was when the particle was spawned, and not the point where the point attractor currently is
is it somehow possible to let the particles move to the current location of the point attractor?
huh. that kinda sounds like a bug. does it happen if you use GPU particles?
(IIRC with Cascade you have to use a different attractor module for GPU vs. CPU systems)
yes, using GPU particles
maybe it's also just that the particles have "picked up so much velocity" towards the original location of the point attractor, that moving it isn't really having any visual effect any more
Hey guys, is there a way to boundto a volume Volumetric Fog in an arena type-game, having it in the whole level is quite perf heavy
no
use a trigger to activate/deactivate the volumetric part
(haven't tested it) but it might work
but this would be camera position dependent
coz the tech is camera view frustum dependent
I'm wondering something. I'm trying to use a flipbook texture for an animated texture that is supposed to be tiled, but I'm unsure how I can use texture coordinate to make the texture tiled.
I found out that the flipbook had a UV section itself
testing out niagara and I'm playing around with the static beam effect
why does it spawn 100 of them by default?
if I set spawn count to 1 it just disappears
I've got a static mesh with quite a few material slots. Whenever I startup the engine, it tries to recompile a lot of the shaders on this mesh. Does anyone know why this might be?
Meshparticle with a ribbon or vap trail combined with regular sprites
Forgive me, I'm not familiar with vap trail?
I've done ribbon and mesh emitters before.
Oh, Vapor trail just another name for ribbon emitter?
Getting closer...
VAP = VievAligned Poly
So a stretched mesh with lookat
Same as tracers
unless you need dropoff
You have Way to much detail in your textures for that look
Lose the middleground
Spyro has super sharp and supersoft, almost no middleground
Ah, good observations, I see what you mean by sharp / soft in the source materials, I'll play with the textures and see what I can get.
Thanks for your advice!
Hey, i didnt see a dedicated material channel so i'll just go for it here:
I just started playing around with custom nodes, and realized that when using GetDistanceToNearestSurfaceGlobal in a custom node, it gives different results than just using the GetDistanceToNearestSurface node. (e.g. i dont get the distance at all, but some odd blurry color artifact) it looks similar in the material preview though... i'm puzzled
i checked the hlsl code, and unless i'm totally overlooking something it looks the same, other than being wrapped in CustomExpression0()
This is the test setup i have right now
and the result of the custom node plugged in vs the proper one
Hello everyone
I'm trying to make a reactive water, with waves after the player collides with the water
the only problem is that I'm using a parameter collection vector to store the player position, so if the player touches the water before the first wave vanishes, it erases the first collision position
is there a better way to do this?
i wouldnt even know how to get playerposition to shader lmao
how do u record(input) playerposition? and how does the shader handle it?
I'm using on component begin overlap event, and using it's location
then storing in a parameter collection and using it inside the material
but it is a simple variable, not an array, so I don't know how to handle more than one collision simultaneously

Mood: trying to achieve the right mood #ue4 #screenshotsaturday https://t.co/wuLPO23dpf
this is what I have right now, a simple water shader for my platform
but I need to handle more than one collision at a time to start the reactive part of the shader
Hey guys, I am new to Vfx can anyone guide me to create a fluid like effect,
I want to replicate how water behaves when poured from any container.
and tap water also
any hack to do this .
i use a cylinderical mesh for the Tap water. and generate this from particle, This looks okay okay.
I think i will have to do it via alembic or splines .
You could do it with Vat, if the standard approaches aren't good enough
Particle count
This is a ribbon and particle count in this moment is 0, and system doesn't know what distance my emitter will pass
and for 1 emitted particle (burst method) this number is 3
Alright then
Newbie here that's pretty excited to get into particle effects, should I use cascade or niagara? 🙂
niagara
Hi guys, I'm getting a strange artifact when using Exponential Height Fog with Volumetric Fog + static lighting scattering + Planar Reflection in VR. It looks correct in one eye, but for the other eye it is kind of offset like the effect a few hundred pixels. (so unwatchable is stereo) Gets especially noticable when bumping up the static lighting scattering value. Any idea if and how that can be solved?
The reflection of the volumetric fog scattering is what seems to be offset in one eye.
Okay seems it doesn't work with instanced stereo. It works when I turn it off, but performance drops significantly meh
Planar reflection is well known to be a feature that is just "there" and not really thoroughly tested by Epic in all scenarios.
Okay, thanks. It seems that it's not only related to the planar reflection, but more with the volumetric fog static light scattering, since the issue is also there when I don't use any reflection probes or planar
ah, I see
maybe its not optimized for single pass stereo (yet), who knows
https://twitter.com/TLegendOfLucas/status/1163821120572649473
did this right now, a rainy glass material in UE4. Very simple setup, only using 2 normal maps

'Just for fun' rainy glass material done in @UnrealEngine. Very simple setup, done with 2 normal maps #gamedev #unrealengine #ue4 https://t.co/Ip9ZdBHEEJ
Sorry if this is a stupidly simple question but how would I get particles to move towards an actor or a position in space?
Use an attractor
he keeps asking, in multiple channels
Hi guys looking to create a pouring liquid effect from a beaker and from Tap.
Any help would be great.
What is the proper approach to create salt particles and sand particles.
They do not spawn over the time.
But stays in a fixed quantity.
pouring liquid? nvidia flex
if you want a cheaper solution, probably a stylized approach, it could be done also
What do you mean by stylized approach
tried standard gaussian blur on my post process and too many things in the foreground get brought into it
found a custom node online that make a blur effect
would like to blend the blur effect based on scene depth
what would I do to blend the blur and non blur based on scene depth
i'mma take a shot in the dark and say use "Scene Depth" node, divided by distance you intend to use, clamped plugged into alpha of a LERP between blur and non-blur
sounds sorta right, pixel depth node might also work
it's a little bit redundant of a feature to do since you can do that with a post process settings without a material, but it's still worth trying and comparing
probably easier to control
with the material
so im trying to do an effect where i have a particle system that emulates simple blood spatter. i have a skeletal mesh with various wound points as sockets, and when the character is hit, i spawn the particle effect at the wound point closest to the attack. when i preview my blood spatter effect in the editor, the blood spatter goes downwards like it was effected by gravity. when i play in editor, the same happens. when i play in a packaged build, the blood spatter floats into the sky like red gas.
what is effecting the direction of the particles to make it different in packaged code?
yeah I think I found the thing, thanks anyways 😄
hehe

In this tutorial you will learn how to create Shooting Trails in unreal engine. you will learn every step for this effect texture, materials, mesh and emitte...
hm is there anything like this?
but good I suppose
maybe any Paragon characters had same ability?
"ue4 homing projectile" should give you some decent tutorials and documentation
there are only projectiles tutorials lol
I'm not sure that BP implementation will be better than particle emitter
thats th thing
you basically make an emitter, attach to "projectile" and done
unless there is a set-in-stone distance, you'll probably have to rely on code/bp to get movement like that
you can stretch meshes, heck even do stuff with splines. but its limited to an extend
cascade in the end is just the visuals, blueprints/code make it come alive
doesn't emmiter have a target location for particles?
yes, but you wont get good results (ab)using that to make them go to a target
might work for static scenes like turn based rpg, but anything more dynamic..
ouch
it's for 2D match3
i'd still use code/bp to control that, loads more options and functionality in the long run
@lilac obsidian thanks my dude I'll give that a go
https://i.gyazo.com/1af6a2b622b2fae1b1e9eeacc49587d2.gif inside cascade, all fine.
viewport: all ffed up
https://i.gyazo.com/140163d2e12c5625327a29be7e6ddfe1.gif


no WPO, no size changes in blueprint, no parents or children with other sizes
nothing weird in modules
just started happening today

http://richard-steffens.com/?p=329 this might be beneficial
mainly timing and readability.
its a good start
(even though you just removed the gif)
is there a way to save/cache a value in a material for a different material to use?
or even BP/C++

Unreal Engine
Material Parameter Collections are a super useful new feature in Unreal Engine 4. They are a collection of Scalar and Vector Parameters that can be referenced from any number of other materials or Blueprints. This means they change globally, so if you change the value, everyt...
of course! don't know why i blanked out on those. thanks!
you're welcome!
can anyone help me with something, i have a post process volume and have LensFlare Intensity set to zero, the volume is unbound, yet i'm still getting lensflares from certain objects with high emmissives
i posted this in graphics too but thought vfx might be more akin to post processing issues?
hello guys
i've a 2dscene capture camera which capture my missile while it lunched and move with my missile to the air
the problem is my missile smoke tail render and stay away from my missile mesh, which its render without any problem into the scene and my main camera. the problem is only on 2dscene capture camera
how gonna fix this?
How should I create a water pouring from beaker effect.
Point me in the right directions with some details.
So I never really bothered learning how to do visual effects in unreal until now and I`d like to learn,can anyone point me to some good tutorials
vertex animation
What if it needs to collide with the environment too
then do research on nvidia's liquid system
I am developing something of oculus go.
Would oculus support Nvidia.
Would not it be heavy for it.
actual liquid, and making it interact is still quite the unicorn/moby dick/pegasus of gamedev
Ohkay.
Then it is quite a difficult thing to do.
It depends on how realistic it needs to look
if it needs to look like Job simulator, then it's a 10 minute job
Not so realistic.
Just shove out some drop particles with collision
done
If it needs to be a more consistent stream, I'd look into raycasting and deforming a cylinder
We can deform meshes?
WPO

I am using a cylinder mesh for water effect from Tap.
It looks okay.
If I can deform cylinder in a arc then I think my work is done for pouring effect.
Any thoughts on this?
Go for it
Thanks for help
Hi there, anyone knows a way to do a circular rotation around a point using Niagara ? I managed to do the desired effect in Cascade using the Orbit feature but can't do the same using Niagara
I think that if you use vortex you can achieve something similar
you just need to tweak the origin pull amount
(oh sorry)
no worries, its fine, but niagara channel is a bit more on the nose for that question 🙂
Ok, thanks. I'll try to play to with vortex then. And I'll write in the niagara channel if I'm still blocked 😉
SpawnEmitterAtLocation spawned potentially immortal particle system! - should I worry? since I can't see it staying in the world outliner?
How would i change the landscape material runtime? im trying to change the ground from grass to snow, ive tried material parameter value and just setting the material 🤔
i'm pretty sure there's a checkbox for that in the Details tab
something like "dynamic" something
thank you sir
for inspiration @silver pendant
https://twitter.com/AlirezaFrostEd/status/1164537277701394432

"Landscape Smart Material".
Coming Soon.
@UnrealEngine @UnrealDevs @madewithUnreal #gamedev #UE4 @polycount #gameart #3dart https://t.co/SOv5kUy5Z6
Likes
251
i would love to do a sweeping effect with it 🤔
Any reason you wouldn't make a muzzle flash a UParticleSystemComponent that you just Activate on each shot instead of spawning a new one each time a weapon fires?
Just asking because ShooterGame and many other examples spawn a fresh particle system attached for every single shot
Try all, compare results
Don't take our word for it. I like anim notifies for muzzle flashes as it makes it easy to time things. It's not an efficiency based decision
@indigo jolt Results are identical. In most cases I agree there are many ways to do things that are valid but it seems a bit wasteful as spawning a new separate UParticleSystem potentially hundreds of times a minute is far more taxing and expensive than simply activating a single UParticleSystem hundreds of times (practically free as the spawning has already been done)
Could be done the same way with notifies, it's more the actual execution and not the timing that matters in this case
Creating and destroying objects seems to be one of the slowest things that can be done so I do feel it's good to take any potential gains possible especially for something like a muzzle flash that is seen constantly and fires rapidly
Either that or a pooling system but of course that's a lot more complicated
ya agreed
seems reasonable
if you get better performance in a newer way go for it
it's good you're finding this out on your own, I don't trust performance lessons that I don't learn by trial and error
since it's good to understand WHY and not just WHAT
Definitely 🙂 It's fun to always question and be curious about what makes a certain approach better or worse in a situation
it seems like most vfx artists are pretty good at having different workflow tricks, but then when it comes to performance most vfx artists have to start leaning on Technical Artists for advice
it would be cool if there was a VFX-Tech Art channel
for high level stuff
hrmph

such a modest norseman
The tutorials are right
That IS the way
but you have to make sure you have amaterial that reads particle color first
Sounds unlikely, but fair enough
Top result when googling: unreal particle tutorial

raywenderlich.com
In this Unreal Engine 4 tutorial, you will learn how to create particle systems and update them using Blueprints.
Third is the documentation: https://docs.unrealengine.com/en-US/Engine/Rendering/ParticleSystems/Reference/Modules/Color/index.html
Color modules impact the color of the emitted particles.
Then start posting what you have. We can't help you troubleshoot if we can't see what's wrong
Not downloading that
screenshots is the currency of the realm
Opaque materials can't fade
make it translucent
Then plug in the particle color alpha into the opacity and you are set
Those are key frames. The in value is when during the particle life, the out is the value.
To fade in and out, you need a curve with at least three key frames.
Are you sure you followed tutorials, and not just skipped around in them?
created a post process blur for far objects, like in the new Link's Awakening
reference:
the intensity and distance are customizable
I assume in Awakening it was not just far objects. It was Tilt-Shift focal plane effect.
hello guys
i have a missile with a tail particle. my problem is that missile tail particle render without any problem on to the scene but it render wrong on my 2d scene capture camera and it looks it render with delay
as u can see in the picture it seems it stay away from missile in to the 2d scene capture
how gonna fix this?
Hi guys, how would one go into makeing Black colored fog, everytime I use black it is treated as transparent
@fickle helm if you velocity stretch it and there is no velocity, it will go invisible. So either make sure there is velocity, use a different alignment or use a system that can clamp the stretch amount.
Thanks, Glad-Partikel 🙂
Anyone got any ideas?

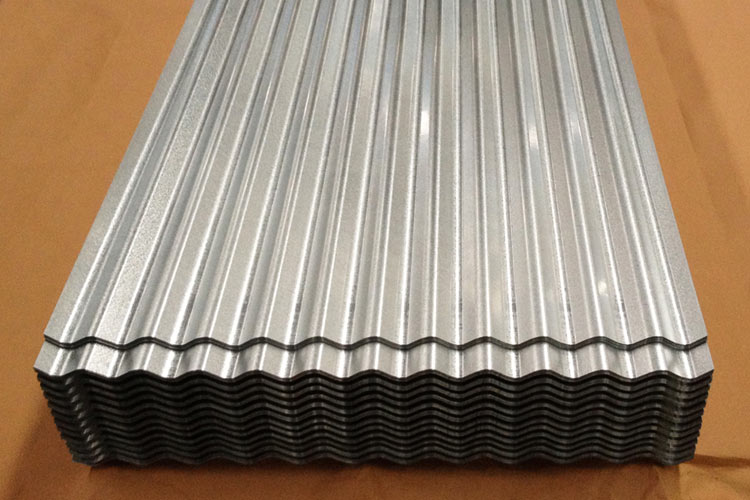
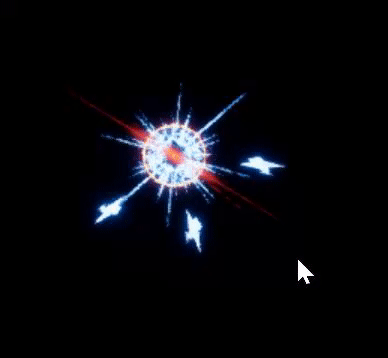
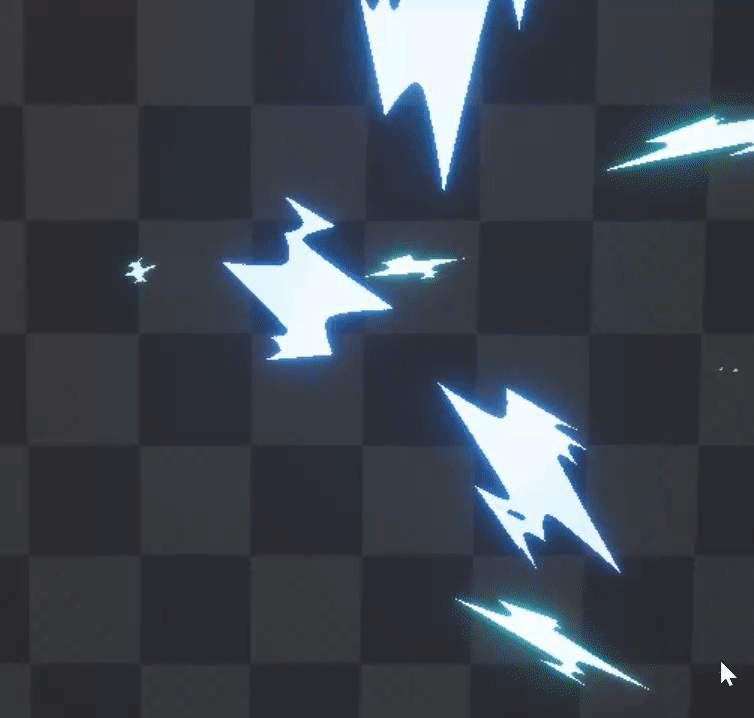
@hexed linden
Really people, clicking every checkbox and messing with every value won't melt your PC. Probably.
trying to taper (round off the tip of) a beam but ue4's not having it
Unreal Engine Forums
Talk about Level Design, Static Meshes, Physics, and more.
this is what I've tried
set taper method to full, gave it 3 values 0=0, 0.5=0.5, 1=0 and set the nr of interpolation points to 3
no beam
oh
I had up vector step size set to 1
my bad
(it should have been 0)