#visual-fx
1 messages · Page 26 of 1
I'll be fast asleep by then
If you have a gpu you can enable Opencl as well. I use it for all of my sims
^
Wait... what?

How would I make a particle effect in which a mesh dissolves into dust?
three ways I do it: vertex animation textures, a masked material with a noise texture and subtraction, and niagara has a system that spawns particles off a mesh and matches their texture color that has been fun
just depends on the look you're going for
Hey, does anyone know how I can create the wind and slash effect that happens in this video when Falco from Smash Bros spins with the wind effect, and when he does that kick with the blue swipe? I can't really seem to figure it out. Also, just like during that kick I want to make it o from smaller to bigger as the kick/slash plays, and stuff like that. Can anyone help me figure this out?
The attack effects I'm talking about are in this video: https://youtu.be/rJj9J5MW8xg?t=12
Not the effects of getting hit, but the attack animations from Falco himself.

@celest birch https://vimeo.com/223354261
@cold sorrel Thank you so much! I'll check it out
I'd skip through it to get the idea as it's a bit overkill for what you are trying to do, but the idea is there
Alright, will do. thanks 😃
@solar remnant I guess Infinity War style dissolve.
Look at niagara for a start then, if you can’t use it vertex animation textures will let you bake the movement and breakdown but you’ll be limited in final polycount which limits the resolution so getting tiny specks is gunna be fun
Hey guys, anyone got a tip how i can make this fx

im also willing to pay if anyone is interested.
Download the example content, open the emitter and see for yourself
Oh this is part of example content? Thanks!
downloaded it, it doesnt have any fx 😃
can somebody tell me why i get this kind of a mask when i use a simple distance to nearest surface setup?
the mask shows up properly on this sphere
but doesn't work on this cube
just in case
@vivid dragon Im not sure what your expected outcome is in the cube case. Your examples aren’t clear. I assume you are working with mesh distance fields?
Hi guys, I've added initial velocity component to my particle, but they are spawned with an offset. If I reduce velocity down, then offset will be smaller.
Any way to fix it
How do I remove this spawn offset?
10 fps
Looks like it skips first frame
that depends on other modules as well, cant say whats up without knowing the modules
Grab the material function for free at: https://realtimevfx.com/t/debug-textures-for-vfx/7510
hey guys, im trying to make a simple ribbon particle effect in cascade and im having a bit of trouble. Firstly, I cant find any good documentation explaining what the parameters in the Ribbon Data module do, all I have are the tooltips which arnt too helpful... And secondly, the velocity/life module does not seem to be effecting it at all, Ive tried using an initial velocity and that works but then if I put the same values into the velocity/life at In Val:0 it does nothing. Also in not sure if this would be fixed by learning about the Ribbon Data module but it all seems to shake a lot
Got scheduled for a presentation on Battleborns VFX at GDC this year! Extremely excited about it. The VFX Process Behind 'Battleborn' #GDC19 https://t.co/3h8r93ilVb
@errant oyster content examples have multiple ribbon emitters
Sorry i feel like i missed something, what is content examples?
launcher > learning tab > variety of content examples
Oh brilliant ill have a look, thx
Gathered most of my free #ue4 content and my #vfx videos/tutorials into one thread on https://t.co/yBPIjvWBrl #realtimevfx
Are you using Unreal Engine? Dabble in the magic world of VFX? want some free stuff? need some tutorials? check out:
https://t.co/5aS7Rev0mT
Hey guys, looking for someone to do paid VFX work, pm me if interested
hey @celest birch job opportunities go in #looking-for-talent (read the pinned message)
nice!
unreal already provides a Material Function for "Fuzzy" Shading
FuzzyShading or something like this
still screenshots really make that stuff look flat 😛 video plz
or GIF
make sharing great again
Hey, I'm trying to add in some game feel into my game, is there any way to turn my enemy character red when I hit him?
need to have a parameter/variable in the material that makes them red, then control trough blueprint
ya, ideally set it up through a Material Function so you can slap that same thing in on all your characters
just run it into "Add" to the Emissive
ya that's kinda situational - i think with damage stuff it just looks nicer to stack it
if my character has green glowing eyes and he gets smacked red - blast some red over it too so his eyes are affected as well etc
often the stuff that does NOT receive the glow ends up standing out really strongly in the moment
is that wasabi?
Quick question: what is the term for a "material template" with only some inputs?
For if you have a lot of different materials with different textures but the same behavior
Material Instance
Thanks
When material is used within context of scene capture, camera vector material expression returns camera vector of scene capture. If you want to get camera vector of scene capture within a material, rendered in main view, you would need to pass location of scene capture through blueprint and subtract it from pixel world position.
hey guys
how can i make the smoke not lose its color in my scene
this is what i have right now, its white in the editor but it becomes different colors in my scene..
Would love any pointers
make it unlit?
I wish spline Thicken wouldnt do this
https://i.gyazo.com/94814257d58bb53a10bf368b752e0cc2.gif
Its fine with very opaque effects, but anything else :/

its not a real spline, but a very thin mesh and some shader math to make it thicker and tries to always look at the camera on a vertex level
I could be talking out of my ass, but what happens if you do it double sided
Does it fix the Artifacts?
it is
same hehe.
nah, seems like a limitation or very advanced math issue that I cant solve
nah, its even in the paragon examples
sall good
@fossil swan You could render opaque copy into custom depth and test out extra fragments, if that is translucency buildup you are referencing to.
meh, too much work for simple projectiles.
Just wondering if splinethicken is viable for them swirls.
https://i.gyazo.com/1d259131164da12878d37606ef8c616c.gif
other option is crossplanes. but that can also be annoying visually.

and the translucency buildup is because the plinethicken function feels almost like either left or right side, no blending.
since it uses cam vector, when you get up close splinethicken looks rather meh, but from a small distance its fine in most cases
if anyone wants a free shitty fire extinguisher particle for free hit me up 😂
thanks @indigo jolt and @fossil swan !
Luos, that thicken is just an additive WPO off the crossed normals right?
he asks when I just closed ue4 :p
I have no clue how it exactly works tbh, all I know is that it tries to align the normal with cam?
all I know is, is that imma give up for today :p
another alternative to cross-planes - tubes + fresnel. of course then there's the off-angle problems
I have a setup for that that could work, thing is, those shapes with tubes is quite a polymonster hehe
ya i mean tubes are definitely the most expensive thingies
even just 5 siders
i tried to figure out that like "directional fresnel" thing a while back so stuff would fade on 2 axis but not on one...couldn't quite get it
i thought it had potential
ah no worries, it was a passing fancy - i blew a day on it but it was a month ago
it seems they use Niagara in Fortnite :> https://i.gyazo.com/7d99af491ac185395463cb0d77d4921d.gif

Looking for a vfx artist to do some stylized work for mobile game in Unreal. Please DM me if interested. :)
New to this server. Guess we don't all have a big IQ like you XD
But for real though @celest birch thanks.
Is this the right place to ask material questions?
Here or graphics
It is specifically related to landscape materials if that makes a difference.
I'm pretty new and trying to understand blending/layers
Then Graphics will probably get you quicker answers
Thank you, I'll post my question there!
Hey guys, so I've got a few questions regarding global environment vfx.
Whats the best method to spawn tree leaves VFX on each tree or a set amount of nstanced trees? I'm guessing I need to convert trees that are near the players location to BP actors and have the VFX in there?
I do want pollen, dust and other global VFX aswell though, which isn't bound by trees. What's the best pipeline for that? Can't attach to the actor as the particles wont move with the vector parameters I've set up. Or is there a workaround for that?
RDR2 did this really cool. if there where trees near the player, it would spawn one/some leaves just offscreen and makes them fly by.
vector fields for global movement of particles, in fact I believe there is an unreal example that has leaves controlled by a vector field the japanese one if I remember correctly

Modeling flocking behaviors of animals with three simple rules. Download my Processing / p5 code: https://github.com/jackaperkins/boids Boids originally crea...
this is frigin awesome
@fossil swan Yeah thats nice. I have the Interactive Tree Creator from the MP which converts trees nearby to BPs and spawns leaves, just wanted to know if the best practice.
@solar remnant The movement wouldn't be much of an issue I think, rather more the actual spawning logic in a huge open world. 🤔
@solar remnant fun stuff
Thanks for the response guys, I will play around with it this evening
I found a nice tutorial for stylized fire material (from RIME). Now I am wondering how to have it on a sphere instead of a plane (I'd like to use it for a fireball projectile). Any tips? Thanks
https://www.youtube.com/watch?v=OK_gtNJ0Olk this is the unreal scene I mentioned earlier if you want something to learn off of
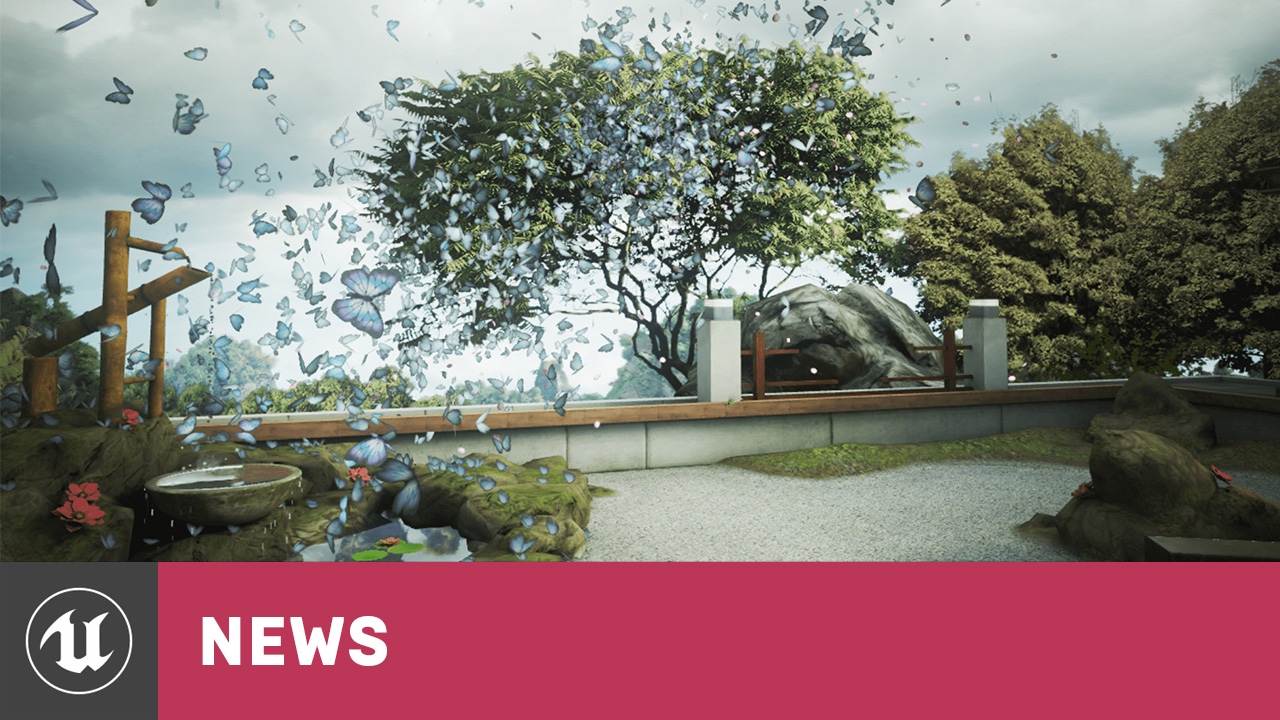
Epic Zen Garden is a beautiful graphical environment showcasing the power of iOS 8, developed by Epic Games with Unreal Engine 4, the first game engine to re...
@pseudo skiff apply the material to a nicely UV mapped sphere.
so, no material magic, just good ol' UV mapping ?
Yeah
i like using camera-facing domes a lot for stuff like this too, sometimes inverted, sometimes regular - lets you get all the silhouette action of a particle + volume of a sphere. A true sphere can still be great tho, but it's likely going to have some rounded sides from some angles, that may or may not be acceptable depending on goal
try a bunch of shapes and see what you like
I like drop shapes
oh like a tear-drop thing?
that's the idea
I used sphere as generic example thinking that maybe it has to be done with some voodoo setup in materials
hey guys ive got a problem with height / volumetric fog
before hitting play it looks like this
after hitting play it looks like this
and i know ive narrowed it down to the height fog because the scene looks fine if i turn it invisible
any thoughts?
Update:
Solution: it was skylight. Skylight was blowing out whatever color the volumetric fog had.
Hey guys, is it possible to make ribbon particle longer? I'm making bullet trail and I want to make trail after a bullet pretty long
And another question.. I have particle collision, and I want ribbon to be removed as soon as particle dies. Right now I can see my trail strech for the whole screen
Does anybody know what's causing this jittery velocity of my cascade emitter. I'll post my 'Velocity/Live' data too

Never mind, I should have been using Accelleration/Life
Are u making game
Me? Nah just an environment
O
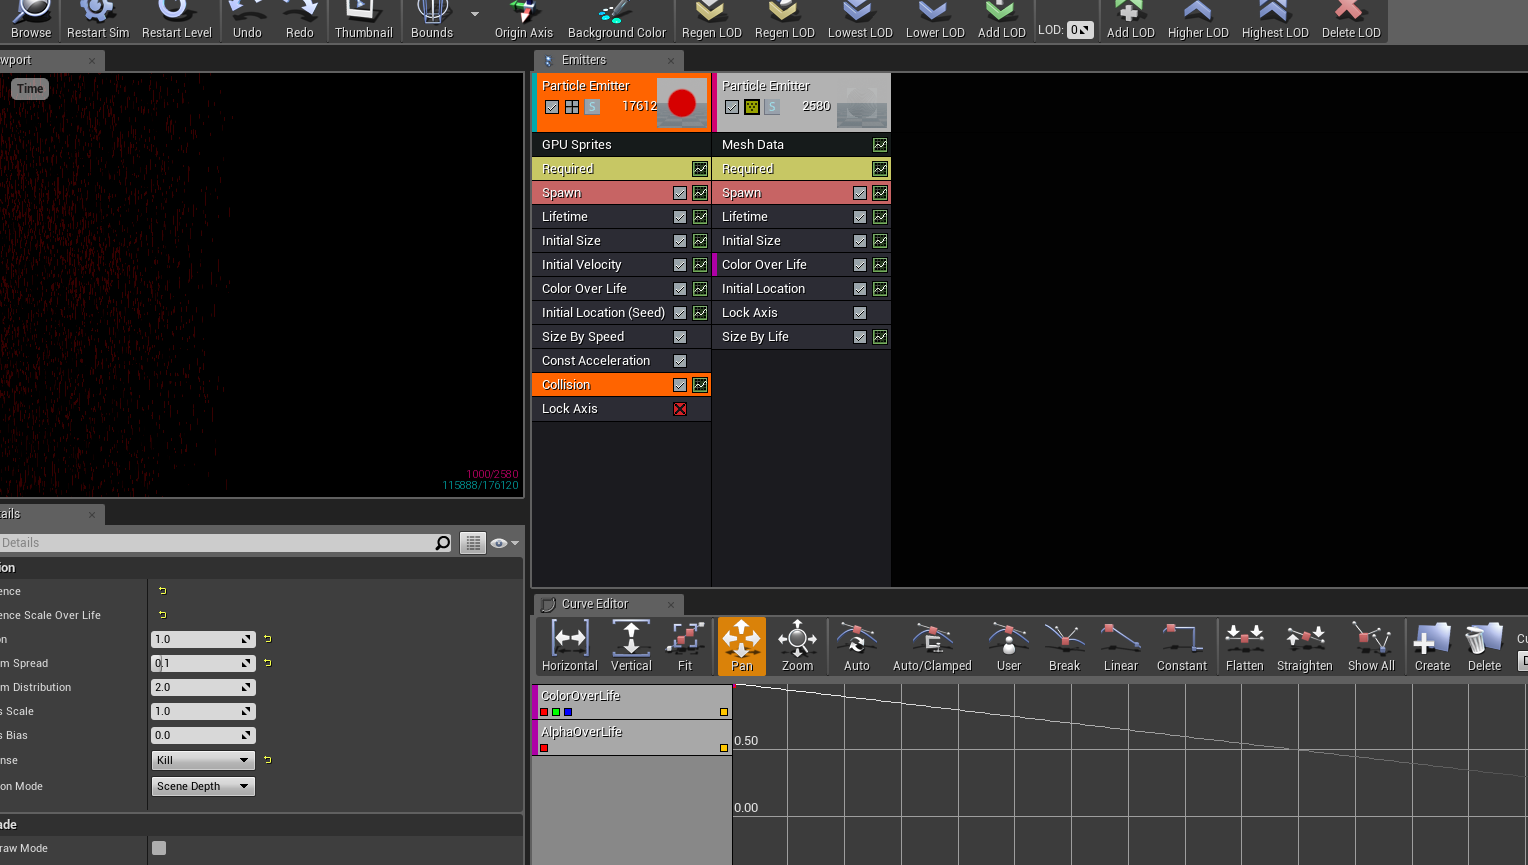
is it possible to set per particle parameter in cascade?
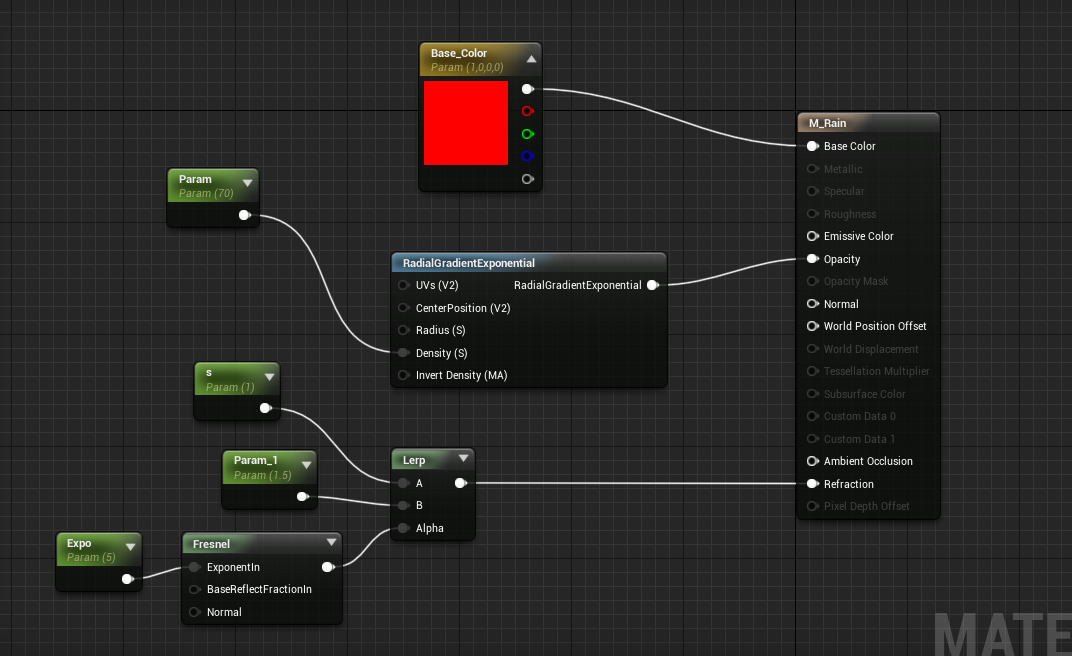
im trying to make a lit particle but it doesnt seem to work(i basically trying to make rain that reacts to light)
u want it to react to shadow areas or just the direction of the directional light?
@indigo jolt just the direction of the directional light
^@lucid swift you use "Uniform Curve". It produces a random vector every tick. So you are changing the Velocity every tick.
anyone know if there's an example of properly lit smoke with niagara to download/tutorial anywhere?
@river forum Can you post images of the material current result and then describe what you expect? I'm having trouble following your explanation.
@river forum what you believe is happening is not what is happening. Multiplying a UV by 2 does not = 2. Your UV has areas of 0.0 value and areas of 1.0 value. Multiplying it by 2 means some areas become 2.0, some areas become 1.0 that were 0.5, and other areas stay 0. If you then Add -1 to this, your 0.0 areas are now going to -1
math with UV's works kinda simpler if you think about it this way - any "multiply/divide" actions increase/decrease Tiling scale. Any Add/subtract actions PAN-move the UV in one or more axis.
you can multiply/divide all you want and it won't pan anything. you can add/subtract all you want and it won't scale tiling. those two types of math will always do those two different behaviors with UV's because they're gradients
@indigo jolt i had to ask 5 people and no one knew the answer. i then asked an artist at work and he explained it to me similarly. i sincerely appreciate you explaining this .
@primal swan i was basically treating it as a math equation, assuming that the variables were texcoord = 1,1. 2vec_1 = 2,2 and 2vec_3 = 1,1.
So i thought (1,1 * 2,2 ) + -1,-1 = 1,1 is the same as (1,1 * 1,1) + 0,0 = 1,1.
i still don't fully understand and can't picture it in my head, but it definitely helps to understand they're not the same. thank you both for responding
i swear i'm semi competent in the editor, just not at materials...
when in doubt - use preview on individual nodes
sometimes it's useless, but often it helps to know "is this black or is this white or somewhere in between?"
if you preview your UV's after multiplying you'll notice some very interesting and odd things occur 😃
sometimes its easier to preview multiplied uv's with a frac, so it only shows the decimal value.
the preview nodes were breaking for me sadly. also the image snippet was from one of luos's materials so 👋 nice work
a few nodes result in not being able to preview, depthfade being one of them
so annoying
my nodes were getting into a mixed up state where the actual visual preview would show but i would still have the option to preview, and then it just broke on multiple nodes. not sure if i'm not supposed to preview multiple
can only preview one node (and whatever comes before it) at a time.
rgr, ty
Any ideas of making dynamic wet area of a large object? ( part of the object gets below water line, emerges, gotta stay wet for a while). Main challenge is size of the object vs resolution required. Things I've tried and failed so far : 1) render target. Works acceptably. Does not scale well enough for required number of objects. 2) Supplying rough approximation of water height history through a buffer to object's base pass shader. Insufficient precision at sane number of points. High interpolation cost bloat. 3) Mesh decal with per vertex history buffer. The most close result to what is desired, yet still issues with shape mismatch between receiving mesh and decal mesh.
Use HPS
HydroPhobic Spray

Ultra-Ever Dry - Part 2: The sequel to the smash hit and viral sensation! http://youtu.be/IPM8OR6W6WE Ultra-Ever Dry is a superhydrophobic (water) and oleoph...
A problem avoided is a problem solved. 😉
Well, that makes perfect sense, but turns a tech question into art question. And possibly lore question. How do you communicate that the object is painted with hydrophobic paint to the player?
"this story takes place in a world where HPS is like carbon on Earth"
😭
make all the characters slime-based, and clean af because HPS based lifeform
@analog onyx could you just pass an object space height param to individual material instances?
Admittedly you would have to think of water interaction as planar. Not sure if that’s sophisticated enough for your use case
@brittle remnant Sadly that would not be enough. Object is 200x32 meters and the lowest I can go with height data is probably 1 point per 10 meters.
@analog onyx what’s your actual use case? Is this for your boats/ocean sim? How many objects need to be showing wetness at once?
guys, quick question, i'm trying to implement explosion (for understanding them), is there any accepted tutorial for this? i'm searching but i can only find for houdini and things like that
So what do you want to use to build it?
Houdini is a good choice but there are plenty of others
i want to be able to understand them, so i can build an explosion for our game
i have made fire, dust, friction and things like that.. but explosions elude me
Explosions are commonly just flipbooks. Either from Stockfootage (rare these days) or a simulation.
Software like Houdini or PyroFX is used to generate that flipbook
was checking a pretty cool tutorial (for unity though)
https://80.lv/articles/making-zelda-like-vfx-with-unity/
the most interesting part is how he dissolved the explosion by using alpha erosion (i'm not familiar with the term, but it seems to be fairly known)
Also how he created the tornado effect is beyond me, he says he uses a flowmap for thhat

Gregory Silva talked about his experiments with Unity and ShaderForge, which helped him to create amazing visual effects similar to Zelda: The Breath of the Wild.
According to this: https://api.unrealengine.com/INT/Platforms/Mobile/PostProcessEffects/index.html mobile HDR enabled with tonemapper set to 1, should mean that bloom is supported in post processing. But it doesn't seem to be. Turning on bloom creates a mess on the screen.
Using Post Process Effects on mobile games.
When I turn on bloom I get this kind of stuff flickering on the scren on an android device
Hmm.. well there is obviously something wrong with post processing. As I stated I turned on Mobile HDR and tonemapper set to 1 in the ini. However, outside of that bloom error, no other post processing effects seem to work. I set my temp to be something really wacky under color grading, but it still appears normal in game. Like no post processing applied.
This is what I Set in the editor, but on loading the game, it's just normal.
@gleaming fulcrum if you want a stylized explosion look up the rime unreal dev and gdc talks. The diablo gdc talk is also pretty good
I've solved this. The docu page has a discrepancy in the cvar between the screenshots and the text. I was looking at the screenshots and it had an old cvar name.
@celest birch that light bounce stuff is epic! I'm not really sure about how much I'd pay though, I'm not too familiar with how much this kind of stuff costs, or how much work was needed to make it
@celest birch $0
sure, why not hehe
Does anyone know how to make the ue4 particle system speed relative to the same speed of a physics object falling? I am trying to make a jet engine but it looks weird when its travelling too fast.
Local space checkbox
Thank you man @indigo jolt you are a god!
I am hoping to have a 3d or even just plane countdown timer sitting in world space... but I can't seem to find where should even start for something like this.
Any hints?
blueprints, timelines, lerps, parameters
I guess I did ask for hints
as someone who knows his shaders/vfx but still learning blueprint, that was all I could give you :p
3d widget component attached to a bp with countdown logic sounds like a valid method
Start with the blueprint, set up countdown logic for whatever seconds/minutes/hours you wanna handle. Create a widget to display it on, and use that into a widget component in said bp
this is probably the wrong place but can't find material section, I'm creating a character customisation for my game. it is cartoon characters and I'm trying to add custom eyes and mouths (bit like the Wii Mii) and I cant figure out how to do it. Iv tried decals but they move around the head.
i'm guessing i need to create a layered material or something
generally they use a seperate uv aligned to the face, and a flipbook with different expressions
another way would be to have tiny meshes in front of the face that morph along with either replacing or flipbooking expression
Thanks Lous, which way would be the easiest, It is a 3D character
can you show me a face of one of those chars?
This is the character at the moment - all the colours are changeable in the menu by a colour wheel
the eye is a decal (but doesn't work)
either have a masked mesh sliiiightly in front of the face with flipbook expression, or an additional uv channel that aligns the eye/mouth properly, and again using a flipbook
Okay thanks, I will try both out and see which one works the best
I thought I had an example somewhere on my channel but no
is the mesh part of the skeletal rig, or added in the character actor after?
it can be a mesh if there is nothing needed to animate it, and just attach it to a socket. if there is animated expression in the face, it might need to be part of it
No animated expression, is going to be done by materials
i would probably keep it part of the skelmesh, but you'll need some proper material and bp controlling it
Okay. Thanks Luos!
good luck
Ill need it 😂
@smoky lintel you can accomplish that entirely in blueprints, however I have made a countdown timer using materials in the past. There are s couple ways to do it but the one I prefer is a flipbook for the numbers that has its time controlled by a material parameter. You can then call the material parameter in your blueprint and change it at runtime to reflect the time. Big tip is to use one time calculation whether in blueprints or in material as the process gets hectic otherwise
@cj awesome, do you know if there is a tutorial anywhere that would get me started?
Not that I know of, unreal documentation for flipbook used a 1-4 number setup if I remember correct though
I have had an itch for making a new tutorial lately though might do a deep dive tonight into what flipbooks are and how they are used, will pm you if I get it up
Thanks
m,
Flip books iz fun, you can use them on tiling textures to "hop" around spastic like or plug in particle lifetime or decal lifetime to auto play stuff
Hey I hope this is the right channel. I am trying to get an ocean from Houdini into unreal. It is kind of working, but I have some flickering at the edges of the mesh, and I am not sure why
Does anyone know why this happens?
VAT?
No I used a flipbook 😳
So it's looping through static meshes?
I just have a grid and then this is my material
Then I'm guessing this is caused by compression on the texture you use for WPO
If you plug in a contant instead of time you should be able to find the faulty frame
Okay thanks, will try that!
What do you mean?
I tried to change the settings of the texture if that is what you mean, but that didn't work
Alright
It looked like it could have been leaking
but if it's clamped then that's not it
Dumb question I know but how would one know whether a particle system is cpu based or GPU based?
Unless particle system has a GPU particle module, it is CPU based.
@cold sorrel looking with a constant and scrolling through, it looks like it happens between frames :/ it seems to just be right for example on frame 31 and 32, but in between it does that weird snap
hmm, try clamping it (with the bool option at bottom of that mat function)
Quite possible that frames on the border are picking up other side of the texture through bilinterp.
worth a shot, but I guess that results in clamping it after it goes over 1
last idea
add a frac after time
(with that clamp bool on)
Still snaps at the edges 😦
meh, sorry for wasting time in that case :/
does the texture have "preserve borders" on?
Haha no I'm super grateful!
have you tried removing all compression from it?
Maybe a stupid question, but how do I remove all compression? because when I turn it vector displacement it flows for a bit, but then it snaps into a static position as well
hey yall! I'm trying to create a material with three textures- one is the base texture, the other is the top layer, and the third are these circles that I want to pan, and be masked by the top layer but show up over the base layer... I tried using material layers but its not working correctly (the circle layer is not appearing) .. any suggestions on more fruitful approaches I can try?
Here's what I'm trying to do:
So I want those cirles to show up over the blue background but when they pan behind the body of the bird, they are covered up by the bird, but remain over the background
thank you!
use the top layers mask to mask out the circle layer so it stays behind it
can you explain that a bit further?
cooking atm :/
not much time sorry
ok, no worries
ah I got it- thanks Luos!!
yay 😃
@analog onyx thanks
i got a post process material that is a texture. But ingame it resizes the texture to the viewports aspect ratio. How can i fix that?
anyone here know about cloth simulation in unreal?
Vertex animated textures or apex depends on what its used for
Or Bone decomp
hello guys, how can i exclude certain actors from post_processing effects?
I probably should've asked this question in #visual-fx first... I'm trying to stitch together 6 rectilinear 2D textures into a virtual cubemap reflection within a material (for performance reasons as an alternative to a full cubemap capture per frame). I don't know how to counteract the pincushion distortion of the reflection-related nodes available in the material editor... https://discordapp.com/channels/187217643009212416/221799195806400512/545905508259856384
Hello guys, i have this post procces effect of pixels for my level (2d blueprint character) and im trying to exclude the player from this effect, how can i do it?
make the player write to the stencil buffer and use that to exclude
@celest birch thanks vincent! i tried that, ( activating the stencil in the options), and putting the character in the 2 channel, but with the nodes i tried, is not working either, what i am doing wrong?
@wanton whale does the stencil part return a nice black and white picture?
(connecting the clamp to the emissive)
also, in the screenshot the last lerp, a and b were the same
a sorry, i do belive between time i touched things in an attempt to get it right
if i connect the pixel effect from the postpo, is still there though
now i get this
i think... this is it? is not exactly what i wanted because i was trying to get the exam same sprite that the 2d character has as default
but it dosent apply the pixel effect anymore i think
you could lerp between the effect and the non modified color texture
iirc, in the B input of your lerp you put the non modified PostProcessInput0 and in B your effect
something like this?
and btw @celest birch thanks for your patience and time with a noob ^^
something like this? (ignore the ugly painting)
ill check it
and the painting is amazing
😄
ok its awesome, it removes the effect on everything except the character XD
i do belive i just need to change the stencils
well, this will exclude the effect from the player
the effect is the pixel
but i belive i got it
now i just need to assing stencils
vincent, you saved my life pal
for real, thanks a lot
🍪 have a cookie friend
still i dont understand the logic of the material nodes
anyway, thanks a lot for the help again
Houdini question, anyone got an ideas on how to render uvs to a flipbook ?
Hi Glad,
Ive got a rain sim colouring a wet map, which is is now colouring a my uvs, ive exported flipbooks from cameras before so ive got no trouble there. im just a little stuck on the inbetween stage
i essentially need to render my texture from mesh uvs to a camera so the T sheets game dev rop can output it
Simplebaker
You are talking about baking, not rendering actual UV attributes, right?
i have a color attribute assigned through a point vop
Yeah, so use the simplebaker to bake that out to a sequence, go to cops, bring in the sequence, use a channel copy to swizzle it the way you want it and then turn it into a flipbook with the mosaic node.
its better to explain what the problem is, with images or video when possible
I need to know how to use it ^^
follow tutorials
Link pls
haha, i feel bad, but yeah...the resources out there are super easy to find. I'll do one better. Try Youtube.com
Can anyone tell me how to change the orientation of the billboard sprites used in particle systems ?
Ah great. Thanks a lot !
It seems to also lock it to rotate around with the camera though ? I need it to face a certain direction and be independent of the camera
I guess I could always fix it in photoshop, but better learn how to do it properly or I might find myself in the same situation in the future
With lock axis flag z it's fine, but that only orients itself. I then add another orient axis with rotate x, and it seems to be that which causes the problem. However, it is also that which actually rotates the billboard which is something I need. The other option just rotates the emitter and gets it to emit in the right direction (which is great but still leaves me with a weird facing particle sprite)
what are you trying to do?
I am trying to get my sprites to face the same direction that they are moving towards
ooh
required module > velocity
(generally its set to square)
once you set it to velocity itll align with the movement (in most cases)
under screen allignment ? still seems to rotate when I move the camera
square actually doesn't. Unless I lock the rotation axis
yea screen alignment, itll mess up if you use rotation modules though
I only have the default modules with the exception of the lock axis one.
still happens if i disable that one too
if you remove the lock axis it should angle towards where its going, while still somewhat facing the camera
if you really want them to behave like i.e. meshes, imho the easiest way is to make a tiny mesh of a few polygons
yeah.
Well. I really just want it to ignore the camera completely
I can fix it by rotating the texture in photoshop for this particular thing
sprites are kinda.. well.. act like sprites
you could fiddle with the orientation settings in the required module a bit
but it would be nice to be able to do it in the future
alright
thanks. I'll give it a look again.
or maybe just do the photoshop fix if I can't find a work around.
When you want to create water rain drop ripples but you accidentally create something more fancy
ikr
i wants it :p
do i smell Opara rain? 😄
yess :D
is Houdini often used for Procedural generation of sceneries?
def. starting to take off quite a bit imho
its a good time to learn houdini. esp in realtime vfx (just my opinion)
I use houdini for most everything I do anymore, its a lot easier imo than other 3d apps
Never heard of houdini
@spare hare sorry for late reply, was afk.
thanks, ill give it a go tomorrow 😃
@celest birch its in 4.22
Hey all, for some reason my lighting is darker in the editor than it is in-game. Does anyone know why it may be? I think it has to do with the skylight
I have it set to affect world and set an exposure
@brittle steppe make sure you disable our at least match auto exposure on your cameras
Anyone know how to do a decent looking tracer for a line trace weapon?
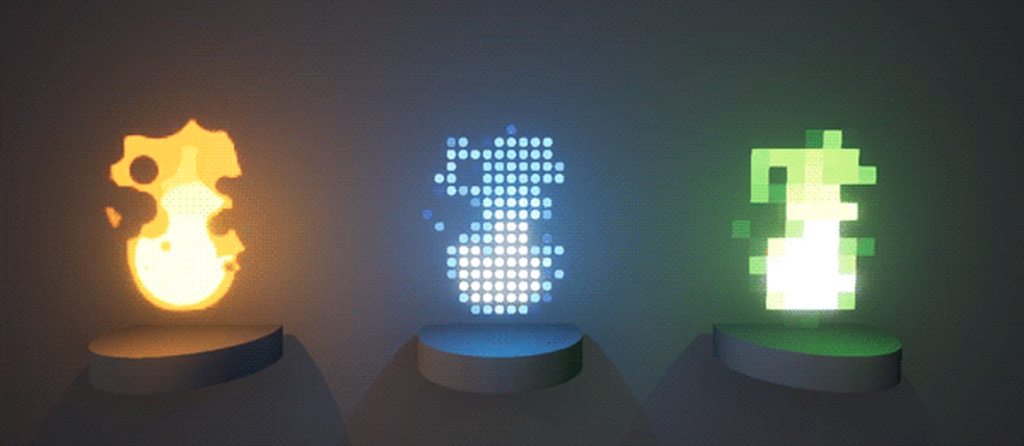
latest state of my little fire effect wich uses a realtime-baked flipbook which captures a particle system hidden in the scene:
https://i.imgur.com/DwbZtav.gif
https://realtimevfx.com/t/simon-trumpler-sketch-20-wip/7654/1


Real Time VFX
Preview GIF: Flip Book Creation Process: Color Variation: https://i.imgur.com/R6qSOuW.mp4 It’s on a plane: The “secret”: I’m trying ...
@drowsy lynx how do you ensure seamless looping?
@spare hare by rendering the first entries in the flipbook transparent and "overshooting" at the end by rendering more flips than necesarry and letting them fade out as well:
https://i.imgur.com/xDXqSBb.gif
thats a neat trick
thanks! 😃 it's not perfect but often good enough. in case the transitions sucks, you can just hit play and generate a new flipbook where it (hopefully) works better until you're satisfied.
anyone got any ideas how Fortnite do their propellers for their planes https://youtu.be/8dMP_ZdTqO8?t=220

NEW Airplane Gameplay in Fortnite Season 7. Fortnite Battle Royale Season 7 Brings a new addition to the vehicle family. The ALL NEW Airplane which can mount...
@subtle idol Just a mesh, radially blurred ?
quick rotating mesh, and a few planes with a very blurry tex
I think they have the mesh rotating very fast, but that wouldn't look like their effect they have with the blur over it. I would say the blur was a plane... but its a 3D
its a 3d cylider mesh or something when you see it from the side.
side view
Place a cylinder on top of the prop. Blur it radially.
cool, I'll have a google of what that blur is.
@subtle idol
cheers guys! I'll give it a go and see if I get a similar effect of speed! 😃
Radial blur is not the way to go for that though...
Cylinder with a straight blurred texture scrolling would be simpler
they also have that effect where it can look like the propeller is spinning backwards. it also spins so fast it looks like there are multiple instances of the propeller. but freezing it frame by frame, this appears to be a natural effect in the engine, just like in real life.
@subtle idol You would use a cylindrical mesh, UVed somewhat like this. http://prntscr.com/mmpj9x Now from here, you can follow path suggested by Glad, and bake a blurred prop there and use this mesh with translucent mat in game, or you can use the same mesh with translucent material, that reads number of scene texture samples, offset along radial axis. Optionally, you can render prop mesh into stencil buffer and reject samples based on that to preserve background untouched . Latter approach is bulkier, but works seamlessly for any propeller and lighting and tags along well with stock linear motion blur. The first approach is less universal, but is considerably cheaper. In both approaches you can simulate rolling shutter effects by offseting UVs depending in position of the pixel on screen on either of them axis.

hey guys. I have a cpu particle that collides with blueprints in the scene. On one of those bps though I wanna check if it collided with the particle. is that possible? I can't seem to get it. Thanks in advance
@ivory dagger i dont think so. the particles are calculated on gpu and collide with the depth buffer...as far as i know you can't "read back" from gpu to cpu if a collision happened
I'm using cpu ones though
oh sorry, i misread!
hey guys is there a way to use a meshs normal to spawn/guide particles in cascade/niagara?
what kind of witchcraft is that @drowsy lynx ?!?! 😮
looking really cool though 😃
is there a way to make it without using flipbook ?
Enabled High Quality Lights and Cast shadow on one of my emitters (content starter fire fx) and the frames dropped to 6 fps on a 1080 gtx. Is this expected?
yea, dont use that hehe
also depends on how many you spawn
if you spawn one, its sort of okay (though id still suggest against it in almost all cases)
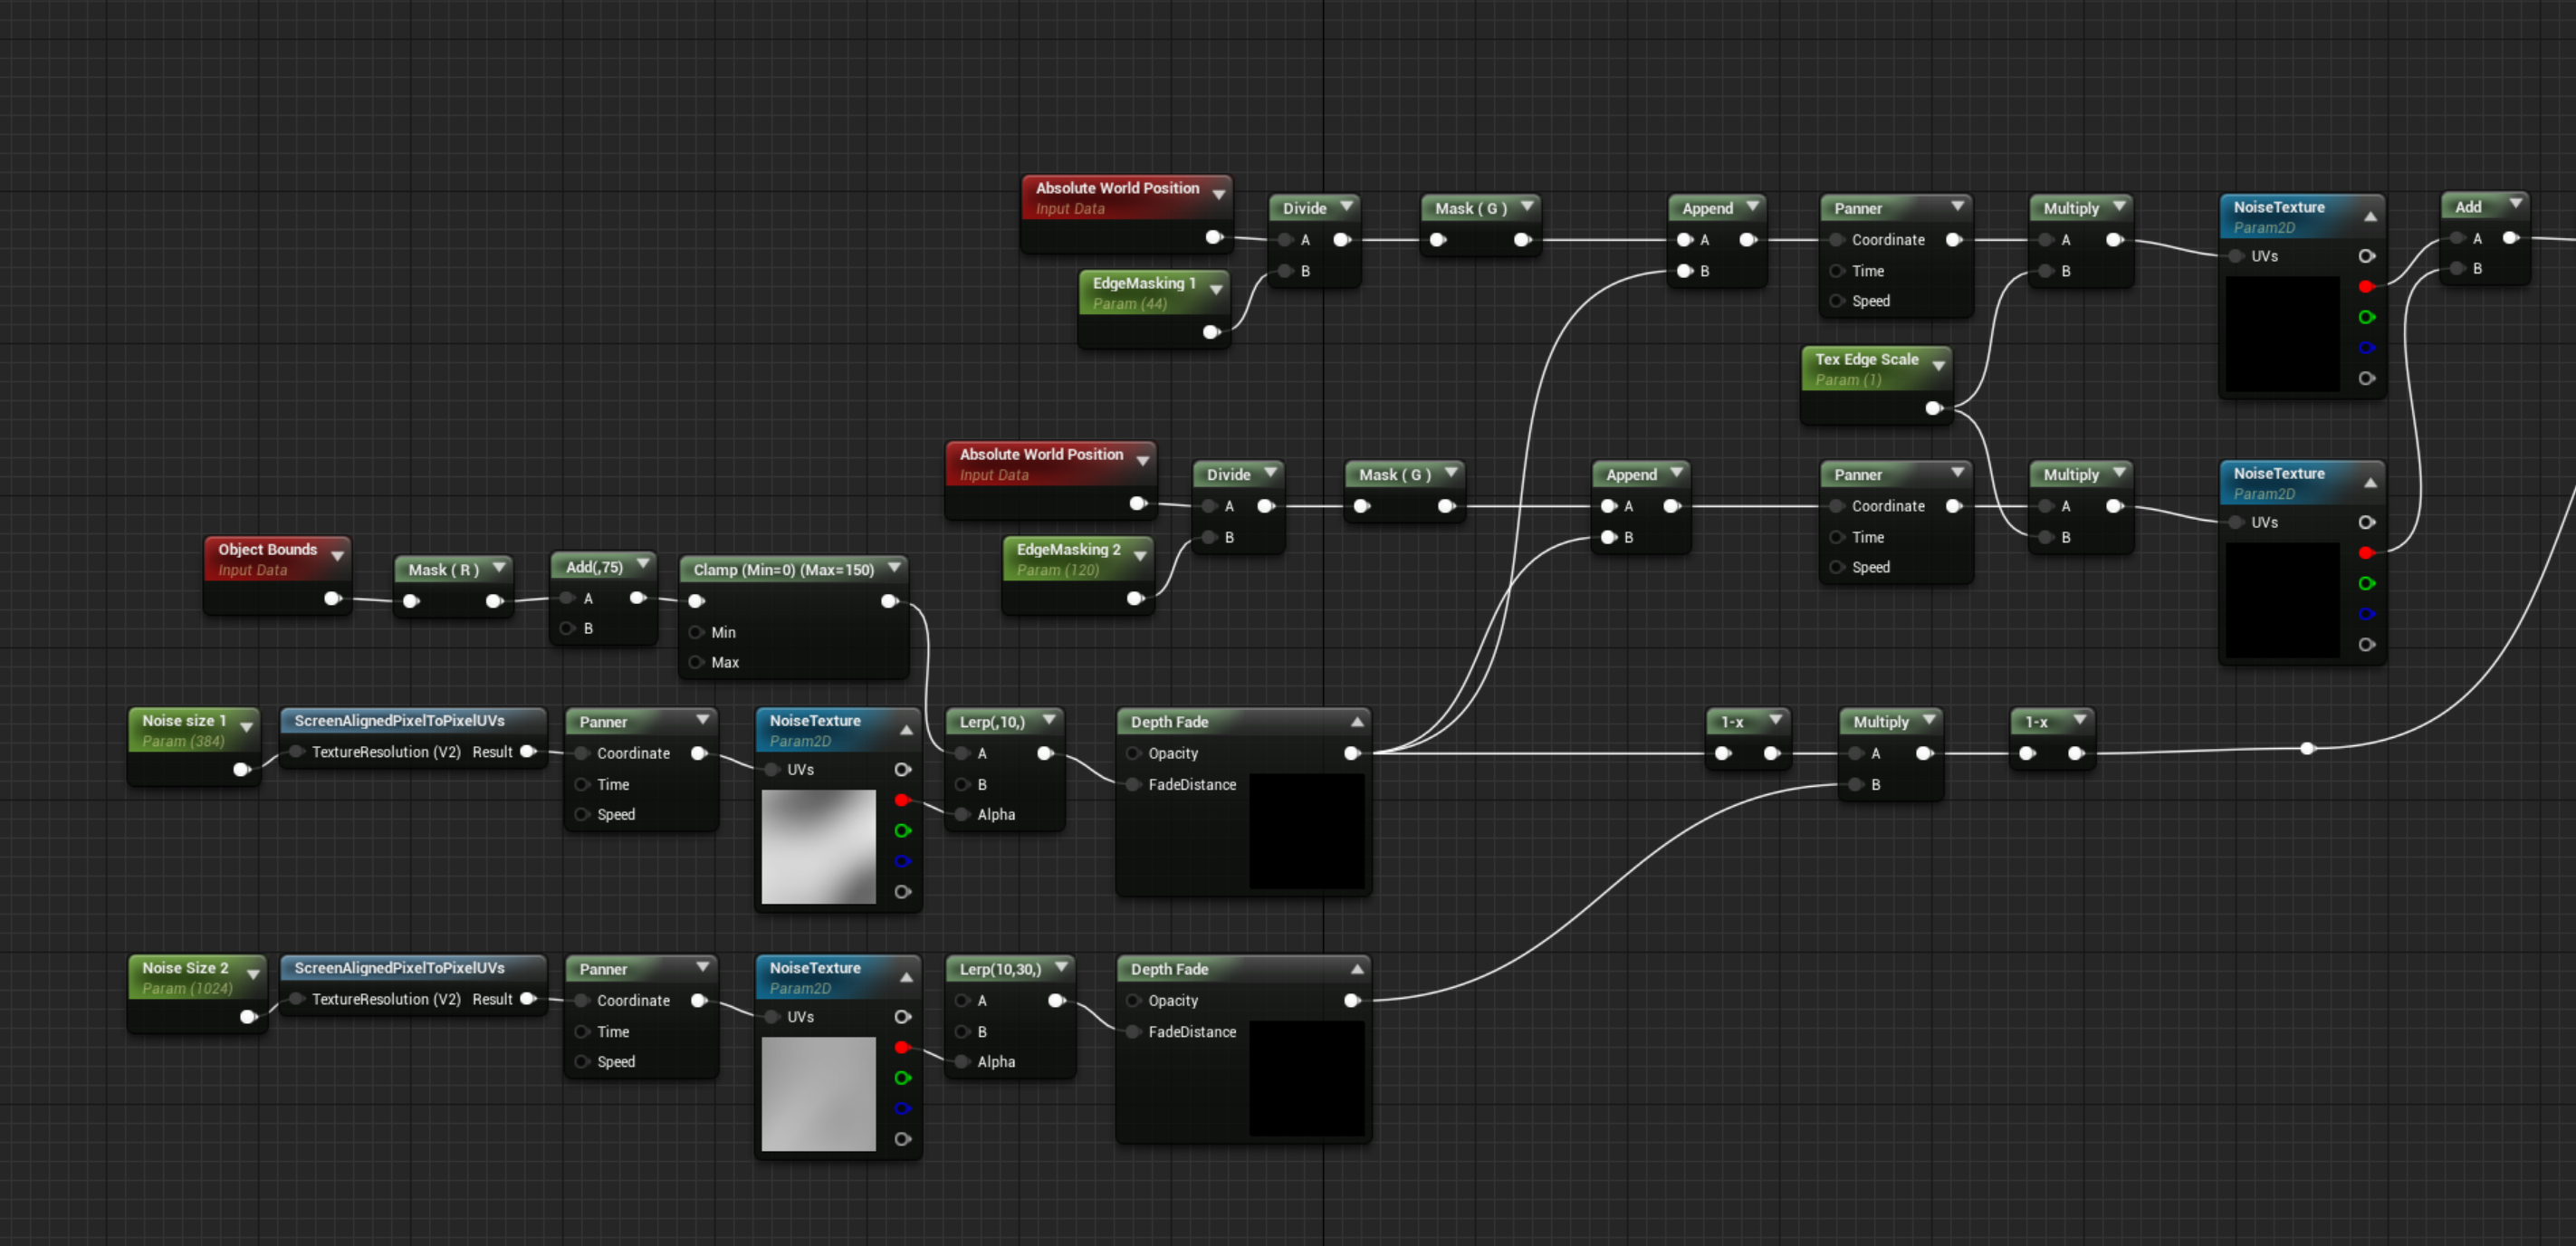
https://i.gyazo.com/f16152b1d177aacac64fa0251a96d5c0.gif no idea what im doing


Just goofing about with some weird shader stuff.
@pseudo skiff the pixelperfect guy is trying to use static noise to do everything in the shader. i tried too but wasn't really successful to accomplish the style i wanted. i guess it could be possible with a lot of tweaking and fiddling in the shader. but changing the effect might take time then while i can play around a bit more free and just record what i made.
new version:
https://i.imgur.com/k3jnYhF.gif

and some style tests:
https://i.imgur.com/SzclALU.gif
@fossil swan love this aura! is it 2 spheres on top of eachother masked by sphereMask+orb-position?
@fossil swan le me guess: two fully transparent spheres and you use depth fade to make it opaque and blend the aura texture :P
@drowsy lynx Well, guess you cheated on rendering the flipbook out 😃 Still within the rules of the contest technically. GL !
anyone has any idea why spawning a blueprint that has particle component, doesn't visualize the particle? I am sure it spawns though even if I cannot see it
@analog onyx we discussed that in my thread 😄 it is a fine line 😄 on the other side, many poeple use noises which could count as kind of a texture as well. in my case i'm not storing the flipbook on disc - as long as everything happens in realtime it should be kind of ok. if not, the whole rendering process could count as cheat as render targets and even textures for storing particle positions are used by unreal to print something out on screen. but yes...it's a very dark gray area here 😄
I already noted that it's totally fine to exlude me from the process if this counts as a cheat. I was just having too much fun trying to make this flipbook-baking working that I couldn't stop 😄
@spare hare yes on the spheres, not really on the depth fade.
it does use a depth fade, but as a UV channel, (V), and a fresnel for the U channel, plus some other math for noise.
not the best thing, but wanted to see what I could do manipulating depth and fresnel as uv's hehe
while I tested it with this wavey noise texture, I kinda wanted to have something that blows dust/force away from center radially
@fossil swan and what makes the spheres appear only near the walls?
part of the depth-fade setup prolly
I was literally goofing off with weird things, so it was a surprise to me as well XD

Hey all, just curious is there a way to mix shading modes? A friend of mine is looking into mixing 'Hair' shading with 'Opaque'. there are strands of metal in the hair that he'd prefer to not run through the hair pipeline. Material Layers don't seem to support mixing shading modes (please correct me if wrong), and not sure if the new 'LayeredMaterial' experimental feature is sufficient.
the layeredmaterial experimental feature has been depreciated already
ah so material layers for sure doesn't allow mixing shading modes?
er its confusing 'layeredmaterial' vs 'materiallayers'
yea, and for that particular problem.. iunno. either fake the metalness, or a seperate material is what comes to mind... with my lack of knowledge on hair/char shaders
appreciate the answer very much luos. thank you
the material layer feature weren't actual layers anways. they where just cascaded material functions like any other "professional" UE user already does.
It's just a fancier way of doing it (+ little bit more flexible, since you can delete/add layers per instance)
ah so it didn't even modulate shading modes?
you cannot mix Shading Models unfortunately.
ah ok well i appreciate the answers still, thanks you two
He is trying to make hair like this: https://i.pinimg.com/originals/b4/b6/5b/b4b65b5edba06556f40cddcf6cfc4d3d.jpg

but the problem is for nv cloth, the steel parts if they were on seperate material id, the simulation would mismatch
it sounds like each material id using apex is split to its own simulation i mean, so the metal peices wouldn't be connected to the hair vertices neccisarily is there a way around this?
@ivory dagger have you tried adding the "Activate" function node after the spawn? (just in case)
Yup tried all of those @misty magnet
has someone some wizardry to make a texture look like it is projected onto a plane?
I have a sky sphere and I would like to add a Cloud Layer that's basically just a plane with a texture
Hi, anyone here with knowledge of particle editor or niagara? I'm trying to convert some of our effects, but need help. Please message me directly if you can help
@candid meadow that wasnt an invite to spam the channels
are you using cascade, niagara, or are you trying to convert from somewhere else?
one line, spam?
in multiple channels. spam.
we are converting from our old particle system which is made of an old engine
and we want to move some of those effects to UE particle system
so I would like to have someone eager to discuss about this
besides textures and meshes, you'll have to set up all the materials and cascade modules manually
might be best to recreate them from scratch then
@spare hare I believe there was a mat function with same functionality, VirtualPlaneCoordinates or something like that
some of the concepts are similar, like emitters, attractors, life of particles, etc
so there could also be a way to convert some automatically
Not outside hand writing a tool that does it
this is what I would like to discuss with someone that has some knowledge
you'd have to manually make such a converter, which might take as much time as recreating the effect depending on amount
if anyone is interested please message me directly
afaik, cascade doesn't allow autocreation of emitters.
you'd need to edit the source prolly
honestly i'd say writing an converter might take more time then to recreate said effects
(ofc i dunno about specifics of your effects)
maybe recreation is simpler, starting from textures and color settings
@mortal lily omg i love you
🤔
get a bounding box you two
If not, you'll have to analyze the difference between your systems pretty thoroughly. Like, how much does Unreals drag reduce the velocity per tick vs your engine.
almost looks like early CG renders :D
Script, that transfers base particle effect, and a neural network, that trains to match it to the image in old engine.
Profit.
Should become net gain at about few thousands of effects and above.

should work just in time for a major revision that breaks it
Depth Chromatic Aberration shader, posted it on #graphics by accident.
https://answers.unrealengine.com/questions/875867/making-custom-chromatic-aberration-can-i-distort-c.html?childToView=875969#answer-875969
Curious if there is any performance and/or visual difference than using the built in chromatic aberration?
Looks cool none the less I might try and replicate 😃
Just wondering how practical it is
neat @devout portal
@fossil swan i can't imagine possible implications however, aberration is function of Angle of View and wavelength, but the OP probably wanted to use it for something
also depth is hard to control variable
ue4 has no normalized depth like Unity, right?
@still delta sorry for poking, do you know by any chance? ^
@devout portal honestly, I don't know if it's normalized but it should be easy to do by dividing by far frustum distance
or far clipping plane, no idea how it's called in UE4
afaik there are no dynamic clipping plane, so depth is always absolute value and there are no "max" one
at least, that was true last time i did a research
in UE4 far plane is at infinity
You can still get normalized device depth, but it is not useful in the context of the effect.
interesting, so they have some custom projection matrix?
They are working properly. I believe UE4 still uses coarse versions by default.
How to get the variable of texture sample for custom node? i need SceneTexture:CustomStencil
check SceneTextureLookup function
Material compiler is unaware that you are using scene textures. You need to use actual material expression in the graph before the custom node.
Man that UE-57416...
they should make a proper documentation for custom node
yay, seems like working, outline by 4 samplers using DDX/DDY
Nah, it's not
still bugged
oh, i see now
any ideas why a particle might not be rendering after setting the particle template at runtime? all templates being passed in are valid, and when pausing game to debug, the blueprint with the particle seems to indicate the right flags for visibility and activation, but the particle with the new template is still not being rendered
@gritty temple have you tried ResetToDefaults ?
haven't tried that. i did some experimenting with making the template change before and after activation, and that seems to have an impact on things as well, but strangely only when a ribbon emitter is in the template
you've channeled your dream about making an Orange Julius in a blender
and staring down into blender
btw - Anyone have any links to a good tutorial on Maya destruction-to-skinned meshes? ie - collapse a tower and the parts simulate and all that gets keyed into an FBX skeletal mesh?
i can't find crap on this subject
Dunno about maya but Houdini is just an rbd to fbx rop if you want to try it there
Yeah does it do an SK ?
Any links on hand? I will search now anyway but any favorites would be appreciated
Houdini would be legit as long as apprentice version doesn't lock me out
luiz and paul make some pretty good walk throughs
you should be able to use FEM fracturing too if you want different forms of breakup without making something custom
Hi all who know good particle system? Need help with this particle system https://youtu.be/RmWgvTVxoVE mb some one can do tutorial ?

Potential item(weapon,armor) drop items from kill showcasing rarity types and FX for each rarity type
@indigo jolt https://vimeo.com/92866922/comments
It's old, but I've posted the maya script in the comments. You should be able to figure it out from that.
Basically it's, for each piece, create joint, constrain joint to piece, bake animation to joint. Remove constraint. Remove animation from piece, skin piece to joint. Connect joint to skeleton hierarchy.
someone can help ?
@cold sorrel awesome ty!
Anytime
I'm curious how to make a simple beacon/ marker on the level kinda like fortnite, just a give huge colored column waypoint thingy. Can anyone point me to a tutorial or something? I couldnt find anything
just spawn a huge cylinder
ah true
Hey guys, does anyone know why using a sphere mask (based on abs world position and particle pos) or sphericalparticleopacity as the opacity input of a translucent material makes the volumetric translucency shadows disappear?
It's similar to this issue https://answers.unrealengine.com/questions/434110/using-absolute-world-position-as-part-of-the-input.html
No shadows
Unless I go super close to the wall, but at that point it seems like the shadows don't actually use the opacity
Using a simple radial gradient works though
Any reason a texture that has been set to clamp in x/y while being panned would cycle in one material and not another? Trying to figure out if its a bug or something I messed up
Weird its from using a scalar
that shouldnt influence it, though if a clamped texture is set to shared tiling, itll tile again, and vice versa for a tiling texture set to shared clamped
it shouldn't haha just a weird bug cause it still works through scalar values when using material parameter collections just not the scalar parameter node. Its in 4.18 though so not much to do for it
was just in the testing phase of the effect and was very confused
CJ just to be safe i'd clamp the min/max values of the spheremask too...i'm not 100% on this but i think spheremasks might go into negative values in black parts
that is rarely useful
When you want to make a texture to always go upwards but instead you make a fire whirl
https://streamable.com/umcbw

that moire though
@fossil swan Sorry, didnt notice your answer to the usage of high quality lights and shadowcasting, thank you. I'll stick to the regular light. 🙂

Breakdown: https://realtimevfx.com/t/simon-trumpler-sketch-20-wip/7654/ Artstation: https://www.artstation.com/simont I show how to capture a particle effect...
I find it funny how many youtube channels Simon has
yea
I'll have to try that out though looks cool maybe I can compete with your submission by the end of the month 🙊

In this 2017 GDC talk, Blizzard's Hadidjah Chamberlain and Riot Games' Jason Keyser present a set of artistic fundamentals applicable when crafting visual ef...
Oh damn, are those videos coming out of the vault now?
I wonder if I'll get pinged if mine does
no time to watch it tonight, but def checking it tomorrow.
how many have you done by now Glad?
If I recall correctly they were on stage straight after me
at GDC? Only one. Well, unless you count booth presentations
But conference presentations in general, I don't know..
was asked to do one here in the Netherlands, but I am more someone who applies what I learn, instead of telling others how to approach it.
I did one in Utrecht a couple of years ago
oh sweet, so you arent foreign to this flat country of mine
I will be in Amsterdam within 48 hours.
But only while changing planes 😛
Also, screw the youtube comments on that video
i'll be sure to wave to the planes flying by within that timeframe :p
and yes, typpical yt comment rage
I need a particular thing from cascade. An emitter, where particles are locked to XY plane in emitter space, but have acceleration applied in world space. Additionally, when particle reaches certain distance along one emitter space axis from emitter position, XY plane motion restriction should be lifted. Is that doable with stock set of modules ?
Went through your gdc slides yesterday glad, now I’m trying out wedges so sad I didn’t find this earlier
@analog onyx not sure, but i think there was a way to deactivate a single module in blueprint, else you might want to look at @swift mantle his https://www.unrealengine.com/marketplace/particle-editor-extension

Code plugin which extends your particle effect toolbox with new possibilities.
The new modules allow for the following new effects:
spawn particles on static mesh surfaces, galaxy creation, particle swarm movement, and more!
alternatively, perhaps do it in shader?
hmm, might be possible if you use meshes and tweak rotation over life.
too tired to think atm
hello! i'd like to ask about (basic?) questions about visual fx materials
from what i've read via documentation and various online posts and tutorials the overall process of making vfx materials would be to have a master material and instance those off for each effect (or multiple?) use cases
i was wondering if theres a notable performance drawback to having more scalar parameters in the master material
i figure more features do increase both the instruction count and general performance requirements
but if i have more parameters to control instead of pre-set values but identical instructions
(in particular uv control)
@radiant frigate There is a non-zero cost, but it is minimal. If you feel you want to expose something as parameter, feel free to do so. Difference between using constant and uniform parameter is in 3 aspects. 1) Parameter needs to be fetched, costing a bit of memory and bandwidth. 2) Parameter is not subjected to constant folding(when you are using constant in graph, in certain cases it will auto collapse networks, that are never used). 3) Updating parameter at runtime adds a separate cost on top. If you are beginner, try applying the principle make it look good first, after that make it fast
ooh
i imagine in most cases the cost is negligble compared to how the features are implemented?
Negligible to a point where you are unlikely to profile any difference up to thousands of parameters.
understood! thank you!
also it may possibly be workflow dependant but would it be better to have a master material > instanced per effect or
have master instances and further child instances off said master instances
the latter being a way to reduce the amount of shaders compiled was how i understood it so far
For you as VFX artist, workflow convenience and general asset management would be the only considerations.
🤔 well i suppose so
thanks for your answers though! it was helpful to know about iut
why ignor ? can help ????????
@drifting jetty Because you have a name that is hard to tag and you don't respond when we asked you counterquestions. You weren't ignored, you just failed to discord.
i dont failed discord, this discoed for ue4, and chanel Visual .. thats wy its correct
...
¯_(ツ)_/¯
Hey, so, I'm kinda stuck on how I could do something; I want to be able to make an effect travel down a spline with the starting and end points being mostly fixed, but the path inbetween being fairly randomized
So basically, I'm just looking on how I could randomize a spline's path from A to B, but am not sure how I could go about it.
@cold sorrel dont see any questions for me ... Hard my nick? Lol tab to nick ...
I need help wthis psrticle system try do light ray like in diablo, when dropet legendary item in video witch in up my messeng have this light ray
Put a gradient on velocity aligned sprite with tiny amounts of velocity. Done.
@cold sorrel i try it, i alsou do matirial gradient and dot work ((
@runic quarry It is usually done by having several paths, identifiable by vertex colors or UVs. One of these is picked randomly.
hello, i have a vfx beam that is attached to a weapon (first person perspective), it works well if i'm standing still but if i rotate the camera i get a huge trail which seems to be caused by the motion blur setting in the camera's post processing. Is there a way to make the vfx bypass motion blur so i dont have to change the motion blur value whenever it shows?
@modest leaf ususaly not as motion blur is a post process filter and appliead to all rendered pixels 😦
(hm...expect you can somehow not write the velocity data into the motion vector buffer...not sure if this is even possble..)
@drowsy lynx that makes sense, so what else can i do to avoid that?
@modest leaf i dont know exactly whats the problelm. i think it would help if you could provide a screenshot or video?
@modest leaf Render the beam in separate translucency pass.
@analog onyx thats on the material itself right?
yes
thnks, ill try it. @drowsy lynx if i dont fix it with this ill show you
@analog onyx i already had Render After DOF on
It is TAA ghosting then
yeah thats a likely possibility
ill try disabling AA
if that's the case then theres not much more i can do, the other AA modes have other problems
actually even with AA off i still have the motion blur effect on the vfx
if i set motion blur to 0.0 its fine
if i enable TAA then there is a bit of ghosting
so its kinda the mix between motion blur and TAA, but motion blur seems like the main culprit, because even with TAA disabled i have a bigger drag effect than with motion blur at 0 with TAA enabled
the weird thing is that motion blur is still affecting the material with Render after DOF on
Yeah, in stock motion blur is run after separate translucency apparently, which makes little sense. It is an easy change, if you are fine with rebuilding, but won't help you with TAA. Consider doing beam as masked instead of translucent.
thnks, i'll try with masked, but if that doesnt help i guess i'm out of options
the masked seems the same
should not be so. Masked writes correct velocities.
Hi guys any way to change particle shape? I would like a slow emission of spheres
nvm
make it a few units higher
i did
ahhh
its a clipping issue
I think caused by the distancetoenearestfield node in the water
hmm still happening
will sleep over it xD
love your work btw @fossil swan
thanks 😃
hey
im trying to use world displacement in 4.21.1 but by default the displacement is only occurring within a radius around the camera
How does one do a battle royale "circle"? I feel like you couldn't use a mesh because there would simply have to be too many sides to make it smooth right? Or is there some sort of PP math you can do?
@sly wraith Could use coarse geometry to render it, but apply virtual cylindrical coordinates for anything effect related.
@analog onyx so would that smooth it visually?
yes
project tthe UVs on a cylinder I guess
@sly wraith I imagine your circle would only be visual in the world at a certain distance?
i know in pubg the visibility of the circle fades out with distance
so what you could do, is have a portion of a cylinder and position it at the edge of the circle based on the players angle from the center
and the radius of the circle
and scale
then again, the cylinder doesnt even have to be that detailed
Hmm
the actual detail of the clinder will be unnoticeable when its huge
and by the time its small enough their will be enough sides for that scale
but even to give it like 1000 sides, is only 2000 triangles
the pubg circle at least on the map isnt especially detailed, you can see the sides
dunno if it has the same sides on the world model
Right that's my problem
3DS Max only let's you do 200 sides
Maybe Maya will let me do more
just ring the top and bottom edges, connect. repeat.
then relax to make it more spherical.
thpugh 200-400 is mooooore than enough
Ok thanks
Maya looks like it will do 1000
Can a non-capped mesh still generate overlap events?
Some can help with particle light system like in diablo when droped legedary item ?
I can't recall how it looked in D3 but i don't think you need particle lights for that. Just a point light bp should work?
Ah you mean those rays/beams? (or whatever they're called)
@mortal lily yep, rays/beams
i'd try to use a mesh and a material thats using multiple panning noises/clouds to get that pulsing. Could also try to use masks for the tappered effect (or perhaps a tappered mesh)
@mortal lily i creat a gradient material, then put it in particle system
@sly wraith World position of a fragment is known. UVs and world coordinates of your virtual cylinder can also be defined by cylinder center and its radius. From this you can construct equation that would relate render mesh fragment position and virtual cylinder position behind it. Check VirtualPlaneCoordinates material function. Your case is same, but with a cylinder.
Anyone have a good link on how to attach a brief "puff" of smoke? I've tried with a particle system, but by the time it warms up, it's too late to have effect.
im really at a loss here guys
there must be a setting somewhere
it keeps appearing/re-appearing
something with the camera maybe
this is the basic setup
my material settings:
excuses for the image spam but im hoping some of you more experienced users can spot the fault
@ivory basalt are both translucent?
water and waves
in that case, you need to set the translucency sorting order of both actors
though you could prolly make the waves thingy masked, as it doesnt look like its doing much with translucency
@fossil swan hi man, yes both are translucent
how do I set the sorting ?
the waves thing if I make it masked the edges appear very hard
if you click on it in the viewport, one of the detail panel options is sorting order
thanks this worked 😃
have you ever considered teaching ? a CGMA class from you would be awesome @fossil swan
I have quite a few tutorials on my YT page 😃
hey guys, how can I create a 'bend' effect, everything that is furthest away from camera bends upwards as an arc with a specific degree ? I want to create a hamster running game and the level to unfold while he runs inside the wheel. Is that possible ? and how 😃
If you are a #realtimevfx #vfx artist, say Hi! (and lets follow eachother)
#gamedev #unity3d #ue4 #houdini
Also, follow @realtimevfx and join https://t.co/yBPIjvWBrl :)
Hi guys I have a particle system with a mesh emitter, is it possible to use a blueprint actor with a mesh as the root component for the emitted mesh?
Howdy guys. Bit of a pickle here.
I am attempting to do an particle beam. First mistake I made is realizing the beam type emitter does not take sprite sheets. The next thing is, because of the shape of the beam, should I just create a basic billboard mesh? And if so should I include some bones/dummy objects in it for target locations?
@celest birch I don't see why not?
well it seemed to only want a static mesh with no additional properties, in the end I just gave up and spawned stuff manually. There's probably a way
For creating a bullet ribbon effect for a line trace, how would one create this without spawning an AEmitter actor
https://gyazo.com/fdc6d94b3de592df375a64f4d76bb345 Hey :)
I'm trying to get the hang of Trail effects, could someone help me out here?
How can I make the trail fade out at the end of the effect? The abrupt ending doesn't feel very fluid

hmm, what I tend to do (not sure if its the right way) is fading out the particle before its at the end of the lifetime
so for instance fade out fully at 90-ish% of its life
Do you usually use the Alpha Over Life for that?
yea, unless a particle relative time or dynamic module are used for that
For these sort of trails I add a gradient that scrolls through behind so it doesn’t all fade at once
in this case Celestial forgot to hook up the alpha from vert color to opacity hehe
I'll definitely remember that next time!
Also, thank you for the suggestion CJ, that's something I need to remember for my future VFX projects
hi all, i creat rays/beam quality item, but its looks not like in diablo http://i.imgur.com/GBdrPb6.jpg can some one help me with it ?
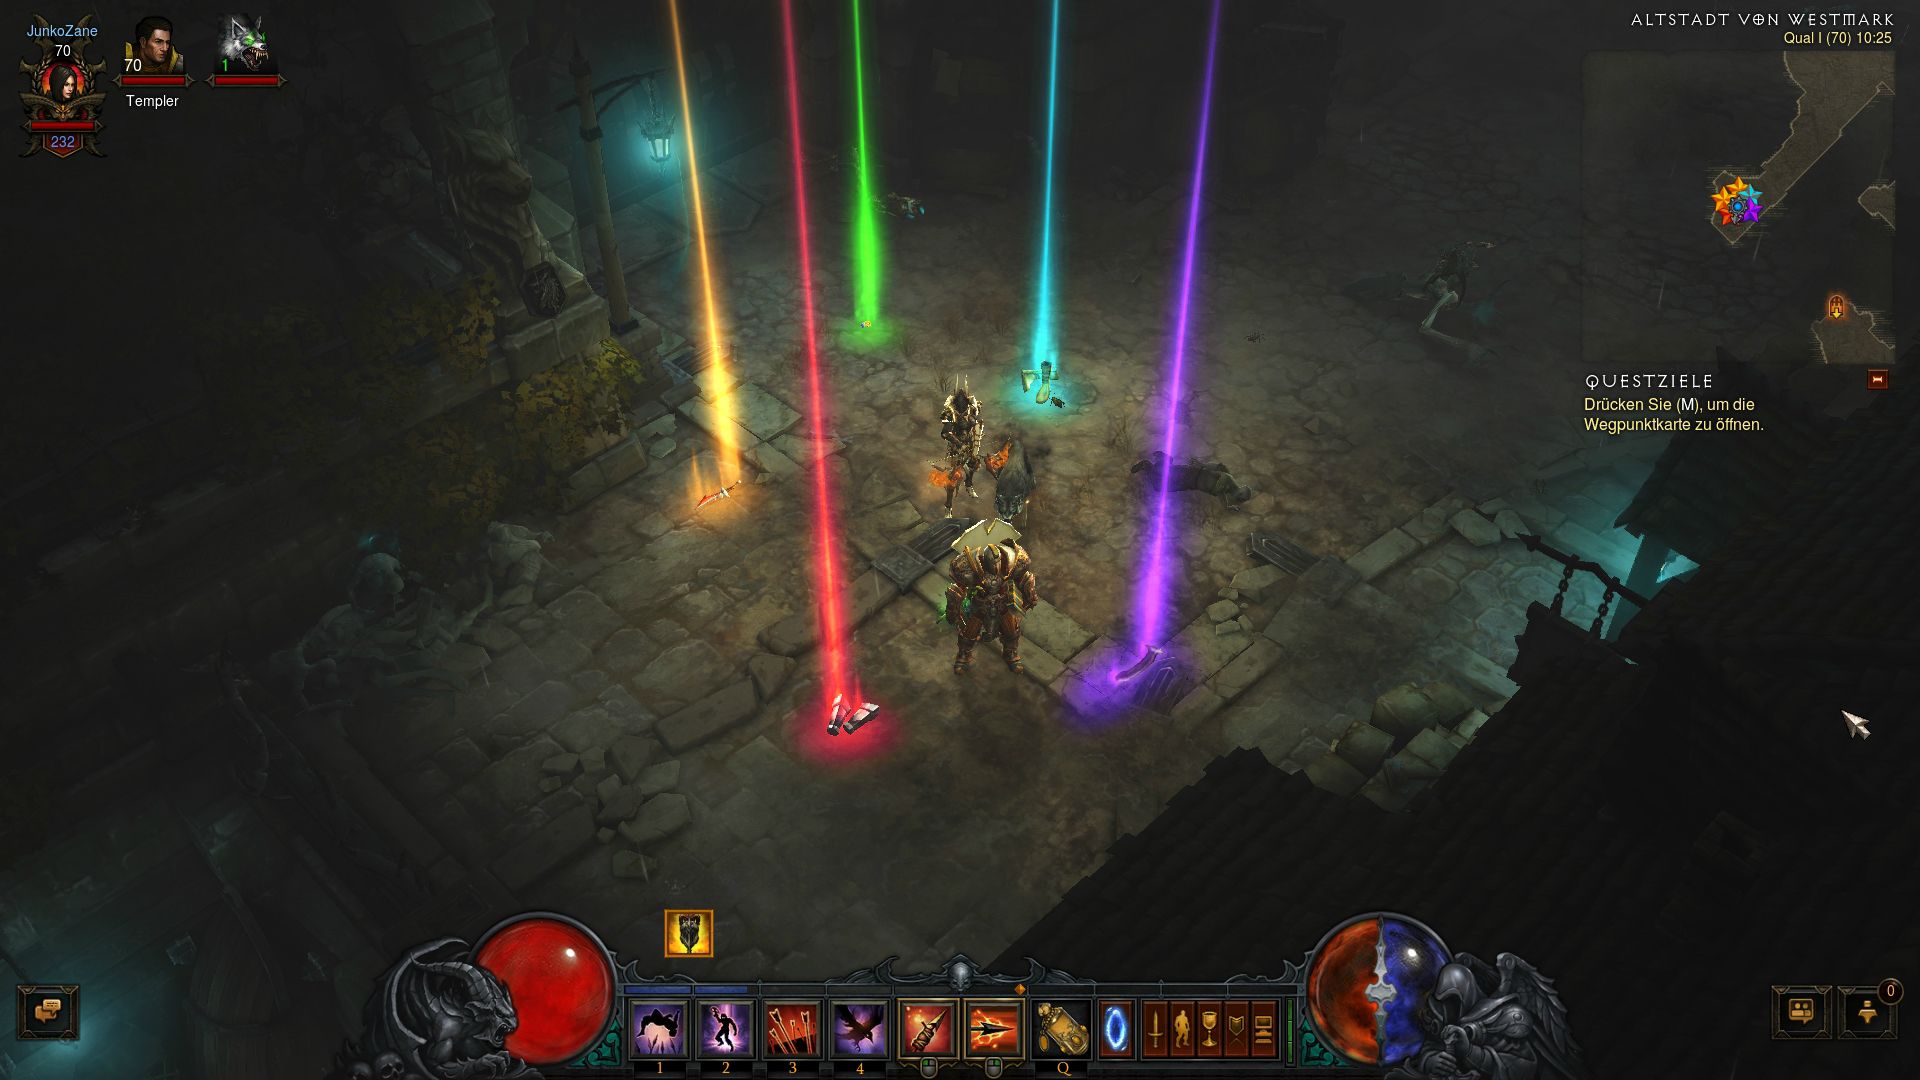
looks like a mixture of Decals or Postprocessing and a particle system or maybe just a simple mesh
https://gyazo.com/f7e719b4c08bbb05df351cd18dd3faba Starting to get the hang of Trails and how to add particles that follow the trail :)

wouldnt it be sweet if we could export an animtrail like that as fbx
why are weapon trails always so hnnnngh to look at?
@spare hare can u how tut how u creat it
@cold sorrel
Hey :)
If you don't mind explaining the process of VFX for a simple attack (process, softwares, etc.), I would really appreciate.
If you don't have time or else, it's fine. I'll just go through several tutorials.
It's cool.
@drifting jetty just use a triplanar mesh and apply a stretched circle to the bottom
haha it's fine, just slept 2 hours so.. X_x I'll find one
if you want the distortion pan a noise gradient and multiply that by your emission
This ball of energy?
https://steamusercontent-a.akamaihd.net/ugc/920292854139390203/5164BB4075CB44CBF5AEEB28EAFC57EC6E2C5426/

wait it's not playing... :S
Soft blur in photoshop, Ring blur in photoshop. Spawn both on sprites. Add ribbons with a soft streakblur.
For the impact spawn the same4 streakblur (with a bit of wobbles) on donuts/rings.
Add a bunch of light streaks behind
So those would all be sprites facing the cam?
ohh
Depending on the actual usecase, animate the ground breaking in your software of choice
when we see trails in game like the melee attacks above how is that done?
Ribbons or meshes with scrolling textures

Real Time VFX
Hello everyone, I am a begginer when it comes to VFX with only basics of UE4’s Cascade knowledge. And I am curently brooding over the “ground breaking” that takes place in this video (at 1:00m mark) VFX video - careful before playing, it might be loud I couldn’t f...
I got schooled
Thank you!
@solar remnant can, show me whot u mean ?
then just a stretch a circle for the texture that should give you a good start after that I would do more in the material to add interest
@solar remnant ok thnks, will try
Heyo, is it possible to lock the axis of a trail / ribbon ? I would like a trail to follow my character movement in x / y but not z, is it even possible ?
@drifting jetty https://www.youtube.com/watch?v=YPy2hytwDLM if you like diablo you should check out this gdc talk they gave on their vfx its pretty good
In this 2013 GDC session, Blizzard Entertainment's Julian Love discusses the implementation of visual effects in Blizzard's Diablo franchise. Register for GD...
@solar remnant , thnks a lot
np
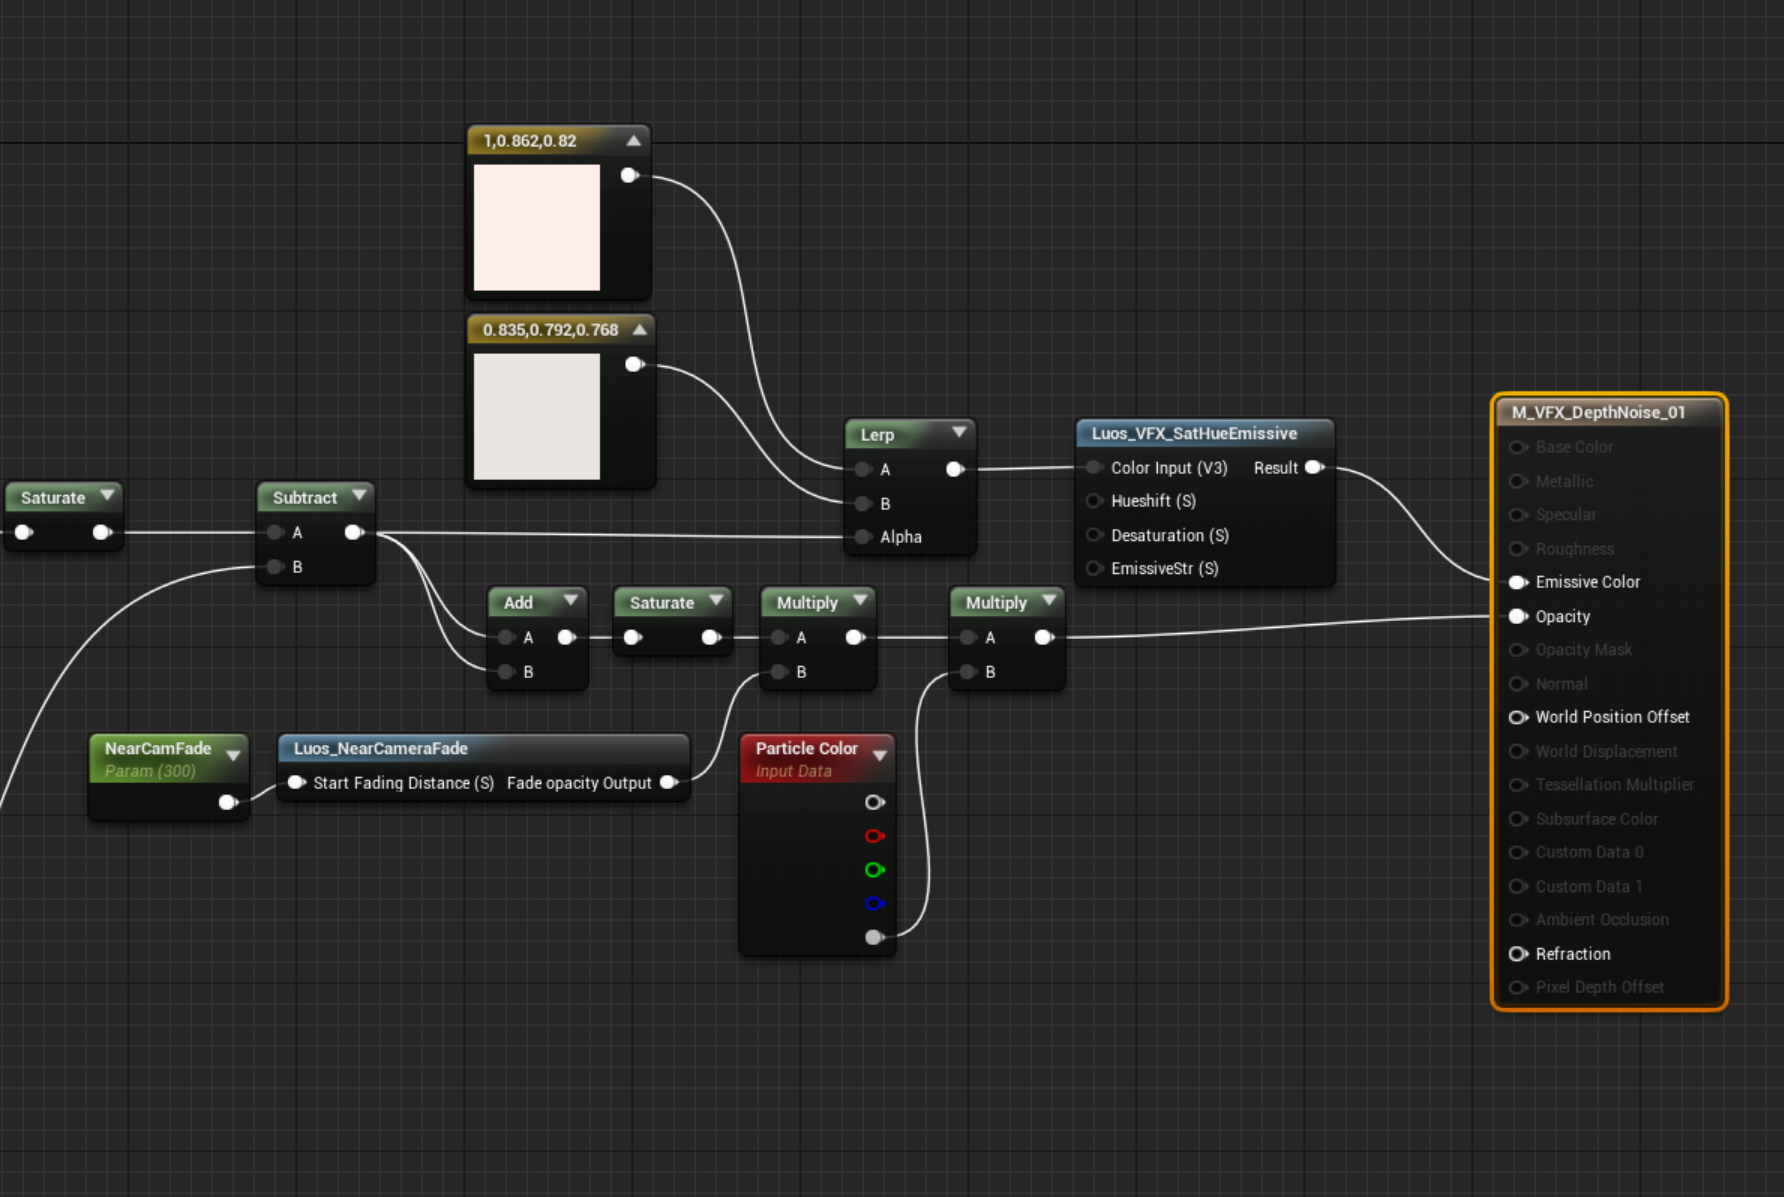
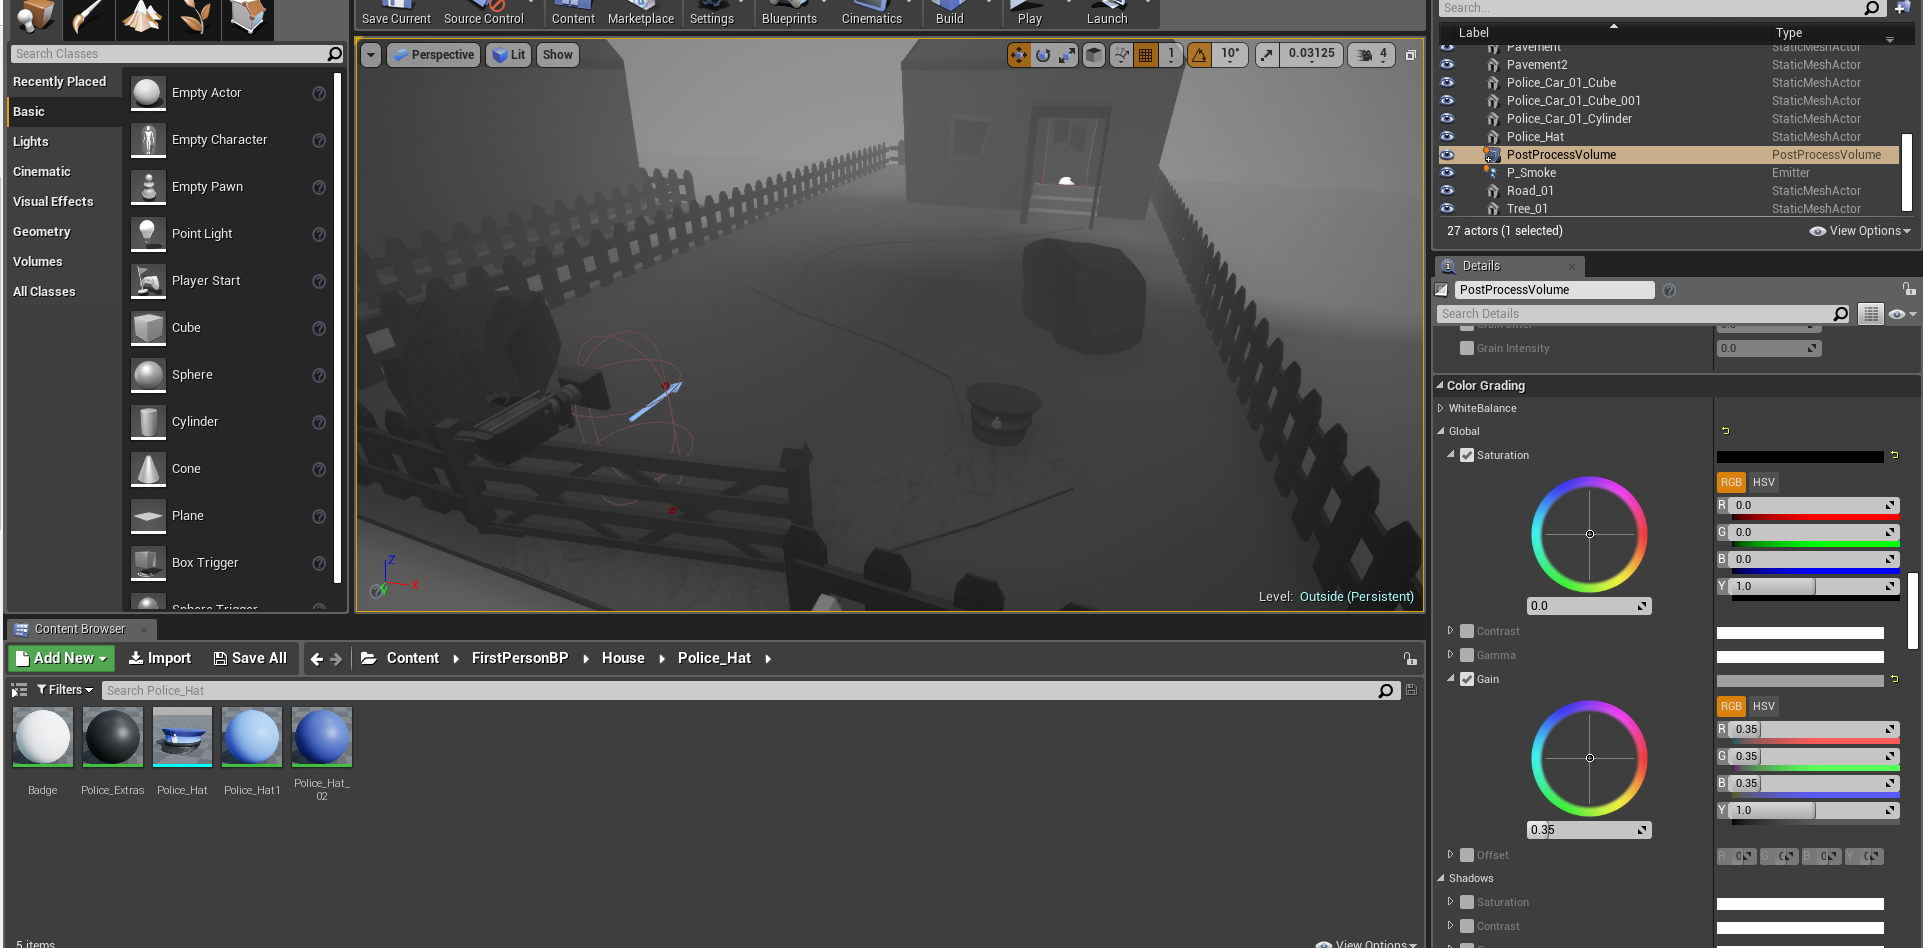
Hi guys, I was just wondering if someone knew how to make a particular object in the scene ignore a post process volume so it can show off it's color ? , I have heard about custom depth but have no clue how to implement it with setup
heres an image.

Im trying to make the hat show off colour but it has 4 materials

Hey I'm wondering if anyone would know how to rework something like this in ue4 https://streamable.com/wkxt8
This is a quick test in blender with particles and using vertex weight map for controlling scale of the particles. I don't even know where to start in ue4.

Niagara, or if they don't have to be particles, WPO
what about doing this to foliage? For example grass that scales up around the character
anyone know why my rain is really not liking my house ? also why i have holes in the particle effect when zooming out ?
this is a better look at what i mean
the house is blocking the rain fall
@thin rampart I recommend temporarily changing your particles into something easier to see and debug. Will probably give you and us more insight into what the issue is. As it stands, not too clear what's happening from these videos.
@thin rampart Some part of what you are seeing is likely perceptual issues caused by the refraction in the rain material, but not sure beyond that.
@brittle remnant I turned up the opacity of my rain material and it kind of worked.. but obviously no longer really looks like rain
dw about the blood rain it was a test.
but i still have the problem wherever my camera looks there is a gap?

my rain material
@brittle remnant its not very clear but it's even doing it in the viewport
a straight ass line
hmm might partially be the fresnel
@fossil swan whats wrong with it ?
@thin rampart I would slowly start disabling features to narrow it down. Strat by removing modules one at a time. Like Collision. Disable transparency on your material as well.
I think UE's refraction expects some normal vectors to work off of, and in your videos it looks like the water droplets are bending light (offsetting pixels) in just one direction, which suggests to me that they're sprites with uniformly flat normal vectors rather than something more spherical. And then you have your fresnel-to-IOR setup with a 1.5 max value that gives it those extreme white contours when in the light.
Can't say anything beyond that because I haven't done this type of effect, but that's my guess.
Warning
Cannot find primitive attribute 'name', binding volume as 'density'.
Anyone know what this means in houdini?
your volume doesn't have a primitive name attribute
how are you making it?
you can specify a name on creation, or just put down a name sop
Hi everyone! Would you have any idea on how to achieve this effect of fisheye mini-world? 😃 Thank you!
https://youtu.be/_OBLI6r2IZs?t=68

Welcome to The Lab, a compilation of Valve’s room-scale VR experiments set in a pocket universe within Aperture Science. Fix a robot, defend a castle, adopt ...
I kinda got it with a cubemap render target, but cannot find how to get the fisheye effect
fisheye is just a wideangle effect, you might be able to get closer to the result you want using a standard 2d render target that is wider than it is tall
Thank you, I will experiment
How would one expand the volume of something in Houdini
because its a box, and I want it to expand further
@uncut sorrel you might want to try the realtimevfx forums/their discord as this channel is basically ue4-related questions only
Didn't know they had a discord

Real Time VFX
discord is slack on steroids. also no weird limitations on big groups, and no per-member fee for bigger group. Also, compared to slack, the discord team is much more approachable, is more open to bigger groups, and also more receptive to suggestions for improvements and addi...
Is it up yet ?
The question is, was it ever down?
true.
Heyo, is it possible to have particle effects that uses the local space in a specific axis and the world space in an other axis?
Let's say I have a character that is moving very fast on the Z axis, and I want him to leave a trail when it's moving on the X axis, how would you achieve that ?
if you use spawn per unit for ribbons/animtrail/regular stuff you can make it ignore movement along axis
Hey all- I'm getting really inspired to make animated illustrations using UE4 - kind of like this .. https://www.instagram.com/p/BuVX9CjAVvs/
Researching around, using the flow map node in material editor seems like a good first approach. I created a flow map using a tool I found online (flowmap painter by teckartist.. http://teckartist.com/?page_id=107) and am running into an issue where when using the flowmap tool the texture automatically tiles. Has anyone worked with flowmaps and possibly knows how to address this?

Instagram
1,180 Likes, 26 Comments - ♏TheGlitch♏ (@theglitch.og) on Instagram: “"Life has its ups and downs. When you are up, enjoy the scenery. When you are down, touch the soul…”
are you using a seamless texture? flowmaps are just 'fancy' panner nodes you can actually create them internally within unreal using vertex color if you understand what the color values mean
thanks CJ.. that makes sense.. I found a great tutorial vid which walks you through creating your own flowmap graph from scratch too. https://www.youtube.com/watch?v=tEr3NE_XLbc

I explain how to setup a material for using a flow map. Flow Map Painter: http://teckartist.com/?page_id=107
Could anyone help me with creating a postprocess material to blur distant objects? I have objects that are illuminated by customdepth, so I can't just use a DoF since those objects aren't effected by it. I would like for objects past, say 10000 units, to be blurred but don't know how to go about doing this
hmm, you'd think there would be an easy way to find all materials in an emitter, and adjust a shared variable they have.
Should be py scriptable.
meh, i rather not add code to a particle pack :p
anyone know how to rotate a ribbon?
rotate how?
like

League of Legends Star Guardian Soraka Skin Spotlight. Purchase RP here and help support this channel via the amazon affiliate program (NA): https://amzn.to/...
the trail
this is what i have now
thats a mesh with a texture that pans in a swirling motion

Real Time VFX
This post is amazing, thanks for all the great tips!
its being discussed in that thread
what if I want the motion not be a straight motion? the trail will not follow the bullet core.
then it might be a ribbon with the same kind of texture thats panning
scroll down to give or take the oktober 2018 posts
@fossil swan ah, hello there)
heya
heyho! I'm trying to calculate a mask that simulates the view angle of my camera so that it can be used as a mask in a material, but I can't for the life of me figure out how to calculate that.
I've got a octahedron SDF with some help from the internet to work, which is close, but now quite what I need
@prime pecan Meh, I would just use 6 plane estimators instead of something fancy.
and how would I do that?
Check distance to each plane of the frustum(camera view is a frustum, encased by 6 planes). Select minimum distance, minding the sign of each plane. Here is your distance field for camera frustum.
alright, I'll try to see if I undertand what you mean, wish me luck 😄
there was a pretty nice tool based on unity to make flowmaps
standalone tool to generate your flowmaps
okay so here's my problem, I'm trying to calculate a frustum for a second camera, and I can't find a way to do that in unreal
so I don't know how to calculate the frustum nor the planes on it
Aight, so you need six planes, that surround it. Top,Right,Left,Bottom, Far and near. Plane is best defined with its normal and origin. So, thinking about it, near plane would have normal equals to camera direction vector and origin at camera position plus camera direction vector times near clipping plane distance. So far seems clear? Can you get second camera position and camera direction vector and supply it to your material ?
well yes, I have the Camera Position and Angle, and ideally the aspect ratio, do I need anything else?
And the near clip plane sounds simple enough, far should be similar, I guess
Far plane has a normal of minus camera direction vector and origin at far clip distance.
are the planes infinite or will I have to constrain them to the frustum?
or will that happen automatically by checking for the minimum distance?
We are speaking about planes. They are infinite. Top plane has normal that can be expressed as camera direction vector, rotated by plus half vertical fov around camera Y(or X) axis.
Its origin is the same as camera origin
Likewise for 3 remaining planes
Now you just get distance to all planes from a point in question. If the distance has same sign(negative or positive depending on normals you choose for furstum planes), your point is definitely either within or outside the frustum.
alright, thanks!
Consequently, if you just take minimum distance from 6, you will get your SDF
@prime pecan What's your use case for this?
I want to mask out a the field of view of a camera in my scene
so I can use it in PP
I've nearly got it now
Ah I see, some sort of shadow casting fog of war type thing?
I think I'm still missing something. Isn't the view from your camera by definition your scene?
nah, just something like this:
More like the view from the cars headlights
this was my initial try by using an octahedron sdf, but I couldn't manage to rotate it
Cool effect tho
well more like view from the lane assistant in the car
okay I've got something, now I only need to work out how to do the correct aspect ratio
I feel like you could accomplish this using custom depth and a big mesh much more easily.
Unless you need the SDF to do some soft edges.
Or perhaps a a Render Target that just renders your mask volume mesh.
well the problem with custom depth is that you'd have this giant chunk in the world and if you'd look through it from this angle you'd see stuff colorized that wouldn't be in the view of the camera in the car
with the SDF approach I only get the pixels colorized that the car could see, no matter from where I look at it
If it is a single effect, SDF is okey. For multiple effects like that, rasterizer based solution is preferable, but you would need to do a bit of coding for that.
well it'll only be one car that we want to visualize
and the SDF allows for flexability in FOV and aspect ratio of the cam
Usually things like that are performed with two stencil tests, one against front face and one against back face.
But yeah, SDF gives you flexibility and stuff.
it's also a good exercise
okay I've got pretty much everything set, I just have to figure out how to calculate the plane normals based on the camera angle... right now all of them are basically hard coded
Those should all be rotations of the camera vector/normal.
yeah I just realised that I could just pass them over when I pass through the position from my object in the scene that acts as proxy
@solar remnant dont work well ( can u show me tut ?
Was playing with this and realized that this won't give you a correct visualization for what that sensor can see because it doesn't account for objects that occlude your sensor inside the frustum. Not sure how critical this is to communicate in your visualization but it might be better accomplished by rendering a shadowcasting spotlight on a proxy of your your scene and then using that as a mask for your post.
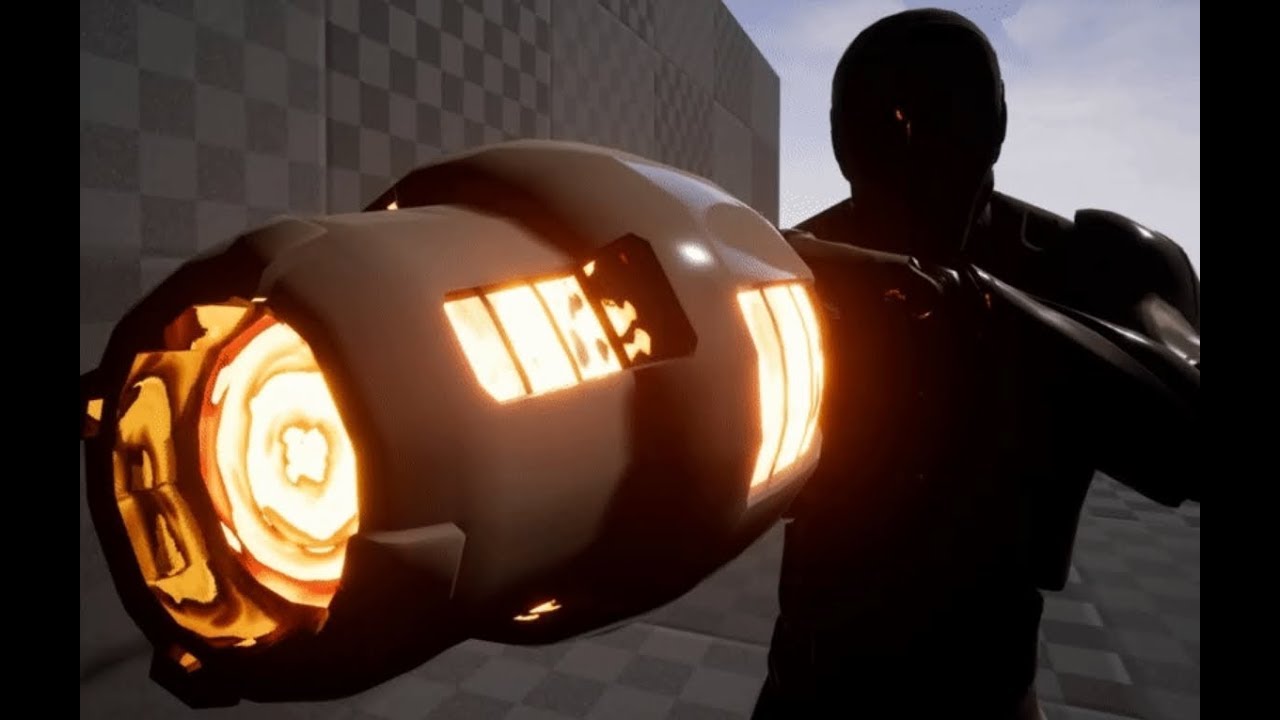
Simple showcase of the effects available in the upcoming "PewPew Projectile Pack" _______ Be sure to check out my UE4 marketplace for awesome vfx packs! http...
Has anyone used the GetUserInterfaceUV node in a material? I'm trying to make a 9-sliced material, but I don't know how I can specify the margins/borders as inputs to the material.
😃
Hi guys, I have problems with particles In PSA Velocity in orthographic camera
facing wrong direction in game
editor


Why does my particle effect look far more dull in-game than in the editor?
What's the best way to do a "lightsaber burn effect" when one object overlaps another?
@gusty cliff Click this button to change the viewport's background color. You can set it to green to approximate your game.
I suspect your blend mode is set to additive and the green backdrop reduces the contrast of the effect vs a pure black viewport. Maybe you should add some opaque smoke to darken things around the flames.
Does anyone know why when I pull a ExponentialHeightFog into my scene there are no options for volumetric fog in the details panel ? I cant figure it out but feel like I'm missing something stupid.
which version of UE are you using?
4.15.3
isnt volumetric fog a particle thing?
no
or havent I touched the expheightfog for so long they added volumetric?
ahh, k
iow havent touched it hehe
ahh well thats why then xD
@fossil swan You can apply Volume Materials to Meshes which makes easy volumetric fog
ooh
no need for particles
i need to be less inside cascade, more in editor itself hehe
but you can of course use particles
how much trouble do you think my scene would have if I download 4.21.2 and open it in there ?
depends on the scene :P
what sort of things would affect it ?
its pretty much just assets and textures in a single scene with some basic lighting
your scene shouldnt be affected then
I'll give it ago, thanks ❤
@civic plover Will do, thanks for the tip!
hi guys has anybody experience with the fluid vertex animation in houdini to unreal? Is there a solution to not have the normals break when the object is rotated? I am using the standard setup copy pasted from houdini.
that looks sweet btw
@cold sorrel might know, he's the houdini god here
mhh how would i go about that? i mean i get world normals from the uvs but when i try to transform those to tangent lets say, it just breaks even more.. 😦 I am not that advanced in normals and shader math stuff sadly....
Sorry. I'm on a bus and exhausted so I can't remember
well no trouble i will continue my google search for the evening then 😄 , if i find no solution do you mind me getting back to you with this?