#visual-fx
1 messages · Page 17 of 1

dang that's cool, honestly you might even want to make a tutorial vid on that
well thats the material
rest is just tweaks for what u like best i guess
its not super cheap but its not overdraw or whatever i dunno 😛
you pay for the volumetric but i can turn up spawn and it wont matter too much
now its spawning 20 times more and they last longer
ok ya that's pretty weak on card
same fps if im not lookin at it so its not super expensive 😛
was doin a cinematic kinda game for my jam but didnt get to finish it
my cascade curve editor somehow got screwed up and it's always zoomed in a bit. Whenever I a do "fit to selected" there are still keys not visible, and I can't see my horizontal timeline labels. I've tried resizing, moving the layout around, detaching the curve editor tab and re-docking. I also tried Window > Reset Layout, and also changing my screen resolution.
should put on 1080p ofc 😃
the smoke on the street is same particle material as the fire
wanted to make a game, ended up spending to much time on other things and it was 30 degrees outside so only worked on it in the evening
i think both the stuff comin off crunch and the moving fog on the street is volumetric particles with flowmaps
not 100% sure about crunch
Did any of you guys recently get an email from allan mckay?
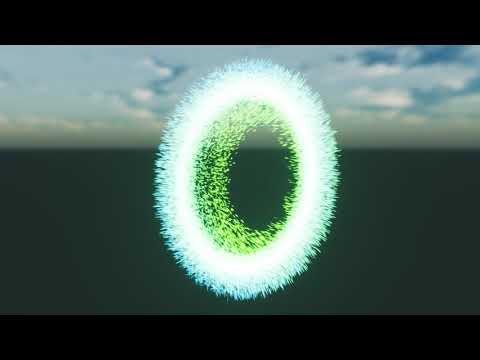
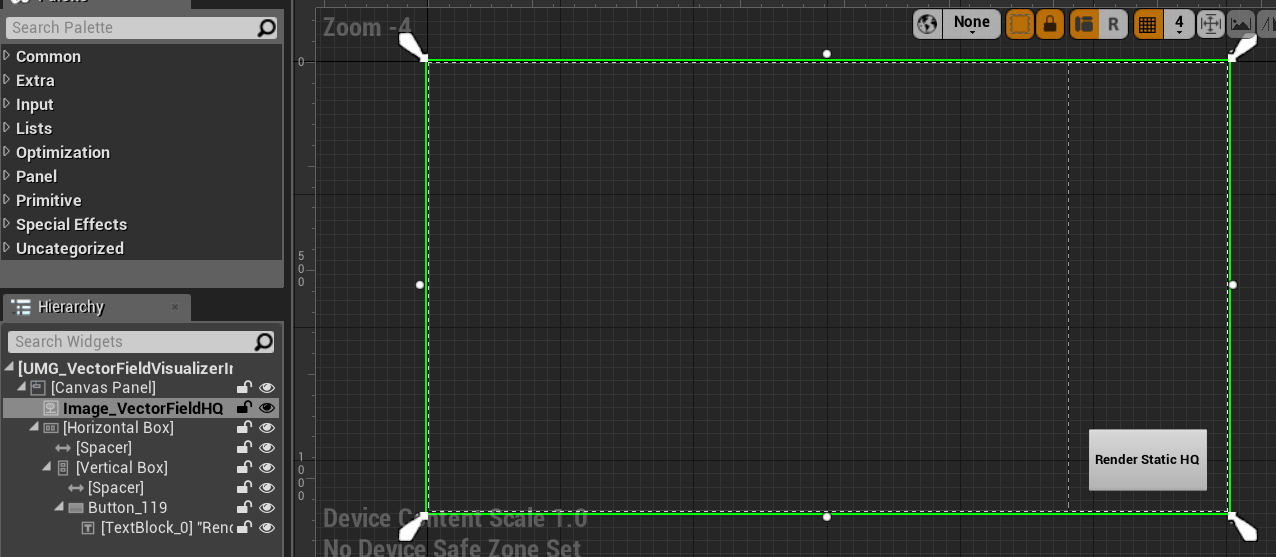
https://gyazo.com/978ba4a84163a6a6e95c5df742f05a87 More fun with visualizing vector fields by compositing Niagara Ribbons to a render target

Less horrendous resolution: https://gyazo.com/1d560e9381931450c8e36bf7b4108ab8


Just put up [Part 1] of a series of articles on how to achieve this affect, and how Niagara works in general, check it out! https://unrealingens.wordpress.com/2018/05/30/exploring-niagara-pre-release-part-1/
Unreal Engine’s new VFX module Niagara has been on Epic’s roadmap for a few years but following Epic’s GDC presentation on Niagara in March, this new system is quickly moving towa…
awesome!
Can two different cameras see two different materials on the same object?
It would be distance. Dot product would just check if they are facing the same direction
@sly wraith you can use Blueprints to select between 2 different materials based on things like "possessed by" or "team"
if that's what you're asking, i'm not sure
but that's often how it's done
Yeah I want an object to have an opaque (normal) material in the world but be transparent in a radar view (which has a specific camera)
Not sure if I can set the camera to see that object with a different material or not
@celest birch You can use both, either use dot product of CameraVector1 and Material and check with dot product of CameraVector2 and Material, then use that -1 to +1 value to do stuff OR like you want: Distance from Camera1 to Material and Distance from Camera1 to Material
But in the end, he needs something else ;P
@sly wraith Can you give more information? Do you just want blue vs red dots on your map?
My anim trails show up in persona, not in game - https://answers.unrealengine.com/questions/80329/anim-trails-matinee-not-showing-in-game-1.html
"I just checked our bug database and found that a bug report has previously been entered for a fix on AnimTrails not showing when PIE. The issue is currently still open but currently being investigated. I am unsure of a date or build when this issue will be resolve but it is in our database so that it may be fixed in a future release.
Thanks again for reporting this issue and have a great day!" answered Aug 2014... anyone else experience something similar in 4.19?
@sly wraith ya your scenario would be done in Blueprint for sure, this is 100% blueprint solution. Blueprints can check to see the owner of a camera, and assign material based on that
you may have to look up tutorials and/or check for advice in Blueprint channel for specifics once you get further along
Yeah my apologies if I put this in the wrong channel
Just trying to figure out how to create a "camera lens" that renders the same object in a different material. So not a red vs green blip on a map
Like this:
All cameras see the hand normally, but an "xray camera" sees the other material (ie the skeleton look)
Note that the "xray" material should not be visible to the other cameras or players, just the one player looking through said xray camera
I want a side of the mesh/ skeletal mesh invisible, ( imagine a plane go through the mesh, the side along the up normal has opacity 0, and the negated normal has opacity 1) any idea? thanks for reading !
Can someone tell me how to make a thrust effect with particle system? Should i create many tiny dots and spawn like 500 each second or how should i do this? I want something like this https://www.youtube.com/watch?v=6_okZRChCeg

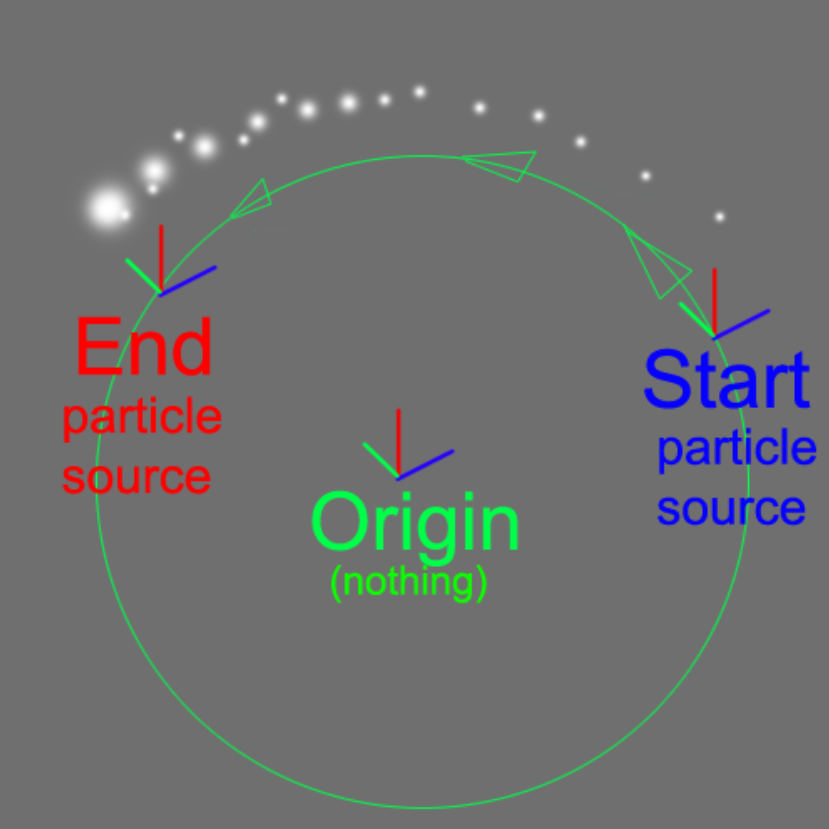
Emits sweet sweet particles into a Vector Field (built in Maya from a fluid volume). I think it looks aiight. Needs a better particle material.
Rly ? No one? nice
Go ahead and try it?
What have you tried so far?
So i created a material, white dot and now i'm trying to make the bottom part bigger, so it goes from "Wide -> Tight"
you can make it start as a circle to get the round source, and then wide in the x axis so its longer as it dies. You can also put a point attractor or smthn to make it come to a point
or do a velocity/life curve to manually control the velocity to form it into the shape you want
@brave wagon if you do it with tons of little particles it'll "work" but there's some limitations there
- high expense due to the heavy overdraw of particles on particles
- as particles get smaller, you'll need to make them longer otherwise you'll get little tiny gaps
- overall shape will be kinda blurry
So i need a circle.. put it on the thrust and then spawn it and make it on "lifetime" smaller ?
so it becomes a cone
yeah honestly this is like the most primitive type of particle system possible so start there just for comprehension-sake
in the end you'll want something that uses probably a camera-facing mesh
that's like a half-cone shape
with an animating material
what you're looking at in the above example is 100% just using a soft circle that changes scale and color over lifetime
it's very inefficient and blurry, but the movement/color is OK
methods using animating materials on meshes allow for far more exotic visuals while being cheaper, like so https://www.youtube.com/watch?v=jOo9Wer9CXQ

A particle effect I made in Unreal Engine 4 for my visual effects class.
this is how you'd setup a material like that https://www.youtube.com/watch?v=lrAchLnhemk

This video is a little help for Brandon how to setup materials correctly to mimic the RIME fire VFX. The original talk about the "Stylized VFX in RIME" you c...
you'd get a gradient-noise dissolve and use that in tandem with a mesh emitter
So it's a thruster effect, so 99% of the time it will be seen from behind not from the side 😃
yup that's why it's gotta be a mesh
a sort of half-cone
i'll show 😛
so the reason a shape like this works, is you can have shaped-alpha edges for silhouette
yet when you look directly downward at the object you still actually see the shape
there's other methods too, but bottom line is - start with the obvious method
little dots
and then move on up to more advanced methods like this later
How do I remove rendering of outline when is behind object ?
I am not sure where to start looking or exactly what to google, halp please 😃
@silver dirge i think this is something you change in the post process material
yeah, think with help I figure it out thanks !
Hey guys, where can I learn about Ribbons? Mine is not working very smoothly. They kind of move in a lagged way
https://www.youtube.com/watch?v=Q1RK7fGEntc

be sure to check your ribbons in wireframe mode to get an idea what the geometry is doing
the ones there look a smidgen "blinky" which usually means your spawn rate is too low
adjusting spawn rate will smooth things out....but it will jack up tessellation a lot, so you have to find a balance
the 2 worst things you can do for ribbons - 1. try to give them zero velocity relative to source. 2. reduce spawn rate too much, causing them to blink at source a lot
actual ribbon resources are really rare
lol in wireframe the particle looks perfect. I'll see about the rate. Thank you 💪
np, good luck. ribbons are NOT easy
@silver dirge if you haven't figured it out yet, in the pp material, sample the the scenedepth and the customdepth and don't draw if scene depth is closer to camera
@calm folio I think I did thanks !
The "Unit Scalar" in Spawn PerUnit was the problem. The lag effect happens if I set this valor to more than 1. Now it's looking good. Thank you @indigo jolt
sweet!
Is there no way to spawn a particle when a Gpu particle collides?
@delicate gyro I don't think events are possible with gpu particles in Cascade
Dang
However it could probably work in Niagara
that's however nowhere near shipping ready
but fun to play with
Im just trying to make some ground splashes for rain
Although I can't seem to make a GPU emitter without it immediately crashing so I probably need to pull latest build 🤔

@delicate gyro It would be too expensive to get collision results of every gpu particle hitting the ground anyway so you're better off making a separate emitter that creates splash particles. And a wetness material of course
Thats what I was planning on doing
but Im not sure how I can make splash particle fall and hit the ground
Im not sure if making a "ghost" particle that spawns the splash is a good idea
@delicate gyro There's this horrendous tutorial that always ends up in the front of search results and I had to try like 5 variations of "rain shader" to find this video which I think is decent https://www.youtube.com/watch?v=ymAuk1z6f-g /endblog

In this tutorial I will explain how to make a shader that mimics raindrops effect inside of Unreal 4, which I used in the World Building project: Check out t...
The rain splash effect in this vid looks good so perhaps it will be of use
Im just looking to find out how to spawn a particle on collision of another particle
Probably not worth approaching it that way for rain. But if you want to spawn a particle on collision of another particle you need to add an event module to the Cascade stack and trigger it with a collision. I have no clue how to do that tho
Oh, and that event then spawns a new emitter at the collision location, etc etc
yeah Im trying to use events but not sure how it works
ya it's not too complicated, there's a few ways you can botch it though. make sure your receiver is set to 0 spawn rate
and set it's spawn inside the reciever
i think
Also I just realized that tutorial is only a material and not a separate emitter
but hey, no need to overcomplicate a setup
I ended up just using an invisible particle to spawn the drops with an event

since the main rain particle is gpu based
@delicate gyro you attached rain effect to character
?
how you handle water drops on ground, since when character moves water splashes will move also
I havent attached it to the player yet
its not really a playable scene
Its just for the marketplace
got it
what parameter makes some materials still be visible when there no light in wold ?
Why does block square and white block are glowing, when there is no light except spotlight
I think i checked and unchecked almost every box but without success 😦
never mind forget to rebuild light map heh
I have a particle system that uses GPU sprites but whenever my screen goes out of view they disappear. I've set the Relative Bounding Box really high (covers whole testing map) but it seems like the bounding box always disappears and doesn't work.
anyone know what causes this?
@delicate gyro great looking scene
What project is it?
Hey guys. I've got moving sand in my desert material, and now I'm trying to recreate this effect: https://www.youtube.com/watch?v=lO61_-6DK6E - how should I go about making the blowing sand particle spawn across my desert material-landscape?

-Suggestions, Likes and Comments will be much appreciated! -Subscribe for more of these sounds. 💨 Sand Blowing Over Dunes Sounds For Sleeping, Relaxing ~ Win...
So if I have landscape material function X, I need to spawn the particle randomly across it's surface and make the sand particles blow along. Any suggestions?
@wanton vector just pan several textures across the landscape, and have the sand, that is being blown off the dunes, as separate manually or procedrually placed emitters.
Hmm okay, so I've gotta place them manually. I've already got the sand textures panning covered. Got a pretty big desert so was hoping to do this procedurally, but I have no clue how 😃 I was trying Skel Vert/Surf Loc, but I'm probably just using it wrongly
handplaced will look best, but surf loc will work if you make an emitter mesh and turn it into a skelmesh
Hmm okay, I'll go ahead with that then. Gonna be a bore placing them on my desert biome as it's huge, but heck it'll look good atleast 😃
Thanks guys, Im superhappy with the result
It is possible to fully automate the effect, but it is not trivial in terms of efforts and performance. Should be easy with Niagara.
Is there a way to make an effect snap to the ground? like its on a socket that moves slightly off the groudn
Hello, I'm trying to figure out how to apply a particle effect to two sphere's like what happened in the Riot Creative Contest. I use UE4 as my engine. Do I need to create blueprints? Are there any tutorials out there? http://polycount.com/discussion/198866/riot-creative-contest-2017-winners-vfx#latest

polycount
Stylized Winners 1st - Etienne POV – Etienne blew us away with an absolutely stunning final piece.
When I watch Shaders and PostProcessMaterials tutorials I just feel in awe at everything you guys do. It's like magic to me.
@smoky marlin go to realtimevfx.com and read the getting started threads
https://gyazo.com/c9869ea3565937182e91247e2e8c125d sorry not sure if this is right place for this

Keep up the good work dude!
@smoky marlin depends on if you want to do this as a legit part of gameplay or not
Hi, I'm thinking I should learn Niagara, but can't find any simple getting started tutorial. Anyone know a good place to look? At this point I feel I'm banging my head against Niagara and just can't find any hold to start from, nothing works and my mind is breaking -.-"
Node based particle systems sounds awesome so I really wish I could lean this.
ok, just found State of Niagara in Unreal Engine...
my strategy is as follows "wait until try-hards figure it out and make tutorials, then assess whether tutorials relate to anything i'm working on"
@cold sorrel just type ‘getting started’ in the search bar? I read through tons of posts but nothing specific to my question.
Is the information found in the ImbueFX videos? I know 75% of VFX is problem-solving. Am i asking for too much hand-holding? @indigo jolt hm... i want to demonstrate fireball spell for my demo reel. So i think it should be part of the gameplay eventually. Perhaps i need to learn more parts of the engine as a whole.
Yes you are.
lol harsh
but ya....self-problem solving is like 99% of it. It's using resources and relying on people mostly when you can't find resources or something isn't working the way you expect
@buoyant escarp You can ask me or ShadowRiver (probably other people are building up some familiarity with it), also use the search tool in discord and look at what ShaunKime has posted in #visual-fx
@buoyant escarp I'm doing a writeup on playing with Niagara, part 1 is already up and I hope to have part 2 done today. https://unrealingens.wordpress.com/2018/05/30/exploring-niagara-pre-release-part-1/#more-56
Unreal Engine’s new VFX module Niagara has been on Epic’s roadmap for a few years but following Epic’s GDC presentation on Niagara in March, this new system is quickly moving towa…
Oh and it's worth watching the GDC talk too https://www.youtube.com/watch?v=mNPYdfRVPtM
Join us for a first look at Epic Games' new Unreal Engine VFX editor, Niagara. This new suite of tools is built from the ground up to provide unprecedented p...
<@&213101288538374145> can we pin that video the guy just posted? It's really really good
Also maybe this really good video about doing toon shaders via PostProcess Materials: https://www.youtube.com/watch?v=cQw1CL0xYBE

This week we'll be diving into Post Processing in UE4. Tom and Sam will go over some basics of post-processing before building a couple small shaders, one fo...
New surprises about Niagara: writing your own NiagaraDataInterfaces is pretty straightforward. Can't wait to try sampling some arbitrary data
fuck yeah
Praise Alex
I'm still lost on how two cameras can see the same object with different materials
It's done by checking camera ownership maybe?
ya in blueprint
you'd create a boolean type thing that looks for "is camera 1" or "is player 1" then use that to drive a selector
or some such logic
Eyy everyone, Part 2 is now up on my series exploring Niagara pre-release! https://unrealingens.wordpress.com/2018/06/04/exploring-niagara-pre-release-part-2/

This is Part 2 of the article series exploring Epic Game’s new VFX module Niagara. If you haven’t read Part 1, you can find it at the preceding hyperlink. In this article I will be expl…
by the way, there's a release date for niagara ?!
It's on the 4.20 roadmap. Not sure if that means "done" or still experimental, though...
It's accessible now (with 4.19 or source compiled), but a bit buggy here and there.
@indigo jolt but does that work if both cameras are rendering at the same time?
ya
this is how multiplayer stuff is done
team 1 and team 2
team 1 shows up as red for the other and vise versa
not sure if you need tutorials to further this, but if you do i'd look up that topic - setting team colors by blueprint or something
@obtuse seal Thanks, I'll keep that in mind. And checking out your writeup I now feel I have a good place to start, so thanks again =).
You really can't emit a decal in the particle system, right?
Materials, Material Parameter Collection, Dynamic Particles, BPs, information everywhere
But I still need to animate a decal with timeline in BP
yikes
That decal life might be useful, thanks!
Used with a remap function you can have an intro, "idle" and outro quite easily
And to adjust values, throw the BP in the level and abuse the compile button to restart the animation ^^
neat!
I tend to bind a keypress to spawn
You're right, I was thinking about the editor, but when the values change, I need to check it ingame, silly me ^^.
@cunning finch Niagara is early access in 4.20, meaning lots of rough edges but stable enough for people to learn from and comment on
@obtuse seal great job on the tutorials, can't wait to see what you come up with
@ocean hedge Hey great timing, was just thinking of shooting out a message
shoot away
It's just a minor bug report so I'll DM you
ok
I have a tapered beam set up. The taper is rather small
But when playing the game, it's much bigger
Weirdest of all, it's tapered even when I set "Taper Method" to "none"
isn't that just perspective?
if you stretched a 2x4 the same distance it would taper too
If it was perspective, it'd be an incredibly odd one:
And the particles on the ground is where the raycast determining the endpoint of the beam hits
oh it does that even when you aim it low like that
Yep
Nobody has any ideas, I take it?
You are probably seeing some issues with the beams direction being perpendicular to the camera. I have had better luck using a single axis aligned particle and parameterizing it's length and position.
Doesn;t the beam target only take location, not rotation?
It still has to rotate the beam normals to face the camera and that math starts to break down as the camera direction == the beam direction
I have often solved this by using a sphyl-shaped mesh emitter
and scaling / positioning it dynamically using a blueprint
Even if I set target tangent strength to 0 and the beam interpolation to 0, it still occurs
What has me dumbfounded, though, is that it used to work perfectly fine when it was a part of the player pawn
Now that I moved the weapon to a separate actor, this weird taper started appearing
I would guess then that your start and end points are not facing along positive X anymore and thus your beam is twisted
It's +y it would seem
Make sure your start and end points are +X forward and +Z up
Yep
That's very likely the issue/
Yep
Rotated it 90 degrees and it works perfectly fine now
Thanks, wouldn't be able to notice it myself 😄
NP!
There's no binary version of 4.20, right? "early access 4.20" is in reference to this? https://github.com/EpicGames/UnrealEngine/tree/4.20
Thx, just wanted to on has caused problems with the Launcher in the past (edit:binary versions take an extra day to show up). Also, didnt know there was a difference between early access and preview.
well, "early access" isn't actually a thing.
the branch on gh exists, so you could pull it and build.
It should be stable enough, but it isn't yet a preview build.

New #unreal #tentacle test, it got materials this time. #Houdini #SideFX #UnrealEngine #gamedev #IndieGameDev https://t.co/JE8XG5zrZ9
Retweets
517
Likes
2731
@tender trench
@boreal gull hi
my tentacle is better
:>
this one doesnt even look like an octopus zzzz
That pre-baked animation is sweet, I'd like to see it done with Niagara Houdini
just wanted to say that we had a lot of fixes in the Dev-Niagara branch that didn't make it into the first preview binary build.
(which ought to be coming soon)
so my suggestion is to either work out of the Dev-Niagara branch or wait for Preview 1 if you need a binary
👍
Niagara's so cool https://gyazo.com/f2f38c7f2c13b3bf98df5e2eb1b08273


Just some snippets
Now to find a way to drive one emitter variable with another emitter 🤔
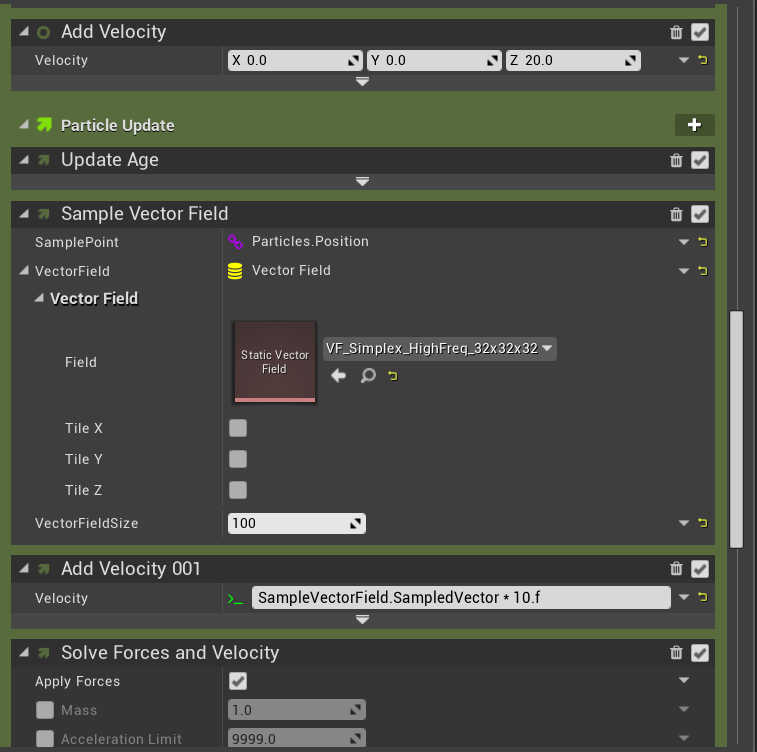
The string is 100 burst spawned particles arranged in a line that deviate by a vector normal multiplied by an intensity factor, all of which are driven by three different sines with different phases. And it's all in one module which means it can be dropped into any system.
Not to mention some other stuff like tapering the sine intensity at the ends and obeying a maximum string length where the more the string is stretched, its period increases. I should probably model that with the actual physical equation but I just went with an exponential factor 🤔
Do you work with scaling multiple keys in the curve editor or is this just broken for me?
You can't key anything in the Niagara Emitter/System as far as I know
the timeline is merely to expose the age of the simulation as something you can scroll through
Was talking about general editing keys in Cascade or the Curve Editor itself.
Somehow it's broken for me, but if I want to shift multiple keys or scale them in time or value, it's not working.
Which is huge if I have to manually adjust all other keys by hand.
One more for the road https://gyazo.com/fda0cd423fe8237c166cd1d7e200c423

damn
Was a lot of fun to write the module, can't wait to see what happens once I have a decent library and just throw ten into an emitter for funsies
Puzzled out how to interact emitters with events, now for silly string that follows a point with various forces

The tense string looks pretty good, now I can simulate some slack and instead of using time for vibration I can sample the velocity of the tip particle
Although oddly it doesn't appear to replicate the y axis value of the position vector, need to test that 🤔
https://gyazo.com/c0c79a3c97156409f9c6e0629e871a2f Smaller minimum period and greater intensity

Annnnd all of this should go in #work-in-progress rather than cluttering #visual-fx so I'll be doing that from now on 🤓
If I wanted to use an expression in Niagara, if I added the Particle.NormalizedAge parameter to Particles, I'm assuming a "one minus" type expression would work like this: "1 - Particle.NormalizedAge" ?
You got it. To be safe I would write 1.0f - Particles.NormalizedAge
Make sure the compiler knows you want floats
It has come to my attention that some people may encounter a crash opening Niagara systems due to a bug copying over INI files in binary builds.
If your Niagara settings look like this:

Use the import command to impor this INI file
it should get Niagara back into proper shipping state
DM me if you have any troubles
Awesome, thanks
ill just put this here in case anyone needs something like this, simple modular with negative emissive, 4 planes nothing else

I'm having a hard time wrapping my head around what's going on there. More detailed explanation?
@unique tulip Im guessing the materials arent two sided?
not 100% sure either my self
It looks perhaps, like some depth trickery on some flat planes?
Still not sure what's special there? I mean, outside of some standard stuff. Am I missing something?
damn niagara data interface stuff seems very tricky
im thinking on how can i attach it to my projectile simulation thingy
nothing special, just some depth fakery
Anyone know of a technique where you can get a mesh to have transparency but also occlude anything that has the same material as itself, and isn't directly visible to the camera?
Like say you got a mesh with some long hair facing the camera. Turning its mats transparent would make the hair visible through its neck and face.
I recall they did some "special technique" in the Vanishing of Ethan Carter to fix it.
I'm looking for a different method though...A friend of mine said there was a different way - where you can freeze a 3d asset, and somehow render it as 2d or swap it out with a 2d one then that way you don't have to worry about occlusion. The mesh doesn't have to move anymore once it starts going transparent, and the camera is fixed so no need to worry about it getting viewed from the side.
For starters, anyone ever heard of "freezing" a 3d asset and converting it to 2d?
@sullen forge what are you finding confusing? There’s a bit of template-fu on the binding side since we are potentially being called with constants or per-instance values. The other gotcha is to make sure that your input and outputs are declared in the same order that they appear in the function call. A simple example of a data interface is the simple counter. The curve data interfaces are another good place to start for cpu/gpu. The mesh data interfaces get really complicated as a result of the desired feature set.
@ocean hedge ill start with the counter, wich is the simplest one
what i want is essentially to upload a straight array, with a function to get data by index, and number of data
basically, a TArray<FInstanceData>. With Instance Data having Faction, Transform, and mesh type
Ok, between curves and the counter you should have what you need. Feel free to DM me if you get stuck.
whats in niagara extras?
@tardy dome Random cruft that we thought people might have fun playing with. Not really "example content" in the official sense. We will continue to throw experimental, obtuse, obscure, random, and playful stuff in there as time goes on
cool
I'm trying to make a recursive Niagara Function but it results in stack overflow due to inifinite loops when compiling 🤔
Which is also making some very large crash logs that are stalling the crash reporter
That makes sense then
both halves of any if are fully evaluated and we choose between the results
the GPU doesn't have this limitation
👍
@ocean hedge I don't mean to pester you but have you had a chance to look over the second batch of bug reports I've sent you?
Good stuff, thanks for pushing the fixes so fast!
the two engine crashes should be fixed now
@ocean hedge One more question, what sets the default value for Particles.RibbonLinkIndex?
I was expecting it to be the same as exec order but I had noticed some oddities with burst spawning 🤔
it uses NormalizedAge if RibbonLinkIndex isn't set
which is why burst spawning gets a little weird
Wyeth is working on some beam modules that straighten this out
Cool, I'll keep sending bug reports. Should have a new set ready tomorrow morning
thank you, we really appreciate it
@obtuse seal You can wait for our beam stuff, or in the short term when bursting just use our helper function called "normalized execution index" which will space them out linked in the order they were executed in that frame. set the link order to that value and you'll get a nice linked up ribbon that also happens to be 0-1, that way you can fit the 0-1 however you want, to say taper both ends of your ribbon, etc.
@strong carbon Thanks for the heads up, I hadn't seen the normalized execution index node so I'll make use of it :)
So, I just wrote a ginormous Niagara Module and the error list when I included it in an Emitter is so big I can't scroll anymore 😬
https://gyazo.com/e769bbf2760a287edd7bee9ac031d9e2 Can't scroll back any further. The module compiles so now it's time to try and replicate whatever causes the issue with compiling the emitter

I really hope that entire script just made something really tiny like a basic sphere gradient card
😄
It's actually not particularly complicated but there's a lot of separate logic sections for adding additional behavior
In any case I fixed compile issues on my end and put the emitter together, but now the particles are nowhere to be found
I think I'm writing garbage data to particle position 😵
use the attribute debugger
it's your friend
just make sure that your timeline is playing for the capture to work (a known issue)
Oh, great idea 👍
seriously couldn't live without it for module development
I should manage it through a blueprint right?
no
go to the windows tab in niagara
and you should see the attribute debugger
it'll let you debug the running sim in the niagara editor viewport
or any simulating instances in a level that are marked as solo
it's all new
Ok, my equation somehow is outputting a 2vec, which explains why it's not working 👍
you can right-click on numeric pins to convert them to a specific type
I've found that helpful in tracking down issues as well
Yeah, I need to get out a piece of paper and step through the equation. I'm getting NaN values on x coordinate of some but not all particles, so I've done some bad vector math somewhere.
feel free to write to intermediate dummy particles values
and use the attribute debugger
it'll go faster
Particles.ThisValueShouldBeNonZero
etc
Good point, probably easier to attack it from that direction
we do it all the time
Ah, fixed it after realizing I terribly misread the equation and wasn't getting length of vectors 🤦
@obtuse seal really appreciate the tutorials/experiments you've made/done. Very interesting reads.
Also Shadowriver's vids are very informative, too.
Has anyone ever had any success using particle parameters from a cascade effect in the sequencer?
@plain dock What kind of issues are you having?
@celest gulch When I add a parameter and then go into sequencer, add that particle system to the timeline and add a Particle Parameter track, the drop down doesn't list any parameters
I can see a small box that would probably contain something if there was something to contain but since there's nothing its scaled itself to almost nothing
@plain dock ah, ok you need to add the parameter to the component first and then it will show up as available to animate. There was unfortunately no reasonable way to enumerate the different parameters when we implemented the fx parameter animation which is why the extra step is needed. I know it won't help much with your current work, but we did a much nicer job with this in Niagara. The parameters show up right in the component without having to match them by name and they're also available in the sequencer menu.
Excuse me, SomeBody Help me. I want to know Blend Add(Diablo 3 Shader).
What is exactly Blend Add?
Is this different function Blend Mode(Alpha Composite)?
This is my Blend Add Test Material.
I found Unity version Blend Add Shader. And make like this.
Is this right?
Sorry, I'm newbie.
@lunar dirge It is called alpha composite in UE4
it involves setting material blend mode to Alpha Composite
and multiplying your color by your opacity
@analog onyx
Thank you for your kind gift.
ok have seemingly simple particle problem
but it's annoyingly difficult

how to send a particle emitter on a specified "Arc" in space
doing this INSIDE the particle system
not via bp, not by attaching to other objects, just inside Cascade
i tried using Orbit, but no bueno
Use Niagara, it's easy there 
whats the best tutorial for niagara atm
@indigo jolt This is a pretty good resource:
https://unrealingens.wordpress.com/2018/05/30/exploring-niagara-pre-release-part-1/
Unreal Engine’s new VFX module Niagara has been on Epic’s roadmap for a few years but following Epic’s GDC presentation on Niagara in March, this new system is quickly moving towa…
@winged nymph Probably my hastily done writeup series, and watching the GDC talk (which is pinned to this channel I think). If you're interested then feel free to pm me any questions
Oh and @limpid geode just beat me to posting it 🤓
😄
@indigo jolt You don't need to build from source though, just enable the plugin if you're on 4.20 from the launcher
Once I put up part 3 I really need to go back and clean up some of the dumb things I did in 1 and 2, particularly noting I didn't include anything about the attribute debugger
Yes those are my articles
Glad it was of use, I've got a ton more writeups to do with Niagara stuff so I'm just hoping to get faster at doing them
you're the defacto documentation at this point
I'll probably put out a quick fix article for using attribute debugger tomorrow then because it's super useful lol
I've just been using bits and peices so far, but think I'll start following along with your articles to get a better feel for it
It's totally fine if it's just being used as a reference guide lol, all of the particular information on sampling vector fields isn't really important
in hindsight what I set out to do in the first place was a pretty good idea because I got to try all of the different aspects of Niagara in one go
you go into some stuff I haven't really had much experience with so far, would be good to try them out
i can't actually enable the plug-in, it's not an indie project
permission = not granted
not an indie project?
ya, i got gatekeepers that say "no"
Probably not a good idea to ship anything with Niagara before it gets cleaned up some more, in any case.
and you're on 4.20? who's your gatekeepers?
programmers of course
ah
and no, 4.19
oh this guide is prior to 4.20 preview
it's still basically experimental
so maybe when we do 4.20 it'll be a kosher idea
thats why it says you need ot build from source
Yeah the guide is done on dev-niagara branch, BUT 4.20 should work
yeah, you can ignore the build from source part
hmmm definitely will have to revisit this topic
I don't think any fixes in dev branch impact the articles
so its missing a lot of features and modules then?
not really? some bugs but most features are there best I can tell
stuff is getting added to Niagara every day, and moreover it's not hard to write your own features for it
ok
Beam modules are being worked on right now so there's still some major features in the works methinks
that and GPU stuff. And dynamic load balanced sim. And branching execution on CPU.
oh ok, havnen't tested them yet
But yeah, the more people that play around with Niagara the faster the bugs get sorted, so I'm just hoping I can entice more people in working with it :)
Im definitely looking into it, seems like it's completely different from cascade though
Completely different beast, but my goodness once you get used to it, I can only compare the two as working inside a cardboard box vs. working in a gigantic open field
Certainly, something low level like directly driving particle location with any data is something you end up taking for granted after using Niagara for just a few days
reusing modules is a huge deal, makes it so much easier
That too, just got done writing a humongous twirly string module, and being able to drop it in to any emitter is Huge
Once you build up a bunch of basic modules/emitters it's a snap to put together new emitters/systems
and you can probably orbit things without so many issues
Orbiting is only the beginning https://gyazo.com/a2d3e6f9a7826e6e3a24474b7c395511

anyone know their way around particles?
@round fog Is that using GPU particle sim? I don't think I could do that many CPU particles without crashing lol
Yeah
the thing i want most out of Niagara or Cascade in general - more complex 3d beam options akin to what can be done with Cable Components
if i can interactively use 3d meshes together to do something akin to a "Pudge Chain" hook in 3d with actual geometry....that would be nice
i can do that with cable component, but it's not something built into Cascade so it's all handled at the BP level
which seems wrong....forces me to handle color, scaling, end points, length all in BP
i really want splines + cable component
@indigo jolt that is something we may look into in the future. If cascade is any indicator, Niagara will be around for a long time.
I definitely want to push Niagara deeper into more complex physics simulation
wow that would be amazing, thanks for the heads up!
anyone know why particles aren't spawning if my emitter duration is too long?
they spawn then I launch the game but then not anymore
it's only a problem in play mode
emitter loops is at 0 and it's a burst particle
@desert sage Did you accidentally set it to loop only once? By default it should loop.
@fresh harness no I didn't. the weird thing is that it loops if the duration is about 2 seconds or so, but when I tried it at 5 seconds it only played the first time
my emitter loops is at 0 which should mean it keeps looping forever
Yeah. Actually, it's pretty hard to accidentally set that to 1.
My bad, I didnt even notice you said loops was 0.
assignment is due in a little over 24h so if i can't figure it out soon I'll see if I can perhaps do something with a blueprint that spawn a new one in every time
Well if it's definitely playing once, it's easy enough to just Use Set Timer by Event to create a new one every 5 sec.
Emitter duration of 5s isnt too long though. Some other setting(s) is causing it not to loop.
@fresh harness it's actually not spawning in at all somehow when I try it with blueprints.
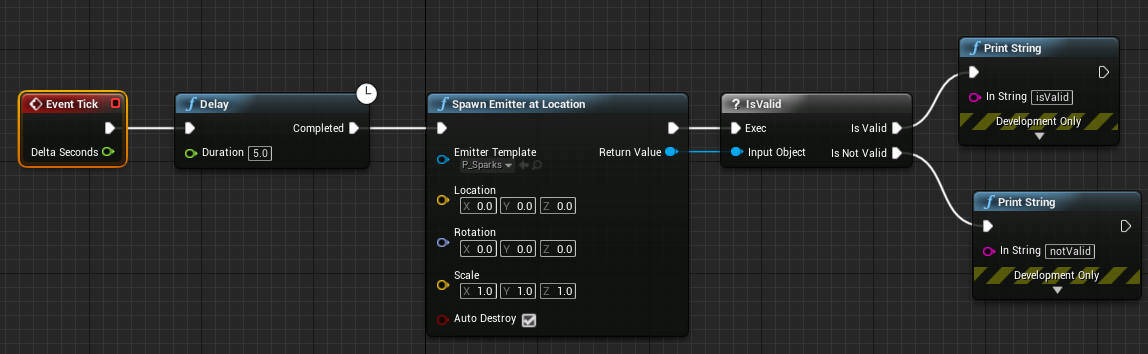
it does print is valid though but nothing shows up
ok this is getting weird, I tried without blueprint again and it seems like the lower my emmitter duration is the more times it loops before it stops
@indigo jolt the only way to do this properly is to animate the properties of a location node by hand
You essentially want to mimic a sine and cosine wave on your x and y position
The problem with orbit, AFAIK, is that it doesn't change the actual position of anything, it just adds a offset to where its rendered.
And yeah, agree with everyone that it would be a bad, bad idea to use Niagara in any kind of production for now
Thanks for the feedback @celest gulch
@desert sage you're not maxing out your particle counts are you?
Hey, I am making a Tron like trail behind my player, and for benchmark purposes, I want to make the line to never fade, so I can check FPS. How can I do that as even when I set the lifetime to a really high value, it still starts fading
set the lifetime to 0
it doesnt work
Can you be more specific about HOW it did't work, MrTapa?
Has anyone got the LocalSpace emitter variable to do anything? I assume that when I tick it on the emitter is supposed to use local space but it just conitnues to behave with a world space behaviour
@plain dock thanks - you're right about key-framing location with curves making it plausible to get a reasonable arc. unfortunately such a solution isn't very good for quick scale adjustments. looks like BP is probably best route
Yeah, it probably is
The good news is that Niagara is going to be production ready before long and far more powerfuk
Long awaited part 3 of my series exploring Niagara is now up! https://unrealingens.wordpress.com/2018/06/11/exploring-niagara-pre-release-part-3/
This is Part 3 of the article series exploring Epic Game’s new VFX module Niagara. If you haven’t read Part 1 or Part 2, you can find them at the preceding hyperlinks. In this article I…
I have a muzzle flash effect, and one of the emitters is always rotated 0,0,0 even though all of the others correctly inherit the barrel's rotation. Any idea why?
Thanks, that was it
np
@obtuse seal thanks for the article! It makes me feel dumb tho, I have no idea what you've done with the render target or why :(
you know what would be great, a particle setting that is X units away from the centre, but rotates towards the camera
would be great for lazy billboards and refraction
but guess I have to do my math in the material editor
sounds do-able
@plain dock Glad you liked the article. The render target is just for overlaying a lot of pictures of a particle system starting from different positions, as I can't burst spawn 10,000 ribbons without exploding the engine.
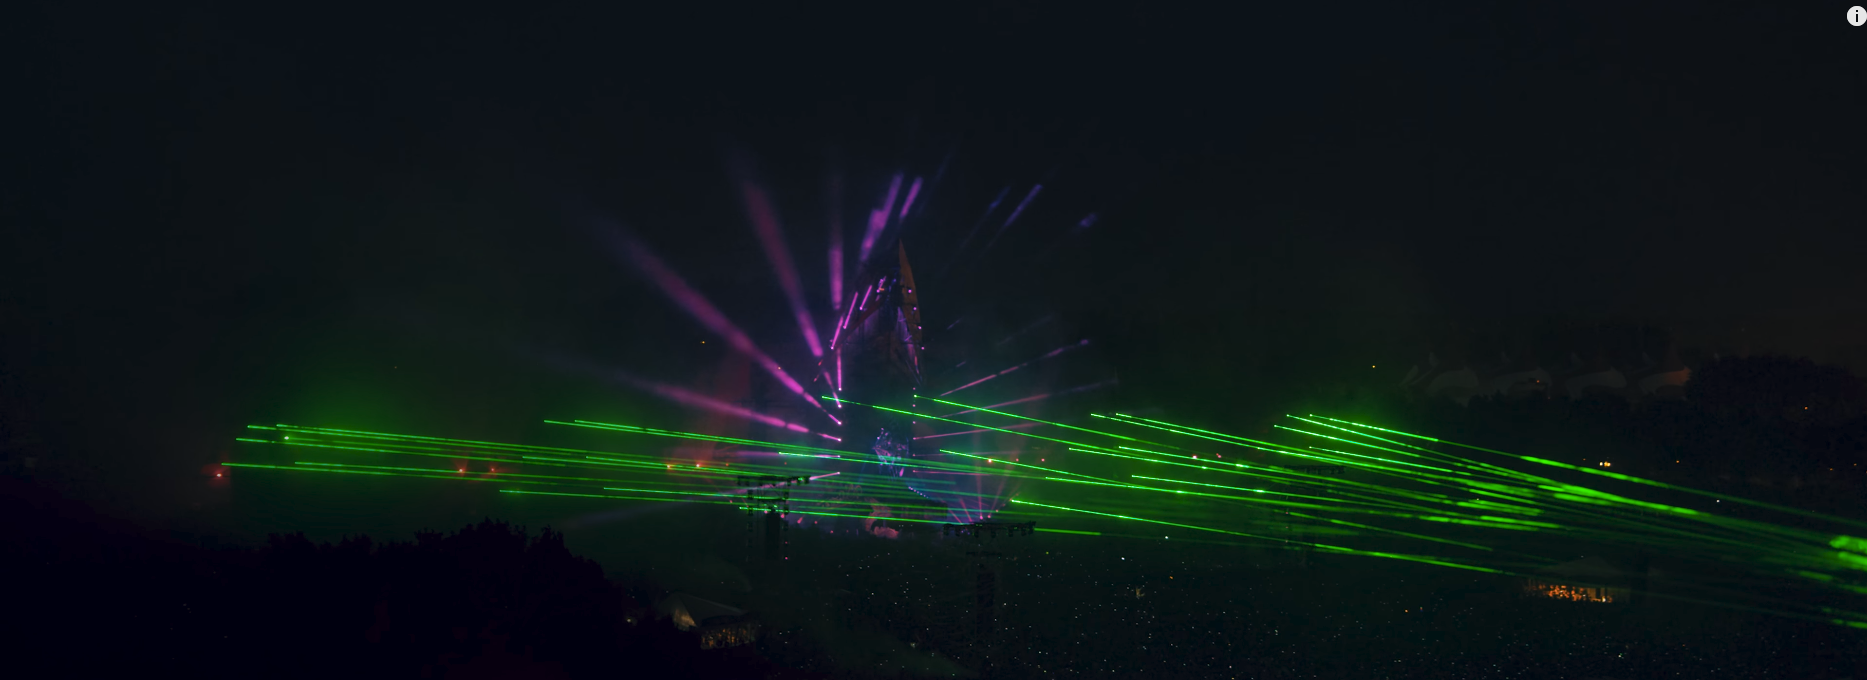
guys is unreal capable of recreating the effects of laser light cutting through volumetric fog yet? I'm trying to create outdoor laser shows like this:

I did try once but the volumetric effect becomes weirdly pixellated when you crank it up
You might be able to do that with volumetric dig particles, @regal sphinx
@celest jasper are you taking about a situation where you have just one quad or multiple? Might be easier to do in blueprint /Niagara depending on which.
But there are examples on the net of camera facing billboard materials. I think theres even a stock material node for it.
@obtuse seal do in your example gif at end how many particle systems are being simmed Cs how many are being rendered?
*vs
How can you occlude, particles
Or I will just explain my case, maybe occluding is not what I am looking for
I have a Particle Ribbon trail, that is basically a TronLightcycle trail, that is constant
and I want to cut off chunks of it
be able to modify a segment of an existing trail
@plain dock The example gif compares 25 ribbon particles in real time vs. 100 that are composited. There's no limit on how many you can composite, I had tried 100x100 for 10k but it wasn't as readable
@untold yoke Cascade or Niagara?
Having an issue with a particle mesh that comes from the center of the particle system. Using this to stretch this beam mesh for bullet tracers. Once the origin of the particle system is out of the cameras view the mesh disappears. Tried making a huge bounding box to prevent that similar to GPU particles but no dice. https://gfycat.com/HospitableIdleJaguar

cascade has some weird issues with scale in viewport
is there any reason you can't just do the particle previews in level?
sometimes i have to do that - put in level and make a duplicate emitter that's mostly the same but is set to loop forever
it's hard to test otherwise
breaks ingame too
@indigo jolt
Which is why its an issue 😦
Happens with any static mesh too, so its not just this particular mesh that messes up in the particle system
ok dumb question but...your bounding box was made huge in Negative values too right?
yep
dang, i'm kinda stumped
Me too
If you have a particle mesh in the center with it being static, does it disappear on you?
@plain dock cascade
@untold yoke you dont have a lot of options. Generally cascade particles are tricky to modify after they're created. The only way i can think of doing what you want to do is to have a huge render target that covers your place space and then paint out the areas you dont want visible and then multiply that render target onto your opacity
but thats a really terrible way to do it
is this for school, personal project or work?
Definitely possible in Niagara, absolute madness in Cascade
You could manage it with dynamically generated mesh that has a material shader but that's also a huge PITA
agree
If this is for a personal project, i'd play with Niagara instead
if its a work project, talk to your tach guys and programmers for a better solution
Ok, we are Year 1 students, is Niagara feasable for programming students who just started using Unreal?
if its for school, rescope
I learned Niagara from 0 VFX knowledge so it's definitely approachable
you should love niagara if you're programming students
"learned"
cascade has a lot of things where you can only do things in very specific ways
But yeah you can snip Niagara ribbons live, only need to edit Particles.RibbonID and Particles.RibbonLinkOrder
niagara is more of a general purpose data processing pipeline with a rendered tacked on, so you can do A LOT
You say I should rescope if its a school project
What are the requirements of your project?
Really I would try to find a method to solve the problem that doesn't involve WIP engine modules or complex runtime geometry editing
I am a technical designer, and me and the programmers are trying to offer our artists a Trail system that cool VFX can be created for
the trail is persistent on the map, so performance is important, I am looking for minimal performance loss. Right now I am using a spline mesh spawner on a spline attached to my character, I dont render it, I use it for collision. And as for visuals, we have a Ribbon particle
the teachers expect us to make the trail visually pleasing and appear and render smoothly
I would say either use Niagara ribbons and cut them as needed or render your spline mesh with a material shader
former option is a little cheeky and is only possible on preview build so latter seems like a smart idea
Rendering the spline mesh takes alot on perofmance
its ok if i use a delay on tick of 0.2
but then it doesnt appear smoothly
It shouldn't be an excessive amount of tris I would think?
if i spawn meshes every frame, then the game becomes unpleable after about 20 seconds
Also sorry to steer the conversation in another direction, but I made a tiling material for the ribbon, then ue4 crashed and I now I cant replicate it
I found out that if you set the texture coordinate index of the UVs to 1, then it would tile automatically, however it just doesnt now, and it worked before the crash
@fallow bone Ask in #blueprint
alright ty babes
@untold yoke If you have questions about creating a material then you should ask in #graphics . Regarding the performance of your spline component I assume it should be acceptable with spawning 6 tri planes, but I'm not familiar with splines in general.
No I am asking how can I configure the Ribbon Trail to tile the material
Isn't there a property in the ribbon mesh module for that? Sorry, not in front of a pc arm.
Regardless, you're likely barking up the wrong tree entirely with cascade. As hyiumungo said, spline meshes are the way to go. What was killing performance before? Blueprint tick rate or poly count?
Or overdraw?
Hey everyone, got a pretty basic question. I'm pretty new to UE4 and still trying to get to grips with things. I've got a basic particle emitter with a sprite attached (material with smoke atlas) but within cascade i cant seem to get the inital size to squash the material so its more elongated like an oval. i can set Y and Z to 0 and that seems to have no effect on it, only the X seems to scale it up uniformly. am i missing something?
ya on your particle system at top
you have it set to square
set it to rectangle or velocity
under Required
Screen Alignment
PSA Square = locked aspect ratio
whereas PSA Rectangle is unlocked, as is Velocity (but velocity won't really draw right with no movement so use with care)
thanks a bunch! kicking my self hard i didnt tick PSA velocity, didnt occur to me! thank again 😃
np
What is the usual method in Cascade for "notifying" a particle system that it should activate. e.g. player A throws a magic missile actor with a particle system and hitbox, when the hitbox overlaps something then if the particle system resolution is not simply destroying it and/or spawning an explosion effect, how do you control the parameters?
well a lot of the time with a spell type thing there's several elements that are independently fired in a sequence of actions
I suspect I'm looking at this from the wrong angle, but for my own use case I need to animate a particle system suddenly expanding and then contracting unto nothingness. I can't spawn a separate destruction effect since the emitter state at any given time is variable.
what expands and what contracts?
Rings surrounding a center orb, the ring rotation rates are randomized floats in range
By which I mean, it would be too obvious to spawn a premade orb with rings in random rotations as it would change too suddenly
I am certain I can handle this in Niagara which is what I'm working with but I wanted to get some insight into the Cascade use case
are you trying to transition from a looping type state to a burst-then-end state?
Yeah exactly
The spawning and travelling behavior are in emitter 1 and the activation and resolution are in emitter 2. But I want emitter 1 to end with more fanfare than dissapearing with a small explosion
oh ok, there's a lot of ways to do that in Cascade. one simple way that i sometimes use - set some of your emitters to loop. then make duplicates of those emitters inside the system
and have them set to burst, but on a delay
Oh that's a good idea
then you set the delay to be same as lifetime of your loop ones
or duration or whatever
right
it requires a smidgen of finesse but it works
just be sure to test it a lot at like 0.1 speed to make sure you don't get any blink-in action
👍
i've actually used the inverse of this method before
sometimes you want to "burst something" into action
then set it to loop
that's pretty common for me
Anyone using Niagara already?
Is there a way to use actor reference to use as a parameter? I can use a vector but it would be nice to be able to skip that step.
2)How do events work? 😃
- right now you have to use the vector. We’ll be investigating better ways in the future.
- that’s a bit more complicated
You need an event sending module, I think we have the Send Location Event for example. Once you have that module set up in your source, you need a receiver emitter. It could be the same emitter or a different one. You need to add a receiver module for the correct source event emitter and event name. From there it is a module stack to add whatever else you want.
There are 3 types of handlers (I am away from my computer so I may get the names a little wrong)
Spawned - allows you to create particles in response to the event. He module stack is only run on those
ForAll- runs the same script over all particles
ById-directed to a specific particle. Currently unsupported.
anyone know if its possible to use text in a particle system?
trying to output random letters
first thought was to use a material but im not sure how you'd get a font into it, let alone then choose a random letter
could go with a sprite sheet but would like to find most efficent solution if there is one
Hey, I have a really important question since it has to be done before tomorrow. How to make a cracking animation which starts from the center just like this guy has done but with a radial gradient, I guess?
https://www.youtube.com/watch?v=Dp_pKYe_RJg

it looks like the Red Channel of that texture is the opacity threshold. multiply Opacity with the Red Channel to obtain the stage of the Crack.
For a Radial Crack you simply do the same with a red radial gradient
@thick wigeon
Hey, thanks for the answer @spare hare I will look into it
I am talking about this texture
almost, you need to multiply the Crack (Green Channel) with your Gradient (Red Channel) so it becomes yellow towards the center
The GreenChannel is the mask of the Crack
the Red Channel is the Opacity-Threshold
Alright, thanks a lot, that's what I needed to know! Have a wonderful day! 😃
come back if something doesn't work :D
@spare hare Hey, sorry for bothering you but I can't figure out how to make the particle work
that's where I got so far
you need to work with Color Over Life Module.
Make the Curve of Alpha something like this:
0.0 -> 0
0.5 -> 1
1.0 -> 0
In your Material, you additionally place a "Particle Color" Node
and drag off the Alpha pin (the grey one, below blue) and multiply it with your texture's red channel and green Channel
why the complicated logic?
I have no idea how to work with masks so I took most of the things from this guy's video apart from the part where he duplicates his crack
But I will do whatever you said I guess
make a backup lol
but yeah, for debugging purposes you can plugin a scalar between 0-1 instead of Particle Color Alpha. to see what the function outputs
or a sine between 0-1 would be a better visualization
I am quite lost. I feel like I should research masks myself since I can't really do the stuff you advised me to do
that's where I have got so far tho
yup, that's How I would things imagine.
I am currently not at home. Text me in a few hours again, I'll create a material for you
I managed to find a solution by making it a decal while using a debugtimesine node. Thanks a lot of the help tho!
anyone know the "selection method" that the Skel Vert/Surf Location module in cascade uses? When using the bone/socket location module you're able to select sequential or random, I was wondering how the behaviour for the vert location method works
I mean, it looks to be random but it's somewhat annoying that it doesn't evenly select verts for spawning so I get rather annoying gaps in my sprite distribution whilst there are several having been spawned in the same place elsewhere
How would you implement something like the "foam" when you dive into the water? how would the texture for the sprites look like?
hmm, never tried anything like that before
it basically looks like thick smoke but with bubble micro details
how close to the effect are you gonna get?
but then you also get large pockets of bubble sort of detach and float up on their own seperate from the less defined mist of small bubbles around
would be an interesting effect to try for sure
Back to my problems with Niagara:
This fails to compile with error:
"implicit truncation from bvec3 to bool"
bvec3 lol
Sounds like an oopsie in the hlsl compiler
Actually scratch that, bvec3 is a thing, goes to show what I know of hlsl
@charred agate Comparing vectors with an equals operator creates a bvec3 in hlsl terminology https://thebookofshaders.com/glossary/?search=bvec3, but an if comparison operates on bools

The Book of Shaders
Gentle step-by-step guide through the abstract and complex universe of Fragment Shaders.
anyway it's a bug so should be reported
I'm wondering, is there a way to render a specific lightsource into another buffer, so its invisible, but i can work with it in a post processor?
ehh... the never ending series of problems 😃 I wanted to change color but it didn't work so I created this (what I thought would be a simple thing) to test if color changing works properly. Turns out even my simple test is causing problems 😃
i havent come across a way to do that at all, at least out of the box
@obtuse seal that's a cool website 😃 Will read some more. thx
@livid swan I'm guessing you would write to a different light channel, I believe ue4 supports 3. Very technical problem though 🤔
lightchannel eh? lemme read up on that
@celest birch Visual FX is: Particles, post processing, advanced shaders and other wizardry
Everything glowey and explodey. Very technical description of course.
@obtuse seal light channels seems like the way to go to 'hide' the lightsource, but there's apparently no way to get the light information in a post processor
maybe there's a form of projection i could use? never really got too deep into shadow casting or projection though so i'm not sure whether that would be a legit way to go
@livid swan If you summarize your use case it could be possible to achieve it
Hard to say without knowing the specific requirements
ok, i was wondering about different methods of a line of sight visualization, and the dynamic, fastest and easiest approach (to my knowledge) would be using a dynamic light. because it does exactly what i want without generating any geometry and projecting polygons =>
now i thought to put the pink rendering of the light in another buffer so i can shade the scene accordingly
but this also seems non-trivial
I've read a good article on approaches for this method although I can't find the URL
well not method, but line of sight visualization in general
certainly never seen a method like this
Although it seems workable so I'd like to see it in practice
yeah there are a few different approaches. raymarching (slooow), geometry based (needs preperation or some sort of generation for intersections)
there are two geometry based ones in the marketplace, which appear to be largely working well, but only in specific usecases
they fall flat when you're working with more organic level design
Wellllllll
Off the top of head I'm sure you could composite the information in light channel 2 (or 1, it starts at 0 I think) into a render target which is applied through a postprocess material to shadow stuff that's not in LOS
Not entirely certain you would need the intermediate render target anyway
But that should work
Actually maybe not 🤔 I need to look at how to separate the lighting channel info without duplicating all of the geometry
i'm currently clueless about how to access the lighting information at all
@livid swan Lighting is all done in deferred rendering so the material shaders get put into the gbuffer and then get lighting and whatever else calculated per pixel
uhhhhhh
OH WAIT
well this is perfect use case for forward renderer then
assuming you'd be willing to bite the bullet on the tradeoffs
but I'm sure you can read the light data directly in hlsl
depends on the tradeoffs
long story short it's not nearly as full featured as deferred renderer but it has a lower overhead which makes it suitable for VR. I'm personally not familiar with the important technical differences so I'd suggest doing your own research
although that only matters if you really needed it in the first place
i take it its either or deferred or forward, no mixing
Yeah, no mixing renderers
i will look into that
thanks for the mention
we will not have huge vistas so it might be viable
@livid swan The only reason I know this is possible is an article by Tom Looman that gets passed around a lot http://www.tomlooman.com/disneyfaciliershadow/

This weekend I stumbled upon a reddit post about Dr. Facilier’s interesting shadow in The Princess and the Frog and it inspired me to experiment with Forward shading in Unreal Engine 4 to re-create a similar effect in real-time shading. OP pointed out that The Shadow Man’...
good old tom looman
light channels do work in forward renderer but I don't see any mention of whether they have separate attenuation textures which is what gets used
this would require some research
I can't really make sense of how light channels would function in forward renderer without multiple attenuation volumes so it should probably maybe be possible kinda
Researching limitations of lighting in forward renderer says that dynamic lighting is very expensive.
ye, each dynamic light is calculated on its own, that much i remember
theres probably a good reason the light channels arent rendered into buffers for use in a postprocessor, but dang, it would be helpful 😄
That's just a tradeoff of deferred rendering altogether. In any case it appears that adding LOS visualization from lighting on a second channel would incur heavy tradeoffs with either deferred or forward rendering
I'm guessing additional light channel attenuation is written into the other channels of the light attenuation texture for forward rendering
this is really becoming more #graphics related so it's probably worthwhile to toss this question over there as well, if you so desire
Or better yet #virtual-reality people are familiar with forward renderer limitations, worth consulting there
aye thanks, i'll have some more things to research now. will recollect myself and go there when i have further questions
my hopes were i was overlooking something simple to fix, shoulda known better
thanks for your input 👌
@livid swan No problem. One more idea I had is that you could duplicate all of your level geometry at high level LODS and then set it to be hidden in game but draw hidden shadows. All of the secondary geometry receives lighting on channel 1 instead of 0 and that information is written to a render target that is used to mask a post process material.
Could probably even duplicate the entire level and shove it very far away but replicate a scenecapture with the same transform as the player camera waaay out there so you don't even have to use a separate light channel
although that would require preventing it from culling
thats not even a bad idea, interesting
ah seems you cant load the same streaming level twice, too bad, that would have been easy to test
Only reason I thought of it was remembering an approach for cheating out really cheap mesh shaped particle spawning by faking a mesh with invisible primitives that roughly fit its shape...
Yeah the performance might be acceptable by attacking it through invisible high lod meshes although the shadowing wouldn't be nearly as precise
I'm sure you could adjust the lods and see what performance is acceptable
our mesh count isnt that high, since its a top down camera. so using even high lod meshes wouldnt be an issue i dont think
Generally speaking duplicating the entire level geometry doesn't seem like a good idea, but considering that you don't have to duplicate any of the shaders and are only casting one dynamic light it could be acceptable
ye, only problem i see right now is that it would need to duplicate the meshes once on level load. not sure how much of on impact that would be
The secondary geometry would be part of the level in its entirety
At least, I assume that's how you would handle it
that would mean each modification on the level would require a manual removal duplication of the entire level
yeah that's a PITA right there
yep
could probably automate it although it wouldn't be easy
find static mesh actors> create static mesh actor with offset> apply new material. sounds simple at first glance
maps arent just xml files, who would have thought
just did a quick try, duplicating the few meshactors we have is no big deal, but the skylight will prevent it from going entirely dark
@livid swan There's probably more efficient approaches but you just need to set all of the duplicated meshes to use lightchannel1 and not lightchannel0 and then add all of the duplicated meshes to a scenecapture's OnlyShow list.
Of course the secondary geometry should also be hidden from the player camera, this is almost certianly possible but I've forgotten whether it's accessible through editor
hiding it is not an issue, i'll just move it a couple meters below the maps walking plane
That seems workable. Might be more efficient to preemptively block the renderer from considering that geometry but I don't see very much documentation
Yeah I expect it will be culled immediately
@charred agate You'll need to break the entries out and compare individually the float channels
we'll take a look at making that easier in a future release
as long as this doesnt prevent the scene capture to see anything
@ocean hedge - will do that. Thx
@livid swan Shouldn't be a problem
yikes, light channel has no setter
that kills the dynamic approach
yep
Fairly certain it could be handled in a plugin
ok i'll see what i can do
hey visual FX folkx, can you please https://issues.unrealengine.com/issue/UE-57785
vote that, its a splitscreen post process feature request... currently somethings are disabled while in splitscreen and requires a custom build of ue4 to enable, we are asking for a simple button that you can opt-in to have those multiplayer settings available
a quick fix for Epic, and a HUGE saver for us local multiplayer game makers
Seems like legit issue
Whomever changed the default Niagara Emitter to spawn a particle fountain, you made me jump out of my seat a little...
it was always that way
just an annoying bug in the plugin code wasn't reading the ini files properly
so it fell back to a super simple old graph
The more you know, lol
Aahahaha, weehaw I made a RenderTarget module for Niagara
I can't believe this thing works
Well I'm doubtful it "works" but the absolute minimum test works

Particles inherit their color from the render target. Now to try burst spawning over a grid position and writing some actual data to it
All of the VM binding stuff in Niagara is nuts, so cool to work with
Yes, given an additional 30 seconds of testing I definitely need to add some safeguards to accessing the render target 🤔
As well I can't even delete the module without asserting. Woops
@obtuse seal LMK if you want a pair of eyes over that code mate.
Glad you like it. Very pleased to see all the great stuff everyone is making 😄
Frank fixed the module deletion bug in 4.20 yesterday
The bugfixes are fast and furious!
I'll have to check but a good chunk of the content examples might make it into the next preview also. I'll post if they do.
some VR stuff from E3 https://www.youtube.com/watch?v=MqsOIp3wrMA&feature=youtu.be

hey everyone. is it possible to use vertex painted meshes in particle systems?
thanks. is it covered in docs? can't find it.
no i just do it
i mean what would be covered? how to vertex paint a mesh?
or how to use a mesh with vertex color data in a particle system?
you can do vertex painting in your 3d package of choice, or do it with the vertex color paint tool in Unreal 4 and propagate that to the base mesh if you want. then normally you'd just utilize a LERP node with the vertex color plugged into the Alpha input to drive some sort of behavior like opacity or other stuff
Hello, anyone know why I'm getting this error when trying to connect the variable?
@smoky marlin You have an array of Material Parameter Info Structures, you need to use a For Loop to iterate over your array and spawn each decal one at a time.
As well, Material Parameter Info Structure is not the same type as Material Interface Object so you will need to convert between the two.
I'm not familiar with those data types myself
I have a BP splinemesh actor that has its origin in shadow, which I think is causing the generated splinemesh to be darker than it should be. Has anyone experienced this before and resolved it?
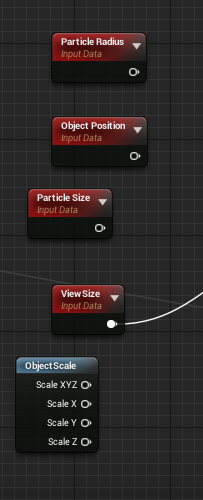
does anyone know of a Material Node that yields any MESH PARTICLE SCALE data?
not getting any luck with these ones https://i.gyazo.com/7bc8e1478e9924c47226b323c2ede828.png

welp, seems you can't access them in a mesh emitter
but yeah, making a parameter and changing it through BP sounds like fun
@indigo jolt Local to world transform should work fine with mesh particles.
and then what? how exactly do you get the current scale just from world transform?
do you want to ask every vertex for its current position with local to world and then divide by world position which gives the vertex with scale of 1?
(right before bedtime with sleepy eyes, so can't check if it works rly quick)
@celest jasper Take a look inside ObjectScale material function.
@celest jasper 1,1,1 -> Transform (local to world) == mesh scale in world space
i'm not seeing a clear answer - object scale to Transform Vector to World is giving some interesting color results
but it's more like breaking things out by angles or something
i have same mesh particle right now at 3 different particle scales for test purposes - i want to see some sign of a DIFFERENCE based on scale
not seeing that yet
@indigo jolt ObjectScale material function will return you scale of each particle on X Y and Z axis. Isn't it what you asked about ?
yes, but it doesn't seem to be affecting Mesh Particles
do it in vertex shader
i'm not sure what that mean
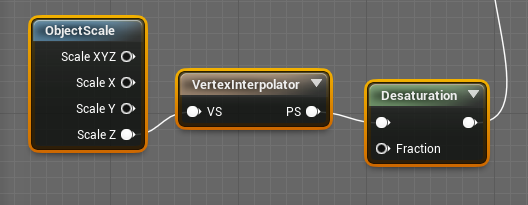
Pass ObjectScale material function through VertexInterpolator material epxression(or custom UVs, if you are on old versions).
vertex interpolator is a node?
VertexInterpolator is a material expression, added somewhere around 4.17
ok
oh snap that did something!!!!
we got different colors based on scale
hell yes
thanks so much!!!
np
this is really simple too https://i.gyazo.com/280e660a189610a5f9fee2247bcfb127.png

100% does what i wanted
lol now i just have to figure out the math to make it useful
it's strangely easy to get differences, but it seems to want to amplify things in one direction or another
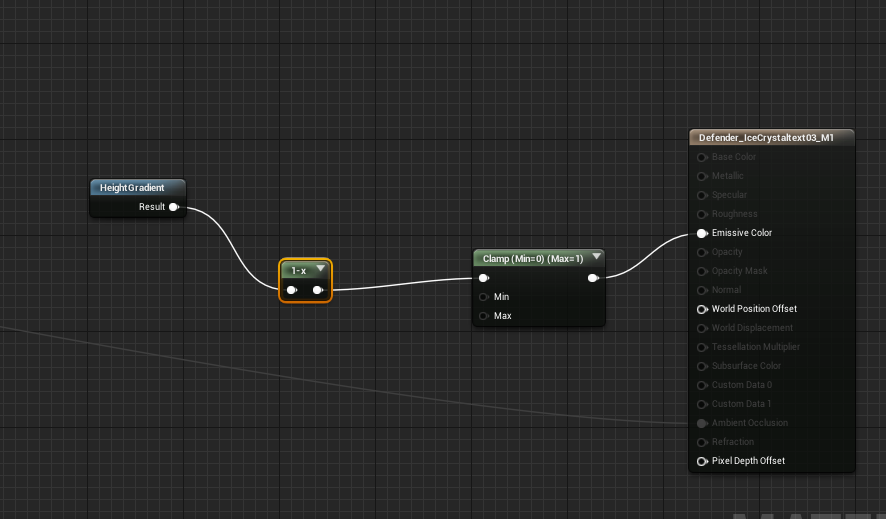
trying to basically make a material that does a simple uniform gradient top to bottom
in world space
and scales with particle mesh
There was a material function for that built in
bounding box based UVs or something like that
that would save me a lot of time
meh that works, just not with particle scale

it's so strange
just want black pixels at lowest point, white at highest
regardless of particle mesh scaling
You want a top down local gradient for every particle? top down in local particle space or world space ?
world space
with local scale
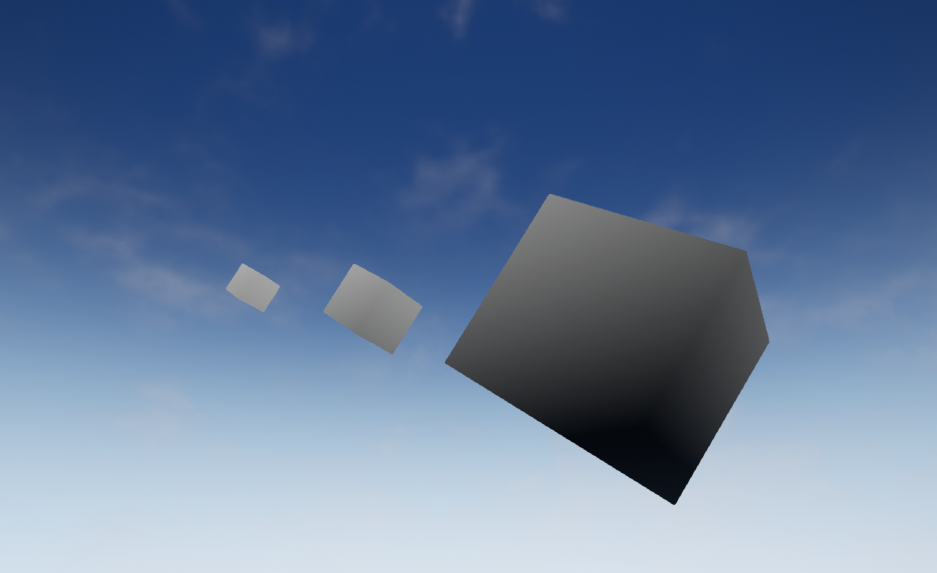
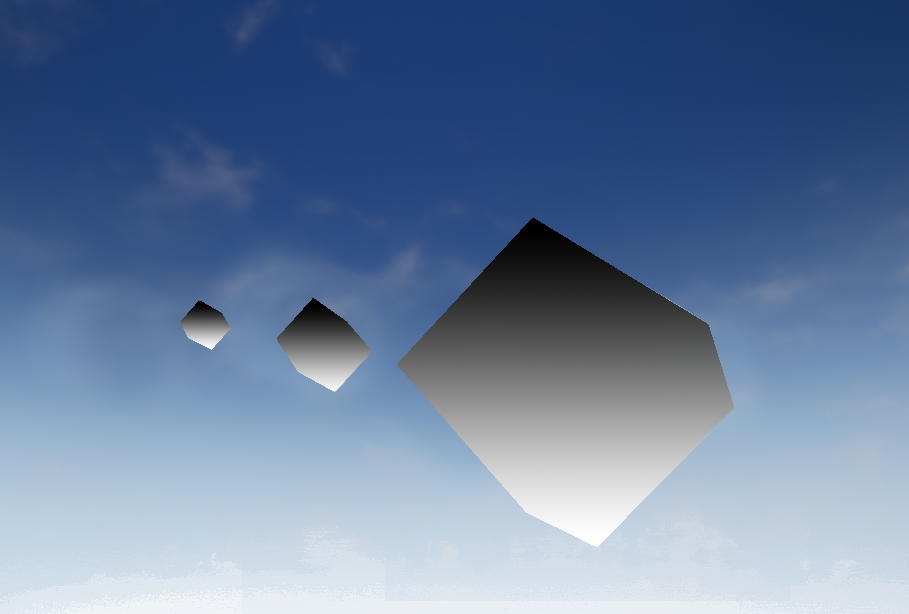
i actually want White at Bottom, Black on top.
full 1.0 white at towards bottom and full 0.0 black towards top, it doesn't have to be perfect, but relatively the same based on differing particle mesh scale settings
i intend to use this on a lot of different size/scaled particle meshes
for an ice material
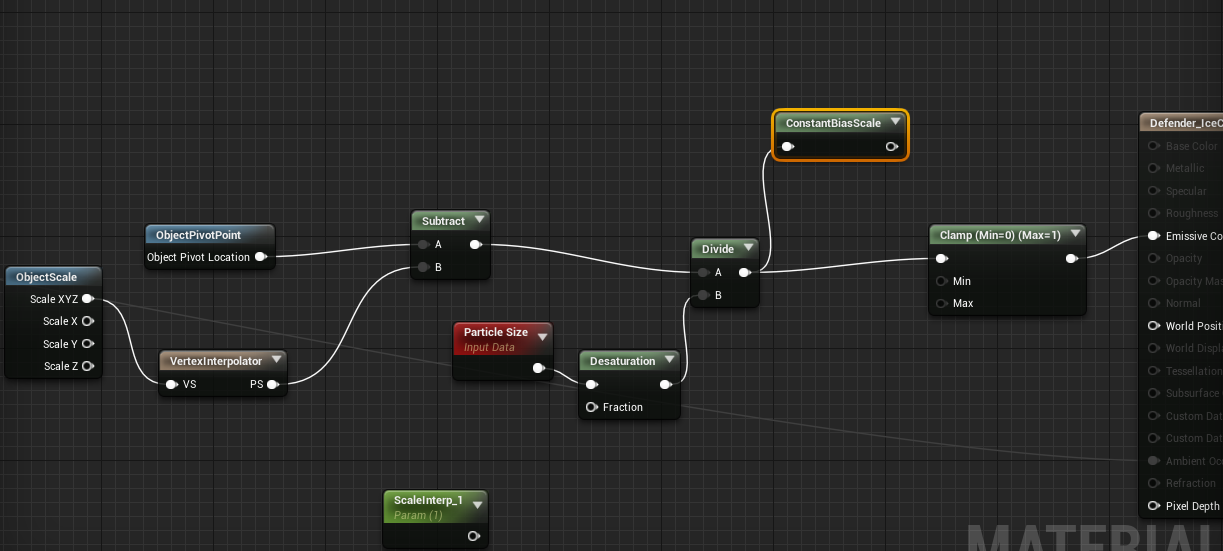
Measure worldspace Z distance between particle pivot and vertex. Divide by particle size. Bias and scale into 0-1 range.
is there a particle pivot node?
object pivot good enough?
and vertex what?
Object Pivot Point to Subtract against Vertex something?

this is what i've got but it's just coming out solid black
i don't think i understood what terms you were using and how they translated into nodes
seems like there's 1000 ways to get this wrong and i'm going to find every one
this is photoshop of what i'm trying to get with a mesh emitter https://i.gyazo.com/8b5ce8b3fb9bb6fa25842294a80d979c.png

that would be what i want
oh wtf
this is insane
ok so this actually works, BUT it varies based on which particle mesh is being rendered at a time....


tell me how that makes sense
as i disable the various sized emitter variants, the largest one gets the proper height gradient
on plus side i can work with this
i think
now i'm wondering if i need some kind of "instance" type deal
ok a material instance doesn't fix this
@indigo jolt Pivot is retrieved the same way, by transforming position 0,0,0 from local to world
it seems like the problem is most of these solutions revolve around "object scale" and for some reason looking up "max object scale" literally looks up "maximum of ANY object in level using object scale references"
actually
i take that back, it refers to any object within the particle system
which is bizarre
if i make a 2nd particle system with same object at different scale, they don't interfere with each other
Balls the object scale is the actor scale ie the whole particle system
@analog onyx I was on mobile, in my bed, so I couldn't just check inside the function (probably shouldn't ask and look up later) 🙂
i'm not scaling the whole particle system though, just different emitters within one system
depending on which one has the highest scale, that's the one that gets the proper gradient application
it's not end of the world though, i can actually work with this
Set shader to unlit and connect color to emissive. That will work as long as day time never changes. You have bigger problem though with better fix
Follow that first
Make shadows pretty first, then decide if you want to go nuclear with glowing trees
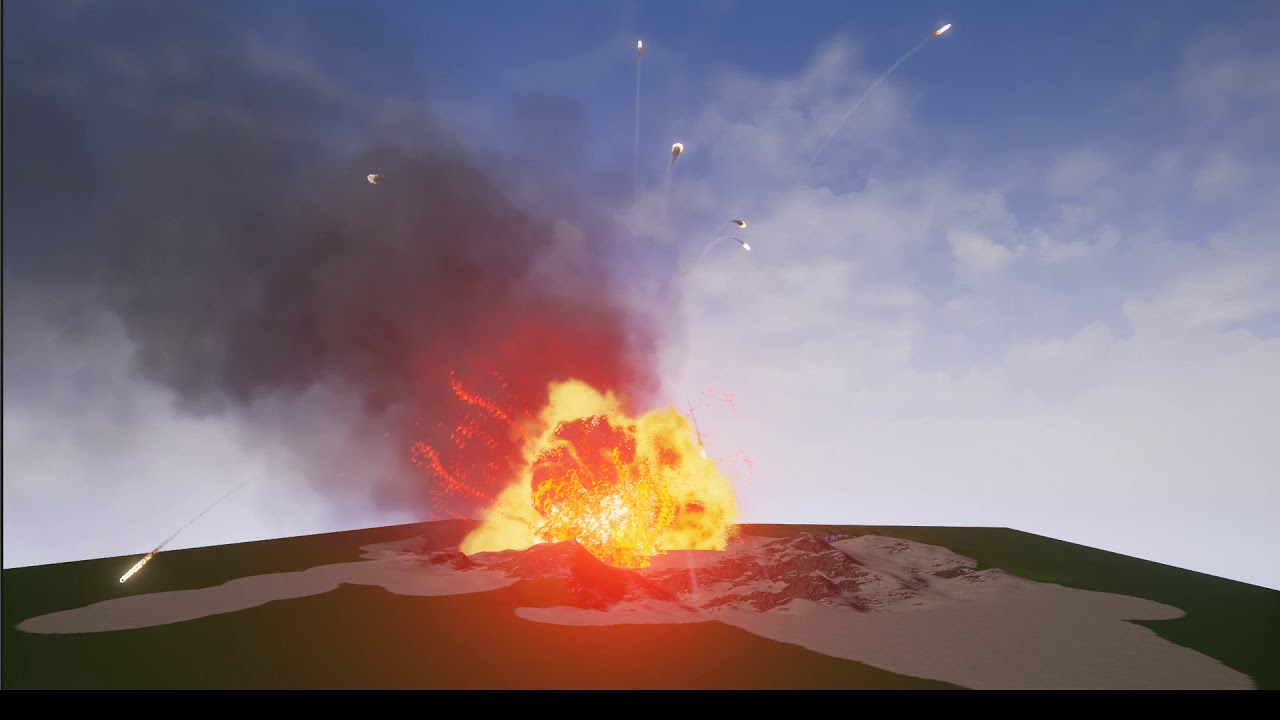
Anyone got some suggestions on how to make a volcano eruption VFX?
try tutorials on liquid vfx, then make material "lava"
then add smoke
and globs
Testing noise texture on the projectile trails (not noise node). This higher detail noise texture was made in AE. Going to compare with Substance Designer next.
that's more or less what i did
if you want to combo that with some smoke that starts off as fire, that can help
It can be done pretty convincingly with VATs

ArtStation
This is a test in Unreal with the new Houdini 16 vertex animation exporter.
The big difference from water is how viscous and heavy it is
It needs a lot of gravity and a hangtime to look good
If you decide to do it with sprites, pay attention to your color gradients as heat is a very prominent key to lava
Now, if by eruption you are talking largescale pyroclastic eruptions, then you need to start simulating smoke yesterday as that's heavy AF to get the detail level needed for that scale.
You also need to work out how it fits in the scene. If it's a background piece you can get away with a mesh with smoke on it. If you can play around it you need particles.
If it's VR, you are in trouble 😛
ya more meshy stuff is even better
big smoke plumes in VR = nightmare
i'm surprised you didn't link that slime-mesh tutorial you did
i think that would work real good for lava
It would, but since he hasn't specified what he is after I figured it would only confuse him.
Would a relatively small number of high quality motion vector flip book particles be the best way to go for close up or interactive smoke plumes in VR? Exchange expensive shader for low overdraw amount?
Is there a best practice in regards to how many vertices I should keep a mesh to when using it in a particle effect? Say for example I'm making a smoke trail, or pillar using 3d mesh smoke puffs.
I know vertex count is super subjective, but I was just wondering what you guys aim for
It does matter. If you emit lod0 versions of generic rock you found that's 5k triangles and kick out 500 of them per explosion and 64 players decide to trigger an explosion each in the same spot at the same time... It'll fuck you up. I have optimized this very scenario in the past.
My rule of thumb is to try and keep an effects total triciount smaller than that of a character.
with masked materials doing dissolves - you can get a TON of shapes out of very low poly mesh emitters
Hey guys, how can I control the alpha erosion to appear at a certain time rather than starting from the beginning
look at your color over life module
the alpha keyframes by default there start at time 0, and alpha 1.0
then have 2nd and only other keyframe set to time 1.0 and alpha 0.0
add in another keyframe and change that 😛
I kind of knew that there was the problem but I feel like the issue is the material itself?
Surface-Translucent-Default lit
or this isn't the problem
because I still can't tweak that stuff
Nope, its the color over life but still can't get it working
Like, should the alpha erosion work without the Color over life attribute? Because in my case it does
Remove time from the material. Plug in Alpha from the particle color node there instead.
There is no time in the material. I kind of use Noise and substract it with the particle color's main channel then I am ceiling it
Anyone know how I can get rid of these nasty flashing lines in my bloom, while keeping the soft glow bloom? This is how it looks at its harshest:
@mortal sandal That's light shaft bloom. Do you want light shafts or just normal bloom?
Found a way to get it working! Thank you guys, you are amazing
and about the softest
well I'd like light shafts but not just from the light being in the sky shooting random diamonds everywhere
I guess the problem is that it's happening as a reflection from the ocean
specular highlights maybe?
No, that's the light shaft doing it. If you want more bloom you should probably do it in a post-process setting.
The light shaft is basically just shooting rays from the sun light, which can look ugly at times.
but I just checked and it actually only has a soft glow when it's in the sky
all those beams of light are coming from the ocean, like there's that nice realistic reflection, but then it's reflecting these beams of light too
here's a clearer pic of the ocean doing it:
it even happens when the sun is under the ocean 😦
but I'll grab a mid-day screenshot in a sec to show it looks fine in the sky
Try turning off light shaft bloom. See if it fixes it.
Light shafts show whenever you look at the light.
I'm pretty sure it looks like that because things are blocking it.
Hmmm... Well if it's doing that then I don't know what the problem is...
sorry for the pic spam
It's fine, I like it when people send pictures of their problems instead of trying to describe it.
😄
well, I managed to work-around by finterping the bloom scale up/down when the sun is near the horizon to avoid the ocean reflections 😄 actually ends up looking more realistic cause you can kind of see the shape of the sun better when it's near the horizon, you know like all those vietnam helicopter pictures 😄
Nice! Decent enough work around.