#cinematics
1 messages · Page 4 of 1
many factors can go into this actually.
post process volumes... camera settings...MRQ settings
i personally like adding render warm up with a minimum of 32 or 64 so lumen has a chance to propogate light
that may help a bit
have you tried cranking up your sampling from 8x8 to 16x16?
or 16x8 , 8x16, or play around with those values?
another trick to try is adding game override
but if you are using pathtracer, the techniques are vastly different
have you been checking movie render queue tutorials out yet?
there are a ton of them, many with tiny tips and tricks that can potentially solve your issue without going through a lot of back and forth
Yeah, I've never gotten them to work though
send screenshots of your MRQ
How does post process effect the MRQ? Its hard to tell what overrides what between the two. I need to up my shadow quality but haven't been able to find that setting
there are 2 levels of postprocessing. each that affect the camera "sensor"
There is an In-Level Post Process
and an In-Camera Post Process
i personally do not like in level post process, as that is designed mainly for gaming,
however. you can do in level post process, and not have to change any in camera post process settings.
or you can purely do in camera post process and have it streamlined for film
there is legit purpose for both and combining them together.
the only settings MRQ overrides from Post Processing (that is mainly concerning to you), is the sample rate of Path Tracing
MRQ always controls pathtracing
if shadow is your issue, then it literally could be a problem of like 20 different things, combinations, or lack there of
shadow settings are in your light source, the atmosphere, skylight, exponential height fog, your camera's exposure settings, your global lumen settings, your lumen reflection settings, your entire project settings for global illumination, and can be visually adjusted in the post process volume for like contrast and white balance and stuff
you said it looks good in your viewport though?
only when you go to render it breaks down?
@fiery stream
Yes it's smooth in viewport
ya at this point, without seeing screenshots i cannot help much besides what i have just told you
there are tutorials that go over stuff like this in detail though
Forgive me, the computer I'm using doesn't have Discord
it is rare, but happens to be where the viewport doesn't represent the render, and viseversa
it seems more like a project setting than anything if your viewport is fine, or you have some setting in MRQ that is causing the issue
...are you using the high quality module?
Sorry this is the best I can do, I'm on school computers


take out high resolution
What do you mean by high quality module?
it has consistently been broken in my experience
for the heck of it add 32 into the engine warmup.
yeah remove the high resolution module toggle switch.
your settings are not even correct to use it properly. and it is most likely what is causing your error/
never use that unless you need to make like an 8k, 16k, 32k, or 64k render.
and ever still. it does not support many features
Ah I was following the documentation which used that
I'll not do that from now on then
On second look it's good in viewport, bad in camera, and bad in render
then it is your camera settings
Apologies for just taking a picture but the school computers don't have discord

This is with path tracing in viewport

But enabling path tracing does nothing in the MRQ settings, it just renders deferred no matter what
do you have a graphics card?
Lol yes
Yes it was on by default in the project template I used
so if the issue the shadows or global illumination
pathtracing is always going to be superior
i see that is the viewport, but where does it look bad
So the top is how it looks in deferred rendering, the bottom is path tracing. Both are in the viewport but it looks like the top in the render. It's those jagged shadows, they look really low res.
Does anyone know how to export a composure element to an image sequence? I can't seem to find any good docs online about that step
Is there a way to make an object in a level to be invisible when rendering from MRQ but visible in the viewport?
Nevermind. Hidden in game in the details panel solves this.
Anyone know how to get an object to render ONLY in the depth pass? Trying to cast "fake" depth onto a translucent.
problem with warming up the engine vs shots. I have render que set to warmup before every shot, but that way doesn't prevent very long periods of lumen warming up to mess my render.
For example, now I have a shot which is dark for almost 5 seconds, before the lumen is able to light the scene in its full potential
how do I prevent this and make sure that the rendered image is actually fully lit before it starts to render?
this result is unusable to me.
ok, it looks like the resolution is to use engine frames instead of shot frames.
hey guys i want to make a cutscene using sequencer, how to teleport the cine camera to specific location?
for example a dialog between 2 characters. i want to teleport the camera to near a character who is currently speaking.
how to achieve that? should i use keyframe on camera location? or there is another more efficient approach?
Separate cameras with a camera cuts track
Anyone know how to solve this problem where the first couple of frames rendered out of MRQ are darker and then the lighting becomes normal after? Like Lumen needs to warm up before the lighting becomes accurate in the renders?
its the same in Realtime, because Lumen is kinda slow
just confirming, since there is not much docs on 5.2...were there much changes to LUMEN in 5.2, updates, improvements, or not much?
Yeah, so I ended up rendering like 20 frames before the main animation starts to get it to warm up and look accurate.
hopefully, it is fixed in a future release.
it doesnt seem like anything in market place will install into 5.2
am i missing something here lol
good to know, does not seem like the time to switch to 5.2 for projects
why my unreal keep crashing when i play the sequencer on the viewport or when i save the level map?


Norilska is set in a desolate and dystopian city, recently struck by a nuclear disaster. What once was a city rich with life and vibrant buildings is now left to be engulfed by the aftermath of the disaster. A driver sighted on the outskirts of the city is headed into the thick cloud which surrounds the city centre, despite warnings over the rad...
How they should fix it?, u can make lumen update faster with a lot of Performance -, but im quite sure u cant get totally rid of it, and pretty sure it never will be.
so its nothing to be fixed its the Nature of an Realtime System
How can I get a focus right on the piano and blur the stuff in front of it?

I tried setting the distance and turning down aperture but it doesn't seem to be affecting anything closer to the camear
isn't that where some of the vignette plays in in PPV?
im fairly sure there is also blur itself
What would you recommend for a render rig for Unreal? What components would be most beneficial? I’m assuming the most valuable would be a GPU with a lot of VRAM. We would use this rig exclusively for rendering. I’m assuming we could use multiple computers to split the load, but would it be better to do one just with higher specs?
For each frame of our animation we are at about 20-30 seconds per frame with 32 temporal samples with a 3090 TI and hardware ray tracing via lumen being forced. Our main issue currently is if the VRAM ever fills up, then it slows down horribly.
Play with your aperture and focus distance!
Look up how aperture works, it'll help a lot to setup focus intensity for your depth of field shots
That all tied together, you need to have a higher focal length
try backing up and starting from 50mm
I figured it out after a while, I just needed to crank the aperture to almost zero to get it to finally blur what i wanted lol
What would be the best way to render out a high quality image capture? I've started to use the level sequencer but it's having some visual glitches that aren't ideal and I'm not sure if i'm doing something wrong or what. i'm rendering a video out to an image sequence currently.
What resolution are you wanting the image to be in? Above 4k?
It's for a portfolio so i suppose the best I can get it to be
My main problem now is artifacting in the shadows when rendering at 4k
and the backgrounds are appearing grainy despite being high res enough that they should not be
Best way to do it is still image sequence export, either .png or .exr - just render a single frame out
Hmmm, are you using lumen or path tracer?
lumen
It might be lumen artifacting due to low light
My "solution" was to just render out 30 ish frames of each camera and try to cherry pick whichever one looked the best
It isn't having that artifacting in the viewport or in high res screenshots though
You can PM me if you'd like, it might be your AA settings in your export then
Might be a low sample count or some setting that isn't being accounted for - like some console variables that aren't being applied
if you have no intent of any post process work like in davinci, you can render out final complete movie in unreal still right?
like you should be able to export some sort of 2k-4k movie
i know people swear by other work to make things pop, but i'm not at that point yet
[QUESTION]: I began diving back into the new sequencer: I have two sequencers moving the same objects' transforms. Currently when the two sequencers play the final transform is an average of the two transforms. I do not want that. I want one sequence to take full control of the transform until it is done playing.
Is there a way to do that without stopping all but one sequence?
is the 2nd one a child of the first or a seperate one?
I have them as a separate one. I didn't think to make it a child of the first @ionic compass do you think that may help?
it may prevent the weird blending
can't hurt to try just be sure you're backed up/saved
Thanks for your suggestion I'll try that and more
You can, yes.
Im having some problems with my final render not matching the same brightness of what I see in the view port. This is before I render my scene.

and this is one of the frames after

I think it has something to do with the cameras post fx settings but i'm not sure. If someone knows what is wrong can you please help?
I have a productivity issue when having to trigger a large number of Niagara Emitters in Sequencer for a Cinematic.
Lets say you have a 100 different emitters.
Is there a better way to trigger them than manually creating a new track in Sequencer for each and every Emitter?
In your game settings make sure you set the lighting to game settings under the tab that says "Lit"
I did that and changed a few settings for the post processing and color of my directional light but the render is still very different.

Also @topaz river you can try to change your editor scalability settings to Cinematic instead of high
current settings

Try cranking everything to Cinematic. UE renders at cinematic so to get 1:1 on editor and render, you have to have them all set
Still get the different colored render
I figured it out
i had a atmosphere and a skylight that were hidden but still effecting the render
trying rail and camera , rail all done, added camera connected to rail as child using tut as I've never worked with this, here in 5.1.1. adding camera to rail already in sequencer, and camera disappears. bug ?
actually it moved a ways off to the right, I can see gizmo on pressing f, but there is no camera anymore.
hi everyone, my name is bastien, i'm currently working in an advertising agency in paris, and we make most of our ads with unreal 😄
I have a question, I always find myself with an unusable Z pass in nuke. It's like this, the Z erodes the edges of the objects, which makes the thin objects almost invisible.
I don't have the problem if I render without anti aliassing, however my aliasing doesn't match with the beauty :/
Have you ever had this problem?
I hope I'm in the right channel,
thanks to all 😄
https://drive.google.com/file/d/1KBZLwJz_JKmi4kzLuumQI1SqbJ2_4iOF/view?usp=share_link problem with lumen and movie render queue, or I have no idea what is causing the problem. I reported a bug, but if someone had similar problem and is willing to share some thoughts, let me know. Thank you.

Google Docs
Can you recommend a training kit where I can learn the stages to make cinematic.
Having the same issues along with unusable WorldPos pass
i got a issue
the movie rendered fine, but the final product the video it had little stutters
i rendered on 24 frames
is there a known fix for this?
sequence settings are the same framerate as the video file
even exporting on premiere pro on 24 frames its still stutters
is it possible to record/render Niagara Fuids linked to a chaos actors on render sequence?
I know how to render out chaos destruction (making a chache with a chaos manager BP)
But my Destruction is generating small particles Debris and dust with niagara systems.....does any body now hato to put them on a sequencer?
thank you for your answer, thanks for your answer, it's annoying, so I export all my scene in blender and I take out my pass with eevee --'
Hey guys - quick question - is it normal that when rendering with MRQ the computer is completely unusable? Like the mouse lags, can forget about using browser etc? Is there way to prevent that?
Also, experiencing this with motion vectors out of MRQ 5.1? Anyone else?

trying rail and camera , rail all done, added camera connected to rail as child using tut as I've never worked with this, here in 5.1.1. adding camera to rail already in sequencer, and camera disappears. bug ?
actually it moved a ways off to the right, I can see gizmo on pressing f, but there is no camera anymore.
thx anyone
nvm , used from tut not using 5.x, followed one that did NOT track camera just rail, and now all is FINE.
Hey all!
I need to output a series of image sequences from various UE levels (the "Media"), then display those Media sequences back on various surfaces inside of a different level and render that (the "Deliverable").
The Deliverable needs to be a Linear Rec709 EXR sequence (Client is hiring a Colorist to grade the render), so I need to retain the >1.0 brightness values of the lighting in the Media levels when I render the final Deliverable.
So when rendering the Media sequences, would I want to set Disable Tone Curve (in MRQ Settings > Color Output) to True or False? My gut says to Disable the Tone Curve at all stages, but it would be nice to have some confirmation.
Thanks!
Is there a way to set or apply camera rotation in MRQ so the camera faces a particular direction when rendering 360/paranomic frames. No matter how I set the camera's rotation, paranomic rendering always renders with camera rotation set to zero.
For working with color, yes you would want to disable tone curve. Though I believe he exr sequence color space would end up as linear SRGB, not rec 709
For more info I recommend this video: https://youtu.be/Bo3BvhGdaUo

Learn how to color grade your Unreal renders easily in Davinci Resolve!
The first 1,000 people to use this link will get a 1 month free trial of Skillshare: https://skl.sh/williamfaucher03221
If the OCIO options aren't showing up for you in MRQ, make sure you have the OpenColorIO plugin enabled!
My understanding is that while Unreal is in linea...
I would highly recommend Camera360 v2 on the marketplace. While Epic's built-in Pano render module gets the job done, Camera360 can do nearly any capture type (Full/Half Domes, Equirectangular 360, Stereoscopic 360, Cylindrical), and even supports re-projecting frames to a custom screen (and yes, the camera's rotation is taken into account).
One of my favorite feature though, is the Path Tracer renderer. You have to recompile some shaders, but it then activates a real-time panoramic rendering of your scene in the viewport (and even corrects in real-time for your viewport resolution/aspect ratio!)
https://i.imgur.com/gyuHklT.mp4
https://i.imgur.com/D6EbkVN.mp4


^^^ Which is great for rendering HDRIs or just getting a good preview of your scene to check for seam issues before rendering.
https://www.unrealengine.com/marketplace/en-US/product/camera-360-v2?sessionInvalidated=true
It's expensive, but if you're making any money at all doing Pano renders, then this is a no-brainer

Unreal Engine
Camera360v2 - camera system for video and screenshot (cubemap 4x3, facebook 3x2, pano2VR 3x2, EAC, GearVR 6x1, 360, Fulldome, Cilindrical, Stereo)
Yeah, I tested out the nested EXR Linear-inside-EXR Linear last night, works great! (Our project Color Space is set to Rec709, so unless I'm mistaken the renders are Linear 709)
Does anyone know how to fix this issue that occurs on water?

Wip of cave with adventurer camp in it World aligned asset material with ray tracing. Lighting is just test lighting but it really giving me the mood I am after. prob throw a tree in at the bottom sucking in the sunlight will be a short cinematic when finished

Thanks for the info. Tbh I find it weird that a plugin made by a dev is supposedly better than the one Epic made. Epic devs really need to look into improving paranomic rendering and add more features to make it easier and faster to use.
Hi all,
I'm a real newbie trying to create a simple animation for a Diablo fans community in Czech republic.
I'm struggling to add any kind of DOF effect to my camera. No settings take effect. Happy to give any relevant info or screenshare. No idea what I've done wrong.
I have noticed that if I drag a skeletal mesh into the sequencer/movie render queue window and move them around in the viewport, if I close the cinema/sequencer window (where you animate assets) the mesh I have moved in the viewport changes to a different location is there a way to get the assets to be in the correct position as the sequencer window when it is closed?
A level sequence, which you edit in the sequencer tab, is just a record/container for any changes you make to your actor's original state in that level. It is information that is overriding the default state of the actor when it is just hanging out in the level without any level sequences being open. For example, if your actor is in the level at 0,0,0, and you add the actor to the level sequence and change its position to 10,0,0 (and set a key), that information of the move only exists and is noted/saved/recorded IN the level sequence. So when you close the level sequence/sequencer tab, the override is no longer active and the actor will go back to the original position of 0,0,0. Does that make sense, and hopefully address your question?
Yes, it does so how do I get the position I set in the sequencer initial location to be the default loaction out of the sequencer?
Ok. Maybe copy the locations from the sequencer to the same mesh when the sequencer window is closed.
Wish there is a way to copy location, rotation and rotation at once in ue5. Common Epic devs, its 2023. Its such a pain to be copying and pasting location, rotation and scale seperately.
The funny thing is I didn't even set a key in the sequencer and the location is still different once you drag into the sequencer and move it.
ah, must be that the level sequence is live and listening and recording any changes....keyed or not...
Is there a way to turn the live listening off?
I guess the best way would be to do everything in one level sequence and then do camera cuts after rather than using different level seauence for each camera shot.
My theory on that (and any UE features in general), is that Epic devs are encouraged to experiment with new features to add the the Engine. However, there is never any guarantee that those features will continue to be actively developed. My rule of thumb when deciding whether or not to get my hopes up on a feature:
Does the feature fall into one of these categories?
- Does it directly improve Fortnite, Epic's biggest cash cow currently?
- Does the feature interest any companies that have large sums of money to essentially pay Epic to continue developement (think Disney studios and the Virtual Production tools they've been touting for all the Star Wars stuff made since Mandalorian Season 1)?
Way I can see it, Panoramic rendering doesn't fall into either of those categories, so it gives basic functionality but nothing extra. Whereas a developer outside of Epic may have a genuine interest in a feature, may even be more knowledgeable on the subject than Epic devs, so they fill a useful gap in the market, and are completely in their right to charge a somewhat high amount of money for their endless hours of work
True. I will look into other means of fixing what I need. That plugin is too pricey tbh 🙂
How can I take a high quality render? not a full movie - just a still image
I don't know if this is what you need, but typing HighResShot 2 in the console command will save a high quality image that is twice your screen resolution. Bigger numbers, bigger resolution.
That'll work for now 😄 Thanks
I need to work on my lighting and stuff but that's what I'm looking for
🙏
and just in case, don't forget to turn up your engine scalability too, depending on what you are doing it could offer some real advantages

You can also press F9 for a quick snapshot... or pop open this tool to set a custom crop size and a few other options:

TY you're all awesome 🙂
Anyone have any good videos for me to start working on a cinematic?
I’m hoping to make a police raid kinda scene but I know that might be complicated to start.
anyone know how to get camera on cinematic rail in 5.1.1, to go slower , smooth in increments when using current position on rail slider ?
it jumps wildly right now. rail is very long and has lots of curves and extra height in places. Is this issue a bug ?
@swift dirge tuts everywhere on youtube
best to search and find one that suits you
yes for cinematics
Anyone know if its possible to expose a struct to cinematics? I'm looking to have animatable controls to use within my struct

Hi! I have a problem getting the motion blur to work with moving meshes.
There's camera blur from the camera when it moves but not from actors/meshes when rendering with multisampling. Strange enough motionblur works when not using multisampling.
I'm using UE5.
Does anyone know if this is a bug or something? Images attached


without and with multisampling


when you're doing projects for cinematics is the landscape tiling feature used often? i don't want to calculate or render anything outside the scope of the shot i'm doing, but i was going to have several 'sets' are those basically each supposed to go into their own 'level' ? i'm really more of a hobbyist and have no formal film making experience
Anyone encountering an issue in 5.0 or 5.1 where shot is present in your sequencer and movie render queue, but when Exporting, the output is is static of world.
Some articles were pointing to duplicate take names within project. I found duplicate takes, and deleted them outright. Still seem to be having issues. All keyframes present. Issue only on export. Previous exports of sequence were known good.
Hello, is there a way to render a sequence but only 1 actor? to comp it later.
Basically I have a shot over the water with a bird flying in. With lumen, everything looks great except the bird, and in ray tracing everything looks bad except the bird. The goal would be to render the scene with lumen and then render the bird by itself using ray tracing and then comp it in
How can I do that, if it's possible?
Hi, I'm having trouble keeping buildings hidden in City Sample project. Actor Hidden in game doesn't work, adjusting the Data Layers to be unloaded at runtime doesn't work properly, they only disappear when camera close to them, and changing world settings for Cell Size and Loaded distance is affecting other actors strangely. Am trying lots of options like toggling Spatially Loaded, Hlod settings etc...Can't afford to delete them either or move them as they need to be available for other shots for rendering. Thanks.
Is there a solution for when blueprints render in viewport, but disappear when rendering with sequncer?? It seems random, like most blueprints render fine, and some just disappear when rendering. UE5
Does anyone know why my DOF is giving these artefacts on foliage..?

you applying any PPE either globally or in camera render settings?
Hello! I seem to be having an issue with the Movie Render Queue tool. I have set up the exporter to use an .mp4 codec which renders out fine. but for some reason it looks like its missing frames (the motion isn't smooth) I'm trying to render out UMG animations too, and these look perfectly smooth in realtime. I've already matched the frame rate settings (60fps) to sequencer so I'm not quite sure what the issue is, anybody else come across this before?
Does anyone know if Quixel Unreal licensing can be used for commercial video projects if its made in unreal?
Having an issue with collisions. In sequencer my characters move fine and look great in the scene.
As soon as I try to render, the characters bounce all over the place. I thought turning off "cinematic mode" would fix this, but it does not. So it's likely an issue with their collision capsule but I don't know what I would change that could fix it. I've tried alot
Yes, I think so. Here are the terms of use: https://www.unrealengine.com/en-US/eula/content
Unreal Engine
The Epic Content License Agreement is an agreement that applies to your use of certain digital content made available to you through Epic channels.
General Sequencer question.
Why is it not possible to update existing keyframes, when piloting a camera that exists in Sequencer?
I always need to manually edit the keyframes directly. Seems to defeat the whole purpose of piloting a camera.
how do I render a video without crashing my editor?
I'd try doing in a different container, maybe .mov with lightweight output setting of apple-prores. Do you have a premade export profile for your .mp4 configuration?
@gusty heath I just did the MP4 export settings on the fly as I was just testing stuff out. I did a bit more digging though, it doesn't actually seem to be an issue with the export, more of an issue with how the UMG is displaying when in standalone. I opened it up in standalone in the editor and I noticed the same problem. The window seems very low resolution and the frame rate is low. Not quite sure why.
Is there way to scroll through the world like in editor while playing the game with your attached camera being default camera?
For development only
Hello, I have a quick question about rendering a sequence. Let's say I have butterflies flying through the level from frames 100 to 500, and I want to have a high quality render of the frame 350, where they are mid flight in a specific position. If I render the entire sequence, it works perfectly, but when I just render frames 340 to 360 for example, the particles are not at the same position they should be
Does anyone knows if the audio export feature in movie render queue is working in 5.1 ? I'm not able to export spatial audio cues with movie render queue. The .wav file is blank.
It only export audio if the audio is set directly into a audio track, this gives only 2D audio.
Happy Easter all. Did anyone have this issue before? I've copied a landscape ( and its foliage actor) from ue 4 to ue5
LoginId:28969ad545c480c1727df0a731475ad9
EpicAccountId:ee919f0694114ab7b48e32333e19093f
Unhandled Exception: EXCEPTION_ACCESS_VIOLATION reading address 0x0000095908000000
ucrtbase
ucrtbase
ucrtbase
ucrtbase
UnrealEditor_Core
UnrealEditor_Core
UnrealEditor_RenderCore
UnrealEditor_RenderCore
UnrealEditor_Renderer
UnrealEditor_Renderer
UnrealEditor_Renderer
UnrealEditor_Renderer
UnrealEditor_Renderer
UnrealEditor_Renderer
UnrealEditor_Renderer
UnrealEditor_Renderer
UnrealEditor_Core
UnrealEditor_Core
UnrealEditor_RenderCore
UnrealEditor_RenderCore
UnrealEditor_Core
UnrealEditor_Core
kernel32
ntdll

Turn on autokeying
anyone know how to rotate the near clipping plane of a camera?
Ok so still learning but digging. So i got multiple levels with different sequences id like to render at one time. So the thought was, I could make a new level. add new sub levels, and use evaluate sub sequences in isolation to make it toggle the levels( i thought thats what it did, apparently not). lol.
In case it helps, in level sequences, you can add a Level Visibility track.
I’ve been trying to go from gameplay to a cinematic and then back to gameplay however once the cinematic ends the animations for the character in the gameplay section don’t work. Any ideas?
Deff will be checking that out when I get home tonight. Thank you thank you.
why does aperture have NO effect? I'm a DP and I; m aware of all camera settings in the real world, but in UNREAL no matter what I do, aperature has no effect. Help please!
if someone has a good checklist of all the setting in PPV, Project and cine camera I'd love to see it.
Oh man, I just noticed this: "Normally when you would adjust the Aperture settings of a real camera, you'd have to also adjust the Exposure settings at the same time to maintain same light intensity received by the filmback/image sensor. However, in UE4, this is not a real camera, so adjusting the F-stop and Diaphragm does not control the light intensity."
this is true in UE 5+ as well?
so I have to go back to adjusting in EV mode to get the lighting I want, and SEPERATELY play with APERATURE to get the DOF correct? They're not linked like a real world camera? WHy did UE take this approach?
Does enyone know how to get maya camera animation to unreal WITH focal length animation?
Hi, I have an automated sequecner in unreal engine 4.27 with a camera and various elements to create a cinematic, when exporting it, it goes into game mode and loses the settings that I had set (blinking lights, etc.) and I want to export it as it is I have in the sequencer, without entering playmode, does anyone know what to configure?
Hi everyone, I'm making a movie using the old particle system of unreal.
I'm using movie render queue and I would like to have my particle in a separate pass
Do you have any idea on how I can find a way to export only the particle and still have the depth of field of my camera?
Maybe with some stencil material or some custom render pass.
I would be very grateful if you can find a solution.
Right now I'm losing a lot of time replacing some material and removing some element to have this pass.
Thanks a lot!
i'm trying to render out a video in a game, but it's completely ignoring my sequencer cameras. Got them selected, got the right cuts selected, says it's rendering it out, but renders out the camera attached to the character. It's in the Valley of the Ancients demo.
Is it just me or do movies render way slower with lumen on? Like, it was took 10 minutes for a 40 second clip
Hi! Have you tried creating a new level and including only the particles? This way when you export it you will only have the particles.
Make sure you set it up as ‘ add level sequencer’ then add a cut camera track and click the camera button on the cut camera track to assign your camera. If active in your outliner you’ll see that orange lighting strike icon (can’t grasp the correct name).
I had the same issue for quit some time and one thing that I remember is that if I zoomed in all the way to very beginning of my time line there were some left over frames from previous attempt and therefore when I hit render that was what I saw. Double check that. Another ‘ fix’ I remember was before creating the camera actors I setup the sequencer and then above the cut track click the plus icon and add a camera from there. That always worked.
In ue5 I remember I had to untick a few options in the lens, post process and camera category and tick options as manual exposure, iso, shutter angle etc. So it’s behaves more like my real-life fs7. by default it’s setup as a consumer camera really but on the other hand, the ability to customize your film back is epic haha.
But yes separately play with dof and exposure etc. Maybe there is a way to link them. Question for you, what does unreal sets for their native iso base? In custom mode.
I've been trying to render a sequence in UE5.2 and it keeps crashing every time I hit "Render (Local)" in Movie Queue thingy.
Please help me, I have a very tight deadline
Are you rendering a movie or frames?
Frames. Image sequence. Jpg
Sorry not sure but seems to be a issue with a skeleton mesh? Tried using diff formats? Exr for example
I'll try it right away and report back. Thank you so much for the response
No problem, I’m not a senior level creator so hopefully I’m useful.
yeah, i've made new Level Sequencers several times to try and fix it with no luck.
Have you tried adding the camera from the sequencer + button? This will create a new camera but just for testing purposes.
Hi and thanks for you're answer. That could be a possibility but the issue is that there is a lot of element (character, set..) that interact with my particle. So even if I put all this in a new sequencer I will still have to put some black material on them wich is very time cosuming
You mean the + Track button? Just did that in a clean sequence and the same result. Says it's rendering from the right cam, but doesn't.
Mmmm, willing to show me a little video? Maybe I can replicate when I’m home.
Hello everybody! I have a curious problem and am wondering if anyone here knows the solution. I have an animation (facial and body) in iClone and I want to transfer it on my metahuman. Trouble is when I use the Take recorder and try to record the motion that way. When I setup LiveLink as source for Take recorder, it works. But when I switch it for the metahun, unreal freezes right after recording starts. Then it depletes any available RAM and crashes. I have checked only the face part of recorder properties, but it did not help. I am using latest UE, latest iClone with all their plugins and custom BP and everything. But still no luck. Any help would be deeply appreciated. Thank you!
I recorded a video, but have since decided to just rebuild the scene in a fresh level. I was using the main game levels rejigged, and it was pretty bloated anyway. Thanks for your help!
No problemo 🙂
Can I scale keys in the sequencer with reference to the keyframe slider like this:

This is from Blender.
is there any way to make sure a viewport's 'allow cinematic control' setting stays between editor restarts?
If I enable the DLSS plugin does it automatically disable/replace TSR
Yeah, so their are 2 options to do it
-
In sequencer, select the key frames, then go last key frame, then your cursor should change to left n right arrows, then drag click, and should scale them down/speed n slow down animation.
-
Make a new sequencer, then drag in the sequence that has all the animations (if wonted all speed up/down) into the new sequencer, now it should be a shot, go to end of animation, and hold crtl, when the cursor changes to a clock (while on very end of animation) then just drag click while holding crtl, and that will speed up animation.
Hope that helps!
anyone know if there is a way to set LOD by viewport in ue5?
i have one dedicated to my cinecameras and then another for moving stuff around - don't care about detail level in the one i'm moving around but want to set the cinematic viewport to LOD 0. i know i can showflag.LOD 0 but that changes both viewports which is taxing
Thanks a ton.
I think you can set lod when rendering out of MRQ in the render settings, Choose Game Override and there should be a setting there to use LOD 0.
Ok. I get it but I am not sure if UE5 has such a feature. Would like to know as well if this is possible too. But you could just render it out and see if it looks correct and adjust it if needed. UE5 renders way faster than other rendering software. So with the Game Override, you can set it to render using LOD zero while using very your LOD settings in your viewport while moving around.

Are you using ue4?
It doesn't seem to be working. I am getting crosshair instead of left n right arrows and when I click drag, it moves rather than scale:

Hmmm that's odd
I got the arrows to show but it isn't scaling like the blender one. Blender uses the keyframe window time slider as its origin point to scale away or towards:

Even if you hold ctrl or alt?
Yes, doesn't work.
nah, ue5, wish we had the ability to do this, seems like it should be easy to add as a flag. its annoying that you can set the LOD for landscape but not everything from within viewport dropdown haha
Ok. 👍 I doubt Epic devs would add that. They would probably say just render it out using the Game Override since rendering from MRQ won't take that long. You could also set MRQ to just render out a frame or a few frames just to make sure it looks right. You don't need to render out the whole animation. 🙂
Yeah I mean this is a real time engine though - I should be able to view things in real time. That’s why I’m working in UE
The whole idea is I should be able to view my final product in real time.
But you are using Nanite? That should solve your LOD issues.
Metahumans do not know what to do with themselves unless at LOD 0, constant flickering of grooms and clothing, also their lod is based on the viewport camera, not my cinematic camera, which is it’s own problem haha. Unless a force lod 0 and cut the life of my gpu by a year or two 😂
Ok. Thats definitely a huge pain. I think we will get nanite support for skeletal mesh in future. I think I remember something been mentioned about baking skeletal meshes to vertex animation so nanite can be used. Someone has already made something like that: https://www.youtube.com/watch?v=0vHDwiPoW2g
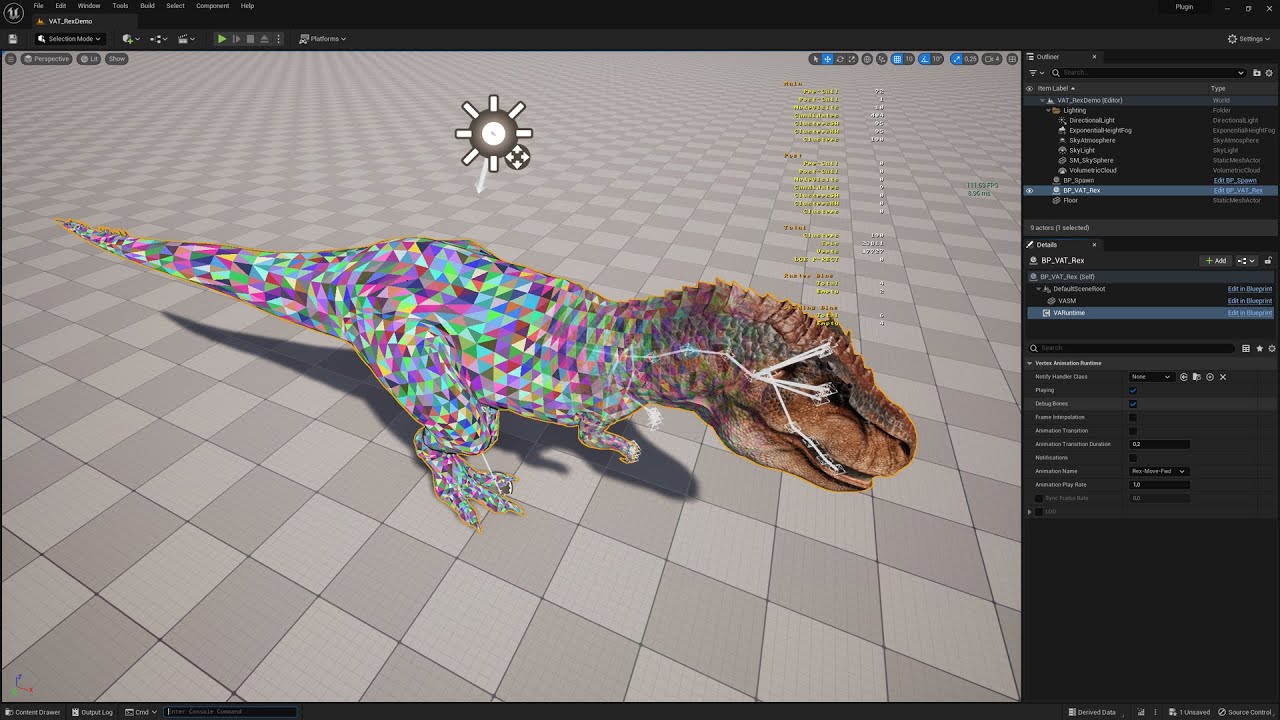
The Rex is not my mesh, it is literally the orignal Rex from the ARK game. This video shows the latest tech that is available in the update to Unreal Engine 5.1. They are using Skeletal Mesh animations but here you can see what happens if you enable VAT + NANITE so optimise your FPS in game. No more LODs, seamless transitions when zooming in and...
You could look into trying this: https://www.youtube.com/watch?v=vrlFozqB0jA

This video shows how to use the AnimToTexture plugin in Unreal Engine 5.1. The video uses an Editor Utility which is available at the link below. Also provided is a basic crowd instancing blueprint which will scatter a static mesh with VAT texture and put a random animation on each instance. The video walks through how to use both of these bl...
Maybe convert your skeletal mesh animations using this so you can use nanite? I am not sure if this works well with nanite either so you will have to try it to see if it works.
I am also not too sure if this would work well with MetaHumans though.
Does yours work?
Hmm no, but works fine with the sequencer shot though
sequencer shot?
Just goggled it. Shots is a thing in the sequencer. Will look into it. Thanks.
Yee all good
👍
Thanks for your efforts @fresh condor I will look into solutions above and report back at some point
hello i just need a quick hand
after i finish my render there seems to be black pixels on the final render
there is no bloom or lens flare on the project
i tried to also change the material, but it seems nothing changed

Wow cool render (except the pixels) could you try and render in a different format, like png or exr?
Has anyone sequenced the lightning strike timing & positions in Ultra Dynamic Sky? I can't figure out what i'm ment to do from the documentation. It says “run the UDW function Flash Lightning using an event track on your sequence”.
I’ve added UDW into my sequence, but can’t see a function for flash lightning, where would I find that to add the event trigger to it? From the edit blueprint page?
guys how can i take all cameras render in same time in same sequencer
Hi 👋
How would I got about having an actor "only tick" on frame change instead of sub-samples?

Hey folks, I'm trying to use the Live Link VCAM app but am having an issue with the reposition control. It seems when I activate it, the app continues to detect my iPad's pitch, meaning that when I disable repositioning and unfreeze the camera, it teleports to a new pitch rather than staying where it was at when I froze it. Has anyone else come across this before?
He guys, really need help here.
I'm doing a short horror cinematic with and out of focus shot focus into an object.. Which is a box in this case. But when it's focus, there's sharp lines around the box. Does anyone know what's causing this and what can I do to get rid of it? Thank you

rmaybe from the director blueprint
i dont' see the black pixels - did you add film grain effect maybe?
👍
Anyone having this issue in sequencer where if you try to pilot a camera, immediately you let go of the mouse, the piloting goes off, so you have to select the camera again to pilot it? I am using ue5.1.1.
the way to fix is to uncheck "Include actor in HLOD" for each metahuman. edit: this is false
is it keyed and you haven't created a new key for your current frame?
Good to know. Thanks for the info.
Yeah, it is keyed.
yeah sounds like what happens wjen you try and move something that is keyed earlier but you haven't created a new key so it snaps back to keyed position maybe?
I found the issue from what you posted. If I put auto key on, every time I pilot the camera and let go off the mouse, the pilot active goes off, because a key is automatically created so I turned the auto key button off, and that issue no longer happens. Thanks, wouldn't have thought of it without your suggestion.
anyone know where i can get some productivity scripts for a maya to unreal engine pipeline?
specifically working on cinematic work with the sequencer n' stuff
google - there's a livelink plugin for maya
Nothing to add, just wanna say nice render!
It's beautifully lit
William Faucher has a cool video about improving your depth of field. Did you checked it out?
Hello guys! I have a problem with the camera clipping like this whenever I use focal length 50 or above. How can I fix this?

Could you elaborate?
Yes, I've looked at that one, still hasn't worked. It's something to do with the mesh. The mesh that comes into focus doesn't not reach well when the focus debug comes anywhere near it 😢
Sorry to hear that :/ that video solved many issues for me. Maybe try to redo the asset?
No worries, but thank you anyway. The mesh is just a cardboard box from bridge. And I also used cardboard flaps to cheat the box opening. But thank you so much
Curious question, I want to use the Mobile Depth of field since it gives me more control. I am finding this:

It has been removed? I can't use it and render with MRQ?
Try adjusting your LOD to 0 and/or render out and see if issue persists
Prob not, I think it was temp solution for DOF on mobile devices
Thank you Ryan, i will do that. 😊
Is this a cinematic viewport? Seems like you need to adjust the clipping plane either I think on camera itself or the viewport settings in upper left?
Play with the camera settings while you are next to humvee and see what makes problem better or worse
Sure, also check to see if problem happens with diff model in same place/angle
I'll try that, worst comes to worst I'll just cheat the focusing shot on davinci. 😊
Haha that could work
Once more question, you mentioned to change the LOD's to 0 and render. Does changing the LOD and its effect not show on the viewport?
Awesome, thank you 😊
So we can't use the older depth of field anymore? I really prefer it in someways, it may not look photorealistic but it gives you more control especially for composition purposes:

The new depth of field is too grainy especially with lumen.
i can def enable those in a postprocessvolume
now that i looked into it also on a cine camera and can key in sequencer? try it out
In post process volume, its greyed out.
check the box
Its checked but the numeric vaules are greyed out. Seems mobile depth of field has been disabled like the doc says.
I'm unsure whether this is the right channel to ask in. But im looking for ways to improve my first person camera behavior. Is there any good reading material on first person camera behavior? Most YouTube tutorials cover very basic stuff, and I'm specifically looking to iron out the details.
try camera, values work
#blueprint or #ue5-general prob best
Alright thanks
@brazen magnet The camera mobile depth of field isn't greyed out but the blurring doesn't show or update in the viewport when those parameters are tweaked. From the docs, I think you need to change the shading model and even if it works, it won't work with the deferred rendering in MRQ unfortunately.
yep, just tried it. nothing happens, bummer
can someone please help? its probably simple, but i do a fade out in my Level sequence, but it persists even if i say "stop sequence " in my logic. How can i fade back in into the game? I tried using camera manager fade in but its not working
trigger a new sequence where you fade in maybe?
Is anyone working with lumen reflections in 5.2
Trying to find out if this was fixed

really? that's kinda messed up lol
If you fade out it stands to reason you need to fade in. If you don’t want to do it in your orig sequence…
Maybe #lumen ?
Yea. They should really consider putting the old depth of field back for those who might want to use it. Having it as an option isn't a bad thing.
or give the present depth of field more control for those who want it.
ok so i tried doing the fade in again at the end of the sequence, but, the camera goes somewhere crazy and then it fades back out. (could it be the sequence is going back to frame 1(since i have a fade in at the start of the sequence)
but the camera issue completly baffles me too
(and it seems it turns to black when the sequence is actually over)
Extend your sequence to before 0
Start render at frame 0 but extend the camera cut to -10 for example
interasting
i was able to fix it by having the fade out at the end, no camera assigned at the end and with an event track to then pick another camera
but this is not great
because my sequence is still active
i thought it should just "die" after its over or stopped
but doesnt look like it. seems to be active even after its finished
As long as it works haha. But when I had that issue, that's how I fixed it
Anyone know how to fix this issue: I have a mesh I have rigged with a control rig. If I scroll through the timeline in the sequencer, it is in the correct position, if I press play, the mesh moves to a slightly different location.
you might have a hidden key somewhere, i've had that issue
Hello, is there a way to only render an asset and its reflections
Or even just the reflections
you can render just reflections in your viewport
But why would it appear correct when I scroll through the timeline or press stop but it moves when I press play?
change your view mode in upper left of viewport
I've done multiple tests but can't get it to work, what's the procedure you're suggesting?
b/c its not in real time it might appear to be correct
I created a new level just as a test, default unreal scene. I placed objects and a planar reflection plane under them
But I can't find a way to only render the reflection
did you try changing view mode in upper left of viewport
where it says lit
change to reflections
Yup, but it all looks weird now and also that doesn't translate to MRQ
ahhhh i see
I could show you but it'll be photos from my phone because I'm at a school computer, if you want
this is an artistic choice, youre not trying to debug something?
Yup. Let me explain. So basically I have a scene with water and water lanterns over it. The issue with lumen reflections is that it causes alot of black artifacts in the reflections
That bug doesn't happen with SSR reflections
yeah i remember reading about that
So my goal is to render the scene without the lanterns, just the water in lumen (which I can easily do)
And then switch to SSR, render just the lanterns and their reflection, no water
Then comp that on top of the original render with just the water
that seems like the right idea
And yeah it's an issue they had in fortnite as well

Just don't know how to render the reflections only and/or the reflections+lanterns
are you using ray traced reflections in lumen?
Ray traced makes the water very smooth, loses all the realism
you have a material for the water or are relying just on the refleciton plane for that?
there is a setting to make the plane blurrier
Either would work, as long as I get a reflection that I can comp in afterwards
I have a water plane normally in my scene, no reflection plane
But for these tests I also tried removing the water and adding a reflection plane instead
roger
Just signed in from the public computer so I can share screenshots if that helps
so my experience with reflections are limited, but the videos i watched to help me were https://www.youtube.com/watch?v=p8TnqBiWKyY, https://www.youtube.com/watch?v=B-fbSiN3yB0&t=162s, and https://www.youtube.com/watch?v=ajzgT5qd9Vo

Raytraced Translucency just got a ninja update in the preview build of Unreal Engine 4.27, and Unreal Enging 5. Previously, in 4.26, raytraced translucency/glass didn't cast any shadows. At all. Now, it does!
I thought Raytraced Translucency was broken in the 4.27 preview update, but after talking to the devs at Epic Games, I found out that the...

MARKETPLACE:
Our Projects: https://www.unrealengine.com/marketplace/en-US/profile/Coreb+Games?count=20&sortBy=effectiveDate&sortDir=DESC&start=0
FOLLOW US EVERYWHERE:
Facebook: https://www.facebook.com/Coreb-Games-104135205047796
Twitter: https://twitter.com/CorebGames
Discord: https://discord.com/invite/7HRDUPg7Sn
Instagram: https://www.instag...

Unreal Engine 5 tutorial on how to get better ray traced reflections.
theres def a way to do it with ray tracing
To just render an asset and its reflections?
i would try to do it all in real-time - if you're looking to render just the asset and the reflections on itself you'd have to look at the materials in the entire environment i would think, or comp it out frame by frame in post
and htne layer in the other comp you were talking about before
sry if im no help 😦
No no you've helped me a lot already! Actually it's a single frame not a sequence so I think that could make things easier
I was trying to do it through a layer system like stencil layers
I'm thinking maybe if it's a material like you shared, it might work to isolate it
you can adjust the roughness of the planar reflection for sure though within the bp if you are interested in using that as your water plane, just would have to be cool with your body of water being completely still haha
yes that first video helped me out with dialing in the settings on reflective materials in 5
Yup will probably do that thanks. the reflections will be very low opacity anyways though nso for a single frame you won't be able to tell
I just hope it gives me a mask of the reflection alone haha
That's the real problem
so that one was for my glass actually lmao BUT the material for my reflective tray is just the silver one from megascans
BUT mr faucher in that first one talks a lot about the settings you need for lumen and RT to work properly with these types of materials so well worth the watch
William Faucher always has great videos on these topics so no doubt, I will watch the videos you shared thank you so much for your time
np np and yes he does. the pristine metals collection has all kinds of good premade stuff for us -

if you figure out how to edit that to layer on a decent water material and then put the planar reflection facing it you should get a good result
I will try this now, silver mat on a plane and layer it out using stencil
yahhh
The water material won't matter too much as long as I get a reflection mask off ofan asset
lmk how it goes with the stencil process i haven't engaged the cryptomatte stuff yet
When I tried rendering the planar reflection on a layer, it came out black so I think that asset can't be layered, hopefully a plane+silver can
i know william has a video on that too lmao
Yeah, actually following his video for stencil layers haha. I'll let you know in a few minutes
ah, this might be a limitation, but would really suck if so
yeah let me know, maybe i can try on my little tray too
Yup, at least there's always a workaround to try
yah
Well this is different
This is the viewport

In red are the reflections I've been trying to capture as part of this test

And this is the render output
yeah so the black areas are the surfaces being reflected
can you apply an alpha to that somehow that will let you play with the value on a greyscale?
im not sure if that helps your use case though
The problem is that those black shapes aren't just the mannequins reflections. If they were then I could probably do that, use it as a mask to get the reflections
aha
The loss of color is strange though
For reference this was with planar reflections

It doesn't render at all, but colors stay
b/c it clearly no likey planar reflections
yup
maybe if I add the mannequins as a layer as well
Manny and the plane? Or just manny
well, whatever you need to mask out
if you can create it on a layer like photoshop that would be ideal too - my knowledge of layers in ue is 0 though
like can you create a stencil layer with just manny and pull a reflection matte on just them?
re: colors i don't think it will show, you will have to mask those in too since its just one frame
Seem something broke with the parent constraints after I duplicated the level sequence as I wanted to make some changes while keeping the initial level sequence as back up. I hate ue5 sometimes always fond of breaking things or things going wrong for no just reason . Its beginning to frustrate me tbh. It has ruined all the keyframes I painstakingly animated meaning I have to do this all over again. Has affected the backup level sequence too.
I will try masking Manny and the plane alone, and not render the rest
reflection is either 0 or 1 it seems. 1 being black (being reflected) 0 being white (not a surface)
always restart editor to make sure its fully broken
This is my setup with stencils

but yes you and me both man. i had this happen to me yesterday, one of my metahumans magically set its pivot 400 feet to the left and there was no keyframe, nothing, and hte pivot itself was set up properly. had to delete and refactor. sometimes its for the best though
maybe mannequins should be in actor layer? and also render main pass to get your color when you need
does it give yuo a layer with just mannys off that pull though? i feel like it should
Actor layer hasn't been working at all for me, not sure if it's UE or the project
I can't create a layer

Yup
if you take out the silver layer
and try just manny what comes out
so ideally you should be getting that layer WITH the reflected mannys right?
your manny jumble lmao
and their upside down world versions


does that reflection pass look like it does in the viewport? because you could just flip the render and it would work maybe?
like does that reflection pass look like the reflected mannys in the silver mat

yeah haha, I think that shading comes from the reflective view

first image was lit
Restarted my laptop, the backup level sequence works well now but the new one I made is ruined. Thank goodness I always back up stuff. Wished this wasn't the case with ue5. I am using ue5.1.1 so thats the scary thing when using unreal engine.
when metahuman animator comes out i am not switching from 5.2 for a very long time, just not worth unless the new feature is workflow changing
Yeah I had the 3 mannys selected and drag/dropped in. I also tried right clicking and no menu came up
Does it give different results than data layers that I'm using?
it isolates the render to the actor
try selecting just one mannythen hit add selected actors to new layer in layers window
like this?
yes haha
might be the same thing then, no reflections
I'll try with 1 manny now
nothing
is this what your layers window looks like

Looks like it's common https://forums.unrealengine.com/t/ue5-layers-panel-bugged-cant-right-click-or-drag-items-to-create-new-layer/656561

Epic Developer Community Forums
I’m trying to create layers, but right clicking doesn’t show me the option to do so, and dragging objects into the panel doesn’t work either. Apparently this is a common problem, and I haven’t found some answers just yet.
lol bummer
But since you're getting the same results as me, I don't think it would give reflections anyways
I tried deleting everything except manny and the silver plane

you would still have to do some manual photoshop work there
I didn't think it would be this complex to render reflections haha
Yeah lots of it, since I don't get colors and it's not just reflections
if you check render main pass it will give you the color info to layer on top and then manually add but yeah theres got to be a way
have you tried this workflow with ssr?
like what you just did
No that's with lumen
it is technically rendering the reflections, just not the color info, to be fair to epic haha
try with ssr and see what kind of result you get maybe?
or just open PS and get to work 😂
I could but after I finish this frame, I'll have a cinematic to do and there's no way to do that much editing for 1000 frames 😅
Is Meta Human animator coming out in 5.2? I thought it was coming in 5.3?🙂

it was part of the 5.2 feature set, no? i've heard its coming out in june/july
@hollow vector that was my result from deferred rendering only with just the actor and the reflection ugh
Any layers?


I guess so, but I feel like it's doable if I knew what I was doing
I'm just cycling through options in nuke, first time using the software I'm kinda clueless haha
omg yeah i need to get into that
also try detail lighting pass it gave me a decent mask

the reflection is different than your previous render though
Having the black bg also helps
For some weird reason, my sequence stop playing. I was wondering what could be the reason. I tried from the level blueprint, and with auto-play from the editor. None is working. What reason could be this is happening?

if you zoom in the info is there its just very light
when does it stop
I feel like it would be hard to separate in PS since they're both shades of white
for me at least, I'm really bad with comp and photo editing
you'd have to slam the contrast all the way up for it to be usable, i feel like your result is better
Ah, Thanks for the info.
I think when I tried adding the Event Track > Trigger
If I can somehow do a normal render and have a mask to substract, leaving me with a black canvas and the manny reflection colored only
then I can turn that black into transparency and overlay the reflection on the other footage
start there. remove it and see if it plays the whole thing
Already did. Nothing.
Otherwise, is it simple to reverse a multi-object render and dim it? so let's say I have 50 lanterns on screen. I render them by themselves no reflections, then in post flip the image to create the fake reflections and turn down the opacity a lot
But find a way to flip it so it goes under each object and not just flip the entire scene
hey so heres an idea - go into your viewport and click on all the lighting components except diffuse and specular
undre the show menu
this is unfortunately beyond me haha
but if you play with those flags, and try with iether lumen or SSR, you might be able to get a good result - and then you can add those console commands in the MRQ to turn off/on the ones you need

turn on stuff until you get lighting info

yahhh

turn everything off in light components except diffuse and specular
return everything else to default


I think the results are similar, but manny is white and your character is dark
In my case the lanterns will be yellow so the reflection will be as well
yours is much sharper though


theres got to be some combination of these you can play with that will you get you both the diffuse info as well as the reflection color info
in both the show menu and the view mode
there is a custom stencil mode in the buffer visualization menu
try buffer visualization, then scene color, or ray tracing debug? but thatdidnt work for me on anything except my mhs
It's probably defaulting to no layer
but maybe you can create a custom stencil

Masking enables you to alter specific parts of your final scene without affecting everything else in it. There are several options in Unreal Engine to perform real-time masking.
In this episode of Unreal Tips & Tricks, we focus on using the Custom Stencil Buffer in a Post Process Material which allows us to alter how multiple objects are rende...
gotta walk dog bbiab
alright no prob, thank you so much for all your help and taking the time :)
Np learning together. If above doesn’t work look up cryptomatte pass in ue5 and combine with the reflection frame you get and then use fauchers nuke tutorial to composite
Or some combination of everything 🤣

In this tutorial, I'll show you a method of how to output a custom render pass inside Unreal Engine 5.1. Such as cryptomatte, normals, z-depth (world depth), motion vectors, AO, world position, lighting, reflection, etc.
Movie Render Queue supports rendering different types of output images in separate passes, such as the final image, object i...
Does anyone know why rendering always gives me a different result than what I actually see in the sequence?
your sequence is shown at your engine scalability settings, your cinematic is rendered at highest quality prob?
But the bugs are, for example, that it reproduces the animations badly, etc., is there any way that this doesn't happen?
your animations are screwing up in your render? but not when previewing in sequencer? that i have no idea
Well, this is the best I could do

No reflections but they overlay and no lumen bug
For my use case I think it'll be fine since they're far so the lack of reflection isn't too noticeable
This is the one with lumen bug

😦
So in the end I just fix the bug but no reflections. I'll avoid water on my next project until they patch this haha
I may also try to fake reflections in photoshop if I find it disturbing
yuo lose a lot oft he reflection info unfortunately
might be able to brighten that area up in nuke if you decide to try to render it out
but yeah reflections are hard
I do yeah.. but it might be my only option given my skill level
either way, I think we both learned something new today. Thanks for all the help!
np np
I have an audio track in my level sequence. If I am doing a render, I noticed I can't export/ render to a video format and the animation is timed to the audio. Isn't there a way to do this with MRQ. If I render out as png sequence, I would have to set up the audio again in another video editor.
render as apple Prores
Yeah but I can't play it back with vlc or any other normal player.
you might need a codec, google fu that one
or use the old movie scene capture? hit three dots next to render
Ok. Thanks. I wonder why Epic didn't add an mp4 option for MRQ.
Or I can use Apple pro res to render out from ue5 and use Blender sequencer to convert to .mp4 video file at least that way the audio is in tact.
It doesn't support audio:

So the .wav writer solves that issue 🙂
Anyone know how to add those cinematic black bars to your video in with the camera in sequencer
in the upper right of the viedwport
the drop down where you can add the action safe title frames, etc.
lets you add the bars
Thanks. I found it earlier but I am having an issue. It is not showing up in my rendered video. Is there a way to render the letterbox from ue5?
no, you would either need to render out at the desired 2.35 aspect ratio or just crop your video in premiere or whatever you are using
where do I set the desired 2.35 aspect ratio:
in your camera's settings. you have to do it for every camera in your sequence
probably best to just crop if you have already rendered
Here?

I am trying to pick custom but not working.
nah
change sensor width to 31.4
see how your sensor aspect ratio changes to almost 2.35?
Ah, thanks. Works. How do you know the right or correct sensor width to use for letterboxing? They should have just added the ability to render the letterbox. Just saves everyone the trouble. Why do ppl like to complicate things lol.
In Blender VSE, I can crop the video. The issue is how to match the letterbox to the one in ue5 from the cinematic window.
i agree
they have like 10 presets but none are 2:35. maybe there is a way to create one?
most people render at 16:9 then crop to 2:35 in post
its how film directors do it usually also, gives them a litt more freedom to find the shot (by being able to go up or down) in the edit.
Yeah but we are using a game engine not real life cameras. I also don't like the way they now made exposure to be affected by aperture in ue5. Its realistic but its a software thats why you have the freedom to bend the rules if you need to.
googled helped - add to defaultengine.ini [/Script/CinematicCamera.CineCameraComponent]
+FilmbackPresets=(Name="Film My Test",FilmbackSettings=(SensorWidth=32.67075,SensorHeight=14.002))

Epic Developer Community Forums
Doing this didn’t work for me. in unreal 5. Note that selecting costume film back in engine also does nothing. Any help is greatly appreciated
re: the aperture can't you adjust your post process volume to make exposure manual?

william faucher's video on lighting really helped, but yeah it becomes clear over and over this engine was built first for games 😄
Thanks 🙏
Yeah, I can but ue5 made it that any time you tweak your aperture, it affects your exposure so you need to adjust it manually.
I think that didn't happen before.
No worries. Appreciate all the help. Found this: https://www.linkedin.com/pulse/unreal-engine-cinematic-cameras-framing-101-matteo-grossi
How to calculate the correct cropping for video editors.

Cinematic Cameras are used to guide the player through significant moments of the game narrative by following principles that have been used in professional Filmmaking and Photography for centuries. One of the most important aspects is FRAMING, meaning how the visual elements of an image are present
who wants to do math
haha jk good stuff
oh ive seen this
its sitting in one of my tab groups, this is a pretty article, he does a good job on composition too
True words, mate. Doing maths for something so simple is a pain. Epic should make things easier by just allowing the letterbox to be added to the cameras so they can be animated and save in the sequencer.
but yeah see how i already knew there was math in this thing before i clicked it lmao. ive run into forum posts with similar info and its jus tlike ughhhhhhhh.
agreed
is blender's VSE getting better? i love blender but i can't see myself switching from resolve.
I would advise you stick with davinci resolve if you are doing a lot of heavy editing. I am just using VSE on the surface. I do most on my post work in ue5 so all I do when I import into VSE is just some minor editing and then render out. Davinci resolve should be better than VSE but I would advise you speak to someone who has used both extensively.🙂
Are you using the free version of Davinci resolve?
thanks yeah, i used premiere a lot when i was heavy into editing and wish i could continue to use but i'm paying adobe enough freaking money for substance and photoshop so resolve it is
yes
Ok. I haven't had time to try resolve. Just too tired to start learning a new software so I am using Blender VSE since I am familiar with it. 🙂
Will try it out when I can find time. Have you tried material maker by any chance?
You could also try Krita as an alternative for Photoshop. Material maker and Krita are free. The issue is the hurdle of learning a new software from scratch which takes time.
they are all basically the same, just varying levels of functionality/why dont you make sense to me
have not tried material maker, substance painter is just too good. hoping one day mixer has a big ol update that brings it up to par, but it seems like they've dropped dev on that, hope im wrong
and krita is great but its just not PS, its more like clip studio, no? adobe's sub packages don't make any sense (should be a la carte with weighting for the more expensive stuff like painter) but its better than the good ol days when we were all pirating everything.
also heard great things about affinity's stuff but like you said, learning new software yadda yadda
i barely know the ones im using 😂
Me too, Haven't discovered all about the ones I am using as well.😁
Yeah hoping for more features for Mixer too.
Hi guys
Created a simple random light flicker Blueprint that I want to use in Sequencer, but for some reason I cannot check the 'Expose to Cinematics' option. Can anyone tell me why?

drag the blueprint onto your sequencer timeline
you probably don't want it hooked up to beginplay though - maybe create a custom event and then add an event track in sequencer that triggers it to start
Thanks for the quick response!
sure
So custom event triggering from Sequencer. Not sure why I keep messing this up.
-Created a custom event in my BP.
-Dragged my BP to Sequencer and added a new event track
-Created a keyframe where I want to trigger the event.
-Right clicked keyframe>Properties>Quick Bind><select my Blueprint and do a search for my custom event>
But when I play in Seqeuncer the custom event isn't being triggered. What am I missing?


does this BP work when you're not trying to do anything with sequencer? like when it was hooked up to beginplay was the light flickering properly?
the other thing you could do is hook it back up to the beginplay event, compile, and then delete the event track, right click the actor's track in sequencer and convert to spawnable, so it only spawns at the start of the shot. but make sure it works without any sequencer interaction before that i would say
Is it possible to remove a blueprint in a specific frame and then make it appear in another frame?
right click the bp in sequencer, add track, actor hidden in game
Thanks Ryan
Yeah it works fine with BeginPlay. I'm simply checking for anything from the Print String node to confirm the custom event is being triggered. Will try your suggestion
Though I am still confused why I am unable to check-enable 'Expose to Cinematics' when selecting the Rect Light variable in my Blueprint.
i don't think you can expose an object, try to create a bool or float and see if you can tick it
Whats the best setting to use for Temporal and Spatial sample counts to eliminate noise from renders?
Thanks 👍 What about spatial if you want motion blur?
Noooot sure. I think William faucher has a vid on it
Ok. Will check. Thanks.
im probably gonna ask a loaded question here lol. i'm finishing writing a book i'm trying to adapt to a movie. i always thought this was a far off fantasy but with the tools of ue5 (and also getting comfortable in blender), this may be a reality. i understand the concepts of good lighting, camera placement, the scenes, etc. but i'm having a bit of a "where do i even start" moment lol. i feel like i am suddenly aware of this undertaking
any advise or articles on bringing it all together in prep for start of a big picture?
The unreal documentation is an okay place to start, the “learning” portal and the forums are good too. William faucher on YouTube. Also, cannot recommend sava zivkovic’s Patreon enough. He’s doing it all. You’ll need a Mocap suit too, rokoko prob best @ionic compass
thanks. i just stumbled upon faucher
i dont need the mocap suit technically but it would def make it easier. i've already gotten decent at scanning people in with help of blender/reality capture
what's that set you back?
i feel like i just flew into Nepal and arrived at base camp and see how big mt everest is lol
omg 2500 bucks
i guess that's small potatoes considering what it took to get this years ago
Yep, tens of thousands
Heyo! I have a problem with rendering where I have OCIO invalid slathered over my render, i cant find anything on here or online about this yet so any idea would be killer!
Hey guys is there any cinematic camera sample project or blueprint out there?
I have some character animation I would like to get some good references I can use as a springboard
Slay project example @white radish
Did you look up OCIO configs on documentation?
Hello guys! I'm trying to make a driveable car so that I can animate a car chase, but it keeps doing this (i.e. the wheels keep not working) when I click play to drive it around. Anyone have any ideas how I can fix it?
Image

This looks like an issue with your blueprint, or you are cranking the back wheels somehow via player input? Haha
everything in the blueprint is linked together. What do you mean cranking the back wheels - I'm very new so it's probably that
I’m not familiar with how cars get set up in UE, is this a sample of some kind?. By cranking I mean holding down the left key by accident
Look in your blueprint for how@the back wheels are set up bc the issue is likely there
ah thank you!
Thanks, mate
is there any benefit to doing a cinematic as a 'game'? like could you move a 1st person camera through a series of places and then 'capture' those frames to an output? or do you always have to do it by camera key frames
basically since i dont have a rig like mandalorian did, could i simplify the camera movements with live movement in game
yes you can
or just apply a camera shake to your camera and try to simulate the handheld effect yourself
you would use the take recorder for this, but you would need a real good custom FPS controller to do the head bobs etc. realistically, idk if htat exists on the marketplace
you can also use an ipad i think to do the camera movements in your level yourself, but i have not tested this workflow
yea i mean seeing how they did the live cameras in mandalorian was amazing. i need something like that. had a real life rig tied to the in game camera which had that realistic bob and shake, etc
do you have the video? is this newest season of mando? havent watched yet no spoilers haha
well i mean i remember watching the behind the scenes of how they did most of the series (season 2) and it was why they were able to do so much production stuff when most studios were closed due to covid. it was a massive panoramic screen that was live casting the engine, had a camera rig externally tied to in engine cine camera and the real life actors were superimposed. pretty genius. way less post production

For decades, film and TV productions have used green and blue screens to place actors into new environments. Now, LED walls are revolutionizing this process by projecting 3D environments in real time behind actors to provide the illusion of being in a physical location. These methods were put to the test on Disney’s "The Mandalorian," of which o...
this honestly is what inspired me to try to dabble into film with ue, i think at this time they weren't even using ue5, so season 3 may have done more
yes, a lot of studios are now adopting this production workflow b/c of mando
whats the timestamp
on the method
are youi interested in the dolly/rig they are using? or looking to emulate a handheld look
you can actually put a dolly/crane track in unreal if you weren't aware
im looking for a more 'consumer available' rig yea. something like an ipad, etc could work. essentially its just about the live link to the in game camera and then using the humanistic filming style live
but hwat they are doing is syncing their camera's position (that exists on a crane/dolly in the real world) 1:1 with a camera in unreal. you can mimic this using the crane/dolly actor in unreal
yea... ok exactly
to mimic a handheld look you can apply a camera shake track to your camera in sequencer
or use an ipad and control it in real time
im just dreading all the camera work i have to go in game and would be great to at least partially offload that with real human action hah
why is there so much reference to apple products? im essentially anti-apple
is there not much android/pc support?

In this video you'll learn how to use an iOS device as a Virtual Camera in Unreal Engine 5. This is a recently updated app that works in the newly released Unreal Engine 5. It replaces the old Unreal Remote 2 app.
You can use an iPad or an iPhone, but is better with an iPad due to the larger screen size. This video will show you how to set up t...
yea i understand the concept, it's cool, i just hate having to get something like an ipad just for this
is this a preference or is there just more active development with apple on this stuff
iphone cameras utilize something called truedepth that allows you to get a pointcloud of everything around you, not aware of an android phone that has something similar
i have a zfold 4 basically the best phone on the market now
but yea i need to confirm the camera specs in this specific instance
Ill put it in this channel instead but im trying to edit my scene out in davinci but it always imports the files as 120 different photos instead of a sequence, Anybody that works with davinci that has a tip to help me out with?

in fact when i did reality capture it complained it didnt have zfold4 in it's library
isn't taht by design?
you need to export as apple prores to get a movie, not individual frames
ryan, i guess what i'm struggling with is the conceptualization as a whole and just trying to identify the technical components on how to get started
ah yes somebody asked this very question yesterday and i remember that being discussed
https://www.youtube.com/watch?v=8eIavj62Mu8 if you are unwilling to join the cult of steve jobs like the rest of us.

The first 1,000 people to use this link will get a 1 month free trial of Skillshare: https://skl.sh/williamfaucher09211
This tutorial covers how to set up and use a procedural camera shake blueprint in just minutes in Unreal Engine. This applies to both Unreal Engine 4 and Unreal Engine 5!
Shaky Cam is one of those things that are either extreme...
ok ill roll with this for starters
what i don't get with mandalorian, is even with the virtual set backdrop, how do the live actor overlay still not have that fuzzy effect, i assume a lot of that is just really good "actual" cameras and some post editing
it's freakin seamless
the camera tracks the actor in unreal and knows what to display behind them in real world space. but b/c unreal is becoming so realistic it's as if that set exists in the real world.
there's a video of that firstbit somewhere, im sure you've seen it
yea i get that, but any time you overlay real with screen its normally obvious to the naked eye, it's so flawless
yah, that's also down to the quality and build of the screens themselves haha
also, on a side note, john favreau is a frickin production genius
true, $millions
but still saved on time/effort vs traditional studios
yep super expensive. and yes he deserves a ton of credit for seeing the value of unreal in production
and promoting its use
he has been somebody in lots of major movies that people don't realize. i think all the marvel franchises too
er *involved with
wow...blast from the past
what is that mid 90s...
vince vaughn, and him, def much thinner and younger lol. so was i
Haha yah!
i have gained what i call covid weight
You and me both!
i just came out of a triple hernia surgery in 2019 and then all the gyms closed in 2020 lol
ok so one more question. if i have a book with 'chapters' and i want to essentially arrange my film that way. are the "levels" in ue5 supposed to flow with the chronological flow of the movie, or specific to the location i'm representing? like lets say i constantly am in a college lab throughout the movie. is that one 'level' i return to, or no
Yeah you can have a diff level per location/scene probably easiest on your comp
And then stitch the renders together in post
ah true. i forget sometimes that the way we see movies is far from how they are filmed. i even hear interviews later of actors themselves a bit lost and get surprised when they see it all in post
my first scene is going to involve some guys in the snow looking at a facility in the distance. i want to incorporate cold breath, footsteps, etc.
then i watched a ton of videos of railhead and chemical loading stations to get an idea of what i'm aiming for
Yeah, always good to gather reference
Alright is there a setting in render queue called prores or?
i usually export them with exr. but sometimes it works as 1 clip and sometimes not 😅
yeah its called prores
i just watched faucher's camera shake video that's great... i know it's for ue4 but fairly sure it's nearly the same for 5. this is a great thing if you want to also have either like an earthquake or some sort of big object that hits the area near you
yep! well worth watching all his other stuff too
I found it and got it working ty alot!
for a filmmaker's perspective, any general guides or recommendations for the general UI and window positioning, etc? fairly familiar with the UI but i see diff folks do things differently. i suppose there isn't really a 'right' way but just looking for a general layout that's favorable to cinmatics/filmmaking

how can i get the keys to slide with this track
they wont move with it, and the track is like barred?
none of the stuff is locked either?
Move the red lines handle to the right - your ending your shot too quick. At least o think that’s it @knotty quail
I have sequencer and cinematic viewport on their own monitor
When using two monitors, have you noticed any significant drops in fps? I noticed this when I place my curve editor on second screen. From 120 fps to 12 fps. Move it back to single screen and it works great again. Wonder if its me or is it some sort of a bug. I am using latest nvidia studio drivers for my RTX3090.
Hi fellow Creators! I'm am having an issue with Rendering. (1st Picture) Left photo is the output (exr in photoshop) , right photo is the unreal editor screen space for comparison. Notice the reflections on the window are much better in the unreal editor. How can I improve my reflections to come out more like the unreal editor view? any help or guidance into the right direction are much appreciated. thanks!
Ive included video of render settings.

How do i reorder these bones hierarchy i am using unreal 5.1

Which of the options do you use for Apple Pro res for best quality and preferable render time?
Does anyone know if warm up frames work for camera cuts rather than shots?
i believe they do, but test it
it defaults to the best i think - but you should be using EXR if you want best quality
maybe try without the console commands, also try changing your temporal samples to spatial samples, just swap the values in deferred render settings
if you have two viewports open, even with 3090 like me, you will experience a drop in FPS yah
and wow you are right, i experience a frame drop no matter what's on second monitor lol paging dr. epic wth
Hello everyone, we are looking for a UE 5 cinematic artist to join us on a very exciting and unique project. Paid job and serious people. I have already posted in the job channels here, but I was curious to know if anyone has some suggestions on other channels we could try to recruit?
Thanks for the info.

Work in progress shot from an upcoming film @UnrealEngine @Moveai_official #UE5
Hi everyone,
I'd have some issue with the movie render queue.
As the camera moves, the grass is not loading in the after a few meters.
Probably missed some settings. could anyone help?
In your game override settings in mrq, set it to use cinematic quality
Glad it is not just me 🙂 Not glad this is not solved yet though.
Looks like LOD issue. Depends on how you made the grass, but search for culling distance or what is the exact name. Distance is the way to go.
is it possible for me to animate a character using control rig while at the same time using preset animation from mixamo?
can anybody help me with this
i already know how to convert mixamo animation to my character
but i cant seems to find a tutorial on how to mix control rig/keyframe with preset animation
In your level sequence, add your character that has a Control Rig. Then delete the CR body track, and add an animation track to choose the mixamo animation. Then right-click on the character anim track and choose "Bake to Control Rig". This will take all the transforms from the mixamo animation and apply to the CR. Then you can adjust the keys directly, or use an additive track to override the keys as needed. If you need to create your Control Rig, that's a bit more involved... but I have a video to recommend if you need it...
what video?
please do 😄
any sort of resource is welcomed
ohh hello ryan
ohh wait you meant how to create control rig from scratch?
yeahh, i got it, no need to trouble yourself with that man, but youre welcome to share the video, who knows i could pick up a thing or two
Ah, if you already know how from scratch, then this won't help too much, but if anyone else needs to know where to start.... (I need to add an update one of these days for fingers too!) https://youtu.be/VXlBqRqFwc4
If you jump to 59:30 tho, it shows what I wrote about above of how to bake your mixamo animation onto your control rig (and to add an additive track for overriding the keys, click on the + for the control rig track and pick ADDITIVE...)
Hi there! Some objects are not visible when I render sequence through movie render. They are visible in editor and sequence but not in the exported frames. How I can fix that?
thank you!


yes please!
Maybe the "visible" checkbox is un checked in objects details. Also try adding the object in the sequencer.
Does anyone know how to get the bloom effect in reflections too? you can see the reflected lamp in the window but it does not look good.

I'm having an issue with my focus settings, when I enable Manual Focus Method, my deferred decals go almost all black, does anyone know what's causing this issue?
Hi everyone, anyone knows if it's possible to use Vcam with IPAD to control Cine Camera in a cinematic sequence? When I use livelink, a sequence is created for the Vcam and I can only record what I see with the camera (it acts like a virtual camera shooting a scene). I just want to use the IPAD to animate a Cine Camera in a standard cinematic sequence. Any advice would be appreciated!

Any one know how to solve this issue where if you pan a camera, in your rendered out video, Lumen seems to then update a few seconds in the shading of the tree leaves canopy? I am using hardware Lumen. UE5.1.1
Hello everyone! does anybody knows the workflow for importing vehicle 3D model that contains 15mil polygons?
@unique ermine thanks! I tried it but it didn't help.
Hey all I have a problem with motion blue my camera attached to the root bone of the bike, but the motion blur is on the bike and not on the background https://vimeo.com/821587575/f090eeae8c

This is "MB_TEST._(13)" by TATO on Vimeo, the home for high quality videos and the people who love them.
It's ok in the viewport..

Do you have idea what it might be?

I haven't used this particular app, but if it's recording some kind of transform, you could theoretically just create a new cinecam with the settings you want and attach it to the recorded Vcam. It should follow the same path that way and then you're not stuck with the Vcam's original view
What can be the reason on why videos played in electra media player are delayed and sometimes has a faster playback speed when played?
Anyone know what causes Movie Render queue to freeze when rendering the last few frames. I had like 12 seconds remaining and it hanged for over 40 minutes. I had to close ue5 through task manager.
any of you cinematic mavericks care to give me a 1 on 1 session for 1-2 hours? I am happy to pay for your time
Hi, i have a problem when i render my camera is spawning at 0,0 i have no idea why, everything is setup correctly (the cam tracks etc.) Sometimes it helps when i change camera from possessable to spawnable but this method stopped working. Also when somehow it started rendering correctly my camera is only changing its focal length and its not moving at all. The funny thing is that it only happens with 2 out of my 3 cameras in the scene. + DOF is not rendering out even its visible in viewport, + while rendering there is like 50% chance that animated objects are going to have ghosting. Its all happening in UE 5.1.1
Hi everyone, I'm currently working on a cinematic sequence in Unreal Engine and I'm wondering if it's better to use the Player Character blueprint or just the skeletal mesh. Also, if I decide to use only a skeletal mesh, how can I seamlessly blend the end of the cinematic with the beginning of the gameplay once it's finished to ensure a smooth transition? Thanks in advance for your help!
Hello everyone c:
I just packaged my game, and for some reason I have white screen instead of cutscenes (widgets with videos). Anyone knows how to fix that?
hi any idea why is my sequence stopping in the middle but only in VR ? thanks
Hey guys. Cinematics beginner here. It appears that in a cinematic sequence, my actors aren't actually working because the sequencer isn't simulating the game? Is that correct? If so, is there a way to get the actors to fire their event graph during a sequence so that I can render it out to a movie?
Can you clarify a bit what the hope is? Are you wanting your characters to run through specific animation sequences? Or?
i actually had a similar question
enabling certain things that are expected to fire in 'game' that you wanna capture in cinematic
Yeah I have some animations and timelines that fire on begin play. One timeline controls the transparency of a static mesh
we may have to adjust the 'firing' mechanism in bp
Hi first time rendering here. Help pls my scenes in the sequencer and in render are not the same. There is only 1 camera in the scene. Also do i need to do anything other than just move my camera to track and click movie render ? cause i cant find what im suppose to do

I have an event track in the sequencer and on the key I opened the properties and bound it to the custom event(s) in my BP event graph but when I play in the sequencer, nothing happens
what exactly are you expecting to happen kyhuthar
camera is not there. I expected to render where its looking ?
it's not "there" or is not visible?
you can see on the back this is the camera view

In the BP for the level sequence, make sure to check the box on the node that is keyed for "call in editor" field, it is off by default ... I think that'll fix it...

there is only 1 camera in the project. idk how it can render somewhere else

i guess i'm still not quite understanding your issue
you're saying that what is being rendered in sequencer isnt from this camera viewport?
maybe to debug try to add a 2nd cine camera and see if issue persists. swap the sequencer to that one temporarilly
Here I'm selecting the event in my even graph.

dont do the whole scene, but just a bit to confirm
Here is the event in my BP.

And I have Call In Editor checked. Still not doing anything. Maybe some of the stuff in the Event Graph can't be executed in Sequencer?

hmmm...
To clarify, maybe I'm playing it wrong. Do I need to be playing the level in the viewport or should it work when I hit the play button in the sequencer itself?
The goal would be "not" to need to be in gameplay mode I think... it "should" trigger when it hits the keyframe... the animation works fine with the other input of EventBeginPlay? (when in game mode...)... also for kicks, try to render and see if it gets triggered for the render... when rendering simulation gets run as well...
huh. Well it rendered out correctly. I guess you just can't see the preview from the timeline
Cool - I THINK this may work, try simulating the game here, then stop the game... simulation mode may still be on... sorry this area is a bit fuzzy, lots of "I thinks"...

ok. I'll check that in a sec. I appreciate all the help
Hello, can we expose our ingame camera to sequencer using Sequencer Recorder/ Take Recorder?
does ue5 do dpx output? or is that the apple pro res format?
on his thigh and stuff.. this is an alembic cache
im also using lumen...
is there arender flag to give each frame warm up time?
Hey guys how can i get this type of variation in grass inside unreal engine?

In the sequencer check the transform keyframes for the camera. This sometimes happened to me to, IDK why though. But setting a keyframe for the transform attribute of said camera solves this. It is generally a good rule of thumb to keyframe everything in the sequencer.
What if you parent the camera to the bike in the outliner instead of attaching to a root bone?
ive run into the weird camera view at 0,0,0 when rendering in MRQ. doesnt matter what i change it just refuses to render these shots where the camera actually is. however some of the other cameras render fine... every time this happens its frustrating as hell and only ever seems to randomly fix itself after remaking the shot a couple times.
any ideas?
Hi ! Can please anyone say why cloth simulation doesn't work when playing sequence in game / in editor? I tried to record it with take recorder or just by adding actor to sequencer. With spawnable / possessable modes. Anyway I can't play result in game. My cloth is static.
I think I'm doing something wrong. Can anyone give a good tutorial for cloth 5.1?
I helped someone else “fix” this by having them upgrade from 5.1 to 5.1.1 … are you also on 5.1, in case same issue?
im in 5.1.1 - the first 6 shots render at 0,0,0 and then suddenly it all kicks in absolutely fine for the rest of them. cant seem to get it to register that these cameras exist!
they are all duplicates from the same camera too :/
For some reason my focal length will not change when I key it to a different value or multiple values along the timeline
playback is just viewport settings it seems
oh I think cinematic viewport overwrote it
Hi guys, I'm new to the software. I played around with some cameras and free assets, but whenever I try to render (both avi and img sequence) I have this problem in all of my shots. I tried looking around for a solution but I can't find any. Thanks in advance!

Hey im have this issue with DOF, so in viewport DOF in cine camera works just fine but whne i render the DOF is not visible it just doesnt render, help
Anyone know why my camera renders out frames all jittery from sequencer?
It plays back smooth in the viewport but the frames are all rendered out with some lagging backwards...

We're going to take a dive into the latest and greatest Movie Render Queue, made production-ready in Unreal Engine 4.26. This is a must-know tool for VFX Artists and CG Artists alike.
This Tutorial covers all the basics of the MRQ that you need to know about.
Relevant links:
Cryptomatte/Object ID Tutorial: https://youtu.be/Ry4-Q8mBjdg
Render C...
thanks a lot
no worries
when i do a render, the lights that i hidden in the outliner are visible. How fix that ?
how can i fix the windows being sharp here?

i am in sequencer mode and lowered arpature
i know this is a loaded question but i'm super in love with villanueve's work in movies like blade runner and dune. what are some basics around how he does those kind of shots? i'm trying to establish my 'style' and guess i don't know yet what that looks like lol. he said he always "uses one camera" does that mean one type of camera or litreally just one?
https://www.youtube.com/watch?v=ibAyJjNbnpo looks like i found somethin

IMPORTANT UPDATE: I am moving all my content to my new channel. Please subscribe here to be updated with all new content: https://www.youtube.com/channel/UCxIyQGrjXyLlvohDabd84Ew
In this video, I dive into how the new sci-fi film Dune was shot by DP Greig Fraser! In the video, I talk about how the film was lit, what setups were used, lensing, c...

You gotta uncheck the "visible" flag in the details for the light...
How do i fix that?
Anyone else having issues with rendering stencils out of MRQ? It looks fine during the preview of the render but upon looking at the final written frame, it's solid beauty and alpha 😦 I am turning r.nanite=0 in the Console Variables for safe measure.
thanks a lot ! 🙂
Howdy folks, with 5.2 I am getting this error whenever I try and render ' [Line: 301] Attempt to create buffer 'Shadow.Virtual.VisibleInstances' with size 0.' I cant find a solution online for it at all 😦 any ideas would be great
Any animation experts?
How do you prevent animations from repeating (looping) in sequencer?
I'm using some Mixamo animations on 2 skeletal meshes. You can see the left character repeats at the end. I've disabled loop in the actual animation.
I was thinking there must be something like a 'hold' keyframe like you find in Premiere.

so i know how to blend the game camera to a cinematic camera, but is it possible to blend the rotation of an actor too?(in this case the player) from the gameplay rotation to the cinematic rotation
So I have a question for you masters of Unreal 🙂
I am struggling to make a seamless transition between the end of cinematics and starting to explore the level. The camera from cinematic properly adjusts my Pawn location and view to match the last frame of it however, since my camera settings are different it's very jarring when it ends the cinematic and allows me to control player. Ideally what I would like to do is simply animate my cine camera settings to match those of the gameplay view so it feels seemless. Anyone can help?
Is there a way I can repeat/loop a subsequence?
Right clicking it and activating "CanLoop" crashes the editor
My MRQ instantly crashes when I try to render 10km^2 landscape with a landscape material. If I remove the material or make the landscape much smaller it renders without a problem. Any idea how can I fix this?
You want the"Hidden in game" checked for each light you want hidden. When theyre hidden in outliner it's only in outliner mode, not for simulating, play mode, or rendering
@marble prawn said that too but thanks 😁
hi. how do i change the leading zeroes count of the mrq ? i have more than 9999 frames to render and naming defaults on 0000 instead of 00000
Hello I am new and I just made this with unreal engine 5(I started to learn it just some days ago) and I have a very bad pc. (Gtx 1650). The thing is, I can run this scene fine with cinematic quality but whenever I try to render it with the movie render queue it just crashes (it’s a still frame, not an animation). I just don’t think it makes sense that I can literally run it with cinematic quality in the viewport but I can’t render a single frame.

Is that normal? I am a blender user and I just wanted to try unreal engine so I don’t know
you're basically pushing the envelope honestly with that
Is there something I can do?
Anyone know the ETA when path tracer and the water is gonna be fixed?
or if you have some kinda crazy solution id love to know
Can anyone help me figure out what's causing this flickering in GI-lit areas when I render a cinematic? It looks like GI flicker but it seems to move based on screen space like AA? Any pointers? https://f.io/on1LMoH_
try enabling „texture streaming“ in your projects settings
dont know why, but it actually helped me preventing crashes while rendering
Hey there,
I'm working on a short animation project that aims to help the deaf community, and I could really use your help. I'm looking for folks who know their way around UE metahuman/control rig to assist with some aspects of the animation production process, such as animation adjustment and mocap cleanup.
I know your time is valuable, so I'm willing to offer a small fee as a token of my appreciation for your assistance. This project is super important to me, and I believe it has the potential to make a real difference in the lives of people who are auditory challenged.
If you're interested in working together and lending your skills to this project, please don't hesitate to get in touch with me. I can't wait to hear from you!
Thanks so much.
Go to the material of the windows , select the material node look for Render after DOF in the details and tick it.
Yes fixed it already the same way but thx 🙂
Ok.
Try to save it as hires screenshot. MRQ needs more resources.
Well, I guess I have to upgrade my PC to be able to run animations B(
So UE5.1 is having issues with movie render queue and panoramic renders.
Suddenly the camera only renders black frames, I have to delete the camera and place a new one for the black frames to disappear
It's totally dark, can't see anything but stuff is there. It's like panoramic in 5.1 is setting the exposure settings to low
And it's giving errors
"Multiple cameras exported but no render pass format found"
"Multiple render passes exported but no camera name found"
Just weird
in the finished render my character is floating a little bit. How can i fix that? First image is the camera and 2nd is a ss from the finished render.


Today is my first day delving in Sequencer, and I've already watched multiple videos; however, I have only one task I aim to accomplish: string all my custom animations together into one long shot so I can make a video showcasing an animation set I'll be selling on the Marketplace. From what I can tell, the max length of a shot can't be beyond some set value.
How can I make one long shot of all my animations? I would think I could simply extend the shot length, but I can't seem to figure out how to extend the length to any arbitrary length.
I've watched a few videos, some of which are by "3D Education with JC" on YouTube, but none seem to address my specific question. (Perhaps the question is stupid because I've only just delved into Sequencer today.)
I may have just answered my own dumb question.

Try game overrides in MRQ and disable the LOD options, try to experiment with all of the options. I did a render of an huge island last year with almost million trees. In the studio we had great workstations, RTX3090, 128GB RAM. And it I ran out of ram :] I found the solution was to disable "Flush grass streaming" . Check out this option here: https://docs.unrealengine.com/5.1/en-US/cinematic-rendering-image-quality-settings-in-unreal-engine/

Adjust the picture quality of your render with Movie Render Queue's Image Settings
What does the game override option do?
Does anyone know why an image source EXR is not casting shadows? ive activated the dynamic shadow, but there are no shadows

What are some best practices to create scenes in a moving vehicle like Train or space ship? I realized I would have to make either the background move based on the spline OR keyframe the vehicle along with the character. I would prefer the latter as it would take a lot more resource to make the world move, but I realized that the character won't stay on spot if so.
Hello, I'm trying to use the MRQ High Resolution. When I set my camera exposure to Manual, the renders are all black. Using 5.1 and 5.2. How can I set my MRQ High resolution so the renders are not black?
my High Resolution setting in MRQ renders are coming out black. How may I fix this?
If turn ‘off’ High Resolution in MRQ and set the camera exposure “Auto Exposure Histogram” the render looks good. But I need to render 16K with High Resolution 16384 x 9216.
These are my settings

If I try an render without High Resolution, UE crashes. I require High Resolution in MRQ.

Hi, I'm sure I'm missing something really simple, but is there a way to make Blueprints (particularly the Event Tick event) run during Level Sequences? I've got a simple "look at the camera" blueprint for these eyeballs, and I want it running during playback of the sequence I've made for this video.
It works great when Simulate or Play is running, but I don't think that'll work while exporting with the Media Queue, will it?


oh never mind, i guess it works.

Hey all!
Does anybody know if its possible to use screen precentage scaling in movie render queue ?
anyone?
type r.showflag lod 0 in console and see if issue persists in editor
the issue isn't even in the editor
just in the final render
yep, try anyway
and how can i disable it again
when wanted
and it didn't change anything about this
just some trees disappeared lmao
showflag.lod 1
to turn off
they are likely not nanite meshes which lod 0 requires
but the character is still not floating in editor but floating in render
yeah not sure, you may want to just try to move it down.
the weird thing is
i made a different render for a different scene and there he wasn't floating
is it a keyframed animation or an actual character with root motion etc
so you used hte take recorder or something to move them or are you hand animating the root transform?
i just add a walking anaimation
and keyframe animate the body
it's transformation only
i mean it works just fine in all scenes
ah, unless you show the exact frame or a clip of the behavior, not sure - you'll definitely have issues with keeping him attached to ground though i think

the behavior in editor and the behavior from render
nevermind i found a workaround, it's just not working in this scene so a workaround is completely fine for me in this case
still thank you!
sure
How can you activate the panoramic rendering in movie render queue to rotate with the camera?
Its a huge issue that the panoramic isnt following the cameraes rotation, makes the renders useless for animations
I figured it out with the panoramic issue and the EXR shadow issue 👍

Anyone know why the red marked movements (moving camera with mouse) aren't being captured by the take recorder when you have the Third Person Chracter plugged into the recorder?
does anyone know how I can get rid of these volumetric fog artefacts in Unreal Engine?

@short nexus
Hey i saw you use the camera2v plugin
im having some issues when it try to render, its rendering all the cameraes, but when trying to stitch the 360 images, its giving this error
[2023.05.12-22.36.08:895][810]LogMovieRenderPipeline: Error: Command Line Encoder: [image2 @ 000002544240e380] Cannot write more than one file with the same name. Are you missing the -update option or a sequence pattern?
av_interleaved_write_frame(): Invalid argument
[image2 @ 000002544240e380] Cannot write more than one file with the same name. Are you missing the -update option or a sequence pattern?
You can by adding console variables and using the variable r.ScreenPercentage.
You should up your exposure compensation. It depends, but 1 is likely too low. Also check if eye adaptation is disabled. If not, then your first frames will come out dark and gradually get brighter as the camera “adapts” to the lighting. But that’s most likely not what you want.
hi, is there a way to record the sound from game in sequencer,? Thanks
looks good but the ease out kill the motion at the end, must slow down earlier i think
how can i hide ui when in rendering a movie in the sequencer?
Is there no way to make a 360 camera capture with rotation?
Is there a way to have the cine camera track the root bone of my mesh? Tracking the actor does not have the effect I'm looking for. I want the camera to track my character as it moves around the plane (playing the root motion animation).
In the below video, I set the focal point to the actor, but, as you can see, the actor does not move, so the focal point does not change. But I want to the focal point to be exactly where the mesh is.
Hi everyone. Have you encountered this problem? can't import alembic into unreal anymore. I change nothing, but Whatever I do i get same message

You can attach an invisible sphere to the bone and use the look at track function to that sphere
Could you share the import options you are using with that?
Add an empty actor and parent to the bone you want to track in the outliner. Look-at to this actor instead
Empty actor is in the ‘place actors’ palette.
I need help..
I spent 2 days to render out a sequence, 3 times. A few of The frames keep on going missing.

Please help
I have a very close deadline
Please
Anyone?
hey everybody! I have a question about the manual exposure in post processing and camera! If i change the exposure i can see it takes effect in the Preview windows! But as soon as i start piloting the camera full screen, the exposure does not respond! What could that be?
Thanks, @fresh quiver and @rocky escarp, for your responses. I did as you both suggested, and the approach works well.