#aec-visualization
1 messages · Page 16 of 1
Guys, what can be the issue? I tried everything about light ans shadow quality and also resolution and i got nothing... Same result =/
@sweet fossil Thanks. Would you recommend I do materials in UE4 instead or is uv-ing in max still ideal?
Hello people
I'm coming from offline rendering and want to start to learn UE4 for making enviroment art and other renders.
What would be a good place to start from?
What's the correct way to create a panoramic backdrop for archviz project?
@drifting drift Well you should always setup UVs in 3ds Max, just make sure that if you have any fancy material or shader effects like you said, those will need re-created in UE4. Tri-Planar mapping just happens to be a very common one so easy to find resources on that specifically.
What's the correct way to create a panoramic backdrop for archviz project?
@tribal gyro Use the HDRI Backdrop actor
man, I cannot figure out how to scale my structures for unreal. I exported the mannequin so that I have a reference in 3ds max. I setup the units to cm so it's consistent with unreal. But when I import into unreal, it's a lot larger. I ejected and saw that the player character (fps default) is slightly higher than the standard mannequin.
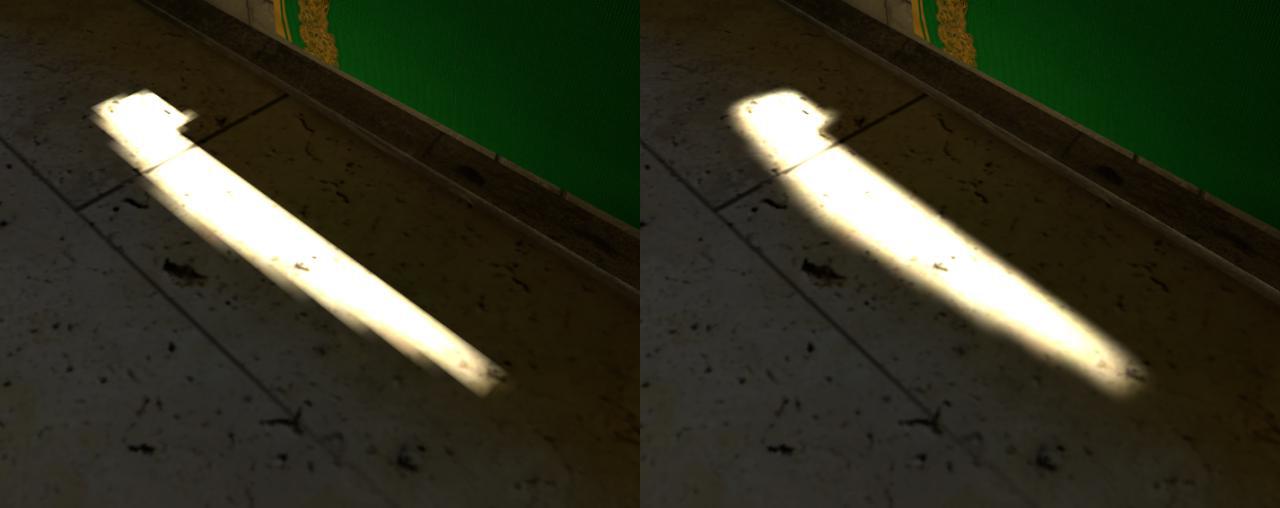
Guys, what can be the issue? I tried everything about light ans shadow quality and also resolution and i got nothing... Same result =/
@boreal meadow I'm pretty sure that's an artifact of Unreal using bilinear filtering for lightmaps instead of bicubic filtering. Here is a comparison screenshot from Bakery plugin for Unity showcasing the difference it can make:
https://geom.io/bakery/wiki/images/1/15/Image2.jpg
@drifting drift I wouln't use manequins for measuring, just make a 1m cube in unreal and a one 1m cube in Max as part of your mesh and see if they match.
Hi guys, My name is Sujayanto, and currently I am really stuck and cannot move any further with a problem. My workflow is Blender (modelling), Quixel Mixer (Texturing), unreal assembly and lighting. Is it correct? The main problem that I am facing for almost 2 weeks with no progress is this. I have tried to uv map a simple cube room with glass on 1 side. I put it on 0-1 space. I export as fbx. send it to quixel mixer and then bam. the resolution is really bad. the line is not crisp. I have tried playing with the uv texture and it bear no fruit. can anyone help me?
thanks in advance
Here's what I get..
@drifting drift I wouln't use manequins for measuring, just make a 1m cube in unreal and a one 1m cube in Max as part of your mesh and see if they match.
@royal osprey thanks dann I'll try it out
although I fixed the scale issue mostly after 9 hours lol
one unexpected thing that works well for scale is to view your place in VR
you will immediatly notice if things are too big or too small (specially furniture)
Is there a way to change ArchvizCharacter walk speed??
@golden cliff were you able to fix your issue? If not I usually don’t map big objects in the 0-1 uv space, instead I just use uvw (or triplanar) mapping and then slap on a tileable texture from quixel bridge. Otherwise you either have to use a huge texture or break up the surface into smaller pieces. Per object textures are good for smaller assets (chairs, books, tables,....)
Anyone knows how to use GPU lightmass in 4.25 ?
Hi! Let's see if someone can help me or give me some advice on that. I'm developing VR archviz and my client would like to show that projects with a webbrowser (Just 360 images not in VR). I've been investigating and I found some platforms used to do 360 panoramas. Would you think that this could be a good aproach? Some examples: Kuula, Kolor PanoTour ...
You can get 360 captures from ue4 using a plugin, ansel i think it was.
You want to have waypoints and move from one 360 to another?
You have a few Wordpress plugins for that, also just for presentiing single 360
Thanks @signal frigate For the moment I'm exporting the 360 panoramas with scene capture cube, is it better to use that plugin?
It probably has more options but scenę capture should be fine.
I have red that I could do my own visualizer with javascript. I know a little bit of code so I will give a try on that. It would be very nice to use several 360 images and connect them like google street view does
But its complicated to use and install. But worth if you want like 360 3D and lot more.
Ansel plugin is that that works directly with nvidia
Hi guys, which tool would be best recommended for baking lightmap texture?
where might I ask for advise on learning for unreal? I got the possibility to get a paid course by my company, and I want to find out what could be my best choice
@sharp vessel Epic conducts training courses for companies if there is a certain amount of individuals in a batch. Check with the Epic representative in your area. If you are in the Asia Pacific region let me know and I can put you in touch with the training team.
hey gang, I have a light build question.
does anyone know why my swarm is failing to build lights?
it says swarm failed to kickoff, please compile from source.
There is an asset in my level that is causing this to happen. I know this because when I remove all assets except for a few basic meshes, the lighting builds just fine.
is there a way to profile my map and find the meshes causing the problem?
@pearl carbon
I dont think the script is available for 4.25 yet... at least I haven't found it
I think it is being integrated into 4.26 tho
https://www.dropbox.com/sh/tfu2wli3t5a2ovg/AABxRGYnCXc_OqgcrQNgQ4vVa?dl=0 GPU lightmass for 4.25.3, from main forum post. page 122
Setting exposure Max and Min to 1 makes my scene all extremely white and bright. Does that mean the light is too bright?
@sharp vessel Epic conducts training courses for companies if there is a certain amount of individuals in a batch. Check with the Epic representative in your area. If you are in the Asia Pacific region let me know and I can put you in touch with the training team.
@twin oar oh but I’m the only one who would take the course and I live over in Mexico hehe, thanks for the tip will check that
hello, i need some help on creating master material and function node for object using multi material ( but not element, just 1 texture with B&W mask for each ).
For exemple, 1 big wall with alot of plastic, metal, fabric,.. panel, all type of material on it, and i render front view to get the diffuse filter and render ID for masking each of them.
now in ue4, i want to add a whole bunch of adjustment node ( power, multiply, desacturation, Hue, Blend dirt,... ) for Each mask in my master material. they all come with different parametter value and boom, a tons of parametter in instance and that doesnt look good for editting.
for now i can only do 2 or 3 mask in 1 single texture, because i only know the "If" and "static switch" and few other node for option chosing. if i have more than 3 mask, i dont know how to work with them.
how would you do it as game dev. is there some kind of function note and attribute node where i can just call it out in instance for each mask layer, like if i have 4 mask, i call out 4, 5 call 5,... and does not depend on how i setup master.
Thanks in advance
does anyone know why the path tracer is not working properly with translucent materials?
Had some fun pusing my pipeline speed in a week with this project :)

ArtStation
I have been collecting feedback over the past few months. The most important point that stood out to me was: 'Your portfolio is starting to look the same'. I decided to look into a variaty of diffrent interior styles. One that stood out to me was a render done by 3DMStudio (ht...
Why is this? High bake + the lightmaps are quite dense
@tribal gyro it's not a lightmap density issue it's a samples issue, you either need more samples or you are trying to correct a very dark lighmap with auto exposure.
samples as in indirect bounces? @royal osprey
default unreal lightmas or GPU lightmass?
in the default engine, samples are hidden in the settings (level scale and indirect lighting quality)
default
ue4 has a GPU lightmass?
in the default engine, samples are hidden in the settings (level scale and indirect lighting quality)
@royal osprey Those are already set quite high
yes, you have to download it and install it
if you have a good gpu it's way faster than CPU
if those settings are high, then it could be the other possibility I mentioned in my first response, how does that look with autoexposure min, max at 1?
It's currently set min and max 1
I try to work as clean as possible when it comes to lighting. no exposure compensation and stuff
tbh nvm i've thrown a spot light there we'll see if that fixes the issue
Your settings are ok for most scenes. Scenes that suffer the most is when there is a lot of contrast. Like very bright but small windows or polygons in an otherwise dark scene.
ill look into it thanks
i'm still stuck in those jagged shadows. I have no idea what is the problem. lightmap resolution is high for all the objects, compress lightmaps turned off(tried with him on as well)...
tried changing the lightmap detail cell and the result is still the same too
on the render is visible that not all shadow edges are like this so it's even more weird to me...
the lightmap resolution is not as important as the density, how does the density look?
@royal osprey thanks for the reply. When you say density, did you mean this?
you could use more on the green stuff and less on the red stuff
basically size those things in your UV
or if they are separate objects give the floor more res
oh, ok i will try, lets see how it goes 😀
@royal osprey it worked! Thank you! You're awesome!!!!! 👍
Hey guys! How are you
ooh
@boreal meadow Dont take what I will say as a fixed ruled but for Archviz, you would generally tend to increase lightmap resolution until everything is red. ( BTW, object will get red when lightmap resolution reaches a texel density of 0.80) There will be cases and objects in which increasing lightmap resolution so much maybe won't be needed though. Also take into account that increasing lightmap density will increase baking times. But in archviz we usually aim for very high lighting quality standards, so...
i'm still stuck in those jagged shadows. I have no idea what is the problem. lightmap resolution is high for all the objects, compress lightmaps turned off(tried with him on as well)...
@boreal meadow Btw, you said that lfloor's lightmap resolution is already high. The thing is that you may prefer to divide that floor into several smaller parts so that you can decrease their lightmap resolution. That strategy usually leads to much lower baking times, that's why you will find so many people that divide their models in very small pieces. It's a better workflow than increasing a unified floor's lightmap resolution to very high values.
@true prairie i see! Thank you for your notes! Splitting the floor(or any object) into more parts also helped! Really appreciate the help!
Correct way to set up urban hdr
not hdr really, I have a panoramic backdrop of a city I need to put around my environment
Right now I have it mapped to a cylinder but the caps are visible.
@boreal meadow you need to change your static lighting scale and indirect lighting quality
for example static scale: 0.5 and quality: 2
lower number for scale is higher quality, higher number for quality is higher quality
good trick is that they should multiply together to = 1
also click the drop down next to build and change lighting build quality to medium or high
its on preview by default
@tribal gyro thanks for the reply man. But i'm using gpulightmass... Does static scale and quality change anything using it?
Hey i was wondering if any of you could share his/her experience with us regarding perforce servers.
We've worked with it already and its great. The thing is, our IT-guy quit and he was the one hosting a private server for our text project.
We are looking for a server to rent which runs perforce and dont know what to rent.
We need about 300GB, 4 Users, and would like to have a server-solution which includes client support in case something happens.
So, does anybody have recommendations?
Running into an “out of memory” error using gpu lightmass on ue4.24. It’s a small flat and I’m not done detailing it yet. Most of my lightmap resolutions are in the reddish zone, some are green. How do I fix it? Gtx1080 and 16GB DDR ram. Is this common or is there something very wrong with my scene?
it is out of VRAM instead cpu ram.
you cant fix the problem without lowering lightmap resolutions and scene complexity now
the new GPU Lightmass in 4.26 will be much better at handling VRAM, though it requires ray tracing
Thanks. I’m considering getting an rtx3080 and start working with raytrace only, am I correct in assuming that scene complexity won’t matter that much with raytace?
4.26 will be out very soon. you can try to hear from other ppl who have something like a 2080Ti about their experience in scenes with different scales
I have a 2070 and I have yet to get that error, but I optimize my UVs a lot
Are we getting any kind of auto texel density tool? I know there is an addon for it, just wondering if there was one planned in house.
Hi !, quick question if anyone had a similar problem. I cant install gpu light mass for 4.25, or rather I'm installing but its like nothing is happening. And I believe I am putting them to the correct file path I don't think that's the issue. Does anyone have an idea of what might be happening ? I have rtx 2060 gpu and ryzen 5 2500X cpu. I did a render with cpu and the temperature hit 95 degrees Celsius, so i don't believe its a good idea to continue calculating with cpu😆
@austere hazel @hallow arrow is right, we've been using GPULM internally on some pretty massive (we're talking gigantic hotel complexes) without any memory issues.
Any pointers on how one would debug this? Other than checking lightmass resolution I wouldn’t know where ro start. Was your massive hotel an interior and exterior project?
I tried splitting up the biggest surfaces in my scene and it doesn't crash now, so to me it looks like more smaller meshes is better than fewer bug bigger, am I right in this assumption?
Hi! If you were tasked with creating a huge residence area archviz project, with several buildings, each building has various apartments you can visit. So the project has exteriors and interiors. How would you approach that level streaming process? Using sublevels with Lvl Streaming Volumes? Perhaps each interior loads a whole different level without sublevel streaming? I need ideas. Thanks!
I'm assuming this is for real-time, not a video. Unreal has occlusion culling on by default, so if performance or memory consumption is your concern, all you need to do is to make sure things are individual assets. (Don't have all the couches from all the rooms in the same static mesh, it's a weird thing to do but I've seen things like this).
@royal osprey That's the issue mostly yes. (real time project ofc). Are you sure it culls everything that isn't visible tho?
Having imported the scene from Revit via Datasmith, I have 3 buildings and when I look at them all the FPS goes very low
it culls what it can't see
I was thinking using LVL streaming to destroy the outside once I enter a building and vice versa, destroy all the interiors when im outside
that is the default behaviour, but things need to be made into units for this to happen
well.. yes and no
More different meshes= more draw calls, but better culling
you can also slow it down if there are too many pieces, but don't group pieces that are far apart
Yeah I see
Think that'll do it without ever touching lvl streaming stuff?
I mean the project is pretty huge
there are other things you can do to oplimize it
like using a a set of 3 or 4 master materials and have instances of that for every material. Reuse the same materials as much as possible to reduce draw calls, and of course decimate/reduce the geometry wherever you can.
gl
@royal osprey using stat scenerendering I can see that mesh drawcall number is huge and performance is slow when looking in the direction of the meshes even when theyre not visible, behind a wall or something
So unreal doesn't really cull them after all
what do u mean?

This is a brief overview of Occlusion Culling and some methods to get better results in Unreal Engine 4.
For more information or questions feel free to post in either of the Unreal Engine Forum threads below:
https://forums.unrealengine.com/showthread.php?86956-PBF-Occlusi...
at minute 1.42 he turns on a console command to visualize culling
Well, it does occlude what's not visible but the performance is still aweful
when looking in their direction
it's not rendering it, but it still has to constantly check if it's there
So might aswell destroy it with level streaming don't you think?
some experimentation is in order..
thanks for ur time
Hi, I would like to make a change of lights similar to this effect: https://www.youtube.com/watch?v=amRDYrLHwpI&ab_channel=MoodLightTV
Do you know of any tutorial or how to do it?
I do it with emissive material. How do I set the timing? And above all, how can I make a single transmitter change in this way from right to left

Sit back, turn off the lights & chillax to this 12 hour fast speed color changing mood light. All the colours of the Rainbow and more…
Change the settings to speed it up or slow it down.
There's no audio - choose your own music.
Subscribe & Follow:
Facebook – https://faceboo...
do you literally want a full screen of color? because there are easier ways than unreal engine if so... it's about 4 lines of javascript to do it in a webpage.
Nono, it must be in unreal because it goes together to an interactive 3d space. Reference step
First, give your material a color parameter, and then in a blueprint that uses the material, you can do something like this:
this is just a random example, tweak the math for the color as you like.
this is the material setup
nothing complex here.
you could add a parameter to multiply the angle by something before the sin/cos to change the speed of the effect
This is the resulting effect of the above...
I did this on the basic shape material out of laziness.. you'd modify whatever material you want to morph colors your scene instead and the blueprint for the actor that you used to place the thing in your scene.
If this material were applied to a long object like a rectangle, if I add the angle, does it represent that it will change from one side to the other gradually?

1 file sent via WeTransfer, the simplest way to send your files around the world
I have sent that wetransfer so that you can see a video (it weighs a little) of more or less the effect.
It does not have a virus or anything, but if you want to check it or tell me a better way to send it that is more comfortable
no.. you need to do something different if you want a long object to have a gradually changing color along the axis.
but that's really just a minor change to the material itself... the rest of the logic is the same
sorry, i don't want to register for the service hosting your download, so i can't reference that, but let me see if i can tweak the material to do what i think you want in the shader.
No need to register, if you look at it, you can download automatically, I will also cut the video to show it here
i'm trying to move all the logic to the texture itself now.. this could take some time, but it will probably be more efficient runtime.
(i mean the material actually)
I get it. Thank you very much for taking all this trouble.
You really help me a lot and I hope I can help you one day
basically what you want to do is take the position in the material as an input to the color chosen...
eventually you'll have a rainbow material, and then you'll offset the starting point over time, and it will appear to animate.
Unfortunately i am new to the language of unreal engine.. i know how to do this in GLSL.
Go ... see if someone can give us a hand
I would use a panner node, moving a hue texture in a uv that is tiled to be really big (so a 0.1 in the tile setting)
@royal osprey That I have been told in other forums. Make use of the UV, however I do not know how to do it or how it would look, any video that you know on the internet that can help this?
Hi, Quick question what is the best way to move the datasmith import coordinates so it aligns with the world objects so it can keep relinking properly as you progress the model? I'm off in the middle of nowhere
I'm very new
For @timber sun
It depends from which program you are exporting and importing from datasmith but if you work on the 0,0,0 axis with the pivot, in Unreal it should take the exact reference
So move it in 3dsmax/Sketchup versus inside Unreal?
In both sketchup and 3dsmax the pivot has to be in the center. In any case, if you work with Sketchup, I would first send it to Max to correct errors
@atomic ether Not for your need exactly. But UVs can be scaled by multiplying them to make them bigger or smaller and they start to tile, the panner node can be used to move the texture along the UV so it appears to change color.
For @royal osprey
I think I understand but, you have no example of how it would be true? I'm something new even in Unreal and I'm lost.
no sorry and I can't make it now, rendering.
OKey! Thks!
This is the panner node, imagine instead of bricks a HUGE texture that has all the colors fading to another, like a horizontal color wheel. https://www.youtube.com/watch?v=24mfLY7aQFQ

What is the Material Panner Node in Unreal Engine 4
Source Files: https://github.com/MWadstein/wtf-hdi-files
of course the texture doesn't have to be huge, just made huge by tyling the uv (making the uv smal makes the image big.. )
Yes I understand! I think it is the best solution we can find right now!
thank you so much!
@atomic ether
This works.
all by itself.
Here's what the material above looks like now...
you can change the multipliers i used.. or transform and rotate the coordinates for different effect directions (like on a diagonal or whatever)
at any rate, this should run completely inside the gpu.
Buah! Great! Thank you very much!!!!
the advantage of this vs panning textures is that the movement of the color shift is coordinated throughout the scene.
so it will appear to go from one object to the next if they're placed in a line.
For example...
i didn't know i needed this material until you asked how it was done, but i'm glad i made it. I'm going to get a ton of use out of this.
@atomic ether I tweaked it a bit: https://youtu.be/2WUgb6Q9h30 this is more interesting to me because the colors have contrary motion and there are variables now to change the scaling and speed.

Testing a material that changes color based on world position over time
Does anybody know how to use 4.26 gpu lightmass, how can I enable it ?
from the release notes "To enable GPU Lightmass:
Enable Ray Tracing and set the Default RHI to DX12 in the Project Settings. (Requires a DXR capable graphics card with Windows 10 build 1809 or later.)
Enable Virtual Texture Lightmaps project setting for real-time preview in the editor.
Enable the GPU Lightmass plugin."
DXR GeForce GTX 1060 and Above
Little confused when to use SunSky versus Skylight etc
@royal osprey and when I press build light ( like we do with cpu) builds with gpu?
@steep shale Today I was late but tomorrow I will try it without fail. It is very interesting what you have sent me! Thanks a lot crack!
cool! let me know how it goes.
i was going to do a mockup of your scene with this material but life got in the way.
Don't worry, if you want, I'll give you the 3D scene already ready to export in case it makes you fun
nah it's more fun to figure out how to do it myself, because i usually learn something trying to replicate things others have done.
For example, just now importing my mesh from blender, i learned that it doesn't know the inside from outside:
should have just made it out of cubes and then i wouldn't have an inside vs outside issue.
flip your normals
Hey everyone!
I want to give back to the community for al the feedback I have gotten over the past year!
Im releasing my project files from a recent project I did over on my artstation store.
The file contains a PDF on how to import the scene to Unreal Engine 4 and the Blender file + FBX
The assets have custom made lightmaps and uv's. This is great for training lighting skills in UE4, as there is no extra work needed to prepare the assets.

ArtStation
Resources - Oceanside project file | FREE, USD $0.00. Project: https://www.artstation.com/artwork/Po23P8I did this project because I have gotten a lot of feedback regarding my portfolio. I want to give back to the...
Hey guys,
I am using Datasmith in order to import models from Sketchup and then replace the textures added in sketchup with Quixel Bridge textures. Works fine for big surfaces, however the smaller 'group' at the right side has this super tiny texture tiling. How can I make that consistent or bigger?
Thanks in advance.
this is how it came from Sketchup (datasmith) after importing...
Modify the material to use tri-planar mapping (world aligned texture)
Can't say for actually modifying UVs in Sketchup (can you even do that?)
You could also generate box-projected UVs in the static mesh editor
@austere hazel I wold consider and rtx quadro instead an rtx 3090
it's kind of hard to buy an rtx 3090 right now, but i'm patient because i want a 24GB graphics card and 10k cuda cores.
Hey everyone! I hope all of you are doing great! This morning I finished my second lighting tutorial for beginners, your feedback is appreciated 🤍
https://youtu.be/2ByANgoQwf4
In this Unreal Engine lighting tutorial series, I share with you what I learned about lighting during my 5 years unreal journey. I hope you find the information in this video useful, your feedback is super appreciated ❤☕
🤜🤛Consider supporting me in making tutorials in higher ...
hey guys,
does anybody have similar problems when bringing light into a scene via HDRi?
Im doing it exactly like in the Unreal course "Creating an Architectural Exterior Real-Time Project" and in his video it lights up the scene with an intensity of 1-2
When i try that, with that same HDRI, first of all its not intensity for me its cd/m² so clearly theyve changed it between verions, and i need to set it to like 50k and even then its a blodgy grey mass, not much of a light
and i cant get the bp_skysphere from the engine content to work with the sunsky object, ive created multipe new projects with and without Raytracingand the sky wont react at all to the sunsky object like it used to
can you send a screenshot of the problem you're facing @unborn pebble ?
why does this happen when I bake my light?
got a baked sun light bouncing up from the ground but creating this ugly gradient in my modules
as u can imagine these are different pieces and not a single mesh
@tribal gyro if you go into the world settings, find the lighting level scale option under lightmass settings and turn it down. the lower it is the greater the build times... much greater. also you might want to check on your light maps as well
make sure the resolution is small enough so that the meshes have enough information to shade smoothly
hey gang, does anyone know why im getting terrible shadows on my landscape? they look very blobby and inconsistent.
I assume it has something to do with the lightmap res?
the problem is that I need the directional light to be stationary so I can get baked GI but dynamic shadows on movable objects for my interior.
Hello everyone, so I'm trying to export my project from Blender 2.90.1 to UE4.26, and every time I try to do that, the weird glitch you'll see in the video happens, I tried with an older versions of both UE and Blender, and the same problem occurs every time.
got a baked sun light bouncing up from the ground but creating this ugly gradient in my modules
as u can imagine these are different pieces and not a single mesh
@tribal gyro whats your ligjtmap resolution for your outer walls?
If I have an apartment that has the same type but mirrored , is there a quick way to show it? Like a mirror post process effect or whatever? Or do I have to create it again?
Anyone point me in the right direction to get clouds using sunsky?
Hey beautiful people! Today we got 2k subs and here's part 3 of what I know I'm lighting with UE4, I hope you find this episode useful! I look forward to see what you guys will create! Cheers https://youtu.be/fcNNAQagYT4❤️

In this Unreal Engine lighting tutorial series, I share with you what I learned about lighting during my 5 years unreal journey. I hope you find the information in this video useful, your feedback is super appreciated ❤☕
🤜🤛By getting us coffee you help creating these tutorial...
@timber sun using sky_sphere and increasing cloud opacity creates clouds for me 😄
@thorny mirage I could not get clouds either.. in 4.25
in previous versions I could.
@thorny mirage I could not get clouds either.. in 4.25
@royal osprey weird... :c
Hello! I am looking this blueprint graph. In the tutorial, it pops up when double clicking the datasmith scene actor. For me, it only opens a screen that shows some default values of the scene actor
any idea what might cause this
Is it possible to use vr headset with ray tracing enabled for architectural presentation ?
Is it possible to use vr headset with ray tracing enabled for architectural presentation ?
@idle mulch
Depends. Shadows and reflections work relatively well. Ambient Occlusion doesnt. It thats activated you'll only see it in 1 eye, the other will have baked lights and thats a rather shitty look
@unborn pebble thnx for the info much appreciated !
Also its not really FPS friendly, best way is to combine baked lighs with some Raytrace touches here and there.
Im working with a 2080ti and have to be careful with it so thats speaks for itselfd
Lol so let’s not talk about the performance with my 2060 😆
Not a good idea to do raytraced VR on a 2060
guys, where can i find specific plant species?
real timed raytracing makes me go 
What do you think ?
guys, where can i find specific plant species?
@ripe tartan quixel bridge or epic games marketplace
@thorny mirage nice !
Only the second photo seems kind off to me but nevertheless it’s just the detail, maybe it’s the white structure in the right, in my opinion it might be too white
Again it’s a minor detail, just feedback hope this helps !
@thorny mirage thats very nice, good work
@thorny mirage How'd you make that beautiful sky?
Thanks guys
@unborn pebble just normal sky sphere and set cloud opacity higher. Then some atmospheric fog and exponential fog
ok id have to try that, i cant get any sky to work in my raytraced project
guys, i want to be able to set this to pause but i cant pull any reference to the sound... Any ideas?
What if I need to make an entire apartment building but they're all pretty much the same.. how can I fake the height from the balcony without having to go and actually add furniture and design every single apartment there?
Hi everyone ! Revit users who moved on 4.26 may have noticed new buttons in the Revit Datasmith Addin :
This is the first experimental beta of what will become Datasmith support at runtime. We are currently looking for people to test out this feature and help us shape it further. If you are interested, please sign up at the following form https://forms.gle/Rjoh1iysPgBqQkex5 and we will contact you to provide technical information and guidance. Cheers !

Google Docs
Sign up to participate in focused discussions about datasmith runtime which will be available as an experimental technology in Unreal 4.26
thanks, i'll share this with my work, big DT department using revit, sending to us max/vray guys, and making our lives hell lol
Sounds like a perfect use case @cyan ether 🙂
Applied on behalf of my work too - done similar projects using "another" engine's toolset that shall remain unnamed. Really looking forward to the Datasmith alternative!
Hi, share with you this Scene I’m currently working on to test and learn UE4’s capabilities for high quality Previs, interactive Archviz and Virtual Production experiences. https://www.youtube.com/watch?v=ZM1fhLP1CvY&ab_channel=Edubais
Unreal Engine 4.24, GPU lightmass, 60fps render in Realtime with Nvidia 1080Ti.
Scene I’m currently working on to test and learn UE4’s capabilities for high quality Previs, interactive Archviz and Virtual Production experiences.
Escena en la que me encuentro trabajando para p...
this looks awesome 🙂
thanks!
that's pretty insane, well done!
Hi group. Novice to intermediate UE4 user. My focus is almost 100% photorealistic cinematics.
Can anyone recommend a really good test scene in the Marketplace for testing lighting, especially ray tracing?
Hello everyone i m bit new to arch viz but i made a test scene where i wanted to test real time lighting and no ray tracing. The thing is i want to make day and night cycle in a scene. I made also to be able to turn on/off lights and open doors in my scene.
I would like some opinions about the lighting mostly.
Here is a download of my baked project its 1Gb download and 2.6Gb unziped
https://e.pcloud.link/publink/show?code=XZQBUZAruiplRf0fXEA9B5aLgaOkcxmPN7
pCloud
Keep, share and access your files whenever you need from wherever you are. Create a free pCloud account and make your life easier.
Anyone figured out how to stop ray tracing translucency causing flashing?

UE4 Dynamic lighting and cinematic quick test.
Sound from
Borrtex: You Me Soft_Piano
@bigalek
you need more indirect lighting for better shadows. you could try hard baking with the sun dynamic but separating the scene into levels for a day and night scene.
No man i will stick to real time, baked is easier to get better results i know that just i need it in real time. Thx for the feedback 😉
Does anybody have experience with Octane for unreal?
i'm having problems with the camera where octane rendered images have a different angle or sensor width than what unreal renders.
But its correctly implemented as far as i can tell
Who here is using raytracing? Have enabled RayTracing, set default RHI to DX12 and enabled several RayTracing features in my Post Process Volume.
My noob question is how do you actually view changes to your settings? Is a 'Build' necessary or by default should any changes to settings be reflected in your viewport in real-time?
@median summit you can see it in realtime if you have the correct settings and hardware.
https://youtu.be/BEBEiNJ875g Here is a clip form a current work in progress. I thought I might interest some of you as Its the first project I have done using full ray tracing, no baked anything, no reflection captures. All GI, Reflections, translucency is ray traced, all screen space effects were disabled. Its done using 4.26 preview and an RTX 2070. I am really impressed by the improvements to the final gather GI in 4.26. It seems much better than 4.25. The video was rendered out using brute force GI with 4 bounces. Its very exciting to see how quickly this is being improved and perfected by Epic.
@royal osprey ok thanks!
@paper crest that is beautiful!
@paper crest thanks for posting. Is there a reference somewhere documenting Raytracing improvements in 4.26? I assume since you were using Brute Force you were not rendering in real-time. Would love to see a render using Final gather.
Have any RayTracing experts tried to create caustics effects from reflected or refracted water or glass materials?
Is this even possible using the official release of UE4.25? Or is it necessary to compile an experimental version from Nvidia? https://news.developer.nvidia.com/caustics-available-this-week-on-experimental-nvidia-branch-of-unreal-engine-4/
Here is a comparison of Final Gather vs Brute force. You can see the brute force has better secondary bounce lighting
@median summit
The first image is brute force, the lower one is final gather

DLSS is a new and improved deep learning neural network that boosts frame rates and generates beautiful, sharp images for your games. We're joined by Richard Cowgill from NVIDIA who will demonstrate how the technology can be used in Unreal. We'll also dive into RTXGI which pro...
Check out the above video on for info on advanced ray tracing features that are available in the nvidia branch
My project will be a realtime VR project but I am using the brute force rendering for the still images and video that are part of the package. The VR project will have everything baked for performance.
@paper crest Thanks for posting! Have you been able to access the Nvidia branch? I keep getting a 404 even after linking my github. This is what I am hyped about https://www.youtube.com/watch?v=ZefvmV1pdP8&t=6900s
DLSS is a new and improved deep learning neural network that boosts frame rates and generates beautiful, sharp images for your games. We're joined by Richard Cowgill from NVIDIA who will demonstrate how the technology can be used in Unreal. We'll also dive into RTXGI which pro...
I haven't tried to download it yet so I cant help there.
Hey, quick question about DatasmithAreaLight actors. How do I set their mobisity?
I can see the construction creating the component, but I don't see the component in the editor.
My caustics decal is only visible in Unlit mode
Once I go Lit it's invisible. Any ideas?
Seems like there is no point in baking shadows of one can generate high quality renderings with raytrace
What about the vray baker? Is it any better than the examples above?
Beautiful render @paper crest
If you can afford a fast RTX card and you dont need to run it in VR then I dont see the need to bake GI anymore either for these kinds of projects. My rtx 2070 is not really fast enough to run scenes like this at high resolution, I only get around 20fps at 1080p when using final gather and it drops down to 4-6 fps for brute force. I cant wait to upgrade to a 3080. The last time I tried Vray for Unreal it was crashing on me a lot so I gave up. The new GPU baker that is included in 4.26 is the next thing I'll be trying. It looks great in my initial tests and other people are getting some amazing results with it.
Anyone here using blender?
I'm modelling a door but I'm not sure how it translates to unreal.
Are the dimensions here accurate in unreal engine?
@paper crest the new GPU baker is pretty cool but it had a limit of 256 lights last I tried, so it was a no go for me (I'm doing something huge)
@real niche the dimentions should be fine in Unreal
Alright thanks
@real niche enable back-face culling in Blender, just to make sure your normals are pointing the correct way.
Hi, I'm trying out the UE4-NvRTX build by Nvidia. It was said in the documents that emissive surfaces are supposed to behave like lights. However, emissive surfaces don't seem to be casting shadows. Does anyone know anything about this?
@whole yacht that must've taken you ten... hours?
Do you guys recommend using the HDRI Backdrop plugin? I'm a little confused about how it works.. do I delete the sky light that is already in the scene by default?
@tacit tapir no actually just 1hr😅
@wicked willow depends on wat you want to do. Keep the sky lights light but set it to movable and mess around with it’s settings till its satisfying to u
Having a big exterior scene with 13 buildings. performance is pretty bad when looking in the direction of all of them. Also baking times are too long. What are some way to optimize this? What do urban levels in games do?
what about culling distance volumes?
I'm having trouble. I have a SunSky along with two DatasmithArea lights infront of windows, but the SunSky always seems to blow out the scene. Just where is the light component that AreaLight creates, is it not in the details panel?
Another thing, There is a Box Reflection Capture in the ArchViz Interior Learning project, but no static lights? What's the point? Raster reflections are completely black except for the sky light through the window. Is that intentional?
i cant seem to get the volumetric light map to give me anything information when i enable it in the visualize tab..... ive baked mylighting , even adjusted in the world settings... but nothing! I have included light mass importance volumes and LightmassCharacterIndirectDetailVolumes, is this visualiyer broken in 4.25.3?
is there something in the project settings that i must enable?
ive even placed volumetric lightmap density volumes... im running out of ideas... super annoying
@paper crest do you have dlss
@mellow crater nope, I haven't downloaded the nvidia branch yet. I read that other people were not being granted access to dlss so I didnt bother. It would be a massive help if it was available. I'm just going to upgrade my GPU to a 30 series as soon as I can get my hands on one.
i just applied
😄 they want your estimated release date of the game, and the name, and the steam page or a youtube video
😭
i gave them 10 pictures lol
est. date: n/a i typed in 😄
@paper crest
Is there a way to import a scene from Blender, but keep relative locations ?
I tried usind blender to unreal add-on but the objects dont keep location
there are several blender to unreal addons
have you tried official one? (on github) @naive spruce
to be honest, I have yet to figure out how to export multiple meshes like that, but no success so far. I had fuzzy thought there's addon that lets export meshes to ue4 placing them in world properly, while keeping object origin. Maybe that was just future feature of some addon. The one I'm using is called blender to unreal engine, has a lot of options, but no solution there either, it can either move meshes to zero world origin (scene/fbx) or keep meshes in world position, but object origins are in zero origin sadly @naive spruce
excuse me, theres a chat focused on materials in this server ?
to be honest, I have yet to figure out how to export multiple meshes like that, but no success so far. I had fuzzy thought there's addon that lets export meshes to ue4 placing them in world properly, while keeping object origin. Maybe that was just future feature of some addon. The one I'm using is called blender to unreal engine, has a lot of options, but no solution there either, it can either move meshes to zero world origin (scene/fbx) or keep meshes in world position, but object origins are in zero origin sadly @naive spruce
@lucid orbit Tom Shannon released a Maxscript that acts as both an exporter and a way to copy/paste object locations - it could be that you're thinking of. (TS_Tools)
Hey! I am looking for a way to incorporate both an environmental cubemap in my project but keep the unreal sky sphere for the sun position and godrays
Right now I have a sphere mesh with inverted normals around my scene so I can have the environment background but it hides the sky BP
Hey there,
Did anybody else experience color shifts when using raytraced Transluceny:
I'm attaching two examples of my scene, one is grass with raytraced translucency the other is rasterized.
I've already tried messing with the grassmaterial to get rid of the redness, but it didn't help.
Any ideas?
in the upper one you can see a lot of red. Gets worse if you look at it from inside, through glass....
Working with reflection cubes ... What is the correct way to fix this? If you look at the floor you can see these rectangular patches that correspond with the size of the reflection cubes I created
here's how they look in the top view
you should have one that covers everything, then smaller ones
@royal osprey ok that did help they are a little less than before but still noticeble
what about this difference here ? the box transition distance?
i already increased it hoping it would produce a more gradual falloff
hmm no idea, are you sure it's not just a shadow?
I don't think so . I switched to Box Reflection because when I used Sphere Reflection I was getting a similar circular border at the edges of the rooms. When tried to make the sphere radius bigger than the room to get rid of it I was getting reflection of items in the adjacent rooms?
but I didn't know about making one giant reflection capture to cover the whole area. maybe that could fix the problem with the sphere captures..
I was watching this about photo realism in blender. I was wondering how UE compares and what settings I should look at it achieve the same natural lighting results
https://youtu.be/m9AT7H4GGrA
Important Note
The Filmic addon is no longer required and will actually potentially cause some compatibility issues with other addons.
Filmic is now included with Blender by default and can be configured via the color management panel.
Discover why the restricted dynamic r...
there plenty of archviz tutorial on ue4 learning site. they walk through what setting usually the goto and what to achieve photo realism.
@prime summit unreal engine uses filmic tonemapper by default so it shouldnt be an issue
guys is that okay to use two materials?
Hard to show in an image but the default 'time of day' sky flickers....I need this to not happen, it looks awful. I have played with a lot of settings.
How do I make it stop flickering?
Fixed : Anti-Aliasing settings by default mess with it, setting AA to medium stops it (good enough fix for me for now)
Hi yall. What's the best way to get a high res 360/panorama from UE? Do you guys use ansel too or is there a better option?
Using ansel here too
Can anyone help me guess at two why I'm getting these pixelated shadows?
I tried scaling up the light mass resolution, which I assume is the 1024 in the screenshot. Scaling to 2048 changes nothing.
A note of importance, - I constructed the walls as one giant mesh, and scaled the UV's up in blender past their bounds. Not sure if that causes problems.
i think you mean lightmap resolution
can you send a screenshot of your lightmass settings?
I haven't changed them, they'll all default
Yes, light map resolution. not light mass. I'm not sure what lightmass is, exactly.
I'm having bizarre issues where the lighting starts dark, but fades into brightness
lightmass settings are essentially the paremeters that control the quality of your lighting
the reason your lighting is low quality is because the default settings are very modest
also i imagine you are building your lighting in preview mode
The screenshot was production mode
ah ok
high is fine until your finaal build
production has a significant build time increase for a very small quality gain
I can't seem to be able to control the lighting in ways I want to. I get light leaks in the corners of the wall, artifacts, and I can't manage complete darkness in certain areas
yep that has to do with your the low sample count from default lightmass settings
try static lighting level scale 0.5
num indirect light bounce 10 as well as for sky indirect bounce
indirect lighting quality 3
and smoothness 0.9
also disable compression
you should see huge lighting improvements
you can scale them up from there to fit your needs
yeep
Let's see what I get on high quality
you can always try GPU lightmass for vastly faster lighting build times
depending on your graphics card
GTX 1070
yeah should be solid for gpu lightmass
Where's the option for GPU? Seeing as my build time won't move past 0%
Im pretty sure its a plugin that you enable
but the builds normally sit at 0% for awhile before going up faster
its normal behavior
Those settings didn't help the walls much
did the build finish?
I think that may be the problem
The walls aren't modular
They're one giant mesh
I scaled the hell out of the UV map
yep
i mean density looks good to me
floor and ceiling are low
but everything else seems fine
Strangely the floor and ceiling don't have artifacts
odd
I don't know if you did this but you need unwrapped UV's on your 2nd UV channel for unreal engine lightmaps
I managed to get away without doing that for other objects. I assumed unreal makes a new channel automatically for lightmaps
yeah I think unreal engine is pretty good about auto generating lightmap uvs from your channel 0 UV's now
I think you're right about the bad 0 channel
yeah I think unreal engine is pretty good about auto generating lightmap uvs from your channel 0 UV's now
@pale prairie doesn’t unreal generate a light map from whatever channel you specify as light map source?
Say you have a UV for textures on 0 and light map on 1, then setting source to 1 should result with UE generating bakes from 1 to 2(default)?
Just wondering if one should use the same destination index as the source or separate them. In my head setting them as the same would override the source wouldn’t it?
if you created a good lighmap UV while modeling then at import untick "generalte lightmap UV" and it should automatically use the one on chanel 1 for baking (channel 0 for texturing) If you didn't untick that it will generate a third channel, from what channel you have as source and assign that for lighmap.
Right. So if I carry over a light map from blender in ch1 and set destination to 2, then all should work as expected, yes?
not sure what you are expecting 🙂
Well I was just trying to wrap my head around whether the destination index denotes the space where a light map is baked to - meaning whatever was there previously is replaced with the baked map during light baking. So Unreal docs mention that if you’re using index 1 from auto generated, then your destination index should ideally be 1 as well. To my mind - it sounds like baking would replace that? Or are those two separate things?
That’s sort of what I’m trying to understand.
there are two common workflows.
- have only the textue UV, then have Unreal generat the lighmap UV from that. (so it should be source lighmpap index 0, destination 1)
- make both UVs in 3d app, and untick "generate lightmap UVs"
In some cases you might have more than one texture UV, (sometimes you need more than one for texturing reasons) so in that case you would have to select a different source and destination depending on what UV you want as source.
I see. So basically the destination should be above whatever index number that is your last UV used for texturing.
Gotcha. Thanks!
you really don't have to touch the defaults unless you have more than 2 texture UVs or for some reason Unreal screwed up. by default it's set as 0 for source 1 for destination. And by default if you untick generation it will use 0 for texture 1 for LM
No I got that. I was just asking for my own education and so I understand it more. What I do now is pretty much the same - I import meshes with texture UVs at 0 and LM on 1, and just use it that way. What slightly threw me was the destination index and it’s purpose and whether it overwrites anything.
about the overwriting I'd have to test
but I've never experienced it, since the defaults are pretty smart usually.
well acording to the documentation, it does overwrite
if you select the destination to be the same as source.
so you can change the padding and pack it better if it was poorly packed.
Understood. So, useful for re-generating a light map
Since we're talking LM. I'll repost my question from #datasmith :
Describes special considerations that apply only when you use Datasmith to bring scenes from Autodesk 3ds Max into the Unreal Editor.
"every time Datasmith imports a geometry object from 3ds Max into a Static Mesh Asset in the Unreal Engine, it uses two UV channels to generate the lightmap UVs for that Static Mesh"
Two? What are they talking about?
@steep ridge Think they just mean there is one for normal textures and second one for generating light maps
@rose comet, thanks for replying. I don't think that's the case because:
"This results in a set of UV channels numbered 0-4 in Unreal. Finally, the import process creates two additional UV channels, 5 and 6 in this case, for the auto-generated lightmaps."
They explicitly say it adds two channels, and I've never seen it do that. If I import an object with 3, I'll get 0-2 plus '3' auto generated. Is it outdated docs?
This has been really bothering because of a bug where I couldn't set the Lightmap Index to greater than '3' on a model exported with four UVs.
I’ve never see more than one
Why does this happen to my models when i import to unreal? on 3ds max using v-ray it does not have that issue... 😟
If you have a normal map, try inverting the green channel. some apps read it different than others.@boreal meadow
My shadows are always jagged. no matter the lightmap density, bake quality or world settings. How can I fix that?
proprty of the light actor
u sure?
are you sure that light is static?
yeah
Apparently it was all too low texel density on those areas
I always find I need to bump the lightmap resolutions higher towards the red area to get nice crisp shadows.
it depends on the material, but yeah
shinny stuff, dark stuff, stuff with textures with variation, look good lower than red.
Optimal FOV for Archviz?
Depends if it is a beauty shot or client wants good overview of the scene... I'd say 45-80 are "safe" values. I usually use around 60 for 80% of the work.
"what looks good" I fiddle around with it a lot depending on the shot. A bit wider shots for interiors than exteriors. Having said that what Gorr mentioned also applies, a beauty shot will usually be a tighter shot, (the typical rack focus transition from a foreground item to the background).
anyone had this issue with datasmith assets where applying a different material breaks it? Highlighted mesh here is from a datasmith import, I've dropped my asphalt material on it and it changes to a checkerboard?
Am I using light portals wrong? Window is a static mesh. Top is shadows disabled on the mesh, bottom is shadows enabled. If I'm understanding light portals correctly there should be four light beams coming through the window on the bottom screenshot.
I used UDIM workflow for the first time with max/substance/unreal. Without it, everything is fine, but with it ...
Everything is darker as well. Some walls are the colour they were supposed to be, another on the exterior has become super dark. None of this happened when not using UDIM workflow.
furthermore, the exterior walls use one texture and for some reason one wall has this yellowy tint to it but another does not. Again, only happening once I began using UDIM
it mentioned in one of the logs that lightmaps were overlapping. Since I haven't done anything with those (never set them up to begin with, so everything is being done auto by unreal), is this the culprit?
@sweet fossil Is it actally compiling the material? You'll probably see an error if you open the asphalt material.
@drifting drift I still don't understand why I'd use VTs.
@steep ridge, the material is already compiled, I was using it on the other road piece there.
where are the shadows? nothin gthere. totally dead
what i tried:
higher light map resolution.
using a default cube from ue4 as a floor. still the skylight doesnt create shadows on the default cube (statismesh)
skylight and sun do cast shadows.
i changed lightmass settings.
and perhaps other things, don't remember.
is everthing static? (including the sky light)
the floor is huge, if you don't have a very very large lightmap you won't get any baked shadows.
@royal osprey when i use a point light the floor gets shadows. skylight doesnt. i also added the initial main text above.
If you have the walls separate from the floor try doing tests of only floor and block.
is that window a hole? does it have a glass? is it a separate object you can turn off shadows?
I had a problem like that once, turns out the skylight was movable..
it might be something silly like that.
floor and walls are one mesh. that window is just a hole, no glass.
lightmap is 2048, blue colour
standard is 64
Okay, but 2048 is the setting in unreal?
I’m wondering if your source lightmap UV might be small (256/512) and when unreal ups the res from the original AND has to bake onto such a large room - your shadows are THERE but are way too big to look like shadows and may just end up looking like tint.
o.O wait
That and you really should separate floor and ceiling from the main walls at the very least
I’ve had all sorts of issues myself with this. I’m doing an apartment for my game and I’ve had so much crap to deal with before I found the “right” thing for me
Okay when you are in that UV mode in blender, hover over the selected mesh and click U, then choose the lightmap option and tell me what resolution is shown in the dialog that opens.
I’m using it and they come out near perfect
512
Right but if your current UV or whatever you mapped in blender is actually 512, and you tell UE to use that as source, then UE would be up scaling. I’m thinking that might involve some weird stretching
Cause you are using 4 times the resolution in UE
where cna is ee the uv resolution in blender tho?
It’s far better for you to split the floor for a test, just use lightmap pack in blender on it, choose the res as 1024, import it to UE and then raise it slightly above the existing floor so it covers it. Then change source index on the new floor to 1 and destination to 2, resolution to 1024 in UE as well (not the minimum res though) and then do a bake and see what’s different.
Cause then you use blenders autogenerated UV’s and it’s not a 1:1 test
Not blenders
UE’s
so using ue4 cube is not good?
Well isn’t it logical that if you are troubleshooting a blender mesh and blender made lightmaps in UE, that you use another comparable blender mesh as a test
Otherwise there’s no point
i dont understand how that is related to the default ue4 cube
It isn’t that’s my point
huh?
I would not use any UE meshes because your actual room isn’t from UE
It’s made in blender
ya but if the ue4 cube dosent work, then its not lightmap reoslution
That’s not true
what how?
Because I can guarantee you that I can make one cube in UE and one in Blender - both identical and make it so that the blender one has shit lightmaps and UE has good ones or vice versa.
You want help, but you don’t want to take 2 minutes to try out something that helps troubleshoot.
i just thought that this is a quicker way
When you’re troubleshooting stuff, you can’t be taking shortcuts
Or you won’t end up solving the issue
Also make sure you recalculate your normals on the meshes if you aren’t seeing shadows, sometimes if you use the solidify modifier and screw with faces and all that - you can end up with inverted faces which will fuck up your LM’s
@mellow crater I’m gonna be on my pc in 2-3 hours or so, if you’re still having issues, I can grab the room mesh and light settings from you and test on my UE and see if I can help in a more involved way.
K I’ll try it out for you when I’m home.
:< ok.
Hello guys. i used an HDRI image for the sky but now the sun is behind the actual image. Is there a way to make the sun actually visible?
rotate HDRI just a bit ccw if it is behind that larger building on the right??
Hey rendering gurus
question, the ceiling had a white material. though it comes out very dark almost unlit.
it is all raytracing,
I'm working with sun and sky but i just can't get the bright indoor lit look that i want
i tried arealights and that gives me the look i want
but i want to change on the fly from daytime to night time
I don't see a sky light in your scene
its in the sun and sky
oh
do you have your glass in a separate layer?
just to test if you can remove it and see if light comes in
yaa it really difficult to get the proper look with the sund and sky thing
this is what happends when i remove the box reflection capture
but then the overall scene is way to bright and all the shadows are washed out
sphere or box
then add another one in the center of the room, smaller one
sphere is fine
make sure both are centered in the middle of the room
or near
but not on the floor, like at eye level
hmm
are they all movable?
skylight all defaultsettings
yeah
but also the blue should wbounce way more
i feel like the raytracing is a bit faake in unreal
like not truly RT, like in otoy octane or Redshift
all the tuts on yt are also using area lights in the windws
it's all kinda new and lot's of settings to move around
mabye it is just not optimized for sun and sky
maybe the skylight has "raytracing" disabled
how about increasing intensity?
nah it just washed out everything haha
I don't see raytracing in your scene
imma build it fromt eh ground up
not in the reflections anyway
are you sure you have directx 12 and raytracing enabled?
yeah I see it, your floor is just rough
all my scenes are baked so I'm out of my confort zone
@mellow skiff try 'force no precompute lighting'? Maybe some bakes are throwing you off?
Hello peeps, I have a bugbear.. I'm seeing these light bleeds on high/prod bakes, and wondered if you've got advice?
As you can see the bleeds in #1 do not correspond to sun direction in #3, and my LM and settings are in #2, I do not see issues like this in the main "decked out" room, but in empty rooms - this is happening
Close up of the bleed(??)
^ one more piece of info - the last image is detail lighting, so the reflection is from the material
I.. uh.. solved it myself.. But just for anyone in the future - box reflection captures can cause this if their bound exceed the room they're in. Additionally - they create light artefacts like so:
This is a little contradictory since the general advice is to make them smaller in radius for accuracy, but that then causes these lighting conditions which is a bit weird..? Any tips on how to not let a RC fuck up my lights?
The workflow I use is one huge spherical that covers everything, then extra sphericals for each area, I only use box captures if there is a big flat shiny area (like a very shinny wall or even a mirror) I put a box capture right on it If I can't use planar reflections or raytracing.
@royal osprey - ive got a plan for using polished concrete as a floor and there’s plenty of wood veneer in places. So you recommend to slap a huge spherical and use granular ones for other objects?
Everthing should be inside at least one or things look dark. Then detail stuff to simulate different areas.
Has anyone used Meshmatic with unreal engine?
Hey guys I could use some feedback on a project I'm working on .. Please take a look if you have time. Thanks . It's all baked lighting no ray tracing https://artbywaqas.wixsite.com/waqas/apartment
waqas
Hi! I'm working in archviz project. I bought some wc assets. They seem to be properly unwrapped but when I lightbacke it this is the result
Does anybody know why this grayed zone appears and how can I avoid it?
are you in production in the bake settings? @broken radish
@wicked willow the thing that sticks out to me is that the kitchen/dining area is too dark.
^ more bounces?
@royal osprey hmm yeah I was feeling that too .. I have the Indirect Lighting Bounces already set to 10
I'll try higher. I just don't want every thing else to get too bright too
You might wanna adjust your sun/skylight indirect intensity before adjusting the world indirect bounces
Could win there cheaply
I bumped up the light mass bounces to 100 and it looks pretty much the same!?
I
I'll try the Sun & Skylight indirect intensities next
adjusting the skylight didnt seem to do anything either
how does this look ? i doubled the indirect sunlight intensity
that would a light map resolution fix right?
Does anyone know how to help me with my building lighting problem? Whenever I build lighting for my map it doesn't work
@limpid pivot what exactly happens when you try ?
So it will say it failed and none of the lighting get's built. It stays on 0 for like 15 minutes.
any error messages?
while copying reflection capture i m getting out of memory error. i tried (https://www.thewindowsclub.com/increase-page-file-size-virtual-memory-windows) but again same issue. my pc having 32gb of ram and 2 gtx 970 graphic cards. please suggest me the solution.
thanks in advance.

The Windows Club
If you see Your system is low on virtual memory message, when you try to start memory intensive applications, increase page file size in Windows 10/8/7.
@signal narwhal - that card is 4GB iirc. So 4G is sort of your hard limit even in SLI since memory of GPU’s doesn’t double in crossfire or sli, it’s just shared in parallel so the same number of effective memory. Secondly - you may need to adjust your texture sizes, especially since reflection captures with a high resolution eat a lot of VRAM. A scene with refcaps with 2048 res will use 256mb per reflection capture so you max your video memory out with just 8 captures. And that’s not counting other stuff. That’s how I understand it. I’m not sure how UE optimisations come into play here. But also there are reported bugs about that message being sporadic and going away with engine restart or scene cleanup so 🤷♂️
will try reducing texture size, some of my textures are 4k right now.. Thank you..
Well try reducing the reflection capture texture sizes first before reducing your main materials / textures
ok
hi i reduced all of my texture size 4k to 2k still m getting the same error
You reduced it for the actual reflection captures too or just textures you use on meshes ?
reflection capture m not using any texture. most of the mega scan texture i downloaded was in 4k i reduced all the to 2k
@hollow canopy
Here. Reflection captures grab a picture of whatever they capture as a reflection so they do rely on that and the resolution of it.
That’s what I was talking about.
It’s in project settings.
Put it to 512 or something.
👍
Hi Dann, thats what I did, I've increased num of bounces and switch to high quality on light backing setup. That solved it. Thx for your response
Hey all~ first time posting, I have a question regarding with Revit datasmith to unreal plugin. I import my datasmith file into unreal and attempt to switch the revit materials that came over to pbr materials and they are at the incorrect scale. what would be the appropriate solution or method to solve this?
Hey all getting a weird issue in 3DS Max -> UE4 via Datasmith. Imported two other scenes flawlessly but this one seems to be behaving really strange
The materials didn't carry correctly, they all have an automatic texturecoordinate node set to scale 300x300 for some reason, and applying any materials to objects, even fresh ones I've just created, won't show up on the object itself
They do show up in reflections though;
See the floor there should have a wooden texture applied, but it just looks almost plain grey everywhere except for the reflection
Anyone have any opinions on the best wireless VR headset?
@leaden axle there is really no such thing, there are stand alone headsets and wireless adapters for cable based VR headsets.
You can't go wrong with a Vive pro with the wireless kit. If you want truly portable go with the Quest2, the lenses and screen are fantastic, but the 3d environment has to be optimized for a high end mobile chip. Having said that you can remove that limitation and also use the quest wirelessly with PC-VR even if it's not officially supported. You need a good wifi 6 router, some paid software and time to configure it all.
Hi, to get the maximum quality for a Raytracing rendering, is it better to use the movie render queue or NvidiaAnsel?
@austere canopy, Try 'em
Has anyone here tried to run VR+Raytracing?
I can get a small scene to 90 fps with 50 percent pixel density
Vive Pro + 2080Ti
hi everyone, do you know why when i "hide" the lights from view, the model is still lit up? i'm trying to get full darkness so i can shine a spotlight on a small area. thanks
might need to re bake
Emerging business models for Arch-Viz??
Can anyone share examples of links to architects, builders or real estate developers using configurable unreal models of buildings or communities to market real estate directly to buyers BUT also linked to prefab manufacturers so "ordered" buildings can offer realistic pricing and fast manufacturing and delivery? This would be similar to how unreal is increasingly being used in the automotive and other industries.
I ask this as a manufacturer of prefab wooden buildings in Oregon. I see this sales "model" as inevitable and imminent and want to help make it happen faster. The booming US West Coast housing market is also the ideal region to lead this for multiple reasons but it requires disruptive change in multiple professions.
There are multiple intellectual property, who pays, who owns, who is responsible and contractual challenges but also nearly unlimited opportunities.
I am in discussions about this with the Epic AEC team and also a group of architects and real estate companies.
Anyone seeing this happening?
You have to uncheck affects world, visibility icon is for editor only
thank you!
Hi quick question, I'm new to Unreal Arch Viz and I was wandering about what can I do with the collisions. I have hundreds of individual objects in my scene, do I need to go one by one and make them custom collision? Is there a better way to solve this problem ??
@idle mulch
oh yes I didnt mention it, I want to make the character interact with the environment, and with the auto generated its not possible, to be able to do that I need to make it custom one by one
I found a way I believe though, I'm going to use the blocking volume, haven't tested it though
any ideas why bringing the mesh onto the fps-template "ground" is causing the textures to get "bleached"? I moved it halfway to illustrate the effect. The post process volume and lighting boxes are all large so even the left side that is out of the "ground" area is still within the lighting box
ok I figured out that it's the post process volume - if I disable it or delete it, the textures are then unaffected by ... whatever it is that post process volume is doing.
so I guess the question is - what's it doing? I like how the texture is when post process volume is disabled, however I imagine for photorealism I need post process volume.
hello guys!
can someone tell me, where can i find free furniture consepts? I'm an architect and making render with ue4 but i have a really big problem about this furniture etc. models.
Thanks!
look for free assets in the Unreal Marketplace, You could scour the internet for 3d models (like in 3dmdb.com) but even if you find one you like there is a chance it's either too low poly or too dense.
@sterile flume
design connected has some free samples iirc
Ansel does not work with the latest versions of nvidia geforce 😦
@hollow fox wow! Awesome job! Is that baked lighting or Ray Traced?
hi, how do you remove the "Preview" indicator in rendered videos? i can hide it in editor mode but when i render the video it appears on the materials there.
@wicked willow This was raytracing
Hey guys, I've been learning UE4 and working on this ArchViz project for about 2 years. Would love some feedback! https://youtu.be/esysldCzFgs

build the lighting in your scene

Finally I tried Unreal Engine. It was based on a real apartment project by SuperLimão Studio http://www.superlimao.com.br/item/apartamento-ret/. Modeling and building a scene in 3ds max. Export to UE4 using datasmith plugin.
Hi ya'll!
We're in the midst of a large exterior architecture project. Looking for tips and tricks in using a real life panoramic image mapped to a sphere of the real world environment and blending it with the 3d environment.
Hey people ! The TMtoUE plugin is out of private beta and now available to public :)
You can now access your @Twinmotion projects in Unreal Engine for expanded functionality and customization! #UE4
Try the free public beta ⬇️ https://t.co/gJ6LbQjNxT
skysphere sparks
HDR Backdrop 😉
greetings ppl 🙂 I have a question regarding skylight, raytraced reflections and GPU Lightmass, maybe someone here can help me 🙂
I have a scene with SunSky with all set to Static
My intention is to bake all light, and use only RT reflections. So, after GPU Lightmass bake, here's how it looks on editor: https://cdn.discordapp.com/attachments/221799195806400512/786929034369695744/unknown.png

but if I play : https://cdn.discordapp.com/attachments/221799195806400512/786929175495573565/unknown.png

so the sky doesn't seem to be affecting the light bake (nor the reflections in editor)
in realtime play, it seems to be working RT (there's some noisy stuff happening on the wall on that other room too, leading me to believe its RT raytracing)
raytrace AO and GI are disabled on a PP volume https://cdn.discordapp.com/attachments/221799195806400512/786929944466161694/unknown.png

any help or insight would be great 🙂 thx in advance 😉
Hello! does anyone know how to solve this problem? When ray tracing is enabled, leaves and trees have double geometry. This can only be fixed on a single static mesh by checking the "Evaluate World Position Offset" checkbox in the Details / rendering tab. But I cannot fix it in Foliage Editing Mode.
if somebody knows, I have a problem with texture streaming pool size, I raised the default unreal size to a 3000, but the message doesn't go away. Also it destroyed my lighting somehow, That is a production bake...
Hi! I need help with something...I am using gpu lightmass plugin in 4.25.3 engine version and I get the "out of memory" error. Is this error about hardware limitations?
yoo
i get that too
@frank arrow
I have this problem like a day now and cant find anything
for me happens when a place more than a few reflection spheres
and my specs, CPU Ryzen 5 2600X GPU NVIDIA GeForce 2060 6GB
soo I don't know what to tell you if anyone knows it could help us both
Is someone know how i can get rid of "Ran out of memory allocating" crash when i build light with GPU Lightmass ?
i don't know if this helps any of you, but for me helped with the crashes the reflection. In project settings mine was set to 2048, and I read in the documentation that the default needs to be 128. I set it to that number and didn't have any texture steaming pool problems or crashes. Still have problems with bakes ... I don't have crashes at least now 😛
@dusk charm wait for 4.26.1 or compile from GitHub source
i have a fix for CPU memory there
4.26.1 will come later than usual
thanks a lot @hallow arrow
@hallow arrow i am using the 4.25.3 and I get this error...any idea?
The error message is Out of Memory
thats an unfortunate limitation of how the old GPULM is designed
it is designed to be lightning fast in small scenes with medium num of lightmaps
and then completely breaks down in larger scenes due to memory
GPULM in 4.26 is redesigned to handle this much better, at the cost of 3-4x slowdown in raw sampling speed
But I read It needs Ray Tracing, no?
yes, it needs ray tracing
Ok, thanks a lot for the answers, I really apreciate
@hallow arrow I'm a noodbie to this stuff now Im starting to get into it, sorry if I ask something too obvious because I dont get it 😅 . So you say thos problem will be fixed in the new update for 4.26 or what can we do form GitHub?? we download something from there?
Now I'm using gpu lightmass in 4.25 and my scene is relatively large so I have some of this problems. Firstly I got the texture streaming pool over, and then I got crashes like @frank arrow. So to conclude, for this things to be fixed we need to wait for the new update ??
and again sorry If I ask dumb questions I'm new to this stuff
@idle mulch, you should learn about Version Control in general. You won't need to wait for 4.26, but cherry picking fixes often isn't practical unless you really need a specific feature.
Anyway, how are people dealing with dynamic actors (changing entire wall sections) with static reflection probes?
doesn't seem to be great way to use static light builds with runtime switching sections if you have a lot of shiny materials that don't take planar
you mean Source Control I think, I found a webinar of unreal engine
l will have a look at it, seams important thnx !
@idle mulch It's the same thing.
How do Dynamic Material Instances work with static builds btw?
Oh, I guess they don't exist when you build.
Do animated materials?
You can do animated materials, like a tv playing a video but haven’t played with it yet to tell you in detail. Better someone with more experience answer that.
Can anyone tell me the reason for that? I am using Luoshuang's GPU Lightmass.Lightmap resolution is high.But getting those weird shadows.I baked it in production quality but still facing same issue
Hope someone can help. If I have a persistent level like collab_viewer_p, and i load in and out variations of my scene that are added as sublevels (bathroom A with red walls/ Bathroom B with green walls), what's the proper baking procedure? Do I load the sub levels in the editor and bake individually?
It's a little confusing because i don't want the sublevel's bakes to interact, which seems to be the standard use case.
Is there no way to force sublevels to use separate lightbuilds? Will I have to setup my level variants as diffirent levels that I open?
What lightmap resolution do you guys like to use for larger architectural elements?
Hi guys, I have a fairly general and possibly silly question. Once Im complete with an ArchViz scene and i want to use the level sequencer to output image files as the format for the video. Does FPS matter or will it not affect the image file smoothness ?
@tropic flicker Depends, do you mean the FPS when the scene is rendering or the FPS that is set in Sequencer
If the former, no it won't matter. If the latter than it will affect the playback speed of the result
Yep I meant the former! Great to know thanks 👍
@toxic lintel resolution is irrelevant, it's the texel density that is important. For arch viz I try to keep it just barely in the red. Shinny, transparent and dark stuff can have lower rez.
@royal osprey Ahh thanks, I was unaware there was a Lightmap density view, I'll use that then

As part of a product visualization course at Linköping University I created a digital twin of my own apartment and added some interactive elements to it.
Using UE4's Variant Manager to customize the interior gives you over 2 million different design combinations. The TV can play any video file you choose and the screen emmits light according to...
so im doing an rvt texture on the default rock from starter pack why is the material doing this? please @ me so we can fix whatever happened
how do you guy work with quixel 3d plant asset. some has really bad overlapping problem, about 15 - 25% lightmap, causing the mesh look black spot all over the mesh
i have the same issue with plants
Never used quixel for plants, I rely on these instead
Hey guys
Hello
i'm trying to import fbx file, unreal engine stop responding when importing process reach to 100%
Does anybody know a good asset that has lawned grass? All the grass that I’m finding are for outdoor nature
I had to make my own grass, I couldn't find any I liked either. Made up of a few different sized clups, made out of planes with color and alpha. The material had a world aligned texture to help with variation, the normals were tweaked so the light behaves more naturally and I had a system to applying it using several layers of foliage, each with different fade distances so it didn't fade out noticeably but it also remained somewhat responsive. Also near the edges I erased the main clumps and added smaller ones, so the grass doesn't poke through solid surfaces.
cool then thnx for the information
Hello everyone, I have this problem, please help
Here's the .blend and .fbx https://drive.google.com/file/d/1Bw_1PAqTa-_wAkirdoOMsPUu8lpIQTSI/view
Google Docs
I made both normal UVs and lightmap UVs. I also tried autogenerated but they don't make it better
did you increase the lightmap density?
@zealous cobalt make sure its at least in orange
Yeah it's mostly orange and some red
Oh I actually uploaded the wrong image, this one is from like a week ago when my UVs were overlapping and out of 1:1 space, sorry
This is what I have now
Someone suggested increasing r.streaming.poolsize and it helped in preview, now I'm doing production build
YES, finally it looks not terrible, there are some weird pixelated splotches in dark corners though
if you want we can have a call about this topic. I am currently into it as well.
@cosmic solar cool lets do that
@zealous cobalt check the reflection capture size
I had a problem with the texture size over, and it created problems to my bakes as well somehow
In archviz the default reflection value is 2048, I set that to like 128 and it fixed many things
I don’t know if this helps but it took me a while to figure this out and it’s a stupid problem to have, Check if it works for you
hello guys , anyone knows how can i generate UV maps for all my objects in a scene at once ?
When you're importing there's an option to generate UVs

My friends i need help i am using a displacment sample from quixel and i have this problem
this is supposed to be a tiled roof 😆 , unfortunatley
Hello guys, is there any way through which I can dynamically download a level while running an app?
Hi! I am trying to bake and it fails. It doesn't tell me whats wrong. Do you have any idea were I may start looking?? what happens in this situations ??
And some other thing if I go to app data and delete my DerivedDataCache will I brake my Unreal project or is it a junk space???
you can delete the folder, but then you'll have to recompile your shaders
to see what is going on, open swarm and look at the log.
I deleted the cache just to get done with it because I had a lot of junk in it anyway
Like 70gb
And now I'm waiting for it to open
It takes a while correct? I have it at 95% about a hour now
it takes a while to recreate those 70gb ;o) (hopefully less this time)
Let's hope everything goes well
The pc is frozen now so I don't know what to expect 😓
But I won't touch it and wait a while
so update
all day today I had it loading
and nothing happened
I restarted my PC and reopened the project and still the PC froze at 95%
in short is there a way to get my project now or should I make a new one from scratch ?
did you light up the scene? how did it come?
@zealous cobalt maybe consider adding some lighting to soften those dark surfaces on your counter that youve mentioned.
typically its under the ribbon, or you can integrate it under the cabinets
Thank you but I decided to use unreal engine later when I get a better pc, my pc doesn't support GPU lightmass
And when I tried to bake the lighting in some scene I downloaded (Lake house) overnight, it was still on 0% when I woke up lol
Hi, How can I make the shadow softer??
Hey all, anyone had the issue when trying to use the sunsky actor, with the physically-based 75000 lux intensity value for the sun, and the whole scene gets overexposed?
I've fixed up the exposure settings, so that it works... but only when the Sky Light is set to Static and has its light baked.
Problem is that I want it stationary, so that it can interact with volumetric clouds... There is a small island of well baked cubemap in the middle... even though the postprocess volume is unbounded
Anyone met and overcome this issue before?
I tried expanding the postprocess volume to the level's extents
but only the small circle in the middle stays well exposed
Or, rather, I've realised that it's that Real Time Capture doesn't work. Doesn't matter whether the sky light is stationary or static, so long as real time capture is not enabled... the scene is not overexposed
But what I don't understand is what is responsible for the well exposed part of the scene when real time capture is enabled...
ok figured it out I believe. Not sure exactly why it still doesn't work Stationary... but you either have to choose to make the Sky Light completely static, or completely movable, and not in between
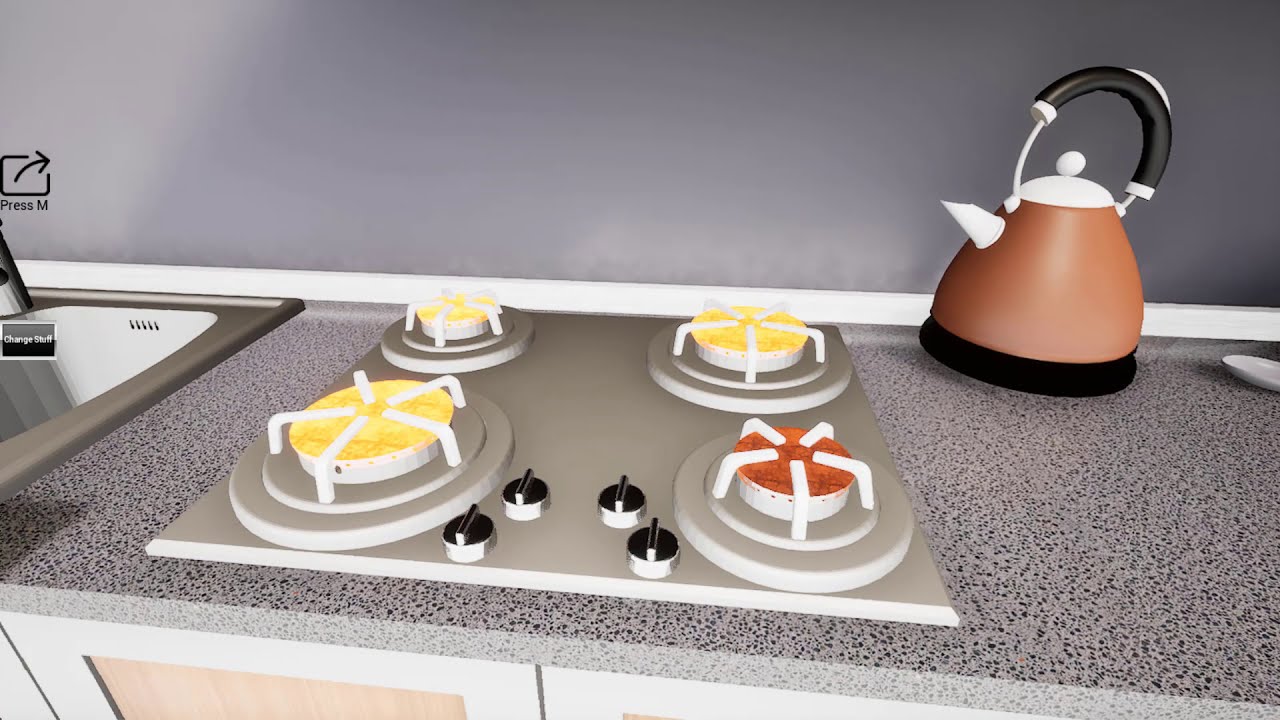
An Interior Design In Unreal Engine 4
It's been Used some premade assets
For some of textures and materials been used from Quixel Bridge.
Used 3dsmax for some of models and unwrapping them
In the photo I have some meshes and as you can see I can not Tinker with light map settings. I can change the values but I can't see the changes with lightmap density. And when I bake the quality is really low. Does someone know what's happening here?
A different type of archviz cinematic 😓

You made it to 2021!
Initially was going for the usual arch viz type cinematic, but i wanted to have some fun, plus this song...… Happy new year everyone!
Behance: https://www.behance.net/gallery/110581487/Zain
Music in this video
Learn more
Song YEAH RIGHT
A...
@idle mulch looks like you don't have UVs
I had everything I don’t know
I opened a new project with the same assets and it worked fine
Maybe it was a bug
I don’t know if anyone finds an explanation to this
maybe you had "generate uvs" ticked in the second project
Hahah guess will never know
(import settings)
I did it with data smith
oh
I haven't tried DS
I'm too set in my ways (that work) so I don't feel like tinkering with it 🙂
If it works this way then there is no need to change
Data Smith it’s just faster
And more organized
That’s why I prefer it
I can see the use for it, specially coming from cad apps
hey guys just wanted to ask a quick question more general about lighting
im finding it confusing as to what should be left default and whats to adjust
im just looking for the general rule of thumb, direction to follow to get clear sharp quality close and distant from camera
i can either adjust the cameras iso, shutter, aperture and leave the scene lights defaultish or vice versa
i know should be working with both always but what would be best for adjustability or proper way to start and work from

Short video showcasing Evermotion Arch Interiors Volume 52 Scene 01.
Project is still WiP until objects popup problem is solved, also materials and lightning quality will be improved.
Music credits go to: https://www.bensound.com
Guys can someone please help me with this ugly object popups? Why are they happening?
It's not LOD, but I don't know what it is.
hi how an I make a material that I can put to a curtain ?? I want the sun to get though it, does anyone have a nice tutorial or a way I can make it ?
@rose cometlooks like you are running into texture streaming, you also have some noise coming from glass, for glass to behave in scenes with depth of field you should disable " Render After DOF" in the material.
@royal osprey Thank you dann, will do that.
Hey guys, does anyone recommend any really good Tree assetpacks such as itoo Forest Pro? I'm not sure if it is compatible with UE4.
Did some testing with a realtime TV broadcast. https://www.youtube.com/watch?v=uQcckbETqaQ&feature=youtu.be

the most versatile would be speedtree, but you have to model each tree yourself of course.
there are also pre-done speedtree packs like american or european
you should also check megascans, if they got any trees. Would be free there
@pastel summit how ?
its pretty simple. ad a media source into the scene and let a 2d camera capture that media. you can use that data as a filter on your lamps and project that in realtime in your scene
i did some digging and found this video if you want an in depth explanation i think this videoexplains it wel https://www.youtube.com/watch?v=LKIBxLbvvPM

This tutorial demonstrates a technique for creating a realistic TV glow and flicker effect in Unreal Engine 4. The example also shows the basics of playing video using the Media Player asset.
Material nodes used in this example include SpiralBlur-Texture, TextureObject, and ComponentMask.
Unreal Engine version shown: 4.19
You can download th...
im not sure if this video still applies to the newer engine versions
Cool Thank you i'll check it out !!
@elder notch apologies in advance for tagging you -- I thought it would help me get visibility.
I've been given a CAD task - I have some pictures and potato quality videos of a bridge that's collapsed in my city. Job could go well up to the government. My task is to:
- Model and embellish said bridge
- Make it destructible
- Make a short cinematic of it
I'm not entirely sure about how to do this in Unreal (I know the PBT well enough to do basic CAD but I don't know much about destruction) and I don't know how much to charge for my work since I'm not a designer but a programmer. Any advice and pro tips will earn me money and boost my confidence towards future pursuits.
regarding your question of how much to charge - here is a video where its explained for the field of architectural visualization by my former prof.
Should be apply-able to unreal art as well

How much should you price your first professional design work?
Let's find out!
My name is Fabio Palvelli, I am an Italian designer and I share my life with you on video.
Come to the d2 in Vienna, you will not regret it ;) http://vienna.d2conferences.com/
-------------------------...
the gpu lightmass in 4.26 makes my scene a lot darker
i dont know what settings that i do wrong
@mellow crater maybe try to do something with chaos physics? not sure what is status of chaos
Turns out the process is a bit simpler and may not involve disintegration. I'm trying to figure out a simple way to animate a simple segment-by-segment "vanishing" act.
I just try to test 4.26 GPU lightmass, there are a lot of artifacts. I turn on 512 lightmap res for every static actor. 1 directional light, 1 area light 1 lightmass portal, 1 lightmass importance volume
wonder if i havent done something correctly yet
the normal CPU rendering would not give this much bad quality of lightmap
try turning off lightmap compression
It's in your Lightmass settings in your World settings
Hello everyone, does anyone here ever tried both EEVEE and Unreal engine 4? I can no longer render in eevee because my VRAM is limited to 2GB for now.
May I ask if rendering instead in UE4 is better in terms of optimization and performance? I just want a still image of my Daz scene.
Blender is not rendering in eevee because I dont have enough VRAM. It's force closing so maybe I should try UE4 instead?
The textures for the archviz i used is fron daz and it turns out it's almost 4mb per textures.
Can some one help me with lighting a scene in unreal?
turning your scene over to unreal is a lot of work just because you ran out of vram
you should try to optimize your scene.
scale down big textures - ged rid of high poly meshes and use mid/low polymeshes
use instances/renderinstances for copies of meshes. not sure if blender uses an instancing system
it does
There is no such thing as enough memory...
64Gb RAM maxed out.
3090's 24Gb VRAM maxed out.
... sadly it's not a downloaded image, it's my screenshot 🙃
Hi, I am making a playable scene and the door will be moving. How can I go about it in the baking prosses? When I bake the lights it is discarding the door and passes through it. Is there a way I can avoid that ?
would love to see what are you rendering
@pastel summit iam still starting can u give me any feedback https://youtu.be/e0966uWkpRY

Iam Still learning more and more everyday about ArchViz and I reached my first milestone in UE to render my first room .
please let me know what you think in the comments , feedback highly appreciated.
Hi. Lighting senior here, you should bake your door has a static model and add a dynamic light close to the door. That way, it looks better when you open it and fully dark when close!
Ok cool I’ll try that
@mossy cipher But I will replace this door with a blueprint actor so it will open automatically when I am near it. Is there a way to do the same method with the blueprint actor?
hi, i just upgraded from 4.23 to 4.25 where are these black lines coming from?
in 23 it was usually the World Settings Ambient Occlusion, but in 25 i have it disabled
im very bad with ue4 but maybr try building the lighting?
@raven atlas It looks good overal! Some things that stand out is to watch out with camera movement. You speed up the camera a lot and slow it back down aswell. This ruins the flow of the shots. One big part of critique is not to use a character in the scene specially not a character that is not animated when you showcase an animation. This destroys the reality of the scene and gives it an odd feeling. Your lamps emit to much light in my opinion. Beside the emission value they don’t actually produce light within your scene, keep that in mind that when you mimic a light source that it also has to look like it’s emitting light. If you look at the wall behind the lamp you would expect it to be overblown by the lamp. The exposure value as don’t feel right aswell it’s way to dark when looking through the window. Some easy tweaking in pp might fix that. I personally would bump up the overal reflection in some materials to really enhance the affect of the trim lights in the roof. I rlly like those!
Sorry for the late reply been quit busy 🙈
@pastel summit yeah bro been following on youtube , good job , i notice that my videos seem like they are lacking resolution , is it something to do with LOD or is there an issue that iam unaware of ?
Hello guys, the static meshes are coming black after building static light. Can anyone help me with this?
@raven atlas thanks 😊 you can increase the screen resolution in post processing under rendering - misc - screen percentage. I use it on a value of 200. You can also do it in the viewport. Besides I created a sharpness filter for the camera lens that makes it pop more
@pastel summit thanks a lot bro , u know u can add me , id like to know a bit more about you , also iam staring a project u seem good with critique and ur genuine too , message me ill run it by you maybe ull like it. that sharpness filter is also very good , man for a guy who knew unreal engine like 2 months ago iam still a bit overwhelmed , for a mechanical engineer , who somehow got involved in banking , i think my pace is okay , i just open unreal everyday for 3 to 4 hours after work , so far iam very excited about this technology and also iam excited about artificial intelligence , the open sourceness of it all.
I think this is a bug happed to me once and I didnt figure out why
what mobility has your light source ?
static
I need to work with static lighting only as on mobile the dynamic lighting uses more gpu & hangs the app.
everything turns black ?
no just few static meshes
I have also tried lightmap coordinate index 1 but no change.
I have already tried this still same issue
I have searched on net about it & come up with the fact that meshes which don't have lightmap uv channel(uv channel 2) turns black after light building but the meshes I am using all contains lightmap uv channel.
This is weird error I am facing, don't know what to do.
have you tried importing those assets to a new map ?
or project
if you make a test project and try bake them there and still turn black, your meshes will have a problem
if they don't turn black then your current scene might have a problem
I have also tested the meshes in blank level there also they come black.
Can you suggest some wayout for this?
I use 3ds max, and when I get weird things I use reset xform, Im not familiar with maya or blender if you are using them.
yeah I am not to familiar with 3d tools, I am just trying to solve the issue in unreal.
In witch program did you made your meshes ?
go to the mesh settings , then under UV , select UV remapping
this happened to me before if was a sure fix
keep the default settings on the window and press ok
the meshes have been bought from unreal marketplace.
okay thanks @raven atlas will try this fix.
I can't find anything related to uv remapping inside staic mesh editor.
I am using unreal 4.25.
I am only able to see UV Channel 0,1,2 under UV section inside mesh editor.
New to Blender. I made this scene from a tutorial on YT. How do I import this scene in UE? Getting "Degenerate tangents" or "overlapping UVs" errors. After baking in UE, all the textures look horrible.
can i see how it looks in UE ?
@raven atlas
After a bit of surfing i came to know about UV and Lightmap. Tried importing a single model and it worked Fine. But now that my scene has lots of models do I do it for every one of them?
yes
Hi all, has anyone experienced this issue in a ray traced scene, where at a given distance the shadows of foliage elements stop displaying? Is there a distance parameter somewhere I can extend the visibility of the foliage shadows?
could be LOD's turning into billboards
I'll look into that thankyou 👍
If anyone else has this problem with ray traced shadow distance on foliage in the future I solved it by going into the r.raytracing.instancedstaticmeshes.lowscalecullradius and setting that to a higher number
Should I use Blender over UE4 for interior design?
Like walls and stuff? Doorways, etc
@mellow crater In Blender. this might change as the internal modeling tools are being improved, but right now, you should make your geometry in an external 3d app.
What is up with the reflection not moving in the second section. The stuck reflection is using forward shading.
Box reflection capture is lined up as best as I could

Low poly modeling in 3dsmax.
placing object in real world with mobile app by using ue4 AR template and changing couple of materials in real time.
Does 4.26 now have luoshuang's GPU light mass?
I found the files on the forum but I thought it was now officially integrated into 4.26?
I installed GPU Lightmass and tried a render.. I cannot tell if its working this time. I dont see the progress window that usually open up .. do I have to do something to enable it?
Hey anyone here use 3ds max?
me
can you help me export a 3ds file to fbx please?
select object -> choose "export selected" -> save as *.fbx
Well the thing is i dont have 3ds max
aaah thats the point
I wanted to write that you need to prepare UV maps first. It can take a long time.
Depends on how complicated scene you have.
Just exporting is enough
🙂
Oh i see.
Ok No worries
I will try getting someone else till you get back
If not I will msg you 🙂
ok, good luck
@thorny mirage not per material, but in 4.26 you can do a object color pass. https://www.youtube.com/watch?v=RHemgKcIYMM

In this tutorial, I'll show you how to setup the new Render Passes you can now do in Unreal Engine 4.26 including Object IDs and Depth Passes.
My new Unreal Engine for Motion Graphics course is now out!
➜ Creating the Unreal Course: http://www.mograph.com/creatingtheunreal
Buy Winbush a Coffee 😉
➜ Ko-Fi: https://ko-fi.com/winbush
------------...
I've got a ruffled curtain I need to lightmap. I'm having trouble unwrapping it. Got any links to tutorials for similar curvy cloth items?
Hi, I'm looking for solution that helps me creates many of glass walls. They are of different lengths so the best would be a expanding procedural system that could hurry up my implementation to UE4. Any ideas?
an example from 3ds max:
does changing screen percentage affect the renderings done in sequencer/render queue?
@velvet viper I'm not sure it does anything. I did some tests with screen percentage at 200%, exported that, then compared it to exporting the images at 200% of the intended resolution and scaling them down in AfterFX. The scaled down full rez images looked much better.