#ue4-general
1 messages · Page 60 of 1
can someone tell me the difference between service and decorator ue4
and when to use them ?
@fierce tulip basically this is what needs to be done, but it's hard... I still haevn't figured it out. https://forums.unrealengine.com/showthread.php?136494-Efficient-Voronoi-Split-Screen
Silly question... How can I take a float and round to the nearest multiple of 32? (blueprints) I mean I can do it a long way just wondered if there is a simple way.
@digital badge there is node in BP "division with whole and remainder"
ok thanks I will look into it
it will give you floor on positive values, to get nearest you need to check how large is remainder too, like if it's larger than 0.5 then Whole + 1
or divide by 32 and Round()
ahh I see, unfortunately because I am trying to do this in the construction script make 2d objects snap to a 32x32 pixel grid, its just not working but you have taught me something
So I'm trying to import a hair material.This is the result.
floats in
Anyone who has an idea to fix this?
Night @digital badge I`ll keep ya up2date on the TwitchPlugin
but i`ll work on that later
http shit is in now
getting all settings for the account
gotta make another set of functions that run on timers though
So I can identify when new subs, viewers, followers, and chatters appear
anyways nini
is gone.
guys, is there any way to take UE assets and turn them into FBX meshes that I can use in cinematics in, for example, 3ds max etc? I'm looking to put together a trailer for my game but I'd like higher-quality rendering for that using the same models you'd find in-game. These are not custom assets so I don't have them in fbx already.
It's probably not allowed by the license.
Also, exporting the mesh is one thing, exporting the material setup is quite another
Would this work in theory?
I may just have to stick to capturing gameplay and then maybe colour grading it to put a trailer together instead. Or animate a camera in-game to capture it with.
you cannot get the material, so you'd need to export all the textures as well and re-set them up
What about doing your game great looking ? Paragon for example uses the game itself for the trailer
^
I agree, though this was intended as more of a cinematic trailer and then a separate gameplay trailer would've been shown. I think it'll work just fine as being a cinematic trailer using gameplay, however. Thanks guys!
Well you can definitely do a cinematic trailer with UE4
And it can look just as good as in 3ds

its actually why a lot of archviz and other companies are moving to real time, its faster, cheaper, and in most cases give a high enough quality.
holy shit that's insane
is it just me or does Paragon look like a little bit of an overwatch rip-off
Paragon is more like DotA in 3D
before changing the state
Overwatch is a better TF2
i want it to change the state
when he see the player
and stop moving to the random location
@foggy patrol if you have a folder with .ueassets, you don't import them into UE
you first make a backup of your project, and then copy the folder directly into your project folder, using windows file manager.
ahhhh okay!
then, you re-open the project and hopefully everything will be there working. if not, THAT'S why you backup your project 😄
😂 true that. Thank you for the help!
np 😃
Anyone interested in collaborating on a Parkour Locomotion system(Character BP and Anim BP). I have already started but it would be nice to have someone to bounce ideas and thoughts with.
what would cause clients not getting a menu when running multiple clients through PIE?
@green spear would you want to do cool foot placement speed warping ik goodness?
@patent siren What do you mean?
Anyone got any exp with morph targets from maya to ue4? im having issues i cant figure out
@green spear im talking about cool anim coding movement shit
@patent siren That still tells me nothing.
I am working on having a few different locotmotion types, a bit of wall running, edge grabing and scaling, vaulting, etc. So, if that is cool anim coding movement shit then sure 😉
Like doing line traces to make sure the foot is on the ground even if uneven?
Yes but also doing ik to change how far the feet are moving based off of speed. And start and stop anims
Why are all my moph targets messed up when i import them in to ue4 D:<
From where @pallid compass ?
Well, I am sure that would be awesome to have @patent siren. But I think that would have to wait till later, more important stuff to do first 😉
Are ya mainly focusing on the character movement code and stuff?
Yes. Will have to expand on the interaction of the world too, to be able to find walls, edge etc.
One day 😃 But right now its single player.
Just a simple morph target i import from maya 2016 to ue4 4.15, and when i leave it at 1 its fine but when i lower the morph target it goes mental and goes everywhere
did you google Morphs from Maya to UE? There might be some export setting that you need.
And what happens if you put it at 0?(Which should be default value)
I tried
and when i move it to 0
sorry i mean when its at 0 it sits fine
when when i move it, it breaks
Hello, I have some issues with creating an UE4 c++ project with visual studio 2017 :/
And here is the compile error it gave me
How do you change which mesh is showing in the PhysicsAsset editor? Its for a Skeleton with multiple meshs, but right now its showing the wrong one...
Great talk today on lighting!
lol
was posted on the hand painters guild, forwarding
http://www.worldofleveldesign.com/categories/level_design_tutorials/how-to-have-best-level-design-game-environment-year.php
unless you render food?
sorry i am not english
Is there a Blueprint node to check if 2 vectors are nearly equal?
or do I have to get the length of both, subtract them and do Float Nearly Equal
second one
Anyone got any info on using PerInstanceFadeAmount ?
So any idea how to hunt down this: "LogLinker:Warning: Can't find file for asset '/Game/Cars/Materials/SpecialMaterials/CarTurntableModel' while loading NULL."
So I made a TwitchIRC Plugin for UE4 4.15.1, have a Question i`m making the Login part for Twitch, anyone thing it would be a problem to use my own 3rd party Server to get the return oauth token?
their setup is either Authorization which requires a actual server to make the requests, or a Implicit Grant Flow, to have the browser make requests.
Would anyone know how to have the folders of the world outliner being closed by default ?
They're open every time I open the level and there are many of them, It's difficult to navigate in the outliner
I'm struggling to get a Tron-style trail to work. I am using a Ribbon system and I need to get the collision to work. I've tried OnComponentHit, OnComponentOverlap, and OnParticleCollide, but nothing seems to work. Can anyone help?
Is there an efficient way to add reroute nodes? Doing it with the context menu is time consuming
@mint sequoia double click wires
Ah thanks
Anyone around? :X Need some Advice before I just say "F it" lulz
Hey, I hope Im in the right channel for this
Accidentally pressed enter too soon. Please don't eat me.
I am trying to use custom collision meshes for spline meshes. I thought I would subdivide my UCX collision mesh before importing it. The problem is when ever I import it UE4 simplifies my collision mesh to a box collision.
Is there a way to keep an imported collision mesh the way it was authored outside of the engine?
hmmm
I need precise collisions for my spline road.
thats a good question XD GG
I've been googling for an hour now and the only thing I found was an unanswered ue4 answer thread.
Nah, nvm
I only have about 60 verts in my collision mesh right now. But since they all are positioned on the same edge they just get removed by UE.
I found one stupid workaround for now. I just use individual box collisions for every subdivision I need. When used in a spline mesh these boxes get stretched properly. I'm not sure about performance on this though.
You could try minor offsets, but if precision is required that won't work
But I'll stop with the straw grasping
It somewhat worked, but it's not really feasible. Interestingly enough UE still created individual collision pieces when I checked it out in the mesh editor tool.
Can anyone Please PM me on Twitch: https://www.twitch.tv/bioblaze Added ReceivedChannelMessage, and a new Event ReceivePrivateMessage, Breaking them seperately need to see how they come in ❤ if anyone wants to help.

what is a proper way to spawn a number of actors? (enemies) I am currently spawning x amount of numbers every wave and it causes lag, not sure if there is a proper way to deal with this
If you break the spawning over a couple of frames it will feel much smoother
nice, a 503 error trying to reach the forums
or anything that uses the epic login (except UDN)
cant login to forum. is it down ?

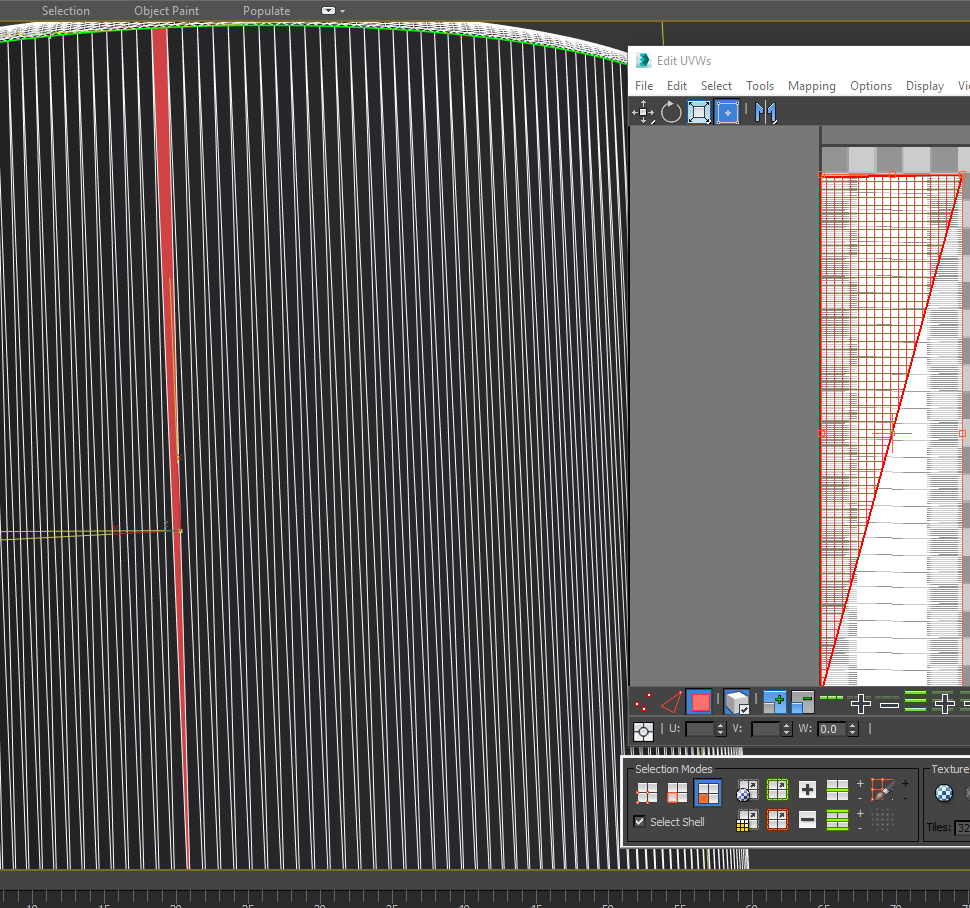
@fierce tulip Here's a screenshot of one of the many supposedly overlapping UVs: http://imgur.com/a/nVpkO
Note that on the other mapping channel these exact same UVs are also used, I don't have different sets. I don't really need any UVs for textures for this project.

Imgur: The most awesome images on the Internet.
Is it a bug that when I hide staticMeshActor s in my scene they somehow still get calculated by lightmass and cast shadows and all? I have a simple room with machinery in it. I want to make some lighting for the room and just hide the machinery while doing it since it takes much time to calculate lighting for the machine when I don't even have the mood for the room yet.
Or am I missing something?
@plush yew thats a very veeeery poorly done uv-map though.
as in, automated by a poor program that does not respect texel density.
aslo, by the looks of it, it might easily be overlapping some polygons within those uv-islands.
id highly suggest to redo that uv map properly
because thats just a nono
I hear you about texel density and I am aware of it. We'd need extra scripts/software for an autmatic unwrap with respect to texel density which isn't possible at the moment. The most party which you see are rather small and I think it might be okay for these purposes. They're not hero objects at all so for the time being that is fine. We really only are doing a proof of concept for a client on our own clock, researching how much could be automated by inhouse tools etc. The islands come from CAD data seams which are pretty accurate. I will dissect one of these objects and look over it though. But fgrom the looks of it it works.
even if they are not hero objects, you are using less than 30% of a 64x64 texture lightmap, means the entire thing is only getting a few pixels of lighting information.
you could look at ipackthat if you are 100% sure no uv's are overlapping, as its quite automated but still requires some time.
if i was a teacher and someone showed me a lightmap like that, they would fail the assignment, not to mention if i had to hire someone and they showed me that.
I hear you. I may look into packing with respect to texel desnity. The thing is It looks totally fine in the Viewport/when ingame. I just found it strange that it shows overlapping UVs by 20 to 50%! Which clearly is not the case. But I thank you for your insightful answers though. Thw hole lightmap idea is new to me since I am a 3D Artist and don't have to worry about stuff like that usually.
if you can send me the file I can take a look in 3dsmax and see if the error is correct or not
Before looking into external software I guess I'd rather invest the money into an automatic solution in-dec-software
I will triplecheck the file myself now ^^
@plush yew with a very low resolution light map, your UV might not overlap in their coordinates but will land on the same texels, this will lead to a bunch of problems like shadows or light leaking from one surface onto another
that doesnt cause a lightmap overlap error though afaik
Ah! So this message respects the resolution? I thought it only meant the explicit mesh UVs
If that would cause the error it would be understandable
let's say your texture is 64x64 it means that you need to have at least 0.015625 U and V distance between each island
I jut checked one mesh, Ill send it to you which shows 34,6% overlap in UE but looks fine (apart from texel density) in maxc
You got a mail adress?
@plush yew I don't think this is the reason it throws error, I'm commenting just why proper unwrap is important
Hello! Does anyone know if you can change the scale of landscape grass by using a texture? 😃
Which max version? I got 2016
same i think, but just export as fbx and it should be fine
I'd rather send a max file tbh. Ill send 2016 and just see if it works
k
just sent it. named "Test-Mesh"
got it
Any info on the above:
"Is it a bug that when I hide staticMeshActor s in my scene they somehow still get calculated by lightmass and cast shadows and all? I have a simple room with machinery in it. I want to make some lighting for the room and just hide the machinery while doing it since it takes much time to calculate lighting for the machine when I don't even have the mood for the room yet.
Or am I missing something?"
just hiding isnt enough, you'd need to disable cast shadows.
Who the f*** thought that was a good feature...
hiding is just for editing reasons
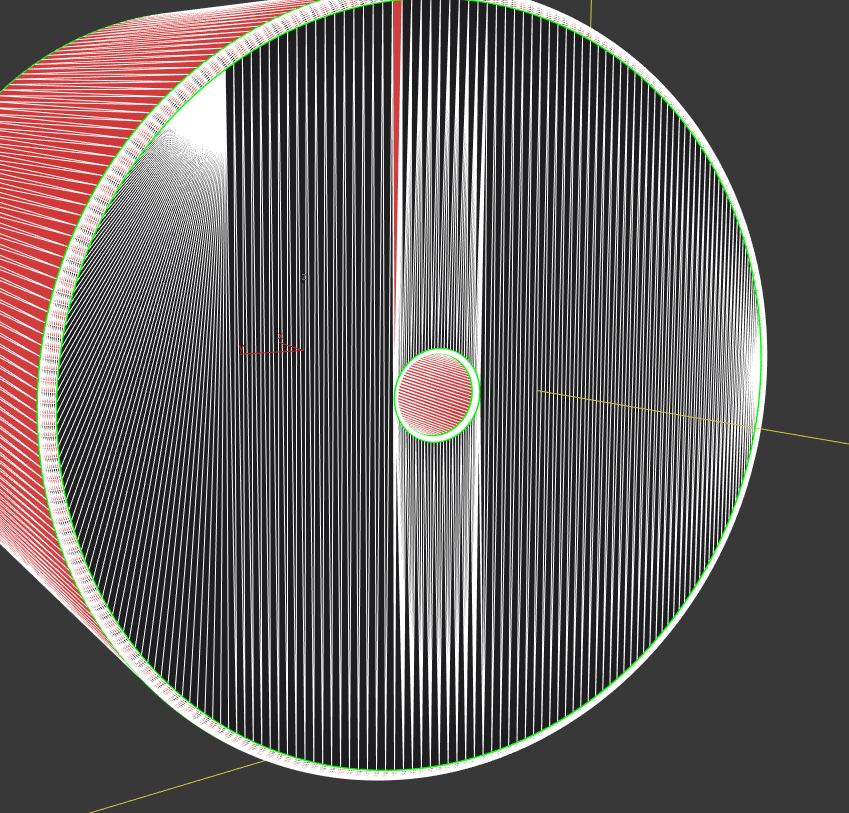
https://i.gyazo.com/45084071ab889ec0dd5bb40b60c9efc6.png
all the red highlighted ones are mirrored uv's
need to un-mirror em
https://i.gyazo.com/9835ccb76a20e72248645e6800efd6df.png
and these are all overlapping
hugh. how? lemme check
The red big strip on the left
it is one single side of the mesh
How can it be overlapping? I don't get it
the top line's left vertex is at the bottom of that
Overlapping means that one part of the UV space is assigned to more than one polygon right?

how the f is that even possible? oO
poor unwrapping :p
but but but....wtf.
and thats happening with a lot of the uv islands
and as for some of the overlapping, there are actually some additional polygons overlapping the spheres due to poor polygon distribution
https://i.gyazo.com/1e1a4505f03a617d7724d753b658620b.png that should never be a thing hehe

that would be better
anyways, polygon wise, its extreme overkill hehe
15k for just that cylinder
now I understand it isnt for a game, and in theory for small scenes its still fine
also, some parts of the mesh arent even welded together O_o
I know the meshes are clearly very far from optimal. But it is about being able to process manye objects from CAD to game engine without much work to do by hand. And the thing is these scenes are literally only a room. there is NOTHING (speak: nearly nothing) there except the product
I cannot weld automatically and keep the smoothing groups intact so I decided against it.
you could go for dynamic lighting
heh I understand (been reading the discussion) but ... talk about overkill 😄
I will need to check this in VR if the framerate is acceptable though but it seems like it
would make lightmaps redundant altogether
yeah go for dynamic lightitng then
Is dynamic lighting possible performance wise if you imagine 2k ob such objects like I sent you in the scene?
(Sorry I have little knowledge of game engines)
might need to test, polycount isnt the biggest issue, mostly drawcalls and dynamic lighting, which might be a bit heavier on high polygon objects (?)
The thing is one of our core competences is lighting (in max now, not realtime) and we want to kind of work in the same way if possible and achieve a similar quality
in a different engine our client used just single direct light and ssao to visualize 40mil polygons factory cad drawing - most likely you have to get rid of shadows too
What would count as a high poly object?
a cylinder with more than 100 polygons XD
xD
lol
15k for a mesh is hardly unexpected on PC today
bit jokingly ofcourse
@plush yew you can bake lighting into vertices and/or into texture in external software. Just need a custom shader to visualize this properly in UE4
Oka yI have little boxes for screws etc here with 98k faces xD
15k for a cylinder would make me doubt I'd need that person though :p
if it's just a regular cylinder yeah sure 😃
if I'm understanding your intention correctly, one big important thing that will contribute to that "high-quality" looks you're aiming for is material/shader work
you can probably get good enough results with dynamic light + PP
It is mostly lighting to be honest. I dont need complex shaders but I may create them I I feel it being neccassary
@fierce tulip if models coms from something like SolidWorks then you don't really have a choice
true
@vale osprey They do.,
though then id almost suggest getting instalod/sympligon to reduce em some :p
welp, I would bake in max then
What would be the drawback of the dynamic light approach? Could I still get something like shadows from window holes in walls on the floor?
Nah I need shadows from the CAD geometry on the floor
then you will cry
lol
I rather go through the process of creating lightmaps better than to having resort to fakes etc.
well, you don't have to have lightmaps on everything
Is the atuomatic lightmap creation algorithm of the FBX importer /UE4 the same or better/worse then the 3ds max flatten mapping?
https://i.gyazo.com/98d0031bd53720879dfffae99417e6f2.png minute of work and saved you almost 15k polygons :p

on high poly machinery itself just rely on dynamic lights and shadows but for floor/walls you can use lightmap
DUde I know. But there are huge amounts of objects like these
I know how to properly model
ue4 uses the first lightmap to generate the new one, so if the map for the texture is crap, so will the lightmap be
But it is about efficiency
and max's unwrap auto tools are crap as well
Of course I could remodel all that crap and be done with it.
@fierce tulip crap, but definitely better than the example shown?
that also depends on the first uv map
it can't do much if geometry is not split properly
it can actually generate that exact map
no, I mean, max can generate some ineficient UV maps when using one of the auto tools, but it won't overlap for sure
Yeah that exact map was basically taking the UVs of the CAD geometry an d packing them
it sometimes does
I rather have inefficient than overlapping xD
I will try to use the flatten map feature
I got a script running unwrapping it all-.
Could you recommend a plugin/Script INSIDE OF 3ds MAX (meaing purchasable or downloadable) to do better auto unwrapping of mass objectS?
I'm talking 3k objects. Most of them are instances though. It comes down to about 200 uniques
Yeah I have used max a similar amount of time
unwrella, xrayunwrap..
It never ceases to demoralize me.
Unwrella in hard surface mode is barely better than the max default 😛
@vale cloud auto unwrap can't split UV in an intelegent way, not all the time at least
its about time we get proper AI for computers so they can do stuff that we ask em to
@vale osprey true, as I said, definitely inneficient in many ways ... but better than overlapped UVs, no?
I cant weld them though, not reliably automated
"sort X" "sure master luos"
@fierce tulip True ^^
some time passes "Make MOAR ice shards, punny human!" "yes master 😐 "
WHUAHA! moar ice
@vale cloud that's how you get overlapped UVs with flatten
Really? Overlapping with flatten? I mean of coursse Id pack the UVs afterwards
flat and repack gets you overlap? I'm definitely lucky then, or I haven't tried complex enough stuff 😄
well, make a cylinder out of booleans instead of primitive and see how it will be cut
note: I mean "physically" overlapped UVs, not overlapped in the sense of poor lightmap res will overlap them
id suggestto look at xrayunwrapper, its cheap. though not sure if there is a demo
max never liked booleans ... it's genetic 😄
yes, physically overlapping because one triangle on one side can be connected to another on opposite side
though it seemsyou'd still need to add your own seams for xray
thats useless
(in your case)
so if it can't separate surface by a nomal threshold for example, then it won't be able to separate cylnder caps into different islands
like try it capsule 😄
but again, boolean not primititve as it cheats with primitives
I think I will give the flatten UVs in max a try first. Thats what I had scripted first anyways and is just commented out when I saw that the CAD data came with some more or less sense making UVs
@plush yew are you targetiing super realistic look?
not to contradict anything you're saying, but really, max never played well with booleans, improved alot after proboolean, but still ... I try to stay as far away from them as I can
try Jbools plugin, makes working with booleans a lot better in max
@vale osprey In an ideal case yes, but since this is on our own clock Ill go with mostly realistic looking for now 😛
cause I'm not sure that UE4 is a good choice for that kind of visualization
I would get some RFP from Delta Gen for comparison
imho you need to mod UE4 quite a bit to get good looking high poly models - strip out all unnecessary things, replace SSAO with something more aggressive
combine ssao with per vertex AO
https://i.gyazo.com/d8477c9252cd53f232a38328121be0be.png flatten uv from max
https://i.gyazo.com/886895534cc739689e6e9d589565f85d.png
steamroller

you can bake per-vertex AO in something like this:
http://www.faogen.com/features.html
or directly in Max, we used max but this was way before you could use GPU to calculate it
yeah I remember testing that a long time ago
also this
(if I remember correctly, just a quick google, sorry if not accurate)
yeah for AO it should work great with high-poly ... problem with vertex bake and lowpoly is the "stretching"
yeap
So that flatten map hsa overlapping UVs now right?
Hm my flatten map looks different. Did you use Unfold mapping?
nah no overlapping uv's in most cases. but it still unwraps crappy.
From the max help:
"Flatten Mapping uses an angle threshold to define the clusters and the clusters will always be contiguous faces. This type of mapping will generate mapping that does not overlap so it is useful for baking textures and lighting. "
you'll only get proper UV unwrap when you do it yourself ... and even then... 😄
Of course.
What the F my flatten mapping now does something completely different
this buggy shit.
but yeah, from my experience, flatten UVs aren't supposed to overlap ever. But I absolutely believe @vale osprey and @fierce tulip when they say it does 😃
I guess maybe it works good with unwelded CAD geometry
and not so goodd with welded xD
but a few small percent overlap I dont care about at this stage.
@vale osprey supose I did a vert bake of AO ... how would you go about putting that to use in UE with dynamic light?
(being an eternal n00b, I never got to really using and understanding AO properly in UE) 😄
well, its the few cases where it did happen that always stick with you @vale cloud but so far its been sporadic.
just multiply vertex color node with whatever
lol what ever? 😄
could be albedo
that's not AO 😐
yea, creative expression
that's dirtying the diffuse with the AO map
well thats the thing, you multiply it with albedo for some easy cheap ass ao
you could try just plugging it as the alpha of a lerp, and point it at the ao
but that will affect even direct illumination of the surface
and AO should just affect indirect illumination, or lack thereof
Hello there ... any experience UE4 dev here? I'm trying to build a PC from scratch and thinking of pairing i7 7700k with 1070. Would you recommend I go for a six-core cpu instead of 4, even if the clock speeds are lower?
@vale cloud UE4 materials have separate input pin for Ambient Occlusion
no idea 😄
lol ok 😄
you can always make your own custom shader
you need to enable it, there is some documentation on it but cant find it
AO does work
😮
" Also the Material AO Channel will only impact static indirect lighting, lightmaps and will not affect ambient cubemap, for example."
so plug it into emmisive too! 😄
and albedo
and metal!
yeah!
heck, create 12 customuv channels and BAM PLUG THAT SUCKA IN
lol
well, I was kinda hoping the damn Ambient Occlusion input would be... you know ... good for plugging in AO map and actually do something useable with it?
the guy in that thread I posted has a good illustration of how it's not working 😐
I would try to combine it with other things, like mask your roughness for example
for sure, but that's basically PBR hacking ... I was kinda hopping there would be a "proper" solution 😃
it's not hacking, its how it works 😄
welp, I did wrote earlier that you have to mod engine 😉
lol ... well, I'll always take you guys word, but ... what does roughness of a surface has anything to do with it not receiving illumination? I mean, it can have, in some cases ( microsurface features and all) ... but, take that example, cube, sides fully not being hit by direct light ... zero val plugged in AO ... should be black or near black surface 😛
because low AO value indicates that surface is blocked from light, so your reflection need to be dimmer
we can argue a lot how it's suppose to be, but keep in mind that PBR is not a standard
and it all depends on which actualy shading model is used
true that
but in that cube case
I guess it has more to do with the fact that the engine simply disregards the skylight when calculating AO from that material input
so basically the skylight floods it over 😄
so if we take standart material:
I would plug a mix of AO and roughness into roughness, then into AO (so it works when it can) and just a bit of it into emmissive
which is not ideal as you don't want to have a heavily pronounced AO on the lit side
but it's better than this (let me grab le screenshot)
ssao is so subtle here that you have to switch it on/off to confirm that it's even there!
really subtle
hello guys, someone around who can help me with a (thought) simple material prob?
I've a modelled car cockpit and whant to have a dynamic mat. in which I can set some symbols to glow independently from another (ex: turn signal left + head light indicator, or only turn signal right indicator)
I've a ao texture and one lumination for the emissive, but i dont't get to mask out some of them independently
any ideas?
@vale cloud and I would prefer ssao like this:
http://3dvrm.com/ssao/main/sm_ssao_only.jpg
can't you aproximate that with playing with the SSAO values?
there are two values intensity (max 1.0) and radius
this is at intensity 1 already
radius doesn't chnage it's contrast either
and I actually had to provide only Base color to see any ssao at all
with metallnes and roughness set to some value it won't render it at all
Anyone familiar with version control inside ue4?
@main pewter you could literally cut those symbols using geomtry and then flip color of material of flat plane behind them
@main pewter there is a material func that generates gradient bands ... with a bit of calculation you can use that to multiply by your mask and plug on emissive
let me see if I can get the correct func link
Procedurally generated gradients to add to your materials, eliminating the need for textures and saving memory.
even this could be used
(but I was referring to another one that I can't seem to remember the correct name 😄 )
@fierce tulip I know, I know ... you need to stop chatting ... but if, by any reason, that specific piece of documentation where you enable proper AO functionality, happens to, say, hit you accidentally on the head while distracted ... please let me know 😄
😃 ok, thank you. but I have no idea to start with this. my texture (ao and the lum) are the complete car. I've create a new one with correct UVs to only show the symbols (not part of the other textures). so I get the turn signals in my green, light indicator in my blue channel as a mask (to multiply with color and feed into emissive). no i need to mask only the left indicator in my green channel when turning right - for example 😃 I'm totally confused...
yes
now
lets say your TurnLeft mask is at postion 0,5 U 0,5V (basically in the exact middle of the texture)
you need to generate a radial gradient with center 0.5, 0.5 and a radius big enough to cover that piece of mask
then you multiply said gradient with your whole mask
and you get just the mask for the TurnLeft
basically, in that way, you're masking the mask 😁
ah I see 😃
but how do you get to the position of the center in uv space? i fire up my photoshop and get the pixels and feed that as a percentage of the height/width into the function?
sorry fur asking dump questions - materials/uv/modelling ... we don't get to be best friends ever :-p
lol no prob ... so, whatever your width/length in pixels, your UV space is 0-1
so if a texture is 1000x1000, pixel 500,500 would be 0.5U 0.5V
ok - I'll try that 😃 thanks for your help!
no prob ... but ask for other opinions, this might not be the better way to solve your problem 😉
but to be more specific, if you want to know UV coord of a specific point in a texture
x / width , y / heigth
I'm fine with that if its working 😄 took already to much time for a simple thing like that blinkiblinki 😉
only need to check performance if this is a "cheap" thing (doing it in VR) I think a dynamic material is one of the cheapes for this effect so I think it is a nice way to go
yeah ... well, this way you'll be adding at least one procedural node for each "signal" you want to mask ... you need to evaluate if it's cheaper that way, or simply using more textures
lets say, you only have 4 signals
you can simply add a single texture, and put each mask on its own channel
how many signals will you have? 😃
hm...I guess around 10 😉
if you're really doing it on the material, I'd say ... you either use the gradient node, or you add 3 extra textures ... or you do some fancy calcs on the UVs, but that voodoo is a bit above my league 😄
😄 looks like I'm getting what I need with the gradient. so i'm fine with that 😃 it would be great to have it not round but a square but i think i can deal with that. or would it be posible to have a white square in a texture and position that with the texture-cordinate node as a stencil over the other material? don't know how to explain in english but you know that calendars with the red square you move to the current day? something like that 😃
basically while writing ... maybe I should take a quick look how the sprite system works in UE ... it sounds somehow like a sprite 😃
yeah I understand what you're saying, and yes, you can definitely do that
just get a TextureCoordinate node, break to float2, then Add to x and to y seperately the amount you want to move in UV space
hm - that would reduce my amount of textures needed - just a little list of uv coords for the symbol i need next and where to position my marker to let this shine through my emmissive 😃 thank you! I need to go researching 😉
then just plug that into the UVs input of your "moving" mask
(AddU and AddV would need to have the correct amount you want to move in UV space)
AMAZING! Thank you so much! going for a try
nice 😃 let me know how it works out 😉
lol actually ... if your "moving" mask is like, a small white rectangle starting exactly at 0,0 of your texture
there is a easier way ... let me test 😄
nope, forget it, was being dumb ... best way I know is really that ^
Question - When I turn on the visibility of my Collision in my scene, objects with collision have a purple line around it indicating where the collision is. Is there an easy to select the object based off of selecting the collision box? Basically I have about 400 objects in my scene. I can see a collision box on an object that I need to remove, but can't identify what object is creating that collision box so I can select it and delete the collision.
Anyone know how to fix "The currently set diff tool 'p4merge.exe' could not be run. Would you like to set a new diff tool?" when trying to diff blueprints?
Diff BP from within the engine
and/or add p4merge.exe to the os app path
If I have a Character with multiple SkM which uses the same skeleton. Would it do skeleton calculation for each SkM or just once?
anyone know the default key that the steam voice integration uses?
So I have this spline here...
I am trying to make the actor generate new splines as the ship moves. Do I do this in the construction script, or as the plane moves?
Hey Oventoaster
I think its possible to make spline by adding Points
I mean, you can add points by getting ship possition over needed time
or etc
There is Set Spline Points function
You should do it as Plane moves i think
Here's what I got so far @quartz patrol. It doesn't appear to add any new meshes...
So its not working?
no
I called Update Spline with the target of my Trail. Didn't work. This is tied to the Event Tick by the way (carrying from the Flying starter kit)
Like this. The current vector is then added to the array 5 times per second. At least that what it should be doing...
Hmm, its hard to find issue that way
@unique flint https://www.youtube.com/watch?v=7YUxM0NDWRY

Check this, hope this will help
I've already looked at that, and I have the construction script right here
Not sure where to throw this question, when using the Game User Settings nodes to set and apply game user settings, what .ini file does it save to? I've been monitoring all the saved/windows/config files while changing settings around in PIE, and they save between sessions, but none of the files actually change... slightly confused.
I want to create glow material how to do please there is now emmisive
Additional query: does Right Click -> Launch Game automatically override your saved configs with defaults?
(sorry my bad it's UI material, never mind what I said)
@quartz patrol I added a few debug string to help me find the source of the problem. I fould that the points are indeed being generated, but my spline is not updating...
@quartz patrol Update: I appended an "Add Spline Mesh Component" However, I am getting warnings that my ship is not static.
Hey anyone know a good place to find a melee/sword tutorial?
@keen pawn with an AI ?

@keen pawn i didnt yet see it because it is an advance tutorials (and i am just a beginner) but it looks good and i will follow it when i get better
i give you the playlist just open it in a new tab
so i think you will like it
hi all, im trying to package up my demo for someone but i cant seem to get it to pack up, keep getting a error 😦 please can anyone help
hi everyone! i've got a question: do you know any good tutorials for top down games? i've tried some on youtube, but they are a bit too chaotic for me
Hi guys. For those of you who released or plan on releasing, have you done an EULA window in your game when you start it or something like that ?
According to Epic legal guidelines we're supposed to do it, so I wonder if there is a bult-in tool for that or if that has to be in the game itself
UDK bypassed that because it created a full installer, but UE4 doesn't, and we'd use Steam anyway
Please how did he display the DATA nav in 21:32
https://www.youtube.com/watch?v=UGIJ3g7VMho&list=PLZlv_N0_O1ga0aV9jVqJgog0VWz1cLL5f&index=59
The key next to Enter should show that
Hey guys 😃 In a Box Brush where are the options for them not to cast shadows? I want some bright light walls in front of my windows. They should let light through but otherwise be just a white area. I got the material already I just need to disable shadowcasting for these brushes
@halcyon marsh ' will do the trick
Key next to enter
@plush yew Should be in the Rendering category
Yeah but n a box brush details panel there is no such category
Its in Editor only
So if you have a gameplay mechanic bound to it you might need to change that or make a workaround
it's ' or `
Ah so the first one you chose
but i change ' for lit mode
can you go to your shortcuts
and tell me
what is the name
anyone here have ue4 running or install ?
Sorry I didnt really follllow and I am a newbie. I thought U just wanted to know a shortcut ^^
i want to debug my AI x)
but i understand nothing on that
can someone tell me how to do i search in the forum i didnt find something helpful
I found out how to make these BoxBrushes not cast shadows. You have to convert them to a static mesh first, then you can adjust rendering properties
@halcyon marsh Sorry can't help you with that 😦
@plush yew in your preference you dont have the ' key ?
Nah I have it lol
I have QWERTZ
for me it's Shift+# key
which makes '
and the # key is left of the RETURN key, th elower one
i find it
ahm guys.. im done with my project how to totally make it finish ?
i mean how to make it a .exe
#animation Anyone know about this?
@green spear you would like to know what ?
@halcyon marsh If you head over to that channel you will see.
If it is possible to change the Constraint on a physics asset of a SkM in BP.
oh sorry idk
Or if you can at least change the Constraint Profile for a set of bones.
what would be the best way to send info from one gamemode to another?
dumb question, the shooter game demo.. is the license free for commercial use as long as credit is used, as a template for own game?
yeeeeeeeeeeeeeeeeeeus
https://www.youtube.com/watch?v=W1_UmN_k80U

@oblique fern Last time I checked, yes.
(However, as with anything commercial with revenue - royalties are due for the engine)
@south hatch read @safe shoal his thing ^^^
so, it seems unreal string hates scandinavian letters, is there something that could help with that?
ok, seems like unreal does support scandis but the advanced sessions plugin or steamworks doesn't like them
I'm trying to get a TRON style trail using a Spline. However, the trail refuses to render no matter what I do. Can anyone help?
Heeeeelp!
I cannot ship my game because "Error Error Error loading C:/Users/Xlent-VR/Documents/Unreal Projects/VrTalk/Content/Multiplayer/Materials/Orange.uasset!"
But I don't have the asset. It disappeared after UE 4 editor crashed some time back and I never readded it. I tried recreating it but still same problem, I also tried removing it again manually after recreating it, still same problem.
I also tried to restart my computer, but still same problem.
What do I do?
Have you cleaned up the file redirectors in your project?
how?
I used reference viewer to try to find it but no =(
I also deleted my intermediate and saved folder but no 😦 😦
Okay I resolved it.
I had a material in my folder, I copied that, renamed it to "Orange" then I started and packaged my project, worked fine.
I shut down the project, deleted the Orange.uasset manually from my directory.
started the project again, tried to package it agan and fortunately it still worked.
Does anyone know of a Tutorial on how to use "Session Frontend" for optimizing? I'm finding very little information on it.
Is the forum down?
@pallid talon https://youtu.be/RwbkvUEgCls?t=2357

also related to optimization: https://www.youtube.com/watch?v=-csRxRj_zcw
Thanks @cursive dirge !
Question - Does anyone know how to get the audiowave from an audio file? I'm trying to make an object's color change to the best of music. But not sure how to extract the audiowave from an Audio file and convert it to change the intensity of an RGB value. Any suggestions?
Highlight with post proccessing. Any ideas why this happens? Any answers may help. Thanks!

Guys im finish with my project.. now im currently packaging it..
check it out.. its ok that my packaging have error
Anyone use Anim Montages a lot? Was wondering if there was is a way to update an animation (eg the length changes) and havng anim montage sections auto update and snap in place to the end point of an animation
Right now whenever we update an animation we basically have to rebuild the anim montage from scratch, re-aligning all the section markers and then snapping the anim notifies back onto the section markers
We have a lot of loop in and out points all strung together in one anim montage, and there's no visible "reload" button that updates the animation length and retains all the relative information marks
anyone know how I can have a particle system activate and then activate before the first system finishes? basically I have muzzle flash on a pistol but I can't find a setting to allow it to fire as fast as the player can press the trigger
Is there a way to tell the UE to not place the camera where it was ingame after stopping the playtest in PIE, but instead where it was when i've started the playtest?
Because i'm simulating orthographic view with low fov + high range, and the camera is always out of space after ending the play
😄
@plush yew Just setup an Camera in the level where you want it, whenever you exit PIE just select that Camera and snap the view to its location
guys please
I was working in 4.13 versoin and I created an open world map
I have a lot of foliage in there but I was getting around 100 fps in 4.13 version
and then I moved to 4.15.1 and I get around 6 fps...
when I change the graphics settings it does not help
@south hatch Sorry for delayed reply :p Yeah I needed to modify some of the modules, and it was a toss up between modding the engine build I'm using or doing it via plugin. I saw your plugin and was like "oh, they must allow that now". So after a bit of trial and error it worked :p The hardest part was getting the bloody modules to show up in categories...
Hey guys, How would I make sure a visibility trace done from blueprint takes the Displacement done in a shader into account? I've got this problem where a trace goes through the surface, and "hits" the surface BEFORE it got displaced in the shader.
This is a landscape component without any shader displacement, which returns correct results
Here the same landscape, but with displacement in the shader. Which returns incorrect results
You can't. You can't read the shader displacement on the CPU
All displacement is done GPU-side only
Shader Displacement just moves the pixels / verts just before they're drawn to screen - so CPU can't know about it.
@main lotus
Alright, makes sense. Is there a way around it other than sampling the heightmap, and adding it as offset?
The way around it would be to sample the Displacement Heightmap on the CPU the same way it's done on the GPU, then modify the position that the line trace returns. But that's expeeeeeensive.
option is to match the mesh closer to the target shape
^ Or that of course
it doesn't really look like you are doing much good with tessellation + displacement there
don't use it on flat plane
Not on this particular area on the landscape. But other parts have a lot more @cursive dirge
you could still try to find some middleground, make sure the base mesh is always somewhat close to where you want the feet to be at
of course, it's more work but that's expected
Anyone got some sneaky information about the possible ETA for 4.16s release?
I'll play around a bit more. Thanks @cursive dirge @safe shoal
I wondered something
I hear quite a lot that motion capture is quite expensive, right?
Depends on how deep you want to get into it you could do it for 10 bucks or you could do it for a thousand bucks or you can do it for ten thousand bucks
But why the fuck don't companies just grab a camera, attach it to their heads with some construct stuff, turn on the cam and let them act out the scene. This will show the animators a reference of how the emotions look, how the muscles work, how the lips move at certain words, even if they have to hand animate it themselves.
Aye
Yeah that's been done for a decade with socks and video cameras
Then why are we seeing so many big games that absolutely suck with facial animation?
But you're also making a distinction there about facial mocap versus mocap
Because facial mocap is not the same as general gross physical body mocap
That's true, I understand that a full body mocap (which is used in Beyond two souls and the Last of us if I recall well) is WAAYY different.
For a good facial mocap you need around 30 tracking points for physical body mocap you really only need about 12
Aye
But then again, if you go for the really cheap option with just a camera for the face you don't need those points. Get 3 cameras for 3 angles and you can study the emotions way better. It might not insert the emotions into the game as the animators have to hand animate it, but still.
Oeh, let me look into it, one second
YEh they did this, which is full body
And this to capture the facials

Thirty-two: That's the magic number of cameras needed to capture the nuances of a person's facial expressions, according to the developers of a bold new video game, "L.A. Noire."
Actually used 32 cameras
Yeah they're just switching to Infrareds now that's been in use for a couple years as well
Aye. But why are so many companies not using it? Not even the simple version that's just recording the facial features? Mass Effect, despite it getting properly patched now, wouldn't have looked the same as it does now WITH the recording, as example.
It's come a slight way since having to use a magnetic setup with a full body suit and a 20 by 20 area hand keying crap in kaydara 20 years ago
You're asking a lot of different questions here
Like it's easy to hindsight a business decision that started five years ago
Aye.
There's all manner of questions there is to pipeline
Budget
Proliferation of Technology
It's not just a simple as why didn't they just
Also, projects like that are pretty much like trains. Once it's on the rails, you don't usually take it off to change something and put it back on
Yeah a lot of those big budget Productions are simply turn key
If you have a running steup to create animation, usually you don't start over
Btw the animation in ME:A isn't bad because of tech - it's bad because of time 😃
Yeh but they already have the voice actors. All they need is to plant something on their head to holds a camera, insert a camera (which can even be SUPER cheap) and record their facial features. I'm just talking about standard cameras here with standard recordings, nothing that will pre-animate the faces. But it'll gave the animators something to work from, a recording of how the animations look like. I get that when you are already a few years in you don't just change it. But why didn't they do it from the start?
That's very true
I'll give them that the new patch that launched is amazing. The eyes look so much better, the "my face is tired" flows so much better. Like, they are fixing it amazingly.
It's simply pipeline like strangers said if you already have a pipeline that's established and working trying to retool a pipeline for something like that is just a monumental work and if they don't want to invest the money into retooling that part of the pipeline it's just not going to happen
please i have a height texture how can i use it in my material
And I only say that as a pipeline supervisor
Height maps are not the most common thing to use in Unreal
You should create a normal map instead
Hmmm. Well, it's a shame really ( @ the previous subject).
Or use something like crazybump to convert it
Thank you for answering my questions though 😄
Thanks for asking it makes me almost look smart
No worries, I really enjoy such convos!
Height maps are typically not used in UE4 - normal maps are a better replacement
At least in the context of regular meshes
does anyone know why i cant turn around properly after enabling and disable mouse cursor?
yes but when i download the material they give me also the height
You don't need it
why they give it to me x) ?
I was going to suggest the detail textures but even that's lacking the height.
Turn on displacement and plug that into the world displacement
they said it is for ue4
Well it's up to you
Go to the properties for the Shader itself scroll all the way down to the displacement tab open that up and turn on displacement
Then just plug your map into the world displacement
Now it's not going to do this magical thing where you going to get this perfect displacement like you think you're seeing in that map
Either you use tessellation and do what @raven cedar says, which is going to add some cost, or you just use the normal
But that will get you 90% of where you want to be
My mouse input is still locked to the screen bounds after disabling the mouse again. does anyone know why? it makes it so i cant turn around properly.
@raven cedar
if i want how to do ?
where i have to do the input
for the height
i just want to see the !=

Do this
And then enable tessellation in the material (use "triangles" for the tesselation type)
slower performance
Mostly, it's not efficient - you should do a more detailed low-poly, bake a normal map, and simply use that. It's more predictable, looks better, it's faster
Of course you can't do that if you just download the assets
why you use 10 and 33 for distance what does it mean ?
That's the itnensity of the displacement
The 10,33 is just a single constant
Not a 2vec
FYI, the errors normally show up in the bottom pane so that you can interpret what they mean
They should be telling you something like incompatible types
@cloud cobalt i dont very understand the Distance and TesselationMultiplier i am new in material what it allows me to do
because even if i change TesselationMultiplier nothing happen
Did you enable tessellation in the material .
oh i see the distance
distance i understand
with distance value change
it gives me more tesselation
but TesselationMultiplier i dont see any change
omg 140 compiling for the materials x)
WTF
So I made this video about why I think VR is shit. However, everyone assumes I don't like it because they think I can't afford it. But in reality I hate it because I think its an overpriced gimmick.
How does me complaining about a product being overpriced equate to me being poor.
I hope it's fine to paste this here.
I'm doing my master's thesis in Unreal Engine 4 and I'm creating a communication system. So if you guys have 3 minutes to spare, I would love if you fill in this Google-form regarding today's communication systems. It's only 5 questions
https://goo.gl/forms/2Gsi93Dtpn4N7qBO2

Google Docs
This form aims to determine what's missing from the communication systems today such as Hangouts, Skype, JoinMe, Lync, Adobe Presenter, JoinMe, Discord, MSN, AIM, ICQ etc
Any Programmers want to save me turning my head into a red stain on the wall?
https://forums.unrealengine.com/showthread.php?141742-Linker-Errors-when-trying-to-use-FRawDistributionFloat-or-FRawDistributionVector&p=691997#post691997
@cloud cobalt thank you i will not distract you ^^
@safe shoal is that the full error message?
I can't spot anything obvious but I've not done very much in C++ with UE4 yet. It's just giving me a headache everytime with the illogical errors 😄
@onyx pewter well there's a little more but that's the key part really
Can you paste the remainings too?
@onyx pewter - it's just three lines like this:
2>ST_CEAdvancedInitialLocation.cpp.obj : error LNK2019: unresolved external symbol "public: void __cdecl FRawDistributionVector::GetRange(struct FVector &,struct FVector &)" (?GetRange@FRawDistributionVector@@QEAAXAEAUFVector@@0@Z) referenced in function "public: struct FVector __cdecl UST_CEAdvancedInitialLocation::SpawnBox(struct FParticleEmitterInstance *,int,float,struct FRandomStream *,struct FBaseParticle *)" (?SpawnBox@UST_CEAdvancedInitialLocation@@QEAA?AUFVector@@PEAUFParticleEmitterInstance@@HMPEAUFRandomStream@@PEAUFBaseParticle@@@Z)
Just plain old linker errors
I just can't understand why I'm getting them. The module is included, and the class isn't marked with MinimalAPI
So it should be exported
@plush yew im working as a VP engineer in a VR company and i partly agree with but strongly disagree with other things. VR, as it is now, is kind of a gimmick and it's very expensive. But what VR brings to the table is revolutionizing. We are using it with Archviz and education, where VR provides an unparalleled experience and understanding of the digital world. This is something that can't be replicated on a 2D screen. When it comes to learning, we've noticed a 70% increase in learning ability (learning speed and retention) compared to ordinary teaching techniques.
For games, it might not fit that well into an FPS or similar genres, where movement and speed is key, but it does bring a new dimension to storytelling. I predict that within 5 years, VR will be a mainstream medium, that does not replace Screens, but compliments it and enhances digital content.
@crude rock Yeah, I agree with you. I think it is good for education and many other fields such as training in military. However, I don't think it is good for gaming. Just my opinion.
@safe shoal Hmm sorry, I can't think of anything in specific then from what I have to go by.
It's alright, as it turns out, it's not exported -.-
Alright
Can I change the font size of my Output and Message Log windows?
Guys, does anyone have any idea why a skeletal mesh might be the wrong scale after importing, unless "T0 as ref pose is checked"
How do I change the pivot point of that red static mesh (it's a cube scaled down as an actor BP component) Normally I change the pivot point in the world view
Is there some BP node I can use to offset the angle I'm rotating from, or do I need to build a model of the needle and set the pivot point in something like Maya or Blender?
Placing pivot in Maya or blender would be the best
You could try moving pivot on object placed in the level in editor, then export it as fox and import back
Another option is to add it as component into BP and move it in relation to the root component
If it's already in BP add scene component as parent to your needle, move needle in local coordinates and then rotate scene component
Hey @fierce tulip
https://www.youtube.com/watch?v=cvM_ejZ9D1c

I did moar
Required an engine source change though -.- someone decied to make distributions a no-export class 😦
@vale osprey I made a new model in Maya and moved the pivot point but Unreal isn't using the corrent pivot point it seems
might need to delete history
In maya or make a new actor component?
in maya
maya is notorious for saving ridiculous amounts of old data on locations etc so it can have extra "undo"
here is pivot point, I export to FBX... am I missing a step?
yeah
put it at 0 on grid
that's your problem
just snap it
or go to the little x y z location fields in upper right and set those to 0
Like so?
Hmm.....the other static mesh rotated fine but this seems like it's moving on a different axis
worked fine before, the pivot was just off on the cube
so it would rotate around the center of the SM instead of the end
and why for the love of god does Unreal not let me rotate actors in the viewport of a BP sometimes...I've never figured out...I can manually put in numbers in the transform section but the viewport is like, "Not this time chump!"
Is it oriented along the X axis in Maya?
uhhh
Hypothetically speaking, just for, um, academic purposes
Assuming it wasn't oriented ....
Yeah the whole axis seems a bit wonky....I can't seem to use the viewport to rotate the actor and the transform values don't seem to correspond
See here where I rotate along x axis but it also seems to be rotating with a different axis
you can see that I was pretty much perpendincular in the previous image
If it's not oriented then pitch/yaw/roll don't have their meaning anymore
(or parellel, whichever makes sense)
Parallel I guess
okay, how do I go about oriented it in Maya (I can PM if you don't want to clog up UE general chat)
Check in Maya that you don't have rotation on pivot and that model is aligned with x axis
Do it like a habit - will avoid headache
How can I tell exactly if the rotatoin is on pivot?
In Maya not sure
In max there is separate control for pivot position and rotation
Actually, if you are not using skeletal mesh then rotation of pivot is irrelevant
Hmm...
The the reason my needle is disappeared is just because it's not completely parrallel with the plane behind it?
Okay, I seemed to get that but here's the issue -
That's the node that is moving the needle ...you can see it is set to 0, which I hope to god is relative and not actually changing an angle to zero, which i suspect thinking about it, it might be
and we broke everything...
that's at play time
I guess when I split that vector pin, I didn't think it would zero out everytyhing, I just wanted NO Change
That node sets world rotation
it was working fine before but I split the pin
Switch to SetRelativeRotatin
You can merge it back, just right click on it, there is option
close...how do I connect this to just one value?
when it is split, it sends a zero to every angle, (for example, before play, the angle of the static mesh is 140
is spatial voip possible with only BP?
@light thunder
that yellow input is a vector, not a single value
split rotator on SetRelativeRotation node and connect green output to Roll, yaw or pitch
@vale osprey I did that but the zeros that are there are rotating the object to an angle of zero
I know because i left the entire thing zeroed out and cconnected it and it MOVED the needle
not sure what you mean
you can set one of those pins to a 90 degree rotation, if it doesn't rotate around proper axis
is your plane rotated too?
My question is this
if the relative angle of your option is 30, 60, and 270, for x,y,z respectively
and you SetRelativeLocation of that actor with new rotatoin of 0, 0,0 , it is going to rotate on all axis, correct?
correct
so I would have to GetActorRotatoin and just pull the pins out of there and put them into the setnode?
well, yes but only if you rotate around single axis and in limited range
the easiest would be to rotate your needle only around single axis
yes, how do I do that?
for this, you can oriented your plane, such that it faces X axis
so X axis is like normal of the plane
then rotate needle in maya, so that it faces along Y axis
now if you make it a child of the plane, needle will be parallel to the plane with 0,0,0 rotation
after this you can animate it just with relative roll value
if you don't to re-import, add a scene component as parent of the needle
and rotate scene component such that needle with 0,0,0 is parallel to the plane
this seems to have worked!
but I am copy and pasting what you said to my notes so I can build things better in Maya
try to roll it over 90 degress, see if it still works
seems to I jsut need to fix some blueprint nodes
The problem is, it immediately updates the new rotation because I have it sent at event play, AND updated when the valve moves
There we go, that did it...now I just have to figure out hte right number to mulitply by
I actually could REALLY use an engineer's help, this isn't even Unreal so much as basic math....let me describe it
trouble with animation?
I need to get corresponding rotation based on the pressure coming from that line...so for example, at begin play, the master pressure is 100... and as the Valve opens, it scales with the pressure, so a half open valve would be at 50 PSI, and fully open would be at 100 psi (I know this isn't the way real pressure is, just as an example thouhg0
you could normalize your pressure input and interpolate rotation from there
so for example your maximum pressure is 500 PSi
C:\Users\Player of Games\Desktop\Screenshots from Jing\2017-04-07_1410.png
divide incomming pressure by maximum possible pressure on gauge
so pressure_scale = pressure / max_pressure
pressure_scale will be in 0..1 range
then add node called LERP
what type of variable is pressure scale? float of 0 to 1 range you mean?
set minimal and maximum roll on it and input pressu_scale as "alpha"
yes
you don't need to store it anywhere
a regular lerp or lerp rotator?
just regular as you provide roll only
you could use rotator but then rotation on other axis need to be provided into it
got a bit confused for a second....the pressure scale variable...is that set to 0 to 1 or is it set to the incoming pressure divided by the max pressure?
incomming / max pressure
^that will give you normalized pressure (pressure in 0-1 range)
what I mean is that it will be in range of 0 to 1 because of such division
so i don't use a normalize to range node correct?
(sorry to barge in, I've been watching your discussion 😁 )
the more the merrier, thank you for helping
well, you could clamp it to 0..1 but this might hide some issue
like if pressure is negative you should see bugs
clamp will set it to minimal pressure instead
what am I setting for A and B on the lerp?
minimal and maximal rotation of the needle
um, what are those?
ohh wait, this won't work 😄
like, the increments to move it in? I thought that would be based on ...
This is what I have
Someone know how to get variable from Level Blueprint into oter BP ?
I DO!
how
rotate your needle in editor into minimal possition of pressure and copy/paste values of rotator into LERP A
then the same for maximum value
so my minium value is 135 correct?
@light thunder you can right click on"Rotation" and copy it
tl;dr ... probably not possible to get them from Level BP, better store them in Game Instance
@vale cloud but the problem is that the game Instance is not for that
game instance is for store variable when level change
how do I pipe this out then @vale osprey
use Game Mode then? 😃
Because I don't want to rotate the other values to zero, that will screw it up
--" how to thank you x)
nevermind i'm an idiot
because i have BP_ManagerSomething and i always do a get all actor from class
anyway, even if you use Game Instance, you can get them in the level BP, store whatever value you want (at begin play?) and then you can also access it from whatever actor... if you want to change it when you load another level, just do the same for the new level
it means i have to do it also in the GameMode
yes i understand what you tell me
but even if i do it
i will use the
get all actor of class
and i want To dodge it
heh well, without knowing xactly what you're doing, I can't really understand... you asked "Someone know how to get variable from Level Blueprint into oter BP ?"
@light thunder split output
You can blend shape with just 1 object right? you dont need multi objects?
to what I replied "can't, but you can store in GI or GM, access it from level BP at begin play, set it, and then access it from whatever actor and get it"
@vale osprey Okay, it is moving the wrong direction....I tried multiply by -1 but that just made it jump to the other side (makes sense I think)
and it doesn't seem to be interpolating accurately
@vale cloud oh ok so i have a class BP named BP_SaveManager and other named BP_Position Manager and i need a ref from them without using the "get all actor of class"
ahh, flip A and B then
very small amount of movement...I moved the pressure up and it's not changing the range at all
also, does Unreal compute 410 as the same as 50 for a circle/rotator?
I checked the transform and it seemed to
@vale cloud or without drag and drop them into the viewport i just want to know if it is possible ?
@light thunder yeap
to avoid confusion better re-import needle such that you don't need to rotate anything but roll
that's not the issue I think though
because there is a problem when you rotate one axis by 90 degrees
it's rotating just one axis though
ok
the moment the valve was opened just a bit, it sent it to the A node which was the 50 degree one
but it is on the wrong side
@vale cloud i dont know if you understand what i want ^^
@halcyon marsh probably not ... also I'm not the best person to help you really, not much more than a n00b myself 😐
You can see the value of the incoming pressure there
@light thunder so what is the value of pressure_scale when you start it?
0
@light thunder
then it should output A
wait, I need to pipe the pressure scale to A? wat?
the idea that it interpolates from A to B using alpha
yeah, I get that it should go from a 135 angle to 410 (the 50)
based on the alpha value
maybe multiple alpha by -1?
for the right rotatoin direction?
so when Alpha input is 0 you get A on output, when Alpha is 1 you get B on output, when it's at 0.5 you get middle
no, alpha should be from 0 to 1
you can simple swtich A with B
I did that, now the neelde starts in the correct location but it moves the wrong way and it doesn't seem to scale
yeah, my incoming pressure now is 400 but the needle moves the same distance
well, the problem is, it's going the shortest path
while Shortest path is off?
it's fine, you can trick it by giving it different angle, like 360 + 50
son of a bitch it works
the problem is that your needle is not rotated to 0 degrees from the start
incoming pressure is 400, valve fully opened! ...IT"S ALIVE,,..ALIVE I TELL YOU!!!
Valve open 50% (gated down) pressure is at 200.....THANK YOU DUDE
@safe shoal seriously, i love you. i want your babies. i want to carry your name, and i want you inside of me. /me plucks one hair and eats it
@light thunder no problem!
Someone here use a BP class only for references ?
I am really stuck with blendshapes/morph targets can anyone help me?
@vale osprey how hard would it be to put a smooth curving animation to that needle rotation?
you can use Intrp nodes for this
but you have to call them on Tick
so basically you get that out put from LERP, this becomes input for Interp node
delta time comes from Tick event
target is output from the Lerp that you already have and Current is a value that you set as output from this function
wait, I put the return value right back into current?
yes, output becomes input on next calculation
And what if event tick isn't set to execute anything