#animation
1 messages · Page 155 of 1
could someone help me export my animations from blender to ue?
for some reason it only exports the messes
what do you mean by messes
mixamo
Select the armature and check bake animation in the export settings
Check import animations in ue import settings
where are the import settings?
sorry, im new
so im using daz 3d and added these attachments, that have bones of their own they imported together but its glitchy as heck when i try to use morph targets
but normal moving isnt broken at all
send help will throw love ;-;
I have an animation montage that I want to transition to a walk animation. Im trying to figure out how to mention the animation montage is playing in the rolling state in the animation graph since the montage is being played through the characterBP


I understand what to tell the transition rules for it, I just don't know what to put in the rolling state
Is it possible to trim/modify sections of an animation within UE? Let's say you have a sword attack with a wind-up, is it possible to make that wind-up be 100% faster then return to normal speed?
I'm reading on animation montages but seems to be more about mixing animations and enabling parameterization f
@tropic basin I was looking back at the original tutorial that I had followed and he dosent seem to have that issue at all... https://www.youtube.com/watch?v=422bzn6tCuA

Hey guys, thanks for watching! This is an UPDATED version of my previous directional roll tutorial. So, this version has some improvements. A rolling animation with root motion is required! But no need to worry if you don't have one, I provide one for free!
I hope my tutorial on directional rolling was able to help you! If you have any issues ...
4:16
@dusky void hmm.. I'm not sure. If thats what your following I'd just start making it over and see if you can find what you did different
@tropic basin starting a new project fixed it
Anybody got a Dog Petting animation!? I cant find a single one!
@dusky void did you figure out why it wasn't working? Cuz that would be awful to have to do a couple months into a project
no idea, i assume it had something to do with when i retsrgated the mixamo skeleton
this new file dosent have it
mixamo prob has one
Ah.. yeah I've never played with mixamo purely cuz of all the bugs involved with the retargeting
first place i looked. no dice unfortunately
Do we have any animators here who would know how to make an animation/pose for sitting on this? Just the default skeleton of SK/UE Mannequin would be good. I dont know the first thing about character animation :( rip. Would it be hard? I suppose linking the bones of the hands to the handles maybe?


@tropic basin agreed
@agile heart getting a sitting animation? No that would be pretty quick
You can just throw a copy of your mesh in blender, use the mr.manniquin plug in, position it and export the pose
And I suppose using thirdperson character code to get on / off and trying to add in the code for switching back first person when getting off would be good too
Yeah i suppose i can try that though I know 3ds max better than blender
I guess i dont really need a full on animation sequence of getting on the thing but rather just "teleporting" onto it so to speak lol might be a lot easier
Or the code would basically call up the animation to play! Hows it work?
If you already spent the $.. the difference isn't worth it to me
Yeah you need to set up an animation state and switch to it when the player mounts
When i "get on" it switches to the chase camera on the back of the snowmobile already so it would be easier than following the character i suppose but
I guess ill try to learn my first animation as this lol ill try this tool you speak of and ill download blender
Its all free and the plug in has really good documentation/tutorials on how it works
Hello guys ,as you see i have this mars rover made by nasa which has animation and constraints in blender , how could i make it do the same in unreal , i have seen a lot of videos of rigging using bones , i have tried that on cars with 4 wheels and it worked .my question is should i make bones for all the weels and suspension here or is there an efficient and easy way to make this rover do the same in unreal .
Anyone have a good way of checking if a character is turning left or right in the animation blueprint. I can't find a clean solution.
Does anyone know if there is a way to export a character animation from blender to ue4 with a gun animation without having to attach them back together later in the engine (with sockets)?
depends what you call turning left or right
is it a mouse/axis oriented character, or is it some other setup? etc
if its an input axis oriented camera (like a standard FPS character) you can find the turning rate by having the animation BP use the current orientation subtracted by the old orientation
That's pretty much what im looking for. I want to use that to setup a turning animation. I've set up a blendshape for turning left and right. Would that method work with a blendshape? One issue I had was when you turn too far the animation flipped to going the other direction.
@dense chasm I don't know tbh, but I can ref you to ALSv4 which has turn in place animations, and their solution is bound to be worthy of studying afaik
you should open up the project (free on the market place) and see how they implemented it
hi! can someone please explain to me wht is morph-based vertex deformation?
is there any guide to understanding ALS?
the implementation is filled with comments explaining the general approach
okay thanks will look into it
the system is quite modular and asset-dependent, so its best to study it with an open content browser
okay
Hello guys, I have problem with importing the animations which I get them from mixamo, when I import them I get error, I tried in othe project, I tried with different animations and again the same result, how I can fix it ? Cus I want to import swimming animations and implement them in my project.
you should post the error you're getting
@vapid ibex

@misty dagger you wanna show the output log with the error details?
where?
Click windows>developer tools> view output log
If I sent someone a model could you animate it for me?
the model already has a skeleton.
When importing this, I'm having a hard time getting the root bone mesh to be in this position...

this is what I get in unreal.. any ideas? I'm not even sure what I should be looking up


This is the error that I get when I try to import animation
I can't wrap my head around this one. What determines which pose is goes first? Here I have a Base pose and an Overlay pose. For the 1st and 2nd blends, the Overlay goes in first, but for the 3rd one it's the Base pose.

Unreal Engine Forums
Animation discussion, including Animation Blueprint, Persona, Skeletal Meshes, and more.
Did you find out? I find myself asking the same thing at times
Nope. I still don't know why it's like that
Hello. I have a question about importing animation from Maya to Unreal.
For the most part, my import went well, but despite exporting with Z-Up from Maya and importing with Import Rotation {0,0,90}, my animation's translation is being applied to the Y-axis in Unreal when it should be applied to the X-axis.
Any advice on how to fix this would be appreciated.
Cheers.
@sullen aurora You helped me before with importing blend shapes. Do you think you might be able to help me again?
So i have made a couple of animations for my character, but recently i had to update the skeleton with some more bones and some other changes, now the past animations won't work with the new rig. What should i do? Cause i need the new rig for the animations i have to make.
You can re-target them to your new skeleton
Can you animate inside UE for cutscenes or should i create the whole cutscene animation in blender ?
You can use the control rig and animate inside ue4 but it's easier in blender. Especially with the mr.manniquin plug in
I don't remember if the plug in has the facial bones rigged, but control rig does
Hello, I started to work with blender and I'm trying to export a basic animation to UE4

the animation is missing for some reasons, and I have those warnings, any idea why ?
even animations longer than just jump or run loops ? like a minute long animation ?
Not aware the time limit for animation sequences.. They have a number of live streams on virtual production and indie motion capture, so I'd imagine you can
Hey guys, is it possible to set "force root lock" at runtime for an animation/montage ?
I know how to enable/disable root motion at runtime using the anim instance but I'd need to change the root lock property
@delicate junco is this what you need https://docs.unrealengine.com/en-US/BlueprintAPI/AnimationBlueprintLibrary/RootMotion/SetIsRootMotionLockForced/index.html
Set Is Root Motion Lock Forced
Thanks ! I saw that function but I think the animBlueprintLibrary can't be called at runtime right ?
I used some of its methods in editor utility widgets but couldn't find a way to call them during gameplay, it feels like there were made for the editor only. Are you aware of a way to use them at runtime ?
Ok apparently this is a public attribute in C++, going to see if I can do something with it
Oh if you know c++ then it's definitely easier to get references and set attributes that way
I actually managed to replicate what I wanted using the animInstance attributes only so I'll just have to override a few parts, won't have to dive deep into the anim logic 😄
Thanks for your time, appreciate it !
Hey, not sure if this is the right channel to ask in, but I'd like to know,
I'm learning the sequencer tools, and using a camera rig rail to move my camera around. However, if I make keyframes for rotating the camera and other stuff, it's based on the current position on the rail, so if I make the rail longer or edit it at all, then it kind of breaks the timing and locations of all the keyframes I've made. How do I extend the rail without changing all that? Or is there maybe a better way to do all this?
How can i rotate a socket half a degree? The editor lowest value is 2.812 and that is too much for my case
Found it. Custom rotation grid did the job
So do yall prefer having a 'main' animBP that just has variables and getters and all of that good stuff? Do you use linked animBPs for the actual animation logic? I'm just curious as to what people prefer or think is efficient when it comes to animations
Newb question here, is the root bone at the origin necessary? I’m rigging my character using mgear and the skeleton and animations appear fine. Am I making a huge mistake not having a root bone at the origin? I’ve always been curious to know
The thing is... I’m adding skeletal mesh armor to a character and I’m seeing one problem of not having the origin bone... the armor inherits the translation and rotation of the hips. If I did have a root bone I’m guessing they would animate exactly the same and that this is one of the reasons to have the root/origin bone. Is my thinking correct?
It’s slightly annoying but I’m thinking I can just add a root bone to the rig and export the skeletal mesh again then retarget the animations and everything should work fine
Any clue if there's a way to import poses from Blender into UE4? I need to be able to import Key stages of my animation as single poses so that I can set up a proc animation system
Hi, sure what is going on? Maybe just post your question here, and lets see if anyone can assist. I am not always on Discord. 🙂
@oblique canopy @wet glen unreal has about a dozen live streams on their YouTube about blender to unreal workflow
If my character needs different running animations for different weapons, do I use a state machine in the anim BP to change those running animations? Or can I somehow store the running animation on the weapon?
Hey guys I'm trying to learn how to use the control rig for gameplay animations and wanted to find the demo called "When robots attack" from this talk https://youtu.be/UyCziUcnqxM?t=6177 but I couldn't find it anywhere. Anyone have an idea where I could find this demo or a similar one so I can look into how I can use the control rig for gameplay?

Let's explore the latest animation features available in Control Rig for Unreal Engine 4.26! The team will cover updates to the Control Rig Mannequin Sample that's available on the Marketplace, rig sharing with Control Rig Components and Setup Graphs, attaching multiple Control Rigs for animation authoring, Slope Warping breakdown with post-proc...
@vapid ibex just make a BP weapon base, wich base mesh it'll change between different weapons, with all the variables associated like blendspace. Then you just have to cast the father class to access all child custom blendspace and variables
Did your parent classes get divorced? Child lives with the father now..
what
Hi, thanks for your reply. My question had been just above where I atted you. I'll paste it here too:
I have a question about importing animation from Maya to Unreal.
For the most part, my import went well, but despite exporting with Z-Up from Maya and importing with Import Rotation {0,0,90}, my animation's translation is being applied to the Y-axis in Unreal when it should be applied to the X-axis.
Any advice on how to fix this would be appreciated.
Cheers.
working on an approach for interfacing a multi-touch monitor to pose the mannequin in Blender via Rigify. Next step, the Control Rig in UE https://vimeo.com/523435003
A step in the development of a tool to bring multi-touch input into character rigging. Geared to build animations for the Unreal Engine, currently using the Blender…
That looks really fun, great job!
Yeah I have a weapon class and whatnot, what I'm confused about is how to set and use the animation assets inside my anim BP
Does anyone know what Animation Layer Interfaces are for/how they are supposed to be used?
i was actually lookin at a few of those interfaces and there is like no info on some of em 😛
@vapid ibex I don't get it. What I mean it's to create variables in the class of type sequence or montage and just cast that class and use that variables
@vestal talon https://docs.unrealengine.com/en-US/AnimatingObjects/SkeletalMeshAnimation/AnimHowTo/LinkedAnimBP/index.html
Illustrates how you can dynamically switch between subsections of an Animation Graph.

its somesort of virtual anim graph
Hi, how can i animate a head with a texture face?
I would recommend following the guide set forth here.
https://docs.unrealengine.com/en-US/WorkingWithContent/Importing/FBX/Animations/index.html
We have imported probably hundreds of animations over the years from Maya to UE4, ranging from vehicles and characters, vehicles I remember was the most tricky, but we have never specified any import rotations. so I don't think I can help you there.
We follow the guides set out by Epic regarding Bone orientation *( if they mention it for vehicles for example ), and we pay close attention to the FBX export pipeline in general, that is the best thing to use, if you specify import rotation, that is news to me, it may be affecting your animation, or it may be something you specified in baking, or export even
maybe try with different settings as a test, but definitely read the guide from Epic, that is primarily what we use and our tools are also written around that, with a bit of different stuff to handle Mixamo *but that does not impact the export/import process, only when importing Mixamo animations into Maya and retargeting to our different skeletons.
Setting up, exporting, and importing animations for Skeletal Meshes using the FBX content pipeline.
Thank-you. I'm surprised as so many tutorials I've seen recommend rotating on Z on import when going from Maya to UE4. I'll give the guide a closer look and see if I missed something.
hi everyone, i currently have some first person camera animations for when i reload my weapons. I have it currently implemented so that the camera will attach to the cube while the reload happens so it follows the anim, and the cube is invisible. It ends up making issues with my lean function, is there a way I can do this in sequencer or something so that I can avoid changing the parent of the weapon?
@wintry nimbus Does this help ? https://soldirix.wordpress.com/2019/08/07/ue4-animating-2d-eyes-on-a-3d-character/
hey I'm having a problem exporting animations from ue4, anyone run into this? I retargeted an animation to my skeleton in ue4, looks fine, but when I export it and import it into 3ds max some of the bones are transformed wrong, like so

it seems like it moved the leg bones into the same position as the mannequin's, but most of the other bones are okay? feet are messed up too. it also works fine for animations originally authored with the skeleton, so the problem is specifically exporting retargeted ones
I am trying to retarget animations to my character. I believe I have set up the rig correctly in the Retarget manager however I am getting a weird deformation on my character forearms and hands. Any ideas?

looks like an issue with the bone rotation maybe
So I likely have the rotation pointed a different way from upper arm or something?
I will go have a look, thank you!!
np
Have anyone used this for FPS animation? just the glove https://www.rokoko.com/products/smartgloves

Professional quality finger tracking by Rokoko. 3D finger and hand tracking for less than $1000. Easy to set up, comes with 7 sensors per glove, 100 meters of wireless range and 6 hours of operational battery time.
Does anyone know why enabling root motion for an animation removes the movement of the root bone?
Sorry if this has been answered before
I found resolved the issue I had, when working with root motion with upward movement then you have to set the MovementComponent movement mode to flying
Yeah, I use an anim notify state for that when I have root motion with movement on the z axis.
Hi folks! I'm exploring the possibilities of using control rig for linear animation. And I've stumbled on this problem:
I'd like to use animation blueprints to make procedural walk for the character (based on walk cycles baked as animation sequences) and then, on top of it, use control rig for the rest of animation.
Also I want to pass some variables to control rig (speed, for example) to make some procedural motion inside it.
But it seems like I have only two options: I can either make use of ABP with walk cycles or I can pass the variables via control rig component in my actor bp. When I'm trying to pass variable to control rig via ABP it doesn't seem to work, looks like instance of control rig in sequencer is overriding the one in ABP. And if I use control rig component in actor bp (using AddMappedSkeletalMesh) then I can't use ABP with walk cycles 😦
Maybe I'm doing something wrong? I'm new to unreal. Would greatly appreciate any help!
How can I import an animation without any bones?
I have animated vertices in blender but I can't import the animation to ue4 with alembic
prob need at least a root bone
Hey there.
Gun firing animations...
What's the accepted way to trigger these?
I think if you make a pose library, you can export the pose library as an animation, and then just extract poses from each frame
Or just make one frame animations
hey guys is there a way to slow down my animation in seconds like I want punch to last 3.6 seconds
I was wondering if someone could help me make an animation
Is it true with Anim Sharing Plugin we can not use collisions of Skeletal Mesh?
I'm having a bit of a dumb problem
i've been progressively learning ue4's animation system during the last day and i almost got the hang of what i need to do
problem is, i can't clean up my object of animations
there's one little animation that keeps playing when i do a certain thing and i don't know for the life of me what's causing it to play
idk what's calling for it to be played or where
i've checked everything i could imagine
is there a way to debug this?
i'm learning animation myself, but it has to be in one of the blueprints
what else can call it
i'm sorry i don't know much about anim, but try searching again for that certain anim and where it is being used/called
oh sorry for not updating
i found out what the problem was
the blueprint itself was clean
but the instance of it in the world had edits that overwrote the code
so it's all fixed now :)
i see
glad to hear that
and i'll keep that in mind in case i face the same problem
thanks! :D
Hi, its my first time trying Animation Montages, and Im wondering how can I do this?
If I press U, it plays the animation montage I want, but it only applies to the main body (skeletal mesh), how can I apply it also to my hair and shirt?

@misty dagger in the construction script you have to assign the skeleton meshes of your complements to the main bone. The function it's something like that.
This one? The Set Master Pose component? I used that and now the animation montage works, but sadly Master Pose doesnt allow physics on child actors

@misty dagger sorry, I use that to attach the hair and others to the main skeletal mesh
I found out this works fine, if anyone is wondering how to do it

@misty dagger that solution isn't very good, there's some montages that you'll need to control the interruptions, and that way I don't know if maybe one of your montages can be running while others don't. It can be very weird to have the hair animated by his side...
I know, its a very basic solution 😅
But I want the hair to be selected for example with mouse hovering over + physics for a ponytail, so master pose component doesnt work for me
There should be an option for adding more than 1 skeletal mesh to each play montage
Like Set Animation node for example
Hello. Searching for tutorials about procedural walk animation like this https://www.youtube.com/watch?v=rh10I5B4dp4

Lightweight procedural movement in UE4.
Music by Dream Machine from Fugue: https://icons8.com/music/author/dream-machine-1
hello guys ! do you know if it's possible to add impulse or push the character during an attack animation while in root motion ?
@deft steeple you can simulate physics through BP. Pretty sure its fine with root motion
Hi all, is it possible to bake rigid body physics simulations in the Sequencer? I want to animate an object using a mix of typical keyframed animation and physics based animation. For example: a toy car driving towards the stairs (keyframed), falling off it (baked simulation) and then driving away (keyframed). Is something like this possible? Thank you!
Well you could bake the simulation as an animation using the record feature in the physics editor im pretty sure
Or simulate it at runtime using the physics skeleton
I got myself in a bit of a pickle. Initially I thought I finalized my character skeleton layout, so to speak. I created NPC character, AnimBP, etc. I got to a point where I realized I missed a few key points with the skeleton. I had to go back, adjust skeleton in a 3D app, re-export my character with updated skeleton and anims.
In order not to mess up original character in UE4, I duplicated it (along with AnimBP) and started adjusting things to accommodate updated design. When I got to duplicated AnimBP, I couldn't find a way to swap skeletons. So now I have to re-do AnimBP from scratch for this "new" character, which is going to be a chore.
Is there a way to avoid re-creating AnimBP from scratch and somehow simply swap old skeleton in AnimBP with the new one ?
something like this might be what your looking for?

would I be able to delete original mesh and skeleton after retargeting ?
As long as it isn't being referenced anywhere
Does anybody know how to export a Blender Armature Custom Property with a driver with an Animation as an Animation Curve in UE4?
Solutions rn:
- Create a morph target and apply the driver on it, then export the anim with the mesh ( Problems: Large file size for each anim, min, max driver val = -10 - 10 )
thats it, that's the only solution i have found
My AnimGraph is not showing its current state when I press play to test my animations. Its not highlighing anything in orange so I can see where in the StateMachine it currently is, so I can work out why etc
Any ideas what I have done wrong?
can anyone tell me how to swap out animations for the state mechine for the idel and running with animation that I have modified
You change the State Animation @prisma quiver Double Click the State within AnimGraph, there you will see the animation that plays depending on the linked Transition Rule
@prisma quiver Double Click this

I figured out I had to create a blendspace and drag and drop my animations for the idle and run
into it and then change it in the setting for idle/run to the blendspace
Okay, I'll check that out. Thank you!
so, retargeting AnimBP and BlendSpaces doesn't work in 4.25.4 😦
nm, had to uncheck "Only compatible skeletons"
My running animation is rotated every so slightly despite the fact that its supposed to be facing forward. How do I fix this?
@lean surge I guess you control your animation states with variables so if you change that variables in the preview window inside the animBP you can test your animation graph.
can anyone recommend a good tutorial for adding a cloak to a character?
@mystic elm modify the animation itself. Open the animation, select the root bone, rotate until you're satisfied, press the add key button, move to the end of the animation, press apply and save. It's very easy to do that kind of tweaks in the animations.
Im struggling making my camera follow a flying character in sequencer
there must be an easier way
is there
You’re an absolute life saver thank you so much!!
Hello everyone. I have a question about animation. I have this bike here and want to make a turn around animation. I did managed to make the animation, but i'm not really sure if I'm doing it right. When I rotate the bike, should I be rotating the root bone or leaving the root at 0,0,0 and move other bones instead? The first animation I didn't moved the root and the second one I did. I didn't finished working on the second one though. Anyway, what do I do?
I'm having a feeling that I should be moving the root instead, but i'm really not sure which one is the right thing to do.
In a UE4 mannequin, it should be the same dillema as moving the root or the pelvis. Both of them seems to rotate everything, but which of them should be used?
Hello everyone,
is it possible to blend an idle animation of holding a pistol and and a jog animation? to get a pistol holding jog?
yeah theres a way, same way how melee games can hold a swrord and run
theres a tutorial on yt i forgot its name
np
Anyone? 😦
I personally like using the root better, but its just a preference
has anyone here looked at the MetaHuman control rig? I'm trying to control the rig ingame, but I can't find a way to change the rig settings during gameplay
there is this node 'Set Control Float
but i cant find a way to connect it to the metahuman control rig
how do i connect this to the metahuman control rig:

@cosmic delta Thanks, I will use that in the meantime however I am fairly sure that in the past I was able to view the live wires in real time to work out what state I was in and then check the logic to see why it was there and not where I wanted etc
@lean surge it's possible also, when I need that I press play in the editor with the option open in a new window. Then I just move and resize the window to be able to see the animBP
@cosmic delta Mines isnt working for some reason :/

I have had it in the past where on the right would show orange wires to the active animation/state
@lean surge isn't possible that the animation it's in another graph? Sure it's that the right animbp?
@cosmic delta Its definitely the same graph as I can disconnect the Idle/Run Anim and it goes to T pose and connect it back up and returns to normal...just never shows active wires :/
is it possible to get current alpha of a 'blend by bool' in C++ ?
So I use this play animation node in BP and it plays the animation, but how can I reset my character back to normal and not get stuck on that animation state? Montages are out of question.
Hey. I have a question regarding animations and sync groups/sync markers. Do they work properly for animation nodes (e.g. Animation Sequence Player, Blendspace Player) that expose their animation asset property via pin? If I set a sync group for such nodes I don't see the name of the group on the node, while notes with unexposed animation assets show it properly.
Anyone have experience with the experimental Alembic animation streaming plugin in UE 4.26
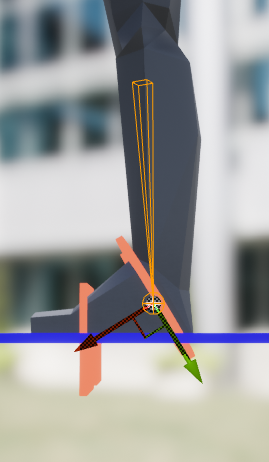
I'm in need of help with a control rig - the Basic IK node causes weird distortions on my character's legs. I assume it's because the primary/secondary axes are not setup properly, as my foot bone is not world-aligned, but I'm unable to figure out a solution
Hey so I have run into an odd problem. I'm using some Ironbelly assets I bought off the marketplace. Anyway the problem is when I equip certain weapons my character no longer moves anymore. I checked my code and the movement function is being called as expected, but like I said the character doesn't move. Anyone have an idea? I can post whatever code is needed
Is anyone here good at using the Control Rig plugin?
Is there any way to export and modify default 3rd person mannequin animations? I need to export them to blender
Export them as an fbx.. should be an option in the animation editor for that
Is there somewhere I can go to download dances/emotes from Fortnite to put on my 3d model?
@tropic basin okay, and I can just open it in blender, and it will be properly rigged and editable?
I use the mr.manniquin plug in for blender. It's free and comes with the ue4 rigged Mannequin, so you don't have to export the skeleton every time too
I have it and it worked for me when making an animation from scratch, but I don't understand how to edit exported ones
Same way you mess with new ones. Once you have it in blender you just apply it and mess with it the same way
After I load the rig and import an animation that's what I have

is it supposed to be like that? 🧐
No. It looks like you have 2 skeletons in the sceen
That's what happens when I import an exported animation using the plugin
Once you import the animation track you want to set it on the mr.manniquin skeleton, so thats previewing the target animation and you can play with it from there like normal..
I've never used the plug in to export. I just export to a separate folder and import manually in blender.
Can't say that's ever happened to me
How do I set it to that skeleton?
Try using the official plugins for that https://www.youtube.com/watch?v=9FjlgyuGhNo

UE to Rigify is a Blender addon that uses constraints defined by visual nodes to drive any rig and its animation with the Rigify modular rigging system. In this video, you will learn how to get up and running with the addon and how you can immediately start using it in your game development workflow!
Here is the link to the full documentation:
...
You can grab these on Epic's github repository, make sure to log in with a github account linked to your epic account.
Does anyone have a strong opinion on the CAT rig over the normal bone system in 3Ds Max? I have used both but would like to hear a more "industrial" or professional opinion, I like to stay in one DCC and don't like the idea of using May for "just" rigging and animation if need be, or is Blender just going to take over there? Almost every jobs I see now notes Blender as a "good to have"
https://streamable.com/x5dk1g Hello, I have made this model and set up this blendspace to blend between animations however, when in between the 2 nodes in the blendspace of the animations, it stutters.

dose anyone know how to do world space IK?
I'm trying to make a quadruped
Is there any problem with changing the SkeletalMesh of a SkeletalMeshComponent at runtime? For example if the player wants to change clothes during the game.
And if I change it in a multiplayer game, I would need a Multicast RPC so that all of the other clients see the change? Since the SkeletalMesh isn't marked as replicated in the component?
the solution I see people do for that is make the cloths its own skeleton and have the skeleton get the same values as the one its going on to, so you would have 2, on for normal character, and one for each set of cloths
Does that solution use the MasterPoseComponent to animate the clothing?
I thought that the clothing had to use the same skeleton as the character, and then it could be hooked up to the main mesh using MasterPoseComponent.
Hi, new to animating, does anyone know why my animation cuts out abruptly every second time it is run? Here is a video example of what i'm talking about:

You guys ever see something like this? The mesh was mirrored in blender to mirror the animations/skeleton etc... But when trying to add a socket the transform goes haywire. forward is back and right is left
LogFbx: Warning: IMPORT TRANSFORM ERROR : Bone (Cylinder_006:9)
Source Global Transform (34.327702,-111.503029,205.469299|-90.000000,31.860880,147.542099|-7.826604,-9.462542,-9.462542),
Converted Global Transform (34.327698,-111.502991,205.469254|-90.000000,28.589901,-29.186920|-7.826602,9.462542,9.462541)
Looks like this is probably the culprit in blender...
I'm trying to mask components based on the Vertex Normal, how could I achieve that in materials? Here's what I have right now:

Basically, I'm currently masking R G, filtering out B (Z axis), so flat horizontal surfaces work, but not vertical surfaces. I would like to use the VertexNormal to determine the current surface and mask the corresponding axis, is there a way to do with materials?

Hello all, does anybody have a successful way of importing "Make-human" characters and rigging them up in place of the default third person mannequin? I have been trying to find this online for the last few days and none of the tutorials have worked on my end.
4.26*
Hey, I have a run cycle that I like.
Do I make multiple animations running with each gun and check which one to play or is there an easier wat to do it?
PlzHelp!
My character coming back to its location after the combo .How do I fix this?
Root motion @crystal abyss
@tropic basin thanks bro

Hello, is there a way for me to reset the position to 0 when this value changes?
Because right now if it changes mid-action, it carries on the next animation at position X
I'd like it to start the new anim at 0
Nevermind figured it out
my animation montage wont play
1 sec testing something then i'll explain the error in detail
yeah it wont work i have no idea why
the animation montage wont work neither will the animation itself
look at this
anim montage works in editor and has its own slot

animation itself works too

it is being properly blended in the animation blueprint (the commanderhatch anims work for example)

if i set this simple code

it plays the commander hatch animation just fine

if i do the exact same thing with the gunner hatch anim
it says "no fuck you" and doesn't play anything

same deal if i set it to play using the "play animation" vanilal node with the skeletal mesh
commander hatch works alright

gunner hatch is like "no fuck you"

i don't freaking underestand and it's getting to my nerves a lot
OK I got the base animation to play on the skeleton
it was a dumb mistake there
but it still wont play as the montage
I'm finding with packaged games playing a montage from a specific section like this doesnt work. Does anyone know why that might be?

Nvm, apparently you cant convert enum to text in packaged builds
no, you would make one running animation and a reference pose for holding the gun, then you would blend both together
Is there any discernible benefit from having a 7MP over 12MP camera for live link ARKit face tracking? Does a $1000 phone work any better than X release?
Night mode, whatever other features? I just need to replace my phone anyway and want to use capturing features.
I'm tempted by X, I'd consider spending more if I knew any of these features help mocap.
Like I'm thinking that a 12MP camera and whatever other features should come in useful for ARKit, as well? It's not clear though.
Like lidar mapping, I'd have thought there'd be some synergy/improvements in fidelity
@plain sedge I'd just change state from the fall transition
you jump, you fall, isCrouching? -> crouchland
that's not really abp stuff
sounds more like general FSM thing
input buffer
Sorry, thought I was in a diff channel lol
can you setup constraints with level sequence? I'd love to have an intuitive way of animating in the engine but have my hands IK linked to weapon, then bake.
it's a pita, for animating you want hands parented to gun.In game parent to hand.
I should really get this working to make my life easier with CR, I think. It'd take some work. Interested in other people's current workflow, for this sort of stuff.
I'm doing things like keyframe joints when I should be moving a target.
anyway, could go on in greater detail
Heyo! I really really need help for a time sensitive issue
i have this blend anim setup done and all the animations play

however instead of playing together, the "hatchgunner" and "hatchcommander" animations seem to be mutually exclusive
and i don't know why
Hi comrades :)
In this very short video, we mentioned an helpful resources for animation and rigging.
You can watch the video at: https://youtu.be/2QQlnyXQ-v4

25+ Free Tools for Maya Animation & Rigging:
https://animationmethods.com/tools.html
also checkout - highend3d for more scripts:
https://www.highend3d.com/maya/scripts-plugins/animation/c/downloads
more videos-
50+ Free Maya Rig Characters for Animators & more:
https://www.youtube.com/watch?v=XxKLjBptA-Q
FREE 15 3D Models Websites:
http...
Hey, I have a run cycle that I like.
Do I make multiple animations running with each gun and check which one to play or is there an easier way to do it?
Is there anyway to render what you see in the active level viewport?
For example; before I was able to play the game using the render preview screen and let it render at the same time.
Hello everyone, dear developers. I want to use purchased animations from the matketplace on the Epic skeleton, in another engine, in particular in Godot. Will I be a license violation? Since, on the one hand, I use third-party content (not Epic Games) and on the other hand, the skeleton itself was created by Epic Games.
@fallow crane I think you'd just still owe epic 5% on sales after $1mil, since you got it from the engine and that is the licensing agreement to use the engine and connected content
If it's for a commercial project then I'd email epic to verify that
@fallow crane no problem, in the help section of the marketplace says you can. You can't use just if it's epic created content.
hey all, I made a livelink plugin for motion capture, i have directions between joints in world-space that i want to apply properly (ie. only make the direction between the joints match, not stretching anything)
on the ue4 side i saw the parent joints have a rotation, and the child joints then have an offset that take their parent's rotation into account
so to do what I want i'd need to set the parent bone rotation to the one i have from motion capture in world space, and also apply the inverse of rotation of the offset vector of the child
is there an easier way to do what I want? (have a world-space direction between joints; I tried setting position directly but of course that bends everything in weird ways and setting only the parent bone rotation seemed to work better)
I'm trying to import a blender FBX and whilst the skeletal mesh imports OK, the animations appear to scale the mesh tiny (and when viewed in the editor I'm far away from the mesh - it's a tiny dot as its animated).. Any ideas?
Is anyone familiar with setup a root animation like a roll or a dodge in a C++ player class and anim instance?
I'm pretty sure I have everything set up correctly and I was even able to get it to work with blueprint ,but I'm kinda stumped on the c++ way for doing. The animation plays ,but its in place for come reason
I just imported an FBX with animations together. How can I create seperate animations? I tried recording the animations in Unreal seperately, but that doesn't give me what I want.
This is so tough figuring out, cause i have made a gun idle animation and an aim down sight animation, but the gun is linked to a socket, so when i move the socket in for example the idle animation, it also moves in the aim down sight animation. Any tips?
The hands and legs are the only bones moving in the animation, but the gun still moves due to it being linked to the socket, so when i try to make the socket fit the animation, it moves in all of them, which is not what i am trying to do
Would this be the best place to ask about rigging? I've got a cable on an asset I want to include in the SK, the cable ideally should only have 2 or 3 bones but will need both the middle and end to be movable as the cable will hit a part of the mesh so I need to be able to move the middle part to accommodate that.
However I am not having much fun with IK or HD rigs, perhaps I need to use look at constraints?
In fact I think that might be it!
Great, 2 hours fucking about and now I am on bed I think I got it.
Hey folks, I have a 5 legged spider-like creature and I'm trying to figure out how to set up his leg sync markers
Normally for a humanoid I'd set the markers for when the foot touches down or something
but that isn't working with this 5 legged creature
anybody have any ideas what I should do?
@vernal lion power ik plugin from the marketplace handles multi-ped ik
@tropic basin Okay cool, I'll check it out
I think it's a bug but maybe it's just my computer. If somebody it's brave enough (and use control source), please test this; open two skeletons. Copy a couple of sockets from skeleton 1 to skeleton 2 (selecting them and Ctrl C + Ctrl V). Paste again (so it generates duplicates). Ctrl Z. The second pasted sockets dissapear, as expected. Everything seems fine. Save and close. Congratulations, your skeleton it's corrupted. Everytime you open the engine it crashes. Everytime you try to do something ith that skeleton it crashes. I asked in the main channel with no answers, where can I submit this?
is it possible to bake out your morph variables for morph targets?
like if i set my characters body fat to 1 instead of 0, how do i save it?
Is there a way to describe a curve with a formula? I am trying to make an elastic easing and drawing it with the graph is driving me crazy 😦
copy a curve node and paste it in a text file and i think the formula is in there with the tangents and stuff
How difficult would it be to take a static mesh, and convert it to a skeletal mesh that uses the default Epic skeleton using Blender? The skeletal mesh will be a child of another mesh via the MasterPoseComponent.
Would I need an artist to do that if it's only being used as a child with the MasterPoseComponent?
Hey guys,
I'm looking thru the ALS v4 content, and I'm really struggling to find where that sprint impulse is being set. (Can't find it in a blendspace).
When you use this in a FPS perspective, the players head dips down to his knees (feels like) during the initial transition into the sprint.
I believe is because of the "ALS_N_Sprint_F_Impulse" being triggered at the beginning then it transitions into the sprint.
TLDR...
Basically Where can I "disable" this implementation of the sprint impulse, and simple go from idle/walk/run -> sprint.
thx
If i have a monster that is spawning, and part of the animation is movement, when the animation is done I want them to be at the animation point, how would I do that?
i thought enabling root animation would do that, but it doesnt seem to


convert a skeleton to epic skeleton (orientation and ik bone)
for IK is there a way to add joint target for CCDIK ? My legs don't bend the right way lol
hm, i've set up a blend space, connected it in the animation blueprint and then used the animation blueprint on the skeletal mesh in my actor. but "Event Blueprint Update Animation" is never triggered
any idea?
i got it...
im tryin to create some modular zombies, but for some dark reason its start adding mesh bones or something. is this normal behavior for importing skeletel meshes?

i mean i have a shit ton to import, i dont want like a whole list with all the skeletel meshes in there, anyone?
What is the workflow for modular characters? I am looking at an example project and they have split their Skeletal Mesh into, Head, Body, Hands, Legs, Feet. If you open each of these up they have an entire skeleton, so the Head shows the whole skeleton if you show Bone Hierarchy. I don't know how to do that, when I import I only get the bones relevant to that body part and the rest do not appear in Skeleton tree
i have the mesh subdivided in different elements, and i export selected, the "skeleton and mesh i want to export" untagged everything that has to do with mesh and or bones. this is the result.
i mean there is not rlly a problem.. it works fine
there is also a option to hide these mesh bones. so i doubt its harmfull
Hey guys what would be the best tuts to learn how to rig up a character
@lean surge @misty dagger look up jim kroovy tutorials. He created mr.manniquin plugin for blender to ue4 and covers how everything works including custom modular characters
@tropic basin I will do, thanks!
Does anyone know how to retarget multiple animations at once
I keep doing it individually
How to get Parameters window for the axes Speed and Direction in the Blendspace editor like here teacher has in the course on UE4.13:

I don't have it on 4.26:

Found it in Asset Details tab

Hi guys! Please help!
I have a problem with my character animation. The problem is that the starting position of animation, every time it is called is not the same.
For example, when I call reload function for the first time, the character will play its hand animation nicely from frame 0. But in the subsequent calls, it seems like the animation doesn't play from frame 0 but frame 5, 10, 10 and so on (every time its called).
Why is this happening?
Which FBX export should be used when exporting a skeletal mesh from Unreal? 2013?
I want to edit the mesh in blender and bring it back into Unreal.
On the documentation page for FBX Static Mesh Pipeline it says: The UE4 FBX import pipeline uses FBX 2018. Using a different version during export may result in incompatibilities. <-- So I guess we should always choose 2018
I export a skeletal mesh from Unreal, and then delete some vertices/faces in Blender Edit Mode, export from Blender as FBX. Then when I import into Unreal I get an error "Failed to merge bones". It says a lot of bones are missing from the bind pose. Does anyone know what happened?
Maybe you forgot to untick not to add leaf bones when exporting ? Or only exported deforming bones ?
For the failed to merge bones. Apparently Blender adds in another parent which you have to remove. But you lose the scale by removing it. https://www.youtube.com/watch?v=gTJ0tm6GscQ

A quick video showing how to get a skeletal mesh from Unreal into Blender, edit it, then import it back into Unreal.
Is there a way to make Blend Space 1D show Base Pose node on the left? Teacher in a course on UE4.13 creates this blueprint:

Then in the animation graph he does this:

I don't have the Base Pose node on the left so I had to do this:

It works but I wonder why did it lose the node on the left in newer versions and if there's a way to make it appear? I'm on 4.26
I edited the fbx exporter to prevent it from adding the root bone. Still don't get why Blender adds one by default
I believe that if you name your armature "Armature" Unreal ignores it though
@fiery eagle I think you need to create an "AimOffset" Blueprint
But you created a blendspace instead it looks like
Stuck .. lost transform after hitting enable root motion .. any help
That's normal. Make sure you have the correct settings in your anim blueprint (root motion for everything or root motion for montages only) set and when you'll play the anim ingame the movement will be correct
Is there any ue4 mannequin rig with hand/finger IK for blender, specifically for weapon animations like reloading and shooting? I don't find anything online, except for the Mr. Mannequin tools, but it has no finger IK either. Is there an easy way to add it there?
Hello, I made a blendspace for my idle, walk, and run animations however the blend between walk and run is not correct. https://streamable.com/jo6ut8

Can anyone help me? I'm working on a reload animation, and I'm just at that stage when the magazine is to be ejected out https://gfycat.com/DirtyRareBeardeddragon

But I'm kind of at a loss here, because I now need to animate the gun as well (and not just the mannequin)
The gun is a separate object in blender
Is there a convenient way of animating two objects like this, and exporting both objects' animations? Hopefully without having to constantly step outside/into pose mode?
You have to combine the weapon armature with the character armature
It should work then
Oh? Can I just drag the weapon armature into the character's? Or do I have to reimport it somehow?
The easiest way would be to just re-rig it because it doesnt seem too advanced. To do that properly, just add the mesh without armature, place the weapon where you want to have it, click on a bone from the characters armature, go into edit mode (not pose!) and add new bones for the vertexgroups of the weapon. You have vertexgroups, right?
I could send you a link to a helpful tutorial on how to do that.
I have vertex groups, yeah
How will that export though?
Will it export a separate animation for the weapon that visually synchronizes with the character?
or if you really wanna do it the fast way, try to select the weapon armature first, then the mannequins one and press CTRL+J
I think you can export them separately but I'm not 100% sure
Ideally, I'd be able to export a Rifle.Reload animation and a Character.Reload animation, and have them visually sync together
Hmmm
You should try to do it with a very simple animation, and if that works, you can go on. To do that, just select "Limit to selected".
Try that and tell me if that helped. Otherwise I'll look for another option
May I ask if your Mannequin rig has Finger IK?
Where do you have it from? I would really need one :0
Oh yeah, it's Mr. Mannequins Tools, a quick google should give you the DL link
But how did you set up the finger IK?
It's a whole blender addon that automagically gives you an entire rig ready to go
Including-
OH
Silly me, I just realized what you meant by finger IK
it doesn't have finger IK, no :(
My overworked brain read it as 'finger rigs'
How did you animate that grip so good then? 😮
At least not that I know of
With lots of time 😅
I'm kinda struggeling doing that, but Mr. Mannequin Tools has in the side panel an option to set up IK. If you select in Pose Mode the tip of a digit and press on "Add IK Chain" it adds IK...it doesnt look great but it may help you. I'm too stupid for that
Interesting, I'll try that, finger posing is extremely tedious at the moment
although I do find that at times I also care about the forward kinematics even more than where the tip of the finger lands
what do you mean
For situations like gripping stuff, placement of all the finger bones should probably be 'manual' (at least in my case)
I can imagine finger IK being useful for some niche scenarios like playing the flute maybe
oh never mind, finger IK SHOULD be useful for gripping stuff 🤔
Definitely! Especially when gripping the slide or the magazine...so u don't have to rotate every bone manually
I found the solution to all my problems!!! So to set-up finger IK select the root bone of the finger, copy the bone name, select the tip of the same finger, press on ADD IK CHAIN, paste the root finger's name into the ROOT field, set the correct axis (may vary) and delete the COPY POSITION modifier. Thats solves every problem! Please try it out and tell me if it works for you too!
pose mode
Do I select the rig's control bone, or the actual finger bone?
You just need to copy the name of the fingers root bone. (the round orange circle at the start of the finger)
At the end you delete the "Copy rotation" from the green circle at the end of the finger/in the middle of the hand

Um I did that, and seemingly to not much avail
When I move the tip of the pinky, no IK is happening :D:
Mind sending a screenshot?


Here a short Video
Let me redo exactly those steps
Aight, lemme know if it works
Oh, for some reason the IK gizmo isn't showing up for me
This red thing you selected

Here are the exact steps I'm doing: https://gfycat.com/HealthyPlaintiveGypsymoth

I exported a skeleton from UE, made some things, imported it in again.. Rotated 90 degrees,, Wut?
OH @deep token it worked, the gizmo was just way higher than the finger :P Awesome
Does it really work as it should? I still encounter some errors @vapid ibex
Me too, it doesn't work as expected
I think some bone constraints could maybe fix it
Blender? Try press CTRL-A and All @maiden vault
But it's a lot of work, and each finger now adds 2 more IK bones which makes it quite clumsy (I'm already having a hard time navigating all the control bones)
They are apparently all in Y forward..
Trying to match up the basic FP blueprint camera..
@vapid ibex Maybe do it with the old workflow until I find a better way to do it
@maiden vault What do you mean?
If you do, please do let me know
I read somewhere that the skeletal meshes were indeed not X forward, so that solves that
Alright, I'll tag you! Good luck on that animation
Now im trying to make a camera that looks kinda like the one in the first person blueprint in my DCC..
Maybe i should just stick to modelling.. 🙂
IS this the right place to ask about the control rig? I'm having some trouble with a control im adding. The control seems to be moving the bone, but the bone doesnt seem to move the others

And my char doin' this... I'm trying figure, whole day, why .. and still don't know 😄
I have encountered an akward import issue for FBX.
I have a morph animation to import and I think there's a problem with "Do not import curves with 0 values". If it is checked then the imported animation looks different from what i have in Blender:/ Maya/ Max The values for curves are different. And I think the option works in a way that if for some curves on some frames they have value 0 then the whole curve is averaged for some reason.
But... if I uncheck this option then ALL of the curves will be imported as zero.
It doesn't make sense. Maybe there's a specific workflow I'm not aware of for importing morphs? 😪
I have a character mesh (including head) and another mesh with just the head. It's the same head in both. I'm trying to "cut off" the head of the character mesh so that the head mesh by itself will fit exactly in the empty space. I've tried selecting both heads in Blender and using the "Knife Project" option, but it doesn't seem to work. Any idea how I can cut off the character mesh head so that the "solo head" will fit exactly in the space created? The 2 heads are right on top of each other in Blender.
Hey animators, VFX guy here trying to work in an animation montage. I have two montages I'm adding FX to, that interact. (player A attack, be getting attacked) Is there a way to just play these montages on loop together somewhere? I need to work through a series of these, so being able to easily swap would be convenient.
When building a AnimInstance, any reason I should not use an ENUM to track the current "State" of my animation? This would be in place of Bools.
I just feel like it would be cleaner to manage one variable, that way I would have a harder time running into state crossover issues

this would be the current use case
That way I do not need to track multiple bools when handling a Jump/Fall/Land sequence, and at the same time I can manage my actions, since you couldn't Attack, SwitchStance, Roll, or Jump at the same time.
Anyone have a clue on how to fix this bug when importing an animation from Blender? The animation just doesn't render at all in UE4.

@burnt vapor What are you using to import?
Blender
any pipeline plugins
Nope
are there any tutorials for world space Ik?
I don't really know how this would be done, and searching for it doesn't really get me anything related
@somber urchin if you got anything that can help
dk if anyones using control rig but I ran into a stange issue, left is wht it looks like when I drop it into game right is inside control rig not sure whts causing it think it may be smth to do with the pole vector, but ive messed arnd w/ the settings n have no clues whts causing it so if anyone has a guess help would be very much appreciated

Hi everyone! Any advice for how to handle big animation blueprints? Nodes/tools/best practice? Our Animation Blueprint is starting to get really big and for any new income animation, we waste a lot of time connecting everything and it's getting hard to read. Any good source that describes how to have the animation blueprint ordered/structured correctly? Thanks!
@fickle citrus Take a look at ALS4's setup
@vapid ibex Going to check that out. Thanks!
Does anyone know how to do the whole "take the baked animation data back into the original files for cleaner exporting" as hinted in this timestamp? https://www.youtube.com/watch?v=dclA9iwZB_s&t=325s

❤️ If you love what we do, please support us by getting a membership at http://www.cgcookie.com
Before we dive into all the technical stuff about how to set up the project and get animating, I want to take a few minutes and share some of the interesting tips and tricks that I found while researching the topic of first-person game animation an...
Anyone notice that animation montages aren't working right in UE?
Hey everyone, I'm working on a physics simulated Locomotion. My issue is how to make them fall down properly. Since I'm not simulating the pelvis it holds the player up. Obvious solution is to transition to a rag doll or a falling animation.
I'm just not sure how to determine that my character is off balance and should fall now?
Does anyone know if it is possible to call an Event in an AnimationBP of an AnimNotifyState class I made. I know Events from custom Notifies can be called in the AnimationBP but I can't get a custom class one to work.
@ancient marlin You should be able to grab the anim instance from the skeleton component in the anim notify state
Then you can call the event from there
Something like this

AnimBP

Thanks for that I will try it out as soon as I can 👍
@tepid inlet why not just use the default state machine?
Hey, before I post, is this the place to ask questions about animation issues?
Hi friends,
I have a boolean that goes off when I pick up a weapon.
How do I hook it up so that my upper body changes to the running with a gun animation and blends with the lower body animation?

@amber flicker this might help

Here we take a look at how we can blend the top and bottom halves of two animations using the layer blend per bone node to split them from the spine and marge them together to create one animation state.
♥ Subscribe for new episodes weekly! http://bit.ly/1RWCVIN
♥ Don't forget you can help support the channel on Patreon! https://www.patreon.co...
Oh yeah, I followed that tutorial.
@amber flicker I've already contacted the guy who made that. And I'm paying for his services. I'm waiting for a response
@amber flicker by bool or by bone?
Bool
Hi everybody! is there any way to know the length of a section (any or current) on a montage?
how do you use non root motion animations, since if it moves in the animation the character glides backward awkwardly when the animation finishes
You have to either make it an in place animation or make sure if the character moves that it returns to it's original position b4 the animation ends..
Otherwise you need the root to move with the character
Anyone used to blender to unreal?
I want to create characters for market place , any rigging tools to match unreal skeleton you suggest?
As Mixamo is illegal for market place asset use
if you're looking for a mannequin sketon I've been using Mr Mannequin's tools for prototyping
https://gumroad.com/l/MrMannequinsTools

Gumroad
Mr Mannequins Tools (v 1.3) - Third major update of the add-on for Blender 2.8+ that gives the ability to export animations and weighted meshes that are directly compatible with the third person mannequin without re-targeting anything in Unreal Engine! Even more bugs and issues have been solved and some new features have been added!Now contains:...
he's also got tutorials on retargeting & all that
https://www.youtube.com/c/JimKroovy/videos

YouTube
Hi my name is James and I like to make things.
I have a long and undocumented history of fine detail creative process across a lot of different subjects... lets not blather on about that though.
Id like to start sharing the creative things i put my time into.. and so i shall endeavour to do so!
Here you can find currently:
- Mr Mannequins T...
Oh , thank you so much
How much should i pay
For“Name a fair price” 😇
Oh it’s 15$ here

Blender Market
Mannequins Tools (v 1.3) - Third major update of the add-on for Blender 2.8+ that gives the ability to export animations and weighted meshes that are directly compatible with the third person mannequin without re-targeting anything in Unreal Engine!
Great will be testing it tomorrow
My friend messaged me asking how he could start his journey as a game animator. He wants to do 3D and eventually cinematics. Where would he begin? I was trying to find a course on udemy, he said he is considering going to community college.
I don’t think Mr Mannequins is what i am looking for , i checked his channel it looks like its a tool to create animations not to rig your character , not sure but any other alternative suggestions for Blender rigging To unreal skeleton ?
@ripe coral if he hasn't already, he should pick up blender
@merry lynx you unparent the mr.manniquin skeleton from the Mannequin mesh and reparent it to your mesh.. then your character is rigged for ue4
@ripe coral tell your friend to check out jim kroovy or cbailyfilm on gumroad if they wanna learn how to animate characters
Is that what you do? , how about weight painting do u use any helping tool?
Does anyone here know how change the play rate of a anim montage via the character bp?
Nah I just paint in blender.
Watch the jim kroovy tutorials and he covers how to do all that stuff @merry lynx

Probably a custom one made by the guy
You can do it quite easily yourself though if it does what I think it's doing : grab the anim bp in the notify and set root motion move to "ignore root motion"at the beginning and "everything" or "montage only" at the end
Hi. I an abstraction logic question. I want to make a melee combat based game where over all, you would have the same type of abilities with most weapons. Light attack, block, heavy attack... but each weapon would have it's own animations for that.
Would the best way to abstract that be make a base character BP that has all the ability logic. Then subclass that to a BP for each weapon type which would have it's own animation BP? That seems to make most sense, just making sure I'm not missing something and there might be a better way.
Maybe an anim montage per weapon where you'd put each variation (light, block etc) anims, with all of the montages having the same section names (light, block etc).
Then you'd just make the anim montage a variable to be set, you'll be able to get the corresponding anims directly using the "start section" variable
Since the section names will all be the same for the weapons it'll work regardless of the weapon
I have this reload animation, I took it from AnimStarterPack

This is how I've set it up

Everything else is set to default
I have a very strange problem. Whenever the reload animation is called, it plays more than it should, it loops
and then, it cuts the loop, then when it's called the next time, it starts from that very same position it ended from previous call
so everytime the animation is called, it starts from a different position and it's really bugging me off. The reload animation is supposed to start from 0 frame, not random positions.
Can someone please help me with this? It's been almost a week and I'm stil unable to fix it 😦

I would think the reload should be an anim montage that you play when the player reloads. Look at ShooterGame to see an example, like in AShooterWeapon::StartReload(). You can try clicking the animation "Play_Rifle_Reload_Inplace2" and uncheck "Loop Animtion" in the settings on the right side. But I would look into playing an anim montage instead and follow the ShooterGame example since it's a good project to learn from. @light panther
When I use ue to rigify to convert rig with imported animation, I lose one frame at the end.
Standart 3rd person walk animation is 26 frames and when I convert the rig, all keyframes at 26th frame are lost
Any ideas?
Hey guys, what command would I use to keep an actor in one place for the duration of an animation on spawn so Event Begin play> [godbloodyknows] > Play animation. xD
Have you checked in your characters BP, in play animation nodes there is a there is a true and false tickbox for looping the animation.
Hi! i need help with something!
I'm making a mod using an SDK, the vanilla game's soldiers all use the same skeleton and have hundreds of animations
I imported my own character with its own skeleton (I can't rerig my char to the original skeleton due to proportions differences) and I want it to work as a soldier and to use the animations of the vanilla soldiers... but retargeting every single vanilla animation when i'm not supposed to edit the vanilla files (edited vanilla files won't be exported with the mod) seems impossible and I haven't managed it!
Would there be a way to get my character to use the vanilla soldier's animations, or its skeleton without editing the vanilla files?
Ah I see, have you tried recording the animation? Then just trimming it to make it perfect for how you need it?
huh? you mean for my question?
Like i said before, the vanilla soldier has MANY animations, that's why i just get completely lost trying to retarget them individually... probably that'd apply to trimming too? unless i'm not underestanding
i just checked
it has 8 THOUSAND animations
i want my new character i just imported (using its own skeleton) to be able to use those same 8 thousand animations
if there's a way to do that? i got told animation retargeting but i don't know how exactly that'd work, i've been trying it and getting crashes, lots of confusion and not much progress
problem is
if i retarget the skeleton itself
does it change the vanilla animation files?
will it cause it to not work when the SDK's vanilla files aren't exported?
Thanks for the advice. I'm not using Animation montage and I think you're right, maybe using those would fix the problem. 😁
Yes, but without loop animation, the animation only plays the first time but not on the subsequent calls.
@tawdry cloak But here's another problem, I can't use animation montage inside Animation graph.
Trying to animate a gun using bones.... does anyone have any pointers on how to proceed? I have these flaps detached and grouped and I want to rig them to the joint. is that how you'd do it?

@warm island yo should create two more bone for each flat if you want to rig it together. Also you can do blendshapes or put A right pivot and animate it with bps
@golden arrow I was afraid i'd have to split it for each flap... guess there's no helping.
for the blendshape, since it is linear interpolation it cannot perform the rotations i need it to do. I tried 😉
the pivot may be an idea but I'd rather stray away from BPs just yet.
Thanks for the feedback!
bone keyframes in an animation montage, is it possible?
at the moment my anim montages will just ignore keyframes I've added to bones in the individual animations
@indigo cove the outfit it's a skeletal mesh? You have set the master pose? Here you have more info about it: https://docs.unrealengine.com/en-US/AnimatingObjects/SkeletalMeshAnimation/WorkingwithModularCharacters/index.html
Describes the different methods you can use to create modular characters comprised of multiple Skeletal Meshes.
I'm looking now, thank you for your help 🙏
ı dont use master pose
@indigo cove just try to assign the outfit to your main mesh in the construction script with the master pose
I used that with variables coming from enumerator to be able to change the skin from the viewport just changing the variables
I am trying to run two different animation montages for two slots. One montage is sword sheathe animation and the second one is attack animation. First one is for upperbody group and slot from spine bone and second one is for default slot and group from root bone. When I try running them, either upper body is paralysed during attack animation, or sheathe montage doesn't play at all, depending on which slot is higher

in this case at the screenshot full body attack animation plays well and sheathe animation doesn't play
Can anyone help?
@pseudo elk that's weird, can your character attack and sheath at time? O doubt it, just add another blend and the result join it the first blend
Hi Folks! We are a motion capture stage open to collab if anyone need some custom animations to test our remote services! If anyone is interested just let me know!!!

nothing changed
like that there is full attack animation and no sheathe animation(montage plays correctly, but no animation is shown)
if I change their order, sheathe animation works, but when I launch attack animation, upper body is paralysed
Looks like when I use animation montage for my default slot, it launches it on every bone before the spine bone which I defined for upperbody
but I don't know what to do here
maybe blend by bool so I can have only upperbody animations when I don't have weapon in hand and only full body when I do 🧐
seems like a retarded solution
@pseudo elk the order of the layered animations it's very important, in your screenshot I can't see nothing and your saved poses names are extremely cryptic.
There is one saved pose which goes from basic 3rd person controller locomotion
What do you want me to show?
What's after that, if it's something that can affect the output
What's the best practice for getting my weapon's skeletal mesh animation to sync up with my character's skeletal mesh animation? I assume I have to use an AnimBP for each, but is there a way to have them nicely sync up?
For example, I have a Weapon.Reload animation and a Character.Reload animation, both are visually compatible, how can I visually sync them?
I'm making a running animation using Mr.Mannequin tool in blender and it's working quite well, except when i imported the animation into blender. For some reason, it A-Poses at frame 3 in unreal.
Blender :

Unreal:
Did you use auto key?

what's that?
auto keying with Mr Mannequins Tools will do that, it's a bug
In blender, when you press that 'record' button, it's called auto keying
oh, i am using it then
That automatically keys your animation when you change something
so should i turn it off?
Yes, key your keys manually until Jim fixes it (next update coming soon)
or just export normally through blender (which I highly recommend tbh)

Thanks 🙏
Hi guys, I need your help. How can I import to Unreal skin cluster animation from Maya? Second question, why when I importing alembic to Unreal it takes ages... 3/4 hours? Any idea?
right now it goes directly to the output
Can anybody tell me how to add different sword swing sound when I am hitting the AI and when I am not Hitting the AI?
Player

AI

Hey so I'm doing this weird thing and I was wondering if someone could check my logic. I want to make a texture with static, like TV white noise but it needs to be random. So I'm planning on using either MATLAB or Python to generate a bunch of white noise images, and then to take these images and then to flipbook them together.
It's going to be 90 Hz refresh rate
@drifting cloud any reason you don't just pack 3 noise textures into rgb channels and use one as a mask for a lerp between the other two.
Then just panne the two active textures and you should get the fuzzy TV look
That would produce a repeating pattern right?
The noise has to be random (gaussian distribution), ideally it would be different every frame.
It's for a neuro research project, people get real nit-picky when it comes to methodology.
my animation is broken when imported into unreal
the entire rig broke when imported into unreal
The noise is procedurally generated. Using three of them and two moving different directions at varying speeds. The chance of a repeated is unfathomably small
it only appears as 1 bone, and when i try to play the animation my model just disappears
If I used perlin noise to generate new noise everytime wouldn't that cause my system to lag, and that would in turn cause uncertainty as far as registering when players responded? One of the things we are looking at is reponse time and we are getting that in ms
I've only been working with UE4 for about 3 1/2 months now so I'm still getting used to everything, so I could totally be wrong.
Nah you just take 3 grayscale textures and pack them into one texture sample using the rgb channels.
Then using one as a mask. You panne the other two textures past each other in different directions at different speeds..
Your not generating anything.
And it's extremely cheap so no lag
Too many frames I got compared to what I exported

comparison I don't know what happened or how to fix it
Looking it up gave me some unrelated answers
Wasn't always an issue
Before it was normal idk what I did I reimported from an old save it still gave huge spaces in between each key
what would you guys recommend I do if I want to start learning 3d animation?
of game characters
I need some help with a very basic thing:
I want to create a simple robot arm (literally 3 bones and 3 cubes).
I create an armature, bones and cubes that I parent to the bones.
However, after I import it to UE, each box appears as its own bone.


any idea why?
Yo so this is prolly a longshot but ive been working on a ps1 demake of the artorias fight from dark souls, and while Ive got asset creation and the actual development part down (im an indie dev), ive been pulling my hair out trying to animate, and what I do have is kinda jank and doesnt feel good. Is anybody here an animator and interested in helping? No pressure obviously, as this is just a personal passion project (tho if it goes well I do plan on making my next game as one to be commercially released)
Will my anim notifies get called if I'm using the sequence evaluator?
can someone help me i have made several poses for my game character but i dont know how to save them and they just end up being deleted can someone help me
Quick question for maya: I made separate bones for each flap for my gun however when checking the weights and hierarchy, the flap bones were not rigged but the flap meshes were assigned a skin cluster. Is there a way to manually add those joints into the skin cluster?

Importing FBX assets previously used in a Unity project. @ me if you know why it becomes extremely small when previewing animations 🤔
i think your imported animations must be using a different scale ratio
its in the asset import options in the animation window, you can also adjust scale when originally importing animations @dry sonnet
Hey guys small question, I am working on a vehicle and I have a good rig for the suspension.. But now the question is, how can I make the wheel socket move up and down with the programming side of the suspension without animations?
Is there a way to just move a bone or socket up and down? Where should I do this? In a Anim BP, code or just BP? Thanks in advance! 🙂
@misty dagger You using the vehicle system or just roll your own?
I'm rolling my own custom vehicle 😉
You can just set bone orientations and positions
It depends on how your rig is set up. You can either set an IK target or just manually set bone transforms.
Oke, thanks 🙂 @shut kraken
Can i move transform/bone inside bp not anime bp
Whn I import my FBX from Maya, it loses the IK_Hand_R....everything else seems to import fine. It is present in Maya, any ideas?
EDIT
This was resolved by using Maya's Game exporter, I have no idea what setting in the standard exporter was messing that up.
Hey guys, small question again.. I managed to move the suspension bones like I wanted using a poseable mesh.. But for some reason, the poseable mesh is not simulating physics anymore?? Can a poseable mesh not have physics?
It can but it needs a physic skeleton and profile assigned
Yo I saw that there are some IK bones in the mannequin skeleton, is it a good practice to use IK_hand_gun to define the location of the weapon ? Or should I create a new bone? (I don't like to use sockets because they may not match depending on the weapon)
Hi everyone, found an old answerhub post where it says that by setting a Subsequence track property (in sequences) to Timescale -1.0 and StartOffset to the duration of my animation, i should by able to play my sequence in reverse but in UE 25 is not working at all. Any idea?
uhm... is it normal that when I imported another mesh the first one was not "overwritten" or swapped
and now I just have 2 meshes in the same SK?

yeah ik_hand_gun is fine. May have some positional fighting if you switch hands but can add virtual bones and space switch to solve
Thanks 🙂
Hey everyone, hope all is well! I am kinda new to UE4 and im trying to move my character with the root controller but this keeps happening. I think it has something to do with the fact that the sword and shield don't have any bones attached to them, but i wanted to know if there was a way to fix this? if more info is needed please let me know. I am also willing to jump in an voice chat channel to figure it out. Thanks
I'm not sure what you mean by asset import options in the animation window. I've adjusted "Import Uniform Scale" but it didn't seem to do anything. Do I need to reimport it?
In control rig how could I do a sphere trace down in local space. So for a vehicle I want to trace down from the wheels based on the angle of the chassis instead of straight down in world space.
@dry sonnet yeah I think you should try to re-import with correct scale settings
In the off chance that anyone knows how to solve this, imported animations mesh's are too small in the view port but the skeletal mesh by itself is large and clear. Is there any way I could scale them uniformally?

I had this problem recently with a blender export. Turns out the armature had a crazy scale by mistake. No way to fix it, had to reanimate.
It's not a huge problem it's only preference I didn't know it was that difficult. It still rescales when assigned to the skeletal mesh I just hate zooming in every time
hello, someone knowns why when I press right button on an animation, this happened:

Ok I'm kinda stuck right now, I'm trying to make an animation modifier that allows me to automatically apply a gradual yaw rotation offset to a bone in an animation in worldspace/relative to root bone space. The bone is the first one in the hierarchy after the root bone but I can't figure out how to transform the worldspace rotation offset into whatever space the animation transform curve needs and can't find anything about that specifically on google either. I tried numerous transforms back and forth now and don't know what else to try. Anyone who did something like this before or has some ideas?
(ping when answering since i might miss it otherwise)
https://i.gyazo.com/e406cb2653e2800d1571040ac6032e96.mp4
Hey Everyone!
I have very little Unreal Engine experience and I need some help.
I am trying to export an animation from Maya to be used inside Unreal but the Character rig I am using in maya has a separate Accessory that doesn't get through the export.
There is 1 mesh where it is the full body of spiderman and then there is a separate mesh with blend shapes that are the eyes.
Eyes were just constrained to the head controller and UE didn't recognize that at all so I made a joint skinned the eyes to the joint and placed the joint inside the Head joints hierarchy. Now unreal sees the eyes as a mesh but it still wont follow the head. What can I do inside maya or UE to make sure that the mesh of the eyes stays connected to the head?
Thanks!
@steep mountain not sure if it's "right" but you could just use sockets to attach the eyes inside ue4
Thanks for the reply! I am not familiar with what that is. Is there an easy way to match exactly what I have in maya in unreal? For the placement of the eyes.
A socket is basically a point attached to a bone that holds its local postion in relation to the skeleton.. most commonly used for weapons and stuff
So does every character imported into UE needs to be a single mesh? Can I not have accessories like a hat for example as seperate mesh without making it a socket?
Not as a separate mesh i don't think so
Fairly sure you need to attach accessories to a socket in the animation editor and character BP
Check out the dev squad channel on youtube. He covers how to add and set up sockets
thanks
Hello, I tried setting up a responsive foot animation for my player following this tutorial https://www.youtube.com/watch?v=kK9rQzbSzio&ab_channel=CodeLikeMe . However, nothing changes.

Project Files : https://www.patreon.com/CodeLikeMe/posts?tag=source code
Support my work on Patreon : https://www.patreon.com/CodeLikeMe
In this episode, I am going to add IK foot placement features to my melee character using Leg IK node in unreal engine animation blueprints.
In maya, when exporting a skeletal mesh and importing it into unreal, the mesh part of it gets treated as a skeleton.
Does anyone have a tip on how to avoid that?


Hi all. Are there any generous souls out there who would be willing to walk me through some of the the logic of the Control Rig Sample? I am trying to do some very minor adaptations to account for a character who is in heels, and it is not going smoothly so far. I'm sure if I had someone I could ask a few questions of I'd pick up a lot very quickly but I'm not finding the sample itself to be self explanatory.
https://cdn.discordapp.com/attachments/822171605551022101/830650691063250944/attack.mp4
Can anyone help me why my second animation, goes forward, but doesnt stay there?
I am using anim montages
@restive star you have to activate the check root motion in the animation and if you're launching from an AnimBP the settings must allow root motion. Before continue read this; https://docs.unrealengine.com/en-US/AnimatingObjects/SkeletalMeshAnimation/RootMotion/index.html
A look at how root-based animation is handled within Unreal Engine 4
I'm using again the Mr.Mannequin tools on blender, I'm getting used to the workflow, I just can't get a hang of the bones/rig rotation and position. I'm trying to do a somewhat cartoon spin animation, but the mannequin is so humanoid that I can't make these non realistic animations. How do you guys deal with this problem in general in animation? Do i have to rotate certain parts to get the right pose?


Ok, if anyone is having the same problem, I got it
for controlling the elbows alone, use the red sphere thingy

i rewatched the live training video where they make a dab pose. I can't believe i didn't notice it
root motion animation work in the air .. any fix?
@plain spade try change the movement type of the character to flying and in the blend out back to walking. If that doesn't works check the same animation with the UE mannequin
If works with the mannequin it's your model's fault
hello, i'm trying to play a montage, but after 1 second or something like this, it just stops, do somebody knows how i can resolve this ?
@half willow you're playing the montage and after that you're executing another animation. Just be sure the node to continue it's in completed

@half willow use the play montage that has a clock in the icon (asynchronous), the one that has as output blend out, interrupted and loop
it is not interrupted
it say that it is completed but the animation is not played 100%
just like 20-40%
Then you tried with other play montage node?
yes
i got it working after i changed some options, thx anyway for trying to help me
can anyone tell me how to add two button combo for animation montage! I am new to blueprints and I dont know how to setup two button combo for an anim montage
and please also tell me how to switch blendspace! I want to change animations when weapon is not in hand and when its in hand!
Get PowerIK
Its a free plugin on the marketplace and will handle all IK for you
very easy to set up and use
Awesome. I will give it a try soon and see how it goes. Thanks!
In this text found on the UE4 animation optimization documentation (https://docs.unrealengine.com/en-US/AnimatingObjects/SkeletalMeshAnimation/Optimization/index.html), do they seriously mean that we shouldn't do anything in the Event Graph for the sake of optimization?

Yeah basically you'd do everything in C++ and then make a derivd BP out of it in which you'd only make your anim graph
Hello do you know if Presto will be available for public?
I'm wondering why there are no professional software specialized in animation out there?

Peatix
The best software for animation is developing at a frantic pace. New versions of the soft... powered by Peatix : More than a ticket.
also premo from dreamworks
Dang, thanks for the reply. UE4 is really misleading like that, with how it gives you the event graph and even provides you with some even nodes to work off from, without hinting anywhere in-engine that it's bad practice if you want optimization smh
hey guys 🙂 can you use a implementable event from c++ in animation blueprints?
Is it possible to use an animation asset variable on a character blueprint as an animation node inside an animation blueprint?

Guys, what are the rules of rigging character for UE4?
Especially for correct IKs
I have this at the moment, and problem is that when im using inverse-kinematics, legs start to bend in 60 places, but should only in 2...

so x should be forward?
Oh, ofc, i forgot i can disassemble ready assets
okay, got it i think
yep, developers use only Maya afaik
I guess it's part of FBX format, it converts axis sometimes
but im not sure how it works
hmmm, then it's strange
how do I get the result of main animation in my post process animation ?
That's just what i am doing 😄
I've asked this before but with no success... the skill and complexity gap between the paragon asset character's blueprints and the ALS is so huge, is there anything in between that I can learn from?
Doesn't have to be free, any paid ones?
I just find it so complex to me that I can't even begin to dissect it
it's like taking apart a toy vs an iphone to me
I guess so, but I don't even understand how all these function libaries, macros, etc
Any you recommend?
I've done that much
okay thank you I'll look into that one
I made this mando ABP
but it was all done very simply using techniques from 3rd person char
Thanks, I've been tinkering for a while I just struggle with basic stuff like macro libraries and BPIs
hello guys.i have one problem.please help me. when i import animation from blender to ue4 animation starts with A pose.how can i fix that /
?
anyone tried this?

Anyone know why this is happening?
i looked in the asset settings and there is nothing with looping anims
the animation freezes for a second after every cycle
this is just in the blendspace btw, i havent done any ACTUAL anim blending yet
its just the jog animation
Can anyone help me understand how to create an animation that blends between two pose assets using curves? The docs basically say that you can and demonstrate an example of it in action, but doesn't say how to actually set it up: https://docs.unrealengine.com/en-US/AnimatingObjects/SkeletalMeshAnimation/AnimPose/index.html
Describes the Animation Pose Asset which can be used to drive animation through weighted curve data.
Hello, when I import my character FBX from blender in UE4 animations aren't wrorking, I get some blank animations. Any ideas? Thanks.

Like there is no mesh
probably a scale problem, try to reimport with 100 for the "uniform scale" param
100 not 1?
I did that but still the same problem
Anyone know a free jumping stages pack?
That was a guess, there's a ton of scale issues that can happen with Blender/UE4 if you don't set the scale correctly in the former. Did you export using the official Blender to UE4 exporter ?
Uhm I used FBX is there an official Blender to UE4 exporter?
Also when I check the mesh it's fine
Oh u were right it's a scale problem

Oh u were right it's a scale problem
The character is so small in the animator
What I used to do was using a Blender scene units set to metrics with a 0.01 scale then importing with a 100 scale factor in Unreal
yeah you can get it on the Epic Games' repository (you need to log in with a git account linked to your epic account to see it)
Oh thanks I'll try both the scale thing and the official exporter.

Send to Unreal is a addon that exports FBX files from Blender and remotely imports them into Unreal Engine. In this video, you will learn how to get up and running with the addon and how you can immediately start using it in your game development workflow!
Here is the link to the full documentation:
https://github.com/EpicGames/BlenderTools/wik...
Their plugin basically uses fbx as an intermediary format but it's pretty convenient once you get used to it. You can send everything directly from Blender with a few clicks.
lol I scaled it in blender to 0.01 and 100 in ue4 and it works
Oh cool I might use it thanks.
please help me. when i import animation from blender to ue4 animation starts with A pose.how can i fix that
You guys know Mr mannequins tools 1.4 is out?

Gumroad
Watch the quick export guide in 2k or 4k! (YouTubes transcoding trashed the 1080p)Mr Mannequins Tools is a Blender add-on that exports animations and weighted meshes that are directly compatible with the third person mannequin in Unreal Engine, without re-targeting anything... As if that wasn't useful enough, it also has several mannequin themed...
Free stuff
Been super excited for this update, I liked 1.3 but had some issues, this version seems like a big upgrade
This is a neat plugin for people who know how to rig 😄
I still need to learn blender modelling because I don't have the monetary resources to hire a modeler 🙂
Then after that, I need to learn 2d drawing for the textures 🙂
Then animation
Total: 5 years before I start my game 🙂
By then I'll be 52 years old
Yes I feel that
@whole lake It's not my favorite software in the world, but you may want to check out Character Creator 3 from Reallusion
assuming you're wanting to work with humanoid characters
I created an anim_notify state, how am I supposed to get a reference to an event raised by that state? I read that anim_notify is supposed to be accessible from the animBP, but I can't find it. Is there some kind of setup that I'm supposed to do? A checkbox somewhere? I tried the Receive Notifies from Linked Instances and still didn't see any events for it.
I'm trying to set up animation mirroring (to avoid sliding in my blends). For example, if my character stops their "running" animation with their right foot having just planted on the ground — it will use the "idle" animation that has its right foot forward. And vice versa, if the player's left foot has just landed, it will use a mirrored "idle" animation where the left foot is forward.
I was planning on using "notify" to toggle data storing which foot is forward, and using that to select between two identical but mirrored animation assets. I'm curious if anyone has any ideas for an alternative approach that doesn't require doubling the number of required animations.
Is this how I'm supposed to be accessing my data in the anim graph?

By showing inherited variables with this button...

...and then just straight up using the proxy struct?

Or is it like so, without any breaking happening? I assume it might be equivalent?

A bit late, but did you ever figure out if this question has a sensible answer? Because this is really confusing for me to - I HAVE to access the anim instance don't I?
no clue it's been a while
I figured 😅
Lol, looks a little outdated https://docs.unrealengine.com/udk/Three/AnimationMirroring.html
Hey all.
does anyone know why it's not working?

it's printing ###################### OR nothing if i don't use append node
and i am not getting player ref either
i am using this animation on AI Enemy
so i need reference of Player (if you think i need to use TryGetPlayerPawn node).
technically it shoud work right?
Player pawn is VR_Motioncontrollerpawn from vr template
GetPlayerPawn is working for other blueprits and even for other animation blueprint that are on the same level for different enemy character.
but for this enemy character it's not working
I had double-checked that, this enemy character is using this animation class and on the output log logging statement showing this class's name so I am sure that this class is being the class that is assigned to the enemy class.
Does anyone know what might going wrong, or what should I do to fix it?
ok new update i am not getting valid player pawn
now the questing is why?
I should be getting a valid player pawn with GetPlayerPawn right?
@hushed stratus your enemy isn't a player pawn, so it'll return always none. Try with get pawn owner.
Uhm can you really not create a blueprint animation library like you can with blueprint function libraries? I'd like to share animations across multiple widgets but idk how
Maybe I can just use a container and a named slot
Hello, I have an issue with the animation of the main character
My main thing is that the animations does not blend properly
The installation is crashing all over the place 😄
Is it possible to make my player immediately move on to another animation once the previous animation is finished?
Can I tell when the animation is finished?
@peak dome transition using a notify
I am trying to get my character from Blender to UE. I have armature (rig), mesh and several animations, few with root motion. I was able to create two situations. I am transferring everything using export / import one FBX file.
- I have one more bone before root and my root animation is not working.
- I used "hack" I found somewhere, that naming armature "armature" will solve that bone but in this situation UE doesn't recognize armature in file. Thanks for any help.
can anyone tell me how to setup two key presses to play one anim montage?
Hello, I want to make a complex scifi door opening animation, but I don't know the recommended way to do this.
- I want to reuse the blueprint, so using an asset sequence doesn't seem appropriate.
- By using some Timeline in blueprints with static meshes, I know I can do achieve it but it is not easy to author.
- So I am trying to use skeletal mesh animations from Houdini, but I don't find much resources for this (except character rigging and animation).
- One thought I had also, was to animate inside Houdini and then exporting curves, and importing those as timelines in Unreal. But it is like implementing an animation player in blueprint...
So, how would you make a complex scifi door animation for Unreal?
How complex you talking?
@shut kraken a quick reference of what I am looking for: https://www.youtube.com/watch?v=sw_3soMdP98&ab_channel=SocialMedia
The idea is to have multiple elements moving ("bolt" going inside, part moving around the lock, tube connecting/disconnecting) and those needs to be sequenced together

3D intro/transition clip of a futuristic vault/tunnel door.
Created in Cinema4D, Illustrator and After Effects.
For details, email ryanparry.id@googlemail.com
But the more general question is about how would you author complex animation for non organic objects? It can be mecha, moving turrets on tripods, automated arms in a factory
It feels like that when animations becomes complex you have to go through the skeletal animation system
you can animate mechanical with timelines
sometimes material even
i would prefer bones over multiple components in a BP but both can be done, performance wil be diffrent, not better or worse
I would drive an animation with an alpha variable, also use it for materials etc
basically the Time variable
if it must pause, unpause, otherwise be more interactive than just playing an anim
otherwise I'd just make a montage with float tracks to drive the mat
So you would create a skeletal mesh and animate it, and in unreal you have a blueprint that drives the animation and sync the other effects (like mat)
@ruby trench https://youtu.be/EBu0ktvYxmo?t=2015

There's been a robot uprising and it's your job to stop it! What weapon will you choose? Why not make your own?
In this demo, given by Zak Parrish, Sr. DevRel Technical Artist, Epic Games, walk through the process of creating your own custom weapon mods for Epic's latest VR game, Robo Recall. Viewers will see how to easily create custom mods fo...
timestamped
it will be waaaay more easy to make minor adjustments
and sync stuff up
1 timeline drives multiple bones and stuff like that
you can keep adding stuff and make super complex anims for mech stuff
Thanks for the link! Indeed, this sounds way easier

like the finger and trigger get moved with the same var
thats the stuff you want
if you keyframe a door like that, its gunna be hell, if you want to make adjustments to the skel animation later its gunna be even more hell
Hello, so I'm trying to create a simple animation where a ball floats up/down infinitely in the air (which also slowly spins, but I got that part). Of course, connecting two 'AddActorLocalOffset' nodes creates and infinite loop that unreal does not like. Any tips on how to modify this to what I'm looking to do?

@raw bay I believe it's an infinite loop because the output pin of the second AddActorLocalOffset node goes into the first. Why have you done that?
Does anyone know how to delete "sync markers"? They don't show up in the "manage notifies" window.
that was my initial attempt at looping.
@raw bay I see. Well this logic is coming from Tick which itself is the "game loop"
So whatever you setup will happen over and over, no need to feed the execution pin back around.
Is it possible to vertex snap a BSP vertex to a static mesh vertex? I have tried but failed, still I hope that there is a way?
How can I change the way two animations are blended together during a transition? I have a bone that spins around backwards where it should just rotate slightly forward
The animations just go from one to the other so if its doing something like that then the rotation values on your animation might be jacked
Or have you set the animation to be additive or something?
Making some anims in blender with the UE4 to rigify, when they come back into UE4 the feet have some extra rotation, can't figure out why... the rest looks good

okay mayyybe because the Anim I exported was Additive or something... Works fine when I modify eg Walk anim
does anyone here know of any ways to control the speed of a blendspace inside a chracter_BP?
@misty dagger the root motion animation move the character itself, if it's real root motion at the end of the animation the character should be where supposed. If the animation it's root motion but the check of the root isn't checked the character can move while the animation plays and when finished it'll return where he started the animation. The easy way to check that it's that in the animation itself in the editor the character should stay in the middle. The animation in game moves the character right.
Hey has anyone used cascaduer?
Messing around with this month's free asset
How does one reconcile montages <-> anim graphs/ state machines?
I'm confused because it seems like state machines transform your character to different animations based on state such as speed/falling, but they seem self contained only allowing their anim graph to change their variables
Meanwhile there's montages which you play directly from your character blue print
Just having trouble identifying how certain things should be done. Like i see for attacks you might play a montage, but that's seperate from your state machine?
Montages have lots of usage it seems, Wes Bunn described them as like a DJ remixing animation clips
good for fight combos and things
For example (his example) loading a shotgun, you might need to play the bullet loading animation X number of times, then close the chamber
Okay so you could loop a reload animation dynamically
Yep. And you can use them to play into animation slots, to have them play on select parts of the body.
But what about the whole state machine approach like i see the default 3rd person character has BP that makes things jump, and then there's a state check for jump in the state machine.
But like if i say "attack" and play a montage
is that seperate from the state machine?
and if so, i'm struggling to see the purpose of state machines besides super periphreal stuff
Yeah I think the montages are good for one-off things like attacks
like i think i saw someone say you might write a state machine to decide how to animate a single hand
There's just more than one way to do things, and they have different advantages
based on your movement or w.e.
I'm just trying to understand a bit more about how to "properly" do things like attacks. Like i found a tutorial about combo attacks and he just used a BP to call montages to play
and then ignore the state machine, but did make a blend
so i got a bit confused about the point of the state machine
i tried to make animation blend twice earlier today
but didnt work
im quite new to coding so i dont know everything
iGotThis, take a look at the Shinbi Character demo BP, it uses both state machine and combos, and it's the best guess I have really. Statemachine is used for locomotion mostly, and Montages are used for attacks/combos
I used montages for my roll animation too because it uses root motion and locked player input for the duration
Honestly I don't know the exact why because I'm still learning too, but like you say it's just how I've seen it done by everyone else and I'm following suit.
definitely easier to play a montage because you don't have to talk between the animation blueprint and the blueprint so much
Hm yeah actually that Shinibi one is helping a bunch
like i didn't know there was another entry point into the event graph for when animations are trigered
I wish they would make a more elaborate one for download... they said they would in a livestream and never did
things like turn in place animations I'd like to see how they are done properly
I'd honestly just download some projects and see how they do it. There are ways to automate it without needing animations tho. I believe the plugin moveit is doing that? There's a lot of different approaches depending on what you want.
Hey guys, hope you are doing great!
Who somebody can tell me how i can spawn a particle system to every bone of my fracture object?
This method does not work correctly: Screenshot

Why are you taking a random socket name rather then looping through all the socket names
And why on tick?
Yeah probably to fire an event on some condition and then do it or fire off another check at a later time right?
cat simulator 0.1
Can anyone help me to understand how to hang on the edges of a ledge and pull up? Would love to add that here 🙂
I did something like this in college in Unity but i'm pretty sure similar concept exists here. Sorry if i mix up terminology but i think i'm getting the hang of this (only been learning unreal for like 1 or 2 weeks passively)
- Detect incoming ledges using a ray trace/cast?? can't remember the name
- If you hit some object within X units check to see if they match a grabble object (use tags i think?)
- If they are in that location it seems like you have two options. Play the montage for a ledge pull either use root motion and translate the model (probably the way to go) or not use root motion and hopefully the animation matches the height of the ledge
@static falcon
Actually now that i thought about it, yeah i rememberd a bit more
instead of just ray tracing. Create a collision sphere without any actual collision around you (can use it for item pickups too) and upon collison, ray trace going downwards at certain thresholds. Switch between super low ledge/low ledge/medium ledge/high ledge/super high ledge
I'm sure someone with real experience can give a better solution
yeah by the switch i meant you need to decie what sort of "ledge" climb you'll need
a little hop, or w.e.
Anyone got an idea why calling Montage_Stop with 0 blend time only visually disables the montage about 2 frames later?
Oh, dang
Does it make sense that if I add global time dilation those 2 frames become a whole second?
Hmm, oddly it does become a whole second 
maybe its something else after the rendering delay
Awesome, thanks for the help 😍
I think that that whole second thing might actually be on my part
Btw, I did notice that when I evaluate the animation normally through the AnimGraph, no such delay exists
Is it only for montage-related threads?
Yeah actually drop the word threads lol, is the delay problem only applicable to montages, do you think?
Aye, I think I'll look into it a bit more, because the delay in my testing is only for montage animations, I can see other things updating correctly (which is how I noticed the problem, through the differences)
does any 1 know what a small dot next to a bone hierarchy cell means?

why aren't these blocking my character?
And what does the lock mean on the physics body at the top? can I unlock it?
Oh I see that means kinematic...
I got it to work, sorry, had it set to "use complex as simple" and needed "use simple as complex" 😕
i made a stamina system but its not regening
does anyone know why?
Hey guys, in today's video, I'm going to be showing you how to create a sprinting (running) mechanic for your player, with a stamina system alongside this. The stamina will decrease and regenerate.
#Ue4 #UnrealEngine4 #Ue4Tutorial
00:00 - Intro
00:33 - Sprinting
05:28 -...
thats the tutorial i used
oh
lmao
i had 0 in max stamina
Hey folks! I'm trying to get a PostProcessing AnimationBlueprint to run. I've linked it in the SkeletalMesh asset and I used a 'LinkedAnimGraph' node to get the output of the normal AnimBP, but something weird happens. Basically to me it looks like the animations in the state machine are not updated, or rather, they are only updated whe a state transition happens. So basically I have an idle and a run animation. I see the character frozen until it transitions between the two. During the transition it plays the blended animation for a short moment. After the transition is done, I get a frozen pose from the new state. Can anyone make anything of that? Anyone here get PPABPs to work?
In the control rig editor my rig looks like this...

But in the viewport...It looks like this...

how do I fix it?
I've seen in some videos that you can take a pose and can of blend it with your locomotion to create, say, the effect of being carrying a weapon without needing to make a full state machine for a weapon. I have no idea how is this called, can anyone point me in the right direction?
Anyone know if the Maya rigging toolkit is still supported?
4.26 doesnt seem to come with it.
why does my animation blueprint not have valid access to it's pawn owner?
(During runtime)

Is it not possible to attach a preview mesh to virtual bone?
Hey guys, is it possible to easily animate 2 meshes at 1 time with montages? I am using a hulled mesh to provide an outline on my characters and I'm trying to figure out if there's a way to play montages on both skeletal meshes at the same time without having to call Play Montage twice (once for each mesh)
Any idea why I can´t import my camera from 3ds max to Unreal via FBX?
When I try to import it, the import button is just greyed out...
you can't import cameras and lights
so to answer my own question: Apparently you need to disable the "Use Multithreaded Animation Update" flag in the class settings for PostProcessingAnimBP to work.
I'm really intrigued by this talk on procedural pose animation and am curious how we might accomplish something similar within UE4. I'm also not the most experienced animation programmer. Anybody have any ideas about what this might look like in UE? The results seem really amazing. https://www.youtube.com/watch?v=KLjTU0yKS00
In this 2016 GDC talk, Ubisoft's Alexander Bereznyak breaks down the basics of IK Rig technology for animators, and explains how it can be used for everything from video games to feature films.
Register for GDC: http://ubm.io/2gk5KTU
Join the GDC mailing list: http://www.gdconf.com/subscribe
Follow GDC on Twitter: https://twitter.com/Officia...
It seems like something that Control Rig would be great for, but I really don't have the depth of expertise to know how such a system could be engineered
how could i shake the character while still playing the default animations?
like walking and stuff but the character is shaking
I think there's a spring node or something
is it just me or do anim notifys at frame 0 sometimes not trigger?
@pastel roost I noticed that time ago, not always but I don't know for sure the pattern.
yeah and only on a specific animation not all of them
Is there a way to add 2 virtual bones per bone? ALS did it somehow...

@minor lichen I'm working on something like that with a physics sim on top for body collisions and things. Shoot me a dm if you wanna talk about it
is it possible to do animation re targeting at runtime ?
To what end?
meta human
i want my boi kwame to copy the mannequins animation
especially since quame has no ik bones
so i think it would be a lot better if he just copied the mannequins bones
but this is what happens when I try that

the one on the left is using this node to copy animation

i am importing an animation and model i made that has a rigify rig on it and the stretch physics are getting all wonky in the import so basicaly the stretching part of my animation is getting smacked up in ue4 the imput or blender
is there a way to slow down a part of animation without doing it in other software? For example i want to make an animation slower half way through it or after frame 20.