
#animation
1 messages · Page 123 of 1
No problem @primal sandal
To me it looks like the character is sliding cause of the center capsule collision of the horse so trying different physic presets should do the trick
Could you show the collision capsule of the horse ? Also if that still doesn't work you could try to put a component on the horse and then attach your character to it
Hey, guys. Serious, fundamental question. How do you save an animation state? I.e. the character is killed, drops to the ground in some pose, the player saves the game, then loads, and that dead character is still in the exact same "dropped dead" pose. I've read through dozes of AnswerHub and forum threads, there is seemingly no solution, which is extremely weird - tons of top quality AAA games have been released and it's a default feature for most of titles.

@untold cosmos save the enemy position and rotation vectors and boolean isDead ?
@delicate junco How would that help me to save the exact pose the dead character is in? In the best case, I'd have to go through all the intermediate states in the anim tree (which is not a valid option). And it's not even an option if the death post was affected by physics.
Also, "dead" was just an example. At the moment of saving the game, the character may have been running, crawling or drinking beer. I just have to save and restore current anim state, whatever it is.
Just like most games do, you know.
Yeah I assumed that it wasn't driven by physics
No need to go through the anim tree, on begin play -> play anim and play the dead anim (fast to reach the final frame maybe)
Yeah if you need something for any anim
You could implement your own state machine in c++ maybe
Cause not sure that the default animBP enables something like this, it's pretty deterministic with a fixed entry point and such
What's "play anim"? The animation is controlled by animation state machine (anim tree), can it be overridden? If so, I need to resume from the exact state I was in when the game was saved. For example, if the character was knocked down while saved, he should properly resume from "knocked down" (the exact frame he was saved in) to "get up" state.
You can play animation montages in blueprint and c++ too
Ah ok I see, yeah I don't know a simple solution for that then sorry
I just thought that animBP (anim instance) had to be compatible with some kind of streaming, since saving animation state/pose is a default expected functionality in... well... any game of any genre.
And surely hundreds of UE devs faced this challenge. So I hoped someone could give me a hint. I'm all down for dirty C++ work, no problem there.
Animation Pose Snapshots can capture a runtime Skeletal Mesh Pose inside a Blueprint and can be used for blending in or out of additional poses within an Animation Blueprint.
Maybe this could help but have no other idea, my game doesn't need such a feature so didn't dig into it
We do use snapshots, thanks. If it could be streamed in/out of the file, that would solve half of the problem.
You can't save the snapshot?
I don't know. Can I? I asked my assistant programmer to research this topic (anim streaming overall and snapshots in particular), he spent days digging the code and UE site, achieved virtually nothing.
I don't know if you can, but I don't think saving the position and rotation of every single bone is necessary anyway. I've never had to save a procedurally generated skeleton pose with such precision, and a lot of games that I know of usually swap out the ragdoll for some pre-made "dead" pose in the case of saving and reloading. If you want to have a character who was, for example, dangling dead off a fence continue to hold that pose, I would do it by saving and recalling an array of "key" bone data, just enough to recreate the procedural pose with however much accuracy I need
I might, for example, store the pelvis and pelvis rotation in addition to the position of the head, hands, and feet
then on startup I would set the pelvis location and rotation, then IK the head, hands, and feet to their proper locations
that should give you not a perfect recreation of the ragdoll but pretty close, and you can add more data to the array depending on required accuracy
That surely makes sense, and the reason I came here was a hope that it's a part of UE API somewhere 🙂
Digging the code to access bone transforms, recreate the state machine, erm, state and such is a long journey that feels like reinventing the wheel.
Sometimes you just have to take a shovel and dig, though. Will get to it then...
Looks like you should be able to create an FPoseSnapshot struct and pass it to yourUSkeletalMesh->SnapshotPose(), which will fill the struct up with the transforms for every bone in the skeleton. You can then save each of the arrays inside the FPoseSnapshot to a file
@untold cosmos One last idea I have would be to check the UE4 replay system and see how they manage to record the data
on initialization you can construct your own FSnapshotPose using those arrays and then you have the functionality to save snapshots
FPoseSnapshot is made up primarily of two arrays https://docs.unrealengine.com/en-US/API/Runtime/Engine/Animation/FPoseSnapshot/index.html
Both are good suggestions - thanks, gentlemen, I'll take a look. Replay system was never on my mind, and yeah, I can pick apart any struct down to bytes and shove it into FArchive if needed.
That would solve streaming the final states (i.e. collapsed, dead, hanging on the fense, etc).
The other part is streaming active anim state machine - i.e. continue from the exact frame and state to transition into proper states in the anim tree.
(so if someone has info on that too, I'll gladly hear it)
you would need to save whichever variables go into determining the state of your state machine
It's not exactly "my" state machine, it's the one from AnimInstance. Again, I understand the idea of going through its variables and steaming them one by one (not sure how accessible it is without recompiling the engine though), just hoped that non-hacky solution already exists.
If I'm understanding you correctly, you have state machines based on various factors. For example, if the skeleton is a certain height above the ground it may be in a "falling" state or if the owning actor has HP = 0 it may be in a "dead" state. The states are intrinsically defined by whatever these conditions are, so you would need to recreate the conditions to determine what the final state should be.
To be clear, I mean exactly this state machine UE gives us out of the box:
I should've called it Anim Graph, probably, I just don't work with this part of the editor often (I mostly do lower level programming and blueprints).
AFAIK, even if I could check conditions on startup, there is no top-level function like "SetCurrentState" for anim graph.
The horrible hack (my assistant programmer has already suggested) would be having a service "startup" state in this graph connected with EACH other state, so transition rules would serve as startup checks, but that would be a complete mess.
There is no way to arbitrarily set the state in a state machine because it's simply a series of conditions. It's like if I said
if (a == 1) {animation.run;}
else if (a == 2) {animation.walk;}
else {animation.idle;}
The only way to get animation.walk here is if a = 2. There is no way to just tell it to walk arbitrarily
you would need to either set a = 2 or change the conditional statement to maybe include something else
else if (a == 2 || forcestate.IsEqualTo("walk"))
Well, the anim graph's state machine does store active state the machine is in. The edges (transition rules) are conditions, but it is possible to be in a state, to get current state and to set current state.
And you surely can force set a state in a generic state machine. Rules just define how you get in/out of state if you're already in that state.
I feel like it would be very easy to create aberrant and unwanted behavior if you were to not follow the rules of the state machine the way they are built. I've never force-set a state in a state machine
Well, if it's your state machine and if you know what you're doing, it shouldn't be a problem. You know what states are safe, what states depend on external (potentially uninitialized) data, etc. With anim graph... I really don't, so I hoped that there are helper classes, plugins, whatever for anim state streaming.
Not that I know of, at least. That's all I can think of, so good luck! I hope you solve it
Thanks. If I find some decent way to do this, I'll probably make a tutorial.
Hi, what's the best way to implement wings physics (using Skeletal Control)? i wonder if Trail is the best one. But im not sure if Anim Dynamics / Spline IK works very well. Do you guys have any idea?
@fair sable https://youtu.be/Oe7fYS9qxmk
14:25 and 18:45 may give you some ideas

This talk by Epic Games' Senior Technical Animator Jeremiah Grant covers Fortnite’s use of animation Blueprints including the use of Blueprints for gluing to...
@delicate junco Coool
Guys is there a way to animate emission map with a mask of some sorts ,i have a stone with some runes/lines on it i would like to animate the glowing of the emission map but i want it to start growing from diferent positions
is there any pointer as to where should i search for info
@cloud stag Dynamic parameters/panner node maybe ?
Hello Guys,
I want to know how I can read the curve value from montage before actually playing the montage? I want to get the start time base on some values & match to curve amount
Is there a way to set per instance animations? looks like animation data can't be set to editable per instance
@young urchin - You can run animations off of variables.
So if you want to create an 'animation kit' that is specific to instances and you don't want to create a child animbp (which would be how I'd do it) you could, theoretically, make a struct and plug that into your character.
Then read from that struct in your animbp to play your animations.
That said, child animbp's are probably a better option.
Hello, Any idea how to fix this failed trail control? 😟 . What's the most settings to control this trail component? i wanna make a wing's physic
I need to push the right hand of my 3rd person char away from its chest, how do I go about doing that, tried a IK dummy cube parented to the character mesh and a FABRIK inside the Animation blueprint to tie it to the ik dummy static mesh but its not working like I think it should, and I don't even think I'm going about it the right way.
can anyone think of a reason my AnimInstance AnimGraph stopped working despite seemingly changing nothing?
no matter what I connect to the final pose everything is "visible but ignored"
also half of my nodes have lost Fast Path for no reason, which I assume is justanother symptom of the same issue
I just ended up restoring to an older version, no clue what I did
whats the correct way to modularise a complex animation graph?
also would you consider this complex enough to need modularisation, or is this trivial
if you have some group of anims only accessible through one state maybe you could create a substate machine
For example change above into bottom
And then in substate state
Where the new state machine would be the 1/2/3/4 above
Not sure at all if that works though cause I never tried it, just throwing some ideas. Your state machine isn't scary tbh, states seem well defined
Awesome, thanks :)
Didn't think about putting a state machine inside the node of another
Hey, just a quick question: Is there any way of playing a BlendSpace instead of a simple animation in blueprints? And if yes, then how do I access the BS's driving var. I just have some blend spaces for NPCs to sit down/get back up, lay down/get back up etc., which should be driven by a blueprint switch on behavior enum
I wouldn't use AnimationBP since it runs on frame and I would probably need to cast every frame to get the behavior enum var's value so... Any help/alternative solution is more than welcome. Thanks!
i've modified VehicleAnimInstance a little to include camber angle and what i get is wrong rotation. Can anyone help me out?

WheelInstance.RotOffset.Pitch = VehicleWheel->GetRotationAngle(); WheelInstance.RotOffset.Yaw = VehicleWheel->GetSteerAngle(); WheelInstance.RotOffset.Roll = FMath::RadiansToDegrees(VehicleWheel->DebugCamberAngle);
I've just replaced roll being 0 with camber angle
const FQuat BoneQuat(WheelAnimData[Wheel.WheelIndex].RotOffset); NewBoneTM.SetRotation(BoneQuat * NewBoneTM.GetRotation());
this is how it's applied
I am struggling with IK, sometimes my traces have the character floating above objects, then I turn the player around or move and it settles down to the expected height. What causes the traces to give the wrong answer?
@latent frost Make sure to trace on Complex
hi guys does anyone know how to import morph targets on a STATIC MESH from blender?
I know how to do it if it's a skeleton but not a static mehs
there's a pluging for 3d max https://docs.unrealengine.com/en-US/Engine/Content/Types/StaticMeshes/MorphTargets/index.html
Deforming a StaticMesh using morph targets and WorldPositionOffset.
@frigid drum Thank you, that fixed it 😃
@cinder linden this script bakes the morph to a vertex animation using UV and vertex color, you could port the code of MS script to a blender (if no one did tat already)
and seems it was made already
Unreal Engine Forums
If you've been waiting for a Blender version of the Vertex Animation max script you've come to the right place! I've recently been working on one, and have a pretty
thanks @young urchin I was looking all evening for a solution 🙂
i didnt even know i was looking for this 😛
@cinder linden btw, notice there's a Pull request for Blender 2.80
GitHub
Blender 3D scripts to use in conjunction with Unreal Engine 4. - MWallace3D/unreal_tools

@young urchin one last thing I wanted to ask you, how heavy are morph targets in terms of performance ? whether it be skeletal morph targets or static meshes morph targets
@cinder linden hmm...not very heavy, shaders wise are very cheap; in terms of memory...may be expensive if you have long animations (like really long, 500-1000 morphs)
we count different morphs in terms of seconds or frames in the animation right?
this method is used to bake water and physics simulations
there are no frames in ue4...just float time...
even in maya or blender, i think no frames, just floats that snapped to second splits
hi guys. i need some help. ive been trying to get this animation to import properly, but every time i import it, it does this
this is how it looks, and is supposed to look, in blender
any idea how to fix?
Import from where? Blender? Maya? Max?
blender
Are all the meshes in one object? Did you zero out the object coords? Do the floating mesh have vertex weight assigned to them?
1- yes im exporting it as one object
2- uh... how would i check that?
3-no
Open properties (‘N’ is the hot key) select the object and look at the xyz coords
Everything needs to be assigned to the rig and have vertex weight on them though
so the main screen area is at 0,0,7, and how do i check/apply weight
Make sure the rig is in pose mode, select the mesh and go to weight paint mode
You can assign weight in weight paint mode or in edit mode. The latter is through the vertex group
Select each bone to see what vertex is weighted to it (in weight paint mode)
You can set the bone to x ray so you can select it more easily if needed
if i do remember correctly the eyes where just parented to the bone, so i just weight paint it and it should be good?
Yep.
ah okay, im really glad it was my own stupidity and not something catastrophic aha
that did not fix it. i went into ue4 and i found out its moving the eye bones back here for some reason. how did i deal with that?
i keep trying to retarget and no matter what it moves here
@restive yew @restive yew @restive yew @restive yew @restive yew
@patent dock@cinder linden they use morphs and vertex anims for all the fish in abzu, cuz cheaper than skels
there are a lot of fish....
Does anyone know where I can find the status on experimental features i.e CCDIV as Id like to package this feature in the near future as it works fairly consistently for me. It's been experimental for 2 years now afaik.
@bronze osprey @young urchin I got it to work it doesn't seem to be expensive however I might have found a different solution that fits my needs better https://gyazo.com/203efe092bdcad4b9566048069eded98
yeah, but shader complexity is not what matters in vertex animation, the memory footprint does
https://gyazo.com/bf06b543740df76ec2f8b238afd55194 these walls are a skeletal mesh in theory, it doesn't have any bones or keyframes just the morph target getting animated in blueprint, I'm going to have a few of this to create the level would that be crazy in terms or performance ?

looking cool anyway

i'd probably just made some WPO noise (but i could tear some geometry on the seams)
yeah I was watching this live stream but it was breaking my geo https://www.youtube.com/watch?v=oPLQOViA8CA
Announce Post: https://forums.unrealengine.com/showthread.php?114268 Alan Willard, hot off working on VFX for Unreal Tournament, dives into the Material Edit...
so do you think it would be reasonable to have say 40 of this around the map being skeletal meshes?
cause to make it properly work you have to either UV the mesh in a specific way, or use world space UVW
ue4 has skeletal mesh caching, read about it
sounds like no problem depends what else is goin on and what target hardware is
is there a better way , prolly does this work than its fine
Struggling to understand why I'm unable to use these nodes correctly:
I've noticed after messing with the numbers that I check against in the above blueprint that the animation blueprint is sort of resetting the animation duration after each frame. In other words, notice I have the float value I'm checking arbitrarily against as 0.97. After every frame, the time remaining fraction seems to always be close to this number, which leads me to believe that either this transition condition is not running every frame, or the animation duration values are being reset every frame.
I'd like to know if there are some things that may be misconfigured outside of the scope of this of this animation blueprint transition. What seems to be happening from my POV is animation progress is not being reported/evaluated how I expect in this transition; it seems the values reported by these nodes should be updated cumulatively, but are not.
Oh, ok, I'm able to confirm. I can see from PIE debugging that the active time doesn't change:
Which is strange because the animation is visually playing all the way through.
is two bone ik taking much performance if the target location is lerping?
Oh, it got stuck because I didn't detach the above boolean check in the screenshot. 🤦 (but the anim time nodes in the transition still don't do what I expect)
Ok, the root of my problem was that I didn't clearly understand how the End Transition Event works. Now that I have some event handlers hooked up correctly, all functions as expected. 👍
@slim lion You can also do the transition using boolean variables and anim notifies, this way you have fast path enabled (little icon on the top right)
Alternatively you can try to just check the following option in the transition options :
How would you setup a box collision component so that it syncs with the animation of the character, e.g if he's lying down or leaning to one side
@blissful linden Associating collision bodies with the bones of the skeleton would be one way.
@delicate junco Appreciate the additional insight. 👍
Is anyone else having the problem with it being impossible to resize physics asset collision capsules?
No but creating bodies crashes my editor every time in 4.23.....
@blissful linden if you need the animation to drive the capsule you need to use root motion anims
It can lead to some weird stuff from my experience if you try to rotate it so you have to use gimmicks to make it work sometimes
I'm importing my skeleton at a uniform 2.2 for various reasons - seems 4.23 can't generate physics assets if the scale is not 1. I know 4.22 could for a fact.
Didn't jump to 4.23 yet, too many people complaining about non working features 😅
I guess I can try and export the physics asset from my (copied 4.22) version
hey I am following a video tutorial and it showed me how to download a character and animations (from mixamo), but after importing them, when I open the character, and select the "animations" tab it does not list all the animations (like it does for the utuber). Is there some sort of action I need to take to add animations to a character?
ah i hadn't selected it right at import it seems. so an animation can only be used by one character? or needs to be imported multiple times?
oh damn.. I guess something still went wrong in the import.. is this fixable?
another question (still havent solved the deformation) is that the walk/run animations include actual movement. Is there a checkbox for "move in place" ?
choices on download is format, frames per second, pose and keyframe reduction
guess the problem is that I am following a 2 year old and outdated video tut
in the comments on the video, there is someone saying "snap animations to root", but where is this option?
if you're talking about RootMotion (which is - in a way - to make your animation "move in place") in the Animation Sequence under "RootMotion" there are some variables there to set that up
do you mean these ? I tried all four without any change
that's in the animation blueprint. I meant the actual animation asset itself
that is not present for me
I'm going under the assumption that you have animations for the Skeletal Mesh?
yes, I set up a Blendspace
when i previewed the animations the walking animation made the character move forward in the preview
so maybe this should have been fixed at import?
when i move the green dot around the character moves around in the preview space
the assets on the bottom right. If you open up one of them, the root motion settings are inside them
is EnableRootMotion enabled?
no
enable it
assuming that your imported mesh has a root bone, the animation should just stay relative to the root bone
i can use the bulk asset edit to enable to all or is it not always right?
I don't have much experience with using bulk asset edit to say for certain I'm afraid
I'd check beforehand that enabling RootMotion fixed your issue before modifying all of them
yes i kinda did. it stopped the character from running ahead. but it seems to have included a sideways rotation
what do you mean by that
nm. it just looks super creepy how the hips now stay in place. any idea how to fix the giraff neck ?>
best way to describe it way the blended movement things are rotated is that it looks like she is walking 5 degress to the left instead of forward
so locking the root caused it to not rotate?
Locking the root can have that effect yes. It depends entirely on the root bone
guess I will look for a new tutorial that isnt so updated where my sitation differs so much from the instructor. thanks though
Guys I want to know the correct way to share a project using Animation & Rigging Toolkit to another computer to work in a team
Hi. I wanna create a animated slime creature. Sadly it looks like there is nothing like a soft body that can help. Now I found 2 ways. First: create custom skeleton. Second: use vertex animations. For the first, I currently don't knwo how to create a skeleton. for the second i sadly just found 3ds max which is to expensive. does anyone know, what's the best way to create such a slime character?
🆘 I can't seem to get the rigidbody node to work correctly in animblueprint! It always results in my mesh stretching and flying all over the place. My phyics asset is set up correctly and animates correctly in the physics asset editor. PLEASE HELP.
for model creation... what does everyone recommend?
Hey im trying to export an animation from Blender 2.8 to Ue4, ive had no problem doing this with Blender 2.79. Now with 2.8 my skeletal mesh looks fine in ue4, but the animation asset is 400 times smaller than it should be, and i just cant seem to get the anime to play either
can someone send me their export and import settings for blender 2.8 anims, as that would clear up the most common issues the fastest
Got it working nvm
@velvet sandal 3dsmax is great for hard surfaces and Z-brush is great for organics
If you can't afford the license Blender is great
I'd recommend maya or blender
Anyone know if it's possible to rotate a PawnSensing Component without rotating the whole capsule in a character BP? I just want it to move along with the head bone of a humanoid avatar
Wondering if maybe I need to create a BP with a pawnsensingcomp and socket that. Since u can't rotate a pawnsensingcomp without rotating the whole capsule in a character bp, unless i'm missing something
I'm pretty sure that Pawnsensing is obsolete, AI Perception being the new version. You should ask in #gameplay-ai imo
@reef agate This seems to be what you need https://www.youtube.com/watch?v=MBEnZfErPcw

This tutorial shows you the necessary steps to attach an AI perception component to the head socket/bone of a character (rather than conventionally attaching...
Anybody have Maya LiveLink 1.0 source that works with Unreal 4.22?
@delicate junco yup, seems like i should try out AI perception asap and that tutorial is exactly what i need
👍
Wait does anybody know, should the plugin from here: https://github.com/ue4plugins/MayaLiveLink

GitHub
Plugin for Maya that send data to Unreal Engine. Contribute to ue4plugins/MayaLiveLink development by creating an account on GitHub.
work with 4.22?
@twin dock Im doing the same tutorial and I dont have your issue but for some reason my animations that involve movement occur above ground
Or, has anybody tried to build MayaLiveLink for another unreal version? I'm trying and the build keeps failing at
  ** For MayaLiveLinkPlugin2019-Win64-Development
  MayaLiveLinkPlugin2019.target (0:00.23 at +0:00)
  Executing post build script (PostBuild-1.bat) (0:00.12 at +0:00)
  The system cannot find the file specified.

  Error executing C:\Windows\system32\cmd.exe (tool returned code: 1)
I'm trying to build for Maya 2019
Blender user here, can't help 😦
Is this maybe a better question for #engine-source ?
Hello! I have a doubt, mostly because Animation Sharing is not marked as Beta or Experimental. But I have seen some issues that appears characters with the system lost their capsule component (or at least is not rendered when you do Show Collision). So, is this feature usable at the moment? I would like to use it in our game that is a Tower defense so we have some overhead of enemies sometimes.
whats the requirements to import an LOD 1 to an skeletal mesh?
mine fails to import no matter what i do
This what i tried
- Same mesh, same skinning, just decimated to 80 procent lower
- Duplicated mesh and rigged and skinned to the same as the orginal
- Same mesh, without being rigged.
Hopefully the correct place to put this but I can't figure out how to get "post-roll" to work correctly even in an empty project. Anyone know what I have to do to get it working to evaluate a track even after the sequence "ends"?
I have an animation that was exported with an offset and we would like to know if there is a way for us to fix the offset without having to reimport
I tried playing with Import Translation but it didn't seem to be doing anything
And this animation is part of an animblueprint so I can't offset the character
does anyone have tips for handling run and walk animations, for example run start and walk start? I tried using blend by bool, but if you toggle walk when the start animation plays, it switches over to the other animation and it looks weird
I get the behaviour I want by using a nested state machine but it seems weird to do that for almost every state
You may want to take a look at how Epic handles it for the Mannequin?
Otherwise, maybe the paragon characters have it, can't remember
I think the paragon characters only have run states
I mean kind of switching from walk start to run start while either animation is playing
Hey guys. This might not be the correct channel for this question, but I'll give it a go none the less. Imagine you have some kind of monitor 3D model within your level, and you want the monitor to display some kind of "moving" image, just like an animation. If you want this "movie" to be controllable, like start, stop, set play length etc., how would you go about implementing that? I read somewhere that flipbooks might be a solution, but I wanted to hear what you guys suggest, before I spend time creating the flipbook 🙂
@noble pelican Blendspaces ?
@delicate junco True that might work in some cases
@misty dagger - Probably this?
Illustrates how you can play a video file inside a level on a Static Mesh with the File Media Source asset.
If it were, like, a video.
Hello! Newb here.
I have a bunch of levels, and a set of animations that repeat in all of them. I'd like to have a "master" animation that applies to all levels. In short, it's a moving camera and some translation values on a few objects.
When creating a Level Sequence, it breaks after duplicating the Level in order to make the next version. I have to re-link the objects that will be affected.
Is there a smarter way of doing this?
Here's a link to a preview. The composite is rough, please don't judge :). These camera passes are separate levels, but as you can see, the camera movement and the opening doors are always the same.

make the door a pawn and control the camera that way?
hey guys, has anyone made the "RigifyToUnreal" script work in Blender 2.8? its throwing some errors at me.. maybe some of you have encountered something similar?
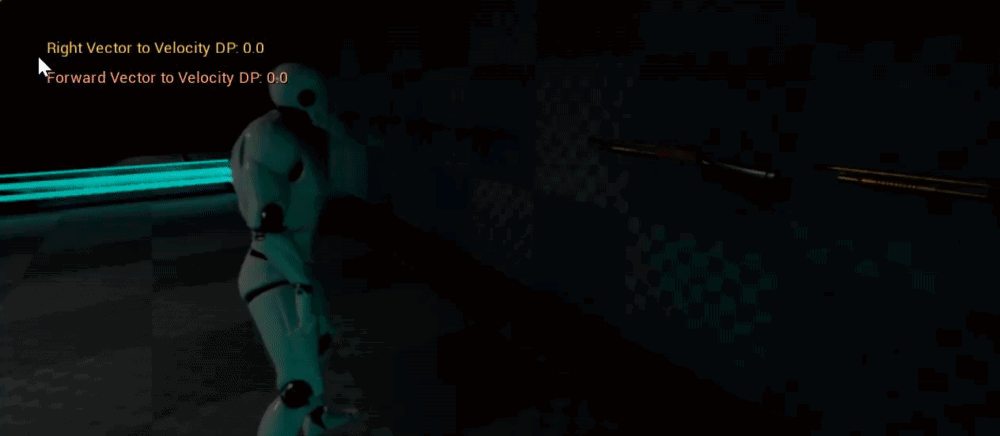
i have that 2d blendspace with MoveForward/MoveRight values going from -1 to +1
and i also have character that moves not in control rotation but on fixed X & Y vectors, while control is rotated at mouse
how can i properly calculate MoveForward & MoveRight values having access to velocity and control rotation?
hey, when i add an animation blendspace to my character, it moves the mesh off from its local origo. making it float above the ground. when i move it down, the fall animation goes through the ground... help?
hmm seems it is the animations and not the blendspace. can i adjust that in UE?
i tried to grab the root node in the animations and drop that, but it didnt seem to help
i tried the transform and the import transform in the animation edit. seems to do nothing
The animation moves up for the walk and idle, whole are down on the other ones.. maybe just bad animations 😦
@twin dock - Look up Root Motion, there's an option to disable it.
hi i post question in ue4 thread but it s about animation if you can help me?
Thinking of a tutorial to put together who like to see a tutorial on how to make this https://youtu.be/8tt8Z-KJ-wY

A WIP Modeling, UVing,Texturing, Rigging, Animating and Customising Blueprint Actor in UE4. there's lots of tutorial about all kind of thing nowadays Pipelin...
@next pine but isn't pelvis movement kinda required for a natural walk animation?
@twin dock - Your pelvis should not be your root.
Hi guys I'm going through some optimisation pass on the animation side of the project I enabled the URO but how and where can I set the interpolation of it https://gyazo.com/1818324fbb0c7fa51ed2e84496a1df97

how would I sync sound so that in plays exactly in time with an looping animation that is played in an animation blueprint
@cinder linden it seems that it needs to be done via C++, I'm in the same position as you, looking forward to understand how to use this optimization method.
@cinder linden Ok, yes, you need to set it up in C++
First, in your character C++ (.h) create a variable:
struct FAnimUpdateRateParameters RateOtimization;
Then in (.cpp)
//Animation Optimization
    RateOtimization.BaseVisibleDistanceFactorThesholds.Add(0.4f); //MaxDistanceFactor > 0.4f 1 frame skip
    RateOtimization.BaseVisibleDistanceFactorThesholds.Add(0.2f); //MaxDistanceFactor > 0.2f 2 frame skip
Container for Animation Update Rate parameters.
This is what I have found so far.
is weird that it seems is not directly associated to the LODs.
so, apparently is more related to distance, and not Screen size.
@dusty burrow thanks a lot man 🙂 I'll have a look into the docs you posted
is there a way to manipulate "Retargeting Translation" during runtime in blueprint???
@cinder linden just wanted to let you know that it wasn't working the way I've described, but you can use GetMesh() to apply directly to your mesh. Also, Found a way to connect to your LODs so they will dictate the distance threshold.
GetMesh()->AnimUpdateRateParams->bShouldUseLodMap = true;
    GetMesh()->AnimUpdateRateParams->LODToFrameSkipMap.Add(1, 1);
    GetMesh()->AnimUpdateRateParams->LODToFrameSkipMap.Add(2, 2);
    GetMesh()->AnimUpdateRateParams->LODToFrameSkipMap.Add(3, 4);
    GetMesh()->AnimUpdateRateParams->LODToFrameSkipMap.Add(4, 8);
First parameter is the LOD, the second, the amount of frames you want to skip.
Hey all, is this a good place to ask questions about animation blueprints?
@dry flame you bet buddy
Killer
So I'm working on a VR project and am trying to get my NPC to turn his head to face me while he's talking to me (via FaceFX)
I'm in the anim blueprint of the NPC, and (per a tutorial's suggestion) added a socket to the head bone
then in the Anim Graph added this
then in the Event graph created a function
both inputs are Actor types
BUT, in the function, the cast to the NPC's blueprint is failing
And I can't for the life of me get this to work
Any ideas?
I guess it's possible that FaceFX might be overriding it, but I can't know for sure

Can anybody here help me with my slide and prone animations?
Your effector needs to be world space
who are you referring to @jolly rain ?
@unborn lion
thanks alot man, I also was referencing the button's relative transform smh
once I switched it to World SPace and World Transform, everything worked perfectly!
@jolly rain
can you rotate Sockets using Fabrik??
does it always have to be Bones?
@jolly rain
I've never used Fabrik but CCDIK which i assumed had the same effector set up, but for an inverse kinetics system id say it only works with bones.
anyone know why or how to stop all that flailing after I grab the shotgun
im using the FABRIK node to move my hand to it

CCDIK has rotation limits to its IK chain
You could compare forward vectors of player to object and apply a slight rotation to ensure the IK never oversteps its solver, either way FABRIK and CCDIK are not perfect unfortunately.
Hey i have simple walk forword root motion animation in server side everything is fine but in client side i am getting foot sliding
I have some UMG widgets that I want to animate in 3D space (relative to a character's hand), and I wasn't sure how to approach that. Can you move individual components in relative space with Sequencer or Matinee, or would the best solution be to completely scrap my UMG widgets and move to a skeletal mesh with elaborate materials?
A Blender mockup of what I'm talking about: https://i.imgur.com/njcKg5y.gifv
Does anyone know how to export a skeleton from blender to UE4 while keeping the actual armature root as the root in UE4?
Oh yeah had the same problem, wait for a sec i'll find you the thread that helped me
@floral horizon There it is, I used the second solution and everything worked fine https://forums.unrealengine.com/development-discussion/animation/1466009-blender-to-ue4-root-motion-not-working
Unreal Engine Forums
Hello, I am using Blender and UE4. I have attached pictures for what i will be referencing.
I'm trying to export an animation to UE4 with root motion, but it
Cheers @delicate junco Still not got it though. As far as I can tell my Skeleton is named armature
Yeah the armature naming convention he mentions didn't work for me too, that's why I use the second solution he mentions
"This is still the cleaner version in my opinion. The FBX exporter is located here: [BLENDER ISTALLATION PATH]\2.79\scripts\addons\io_scene_fbx\export_fbx_bin.py. Open it, find the follwing code snipped and comment out the code below. After that, your skeleton should export without the extra bone created. If root motion still won't work, it is likely one of the settings you set in the Unreal Editor."
Hmm... I wonder if that will work in 2.80
If the fbx exporter didn't change it should work, I didn't make the move to 2.8 myself yet even though I really should 😅
Just telling me multiple roots found
Got it
I unchecked only deform bones
Thank you @delicate junco Youre a life saver!
Np, glad you solved the issue, this one was super annoying for me too lol
Just gotta backup my project. Then replace the old skeleton with the new one.... All so I can use root motion!
haha
yeah had to do the same thing 😅 Good luck with your project !
Thanks ! Not sure at all but maybe the "reimporting with new file" could work ?
Damn. That actually worked
👌
Anyone use akeytsu? Is there an easy way to get the feet to stay planted when I have moved the pelvis or do I have to just go frame to frame and keep moving them until theyre matched?
hi guys i want to create a Surveillance Camera but i don`t know how to animate for rotation , any help?
Anyone know how to enable URO as seen in this video? https://youtu.be/KHWquMYtji0?t=766

Fortnite has served as a development sandbox for UE4, and in this presentation from GDC 2018 we explore the effort involved with taking FNBR from 30fps to 60...
I have set GetMesh()->bEnableUpdateRateOptimizations = true and also set GetMesh()->AnimUpdateRateParams->UpdateRate = 30 but no difference in results as far as I can see
Does anyone know what might cause separations along unconnected verts in a skeletal mesh, if the separations don't occur in Maya?
I guess there are some slight seams in Maya
But in UE4 they're really obvious. What might be happening between Maya and UE4 to cause this?
@steady ether skin weighting probably, if no blend shapes in effect
try to import as static mesh and see if they are there
also check in bind pose
@oblique remnant why are you asking in #animation? bloom is enabled in ue4 by default, it's visible for all objects that has brightness above 1.0...(and noticeable for all that has brightness above 5-10)
Wrong channel my bad
I downloaded the Mixamo Animation Plugin on how to root animation skeletons

From where can I access the plugin information?
its settings?
Hi!
Does anyone know how to override a pose on a skeletal mesh from c++?
I have an animation and I can grab all the bone´s tranforms at a given time (what you get is the GetCompressedTrackToSkeletonMapTable, which gives you the root bone transform at said time + offset transforms to all the other bones).
It seems that I should already have everything I need but, how do I build a Pose object and override the mesh with it? Keep in mind that, at the moment I want to do this, the Skeletal mesh is not being animated. The skeletal mesh component is not even ticking at this point.
Does anyone know if this is possible?
Any hints would be very much appreciated.
PD: I would guess that this is very close to what I'm trying to achieve
https://docs.unrealengine.com/en-US/Engine/Animation/PoseSnapshot/index.html
Cheers!
Animation Pose Snapshots can capture a runtime Skeletal Mesh Pose inside a Blueprint and can be used for blending in or out of additional poses within an Animation Blueprint.
hi anyone using blender for animation? How do i speed up the viewport playback?
its playing back at quite the horrendous 6 fps
hi again!
question: if, in an animation sequence (UAnimationSequence), all stored locations at any given time are offsets from the rootbone, should I assume that all the stored rotations are also offsets? If they are, to who? to the T-Pose original rotation of that bone? or to the initial rotation of that bone at t=0s in the animation? or is it an offset from the rootBone rotation?
ok, never mind. Got all this wrong. They are offsets relative to the parent.
@sinful yacht Hiding some parts can speed it up
For example hide all bones with H
We're talking about skeletal anims right ?
Yeah I sometimes have anims running at 40fps and when hiding all bones and non relevant parts I hit my targeted 60fps
I purchased an asset from the marketplace (https://www.unrealengine.com/marketplace/en-US/slug/cyber-ninja-wolf-deadly-robotic-assassin) and its skeleton has the exact same hierarchy as the default UE4 Animation Starter Pack skeleton, but I can't seem to find a way to assign the same animation blueprint to the newly added asset. It doesn't have the same animations as the default one.
Quick question, since this is kinda pissing me off.
This is what my character's feet look like.
This is how the bones look
They're mirrored, so they're exactly the same.
This is how it looks in Unreal.
What the hell. Why the hell. And how the hell.
After experimenting with it, it looks like Unreal is importing the location of that one specific bone wrong. Like completely wrong.
It works well in the default pose. But not when importing the animation.
WTF why is the bone visualization messed up?
Getting phantom missing weights too 😭
I wish UE4 supported blender properly
You can see the 4th bone is on the tip in the FBX when I import it
but in UE4 it's shown as the penultimate bone but deforms like it's the last one
Just spitballing here @opaque stirrup . Did you make a default binding pose with a key for every single bone when exporting? Did you name the armature something other than “Armature”? (I use blender too and had problems with importing skeletons named Armature in the past) Are you exporting using blenders FBX exporter?
using Autorig pro. I've got it to a point where it appears to be working functionally, but the bone display in the tail is off?
Anyone care to explain this stuff to me?
It seems it always places the constraints backwards to my eyes? is the arrow suppose to point in the joint forward postion or back?
also, does the orientation not really matter? it seems no matter how I angle it, it dosen't actually change the joint swing
I keep trying to find documentation but nothing that really explains constraints in detail
like is there no way to keep a ragdoll from say making the knee bend backwards?
@opaque stirrup i think if you want to stop the knee from bending backward (assuming this is a physics asset), you'll have to modify the limits in Angular Limits in the constraint.
I tried but the limits seem bilateral
and rotating the constraint doesn't seem to effect it, is it driven off the bone?
like regardless of what limits I put it seems to bend equally forward and backwards, and at first I thought i'd rotate the constraint marker in the direction I wanted to to be the 'midpoint'
but that seems to do nothing.
great now my head is just deciding to flop around on the neck like it's a ball joint... but it's not.
I just want the damn constraints do what they say they'll do
how would i go about editing the default animation for the first person template, as i wanted to change the way he holds the weapon as you can see its kinda floating
Q about twist bones and Epics way of doing them, is this standard?

To have them outside the hierarchy? My understanding of them is that they will help with deformation of the skin (which would be no different if they're inside or outside the hierarchy) but perhaps more importantly they offload twist rotation responsibility from the bones later in the chain, which won't happen in this case since they're not connected
i usually use Shoulder->Elbow->Wrist
and Elbow->ForeArmTwist
Do bones with no vertex weight degrade performance? Autorig exports some bones to FBX that I'm not using but can't delete without breaking the export.
@opaque stirrup There is a cost to bones that are not skinned to any verts. Their transforms are evaluated on the animation thread, and copied back to the game thread. But it's unlikely to be a concern unless you are on mobile or if there is a ton of them.
Okay. I could try importing the fbx and deleting them and seeing if I can re export it without blender butchering their orientation... I wish UE4 could delete bones directly. But thanks for the info.
Unreal can delete bones
Oh? I searched and searched and couldn't find any info on it.
Beyond people reqursting it.
on the skeletal mesh itself, there is a field under LOD info tab. it's an array called "Bones to Remove"
Ohhh
Yeah, I guess I could make LOD1 the default LOD and hack it that way? My understanding is LOD0 can't delete bones? But thanks for reminding me.
you may have to reapply the removal of those bones each time you reimport
you can remove from LOD0
True, I'll give it a shot. Thanks!
Right now I'm trying to get my physics object to not collapse into a jiggling pile.
And I've pretty much given up on not having joints bend backwards
ah, is your component scaled up?
say its a ragdoll that you were doing
if your skeletal mesh was scaled up to 2x
when you start ragdolling, your skeletal mesh will shrink to scale 1x
ah ok, then it's likely something else
Some stuff works fine other not so much.
Still learning the tools but a bit frustrated
The documentation is very sparse
the physics editor will either work perfectly, or it'll explode
The tutortials videos are often very superficial
I've gotten good results but I don't know why they show the constraint axis
When as far as I can tell it has no effect on the joint
it lets you set a different hinge point than the joint location
I dont remember what the button is that lets you swap the forward axis and move it
Yes I discovered that, for the shoulders it helped keeping the clavicle from collapsing
Q seems to swap stuff
But I can rotate it all o want, I can't offset the centerline of rotation
Say I want the knee to bend 45 degrees back and 0 degrees forward, well obviously that's just a 22.5 degree either way rotated 22.5 degrees
But rotating the constraint dosent appear to 'set' the constraint.
I guess it's based on the initial bone position
But none of that is documented so I'm just going by trial and errors
Well I saw there are some settings hidden but nothing I've tried has allowed me to tweak a joint
Like obviously we don't want backwards bending knees or fingers.. gross.
honestly, I feel like I can never get the physics asset to respect the range limits.
I noticed the soft limits (spring) needed dhige dampening, but even then would often go crazy
I'm wondering if non spring limits would be better but they appear to be very clunky, which is why I wish I had some good write-up on best practices for humanoid ragdolls, looking at the base one has been some.help
ya, a best practices would be nice
But most of the documented parameters read like "Dampening amount: sets the amount of dampening"
wish epic would give us training on more than just the beginners intro to a feature
Like wow thanks!
Yes!
I do appreciate that you can reimport a mesh or weights, that's been a life saver
To be able to tweak some weight painting and reimport that without doing everything from scratch.
ya thats pretty cool
I hope Epic investing in Blender is a sign of maybe better integration. I know a lot of profesonals use Maya or 3DS but I can't justify anything with a rental fee like that.
But it's been fun getting my feet wet with UE4, I just wish I hadn't spent nearly two days Messing with the physics asset.
i'm curious who wins between an animation graph and a physics asset
because an animation graph could constrain the limits of rotation
I retargetted my Animation to another skeleton and here is the before and after picture
what went wrong
does it only look like that on that on retargeted animations?
yes
wow, that's strange
my other anim animated specifically with that skel looks fine
@blissful linden you could try exporting the animation out to FBX, and then reimport that FBX
When I drag the animation into the world I notice its like around 100x larger than the original model
could that be it @frosty peak
like its massive I have to turn my camera speed all the way up just to see it
that sounds reseasonable
how would you make the animation smaller?
the normals are freaking out at the scale
hmm, that's tricky
you can adjust the import scale of the original animations & skeletal mesh
that might do the trick
nah but this thing is like really really big
my unreal just crashed for 30 sec when trying to edit the scale
also why cant I edit the scale manually?
why I try editing it jumps to either a really small negative number ot a really large value
@opaque stirrup There's an option in blender to only export deform bones in the fbx params
Yeah. But I'm using autorig pro, which pretty much exports some bones in its script
Oh ok
The good news is the ue4 export script seems to work (proper bone names)
But the bad news is it includes some face bones I don't use
But thanks for the feedback!
Does importing the file in blender and then re-exporting it with "only deform bones" break the link ?
(Using the native fbx exporter)
When I re import it, the bones look rotated
So not sure if I re export it again if it'll break
I could test it.
I guess it's worth a shot!
Oh ok, I guess the script must do some operations to take care of the axes changes or something
Yeah, I noticed UE4 and blender don't play nice as far as bone orientation
Which is one of the reasons I got auto rig, is it's fbx exporter seems to be competent.
But while you can customize the output, you can't change some things from what I've seen.
Like I could not export face bones, but I can't export only some face bones
Oh I see
And from looking at the workflow for morphs, I'm going to attempted rigged face vs shapekeys for this project, wish me luck.
Haha good luck, didn't try shape keys yet but apparently it should work
Shape keys are very cool.
And I might use them for some body types.
But what my understanding is, you need a duplicate mesh for each varient, which can get pretty out of hand for face expressions, vs bone deforms, and I have characters who will look different but I could possibly recycle rigged face shapes with some tweaks.
So I'm thinking shape keys are still useful, but for my purposes, doing face shapes via shape keys is not the way to go at the moment.
I think duplication is not needed, iirc you can just "save" the vertices positions as a shape on the same model
Btw there's a plugin to do shapekeys for static meshes if you need it one day
Unreal Engine Forums
If you've been waiting for a Blender version of the Vertex Animation max script you've come to the right place! I've recently been working on one, and have a pretty
Gtg rn lol, good luck for you anims !
Thanks!
What I mean by duplication is, apparently shape keys data contains the verts for the entire mesh, not just the changed verts.
So on a low poly model or a limited scale it's not that bad.
Oh I get what you mean, I'll dig more into it cause that'd be annoying indeed, thanks for the info
Hey guys. I'm trying to figure out the correct workflow for adding a root bone to a model that is already skinned within Maya 2015.
From what I understand, I need to:
- Detach the skin with the option to Keep History
- Create the new bone and position it
- Set the new bone as the parent of the skeleton
- Reattach the skin using the previous weights
Is this correct or am I missing some steps?
Also, I'm unsure exactly how to reattach the skin with the old weights in Maya 2015
I know how to add a new root in an animation which is super easy but adding it to a skinned mesh is where I'm having issues
I think I figured it out by exporting and later re-importing weight maps for the skin
Yay! All is good now
Hey all, is there a way to copy all anim notifies from one anim sequence to another? They are of the same skeleton, same length (same animation with some edits made outside UE4).
@frosty peak thanks for the tip on LOD and bone removal, I didn't know you could do that from LOD0, now if only I could auto-populate it with bone with zero weight
So I have a horse riding system that I wrote. The horse anims are root motion. Which are the parts needs to run on server and which variables need to be replicated? Any guidance>
Currently in 2 clients I see the horse moving but not animating. In 2 clients run on server. IIt doesn't work at all.
Why does setting a skeletal mesh at runtime fuck it up? (examples incoming)
Normal Mesh that I set inside my character BP
then if I set during runtime
It works both ways
if I set the default mesh to be the elf character it works fine
but then if I change it during runtime it messes up the mannequin mesh
Hey everyone, having issues with character creator 3 to unreal. Everything is great but the fingers are wonky. https://gyazo.com/1763abcd99802def544acb910a56f806 Any help would be greatly appreciated.

How do I stop my characters from turning abruptly through animation blueprint ? What is the proper way ? I have animations for turning 45 and 90 degrees but I have no idea how to work them in ... please @ me if you know
@simple star have a "goal" direction, then an actor rotation, f-interp between them
when you walk forward
you can also turn the speed into a multiplier, so the slower you're moving the more quickly you can turn
So I've swim animations which are appearing lower to ground. How can I bring it up z-axis?
if it's beyond a certain threshhold, you could play an animation
and do movement driven by animation
Yeah root motion could be useful here
how do you people work with animation blueprints? It seems that every marketplace asset I have bought doesn't have working preview functionality for the animBP because it relies on the pawn being of some specific class
then previewing blending and different poses with different parameters like speed and direction just doesn't work
are there any blog posts or something that goes over best practises?
Hi everyone
I'm trying to import a car animation into ue4, nothing i do seems to be working. The animation was made using a not so complex car rig. I have tried selecting the main rig control which the car parts are connected to and importing via fbx, the animation doesn't play in ue4.
don't know what else to do.
thanks
is there an euler filter for sequencer?
@brisk ocean I never done vehicles myself so sorry if this is not much help.
if your're trying to import the car: https://docs.unrealengine.com/en-US/Engine/Content/ImportingContent/ImportingSkeletalMeshes/index.html
if you're trying to import the animation: https://docs.unrealengine.com/en-US/Engine/Content/ImportingContent/ImportingAnimations/index.html
I'd also recommend exporting the car from vehicle template or the vehicle game from learn tab to see how they've exported it and look at the static mesh to see how they've imported it.
Learn how to import skeletal meshes.
Learn how to import animations.
Hello Guys, I've downloaded an animation from mixamo & imported to UE4 and works good but i need a little bit edit, any good motion builder tutorial for beginners to edit animations?
Already i searched the youtube but i could not find any good tutorial for editing animations...
In this case I need to keep hands in location (Lock) & just use the rotation animations
Looking for an animator to make 3 mannequin animations for me, paid. Send a msg if you're interested.
how can i rig a human model with the ue4 skeleton? is there any tool like mixamo to do this?
does anyone know where I can find first person bow animations
@sleek plover if you use Blender I think autorig supports ue4 mannequin export, double check though singe I dont use it myself https://blendermarket.com/products/auto-rig-pro

thanks @delicate junco ,i did it with unreal 4.23, it more or less ok
i mean, the retargeting of the skeleton using the human base
Hey, I'm having some issues with Blendspaces,
I have followed pretty much every tutorial on youtube to the dot and I still can't get my character to go from Idle to Walking animation?
It's just an endless loop of the Idle animation even while walking.
I'm using MoCapOnline animations with the standard Unreal skeleton
It's a simple one dimensional Blendspace, so I'm not sure what's going on
the idle animation is playing, but the walking animation is not
and I can't figure out what's different about them
Oh that's because you didn't put your blendspace in the graph, wait a min i'll show you an example
So here I have one state for my blendspace
You shouldn't have different states for the different anims of your blendspace cause it already has the info in it
Here's what I have inside that state
(don't mind the slot "default slot", it's a montage thing to override the motion when needed in my project, you don't need it here)
Speed is a float variable created in the animation blueprint
You update its value using the event graph
I recommend you to check this vid and the few next ones talking about the event graph and all, it has all the info you need https://www.youtube.com/watch?v=gTTx17qLK-o&list=PLfQ3pODBwOcaV1TdnqNWLTJ4wiUzEvXis&index=10

(00:05) - Intro and Persona (01:06) - Populating the State Machine (02:10) - Updating the Speed variable (04:46) - Creating new states in the Locomotion tab ...
thank you, I will make the changes and check out those videos!
Would anyone here that knows a bit about animations know how to fix this? This happens every time I target/retarget Paragon Greystone animations to the default UE4 mannequin. https://ibb.co/XLqCfbc

bit of an odd question, but would anyone know how to set bone scale values outside of this: https://docs.unrealengine.com/en-US/Engine/Animation/NodeReference/SkeletalControls/TransformBone/index.html
I'd like to be able to set individual bone scales per event and sort of freeze them for the sake of character customization. Using that modify node is a bit too pricey for me, though. Realize it may be a bit of a pipe dream, given how bones update, but figured I'd throw the question out there.
Describes the Transform Modify Bone control which can be used to modify the transform of a specified bone.
I can't seem to add an offset animation without it blowing up the mesh x1000. I don't know why. I've made sure that the fbx exported is in CM. I've tried turning on and off the Convert Scene Unit in the import FBX options within unreal, which had no impact
The animation looks to be normal size when viewing the animation by itself. As soon as I drop that aim offset animation onto the aim offset grid, the mesh blows up
Does anyone have any idea what the heck I can do about this?
HELP! I am having a huge problem in my project that I don't know how to fix. It is driving me nuts, and keeping me from working on this project.
Basically I had a skeleton that I am going to use as the basis for all my human characters. I imported a new character to attach to that skeleton, but for some reason UE4 didn't see them as the same skeleton, so I couldn't just simply do that. I eventually tried "Retarget to another skeleton" on the base skeleton, and used the skeleton from the new character as the target, to see if that would just fix the new character's skeleton. But now ALL of my animations and the base skeleton itself are messed up!! And UE4 decided to save this into my project!
The base character is missing it's mesh in the skeleton now, and every animation shows the new character (who is untextured) crunched up in a ball. And when I click to view the animation, there is no mesh.
What do I do to fix this?
(Ping me when you reply so i can get the notification please)
Hi guys! Hope yo projects are going well :)
Could anyone one point me in the right direction for streaming facial mocap in ue4 via Iphone but with facial joints instead of blendshapes? Please? I did think via the animation blueprint, grab the values from 0 to 1 like you said and translate them to positions then determine in which direction each joint has to go up,down, left right but just wondering if anyone got better solutions? maybe hopefully?
Sorry for disturbing ya ;-;
Can someone help me please? :( (my issue is above)
Im really not sure how to fix that
@tranquil fable when retargeting you're making copies of animations, you're not changing the originals...ofc if you're not overwritten the old ones...in that case all your animations are gone
you can attach new mesh to existing skeleton if it has original structure (from root bone)
animations also using "preview" mesh...if your original mesh is intact you still can use one for previews
@tranquil fable , I did the same thing today. Had to reimport all my animations
yeah... same here... ugh :(
I too am having issues with retargeting animations. I have a character from MIxamo that I added a root bone to. When I retarget the animation, the Hips translations in each frame are lost.
Pictures incoming
Picture #1 is the original animation, Picture #2 is the retargeted animation to Mixamo skeleton (with root bone)
Ugh. I should just create a Maya script that converts Mixamo skeleton to UE skeleton and avoid all this but I'm in too deep. lol
im trying to retarget too lol
It's a giant pain in the ass. lol
Does anyone know what DefaultAnimCurveCompressionSettigns are?
Is there a easy way to decide which animation should play depending on the hit side inside of a AnimationBP ?
Got here 4 animations hitForword, hitRight.. and i'd like to use them properly when a projectle hit the mesh which uses this AnimationBP
Can anyone help me fix this error?
"Character does not inherit from Pawn (Cast to Character would always fail)"
@clever shore its your player character? if so try get player character
@valid maple now I get character does not inherit from character
hmm .. is "Character" the name of class you are trying to access?
ohhh that's it
I was casting to the wrong character
Thanks for pointing that out!
haha ..you are welcome
Does anybody have any experience with ue4's Control Rig?
My movement input suddenly stopped working even though I haven't modified anything to do with movement. Does anyone know what might be the cause of this? WASD brings me in seemingly random directions with a and d going in the same direction. I was working on attaching a socket at the time of the problem.
Has anyone experimented with Anim Layer Interfaces? How would someone start a Weapon System with it?
I'm getting a lot of IK jitter when I try make a spine IK squash / stretch system. Is there a proper way of doing this, or a way to solve some things in parallel rather than in a chain?
Hey guys. Stupid question - just started working with animation. Is it possible to export an animated transform from 3d package to Unreal just making a bone animating it and bringing it to UE4. And then attaching random static mesh to it?
The rig itself is a separate asset. You can import it by leaving the skeletal mesh empty in the import menu. You can then import your meshes that’s weighted to the rig by assigning the skeletal mesh you just imported
Now if it’s just a simple transform animation, I’d wouldn’t bother with a rig. Just use Timeline node to do it.
Does anyone know how to retarget an animation without losing hip bone translations?
Can someone tell me how to delete a bone from a skeletal mesh?
@misty dagger - The traditional way to do that is in your DCC (maya or blender), and reimport your skeleton and your mesh from there.
😦 No one has retargeting experience?
@slow valley https://www.youtube.com/watch?v=xy9aLbZLdeA

In this video we take a look at how we can share animations between two Skeletal Meshes that are using different Skeleton assets. We go through the setup and...
@haughty pollen , I'm able to retarget the animation. But I'm losing the translations on the Hips bone
Hmm weird.
One of the animations is a jump landing
So it's pretty important
Let me record a short video of what I'm experiencing
Alright.
OBS isn't agreeing with me rihgt now. 😦
Got it
I could fix these all by hand, but then I'm really worried about future workflow speed. lol
I'm wondering if the animation is somehow binding with the ik's, which my target skeleton does not have?
It seems maybe it can't find subtitutes for certain bones ?
The targetting is correct, I believe. I can get a screenshot of it
Well I don't doubt you.
This is just very weird since I haven't had this issue before.
Yeah, same. 😦
I was wondering if it was maybe the retargetting options in the skeleton
I've played around with these options but it doesn't seem to have any affect
I have to be honest, I can't really think of a solution...
😢
:3 Hopefully someone with more experience in animation inside UE4 will know...
Where is my savior!? lol
I'm no 3d master, but maybe examining the animation itself will give a clue
Nope. 😦
Does the animdynamics node support collisions?
Guys i wanna ask something, if i want to create Anim Dynamics or Chains in animbp the mesh needed paintweight/animation from maya? thank you..
hey guys i saw that you were talking about Retargeting, i have this problem and i still haven't understood what is due. do you have any ideas?
@azure brook AnimDynamics only need bones iirc
UE4 Skeleton based animation retargeted on DAZ Character causing Slinding feet, any idea ?
https://imgur.com/GngTlSK
@slow valley I guess the root bone is not at the right place on mixamo character, there is some plugin to add root correctly
Does anyone know if there is something like Camera Shake for scene components. to animate?`
@sinful smelt the root bone is correct. All my root motion animations work correctly
I can show you my Maya script just in case though
AddRoot(IP)
// Create joint1 and rename it Root
select -d;
joint -p 0.0 0 0.0 ;
rename "joint1" "Root";

// Parent Hips to Root
select -r Hips ;
select -add Root ;
parent;
AddRoot(NoVertical)
// Create joint1 and rename it Root
select -d;
joint -p 0.0 0 0.0 ;
rename "joint1" "Root";

// Parent Hips to Root
select -r Hips ;
select -add Root ;
parent;

// Copy Hips X/Z translations
select -r Hips ;
copyKey -t ":" -f ":" -at "tx" -at "tz" Hips;

// Paste Hips X/Z translations to Root
select -r Root ;
pasteKey -connect true -time 0 -at "tx"  -at "tz" Root;

// Clear all X/Z on hips
CBdeleteConnection "Hips.tx";
CBdeleteConnection "Hips.tz";

// Set the Translate X/Z of the Hips to 0
setAttr "Hips.translateZ" 0;
setAttr "Hips.translateX" 0;
The animation I'm trying to get working doesn't have any root motion to be clear
So I have a basic zombie animation blueprint that uses the standard UE4 animations. I want to use that same logic inide the animBP but I want to use Mixamo anims instead. Can I retarget something in order to swithc the animBP's skeleton? I've done this the long way which was to just make a new animBP from scratch and copy all of the logic over. But I was just curious if I could retarget somehow. I don't need any of the UE4 skeleton stuff I just wanted to save time and not have to recreate the animBP everytime for different skeletons.
I hope that makes sense. 🙂
hey guys,sup? Under the Physics window of a mesh, how do I hide the capsules when simulating selected?
@slate olive https://www.youtube.com/watch?v=xy9aLbZLdeA
First minutes
In this video we take a look at how we can share animations between two Skeletal Meshes that are using different Skeleton assets. We go through the setup and...

Tried to find some good tutorials on smoothing out animation transitions but everyone uses animation montages, and I don't think that's necessary
Any ideas?
Hey I have a question about importing a socket over into an animation. So I have my spawnactor spawn a weapon and have it's attach component attached. What I am trying to do is have it play the montage fire animation still despite being separate.
Do I have to attach it to the socket and then....?
This is what I have for that aspect.
@slow valley I dont know much about Maya but if root bone is at 0 position it must be good, also check the other bones dependencies from the root bones
im an absolute noob at ue4 boys so could someone give me a hand with trying to implement some swinging animations? Any response or advice would be greatly appreciated!!
Alright I have a much better grasp at retargeting a skeleton. The only thing I'm stuck on is importing the second model in the this tab. The naming convention for one of my skeletons is too bad to risk freeballing
The main issue is saving my assests within UE4, I'm not confident about what to make the skeletal mesh when I right click on it
https://www.reddit.com/r/unrealengine/comments/dbq8w4/free_tool_to_retargeting_mixamo_animations_for/ has anyone used this before? its detecting a virus for me wondering if its safe 🙂

reddit
Posted in r/unrealengine by u/TerribiliStudio • 75 points and 29 comments
hey guys quick question when i animate my character for a weapon the left hand is always in a different place to the last position in the next one do i need to make a left hand socket for all the left hand animations to be in the exact place?
@dusk dove is there anyway i can just have this blendspace play out smoothly once i enter my swing state rather than have it controlled by my player's speed?
Not sure to understand your question @scarlet spade
A blenspace is controlled by a value by definition
How would I go about playing 3 anims one after another blended, but not controlled by another value
In animstates
if possible
To transition from one anim to another, the simplest solution is to use this in your transition rule
Basically get the time remaining from the other anim (there's one with a ratio iirc) and if < to a value, do the transition
I prefer setting a notify in the anim personally though cause this doesn't allow fast path iirc
Oh yeah another solution which seems to work for some people
Click on the transition icon (double arrow) and tick the "automatic rule based etc"
This may work directly
For blending, you have the blend settings just below @scarlet spade
Also you don't need blendspaces in a state if you use simple anims, just put the anim directly
You should watch these few vids about anim blueprints, you'll understand better imo https://www.youtube.com/watch?v=Mr7q5Cfjj7c

(0:05) - Intro and closing Blend Space (00:51) - Creating the Animation Blueprint (02:17) - Graphs in the Animation Blueprint (03:13) - Tabs in the Animation...
@delicate junco Thankyou so much dude, works perfectly 😄
Will def check out more on anim bp and such so this won't happen again aha
Oh cool then haha
Yeah these few vids are really good to get into anim blueprints, you should definitely watch them
Good luck for your project 👍
Im having a strange problem where im using "Get Owning Actor" and casting to a BP in my state machine to access my variables. My casts are successful in all my transition rules but one and I can't figure out why.
I don't know where else to put this so im gonna ask here
I'm uploading this hoping to reach out for someone's help. For some reason, whenever I play the dodge animations once, the character only has a short burst o...
I'm uploading this hoping to reach out for someone's help.
For some reason, whenever I play the dodge animations once, the character only has a short burst of animation. However, when I play the animation on loop, when it plays the second time and beyond, it plays to the full extent?
Can someone help me make sense of it and help me make sure it plays the full animation the first time?
@fringe oriole I assume you use a montage ?
Can you show it ?
what's the blend time on your transitions ? Cause some of my anims didn't fully play due to it being 0.2 by default
try to put it at 0 and see if there's any change
If you're talking about the time set for the delay's it's 0.35
I set the dodge time to float, nothing changed
I'm talking about this
where do I find that?
in which blueprint?
try to put it to zero on a transition from a dodge state to the idle state
anim BP
For example select the transition from your dodge R state to your Idle/run state and put that time to 0 and see if it changes anything
Nice, still not perfect ?
Dope 👍
Thank you so much!
Don't know why they put this blend time to 0.2 by default tbh, they do the same for montages and it's annoying to change it everytime
No problem 👍
@nova cipher You're casting in your transition rule ?
I am 🤔
Why do you do that btw ? It's expensive
You can't take advantage of fast path this way
You should do all casting and such in the event graph
I do it when the blueprint is created once and for all and put it in a variable
I'll try casting it in the graph and making it a variable
Then you get all relevant variables like speed and such in the "event blueprint update animation"
And then you use these variables to make the transitions, taking advantage of fast path
If you don't have this icon
It means you don't take advantage of fast path
You can check if you have some unoptimized stuff going to class settings and checking "warn about blueprint usage"
When compiling it'll put a warning on the nodes which don't use it
If one node is not fast pathed it means that the whole animbp is not fast pathed, so it'll run on the gamethread
I mean it's not THAT big of a deal I think unless you have several characters but that's best practise imo lol
This page has the info if you're interested https://docs.unrealengine.com/en-US/Engine/Animation/Optimization/index.html
Describes methods to achieve more performant Animation Blueprints through optimization techniques.
But back to your original question lol, why did you need to cast in the transition rules ? Did you need to get some variable ?
Honestly no particular reason
So you're saying I should set all my variables for my transitions in the Update Animation?
What I do is
-putting stuff which can only be obtained by casting in variables in the blueprint initialize event
-setting all variables which have to be obtained at runtime (speed for example) in the event blueprint update anim
-setting other variables which don't have to be obtained every frame with events, to avoid setting/checking them every frame
Notifies can be used for the latter, custom events work too
I managed to fix my bug, it was due to some other, unrelated issue, although I'll make sure to give my anim bp a solid makeover
Thank you 👍
dope 👍
Something weird going on
I have these animations and they all have root motion, but when I try putting them into the state machine some of them don't have root motion
Anybody around thats setup a 3rd person strafing movement AnimBP recently? Ive got a basic blend space setup and Im piping in Front/Back and Left/Right values in (so the basics working) but whenever I move back Im still getting like 20 degrees of L/R even using a keyboard that should be giving me pure Front / Back values
Does anyone know how to add root motion to a model that has a root bone but for some reason doesn't have root motion or perhaps have lost it?
Anyone?
should i use root motion or in place animations for my single player rpg game?
I've created an anim state where my player will go into this 'fall' mode once the player's velocity on Z is negative
Does anyone know how I could make it smoother so it isn't as like
rigid and stiff?
Hello guys i wanna ask how to create head movement like this? https://www.youtube.com/watch?v=0Dv4hBXHdRU
Enjoy the videos and music you love, upload original content, and share it all with friends, family, and the world on YouTube.
Thank you
@azure brook SE used mocap for their anims https://www.youtube.com/watch?v=c3eLTeNQBjQ
Enjoy the videos and music you love, upload original content, and share it all with friends, family, and the world on YouTube.
@fringe oriole Make sure that you have "root motion for everything" instead of "root motion for montages only", which is the default option
@scarlet spade Either add an intermediate anim or try changing the blend params of the transition maybe
Does someone know how i can run an animation with two bone ik?
You can access these by clicking on a transition and checking the window on the right
@misty dagger Never used it myself but maybe this could help ? https://docs.unrealengine.com/en-US/Engine/Animation/NodeReference/SkeletalControls/TwoBoneIK/index.html
Describes how the Two Bone IK control can be used to apply IK to a 3-joint chain.
didnt even know they existed lmao
with the starter content assets, if I want to make an aim space I need to manually extract the poses from the aimspace animation, right?
Hey, animation experts. We have an animator who moved from Unity to UE, and he can't figure something out, maybe you can help. So there is this skeleton he's rigging in Maya, and when he moves the pelvis there, it works correctly. When it's played in UE, it affects the whole upper body.
Any idea what's causing it?
Not to be a bother again, but does anyone know how to smooth out the movement when im in an animation like this
Like as I'm falling, is there anyway to make that turn smoother so it's not as abrupt?
In the anim blueprint set the animation of normal state of falling to the person standing
And put the falling animation to the other end
Will that smooth out the turning while falling?
Youre talking about side movement? Like when your turning your character while falling
https://cdn.discordapp.com/attachments/624022797248888852/631927856922099752/unknown.png Alright, so my friend and I are both doing the same thing, with our models skeletons. She automapped her models original skeleton to Arks diplo and that was her result. She pre-weight painted hers and I haven't weight painted mine yet. If I just automap my models skeleton to one of Ark's will my mesh smoothly take the shape of the dinosaur I'm trying to mimic?

@slate olive to use another model's skeleton properly, the new model should have the same size, features, and proportions of the skeleton
Hello UE4 Animation Experts. Can I recreate a functional UE4 Mannequin Skeleton with just Virtual Bones?
why would you need to?
is it possible to switch which skeleton a blendspace is targeting? In particular, I want to copy an existing blendspace for a new skeleton and swap out the anims.
@sudden sedge The idea is dynamic skeleton. Want to experiment. If its not possible, ill move on.
Anybody been able to create epic skeleton compatible custom skeletal meshes with Blender? All I find are results for paid scripts which are kinda outside my options.
@misty dagger https://blender.stackexchange.com/questions/49837/from-blender-to-ue4-armature-bone?rq=1

Blender Stack Exchange
I'm exporting my file with a mesh and its relative rig from blender to ue4 using FBX. After the export in ue4 it appears that my skeleton has one more bone, called Armature (it's the highest in hie...
Hey thanks @sick halo I think that came up once in my rampart googling yet I missed it
Hello, what rule can we set for stop animation from blendspace?
e.g : Start Strafe - Blendspace Strafe - Stop Strafe
@fair sable is the stop triggered by an event? or just need to stop somewhere during the state machine transition?
Another Q, I get the asset imported in such a way I can use the mannequin skeleton, but all the animations become a distorted mess.
I think it is because of bone orientations in Blender export settings but I can't seem to find the right combination. Any help?
https://answers.unrealengine.com/questions/437987/blender-auto-bone-orientation-problem.html pretty much this problem here
@sick halo Yah, somewhere during the state transition. Example, i wanna do a Right Stop animation, how do i do that after Blendspace movement? i mean what rule can i do for it?
anyone got a clue why the animation is "popping"? this is the same as my old rig, same anims, same animbp and blendspace, but this one is popping. hm
not "the same" but rather it's quite identical. been trying to troubleshoot it for a while but cant find out what's wrong
@fresh sandal can you show your state machine ?
If I had to guess I'd say it's a blend problem between the jump start anim and the next one
Ok so I think the popping is probably due to the jump start to jump loop transition
Are you sure that the jump loop starts from the exact same pose as the last frame of jump start ?
What's your transition rule ?
try to check the "automatic rule based on sequence player in state" checkbox
now he's always in JumpStart
ah
I assume you followed the animBP tutorial online ?
The guy put 0.1 in his remaining time parameter in the transition cause it was the right time for his anims to make the transition
hm, well i mostly referenced a little older project of mine, which works quite nice, not sure how i succeeded with that one but might've been the tutorial you're referencing
Ah ok
the animations are the same length in keyframes so i figured it should all work out. though it's quite easy to miss something, not even sure if that would have any consequences if they're off
When i do my jump anims I make sure that my jump loop anim starts right from the end frame of my jump start anim so I don't have to worry about blending parameters
Here it looks like your jump start anim ends with the guy having his arms up and the loop one starts with his arms down
i did that as well, figured it's just the easiest way to start the loop animation. though i did notice the mannequin is not doing that
Did you try to change the 0.1 value to a lower value ? cause it looks like tyour character ends the jump start anim with the arms up
Ah I see nice
But yeah I prefer to handle all anims transitions as you do in Blender, the less I have to mess with blending in UE4, the better I am, had some problems with that before
it seems a lot better. there still is some popping, but i just have to tweak it a bit i assume. and at the jump end as well, but now i have something to go on. thank you very much : )
used .01 at first, but forgot to disable the "automatic rule" thing so
Great ! 👍
One thing I like to do instead of using remaining time
Is to put a notify in the anim and then in the event graph, the event notify sets a boolean to true to make the transition
This allows me to choose exactly when I want to make the transition visually and it enables fast path, which is broken by get remaining time
oh, i was a bit curious about alternative ways of doing this. not exactly sure how to accomplish what you're suggesting tho
wait a min, starting UE4, going to show you some screenshots of what I do
My PC crashed sorry, restarting rn -_-
alright : )
@fresh sandal Sorry for the wait
that's alright
So here, in my jumpstart anim, I put a notify (right click on the timeline, add notify, name it)
I put it randomly as an example, you have to put it at the time you want the transition to be made
what'd you think be best to transition at? just somewhere really close to the end i suppose?
Yeah exactly
I usually make the jump start anim stay a few more frames in the same position at the end in Blender to have the time to put the notify
Ah it's just a notify to restrict the player movement for my prototype, a quick and dirty fix to a bug I had before
i've been struggeling a bit with the end animation, as he lands and i start walking it just never seems to play at all. i wish for it to finish playing the animation before he can start walking. but perhaps that's bit off topic.
i'll propose a solution just after if you want
Just finishing the above thing first lol
yup, done it : )
So after you placed the notify, in the event graph, when right clicking you'll have "add anim notify event"
And you'll be able to place a node with the name of the notify
got it, this is my event graph, just so you know where i'm at
notify on the top there
got it
Then just add a notify at the beginning of the jump loop animation, to set the bool to false when the transition is done
Then in the transition rule, simply put
the little sign shows that fast path is enabled : )
you mean the animation right? same as the transition to loop.
So the animBP is optimized and won't need to run on the game thread, contrary to the get time remaining node
anim yeah exactly sorry
In the jump loop anim
This introduces a few bools and anims but you get the fast path optimization for the animBP and it's quicker and better visually to place a notify than determining the remaining time imo
Also if you change the anim later you just have to change the notifies position
i think i followed your instructions badly, now he is stuck on the jump start again. perhaps there is something conflicting in my event graph?
Btw I recommend checking the checkbox "warn about blueprint usage" in the class settings of the animBP
It tells you where you don't have fast path
Ah
I see
Let's go in DMs first lol, I posted too much here
hey guys. im just about at my wits end with this. so the animator on the team passed this on to me to finish up and import and no matter what i do animations seem to always mess up. please tell me someone knows a fix because i cant find one. its been hours and it just keeps getting worse.
animation in blender:
animation in unreal:
hi guys, whats the best rig to use?
i'd like to make a character using some procedural/ mixamo animations
i know mixamo works well with biped
maybe theres unreal's own rig?
for that white base character
for example, how do i use mixamo for unreal character rig
does blendspace grid snapping affect blending itself?
also: how do people deal with blending moving (for example) Left to back left
so basically when you're facing front but running to left and then you start moving backwards a bit and you switch to a backpedal type of movement anim
@near hamlet does the model have an armature ? What parameters do you use when exporting ?
@supple axle probably 2d blendspace
yea 2d, just the plain old speed and direction where the direction is from -180 to 180
Ah you're asking about how to blend ? Didnt understand the question sorry
I don't have that much experience with this kind of stuff cause my character movement doesn't need it but perhaps this vid can help a bit, he showed some nice tricks https://youtu.be/YlKA22Hzerk

From the nucl.ai 2016 conference, Laurent Delayen shows how Epic Games brings a Hero from Paragon to life. With a programming focus, this talk shows and expl...
basically my problem is with blending between moving left/right (90 degree direction) and then backleft/right (135 degree direction)
this looks fine https://i.imgur.com/Pp1nun0.png
and this looks fine https://i.imgur.com/PP1YntJ.png

but then in between those the animation blends into this weird stepdance looking thing https://i.imgur.com/SXqDvhZ.png
and the whole lower body rotates really fast during gameplay and it looks like a weird dance if I'm changing movement directions fast in game
I just realized that this might work better with strafe anims but I'm not animator 😄
anyone has tips how to make combo animations(sword swings) blend better as atm my animations feels like i can't blend between the animations without it looking off


i animated the frist one and splited it into part
which is the second one
hello people, any help with this parameter in blendspace?
Is it possible to manipulate multiple skeletons with one single post process animation blueprint? The game attaches a skeletal mesh accessory with a single root skeleton to different bones in the master skeleton and I'd like to have an animation blueprint for the master skeleton that applies to the single root skeleton aswell if it's connected to certain bones.
@supple axle you really need strafe animations for that sort of thing
Yea seems so
I’m a total noob at this but I was following a tutorial online and made a blendspace and imported animations and a character model off of Maximo, the character moves but doesn’t go from walking too running (I set the state machine up) and it goes really fast and slingshots back, and when I jump in the air it runs too the right for some reason. I haven’t got too the tutorial about jump animations yet but in the video the creators character doesn’t have this glitch. Any explanation why this would happen and help on the slingshotting issue?
What I mean by slingshotting is the character runs very fast in one direction and then slings back too a few feet ahead of where I began
He was using 4.16 and I’m on 4.22, so there must be some difference. Currently away from my pc but I can send screenshots of it later
All I did since yesterday too this is add idles along the bottom
Do I save my skeleton retarget from set up rig area or the top left? The tutorial video saved it from the top but now I'm having trouble with the animation retarget
the video is start from Unreals youtube channel but its four years old, idk if that makes a difference
hoi
hmm
does the engine still not support mirroring animations out of the box?
I've gotten to the point where I need to solve this problem
but I'd rather not buy a mirroring plugin if I don't have to
Anyone have a sec to save me from an oft encountered headache? I have a third person template and I'm about to retarget the mannequin to my own skeletal mesh avatar. Thing is, I know once you do this it totally replaces the mannequin so all the animations work on my own custom avatar. This is great, but i'd like to somehow keep the mannequin and its animations intact. What do I need to duplicate to make this happen?
Is it enough to duplicate the mannequin skeleton and retarget to that?
Hello, What's rule for doing a stop animation from blendspace movement? do i need a sync marker? or can i do that with notifies?
I'm an animation noob so bear with me, but why do you have different states for strafing into different directions?
@supple axle it's start from idle, i just want to use the stop animation.
wouldn't it make sense to create a 2d blendspace for the stopping anims?
then you could just have one state
@supple axle 2d blendspace for stopping anims? still don't get it. I'm new at this. What rule should i give if i can do that?
I'm not sure about syncing them
but I'd create a 2d blendspace for the stopping anims and just have one state for stopping
and then let the blendspace do the blending depending on speed and direction
do you have different stopping animations?
oh i see
so we connect the StrafeBS to StopBS ( with 4 different stop animation,each with their own axis value) right? i'm gonna take a shot. Thank you.
Quick Question: How do I use my variable NumberOfShots as a loop counter for my animation?
You could detect an anim event at the end of the animation and increment a counter until it reaches a value
How do you go about resuming an animation across multiple states?
For example a reloading animation playing whilst moving around going into a blend of the reload animation with a slide.
Without the reload animation playing fresh from the start
@remote bison alright thanks, hoped to avoid that
So I have my skeleton retargeted, how can I export it without having the file extension be a copy file?
Hey all. I have a lot of skeletal mesh components in a character bp for clothing items. Is it cheaper to put my main character mesh anim bp for all of their anim classes or should I make one with copy pose from mesh and load that on all the clothes?
the end result is the same, but i dunno if there is a preferred way?
Set master pose?
Fortnite uses something like 4 I think
Unsure how your setup is right now but what I’ve done is one skeletal mesh component per ‘slot’
Not one per every unique glove
@lone bluff Sounds like a root motion issue. And a fuzzy still photo of your monitor isnt much help. Take a screenshot or better yet use ShareX(or similar) to record a short video
Can anyone in here help me?
is it possible to keyframe the entire skeleton in an animation?
in ue4?
yes
hmm
im not sure
maybe if you have the reallusion plugin and software
what exactly are you trying to do?
my end goal is to have an animation that depicts a training exercise (think squats for instance) and controlling it by slowing it down/pausing etc
maybe i just understand the editor wrong, when I try to add a keyframe it only works for the one bone i have selected?
so is it like you need to hit combination of buttons to execute the anim
or a repeated button press?
when you say control can you be more specific?