#animation
1 messages · Page 107 of 1
@frosty peak layered blend by bone, got it, but is it best to have animations on both hands and define them or would you have one animation for right hand and one for left han
@woeful aspen That depends on what your use case is like. With layered blends you can make it work either way
I would have it all be 1 animation bp
and then simply have slots or state machines for each hand
then use a layered blend per bone to combine the left and right hands, and then run your IK on those results
Is there a more formal term for the 3 parts of an ability animation? like the windup, cast point, recovery?
@shut kraken If you were to use animation terms it would be like 'Anticipate', 'Action', 'Follow-through'. But I'm not sure I would say there are standard names for this in regards to mechanics.
I tend to use Start, Loop, Stop for states.
Is gameplay being driven by animation timelines good practice? I'm building a 3rd person brawler, kinda like halfway between a shooter and fighter. Right now I'm having DoAbility kick off an AnimMontage, and the montages notifies are what kick off firing of projectiles and testing for collision etc. This sound about right? I could decouple the timing of abilities from animations but then you have 2 separate parallel timelines so to speak.
@frosty peak good idea !! Thanks
@shut kraken Personally, I would suggest that you make it work without the animation notifies.
I take the stance that gameplay logic should be as separated from animation as possible.
That approach makes debugging a lot simpler, because there are fewer systems in play where it can go wrong.
But there are some areas where it may just be unavoidable, like when you have physical contact between characters.
But ultimately, whatever it takes to make it work is fair game.
@frosty peak How would you handle timing between the logic and animation? just make sure things like cast points and durations line up close enough? Or I suppose I could split animations up so that something like a spellcast Dota style is 2 animations, and the backswing starts when the logic thread says to, no matter how far along the cast animation is.
I'm currently using this as my locomotion blendspace
I've been having some weird locomotion issues, so I checked out the content examples and it looks like their Blendspaces are all more complex
And they use Speed and Direction as the axes instead of Forward/Right
Any benefit to switching?
is there a way to create sort of a motion blur on a model instead of as post processing?
hard to explain
nvm figured it 😃
Good day,
Is there a way that I can request if the animation is done?
Anyone with root motion experience here?
Any help will go a LONG way, I think there is something I am missing
Blender to Unreal
Every box is checked but my capsule still does not move with character
@thorn tendon Is the animation that has the root motion being played via a montage?
@frosty peak The animation is set to "everything"
The animation its self is in a montage but sience its set to everything that shouldn't matte
then perhaps it is a setting in your movement component
Really?
@frosty peak If you help me figure this out, I will give you the biggest digital hug ever haha
I need to open the editor, but I feel like there is a setting to disable root motion in the movement component, could be wrong though
Ill send screenshots
can you send a screenshot of your animation?
whats going on with number 2?
I thought buy using the UE4 mannequin it would help but it seems I still can't get it to work properly
Oh, Im highlighting that root motion is enabled
Character>animation>show root motion
Process root motion*
im wondering why the skeleton is looking crazy
anyway, I don't think Ref Pose is the right setting for the root motion lock
when root motion is extracted, you won't see the red line
Its the official skel from Unreal themselves so I don't know whats up
i'm opening the editor, I'll double check in a few
Cool cool, I really appreciate your help man, I litterally got so frustrated I got an upset stomach and all haha
I just walked away for a bit and tried to calm myself down. Once I figure out this root motion issue I can start working on other things
no problem! Root motion can definitely be a pain
I looked everywhere on the forums and some solutions work for some, some it does not. Not too many youtube vids either nor any hardcore documentation from unreal
Some people say it's skeleton bone naming, others say it's about animating it in object mode (blender)
I tried most solutions and have no clue haha. My capsule just won't stay with the root
ya, the resources need some love
Hello. I was wondering how developers are dealing with animating cloth for mobile? Are there any Epic Games content examples available?
@high egret Apex cloth from Nvidia
@thorn tendon does it work on iOS and Android?
@thorn tendon I tried that and when running on mobile all the clothing animation stops working
I have no clue if it does, I suppose it can. Depending on the resources it needs
I have no clue to be honest man
Im still trying to get help on my own here
I never made any cloth for unreal, only in blender
Lots of tuts out there
@thorn tendon oh, that's ok, thank you anyways!
@thorn tendon Can you screenshot your skeleton hierarchy?
Sure, stand by
@thorn tendon yes, we are considering doing all the clothing sims in Blender and baking it
@frosty peak
It looks like you exported the group that your bones and meshes are parented under
don't know what they call it in blender
the top most bone is the bone that root motion is extracted from
and Ideally you only have bones in the skeleton
Gotcha...well My main character has the same issue with way less bones haha
when I export my skeleton, there are parent objects to the skeleton itself
I jumped over to unreals manni so I can see if it was just my rig or something I dont know
can you screenshot your actual character skeleton?
In blender?
have you brought it to unreal yet?
Yes
screenshot the unreal skeleton, if it is different than the mannequin
These settings work for extracting root motion
This is what it looks like when root motion is not extracted, there is the red line
The skel tree is for another character
It was an import from Make Human
the mannequin is from unreal
Your manni has no pole bones
pole vector bones are not needed
as far as the engine goes
you can have them, but they are optional
Humm, when I select the rig though it selects all the bones. In blender you need to select the armature and export
I can't help with the Blender side of things
For sure, my other animations work fine. Just not with root motion
all I can say is that your skeleton should ONLY have bones in it
Technically the poles are bones haha
liike the IK_Arm_end?
But I know what you mean
so you've made a character from Make Human
does that get rigged from MakeHuman?
or are you rigging it in Blender?
Yes, there is a pluggin that exports a rig to blender. I did some tweeking in blender just for IK and pole targets but thats about it, these END bones are wack
and that plugin makes it work with the Mannequin?
I was kinda hoping this unreal skel was good so I could just use that and weight paint it myself
the unreal skeleton is a solid foundation
No no, I downloaded the unreal skel from Unreal's website
For sure
It was a skel from their blender import page. Ill try to find it
here is what I would do
get an obj from MakeHuman, Bring the Mannequin skeleton in from Unreal
add any additional deformation bones that you need
pole vectors if you need, though you can recreate pole vectors in unreal with virtual bones
bind your makeHuman mesh to your updated Mannequin skeleton
and export that out
Yeah, I will need to weight paint that sucker out
Then I would make a separate skeleton or control rig that is outside the hierarchy of the game skeleton, to be the control rig for the character
I just don't want to do all the work for it to not work again
right so
if you just bind your mesh to the mannequin, and get that working before making the control rig
you can test it before making a big investment
just make sure that your skeleton is the top most object that gets exported, and make sure the meshes are not in the skeleton's hierarchy
Aye, with a simple animation like I just did. Tis possible. I was dreading this option but it seems like I need to have a skeleton thats way easier on unreals eyes haha
Yeah, For blender, select the mesh, then armature then export
Maybe I did it in reverse and fucked shit up?
lol
selection order should not matter for exports
unreal doesnt care
unreal looks through the FBX, finds all the bones, meshes, and materialsm and reconstructs the data into its own format
Cool cool. So pretty much just OBJ the character, create a basic skel, root bone. Test her out and see what happens
Yeah, that skel they provided has some wack features in it
A bunch of stuff that does not need to be there is
I would honestly goto Unreal, and export the mannqeuin skeletal mesh to FBX
I need to basically keep its IK guts and toss the rest
well, thats still using the blender file from Epic right?
if you like their rig, you can definitely keep that
Ill let you know how it goes (takes deep breath....stares off into nothingness thinking of all the shit I gotta do)
Yeah their rig has some wacky things in it, stand by
step 1. Make a file with only the skeleton in it
step 2. Bind your makeHuman mesh to that skeleton (don't bother to do much skin weight panting yet)
step 3. Bring that into Unreal, and make sure that it works with the mannequin animations
step 4. Rig it up? or place it in the Epic rig?
Like for example there are gold bones...I have never seen bones been gold before haha
blender sure does have a funny way of displaying oriented bones
thats because the forward vector of those bones are flipped
thats on purpose
in Maya, it looks normal
edit mode looks normal...accept for the feet still
Yeah man if you use maya or 3ds max you are doing alright. Us blender guys have to deal with weird shit
See how the X-axis is in different directions on the shoulders?
thats the mirrored rotations
looks like the bones need to be rolled
The unreal skel I have is wack man, Im just gonna make a easy skeleton and and rig with that. I just literally need one golden skeleton and just duplicate or copy it into other characters
try my suggestion?
export the skeletal mesh to FBX form the engine
import that, delete all Meshes, Bind your mesh to the skeleton
okay, stand by, ill give that a whirl
@frosty peak How the heck to I export this dude? hahah
Make static mesh?
here is the exported skeletal mesh
in the content browser you can right click on an asset, Asset Actions, Export
@frosty peak Sweet export bro 😛
is Blender Y-Up or Z-up?
lol Well I think Im just gonna start a fresh rig, fuck it. Im gonna name shit the way some other forum posts were saying too. Ah its good exercise anyways
when you go to export, try having the hierarchy like this
with the skeleton and meshes separate hierarchies
Sall good man, Ill just make a fresh rig. Its cool.
It will take an hour but im okay with that now. I needed to just talk to someone and try to get it worked out and step away from it for a bit
I appreciate you taking the time to help me man! Yes Root bone for sure and the armature called armature
good luck!
Ill keep you posted later haha Thanks
Hello! I wanna make a mech game with very accurate mech animation system without any foot slippages that uses in character animations. Where i can start and what to read for this task? Do i need to use root motion (baked animation) or I can make this fully procerurraly? Thanks
does anyone know how to properly set up first person offset animations because the only thing I've accomplished is this 
@tired heath Both approaches can work. Procedural would be more responsive, but perhaps mechs can get away with a 'clunkier' feel.
you could use notifies to sample when to plant to the ground, and enable a world space IK position
@bitter phoenix So my question was a couple pages up. I've found a solution so I thought I'd quickly share for those who were interested but couldn't answer the question. Basically kids you can't animate sockets period, BUT you can animate bones so just make a new bone and parent it to the root bone then you can move it freely about. K bye
@bitter phoenix Was that you asking about animation for a skateboard on reddit? small world if so.
@shut kraken It was indeed. Tbf I’d tried to make myself as loud as possible in the community so someone could answer my question. It’s good to know that paid off...
That was me telling you to try using a free bone for it lol.
Hi retargeting in 4.19.2 causes this error Error: appError called: Assertion failed: FVector::Distance(InitOptions.ViewRotationMatrix.GetScaleVector(), FVector::OneVector) < KINDA_SMALL_NUMBER [File:/home/linuxdonald/dev/UnrealEngine/Engine/Source/Runtime/Engine/Private/SceneView.cpp] [Line: 432]
Has anybody gotten this error before?
What's the best way to handle multiple animations on blender. Would I do different fbxs, would I do all of them in the same animation and split it up later, or would I use the action editor on the dope sheet. I am intending to import this asset in ue4
Action editor
on export settings you can choose to export only the action playing or all actions
Is there a way to add a weapon in artv1 kit maya ?
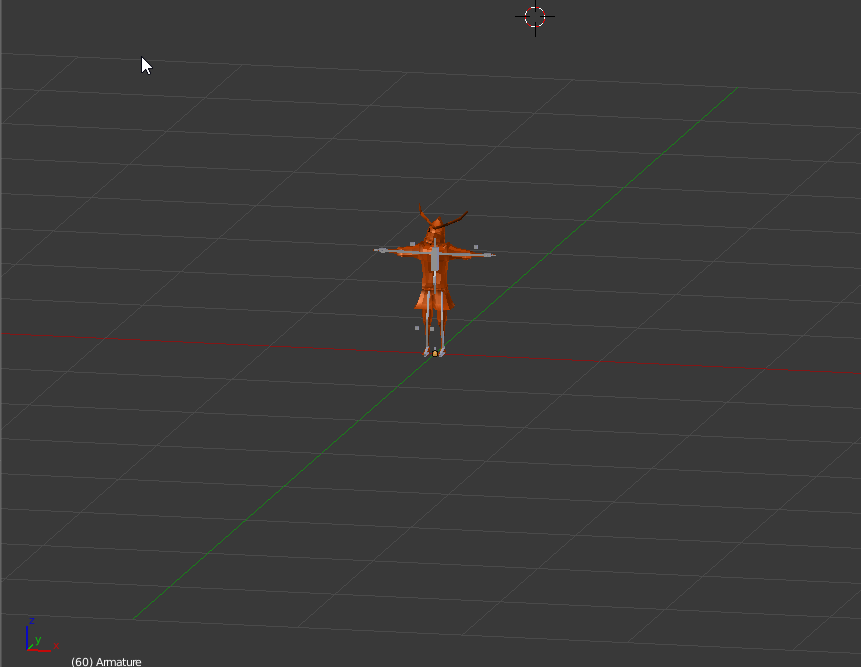
Is this Armature structure going to work well with root motion?
@warped field We've been wondering the same and we haven't been able to export multiple animations in a single FBX. Only the active one gets exported and the rest are present (an asset is created in UE4) but empty.
@frigid drum Yes, we've tried that and still no luck. Only the active one is functional.
Does anyone use ART tool from unreal? I'm trying to do a transformation on all frames
Anyone know how to delete an action in blender without breaking the mesh
cause i think i got reod of some but my animation stopped working
there is one that i want to keep that has my whole animation in it.
but i can redo the animation
i just want to get rid of all the actions and make some new ones
i deleted everything in the NLA editor
and i cant delete anything in action editor
and whenever i click on an action it moves around parts of the mesh
Hello. I'm working with constraints and physics for the first time on a skeletal mesh, and after reading documentation and watching a video stream (4.18 Physics editor updates) I'm still confused. When setting up constraints, what is the difference between the two "reference frames"? What are these exactly?
If I alt-drag a gizmo, it detaches from the constraints. What does this mean?
And how do these references relate to the actual bone position?
I will appreciate any help with this
does anybody know why root motion might not work on a custom skeleton even though its being processed correctly in the anim preview?
Problem demo video playlist (Read Description for any animations help) > https://www.youtube.com/watch?v=1N0bds6GbJw&list=PLlwJ8V-ghUTOkagp7XW4iAIW94cYqqc9N&index=9
Solution Applied > https://skfb.ly/6zVBJ

TEST 09 Autodesk Maya Live plugin to Unreal Engine 4 with home made Flip Back animation done on blender and added DAZ Characters !!!!! READ UNDER THIS !!!!! ...

UE4 Man Flip Back Animation and Music Drafts that i have done.
Need some rework off course, advices are welcome.
Exported from Blender for UE4 Project.
PC Hardware Specs
https://pcpartpicker.com/user/sayato/saved/KQxtJx
I offer my services of private lecons related to UE4 don...
So I have multiple meshes in blender and I do not want to combine them for animation purposes. I made an animation for the entire scene, but it made separate animations for each mesh when I imported the entire skeleton to unreal. How do I get it to be a single animation file?
Here is my scene
@warped field you're animating separate skeletons?
hello animators. is there a slick way to select an animation based on a float? in this case im looking to add 4 directional dodge animations. 0, 90, -90, 180. I want to select one of those based whichever is closest to the gamepad direction float value
so a direction value of 44 would select the 0 (fwd) dodge and a value of 46 would select the 90 (right) dodge
and i also wouldnt like to create 4 states to select each dodge. i am aiming to keep the state machine setup clean and have a single dodge state and select the appropriate animation there


G r e a t f u n
How can i do a translation on all keys using the Maya ART tool? I have an idle animation that has the legs so separated and i want to solve this
Is there a way to have Physics applied to animations without managing it in the blueprint? I.e. is there a AnimGraph Node which does that?
@uneven axle Look up tutorials on animation blends
I've got an issue where the only thing in my character that is generating hit events on another skeletal mesh is the capsule component. I've got two skeletal mesh attached the I would like to generate these hits instead. I've tried fiddling with every setting I can think of and just can't get it to work. Anyone know how to fix this?
Video of the problem
@dry harbor Yeah, for now I have a Blend By Bool set up going. But the issue is that it will blend to another animation if the bools change
@dusk dove there is the Rigid Body node in the animGrap, runs a physics asset.
@uneven axle to answer your dodge question. I think the easiest first approach would to make a custom Enumeration with the cardinal directions: north, south, east, west. And set those values with your controller. When Pressing D, Cardinal = East. Then in the animGraph make a blend by Enum( cardinal direction). Add pins for south east and west. You can treat the default pin as north.
@frosty peak Rigid body only works for already simulating bones.
I want to have my legs hang freely in certain situations. Switching on/off Physics Blend manually is very cumbersome since you need to manage all the transitions yourself
would be better to have it all contained in the animation itself
@dusk dove perhaps a combination of the Rigid Body and an anim curve to drive the alpha of the Rigid Body node?
@frosty peak Thanks for the help. But the issue with the Blend By node is that it will blend when the variable value changes. I need something along the lines of a "Select Anim By" node.. which doesnt exist I dont think
Trying to animate a gun that is rigged. Is there a way to hide gun parts via bone in unreal?
@uneven axle then it sounds like you should simply fire off a montage.
Is there a way to debug Animations except for printing strings?
Because some animation is blended in that shouldn't be possible and I'd like to see where it comes from
@polar dune I'd like to see if I can hide bones for my third person character when I go first person is like the head to be invisible
Of course I could just make a new mesh but I'd need that for every character
Also
Anyone know why traps like swinging hammers only hit my player when the player is moving?
Any help would be appreciated
Do you think it would be possible to have primarily a first person but somehow seamlessly switch to third person during combat rolls and such?
Or would it just be annoying
because rolling in first person seems to be a huge limiting factor of first person gameplay.
hey guys, best practice question, what's the best way of setting variables in Blueprint Animation to avoid those long SetVariable nodes row? I guess as the game development goes on a lot of variables will stack beyond that
@wise spoke is zombiepawn a c++ class by any chance?
if yes, use constructor
if not, the above is bscly the way to go
no unfortunately, it's a Blueprint class
then the above is sadly the way to go
@wise spoke I use Components+EventDispatchers :)
Reduces Update Animation Event Overhead, and it only updates once it is actually needed
Most of my Components have an Event Dispatcher which sends it's data to the Animation BP (AnimBP listens to Component ED)
The Character for example already has an Event Dispatcher OnMovementModeChanged which returns the new MovementMode Data. I bind an Event on that in Event Blueprint Initialize Animation to save the Variables in the AnimationBlueprint
Hi,
Quick question, would swapping this achieve the same thing? I want to replace all the transitions with this.
(idea being that i wont need to update transitions if the animation itself changes..?)
@misty dagger not necessary. By default all animations are relevant so it shouldn't change anything by default
cant import any animation since yesterday , i havent changed anything in import or export options .. keeps saying to me "animation has no data " in ue error log
even animations straight from mixamo
ffs
@vast trellis You think it could be done seamelessly?
what I'm picturing is a large 'troll' (or whatever) hitting a player and have the camera stick where you were before but have it rotate around to follow the player as they ragdoll. It would be tricky to get right but could work.
For rolls it could stick to where you were before the roll and rotate to follow the player. Maybe pan a bit outward too
Wall running could just pan out on the opposite side a bit and follow the player with rotations and movement
Does unreal engine support importing key framed blend shape animation data?
I have some facial animation I would like to bring in, however the animation has been done with blendshapes, not bones.
Can any of you animation gurus have a quick look at this (https://www.youtube.com/watch?v=3Xz027SDB6I)dodgy jump animation i have and try point me in the right direction to fixing it. i have setup the anim graph with a jump start, jump loop and jump end and i've tried changing a few things but my character still seems to hang there?

Hey Everyone,
I just got the IKINEMA ORION Trial version. I succesfully tested it with HTC Vive trackers with the already existing IKINEMA MALE BODY skeletal mesh. Mocap as well as animations work fine.
What I am trying to do is use this mocap data on a different skeletal mesh. Does anyone have idea how to do this
?
@hybrid latch I think you need to lower the blend time between jump loop and jump end. On the transition between loop and jump, change the blend time to 0/0.1, and see how it works.
Also on top of that I would maybe tweak the play rate of the jump land and speed it up.
To top it off, you could also shoot a line trace down, and see when you're about to land and heading down towards the ground, and play the animation before you land.
@marble ferry Hi thanks for the help. I'm not sure i know where i can find the option to change the blend time between those animations tho. I thought it might be in the anim graph or in the transitional rule but i cant find anything. I knew to ue4 and i must admit the whole animation part scares me 😱
this is what i have
in the top right, click on "details" and not "preview scene settings"
right under the top right highlighted "Blueprint" option
In blend settings, the duration, tweak it, and move it down
@marble ferry i'm having a quick play now. I'll get more time in the morning so I'll let u know how it goes. thanks again
As I said, i would also make the jump land animation play quicker
but just tweak the numbers and should be good
Hello. I'm looking for someone with physics driven animation experience that could help me with an issue I'm having. I've been banging my head against the wall for days and can't find an answer.
Little explanation would help?
@marble ferry Thanks! I've been posting that explanation and getting silence back only. I have setup a constraint and body, part of a characters clothing, and upon simulating the constraint's center jumps to a different position.
This happens only when the other side of the skeleton has a constraints and bodies added.
As seen in the GIF, the one in the right remains in position properly, but the selected one jumps to the center
It's not colliding with anything.
It's like if something made it snap to a different position.
I can provide as much detail as needed, if someone could please help me with this.
Hi!, is it possible to "override" animations in the anim BP? I mean if i have a node for a character with a sword and i want to give him a shield can i override the left arm animation and replace it with shield related animations?
@crude delta it does happen in game too. GIF can be seen here: https://answers.unrealengine.com/questions/806205/constraint-jumping-on-simulate.html
It seems that for some reason the constraint jumps to the reference origin. If I snap the constraint to the bone, then alt-drag the reference origin to the same location I avoid this jump.
I have a question regarding animation blending. I have a standard blend space for movement, direction of -135 is move back left, direction of 135 is move back right. Now when I am in the game and moving, if I go from moving back left, to quickly moving back right. It seems that the animation will blend every single animation along the way into the animation. When really I just want to go from back left, straight to back right.
Not back left -> left -> forward left -> forward -> forward right -> right -> back left. I have tried all interpolation types and have no luck.
This is the blendspace preview here ^^
What actually happened to the speed warping node from Paragon, that is used to adjust Feet and Hips depending on the characters speed, instead of using multiple animations for walk, jog, run, sprint?
Did they drop it? Because Shinbi from the marketplace is not using them.
When I want to animate a gun from the skeleton... It creates a new file. When I open the file the root bone changed and the other parts of the weapon (gun) did not. Any idea how to fix this?
using the record button
Does anyone have any good recommendations for playing a recoil animation? My current method is not taking into account aim offsets and is a bit of a pain so far.
Hey everyone, is there a way to stop a particular montage (and not all)
nvm! thanks!
Anyone have issues with bones being offset in translation when you're retargeting animations?
for example
second is a pose I made
(working as it should)

^^ how can I make my AI Character to blend from walking into stop properly ? (currently using blendspace to blend from idle into walk using AI's movement component speed)
@frosty peak ^^ 😊
I need to enable root motion to follow my char. With it DISABLED the animation plays fine. When I enable root motion my animation stays put on the ground. Any tips to help? The capsule seems to remain stuck to ground too.
that animation wouldn't happen to be a montage, would it?
@devout dagger Unfortunately I don't have a good answer to this question yet. It would likely be some combination of tracking velocity and acceleration to determine if they are coming to a stop.
I suspect deceleration is broken in AI movement component
that's the only explanation I got so far
@devout dagger is there an event that you can call when they are within a stopping distance of the destination? Perhaps that could set a bool or raise a dispatcher that the animBP is listening for.
Potentially.. But since AI's speed is hooked into walk/idle blendspace, it needs for the float to decrease gradually.
@weary pine Yes it is in montage form.
there is also a braking distance on AI, which I didn't know about.. I'll have to see what it's set to. Increasing it might fix the issue.
Any Maya users?
Is there a way to prevent Maya from switching left and right halves when defining a character?
@thorn tendon if it is inplace when enabling root motion, then root motion is correctly calculated. you can go to "Show" (top buttons of the viewport) and then "process Root Motion"
it will then move the mesh according to your root motion
@frosty peak I figured it out - there is braking distance option that is disabled by default on character's motion component. I enabled it and it seems to be working now (I'd probably need an anim for proper transition stand > !start walking! > walk for it to look really good). Not perfect, but better than before.
Can someone link me to Epic's guide for Twist bones? I've heard there is one.
anyone know where i can get some climbing animations?
...and it not cost a ton. i mean it doesnt have to be fancy animations, I just need it for testing
What would be the easy way to fit the Animations to the movement of a charakter? or is it based on trail and error ?
Animate with Root Motion
will take a look into that thanks 😃
anyone here with a optitrack motion capture ?
Hello
Does UE4 recognize a simple Blender animation of translation (from point A to point B) or simple scale animation? Because I tried to, setting a key frame on the start and one on the end) to make a simple rescale animation (that worked on blendee) but when i exported on ue4 the mesh doesnt scale down (so the animation didnt work)
I have also added a skeletal mesh to my object, but it still doesnt work, any idea?
(or yt tutorial)
are you animating by translating the object, or translating a root bone
I really don't know if this is a #blueprint or #animation problem but I'm seeking a little bit of advice for my animation BP.
I have a montage playing under a layer.
The animation plays succesfully but does not blend with the lower body
The blend per bone is set to spine_01
Does anybody know why it isn't blending?
just try blend rather than blend by bone?
seems a little odd to use blend by bone and want it to blend with everything
I
This seems to work fine
I need to figure out how to connect this code to the rest though, as I'm confused
Does anybody know how I could interpret this code into the stuff before?
@marble ferry Thank you for the suggestion btw
nm got it working 😄
Looking for some advice from someone with experience with draw calls and character animation. I'm looking to have many sprite characters and I want to keep draw calls low. I figured I could have all the characters be connected to the same octopus like bone structure with each character being controlled by an arm of the skeleton. This way they can all be the same mesh and be 1 draw call. To manage the characters I would apply new locations for those bone ends - which would move the polygon cards associated with that bone. Anyhow I'm curious if someone can help me understand the savings of draw calls compared to distributing the load across different bones of a skeletal mesh?
Can someone link me a good tutorial for a "flagel" animation?
Like a bacteria movement
(im using blender)
Hey guys, any tips on static mesh collision? I added a tie to my character and cloth painted it, when I play the tie goes through my char. Any help will go a long way!
@thorn tendon Did you add rigidbodies to your physicsasset?
Also what values did you give it?
I reimported that SOB, I think my unites were wonky
units hehe
They are eh, okay then, well I haven't really dinked around with it yet, perhaps you can walk me through it?
I'm just asking what values you used
Well nothing, I haven't done any ridged body work
you have to give it specific values from 0-100
gotcha
for it to use cloth physx
However if you dig into it, they're supposedly "cm the vertices are allowed to move"
Im in the physics asset now but can't find the word ridged bodies haha
You're gonna need to google some tutorials
Does your character only have 2 bones?
Nope, my char has all the bones he needs
Sure they're weighted?
Normally the physics asset creates a collider for each weighted bone
I did the weight painting myself earlier today...although I added the tie last min and didn't weigh it to anything....
Could that be the issue?
The tie has no bones though, just a mesh that I attached to the main mesh
Has a separate material tho?
@carmine cove
Its not actually attached to the rig. The tie has its own material
In blender that is
Its a simple char
@carmine cove My tie is not weighed to anything, should I? In theory I suppose I should hahah. Which bone you think would be best? Neck?
Not sure if that's causing your issue
gotcha, thanks anwyays
Try importing it farther away from the character
And check out the Animation level of ContentExamples
There's a character with a bunch of clothing physx
Yeah, I have that example, I might have to dust that beast of hah
anyone interested in having a character rigged 😃
hey! im having problems with the 2d blendspace. all the animations look good seperately, and the diagonal forward/right and backward/left work but the other diagonal looks completely off! can anyone help me out?
I need a physics guru for like 15 min to help me with a cloth asset
@untold gale Do you know anything about cloth and physics asset/collsion?
that kind of depends what you are using really, is it UE4 physics
or is it rig physics
@untold gale UE4 Physices
Spelling haha
Physics*
I have a character with a tie, Ineed this tie to respond to collision. Currently it is not. I followed every step to the T and it's still not colliding and just goes right through
Any help will be a life saver
what way have you set up the joints and where is it rigged
The tie is attached to the neck bone in blender.
@untold gale
I read a forum post were it said my scale was wonky, so I adjusted and I still have the same issues
Screen share?
have you added the body as a rigid
What do you mean? (I guess that's a no haha)
in order for any application to give you a dynamic object youll need to add a rigid body and collider
I added a capsule in the physics asset...I guess that's not the same thing though eh haha
@untold gale Any resources you can share for that?
you would more than likely have to look it up on a blender youtube, but youll also need a couple of bones to skin the mesh to the neck so it doesnt drift, altho after that you probaly would just need to add physics
@untold gale I tried a few things, this is as close as I can get. Still not working as intended
youll need to tweak the physics a little but and keep the neck piece pinned
https://www.youtube.com/watch?v=H1UL--8EDfk does anyone know if there was ever a fix found for this bug?

God created cheese, but not the lasagna. I created lasagna. Does that make me god?
Hi! Is it possible to do a symmetry on montages and other animations? I'm doing a character that can equip different weapons in different hands
something like https://api.unrealengine.com/udk/Three/AnimationMirroring.html but in UE4 instead onf UE3
@honest shard You tried scaling?
yes
but that just scales the full mesh (as expected) so the orientation changes. I want to mirror the animation not the whole mesh
also IK gives problems with this workaround
Yes, but i dont want to duplicate every animation, montage etc
thats a lot of hardcoding
so i dont know animation stuff and i know a little about bp, but if i wanted a player to run a certain animation X amount of times then go back to idle or whatever... is that something i would handle in the anim blueprint or would it be in the character, forcing it to play animation and then set anim mode back to the default?

anyone else have trouble with blender IK changing on import to UE4?
the legs on my character spin around in UE4
I don't even use UE4 IK
@main frost Siaka does that only happened when the character is rag dolling?
no, I just checked and the fault is on blender
something happens on export and the legs twist
the animation isn't baking correctly
Binary
should be using fbx 6.1 acii
binary gives a lot of issues
ive got a good feeling that's your issue
got this error
try importing under a new file name, so it doesn't try to "re_import"
Imported but still getting the weird leg issues
I feel like I'm missing something since it looks fine in blender, then on export it's messed up
like the bones are baking incorrectly
These are export options that I use and never had an issue with, I guess try to match yours with mine
Also can you send a screen shot of the settings you have on import in unreal engine, there's a chance the issue might be in there too
When importing/exporting your not changing the scale of the armature are you? changing the scale will mess up the armature like that. Also make sure the scale of the rig and model in blender is "1"
I managed to get it to work and I have no idea how
it's weird
I just downloaded a previous version of blender
the one I originally used for the initial skeletal rig
exported the animation
and it imports completely fine
huh that is odd, what blender version was giving you the issue?
2.79
I downloaded 2.77, but I can't use 2.77 for work because for some reason it has a horrendous resolution
🤷 2.79 works fine for me, but if another version works fine for you I guess it doesn't matter, good to see you got it working 👍
I guess I'll have to jump between versions for exports
fun
anyways thanks a million Tingle
Yup no problem 😁
Greetings, have anyone tried to export Owen (Epic Infiltrator dude)?
@main frost https://blender.stackexchange.com/questions/27016/make-blender-usable-on-high-resolution-screen

Blender Stack Exchange
The Blender UI elements are incredibly small by default on high resolution screens on Windows (15" UHD screen). I found the Preferences -> System -> DPI setting which can be set up to 144. This m...
So i was trying to export with Blender FBX 7.4 binary, and and i could not get the animations to work in ue4, so i tried what Tingle said and i the animations seem to work but they are the size of a grain of rice.
any help is apreciated 😄
My blender file just in case its needed
Probably wrong scale,
try scaling up 100x or set units in blender to be 0.01
just remember that if u do that you probably gonna mess up your animations

TEST 10 DAZ Characters to Unreal Engine 4 with materials, morph targets, actions, camera moves, etc... !!!!! READ UNDER THIS !!!!! In slow motion we can see ...
@green island yeah its just the wrong scale, which sucks because fixing the scale might screw up the animation (And is 100% guaranteed to be screwed using it with Unreals physicsCharacter/ragdoll system). Its best to make sure you have the scale correct before you start animating
hey guys I have this small dude here https://gyazo.com/af0f3e0706efca3d32a227812ffdaaa1

and I've setup a physics asset for him
but I experience this in game
watch the left guy

and idk why this happens since I even put in two failsafe bodies

and I even disabled all the rotation of the neck and everything https://gyazo.com/7848579834fe56860700e09bd7bc08f4

idk why that's happening
and he's using the standard SK_Mannequin skeleton btw
any help would be appreciated
Which ways are there to animate a hovering 3x3m platform? Platforms moves few centimeters up and down, and left and right, and in random numbers.
Is the LegIK node in the animBP broken?

Epic Games has released 20 character assets from Paragon and now we want to show you how to get started with those assets! Shinbi's animation Blueprints are ...
I downloaded shinbi and imported her into a blank project, but her foot is not adjusting to slopes.
Just out of curiosity if I'm understanding the documentation right this animation HAS root motion at least according to the engine preview? https://gyazo.com/15ccc328d441c20c0e26cc0cdbbe43af

does the root have translational or rotational change?
I may need to look into that actually. It's definitely supposed to have that but I probably overlooked that if anything
Is there anyone who can help me with rigging a gun
Someone who can guide me live, i can send you some paid assets for free as thanks! 😄
Is there any way to sync AnimBP's state machine with Behavior Tree ? (like, executing Task in BT on an anim notify)
Anim Notify -> Get callback -> Change BB value that impacts BT ?
that's what I figured @round shale , but thought it was hack'ish and wanted to ask if there is a better way
Hey everyone, I have a pretty annoying issue in which my state machine animations don't play from the start if there is any blending. I have my regular locomotion state, and then that one connects to my attack state, and if I attack in the middle of movement and the blending time is over ~0.03, the attack animation will start somewhere more than halfway through (different every time).
If I set the blending time to anything less than 0.03 then it starts at the beginning of the animation but it looks as if there were no blending. I'm sure the animation isn't playing from the beginning because I put an AnimNotify right at the start and it only gets called when there is no (or nearly no) blending
thanks for any help
Hey,
Is it possible to get the time in seconds or frames from the start of an animation to the start of an anim notify?
Would anyone take a quick $20 to fix a skeleton mesh for me 😂 : I need it to work with the gun kit I'm using but it gets all skewed up :3
@stiff ledge in not sure how accurate it would be but you could get the time by adding a curve var to the anim
@random shale what kind of skeletal mesh and gun kit? Do you know what the gun kit requires of the skeletal mesh?
@hazy pollen Thanks
@stiff ledge actually you don't even need to do that. Animations always start at zero (this is different from when they play, which could be at any time; especially in the case of montages). Afaik, you can't change animation notify positions at runtime. Therefore, you already know at what time the notify is, just by looking at the time it's set to.
Unless something has changed, it seems there's no way to get the current frame. According to an older thread, UE4 measures anim length by Time, not frames.
@stiff ledge the curve, I think, just returns a float. So you'd set the first point on the curve to time: 0 value: 0, and the second point to time: <time at end of animation> value: <time at end of animation>
@hazy pollen yeah it can, as you say, be found by looking at the timeline.
However, what I want is to know it at runtime where multiple animations have the same notify , but on different time.
Without manually checking it that is.
But I think I will switch to using anim montages instead, and then my issue will not be a problem anymore.
@stiff ledge Nice!
Anyone know why a GameState BP based on GameStateBase would work, while one based on GameState wouldn't?
I've got both using default settings.
Fsr, the one derived from GameState can't find the player controller.
Ah, I guess my GameMode was derived from GameModeBase and GameState references something it doesn't have.
Using a custom GS derived from gamestatebase fixed it.
hii!!
is it possible to set an animation time based on a float?
like for example the float is 300 then timeline of animation is at 300
lol never mind that was a stupid question haha
Let's say I'm animating some text in Blender via rotating some "empties". I've keyframed it and have the animation playing and everything seems good on the Blender side of things. How can I import this into UE4 and have the animations playable? Are bones required in the end?
@tender mist Currently if you need animation you'll need at least a single bone skinned to the mesh or you can use Morph Targets and import as a rigid body mesh.
Thank you
Does anyone got an example why in an AnimationBlueprint, in the Event Graph, a single Cast to the character would not be enough? I got this Code Snippet from the ActionRPG content example and wondering why they do it:

@ashen elbow Looks like they only cast to the Character if it is not valid.
This is actually confusing me more the more I look at it, seems redundant. Id have to see more.
You literally described the graph 🙂 The question is, why would they do this and when is the character invalid to save a cast node?
Might be in pause menu or something, but even then, that's some weird optimization.
IsValid must be cheap af if they want to make this kind of check when the player doesn't move or something.
They have there own validation system in place, but seems redudant to me...
They just really want to make sure there character is valid and they have a reference I suppose.
This might be a long shot, but anybody here used the IKinema with Unreal? I am testing things out and previously I have not been having problem to expose the Solver tasks to Anim BP, but now in this project, if I do it, the character would just crouch down and trying to reach I think (0,0,0) location. Previously if I left structs untouched, it would work with default settings. Any idea what is going on?
could someone help me out with anim montages? 😖 i'm trying to set one up but i can't get it to play, whenever the function is called there is no animation and nothing happens
Someone knows or helps me correct this problem 😦 https://cdn.discordapp.com/attachments/438858680344117249/469934119971717121/2018-07-20_13-28-09.mp4
Okay I think I noticed something with my Root Motion issue. When I enable Root Motion the model size scales small. When I disable it the model scales big. I don't think it's supposed to do that
Has anyone that migrated to 4.20 tried to import animations?
I've been thinking of doing it since I'm just using pre-made assets to learn
I think it might be broken
I'm currently trying to import the same animation into the same project, one upgraded to 4.20
Comes in fine with 4.19, throws an error with 4.20
@misty dagger or @ashen elbow You don't have a project you could test with do you?
If you have a project using 4.20 and an animation you can test @misty dagger
@carmine cove Whats the error say?
I'm just unable to import the same animation in 4.20 that i can import in 4.19
Im looking over the 4.20 patch notes, were you using the "Control Rig" ? It has been removed in 4.20..
BaseHuman has been removed and will not work anymore either.
Don't know if thats the case here.
4.20 is installing tho, 25% so I can atleast test it in a new project when its complete for you.
Ill let you know when 4.20 is installed, should be very shortly.
You have any project you can convert over that contains anims?
Alright so the entire animation doesn't have root motion on it yet.
Time to learn how to root motion now xD
@carmine cove Okay im all ready.
weird
Couple things to check, are you exporting just the skeleton to an FBX?
Or are you exporting 1 FBX with all the animations included?
In the import options make sure if its just a single animation FBX that you have the correct skeleton selected, and that you are not importing a new skeleton..
Alrighty,
So, that work out for you @misty dagger?
ah
That's in 4.20, how about 4.19?
Our model uses a locator for a root, but we haven't had any issues with this until now
I tried redoing the animation using a bone instead and still got the same error
One sec, make sure the *bone names are correct inside UE and your exported FBX. That may fix it.
Im still investigating.
What app are you exporting the animation from?
@carmine cove Okay create a root bone inside the rig and parent the Pelvis too the new root bone. I got it to import
Its missing the root bone on the skeleton.
Im using Blender atm. Ill try it in Maya.
@misty dagger Pretty sure something big changed with 4.20's fbx importer
Yo.
I've got a peculiar problem today that I'm pretty much just interested in why it's happening at all in the first place. I'm animating each of these letters from their individual pivot point in Blender. They're all separate bones. Now when I import the fbx into UE4 the animation for the last letter animation asset(it splits up each letter animation) shows nothing when assigned to the mesh. When I previewed or assigned I can't find the mesh that it's supposedly attached to anywhere.
I've tried exporting just the last letter and bone together and the animation still shows nothing. I've copied the object data from one e to the last and still nothing.
It'd be cool if someone could help me understand how this data is being processed, although it's not completely necessary as I can just replicate one of the other "e"'s in-engine. It might be worth mentioning that I separated the string into individual letters with the Animation Nodes add-on for Blender.
@tender mist I kind of just skimmed your post so sorry if I missed something, but from the looks of it in blender each letter has its own armature object/parent bone. How it should be is one single amateur object/ parent bone to have control of all the letters, The make a child bone for each individual letter.
hey has anyone experienced this before? https://gyazo.com/83443403c80ce669d41f976f999b6ed0
the left is ue4 and the right is maya and for some reason ue4 is renaming my bones upon importing

Basically if your in object mode, and create a bone it will be a parent bone, and if you go into edit mode for that bone, any bone you make will be a child bone
motoko
nah, i think it's renaming my root
I can import the exact same thing in 4.19 perfectly and it's broke in 4.20
mines renaming the feet to foot_l2 foot_r3 and head to head1
Did you convert a 4.19 project?
Hmm, i'm just importing animations for an existing character
I'm gonna try in a new 4.20 project
yeah
mine doesn't even work in a blank project
But works fine in .19
I'm gonna put in a bug report
@misty dagger Are you able to import animations?
efficient animations
Okay, i've submitted my bug
i can import animations but the skeleton bones wont accept head or foot_l/r
Can you export ascii and send it?
Yea, the warning says those bones have a different transform than in the skeleton
maybe try a new animation directly using the skeleton you exported
So that warning was for importing an animation targeted at this skeleton?
ya
Do you get any warnings when just trying to import the skeleton?
nope
Can you export your skeleton fbx as ascii and send it to me?
from maya yeah
@misty dagger Found your issue
can't have things named the exact same (caps are ignored)
Thanks @thin glade
@carmine cove no thats not true i only have foot_l and foot_r
it doesnt take mesh's into that scenario
ill try it but ive never had an issue before
Working for you now?
omg that is freaking stupid
im guessing its a 4.20 thing cause ive never had that before from 4.14 till now
I'd try re-ordering the bone chain ahead of the mesh and see if it changes anything
just a thought
And you should check in a blank 4.19 project to see if it still renames
Lots of bugs with the new fbx importer it seems @craggy needle
Bone chain order didn't change anything? Or it doesn't rename in 4.19?
doesnt rename
@carmine cove - I'll make sure to call it out to our teams.
Thanks for reporting it too btw!
Our team should catch it there, but I can follow up 😃
Appreciate it, been looking into it with my animator since the release and it definitely seems like one of the major differences is removing support for fbx namespaces
Of course.
Question: Does anyone know how to move a character while swimming? Like when I swim down my char's head will be down and feet up vertically
Probably something about rotation, just no clue how to do it haha
rotate him towards the swim direction
Is there a tutorial for how to make very simple animations in Blender for Unreal?
I need some placeholders for gameplay testing.
https://gyazo.com/969f801b4f8e49acf4582d86c73fbc02 Hey, does anybody know how to fix these issues with weight paint?

I'm importing from blender to ue4
It's something on ue4's part
Not sure what I'm doing wrong 🤔

AHHHHHHHHH
Lol
Spiral error list of hell
you need two bones atleast:
Root and your ButtonBone, which shifts your red thing.
The red thing needs all it's vertices applied to the ButtonBone
while the white frame needs it's verts applied to Root#
How do i remove attached preview assets from the skeleton now in 4.20? right clicking doesn't give me the option
nvm, got it, right click the bone itself :)
Is it possible to get bone location from montage at a certain frame from blueprints?
Hi guys, quick animation optimization question. say you'ld simulate fracturing a mesh into 10.000 pieces, parented a joint to each piece, baked the animation onto the joints on every frame and then skinned the mesh back onto the joints. You're going to end up using a lot of animation frames. My question is what is the performance cost of this? is it just memory or does the cpu take a hit as well trying to process all this Data|? Thanks a bunch!
@craggy needle Hey Amanda, I just wanted to add that missing namespace support is a feature that is preventing our team from upgrading to 4.20.
@glad mountain 10,000 joints is a pretty big CPU hit. It would likely be more performant to use either Vertex Animation Textures or even Alembic
I'm unfamiliar with those, would have to look into it. What's the bigger bottleneck btw? # of joints or # of animation frames?
the memory cost of 10,000 joints would be fairly high. But it's definitely more of the CPU cost to update the transforms of those bones.
it all depends though, do you need full animation graph control?
Well it's all a bit hypothetical at the moment. Looking Into the best way to collapse a large structure.
Doing my research
Ideally... I'm going to build up the structure out of modular pieces that have a baked fracture animation for when they are hit. But after enough modules have been taken out I want the entire thing to collapse as well. Which makes everything a lot more complicated.
To give you more of an idea :)
Also going to be challenging to get all the separate animations baked out for the "master collapse".
I have gotten some new character animations, but I can't get them working. I can't get Root Motion to work. Under Root Motion I have set EnableRootMotion to true, Root Motion Root Lock is set to Ref Pose, and Force Root Lock is set to true too. Here are my settings Any help would be great! Thank you!
@glad mountain interesting. How many of these walls might you have?
Is there anything special about "RootMotionFromEverything"?
I found that when I enable that, my Montage isn't properly playing anymore
It's supposed to move 90°, but when I go from "RootMotionFromMontages" to the one above, it doesn't rotate the full way.
I made an empty AnimBP to make sure that it's not something in the BP
@frosty peak not got further than this but I would imagine a large structure would be 100-200 or so.
Maybe more
wtf
It counts the AnimBlendTime for in and out into the whole thing
But only when you select RootMotionFromEverything
Had to set that to 0 on both settings
@frosty peak you guys are getting the errors as well?
@glad mountain why not destructible mesh?
@carmine cove Yes, I am also seeing I cannot import animations in 4.20 because the names do not line up.
You guys figure it out or did you see my post?
Curious how you diagnosed it
Btw, as of 40 seconds ago... https://issues.unrealengine.com/issue/UE-62067
these are definitely all related
when you import a skeletal mesh it used to make a 'root', but now it makes a 'rig_root'.
But when you import the animation it is still looking for 'root', which no longer exists because the namespace got baked into name of the bone.
@carmine cove I figured real time fracturing and physics would be more demanding than pre calculated animation.
@glad mountain Lighting giant skeletal meshes might be a problem too
Also I couldn't art direct it if it was real time.
I plan to have all my lighting dynamic
And then have a diffuse only artstyle to compensate
What's your target platform?
Pc for now
How many lights do you plan on adding? Guessing a couple for each tank and then a directional?
Sounds about right 😄
Is there any proper way of stopping a root motion rotation at the correct point to only apply part of the rotation?
Hey, So... I’ve been trying to import a Pac-Man playermodel and I’m having issues with the bodygroups I have for his face.
Does UE4 allow bodygroups of sorts or does it have to be entirely seperate meshes
@cobalt steppe I could probably answer you but i don't know what bodygroups are
If they're mesh objects that will need to move independently, you need to skin them that way
They are part of a mesh but not entirely
but they aren't seperate either
here's the model I'm using just for a better explanation
he has different mouth/eye subgroups and I don't know how to change that in UE4
as when I import the model all of them are applied at once glitching out his face
When you export use Edge or Face smoothing
Second, you sure you want a 146 meter tall pac man gargantuan?
that'll be rough on performance
No
That's not the size I wanted
I figured I would be able to scale him down later
or something like that
I'm trying to do a bunch of things myself and even then I'm not sure how tall my model should be in blender for it to appear in UE4 just fine
I'm not sure what Pac-Man's actual canonical height is but at best I want him as tall as those Mario UE4 tech demos and creations shown off on YT
I thought I could resize the actor in UE4 itself but I'm too much of a noob in general and am trying to get the pretty stuff out of the way. I gotta make the animations from scratch too and even then I don't know if I should do that in blender or UE4 itself
It doesn't exactly tell me the height in Blender sadly
and this is just how the model looks when imported from the raw SFM .smd file
as far as body groups are concerned, i'm guessing you're talking about the stuff with the eyes?
And the mouth
yep
the eyebrows too kind of
These are bodygroups in SFM/the actual modeling program
in that they can be toggled
I don't know if i'd call SFM a modeling program
Well not just SFM
I'm talking about blender more specifically
they are togglable in Blender
too
here's his body texture should you need it
although I don't think this blend has it applied yet
The eyes/eyebrows will probably be simple vertex coloring
These look like Blendshapes/Morph Targets
But they're mesh objects which is really strange
So I'm guessing it's not possible? At the very least is something like making a mesh in UE4 change to a different one possible?
just so I can have his expression change
when needed
There are 2 common ways to do this
Morph Targets/Blendshapes
or
Skinned facial mesh driven by bones
Pac's face isn't exactly rigged
It seems like you have a bunch of different meshes in different poses
I could try importing a MMD model instead but I doubt that would help either as that also uses what are similar to bodygroups
You could turn that into blendshapes, but i can't walk you through it
This model is so low-poly that it'd be quicker for you to learn how to make blendshapes than for you to devise a clunky hack
I would ask if somebody could help me but I doubt I'm going to get any. And I just wanted to get started with a basic Pac-Man World techdemo
I literally have no idea how I'm going to convert them into blendshapes
You'll either need to learn, hire someone, or find a better model
Again, is it possible to have the actor change it's model to a completely seperate one for certain states?
Then I could have several different Pac models with different expressions needed
yea, you can swap out meshes, but it'll be a really in-efficient solution
I'll probably go for that then
because it seems like the easiest option
@carmine cove what scale can you at least reccomend
because I'm trying to do something like this https://www.youtube.com/watch?v=VUKcSiAPJoQ
Here is Mario running in Unreal Engine 4, all the environment assets were taken from the Unreal marketplace, all the character actions were scripted using bl...
You can download the Blueprints project that's in and see
It's free from the launcher
It's all up to you, i'd just recommend learning the basics of the tools you're going to be working with. Setting units in blender is pretty important.
@carmine cove this one doesn't have a public link though
?
the Mario one
It's in the Blueprints project
I'm not sure what Blueprints project I need to go to
@carmine cove please explain because I am confused
seriously, can you help me out with the scale... please?
I'm still unsure what exact size my character model needs to be
in order to not be a hulking giant
@cobalt steppe Make sure your scene unit size is set to 0.01 using the metric system. Also your Object scale should be 1,1,1, you can press ctrl+A and apply scale to reset it to 1,1,1.
How did I do with making an aim offset? 🤣
https://gfycat.com/DisastrousSlipperyGentoopenguin

Okay, it turns out the aim offset was in the wrong spot, now I put it in the correct one 👌
https://gfycat.com/GenerousReasonableBlackmamba

@cobalt steppe
The scale your setting there won't change anything in UE4 unless you apply it.
First you should:
- Reset the scale of your actual model first (by selecting it and pressing Alt-S while in Object mode).
- Save the blend, relaunch it, and then set the Length to Metric and Unity Scale to 0.01000 like Noob said.
- While still in Object mode, scale Mario to about this big. https://i.imgur.com/1OyYDRE.png
NOTE: If he has a skeleton, then scale that, NOT the mesh.
- Finally, make sure you apply the scale (via ctrl+A Scale) before adding animations and or exporting it.
Okay, turns out the axises were set to be in (0,100) range, instead of (-90,90), a silly mistake. I fixed the values tho.
https://gfycat.com/RareTenderAcouchi

Anyone familiar with step anims?
I've got a walking anim, made in Blender. It's got 1 keyframe every 6 frames.
It looks like it's still getting interpolated when I set it to Step though. Last I recall, setting it to Step should override the interpolation type it had in the DCC, no?
Okay, posted some fails, now the real question: how do I fix it?
The AimOffset itself is perfectly fine, but the animation blend isn't. What's more curious, the other AimOffset I have is working just fine.
https://gfycat.com/FamousAlarmedFrillneckedlizard

looking good @drifting oyster (except for the issues you are having)
anyone have any advice on the root motion for this?
trying to get it to loop seamlessly
Whats going on with my skeleton? The circled area is where that bone should be and every other bone is in wierd positions like that
looks like your bones are connected to the right joints
it should go spine 1-2-3 > clavicle > upper arm
looks like its connected to the base
Heres another example where its in the wrong place
This is my blender rig hierarchy which might be where im messing up https://gyazo.com/5b69debe10b9bd890932fdfc6b589f93?token=3721b292faf364eb0a16e0418bed0f3b

Well I think ive fixed the hierarchy and im still having the problem
Guys does anyone know how to edit an existing animation within UE4?
@cobalt steppe Like this ?
do animations affect the velocity of the mesh? my mesh is fluctuation between 0/200 velocity whilst doing an animation?
making strange jumping/clipping issues in the animations
i guess i could lerp between them to make it smoother, but this still isnt the best way to go about it
Ah
@sinful smelt OMFG YES
Let me give you an example, I have a running animation but I want the hands to be more fast paced looking (for parkour type of running) but I don't know how to edit that anim
THAT’s exactly how I want it
Here the file, just add your material on it
For more, you can ask my services in Private
@coral valley if it's on the epic skeleton you can probably edit it using the control rig plugin
you can add additive tracks over existing animations easily in the animation preview window, but i don't know if you can override the keyframes or if they're just additive
i have only ever used the additive track to create hand poses for vr hands
What's the best (or proper) way of having NPC idling for some time (playing idle anim), then play a montage, then play idle again, play another montage, play idle again, etc. ? (I am using state machine and cache poses)
Also it would be nice to be able to break away from montage if necessary (let's say NPC needs to run away or attack player)
after searching the documentation in vain I don't suppose anybody here knows how to use "AnimUpdateRateTick" either?
@frosty peak ^^ what do you think about my predicament ?
@devout dagger I would start with the simplest solution possible. Which would be a re-occurring timer that sets a random INT. And then in your idling state you have a Blend By Int
or, instead of an INT, it could pick a random montage to play. And that montage slot is inside of your idling state
I see.. How can I set it up so that I can pick montage on the character actor (say, path_corner actor, so that when AI character reaches it, it would cast to it, grab the montage specified and then use that montage in the state) ? I don't recall if I can use a variable that holds montage and use it directly inside the state.
I would probably have the animation blueprint be in charge of something like a random idle
give it a unique slot to play in
well, while idle can (and should) be random, montage can not be. Imagine character walking between path_corners and the next one is path_corner by the well. So when character reaches that path_corner, the anim of him looking down the well should play.
The way I see it being done (wearing level designer hat) is me placing path_corner there, selecting montage called "looking down the well" (in the actor's detail panel) and moving on with level design
so your AI will have some task for selecting an object in the world, perhaps with EQS. Then you simply need a task that fetches the montage from the object in the world, and to call it
right
but in the state, how to I "feed" that acquired montage from the variable to the final pose ?
does anybody know why when root motion is ticked my speed wont go past 0.5?
@devout dagger I don't quite understand. You get the montage variable, then you would have an action/task that would call that montage on your skeletal mesh with like a 'Play Montage'
I know I can do it in the event graph, but I don't see anything to grab montage in the anim graph and plug it into the final pose
unless I should be doing stuff with montages in the event graph.. I guess I need to get get to it and see how it unfolds
@devout dagger You don't do anything from the animGraph other than provide a Slot node. You can call the play montage on the skeletal mesh from just about anywhere. The montage will play in the graph where there is a matching slot node.
@misty dagger since the movement is coming from root motion, the speed of the movement is directly tied to how quickly the animation plays.
If a root motion moves at 1 meter per second, And you want the character to move at 2 meters per second, you need to double the animation rate of that animClip.
anyone know why, after creating a montage, and then creating a new slot and switching over to that slot, all the anims and such disappear? they are still in the montage but the char goes into t-pose. was doing the tutorial from way back (and they had notes on post 4.7)
@gilded latch That's just a quirk of the editor. If you close and reOpen the montage it should continue to work
i created new slot using magnifying glass, Add Slot, named it (UpperBody), saved it
oh... rly..... let me check!
thought i was missing a key step since the tutorial is from 2014 (but has some updated info)
ahh it does work... thanks crow. def thought i was going crazy
No prob. I wish they'd fix it. seems like a pretty simple thing
@cerulean cedar thanks a lot
Does anyone have any advice for restarting a state inside an anim state machine?
attempting to do some retargeting of anims. i load up retargeting manager and theres no base skele on the left side (i can select the one for the right). any reason why that would happen?
i think i got it. weird
If I had a character with swords, where the swords were built-in his mesh and animations, would it still be possible to setup hitboxes on the swords in UE?
yea just add a socket, attatch an object to it like a sphere or box.
like, add a socket to a bone
then attach the object to that bone. scale it etc

As a simplistic way to complete our effect, we attach some basic physics components to our character's hands so that he can actually punch objects in the lev...
ok cool thanks. Just wanted to be sure before I spend the time rigging/animating
Hey also, do you by any chance know how to set up an animation so that when the button is pressed to activate it, it has a preset distance, speed, and height? Where in Unreal is that normally done?
no clue 😦
ok all good 👍
So, Um, for getting my game ready and to actually take off, anybody care to teach me how you animate in UE4 or do I have to do it in blender?
Because if so I'm still confused if all the animations need to be skeletal animation files or not
Because getting Pac-Man animated is my main concern especially
Asking just because I heard you can make animations in UE4 itself
which I kind of would prefer to do
blueprint/programing is what I'm gonna ask for afterwards moreso. (Mostly just getting a working Butt-Bounce and Rev-Roll)
is it possible to copy a paragon asset, like a skeleton, physics asset, and skeletal mesh, and put them in diff directory? i moved twinblast mesh, physics, and skeleton to a diff directory (Well copied), and wont show up. cant select the mesh to place on skele
if i go to preview mesh, the list isnt populated 😦
@cobalt steppe you basically cant animate in UE. You can tweak things on skeletons while viewing the animation by adding keys. But you cant do a full blown anim
basically im just trying to have a clean twinblast. only skele, mesh, and physics object. but for some reason i cant get it to show up in new directory
you made a new folder, hold ctyrl highlighted those 3, then drag to folder in content browser and hit move here?
ctrl*
yeah
lemme try again. i didnt hold ctrl. i just dragged, then i selected COPY once let go of button
hold ctrl highlight all three then drag to folder and move or copy
Alrighty
ok def did that. but yea once i copy over, they arent linked. i click skele and theres nothing there
lemme try move instead
damn yea this isnt working how i wanted 😦
would be easier if i just had a fbx and could import lol
unsure how they are actually linked. i really only want the mesh, skele, and phys object
once you properly import a mesh and skele, it should be findable throughout the whole project
well im not importing it really. i already have twinblast stuff from marketplace. but i want to delete everything except his skele and his mesh. also wanna put it in a proper directory structure instead of ParagonTwinBlast but seem unable to do so
guess it doesnt matter for now
Hmm yeah. would have to test it myself
no worries. taking more time than its worth right now. just thought i could make it super clean
is it possible to export a paragon mesh to fbx? doesnt seem like it
i can export some stuff as fbx but not the paragon mesh looks like
I can. Right click on mesh, asset actions, export?
odd yea works for me now. i was getting COPY option. so odd lol
i retargeted some anims. everything works great. have a question tho. is there a way to set the default mesh to play anims?
i retargeted twinblast over amd hes in game. works well. playing the anims. when i go to his anim dir, its all him in the preview. but when i go to the old anims, its the default mannequin (even tho in-game it plays as TB)
prob not important
nm figured it out sorry
heres a new question: i got everything working. my blend space works, idle to walk to run. when i add an actual TB idle anim, when it transitions between idle and walk he dips below the floor then ends up back where hes supposed to be