#animation
1 messages · Page 100 of 1
guys i have this problem
so i made this character creator
with the umg
i made a certain button in the umg trigger a anim montage
but when it triggers the animation
the animation snaps
if anyone can help me i would be extremely grateful
Could use some help here, I retargetted animations which works fine, but I did it from a different pose so when I use 'bone space' in the anim graph it uses the bone space before the retarget pose essentially invalidating the animations base pose
I mean it actually makes sense, because it uses the character's ref pose, but I specifically need it to use the animation's since it's retargetted from a varied pose
Is there some way I can bake it to the animation?
Got it sussed, had to copy the ik bone transforms, was unnecessary prior to using retargetting
I believe it is Toon Boom
@tranquil hound I used to be in a 2d animators discord and one of the best guys there uses it in the way you are describing

Here is an old gif from that animator made in toon boom
Although setting up a rig is a nightmare I think

Flash has bones too
anyone even remotely able to export models/animations/skeletons from blender to UE4?
I created a Bow in Blender and rigged it. After animating I exported it whole in Unreal engine. The skeletons and mesh are all good and shown correctly. But, whenever I play the animation, nothing is visible 😦
Here's the Bow fbx
hey, can anyone help me to make that the weapon aims downwards when you look downwards and upwards when you look upwards
That's how it looks right now
I have the animation but don´t know how its work
can we post animation from other software here like SFM?
say you make your model, UV + texture it, rig it, then animate it. Then you make a set of animations for locomotion and actions. then I create a different character variant (different mesh completely but same proportions). is the workflow to load up the original mesh rigged, delete the mesh and then skin the new character variant to the original skeleton and import to ue4 but choose the original skeleton instead of importing a new skeleton? hope that makes sense
take fortnite as an example since they have many skins but use the same animations
I wonder what is the right workflow to bring animation from Blender to Unreal? Currently I'm thinking of selecting and exporting the armature and the mesh into one .fbx file, then importing that .fbx in Unreal. However, I don't see anything in the assetname_Anim blueprint, although the timeline is moving.
I also received these warnings.
Does anyone have some experience in this?
@frosty rock for the first one, when you import, chose Use T0 as ref pose.
second one: you didn't have UVs for the mesh, UE4 is just warning that it is making up its own. setup UV's in blender and the error should go away
I don't know about the last
OK, let me try again.
Thanks for the link!
Should I export the armature and the mesh into 1 .fbx file, or 2 separated .fbx files?
Oh this is funny. It worked, finally. I changed animation mode to "Use animation asset" instead of "Use animation blueprint". I don't know if it's preferred.
But the door ended up being so tiny that I almost didn't see it...
I know there is a boolean for animations to adhere to custom time dilation, but for the life of me I can't find it anymore. Anyone know where it is by chance?
Has anyone used perception neuron? Keen to hear about the results
is there any easy way to reuse logic of a blueprint?
and don't say animation retargetting as it won't work for what I'm doing
of an animation blueprint? @sudden sedge
If I want to control multiple animation of an actor, is the animation blueprint the way to go? Or I should just use a normal blueprint?
animation blueprint and normal blueprint really. You can do some stuff in the animgraph. you can also manage animations in a normal blueprint.
speaking of which I have an issue.
I set custom time dilation on an actor (enemy ai). Everything works ok, running animation slows as expected. However when I call a Play Animation on that actor, the animation ignores custom time dilation. Now I can probably just set the animation rate to counter that, but I was wondering if that's normal?
I've finally managed to setup the logic of my animation of a door,, in anim blueprint with state machines. I just have one last problem. How can I make my door stay in the last state, which is idle but opened, instead of infinitely looping? I try to find the loop option but don't see it anywhere ~_~
Nvm I've finally found it. Spent 2 hours on it. Probably won't make it for the game jam...
I have to click that node in that individual state, and it shows up on the right side.
@dusky arrow yeah, reuse animation blueprint logic and transitions
just with different animations for a different mesh
with a different skeleton
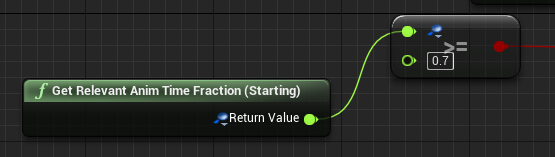
So get this, someone reported that the Get Relevant Anim Time Remaining node breaks when you copy/paste animation states, Epic fixed the Get Relevant Anim Time Remaining Fraction node, and only that node, I mean at least I can build an anim instance now .. but seriously???????
I lost an entire anim blueprint to that, a very complex and involved one, because the fix isn't retroactive either
Wait no, they didn't fix either, they're both broken
Found a piss poor workaround but w/e

This should work, shouldn't it? The printstring inside of my animBP fires on this notifier, but this breakpoint in a normal blueprint never gets called...wondering....
i believe a notify thats not a range notify will only trigger the interrupt pin
what is a "range notify"? i know only that one in eg animMontage you can set type of queued or branch - both doesn't make any difference for me
notify state(for me its a range), but only the notify Montage Notify will trigger On Interrupt pin and only Montage Notify Window will trigger the On Notify begin/end pin
sorry, still don't get your point. can you make a screenshot what to do?
the normal notify will only be available in animBP, to get any notifys to trigger the execution pin of Play Montage then need to be Montage notifys
great! Thanks for clearifying - works like a charm! so I need 2 notifiers if I want some action in animBP and some in Blueprint? Dosn't make sense to me ... but if it is the way it works, I'm fine with that
well you could always have a event that gets called from the animbp when the notify is hit
that play montage node and montage notifys are more for simple things that dont have a animbp, so that you still can have notifys
ok. thanks 👍
Good night
why does my foilage paint tiny? , it kinda sucks because thats not the real scale of my grass
My AI look like they're ice skating during their movement. Do I just need to slow them down?
what I do is see how fast they move in units in the animation themselves
then get the movement speed
so if it moves 200 units in the animation
and it's a 60 frame animation @ 30 fps
it's be 200 units every second
if we're moving at 400 units per second, we'd need to double the animation speed
sec
had a neat little thing in the animation blueprint, where you feed the speed and it'll sync animation speed
@sudden sedge thank you! that was very helpful
I feed in speed, divide by the distance moved in the animation, then set the play rate accordingly
so 400/200 = 2
so it sets playback speed to 2
awesome
of course, you have to keep in mind UE4's default playback speed is 1
which is 30 frames per second
so if you're doing say 16, or some arbitrary number, you'll need to convert that as well
cool, thank you
if you have an animation where the movement is locked in place, I parent the root bone to a dummy, then animate that dummy, then play back until it feels right
then I get the position differences between start and end and use that
or you can throw numbers at the wall until you find a value that works
Guys
I hearing that alot I should avoid Root Motion for multiplayer games
What the reason behind this?
I really can't figure out why I its not a good idea use root motion for things like turning, or stopping.
in multiplayer stuffs
I believe it is because the root motion doesn't play nice with the network interpolation of character movement.
can maya or some software be used to quickly skin a model?
posting it here as well, in the hope its something that could be done in the animation blueprint
https://twitter.com/Luos_83/status/958801316834430979
Hey fellow #ue4 devs, how do you change colors and locations of animtrails in persona when you have multiple different shaped weapons and colors? @UnrealEngine #UnrealEngine #unrealdev
( @ me please, close to bedtime)
Guys, is there a way for UE4 to use the 3DsMax manipulators (slider) from blueprints or c++ ? like in this video https://www.youtube.com/watch?v=dFO-njFJ2a0

Adding a simple slider to animate a part of your model.
Hey guys is there a way to change blend space at runtime. I am trying to create a game where a player picks up a gun and his walk run blend space changes to one holding gun
Why after importing custom animation of standart mannequin in UE4 the number of frames is significantly increased?
I have a setup where I have a socket on a skeletal mesh which is being driven by an animation clip running through a sequencer. I then have a separate actor being attached to the socket on every tick through the level blueprint making it move with the animation. If I set the animation clip to not be visible then my animation stops working. i.e the actor stops moving, Should this be happening? If an animation clip is set to not be visible does it effectively not play back any more?
@cloud ibex try this, its at the bottom of the skeletal mesh component
Hello, do you know the way to convert animations of Mixamo characters and mocap animations from https://www.unrealengine.com/marketplace/two-handed-sword-animset-pro and to unite them into blender and the UE4Tools plugin that create the UE4 default manequin with IK and use it to make it easier to edit animations?

This is a set of 173 motion capture animations for character with Two Handed Sword
@spring steeple Genius! Thank you!
how do pose assets work?
am I able to make keyframes and animate those from the tpose of the mesh?
I also dont have any animations for it
if anyone answers this please @ me, im heading to bed now
@worthy walrus https://www.youtube.com/watch?v=iQO9yRutpso

No I dont know da way!! This meme is going hot so why not :D Credits @ gregzilla
has anyone tried to import an mmd model and animation into unreal? i've managed to get the model in but the animation doesn't register
@misty dagger I didnt try it but mmd animations are often used in VRchat, also there is mmd converters for other file format or give a try with http://www.bvhacker.com/
If you find a way, im interested
thanks for the link! i'll try it out. i've been trying to follow the VRchat tutorials to do it, i have a blender plugin that lets me export an fbx file that works with unreal, but even after exporting it dozens of times and changing the settings it still doesn't register the animation. i'll try it with something else to see if it's a blender issue rather than an issue with the model
okay so if anyone wants to do it, you can get mmd tools (https://github.com/powroupi/blender_mmd_tools/tree/dev_test) and cat's blender plugin (https://vrcat.club/threads/cats-blender-plugin-0-6-1.6/), the mmd tools folder has to manually be put into blender's addon files and cat's plugin can be installed inside of blender. when they're both activated, use cat's plugin to import the model, 'fix model' button, 'generate atlas' to generate a texture, and translate to translate the names of bones. then mmd tools can be used to import the animation, though sometimes it screws up. from there, this video is good on how to export the fbx correctly: https://www.youtube.com/watch?v=nNA6V_vpgvI you need to export the model and animation separately otherwise it won't work (dunno why 🤷 )

Today, in 10 minutes, I show you how to export rigs (armatures... skeletal meshes) and then animations of that rig to Unreal Engine 4.7.6 from Blender 2.74 W...
when you use cat's plugin to export the fbx, the texture works but the rest of it (animation etc.) doesn't, so you have to export using blender. but when you use blender, the generated texture isn't mapped properly, so you have to fix that as well
@misty dagger Gratz ! Yeah it was the cats plugin i saw, i didnt had time to try it yet,
The BlenderTek Video tutorial is nice, there is also official UE4 Dev workflow tutorial https://www.youtube.com/watch?v=waC5tjCH2GI + the link of the docs is nice
Im still stuck or to lazy to remap all...
This is the way ? According to...
https://www.youtube.com/watch?time_continue=2&v=FNA4khhEGeY

blender mixamo downloads from unreal 4
Anim Dynamics node dont work with morphs?
afaik it only works on skel mesh's
well yea but my mesh have morphs on it
and when i put anim dynamics on it morph value goes over 9000
and mesh stretches
alot
I have almost to none experience with animations. I'm using imported animations from places like Mixamo and I'm trying to use Root Motion. however, the character is stuck by it's Pelvis/Hip bone when I enable it. anyone know the reason?
hey guys

my problem is that she is not using the morph gradually
any ideas on how to fix that
Guys
I have a Pose and want to find the Anim which mostly matches it
Is there a node or smth like that?
What I want is:
When I stop, I want to choose which stop animation would be the best to use
This is insane: https://www.youtube.com/watch?v=KLjTU0yKS00
In this 2016 GDC talk, Ubisoft's Alexander Bereznyak breaks down the basics of IK Rig technology for animators, and explains how it can be used for everythin...
oy i know tis can be done a body swap. I want to take my pose instance and spawn another actor in the same pose
mesh anim instance or something
hmmmm
@noble swan they seem to have used a lot of that stuff on paragon, along with some other techniques: https://archives.nucl.ai/recording/bringing-a-hero-from-paragon-to-life-with-ue4/
mostly in the leg IK/foot stride matching and stride scaling stuff
in maya 2017 how do you change the dolley direction when holding alt right mouse
been using the program for a few weeks now but theres literally nothing when i google how
scroll wheeling is in the normal direction but dolleying is inverted
by default
does scaling the armature down to .001 work to fix the physics asset issue for skeletal meshes from blender the same as scaling the scene to .001?

Meet DensePose! We introduce a new computer vision task of dense human pose estimation in the wild, which aims on mapping a RGB image of a person to 3D surface of the human body.
First results are in https://t.co/UOrHfa6Tvy, data and code are coming soon.
https://t.co/V7IJYHY6cn https://t.co/WDPVNpHkJk
Retweets
929
Likes
2255
Hi
ive got a custom skeleton i retargeted
but its missing the 'ik hand' and 'ik foot' bones
anyone knows how to add these bones to a skeleton. (is that even possible) ?
@wraith verge is it possible but i wanted to know how too ^^
I would like to to same with animset pack and IK it in Blender to animate it, anyone know ???
It seems like the animations for the standard mannequin are also on the IK bones.. thats why its kinda impossible without manually change all the animations ..
@wraith verge you can add the IK bones in a modeling package and add a copy transform constraint
@vast trellis i can add the copy transform constraint in unreal or modeling software?
modeling software
Does anyone has an experience with SetMasterPoseComponent or CopyPoseToMesh?
I'm trying to use ONLY SkeletalMesh
Right now I have two Slot 'DefaultSlot' in my Anim Graph.. I'm trying to get down to one, but, the point of the DefaultSlot doesn't make total sense to me.
When I remove one, the animations are only on the upper body.
Everything works, but, when I compile it complains about having two.
you can only sample an Anim Montage Slot once in your AnimGraph
so ive made a rough overgrowth style blend system but now im wondering if im gonna have trouble rigging a model to UE4's IK rig style or anything like that.
does anyone know if the IK system in ue4 will work on any skeleton?
ive been trying to google-fu my way to an answer but so far there's just a bunch of unanswered questions
Erghh guys, not really familiar with anim in UE4, hence a question. I need to bring a ton of animations in a single FBX, and split them into individual animation sequences, but retaining the link to original anim sequence, that contains all animations, so that if it gets re-imported, all anim sequence assets get updated too. Is that possible ?
Can anyone explain what these settings do? Im trying to make it so that after i play an attack montage it returns to idle the problem is that currently the change is really noticible so literally as soon as the attack reaches the end it SNAPS back to idle and doesnt look good how can i make it blend or slowly go back to idle? i tried messing with these settings but nothing worked?
Hey, can i make a gun reloading animation that just animate the hands ( works for running and idle and prone etc.. )
hello all
I have some problem of Root motion, i hope i can get some help here 😃
if i enable the root motion do i need to do something in blueprint to make the character move
currently if i do root motion for everything, it's just walking on the spot
byt in the preview i can see the character moving forward
@plush adder just play with the blending value of your punch, the image you have show is correct
hmm tried lots of different values nothing made a difference . docs say those values are used for blending from 1 montage to a seperate 2nd montage which isnt the case for my situation
im going from blendspace/locomotion state machine ->montage->blendspace/locomotion state machine
@solar lava
your loction motion state machine is it playing montage? or animation itself?
state machines cant play montages (wish they could though would make things so much easier )
my locomotion just has one state entry ->walk/run which consists of 1 blendpace
when you play montage it overides whatever state youre in plays montage then returns to the state

Testing out strafe anims blendspaces , also fixed issue with attacking where player would leave the ground
see after he does the strike how it snaps back to idle and looks very unnatural
ok what is your blend value now?
you try to play with the blend out trigger time
@plush adder
Excuse me, newb question here. What's the difference between anim montage and just the animation?
I can't come up with a proper mental model about how to think about montage vs animation...
animation montage can edit mutiple animation there, like some combo and can adjust the blending time
(00:05) - Intro to Animation Montage
oh so animation montage can be though like of a simple 1D timeline blending tool?
this is the introduction o
think like a puzzle, you can drag mutiple animation in one montage and fire it by one button
yeah nice!
Thank you @solar lava
no problem
yeah tried all different values nothing changed
@plush adder how about your blueprint, it seem like have a "notify " in the animation montage to force wait for the animation finsh
wait for the "attack" animation finish
Could you check the Spear attack montage?
and the blueprint itself , i have double check the video seem like it waiting for this animation fully finish
Hm I see animation starter pack has some blend artifacts when in -45 direction
How can I fix this? Can I sorta tell him to weight sidestepping animation more then forwards animation when in that state?
Can anyone tell me al lil about the root weapon bones on the mannquin?
Anyone knows about this setting in skeleton three:
its not there in 4.18 ?
should fix this issue:
@wraith verge yeah animation docs is kinda hard to follow T_T having same issues here with outdated docs...
Took me a while to figure out axis properties for aim offset LOL
What might be a good way to get cartoon-ish bendy arms in Unreal? Like Adventure Time https://i.imgur.com/ZJItZ4U.gif
I know that Blender has "Bendy bones"... and that Unreal doesn't support them. Would you just use regular bones but add like, 20 of them? Or maybe there's a way to use splines somehow...? I mean, i'm sure anything's possible with engineering... but does anyone have any better suggestions?

I retargated my character from a mocap pack, does anyone know why everything is perfect BUT the arms? https://i.gyazo.com/ca8c9ef4154f136fad42918bcba1fb1b.gif

Looks like one of your skeletons is A-Pose the other one T-Pose
Guys
I want to import an fbx which contains 10-20 animations
But somewhy its all gets merged into ONE long animation sequence
Instand of 10-20 dividual
@0@
when you import are you in the animatiopn sequence editor?
and did you specify an existing skeleton?
@pastel spindle
Does anyone know if I can set one skeletal mesh pose to be an exact copy another skeletal mesh pose?
having a big problem here
importing vehicles rigged
and the wheels are all over the place
i fixed the wheels but whats that weird space between ground and car?
can someone tell me how to improve my slow walk cycle? im only using 4 keyframes and blending between them but im pretty sure i can make it work with IK i just can't figure out whats off about it
does anyone have issues with Clothing ?
When I attach cloth as seprate component (with shared skeletal mesh)
it goes bonkers
folds on itself
and from long skirt
I have ultra mini skirt..
Its so weird this rigging
at one point i have a whole finished rigged car, working perfectly, repeating the same procedur doesnt make it work
muchcharles - afgelopen zondag om 20:18
@wraith verge you can add the IK bones in a modeling package and add a copy transform constraint
Anyone knows how i do that in 3dsmax?
Has anyone tried https://mocaponline.com/products/ue4-rifle-basic , the mocap BASIC (not PRO) animations?
they are 50% the pro ones... the basic animation free pack from EPIC is really awful at certain things... and missing animations (no walking with gun at hip for instance)

MoCap Online
113+ MILITARY RIFLE ANIMATIONS: Including IPC (In-Place Custom Attributes) Updated: Rev. 2.7 All Animations with Root Motion and IPC (in-place with custom attr
alternatively, do you use the mixamo ones? other recommendations?
Calling "Get All Socket Names" on a skeletal mesh includes custom sockets AND actual bones. Does anyone know if this a feature or a bug?
Ah, nope, it's a feature.
how can one skelmesh differ from another to prevent clipping through floor when using Crouch function?
I just have very old inherited skelmesh component and can't figure out how it managed to fix this bug
but there is definitely no c++ or event graph code involved, pure blueprints flags
Hi this might not be the right place - is there a built-in way other than ConstantCurves to associated values with a certain animation? And even if not - how do I set ConstantCurves values :/ ?
anyone has a idea on how to fix the ik bones?
i mean, without mannualy fix al the animations..
Im following this tutorial about ragdoll to animations. In this section Im posting, they add a Body to the root, set it to Kinematic and turn off the collision. Then set the Pelvis constraint Linear limit to Free. However this just causes the entire model to fly into space, even though the new body shouldn't collide with anything. Anyone know the reason for this or another good solution for resetting the Skel Mesh orientation after a ragdoll ? https://youtu.be/nkj6PAbGYtM?t=19m11s

Wes Bunn walks through how to set up and use Animation Pose Snapshot to create more natural looking ragdoll-to-standing animations. Ragdolls are fun, but sna...
its possible copy the position?
is that blender? if so, highlight the bones you want to copy the position of and press ctrl+c. Deselect those bones and highlight the bones you want to copy them to and press ctrl+shift+V
If you want to copy a bone's rot/loc/scale;, looks like you can do it with this node:
https://gyazo.com/36a5d1264b71e3c178f76fd420195a30

is there a way to create a generic animBP that works for different skeletons? I have an RTS game which has various units (different models and animations) and I'd ideally like to manage them with one animBP. So I'd like to be able to input their walk animation/attack animation as a variable
not sure if it'd be possible with different skeletons
@hazy pollen thanks!
@ϟKΔŁ#1842 you can also save a pose which is really handy for blending between two poses or animations or even physics->anim .
Bringing Hell to Life: AI and Full Body Animation in DOOM (GDC)
https://www.youtube.com/watch?v=3lO1q8mQrrg
Does anybody know how to stop an AI enemy chasing you after you get so far away from it? Once it spots me it doesn’t stop chasing me no matter how far away I get
I have a problem ive been unable to fix for awhile now, basically when im not aimed in, the weapon is pefectly positioned but when I am aimed in the front is way off and I obviously can't change the weapon position because then it will offset it in all anims
https://i.gyazo.com/fd767e212d2c8cdfc273714cd46c356b.png
https://i.gyazo.com/6e63f1e4abaebde6b9261f58f042d91b.png


Hello guys, has anyone used spritesheets to make 2D animations with flipbooks? It seems that the background needs to be black and I can't seem to use black animations at all
@sonic narwhal
The thing is that you maybe attaching it to the wrong bone
Or you not giving it a proper transform
Its deffinitely the right bone, it works flawlessly in all other anims just not when I aim in
Hmm so in all anim but this?
Then its has to be the animation itself
If you attach it to the hand
then maybe the hand rotation is not been set propelly

Then its the Animation itself
Hi guys, I want to make my own hand animations for my FPS Mage game, does anyone know if Maya Motion Builder + LeapMotion are good way to make them?
dam i cant get my gun on my third person to be facing my cross hair, anyone advice me on this
did anybody ever manage to create a working custom animNotify bp/class? I can create one and create notifies with it, but I cant assign anything to the notify event
Hi, my weapon is attached to my character, the animation has a sway to it so when it's idle, my weapon sways with the character. Is this how weapon sway is done normally?
And then I can just make another anim that doesn't sway for holding breath?
I set up the shapekey to use a single bone as a driver, I made an animation of that bone moving from 0->1 in the correct axis, saved that anim, and selected the bone and the mesh and tried exporting but when I import I don't see the shapekey data. I miss a step?
Nevermind, forgot to tick import morph targets.
I definitely gotta use the search button in the top right more often.. aha
I think this is the right place to ask for suggestions
I need advice on how to make my morph target animations smoother and less stuttering

morph test (idle mocap).mp4
here's a vid on how it looks
what is the best way to design combat animations to use on my character ?
Is there a way to split animation in Animation Asset?
I have 60seconds animation, I want to chop it on a small fragments.
Importing original animation with specific start/end keyframe doesn't work. It gives me a strange error.
you could copy it X times and than remove the frames you dont need
In where, Sequencer or Anim Asset?
copy anim asset and open it, when you right click on the frames bar you can remove X frames at end/beginning
hey guys & gals, I'm looking for some advice on best practices for a character animation system
mostly concerning the use of "proper" blending, if there is such a thing
currently, I have a state machine for most of my characters that's mainly reserved for locomotion
pretty standard stuff there
then I also have two slots
one called "upper body" and the other called "full body"
upper body gets blended together w/ the cached locomotion pose via layered blend per bone, from the waist up
and then I cache that & plug it into a regular Blend node to combine it with my FullBody slot
this goes into the final animation pose
I have a bunch of animations e.g. shooting (upper body blend), leaning left/right (full body blend), etc.
but since my system is set up as such, I have to use animation montages for all the "situational" animations, e.g. leaning, assuming an attack position, etc.
I don't know if this is the "correct" way, but so far so good. so I wanted to ask if anyone can give some advice on how best to structure this going forward
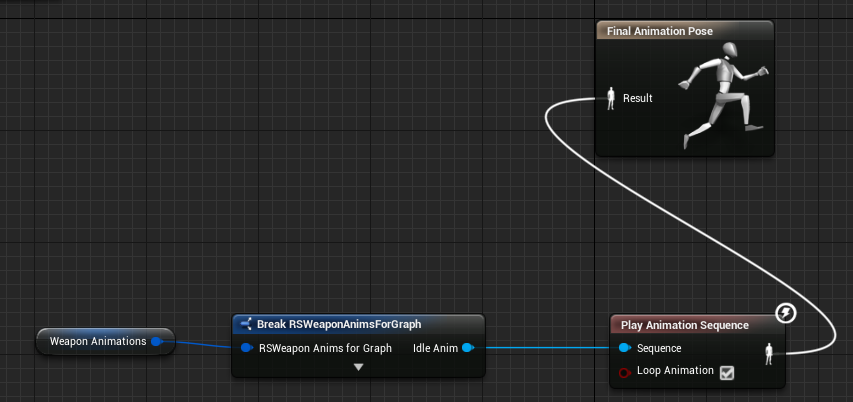
here is a typical anim graph of mine:
this system works fine for my game's current needs, but I'm no expert when it comes to animation so am wondering if there's a more standard way of doing this
any takers?
hey buddy, people are rarely active on this section try #ue4-general you'll find more help there
Could someone tell me why there is a _C at the end of my anim blueprint please? Its not there when I pick it from the list and I am getting a couple issues with it so I wonder if Unreal is trying to whisper something to me!
It's a _C class ?
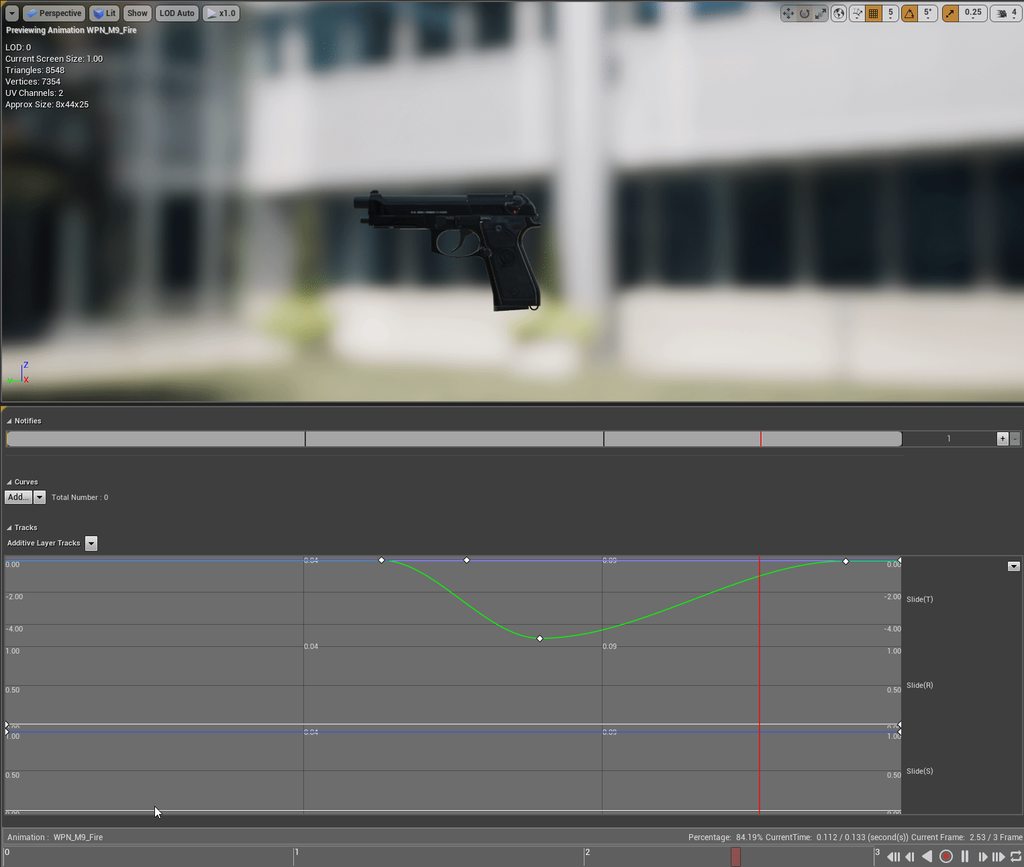
Hey guys, Is there a way to copy paste Additive Layer Tracks from one anim clip to another?
community plz halp
😂
for some reason, different mesh same anims
this guys eyes pop out of his face
should I use an unique StateMachine with all movement stances or should I have different ones?
in my game, the character has animations for each stance he is currently, depending on the weapon. it has an unarmed (default) stance, a martial arts (still unarmed) stance, a bow stance and a sword stance. should I make a StateMachine for each and Blend by Boolean (x weapon is toggled) chain in the animation graph?
it feels more clean than making a single StateMachine since I have different animations for idle, walk, run, crouching
thanks in advance :)
@pseudo flame you dont need a blend bool chain, if you go that way have a master state machine with a sub state machine as input in each state, but i dont know doing it with state machines is good or bad
@jolly osprey That's a pretty normal setup. It all depends on how you want to drive your character. You can fire off a lot of montages, and You may want to have additional slots for Additive vs Normal montage assets.
The montage approach is fine if you have a lot of one off things that you need the character to do, but that work is likely going to happen at the character blueprint layer.
You have finer control if you do more of the work in the animation graph. You can have multiple state machines, and you can even have multiple animation graphs via Sub-AnimInstance.
You should just write out all the things that need to happen at the same time, and then sort through the order that those poses have to be constructed. Locomotion > AimOffset > Upper body Pose > Upper body Additive > Hit Reacts > Look At & IK.
@frosty peak thanks for the follow-up! I'm using delegates for communicating between my character and animation bps. when you say Normal montage assets, I guess you're referring to animations that are done on the full body of the mesh vs. a per bone blend, correct?
@spring steeple hmmm... subStateMachine? I didn't know it was a thing. I've done with using a Blend by Int with a "StanceIndex" variable as input
oh, you actually put the weapon "StateMachine" inside a State?
oh you can literally put a StateMachine inside a State lol. is that the way to make a SubStateMachine?
yeah
each state is a full anim graph and i assume that it has all option the main graph has
I see. I think I'll make a State toggled by a weapon being drawn, so it chooses whatever state machine it wanna use. thank you :)
Hi I have an issue with a tutorial on ragdoll to animation using anim poses. At the point in the video I have linked, they create a body for Root and set the physics to Kinematic and also disable collision for the body. Then the Pelvis constraint is adjusted to FREE on all linear limits. I have followed this to the letter several times but everytime I seem to be having some collision which sends the actor spinning into infinity. I can't seem to find out where though. My only other option is to reset the position of the actor manually but I also have issues with that. Any ideas at this point are worth gold to me because I've wasted too much time on this. Thanks. https://youtu.be/nkj6PAbGYtM?t=19m14s
Wes Bunn walks through how to set up and use Animation Pose Snapshot to create more natural looking ragdoll-to-standing animations. Ragdolls are fun, but sna...
@jolly osprey The normal montage is referring to 'No Additive' animation import settings.
If you have an animation that is an additive, such as a small hit react, you have to run that through a 'Apply Additive' or 'Apply MeshSpace Additive'. So you'll want a Slot that takes an 'Additive Identity Pose' into a unique Montage Slot which then feeds into an 'apply additive' node.
For the 'normal' montage you'll continue using the Slot + Layered Blend per Bone.
This will give you a lot of control.
@frosty peak thanks so much for your advice!
No problem! Hope that helps. Ping me if something gets weird!
hey guys, is there a way to slightly alter the animation of the default FPS character to hold something one-handed? or would i just have to animate a whole pose from scratch?
hey
sorry to bother you
i imported a sk mesh, and it modified the tip of one finger on all animations
lol, done the retargetting the wrong way around and now the manequin animations are borked. is there a way to reset the rig? like a factory reset?
..well it's the anims for the manequin that got screwed up so guessing i need delete the anims and copy them in again from a clean TPS project
Can anyone explain to me how to use TimeStratchCurve in my montage ?
Is it possible to setup (Foot) IK without special Bones?
@dusk dove Do you mean just using the 2 bone ik node?
How would you use speed and direction to control a blendspace 2d?
Awsome thank you this is exactly what I needed to see
@onyx dirge Really appriciate it, I was trying to do all kinds of goofy stuff in blueprints when all I needed to do was reconfig the Axes in the Blendspace.
@cedar rain it looks like I can use Virtual Bones as the IK Effectors 😃
@crude fjordildex#6923 Yes, Virtual Bones will remain unaffected by your ik so you can have correct calculations
@glass temple For the speed just use your velocity length (you can remove the Z part of the vector to flatten it) and for the direction you can use the calculate direction node, even is the math behind it are quite simple
@onyx dirge I have something similar that seems to accoplish what i want.
@onyx dirge I want the animation to slowly return to idle if there is no movement. Should I just decrement speed in the event graph? Or does speed decrement need to be updated on delta or tick?
It's a falling or skydiving animation 😃
I would say it’s better to have the animation and speed matching so you make your falling speed increase and decrease smoothly
But if you really want that
Look at the Float Interp node
Current : your speed value in the anim BP
Target : you character actual speed
Delta : the delta time x from the update animation node
Speed : your value to tweak so you can make the speed change faster or slower
This node will interpolate smoothly, so the closest you are from the target float the slower it will change
You also have Float Interp To Constant if you want the interpolation to be, well, constant ^^
hey can somone show me a quick way to impliment a lean when walking in a certain direction; sorta kile in FPS where the character moves left, the weapon leans left showing that the character is moving left.
i tried doing this with key frames in the original aniamtion and throwing them into a 3d blendspace but no luck :/
guys nvm, I am an idiot in the blendspcae I had the direction where the speed goes and the speed in the direction sopt xD
just goes to show to double check your work, or not to work when half asleep xD
Hi, can I ask if anyone has some experience using EMeshComponentUpdateFlag and what's the difference between them other than the comment in source code?
Recently I came across a bug that may because if the meeshcomponent is not rendered, the animation can't finish correctly.
OK, I think I've got the idea. So in AnimInstance.cpp there is a function called NeedsImmediateUpdate. This function decides whether we should skip the evaluation phase, and If Evaluation Phase is skipped, PostUpdateAnimation() will not get called which means animation notifies won't be dispatched.
Unreal has recently started telling me I have Multiple Root bones found in the hiearchy of my skeletons and won't allow me to import them, but they're the same skeletons I've been using since 4.15, any idea why?
I'm using 4.18.3 now
Oh.. Apparently 4.16 deletes the root armature bone if imported through Blender .fbx files, and renaming your armature to Root instead of Armature fixed the issue.. Alright.
@distant breach This only means that you don't have a real root bone, using the armature object as a bone isn't great when animating root motion for example.
Alright, in the future I will start armatures off with a proper root bone then
Usually you would have a hierarchy of Armature object - root bone - other bones parented to the root bone, name the armature object "armature" so it's deleted on import, that way you get a clean hierarchy which you can use for multiple characters.
Is standard practice just to have a regular bone on the origin point?
with default transforms
Does anybody know why my characters arm moves away slightly when its moving down
as you can see, the gun slowly drifts away from the front hand half way between the bottom and center aim
when it gets to the bottom, it goes the way it should (with the right hand aligning with the left)
Any help would be great! 😃
@distant breach Root bone is usually at 0,0,0 (documentation for root motion says this too I think)
Okay, thank you for the tips @winged valley :)
Could anyone give me advice, seem to be having the same problem 😦
Anyone know of a way to bake in additive animations?
Anyone have any luck skinning with Blender and exporting to Unreal4? Im about to rip my hair out.
My re-import from Blender once broke, so I had to delete the mesh and import again, other than that, it should work.
@ashen elbow did you have to set anything up special?
what exactly is not working?
I'm not using Blenders default scale
and you have to change some export settings
Hey guys, New to blender just wondering would this work if exported to Unreal? For the life of me I can't work out why the animation isn't working in Unreal.

Just using keyframes.
you can try an alembic export import
idk much about blender or modeling yet but i know that was a thing
hey guys
Is there a way to export (bake) animations resulting from the animgraph?
for example
I have an Idle pose... I add a bunch of additive layers on the anim graph... I would like to then export the result to an animation asset (which will only need to be trimmed afterwards)
Hey guys, I'm trying out mixamo for the first time and I want my walking animation to follow the position indefinitely ? At the moment my animation when finished starts form the beginning..
Is there a simple way to achieve this ?
yea, use walk in place
checkbox in mixamo if im not mistaken, dont use mixamo myself tho
does anybody know a way to modify animation so i can set a predetermined location where the animation (maybe with root motion) would stop?
I was wondering, does UE4 have bone driven morph controllers?
or the only way is manually set it in anim bp?
Have you looked into the Bone Driven Controller Anim Node?
Describes the Bone Driven Controller node which allows a
it looks like you can drive a curve (= Morph Target ?) with it
@young urchin
This is a a mix of blueprint and animation question here but I was wonder how are Anim Notify Blueprints called from the animation notify such as the images show below.
As these blueprint notify hold all the logic in them to do the effects of say footprints
But then getting the information from a notify that is added to the animation, how do you expose the said Anim Notify as circled in red?
@gusty hedge you can add variables to the notifyBP and make the instance editable to expose more variables to the animGraph
yo i have my matinee but how can i make it play when i click play https://gyazo.com/f96e1e99933ab310d151141c962c0b1c

@dusk dove yeh, that's kind of manual I meant
@orchid spindle https://docs.unrealengine.com/latest/images/Engine/Matinee/HowTo/MHT_7/MHT7_MatineeFinished.jpg

How to animate a Skeletal Mesh jumping onto a platform and applying sounds in Matinee.
@orchid spindle you have to provide more information than just "it does not work"

this is what happend
this is what i did https://gyazo.com/0b3660a76d1c3ffefc6bfd730d2e7f35

i set it also to play on level load
i wanted it to play the camera sequence i created with the matinee when you click play
and i needed this finished an hour ago and i just can't see why it wont work
@young urchin
for camera sequence you need level sequence
well me and friends did this a long time ago and the matinee was fine
i just need it to play when you click play that's it
yeah, long time ago it was...not even sure if matinee could work with cameras in newer engine editions
i think it's been a year or two since sequencer been added
fix was simple set camera to follow player 0
and make sure u done this https://gyazo.com/0b3660a76d1c3ffefc6bfd730d2e7f35
@spring steeple Thanks and that is good to know for getting the variables to be displayed in the animBP.
As for the actual notify in the animation timeline scrubber, this might sound a bit odd but how it is indicated with a dark red where as a standard notify is different. I am guessing that is where some right click > convert to happens somewhere or is it a different process?
Thanks again in advance
the notify BP has a color that you can set or what do you mean?
such as I add a notify but I want this notify to be able to reference that AnimNotifyBP event to happen, I am guessing that once the newly created notify is linked to this AnimNotifyBP that is would change its look (color) and have those values exposed in the animation previewer as shown in the last image
Sorry for the question being a little vague as last night was the first time I have stumbled across this method and found there is actor class called AnimNotifyBP.
It just seems like a much better way to handle having logic fire off for animation notify to be taken care of in their own AnimNotifyBP than to have to toss more logic into the AnimBP for when different notify event occur. And seeing that you can assign different values to the notify to give more variation by altering it from the animation previewer.
Hey everyone, just trying to get a feel for how to set up a first person character. Was wondering if anyone has a good tutorial set showing how to use the starter animation pack to make a basic animated fps character?
The third person game tutorial works okay but only teaches you walk/run. I would like to understand how to set up aim offset/crouching.... all that good stuff.
I have an animation setup to play in this manner, the reference is valid, the animation doesn't work, if I set the same animation normally (without reference) it works
https://i.imgur.com/Jn1wKFi.png
@devout hawk Not sure if this is the best one to look at but probably a decent place to start. He is a bit sloppy but gets right to it https://www.youtube.com/watch?v=xjGnlQLyU-o
@errant oriole @devout hawk Avoid, have a look at Tom Looman's stuff for FPS, he has a udemy course as well, I don't have any specific links
Will check that out. The big thing, is that most of the tutorials I have found, are using Mixamo animations and characters, which I doubt I can use .
Thank you though. I will look into these. If anyone else knows of some good tutorials, please give me a heads up. 😃
You can use mixamo animations if you get familiar with retargeting .. It's a pita but it's doable
I wonder about the legality of that however?
@devout hawk https://forums.adobe.com/thread/1992542
You're free to use them in your games however you want. 😉
Anyone know a good way to normalize any animations such as mixamo or animset into Blender modify the animation with IK then export to UE4 with the main UE4 Manequin skelton ?
there might be scripts you can find, but as far as I know there really isn't a way
Has seomeone here worked with Sub Anim Graphs before?
Of course there is :P retarget to ue4 mannequin - export as fbx - import to blender - add ik and modify as needed - export as fbx - import to ue4
The retargetting system is fantastic, isn't as hard as some people insist on thinking
Unless the skeletons are wildly different then retargetting barely takes any setup or work
You just need to know how it works
It's not hard, it's just tedious and convoluted
Ah retargeting, the devil him self but i need to make a try you are right @smoky shell
Any one Know how to modify the animation of Animset Pro by Kubold into Blender then export to UE4 ?
Hello. I've set up a basic vertex animation for a fish swimming which I am applying to a mesh particle emitter - Problem is, they are all swimming at the same rate and in sync. Any ideas how to add some Per Particle variation to the vertex animation? https://imgur.com/a/V1Yba
Someone has met any problems with 4.18 animations? After years I with UE4 I realized the forum it's not a place where to post newbie questions. By the way this time it's not a "How To". I meet a strange problem: in a few of works I enabled root motion everywhere and I attached a socket containing a flipbook as preview inside the root. The animation sequence I did in UE4 plays, but in the anim blueprint not(it results an empty animation). Here's a pic of the anim bp. I've never got this problem, just now I enabled root motion to move a first person sprite(like Doom). Someone had my same problem in Unreal Answers, I follow the istruction of the best answer too.. but nothing...
@vernal steeple Italiano?
L'hai capito dal cattivo inglese vero?
Magari dal "Cattura.png"
so pessimist
Comunque si, italiano
Avresti per caso idea di cosa sia successo al mio anim bp?
Anyone know what causes get velocity to return 0 every other tick even when you're moving? Can't for the life of me see why it's doing it on one project and not the other - everything is the same
exact same issue as this: https://answers.unrealengine.com/questions/221901/event-blueprint-update-animation-inconsistent.html
Pretty much a blank project in 4.18.3. I have a similar setup in a project from 4.15 and it doesn't do this even though everything appears the same
something is causing it to reset to 0
In my experience animation instance is chocked full of internal bugs
Never had anything like that myself though
I've never seen it either
Should check Delta > 0 too
okay, but I'm thinking it's something somewhere else resetting it to zero. I have the exact same graph setup in another project and it doesn't do this behavior
Tbh I suspect the editor is printing 0
While game prints actual
Like there's no validation
animation events that trigger on speed 0 are being triggered
So you are validating the pawn unlike that example right?
Try Get Pawn Owner -> IsValid before doing anything else?
I'm having trouble believing this isn't a user error because I've done loads of character work and in 4.18 and never seen it
however in 4.15 project it doesn't do this
yeah, i just posted a link where they talk about some unrelated function reseting character movement velocity to zero
don't sweat it, thanks for the help
How does one create animations inside ue4?
You can't create animations in UE, but you can blend single poses together to create an "animation"
Hi, I have a question regarding animation retargeting.
I've bought Advanced Locomotion System V2 (ALS) on a market, it uses IK bones.
When I'm trying to retarget animation from free AnimStarterPack to ALS skeleton (which has same bones), feet aren't moving.
Why could it be so?
There is link to recorded flow https://dl.dropboxusercontent.com/s/gy7i6pob0x05pp9/2018-02-23_13-46-04.mp4
did you set up both retarget poses and save them and make sure you have a default pose saved?
Just throwing this video out there for anyone who can benefit from the awesome amount of knowledge this guy lays out. One of the industry old-timer's who is still up-to-date on the best current animation workflow and breaks down state machines vs blendspaces and how to properly transition between them. If you are animating, and aren't 100% pro level, you may want to watch this little gem.

What starting to look like an ongoing problem as to the progress and progression of what needs to be a complex player control system the idea of what a blend...
@compact urchin watch the video I posted at 12:45 and you'll see your answer.
Hi all, would be great if someone could point me in the right direction.
I'm setting up a 1D Aim Offset, but the angle between the centre aim and bottom aim seems to unalign the weapon from the front hand, making it look, well weird.

Notice how the gun deattaches from the hand holding the grip halfway between the blend?
I was wondering what could be causing this, been stuck on it for weeks.
You'll probably need to apply a deform to the bone during the transition. There's a video I saw somewhere a while back that explains getting the hands to line up on a gun during anim transitions. I'll try to dig it up for you.

I figured out a way to solve this by using a fixed offset value from my right hand bone to drive the location of my left hand bone, and use the preview to ad...
hope that helps
@mild isle
it looks close, like you may have to just adjust the shoulder a little during that transition.
This will do just the trick, thanks! 😃 @steel knot
Is there any specific thing one should do to export your ue4 skeleton to make animations in maya and bring them back in.
@steel knot thank you!
Anyone here ever exported animation from maya but have it be different in UE4?
This is how it looks in Maya

This how it looks in UE4

Any ideas?
what version of 3ds max are people usin these days? does 2018 seem stable (yet)?
or is it still 2016 or bust
hey would using anim notifies for a melee system be viable or is there a better way to do it?
Anim notifies are for driving animation events, do yourself a favour and don't try to drive gameplay with it, animation is a representation
There are some exceptions I guess, but in general, that's what it's for
@smoky shell could you explain further? Like I'm using a gameplay melee combat where the combo system is driven by anim notify for combo chaining. What would be a better way to do it?
this doesnt stop the montage
what i can be missing?
both target is character
and i need to stop montage for its component sk mesh
Hi
I have a motion capture animation
Any way on how I can turn that to a in place animation...??
I've retargeted to a new character and duplicated it's anim blueprint for the new skeleton anims. For some reason the new anim BP works find in the previews but as soon as I play the character goes back to T-pose. Any ideas?
@tacit pilot Did you assign the new anim BP to the new character?
@wet pivot yeah, I just added a second mesh with the BP and moved it forwards and it plays the BP
I think it might be something to do with collisions
inside the character BP
Defaults to T-Pose only in game
which is your new character? the one inside capsule or outside it?
is the new correct character BP being placed by the GameMode?
both are the new retargetted character with the updated animations. I'm overiding in world settings and nope I'm sure ingame it's the correct character
Sorry, i cant figure it out
thanks, I think it's just something in the BP's maybe overriding to the wrong anim_BP on play. I'll figure it out
Is there a way in which I can play a animation for some time in state machine and then transition to the next?
can anyone help me identify how to put two animations (slash sword and equip shotgun) together to look like this? I feel like it would be more efficient to ask around
https://www.youtube.com/watch?v=1Ey-JPRnKII
here is another example but in ue4 so I know it's possible
https://www.youtube.com/watch?v=HseSD6PYGJc&feature=youtu.be

@Vaei#5603 is that because it is unoptimized way of doing it or just because it traditionally should be kept separate?
Anybody know how I can fix root motion of my Montage with high latency (250+) when the server is correcting final position of player on Autonomous_Proxy side ?
Is Art a solid tool for rigging and animating?
I'm interesting to get into both, but I'm still having trouble finding what are the good options for
at some point i thought humanik was good, but then when I test it and look deeper into infos about it, now it's bad.
Anyone on able to help with an animation issue of mine?
http://sol.gfxile.net/dontask.html then maybe no-one will respond, but anyways 😃
Hi! I have a motion capture animation in which there is root motion. I want to turn it into a in place animation so that my character capsule can move it
Is there a way I can do it?
Basically I want to freeze the X and Y transform of the hip bone in the skeleton mesh...Any ideas?
How far can I push skeletal mesh sockets? Can I have the chain of Socket attached to anothe r socket? It says that the socket is an offset from the bone, so it doesn't sound like I can offset one socket from another.
However, logic wise, it shoudl be a rather simple offset from another socket?
hey anyone here help me with animation ?
im new to ue4 and i imported a animation and how do i make it longer https://gyazo.com/e95f09abdd47510cc4d11bc13cbd7f96

i can make it not loop easily but i need it to run for longer
We can interpolate pose assets to create animations in UE4, does anyone know if animation extrapolation is possible?
Eg having the animation curve go above or below the 0 to 1 value to allow the animation to overshoot the pose.
@orchid spindle how do you mean longer? Like travel through space further? Or looping and running on the spot?
Because if you want to make the character keep running forward with their root motion in the preview you can enable Process Root Motion
I have several hand poses (many, in fact). I need to blend some poses into other poses and back. For example A > C > D > F > C > A. On top of that, there are intermediate poses, for example, A can't just directly blend to C. It has to blend into B first as A > B > C (although A can blend to let's say F without any intermediate poses). How do I do that ? Thanks
I have a question about aim offsets... I guess?
I'm using ALS (Advances Locomotion System from Marketplace), and when I'm trying to use one of states as 'Combat mode' to hold a gun - it get small rotation to right for some reason. And during walk forward - gun waves from side to side. How to prevent that?
Well, here's the video:
https://www.dropbox.com/s/ap3l1lw6c0pl07f/2018-02-24_02-42-05.mp4?dl=0

Is there a good tutorial how to create replicated aim offsets?
There is documentation on how to create aim offsets:
https://docs.unrealengine.com/latest/INT/Engine/Animation/AnimHowTo/AimOffset/
https://docs.unrealengine.com/latest/INT/Engine/Animation/AimOffset/
A critical thing is to make sure the additive settings on your animation assets are correct
Using an Aim Offset, a character aims a weapon in the direction of your mouse or controller.
An Aim Offset is an asset that stores a blendable series of poses to help a character aim a weapon.
@compact urchin As for the rotation issue, the rotation is coming from the hips which suggests your upper body has no animation and your aim offset if not being called, therefore causing the upper body to rotate with the hips of the character in FK
@devout dagger what might be beneficial is to look at this talk from GDC about how Abzu used blend shapes and poses to create their animations https://www.youtube.com/watch?v=l9NX06mvp2E&t=586s

In this 2017 GDC talk, Giant Squid Studios' Matt Nava offers insight into the unique art style of Abzu, and the processes that he and the team at Giant Squid...
If it is skeletal, using animation curves would probably get you there too https://docs.unrealengine.com/latest/INT/Engine/Animation/AnimHowTo/CurveDrivenAnimation/
Illustrates how you can use a Pose Asset and Curve Data to create a new Animation Sequence driven by animation curve data.
yeah, they really took it to the extreme, but if you have pose assets and you want to blend between them you can create animation curves that interpolate the poses, this is quite a manual process and the curve editor in unreal is rather unwieldy
what I have is basically a skeletal mesh and bunch of anims for it (each of the anims is just 1 frame anim)
relaxed hand, fist, thumb up, thumb up + index finger pointing, index finger pointing, etc.
so depending on what button is pressed on the motion controller (or touched), hand in-game should blend from one anim into another
Oh, in that case you would just want a series of montages, or build them into a animation state machine and take advantage of the native blending present in either
ah, state machine..
would you like an example?
sure, please
k ill make a mockup
some buttons are pressure sensitive though.. like putting index finger on the trigger is one input event, but pressing it is another and it yields float from 0.0 to 1.0 I believe (0 is not pressed, 1 is fully pressed). So I think I'd still need a blendspace for that
In that case yeah a 2d blend space would probably get you there too, might be a case of combining a 2d blend space and a state machine, so the anims which are based on sensitivity values would be in the blend space and then you can blend to a different state which can house another blend space
how would I do that? (use blendspace as transition rule ?)
I don't see it in the uE4 docs
The blend space would be inside the state
the transition rule is what tells the graph which state to use
I see
so you have a state machine which contains your states, and within those states are your animation assets, either blend spaces or just plain assets, then the transition rules define how the states blend between each other and which state is used at any given time
gotcha
if you click on a transition rule (aka Conduit) you should see blend options
this is what i was initially thinking for what you were trying to achieve
But you could have less states and put your poses into blend spaces instead
so in that case is state would have blendspace with 2 poses ?
exactly, but you also mentioned you wanted to blend between more than two poses so you can put more than two poses into a 1D blend space, subsequently there is also a blend space 2D which allows for more axis of blending in the blend space
so it kinda comes down to, which animations to you want to blend between and then, which ones do you want to break off into separate states, if you even need to that is
aye, thanks.. I'll dive into it
no problem, sorry if it was a bit confusing, everything starts to layer up in animation so it gets hard to explain very quickly
yeah
I am wondering if there is a comprehensive tutorial series explaining anim system behemoth.
kinda, there should be an youtube series i believe, its a shame really there are a lot of people in here asking questions but not a lot of answers
It would be nice to see some Epic input into some of the channels
yep
@graceful nimbus The ART tools are very widely used. Been using them a while, so have many of the animators I know. Ive never delved into the rigging side but from what i can see it is a very good system. Its not without its issues, most of which are known, many of us are anticipating ART v2\
@wet pivot I think you are looking for root motion on the left hand side of the animation preview window
Cool, thanks.
Any good rigger with Blender here ?
Almost all rigging is done with Rigify in Blender these days haha, is there something you are having trouble with @sinful smelt?
Is there a lod system for animation?
I want to freeze animations in the distance based off screen space
@viscid willow Yeah im kind of stuck, im using UE4 Tools Addon and i would like to put a non rigged character into the ue4 tools skeletons with IK
@viscid willow Thank you for your reply, but I was not looking for root motion as forcing it inside the unreal engine causes various issues, I got it done by editing up some key frames in dope sheet(blender)
@wet pivot Cool, glad you got it sorted
yeah, thank btw
@sinful smelt You can skin your new mesh to the UE4 tools skeleton if that is what you are after
forcing root motion in unreal engine also locks up the rotation and z-axis transform of the hip bone in my case, which I guess no one would want
@viscid willow Yes and rig the mesh to follow the movements of the UE4 Tools Skelton and IK
Okay, you could do this one of two ways:
-
Skin your mesh to the UE4 skeleton directly - It helps if your character is roughly the same proportions as the UE4 Character Mesh for this
-
Rig your mesh with its own bones, then add Copy Transform Constraints between your characters bones and the UE4 Skeleton bones
That would be my suggestion
@viscid willow Thganks a lot for your advices ! Im stiull a beginer but ill try as you said + try the Rigify Addon thats look cool too
Rigify is good for your own custom stuff. You may encounter some issues with the skeleton that rigify exports, but if I remember correctly you should be okay if you make sure to tick export "Only Deform Bones"
okay noted 😃
hi, someone know ho to increase performance for skeletal mesh clothing?
Can anyone point me in the right direction when it comes to characters holding things?
I want a character walking with a rifle, but am not sure how to approach it. I could add it to the socket of his right hand and then adjust the left hand so it fits, but this seems like too much work and I am sure there is a better way to handle this.
Hello, I have a question about bone contraints from blender -> UE4. What would be the best way of implementing this piston constaint I have in blender to work in UE4. https://cdn.discordapp.com/attachments/211963007981453312/418302869393899530/2018-02-28_02-03-40.gif

Hey guys
I have a rigged mesh, and I need to reorient bone transforms without deforming... Has anyone ever had to deal with this issue?
@rigid coyote There are two things:
You would either need your animation assets to be animated to hold the weapon.
Or
You could look into FABRIK to use in engine IK to follow a target - If memory serves I think this also requires a bone to be able to follow too but im not too sure
@west spire There are bone constraints in unreal, although im not sure you would be able to achieve this effect. Could you not export it as part of the animation?
@west spire Look into animation offsets. Give it the steps for various angles and it might work out, Easier than trying to replicate constraints.
Anyone know of a way to add custom leaf joints to manaquin rig using ART tool or does it have to be custom rig created to modify that
I went back and added weapon joints to hand but the controls and joints on fingers seem broken now possibly due to recompiling rig
Anyone know of a way to add a weapon joint to manaquin rig and still keep its controls working?

How can I isolate index finger, so that when I blend from one pose to another, only index finger bones are blended ?
Hi guys I have a problem with the AI not playing its walking animation, it is playing the Idle animation so the Anim BP is working. Maybe it is not reading its speed as to why it's not moving? Can someone tell me where to check? Here is my Anim BP graph setup:

Hi all, I have an fbx animation file that has been created at 60fps. When importing to unreal and unchecking the "Import using default sample rate" it still imports at a very quick sample rate. The animation is sped up 2x
Has anyone else run into this issue?
@viscid willow https://www.youtube.com/watch?v=hHrsbmbAPpM How can I isolate index finger, so that when I blend from one pose to another, only index finger bones are blended ?

hey, for an aim offset, can I only animate the head and leave the rest in t pose or would that not work
like if I did that would the rest work with the other animations like normal?
Is it possible to have a sequencer that animates a specific character/actor, but, that character /actor reference can change at runtime?
The goal here is to create a sequencer animation that I can use on multiple characters. Instead of copying the old sequencer and changing the character reference. I found this, but, I'm having trouble getting it to work with a character + animation. https://docs.unrealengine.com/latest/INT/Engine/Sequencer/HowTo/AnimateDynamicObjects/
This example illustrates how you can apply Sequences to dynamic objects at runtime that are different than the one the Sequence was authored with.
hey, if I use the "play animation" node in the character bp, how do I make it go back to normal animations (anim bp)?
@devout dagger
I still don't get that, its the actual animation that I make itself that I was wondering about
thats why that post was tagged for motosep
here is documentation on aim offsets
Using an Aim Offset, a character aims a weapon in the direction of your mouse or controller.
I know but I asked about the same thing, I always go unnoticed ._.
motorsep was asking about animation isolation (essentially masking animation), you had a question about aim offsets and there is a some documentation about how they are made (linked above), as for your last question about making your actor return to using their animation blueprint you could try this node:
@viscid willow but where do I specify bones to be affected ? :/
oh thanks, the aim offset I was asking about was for animations playing with other body parts playing other animations, thought that was the same thing
@devout dagger there is another node, blend per bone, perhaps take a look there
@real atlas aim offsets are additive so whatever you do in the aim pose will be added to your current pose, the idea of an aim offsets is to aim parts of the character to something. There are also additive animation nodes for simple additive effects
yeah, I was thinking about it, but the arms only work don't work in the falling animation and stuff
it confuses me
sorry i dont know what you mean, it sounds like you are talking about a specific case i am not aware of
Honestly the best way to progress with this stuff is to find documentation (if it exists) and try it out, if it doesnt work, look at the settings it asks you to change and work with them
my aim offset kinda just worked itself out, like the legs were idle in the original animations but whilst running in game the legs play running whilst the upper half aims
hey, does anyone know why when i play a fast animation, it doesnt play entirely on my mesh? (it only plays some parts)
it plays ok in persona
Is it blending at the start and end of the animation?
its firing from a montage
should i check something inside the montage for blending?
alright, found some, will try with 0 blend time
that was it! thanks a lot battz!!!
ugh this is so annoying going from jump to falling theres like half a second of idle inbetween ._.
@edgy shale yeah blends are great and also a nightmare, o long as you are happy with instant snapping into an anim, 0.1 blend is also very fast if you want some blend
ugh god now jumping breaks aiming too
@real atlas better check your fall states in your state machine
...
if you want aiming over everything you can put the aim offset between your main state machine and the final animation pose
if you imagine that the aimoffset gets piped into the final animation pose
no its like where you said it just works thats true for running and stuff but not falling or jumping, no idea why
for now I just have it so it only plays the jump when not aiming, you don't notice really
also I really wanna know how to activate animations whilst in a physics volume
or should I just add a trigger volume or something? idk
ah, may have finally found it
For really basic animation, (such as the slide of a gun going backwards) can I just capture two frames in engine of the slide position then lerp between them to make it look like an animation?
omg I did it! the swimming!
nice, thats good, lots of straight forward things add up and make something that looks complex as a whole
yeah sometimes
@misty dagger if you open up your skel mesh, you can grab the bone and move it to a position that you want, then hit this guy
the big red button. That will open a recording option, it will record until you press the big red button again
you can then open this asset as an animation asset
Can you crop them in editor to 1 frame? Or do I need to open in 3ds or something
you can then delete unnecessary keyframes by right clicking on the timeline or create a pose asset from here
Thank you! Then how can I use them, with like a curve to control it
I only know plugging them into animbp
Would I use blendspaces?
yup, a curve would work for a pose asset, for an animation asset you would be putting that in a blend space, pose assets combine to make an animation, so you have two poses and a curve drives the interpolation , the blend space uses a value to interpolate in the anim bp, i would suggest the pose method if you just want to make an animation
The pose method sounds perfect
the blend space method would work well for different animation rates perhaps
Where do I drive the pose method?
Illustrates how you can use a Pose Asset and Curve Data to create a new Animation Sequence driven by animation curve data.
Thank you 😃
np, there needs to be more ppl here who answer questions, coz there are so many questions lmao
When I record the mesh for an animation, all my bones move to random spots.
I have no idea what would cause this.
That is a picture of the animation. The skeleton reference pose is perfect
hmm, thats a weird one sorry, nothing springs to mind on that, did you do this without moving any bones yet?
Yeah. And I check each bone in the animation, and its local space is different than the base pose
The X is fine for all of them. Y and Z got messed up somehow. Weird
It's probably my fault with the skeleton. I made the skeleton and have no idea what I'm doing
yeah that is weird, not sure what could cause that unless there is an issue with the skeleton yeah, that would be the only thing i could think of, what is your rigging software?
Oh I see
The root on the skeleton is shifted from 0,0 for some reason
Shifted it to 0,0 then recorded. All's good
Thanks for a link to the docs, too.
I've been using UE4 for almost three years and didn't know there was docs.
Very sad now 🤦
haha, the docs are never complete but there is a lot on there, definitely worth a read
omg I'm an idiot
been looking for a problem for ages and it was one node not connected hahah
Holy crap curve driven animation is harder than it should be
@viscid willow Everything is still super rough, but this is what you helped me make.
I ended up just transforming the bones in the animation instead of using Pose Assets
https://www.dropbox.com/s/iotp1qwvl16dl34/2018-03-01_16-21-43.mp4?dl=0

rad, looks good, nice feedback with that animation. I didnt do anything though lol so you went with bone transform nodes?
I would have nothing if you didn't help me get started.
And pretty much yeah. Just added keyframes of bone transforms to additive layer tracks, then edited the curves to look less linear
oh wow thats a cool way to edit the transforms i wasnt aware that is how the tracks work
that is super powerful
do the tracks feed into a bone transform node?
Yeah. Each track is x,y,z for position, rotation, and scale.
It's awesome and I'm so happy I found it
Can make and edit animations in engine
An idle animation is edited to create a new reload animation through Animation Layer Editing.
seems like it is a good tool for creating variations and tweaks too, as well as simple animations like you have done here
the root motion example is interesting too
Anyone have ideas on what's the best way to sync animation between multiple characters? kinda like Gears of War chainsaw duel
@potent current You want them all to have the same animation blueprint at the same time?
If so, get the skeleton of each one (on construct probably) and set the master pose component to one of them
Wouldnt you want them to enter the correct animation blueprint state at the same time? if they are different characters eg an enemy and the player they would probably have different animation blueprints
aside from that it would be important to make sure your animations are built to match frame for frame and that you know the location and rotation of the actors in relation to each other to make the animations line up
that way you have the two actors move to the correct positions, then play the appropriate animation
I don't know the gears of war chainsaw duel. I just understood syncing animations
if you watch here Lina answers a question and briefly explains how Gears animations were done where characters had to interact, specifically she starts to talk about the Gears execution animations

Announce Post: https://forums.unrealengine.com/showthread.php?136333 Tons of new animation features and improvements have gone into 4.15, so we have Sr Anima...
cool, that talk is pretty informative.
I was thinking syncing montages. My take away from that talk is interpolate character into right position and just play the animations
anyone have any idea how to get ART tool manaquin same bone structure as UE4 project manaquin with added ik hand and foot joints for weapon attachment etc?
Or is it possible to get ue4 manauin exported from engine rigging controls similiar to ART manaquin?
what is "cached pose" and what is it used for ?
@strong flame I know Blender UE4 Tools allows you to import the mannequin + a rig
ok thanks, i dont use blender but i think i might use a custom character anyways and rig from scratch
@devout dagger As far as I know cached poses are good for cleaning up your animation graph, they save the pose that is output by your state machine and then allow you to pipe it into modifiers or IK or what have you, here is an example of how i have used it
so i have my state machine in the top left, then i cache that off, take it through IK, cache that, pass it through the next, so on and so on
I lo~ve using cached poses. That's one way to get certain skeletal meshes to play multiple animations at the same time. Basically, you can have separate state machines to drive animations for different sections/parts of the rig. Like if you want the torso to do a specific anim while the head or legs do their own specific anim, cached poses is one way to do it (using the layered blend per bone node).
oh yeah animation slots are a really good use case
Sorry about not showing a ss:
https://gyazo.com/774e485dbc543b6a31bfe93e461de978
@viscid willow Yeah, I love it. So easy to set up too.

That's the animBP for a piece of equipment the user can use.
Thanks folks. It sounds like I still don't know a ton about animation systems in UE4 :(
I'd like to make a glow for the bullets in the material probably, and a small effect for when they hit walls
I got the wall hit script
maybe a splash effect would look good enough
but hrmm how...
well I made an effect for when it hits, but dunno how to get rid of it
its an emitter
i seem to have lost the max bone influence option in my skeletal mesh and cant find it, anyone know why?
Do you know why my animation made from Blender+UE4Tools imported in UE4 as .FBX file on the native UE4_Mannequin_Skeleton appear like that ?
Does anyone know if it's possible to export rescaled animation from ue4? (i.e. one that uses "Skeleton" Translation Retargeting)
@young urchin Oh thanks ! ill try that
@real atlas Are you spawning your emitter as part of your Blueprint?
yeah, but I've done something else that works instead
I put the emitter in the bullet actor and used visibility
might be worth checking to see if the bullets and their corresponding emitters are being destroyed after they disappear, otherwise i wonder whether you have a bunch of hidden emitters slowly building up and slowing performance
Is there anyone here who has animation experience? I need an idea/direction for the best approach for a bow
i can see 2 methods of doing it, just dunno which one has less pitholes
As in, is it better to rig the bow with a firing animation and then fiddle with the character hands to allign/time them, or is it better rig the bow and animate it WITH the character. When it comes to arrows, do you make a socket at the bow thread and attach it after animation plays, or do you keep it attached to the player hand? When the arrow is fired, do you destroy the arrow in hand and spawn another one with the correct velocity, or actually detach it from the hand and fire the same object off?
Or do you animate and rig both the bow and the arrow, and then go from there for firing?
@novel oxide you could import collision mesh by fbx
but does that work with characters? like use the collision as a physics asset?
well yeah thats what ive been using by now. but its highly impractical
@novel oxide compared to what?
nothing, just by itself
keep in mind those are expensive
they are calculated not even once per tick...4-10 times per tick (depends on physics settings)
@novel oxide Collision for your skeletal mesh should be handled with a physics asset unless you are talking about skinned collision like this example from Shadow of the Colossus
Deformative Collision: Usually a game character’s collision is a cylinder or pill-shape. SoTC’s collision was actually skinned to the Colossi, making it possible for the player to climb over a complex animated character.
Likes
196

@mossy carbon My approach would be the last way you mentioned, having the bow, character and arrow all in one animation. Then spawn the projectile at the right time to fire. To hide the arrow in your rig you could scale the arrow bone down to 0 over one frame. That way the arrow disappears and appears to fire off, when you draw the arrow again, scale back up to 1 over one frame
@viscid willow and how would i make a skinned mesh "collisionable"?
im not even sure if it is possible in Unreal, i was looking into it after i saw that tweet. I mentioned it coz i wasnt sure what you were trying to achieve because for all other purposes you would create a physics asset for a skel mesh
you can import custom shapes for your physics bodies it seems

Charles and Tom show off our Physics Asset Editor (formerly known as PhAT), which has been completely overhauled to significantly improve usability and expan...
So, turns out when you add a physics body you can choose this for custom shapes
I imported 2 models from Fuse CC to Mixamo and implemented them into UE4 FPS project. When I apply the same AnimBlueprint and Mannequin to both of them this is the result: https://i.imgur.com/qlztAGd.png
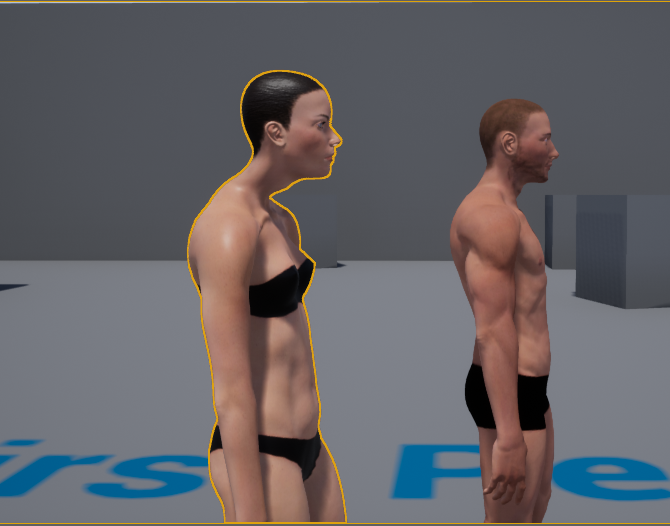
As you can see the neck of the female mode is just weird.
@novel oxide Also Per Poly Collision does appear to work but it will mean you have to dig into some settings/ini files to enable the functionality, the posts i am finding are pretty old but it seems like it works to some degree
@velvet blaze Have you made Retarget Sources for your skeletons? sharing animations is easy, sharing animations accurately is tricky and annoying
@viscid willow yeah but that would mean if i want to have different bows selectable by the player, I'd have to export the entire rig for every bow no?
btw for physics asset you can even generate convex collision
hmm, you could either have the bows be the same size and skin them to the same rig, eg one rig multiple skins. But I think you would rather have the bows as separate skeletons in engine and attached to the hand of the character, the same way you parent objects in your 3d software. So you could animate them all together but export them seprately
@viscid willow I don't think so, all I did was drag and drop the model and assign the Skeleton.
Breaks down the Retarget Manager options within the Skeleton Editor.-
see what retargeting does to help, but sharing anims between skeletons is never gonna be 100% perfect
Oh yeah i need a modular system, so you reckon best way is to rig skelly and bow sepparately, socket the bow in, animate together for good timings?
are you sure about scaling the arrow? wouldnt a socket be "better"
i mean animating it
sorry for many questions im just trying to prevent a realization that ive wasted time on the wrong approach 😄
yeah so as far as your animations are concerned it is all animated together and then exported separately and reassembled in engine. You dont have to do that for the arrow no, but i would assume the arrow would become part of your rig if you are animating it. My understanding is having two rigs, one of the bow, one of the character + the arrow they draw. The reason i say scale it to 0 is so you can hide it when you want, for example between drawing new arrows. It would be more difficult to have the arrow shoot when it is part of the character skeleton, so having the arrow disappear and a new projectile spawn would be my approach
yeah i dig the idea, very elegant, timing it right might be a pain but the arrow seems ez enough to solve once i have the other bits done
unless i can scale it down in a frame
but then what am i talking about lol
you can toggle visibility
the nice thing is you can control the timing via the animation and have a notifier in the animation that calls the arrow projectile to spawn
no need to scale
oh yeah theres that
oh wow thats a really good idea
id honestly have just disabled the mesh
scaling over one frame, is super hard to spot, but you could disable the visability of the bone instead. one thing i will say is, all bone visibility does is scale the bone to 0 lol
hah
never knew that
wait
u mean i should have a rig on the arrow and not just a socket?
i rly dont intend to use archers paradox here 😄
although...
sounds appealing
i mean the arrow could be part of your character rig, you could socket it, either way would work really, i would have it on the character rig so if i wanted to animate the character holding the arrow differently or turning it in an idle etc
Im sure you will figure out the best way that works for you :)
eh i just need a starting point, i hate re-rigging
oh yeah one more thing
this has nothing to do with the bow,
have you tried having a camera inside a characters head?
like i know you either make floating hands with camera and then render that for the player, and you have a corresponding 3rd person for other players to seee and dont render the hands
but them dudes at Star Citizen actually managed to make a camera attached to a 3rrd person head
have you ever tried it, and if you have, what kind of problems did you have with animations?
Are you sure it is attached to a third person head, i would think the meshes are swapped out when you toggle third person and first person
Oh yeah, thats the reason they lost 1 year of work
they really retimed all 3rd person animations to work in first person
so you only really have the 1 character
im just curious if its doable in UE4, just cant be arsed to try it any time soon, was interested if you ever made an attempt
it doesnt rly matter either way, the oldfashioned method works just fine
yeah im not sure how they go about that coz you would be worried about camera clipping and all that, perhaps they disable the visibility of the head. I just cant imagine making animations that work from both first person and third person
oh the camera clipping is simple, you just cull the geo a few units up close
but yeah, google it if you want, i dunno if its a boast, but when i played the game, the camera certainly felt like it was legit
cuz i looked at my char aniimations
and at other ppls animations
and there was literally 0 difference in frames
so, either their claims are true, or they are very good liars
or im just blind
lol those poor animators
in cryengine no less...
Makes me Cry Engine
😢
I have a rig that matches UE4 skeleton heirarchy except for the hands, My rig has joints in between the wrist and fingers...
Does this conflict with retargeting and using UE4 stock animations? There cant be any joints between all major locations for this to work correctly?
@strong flame If you set up a retarget source for this skeleton and match the ue4 skeleton hand to your equivalent hand you might be okay, it is difficult to gauge how retargeting is going to perform on skeletons
ok thanks
im sorry if im bothering you guys
but can someone teach me how to do aim-down-sights with a rifle
ive been able to learn a million different things easily and i can easily do ADS in the unity engine
but this in unreal for some reason really has me thrown-off
I have an animation I did in Maya, the left hand is placed using IK (in maya), the animations export fine and if I import them back in Maya they're fine, but in UE4 the hand is out of position.. and I'm baking constraints beforehand
Even if I export Maya -> Import UE4 -> Export UE4 -> Import Maya it's fine
Just in UE4 it has the hand in the wrong place
The skeleton thats baked is just constrained to the actual rigged skeleton, so nothing complex going on there
Basically I can see no way for this to happen and therefore I see no way to solve it
Unless there is some obscure engine bug at play
hey, does anyone know how to get an outside app to control an animation bp?
on the ue4 mannequin the upperarm joint is weighted to the bicep while the upperarm twist is weighted to the shoulder. isn't that backwards?
@noble pelican no that is correct believe it or not. The idea is that bone will help maintain volume of the shoulder when it twists
@gusty charm could you elaborate on what you mean by outside app? Do you mean a different blueprint?
@smoky shell that is a bizarre turn out. Could you post some screenshots or a gif of what you are seeing?
Haha NDA's?
Do you have anything modfiying the bones in Unreal? Like IK on the arms?
is here anybody familiar with MEL programming in Maya or knows a server or somebody I could ask? I'm having a problem with a certain command
@viscid willow Yeah NDA. Naw nothing modifying the bones on the arms and it happens in persona too
Gonna try in an earlier UE version in case it's a 4.19 bug, but not too hopeful (need to wait until I can load the editor to export em lol so I'll report back)
Welp, works in 4.17, think I got my lead
@viscid willow Thanks 😃 In the end, the skeleton had some.. strange bugs or.. something.. anyway, I exported the skeleton/mesh -> import into a new folder -> delete the current/initial skeleton while using replace references to the new ones -> animations are now working fine
glad it all worked out, it is really frustrating when the only thing you can think is "this should work" haha. Good work!
Haha indeed 😃
@electric93#4346 Just saw your message now that I'm not focusing on my own stuff, I used to be in film, focused on technical art a lot so I'm very familar with python and the API, mel is very similar where Maya's api is concerned, so I might be able to help if you want to elaborate (in here not pm)
Hmm maybe he left server? 😐
Nup he's on mutual servers so it's just not working
I'm having issues with my State Machine freezing on attack animations when I rapidly press the inputs
All my transition rules look okay
How do I fix the issue with blendspaces interpolating poorly resulting in hands being placed in the wrong location?
I only see one thread when I googled which is freaking odd, and no solution
I'm very new to animations, and I don't know how to create a basic animation of modifying a bone
when importing an animation, my mesh disappears
and now stretching occurs when applying the animation
has anyone tried the animations in Mixamo are they good to use for UE4?
does anyone know how its possible for animation state to change to a different state even though there is only a transition rule to go one way?
this bug doesn't make any sense
its going from 2Handed_walk back to unsheathe even though there is no rule that allows it to go back to that state.
just uploading a video now

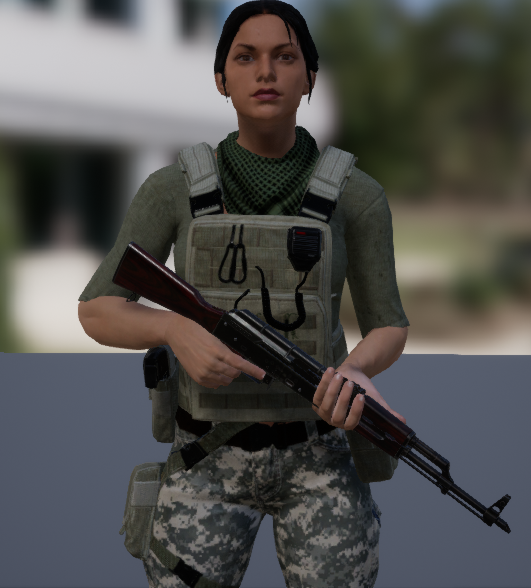
@smoky shell I'm having issues trying to replicate the "Modify -> Evaluate Nodes -> IK Solvers" option from the menu in MEL. I'm just trying to toggle that option via script and it doesn't work. Also tried using the echo all commands option from the script editor but it still doesn't work. I'm using Maya 2017 btw
does anybody know a way to limit the anim dynamics chain base on chain position? like, bones closer to end can move more than bones closer to start of chain
@hollow warren The mixamo animations are terrific but if blender is your only tool available you will have issues for sure. You will need real FBX format support such as Maya, 3DS etc to avoid very serious issues with bone weights
I had a lot of issues with blender exporting meshes and bones, with Maya 0%
same.
I'm still wrapping my head around root motion and wondering, would it be best to use in-place animations for standard motions like walking, running, swimming etc and use root motion for complex animations like attacks etc? Or should I be using root motion for all movement? I'm worried about if root motion would be difficult to scale with character attributes meant to scale a character's movement rate or not.
i use root motion anims only for oneshot animations
but you can integrate it into the basic movement, like having a stop animation after running
and through montages you can specify a moment when the root motion gets disabled, so for example the player can move even though the animation wasnt finished yet
@ebon portal Don't have time to find a solution but I can tell you why it fails, because when it's not being called internally the if statement returns false
if( `menuItem -exists $whichItem` ) {
    int $newState = `menuItem -q -cb $whichItem`;
    setState $name $newState;
}```(That's the relevant part of the command that is being called)
You could try tech artists slack for a solution
Quick question about sockets. So in the skeletal mesh and brought in a preview of the weapon I am socketing, lined it all up right. Looks great to me. But when I go to socket it on the CharacterBP it is way out of position
@proper tangle Blender to Unreal FBX works surprisingly well. So long as you have everything set up correctly there souldnt be any issues between blender and unreal. Honestly speaking, the number of issues that crop up in this channel because of mixamo are too many to count
Its because mixamo is using a much higher precision for the bone weights and blenders importer interprets it as invalid data and zeros it out, breaking it
thats the primary issue we see anyway. other issues were just variations in how being imported/exported
Ive never used mixamo, but would it be using more than 4 bone influences per vertex?
coz i could see that being a problem
mmm not that I noticed. Only real problem was the rounding error
worst effected weights would be knees, elbows, groin, buttocks areas
rounding error? like the deformation goes bad?
no. mixamo uses very high precision on its weights to give a really high-quality deform (0.0001 etc) but Blender interprets that as invalid data upon import and zeros it out
interesting, do you know if the same error occurs in maya?
I think blender was rounding anything less than .1 if I remember right
nope. maya handles it perfect
official fbx supports it, just blender's cleanroom reverse engineering of fbx import/export doesn't
something odd though: if you bring the mixamo rig into maya first, then import to blender after exporting from maya, the weights are fine. voodoo
gotta be something else at play as well but I have no idea what
lol this just makes me trust mixamo less and less, that is pretty weird though
Yeah, I won't use in this channel the language I'd prefer to use to describe Adobe...
This whole Fuse CC fiasco has been royally frustrating
@novel oxide would you want to be setting constraints smaller the closer to the end, there are constraint options in the anim dynamics node
curious though, because you could use rigid bodies instead which are more performant and easier to set up
As far as adobe is concerned they only exist for photoshop and premier in my mind haha
same.
ok, another thing, if i wanted to attach a skeletal mesh to a socket, can i somehow make it still movable? like it dangles around even though its a separate skeleton
I think in that case you would want to make the socket bone dynamic, im not sure if there is a way to make the socket itself dynamic. For example if you had a holster you would make a holster bone in your 3d software, then in unreal this would be your socket bone and you can make that dynamic
Does anyone in here have any information on how to set up paired animations inside of ue4??? Can anyone link me to any resources around how you pull it off. Example a killmove in skyrim. Any help would be much appreciated.
@regal crane If you scroll up a bit we had a conversation about this and we talked about Gears of War as an example
@viscid willow Much Appreciated ^^
i added a root bone so when im simulating the physics asset the character would still move with the capsule, but for some reason it doesnt if i have no body setup on the root, and if i create a body the pelvis will get kinematic too, even if its set to simulate
any idea
huumm happens in third person example too
i must be setting it up wrong
nvm, cant do the way i was thinking
i have a skeleton, animation and mesh working fine in unreal but i'd like to add another mesh to this animation. how do i do that?
@wraith verge i know that, if youre working with maya or any other 3d app, you can add bones as long as you keep the existing skeleton untouched. i dont think you can add a bone inbetween somewhere or move bones around. someone correct me if i'm wrong
@wraith verge you can add bones for fingers for example without any problem. but if you want to add a second elbow or something it would mess things up
@kind glacier so i can then 'update' the existing skeleton? (without making a new one?)
need to add the ik_ bones so that would not be a problem as u say?
i did it by exporting the new skeleton and putting the animations on the new skeleton
i dont know if there is a way to update
https://twitter.com/Riuthamus/status/970668219995365377 any thoughts on how I could make the "get up" from the ledge look better? I mean I am okay with it as it is now, but I do wonder if it couldnt be better, that I am missing something

Check out the new movement system in full swing! #gamedev #gameart #indiedev #indie #screenshotsaturday #ue4 #UnrealEngine #VoCM https://t.co/w2pf5EYOza
@battz#7387 yeah when I meant outside app is that I have a separate app not in unreal that's supposed to control the characters emotional responses, it works well with morph targets, but when I try using anim montages or anim blueprints I can't seem to get it to work
@remote summit i think it will look better if the pull up part was faster. stuck too long in animation for the player imo
@kind glacier oh, well its a state
you can hang there as long as you like
or press the up button to pull up
sure, same feedback though
yes
kk, ill see what i can do to fix that
you wanna have the feeling that it struggles i assume. so you can start at the speed it is at but just speed it up a bunch a couple frames in
when its legs reach the ledge it looks like a decent speed already so you might wanna dial the speed down again when it reaches that point
What way would you have a vr hand go into a pose, and what's the best way to lerp between two poses (such as when they're pulling the trigger)
I've only used animation blueprints and don't know how to do it in there.
Each item has its own "pose" for the hand to hold it. Can't use a state machine as I'd have tons of states.
Maybe have the pose as a variable in the blueprint or struct and pass it to the animbp?
Then can I lerp it in there based on the trigger alpha?
What's the purpose of Twist Bones in the Forearms and the Legs?
@dusk dove To preserve volume when twisting the arms, so instead of the arm twisting sharply at the wrist, the rotation gets staggered to the forearm twist creating a more believable deformation. The same thing happens at the shoulder and legs
I know about Forearm only, is there an example what it looks like?
cant really find a good example of it in engine but this video shows what it is supposed to do

Yes, this is a new rig for source engine. Completely re sculpted the hand in mudbox(base mesh is cod4's) and added leather for that classy look. Here's a tin...
put it this way, it is not necessary, but if you have it it will make your limbs look much better in terms of deformation and volume preservation
This can either be exported in the animation, some people drive these bones procedurally, we do that at our studio and i know the destiny animation team did that too
I have a question about tranforms and inheriting them in this scenario. Obviously, I don't want to inherit tranform values. In 3d packages, you just freeze or zero-out those values for animation, but I don't know how UE4 works. Any suggestions how to avoid similar issues in the future?