#animation
1 messages · Page 94 of 1
@soft crown Yes, a blendspace can be used to blend between two or more animations
When you create a new blendspace, you'll see the animations in the asset viewer to the right and the timeline to add them to.
In most cases, you'd use a 1D blendspace unless you needed a multi-layered, directional timeline
Going from Idle to Walk to Run would use a 1D blendspace, for example
Going from Run while pressing W and run forward and slightly to the side by pressing W and Q would use a regular blendspace
Yup, so I have my regular blendspace all set up, and I call it in my statemachine
the thing is, from within my statemachine how can I blend the walking that is happening there so only the lower half of the animation is happening and the top half remains untouched? Even just an affermation that it is possible (as I've described) would be good.
Doesn't seem like I can cache a pose inside a statemachine?
@soft crown To target parts of the body take a look at animation slots, you can specify a bone (eg Spine_01) and everything below that bone in the hierarchy will play the animation you feed into it. https://docs.unrealengine.com/latest/INT/Engine/Animation/AnimMontage/#animslotmanager
Info detailing what AnimMontages are and how they are used in UE4's animation system.
Also blending when it comes to montages is something you can utilise to blend between animations, there is a blend time you can specify and when changing from one montage to the next the engine will blend/interpolate between the two poses of in the animation
Or just use Layered Blend Per Bone after the blendspace. 😛
Hey guys just wondering how i could make the movement in ue4 like in mass effect andromeda
Ideas?

@viscid willow I realize how slots work with montages but does it only work with montages is what I'm trying to understand. Blendspaces take animation cilps and thus can't have slots to them?
Also guides I find show how to use slots to mix aniamtions in the AnimGraph but not inside a state machine node.
I guess the question I'm trying to ask is, can I have blendspace movement only control legs even though the clips used inside the blendspace cover animations for the whole body.
t@soft crown you can use the Node "Blend Bones per Layer"
It's Layered Blend per Bone. 😛
Ok I think my confusion was with thinking blend pose 0 worked from spine_01 and down not up
basically I have switched it and now it seems like my legs are the only things animating, which is good!
now the tricky part is this. My Statemachien has some animations that cover the full body like walkl and hold pistol, but I don't have a crouch animation for crouch walk and hold pistol, so I've done the layered blend per bone to only have movment deal with legs despite some of those movement animations also covering the fully body. What trick should I use to now also apply back the upper body animations from full body animations I do have? Do I just copy the statemachine and blend them in for upperbody?
I think I'll try that but it seems like overkill
ok that seemed to work, seems like overkill but it did the job with one minor error not sure why when I crouch it will play the correct pistol animation hold but the pistol is no longer near the weapon point https://gyazo.com/3ae925928222de34875bd6e3cd4ec657

Why would my IK_hand_r go so far off ? https://gyazo.com/9d2074bbb7c6ce87d5eff70a53f1c07b

Is it animated?
@winged valley bad exampe pic https://gyazo.com/9325c49944d1ad394ac829db1c07b349

actually in both they are in fact animated,
but the bottom pic one has the top animation set for the pistol animation, for some reason though the IK_hand_r gets displaced.
@copper dawn yeah i meant the movement like running and then when i press w+a it will be very smooth
Not like in ue4s pawn where it will compmetly change his direction
@soft crown And that happens in the animation too? (you can check the location of the bone)


That's not an animation... 😛

that is an animation on its own not being blended in with the seperate crouch animation
Why use the ik_hand bone though instead of just the hand bone?
idk?
Because the ik_hand bone is a controller for IK, you shouldn't attach stuff to it.
I didn't know that
Now you do. 😛
so its just for controls not for attaching eh?
Yes, it's for having the ik_hand bone act as a target for IK.
Like this:
The IK will try to reach the target (but won't stretch).
But if you're not using IK anyway those types of bones aren't too useful.
yup that solved it! Good to know! Maybe you also know how I can lower my First Person animation when I crouch? When I crouch it lowers my camera but my animation stays where its at.
exampl normal https://gyazo.com/cd7781edb0516663d9845bc7b2aba1b6

If you have a crouching animation you can blend that with the legs maybe (using layered blend per bone).

Ah, right. 😛
is there like a simple way to offset?
I guess you could do it in the event graph.
Just modify bone or something, move everything down with a lerp or something, then when it's released move everything back.
Or in the character BP itself moving the skeletal mesh components.
Or create an animation where you move everything down a bit (you can do that in editor with create from current pose).
That sounds like it could work. And one final question for the moment that has been lurking on my mind which could help me with my animation resources. How possible is it to use my First Person animations which only animate the arms with my third person mesh?
If they have the same pose it's easy, just retarget.
and using layer per bone I should be able to aniamte the rest of the body and animate the arms of the body with my already existing first person animations correct?
Providing for a fully animated experince ?
Probably yeah.
But I haven't done so myself so I don't know really, just test and see if it works or not. 😛
ok
Yea becuase if I can do that, I'm going to get the FPS Kit, which has the 9 weapons and animations for it, then use the starter animation kit for basic movement animations and layer the FPS animations in for the arms in third person and then of course I'll have all the FP animations already for FP.
This in theory once I can prove it in a trial run will allow me to animate everything in FP and TP with a lower budget.
thats the hope anyways.
BTW thank you all from #animation you guys have been the best! I've learned so much from this section then anyother section.
sadly I think retargetting is going to be a pain with my idea

lol
I think it looks very natural
Shipping it...
Heyyy
I recently watched the devstream about physical animations and I have a question. If I wanted to do a skate 3 like game...Tbh I have no idea where to start, the confusion on greatens when I know more about it.
Is there a way
to always make bone Afollow Bone B
i have a bow and arrow, but because of my aimspace, the bow string isnt always in between our players fingers unless we are looking straightrr.
Im wondering if there is a way to essentially lock a bone to another bone or socket location
Anyone know how I should animate using physics animation for a skate 3 like effect lmao
@misty dagger There's the Constraint node.
Any insight on Translation Retargeting Animation vs skeleton
and any of the other two options?
well I got what I asked for but the FP animations look bad in TP
😦 makes sense and now I have to considor what I want to do
Can anyone tell me why the transform values are all 0? my characters IK arms are pulled to the floor, where they should be positioned where the LeftHandB and RightHandB points are, which do have values
@oblique canopy How are you setting the references in BP_MTB_Trials?
Also casting on tick is expensive, don't do it. 😛
Do it on Initialize Animation instead and save them for later use.
Short Question about Root Motion:
Does the Root have to be at 0,0,0 on the first frame or is translation calculated relative to the previous frame?
The 0/0/0 thing is for the skeleton itself, not the animation. But your animation will probably be weird if you don't start with the root at 0/0/0.
how do you add meshes with animations to the third person character
Adding meshes: open the character BP, add skeletal mesh components, set anim BPs for those components.
Replacing meshes: open the character BP, click the skeletal mesh component, replace the mesh with another one, change the anim BP to your custom one.
Hi all, apologies if this is the wrong place for it, but I know a company who are after someone to model and rig a basic character for them (non-ue4). It's paid. If you're interested, drop me a message and I can pass on your details.
Admins/mods, if this isnt the channel for this, please feel free to delete, just let me know 😃
Post this in the #career-chat
does anyone have any references how to replicate morph targets/shape keys onto clothes? im a bit worried that this takes weeks of trial and error
for example if you make a character fat AND taller, clothes would need the same shape keys, i guess as a child mesh in blender and exported with the same shape keys?
Anyone knows how to get the position of a bone from a skinned mesh in an animation blueprint ?
i can get it with a poseable mesh, but not from a skinned mesh apparently
do i have to use sockets ?
@ruby bobcat Morph targets don't work with the clothing tools in engine (simulation). If you're not using that you can use morph targets.
yeah i did read about that they wont work with physics :/
but my question was how they work when they would influence each other
like .. do i need the exact same morph targets in a second object (e.h. trousers) to make them fit on the main character if, lets say, the morph targets for character height and fatness were changed
just some references for that would be nice, there are like 0 available articles for this
but it must work somehow, i mean ark does it 😄
Yes you need the same morph targets.
Well not really but it makes things easier if they have the same name. They do need to fit the character at the maximum value.
awesome if that would work exactly as i think it would
will get a bit annoying with a ton of different clothings, but worth it
Then you just need some logic that sets the morph target on the body and the clothes at the same time.
It's a bit disappointing that morph targets don't work with the clothing tools though, I would gladly pay the extra performance cost.
e.h. body height and then something like fatness
these 2 morphs would be like .. influence each other
Really?
yeah sure
because one morph target would already change the complete body structure while the other one would make it fatter
Morph targets usually only do something from the base pose, so if you have several ones you still move the vertices out from the base pose, if they have been changed they are combined obviously.
but by watching the ue4 morph target training vid i learned that ue4 does not take it too strictly
For example if you have a morph target for body length it will stretch the vertices, those stretched vertices would then be used for the fat morph target.
thanks for your input, i was really hoping that it works this way 😄
currently occipied with my >30km² landscape, tiled level streaming ftw
thats why i didnt dare to run blender next to it
Alright. Alright.
Noob as hell question.
How do I add a keyframe to an animation in UE4?
You don't really do any kind of animation in UE4. 😛
If you really want to you can make a single pose animation by editing the bones, then do New Asset at the top choosing animation from current pose.
...
If you want to add frames you can right click in the timeline at the bottom. But it's impossible to add keyframes in UE4.
Use Blender or something else for making animation with keyframes.
Alright. Thanks.
@winged valley do you happen to know of any good Blender tutorials about FK/IK switch and FK/IK snap ?
No. 😛
😦
that's what sucks about Blender.. Something that should be standard isn't implemented and there no training materials about that either 😦
And that's Blender's fault? 😛
For example the UE4Tools rig already has IK/FK switching.
And for IK/FK snap you can just bake the bones.
@devout dagger There are a lot of youtube videos on the subject. This thread explains the theory behind IK FK Switching.
I mean bake the action for the bones.
At least for IK to FK, I guess you can't do the reverse. But that's pretty easy to do too.
IK FK Switching is not a standard setup in any 3D package as far as I know unless you use a generated rig like Rigify or the UE4 tools rig, it is something that a Technical animator/rigger would set up on the rig
Who knows, they might come out with an official Blender tutorial on it since they have been making that new tutorial series, and IK FK Switching is a common part of rigging if you get more into rigging and technical animation
I don't see the point of even making a custom rig for UE4 when there is a few already either.
this again lol
Snapping is a feature of a fully implemented IK FK Switch
no
WIthout snapping its just IK or FK
snapping is when you animated with FK and then you need to continue animating from last FK pose using IK and then when you done, you need to continue back with FK from the latest IK pose
aligning IK rig to FK rig manually (and vice versa) is a royal pita and it never matches up exactly
Yes i know how it behaves, what im saying is you need both snapping and switching for a fully implemented IK FK Switch
switching FK/IK is when you need to enable IK or Fk rig to animate with either one of them at a time.. It has nothing to do with matching poses
I did switch in the past using drivers, but could never make snapping (not Py programmer) :/
Yeah, you need to be able to snap the transforms in both directions (IK >FK and FK>IK ) so that you can have a seamless switch
oh well, hopefully I get my questions answered about Akeytsu.. It looks super friendly to animation - no scripting and no mess
did you put a question on the forum about it?
@viscid willow Akeytsu ? Yeah.. I am guessing they only check it once a day, so I missed window of opportunity today
Found your thread from May this year, it seems people have used it and been somewhat successful, one guy mentioned it exports without a root bone, which is problematic
hmm.. that's odd
@viscid willow I just tried exporting from Akeytsu and it exports fine. Root was there too.
nice, they must have just had the wrong export settings
hi, how do i set a bones location too a parameter?
i'm trying to use a bone in a rig to offset a materiel UV to make cartoon eyes
Try Bone Driven Controller.
where do i find that?
Animgraph. 😛
ok wheres that, sorry kind of new to unreal still
Ah ok.
It's in the animgraph in an animation blueprint, you can create an animation blueprint by right clicking a skeleton and doing "create anim blueprint".
The animation blueprint has two tabs, the event graph which is used for initializing stuff/triggering montages and so on, the anim graph is for doing state machines/blend spaces/playing normal animations/montages and more.
I started implementing IK/FK snapping for UE4Tools btw. 😛
Not sure how useful it is though, I usually just blend between IK poses and FK poses myself.
well im trying to get the location of a bone to use as a parameter, so how do i set this up.
Describes the Bone Driven Controller node which allows a
The only thing that's not mentioned is that you can set the output to affect morph targets and material curves. In your case you want material curves.
Then just set it to the same parameter name as in your material.
ok how do i get the output, i tried dragging the node and and searching the tab and material curves dident show up
Destination Mode Material Parameter.
so i just put the name in the box? also do i need to put any thing in front of the controller?
Well... your animation. 😛
so just this?
Thank you ill test that when i get home, class finished.
So I was hoping for a one socket fits all type of deal but the FPS starter kit's weapons seem to all need their own unique socket position to align right with the animations. Any tips on solving that? Is it normal to specfiy at run time the correct position the socket should have for a given weapon?
Ideally the weapon should be modelled so that its root is where the hand should grip it (usually the right hand), you then have a bone/socket in the right hand which is where you socket the weapon. It is a bit odd that all the weapons require different offsets 😕
yea... I'll line one weapon up perfectly and then test another weapon and it needs to be offseted
what I think I'm going to do is just have 9 sockets
one for each weapon
since in my weapon class I can tell it which socket to attach to
I'll just tell it to attach to its tailored socket
Sounds like you need a weapon class
one that takes into account all the default stuff and the animation / mesh changes for the sugar.
@winged valley The references are Billboards in the scene, attached to a bone but with transforms, so the hands should get the reference in the animation BP and go to the right spot. But all the references are reading all 0 for their transforms, leading the the IK's all being drawn to the bottom of the scene
Why can't I use the animation morph lines thing
fuck
why would someone just take something like that and ruin it?
I can't use the blendspace timeline
ok so i have to hold down shift
Anyone know if I HAVE to have a UAnimInstance in order to populate a FCompactPose?\
Greetings, I imported a model into ue4 and it was paralel to the ground, so I went to 3ds max and reposition it and now the skeleton is weird, like pic related.
How can I resize and reposition it inorder for it to be the size I want relative to the other character in my game and be facing the correct orientation when I place it?
You probably need to rotate it 90 degrees so it faces forward in Persona. Also the scaling of the bones look weird, are you using inches instead of cm?
well the character is very tiny when I imported it to ue4, like he is smaller than the foot of the ue4 mannequin 😒
o_O
Maybe you're using meters then. You should check the units.
Or your character just has the wrong scale in general (compared to real life measurements)
Ok. 3ds max says the unit of mesure is in inches, While I believe the unit of ue4 is meters. Other imported character work fine. Would I be correct to just resize and repositionner the model in the ue4 meshe/skeleton tab and save it?
I wouldn't recommend it because it would screw up the physics asset and maybe other stuff too.
It's better to set the units to cm, then resize the character to the right size and freeze transforms again.
Hello there!
I need help
Need to make my character approach a weapon, and when inside the area (I guess I use a trigger box?) I press a key, and my character picks up the weapon
Then presses they key again, and drops it
Please ping if can help me, thanks!
@empty crypt Not really related to animation but whatever. You can have the trigger box in your character, when your weapon overlaps it set something to true. When you press the key do a branch checking if the thing is true, if it is do a flip flop with attach to, then detach to.
Detach from I guess. 😛
Can you teach me how, please?
I have my UE4 open, in case you can help me out with screenshare
@winged valley
No. 😛
Do what?
That what I just asked
My character is supposed to approach this hammer, press a key and the hammer gets attached to its hand
Then also press another key to drop it
I don't know what to do if you just tell me "set to true, branch, true, flip flop", I don't understand
So you have no experience at all?
I don't, I'm new to this
Okay, that's fine.
In your character BP you should have an add component thing in the top left, you can add a box collision there.
You drag the component into the BP, then drag from it and assign On Component Begin Overlap and End Overlap.
And hook the blue ones into Begin Play.
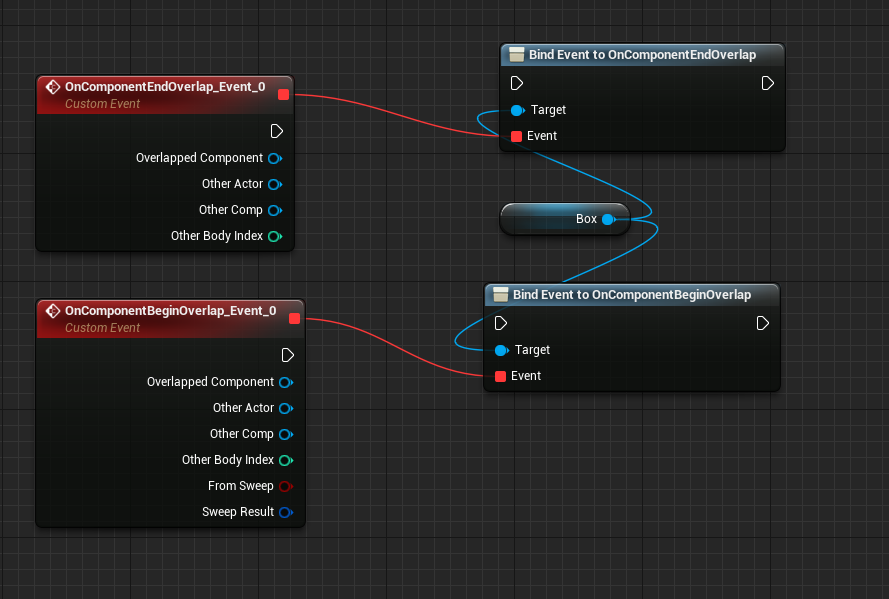
Then you create a boolean variable, IsOverlapping and Set it to true on BeginOverlap, and to False on EndOverlap.
Also hook up the Bind Event to Begin Play, you should have it somewhere or you can create it by right clicking and typing Begin Play.
In the project settings Input add an action mapping called PickupDrop or whatever and set it to some key.
Then add that event in the event graph by right clicking and searching for it.
Bind Event to Oncomponent etc. 😛
But you should set the boolean in the event (red box), not the blue box, the blue box is only for attaching those events to your character.

Yes, but the blue ones should be attached to eachother too and the booleans should be attached to the red boxes.
Is your hammer a BP?
Begin Play - Bind Event - Bind Event.
You can delete wires by alt clicking.
Or drag them around with ctrl+drag.
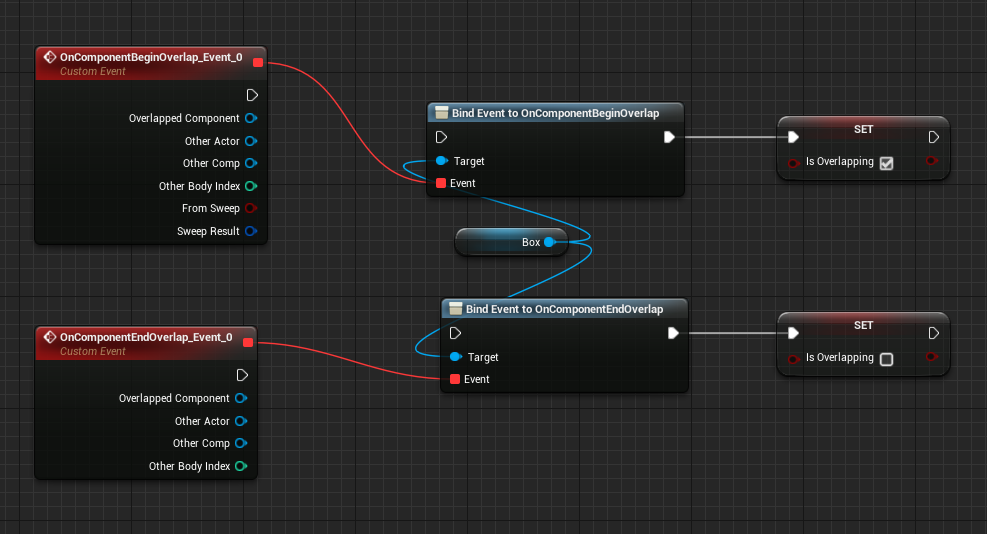
like this?
Yeah, you could have it more straight though so it makes sense. 😛
Then attach the boolean Set nodes to the events, True for BeginOverlap and False for EndOverlap.
https://i.imgur.com/yEmZm1S.png like this?

Yeah.
Then you need to check if the overlapping thing is your BP, so is your hammer a BP?
Blueprint?
Yep.
I imported it as fbx from Maya
But it's in the world right?
yes
You can just click it, to the right there should be a box that says "Add blueprint" or something.
ok, made a bp for the hammer
Then make a nice name for it. 😛
hammer_bp
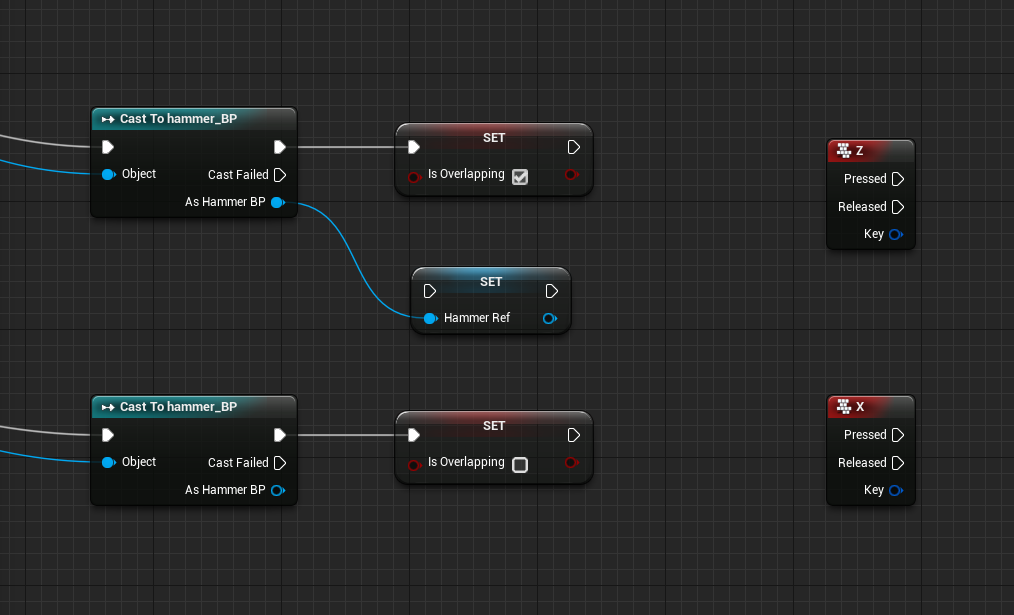
In BeginOverlap and EndOverlap you need to drag from OtherActor and do Cast To hammer_bp
So if you overlap you cast to your hammer which is basically asking the object if it is your hammer, if it is it will continue execution, if it isn't it will just stop and do nothing.
Then move the Set boolean thing after the cast and connect it to the execution wire that does not say "Cast Failed". 😛
wait which one? https://i.imgur.com/6UiG2OQ.png

BeginOverlap - Cast To - Set
Just use the top wire.
The Cast Failed is for when the cast failed (meaning the overlapped thing was something else than your hammer).
No. 😛
this?

Yeah but connected to the BeginOverlap too. Not sure why you made extra nodes though. 😛
You should probably do things horizontally rather than vertically.
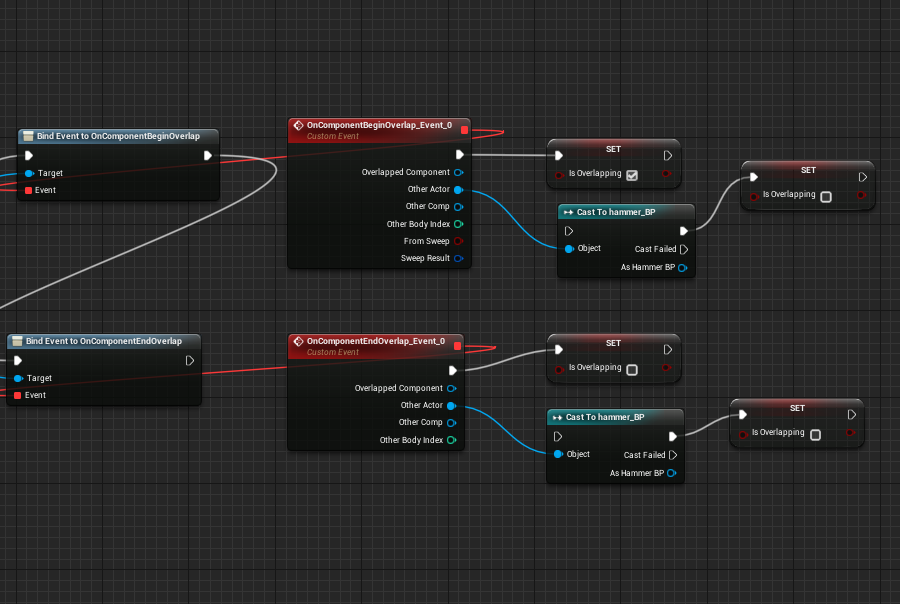
First delete the Set nodes to the right.
Then move the other Set nodes over to the right.
Then ctrl+drag the white wire going into Set into Cast To instead.
And add a new wire from Cast to to Set.
oh this
Yep.
Then you can make the action event in Project Settings (Input category) if you didn't do so.
Action Mappings somewhere, then expand it by clicking the triangle thing to the left, then click the +.
Then add those keys in your BP.
how to add?
You right click and type the name.
Yeah, you need to do some more stuff before using those though.
You can right click the As Hammer BP in your top Cast To node, then do Promote to Variable.
Nah, you drag the variable you created from the left into the BP, then do Set.
And connect that.
It doesn't need to be connected with the blue wire, it will just be nothing if you end the overlap.
But it should be connected with the white execution wire or nothing will happen. 😛
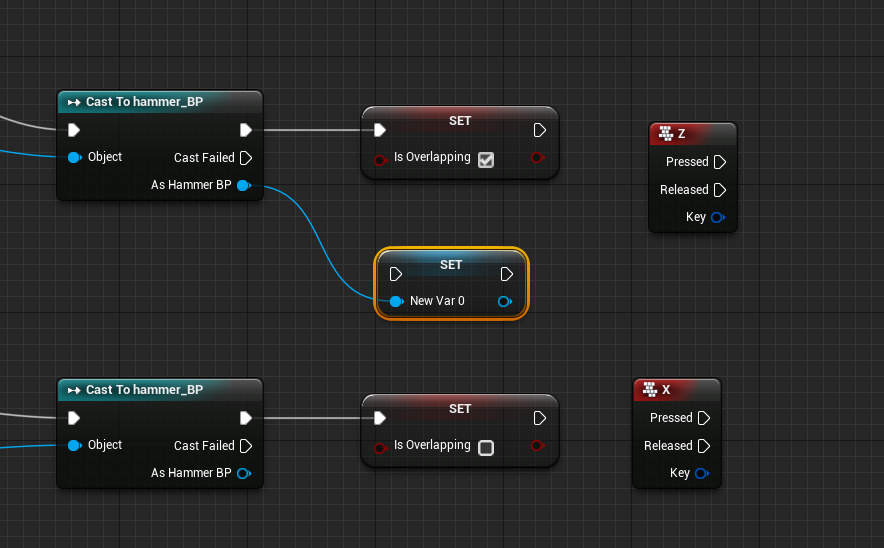
The top one should be connected with the white wire and the blue, the bottom one should only be connected with the white.
You can rename the variable HammerReference or something.
Do you understand what you're doing? 😛
Well you can think of what you're doing.
The white execution wires make sure things happen in the right order.
Basically from the left to the right.
I'm studying it on the go
kinda working it out with the names, but still very new to BPs
Wires with other colors are for setting variables to some value. If it's connected to something it will use that value.
If it's not connected it will just be nothing (or the default value).
I meant the top Cast To node.
Basically you've got two things you're working with right now, the two red events (Begin Overlap and End Overlap).
So everything should be connected into two lines, one line for each event.
ok
I think I have it already set like that?
the top cast to hammer_bp is connected to the white and the blue
the bottom one is only wired to the white
right?
Can you show how it looks now?
How is that Set node connected to the white? 😛
Then you need the same thing below but without the blue wire, just duplicate it by right clicking it.
Yeah.
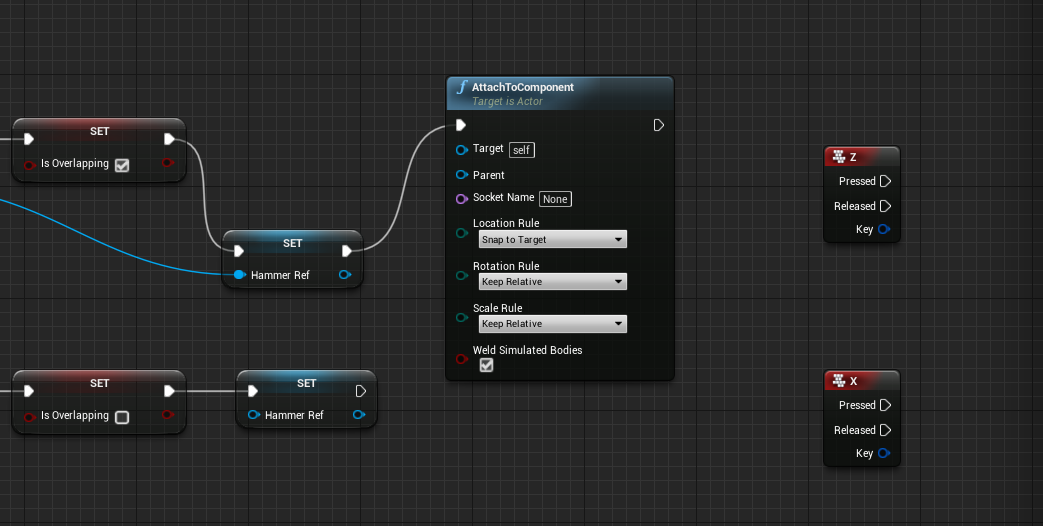
Then you can use your pickup key and do Attach to Component.
And change the Location Rule to Snap To Target.
First you should not put that there. 😛
Use the pickup event you created.
Also you should type the name of the action event, not the name of the key.
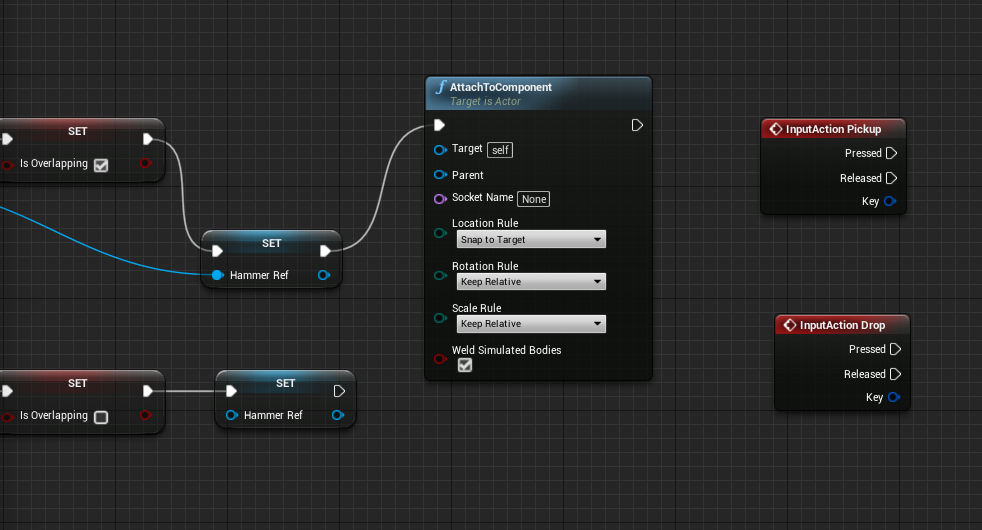
You remove the wire from AttachToComponent, then drag a wire from Pressed to it.
But first you should check with a branch if it's overlapping or not, drag IsOverlapping into the BP and do Get, then drag from there and do Branch.
If it's true connect it to AttachToComponent.
For the target you will need the HammerRef you created earlier, drag it out into the BP the same way and then connect it to Target.
like this? https://i.imgur.com/ZwVvSdU.png

Pressed should go into the branch first. 😛
Debug time then I guess.
You can add Print String next to stuff, for example right after begin overlap/end overlap that say "overlap start" "overlap end" and so on.
And probably the reason it didn't work is that you didn't have Mesh attached to Parent, you can drag your Mesh into the BP and connect it. 😛 (forgot that)
You drag it from the component list into the BP.
Usually you drag components in and drag off of those, that way it's context sensitive and will automatically fill in stuff.
static mesh?
Your character is a static mesh? 😛
The Mesh is from your character.
You're attaching the Target (hammer) to the Parent (character mesh).
That box is super tiny, it won't overlap anything. 😛
?
how do I attach myhammer to the character mesh?
oh
With AttachActortoComponent.
Where Actor is the hammer and Component is your character skeletal mesh component.
Did you connect Mesh to Parent?
No, you drag Mesh from the component list in the top left into the BP, then connect it to Parent.
Or Skeletal Mesh or whatever it's called. 😛
Yeah.
Then in your character BP you need to increase the box extents.
Right now it's so tiny it won't overlap something on the ground.
Yes, you should see box extents to the right.
like this?
Yeah, but you should move the view down and align it to the feet so you're sure it's all the way to the ground.
yup, it is
it's uh
the bottom of the square is touching the bottom of the feet
and no further below
Then you should be able to pick the hammer up in game.
don't I need to set the hammer's position in the hand first?
Well you can see if it attaches to your mesh at all first. 😛
Did you add print screens for BeginOverlap and EndOverlap?
Also add one for your button that says "Pickup key pressed".
You can add a print screen to the false output of the branch in the key "Not overlapping"
ok
going to false
it's not overlapping
should be something here missing
do I connect the bottom hammer red for target too?
I think your box is still just too small then, it can be bigger than the character.
Yeah, you can make it huge right now and make it smaller later.
ok
Ah actually it could be another thing.
still not overlapping
You can open your hammer BP, under Collision there should be a checkbox for enabling overlap events.
Maybe your static mesh didn't have that checked.
Then click the hammer in the world and check if it's enabled there too (if not, click the yellow arrow).
Generate Overlap Events?
Yes.
ok
it's now overlapping, but cannot pick it yet
now I need to attach it to the hand?
It should still attach to your mesh. 😛
What happens if you run around after pressing the key?
hammer stays there
Do you get an error after exiting PIE? (play in editor)

Yeah, but the second part.
It says your hammer is static. 😛
Probably not.
Yes. 😛
alright, it picks it up
just need to adjust the position
it's like 5 meters in front of him
o_O
idk why
That shouldn't happen if you use SnapToTarget.

You can try that.
But for attaching it to the hand you can add a socket, you do that in the skeletal mesh skeleton view.

Then check the bone list to the left, you can right click hand_r for example and add a socket.
You can go to Mesh in the component list, to the right you can double click the mesh there.
where's the component list?
In the BP to the top left. 😛
... no.
oh?
Then go to Skeleton in the top right, then see if you can find a bone list to the left.
You can right click the socket and add the hammer as a preview mesh.
You do know that there is #blueprint for such stuff, right? 😛


? You right click the socket in the bone list to the left.
oh
Then add preview mesh or something, then search for the hammer.
Then you can rotate/move the socket around so the hammer looks better.
Pivot?
There are shortcuts for the move/rotate tools, I forgot the defaults though. But there are probably buttons you can click at the top to do move/rotate/scale.
Well if you would like things to make sense. 😛
omw
But you can fix that, export the .fbx, then double click the hammer mesh in the content browser, then reimport.
double clicked
hmm
ok
need to place at center of scene
and freeze transforms
right?
Yep.
It should be where the socket is.
I mean the scene
No idea how Maya works.
In Blender it's really easy, just move it to the center and do apply object transforms.
@winged valley err
my character
went flying into stratosphere
when I picked the hammer
Cool. 😛
how to fix : (
You could set the collision for the hammer to only overlap pawn instead of block it.
ok
did not fly
but
picked it, but did not use thehand to grab it
more like just following my char around
hmm
Did you check the socket?
That it looks good with the preview mesh. 😛
Anyway for the rest you can add a variable IsHolding, set it to true after attaching the actor, then check it with a branch on the drop action event.
If it's true you can connect the HammerRef to DetachActor.
Yeah.
Greetings. I have a meshe of a humanoïd creature and I want it to have some of the ue4 mannequin animation. I noticed that the humanoïd model the not have the same number of bones than the ue4 mannequin. Notably it has less spines bones than the mannequin. Can I open the fbx of this model in 3ds max and remove the actual skeleton and generate a New one before putting it back in ue4?
Hello? need help with sockets here
So it seems AActor does not have PlayAnimMontage, does that mean it will not play montages but only work via Blueprint?
@soft crown, AActor don't need to PlayAnimMontage, but USkeletalMeshComponent can through UAnimInstance
So actors can't trigger montages in code? That sounds a bit silly.
UAnimInstance::Montage_Play
Anything that can get a reference to a skeletal mesh can start a montage on that mesh's anim instance
or can at least call the function
Yeah, that's what I thought. 😛
We cannot Cache or copy poses anymore?
does turning off context help?
no
oh my fucking god
You cannot Cache Poses within a State Machine. only the outer most
what should I do now? 😦
Why do you need to cache a pose in a state machine?
@winged valley Blending Montages
So why can't you do that outside of the state machine?
@winged valley because the Montage is only played within a certain State Machine
But your slot node isn't in the state machine right? o_O
it is
Okay... interesting. 😛
fyi
The Flare Montage Slot should only be played when I am on ground walking
But I would like to blend it on certain bones
which is why I need a cached pose
Blend the whole pose or just the montage?
Yeah, you just can't save them from inside a state machine.
😢
ok, it looks Like I can just plug a dummy animation into the Slot note
anyone here great at rigging with max?
@native moss whaddup
is maya more used than 3ds max?
Yes
I'm getting some weird twitching in an animation loop... hmm

but that happens only when played or launched

the second one is from simulated
I just play and loop the propeller animation, should work fine, but something's wrong.
If someone knows what I'm doing wrong, then I'd greatly appreciate the help. 😃 Maybe a baking issue of some sort? It seems the twitching happens every time the loop starts/ends, I noticed this when I slowed the rate to 0.1
anyone know how i can blend two anims together without using a blendpace?
Is controling an Anim Montage via C++ pretty limited (as compared to an Animation Blueprint)? The ShooterGame uses Montages for l ike one shot play calls in C++ but I'm wanting to do something a bit more fancy like loop a section in the Montage and so far that seem to be an Animation Blueprint thing only.
What is more optimized, face morphs or fase bones?
hey guys, I have a slight nuisance... my animations and animblueprint all work as intended... however in the preview editor I can't seem to preview any animations
anyone have any idea what the problem is?
the mesh is stuck on its idle animation btw
@soft crown looking like montage control is possible but you gotta create the montage itself in editor.
did some minor digging and you can probably do the animgraph in C++ if you really want to. So you'd create the montage/anim assets themselves and then you can implement your Anim'BP' in C++ @soft crown, although its probably not really what you wanna do.
the only real reason why you'd still have to create the montage in editor is too make the sections loop and add notifies if you want. Probably could do that in code too.
yea just trying to reconcile C++ with montage section looping
I was given the advice to make a Notify event in C++ then ref in the ANim MOntage and trigger it in C++ don't know how to do any of that yet but makes some sense
Yeah I've done some montage stuff like what you're talking about - did it with notifies as well
basically I just had the montage loop normally and I had a notify just before the loop point to exit the loop if needed
so I guess that is how it works then? The notify when triggered? Or is it hit? Will tell it too branch off automtically to the next section? @weary pine
Look at the functions in uh.
UAnimInstance
lotta stuff you can do with montages
about the only thing I'm not sure of is getting a callback when it changes sections
lol im a newbie, how do i add animation to the model im playing as?
nvm
can morph targets change the texture as well or just move the vertices?
IIRC they only move vertices
Does anyone here know how to signal an Animatino Notify Event from C++ ?
Ok I may have figured out how to trigger a notify event from C++ but now I'm not sure if the trigger alone is what I really want? If I make a custom Notify and set it to branch, does that mean when the notify is triggered it will branch? Or does it mean something else?
now that I think about it why can't I just tell the time to start to be later? After the loop? Or Jump To Section?
did I just broke it?
it doesn't allow me to link 1 output to 2 inputs
... unless I use a re-route node
is that indended?
Greetings, I have imported characters from Mixamo, and when I replace the mannequin mesh by them my characters are always facing the wrong way when moving. How can I fix this?
Here is a video of what I mean
Yeash, I see that my models are in the wrong orientation
How can I change them? When I reorient the meshe in the skeleton tab and save, reopening it will bring in the same orientation as before
Ok almost there with my shotgun reload animation, issue now is since the right hand goes to reach for the bullet it moves the gun with it as well 😦
Guess it should get moved to the left hand then?
seems to be much better!
Alright I found why I had an orientation problem, the Force x axis while importing was set
Anyone know how to reset pose of skeleton after I tweaked it?
Ctrl Z doesn't do anything
I adjsuted it inside an animation and now I just see the privew that way
for all animatinos
just reset the editor, seem like brute force but worked.
does anyone knows why the default mannequin model has these bones called "_twist"? Like, the calf_twist, upperarm_twist. etc? Basically most limbs are divided into 2 bones, ie, the lower arm bone, then lower arm twist bone. Why is that? Why not just make it one bone? What is the advantage?
not sure, but I think it helps to lerp vertices mid two bones without making a double-cone
makes sense, could be that
Twist bones are there to help animators avoid pinching when it comes to twisting the wrist and in this case ankle and arm of a character. By sharing the twist across a couple of bones you can avoid one harsh pinch in the joints
Can I select multiple bones and move them at the same time? I mean I do that but nothing happens, don't know if there is a trick?
@modest hare exporting it from blender as fbx an importing in ue4 should just work. just double-check the export settings in blender and import dialog in ue4
@soft crown do you mean blender, ue4, c++, blueprints, animgraph, ???
UE4 @misty dagger
Right now I'm using blend by int to assign each weapon an integer ID to have my animation blueprint know which one to animate for, is there a better way?
Which software is best to use for animation? 3ds max or maya and why?
I think Maya because its more officially supported but someone may be able to give you a better reason than that
alright, another issue, seems like when I fire even though I'm looking up it resets back to looking straight since that is how the fire animation is made. Is the solution here to make aim offsets for the fire as well?
Hi, i'm a beginner, does anyone knows how to check some animation to running, we need to montage or somethink more?

Team America OST. Sound track may be explicit. Proceed at your own caution. "Copyright Disclaimer Under Section 107 of the Copyright Act 1976, allowance is m...
@soft crown consider making firing an additive animation
@cinder ocean I think Blender is the best because of the smooth interpolation branch: http://graphicall.org/1221
GraphicAll.org
Bringing Open Source Software builds to the masses!
@soft crown You should probably have the montage slot node before the blend space in the anim graph.
@winged valley so sounds like I can't just call to play the montage from c++. I should set a firing book and have my blueprint listen for that change?
You could call it from c++ or whereever but you need a slot node in your anim BP before the blend space.
@soft crown you can play the montage from c++, first person c++ template contains code for that
I know it's what I'm using that's why I mentioned it I'll look into this slot node
I didn't even know you could play a montage from C++ without having a slot node when using an anim BP, if you did that in BP the montage probably wouldn't trigger at all.
Anyway triggering montages without a slot node assumes that you don't have an animation blueprint at all.
I do have an animation blueprint
And I am using slots with in my Montage but I'm not sure what you mean by slot note exactly inside my animation blueprint perhaps I am using one I'm just not sure
Well do you have a slot node in your anim graph?
It shouldn't be hard to tell. 😛
It's called Slot.
@soft crown
@winged valley I have a crazy little idea, is it feasible?
I need my character to do frontflips/backflips, gradually. like, using input to drive the animation. I was thinking, the most modular approach might be to somehow use additive animation? having a small delta rotation in the animation, then playing it continously at some point to eventually do a flip.
didn't get it to actually continue applying so far ;d
Yeah you could do that. I don't guarantee it looking good though. 😛
I guess the alternative would be to use a blendspace with a bunch of poses. or if it's somehow possible to scrub back and forth through a regular animation
You can right click on a Play Animation(name) node in the anim graph and turn it into a single frame evaluation based on a float, then use the float to control the time of the animation.
Greetings, I followed the ureal guide to retarget the animatio form the starter pack to the SWAT guy from Mixamo and I end with this
That looks like you didn't set the arm bones in the retargeting manager correctly.
hummm....weird because check this
I don't see what I did wrong, the retarget are as the guide suggest
Could that be because the mannequin is in A pose and the mixamo model are in T pose?
If that's the case, then yes. 😛
That's why usually you upload a rig of your own first so you get the output in an A pose (for example uploading a UE4Tools rig)
But I don't know how that works with changing the character.
@winged valley at work but once I can remote in or get home I'll let you know
Much better! The problem was the T to A pose
Is there a document or grid that tells you the exact angle per bones the A pose is? Seems like a trial and error game
Can I change an animation inside ue4 by moving the angles of the bones in the animation editor of ue4?
Oh, I found how, I just hit record on an existing animation and a new one will be created
There's also https://docs.unrealengine.com/latest/INT/Engine/Animation/AnimHowTo/LayerEditing/index.html .
An idle animation is edited to create a new reload animation through Animation Layer Editing.
@winged valley in Blender, do you know a simple way to make keyframes interpolate correctly when you're doing something like a frontflip, and want to paste the first keyframes at the end? it goes back around even though the shortest way is only a small distance
You can try putting a minus sign in the rotation transform to negate it.
👍 works
Quaternion magic. 😛
black magic
@visual ore You can set the T pose for the manquin.. T pose is a file
Guys if you are interested in coverting mixamo animations to have a root bone.. please have add this plugin to your blender https://github.com/enziop/mixamo_converter
GitHub
mixamo_converter - Blender addon for converting mixamo animations to Unreal 4 rootmotion
Akeytsu v1.0 is coming Oct. 25. Indie version will be ~$180. I think you can still purchase it at early-access price ($79).
what's the meaning of having both a transition to a conduit, and a transition check inside the conduit?
Probably the wrong place to ask but if I paid someone could they rig and animate some animations for me on this model https://www.artstation.com/artwork/qRVNP

ArtStation
This is a low poly 3D Model Styracosaurus dinosaur designed for video games.
Polycount (quads and tris) : 2268
The presentation images were rendered in Marmoset Toolbag3.

When blending here, do I have to do it in blueprints and cast to the class?
Or can I blend from the animation blueprint itself?
is it possible to control a blendspace 1D without an anim blueprint?
What are you trying to do?
anybody knows about the snake IK? or how could i make snake movement so freaking Real!
@solid fossil https://docs.unrealengine.com/latest/INT/Engine/Animation/NodeReference/SkeletalControls/SplineIK/
Describes how the Spline IK Solver node can be used for controlling character spines or bone chains within Animation Blueprints.
Thanks @winged valley i'll take a look
Is there a way I can without fail make a T pose to A pose with the correct angles when I import a model to ue4?
Can some one help me about replicating animation
@winged valley do you have any tips for avoiding spaghetti in animation state graphs? I wish there was either a way to 'go deeper' and have state machines inside state machines, or a way to get an event fired from BP/C++ to trigger a certain state.
I want to avoid having arrows in every possible combination when they should be entered regardless of current state
a quick google yields horrifying images such as this: https://answers.unrealengine.com/storage/temp/23368-statemachinespaghetti.png
;S

That's just stupid though, mixing locomotion with weapon stuff.
might be a bad example, but I already start getting a mess just with locomotion
(or rather start seeing warning signs)

Well if it should be entered regardless of current state it probably shouldn't be in the state machine.
so how would they be triggered otherwise? I haven't found a way to use blend trees with montages
Like the landing thing, do you need three things? You could just have one and do something different inside the state itself.
Blend tree?
sorry, Unity terms >.< Blendspace
okay so you said to do different things inside the state itself. but inside the state is only the 'Can enter transition' node
How are you playing animations then?
(inside the conduit, that is)
I didn't say inside the conduit. 😛
well, how would I make conditional animations inside the state?
BlendPoses(Enum) or Blend Poses by bool/int
np
:D
Hey guys has anyone seen the Fortnite Trailer Pipeline - Unreal Dev Day Montreal?
looks like they use Alembic support quite a bit
and I wonder - since my alembic files get very large very fast
Hey guys, wonder if anyone can help... I've imported a new FPS rig and attempted to retarget it but I'm having errors... does anyone know what would cause the bones to contort like this?
Why the fuck camera in UE4 Sequencer has to be fucking hard?
i just did a reskin in max, how do i reimport into unrea lengine
have pig_skin, pig_skeleton etc
pressing reimport doesn't work (neither does changing hte path to the reimport)
From my experience, pressing [reimport] button on mesh/model doesn't reimport it
you need to delete and import again
and then i should just be able to put the new mesh in the old anim bp
?
or i need to make a new animbp
I have a very quick question
How can I create an event for when my character turns directions?
I need to play a sidestep animation, and also if he jumps play a sideflip animation
Hey guys I need some Maya and Unreal help. I edited a third person mesh down to just the arms but when I export it out I get a new root. At first it was a Multiple Root error but then I renamed the group and it seemed to get rid of the multiple root error but I still have a parent to the root
Anyone here know why Unreal imports skin weights from 3dsmax/biped wrong ?
is there a work-around?
in the skeleton tree, my neck bones moves my characters arms, this is not correct behavior.
anyone knows if I can watch transitions while playing? finding it hard to debug some things
https://puu.sh/y1gj3/e471e3dca4.png

(like, watch how they play out)
You should be able to see the changes by setting the debug instance in the top right when playing in PIE.
it's set to Preview Instance and I'm playing in PIE
or does it need to be explicitly set to use the instance that is spawned in-game.. somehow?
so how do I preview on the actual game instance?
You select the real anim BP.
select it where though?
Clicking the drop down. 😛
.< .. thanks. didn't realize it changed, but that makes sense
@wicked ore looks like the elbow joint is retargeting with a 90 degree offset. Check your joint orients
i'm trying to make a box smoothly turn 180 degrees (triggered by a box collision) and i have no idea where to start
hey guys
anyone see any red flags here?
basically am simulating physics on a fracture mesh - baking to keyframes, and parenting objects to a bone
trouble is, exporting FBX takes a very long time
and importing to UE4 takes a very long time
is that because of the amount of objects + keyframes?
is this NOT a proper workflow to carry forth pre-baked physics sims into UE4?
maybe I should just use alembic ...
I feel like im cheating when im using alembic
I know that this is a 3ds Max question, but why are the thumb bones placed there? does anyone know of a biped for 3ds Max that matches the UE4 default player model's bone structure? I'm just trying to do some pre-modeling testing of my game with simple animations, but I don't want the model all effed up.
@faint hull U have Biped animation tutorial its usefull
Now my problem how to make When have weapon it can crouch with weapon also without weapon do i need blend animation or trigger them by animstance
deos anyone know (or want to guess) what physics solution epic uses for the long haired heroes in paragon? just joint chains?

Thanks for leaving a "Like" on the video as this really helps me out and continues to grow our amazing community! ☺ Thank you 💙 ★ For LIVE content you can ca...
Hey there, I am using Animation Blueprint for character head rotation but Sequencer animation weight is not working. Therefore, How can I solve the problem ?
@merry rampart I've never used alembic but i believe that this is the exact use case where alembic would be preferable. I cant seem to find the video but Epic put out a video on the Fortnite Trailer explaining that they used Blender + Alembic for a bunch of destructible simulation effects
Can you only retarget stuff tied to humanoid rig? Im trying to just retarget some VR hands.
nevermind I got it
got a question,I'm using blender to model objects and I'm using the boolean "Intersection" modifier to make animations, any idea how I can export the animation into UE4?
Is there ways of connecting a gun dir example to a mesh in multiple ways like hand to stock and handle so it constraints in two spots?
@tight blaze You would need alembic or something for that. Anything that changes per frame won't work, the things that work are skeletal animation and shape key animation (also rigid bodies I guess).
@viscid willow Thanks man. Yea Alembic works quite well but file sizes can be large
I think i'll go with it anyway
Greetings, could someone direct me to a ressource that can tell me the exact angle changes of the skeleton when retargeting animation from t pose to A pose?
I seems to me like its a rtial and error game
I am importing animation from Mixamo to my UE4 mannequin
It is a trial and error game which is why you normally don't do that at all. 😛
For example if you want mixamo animations on a UE4 mannequin style rig you would upload that in the first place, then you don't have to mess with the base pose.
@winged valley after some time trying to search up answers, digging through ue4, and blender documentations, and forums I kind of decided that apparently there is no practical answer to this. Guess I'll have to remodel :/
Anyone working with Alembic here?
Playing with destructive simulations and when importing as Alembic Skeletal i'm getting tons of Material IDs
For some reason when I import my asset from Blender into UE4
The animation is split over about 50 individual files
This is what I'm selecting, and there's only one animation for each set of bones (3 in total, at least there should be)
That thing is a single object?


Then you will get an animation for each object (per animation).
the only animation I have is the 2 bottom arms going up and down
and the middle swaying left / right
@rugged imp Animation weight is only for changing the weight for animation sequences placed in Sequencer, probably won't do anything for animation BP stuff.
@terse forge You could select the objects themselves and check the action editor, maybe you've got animation for the objects too.
I think I do
there's a bunch of random ones I never made myself
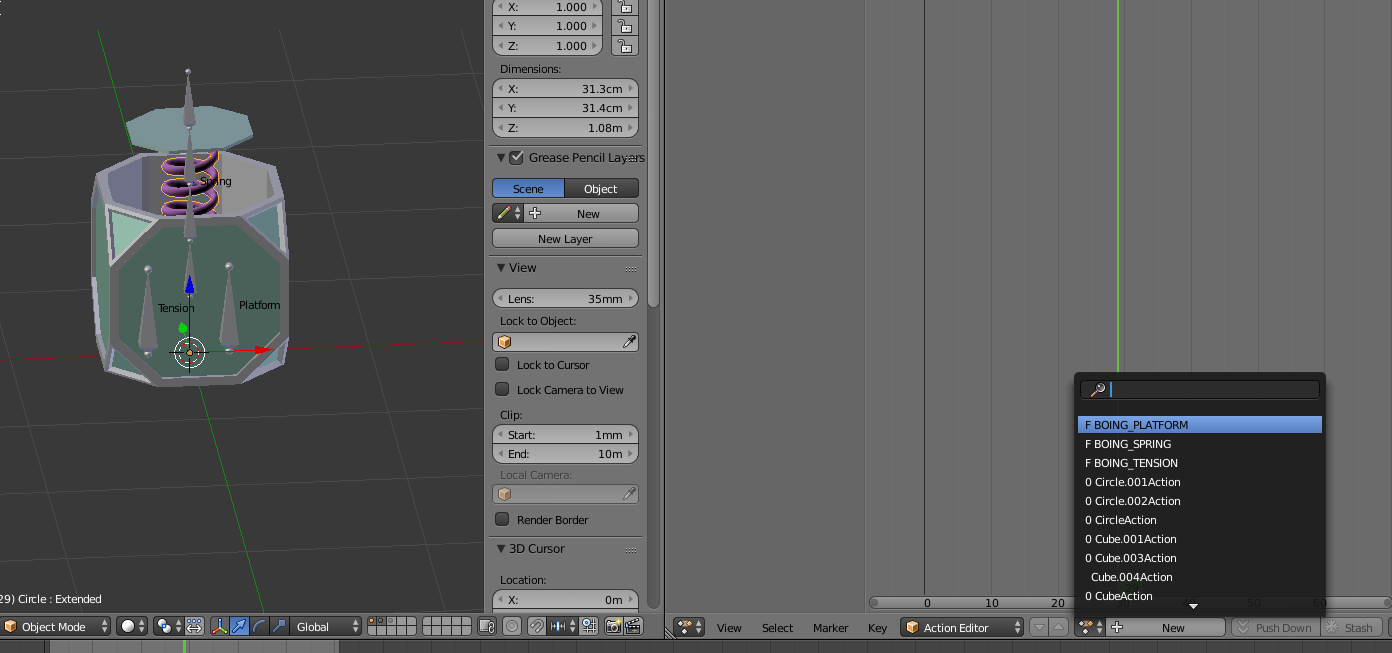
I have no idea where they are from
Any way to delete them?
Yeah, you can select it and hold shift when pressing the X, but the ones with 0 are already going to get deleted if you save the file and open it again.
for some reason when I export it isn't grabbing the chest's geometry.

I also don't get the shapekeys animation.
I try to import it by itself by only selecting the outside mesh and it still only imports the spring
and then it tells me something about a bone missing
You need to tick import morph targets to get the shapekeys. The missing bone thing means you exported with leaf bones accidentally when importing the first time.
Also is there a reason they are separate objects? Would probably be easier to handle if it was one.
Or if you want them separate then export them one by one and combine them in a BP or something.
yeah I'm currently working on exporting one by one
also I'll try that morph target
thing
Also you need to make sure you're not applying modifiers on export or the shape keys will be removed.
Indeed, I'll give that a shot now.
I finally got the lid physics working properly

I wasn't aware you could add non-capsule collision to a bone until just now.
@winged valley I disabled apply modifiers and it still doesn't offer the option to import morph targets.

that's what I'm selecting
For the morph targets*
If you've got any skeletal mesh you will have that option.

I think Im missing something
Oh, it was in the drop down menu, I see.
Do I need to do anything special to access the morph target animation?
Everything imported fine this time, no errors, I just don't have a specific animation to choose from that shows the spring extending.
I thinik they come in as curves under the skeleton
so go one tab back and look in the bottom left tab
yeah mine doesn't seem to work for some reason

I'm playing around with the settings here but no matter what I choose nothing works
Having dots in the bone/curve names is a bad idea.
And you need to export both the mesh and the rig for the curves to get imported, other than that not sure why it doesn't work.
I did export both the mesh and the rig
1 sec, I'll take a vid.

It said mats needed to be saved before it could support morph targets, so I went and saved them, and nothing changed.
And vertex count doesn't change in the animation?
No, not as far as I can tell.
Would that appear up at the top?
verts for the scene?
Yep.
Looks like it remains the same.
No idea, you would have to share the file. 😛
I mean I can make a thing that's the same but does import correctly probably.
Yeah I got it.
Is there a reason you've got three rigs though? I'm guessing that might complicate things... 😛
well originally I wanted to drive the s pring and platform with one bone
but for some reason it wouldn't allow me to choose two separate morph targets with 1 bone as the driver
So i just added another one
Anyway one cause of the morph target curve not importing properly is because of the morph target name, it was Cube.005 or whatever, but when imported it turned into Morphtarget_0 or something.
Because UE4 doesn't like periods, didn't know the name would change like that though, usually it's just converting periods to underscores. (will mess with reimporting though)
So if that happens the curve and morph targets are no longer linked. 😛
But that would only break the platform correct?
The spring seemed to be named fine
it was Basis / Extended
I renamed it to SpringExtended and the other to PlatformExtended however for consistency sake
The spring worked for me. 😛
Spring and armature only. (not the driver bones)
oh okay
You didn't actually need to export the driver bones either.
It gets baked anyway. Still, I would have them in the rig because otherwise things are confusing. 😛
How are you testing them to see if they work?