#animation
1 messages · Page 62 of 1
It is just den basic mannequin skeleton which now has a few bones like a sword an shield bone added. But this bones are missing on the skeletal meshes
Did you pay for the fab one?
yes
But I'm not sure why this matters, as far as I can tell this is pretty standard that some animations have additional bones, for example for animationg the shield or sword.
I just wonder how people are handling it, because having to add the bones to each skeletal mesh and keeping that up to date seems a bit tedious, so maybe it has to be that way but maybe there is another better way of doing it thats why I'm asking it. 😅
Bc I wanted to test and see for myself that having the same skeleton they share they same animations
Im assuming you probably did something wrong on import
All of these share one skeleton

They all share the same animations
If your mesh does not have the same animations as the other one I dont think they are sharing the same skeleton
I didn't test I probably can just play them for each other sure
But thats not what I need I want to know how to handle the control bones ...
You shouldnt need to test them. They appear in the animtion window thingy

You probably just missed a tick box Im thinking
Just try assigning the fab skeleton to your main skeletal mesh

stuff might break tho
Yea but thats not my problem 🙈
Is asks you if you want to merge your bones.

Yes thats exactly what I did, but now check the original skeletal mesh,
The original skeletal mesh is now missing the bones

at least for me 😦
thats my issue
Maybe you merged the wrong way?
Does your new skeletal mesh now have the bones?

Should I not use it?
I meant the camera rig rail

I'm sorry I just remembered I used a level sequence and added the camera from there so I'm not sure which cam it is
No...what is that...?
Its a curve that your camera moves along
So you have your skeletal mesh A, which has the additional bone, then you assign skeleton B form skeletal mesh B to skeletal mesh A, now skeleton B has the bone from skeletal mesh A and skeletal mesh B has them as well?
Man thats confusing to read😂
So it will slow the cam down and make it smooth and stuff?
You animate one value. And its the cameras position on the curve
so yeas
Ohk
0 - 1
You have a skeleton & mesh A that have a bone that is not in B.
But after you assign the skeleton B to mesh A now the skeleton & mesh of B have the bone?
Then probably mesh A is the parent
Yes. It asked me if I wanted to add the missing bone. But i will need to do a proper test.
Hmm maybe I have to play around with it then, because for me It asked me if I want to add the missing bones, but it just added it to the mesh not the skeleton
Its weird bec im getting this as well. But I need to do some proper tests, bc I just ended up messing up the mesh

I guess its propably bc that bone was actually weight painted on the main skeleton
Yea I think not all are used especially for the simple version
but i don't understand why the new bones for me where not added
Ill try with a paragon character
sure
but maybe I'll try playing around with it, if I know it should add them to the mesh
what does it say when you hover over this in the fab mesh

which is probably what I want it to be

Yeah.
I tried it again, but still ... 😦


hmmm
I had to open up an older version of unreal bc paragon wasnt available for 5.5 and now im stuck waiting lol

Ok so I tried exporting out the mesh and importing it as another skeletal mesh but selecting paragon's instead and it crashed on me
But when I changed skeletons from my main mesh it didnt change to paragons animations
No for me it is about the bones do they get added?
I think my mesh that I was using was too broken. It’s said failed to merge. I’ll try again with manny in a bit.
Maybe it was the old manny skeleton
sure no worries, I just wonder what the easiest and best way is to get such animations to work for the other skeleton
if it should be added this way I wonder what is going wrong for me, but atm it just adds the bones to the skeleton
Did fab tell you how you were supposed to use the skeleton?
Not at all but I need a common denominator
If I get animations, I want to use them with my skeleton and my skeletal mesh, so I need to get the bones required for the animations on my skeletal mesh somehow.
Especially since in the future I'll change the manny mesh to another I need to know how I'm handling this then
When I go back inside, I’ll try exporting the merged skeleton out and see if the bones are exported out too
it's not about the skeleton
it is about the skeletal mesh
you understand my issue right?
🙈
The skeletal mesh missing the bones right?
I’m thinking if both of those get exported out it might be added to the mesh
And just reimport it back in
Also I'm pretty sure that the skeletal mesh won't get the bones added automatically as you said right?
I think one way or another I need to add the bones to the skeletal mesh sadly.
Looking like it
Finally got past my last hurdle. Revisiting this issue finally. Im curious as to what would cause my MH character not utilizing the sprint feature, and repeating the start animation, while the other mesh doesnt have this issue. Im not sure if it has to do with how the MH and Sandbox character translates.
Leaderpose fixed your problem?
The issue stemmed from the source rig in the IK Retargeter. I changed the source rig to another rig with more bones (commom sense got to me a bit late) and that fixed the issues with the limbs not aligning.
Actually gonna cross reference the other rigs to see why those dont have issues either.
lol
I dont know if Im even on the right track, noticeable difference I see is the other rigs seem to have less bones than the MH rig. Wondering if I need to delete the MH bones and replicate the 1:1 mirror they have going on
Thats one of the reasons I dont just use ue stuff. I take some of it and make it my own bc its so confusing to debug


Are you live retargeting?
I am
Yea im starting to notice that lol
A verrry verrrry hacky way would just be to live retarget. it. But I think thats what ue does in their sample pack
Yea its already retargeting for like the Echo skin for example
Its quite odd lol. I can use the sandbox character, other characters, its fine.
The MH, randomly registers the sprint
Not sure if it has to do with the physics not reading right and not allowing the sprint to fully go through
Ohh I think I need to replace the skeleton vor the animations as well not only for the skeletal mesh
you can add and edit bones with this plugin

yea thats what I'm doing, I just have a few bones I need to add and also in the future if I add another mesh I need to add 20-50 bones to it but it is what is is i guess ^^
the skull of that plugin gives mad gen z vibes💀
But i just realized I need to change the skeleton for the animatiosn as well, does this work well or do i need to retarget?
Retargeting would be tedious as well
yea 100% worse then just chaning the skeleton for animations (if it works well)
when you change the skeleton on your mesh. You can just reload the mesh
I did the retargeting, then you forget a bone on the mesh or bone is not placed 100% same and there are settings you can miss had all of that and then you retarget the animtions 100 time you think everything is ok and year

theres a one click retargeter
But I mean i guess you can do live retargeting but it comes at a performance
Youll have the main guy always in your game
hell just be invisible

How to retarget in unreal 5? How to easily retarget a mesh? How to copy animations from one mesh to another?
Welcome to How to... a snack-size video for a snack-size question in Unreal Engine 5.
SUPPORT ME
Patreon I https://www.patreon.com/ryanlaley
Buy Me a Coffee I buymeacoffee.com/RyanLaley
Donations I paypal.me/ryanlaley
PRIVATE 1-2-1 SES...
But i guess it depends on how ever many people are in your scene at any given point
na i just want to change the skeleton for the animations if this is possible, but i think so judging by the optiosn
why?
Bc the animations belong to that skeleton

If the bones arent aligned the same its going to end up wonky
Hello sorry to interrupt but does anyone know how to fix a skeletal mesh incompatibility error because I imported it from mixamo and I animated it on level sequence and it is not working and saying that error
send ss
Hmm so retargeting is the way you say?
It is on uefn
I mean the animations appear to be all based on the ue5 skeleton and

hmm yea but retargeting takes very long and then something is not right
thats what I'm scared of ^^
yea in another project i did the retargeting
It doenst take long for me.
yea but this are 100+ animations right now
Gotchaaaaaaa
how many different characters are you going to have?
and then if something is not right ... xD
send ss of the error
no it's fine for now i think i'll base most of the characters on the same skeleton
so this should be fine
aight
but getting them all to share the same skeleton ^^
This is the error i am making a project and it was working fine no errors and then this came up randomly and i do not know why

ignore the name i got it from sketch fab
click the link
I actually dont know how you have an incompatible skeleton. Try reimporting it
Oh… I tried that and now it is fucked
Sorry for the bad language I am just irritated because I don’t know how to fix it and it took me ages to make and now the error is gone but its arm is like inside it and it is all messed up
Can i see the anticipation animation?
as a montage or import file?
a video of the montage
i tested it out and it seems that the on cancel - where the gravity is supposed to increase to 12 and pull the player down to the ground is sometimes not firing
can you send a ss of that code
But dang you spending a lot of time making that cube look good and you not even gonna use it

see i hate this, now I'm already having the issue, that from the animations two have sword_holder socket but they are different now the retargeting already sucks 😂
And you said this isnt running all the time?

I just realized something. im seeing that you are playing with the gravity
There are options in the character movement that handles that stuff
Theres also a stop jumping thing I think you should call

yeah that is not good lol
lol
that was the first thing I did
this method is much cleaner and more accurate
except for now haha
montage messin with it
gotcha
i feel like if I let go of the key during those 2 frames
it doesn't fire the cancel
that's my guess
do complete instead
yeah did that too - which is rad cause then you dont even need a delay
but same result
is there a hard cancel for montages?
just like I'm stopping the timeline
the stop anim montage does that I think
why do you have stop all anim montages unticked?

In this video you sent. im seeing you jumping but the canceled isnt resetting
at like the 12 second mark
oh i meant to check that back when I was testing

stop doesnt' seem to work
Im thinking you can maybe lower the actuation threshold of the release on your input maybe
Im thinking too you can maybe change how it functions as well.
can you send a ss of yours
im thinking maybe just have it as hold. Ahh ur missing a delay
have one trigger and make it be hold
ok thats not working
actually i lied. I tested the wrong thing
what about this
which is weird bc you were jumping
i was staring at it just now and hitting it over and over
it is technically activating the cancel
but the gravity isn't being set to the cancel
wait
I know what the problem is
hold on
fixed it
jesus
the timeline wasn't getting canceled
for some reason during that time that a montage is active, it seems that other logic cannot exist inside it
so i set a .1 second delay on the cancel
nope. not ...... hmmmm
yeah its working 100% now lol
cool cool. Ii knew i was right
even a .01 delay works great
I do think the actuation is a good call too for even more tight feel
I was just kidding lol. I added ur missing a delay at the end of the sentence. youdid all the work
hey now - this was a team effort
it's really nice having someone to chat with through this stuff
very much appreciated
Oh yea man. no problem. loving what you cooking up
ahh thank you! I hope it turns out fun
learning unreal / BPs has been so freaking fun
All for ue. Ue is the best. So many features
I like bp bc im more of an artist than a programmer and I dont feel too restricted with it
Solo devving can get tough. Learning to scope is so important
what is your project??
oh yeah I've been around long enough to know how to scope properly
i actually released a game on steam back in 2016
and have worked on other games before and after that
scope is a huge deal to me
I still struggle with it. butttt we would need to talk outside of this channel
haha for sure
idek what other channel. Im still new here 😂
you can add me if you want!
I'm trying to retarget some animations, but now I have an issue, where on the skeletons a bone is named weapon_l and Weapon_L but I can't rename it on the skeleton with the skeleton edit plugin but after retargeting the animtions are not correct. I think this might be the issue, any idea what I can do or how to rename it?
by editing the generated retarget
just replace the weapon
but editing it in blender and reimporting would be the option that I choose
but is this the issue?
Did you look at the generated retarget ik
did the bones not match up
Does someone now how to fix this weapon jiggle? its caused by unreals interpolation and only happening between the frames of my baked out animation.
Dm @primal perch
Hello, can I have some pointers on how to implement a "counter" type ability? I think it is like the "inverse" of the finisher/execute ability maybe?
The thing that I struggle is the snapping.
I have 2 animation basically yeah? Attacker being countered and defender doing the counter. But, their hands and body are rotated and located at the baked locations.
What I think I need is to add some procedural animation techniques here to slightly reposition the hands for the counter ability to make the snapping less obvious.
Any tips on how to do that?
If money isn’t a problem maybe dragon ik plugin
I’m not too familiar with the control rig but it may also be able to help you. There’s also two bone ik you can do research into
Do share with the class your solution if you got one
A solution I just thought of would be to attach your sword to the ground when it hits the floor, and reattach it back to the bone
Using anim notify
That is pretty much what Im doing in casc, just with a constraint to an independent transformer object
Well Cascadeur is a whole other app. Unreal does not subscribe to it. Unreal also does not care about the most of the things you do in your bones in blender either. If you have an ik rig in blender, you’ll have to make a new one in unreal
I think you’ll have to make your own custom parenting solution
It’s not hard to recreate
Well, that is my custom dynamic parenting solution, as in the plan was to simulate that via a constraint in casc, then bake out the anim so unreal doesnt have to care about it but just plays the animation.
Then you’ll have to make the animation without the constraint and counter the parents offset
Ahhh I see what you are trying to do
The baked animation should already have the proper position
Pretty sure unreals interpolation shouldnt work like that. Actually found 2 forum posts that the interpolation is broken since 5.2 or smth
Correct
With unreal simply interpolating from one location to the next
What is it interpolating if it’s reading your animation frame by frame
Are you adding more frames?
There shouldn’t be between frames is what I’m saying
I mean the frames unreal "inserts" to interpolate
Try to disable that then if it’s possible
How many frames does your animation have
In casc
That step interpolation. Step works as it should, but then the animation gets choppy and I couldnt use slowmo effects in my game anymore as that would make my anims look like stop motion lol
Can you send a video of your stepped interpolation?
If you give me 2 minutes to get on my pc
If there’s a frame on every frame then stepped shouldn’t be choppy
If you already had your inbetween frames
It is choppy because it is not interpolating anymore, its like using no interpolation in cascadeur
Keep interpolation in casc. Use stepped in unreal
Stepped would basically function like interpolation if the animation changes every frame
step is just unreals "no interpolation" term
as its just snapping from one frame to the next
keep in mind its looks smooth only becuzase I remade the anim in 60 fps instead of 30. but the slower I set the playback speed (slowmo effect) the choppier it gets, due to it becoming more visible that it just snaps to the next frame instead of interpolating to it
There’s a rate scale option on the left hand side
So what’s the problem?
that unreals interpolation cares for parenting relations instead of just interpolating from one bone location to the next
it shouldnt
its a baked out keyframe animation, every frame is predetermined, there is no need for unreal to apply parent movement to a child bone
That seems out of our control lol
Everywhere I looked, people keep saying, "use a dedicated weapon bone for your weapons". Than I do that the way Unreal does it, by using mannequins sk and its still not working
my setup is pretty much textbook example of how to utilize manny weapon bones
from a set up perspective
have the dedictaed bone, animate it seperately outside of unreal via a constraint. bake all frames.
thats how it should work
And it does for the most part no? The only time it breaks is when you add new frames
with me being able do do whatever funky things I want in the anim software and unreal doing nothing else but reading the frame data
That weren’t baked
I dont really "add" frames
Changing the frame rate adds frames I believe
well, to change it from 30 to 60 I doubled the amount of frames in total yeah
like doubled every interval in casc so the speed remains the same
So the problem seems like it arises when you add new unbaked frames into the mix
My solution would be to disable interpolation for that specific animation
Have it exactly as it should be in Cascadeur
if it would be only for that animation...
Any animation where you throw your weapon
its an issue that will arise again as soon as I try to animate the weapon bone out of the hand
like Imagine an Emote or smth where the character is playing a little with its weapon. Nothing fancy but the weapon leaves the hand here and there.
Couldnt do that
The most annoying part is, that I know there is a way to achieve what I want. Because there are plenty of games out there who do exactly what I want...
but seemingly they use the same way I do it
but mine doestn work
They use unreal?
These animations look fine to me
There are fighting games made with unreal
that involve weapon throw mechanics
or generally let go of it for a period of time
It does only because its 60 fps.
imagine Id have a slow mo mechanic in my game. like a debuff that slows you down or smth
that would look very very stuttery
with step
because no interpolation
True. Depends on how slow u make the person
Buttttt. You see how much time you are spending trying to find the perfect way? Just work around it. That interpolation problem seems inside the engine
yeah, but Im building my game in the engine
so it needs to work xd
It can work. Just have a bone outside th hand parenting
For your emotes
And just swap back and forth
did that aswell. Issue is that then hand and weapon are not matching up on every frame
the constraints in cas work flawlessly
I was able to fix my
this is the same animation with the weapon bone being a child of the root instead of the hand
You exported that out af cascadeur fixed?
I have two skeletons
the one we made a few days ago
and oG mannequin
When you have the points of your sword selected and right click on the hand joint,


And have these like this, you can copy the swords position and rotation in relation to the hand
So on a frame where the sword is in the correct position, ctrl c. and ctrl v on the rest. Where the sword is supposed attached to the hand
its already where it belongs
mind, the waepon bone here is a children of the root,so I had to to constrain it to the hand when the weapon is hold
otherwise it wouldnt follow the hand between keyframes
My weapon wasnt constrained
try this animation
hmm i guess it was constrained. But i didnt edit the file you sent me so Idk what it was constrained to
here you can see where its constrained to
the constraint is only there to make it easier for me to animate thw eapon in casc
I could also paste and copy the location of the sword being stuck in the ground every keyframe
but this gets tedious
and every change to the hand would move the weapon aswell
So I'd have ro readjust the weapon transform everytime I change something
the contraint takes care of that by allowing me to place the weapon anywhere, and it just stays there betwwen keyframes
once the animation is done im exporting all frames baked out
´this is how it makes sense to do, and how others do it
be it in Blender, Maya, cas or wherever
the principle is always the same.
You can copy and paste a value into an interval
yea, but Id still have to correct the weapon position every time I change the characters hand on the respective frame
So i figure out the pose, put the weapon where its supposed to be at that frame and when I now have to readjust the character just a little, it moves the weapon aswell, so I have to fix the weapon too
to make this process easier, I used constraints
which "overrides" the parent relationship when I need it (Weapon out of hand).
Thats how its done. Thats how Im told/read its done.
I do it
It doesnt work
I think technically it shouldnt matter if I the weapon is a child of the root and constrained to the hand or if the weapon is a child of the root and parented to an independent empty thats just how it needs to be in cascadeur to animate the weapon properly, without having to keyframe every frame an utilize interpolation in casc. After exporting the animation is baked out and Unreal should simply play every baked out frame with interpolation from one bone location to the next.
The way I do it in cascadeur should be irrelevant to unreal
And it is.
But because of that Unreal is doing their own interpolation. And it does that wrong.
That moment between frames where unreal interpolates - it lets the hand bone influence the the weapon, therefore the weapon moves. But it will move back until it reaches the next "actual" animation frame
Have you tried asking on epics website?
Can I dynamically change a bone from fk to ik in unreal?
Not yet
No idea. That seems like something youd be able to do in control rig.
Actually I think so
hold on
I just the thought that perhaps bcs its fk, the weapon bone moves with the hand. If I set it to ik, it shouldnt move
But rather adjust everything else to it
Idk. The method I was thinking of is inside the abp and youd lose the animation you had on the bone so not applicable
Thanks ill try
hello,
I have made some adjustement to the bone of the left arm of this animation to better fit the weapon, but each time I save and quit, the adjustment are no longer here. How can I save the new bone positions please ?


oh nice thank you ! So I just need to add a key to the begining after placing my bones right ?
Yes
also i have an other question, is it common to have multiple socket for same item but different animations ? For example my rifle socket for idle animation doesnt suit the one for aiming
Im not entirely sure but its up to you. There are multiple ways to do things. If it works it works (to an extent. There are better ways of doing things)
<@&213101288538374145>
I want to add (simple) ladder climbing to the gasp project. I already have animations, I can make a state machine for the logic, I can make vertical movement, but how do I actually use it in the gasp animbp, without actually spending days learning what they did over there (don't have time, will never use it again). any resource for this?
does anyone know if its possible to make a runtime attached SK mesh, perform rigid body simulation againts itself and its attached parent (which happens to be another skel mesh)?
I'd love to keep this on animation-land, currently using the RigidBody node, but the RBAN world object collisions is really slow and jittery... and I really didn't want to write my own haha
Open to suggestions or alternatives
anyone else having problems with uefn mannequin when trying to add virtual bones from the head to any bone. For some odd reason when i try to add a virtual bone from the head to hand_r it's not connecting to the hand_r bone but it's floating in the air, but other bones seem to work fine


does anybody know why this control rig doesnt work, when I rotate any of the points the rig moves but nothing happens to the character.

is this the right approach? i want to toggle items in left and right hands, none, either or both at the same time

Im slowing down my attacks at the start and end of an animation, to add the feeling of power. Works perfectly on the upper body, attacks feel more powerful and less all over the place in comparison to the original animation - however, the legs move slower. Is there a way I could slow down the montage speed and have that just affect the upper body? 🤔 The attack montage is already playing on the upper body only, while lower body is jogging.
Can you send a video?
Its just for a brief moment at the beginning of the swing
How are you slowing the animation down?
By changing the montage’s Play rate.
Retire me with you😭. I honestly forgot what ur problem was.
The independent weapon animation
How’d you solve it?
In a nutshell, turns out you have to use the IK hand gun bone instead if the weapon bone to attach props.
I assume that has something to do with the IK rig doing something with the ik gun bone but not with the weapon bones.
So you have to animate the ik hand/feet bones along with their counterparts and are then free to animate the ik hand gun bone, or rather just fully constrain it to the weapon mesh in the anim software
I have yet to figure out how to properly constraint the hand gun bone to a mesh in casc, but its working now with the default mannequin skeleton as it should.
In fact I even found a reddit post talking about the devs of Borderlands 3 who had faced the exact same issue as I did now with weapon bone. They seemed to have fixed it by simply cranking up the fps of their animations so Unreal has no real time to interpolate between keyframes, but that seemed like a whacky workaround for me so I digged deeper and deeper until I had enough pieces to put the puzzle together and realize what I had to do - animate on the Ik hand gun bone instead of the weapon bone.
So what you are saying is that I was right
???
Idk what did you say?
Having your weapon bone parented to the root functions the same basically
Through the montage play node or on the montage itself
Yes but having the bone to use for the weapon be parented directly to the root, requires updating the skeleton
I wanted to use the default mannequin as it comes to make my animations as I dont have to update and retarget all their starterpack anims
It bothered me that the default mannequin had the aporopriate bone structure already theoretically but that I couldnt figure out how
Is there a reason why Character-->Mesh-->AnimInstance-->PlayMontage not working with root motion ?
The "PlayMontage" node that we can call on event graph works without a problem...
*Montages are working... just rootmotion is not playing as it should be...
Do you have root motion enabled in the abp?
Its ''RootMotionFromMontagesOnly'' selected...
Through the montage play node
im assuming the animation does have root motion right. do you have root motion enabled on the animation itself?
still trying to figure this one out if anyone has any suggestions
I am importing animations from Blender and it looks different from what is in Blender. The arms or my character are using the IK control positions even though I only have FK positions in my animation for the rig. Anyone know why Unreal isn't using FK for the arms?
It does have root motion... Also root motion is enabled for the animations...
Like i said, root motion works just not properly...
The problem is, if i use anim instance to play montage, character goes down to floor and play animation... Like have a gravity...
If i use the normal play montage, animation starts at correct position where players sits on the seat of the vehicle...
I think movement component or capsule component have a effect on anim instance-->play montage, idk any ideas ?
is there a way to use the retarget animation on facial blendshapes?
The abp does say extract root motion from montages only. But can you send a video of the problem.
hey, can someone please explain how to make a super basic animation in sequencer ? youtube channels arent helping. I want to make an oar / rowing animation; this is simple enough, I have an oar, i converted it to a skeletal mesh, put it in sequencer, made 3 keyframes, but then the issue of saving it comes; im saving it as an animation, it doesnt work; if, when saving im selecting "record in world space" then its working but the oar fucks off to some far away place on the map. What am I missing ? UE 5.5
Yes it does...
Has anyone made a video on how to get a smaller character to work for the game animations sample?
is the retarget from pose the best way to use the animations in the animation game sample project? can you build your game just of that?
It’s probably colliding with the environment?
When I import this animation from Blender, why is my animation using the IK controls(top) for the arm position instead of the FK ones that have keyframes?

Does anyone know the answer to this
If I wanted to create a "living cave", would anyone have a decent idea on how to go about that? I am trying to make a cave that leads into the stomach of a large creature. I wanted the walls and floors to move and seem like they are breathing. I thought I could maybe create multiple sections of skeletal meshes and animate them. But I didn't know that would be an optimal way of doing it. Also didn't know if using a skeletal mesh as the floor would be fine. Any help or suggestions would be appreciated, thanks.
Anybody know how to make an animation loop without snapping to the first frame, which is slightly different from the last?
guys is it better to use cloth simulation on character with skirt or better to animate with armatures and rig? im just wondering cause my clothing simulation looks awful all times
Material world position offset on a static mesh
Why are the first and last frames different?
Seems like you might have answered your question. Experiment with both and see maybe
hey everyone, i migrated lyra's animation locomotion into my project and im running into a problem. when a client is watching another player strafe by spammign A and D, the first strafe looks good, but then all other strafes after the first dont have any procedural animation. it resets whenever the player stops strafing and repeats again. anyone know what is going on? thanks
Thank you for this. Looks promising. I appreciate it.
Idk if this falls under animations, but i am trying to tweak the sandbox character. It's being rotated and controlled by the ABP it seems like, so kinda tricky to make it do what i want. Basically i want to lock the camera, face the direction of movement (this part works) but i also want it to face the mouse cursor location while running in any direction.
Ideas?
has anyone ever played with this "render static" setting on skeletal mesh optimization tab?
what would you even want to use it for?

my mind is wandering to a class type that can swap between skeletal and vertex animated on the fly, but you'd lose any instancing so idk why you would
Hey guys, I am trying to replace a skeleton on a character in my game. The old character/skeleton has an animation blueprint and other animation asset references.
What is an easy way to replace the skeleton with the new one and replace all the references to the new one?
is anyone well versed in animation retargeting? its kinda a new topic to me coming from Unity, im trying to basically retarget a mixamo animation to a character in the GASP, i have the UEFN manny retargeted to my custom character, idk how to integrate mixamo animations to that
basicallly this

is there a way to invert the constant interpolation?

<@&213101288538374145> errrm took me a while to realize
?
oh didnt see that on mobile
it's just a picture of some kind of broom thing...

i asked some friends. my bad i guess

hey everyone hope someone can help :). the first video is how it should be working and the second video is the problem. when I change the animation slot to the new one i created, the character no longer rotates towards the forward direction.
Does the GetNotifyName in AnimNotifies (I'm making a custom BP version) only fire when you first add it to the animation graph? I have a bool set up to switch the name, pending the bool type and it never updates when I change the bool from the animation details panel. I'm in 5.5
Ohh what, I just switched the bool and then moved the notify and it did update the name. But if I play the animation it does not update the name
Can anyone help me or point me to resources for blending random/procedural animations with hand keyed assets?
I can see how to do a lot of what i want to do in blueprints but wondering if there are better ways in anim_BPs or montages
mostly looking to, add a random rotation over the length of an animation - a coin rotating right and left and it spins
and combining two random animations in one call - animation A) a coin spinning and landing, animation B) the coin bouncing (both can blend on the same keyframes)
Trjy motion warping
Can you send ss, videos?
Hey there folks!
Hope you're all having a great day/night.
I am spawning a few actors at once, they all share the same anim bp and as a result are all in their idle state at the exact same time, creating a bit of an awkward synchronized breathing contest.
Is there any way to stagger them a bit so they aren't all mirrored?
I just came across this Interchange stuff because of Character Creator Autosetup mentions that this should be disabled for 5.5 workflow (https://courses.reallusion.com/home/character-creator/pipelines-and-render/unreal?v=updated-workflow-for-unreal-engine-5-5-auto-setup-|-character-creator-4-tutorial) - no answer on their discord channel about WHY this should be done. Disabling these Plugins interferes with others, e.g. Fab plugin which relies on this. So I kept them enabled, found no problems yet. Anyway, when importing FBX, I actually do not see any difference in the Import dialogue at all, also no Essentials checkbox you mention. Only thing I found is Show Import Dialogue at Reimport in editor preferences and some Pipeline and Translator Pipeline definitions in project settings. I must admit - this does completely confuse me... So what does that Interchange actually mean for the standard user, who simply imports assets like Skeletal Meshes, not doing any Datasmith or gltf stuff at all? Thanks for some quick guidance into the right direction.
Reallusion Courses
Level up your 2D & 3D animation skills in iClone, Character Creator & Cartoon Animator for free. Start learning with the free tutorials & webinars now.
Hello , when i try and play these animations before the previous one is done , the animation gets "stuck" on the first frame of the animation , this is the locomotion setup and is set up to play a certain animation when a value is true what am i doing wrong here?

For sure! See attached
could you be a little more specific?
Ohh ok I think I see your problem a bit better now. Can you send a ss of where they’ve placed their default slot
This isn’t the entire screen. I think I’m missing some valuable information. But you should be using an interface call to your blueprint and call that from inside the animation
Ohh yeah I'm on a wide screen. That first BP is an anim notify graph. base class animnotify.

This is how I do mines. It calls the footprint function inside of my blueprints which hands the animations informatin

Right, but that's not quite what I am after. I am looking for proper updating the name of the anim notify in the animation graph. As per the video you can see that it won't update unless I move the notify in the graph
I guess im just misunderstanding then

oh wait its not a montage
you can still update the information by calling a direct function
So sorry 😅 In an anim notify, there is the function GetNotifyName that you can override. That function seems to only be called when you move a notify in the animation graph? I think?
When you say animation graph what do you mean. The ABP?
oops sorry Animation Sequence assets
I believe so.
buttt lemme check something
Where are you trying to access the animation?
not using choosers. Are your animations set to loop?
I'm just in editor. Just like in the video. It's the 3rd person template content. So just opening up the MF_Run_Fwd asset and adding in my custom notify. But I couldn't figure out a way to update the asset on bool switch


Can anyone help me or point me to resources for blending random/procedural animations with hand keyed assets?
I can see how to do a lot of what i want to do in blueprints but wondering if there are better ways in anim_BPs or montages
mostly looking to, add a random rotation over the length of an animation - a coin rotating right and left and it spins
and combining two random animations in one call - animation A) a coin spinning and landing, animation B) the coin bouncing (both can blend on the same keyframes)
is there a way in animation blueprints or montages to procedural append two seperate animations
additive animations
https://www.youtube.com/watch?v=flHL3qJB3_I&t=41s this might be able to help?
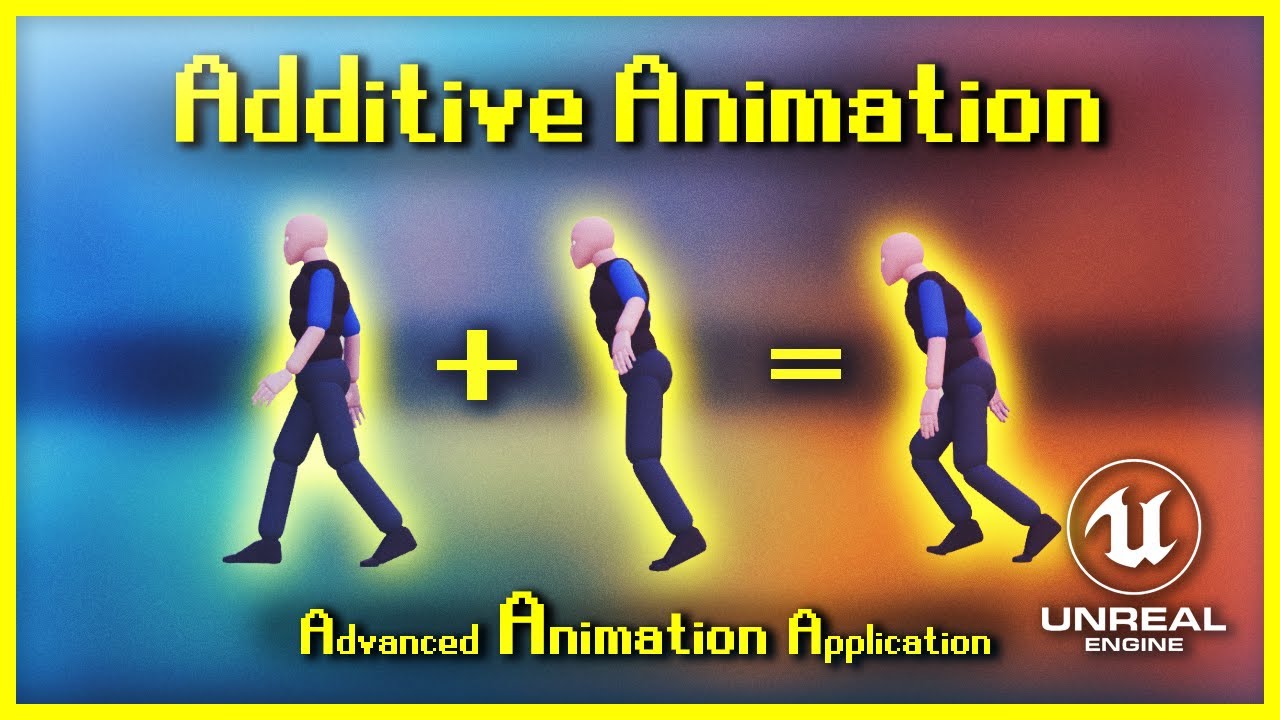
Welcome to my new series, Advanced Animation Application [for UE4]. This fine evening we're exploring the use of Additive Animations - whether it is for purely aesthetic reasons or even for gameplay. The 3 examples I cover today are acceleration leaning, landing compression and breathing animations. Additive animations can be used for absolutely...
not quite
its somewhat close, as its calculating an acceleration and adding it. which i might work
I was hoping to determine a pose randomly and have the animation lerp to it in the span of its playtime
Theres a pose snapshot
-in this specific case adding a random yaw to a spining coin as it moves
hmm yeah a blend space is great for the range of outcomes
i just need it to lerp to the blend space location in sync with the animation being played
eg- there are multiple flip animations
i want the blend space lerp to map to the lenght of the played animation
eg
12 frames to move, or 35, or 10 etc etc
Its tickling my brain. It feels like I have something in my mind
yeah the other part of system is
i have 2 arrays of animations
spins to land + land to settle
I want to randomly combine animations from each array
the land keyframe on all of them are identical
is the best way to execute this just literally in BP with
Anim1 -> Anim2
or is there a path in anim BP or montage that would serve me better
ha, i will when they are animated
wanted to think through the implementation
and chooser player, is that in anim bp?
yes. Its so powerful
hmm yeah that solves problem 2
the next quesiton is can i animate a blend space over the run of an animation
Can you elaborate
are the coins spinning for a set amount of time? Is it random?
besides the point. Im thinking you can play a montage at the end
your lands could be montages
and just choose which one to play based on the direction that the coin is facing when its landing
Ill need to mockup stuff and see. Its hurting my brain too much now I gotta scratch the itch
https://www.youtube.com/watch?v=N26-uYMJKNs heyyyyyy. What you think about this?

Coin Rig:https://olepatrick.gumroad.com/l/czxjv
I also have some other character models there.
Coin Model: https://sketchfab.com/3d-models/chinese-coin-c71b14a7affa450db4659c50dafa9ce7
Fiverr: https://www.fiverr.com/olepatrick
Gumroad: https://olepatrick.gumroad.com/
patreon (there's not much on there but everyone has one): https://www.patreon...
Dang that's cool
I can recreate that with the control rig thankfully
As I've got some of the animations done lol
Yeah. I think youd have endless possibilites too.
set ammount based on spin animation
maybe
i can just rotate the root and all the settles can play in any direction
so where can i find info on the chooser node

Watch this recorded session from Unreal Fest Seattle 2024 that explores how Unreal Engine 5.5 levels up gameplay animation with Choosers.
This talk deep dives on Choosers in and outside of animation, root motion-driven Motion Matching, and many of our Motion Matching improvements coming in UE 5.5.
We also explore updates to the Game Animation...
Its simpler than that. But thats just how to kinda use it.
normally how would you play chained animations
litereally
animation a + b outside of montoges
and also is there a way to blend to a target point on a blend space over an animation
say i have a blend of .5 in a "Coin Direction" space
and i have a 22 and a 33 frame animation that can play
is there a way for both of them to smoothly blend to that .5 in the blend space by the end of the animation
hmm if i could have a float track animatied
You can @ me btw yk. You can use animations notifies inside of the animation to drive some logic maybe.
Can i see your coin direction space?
right now its fairly simple
bones are
Root -> Position -> Spin

Hmmm. Control rig is out of my skill set for now. I was thinking maybe literally recreating the blender rig inside of ue. And connect your "ik" bones to the controls. And just play with the values in bp. When its spinning. I actually dont even know if its possible to play with "ik" bones like that
i can figure that element out
i'm not that woried
the bigger question i have is how to propery set up a blend space
where -1 = -360, 0 = 0, and 1 = 360 degree turns
That should be easy no?
are your animations looping?
they are not looping - this whole system is determining an outcome - so its a play and stop
and i can't figure out how to set up a proper blend space with just a set of poses
only taking animations etc and the resources i'm finding only use them to blend complex animations
hmmm.
why not have the ends spinning
-1 and 1
have two blend spaces
for your spins left and right and one for up and down
add them together, and possibly do an alpha lerp to the position it landed on
My ue keeps crashing so cant really show
could do that
but yeah i'd love to see how you set up that blend space
i need some better tutorials on the anim blueprint and montage side of things
I think my ue was just crashing bc of the project I was trying to open. But ill see
Actually as im playing around with it im seeing a potential solution.
I mean it kinda works i think. Just needs more blends
I think you can have an additive one. Lemme Experiment
I think a blend space is all you need really.
Two blendspaces. One for spinning and one for leaning
does anyone know whats going on here?

the skeleton is fine its only when i import the animation that it does this
and the same thing happens to my other model that i have but with a different animation
Hey I have a general question about root motion. I have a dashing attack animation I am using as a montage to play. When the dash is occuring, the pawn should be able to pass through other pawns. So before playing the animation I set its collision object type to a custom created one that ignores pawns. What I've found is that as long as im not playing an animation, I can move through that pawn using that channel. If I play the dash animation using root motion, it seems to get caught on my player character. I only need root motion to give me the physical location of the pawn, I dont want it doing any physics checks but I cant figure out how to disable that.
wow actually you're right
i was thinking of using the blend spaces for something else but yeah
that looks great
i'd love to see a walk thorugh of what each point on the blend is
this is a bit better than what i was thinking of doing
It’s something I’d need to experiment with But the point on the left is spin left. Point on the right is spin right point at the top is spin forward. Points on the bottom are the heads or tails
Hello. Is there any way to make anim notifies fire when using frame evaluation (frame based animations)?
It does need some work. The bones. It needs to spin from the middle in the air and spin from the bottom on the floor. I’m thinking a bool to just switch blend spaces can deal with that orrr. It can all be in one blend space but it does need more animations. I looked at the coin rig in blender and it spins differently when it’s landing so I, thing that it itself can be an animation as well
Have you tried? I don’t see why it shouldn’t work
Yeah I have tried many times, they don't fire. I use frame evaluation for weapon reload animations which are tied to the reload percentage.
No it's just a normal non-montage animation with a play sound notify
Can record a video, sure
gimme a few mins
Set movement mode to flying
I’m assuming the animation isn’t being imported in correctly
@undone arrow In the video you can hear a shield shattering sound effect in the animation window (just a test sound). Then when playing and when the rocket launcher reload animation plays, the shatter sound can not be heard.
When I play the animation normally (non frame evaluation version) it DOES play as intended
Ah wait I found it!

turning this off fixes it
What is the downside though of turning this off. The animation still seems to work correctly. But I wonder what teleporting does. 🤔

Hmm even the docs just say to turn it off without any explanation as to why it's set to true by default 
Gotta love that lol
"Yeah your problem is caused by this setting, just turn it off"
"Okay, but why is set to this by default?"
"Dunno"

Funnily I’ve never encountered that problem
Does anyone know why my animation is unable to lift off the ground? It looks like Unreal removes the "Z" axis on my animation when it's played in the world when I have Enable Root Motion checked. Is this a rigging problem?
For example, I have the animation leap into the air and do a flip. But in reality it just flops on the ground.
I thought maybe gravity was actively fighting it so I disabled it to test things out but it just flopped around regardless... just... floating in the air this time.
The model, rig, and animation are all made by me. And frankly I'm just lost on what's causing it. The animation looks fine when viewing it, and even plays fine without root motion with the exception that the hitbox doesn't follow it.
Set movement mode to flying
oh my, scroll down a bit more and there it is 😆
Oh thank you, wasn't even aware of a "movement mode". I'll hunt that down and try it out when I can, thank you!
Don’t forget to set it back to walking during the animation
During the animation? You mean once the walking animation needs to be retriggered after the "jump" animation?
ok what the heck even is control rig "initial" transform - for some reason, it seems like it's always the base pose of the skeletal mesh asset, not the pose I'm passing in as the "source" pose in the anim bp
source pose being fed into control rig node

pose if there's nothing in the rig graph:

pose generated from control rig using "initial" transform of the feet

what I want is for the feet to be as they are in the first picture but alligned with the ground. Previously, I was grabbing the "current" transform of the bones on the first frame but I suspect this is causing problems for certain actors in my game
Hey friends! I'm a programmer starting to explore control rigs. From what I can tell, so far, it seems like I could achieve the same kind of "rigging" just using traditional animation blueprints. Am I overlooking something? Does control rig offer any unique capabilities that aren't possible with animation BPs, or is it more of an alternative workflow? One that's closer to how things are done in 3D software and more geared towards animators rather than programmers?
has someone found an easy way to implement the gasp onto an already existing player blueprint, via anim blueprint only or something? i got a fully written char, but it would take months to fully convert everything to gasp. i would rather just have a simple anim bp where i can add layers for my montages and so on.
control rigs are for animation creaton, anim bp usualy for executing animations. but if you found a way, its good for you, but i wonder how you wanna bake those animations when they are done without a control rig?
In my case, I don't need to bake animations. I have skeletal mesh with a physics asset. Some bones are driven by physics simulation. Others are going to be animated to adjust to the physics simulation. Similar to what you can see at https://youtu.be/Wc6lUXOhRO0?t=714&si=cYLCyoURfV1Dtp71.

Watch our evangelism talk ‘Driving Around: Exploring Chaos Vehicles’ from the State of Unreal 2022 livestream.
Chaos Vehicles is Unreal Engine's lightweight system for performing vehicle physics simulations. In this video, we go over the system’s features, the basics on how to set up your own wheeled vehicle from scratch, and tips and tricks to...
So, your answer pretty much aligns with my impressions so far. Control Rigs seem to be mainly a tool for animators to create and edit animation clips or sequencer animations directly in Unreal. But when it comes to real-time procedural animation, like handling bone transforms in IK setups, it looks like everything can be done directly in animation blueprints without needing a Control Rig. What I’d love to hear from you all is whether there’s more to it that makes it worth diving deeper into it. Am I missing any key advantages?
I'm not aware of being able to set bone transforms/do procedural animation in the anim bp - AFAIK you do that in control rig (and I'm currently struggling mightily to make my control rig procedural animation work)
Oh yeah, procedural bone transformations have been possible long before Control Rigs came around. A classic example is foot placement using IK, but honestly, you can achieve pretty much anything you can think of directly in animation blueprints.
Whenever you stop ascending in your animation. You can use a montage notify and set your players movement mode back to walking
Gotcha, thanks for the tips!
...I am an idiot. The source pose is just the pose when we enter forward solve
How to Ensure a Full Step Animation Completes When Tapping "W" in Motion Matching?
I'm using Unreal Engine's motion matching system for character movement. Currently, when I tap the "W" key, the character starts taking a step forward, but because I'm not holding the key, the system immediately blends back to idle in an unnatural way.
I want to modify this behavior so that when I tap "W," the character fully completes the step animation before transitioning back to idle, rather than blending out prematurely.
Is this possible within the motion matching system? If so, what would be the best way to achieve this?
Hey, friends! I have a skeletal mesh where some bones are driven by physics simulation. However, when I try to get this bone’s transform in the Animation Blueprint, it returns the pre-simulation (non-physics) transform instead of the updated simulated one. Is there a way to access the actual simulated transform from the Animation Blueprint?
Hi I have horse model I am rigging and skinning. When I rotate the horses neck down the mane hair stretches really bad. See my attached screenshots. I do not want the mane hair to stretch and need it to look natural. Is this a geometry issue, weight painting, not enough bones, etc? I am new to rigging and skinning and not sure how to go forward


Looks like weight painting to me
Hey does anyone know why my camera isnt following my ads, someone said it was because of aim rotation which is linked here but never told if anyhing was wrong?


is there a way to add an offset to an animation so that the hand lays somewhere or attaches to the surface of somewhere? I'm not really interested in IK, since i just have the hands visible, I'm using the transform bone node but I'm trying to figure out how to get it to offset towards an object
hey guys, I'm using motion matching with chooser tables, but I wonder, is it possible to use animations for transitioning from idle to walk or jump start animation with it?
If so do you have and directions on how to do it?
can some one help me with blend spaces?

even in unreal's documentation it states you can place poses in blend spaces
but i can't drag pose assets in ??
i'm really confused here
Place a still of the animation
yeah actually figured it oout
pose assets being something totally different from 1 frame animations lol
I’ve never done it through poses so idek if that is possible
i do have an issue of creating a blend space still
trying to make it so
-1 = -360 , 0 = 0, 1=360
but its treating all of the poses as identical so its not interpolating at all
So we’re poses working?
yeah i have the 1 frame animations

Is it spinning on Z?
yeah
but its treating all 3 states as identical
so its not rotating
-360, 0, 360
Go in your details panel and check the bones rotation
I don’t think unreal goes to 360
So the pose might have to be 359. I think blender is the same
360 is 0.
But unreal goes to like -180 to 180 I think
yeah its all reading as 0
It instantly swaps when the rotation passes that threshold
Your animations don’t have any spin
Why is it spinning that way?
so when its 359 it just lerps from 0 to -1
it does not wrap the correct way
and the whole reason for the blend space is to add a random z turn in the animation for variety
Idk for sure but when you rotate the bone you’ll see. It doesn’t even go up to 359


Yeah. Something like that
so how do i fix it?
Try making it spin indefinitely?
no
-1 = -360, 0 = 0, 1 = 360
-0.5 = -180, 0.5 = 180
etc etc etc
pose to pose blend
0.7 = 270
etc
Such niche. It’s brain itch after itch. I do like solving problems tho. Hmmmmm.
Might have to move that outside of a blend space maybe
just need info on how to do rotational blend spaces
But the problem would still exist. Hmmm
there have to be parameters
and when i put in 180s it will rotate and rotate back
yeah will try -179
nope
there has to be a way to specify how blend spaces rotate
Have a small database inbetween. Like have a database for run_jumpstart. When you run set a bool just started running to true. And after a while disable it
between single frame animatinos
going to try 90 and -90
ok that did it
with just 4 poses
0, 180, 90, -90
gets the correct span
Yeah it’s weird
it makes sense
i was just hoping the poses would save symetrical rotations as different because of the quaternions
BUT
this fully solves my issue
I wonder what the next problem would be
The way I handled this was to move my camera to the guns sight
Can someone explain to me what Component Space is? ("Set position of bone in SkeletalMeshComponent's reference frame", what does that mean?)
For some reason I need to set my bn_weapon bone to rotate in Component Space and bn_base to World Space to get the rotation I want, but I don't understand why.
The Pawn is attached to a Scene Component in another Actor. That Scene Component has a relative Z rotation.
So I'd expect that I have to set bn_base to Component Space, which I'm rotating on Z. Not bn_weapon, which I'm rotating on Y. I'm confused 😕
Parent Bone Space also works.

Hi,
project is lyra
I have a custom character that is being retargeted using the IK Retargeter. One of the montages, specifically the archer draw montage assigned to the "Upper Body" slot, is not blending correctly. While the legs move during running, the character remains still when jumping. I attempted to use a Layer Blend with the pelvis bone, but it caused the character to tilt at a 45-degree angle. Although the bone structure is different, the locomotion animation plays perfectly. I'm unsure how to resolve this issue.
Do I need sync markers with motion matching or should I add them to my animations?
Can you elaborate
sync markers to do what
To me you would just handle that logic in bp
As far as I understood, sync markers are used to sync animations, so that when blending between run and walk, that they sync up also for footstep sounds right?
I'm just wondering, since I'm going to place AnimNotifies for footsteps, if I should also place sync markers.
Im not too knowledgeable about that. I thought was just for visuals
Me neither, thats why I'm asking, because I'm going through all the animations for footstep notifies and this would be a good time to place them as well.
Better safe than sorry I guess.
But I havent found a use for them as yet So i personally dont think they are that important
Yea, maybe someone else has experience with it 😅
is there a way to change my IK goals to work in the skeleton transform space instead of them having (0, 0, 0) just mean default position?
I feel like there must be an obvious fix in a menu but I cant find it for the life of me
Hey the effector space "World location" doesnt really behave as I expected, anyone knows whats up?


ok
so I'm running into a huge issue with my animation Blueprint and Montages
@undone arrow
I have two sets of montages with relevant animations
one where the coin lands on heads and one with tails
for whatever reason when i try to play a montage that flips to or starts in a tails position,
it still plays the animation heads up
there are no blend spaces active, i've tried to run off the animation blends
but its just so strange
Can you send a vid
here is the montage
here is what happens when i play it on loop in an anim BP Call
wait may have found it
i needed to set the blend state on blend out and not completed
it was created a 1 frame gap
man.. whatever team designed Control Rig... had they never used Unreal Engine before? why is everything so ass backwards in that graph editor?
it's like working with some bootleg version of blueprint or something
Oh you mean for the entire thing. I thought it was just the last thing
Anytime man
its in beta
and its also trying to conform to animation bp standards
render target
beta, i get that- but it's been around since unreal engine 4. it's older than nanite ffs. i crash more often in control rig than anywhere else in the editor
and it's definitely not conforming to ABP standards, it feels more like the old Blackboard system. IE) you can't access function parameters through local gets.
want to get the length of an array? nah we don't use length over here- we use "num" lol
anyway i'm just ranting 😛
crashed too many times today and wish i could yell at whoever designed this mess
basically
i have the bp in the level
it has the coin and render target camera
that writes to a texture, I use a material to mask out the non actor parts of the image
then on the UI its just an Image component using the material
@undone arrow
I might have to play with that sometime
The good outweighs the bad imo. replied to the wrong thing
Newbie question! Whats the easiest and best way to a character interact with the ground hes walking on?
Hi everyone, when I pressed key in animation sequence in the top bar to keep changes, the mesh dissappeared, how to bring it back?
tun on collision on character and the ground?
Elaborate. Footstep sounds? Foot placement?
Can you send a video
I need a blendspace montage and apparently this is not a thing in the game. I want a cast animation that plays once and overrides other animations, so a montage would be perfect, but it needs to interpolate between left/right/up/down animations, so it needs to be a blendspace. Chatgpt says I can't, google says I can't. How am I this far off the beaten path for such a simple feature? What am I missing?
I needed multiple animation sequences but they did not save the changes I have made and when I would edit other animation sequences, all of the animation sequences would change to the same pose (I duplicated each of them from one source animation sequence), and to keep changes I hit key button at the top and it helped, but the mesh is not seen

Hey everyone! 👋 I’m fairly new to Unreal Engine and could really use some help. Has anyone successfully retargeted an ActorCore skateboarding animation to a MetaHuman? The movement transfers perfectly, but the skateboard animation doesn’t, and the mesh disappears entirely.
I’ve tried different approaches but can’t seem to get the skateboard to stay linked. If anyone has run into this issue before or has any advice, I’d really appreciate the help! 🙏 Thanks in advance!

Hey the effector space "World location" doesnt really behave as I expected, anyone knows whats up?


@sweet kite did you get that?
I have a character walking on a simple terrain,the problem is that the terrain itself is a little more like a downslope so im trying to find a way to make him walk on the terrain without sinking into the terrain as the terrain gets highier.
I have a weird question. has anyone experienced this animation issue? I retargeted these animations and they were all fine until today, its like they are completely broken
the funny thing is that im not even playing the animation
looks fine in the preview as well
I think i figured the issue, i am looking in my retargeter and it seems i dont have a root source chain, not sure if thats the issue but i think it is
so apparently that didnt fix the issue. if anyone could provide advice that would be appreciated thankyou
its doing it in the rig as well for some reason

How does ABP_Manny get from Locomotion to Jump? It doesn't have a transition rule between them, and I can't find anywhere in the ABP where it forces the state to jump

Look at the To Falling alias
it's one-directional though? There is no arrow from Locomotion to Land, and arrows only go away from To Falling, not towards it
Can someone give me a basic run down of what I would need to look into to add an animation to Lyra?
This is a first-person project and all I want to be able to do is on Interaction, fire off an animation state that moves the character arm(s) up in front of them, for example picking up a tablet to look at the screen. Then, on a button press, reverse the animation and put the arm(s) down.
I have the animation sequence for holding the item, just not sure how to blend to it. Would this be a new animation Layer?
I'm an unreal C++ systems engineer, so Animation stuff really hasn't been my thing.
You need to read up on alias. You don't understand them. Click on the node to see where it can transition from. There won't be an arrow
Ahhhh, I see. The list of state names selected are basically the input arrows, and you apply your condition coming out of the alias
Yeah. State alias' are game changers coming from UE4 for graph organization/tidyness
Well, there weren't as necessary as some people made them out to be, that was just bad implementation but they still help a ton 😄
man this stupid animation offset is just making stuff a mysery
no mater what i do its always there in game some how


Intermediate Tutorial for Unreal Engine 5.
0:00 Intro
0:33 Make Animations
3:24 Make Blendspace
5:45 Custom Player Controller
9:16 Use Arm Boolean
11:54 Anim BP
15:31 Fin
Is Motion Matching production ready in 5.5?
man that is a idea i could get behind
rather then strugling to animate hands and such
How do I get the blend mask to only apply to the upperbody slot? Somehow the upper body does some wonky stuff on stuff that is just default slot 🤔

non upperbody slot animations should play normally without blend masking but they don't for some reason?
nvm figure it out
Does anyone here have some MotionMatching knowledge?
Generally confused what I'm looking at regarding the debug prediction line when using Epic's Character-based Trajectory generator.
any idea why when I use an AimOffset my character straight up disappears ? (scales to 0)
ok nvm i needed to have a non-additive idle animation
What are you confused about
The Line that one can draw to show the Trajectory, on Epic Character, if I inject a steady input (Forward + Mouse Right), barely bends.
It has a small bend at the start and then goes straight on. And I'm implementing this stuff for Mover at the moment, and after "fixing" the Predictor for mover, I get a Line for my Character that is properly bend, basically fully round, the path that the character will follow.
And I'm confused if:
- My stuff is wrong
- Epic's stuff is wrong
- The debugging line is misleading
And the History, even though the values are the same for the Trajectory nodes, draws diffently (distance between sample seems different).
Gotcha. Ya, I'm not sure how they do their predictor using mover. I Just extended the PoseSearchTrajectoryLibrary to use my movement system instead (I dont use character and instead something similar to mover.)
Thus the same problems of decoupling
I duplicated their Library by now to add some logging.
MaxSpeed: 500.000000
BrakingDeceleration: 500.000000
BrakingSubStepTime: 0.030303
Friction: 5.000000
Velocity: X=-413.677 Y=280.841 Z=0.000
Acceleration: X=-760.833 Y=247.251 Z=0.000
Position: 0.000000
Facing: P=0.000000 Y=78.419479 R=-0.000000
MeshCompRelativeRotation: P=0.000000 Y=-90.000000 R=0.000000
bOrientRotationToMovement: false
bStepGroundPrediction: true
[2025.02.11-12.50.24:174][927]LogGAPoseSearch: VeryVerbose: [UGAPoseSearchTrajectoryLibrary::UpdatePrediction_SimulateCharacterMovement]
[2025.02.11-12.50.24:174][927]LogGAPoseSearch: VeryVerbose: CurrentPositionWS: X=2680.574 Y=-5794.922 Z=4.275
[2025.02.11-12.50.24:174][927]LogGAPoseSearch: VeryVerbose: CurrentVelocityWS: X=-413.677 Y=280.841 Z=0.000
[2025.02.11-12.50.24:174][927]LogGAPoseSearch: VeryVerbose: CurrentAccelerationWS: X=-760.833 Y=247.251 Z=0.000
[2025.02.11-12.50.24:174][927]LogGAPoseSearch: VeryVerbose: ControllerRotationPerStep: P=0.000000 Y=0.000000 R=0.000000
[2025.02.11-12.50.24:174][927]LogGAPoseSearch: VeryVerbose: [ 1] ====== START ======
[2025.02.11-12.50.24:174][927]LogGAPoseSearch: VeryVerbose: | | CurrentPositionWS: X=2680.574 Y=-5794.922 Z=4.275
[2025.02.11-12.50.24:174][927]LogGAPoseSearch: VeryVerbose: | | CurrentFacingWS: P=0.000000 Y=78.419479 R=-0.000000
[2025.02.11-12.50.24:174][927]LogGAPoseSearch: VeryVerbose: | | AccumulatedSeconds: 0.028709
[2025.02.11-12.50.24:174][927]LogGAPoseSearch: VeryVerbose: | | CurrentAccelerationWS: X=-760.833 Y=247.251 Z=0.000
[2025.02.11-12.50.24:175][927]LogGAPoseSearch: VeryVerbose: [ 2] ====== START ======
[2025.02.11-12.50.24:175][927]LogGAPoseSearch: VeryVerbose: | | CurrentPositionWS: X=2639.207 Y=-5766.838 Z=4.275
[2025.02.11-12.50.24:175][927]LogGAPoseSearch: VeryVerbose: | | CurrentFacingWS: P=0.000000 Y=78.419479 R=-0.000000
[2025.02.11-12.50.24:175][927]LogGAPoseSearch: VeryVerbose: | | AccumulatedSeconds: 0.128709
[2025.02.11-12.50.24:175][927]LogGAPoseSearch: VeryVerbose: | | CurrentAccelerationWS: X=-760.833 Y=247.251 Z=0.000
The ControllerRotationPerStep is 0,0,0, even though I'm moving my mouse.
And you're getting a weird trajectory

looks like a mitchmatch in skeleton
first thought
that's usually the case when the bones are like that
Would that make sense, given the data is just CMC driven?
Ah don't look at the character mesh
It's about the line
gotcha... looks like a slight prediction to the right is happening
Yeah, but the rotation applied is a constant right value
Injected via EnhancedInput.
Here is the history line:

So it runs constantly in circles and i would expect the prediction line to look like the history one more or less
Curve wise
And in my Mover setup I also get that
Ya, that's a long history
I think mover does that
You can just not use movers predictor
oh
The line is unchanged CMC code
maybe i'm seeing the scale wrong in the image
gotcha
ok, so you're running in circles and the line is following (is this in a bad way yet?)

That's the CMC line. Basically what you see when you run in circles on teh GameAnimationSample
History shows I'm running in circles
ok, so it's not predicting a turn in the future
since you'r still holding right, but the line is showing straight
This is my mover version. Not perfect cause it seems to curve too much, but way more what I would expect.

History is also way further apart for whatever reason. They are walking with the same speed and same prediction and history values.

fwiw, the history of the CMC one seems to look like the prediction of the Mover one xD
why is the history of the mover different then the history of the cmc?
if the movements are the same
Yeah that's one of my questions too
is the line accuratly following both?
if that's the case then that means they're in fact behaving differently
You'd think, but this is when they are both running straight for a while.

They don#t drift further apart, so neither of them is faster than the other,
Hey everyone,
I'm trying to export a modular character from Blender. I created the rig using Rigify and then converted it for Unreal using the GameRig Tools addon. Everything is working fine except for the export.
When I try to export all the mesh parts along with the rig, Unreal imports it as a single skeletal mesh with all the body parts already attached, instead of multiple skeletal meshes.
The only way I've managed to achieve this is by first exporting the entire mesh with the rig to create a Skeleton. Then, I export each mesh part individually along with the rig and convert the exported static meshes into skeletal meshes using the previously created Skeleton.
Is there an easier way to export the entire modular character with the rig in one go while keeping the skeletal meshes separate?
Thanks in advance
Hey so I'm trying to make my bear characters legs always touch the ground, although I had it working with component space, when i set the effector space to "world space" it suddenly doesn't work in the world. Anyone knows what's up??


@unborn crypt So I figured out the problem with the History.
The Mover Predictor adds the created Prediction Samples starting with 0.0 for the accumulated time.
But 0.0 is the current one. CMC correctly adds it with DeltaTime, so in the future.
That caused the first predicted sample to be "old", and also the code that grabs the "previous location" to make the History Samples "Relative Locations" was using a completely wrong location due to this.

That looks better :D now trying to fix the rest haha
@unborn crypt Also figured out why the line of the CMC one is straight. They limit the ControlYawRate in the AnimBP to 0.0 while moving.
For whatever reason.
Sorry could someone help me because I've been stuck here for a long time and I have no idea what to do ?
Hey, this is a weird question but I was wondering if you as an Indie dev, would consider renting an affordable mocap studio for like an hour or two to make some custom animations, rather then doing it all by hand? Let's say for like 100-200 bucks per hour. Like does this make sense for you?
You can use the new skeletal mesh editor tools to delete the modular parts you dont want. Just import it once, make a bunch of duplicates for each part then delete the mesh parts you don't want
Not going to happen by the hour. It'll be day rates. Need to cover the studio space, the actors, the equipment, and that's done by the day.
Mocap isn't available to indie at a sufficient quality/price
You can get low quality suits without a good quality actor and get an awful but situationally passable result with cleanup
Yeah I noticed. I've been thinking about getting an OptiTrack system for quite some time now and I got the idea of opening my own mocap studio with good rates because as an Indie developer I know that it would've helped me a TON to have access to mocap but the rates were way too expensive since I needed a lot of animations done and for many games which would add up really really quickly.
I'm using contextual anim scene. How do I select a different anim set based on condition? No matter what I do, it always defaults to the first one
Also why is there 0 documentation on CAS?
Hey, folks! On my animation BP, I'm using the Transform (Modify) Bone to rotate a bone given a rotation that I'm calculating in the C++ side. But this damn animation node accepts an FRotator as input parameter instead of an FQuat and I'm experiencing gimbal lock. I can create my own version of this node and solve this with a custom node, but before I get into this rabbit hole of creating a custom animation node (which I'd love to avoid), do you know of another way to solve this issue?
Thanks for the advice I'll try that approach! 👍
It is easy to create an anim node. If you haven't done it before be aware that there is the editor AnimGraphNode_MyNode and matching runtime AnimNode_MyNode, and expect to copy both entirely rather than inherit they're pretty much never exported which is honestly fine with those
Thanks! That's what I'm doing. It's so weird that there are no default anim graph nodes that allows a bone rotation to be set with a quaternion.
What happens if I create FirstPerson animations with the default UE4 Mannequin in Blender, and then retarget to other character in the engine, will the grip do not match if the models have diferent dimensions (like hand dimensions arms and so on)?
Hey guys, I'm currently facing an issue with an animation, which should go forward left.
It works fine (first video), but as soon as I turn on Enable Root Motion, it starts going to the right.
Any idea what the issue could be and what I can do about it?
Is it possible that this is an issue with the orientation? (See the arrows)
Also how could I fix that?
(First image is a animation where it is ok, second is the one with the issue)


My Animation Blendspace is not playing from the start but starts at a random position.. Any help please ?
how are you playing the animation? is it played as a montage or an animation sequence in your ABP?
as a montage
ideally I would like to fix it in the animation though
if your characters have different proportions it's safe to say that things like contact positions will be different across your characters. e.g. if you shoulders are wider your hand positions will be further apart.
https://youtube.com/watch?v=vZW8mxlQJEk&si=SOEQPswqjZ4XZNG3
you can use IK to correct hand positions, if you have different hand proportions like a larger hand or wider spread fingers you can also expect some discrepancies in the contacts of the fingers etc.

Senior Gameplay Programmer Laurent Delayen explores animation retargeting and what it can do for improving your animation workflow.
yep, thats fine, just wanted to check that it's played through a montage.
the orientation of the root shouldn't impact the direction of the root motion it should just follow the translation from the root which is applied as velocity on the character.
what are the root motion settings of your ABP? there's "root motion from everything" or "root motion from montages only" etc
But isn't there a way I could fix this, because if you look at my pictures, for the first one the orientation is good, I would like to fix it for the second one as well 🙈
For montages only
its the same animation right? but the character moves incorrectly when you enable root motion?
So for the videos, the first video is without root motion enabled the second one has root motion enabled.
The first image shows a animation for which the works fine and the second image the animation for which it does not work.
I mean looking at the root motion orientation arrows it makes sense why it does not work with root motion enabled, I would assume that the character is rotated so the arrows faces forward and since the arrows are titled 90° this leads to a righte movement
typically the rotation and translation are independent. so you could rotate your root 180 while moving the root backward for something like a turn start for locomotion, but the orientation shouldnt have any impact on the translation of the root. it should only determine the orientation of the capsule relative to the character mesh when root motion is enabled
I'm not really sure what the arrows really are telling me. It is just that setting, is there an additional orientation for the root motion?

if you did want to adjust this in engine you could pull it into sequencer and bake the animation to the mannequin control rig so you can adjust the root independently
Is this a actual skeleton bone that is causing the issue?
the orientation of the root will determine the orientation of the capsule, while the translation will determine the translation of the capsule.
But so there is an additional thing besides the bones in the animation, that tells how to rotate the capsule?
from what your animation shows i would think not, because the trajectory looks correct based on what you mentioned. but its hard to say, is there anything else you're applying to the character when you play this montage?
I mean i bought the animation pack and the creator/seller is quite responsive and already fixed another issue, so I hope/assume he will do the same thing, but I was just wondering if I can do this myself, also I'm interested what this really is.
no and I have to animations sets, both a dash forward left, and for one it works for the other it doesn't and this are the two images.
So the difference I can see is that the arrows are pointing to the left where for the other animation they are pointing forward, and I would assume that the capsule is rotated so that the arrows look forward.
It 100% is an issue with the animation itself, this is the only variable in the equation, just wondering how easy it is to fix and besides that what it means 😅

yeah it's a curious problem. what are the values on the root in the details panel for those two animations?
maybe it is the rotation after all 😅 if the orientation is determining an initial angle, still seems very odd
I mean further investigating i think it is an issue with the root bone
This is the animation for which is is fine.
This is the animation with the issue
I think you might be right, I don't exactly understand why tbh haha
I think he retargeted the animations from ue4 to ue5 and thats where it happened but i wonder if i can fix it because I'm retargeting his animations to my skeleton.
you could still correct that how I mentioned before, you can pull the anim into sequencer, bake it to the mannequin control rig, and remove the rotation on the root
Is it easy? ^^
yep pretty easy
if you have an empty level, bring your character in and open up sequencer
^^

you should then be able to add the character to the sequencer track if it doesn't do it automatically
do i need to add a level sequence?

yeah you can do it that way, or just create a level sequence in ur content browser and double click
ok got that
if you have your character mesh you can either pull it into the level or drag n drop it from your content browser into the sequencer viewport, this should spawn the character to work with
so i drag the character mesh into the level right?
probably easier to drag the character into the sequencer, it should just spawn it automatically
yea have that done
if it created a control rig, you can delete that first of all, otherwise ur anim will be overridden

okay, in that case you should be able to add your animation to the animation track
yea i have done that
ohh you mean just change the yaw to -90 and then export it like that?
then if you right click on the skeletal mesh track you should be able to bake it to a control rig
that could be an option, I was going to suggest removing all rotation from the root on the anim that is incorrect
how can i do that, because having it static to -90 will be not right since the rotation is not always -90
but maybe I'll just wait till tomorrow maybe then the guy fixes it in his pack 😅
is that not how your other correct animation is set up?
that is the correct one all are pointing forward

for this it is dynamic as you can see

meaning for the good anmiation, the root bone is not rotating, but for the bad animation the root bone is rotating with the character
yeah so in your "bad" animation you can remove that rotation in the level sequencer we just set up
how can i do that?
because the animation i dragged into the sequencer is also bad in the sequencer
what do you mean?
if i play the animation in the sequencer it is also rotating the wrong way
what if you disable root motion on the anim asset, then add it to sequencer?
then it works but then it also works for the montage
yeah okay, so if you have it in sequencer working "correctly", then you can right click on the skeletal mesh track and find bake to control rig
you should be able to bake to the mannequin control rig which will allow you to adjust the root rotation

maybe, control rig means you can just change the keys and save out a new asset
I maybe think I have to sleep about it and hope that the guys fixes the animations 😂
I is 99.99999% this one animation that has an issue, maybe I could even fix it, by adding the package and then trying to retarget the original ue4 animations to ue5
But i really really appreciate your help!
no problem, there aren't that many steps to adjusting the animation in control rig. once you have the animation baked, you can just change the keys, save the asset back out, and done
For me it is just late and then I'm trying to do it quickly and then I make it worse, thats the only reason I'm not trying it right now and until now I did not try rolling back changes with perforce so ... 😂
that's fair, better to be rested
Yea, so if it somehow fucks up I have time to fix it, better go to bed with a small itch knowing this one animation does not work instead of a headache 😅
Also I'm pretty sure, since the animations I got where originally ue4 and then retargeted to ue5, that something happened there.
I just deleted the ue4 animations so I can't try it right now, but maybe if I just retarget the animation from ue4 to ue5 myself it is already fixed.
good idea, you might get more consistent results
Ive been wondering, how did they even achieve this with the 2 different mannequins? theyre clearly different proportions but yet they can use the exact same animations just fine (albeit whatever offsets naturally happen) but I cant find any way to do that with my own characters

whenever I try to retarget anything it ends up either duplicating every single animation as a compatible version or just irreversably breaks my character rig entirely
same bone names, barely different proportions

Learn how to make perfect animation retargeting with IK Rigs and IK Retargeter of Unreal Engine 5 (UE5). This tutorial will show you everything there is to know about these new Unreal Engine 5 (UE5) tools.
🎁 Download my custom version of Blender : https://evansbohl.gumroad.com/l/mixamotoue5
💙 If you like what I do, please consider supporting m...
Hey everyone, can someone help ?I'm trying to make my bear characters legs always touch the ground, although I had it working with component space, when i set the effector space to "world space" it suddenly doesn't work in the world. Anyone knows what's up??


I expect these two mannequins, while being different skeletal meshes will share the same skeleton. Because the share a common skeleton, the animation assets can be shared.
when retargeting across the same skeleton with different skeletal mesh proportions you need only define your skeletal mesh in the retarget manager as a retarget source and set up the retargeting options on the bones of the skeleton.
https://dev.epicgames.com/documentation/en-us/unreal-engine/animation-retargeting-in-unreal-engine
if you have a different skeleton you're wanting to import and it has all the same bone names and hierarchy like you say, you should import this as a skeletal mesh, using the existing mannequin skeleton as a target skeleton. this will make it compatible with all the mannequin assets.
if you want to keep it as a separate skeleton, you can also set this as a "compatible skeleton" in the details panel
https://dev.epicgames.com/documentation/en-us/unreal-engine/skeletons-in-unreal-engine
(see the bottom of the page)

Epic Games Developer
Describes how retargeted animations can be used with multiple Skeletal Meshes, allowing you to share animations.

Epic Games Developer
Learn about Skeletons, Bones, and animation data management in Unreal Engine.
component space will be relative to the root (iirc) where as world space will be the absolute world transform. That might explain the discrepancy you're seeing.
are you trying to achieve a IK Leg setup for this character?
When updating animation blueprint is querying the character always the way to go?
its often recommended that the ABP shouldn't do too many calculations of its own. You can certainly calculate some essential values to do with velocity, acceleration and rotation etc but you'd derive these from the character/character movement component first and foremost.
Using Property Access in UE5 is often suggested for this purpose
I was just thinking, would it be better to have the character update these values? If the ABP is checking the Character->IsAiming on tick, it seems like it would be better if the character does ABP->IsAiming = true/false
Makes sense for something like Aiming to be a state on the character. if you have this as a variable you can read that variable in the ABP through something like Property Access and use that as needed. As opposed to having a similar variable stored on the ABP which you would need to set and update as well.
typically the ABP is reading from it's owner, in this case the character. rather than writing information to the ABP from the character, if that makes sense.
Yeah. I just see a lot of ABP where they use the Propery Access to get a variable from the character and then set a local ABP variable to that. Then inside of the Animation Graphs it gets used
that's usually the case yes. that said you don't always need to set a local variable on the ABP, but doing so can be useful for debugging.
Is it bad to bind to delegates in a ABP?
I'm not much of a programmer so I'm not sure i have a good answer for you 😅
yeah I just get failed to merge bones whatever I do
also I assume compatible skeletons is a ue5 thing
in that case you're skeleton hierarchy must be different. are you wanting to share the skeleton?
I believe so
the only difference in the skeleton was added on hair bones
gonna try without them rn
yeah still happens
in fact I think Ive gotten that error without even making any changes to a skeleton before
if they're leaf bones they shouldn't be an issue.
if you import as a new skeleton, then bring up the mannequin side by side can you see any differences in the bone hierarchy?
oooohh it was doing that thing where it adds an extra root bone, I think I got it working now
blender?
classic
no problem, glad it's working.
Does anyone know if a method to pause anim state machines, or even time dilate it in a way that also effects state transitions? Blends will continue happening at full speed for most methods.
The only thing I could find that works is changing the custom time dilation on the actor itself, but that effects everything.
I have an additive animation that plays on the final pose, and I'd really like that not to be effected by any time dilation.
aaaand now it broke again
ok I dont like how it adds the bones to the other skeleton too, that means you cant make any changes at all after importing the new one even though thats something else
how do you mean?
since the skeletal meshes are sharing a skeleton, that skeleton needs to contain ALL the bones of every skeletal mesh. each skeletal mesh however will only load the relevant bones that it needs for that mesh.
you can think of the Skeleton as a container or definition of all the bones. and each skeleton mesh is like a skin
yeah, that makes sense but it seems like that prevents you from making any changes even to the other rigs heirarchy after the first import, because then the original skeleton will freak out
you don't wanna be making hierarchy changes. you can add and remove leaf bones, and there's a little tool you can run to remove redundant bones if the engine sees they're not used. but the core hierarchy is pretty locked once you get started, unless you got back through and change every skeleton.
yeah but I mean hierarchy that didnt even exist on the original skeleton
but then importing the new one adds it to that original skeleton so it is
oh man its also offsetting bones that dont even move in some animations
hat bone is getting offset in an animation that doesnt move hat bone at all