#animation
1 messages · Page 53 of 1
If you double click on your animation sequence, and you turn on the debug option to see the bones, you should be able to see if there's a bone floating in the position where the spear is.
Yeah I rigged up the spear with only a Root and grip joint. I thought exporting the animations straight from maya would line up with the meta human I'm working with inside of maya to unreal.
Here are the bones inside of unreal

Yep, there's your problem.
The only way it's going to line up with your metahuman is if you have the metahuman skeleton in maya.
If you don't, then you'll be out of alignment.
I do
Then it should line up, so something is either wrong with the skeleton, wrong your import settings, wrong with your animations, or wrong with the playback.
This is the same metahuman in maya

Pose seems to match pretty well.
Did you bake that constraint before exporting your fbx file?
Yes I baked down the joints when I exported
If you hover your mouse over that bone, you should see an explanation. A circle means that the bone exists in the skeleton, but not the mesh.
Have you confirmed that by reimporting your exported fbx into maya?
Let me do that now, just a second
Yeah it seems to be lining up correctly In Maya.


Interesting. And when you open the anim sequence in unreal?
Your screenshots are from the level itself.
What about the anim sequence viewer?
Those screen shots are from a animation sequence. Just has spawnable assets to pop into the level.

Right, but what happens if you open it in the anim sequence viewer?
Like - by double clicking on the animation sequence in the content browser?

Well, that's interesting.
I would have expected that the weapon bone for the spear would be attached to the characters skeleton.
That's what I was assuming.
That tends to be how you do it for video games. Is this a movie or trailer?
Just a cinematic test and just figuring things out and trying to build a workflow. I just got stuck on why there is a offset and If its a fix for this method of doing it. I'm not opposed to creating a weapon socket on the meta human to get it placed but would that take away the option of adding animations to the spear itself (The animation on the spear is a spin before the character grips)
Not quite. See, what you can do is you can have a bone for the weapon in the character skeleton.
Sometimes this is attached to the hand, sometimes it's attached to the root, and sometimes there's multiple ones and you switch between them based on circumstances.
I don't know why the offset is appearing, I would check the actual translation values between the FBX file, the maya scene, and the animation sequence.
If you really want to track that down.
But if this is a video game, and this is a video game character, and you want the character to be able to spin the weapon around - adding an actual bone to the skeleton that you can animation, that's probably your best bet.
I can add these to the metahuman without screwing things up? The metahuman is a exported from bridge.
You can add bones to a character without messing anything up with the huge caveat that you should not do so without thinking about it, and removing them is much more fraught.
But yes, technically, you can add bones to a characters skeleton.
Yeah I'll dig more into it and thank you for the back and forth! 🙏
Good luck!
ah gotcha thank you
Anyone?
When using the Game Animation Widget, what does it mean if the trajectory is going -Z direction during idle?

Hey I’ve been messing with modular control rig a bit to see what I can do with it compared to the normal control rigs and wanted to know if there’s a way to move the controls it generates. Haven’t been able to find a way
My arms and legs all work, but the controls are oriented incorrectly
is it possible to play two additive montages at the same time? i noticed it only works if i play them in slots from different groups
but when they are under the same group, one montage plays and other stop
If I have a customizable character with backpacks, etc... , I use master pose and different skelethal meshes for it, but I dont know how to manage the fact that I might need that different backpacks have different animations (like fortnite)
Modular Rig is pretty cool I must say, but one thing that confuses me is. It doesn't really seem to expand outside of the limbs,head and feet.
If I have a character with hair, facial bones or anything like that. It can't really do anything of that nature, unless I'm missing something here?
Is there a way to move the root point closer to the mesh? Or do I have to make a new root?

When exported to Unreal, it shows my root 4 feet in front of my character
Would it be possible to move your root bone to where the cursor point is? Seeing as how the cursor is at 0,0,0.
I moved it there, but all it did was push the mesh and armature back
Not sure what's going on with Control Rig but when attempting to rotate a control to test, the values gets stuck between -1 to 1 instead of the whole 360 degree angle, if I punch in the values manually it'll work just fine.
Not entirely sure why that is.

Hello,
I edited an animation, is there any solution to apply these additive layer tracks into the sequence or totally create a new animation asset without those?

Fixed the issue. If anyone else has this problem. Select the Origin Point > Go to Object (drop down menu) > Set origin to geometry.
Does anyone know why my walk forward loop animation looks like the character is not moving straight along the axis in the PSD, but looks totally fine in the sequence? I'm using the same settings for the PSDs and schemas as the sample project. The animation was originally from the sample project, for testing I retargeted it and made some minor adjustments to the arms/hands in iclone.


fixed it. Not sure what happened but I put a print string on my set pitch variable and saw that it was reading negative for both, so i just had to recalculate

both directions*
Hurrah!
That is how you have to do it. Two montages in two separate groups can play together.
The Anim Sequence Viewer normalizes the characters rotation based on the first frame. So even if the angle is off, it will reset the character so it appears to be facing forward. The motion matching tools can't do this though, because they use the angles to drive their system.
I would double check the actual rotation of the root bone in your walk animation, because that will display correctly, even in the anim sequence viewer.
I think you could create a new animation with those modifications by loading that animation into the Sequencer using the FK Control Rig, then saving the sequence as a separate anim sequence.
You're not. Epic has released only a limited set of modules. You could create new modules to handle those systems though.
In Unreal, animations with broadly matching skeleton setups can use the 'Copy Pose From Mesh' node to copy the pose from one mesh onto another. A common way of doing complex clothing is to create custom skeletons that integrate parts of the master skeleton into them. So your backpack would have the root, pelvis, spine, and shoulder bones from the main skeleton - and then use the 'Copy Pose From Mesh' node to copy the pose from the body mesh, and then additional dynamic bones to make the backpack bounce and move properly.
Int he same way that a complicated pair of pants would have the root, pelvis, legs and feet bones - as well as whatever other bones and systems are necessary to make it work.
The modular control rig is pretty locked down. It trades ease of construction for the ability to customize.
Damn. That’s lame. My test rig has incorrect control transforms but the bones have no roll, and scale is correct
Lane that can’t customize it a bit more
Normal control rig is the way I guess
Yeah, I'm overall pretty critical about the state of the modular control rig right now. It feels a lot like an investor facing product, and not something that users are intended to like... build things with.
Definitely hard to build with as is without transform options and more prefab types
Also seems slow/ has caused the only crashes I’ve ever had in engine
It's very new, so it might improve over time.
But right now, I wouldn't use it personally, even if I could get my characters bones all aligned the only way that it allows them to be aligned.
So I got this free asset pack from the Marketplace but the character does not have a jump, land and fall animation. After a bit of research I found that you can actually retarget animations from meshes to other meshes however as you can see in the retarget window the animation seems fine but after I export it the animation looks like this:


Anybody know how I can fix it?
I would turn on the bone display in the retargeter, and double check what the root bone is doing.
Because that looks like the body pose is OK, but the character is oriented incorrectly.
And that's probably the root doing that.
See I got it working perfectly and ik was great, felt like magic but a control for shoulders was way outta place and so were hips. Def gonna keep an eye on its updates!
I bought the Adventure Character Pack 2 b/c it was on sale, the characters are nice but each character has its own skeleton. What is the best way to handle this so that you don't have to make the same sockets on multiple skeletons, or retarget animations to multiple skeletons?
Sorry to ask this but could you tell me how you enable the bone display in the retargeter? I'm on that menu right now and I don't see an option
Should be in the 'Character' menu:

I'm not sure how to acces that entire window because mine looks like this:

Oh, you're using the automatic retargeter.
Unreal, sometimes delightfully, often confusingly - has multiple ways of doing the same thing.
You are using a new automatic way that is different then the way I was using, and has a different window.
another problem this time lol. Arms should be using the animation i made that is attached to Blend Pose 0, but they aren't. Why not? : (

So is using the old way better ?
Depends! If the automatic way doesn't work, than yes!
You also tend to have more control over things in older IKRig method, but it is more time consuming, and you need to create several assets to do it.
There are some good tutorials on how to do them.

- You can support this channel via https://www.patreon.com/sarkamari
- Check out my Unreal Engine playlist for more similar videos: https://www.youtube.com/playlist?list=PLbvsJz5ZcmxF9fclMrFPfdRA77crIZAUs
- You can access our online shop via: https://www.youtube.com/channel/UCeMhJ9SijyiDCOlcTAhOHag/store
In this step-by-step guide, we'll delve ...
Can I go in the animation (the one that was retargeted in the new mesh) and just rotate the root part?
Probably not.
No.
oh
You might be able to do it if you loaded it onto a control rig in Sequencer, or exported an FBX and then did it in Maya or Blender.
But just inside unreal, 'change the values' - probably not.
At least, not in a way that wouldn't lead to cascading problems down the line.
interesting. the Layered Blend per bone's branch filter index has to be set to match the bone that it's moving letter for letter lol.

This is just so confusing because in the retarget window the animation looks okay lol
Well I kinda fixed it. I just used another jumping animation to retarget
If I were to make a character with customization options (like different clothing and such), would I make the base model and then add different clothing on top of that as a different file, or would I just put all of the different options in one file?
Ok figured as much, thanks for the answer! :) guess it's back to regular Control Rig for now
You would want them to be separate files in Unreal, but how you author them is up to you.
Sometimes people make all the hats in one file, sometimes they have a separate file per hat.
Up to you.
okay, and then would i just be able to attach those models to the player with a component?
also how would i handle things like shirts and pants? same way?
Depends on what it is. A hat typically doesn't have deformation and can usually be directly parented to a head bone.
For objects that deform with the character, like pants and shirts, you're going to have to apply vertex weighting to them like a character, and you may need additional supplemental deformation bones, and physics simulations, depending on what they are and how they work.
would there be like tutorials I can follow to do such a thing?
Unreal has a page on Modular Characters in it's documentation:
Epic Games Developer
Create modular characters by combining multiple dynamic skeletal mesh components in Unreal Engine.
And an hour long video on it:

The stories you create aren't static, so why should the look of your characters be? Using the UE5 Lyra Sample Project as a starting point, this session will discuss various techniques available to add, swap, and customize your characters.
We’re excited to bring you sessions from Unreal Fest 2022, available to watch on demand: https://www.unreal...
okay cool! thank you so much!
👍
Thanks! All was fine with the root, the angle was fine. I tried exporting as an FBX and then importing instead of using Livelink to send the animation to Unreal and that worked. So there must be something wrong with Livelink for reallusion.
took days of troubleshooting but we got it 😭
does anyone know if theres a plugin or something to save out a new anim seq from this window in a very streamlined fast way? its very convenient to edit poses here by rotating bones, but getting it out into a new anim is very annoying
you have to hit play, record, then stop recording and then go and manually cut off the front/end frames to trim it back to the right amount of frames. i have to be missing something but i cant find it... and i know theres the level sequencer but that one is super overkill for what im doing

Quick question, I am following a inverse kinematics tutorial and I am supposed to link the bone "pelvis" to some blueprint but my character does not have a pelvis bone.
Are there any other typical names for the pelvis in animation?
hip?
Sometimes it's spine 1.
Doing the retarget for our climate jam internship stuff. (programmer so no idea what im doing to be honest but our artist is being ass)

Why would the land animation change scale of model
by like 500 lmao
retarget in unreal
if I change it to

It has right scale but wrong direction lol
The run, walk, etc from manny work. just land isnt
thanks! i also found another way. i add multiple related additive animations into one montage and play them simultaneously this way.
That would also do it, provided you were willing to do the combination offline.
Apparently it is called hip. The problem is that instead of just having a Hip bone I have HipLeft and HipRight
potentially the bone that those ones are attached to?
if you send a pic of your hierarchy?
they are atached to the root

Is there way to merge those 2 bones into one that would be in the middle of them?
Or would that mess with the animations?
this is quite a weird setup yeah
Btw what I am trying to do is to add Inverse Kinematics to the character but the tutorial I am following says that for the root I need to select the Pelvis. But since my Hip is divided into 2 different bones the Inverse Kinematics only works for 1 foot

is this something you have rigged and are able to edit?
I got this character from the marketplace
It came rigged
But I guess I can edit it in Unreal?
This is what the skeleton looks like

if you select the Root_M bone, is that at the feet, or is it at the centre where the hips should be?
Pretty much where the hips should be, it's in the middle of them but a bit higher up
you may? be able to use the root_m bone but this is a bit of a strange way to rig a character
ideally the root bone is at the base of the character, then goes up into one hip/pelvis bone
if you did use the root_m bone though, it might cause issues for you for anything using root motion, but the position of that bone being incorrect could also cauase you issues
You mean selecting the Root_m for the root in the blueprint? I've tried that and the character does some weird things
yeah it's not a very conventional or game ready way to set up a rig
So there's no way to do it without editing the skeletal structure?
And doing that will mess up my animations?
you would probably need to edit the skinning and rig unfortunately
my opinion is that you might be able to add a new root at the base of your character, changing the current "Root_M" to be named hip or pelvis, but if that bone currently isn't skinned then you will have issues where your IK may not work
newbie animator here. does anyone have a good tutorial on changing FPS arms animations to full body ones? I have a FPS asset and I want to use the animations on an ALS project
Doesn't this red line mean you don't have a root bone?
I've been following one that's extremely good imo. I'll find it, one sec
thank you very much

Not sure if that's what you had in mind but i did it with a mixamo model and it worked and looks really good so far

I want to retarget these animations to a full body one (UE5 skeleton)
not sure if the retargeting from mixamo will work.. but I'll give it a try
Ohh i see. So do you already have arm animations setup?
yeap. I got a low poly weapon pack that has animations, so I want to mix them together with the motion matching ALS project
I imagine you could be able to take the skeletal mesh thats driving the arm animations, and retarget to any full body model. Just match up the arms of the model and your current arms
I think so, too. I hope it works
Yeah, sorry I'm extremely new to all this so
it's completely okay! I'm not good at animations, either. I'm a... generalist
It means their root is not on the floor.
It's not at 0,0,0 of their scene.
Ah okay. The model i use, has the hips as the root bone so that makes sense lol
Mmhmm
Yeah, I agree with Nat. This is a very strange way to setup a character. My guess would be that they just took a blender asset, and directly imported it. If you do that, some Blender bones will split into two halves, which is what it looks like happened here.
after fighting unreal a bit, I was able to retarget the animations, but holy cow, they suck for TPS ;-;
expected, but still sad
how do i make the mesh face the correct direction (forwards) instead of laying down, i know i can rotate it but if i do it goes in a different direction in game

So, I'm guessing you started with a template of some kind and then replaced the mesh?
Yeah, I was worried that might happen. First person animations and third person animations tend to look really bad when you try to use them for the other purpose.
yeah kinda, i mean i found the model on deviantart so i uploaded it into my project
OK, well... that doesn't fill me with confidence that the asset is going to necessarily work super great.
So which template did you start with?
well the model and textures imported pretty well
'Cause I would think rotating the character so that they're vertical would normally not affect the direction of movement unless you're using a root motion based movement system.
And I don't think any of the templates except the most recent motion matching one use those.
im just trying to make the direction face the correct way instead of the general direction being down
Right, so when you rotate the Skeletal Mesh Component of the character mesh - that changes the direction they move?
Inside the Blueprint, is what I'm talking about.
so in the picture he is facing down, thats the only way i can get him to move normally upright in game
When you say 'move normally upright' do you mean that when he's moving in game, he is vertical, but when you open the BP he's horizontal like that?
yes
Interesting.
And you didn't do a... retarget or anything right?
You're using the animation BP that came with your template?
What if you stand still in game?
Horizontal or vertical?
no thats a different issue im having, i am trying to use Mixamo animations and i get a specific error
no animation came with it
OK, so this character doesn't animate when you run the game? They just stand there in t-pose?
yes
But when the game is running, they are vertical in the t-pose?
I know that I'm kind of going over the same ground over and over again, but all of this is a bit unusual.
But hey! Props for trying to make a character animation BP from scratch!
thanks
yeah he is just in a t-pose, i dont mind that because im looking to rig the animations myself, its just weird he is facing down in the blueprint but upright in game, i am hoping this will not affect any abilities i create for them
I would expect that to cause problems. I'm not sure what exactly is causing that - but I wouldn't expect to get away with not fixing it.
Now, personally - I would try printing out the orientation of the skeletal mesh component both in the BP and at runtime.
To see if it moves.
I'd also take a look at the character root bone, in their skeleton - and see if it's got a weird rotation on it.
i should preface by saying i am very new to all of this so any lingo that you may use might go over my head and i may not understand exactly what you mean sorry
OK.
Well, OK. So
First - I'd try just dragging the mesh from the content browser into the scene.
Not into a BP, but just into the level.
That should create a 'skeletal mesh actor'.
I'd be interested to know if that displays the same behavior.
Where he appears on his face, but stands up when the game is run.
the skeleton mesh seems to stand up on its own by the looks of it
yeah
So.. how did you go about getting that character mesh into your Pawn BP?
i downloaded the FBX file, imported it into my project, applied the skeleton onto my main character and then applied the meshes as a material
OK, so when you say 'applied the skeleton onto my main character' - what do you mean?
And meshes as a material? That's a new kind of way of doing it to me.
i have an asset pack called RPG System All In One, i used that character template that came with it as seem in this picture, all i did was change the skeletal mesh to the one i downloaded

OK, interesting. I've not used that character template before, so I can't say for sure what they're doing with the mesh. What happens if you change the mesh back to the original one?
Does that also appear to rotate strangely?
no its normal
So that's very strange.
Sorry, I don't really know how to advise you on this one, because I haven't used the template, or seen this behavior before.
I could tell you the things I would look for, but it involves looking into the two assets and comparing them, and then checking the event graph if that doesn't show me anything.
Sorry!
I'm not sure if trying to solve this problem is a good starting place, if this is where you're starting with Unreal and animations.
all good, aprpreciate you helping anyways
do you know of this error by any chance?
Mesh contains root bone as root but animation doesn't contain the root track. Import failed.
I've never seen that specific error, but I guess it's coming from you trying to import Mixamo animations onto a character that has a root bone. Mixamo characters don't, they have a pelvis bone as their root.
So there's probably a mismatch going on.
If you've uploaded this character to mixamo, and you've downloaded their version of retargeted animations onto this character, I would be surprised if you have this error.
But if you just grabbed the animations from Maxamo on one of their characters - then they don't have root bones, and if you tried to import it onto this guy's skeleton, I wouldn't be surprised to see an error like this.
thats what im trying now which may fix it
dammit, "unable to map your existing skeleton"
Hello everybody, beginner here. I have difficulty with understanding how to add animation to an action of my character. For example my character can crouch and dash now but I don't have an animation for them.
Surprisingly, I cannot find a useful video on this subject and all of them jump to more advanced stuff without covering the basics properly. If you have any good tutorial about this I'd be thankful if you share it with me.
Thanks!
https://youtu.be/WUXvq6At6pE?si=0NmIDRIK1f8Kqfrt Gorka is good and otherwise you have Matt Aspland and a few more
Hello guys, in this quick and simple tutorial we are going to learn how to create an animation blueprint and a blendspace in Unreal Engine 5
↪️Check out awesome Unreal Engine courses: https://bit.ly/GorkaGamesWingfoxCombat
Check out my Steam Game! https://bit.ly/3rVlXU1
Follow me on Twitter: https://twitter.com/GorkaGames
Subscribe to the chann...
Or some other video in one of these 300+ collected https://youtube.com/playlist?list=PLo5oFORjmbJ9Ij4l3ecSNdfXFDYelDVtG&si=izkmhC21UO4Za8FR 😅

YouTube
I've got no idea, i got this character from the marketplace
I do have a root bone. I think the red line is to say that it's not in the rigt place? Someone said that typically the root bone is at the bottom so I guess it should be where the line ends but mine is at the hips
I have some basic questions about virtual bones I can't seem to find the answers to.
- ik bones are always moved using code and rarely additive anims. is that the same for virtual bones? are there ever situations where you don't move the virtual bones?
- Virtual bones can be used to fix swimming for weapons, but i also see hints elsewhere that they can be used for other more ik-like things, anyone got a source/example?
- what is the purpose of having virtual bones that are parented to something other than the root, e.g. shoulder or elbow? what difference does parenting make?
- Is it that whether to use IK bones or virtual bones depend on whether you want the bone to be relative to another bone?
Page turn / pepper peel effect
Hi i wonder is it possible to do such effect in Ue possibly in the motion design editor.. does anybody have an idea how could i achieve such thing.

How to Create Page Turn Effect in After Effect | Page Flip Animation @ezeditofficials
➡️ Join YouTube Membership: https://rzp.io/i/gffu77jTp
➡️ Envato Elements: https://ezedit.in/envatoelements
➡️ Aejuice: https://ezedit.in/AEJuice
➡️ Join My Video Editing Masterclass: https://ezedit.in/...

Here’s my animated book menu plugin for Unreal Engine and the Getting Started video for it.
https://www.unrealengine.com/marketplace/en-US/product/animated-book-menu
You always wanted to use a book as the menu inside your game?
Maybe to create more immersion?
Or just because you like the idea of a fully interactive
and animated book that ble...
Thank You , but it is a paid plugin for UMG Widgets..
Oh lol I didn't know it was paid
unfortunately yes.. but it looks cool tho xd
What are the techniques for handling weapon animation? Like having a montage that not only animates the character but also the weapon mag and some other stuff like on a sci-fi gun a switch or screen. I used to include curve values within the skeletal mesh and the weapon actor would listen to it but it easily gets annoying to maintain even after two unique weapons
-
Yes, there are scenarios where you don't move the virtual bones, and instead move other bones to match where they are! That's a fairly common way of doing relative IK setups for weapons and objects.
-
Virtual bones can also be used to tilt walking animations to account for changes in terrain. You attach two virtual bones to a virtual root, then rotate the virtual root at runtime and ik the legs to their respective bones, this maintains the animation but allows you to accommodate tilts.
-
Virtual bones that are parented to other things can be used to define animation within the space of other bones. Creating virtual bones that are child of the top of the spine, and then constraining those to the wrists will let you play back animations relative to the spine. Same thing with the head.
You can have the weapon be a separate skeletal mesh and have it's own animations that are triggered by actions in the characters animation BP. I've seen several people do it that way.
You can have a bunch of 'weapon animation bones' in the character skeleton that are constrained to parts of the weapon during animation, and then vice versa during playback.
That way is less common and more rigid - you kind of have to pick a total number of moving parts and you can't easily do physics.
The most common way for complex weapons is to have them be a separate mesh with their own animation bp.
Ah I see, I'll try that
Thank you very much!
Follow-up question if that's ok.
To fix swimming with additive, many tutorials ensure that the virtual bones are only moved by either the base or the additive animation, ensuring the virtual bones have a consistent relative position. Taken from anim A or B if you will. This makes sense to me (though I'm not confident my understanding is correct)
But I have one example project open from a tutorial where i don't see such a filter, yet the virtual bones are still ensuring consistency and that I do not understand and indicates some fundemental misunderstanding
In the first image without virtual bones, we can see the left hand detaches from the weapon during the melee animation (Swimming)
In the second image, we can see that the virtual bones fixes it
How are the virtual bones magically immune to the swimming issue? should they not get blended the same as the hands and end up in inconsistent positions?
Note that nothing is moving the virtual bones other than the two animations


Can I animate a socket within Control Rig? I am using the default Mannequin rig and I added a socket for a weapon and I need to animate it
Sockets aren't for animating. If you need to animate something you need a bone.
Okay, thank you so much
You get 'swimming' when animation blending adds up modifications over time. You typically see this kind of thing at the end of long bone chains, like the arm.
An IK structure allows you to avoid this by either not blending the IK target bones OR by simply not having as deep a hierarchy to accumulate error.
That said, Manny and Quinn, in the epic example projects, don't use virtual bones, they do use IK target structures.
What's the best way to get the direction of an attack animation?
Let's say an enemy plays an attack animation like a right hand punch.
The player should know that an attack is coming from the left.
I can think of a way using animnotifies but I was wondering if there was a better/cleaner way
If you're using hurt volumes, you could use the impact vector.
An IK structure allows you to avoid this by either not blending the IK target bones OR by simply not having as deep a hierarchy to accumulate error.
But in the example, I have neither. I'm not blending the ik target bones (the virtual bones are the target bones btw) as you can see I'm doing a simple apply additive, and my hierachy is deep enough since i get swimming without the IK.
Does that make sense? Thanks!
Not really. I don't know your example.
i posted 3 images
And I looked at them.
anything missing?
What would be missing? You described a scenario where using the virtual bones solved a problem.
right, in the second image, you can see the two "Two Bone IK" nodes, when those are connected the swimming is fixed. When they are not connected the swimming is there
OK? And?
ah i see what you mean, I'm sorry if I am being frustrating, just really trying to wrap my head around
I don't understand how the virtual bones are solving the problem, according to my (evidently flawed) understanding the virtual bones should not be able to solve it in this simple example.
The virtual bones should get blended and be put in the same problematic blended positions as the hands
I am a little confused by the setup. You have weapon_l and weapon_r bones that are unexpected, the VB bones are relative to those.
So I can't really say I know exactly what's happening, when, or why.
Ok thats totally fair
I think the additive animation itself is a good place to start looking.
both ALS refactored and this guys tutorial does it this way and yeah i don't fully understand why other than something about the weapon bones rotation being included this way
I think additive animations don't get applied to virtual bones - but I could be misremembering that.
Ah that might explain it!
or wait, no actually, since the melee animation is the additive and the virtual bones clearly do follow the melee animation swing
Oh, OK. I think I see what's going on.
So, remember, an additive applies an offset to another animation generated from the offset of the original animation relative to a pose.
Which is really weird, but that's to say - additive animations do not always affect the entire skeleton.
right, i get that
They only affect the parts of the skeleton that have an offset from the pose.
Also, the virtual bones in this case are criss-crossing, so the weapon_l bone has the hand animation for the right hand, and vice versa.
So you have the opposite arms wrist position in the space of the weapon held in the opposite hand.
So assuming that you don't have a lot of animation on the characters idle, I would assume that the animation data on the virtual bones is mostly the additive animation.
Which means when the IK nodes reconstruct the arm position, they are mostly getting the unmodified relative hand position to the weapon bone.
sounds right
It seems like a really weird way to set this up. I have no idea why one would ever use an additive in this scenario.
Seems real strange.
I would expect a layered blend, and a normal animation.
ah it actually was a layered blend, i changed it from a layered blend with a non additive animation to what you see above, in an attempt to see if the virtual bones were somehow being filtered by the layering
the results are the exact same though. Swimming without IK, no swimming with
That makes sense.
Though you can also see some extreme tension on that non-leading arm's wrist rotation.

Yeah, that's one way of doing it.
I prefer a floating weapon bone relative to the chest for most cases.
But having ones on the wrists are useful in some cases.
interesting!
Thanks for trying to dig into it! I'll chew on it some more
I think the best way to think about that setup is that you're basically extending one arm's animation to cover the other arm. You have the left arm's wrist position in the right arm's animation - so as long as the right arm is playing fine, it will also play the left arm correctly.
(if you use the IK)
So i can at least confirm that the virtual bones move quite differently:
Here i have disabled the IK so we see the swimming but at the same time i draw the two virtual bones in yellow (where the hands would be with IK)

I don't think they're moving differently, they're accumulating errors down different FK chains.
Remember, your virtual bones are the child of the arms, so every modification to an arm bone's rotation modifies the final position of the opposite arm's virtual bone.
So it is entirely expected behavior that they would not end up in the same place during blends as their FK counterparts.
Hiya! 
I'm having a frustrating issue with anim curves not respecting the rules of stepped/ constant interpolation! I suspect this may be a bug, but to explain, I have a sprite sheet of 2D facials that use a param to offset the UV coords, which are being controlled via anim curve. While HOLDING the key with the interp set to constant, the playback looks absolutely fine! But once I let go and view the anim in preview or in-game, it's scrolling like a slot machine 
Has anyone else come across this? Am I just boned and need to wait for some kinda bug fix or am I doing something inherently wrong? I'm also getting some weird inconsistencies with multiple materials being controlled by anim curves, sometimes maybe good sometimes maybe shit 
(I'm an intermediate UE dev but new to modifying physics assets to this degree) Wasn't too sure where to ask this, I have this spinning dummy, essentially the wooden arms that protrude out can freely spin 360 degrees when pushed. It's 4 bones, a root bone that the tall square box is assigned to, and 1 bone for each tier of arms with 2 capsules assigned to each. The root box needs to be kinematic so it doesn't move. If the root isn't kinematic, everything works fine but the whole dummy can be pushed and thrown around. When set to kinematic however, all but the bottom row of arms just fall to 0,0,0 immediately even with gravity disabled. The only other way to prevent this is to remove the physics body entirely for the bones. Each set of arms has the exact same constraint setup (constraint to the root body, all motions limits locked except for swing 2) but it's confusing that the bottom arms are the only ones that don't break. Rig created in blender, all 3 bones parented to the root bone specifically, everything applied already (scale, loc, rot).
Happy to provide any further info that might be needed to help me diagnose this!


I need help with UE5 Retargeting. I setup my IK rig's for both characters. I then created my IK Retargeter asset and the animations looks perfect between the two skeletons. But when I export the retargeted animation, my character face bones derp out. 😥
How do I fix this?
https://i.gyazo.com/bd45dcd140ac4d256a5336da64bdacfd.png
https://i.gyazo.com/7a40cae02933bbea975ef10a7610b3e0.png


Hello! Had a quick question about foot locking. Can I add foot locking to an In-Place animation? Or does foot locking only work with Root Motion animations? I'm trying to make my In-Place animation's look as if it were using Root Motion, but using an In-Place animation. Is this possible or is there a tool out there that could help me achieve this?
is there a way to import a custom physics asset for a skeletal mesh from fbx?

can someone help me?
whenever I import an animation to unreal, The skeleton is okay, but when I import the animastion, it screws up everything
only the root bone seems to be moving right while the rest is frozen stiff, and before i tried fixing the naming functions, that was screwed too
is there a way to import it right so I don't get this stupid error message?

It sounds like you're trying to import animations made for one skeleton onto another.
That's not possible without breaking things.
You have to use the retargeting tools if you want to take animations from one skeleton and use them on another.
no its a skeleton i made entirely from scratch
it shouldnt be any different frpom the ani
Don't think so. I think you can use a static mesh as a physics capsule, but you have to create the physics asset in unreal.
Well, unreal thinks they are.
Is it possible that you exported part of your animation control rig into the FBX file?
for the rig or the animation?
For the animation.
You have a lot of bones.
You probably don't want to use 'Layered Blend Per Bone' for this. Look up additive animations. That's probably more what you're looking for.
I'm pretty sure i selected the bones for the animation, but they do have a lot of contstraints for the controls
This error happens when there's a mismatch between the hierarchy in the target skeleton and the hierarchy in the animation file.
Cool bear character! Is the characters face controlled by bones or by morph targets?
I am looking it to using a static mesh and copying the collision from that now, these are from some procedural meshes in Houdini so I was hoping I could do the collision setup automatedfrom there as well
I don't believe you can. I know you used to be able to import havoc data from Max, but I Unreal isn't using Havoc any more iirc.
copying the collision from a static mesh in the phat editor seems to work, so will try to go with that
how can it be mismatched?
It's probably export settings?
You could import the FBX file for your animation back into your DCC to see what's in there.
Have you tried setting your default interpolation mode to stepped? I haven't used stepped keys in the engine before, but googling around it looks like several people have had issues with this from time to time.
Other suggestions include manually setting each key (yikes) or specifically setting the key before the key you want stepped.
what about IK handles?
shoudl they be exported with the animation?
Probably not.
Nothing that isn't in the skeleton file should be in the animation files.
what about constraints?
Constraints are maybe a grey area, but it depends on the package.
Unreal usually just discards that kind of data.
But if your constraint is a node in the graph - those should not be in their either.
@nimble torrent I'm not using any face animations but I do think it's controlled by morph targets. Is that why it messes up? If so how do I fix it?
Huh - that's surprising. I was expecting it to be bones. It's possible that the retarget might have set the curve values that control the morph targets to something strange.
I'm not sure why - it might be good to check those new anim sequences to see if there's anything odd in the curves.
It does have bones too for the face. I can move his jaw, tounge, etc.
I tried removing the curves from the messed up retargeted animation but it's still derped lol.
Hmm, weird! Did you check the values on those bones in the broken animation files?
It might be interesting to see what their transform values are.
Like - if they're all scrunched down at 0,0,0 or if they all have the same value, or something.
I'll have to check that out. I'm not at my PC at the moment. I did find an annoying workaround by exporting the broken anim into a ue4 project, then using the old retarget manager to retarget it to the same skeleton, and it fixed it 🤣
But having to do all that for every animation will be a weird work flow. I was hoping there would be a setting in ue5 to fix it. I figured since I selected all the face bones and clicked the ignore bones from retarget, that it would fix it, but nope.
Thanks for the reply!
I ended up solving the issue by ignoring the anim stuff, and instead truncating the float param value so that it became an **interger **instead of a float, therefore only allowing it to act "stepped". Works perfectly!~ 
Ah! That'd do it!
Well, actually not quite, It stopped the scrolling, but I still can see my other facial expressions in the between frame. For context in a 2D blink anim my eye open is on value 1, and eye close is on value 5, and for a split millisecond I see value 2,3, and 4! 
I suppose I could move the texture so eye close is on value 2, but I will still get this issue when doing expressions. Sad days 
I'll see if manyally key framing things alleviate the issue
It's a bit annoying the Game Animations Sample uses UEFN as default considering all my other animations are Mannequin. Magic retargetter doesn't fix this issue. Again showing off rather than being practical.
Is there a way to get all bones "downstream" from a particular bone?...
My goal is to make a "bobble head" mode essentially. To achieve this, I want to select the head bone, and every hair bone attached to it, and all the hair bones attached to those (etc.), and set the scale on all of them.
Is there a nice way to do this, or do I have to explicitely get and modify them one by one in my animation blueprint?
Hello, is it possible to "paritally retarget" a skeletal mesh? I wanted to create a character that would use the default skeletal mesh from manny/quinn with some wings attached
if I want to ask for help with character model stuff, do I ask here?
I will assume so
so I am trying to import a character I rigged using accurig and this happens when I use the retargeter. can someone help me figure out what went wrong.

did you remove unnececary bones in general they have different skeletons they might have different rigs it happened me too and i fix it like it you can try
btw guys do you know why it happens its strangely rotating on my server but the camera is still look forward do you know why?

I ended up learning that 5.4 has a new rig generator, that worked
I have been trying to get a sequence (simple linear rotation) to loop in editor. What do I need to enable for this to constantly play in editor?

Howdy folks, not long reached the stage where I can dive into learning how to encorperate animations for basic movement and abilities (basic attack, basic block etc).
What is an appropriate way to go about adding more "blended" poses to the characters "output pose", they currently have a block ability (through GAS tags) they can do whilst moving, and I would like to do the same with the basic attack and probably other movement/abilities as well. All info and advice is grealty appreciated 😄

I'd only be taking a stab here, but I'm guessing you'd have an initally keyed frame at the beginning of the sequence noting the transform, and at the end you have the object that is rotatings' transformation info (how many times it rotated during that time in the sequence) keyed as well
Did you delete your message?
Yeah pressed enter only after I had typed -> I'
full message is as above
Basically keyframe rotational transform at start, and keyframe rotational transform at end (Thats how i'd do it in after effects back in the day, Im assuming they they function similarly). Also pretty sure there's a loop animation option in the details panel. would need someone more experienced to confirm
Well the issue is that the animation works fine in runtime but I'd like it to be working in editor as well. Because it would be nicer to preview things that way
this is in editor
This is in runtime
( The red ball is the point of focus here )
Sounds like more like theres a link missing
try looking at the red ball animation asset in the reference viewer and see if its all linked up how it should
I'm not sure I understand what you mean by that
It works fine in runtime so I dont really understand the reference issue

if 4 out of 5 balls are moving as they should, maybe you missed something on the 5th
like go through the steps you did to get them moving with the red one again and just see if theres anything you missed
no, the only ball that is using sequencer is the red ball. The red ball is the only relevant actor in this scene
I want the red ball to rotate with sequencer in editor but it doesn't seem to do that so I wondered if someone in here knew why or what I could do to enable the animation in editor. I'm sorry for not being more clear on my intent, I do understand that the other balls are adding confusion to the whole thing.
What can I say I just like showing my balls to people....
lmao, there was free the nips, now there's free hte balls
Are you able to see where the transforms for the other balls are located?
like where are they getting their transform information if it's not the sequencer
Its all just shaders
I am making this scene to showcase the shaders easily and i'd like to rotate the ball in sequencer to showcase the worldspace vertex normal mask shader more effectively
https://docs.unrealengine.com/4.27/en-US/AnimatingObjects/Sequencer/Overview/
just having a squiz through this, do you have a "Level Sequence Asset" your actor is attached to?

Learn about Level Sequences and the primary features of the Sequencer Editor.

other way around, Level Sequence Actor is the container, it looks like theres options there to "Auto Play" and "Loop", have you enabled/set those?
@somber heath I reckon this might be your answer

rippa I was hoping that was it!

Might be something like this you need to do in blueprint^
Hi peeps, I'm trying to import a second skeletal mesh that uses the same skeleton as another skeletal mesh.
When I do the FBX import I specify the skeleton to use in the UE editor and when it imports I get these kinds of messages
**"FBX File Loading: Found name clash. node 'Bone_1' was renamed to 'Bone_11' **
and it does this for all the mones. I'm trying to have the mesh use the same skeleton not get its skeleton added on as extra pieces.
Has anyone else experienced a simliar case?
So, if you use the 'Transform (Modify) Bone' node on the head, it should automatically scale all the hair and face bones.
I haven't had this error myself, but it appears that someone else has.

Epic Developer Community Forums
I’m having a naming issue when importing 2 different characters that share a skeletal mesh. It is renaming some of my bones due to a name clash. I’m curious why its renaming my bones, what I can do to avoid it, as having to re-program parameter for each newly imported character which brings in renamed bones is something I’m trying to avoid 🙂
The issue seems to be caused by having meshes or non-bone nodes with the same name as the bones.
hey squishy, any thoughts on this?
If you have a spare moment
Hmm - well there's several ways of giving your character the ability to do more things.
The two big ones are state machines and montages. Do you know what those are?
State machines; know what they are, not too familiar with using them. The tutorials I've been following have used Montages
This is how I have a montage implemented, through the GA_Roll (Gameplay Ability)

That's a common way of doing one-off animations.
Often people use montages for attacks or gestures.
State machines are more for states.
As the name suggests!
So you might have a locomotion state machine that has an 'on land' state for walking around, an 'in water' state for swimming, and an 'in air' state for falling.
That's the kind of thing they're good for.
You could also have a 'combat locomotion' state machine with states for each weapon.
That kind of thing.
aah thats neat
my currect project makes use of GAS tags for abilities, can such a thing be achieved through a tags method or would adding state machines be a better method of going about it?
You could but probably 'being on land' isn't an ability and probably wouldn't run through the GAS system.
I have IsGrounded implemented as a tag, also IsAirborne
is that not the same thign?
It depends on the game.
Sorry I think the correct term is Gameplay Effect*
Those could have contextual RPG combat mechanic meanings.
possibly, I was following a "dark souls' themed GAS tutorial
Interesting. You'll quickly learn that there are many different ways of getting too a similar result. All of them have positives and negatives. There isn't a 'correct' way of doing almost anything.
There are lots of incorrect ways though.
So that's fun.
Indeed there is
My current "block" action is an ability implemented through an anim Montage, would it be better to do such a thing though the locomotion state machine?
It depends on the block. If it's something you can hold indefinitely that prevents movement - sure, you could put that in a state machine.
If it's something like Sekiro's parry, then maybe not.
the kind of block you can hold indefinitely but the player has movement
might be hold until stamina runs out but thats in the finer details, just need to workout the funcitonality first
Then you wouldn't be badly served by leaving it the way it is, with a "Layered Blend Per Bone" layering the block over top the locomotion pose.
Alrighty good to know thank you, back to the initial question in that case, how do I give more "blended poses" to the output pose

You have to blend them in sequence.
So after your first blend, add a second.
(probably between it and the 'DefaultSlot' node)
alrighty Ill give that a crack
didnt change anything unfortunately
Change anything from what?
What were you hoping it would do?
And how did you end up laying out the graph?
Tried adding another step in the output to pose just like the first but it didnt seem to change the players animation at all

Was hoping that it would enable the player to punch while walking
Okay, well. I spot two things.
they can block while walking, thats what the first bit does
oh beauty haha, wisen me up grasshopper
OK, actually - this looks like it should work. The layout is a little confusing.
Places I'd check:
- the layered blend per bone for the attack pose - is the branch filter setup properly?
- the 'IsAttacking' boolean value - is that being set properly?
To clarify - I would personally not do an attack this way.
I would use a montage.
Consider a structure like this:

Ah okay I see why the block works but the punch does not,
the block uses an ANIM_Blocking sequence (one keyframe no animation) that gets blended with the standard pose, and no montage within GA_Block BP so it works with walking
the attack currently has a montage attached to the GA_Attack BP, and the Punching_UE sequence has a whole animation to it not just one frame
Where you play the attack into the 'UpperBody' slot.
Got it working functionally wise, using an UpperBodyOnly slot suggested by an ue youtuber, the punch is off to the left but i think I know how to fix that

cheers! your info helped lead me in the right direction, and yes the graph will be cleaned up lmao
okay lil side snag
punch looks good when standing still, and punch works while moving, but the trajectory (hit spot) of the punch changes out to the left if its moving
@nimble torrent So I checked out my bear character today and he doesn't use face morphs, just bones. I compared the bone locations from the broken retargeted anim to a normal anim and they seem to be in the same locations as a working normal looking animation. I'm confused lol I don't know why they are so scrunched up looking
Rotations, probably.
Does anyone know why this very basic IK setup isn't working in runtime? It's working in editor, but I can't get the IK effector to be at the player's location
IDK the numbers match but both location and rotation. But they don't look like they are in the same spot when I'm visually looking at the two
Correct me if I'm wrong, but it doesn't look like you're using the IK_Position value anywhere.
That's very strange! My mind immediately goes to the idea that maybe the scale on the model is off somehow.
If you open your bear's skeleton and you click on the root - is the scale good?
Is it 1.0?
I think I'm using it here. I split the effector's transform and assigned the player location to the effector's transform location

OK, but it doesn't look like you're actually using that transform value in the graph of the control rig.
It looks like you're getting the control transform from the control.
You're not setting it, you're just reading it.
Yeah it looks fine, but I think you might be onto something. Maybe since the root bone is moved forward in this anim, it squishes the face forward too. See the difference between the two anims, one normal, one is retargeted. Maybe I need to remove the chain for the root in my retargeter
https://i.gyazo.com/593f4945a58edb6d5307d122e9f98047.gif
Am I not setting it here? 🤔

No, that's just reading a control's value.
The control exists in the hierarchy.
Hmmm - I've personally never exposed a controls transform value in the way that you are.
I wasn't aware that was a thing. I've always used transform variables myself.
Now, it's possible that due to trying to set only the location value, the transfer between the control rig and the animation BP isn't going through properly.
You could try constructing a transform struct, and not splitting the transform value.
But I admit, I don't know if that will fix the problem.
What would be the standard approach to modify an effector transform/location in runtime? I'm pretty much new to control rig, so I don't know if there's a better way of doing it
I'm no expert, so I suspect that the intended way is what you're doing.
I suppose the issue could be elsewhere. Are you certain that the player position value that you're feeding into this is accurate and changing?

hey
why is it when I import a mesh with a skeleton it just adds a bunch of random numbers to the bone names?
And of course the only documentation for this feature on Epic's site is incomplete:

Though it does imply that this is the way they intend you to interact with it.
Unreal will rename things in an FBX import if there are multiple objects of the same name in the FBX file. I would import my FBX file back into my DCC to make sure that I was exporting only what I intended to export.
what do you mean DCC?
Maya, Blender, Max, Houdini - whatever you used to create the mesh and character.

Yeah, Maya is less strict about names than Unreal is. Unreal uses a global namespace, while in Maya it's all path based.
If there are meshes with the same name as bones, or other nodes - that could cause a naming clash.
Yep

OK, then I suppose my question at this point would be 'Are we sure that the animation blueprint is actually playing?' because it appears as though it should be moving the data correctly through your setup.
Oooh
I think I know what it is.
Is the object stretched out in playback?
As though it were pulled very far in one direction?
Rather than just not doing anything with the IK?
Yep, it is. It's very subtle, but you can see how the mesh is changing its location when I move the player in the video I shared
So, I suspect what you have is you've fallen into one of Epic's wonderful naming traps.
So 'World Space' in the Control Rig is not the level's world space.
It is the Control Rig's world space.
Which is relative to the component.
So you're putting a level world space value into a control rig which expects everything to be relative to the component.
Try subtracting the skeletal mesh components world space position from the players world space position and putting that value in.
That should get you the offset from the skeletal mesh component, which is 'world space' according to the control rig.
Even if this works - you're not finished, because subtracting vectors only works if there is no rotation.
To actually convert spaces, you need to use full transforms.
Oh my god, thank you so much, that's exactly what was happening. Now it's working!
Hurray!
how are we supposed to know that world space there means control rig's world space 😭
To make it possible to rotate the object with the IK - you need to get the World Space Transform of that component, and use the 'Make Relative Transform' node with the world space transform of the player using this node:
Epic Games Developer
Make Relative Transform
That will give you the transform offset, and you can use the position value of that.
I have no idea. It was a baffling decision on their part to call it "World Space"
Thank you Squishy, I've been stuck with this for almost 1 day lol, I was even debugging the C++ implementation
No trouble! Glad I could help!
This isn't exactly unreal related but I'm trying to get into FPS animations and I was wondering if anyone here thinks either blender or maya is easier to get into animation for a beginner?
I have both but idk which to use
most animations I see on the Epic marketplace store says exported from maya, might be more worthwhile to learn maya first ?
Maya costs money though!
I got it for free with a student liscense
Cool!
It wont always be free though 😛
good point lol
check the pricing to make sure you know what you're in for down the line
idk I just need it for a bit to learn the basics of animation for now
but yeah I know it's hella expensive normally
I'm more used to the navigation in maya because it's similar to unreal so I think I'm going to go with that for now
Also fyi just incase educational licenses cant be used for commercial stuff I believe (selling anything made with maya under educational license)
kk thanks that's good to know
Navigation is pretty similar across the board tbh, either way you'll probs be watching several youtube tutorials to figure something out ahah
I don't think this worked in my experience... it seemed like my head bone was the only thing that scaled, while all my head bones remained the same size
That's very strange! They should scale with their parent.
I end up with this


actually.... funny you say that... because that makes sense... and I think tells me what my problem is
I unparented most of my bones in blender... and bent them into unreal orientation on export...
So I'm wondering if the hierarchy is still there.... but they technically aren't parented in the way this is supposed to work?

I think the parent relationship for a lot of these is essentially broken here so that I could bend them into the left hand rule unreal orientation

so I guess I feel like I probably have two options....
-
Parent all my bones in this orientation....
-
I learned afterwards, you can orient your bones "normally" and just turn the model 90 degrees or something on export? and then turn it back or something?
I'm actually still not sure...it looks like this functions how you say here, if I do it directly on the skeletal mesh itself.
I just think I'm getting different results using the modify transform bone node in the actual animation graph


Not sure if this is the right place, but it relates to animation so I'll try here. I'm about to work on my enemies for my game. In theory it's believable that somewhere between 10 and 20 enemies could be on screen at any one time.
If I'm using an animation blueprint state machine driven animation system on each of these enemies, is the performance going to be usable, or is this too many enemies for an unreal system?
hello devs , i am using ALS , and runtime retargetting the als animations to my custom mesh , and it works perfectly in locomotion but when ragdolling it does this weird thing i don't know what is causing that
i made sure that :
1- my mesh has no collission
2- the gun has no collision
any tips and directions ?
thanks in advance
Hey guys. I’m looking into Slope Warping. I understand that this works based on the root position, so you can move the character’s root location to get in place for an animation.
What I am wondering is how do you do something similar with their hand for example but without moving the root?
I guess this could be set up with control rig and full body IK, but before I go into that, is there a feature or way of doing this with animation warping or something similar?
Like imagine somebody reaching for a door handle in different places, but not moving their lower body.
This is probably a very noob question but I can't find the answer: The animations I export from blender to unreal are at a wrong scale. How can this be fixed? There is no scale applied to the skeleton and mesh in unreal or blender.


Blender and Unreal disagree about what a unit means.
This video will walk you through getting them to agree:

In this video I will show you how to correctly export a character from Blender to Unreal Engine 5.
Common mistakes include issues with the scale of the root, joint orientations and differences between bones and joints. In this video I will talk about everything you need to know to correctly export rigged characters that follow Unreal Engine sta...
Blendspaces are frequently used for strafing locomotion.
Aim Offsets are frequently used for aiming with a gun.
However, is it possible to use BS or AO for anim montages? Animations that are just done once.
For example, an attack animation montage that has specified input direction.
Thank you!
Not really, no. It's kind of an oversight in the animation system for Unreal. There isn't an easy way to trigger a one-off blended animation.
You can force it with additional variables and machinery, but there is no designed way to do it.
Gotcha, thank you for clearing that up
I'll stick with my 8 anim montages (the main 8 directions)
Slope Warping doesn't use the root, instead it uses a secondary bone called an IKFoot Root - you can see that on the mannequin characters.
They also have a structure for the hands that consists of a floating ik target bone called 'ik_weapon' and two bones for the hands. These are used to animate the characters hands relative to objects by moving the ik_weapon bone to the position of the object, and using the two-bone ik nodes on the arms.
Well, Unreal is the engine behind Fortnite, and Fortnite regularly has 100 player matches - so yes, Unreal can handle 10 characters on screen at once.
Fairly easily.
Thanks this helps. Would you do this in control rig or anim bp? The IK hands
Any tutorials you know of for this?
Hi. Is there Full Body IK ready to be used in with human for animating? I saw ue5's control rigs, but they are not good (mesh stretches, no limits)
or at least system i can buy to control rig to any skeleton
You can definitely apply limits to control rigs.
For simple IK, I would just do it in the animation BP. I would use control rig at runtime only if I were doing something particularly complicated.
I haven't seen anyone do any object-relative IK tutorials - which is a pity, because it is a useful technique!
sry, how do i make it right? feels like there is no IK

That's a very odd result.
it's ue5's Control rig
OK, but that's not a control rig, that's a specific control rig.
In a specific state.
That control rig has both IK and FK modes for limbs.
The IK control for the arms are cubes, and they need specific switches to be flipped:

That's the IK control for the arm.
And you need the 'fk_ik_switch' boolean values flipped on for them to work:

YOOO. thats amazing
Thank you so much 🙂
👍
Hey all, is there anything similar to Mr Mannequin for Maya? I remember there used to be the ART plugin, but I don't know if that's still available or supported.
I just want a mannequin with controllers.
the animation im currently on is the "MM_Unarmed_Walk_Fwd_Left"


and when i open it up by itself, it walks in a 45 degree angle which i want, but in the blendspace it keeps on walking forward?

hey when importing an annimation and ive retargeted the skeleton to mine but its not working 100%
asu can se the arms and hands are all messed up how would i set it up properly ? im guessing thers some bones missing/added in the anim or +

Working for animations in sequencer for a game , with weapons attach to the player , but when i create the animation (export it from sequencer ), i see no weapons or objects attach to it , anything i am missing in the sequencer or in the hierarchy project ? From now i work with the static mesh (weapon) , SKM_Manny et the CR_Mannequin_Body in sequencer and static mesh (weapon) and SKM_Manny in hierarchy
Looks like you might have to do some adjustments to the bones in that area, the retarget is really good but sometimes it still messes up.
Anyone please ?
Are you referring to the pinched skin geometry at the wrist? This normally happens when you dont have twist bones in the forearm setup, or they are not retargeted - inactive. Or they are not skinned.
Hey, does anyone know how a lot of games have the same lower-body animations for most of their weapons? Games like Valorant and Call of Duty change their upper-body animations for each weapon, but the lower-body anims (walking, running, etc.) are always identical, so when you switch weapons, only your upper body is moving.
Are they just copying the key frames from some master animations? Maybe there’s a set of global animations that they blend on top of the per-weapon ones?
I'm trying to set up a procedural control rig, and am having real trouble just spawning controls. I have no option to provide settings such as shape information, and I'm getting a compiler error because I don't have those inputs. Most tutorials I've seen use a "spawn transform control" node which has options for all the shape stuff, but I can't see that node, and don't see any way of generating those shape settings.

P sure valo uses the same / compatible skeletons for their characters, so you would just have your walking animation (which all characters can use), then use a Layered Blend Per Bone node to have the upper body and lower body use diff anims
Right click the gray diamond, there should be options to create input pins. Cant remember off the top of my head what type they are, but if the input pins are grey, you gotta define them yourself by right clicking, OR dragging a compatible var type onto it
....huh. I just tried one of the random options and it populated. Weird
So like this, where IdleAnim is the weapon's upper-body idle animation, and GlobalLowerBodyIdle is the default lower-body character idle animation?

Pretty much! It's a real basic way of doing it, but sometimes basic is enough 
Could I ask how your sequence anim is thread safe btw? Are you setting that var in the thread safe function or...just curious is all 👀
Those two animations are just class variables that the anim players are bound to. Each equipment derives from this base animation blueprint, and plugs in its own animations where it needs to.

Fantastic, thanks for the explanation! Always trying to integrate more thread safe into me workflow 
Now I've got a doozy of a question that, upon searching, only ONE other person asked here. Is there a way to get pose assets into a control rig? Or an easy way to get the bone transforms associated w/ those poses? This seems pretty overlooked. I know you can drive morph targets in control rig, but what about pose assets?
My goal here is to use control rig's Spherical Pose Reader aka control rig's version of Pose Driver, to enable/disable poses. Anyone have any idea if that's achievable? I really don't think it is at this point 😔
hey what are root motion in animations?
I believe Lyra does something like this. I think the CR_Mannequin_Procedural rig and the ABP_Manny_PostProcess blueprint might be what you're looking for.
From overall perspective I see they work the same
Yoo im gonna check that STAT! I was looking at the metahuman project but lyra is a great idea! tyty!
Root motion determines whether the motion of your character's root bone will be applied with the animation. If your animation is in-place, then it makes no difference, since the root bone isn't moving. If you have an animation that does move, you can use root motion to keep it still while your character handles actual movement. Root motion is primarily used for motion warping (like mantling on a ledge) and stride warping, which are more advanced topics.
Ahh unfortunately not the case. They have a control rig for thigh twist fixes and then hella pose drivers 😔

Ah, sorry. I don't know much about poses. If I need a singular pose frame, I just export and evaluate a single-frame animation sequence.
I have an animation where the capsule is below the player's animation. I'm guessing because the root in the animation is in the same spot. How can I move the root of the animation up without adjusting the actual position of the chracter's animation? Or vice versa, move the animation such that it is closer to the root?


For example, when i move the pelvis down to match the root position, it does reposition the animation, but it has a wild pivot. So Looking to resolve the issue without that.
sorry this took days to get to, but unfortunately enabling Persevere Local Transform, did not work
reading documentation rn
@night rover documentation says to press Show > Bones in the viewport but that option isn't there
could it be because the documentation is for UE4
also, the examples in documentation shows the character moving away from the capsule, but here the capsule follows

oh lol I just made a cheap vault animation but I made it animate in place, should have known this before. Thanks bro
I am retargeting the rig of my character to the Unreal 5 Mannequin rig. However, the character seems to be way up in the air and is bobbing in a wild manner. Can you help with this issue?

Anybody run into Assertion failed: NewAssetTime >= 0.f && NewAssetTime <= 1.f with PoseSearch? The line referenced has this comment but I have no idea why this would ever be an issue.

How can I create handcuffs? I modified animation for my character, but hands kind of sway around during animation anyway (Nevermind: Figured it out by making additive anim Layer)
hello, i'm new into the animation
i have receive an animation base on a skeleton ( an idle pose)
i have received separatly a sword, that is supposed to work on the idle animation
if i could connect the skulleton of the sword to the skelletong of the idle position
is it possible to do that?
i'm asking because i think it will be a general issue for skin system, if i decide to animate hair as well. i can't for seen a full idle animation per hair type
i assume i can animate on the hair level, and just connect the hair to the existing animation?
working on a procedural control rig, what are these giant wireframe cubes doing? (I haven't spawned any cube controls; they seem to be emerging from my cube shape controls though) (they seem to have vanished... weird)

when i add a socket
it does'nt appear into the parent socket list


any idea why it doesnt appear into the list?
Is anyone here who can help me? I Opened my unreal engine today and the IK control for the elbows and knees are all twisted
I am having a panic attack
Would anyone know why Unreal would decide to mess up my bones upon import like this? Both screenshots are the exact same FBX file, left is Unreal's... Unique approach to the joint structure-


(Yes, the naming conventions of the skeleton are correct, no duplicate names or objects)
Wanted to go back and thank you again for this advice - the ask a dev control rig series was absolutely awesome, and it really is the case that procedural control rig is waaay better for my purposes than whatever the heck is going on in the modular control rig. Definitely agree that it's an "investor facing feature" - but I'm on my way with procedural controls and it's going great. Cheers!
Hello I'm wondering if anyone has experienced crashes with animation sharing, when I close pie it closes to desktop in 5.3
When I get this message in the skeletal mesh editor, where do I find GrpPen, etc.? 🤔

Just finished making a procedural control rig that works great when in the default pose (picture 1) - the leg IK works as expected, all is well.
When I transform the root bone (but not the IK targets for the feet), the legs don't move, even though they're set to stick to the location of the feet controls (picture 2, note that the ik targets for the legs haven't moved, but the legs are stil straight out. If I move the IK controls, the legs move as if the control was still exactly at the foot)
When I transform all the controls at once, the IK parts move around weirdly, as if the controls are moving further than they appear to be in the viewport. (picture 3)
What gives?


I'm somewhat losing my mind over this - I've checked and re-checked all my controls (both creating the control nodes, and setting up the IK), and everything seems identical to a manually created control rig for the same actor on which this behaviour works fine
HAHA I FIXED IT - it was a problem with the order in which I set up the actual control rig constraints - I needed to parent the body before setting up the legs
I wonder if facial expression animations can be made simultaneously from speech sound waves?
but why on earth should that matter? It works, but I don't know why
i think order of operations with IK is quite important, great that it's working now!!
there are a few teams working on systems that do just that, you could take a look at audio2face from nvidia, or other applications like faceit or speechgraphics: https://www.nvidia.com/en-us/ai-data-science/audio2face/

NVIDIA
AI-powered application that generates expressive facial animation from just an audio source.
(faceit for blender has audio2face integration as well as ARkit support) but i haven't seen anything taking audio and generating facial capture native to UE5 yet i think
Check out nVidias Audio2Face
Hey, how can i instead of playing a montage, play a blendspace? So i want my animations to have both looking up and down version, but AimOffset wouldn't work, because the skeleton come out weird. So i just make 2 animations, one up, one down, and i want to make a blendspace for each animation in the project to blend it. How can i archive this?


I mean i created the blendspace, i just don't know how to play it
hello. im trying to do something similar and try to learn some concept. Is the sword is rigged with your body to be able to animate all of them?
i mean you model the character and the sword into the same model? and rig everything there?
that is not related to my question though
no i know, it's a question that i have and it look you have the answer
But if ur asking, i just attach the sword by socket
so like that the sword is not part of the main body
how do you do that? when i try to create a socket to my hand
it doesn't appear into the character
i have created a socket like that

but when i look for that socket

it doesn't appear
yeah i do the same, when i click it appear

i think i understand why but to have a proper animation for that sword per animation, we will have to re animate everything? so i guess its the same thing that create animation with the sword directly? or im wrong?
In my project, i have male and female characters. For the female characters i wanted to add some additional bones. Would i need a new entire skeleton for that or is there a way to use the base skeleton from the male and add an additional set of bones to it? I am not sure, but i think i saw something like that before but i am unsure. Since i will have some characters that would need additional bones (for additional clothing or because they have different looks etc.) i would like to be able to have a base skeleton and just add the missing bones to it.
of course you can, either in Blender or Unreal
Why I dont have root animation in game if in my AnimBp everything is as it should?

I was pretty sure there is a way to do that, but i was more into looking for an aswer giving me ideas how to do this or tell me about tools that allow to do that.
For your root motion problem, make sure you use montages for your root motion animation, or change the "root motion mode" in your animbp class defaults

I did that already but set to "everything".
I recommend you to use the base rig
and adapt it in Blender
when you finish adaptation, even scaling bones etc
you apply Armature modifier to the mesh
then in rig Set pose as rest pose
then again add an Armature modifier to the mesh and select the rig
this if you want to have a character with, eg, longer arms, but same rig, with same bones
for female male, I imagine you could want breast bones to add physics. just add them to the base rig of mannequin
I checked again and it was setted back to montages in a reset 🥲 so now is working
Please help

hi!! i'm looking for an animation for a FPS project, i need the player to lift their gun when walking towards a wall. does anyone have a link?
Anyone have solution to search across Animation Montage for e.g. specific Notify Name?
Like in Search in Blueprints but for Animation Montage
Sure I can help you to make Animation for your FPS but I have some questions to ask before we can proceed but you Inbox me now
What kind of animation do you need ?
Please help
I created an animation player and binded a function
for sequence I made anim sequence type
Still trying to figure out Control Rig properly, so I transferred from the UE5 Mannequin control rig to my character. Which works for the most part... just the breast for some reason is rotated completely wrong.
If I create controls for the bones on the breast, they do show up where the bones should have been.
Just for some reason it's clipped through the back.


Well it depend on how polish you want your game to be. Me, as long as it's swinging i'm fine with it
Im a hardcore programmer and i just learned cascadeur for animation, im so bad but i got myself a bunch of placeholder animation
Ok i understand. If I have budget to get animation with weapon is better but take more time to create
Is UE 5.4.3 modular rig broken for anyone else? Is this a bug? In 5.4.3 the knee controls seem to spawn at 0,0,0; this looks like a bug. The knee controls were working correctly in the previous version. I tested this with the Manny skeletal mesh.


Hi, so I have this specific problem, as I understand, in the lyra animation system the HipFire and Aiming animations overwrite the upper body animation. Now, my problem is that I have added a set of unarmed animations for when you walk crouching slowly, in the video you can see that the upper body overwrite for the rifle layers works, but not for the pistol layers. Being that both Layers use the same set of animations (Those i added) for crouched walking and both inherit from ItemAnimLayerBase, shouldn't both fail or both be overwritten?. Sorry if this is too specific to Lyra but I'm lost on this.(Acceleration in animation is a separate problem haha)
how can i cut this animation from frame 27 to frame 40?

Any ideas why just clicking "edit skeleton" in a skeletal mesh and accepting without doing any changes, changes the appearance of my character, making it a lot thinner.
Really weird because I'm not even doing any change? (it's a Metahuman skeletal mesh)
Same happens with a Paragon character but worse

Is this logic made with Motion Warp, right?
I'm seeing the same issues with my rigs. I've always had weird pole vector defaults with the modular rig, though. I mean, since 5.4.0
Hey, does anyone know where the hip controls are supposed to be for the modular rig, or if there's a way to turn them on?
you can select them in the curve editor but I don't see a switch for them
If I want to play some random Idle Variation (Montages?), what's the usual way to trigger those?
My idea was to use the Enter and Exit state functions on the Idle/Walk State I have and start/stop some timer, but those functions seem to require thread safety by now, which Timer stuff isn't I guess.
any idea why an animation might only be playing once?
i put the default manny animation on an ai
and when it walks, it plays once and then doesnt play anymore
That's a weird one! You sure you didn't set the sequence nodes to non-looping?
Have you considered the 'Random Sequence' node? That seems designed to do what you're looking for.
Yeah I just noticed it. Problem is/was that I only had the IdleWalk Blendspace, which didn't support that
I split that now into two states, one specific for idle I guess
The modular rig requires a very specific setup in terms of the directions that bones are facing. This is likely the cause of your pole vector woes, and any issues you're having with the hip controls.
The modular rig is not in a particularly flexible state right now.
What logic? The way the two characters align with each other?
I think a blendspace can have a subgraph attached to a blendspace position - so you could put the random sequence node in there.
I looked for that, something along hte lines of exposing the pin, but couldn't find it that fast
The 'edit skeleton' tools are very new. That sounds like a bug!
to be fair, I don't know if I'd say I'm having issues with the hip controls
Will check later again, it works for now.
in fact, the hip controls work fine when used with the curve editor
the thing is, they're just not visible
so I was wondering if there was a toggle
and the pivot on them works fine and everything. Do you think the invisibility of the hip control has something to do with the bone direction?
Bone direction? No. Possibly bone scale - it might be there and invisible, or it might be there and inside your mesh.
definitely not inside the mesh, because I set the controls as overlay
Okay.
I tried adjusting the transforms in the module editor as well - no dice
in fact, everything works well for our characters with the exception of the hip control visibility
but whenever I see people make modular rigs in tutorials, I never see the hip control
so I'm wondering if it might just be a toggle that nobody's using or if bone scale is really that widespread of an issue

Or it could very easily just not be visible.
that's what I was thinking
The modular control rig is not what I would call a particularly robust system yet.
though it's visible on the base manny control rig, so I was just wondering if I was missing something
The base manny control rig is not modular.
Yea, it doesn’t happen on the Paragon character in 5.4.3, but still on the Metahuman
the control shapes and placement are all the same
Which is one of the indications that it's not particularly robust.
for sure. I didn't think having visible hips necessitated robustness, but if nobody's ever seen the control, then nobody's seen it I suppose
curiously, it has transform attributes and a control shape
But which change on a skeleton would make a character thinner?
I meant that the fact that it is very clearly based on the one example control rig is a good indication that they built it to be able to do that and nothing more.

Basically nobody has ever come in here to show off their cool modular control rig. Every single person who I've ever seen in this channel talking about the modular control rig has not been able to get it to work.
It appears to be what you might call an 'investor facing feature'.
It looks good in videos.
But is not actually usable.
hmmm I've had some issues with ik hands, but for the most part, I've found it sufficient for very basic biped animations
with the exception of some weird wrist deformations
that's why I thought this hip thing was really out there
it's got a control shape and everything
Then you appear to be one of a very small minority.
hey guys- Animation Blueprint question for you if anyone knows.. I was recently watching an old GDC talk on fortnite technical animation and saw that they are using an "invisible rig" for locomotion, and each character has its own unique rig. can anyone explain how they're using the invisible rig to drive the character rig? i've been trying to wrap my head around it for hours and haven't been able to find a basic implementation example to help me understand it
It does not work with most characters.
I think, depending on the skeleton, it takes some real adjustment, and I think it necessitates having a dedicated root joint
Yeah, having a dedicated root is important, but so is having a very precise and rigid orientation of bones.
Which most characters do not match.
that's fair
It's also not documented.
that's also true!
very scant documentation on these new features
that's how we all wind up here
Could you link this GDC talk? I don't know what you mean by an 'invisible rig'.
sure thing, it's this one: https://www.youtube.com/watch?v=TYSdxW2WHcI
Control Rig is a highly flexible tool based on Blueprint that can be used to drive animation inside UE4. In this Unreal Engine Learning Theater session by Epic’s Wes Bunn during GDC 2019, you will get a look at the Control Rig system and learn how to set up a Control Rig Blueprint to drive and animate a Skeletal Mesh, illustrate how Control Rigs...
Oh, OK. So this is just using a control rig at runtime to read data from the animated skeleton and adjust other bones based off of that.
The one they use for locomotion is taking a digitred character and constraining their digitred legs to the default fortnite character.
So you have the normal bipedal fortnite character animations, and then they are using a control rig to adjust the werewolf looking characters legs to follow the animations in a way that looks good with their modified leg shapes.
so say i have a character with some armor that requires extra bones- maybe large shoulder pads or something along those lines. if the locomotion rig is driving that character, am I using a separate animation blueprint for the character itself for 'corrective poses' that are specific to that armor?
or does all of that corrective animation happen in control rig itself?
So you would be using a separate animation blueprint, the separate animation blueprint would be copying the pose of the main character skeleton using a 'Copy Pose From Mesh' node, and the armor bones could be controlled using animation BP nodes or, if you wanted and needed some more complex controls, you could also create a control rig and use the 'Control Rig' node in the animation BP to run the control rig as well.
Is it possible to combine two animations into one "Animation Sequence" with Unreal? I tried using an Anim Composite, but I'm not able to apply modifers to anim composites. Specifically I need the distance curve modifier and copy/pasting the distance curves from each individual anim sequence doesn't seem to work (unless I'm doing it wrong). Any ideas?
okay this is a good lead to follow up on, thanks for that information- it will give me a good start for some experiments!
I think you can import two separate anim sequences into Sequencer, and export the animation as a single sequence from there.
But you would have to regenerate any curves after you'd done that.
Regenerating curves is totally fine, I just need the two sequences to be one anim sequence. I'll try the Sequencer option, thanks!
Hello, I hope I'm on the right channel. I would like to change the layer setup at runtime based on the animation the character is playing. Do you know how to do that?

ill check thanks
where do i find the sequence node
the way one player trigger an animation for both characters/players
and get aligned too
I imagine a motion warping, cancelling inputs on the other player, triggering in both characters a montage
cancelling -> if successfull. player 2 has option to be fast and avoid this of course
Is this a different setup from the Game Animation Sample? Because in that they seem to have the base Sandbox character animating but invisible, then they're retargeting the visible character to it in a child component. I don't know if they're set up with offsets from a control rig on the child character though.
so, I just dragged my control rig into the sequencer and it's all scrunched up/improperly rotated
It's a procedural control rig, which looks fine in the control rig editor when compiled but seems to be uncompiled in the sequencer
(left is the sequencer, right is the control rig editor)

anyone knows why this happens to rotated sockets?
Hi, is there a way to do 2D rigs like in unity?
Things are getting complicated and messy in my current situation. I cant do ponchos for example
which are iconic in my setting
i don't know how unity dose their rigs but its likely all in the constraints of your rig , so you could just constrain your rig to what ever your vertical and horizontal axis are
Do you mean for characters made of sprites?
What happens if you drag your control rig into the level before assigning it to sequencer?
It's similar! Having the animated character be invisible, then either copying the pose of, or retargeting to, that invisible animated character with your display meshes is a pretty typical setup in Unreal projects.
so after probing a little more, turns out that the "initial" transform is only assumed on play, while the "offset" transform is what the control has when it spawns
so I just need my control rig procedure to set offset transforms rather than initial ones
It's probably a combination of things. I wouldn't be surprised if they have offset bones in their skeletons either. You would need to have the offset from the target character stored somewhere, so having it be in a bone wouldn't be a bad idea.
They could be doing motion warping with the Unreal feature, or just as likely they rolled something similar of their own (considering their budget).
Huh! That's interesting!
In your animation blueprint. I assumed you'd looked at that when assigning it to your AI character.
Yeah, in UE4 my character is currently made of a separate sprite component for each bone, so the elbows dont look perfect and ponchos dont look right.
You also need to make sure that your AI character's movement component has 'Use Acceleration for Paths' turned on.
Ok, so technically you can create a control rig for a character like that, but there are going to be no examples, sample projects, or technical assistance for doing it.
In Unity I would just need seperate sprites for the individual limbs
It can be done, because a 2D rig is basically just a 3D rig that mostly happens on one plane.
But Unreal has no 2D specific rigging tools.
As Epic no longer directly supports Paper2d.
Yeah, ChatGPT will say whatever makes you happy.
Spine has a UE runtime, so you could use that.
But you need the plugin.
Claude AI is slightly better at not yes-manning
how much?
I dunno. I have a Spine license but it's about five years old at this point.
Not a 2D game, so I'm not using Spine.
Ah ok. Do you know how I might be able to, once I have a really good looking demo, get someone to help me flesh it out for a profit share?
There's places to post here and on various forums, but be ready for a lot of skepticism and flakeyness.
Because almost all games that try to use rev share fail.
Unless you are starting with a dedicated group of previously established friends and/or coworkers.
As far as getting spine: I just need to be able to import sprites with bones that cause the mesh to deform when moved and then be able to set the transforms of those bones using blueprints. Will the cheapest license allow me to do that?
Like I said, I haven't really looked at it in five years.
Their site should tell you what you need to know.
I think the plugins come with both licenses.
Also, thank you for the advice. I just realized that I know someone trustworthy I can convince.
is there a way to pose rigs directly in ue5?
Yep! It's called 'Control Rig'.
i mean like i dont really want to have to pose my rig in blender then import that as an animation on its own
or the animator
i jsut want to be able to directly pose it in ue5 so i can take pics that r interacting w the environemtn
ty
Let me get you a good tutorial series on that.
btw I dont have an answer I'm piggybacking on your question
to see if I need to know the answer too
OK, so this is the start of the 'Ask a Dev' control rig series.

In this Unreal Engine Blueprint Tutorial series we are going to help you break down the learning curve for all things Control Rig. We start by taking an intro look at what Control Rig is and creating your first control.
🎓 Why Control Rig
🎓 Control Rig Intro and tour
🎓 Control Creation
🎓 Understanding control visuals
Truly thankful for supporti...
It's relatively long, but it's a really good series and will teach you all you need to know about what Control Rig is, and how it works.
What do you mean by 'the animator'?
the annoying animation sequencer thing
Sadly, Epic isn't great at naming things in a way that isn't confusing.
In Unreal:
- an individual animation file is called an 'anim sequence'
- a piece of blueprint code that controls animation blending is called an 'animation blueprint' or an 'anim bp'
- a piece of blueprint code that defines a set of controls and manipulators for a character is called a 'control rig'
- the animation tool that allows you to create new animations in the engine and display them in engine as cinematics is called the 'Sequencer'
I will approach it animating 2 characters interctions indepently in one sequencer. Then when approaching running, if player 2 doesnt dodge/block, player 1 will start motion warping sequence with the 2 anims
That seems like a good place to start.
why dont metahumans have ik bones?
Metahumans are not designed as game example characters.
thats a shame..
Does uh... does anyone know why this animation sequence's preview is upside-down, or how to refresh it?


Haha yeah I have. I've also tried re-importing them but nothing changes.
closing the animation...or the whole engine?
The whole engine
are u using some control source? perforce, git...
if is bothering you and is important, I woul export, then import with another name, then delete the old and when ask to delete choose replace by the new onw to link the reference
if this is the case then, refresh/submit your control source
Hello guys i have a problem that i resolved but i dont remember how anymore, i have multiple anim montage playing in loop and going to the next one on notify end and the blend out and blend in never work correctly it should work set to 0 each cause my animation are tailored to sync perfectly but it always display a frame of the current idle of the abp of the mesh between anim montage any idea ?
Hey peeps,
I recently recieved some killer animations from a freelancer. I am implementing them currently, and am running across an issue. When the player enters their shell (they are a turtle), the player is falling through the ground visually. Every collider and such is fine. I had this problem when implementing my temporary animations to get everything functional. My solution then was adjusting the animation so the players center remained the same throughout. Is there a way I can solve this without requesting a revision?
Thanks!
Does your character have an independent root bone? If so, does the animation for being in the shell keep the character above the root bone?
If not - you probably need one, because it's quite hard to do animation without one.
It should. I had the model created initally with the base UE skeleton being applied. All the base animations work with it. These animations I did not make
OK, well. When you open one of your 'in the shell' animations, and you look at the root bone, and the pelvis offset from the root bone - what do you see?
Does the character stay above the root bone?
The root bone should stay on the floor.
It is staying on the floor.
OK, can you show a screenshot of that?


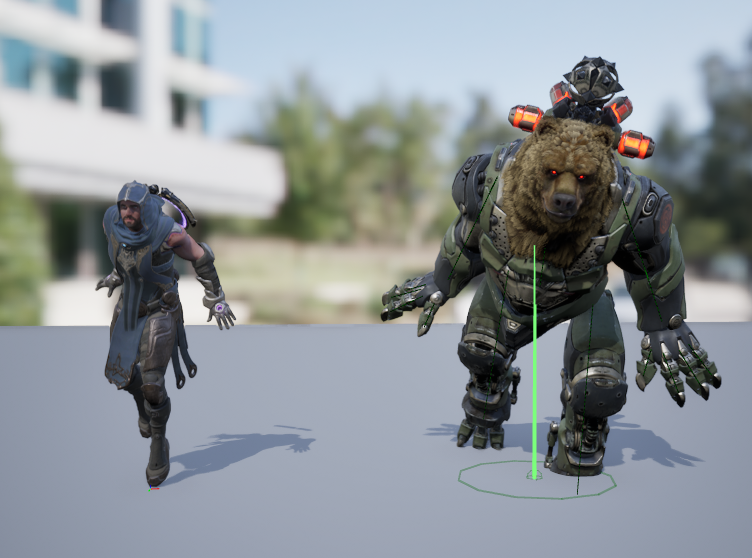
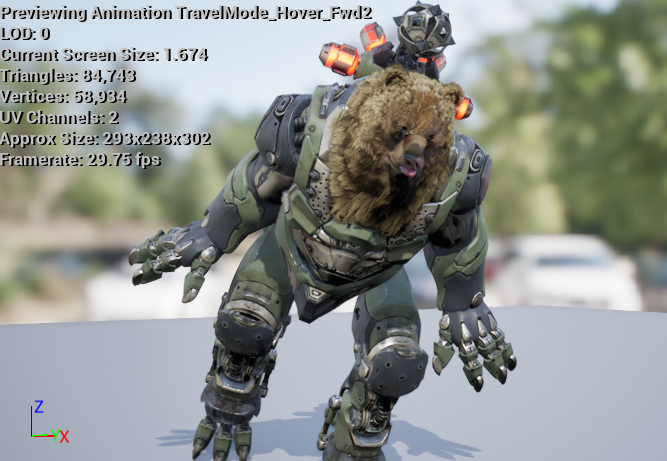
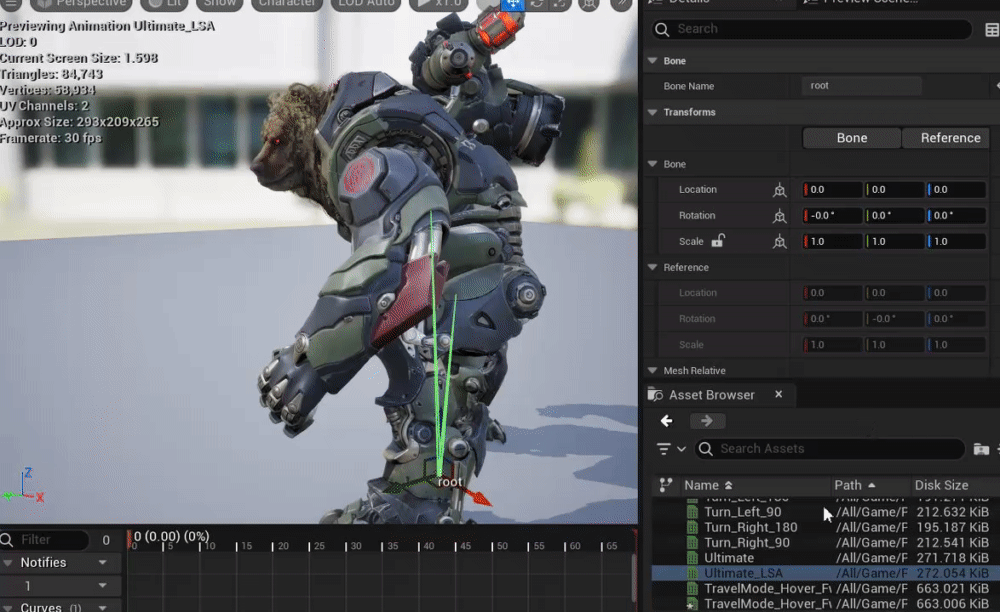
Interesting. OK. Are you changing the collider size of the character when they go into the shell?
Yes I am. I have looked into that aspect as well, I think that is the main reason it occurs, but I am unsure how I could solve that effectively.
I actually have that enabled in the video so you can see it change
I think that's probably what's going on.
Often, the collider's origin, and the characters mesh origin don't match, so I wouldn't be surprised to see this issue if you're changing the collider size.
Do you know how I could potentially solve that issue?
Chances are, you're going to have to move the characters skeletal mesh component in the same code that you scale the collider.
Ahhh
I figured as much. That is actually how I am doing it currently to test other animations. Look like I will have to find a way to smoothly do it now
Thank you for your help Squishy!
👍
Here is my solution, in case anyone is interested. On a timeline that starts when he enters his shell (timeline typically handles speed) I am using the interp smoothly transition it to where I need it. Once it reaches it fails the check. Simple yet works perfectly. Again, thanks Squishy!

If am trying to a demo where the character strikes an object with an item, let's say a tennis racket and a ball as an example
What aspect of UE would adjusting the racket and the ball to interact be? Collision?
Do meshes of all objects and characters have adjustable collision properties?
And any suggestions for learning about doing physics, momentum, etc for the ball etc
Glad it worked!
The answer to those questions strongly depend on what the item is, how you're striking it, and what it needs to do.
It's extremely contextual.
You wouldn't use the same things for pong, as you would for reflecting an energy blast with the master sword in a 3D zelda, or air juggling someone with a combo in a 2D fighter.
I see, but for the tennis racket? Where would I learn about setting the collision, or adjusting the ball's physics
Is this usually considered part of animation, or another category?
Again, depends on the context. A tennis racket in a physics toy VR game would be setup differently then a tennis racket in Mario Tennis.
But it would probably be handled down in #chaos-physics .
This would be with a 3rd person view style demo, not VR
Didn't notice that channel thanks... For collison too?
If it's a tennis game, you're probably going to have to heavily custom code the ball behavior, as Chaos is unlikely to provide consistent results that integrate into other systems properly.
Especially if it's online. Getting dynamic physics objects that are gameplay essential to sync accurately enough at high speeds is a considerable challenge.
Things like player strength and accuracy, stamina, etc. If the game is more arcadey things like special moves or custom abilities etc.
It's almost impossible to suggest how to do something without knowing what you're talking about for real.
Because it's not tennis.
Don't get me wrong, I may end up trying tennis
But I am just wanting to start with some basics like how to make objects contact etc
If you're just playing around, then chaos will do.
https://dev.epicgames.com/community/learning/tutorials/BbX7/unreal-engine-chaos-destruction-overview

this thing right?
Kind of. Epic replaced the old physics engine with 'Chaos Physics'. That is part of it, but all of the colliders and physics interactions in Unreal are also part of 'chaos'.
I see, tyvm!
Hey guys i got this error while importing animation of breaking wall simulation from houdini. Animation frame is 1-240. Error suggest me to use "Snap to closest frame" but when i use it - the animation technically gets imported, but it doesnt work. I mean i get 4 meshes, one of them with green label (i assume it suggest its an animation). When i open it, the animation slider plays, but the animation doesnt work. I tried settings custom sample rate into like 24 or 30 but it didnt help. Also changed different animation length but it also didnt help. What should i change to make this animation imported properly?
It works well in blender.

I have no idea why it says like my animation uses like.. subframes? Cuz thats what it suggest. That it starts in 1.25? But i didnt use any subframes in houdini.

I simply just followed this tutorial https://www.youtube.com/watch?v=FxbP3ASS9u4&ab_channel=Houdini

Lessons and Project Files: https://www.sidefx.com/tutorials/foundations-procedural-assets-for-unreal/
In this part of the lesson, you are going to create a wall then smash it using rigid body dynamics. Export this system to FBX then import it into Unreal for use in your game. This is a simple example of bringing visual effects from Houdini to U...
Also it doesnt work when i export this animation as vertex animation from blender into unreal. i mean, it works perfectly inside blender, but doesnt see ANY keyframes inside unreal. Does anyone have an idea what im doing wrong in my workflow?
My import settings. But ive tried different options too.

Does anyone know how you can update a 'Dynamic Variable' in the anim BP? I can't find any information on how it works. :/
Edit: Nm, i figured it out. 🙂

If I want to enable my character to walk around with different items in their hand, do I need separate idle, walk, run animations for every object?
hello, new to unreal here, I've retargeted some animations from Manny to a different skeleton, does anyone know why the animations are all over the place, it only seems normal in the blend space, otherwise the character is either scaled wrongly or rotated the wrong way, etc

Do they actually play like that when you open the animations in the anim sequence viewer, or is it just a display issue with the preview images?
Nope! You can create one 'holding an item' animation for each item, and then use a node in the animation BP called 'Layered Blend Per Bone' to apply it only to the upper body.
Ok, cool. And the holding an item animation could be an idle animation?
Yep!
Thanks, I'll play around with that
Yes they actually play like that. In some cases the character is super small, ik crazy.
That's odd. What was your process for retargeting these?
I used the 5.4 autoretargeting. Funny thing is everything seems fine in the retargetting viewport but once I export is when issues start.
I’ll probably just try to manually create and tweak the retargetting assets
Yeah, that would be where I'd start.
The auto retargeting really only appears to work perfectly between standard skeletons.
Like the UE skeleton and Mixamo, for example.
Could you tell me how that works? Because that feature has, as far as I can, zero documentation.
Does anyone have a tutorial for adding a jumpscare to an npc instead of only having it in the level? I want the npc to catch you and jumpscare
Hello, I am currently doing my reloading animation using “Child of” constraints, I have exactly put a “child of” on my hand as well as the “magazine” the parent is therefore for both “magazine2”, my problem is that I have a kind of lag in the tracking of movement of my magazine “magazine2” as you can see on the video the magazine “magazine” having for parent “magazine2” does not track movement correctly, if anyone has the solution I am really interested thank you in advance.
Sorry for my English
Any answer to this is going to be extremely contextual based on how your character works, how the npcs work, and what you want the jumpscare to be composed of.
I don't think anyone could create a tutorial for a generic version of this concept.
anybody know if it's possible to play a montage, but mirrored? I've got a bunch of right hand sword attacks that I want to play exactly the same way on the left hand and would prefer to avoid having to maintain two sets of montages (with all of the various anim notifies that could accidentally be bumped out of position, etc)
You can use a mirror data table, and activate it when the character uses the left hand:
Hello and welcome to my tutorial on the Mirror Data Table in Unreal Engine 5. It's a new tool within the Unreal Engine that can be used to create mirrored animation for your characters. Hope you find this tutorial helpful and thank you for watching!
#unrealengine5 #unrealenginetutorial
0:00 Introduction
0:57 Example: Using Within Sequencer
2...
interesting! watching now, thanks!
okay this looks great- so i'm assuming that if I want this to mirror a montage, I would just put the mirror node right before the final output pose in the animbp. gonna set up a mirror table and play with that now, thanks again
why animation do that after a while? any idea?
How long is that sprint animation?
Could it be playing only once?
There is an option not to loop in the sequence nodes.
You might have accidentally disabled the looping.
Is it too small?
I could give you some speculation like how the animation may not be set to loop properly or that your condition for going into the run is a speed > 0 as opposed to != 0 so that it plays correctly. But honestly the way you're building out this animation is a bit unintuitive for Unreal Engine development. Most basic tutorials usually give you the IdleWalkRun State with Blendspaces and setting the values to whatever velocity you're going to use and all that because that's generally the simplest way to get an IdleWalkRun up and running in Engine. So here's what I'll suggest: go into your content folder whereever you're holding onto your animations, right click -> create 2DBlendSpace. Then go into your 2D BlendSpace and set your X and Y Values. Name X ForwardAxis and Y RightAxis for the sake of searching this stuff up later. Set the max value of X to whatever your character's strafe speed is going to be. Keep in mind Unreal Engine works in centimers so a WalkSpeed of 100 ~= 1 Meter Per Second. Set the Y Axis to that same value. Then in the center of both those Axes, at 0,0 is where you'll put your IdleAnimation. Then you put the Strafe directions, forward, back on ForwardAxis, Left and Right on RightAxis, and any inbetweens that you have for inbetween direction like ForwardLeft, BackRight, etc, if you have any of those. They're not super necessary but they increase precision. Then inside your AnimationBlueprint, you'll take your Idle State, rename it to IdleWalkRun for posterity, then replace the animation that's in there with the blendspace you created, which you also named Archer_IdleWalkRun or something equally searchable. Then you'll create 2 variables, one for ForwardSpeed and one for RightSpeed. Plug those two into the correctly named axis slots, then inside your BP Code, you'll get your character's current velocity, right click split struct pin, then set forward speed to velocity x and right speed to velocity y. That should get you started for now.
I'm trying out the Modular Control rig, and almost everything works fine, except the legs. When I add the leg modules, my character's knees bend towards each other
I think because of the twist bones, but I'm not sure exactly how best to fix this. Can I fix this inside of Unreal?

Usually Inverse Kinematics bends the bones it's attached to based on the orientation it's already in. More specifically, when I would make old Blender rigs, I found that when I attached IK to my characters, if the character's knees were bent inward or backward even just slightly like they were locked, IK would bend them further in those direction. This disappears entirely in animation states where the prior frame has them bent in the correct direction. Easy enough to fix in animation programs where you're actively touching the bones anyway, not super easy to fix in a game engine where the orientations are, for the most part, what they are. I hope this lends some insight though.
Sup lads, need some help, and I'll make it short. Got two animations, we'll say running animations: Sword_Run and Gun_Run. Got a Blend Poses by Enum (to see which weapon the character has and switch appropriately) when switching the run animations restart and it looks stuttery/snappy. Any Fixes/Tips?
This might be silly, but is there a way to connect a trigger box to a moving character and not in a spot on the level?
Click the sequence node and make sure looping is on and check blend weight
Add a box collision component
Sequence node?
Ah thank you
The node in the state for the animation
Depends how you're setup is I suppose
Is it in a state machine
What the Run?
Yeah, it's in a state machine
It's a Blend space and there's a lot of other stuff there like the usual Idle and whatnot...
Oh hm show a screenshot of bs