#animation
1 messages · Page 49 of 1
In UE 5.4.2: Why is the skeletal mesh root bone at an offset? I would like the root bone to be in the center of the handle at 0,0,0.

its the same skeleton and mesh ?
It is the same mesh. The skeleton is being created in UE 5.4.2 with the skeletal mesh tools.
There should be a way to center the mesh at 0,0,0 as well?
but it is not in the Details tab
root bone and skeleton in unreal engine have specific name convention if u dont do it properly the root bone go nuts and it fuck up root motion animation thats why i know, maybe its that i dont know
This is the default "Root" bone name
in the skeletal mesh editor, there should be a way to center the mesh at 0,0,0 as well?
but it is not in the Details tab
u want to move the pivot point of the mesh ?
maybe this will help even if its for blender to unreal https://www.youtube.com/watch?v=c41Di_Umhkc&ab_channel=CGCatZ
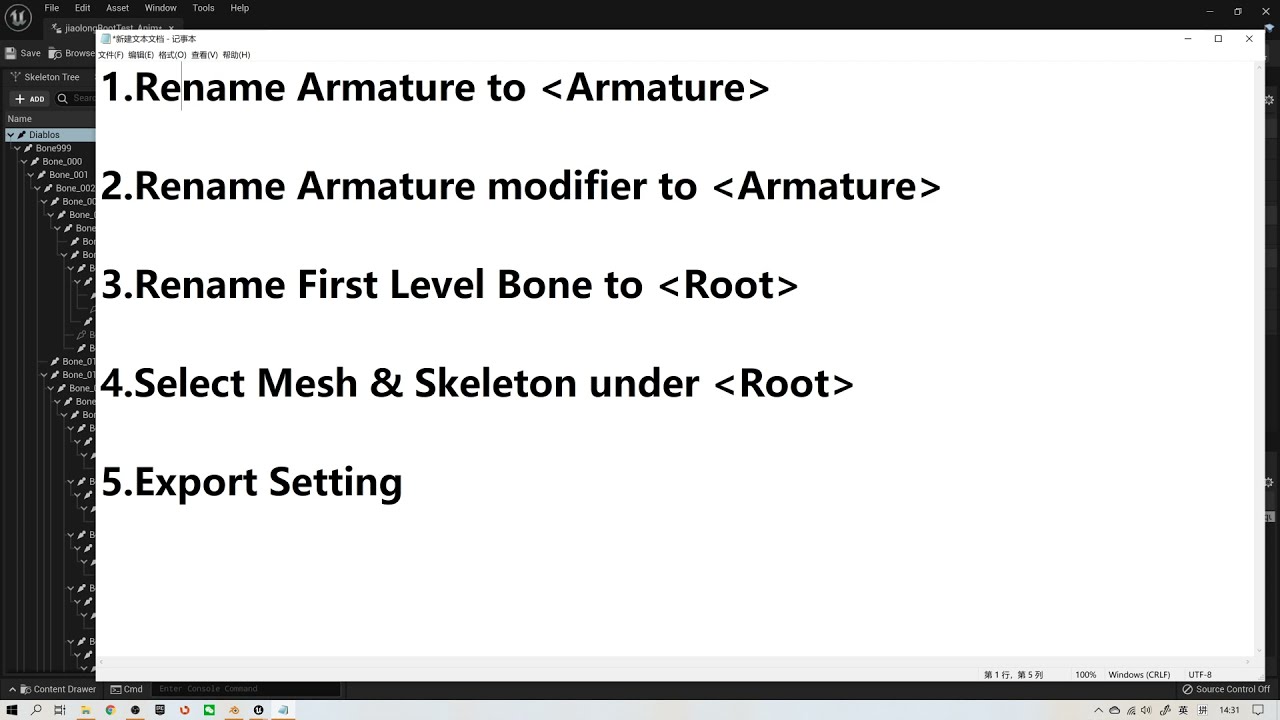
Another Important Setting:
a) Setting scales to centimeters in the Blender with unit 0.01
b) Applying transform (CTRL + A) in object mode for both Object and Armature.
Rename & Select are the Key Points.
How to Export Rootmotion from Blender to UE/root bone/ keep animations in place.
I would like to move the mesh to 0,0,0. like it is in the level. So the center of the handle will be a 0,0,0
not the pivot
yeah but if the mesh is already at 0,0,0 it mean u need to move something else than the mesh no ?


i see nice to know i never did this
That's not out yet. It's still in the Engine Roadmap under 'Layering and Blending Advancements'.
So it might be in 5.5 or it could be even later.
Hmm - it doesn't seem like her body is messing up, it looks like her legs are all puddling down at her feet. Have you linked to the character in your animation BP or used ShowFlags.Bones to look at what the skeleton is doing?
Is there a strong reason you need to change the blend values dynamically? I'm trying to imagine a scenario where that's necessary.
For recoil animations which approach is recommended? Add animation or create the force of the recoil via AnimBP using the Control Rig/IK stuff?
Usually it's animations, and usually they're additives.
Fully procedural stuff can work, but it tends to be more fussy than just animating it.
So there isn't a system exactly like you're describing, but there is something similar with the retargeting tools.
You can import an animation for one character and use the tools to associate a hand to a hand and a foot to a foot, and create an animation that works on another character.
You're not editing the bone hierarchy, instead you have two skeletons and you're transferring the animations from one skeleton to the other.
Yeah, there is something similar in unreal, however it is not limited to bipeds and links characters to each other.
Remember - retargeting is a transfer from one skeleton to another.
Yes!
Unreal is a bit chaotic, so it has several ways of retargeting things.
5.4 introduced a new one for common skeletons, but if you have a custom skeleton then this video by Ryan Laley will probably be what you're looking for:

In UE5, the process of retargeting animations has changed greatly with the use of the new IK Rigs. Check out how to accomplish a retarget using this new method in Unreal Engine 5.
SUPPORT ME
Patreon I https://www.patreon.com/ryanlaley
Buy Me a Coffee I buymeacoffee.com/RyanLaley
Donations I paypal.me/ryanlaley
PRIVATE 1-2-1 SESSIONS
Email me ...
👍
So, I have some meshes of varying sizes, but they all successfully share the same skeleton. An issue that I'm consistently running into with animations is that they don't all line up correctly (as expected to be honest). So, when holding the handgun - it'll look fine in one character's hands, but completely incorrect in another. I'm sure Epic has encountered something like this before - what tools of animation should I be looking into to correct this?
does it matter which blueprint houses all the "play montage" nodes? ie player controller vs player character vs animation blueprint
seems rather annoying that animation blueprint version of montage node has less options than the same node in other blueprints, making me question why anyone would bother having that logic in the animation blueprint
leading to this conflicting conclusion that it's MORE CONVNENIENT to NOT have animation montages stored in the animation blueprint
does anyone have any explaination of why this is setup this way?
What do they do instead of work?
Generally, you don't want anything to do with implementation of visuals in your Player Controller - because your Player Controller could switch Pawns, or disconnect from them, or whatever. Your pawn could swap to an AI controller, or you could start controlling a vehicle etc.
So not in the Player Controller.
So that definitely sounds like you have something going on with your arms. I would double check to make sure that I am using the correct arm bones, and not, for example, the IK_Hand bones or anything like that.
Hi all, I have a problem. I have a character that I want to apply an attack montage to, I know how to make the slot and all that, but my character's attack animation starts at the feet, so I would like to blend the attack and locomotion from the feet up, as it were. Is that possible? If I could pass multiple poses to a control rig I could do it but I can't figure that out either. Any hints?
What do you mean 'from the feet up'? Do you not want to move the feet?
OK, I can't say for certain what could be causing the problem. Are you sure that you have the type of bone assignment correct?
Imagine the attack animation is playing, the root bone is being moved a lot by the animation. Now I want to IK the locomotion over that attack animation, with the feet locked to the locomotion, and blending more and more into the attack with each joint up.
OK, not quite what I meant, I meant more the 'Translation retargeting' mode:

Try setting the hands to 'Animation Scaled' or 'Animation Relative'.
I expect that to be very challenging to make look good.
I've got a low-fi look going, right now reading attack telegraphs is more important than it looking perfect.
OK, but why do you need to layer the locomotion animations?
It's for a moving attack.
OK, but why does your moving attack not include leg movements?
No I'm trying to reuse the standing attack, that's not out of laziness, the larger problem is that the character can move in all directions, if I were to animate the attack moving in each direction I wouldn't be able to use the montages cos montages can't be blend spaces, now I have to add the attacks to the state machine, eventually the single AnimBP that I can use right now for 6+ characters has to be customized per character. There has to be a simpler way to do this.
They should be in the skeleton tree that you're defining when you're working on the retarget?
You probably don't need the attack in every direction. You can just have the forward attack rotate towards the target. There is a tool in Unreal for doing just this called 'motion warping'.
That's curious. I worry that you might be trying to use the more recent retargeting tools and not the standard ones.
Try reading this page:
Epic Developer Community
Describes how retargeted animations can be used with multiple Skeletal Meshes, allowing you to share animations.
Cool!
Sorry, I haven't done a ton of retargetting myself lately. I tend to make animations directly for my own skeletons and so I don't ever need to use it. I suggested the video because Ryan Laley is very good at what he does, and his videos tend to be very high quality.
There's no way that motion warping solves this problem. I need the character to attack while walking, there's no root motion to warp.
OK, but consider - you could have movement in the attack animation, and then you could warp that.
However, if you're really married to the idea of running your locomotion and your attacks fully separately, then you should look into using IK legs in the way that Manny and Quinn do.
If your skeleton doesn't have Ik leg bones, you can create them as Virtual Bones.
The basic idea is that you have three extra bones, ik_legs, ik_foot_left, and ik_foot_right, they follow the FK legs in all animations.
Then you can IK your legs back onto those bones. This is useful for slopes and for things like your scenario.
You can use the Layered Blend Per Bone to isolate the Ik leg bones and blend the full attack montage onto the rest of the skeleton, and then IK the legs and feet back onto the IK leg bones which are still running the locomotion animation.
How do I fix this? And how do I get both arms to show equally

No idea what's going on here. You're going to need to provide a considerable amount more information if you want anyone to be able to help.
I don't understand why you would use a template, and then a child?
If you've created retargeted animations for your skeleton, shouldn't you just be able to create a new animation bp, and use those retargeted animations in your new BP?
Why go through the elaborate process you describe?
OK, but I would expect, in almost all games, you're probably going to want to make your own animation BP.
So being tied to a skeleton you don't want to use is, as a rule, not something that you're likely to want to do as part of an ongoing development.
Welp, I'm finally happy with the rig
@nimble torrent I have an issue with the animation bugging out and the camera angle not being centered properly
Anyone tried the game animation asset from Epic? How can you make the character rotate using mouse?
Looking pretty cool! Nice job!
The specifics on exactly what you're doing, how, and what the issue looks like are necessary to help you debug this one. One blurry screenshot from your phone is not enough information I'm afraid.
@nimble torrent I figured it out thanks
Fantastic!
I have figured it out now.
I originally had no idea for how to apply it but I think it could be quite useful for like additive hit reacts or combos maybe
OK, how did you get it to work? Was there another pin for Blend Out?
Hi, i made a idle animation holding a sheathed katana, , that was made with control rig, now that im watching tutorials of how to make the character sheath and unsheath i've been facing the problem in wich is extremely hard to align the sockets to the exact animation position the blade and scabbard was, any tips of how to make that easily?

That's going to depend on how you have the blade and scabbard attached to your character, and how you have your character setup with weapon bones etc.
What sockets and things do you have?
@lunar storm
Sorry, just saw this. How do I check any of those?
To use the display flag, you run the game in the editor and hit tild '~' that shows the console and then you can type in 'ShowFlags.bones 1' to show the skeletons of the character.
I expect that some of the characters bones will be in the wrong place.
I would also check your locomotion animations to see whether the distortion is also visible when you view them in the anim sequence viewer (double click on the animation in the content browser).
Oh interesting. I will do that, thank you
Did the display bone flag, looks like my source mesh got stuck to my target mesh in the retargeter. Is there a way to get rid of the source mesh?
I think that's what is dragging my character
I have no idea how that could happen. I don't even... what does that mean?
The mannequin mesh shows and I cannot get rid of him lol


That is truly bizarre.
I have no idea how you went about retargeting this character, but however you did it - I think something might have gone wrong!
Just a bug I guess
It's always possible, but I suspect it's more likely that your process might be a bit strange.
I would review your retargeting process with the retargeting documentation page, and possibly some retargeting tutorial videos.
I've been going off of a few tutorials, ill just try again
https://youtu.be/PBFdbD0OBL8?si=zWmr389XhGxC0FMq if it helps with the sockets/animation

👉Learn How To Make Full Games From Start To Finish At : https://bit.ly/3SyYx5x
👉Get My Free Unreal Engine Beginner Course : https://bit.ly/46mUWMr
Animations + Sword Model : https://bit.ly/3RgDJzb
#UE5 #UnrealEngine5 #Uisco
Hey, complete noob question:
Let's say I have 4 run animations in cardinal directions, where the character's unarmed. Now I want to add "armed with sword" animations to the character, so I want to close the character's hand. I don't want to use a blend per bone node, because in the future they would be completely different animations - with different gait etc., but for now it's good enough for me to just have the hand closed and keep everything else the same.
Is there a way to apply that change to all of the animations? I know I can use sequencer to create a pose and apply it to a single animation and close the hand.
Any ideas? Thanks!
Hi, do you know animation editor/blender plugin that comfortable for making animation for games? For games i mean bunch of short actions that meant to be combined together in animation blueprint.
In blender it's quite annoying when you try to make combined action for 2 meshes. Hands and gun for example. You need to constantly switch between two armatures and check like idiot if there missing keyframe. More separate meshes make things even more painful.
Hey I have a minor issue with one of the mixamo wave animations+metahuman, the hand on the left (the right hand) seems deformed and I'm not too sure about the shoulders, what do you think?
I think the pros use Maya, then there is Poser and then DAZ Studio, I've heard about a new one called Cascadeur but haven't tried it, there is Mixamo but as you can see it can come with issues however for development stage it should be helpful
Thank you for answering but i kindda worked around that already 🙂
But now i faceother problem with constraints the video below will explain better than any word.
Thank you! i will take a look!
I don't understand why this is happening, what i've done is deactivate a constraint where the scabbard was the parent of the blade, but since the scabbard and blade will be pulled in oposite directions for unsheathing i deactivated the constraints in te moment that it would happen, but now there's this flick between constraint on and off.
I was expecting that it would maintain the original offset
Cascadeur is usefull for when you wanna make realistic - physics like animations, for something simple i wouldn't recommend it, Blender is enough.
Hi i have downloaded city samples car from market place and when i added the traffic BP in my level the car are spawning but they are not moving i want to add it into a sequencer
hello i would like to make a setup where the player press an input and an anim montage play but wait for the current anim montage playing to end, what would be the best solution ?
use a boolean, branch, and delay:
set bool to true -> play first anim montage -> delay -> set bool to false
press input -> use a branch to check if bool is false -> play anim montage
something like that
I'm trying to move arms up and down with a character controller I'm making, but it's not quite right. Currently, the camera can move up and down to -85 and 85 and the pitch is supposed to move spine 5 (and the arms) up and down. But the arms don't start moving until the camera reaches -85 or 85. I think the head is tilting with the camera pitch first, then when the head can't move anymore, spine 5 starts moving and the arms. Does anyone have a suggestion what part is wrong? Here is my animbp and the pitch movement:
https://www.youtube.com/watch?v=GKLUIibB6fw&ab_channel=Alex

I can show character bp and anim event graph if it's helpful
thx sir
Hi, I have idle poses for each weapon, that is just 1 frame. and I have an animation that is just additive, that only moves certain bones, is there a way I can merge them together? Most videos I see are people doing upper body and lower body playing together... these are just Arms.
Hello how would u change the play rate of an anim montage in real time in game with an input for example ?
I have been using the built in 5.4 modular control rig for things like this
make sure you have also applied scale rotation and location in blender
it also seems like your fbx export settings are not correct for UP and Forward Axis
Hello, I need some assistance, I getting this error on the retargetting. Only happends in a packaged build.
in the editor the retarget from pose works perfectly on packaged the hand is weird or something not even full body montages move it.
this is using vroid and the rtarget from pose node


It doesnt look as though your active_idle sequence is set to be additive, usually additive sequences appear green in the ABP. Have you checked your additive settings on the sequence asset?

Scale issues between Blender and Unreal are quite a common issue. The fact that scale of the root bone of your skeletal mesh is not 1.0 is certainly an issue. This video is often shared as a good guide for exporting skeletal meshes between blender and unreal. https://youtu.be/YbWfoyf4MqI?si=0HmwxYCxdtuPqT-1


In this video I will show you how to correctly export a character from Blender to Unreal Engine 5.
Common mistakes include issues with the scale of the root, joint orientations and differences between bones and joints. In this video I will talk about everything you need to know to correctly export rigged characters that follow Unreal Engine sta...
ah right, you have it as mesh space additive, so if you're going to apply that as an additive in the abp, you'll want the Apply Mesh Space Additive node.

im not sure if mesh space is the best way to go about it though, im a noob when it comes to animations
if you have a better suggestion I am all ears. I greatly appreciate your help you have no idea
someone managed to have AI to move properly on the new motion matching asset?
Any idea on even how ti debug this?
here's some info on what mesh space additive does and how it's typically used in an Aim Offset https://dev.epicgames.com/documentation/en-us/unreal-engine/aim-offset-in-unreal-engine#meshspaceadditive
I'm not sure what you're trying to achieve exactly, so i'm not sure what to suggest, but if you have any specific questions, very happy to help.
Epic Developer Community
An Aim Offset is a type of Blend Space that uses additive poses, typically for creating aim-spaces.
its essentially the idle anim is the base ref pose and the active idle animates just the bones it needs to
but the active idle animations the arms are straight out, (not my own creation) so i thought i would have to have an additive animation in order to make the active idle drive the idle pose
the "apply additive" node is the closest i have gotten, but then the model is like 200x bigger and distorted
the additive scale issue will likely be because there are two types of additive, local space and mesh space. The Apply Additive node is Local Space, your Animation is set to Mesh Space, those two things aren't compatible. You will either need the Apply Mesh Space Additive node or change the additive settings in your animation to be Local Space.

so the scale is behaving, what are your base pose settings in the additive sequence? The base pose settings will determine how the animation applies the additive deltas

I'm not sure what your animation assets looks like, but it might be that the delta between the idle and the active_idle arent particularly compatible either. What is the outcome if you set the base pose to be the first frame of the Active_idle?
these are the two
they should be compatible though..
they were made specifically for the skeleton
hi! I have a question, anyone knows how can I blend both hands? I'll explain. I want to use only the Right hand whenever an item it's picked up, but I also want to use the Left hand if it has the flashlight on. so I wanted to show both when the flashlight is on, right if has item and not flashlight on and left if doesn't have item and flashlight on. but I've been having a trouble trying to blend both anims

I think this may have fixed it
yeah it's not so much a skeleton compatibility, more of an animation compatibility, they "work" together, but might not look great depending on the poses
Nice 🎉
In the setup you have there you have three poses, and the arm poses you are blending are beginning their blend at the spine_01, meaning every bone below the spine (including the arms) in the hierarchy will be fully blended to the pose based on the weight. But all of your blend weights are set to 1.0, meaning that whichever pose is last will take priority.
Instead of blending from the spine, you could blend from the clavicles of your character so that the blend only influences the arm instead of blending over the spine. So where you enter the Bone Name, you could input clavicle_r for your first filter and clavicle_l for your second filter.
Then you control how they're active with the Blend Weights.
OMG, I didn't firuged out why didn't work. now I get it's because of the bone it's attached. thanks a lot 🫶
glad it's working 🎉
What is this green arrow icon and how can I replicate these?


Epic Developer Community
Edit, blend, and manipulate poses on Skeletal Meshes using various graphs in Animation Blueprints.
Thank you for the link I'll give it a read. So I guess this data is coming from the skeleton/animation or something
From the animation yes, those lines denote what data is being passed along the execution line.
Okay thank you. I was looking through the properties and couldn't find any of those fields. I guess you can only see those lines while simulating as well
Hello! I am trying out TimeStretchCurve but I'm getting some unusual behavior. Previously, I used a montage that had the same sequence broken up into two sections, each with a different playrate. For documentation sake, the first section was 2x play rate and the second was 3x playrate. Everything was working well, except that root motion was not being applied properly and the character would glide backwards at the end of the montage. I tried swapping to a single Sequence and using TimeStretch Curve, but I find that making the second half 3x play rate would actually cause the character's root motion to send them backwards from where they started!
https://youtu.be/UVj5tDEVc5g got it
if i have a ue5 mannequin with a comprehensive ABP that i want to now equip with different meshes, whats the way to do that with introducing the least amount of new imprecisions?
i also wanna make a gun ik, what would be the correct order? first to skin with a mesh and then have an ik introduced to the mix? or the other way around?
So I can use the modular control rig if I just bring in the 2 separate meshes from blender?
What video are you referring too?
Yall this is a very silly newbie question but ive heard mixed answers so i need to ask. I want to use the UE5 manequin skeleton and skin it to my own character so it has the same skeleton hierarchy and all.
What is the best way of adjusting the skeleton bones to my own model's mesh? Should I rotate the joints or change their position? There are all these extra IK bones and the skeleton has specific joint axis orientations so i wouldnt want to mess with them either. What's the correct pipeline?
Hey does anyone know how I can use the New animation character for my fps game? I am trying to get it to work so when in multiplayer, other players see the animations. my issue is that I cant just use the sample because its for 3rd person, and i cant use the ABP on the fps character because it doesnt have all the event things.
You're going to have to weld them together, and that takes coding. This is not an insignificant task if you want it to work properly. The motion matching demo doesn't have a weapon - for example, it's climbing animations don't account for holding an object.
Even if you technically got it to work, you would still have a lot of animation effort to put in to make it look correct.
Why specifically do you want to use the mannequin skeleton?
If you're reusing a skeletal hierarchy in unreal, you want to keep:
- the hierarchy
- the major orientation of the bones (so if 'x' is forwards for the spine, you want 'x' to be forward for the spine, etc.)
- the original pose (so if they are in A-stance, you should rig you character in A-stance, if they're in t-stance, do it in t-stance)
Everything else can be changed, positions, orientations, etc.
As for the additional bones - you should look up what they do, and decide if you want to use them on a case-by-case basis.
Battz is talking about this one:
In this video I will show you how to correctly export a character from Blender to Unreal Engine 5.
Common mistakes include issues with the scale of the root, joint orientations and differences between bones and joints. In this video I will talk about everything you need to know to correctly export rigged characters that follow Unreal Engine sta...
When you say 'equip with different meshes' what do you mean
Do you mean: "I would like to create new meshes for the characters body and clothing" or "I would like to create new weapons."?
Hey thank you for taking the time to answer, much appreciate the insight!
I want to use it so make sure when I retarget it in unreal it has all the same bones, both in naming and hierarchy.
No additional bones, it's like stuff like slightly adjusting the arm and feet position along with some spine adjustments.
Practically to adjust the OG manequin skeleton to my own mesh, should I do it by say rotating the upperarm bone, or moving the lowerarm bone? Same with the spine stuff i guess as my character's back is a bit more forward for stylization.

You definitely want to rotate rather than change position, probably. It looks like you're in blender, so blender should keep the joints pointing at their descendants, but I would still rotate the shoulders to place the elbows just to be safe.
Ohh gotcha, thats great to know! It's Maya shenanigans, my instinct also told me to rotate it as all the IK reference bones would adjust nicely too
I would only translate a bone either towards or away from it's parent, with the exception of the first joints of the fingers (those you're probably going to have to actually translate).
That makes perfect sense yeah, so not to mess with the joint orientation, thank you so much for the answer!
So I don't think the Time Stretch Curve is going to work for you. My understanding of how it works is that it's a distribution curve, not a direct time distortion curve.
So if you set a montages play rate to 0.5, and then add the curve to the montage and create some keys in that curve that set the value to one during a step of the animation - the change in play rate will be applied in that period of the montage, while keeping the overall length of the montage the same.
So if a montage is 2 seconds, and you set it to 0.5, and you only have 0.1 seconds with the Time stretch curve on, that 0.1 seconds is going to be really stretched to make sure that the overall montage takes 4 seconds to play.
(this is confusing, but it is a confusing tool)
I would use two layered blends myself. One for the left hand, and one for the right hand.
awesome. Thank you!
the former, i want to lets say change it from default ue5 skeletal mesh to some other skeletal mesh, or using a metahuman with the same blueprint
that would introduce imperfections wouldnt it? even best case where the same skeleton is used, different meshes have different spatial representation
and if its a different skeleton then that might also require retargeting which might not yield great results right?
Yeah, probably. If your goal is to mess with your animations the least, you should create your new mesh so it exactly matches the size of the existing geometry.
since im not creating the meshes or having anyone make them, rather im using what i can find, what are my options?
i bet i can find for instance meshes layed on the same ue5 skeleton
but the meshes are diff
If you're not creating your own meshes, you're almost certainly going to have to use retargeting, which will probably result in you having to do some animation work to compensate for variations in proportions.
i fear no man, but that thing, that scares me
if my end goal would be to add variation to the meshes that are being animated, and as part of that animation i would like the mesh to be able to hold various gun meshes, for instance. would that mean that for each character skeletal mesh in combination with each gun skeletal mesh i would need to make a variation of the base animation blueprint?
There are ways of handling different weapons within the same animation blueprint.
Also - if you have characters of different proportions, you can still keep the same animation graph. Unreal has real-time retargeting, which should allow you to use characters of different proportions with the same blueprint.
Making this all work usually requires the use of IK and some clever setup.
whats the approach for multiple gun meshes?
also, i havent looked into live retargeting
how does live retargeting differ from ik retargeting?
Usually guns will have custom reload and draw / undraw animations, they will often include sockets that the hands of the characters can IK onto in order to be placed correctly.
Offline retargeting is done to create new animation files and is typically done between incompatible skeletons.
and then u just setup the sockets per gun to use as anchors?
Live retargeting is done between different characters who share a skeletal hierarchy but not identical proportions.
People do this, but it seldom is enough on its own.
Usually you do require some custom animations per gun, often using a IK_Hands setup to create arm movements in the gun's animation space.
Anyone been having issues with these two nodes in the new match making template?
It's making my own custom character insanely huge and distorted. The left one is when moving. Both skeletons and meshes seem to be of the same scale so im curious what to check next

Did you maybe import your character from blender?
When you look at your character's skeleton, and click on the skeletal root in unreal, does your skeletal root have a large scale value?
a metahuman skeleton & ue5 skeleton i assume dont fall under this bracket, but lets say different sized metahumans do fall in that bracket?
I don't know if the metahuman skeleton is compatible. Sorry, I've never used them.
that makes sense, a loading animation is different between a pistol and a machine gun
sharing a skeletal hirarchy means having the same bone structure?
like having 3 bones per finger
The same bones with the same names in the same broad orientations.
so that means it needs to be identical through and through
Nope, because they can have different positions and minor changes to the orientations.
You can have substantial changes to a character with just that.
ah, which is what would create slight imperfections
Depends you could make a guerilla and a Lalafell share a skeleton.
But trying to use the same animation between the two would likely result in artifacts.
in the industry, i assume when u go about making a game, u just decide a skeleton hirarchy, and exact pose to use on all characters?
or do u make multiple skeletons, what would be the benefit of that?
If you have very different kinds of characters, then usually they're different.
You generally don't share a skeleton between a person and a wolf, or a person a giant tentacle monster.
that makes sense
and u just make the meshes modular
to be able to swap a shirt/pants etc
well, now after u told me what u did, i think right approach would be to first integrate a gun into my ABP, and have the UE5 mannequin use it, and after i have a gun done ill reskin the mannequin, right?
It's up to you. Either way, you have some work ahead of you.
do you maybe have a good source for character meshes?
maybe they share the same skeleton, that way i can honeto that skeleton, and then live retarget between the other meshes
no Blender, just Maya for this one.
And nope the skeletal root is 1 as the og UE one. very odd :/
Hmm, that is strange. Scale issues are usually import problems.
Have you checked the animations? Do they have a weird scale?
animations look good, its these specific two nodes that cause the issue
maybe try try to apply transformation in a weird space but i dont find any useful options in these nodes
if i bypass these nodes its working fine minus whatever work they were supposed to be doing 😄
The animations can look good and still have a weird scale.
sure but i did check them in scene, plus even if i didnt the fact that these two nodes make the scale issue while without them they're all great it means its not the animations
check that the additive settings for the animations in those two blendspaces are correct
Hello! Does anybody knows what is happening here? I exported a katana unsheathing animation from Blender to UE5 all is cool but the hands are in this cursed form in UE lol, Im using Mr Mannequin ADDON


Those look like different characters. I imagine their hands are different sizes, which will affect the hand poses depending on your retargeting settings.
I would say no. The modular control rig is heavily focused on bipeds, but you can make a custom control rig for that mesh very easily.
What options do I have, then?
What are you using the montages for and why do you want to slow them down?
This is an attack montage I got from a marketplace pack. The base version is extremely slow so I used play rate to speed up different parts of it. Then I discovered that root motion stops working if you split up the sequence into two, so I needed a new solution.
I don't know why the root motion would stop working if you split it in two, that's strange.
Are you sure you imported the animations at the correct frame-rate?
Yes. I got the animation off the marketplace. If I use one contiguous sequence the root motion works fine, but if I split it into two sequences within the montage with different play rates the root motion stops working. I can share a video/image in about 90 minutes .


This is the original setup
its possible to retarget an animation from FPS Hand to a Manny full body skeleton ?
Technically yes, but you will need a custom setup to do it.
What did the root motion do instead of work?
because im noob in animations, so i want to copy the animations from fps animated hands to Manny skeleton😅
Iirc, the animated hands don't have many animations. You might have an easier time making new animations for Manny than retargeting the hands - but it's up to you!
i cant understand how to do them with a weapon, my weapon is attached to ik_hand_gun bone, how can i make this reload animation? its looking horrible🥲
i need to make first animation for manny and second separated for weapon?
You shouldn't need too, no.
or can i connect them together do make all at once_?
It depends on how you have your rig setup.
I would, personally, make my gun follow my hand by temporarily constraining the ik_hand_gun bone to the hand with a parent/child constraint.
I'll get back to you on this. Interview soon.
mmm this is not for beginers in animation, and 0 tutorials about this in youtube, all videos are only about weapon to hand socket and done, nothing about ik bones
Anyone can explain how to set this value in anim dynamics node?

Hi, I am currently trying to export an animation from blender to UE5 and for some reason, my rotation keyframes are smooth in UE5 but all location keyframes aare not?? anyone have a solution?
my location keyframes are skipping from one to the other, but only after exporting into UE5
have you checked your import settings into unreal? iirc the default is linear interpolation on import
tried a few different settings, let me see what it is set to. do i want linear interpolation?
changed to Step with no changes
that is quite strange. so the location keys are stepping but the rotations are smooth?
I forgot to paste the link 😅 I have updated the post and the video is this: https://youtu.be/YbWfoyf4MqI?si=0HmwxYCxdtuPqT-1
In this video I will show you how to correctly export a character from Blender to Unreal Engine 5.
Common mistakes include issues with the scale of the root, joint orientations and differences between bones and joints. In this video I will talk about everything you need to know to correctly export rigged characters that follow Unreal Engine sta...
Nice, it might not be an issue, but you may not want the "Armature_001" bone in your hierarchy.
You can ensure this is ignored by unreal by keeping the armature object in unreal named "Armature" as opposed to "Armature_001"
good to know. I was wondering that. Thanks
It looks like your weight painting either didn't exist, or didn't import. Did you weight paint your mesh, or was your mesh in a hierarchy without bones or skinning data?
(sadly the latter is not supported by Unreal, you need bones, an armature, and skinning data)
Have you tried reimporting your fbx into your DCC (Blender, Maya, etc.) ?
You... type in the numbers? I think 'Box Extents' might only be used in Chain constraints.
dont know what i did wrong in the first scene, but exported my character, created a new skeleton, remade the animation and now works fine
and.... im pretty green so, to be expected
All right, well it should work the same way in Unreal as it does in Blender, so something must have gone wrong with either your export or your import.
I recommend trying to import your FBX back into Blender to see if the armature works there.
If it does, the problem probably import settings.
If it doesn't the problem is probably export settings.
Are dynamic animations really bad for performance? And can you get similar results with old school baked animations? Use case is an army of spiders so a LOT of legs.
Gotcha, thanks for the help
This breaks the armature as far as im aware. At leat the default manequin is broken after import.
Anything you do a lot of is bad for performance eventually. Optimization always involves figuring out clever ways of doing less.
Import into what?
Because you should, if your settings are correct, be able to round-trip a file from blender to Unreal and back again without breaking anything.
Blender. The bones become messed up no matter how you do it. Either the length changes or the orientation breaks.
Maybe its just because the unreal manequin is made in maya or something.
It still works but its messy
So I have a strange issue. I am trying to setup a actor so that I can trigger animations by pressing Z for my VFX that I want to test out. I have managed to set up an actor with the model and animation but the animation plays in a weird way on the skeletal mesh. Even thou in the preview of the fire animation it looks good. What is wrong here?
But I do assume baked animations would allow more enemies?
And if you do baked animations with some additional IK rigging so feet touch the ground is that just as bad as fully dynamic animations?
This 100% depends on the complexity of the dynamic animations.
And I wouldn't assume anything, I would test
I do intend to test. I just want to set base expectations before I start going crazy with animations.
I might think dynamic animations have heavy performance impact but someone with experience could tell me "nah its the same" in which case I have no reason to bother animating by hand.
Shot in the dark but was it exported correctly? Did you apply all scales and rotations before export? I would assume yes since the preview works. Second shot in the dark: Is something modifying the scale or orientation of either the mesh or armature of the model you have spawned?
Not that I can see sadly. does not seem so. Mesh is scale 1 both as in the blueprint and in scene
I noted to that all fire animations have the same issue. Works in preview but when applied to the BP actor it goes hawvire like the first one. Other animations works fine as idle
These models and animations where added through UE marketplace
So I did not export them myself
I cannot get copy pose from mesh to work correctly for my character. Every piece of the character works fine but the head, instead of going into place it has a huge offset and flails around wildly. I cannot figure out why every other piece of this works but the head. I've tried applying transforms and rotations in blender and removing bones from the skeleton niether of which seemed to help at all. Does anyone have any ideas here?
How do i make the new animation sample from epic to start walking instead of sprinting
also the i migrated the locomotion from the epic project to mine and its working fine but the character doesnt vault
I feel like I'm getting close to having this right. She has no arms and she grows when she jumps, but I'm close!
Not sure what's going on with the camera though
did you replace the character with the thirdperson template character ?
like just replacing the skeletal mesh
I replaced the default mesh with my character
I did the retargeting like that. The animation fix is easy just the camera being weird
did the retarget method work ?
try and add a camera spring
to the camera
The scaling suggests that you have the wrong additive settings for an additive landing animation
Yes and no. I have to go back and reconfigure her arms to be on there.
Yeah I figured something was wrong with the landing animation
I also don't think that this is a camera problem, it looks more like your character is moving off the capsule, a bit like unapplied root motion. The camera movement looks pretty standard
Is there a significant difference in speed for using control rig in C++ vs blueprints?
does live link for android exist?
I don't think it does out of the box because the plugin is built around the Apple ARKit.
I don't know how reliable it is but there's a reddit post with an alternative plugin for android: https://www.reddit.com/r/unrealengine/comments/wwt728/live_link_on_android/

Reddit
Explore this post and more from the unrealengine community
No, not really. Both compile to the control rig bytecode, which would be the same both ways.
awesome, thanks!
There's a lot going on here!
I'm glad her legs are fixed!
Could you show a video what what's going on?
What happens when you debug the animation blueprint?
Does the skeleton stretch or is it rotating around weird?
Also - what happens when you look at the skeletons for both meshes, are they the same?
Me too! Unfortunately, more issues open up
Now the animation's all screwed up
Definitely looks like a lot of the animations have retargeting errors.
Those 'get gigantic' ones in particular.
And the arms.
I'm interested to know how you're doing it.
Because I suspect something is wrong.
How do I apply a post process animation blueprint to a skeleton? I tried to migrate the rifle anims from the lyra sample project. I am using the same skeleton as the Lyra project, but the wrist is twisted once they are retargeted. If I open the anim before retargeting, I can see a notification in the viewport that says there is a post process anim blueprint running with a button to disable it, and when I do so, It results in the same wrist twisting issue. Cool, it's not an issue with retargeting, it just needs that post process abp. I tried to retargeting the anims with the post process abp and the poses it uses, but when I open an anim there is no notification in the viewport that says the post process ABP is running and the wrist is still twisted, even though it exist and is assigned to the skeleton.
I've scoured the post process abp for anything that might get it to run on my skeleton and can't find anything and the skeleton for anything that might assign the abp to it and can't find anything.
There's a section for the Post Process ABP in the Skeletal Mesh Asset Details.
I would guess the post process abp is ignored when retargets are being processed so you're retargeting the source assets "faithfully"

Damn, for some reason my skeletal mesh asset details is blank. Looks to be that way in the lyra project too.

I followed a tutorial that showed I had to move the arms from Tpose to Apose. I did Edit mode>Highlighted all bones on arms>rotated them. That has to be where I messed up
I'm trying to be careful and figure out what to do here now

It looks like you're in the Skeleton Asset, you will need to be in the Skeletal Mesh Asset to assign the post process abp. You dont have section2? the Asset Details? https://dev.epicgames.com/documentation/en-us/unreal-engine/skeletal-mesh-editor-in-unreal-engine#assetdetails/skeletontree


Epic Developer Community
An in depth look at the Skeletal Mesh Editor mode in Unreal Engine.
Ah! Thats it! Thanks you. Not sure why I did not think to check if it was applied to the skeletal mesh not the skeleton, guess I just got tunnel vision
understandable, the editors look practically identical. Glad you found it
question, i noticed with my root motion animations, if i put it in a blendspace, my entire mesh shrinks
but when playing root motion animations outside it it does not alter the size of the mesh
i imagine this might be a blender issue
but i need to know if i should resize the entire skeleton to fit this or if i need to do something else to ensure it doesn't shrink when playing those animations in a blendspace?
Thanks, bro, I have same issue with you about Rewind Debugger, documentation does not mention it at all
https://dev.epicgames.com/documentation/en-us/unreal-engine/animation-rewind-debugger-in-unreal-engine
Epic Developer Community
With the Rewind Debugger you can record real-time segments of projects and preserve the data for debugging workflows.
Yeah lol it took me a while to figure it out, I'm glad it was useful for you
im having an issue with root motion not working on an AI character. First screenshot is on my player character and montage plays correctly and root motion works(i set the skeletal mesh and anim bp to be the same both on AI and playercharacter) however on AI montage plays but the root motion doesnt move the AI. Any idea why could this be?


i also have these settings set like this on both AI and player character blueprint

same animation, same animation blueprint and same montage
alright i solved it, I had set the ai controller to null so the AI wouldn't move while I test but for some reason root motion doesn't work when the controller is null
this was it!!! When retargeting some of these options were reset. Making me think what else isn't correctly set 😄 Thank you so much!
That depends on where the scale issue is, and if it's a scale issue! Have you checked the root node of your skeleton in your skeleton file and your animation files?
In the early version of the control rig, there used to be something you could add onto the hierarchy called a 'space' (see the red icon item first image, add selection option in second image). As of 5.4, this is no longer available. I am not totally sure what it was used for, but would like to learn it's intended use and how to achieve that same use as of 5.4.


Would it make more sense to apply my mesh to the Lyra blueprint , rather than try and add lyra locomotion to my own character blueprint?
Looks like slapping my mesh into the Lyra blueprint works very well without any fuss
might need to check IK functionality - but its a Metahuman so it might be 100% compatible
Question about synched anims.
We have two ABPs, one for a bike and one for the bike-rider. Their state machines have the same states and transition conditions.
Is there a standardized way to ensure those two stay in synch or is the only work around to have a single merged mesh and set of animations for both?
it depends if you want all the other lyra stuff or not, there is a repository that has the lyra locomotion / abp extracted out
Lyra is great, but its great for a halo-like shooter. There are a lot of people that are extending it in various ways, you should check out the Lyra Dev discord server for more info
I like the jumping and mild air control
might be better option for 3rd person RPG rather than the motion matching
might layer some motion matching on top of lyra fundamental anims
dont want all the vaulting possible in my game, but the new feature is tempting. just want dodge roll and jumping. adding all the vaulting would make level design very difficult. but it might be more fun?
gonna dive into these and see what is mix and matchable - interchangeable to me needs
NAH motion matching feels like a trap. i'
waste of time for what i want and need. gotta keep moving forward
can anyone help me to figure it out why my animations are x10 times bigger in my PSD ? 😦 is this defined in the animation itself or something to do with the PSD?

There are three places to check - first on the animations themselves (do they have a scale value on the root node), then on the skeleton for the character (does it have a weird scale) and then on the additive settings (if you're using the motion matching template, which it doesn't look like you are).
As the movement of the bike is fully controlled by the character riding it, I would personally make the bike BP procedural and react to the animations of the character.
it seems to be related with the root motion, when I enable is when it becomes suuuper giant but when disable some of them not working :/
I would still check those three places first.
thanks
Heya, if you want to try the new great animations released in the Game Animation Sample with your own Metahuman, I've made a tutorial about it, you can check it out here!
https://youtu.be/jmLosvbFAK4

In this video we are going to see how to get the new Game Animation Sample project, see the Motion Matching in action and how to use our custom Metahumans with this great suite of controls and animations.
Support me here:
https://patreon.com/gono
Create a custom Metahuman that looks like you:
https://youtu.be/7RKITpBZN-s
–––––––––––––––––––––...
Ooh! Handy! I'll bookmark that, as I am guessing there will be lots of people wanting to do that.
I'm hoping someone can help me, I've got my character working with all the animations and locomotion the way I want to but I noticed that the mesh that I want to use has wider shoulders when applied to the skeleton for the animations --- Is there a way I can move the rig slightly in the shoulders where it should apply to all the animations or should I start from the beginning?
You probably shouldn't have to do that if the characters skeleton has the same hierarchy and your retargeting settings are setup the correct way?
Have you looked into the runtime retargeting stuff?
I just started messing with the new retargeting system so I don't think i've looked into that yet
Hello. I’m gonna preface this by saying I have zero context for animation from a technical standpoint, or the capabilities of the unreal engine. I’m in a position where I need to hire an animator for a multimedia project. The project is not a game, but rather a visual mockup of a 16 bit era video game in video format. Is unreal engine capable of rendering such things? I was thinking about posting on the job board but I don’t know if this is where I should look.
A 16-bit video game can be done by unreal, but it's not good with pixel art. Unless you're looking for something sort of Donky Kong Country-esque, you're probably better off going to dedicated pixel art places, or engines that are better at 2d games, like Unity or Godot.
Is there like a place that’s good for hiring such animators on a freelance/contract basis that you know of?
Sorry, I'm not really plugged into that space. I know that r/pixelart is really busy.
So, if it were me, I would go on there, find an artist whose style I liked, and approach them directly.
For context: my medium and personal experience is in the realm of audio production and sound design. Visual art is alien to me, yet somehow I find myself in this position lol. No clue where to start.
So is that subreddit for static artwork or are there animators? Also I know a bit about 3D animation, someone creates the model, another rigs it, another animates. In pixel type animation is this all done by the same person with the same skill set?
I will definitely check out that subreddit thanks.
There's lots of animations, and while you can do pixelart in a team (one person does design, other people do animation) it is often done by one person.
In contrast to 3D animation where you do typically work in teams, because the production weight is skewed in different directions.
I see. Concept and storyboard art is complete so it seems I would be looking for a small team or an individual rather than a studio. Thanks for the info!
it probably ended up being a scale issue
though found a really strange method that got it to work
Oh boy!~
You're welcome! Best of luck!
basically when exporting from blender i have the scale transform of the export be 50 (with ofc blender units being in centimeters 0.01)
when i'm exporting just the rig and mesh i keep the transforms as is
but when exporting the animation
i do unreal's export scale of 50
Okay...
on top of the blender 50
which allows both of them to be scaled the same regardless of if root motion is enabled or not
Yes I’m sorry to ask a question and dip but I appear to be in the wrong place like I said I do audio normally and ended up in a weird situation. Take care.
did someone say animator
You might benefit from checking out this video:
In this video I will show you how to correctly export a character from Blender to Unreal Engine 5.
Common mistakes include issues with the scale of the root, joint orientations and differences between bones and joints. In this video I will talk about everything you need to know to correctly export rigged characters that follow Unreal Engine sta...
That's the one I used to get all my scale values in line.
eh probably
but the method i have seemed to work fine so maybe i'll just stick with that for consistency
yeah...my rig is more complicated than that as when i tried 100 scaling the root bone it did some funny things to my mesh...
It is easier to do these things when you're initially setting things up.
ye
unfortunately i dumped a crap ton of hours making my model work with Unity
so i am thankful i found this weird workaround
weird because i dunno why 50 works
cause 100 makes it double sized
are lyra animations innately compatible with metahuman?
or do you need to retarget
Thanks for the info!
In our case, the bike ABP is almost procedural in the sense that it's state is entirely driven by the rider's ABP
Unfortunately, seemingly because both ABPs don't run on the same thread, the animations can become out-of-sync during their common state (e.g. moving forward)
One thing I'm considering is to put animation markups in the rider anims that force the bike to skip to the correct matching animation frame if its not on it. Still, that seems like a wonky wordaround to a common problem.
If the bike is procedural, the animation frame is irrelevant, isn't it?
And it being a single frame out of step is bad, but not that bad, right?
Oh right, in the case of a bike we can make it fully procedural using purely IK, but that wouldn't work as well with something like a horse
We can end up being several frames out of sync when the framerate fluctuates, still trying to figure that one out
If it's a horse, not a bike - it's entirely different.
Even then, probably not a significant problem being a frame or two out of sync, unless you're using animation to translate the objects.
So they would visibly desynch from each other.
Is that what's happening?
No, it's just the pedals not matching the feet
Maybe the bike was not the best example in the sense I'm trying to find a generic solution to any two ABPs we want to sync
Hmm - I've never tried to keep two full complex animation blueprints fully in synch with each other. I've done it montage-to-montage, but not over an extended period of time.
I don't know how possible that is.
All good, it's a fun challenge, I'll reply to the thread once I find a solution
fast question for people who uses control rig and does animations inside UE5, dumb one, how can I attach item for preview in sequencer? per say to a hand like a stick so I could have better reference?if anyone interested add object to world, then parent it to control rig (in outliner), and then select bone/socket and reset trasforms
never mind figure it out 😄
guys, is motion matching compatible with animations what are running in idle position? i mean are staying at the same location?
best way to retarget lyra > metahuman?
im using the RTG_Metahuman that comes with the engine, and its 90% good, with slight awkardness in the wrist.
Look at those wrists!


gotta tweak ik settings
Im having issues using modular control rig on characters with a different leg layout, basically using the foot as the last bone in the leg and the ball as the foot. The bones are all named like mannequin, but when modular control rig is applied, they get lifted way up.


Metahuman retarget wrist improvement, changed the IK Hands to have 0.9 IK Scale Vertical. modified from defaul RTG_Metahuman with Quinn as from mesh.

Much better!

do you know how to fix motion matching movement lag? i mean when i press WASD it starts to move after a 0.5 second for example
i don't use idle to walk or walk to idle animations
hello how do u get the time remaining of the current anim montage playing ? in blueprint, i can use get play lenght not sure what it mean
i just can't find where is located blend in/out parameter in motion matching🤔
how the flip do i get Left hand ik to work with anim montages mb im trippin rn
You're looking for a node called 'Montage Get Position'.
Best way to convert lyra to metahuman? Their skeletons are different height
Has anyone come across some technical references for motion matching? The system is pretty opaque right now, it's not clear to me how to space out animation frames, and to what extent the frames can be blended. Just hunting around for some papers or talks on the subject if anybody has come across anything like that 👍
@pine parcel sorry to ping, did you ever finish your control rig anim notify?
Forgive me if you don't know what I'm talking about, you have the same name as someone who was working on this
There was this walkthrough recently: https://www.youtube.com/watch?v=mhVp_cC9MLc
Good explanations and the QnA was very informative
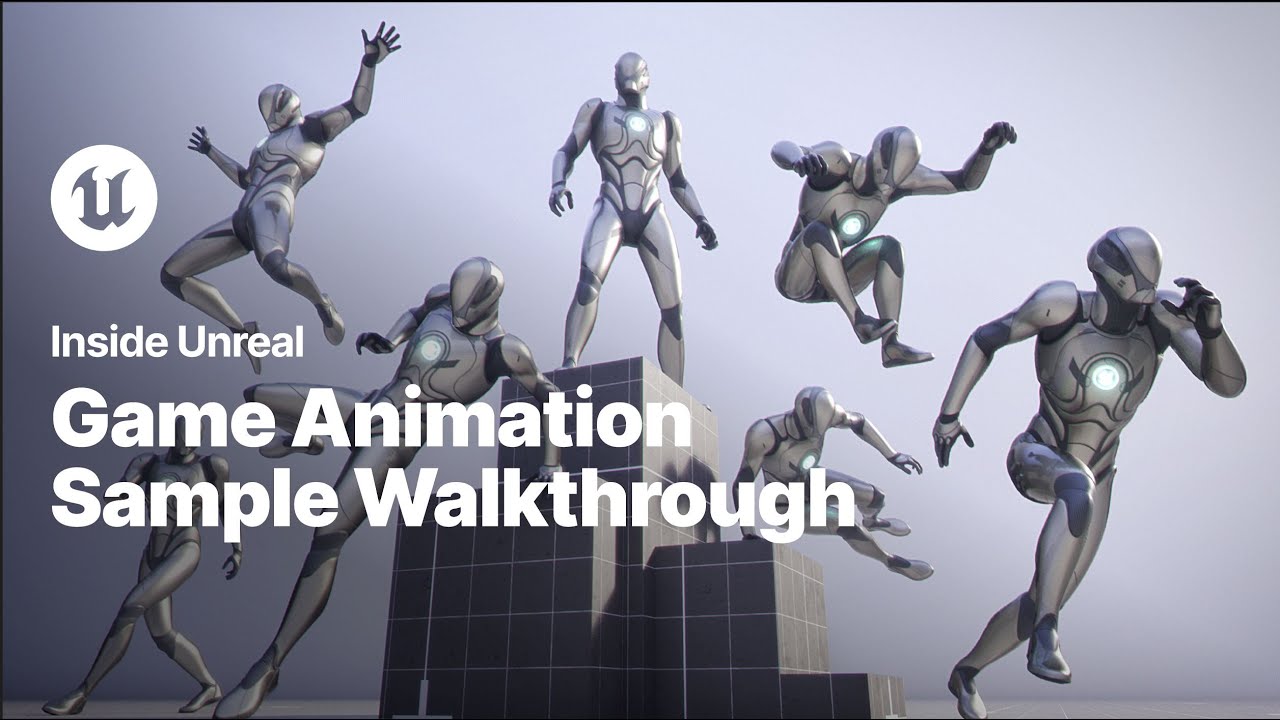
Unreal Engine has been advancing in a lot of ways, but some of the most recent key strides have been in regards to animation. To get a better handle on some of these new systems & learn how to master these movements, we’ve recently released the Game Animation Sample project - where you can not only improve your skills, but also get your hands on...
Is there a name for this preview thumbnail and/or can I assign it to a variable to use as an image?

@nimble torrent Thanks for the advice earlier, after looking more into the documentation it became a lot more clear. Cheers 🍻
Like why 🙃
Lazy man's icon for UI use
👍
Is there a way to use Anim Graph's Anim Dynamics with Anim Montages?
Anim Dynamics can be applied in tandem with Montages.
What's your use case?
when i call this function, my anim dynamics simulation is stopped


Is your montage slot positioned after your anim dynamics nodes in the ABP?

after
Theoretically, when a montage is called by the "PlayMontage" function, Anim Graph stops playing, stopping anim dynamics
Ah okay, if that's the case your montage animation will be overriding the motion created by the dynamics.
Are you familiar with a post process abp?
nope
A post process abp is an anim blueprint which can be assigned directly to a skeletal mesh, and will operate any time you see that mesh.
This is a good place to out things like dynamics because it will take all the pose data from the main abp and be applied as a post process.
Alternatively, you could position the dynamics after the montage slot so that the dynamics aren't being overriden by the montage being played.
The anim graph operates in order which is why that happens.
Thank you very much my dear, I will try to learn how to implement it and get back to you with the results ^^
It worked! thnkss

🎉 fantastic
Hurrah! Nice job battz!
I know this is a long shot but I'm using the chooser table for Motion matching and when trying to bind a property to a nested chooser none of my functions show up. I write all of my anim instance getters in c++ so that may have something to do with it. Is there some kind of meta markup I need for those to be displayed as options in the chooser?
You might have better luck down in #cpp , but probably. There are preprocessor instructions for Blueprint, so I wouldn't be surprised if it's also something similar for Choosers. Have you looked up the chooser functions that Epic uses?
They are all written in blueprint in the example there is no difference between mine and the example ones other than that they were originally created in BP. I have my native functions marked thread safe as well as returning pure with no execution pins so I'm not sure. I'm trying a few things now. But i fear I will have to wrap my C++ in a blueprint function that just returns the native function lol yuck
That is pretty yuck! I bet there's a preprocessor instruction for it though!
Probably. this is the UPROPERTY declaration for the binding variable UPROPERTY(EditAnywhere, Meta = (BindingType = "bool", BindingAllowFunctions = "true", BindingColor = "BooleanPinTypeColor"), Category = "Binding") I wonder if there is a BindingAllowNativeFunctions meta specifier somewhere
Possibly, but those BindingType meta's look like they might get you there.

Funky. Is this a custom rigify rig you have built over the mannequin skeleton? Or are you using the UEtoRigify plugin?
@viscid willow This is the Rigify Rig that comes with Blender. I basically used the Mr Maniquins template plugin thats free on Gumroad and Imported Manny into blender. It comes with a rig but That rig is hard to work with imo. SO I wanted to rig it with Rigify. Well everything is going good but I cant get the Rig to attach to the Fingers lol

I don't see any finger controls in your rig. Have you built the samples and parented them to the hands?
Also if you're curious the UEtoRigify Addon does exactly what you're setting up here. I think it may be incompatible with some newer versions of blender, but could be useful.
@viscid willowIve weight painted the Fingers to be attached but its still not moving them. Idk Ill probable just try the Manniquin from ue5

Hi all, I'm importing an animation, and it aint workin.
It seems to be gimbal lock, which I've never heard of, and haven't had much luck looking it up in this exact scenario.
Is there any way to fix this?
I have half a mind to just give up and figure out a different pose for the player character.

I don't know that the ue5 mannequin will provide much difference. I mentioned the finger controls because I don't see them in your built rig, so I'm curious if the fingers aren't being controlled at all?
https://www.youtube.com/watch?v=PEh9BoD6u2w ALS vs Epic Motion Matching system

After watching a video, I felt that the comparison between Motion Matching and a Bare Bones as basic as it gets animation setup....was just unfair and unrealistic. So I ran my own test
Join our Discord: https://discord.gg/38ceaJ67Eu
MM wins
just make a screenshot of it, put the img in your project and slap it onto the ui
Holy sh*t you can rename these now?? 😮

hey yall 👋 has anyone tried to completely replace the UEFN character in the motion matching sample project?
like not use the retarget setup they have implemented atm, but pretty much applying the motion matching system to a custom character if that makes sense
The problem is I need about 300 of those so the whole idea was finding a way to visually distinguish them with as little work as possible, hence why I wanted to know if I could point a variable to that image so each one would set itself automatically, and obviously doing all that manually would defeat the point then
Its just for practice honestly. The fingers arent an Issue except I cant keep them attached lol
I got the ue5 manny to work fine. Now that Ive been playing with it. Im not liking the rigify rig. Maybe im just using it incorrectly. Idk
Retargeting to smaller Scale skeleton?
Changing skeleton bone retarget option from Animation to Skeleton does not work.
Do you mean making your own animation set? That sounds expensive, but worthwhile. Their stuff is impressive, but definitely in the fortnite / cartoony vein.
You didn't know you could rename poses?
What is this supposed to look like? And in what context does it mess up?
nah more like I want to use my own character with the animations from the sample project, so I've retargeted all the UEFN animations and used those but somehow things aren't working out 😅 character runs away from the camera
That's probably a root motion bug. When you look at the individual animations in the animation sequence viewer - is the root working correctly?
Also - you do have a root for your skeleton, right? It doesn't just start at the pelvis?
yap, so when looking at the retargeted animation on my character, everything looks fine
root motion is enabled, force foot lock too
and yea my character has a root, I used auto-rig pro in blender to create my rig, so all that should be fine but Idk 😦
Should is a word that almost always preceeds things that aren't true.
When you say 'everything is fine' do you see the red line of the root offset on your character animations?
I checked the PSD's and the lines differ for my character and the UEFN character  like, a lot


Yeah, that doesn't look like your root is moving. What does this look like in the animation sequence viewer?
how exactly do I enable that debug in the sequence viewer?
Well, in the animation sequence viewer, you should be able to see your characters root moving.
What does that look like?

Yep.
do you think that's some issue because of the retargeting or something related to my rig itself? I do remember some setting about root motion in my export settings in blender
It's retargeting, your root's retargeting setting has to be off.
gotcha, thank you! I'll see if I can fix it 😄
I’ll grab some better screenshots this evening.
In Blender, the pose/animation is just fine.
After importing the animation to Unreal, the Primary feathers point dramatically toward the center of the model.
I’ve looked at the bones in both Blender and UE, they’re in the exact same position, so I can’t figure out why the mesh is borking and applying these extreme rotations that aren’t present in the original animation. 😕
When you say 'just fine' - is it a bird? It's impossible to tell what it's supposed to be, or what it is doing.
Also - what does the skeleton look like when it's doing that?
It’s a dragon, I’ve only exported the wing meshes for troubleshooting purposes/ease of visibility.
(Sorry, I should’ve inferred that that was the info you needed)
The skeleton appears to be behaving normally. There’s no twitching or misbehaving from any parts of the mesh.
Upon another look, it may also be my weights. None of the feathers have any additional weights/aren’t assigned to any other bones… I’ll keep poking at it later.
i like to append to this something else i discovered because of my wishy washy method
i just learned blendspaces don't support root motion so this method i said works best with non-root motion or at least non-blendspace animations
cause at least once i use root motion for montages, it actually considers the root scale
Hello all - Im having an issue with the "LookAt" node in anim BPs.
It appears that no matter what I set the interpolation time property to on the node, the interpolation always happens instantaenously. Does anyone know why this is?
I vaguely remember something about this - did you set the interpolation type and trigger?
Type is set to linear, trigger is set to zero
So I think the trigger is the problem.
A trigger of zero means it is always trying to look.
Try setting it to a higher number.
This is why making sure you're not working with a weird scale is almost always the best option.
Because it means you don't have sudden landmines in front of you.
Thanks, just changed it to something random (30) and it now interpolates. Do you know what this property does in laymans terms? The documentation didn't realy explain it
Because based on what you said before, I do always want it to look, I just want it to do it slowly
I think, if I remember correctly, trigger threshold is 'how far off of the known target angle do you have to get before you start interpolating?
It's to stop things moving until they're a larger movement? I think it's designed for heads mostly? So people aren't perfectly locked onto you.
They'll look at you, then if you move away they'll turn to look that direction.
Eventually.
If you just want a laggy lookat, then setting the trigger threshhold to a small value should be fine.
yeah but again was just a case of never had to deal with this in unity
Yeah, I think unity and blender agree about what a unit means, while unity and unreal disagree.
yeah
i don't think i've seen an engine use cm as a base unit
am curious if that was a case of trying to get maya's fbx to work or smth in the past
Thanks for your help, unfortunately this isn't behaving as I would expect.
What Im building is a system where the character will look at the nearest point of interest, so as you cross the threshold where the "closest" object changes, the character should turn their head to look at the new one.
What im getting though is when the target changes, I just get a more or less instant (or otherwise unnatural looking) snap, and I can't for the life of me figure out why
I just don't think these options are designed for what you're doing.
My recommendation is to use the lookat's alpha channel to ramp the effect of the lookat on over time.
Tbh I dont really get what its designed to do haha
And control the alpha itself directly using code.
Me neither, the interpolation stuff has always been a bit confusing to me. I've never found a good use for it.
Yea, it doesn't really seem to work all that well
I'm sure it works fine for whatever it's designed for, I just don't really know what that is.
I don't think it's designed for what you're doing.
Im going to use this quote so often 😂
whats the difference between this two montage tick types?

There's a note in documentation about those.

Notifies are a system for setting up and receiving events in Animation Sequences to perform external actions.
Basically, branching points are for time sensitive things.
Whereas Queued is for things like particles and sounds.
thxxx
To celebrate their 10th anniversary, Blender Market have given away several add-ons, with the last being the hugely popular Auto-Rig Pro
Just gotta make a account on blender market place
I didn't. I only recently migrated from 4.27 and iirc you couldn't rename them back then.
guys why this is happening with legs when using Legs IK node? it happens only when crouch

this is withous legs ik

For a game like mortal combat are the attack combinations done in the Anim state or done in Anim montage
Hey can anyone help me explain why the animation freezes like that? I've had the same exact issue in a completely seperate project before, so I've got to be doing something wrong
This looks like your crouch animation assets don't have the IK bones animated.
If the IK bones aren't animated, and you enable foot IK the feet will be snapped to the tpose position.
migrated from original Epic games 500 animations asset
so i just removed all keys and made a static pose for Idle because that asset dont have a Idle animation fro Crouch ((
Could be done either way, but more likely Montages. Montages are good for one off actions and allow for things like combos in a combat system without needing to build a complex state machine.
If you open that migrated sequence are you able to confirm that the ik bones are animated?
so Motion Matching can be used only with Root animations?🤔
i mean that animations what are moving the character away from start position
The IK bones and root motion are two different things. From the livestreams they mentioned that while motion matching is not root motion based, the root motion data is still very important
i mean this type of animation, in place or not in place, motion matching is supporting only not in place animations?

from mixamo
If you have the motion matching sample open you should be able to determine how the animation assets are set up. I believe they have root motion and are set up with various markers for sfx and pose search information
root motion are that animations what are not in place with root motion checked inside animation sequence right?🤔
Epic Developer Community
An overview Root Motion Animations in Unreal Engine.
Do you have loop enabled?
Tried that, same result
I'll try it again later when I'm at my desktop, but meanwhile if you have any other ideas I'd be happy to hear em 😄
oh yeah, whenever I open the walk animation the game crashes
opening the run animation works fine tho
quick question, does anyone know how to save a pose in unreal. i create a new pose and i put my character in A-pose but when i click on running re-target it goes back to T-pose. i'm trying to make the animations of mannequin look better.


have you had a look at this page? hopefully it directs you to the section titled "Retarget Pose"
Epic Developer Community
Share and transfer animation between characters of any size using IK Rigs and IK Retargeting.
should be the UI on the left
cheers @lusty venture i will have a look at it tomorrow and update you if that fine
hope it works!
Is Motion Matching bugged for non "Character" derived classes?
Been working through some rig retargetting too and I'm running into offset in the results, I've looked through the community docs and followed a few tutorials (rigs pulled from mixamo etc) but haven't found any way to address the problem:
Here's the resultant anim/pose


I've matched the retargetting poses and afaik the bone chains should be correct? (I've done a few variations including different spine/neck/head bones etc but in certain animations there seems to be quite a lot of drift. It's odd because it works pretty well in others.
though actually, now I look at it, maybe the problem wasn't as apparent because my man wasn't stabbing himself in the chest, seems the upper body (from the spine onwards) is generally pretty off

for the arms, are you using the IK settings to make the hands match the same positions as your source?
Don't think I've set anything extra up on the hands, could you point me to where this is?
I see in the manny ik rig the arms and legs have hand and foot ik goals respectively - assume they're part of the control rig?
yeah, are you using the goals for your retarget? or not
is that done through the retargetter? or do I need to create ik goals in the mixamo rig I've built?
this screenshot here looks as though manny's hands are trying to match the source position, is that what you want to achieve?
i think it may help your setup
Can I add an offset to a limb IK control? I'm working with the UE4 mannequin skeleton and have the rig set up with solvers, except the rotation doesn't line up how I want it to in the anim BP, ideally I'd like the rig control to always point in the direction of a socket which has an actor attached
is it easy to add/replace animations in epics motion matching system?
i would assume probably not considering they are using a DB of 500 animations
Alright - I'll do some research on this, thanks
Sorry, just to clarify, this is something I set up in the IK rig/retargetter? I can see my target rig (Manny) uses IK but my source (from mixamo) is just baked joint anim, so I'm changing the targets of the Many IK so their effector location is the incoming hands?
OH the blend to source slider... derp. Added clavicle chains as well as turning up those IK blends, looking a lot better now, thanks Nat!
woohoo!
I mean, if you have a full mocap setup, a skilled actor, and several thousand hours, it's probably not hard just a huge amount of work.
When you say 'rig control' do you mean 'a controller in a control rig' or 'a transform value I'm putting into an animation blueprint' or something else?
As a workaround I'm trying to get the delta rotation between the bone which the ik control is attached to, and the socket with the attached actor. I'm using the ik rig node in the animbp to apply it and plugging in the ideal rotation, the direction which the attached actor should point in, as the rotation transform value, set to use world space. In a bit I could get some pics that might clarify things
So the issue is because the bone is rotated differently to the socket, the controller's rotation isn't ideal because of the offset in rotation
I forgot about ikrigs. Epic need to stop reinventing the wheel every ten minutes.
Lol
I'm kidding, but also there are literally three entirely different IK systems.
Four if you count the automatic retargetter.
It sounds like the socket needs to be rotated so that it works with your hand.
I've considered that, but then the attached actor (or any actors that could be attached, it's just holdable objects) would need to be attached differently to account for it
OK, I don't understand enough of what's going on to really comment.
To answer your question - yes, you can offset the target of an IK goal.
You can do so with math (by assembling a transform in the graph to feed into the node in the animation bp), you can do so with additional sockets, you can do so by creating additional or virtual bones in your skeleton.
There are lots of ways of doing this.
Yeah I can figure out the math eventually, I'm wondering if the ikrig had some way to offset the controls. The position and rotation settings when the asset is open just changes the preview.
It seems Motion Matching only works when used on a Character, why is it that? How can this be fixed?
Hi. When creating a rig module for a modular control rig, is there any way to set a control as a visual cue only? With the old control rig it was possible to change a control to "visual cue" so that it wasn't selectable, but when spawning controls in a rig module there doesn't seem to be an option for this. Thanks
can someone help me to fix this problem when using turn in place?, if i rotate camera smooth all is ok, but if i rotate fast, is happening his with spine🤔

Generally speaking, if you're trying to have a character respond to a mouse, there comes a point where the mouse moves faster than a character can reasonably react. At that point, you have two choices - either have the character stop reacting, or limit the reactions in some way.
For you, you could limit the amount of spine movement to an angle that looks good, and accelerate the speed at which the feet react when that spine limit is hit.
Having issues retargeting Lyra to Metahuman. Metahuman skeleton is shorter than Quinn. And the wrists are buckling.

I was told retargeting is perfect and easy now for metahuman. this is not the case
I can turn Blend to Source to zero, but this doesnt work if you need Hand IK intact. for locomotion animations - it will work for now
luckily im only using this for locomotion, so it works :/
i can't add some limits because this is a full body FPS, and not TPS, so i need to make it rotate fast, but i can't find the setting how to made turn in place react faster, i use epic games animations from 500 anims asset with motion matching, so when i rotate, the turn in place is making small steps to turn around, i have set turn animations to 45 to 90 135 and 180 but there are not any rotation to 45, there are maximum to 10
What do you mean by FPS and TPS?
first person shooter third person shooter
OK, well - as I often say, making full body awareness for a first person character is never worth the cost. It is a constant source of bugs, a massive drain of resources, and is never worth it.
So my suggestion is - don't do it!
what to do then?
Attach a pair of disembodied arms to your camera and focus on making your game fun instead of making the legs look cool when people look down.
There are so many more important things than that.
im trying to make it cool when other are watching near to you😅
smooth animations
If it's just for third person observations, then you have a lot of play in accuracy. So you can smooth out and slow down inputs, make them more comprehensible etc.
You can cheat with network representations a lot.
how is better to attach weapon to hands? with ik_hand_gun or simple socket?
Entirely depends on what you're doing and how the rest of your game works.
My personal preference is an IK_gun hierarchy attached to the spine, not the root, but it really depends on how you have things setup.
There are no correct ways of doing things, but there are many incorrect ways.
What problem are we meant to be observing here.
thats why i want to make full body, because i have to make and setup only 1 animation and not twice for fps arms and for all the body
That's very unlikely to be the case.
wrists
A first person character put onto a working third person character skeleton will be nauseatingly disorienting to play with.
they retarget with the extra bend and the ik is inaccurate
So the problem I'm seeing is the height.
It's not an extra bend, they're reaching their IK positions and your metahuman is just shorter than the mannequin.
So the wrists are bent to accommodate that.
You can't have the hands in the same position with a shorter character without changing the pose.
what you mean "nauseatingly disorienting"?🤔
A good looking third person animation will have a lot of spine, head, and neck movements. This creates a large amount of disorienting camera movement, especially during large actions like running or jumping.
That camera movement is nauseating to many people.
It will also make the game difficult to play, as aiming when the camera is moving around like that is very hard.
Yes! they are different heights - how can i account for that?
Well, you can set the wrist retarget type to 'animation scaled' (I think that's the name).
Now, that will work for animations that are self referencing, they reference the character and objects on the character - but it will break for world interactions (because the characters ik targets and limbs will be scaled, so if they reach for an object in the world, they will reach to the wrong height).
pubg is full body too and all is ok with animations😅
I believe pubg has different animations for first and third person.
How can i make my character move a little during the "Walk_Stop" state so he doesnt stop immediately which looks unrealistic? I tried enabling "root motion for everything" in the anim BP, but this causes me to not be able to move so i disabled it again. "EnableRootMotion" is also enabled on the animation assets.
Also, their third person character animations are, generously, mechanical looking.
what about arm spring ? it fixes the camera jiggeling and nausea
I've never seen that work.
You need to keep the camera relative to the arm and shoulders.
for now is working fine when walk run jump crouch

The idea that you can use the same animations for first and third person is... if you're aiming for quality in both - very unlikely.
with everything set to Skeleton except for the hands are Animation Scaled. on the metahuman

i can't find a tutorial about how to make procedural ADS to Scope Aim Sockets, everything is not for my project🥲
all methods are moving my hands in different ways but never in center of the camera
The wrists still look like they're the same height as the mannequin. That doesn't make sense. It might be a proportion thing but it really looks like they are exactly the same position as the mannequin version.
Which shouldn't be how animation scaled works.
(it should scale them relative to the height of the character).
If i could scale the metahuman exactly 1.15 it would be flawless
ill keep playing with these settings
do i need to change them on both skeletons?
No, it should just be yours.
im looking into these settings now - thank you


Hey guys, hope everyone is doing well.
I'm looking into state change in unreal and found a couple of videos but nothing well done on how to do blueprint on character state change animations (normal -> injured -> tired....)
After trying stuff out I thought about using state machines + alias, is it a viable option or is there a better way of doing it through blueprints while keeping fluid animation blend? (or should i just aim for a mix)
If you have any advice or video tutorial on the subject I'd love your recommendations! 🙂
Guys, whats up with IK Retargeter, when i preview an animation inside the retargeter preview it looks correct, but once i retarget said animation sequence it is a little bit off when i overlap the 2 sequences on top of each other. Has Anyone encountered a similar issue?
doesnt really need fixing - just make all your skeletal mesh components have teh same skeleton


What happens if you change it to something else?
Like, I would expect Animation Scaled to work and I am surprised that it doesn't.
But what happens if you change it.
nothing changes regardless of my settings
I would not necessarily do that.
This looks like you might have imported a turtle, and then a fish, and assigned the fish mesh to the turtle skeleton.
That is not a good idea, you want to import the fish mesh with a separate skeleton.
Because otherwise Unreal will add gill bones to your turtle.
Which is not useful, and will make everything confusing.
I just have downloaded the free project
I don't have any blender or other file related
Then the person who created the free project created the error - but the error was created in the same way.
Which was, by importing a fish onto a turtle skeleton.
Not all free projects are free of errors.
That tells me that your test environment and your settings are probably not connected.
SOMETHING should change, and if it doesn't, it means that something weird is going on.
So what can I do to fix 🥲
Hmm, what came with your project? Was it unreal files? FBX files?
lol

OK, well - go tell whoever made the project and get them to fix it.
Without the source data, you can't easily fix that problem.
That doesn't seem great. It seems like maybe you're using a IK Rig? Is that true?
Yes the problem is the IK retargeting is bad because of height difference. if I could only scale the metahuman 1.15 and apply that
OK, so my suspicion is that by using the IK Rig, you're getting direct IK results.
And that means that changing property values in the skeleton will do nothing.
Because you're using the IK Rig, which is overriding all the settings.
So that's why your settings don't work.
Yeah, see what happens with just Animation Scaled.
Animation Scaled retains the post process
but when its set to skeleton, the animation correctives go away and the skin slumps slightly
but hand position is same
When you say 'retains the post process' do you mean 'It's still using the IK Rig'?
Deactivate that?
I haven't used IK rigs much, but like... turn it off, disconnect it.
Get rid of it.
Hello everyone… so i need to create a cloth with metahuman-marvelous designer-unreal workflow for CGI fashion animation.
I’ve been through several tutorials and the workflow is to need make a character animated first Then you simulated in MD and export to unreal.
The question is, do i need to make the animation first, or clothing first?
Because the workflow with metahuman and marvelous designer Had a tedious step to make, so i need to make animation first such as walking? Sitting etc.
What i want is, make clothing first, and animate later within unreal and had simulated cloth within unreal.
What is the best workflow? I heard udraper and chaos cloth. Thanks before!
You can do them in either order. It doesn't really matter.
Simulated cloth inside unreal is possible, but the simulation quality is relatively low, especially with collisions. Usually it is skinned to the body skeleton and only draped parts are simulated with chaos cloth.
Udraper is good, but expensive, and really just automates the step of exporting to Marvelous and simulating - because the cinematic quality simulations are very time consuming and cannot be done in real-time.
They have a real time simulation setting for Udraper and the quality is ok but still not the same as the offline simulations.
I’ve seen this
https://youtu.be/nXytsAAnATs?si=2yvvGEddSDTBpSz5
And i think it was the best tuts out there for now with Metahuman - marvelous designer workflow.
But the 1st step was always import the animation first, and copy the head and foot, export and export… then i create clothing in marvelous, although clothing can retargeted to different avatar.
In this lesson, you'll learn about the new MM workflow.
You can now easily import MetaHuman directly from Unreal Engine into Marvelous Designer, bypassing Blender.
#unrealengine #metahuman #clo3d #unrealenginetutorial
🔗𝗥𝗲𝗮𝗹𝗮𝘁𝗲𝗱 𝗟𝗶𝗻𝗸
original tutorial: https://youtu.be/ECTZ09JlYOw...
You obviously need to create the clothing on the same character that you're animating.
But if you're doing that - it doesn't matter what order you do it in.
Yeah.. what i mean, i hate to separate body, head and foot with metahuman workflow.
I can simplified the workflow with character creator and iclone, but its expensive. And i love the look of metahuman rather than CC.
meh - best results are still with using the IK retargeting.
and its damn good lol
moving on. ty
Anyone? 😦
@nimble torrent thanks for the insight!
Wish I could help. I'm not entirely sure I understand though.
When you say 'overlap two sequences' do you mean 'When I put the old character and the old animation over top of the new character and the new animation there is a noticeable difference in the animations'?
And are you absolutely sure that difference wasn't there when you were looking at the retargeter before? Like - have you checked the actual translation numbers on things like the wrists?
Still looking for the best workflow with metahuman-marvelous designer, since i need to do 4-5 animation poses, it will be tedious work if i need to separate mesh every animated character/animation poses. Its not a lot of work, but i wish its just import one meshes to MD.
You could merge the meshes in Blender or Maya?
@nimble torrent Check minutes 5:30 if you have time. 🙏🏼
No, sorry. I have work to do.
for near perfect results - just fiddle with minor local offsets for ik targets per animation set. so i get 95% great retargeting to different skeleton at different proportions with IK retargeting
🥂
Yes its exactly what i mean, and yes there is visible difference between the preview inside the retargeter editor and whats in the world viewport
Interesting! What's different?
And are you testing with full characters, or just animated meshes?
And how are you running your in-game test?
The retargeter hands overlaps exactly while the retargeted animation does not
I just pull in the anim sequences and put them on top of eachother
So, you drag the anim sequence from the content browser into the scene and align the two skeletal meshes with each other?
Yes
Sorry, I know it seems like I'm being insane about the details, but the exact methods used are important.
I know
Do either of your meshes have post process blueprints?
Do you only look at the first frame or are you playing the game and watching the whole animation?
No they dont
How much of a difference is it? Have you measured it?
Theres no game
I just drag them into a blank world
OK, so you haven't hit play? You have only observed the first frame?
Yes quite alot,i dont have my PC here but its clearly visible
I hit simulate to test
I wish I had more experience with retargeting. The projects I've worked on seldom used it.
My guess would be either the settings you assigned to the retarget weren't saved or used when you ran the retarget process.
Or the retarget process didn't use your settings at all.
Which of the four retargeting methods did you actually use?
IK rig
Interesting.
Consider trying the old retargeting system.
Or the new new retargeting system.
I even tried in 5.4 to see if 5.3 was bugged
But both produces same
Ive tried both old and new
The old is not working well
As in the compatible skeleton way
There is actually a post process, but it operates on other bones not affecting the hands at all, tm i can try turn it off entirely to see
It only affects hair and stuff
Might be worth trying? At this point you're throwing stuff at the wall.
Ye...
Also the retargeter cant use Set Transform solver properly as well
I have to use anim modifiers for those
Set Transform solver?
Oh, edge of my knowledge I'm afraid. I really don't know the IK rig at all.
What does it do instead of do this correctly?
Ok thanks anyway man
It always says error of not enough bones, but the solver only accepts 1 bone
Very weird
Reading the documentation, it suggests that you need an IK goal for the solver, even the Set Transform one? Did you assign one?

Yes ofc i did
Solvers need goal and root normally, except the Set Transform
Which auto set both to same
OK.
Would be cool if they add Control Rig Retargeter one day
Full control rig support for retargeting logic
On the one hand, Unreal probably should not have another retargeting system. We already have three.
On the other hand - yes! That would be good!
anyone did any rigging in kinefx in houdini for unreal
I
I'm having trouble figuring something out. In my BT I have an enum key that tells the ai what state it is in, ie passive or melee attacking or ranged attacking etc. The key is changed by using tasks. I'm having trouble finding a way for the animation blueprint to get this information so that the correct state machine can be used. What's the best way to set this up?
hey guys. I have this character that i wrongly imported into UE5 with the controllers of my rig. This messed my skeleton and is in fact what it didn't allow me to use root motion ( i asked a few days ago). I imported correctly the skeleton without the UI but of course all the anim I had are not working for this skeleton now. I tried to re-export the animations excluding the UI but it won't work as when I try it says "FBXImport: Error: Mesh contains root bone as root but animation doesn't contain the root track.
Import failed. " any ideas how can i exclude it correctly from blender please?


I think you can get your AI Controller from your Pawn, and from there you can get access to the Behavior Tree and the Blackboard.
So, in your Update Animation Event in your Animation Blueprint, you should be able to retrieve access to the blackboard and read your enum value from there.
Does anyone know if its possible to rerun the retargeter on animations you have already retargeted? I have hundreds I've already done and added curves to, but realized later that the IK retargeter needed some settings changed to fix wrists. It would be a huge pain if I had to retarget and redo all my changes.
do you mean set up two version of your rig in the retargeter, one with the "broken" wrists, and one with the correct wrists?
I just used whatever the default autogenerated ik retargeter made for me initially and retarged like 300 animations. I just learned how to fix my hand positions in that retargeter today but I'm not sure I see an option to take an existing retargeted animation and just rerun the process on it
maybe its not possible, but it seems like it should be doable
you should be able to set up two different IK rigs for the same skeleton, and retarget your older animations to your new IK setup
the problem is I will lose all the notifies and curves I've added to the animations since retargeting... its not the end of the world, just probably a day or 2 lost of having to readd all of that
I was hoping there was a process they have like you can do with reimporting an animation sequence from source where it maintains all of your additional asset data while taking in new animation data
I think you might be outta luck on that one!
Anyone know how to fix this?
I set up the bones correctly and now my mesh doesn't move at all
That certainly doesn't seem correct. Can you show another video of you rotating a character bone in the skeleton editor?
I can try it out
Good catch. It could be another scale issue.
What scale value do you have on the root of your skeleton when you look at it in the skeleton editor?
How do I get to the skeleton editor?
Double click on the skeleton in the content browser.

I think Squishy would ask, what is the scale value of the root bone?
If you select the root bone in the skeleton hierarchy, what does it show as the scale value?
all set to 100
Coming from someone who has little experience in UE, I'm guessing that's too high?
they should be set to 1!
Ah good to know
the forbidden knowledge: https://youtu.be/YbWfoyf4MqI?si=PVVNWNmPA5ECuZAL
In this video I will show you how to correctly export a character from Blender to Unreal Engine 5.
Common mistakes include issues with the scale of the root, joint orientations and differences between bones and joints. In this video I will talk about everything you need to know to correctly export rigged characters that follow Unreal Engine sta...
Thank you! I've been looking for a tutorial that discusses these issues!
np, this tutorial is often linked here 😅
Hey, still having this issue. If anyone could* help they would be a lifesaver! thanks 😄
How is this anim setup? Is it a state machine in the ABP?
It's the default first person shooter anim

I did just outright delete all the other code for jumping, falling, and the animations with rifle
Went through the tutorial and fixed what I needed. However, my bones are moving without the mesh
Both the armature and the mesh are parent in Blender, what am I missing?
is it skinned 😅
They removed retarget manager already no? At least i cant seem to get it to work
have you watched the abp in the debug view to see how it behaves when it stops animating?
Yeah, my guess would be it's trying to play a montage that doesn't exist?
You could also see what happens if you fully replace the animation graph with just a walking animation.
If it still freezes, the problem is somewhere in your pawn.
If it doesn't freeze, the problem is somewhere in your animation bp.
By 'replace the animation graph' I mean 'go to the main animation graph, drag a walking animation from the content browser into the graph, which will create a sequence node - plug the new sequence node directly into the 'Output Pose' node'.
Did they? I thought it was still accessible.
I really need to retarget more things. I don't know enough.
what do you mean?
is your mesh skinned to the skeleton?
It should be. That's how I've exported all of my other meshes and they've moved
It is accessible but it's kinda broken and not working
If you move the skeleton in Blender - does your mesh move?
Yes
This might sound silly, but when I say 'if you move the skeleton' I mean 'if you rotate a bone, does the part of the arm associated with that bone move'?
no but I will try that first thing tomorrow and let you know 👍
is there any way to rotate a attack animation with the aim offset?
would i create a seperate aim offset?
Aha! So what's happened is, it sounds like you parented your mesh to your skeleton, but didn't choose to create 'automatic weights'.
Just parenting a mesh to a skeleton isn't enough, each vertex of the mesh must be told which bone to follow.
Blender has a way of doing this automatically, but you have to choose it when you create the parenting.
(and it's not always perfect)
Why do you want to do this?
So apply the automatic weights and that should do it?
let me try to get a video of what i mean
Yep!
Great! Thank you so much!
would i play the animation in the animbp as well to get the IK working?
current setup

So, the answer to this is "Yes, but with the caveat that it is relatively complicated."
i love complications, do you have a short explanation that would point me in the right direction?
Sure. So what you're trying to do is to play an attack animation relative to the chest. Right? So the direction that the top of your spine is pointing, you want to play the arm animation relative to that.
Following me so far?
kindof
So when the character bends back, they still attack 'forward' relative to the direction that their torso is pointing.
i think i sortof get it
how would i play a montage in the actual attack event though?

You'd play it like that, but you'd use an IK structure to make the arms move relative to the spine.
I... think, sorry. It's a little hard to see exactly what you're doing in the video, 'cause I can't tell your controls. Right now, when you click attack, it always appears to play the 'forward attack' but the left hand is always wrong.
Is the left hand wrong in the animation file itself?
Or is that some part of your blending architecture that is causing that?
This would follow from the Upperbody Montage node being last in the flow graph.
It moves in the file itself
When you say 'it moves' do you mean 'it moves incorrectly, like we see in your video' or do you mean 'it moves correctly, and something is wrong'?
i'm currently using marketplace animations, from what i can see now
it's supposed to attach to the left habd
not the right
so in this instance im dumb lol
what i'll do instead
is have the right hand IK
OK, so the animation is correct, it just looks weird because the spear is in the wrong hand.
yeah
i still gotta solve the issue of rotating attacks
but for now
OK! So, here's what I'd do:
-
Create three virtual bones that are child of the bone at the top of the spine. I would call the first 'ik_spine_item', and I would assign it to follow the item bone. I would then create two children called 'ik_spine_hand_l' and 'ik_spine_hand_r' and assign them to follow the left and right hands.
-
Create a slot called 'AttackSlot', play my attack montage into that slot.
-
Use the Layered Blend Per Bone node to blend the AttackSlot animation exclusively onto the fingers of the hand AND the three ik_spine bones I created in step one.
-
Attach your weapon to the ik_spine_item bone.
-
Create Two-Bone IK nodes for the arms that constrain the arms to the ik_spine_hand bones. This will play all hand and arm animations relative to the spine.
- (maybe) You might have to make two more ik bones for the elbows and use those as pole vectors. It really depends on your specific circumstances.
Actually, thinking about it, one sec.
Sorry, revised - you do need an item bone as well.
already have one
But not one child of the spine.
ah
Like I said, this is relatively complicated.
I assume there's no easier way
Uh... I mean, there are a few ways. You could try just playing the attack animations on the arms themselves?
true
I think that would probably result in some awkward aiming.
You could try using a blendspace, but triggering a blendspace for a one-off animation has historically been awkward as heck.
And you'd have to author a bunch of additional animations to create coverage for the blendspace.
You could try playing the animation and then bending the spine after the animation in the node graph.
Like, you could blend the aim pose into the spine, after the montage, and then re-blend the arms into the pose afterward?
Cache the montage pose.
It's doable!
If automatic weights do not show up under the parent option, where would they be or how do I get it?
How are you parenting them? You should click the mesh, then the armature, then hit "Ctrl-P".
That should bring up a little menu where you can select Automatic Weights.
Oh! You could control the spine bending procedurally, or with additive animations.
https://www.youtube.com/watch?v=X590IZeyT1s highly recommend familiarising yourself with a bit of the rigging pipeline as well, this youtube channel goes through a lot of the process quite quickly
Alright, today I'll show you the ENTIRE rigging process for a game-ready character from scratch to finish, WITH advanced features like IK and custom color coordinated layers in less than 5 minutes-!! Hope it helps :)
If you enjoyed this video, please consider becoming a Member :)
https://www.youtube.com/channel/UC2U5mRfclG1Rrr1ztNkpGKA/join
Or ...
Now it worked lol I tried it a few times and it showed a few options
Thanks for the tutorial I'll take a look
Almost got it. The hands and the head are working, but something is going on with the body. The head, body, and hands are one mesh, but only 2 parts work
Just fixed the issue. Had to go to edit mode and choose merge by distance
Interesting!
idk how that fixed it, but the whole mesh moves now
Still a bit to work on considering some pieces get left behind and the torso expands when jumping, but it works.
Hey all, I need some tips for stun and push animations implementation.
I have some attacks that can Stun enemy, and some that can Push enemy.
Stun has variable duration, as well as Push (travel time). Push can then go into Stun. And some attacks or enemies can stunlock - resets stun duration.
How would this be best implemented? All with Anim Montages or something with machine states?
A bit tricky thing with Anim Montages is interrupt and durations.
Its a bit tricky to set it up because if you make Montage Looping you need to interrupt it, manually or by paying another animation.
Retriggerable timer is a bit funky when you link multiple Anim Montages (I cant use multiple sequences in one because there is not blend option there, as far as I know).
I am still not sure if I want Start and End animations for Stun and Push - start>loop>end .
So i tested further and found that the Retarget Pose From Mesh works exactly as the retargeter preview, but the retargeted animations are wrong
There wasn't a pin, I found a work around with a timeline set up but I wrote a c++ function and it works real well.
Allows you to adjust the play rate and dynamically scale the blend times so the animation dosent snap in higher play rates
Cool!
the green is the Source skeletal mesh, the red is the Target skeletal mesh running a single "Retarget Pose From Mesh". Everything seems fine until I retarget the actual animation to an animation sequence of the Target skeletal mesh (blue). Has anyone encountered a similar issue?


@nimble torrent this was the bug I was talking about
I imagine lots of people have encountered similar errors.
Because it's not particularly distinct.
Like - it looks like a normal retargeting error.
I need to look into the retargeting stuff, 'cause I don't know enough.
I think, iirc, that Retarget Pose From Mesh is the dynamic retargeter, and not the offline retargeter.
I think they might be different, and use different things.
Which would explain the difference?
Ye, weird thing is that it runs fine in editor and dynamic at runtime, it only gives error when using the retargeter to retarget actual sequences
Yes
But i thought they would have fixed the offline by now
5.4 still has the issue
Well, I don't think this is a universal issue.
People have issues with retargeting of various kinds.
I don't think this issue you're experiencing is universal.
I think it is cus what it means is that the retargeter cant produce the preview
Imagine material editor showing different shading than in viewport
I don't know if that's the case.
Cus dynamic or offline uses the same retargeter
I suspect more people would have more issues with the retargeting system if this were a universal problem.
I suspect it is more likely that the problem is somewhere in your data.
Because otherwise I would expect everyone to have problems with all retargets.
And we don't see that.