
#I'M A NOOB IN NEED OF HELP
1 messages · Page 1 of 1 (latest)
 chrome oak
 elder juncoBOT
chrome oak
I'm a noob at 3d printing and have no idea what I'm doing, I tried to print some...
AI Help
It does indeed look like under extrusion. Several factors could be causing it, such as a clogged nozzle, incorrect filament diameter settings, insufficient filament tension, or a partially blocked filament path. I recommend checking each of these potential issues and adjusting settings as needed. Let me know if you need further assistance with troubleshooting under extrusion.
WARNING: This response is AI generated and may contain errors.
 pulsar nexus
chrome oak
I'm a noob at 3d printing and have no idea what I'm doing, I tried to print some...
looks to me like the zoffset got too low
elder juncoBOT
Leveling Your Printer
Here is a handy infographic that will help with levelling your printer.
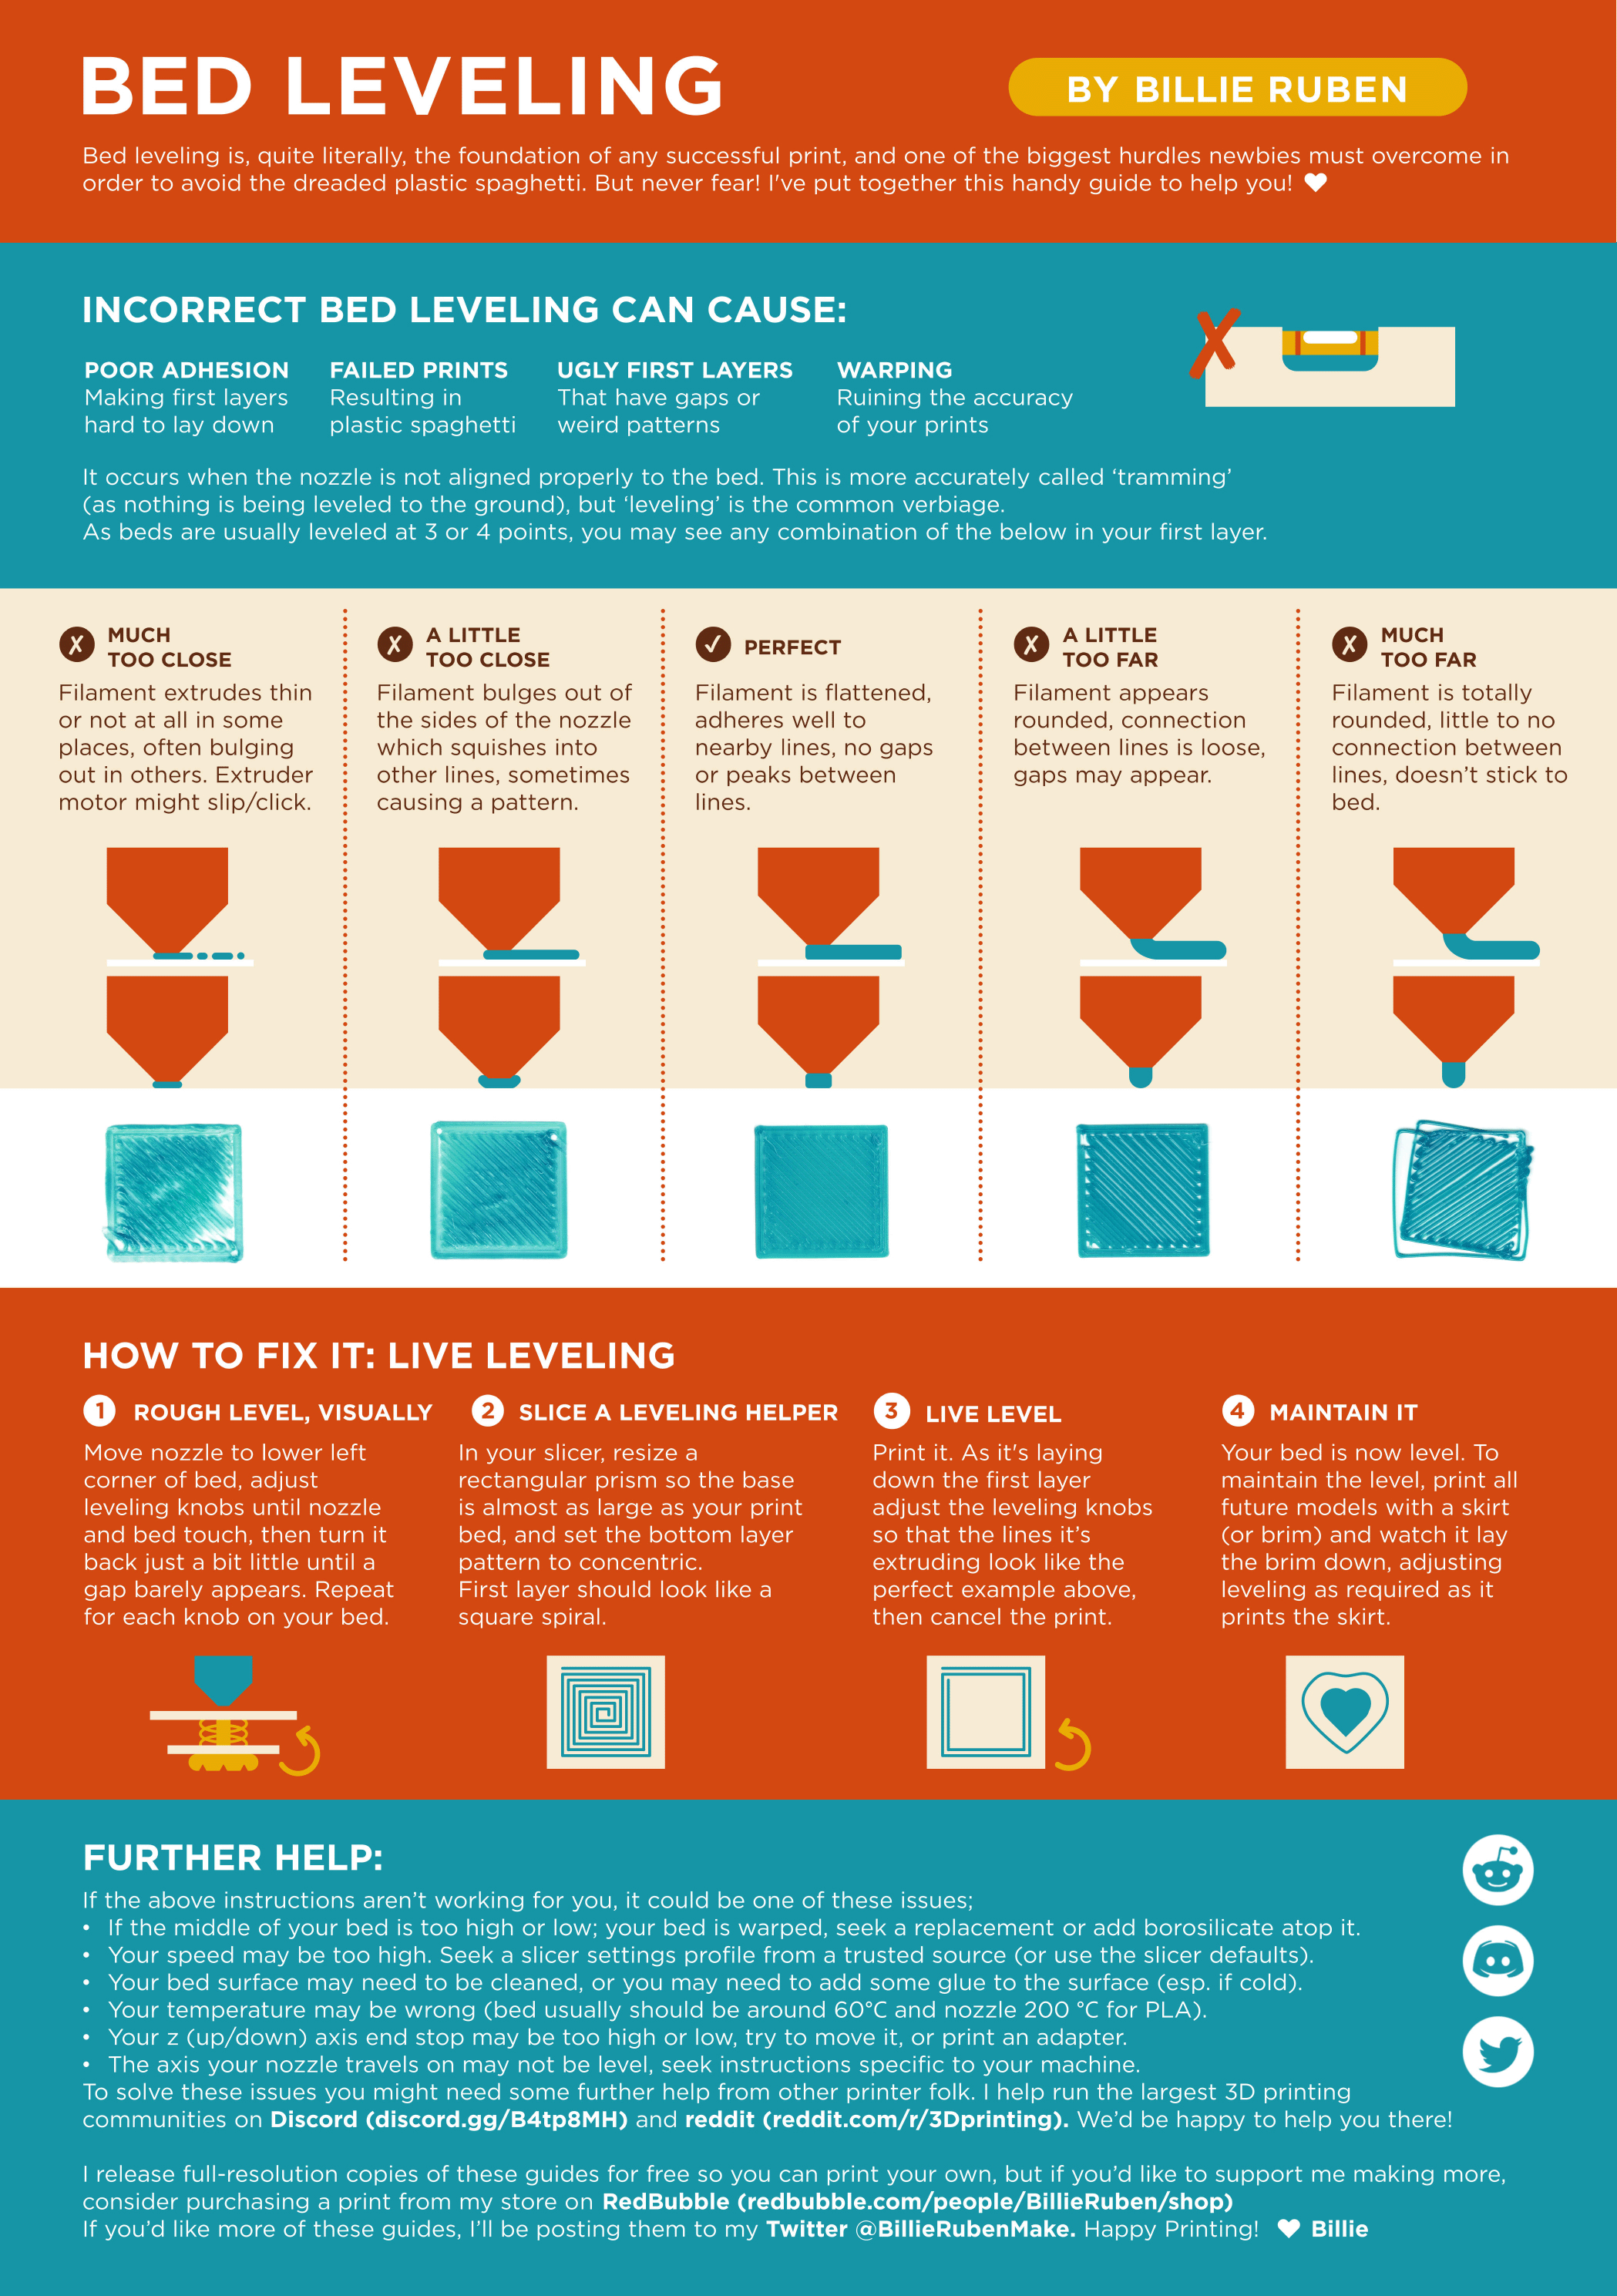
?leveling requested by: jack3939#0
pulsar nexus
where the filament has to bublbe out around
chrome oak
I'll try to set it to something else and check back in a little
Thank you
I have it at -1. 82
Is that like anything super irregular
pulsar nexus
sv06? could be anywhere from like 0 to -4
chrome oak
Oh crap
pulsar nexus
gotta find your number
chrome oak
It seems to be pushing down on the plate
pulsar nexus
check the images above, too far your just setting it down ontop, soo close your ramming the bed, gotta mash it in just right
elder juncoBOT
This post has been closed due to inactivity.
This post has been inactive for over 1 hour and so has been closed. To reopen this post simply send another message.
 heady terrace
chrome oak
I appreciate it
did you fix it? when you are done, follow ellie’s tuning guide. it’s really easy and will perfect your prints!
i have an sv06 too
chrome oak
It was changed for sure but it's still gonna need lots of tuning
I knew this wouldn't be easy but it's really frustrating
I'm gonna do more tuning tonight and try to perfect it
Because I'm still getting some really annoying issues but adjusting the z offset seemed to work I think it really just need more perfecting
elder juncoBOT
This post has been closed due to inactivity.
This post has been inactive for over 1 hour and so has been closed. To reopen this post simply send another message.
chrome oak
I'm trying every different z offset and it still seems to be messing up
It's actually printing now but like it's still so bad
Like just

I'm so confused and so frustrated
I just want my printer to work and seeing how good people's work online really makes me feel stupid because I'm clearly doing something wrong
It always has the most trouble with supports and infil
heady terrace
chrome oak
I knew this wouldn't be easy but it's really frustrating
to be honest, i had a problem for like 8 months. i regretted buying my printer so much. a few weeks ago i fixed it and have been printing every day. i’m so glad i got through every thing. every fix it definitely worth it. even tho you don’t fix it in a day, weeks, even months, the knowledge is also very worth it.
heady terrace
chrome oak
have you tuned your esteps? i also suggest putting this on reddit on the forum called “fixmyprint” good luck!
chrome oak
heady terrace
have you tuned your esteps? i also suggest putting this on reddit on the forum c...
What might my esteps be?
pulsar nexus
chrome oak
What might my esteps be?
how far your extruder thinks its extruding https://all3dp.com/2/extruder-calibration-calibrate-e-steps/

All3DP
Delivering the correct amount of plastic is critical to printing success. Read all about extruder calibration to get great prints!
 vapid belfry
Also need to check whether you are on the newest firmware as the original had a bug that wouldn't automatically save your bed levelling and z offset info.
You have to manually press store settings after it.
Keep learning 
It's a steep curve but you can make it!
chrome oak
This e step thing is so confusing and I'm terrified of it
Like I gotta take it apart
Why is this so difficult
pulsar nexus
you mark the filament 120mm from where it enters the extruder, get thte nozzle hot and extrude 100mm, throw the number into an online calc
chrome oak
You mark the filament 120mm then put in and extrude 100
Wouldn't that be 20 everytime or am I missing something
pulsar nexus
if its 20 then yyour good, the esteps are right, but its commonly just off enough to cause issues
why we want to check it on most any printer
elder juncoBOT
This post has been closed due to inactivity.
This post has been inactive for over 1 hour and so has been closed. To reopen this post simply send another message.
chrome oak
OHHHHH
I GET IT
still not sure how to fix it but im sure a youtube tutorial might help
thank you m8
elder juncoBOT
Unknown G-Code
vapid belfry
on the base sv06 esteps setting are both in the slicer and also on the printer under advanced...
?esteps
elder juncoBOT
vapid belfry
you just gotta adjsut the number...
elder juncoBOT
This post has been closed due to inactivity.
This post has been inactive for over 1 hour and so has been closed. To reopen this post simply send another message.
heady terrace
chrome oak
still not sure how to fix it but im sure a youtube tutorial might help
u can also follow
?ellie
?ellisz
elder juncoBOT
Ellis' Print tuning guide
Follow this guide for easy print tuning
Guide
?tuning requested by: neptunenora#0
heady terrace
that’s the one
so what you do is u measure with a ruler exactly 12cm(120mm). then u go to prepare (in ur printer settings u adjust with knob) and move axis, then move extruder exactly 100mm (10x10mm) and when its done, measure the distance. if the distance is 1.8 or smth, ur overextending. if its like 2.2 ur underextruding. measure the exact mm and then put it in a calculator u can find on google (esteps calculator)
its really easy actually
elder juncoBOT
This post has been closed due to inactivity.
This post has been inactive for over 1 hour and so has been closed. To reopen this post simply send another message.
heady terrace
chrome oak
Thank you <@810854884974657566>
let me know if you did it!
elder juncoBOT
This post has been closed due to inactivity.
This post has been inactive for over 1 hour and so has been closed. To reopen this post simply send another message.
chrome oak
I did it
But I think I did it wrong

Do I feed it before I extrude 100 mm or do I just let the 100 mm go through
I'm so confused
 twin pebble
Try turning up the nozzle heat...
Add like 5 or 10 degrees
This last picture is much better then your first picture
chrome oak
Okay so I think I simply just did the measuring wrong
Because I just redid it and came up with a number that makes so much more sense
So I'm gonna try a print quick and see if I did it right
I definitely did it wrong the first time
I came up with 86.76
This time I came up with a much more plausible 95.4
pulsar nexus
the number is arbitrary, ive seen 400+, but that does use a different gear ratio, usualy they come with 93 for whatever reason
also is that a raft? shouldnt need one for most anything nowadays
chrome oak
I tried a test print and this

This is brainachingly annoying
The YouTube tutorials are the least descriptive tutorials I've ever seen
I don't understand what I'm doing wrong
And yes it is a raft I used rafts for support because certain parts kept coming up
chrome oak
I'm so confused as to what I'm doing wrong
I've done so many tests to figure it out at this point
 little mason
chrome oak
And yes it is a raft I used rafts for support because certain parts kept coming ...
Rafts are pointless don’t use them
Brims are better
chrome oak
Noted
But that isn't something I need to worry about until this stupid printer gets fixed 😭
pulsar nexus
out of curiosity, which slicer? could try another just in case theres some borked setting
pulsar nexus
ah, already tried that trick then, tried a cube or benchy? simple things are better at the start when trying to diagnose
chrome oak
I use low poly stuff to test
I literally don't know what more to do
I might still have done the e step wrong
pulsar nexus
https://teachingtechyt.github.io/calibration.html#intro you follow any guides?
chrome oak
I've followed so many guides
pulsar nexus
make sure/store setting to save after edit toi keep the change
chrome oak
Yeah
I know
A lot of the tutorials I've followed leave me with questions I don't even know how to word out
pulsar nexus
for one thing else to look into, why your raft is missing some lines, im guessing zpffset/dirty bed, or maybe the filament doesnt have a clean path to the extruder
chrome oak
There's so many variables in this
Like I literally don't understand
I've tried calibrating z offset a multitude of times
It could be a blockage but I'm way too scared to take it apart especially considering it could just not be
pulsar nexus
at least tried a new nozzle?
chrome oak
Don't even own one
pulsar nexus
and printing is stacking up 1000 wais to fail just right that it (mostly) works, one bad thing and boom
sv06 or plus? mk8(ender 3 nozzles) are cheap
chrome oak
Is my bed supposed to shake a little
This is something that has caught my eye but I never thought it was that bad
pulsar nexus
no, even on the old printers they had little hacks to keep them only moving in y axis
chrome oak
Oh
pulsar nexus
nothing should wiggle freely
pulsar nexus
if steppers are on and belts tight shouldnt mve at all
chrome oak
It's kinda hard to describe
pulsar nexus
think it would be observable on a video?
chrome oak
But if it moves it kinda
You can definitely hear it but Its not entirley visible
Like it is a little but that's why it never took me as an issue
Ill try and get a video of it
Gimme a sec I'm just waiting for it to heat
vapid belfry
chrome oak
Quick question.... How tight is your filament tensioner....?
vapid belfry
Your z looks fine btw 👌
chrome oak
 chrome oak
How do I fix it
pulsar nexus
tighten it till there are teethmarks on filamnt that pass through it
elder juncoBOT
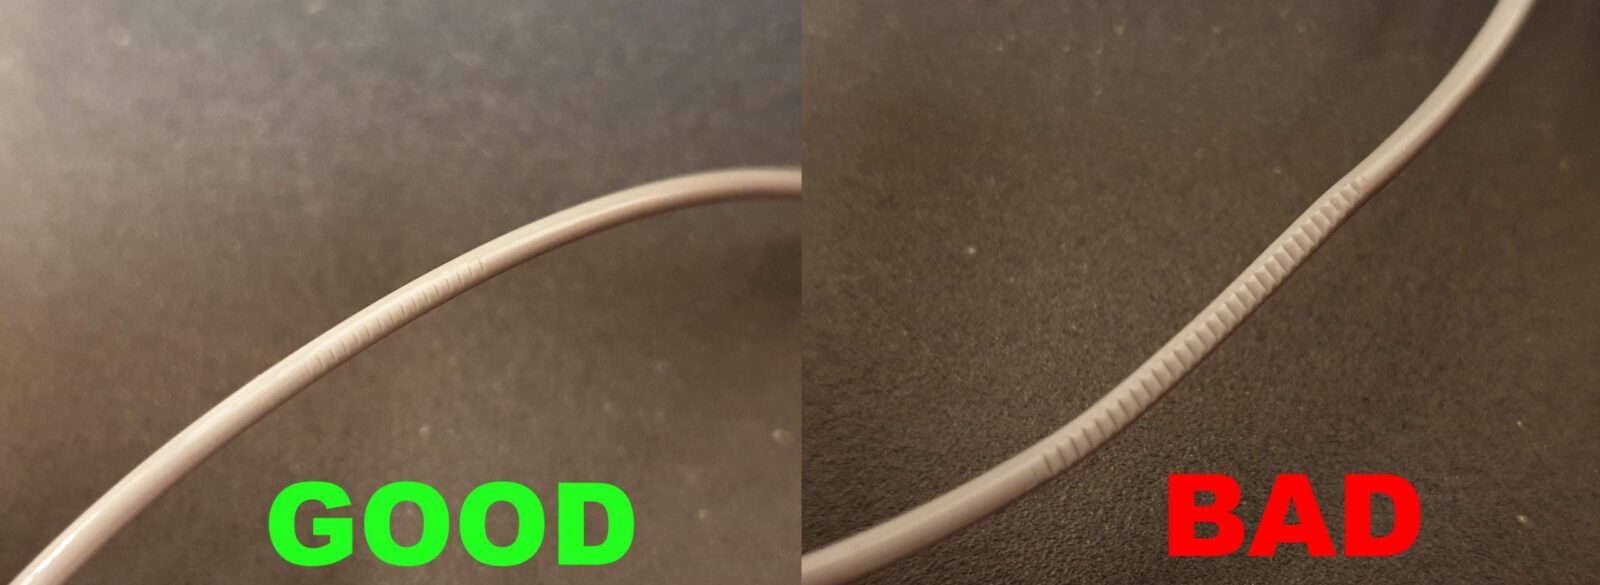
?idlertension requested by: jack3939#0
vapid belfry
Was looking for a reference...
Yeah small amounts, half turn. 👌
If it flops open, thats the wrong way, but know that you can see into the extruder easily like that 🙂
I think mine is a little over halfway the full screw. (Idk if that helps)
pulsar nexus
once its done pull out a bit and check for the marks
chrome oak
I'm printing a big test because the bed shaking issue is worse on big prints
But I'll take it off like 5 layers in
pulsar nexus
first layer or 2 would be enough, really just the first
chrome oak
My problems really are much more noticeable on layers but still noticeable on the first
Wow so far so good
Actually not jinxing it bc I've said that before
pulsar nexus
another double check, whats the start gcode look like in your slicer
chrome oak
Wdym?
pulsar nexus
gcodes run at the start of every print, under printer settings somewhere
chrome oak
I actually don't know
I'll go check
My print settings tab only has filament types
Oh wait
I'm stupid
Well for some reason my settings didn't change but I pretty much changed the support type to organic, infil to 15℅ and infil speed to a lower number
The infil speed was a test so I know these issues aren't from that
pulsar nexus
start gcode? im checking for a G29or M420 S1
vapid belfry
The bed screw under the pei sheet sometimes gets a little loose as well.
Just cos of expansion and contraction, heating cooling.
(Check ur gcode first)
chrome oak
How do I see that?
chrome oak
vapid belfry
The bed screw under the pei sheet sometimes gets a little loose as well.
Just co...
I'll check that
Thank you
pulsar nexus

 pulsar nexus
and your not loading the probe data, add a G29 ; probe new mesh under the G28
with that the nozzle moves up and down on the first layer after a bunch of probing at the start
 pulsar nexus
you see how when you home z the nozzle gets close to the bed without touching? it does that across the entire bed, then accounts for where the bed is on the first layer
 pulsar nexus
and if you hookup octoprint lets you get something like a visual of the bed
 vapid belfry
pulsar nexus
and if you hookup octoprint lets you get something like a visual of the bed
Firmware needs modifying for it to work... 
Great idea though!
pulsar nexus
damn, been a second since ive seen my full mesh, .529 range, now i have a project again
pulsar nexus
vapid belfry
Firmware needs modifying for it to work... <:pepecry:881227647240245258>
Great ...
octoprint not work stock? i know im on klipper but still should work
pulsar nexus
now image doing manual bed leveling with no help in 2018 
pulsar nexus
takes a special type of persion if you know what i mean
vapid belfry
pulsar nexus
octoprint not work stock? i know im on klipper but still should work
No.....unfortunately... Tried already...
Printing a physical square is very revealling for your mesh... 
vapid belfry
chrome oak
I'd honestly rather die
BREAK TIME.
Go have some choccy or cuppa
pulsar nexus
vapid belfry
No.....unfortunately... Tried already...
Printing a physical square is very rev...
bite the bullet and klipper already, join the cool kids club
chrome oak
You guys being in the printing hobby should know how I feel right now
Especially with Manuel bed leveling
Jeez
pulsar nexus
chrome oak
hard to tell with the quality, but if you can see the bed through parts probably should lower z ofset some more
chrome oak
Probably
pulsar nexus
enhance
 chrome oak
That's not priority ATM bc it seems fine without for now
I will after this test print
pulsar nexus
could cause problems later, like benchys flying off
chrome oak
That's for future me
Or me in about 10 minutes when this test finishes
Still future me though
No words have sent chills down my spine more than Manuel bed leveling
pulsar nexus
yeah, one screw rotation is .7mm, and you want the hole bed within like .1 without a probe to check , now anything under .5 flies
to be fair you could just use less of the bed and it kinda just worked
elder juncoBOT
ABL (Auto Bed Leveling) uses a probe to measure the bed surface and compensate for deviations in flatness. It is not meant to replace manual bed leveling, but to compensate for imperfections.
Upgrading to ABL requires firmware modifications, so ensure your machine is compatible or you are comfortable with the modification process. Additionally start gcode in the slicer must be updated to enable and load or reprobe for mesh compensation.
Probe Z offset, the distance between the nozzle tip and the probe trigger point, must be set accurately for best results. You can adjust this through Configuration>Advanced Configuration>Probe Offsets or during the first layer of a print using live leveling.

?abl requested by: wolfesbluebox#0
vapid belfry
Here...
chrome oak
Takes a special type of person
pulsar nexus
2 weeks and few drinks fiddling was great in memory, thinking back probably dont remember half of what i messed with
chrome oak
pulsar nexus
2 weeks and few drinks fiddling was great in memory, thinking back probably dont...
Makes sense
chrome oak
vapid belfry
Here...
what in the Egyptian hyroglyphs is this
pulsar nexus
basicaly you bed was close enough to level that ignoring the mesh was almost working
chrome oak
Ahh
Makes sense
In the most liberal usage of that
THAT'S THE SHAKING
It usually happens when infilling or doing supports
pulsar nexus
looks like normal printing small circles to me
chrome oak
Okay then that's not the issue
pulsar nexus
check the sliced view around that area
vapid belfry
chrome oak
what in the Egyptian hyroglyphs is this
So your black probe with the blue round end attached to the hotend?
Yah it does this
Just look at the picture.
You are not in manual mode anymore....
By adding g29. It will now use it.
You have magnetic induction probe (z) with sensorless homing for x and y.
Is it an sv06 PLUS with touchscreen?
pulsar nexus
on the right
 chrome oak
Oh whoops
pulsar nexus
also in theory you can use crealitys K1 nozzles stock, or volcano with some mods
vapid belfry
The Plus i thought was already volcano?
Aka not that important just can pump out more plastci
pulsar nexus
same threads, not as pointy so need new fan vent and probe mount

Guide on converting SV06 Plus hot end to use Volcano style nozzles
vapid belfry
Sorry we got distracted.
That not important
pulsar nexus
proprietary nozzles you got, and how to mod to use the open source stuff, so nerd talk
vapid belfry
Black afder is great start for sv06 info though... So nookmark for later 😅👌
chrome oak
Okay
This machine is driving me insane
This is how ai is gonna take over
They aren't gonna kill us they're just gonna overload our smol brains
Or maybe it's just me
Considering half the stuff you guys say sound like pig latin
vapid belfry
chrome oak
If u do a 45 degree picture of this....
Cos over photo... Close and too far can look similar... 😕
chrome oak

 vapid belfry
chrome oak
They aren't gonna kill us they're just gonna overload our smol brains
"i'm learning new things, mistakes are just more ways to learn more" that an take ur time.
chrome oak
Should I stop it
chrome oak
vapid belfry
"i'm learning new things, mistakes are just more ways to learn more" <:blobthumb...
That's fair
The things I'm trying to learn are gonna put me in cardiac arrest but fair
And I appreciate it
I stopped the print
Now what?
I'm out of ideas
I don't suppose you got more nerd jargon to throw at it
vapid belfry
I'm questioning why there is gaps in that first layer.... 🤔
Your prints will stick...
But why is it there.
This might be a very good chance to take a break though.
Just for 10-15mins serioulsy muting me is ok
chrome oak
I'm gonna fix this printer if it's the last thing I do
Although I do have some premade rice
Might eat that then come back
vapid belfry
Rice sounds good. 💜
chrome oak
I'm back
That was tasty
I'm honestly about ready to give up on this
I know this isn't some plug and play hobby but
This is insane
pulsar nexus
i will say your in the top% for how hard it is now, this was standard fair back then but now like 95% of people have little issues, not some major ones
chrome oak
Then why is it so bad
It's so frustrating man
It's not even about the money or anything
I just wanna make some cosplay
pulsar nexus
you are using the default profile for it right? been thinking why that G29 wasnt there
pulsar nexus
prusa bad at making the default? i used their MK3S profile and editted the start gcode since there was no default at the time
pulsar nexus
switched to orca and did the same, so cant verify thats good either
well i mean they are a printer company making profiles for other printers
pulsar nexus
cura is the slowest to update, and still owned by another company
orca was someone saying "i could do this better" then did it better
chrome oak
Bambu is terrible
That literally stringed my prints
Wait what
I just started a test print and it's auto leveling
Is that G29
pulsar nexus
thats G29, you could have it just load the auto leveling, but whats another 2 minutes to a perfect bed mesh
(change G29 to M420 S1, but dont)
pulsar nexus
nerd stuff, and you dont have to manualyt run the bed mesh
it will always be up to date
chrome oak
Okay
I hope this test goes well
It's a much smaller low poly test
But hopefully G29 helped
I also changed the z offset to a little lower
pulsar nexus
hows it look sliced? both full and just the first layer
chrome oak

 pulsar nexus
looks fine, just wanted to double check, some try printing round things on the bottom or dont get good first layers
pulsar nexus
nozzle too close again?
chrome oak
Actually
Maybe not
I'm not sure
Too early to tell
That e step thing seemed to have helped a bit
But still not enough seemingly
OMG
WAIT
INFIL FROM WHAT I CAN SEE LOOKS GOOD
Not trynna jinx it but yknow
Hope has been restored even slightly
pulsar nexus
oh another thing to throw at later you, x gantry leveling, or good old soupcan method https://www.youtube.com/watch?v=BH7nQ1z6Y1M&t=497s
Find out more or sign up for Obico here:
http://bit.ly/3UTbky7
Love the channel? Consider supporting me on Patreon:
https://www.patreon.com/user?u=806627
ModBot Merch Store is now live! Get yours here:
https://bit.ly/3qhJ8Yl
In today's video we dive into the Sovol SV06, a $300 3d printer that comes with quite a few things that are not common...
vapid belfry
pulsar nexus
you are using the default profile for it right? been thinking why that G29 wasnt...
I think it's missing in 2.3.0 orca profile too. (At least for the base 06)
So might just be a commonly missed item.
How much do you want your printer "tuned"...
you have the following options:
- working: zoffset is set, and stuff stick and prints but isnt the prettiest (recommended for people who haven't had the chance to print something simple and the printer is yesterday new)
- decent: most items look clean enough to use, and no major issues present, but a little rough round the edges. (Fine for most people)
- perfect: everything...everything is tuned. Run through ellis running guide and teaching techs calibration guide.
It's incredibly easy to get caught up in perfection and burnt out.
Soup cans if the auto z align does not work.
U and jack have got it going fine so far. 👌
chrome oak
Im gonna be using this for cosplay meaning a lot of sanding
So working is good
I just want it to work
Perfection doesn't matter to me because I'm gonna be using filler on it anyways
Like just having this thing work would be a dream
UPDATE ON THE TEST
The layer lines are so bad
It's working I suppose
But those layer lines look like weak points
Like they could snap the print in half easily
Possibly z offset
pulsar nexus
how bad? and z offset is like the first 2 layers, shouldnt matter past that
and i swear to god if somehow your zsteps are wrong im gonna do somethings
 pulsar nexus
now we are back to not easily identifiable since ive never seen it, but wet filament is the goto point at that
?beddrying
elder juncoBOT
https://www.youtube.com/watch?v=WC3jvuq-uq8
https://media.discordapp.net/attachments/667463307963138058/1285333276504096818/Screenshot_2024-09-16_at_4.08.38_PM.png

What if i told you that you already have everything you need to assemble one of the best filament dryers available? Don't believe me? In this video i'll show you how, with a combination of very simple principles, we can all dry filament without an oven for free.
....................................................................................
 pulsar nexus
or the filament snagging somewhere above the extruder
pulsar nexus
?floridament
elder juncoBOT
 pulsar nexus
told you, 1000 things to go wrong
pulsar nexus
new doesnt equal dry, still a consideration, usually PLA is fine for some time
and thankfully we are not in the anet age
elder juncoBOT

?thefloor requested by: jack3939#0
THE ROOF IS ON FIRE

?theroof requested by: jack3939#0
pulsar nexus
bad PSUs were a firehazard
chrome oak
That's like next level
pulsar nexus
yeah, 2015 was a wild time
chrome oak
So
The print

Boutta torch this printer 😭

It broke apart
Like
What is going on
I just spent the last 6 hours trying to fix this and it ended up like this
elder juncoBOT
This post has been closed due to inactivity.
This post has been inactive for over 1 hour and so has been closed. To reopen this post simply send another message.
chrome oak
Yknow what
I'm gonna just set this thing on fire
I'm so done
Im honestly just gonna beat it
I think it's pretty crystal clear that nothings gonna work and I'm so tired of trying
So screw it
heady terrace
chrome oak
Is my bed supposed to shake a little
video?
chrome oak
chrome oak
.
heady terrace
chrome oak
I've used 2 rolls of filament trying to fix this
i used 1kg for my problem in almost a year, still don’t fully know the issue, and he’s gotta earn my trust back, but i bought 5kg of filament now and have been happier than ever. how the f did u use 2 spools thi
chrome oak
I've been nonstop testing this for like 3 months
heady terrace
chrome oak
This is insane
yea, i regretted buying my printed so much actually, not touching it for weeks, but when you fix ur problem, and you’re sure, it’s worth it
heady terrace
also i can’t see new msg until i finish reading this conversation, am now at 3am
heady terrace
chrome oak
DRYING FILAMENT
i dried my filament on my bed, it’s really easy. u just can’t use ur printer for a day or so
forgot the temp and times
chrome oak
Oh
heady terrace
chrome oak
it almost looks like the printer is having too much space between the layers or smth
heady terrace
chrome oak
I've been nonstop testing this for like 3 months
damn
heady terrace
chrome oak
I fully regret buying this
been there
heady terrace
chrome oak
How did your problem get fixed
fully unasseblying it, then fully assembling it, and fully retuning
as if u bought a new printer
u can also do that if ur so lost
but that was my last resort
after 8 months
chrome oak
I didn't assemble It to begin with so I don't know how
heady terrace
chrome oak
I didn't assemble It to begin with so I don't know how
i have the normal sv06, it’s really easy
heady terrace
chrome oak
I didn't assemble It to begin with so I don't know how
also how didn’t u assemble it
how’d u buy it
heady terrace
heady terrace
i have the normal sv06, it’s really easy
do u have the manual? if not u can search it online
chrome oak
He showed me it working fine before I bought it
heady terrace
bc if so, ask his profile and slicer etc
heady terrace
interesting
chrome oak
And then my next prints weren't working
heady terrace
same for me, but after a couple of weeks it went weird
probably hardware then if u didn’t switch anything
u could unassemble it
maybe ask ur uncle to help you
heady terrace
heady terrace
u could unassemble it
and then reassemble
then esteps
pressure advance or whatever it’s called
then flow
etc
chrome oak
I don't know
I might try that but im not trying to waste an hour trying something that isn't likely to help
I've wasted months trying to fix this
heady terrace
chrome oak
I might try that but im not trying to waste an hour trying something that isn't...
yea, it was my last resort, maybe some day u can try it too
its not hard tho
like 30min i think
and ik when people say “it’s not hard” bc they’re good at it
no, i was in ur position a year ago
its not hard at all, i mean its its the same assembly as sv06
i think only diff is screen and bed
heady terrace
lemme recheck
a little bit tbh
lemme film some of my printing
its going slow for the first layer, but compare with ur own
ill film when its going faster
@chrome oak
chrome oak
Mine likes to shake when infilling
I think it's speed that does it
It's almost like it's not tight or something because if it goes fast it doesn't stop when the motors stop
I could be entirely wrong
heady terrace
try tightening all the screws
like the bar things
up and down bars
and the side and side
check the manual
chrome oak
I'm probably gonna factory reset it and disassemble/reassemble it
I'mma follow a assembly guide backwards
And then do it forwards again
vapid belfry
heady terrace
and ik when people say “it’s not hard” bc they’re good at it
Each step is not hard... But problems can have many solutions....and some need some testing to get tooo....so lots of work + time.
small \ tiny test prints are key.
Directly for underextrusion...
- filament tensioner (if the lines are inconsistent)
- coldpull in case it's partially clogged
- flow testing.
Before u disassemble the whole thing
?coldpull
elder juncoBOT

All3DP
If your nozzle is partially clogged, the 3D printer cold pull is your first line of defense. Read on to learn how to do it!
chrome oak
A cold pull?
elder juncoBOT
This post has been closed due to inactivity.
This post has been inactive for over 1 hour and so has been closed. To reopen this post simply send another message.
vapid belfry
chrome oak
A cold pull?
Yup.... (See instructions) but basically:
Stick filament into nozzle, heat up nozzle to melt it together, allow to cool to certain temp, yank upwards to remove bits that might be making the nozzle hole smaller...
?coldpull
elder juncoBOT
All3DP
If your nozzle is partially clogged, the 3D printer cold pull is your first line of defense. Read on to learn how to do it!
elder juncoBOT
This post has been closed due to inactivity.
This post has been inactive for over 1 hour and so has been closed. To reopen this post simply send another message.
chrome oak
I'll try it out
elder juncoBOT
This post has been closed due to inactivity.
This post has been inactive for over 1 hour and so has been closed. To reopen this post simply send another message.
chrome oak
YO
GUYS
YOU'LL NEVER BELIEVE THIS SHI

That part right there was just dangling off
I think I may have found the problem
The one side wasn't even screwed on
@vapid belfry @heady terrace
I'm like 1000℅ sure that was the problem
I'm running a test print just to see
chrome oak
@pulsar nexus
pulsar nexus
i did say that the bed shouldnt wiggle
chrome oak
LMAO
I'm tuning s offset
Real quick bc it's way off after I put that on
Z offset*
chrome oak
@pulsar nexus print is halfway done and looks flawless
I wanna be mad at myself for not seeing that but I don't even care
I'm so happy
pulsar nexus
wonder how that screw got lose, and intresting it could cause that much of a problem
chrome oak
Not sure how the screw got lose
But you could tell the bed wants able to properly move
Oof we are still getting occasional print lines
But still
Not near as bad as before
pulsar nexus
hows it look?
 pulsar nexus
seems like too low a z offset, but really hard to tell from that, and even without the G29 thats small enough it probably wont fix too much
on the gaps ive always seen others with them, but never found some fix, they always ask then solve it themselves
chrome oak
Oh
pulsar nexus
id blame wet filam,ent or extruder not extruding somehow
pulsar nexus
intresting about the ear though, im guessing the surface area was small enough the printing forces caused it ot tip, good flow tuing/ a little z hop could help
and now that you can printyou can do the flow print
chrome oak
No no the ear was another line
pulsar nexus
another?
chrome oak
I just pressed to hard on lol
pulsar nexus
ah, yeah layers are the weak part
pulsar nexus
make sure its leaving teeth marks, but not too deep
elder juncoBOT
?idlertension requested by: jack3939#0
pulsar nexus
it all is
chrome oak
I found that out the hard way
elder juncoBOT
This post has been closed due to inactivity.
This post has been inactive for over 1 hour and so has been closed. To reopen this post simply send another message.
chrome oak
Dude
It's not working
I'm trying to print something and it's being annoying again
This printer is the band of my existence
Bain*
Not in the mood auto correct
It prints smaller things relatively well now but it's still screwing up bigger prints
 small sinew
 languid ridge
too much troublshooting. refund
Man this was so helpful. thanks for contributing!
small sinew
chrome oak
It prints smaller things relatively well now but it's still screwing up bigger p...
sounds like a bed leveling issue.
heady terrace
chrome oak
wth even is that LOO
heady terrace
chrome oak
wow
heady terrace
chrome oak
YOU'LL NEVER BELIEVE THIS SHI
never get too exited lmao
how’d u tension ur belts btw
elder juncoBOT
This post has been closed due to inactivity.
This post has been inactive for over 1 hour and so has been closed. To reopen this post simply send another message.
heady terrace
alright go to this site
elder juncoBOT
Belt Tension Frequency
For a belt:
Length: 0.3 m
Mass: 1.252 kg/m2
Width: 6.0 mm
The required frequency is:
MIN: 96.148 Hz (T= 25 N)
NOM: 105.325 Hz (T= 30 N)
MAX: 113.764 Hz (T= 35 N)
chrome oak
The prusa one is telling me 97 hz
pulsar nexus
sounds close enough, want them tight but not overtight, fits around the thing above
elder juncoBOT
This post has been closed due to inactivity.
This post has been inactive for over 1 hour and so has been closed. To reopen this post simply send another message.
heady terrace
@chrome oak any update
chrome oak
Messed with settings a little and printed another test
This one is so much better line wise
Literally perfect print
But the big print I tried ended up coming off the plate and turning into a stringy mess
So I'm thinking bed leveling
I added the g29 code just for extra security too
And I'm retrying the print to see if it was a bed leveling error or just a regular print mess up
@heady terrace
heady terrace
chrome oak
Literally perfect print
wow send a pic!
heady terrace
chrome oak
But the big print I tried ended up coming off the plate and turning into a strin...
happens to everyone
?adhesion
hm
?bed
elder juncoBOT
Tips for better first layer success
The first layer is quite literally the foundation of a successful print. These are some of the things to keep in mind:
- Wash your print surface with dish soap and water, refer to
?bedcleaning. - Ensure your printing temperatures are appropriate. For PLA, the ideal bed temperature is 55°C-60°C. If the lines appear to come out "gummy" and forms clumps, raising the nozzle temperature may help. Calibrate your nozzle temperature by printing a temperature tower. Refer also to
?platemps. - Relevel your bed and ensure your nozzle distance is equally spaced at each corner, refer to
?paperlevel. If your printer is equipped with a bed meshing probe such as a BLTouch or CRTouch, make sure your Z-offset positions the nozzle close enough to the bed, refer to?z-offsetfor additional information. If your printer has automatic Z-offset calibration, make sure the nozzle is clean while the calibration runs. - You can confirm that your leveling and Z-offset is correct by observing your first layer extrusion by printing a full layer test: Printables, Thingiverse Refer to
?levelingfor help with the interpretation of the results. - Ensure the nozzle is not colliding with the print. This usually presents itself as loud noises and layer shifting. Some causes may include overextrusion, insufficient cooling, mechanical Z axis issues, or insufficient Z hop
- For warp-prone materials such as ABS, Nylon, Polypropylene and others an enclosure is recommended, ensure ambient temperatures are high enough (40°C+) and stable. Consider using a specialized bed adhesive.
?firstlayer requested by: neptunenora#0
heady terrace
z-offset, bedleveling (just do auto), and if those don’t work, tbh i do the lazy way. buy a glue stick
lovee my adhesion since

 pulsar nexus
could add a bit of elephants foot compensation for the first layers, and mess with fuzzy skin, . 2 on its 2 main distances does wonders for layerlines
chrome oak
I don't even know how to do elephants foot on prusa


 pulsar nexus
sounds like crossing infill, whats your zhop setting look like
chrome oak
Oooooh wait shop is a setting
I dunno what it is right now I'm not home anymore I'm going out to buy more filament
But I'll look into z hop when I get home cause that might actually save me
I think z hop is the reason it's failing
So thats a huge news flash
Thanks bro
pulsar nexus
was it at 0? .2 is more than enough, or whatever your layerheight is
the other sounds are infill crossing itself, semi normal to me
?infill
elder juncoBOT
https://cdn.discordapp.com/attachments/667463307963138058/720300104262615070/Cura-Infill-Patterns.png
https://cdn.discordapp.com/attachments/667463307963138058/720264625177886790/unknown.png https://help.prusa3d.com/article/infill-patterns_177130


PrusaSlicer offers many infill patterns to choose from. When choosing an infill pattern, these are the main things to consider: Print speed Density per material used (better support for top layers with less material) Visuals Support for top layers F…
heady terrace
chrome oak
looks amazing! good job
chrome oak
THANK YOUUUU I APPRECIATE ALL YOUR GUYS HELP AND SUPPORT THROUGH THOS
heady terrace
chrome oak
damnn whahha printing
chrome oak
Y'ALL ARE THE BEST
chrome oak
heady terrace
damnn whahha printing
I wanna use my printer for cosplay
So it's an iron man helmet
heady terrace
so cool!!
chrome oak
Thank youuuuu
pulsar nexus
you get help, we get a serotonin drip
heady terrace
also if ur adhesion is still bad, get a gluedtick. i was way too lazy to try and figure out the things so i just bought a stick and now i dont have to worry about adhesion
chrome oak
Lol
Yeah for sure I'm gonna do the glue stick thing is z hop isn't it
Other than that though
I think we're good
Like fully
I will check in tomorrow to tell you guys wether or not z hop helped
heady terrace
yhh
elder juncoBOT
This post has been closed due to inactivity.
This post has been inactive for over 1 hour and so has been closed. To reopen this post simply send another message.
chrome oak
Z hop seems to have made it worse
Because instead of knocking over pieces it's turning them into a stringy mess
elder juncoBOT
This post has been closed due to inactivity.
This post has been inactive for over 1 hour and so has been closed. To reopen this post simply send another message.
chrome oak
It seemed to have pulled the pieces off on the first layer
Because there aren't any actual pieces it's all string
Not sure z hop is supposed to do this
pulsar nexus
how much did you put? zhop pauses slightly before travels and moves up that distance, it can cause some more stringing, but a small enough distance sholdnt be much, id blame retraction distance or twet filament before .2 of zhop
languid ridge
HE DEMANDS VISUAL PROOF!
pulsar nexus
seperate messages, photos show more
elder juncoBOT
This post has been closed due to inactivity.
This post has been inactive for over 1 hour and so has been closed. To reopen this post simply send another message.
chrome oak
I can't really take photos
Well I can but it's just a bunch of string
It pushed it off the bed on like the first layer
pulsar nexus
like first layer issues?
elder juncoBOT
This post has been closed due to inactivity.
This post has been inactive for over 1 hour and so has been closed. To reopen this post simply send another message.
chrome oak
pulsar nexus
like first layer issues?
I wouldn't diagnose it as that yet
For all I know it could be a fluke
I only tested once then took off z hop bc that was depressing