#Having a really annoying issue with my SV06's bed adhesion for 2 days. Help needed.

1 messages · Page 1 of 1 (latest)

scarlet jetty
#

Hey guys, I just cannot get a print to adhere to my bed (and its the last part of a 6 part kit too...)

After ~12 failed prints and a good amount of time crouched down staring at the first layer and my nozzle, what seems to be happening is that when a line of filament has finished beint printed, the filament somehow sticks to the nozzle or the PLA still in the nozzle, so the recraction and Z hop just slightly lift that line of PLA. Then when the next line comes next to it gets printed it also gets lifted and sticks to the old line and before the first layer is even finished the whole thing is just a mess. (weirdly enough it also seems to happen in the same 2 places?)

SV06, Default OS, Standard Ender PLA,

Things ive tried:

  • Switching from a 5-prints new 0.6mm nozzle to a brand new 0.4mm nozzle
  • Switching from black PLA to grey PLA
  • Changing bed temp to 50, and nozzle temp from 195 (what i normally print at) to 205
  • A multitude of tiny Z axis adjustments - the offset seems completely fine and im getting optimal "squish"
  • Giving my bed a wipe of IPA
  • Brim and Skirt bed adhesion (i tend to use brim)
  • ive checked under the print bed for any debris (which would make sense as its happening in the same place it seems, nope)
  • Moving the model in cura to a different part of the bed
  • changing print speed down to 40mm/s
  • 0.2mm quality - 0.32mm quality
  • Checking all my cura settings to make sure theres no mess ups in there like disabling retraction or forgetting to change nozzle size - from what I can tell, on the PC end is doing fine

I dont have a heated enclosure so cant try that. An idea i had is that maybe the bed isnt heating uniformly? but i dont have an IR thermometer so I cant really test that. Ive also not tried the gluestick trick but again... not had to in a year of printing.

Maybe it could be the PLA being "wet"? but ive never had any problems at all like this so im honestly wondering if i just need a new extruder.

Thanks in advance.

ashen robinBOT
#
AI Help

It sounds like you've already tried a lot of troubleshooting steps. Since you mentioned that it seems to be happening in the same places, it may be worth checking the bed leveling in those specific areas to ensure there are no issues with the bed being slightly uneven.

If you suspect the PLA may be the issue, you could try drying out the filament by using a filament dryer. Sometimes moisture in the filament can cause adhesion problems.

Regarding the bed heating uniformly, you could try using a surface temperature sticker to check if the bed is heating evenly across its surface.

If you haven't already, you could also try using a different brand of PLA filament to see if that makes a difference.

If none of these suggestions help, it's possible that there could be an issue with the extruder, but that would be a more advanced troubleshooting step.

If you have any more questions or need further assistance, feel free to ask. Good luck with your printing!

scarlet jetty
ashen robinBOT
#

Tips for better first layer success

The first layer is quite literally the foundation of a successful print. These are some of the things to keep in mind:

  • Wash your print surface with dish soap and water, refer to ?bedcleaning .
  • Ensure your printing temperatures are appropriate. For PLA, the ideal bed temperature is 55°C-60°C. If the lines appear to come out "gummy" and forms clumps, raising the nozzle temperature may help. Calibrate your nozzle temperature by printing a temperature tower. Refer also to ?platemps .
  • Relevel your bed and ensure your nozzle distance is equally spaced at each corner, refer to ?paperlevel . If your printer is equipped with a bed meshing probe such as a BLTouch or CRTouch, make sure your Z-offset positions the nozzle close enough to the bed, refer to ?z-offset for additional information. If your printer has automatic Z-offset calibration, make sure the nozzle is clean while the calibration runs.
  • You can confirm that your leveling and Z-offset is correct by observing your first layer extrusion by printing a full layer test: Printables, Thingiverse Refer to ?leveling for help with the interpretation of the results.
  • Ensure the nozzle is not colliding with the print. This usually presents itself as loud noises and layer shifting. Some causes may include overextrusion, insufficient cooling, mechanical Z axis issues, or insufficient Z hop
  • For warp-prone materials such as ABS, Nylon, Polypropylene and others an enclosure is recommended, ensure ambient temperatures are high enough (40°C+) and stable. Consider using a specialized bed adhesive.
#

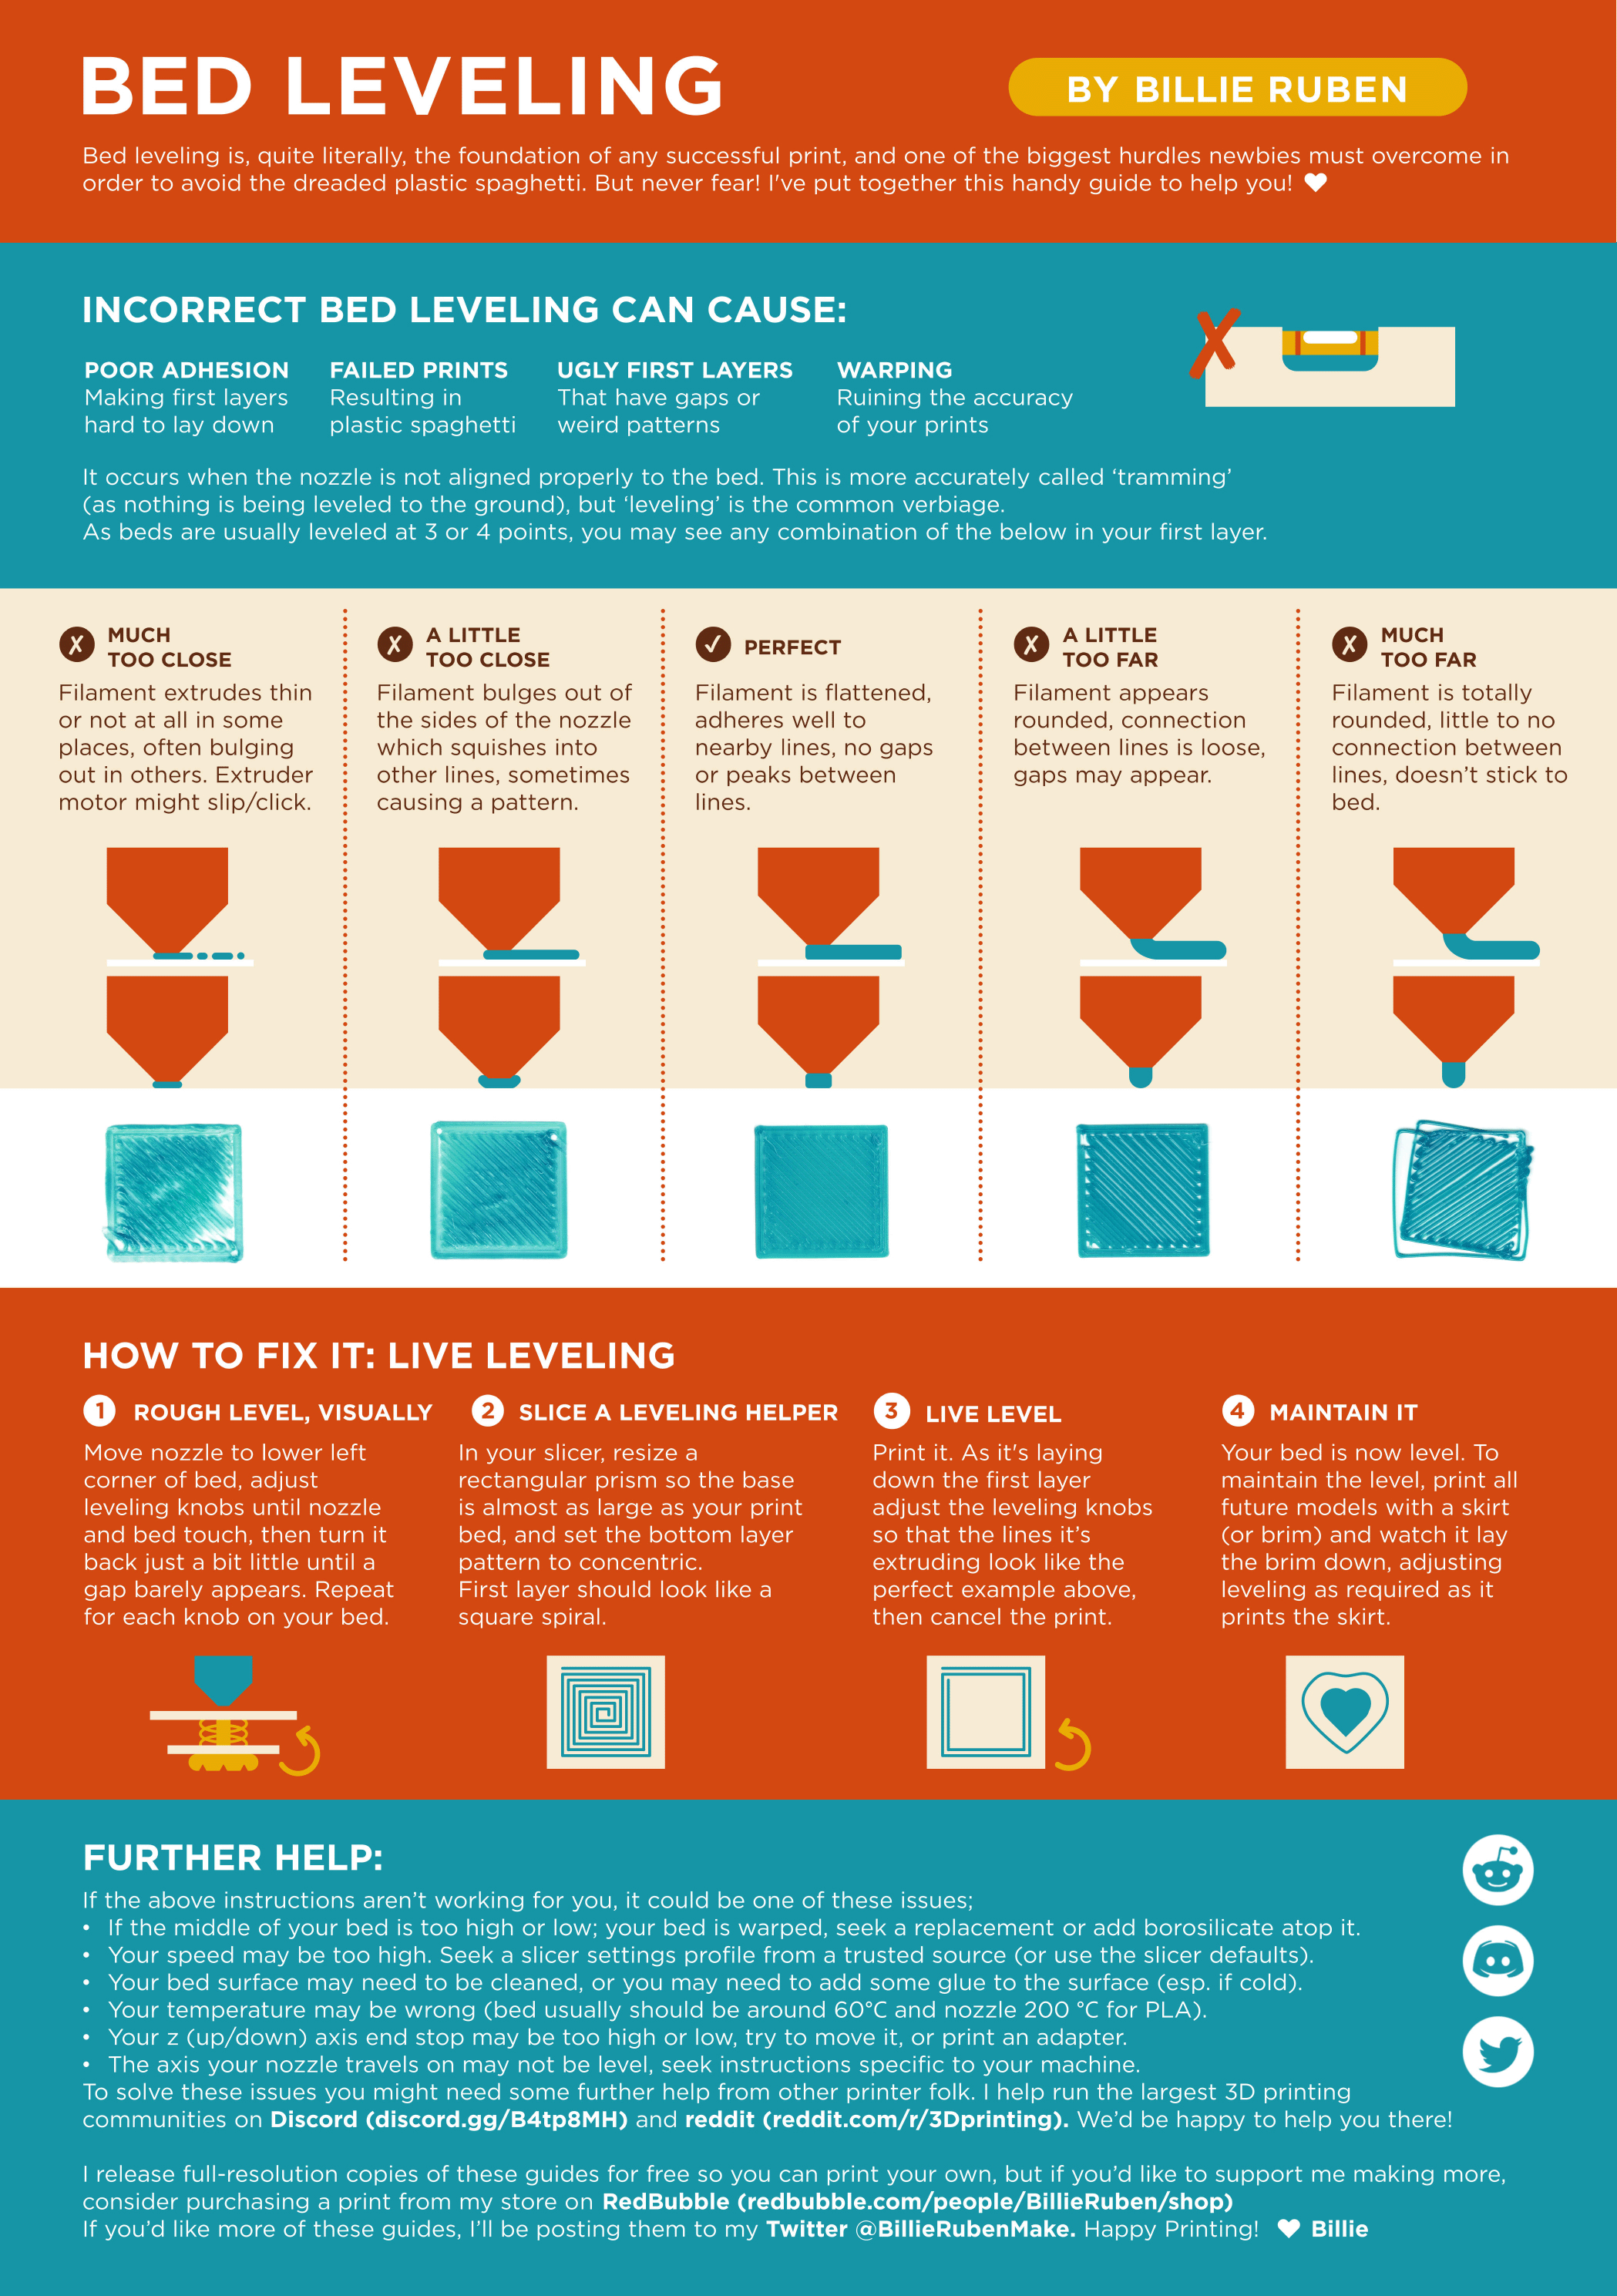
Leveling Your Printer
Here is a handy infographic that will help with levelling your printer.

dense junco
#

if you are unsure about wet filament, do dry it first.

#

Wet filament can cause all sorts of stupid stuff

scarlet jetty
#

i dont have a dryer

dense junco
#

?beddrying

ashen robinBOT
#

What if i told you that you already have everything you need to assemble one of the best filament dryers available? Don't believe me? In this video i'll show you how, with a combination of very simple principles, we can all dry filament without an oven for free.

....................................................................................

▶ Play video
dense junco
#

Yes u do :d

scarlet jetty
#

oh ok cool

#

any other tips cuz like

#

god damn xd

#

ive tried all this

#

besides using IPA instead of dishsoap which doesnt seem like it could be a problem? my adhesion is fine in terms of the Z axis being right and the PLA squishing, it just lifts for some reason

#

i thought maybe it was dirty in those areas somehow but... nope

scarlet jetty
dense junco
#

Well, First thing u do is dry your filament

#

2nd thing, print a "first layer calibration" live print

#

And check the infographic for the squish

scarlet jetty
#

would trying brand-new filament still vaccuum sealed also work?

dense junco
#

Can still be wet

scarlet jetty
#

right

dense junco
#

Its made by melting plastic and blasting water on it to cool it

scarlet jetty
#

lul

dense junco
#

Yes I saw that

#

But you saying that and other ppl confirming that is not the same :d

scarlet jetty
#

alright ill do a third one and send a video of it 😭

dense junco
#

Videos dont work for me (blame discord)

#

But yeah.

#

From the small portion I could see in the initial video, you have the left one here.

scarlet jetty
#

but referring to the infographic it is right s

#

huh yeah

#

thats

#

okay ive recallibrated it twice over the 12 failures but i guess i need to do it again now lmao

#

over prints does the calibration just slowly shift or something because it was fine

dense junco
#

But the sv06 has a notorious banana bed

scarlet jetty
#

and this issue was happening when it was happening with the 0.6 nozzle which i calibrated too

dense junco
#

Getting some software to check the heightmap would be helpfull

scarlet jetty
#

i mean i have been considering buying an x-plus 3 or a k1 lol

#

perhaps i bin the sv06 in spite /s

#

ill do an adhesion test 2 ticks

scarlet jetty
dense junco
#

Banana

#

Bad part quality on sovol

scarlet jetty
#

"banana" doesnt help me understand what u mean 😭

dense junco
#

Here is a reddit post about it

scarlet jetty
#

uh how do i do this step? haha

#

ive never seen a setting in my printer that lets me change that

dense junco
scarlet jetty
#

is it smth i can put into cura so the g code allows for the bed not being level?

#

oh*

#

u just mean offset of the whole bed

#

yeah lmao

#

i thought u mean like "manually map the whole bed"

#

i always adjust Z axis offset manually

#

TIL Z-steps = Z axis offset

scarlet jetty
#

because this is just tuning Z axis offset to make sure the nozzle is close enough right????

dense junco
#

If ur bed is a banana

#

U are doomed untill you fix this.

scarlet jetty
#

uhh

#

this being the height of my nozzle? (sorry im really confused at what im meant to be changing)

dense junco
#

The red is the "line" your nozzle works at

#

The black "curve" is the "banana bed" you POSSIBLY have.

scarlet jetty
#

the bed is referred to as "banana bed", which probably means that its a weird shape, so the first thing to fix is.. the height of my nozzle??

#

right

dense junco
#

Your nozzle will not and can not reach some parts

#

Without scraping other parts of the plate

scarlet jetty
#

yeah igy

dense junco
#

BUT

#

First thing yu do is check if that's the case.

scarlet jetty
#

and if it is the case what can i do

#

is it just "buy a new heated bed" time?

dense junco
#

You add silicone bed spacers

scarlet jetty
#

right

dense junco
#

Wich you can cut, squish, push, into the height u need

scarlet jetty
#

oh is it actually the PEI sheet thats a bad shape?

dense junco
#

No the bed itself

scarlet jetty
#

oh ok

#

i throught the bed was just a big plate of metal

dense junco
#

pei sheet is floppy it just bends however your bed bends

dense junco
#

Compared to the rest of the frame

scarlet jetty
#

gotcha

scarlet jetty
#

...ah - very slight oversquish in bottom half, top right is okay, top left is undersquished and has gaps

#

banana bed?

dense junco
#

So that would be a straight up indicator

scarlet jetty
#

balls

dense junco
#

Top left has to go up a bit

#

Bottom half down a bit

#

Top right, keep

scarlet jetty
#

yeah

dense junco
#

There is no way to know "how much" u gotta screw, so make mini adjustments and keep doing the calibration print

scarlet jetty
#

gonna do another full test (and move the layer slightly so its not overlapping the line it does at the left...) to get a full map of the bed tho

scarlet jetty
dense junco
#

Yup

scarlet jetty
#

oh sick

#

ok yeah thanks ill get back to u

dense junco
#

But eventually they are "maxed out" and u might need to sand some off OR replace them with silicone

scarlet jetty
#

gotcha

dense junco
#

This is quite tedious process but once u got it, its set for a long long time

scarlet jetty
dense junco
#

Good luck kekW_salute

scarlet jetty
#

tedius or not i just want my kit to work again haha

#

ty

#

lets hope lefty lifty righty... lowery

dense junco
#

Right tidy, Left loosey

#

Tidy righty, Left Uppey Kappa

scarlet jetty
#

aye x)

#

it just feels like im unscrewing the bed

#

only adjusting by like an eighth of a turn but the screw goes really slack after its untight yk?

scarlet jetty
#

really sorry but just to be clear, you do mean these right?

#

they literally just feel like normal ass screws

#

tight, then completely loose and screwing out

#

unless i can keep tightening more and more than im wanting to because im worried about going past wrist tight??

#

plus googling i can find nothing about these bolts besides them just being the thing that screws the bed down?

scarlet jetty
#

i must be doing smth wrong or theyjust arent adjustment, i full untightened it and fully tightened it, same result

scarlet jetty
#

white is where to my dumbass it seems like good smush, red is where the bed is slightly too high, blue is too low

#

so unless i can put like

#

...0.1mm slices of silicon under the sheet i cant see what i can do besides buy a new one

dense junco
#

Well you can always send your results to support and ask a new bed (or a new printer all toghetter)

#

But ill be going now, sorry I cant help you for a bit kekW_salute

scarlet jetty
#

yeah? i bought it from amazon over a year ago so its probably out of warranty right

scarlet jetty
#

been considering a more mid-range option for months anyway

ashen robinBOT
#
This post has been closed due to inactivity.

This post has been inactive for over 1 hour and so has been closed. To reopen this post simply send another message.

cerulean roost
# scarlet jetty its bulging in areas BETWEEN the bolts, the bolts dont seem to adjust the bed - ...

I've also noticed my bed screws seem to work themselves loose overtime due to the heating and cooling of the bed.

Your current first layer looks good. You can probably start printing again fine now.
Don't forget to go to where it says "store settings" in the menu after changing it, as well as after running the bed levelling command. I don't know if the bug has been fixed.

If you notice layer shifts, check your belt tension, they loosen + stretch a little over time.

ashen robinBOT
#
This post has been closed due to inactivity.

This post has been inactive for over 1 hour and so has been closed. To reopen this post simply send another message.

scarlet jetty
cerulean roost
#

Yeah there aren't any adjustment screws 👌
But the ones that go through the metal spacers get loose over multiple cycles of hot cold....possibly.
I have previously undone mine to put something there... so it could have just been that too.
I did fingertight too btw.

I'd stay on the stock spacers.....there are many other things you'd want to check before doing mods to this printer..... 👌

Worth greasing your rails a little, in an attempt to get it to your bearings.

#

Also... 😉

ashen robinBOT
#

Is your problem solved? / No longer need this channel?
You can close a help channel with ?solved when it is no longer needed.

scarlet jetty
#

uh no, ive still not actually solved prints peeling

#

i did another test and while i managed to actually ge tthrough the plrint, a few parts of the adhesion layer peeled off and it managed to get most of the first layer down before continuing

#

gonna tey more tomorrow, its 1am rn

#

this is what i mean like ive gotten everything as level as possible but it still just nonsensically doesnt stick, ill dry my filament tomorrow and see if that works

cerulean roost
#

Hmm ok. (Later)

  • room temps....
  • washed with soap and water...?

If it was a banana bed, it would show up on that big square to btw....
No printer bed is flat.

ashen robinBOT
#
This post has been closed due to inactivity.

This post has been inactive for over 1 hour and so has been closed. To reopen this post simply send another message.

scarlet jetty
#

washed with IPA and and my room is fairly warm, and the printer is in the warmest part of my room (next to a gaming PC that i use very often, especially when printing)

#

so not soap and water but its clean

#

only thing i havent tried is gluestick

ashen robinBOT
# scarlet jetty so not soap and water but its clean

Cleaning Your 3D Printer Bed

While IPA (Isopropyl Alcohol) may dissolve the oily compounds built up on your bed, it mostly just spreads those oils around. For a more permanent solution use a degreasing agent such as dish soap and water (unscented, as those sometimes have chemicals that make the bed adhesion worse) under warm water, scrub the entire plate taking care to push the soap into all the cracks (if your bed is textured). Dry with a lint free cloth or leave to air dry. You can then put the build surface back on to your printer. If you like you can use the isopropyl alcohol to clean the bed intermittently between prints, but please note it still wont remove any of the oily compounds.

If you are still experiencing adhesion issues it may be z offset, speeds or temperatures. You may also find more success in using adhesion boosters such as hairspray, glue-stick, or specially formulated adhesives for 3d printing. Happy printing!

scarlet jetty
#

fair, ill give it a try

#

i swear to god if the issue after 2 days solid of troubleshooting is "you cleaned it slightly wrong" im binning the damn thing

#

i heavily doubt it is after this much crap and the areas that failed to adhere are the same before and after "spreading it" but

#

screw me ig

ashen robinBOT
#
This post has been closed due to inactivity.

This post has been inactive for over 1 hour and so has been closed. To reopen this post simply send another message.

cerulean roost
ashen robinBOT
#
This post has been closed due to inactivity.

This post has been inactive for over 1 hour and so has been closed. To reopen this post simply send another message.

scarlet jetty
# cerulean roost Any luck yet? 🤞

nah real life has really been real lifing yesterday, printed some smaller stuff in the middle of the bed but havent had the headspace for another 6 hours of troubleshooting. will get back into it when i can

ashen robinBOT
#
This post has been closed due to inactivity.

This post has been inactive for over 1 hour and so has been closed. To reopen this post simply send another message.

ashen robinBOT
#
This post has been closed due to inactivity.

This post has been inactive for over 1 hour and so has been closed. To reopen this post simply send another message.

scarlet jetty
#

i think i need to look into the silicone mod or buy a new heated bed

#

it doesnt even look like it has bad squish it just doesnt fucking stick

scarlet jetty
#

handsoap worked

ashen robinBOT
#
This post has been closed due to inactivity.

This post has been inactive for over 1 hour and so has been closed. To reopen this post simply send another message.

cerulean roost
scarlet jetty
#

warping not peeling*

#

my fault for buying creality ender filament like 15 rolls in a row

cerulean roost
#

poggies ooooooo

It sticking!!

cerulean roost
ashen robinBOT
#

Warping can be a real issue, it can ruin the foundation of the printed part and its dimensional accuracy, leading to a potentially unusable part or a detached print.
Warping happens due to the shrinkage of plastic as it cools.

Here are some easy fixes:

  • Make sure that the buildplate is completely clean, refer to ?bedcleaning
  • Check if your bed is set to the correct temperature.
  • No or minimal part cooling for the first few layers, usually one or two.
  • Using a brim (or raft as a last resort) can ensure better adhesion to the buildplate.
  • Using an adhesive such as gluestick, hairspray or a specialized adhesive can be an easy and safe solution. This depends highly on the used buildplate material.
  • Be careful for ambient temperature changes such as opening doors, windows or the printers enclosure. A gust of cold air can throw off your temperatures enough to cause warping.
scarlet jetty
scarlet jetty
#

but i was lkike

#

"well... the brim doesnt stick... maybe i should just try printing without "

#

"lets also try using handsoap (forgetting that dish soap is recommended)"

#

low and behold xd

cerulean roost
#

i use handsoap too lol

scarlet jetty
#

haha

#

should be less of a problem soon, starting to get warmer (plus a bedroom i spend all day in with a 3d printer and an AMD gaming pc right next to it gets a bit warm)

#

if i get to the point where i really want an enclosure or more specific cooling (and maybe extractors/purifiers so im not breathing in plastic while sleeping...) ill look into a K1 or an X-Plus 3 (or... 4 now?)

cerulean roost
# scarlet jetty if i get to the point where i really want an enclosure or more specific cooling ...

....nah just build one.
Cardboard box or trash bag'll do with supervision.

Sv06 need to sit on a 45 degree angle on a lack table and could benefit from 10cm of extra space at the back ablobwink
You'll want some tpu vibration dampeners as well.

Also crank that pc for some warmth.
Sheepit is great way to do so as well btw..

I can get about +8 over the other rooms with 3 pcs and a printer running full ball....and the windows with hot sun.... blob3cevil
Not a competition sorry... 😅

Glad it sticks now!! Enjoyyyy!

ashen robinBOT
#
This post has been closed due to inactivity.

This post has been inactive for over 1 hour and so has been closed. To reopen this post simply send another message.

scarlet jetty
cerulean roost
# scarlet jetty uhhhhh wow okay fair, perhaps, ill look into it before spending 500 quid it ha...

yes, it'll be half the price!
yay! gotta have that space!

sheepit is a crowdsourced render farm where you can get your blender project rendered for free, after rendering some frames in return. good production pc stress test. (you get a preview of all you render.)
imagine cinema4d benchmark... but you are also helping people!!!

yah, i'm tempted to pipe my pc heat into my enclosure... but it's already warm enough on it's own... heated bed make the enclosure hit maybe 5-10 warmer than outside.

CatWave

#

For your interest.....

Screen and octopi in a draw each 👌

scarlet jetty
#

hell yeah nice setup <3

#

just spent literally 15 mins looking through 100 servers to find what the hell was pinging me and it was reactions here 😭