#Fast Ender Build
1 messages · Page 6 of 1
 weak imp

 covert wagon
looks good
do you have strain relief for the cables
well ig you can zip tie to the duct
 pallid laurel
I love these super fancy looking toolheads and then you have to loop zipties around everything because easy strainrelief wasn't on the designers list of requirements
weak imp
They acc have that cadded in lmfao
I believe then it maybe hits the cpap thing
What abt this spacing
There’s only .3mm from a pin to the nozzle in z height
 zealous wraith
weak imp
There’s only .3mm from a pin to the nozzle in z height
Your nozzle tip should be on the same plane as the green bit
zealous wraith
weak imp
And I assume the red bit is where there can’t be like any metal
Yeah but it's more of a suggestion
Not the end of the world if there is metal in there
weak imp
Okay
 limber laurel
zealous wraith
Not the end of the world if there is metal in there
static*
moving metal in the keepout will be very annoying
weak imp
Back from Scotland so I might work on this perhance
weak imp
I bought some abs-gf and pa6-cf
weak imp
weak imp
I bought some abs-gf and pa6-cf
These bambu sales are crazy
weak imp
I’m at the point where I’d pay someone like $30 to cad a decent toolhead
should i just go bowden with the boombox
that would make life sm easier
weak imp
weak imp
I’m at the point where I’d pay someone like $30 to cad a decent toolhead
if anyone wants to?
limber laurel
what's wrong with the current ones?
weak imp
all overcomplicated
kevins just look so simple
ive tried using breackneck but its bad
uap is weird too
ive tried cadding my own but i cant
weak imp
would it be dumb to print kevins toolhead out of pa6-cf
or should i use abs-gf
i have both now
ive decided to just use this
 covert wagon
weak imp
would it be dumb to print kevins toolhead out of pa6-cf
nylon creeps
use abs
weak imp
Bambus website says it’s good for stuff that needs to vibrate
weak imp
covert wagon
nylon creeps
I mean it’s not like it’s under lots of load tho
covert wagon
belt tension
it won’t be able to handle it
just use abs-gf
it’s lighter weight
and better
weak imp
covert wagon
belt tension
What if I use abs for that part
weak imp
covert wagon
and better
So what do I use my pa6 on
zealous wraith
weak imp
ive decided to just use this
not this one
this is old
like, really old
weak imp
zealous wraith
not this one
Soo I should use the server fan one?
zealous wraith
weak imp
Soo I should use the server fan one?
Sign in to Onshape, the #1 fastest growing CAD system in the world with over 4 million users.
this is the most up to date one
weak imp
zealous wraith
https://cad.onshape.com/documents/7d1e1c9f03629db48e8db3d1/w/f92eb893a102a281200...
It looks the same but with 2 more fan mourning points and the canvection
zealous wraith
weak imp
It looks the same but with 2 more fan mourning points and the canvection
Sign in to Onshape, the #1 fastest growing CAD system in the world with over 4 million users.
it also uses the new belt mount
and klack probe
zealous wraith
zealous wraith
weak imp
Oh I adapted your old belt mount for bltouch
why are you using bltouch
klack is pretty much free and better
zealous wraith
bltouch rattles and vibrates at high accel
the only thing you need to do for klack is print some parts and get some 6x3 magnets
and for the switch you can reuse the Z limit switch
weak imp
zealous wraith
bltouch rattles and vibrates at high accel
This is true
When I removed it my shaper graphs got so much better
weak imp
zealous wraith
and for the switch you can reuse the Z limit switch
I lost mine
weak imp
I did
zealous wraith
so you lost all your limit switches?
 wraith fulcrum
Wiring is just two wires
covert wagon
weak imp
But the x and y are on a pcb
you can take em off the pcb

 zealous wraith
weak imp
The klack ender says you need a rly specific probe tho


You can just cut it off
 hardy steeple
It would have almost zero rigidity
The purpose of a rail and extrusion is to provide a means for alignment and rigidity on the axis. Belts can twist very easily unless under super heavy load, so they’d be unable to support the weight of a toolhead in any way that could be used on a printer
covert wagon
weak imp
Linear rails don’t limit speed
At least not noticeably
They provide rigidity and keep everything in place
With just belts it would be bouncing all over the place
I mean I guess if you ran like double 20mm belts it might kinda work but good luck doing that lmao
Resistance is negligible from the rail
But if you want you could spend a couple thousand on air bearing linear guides
weak imp
It was js a dumb idea I had
weak imp
Bought everything for Kevin toolhead and y axis with 9mm belts
I’ll have to make my own y axis belt mounts cause I always fuck up drilling
But this don’t have to be super aligned so maybe it’ll be fine
 weak imp
Hotend fans and bolts come Saturday the rest from Ali comes aug 1st
Goal is just a fucking working 3d printer
I’ll go 9mm for y axis too
Maybe
I can’t copy Kevin’s cuz of my carriage mounts
 limber laurel
m3 because m3 fits
 hardy steeple
I used M4 with a nut
M3 you’d need a washer but you can use it
If you don’t have M4
weak imp
so i can put an m4 heatset here
hardy steeple
I mean you could if the OD of your heat sets fits the hole 🤷♂️
Idk what size your M4 heat sets are
limber laurel
weak imp
but this is 4.5
not there, the printed part, m4 heatsets are thicker
why waste space and weight doing m4?
might as well just skip the heatsets and ziptie them or make snapfit
weak imp
Damn this abs gf part feels weird to touch
pallid laurel
Its made for m3 heatset inserts
weak imp
i build kevin toolhead with ONLY the fans
cant even do 500/500k
new motor time probably
what do i get
i have the omc 48mm
weak imp
also wow these 5015 fans suck
my cpap has sm more
aux cooling time
cause this is BAD
weak imp
weak imp
what do i get
?
 zealous fox
weak imp
i build kevin toolhead with ONLY the fans
the hotend contributes to the com
weak imp
Okay but what motors should I buy
weak imp
But eh I mean leadshines won’t give me better quality
Just a faster benchy which is useless

 zealous wraith
It's missing the hotend and extruder, and that's not how ur supposed to attach the accelerometer
limber laurel
the adxl itself is the problem
weak imp
Why
pallid laurel
sees its own vibrations if its not securely mounted
zealous wraith
weak imp
Anyway it’s nice to see it move again after not in months
You also need to install cross feet. Shaking front to back like that destroys Y shapers
weak imp
Okay I’ll js go pla for those should be good
weak imp
zealous wraith
You also need to install cross feet. Shaking front to back like that destroys Y ...
does the carpet matter
zealous wraith
weak imp
does the carpet matter
Yes
weak imp
like its better?
weak imp
incase anyone cares i made a thread for a 10 day 3d printer cad attempt :)
looks like this so far

 hardy steeple
Well to be fair Kevin just found it as a random CAD on OnShape and didn’t make the original design
Was clearly heavily based on Stinger toolhead
weak imp
hardy steeple
Well to be fair Kevin just found it as a random CAD on OnShape and didn’t make t...
Bro what
I thought he fully made it from scratch
hardy steeple
Nope. Was some random CAD he found because OnShape makes all your work public unless you pay for it
He modified it for duct length and some other minor changes
But it was basically 80% ready when he found it
weak imp
Wait that’s crazy lmfao
I remeber Kevin said he wasn’t great at cad and I was thinking “how’d he cad THIS”
hardy steeple
Well he got better at cad and some of the stuff now is a lot better but that toolhead was one of the first things IIRC
pallid laurel
Pretty early in kevins hero arc
weak imp
I’m ngl, I might cad a 3d printer to get benchy wr
Like 50mm bed
Bowden
Only aux cooling
Awd everything
48v
Wouldn’t that basically be guaranteed
 low whale
Yup

 spice warren
weak imp
would i need 9mm belts for x
9 for sure
hardy steeple
weak imp
Like 50mm bed
If you’re going for WR benchy you only need a bed as large as the base of the benchy which is only like 30mm
Doesn’t need to be as wide as the full thing
weak imp
well yes but the belt
weak imp
hardy steeple
If you’re going for WR benchy you only need a bed as large as the base of the be...
OHH YEAH
ill get that later though the bed is easy to change
hardy steeple
You only need the base to stick so the rest can hang off the sides but yeah
weak imp

this is it rn
planning to use boombox
awd x and y
48v
to be honest this will probably never be built but maybe
 zealous fox
with ducts tho
zealous fox
tou still need ducts to direct the air
hardy steeple
Kevin is using open “ducts” to direct the aux cooling down towards the nozzle
weak imp
yeye i see
i could just go abs so less cooling though
sureley for a benchy u dont need too much cooling
hardy steeple
ABS or PC-ABS are generally the best for speed benchy since they’re very rigid when printed and get a lot of flow but they still need a ton of cooling when you’re stacking layers in seconds or less at a time
weak imp
ill figure cooling out later
motion system is harder

his is only 1 motor per axis
i want 2
cuz why not
hardy steeple
Money probably
weak imp
i mean id gladly pay $50 more to get the edge over other people
cuz u also need more drivers
hardy steeple
A single 48 N17 will easily move a bed that small but I mean it can’t hurt to have more
If all-out is what you’re going for then yeah do 5 motor
weak imp
ah
cute lil 150mm rails
i wanna put the tensioner on the bed but i know thats bad cuz it just adds vibro
hardy steeple
Yeah it’s just extra bulk on the bed, not really any reason to do it
weak imp
would make motor mounts easier to cad
i wonder how much this whole thing would cost
i think like 300
but if im spending $300 i BETTER get the wr
hardy steeple
I mean you might be able to save some money if you hack saw some longer extrusions
Since you’re going so small lol
weak imp
Do u think id get wr
hardy steeple
I mean as it stands right now I think it’s just that anybody who is the first to build a tiny purpose build bed slinger would probably take it
weak imp
Sooo me if I make this then
hardy steeple
The T250 record is impressive but it still honestly an inferior motion system for speed
weak imp
weak imp
looks like this so far
I mean this thing could too but it’s not beating Kevin’s new one
hardy steeple
The fact somebody took WR with a CoreXY is impressive but Kevin was also barely trying
weak imp
Well yeah
The custom printer I cadded is a small bedslinger but I think this tiny one would get it
I guess it’s just, is the satisfaction worth $300
hardy steeple
I mean it’s also a hobby project for the next couple months and if that’s what you enjoy I don’t see anything wrong with that if you’re not strapped for cash
weak imp
I mean that would be my 3rd printer build at the same time
Ender, custom one, and this 
But I mean wr would be so cool
I’ll cad the y motor stuff tn
Yes it’ll look just like Kevin’s
weak imp
ok maybe ill steal kevins
y axis
this is unironically harder
and im a lazy mf
might as well take his toolhead too
but that feels wrong if i got wr with HIS stuff
 weak imp
x axis is gonna be a pain to cad

made tensioner 9mm
i should make a new thread
#1398014751790858370
weak imp
weak imp
x axis is gonna be a pain to cad
WAIT IM A GENIUS
IF I MAKE THE X AXIS OUT OF 2040 I CAN USE THE Y AXIS MOTOR MOUNTS FOR THE X AXIS
WAIT AND THEN THE 9MM BELTS WILL FIT

it just needs a z axis
any ideas?
hardy steeple
What is the motive for making the X a 2040 extrusion? Is it so you can pass the belt through the middle? Or just so you don’t have to design anything?
zealous wraith
weak imp
2. it lets me use 9mm belts so it can go through
it doesnt
at least not with this design
weak imp
R u sure?
zealous wraith
weak imp
R u sure?
for the X axis id just remake it and put the tensioner on the toolhead
weak imp
8500rpm fans came
 pallid laurel
Any mains voltage bits on the printer?
weak imp
nope
weak imp
weak imp
I never ordered this
Bro they gave me this instead of the micro switch
weak imp
Wow my P1S js prints everything amazing
Abs gf

Motor mounte
Would making the belt tensioner out of pa6 cf be dumb cuz creep
low whale
Yup
spice warren
weak imp
my pulleys are stuck on the shaft
heat
weak imp
spice warren
heat
Like how so
wraith fulcrum
weak imp
Like how so
Torch?
weak imp
weak imp
my pulleys are stuck on the shaft
I used a hammer to get the 9mm on
weak imp
POS
cant even do 800/50k with bed
x axis cant even do 700/1mil with just the stepper
is it 48v time
weak imp
ok thread revival time
goal is a print done by the end of tn

this is WITH kevin toolhead
why is it still so shit
zealous wraith
how are you mounting the adxl? you can see the peak is clean but it's vibrating in the Y axis too
also, this is a lis2dw right?
weak imp
yep
weak imp
zealous wraith
how are you mounting the adxl? you can see the peak is clean but it's vibrating ...
OHHHHHH FUCKKK
WAIT
I HAD IT AT A 45 DEGREE ANGLE
zealous wraith

weak imp
vibro is still super high though
zealous wraith
weak imp
I HAD IT AT A 45 DEGREE ANGLE
how the hell are you mounting it
 weak imp
yeah
but it doesent fit straight
it needs to be at the angle
i think i just suck it up and go with what it gave me probably
zealous wraith
honestly, just dont look at the vibrations
zealous wraith
I think there's something wrong with the testing setup
weak imp
ive had super high vibro on every single toolhead ever
thats why i spend $60 on the kevin toolhead
zealous wraith
try just using 81hz mzv
zealous wraith
yeah. id print with it and see if there's any ringing
weak imp
goal is a voron cube by tn
zealous wraith
bc this matches what I get amost exactly, except I have 0% vibro
weak imp
oh deadass?
zealous wraith
so there's probably something wrong with the lis2dw setup
weak imp
i fianally did something right
yay
its a little sad cuz its no longer my printer
its ur design
but yours is better tbf
i spend god knows how much just to go back to your shi
weak imp
great minds think alike
weak imp
@zealous wraith what is ur PA value
weak imp
and input shaper for y
zealous wraith
weak imp
<@923867578219237396> what is ur PA value
Depends on the filament but ~0.02
zealous wraith
weak imp
and input shaper for y
79.6hz mzv

 zealous fox
um
zealous fox
but heat radiates out
 proud wagon
weak imp
And at some point I’ll use pa6 cf
thats gonna creep
zealous wraith
Let him cook 😂
weak imp
hardy steeple
weak imp
why are mfs always on abt creep
Theres a reason why ducts usually aren’t that close to the nozzle but okay let you cook
weak imp
Okok
 minor shell
Vid? @weak imp
pallid laurel
weak imp
im gonna print the canvection
God damnit you don't even have a deposit on your cans
Do you want a molten mess? Thats how you get a molten mess
weak imp
pallid laurel
God damnit you don't even have a deposit on your cans<:feelssobman:3937838652415...
i have a can
its just hard to use
pallid laurel
weak imp
i have a can
scissors can cut cans and you even have a printed template
weak imp
ill stick with this for now
its printed some items and its fine so far
i cant even do like
450/40k tho
its kinda ass
weak imp
minor shell
Vid? <@860870378224877619>
cant rn
but basically quality isnt great
and it like lifts off the plate sometimes
and its not rlly fast
kinda disapointing i spent this much money just for it to be bambu level speeds
minor shell
No rush
proud wagon
weak imp
but basically quality isnt great
LMAO

 proud wagon
weak imp
Shut up fry
 hardy steeple
Really think you guys just need to block each other and move on
 past wigeonBOT
@proud wagon
fry3000#0 please see the rule below:
Rule 2
Be excellent to each other. First, be kind. Be helpful. Keep all feedback constructive and framed positively.
Sent by: derragon#0
 split creek
If you don’t have anything constructive or positive to say, keep it to yourself, thanks.
I see a history of popping in here and being a general ass, making this warn long overdue
hardy steeple
 weak imp
Yes but it’s hard to cut
covert wagon
weak imp
Yes but it’s hard to cut
but printed shield will melt
you can cut soda can with scissors
weak imp
im kinda limited by flow rn
and max speed
i can only realistically print at like 300/20k
 pallid laurel
Nice
 pallid laurel
I mean tune max vol flow🤷
weak imp
Other part is I don’t have the 80w heater yet so it cools down to 195c
And at 195c I’d imagine flow sucks
weak imp
But PETG is less flow
But jeez
30 is disappointing
What’s also disappointing is how my y axis isn’t as fast as it was with 6mm belts
Tops out at like 700/60k

Impressive detail tho for 10k outer walls
zealous wraith
weak imp
you can see it shaking all over the place
you need to put it on something better than carpet
weak imp
zealous wraith
you need to put it on something better than carpet
Like what
Prolly smth solid I think
Idk
 halcyon tiger
a concrete paver is a common one
weak imp
Oh wait I actually might have a spare one
hardy steeple
A paver on carpet would work pretty well. It gives even dispersal of pressure across the printer
weak imp
weak imp
Oh wait I actually might have a spare one
From this table I made like 6 years ago
 heady kestrel
Bolt printer into the floor 
weak imp
Anyway thank you so much to like all of you guys along the last like 9 months helping me with shit
weak imp
heady kestrel
Bolt printer into the floor <:5Head:528729064299692042>
This might be meta
hardy steeple
heady kestrel
Bolt printer into the floor <:5Head:528729064299692042>
You mean you don’t encase the base of your printer in solid concrete? Amateur
zealous wraith
weak imp
Like what
anything that makes it so that it doesnt rock back and fourth
halcyon tiger
hardy steeple
You mean you don’t encase the base of your printer in solid concrete? Amateur
you mean you dont get a entire machine base casted and machined out of Iron or Granite?
weak imp
That’s what cnc machines do
weak imp
Don’t they like fill their extrusions with cement
heady kestrel
You don't have a robot arm as printer that's bolted with 24 M18 bolts into a 5000kg solid steel base? 
halcyon tiger
thats a cheap way
hardy steeple
V-chonk but the entire base is a solid CNC block of steel
weak imp
I feel like a cnc machine would be a fun thing to have
covert wagon
hardy steeple
V-chonk but the entire base is a solid CNC block of steel <:vaulthah:59778724181...
There’s a bed slinger that did this
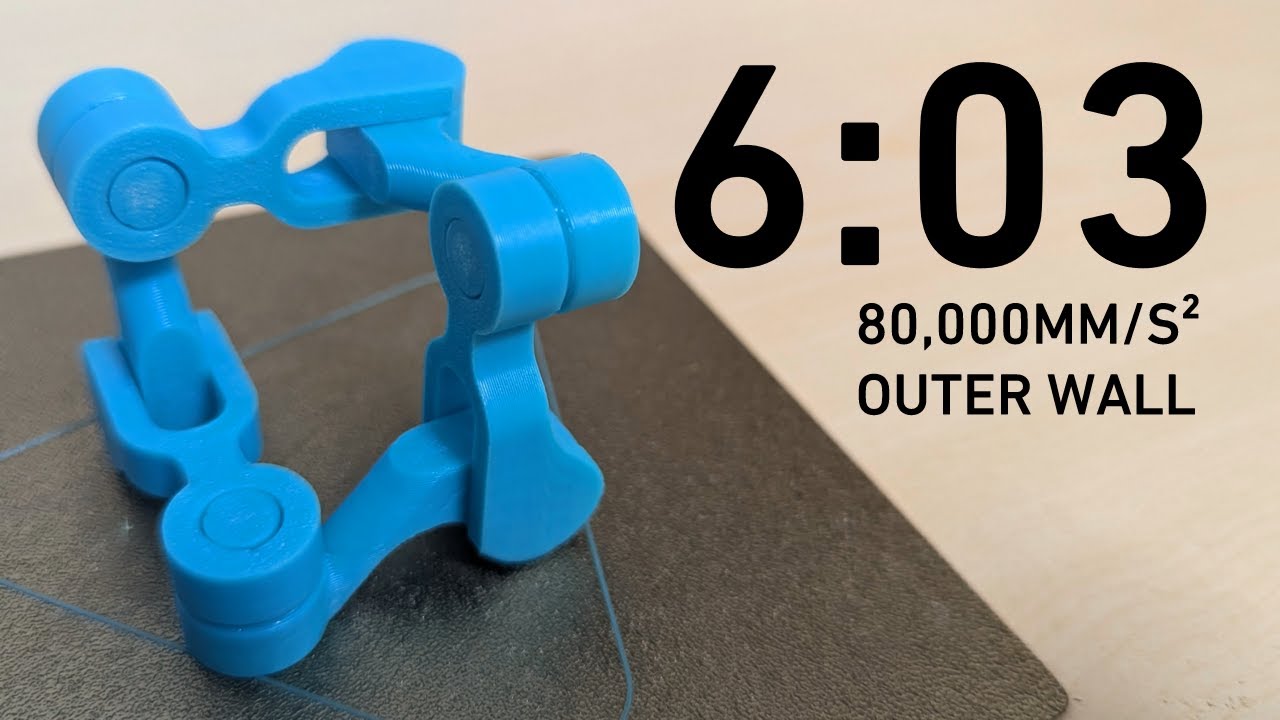
Paticipating in @Rolohaun Discord's challenge with a fast bedslinger!
Stormwalker 120 is a 3d printer focused on rigidity and bed center of mass, resulting in very high input shaper recommended acceleration (86kmm/s^2 on Y, 63kmm/s^2 on X).
Thus, the outer wall of the model can be printed at a whopping 80kmm/s^2 acceleration, and still preserve...
 low whale
covert wagon
It’s all cadded in blender
covert wagon
low whale
It’s all cadded in blender
i saw that
could be worse but
why do that to yourself
 covert wagon
i would argue it is that bad
onshape is free
idk i know people who unironically use Roblox studio as cad so
hardy steeple
covert wagon
I mean I see it being possible to get relatively close to this with just a drill but I’m sure a CNC makes it way easier
covert wagon
hardy steeple
I mean I see it being possible to get relatively close to this with just a drill...
drill would really struggle with alignment and tolerances id think
hardy steeple
Yeah of course. Wonder how much it would cost to get somebody locally to drill press it
Also that X gantry is nuts
Double rail
heady kestrel
Print a template, Drill using the template, You can get prety close tolerances depending your template :d
hardy steeple
I mean depending on application the tolerances don’t matter TOOOO much
Motor alignment maybe but linear rails you better not mess that up
covert wagon
hardy steeple
Also that X gantry is nuts
the hotend is certainly something aswell
lemme try and find a photo
It’s a tz v6 with this screwed into it

And there’s the flat ceramic heaters literally kapton taped to it
hardy steeple
covert wagon
It’s a tz v6 with this screwed into it
?itworks
past wigeonBOT
covert wagon
It’s a tz v6 with this screwed into it
 covert wagon
lol
weak imp
covert wagon
idk i know people who unironically use Roblox studio as cad so
Holy shit
weak imp
ok silicone sock fixed that
low whale
Logan pls cable manage a little 😭
weak imp
wait i could see this thing being really good for prototyping
 weak imp
weird i only get 160mm of y axis build area
i think i gotta rotate my extrusion 180 degrees
160x200mm build volume is shit for a 235 bed
 covert wagon
weak imp
weird i only get 160mm of y axis build area
Buy a longer extrusion
Maybe?
You should be getting like 200-220
zealous wraith
covert wagon
Buy a longer extrusion
You just shift it forward
I get full build volume
100%
covert wagon
Close enough
covert wagon
weak imp
its about 40% faster than my p1s
Hell yeah
Now just buy zip ties 🙏
You can even door dash them
weak imp
Kinda great quality

Esp for 10k outer walls
I wish I could go faster than 300mm/s but it’s whatever
weak imp
but jeez this printer is so nice for rapid prototyping
weak imp
.25 tolerance
hardy steeple
Not bad for the speeds
weak imp
True
weak imp
wait my y cant even do 500/50k
zealous wraith
weak imp
wait my y cant even do 500/50k
did you sync the motors
weak imp
Yes
zealous wraith
the only other thing would be the rail alignment
weak imp
80w heater came but I’m far too lazy to install it
weak imp
 low whale
weak imp
ayy starting to look better
what me and kevin do to keep it up is

hook this to the clip and attach to the top x extrusion
weak imp
clever
weak imp
I still have some ringing but im too lazy to fix it
weak imp
Also the printed convection is picking up filament
So prints aren’t great
Time to print a fresh one
covert wagon
weak imp
Time to print a fresh one
soda can
covert wagon
weak imp
im lazy
how is constantly reprinting it less work than cutting a can one time 
weak imp
hard to cut
low whale
you can use sissors
pallid laurel
Get a bunch of these kind of scissors
 halcyon tiger
is it a DIYd hotend or bought?
pallid laurel
No mk8 nozzles in that one, yes?

 halcyon tiger
after tight comes loose and after loose comes work
weak imp
I don’t know if this was a cht
limber laurel
that bore is pretty big to not be
weak imp
True
 wraith fulcrum
 pseudo isle
You still got that picture of your snapped heatblock
pseudo isle
which one
wraith fulcrum
The mze one
pseudo isle
which mze one
lol
still kind of how the printer looks ngl
not a snapped heatblock now but a nozzle
weak imp
Amazon sent me extra nozzles for some reason
So now I have 30 hardened steel volcano nozzles for $6
pallid laurel
Time to make a DIY big bore nozzle
zealous wraith
pallid laurel
Time to make a DIY big bore nozzle<:vaulthah:597787241812852736>
Drilling HS doesn't sound too fun, but at least there's a pilot hole
pallid laurel
Not with that attitude
weak imp
Print quality is utter shit now
It used to be perfect


ohh
i think its a lack of flow
cause im not using cht
halcyon tiger
zealous wraith
Drilling HS doesn't sound too fun, but at least there's a pilot hole<:vaulthah:5...
Did tapped Hardened steel in the past, the tap did 3 holes until it was dull and cost 120€
halcyon tiger
weak imp
i think its a lack of flow
Usually gives different artifacts
weak imp
So what is this then
weak imp
@zealous wraith how much flow does ur tz give you
weak imp
Are theee nozzles just shit that I got
pallid laurel
🤷
weak imp
Would that cause inconsistent surface finish
pallid laurel
Did you increase temp for hardened steel?
pallid laurel
Like 20ºC extra
weak imp
Pla at 250??
halcyon tiger
thats fine
past wigeonBOT
Premise
Experimental investigation on effects of fabrication temperature on mechanical properties of FDM parts is presented. Specimens fabricated at temperatures ranging from 180 to 260 ∘C were used for this investigation.
TLDR:
PLA has been shown to benefit from printing at elevated temperatures, even as high as 260C. Some of these benefits include higher density, lower internal porosity and improved interlayer adhesion. These benefits amount to a stronger part.
Caution:
Take care before exceeding 225C to ensure your machine and hotend are up to the task. Stock machines usually are not safe above these temperatures due to a ptfe lining see ?ptfe-temps for more info.
?platemps requested by: m.von.d#0
halcyon tiger
you also melt at higher volume means it wont actually reach that temperature
weak imp
weak imp
Okay I’ll try that for the last half of this benchy
Didn’t work
I mean
The prints come out like shiny
weak imp
weak imp
Maybe the filament is wet
Nope
Hey wait

These look 2 different fucking sizes
weak imp
I bought a $3 brass cht
weak imp
It finally came and it prints
This one seems to have slightly more flow so I might be able to push speeds more
My motion system is still slow for some reason but I think I’m still flow capped
weak imp
Still has weird surface texture but it’s not that bad
 hardy steeple
Looks like extrusion inconsistency to me

Looking to spots like that where the lines look very inconsistent stacked likely due to extrusion
weak imp
hardy steeple
Looks like extrusion inconsistency to me
Yeahh I’ve noticed the protoxtruder gears are kinda weird
The gear has so much play in it
hardy steeple
The small play in the gear shouldn’t be an issue when the filament is in there and has proper tension on it
The play is so that the gears can line up properly on the filament
weak imp
I meant the gear that goes on thr stepper

 zealous fox
send a video
weak imp
zealous fox
seems like a bearing died
zealous fox
weak imp
It was like that as soon as I installed it
If I could fix that though it would make my print quality better right?
zealous fox
are you using the large bearing version?
zealous fox
take it apart and inspect the bearings
weak imp
The hole for the bearing is too big
zealous fox
weak imp
The hole for the bearing is too big
show
weak imp
I’d have to disassemble the whole think
Thing
And also layer adhesion sucks for infill
zealous wraith
weak imp
The hole is too big
The hole is for a larger bearing. This extruder is for large bearing upgrade
weak imp
zealous wraith
The hole is for a larger bearing. This extruder is for large bearing upgrade
No this isn’t your remix
zealous wraith
zealous wraith
weak imp
No this isn’t your remix
Wym this isn't my remix
This is the tall version of protoXtruder right?
So that it fits the toolhead
zealous wraith
Yes
weak imp
Anyway Kevin what speeds do you print at
zealous wraith
I default to 500mm/s on everything, and each filament profile has its own flow limit
weak imp
What accel
zealous wraith
With 300 outer wall bc I find that to have the least VFA for the motors and drivers that I am using
zealous wraith
weak imp
What accel
10k outer 20k inner 40k infill
weak imp
I do 10k outer 30k everything and 330mm/s
1.5 sec min later time
Layer
But for some reason
Reducing my fan speed to 50% makes the infill actually stick
It’s so weird
I hope it’s just wet filament
hardy steeple
Yeah uh looking at the video that gear is not supposed to move lol
The gears that touch the filament sure
But that one definitely isn’t
So yeah seems like a dead bearing like 1mon said
zealous fox
dead? it’s missing
spice warren
weak imp
My y can’t even do 500/100k
Its definetly the rails, idk what else would be messing with it so much. You're in spreadcycle right?
weak imp
mhm
could also be shot motors
but ive basically accpted it
the prioject is kinda done
but
then again i getr layer shifts sometimes and its just 500/40k
weak imp
spice warren
Its definetly the rails, idk what else would be messing with it so much. You're ...
I mean I haven’t lubed them in a few months but they feel fine
weak imp
x axis cant even do 500/200k
HAS to be motors
maybe i should just rebuy the same ones
spice warren
weak imp
maybe i should just rebuy the same ones
Can always put the old ones on a future project
My 2104 will go in my ht printer
weak imp
I wonder what my future project should be
I really want one of the h series printers but an idex ender could be cool too
spice warren
weak imp
I really want one of the h series printers but an idex ender could be cool too
Build a cnc!
spice warren
weak imp
That’s so expensive
Mine will only be about 1000
Plus probably 500 in accessories
weak imp
And what are you gonna use it for
spice warren
weak imp
And what are you gonna use it for
Same thing I use my 3d printer for😂
Making parts for new machine