#how to reset settings on ender 3
1 messages · Page 1 of 1 (latest)
 supple dragonBOT
AI Help
It is important to ensure that your settings are properly configured for successful 3D prints. If your prints are not turning out well, irregular settings could indeed be a contributing factor. Consider comparing your settings with recommended values for your specific printer and filament type. Make sure your nozzle is clean and level, bed adhesion is sufficient, and your filament is loaded correctly. If you are unsure about specific settings, refer to your printer's documentation or seek help from the manufacturer or online resources. Regular maintenance and calibration can also help improve the quality of your prints.
WARNING: This response is AI generated and may contain errors.
supple dragonBOT
This post has been closed due to inactivity.
This post has been inactive for over 1 hour and so has been closed. To reopen this post simply send another message.
 steep jetty
 slate kite
Is the auto home fine if it’s a little off the bed?
If you provide more info us humans could give it s shot🤷 otherwise
supple dragonBOT
Is your problem solved? / No longer need this channel?
You can close a help channel with ?solved when it is no longer needed.
?close requested by: m.von.d#0
slate kite
steep jetty
If you provide more info us humans could give it s shot🤷 otherwise
What info do you need
My printer is a used ender 3
supple dragonBOT
slate kite
What info do you need
How to get the best help!
To get the best help please provide as much of the following information as you can.
Printer
  - Make:
  - Model:
  - Any Mods:
  - Firmware:
Filament
  - Material:
  - Brand:
  - Print Temp:
  - Bed Temp:
Settings
  - Any relevant settings:
  - What Slicer are you using?:
Printer Health
  - Calibrated XYZ?:
  - Calibrated E steps?:
  - Calibrated Flow?:
  - Calibrated retraction / Coasting?:
  - Have you hot tightened your nozzle?:
Any recent changes to:
  - The printer:
  - Slicer Settings:
  - Firmware:
Troubleshooting
  - What are you trying to do?:
  - What is it not doing?:
  - What steps have you tried so far?:
?help_me requested by: m.von.d#0
steep jetty
when? All the time? While printing?
slate kite
When I set it to home
steep jetty
Does it print where its supposed to?
slate kite
Slightly off centered
And I want to print a helmet that takes the whole space
So I need it accurate
Also it keeps failing because the nozzle was pushing the print
So I switched leveling
And it was working for a while
But then the nozzle messed up
I think this is something to do with the settings in the ender 3
I just need to know
What should the z offset be
Mine is set to 0
I don’t rlly know much about 3d printing
But that’s basically all I think is wrong
I also can’t find any tutorials (prob because I suck at finding them)
That solve the problem of z offset
Is that enough info @steep jetty
steep jetty
slate kite
Mine is set to 0
If you don't have a bed probe and auto bed leveling z offset is 0. For the nozzle being slightly off of the bed you can use a M206 command in the start gcode.
supple dragonBOT
Marlin Firmware
Use M206 to apply a persistent offset to the native home position and coordinate space. This effectively shifts the coordinate space in the negative direction. See examples below.
slate kite
steep jetty
If you don't have a bed probe and auto bed leveling z offset is 0. For the nozzl...
Can I ask Rq what’s the difference from a z offset and bed leveling
steep jetty
Also, this being a used macchine, check everything for rigidity, check belt tension, the axis wheels
supple dragonBOT
V Rollers
Vslot rollers are on most of the popular budget printers such as the ender 3 and other v-slot based printers. Your printer should have come with a wrench that is able to adjust the eccentric nut that increases the tension of the wheels. Usually on a plate with 3 wheels, only one can be tensioned, and on a plate with 4 wheels (usually the Y carriage) there are two wheels that can be tensioned, you can see which ones need to be tensioned by looking for eccentric nuts (Labeled in drawing below).
Vslot rollers should be tensioned and checked as a part of your frame check before you fire up your 3d printer. They should be tightened until you are able to turn the wheels with your fingers with a little friction, but not too tight that they are too hard to turn at all (failure to do so will result in quicker wear and tear of your Vslot wheels, certain printing artifacts and excess strain on the stepper motors ).
Make sure to check that all your Vslot plates and carriages are free from wobble along the X, Y and Z axis wherever your printer uses Vslot rollers. You should check these regularly to clean them of dust snd to see if the rubber is worn, if so, they should be replaced with new ones.

?vrollers requested by: m.von.d#0
slate kite
I leveled my bed with a business card to be able to fit through
slate kite
steep jetty
Also, this being a used macchine, check everything for rigidity, check belt tens...
I fixed belt tension already
steep jetty
slate kite
I leveled my bed with a business card to be able to fit through
no, paper...
supple dragonBOT
Leveling Your Printer
Here is a handy infographic that will help with levelling your printer.
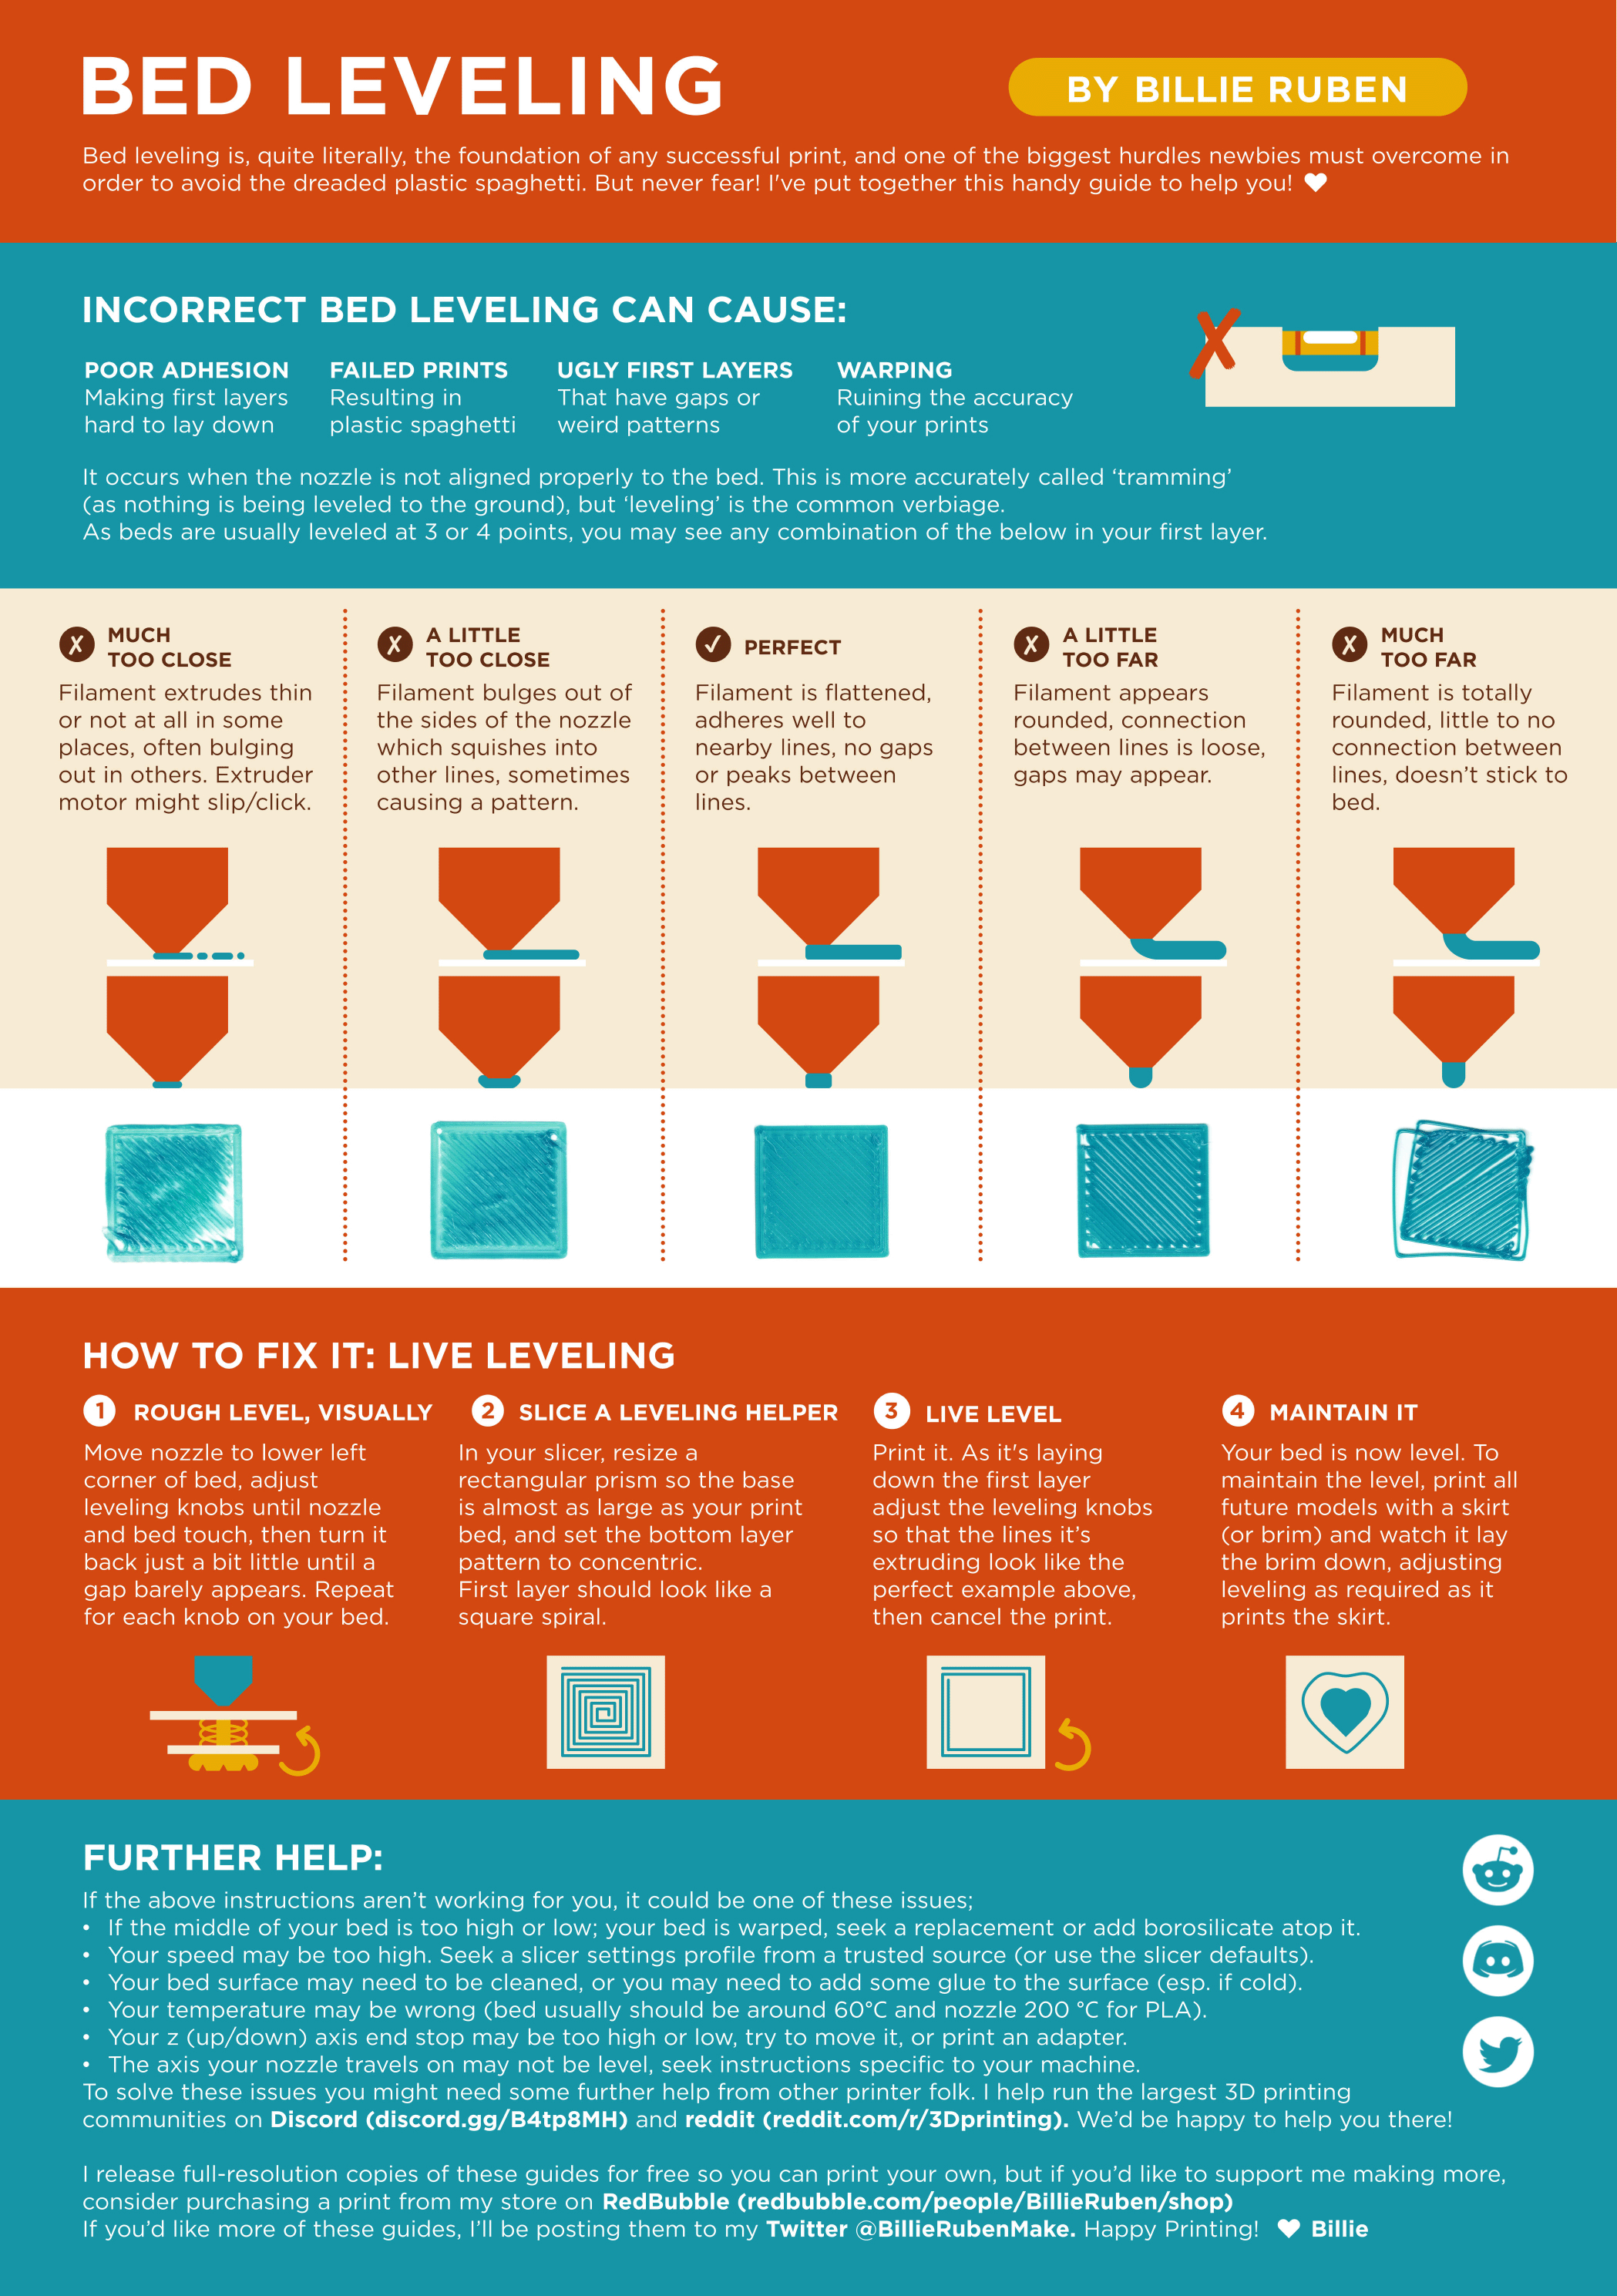
?leveling requested by: m.von.d#0
steep jetty
slate kite
Oh a vid told me to do with a business card
My brain autocompleted to credit card, sorry
slate kite
Oh
slate kite
supple dragon
Mine looks like the rightest
steep jetty
Business card should be fine
steep jetty
slate kite
Mine looks like the rightest
Thats not right
steep jetty
?firstlayer
supple dragonBOT
The first layer is quite literally the foundation of a successful print. These are some of the things to keep in mind:
- Wash your print surface with dish soap and water, refer to
?bedcleaning.- Ensure your printing temperatures are appropriate. For PLA, the ideal bed temperature is 55°C-60°C. If the lines appear to come out "gummy" and forms clumps, raising the nozzle temperature may help. Calibrate your nozzle temperature by printing a temperature tower. Refer also to
?platemps.- Relevel your bed and ensure your nozzle distance is equally spaced at each corner, refer to
?paperlevel. If your printer is equipped with a bed meshing probe such as a BLTouch or CRTouch, make sure your Z-offset positions the nozzle close enough to the bed, refer to?z-offsetfor additional information. If your printer has automatic Z-offset calibration, make sure the nozzle is clean while the calibration runs.You can confirm that your leveling and Z-offset is correct by observing your first layer extrusion by printing a full layer test: Printables, Thingiverse Refer to
?levelingfor help with the interpretation of the results.
- Ensure the nozzle is not colliding with the print. This usually presents itself as loud noises and layer shifting. Some causes may include overextrusion, insufficient cooling, mechanical Z axis issues, or insufficient Z hop
- For warp-prone materials such as ABS, Nylon, Polypropylene and others an enclosure is recommended, ensure ambient temperatures are high enough (40°C+) and stable. Consider using a specialized bed adhesive.
slate kite
supple dragon
The first layer is quite literally the foundation of a successful print. These a...
I cleaned my bed with rubbing alcohol like a video said
The temp seems right too
If I make the z offset a little higher will that help?
So it doesn’t mess up the print?
steep jetty
slate kite
It got better
For leveling tighten all bed screws fully, turn back two turns. Bring the nozzle down on the bed on the front left (you might have to move the z endstop switch up or down to get it down or not crash into the bed while homing. Then start your leveling around the bed
steep jetty
slate kite
I cleaned my bed with rubbing alcohol like a video said
Water/dishsoap
slate kite
Ok
slate kite
steep jetty
For leveling tighten all bed screws fully, turn back two turns. Bring the nozzle...
Turn all right or left?
steep jetty
If it looks like the right in the graphic your nozzle is too far
steep jetty
slate kite
Turn all right or left?
Tighten. Righty tighty lefty loosy. Bed should go down as the springs compress.
steep jetty
slate kite
So make it closer?
Make it right😁
slate kite
You fold the paper right?
steep jetty
No
slate kite
Oh
steep jetty
?paperlevel
supple dragonBOT
While often recommended paper "leveling" also often causes issues for people. The reason is simple - it is a very inaccurate way of levelling your bed. Theres no defined units, you're working off feel alone, and that is highly subjective. It's not easy to explain through words - "just scraping the paper" can mean something to one person z and something completely different to another.
What paper levelling is useful for, is getting the bed at the same height away from the nozzle in all four corners of the bed. As long as you can consistently make sure you have the same amount feel for each corner, your bed should have minimal tilt in relation to your gantry.
It may be higher than it should be, it may be lower than it should be. But you can easily correct that - print something, look at the first layer, and just adjust the levelling knobs accordingly. Since your bed should not be tilted anymore, you can easily turn each knob, in the exact same increments to raise and lower it, or adjust Z offset on your machine or slicer. This of course, assumes your bed is not warped.
slate kite
Vids keep lying to me
steep jetty
Technically it doesn't matter because you should always judge by a testprint
slate kite
I still don’t get how the paper is supposed to feel when the nozzle is above it
Like not at all
Or barely
Or it moves the paper
steep jetty
slate kite
I still don’t get how the paper is supposed to feel when the nozzle is above it
I personsly go by "can be pushed under the nozzle without folding itself"
slate kite
Because mine slightly moved the card
slate kite
steep jetty
I personsly go by "can be pushed under the nozzle without folding itself"
So it just doesn’t wrinkle?
Alr
Ima retry
Tysm
Index card works like reg paper right?
steep jetty
when you home make sure the nozzle does not crash into the bed first
slate kite
It doesn’t
It did before
Ima try index card it is less thick
Wait rq
I have no idea if these settings stay the same
I may have switched one of these by accident
Do they save
Or is it a one time thing
woah that’s weird
It doesn’t go over the index card
Or the businesss card
I guess I moved it by accident
Ima figure this out tmrw
steep jetty
slate kite
I guess I moved it by accident
Just stay away from x/y/ steps
slate kite
Is there not a way to completely reset the printer settings?
steep jetty
slate kite
I guess I moved it by accident
Also if it has the stock springs under the bed: Those are garbage and do not exert a lot of pressure
slate kite
Like a factory reset
slate kite
steep jetty
Also if it has the stock springs under the bed: Those are garbage and do not exe...
That’s prob why
slate kite
Ok
supple dragonBOT
Marlin Firmware
Reset all configurable settings to their factory defaults. This only changes the settings in memory, not on EEPROM.
steep jetty
By putting it in a .txt file, renaming that into a .gcode file, put it on the sd card and "print" it
slate kite
Thanks so much
I thought I wasn’t gonna get help from this discord server
The ppl in quick questions ignored me when I just asked if it’s ok for my nozzle to be off the print bed when at its home
slate kite
steep jetty
By putting it in a .txt file, renaming that into a .gcode file, put it on the sd...
wait what do i put in a text file
where do i copy

this?
ima guess it is

this is how it looks
slate kite
steep jetty
By putting it in a .txt file, renaming that into a .gcode file, put it on the sd...
now what
@steep jetty
its in printing stage
do i just cancel?
slate kite
yea it looks like it worked
it didnt heat up or anything
so im guessing it read it
ok im leveling it tmrw
steep jetty
good luck
supple dragonBOT
Troubleshooting
A number of troubleshooting guides exist online:
• Simplify 3D Print Quality Troubleshooting
• Rigid Ink Print Quality Guide
• Institute of 3D Printing Cheat Sheet
?troubleshooting requested by: m.von.d#0
Calibration
Calibration and tuning can help with all aspects of print quality.
Extruder calibration should be done only once, and then again if you change any hardware on your extruder setup (new tube, gear drive, different motor, etc).
Flow calculation should be done for every filament, even different colours from the same brand.
A number of calibration and tuning guides exist online:
?calibration requested by: m.von.d#0
steep jetty
those are for tomorrow then 😄
supple dragonBOT
This post has been closed due to inactivity.
This post has been inactive for over 1 hour and so has been closed. To reopen this post simply send another message.
slate kite
Ok so I’m leveling it rn
Ima record and you tell me how much the paper should be touching the nozzle
steep jetty
slate kite
Ima record and you tell me how much the paper should be touching the nozzle
Its feel. Doesn't translate to video all that well
steep jetty
The important part is, that its equal and you do at least three rounds around the bed
slate kite
Should I use the bottom left or top left
slate kite
steep jetty
The important part is, that its equal and you do at least three rounds around th...
Oh ok
The front left is higher but there’s still a little bit of contact
That’s good right?
steep jetty
slate kite
Back left would be preferred by me
slate kite
Oh ok
steep jetty
slate kite
The front left is higher but there’s still a little bit of contact
Equal everywhere. Remember that this is Z= 0 mm for the printer. For the first layer it moves up by the layer height (for example 0.2 mm) from there
So if it has only light contact on the front left while leveling, it has no contact while printing
steep jetty
slate kite
The paper can’t get in on the back left sometimes
Try to get it equal with the wheels
And the springs need to be somewhat tight
slate kite
Ok so I did some tweaking
I made the nozzle actually touch a little less on the paper
But it’s working so far

Small test print
It didn’t work before
Thx
I think we’re done now
Time to print something bigger
steep jetty
nice
#1270200207740764181 message remember these
After resetting you should redo estep calibration and PID tuning
@slate kite
slate kite
steep jetty
After resetting you should redo estep calibration and PID tuning
What’s e step
I hear it everywhere
No idea what it is
steep jetty
slate kite
It seems to work perfectly
Pid tuning ensures your hotend and bed are working accurately. Esteps calibration ensures your extruder actually extrudes the lenght of filament that is requested
Kinda important.
steep jetty
Basically the foundation of all tunings
slate kite
Perfect timing on the react 😂
steep jetty
At least those two are absolutely required in my eyes

 steep jetty
That looks really fine❤️