#Qidi XPlus3 IDEX HT conversion
1 messages · Page 2 of 1
 radiant ether
 radiant ether
wait. why do I care where the bolt holes are on the printer
I can just drill more holes and mount things wherever i want
radiant ether
rough sketch of the idex gantry

gonna put the tensioner on the toolhead to make my life easier

I could also keep the stock tensioner 
radiant ether
switching to markforged
 radiant ether
added up the running costs so far and im $670 down on this printer 😭
the little things add up quick
 small aspen
Neat
radiant ether
😁
 small aspen
Mad lad
radiant ether
Bed is here

 wraith bloom
radiant ether
Bed is here
Looks preem
 daring quarry
I love the juxtaposition of shredded brass and perfectly milled bed
radiant ether
i wonder how you're supposed to do berd ducts

 fluid ravine
radiant ether
i wonder how you're supposed to do berd ducts
people in the past got a bit of brass tube, crimped and soldered one end shut then bend it round to go around the nozzle and drilled some holes
radiant ether
fluid ravine
people in the past got a bit of brass tube, crimped and soldered one end shut th...
I've seen ppl bolt the end shut
radiant ether
Mhmm
fluid ravine
in your case it doesnt really matter tbh
radiant ether
Yeah. I got space in front
fluid ravine
will work
would design the mounting for the tubes in a way that you can rotate them to fine tune the outlet angle
radiant ether
fluid ravine
would design the mounting for the tubes in a way that you can rotate them to fin...
I plan to friction fit+grub screw
fluid ravine
should work
radiant ether
I should also leave enough space for a nozzle wrench
fluid ravine
did a hybrid duct ages ago that was just a friction fit. but it was for a machine that wont manage to go past 100mm/s
yea thats usually a aftertough for a lot of people
radiant ether
fluid ravine
did a hybrid duct ages ago that was just a friction fit. but it was for a machin...
Honestly I probably won't go fast but it should actually be pretty speedy
fluid ravine
would also print a jig for drilling the holes, free handing it can work but is annoying since its a round surface and a centerpunch might close the bore to much
radiant ether
fluid ravine
would also print a jig for drilling the holes, free handing it can work but is a...
Oh yeah. I might go do it on a drill press tbh
Seems like a pain
fluid ravine
did it on a drillpress too but freehanded it
was not great
a jig that holds the tube in place with guide holes for the drill helps a lot
did used thin walled aluminium tube
radiant ether
But the tube comes pretty long so I'll probably try going at it with a cordless
radiant ether
fluid ravine
did used thin walled aluminium tube
I'm planning to use brass
3mm id 4mm od
fluid ravine
ive got the tube for cheap so ive used it
brass will be fine too
wraith bloom
radiant ether
I'm planning to use brass
Yellow brass (the one that cuts easily) can easily crack while bending, so be careful and anneal often
 warm thunder
radiant ether
Bed is here
Scraping your bed when?
radiant ether
Stilts installed
 radiant ether
Surely this isn't gonna be an issue

Wait. Now that I've got the stilts on it actually clears the heatsink
 radiant ether

 royal moss
you happen to get more than one bed?
radiant ether
royal moss
you happen to get more than one bed?
for the heater fan
@wraith bloom I can just parallel the two 24v 5a on the flexpower toget 24v 10a right?
royal moss
radiant ether
for the heater fan
no lol i was asking if you bought more than one bed plate so i could buy the second one lol
radiant ether
royal moss
no lol i was asking if you bought more than one bed plate so i could buy the sec...
oh no. why would i do that
just buy direct from midwest steel supply
if you wanna high temp you have to at least have the bed and hotend for it
royal moss
not bad at all
radiant ether
you gotta drill and tap it yourself tho
royal moss
they come with the holes and stuff?
radiant ether
no
radiant ether
not with the holes tapped in the step
royal moss
thats fine
radiant ether
royal moss
ty ty
radiant ether
royal moss
ty ty
I dont think they have cast alu

just gonna put this here so I dont lose it
radiant ether

Don't have the crimps for it but probably good enough
Maybe I should creality all over it
Crimped jst ph onto a wire and heatshrinked on top
It holds on a lot better than DuPont
wraith bloom
radiant ether
<@374587076718624768> I can just parallel the two 24v 5a on the flexpower toget ...
I'd need to read the datasheet
 radiant ether
wraith bloom
I'd need to read the datasheet
the picture above mine is from armchair and idk why they have pin 2 connected
so im just connecting pin 4 only
wraith bloom
radiant ether
Ah, nice
radiant ether
wraith bloom
Ah, nice
oh yeah. the ssr says earth the mounting rail, and the psu chassis/shell is earthed, so it shouldnt be toooo bad to mount the relay onto the side of the psu right?
wraith bloom
radiant ether
oh yeah. the ssr says earth the mounting rail, and the psu chassis/shell is eart...
Does PSU chassis heat up?
radiant ether
wraith bloom
Does PSU chassis heat up?
it actually stays really cool
big fan blowing through it
but at that time I was only pulling ~300w
actually, this shouldnt be that far off either. 150 chamber, 160 hotends, 30 fan,
wraith bloom
radiant ether
it actually stays really cool
Then maybe
daring quarry
radiant ether
I've seen ppl bolt the end shut
Could use headless bolts
radiant ether
daring quarry
Could use headless bolts
Good idea


 median eagle
Oh its still inside the cartridges? You need a can opener?
radiant ether
median eagle
Oh its still inside the cartridges? You need a can opener?<:vaulthah:59778724181...
I'm just gonna keep it in the box and pull from it out the front hole
To respool and dry
warm thunder
radiant ether
<@374587076718624768> I can just parallel the two 24v 5a on the flexpower toget ...
There is a way to do it, look up the datasheet of the flexpower, there are like 4 wires you need to plug in IIRC
radiant ether
radiant ether
@warm thunder Only one wire apparently
warm thunder
On mine I need to link 4 or 5 wires I think


 mortal portal
pimp my fryer
radiant ether
mortal portal
pimp my fryer
the whole process was surprisingly painless
I even had an m10 tap that I didnt know about
median eagle
radiant ether
did a spool carousel for the air fryer
👉 👈 gib file, many thanks?🙏
radiant ether
median eagle
👉 👈 gib file, many thanks?🙏
the cylinder looking thing is printed in vase mode
15g in total of filament
surprisingly light
median eagle
okay bolt down bearing block add plate with bolted in cylinder to hold the spool?
radiant ether
median eagle
okay bolt down bearing block add plate with bolted in cylinder to hold the spool...
yep
radiant ether
median eagle
okay bolt down bearing block add plate with bolted in cylinder to hold the spool...
you might have to 3d builder your way aroud to get the holes to fit with your fryer basket
for bolting it down
median eagle
you know me too well 😄
radiant ether
median eagle
you know me too well 😄
id also print a few sizes of the vase mode one. the closer it is to your spool inner diameter the better it is
and if you use the spool clamp, here's the tiny one
median eagle
I'll see how much headroom I have and might add a threaded rod and conical clamp
radiant ether
radiant ether
one cool unintended feature. when you tighten the bolt on the top too much, it causes the nut to expand the print on the bottom, grabbing onto the bearing
this is nice bc the bearing now comes out with the spinning plate, so you can take the bearing out of the fryer for when you are annealing or regular drying
 median eagle
I'll hereby suggest the name "Master Blaster"
Also print a decorative turbine shroud
 hazy finch
radiant ether
Looks like the same airfryer I am using for annealing
Just bigger, mine doesnt fit a spool
radiant ether
median eagle
I'll hereby suggest the name "Master Blaster"
from the original 750rpm to 7000. at this point I will probably eliminate the berd air cooling for the time being
radiant ether
hazy finch
Looks like the same airfryer I am using for annealing
came free with my previous apartment. it's kinda bad and the door gets easily stuck when trying to put the basket in, but it is big and VERY quiet
almost like it was made for drying
hazy finch
I was about to buy one but then I found it in the basement I had no idea it was there
This

Its pretty quiet yes, does what I need it to do
radiant ether
hazy finch
you should take the coil to make a filament dryer lol

 hazy finch
radiant ether
you should take the coil to make a filament dryer lol
Already have a commercial drier, no need
The coil in mine doesnt look like that tho
Its round like this
 radiant ether
first one seems a lot more stable but second one with loong bolt should also be not bad

 radiant ether
@wraith bloom what do you think about using this stuff to stick the heater onto my bed and to bond some g14 to springsteel

it's not too expensive and a lot less messy than RTV
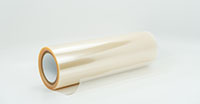
CS Hyde Company
TRS050 2 mil. high temp. silicone transfer adhesive, available in rolls or sheets.
wraith bloom
radiant ether
<@374587076718624768> what do you think about using this stuff to stick the heat...
How hot are you planning to run it?
radiant ether
wraith bloom
How hot are you planning to run it?
at least 180 and no more than 230
afaik 230 is what I want for PPSF but im not gonna go there if it makes things hard
wraith bloom
Honestly, I don't know. 3M gives their silicone transfer tape 260C short term and only 90C long term
For 3M 91022 silicone transfer tape
 radiant ether
im probably just gonna buy a thicker build plate and go with the RTV then
radiant ether
wraith bloom
For 3M 91022 silicone transfer tape
thanks btw 🙏
wraith bloom
radiant ether
thanks btw 🙏
Thanks for bringing to my attention that these exist
 radiant ether
 radiant ether
Should I leave the mouse bites in or sand it down somehow
 median eagle
If it works why bother🤷 unless you don't like the looks of it of course
radiant ether
median eagle
If it works why bother🤷 unless you don't like the looks of it of course
I dont hate it. ill leave it in
adds a certain charm
mortal portal
looks fine
if you want to be pro about it add an edge rubber seal
less effort and looks nice
radiant ether
mortal portal
if you want to be pro about it add an edge rubber seal
good idea
duct tape is close enough right?
actually, ill be covering everything in alu tape anyways
warm thunder
radiant ether
duct tape is close enough right? <:vaulthah:597787241812852736>
Duct tape is always the solution
royal moss
radiant ether
getting it from jlc?
radiant ether
radiant ether
poll_question_text
Will the filament still be dry after 10 years
victor_answer_votes
5
total_votes
7
victor_answer_id
1
victor_answer_text
Wet
radiant ether
Lmao TL I literally found the drawing on ali
 radiant ether
 median eagle
radiant ether
Whats up with the ball bearing looking thing on the side?
wraith bloom
median eagle
Whats up with the ball bearing looking thing on the side?
Likely a press fit plug, from how it was manufactured
And yes, balls are used because they're very easy to press fit into various diameters
wraith bloom
median eagle
So they made a U by drilling a π and plugging the ends?<:vaulthah:59778724181285...
Well, usually you'd plug one end, just make the hole blind
median eagle
Makes more sense yes but I didn't have a symbol ready
wraith bloom
median eagle
Makes more sense yes<:vaulthah:597787241812852736> but I didn't have a symbol re...
TI → ∏
radiant ether
AAAAAAAA
 median eagle
What did you do?
radiant ether
median eagle
What did you do?<:vaulthah:597787241812852736>
I accidentally clicked save when tuning pressure advance so my slicer got all fucked up
And wasted a lot of filament trying to troubleshoot

 vale narwhal
is the heat from the blower going to be a problem for the belts in the chamber?


 daring hound
radiant ether
Preem
 daring hound
Just to maintain temp you’re gonna be running max heater fan the whole time
radiant ether
daring hound
Just to maintain temp you’re gonna be running max heater fan the whole time <:va...
Now I just gotta find a way to control it. It starts spinning as soon as I plug it in for some reason, even when I have the fan turned off
Guess I need to high side switch this too 😭😭😭
 median eagle
Its also looks like a very effective finger chopper
radiant ether
that's where the cover comes in
 daring hound
But my fingers crave the blade
median eagle
radiant ether
that's where the cover comes in
So you can funnel stuff into the blade, got it
radiant ether
well I guess im doing a complete gantry overhaul
 noble aspen
radiant ether
Can the plastic handle the temps
noble aspen
I meant the clear plastic
radiant ether
ah yeah, i honestly dont think itll survive but mr sanchez already did this and he just put foil tape on it and it was fine
noble aspen
Huh, neat
 radiant ether
 royal moss
this is sick
radiant ether
royal moss
this is sick
and the belts are also pulling on COM now too
median eagle
22IDEX V.kevin

 radiant ether
So the plug on these motors aren't rated to above 100c. Do I just solder fep or silicone wire to here or do y'all think the JST will be fine in 140c
 median eagle
radiant ether
So the plug on these motors aren't rated to above 100c. Do I just solder fep or ...
considering PEEK Performance was fine at 147°C for extended times.....probs fine for a few prints?
but if you have it already open....
wraith bloom
radiant ether
So the plug on these motors aren't rated to above 100c. Do I just solder fep or ...
Gonna have a strain relief for the wire?
radiant ether
wraith bloom
Gonna have a strain relief for the wire?
sure i can add that
but im definately gonna have to redo the wire on my leadshine with PVC insulation right?
wraith bloom
radiant ether
but im definately gonna have to redo the wire on my leadshine with PVC insulatio...
Yep
wraith bloom
radiant ether
sure i can add that
You'll need to add it because solder barely holds at these temps
radiant ether
wraith bloom
Yep
Oh boy. Guess I'm not using the leadshines
 median eagle
radiant ether
Oh boy. Guess I'm not using the leadshines
just strip it completeley and put glass fiber sleeves over it
wraith bloom
That's problematic
median eagle
hence the crossing out
radiant ether
guess there's only one thing left to do. watercool the wires

I could try using these funny mineba motors
radiant ether
Hard to see but the parts fit 


 noble aspen
heyyyy Kevin
what chamber temps are you going for
and are the motors in the chamber
@radiant ether
 elfin lark
I gotta show the guys in printsleo server this
radiant ether
Time to do unspeakable things 🙈
 wraith bloom
radiant ether
Time to do unspeakable things 🙈
Give them a shim or they might pinch your belts
mortal portal
radiant ether
Time to do unspeakable things 🙈
that's screwed up
 snow vine
radiant ether
Time to do unspeakable things 🙈
those need a 0.5mm shim inbetween the bearings
radiant ether
snow vine
those need a 0.5mm shim inbetween the bearings
I know it needs shims. this was just for laughs
snow vine
oh
radiant ether
snow vine
oh
I even have it modeled into the bearing stack in my CAD
 royal moss
radiant ether
I even have it modeled into the bearing stack in my CAD
whats the space in the part you left for these like?
9mm?
radiant ether
royal moss
whats the space in the part you left for these like?
wdym?
royal moss
like how big is the gap between the top of the printed part and the bottom?
i forgot to add the spacer lol
 radiant ether
royal moss
like how big is the gap between the top of the printed part and the bottom?
Id leave 1mm on each side and put 0.5mm washers on each side
royal moss
so 8 + 1 + 1 + .5 + .5?
radiant ether
royal moss
so 8 + 1 + 1 + .5 + .5?
9+1+1=11
royal moss
same number
radiant ether
gonna be switching from beacon to klicky00 buckshot
what the hell do I do with the beacon now 😭
wraith bloom
radiant ether
what the hell do I do with the beacon now 😭
Put on a HDT test jig for distance measurement
radiant ether
wraith bloom
~~Put on a HDT test jig for distance measurement~~
hmmmmmmm
yes
hmmm I have ~10mm left at the back

I can put up some insulation to seperate the motors from chamber
wraith bloom

 radiant ether
wraith bloom
<:angryr:1159192435633705163>
accidentally did 30mm spacing instead of 31mm on the motor mount
how the hell did I even get the bolts on when doing the test fit 🤔
oooh i only put in one bolt 🤣
wraith bloom
radiant ether
oooh i only put in one bolt 🤣
Well, it was good enough for testing
elfin lark
Once this is done we just wait for the amazing plus4 IDEX HT
royal moss
radiant ether
I even have it modeled into the bearing stack in my CAD
what size are these bearings?
radiant ether
royal moss
what size are these bearings?
f623
royal moss
ty

 radiant ether
I think im gonna do a purge bucket kinda thing with a silicone/ptfe wiper on the edge
radiant ether
something like this

 fluid ravine
It takes quite some space, cant run the purge bucket on my k3 because the mrw bed is slightly wider
radiant ether
noble aspen
Yeah, seems overly complex to me
fluid ravine
radiant ether
Yeah, seems overly complex to me
its a bit of a system
it uses the magnets for the Quickdraw to lift the arm of the wiper towards the nozzle
probably to make sure it goesnt get hit during a print