
#Sliding Door with Linear Rails (WIP)
1 messages · Page 1 of 1 (latest)
I think your gonna be putting a pretty large amount of axial load on the screws that hold the rollers with how far the glass is cantilevered out. Might twist the bolt in the plastic unless you have the printed wrap around to the back.
you might be able to make it work if you have the screw go all the way through the plastic and secure both sides with washers to distribute the load.
@fluid zephyr Aye thanks for the feedback! Yeah i was worried about that. When you meant having the print wrap around to the back, is it to the other side of the pom wheel? So there's 2 walls at each side of the wheel.
In the picture, this is how it currently looks haha. undecided yet. I think having the screw go through all the way might be good and securing it with washers.

Also the center of gravity is way off without any support for the glass.. i need to think of solution for this. My idea in my head is just the tension between the top and bottom pom wheels clamping together
maybe a small spring pin thing holds the glass and sort of locks the slider in place unless pushed with a certain amount of force.

This shows both techniques in the same model. for the load distribution technique two washer types are used, one small set against the bearing to ensure the outer moving ring of the bearing does not rub on the larger load distribution washers. the load distribution washers spread the axial loading out so it is not just on the bore of the printer part, but on the walls of the plastic too. It also lets the plastic be sandwiched compressively.
the other technique here is doing something akin to double sheer on a motor mount. when you do this the axial load is distributed across the top support between the two plates, you can make that arbitrarily beefy.

the other problem will be the slop, you aren't really effectively constraining against downward tilt with only one roller per rail, usually you would want 2+ per rail but then you cant swing the door out far enough.
Aye sorry been busy the whole day but i saw the message. This is pretty cool! I'll try to fit this in. Either that or i gonna try another design again. Been looking into using Plasticity with Blender to get into CAD.
Currently there is 2 rollers for both top and bottom but i agree i dont think it feels enough. I need to clear the idea of the door hanging on the side xD
Gonna chuck the link here that @split dagger https://drive.google.com/file/d/14LOYjGhs-4JjtKzOdUlhWIrymVl4s_9F/view shared for the inspiration
Google Docs
oh another thing I was thinking was you could do rollers on both sides of each rail so if it rotates you arepinching the plastic part. might reduce slop somewhat but I'm still not sure it would be enough
I had this idea in mind too 😄 but uh just plastic instead of wheels haha

i am also looking into figuring out the other side of the wall.. kinda tight with the current space.

I think you could use plastic v slot rollers, especially if they are nylon. But I'd want a bearing of some kind in there. regular rollers use 625 bearings in a pom or nylon shell
Yeah then I would just ust wide washers probably don't have the clearance without making it thicker
Do you mean like a 2020 extrusions but 3d printed?
oh wait
the rollers themselves. say if you have bearings but v slot rollers


yeah I was thinking you were meaning printed rollers? I think you will need a reall bearing in there or else its gonna be really grabby and wear quickly. Also loud
Yeah xD
I wanna do this a little bit more proper. I like this idea and feels much safer with the v slot roller
XD this will be a good direction
alright time for a 3rd design
XD
with the new stuff i've learned haha
I hate to say it, but at a certain point I wonder if the linear rails aren't such a bad idea given the amount of hardware to do this relatively well with rollers (multiple washer types, blots, rollers, a nontrivial amount of filament) for a result that probably won't be too robust. Cheapest I can find 2 packs of 400mm MGN9 or 12 rails on amazon is 26.50 shipped and a design using them would require less plastic.
your probably looking at 8-12 bucks for the rollers anyway.
Haha for sure. Been thinking about it too. I have a spare linear rails and lots of spare pom wheels. Just making use of some old parts from old printers haha
Bunch of MGN12H
actually.. am still using the first version
Will give POM wheels a few more tries. Before throwing in the towel for linear rails. xD
I think you should just use linear rails anyway
I can have the panel much closer to the frame with linear rail.
Will work with MGN12H as this are the spares i have with me now.


Sliding Door with Linear Rails (WIP)
why not rods + linear bearings? cheaper, easier to maintain...
Mmm i do have 2 spare rods too.. and bearings.. hm. it is possible too. Just wonder if the rod will deform overtime
harder to mount, less constrained. with rods you can only secure them at the ends, while for rails you can do the entire length without interfering with travel.
for a 400 mm span I'd guess youd need 12 mm rods to keep them from bending
still cheaper than rails

thats gonna bend 100%. I was talking real steel rods
aluminum wont hold up, not stiff enough
and steel ball bearings will also pit the aluminum quickly. This is what you'd probably need.
https://makerstore.cc/product/hard-rod-12/
$20 a meter, so cheaper than rails, but probably not by all that much after you you add in the cost of the linear bearing

Printables.com
Download 3D printable STL models
😂

Printables.com
Download 3D printable STL models
yeah yeah, you won ^^
lol the printable rails aren't actually as bad as you might expect in certain applications. I've seen people use them short-medium term as z axis rods is things like pandoras box. Low amount of force needed to guide the axis and you can get decent enough tolerance for good prints.
XD maybe i can give this a try with.. ASA... i have polycarbonate too but hmm..
or perhaps just PLA for cheaper
cold try it for fitment before buying rails. I wouldn't use it like that though- youd be better off with rollers even if they are sloppy. your loading along the thin layer lines along the side of the carriage, so your door could shatter.
My ahh ain’t using the glass door ima be getting the plexiglass upgrades
I actually wanna be able to see inside my machine
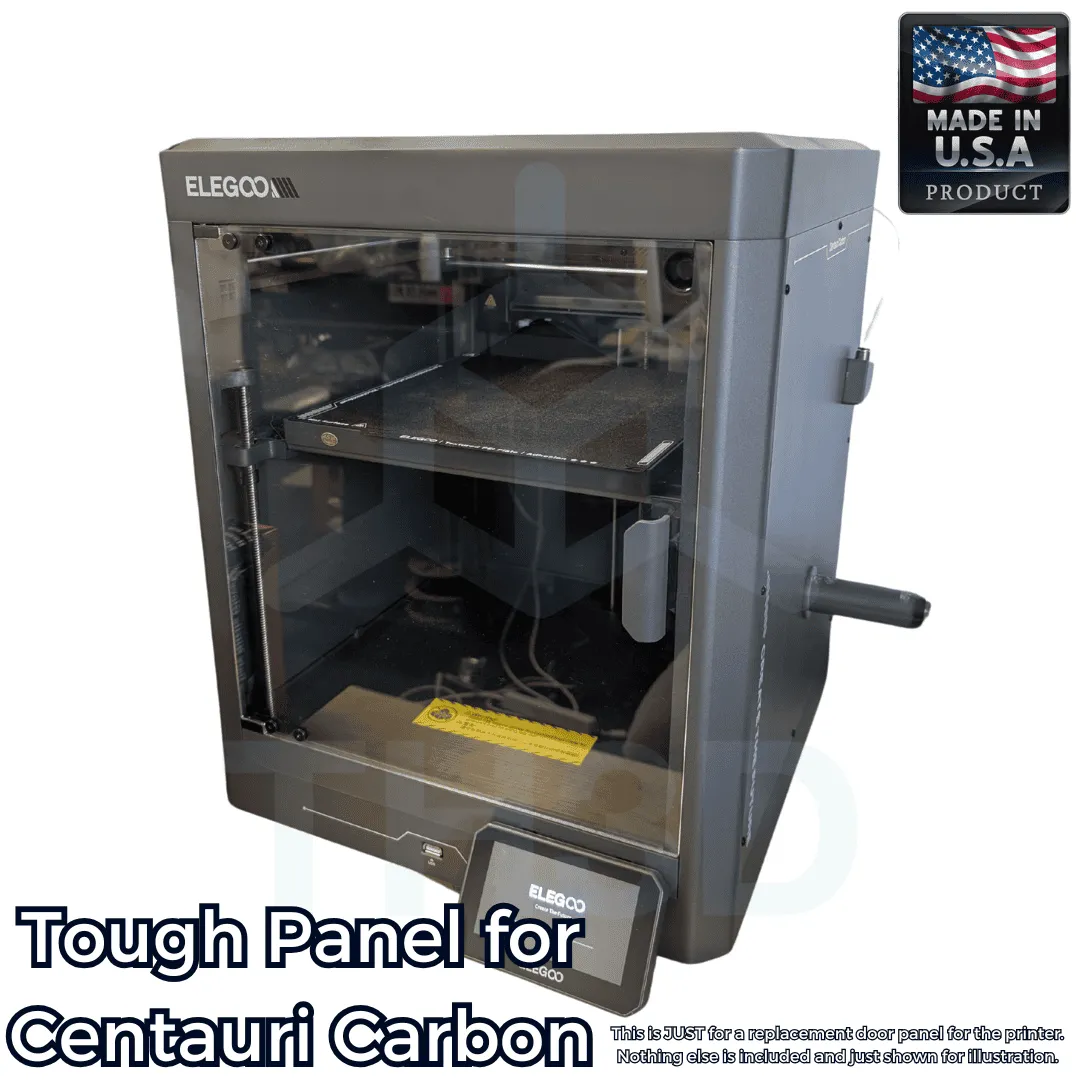
Replace the dark, dangerous glass door on your Elegoo Centauri Carbon with our Tough Panel. Say goodbye to shards of glass when it breaks and not being able to see your prints. These are high quality cast acrylic laser cut panels made right here in the USA. This will be the LAST door you will ever buy for your Centauri Carbon! Install in 5 minut...
ah ok, this is actually going to significantly improve the situation for you, the density of plexiglass is only about half that of glass so you dont need to worry about weight nearly as much
probably gonna be really light for this guy xD

lol... nope

Yeah maybe better to make your own
Anyone know the thickness of the glass door and glass lid
woah that's crazy price
For me with my caliper
Door 3.12mm
Lid 3.21mm
@split dagger
Idk if normal acrylic is heat resistant for the use we might use
If I was self sourcing I'd do polycarbonate. Not all that much more expensive, but much less likely to crack when you are drilling and cutting it.

Great for vacuum forming All dimensions are nominal. Unlimited Thermoform Plastic Sheets are perfect for inventors, small businesses, and DIY hobbyists who want to make custom vacuum formed plastic parts.
25 shiped for me


Very cool
ill get this printing
Extruder clogged 🙄 just popped a stuck PLA
Rip
I have one single issue with this
Where would I place now my Print sheets/Top cover since I store them there 🙂
Hahaha your issue is also my issue too
My solution is to just extend it out similarly to the previous pom wheel version but.. uh.. i will try this first as it's the very basic type. Will do the add-ons after
i actually did manage to print a version but i have some things i need to fix.
i think the bridge in the middle is too long and its bending. Might have to rethink that.
aside from that, working pretty well and isnt tilting downwards when the door is hanging
Try metal rod or wood rod inside the bridge
Hmm.. i do have metal rods..
probably needs to be adjustable because maybe the linear rails aren't truly parallel
i can probably keep it the same but have like a spring like thing in the middle of it
like tolerance gap
or something

Printables.com
Download 3D printable STL models
Gonna take a short break on this model for awhile. I wanna work on switching my Sonic Pad to debian for my N3M
That's awesome! Great progress
Thanks!! Yea looking forward to refining it further.
I plan on having it extend it to work with spacers
perhaps intergrate it with spacers
Any update(s)?
No Updates yet! Been swarmed with work and getting my Neptune 3 Max to work well. I can say im close to getting my N3M kind of done and will jump back to the Centauri 🙂
Hoping to print the centauri carbon parts with the N3M
I had printed this in PLA a while back, and was just looking at reprinting it in PETG. However, I noticed that there was a piece* that "fell off" of the build plates in my slicer when I loaded the .3mf file, and when I finally got it back onto the plate and visible it turns out to be far too large for the CC's build envelope.
Is this mod not printable on the CC? Or is that piece, as the object name suggests, from an older, obsolete version?
*CC_Linear_Rail_Sliding_Door.stl_5
Also, the object CC_Linear_Rail_Sliding_Door_v2.stl_4 seems to have zero volume.
Hi and yeah! It’s printed with the Centauri Carbon. I have not tried with PETG before.. Give me awhile i will take a look at which part it is.
hmmm dont think im seeing the same parts as you for some reason.. are you alright with giving me a screenshot from your side?
i assume it might be the piece on the right thats sticking out the build area? I might have to squeeze that in a bit


Im starting to think you might have my silly version where.. i think this piece.. was out of the build area. Faaar far hidden (wasn''t in my view in orcaslicer)
and i deleted it
i think..
In the .3mf file there's an object called CC_Linear_Rail_Sliding_Door.stl_5.stl, looks like this.

HAHAHA
lol
uhh dont uuse that xD
So I can safely ignore that?
yaep
Good to know 😁
gotcha
I looked at printables very briefly, but it didn't look like there was an updated file
Any idea what the stl_4 object is all about?

ah
oh
no, I mean in the .3mf file there's an object called CC_Linear_Rail_Sliding_Door_v2.stl_4, but selecting it or exporting and re-importing it makes the slicer complain that it has zero volume and it doesn't do anything with it.
Hmmmmmmm
Here's a screenshot of all of the valid objects I was able to get from the .3mf file

just incase, you wanna download the latest version? im slicing it fine on my side
actuallllyyy let me sharee with you one more file. I should've shared this in printables
CC_Linear_Rail_Sliding_Door_v2.gif

this 3D preview is amazing
ooh, nice
I will take awhile to work on this. Currently working on making my own riser
Yeah, no rush or anything, just wanted to make you aware 👍
(also that zero-volume "object 4" is still there 😛)
Thanks!! xD
aaaaa
weird im not getting that error
maybe u can send me your 3mf file
the only 4 i have is this

Odd. Here's the .3mf file I extracted from the zip
thzprint_centauri_carbon_linear_rail_sliding_door_v1.gif

And here's that object exported to a .stl file.
CC_Linear_Rail_Sliding_Door_v2.stl_4.gif

interesting
yeah this one is fine for me too
what's that part supposed to look like?
I'm assuming it's not a 2-dimensional replica of Carmen San Diego's hat
i think.. it's not suppose to be there at all
HAHAHAHAHAH
summon carmen san diego's hat
haha
well should be all good now i hope. Let me know if there
if there's more troubles. Happy to help out
Will do, cheers!
making a riser with exhaust and voron cpap and some storage compartments

woah, that's a chonker
One last question, haha. Does this mod require 2x MGN12H 400mm Linear Rail? The description on Printables makes it sound like it only needs one, but the design seems to have slots for two.
Oops yeah it needs 2
Honestly though it is bcause i have MGN12H lying around. If its easier and cheaper you can get MGN9 but will need to modify the STL file
There was a discussion on using 3D Printed Linear rail somewhere up there.. not sure how well that holds XD
Probably will be good to use PETG or Nylon for less friction surface
wow.. I wonder how many kilos of filament will be used for this ^^
Hahaha hopefully not a lot. Gonna trim lots of areas
shrunked it down and rearranged the layout a little bit
no extra opening for the bowden tube?


damn
The goal would be to..
- Turn the riser into an exhaust and using bambulab carbon filters (won't require the top glass to be open but it's optional.. i can make it slide i guess)
- There'll be 24v LEDs for the riser too 🙂
- Have compartments for nozzles and tools.. or multiboard
- CPAP design with custom toolhead model (maybe i can add a 24v led in the toolhead and have it powered from the PSU)
- I guess the bowden tube can follow the cpap
Additional stuff
- Remix the recirculation mod to cover the existing exhaust holes.. maybe use another 12032 fan?? hahaha
- Custom side panel spacers for a chamber heater i bought from taobao..
- Door seal for the existing sliding door mod
- bed plate holder
sounds like a lot
CPAP? For tool/model cooling?
Yeah

Biqu Equipment
Product Description: The BIQU Universal Turbo Kit consists of high-quality, high-performance components supplied by Wonsmart Motor (a supplier of medical equipment), along with our self-developed controller adapter board and custom cables, to make your CPAP blower installation experience as easy as connecting a regular
When you already there, here is my tiny wishlist of features ^^
- Printhead lights
- Nozzle-Cam
and other stuff 😉
Printhead lights will be great haha that's something i want too
Nozzle Cam.. i assume we will need this plugged to a rpi? I do like nozzle cam.. especially for my N3M haha
Sure XD once im there
maybe by then we have a stable solution for klipper cc
or just do an entire board replacement and throw in a BTT eddy like in the neptune printers.
Make sure you figure out how to run your part cooling control back out the toolhead and fake a tach signal unless you can run stock klipper and output the part cooling to a pin on the mainboard. The toolhead will error out if it goest get the expected signal back from a fan.
Also it would probably be worth it to investigate the cad for the plastic insert if you are doing something this tall. If you are doing it that big I would advise just replacing the stock plastic part so it is more secure. I have the cad for that plastic part partially done.
Replacing the plastic part makes a lot of sense! Thanks man will take a look at that. Yeah i will need to probably run some test with the part cooling control from the toolhead
will be sad if i print all that and it doesn't work hahaha
Sorry if this is a dumb noob question, but how do you get the hinges to work? I just broke the pin off of the lower door hinge part trying to get it seated into the corresponding sleeve.
what orientation did you print in? This is the only way the pin would be strong enough

That's how I printed it.
The lower one snapped off right where it connects to the plate.

I haven't tried to fit the upper one, but I can't imagine it would go much better.
Is there a trick to printing cylinders and cylindrical sleeves horizontally? Neither came out particularly round, so even if I do get them to mate it seems unlikely that they would rotate very well or at all.
Better view of the break.

Basically the whole pin snapped off when I applied the tiniest bit of pressure to rotate it in the sleeve.
how many walls, top bottom layers, and what was infill percentage?
Also what material
3/4 walls (alternate extra wall setting on), 5 top layers, 3 bottom layers, 15% infill, PETG
Oh I would want to use voron settings at least for for the third of the part that has the pin in it. that would be 4 walls, 5 top and bottom, 40% infill.
Also is that acrylic or polycarbonate? If it breaks with polycarbonat its NBD, but if it breaks and its acrylic it could actually crack the panel so you'd want higher strenghth.
It's the acrylic door from TH3D.
Not familiar with Voron settings (though I do plan to build one at some point), but I'll give those numbers a try.
ah ok yeah so it is unlikely that it will break if it is acrylic, but possible so I would definitley use 40% for the hinges
Is there anything I can do about the not-quite-roundness of the hinge pins and sleeves?
Or is that just something we have to deal with in this industry? 😅
You have to either use metal parts or design around it. both are possible but I would do the first given any possible means, it will always be better to use a screw in a printed hole rather than a printed pin in a hole. I would just put an long M3 or 4 screw all the way through that hole and call it a day like on this dry box hinge
If you absolutely have to use a printed part then you can design the geometry to be more printable. For the ECAS connector in the constellation the cylinder continues up and bridges so the fit is proper. likewise the filament path bore is a 2mm circumscribed hex bore rather than circle because it never has any unprintable angles, the filament path is much cleaner.
you would need this to be in parametric software probably but on this model I would slice the part that has the 45 degree so that just continues up to the edge of the circle. on the unsupported part of the pin I would truncate the circle parellel with the bed and do a small built in support block seperated by a 0.2 mm gap since that will print very well. The suppor t block is green and the cutting planes are in red.


Ah, so it's not something wrong with my printer or settings. I'll tuck all of that away for when I can understand it better, and see if I can get this working as-is for now. 🫡
yeah no its just a general thing you have to design around. You can use adaptive layer heights but it wont really help with the underside as much as the top.
Hey Sorry man! I just woke up. I think you can give this printed part 100% infill.
I think thats what i did for mine as its a part of the print that will be stressed
Ah! I'll try that next if the 40% breaks too. 😁
Do the same for the part thats holding the hinge too! 🙂 Hope it goes well. Mine is still holding well and im using PLA. It should work for you
😄
Actually it seems to work fine as it is. 👍
Now I just need to wait for the second linear rail to come in and I can finish assembling this thing and get it mounted. 😅
Definitely a nice, low-stakes project to learn how to install threaded inserts.


oh thats nice
Honestly I wish the ECC was more black, would make the white pop more. 😁
But yeah, seems to work pretty well. It feels a little fragile, but there's no squeaking or sticking or anything.
Oh that's great to hear!!
Im sure the fragile bit can be worked out somehow but thats awesome
Yeah
Im using mine with the actual glass
Ah
I slightly chipped my glass door, so I swapped everything out for TH3D's acrylic, lol.
Before I even started this mod.
I like the acrylic! Much clearer
Me neither but well.. i won't be surprised if they changed it for their next few printers
One could only hope.
XD
Dude~If you have time, don't mind sharing it in the Printables web. Just the pics are fine 😄
if not it's ok no pressure haha
Sure, I can do that.
Sick~!
That'll be my first upload to a 3d printing model site, lol.
It looks so cool with the white
Sounds like it'll be a nice learning journey of knowing your printer more
Mmm if i can i would wanna replace my panels with transparent polycarbonate panels.. like the Voron printers.
Seeing how clear your door is.. kinda makes me wanna just have the rest of the printer panels like that haha
If you ignore all of the fingerprints I haven't yet cleaned off, at least. 😂
Hmmm.. i should probably do a quick model of sealing up the left side of th door
there is the gap

could probably try this but im looking to try have something where we can screw it in? Cuz there is still mounting holes that was meant for the original hinge. I might make use of that.


lol, nice
With that kind of flat space, will be great to boolean a name onto it or somesort of design 😄


Polar Filament has an experimental petg?
Yeah, it's in open beta right now:
https://polarfilament.com/products/open-beta-pre-release-experimental-white-petg-1-75mm-1kg

Polar Filament
We are in the process of adding a new higher-temp PETG to our lineup. If you've printed with our existing PETG, you know that it prints at lower temperatures than most other PETGs. This new PETG will be more in line with PETG from other brands, likely printing best around 240C. EXPERIMENTAL MATERIAL - No refunds / re
They basically modified their formula to make it print at higher temps, so it's closer to other brands' PETG.
does it have a door holder or anything
I just have the stock handle on it.
oh, no
oh
I use a vented riser, so the top panel always stays on
i guess i can put it on the side
i do too but i like the feeling of putting it on the side
ah
Just be aware, the way the sliding door mounts doesn't really leave any options for mounting other stuff on that side.
It uses all three screws along the top and along the bottom.

Time to try it

Mmm i need to dedicate a day for this haha. It only exist in my older versions
Aight it covers


Will share the blank version soon.
Probably works better with the clear door panel

It relies on structural rigidity to hold it in place, not sure if dovetailing will work for this piece. 🤔
It has little pins at the top and bottom that just goes in the screw hole.
Yeah, I'd just be worried about the dovetail joint buckling and making those pins pop out.
I dunno, it could work, I haven't tested it yet.
Hmmm XD only way to find out
ThzPrint_Side_Gap_Cover_for_LinearRail_Sliding_Door_v1_Blank_dovetail.gif

ThzPrint_Side_Gap_Cover_for_LinearRail_Sliding_Door_v1_Blank_dovetail.gif

better
oh thats nice
magnetic strip on it would be cool
Magnetic strip to hold it?
also will probs stop any rattling
I did a print last night. So far it holds itself well and i was printing at 20000 acceleration i think..
yeap


I can take a look at the magnetic strip idea. I do have some strips but im not sure where it should be placed haha
for a first test try mirror the other side where the handle magnet is
then after do one top and bottom
so its triangular
Oooooohhhhh
wait you meant the magnet is for the door??
my bad i was thinking the magnet was for attaching the cover
I think that is very doable yeah!
I think this idea works great for one of the mods with the 270 hinge on the right instead of the left
I can take a look at this during the weekend 🙂
A low profile gap cover the same width as the one on the right would be cool

haha sure xD i can modify that! Thanks for the measurement
messed up my nozzle.. made a huge blob around it and just replaced with another aliexpress nozzle.. the heatsink feels different and kinda lighter compared to the original

printing well tho haha

currently my .2 and .4 nozzles goop that holds the ceramic heater element in place has turned to dust and fall off with out the sock on
😆
man.. kinda makes me wanna do the hotend upgrade more but.. i bought a few bunch of this nozzles.. holding me back from upgrading
any progress on the modified gap file
not yet 🙂 taking my time
ah kay
@split dagger

ooooohh myyy

Untested but feel free to give this a try if you want xD
i will print it when i get the hardware required for a 270 door or the sliding one
I think i might very likely jump off the CC ship while i still can to a Prusa ship 🙁 Been doing upgrades to printers since the ender 3 but this CC is getting more and more questionable xD and i wanna stick to something more long term and print more of the other stuff than printer stuff. Just joined with a friend of mine and going with the Core One and hopefully get that tool changer they have in the future. Once i got my Core one up and running, gonna sell my CC away :l
gonna stop with the riser project and gonna work on the sliding door more now 🙂
One thing I've noticed is that when I have the door open for a brief period, occasionally I bump into it, and the hinge sleeve has developed a crack. Doesn't seem to harm functionality so far, but it's there.
do you have a picture of the crack?
1 sec

good, kinda hard to get a good angle on that, lol
white plastic isn't good for photos 😂
XD
i think if it opens freely it should prevent that crack from happening. Aight thanks for the feedback!
I hope to get this figured out before i get my prusa core one kit
I've also been puzzling out if there's a way to have a bit that covers and "captures" the door when it's slid back.
Haven't had much success though.
yeah
i noticed that too
aight keep throwing me this feedback xD will work on it once im free after work
lol, roger that
i need to think of some cool design for it too
right now is just blocky
HAHAHAHA
or maybe a simple rounded edges might just help
Yeah
Once I get sorted out for ASA-CF printing, I'll probably try printing it again in that; by that point you'll probably have the design quite polished. 😆
ASA-CF sounds pretty lit
looking forward to that
I'll probably still print mine with Basic PLA XD
should be fine as long the printer doesn't get to more the 60°c
outside
Yeah, definitely. I just like consistency, lol
So if I reprint all of the in-chamber mods using ASA-CF... 😛
I was thinking maybe magnets would help with that
I like this
the more i think about it
aaaa BUT i just remember it doesnt slide in fully
Magnets might be the best choice since there could be some sag in the mounts and the coupling range for magnets isn't very long unless you you make them very large. I just kinda wonder if it will be fiddly.
Here is an easier approach, just use the approach that was used for the internal burge bin that slides, out put a small notch that just allows a bit of mechanical feed back and holding power. I'm thinking a printed arm on one side of each carraige that kind of springs out a bit. At the end of the travel range there is a slight widening of the surface it touches.

that way you can also easily calibrate stiffness of the connection and how long you make the channel if there does need to be a longer distance because of slotp
AWESOME!
because with how much this is levered out you want to overconstrain it, and linear rods+bearings just won't do it. Besides proper square rails cost almost nothing nowadays anyways.
damn... how time flies.. I asked that over 3 months ago... damn
there are side mounted rods and the appropriate bearings for them, but uses a lot of space for what it is.
Ich weiß 😉
did you align the rails? an easy method would be to secure on rail, assemble with screw loose on the other rail and tighten them as you run the carriage next to the screws.
just found the thread, looks interesting
must be some extreme form of masochism to use blender for this though, respect