

1 messages · Page 1 of 1 (latest)
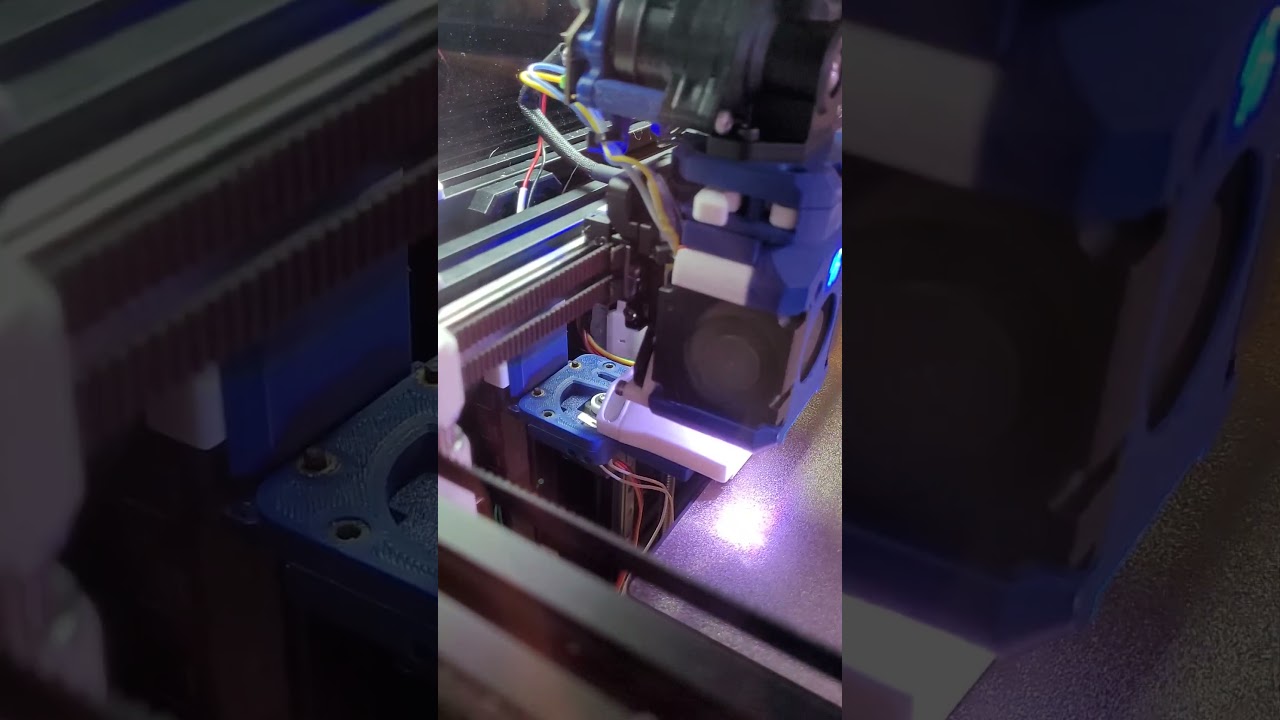
I started this project after realizing that @half dock 's ABP and @naive forge 's Blobifier for CoreXY projects wouldn't work for my Trident as I only have like 1mm travel outside of my bed area. Turd Herder actually extends out over the build plate, accepts the turd, retracts and flushes the turd down.
It's hot end / probe agnostic and the only "exotic" piece of hardware required is a servo.
It includes a modified G28 to check if the "bowl" is extended and will retract before trying to home Z. I've done a full installation / build write up with STLs and STEP files on Github: https://github.com/WikenwIken/TurdHerder and here's a video of the thing in action: https://www.youtube.com/shorts/MkPq-ydEZxc
This is still very much a brand new project so bugs are to be expected but I would love some feedback.
STLs and Config Files for TerdHerder filament toilet - WikenwIken/TurdHerder
Check out this unique Waste Management Solution!
Very cool! I like the emblems on the mount 
Sweet! I'll probably try it on my SimpleCore.
Heh, thanks. I figured I'd get a little cheeky after I put all the scatological humor in the GH write up. I need to add a version without the icons but if anyone is super adverse to them, the STEP files are there
That'd be rad! Let me know what you think. This is my first real go at a project like this so any and all feedback is welcome.
thats awesome good work!
nice
Parts are ordered, looking forward to the build!
Parts ordered, I'll start printing parts today.
Incidentally, here's an AT brush mount for attaching to the bottom of the extrusion. For printers that mount the Y rail on the inboard face of the extrusion.
https://www.printables.com/model/1386507-2020-bottom-mount-for-armored-turtle-brush
Oh wow, this is so specifically perfect for my setup
I've been through so many angled brushes and other weird shit trying to get something that'll fit and work on a trident with tap
Parts on hand... digging out he hardware and hoping to get it built today. Also doing work on my HTLF, so testing may take longer.
Heck yeah @umbral prawn ! Let me know how everything fits together, specifically Y axis slots. I printed out a copy in PLA a couple days ago and there seemed to be a lot of slop in the movement. I'm hoping its just because PLA doesn't shrink as much as ABS.
I figured there had to be others out there with a similar configuration so I figured why not learn how to write a github page and publish this thing. Let me know how it works if you end up building it. Cheers!
I've got one printed out i'm playing with as a fidget toy until the servo arrives 🤣
initial thoughts: the magnet to nut interface doesn't seem quite enough to overcome the stiction of the plastic-to-plastic connections when withdrawing - the plastic starts moving first and only snaps back into place 4/5 of the time - might be worth trying a magnet to magnet configuration?
adding a 0.45mm bevel to all the bottom print surfaces is normally a good idea to prevent any elephant footing from being a problem
Aye i just did a horrible hack and melted a magnet into the hole where the nut was, then replaced it with a non-ruined magnet and it works 100% of the time now

I originally had it as a double magnet connection but it ended up being a little more than needed. That bottom magnet is really just to keep the sled in place while the chimney moves from "in" to "mid" but since it's a sliding release, rather than pulling the two bits apart it'll probably work out. I wouldn't try magnet->magnet on the vertical one.
That said, I 100% have an older iteration in my labcoat at work that I use as a fidget toy as well LOL
I could have sworn I had a chamfer on those bottom edges! I'll add those in and re-upload today.
My assembly is paused... My hot end sits too high for the AT brush mount, so I'll be looking for or hacking together a mount to let it sit a little over cm higher.
@summer sandal Going to order the parts for this as had a nitemare today due to having brush close to bed as can’t get nozzle back enough and think this could be what I need. My question is do I need a 180 or 360 servo??? And would silicone work instead of the aluminum piece?? Thanks for your invention, I look forward to building and testing it.
A 180 servo is what you want. I hadn't thought about silicone in place of the aluminum but it's a fantastic idea! Something like a silicone baking mat would be super easy to cut to the right size. As long as whatever material you're using is <=1mm thick you'll be good.
I wonder how easy those mats are to find at thrift stores 🤔
Ok I’ll order 180 and yes I have some silicone wrist straps that I’ll fish out and check how thick and if there to thick I’ll cut a bit of a thin mat I have that I use for gluing. Thanks for the help.
Any time! Let me know how the build goes
Building mine - just stripped the mount because my m3x35 wasn't fully threaded 🙁
Just finished hacking together a "High Mount" for the AT-brush... now to print it and get back on this build...
I have mine fully assembled, but have an issue - once the servo has rotated into SERVO_IN position, it goes all the way over the lever on the microswitch, the lever pops up and the servo can't move back to SERVO_OUT
maybe the end of the lever needs bending down slightly?
The idea is that the tab on the chimney should slide over the lever as it's drawn back and keep it depressed until the arm swings back the other way. I fussed with that for a while.
I recently had to install the arm upside down with the notch facing up and that seemed to work a little better
That said, I'm wide open to new ideas.
Done a little fiddling but couldn't get it to work - I wonder if putting the switch in the other chimney tab slot so its entirely out of the path of the servo?

What i think is happening is that the lever is starting to pop up just before the servo horn gets there, and it going to be different between switches :/
oh hang on
my mg90s is different to yours

Hmm... I've got a couple ideas but I'll have to mess with it tonight after work.
Oh weird. Dang, I figured they'd all be similar. OK, that can be fixed in CAD.
yep thats it, got it opening and closing properly now by putting the servo arm even with the top to the other printed part
The switch being mounted in the other lane is a great idea. That'll take more time to figure out the positioning though.
I'll look into it tonight
Can you send a pic of a top down shot of your servo if it's not too much trouble?


From the top of the mounting lugs to the top face of the servo is 4.2mm
apart from that it fits perfectly in the mount, just higher
we have a first poop!
Pooping is mostly working but flushing isn't
I'm going to try sanding the inside of the chute to try and make there be less points for it to get stuck on
Ah I see why

This is all the way in
We poopin'

Very nice! I like that blue too. Care to share?
its LDO Dark Teal ABS
I had no idea LDO sold filament. I'm gonna have to look into that
I swapped the position of the switch to the opposite side. I had to thicken the slide_base by 1mm to keep the integrity of the channel but according to the CAD assembly, it should work. I'm gonna run off the parts tonight and see if I need to extend the tabs on the chimney as well.
If all goes according to plan I'll post the updated STL/STEP files in the morning
Welp, this is gonna take a couple more iterations. I really hate this slide-to-trigger switch motion but I don't want to have to add a reed switch to this situation. I'll get there.
This project looks very interesting! I’d like to adapt it to my 2.4. Would it be possible to get the assembled STEP file with all the hardware included? Will also be helpful for assembly
The STEP files are in the github but as far as the assembly goes, all I can do is point you toward the Onshape project. I'm on mobile right now and can't get the link but it's in the public space so just search for Terd Herder and it should show up
I did a remix to fit my v2.4, smaller form factor. Next step wiring and test


Welp, swapping the switch to the left side doesn't look like it's gonna work. The chimney is too light to trigger the switch and it just lifts the whole left side up.
Didn't think about that, servo motor touch the bottom deck panel on 2.4 :/
My build of it is on iteration 3 of raising the mount higher. The SimpleCore Legacy with Eva3 and Bambu hot end has the nozzle so high up that it's taking major mods to the mount assembly.
could it go on the side of the slot maybe instead of the bottom?
or ig uess having a screw go through the very front of the slot to hold the carriage in the slot properly, hrmm
chaos option: change the whole thing to use the same tiny rail & carriage as tap, i have like 5 of those spare now after my multiple attempts at various tap implementations 🤣
I like the side mount idea but I'm on vacation for the rest of the week. I'll try and mess with that when I get back
Any thoughs if this is doable with tap carriage?
Absolutely! I made it, in part, because I use TAP and I didn't have enough negative Y travel off the back of the bed to use any of the other solutions out there.
So you just made a lever that hits the tap carriage for activation?
No, it's driven by servo that extends/retracts over the bed
The print head touches nothing but the brush during the wipe.
@summer sandal my parts have finally arived and im building this. im not that great on the wiring part and wondered if you can advise where to plug the servo and micro switch in. i run the octopus 1.1 board so where is the best place to plug them in in your opinion, i no how to look up and then get the correct pin outs etc. Just when i was looking there wasnt much saying where to plug them in etc, Thanks for any help.
@summer sandal oh i think ive found it. if this is corrct would i just conect the black, Red, Yellow to the same colours as in the pic??? and then connect the micro switch to a fan port or the likes??? thanks

I can use the x endstop plug port for the micro switch as dont use that on the board anymore, So just need to sort out the place to plug the servo in and should be sorted.
Yup, I figured that few people would be using BL Touches on Vorons so I kind of hinted at plugging it all into that port since most boards have one but left the wiring intentionally vague because everyone's board is different.
I ran with @wary chasm 's idea of mounting the switch sideways and I kind of like it. It beefs up the platform making the connection to the mount a little stiffer, provides more real estate for the pin screw to grab hold of, and makes for a much more reliable method of depressing the switch.
Using these will require some different length screws. I used M3x12 to fasten to the servo mount, M3x10 in the end of the cog and M2x6s to secure the switch.
Its a little uglier than it was but I'll take function over form most days, especially since it's pretty tucked away behind the bed most of the time.
Ooh will have a go with this version this week
@summer sandal i will print these new parts out today and use the new design and see how it works... quick question in reguards to Homing overrides, i use a z endstop pin so will i change the parts ive pointed to in the attached pic to my Z end stop coordinates????. and add all that to my printer.cfg... just want to make sure im doing the software part correct??? Thanks

Yes, those are to be where your printer normally homes Z
Turns out the hole in the Cog.m3f that was in the zip file above was just a hair too large (for my shrinkage factor anyway) so I shrunk it by 0.5mm
Yes it was. lol. ive made it a hair smaller and its fitting good now.. ill download your fix as well and add it to my folder.. Its all coming together nicely and should wire it up tomorrow and get it tested tomorrow or the next day depending on time. The new place for the microswitch seems to be a good move, (not to ugly lol) I will let you no how it goes...
OH! I forgot to mention, I swapped the M3 nut on the top of the Slide_Base for another 6x3 magnet. It needed the extra traction.
Hahaha. Yes got that change aswell. Good change I think as well.
@summer sandal ive got it all wired up and installed and im trying to get the micro switch to trigger as per instructions. it undetected when in servo_out which is correct and its triggered when servo_in which is correct but wont trigger when in servo_mid. i have adjusted my variable_tray_angle_mid: 40 and still wont trigger??? any help on this one??
I was running into a similar problem. Without reprinting anything I would try flipping the cog over so the flat side is down. See I'd that works.
If that still is fickle, I posted a couple remixes just above that moves the switch to be side mounted and that seems to be working a lot better
but im using the new setup with the microswitch on the side and the thicker cog, so cant flip that over..
@summer sandal yes im using the new design
Hmm, that's a puzzler.
Is the top bit that slides sitting flush? If it's raised a bit that could cause it not to trigger right away. It may require some filing of the slots
@summer sandal hmmm heres 3 pics of out mid at30 ange (still not triggering) and in. just incase you see something ive done wrong. and while i had it out i put in mid and its running flat so hasnt lifted


ive got it triggering in mid so ill put it back in place and do some more testing.
It could probably stand to have the switch nudged forward by a mm or two. I can probably make that edit real quick if it's still being fussy
its ok. yes its being a bit of a fuss pot lol.. ive taken it all out and found the issue and im printing a temp fix to see if it works and once ive sorted it ill post what ive done etc.. basicly the leg in the picture needs to have one on the yellow part (well in my case) so im printing a little piece to see if that works.. will let you no how i get on.. Thanks

Ah, yep, I thought about going that route but didn't know how to model it up so it wouldn't require supports.
Yeah I’ve glued this little piece in (as a temp test) and tested it on the bench and it triggers just right now. So I’ll put it back in the printer and do the adjustments and see how it all goes. Quick question when I was doing the server_in it didn’t quite come back far enough to open the toilet hole fully. Can I increase that angle (180) higher to get it to come back fully or is there something different I should adjust?? Thanks

The max min of the servo are defined by the pulse_width variables in the turd_hw.cfg
I'm not that well versed in how much tweaking those will affect the motion but those are where it can be adjusted
Ok thanks I’ll play with that if the poops don’t flush through the hole and get stuck.
We have poops. Yes that little bit worked perfectly to trigger the switch and yes I adjusted the pulse to open the toilet hole fully, so thanks for that. Also for anyone else that’s looking for the little metal piece in the bottom of the toilet. A copper raspberry pi heatsink works perfectly as per last picture. So now I’ll work on tuning the purge lengths so they don’t get too big for the toilet to flush now. Thanks very much for your help today. I’ll now do some test prints and see how it all works.


Excellent! Glad to hear it's coming together. Always happy to help. I'm just stoked to see others using the thing I made. Feels good man.
I loved your project and want to give a shot on my trident 250. Currently waiting for servo, but started with all other components.. While installing slide and base, there are two magnet slots, i assume these should retract each other, correct? ( i grabbed the updated design up above from a post with switch from a side)

The magnets should attract one another. They keep the sled from sliding forward when going from in-->mid
I've tried this on my Trident 250 and i need to do some mods... First of I don't have long enough screw to adjust the vertical position, the assembly sits too deep. I tried reversing the bracket and obviously that doesn't work..
Plus I use PEI sheet with some area like on Bambu printers and that is interfering with a brush

So will spend some CAD time and see how it works
Do you have step files for these?
I think the head of your up/down screw is in the wrong place - its meant to sit kind of in the middle of that part iirc?
also i had to use a super long m3 screw for up/down - i think a 40mm
That part of the mount hasn't been modified. It should be assembled as shown in the AT Brush instructions.
Now I'm wondering how I've got mine assembled because I ended up using a super long screw and it's too short as well. I'll have to check when I get home tonight.
Not those specifically. I'm a pretty casual OnShape user and am real bad about saving versions.
I'll be dammed.... anyway, there is no amount of user stupidity that CAD skills can't fix 😄 😄 I've made a modified version which is 20mm lower, basically added 20mm of material to the top piece
I got it working, kind of. The top section feels very wobbly and issues so far:
How do I adjust the chimney in MID position?
I've found that a lot of success comes from the initial positioning of the cog on the servo rotor. If it's not triggering around the 90 mark, try removing the cog and re-attaching it at a slightly different angle.
If you can, remove the cog, wire up the servo and send it to Mid. Then reattach the cog in the right position while it's energized so it's got less chance of moving during the fitment.
Of course you could send it to any angle but since 90 is the "defacto" mid point that's where I usually position it
In regards to the wobbliness, are you using a PTFE tube as a collar around the pin? I've found that helps sure things up a bit. I use a tiny piece of 4mm OD, 3mm ID bowden tubing
I've not used PTFE tube yet, and started installation based on your instructions, basically from OUT position. But what you are saying makes total sense. I will reprint the chimney piece with longer edge to hopefully trigger the switch in both IN and MID positions and then try out the cog repositioning idea
Oh dang, yeah I need to update the Github. With the switch being mounted on the side instead of the top there's no risk of the cog banging into the back of the switch.
I will get mine figured out and then I can share CAD files I've used and updated
Update from my findings.
I was able to get it working. I've redesigned chimney to have longer edge for endstop, I've needed extra 6mm in length and also modified servo plate since my servo was higher for some reason.
Anyway the issues I'm seeing:
Here are the parts I've changed (in green)
Servo mount adjusted for Aliexpress Servo (1.6mm deeper)
Cog - increased height
Chimney - added extra rib for making sure to press switch in IN and MID positions.
Sounds good! Glad you got it working, albeit wobbly-ish 😆
I'm brand new to designing assemblies and knew that there was going to have to be some tinkering from the community. Trying to model "universal tolerances" is tough on a part like this.
My servo only move 3/4 the way it should move. Is this a configuration issue?
I had the same. It works like this. Just start with MID position by installing the upper carriage to make sure it's flat with the mount before tightening it onto servo
In addition to this, I had to adjust the IN position by reducing min pulse
I have a question. My blobs look like this and gets stuck - not getting ejected. Any ideas? Its not a blob

What are your settings that have this working? Preferably on standard flow hotend, maxing at 15mm^3
I had a similar issue with the purges being whispy like that and getting stuck. I'm pretty sure I've got mine set to purge the default length but I had to really dial in the retract/pushback settings in the AFC macro.
Once I got it so the pushback just right I started getting better little coils and a higher percentage of turds down the toilet.
Can you share your settings? Mine eject works only like 40% of the time
My sled is extremly wobbly and if i tighten the screw in the chimney slot, the sled just cant move. How can i improve this?
That looks like the original version that's on the github where the switch is mounted next to the servo, right?
There's a remix posted above that has the switch mounted out the side that deals with the wobble pretty well, but does add about 5mm to the slide plate.
I really need to update the github...
yeah it's the github version
awesome, let's print some new parts! 😂
Sorry bout that
IS Side_Switch_Parts_V0.4.zip the most current one?
Give me 5-10 minutes and I'll get the new versions posted to the Github. I'm working on tracking down a full set of .stls as we speak
@past anvil Ok, the github has been updated with a new folder with the update. You should only have to re-print the Cog, Slide_Base and Servo_Mount.

STLs and Config Files for TerdHerder filament toilet - WikenwIken/TurdHerder
Hello, I'm very curious about this project. I'm somewhat familiar with the Blobifier as I recall looking into it when it first came out, however my CoreXY printers have the bed move up and down versus a gantry that moves up and down so I did not look into adopting it. I also use a bed slinger for experimenting with MMU systems and the original Blobifiier doesn't adapt well to that style of printer either.
My understanding is that the Blobifier generates the purge poop by a sequence of extrusion "pulses" as the toolhead moves upwards (like it can on a Voron 2.4). I think the Trident is a moving bed (not a flying gantry design). Does this Turd Herder project adjust the blobifier macro so that it can generate well formed poops for the Trident?
Put another way, I've been experimenting with various purge methods and I'm wondering how well this system works. I'm looking for something that is very reliable in generating a pellet/poop that always separates cleanly from the nozzle.
I had developed a servo based "pellet purge" that worked fairly well, but sometimes the pellet wouldn't always eject. Maybe once or twice every 300 or so filament swaps the pellet wouldn't eject cleanly and could end up on the print bed. So my quest for a more robust purge mechanism continues.
Does anyone have an STL for the taller servo?


See my post above with files.
@raw tartan
@raw tartan I updated the github a few days ago with the most recent STL files
Thanks for letting me know, I printed them last night before starting
@kind karma Hey did your servo move the full 180 degrees when you set it up?
No, it actually moves like 160deg only in IN position. here are some tips:
from there you can play with min and max pulse so it would clear the hole, you need to tune min pulse to the slider would completely move away from metal plate
I saw your post about changing the pulse and it fully turns 180 with
minimum_pulse_width: 0.0005
maximum_pulse_width: 0.0029
Thanks, ill do it that way when putting it back together
Awesome, that's working perfectly now
Please share your progress if you get your's working reliable.. mine only ejects like 40% of the time, in other times it either pulls out the poop when doing brush or poop doesn't eject and gets stuck
i remembered, i eventually increased min pulse width as it was moving so far that it was lifting up the carriage. So had to reduce it to make it still flat
Ok, ill keep you updated. I'm using the newer carriage so it might be slightly different
First poop worked but second did not. I think i need to try and change the macro so it does a nozzle clean before pooping to eliminate nozzle oozing as a variable. Ill also play around with the fan speed
@summer sandal I recently had a printer crash during mid print, when filament runout kicked in.
It appears that there was something comming from Turd Herder macros, for changing position from poop to wipe.
My printer is 250mm Trident and not sure where these coordinates came from.
I was going through your macros and nothing obvious came up to me. Do you have any thoughts? I'm guessing it doesn't save the position properly.
Thaaaaaaat is something I hadn't planned for, though I don't know why it would happen. Macros aren't my strong suit, all I really did was adapt the macro from the original Blobifier. I'm afraid I don't have much of an answer for you. Has infinite spool worked for you in the past? I've never utilized it.
Yes, It did worked before
Weird, unfortunately I've got no idea what happened. Sorry.
Ok. I will dig into it. That specific time, after filament was changed, TurdHerder did not extend, printer parked the nozzle, but TrudHerded stayed in MID position, so it started extruding in air and after it was done purging, whole thing crashed. So far this happened only once
One of the differences with blobifier is this line:
RESTORE_GCODE_STATE NAME=TURDHERDER_CLEAN_state MOVE=1 MOVE_SPEED=300
The end section only exists in TurdHerder, do you know what this part does? - MOVE=1 MOVE_SPEED=300
Those lines are to restore the state of the printer from where it was when the Clean macro runs. The move=1 restores the xyz location of the printhead and the speed is pretty self explanatory.
I want to say there's a way to get klipper to remember what the last servo move was which would maybe help with this but I can't remember if that was a fever dream or not.
Either way, as it stands now, the macro is not storing the position of the servo which is likely what caused the issue.
Likely. and another interesting part is that nothing is seen in any of the logs lol
Can someone test something for me? Im trying to get it to poop twice on one purge, 50mm3 twice for a total of 100mm3. It does the first poop fine, cleans the nozzle and then when it does the second poop, it does not put the servo out and it poops in front of it.
I might have changed a config somewhere that is causing this. This is my poop setting for 2 poops

Looking back on the code it looks like I clearly missed a While loop in there that deals with multiple blobs. Should be an easy fix but I'm going to be busy most of the day. If I get some time today I'll work on it but it should just need a BlobCount variable and whatever this programming language's version of a While loop is.
I tried modifying the author's design, increasing the height of Chimney and Chimney_Slot. I added a positioning block to the bottom edge of Chimney to prevent sled objects from slipping. I'm not sure if this will make it smoother, but the finished product moves without problems.
I still don't quite understand the configuration file part, but I'm very grateful to the author for designing this waste disposal device, which has been a source of confusion for me for a long time.😅
Excuse me, there is no signal when I operate ”servo_mid“. Do I need to change the angle setting to be the same as ”servo_in“?

You shouldn't need to go that far with it but I should ask which version of the slide_base are you using? If it's the thinner one where the switch is mounted next to the servo then you should just change the angle 5 degrees at a time until it triggers.
If you're using the thicker version where the switch is mounted sideways in the slot then I would have to guess that you installed the Cog at the wrong angle.
@quick girder
I use the new version of the slider base modified in November. At present, it has been triggered. What should I have left to do with the happy hare system? I deleted AFC.cfg. I use the equipment of Quattro Box.
I don't really know anything about the Happy Hare environment. This project was designed to be used with the existing Box Turtle macros. I'm sure it could be integrated with the Happy Hare software but I'm not the guy to do it.
Understood. I'm still working, and I'm looking for time to retest how to apply this troubleshooting system.
I have a question. I have a printed copy.stl file, but the new version seems incompatible with my copy. It's very loose when I install it. I'm not sure if I damaged the gears with a tool, because my screws are stuck and I can't remove them. 😅
@summer sandal Does the new file have a larger hole?🤔

Because it is not very suitable, I have modified the size of the hole. It seems that the size of the document in September is smaller?
Yeah, I switched servo brands and the existing geometry was just a hair too large so I shrunk it just a tad.
I can upload the STEP files if you're needing to make some adjustments
Thank you, please upload STEP again👍

STLs and Config Files for TerdHerder filament toilet - WikenwIken/TurdHerder
Have fun, and let me know what you come up with.
OK👌
When I got home from work yesterday, I changed the new MG90S servo motor, and then I found that the new one looked different from the old one😅. I had to change the picture and reprint it.

Oof, yeah, that's all kinds of different. I suppose I could make that hole a little more universally sized, I just didn't want folks installing the servo the wrong way around.
Plus I didn't know they made MG90S' in different form factors.
I'm not sure. Maybe the left side is what everyone uses, so we could add an STL file where the walls could be shortened further inwards.
If you've got a molded STL that works for that style I'd be happy to create a MODs folder on the github and host it there.
This is my first project that I've actually published so I really have no idea what it is I'm doing right now LOL
I think it's really cool, LOL. A few months ago, I also asked the creator of the Quttro box how LEDs light up, and I found the process very interesting.
It will take me another 5+ hours to get home. I'll measure the difference again and share the results here. 😄
Sounds good to me
I've taken the pictures. Visually, the old casing's step height is 1mm, while the new one is 4mm.
However, in my revised drawing, I extended the internal depth by 2.5mm. I don't think this will affect installation or even cause people to install it incorrectly.


@summer sandal However, the file I modified was from the September file, so please check it again. 😅
@kind karma Hi
Have you resolved the problem you encountered last time? I reviewed the chat history above, and currently my printer is experiencing an error during the printing process.

I have not had much time yet. This only happened to me once, previous prints were ok.
Your error looks different though. Are you able to change tools when not printing?
I haven't tested it yet
I have some ideas and suspect that the happyhare configuration file needs to be adjusted.

I'm not sure if this is caused by the 'servo in' and 'servo out' settings.
🥲
What's your printer bed size? Review where's your park and poop locations
305mm*305mm
@kind karma There are no major problems with my position right now, but the cleaning macro isn't working very smoothly.
@summer sandal
I discovered that the gaps in the screw movement rails caused the waste discharge chute to not retract completely.
That gap is huuuuuge. I see you've got the PTFE tube around the pin screw which is ideal but are you using an M2 screw? That should be an M3. It's a bit tough to screw into the plastic but that's the intended set up.
I think you need to reduce min pulse width. In IN position servo needs to move more
@summer sandal Oh, yes, it's an M2 screw.
What should I do?
Maype I need to reduce the pulse width. I've also changed the movement width of the M3 screw to reduce wobble.
@quick girder this is what I did. There's config file with min and max pulse width, those set servo angle at min and max
And screw needs to be M3 btw
I would suggest to update instructions for everyone to install the chimney while servo is in MID position. This alone helps to eliminate first issue
ok,I'm trying it.
Dang, I could have sworn that I had it as "mid" in the instructions. I guess I changed it at some point. I'm going to rewrite the assembly portion of the Readme. I just need to get screenshots of the new parts.
Thanks for the heads up!
All good. Just seeing new users trying your design and stepping on same issues. Would be helpful to provide newest list of prints and instructions, so we wouldn't need to repeat same things over and over here 🤣
🤣
@kind karma
I just tested switching consumables, and the test went smoothly.
The error only occurs when resuming printing after the switch is complete.
The error only occurs when resuming printing after the switch is complete.
Seems like there's something wrong with your pause macro. No clue since you're not using AFC
Yes, I don‘t have the big episode of AFC.
I don‘t even know which one should be deleted to be normal.
@kind karma Could you take a look for me? These are the parameters from a waste disposal configuration file that someone else created. I used to rely on macros in this file to perform color changes.
You might need to translate the Chinese text inside. 😅
I'll take a look later. But I'm no expert. You might reach out to discord of your software, whatever it's called...
These are the settings I used to get full motion on that servo
minimum_pulse_width: 0.0005
maximum_pulse_width: 0.0029
But you will have to reinstall the arm after using those settings so it's in the right place
There is no problem with my consumable channel, mainly because there is a problem in the process of returning to the printout to continue printing after changing the color.
There should be no problem with this part.
In your video the chimney doesn't go back far enough to make sure the hole is fully open
Mine is working with
min pulse 0.0008
max pulse 0.0022
anything lower than this, actually lifts up the chimney slightly
Are you using the newer parts? Mine doesn't lift at all
Yep. I think so at least. I had a video here somewhere which shows the chimney lifting up. Anyways have you got yours working reliably?
The part works great but I cant get the purges to drop down the shoot. They kinda get wedged in the chimney or slightly stick to it so they don't drop. I think ideally id want no part cooling fan for the the purge and then enable part cooling after the purge to solidify it. I haven't looked into the macro for doing something like that but im sure it would take me a long time to figure that out.
For now im back to using a purge block on the plate.
Yeah, same here...
🤩
This time it worked
Have you also set the minimum servo angle to 0?
I have X1C at work and looked how it purges:
It purges onto steel plate powder coated
It purges a lot, no fan. Once purge ir done, it turns fan 100% waits few seconds, then ejects
By the way i have my park location the same as poop, to contain the oozing
Why can it repeat the discharge action 3 times? Do you have any special settings?
🤔
variable_tray_angle_out: 180
variable_tray_angle_mid: 0
variable_tray_angle_in: 0
@raw tartanShould I not have set it up this way?
😳
When i did mine i found that 63 for mid was good to make it flush at the front. Yours will be different as it's not turning the full 180 degrees, so trial and error to get the parts flush when in the mid position

My situation is a bit awkward; the servo motor's rotating arm angle can't be too centered, otherwise the nozzle can't move to the chimney.
The nozzle should only reach the chimney when the servo is out. Servo IN is for the purge to drop through the hole and MID is just the parked position during printing
I have them set up as default:
variable_tray_angle_out: 180
variable_tray_angle_mid: 90
variable_tray_angle_in: 0
To make it eject 3 times, you need to change deposit section in turdherder.cfg:
# ==================================================================================
# ==================== DEPOSIT BLOB ================================================
# ==================================================================================
{% if safe.tray or ignore_safe %}
# Double tap the drain to increase the odds of the turd flushing
TURDHERDER_SERVO POS=in
TURDHERDER_SERVO POS=mid
TURDHERDER_SERVO POS=in
TURDHERDER_SERVO POS=mid
TURDHERDER_SERVO POS=in
TURDHERDER_SERVO POS=mid
{% endif %}
👍
But I remember that the author‘s instructions say that the ’servo-mid‘ and ’servo in‘ microswitches need to be triggered...
@kind karma @raw tartan
🤔
Yeah mine triggers in both
Now thinking about it I got my 63 number from tuning it to trigger
Correct, ihad to modify my chimney end piece to make it longer so it would trigger in both positions
here
yes, Out - max position. Mid - chimney needs to be flush with undercarriage, IN - retracted and hole should be fully open for ejection
@kind karma @raw tartan Excuse me, when I run ’SERVI-Mid‘, should my channel be half covered?

This is mid position

The opening on chimney is directly under metal plate and chimney is flush with undercarriage
I seem to understand. I‘ll revise it later. 😅
Could you please explain what this line means? My English isn't very good, so I'm relying on translation to understand the general meaning.

I suspect the reason my printer crashed is here.
I set these two X and Y coordinates at the center coordinates of the chimney.
@kind karma @raw tartan @summer sandal 😅
Those variables are for safe XY movement of the toolhead. The top one needs the distance from the nozzle to the leftmost part of the printhead itself and the bottom is the distance from the nozzle to the front most part of your toolhead.
For instance, I'm running a Dragon Burner toolhead and my values are x=70 and y=50
Can this value be negative? I think you mean that this is a coordinate of the safe area centered on the position of the chimney extension.
That is to say, my chimney coordinates are X=205 and Y=280, so I should change the coordinates to X=0, Y=-50.
By the way, my chimney is located at the right rear of the printer, and there is no way to install it on the left.
I tried to operate it remotely, and it seems to be fine. I‘ll check it when I get home. It seems that the blockage has been suspended.😆
Move out of range: 61.000 300.000 23.054 [48.000]
I'm getting this out of range error after implementing the install script. Not sure where the Y=300 came from since my trident is only 250. Any clue on where this movement may come from?
@quiet kettle the macros for this were formed around my 300mm Trident. You should be find changing that.
So it should be kne of the turdherder scripts?
@quiet kettle Do you have the script to install HappyHare?
@quiet kettle My first guess is that it's variable_purge_y in turdherder.cfg. That's the only variable I can see that has a defined Y value of 300. Make sure you define all of the variables as noted at the bottom of the readme.md file to fit your specific printer.
@summer sandal My problem seems to be solved; I look forward to the next test.
👍
@quiet kettle Perhaps you're encountering the same problem. I'm having issues running Turdherder's script; you could check the parameters related to setting the x and y coordinates.


@quick girder I dug into those variables and they are used during the _TURDHERDER_SAFE_DESCEND macro and are designed to keep the gantry/toolhead from descending on top of the chimney. The comments in the config file are correct and are looking for the measurements indicated. If you search the document for "toolhead_x" or "toolhead_y" you can see where and how they're used.
Understand🤔
Thanks. Found the relevant sections that need to be changed.
What are you using for collecting poops from TurdHerder? I'm working on designing my own poop collector, basically removable bucket that snaps below TurdHerder and collects the poops, If anyone is interested in testing, let me know
I haven't tested that step yet. At present, I think changing the color of the consumables is not a good idea, as it will cause color mixing.
For example, after printing in red and then switching to white, the white will mix with the red color.
@kind karma Will yours be like this?
I used Google Translate, so the translation might not be very good.🥹
This is BT functionality lol, why would you need turdherder then? 🙂 You have to adjust the poop amount, so it would purge out old color. Mine's working well on this. no color mixing
Can I refer to the change of your extrusion consumables?
😳
Has anyone had luck using a piece of one of those silicone mats on the sled instead of the aluminum square? I've been running into issues with blobs sticking inside the chimney and not dropping out. Wondering if a less sticky situation would do me better.
I haven‘t tried this.😆
Does your chimney not have any waste residue stuck to it? I'd like to know how you adjusted the parameter changes.
Also, I'd like to ask what the container for collecting waste from the consumables looks like; I'm very curious.
I have copper square instead and not seen blob to stick to it. Instead, it gets stuck everywhere else. Repeatability is very poor with it currently.
Yeah, that's kind of where I'm am at too.
@kind karma Maybe, I need help.
Should I change the XY coordinates of the tool head I said last time?
@summer sandal
😭
Have you tested it before print? It does seem that you changed quite a bit 🤣
I don't think it's a printout issue, and I'm not familiar with "happyhare" and "TurdHerder"; they need to work together. I think I accidentally added the "SERVO-OUT" command to it.
🤧
I'm more confused as to where the Z move came from. I specifically designed the macro so there would be no negative Z moves to prevent exactly that.
You might want to get a fresh copy of Turdherder.cfg and start over with your variable definitions. Something is very wrong.
I need to redo and run the test. If the problem persists, I will compile the configuration file and share it here.😅
At present, I still don‘t know how to set the XY coordinates of my toolhead. The X=70 and y=50 of the toolhead, so what is the coordinate position of the chimney?
You will have to drive the print head to where you want it to purge. So you would home XYZ, extend the servo to the OUT position. Then use your GUI to position the toolhead so the nozzle is positioned directly over the hole in the chimney and take note of those X and Y coordinates. Those are your purge_x and purge_y. There should also be a couple brush variables that should be defined in a similar way.
@summer sandal i have an idea how to make this work more reliably. Just didn't had time to try it.
Make the chimney opening twice as tall so there would be more space for poop. Then glue in the same metal on the sides of the opening, so the filament wouldn't stick to the sides.
This should fix the ejection issues.
I'll try next week when I get time
I've also saw people rubbing sides with talk or white lithium grease, to prevent filament from sticking.
Another problem is that the opening for filament is very small, making it much bigger would help
I found that my hot bed would not squeeze into the chimney, but strange things would happen when printing the first color.
My chimney didn‘t catch consumables immediately.
The consumables in my chimney ran to the hot bed.
Discord has data transmission restrictions. I just bought a membership.😥
Does your waste disposal process look like this?
Seems that you have mechanical issues. While purging you can see the gap betwen chimney and the dark blue piece below, filament actually gets out from that gap. And more over gap gets bigger when chimney moves inwards. Something is not right
Your first video seems that something is messed up with your macro, as chimney wasn't extended during purge
Yes, he didn't stick it out. I think there's something wrong with the design.
I even went to the trouble of translating the English to confirm. Did you use this setting?

TURDHERDER_PARK
Idk where did you get this, but there is no chinese language in standard script lol...

My translation
🤣
My English is terrible.

Here
I originally had this setting applied, but because I was researching the issue of my heated bed pressing against the chimney, I removed this PARK setting.
which setting? Park macro is fine
Have you already used this setting?😐
No clue about which setting are you talking about.
Mine's configured as follow:
Before loading filament, executes TURDHERDER_PARK macro,
When printer loads filament, AFC executes TURDHERDER macro
that's it
I understand. You guys use AFC to execute TURDHERDER_PARK, while I use happyhare's MMU settings to execute the PARK part.

you need to override your MMU park with this turdherder macro
form tip, that doesn't seem like valid location.. maybe pre load?
I'll set it back then...
you need to talk to happy hare guys
Is he in this group?
No clue, i know nothing about happy hare. 0
😅
I added this to the MMU settings after seeing this instruction.
Park the nozzle on the tray to prevent oozing during filament swaps. Place this
extension in the post_form_tip extension in mmu_macro_vars.cfg:
variable_user_post_form_tip_extension: "TURDHERDER_PARK"
I've been thinking about how to fix the ejection issues. I'm having similar reliability issues, sometimes the poop clings to the nozzle and gets pulled out when it goes to the brush. Other times it sticks to the wall/rim and then doesn't flush. I had tried the idea of adding metal to the sides by slicing up a soda can but didn't have a good way of easily attaching it.
I've been toying with the idea of actually making the hole in the top of the chimney smaller. A smaller orifice would mean that the blob shouldn't get ripped out as it would expand once it hits the sled.
Either that or try and install a horizontal bit of bowden tube to bump / wipe the nozzle against as it moves to the brush.
Its gonna take a bit of prototyping but now that I've got my Secret Santa project out of the way I should have time to prototype/test
I will say that replacing the tiny metal square on the sled with a piece cut out of one of those silicone baking sheets has helped a LOT. I ran a couple multi color prints over the past couple days and only had to unclog the toilet maybe 10% of the time.
Bambu x1c planter has opening of 45 x 50mm but it is deeper than yours, about 35mm deep and filament is not being ripped out with the toolhead
Interesting. I haven't looked at their solution. I probably ought to since it obviously works and I've already borrowed heavily from others work on this one LOL I'll see if I can glean where the magic comes from.
I've been going over the macro and boy it is messed up as well. One area that im currently struggling is that it should poop with fan off, then turn the fan for 4s or so before wiping
Here is bambu x1 purging
The head there pushes lever which flips the plate inside to act as a platform onto which it purges, once the head moves away, poop drops down the chute
I see. An idea like that sprung up too, I just haven't had time to realize it. The tough part with making the chimney taller is that we'd end up having to drop the print bed even further when the chimney extends and at some point moving all that mass would get tough and even more fiddly than it already is, I fear
I need to watch some more Engineezy videos. He's always got clever mechanisms. He may have some sort of spring loaded ejection system that I could borrow.
I can tell you that to make it reliable, it has to be simple. It's not easy to make it simple
Yep, that's the trick. I'm running off a prototype right now that integrates a PTFE tube into the opening for the nozzle to bump on. Hopefully that will stop the filament from grabbing on to the edge of the lip.
@kind karma I'd like to ask what time it is in your area.

@kind karma I still don't know how to configure this part. My waste discharge device has an initial discharge of 60mm, but my pallet is not performing the "servo-out" action.
@summer sandal
Author, is your "Turdherder.cfg file" directly applied to printing.cfg? Because some people noticed that I explained my Turherder settings were applied to Happyhare, and it seems you don't quite understand this part.
😫
This was designed to be integrated into the AFC software that's used with Box Turtle. I don't know anything about the Happy Hare software.
The macros [turdherder] and [turdherder_park] are called from within the AFC.cfg instead of [AFC_POOP] and [AFC_PARK]

Automated Filament Changer Software. Contribute to ArmoredTurtle/AFC-Klipper-Add-On development by creating an account on GitHub.
This is the default AFC.cfg file. Change line 81 from AFC_PARK to turdherder_park and line 85 from AFC_POOP to turdherder
ok,thanks you 👍
@summer sandal here's another insight how to make the blob drop
@quick girder I was looking through the Happy Hare Wiki and it looks like this is where you would need to tell Happy Hare where to find the turdherder.cfg file
https://github.com/moggieuk/Happy-Hare/wiki/Addon-Feature-Setup#config-1

MMU software driver for Klipper (ERCF, Tradrack, Box Turtle, Night Owl, Angry Beaver, 3MS, ...) - moggieuk/Happy-Hare
I set it up yesterday, and it was all done before I left for work. 🤣
@summer sandal
I added "servo-mid" to all the expansion fields related to unloading and loading consumables to ensure that the heated bed would not press on my chimney when it was extended.
Excellent news!

That's pretty cool. I'll have to dig into the Happy Hare software a little bit. It seems to have some interesting features. I'm glad you got it working!
I've been thinking about your suggestion to modify the chimney size over the past day or two. I also feel it seems a bit small. I spent a long time revising the design, enlarging the central hole by 3mm.😅

Making one change requires tweaking almost everything else, which is quite painful.
😮💨
Oooh, I like it! I went the other way and made the hole smaller. I'm very interested in our results!


Is this using a PTFE tube to clean the nozzle? That sounds cool.
Yeah, my hope is that as it moves to the brush it'll drag the nozzle across the PTFE to knock the filament off and then the rattling of the nozzle on the brush will keep it bouncing around in there long enough for the poop to cool and not grab onto the sides.
I'm hoping to start running tests with it tomorrow night. (I've got the printer tied up at the moment.)
Looking forward to your results.😄
👍
So i fully assembled the turd herder yesterday. It kinda feels unstable
So friggin poorly. The couple poops went well but the ones that didn't were catastrophic 🤣
I've been dealing with a sinus infection the past couple days so I haven't felt like doing much after work.
@dawn burrow do you mean unstable as in the physical build or as in the reliability?
Me too. My structural drawings weren't done well, and something felt off after assembly. Also, my new motor isn't turning properly; it seems broken.
I asked a friend for the black MG90S servo motor, as I feel it's more stable.
Physical build
Yes, as I've noted also, it is not rigid design, wobbles to both sides adn feels flimsy
2 m2 heated inserts with screws in the slider should fix it
I've improved the servo motor's COG, so it shouldn't need a shim anymore, and the bottom will be suspended, so there's no need to worry about it being too tight.
Modified based on the Angry Rabbit selector arm profile.😆
@kind karma How does your chimney work?
It works, but not reliably releases poop. I have few ideas to work on, but had no time yet. One of the things I'm thinking is to make the chimney taller by 5mm and on the sides of it, insert pieces of plastic from like detergent or something similar with PE plastic, it will act like repellent and no plastic will stick to it
Just like that:

feels good 👍
Mine isn't finished yet..... Why is your motor running so smoothly? 😐
If yours is not like that, then there is something wrong
Maybe I changed too much... I even feel that the tray can‘t hold the rear nut, and the rear has been changed to a magnet.
SUCCESS!
I feel like the entire structure of this chimney has been redesigned...😂
The whole reason I published this thing was in hopes that the community would get ahold of it and help me to improve it.
I'm not very good at drawing 3D models; I can only cut and modify them.
I feel that many structural adjustments are needed after the lengthening, and I don't think my adjustments were very good.
@summer sandal For your reference.😳
I later changed the trays so that they could be held together by magnets, because hex nuts weren't very effective...
COG also lengthened it because I needed the chimney to extend further.
I moved the microswitch position forward a bit.
I got a bit overwhelmed while making the changes. Hope this helps.
Can you do 10 purges in row? with success
@kind karma I'm still adjusting the printer... all the settings were lost after the update.🥲
To put it another way, the waste material coming out of the chimney is probably due to overflow from the nozzles.

There seems to be some problems.
In fact, I think the chimney seems to be warped. I don‘t know if the original version will be the same.

@summer sandal I think the structure of the trigger microswitch can be raised a little higher. It is warped and pressed against the hot bed, so my printer is out of place😐

I don‘t know if the translation can be understood.🫠
Yeah, I'm unsure of the part you're talking about. Can you circle it?
Ah, I used to have an issue with mine lifting up like in the image you showed earlier. If I recall correctly my problem was that I had the screw in the end of the cog too tight. Let me find a pic. One sec.
I cut a short piece of PTFE tube to go around this screw to take up the extra space in the slot. When I tighten it down I wait till the cap of the screw just touches the yellow part, then back it out one half to one full turn.

With that configuration I haven't had the lifting up problem that you showed in your last photo. It only gets lifted up if a poop doesn't fall out of the bottom and jams or if the bed raises while it's extended accidentally.
🤔
I had to drill out the PTFE tube to fit around the screw but I know you can buy some 3mm ID
Thats exactly the idea! I would shorten the PTFE so it is just the height of the channel.
I would also use a Button Head screw instead of a Cap Head screw, just for clearances
I'm working on remaking the images and instructions on the GitHub since lots has changed since they were first published.
okok
But my printer still broke down due to this accident. I'll continue testing it after I buy new parts and get it repaired.😅
Yeah, this thing has put my printer out of service for more than a few days. It's frustrating for sure.


Looks good to me. If the arm has trouble moving you may need to loosen that screw a bit but that's exactly how mine is set up
okok
Sorry this thing knocked your printer offline for a bit. I feel a bit bad but I really really do appreciate the help testing it out.
That goes out to everyone else as well. It's pretty cool that you all even took a chance on this idea I had. I appreciate it.
I'd love to try this, so no problem. I'll test it again once the materials arrive to see if the color change is successful and if waste material can be eliminated.
I was finally able to get to do some testing. I have modified original chimney design by making the opening 5mm taller and made slots for some PE plastic, which I've taken from liquid detergent bottle, I've cut it to size and inserted inside. So far I'm happy with it, out of 10 filament swaps, between PLA-> PLA-> ASA only single PLA was not ejected
I think if chimney would get another 5mm taller, it should work

I modified the chimney and the brush holder to make this mod
Filament no longer sticks to the sidewalls and stays inside when wiping
That looks REALLY promising @kind karma ! Very nice work! A hell of a lot better than my slit top design which failed miserably 
Would you mind sharing the STEP file? I'd love to print one out and get it added to the new instruction manual I'm writing up.
I started cleaning up some of the CAD last night, adjusting some mounting holes and minor fitment tweaks. I had the idea to incorporate the brush arm directly into the chimney so it would be one piece. Thoughts? Mine keeps coming loose and trying to spin.
Another update, successfully made 10 filament swaps. So this design has lower failure rate, but still it exists.
My design is based on inserting pieces of HDPE/LDPE plastic (which i've taken from old liquid detergent bottle i found at home), which repels the plastic from side walls
Attached are my files
I am using your version of microswitch mount, where it's mounted from the side, but then my chiney wouldn't get detected in MID, so i had to make the chimney pin longer
if I would do it again:
Other improvements could help I think should come from macro. Now when i Poop, i have fan at 25%. I would probably want to do the poop with fan off, then after pooping, turn fan ON for 3 secs at full speed and then wipe only. I plan on sitting down and reviewing macro from scratch, but don't have enough time i could spend on this for next week or so
or even move the print head back and forth a bit while pooping
I agree with all of the above.
I like the idea of reducing the fan for the purge then blasting it before the wipe. Should help with nozzle release.
I will take all the help I can get with the macro. I know virtually nothing about Jinja as a language.
I doubt I'll make any progress tonight but I've got a place to start tomorrow. I spent today making some modifications to the slide_base, servo_mount and mounting bracket. Nothing functional has changed so far aside from extending the height of the mounting bracket by quite a bit.
I'll post files once some progress is made
Well i have posted my servo plate before, this is the one that worked for me.
Another suggestion @summer sandal is to improve the servo cog mounting, there are couple things i don't like about this design:
Ideal solution would be to get the servo cog in line with the chimney and fixed on both ends, not just on one side, to prevent it from twisting. then use a pin instead of bolt to pin the cog in place
Hey @summer sandal thanks for your awesome mod.
I have 1-2 suggestions after testing a bit:
Maybe it's the cold medicine but I'm having a hard time visualizing this sort of cog configuration. I understand getting the motor up and inline with the rest of the system but I'm blanking on the "fixed on both ends" bit.
Maybe something like this slider-crank mechanism? https://www.youtube.com/watch?v=XXdlVlzxBjk

This video shows how a scotch yoke creates a perfectly sine motion along the horizontal axis, whereas the slider & crank mechanism does not. It produces a slightly different oscillation.
[ 4K - 1 minute loop - no audio ]

Here's the idea
@dawn burrow I'm thinking you may have some extra tolerance/shrinkage introduced somewhere or are working with a mish-mash of parts versions. With the current versions of the slider-base and chimney I get very little chimney wiggle and generally pretty smooth motion. The servo arm is currently under the looking glass and is likely going to be reworked this week.
AH! Got it. That looks like it should be very doable.
That might actually eliminate the need for the servo_mount all together. I've been toying with the idea of merging the mount and the slide plate into one part for a few days anyway, just haven't come up with a clever way to do it yet.
COLLABORATION! I love it 
all abs 😄
i had a very hard time adjusting the turd herder
and its still kinda off but hey it somewhat works and cleanes the nozzle
Hey @summer sandal would it make sense to print the servo arm in resin?
I suppose you could but I don't know if it would be any benefit. I, admittedly, don't know any of the benefits of using resin in structural parts over FDM
I've been toying with the idea of turning the rotational axis on its side and making the thing only have two positions, in and out. If anyone out there with a better engineering mind than my own could shoot this down or encourage me to go forward I could really use the insight.


hmm brush is kinda not working for me
I plan to incorporate the brush into the chimney so that it's just one piece and more solid. It should be an easy boolean operation but since the chimney is in the midst of a redesign I figured it would be easier to tack together at the end
I can whip a quick one up using the existing geometry if you're in a pinch but just be aware that it's going to change again pretty soon
Will that make the whole assembly longer? Seems to me that having servo as it is currently is the most optimum way to save space. I would just line up servo cog with around the center of the chimney and good to go.
the thoughts i have is:
i have a silly but maybe working idea, maybe a super short mgn9 rail can be used for the chimney

Well fuck xd
the endstop also kinda makes no sense
its only triggered when the turdherder is fully in
but in homing_override and overall it only gets half retracted (mid position), so the endstop never gets triggered
i decided to ditch the endstop checks and make absolut sure that the servo is at 90, before homing z and even starting the print
You have to modify so the endstop would be triggered in both IN and and MID positions. This is important for safety so you wouldn't damage your machine
I have posted updated chimney file here, which makes the pin longer, to trigger the switch in both positions
@summer sandal just a suggestion - you could post current issues somewhere or just the heads up that this is WIP, so people would know.
Turd Herder - A WORK IN PROGRESS waste disposal system for Trident
- Should the chimney be sliding in undercarriage part which prevents the chimney from lifting up? currently there is no vertical movement limiter, e.g. to make the slide on the sides as well so it would slot into the undercarriage / servo mount and would not be able to lift up
I tried limiting vertical movement on earlier iterations (before creating this thread) and all of my ideas introduced too much friction for the servo to overcome. That's not to say it's not worth revisiting. That said, if the bed does lift up while the chimney is extended, the odds of only having to reprint the cog or chimney_slot are much higher than if the entire apparatus gets jacked up by the bed movement.
- Then make the servo cog fixed in the middle of the chimney (from vertical direction)
This is very tricky because as it stands, the chimney slides over top of the servo in the Y axis. If you have an idea that works without cutting too much away or introducing some sort of linkage I'm all ears. I've tried modeling this up a few different ways but can't figure out how to keep the chimney and servo from trying to occupy the same space.
Got the WIP added to the title. I don't know of a good way to implement known issues via discord
Or hear me out, why not enforce mid position while homing?
Double redudancy - servo position + endstop? To make sure it's really safe to home and prevent from damage. If you take away switch and for example your cog breaks or something else, you will get rekt as there is no double check if it's really safe
Hmmm
Good call
I think I will move the servo to position 0 and add a check in my macro
How long is the travel of the chimney?
[gcode_macro _TURDHERDER_SAFE_IN]
gcode:
    SET_SERVO SERVO=TURDHERDER ANGLE=0
    G4 P500
    #SET_SERVO SERVO=TURDHERDER ANGLE=90
    #G4 P500
    G4 P2000
    _VERIFY_TURDHERDER_IN

[gcode_macro _VERIFY_TURDHERDER_IN]
gcode:
    {% set sled_state = printer["filament_switch_sensor turdherd"] %}   # Query the state of the sled sensor
    {% if not sled_state.filament_detected %}                           # Check if sled sensor is not triggered
      #RESPOND MSG={"turdherd " ~ (sled_state.filament_detected|string)}
      {action_emergency_stop("Turdherder didnt retract")}
    {% endif %}
this seems to work
I've actually encountered this problem myself, and I'm wondering what's causing it.
Despite my continuous adjustments to my model, it still ends up looking like this.
i solved it permanently

[gcode_macro _TURDHERDER_SAFE_IN]
gcode:
    SET_SERVO SERVO=TURDHERDER ANGLE=0
    G4 P500
    #SET_SERVO SERVO=TURDHERDER ANGLE=90
    #G4 P500
    _VERIFY_TURDHERDER_IN

[gcode_macro _VERIFY_TURDHERDER_IN]
variable_attempt: 0
gcode:
    # reset attempt counter and do the first check now
    SET_GCODE_VARIABLE MACRO=_VERIFY_TURDHERDER_IN VARIABLE=attempt VALUE=0
    _VERIFY_TURDHERDER_IN_CHECK

[gcode_macro _VERIFY_TURDHERDER_IN_CHECK]
gcode:
    {% set sled = printer["filament_switch_sensor turdherd"] %}
    {% set tries = printer["gcode_macro _VERIFY_TURDHERDER_IN"].attempt|int %}

    {% if sled.filament_detected %}
        # success
        SET_GCODE_VARIABLE MACRO=_VERIFY_TURDHERDER_IN VARIABLE=attempt VALUE=0
    {% else %}
        {% if tries < 2 %}
            # fail: schedule another check in 2s (2 retries max)
            SET_GCODE_VARIABLE MACRO=_VERIFY_TURDHERDER_IN VARIABLE=attempt VALUE={tries + 1}
            UPDATE_DELAYED_GCODE ID=_VERIFY_TURDHERDER_IN_RETRY DURATION=2.0
        {% else %}
            {action_emergency_stop("Turdherder didn't retract after 3 checks")}
        {% endif %}
    {% endif %}

[delayed_gcode _VERIFY_TURDHERDER_IN_RETRY]
gcode:
    _VERIFY_TURDHERDER_IN_CHECK
and just call _TURDHERDER_SAFE_IN in homing overwrites
this will absolut make sure that the turd herder is on in position
and if there are more then 3 check fails it will stop the machine to prevent damages
oh yeah happen to me again
Thank you, I will test it again. But first I need to reprint my damaged model.🫠
after pooping it fails to retract
for whatever reason
yeah i found why
in the purge macro and clean macro, there is never a position update
at the end
Is this newly added g code?
yes
i am currently modifying the turdherder config aswell
so modified alot of macros, including start print
i will not post it, till i am sure that its fixed
okok
my chimney was also stuck on the alu foil
I've increased the size of my chimney, but the exhaust material I'm sending out is falling onto my heated bed.
I just modified the chimney structure; I drew a groove to hold the PTFE pipe.


I noticed that the silicone brush was positioned higher than the chimney, so I added a PTFE tube to increase the height and prevent the extruded filament from falling out.
@summer sandal
🤔
I do like the idea of having a tube up there to kind of bump the nozzle on.
I never ran into any problems with chimney position being off. I just made sure that my switch reads in both in and mid positions and never ran into a problem. This macro modification sounds like a workaround for specific situation
My test print went smoothly; this counts as the first successful print...
The current problem is ink spillage; some ink drips onto the printed product.😮💨

You need purge tower i guess
you also might have high flow hotend, so more ozzing from the nozzle or poor wiping
Maybe I should find time to re-correct my hot end.
i might redesign the chimney and the base fully, as soon as i get a super short mgn9 rail. i will use one for a voron tap for that mod. with that i think the falling of problem is solved and its more stable overall
I also have a plan for the guide rail, but at present, if it doesn’t fail again, I think it‘s good if it can be stable.
There is something wrong with my raspberry pi 4B. I sent it for repair and can‘t be printed for the time being.
💬
Yikes
Yeah I am also having a difficult time with printing. Buts more related with my printhead
so i noticed something interesting
the start macro just skips my check
T{initial_tool}
G4 P250
_TURDHERDER_SAFE_IN
hopefully that solves it?
What problem are you solving? Which start macro are you talking about?
Lol, no idea what's going on for you. My works exactly like it should, if turdherder is left in out position, before homing it does retract it to mid position. Doesn't matter of its print start, or just homing axis. This is standard config and behavior
I think the only possible bug or the macro logic break is if you would leave the turd herder out while it's homed and then go to Z0 manually
got stuck again on mid position, yeah i give up for now
i think i will replace the server with a bigger stronger one
to prevent the sticking issue
Hi folks. I've tried to apply TH to my trident setup. Here are some of my observations:
Looking forward to any feedback if anyone faces the last issue, How to make the blom dropping be more consistent

Hmnn maybe it's because I didn't install the PE plastic as intended?
Yep, try with plastic. Also for the macro you need to make sure that switch reads when both in IN and MID positions, then you don't need to modify anything.
yeah mine doenst go fully out anymore...
I mocked up a version with a smaller opening in the top and it failed spectacularly. We've been kicking around the idea of making the chimney taller which a few of us have had good results with.
Where are you guys plugging your servo to? I'm attaching it to an end stop in m8p. And somehow it's causing a system crash
My hypothesis is that it's sucking too much power and causing the on board cm4 to crash
That won't work. End stop pins are simply a 1 or a 0, a servo needs a data pin. The M8P should have a couple servo ports to use
I've got mine wired into the BLTouch probe port
It has a data pin which i managed to use initially. Just something went wrong recently with the power draw. Let me look into using the probe pin instead. Probably has better protections in case of overload?
Bltouch pin is the way to go
I guess there's not enough torque in this motor. It keeps on stalling and crashing the whole system

Gets quite hot when it's stuck
Similar issue to this I guess
I'm going to find a stronger servo motor. And move the power to a dedicated buck converter. At least prevent a stall from crashing the whole system
This motor has 1.8 kgfcm. I'm going to upgrade it to one with 9.4 kgfcm
I have the same motor running no problem. Are you sure that mechanically chimney moves easily without any bumps or jams?
It might be because of the magnet I used in the sled? I used dual magnets which lead to stronger force needed to move it. Let me try changing one of them to use a nut instead
nono
motor is fine
mine colided to often with the bed, the servo arm itself broke
that might be your reason
i got a awesome safety idea
there is a long spring included in the box turtle kit that has no use (atleast with the anthead toolhead)
maybe this can be used as safety feature?
this is my rough idea
50 mgn9c rail on the side, chimney is mounted on there.
also there will be a spring between the chimney slot and chimney, screws are working as guide, maybe that works and if there is a unwanted collision with the bed, the bed will just push the chimney to the rear

what do you guys thing and also what do you thing @summer sandal of the idea?
I'd be nervous about putting something so rigid on there until we can figure out a better solution for safe Z movement. If the bed raises with the chimney out you're looking at shredded parts at best, bent lead screws at worst.
thats why spring 😄
and a wedge at the front of the chimney
in my testing the servo didnt retract most of the time after loading for whatever reason and now the servo arm and the alu foil is busted
maybe also the servo
I mean, give it a shot! If it works then heck yeah, if not, well at least we explored the idea
yeah and i will also add a stabilizer on mount thingi at the rear
makes the whole thing more rigid and easier to adjust
That's really weird. I haven't had any issues with movement on mine in quite some time.
yeah i even added multiple servo in calls and breaks before the prime line but klipper just gave a fuck so yeah
will continue the design tomorrow
maybe i will even have a working prototyp
One change i did was to force the position to be IN at the end of all actions. Had issues where the chimney got caught by the bed when it was in MID position
solved the getting caught issue for me. Though i haven't progressed to an actual print to verify it's stable longterm
Lol, with this direction you are going to, this could get more complicated than the printer itself really fast 🤣
It will only work if it's dead simple. The more complicated you make it, the less reliable it will be
if you mean me, i am german. of course i will go absolut overkill 
but project is on hold for now... currently the printer has other bigger issues with the toolhead

I'm finding some difficulty in getting things to reliably eject. Sometimes it gest stuck
Probably need to make the overall hole smaller? So that it slides better when pulled in
What's your failure rate? You can try trying to eject more times

It's getting caught in the inner lip of the sled
I'm going to try to modify this design with smaller opening
Don't. People done that and it didn't worked. My opinion is that actually larger and more taller opening is needed
Going larger requires modifying everything though. Bigger sled and base
Vague thought: maybe we add something like this to use as the entire poop chute: https://www.aliexpress.com/item/1005006401134305.html
say a 10mm to 6.35mm with the smaller end facing up
the bottom entirely covered with a little copper heatsink pad
Trying to think of something that kind of profile thats available cheaply worldwide
OH
middle of a 608ZZ
other 3d printer hobbyists are likely to have hundreds of those fuckers around yeah?
Based on my observations, current problem with small opening is because of the natural coiling action of the filament.
Smaller coils -> Stronger force holding the coil from dropping with gravity
I'm trying out a larger hole, might be better.
Another thought is if we can make it become a blob instead. Squish it like a traditional poop process. This way it doesn't have any chance of sticking to the wall of the chimney
time to start the project "overkill turdherder"

With the track?😆
That one
Mine turdherder gave up and barely works - meaning poop stays in chimney. I think this design needs major change. What's good about it is the macro working pretty well. I've made some changes where it poops with fan off, then kick on the part fan before cleaning, that helps some, but the drop mechanism really doesn't work reliably
Mine doesnt extend anymore
I would say contrary to this - hardware works pretty well, servo is reliable and the system performs great, never had a single issue after assembled correctly
In fact, I think it should be bigger... I even hope that the drag plate can shrink back immediately. Sometimes it will get stuck outside, and the hot bed will be bumped after lifting.
Bambu‘s machine seems to have a tilting angle on the tray, which has more space to exclude consumables and is relatively less likely to get stuck.

I have tried making a larger chimney. It's better than before, but still has occasional issue of getting stuck
If we try to mimic how bamboo works, it seems we need to create one more servo to "Force Push" the filament into the waste basket? Instead of depending on gravity to pull it down.
Let me try adding this. See if it works

I have just confirmed again, when using TurdHerder with AFC and if mid print you run out of filament on lane, here is what happens:
1.Filament on lane 1 runs out, AFC runout kicks in
2. Filament on lane1 is cut and ejected
3. Lane 2 filament gets inserted
4. When it should purge, Turdherder goes to MID position instead and then starts purging in thin air
5. When purging is done (in thin air) klipper crashes, and only error pops up in console
Move out of range: 116.000 486.000 30.040 [18721.307]
Move out of range: 116.000 486.000 30.040 [18721.307]
Try again
I just can't figure out why this is hapening. This is the section of config that gives this error:
G1 E-{bl.retracted_length} F{bl.retract_speed * 60}
{% if safe.brush or ignore_safe %}
TURDHERDER_CLEAN
{% else %}
RESPOND MSG="Try again"
G1 X{purge_x} Y{purge_y} F{travel_spd_xy}
{% endif %}
@summer sandal i found a fix in your macro. you need to remove G91 from TurdHerder macro completely: this part was switching coordinates from absolute to relative, thus doubling up the Y axis and then giving this error Move out of range. I've tested it now, after this change, it works as intended. Except not always releases the poop

@kind karma Are you sure? Do I need to delete g91?
Yep. That fixed my issues
But I remember you said before that your device is working normally.😅
It did. Read the whole thing. It was working, except when filament rollover was happening. If you aren't using Box turtle then you are on your own. It's just that this macro had no sense in having G91 there.
Understood. I won't delete G91 yet. I plan to print my modified model now, and I need to test the linkage between the parts to ensure it works correctly.

Change bigger🤣
I don’t have any aluminum sheets. I don‘t know if the aluminum foil paper can hold it. 😅

Now do this another 100 times and with different colors and materials, then let us know 🙂
I need to find time to try. There is something wrong with my ”Quattro Box“. I need to reprint a part first.
@kind karma
Is your printer controlled by happyhare‘s mmu?
At present, I have found a very serious problem. When the printer replaces the consumables and reports an error, the hot bed returns to the previous coordinates (140, 130, 10)
My hot bed will go up to squeeze my chimney and lift the chimney up.🙂↕️
The chimney will not put away the tray immediately after reporting an error.
No, box turtle here.
For me it works as intended. The only way to damage is to manually move the bed up, then its possible to lift the chimney. In every other case, it retracts the turdherder before automatically moving bed
Ok... I‘m looking to see if I can turn off that setting.
Ok gang, I dreamed this thing up yesterday afternoon and have this somewhat working prototype.
Obviously I'll need to figure out the servo angles and I plan to incorporate a brush into the side opposite the "poo hole" but how do we feel about this as an idea?
The only hardware it needs (as of right now) is a servo, an F695 bearing (half of a bearing stack for a traditional Voron Core XY motion system), 6x3 magnets (x3) and an M2.5 x 6 screw.
Interesting concept. How do you get it over the toolhead? 2 servos you mean?
One servo. The thing is mounted a few mm from the bed. When activated, the bed drops to below the top spinny bit. The spinny bit rotates out so the hole is over the top of the bed. Purge, then it all spins back the other way and drops the poop out a hole in the rear.
I haven't tested this whatsoever BTW. Could be a complete flop
thats neat, the problem is it wouldnt work with my printer because i cant move far ernough back. the nozzle stops right at the end of the sheet
ohhh i see
The push concept seems to be working fine. Haven't had a stuck purge issue during a 2 hour print

Ok, that's pretty awesome.
Looks nice but also is funny and overcomplicated 😄 great thinking though!
I'll clean up the cad file later and share here incase anyone wants to play with it. It requires several modifications to the main file though:
So far it's much more reliable than depending on gravity to pull the blob out. Need more testing to fine tune it
you could think about spring loaded lever, which would get pressed as the chimney goes into MID position, basically chimney itself would press the lever which would press out the remains of poop
TerdHerder Flusher Mod
need a little speaker to play a toilet flushing sound
Any updates?
I can share to the dev team here that there are still bugs in macro. Sometimes it continues to purge in thin air because it looses variable that it's safe to extend. other than this my turdherder works great, but only ejects 3 out of 4 poops.
the latest fix i made prevents the system from crashing, but I'm not sure how the macro looses those vars and give me message try again
invasive thought I have every time I see the name of this project

Thats the whole point of this. It will go over the bed
Ohhh true then nvm
It sits off the edge of the bed. Then it rotates over the bed.. u purge into it and then it spins behind the bed and drops it
Hallo zusammen, kann es sein das das ganze nicht mit dem Beacon 3D funktioniert ?
Bekomme immer den Fehler, aber wenn ich dementsprechend alles entferne bekomme ich den Fehler No Beacon Modul loaded


My original release TH finally exploded yesterday, now reprinting the latestish parts
looking forward to the @quiet kettle's terd plunger mod 😉
How can it explode lol?
the end of the servo horn snapped, which got stuck under the microswitch stopping the servo horn from moving at all, so it got stuck fully extended, then the bed came up and caught the front of it. Since the end of the servo horn is the only thing holding it together, that being broken pulled the screw out and the entire mechanism exploded apart with bits everywhere 😄
OOI does anyone know what are the two holes on the side of the TH lower are for
these

ohh they're leftovers from the old switch position aren't they 😄
so i got an idea
instead of the small cute servo, how about a servo that can push 20kg?
that should fix the sticking issue with bruteforce
If you have this issue, go for it. My servo works great still probably after 200 filament changes or more. My only complain about this is that it only ejects 3/4 or purges
i dismantled my turdherder and well the servo arm failed once again... kinda annoying ngl
maybe something like this can help?

guys i got maybe a great idea. instead of a servo how about we use a solonoid?
ordered linear actuator and driver breakout board... i think this is the best solution because the servo arm is very fractile
hmm it fits sofar very nice and i only need to make 2 parts new

Lol there's no limit how far you can go with this
this looks like it would need a lot of space between the print bed and the enclosure. how long is that linear actuator?
this fits just perfecty in a voron trident
its 96mm long retracted
and it can extend 30mm
hmm that might fit in my printer. interesting
my system is working fine but the tinkering compulsion is activating
yeah will assembled it tomorrow
also got a drv8871 breakout board for that... that will get interesting because i need 2 pwm signals to controll. one pwm for the one direction and another for the other direction
and if my math is correct i need to extend for 1s for mid position

first inital tests, it runs slow and smooth
except that the chimney kinda jumps over the endstop.. i made the guids a bit longer to prevent that
so... my fix for the jumping issue

Is that from a voron tap?
the first poop was successful (without the linear rail addition)
Well..

this properly fixed with my rail mod
Works now smooth

i think i will also adpot this one.. not sure yet how but well i find a way 😄
and plunger addon designed

Neat

first test with the plunger was more then successful.. sofar the system works now butter smooth except that the front arm base is kinda loose, but i have a fix for that
What extra electronics did you need for the linear actualtor ooi?
mgn9c 50mm rail, drv8871 breakout board in adafruit style, 30mm 24v actuator (https://www.amazon.de/-/en/Ejoyous-Electric-Actuator-Automation-Robotics/dp/B0FHF8XQS1) 3 free data pins (2 for motor drivers, 1 for the plunger servo)

Spec:
Item type: mini electric linear actuator.
Material: aluminium, ABS
Input voltage: DC 24 V.
Speed range: 15 mm/s (0.6 inches/s).
Thrust: 50n.
Stroke: approx. 30 mm / 1.2 inches.
Tube: aluminium tube.
Mounting connection: ABS.
IP rating: IPX4.
How to use:
Take out the product and ...
i am still testing and fine tune it.. i will update my fork as soon as its properly working

STLs and Config Files for TerdHerder filament toilet - eliteSchwein/TurdHerderLinearActuator
currently i have a print with 134 switches. works sofar fine without any issues
but keep in mind, the linaer actuator is slow. it takes 2 seconds to fully extend the actuator... for mid and out i have a small logic that uses the endstop in the turdherder to cut it in half the time. mid checks if the turdherder is in in position and moves 1sec out or in depending of endstop state. the out checks if the endstop its triggered. if its triggerd, extend for 2s otherwise 1s (because in mid, the endstop isnt triggered)
Is the mg9c bit compatible with OG TH? I have so many dead tap rails lying around
not sure, could be. i ordered a cheapo mgn9c 50mm rail from ali
soo after some testing and printing, i modified the sled. i moved one magnet to the other side.
and on the base i added 2 screws in the front to make the whole base more "fixed", hopefully it doesnt wiggle anymore

@summer sandal well my design got kinda overkill haha

And yes 2 brushes. Should solve the issue that the poop gets ejected at the front and also changed how it works. Brush happens after clearing chute
Oh dang! 🤣 Hey, if it works it works
yeah we will see
but sofar, the 3 screw system for the base is very very good
its kinda bad to adjust but hey, as soon as its adjusted it aint going anywhere..
basically, first adjustment is like the normal turdherder/at brush
after that increase the height by around 1 and half millimeter.
then hold it on the servo, while holding screw in both screws till it doesnt go any further.
then with the main screw the angle of the whole turdherder can be adjusted... i will test tomorrow how well the system works, but from my fast testing without filament. it looked very good.
The R2 update of trident should pretty much obsolete this and should be no longer needed, as the print hewd will be able to travel back more
But your skill of over engineering something is great!
Not far off that this thing would require it's own controller lol
I'm really excited to get my hands on the Rev2 files.
Hmm yeah i have cnc parts so no r2 for me
CNC R2 ? 🙂
Hmm yeah we will see
is it already aviable?
first test run with dual brush and purge sequence change... it prevent that the poop went out in the front.. second poop was well more then bad, but fixed the macro so the clean macro doesnt mess it up
i dont get it, the brush actuelly touches the nozzle but it doesnt clean the nozzel. i had the exact same issue with my stock sv08 brush thingi... i think i will make a mount for a brass brush. that thing worked amazing for my sv08
My silicone brush is pretty worthless as well. Been thinking of trying to have it add some Y travel to the wipe macro. Just been too lazy.
yeah i will make a brass brush mount
because, i have a brass brush on my sv08... after that i never ever cleaned the nozzle again. it just works. also i will add my zigzag pattern.
[gcode_macro SHAKE_NOZZLE]
gcode:
    {% set shake_count = 24 %}
    {% set fine_shake_count = 48 %}
    {% set shake_feedrate = 25000 %}
    {% set fine_shake_feedrate = 35000 %}
    {% set max_accel = printer.configfile.settings.printer.max_accel %}
    SET_VELOCITY_LIMIT ACCEL={max_accel}
    # Shake it!
    M106 S255
    G4 P1000
    G91
    G1 X-2 F{shake_feedrate}
    SAVE_GCODE_STATE NAME=shake_nozzle_state
    {% for shake in range(shake_count) %}
      {% for coordinate in [(4,0),(-4,0)] %}
        G1 X{coordinate[0]} F{shake_feedrate}
      {% endfor %}
    {% endfor %}
    G1 X2 F{shake_feedrate}
    G1 X-1 F{fine_shake_feedrate}
    {% for shake in range(fine_shake_count) %}
      {% for coordinate in [(0.5,0),(-0.5,0)] %}
        G1 X{coordinate[0]} F{fine_shake_feedrate}
      {% endfor %}
    {% endfor %}
    G1 X1 F{fine_shake_feedrate}
    RESTORE_GCODE_STATE NAME=shake_nozzle_state
    G90
    M106 S0
[gcode_macro CLEAN_NOZZLE]
gcode:
    {% set heater_target_temp = params.HEATER|default(200)|int %} ; Set Heater
    {% set first_loop_count = 5 %}
    {% set second_loop_count = 3 %}
    {% set clean_z = 2.4 %}
    {% set clean_y = 360 %}
    {% set start_x = 295 %}
    {% set end_x = 345 %}
    {% set max_accel = printer.configfile.settings.printer.max_accel %}

    {% if printer.toolhead.homed_axes != "xyz" %}
       G28
    {% endif %}

    G90
    G1 X{start_x} Y{clean_y} Z2.5 F9000
    SET_VELOCITY_LIMIT ACCEL={max_accel}
    M117 Nozzle heating...
    M109 S{heater_target_temp}
    G91
    ;G1 Z10 F300
    G90
    M106 S255
    ;M104 S130
    M117 Clean nozzle
    G1 X{start_x} Y{clean_y} F9000
    G1 Z{clean_z} F300
    G1 X{end_x} F4500

    SAVE_GCODE_STATE NAME=clean_nozzle_state
    {% for first_loop_index in range(first_loop_count) %}
      G1 Y{clean_y} X{start_x}
      G1 Y{clean_y} X{end_x}
    {% endfor %}
    RESTORE_GCODE_STATE NAME=clean_nozzle_state

    G1 Y{clean_y} X{start_x}

    SAVE_GCODE_STATE NAME=clean_nozzle_state
    {% for second_loop_index in range(second_loop_count) %}
      {% for i in range(start_x, end_x, 2) %}
        G1 Y357 X{i}
        G1 Y362 X{i}
      {% endfor %}
    {% endfor %}
    RESTORE_GCODE_STATE NAME=clean_nozzle_state

    M400
    M117 Clean Finish
    ;M109 S130
    M107
    G91
    G1 Z10 F300
    G90
that 2 macros
shake afterr pooping
clean after removing the poop
oh yeah btw @summer sandal changing to clean after poop remove works amazing with the second brush
so...
i noticed that the poop now falls out on the left... how about a 3 brush solution? 😄
brass brush mount.. maybe it works and fits

and had to shorten it by alot because well the plunger colided with the brush -.-

in theory i can remove the wipe sequence after purging because the 2 a1 brushes are already cleaning the nozzle very well but hey what helps with a cleaner nozzle? more cleaning lol
I love this lol 😄
yeah and yet it fails and i am kinda mad about it
poop flew out again and the brush didnt fully clean the nozzle once again... i am slowly out of ideas
so i lowered it to 250mm/s and in the zigzag pattern i use half speed. should be better then
Another brush lol?
nah, i will just copy the shake function from my sv08
that looses the connection to the poop for shure.. shake uses max accel (in my case 40k) for 0.5mm x movements
Where I'm at - When i swapped from SB to A4T I already have more clearance at the back in Y axis, once R2 is released, will upgrade and then will make a stationary purge and kick and no more time messing with trying to make this work
yeah i will also wait till r2 is out and also waitt for r2 cnc parts.. maybe i will switch to r2 aswell


