
#enfusion_model
1 messages · Page 6 of 1
 surreal ore
even the prefab is correct
the preview for the icon and the inspect menu are messed up, not sure how to fix it tbh
 delicate condor
surreal ore
the preview for the icon and the inspect menu are messed up, not sure how to fix...
delicate condor
surreal ore
the preview for the icon and the inspect menu are messed up, not sure how to fix...
Might need a bug report
 quiet fog
would you mind elaborating? Im completely new to this and in every tutorial i watched they basically said "turn it on or off depending on if it is giving you the result you desire"
surreal ore
@delicate condor I thought this would help

in the PreviewRenderAttributes, but no luck
delicate condor
quiet fog
would you mind elaborating? Im completely new to this and in every tutorial i wa...
There are million ways to model. Don't 100% trust what anyone says
 tacit eagle
bisect is like a boolean opp that only works in union, so where parts a and b intersect you have geometry, its a useless setting for 99% of the times and a bad habit to use
and to make sure you have no scaling issues reset scale and rotation on your mesh by going to object mod and pressing ctrl + a and select what ive just said
quiet fog
ok, but that unfortunately didnt solve the issue im having :/
I must say, coming from Autodesk Inventor it feels like some things are overly complicated 😄
tacit eagle
cad and 3d programs have different workflows
so pretty much forget most of the stuff your learned with cad programs
quiet fog
i figured as much
tacit eagle
for this type of work you can easily just box model it out of a box,
also make sure your normals are pointed in the correct direction, select all in edit mode and hit ctrl + n and then enter
quiet fog
you mean shift+n?
tacit eagle
for me its ctrl + n
quiet fog
ctrl + n asks me for a new file
surreal ore
If you can't remember the shortcut keys use F3 to search
quiet fog
i am in edit
tacit eagle
well what does shift n do
quiet fog
recalculate normals
tacit eagle
yes its that one
quiet fog
but when i hit enter nothing changes
like the menu on the bottom left doesnt disappear
delicate condor
it stays as long as you do something else
quiet fog
oh ok
delicate condor
you can still adjust you action through it
quiet fog
usually it disappears when you click somewhere or move the camera
tacit eagle

too see your normals
blue is proper and red is inverted
at least with my theme
face orin...
 quiet fog
looks good i think
tacit eagle
everything blue?
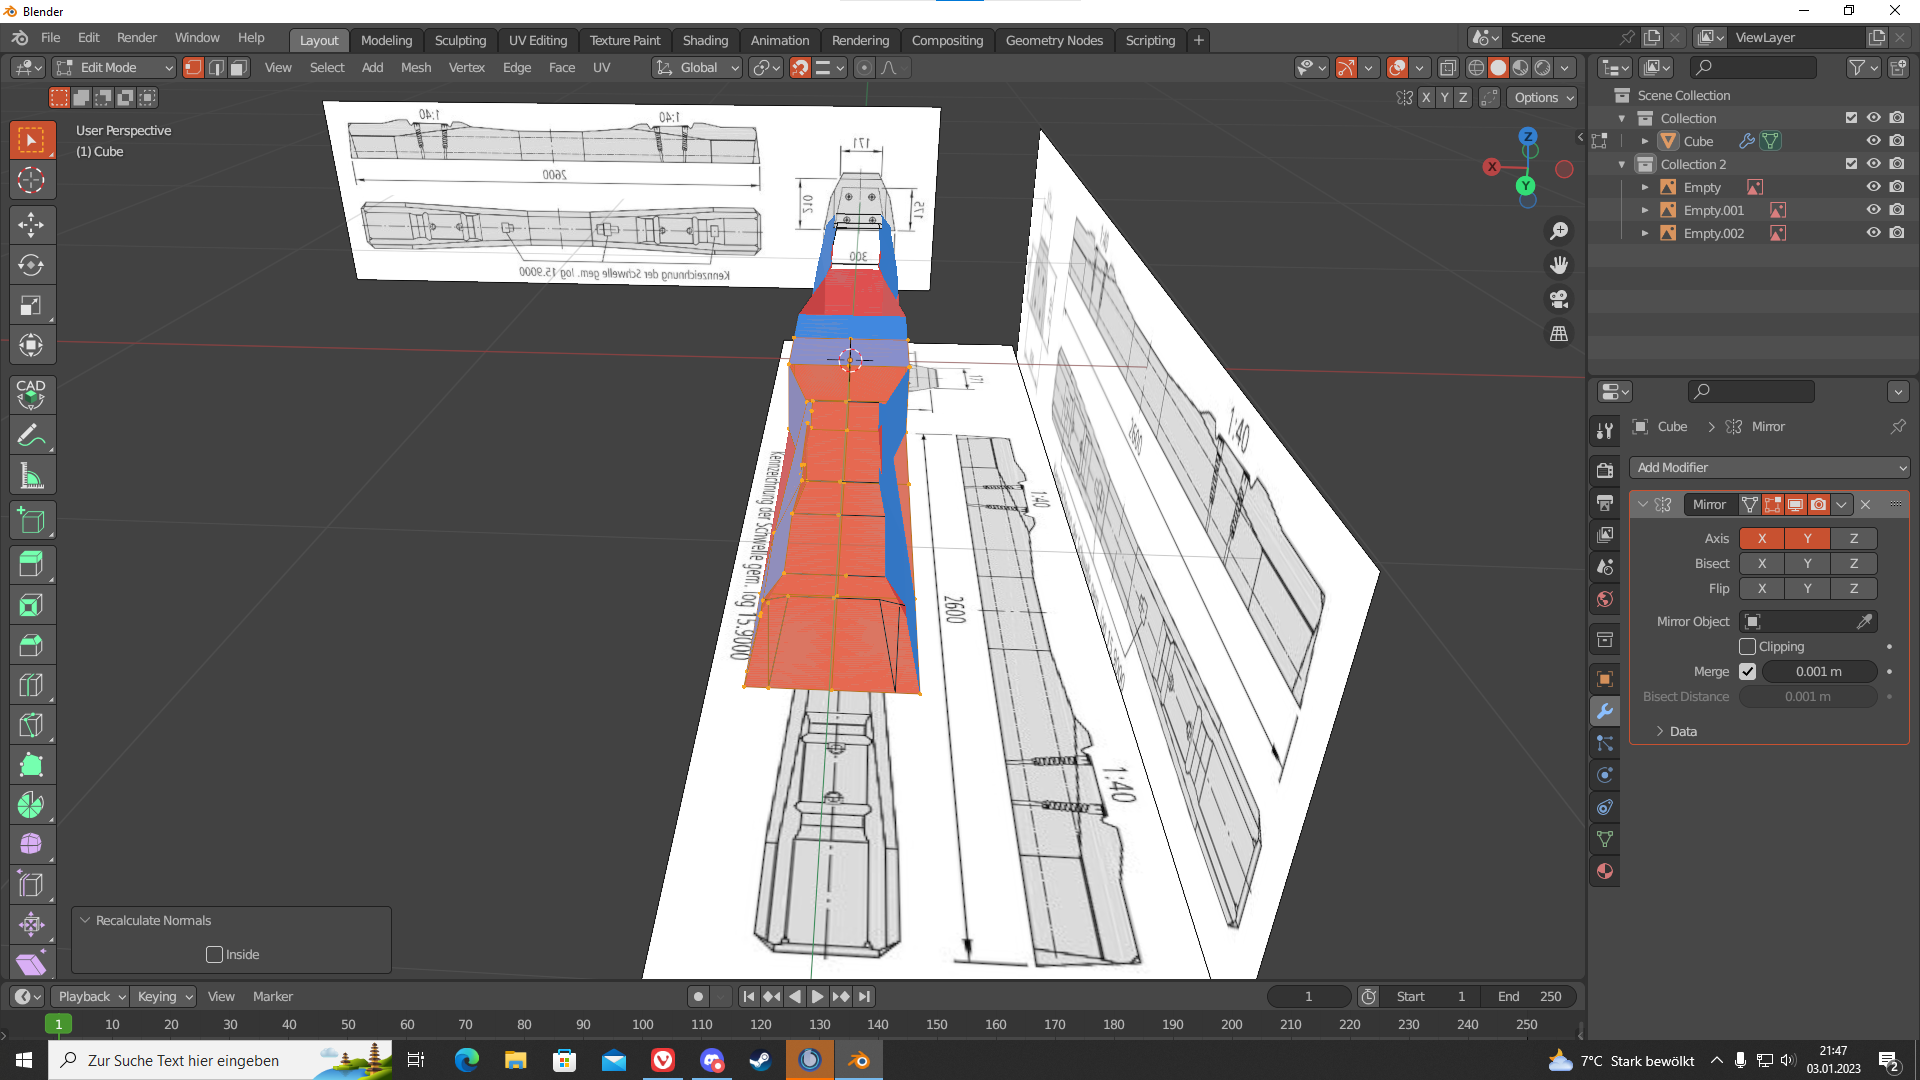 tacit eagle
I would also get rid of those faceless geometry parts like those lines
quiet fog
would you mind going into one of the voice channels so we dont spam here?
tacit eagle
fine
quiet fog
@tacit eagle thanks for all the pointers tonight 🙂
 junior wigeon
hello, has anyone tried to export 3D models from DayZ to Reforger? And I would be also wondering, if there is any way how to export a height map from dayz map so I can generate a map in the Reforger Workbench 🙂 Thank you
 covert dune
Porting official assets over from DayZ isn't allowed, and there's no way to access the maps in Terrain Builder to my knowledge. You may find something from Chernarus in the Arma 2 sample map files, but I have heard they would not work well anyway.
 sly bridge
junior wigeon
hello, has anyone tried to export 3D models from DayZ to Reforger? And I would b...
sly bridge
junior wigeon
hello, has anyone tried to export 3D models from DayZ to Reforger? And I would b...
define export 3d models from DayZ? Which models? Who made these? Etc
junior wigeon
I have a decent amount of assets from the stalker so my goal was to put them from dayz p3d to reforger but it's ok. I think i have found a way. There are blender tools for converting p3d objects to enfusion model. And in general, I think the best way to import new models to enfusion is to take them directly from the xray engine from the xray plugin in blender.
delicate condor
junior wigeon
I have a decent amount of assets from the stalker so my goal was to put them fro...
I'd recommend getting a clear permission from stalker devs who own the IP to use the assets like that to make sure you don't get shot down later when you try to publish them in the workshop.
In general this channel is meant to support making of models and not taking them.
 lethal frigate
Stalker models are everywhere, look how many are in arma 3, and they are in many other games too
delicate condor
lethal frigate
Stalker models are everywhere, look how many are in arma 3, and they are in many...
That does not make them exactly legit. I know the history, but right now there is no recent permission as far as I can recall.
junior wigeon
GSC GameWorld has a legal statement about using of their own assets for non-commercial usage however you want for modifications and games. There is no prohibition either anti-legal behavior. The only controversial bullshit around this topic is, that many people things that they can sell it and do inappropriate actions with that. I got your point but don't worry. 🙂
junior wigeon
delicate condor
I'd recommend getting a clear permission from stalker devs who own the IP to use...
I agree that my question is maybe not valid for this kind of channel and all respects for the 3d artists and creators for the models. . Anyway I have a clear vision now and thank you for your insights. I appreciate that and hope that I didn't insult anyone.
delicate condor
junior wigeon
GSC GameWorld has a legal statement about using of their own assets for non-comm...
can you point me to this so we can add it to the wiki
junior wigeon
Sure, i have it on my mod on steam, let me find it
 midnight path
@delicate condor have you rigged a car before, or know anyone who has?
trying to figure out what direction the bones\armatures are supposed to face for wheels
 willow sage

 fluid fern
hey do you know this error? i try to import old p3d (RSO building pack) @lilac sand if you have sources 🙂 (i change pc and i have no save than work drop to me there is 2 year)
 delicate condor
fluid fern
hey do you know this error? i try to import old p3d (RSO building pack) <@106463...
delicate condor
fluid fern
hey do you know this error? i try to import old p3d (RSO building pack) <@106463...
cant import someone elses binarized p3ds
 burnt thunder
willow sage
burnt thunder
willow sage
Is that an LAV?
 glossy lynx
honestly looks incredibly similar to the suspension
 light vault
I have the same as you here - did you get an answer on the missing "Addon Folders" section?
 tidal latch
light vault
I have the same as you here - did you get an answer on the missing "Addon Folder...
tidal latch
light vault
I have the same as you here - did you get an answer on the missing "Addon Folder...
documentation was updated, check the wiki again
fluid fern
delicate condor
cant import someone elses binarized p3ds
i know but now, when i would like open A2 source p3D, i have this error whereas before I had no errors at all
 delicate condor
Maybe that one is binarized too see below
tidal latch
fluid fern
i know but now, when i would like open A2 source p3D, i have this error whereas ...
https://community.bistudio.com/wiki/Arma_Reforger:Enfusion_Blender_Tools:_P3D_Conversion see updated documentation. Since 0.9.7. version of the plugin, it is necessary to have Workbench running in the background with net api enabled
fluid fern
tidal latch
https://community.bistudio.com/wiki/Arma_Reforger:Enfusion_Blender_Tools:_P3D_Co...
ah ok there was a delta between the 0.95 my bad I had just read the line when you answered me!
I would pay more attention to the docs and avoid reading diagonally 🙂
tidal latch
no worries, there is also tweak deployed internally which catches that exception and throws human readable error, informing user about new requirement
light vault
tidal latch
documentation was updated, check the wiki again
@tidal latch thanks, I checked the wiki. So just to confirm we should not expect to see an "Addons" section just "Export Profiles Folders" section?
 tacit eagle
I am trying to put this as a backpack. but when I do there is a lot of clipping or it doesnt move with the charecter. any ideas?

 calm rune
tacit eagle
I am trying to put this as a backpack. but when I do there is a lot of clipping ...
calm rune
tacit eagle
I am trying to put this as a backpack. but when I do there is a lot of clipping ...
You need to rig it to the skeleton and also weight it. Its quite the process if you have zero knowledge on the subject. If you are using blender I will send to the .blend files for rigging and weighting. As for clipping you need to also properly mold the model(suggest the lattis modifier) to whatever base mesh you'd like it to fit over.
tacit eagle
hey thanks I know how to do all of that its just idk how to make it a back pack
when i weight it and add the skeleton it clips really badly
thanks btw@calm rune
 tacit eagle
@calm rune is it OK if I dm you? I appreciate the help
 buoyant nymph
tacit eagle
I am trying to put this as a backpack. but when I do there is a lot of clipping ...
buoyant nymph
tacit eagle
I am trying to put this as a backpack. but when I do there is a lot of clipping ...
I love you
Vergy and Ronin = ✅
calm rune
tacit eagle
<@165928416669990912> is it OK if I dm you? I appreciate the help
Sure! I might not get back to you right away. Watching hockey 😅
tacit eagle
@buoyant nymph
Is that your model I bought?
buoyant nymph
No, I'm just a fan of you all.
tacit eagle
is fan of me ?
tidal latch
light vault
<@105548653594193920> thanks, I checked the wiki. So just to confirm we should n...
yes
 sick shard
anyway to move the hand position or do I have to make a new custom animation? snap_hand_left doesn't seem to work unless I'm doing something wrong

 finite quartz
i got a quick question: What are the Limit of Polygon for a Vehicle?
tidal latch
sick shard
anyway to move the hand position or do I have to make a new custom animation? sn...
snap_hand_left has no function at the moment, in future it might be used as reference point for weapon deploy. You need to make new ik animation to move left hand
sick shard
Heck okay time to learn how to animate lol thanks for the info would love to see snap points in the future would be pretty handy
delicate condor
#creators_recruiting is the place, follow the template and prepare to pay premium if you want speed.
tacit eagle
is Christmas gift :3


also sight picture

if you complain that you cant see, well thats you a problem.
covert dune
Perfect way to send the tank crew their christmas present. 😛
 autumn ledge
Doomtube.exe
surreal ore
@calm rune You around?
calm rune
surreal ore
<@165928416669990912> You around?
I ment to reply to this 2 hours ago. Im sorry 😅. What’s up!
surreal ore
No worries lol
calm rune
surreal ore
No worries lol
Do you still need help?
surreal ore
I was wondering if you could do me a favor
calm rune
surreal ore
I was wondering if you could do me a favor
Depends on how difficult it is haha
surreal ore
dm me lol
 last hill
tacit eagle
is Christmas gift :3
last hill
tacit eagle
is Christmas gift :3
Isn't a gift something that we receive? We can't do anything with the picture.
tacit eagle
is free nft
midnight path
@tacit eagle what are the blue lines called in blender
in edit mode when you make lines theres the black ones and the blue ones i forgot what you told me about the blue one
sharps or something like that??
tacit eagle
EDGE SPLIT
midnight path
ok cause the collider model for the car tires for the sample car are all blue lines
and i wanted to replicate that but didnt know how, so i can select my current lines and edge split them?

edge split is not doing that
SEAMS
tacit eagle
bad edge seams
midnight path
when i do it they come out pink
tacit eagle
pink or red
Alright guys, we are making our way to the good stuff. I know these explanation videos might seem a little basic for those of you who are more advanced, but I really want new users to be able to follow a streamlined playlist if they've never done this before. This next video tackles what I believe to be one of the most confusing things for new 3...
 woven swallow
WIP.
 buoyant nymph
Is that gonna be a composite?
woven swallow
buoyant nymph
Is that gonna be a composite?
First of all I want to model my second structure.
this is my first one: it was meant to be release as a mod for dayz. underground base building. I have plants to make houses with basements and attics.

Second, I want to model a couple of american style houses and hopefully i can make different variants of the same houses by changing colors, and last I would like to work with someone on different stages of the house. like new, old and destroy, and weather effects too.
updated. I Came up with some techniques for uneven floor planks and roof tiles.
 sly bridge
woven swallow
Second, I want to model a couple of american style houses and hopefully i can ma...
sly bridge
woven swallow
Second, I want to model a couple of american style houses and hopefully i can ma...
i have a couple of these things already made, a couple already textured= american rural style (pennsylvania-ish) buildings. I’ll check it next week
woven swallow
sly bridge
i have a couple of these things already made, a couple already textured= america...
noice
 unborn reef
you know what we need, mk 4 supra
woven swallow
unborn reef
you know what we need, mk 4 supra
then model it.
unborn reef
well time to waste 5 hours of my life
woven swallow
then don't model it.
unborn reef
but i want supara stututututu
last hill
Start modelling it then, if not worth your five hours, not worth ours.
 zenith quartz
I wanna do buildings.
But also I have so much I wanna do already.
Need to invest into cloning tech.

midnight path
wtf, i spent like a week editing this car to get everything exactly like the sample car, and it wont import correctly
woven swallow
hahaha
woven swallow
I'm adding an attic, I'm thinking about adding a basement or that would be overkill?
 tacit eagle
if you gonna add a basement I would make two versions of the haus one with and one with out.
the one with has to have a ground skirt
woven swallow
yeah that can be solve by blocking the door that goes down the basement
 young shard
Would you like to know more?
 woven swallow
I hope this stairs design doesn't glitch people lol.
 tacit eagle
No trip people
woven swallow
tacit eagle
No trip people
Nah, I fixed it. made it square.
light vault
I have a question on how to animate house doors. Does this use the same approach as for any other “hinged” animation (e.g. adding bones in Blender, etc), or is there a different way of doing it?
tidal latch
door is a separate entity which is rotated as a whole
light vault
Thanks. So is that achieved within the Enfusion tools alone, e.g. using the Animation Editor (i.e. not using Blender)? Do you know of any references I can look at to find out more on how to add a working door to a building? I can’t seem to find any. That would be greatly appreciated!
tidal latch
no, it's not using Animation Editor. Best I think would be to take a look at existing door prefabs
Door set contain door frame and door frame contain door entity
DoorComponent is responsible for rotation of whole entity
light vault
Thank you. That helps to narrow the search down quite a lot 🙂
sly bridge
unborn reef
well time to waste 5 hours of my life
it surely isn’t 5 hours job, no matter how good of an artist one is
sly bridge
unborn reef
you know what we need, mk 4 supra
do NOT post that sort of thing here
 shell hedge
I think I could make the wheels in 5 hours
 sand pagoda
zenith quartz
I wanna do buildings.
sand pagoda
zenith quartz
I wanna do buildings.
I know that feeling
tacit eagle

@midnight path whats with the edge crease
is that for the collision mesh?
yeah I guess it is with the log
you dont need edge crease(no sub D), no edge seams or edge seams


 zenith wave
Looks amazing the details on the cockpit when can we see this in action 💯🔥
 toxic obsidian
Rafale interesting choice
young shard
ooh me like.
young shard
Almost done with the High.


 hardy cairn
Or when can I just place this on the airfield as a prop?!?
sick shard
100rnd beta c magazine
 woven swallow
sick shard
100rnd beta c magazine
woven swallow
sick shard
100rnd beta c magazine
looks good bro, I would make the screws with normals instead of mesh.
sick shard
I didn't make the model just bought it from cgtrader lol
woven swallow
ah okay.
young shard
In that case you could probably clean it up in blender a bit and make it have fewer poly's.
young shard
High Poly is now done.


 eager grove
 looking good
young shard
Thank you wolf.
 minor crystal
based
lethal frigate
Anyone here working on some structures? Apartments and stuff
That rhs apartments are amazing
Wish they port them soon
delicate condor
Not many pics been posted about buildings Im afraid
 astral hull
lethal frigate
Anyone here working on some structures? Apartments and stuff
astral hull
lethal frigate
Anyone here working on some structures? Apartments and stuff
@midnight path is working on some buildings
covert dune
BullsEyE too
 bright raft
I have a question regarding UDIMs.
I know we can make them in blender and later paint across multiple udims in Substance Painter (big thing for me since I'd like to paint panel lines on model).
Will those UDIMs be later usable in game engin esuch as Enfusion (or A3) ?
Maybe if not, can those UDIM uvs be separated into multiple UVs?
fluid fern
lethal frigate
Anyone here working on some structures? Apartments and stuff
https://drive.google.com/drive/folders/1EwSrnNHvEvTVo6O0usnZyQ_9_V6gEGf3?usp=share_link
but I don't know how to make the textures, I tested the colliders, they work well, I just need to rework the outer doors
delicate condor
bright raft
I have a question regarding UDIMs.
I know we can make them in blender and later ...
A3, no, Enfusion, my hunch is no.
surreal ore
@fluid fern Have you gotten Portals to work?
fluid fern
surreal ore
<@135107111485964288> Have you gotten Portals to work?
whats portals?
surreal ore
For doors and windows
shell hedge
you mean you never played portal?
surreal ore
fluid fern
no I didn't use the doors of the 3d object, I had created a prefab and added the doors of the vanilla game
shell hedge
portals are not fully implemented in the game yet are they
 leaden trench
bright raft
I have a question regarding UDIMs.
I know we can make them in blender and later ...
leaden trench
bright raft
I have a question regarding UDIMs.
I know we can make them in blender and later ...
No UDIMs in the engine, but your model can have multiple UVs.What exactly is the problem you are trying to solve? You don't have enough resolution to paint "panel lines"? If that is the case you could construct/project decal geometry on the areas where panel lines appear, paint in Substance with alpha blend and render with PBRDecal shader in game. This way you have high detail for low memory cost.
bright raft
leaden trench
No UDIMs in the engine, but your model can have multiple UVs.What exactly is the...
I never hard good results with decals (or I don't know how to properly apply them on curved mesh). What I am currently trying to do, is to use UDIMs in substancce painter, because you can paint those panel lines/rivets/any other detail accross multiple texture sets. And I'd like to know if those UDIMs can be separated into individual texture sets
delicate condor
how many udims you got? (as in how many texture sets are you looking at)
it does not sound very performance friendly idea
bright raft
Currently just 4 but I am just testing workflow
leaden trench
bright raft
I never hard good results with decals (or I don't know how to properly apply the...
Shinkwrap modifier with a plane, subdivide it up first to get enough vertices to match the original surface curvature.
leaden trench
bright raft
Currently just 4 but I am just testing workflow
4x 4k or 4x 2k?
bright raft
4x 4k
bright raft
Well I got it down to 3x4k for main fuselage. One more for main and tail rotoor, one more for other details. Something like that
I know it can't be compared but I checked how DCS has textures for its Apache. It's like 20 4k textures for external model 😐
leaden trench
bright raft
Well I got it down to 3x4k for main fuselage. One more for main and tail rotoor,...
I really suggest decal workflow. Read on MSFS docs; it's directly translatable to Reforger. Will save you hundreds of MBs of VRAM. https://docs.flightsimulator.com/html/mergedProjects/How_To_Make_An_Aircraft/Contents/Modelling/Airframe/Texturing/Surface_Detail.htm
fluid fern
what software do you use to texture your objects?
bright raft
leaden trench
I really suggest decal workflow. Read on MSFS docs; it's directly translatable t...
Thanks for that link, I never thought you could use decals in texturing object to achieve indentations
bright raft
fluid fern
what software do you use to texture your objects?
Substance Painter
leaden trench
bright raft
Thanks for that link, I never thought you could use decals in texturing object t...
Yea, first time it suprised me also. But if you think about how a normal map actually works, it makes sense. You can texture it just like any other layer in Substance.
bright raft
Thanks 🙂
midnight path
astral hull
<@230890238740791296> is working on some buildings
yes
 glossy lynx
If you want more examples of decal usage look at the BTR’s welds and the jeeps indents
bright raft
glossy lynx
If you want more examples of decal usage look at the BTR’s welds and the jeeps i...
Will do
delicate condor
the decals are definitely way to go for better perfromance and higher details
tacit eagle
how does the decals work? is its an overlayed uv?
 shut bloom
midnight path
yes
shut bloom
midnight path
yes
is that building using Hero UV Workflow or are you working with Multi materials
midnight path
shut bloom
is that building using Hero UV Workflow or are you working with Multi materials
just assigned materials in blender and uploaded to enfusion, nothing special
glossy lynx
tacit eagle
how does the decals work? is its an overlayed uv?
It's an overlayed mesh
tacit eagle
a mesh???? really I need to look into this after I reinstall everything
glossy lynx
 midnight path
shut bloom
is that building using Hero UV Workflow or are you working with Multi materials
midnight path
shut bloom
is that building using Hero UV Workflow or are you working with Multi materials
forgot to mention once in enfusion i just assigned materials that are already in game, to test if everything was right
tacit eagle
oh ok like with cgi
shut bloom
midnight path
forgot to mention once in enfusion i just assigned materials that are already in...
you should look into Multi Materials
tacit eagle
have you made randomized numbers for the decal?
glossy lynx
No as the numbers are not random, I would also need to make it a render target if I did that which would be a pain
midnight path
shut bloom
you should look into Multi Materials
is that something in blender?
shut bloom
midnight path
is that something in blender?
no thats a workflow that is used for Buildings in the Enfusion Engine
midnight path
shut bloom
no thats a workflow that is used for Buildings in the Enfusion Engine
do you have a link to info about it?
fluid fern
bright raft
Substance Painter
It is possible to import new materials on substance?
glossy lynx
You just re-import your model
shut bloom
midnight path
do you have a link to info about it?
this one is for arma 3 but it explains the process
Arma 2 Actually
well simply explained its a mask Based Tilable Texture Workflow similar to Vertex Paint but a bit different
 spark onyx
Hey everyone! Were lookin for help with our WWII mod: Forged in Europe
If you have any models you would like to donate or would be interested in joining the team ( Lordjudicator and myself ! ) Then give us a jingle!
We also have a form for anyone who does wish to submit a model or is wanting to suggest a model to our team!
 midnight path
surreal ore
<@230890238740791296>
midnight path
surreal ore
<@230890238740791296>
very nice
tacit eagle
that is the bi building behind?
glossy lynx
That is a BI building
young shard
So low poly is basically done and I'm just seeing how it looks with some materials and with the high baked on.

 glossy lynx
young shard
So low poly is basically done and I'm just seeing how it looks with some materia...
glossy lynx
young shard
So low poly is basically done and I'm just seeing how it looks with some materia...

Looks like you are doing your part
young shard
The only good bug is a dead bug.
This side looks the best.

After I'm done making the Clothing and vest Ill make more variants of the helmet and such.
woven swallow
v0.5 House


 young shard
Nice.
young shard
young shard
After I'm done making the Clothing and vest Ill make more variants of the helmet...
Like make this part.
 young shard
Idk. But there are plenty of mods out there already for it like there's one in Arma 3 and another really good one is Squad.
So I'm sure its fine.
young shard
Its Starship Troopers.
young shard
Humans verses aliens.
woven swallow
lol I never liked sci fi stuff
young shard
1,358 Facses
glossy lynx
Very liberal Fascists
woven swallow
If you don't mind me telling you, I would add more detail to rounded mesh
young shard
I just really like the movie. Not a Facist.
Like the top and stuff?
I was thinking of adding more to those parts.
Heres the wire for the front.
 woven swallow
yeah
when i was making my shotgun i went with 16 edge loops with the rounded parts

but then i didn't like the end result so I just added more till i was happy.
woven swallow
yeah but you're @ 1.3k faces
young shard
How many faces does the Helmet in Arma Ref have?
glossy lynx
For something you don't really see up close because it's on your head, I think it's really good
woven swallow
glossy lynx
For something you don't really see up close because it's on your head, I think i...
yeah you don't see it but other players do.
some people are still making their models like it's 2009
@young shard don't get me wrong, your helmet looks good.
young shard
woven swallow
you still got room for more
How much would you say be a good amount?
5k?
woven swallow
I would think so. i mean all I'm saying is that models look a lot better when rounded parts are actually rounded and not blocky.
young shard
Yeah.
woven swallow
if you can add a little bit more to make it look rounded
young shard
Especially with the new game being very high quality.
glossy lynx
Base game has 6k verts
woven swallow
there you go
young shard
glossy lynx
Base game has 6k verts
Good to know,
woven swallow
time for more coffee
 leaden chasm
lethal frigate
Anyone here working on some structures? Apartments and stuff
leaden chasm
lethal frigate
Anyone here working on some structures? Apartments and stuff
Hopefully one day


 young shard
Ok I'ma rebake the new mesh and see what it looks like.
young shard
Ill have a better asset to show tomorrow then.
woven swallow
Wood is actually dimensional and real world size, 2x4", 2x6" etc etc.. Maybe I'm going to far with this.
 covert dune
I think that's actually pretty neat cause then you can make houses that are uniform with eachother. A 2x4" is the same as a 2x4" in another house and so on
woven swallow
yeah the idea is to be able to make different variants of the same structure by changing from siding to stucco or just planks.
and colors of course
2x4 are every 16" apart just like in the U.S construction code lol
covert dune

tidal latch
that should also work quite well with destruction - you can notice that some of the Reforger buildings have modeled inner bits (attics) which you cannot access from the ground
woven swallow
tidal latch
that should also work quite well with destruction - you can notice that some of ...
I see
woven swallow
Attic and basement 😉

 delicate condor
This is gud! Realistic internal design makes good buildings!
woven swallow
delicate condor
This is gud! Realistic internal design makes good buildings!
taking game assets to the next level haha, nah just trying to come up with something for future map i want to work on.
delicate condor
Honestly I believe buildings should be modeled like this to make them work. Armas world is in real dimension and when building dimensions are off it stands out
covert dune
It does really stand out. Mostly grab or rip assets from games and asset stores and most the time they're not exactly in proportion. Pretty rare to see people actually make structures themselves
glossy lynx
Are you using a large amount of array modifiers?
fluid fern
Hi all, in substance painter, you use PBR - Metalic Roughness when you import your fbx?
glossy lynx
I made my own
fluid fern
glossy lynx
I made my own
I believe that the default pbr works well, I have not found any software that automatically converts to .nmo, .BCR etc, does it exist?
fluid fern
glossy lynx
Look at the pinned messages in texture makers
my bad thanks
woven swallow
delicate condor
Honestly I believe buildings should be modeled like this to make them work. Arma...
I've been having that feeling to be honest. I feel like buildings in game are too small but I always thought that's how buildings are in Europe lol but yeah in game buildings to me are bare and small , empty.
delicate condor
Older buildings definitely are smaller especially in the countryside
well factory worker apartments are that too 😄
there are big houses too but those were more rare or are more recent builds
so it goes both ways
but even small house needs right width for walls and right size for doors
America for example has far more newer houses than europe
and the designs are very different
and vary between north and south due to climate requirements
well it does that in europe too I suppose 😄
leaden chasm
The scale thing is important for any object, moreover for the textures especially.
woven swallow
Yeah my walls are 4" plus 1" on each side for stucco, sheetrock, plywood or siding.
Red dead redemption 2 is a great source of inspiration and references for for me.
Plus I'm a construction superintendent so that's a plus haha
delicate condor
😄
Work - Hobby crossover
Not too many American assets for Arma mods around so great to have someone making such
buildings have always been the least made thing
woven swallow
Haha yeah.
young shard
delicate condor
buildings have always been the least made thing
They also seem to be one of the hardest to make at least for me.
calm rune
woven swallow
Plus I'm a construction superintendent so that's a plus haha
Im an electrician. Let me start modelling some wires and conduent for some semi build homes 😅 (joking)
young shard
My brain hurts to try and make em cause the scale always looks off to me and I just go insane.
delicate condor
young shard
They also seem to be one of the hardest to make at least for me.
they indeed are more complicated than one might initially think
delicate condor
young shard
My brain hurts to try and make em cause the scale always looks off to me and I j...
I recommend using real life measurements. that gets scale pretty decent
young shard
Can't use real life measurements all the time or your space will become too small in game.
Gotta use the games measurements.
I've been trying to figure out the measurements for like doors and stuff.
I've been able to get the character to the right size in blender.
delicate condor
have you used the sample character?
young shard
Yeah.
Had to resize it after joining all the parts together cause when you delete the bones it like super sizes the character.
Although I'm sure there's a way to delete the bones without doing that.
Probably dissolving then actually.
Why didn't I think of that.
delicate condor
there is yes. but also its made bit weird since it does that 😅
young shard
Well I've already gone through the pain of resizing the character and bringing it into Reforger to see if it's the right size. I actually got it first try though so it's no biggie.
Sized it to 150 cm.
young shard
Yeah.
calm rune
No that’s not right
delicate condor
no wonder your scale is off
young shard
It doesn't but when I brought it into Reforger it was pretty much 1 to 1.
I think blender has a scaling issue.
delicate condor
youu have some major issue with it
calm rune
Use this @young shard It is the proper scale.
young shard
Thx.
woven swallow
Every time I do a model I always end up watching videos on YouTube about them and how they are built.
Before modeling Information gathering is very important. If you really want to make something nice and realistic. For example with my Ithaca model 37 shotgun I watched bunch of shooters on YouTube and reading pdf manuals for specific parts.
Next I want to learn clothes and animations. You better watch out @calm rune I'm going to be making clothing 🤠
calm rune
woven swallow
Next I want to learn clothes and animations. You better watch out <@165928416669...
I like some competition, means I need to try ever harder 😉 haha
 plain galleon
Are there any info of maximum size for things like geo collisions? Like for ships etc.
young shard
Is there like battle states in Reforger. Like the more your character goes through the more like dirty he gets over time and such?
woven swallow
That would be epic. If your bears would grow and your hair..
Question. Do we have birds in game yet ?
young shard
Yeah that also but I was thinking more for the armor.
So like if explosions go off around you and such.
woven swallow
Ah no idea brother
young shard
Hmm...
woven swallow
Maybe with some texture changer script ? Maybe bacon knows lol
young shard
I'll find out. Cause that would bring a great level of realism.
woven swallow
Yup
young shard
Like it wouldn't make sense before a battle that armor would be super dirty and such. And wouldn't make sense that armor is as clean as it was before a gruesome battle.
woven swallow
Haha yeah
young shard
Like with my helmet I'm working on the basic texture I have on it has a lot of scratches and such on it.
That could be for after a battle.
I also wonder if there's Inverse Kinematics in the game.
I've got a lot of questions for modding lol.
 woven hull
young shard
Like with my helmet I'm working on the basic texture I have on it has a lot of s...
woven hull
young shard
Like with my helmet I'm working on the basic texture I have on it has a lot of s...
what are you using to make mods?
young shard
A variety of softwares.
I'm mainly a asset creator though so I'm not gonna be really coding things for mods.
woven hull
ok thanks
young shard
Are you asking what softwares I use to create the assets?
woven hull
yeah
young shard
Blender for Modeling.
Marmoset Tool bag for baking High to Low.
Substance Painter for texturing.
Marvelous Designer for creating clothing.
Krita for creating sprites and such for textures.
Substance Designer for creating Textures.
Speedtree for foliage.
MoI 3D for organic modeling.
Those are the ones I can think of off the top of my head.
woven hull
bet thank you
young shard
I have a handful of others I use but I'm not home ATM so I can't list those off.
But those are like the essentials.
woven hull
all good I just needed a general idea of some softwares
woven hull
alr
young shard
You could technically do all of those things from Blender but it be really difficult.
Like Marvelous Designer is really good at creating clothing and it's really easy to learn.
woven hull
good thank you for the help I really appreciate it
young shard
Fusion 360 is another one. It can be used to create realistic Mechanical things.
Your welcome.
autumn ledge
How did you start off when you first got into modeling?
young shard
Well I started almost 4 years ago. But I only started to actually learn the workflow less than a year ago.
So for the first 3 years I was entirely self taught.
I started modeling when I went to Special High School for Computer Science. And I had assignments like creating games and such. So I started to learn how to use Blender.
I didn't know a thing about creating game assets thouh until I joined a Modding group for Arma that was almost entirely comprised of 3D Artists then went to college for 3D Art.
And they've been teaching me this past year how to create High Quality 3D Assets.
Idk if you've heard of them or not but the modding group is called Chokepoint Games and where working on creating a Halo Arma 3 mod called Far Isle.
They taught me everything I know. Well almost everything but if it wasn't for them I would still be creating basic models and scenes in blender.
Sorry for uhh dumping all that information onto ya.
I'm definitely not a professional at this. I'm still a Junior Artist.
delicate condor
plain galleon
Are there any info of maximum size for things like geo collisions? Like for ship...
no official word. Blud said they tested some 800 meter cube and it worked
or something like that
Id wager best way is to just make big ass blocks and test which ones work
midnight path
so after multiple tries. i continue to fail to set up armatures and bones correctly for my cars. can someone make me a simple tutorial on how to exactly go about setting that up. i will even pay
when i get the car into enfusion with bones finally, they are not linked to anything. and i swear i am following the instructions, there must be something im missing
what i mean by not linked to anything, they are all linked to eachother, but not to any geometry, when i turn a bone it doesnt turn the wheel.
but in blender its all parented correctly and when i turn a bone in blender it turns the wheel like it should
young shard
 glossy lynx
I would recommend using a pbrmulti for that\
last hill
midnight path
what i mean by not linked to anything, they are all linked to eachother, but not...
Did you weight the mesh components to the bones?
glossy lynx
I talked him through it, he was not using vertex weights for the mesh
quiet fog
is there some kind of "assembly" option available in blender? In Inventor the workflow for complex assemblies is that you create each individual component in a separate file and later place them together in a master scene so to say. There you can still access the individual components and change their properties etc but duplicate/orient them in a specific order as well so that you for example only need to model one screw of a pitch circle.
What I am trying to do is to place a single supporting structure of train tracks that i modelled into a new scene and add an array modifier to it so that i dont need to do this manually. But since my object is linked, I am not able to apply any modifiers to it.
If I understood the wiki right, I could use append but then I would be creating a new standalone object in my "master scene" which wouldnt represent any changes made in my original object right?
How is something like this done?
woven swallow
Like open two blender files and copy paste one into another ?
quiet fog
its not as simple it seems. A mate of mine helped me now, but I would like to make sure it is the right practise:
- Drag and Drop the file into the viewport or hit File->Linked
- Select the object you want to place
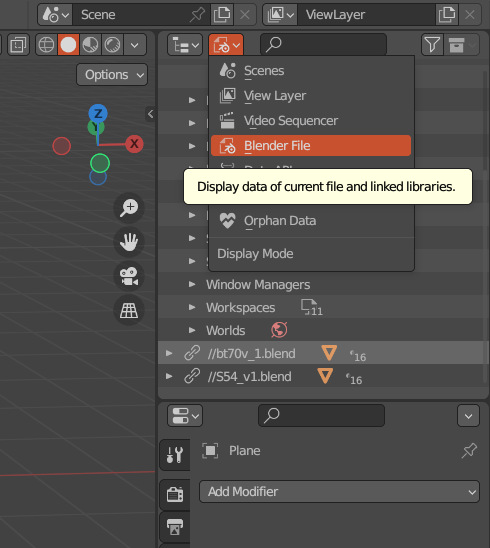
- Under collection (top right), right click the desired object -> Library Override -> selected: Now you can edit the object.
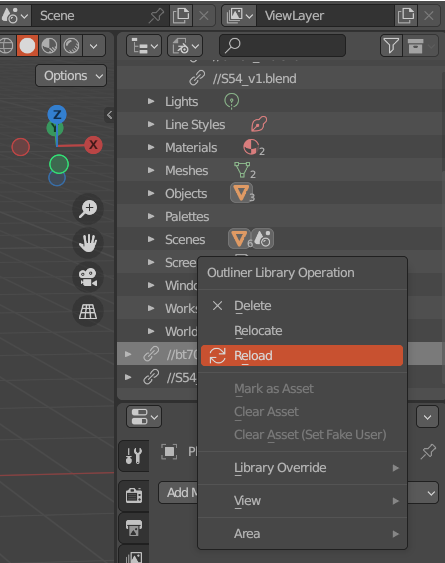
- If you made changes in the original file and want them to display in the assembly, hit the dropdown above collections which has the three images stacked, select blender file, scroll down to your object, right click -> reload
 quiet fog
yeah i know, but as far as i understood it, when using append, blender creates a completely new file which isnt affected by any changes i make in the original (which i want)
surreal ore
@quiet fog I don't even have a button for reload
nor do i have "Library Override "
i think im still on 3.0 or 3.1 though
 chilly dragon
Been working on a Thompson. Highpoly is done just need to finish up the low and then onto texturing

 glossy lynx
looks good!
chilly dragon
Thanks 🙂
tacit eagle
 agile crater
https://cdn.discordapp.com/attachments/392728823105323020/1061439371951226981/im...
agile crater
https://cdn.discordapp.com/attachments/392728823105323020/1061439371951226981/im...
Oy, what mod/plane/thing is that
sand pagoda
is there a way to completely disable culling and mipmaps for a model?
shell hedge
mipmaps can be "disabled" by unticking generate mips in texture import settings
I have to do it for things like optics reticles otherwise xbox series s displays them in roblox graphics
sand pagoda
sand pagoda
is there a way to completely disable culling and mipmaps for a model?
case of usage
model is moving by simple animation, but its initial point(origin) is static
so when i move my camera from it, game thinks that object no longer visible and culls it
so im trying to find a way to disable it
shell hedge
uhh maybe set material cull to none but I don't know if that makes any difference, it might be trying to cull by entity origin?
shell hedge
well a script to literally move the entity every frame
shell hedge
exactly :/ if you move origin to where your joint is then your joint will move in relation to the origin as well
sand pagoda
first one is make a script that transforms animation into a scipt
second one is go to a room corner and cry
second one is better cuz im REALLY bad ad scipting or programming
shell hedge
I think we could create a generic script that would make entity follow a spline
shell hedge
so you would have it on rails
sand pagoda
yea, it is a way to go actually
shell hedge
for airplanes this is a bit wonky because the rotation changes won't work the way you'd expect an airplane to turn
sand pagoda
if i remember correctly, curves do have normals so, it can be rotated
but i might be wrong
 shell hedge
it would rotate but the spline points in world editor dont have rotation
so best you could do is have the plane aim at the next point
I guess
so no banking (unless you add desired banking values to the spline points somehow but that seems like too much extra effort)
sand pagoda
well, then curve is not really the way to go
surreal ore
@shell hedge @sand pagoda use proc animation for banking
sand pagoda
sorry for a ping after literally 2 months, but, what do you mean by attach to the bone directly?
 reef sun
sand pagoda
sorry for a ping after literally 2 months, but, what do you mean by attach to th...
reef sun
sand pagoda
sorry for a ping after literally 2 months, but, what do you mean by attach to th...
Good question 😄
I think I added it here
 sand pagoda
thanks a lot
reef sun
np

 reef sun
Yeah it breaks the transform but I don't remember how to fix that 😄
surreal ore
@sand pagoda @reef sun change the transform in blender and don't apply the changes
sand pagoda
like scale it down a lot?
surreal ore
Just move it back where it needs to be.
surreal ore
@sand pagoda@reef sun I found another way, that's a little more convenient.
In edit mode select the bone you're using and set its Tail Z location to something small that's above 0
If you set it to O the bone is deleted

I just found another way as well

the offset is caused by the tail Z
so in this situation i moved my collider on the z axis by -0.03
zenith wave
sand pagoda
well, its attached now, but its weeeeeird
Globemaster?
sand pagoda
il-76
tacit eagle
I should make the an22 :3
sly bridge
zenith wave
Globemaster?
don’t
glossy lynx
sand pagoda
well, its attached now, but its weeeeeird
Parenting the collider using this method is correct, you just have to move the collider back in blender after you set it
When you parent a collider in blender to a bone it should ALWAYS move the collider, if it does not then the parent did not work and you will end up with odd transforms in game
woven swallow
Anyone knows the polycount of a standard house in reforger?
last hill
woven swallow
Anyone knows the polycount of a standard house in reforger?
Pull up one as the xob and check the material list for number of poly/vert
I wouldn't think they would be too extreme given they are squares etc. The furniture prefab compos might be a bit more.
woven swallow
last hill
Pull up one as the xob and check the material list for number of poly/vert
I'll check it out. thanks
Working on the chimney of the house
 last hill
woven swallow
Working on the chimney of the house
last hill
woven swallow
Working on the chimney of the house
Detail baked on or painted in using normal/height map? Looks great thus far.
woven swallow
last hill
Detail baked on or painted in using normal/height map? Looks great thus far.
normal + displacement. trying to keep the displacement.
glossy lynx
I think some of the in game shaders allow for height maps but not sure about displacement
woven swallow
displacement can be applied to the mesh
but I'm not applying it just yet till i figure it out how im going to finally model this chimney
woven swallow
So.. I think i got it. Ima apply the subdivision modifier level 6 just the get all the high details from the displacement map then run a decimate on it 😉
this are the results.


I wonder if I should standardize chimney size and make different designs and keep them as a separate models.
you guys think that could work ? 🤔
woven swallow
zenith quartz
Also I love the uneven-ness on the edges.
Yeah me too. If I only used the normal map it would look too flat and even. I was going after an organic look.
 daring condor
woven swallow
daring condor
woven swallow
isnt something like this going to be pretty heavy?
shell hedge
considering average brick weighs about 2 kg this structure could weigh up to 500 kg
that is indeed quite heavy
woven swallow
daring condor
isnt something like this going to be pretty heavy?
No, because everything is going to be balanced. I did apply the subdivisions just to get the details from the displacement map then I decimated down to a decent number without losing the shape too much.
daring condor
yeah but if this is a map object there will still be a lot of them in the scene
tacit eagle
we have the lod 🙂
shell hedge
kinda makes me wonder how performance heavy it would be to make a structure out of actual individually modelled bricks and stuff, I wonder if they would be culled when behind things or not
woven swallow
tacit eagle
we have the lod 🙂
Exactly.
woven swallow
shell hedge
kinda makes me wonder how performance heavy it would be to make a structure out ...
You don't need a whole brick. You just need the parts that are meant to be seen by the player.
shell hedge
oh I know, just wondering how it would be handled
woven swallow
Same with the rest of the models. Like for example they are faces on the wood that you can't see so mind as well delete them.
shell hedge
you know, for science
quiet fog
Is it possible to bevel perpendicular to the selected edge? https://imgur.com/vRuRYpP A quick search didnt bring anything up unfortunately
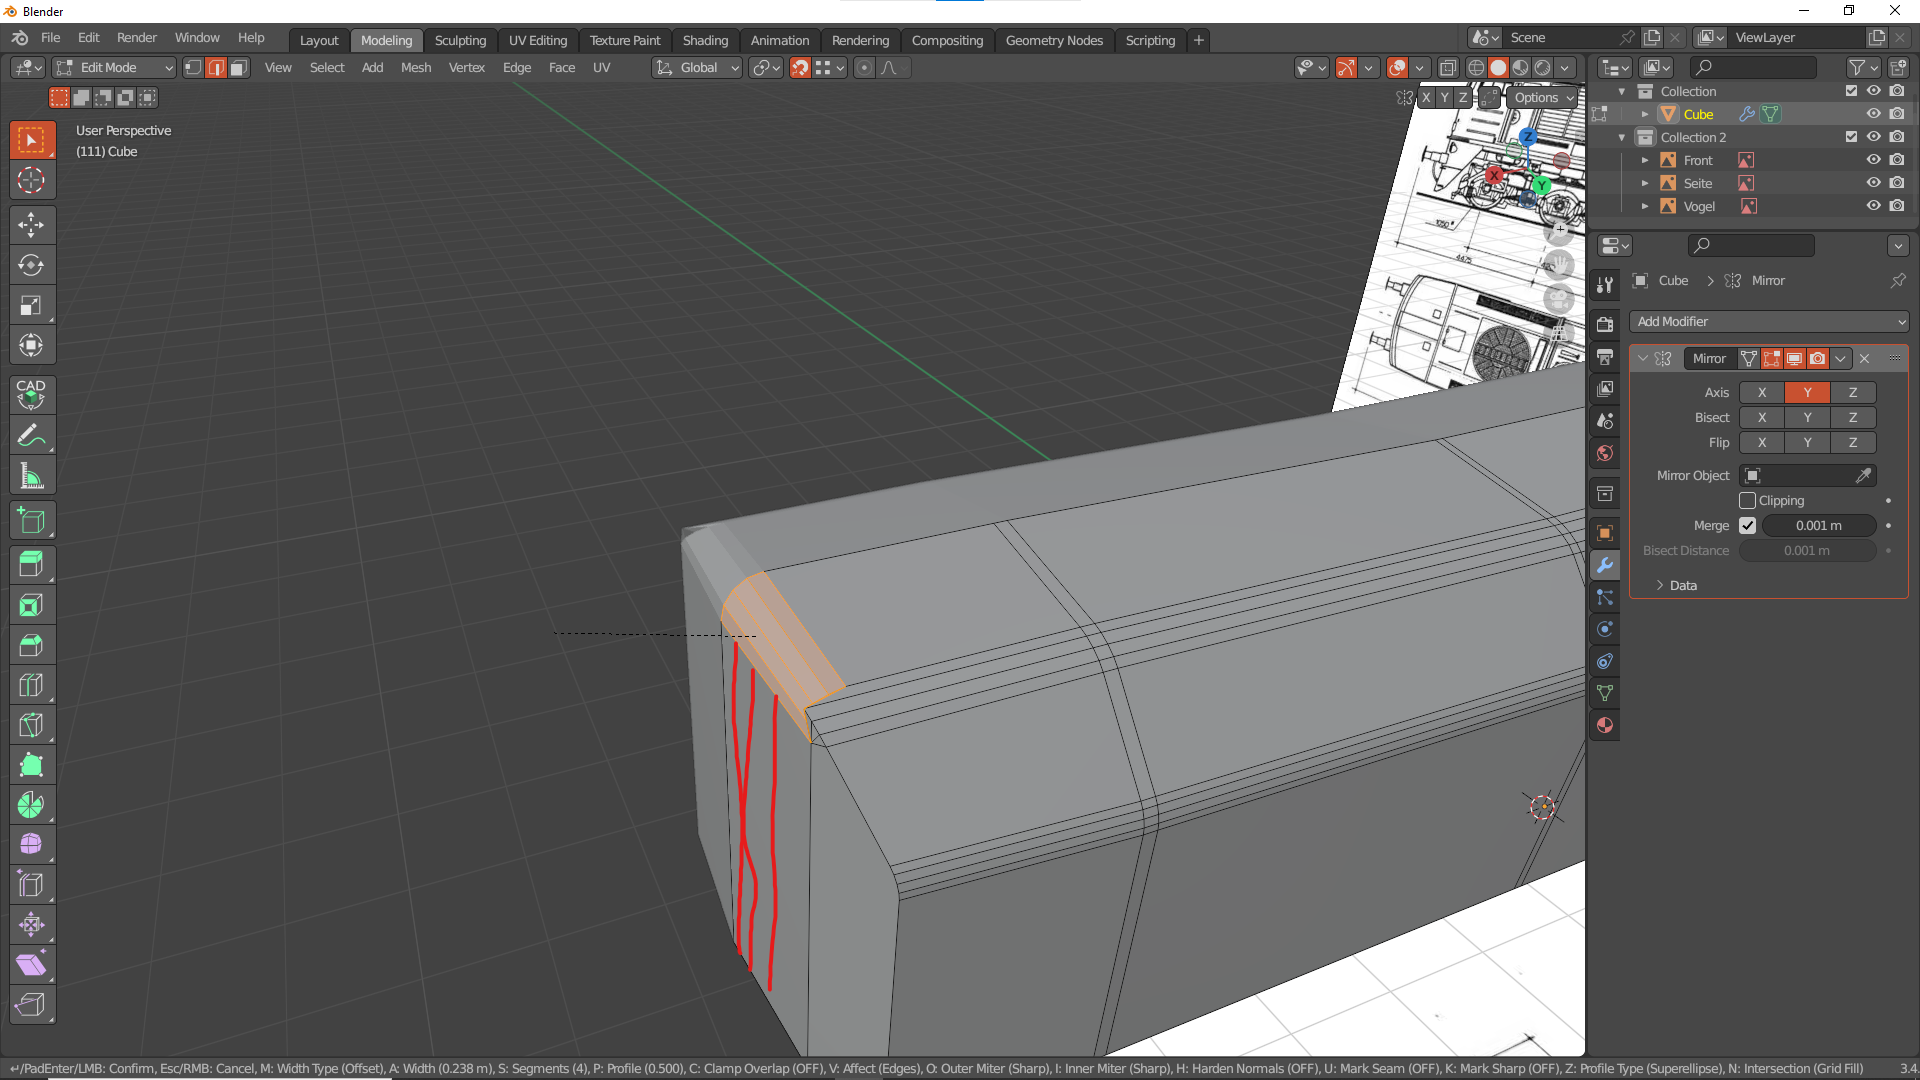 delicate condor
quiet fog
Is it possible to bevel perpendicular to the selected edge? https://imgur.com/vR...
delicate condor
quiet fog
Is it possible to bevel perpendicular to the selected edge? https://imgur.com/vR...
no
bevel works on edges
quiet fog
hmm is there another operation that can achieve this?
quiet fog
I guess i could too loop cuts/subivisions but then i need to manually pull them out, which likely doesnt get me a "smooth" curve :/
delicate condor
extrude - bevel maybe
you can do a lot if you make the basic shape first, then bevel in right order
quiet fog
kk, gonna try that then ty 🙂
on that note, can you make loop cuts without the loop? There is the knife tool but its more manual, the loop cut has that convinient feature that you can control how many cuts are made with the mouse wheel and they are evenly spaced.
delicate condor
well it can cut single quad too but it will cut the loop if there is any
you can try hiding the parts you dont want to cut
or separate mesh
dont be afraid of some manual work tho

 tacit eagle
YUS press H on the parts you want to hide work, work on them and finish up after unhiding them.
sand pagoda
zenith quartz

 delicate condor
surreal ore
For anyone wondering, that's the max amount of bones before crash.
delicate condor
surreal ore
For anyone wondering, that's the max amount of bones before crash.
😮
so low :C
more than in RV
but not even double 
midnight path

 delicate condor
cool
first thing to come in mind is safari
maybe because of the colors of your reference pic
midnight path
 tacit eagle
you mean bomb truck
midnight path
im a mechanic with a photographic memory, all of the parts i made from memory
(all the engine and suspension)
if anyone needs anything like that i can make it
tacit eagle
the roof is a one piece tho :S
midnight path
for now
tacit eagle
yeah you can just select the faces and separate them
I know it seems strange but define the whole body of the car
and then you can cut in panels like the doors and windows
midnight path
already did that 🙂
tacit eagle
nice
midnight path

 whole cove
Hey, if I made say a sign asset for map makers, can I make them be able to write on said sign so it appears in-game so the players can read custom text?
tidal latch
delicate condor
so low :C
that's not a problem after all since in Enfusion you can have animated "proxies" (called slots/entities in Enfusion)
woven swallow
midnight path
nice, this reminds me I gotta finish mine. lol
midnight path
woven swallow
nice, this reminds me I gotta finish mine. lol
what you makin?
delicate condor
tidal latch
that's not a problem after all since in Enfusion you can have animated "proxies"...
ah right this does help!
👍 👍 👍 👍 👍
 upper nebula
Hello ! Is there anywere a good tutorial explaining all the process from modeling to blender to importation in enfusion ?
After som research , i dindt found anything enough complete
delicate condor
upper nebula
Hello ! Is there anywere a good tutorial explaining all the process from modelin...
start from just modeling and texturing tutorials
once you understand how your do those you can more easily start to figure out the enfusion specific requirements
upper nebula
Im used to use blender and substance painter, its just the LOD and Collision things where im a bit lost
how many polygons max on LOD5 for exemple, how to smartly cutting them
tacit eagle
depends on how big the object is also you can look at how at how its done in the sdk
woven swallow
midnight path
what you makin?
A golf cart lmao


 tacit eagle
finally a spiritual successor to battlefailed babcompany 1
woven swallow
haha thanks
I was making an RV like the one in breaking bad but I lost the project..
still wanna make one tho
midnight path
woven swallow
I was making an RV like the one in breaking bad but I lost the project..
bruh.... that sucks
 midnight path
lol nice
woven swallow
🍻
woven swallow
Anyone knows how many textures a house has in reforger?
glossy lynx
3-4 on the guard hut,
Inside, outside, roof, foundation
woven swallow
awesome
glossy lynx
There might be more on larger buildings
woven swallow
So i have room. I want the chimney to be high detailed so I'll use a whole texture just for it
glossy lynx
And the inside outside texture is separated on the middle of the window/door sil
That way you can’t see the seam when you put the window/door model there
woven swallow
good to know
thanks dude

since players are going to be interacting with the chimney, I want the Chimney to look awesome
 shell hedge
open the sample weapon and you can see how its setup
open the m16 in workbench and look where the scene root is?
or rather where the weapon is related to the scene root
woven swallow
glossy lynx
Are they going to be dropping down it?
haha imagine?
zenith quartz
RHS's new radio looked cool so I wanted to make my own inferior version.

Draws inspiration from various Azart radios and some other random fictionalization 'cause fuuuuture.
Still doing the knob and antenna on the top, and side buttons.
tacit eagle
future should mean touch pad
zenith quartz
Probably not I think, since gloves, but at least not for a cheaper Eastern radio I think.
glossy lynx
Everything only needs to be it's own prefab if you plan to be able to spawn it in game that way
If you have an m16 you don't need to make a prefab with the scope because you can just let players attach them
But if you plan on giving AI the gun with the scope then you need to make it a prefab
zenith quartz
Having the ability to assign attachments in the soldier's prefab would be cool.
Rather than preset weapon prefabs. Just to avoid clutter.
glossy lynx
restart workbench
upper nebula
Hello Guys, im trying to import a simple house in Enfusion, I think im close, but i have an issue with the colliders, does my name on blender isnt the right one ?


 tidal latch
upper nebula
Hello Guys, im trying to import a simple house in Enfusion, I think im close, bu...
tidal latch
upper nebula
Hello Guys, im trying to import a simple house in Enfusion, I think im close, bu...
you are missing layer preset and game material
https://community.bistudio.com/wiki/Arma_Reforger:FBX_Import#Physical_material_.28Game_material.29 take a look over here too - you might need to reset current collider settings
upper nebula
aaahm so it permit enfusion to emit sound with the proper kind of material I imagine
thanks a lot ! i will study theses two links
 woven swallow
quiet fog
hmm is there another operation that can achieve this?
woven swallow
quiet fog
hmm is there another operation that can achieve this?
Try Ctrl + Alt + Shift + B
tacit eagle
Why is it when I import a model into the enfusion workbench that it is red, even after applying the texture files? Is it something to do with the base color on blender?
tacit eagle
Yep that was the issue
midnight path
almost...
check out the action manager component
compare it to the one u copied
so in actions manager
it has scr_pickupitemaction
?

well yeah im guessing no bones is the issue
well is a bone required to make a gun work?
ive been working on a car for a month, and getting bones to work is my issue
so im guessing its the same for guns
the tutorials are kind of spread out for stuff..
shell hedge
export skinning, export scene hierarchy
one of the two
shouldnt matter if your action context is valid
I wonder if there needs to be a collider?
tidal latch
lack of colliders might cause it
surreal ore
@lucid bridge has to have view geo collider
calm rune
Also seems like a lot of UV maps for just one weapon. Assuming it’s a weapon right? 9 materials is a lot.
 patent flower
more radio nonsence
 quiet fog
woven swallow
Try Ctrl + Alt + Shift + B
quiet fog
woven swallow
Try Ctrl + Alt + Shift + B
that doesnt seem to do anything on my end. Do you by chance mean Shift+Ctrl+B for a vertex bevel?
quiet fog
midnight path
im dying 😂
midnight path
quiet fog
im dying 😂
its so funny looking LOL
the instructions for cars on the wiki is lacking so much stuff
so it looks like the LOD for the wheels on the sample car has its origin at the tip of the bone instead of the beginning
on my car the origin is in the center of the wheel
so it spins oblong like that
theres nothing on the wiki talking about that part
also not much about the 'CarProcAnimComponent'
which is required to make the wheels move visually
surreal ore
Did you read what i said this morning?
tacit eagle
 tacit eagle
the mesh needs to be triangulated is my guess
"Non orthogonal transformation on collider" I think this has to do with non uniform scale in object mode try resetting the scale on your objects
press ctrl + a in object mode on a model and hit apply rotation and scale
tacit eagle
round things do round things
what are you making?
if there something to change the center of mass?
 primal prawn
does the uniform overrides the base body model or it just overlays it?
tacit eagle
dont know ive never really opened the sdk
tacit eagle

 hasty basalt
woven swallow
A golf cart lmao
hasty basalt
woven swallow
A golf cart lmao
can you make it fly?
woven swallow
hasty basalt
can you make it fly?
What are you talking about ? Lol
hasty basalt
woven swallow
What are you talking about ? Lol
a flying golf cart
tacit eagle
in bfbc you could just use AT mines to do this
tacit eagle
 tacit eagle
probably for the sling loops
surreal ore
@lucid bridge Not 100% but im pretty sure they're locations for sounds
delicate condor
Are you using a lot of modifiers, those can take processing time after bone moves
 lavish ingot
Anyone know what causes head gear model to stay visible in 1st person
 tacit eagle
yes there is a way to turn it off while in fpv
lavish ingot
tacit eagle
yes there is a way to turn it off while in fpv
Do you know how
I thought it was just HeadClipping_A.edds added to the opacity map
tacit eagle
yep I think
lavish ingot
Ive got that on and makes no difference
tacit eagle
well did you do the opacity?
lavish ingot
tacit eagle
well did you do the opacity?
What do you mean ?
tacit eagle
well you have have to assign the opacity white or black. typically its white for 100% opacity if im thinking how it should work
so that specific texture map for that hat would be all white in the correct file format
lavish ingot
tacit eagle
well you have have to assign the opacity white or black. typically its white for...
I will try
lavish ingot
this is the default one
 tacit eagle
:S so low res
lavish ingot
the one that comes with the game
tacit eagle

This tutorial we will help you create your very own low poly game foliage assets we will start with the creation of textures.
For the next steps in creating the plant in 3DS Max try this one ... http://youtu.be/YCUn6lynDAQ
lavish ingot
Thanks ill take a look
tacit eagle
just as a general overview on it
lavish ingot
tacit eagle
just as a general overview on it
No difference there
tacit eagle
@lavish ingot did you make it black so its invisible (if that standard for refrogers)
also make double sure that the file format is correct and that naming for the file fits the standards
lavish ingot
tacit eagle
<@325930103571873803> did you make it black so its invisible (if that standard f...
Makes no difference its odd because its fine on my other head gear and its exactly the same. Maybe i did something wrong in blender
tacit eagle
maybe restart the workbench
lavish ingot
tacit eagle
maybe restart the workbench
Done that so many times 😂
tidal latch
You have to enable two params in materiál too
On phone now so check i. E. Sample headgear on github
tacit eagle
based reyhard
what's your poly count knight?
that's really high, 30k tris for the bi weapons. and thats 77k for 1 / 31 objects
that for lod 0?
delicate condor
armature modifier of course is a must for moving parts and triangulation should not be very heavt. but perhaps you are reaching limits of your hardware then.
tacit eagle
what gpu and cpu you got?
delicate condor
which draw mode you use?
rendering mode
wireframe-solid-textured-render
perhaps some sort of issue on how you had that set up then 
tacit eagle
computationally heavy
make a save and copy of your blender file and apply the tri modifier
this is how I label my blend files I can make incremental saves of them

if something happens that I dont like I can go back
but yes apply the triangulate modifier, its used in game so that the game knows how each face is orientated
or you can just turn off the tri mod until after your done
some people do it before baking or after right before they import it into the game
tacit eagle
good uv for a round cube shape?
 calm rune
lavish ingot
Anyone know what causes head gear model to stay visible in 1st person
calm rune
lavish ingot
Anyone know what causes head gear model to stay visible in 1st person
Did you get the issue solved?
buoyant nymph
What's the word on this beauty?
glossy lynx
Not much at the moment as it is a lot of work
Still needs textures
 sick plume
Well I love the other two thus far Space! Good job
lavish ingot
@calm rune sadly not
last hill
lavish ingot
I thought it was just HeadClipping_A.edds added to the opacity map
Did you add the parametric component to your prefab and set the two check boxes in the material?
Right down the bottom near the alpha mask settings there are two check boxes. I am not at my rig right now though so can't remember the options
lavish ingot
last hill
Did you add the parametric component to your prefab and set the two check boxes ...
I will check
willow sage
lavish ingot
<@165928416669990912> sadly not
Alpha blend & alpha bias at middle of the way on your object .emat
Check it on helmet emat an everything will be as you wanted it to be.
lavish ingot
willow sage
Alpha blend & alpha bias at middle of the way on your object .emat
Check it on ...
Just makes it have loads of holes
lavish ingot
last hill
Did you add the parametric component to your prefab and set the two check boxes ...
 last hill
lavish ingot
last hill
lavish ingot
Show us the material settings
If it is making it have holes, you've set it up wrong
That component will only hide the mesh in first person mode, unless you have the material set up incorrectly/wrong.
lavish ingot
last hill
Show us the material settings
Default and set to halfway

 tidal latch
lavish ingot
Default and set to halfway
tidal latch
lavish ingot
Default and set to halfway
as I mentioned before, Allow User Alpha Bias & Disable User Alpha In Shadow are required https://github.com/BohemiaInteractive/Arma-Reforger-Samples/blob/main/SampleMod_NewCharacter/Assets/Characters/SampleCharacter/data/Headgear_Example_01.emat
GitHub
Modding Samples. Contribute to BohemiaInteractive/Arma-Reforger-Samples development by creating an account on GitHub.
you should not touch alpha test and alpha mul
lavish ingot
tidal latch
as I mentioned before, Allow User Alpha Bias & Disable User Alpha In Shadow are ...
Thanks
last hill
lavish ingot
Thanks
Should be fixed now?
calm rune
I honestly have no idea how to do it from scratch either and when I look at GitHub I still do not understand it. I just duplicate a vanilla headgear emat, change the name and assign my textures then drag into my models material slot.
covert dune
tacit eagle
good uv for a round cube shape?
This is the way I'd have done it atleast
agile crater

created a 3d into character creator and move it too the enfusion position
exported the mesh and transfers the weight

and its work 🙂
so you can creat your own character and import it in enfusion however with women model its will be more longer. indeed it will be necessary to have the sources of the animations in order to resize them to a feminine height so as not to have a woman of 1m80. Otherwise it will be necessary to redo all the animations of the game for a female character.
delicate condor
agile crater
so you can creat your own character and import it in enfusion however with women...
same as before then
except harder if the animations are not released
I was hoping it would be easier not but perhpas in A4
agile crater
it would be good for the game to have the sources of the animations or to have animations of several sizes.
to increase the immersion on the other hand it involves more work level 3d of clothes it is sure
delicate condor
more access to the animation via editor/coding would be good
or well preferably more adaptive animation system to begin with, but those are not easy to make
agile crater
@delicate condor im agree with you
how many textures are they in the Enfusion charactere ?
young shard
agile crater
https://cdn.discordapp.com/attachments/392728823105323020/1065735010512011425/im...
So you could probably resculpt the head aswell.
agile crater
@young shard
yes , take a look of character creator 4 .
delicate condor
the head will need to fit the head skeleton to work
agile crater
its work 🙂
tacit eagle
 shut bloom
Anyone have a clue why my normals are broken in Enfusion. works fine in Blender Marmoset and Substance so no clue what is causing this.
 tacit eagle
where the broken?
shut bloom
its quite obvious 0.o
 tacit eagle
maybe shading issue is everything tri
shut bloom
tacit eagle
maybe shading issue is everything tri
nope sadly not its a in engine problem it changes when the object is moved
tacit eagle
how does it look in blender?
shut bloom
fixed it
delicate condor
shut bloom
fixed it
what was the issue/fix
last hill
delicate condor
what was the issue/fix
It looks like a normal map issue when the model is being auto triangulated on import to the engine.
But that could be just me seeing that.
shut bloom
delicate condor
what was the issue/fix
Idk had to rebake the whole thing 2 times and trial and error the shading for some reason something that normally works did not work correctly.
shut bloom
last hill
It looks like a normal map issue when the model is being auto triangulated on im...
thats what i thought too but it wasnt
delicate condor
shut bloom
thats what i thought too but it wasnt
did you triangulate it before baking?
shut bloom
delicate condor
did you triangulate it before baking?
yes but that did not make a difference
delicate condor
does it have all smooth edges or does it also have hard/sharp edges defined?
 karmic adder
Is there any reason as to why Reforger is rendering the characters head at LOD0 while in first person?
That's +40k triangles (5-10% of total) at all times, and for shadows, even LOD3 is easily good enough.
bright raft
shut bloom
its quite obvious 0.o
This issue appears when you haven't marked the edge sharp in Blender before exporting to reforger.
 uneven vessel
tacit eagle
good uv for a round cube shape?
uneven vessel
tacit eagle
good uv for a round cube shape?
Since nobody else picked up on this - it's close to good, I'd suggest properly quadrifying so if you applied something like a 2d diamond pattern or stripes they wouldn't look slightly warped. If you haven't heard of/don't have ZenUV (good set of UV tools) and UVPackmaster (fantastic island packing), I'd recommend them: https://sergeytyapkin.gumroad.com/l/ZenUV https://uvpackmaster.com/
tacit eagle
when you guys do UVs do you try to group the parts together? I want to do that with my models for those who want to do retextures
 woven swallow
Maybe I'm going way too far with this. lol


 tacit eagle
why you put studs and beams
hardy cairn
For future destruction
tacit eagle
I love it but I'm not sure my FPS is going to love it.
woven swallow
Trying to create different versions of the same house.
- under construction
- completed version
- destroyed version
however, I might change some things. Haven't decided yet.
for example:
 tacit eagle
woven swallow
Trying to create different versions of the same house.
- under construction
- ...
tacit eagle
woven swallow
Trying to create different versions of the same house.
- under construction
- ...
Ah okay, excited to see how it comes out, having an area on the map thats like an under construction housing area sounds super cool.
woven swallow
tacit eagle
I love it but I'm not sure my FPS is going to love it.
bunch of cubes wont hurt FPS. the chimney might. working on it. trying to keep details without going crazy with the amount of polygons.
woven swallow
Just messing around with some smart materials in Substance Painter.
 sly bridge
tacit eagle
when you guys do UVs do you try to group the parts together? I want to do that w...
sly bridge
tacit eagle
when you guys do UVs do you try to group the parts together? I want to do that w...
i personally don’t because it’s been a long while since i packed anything manually, my aim is to pack as tightly as possible and also keep a consistent texel density
for retexturing i’d rather render a colored masked and provide that instead
 white sigil
@tacit eagle Quixel and Substance uses Color ID mask so as PuFu said its easier do that.. then group it also you can easily turn it into mask in PS
 sleek forum
why is one of my items heavy and cant be picked up, even tho all the settings and weight are the same, it is a little bigger model tho
other items work fine
i found a fix, had set it up as scaler
 trail cave
Don’t know if this is the right place for this , but I’m trying to get some models out of Arma into 3ds max to edit them , is there a tutorial on that ?
delicate condor
trail cave
Don’t know if this is the right place for this , but I’m trying to get some mode...
you cannot do that
surreal ore
@trail cave Are they models from the licensed data packs?
If so you can absolutely do that because that's what they're for.
Also if they're your models you can do so, or if you have explicit permission from the person who made them you can do so.
Also if they were released under certain licenses you can do so.
trail cave
Can you explain the licensing thing ?
delicate condor
surreal ore
Also if they're your models you can do so, or if you have explicit permission fr...
nothing can be taken out of Arma though
sources are needed
like the released datafiles
trail cave
Sources ? Like where they got those from ?
delicate condor
yes
surreal ore
You need to find out if they are released under share-alike
delicate condor
even share alike does not allow the models to be taken out
surreal ore
You're not allowed to unbin anything.
delicate condor
there is no scenario where you can take out a model from the game or a mod for editing
you will need to ask for a source model from the maker
and they dont have to give it to you
source models/data can be used if it is released separately with a license that allows its use
trail cave
Ahh there’s more to this then I thought
Well , is there a direction you can point to purchase or find good models ?
delicate condor
there are various 3d model trading sites. good models dont come cheap though and are usually not game ready anyway.
pretty much all cases of bought assets I've seen require quite a lot of adaptation to make things work and be performance optimized
Also you as the mod maker are responsible for making sure your outsourced assets are not ripped from other games.
 shut bloom
well how big is the rest of the model ?
and how big is it in general.
also is it a General Prop or a Hero Object ?
But I Would prob do it in Texture.
midnight path
tacit eagle
what you guys think geometry or texture?
i need some advice

such small footprint polygon wise
but i want to have a better LOD0
woven swallow
tacit eagle
what you guys think geometry or texture?
Depends. if those details are meant to be seen by the player or not.
midnight path
but no matter what i do i get to like over 1 million poly
delicate condor
over a million???
woven swallow
lol
delicate condor
you probably need full lowpoly remake of the mesh
delicate condor
this in the picture?
midnight path
yes
delicate condor
so whats over million?
midnight path
so if i subdivide the shell like 2 times
it gets over 1 million
but looks perfect
delicate condor
A) you need to turn smooth shading on and setup smooth/sharp edges right
delicate condor
B) you need to bake the normalmap out of the hightpoly on to the lowpoly to capture the details
select object, hit space, type in smooth
and then possibly turn on autosmooth in the vertex tab of the object
woven swallow
@midnight path , do you know the difference between low poly and high poly models?
midnight path
woven swallow
<@230890238740791296> , do you know the difference between low poly and high pol...
the complexity of the geometry?
woven swallow
you know how to bake high poly into low poly ?
midnight path
no
woven swallow
you need to know what high poly and low poly is. brother
midnight path



 tacit eagle
1 million poly assets are pretty standard noaw in unreal games
woven swallow
midnight path
https://tenor.com/view/okay-ok-meme-gif-21668690
Trying to find a video on youtube that explains the difference. very useful.
midnight path
woven swallow
Trying to find a video on youtube that explains the difference. very useful.
thank you
midnight path
tacit eagle
1 million poly assets are pretty standard noaw in unreal games
yes but what about arma lol
delicate condor
midnight path
yes but what about arma lol
not
tacit eagle
no arma devs know what they are doing
midnight path
can i have my lod0 be 2 mil?
woven swallow
no
midnight path
since the distance is only like 30 meters
or is it because of how big the file would be
woven swallow
@midnight path bad practice not optomize
delicate condor
tacit eagle
1 million poly assets are pretty standard noaw in unreal games
im gonna say you are wrong about that.
woven swallow
delicate condor
im gonna say you are wrong about that.
I agree to that
@midnight path
https://www.youtube.com/watch?v=eS6gI1bAvPA&t=637s&ab_channel=FlippedNormalsMarketplace

In this video, we'll explain all the basic steps needed in order to make 3D models for games. We'll go over blocking out, high poly, low poly, UV unwrapping, texture baking, and texturing.
If you're interested in putting your knowledge to the test, have a look at our FlippedNormals Exclusive - Hero Prop Creation in Blender & Substance Painter ...
zenith quartz
I'm remembering how much I hate doing organic shapes / subdivision.

My brain is just sitting here making dial up noises. 
midnight path
so high\low baking is the new way to achieve high quality without using the actual geometry?
zenith quartz
Yeah.
You make a high poly for fancy shading and stuff.
And then you bake that all down onto a low poly which is used in-game.
midnight path
that blows my mind
zenith quartz
Here's a high poly.

Low poly.

High poly has all the bevels and the serrations and such.
midnight path
so the model i have right now, would be the low poly that i bake the high onto
zenith quartz
Yeah.
midnight path
if i make a high poly model using modifier do i have to hit apply
enfusion understands mirroring and stuff when its not applied so im assuming no?
woven swallow
the results of that baking is a normal map image
tacit eagle
no unreal devs almost always use 1 million poly assets and templates written using "3d programing nodes"
woven swallow
I don't recommend applying modifiers unless you really have to
midnight path
gotcha ok
delicate condor
midnight path
so high\low baking is the new way to achieve high quality without using the actu...
no its very old way 😅
delicate condor
tacit eagle
no unreal devs almost always use 1 million poly assets and templates written usi...
Im still fairly certain you are talking nonsense, but this is not unreal channel anyway. Lets stick to enfusion related things and advice that fits it
midnight path
i thought we were making better hardware to get higher poly counts
but now it doesnt matter as much if you can bake
zenith quartz
delicate condor
Im still fairly certain you are talking nonsense, but this is not unreal channel...
You could say it sounds... unrealistic.
delicate condor
🥁 
zenith quartz
👉 😎 👉
midnight path
like what are the limitations
couldnt i just make a brick and bake my high poly on it and it looks like a car?
delicate condor
you can find lot of tutorials and explanations on how higpoly and lowpoly workflow works
on the web
woven swallow
I think he means this
https://www.youtube.com/watch?v=qC5KtatMcUw&ab_channel=UnrealEngine

Unreal Engine 5 empowers artists to achieve unprecedented levels of detail and interactivity, and brings these capabilities within practical reach of teams of all sizes through highly productive tools and content libraries.
Join Technical Director of Graphics Brian Karis and Special Projects Art Director Jerome Platteaux (filmed in March 2020)...
delicate condor
in case further UE talk is needed it can continue at #other_games_chat
covert dune
Highpoly is painful. So so painful..
I've been trying to get good results for months
Trying to tame the subdivision makes me wanna cry. 
midnight path
covert dune
Trying to tame the subdivision makes me wanna cry. <:notlikemeowcry:724201124369...
i am experiencing that right now
the space between the body of the car and doors now is messed up
woven swallow
I like to combine bevel modifier and subs 🙂
covert dune
Same
tacit eagle
sub d is the easy 😦
delicate condor
subdivision is not always the right way to do HP
covert dune
bevel weights allow you to non-destructively bevel things, have things bevelled on different levels and more. That's why I like it
woven swallow
delicate condor
subdivision is not always the right way to do HP
lol then how?
tacit eagle
I just make a base mesh 90% of the time and my high poly is just at most a modifier stack while my LP is just deleting some extra unneeded stuff and merging verts
woven swallow
normally I do my low poly then i achieve highpoly by adding subs and bevels..
midnight path
woven swallow
normally I do my low poly then i achieve highpoly by adding subs and bevels..
this is what im doing
delicate condor
woven swallow
lol then how?
you might for example have details like bolts and panels and whatnot that dont exist on your LP model at all