#arma3_texture
1 messages · Page 11 of 1
 livid knot
 rocky whale
im working on importing something that this is the error im getting
after i set up the p3d and the config files i then opened arma and pressed on it (its a facewear) and the game crashes and shows that error
livid knot
Try using a jpg instead of paa and see if the texture appears
 stray relic
If you can narrow it down to definitely only occuring with one particular texture, that would be good
rocky whale
livid knot
Try using a jpg instead of paa and see if the texture appears
when converted to jpg it fails to convert
stray relic
what pixel size is it?
stray relic
you've checked it's exactly 1024x1024?
 stray relic
as jeff suggested, post the texture jpg here for us to have a look at
livid knot
rocky whale
when converted to jpg it fails to convert
What does this mean? What file format is your texture originally in?
rocky whale
png
im going to re export the textures and re do the config and see if that works
got it working
stray relic
rocky whale
got it working
Explaining the solution would be the polite thing to do, not just for those that tried to help, but also anyone else in future that searches for the same issue.
rocky whale
i dont know what fixed it otherwise i would
i just did it again and something fixed it
stray relic
Did what? converted the texture to paa?
rocky whale
rocky whale
im going to re export the textures and re do the config and see if that works
did this
 full quarry
Shiny Gold Example


@upper thicket maybe this can help you
class StageTI
{
    texture="a3\data_f\default_vehicle_ti_ca.paa";
};
ambient[]={1,1,1,1};
diffuse[]={1,1,1,1};
forcedDiffuse[]={0,0,0,1};
emmisive[]={0,0,0,0};
specular[]={0.98,0.57,0.11,1};
specularPower=65;
PixelShaderID="Super";
VertexShaderID="Super";

class Stage1
{
    texture="vn\objects_f_vietnam\civ\statue\data\vn_dragon_02_nohq.tga";
    uvSource="tex";
    class uvTransform
    {
        aside[]={1,0,0};
        up[]={0,1,0};
        dir[]={0,0,1};
        pos[]={0,0,0};
    };
};
class Stage2
{
    texture="#(argb,8,8,3)color(0.5,0.5,0.5,0.5,DT)";
    uvSource="tex";
    class uvTransform
    {
        aside[]={1,0,0};
        up[]={0,1,0};
        dir[]={0,0,1};
        pos[]={0,0,0};
    };
};
class Stage3
{
    texture="#(argb,8,8,3)color(0,0,0,0,MC)";
    uvSource="tex";
    class uvTransform
    {
        aside[]={1,0,0};
        up[]={0,1,0};
        dir[]={0,0,1};
        pos[]={0,0,0};
    };
};
class Stage4
{
    texture="vn\objects_f_vietnam\civ\statue\data\vn_dragon_02_as.tga";
    uvSource="tex";
    class uvTransform
    {
        aside[]={1,0,0};
        up[]={0,1,0};
        dir[]={0,0,1};
        pos[]={0,0,0};
    };
};
class Stage5
{
    texture="vn\objects_f_vietnam\civ\statue\data\vn_dragon_02_smdi.tga";
    uvSource="tex";
    class uvTransform
    {
        aside[]={1,0,0};
        up[]={0,1,0};
        dir[]={0,0,1};
        pos[]={0,0,0};
    };
};
class Stage6
{
    texture="#(ai,64,64,1)fresnel(1.33,10)";
    uvSource="tex";
    class uvTransform
    {
        aside[]={1,0,0};
        up[]={0,1,0};
        dir[]={0,0,1};
        pos[]={0,0,0};
    };
};
class Stage7
{
    texture="a3\data_f\env_land_co.tga";
    uvSource="tex";
    class uvTransform
    {
        aside[]={1,0,0};
        up[]={0,1,0};
        dir[]={0,0,1};
        pos[]={0,0,0};
    };
};
 severe rune
Most notably. They ONLY happen with p3d files.
And that file listed there, is a paa.
and part of that text either being missing or censored, and the reluctance to sending the broken file to be looked at, doesn't instill confidence.
Seems like something fishy which one probably doesn't want to get involved with.
stray relic
severe rune
and part of that text either being missing or censored, and the reluctance to se...
Good call, thanks. With the low effort responses from the OP I was done with attempting to help there anyway.
 upper thicket
full quarry
```cpp
class StageTI
{
texture="a3\data_f\default_vehicle_ti_ca.paa";
};
amb...
upper thicket
full quarry
```cpp
class StageTI
{
texture="a3\data_f\default_vehicle_ti_ca.paa";
};
amb...
🫡 ty very much, I will now make gold uniforms for the funny
huh why is the CO map in Stage0?
full quarry
upper thicket
huh why is the CO map in Stage0?
it dont need to be
upper thicket
full quarry
it dont need to be
wat does it do if it is?
full quarry
upper thicket
wat does it do if it is?
Im not sure if its even valid method anymore, but at some point it was possibly to assign the main color texture on a models through the rvmat. Its not really used anywhere now though (dunno really why its been put in there, probably a overlooked mistake)
 wooden lantern
full quarry
Im not sure if its even valid method anymore, but at some point it was possibly ...
wooden lantern
full quarry
Im not sure if its even valid method anymore, but at some point it was possibly ...
that's
actually good to know
one less line of config for hiddenselectiontextures ig
can just use hiddenselectionsmaterials
full quarry
wooden lantern
can just use hiddenselectionsmaterials
I dont recommend that
I think it may have worked like in OFP or something
but it is best to do the normal way
wooden lantern
full quarry
I dont recommend that
 hmmm
hmmm
full quarry
I'll just remove it from the example
that was my bad for showing you that
do the normal stuff that is proven to work
 ornate veldt
why Is texview crunching the texture ? is there anything I am missing ? 😄
 livid knot
What resolution is your image?
ornate veldt
livid knot
What resolution is your image?
it was 2048x2048
the strange thing is, when I saved it in photoshop and exported it again, same res. everything was okay
just with the raw texture I got it was an issue
full quarry
Wrong bit depth or something like that maybe
ornate veldt
full quarry
Wrong bit depth or something like that maybe
Yeah I strangely have it on every AO which I got from that Modeler 😄
full quarry
ornate veldt
Yeah I strangely have it on every AO which I got from that Modeler 😄
same wrong export setting used
ornate veldt
full quarry
same wrong export setting used
yeah probably I mean I need to make them to AS anyways but its a little annoying to open everything in PS an export as PNG. then convert to as with TexView
full quarry
ornate veldt
yeah probably I mean I need to make them to AS anyways but its a little annoying...
batch convert in something like infranview or maybe PS has that too
and convert to paa with imgToPaa
upper thicket
wooden lantern
one less line of config for hiddenselectiontextures ig
blud is tryna min max config line count even tho its like 1% of 1% of 1% of total line count 🙂
 cyan mason
Hey, I've been doing a small reskin of RHSUSAF vehicles and so far it's been going fine. Stopped for the day yesterday and continued on today.. Now for some vehicles, the one I didn't finish yesterday none of the reskins are working. When I look at the Config ingame, I see that it's been succesful and they are linking to the proper textures, yet the old ones are still in place. If I remove the textures from the config, they don't show up. Textures are 100% correct.
Any idea what this could be?
 wary robin
how can i create the ao and nohq textures for model ?
 livid knot
Using a texturing software is ideal, image editor works too but not nearly as good. They are the normal and ambient occlusion maps
wary robin
livid knot
Using a texturing software is ideal, image editor works too but not nearly as go...
Any software recommendations?
livid knot
I think Blender might be able to create them..? I use Substance Painter. Don't know of any free ones
 halcyon grotto
I am trying to get some transparent Textures on a Gun to work but nothing I tried is working.
What are some common Mistakes that may cause the Transparency to just be Black on the in-Game Model?
halcyon grotto
I did forget the _ca thanks for the help
 keen terrace
wary robin
how can i create the ao and nohq textures for model ?
keen terrace
wary robin
how can i create the ao and nohq textures for model ?
If you have the 3d model then you can use blender to bake AO and normal maps.
 unique palm
wary robin
how can i create the ao and nohq textures for model ?
unique palm
wary robin
how can i create the ao and nohq textures for model ?
I can recommend Blender, very easy
 severe ibex
Hello guys if any lf you already re-texture "combat worn" (with dirt and others details like.) vest/uniform to make them fresh and clean. Do you have any good tips to apply that texture without erasing all the details of the vest that make it real. (Like folds of clothes etc...)
It's easy to add dirty détails on a clean texture.
But what if we do reverse ? If you have advices, I take it ! Thank you.
unique palm
So the textures are just being moved forward a bit.. wth
Even with the G and B channels changed, no fix... UV unwrap is perfect but for some reason i cannot load the AS, SMDI and NOHQ textures in Object Builders UV Editor. I just get an error that its "Unable to load bitmap"
Anyone here has an idea what my issue is? The models location, scale and rotation is reset so its 0, 0° and 1.0
 full quarry
unique palm
So the textures are just being moved forward a bit.. wth
Even with the G and B c...
full quarry
unique palm
So the textures are just being moved forward a bit.. wth
Even with the G and B c...
Incompatible resolution/ Format/bitdepth?
Comes to mind
unique palm
yeah could be that my NOHQ is 16Bit? All my textures were ARGB8888 but now they are DXT1 and NOHQ is DXT5
But in Object Builders UV Editor i still cannot open the AS, SMDI and NOHQ textures. I still get the error "Unable to load bitmap" even though they are not DXT1 and DXT5 for NOHQ
 manic mulch
Decided to do some tests with enviroment textures.
The silver jet from S.O.G has become a red jet,
env textures are very powerful

 neat cape
ornate veldt
why Is texview crunching the texture ? is there anything I am missing ? 😄
neat cape
ornate veldt
why Is texview crunching the texture ? is there anything I am missing ? 😄
got the same issue, i just copy the whole and do new in Gimp and save it and its fixed
 wide shadow
if I've got a gun with an integrated scope, how should I be setting that up when I'm authoring the texture for it? right now it's just opaque like the rest of the model, do I need it to be transparent? or does the overlay(?) get handled by a separate process in the engine when you scope in
this is what it looks like in SP right now for reference
 stray relic
wide shadow
if I've got a gun with an integrated scope, how should I be setting that up when...
stray relic
wide shadow
if I've got a gun with an integrated scope, how should I be setting that up when...
You're doing it right.
Scope in uses a config defined optics mode, which can include a separate p3d with scope edges and reticles
wide shadow
cool, thank you
full quarry
wide shadow
this is what it looks like in SP right now for reference
is that an G11 I see btw?
wide shadow
full quarry
is that an G11 I see btw?
indeed it is, I’ve got a couple other unusual guns in the works as well like the delisle carbine, some of the mateba revolvers and some early 20th century semiauto pistols
(And some regular old revolvers like the schofield and the buntline SAA)
 tidal elm
Hello, so im super super confused here. so i have made a tank model in blender. and im trying to texture it for arma. however im so confused as if i need to get the ENTIRE vehicle into 1 box of texture 4096x4096 there will be no detail in any of the textures. how dose arma texture vehicles? with all the track links ect
full quarry
tidal elm
Hello, so im super super confused here. so i have made a tank model in blender. ...
tracks are their own texture
and you can have multiple material/texture combos too
tidal elm
like as many as i want?
tidal elm
like hull as one, tracks as another, turret as another
tidal elm
so say 3 is fine
full quarry
yes
tidal elm
ok
full quarry
you also will want to check you vanilla track textures to see how they are set up
(and the track needs to be a tube)
tidal elm
how do i find them?
full quarry
as the track moving is done by scrolling the UV

 fierce fable
can you find the tanks in the addons folder and just unpack them with the pbo manager?
tidal elm
So i need to bake the tracks into a UV image
full quarry
when setting up P drive development environment the vanilla data gets extracted on it
full quarry
tidal elm
So i need to bake the tracks into a UV image
yes
or you can even use one of the vanilla textures if they look alright with your tank
 full quarry
yes
the image will be repeating
and you will also want to have sides on it

theres some possibilities for layering too
 full quarry
when you got the a3 data unpacked on p drive you can just file search the a3 folder for "track"
tidal elm
thoes?
 full quarry
the .paa files are the textures yes
they can be saved as .png or .tga via the texview2 program
 tidal elm
full quarry
theres some possibilities for layering too
tidal elm
full quarry
theres some possibilities for layering too
what is this track texture called?
tidal elm
What are the defauts one called? i found 2 but only like a normal map
full quarry
dont remember off the top of my head sorry
its something track or tracks im pretty sure
tidal elm
its fine, just found a track. how would i export it was a PNG in texture
full quarry
how did you set up your P drive?
tidal elm
 full quarry
youll want to even out the unwrap
tidal elm
Is this whole thing one track texture, or 2 as its a seam in the muddle
 full quarry
outside, side ,inside and the side of teeth
tidal elm
ah ok
tidal elm
can i see your track UV?
 tidal elm
haha, i still have no clue how to uv map this track

almost got it
just how do i fix it warping
 full quarry
what unwrap method you use?

 short salmon
Someone that could give me a tip on a quite ancient problem? I have a texture that has transparency to it and i get this faint white outline. I have been searching the web and found a old post about this but im having trouble making it work based on whats written in it.
this is the post: https://forums.bohemia.net/forums/topic/24467-white-outline-problem-with-paa-textures/
Anyone that could give me a tip?
Bohemia Interactive Forums
Ive noticed that sometimes my weapon optics, especially the crosshairs, get faint white outlines. Suchey also had some problems with the ghillie texture for his USMC sniper. I think I found the reason for it, so I wanted to share my solution and see if anybody else has more info about this. The b...
stray relic
short salmon
Someone that could give me a tip on a quite ancient problem? I have a texture th...
Try putting down a black background layer under the texture with alpha of 1/256 so it is not entirely transparent
short salmon
stray relic
Try putting down a black background layer under the texture with alpha of 1/256 ...
.< i love how im searching for all these complicated answers and then this guy shows up 😂
thanks, that really helped
 rancid obsidian
Guys what was the best resolution for insignias and flags?
full quarry
rancid obsidian
Guys what was the best resolution for insignias and flags?
is vanilla quality ok?

the flags are pretty small textures

so are the vanilla insignias
rancid obsidian
full quarry
is vanilla quality ok?
What's the other qualities?
full quarry
rancid obsidian
What's the other qualities?
anything higher resolution Id suppose
rancid obsidian
full quarry
anything higher resolution Id suppose
It won't change color?
Like the uniforms problem I had
full quarry
rancid obsidian
It won't change color?
if its acceptable power of 2 resolution it should work
you had some weird resolutions in there
rancid obsidian
full quarry
if its acceptable power of 2 resolution it should work
I'll try
manic mulch
Is it possible to change a terrain texture in real time with a mod?
 lethal condor
No
 iron thunder
You can spawn user texture objects and set the texture on them, but oof... 
It also might not match the slope in a single cell (if the slopes of upper and lower triangles are not the same)
 fading field
Hello texture makers! I have little idea whether you guys could help me with this, but you're all my best shot.
What does preNLOD mean?
For context, a depreciated mod I downloaded (That according to the dev should still be working) apparently has an item UI texture that is 'preNLOD' and therefore crashes my game when I try to open my arsenal.
Thanks in advance!
Extra info, I tracked down the texture in a .pbo folder and it has the same file type as the rest, and opens successfully.
lethal condor
That error is related to P3D. Why do you think it is a texture related error? What exactly is the exact error?
fading field
'Warning: preNLOD format in object edaly_items_assets_1\ui\edaly_item_water_bottle_empty_01_f.paa. (Game files most likely corrupted, verify integrity of game files in steam.'
Haha, so... I deleted the file and now instead of crashing my game it just throws up an error I can just close. easy.
fading field
That's not good, sorry for the wrong channel then.
fading field
lethal condor
You are trying to load a P3D file as a texture, or vice versa
Well it's because that .paa is an image for an item in the Arsenal, so when I open the arsenal it tries to load it and crashes from doing so.
lethal condor
The file doesn't have a proper texture naming convention anyways
fading field
I wouldn't know either which way, to be fair
full quarry
fading field
I wouldn't know either which way, to be fair
Is poorly made mod.
 celest obsidian
it's a very old error we had, I think nikita failed one of the config at some point
probably the ui pic is under the wrong thing in the config or something
jsut inherit things from another vanilla class or delete it basically
"Items assets" were only used for the multiplayer framework. Something that was never released (like the campaign) because we had to scrap it.
full quarry
Pls fix
celest obsidian
I'm pretty sure one of the Level Artists used a barrel or something from items assets in the map too, which made a pain to work with. Long story short: avoid working on a 5 years production total conversion for a game without a game design document and a technical design document 😄
full quarry
Oof
celest obsidian
We've learned a lot
@fading field Just DM me the error, I'm gonna check the sources directly. Also, explain me, what you're trying to do 🙂
stray relic
Right click the UV icon in the taskbar, select maximise (from my memory).
full quarry
id strongly recommend doing stuff like uvmapping in source model and in program like Blender or other more modern 3d modeling tool
also _mlod in your file name indicates you are using ripped models
@sterile hound this is forbidden with 0 tolerance. so this will be your only warning on the matter.
 sterile hound
full quarry
id strongly recommend doing stuff like uvmapping in source model and in program ...
sterile hound
full quarry
id strongly recommend doing stuff like uvmapping in source model and in program ...
Only retexturing but I have the owner’s consent
full quarry
sterile hound
Only retexturing but I have the owner’s consent
You'll have to get source model from the owner then. Ripping is forbidden.
 wispy vigil
Can I make a flag with a different aspect ratio from the usual 2:1?
wispy vigil
Well, but I could make it transparent to give the illusion, right?
lethal condor
IIRC flag texture supports alpha, yes
wispy vigil
Ok, then I'll check the wiki and if that's the case that's what I'll do
just wanted to know if there were alternatives
wispy vigil
It should work, I'll report back as soon as I find out whether or not it does
Works like a charm

 hallow jay
If I want to make my vehicle retexture-frirendly (as in, easy to create camouflage variants for), should I put all the retexturable parts onto a single texture set?
stray relic
Not really, most vehicles have multiple "camo" selections for hiddenSelections.
With a vehicle of any size, getting the entire reskinnable part on 1 texture, even a 4k one, is likely to lead to low pixel density.
hallow jay
Yeah I was hoping to use a single 4k for the retexturable exterior, but for now it does not seem super optimal
What would be a good average TD to aim for nowadays for an APC?
full quarry
hallow jay
What would be a good average TD to aim for nowadays for an APC?
there isnt really any record of recommended texel density
"what looks good"
main things you can do about retexture friendliness is clean and clear uvmapping
and when you release a easily used blank grey/white base texture
retexture friendly uvmap might not always be the most pixel use efficient
 brittle rivet
hallow jay
If I want to make my vehicle retexture-frirendly (as in, easy to create camoufla...
brittle rivet
hallow jay
If I want to make my vehicle retexture-frirendly (as in, easy to create camoufla...
A carefully made template with layers ready for adding camo or colour is really useful, either gimp or photoshop files work and probably some other types as well
The few things I've retextured without a template or with a poor template took many times longer than the objects with good template files
You can include the template file in the .pbo, but it will make the .pbo significantly larger
 shell rock
Anyone Know how the RHS Flags work? how they're seperate from the actual texture? Attempting to do something similar, but like, i cant even find the RHS ones in the their configs
The ones on the uniforms and vests, like the SPC for example, the Marine corp flag is seperate from the actual texture itself
just layered on
full quarry
shell rock
The ones on the uniforms and vests, like the SPC for example, the Marine corp fl...
maybe insignias/unit patches. or just separate mesh decal with different hiddenselection (if it has hiddenselection)
shell rock
full quarry
maybe insignias/unit patches. or just separate mesh decal with different hiddens...
They aren't Insignias they're seperate Textures that are being slapped onto the actual texture
Me and my friend have been looking for it for like a week
full quarry
then its piece of mesh above the first surface with a transparent edged texture on it
like insignias
full quarry
config has texture paths only if there are hiddenselections
textures need to be assigned on the model
stray relic
shell rock
But Where in the files is that, especially the config
Do a search in config for forceFlagTexture.
shell rock
stray relic
Do a search in config for `forceFlagTexture`.
Which one...
shell rock
full quarry
textures need to be assigned on the model
ahh
i see
said the blind man to the deaf mute
full quarry
shell rock
said the blind man to the deaf mute
Im not quite sure if that solved it or not.
shell rock
Yea still absolutely lost, Arma modding is like a Skyscraper tall tsunami that hits you at 300 miles an hour
full quarry
then you need to step back and start from something simpler
so you get the basic mechanics down
shell rock
im not trying to become a Part-Time Arma Modder, just trying to make some uniforms for my unit
full quarry
ye thats complex stuff you need to be a part time arma modeler for...
 crisp comet
Anyone able to give us an idea why the tools ImagetoPAA tool is causing these black marks? Exporting from photoshop to PNG- 8bit sRGB, then converting to .PAA with it

 lethal condor
What is the name of PAA
 trail sequoia
Seems to be having transparency issues
Do you have the CA suffix on the filename
crisp comet
Fuck totally forgot abot the CA not CO
Big dumb dumb over here
been messing with my photoshop outputs for the last hour lol
 hallow jay
I am slightly lost at how to properly bake out AO for vehicle interiors.
If I bake it out as per usual, the entire interior is way too dark and all procedural masks break due to a basically "black" AO texture.
If I remove the AO completely the interior looks very flat and uninteresting.
For various interior components I can at least bake out the AO while disabling the occlusion of the vehicle´s "shell", but for the interior faces of the actual vehicle I have no clue how to get a good result.
I also tried manipulating the output in GIMP but no shot :/
What is the standard industry procedure?
The vehicle also has basically no windows to let in any natural light through
I´d want to have the colour scheme be light-beige, (red arrow), but the excess AO on the interior faces makes all the interior faces look way too dark in comparison (green arrow)
 livid knot
Well, realisticically, if there is no light in there then its gonna be dark...
If you're using substance painter then theres a couple things you could do:
Bake your AO like normal and then use it as a layer and see if decreasing its amount works.
You could also try using a generator with no bake, like dirt(assuming it works with no ao bake), and use it to mimick the effects of AO
hallow jay
Hmmmm, I haven´t thought of that, I will give it a try
wooden lantern
hallow jay
I am slightly lost at how to properly bake out AO for vehicle interiors.
If I b...
seperate the walls as different objects and only allow occlusion if the mesh is the same name in substance painter
easiest way to do it
or u can slice it in half, hamburger style, flip the top half 90 degrees and move it off to the side for baking
 nocturne lake
Can't you just adjust ray distances (cage) and attenuation?
wooden lantern
ray distances also mean the depth of every piece of ao will be dropped
iirc
so it's not really the best way of doing it, because it kinda squashes the ao range instead of baking depth fully
hallow jay
Cheers for the tips, I'll see what I can do
 mint yoke
Hey folks, I am really not sure if this is the right channel because calling me "texture maker" would be a little bit pretentious.
Still I have a problem with a custom texture I made for a rugged tablet.
It doesn't get shown right until you are super close (like one meter or so). Before that, it's weirdly distorted.
As I lack the ability to describe it correctly, I added some screenshots


I made this with Affinity Designer with RGB Webcode colors, saved it as png in a 512x512 and converted it to paa.
If that is of any importance.
So, if anyone has an Idea why this texture gets displayed so weirdly it would be great. I have not much experience with that and I never had this problem with showing a picture as a texture
Oh, and yeah, I have that problem on otherscreens as well, not only on the rugged tablet.


 full quarry
mint yoke
Oh, and yeah, I have that problem on otherscreens as well, not only on the rugge...
full quarry
mint yoke
Oh, and yeah, I have that problem on otherscreens as well, not only on the rugge...
Is it converted to PAA? Did you use naming suffix _CO for it?
mint yoke
full quarry
Is it converted to PAA? Did you use naming suffix _CO for it?
Yes, converted it to paa with a web converter from Gruppe Adler. Used that one many times, always worked flawlessly.
What is naming suffix _CO and what is it for? Never heard of that.
full quarry
mint yoke
Yes, converted it to paa with a web converter from Gruppe Adler. Used that one m...
Check pins for wiki page about naming rules.
mint yoke
full quarry
Check pins for wiki page about naming rules.
Oh dear, I had no Idea that existed. Strangely never needed it until now. But yes, it solved it.
Thanks for the help. Would have never guessed that.
full quarry
mint yoke
Oh dear, I had no Idea that existed. Strangely never needed it until now. But ye...
you had been lucky 😅
mint yoke
full quarry
you had been lucky 😅
Shit, I got lucky a lot ^^. I mean, like for a freakin long time 😄
The cooler I just now learned something completely new. 😄
celest obsidian
hallow jay
I am slightly lost at how to properly bake out AO for vehicle interiors.
If I b...
You either do it in Substance like the others said because it's much faster or you use Marmoset Toolbag and do almost the same but with a much better tool to avoid a lot of pain. If you really want to follow the industry standard, most of the artists use Marmoset because it's better at baking stuff. Problem is that it takes more time and it's not free so it's really up to you. Take the extra time to make what we call an Exploded model. It will help you a lot. Especially in Substance.
hallow jay
Yeah either substance or blender for me
full quarry
you could set up lights inside in blender
hallow jay
full quarry
Ugh, how do you get the side of the track to unwrap in a straight line? I tried using UVSquares to straighten it, but no dice. For me it just creates spaghettis like this.
 full quarry
I use textools rectify for that


GitHub
TexTools is a UV and Texture toolset created several years ago for Blender and Max by @renderhjs. In this open repository, originally created by @SavMartin, we develop the current version of this p...
I think this migth be the latest one
hallow jay
I guess one can never have too many blender addons 
full quarry
never
celest obsidian
I discovered Mio3 UV recently, you can check it out, it has some interesting options and it's free 🙂
 full quarry
lot of similar tools to textools. got to try it out
hallow jay
full quarry
https://renderhjs.net/textools/blender/images/demo_rectify.gif
Hm, I assume I need to add more seams to this? No clue, I have never done textures this way :/
nocturne lake
Well, one cut
 elder wind
Hey, can anyone here help me?
I got this message
z/ace/addons/maptools/data/mapgps-display.p3d
what am I supposed to do?
 inner ingot
Try #arma3_troubleshooting and more context would help there, like where you saw this error, what addons you have loaded, etc.
elder wind
Thanks
wide shadow
I've been noodling around with substance painter and the SubstanceToArma presets and I noticed that some of the available presets are noted as being "metallic/roughness". I was under the impression that arma doesn't support PBR, so I'm a little confused about what those presets export
hallow jay
I think they are supposed to be used if you are using the MetRough workflow in Substance
I tried it once and the results were bad, so I just use SpecGloss in Substance
wide shadow
hmm
I've been using metallic rough but adding diff/spec/gloss channels and making sure they sync up more or less with what's happening in the PBR channels so the exporter has something to work with. it is probably more work than I need to be doing which is why I was interested in possibly exporting directly from the metallic/rough workflow
manic mulch
wide shadow
I've been noodling around with substance painter and the SubstanceToArma presets...
It kinda of has a PBR-like system, it's just that 90% of the game don't use it partially
For metal, if i remember right (quite some time since a tweaked with it), one of the texture channels on specular textures (SMDI, DTSMDI), is roughness/smoothness (i don't remember anymore if Arma uses roughness or smoothness).
The other channel will be the metallic Map. (and the other channel, as well as Alpha, are just ignored).

 ashen violet
Using the MetRough preset can create good results, you more than likely just have to manually edit the Green channel of your SMDI to your liking. Typically the B channel is alright since it’s just an inverted roughness map
 floral fiber
@wooden lantern Ur up here
full quarry
manic mulch
It kinda of has a PBR-like system, it's just that 90% of the game don't use it ...
Arma/RV engine uses olde specular/Gloss shading. there is very little connection with PBR
metalness and roughness as they are in PBR dont exist
and dont directly translate into spec/gloss
the specifications are different
export presets try to mitigate that by mixing the PBR output into something that fits the specs of specular/gloss shading
hallow jay
Ah sorry, but should a wire mesh object with transparency only be a plane (no backface), or should it also containt a backface?
full quarry
hallow jay
Ah sorry, but should a wire mesh object with transparency only be a plane (no ba...
there is never backface so youll need duplicate and flip the mesh
in RV engine only the front side is ever drawn
wooden lantern
floral fiber
<@946499892531069018> Ur up here
ill be so real im eepy
https://github.com/Scouter407/Arma-3-PBR-Workflow github is all i can offer
GitHub
Arma 3 Substance Painter Export + RVMat Guide. Contribute to Scouter407/Arma-3-PBR-Workflow development by creating an account on GitHub.
i need a keybind to just auto paste that link fr fr
celest obsidian
If you're using Scout's presets, read his readme.
If you're using mine, read my readme.
Either way, read the readme 👀
wooden lantern
celest obsidian
If you're using Scout's presets, read his readme.
If you're using mine, read my ...
 truth
truth
reading is the bare minimum 😭
inner ingot
Are there any image comparisons of different values in the fresnel function in an rvmat?
wooden lantern
inner ingot
Are there any image comparisons of different values in the fresnel function in a...
 fresnel is miserable
the equation u see on the wiki is ur best chance or just sticking to the wiki values
stray relic
You can enter the fresnel values inside Substance iirc.
 urban magnet
Hello. Why does Substance give out artifacts?
 urban magnet
Hello. Why does Substance give out artifacts?
urban magnet
urban magnet
Hello. Why does Substance give out artifacts?

1024/1024

4096/4096

2048/2048
 wooden lantern
urban magnet
Hello. Why does Substance give out artifacts?
wooden lantern
urban magnet
Hello. Why does Substance give out artifacts?
Artifacts?
ur UV unwrap edges look a little jagged
and there’s a lot of unused space
inner ingot
urban magnet
Hello. Why does Substance give out artifacts?
Any overlapping UV islands maybe?
hallow jay
urban magnet
Hello. Why does Substance give out artifacts?
A million possible reasons
You also didnt specify which texture the artifacts were happening on
urban magnet
hallow jay
You also didnt specify which texture the artifacts were happening on
All. Base color, AO and etc.
urban magnet
inner ingot
Any overlapping UV islands maybe?
New UV


Maybe there is not enough memory?
 livid knot
WHERE is the artifacting??? Are you talking about the pink?
full quarry
What is it supposed to look like?
livid knot
urban magnet
+
Ive never seen an issue like that before, especially when viewing the base color alone. Could you try other meshes and see if they wor correctly?
wide shadow
is there a way to get an equipment object to use one of a randomized selection of textures? like say one uniform with different patterns of mud stains on it
I know vehicles can spawn with different randomized textures but I don't know if the system that uses can apply to equipment
lethal condor
Uniforms and backpacks, yes. Others no
wide shadow
ah, not vests/helmets then?
wide shadow
weird. thanks though
lethal condor
Because unfiroms and backpacks are vehicle, which is retexturable on the fly
Others are not, hence only engine driven way to retex
full quarry
You can create variant gear pieces with different textures and randomize which ones a unit has when spawned though.
wide shadow
yeah, I've seen mods do that, I just kinda wanted to avoid doing that for mod bloat reasons
urban magnet
livid knot
Ive never seen an issue like that before, especially when viewing the base color...
Not correctly
full quarry
wide shadow
yeah, I've seen mods do that, I just kinda wanted to avoid doing that for mod bl...
With small objects it's the textures that bloat the size anyway.
wide shadow
oh, I meant in terms of how much stuff shows up in the equipment list
like those mods that are so fond of adding two dozen AK variants
full quarry
Ah yeah that
Well if suppose you could make the flavor variants hidden
So it can be swapped via scripts (live game or config made randomizer script)
Personally I would leave any kind of randomization For mission level, as otherwise the unit can't be used to have some specific gear
wide shadow
alright i'm trying to set up my alternate texture selections but I'm not sure if I'm doing the config right. this is what I have right now
class CfgWeapons {

    class HeadgearItem;
    class H_HelmetB;
    class JSM_stetson_brwn : H_HelmetB {
        author = "E-Squid";
        displayName = "Stetson (Brown)";
        model = "\JSM\squidhats\stetson\data\stetson_brwn.p3d";
        hiddenSelections[]={"camo1"};
        hiddenSelectionsTextures[]={"\JSM\squidhats\stetson\data\stetson_brwn_co.paa"};
        scope=2;

        class ItemInfo: HeadgearItem
            {
                mass = 1;
                uniformModel = "\JSM\squidhats\stetson\data\stetson_brwn.p3d";
                hiddenSelections[]={"camo1","camo2","camo3","camo4"};
                hiddenSelectionsTextures[]={"\JSM\squidhats\stetson\data\stetson_brwn_co.paa","\JSM\squidhats\stetson\data\stetson_tan_co.paa","\JSM\squidhats\stetson\data\stetson_blck_co.paa","\JSM\squidhats\stetson\data\stetson_white_co.paa"};

            class HitpointsProtectionInfo {
                class Head {
                    hitPointName = "HitPointHead";
                    armor = 1;
                    passThrough = 0;
                    };
                };
            };
    };

    class JSM_stetson_tan : JSM_stetson_brwn {
        displayName = "Stetson (Tan)";
        hiddenSelectionsTextures[]={"\JSM\squidhats\stetson\data\stetson_tan_co.paa"};

    };
};
the brown hat is supposed to be the base version, I have 3 other color variants. one of them (tan) is at the bottom. I think I've done that one right bc it's just inheriting from the base version, but idk if I've done the hidden selection stuff right or if I even need that many camo selections to begin with
full quarry
wide shadow
the brown hat is supposed to be the base version, I have 3 other color variants....
the model needs a hiddenselection namedSelection/vertex group per texture/material you want to change
that is commonly named "camo"
or with numbers after if you got many
Id wager your hat has only 1 texture?
wide shadow
the model has those matching the names in there
full quarry
does it also have multiple colored meshes in it?
wide shadow
 wide shadow
full quarry
does it also have multiple colored meshes in it?
wide shadow
full quarry
does it also have multiple colored meshes in it?
not sure what you mean
full quarry
ok so you need just camo1
full quarry
wide shadow
not sure what you mean
from your setup there it looks like you have multiple overlapping models for each camo selection and texture combo
but you need only 1
the texture is swapped on that one selection
wide shadow
oh I had it set as multiple vertex groups on the res lods
like res 1, 2, 3 each have camo1, camo2 etc on them
wide shadow
ok
full quarry
then camo1 needs to be defined in model.cfg sections array
and then it can be used via config hiddenselections
wide shadow
full quarry
then camo1 needs to be defined in model.cfg sections array
can you give me an example
full quarry
hiddenSelections[]={"camo1"};
hiddenSelectionsTextures[]={"\JSM\squidhats\stetson\data\stetson_brwn_co.paa"};
this applies brwn texture on camo1 selection
accross whole model
hiddenSelections[]={"camo1"};
hiddenSelectionsTextures[]={"\JSM\squidhats\stetson\data\stetson_tan_co.paa"};
this applies tan texture on camo1 selection
so your tan variant class is pretty much right
the first class just needs the hiddenselections cleaned
wide shadow
alright I'm trying to follow but I'm not clear on what goes where in the model.cfg
sorry
I see class CfgModels > class Default > sections[] = {};, would I put camo1 in there?
oh wait not that's sections, not selections
full quarry
wide shadow
I see `class CfgModels > class Default > sections[] = {};`, would I put camo1 in...
sections is the place yes
wide shadow
sections[] = {"camo1"}; like so?
full quarry

 full quarry
wide shadow
`sections[] = {"camo1"};` like so?
full quarry
wide shadow
`sections[] = {"camo1"};` like so?
yes
also the sample headgear does get this part right 😅
wide shadow
I think that did the trick, cheers
full quarry
👍
hallow jay
Could some texture expert please tell me what am I doing wrong when especially darker surfaces with normal map details get this odd and ugly bright-ish glow? Especially the stretchers and table for example.
Everything is enclosed within the shadow lod of the vehicle.
 full quarry
high specularity perhaps?
 floral fiber
add transparency to specular
hallow jay
I mean, I can try with 1 I guess 
hallow jay
floral fiber
add transparency to specular
in Substance? I was not planning on having transparency
hallow jay
is that the last number?
full quarry
hallow jay
you likely want higher specular power.
but lower specular color in the array
also the ambient and diffuse changes are not best thing if you dont exactly know what you do
Id recommend starting those with 1.1.1.1
and adjusting texture brightness first instead
hallow jay
This is me when I open any rvmat basically
 full quarry
yeh that is often the case Im afraid 😅
hallow jay
I think when I used all 1s in ambient and diffuse everything was very oversaturated
full quarry
yeh it means your textures are like that
personally I prefer to adjust the textures first
changing ambient and diffuse can have negative effects in different lightings if you are not very careful
hallow jay
Well, unfortunately I´d export a washed-out dark green out of substance with the SpecGloss export preset, and all 1s in the rvmat would turn it into a saturated deep green colour :/
So I can´t rely on what I see in substance, right?
full quarry
well. only to some extent
hallow jay
Fair, I´ll try and see what gives
wooden lantern
hallow jay
This is me when I open any rvmat basically
type shit
hm
u might wanna try using a base color map
bc iirc diffuse maps change the color
 vocal copper
not sure if this is the right place, but does anyone know if it's possible to change the thermal effect of particles?
currently they show up as hot on thermals
for example dust / smoke
lethal condor
IIRC having emission is involved
vocal copper
universal particle effect doesnt seem to have an rvmat, maybe that's the issue
if i make a new particle, i should be able to work with it
vocal copper
yup, works.
ok actually doesnt
seems to be working a little bit
nope, no change at all
lethal condor
Modding 
vocal copper
pretty much
wide shadow
running into a problem with textures for some reason; I have my rvmats set up with the right texture paths, the textures converted to .paa, and both rvmat and texture source set in the object builder addon panel in blender, but when I open the p3ds in object builder and view them in the render viewer, the textures don't show up and they just render white. I'm probably forgetting some step but I have no idea what.
I got everything working correctly previously for my hat project, idk what it is this time.
hallow jay
have you tried running the game and checking the rpt?
hallow jay
Could anyone have any idea why are such artefacts happening at slightly greater distances in the ViewCargo LOD?
full quarry
hallow jay
Could anyone have any idea why are such artefacts happening at slightly greater ...
Z fighting between very close surfaces most likely
hallow jay
Strange, I have never had this happen before. Is there some recommended minimal distance?
wooden lantern
it kinda looks like overlapping geometry
full quarry
@stray relic youve fought with the dials quite a lot 😅 do you have any recommended distances between surfaces?
to combat Z fighting
inner ingot
Maybe a matter of trial and error of picking the farthest seat that can see that specific area, then just double the existing gap first. See if that resolves. Then just keep incrementing until the Z fighting cant be seen by the farthest seated
full quarry
yeah it does depend on viewing distance too
cargo could have their own lod too where the dials are on a simpler baked texture
they probably dont really need to see them
hallow jay
wooden lantern
it kinda looks like overlapping geometry
It definitely isn´t overlapping, but yeah, there might not be enough leeway between the surfaces
stray relic
hallow jay
Strange, I have never had this happen before. Is there some recommended minimal ...
It will always be a problem from the furthest seats, no matter the separation distance.
Do what Bohemia did, and put a blocking wall in all their vehicles so the rear cargo can't see into the cockpit area!!
You can have quite good success with setting face property z-bias to none (behind) or high (in-front); sadly "low" and "medium" settings don't work (aren't remembered).
 hallow jay
Hmmmmm, I see
Ugh, the front seat is "cargo" as well, I´ll probably have to change that into the commander then
stray relic
hallow jay
Ugh, the front seat is "cargo" as well, I´ll probably have to change that into t...
No it's not virtue of it being a cargo position, but the seat's distance from the objects which have the z-fighting.
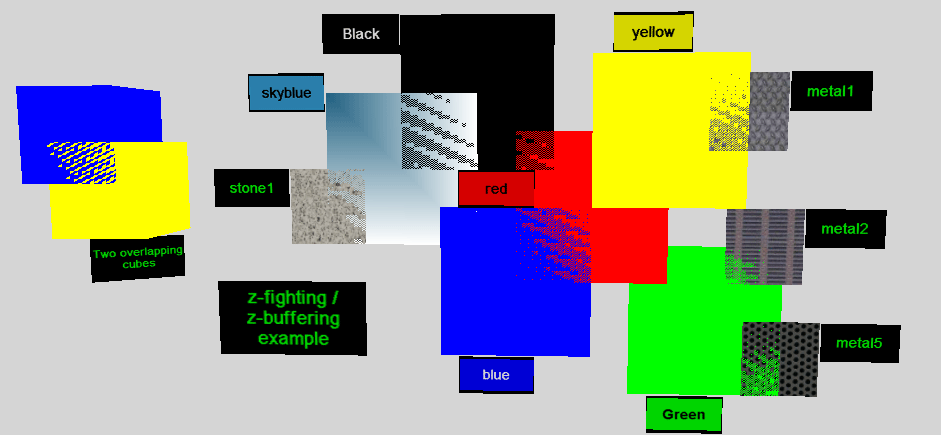
Z-fighting, also called stitching or planefighting, is a phenomenon in 3D rendering that occurs when two or more primitives have very similar distances to the camera. This would cause them to have near-similar or identical values in the z-buffer, which keeps track of depth. This then means that when a specific pixel is being rendered, it is ambi...
hallow jay
I mean technically there should be someone in the front seat, blocking the LOS of the people in the back
I´ll check it out, cheers
stray relic
Anyway, use the z-bias in the face properties and that will get you decent results.
hallow jay
Will do, thanks
wide shadow
hallow jay
have you tried running the game and checking the rpt?
I have not, I usually try to get stuff in a state where I think it’s working before packing the PBO.
I don’t mean that sarcastically or anything, I’ve never checked the rpt to troubleshoot bc so far everything has either been solved before packing or the nature of the error became evident once loaded into the game
full quarry
wide shadow
running into a problem with textures for some reason; I have my rvmats set up wi...
disconnect between tools and P drive typically is caused by mounting P drive from the arma3 lauchner and/or starting Object Builder from the launcher or steam shortcut
floral fiber
Iirc I use like 0.005m on a screen for one of my weapons to do the reflectivity separately and that works fine
floral fiber
Oh wait that conversation was at 9am
full quarry
what is time
floral fiber
Serves me right for not reading everything properly 
floral fiber
full quarry
what is time
The fourth dimension of our existence
 low helm
what kind of export settings do you guys use for substance painter?
 bright mantle
Hi, does anybody know of some solid color S&S new wave PASGT helmets or at least templates of the PASGT helmets?
 crisp timber
Does anyone know if there are any Tempest, and Neophron templates anywhere
crisp timber
crisp timber
Does anyone know if there are any Tempest, and Neophron templates anywhere
also oppinions
 wide shadow
full quarry
disconnect between tools and P drive typically is caused by mounting P drive fro...
wide shadow
full quarry
disconnect between tools and P drive typically is caused by mounting P drive fro...
what I don't understand is why all of it was working perfectly fine before in the same session. but to be sure, I tried again opening ImageToPAA and obj. builder from the folder their .exe's are located in. I ran all the textures through ITP again and reopened the file in object builder, but it still doesn't read the texture the file is supposed to have. it does correctly read other files I've previously made successfully though.
full quarry
wide shadow
what I don't understand is why all of it was working perfectly fine before in th...
check image resolution maybe?
wide shadow
for it to be a power of 2?
full quarry
yes
wide shadow
2048x2048
full quarry
is the source png or tga?
does the .paa open up in texview2?
check object builder texture renaming tool if the paths are red or black
wide shadow
source is png, though I haven't had issue with that previously
I'll check the other two
full quarry
png typically should work
full quarry
it too can be saved in incompatible bit depth but that usually needs user input
 full quarry
typo?
wide shadow
maybe? I could've sworn I copied/pasted the path, but I'll look around further
thanks 👍
hallow jay
Bit of a necro, but is this possible to do in any way in Blender, so that I don´t have to do it every time I reimport the P3D?
full quarry
hallow jay
Bit of a necro, but is this possible to do in any way in Blender, so that I don´...
yes
its just very basic modeling
dont over think it
hallow jay
Ah I meant the moving the things to the top of the stack
What is the order visible in OB decided by? The order of Blender materials?
Actually it does not matter, I´ll just fix it for once on the very final version of the model
full quarry
there is a tool for that too in the toolbox. but sometimes it might not work right.
id recommend disregarding it while you work on stuff and just do it one time last when everything else is ready
hallow jay
Yeah, on the final version. And by that I obviously mean the model_final_V5_finalX_3_ultimate.p3d version
 torn mesa
recently discovered that you can force mipBias to -1 in the config, whilte ultra setting only provides mipBias 0, so what's loaded when you set mipBias to -1 cause the textures look even better, i'm not quite sure how mip mapping works
fading field
Hello, If I have an object made with textures in Blender, how would I apply those textures to the object in Oxygen 2?
wide shadow
What plug-in are you using for export from blender
fading field
.obj
wide shadow
…doesn’t it need to be in .p3d
fading field
I tried Arma tools but it won't open the p3d in Oxygen
wide shadow
oh
fading field
Oxygen can import a .obj but I don't know if it imports the textures from Blender
stray relic
fading field
Oxygen can import a .obj but I don't know if it imports the textures from Blende...
When you say "Oxygen", do you actually mean "Object Builder"?
fading field
Well yes sorry, all the guides are from 2012 so they call it Oxygen
stray relic
As Oxygen has been replaced
https://community.bistudio.com/wiki/Oxygen_2
fading field
My mistake, other people from old forums said that Object builder is just a rename
To be fair, they look and behave the exact same to my untrained eye
stray relic
Use the blender toolbox to export a p3d directly from blender.
Model_makers has a pin for installing it.
fading field
I have already tried that, unfortunately. Object Bulder refuses to open the file. I have already asked about that error but no-one seems to be replying
fading field

14 mins of me remaking the p3d to reproduce the error

Ok well not the arma 3 tools category isn't appearing here
that's a second problem now
stray relic
Or you could just link to your previous post where you asked for help and no one replied
fading field
'twas in another place that I can't find it now
Anyway, any reason why I'm getting this other problem now?
Arma tools is enabled, correct O2 path
 mint hare
maybe the original help request from Valky is here #arma3_model message
fading field
Okay - found a workaround for that
fading field
mint hare
maybe *the original help request from Valky is* here https://discord.com/channel...
I appreciate it, but ironically that's another error that I have since fixed
Ok I will go ask in modelling
full quarry
fading field
Anyway, any reason why I'm getting this other problem now?
You either have no Arma properties/lod types set so nothing gets written out, or you have errors that prevent working file to be exported.
fading field
I think I was talking about a different problem
 silver gull
http://wiki.polycount.com/wiki/Mip_Mapping disabling it seems like a daft idea (provided -1 is indeed disabling it)
wide shadow
I’d love to help but it’s getting a little confusing as to which error you’re referring to
if the toolbox is not appearing on the sidebar then it looks like blender isn’t loading the addon at all. Did you make sure to go into the preferences and enable it, not just install it?
 muted harness
hi, everyone. a member of the group i run arma missions with passed away in an accident very recently, and some of the mission makers are putting a memorial up for them in our training map. does anybody have/know where i can get the texture for the Art of War picture frame (Land_Photoframe_02_F) for me to retexture? thanks, and sorry if this is the wrong channel.
ah, no worries, i just finally found it (typical that i find it immediately after asking for help), if anyone else has the same sort of issue just navigate over to a3\props_f_aow\items\decorative\data\photoframe_02_us_co
wide shadow
my condolences
torn mesa
oh okay, yes i saw that -1 jump in video memory usage by alot so i had an idea that it's just disabling mipmapping and it's not a healthy thing to do
fading field
So.. is anyone able to tell me the basics of how to export from blender to a .p3d with textures
or do the textures have to be a seperate file I link to? Can I possibly export those from blender so the UV map is already set up?
keen terrace
fading field
or do the textures have to be a seperate file I link to? Can I possibly export t...
At a basic level:
- get an addon for exporting from blender, https://github.com/AlwarrenSidh/ArmAToolbox/tree/master or https://github.com/MrClock8163/Arma3ObjectBuilder are the two I'm aware of
- setup the model (LODs, unwrapping, validating geometry, etc)
- make the textures
- make an rvmat (if you want normal maps, ambient occlusion etc)
- assign the textures and rvmat to the faces (normally using a filepath), exactly how depends on the blender addon
- export

GitHub
Arma Toolbox for Blender. Contribute to AlwarrenSidh/ArmAToolbox development by creating an account on GitHub.
GitHub
Arma 3 toolkit for Blender. Contribute to MrClock8163/Arma3ObjectBuilder development by creating an account on GitHub.
 young patio
so regards to rvmats and textures i heard somewhere that normal maps need to have a channel inverted is that right?
something about the coords being off otherwise
inner ingot
Yeah your normals should be inverted. Here's an example comparison between them, the first being the arma inverted normals one

 young patio
inner ingot
Yeah your normals should be inverted. Here's an example comparison between them,...
young patio
inner ingot
Yeah your normals should be inverted. Here's an example comparison between them,...
just inverted overall or is it a specific channel?
inner ingot
I believe overall, up is down, down is up

 inner ingot
Not like a literal color inversion but green/purple, I dont know the right words for this. What are you using to generate the original normal map?
inner ingot
Oh, sorry, yes. Invert the green channel.
young patio
inner ingot
Oh, sorry, yes. Invert the green channel.
coolio
 tame warren
What's the best way to texture projectile (i.e. ammo) objects?
I'm looking through some of the TF47 launcher files and see custom models for the projectiles, but no texture or material files. Do projectiles work differently?
Ok now I see textures that are clearly meant for the projectile in the file for the launcher texture itself and am more confused
brittle rivet
Some of them have textures baked into the .rvmat and can't be changed without redoing the .p3d (or just .rvamt if you are lucky and there is hiddenMaterialSelection)
Sometimes textures for multiple objects are combined into one .paa file
tame warren
Ok so I guess the only question I actually have now is how do I bake the rvmat/texture into the model? I don't see anywhere in the config.cpp where they declare a path to the rvmat
Is that an export setting?
(using Blender)
brittle rivet
The .rvmat path is often baked into the model,
You can check with mikero's Eliteness tool, that allows you to examine the attributes of the .p3d
brittle rivet
tame warren
(using Blender)
Blender, depends on which arma addon you are using
With object builder addon, iirc it was just set the rvmat in the right field when exporting
I'll check what I did for the one I had that worked
In the material settings, there's a tab called "Object Builder: Material Properties"
You can set the material in there
Don't know what the equivalent for arma toolbox is, probably something similar
tame warren
Aight, thanks, I'll see what I can figure out
full quarry
tame warren
Aight, thanks, I'll see what I can figure out
The texture and material are assigned on the model itself. Not in config
In some cases you can define alternative textures via config.
tame warren
full quarry
The texture and material are assigned on the model itself. Not in config
Trying to figure out how to assign it to the model with Blender though
 modern pond
I made a custom insignia. It's in the game, but when I use it on a uniform, it's massive. I scaled it down to 64x64, and it was still massive, the same size just shittier resolution
I want to make the insignia smaller, WW2 division patches were about an inch and a half wide, how do I do that?
full quarry
modern pond
I want to make the insignia smaller, WW2 division patches were about an inch and...
Leave empty space around the insignia
 proper palm
Do somebody knows INTRACT?
It was a software that allows you to scan someone's face and then Create a face that you can import to arma.
If so, is it still alive or is there any other softwares that allow you to do so
full quarry
proper palm
Do somebody knows INTRACT?
It was a software that allows you to scan someone's f...
if you put that on google stuff might come up
such a thing can be done with just photoshopping too
 grim kraken
Is there already a "default" uniform TI map, like for a cloth uniform?
And if so, does anyone know the path?
nocturne lake
why would there be a default one when every uniform has different UVs?
the TI map isn't just flat single colour, so wont be universal across different models
 north pawn
Does anyone know where to find the western sahara texture files? I bought the DLC and im really impressed with the sand texture and wanted to see how they did it. Any help would be great thanks!
(im new to making textures and am very interested in map making)
inner ingot
CDLC data is stored in encrypted PBOs called EBOs, there is not way to get those textures
north pawn
they encrypt the textures? hmm
thats a shame. Do you know where they are located anyway?
Found a thing called PBO viewer. Would that let you look at the texture?
grim kraken
nocturne lake
why would there be a default one when every uniform has different UVs?
I mean, you can basically flat color the cloth and it'll be Good Enough For Government Work. Was wondering if there was an existing one for that like there is for vehicles
nocturne lake
The ones I did for basically all the RHS uniforms, vests etc. were IIRC a case of taking the normal map and using it to generate a diffuse overlay/curvature/cavity type texture in xNormal, Quixel or Substance, and scaling it down to create a base. Then applying the normal map again on top of it in grayscale, blurring it and manipulating it with various levels, opacity and blends to get stronger edge highlights. Your TI map generally doesn't want to be full resolution with your other textures - low texture size for it is more efficient and I think enhances the visual effect of thermal imaging fuzziness
brittle rivet
north pawn
Does anyone know where to find the western sahara texture files? I bought the DL...
This might help,
https://www.reddit.com/r/arma/comments/10oasot/comment/j6eecl3/
The basics of it is you have to use the config browser to check all the files and find the texture path
And then use stuff within the game to display the texture
There is also the Aegis sharealike repository, they might have retextures that you can reference
full quarry
north pawn
Found a thing called PBO viewer. Would that let you look at the texture?
youll have to ask in their discord if they want to share
north pawn
brittle rivet
This might help,
<https://www.reddit.com/r/arma/comments/10oasot/comment/j6eecl...
ill take a look at it thanks man
 winter sierra
If I wanted to make a retexture mod for one of the vanilla helmets but its pretty low resolution, how difficult of a task is it to increase the resolution of the object's texture?
full quarry
winter sierra
If I wanted to make a retexture mod for one of the vanilla helmets but its prett...
well scaling it up does not really increase details that dont exist
winter sierra
well yes I'd be remaking the texture from scratch
I have a real HGU-56 for reference
full quarry
you cant paint it in 3d though
winter sierra
but the years have not been kind to this texture imo
 winter sierra
full quarry
you cant paint it in 3d though
winter sierra
full quarry
you cant paint it in 3d though
I'm aware, I have experience making custom textures for helmets/vehicles
I've just never tried to increase the resolution
don't know if its as simple as just doubling the canvas size or not
full quarry
thats basically it yes
winter sierra
alright, coolio
full quarry
you can run sharp filters and stuff like that to try to make the vanilla ones bit crispier too
as a base
winter sierra
thank you for the help 😄
nocturne lake
can try an ai upscaler
wooden lantern
nocturne lake
The ones I did for basically all the RHS uniforms, vests etc. were IIRC a case o...
X normal is ancient tech lol never thought of trying that
severe rune
inner ingot
CDLC data is stored in encrypted PBOs called EBOs, there is not way to get thos...
You can ask the CDLC authors for the textures.
You don't have to just take everything without asking. There are other options to
lethal condor
Especially, we're (I mean Lexx is) really good to throw some PAAs
 fathom bloom
hey texture people i need help with either seeing if this is code or my textures fucked somehow.

 full quarry
fathom bloom
hey texture people i need help with either seeing if this is code or my textures...
full quarry
fathom bloom
hey texture people i need help with either seeing if this is code or my textures...
unless this is Disney approved star wars content we dont allow that here.
winter sierra
Been fiddling with ground decals and rvmats to try and make an areas that look like lava fields
 winter sierra
Is it possible to make a decal with an animated texture?
full quarry
winter sierra
Is it possible to make a decal with an *animated* texture?
yes UVanimations should work
if the decal itself is set on house simulation at least
winter sierra
I do not know what that means but since I know its possible I will do more research
full quarry
winter sierra
I do not know what that means but since I know its possible I will do more resea...
what kind of animation are you looking for ?
winter sierra
Easier to show you than explain, something similar to the ground here

Some flickering, some slowly growing and contracting
full quarry
that may not be possible
flickering and stuff like that might need to be done via texture swap
as uvanimation scrolls smoothly forward
it cant be made to skip forward to produce frame effect
unfortunately
winter sierra
Ah I see
Well at least if it scrolls it'd be theoretically possible to make a flowing animation, right?
full quarry
yes
winter sierra
 thank you
full quarry
incremental uv animations 🙏 Santa at BI how about it? 🎅 
short salmon
I know this is going to be something super simple and dumb thing i haven't thought about when doing this. But can anyone explain to me why on earth i cannot reference a already existing image file in my drone model for the rotor blur? Path is assigned, texture is applied to the parts. I can see the game applies it based on the image, it just doesn't have any transparency.


it works unbinarized, so i assume something is going wrong during that process
full quarry
short salmon
I know this is going to be something super simple and dumb thing i haven't thoug...
what do you pack the pbo with?
short salmon
addon builder
 full quarry
looks like none of your textures show up
could be OB is not set up right
the path to textures in the settings needs to be P:\
so it treats P:\ as the virtual root of the game engines file system
P:\path\to\texture then becomes path\to\textures in buldozer
and matches what you put into the model
short salmon
full quarry
could be OB is not set up right
Yea... i tried to fix that but now i can't even launch buldozer i just get this error

i set this up ages ago but never really needed it
this has me stomped now xD
full quarry
this may go deeper into how P drive is set up im afraid
short salmon
no worries i got that fixed now xD
full quarry
👍
short salmon
full quarry
the path to textures in the settings needs to be P:\
okay, so just i understand this right, you mean in OB you want this set to P, right?
 full quarry
yes
that way when you put in correct kind of path without P:\ in it on a model or rvmat buldozer reads it right
if it is on P drive
short salmon
I could not make it load buldozer from the P drive. I had to point it at the regular A3 exe, is that a problem?
full quarry
no arma exe works better
buldozer exe is basically a copy of arma exe at the time of populating P drive with the arma files
short salmon
full quarry
that way when you put in correct kind of path without P:\ in it on a model or rv...
does my project need to be in the P drive too for this to work?
full quarry
yes
in this setup and how the tools are designed, P drive represents the games file system
short salmon
full quarry
in this setup and how the tools are designed, P drive represents the games file ...
aye i get that part, but not quite why my project also needs to be under the P to work. But thats fine. Can i just put it in the root or do i need to create a sub dir?
 full quarry
Buldozer reads P drive as it were the games files
and interprets the paths
it does not know files outside of P drive basically
when P:\ is set as the path to textures
technically sure you can set it up to read from anyhwere but its not really worth going into
short salmon
full quarry
when P:\ is set as the path to textures
yea, so it always thinks it needs to read P:\ first and then whatever path to the texture. So if i have a path in the model that says (see img) then it needs to be under "P:\GX_DRONES\Data\Textures\GX_Drone40\Base_co.paa" in the drive

ignore the spelling mistake

so it loads the model and it messes up the texture for whatever reason but at least its reacting to the path
so i guess thats good

it does however still make squares
I can open the texture in OB now through the path, so thats a step in the right direction
short salmon
I think I will call it a night here. Thanks for your help @full quarry . If you could answer me one last thing when you get a chance. What effect does having the P drive setup have on the Addon Builder? Like I said before it seems to work when I don’t binarize, so it must be something in that process that messes it up, even though it’s just a file path
full quarry
when you build from P drive you basically should have same file structure going into the pbo as you have in configs etc
if you build from random folders inside more folders the paths might get messed up
short salmon
full quarry
if you build from random folders inside more folders the paths might get messed ...
yea i get that, but if the path is defined in the model like this then there isn't really a whole lot of wiggle room? It is the correct path, its applying the texture, it just isn't transparent like it should be.
 full quarry
If your project is not on P drive binarizing might not find the texture and can't write the P3d surface as transparent.
Idk much about building mods outside of P Drive
floral fiber
Transparent textures from base game don't work outside of p drive yes
short salmon
full quarry
If your project is not on P drive binarizing might not find the texture and can'...
I see, so there is data that is written into the p3d about a textures transparency during the binarization process? My logic was that its simply a path and if that image at the end of the path happens to be transparent then that is what is displayed in game. But if information about the surface is somehow stored with the p3d during binarization then that would make sense.
full quarry
short salmon
I see, so there is data that is written into the p3d about a textures transparen...
Yes stuff like that happens during binarization
short salmon
full quarry
Yes stuff like that happens during binarization
Thanks again for the advice
full quarry
👍
young patio
anybody got any good spexp settings for substance painter for arma 3?
ive got my own preset im using which is now not working the same thing can be said about the preset i downloaded off of github A3 Scouts
 lucid halo
Is there a plugin for Photoshop to change from BW to RGB for SMDI? I don't have substance painter and using free textures and would like to make my metallics look right.
nocturne lake
BW to RGB? I assume you mean for isolating the spec map you have in to a green channel that's not present in the grayscale image? Image->Mode->RGB Color in Photoshop will format a grayscale image to RGB. All channels will have the same colour information by default when going from grayscale though, so you then edit in R, G and B separately, or apply blend modes to it as a layer, so it's only in one channel.
wooden lantern
young patio
ive got my own preset im using which is now not working the same thing can be sa...
what’s not working about it?
young patio
wooden lantern
what’s not working about it?
i think i broke your preset
so now whenever i export my shadows are fudged
this is a backpack im working on as it is in bulldozer looks fine right?
well yeah but thats because my bulldozer doesnt have the proper ALTIS lighting setup

standby im booting up arma now to get a screen
full quarry
young patio
this is a backpack im working on as it is in bulldozer looks fine right?
well ...
theres a pinned message about the lighting
young patio
the shadows are borked

 young patio
full quarry
theres a pinned message about the lighting
young patio
full quarry
theres a pinned message about the lighting
that the torrent link?
i was going to ping you about that im getting an "this no longer exists error" big sad
so yeah when my character is with their back to the sun super bright but away from it super dark
young patio
wilco standby
my rvmat:
ambient[] = {1,1,1,1};
diffuse[] = {1,1,1,1};
forcedDiffuse[] = {0,0,0,0};
emmisive[] = {0,0,0,0};
specular[] = {0.0625,0.0625,0.0625,1}; // Modify these to increase/decrease the overall shine
specularPower = 100; // Modify this to increase/decrease the precision of the shine
PixelShaderID = "Super";
VertexShaderID = "Super";
class Stage1
{
    texture = "PodWIP\Backpack\BackpackTextures\BR\BRColour1_nohq.paa";
    uvSource = "tex";
    class uvTransform
    {
        aside[] = {1,0,0};
        up[] = {0,1,0};
        dir[] = {0,0,0};
        pos[] = {0,0,0};
    };
};
class Stage2
{
    texture = "#(argb,8,8,3)color(0.5,0.5,0.5,1,DT)";
    uvSource = "tex";
    class uvTransform
    {
        aside[] = {0,9,0};
        up[] = {4.5,0,0};
        dir[] = {0,0,0};
        pos[] = {0,0,0};
    };
};
class Stage3
{
    texture = "";
    uvSource = "tex1";
    class uvTransform
    {
        aside[] = {1,0,0};
        up[] = {0,1,0};
        dir[] = {0,0,0};
        pos[] = {0,0,0};
    };
};
class Stage4
{


    texture = "PodWIP\Backpack\BackpackTextures\BR\BRColour1_as.paa";
    uvSource = "tex1";
    class uvTransform
    {
        aside[] = {1,0,0};
        up[] = {0,1,0};
        dir[] = {0,0,0};
        pos[] = {0,0,0};
    };
};
class Stage5
{
    texture = "PodWIP\Backpack\BackpackTextures\BR\BRColour1_smdi.paa";
    uvSource = "tex";
    class uvTransform
    {
        aside[] = {1,0,0};
        up[] = {0,1,0};
        dir[] = {0,0,0};
        pos[] = {0,0,0};
    };
};
class Stage6
{
    texture = "#(ai,16,2,2)fresnel(0.2,3.87)";
    uvSource = "tex1";
    class uvTransform
    {
        aside[] = {1,0,0};
        up[] = {0,1,0};
        dir[] = {0,0,1};
        pos[] = {0,0,0};
    };
};
class Stage7
{
    texture = "a3\data_f\env_land_co.paa";
    uvSource = "tex";
    class uvTransform
    {
        aside[] = {1,0,0};
        up[] = {0,1,0};
        dir[] = {0,0,0};
        pos[] = {0,0,0};
    };
};


I know i could condense the textures down into like 4 files by putting it all on 1 map but eh
probably could of done it with UDIM titles too but again eh
at this point i just want to get it working
wooden lantern
bro u don’t need to screenshot all that 😭
anyways yeah so it just appears you made a really shiny texture, im kinda missing on what’s broken
full quarry
young patio
that the torrent link?
 young patio
full quarry
young patio
full quarry
yeah cant get it to DL

not for lack of trying either also noob at torrenting never done it before
full quarry
eh?
young patio
i dumped the torrent link into the little + area and then tried to get it to download but couldnt get it to wokr
*work
young patio
 young patio
i think your right on that one because its stuck in an inifinite loop of searching
full quarry
now where did I posted the original
young patio
wooden lantern
bro u don’t need to screenshot all that 😭
anyways yeah so it just appears you ...
what about the shader settings or whatever?
young patio
full quarry
now where did I posted the original
goat trying to remember a post from 2 years back like

 young patio
full quarry
young patio
full quarry
ayyyy i got it
full quarry
although that may need to be combined with latest config.cpp in P:\bin since new stuff been added in later A3 updates
young patio
yeah thats fine cheers for that tho
full quarry
the lighting injections are still the same though
young patio
annoys me because bulldozer everything looks great like its working giving me false hope then i load into the game and im just met with disappointment
this way at least i dont have to keep hopping back on and off A3 to check my textures
@wooden lantern you mentioned i made mega shiny model? if i made it matte would that fix it at all you think?
wooden lantern
not model, texture
and no i still don’t understand what ur full issue is
bc ur saying something about a shadow, and unless the SMDI is really fucked which it doesn’t appear to be, the shadow shouldn’t be affected
young patio
full quarry
🤔 <@815180273398448138> you mean shading is not smooth?
well yes you can see that in the image as theirs obvious squares on the ico sphere 
but wait one ill do one better
full quarry
that is shading
not shadows
and it means you have either messed up the normalmap or you have set the edges all sharp
young patio
full quarry
and it means you have either messed up the normalmap or you have set the edges a...
no sharps on the model (this is after i removed all the seams)

with seams
 full quarry
young patio
no sharps on the model (this is after i removed all the seams)
full quarry
young patio
no sharps on the model (this is after i removed all the seams)
seam is not same as sharp
seam is for uvmap
is it autosmoothed?
young patio
yeah i know but im showing you that there is 0 sharps on the model as theyd come up like a cyan blue
uhhhhh wait one
young patio
I just noticed now there was a Custom split normals applied to it so that might be it maybe
full quarry
Alwarrens exports smooths and sharps 1:1 at least
I dont personally have had to use split normals ever
could be part of different workflow
young patio
no i dont either but ive noticed it gets applied after using some modifiers
so i often have to go back and turn it off
full quarry
could be some addon you run doing that too I suppose
young patio
most likely ive got a few
young patio
full quarry
Alwarrens exports smooths and sharps 1:1 at least
wasnt aware there was a different A3 toolbox out there 
full quarry
Alwarrens is the original
Clock Remade his similar to it and added stuff on top
but Im fairly sure you should be able to export the p3d right with it
young patio
so like the difference between a petrol car and diesel car they both basically do the same thing but with some diffferences
young patio
full quarry
but Im fairly sure you should be able to export the p3d right with it
ive had no issues up until now knowing me its probably something minor ive missed thats fucking me over
young patio
wooden lantern
and no i still don’t understand what ur full issue is
@full quarry here you go this is what my issue is
wooden lantern
check clocko’s github wiki
it has a set of troubleshooting for normals
that’s most definitely not a texture issue tbh
young patio
So by default theres already like a "darkness" overcasting on the textures to get it to look like it does in substance i need to turn around and put it in direct sunlight when i do the cable which is furthest away still gets darkness
young patio
wooden lantern
that’s most definitely not a texture issue tbh
in a way kinda relieved as textures are the bane of my existence 
but also concerned as this is a new one
young patio
wooden lantern
check clocko’s github wiki
you got a link for that by any chance as google doesnt know what im looking for
brittle rivet
young patio
you got a link for that by any chance as google doesnt know what im looking for
Here
https://mrcmodding.gitbook.io/arma-3-object-builder
I was using it a bit ago
young patio
brittle rivet
Here
<https://mrcmodding.gitbook.io/arma-3-object-builder>
I was using it a bit ...
 young patio
@full quarry @wooden lantern managed to get it working now turns out condensing the 36 textures into 4 was the trick
young patio
full quarry
😅
yeah thats on me i was being messy but i took my time carved it up into a nice colour assigned ID map.
Then made it into one.
full quarry
👍
wooden lantern
young patio
<@150949769953411072> <@946499892531069018> managed to get it working now turns ...
...
i see
 jade briar
I need some help with the arma 3 substance painter export preset by mooniefr
 umbral gyro
I'm very confused as to why the nohq texture is showing when I try to set the texture

Should look like this :(

And funnily enough this is just a color shifted texture of another of mine which works perfectly fine

Has someone encountered this before? Cause google is very much not helping
inner ingot
umbral gyro
I'm very confused as to why the nohq texture is showing when I try to set the te...
Dont think that's the nohq, I think that's just the blue variant. Are you setting the texture in 3den, then when you load it's not the correct skin anymore? If so, it is could be that when the mission is started, the vehicle's init makes it randomize the livery.
full quarry
umbral gyro
I'm very confused as to why the nohq texture is showing when I try to set the te...
Not nohq. Just blue default texture is my guess
Ah what bromine there said.
umbral gyro
Hmm, restarted my game just to see if it would do something and indeed it fixed it, so I'd guess a caching issue
 silent gull
very very strange question
I have a p3d in my mission file and I want to set the texture on the surfaces to a paa thats also in my mission file
I've tried "MissionName.Altis\images\texture.paa", "mpmissions\MissionName.Altis\images\texture.paa" and "images\textures.paa" and a few others i can't remember but nothing works
Anyone know if this is even possible? I haven't been able to find any documentation on it
full quarry
silent gull
very very strange question
I have a p3d in my mission file and I want to set the...
do you assign the texture on the p3d itself?
or how do you try to add it?
inner ingot
silent gull
very very strange question
I have a p3d in my mission file and I want to set the...
p3d in your mission file as in you are putting a .p3d into the mission directory? Or you mean you have an object in the editor you're trying to texture?
silent gull
inner ingot
p3d in your mission file as in you are putting a .p3d into the mission directory...
p3d file in my multiplayer mission pbo
then spawned into the game using
createSimpleObject [getMissionPath "models\custommodel.p3d", getPosATL player, false];
texture is setup in object builder like this, but doesn't seem to work

just throws a missing texture popup
silent gull
full quarry
do you assign the texture on the p3d itself?
@full quarry ^^
inner ingot
What is your mission folder's name? Is it literally missionname.altis?
silent gull
full quarry
mission folder is treated as root
Thats what I thought but missionname.altis has the images folder which contains the paa
and "\images\texture.paa" doesn't work
but that same path works fine for setObjectTexture on vehicles
fathom bloom
is there any good place where ic an find 2d versions of futuristic magazines for guns?
full quarry
fathom bloom
is there any good place where ic an find 2d versions of futuristic magazines fo...
google is the simplest starting point
linedrawing is what you might want to see
 warm quartz
what app can i use the best for retexturing
full quarry
warm quartz
what app can i use the best for retexturing
ms paint, gimp, photoshop etc image editor works
whichever you can use or want to learn
warm quartz
bc i wanna learn how to overlay with another camo but it is verry difficult to watch a video and do it
but another problem is that i can not find any good tutorial
full quarry
warm quartz
bc i wanna learn how to overlay with another camo but it is verry difficult to w...
no program is really better at that than other
it depends widely on the model and how its unwrapped to form the texture
 feral grove
quiet in here. i'm porting A2 assets to A3 for CUP. I'm working through all the LHD based assets and vehicles. I've just ported the Towing Tractor (we will have fully functioning towing on the LHD). Anyone fancy redoing the textures for this?
Lots of reference shots here http://www.tankograd.com/html/img/pool/MO-Aircraft-Carrier Tractor.pdf
 warm radish

anyone have any idea what would cause shaders to appear all black and can help? have tried multiple different rvmats and still no luck. maybe i am doing something wrong with them?
 distant rose
most favourite a2 vehicle ever, totally under-utilised
lethal condor
What if you have default RVMAT?
full quarry
model vertex normals might be messed up
lethal condor
But will it make it pitchblack? I doubt
distant rose
you going to rig it with ropes for towing @feral grove ?
warm radish
even with default it seems to be all black
lethal condor
Your texture path (name), resolution?
warm radish
I've been packing it as a mod with the correct file pathing + all textures are in 2^2
feral grove
Well atm its compatible with Leshrack's Towing mod, so if he implements ropes or tow bars then yes 😃
lethal condor
I asked about specifications not your summary. What exactly is the name, what res
distant rose
nice that would be an awesome addition
warm radish
2048x2048 and theres a few in 1024x1024. and you want the exact path to the texture, correct?
distant rose
I would volunteer but im shit at uvmaps 😃
feral grove
Would the UVs need redoing? This is same model, with same UVs, just needs a better res texture
I guess it actually looks ok, but would be a quick win for anyone messing around with some of the quixel stuff
lethal condor
Yes. And name
silver gull
you need a proper normalmap to get the best out of quixel. And i doubt this one has one
 calm tangle
Is there any reason we can't change de texture of the buttons of the US parade uniform ? We can change the texture of the button of CSAT, AAF, LDF parade uniform but no the US one. Is it intended or do i need to update original texture ?
lethal condor
Model issue
calm tangle
hmmm i see
 livid turret
Hello folks, is there any way to change building textures in configs?
mint hare
i mean, if VR blocks inherit from "House_F" and can be retextured from 3DEN or even running game...
so the answer is "If the building model is configured for that", i'd say
trail sequoia
livid turret
Hello folks, is there any way to change building textures in configs?
There needs to be hidden selections defined for retexturing objects which is rare for buildings
distant rose
yeash
and I only have quixel for ~2 months, much better people around to do this than me
@gritty pasture wanna try out your skills on a non-2017 object?
 silver adder
quiet in here
Working on stuff for future modded assets in Squad, and ACE3 at the same time...........
Would the UVs need redoing
You shouldnt have too redo the UV map, but ^^^^ yep, a highpoly would be needed so that you can create a normal and curvature for the texture tools we all use now
 winged sandal
I have created a texture to use on a tank but where the hell am I supposed to place it? In the arma 3 installation folder? Haha, going nuts over this
full quarry
winged sandal
I have created a texture to use on a tank but where the hell am I supposed to pl...
what tank?
and how do you intend to use it?
winged sandal
full quarry
what tank?
It's the Tiger tank from Spearhead DLC.
Haha, that's a really good question.. the goal is to have it as an option when choosing "camo"..
I really have no idea what I'm doing truth to be told...
full quarry
so what you are doing is a retexture mod.
and preferably you would set up the arma tools And P drive development environment where you then build your mod project folder
there you make your mods config.cpp file where you configure the necessary stuff
and also thats where the new texture goes
and then you pack that folder up into a pbo
silver adder
Also, i thought it was a nice 1 day project. so i have taken the task to make a new texture for the towing tractor
part way through, i though this would be a good project for a tutorial about upgrading a A2 asset to an A3 asset, wish i thought of that at the start
silver adder
almost finished the highpoly, i deleted a few bits that did not make sense and replaced them with highpoly detail refernced from images and diecast models
like the old A2 model had some sort of clipboard holder in the driver area, i got rid of that because it was ugly
so that will have to be removed form the P3D as it wont properly exist on the new textures
silver adder
no, same UV, the bits of the model i have removed will just be unused space
feral grove
yep
 mint root
So I've had an issue in the past where decals on a CA .paa appear to glow in the dark during night time ingame. I was able to fix this by setting the texture to 99% opacity.
I'm having a related issue, where the decals are not being affected by object shadows. Anyone know a fix for this? I've tried tweaking values in the rvmat by referencing vanilla ones but haven't been able to find any that work

 distant dawn
what part of the rvmat (i assume it's rvmat) causes these to become way too dark? how can i fix this?

when under shadow they become too dark to read anyhing
 silver adder
be better to create a new model from scratch after all that lol
 ancient smelt
So, like a fly-by-night Life server asset? 😉
feral grove
Lol
silver gull
@silver adder iirc the normalmaps and stuff where mostly handpainted back then... No baking. And photoshopped stuff from real photographs. It may also be an asset from ArmA (1) ? who knows... and that was directly after OFP.
are BI AAA studio now? They certainly wheren't back then i feel 😉
 pale bough
can anyone help me with rvmat stuff? want to make an rvmat for an illuminated sight reticle
lethal condor
What is your goal and what exactly is the question
feral grove
I'm no modeller unfortunately 😦 just porting existing assets.
 sudden ferry
any chance anyone has a template cut out for the hatchback? i can't seem to find em anywhere, all the links are dead
figured i'd ask here before i start clipping it out myself
brittle rivet
sudden ferry
any chance anyone has a template cut out for the hatchback? i can't seem to find...
Try these, should have what you need
https://forums.bohemia.net/forums/topic/173313-nevboxs-texture-resources/
sudden ferry
brittle rivet
Try these, should have what you need
<https://forums.bohemia.net/forums/topic/17...
i checked there but all the download links are dead sadly
brittle rivet
Don't where to find templates then
If you do decide to clip it out yourself, using the other textures to find the edges can help
 viscid terrace
is anyone good with arma graphics
full quarry
viscid terrace
is anyone good with arma graphics
Is it related to your distance view issues you mentioned elsewhere ?
 stoic kite
hey there,
Does it possible to remove a multicam texture so i can retexture it to a one color?
brittle rivet
Probably, but depends on the item you want to retexture
There are pretty good templates for most or all of the vanilla gear
https://forums.bohemia.net/forums/topic/185433-petes-texture-templates/ and links on that page
rancid obsidian
Hi can someone tell me the "ctrg balaclava" hidden selection?
The one with goggles
 vernal sage
Use camo1 for the balaclava texture (defaults to using a3\characters_f_exp\blufor\data\g_balaclava_ti_tna_f_co.paa).
Use camo2 for the goggles' texture only (defaults to using a3\characters_f\heads\glasses\data\g_combat_ca.paa).
rancid obsidian
vernal sage
Use `camo1` for the balaclava texture (defaults to using **a3\characters_f_exp\b...
Thanks just wanted the goggles hidden selection
Also I can't find the Csat red beret texture
full quarry
if you read the config classes for the items you can find the paths if they use hiddenselections
 indigo epoch
Hey, I'm working on adding in some custom faces and I'm running into an issue where the texture appears off on the face itself. I only have the Placeholder_CO.paa, so no SMDI/NOHQ etc. What else could be the issue?
lethal condor
What exactly do you mean? Screenshot?
indigo epoch
lethal condor
What exactly do you mean? Screenshot?
I'll dm
lethal condor
https://cdn.discordapp.com/attachments/1325305864847884338/1325305891519594517/millerreplika.png?ex=677b4ecb&is=6779fd4b&hm=a8c04c088cfed631a0bf32fdde7cbe3d5bdce8f5c2ca340d09b809952fa4ca3e&
https://cdn.discordapp.com/attachments/1325305864847884338/1325305890974470219/ArmA_3_Screenshot_2025.01.05_-_01.44.24.90.png?ex=677b4ecb&is=6779fd4b&hm=50b578a6443b9a754598264b3b927595d3bc77bcbc6b33bffa98ef5aa80e36e3&


What config you have
indigo epoch
I don't have the config used in the screenshot, he said it was based off of what is in the character_f section of arma
lethal condor
Then you're terribly done something wrong
It is simply, that't not how a modding in Arma 3 works
indigo epoch
It references the class of the existing head in game?
lethal condor
What is it you say
indigo epoch
The custom head class references the corresponding head class in the characters_f config trying to apply the retexture
lethal condor
Okay that is a summary not a details. Please share details, what exactly you've done
So, you say you don't have a config but apparently you do?
indigo epoch
Because I don't have it, I'm helping someone get this into a mod and I just typed this out
lethal condor
Whoever wrote it doesn't matter. So you have a config that is packed into a PBO?
indigo epoch
I was working with Scarecrow on it, apparently he was working on it earlier in Arma3_config
I don't have the config he made, I was really just looking for any ideas on what the problem could be
lethal condor
Then let him ask it
indigo epoch
Okay, my apologies
hallow jay
Uhm, I have a bit of a situation:
At this point I have 8 different variations of a vehicle, each with 6 resolution LODs.
I have now ~~realised ~~ decided that it might be a good idea to create more camouflage variants for them, for variety´s sake.
The problem is, I have absolutely no hiddenselections done for this on any of the models, meaning I would like have to assign the vertex groups manually for every single LOD of every single vehicle.
How much have I screwed myself over? Is there anything I can do to make it less painful?
full quarry
you can select by material
Im guessin you have done stuff in OB that is not in your source files
 full quarry
yes that would be prefrable
the export toolbox might also have tool to create hiddenselection groups,
by material
hallow jay
I´ll take a look hopefully there is something there
I am guessing next time I need to set up the hidden selections way earlier in the entire process
full quarry
hallow jay
I am guessing next time I need to set up the hidden selections way earlier in th...
preferably
stray relic
hallow jay
I am guessing next time I need to set up the hidden selections way earlier in th...
hiddenSelections are always by texture and/or material so it's simple to go into Object Builder, select one and assign a camo name. Or do it in Blender and reexport. For 8 vehicles and 6 LOD's, with 3 camo selections, might take 30 minutes perhaps.
hallow jay
Ah sorry I have never done this before, let me double check that I am about to do it correctly:
- Assign the vertex groups in Blender based on material (texture sets), say camo1, camo2, camo3.
- In the model.cfg add the camo selections into the "sections".
- In the vehicle config define the camo selections in hiddenSelections[] = {"camo1","camo2","camo3"}; and in hiddenSelectionsTextures[] = {} link the "default" texture.
- In vehicle config add TextureSources with all the additional camouflages.
Is there anything else? 
stray relic
hallow jay
Ah sorry I have never done this before, let me double check that I am about to d...
That sounds good.
Be careful not to assign camo selections to any PiP (or other "special" faces like clan or spz) or proxies.
You might also want to add an eventhandler to initialise the randomisation/VhC textures
hallow jay
Yep it works, thanks a lot for helping
 upbeat jacinth


 full quarry
Models are not usually available for editing
so lets start from are you supposed to edit it
so no comment on if you have legit mod in the works there? 
hallow jay
full quarry
so no comment on if you have legit mod in the works there? <:blobcatsweats:72834...
You can tell the models were imported into blender from a p3d due to the blender materials all being white and having "Use nodes" unticked.
My guess is he wants to add a headset from one P3D onto the helmet which came from a different P3D, since if he modelled it himself the headset wouldn't be clipping into the helmet all over the place.
keen terrace
Messing around with multi materials and I have a few questions assuming a house sized building (~8m x 8m x 8m)
- Mask resolution 2k/1k?
- Is it better to make the detail textures myself or just use the ones in the game files
- How does the blending of the macro/_mc texture work, by the sound of it 50% grey should do nothing with other colours tinting the detail texture diffuse colours?
- Is there a good way to replicate the blending using blender? I've got the mask showing the detail in the right places using mix shader nodes, but not sure how best to mix in the macro texture colour
