#arma3_texture
1 messages · Page 6 of 1
 floral fiber
i assume thats just set in the uvtransform too?
 floral fiber
i have no idea what superext means
 severe rune
Its a pixelshader
floral fiber
o
floral fiber
i dont know what i use i just macro siege's stuff
severe rune
I have an example I just can't find it in my mess
floral fiber
is this just a case of shoving emissive[] into the transforms?
severe rune
PixelShaderID = "SuperExt"; in the rvmat. And Stage8 has the emissive texture
floral fiber
oh so you would just use superext and the emissive texture to do it?
severe rune
well the stages
you'll need to use texGen because there isn't enough space for all the transforms
Have fun bye 🏃♂️
floral fiber
someone else probably knows what that means
severe rune
It's been 5 years since i made that thing and you expect me to still remember all the stuff
 cedar lichen
I just figured it out
https://drive.google.com/file/d/1GcQ6GYuvG1MBHluod4Ey_SX20V4uryom/view if you compare this rvmat with the one ded linked you can see the difference
Google Docs
@severe rune did you ever get it binarising/working ingame back then you said it was causing crashes
cedar lichen
nvm I got it working
cedar lichen
unfortunately doesn't work the way I was hoping - its visible during the day too
so its fine for things that appear the same day or night but like radium paint etc where its white during the day and greenish/teal at night it no good, have to do it the usual way
severe rune
Yeah as I tried to write above, its always emissive. No matter what time or if nightvision
severe rune
cedar lichen
<@90532520101183488> did you ever get it binarising/working ingame back then you...
I think Mikero didn't support it back then, but he fixed it up. I don't remember other issues
 silver adder
well then you will have to do it manually in photoshop, all i did is automate the process i was doing by hand previously............finish a guide to it when i have time, but it is not that hard, you invert the green channel of the normal (like usual), apply a pink gradiant to the occlusion, take the new blank texture, paste the specular into the 'G' channel, paste the gloss in tho the 'B' channel, probably invert the gloss, and mess with the levels of each channel, then you have a smdi
floral fiber
Yeah emissive you just fix with texture being black, no?
Sure it'd still glow in pitch black
but like
its glowing black
in the pitch black
would be nice to get some sort of way of changing properties like that based on ti/nv given not everything has the same colours etc under nv but probably too much effort for such a minor feature in this stage in dev
severe rune
But the RGB values specify the glow power. If you make it zero(black), it didn't glow
I think effort isn't too much. But I don't like the performance cost of checking for that when basically nothing used it
floral fiber
emissive = {7,7,7,7}; is what i saw
floral fiber
severe rune
I think effort isn't too much. But I don't like the performance cost of checking...
add it to base game uniforms? 🙈
realistically flag patches on nato etc would be ir
severe rune
rendering no work like that
floral fiber
🤷 thats what rvmat from image i sent you the other day used so
 cyan solar
Is there any decent tutorial on how to use substance painter to build textures for arma?
 lethal condor
Probably you want to check the pinned
 hallow jay
Has anyone managed to create a decent looking stainless steel rvmat? No matter how I try, it always ends up looking like some sort of a painted monochrome metal 
lethal condor
You want to post the picture if you want a criticism with your work
hallow jay
Once I stumble out of bed 
cyan solar
lethal condor
Probably you want to check the pinned
I've seen that, but how do I get substance painter to stop exporting separate files for every individual texture section? Will that plugin do that?
lethal condor
I'm not a Substance Painter user
cyan solar
Ah fair enough
lethal condor
And it sounds like a question that Google knows
cyan solar
Google hasn't helped in a way I can figure it out 😢 . But I will chug on. Appreciate it!
 hallow jay
cyan solar
I've seen that, but how do I get substance painter to stop exporting separate fi...
hallow jay
cyan solar
I've seen that, but how do I get substance painter to stop exporting separate fi...
What exactly is a texture section? Do you have multiple materials on your mesh when you export the fbx?
SP will by default separate all the materials from Blender into separate texture sets. If you delete all the materials assigned in Blender, then SP will only create 1 texture set for your whole mesh
lethal condor
hallow jay
Do you have a good example what is the goal aka real-life counterpart picture?
hallow jay
lethal condor
Do you have a good example what is the goal aka real-life counterpart picture?
That´s off a PBR shader in SP though

I was unable to replicate it once I switched my SP into non PBR
lethal condor
Oh, so it should have more roughness so it should reflect less?
hallow jay
Yeah I think so. I have tried increasing SpecularPower, but the results are kinda mixed
I mean, the main issue is Arma doesnt know what Metallic is
lethal condor
https://community.bistudio.com/wiki/HQ_Normal_Maps#Optimized_specular_map_onto_bit_depth
Besides how poor Arma 3's shader, I think you want to edit your smdi
hallow jay
Ah okay, that´s something new, I´ll take a look, thanks!
But yeah, I understand Arma´s limitations
lethal condor
What is your rvmat you have so far BTW?
hallow jay
lethal condor
Looks fine enough. This covers both stainless (tip) part and the body?
hallow jay
Just the tip, I have a different one for the body
I assume a different surface should have a different rvmat
lethal condor
Oh well. Yeah having different rvmat should work for sure. Would be a bit work for the GPU, though
hallow jay
Hmm yeah. I guess it depends of what kind of material it is. Stuff like Glass / Wood etc definitely need separate ones, but metals perhaps dont
lethal condor
Not my model but rvmat. The wooden part shares a bit of UV aka material with metal part, so it is possible to merge your materials into one I guess

(please ignore that the wood does have zero metallic due to the limitation of Super Shader, there is only one color to reflect and I don't want to have yellow reflection on the wood part)
hallow jay
very interesting
 atomic kernel
Hello! I'm making my first mod and it's a optics pack. I have one model ready and textures being converted in PAA, but I have problems with RVMAT.
I tried to find any RVMAT from the scope tube from arma 3 scopes but cant understand what I should use... Is RVMAT necessary? How can I made my own RVMAT? all I need is to make the tube looks like real metal.
😦
hallow jay
I´d reckon you need one rvmat for the tube, and one rvmat for the glass of the scope itself
lethal condor
RVMAT itself really is just a text file
hallow jay
atomic kernel
Hello! I'm making my first mod and it's a optics pack. I have one model ready an...
https://jdtools.dev/rvmat/index.html There are some prefabricated rvmats over here
hallow jay
atomic kernel
Hello! I'm making my first mod and it's a optics pack. I have one model ready an...
The way I understand it, rvmat is an additional tool that helps you modify your textures after their export from SP. Arma uses non PBR shaders, which are quite outdated by today´s standards, and rvmats give you some additional control over some parameters of the textures
atomic kernel
hallow jay
I´d reckon you need one rvmat for the tube, and one rvmat for the glass of the s...
Yeah! But already made my textures with the glass of the scope in a model with their uvs. So rendered in Blender shows as I want. Still I need 2 rvmats for my model?
atomic kernel
hallow jay
The way I understand it, rvmat is an additional tool that helps you modify your ...
Oh... SP is substance painter? Cuz I made my textures with blender 😦
hallow jay
Yep, you do need them. Also, what you see in Blender / SP will not be what you will end up seeing in Arma due to the outdated shader
hallow jay
atomic kernel
Oh... SP is substance painter? Cuz I made my textures with blender 😦
Oh, in that case I have absolutely no clue unfortunately, I haven´t attempted to texture stuff in Blender
but still, the rvmat is necessary
I can give you a sample if you want
atomic kernel
hallow jay
Yep, you do need them. Also, what you see in Blender / SP will not be what you w...
okok... So... I should seperate the lens of the scope and made them as other model or how can I assign the lens rvmat to lens and tube?
atomic kernel
hallow jay
Oh, in that case I have absolutely no clue unfortunately, I haven´t attempted to...
Well, for me is easier and more flexible than SB. But making materials with nodes can take time
atomic kernel
hallow jay
I can give you a sample if you want
Sure! I'll thank you! 😄
hallow jay
atomic kernel
okok... So... I should seperate the lens of the scope and made them as other mod...
They do not need to be a different model, they just need to have a different material slot assigned in Blender:
Each material in Blender can have 1 rvmat assigned to it.
Then you can assign these materials to different faces of the mesh, you do not necessarily need to separate the single big mesh into multiple smaller meshes

You probably want to have one blend file in which you create the textures, and another blend file out of which you will be exporting the P3D itself
 full quarry
you do not want to have this many materials for a weapon in Arma though
typically you have 1 or 2 textures/materials for such a small asset
full quarry
hallow jay
The way I understand it, rvmat is an additional tool that helps you modify your ...
rvmat is not just an additional tool, it sets the shader type (arma has many) that the surface uses and what technical textures it can have to enhance/create the visual effect you want
full quarry
hallow jay
https://jdtools.dev/rvmat/index.html There are some prefabricated rvmats over he...
I have recently grown to dislike this tool Im sorry to have to say as lot of people use it without ever learning to understand RVMAT
and then they struggle with it
shortcuts never replace learning what you are doing
atomic kernel
hallow jay
They do not need to be a different model, they just need to have a different mat...
Oh! I just forget about textures slots and I used them in with my materials Lol! I'll do that!
atomic kernel
full quarry
shortcuts never replace learning what you are doing
So... How can I create my own RVMat?
full quarry
they are just text files
you can read about them on couple of the wiki pages
and you can look into the default ones in P:\a3\data_f
and any of the games own rvmats
via text editor (notepad++)
 mint hare
https://community.bistudio.com/wiki/Super_shader#Example related doc for apparently most useful shader
full quarry
and experiment
mint hare
And another more generic piece of documentation https://community.bistudio.com/wiki/RVMAT_basics
atomic kernel
mint hare
https://community.bistudio.com/wiki/Super_shader#Example related doc for apparen...
Oh dude, thought that was another thing and not RVmat. But thanks, can understand a little bit more... So, I need to make 2 rvmats... one for the scope tube (metallic look) and another for the lens (with high glossy). Right?
mint hare
Sounds about right. IIRC there should be a special shader for collimator sight lenses or something like that
Or just UVs  Probably this https://community.bistudio.com/wiki/Arma_3:_Scope_3D
 short scaffold
hey all, im trying to add custom flags into the game. i have the .paa files already, im just confused on how to setup the file structure and config files etc. does anyone have tips on how to do this or any videos
^custom flags meaning retexture of default flags
 mossy estuary
any good retexture templates for nato gear?
full quarry
short scaffold
^custom flags meaning retexture of default flags
you can search chat history here or config channel. I recall someone recently got that solved
full quarry
mossy estuary
any good retexture templates for nato gear?
there is a template thread in the BI forums but not sure how up to date it is. Worth a look though
short scaffold
Thank you
mossy estuary
Could I retexture the Apex CTRG uniform even if some of my players don’t have apex. Would they get any issues?
 soft silo
mossy estuary
Could I retexture the Apex CTRG uniform even if some of my players don’t have ap...
soft silo
mossy estuary
Could I retexture the Apex CTRG uniform even if some of my players don’t have ap...
There is a lot of DLC assets that are actually just reskins of vanilla assets.
So depending which combat uniform you are re-texturing, you could just do the original vanilla one
lethal condor
mossy estuary
Could I retexture the Apex CTRG uniform even if some of my players don’t have ap...
And all vanilla assets are installed for everyone
mossy estuary
lethal condor
And all vanilla assets are installed for everyone
I know that, however there is sometimes a purchase this item sign that pops up on the Hud when people are wearing an item from a dlc, even if it is already installed in game.
lethal condor
Well I did not thought that's what "any issues" you mean
mossy estuary
All good. Understand the confusion
 mighty crest
@silver adder Thanks for the SD file, I will try it out later tonight. Cheers!
 cyan mason
Question: I have a model, and separated out the top+gloves+boots and the pants on 2 seperate UVs. Got the different vertex groups set up but I still only get a bad texture ingame. What else can this be?

 livid knot
The uniform in game doesnt look like the same model... why arent its sleeves rolled?
cyan mason
That;s also one thing I'm trying to figure out ... Object builders shows rolled sleeves..
 livid knot
Did you change the model selection in the config so its actually using your model?
Can we see the class for it?
cyan mason
    class B_Soldier_base_F;

    class UNIF_CRYE_ROLLED : B_Soldier_base_F {
        _generalMacro = "B_Soldier_F"; //unsure what this does
        scope = 2;
        displayName = "Uniform Test Soldier";
        nakedUniform = "U_BasicBody"; //class for "naked" body
        uniformClass = "UNIF_Crye_G3_Rolled"; //the uniform item
        hiddenSelections[] =
            {
                "camo",
                "camo2"
            };
        hiddenSelectionsTextures[] =
            {
                QPATHTOF(data\uniform\tex\camo_co.paa),
                QPATHTOF(data\uniform\tex\camo2_co.paa)
            };
    };
};

class cfgWeapons {
    class Uniform_Base;
    class UniformItem;

    class UNIF_Crye_G3_Rolled : Uniform_Base {
        scope = 2;
        displayName = "Crye G3";
        picture = "\A3\characters_f\data\ui\icon_U_B_CombatUniform_mcam_ca.paa";
        model = QPATHTOF(data\uniform\crye_g3_rolled.p3d);
        hiddenSelections[] =
            {
                "camo",
                "camo2"
            };
        hiddenSelectionsTextures[] =
            {
                QPATHTOF(data\uniform\tex\camo_co.paa),
                QPATHTOF(data\uniform\tex\camo2_co.paa)
            };

        class ItemInfo : UniformItem {
            uniformModel = "-";
            uniformClass = "UNIF_CRYE_ROLLED"; //would be same as our made soldier class
            containerClass = "Supply20"; //how much it can carry
            mass = 80; //how much it weights
        };
    };
};```

I must be doing something wrong.. but I'm extremely new to this so it's probably something in here.is there particular reason to use path macros like this?
its a bit advanced config making method and likely what throws this thing off the rails
cyan mason
I took them straight out of the examples. (I believe, I returned back after 3 weeks of nothing)
livid knot
You should remove them
switch it to this "pboname\data\uniform\tex\camo_co.paa"
or whatever file you're trying to get
cyan mason
Well.. I'm getting somewhere. But I think my Shadows are set wrong. Also noticed I have some wrong flipped normals
 full quarry
shadowlod has couple of requirements that must be met
typically for characters you can just copy the sample character shadow though
maybe adjust it a little where needed
cyan mason
full quarry
typically for characters you can just copy the sample character shadow though
Gotcha. I figured it out with a helmet.. thought it might've been the same. But I'll just copy the one from the sample. Just to double check, that would be A3_character_template.p3d?
full quarry
cyan mason
Gotcha. I figured it out with a helmet.. thought it might've been the same. But ...
yeh
cyan mason
full quarry
maybe adjust it a little where needed
Would it be best to adjust the uniform or the shadow to fit it all?
full quarry
shadow
usually at least
the sample man shadow should be pretty skintight though so it should fit pretty easily
 willow marlin
whats the easiest way to texture in a 3d space?
2d texturing its hard to lineup camo
full quarry
willow marlin
whats the easiest way to texture in a 3d space?
2d texturing its hard to lineup...
for retexturing there is no way to do it in 3d
only the texture images are available for that
 ebon shoal
Hey! Question!
So you know how in GM, you get mirrored emblems. Right? They're 2:1 ratio.
Say I make an image 1024x512. Will each half be a perfect 512 pixel box, or will it be cropped down to a smaller size? The ArmA wiki only gives me this as a "template" but this doesn't fill the full 512px space.

The template license plate file is also a tad confusing as to how it all bounds together.
 austere carbon
cyan mason
Question: I have a model, and separated out the top+gloves+boots and the pants o...
austere carbon
cyan mason
Question: I have a model, and separated out the top+gloves+boots and the pants o...
nothing constructive to your prob. the right one looks great tho. is that MARPAT?
cyan mason
austere carbon
nothing constructive to your prob. the right one looks great tho. is that MARPAT...
No, it’s Pencott Sandstorm. I’m doing a full range of Pencott range camo for my unit. 7 types. And thanks 🙂
austere carbon
still looks good dude!
ebon shoal
Answered my own question. It gets cropped. 
 ionic laurel
Hi, i have a problem with making paintjob for offroad. Idk how to add new painting to arsenal. I failed mine attempts. Can i find tutorial somewhere? I want to make it as an addon
lethal condor
Share your config
 plain wyvern
need some texture help if someone can pm me
lethal condor
Ask your question here so you can get more helpful answers
ionic laurel
lethal condor
Share your config
Im not at home rn, ill send it in ~5hrs
lethal condor
Sure. No hurry of course, take your time
lethal condor
- CfgPatches
A3_Soft_F_Offroad_01you definitely should not use this name. Because it is aleady used by vanilla game. - If the intention there is just to make a retexture of a vanilla offroad, you have to make a proper inherit. Redefine everything is not how it works.
ionic laurel
i just want to make my own texture in here
 ionic laurel
lethal condor
1. CfgPatches `A3_Soft_F_Offroad_01` you definitely should not use this name. Be...
ionic laurel
lethal condor
1. CfgPatches `A3_Soft_F_Offroad_01` you definitely should not use this name. Be...
is there any template or example of it?
lethal condor
class CfgVehicles
{
    class Offroad_01_unarmed_base_F;
    class Offroad_01_civil_base_F: Offroad_01_unarmed_base_F
    {
        class TextureSources
        {
            class Red
            {
                displayName = "$STR_A3_TEXTURESOURCES_RED0"; //Red
                author = "$STR_A3_Bohemia_Interactive"; //Bohemia Interactive
                textures[] = {"\a3\Soft_F\Offroad_01\data\Offroad_01_ext_CO.paa","\a3\Soft_F\Offroad_01\data\Offroad_01_ext_CO.paa"};
                factions[] = {"CIV_F"};
            };
        };
    };
};```should i keep the cfgpatches class?
lethal condor
No
ionic laurel
still nothing there

class CfgVehicles
{
    class Offroad_01_unarmed_base_F;
    class Offroad_01_civil_base_F: Offroad_01_unarmed_base_F
    {
        class TextureSources
        {
            class PSR1
            {
                displayName = "PSR Offroad";
                author = "RysiekIsHere";
                textures[] = {"\psrpojazdy\textures\txt_psr_offroad_1.paa"};
                factions[] = {"CIV_F"};
            };
        };
    };
};```Show the CfgPatches please
 lethal condor
Well I thought you've said you wanted to keep the name
CfgPatches is a required part of config
ionic laurel
okay, ill try to do it like that
class CfgPatches
{
    class psroffroad_1
    {
        addonRootClass="A3_Soft_F";
        requiredAddons[]=
        {
            "A3_Soft_F"
        };
        requiredVersion=0.1;
        units[]=
        {
            "Offroad_01_civil_base_F",
        };
        weapons[]={};
    };
};

class CfgVehicles
{
    class Offroad_01_unarmed_base_F;
    class Offroad_01_civil_base_F: Offroad_01_unarmed_base_F
    {
        class TextureSources
        {
            class PSR1
            {
                displayName = "PSR Offroad";
                author = "RysiekIsHere";
                textures[] = {"\psrpojazdy\textures\txt_psr_offroad_1.paa"};
                factions[] = {"CIV_F"};
            };
        };
    };
};```"Offroad_01_civil_base_F",don't make a period there- Check the pinned of #arma3_configtells which is the proper
requiredAddons
ionic laurel
lethal condor
1. `"Offroad_01_civil_base_F",` don't make a period there
2. Check the pinned of...
i really dont know how to do it correctly
ionic laurel
ionic laurel
```cpp
class CfgPatches
{
class psroffroad_1
{
addonRootClass="A...
but i tried with this
and i got something
unfortunately there is no texture

previously i made my texture bigger to get better quality but i dont think this is a reason
hallow jay
How many texture sets would generally be used for a medium-sized artillery piece?
full quarry
hallow jay
How many texture sets would generally be used for a medium-sized artillery piece...
2
well 1 could be enough too
hallow jay
I see, yeah, I was thinking about two as well
 covert spade
Hello - I have a texture for a jet..
The texture works fine, the path to the retex is there and it works.
But when i PBO the mod the texture doesnt load. I have tried hundreds of attempts to get it working.
Has anybody else ever had the issue of a .paa not loading after packed?
livid knot
Is the paa actually in the pbo? Double check, sometimes depending how you pack it they can dissapear
full quarry
or folder structure in pbo does not match path in config
covert spade
Its a massive headache.
The defined paths are correct, tried several different names as well
The .paa files are still there after unpacking and are not corrupt etc.
Its just when they get packed into a pbo I get the "can not load texture" error... But then the pre-packed version works flawlessly. I excluded it from compression tried several different settings and no joy.
Also when using mikero PBOproject, it doesnt let me pack the mod because the "cockpit" etc... textures from the original model are defined in the config - and it gives an error "missing files!" then lists all the textures....
So I am stuck bouncing between addon builder and PBOproject
full quarry
covert spade
Also when using mikero PBOproject, it doesnt let me pack the mod because the "co...
if your P drive is set up right the original textures shoudl be in there
covert spade
So I need to take the textures out of the plane mod and put them there - with the new hull texture?
full quarry
ah its a modded jet
well then you would unpack the mod to your P drive so pboProject can check the paths
you would not copy them into your mod
they would remain in the original mod
and be used through there by your mod
covert spade
Oh dang
Alright.. So I unpack it to the P drive then it will be picked up by the tool when packing?
covert spade
I must have something set up wrong. Its still telling me rapify warning files dont exist.
covert spade
full quarry
yes
Sorry to bother. Ive redone my P drive -
Where should I place the mod with textures?
covert spade
Okay so place the extracted folder on P drive - outside a3 folder?
full quarry
Yes
like your own data is outside of A3 (hopefully)
and A3 data is in P:\a3\
you can see the folder structure in the configs too in the paths
covert spade
Okay thanks.
I've placed (plane mod folder) and (new texture folder) on the P drive outside of a3, and it still tells me none of the textures exist.
I'll upload the config
class CfgPatches
{
    class SU27retex
    {
        units[] = {"Su_27CM"};
        weapons[]={};
        requiredVersion=1.83;
        Icon = "";
        requiredAddons[] = {"A3_Air_F"};
        name="Su_27CM";
        author="c";
    };
};
class CfgVehicles
{
    class JS_JC_SU35;
    class Su_27CM:JS_JC_SU35
    {
        scope= 2;
        author="c";
        side = 1;
        displayName = "SU-27CM";
        faction="BLU_F";
        vehicleClass="Air";
        crew="B_Pilot_F";
        hiddenSelectionsTextures[]=
        {
            "SU27retex\data\Su27hull1.paa", //new hull texture
            "SU27retex\data\Su27hull2.paa",
            "\js_jc_su35\data\Su35_cockpit1_co.paa", //original textures the plane depends on
            "\js_jc_su35\data\su35_cockpit2_co.paa",
            "\js_jc_su35\data\Su35_glass_ca.paa",
            "\js_jc_su35\data\Su35_ladder_co.paa",
            "\js_jc_su35\data\su35_clear_ca.paa",
            "\js_jc_su35\data\su35_clear_ca.paa",
            "\js_jc_su35\data\su35_clear_ca.paa",
            "\js_jc_su35\data\su35_clear_ca.paa",
            "\js_jc_su35\data\su35_clear_ca.paa",
            "\js_jc_su35\data\su35_clear_ca.paa",
            "\js_jc_su35\data\su35_engine_fire_ca.paa",
            "\js_jc_su35\data\su35_engine_fire_ca.paa",
            "\js_jc_su35\data\su35_afterburner_ca.paa",
            "\js_jc_su35\data\su35_afterburner_ca.paa"
        };
    };
};```Perhaps its the backslash in front?
livid knot
send a pic of the file path from your p drive to one of the js_jc textures
covert spade
Do I need to take just the texture folder and put it on P drive, or the whole mod?
livid knot
it can be just the textures, but it needs to follow the same filepath as you have outlined in your config
full quarry
covert spade
Do I need to take just the texture folder and put it on P drive, or the whole mo...
are the paths like p:\js_jc_su35\data\su35_afterburner_ca.paa
covert spade
 covert spade
 full quarry
looks alright
covert spade
Yeah I'm wildly confused
full quarry
whats the error in pboProject?
full quarry
example?
covert spade
WTF
It just worked
For the last 2 days its been giving me an error and now when i go to get example it worked..............................
 covert spade
Well.. I'm going to dinner the real test is to see if it still appear invisible lol
Literally mindblown to the greatest degree rn
 devout cedar
Not exactly sure if this is the best place to ask, but does anyone know of a workflow for gear icons? (Consistent camera setup, batch jobc, etc)?
devout cedar
A Chromakey or Green Screen mod?
full quarry
devout cedar
A Chromakey or Green Screen mod?
Arma already comes with incorporated greenscreen
 lyric dagger
Does anyone have a blender shading setup that makes the textures look in blender as close as possible to what you get in arma?
 naive elk
I want to retexture Arma's assets and make them into mods, but I don't know how. Is there any article with instructions?
full quarry
there are some guidelines written down in the BI forums if I remember right
mossy estuary
I'm retexturing the basic Nato uniform but I'm encountering an issue with the tee shirt variant. I want to change the tee shirt color to the basicbody_black paa file instead of the basicbody_green which is what it currently is I think. Does anyone know how to do that?
 young patio
my friend is trying to do a custom headgear but keeps getting this error i thought it was a pathing issue but weve gone over the paths in the RVMAT, the config and on the P3d and they seem correct

dont know what could be causing this?
livid knot
Can you open the image in texview? Maybe its corrupt
full quarry
young patio
my friend is trying to do a custom headgear but keeps getting this error i thoug...
whats the path to the file in the pbo
young patio
full quarry
whats the path to the file in the pbo
good question
full quarry

young patio
full quarry
<a:smarts:800412392714272819>
other thing i thought of was the PBO packer they are usng
its not mikero's pboproject
 tranquil mason
Couldn't really think of a specific channel other than here, but I'm getting really zoomed out previews when I use BIS_fnc_exportEditorPreviews. I tried a vanilla vehicle for comparison, I forget the vanilla name for it but ace renames it to the T100 Black Eagle.
Comparison - https://imgur.com/a/H7epgwz
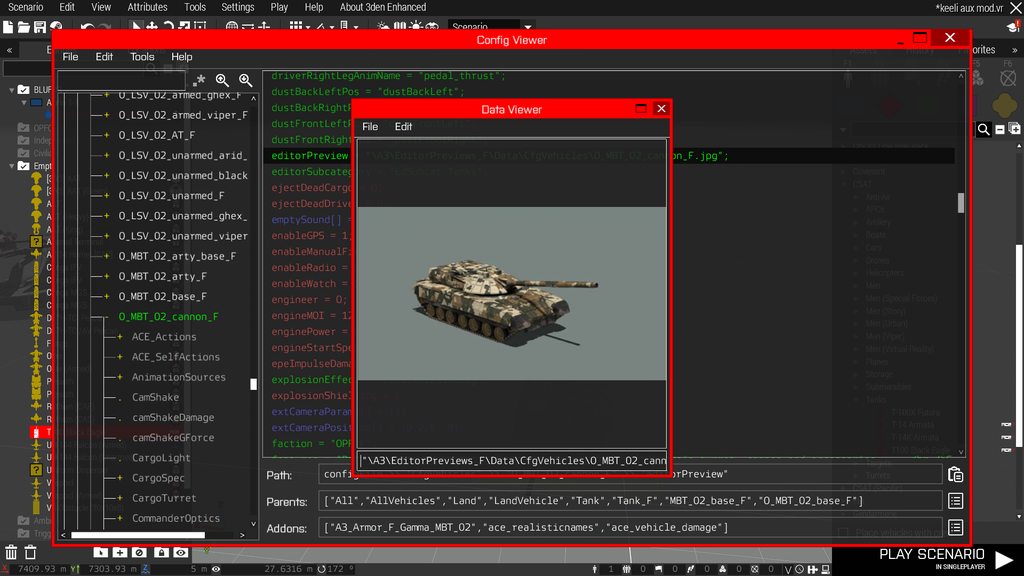
I've followed everything as directed in the https://community.bistudio.com/wiki/Eden_Editor:_Configuring_Asset_Previews guide
Units seem to be fine, it's only vehicles
tranquil mason
Seems to be an issue with the vr map for me though, tried on altis and it was closer to what they should look like (position wise at least)
Marked as a spoiler because the image is very bright
 hallow jay
young patio
hallow jay
young patio
I dont think the first forward slash is supposed to be in the path of the rvmat. At least I never put it there and never have issues
tranquil mason
hallow jay
I dont think the first forward slash is supposed to be in the path of the rvmat....
The only cases I know where it's required is for the picture of a weapon/item, but it's pretty standard (from what I've seen) to have all paths starting with a leading backslash
hallow jay
I never put them in my rvmat, and everything works fine
 tranquil mason
Yeah like I said, most cases there's not really a difference
hallow jay
I see
I do remember the forward slash causing issue in some spot, but I am unsure if it is the rvmat or not
tranquil mason
For the picture property specifically though, it'll go looking for a completely different file path if you don't put a \ at the beginning
cyan mason
Euhm. I assume there are some vertexes that are weight-painted on the proxies for this to happen no ?
 full quarry
not on proxies but to wrong selections or not to any selections at all
proxy triangles should not show up either though
so either those are no longer proxies or they might have material set on them which can mess them up
cyan mason
full quarry
so either those are no longer proxies or they might have material set on them wh...
Hmm.. interesting because when I open up the character_example.p3d it already has some proxies with materials.
 full quarry
yeh blender has a way of assiginig first slot material to all surfaces.
it may not always cause issues
more likely is that the triangles you see are no longer proxies
cyan mason
Then the next question: Should the proxie triangles only be weighted on the @@armaproxy vertex groups? Since this was converted to this for Spine3 group

And none of the proxies should have a materials on it
full quarry
no they are weighted to various animated selections so they move with those selections
cyan mason
yea, I think i've seen what the biggest issue is. didn't properly check all the weights on the needed places. For example this is LeftHandPinky3

And LeftLegUp
 cyan mason
So I fixed all my proxie issues.. after a couple of hours of testing things.. but wondering what the vertext group hl does. It seems to change the contrast of texture where its applied. And the texture without HL looks great.
On the example it's painted on the arms and legs of the body.
mint hare
sounds like skin selection then 
cyan mason
Kinda what I assume. Just wanted to be sure.
full quarry
cyan mason
Kinda what I assume. Just wanted to be sure.
skin identity selection yes
swaps with whatever identity isf given
tranquil mason
tranquil mason
Couldn't really think of a specific channel other than here, but I'm getting rea...
After doing some debugging, it turned out the issue I was having was only affecting the VR map. It was not a mod issue, since it was still zoomed out and flat with just CBA/ADT.
I reset my video settings which seemed to help a lot, but the image still appears much brighter, as well as the shadows appearing larger


Figured out that the function sets the time to 10:00 am for the picture, causing the shadows to appear a lot longer. But the image is still a lot brighter
 tranquil mason
Does anyone have settings to try and match the vanilla ones?
I've been fiddeling with settings for ~20 minutes trying to get the same style, but they all come out looking washed out and bright
tranquil mason
It's a bit closer, but then the colors are too muted, need to play around with it more


It also seems like a specific date/time was used for all of the previews, which I don't think there's really a way for me to find out unless I tried every option
If possible, having the settings used for base game vehicles present on the wiki would be a massive help
I've got it a bit closer


 stable swallow
The Bohemia Previews are made with a script command
floral fiber
yeah, BIS_fnc_exportEditorPreviews, which is what dart said they are using
tranquil mason
Yeah making previews by hand would suck
You could just do a screenshot of it, but that looks bad
 rancid obsidian
Guys
I wanna retexture some uniforms but idk where can I get the uniform texture files
Especially game's default uniforms
livid knot
You can use getObjectTextures on the unit to find the path to the file
rancid obsidian
livid knot
You can use `getObjectTextures` on the unit to find the path to the file
How to do that?
livid knot
When you press esc in singleplayer there should be a console, just make sure the unit you want to get the textures for has a variable and use that variable name
rancid obsidian
livid knot
When you press esc in singleplayer there should be a console, just make sure the...
Type the uniform name?
rancid obsidian
livid knot
When you press esc in singleplayer there should be a console, just make sure the...
I literally don't know what u said
After console
livid knot
When you press esc in singleplayer there should be a console, just make sure the unit you want to get the textures for has a variable and use that variable name
No, the variable name doesnt matter
@rancid obsidian Ok, so give a unit the uniform you want in the 3den editor. Then double click it and give it the variable name tMan. Then play the mission, press esc, and type in the console getObjectTextures tMan;. At the bottom it should give you a list of file paths
rancid obsidian
livid knot
<@838035760972169217> Ok, so give a unit the uniform you want in the 3den editor...
I can use his default name or I must give him a variable name?
livid knot
Must give a variable name
 sonic dagger
Where can I find vanilla assets templates ? Specifically the RHIB and the M-900
full quarry
sonic dagger
Where can I find vanilla assets templates ? Specifically the RHIB and the M-900
There has never been templates for all vanilla assets released. You might find some on BI forums texture template thread, but sometimes you just need to make your own.
lethal condor
M-900 is basically released as a part of TKoH samples
sonic dagger
Oh, okay. I'm basically looking to recreate this helicopter in game, I thought there was a template for it

 lethal condor
What is what?
rancid obsidian
lethal condor
What is what?
The texture location?
lethal condor
The path said where it is?
lethal condor
Do I need to have a guessing game? If you meant PBO, it's in Expansions folder
lethal condor
sonic dagger
Oh, okay. I'm basically looking to recreate this helicopter in game, I thought t...
I said there is. Look for Take on Helicopters samples
rancid obsidian
lethal condor
Do I need to have a guessing game? If you meant PBO, it's in Expansions folder
If I retexture the uniform and add it to game does it need to have Apex dlc?
lethal condor
I can't remember which uniform you have
rancid obsidian
It's paramilitary
lethal condor
Which
rancid obsidian
lethal condor
Which
It had Apex icon in front if it
rancid obsidian
lethal condor
An icon does not represent if you need DLC or not
I think it's paramilitary garment
Idk the name
But its a sleeveless shirt
lethal condor
"Idk the name" please no. If I wanted to have a precise answer, you want to answer precisely.
Anyways, according to this article, looks the answer is "yes"
https://community.bistudio.com/wiki/Arma_3:_DLC_Restrictions
rancid obsidian
lethal condor
"Idk the name" please no. If I wanted to have a precise answer, you want to answ...
U mean it needs that dlc?
lethal condor
Probably
sonic dagger
lethal condor
I said there is. Look for Take on Helicopters samples
Thanks, I'll take a look
cyan mason
I'm almost done with my uniforms, after a while.. Only have one thing left. Skin on the arms. It works on 1 model, but it doesn't on the other.. When looking at blenders materials they are assigned the same.. HL vertex groups are both set correctly. What else am I missing? Left is on the image is working, right isn't
 devout cedar
I'm investigating a pboproject error that is suggesting a corrupted paa file, but its proving difficult to track it down. I am able to open several paa's in texview2 but I can't open them with imageToPaaGUI
The error reads like writing header entries.. creating a texHeaders.bin... failed: detex module found an error in (one or more) paas dll's pbo_Make failed with 'Error(s) detected' </MakePbo>
full quarry
devout cedar
I'm investigating a pboproject error that is suggesting a corrupted paa file, bu...
image to paa does not open paa, it turns other images to paa
check if the log says anything (and make sure you have noisy output on)
hallow jay
Is there any possibility of making dirt / rust look at least remotely realistic on a metal surface? I truly dont understand how can that be possible given that I am limited to a single master rvmat setting that controls specular and specularpower of the whole face?
For example:
There is a main coat of pain that has a certain amount of reflection
Peeled paint should reveal shinier metal underneath
Rust spots should have pretty much no reflection
But this whole section is controlled by a single rvmat, and the specular and specularpower values of the rvmat affect all three of the above equally. Which means if I want to make the main coat of paint look realistic, and I make it reflect the correct amount of light, this will automatically make the rust reflect the same amount of light, which looks terrible.
This certainly is not a shader issue, since the non-pbr shader of substance can handle this just fine, so I think this is definitely something caused by the rvmat.
here´s an exagerrated example of what I am trying to achieve

I spent several hours trying to make it work somehow, trying different specular values of the substance layers themselves, but nothing seems to help
Here´s my problem: The reflectiveness is exactly the same between the two different surface types in-game
 full quarry
hallow jay
Here´s my problem: The reflectiveness is exactly the same between the two differ...
full quarry
hallow jay
Here´s my problem: The reflectiveness is exactly the same between the two differ...
do you have smdi texture in the correct stage to modulate the rvmats power?
hallow jay
I hope so?
stage5
{
    texture="2b9\data\one_smdi.paa";
    uvSource = "tex";
    class uvTransform
    {
        aside[] = {1,0,0};
        up[] = {0,1,0};
        dir[] = {0,0,0};
        pos[] = {0,0,0};
    };
};```I have tried simply removing Specular and Specularpower values from the rvmat completely, and it was still as if the smdi were completely absent
full quarry
dont remove stuff that breaks rvmat
most likely something goes wrong in your process right now
hallow jay
I tried to see what it would do
full quarry
maybe you dont edit right file, pack right folder or something like that
if changes dont seem to apply
make sure your paths are correct and that you work on correct files as first step
then try apply the copy of default super rvmat on your model and add your textures to it
 queen siren
Should I use blender for texturing or would something like substance painter / quixel mixer be significantly better?
full quarry
Blender can do texturing just fine. Those other programs that are designed solely for that can make it easier, but results can be just as good in any way you learn to do it
devout cedar
full quarry
check if the log says anything (and make sure you have noisy output on)
I am using noisy to log, as well as full build
full quarry
devout cedar
I am using `noisy to log`, as well as `full build`
does the log say what the reason for the fail is
devout cedar
failed: detex module found an error in (one or more) paas
no idea what that means
I can't find any corrupt paa's
everything I've looked through is also a ^2
full quarry
does it mention which paas?
queen siren
Welp my textures are still failing to load onto my model.
The .rvmat is pointing to the right location; I have tried using both blender and substance painter for the different file types. (Yes, everything is a .paa file and I even tried the substance painter preset in the pinned comments)
I was wondering if anyone could provide like 'an idiots guide to coloring an object'. Sorry if this is a big ask.
livid knot
@queen siren How are you assigning the textures to the model? And do you get an error in game when you load the object?
queen siren
livid knot
<@97844977937178624> How are you assigning the textures to the model? And do you...
I have tried three ways.
The first is just via blender using a UV map. Convert it to a PAA file and using a helmet.rvmat file.
I also tried using substance painter to export the _us, _nohq but those would not assign at all.
When loading into arma 3 the helmet is either just white or all black.
I have also loaded the .p3d file into object builder and used the e hotkey and assign the helmet textures and rvmat that way.
I would love to use either blender or substance painter to do the texturing and modeling. I am just clearly not something correct.
how it looks in game right now.
 livid knot
I dont know how to attach it through blender, though it is possible via the toolbox addon. However doing it through object builder should work fine. Whats the file path you use? Also what resolution are your textures?
queen siren
1024 x 1024 I believe. or 2048 x 2048.
ive been going through so many different iterations that I am not 100% at the moment.
path: firewall_helmet\textures\file_name_here
UV map seems to not work. How would I attach it via the toolbox addon?
 full quarry
queen siren
UV map seems to not work. How would I attach it via the toolbox addon?
full quarry
queen siren
UV map seems to not work. How would I attach it via the toolbox addon?
Your uvmapping is not made right.
You probably have multiple uv sets or your uvmapping is just not right.


 full quarry
That is part of it yes
queen siren
So I did smart uv project, it creates a UV map. I did notice that I have three options under the image choice

What is your workflow after you hit smart uv project?
full quarry
queen siren
So I did smart uv project, it creates a UV map. I did notice that I have three o...
This does not affect it. What you need to. Check is if your object has multiple uv sets.
You should be able to find what that is from blender manual if it is unfamiliar thing
queen siren
to the manual!
full quarry
to elaborate a bit, uvset is what saves the uvUnwarp you make and a 3d model can have multiple uvSets with diffferent looking uvmappings for various purposes
Arma however uses typically only the first uvset of the model
also objects built from multiple parts in Blender and exported so that the same lod objects are combined on export also combine their uvsets
but if each object has different uvset name
you end up with multiple uvsets in the export
queen siren
in terms of the _as, _co and so forth textures how important are those to have?
or I guess another way to ask is using a blender UV map vs trying to set up those files as well
ah
full quarry
you need to do both
uvmapping is just the 2D reference on what to draw on the 3d surfaces
you still need the textures to draw on the model
queen siren
I guess my map is just broken, I only have the one UV map.
full quarry
are you exporting the correct part?
 gleaming pewter
anyone know why parts of my textures aren't lining up? it only seems to be in-game, buldozer shows it just fine, so really stumped
buldozer


in-game
queen siren
full quarry
are you exporting the correct part?
probably not lol
 near warren
You cant get textures from CDLC right?
lethal condor
Not directly of course. They might have templates for retex
near warren
Hmm- im not the best with textures but I am wondering if I could get the speadhead planes and remove there side insignias and then use my own xP
 calm flame
Is there a shader for substance painter to preview how does model look like in arma 3?I googled,and find a shader on GitHub,but it probably not work cause my model will turn to black when i applied shader.
full quarry
near warren
Hmm- im not the best with textures but I am wondering if I could get the speadh...
you can ask in the spearhead discord. they are very supportive for modders
full quarry
calm flame
Is there a shader for substance painter to preview how does model look like in a...
you might have wrong kind of textures on it
full quarry
gleaming pewter
anyone know why parts of my textures aren't lining up? it only seems to be in-ga...
how did you unwrap it?
are the models even same? there are differences
near warren
full quarry
you can ask in the spearhead discord. they are very supportive for modders
discord?
full quarry
near warren
discord?
the DLC has its own discord server
gleaming pewter
full quarry
how did you unwrap it?
There are proxies on the model hence why they look different, and manually, I unwrapped it myself
Using project from view on blender
I have hide proxies on bulldozer view so you can't see them
livid knot
Project from view is terrible and very innacurate. However it should be consistent between buldozer and the game
 lucid halo
does anyone know of a tutorial on how to make a texture that I can place in Eden but follow the terrain like a road texture? I'm trying to make some parking lot's and think this would be the easiest way to do it unless someone else knows of a mod that does this?
livid knot
I havnt done it before but I believe its a Decal, try googling that
hallow jay
calm flame
Is there a shader for substance painter to preview how does model look like in a...
SP supports non pbr spec glos by default
Your model might turn black because spec glos shader cant read metallic
Since I assume you used pbr met rough in SP originally
calm flame
hallow jay
Since I assume you used pbr met rough in SP originally
yes,I using metal-roughness(alpha) workflow to build texture.
how to fix that?change my workflow to spec-glos?
hallow jay
I generally had better results once I switched my substance into nonpbr spec gloss
as in, the end result in-game looks more alike to what you see in SP
calm flame
I found this exporter on github,It might work but I haven't give it a try
https://github.com/MoonieFR/SubstanceToArma

GitHub
Substance Painter export presets for Arma 3. Contribute to MoonieFR/SubstanceToArma development by creating an account on GitHub.
queen siren
If you are building a complex object in blender (or whatever program) and you have it ready to be textured; should you keep the objects separate or combine them?
So lets say a car frame and wheels just as an example.
hallow jay
Mine remain joined in whatever way I joined them when baking the normal map in Blender
queen siren
Okay
full quarry
either way is fine
I prefer to keep parts unjoined (but that does add management overhead to make sure there are no different names in UVsets, no wrong materials, LODs are setup right on all parts etc)
queen siren
What do you mean by different names in UVsets?
full quarry
I explained that earlier above
 dense peak
tog_416/tog_eotech - missing these in the rpt but cant find them for the life of me
anyone so kind to help me
queen siren
full quarry
I explained that earlier above
Yeah, you did; my bad. Tons of termnology I am not use to.
 vague iron
@silver adder Very nice stuff :)
calm flame
having trouble on rvmat
the reflection on model is weird,want know how to adjust rvmat more effectively to have result that what I need.
bi wiki's "rvmat basic" said:"In ARMA engine we are able to use SPECULAR POWER, IRRADIANCE TABLE or FRESNEL values in *rvmat files." at Theory section,also said:"All above mentioned settings can be calculated in some shaders per pixel using effect bitmaps." at Basic surface setting.
Is this mean,if I generated a SMDI texture in substance painter,and applied it to ravmat that using specific shader like "super" shader,then there is no need to set "SPECULAR POWER, IRRADIANCE TABLE or FRESNEL"?
full quarry
calm flame
having trouble on rvmat
the reflection on model is weird,want know how to adjust...
The texture is what modulates the values
 novel lagoon
gleaming pewter
novel lagoon
gleaming pewter
uvs maybe
 celest onyx
does any one have video can show me how to design uniform ?
gleaming pewter
calm flame
having trouble on rvmat
the reflection on model is weird,want know how to adjust...
There are some default values that I would use for all of them but horrible is correct, it's all the textures inside of the rvmat that determine shinyness, normals, shadows ect
Best bet would be to look at some other people rvmats and compare so you can improve your own
tranquil mason
What exactly causes the materials in a unit's Wounds class to appear?
I wanted to test to make sure I had my materials set up correctly but after shooting at the units a couple times I didn't notice any of them apply
tranquil mason
class Unit
{
    class Wounds
    {
        tex[] = {};
        mat[] =
        {
            "DA\Aux193\armor\data\uniforms\armor1_clean.rvmat",
            "DA\Aux193\armor\data\uniforms\armor1_clean_injury.rvmat",
            "DA\Aux193\armor\data\uniforms\armor1_clean_injury.rvmat",
            "DA\Aux193\armor\data\uniforms\armor2_clean.rvmat",
            "DA\Aux193\armor\data\uniforms\armor2_clean_injury.rvmat",
            "DA\Aux193\armor\data\uniforms\armor2_clean_injury.rvmat",
            "A3\Characters_F\Common\Data\basicbody.rvmat",
            "A3\Characters_F\Common\Data\basicbody_injury.rvmat",
            "A3\Characters_F\Common\Data\basicbody_injury.rvmat",
            "A3\characters_f\heads\data\hl_white.rvmat",
            "A3\characters_f\heads\data\hl_white_injury.rvmat",
            "A3\characters_f\heads\data\hl_white_injury.rvmat",
            "A3\Characters_F\Heads\Data\hl_white_bald_muscular.rvmat",
            "A3\Characters_F\Heads\Data\hl_white_bald_muscular_injury.rvmat",
            "A3\Characters_F\Heads\Data\hl_white_bald_muscular_injury.rvmat",
            "A3\Characters_F\Heads\Data\hl_white_02_bald_muscular.rvmat",
            "A3\Characters_F\Heads\Data\hl_white_02_bald_muscular_injury.rvmat",
            "A3\Characters_F\Heads\Data\hl_white_02_bald_muscular_injury.rvmat",
            "A3\Characters_F\Heads\Data\hl_black_bald_muscular.rvmat",
            "A3\Characters_F\Heads\Data\hl_black_bald_muscular_injury.rvmat",
            "A3\Characters_F\Heads\Data\hl_black_bald_muscular_injury.rvmat",
            "A3\Characters_F\Heads\Data\hl_white_hairy_muscular.rvmat",
            "A3\Characters_F\Heads\Data\hl_white_hairy_muscular_injury.rvmat",
            "A3\Characters_F\Heads\Data\hl_white_hairy_muscular_injury.rvmat",
            "A3\Characters_F\Heads\Data\hl_white_old.rvmat",
            "A3\Characters_F\Heads\Data\hl_white_old_injury.rvmat",
            "A3\Characters_F\Heads\Data\hl_white_old_injury.rvmat",
            "A3\Characters_F\Heads\Data\hl_asian_bald_muscular.rvmat",
            "A3\Characters_F\Heads\Data\hl_asian_bald_muscular_injury.rvmat",
            "A3\Characters_F\Heads\Data\hl_asian_bald_muscular_injury.rvmat",
            "A3\Characters_F_Exp\Heads\Data\hl_tanoan_bald_muscular.rvmat",
            "A3\Characters_F_Exp\Heads\Data\hl_tanoan_bald_muscular_injury.rvmat",
            "A3\Characters_F_Exp\Heads\Data\hl_tanoan_bald_muscular_injury.rvmat",
            "A3\Characters_F_Exp\Heads\Data\hl_asian_02_bald_muscular.rvmat",
            "A3\Characters_F_Exp\Heads\Data\hl_asian_02_bald_muscular_injury.rvmat",
            "A3\Characters_F_Exp\Heads\Data\hl_asian_02_bald_muscular_injury.rvmat"
        };
    };
};
That's a lot longer than I thought it was
I just copied the material list from the unit I was inheriting from and then swapped out some of the materials (i.e. the top six that start with DA\) with my own
They work fine on the base units, not sure why they don't on mine
Seems to be my config, gave it the same values as the base unit and didn't work
tranquil mason
It's because of the issue described here: https://forums.bohemia.net/forums/topic/227355-class-wounds-problem/.
I changed the materials used on the uniform, which causes the materials listed in Wounds to not apply.
 feral grove


Basically moved those faces to top but still getting this issue
Texture is alpha, rvmat is using the glass shader
Any ideas?
feral grove
Assuming it's an issue with the rvmat
 twin bane
vessel in the water.
i have tex/mats that work for this. i recall it being annoying on the MkV. i'll send you relative foo Tupolov.
speaking of vessel/ship in water and 'alpha' texture issues.. i still have one that i never sorted on the MkV, getting ready to finsih up the new texture set on it, so i should probably sort it. i'll grab couple screens here.
mkay... apparently the removal of an old A3 alpha entry via the CP, prompted a Steam popup to remove files.. which it did. but was my current A3 installation. f'n all pro.
(╯°□°)╯︵ ┻━┻
 frosty pumice
do i have to make textures in 2k or can i make it 4k? i see vanilla is 2k only
 whole steppe
Hi everyone, I wanted to know how can I make textures for custom ligthsabers color blade ?
hallow jay
frosty pumice
do i have to make textures in 2k or can i make it 4k? i see vanilla is 2k only
Really depends of the size of what you are making, and how close the player is going to be to it imo
frosty pumice
is it possible to have 2 rvmats from 1 p3d? if so how?
i want to have a fabric cover and a metal version of a helmet
mint hare
- assign different rvmats to faces
done
frosty pumice
mint hare
1) assign different rvmats to faces
done
they would have the same face, just 2 different rvmats for 2 versions of an object
mint hare
hiddenSelections[] and hiddenSelectionsMaterials[] in the object's config then 🤷♂️
frosty pumice
arent these only for the CO?
mint hare
hiddenSelectionsTextures for the texture, hiddenSelectionsMaterials for rvmats
frosty pumice
ah right, thanks
full quarry
Most likely missing alpha sorting
 trail sequoia
what textures do I need from a bake do I need to create a SMDI Texture?
or is it just a AO/Rough/Met map?
full quarry
its none of those straight
you can look up differences between metal/rough pbr and specular/gloss shading to determine what you can use
 robust pasture
Anyone know what is going on?

The texture is a correct .paa and its in the tex folder
lethal condor
You have a whitespace .paa
robust pasture
huh?
 robust pasture
blender config or?
lethal condor
Maybe maybe not
Can't say where and which is the faulty without checking your config or source
robust pasture
 lethal condor
Then check your P3D's texture
robust pasture
Ight
full quarry
robust pasture
You have no path to the file set here
robust pasture
Its working now dw
full quarry
K.
trail sequoia
Do alpha values not work on multimaterials?
or do I have to apply alpha to mask rather than the texture
full quarry
trail sequoia
Do alpha values not work on multimaterials?
no dont put any transparency on multimaterial
use separate texture/material for transparent stuff
trail sequoia
damn
feral grove
DXT1 or DXT5 for transparent?
 frozen blade
@feral grove
@rose minnow suggested that you can have alpha textures using CO suffix, that should fix the error in water with the CA suffix (alpha) textyres. I personally haven't tested it
 noble elk
I'm not sure if it's a bug, or my mistake, or if it's supposed to be like this. But here's what I noticed. When texture with an alpha channel are present in the models, a strange "transparencies" appears when SSAO is turned on. It appears like shadows seen through the textures (when this texture has no alpha or there is no texture at all). I tried to fix this issue on my models in various ways with no success. And then I found a similar issue appears on some vanilla objects with alphas. More SSAO level - more "shadows" appears. Same problem spotted here: #arma3_model message
Is there any way to fix this? Thanks!


 full quarry
noble elk
I'm not sure if it's a bug, or my mistake, or if it's supposed to be like this. ...
full quarry
noble elk
I'm not sure if it's a bug, or my mistake, or if it's supposed to be like this. ...
lot of transparent surface makes the game render the thing in transparency render pass causing the issue
you can try if using forcenotalpha named property solves it (and does not cause other visual issues)
 hot dock
DXT5
 silver gull
wasnt there a DXT1 with alpha format?
could you actually rename a .dds to .paa and have it work (proper dxt format assumed)?
hot dock
DXT1 w/ will only look decent if you're either 100% alpha or 100% opaque. if you have alpha gradients you need 5
silver gull
well in his case there are no gradients, just a flat alpha map
noble elk
Thank you, it works!

 feral grove
So the issue in the end appears to be the rvmat that was being used. It was using the glass shader instead of super shader :(
 iron glacier
How can i add icon to a vehicle
full quarry
iron glacier
How can i add icon to a vehicle
add icon to where exactly?
full quarry
you can make a new texture with a logo painted to where the door texture is at
iron glacier
Ok
full quarry
or some vehicles might be set up with separate decal textures that are on top of the model
iron glacier
Is there a video somewhere for this
full quarry
no
full quarry
iron glacier
would i use arma tool to change the texture?
in a way. you would have to make a new mod that contains the new texture file and then a new config that applies the new texture file
if you look up arma retexturing on BI forums there may be some guides/tips over there
iron glacier
Ok
 viral oak
is there a way to interpret the textures in a multi material in 3d software, so they can be applied as textures. for ref i am using blender, the adobe suite and i can do most things i just want to bake them as images for my project if that makes sense, i know how to mask them with the mask texture but i cant get the scale or location right
full quarry
Yes it is possible to make a material setup in blender that closely mimics the in game multimaterial
twin bane
glass shader does work, i just prefer the super shader. you can do some crafty stuff if you dink around with it enough.
but speaking of glass issues.. i'll post mine here quick, now that my game is back in place.
fairly annoying. only happens when looking at the water and the _ca foo. doesn't do it with them on, because those are _co textures.
 crystal dock
Hello, I am currently working on a weapon and have the textures on.
I have run into an issue where the textures apply when in 3rd person or the arsenal but when in 1st person its all white. It will also state that "cannot find tsr_bolter/data/magazine" I have searched all my code file and looked for a wrong path and can't even locate the word data even once with in.
I am wondering if there is another issue that I am not considering.
lethal condor
Model is wrongly made I suppose
crystal dock
well. . .
Time to pull it apart and start over then
full quarry
crystal dock
Hello, I am currently working on a weapon and have the textures on.
I have run ...
sounds like you dont have the textures assigend right on the first person lod model
crystal dock
oh, yea. LODs are a thing. can't just change one have to change each one on each LOD...
Well, thank you both. That was my issue
full quarry
👍
lucid halo
is there a limit to the pixel size of a texture or what is the standard size that should be used?
lethal condor
Up to 4k, and texture size must be 2^n
full quarry
lucid halo
is there a limit to the pixel size of a texture or what is the standard size tha...
Most vanilla things are 2k
4k works only with ultra video settings
silver gull
oh man i really hate it that you cant go back and adjust the color map for dDo without redoing the whole project...
i always forget a little thing and bleeeergh start once again
twin bane
wut? you can just add on top of it..
i forget details all the time. it's kind of annoying, but you can simply make a selection, and generate a new ID from it. it's a bit ticky from time to time, but it works.
happens to me usually when i decide to add some more NDO foo, i use a script to colormask those layers, then i copy them into my albedo in DDO, do the selection thing.
oh, labeling is where i do it frequently also..
silver gull
dDo as well? i dont use DDO because no precudural stuffs...
silver adder
i thought it was all there, just in different places and ways to get to the same result?
silver gull
procedural? no, nothing like that. Every detail you have is driven by AO/cavity/normal/etc
blank surface-> no details for you sir
twin bane
im confused at this point..
silver adder
i dont think that is true.....
twin bane
so whats the deal with my MarkerLight textures? why they no appear with water on other side!?
(╯°□°)╯︵ ┻━┻
silver adder
RVMATS probably have no-zwrite or something flagged in them?
twin bane
man, i tried everything i know.. i'll go look right now though. really need to sort it or report it.
silver gull
@silver adder it has to be, otherwise many people whouldnt ask quixel to implement it back. I havent found any way to just generate textures/ layers from blank input maps. You can do that in dDo. No such luck in DDO. Unless you want to use their preset materials...
 trim flintBOT
ugh, typo?
ugh, typo?
ugh, typo?
ugh, typo?
ugh, typo?
ugh, typo?
ugh, typo?
ugh, typo?
ugh, typo?
 brittle citrus
bruh.
silver gull
i would switch in a heartbeat if somehow this works in DDO, because the interface and handling of dDo was clearly designed by Satan himself
easiest example are random scratches - in DDO you can only have scratches where there are normal/cavity informations. Unless you paint them manually. In dDo you can apply proceduraly generated scratches over the entire image without normal/cavity.
twin bane
im sorry, what is the difference here between dDo and DDO? you meaning old dDo vs. Suite? still confused on that.
silver adder
yes
twin bane
and the root issue is not being able to generate a new ID/layer?
not sure if i have the old dDo installed, but im fairly certain the same loop jumping processed worked there.
i'll be back at the rig shortly and will see. maybe do a quick video.
twin bane
@silver gull what do you mean by blank input maps? that seems self defeating on it's face. you really only need a normal map though honestly. you could generate everything else in xnormal (requires some fuckery but works), or just do it in nDo.
viral oak
full quarry
Yes it is possible to make a material setup in blender that closely mimics the i...
man if you could provide some sort of a guide on how to do that i would be beyond grateful
full quarry
viral oak
man if you could provide some sort of a guide on how to do that i would be beyon...
there is one in the channel pinned messages
viral oak
full quarry
there is one in the channel pinned messages
tysm
noble elk
lethal condor
Up to 4k, and texture size must be 2^n
I thought the engine was optimized for 2k textures. At least it used to be like that: 4k textures at medium resolutions displayed much worse than 2k textures. So when I tried to increase the qualityby making hires textures, it had the opposite effect for players with standard and medium settings.
full quarry
noble elk
I thought the engine was optimized for 2k textures. At least it used to be like ...
it is and most A3 assets are 2k. 4k is just the maximum you can use
 dusky solar
hi, can you help me with removing some red squire and to change the color from the numbers from red to white from a Btr-80 in config?
full quarry
dusky solar
hi, can you help me with removing some red squire and to change the color from t...
you would need to paint a new texture
 outer needle
has anyone else experienced that selections with procedural textures get rendered over even when sorted properly by other selections with actual textures assigned to them?
Ive tried everything at hand to make the procedural render over the other selection but looks like it only liked to do so when I unassign the texture to the mesh behind it.
full quarry
does it also have a material?
and do you mean procedural with transparency?
whats the exact procedural color line you use?
outer needle
is black, co it does have a mat, it uses the nodiffuse rvmat from the samples
@full quarry
full quarry
outer needle
is black, co it does have a mat, it uses the nodiffuse rvmat from the samples
any specific reason you use the nodiffuse rvmat?
outer needle
the sample more than anything, its just a tube, basically the same as in the scope sample
i can change my actual te4xture to include the darkness in that same position, no issue on that
was just wondering why it happens
outer needle
sure, i have another mats i can trey right away
full quarry
do you test it properly binarized?
outer needle
yup
i wonder if its the default Z flag it has
noZWrite or something like that
im testing another mat right now as we speak
yeah, change the diffuses to 1 and removed the flags
and they show now
thanks for the headups
ill prepare a new mat for that selection types
stable swallow
does this texture look good ?
 full quarry
there seems to be some odd shadings happening but that might be more a model related thing
the darker section between the doors looks a bit out of place maybe?
the rivets seem alright from what can be seen from this distance
stable swallow
That odd shading might be the normals because the metal is deformed a bit
The darker section between the doors really look strange, thanks for the input
full quarry
stable swallow
That odd shading might be the normals because the metal is deformed a bit
The d...
theres also weird shading under the doors and few other spots.
and some normals seem inverted
stable swallow
I see, thanks.
 merry frost
Hey, anyone here have a solution for having different specular colors on the same material, maybe even as a texture?
Or something simmilar to the "Arma PBR Shader" mod but updated?
full quarry
merry frost
Hey, anyone here have a solution for having different specular colors on the sam...
cant
 thin atlas
trying to make a kitbag retexture mod
I have the textures I want to use
currently I cannot figure out how to get the bag itself to not be invisible
Tried to use the example code from astartes video tutorial, but the backpacks for whatever reason are invisible except for the shadows
Useful help would be appreciated
full quarry
thin atlas
Useful help would be appreciated
Could indicate your pathing for hiddenselections is not correct.
As in the paths you use don't match the paths inside your pbo
 agile glacier
Is there a place I can go to find templates for retexturing modded assets? I want to make a retexture of some RHS vehicles & equipment, but I can't find any templates for them.
full quarry
agile glacier
Is there a place I can go to find templates for retexturing modded assets? I wan...
there is a thread about that on BI forums but there are not templates for everything
usually you need to make your own
and some of the old links might not work anymore
dense peak
i dunno whats causing this issue rvmat is right and every selection/faces are and their textures are added right


does it have something to really do with the nohq itself or smdi?
 bleak eagle
Yo are there any texture templates for the helicopter pilot coveralls?
full quarry
dense peak
i dunno whats causing this issue rvmat is right and every selection/faces are an...
what rvmat shader you use?
dense peak
full quarry
what rvmat shader you use?
what do you mean shader?
lethal condor
AKA how is your rvmat, post yours
Also not entirely sure what is the issue you mean
lucid halo
doas Arma 3 support tiled textures?
lethal condor
How about my second question
dense peak
lethal condor
How about my second question
the issue im encountering is regarding the texturing maybe the rvmat or something overall i dunno what youre seeing here is some parts of it are pitch black while others actually okay
 ornate stream
Hey guys! Fisrt time here and first time messing with tex's.
Got a question.I jsut did a tex swap for the runway_beton object and it looks blurry.The standard A2 runway_beton tex is also blurry.Was hoping a new hi res tex would do the trick but doesnt look like the tex i used.I replaced the tex with the runway/concrete tex from A3.Any ideas why its like this?It should be hi res but isnt.
Thanx
full quarry
lucid halo
doas Arma 3 support tiled textures?
Yes if you unwrap your model to use tiled textures. Multimaterial is what typically uses this method
stable swallow
dense peak
the issue im encountering is regarding the texturing maybe the rvmat or somethin...
Its either your diffuse/base color texture is like that or the paths to the nohq, smdi, as are not correct.
 spark narwhal
looking for someone that can do textures for some gear
lethal condor
 prime fable
Got an issue where the transparent parts of my texture still appear black in game, any idea on a fix?
livid knot
Is the texture names as _ca?
prime fable
livid knot
Is the texture names as _ca?
yes
livid knot
Are you using an rvmat? I believe transparent areas need a seperate rvmat than the one used for other areas
prime fable
the rvmat mat is
class StageTI
{
    texture = "#(argb,8,8,3)color(0,0,0,0)";
};
ambient[] = {0.0,0.58,0.05,0.15};
diffuse[] = {0.5,0.5,0.5,0.7};
forcedDiffuse[] = {0.65,0.45,0.5,1.0};
emmisive[] = {1.0,1.0,1.0,1.0};
specular[] = {0.01,0.01,0.01,2.5};
specularPower = 5;
PixelShaderID = "TreeAdv";
VertexShaderID = "TreeAdvNoFade";
RenderFlags[] = {"NoLODBlend"};
class Stage1
{
    texture = "a3\characters_f_mark\common\data\ghillie_threads_nohq.paa";
    uvSource = "tex";
    class uvTransform
    {
        aside[] = {1,0,0};
        up[] = {0,1,0};
        dir[] = {0,0,0};
        pos[] = {0,0,0};
    };
};
class Stage2
{
    texture = "#(argb,8,8,3)color(0.5,0.5,0.5,1,MCA)";
    uvSource = "tex1";
    class uvTransform
    {
        aside[] = {1,0,0};
        up[] = {0,1,0};
        dir[] = {0,0,0};
        pos[] = {0,0,0};
    };
};
is the texture converted from a tga or png that already has the _CA suffix?
prime fable
full quarry
is the texture converted from a tga or png that already has the _CA suffix?
No
It was a png in photoshop with empty gaps, then exported to png and then with tex2view i made it a _ca
full quarry
prime fable
It was a png in photoshop with empty gaps, then exported to png and then with te...
it needs to have the _CA suffix in the source file too
prime fable
so the png needs to be x_ca.png?
full quarry
also when you open the png in texview is it black there?
full quarry
prime fable
so the png needs to be x_ca.png?
yes
prime fable
in t2v it's gray, same as the the rest of t2v
no black background
the file being 2048x1024 shouldn't be an issue?
prime fable
Yeah looking at it now as a paa its gray background, same as background of t2v
prime fable
Yeah, the one i posted above is one my mate made since my knowledge of rvmats is just assigning directories and that's it
prime fable
full quarry
problem might be your rvmat
Here's what it looks like in-game

for some reason it makes my screen SUPER bright too if i zoom in close
livid knot
Try it without the rvmat and see if it works just to confirm
prime fable
livid knot
Try it without the rvmat and see if it works just to confirm
No change at all even with getting rid of a material on the model
livid knot
hm if its still broken even without the rvmat then something else is causing it
prime fable
Got it fixed, turns out half way through making this I moved rvmats into a separate folder but didn't repath it on the p3d
ornate stream
full quarry
Yes if you unwrap your model to use tiled textures. Multimaterial is what typica...
I'am trying to do this now with Object builder.It says Unwrap structure in object builder but doesnt seem to be working.It is still strecting the texture.Do you know Object builder well?Also still trying how to work out how to stop grass/clutter from sticking through my object/pavement.Is there a tool in Object builder that controls that?
Anyone? Any help apreciated!
full quarry
ornate stream
I'am trying to do this now with Object builder.It says Unwrap structure in objec...
I dont recommend doing unwrapping in OB. the UV tools are highly manual in it. and not very easy to use
ornate stream
Oh ok.Thanx.Any easier to use tools?
Also, are very large clutter killer objects possible? Trying to learn to do that too!
trail sequoia
ornate stream
Oh ok.Thanx.Any easier to use tools?
Blender with UV-Packer/Textools would be a go to
full quarry
ornate stream
Also, are very large clutter killer objects possible? Trying to learn to do that...
50x50 meter clutter cutting decal is max size
outer needle
I have a glass surface that is textured as "glossy" with a high specular power, when shone light to it, the color profile changes from bluish to magenta-ish.
The effect itself its really nice, but is there a way to control that color of specular reflection in the rvmat or is that something related to how it was textured?
(update: this is controlled by Fresnel procedural)
Also, in the vanilla jet pilot helmets you see a reflection itself (or a simulation of a reflection?) in the HUD visor, is that also related to the texture itself or the rvmat?
full quarry
outer needle
I have a glass surface that is textured as "glossy" with a high specular power, ...
Shader needs to the kind that has envmap reflection stage
Like super shader (last stage)
outer needle
Yeah, im using SS with envmap in stage 7
since I was mingling inside the vanilla rvmats while trying to recreate those effects seen in the scopes that are not transparent or the helmet itself
any other tip I could get?
agile glacier
How do you make a retexture template if you can't find one online? Is there a tool or technique to help with this?
full quarry
agile glacier
How do you make a retexture template if you can't find one online? Is there a to...
there are no specifc technique for that
it comes down to understanding how computer images and image editors like Gimp or Photoshop work
agile glacier
So do I have to manually select the rights parts of the texture and replace the existing camo with the new one?
full quarry
that is often one part of the process yes
stable swallow
There is much more than just changing camo or colors
frosty pumice
my textures look a lot worse in game than in substance painter, even on ultra settings.
The texture files are in 4k but does not look 4k ingame.


I use MoonieFR's SubstanceToArma preset using the Arma 3 SuperAlpha (MetRough) setting. Any help?
floral fiber
use base colour as a reference for how it looks in general
that also looks like a bad paa conversion or compression somewhere
lethal condor
I also want to know what is the texture name
floral fiber
^ should be suffixed _co
ornate stream
trail sequoia
Blender with UV-Packer/Textools would be a go to
Thanks.
ornate stream
full quarry
50x50 meter clutter cutting decal is max size
Thanks.
frosty pumice
lethal condor
I also want to know what is the texture name
they are CO
frosty pumice
floral fiber
that also looks like a bad paa conversion or compression somewhere
thats what i think, although im not sure whats causing it. I use TexView to convert to PAA, does that meddle with compression?
full quarry
frosty pumice
thats what i think, although im not sure whats causing it. I use TexView to conv...
you got too many colors in your camo
.paa is compressed format and you got too many shades
technically dxt5 compressed paa might hold more colors but typically its better to get the source in right way
 bright mantle
Hey, anybody know where the textures to the parade uniform belt are?
 dawn bough
bright mantle
Hey, anybody know where the textures to the parade uniform belt are?
dawn bough
bright mantle
Hey, anybody know where the textures to the parade uniform belt are?
a3\Characters_F_AoW\Uniforms\Data\
cheers mate!
ornate stream
floral fiber
yeah uh
dont do that
Thanks.Been using texview too.
hallow jay
Uhm, what exactly is the P3D of a scope?
Is it a fully opaque plane that has mildots / chevrons masked on to it in Substance, for example?
hallow jay
I can´t find any info regarding the actual "size". Or does it not matter?
lethal condor
Good question 🤔
hallow jay
I guess I will have to try and see what abomination comes out in the end
lethal condor
Diag exe and diag_resetShapes , maybe diag_mergeConfigFile can help you too
frosty pumice
full quarry
you got too many colors in your camo
sorry for being late with this, the cirlces you see arent in the CO, they are part of NOHQ (forgot to mention this, sorry). So this shouldnt have anything to do with colors
And ive seen the file difference before it is converted to PAA, it doesnt seem to do as much difference. The exported JPEG from substance painter is already low quality despite it being 4K and not looking low quality in substance painter
frosty pumice
could it be an issue that i export in 8 bit instead of 16 bit? there is no 16 bit option for JPG
full quarry
frosty pumice
sorry for being late with this, the cirlces you see arent in the CO, they are pa...
you should never export jpg in 3d work
png or tga
jpg is compressed format that causes artifacts that get way worse when further compressed to game file formats
frosty pumice
ah ill see if that works. Does PAA support 16 bit?
because i remember i coudnt convert 16 bit stuff to PAA
full quarry
frosty pumice
ah ill see if that works. Does PAA support 16 bit?
no
typically games dont use that
I dont recommend using it in any development stage either so that there is no step where you have to downgrade
frosty pumice
yap textures have significantly improved, thanks
lucid halo
I have a texture with a transparency and that works, but in bulldozer it looks green. Like just the green channel is displaying. Any clue why that may happen or is that just how bulldozer shows it?
full quarry
maybe wrong source format or resolution that breaks conversion to .paa
lucid halo
its 512x512 and tga 32bit. Should it not be 32bit?
full quarry
if thats 8bit per RGBA channel then its right
next issue could be your rvmat for it and wrong values that tint it green
lucid halo
I'll double check it
lucid halo
full quarry
if thats 8bit per RGBA channel then its right
It was the rvmat. Placing numbers in the wrong spots.
New to the rvmat stuff
full quarry
lucid halo
New to the rvmat stuff
It takes a bit of trial and error sometimes.
Good that you figured it out👍👍
lucid halo
I built once just fine, but now Mikero's pboProject is giving this error:
vegetation\corn\data\corn.paa: Error. AlphaFlag value is not 1 or 2. is -255
How do I fix this?
full quarry
you need to use correct file suffix in textures
_CA for transparent textures
and it needs to be in the source file prior to conversion to paa
so that the paa is converted with correct rules
lucid halo
ok, thanks
lucid halo
No clue what I am doing wrong and no clue why it built once without any errors. What is the best file to use and covert? TGA, GIF, PNG?
lucid halo
I create those in PS and they load and show fine in object builder. I convert to PAA fine. No clue where this -255 is supposedly at.
full quarry
ive never seen that error so dont know more
Id delete the old file and try convert again
and try run full build in pboProject so it clears the Temp folder
lucid halo
Deleting the file and remaking it worked. There is no way BIS made Arma with these tools.
lethal condor
Imagine making Poseidon and OFP from scratch and ended up Arma 3
full quarry
lucid halo
Deleting the file and remaking it worked. There is no way BIS made Arma with the...
things work alright when correct things are fed into it. 😅
outer needle
Being aware of the how to and what you are supposed to be feeding them helps too.
There's a lot of black spots that can only be covered in the forums with info from 10 years ago in non-easily accessible places haha.
Granted, the tools haven't really changed in that period of time, it's kind of unnerving to have to access info that old in non-practical formats, such as the dreaded 360p videos on yt
full quarry
outer needle
Being aware of the how to and what you are supposed to be feeding them helps too...
It's the same stuff we old beards learned from 😅
Maybe we just wanted to preserve the learning experience
frosty pumice
these two vehicles have the same rvmat properties and similiar SMDI texture but one is more shiny than the other?
 full quarry
youll need to adjust the shiny ones smdi
frosty pumice
thats strange because theyre both the same color???

 lucid halo
The texture has transparency but the plant part isnt supposed to be see through. What do I change in the rvmat to make it so that the plant part is opaque?

Better pic. You can see the guy through it.

 plush orchid
lucid halo
Better pic. You can see the guy through it.
plush orchid
lucid halo
Better pic. You can see the guy through it.
try sorting faces in object builder
 whole karma
Hello yall, I am wanting to make personalized gear for the milsim that I am in. I have a decent amount of time put into arma and I was wanting to dip my toes into this stuff now but I dont know how to or even where to start. I wanted to reach out and see if someone could help/teach me how to.
lethal condor
Personalize as in, you want to make like, a vest with a specific name tag?
whole karma
Yea like personalized uniforms, helmets etc.
lethal condor
In order to make textures, I think you will have two options:
- Have multiple textures per your mates. This is very straightforward and have multiple tutorials about it, and a bit bad for storage because you basically duplicated them
- Have one texture and put text over it using some procedural way. This is very hard for beginners since it needs two skills: scripting, and configuring GUIs, alongside of texturing. However this is nice because you don't really need to have big storage space, and it is very easy to add one, unlike having multiple textures and the only difference is just a name
Apparently you want to get the source PAA texture, modify it, and configure them all, last but not least, a proper way to pack into a PBO
Would recommend 1 if this is your very first modding, however if your members can be added or removed anytime, or frequently, you may want to consider 2
 void wave
How do I add tail codes to the planes ?
full quarry
Depends how the plane is made
 pseudo shoal
Does anyone have experience with image to paa conversion using community scripts rather than texview2? I'm trying to automate the conversion process for a project independently, and it seems that old libraries like img2pac don't generate correctly formatted PAX files anymore https://github.com/BohemiaInteractive/img2pac/tree/master
GitHub
jpg & png to paa / pac image conversion. Contribute to BohemiaInteractive/img2pac development by creating an account on GitHub.
severe rune
Gruppe Adler has a web PAA converter, thats probably open source
pseudo shoal
 iron thunder
https://github.com/gruppe-adler/grad_aff/blob/master/src/paa/paa.cpp
iron thunder
https://github.com/gruppe-adler/grad_aff/blob/master/src/paa/paa.cpp
Thank you! I didn't realize they had it open-sourced; I tried reading the code directly from their site but it was 27,000 lines long 💀
iron thunder
I don't think you would've found anything interesting because it uses web assembly 😅
pseudo shoal
I was experimenting with including the original CLI version of Pac2PalE from arma 3 tools into the source code of the project, but EULA says you can't copy the application, even for open-source or community made applications. I'll see if I can compile and integrate this somehow 🙏
 vestal crag
Hello, I'm searching for a way to change the texture of a certain uniform (recolor it) and export it into the workshop, so anybody can use it in multiplayer equipping it on the arsenal.
Problem is, I'm very new to arma modding. I have no clue where to start.
So far I've figured out how to extract the .paa file and edit it as image
But that's about it
I have no clue where to go from here
Xddd
vestal crag
lethal condor
In order to make textures, I think you will have two options:
1. Have multiple t...
This actually covers my problem pretty well
Would I need to / can I export the textures into a specific workshop item
?
Hm. From what I'm seeing here, I can put the .paa file into the mission itself
And then load it up via a script
The example is on a car object though. I'd need to check out how to do it on player spawns...
Peculiar
livid knot
you need to create a class for the uniform within an addon config
The arma samples have examples of this
 idle valley
hello, some general questions about textures if anyone is experienced with the the best practices. What size should textures be? How much should you fit onto a single UV map? A single headgear, multiple headgears? Should clothes be a single UV? what about armors?
oh and can you do emissives with textures? I.e .lights?
lethal condor
- textures only can have 2^n resolution (eg 512 1024 2048, up to 4096)
- UV does try to fill the entire tex, regardless aspect ratio and res
- You can have multiple UVs as much as you can until it breaks the game, but for a simple headgear, 1 is sufficient, I guess up to 2 at least
- There is no "should" terms of how the mesh is done
- (Basically) you cannot have a emissive part on a texturw but only material can, and entire of it
idle valley
I meant as in what does arma do for optimization purposes wise. Like for Kenshi the best practice is to fit as much as possible into a single 1K or 2K UV map. For arma is it the same?
i dont know how performance heavy textures are with the engine and stuff
like for example if i make 5 different hats, should all 5 share the same UV?
lethal condor
Again, UV does not take resolution into count. Also UV is a part of model not tex
And yes, regarded to UV/resolution pretty much are based on industry standard
idle valley
lethal condor
Again, UV does not take resolution into count. Also UV is a part of model not te...
so if i have 5 different hats and unwrap them together so they share the same UV and have the UV be 2K texture is that better or worse than having each hat unwrapped separately on its own UV square at something like 1K texture?
idle valley
lethal condor
What do you mean by worse
I try to show you

so pretend the 4 cubes are hats
is it better for all of them to share the UV like above
or
is it better for each hat/cube to have its own

like that?
full quarry
idle valley
so if i have 5 different hats and unwrap them together so they share the same UV...
Each individual gear/item would have its own textures and materials.
Except from some small parts that can be shared accross multiple larger objects, like individual bullets/similar ammo are often spread on an larger "atlas" and used from there
You can look into the vanilla Arma files themselves to see how texture spread has been done for them
idle valley
would it be better for optimization to have them share one UV or it doesnt matter really in this engine?
and what about modular/variation of a hat/clothes?
For example, if you have a backpack with a water bottle and then you want a version without the water bottle. Would it be better to just have it share the same UV?
sorry if my questions dont make sense
lethal condor
Using same UV aka same model is wiser
full quarry
You'd likely have that water bottle and other details you would swap around in their own atlas.
Vanilla does not have that many variants of things like that as its not really good for performance
idle valley
full quarry
You'd likely have that water bottle and other details you would swap around in t...
can you explain how an atlas works?
I dont want things to be performance heavy
full quarry
idle valley
can you explain how an atlas works?
its just many small things unwrapped on single texture/uv space and those small things are used as part of many models
its just a suggestion though, its not that commonly used method in vanilla data
idle valley
full quarry
its just a suggestion though, its not that commonly used method in vanilla data
how can i look at vanilla data?
full quarry
if you have P drive set up in traditional way, you would have A3 data unpacked in P:\A3
otherwise you can look inside individual arma pbos
idle valley
full quarry
Vanilla does not have that many variants of things like that as its not really g...
so this is an example of what i mean when i say varations. Its base is the same but also has additonal parts. Should they all share the same texture/UV because the additons are small? and you would just delete that part of the object
 lethal condor
Uses same UV, same texture
idle valley
lethal condor
Uses same UV, same texture
thanks so i think i understand it, in a case where you have variations like that you would use the same texture. But if it was a completely different vest you would use a whole different texture and not fit them together on one
lethal condor
Pretty much that's the industry standard
idle valley
Ok, ive been just trying to fit as much into one UV/texture as possible
because I was told it was better performance wise to load less textures
hallow jay
idle valley
so if i have 5 different hats and unwrap them together so they share the same UV...
For Blender download the texel density checker addon to check the TD of your UV islands for both of the cases you mentioned above. It'll tell you which case will have higher texture quality.
Though I am pretty sure putting 1 hat on a 1k will have a higher TD than 5 hats on a single 2k.
You should also consider using the 2nd udim for cases where applicable
Also, at a certain point it becomes pointless to increase the TD at the expense of performance. Most models dont need very high TD anyway.
idle valley
hallow jay
For Blender download the texel density checker addon to check the TD of your UV ...
to be honest I've never understood UV's very well. I get the basics but I've never understood the importance/complex sides of them. Like texel density or which things are best for performance/optimization so i am never sure what the best approach is
pseudo shoal
When creating a uniform mod, you need to define the uniform in both CfgVehicles and CfgWeapons for it to be accessible in the arsenal. But I've been looking through mods that implement retextures of the original backpacks (assault pack, for example) and they only implement it in the CfgVehicles class which makes it only show up under "Equipment" in Eden, not in the arsenal.
Do backpacks also get added to a different class or maybe I'm just missing something in my vehicles config?
 vernal sage
Backpacks are vehicles so you don't need to add anything else.
If you inherit from Bag_Base or Weapon_Bag_Base, your backpack will automatically appear as an entry under the Arsenal's 'Backpacks' tab unless you made the backpack private (scope = 1 or 0) for whatever reason.
And don't forget to include your backpack as an entry on your config's CfgPatches (in the units[] array).
pseudo shoal
vernal sage
If you inherit from **Bag_Base** or **Weapon_Bag_Base**, your backpack will auto...
So rather than just doing this currently:
class B_AssaultPack_Base;
class Testnew_AssaultPack: B_AssaultPack_Base
{
    ...
}
I should include class Bag_Base;?
class Bag_Base;
class B_AssaultPack_Base;
class Testnew_AssaultPack: B_AssaultPack_Base
{
    ...
}
You don't need to do that since B_AssaultPack_Base already inherits from Bag_Base.
Your issue seems to be scope. You're inheriting from the Assault Pack's base class which still has scope=1;
In your classname, make sure your scope token is defined to 2 (public).
pseudo shoal
Part of my config definition in CfgVehicles is this
class Testnew_AssaultPack: B_AssaultPack_Base
{
  scope=2;
  class TransportMagazines
  {
  };
  class TransportWeapons
  {
  };
  isbackpack=1;
  reversed=1;
  mapSize=2;
  author="bijx";
  vehicleClass="Backpacks";
  allowedSlots[]={901};
  model="\A3\weapons_f\Ammoboxes\bags\Backpack_Compact";
...
}
There's no need to redefine most of those tokens. You already inherit them from the Assault Pack's base class.
The only tokens you need are author, scope, and your hiddenSelections textures (if you applied any). Model too if you're using a custom model.
pseudo shoal
Oh I must've changed scope between when I sent my original message and now because I can see it in my arsenal now. I was basing my config off a similar mod so I just assumed re-declaring these tokens was necessary. I'll clean it up now, thanks @vernal sage 🙏
 queen cobalt
Anybody have some idea if using Easy Developer Tools can allow me to change my configs while texturing ingame without having to constantly restart?
lethal condor
Diag Exe
queen cobalt
lethal condor
Diag Exe
I figured I was able to using file patching right? If so do you have something that would help me set that up?
lethal condor
#arma3_config message
Even tho different channel but pretty much this. Textures are reloaded upon you change
queen cobalt
lethal condor
https://discord.com/channels/105462288051380224/122121444703338496/1169573729324...
Thank you very much. I appreciate you!
 blissful knot
Heyyo.
So I want to retexture the morphines in the ace medical addon.
How do I go about doing that?
I have Blender + Arma Toolbox.
I have Arma tools.
Im not necessarily asking for step by step instructions, just enough to get me going in the right direction.
lethal condor
As in 3D model or UI icon? If former, check if it supports hiddenSelectionsTextures. If not, you most unlikely can
blissful knot
So I checked the config and it doesnt have hiddenSelections.
lethal condor
Then most unlikely
blissful knot
🥲
lethal condor
I mean, it actually is possible to have a selection for the entire model, and not used by the config, which means you technically can if you figure out
blissful knot
I have the p3d file and the original texture. So retexture isnt what I want actually. I am making my own injector. I want to make a copy the morphine p3d, and give it a different texture.
There is a p3d for the morphine and a p3d for the epi. And just one paa with both textures. I assume the p3d file has some sort of reference to the paa, right? Am I able to just copy the p3d and edit it to reference my new texture?
blissful knot
Actually, i think i got it.
I just opened the file in a text editor and i can find-replace all the file references.
queen cobalt
lethal condor
https://discord.com/channels/105462288051380224/122121444703338496/1169573729324...
Back to this, would you be able to help me out more in detail? I am still struggling to do this with textures
lethal condor
If you launch Diag exe, there is nothing you need to do in order to reload tex. Just Alt+Tab
queen cobalt
lethal condor
If you launch Diag exe, there is nothing you need to do in order to reload tex. ...
But since I am unable to unpack & repack the pbo to add/remove textures what do I do?
I hate to ask this since I am sure you get this a lot. Would I be able to screen share with you? I am running into a few issues.
lethal condor
You can use your local file in your computer. eg C:\bra\duh\yourPic_co.paa
You may want to use jpg to preview (more like export) quickly
queen cobalt
But then how am I able to load the config and see the uniform ingame?
lethal condor
diag_mergeConfigFile I've mentioned there can help
queen cobalt
As I try to execute it in debug I just get Error Missing ; even when its not aha
lethal condor
It is your config. If you know how to, you know why
...Or, do you mean Debug Cnsole says so
If you mean so you failed to launch Diag exe
queen cobalt
Yes Debug was saying that, last thing and I think i am set, how can i set launch parameters for arma3diag
lethal condor
Reread the original post
queen cobalt
Interesting, I see now, I must've been a bit confused. I am now stuck with a see through body in editor when it worked in normal pbo form. fun stuff aha
queen cobalt
Ahhh, Interesting I got it all solved and textures showing etc. I appreciate it
lethal condor
You cannot to go back your legacy way to test anymore
ornate stream
Hey guys.I have a issue.Been tryiing to use a texture that "blurs" out at the side.I have deleted the section i want to work with so as a test i have put it into game but the model shows a plain black area where the missing section of texture is.

iam trying ti add a section of texture to the side of the runway texture where edge of the concrete is.I need to apply this "blur" out section but it has a black bachground.How do i tell the model to be transparent so the texture blurs out correctly.
Thanks
full quarry
ornate stream
iam trying ti add a section of texture to the side of the runway texture where e...
Needs alpha channel and _CA suffix in name before converting to paa
queen cobalt
lethal condor
You cannot to go back your legacy way to test anymore
No kidding aha
ornate stream
full quarry
Needs alpha channel and _CA suffix in name before converting to paa
Thanks!! Will have a go at that.:)
ornate stream
full quarry
Needs alpha channel and _CA suffix in name before converting to paa
Worked a treat m8.Thanks.
 blissful knot
full quarry
Needs alpha channel and _CA suffix in name before converting to paa
blissful knot
full quarry
Needs alpha channel and _CA suffix in name before converting to paa
Why does it need _CA in the name?
full quarry
blissful knot
Why does it need _CA in the name?
For correct paa conversion rule to apply
idle valley
what texture sizes should clothes and hats be? something like 1k or 2k?
full quarry
idle valley
what texture sizes should clothes and hats be? something like 1k or 2k?
clothes typically have been 2 parts and 2k textures
1 texture for upper body clothing and one for lower body clothing
hats could be 1k and still have similar texel density as 2k clothing
idle valley
full quarry
1 texture for upper body clothing and one for lower body clothing
isnt clothes just one object in the game?
lethal condor
What do you mean by just one object?
idle valley
like its not different objects. Cant objects only have one texture?
lethal condor
Also it is possible to have (up to) 4k tex for a very small thing
No, you can have multiple texs
full quarry
no objects can have as many textures as they need
idle valley
how do you do that?
lethal condor
A lot of vehicles do. Some equipment even do
model.cfg and config.cpp things. Cannot tell where to go rn
full quarry
and on model you have uvmapping for each texture
its all same way you would do 1
but you instead of one for whole thing you make multile for the parts that need them
idle valley
So i've not really messed with arma 3 past one thing but dont you have to use the tools for blender and when you export the object you have to select the _co for color texture right?
 lethal condor
That'll do
idle valley
but doesnt that mean it can only be one texture file? Since you can only put one _co into the "face texture"?
full quarry
idle valley
but doesnt that mean it can only be one texture file? Since you can only put one...
you add multiple materials in blender and give each different arma properties
idle valley
full quarry
you add multiple materials in blender and give each different arma properties
can you show me?
lethal condor
It's Blender thing
idle valley
lethal condor
It's Blender thing
you mean materials?
idle valley
lethal condor
And you can set Arma tex/mat per Blender mat
how?
lethal condor
What?
lethal condor
idle valley
This
full quarry
idle valley
how?
This is very basic blender stuff so I'd recommend running some more tutorials for Blender.
But basically In the material list you just hit plus to add more material slots and you can assign them as you want in edit mode.
 calm tangle
Hi eveyone. Why do i get these weird lines on my textures ?
 full quarry
calm tangle
Hi eveyone. Why do i get these weird lines on my textures ?
full quarry
calm tangle
Hi eveyone. Why do i get these weird lines on my textures ?
What shader type you use?
calm tangle
full quarry
What shader type you use?
VertexShaderID="Super";```Buildings generally look and work better with multimaterial
How have you unwrapped the uv for the wall?
calm tangle
full quarry
How have you unwrapped the uv for the wall?
What do you mean ? The wall uv is larger than the texture size
full quarry
Is your rvmat stages all using same uv source "tex"
calm tangle
full quarry
Is your rvmat stages all using same uv source "tex"
Here is the rvmat:
diffuse[]={1,1,1,1};
forcedDiffuse[]={0,0,0,1};
emmisive[]={0,0,0,0};
specular[]={1,1,1,1};
specularPower=30;
PixelShaderID="Super";
VertexShaderID="Super";
class Stage1
{
    texture="ArmaWorld\data\Rocks025_nohq.paa";
    uvSource="tex";
    class uvTransform
    {
        aside[]={1,0,0};
        up[]={0,1,0};
        dir[]={0,0,0};
        pos[]={0,0,0};
    };
};
class Stage2
{
    texture="#(argb,8,8,3)color(0.5,0.5,0.5,0.5,DT)";
    uvSource="tex";
    class uvTransform
    {
        aside[]={1,0,0};
        up[]={0,1,0};
        dir[]={0,0,0};
        pos[]={0,0,0};
    };
};
class Stage3
{
    texture="#(argb,8,8,3)color(0.0,0.0,0.0,0.0,MC)";
    uvSource="tex";
    class uvTransform
    {
        aside[]={1,0,0};
        up[]={0,1,0};
        dir[]={0,0,0};
        pos[]={0,0,0};
    };
};
class Stage4
{
    texture="#(argb,8,8,3)color(1.0,1.0,1.0,1.0,AS)";
    uvSource="tex";
    class uvTransform
    {
        aside[]={1,0,0};
        up[]={0,1,0};
        dir[]={0,0,0};
        pos[]={0,0,0};
    };
};
class Stage5
{
    texture="#(argb,8,8,3)color(1,0,1,0,SMDI)";
    uvSource="tex";
    class uvTransform
    {
        aside[]={1,0,0};
        up[]={0,1,0};
        dir[]={0,0,0};
        pos[]={0,0,0};
    };
};
class Stage6
{
    texture="#(ai,64,64,1)fresnel(0.4,0.2)";
    uvSource="tex";
    class uvTransform
    {
        aside[]={1,0,0};
        up[]={0,1,0};
        dir[]={0,0,0};
        pos[]={0,0,0};
    };
};
class Stage7
{
    texture="ArmaWorld\data\Rocks025_nohq.paa";
    useWorldEnvMap="true";
    uvSource="tex";
    class uvTransform
    {
        aside[]={1,0,0};
        up[]={0,1,0};
        dir[]={0,0,0};
        pos[]={0,0,0};
    };
};```This looks alright yeah. Can you screenshot the uv editor too
calm tangle
full quarry
This looks alright yeah. Can you screenshot the uv editor too
Here is a screenshot of the uv editor
 full quarry
Ah
That's too big uv I think
I'd strongly recommend using multimaterial for this stuff
calm tangle
full quarry
I'd strongly recommend using multimaterial for this stuff
I do have the same problem with smaller uvs, it only happen with some textures, it's not a random glitch
full quarry
calm tangle
I do have the same problem with smaller uvs, it only happen with some textures, ...
Is all of the model unwrapped on this uvset or is some of it moved to the second uvset you seem to have
Is there reason to have it since your rvmat does not seem to use it
calm tangle
full quarry
Is all of the model unwrapped on this uvset or is some of it moved to the second...
I do not have secondary uv, or maybe there is one but it's not used
full quarry
Best to check what's in it in case you have lost some of the mesh to it
If its not intended then best to fix whatever causes it
calm tangle
full quarry
If its not intended then best to fix whatever causes it
I'll check
idle valley
full quarry
This is very basic blender stuff so I'd recommend running some more tutorials fo...
mo i understand that part. I meant how do you get arma to use all the materials if you can only use one _co.paa file?
full quarry
where does it say you van use only one co.paa file?
idle valley
 idle valley
that per the material? not per object?
full quarry
yes
full quarry
👍
idle valley
thanks if i have more questions ill send some
idle valley
full quarry
👍
why do they make the shirt and pants two differernt textures instead of one? wouldnt one be more performance friendly?
full quarry
probably would be but its better resolution and makes them easier to swap independently
best not to over think it
idle valley
hm, ok.
pseudo shoal
Hello fellow texture addon creators! I recently created a tool to create basic uniform / camo mods without any scripting or photo editing and I figured I'd share it here. It started as a test originally, since automating stuff for arma is what I loved doing, but after a few people reached out with ideas and feedback, I decided to make it an open-source community release: https://github.com/bijx/ARMA-3-Camo-Mod-Maker
GitHub
An application that allows you to create a equipment mod for ARMA 3 in minutes. - GitHub - bijx/ARMA-3-Camo-Mod-Maker: An application that allows you to create a equipment mod for ARMA 3 in minutes.
I'm definitely not an expert when it comes to texture making myself, and the configs might not be optimized, but it acts as a nice base for people who are deterred from mod making due to the learning curve. I'm open to ideas and feedback!
full quarry
pseudo shoal
Hello fellow texture addon creators! I recently created a tool to create basic u...
I'm curious what kind of results does this produce?
I'm also slightly worried that automagic tools for those who have trouble learning the basics often result in influx poor quality mods. And nobody wants that.
You have a good intention here for sure. But also the stuff needed to learn to make mods kinda really need to be learned to make good mods.
pseudo shoal
full quarry
I'm curious what kind of results does this produce?
it's definitely a WIP proof of concept since I'll definitely be tweaking the texture results and config files that are generated, but I can show you a few examples of the outcome
pseudo shoal
full quarry
I'm also slightly worried that automagic tools for those who have trouble learni...
I agree. I think the ideal use case is for people trying to add some additional immersion to their own campaigns and creative projects that add to the overall experience. And best case scenario, it encourages people to go out and learn modding since the automation can only do so much
full quarry
Let's hope so. I don't mean to be buzz kill since it's cool when people make new tools. Just from previous experience the worst often comes to pass. 😅
First feedback then.
Textures need not be square, but resolution needs to be in power of 2
pseudo shoal
full quarry
Let's hope so. I don't mean to be buzz kill since it's cool when people make new...
Not at all! Open-source community tools relies on community input.
full quarry
1024x2048 is still valid
Depending on what the model is made with
So user need to figure that out as one of first things
pseudo shoal
I only suggested square due to how the application applies images to the equipment textures. Basically it turns your image into a 2x2 grid then applies that over the pre-cut texture maps
full quarry
Preferably use the same resolution as original files
pseudo shoal
if it were 1:2 resolution, my app would unfortunately squish the texture