#・faq

1 messages · Page 1 of 1 (latest)

earnest sinewBOT
#

Collei Pre-TC FAQ by @analog scaffold (Author, Calcs), @dark sentinel (Co-author, Consulting), @royal pike (Calcs, Troubleshooting), @ionic mulch (Calcs, Troubleshooting)

For all Collei Calcs you can reference: Collei Mastersheet by @analog scaffold and Collei Frames Mastersheet by @tardy notch

DISCLAIMER (This one is especially important)
Dendro is a new element and there are many things we still do not know about the new elemental reactions.
Pre-TC is volatile and, as always, perpetually subject to change until release (and sometimes later!). Please note that these are theoretical suggestions. Everything described in this FAQ is a good faith analysis based on the little information about the character’s kit that we know. Team calcs, additionally, are not established yet, and as with everything in TC, the content in this FAQ should be taken with a grain of salt.

_**CHARACTER OVERVIEW**_

Collei is a Dendro Support unit who offers fertile ground for chain reactions from other party members. Between the three Dendro characters introduced in 3.0 (including the Traveler), Collei is the only Dendro unit capable of sustaining Burning reactions while off-field, creating a special niche.

The majority of her damage comes from her Burst, and her personal damage benefits from the new Spread reaction. Her Burst also has the most frequent Dendro application of her kit at C0, maxing at four instances. Constellations change this in favor of her Skill.

To reliably Burst, Collei requires lots of Energy Recharge, as well as particle generation from characters like Raiden, Fischl, or other Dendro characters. It is recommended, then, to use an Energy Recharge weapon or Sands of Eon.

Being a bow-wielder, Collei has access to the team-buffing Elegy for the End, which also provide all the stats she wants, and has access to excellent artifact sets in the new Deepwood set, which shreds Dendro resistance, or Noblesse Oblige providing the much-appreciated 20% teamwide ATK buff and 20% personal Burst damage.

Collei's Constellations focus on improving her personal damage and Dendro Application. By C6, her raw damage is increased by roughly 30%, mostly via C2, C5 and C6. Furthermore C2 and C6 grant her 1 additional Dendro application each, improving her ability to benefit from or enable more Dendro Reactions.

_**TALENTS**_

Leveling priority: Burst > Skill >> Normal Attack

Analysis:

Collei’s Burst is more than 70% of her total damage output, making her Burst the most important Talent to level. Her Skill should be leveled insofar as she deals Dendro damage and will often be holding a Dendro DMG%o Goblet.

The Burst is 6-seconds long, but can be extended to 9 after initiating a Dendro-based elemental reaction – something you should be doing anyways as soon as Collei takes the field. 19 hits take place during the Burst, but due to the ICD being every 2.5 seconds without a hit-based cooldown, Collei can only apply Dendro a maximum of four times with her Burst.

Collei’s Skill throws a boomerang that applies Dendro on hit. It can hit on throw and when the boomerang returns to Collei. On return, it creates a Sprout if Collei is properly ascended, dealing another instance of Dendro damage. Her Skill then applies Dendro about three times at C0, but improves with constellations.

Normal Attacks are unimpressive, and her Aimed Shot is standard for 4-star units. Diehard Collei loyalists, however, can use charged shots to trigger Quicken, Spread, or Bloom.

As previously mentioned, the first ascension passive talent applies a negligible instance of Dendro damage via Collei’s ‘Sprout.’ The latter ascension passive talent extends the duration of her Burst – this is a must have, so ascend Collei to at least lvl 60/70 ASAP if you intend to use her.

Her passive exploration talent, much like her girlfriend, Amber, reduces gliding stamina consumption by 20%.

_**ENERGY REQUIREMENTS AND BATTERIES**_

In typical, 20-second rotations, Collei will need around 200% Energy Recharge due to the long 12s cooldown on her Skill inadequately charging her 60-cost Burst. Collei will mostly be contributing damage and application for reactions off-field.

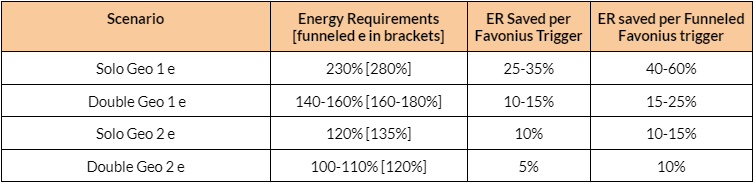
In longer rotations and/or in teams with many rich energy sources, these energy needs may drop to 160% or lower. Equipping weapons like an R5 Sacrificial Bow or a Favonius Warbow at any refinement rank can also reduce these needs. We strongly advise the use of an Energy Recharge calculator to plan.

The top 5 sources of energy for Collei are

  1. Raiden Shogun
  2. Fischl (due to not having caveats)
  3. Traveler (Electro, Dendro, or even Geo, equipped with Favonius Sword and two Skill uses)
  4. Tighnari (25-second rotation, two Skill uses)
  5. Most other characters that can use two Skills in a rotation and carry a Favonius Weapon

The Raiden Shogun and Fischl, who are both Electro units that benefit from Quicken and Aggravate reactions, are by far the best choices for controlling Collei’s energy needs. Her Dendro application will also offer a respectable buff to Raiden and a quite exploitable buff to Fischl, utilizing Fischl’s A4 passive.

It is only recommended to run one other Dendro member at most, due to Dendro’s tendency to want to interact with more than one outside element.

Additionally, Taser teams involving Fischl, Kokomi, Xingqiu, Sucrose, and the like, generate lots of energy and require a long rotation. Taser and Raiden-Fischl teams will minimize Collei’s energy needs the most (though it’s not currently known whether that translates to most damage).

#
_**COMBOS**_

Collei’s on-field inputs are extremely straightforward. You’re basically dealing with one of three possible combos.

E, Q (Skill, Burst)
Recommended over “Q, E” so Collei doesn’t waste time on-field waiting for her particles.
N1, tCA, E, Q (Normal Attack, Tap-Charged Attack, Skill, Burst)
This should only be used while equipping the Polar Star, in order to guarantee as many stacks as possible.
N2D (Two Normal Attacks, followed by a cancel (aim, dash, jump) of your choice)
This is only for the people that really, really, really want to use Collei’s low-damage auto’s.

The majority of the time, you’re simply using her Skill and Burst in some order and then swapping off for someone to take advantage of transformative reactions or Aggravate.

_**ARTIFACTS**_

There are a few artifact options available, depending on your preference.

ER / DMG / CRIT
The safe default option when NOT equipping an Energy Recharge weapon.
ATK / DMG / CRIT
The safe default option when you ARE equipping an Energy Recharge weapon.
EM / DMG / CRIT
Awkward in-between arrangement. Comparable to ATK when focused on Spread.
ER / EM / EM
The Bloom (trigger-focused) option while equipping an EM weapon.
EM / EM / EM
The Bloom (trigger-focused) option while equipping an ER weapon.

The Sands of Eon should always be ER if your ER needs are not met. Equipping an Energy Recharge weapon gives room for an ATK Sands. If you equip a weapon like Favonius Warbow or Elegy for the End, ATK will be a stable choice. An EM timepiece, after factoring in Spread damage, will be about equal in damage to an ATK sands, but without reactions, damage will significantly fall off.

For comparing Burning damage, we assume ten total seconds of uptime for Burning, with Collei as the Trigger. Burning deals four instances of damage per second, for up to two seconds before running out of Dendro “fuel” to burn. Collei can apply Dendro seven times at C0 between Skill and Burst, but there is overlap in applications that prematurely reset the timer. As such, we knock off about four seconds from the expected total. This gives us forty instances of Burning damage, which based on the Transformative Reaction formula, is equivalent to five Overload reactions.

At 700 Elemental Mastery with high Burning/Bloom ownership, Collei does respectable damage, comparable to the ATK build. However, it is much more difficult to obtain an EM/EM/EM Set of equal quality compared to an ATK / DMG / CRIT Set. EM Build has much more to lose if Collei lacks high reaction ownership, which will vary based on the teams she is used in.

Since Bloom into Rupture is the same damage (exactly) as Overload, and Collei can trigger more than five Bloom reactions in a rotation, six or more Ruptures deal more damage than 40 ticks of Burning damage.

Only a few 4pc sets compete for Best-in-Slot for Collei.

Deepwood
Best-in-slot. Shreds Dendro resistance while providing a Dendro DMG bonus. Hyperbloom and Burgeon both deal Dendro damage, so this does not only support Dendro characters Deepwood is functional on every character and most characters can benefit from the Dendro resistance shred.Don’t sleep on farming for this set.

Noblesse Oblige
The de-facto support set. If you’re okay with sacrificing personal damage and simply want to stack buffs for your teammates, this is your best bet.

Emblem of Severed Fate
At 200% Energy Recharge, competes toe-to-toe with Deepwood for personal damage, but offers no support capabilities and requires a dedicated build to match.

Instructor
Available in 4-star only, but an alternative buffing set when the team prefers an Elemental Mastery buff over ATK.

Exile
Available in 4-star only, but an alternative energy generation source when the team is energy hungry.

The Best-in-Slot artifact set is the new 4pc Deepwood set. It provides 15% Dendro DMG and offers a Viridescent-Venerer-like effect, shredding Dendro resistance. This effect can be triggered by anyone equipped with this set. Deepwood benefits Collei’s personal damage as well as any Dendro teammates she’s paired with. It is the best balance of personal damage and support.

The 4pc Emblem of Severed Fate is equivalent in damage only at 200% ER, but loses the bonus team utility. The default support option is, of course, 4pc Noblesse Oblige, though 4pc Exile and 4pc Instructor will also work for team utility, if they need it.

#
_**WEAPONS**_

It’s hard to rank these weapons, as many of them are best when factoring in a whole team, even if they’re not the best in personal damage.

Elegy For the End [ATK% Sands >= EM Sands]
Most stable 5-star choice. An excellent balance of damage and team support.

Polar Star [ER% Sands]
Strongest in terms of personal damage, but offers no team utility and requires its own rotation to get used to. 8% more damage than Elegy in best-case scenarios.

Aqua Simulacra [ER% Sands]
Approximately matches Elegy’s personal damage with Collei, but Elegy buffs the team.

Stringless R5 / Mourn’s Moon R5 [ER% Sands]
Stringless performs worse on Emblem of Severed Fate, but trails only 2% behind Aqua Simulacra on Deepwood.

Favonius Warbow [ATK% Sands >= EM Sands]
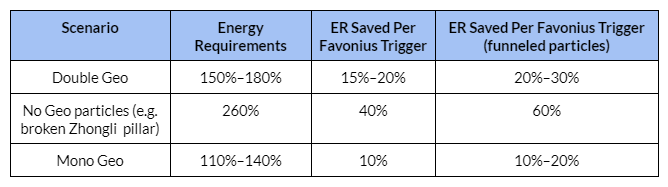
Favonius weapons are just extremely powerful. They lower ER requirements with their passives, allowing you to build more offense and smooth out the rest of your team’s rotation. If your Energy Recharge requirement would normally be 200%, it becomes 170% instead.

Some weapons in the mastersheet are listed in a different order, placed, higher, or not listed at all. Sacrificial Bow is one of these weapons. Sacrificial Bow looks good on paper, compared to R5 Stringless, but it only reaches this damage after you’ve significantly altered your rotation.

The reason for this is that Collei’s Skill only applies Dendro on the throwing of the boomerang once per 5 seconds, similar to how Ningguang’s Jade Screen can only generate energy once every 5-6 seconds. This means to maximize Spread instances you have to wait for her boomerang to return most of the time in order to get the damage boost from an additional Spread reaction. Since Spread accounts for around 30%+ of her personal damage, this is a significant loss. You either stay on the field as Collei and deal mediocre damage, cutting into team DPS for the rotation, or you interrupt your rotation to switch to Collei, use her Skill, and swap out.

Because of this, I do not recommend Sacrificial Bow to most players, especially since it extends rotations when below refinement 5, due to passive cooldown time. Prototype Crescent can also compete, but only post-headshot, and it takes time to set up a reliable headshot, lowering DPS in the long run.

#
_**TEAMBUILDING**_

Since Dendro needs heavy testing before we can make conclusive team comps, what follows here, instead, is a loose guide on constructing a team based on the reactions Collei can facilitate. The characters listed are only suggestions.

Quicken / Spread / Aggravate Teams

Aggravate focuses on increasing an Electro DPS’s damage, and can only be triggered while Quicken is active.

Quicken occurs when Dendro and Electro hit an enemy, adding a flat damage buff, much like Shenhe and Yunjin’s talents against that enemy for as long as they are affected by the Dendro Aura applied by Quicken.

Electro / Electro / Collei / Flex (Usually an Anemo unit or Zhongli)

Electro: Fischl, Miko, Shinobu, Keqing, and most other Electro characters.

Flex: Kazuha, Jean, Sayu, Sucrose, Zhongli

Pyro and Hydro can interfere with Quicken, so they are generally not advised in these teams.

Spread focuses on increasing a Dendro DPS’s damage, and can only be triggered when the Quicken reaction is active.

Quicken occurs when Dendro and Electro hit an enemy, adding a flat damage buff, much like Shenhe and Yunjin’s talents against that enemy for as long as they are affected by the Dendro Aura applied by Quicken.

Dendro / Collei / Electro / Flex

Dendro: Tighnari, Traveler

Electro: Fischl, Miko, Shinobu

Flex: Zhongli, or whatever your team needs. Anemo cannot swirl Dendro, but it can still swirl Electro if that’s of interest still.

Pyro and Hydro can interfere with Quicken, so they are generally not advised in these teams.

Burning Teams

Burning combines Dendro and Pyro to deal rapid Pyro damage over time that scales with Elemental Mastery. Burning Teams utilize Collei’s specialization as an off-field Burning sustainer.

The viability of Melting and/or Overloading off of Burning is uncertain at the moment and thus not covered in further detail.

Collei will usually still be best off with [ER or ATK] / DMG / CRIT artifacts, even when the trigger element.

Collei / Pyro / Pyro / Flex:

  • Pyro: Klee, Xiangling, Bennett, Thoma, but no perfect fits right now.

  • Flex: Kazuha, Sucrose, Jean, Sayu, Zhongli, or a Pyro character.

Bloom Teams

Rupture teams focus more on making as many Blooms as possible, since one Bloom will automatically detonate when there are more than five on the field. Otherwise, Rupture takes about five seconds to occur without elemental interference, dealing damage to everyone caught in the blast (you only take a very small fraction of this).
It’s important to note that Frozen enemies preserve a Dendro aura for longer, allowing for more Blooms to occur.

If there is a character released that auto-Rupture’s Blooms, this strategy will see more play.

Rupture damage is exactly equal to Overload in terms of damage.

Collei / Hydro / Cryo / Anemo:

  • Cryo or Anemo can be swapped out for a different Hydro unit. High Hydro application is extremely important.

  • Hydro: Tartaglia, Yelan, Xingqiu, Mona, Kokomi
    Tartaglia is the only character at the moment who can apply enough Hydro on his own.

  • Cryo: Rosaria, Kaeya, Ayaka, Ganyu, Diona (though Diona’s application isn’t great)

  • Anemo: Kazuha, Jean, Sayu, Sucrose

Hyperbloom and Burgeon that Dendro Cores have their own elemental app icds, so any attack that can apply Electro/Pyro will trigger Hyperbloom/Burgeon.

Two characters are particularly good triggers for these reactions. despite their otherwise unimpressive elemental application rate.

  • Hyperbloom: Shinobu

  • Burgeon: Thoma

Hyperbloom teams utilize Electro application on Blooms in order to create single-target Electro attacks.

At time of writing this, building a Hyperbloom team is difficult, due to the need to balance individual damage output with sustaining enough reactions to make the strategy matter.

Collei / Dendro / Hydro / Electro:

  • Dendro: Tighnari or Traveler

  • Hydro: Tartaglia, Yelan, Xingqiu, Mona, Kokomi

  • Electro: Fischl, Miko, Shinobu, and most other Electro characters.

Burgeon teams utilize Pyro application on Blooms in order to create AOE Pyro explosions that damage everyone caught in the blast (you only take a very small fraction of this).

Pyro always gets ownership of the reaction, so build your Elemental Mastery on this character.

Bloom consumes a lot of Hydro. To simultaneously trigger Burgeon and Vaporize reactions, you have two choices:

Bring lots of Hydro application from someone like Childe to work with Pyro DPS units like Xiangling.

Bring only a Pyro unit with slow application, like Thoma, to ensure Pyro doesn't overtake the Hydro aura on an enemy – overtaking Hydro will halt Bloom/Burgeon reactions.

Collei / Hydro / Pyro / Flex:

  • Hydro: Tartaglia, Yelan, Xingqiu, Mona, Kokomi

  • Pyro: Thoma, Bennett, Xiangling.

  • Flex: Hydro/Pyro/Anemo/Zhongli


#
_**CONSTELLATIONS**_

DISCLAIMER: For explicit numbers on DPS increases, please refer to our linked Mastersheet for up-to-date numbers. Changing numbers in the sheet is much faster/easier than editing an embed.

C1 – While the constellation says that Collei gains 20% Energy Recharge, in practice, it’s less than that – more like 14%. This is because Collei, to maximize her energy intake, must be on-field to absorb the Dendro particles she generates.
From last constellation: 3.38% || Total: 3.38%

C2 – Essentially, this extends the length of Collei’s Skill uptime, allowing for more opportunities for Dendro application and damage. For the sake of conservative estimates, I assumed this gave only one extra Spread instance. A safe stopping point.
From last constellation: 6.69% || Total: 10.29%

C3 – Three talent levels added to Collei’s Skill. Not a significant increase, as her damage comes from her Burst.
From last constellation: 2.42% || Total: 12.97%

C4 – Grants 60 Elemental Mastery to all party members but herself. As such, this is good for team damage, but has zero impact on her personal damage.
From last constellation: 0.00% || Total: 12.97%

C5 – Three talent levels added to the Burst is a welcome boon. Tied for the most beneficial constellation with C6 and C2.
From last constellation: 7.65% || Total: 21.60%

C6 – Adds yet another Spread instance in the form of a Culein-Anbar attack at 200% of Collei’s ATK.
From last constellation: 7.20% || Total: 30.36%

sonic starBOT
#

Tighnari Pre-TC FAQ by @tawny heath (Author, Calcs) and @dark sentinel (Author, Calcs)

For all Tighnari Calcs you can reference: Tighnari Constellation Mastersheet by @tawny heath, Tighnari Weapons and Artifact Mastersheet by @dark sentinel, and Tighnari Frames Mastersheet by @tardy notch

DISCLAIMER (This one is especially important)
Dendro is a new element and there are many things we still do not know about the new elemental reactions. Pre-TC is volatile and, as always, perpetually subject to change until release (and sometimes later!). Please note that these are theoretical suggestions. Everything described in this FAQ is a good faith analysis based on the little information about the character’s kit that we know. Team calcs, additionally, are not established yet, and as with everything in TC, the content in this FAQ should be taken with a grain of salt.

***CHARACTER OVERVIEW***

Tighnari is a 5 star Dendro bow unit and is the first Dendro 5 star to be released in Genshin Impact. Because Dendro is new and has not been thoroughly tested, please take our work with an extra dose of salt, as we may learn a lot more about Dendro teams in the future after testing.

Tighnari is an on field DPS unit that has a very short (4 second) field time requirement for each rotation. His kit seems designed around the Quicken reaction, and Spread makes up around 40-50% of his total damage output in these teams. Because of this, Tighnari will likely have a role in enabling Electro units, especially Fischl and Yae Miko, but he may have some viability in other Dendro reaction focused teams as well. His short field time requirement makes him a good choice for Quickswap oriented teams as well.

Tighnari’s playstyle is based around his Charge Attack, which has a 2-stage charge, akin to Ganyu, but the charge time is longer than hers at nearly 3 seconds for the level 2 charge. The level 2 Charge Attack has 5 instances of Dendro DMG, an initial hit, and 4 Clusterbloom Arrows that branch off and home in on the enemy. The Clusterbloom Arrows are technically AoE, but have a very small hitbox, meaning most of the time 1 enemy will be hit (upon release we will test how close or grouped enemies will have to be for any AoE). Each level 2 Charge Attack at C0 applies Dendro twice.

Tighnari’s E grants him 3 orbs which reduce the charge time of each level 2 Charge Attack to .5 seconds, making him very fluid for a Charge Attack Bow unit. The orbs granted by his E will persist when he swaps out. The E also creates a taunt field that makes nearby enemies attack each other, which helps him avoid interruption during his short field time window. The E is also Tighnari’s best source of AoE Dendro application. Tighnari’s E grants 3.5 particles per cast, making his energy generation quite good, though he will still need some ER% to use his Q every 12 seconds.

Tighnari’s Q is a 40 cost multi-hit nuke that nets him a lot of Spread procs when combined with his CAs. Tighnari’s ascension passives grant him 50 extra EM when he uses a level 2 Charge Attack, and gives EM to DMG Bonus conversion for his CA and Q, which incentivize Tighnari to build EM to capitalize on the Spread reaction, which scales off of EM, Dendro DMG% Bonus and CRIT stats. Every hit of the Q targets a single enemy, and Tighnari has a generally single target ranged niche as a whole.

***TALENTS***

Leveling Priority: AA>Q>>E

While most of Tighnari’s damage comes from the EM scaling Spread reaction, the ATK scaling of his multipliers is still important for his overall damage. Prioritize leveling the AA for the Charge Attack and the Q, whereas the E can be prioritized last as the initial hit is only one moderate instance of damage. Due to Tighnari’s reliance on Spread reaction, getting him to Level 90 is highly advisable more so than crowning his talents.

***COMBOS AND ROTATION***

E, 3x CA into Q for most teams. With his C4, it may be advisable to use Q first to obtain the EM buff before using his CAs.

#
***ARTIFACTS***

Tighnari has multiple Artifact Sets suiting him. Namely, Deepwood Memories, Gilded Dreams and Wanderer’s Troupe.

Deepwood Memories is a special case, since it's the Viridescent Venerer equivalent for Dendro, providing Dendro RES Shred. Ideally for Tighnari, someone else on his team would wear this set to provide the RES Shred for him. However, should no suitable or worthwhile wearer be on Tighnari’s team it is his best option to maximize his own damage by a respectable margin.

In case Deepwood is covered by someone else, Tighnari’s best options are Gilded Dreams and Wanderer’s Troupe. The difference between these 2 sets is fairly small and which one comes out on top depends on the specific setup used. Wanderer’s Troupe ends up favored with external EM Buffs, Constellations or if Tighnari’s Burst is not used in every DPS cycle.
Whereas Gilded Dreams is favored if Tighnari is EM starved due to a lack of buffs or running a non-EM Sands. Getting significant DMG% buffs would also favor Gilded Dreams, however there are next to no Dendro DMG% buffs in the game in 3.0.

Generally Wanderer’s Troupe is easier to recommend as long-time players will undoubtedly already have strong pieces of it and it is also available as a Strongbox, making it difficult to obtain a brand new Gilded Dreams set good enough to match or beat a pre-existing Wanderer’s Troupe set.
However, since Deepwood Memories is in the same Artifact Domain and Tighnari players will want a functional set in any case, players may still end up with a competent Gilded Dreams Set on the side regardless.

Mixed Sets are generally a bit behind, but follow the priority of 2Deepwood (15% Dendro Dmg) > 2EM/ER > 2ATK >= 2NO. With 2ER only being valuable if Tighnari can use it to meet his ER requirements.

Trap Sets:

Shimenawa might appear attractive at first due to Tighnari’s emphasis on CAs and his low energy cost. However the set would significantly increase Tighnari’s ER requirements under normal circumstances as his Burst is still important. And even if you manage to cheat your way around that you have to make sure that Tighnari gains enough energy after casting his Skill so that he can burst timely after doing his CAs, creating practical issues and removing a lot of flexibility from his rotations.

Thundersoother cannot reach a good uptime as Tighnari himself will constantly remove Electro by applying Dendro and refreshing Quicken.

***ENERGY REQUIREMENT***

Despite Tighnari’s primary home being Quicken Teams his Energy requirements can vary a lot depending on the exact Team and Rotation.

The 2 most important factors are the number of Dendro units on the Team and if Tighnari wants to use his Burst every DPS cycle (12-15s) or only every other DPS Cycle (24-30s).

In Double Dendro Teams, his ER requirements are usually 120-140% if he wants to burst every DPS cycle. Whereas in Double Electro Teams his ER requirements are usually around 160-180% if he wants to burst every DPS cycle.
Teams with neither a second Dendro unit nor Electro Resonance may feature even higher ER requirements and it is not recommended to burst every DPS cycle in such Teams.

Should you opt to burst every other DPS cycle, his ER requirements are generally non-existent.

Notably, since Tighnari thrives in a flexible quickswap environment a possible approach is to mostly forego ER in high ER demanding Teams and simply use his Burst whenever possible and either let him do an additional slow CA or let someone else fill the field time should not enough particles drop to fill his Burst for a given DPS cycle.

#
***WEAPONS***

Bows are known to have a colorful and powerful range of options to choose from, so which ones fit Tighnari?

*5: **
Hunter’s Path > Polar Star/Aqua Simulacra > Thundering Pulse/Skyward Harp > Amos’ Bow > Elegy for the End

His 5* Signature Bow Hunter’s Path stands tall above all other options. At R1, it is a massive 25-30% upgrade over his best R5 4* options and even gains significant mileage over other 5* Bows. Additionally, should Tighnari not burst every DPS cycle, the advantage of Hunter’s Path increases even further.

Should one look to invest more Primogems into their Tighnari his signature weapon is most definitely your first stop and takes priority over his Constellations.

3 & 4: **
The general recommendation if you don't have a 5* weapon available for Tighnari is not even a 4* weapon, but a 3* weapon: R5 Slingshot!
As so much of Tighnari’s DMG comes from Spread Reactions, its low Base ATK is not as much of a detriment. Its passive +60% works pretty effortlessly on his initial CA Hit and makes more than up for the -10% the Clusters afterwards receive. Combined with its high CR Substat, it becomes an excellent choice competing with R5 4* options.

Otherwise, if one insists on using a 4 weapon*, a lot of high refinement ones are comparable to Slingshot if you can satisfy their accompanying conditions. None of them however really stand notably above Slingshot for general use.

all 3 Craftables are fairly close to each other, but all come with their individual requirements. None of them really excel over Slingshot consistently enough to warrant spending the 5 Billets on them.

Stringless can be a fine option if you burst every DPS cycle, but doesn’t stand out and an accompanying Fischl would love to have it much more.

Windblume Ode is just a worse Stringless for the most part and falls behind Slingshot, so sadly it stays all dusty and rusty.

Fading Twilight can be solid if its ER Substat is put to good use.

Alley Hunter at high refinements stands out as Tighnari’s best non-5* weapon IF you execute Tighnari’s DPS cycles cleanly within 4s and thus prevent its Stack decay. Not suitable for extended field-time and quite inaccessible being a limited 4* Weapon.

#
***TEAMMATE SYNERGIES***

Electro Units for Quicken Teams

Fischl: Likely one of Tighnari’s best teammates, Fischl is looking to be the premier off field DPS in all Quicken teams due to her A4 triggering when the on field unit triggers Quicken or Aggravate. While on field Dendro units cannot trigger Fischl’s A4 with Spread, reapplying Quicken will allow them to trigger Fischl’s A4 regardless to get additional Aggravate procs from Fischl. Because of this and her excellent energy generation, Fischl is looking to be nigh irreplaceable in Tighnari’s main teams.

Yae: Another powerful off field Electro unit, Yae looks to be strong in Quicken focused teams. Her A4 talent incentivizes building EM on her, which allows her to slot into Quicken teams better than most would expect. Her long field time requirements work well with Tighnari’s short field time requirements and Yae also has high synergy with Fischl as well. Yae can provide extra Fischl A4 procs with her Elemental Burst while she’s on field, and Yae appreciates the energy from Fischl.

Lisa: While an often overlooked unit, Lisa could have strong potential in Quicken teams through the use of her Q for off field Electro application. Lisa gains EM from ascension, boosting her own Aggravate damage, and her DEF Shredwill also be a sizable teamwide damage boost. While usually a TTDS slave, Lisa here can be built more offensively with weapons like Widsith, or more supportively with Hakushin Ring. She will need a fair amount of ER and Fischl in order to use her Q as frequently as possible. Her C4 gives her a huge boost in multi-target scenarios.

Keqing: A decent partner for Tighnari in dual carry or quickswap setups. Tighnari only needs 4 seconds of field time for every 12 second rotation, which Keqing can slot nicely into, while providing more A4 procs for Fischl.

Beidou: Not recommended but could work, Tighnari doesn’t seem to be a strong driver for Beidou.

Raiden: Works fairly well with Tighnari in a dual carry setup as Tighnari will be able to maintain Quicken for most of Raiden’s Burst uptime, but the two units don’t have much synergy in terms of energy/resolve gain. Potentially fun for overworld where Raiden’s E will allow Tighnari to use Quicken when sniping from far outside of Fischl and Yae’s range.

Dendro Units for Quicken Teams

Devil May Cry (DMC): A decent option for Dendro Resonance and EM buffs, but has lower personal damage compared to using a second Electro unit. Can hold Freedom Sworn if you have it. Can hold Deepwood Memories 4-PC to shred Dendro RES.

Collei: A decent option for Dendro Resonance and EM buffs at C4 (or with Elegy), but has lower personal damage compared to using a second Electro unit. Can hold Deepwood Memories 4-PC to shred Dendro RES.

Defensive Options

Healer Sucrose: With Prototype Amber and VV, Sucrose is the best healer for overall damage potential for Quicken teams with 2 Electro units, and outperforms Jean for personal and team damage output at the expense of comfort. Prototype Amber also lowers her ER requirements a bit.

Jean/Sayu: Anemo healer with VV for double Electro teams, but lack of EM or DMG % buffs hold them back relative to other Anemo units.

Zhongli: The Jade Shield isn’t super necessary on Tighnari due to the fast charge time of his E and his taunt, but he can still be useful for more difficult content. He only applies -20% Electro and Dendro RES shred via his shield, and has no real damage contribution besides that. He could run Archaic Petra to buff Electro DMG%, or Deepwood Memories set to shred Dendro RES further, but even then Zhongli will tend to lower the team’s DPS potential.

Kokomi: Enables various Bloom-related teams while being a powerful healer, and her slow off field Hydro application can let her generate some seeds without removing Quicken during Tighnari’s DPS window. Can run utility weapons such as TTDS and supportive artifacts such as Tenacity of the Milleleth 4-PC or Deepwood Memories 4-PC to help buff her teams.

Diona: Shielder with an EM buff at C6. Doesn’t fit nicely into Tighnari rotations, and Cryo will not interfere with Quicken due to Cryo and Dendro auras not reacting, but is still usable.

Kuki Shinobu:/Dori: Alright options for Electro and healing, though their Electro application is low, so don’t expect a lot of Aggravate procs. Kuki may work well in Hyperbloom setups as a reliable Electro trigger for the reaction and can buff teammates with ToM (most relevant for Raiden dual carry, which wants as much ATK as possible), but may feel compromising to play with Tighnari in somewhat close range.

Miscellaneous:

Other Anemo Supports: Double Electro teams may especially appreciate Sucrose, Kazuha or Venti to provide VV, grouping, Electro DMG% buffs, or EM buffs. Anemo infusions with Electro, as well as Electro Swirl in AoE will also net you more Aggravates. Bloom seeds are also suckable by CC abilities.

Ayato: A possible option to apply Hydro off-field for Hyperbloom teams with Kuki Shinobu.

Albedo: A random flex option that has off field damage and buffs EM. Could work with Zhongli in Geo Resonance comfort teams.

Rosaria/Ganyu/Kaeya: an option for the gimmicky but likely viable Fridge teams, where Dendro aura+Freeze increases the amount of Hydro needed to completely eat the Dendro aura, allowing Hydro units to generate more Blooms.

#

**Some Recommended Teams: **

1. Double Electro Quicken: Tighnari, Fischl, Electro Flex, Defensive Flex

Tighnari’s best team due to full uptime on Quicken. Two electro units for max synergy have the best synergy with a defensive VV support. As an enabler carry, 2 Electro teams with VV will generally outperform 2 Dendro 2 Electro teams with the current roster of Dendro units. In these teams, the electro units will typically have a higher damage contribution than Tighnari, and Tighnari will want to use the Deepwood Memories 4-PC set. Best units for the second Electro are Yae, Keqing, or Lisa, as all of them can swap on to use their Skill/Burst, and get more Fischl A4 procs with their own Aggravates before swapping off.

2. Double Dendro Quicken: Tighnari, Dendro Flex, Electro Flex, Defensive Flex

A Dendro flex support instead of electro can trigger Dendro resonance, resulting in more EM and personal damage for Tighnari. A second Dendro unit will be able to hold the Deepwood Memories 4-PC set to shred Dendro RES while also lowering Tighnari’s ER requirements, making this the best team to maximize Tighnari’s personal damage. Keep in mind that because our off field Electro DPS units have considerably more damage output than Collei/DMC do, this team will likely perform worse than the Double Electro version until we get off field Dendro units with more DPS or utility. If using Fischl, the off field Dendro unit may reapply quicken instead of Tighnari and prevent you from getting some Fischl A4 procs.

3. Hyperquick: Tighnari, Kokomi, Fischl, Anemo Flex

A team that uses Kokomi’s slow off-field Hydro application to generate some seeds without removing Quicken while Tighnari is on field. These seeds are then triggered for Hyperbloom by either Fischl or through Electro Swirls from the Anemo flex unit. It is recommended to put Kokomi on the Deepwood Memories 4-PC set to shred Dendro RES to increase Hyperbloom damage, while Tighnari can use Gilded Dreams 4-PC.

4. Geo Quicken: Tighnari, Fischl, Albedo, Zhongli

A comfortable Quicken team that may be useful if you want Tighnari to stay on field for longer, but will have a lower damage ceiling than other options.

5. Raiden Replaces Her Fox: Tighnari, Raiden, Kuki Shinobu, Kazuha/Sucrose

A Quicken Dual Carry team that will likely be functional, but Raiden may prefer to be paired with more synergistic Dendro units (with higher energy cost/ER reqs) that aren’t in the game yet, or may prefer to use her normal Bennett focused teams.

6. Refrigerated Fox: Tighnari, Kokomi, Cryo Flex, Anemo Flex

A bloom team that uses Freeze co-existing with Dendro Aura to allow Kokomi to generate more Blooms per Dendro application (see Fridge mechanic in Dendro-TC chat). Kokomi should be built full EM here as she will be the Bloom/Rupture trigger, while Tighnari can use 4-PC Deepwood Memories to amplify the Bloom damage. The Cryo unit can be any off-field Cryo applier (Rosaria/Ganyu are recommended). The Anemo unit can group seeds and enemies together for more focused AoE. A more gimmick oriented team that does not utilize Tighnari’s DPS output the fullest due to no Spread, and other Dendro options with more AoE Dendro application may feel more consistent in this team, but it should still be bare-bones viable.

***CONSTELLATIONS***

C1- Gives 15% CRIT Rate % to Tighnari’s Charge Attacks. Overall an alright constellation since the CRIT will scale up Spread damage from CAs, and it allows you to reinvest 1 CRIT Rate % substat into EM so you don’t overcap CRIT Rate on CAs. Free CRIT Rate is always nice, but the fact that the Q is not boosted by the extra Crit Rate holds this constellation back a bit. Would not recommend that Dolphins specifically go for it. Rating: 2/5.

C2- Provides 20% Dendro DMG bonus to Tighnari when an enemy is in his E’s taunt field. A nice boost to his damage given that external Dendro DMG bonus % buffs will be rare in the game for now. May be unreliable if 1 enemy dies in the E’s taunt field and the rest of your damage goes to enemies outside of the taunt field. Rating: 2/5.

C3- Tighnari gains much less from his ATK scaling multipliers relative to his EM scaling Spread damage (or compared to CRIT and DMG bonus that can affect both forms of damage), meaning this constellation is very insignificant. Rating: 1/5.

C4- Tighnari’s Q gives a 60 EM buff for 8 seconds to all party members including himself. If the Q triggers a Dendro related reaction, the buff is refreshed with an additional 60 EM, to buff allies for up to 120 EM. While this constellation only gives Tighnari around an 14% DPS increase, being able to buff EM for the entire team can net high teamwide DPS gains for Tighnari’s Electro DPS units, making it easily his most impactful constellation for teamwide damage. Rating: 3.5/5

C5- Tighnari gains much less from his ATK scaling multipliers relative to his EM scaling Spread damage (or compared to CRIT and DMG bonus that can affect both forms of damage), meaning this constellation is very insignificant. Rating: 1/5.

C6- Tighnari’s level 2 Charge Attack’s charge time is reduced by .9 seconds, and provides an extra Clusterbloom arrow that deals an additional 150% ATK scaling damage. This constellation is great QOL and allows him to bypass the ICD on Dendro application. Rating: 4/5.

#
***How is Tighnari’s Power Level? Is he worth pulling for on his banner or waiting until I lose 50/50 on future standard banners?***

Despite being banished to standard banner in 3.1, Tighnari’s pre-release viability is looking to be well-balanced and comparable to average new 5 star releases, and he looks to be easily better than most of the current standard banner units. He will have a powerful role in enabling the powerful off field Electro units, and the DPS potential of most Quicken teams is looking to be in the range of better meta teams. In terms of power level, Tighnari seems a bit similar to Ayato or Yoimiya on paper due to having similar damage contribution per field time requirement while also enabling powerful off field DPS units.

However, there are some potential drawbacks to Tighnari that you may wish to consider before pulling for him. While Quicken teams are very powerful, Tighnari works well in them mainly because his personal damage is higher than what Collei/DMC can provide (and while Tighnari has more personal damage, it is mostly single target while the others excel at AoE Dendro application). Because of this, it is not certain whether Tighnari will be the best Dendro unit for Quicken teams as more Dendro and Electro units come out.

For example, if we get a powerful off field Dendro DPS or EM buffer, or a Dendro healer, Tighnari may become less valuable in future 1 Dendro/2 Electro/1 Anemo Quicken teams (though such a unit could make 2 Dendro Quicken teams with Tighnari much more viable). An on field Dendro unit that uses normal attacks may have better synergy with Fischl for C6 procs, as well as with Beidou. Additionally, if we get an on field EM scaling Electro unit designed to take advantage of Aggravate in the near future, it is very likely that such a unit will want to use Fischl (to drive Fischl A4 procs more effectively than Tighnari can) and may prefer a unit with off field/AoE Dendro application rather than using Tighnari as an enabler. So while Tighnari may be meta for Quicken teams during 3.0, he may become overshadowed for these teams later on as more units designed around Dendro reactions are released. Despite this, Tighnari should still retain a powerful and flexible niche in these teams as a Quickswap enabler of Quicken related teams.

Because Tighnari will be added to the standard banner in 3.1, those that pull for Tighnari in 3.0 may get better long term value from investing in him if they get his constellations gradually over time from losing 50/50s. While Tighnari’s early constellations aren’t very useful, his C4 and C6 are powerful and may help him retain meta relevance over future C0 Dendro units that are only available on limited banners. Of course, given the RNG of getting specific standard banner units it may take years to get Tighnari’s higher end constellations. Those who want Tighnari but may want to wait to get him on standard banner should consider getting him on his limited banner in 3.0 due to the low odds of getting him over other standard banner characters. Additionally, he may not have another rate up banner after 3.0, so it's possible if you miss him now, it may take you years to get him, if ever at all. Those who pull on limited banners will need to pull a 50/50 pity 8 times to have had a roughly 50% chance of pulling at least one Tighnari. So if you really like Tighnari, I would suggest pulling for him in 3.0 and hopefully watch him get stronger over the years from gradually getting constellations from lost 50/50s.

opal nexusBOT
#

Nilou Pre-TC FAQ by @analog scaffold (Author, Calcs), @tawny heath (Co-Author, Calcs), @fallow mica (Co-Author), @gloomy wadi (Consulting)

For all Nilou Calc you can reference: Nilou Mastersheet by @analog scaffold and Nilou Frames Mastersheet by @high silo

DISCLAIMER (This one is especially important)
Pre-TC is volatile and, as always, perpetually subject to change until release (and sometimes later!). Please note that these are theoretical suggestions. Everything described in this FAQ is a good faith analysis based on the little information about the character’s kit that we know. Team calcs, additionally, are not established yet, and as with everything in TC, the content in this FAQ should be taken with a grain of salt.

__**CHARACTER OVERVIEW**__

Nilou is a Hydro sword-user who can play both DPS and support roles on Bloom teams specifically, thanks to her unique Skill that allows for varying playstyles. She is hyper specialized for teams utilizing the Bloom reaction. The majority of her team benefits depend on her teams consisting only of Hydro and Dendro characters, meaning that while fulfilling her designed role, she cannot benefit from other types of reactions. Aside from this, her Hydro application is consistent and/or rapid, depending on what “stance” she takes with her Skill.

In most cases where Nilou may want to use her Burst off cooldown, Nilou needs 180% Energy Recharge. Players who pick up Nilou do not need to prioritize using her Burst off-cooldown unless the equipment she carries depends on its use, or if the extra Hydro application helps her team produce more Blooms per rotation. The damage in the end is usually comparable or better when forsaking Energy Recharge altogether.

Nilou cares exclusively about three stats: HP, Elemental Mastery, and sometimes Energy Recharge. This trivializes many weapons that only grant ATK bonuses, since Nilou’s talents scale purely off HP. Bloom reactions scale purely with Elemental Mastery, and ATK is not needed there either.

That said, Nilou has exactly one use case: Bloom teams. While she can play any role on these teams, and she is the undisputed best character for these teams with her incredibly efficient passive talents, this means that often Nilou will require other limited 5-star characters or high-constellation 4-stars to function. In these teams, one can safely and conservatively estimate 8 blooms per 20-second rotation, but can reach upwards of 10 Blooms with the current options for Dendro supports. The greatest challenge to piloting Nilou in-practice will be controlling the ownership of Bloom reactions so the character with the greatest Elemental Mastery gets to deal the damage.

Nilou’s greatest weakness, even beyond that, is that her ideal teammates are not currently available in-game. A Dendro healer, or a unit with faster Dendro application (whether off-field or on-field) would greatly enhance Nilou teams’ potential.

#
__**TALENTS**__

Leveling priority: Skill > Burst >> Normal Attack

Analysis:

It is highly recommended to get Nilou to level 90 to boost her base HP pool as high as possible, as well as to enable her Blooms to have the highest possible level scaling for base damage.

Nilou lives and dies by her Skill, as the Burst can be neglected entirely and her Normal Attacks are the only talents that use her ATK stat.

When using Nilou’s skill, she can then do a 3-hit combo in any combination of Normal Attack and Skill button presses, all dealing Hydro damage based on Max HP. Depending on whether you use a Normal Attack (changed to “Swords Dance”) or Skill (changed to “Whirling Steps”), Nilou enters one of two stances she can take, “Luminous Illusion” (Normal Attack) and “Water Wheel” (Skill).

Luminous Illusion continuously converts her Normal Attacks to Swords Dance moves for 8 seconds. This is Nilou’s DPS stance, and should be used when you want her to spend as much time on-field as possible.

Water Wheel creates a ring around the active character that continuously applies Wet to enemies. The ICD on her Wheel is 2 seconds, but will tick every half-second checking for new enemies to affect. This is Nilou’s support stance, and although it doesn’t deal damage, it allows her to apply Hydro from off-field.

Nilou’s Burst is simply a modest instance of Hydro damage based on Max HP that marks enemies affected. These marked enemies will then suffer a second delayed hit of comparable strength. There are no other effects for this talent. The Elemental Burst should be used if you need two more applications of Hydro to generate more Blooms for your team.

Nilou’s passive talents depend on the team consisting only of Hydro and Dendro characters, with at least one of each of the two elements. These passives buff Bloom damage for the whole team by up to 400% based on Nilou’s Max HP, and can give Nilou and her teammates 100 EM to further boost Bloom damage. Blooms will become “Bountiful Cores”. which also explode almost immediately upon creation and damage enemies in a greater AoE range. The radius of the AoE hitbox of the Bountiful Cores is slightly bigger than the radius of Kokomi’s Jellyfish, which can damage groups of enemies without the need for significant grouping. The HP scaling boost to Bloom damage and her signature elemental reaction is the Crux of Nilou’s kit and enables Bloom to function as the main source of damage for Nilou’s teams.

#
__**COMBOS**__

While Nilou’s combos may seem complicated at first glance, they’re fairly simple. Each type of attack as Nilou dances serves a purpose (application range, number of enemies hit, etc.) despite having different multipliers.

  • Q, E, N3x6 (Optional Burst, Skill, 18 Swords Dance attacks) – On-Field Focus

  • Q, E E E E (Optional Burst, Skill, 3 Whirling Steps attacks) – Off-Field Focus

  • Q, E, N3 (Optional Burst, Skill, 3 Sword Dance attacks) - Off-Field Focus
    use this rotation to apply Nilou’s buff while minimizing her own Bloom ownership

#
__**ARTIFACTS**__

Artifact Main Stats

Generally, Nilou will want to use either triple HP% main stat gear (when bursting every second rotation), or ER/HP/HP gear with enough ER% substats to reach 180% (when bursting every rotation). Both combinations are generally equivalent to each other as long as the extra Hydro application from using the Burst off cooldown doesn’t help you get more Blooms for your team. Focusing on HP% gear makes Nilou very easy to farm for and to build (as you don’t worry about crit) and gives her the highest possible team-wide boost to Bloom damage through her A4 passive.

Crit DPS builds are possible and viable, and dare I say, fun, but are not recommended, and will generally perform worse than HP% focused builds.

Artifact Sets

Nilou’s Artifact set options are fairly flexible. In general the best option is 2-PC Tenacity of the Milleleth for the 20 HP%, with any of the following 2-sets: 2-PC Gilded Dreams, 2-PC Heart of Depth, 2-PC Noblesse, with 2-PC Heart of Depth/2-PC Gilded Dreams also performing well as a combo. Just use whichever combo of these 2 piece sets gives better substats, prioritizing HP%, ER% (if bursting every rotation) and EM.

Note that for Sword Stance, where Nilou is on field, 2-PC Tenacity of the Milleleth/2-PC Heart of Depth will start to outperform other 2-PC combinations.

You may also consider using 4-PC Deepwood Memories on Nilou in the event that your other teammates have more optimal sets that they would rather run, as the Dendro RES Shred is very important for Nilou’s teams due to the general focus on Bloom damage. However, this may be unlikely as most Dendro units will be able to synergize well with the set better, and will be able to maintain the Shred uptime more easily from off field, as Nilou’s Whirl stance Tranquility Aura will not refresh the Shred.

#
__**WEAPONS**__

Your weapons, in some small part, depend on whether or not you are using Nilou’s Burst off cooldown (and thus building with Energy Recharge). If you are Bursting off cooldown, Festering Desire, the event weapon from 1.2, is a top-tier option just below Nilou’s own signature weapon. Favonius Sword also becomes an obvious choice.

In all other cases, these weapons are your go-to.

Key of Khaj-Nisut - Limited Signature Weapon; gives lots of HP% and allows Nilou to convert her max HP to an EM buff for herself and for the rest of the team. Allows Nilou to double dip by getting high EM while building full HP%, which both empower her Blooms.

R5 Sacrificial Sword - Any hit from Sword stance can reset the skill cooldown, which allows Nilou to use Sword stance attacks while her Tranquility Aura is active

R5 Xiphos’ Moonlight - good stat stick and benefits team, but depends on refinements

Freedom-Sworn / Primordial Jade Cutter – just for the stats.

Iron Sting - Craftable EM stat stick; R5 is competitive with and sometimes bests other options here.

Sapwood Blade - Craftable option to provide a small bonus amount of EM to an ally.

Options change orders based on how many Blooms Nilou is able to trigger and whether Nilou opts to Burst off cooldown or not. Because of this, a clear hierarchy is nearly impossible, but unsurprisingly, her signature weapon stays head-and-shoulders above the competition in every possible circumstance.

#
__**TEAMBUILDING**__

Bloom Teams

Bloom teams focus more on making as many Blooms as possible, since one Bloom will automatically detonate when there are more than five on the field. Otherwise, Dendro Cores take about five seconds to occur without elemental interference, dealing damage to everyone caught in the blast (you only take a very small fraction of this).

Nilou’s passive allows Blooms to explode almost immediately, deal more damage, and expand the range of Bloom explosions. She is a must-have for Bloom teams that can afford to commit to her, but cannot compete in other roles in other types of teams.
There are three options for team structures:

Double Resonance (2 Hydro 2 Dendro) is the most chaotic when trying to control Bloom ownership unless you run a character with very minimal Hydro application like Barbara. If you struggle controlling Bloom ownership, the power of teamwide EM buffs like Instructor and Elegy for the End increase. In these teams, consider building EM on units that do not have high personal damage with standard DPS builds (for example DMC), but running standard DPS builds on units that do have decent personal damage (such Ocean-Hued-Clam Kokomi or Yelan). Nilou can still more than double the Bloom damage of teammates that build low to no EM, even with F2P builds.

Your double resonance team will basically be restricted to Nilou, Dendro Traveler, Collei, and Kokomi or Barbara. A healer is (basically) mandatory, since Blooms also eat away at your characters’ health. Sadly the only options for healers are a limited 5-star and… well, Barbara, who also can’t generate energy for the team. A dendro healer is sorely needed, but does not exist in the current game state. Unfortunately, Prototype Amber or Xingqiu rain sword heals are not enough to heal through teamwide Bloom damage, especially in multitarget scenarios.

Triple Hydro teams focus on rapid Hydro application in order to ensure a Dendro character building full EM takes full ownership of Bloom reactions. The Yelan + Xingqiu off-field DPS combo can certainly carry nearly any combination of other characters, so the last piece of the team is a Dendro unit with healing.

Lastly, when another Dendro character is released, Triple Dendro can ensure Nilou has full ownership of the Blooms she buffs. However, sacrificing the new Hydro resonance HP boost is a huge detriment, so the bar for Dendro performance must be high enough to compensate.

#
__**CONSTELLATIONS**__

DISCLAIMER: For explicit numbers on DPS increases, please refer to our linked Mastersheet for up-to-date numbers. Changing numbers in the sheet is much faster/easier than editing an embed.

C1

Gives Nilou 6 more seconds of Tranquility Aura uptime in Whirl stance, or 65% DMG bonus to the last chain of Nilou’s auto attack string in Sword Stance. Specifically, if the 3 more instances of Hydro application result in Nilou triggering 3 more blooms owned by her (which is unlikely with current Dendro supports), then this constellation can add around 40% more damage to Nilou in single target scenarios, and possibly twice as much more damage against 2 targets, and the value of this constellation may be slightly less if your team can already generate a higher number of blooms than our somewhat conservative assumption. However for sword stance this constellation only adds around 7% more damage due her raw Hydro damage being less significant compared to her Blooms. Rating: 4/5 if you can get 3 more blooms per rotation, 1/5 if no extra blooms can be produced, and 2/5 for Sword Stance.

C2

Provides 35% RES Shred for both Hydro and Dendro DMG for the entire team. This constellation is a solid increase by virtue of increasing team-wide Bloom damage alone, and may become more
valuable in the future if Nilou can run Dendro and Hydro teammates with higher personal damage contributions outside of Bloom. Rating: 3/5.

C3

Increased multipliers for her Elemental Burst do very little for Nilou overall. Rating: 1/5.

C4

Makes Nilou’s Elemental Skill grant her 15 energy, and 50% Elemental Burst DMG bonus if used within 8 seconds of her Elemental Skill. Given the supportive nature of Nilou’s kit, this constellation sounds like it doesn’t do much, but it is actually relatively impactful because it lowers Nilou’s ER% requirements to around 140% when bursting every rotation. This allows you to drop ER% sands when bursting every rotation and run HP% sands instead with a few more ER% subs, which results in a significant gain alongside the Elemental Burst DMG bonus. Rating: 3/5

C5

Nilou gains multipliers for her Elemental Skill. This does very little for Whirl Stance but is a small boost to Sword Stance. Rating: 1/5 for Whirl Stance, 2/5 for Sword Stance.

C6

Gives Nilou .6% Crit Rate % and 1.2% Crit Damage % for every 1000 HP she has to a cap of 30% and 60% respectively. With 50,000 HP, Nilou can easily hit this cap. This constellation is quite powerful and allows Nilou to be able to attain a decent Crit Ratio without compromising the HP% she needs to amplify team-wide Bloom damage, and truly takes her personal damage to the next level, though its effects are less impactful for Whirl Stance. It may open up the viability of more crit focused builds, but this will have to be explored upon release Rating: 3/5 for Whirl Stance, 5/5 for Sword Stance.

snow dockBOT
#

Cyno Pre-TC FAQ by @old glen (Author, Calcs), @dark sentinel (Consulting, Mapping), @tardy notch (Mapping), @gloomy wadi (Mapping), @olive spoke (Consulting), and @river star (Proofreading)

For all Cyno Calcs you can reference: Cyno Mastersheet by @old glen and Cyno Frames Mastesheet by @tardy notch

DISCLAIMER: Everything on the FAQ and Mastersheet is Pre-TC, which means information gathered here is SUBJECT TO CHANGE (STC) until release comes. Pre-TC is really volatile as things could change on a snap on release and numbers could change drastically on that point so take every content on this FAQ and Mastersheet with a grain of salt. Thank you and much love

__**TLDR**__

Role: Hypercarry

Talent Priority:
Q (Burst) = E (Skill) > NA (Normal ATK)

Combos:
(C0)
Non-TF
EQ N3E N5E N5N2E N5N2E

TF
EQ N3E N5E N4E N4E N4E N4E

(C1)
Non-TF
EQ N4E N5E N5N3E N5N3E N3 - First N5 E CD is on 0.5-0.7 waiting time

TF
EQE N4E N4E N4E N4E N4E N4E N4E

Artifacts:
● 4PC Thundering Fury
● 4PC Gilded Dreams
● 4PC Gladiator’s Finale
● 2PC Thundering Fury, 2PC EM

Weapons:
● Staff of the Scarlet Sands
● Primordial Jade Winged Spear
● Staff of Homa
● Deathmatch
● White Tassel

Constellations:
C2 > C6 > C1 > C3 > C5
C4 ranking is based on his team composition

Team Compositions:
Aggravate Team
(Cyno, Electro, Dendro, Anemo/Zhongli/Dendro)
Hyperbloom Team
(Cyno, Hydro, Dendro, Zhongli/Dendro/Electro)
Electro-Charged Team
(Cyno, Hydro, Anemo, Flex)
Overvape Team
(Cyno, Xingqiu, Off-field Pyro, Flex)
Mono-Electro Team
(Cyno, Electro, Electro, Anemo/Zhongli/Dendro)
Hyper Team
(Cyno, Fischl, Zhongli, Geo)

#
__**CHARACTER OVERVIEW**__

Cyno is a 5* Electro Main DPS, and is considered to be an Electro Hypercarry. He relies on his teammates giving him buffs throughout his Elemental Burst duration, which is where the majority of his damage comes from, with both his A1 and A4 passive focusing on specific mechanics tied to his Elemental Burst. However, this comes at a cost: Cyno needs to spend a large amount of time on the field to maximize his damage potential, making his supports take a toll in terms of the requirements such as their ER requirement and overall damage.. Nevertheless, his needs are super accessible to anyone with White Tassel, a 3* weapon, which is competitive even with some of his 4* options, and when it comes to his team compositions, Cyno’s ideal teams lean primarily towards Aggravate Teams or Transformative Teams.

Cyno’s kit gets the most utility out of the 4PC Thundering Fury set, as this set makes great use of Cyno’s overall playstyle. This set heavily affects his short Elemental Skill cooldown on his Elemental Burst duration along with timing TF Procs with a specific combo that you should run on him. However, the A1 passive poses a challenge to some of Cyno’s combos, as it has a specific timing regarding its procs and it is not tied to anything, only on specific intervals. This makes Cyno a hard challenge to TC as mapping out TF procs, ICD procs, and A1 procs along with the rotation time is quite hard due to many reasons such as MV/s, ICD procs, etc.

#
__**TALENTS**__

Leveling Priority:
Q (Burst) = E (Skill) > NA (Normal ATK)

Cyno’s Elemental Burst is his main source of damage, providing Normal, Charged, and Plunging ATK MVs separate from those of his NA MVs. It also provides Cyno an additional 100 EM upon entering Pactsworn Pathclearer, and converts his NA from Physical to Electro DMG. In corresponding to his Elemental Burst, his Elemental Skill should be the same level as it has two multipliers: one from outside of Pactsworn Pathclearer and one when he is in the Pactsworn Pathclearer state. The CD of the Elemental Skill outside of Pactsworn Pathclearer state is longer compared to the one when Cyno is in Pactsworn Pathclearer.

Cyno’s A1 is the most tricky part of his kit, as it forces him to play a specific attack combo based on which artifact set he has equipped. This passive summons Endseers on the screen, allowing him to buff his Elemental Skill by 35% and is considered DMG%, and triggers three Duststalker Bolt per Endseer Proc. Its biggest caveat, however, is that it’s hindered by an interval that is not linked to anything on his kit, which makes counting frames of each of his MVs all the more important to how to maximize Endseer procs in his combos while still maintaining the highest MV/s, low field time, and TF CD time when running 4PC Thundering Fury set, and maintaining the buff timer up until he can cast his Elemental Skill to trigger the said buffs. Cyno’s A4 buffs his Elemental Burst NA by 150% and his A1 Duskstalker Bolts by 250%, both based on his Elemental Mastery. Combined with the Aggravate reaction that also relies on the stat to increase its value, this makes Elemental Mastery a very powerful stat for Cyno.

#
__**COMBOS/MECHANIC**__

DISCLAIMER: COMBOS WILL BE DETERMINED ON RELEASE IF THEY ARE CORRECT OR NOT. TAKE ALL OF THIS COMBO WITH A GRAIN OF SALT WHEN PASSING DOWN THE INFORMATION

EQ Mechanic

With his Elemental Skill CD outside of Pactsworn Pathclearer being 7.5s, casting Elemental Burst after it decrease said CD by 4.5s, allowing Cyno to funnel particles while not worrying for his Elemental Skill CD and will able to cast a few seconds after entering Pactsworn Pathclearer.

Combos will be differentiated with Non-TF Combo and TF Combo

Non-TF Combo

EQ N3E N5E N5N2E N5N2E

This combo provides the highest MV/s that also gives a decent amount of ICD procs that can be used for Aggravates and other reactions. It also aligns well with his A1 passive as some of the Endseer procs will either pop early than casting the Elemental Skill but all of the A1 buffs are triggered nonetheless.

EQ N4E N5E N5N3E N5N3E N3 - C1

This combo is only viable if you have Cyno at C1. Adding extra NA’s with the same allotted time compared to his C0 non-TF combo provide a greater damage comparison to the its C0 combo variant. Although it produces more NA’s, the timing of his Elemental Skill CD will not line up on the first N5E as you have to wait 0.5-0.7s for the Elemental Skill CD to reset.

TF Combo

EQ N3E N5E N4E N4E N4E N4E

This combo is perfect for such an easy TF Combo that maps out A1 passive and TF CD procs. It also provides a good amount of ICD procs that he can utilize for reactions. However, the Endseer procs are quite tight to cast as 1 of it will pop early depending on the hitlag that Cyno provides on your end.

EQE N4E N4E N4E N4E N4E N4E N4E - C1

This combo is only viable if you have Cyno at C1. Casting the Elemental Skill after Elemental Burst leaves a 0.3s waiting time before casting it but the time wasted is mitigated by the ATK SPD Buff C1 provides, allowing him to get away with casting the Elemental Skill itself + the time waited for its CD to be 0s. Combo is pretty straightforward of casting N4E until you cast 7 portions of it.

#
__**ER REQUIREMENTS**__

His ER Requirement will depend on whether he is carrying 4PC Thundering Fury Set and on his rotation time. As this set allows him to cast more Elemental Skill, his ER Requirement is lower compared to different sets such as Gilded Dreams or Gladiator’s Finale. Please use a Pre-TC ER Calculator to calculate what Cyno’s ER Requirement is depending on the team composition.

#
__**ARTIFACTS**__

Mainstats:
Timepiece - EM/ATK%
Goblet - Electro DMG%
Circlet - CR%/CDMG%

Substats:
ER (When ER Requirements are met) > CR% = CDMG% > EM = ATK%

__***Recommended***__ **4PC Thundering Fury**

His optimal artifact set to run with a TF Combo. Giving him 15% Electro DMG, 40% Transformative DMG, 20% Aggravated DMG, and CD Reduction of 1s per Elemental Reaction proc that he can utilize when he is on Pactsworn Pathclearer. This set fits his playstyle well as a hypercarry that is able to bring out more damage over time with his required field-time.

**4PC Gilded Dreams**

His optimal artifact set to run with a Non-TF Combo. Providing him ATK% and EM based on his team composition benefits his whole kit compared to Gladiator’s Finale. Solo Electro grants him 150 EM only, Double Electro grants him 14% ATK and 100 EM, and Mono-Electro with Dendro grants him 28% ATK and 50 EM. Realistically, this set buff uptime would be cut midway on his field-time and need to trigger another Elemental Reaction again to get said buffs.

**4PC Gladiator’s Finale**

Able to provide 18% ATK and 35% Normal ATK DMG Bonus when the user is a Sword, Polearm, or Claymore wielder. This set is quite a good substitute for Gilded Dreams when it has better substats than the current pieces you have. Generally would run as Gilded Dream set is new to the game and getting the exact pieces on it are quite hard as of now unless one is lucky enough to already have it or resin refresh their way to getting it.

**2PC Thundering Fury, 2PC EM**

Also contesting between Gladiator’s Finale and Gilded Dreams as their differences aren’t exactly that high. Granting Cyno 15% Electro DMG and 80 EM without any requirements is easily an option for him to use these specific mixed sets.

__***Questionable***__ **4PC Thundersoother**

This set provides 35% DMG Bonus when enemy is affected by Electro which sounds good on Cyno but in terms of its uptime, it will not be consistent due to Aggravate needing to remove the Electro aura to refresh Quicken again and leave no Electro aura for Cyno to proc the 4PC passive.

#
__**WEAPONS**__ __***Recommended***__ **Staff of the Scarlet Sands**

Cyno’s BiS weapon. Able to provide him 44.1% CR and flat ATK through his EM, which works really well with his kit focusing on EM primarily. At R1, it already provides a good amount of damage with Aggravate as the reaction is an additive reaction damage, which counts final ATK, DMG%, and CRIT to its formula.

**Primordial Jade Winged-Spear**

He utilizes this weapon very well as he focuses on Normal Attacks, which are fast to hit to trigger the weapons passive. Giving him 22.1% CR, stackable ATK%, and DMG% once stacks are maxed, this weapon is a great option to put on him as a 5* polearm

**Staff of Homa**

A good stat stick on Cyno. Providing 66.2% CDMG, 20% HP and converting his final HP to flat ATK to increase his final ATK that affects all of his damage. The only caveat this weapon has is that Cyno cannot trigger its last passive which increases the conversion value of the final HP to flat ATK passive. Overall, slightly under White Tassel on Non-TF sets and under Primordial Jade Winged-Spear on TF set.

**Deathmatch**

The battlepass weapon, which means one has to pay to get it. Able to give 36.8% CR, and ATK% and DEF% respectively depending on how many enemies are near Cyno. If there is only 1 target, he gets a high amount of ATK%. However in 2 or more targets, he gets a slightly lower ATK% value but gains DEF% on that end. Nevertheless, this weapon is pretty much a good weapon to get due to its high CR% value for a 4* weapon but it is locked via the Battlepass.

**White Tassel**

Surprisingly, a high contender amongst all the weapons that Cyno can use. Providing 23.4% CR and NA DMG% without any constraints makes this weapon value quite high. Being a 3* polearm, it is easily refinable to R5 due to it being obtainable through chests, and is an outstanding weapon to put on him as a F2P option.

#
__***Options***__ **Vortex Vanquisher**

Good 5* option when a shielder is at the party. Able to provide 49.6% ATK while its passive also gives more ATK% via hits on the enemy. Passive fits well with Cyno’s playstyle and he can easily maximize the buff along with Zhongli, one of the units that Cyno would want as his shield has the longest duration and being strong enough to withstand attacks.

**Calamity Queller**

Provides the highest amount of Base ATK out of all the 5* weapon. Gives out 12% Elemental DMG Bonus and stackable ATK% when Elemental Skill was casted. The stackable ATK% takes quite a time to max out so be wary of that when using this weapon.

**Engulfing Lightning**

Really good 5* option when you are forcing Cyno as the solo Electro unit. Grants him 55.1% ER, converts ER to ATK%, and gives 30% ER after casting Elemental Burst. It has more value when Cyno needs to meet his ER requirements but usually is just an option when he does not have a battery to go with him.

**Skyward Spine**

Same category as Engulfing Lightning, which suffices for Cyno’s ER requirement. Provides 36.8% ER, CR%, ATK SPD%, and another source of DMG with its vacuum blade that triggers every 2s. Cyno needs a new rotation for this weapon to maximize its potential but currently its only use is its ER% and CR% built in the weapon.

**Lithic Spear**

Only viable when 1-2 Liyue character are in Cyno’s team. Able to give 27.6% ATK and stackable ATK% and CR% based on how many Liyue character are in your party puts this weapon quite on the niche side of his options.

**Kitain Cross Spear**

The Inazuma Polearm craftable. Gives out 110 EM, Elemental Skill DMG%, and Flat Energy that has a draining mechanic. If one performs EQ Mechanic with this weapon, there could be slight problems with the Elemental Burst casting after Elemental Skill Cast so be wary of using this weapon with this caveat.

**Moonpiercer**

The Sumeru Polearm craftable. Grants him 110 EM and a leaf that provides ATK% after picking it up. To get said leaf, one must trigger a Dendro Reaction and have a CD of 20s for another leaf to be triggered. Really fits well with Cyno on Aggravate teams as he will mostly catch the leaf himself during Pactsworn Pathclearer state.

**Missive Windblade**

Another F2P option that will be given during 3.1. Gives out 41.3% ATK, and more ATK% and EM after triggering a Elemental Reactionl but has a duration of 10s per buff so Cyno won’t have 100% uptime on this weapon buff.

__***Situational***__ **Dragon’s Bane**

A really outstanding weapon to use on him when he is abusing Transformative Reactions. Able to provide 221 EM and DMG% to enemies affected by Hydro or Pyro, making this weapon a really good option for Electro-Charged, and Overvape teams and the EM goes well with Hyperbloom teams.

#
__**TEAM BUILDING**__ __***Electro***__ **Fischl**

Super strong unit that makes Cyno’s ER requirement lower to non-existent depends on whether you have her on C6 or not and is able to provide a good amount of damage coming from her versatile kit ranging from her Elemental Skill to her C6. Her only caveat is Oz is mostly Single Target (ST) so in scenarios where 2 or more targets are present, she will fall behind in damage.

**Beidou**

Super reliable at 2 or more target scenarios due to her Elemental Burst functionality and her constellation improves her team composition along with Cyno’s overall damage. However, she suffers being on Cyno’s team due to both having a high energy Elemental Burst cost and both has weak particle generation, which means their ER requirements will be quite high.

**Yae**

Can act as a dual carry but suffers the same reason as Beidou with ER requirements being high but that can be negated with casting Elemental Burst every other rotation to suffice for the ER requirement. Overall, she is a solid unit to substitute to Fischl when she is on another team composition.

**Kuki Shinobu**

Works really well with Cyno as her Elemental Skill follows the character itself, which means he is not locked into a certain field where he has to stay to either get buffs or heal. She can also carry Favonius Sword or Xiphos’ Moonlight for helping party members ER requirements. However, when she carries Tenacity of the Millelith, she can’t quite buff Cyno’s whole field time, due to her Elemental Skill having a 12s duration.

**Dori**

A substitute if Kuki Shinobu is not available to your party. However, in order for her to provide healing, she needs to cast her Elemental Burst unlike Shinobu. Her only potential in Cyno team composition is her C4 providing a stronger heal when Cyno is below 30% HP and ER% when Cyno’s Elemental Burst energy is below 30, which makes Cyno’s ER requirement non-existent in team compositions that are quite low on particle generation.

__***Dendro***__ **Dendro MC**

The only Dendro unit that can keep up with Cyno’s long-field time with their C2 due to how their Elemental Burst interacts with Electro as it increases the Elemental Burst ATK SPD, which allows it to bypass its Standard ICD. With their A4 providing EM as well throughout the duration of their Elemental Burst, Half of Cyno’s rotation will get buff with that passive and helps increase Cyno’s A4 and Aggravate DMG.

**Collei**

The second Dendro unit in the game that currently can keep up with Cyno’s long-field time but is outperformed by Dendro MC due to how her burst functions with its ICD. Even at C6, she struggles to keep up with Dendro MC’s Dendro application with her 2.5s ICD on her Elemental Burst.

**Tighnari**

Can act as a dual carry and provides good damage output with his low-field time requirement. However, most of this time Cyno’s field-time is cut off in order to fill Tighnari’s full combo in the rotation which would hurt Cyno’s overall damage as he needs a certain amount of time on-field as well as Tighnari’s overall damage as he usually needs a short team rotation.

#
__***Options***__ **Kokomi**

Has consistent Hydro application with good healing that helps Cyno stay alive on the field longer. Preferably would run with Cyno on Hyperbloom team compositions as she fills in the roles mentioned before and she does not need any investment apart from HP% and HB% on this team composition.

**Yelan**

A solid unit to have with Cyno. Able to provide a DMG% buff that relies on the on-field character’s field time when duration of her Elemental Burst is active. Provides consistent Hydro application and paired with Xingqiu activates Hydro Resonance, which buffs her Elemental Skill and Elemental Burst damage up as they scale with HP%

**Xingqiu**

Currently provides the fastest Hydro application in the game. Along with this, he provides DMG Reduction and healing with his Rainswords and can burst out quite a ton of damage with his off-field Elemental Burst DMG.

**Bennett**

One of the most-contested units in the game due to what they provide to team compositions. Flat ATK buff, healing, and decent damage with his Elemental Burst, he is usable in every way that needs 1 or 2 of these 3 roles that he can fill in but with Aggravate being lived, Bennett’s rate on pick lowered on Electro DPSs that relies on his said roles so his synergy with Cyno is overall decent.

**Xiangling**

Amazing Pyro unit that provides good off-field damage with her Elemental Burst. With it having no ICD, she can proc Overloaded or Overvape with team composition that has Cyno or the secondary Electro unit providing Electro for these two setups. However, her ER requirements will skyrocket without any Pyro battery so be wary of that.

**Thoma**

Provides a shield and decent Pyro application whenever the on-field units triggers a Normal Attack animation. His Elemental Burst provides a refreshing shield each time Fiery Collapse is triggered and along with his A1 passive that gives him Shield Strength each time the character obtains or refreshes the shield and this can stack up to 5 times.

**Kazuha**

One of the best units in the game due to his unique kit that allows him to buff Elemental DMG% depending on what element his Swirl absorbs. With him carrying Viridescent Venerer set, he can also provide Elemental Shred to said element that is going to receive the Elemental DMG% buff however with Cyno, his buff and Viridescent Venerer shred would not last until his duration end and will cut out on the middle of his combo.

**Sucrose**

Secondary Anemo unit to use when Kazuha is unavailable or she excels better than him on the team composition that does rely on EM buffs and Elemental DMG% when she is C6. This has some drawbacks though as her C6 requires her to use her Elemental Burst, which is detrimental to her and her team rotation as either the rotation extends to be able to fulfill her ER requirement or she carries Prototype Amber to lower said ER requirement while providing a team wide heal which will lower her EM and her buffing potentiality. Suffers the same issue as Kazuha when holding Viridescent Venerer set as the RES Shred does not reach Cyno’s full field time.

**Jean**

Great unit to use when Electro healers are unavailable due to her providing heals with Viridescent Venerer but suffers the same consensus with Kazuha and Sucrose in terms of the RES Shred. If she is on C2, she can drastically change Cyno’s rotation as the ATK SPD will affect his timing with his A1 Endseer procs but will yield in more damage as extra NA’s are being added.

**Sayu**

Substitute for Jean if she isn’t available or when no Electro healers are available. Her role in this team composition is just to provide heals and carry Viridescent Venerer, in accordance with the same consensus with the other Anemo units in terms of its RES Shred on Cyno.

#
**Venti**

Has the most useful CC in the game and is able to lower down Cyno’s ER requirement depending on the team composition. It is still questionable if Cyno can hit enemies when his Elemental Burst is active on the field and that will need testing on live. Suffers the same result as every other Anemo unit in terms of carrying Viridescent Venerer.

**Zhongli**

Has the strongest shield in the game and also provides a Physical and Elemental Shred that lasts for 20s depending on the shield’s HP. Generally is a must on Cyno as he is the only one who can provide him comfort and shred with his kit. However, his damage will be lacklustered if built specifically for the shield itself so carrying Favonius Lance and having CR% substats would be wise to run on him to help Cyno’s ER requirement.

**Albedo**

Solid Geo off-field support unit that provides an EM buff with his A4. Paired with Zhongli to activate Geo Resonance that provides 15% Shield Strength to make Zhongli’s shield stronger, 15% DMG and 20% Geo RES Shred when the active character is shielded. With his Elemental Skill being proc on enemies taking DMG, Cyno can carry 4PC Archaic Petra to be able to proc the 35% Elemental DMG buff while on-field

**Yunjin**

Paired with Zhongli to activate Geo Resonance that provides 15% Shield Strength to make Zhongli’s shield stronger, 15% DMG and 20% Geo RES Shred when the active character is shielded. She can buff Cyno’s Normal Attack with her Elemental Burst but it will be cut midway unto his rotation due to only having a 12s duration.

__***Team Compositions***__ **Aggravated Teams (Cyno, Electro, Dendro, Anemo/Zhongli/Dendro)**

With Cyno having a long field time, Aggravate can suffice for the lack of buffs he can use in terms of choosing units and Aggravate is easily accessible with only needing a Dendro unit to trigger the Quicken state to be be able to proc Aggravate with his NA and Elemental Skill. Note that he needs to have a Dendro unit that can match his fast Electro application and currently, only Dendro MC suffices for this role.

**Hyperbloom Teams (Cyno, Hydro, Dendro, Zhongli/Dendro/Electro)**

Focuses on building Cyno on EM, which benefits his A4 passive and produces high amounts of damage with Hyperbloom procs. There are also chances that Cyno will trigger Aggravate in the team composition. Only caveat of this team composition is that it locks 3 spots on the team which means the last spot will have to flex out into options on whether you want RES Shed, EM buff, or batterying Cyno etc.

**Electro-Charged Teams (Cyno, Hydro, Anemo, Flex)**

Theoretically a good team composition for him to run on due to him being Electro but as of now, the team composition is volatile with its certain mechanic in which it consumes Electro and Hydro aura while maintaining both aura on the enemy, which means ownership of this team composition will need live testing and counting.

**Overvape (Cyno, Xingqiu, Off-field Pyro, Flex)**

Allowing the Pyro unit to trigger both Vape and Overload, this team composition stands out as Cyno’s overall damage is not lowered with him triggering Electro-Charged on-field while the Pyro off-field DPS like Xiangling or Thoma can trigger Vape and Overload off-field with their Elemental Burst. Xingqiu was locked in here as he provides fast Hydro application that can keep up with Cyno's field time.

**Mono-Electro Teams (Cyno, Electro, Electro, Anemo/Zhongli/Dendro)**

A safe choice in his team composition as it is straightforward with his selection of units and helps Electro units who has high ER requirement to be much lower. However, 4PC Gilded Dream Set is lowered on numbers as Cyno loses out 50 EM for 28% ATK and is also locked into 3 Electro and 1 Dendro unit to be able to proc a reaction compared to 2 Electro which gives 100 EM and 14% ATK.

**Hyper Teams (Cyno/Fischl/Zhongli/Geo)**

Focusing on Cyno’s raw damage, this team composition is another straightforward one as the goal is to buff Cyno drastically. With Fischl on this team, Cyno would not have an issue with his ER Requirement and Zhongli provides comfort to his long field time.

#
__**CONSTELLATION**__ **C1**

After using Sacred Rite: Wolf's Swiftness, Cyno's Normal Attack SPD will be increased by 20% for 10s. If the Judication effect of his Passive Talent Featherfall Judgment is triggered during Secret Rite: Chasmic Soulfarer, the duration of this increase will be refreshed. You need to unlock the Passive Talent "Featherfall Judgment."

This constellation allows Cyno to deal more on-field damage due to the ATK SPD given upon casting Elemental Burst or triggering A1 through his Elemental Skill. Combos for this constellation are posted in the Combo Section of this FAQ. Overall, a decent constellation to acquire.
From last constellation: 14-16% || From C0: 14-16%

**C2**

When Cyno's Normal Attacks hit opponents, he gains 10% Electro DMG respectively for 4s. This effect can be triggered once every 0.1s. Max 5 stacks. Each stack's duration is counted independently.

A strong point in his constellations. Able to provide a huge amount of Electro DMG with ease makes this constellation of value quite high and a good stop point for people who would want to get Cyno Constellations.
From last constellation: 23-25% || From C0: 41-45%

**C3**

Increases the Level of Sacred Rite: Wolf's Swiftness by 3. Maximum upgrade level is 15.

Standard +3 Constellation. Increase Elemental Burst MVs, which means stronger damage outputted by his Elemental Burst Normal Attacks.
From last Constellation: 6-7% || From C0: 49-55%

**C4**

When Cyno is in the Pactsworn Pathclearer state triggered by Sacred Rite: Wolf's Swiftness, after he triggers Electro-Charged, Superconduct, Overloaded, Quicken, Aggravate, Hyperbloom, an Electro Swirl or an Electro Crystallization reaction, he will restore 3 Elemental Energy for all nearby party members (except himself.). This effect can occur 5 times within one use of Sacred Rite: Wolf's Swiftness.

This constellation turns Cyno into a semi-battery for his party members. Granting a 15 energy that would make his support’s ER requirement lower with his current rotation time. Overall, not a bad constellation on teams that are suffering in ER requirements due to Cyno’s long field-time
From last Constellation: 0% || From C0: 49-55%

**C5**

Increases the Level of Secret Rite: Chasmic Soulfarer by 3. Maximum upgrade level is 15.

Standard +3 Constellation. Increase Elemental Skill MVs, which means stronger damage outputted by his Elemental Skill outside of Pactsworn Pathclearer and when in Pactsworn Pathclearer state.
From last Constellation: 1-2% || From C0: 52-57%

**C6**

After using Sacred Rite: Wolf's Swiftness or triggering the Judication effect of the Passive Talent "Featherfall Judgment," Cyno will gain 4 stacks of the "Day of the Jackal" effect. When he hits opponents with Normal Attacks, he will consume 1 stack of "Day of the Jackal" to fire off one Duststalker Bolt. "Day of the Jackal" lasts for 8s. Max 8 stacks. It will be cancelled once Pactsworn Pathclearer ends. A maximum of 1 Duststalker Bolt can be unleashed this way every 0.4s. You must first unlock the Passive Talent "Featherfall Judgment."

This constellation provides more A1 Bolt when hitting enemies with Normal Attack in Pactsworn Pathclearer state and having Day of the Jackal effect active. A total of 15-20 bolts can be achieved depending on how much field time Cyno will take throughout his rotation. This constellation ICD is separated with his A1 ICD so it does not mess up ICD procs of A1.
From last Constellation: 25% || From C0: 89-96%

astral topazBOT
#

Candace Pre-TC FAQ by @analog scaffold - Lead, Calcs, Writing Supervisor + General Writing
@cerulean mirage – Calcs || Writing: Talents, Combos, Artifacts
@trail sand – Writing: Weapons, Constellations
@mellow island – Writing: Character Overview, Team Building

For all Candace Calcs you can reference: Candace Mastersheet by @analog scaffold and @cerulean mirage and Candace Frames Mastersheet by @high silo

DISCLAIMER: Pre-TC is volatile and, as always, perpetually subject to change until release (and sometimes later!). Please note that these are theoretical suggestions. Everything described in this FAQ is a good faith analysis based on the little information about the character’s kit that we know. Team calcs, additionally, are not established yet, and as with everything in TC, the content in this FAQ should be taken with a grain of salt.

__**CHARACTER OVERVIEW**__

Candace is a Hydro polearm-user who is most comfortable being played as a support. She is the only character at the time of writing who offers a Hydro infusion to melee weapons. Aside from this, she is a character who scales entirely with HP, much like Nilou, unless you’re committing to auto-attacks (which is not recommended).

Using Candace’s burst off cooldown is essential, so you must have 220% Energy Recharge as a solo Hydro (no Favonius Lance), and 200% if you are using Favonius Lance. If you are using Favonius Lance with another Hydro character, Candace’s energy requirements are lowered to 180%.

Candace cares about Energy Recharge, Crit Rate (at least 30%), HP, Crit Damage, and sometimes ATK (if on-field DPS) or Elemental Mastery (if built for transformative reactions). As far as weapons go, you can pick any weapon that has Crit, HP, or Energy Recharge, since all of her talents scale off of HP (excluding auto-attacks).

Candace’s constellations focus on improving her personal damage, increasing application, and extending hydro infusion. Her C6 gives her extra Hydro application and where most of her personal damage comes from, assuming she isn’t the one on field. Furthermore, Candace’s C1 extends the duration of her Hydro infusion, and 2 will increase her max HP by 20% when her Elemental Skill hits an enemy.

__**TALENTS**__

Leveling priority: Burst > Skill > Normal Attack

Analysis:

Candace’s kit mainly involves around her Burst to enable her Hydro infusion, and since she scales almost entirely of HP aside from Normal Attacks, leveling her to 90 is recommended to max out her base HP. Keep in mind that her damage contribution is not the greatest, therefore investing in other important units is advisable here.

Her Normal Attacks do not deal a great amount of damage, and it is also the only part of her kit to scale off ATK instead of HP, thus diverting her build (except for on-field Candace enthusiast, then level her Normal Attack first).

Candace’s skill has two options, tap and hold. Both scale with max HP. On tap, she rushes forward and deals Hydro damage, while holding her skill blocks the incoming damage with a shield that scales off her HP, has a longer cooldown but deals more damage. While holding can inflict more damage, it is not recommended since it takes a long time to cast , and the damage difference is not worth the time. After Ascension 1, when you get hit while shielding, her skill will finish instantly (similar to Yun Jin’s skill) but still has the same cooldown as when holding. With her fourth Constellation, her hold cooldown is reduced to be the same as her tap cooldown, which allows for more hold skill use if get the right timing.

Candace’s burst is her biggest selling point. Being the first character that provides Hydro infusion, she enables driver options for freeze, vaporize and bloom teams among others. Her Burst, combined with her Ascension 4 passive, will buff Elemental Normal Attacks hence also buff the on-field driver. When swapping between characters, it creates Wave Impact DMG instances that scales off HP, which is her main source of damage when playing as a support.

Finally, her overworld passive talent is great for exploring with the 20% climbing stamina reduction.

__**ENERGY RECHARGE REQUIREMENT**__

In general, Candace needs around 220% Energy Recharge (ER%) with Favonius Lance to burst every rotation as a solo hydro unit due to her Skill’s particle generation being lackluster for her 60-cost Burst, as well as she will most likely be off-field after using her Burst, making funneling energy particles difficult. Each favonius weapon passive proc will reduce her Energy Recharge requirement by 15% to 20%. In situations where her team comp has another hydro unit, her Energy Recharge requirement is significantly reduced to 180% with Favonius Lance. As always, an Energy Recharge Calculator is recommended to figure out how much ER% Candace needs in certain team comps.

#
__**COMBOS AND ROTATIONS**__

When playing Candace as a support, her combos are extremely straightforward with two variations.

Tap E, Q / hold E, Q

You can swap to Q, E when you want to funnel Candace’s Skill particles onto another character needed

In general, she needs around 220% Energy Recharge to Burst every rotation as a solo Hydro unit, and 180% with another Hydro team mate (assuming Candace is wielding Favonius Lance)

When playing Candace as an on-field Hydro DPS, there are two main combos depending on her Constellation.

For Constellation 0:

E, Q, N3D, N3D, N2E, N3D

For Constellation 1 and above:

E, Q, N3D, N3D, N2E, N3D, N3D, N2

For her rotation, although her Burst has a 15-second cooldown and her tap Skill has a 6-second cooldown, using two tap skills in a 15-second rotation can be punishing (before Constellation 4) because of the interactions between her Ascension 1 and her Skill’s mechanics. If your tap E gets hit, its cooldown will be increased to 9 seconds and can mess up the rotation length. Therefore, it is preferable to use Candace in at least a 20-second rotation.

__**ARTIFACTS**__

Artifact Main Stats

Candace has three build options: On-field Hydro DPS, Off-field Burst DPS and Off-field support. Depending on what purpose you choose, her builds will change in order to fit the corresponding playstyle.

Off-field Burst DPS:

HP / DMG / CRIT
The option when using an Energy Recharge weapon in energy-rich teams. Since her Skill, Burst and C6 scale off her HP, HP% sands is much more favorable there.

ER / DMG / CRIT
The option when not using an Energy Recharge weapon and/or when energy requirements are not met.

Substats priority: ER% (until meet requirement) > CR > CD > HP% = EM

Off-field support build:

HP / HP / HP
The option when using an Energy Recharge weapon. Focus on providing NA DMG% buff with Candace’s A4, in addition to that her burst and C6 also benefit from HP%. If you prefer more personal damage on Candace, she can still provide adequate buffs with an ER or HP / DMG% / CRIT build.

ER / HP / HP
The option when not using an Energy Recharge weapon.

ER / EM / EM
The option when using C6 Candace to proc bloom reaction.

Substats priority: ER% (until meet requirement) > CR (to proc Favonius passive) > CD >= HP% = EM

**On-field Hydro DPS build: **

ATK / DMG / CRIT
The usual default option for almost every character who focuses on DPS rates when energy requirements are met.

ER / DMG / CRIT
The option when not using an Energy Recharge weapon.

Substats priority: ER% (until meet requirement) > CR = CD > ATK% > HP% > EM

For Candace, the Sands of Eon should always be ER% if your ER% requirement is not already met. Using ER% weapons should allow her to equip ATK% / HP% sands depending on the build.

Artifact Sets

DISCLAIMER: For explicit numbers, please refer to our linked Mastersheet for up-to-date numbers.

On-field Hydro DPS

For on-field Hydro DPS Candace, her artifacts choices are quite flexible. Usually you would aim for 4pc Heart of Depths or 4pc Gladiator’s Finale, but a combination of 2pc ATK% (Gladiator’s Finale, Shimenawa’s Reminiscence ,...), 2pc Tenacity of the Milleliths, 2pc Heart of Depths, 2pc Emblem of Severed Fate with better substats than the 4pc options above should also perform very similarly.

Off-field Burst DPS

For off-field Burst DPS, Candace has two main choices: 4pc Emblem of Severed Fate (EoSF) and 4pc Noblesse Oblige (NO). For 4pc EoSF, combining with an ER% weapon can increase her burst and C6 damage; while 4pc NO is generally used for buffing other teammates. The other 2pc options can be viable with good substats, but in most cases it is not recommended.

Off-field Support

For off-field support, Candace has two main choices: 4pc Noblesse Oblige (NO) and 4pc Instructor to buff teammates after using burst. Using 4pc Emblem of Severed Fate or combining 2pc sets can achieve higher damage, however it lacks the utility provided by the two mentioned above. In certain 15-second rotation, 4pc Exile can also be worth using to lessen other characters’ Energy Recharge, making it useful to invest the substats leaning more toward damage (Note that in 4pc Instructor and 4pc Exile case, a 5 stars ER Sands is very recommended for more Energy Recharge on Candace to meet her Energy Recharge requirement).

You can also consider 4pc Deepwood Memories on her if your teammates have better options for DPS and your team needs Dendro RES Shred. However, this is usually unlikely to happen, as most Dendro characters synergize with the set better than her.

#
__**WEAPONS**__

Weapon ranking

1. Favonius Lance if available
2. R5 Kitain Cross Spear if billets are available
3. Any ER weapon/Black Tassel

Candace follows the general trend among recent 60 cost units that dictates that they need more ER than 80 cost units, and she follows this quite well. Despite having 2 / 3 particle gen on her burst, she often requires 230+ ER and Favonius Lance if no other hydro units are present to alleviate her needs unless you make room in your rotation to swap back to let her E a second time. This seriously impacts her weapon choices outside of double hydro team setups, and any weapon that does not help her with this issue is a non-starter there

Favonius Lance is the obvious best choice here with a 30.6% ER substat plus a passive that is often worth another 40-50% on a unit as energy starved as she is.
Engulfing Lightning is technically better with an 85.1% ER stat, but unless your team has all their energy needs already met, the extra energy given off Favonius’s passive will likely be more relevant than whatever you’d gain

After this, there’s 2 different 45.9% ER sub weapons to choose from: The Catch and Prototype Starglitter. While The Catch does do more damage, it’s also generally wasted on her, so Prototype Starglitter will do.

The last ER weapon of note is the Kitain Cross Spear. Depending on team and rotation, its passive can be worth anywhere from 30-60 ER. In most solo hydro comps with no additional help, a R5 Kitain Cross Spear is on par with generic ER sub weapons, pushing her ER by a multiplicative 25-33%. However, with an Exile set in the mix, this number gets pushed to a multiplicative 30-40%, enough to potentially get close to even Favonius while being 100% craftable.

However, in double Hydro setups, her ER needs fall to a somewhat more manageable 180% with either Favonius, or making room for a 2nd E. At this point, ER is still an issue, but no longer crippling to her entire kit. Feel free to use more damaging weapons if you feel the need to, but her damage by and large does not matter, so Favonius remains king.

__**TEAMBUILDING**__

Some Recommended Teams:

Mono Hydro

Candace/Xingqiu/Yelan/Anemo

One of the safer team compositions, since it allows characters with higher energy recharge requirements to build less ER. Xingqiu will likely be the character exploiting Candace’s Normal Attack infusion, since he will have a Hydro DMG bonus goblet. Yelan works nicely with this team, since she has good off-field damage and makes use of the new hydro resonance. Sucrose and Kazuha work nicely as the Anemo flex, since they have crowd control and gives teammates damage bonus (assuming c6 sucrose). Jean and Sayu also work well, if you think that Xingqiu’s healing is not enough.

Bloom Teams

Fridge

Candace/Dendro/Cryo/Anemo

Fridge is a playstyle where Cryo and Dendro coexist on a target, so applying hydro will cause both Frozen and Bloom. It’s also important to note that Frozen enemies preserve a Dendro aura longer, so more Blooms occur. These teams focus on creating as many Blooms as you can, since Blooms will automatically detonate when there are more than five on field.
Some recommended Cryo characters are Kaeya, Rosaria, and Diona (recommended for heals, though application isn’t the best). Both Rosaria and Kaeya would have better cryo application, but having a healer is basically mandatory with Bloom. The Anemo flex can be Sucrose or Kazuha (Though you can use Jean or Sayu if you aren’t using Diona). Sucrose would buff the party with Elemental Mastery while providing crowd control. If you use Kazuha, you can use him as a driver since he will be the one with the most Elemental Mastery, and also providing better CC than Sucrose. Either Collei or DMC will work in the Dendro slot, as they can both apply Dendro off-field.

Hyperbloom

Candace/Fischl/Dendro/Anemo

Hyperbloom focuses on building a bit of Elemental Mastery on the Hyperbloom trigger, to maximize the amount of damage dealt by Hyperbloom. The Anemo character will generally be the driver, since they generally be the ones with the most Elemental Mastery. Some recommended Anemo characters are Kazuha, Sucrose, Jean, and Sayu. If you run Sucrose instead of any of the other recommended Anemo characters, DMC would be the one driving. Electro-Charged can also proc in this team, while also making Blooms.

Vaporize

Xiangling/Candace/Bennett/Xingqiu

As a solo Hydro, Candace will not apply enough Hydro to where Xiangling can Vaporize every hit, so Xingqiu will be necessary in order to apply enough Hydro. Candace’s infusion also doesn’t last the entire Pyronado duration. Unfortunately you can’t use Viridescent Venerer with this team composition, but you get Hydro application and extra damage from Candace’s infusion instead.

Freeze

Candace/Cryo or Hydro/Cryo/Anemo

Candace in freeze would allow Kaeya or Rosaria to drive to apply Hydro, while their Skills and Burst allow them to apply Cryo. A Hydro flex like Yelan or Xingqiu would increase the amount of Hydro application and do a good amount of off-field damage. If you are using a Cryo flex, Diona works if you feel like you need healing and aren’t using Jean or Sayu as the Anemo character. Otherwise you can use both Kaeya and Rosaria for the Cryo slots.

#
__**CONSTELLATIONS**__

DISCLAIMER: For explicit numbers on DPS increases, please refer to our linked Mastersheet for up-to-date numbers. Changing numbers in the sheet is much faster/easier than editing an embed.

C1- Gives 3 more seconds of burst uptime and infusion. Doesn’t increase her damage, but increased uptime means more uptime on hydro aura and her buff, allowing for greedier rotations, which is basically always a welcome addition. Rating 4/5

C2- Gives 20% more HP to Candace, which results in ~7% more personal damage and an extra 1% on her NA buff. More stats is more stats, but it’s nothing to write home about. Rating 1/5

C3- Adds an extra 3 levels to her burst. However, this only adds a little damage for a character whose damage by and large does not matter, Rating 1/5

C4- Reduces hold CD to match tap CD so you no longer have rotations ruined by accidental perfect counters. Largely QOL, but a large QOL Rating 3/5

C5- Adds an extra 3 levels to her skill. However, this only adds a little damage for a character whose damage by and large does not matter, Rating 1/5

C6- C6 is an entire kit, almost doubling her damage while also bringing her up to 9-10 hydro apps over 12s in addition to the normal infusion. This alone makes her damage actually notable, while also making her a very usable hydro aura for characters that can work around her infusion, while also making her a good bloom proccer should we ever get the Dendro app to support it. Rating 5/5

While it is hard to specifically quantify how much better c6 than c0 is for a unit whose primary usage is for hydro application, an extra 3 seconds of infusion in addition to 4-5 extra waves generally will translate to 6-7 more apps in a 15 second period. This is a very large amount of additional application and brings her from a niche unit with incredible energy issues to an invaluable addition to teams that cannot reconcile themselves with Xingqiu's long cooldowns.

grave voidBOT
#

Nahida Pre-TC FAQ by @gloomy wadi (Author), @neat forge (Co-Author, Mapping), @high silo (Writing), @oak axle (Calcs, Writing), @dark sentinel and @blissful sage (Calcs), @tardy notch (Framecounts), @old glen, @analog scaffold, and @neat kayak (Consulting)

For all Nahida Calcs you can reference: Nahida Artifact Sheet Compilation by @oak axle, Nahida Weapon Ranking by @dark sentinel, and Nahida Frames Mastersheet by @tardy notch

DISCLAIMER Everything in this FAQ is Pre-TC, meaning any information is SUBJECT TO CHANGE (STC) until release. To our knowledge there is only one version of Nahida and no proof has been given to show otherwise. Anything can change at any time before the official release but this is meant to help give our current understanding of the character. And with that, enjoy reading and happy birthday Nahida!

__**TLDR**__

Role: On-field Driver / Sub DPS

Talent Priority
E (Skill) = Q (Burst) > NA (Normal ATK)

Constellations
C2 > C6 > C4 > C3 > C5
C1 ranking depends on team compositions

Artifacts
4pc Deepwood (preferred)
4pc Gilded Dreams
2pc GD / 2pc WT / 2pc DW

Weapons
Weapons can change depending on team compositions
A Thousand Floating Dreams
Kagura’s Verity
The Widsith
Solar Pearl
Wandering Evenstar
Sacrificial Fragments
Magic Guide

__**CHARACTER OVERVIEW**__

Nahida is a 5* Dendro character who can be played as an on-field driver or off-field buffer. The majority of her damage comes from the mark applied by her Elemental Skill, which is further buffed from her A4 passive. Nahida’s Elemental Burst also gives different effects to her Skill depending on the amount of Pyro, Hydro or Electro members in her party, as well as granting an EM buff that reaches up to 250 EM to the on-field character through her A1 passive.

Her Normal / Charged Attacks have a high frequency of application, making her a great on-field driver / enabler for many team compositions. Her Charged Attack can also be canceled very quickly, although at the cost of stamina.

Nahida’s Elemental Skill has both a press and a hold form and applies 1U Dendro with no ICD. Pressing her Elemental Skill does a quick AoE hit of Dendro DMG and marks enemies with the Seed of Skandha. Holding her Elemental Skill allows Nahida to enter an aiming mode, which will mark up to a maximum of 8 enemies when aimed at. During this time, Nahida’s interruption resistance will also be increased.

Enemies marked by the Seed of Skandha will be linked to one another, signified by green chains between enemies. Triggering an Elemental Reaction or dealing damage with Bloom Cores to marked enemies will trigger Tri-Karma Purification on all marked enemies, dealing single target Dendro DMG which scales off both ATK and Elemental Mastery. Tri-Karma Purification can be triggered every 2.5 seconds and applies 1.5U Dendro to enemies with no ICD. This will also generally apply as an aura in a lot of cases due to being procced after a reaction takes place. Three particles are generated from Tri-Karma Purification when it procs and can happen once every 8 seconds.

Nahida’s Elemental Burst creates a very large AoE field and grants buffs to Nahida’s Tri-Karma Purification and the Burst itself depending on the current elements in the party. Pyro party members grant Tri-Karma Purification extra DMG%, Electro party members shorten the time between Tri-Karma Purification procs and Hydro party members increase the duration of her Elemental Burst. This Elemental Burst is a 50 cost Burst with a 13.5s CD and 15s duration, allowing for 100% uptime if needed.

Nahida’s A1 passive grants up to 250 Elemental Mastery to the on-field character inside of her Burst based on 25% of the Elemental Mastery of the party member with the highest Elemental Mastery. This can be a sizable buff to characters who appreciate EM and also affects Nahida’s A4 as well.

Nahida’s A4 passive gives her Tri-Karma Purification bonus DMG% and Crit Rate based on the amount of EM she has that exceeds above 200 EM, maxing out at 80% DMG bonus and 24% Crit Rate. A very nice amount of stats to her main damage source, which emphasizes building EM on Nahida.

__**TALENT PRIORITY**__

E (Skill) = Q (Burst) > NA (Normal ATK)

The majority of Nahida’s damage comes from her Elemental Skill, but her Elemental Burst buffs increase with talent levels so it’s important to level both. Nahida’s Normal Attacks don’t have impressive scaling and are mainly for applying Dendro so they aren’t as necessary. It’s worth leveling if you’re playing her on-field.

__**COMBOS AND ROTATION**__

Nahida’s combos will differ depending on if you’re playing her on or off-field.

On-field:
Nahida’s main goal whilst on-field is to apply as much Dendro as possible through her Normal Attacks whilst also driving the rest of the team. Her Elemental Skill can also be used to add extra Dendro applications during her field time. Her Charged Attack can be canceled extremely early, allowing for even more Dendro, however, due to being a Catalyst user, this can cause you to run out of stamina very quickly.

Off-field:
E, Q is recommended over Q, E due to her E being cancellable slightly early and also allows funneling particles to Nahida if Tri-Karma Purification procs during her Burst animation.

#
__**ARTIFACTS**__

Mainstats

Sands - EM > ATK%
Goblet - Dendro% / EM
Circlet - Crit / EM

EM mainstats are favoured if using a non-EM weapon and if Nahida is off-field. An ATK% sands is typically subpar to its EM counterpart, especially if you intend to maximize Nahida’s A1, but the gap can be closed if:
1.) The ATK% sands has good substat quality
2.) Nahida is being played on-field and performing Normal or Charged Attacks
3.) Nahida does not trigger any reactions

Substats

ER (120-150% depending on team) > EM (~900-1000) >= CRIT > ATK%
In Bloom teams where Nahida can get some ownership of Blooms, EM becomes more valuable over CRIT and ATK stats.

Generally, it is recommended to reach ~900-1000 EM on Nahida even if she is not triggering any reactions. This range is typically optimal for her damage output, whilst also maximizing her A1 passive. Going beyond 1000 EM is not usually recommended, unless she is on a Bloom team where she has high ownership of Blooms. In that case, reaction damage becomes a huge portion of her damage and CRIT becomes less relevant.

TLDR: Triple EM is the easiest way to get near 1000 EM, but if you can pass that threshold, other mainstats start becoming better (except in Bloom teams where Nahida gets some ownership).

  1. For Spread teams and teams where Nahida has little reaction ownership, aim for artifacts that get you closest to the 900-1000 EM range (factoring in external buffs) while also meeting your ER needs of 120% ER for Spread and 140-150% ER for teams such as Hyperbloom or Burgeon. After that, start prioritizing CRIT substats. ATK substats do increase Nahida’s damage output, but are low priority.

a. On-field Nahida gets the benefit of her A1, so typically triple EM will cause her to go beyond 1000 EM. In this case, it is recommended to use a Dendro Goblet and/or CRIT Circlet.

b. For teams where Nahida is specifically on-field but has low reaction ownership, 1000 EM is less important to aim for and CRIT substats become more valuable.

  1. For Bloom teams where Nahida gets a significant amount of Blooms: Run triple EM mainstats while also meeting your ER needs of 130% ER. EM substats take precedence, even if you go beyond 1000 EM. CRIT substats are fine, but not as important.
__**Recommended**__ **4PC Deepwood Memories**

Proccing on Elemental Skill hits, this set is practically made for Nahida, allowing for 30% Dendro RES shred 100% of the time, increasing not only her damage but also other Dendro party members and Bloom reactions. Fits her very well whether she’s on-field driving or off-field and will generally be preferred if she’s the only Dendro in a team.

**4PC Gilded Dreams**

If another character is already holding Deepwood, Nahida can benefit more from running Gilded Dreams, providing ATK% and EM depending on the teammates in the party. Generally will be giving 14% ATK and 180 EM with double Dendro or 230 EM as the only Dendro although she needs to proc a reaction to gain the effect which, due to how her Elemental Skill applies Dendro, may be hard to do from off-field only. Thus, it is not recommended in scenarios where Nahida does not trigger reactions very often (for example, off-field Nahida in Bloom teams).

**2PC WT / 2PC GD / 2PC DW**

A consistent source of stats which isn’t reliant on Nahida proccing reactions, allowing her to make more use of the sets whilst off-field. Either 160 EM or 80 EM + 15% Dendro DMG%, both work for unconditional sets.

**2PC ATK**

An OK option, but is worse than the 2PC above.

**4PC Tenacity of the Millelith**

An uncommon option that trades Nahida’s personal damage for a more supportive role, providing 20% ATK to the party. It can be quite powerful or even BiS if your damage dealers are disproportionately stronger than Nahida. With another party member running Deepwood, this can be a usable option in some situations or whilst farming for a dedicated set for Nahida.

**4PC Noblesse Oblige**

It has the same 20% ATK buff as 4PC Tenacity of the Millelith, but with worse uptime. It may be situationally better if you want to buff multiple party members.

#
__**WEAPONS**__

Due to Nahida being played both on and off-field as well as having high or low reaction ownership depending on the team composition, weapon rankings can vary drastically. Because of this, recommended weapons will be options which performed well across all scenarios. Please see the full weapon calcs for specifics.

__Recommended__ A Thousand Floating Dreams

Nahida’s BiS weapon, providing 265 EM base as well as extra EM/DMG% to Nahida depending on the elements of her party members. Generally will be given a 30% DMG Bonus due to her being played as solo Dendro in a lot of teams. On top of that, it also grants 40 EM to other party members, a small but nice unconditional buff for the rest of the team.

Kagura’s Verity

Another 5* weapon option which synergises with Nahida very well, providing 66.2% CDMG as well as Elemental Skill DMG and DMG Bonus. Her short Elemental Skill cooldown allows for her to stack it quite easily when played on-field but even with one stack performs very well. However, due to the substat being CDMG%, you may need to run an EM Goblet / Circlet to make up for the lack of an EM substat.

The Widsith

An amazing 4* option for Nahida, providing 55.1% CDMG as well as a large random buff for a short amount of time. Contrasting Kagura’s, Widsith excels when being able to kill enemies in one rotation and lowers in value for extended rotations due to the long cooldown on its buff but again, still performs well overall.

Solar Pearl

The battle pass exclusive Catalyst, providing 27.6% CR and an Elemental Skill and NA DMG% buff. This weapon buffs all sources of Nahida’s damage, even beating out 5* options in some on-field situations due to the short but easily refreshable duration on its buff. If you have this weapon, especially at high refines, it’s worth considering but don’t feel pressured to buy the battle pass just for this weapon.

Wandering Evenstar

The new Catalyst option on the current weapon banner, providing 165 EM and a flat ATK buff based on EM to Nahida and 30% of that to her teammates. The buff given to teammates is around 50-75 ATK at R1 and around 100-150 ATK at R5. Due to Nahida wanting to build EM by default, this weapon is a good all-rounder option for both her personal and team damage, if you have it. Similarly to Solar Pearl, this weapon has only just released so don’t feel pressured to pull on the weapon banner right now just for a chance at getting it.

Sacrificial Fragments

Another 4* option with a high 221 EM substat, which Nahida likes. The extra Dendro application from another Skill cast can be valuable for damage in comps where she has reaction ownership but generally won’t be too useful at low refines due to the small proc chance and long cooldown. Either way, just being a large EM stat stick is good.

Magic Guide

Surprisingly, a really good option for Nahida, providing 187 EM as well as DMG% to opponents affected by Hydro or Electro. Due to her EM scalings on her Elemental Skill and ATK subs being less valuable, the base ATK doesn’t affect her too much and can even beat out 4* and 5* weapon options in certain scenarios. Refines are also easy to get due to it being a 3* weapon. Overall, an amazing F2P option considering its rarity.

#
__Options__ Lost Prayers to the Sacred Winds

A 5* option, providing 33.1% CR and a stacking Elemental DMG buff whilst on-field. Unfortunately, these stacks disappear when swapping between characters, meaning it's generally a CR stat stick but they’re a nice bonus when playing comps that play Nahida on-field.

Skyward Atlas

Another 5* option with a high Base ATK and a 33.1% ATK substat, as well as providing 12% Elemental DMG bonus and an extra portion of DMG from the clouds it creates. This ATK% can be valuable in places where Nahida is on-field but doesn’t have ownership on reactions but can leave her struggling for other more important stats overall.

Mappa Mare

A F2P craftable Catalyst, providing 110 EM as well as an Elemental DMG Bonus buff upon triggering Elemental Reactions. Can be a very good option specifically for on-field Spread teams where Nahida has a lot of reaction ownership. However, for other scenarios, Nahida can struggle to trigger its passive due to how her Elemental Skill applies Dendro as well as her own reaction ownership in Bloom reaction teams.

Fruit of Fulfillment

Another craftable Catalyst, providing 45.9% ER and an EM buff at the cost of ATK. Generally, the passive isn’t enough stats to make this weapon worth crafting over other options and the large amount of stats from the substat aren’t as useful although it can mean you can focus on more offensive substats in artifacts.

Blackcliff Agate

A 4* option which can be bought from the Starglitter store, providing 55.1% CDMG as well as ATK% when defeating an enemy. Unfortunately, ATK% does very little for Nahida and she can struggle to gain stacks at all, especially off-field, due to the enemy needing to die to her damage. Basically just a CDMG stat stick if you don’t have other options.

Hakushin Ring

A more supportive craftable Catalyst, providing 30.6% ER and an Elemental DMG Bonus to Dendro and Electro when Nahida triggers Quicken. This weapon sacrifices Nahida’s personal damage a bit in return for buffing the rest of the party, allowing more of the team’s damage to come from her teammates instead.

Prototype Amber

Another more supportive craftable Catalyst, which sacrifices Nahida’s personal damage a lot in exchange for healing the party upon casting her Elemental Burst. If you need some role consolidation in a Dendro healer, it’s an option you can use although may not be enough to survive on for some players.

Thrilling Tales of Dragon Slayers

A 3* F2P Catalyst that utterly butchers Nahida’s personal damage in exchange for its 48% ATK buff. Generally not recommended, unless you intend for Nahida to be a pure support.

#
__**TEAMBUILDING**__

Nahida is a very versatile character, able to be played in almost every Dendro composition, on and off-field, with an EM sharing passive boot. Her Elemental Skill has high uptime, and her Dendro application is not constrained by energy. Rotations will change depending on what teammates you use just like artifact stats and weapons.

__Bloom Teams__ **Nilou Bloom**

Nahida / Nilou / Kokomi / Hydro

Hydro options: Xingqiu / Yelan / Barbara / Ayato

Due to the way Nahida applies Dendro with her Elemental Skill, she unfortunately can’t be used as solo Dendro off-field for Nilou Bloom teams. However, her on-field application is strong enough that she can keep a Dendro aura on the enemy, allowing for your Hydro teammates to trigger a lot more Blooms. Although Nahida can still get some ownership on Blooms, building Elemental Mastery on your Hydro teammates is still recommended. If Kokomi or someone else on the team is built for full EM, Nahida’s A1 passive can end up using their EM rather than her own, allowing for a larger EM buff whilst on-field.

**Hyperbloom**

Nahida / Hydro / Electro / Flex

Hydro options: Xingqiu / Yelan / Kokomi / Ayato
Electro options: Electro DPS / Kuki / Fischl / Yae
Flex options: Anemo / Beidou / DMC / Collei / Any above teammate

Nahida's Dendro application is capable of allowing an Electro unit to build EM to deal large amounts of DMG with Hyperbloom. This composition also allows for Quicken, Aggravate and Spread to be triggered (Quickbloom), further increasing overall team damage. Due to Nahida’s high amount of Dendro application, the last slot can be used to fill any necessary roles such as healing, shielding or buffing.

**Burgeon**

Nahida / Hydro / Pyro / Flex

Hydro options: Ayato / Kokomi / Xingqiu / Yelan
Pyro options: Thoma / Xiangling / Xinyan
Flex options: Anemo / Bennett / Any above teammate

Nahida's Dendro application allows for a Pyro unit to build full EM to maximize the DMG dealt by Burgeon. This team has one large caveat and that's its very delicate setup. If Burning is triggered, you may lose out on potential Burgeon procs due to having to overtake the Pyro application from Burning with your Hydro character.

__Quicken Teams__

Nahida / Electro / Flex / Flex

Electro options: Electro DPS / Yae / Fischl / Kuki
Flex options: Anemo / Dendro / Zhongli / Beidou / Any above teammate

Quicken teams are very flexible, allowing Nahida to maximize Spread reactions by driving, or just provide enough off-field Dendro whilst an on-field Electro prioritizes their own Aggravates. Her A1 Passive is also helpful for providing more EM to your on-field character, further increasing the DMG output of your Spreads and Aggravates.

__Burning Teams__ **Burnmelt**

Nahida / Cyro / Pyro / Flex

Cyro options: Ganyu / Ayaka / Kaeya / Rosaria
Pyro options: Bennett / Xiangling / Thoma
Flex options: Anemo / Pyro / Diona / Zhongli / Shenhe / Layla

Burning has been seen as a largely underwhelming reaction since Dendro's official launch in 3.0, the reduction to its Pyro application has effectively reduced its viability significantly. With the release of Nahida, Burning can now be used to enable Melt teams. However, with the setup being rather delicate, characters such as Ayaka may not make much use of Burning compared to someone like Ganyu due to the reaction being more susceptible to being ruined by additional Cryo applications.

**Pure Burning**

Nahida / Pyro / Flex / Flex

Pyro options: Xiangling / Bennett / Klee / Thoma
Flex options: Anemo / Zhongli / Any above teammate

Outside of using Burning to enable a Cryo character to trigger Melt, there is also the option of running full Burning based teams as it allows the use of 4PC Lavawalker for 35% DMG to opponents affected by Pyro. One flaw with this team is that Nahida doesn't really provide much other than fueling Burning. Also, Burning ticks are unable to proc Tri-Karma Purification, meaning Nahida ultimately ends up being reliant on Swirls from an Anemo character to deal damage with her Skill.

#
__**CONSTELLATIONS**__

Due to Nahida being played both on and off-field as well as having high or low reaction ownership depending on the team composition, the value of each constellation can vary drastically. DPS increases assume a reactionless, off-field Nahida.

**C1**

A nice QoL constellation, providing one level of each Elemental Burst buff without needing specific teammates and has a good chance of adding another Tri-Karma Purification proc due to Electro reducing the cooldown between procs as well as the Hydro effect increasing Burst uptime. This can lead to a longer burst duration, more damage and Dendro application. Also adds 25% DMG to her skill, assuming there is no Pyro character. Mileage depends on teams, whether you can get another Tri-Karma Purification proc or not, and whether or not Nahida's Elemental Burst is activated every rotation. (3/5)
DPS increase: ~5-29%

**C2**

An outstanding constellation. It is a straight-up 16-20% DPS increase to not only Nahida but the entire team, given they utilize Dendro reactions. It is roughly equivalent or stronger than giving every party member their BiS 5* weapon thus, making Nahida an even more exceptional support for practically every team that wants a Dendro character. (5/5)
DPS increase: ~18% in Quicken teams, ~14-16% in Bloom teams
DPS increase over C0: 5-29%
(The effect of C2 is not included in this figure because the assumption is a reactionless Nahida)

**C3**

+3 talent levels to Elemental Skill. Given that most of Nahida's damage comes from her Elemental Skill, C3 is a fairly good buff to her DPS output, although nothing spectacular. However, on teams where Nahida triggers Spread or Blooms, MVs aren't as important and the value of C3 diminishes. Still, it is a decent constellation. (3/5)
DPS increase: ~17% (Less valuable in both Spread and Bloom teams, especially the latter).
DPS increase over C0: 51%

**C4**

Grants a sizable amount of EM for Nahida, a stat she greatly appreciates for both offense and support. This constellation makes it easier for Nahida to reach the 1000 EM benchmark, or allows her to drop some EM mainstats/substats for better stats such as CRIT or a DMG% goblet. (3.5/5)
DPS increase: ~8-16% (Slightly more valuable in Spread teams, and less valuable in Bloom teams where Nahida has some ownership).
DPS increase over C0: 69%

**C5**

+3 talent levels to Elemental Burst. Levels on Nahida's Burst are not particularly impressive: the extra DMG% bonus is quite small, and the CD reduction and Burst extension are also rather minor. It is unlikely to grant another Tri-Karma Purification proc, but in certain scenarios it may give you the push needed. (2/5)
DPS increase: 1-15% (15% is very optimistic)
DPS increase over C0: 72%

**C6**

Like most C6s in the game, Nahida's final constellation is a remarkable one. It gives her a frontloaded AoE nuke after using her Burst when she attacks marked enemies and can be triggered up to 6 times, significantly boosting her damage at the cost of field time. While it is an absurd constellation for her personal damage, Nahida is usually not the one doing majority of her team's damage, so the actual team DPS increase is not stellar, especially as she is taking field time to properly utilize this constellation. Hence, it is crucial to form teams around Nahida and even change her entire playstyle in order for her C6 to truly shine. (4.5/5)
DPS increase: ~77%
DPS increase over C0: 204%
Note that while this seems like a massive % increase, since Nahida takes field time and you may be playing her in a Bloom or Spread team, the actual % increase is actually lower.

strange magnetBOT
#

Layla Pre-TC FAQ by @hidden ermine (Author, Calcs), @cerulean mirage (Author, Calcs), @rapid valve (Contributor), @analog scaffold (Consulting, Supervising),

For all Layla Calcs you can reference: Layla Mastersheet by @cerulean mirage and @hidden ermine, and Layla Frames Mastersheet by @high silo

Pre-TC is volatile and, as always, perpetually subject to change until release (and sometimes later!). Please note that these are theoretical suggestions. Everything described in this FAQ is a good faith analysis based on the little information about the character’s kit that we know. Team calcs, additionally, are not established yet, and as with everything in TC, the content in this FAQ should be taken with a grain of salt.

__**CHARACTER OVERVIEW**__

Layla is a Cryo 4-star sword-wielder who deals damage and creates shields based off of her HP stat. She requires very little on-field time to perform, therefore she pairs well with DPSs that require a lot of on-field time. Low energy requirements eliminate the need for a battery, making it easy to slot Layla into any team that needs her.

HP, ER, and 30% CRIT Rate or more (to proc Favonius passive) are most valuable to Layla. Due to her HP scaling, the ATK stat on weapons doesn't matter, meaning that she will perform when equipped with anything that offers a good enough ability or offers HP% or ER%. She is not picky when it comes to weapons, generally any sword with ER% or HP% substat or boost in the passive could be a good option for shield support build. Her build can skew towards shields or damage, but no matter what gear is used on Layla, her shield will be decent. However, the difference in builds between defensive and offensive options is minimal.

Layla’s constellations provide extra shield strength, ER requirement reduction, damage boosting for on-field character and more personal damage. C1 enhances her Shield Strength and grants all your co-op teammates with a shield identical in utility to your own. C2 restores energy with skill hits and eliminates her ER requirement , enabling her to build more HP. C4 provides Normal and Charged attack DMG to the character on-field, usually around 2k per NA or CA hit. C6 increase her overall damage and reduce the required time to stack up her Shooting Stars

__**TALENTS**__

Leveling priority: Skill > Burst >> Normal ATK

**Analysis:**

HP scalers usually want to be level 90 to fully take advantage of the large amount of HP% gained through final ascension.

At face value her skill and burst are straight forward: her skill generates a cryo shield with 250% effectiveness against cryo attacks. It has a 12s duration and 12s cooldown, allowing 100% uptime. Her Burst summons a turret that shoots homing projectiles (Starlight Slugs) every 1.5s dealing DMG based on her HP. This is the majority of her personal DMG.

There is more to her Skill and Burst: The Night Stars/Shooting Stars. Whenever the shield is active, stack-like marks called the Night Stars are generated. They can be generated three ways:

  • 1 Night Star is automatically generated every 1.5s
  • If the on-field character uses their elemental skill, 2 Night Stars are generated. This has a 0.3s cooldown.
  • When the Starlight Slugs from her burst hits, 1 Night Star will be generated. This has a 0.5s cooldown.

Through these methods, whenever four stars are accumulated, all of them will be consumed and shot out as Shooting Stars that deal damage. Expect around 12 Shooting Stars every shield duration. This process will be interrupted if her shield breaks at any moment.

Her passive talents are simple. Ascension 1 gives her stack-based extra shield strength based on the Night Star generation. And Ascension 4 grants her additive DMG onto her Shooting Stars. It is worth noting that even with this passive active, the Shooting Stars will still not be her dominant source of damage.

The over-world passive talent is quite nice as she gives 10% chance of doubling the product when crafting character talent materials.

__**ENERGY RECHARGE REQUIREMENT**__

One thing to keep in mind is her Burst uptime. Having 100% uptime means she can either use it once in a 23 seconds or lower rotation, or up to twice in some 25 seconds rotations. It is tough to keep up with Bursting off cooldown in non-Cryo teams, since not catching any Cryo particles generated and investing that energy to other characters is more advantageous. With her Constellation 2 active, her ER requirement drops significantly, and so Bursting every 12 seconds becomes viable.

#
__**ARTIFACTS**__

Main Stats

Layla’s main role in a team is to provide a shield with her Skill as well as some off-field Cryo damage. With her shield being the main attracting point, the artifact main stats choices are quite straightforward.

Sands of Eon: HP% or ER%

Depending on team composition, ER% Sands can be used if you want to Burst off cooldown when Layla is the only Cryo character in the team. In other scenarios, HP% Sands is preferred to maximize her shield and damage from her Ascension 4.

Goblet of Eonothem: HP% or Cryo DMG%

Using a Cryo DMG% Goblet will let Layla deal 20% more damage at the cost of a 10% thinner shield.

Circlet of Logos: HP% or Crit

Both HP% and Crit circlet will perform comparably, while HP% allow a stronger shield and Crit one is more offensive. Substats will play an important role here, where Crit Circlet only leads by ~10% if both circlets have similar amounts of useful substats.

**Sets**

With how her Elemental Skill works, her best-ins-lot artifact set is arguably 4-piece Tenacity of the Millelith (TotM), providing ATK% and Shield Strength% to her team with a relatively high uptime. 4-pieces Noblesse Oblige is comparably effective if there are better units in the team that already utilize 4-piece TotM. Personal damage wise, 4-piece Blizzard Strayer and 4-piece Emblem of Severed Fate are the best choices, but considering her lackluster damage output, it is best to use the supportive options above.

You can consider 4-piece Instructor when using her in a team utilizing amplifying reactions like Vaporize and Melt to further buff the damage. Note that when using a 4 star artifact set, shield strength will be much lower compared to 5 star options, therefore a 5 star piece (preferably Sands) is much recommended.

Substats priority: ER% (until meet requirement) > CR (for Favonius proc) > CD = HP% > Flat HP > ATK%

__**WEAPONS**__

Her selection of weapons can be separated into two focuses: shield support or off-field DPS. And the ranking would vary since for shield support she would like as much HP as possible, while for off-field DPS, Crit would matter a lot more. The DMG gain from extra ATK is negligible, therefore weapons with ATK substat is not recommended.

**The DMG gained/Shield Absorption lost or vice versa when switching build direction is not significant compared to other characters. Please reference Layla Mastersheet for detailed comparison. **

For Shield Support builds, the difference between high-investment and low-investment shields is miniscule, meaning you can be liberal in weapon choice for this build. In that case, weapons with overall team support capabilities start to become more preferable, such as Key of Khaj-Nisut, Freedom Sworn and **Favonius Sword. **

For Off-field DPS builds, the standout performer here is Harbinger of Dawn. Being a 3 star weapon the low base ATK is less of an issue for Layla, and it provides plenty of Crit stats which she really benefits from. Her off-field nature also means she can take advantage of the passive very well, since there are few opportunities for Layla to take damage. Primordial Jade Cutter is also a strong option for her. For the rest of the options, weapons with ER% or Crit substats are preferable, and higher substat value is preferred over higher base ATK.

#
__**TEAMBUILDING**__

General Shielder

Layla can be a shielder in various comps with on-field characters that want the Interrupt Resistance (Melt Ganyu, Yoimiya, Cyno). On-field units that perform more skill casts can get more value out of Layla, as Layla gains 2 Shooting Star stacks every time your on-field character casts an Elemental Skill. Do note that in some teams, Layla’s Cryo application might interfere with Elemental application, such as in Melt Ganyu. This can be mitigated by not casting your Burst.

**Freeze**

-Layla/Cryo/Hydro/Anemo

Layla can be a more offensive alternative for Diona in Freeze teams where you want Diona’s battery capabilities and shielding. Layla provides defensive utility, Cryo energy generation, and the ability to hold support sets like 4ToTM, which is more valuable in teams that use 4BS. Freeze teams also help preserve Layla’s shield by making enemies unable to attack to break it, which allows you to get more Shooting Star triggers.

The main Cryo DPS in this team will generally be Ayaka or Ganyu, although you can run a unit like Rosaria or Kaeya as a budget alternative that can get more value out of Layla by playing in a quickswap combat style, getting more skill casts for Layla’s Shooting Stars.

**Mono-Cryo**

-Layla/Cryo/Cryo/Anemo

An alternative to freeze teams for enemies that cannot be frozen. Mono-Cryo teams work by stacking more Cryo units to synergize with each other by generating more Cryo particles, benefitting from the first half of the 4-piece Blizzard Strayer set bonus, and gaining more value out of Shenhe’s Icy Quills, which incentivizes you to run as many Cryo units as you can. Layla works well with Shenhe as she can use up the Icy Quill stacks quickly due to her multi-hit nature.

Though not recommended, players without Shenhe can opt to run Rosaria and/or Kaeya instead as a budget alternative, which synergizes well with Layla due to their low cooldown Elemental Skills.

**Forward Melt**

-Bennett/Layla/Anemo/Cryo, Anemo or Hydro

Layla’s Shooting Star mechanic rewards you for spamming Elemental Skills, and applies Cryo for Bennett to Melt his Elemental Skill. Using Bennett’s low-cooldown E allows Layla to get more Shooting Star stacks than normal, which improves Layla’s energy generation and personal damage.

An Anemo grouping unit is preferred for the third slot to provide VV and other team buffs and utility, while the last unit can be any off-field unit that will not interfere with the Cryo application needed for forward Melts, but a second Cryo unit is recommended for the increased Cryo application.

**Eula**

-Eula/Layla/Electro/Flex

Layla can be a defensive option in Eula teams, and still give offensive utility through her good uptime on 4TotM and a bit of personal damage. Due to Eula’s energy consumption timing, Layla can be a better battery for Eula because she generates her energy over time, instead of Diona’s upfront energy generation. The two last slots in the team are very flexible, though it is generally recommended to bring an Electro unit to trigger Superconduct for the Physical Resistance Shred.

**Laylational**

-Layla/Bennett/Xingqiu/Xiangling

Layla can be added as the flex slot in the National core to hold support sets like 4ToTM or 4Instructor and let Xiangling melt instead of vaping some of her Pyronado hits.

**Fridge**

Fridge teams are teams that use the interaction between Dendro and Cryo where both of them can co-exist on a target so applying Hydro onto the enemy will reduce the amount of Dendro consumed when triggering Bloom reactions while also keeping them frozen. These teams focus on increasing the amount of Blooms that you can trigger, which gives you more seeds that you can further react with by adding a Pyro or Electro character, or just using Bloom by itself, since Bloom will automatically explode when there are more than five on the field.

Layla is not recommended for some Fridge teams as Bloom damage will break her shield and stop her Cryo application, rendering her ineffective. However, this can be mitigated by using an Electro character to trigger Hyperbloom with the seeds, as Hyperbloomed seeds are less likely to damage your shield.

#
__**CONSTELLATIONS**__

DISCLAIMER: For explicit numbers on DPS increases, please refer to our linked Mastersheet for up-to-date numbers.

**C1**

Grants her a thicker shield with 20% extra shield strength. Also provides shields at 35% absorption of her own to nearby party members for 12s. This is especially useful in co-op and the uptime is very good. Rating: 3/5

**C2**

Generate 1 energy per Shooting Star hit. Within one duration of her shield 12 hits can be expected therefore dramatically reducing her burst ER requirement. This enables her to Burst off cooldown easily in Cryo teams and makes it viable in non-Cryo teams. Rating: 4 - 4.5/5

**C3**

Adds 3 more levels to her Skill. This boosts her shield absorption for another 20%. With her skill not being her main source of damage the gain here is negligible. Rating: 2.5/5

**C4**

When firing Shooting Stars, increase Normal and Charged Attack DMG based on Layla's Max HP. A decent bonus, becomes better with amplifying reactions. Rating: 2.5/5

**C5**

Adds 3 more levels to her Burst. Some extra damage however the gain is negligible given she will not be a major contributor to team damage. Rating: 1/5

**C6**

Shooting Stars and Starlight Slugs deal 40% increased damage. And Night Stars are automatically generated every 1.2s instead of 1.5s. It is hard to pull off another wave of Shooting Stars without sacrificing driver/carry’s on- field time. Rating: 3/5

sharp galleonBOT
#

Wanderer Pre-TC FAQ by @analog scaffold (Team Lead, Author, Calcs), @dark sentinel (Consultant, Author, Calcs), @hidden ermine (Author, Calcs), @tardy notch (Framecounts), @oak axle (Contributor)

For all Wanderer Calcs you can reference: Wanderer Mastersheet by @analog scaffold, @dark sentinel and @hidden ermine, and Wanderer Frames by @tardy notch

Pre-TC is volatile and, as always, perpetually subject to change until release (and sometimes later!). Please note that these are theoretical suggestions. Everything described in this FAQ is a good faith analysis based on the little information about the character’s kit that we know. Team calcs, additionally, are not established yet, and as with everything in TC, the content in this FAQ should be taken with a grain of salt.

CHARACTER OVERVIEW

Wanderer is an Anemo catalyst user who takes up the majority of the team’s field time in order to dish out high amounts of damage. This means that Wanderer teams will focus on having teammates that increase Wanderer’s damage values while taking little field time.

As for stats, Wanderer is a pretty standard unit to build, focusing on the traditional ATK, DMG%, and CRIT stats. While his ER needs are quite high, even with his dedicated support, Faruzan, and a Favonius weapon on the team, Wanderer can instead Burst every other rotation in order to put all of his artifact stats into offensive capabilities. In fact, this is his strongest option until constellations are added to him. Otherwise, Wanderer needs somewhere around 170% ER when C6 Faruzan is not included in the team – however, we do not expect players to have a new 4-star at C6 the same patch they are released.

When played as an Anemo DPS, he is heavily dependent on the new Anemo support, Faruzan, who brings Anemo resistance-shredding to the team, much like Viridescent Venerer does for Pyro, Electro, Cryo, and Hydro characters. Additionally, with constellations, she skyrockets the damage potential of teams focusing on Anemo DPS units like Wanderer and Xiao.

Being an Anemo unit, some people may consider him another Viridescent Venerer driver for teams including characters like Fischl, Beidou, and Xingqiu. Additionally, focusing on Elemental Mastery for Swirls makes him comparable to Sucrose in some cases, but Wanderer lacks the utility in EM-sharing and crowd control that Sucrose has.

One of the main highlights of Wanderer’s kit is that he can fly in mid-air while attacking enemies while also absorbing up to two elements for various buffs. Hovering in mid-air leaves Wanderer vulnerable to being knocked down and staggered by enemy attacks, so a shield may be desirable in some cases. Additionally, dodging when his A4 cannot trigger significantly reduces his air-time and thus his DPS. With regards to elemental buffs, they are quite hard to control, though the absorption priority is the same as Kazuha. If Bennett is on your team, Wanderer will almost always be able to absorb Pyro for a 30% ATK bonus. The other elements offer comparable damage increases, and so building your team around the infusions is (typically) not recommended.

TALENTS

Leveling priority: Normal Attack > Skill = Burst

Analysis:

Since Wanderer only focuses on ATK, there is no necessity to level him to 90. Level 80 is fine, if you’re saving on resources. However, incidental low-EM swirls will still be beneficial, so there are still some benefits to leveling to 90.

Most of the damage Wanderer dishes out comes from Normal Attacks, which fire arcs of blade-like Anemo energy at opponents. Naturally, this is the first choice. However, his Normal Attacks are not nearly as strong unless he is benefitting from his Skill, which provides a valuable damage bonus akin to Yoimiya’s Skill to his attacks.

Upon using his Skill, Wanderer will stay in air and will have an alternative stamina bar to for show how long he can stay in mid-air. Moving and sprinting will deplete the bar quickly, so often it is best to stay still in mid-air and unleash ranged attacks.

Finally, while his Burst is not terrible, we are usually Bursting every other rotation, so this becomes the lowest priority. However, all talents should be leveled as high as possible, since he is responsible for the vast majority of your team’s damage. Wanderer’s Burst is pure damage, with no special effects, and hits opponents within its range five times in quick succession.

For Ascension Talents, A1 offers Wanderer up to two buffs based on elemental infusion with his Skill, depending on the elements absorbed. The priority is the same as Kazuha, making Pyro (+30% ATK) one of the two buffs most frequently. With Electro infused as well, Wanderer gains enough energy that, in some cases, Bursting off-cooldown becomes possible. Cryo gives 20% CRIT Rate, and Hydro increases the maximum amount of time he can spend in mid air (though keep in mind this could extend rotations depending on team composition).

None of the elements provide a buff greater than 10% of each other, and controlling the elemental infusion, aside from Pyro with Bennett’s Burst circle (and Hydro due to it being second-priority), is difficult, and so building a team around certain infusions is not always advised. For Hydro, Xingqiu’s orbiting Rain Swords can help with interruption resistance and Hydro infusion.

Wanderer’s A4 allows some dashes to not consume this alternate flight stamina during the duration of his Skill; when this happens (based on RNG, increasing the odds with each failure like Royal weapons), a brief flurry of Anemo attacks will occur automatically, which can provide a valuable DPS boost. However, without testing, the fact dashes can still consume this alternate stamina and shorten the airborne state is often too large of a sacrifice to risk it, unless you must dash to avoid knockdown. This, however, is subject to change with constellations and once actual testing can be done.

#
__**COMBOS**__

Wanderer’s combos are fairly difficult to precisely pin down. His kit is designed with Normal Attacks in mind, so any weapon that benefits Normal Attacks excels. However, with many weapons that don’t fit this criteria, N2C helps squeeze around.

We calculated based on the following assumptions, but the number of attacks are conservative estimates. You may get more than what we’ve assumed.

Tullaytullah’s Remembrance + 4pc Desert Pavilion - (Q), E, CA, N3x6
(N2C Version) Most weapons on Desert Pavilion - (Q), E, C, N2C (x5) + N2
(N2C Version) Most weapons with NO ATK SPD buffs - (Q), E, N2C (x5) + N1
(N3 Version) Most weapons on Desert Pavilion - (Q), E, CA, N3x5 + N2
(N3 Version) Most weapons with NO ATK SPD buffs - (Q), E, CA, N3x5 + N1
Dodoco Tales CA Spam on Desert Pavilion - (Q), E, N1, CAx6, N1, CAx6

Based on these calculations, N2C can squeeze out more damage. However, this is mostly for players using low ATK SPD, non-Yunjin teams. Newer info that is being released leans towards this being more of a sidegrade, so calcs may not perfectly reflect this. That said, N2C is not always a strict upgrade.

N2D, when controlled, might deal even more, provided you only dash when A4 activates - learning to master the dash timing will take time, rewarding the player for going the extra mile, but not dealing so much more damage that it’s mandatory to get down (about 10%). Dashing too early, however, will tank the damage in your rotation.

Even further, Wanderer’s A4 has a visual indicator for when you can dash without stamina consumption to unleash bonus attacks. You can increase your damage even further by dash-cancelling N2 or N3 once you know for sure you can trigger the A4 passive.

Again, we urge you to take this with a grain of salt - research on these combos is ongoing.

__**ARTIFACTS**__

Sands of Eon: ATK%

Goblet of Eonothem: Anemo DMG Bonus

Circlet of Logos: Crit Rate/Crit Damage

Substats: CR%=CDMG% > ATK% > ATK

__*4PC Desert Pavilion Chronicle*__

His BiS artifact. The 4 piece effect is tailor made for Wanderer’s normal attack heavy playstyle. Being a catalyst character he does not suffer hit lag therefore attack speed is especially valuable for him. 10% attack speed from the set allows him to squeeze in an extra charged attack per rotation which is perfect for triggering the set effect, and it lasts his entire on-field time.

__*4PC Shimenawa’s Reminiscence*__

A strong but slightly polarizing set. The extra attack is very appreciated by him. When bursting every other rotation this would be his second best choice. However when attempting to burst every rotation this set will suffer and be one of the worst, due to it making Wanderer more ER hungry and requiring extra ER subs.

__*2PC ATK/2PC Anemo DMG mix and match*__

Please checkout the mastersheet for detailed assumptions

Generally, the three combos are ranked in this order:
2PC Anemo DMG + 2PC Anemo DMG > 2PC Anemo DMG + 2PC ATK > 2PC ATK+2PC ATK

The difference between each combo is minimal, at most at around 4%. So if running one of these sets simply choose whichever has the better substats.

__*4PC Echoes of an Offering*__

A mediocre set for Wanderer. Depending if an attack speed buff is present or not, he is projected to proc the 4 piece effect for 5-6 times per rotation. This is not enough procs to contribute a significant amount to his overall damage per rotation.

__**Circumstantial Sets**__ __*4PC Viridescent Venerer*__

The set of choice when running him as a driver for reaction teams. However due to the reasons mentioned above he is not the most naturally suited character played as a driver. His personal damage with the 4 piece is decent, about 4-6% worse than 2PC ATK + 2PC ATK.

__*4PC Lavawalker*__

A choice based on his great synergy with Bennett. With Bennett on the team the enemy is very likely to have pyro applied onto them, hence proccing the 4 piece’s set effect. The effect itself is comparable to 2PC Anemo DMG and 2PC Anemo DMG, winning over that combo by 5% extra DMG Bonus.

__*4PC Blizzard Strayer*__

An interesting set to use in freeze teams. Although given Wanderer is a Crit Rate ascending character, he is very likely to over-cap on that with the set’s 4 piece effect. And equipping 4 piece VV will be more beneficial for the overall team’s damage. Switch over to this set over 4 piece VV will only gain him marginal personal damage.

#
__**WEAPONS**__

Wanderer’s weapons depend on your team; most notably, they depend on whether he is being supported by Bennett or not, as Bennett’s massive Flat ATK buff devalues ATK% weapons.

Here I will list the main recommendations from the signature weapon to the most efficient freely accessible weapon. However, for a more complete idea of weapon rankings, please refer to the mastersheet included here, make a copy of it, and play with the filters to examine the relationships with buffs in more detail.

1. Tullaytullah’s Remembrance - Limited Signature Weapon

It gives CRIT DMG and ATK SPD, which makes it a good stat stick by itself for Wanderer, while also providing an extremely valuable 48% DMG bonus on Normal Attacks. While this buff takes time to ramp up, Wanderer can quickly ramp the buff to its maximum potential. It is consistently between 10-15% stronger than the next best option, but declines with buffs compared to N2C weapons.

2. Memory of Dust (w/o Benny) // Lost Prayer to the Sacred Winds (w/ Benny)

a. A shield for Memory of Dust is valuable, but does not affect the weapon’s ranking (shielded is 2nd place, unshielded is third). It’s a natural fit for Wanderer since he attacks so rapidly.

b. Lost Prayer to the Sacred Winds finally has a home; we have not yet had a catalyst-wielding DPS who values CRIT and spends lots of time on-field. Wanderer fits the bill.

3. Skyward Atlas (w/o Benny) // Kagura’s Verity (w/ Benny)

a. Atlas is generically strong on almost any catalyst-user who values ATK, and Wanderer is no exception. The passive is straightforward, so there’s not much to say here.

b. Kagura’s Verity was calced without regard for the passive, due to Wanderer only using his Skill one per rotation. It ranks this high purely because of its CRIT DMG stat and high ATK.

4. Widsith // Solar Pearl

Widsith and Solar Pearl are, on Normal Attacking catalyst-users, quite close in terms of damage. Widsith scores higher than Solar Pearl and has higher spikes in damage, even when averaged across two rotations. Wanderer does not quite benefit from the Elemental Mastery buff, often feeling close-to-wasted on him and leading to Abyss floor resets. Solar Pearl is the consistent option for lower damage.

5. Dodoco Tales (Event Weapon)

This event weapon made for Klee is surprisingly strong on Wanderer on a modified rotation. Since Wanderer’s Charged Attacks are quick to execute, he spam them while only Normal Attacking once every few seconds to maintain the buff. Without Benny, this weapon on its specialized rotation surpasses the weapons in “Tier 3” of this section.

Blackcliff Agate (Paimon’s Bargains)

Even when not counting any stacks, this is at least respectable for pure F2P players, and beats out Mappa Mare by a good amount even at R1. Think of the ATK bonus as just an occasional buff to an OK weapon, since some floors of Spiral Abyss only have one enemy, making it impossible to trigger.

Frostbearer (Craftable)

Frostbearer is a generic ATK%-scaling weapon that is best when Bennett is not on the team. For Bennett teams, Mappa Mare at high refinement offers a desirable damage bonus.

#
__**TEAMBUILDING**__

Wanderer is an ATK and CRIT based Anemo DPS, and is therefore not reliant on reactions to deal most of his damage, unless you intend to use an EM-based build. While he’ll likely trigger swirls and possibly chain reactions in his teams, they’re not pivotal to his damage. That being said, his A1 incentivizes players to bring Pyro/Hydro/Cryo/Electro units to the team to obtain additional buffs. Each A1 buff is close to each other in strength, except for Electro which is volatile in value. Otherwise, Wanderer does not strongly prefer a specific element and is quite flexible with his team compositions. His teammates will either be a buffer, an off-field DPS, or a defensive option.

**Buffers**

More often than not, Wanderer will be dealing the majority of his team’s damage. It is never a bad idea to buff his personal damage, especially if your Wanderer is highly invested.

Faruzan: Faruzan is a new 4 star Anemo unit launching with Wanderer in 3.3, commonly dubbed as Wanderer’s dedicated support. Her kit revolves around buffing Anemo damage: she provides Anemo DMG% bonus, shreds Anemo resistance, CRIT DMG% at C6, and can group enemies. Anemo buffs and debuffs are extremely rare in the game, making Faruzan all the more valuable. Needless to say, Faruzan is an integral part of Wanderer’s teams where his personal damage is the focal point. Additionally, if played with other off-field damage dealers, she can hold the 4 Viridescent Venerer (VV) set to debuff enemy and boost damage.

Bennett: Gives a massive ATK buff second to none, on top of 20% ATK from Noblesse Oblige, 30% through Wanderer’s A1, and another 25% if played with Pyro resonance. Also doubles as a defensive option by healing the team. Unquestionably a powerful support for not only Wanderer, but possibly his teammates if they benefit from his ATK buff.

Yun Jin: As Wanderer’s damage mostly comes from his Normal Attacks, Yun Jin is naturally one of the first picks that come to mind. Her burst grants a flat DMG buff to all Normal Attacks for up to 30 stacks. At C2 and C6 respectively, she additionally provides 15% DMG to Normal Attacks and 12% ATK Speed. Wanderer’s N3 is multi-hit and his kit lends itself towards ATK speed, meaning Yun Jin’s stacks will be consumed faster–in other words, Wanderer gets even more mileage off Yun Jin. Unfortunately, she is not as strong in AoE situations.

Mona: With Thrilling Tales of Dragon Slayers and her Omen debuff, Mona grants a 48% ATK, around 50% DMG bonus, and Hydro absorption for Wanderer’s A1. Unfortunately, her Omen debuff has low uptime, so she will fall behind other buffers.

#
**Off-field DPS**

Another way to increase team DPS aside from buffing Wanderer’s personal damage is to include an off-field DPS. Ironically, Wanderer does not provide much for these DPS units except for driving. Rather, it is Faruzan who supports these units by carrying the Viridescent Venerer set, providing grouping, and potentially through Favonius triggers.

It should be noted that many units under this category rely on their burst to dish out damage and will likely have high ER needs. To offset this, players can run a second unit of the same element to reduce ER needs or trade offensive stats for more ER. In the former case, Wanderer cannot absorb a secondary element through his A1 and thus loses a buff. In the latter scenario, the off-field DPS will of course lose significant damage and their place in the team becomes harder to justify. Alternatively, if the team consists of Bennett, the loss in damage can be mitigated.

Yelan: Has strong single target damage potential and can also buff Wanderer through her A4 passive which increases DMG% over time. On the downside, her ER requirements are quite high if played as solo hydro, significantly reducing her damage. Playing her with a secondary Hydro can alleviate this issue.

Xingqiu: Like Yelan, he has strong single target damage but high ER needs. He provides defensive utilities such as minor healing and interruption resistance.

Xiangling: Even while Wanderer is in midair, Xiangling’s Pyronado can still hit enemies on the ground. She has strong AoE Pyro damage at the cost of high ER requirements. Recommended to play only with Bennett and potentially Favonius weapons.

Fischl: Has strong off-field single target damage while being relatively low maintenance. Wanderer is not a bad driver for her and can trigger multiple instances of her A4 and C6, further increasing damage.

Beidou: Specializes in AoE off-field damage. She offers interruption resistance via her burst as well as a small shield at C2, which Wanderer appreciates. However, she is greedy for energy and wants to be paired with Fischl to battery her.

Yae Miko: Yae’s damage is split between her Elemental Skill and Elemental Burst. She does not need her burst to deal damage, but it is a significant portion of her DPS. Contratrily, her burst costs 90 energy, making it difficult to burst every rotation, and even if you can, it leads to rotation extension.

Ganyu: Her burst can deal a fair amount of damage. With Faruzan’s grouping, she can take advantage of her burst’s targeting mechanics to deal even higher damage in AoE situations.

Rosaria: Has solid damage output, especially with constellations. Also provides a partywide CRIT Rate buff with her passive.

Kaeya: Kaeya’s burst follows Wanderer while he is midair, making it impossible to hit most enemies. Not recommended.

Ayaka: Most of Ayaka’s damage comes from her burst which is entirely off-field, allowing Wanderer to take the field. Not only does she have high multipliers, but also high energy cost! It is not recommended to play solo Cryo with Ayaka, and even if paired with another Cryo unit, she will struggle with energy. It can also be challenging to play her without Freeze, even with Faruzan’s grouping.

Venti & Kazuha: Many people play Venti and Kazuha as supports, and in doing so also forget that they have high talent multipliers. Because Wanderer wants to run Faruzan and Bennett, this means Venti or Kazuha will also benefit from their buffs, producing noticeable damage. In teams with Wanderer, they will function closer to a subdps than a support.

**Defensive Options**

Wanderer prefers having a shielder support over a healer, if possible. This is because Wanderer has low interruption resistance even during his Windfavored state. He can get staggered midair, which is a DPS loss, but dodging without his A4 ready also depletes his secondary stamina bar and reduces his DPS uptime.

Layla: Has a strong shield and allows Wanderer to gain 20% CRIT Rate through his A1. She is also a reliable Tenacity of the Millelith holder, and can buff Wanderer’s Normal and Charged Attacks at C4.

Diona: Similar to Layla, but has a weaker shield and cannot hold Tenacity of the Millelith. On the contrary, she can heal.

Zhongli: His shield is the strongest in the game while also providing a 20% universal resistance shred as well as 20% ATK from Tenacity of the Millelith. While not the best option, he is a good comfort pick with some buffs and debuffs in his kit.

Thoma: Unlike the above shielders, Thoma relies on his burst to maintain uptime on his shield, which to some players may be a turnoff. Though his ER needs are demanding, his shield is reliable. He can provide a 30% ATK buff through Wanderer’s A1 passive and potentially complete Pyro resonance for 25% ATK. His C6 also confers 15% DMG to Normal and Charged attacks.

Jean: A decent healing option. With Faruzan’s buffs and lowered ER requirements, she can build into damage, although note she is not particularly impressive at C0. If Bennett is on the team, her damage can become significant via his ATK buff and her Sunfire tech. At C2, she provides a 15% ATK Speed buff, and shreds Anemo resistance by 40% at C4, boosting Wanderer’s damage by a significant margin.

Kokomi: Heals while holding Thrilling Tales of Dragon Slayers and Tenacity of the Millelith for a total of a 68% ATK buff, and also gives Hydro absorption for Wanderer’s A1.

__**Do I need a battery for Wanderer?**__

No. Most of Wanderer’s damage output comes from his Normal Attacks. While his burst deals a good amount of damage and should be used if possible, it is not the main feature of his kit.

#
**Hyper Wanderer**

Wanderer/Faruzan//Bennett/Flex

To no one’s surprise, pairing Wanderer with his best buffers skyrockets his personal damage, becoming the default hypercarry core for him. This configuration is particularly effective because the buffs each unit offers is unique and undiluted. Faruzan provides DMG% bonus, Anemo shred, and a CRIT DMG buff at C6, while Bennett supplies Wanderer with a ridiculous ATK buff.

Many characters can fit within the fourth team slot. Yun Jin’s Burst, for example grants additional flat damage to all Normal Attacks, and it scales with Faruzan’s buffs and debuffs. At C6, she will also give 12% ATK speed, another stat Wanderer greatly appreciates. Overall a potent team that scales well the more invested Wanderer is.

**Double Hydro**

Wanderer/VV Faruzan/Yelan/Xingqiu

Pairs a strong Anemo duo with another Hydro duo. Yelan and Xingqiu are both off-field damage dealers who become even more powerful when slotted together, as they mitigate each other’s weaknesses. Provided they have an on-field DPS who can drive them, they can practically be put in any team. Wanderer enjoys Yelan’s ramping DMG% buff and Xingqiu’s defensive utilities on top of their high single target damage. Faruzan carries a VV set to lower Hydro resistance, and can use Favonius Warbow to reduce energy requirements.

**Double Cryo**

Wanderer/VV Faruzan/Cryo/Cryo
Cryo Units: Rosaria, Layla, Diona, Ayaka, Ganyu, Shenhe

A double Cryo core grants Wanderer 20% CRIT Rate through his A1 passive as well as another 15% via Cryo resonance. He can run two offensive Cryo units such as Ganyu, Rosaria, and Ayaka, but can also run an offensive option plus a defensive option.

**Triple Anemo**

Wanderer/Faruzan/Anemo/Bennett or flex
Anemo: Venti, Kazuha, Jean

Wanderer is not the only character who can benefit from Faruzan’s and Bennett’s buffs. Adding a third Anemo unit who can take advantage of their buffs is certainly a viable option. Unfortunately, many Anemo supports don’t provide utilities relevant to Wanderer, so they only function as a subdps. For example, Venti’s grouping is redundant since Faruzan already has some, and Kazuha’s A4 DMG bonus is straight-up useless for Wanderer.

**Sunfire**

Wanderer/Faruzan/Jean/Bennett

A variant of triple Anemo that uses Jean as the third Anemo unit combined with Bennett to trigger her Sunfire tech and deal more off-field damage. Jean has lower ER requirements than she normally would, while also benefiting from Faruzan and Bennett’s buffing. Aside from that, this team does not particularly stand out until Jean gains constellations, most noticeably at C2 and C4.

**Double Geo**

Wanderer/Faruzan/Yun Jin/Zhongli

This team composition leans towards comfort and consistency in exchange for lower damage potential. Wanderer loses two potential A1 buffs, although it is slightly offset with Geo resonance. Nonetheless, he will still have decent baseline damage due to Faruzan and Yun Jin supporting him along with minor buffs from Zhongli.

**Double Pyro**

Wanderer/VV Faruzan/Bennett/Xiangling

One way to gain extra value from Bennett is using him to buff multiple units. Xiangling deals significant off-field AoE damage, can snapshot buffs, benefits from Faruzan’s VV debuff, and completes Pyro resonance for an extra 25% ATK. On the contrary, she has monstrous ER needs even with Bennett to battery her. If you cannot manage the team’s energy economy, her damage will plummet.

Thoma can also be traded in for Xiangling. While his damage is not as impressive, he brings a shield for Wanderer.

**Double Electro**

Wanderer/VV Faruzan/Fischl/Electro
Electro options: Yae, Beidou, Kuki

Fischl, Yae, and Beidou are off-field Electro characters who are capable of dishing out serious damage. With Electro resonance, Fischl, and Wanderer’s A1 passive, the team is quite energy rich. Normally, Wanderer requires an unreasonable amount of ER to burst every rotation, but playing him on double Electro significantly reduces that threshold. It becomes feasible to burst every rotation with him, although you’ll still need to build a bit of ER on him.

Kuki can be played as a defensive option, but team output will significantly tank.

#
*What about Wanderer teams without Faruzan?*

Not playing Wanderer with Faruzan will of course cause his DPS to drop. As mentioned, Anemo buffs/debuffs are rare, so there aren’t any suitable replacements for Faruzan. The nature of Wanderer’s teams will be warped, focusing on his team’s total output rather than just his personal damage. For example:

1.) Playing Wanderer as a Driver. This can happen for both ADC and EM Builds. ADC Builds are favorable for Single Target scenarios or if a Buffer like Bennett is still present on the Team. Whereas an EM build primarily pays off in AoE scenarios with increased Reaction counts as he cant trigger enough Reactions against single targets for EM to be worthwhile. A Driver Playstyle also allows him to operate in a more quick swap-y fashion by cutting his Skill short and use it more frequently in shorter bursts across a rotation to allow teammates to cast their abilities off cooldown or even use his grounded form to fill gaps. This isn’t his optimal use case but can be a serviceable transitional or budget option for those who can’t field a Team centered around him or simply don't want to do so.

2.) Pairing him with another strong team core (e.g Wanderer National)

Alternatively, if you still want to build around Wanderer’s personal damage, you can form a three member core with Wanderer/Bennett/Yun Jin and add in an off-field DPS or utility support in the fourth slot.

**EM Driver Wanderer**

A common trend among Anemo units is their synergy with EM and their ability to deal considerable amounts of damage with it. While Wanderer is capable of following in his predecessors’ footsteps, it is not optimal. His kit points to him being a selfish ATK-based DPS who deals most of the team’s damage without relying on reactions, the exact opposite of an EM driver. He does get the benefit of being an Anemo catalyst and being able to hold VV, but this is not exclusive to him. Sucrose and Heizou fulfill both conditions and offer additional utility such as grouping and EM share. Nonetheless, he can still perform the role of an EM driver just fine.

**Wanderer National**

Wanderer/Bennett/Xiangling/Xingqiu

Dubbed as “National” by the community, Bennett/Xiangling/Xingqiu is a powerful three man core with high internal synergy. They deal substantial DPS by themselves, so practically any fourth member can be slotted in. Wanderer can hold VV to debuff enemies while also taking advantage of Bennett’s ATK buff. Compared to the Sucrose variation, his personal damage will be higher, but he has significantly less utilities such as EM share and grouping. Wanderers regular field time demands also make funneling Xiangling more troublesome. Usable, but nothing special even among National variants.

#
__**CONSTELLATIONS**__ **C1 - Shoban: Ostentatious Plumage**

Increases NA/CA ATK SPD by 10% and increases the total damage of A4 Procs from 140% ATK to 240% ATK.

Allows Wanderer to fit 1-3 NAs more into a DPS Window. Increasing total DPS by 6-11%.
Value can vary based on how much ATK SPD Wanderer already has.
The increased A4 damage can further increase the value of this Constellation if Wanderer
has to dodge frequently or can utilize A4 Dash Cancels for a DPS gain.

Individual Increase: 6-11%
Total Increase from C0: 8.5%

**C2 - Niban: Moonlit Isle Amidst White Waves**

Grants Wanderer increased Q DMG% based on Kuugoryoku Points spent while in his Skill State, up to 200% after 50 points spent.

Grants Wanderer a powerful nuke option but also forces him to use his Burst as a finisher at the end of his DPS window. Generally yields around 15% more total DPS, which isn’t impressive for a C2. The effective value of this Cons however can be higher due to the practical advantages of powerful nuking abilities.
Only major stopping point for Wanderer Constellations prior to C6.

Individual Increase: 14-17%
Total Increase from C0: 25%

**C3 - Sanban: Moonflower Kusemai**

Increases the Wanderer’s Elemental Burst Talent Level by 3.

Further build upon the nuking power of his Burst after C2, but nothing to write home about in terms of value. Usually around 5% more DPS.

Individual Increase: 5%
Total Increase from C0: 32%

**C4: Yonban: Set Adrift Into Spring**

Grants Wanderer an additional Elemental Absorption Buff he doesn't already have at random, when he is absorbing an Element with his Skill and increases the cap of Buffs to 3.
Can provide 0%-15% more damage. The randomness makes these Buffs difficult to use consistently, as they may require you to adjust your Stats, are devalued in some Teams or require changes in your rotation.
Hence a pessimistic evaluation at 0%.

Generally: Cryo > Pyro > Electro/Hydro

Individual Increase: 0% (up to 15% at the mercy of RNG)
Total Increase from C0: 32%

**C5 - Matsuban: Ancient Illuminator From Abroad**

Increases the Wanderer’s Elemental Skill Talent Level by 3.

The value of Skill Talent Levels on Wanderer is generally pretty awful, making this his arguably weakest Constellation at around 3% more total damage.

Individual Increase: 3%
Total Increase from C0: 36%

**C6 - Shugen: The Curtains’ Melancholic Sway**

Causes the Wanderer to shoot a second Kuugo:Fushoudan (Skill State Normal Attack) whenever he uses a Normal Attack in his Skill State.
This second attack deals 40% of the original Normal Attack and also counts as a Normal Attack.
Additionally when Wanderer drops below 40 Kuugoryoku Points, his Normal Attacks will restore 4 such Points with a 0.2s CD, up to 5 times in total per Skill use.

The additional Normal Attacks are the primary value of this Constellation, effectively increasing his Normal Attack dmg by a total 40% or about 25% more total damage. A notable synergy is being able to rapidly fire the added Bonus Damage Stacks granted by Yun Jin’s Elemental Burst.
The additional Skill State duration is mostly QoL and isn’t used for the numerical evaluation of this Constellation.

Individual Increase: 25%
Total Increase from C0: 70%

tall fractalBOT
#

Faruzan Pre-TC FAQ by @cerulean mirage (Team Lead, Author, Calcs), @old glen (Author, Calcs, Consultant), @fleet lodge (Contributor), @cosmic fox (Contributor)

For all Faruzan Calcs you can reference: Faruzan Mastersheet by @cerulean mirage and @old glen, and Faruzan Frames Mastersheet by @tardy notch

Pre-TC is volatile and, as always, perpetually subject to change until release (and sometimes later!). Please note that these are theoretical suggestions. Everything described in this FAQ is a good faith analysis based on the little information about the character’s kit that we know. Team calcs, additionally, are not established yet, and as with everything in TC, the content in this

__**CHARACTER OVERVIEW**__

Faruzan is a 4* Anemo bow user whose kit revolves around buffing her team's Anemo damage while decreasing the enemies Anemo resistance. This allows her to serve as the staple support for a team with an Anemo DPS.

For stats, Energy Recharge is the most important stat on her. With her 80 energy cost, her ER requirements on her teams can reach extremely high levels. As her Energy requirements are quite high, Favonius Warbow is often recommended to be able to use her Elemental Burst off cooldown and continually support the Anemo DPS. ER sands, Anemo DMG% Goblet and CRIT% circlet can be used, CRIT Rate% becoming even more important with Favonius Warbow as her weapon.

While her Elemental Skill can provide light crowd control for small enemies, the main part of her kit is her Elemental Burst, which provides the buffs for her Anemo DPS teammate. At C0 she is a serviceable Anemo DPS support that can be used. Her C1 allows her to use a second charged arrow after using her Skill. C2 increases her Burst length by 6 seconds to a total of 18. C4 allows her to gain more energy for the amount of characters hit by her Elemental Skill’s Charge Attack. C5 is notable since it adds 3 levels to her Elemental Burst, which boosts the Anemo damage bonus she gives. While her C2, C4 and C5 are decent, her C6 drastically improves her. Her C6 both adds CRIT Damage to Anemo attacks and significantly boosts her support capabilities for the team and herself, while reducing her ER% requirements for herself.

__TALENT__

Leveling Priority: Burst > Skill > Normal Attack

Analysis:

Part of Faruzan’s kit increases Anemo damage by 32% of her base attack, so leveling her to at least 80/90 is recommended. Leveling her to 90 would maximize this buff that is based off her base attack, which is only increased by level and weapon.

Faruzan’s Normal Attacks do not deal a great amount of damage and her Charge Attack damage mainly comes from her Elemental Skill. Most of her kit is focused around her Elemental Skill and Elemental Burst.

When pressing her Elemental Skill, she will deal AOE Anemo Damage to nearby opponents and enter her Manifest Gale state. When in this state, her next fully charged arrow will apply Pressurized Collapse to enemies hit by the AOE. It causes light CC to nearby enemies, provides a fixed 30% Anemo RES decrease to enemies from her A1 and deals Anemo damage to enemies hit. This part of her kit provides decent grouping for small enemies that can make it easier for your Anemo DPS to target them.

Faruzan’s Elemental Burst releases an Anemo Shape that moves in a triangular path on the field. When used, it reduces enemies Anemo RES by 30% while also boosting Anemo damage of nearby party members by 30.6% at Talent level 9. This is the most important part of her kit, providing herself and the Anemo DPS on the team with pretty good buffs. Recommend leveling this talent first over any of the others.

Her 1st Ascension Talent reduces the time taken to charge a shot by 60% for her Charge Attack of her arrow after using her elemental skill. Also reducing enemies with the 30% Anemo RES on enemies hit by the Charge Attack’s AOE. Think of it like Sara’s A1 and Charge Attack after using her Elemental Skill. Decent A1 which helps boost her team’s damage outside of her burst.

Faruzan’s 4th Ascension is when your characters deal Anemo damage while under the effects of Faruzan’s Elemental Burst, their Anemo damage is boosted by 32% of Faruzan’s Base Attack. While this isn’t the biggest damage increase (Especially if already pairing your Anemo DPS with an external attack buff like Bennett), it does still help overall. Leveling your weapon to 90 and leveling Faruzan to at least 80/90 should maximize this A4.

Lastly, her overworld Passive Talent is the basic expedition talent which gains an extra 25% of materials when dispatched in Sumeru for 20 hours.

#
__**ER REQUIREMENT**__

Faruzan’s particle generation relies on her hitting her Hurricane Arrow to the enemies and waiting for Pressurized Collapse to trigger, meaning she will rely on a specific combo of E CA Q to funnel the particle to herself or E Q CA to funnel the energy to the Anemo DPS. Generally, funneling energy to another party member is not ideal for Faruzan due to her particles generation being 2 per CA so her ER Requirement would be high. Typically, 220%+ ER Requirement solidifies her need to cast Burst every rotation with Favonius Warbow and without it, her ER skyrockets to a degree in which the KQMC distributed subs cannot reach.

__**WEAPONS**__

Due to her enormously high ER requirement before C6, the weapon options are quite limited here; some of them make 2pc Emblem/Exile mandatory on her, thus may reduce team’s damage without 4pc Viridescent Venerer effect. At C6, she can choose more offensive options to increase her personal damage without worrying too much about her energy problem

For more explicit number and ranking, please check out the mastersheet

Favonius Warbow

Arguably her Best-in-Slot 4* weapon; it lowers her ER requirement with the particles provided by its passive. Also allow her to use 4pc Viridescent Venerer without compromising the ER needed.

Elegy of the End

Also an amazing choice that both give ER% needed and team-wide buff.

End of the Line

An acceptable F2P weapon that gives moderate ER% if Favonius Warbow has been occupied.

Other ER Weapons

They can be used if all the options above are not available.

Offensive Options

Only use them if you have Faruzan at Constellation 6, where her ER requirements are much more acceptable. All of them are pretty similar in strength therefore any option will do.

#
__ARTIFACTS__

Artifacts will be dependent on what team composition you will run Faruzan with the proper Anemo DPS and other supports that provide other utilities compared to Faruzan.

Timepiece: ER% - This consolidates her ER needs and with Favonius Warbow, reaches that requirement fairly easily along with 1-2 ER distributed subs.

Goblet: Anemo DMG% - Strictly to push out damage from her kit overall

Circlet: CR% - With Favonius Warbow, CR% is mandatory for its passive to trigger consistently while allowing Faruzan to proc CRITS for her damage as well.

Substat Priority: ER% (Until requirement is reached) > CR%=CDMG% > ATK%

Recommended 4PC Viridescent Venerer

This artifact set excels at providing RES Shred for the off-field DMG that the other units provide for the Anemo DPS. It also amps up Faruzan’s overall DMG but not to a significant degree compared to the other artifact sets

4PC Noblesse Oblige

Standard support artifact set. Quick and easy to use for Faruzan and generally helps the Anemo DPS deal more DMG and works well with a dynamic off-field DMG.

4PC The Exile

With Faruzan’s ER Requirement needing to be high, this artifact set stands out from the rest as not only her ER Requirement lowers, it also lowers the entire parties, consolidating the ER subs to a much more offensive distribution for DMG. Faruzan would want the off-piece to be a 5* ER% Timepiece with this set.

4PC Emblem of Severed Fate

Along with Exile, this set consolidates with her ER Requirement but provides a much more offensive attribute from its 4PC passive to Faruzan only.

Options 4PC Tenacity of the Millelith

Only viable when Faruzan is at C6 due to its extra Collapse being able to maintain the ATK% Buff throughout the entire Anemo DPS on-field time.

__TEAMBUILDING__

Her kit excels at giving buffs to Anemo characters and Anemo RES Shred to the enemies, therefore she should be paired with some of the Anemo main carries that are available at the moment.

**Hypercarry Anemo:**

Wanderer / Xiao / Heizou - Faruzan - Bennett/Flex - Flex

Pairing anyone of those 3 above with Faruzan is essential to bring out their maximum potential. The last 2 slots can be anyone that either brings more to the team or the main carry: Bennett, Zhongli, Yelan, Fischl, … Do note that in teams that have a sub DPS like Yelan or Xingqiu, pairing her with 4pc Viridescent Venerer should be prioritized to enhance their damage.

**Overall Anemo support**

As an Anemo character, she has access to 4pc Viridescent Venerer, which is useful overall. Therefore, she can technically fit in as the flex slot just for the 4VV effect and ignore her energy problem by not Bursting every rotation. However, she is not recommended because there exist other Anemo characters that either have more utilities or deal more damage than her.

#
__CONSTELLATIONS__ **C1 - Truth By Any Means**

Gives her the ability to fire two Hurricane Arrows when you use fully charged aimed shots, but only after you use her Skill, Wind Realm of Nasamjnin. Normally, you do not want to fire both of them twice due to energy ICD, which will not generate another instance of Energy with the second consecutive second shot; rather than that, the second Arrow should only be used when you miss the first shot. Rating: 1/5

**C2 - Overzealous Intellect**

The polyhedron that is created during her burst stays for 6 seconds more on the field. A moderate constellation which can extend the rotation to around 22 seconds without losing its uptime. Rating: 2/5

**C3 - Spirit Orchard Stroll**

Adds 3 more levels to her E skill. A minuscule damage buff, become better with her Constellation 6. Rating: 1/5

**C4 - Divine Comprehension**

The vortex that is created by pressurized collapse gives her energy particles based on how many opponents it hits, minimum of 2 energy and 0.5 per extra enemy, up to 4. This Constellation alone does not solve her energy problem, but combined with C6 will. Rating: 2/5

**C5 - Wonderland of Rumination **

Adds 3 more levels to her burst. Increase both the main Anemo carry and her own damage. Rating: 2.5/5

**C6 - The Wondrous Path of Truth **

Characters that are in her burst’s field and obtain the Prayerful Wind’s Benefit will have their crit damage increase by 40% if they happen to deal Anemo damage, while also apply Pressurized Collapsed to the enemy. Not only does it improve the main Anemo carry damage, it also lowers both of their energy issues by triggering Pressurized Collapsed that deals more damage from C3, restore energies to Faruzan with C4 and generate Anemo particles overtime. Rating: 6/5

sonic starBOT
#
__CREDITS__
Leads:

@drowsy plaza, @vagrant dagger

Authors:

@drowsy plaza, @vagrant dagger, @oak axle, @gleaming stratus, @olive spoke, @finite anvil

Calculations:

@vagrant dagger, @oak axle

Framecounts:

@tardy notch

DISCLAIMER

Pre-TC is volatile and subject to change. Everything described in this FAQ is a good faith analysis based on the limited information we have. Team calcs are not established yet, and as with everything in TC, the content in this FAQ should be taken with a grain of salt.

__OVERVIEW__

Alhaitham is a Dendro on-field DPS with a stacking mechanic that allows him a fairly flexible field time. His kit revolves around his Chisel-Light Mirrors, which convert his basic attacks to Dendro and provide him with additional damage and Dendro application based on the number of Mirrors he has.

Alhaitham relies on Dendro Elemental Reactions to deal respectable damage, most notably through Spread. This means that his teammates will usually consist of at least one Electro character, and Alhaitham will build stats as expected of a Spread DPS: EM, DMG% and CRIT. This doesn’t mean that Spread teams are his only viable teams, though. In fact, as one of the only Dendro characters currently able to apply sustained Dendro on-field, Alhaitham can also be played as an on-field Dendro enabler in Bloom, Burgeon and Hyperbloom teams.

#
__TALENTS__ **Talent Priority:** Elemental Skill > Normal Attack = Elemental Burst

Players should prioritize getting Alhaitham to level 90 over getting high Talent Levels. In Quicken and Quickbloom teams, a significant chunk of Alhaitham’s damage comes from the Spread reaction, which is independent of Talent Levels but scales well with character levels. This means leveling his Talents doesn't yield as much of a DPS gain as it would on most characters, but it is nonetheless beneficial.

Out of Alhaitham’s three Talents, his Elemental Skill comprises the biggest portion of his non-Spread damage, so prioritize that first. If Bursting every other rotation, prioritize his Normal Attacks over his Elemental Burst. If Bursting every rotation, level them both equally.

__TALENT OVERVIEW__

When Alhaitham has at least one Mirror, his basic attacks are converted to Dendro. Mirrors can be generated via his A1, Skill and Burst. He can have a maximum of 3 Mirrors at a time and they disappear if he goes off-field. One Mirror will expire every 4s, so players must manage them carefully to maximize Alhaitham’s potential. Note that gaining a new Mirror specifically while having 3 Mirrors will refresh the current Mirror's duration to 4s, though this duration refresh does not happen if he only has 1-2 Mirrors.

It is technically possible to maintain an infinite Dendro Conversion even at C0, though this isn't recommended outside of overworld and co-op.

Upon hitting opponents with his Dendro-converted attacks or Elemental Skill, Alhaitham can trigger a Projection Attack every 1.6s, which deals instances of AoE Dendro DMG based on the number of Mirrors he has. Projection Attacks are triggered on hit, so in practice, the interval between Projection Attacks may be longer than 1.6s. It’s important to note that his Projection Attacks are tied to his Mirrors, which can also be gained through A1 and Burst. As a result, he can gain Mirrors and trigger Projection Attacks without ever using his Skill.

Each Projection Attack inflicts a separate hit for each Mirror currently present, which means that having more Mirrors increases the damage and Dendro application of his Projection Attacks. Due to their 2-hit ICD, every other wave of 3-Mirror Projection Attacks will apply Dendro twice, which markedly increases Alhaitham’s Dendro application rate.

Alhaitham's Burst is a flexible Talent that can be used either as a utility tool to generate Mirrors or as a nuke. His Burst deals additional hits based on how many Mirrors it consumes, and refunds Mirrors equal to 3 minus the number of Mirrors consumed (e.g. consuming 1 Mirror generates 2 Mirrors). Note that Mirrors generated from his Burst are only granted 2 seconds after Alhaitham's Burst animation finishes.

It is generally more optimal to use his Burst with zero Mirrors to generate 3 Mirrors, as using his Burst as a nuke prematurely terminates his DPS uptime pre-C6. This can be useful for frontloading damage or quickly clearing a wave of mobs, but is otherwise generally a suboptimal use of his Burst.

#
__CONSTELLATIONS__ C1 - Intuition

When a Projection Attack hits an opponent, Universality: An Elaboration on Form's CD is decreased by 1.2s. This effect can be triggered once every 1s.

Practically useless. This Constellation allows Alhaitham to use his Elemental Skill again faster when attacking on-field. However, this has no significant effect on gameplay, because Alhaitham’s long cooldown on his Elemental Skill doesn’t allow him to use his Skill twice in most rotations even with this Constellation. Using a second Skill during Alhaitham’s field time also brings the massive drawback of generally having its cooldown not ready in time for the next rotation, as the cooldown on the second Skill will not be sufficiently reduced with his C1. The best use case for this Constellation may be enabling rotations shorter than 18s, using one Skill per rotation. But as of now, this Constellation only has value in overworld/co-op and is otherwise merely a stepping-stone to other Constellations.

*DPS Increase from C0:*

0%

*Rating:*

0/5

C2 - Debate

When Alhaitham generates a Chisel-Light Mirror, his Elemental Mastery will be increased by 50 for 8 seconds, max 4 stacks. Each stack's duration is counted independently. This effect can be triggered even when the maximum number of Chisel-Light Mirrors has been reached.

C2 can be regarded as Alhaitham’s overall second-best Constellation after his C6, providing players with a significant 200 EM boost at maximum stacks. However, if players possess Nahida, it is advised to get her C2 instead, which offers better value in increasing Alhaitham’s personal DPS than his own C2.

*DPS Increase from C0:*

14%

*DPS Increase from C1:*

14%

*Rating:*

3/5

C3 - Negation

Increases the Level of Universality: An Elaboration on Form by 3.

Given that most of Alhaitham’s damage comes from Spread, which is independent of Talent Levels, C3 provides only a modest ~5% boost. However, players should note that C3 still provides a greater damage boost than C5.

*DPS Increase from C0:*

19%

*DPS Increase from C2:*

5%

*Rating:*

1.5/5

C4 - Elucidation

*When Particular Field: Fetters of Phenomena is unleashed, the following effects will become active based on the number of Chisel-Light Mirrors consumed and created this time around:

·Each Mirror consumed will increase the Elemental Mastery of all other nearby party members by 30 for 15s.
·Each Mirror generated will grant Alhaitham a 10% Dendro DMG Bonus for 15s.

The pre-existing duration of the aforementioned effects will be cleared if you use Particular Field: Fetters of Phenomena again while they are in effect.*

C4 allows Alhaitham to give his teammates an Elemental Mastery buff when he consumes Mirrors, and also gives Alhaitham a Dendro DMG Bonus when he generates them. Since Alhaitham typically starts his rotations with no Mirrors, he usually only benefits from the personal Dendro DMG Bonus. C4 becomes more valuable when C6 is activated, because the latter allows you to consume Mirrors for the team buff while always receiving max Dendro DMG Bonus on Alhaitham. Overall a decent Constellation, and better with C6.

*DPS Increase from C0:*

31%

*DPS Increase from C3:*

10%

*Rating:*

3/5

C5 - Sagacity

Increases the Level of Particular Field: Fetters of Phenomena by 3.

C5 provides a negligible damage increase in standard rotations where his Burst is used with zero Mirrors, though it has slightly more value in Burst nuke setups. As mentioned previously, most of Alhaitham’s damage comes from Spread, which is unaffected by Talent Levels. This Constellation is only worth getting if you are going for C6 anyway.

*DPS Increase from C0:*

32%

*DPS Increase from C4:*

1%

*Rating:*

1/5

C6 - Structuration

*Alhaitham gains the following effects:
· 2 seconds after Particular Field: Fetters of Phenomena is unleashed, he will generate 3 Chisel-Light Mirrors regardless of the number of mirrors consumed.
· If Alhaitham generates Chisel-Light Mirrors when their numbers have already maxed out, his CRIT Rate and CRIT DMG will increase by 10% and 70% respectively for 6s.

If this effect is triggered again during its initial duration, the duration remaining will be increased by 6s.*

Like many characters, Alhaitham’s best Constellation is C6. It ensures that his Burst always grants the maximum number of Mirrors, along with a potential CRIT Rate and CRIT DMG buff. However, it comes with its own caveats—if you try to get some stacks on Burst to take advantage of the guaranteed 3-Mirror refund, you need to save either Skill or A1 to activate the C6 buff by overcapping with the Burst-generated Mirrors. This limits the damage potential of his field time before Burst and also shortens the maximum 3-Mirror uptime he can get after Burst. Players willing to unlock his sixth Constellation are still advised to open with the QE rotation, which should provide a 12s C6 buff from the start as the second Mirror overcap also triggers the duration extension.

*DPS Increase from C0:*

66%

*DPS Increase from C5:*

25%

*Rating:*

4/5

#
__COMBOS__

Alhaitham generally wants to maintain 3-Mirror uptime while he is on field, as 3-Mirror Projection Attacks yield the greatest damage and Dendro application.

More testing is needed to determine specific optimal combos for Alhaitham. Combo optimization aims to: (a) maintain Mirror uptime, (b) line up basic attack hitmarks to lower the interval at which Projection Attacks get triggered, (c) maximize the rate of Dendro application from his basic attacks and (d) much less importantly, maximize MV/s.

Below are some general principles for playing Alhaitham.

General Combo Information

To maximize the length of 3-Mirror uptime, open with Burst, attack/wait/swap for 2s until you get the Mirrors from Burst, then use NAs for ~4s. Use either CA or E to refresh 3 Mirrors, attack for ~4s more, then use E or CA (whichever one you didn't already use) to refresh 3 Mirrors again. You should avoid using CAs in your attack string until you actually want to trigger A1 to top up your Mirrors. After you trigger A1, you can opt to mix CAs into your attack string.

If you want less than 12s total field time, it is optimal to use Q and then E immediately, since this allows you to get the Conversion and start triggering Projection Attacks slightly earlier than waiting 2s for the Mirrors from Burst.

If you opt to Burst every other rotation, you should open the Burstless rotation with E N1C/N2C to get 3 Mirrors and then attack for your desired amount of fieldtime as the Mirrors fall off one by one.

Optimal Attack Strings

N3 dash cancel (N3D) is the optimal NA-only attack string to maximize Dendro application, since his third NA is a multihit. However, be careful not to cancel it too early and accidentally miss the second hit of the third NA.

N2C and N3C are viable CA-based attack strings to maximize the rate of Dendro application. N2C is about the same duration as N3D and is easier to pull off since it doesn't require dash canceling, but its hitmarks may not line up well to maximize Projection Attacks. More live testing is needed to optimize attack strings to maximize Projection Attack procs.

N1C is the fastest way to trigger A1. If you use it when you have no Mirrors, the CA will both trigger A1 and proc the first Projection Attack.

If driving Xingqiu/Yelan/C6 Fischl, it’s better to use strings without CAs.

Other Mechanics

You can use Burst, swap to use a quick ability on another character (such as Dendro Traveler E to funnel particles to Alhaitham, Kuki E, Fischl E, etc), and swap back within 2s to catch the Mirrors generated from Burst. However, if you can’t swap back in time because you get interrupted or delayed, you will lose the Mirrors from Burst, so use this at your own risk. Note that this technique may not be viable at high ping.

Tap E is generally better than Hold E since it’s faster.

A Plunge Attack can trigger both A1 and Projection Attack from the same hit, prioritizing Mirror creation first and then triggering the Projection Attack. This means that you can use Hold E and Plunge to get 3 Mirrors and immediately trigger a 3-stack Projection Attack.

Burst Quickswap

As his Burst multipliers are somewhat underwhelming and he has long 18s CDs on Skill and Burst, using him as a quickswap unit is generally not recommended. However, if you do choose to use him this way, you can do E N1C/N2C to quickly gain 3 Mirrors and then Burst with 3 stacks. Note that pre-C6, this means you won’t have any Mirrors available after Burst, and will need to swap to other units.

C6 Combos

The guaranteed 3-Mirror generation from Burst at C6 allows for more flexibility in using Burst with some stacks part-way through his field time and additional Mirror uptime after Burst. However, the C6 CRIT buff will not proc if you do not save an E or CA for after Burst to overcap the Mirrors. As such, it is possible that even at C6, his optimal combo remains opening his rotation with QE. QE also gives you 12s of C6 buff uptime from the get go, as the C6 duration extension is triggered by immediately overcapping by 2 Mirrors.

__ER REQUIREMENT__

Every time a Projection Attack is unleashed, Alhaitham creates one Dendro particle, which can occur once every 1.6s (in practice, this interval is a bit higher). In other words, Alhaitham must take field time to generate Energy. He can be expected to generate 5-6 particles every rotation.

With a 70 Energy Cost, Bursting every rotation with Alhaitham can be challenging. Bursting every other rotation is fortunately a viable playstyle—in that case, Alhaitham’s ER requirement is usually only 100%. Otherwise, it is rarely viable to Burst every rotation without building some ER.

#
__ARTIFACTS__

Sands: EM > ATK%
Goblet: Dendro DMG% > EM
Circlet: CRIT Rate or CRIT DMG > EM

Substats: EM (~250-300) > CRIT% > EM > ATK% > Flat ATK

With EM scaling on his Talents, a Passive that gives DMG% based on EM, and teams built around reactions, it’s no surprise that EM is a valuable stat on Alhaitham that will almost always be better than ATK. If using his signature weapon Light of Foliar Incision, EM becomes even more important. The 250-300 EM threshold is recommended on Quicken/Quickbloom builds before building CRIT substats, but with an EM Sands, external EM buffs, EM artifact sets, etc. there should be little issue reaching this range.

*What about ER?*

At higher ER requirements, building ER to Burst every rotation can be a DPS loss. Bursting every rotation at 130-140% ER requirements is roughly equivalent to Bursting every other rotation at 100% ER. Whichever option players go for depends on Alhaitham’s ER requirements, what artifacts they already have, and their playstyle preference.

__Artifact Sets__ 4PC Gilded Dreams

Alhaitham’s BiS set, provided that another character can hold 4pc Deepwood Memories. This set gives him a hefty amount of EM, a stat he greatly appreciates. Although it has a bit of downtime, its 4pc effect is relatively easy to trigger.

2PC EM/EM/Deepwood Memories

Only slightly weaker than 4pc Gilded Dreams. If players have high substat quality on their 2pc sets (which they likely do), it is possible that this combination of artifacts will overtake 4pc Gilded Dreams.

4PC Deepwood Memories

This is technically Alhaitham’s BiS set if no other character can hold it to proc the 4pc effect. However, Alhaitham typically deals the most damage in his teams, so it is advised to have another support unit hold 4pc Deepwood and him hold another artifact set instead. In this way, he can benefit from both artifact sets at the same time.

2PC Emblem of Severed Fate/EM/Deepwood Memories

When Bursting every rotation, 2pc Emblem is a very competitive 2pc option and comes close to 4 Gilded Dreams, allowing players to build offensive substats instead of ER. Of course, at lower requirements, it is relatively less powerful.

2PC ATK%/ATK%

A weaker 2pc variation than 2pc 80 EM/15% DMG. Not recommended, but technically better than having no set.

4PC Gladiator's Finale/Emblem of Severed Fate/etc.

Not recommended. Alhaitham’s damage is distributed throughout his kit. Hence, it is counterproductive to use sets that focus on a singular aspect of his kit.

#
__WEAPONS__

Alhaitham has a variety of weapon options at his disposal thanks to his flexible scaling taking advantage of a wide number of stats. Thanks to his reliance on EM over ATK making low Base ATK relatively inconsequential, he has many powerful free options. You can view the full weapon ranking in the WFP Alhaitham Mastersheet.

__Signature Weapon__ Light of Foliar Incision

Alhaitham’s signature weapon gives a hefty 88.2% CRIT DMG and provides an EM-scaling buff to his Normal Attacks and Projection Attacks. It is approximately 8% stronger than the next best option, although its effectiveness is impacted in AoE situations where Alhaitham can use up its buff stacks prematurely on lower-scaling Normal Attacks rather than on Projection Attacks that benefit from A4. Foliar’s passive does, however, synergize well with EM buffs and makes him strongly favor EM in his build. Note that due to his lack of CRIT Rate ascension, it can be difficult to get a 1:2 crit ratio with Foliar.

__5★ Options__ Primordial Jade Cutter

The evergreen stat stick, Primordial Jade Cutter is the 2nd-best option for Alhaitham after his signature weapon, thanks to its CRIT Rate stat and unconditional ATK bonus passive, both of which Alhaitham can take advantage of.

Haran Geppaku Futsu

Tied for 3rd place with Mistsplitter. Alhaitham enjoys its CRIT Rate and Elemental DMG Bonus buff. In order to make full use of its Normal Attack DMG buff, he should use N3D combos.

Mistsplitter Reforged

Tied for 3rd place with Haran. Alhaitham can make good use of Mistsplitter’s Elemental DMG Bonus passive, and he’s able to reliably maintain 3 stacks in most rotations.

__4★ Options__ Toukabou Shigure/Iron Sting

His best 4-star options, Toukabou Shigure and Iron Sting perform similarly. Between their Elemental Mastery and passive buffs, they both provide everything Alhaitham values in a weapon.

Due to their differing passives, Toukabou Shigure will perform better in single-target scenarios, while Iron Sting will pull ahead in AoE situations.

Festering Desire

A respectable option for Alhaitham that provides useful DMG% and CRIT Rate buffs for his Mirror Projection Attacks. Festering Desire is competitive with Iron Sting and Toukabou Shigure in teams where he can take full advantage of its Energy Recharge stat, but sees worse performance if he does not Burst every rotation.

Xiphos' Moonlight

Alhaitham values all the stats given by this weapon, which also reduces team Energy needs. However, Xiphos’ passive does not work with many EM buffs, lowering its overall effectiveness.

Sacrificial Sword

Sacrificial Sword offers Alhaitham the luxury of starting rotations with his Elemental Skill prior to Elemental Burst (changing his rotation to E > N1 > Q > E), allowing him to Burst with 2 Mirrors for additional damage. His typical rotations require R4 minimum to trigger consistently.

Harbinger of Dawn

Not to be discounted. With its passive up, Harbinger of Dawn competes with his 5-star weapon options, performing similarly to Haran and Mistsplitter thanks to its CRIT Rate and CRIT DMG buffs. However, given Alhaitham’s role as an on-field character, a shielder is mandatory to realistically take advantage of this weapon.

#
__TEAM BUILDING__

Early potential teams for Alhaitham primarily focus on Spread for his personal damage. Additionally, he may be used as a driver in Bloom, Hyperbloom and Burgeon comps. Quickbloom teams—teams that allow for both Hyperbloom and Quicken to coexist through slow Hydro application—have also shown great promise. These teams should have similar Quicken uptime to Spread teams, with additional Hyperbloom DMG.

Note that in Burgeon, Nilou Bloom and Hyperbloom teams where Alhaitham does not get many Spreads, his personal damage will be underwhelming. It would thus be more useful for him to Burst every rotation for better Mirror uptime and higher Dendro application. To reach his ER requirements, particularly when he is the solo Dendro unit, it is likely better to gear him with supportive ER weapons like Favonius Sword.

__Quicken Teams__

Example Team: Alhaitham/Nahida/Fischl/Kuki Shinobu
Example Team 2: Alhaitham/Yae Miko/Fischl/Zhongli

With his high Dendro application and EM to DMG% conversion on his A4, it’s no surprise that Spread is a massive boon to Alhaitham’s DPS output. Additionally, there are multiple Electro units that can contribute substantial off-field damage via Aggravate. A secondary Dendro unit can also be slotted in for extra Spread procs and Dendro Resonance.

Electro Units: Fischl, Yae Miko, Kuki Shinobu, Beidou, Kujou Sara, Raiden Shogun
Dendro Units: Nahida, Collei, Dendro MC, Yaoyao
Flex Units: Zhongli, Kazuha, Sucrose, Albedo

__Hyperbloom/Quickbloom Teams__

Example Team: Alhaitham/Kuki Shinobu/Xingqiu/Nahida
Example Team 2: Alhaitham/Raiden Shogun/Xingqiu/Yelan

Quickbloom teams utilize a lower amount of Hydro application compared to Dendro application, so as to allow for high to full Quicken uptime with additional Hyperbloom DMG from Electro character(s). Quickbloom teams focus more on Alhaitham’s on-field Spread DMG and the Electro character’s Aggravate DMG, though units with EM-scaling such as Kuki can also build full EM to maximize Hyperbloom DMG. Alhaitham should stick with his normal EM/DMG/CRIT build.

Note that due to Alhaitham’s high Dendro application and tendency to run with Nahida as a second Dendro, you should still get decent Quicken uptime even with a unit like Xingqiu.

Hyperbloom teams utilize more abundant Hydro application, resulting in notably lower Quicken uptime and a much greater portion of team damage coming from Hyperblooms. Alhaitham serves more of an on-field driver role in such teams. It may be beneficial to run two Hydro units to keep up with Alhaitham’s on-field Dendro application.

Electro Units: Kuki Shinobu, Raiden Shogun, Yae Miko, Fischl, Lisa, Beidou
Hydro Units: Xingqiu, Yelan, Kokomi, Barbara
Flex Units: Zhongli, Kazuha, Sucrose, Dendro units

__Burgeon Teams__

Example Team: Alhaitham/Thoma/Kokomi/Xingqiu

With his high, consistent Dendro application, Alhaitham can be used as an on-field unit to enable Burgeon teams. However, such teams have delicate setups, as triggering Burning can easily lose Blooms. Running a defensive unit such as a healer/shielder is also necessary due to Burgeon self-damage.

Pyro Unit: Thoma
Hydro Units: Xingqiu, Yelan
Flex Units: Zhongli, Fischl, Kokomi, Kazuha, Sucrose, Diona, Kaeya, Rosaria, Yaoyao

__Bloom Teams__

Example Team: Alhaitham/Nilou/Kokomi/Nahida
Example Team 2: Alhaitham/Nilou/Kokomi/Xingqiu

Alhaitham can also be used as an on-field Dendro enabler in Nilou teams. Unfortunately, he has little utility, and his personal damage will be lower than usual as he has little reaction ownership unless all three of his teammates are Hydro units. It is strongly recommended to bring a healer, or Alhaitham will not survive the Bloom self-damage. Swapping him out midway is punishing, as his Elemental Skill has a 18s CD while his Burst costs 70 Energy, and he has no off-field Dendro application to compensate.

Hydro Units: Nilou, Kokomi, Xingqiu, Yelan, Barbara
Dendro Units: Nahida, Collei, Dendro MC, Yaoyao

earnest sinewBOT
#
__CREDITS__
Lead:

@hidden ermine, @cerulean mirage

Authors:

@hidden ermine, @fleet lodge, @dark valley

Calculations:

@hidden ermine, @gloomy wadi, @oblique jackal

Framecounting:

@high silo, @lucid ingot

Consultation

@old glen

DISCLAIMER:

Pre-TC is volatile and, as always, perpetually subject to change until release (and sometimes later!). Please note that these are theoretical suggestions. Everything described in this FAQ is a good faith analysis based on the little information about the character’s kit that we know. Team calcs, additionally, are not established yet, and as with everything in TC, the content in this FAQ should be taken with a grain of salt.

__OVERVIEW__

Yaoyao is a Dendro Polearm character and the first Dendro healer in the game. Aside from being a solid healer, being a Dendro character opens her up to some unique applications. Her role in a team composition is flexible thanks to her low desire for on-field time and in many applications low desire for Energy as well.

Yaoyao’s playstyle can be split into two directions: Elemental Skill focused or Elemental Skill & Elemental Burst focused. The main differentiator between these playstyles is the requirement for ER and on-field time. Yaoyao’s healing scales off of her HP. Because of her HP% Ascension stat and high Base HP, she gets more value out of Healing Bonus% than HP%. As an off-field DPS, she wants a good balance between Dendro DMG Bonus, CRIT Rate/CRIT DMG and EM (to boost Spread DMG). Artifact set and Weapon wise, she is not picky, and players are free to choose whichever combo fits their team-building the best.

While picking playstyles for Yaoyao, the main thing to consider is the pressure of survival. Her Burst can be treated as an emergency heal button for the whole team. Using it will extend her on-field time and decrease the overall team’s DPS by a small margin, in exchange for a substantial amount of healing. For instance, in teams with less i-frames and high self-damage like Nilou Bloom/Burgeon, players would likely utilize Yaoyao’s Burst more often than other typical Aggravate/Spread teams.

Yaoyao performs all of her core functions at C0. Her Constellations provide QoL features such as Stamina restoration, ER requirement reduction, self EM boost, extra Dendro application and healing.

#
__TALENT__ **Leveling priority - Elemental Skill >= Elemental Burst >> Normal ATK**
__ANALYSIS__

For HP scaling characters, it's usually recommended to level them to 90. If not, Yaoyao should at least be fully ascended to take advantage of the HP ascension stat.

Yaoyao’s Elemental Skill creates one instance of Yuegui: Throwing Mode, a turret-like summon akin to Fischl’s Oz. By holding the Skill button, players can also manually adjust the position of the summon on initial cast, similar to Amber’s Baron Bunny. Yuegui: Throwing Mode will continuously throw out projectiles called White Jade Radishes. Upon contact with either an enemy or a character, they will explode and deal damage to the enemy while healing the on-field character within the same AoE, albeit a relatively small one. If a Radish does not contact an enemy or a character, it will remain on the field for 5 seconds.

“Yuegui: Throwing Mode” also has a set of logic for picking its target:
If the on-field character has below 70%: targets the on-field character
If the on-field character has above 70% HP with enemies present: targets the enemy
If the on-field character has above 70% HP without enemies present: targets the on-field character

Yaoyao’s Elemental Burst grants her the Adeptal Legacy state while she is on-field. This state’s effect consists of three parts:
Yaoyao will throw out three instances of Yuegui: Jumping Mode, turrets with the exact same targeting logic as Yuegui: Throwing Mode, in very quick succession.
All of the White Jade Radishes fired during this state, from both Yuegui: Throwing Mode and Yuegui: Jumping Mode, will be converted to Adeptal Legacy White Jade Radishes. They deal extra damage and healing, and they are considered as Elemental Burst DMG. The healing also benefits her whole team instead of only the on-field character like her Skill.
Yaoyao gains 15% Movement SPD and 50% Dendro RES Bonus.
If Yaoyao leaves the field, all Yuegui: Jumping Mode will immediately despawn.

Yaoyao’s 1st Ascension Passive is a nice addition to her Burst mechanic, as she is encouraged to move around while in her Adeptal Legacy state, evading a large portion of both damage from enemies or Bloom self-damage, at the same time boosting her healing even further. Her 4th Ascension Passive is another addition to her healing. It’s worth noting that this Passive will be hard to trigger when the Yueguis are targeting the enemy instead of Yaoyao herself due to the small Radish AoE.

Yaoyao’s Utility Passive is very handy for exploration, as it reduces difficulty for catching Crystalflies or wildlife for teapot.

#
__CONSTELLATIONS__ C1 - Adeptus’ Tutelage

When White Jade Radishes explode, active characters within their AoE will gain 15% Dendro DMG Bonus for 8s and have 15 Stamina restored to them. This form of Stamina Restoration can only be triggered every 5s.

This Constellation provides a decent boost for Yaoyao’s Dendro teammate’s damage output, making it a decent Constellation in teams where Yaoyao is the 2nd Dendro on the team. The 15 Stamina restoration is also a quality of life in her teams as well.

Rating:

3/5

C2 - Innocent

While affected by the Adeptal Legacy state caused by Moonjade Descent, if White Jade Radish explosions damage opponents, 3 Energy will be restored to Yaoyao. This form of Energy regeneration can occur once every 0.8s.

After using her Burst, while Yaoyao is on-field, Jade Radishes that hit opponents refund 3 Energy to Yaoyao with a cooldown of 0.8 seconds. This Constellation helps with some Energy because she has an 80 Energy Cost on her Burst, but it could be inconsistent. This Constellation only is accounted for when Yaoyao is on-field while her Burst is active. In teams where she spends a significant time on-field during her Burst, this can be a pretty decent Constellation for reducing her Energy Cost. If used to its full extent, this can essentially reduce her Burst from an 80 Energy Cost to a 62 Energy Cost.

Rating:

3/5

C3 - Loyal and Kind

Increases the Level of Raphanus Sky Cluster by 3.
Maximum upgrade level is 15.

Adds 3 levels to her Elemental Skill. Not much to say about this Constellation; it just increases the healing and damage of her Elemental Skill slightly. The healing portion can be somewhat relevant, since it can allow her to rely a bit more on her Skill for healing.

Rating:

2/5

C4 - Winsome

After using Raphanus Sky Cluster or Moonjade Descent, Yaoyao’s Elemental Mastery will be increased based on 0.3% of her Max HP for 8s. The maximum Elemental Mastery she can gain this way is 120.

After using her Elemental Skill or Elemental Burst, Yaoyao’s Elemental Mastery will be increased by 0.3% of her maximum HP. This bonus is capped at 120 Elemental Mastery. This Constellation can be good depending on the team you are playing. In Bloom teams such as Nilou’s with Candace, the EM bonus can help with your Bloom DMG. If you want to max this bonus out, it caps at 40,000 HP, which is easily achievable without having to go HP/HP/HP + Black Tassel .

Rating:

3/5

C5 - Compassionate

Increases the Level of Moonjade Descent by 3.
Maximum upgrade level is 15.

Adds 3 levels to her Elemental Burst. Just like her skill, this Constellation just increases her healing and damage output slightly. As with her C3, the healing portion can be somewhat relevant as it allows you to gain more healing in Bloom teams if needed.

Rating:

2/5

C6 - Beneficient

For every 2 White Jade Radishes Yuegui: Throwing Mode throws out, it will also throw a Mega Radish that will have a larger AoE than the standard White Jade Radish and have the following effects upon exploding:
·Deals AoE Dendro DMG based on 75% of Yaoyao’s ATK.
·Restores HP for the active character based on 7.5% of Yaoyao’s Max HP.
Every Yuegei: Throwing Mode can throw out a maximum of 2 Mega Radishes.

For every 2 White Jade Radishes Yuegui: Throwing Mode throws out, it will also throw a Mega Radish. This Constellation increases Yaoyao’s healing and damage output. The Mega Radish not only heals, but can also provide more Dendro applications for your team. Depending on the team, this can be a decent boost for her supporting capabilities. In Nilou Bloom, this allows her to build more EM assuming the Radish hits more than one enemy at the same time.

Rating:

3/5

#
__ER REQUIRMENTS__

The table assumes Yaoyao Bursting every rotation. If she is Bursting every other rotation instead, she would not need to specifically build ER; in the worst case scenario she would need around 150% ER. C2 gives her 18 Flat Energy, which lowers her ER requirement by 30-40%.

#
__ARTIFACTS__

Sands of Eon:
For Healer: HP%, ER(Only if Bursting every rotation)
For Off-field DPS: EM

Goblet of Eonothem:
For Healer: HP%
For Off-field DPS: Dendro DMG Bonus, EM

Circlet of Logos:
For Healer: Healing Bonus, HP%
For Off-field DPS: CRIT Rate, CRIT DMG, EM

Substat Priority:
For Healer (Non-Bloom): ER (Only need to be considered if Bursting every rotation) > HP% > Flat HP
For Off-field DPS (Non-Bloom): CRIT Rate/CRIT DMG > EM
For Bloom: 30% CRIT Rate (For Proccing Favonius Lance if it is equipped) > ER > HP% > EM

For Bloom, even though building as much EM as possible would increase her Bloom DMG, it is not significant enough in the overall team’s damage contribution to be considered over building her to heal. For detailed comparison between builds, please refer to Yaoyao Mastersheet in the Artifacts - Burst Focused section.

__Notable Sets__ *4pc Deepwood Memories [Non-Bloom][Bloom]*

Yaoyao’s BiS artifact for all of her damage applications with a caveat. While she has excellent uptime for the set, the small AoE from Radish explosions means that coverage in a heavy multi-target situation will suffer. In Nilou Bloom teams, it is highly recommended for another Dendro unit to equip this set and free Yaoyao to equip a more healing-centric set instead due to the above-mentioned reason and the very high demand for survivability.

*4pc Maiden Beloved [Non-Bloom][Bloom]*

Yaoyao’s BiS artifact for her healing applications. The set’s effect uptime perfectly covers the entirety of her Elemental Skill’s duration, and it could be refreshed to boost the team-wide healing from her burst. If the player is looking to farm this set, getting the correct main stat will be good enough and grinding substats here is not recommended.

*4pc Tenacity of the Millelith [Non-Bloom]*

An excellent support set in non-Bloom teams. She has great uptime on this set and the HP from this set’s 2pc effect helps with healing. In non-Bloom teams, the ATK will be appreciated by the entire team. It is worth noting that Yaoyao’s Burst will transform all Radish DMG into Burst DMG, meaning the set’s 4pc effect will not be active during that time.

*4pc Instructors [Non-Bloom][Bloom]*

A very good option for boosting the entire team’s damage. Non-Bloom teams and especially Bloom teams will enjoy the EM boost. The frequency Yaoyao applies Dendro also ensures that the set has good uptime. As Instructor is a 4-star artifact set, the lower base stats will result in less healing, though it’s not far off on a full healer build.

__Honerable Mentions__ *2pc HP/HB/EM/Dendro DMG Bonus mix and match*

To achieve the most amount of healing, Healing Bonus is preferred over HP and to achieve the most amount of damage, Dendro DMG Bonus is preferred over EM. Generally 2+2pc are solid performers on Yaoyao and not far off from her BiS artifacts in each build scenario.

*4pc Gilded Dreams [Non-Bloom]*

A good set for Yaoyao’s personal damage. However, she is not going to be the main damage dealer from the team, therefore the opportunity cost here is quite high. Slotting in sets with support capabilities is preferred.

*4pc Exile [Bloom]*

A set catered to easing the team’s ER requirement, which can be especially handy in ER-hungry teams like Nilou Bloom. However, it does require Yaoyao to Burst consistently, which might be undesirable in teams with less ER requirement and pressure for survival.

#
__WEAPONS__

Since Yaoyao is a character who has heavy role consolidation and benefits from many different stats based on her teams, this leaves her with numerous build paths, and it can be confusing to players when deciding what the best option is. As such, when picking Yaoyao’s weapon, players should pay attention to what team she’s going to be played in, her field time in said team and what type of content they’re facing. Generally:

[Nilou Bloom] are weapons that have a specific value in Nilou Bloom teams, be it Energy for frequent Bursts and/or high EM for her own Bountiful Core DMG.
[Spread] are options specialized in providing Yaoyao with personal Spread DMG and are recommended in Spread/Aggravate teams (and some Hyperbloom teams), where Quicken aura has high uptime and her Burst has lower value. These usually boast offensive stats like CRIT Rate/CRIT DMG, EM, DMG Bonus or ATK.
[Support] signifies Polearms that are highly flexible picks for most of Yaoyao’s teams, where she is used primarily for heals and Dendro application but can provide additional support value.

Additionally, Notable Options will go over a selection of Yaoyao’s most competitive weapons while Other Options includes viable but situational ones.

__Notable Options__ Favonius Lance [Nilou Bloom] [Support]

A flexible option that extends Yaoyao’s support capabilities by supplying the whole team with Energy through clear particles and enhances her with its ER secondary stat. It should be noted that the passive only triggers while the holder is on-field and requires them to build CRIT Rate, so generally, aim to perform Skill → N2 in teams where Yaoyao does not use her Burst frequently.

Kitain Cross Spear [Nilou Bloom] [Spread]

Yaoyao can virtually utilize every facet of this weapon, from the EM secondary stat and Skill DMG Bonus to the Flat Energy generation. Most notably, the Energy generation passive lets Yaoyao Burst every rotation even with lower-ER builds. Contrary to its description, Kitain does not drain any Energy when the holder has none, but this does not affect Yaoyao’s rotations given Yuegui’s Radish hit delay after Skill usage. Overall, Kitain’s performance is amicable for Yaoyao in most situations and an exceptional one for Nilou teams.

Black Tassel [Nilou Bloom] [Support]

The highest HP%-stat Polearm in the game and gives a direct boost to Yaoyao’s healing potency. Overall a capable weapon when it’s already leveled but can be substituted for HP% Sands + another ER weapon instead.

Deathmatch|Staff of Homa|Missive Windspear [Spread]

Competitive Spread-focused Polearms, all of which provide nearly unconditional stat-buffing passives. This alongside their high inherent stats makes them stable and reliable options as opposed to Staff of the Scarlet Sands. Note that Missive Windspear’s passive will only be snapshotted onto Yaoyao’s Skill from the 2nd rotation onwards given its 10s duration and Yuegui’s downtime.

__Other Options__ Moonpiercer [Support]

A unique spear capable of providing a hefty ATK% buff (16%-32%) to another party member while granting Yaoyao with its offensive stats. With the ATK% buff only benefiting a single character and high uptime (12s duration/20s cooldown), Moonpiercer becomes an immensely valuable option for ATK-scaling hypercarries. Even though the Leaf placement can be finicky to deal with, the passive trigger condition (off-field compatible) keeps rotations relatively simple and controlled. In spite of that, its value drops significantly for rotations that aren't 20s.

Staff of the Scarlet Sands [Spread]

Even for its 5-star status, this weapon boasts an extremely high CRIT Rate secondary stat (44.1%) and a stacking ATK passive that directly scales off Yaoyao’s EM, both of which make it one of her best options when built for Spread DMG on paper. But the value of this weapon becomes less impressive seeing as how Yaoyao is only able to gain the passive’s stacks while on-field and how her Skill/Burst snapshots. Which means that in order for Yaoyao to gain maximum value from the passive, she would have to spend 4s on-field to gain full stacks to then snapshot those stats onto her Burst. All things considered, Staff of the Scarlet Sands is usually not recommendable over more stable options, as Yaoyao is incapable of making full use of it, and should be in the hands of a more effective user in the team.

Dragon's Bane [Nilou Bloom] [Spread]

As Quicken aura is not able to coexist with Hydro or Pyro aura and other Dendro reactions gain no value from DMG%, this weapon’s passive proves to be of no use to Yaoyao. Regardless, its high EM secondary stat makes it a usable stat stick when there are no better options.

#
__TEAMBUILDING__ *General Healer*

Yaoyao’s unique disposition as a Dendro healer lets her play an important role in practically any Dendro-related teams or in teams where her Dendro application does not interfere with their intended reactions. Subsequently, as Yaoyao’s raw healing output is sufficient in most cases, her primary role will always be the healer of her teams—even when built offensively.

Yaoyao’s Burst significance will shift as her teams’ healing needs change. There are a few factors that affect this:

Team’s field-time distribution.
Enemies’ team-wide DoT effects (e.g. Corrosion, Brand of the Abyssal Flame, etc.) or highly-damaging enemies like some bosses.
Self-damaging effects from Dendro Cores (i.e. Nilou’s Bountiful Core, Hyperbloom, Burgeon).

*Dendro Support* **Quicken Teams**

Yaoyao as a solo-Dendro support in Aggravate teams provides rotation-tight Quicken aura uptime as well as her own damage through Spread, however insignificant it is. Her being the healer of said team will free up a slot for competitive Electro or Anemo picks—such as Yae, Kazuha, Sucrose, etc—which will naturally boost the Electro DPS slots’ performance.

With that said, in Spread-centric teams, she has various utilities: Dendro Resonance, C1’s Dendro DMG% buff and some minor battery capabilities. More importantly, in the same vein as Aggravate teams, Yaoyao as the healer opens up her teams’ potential—giving leeway for Electro Resonance, supporting Energy-hungry characters (e.g. Alhaitham, Yae, Beidou, etc). Not just that, she also has indirect synergy with ranged teams like Tighnari’s or Nahida’s teams, as Kuki’s or Dori’s Electro application is largely limited by range/placement.

Character Options
Dendro: Alhaitham, Collei, DMC, Nahida, Tighnari
Electro: Beidou, Cyno, Fischl, Keqing, Lisa, Raiden, Sara, Yae
Flex: (another Dendro/Electro unit) or Kazuha, Sucrose, Venti, Zhongli

**Nilou Bloom**

Since Nilou’s Bountiful Cores explode immediately and can deal lethal damage in their damage window, Yaoyao is one of Nilou’s teams’ essential picks with her Skill’s Yuegui off-field heals, A4 healing effect and on-field team-wide healing from her Burst (the personal Dendro RES will also help her survive during this phase). As such, Yaoyao when played in a Nilou Bloom team should be built with enough ER to consistently Burst every rotation for the teamwide healing and to lessen others’ burden by taking on some Bloom DMG herself. Artifacts featuring HP and Healing Bonus from a healing-centric set like 4pc Maiden are generally recommended unless there isn’t already a better holder of 4DW, in which case Yaoyao will use it herself instead.

With that said, since Yuegui’s priority switches to healing (as opposed to attacking) when the on-field character’s health goes under 70%, it is still recommended to use another Dendro character alongside Yaoyao, as her own Dendro application proves to be insufficient for creating enough Bountiful Cores to comfortably clear higher Abyss Chambers. In Nahida’s case, Yaoyao’s Dendro application triggers her Tri-Karma Purification and allows her to be used off-field so that another on-field Hydro DPS (Ayato or Tartaglia) can take the reins instead, reinforcing the team’s AoE potential. Furthermore, with Yaoyao as the main healer of the team, this lets Kokomi (with her high Bloom ownership) be built with full EM on 4OHC and become the team’s consistent source of Core generation. At the same time, having Kokomi in the team will help with team’s survivability against the high Bloom count, in which case Yaoyao’s own healing output won’t be enough without sacrificing team’s rotation time to Burst. Barbara using the same build instead of Kokomi will largely serve the same function but as a less effective substitute with her overall lower Bloom count and restrictive range.

Character Options
Dendro: Alhaitham, Collei, DMC, Nahida
Hydro: Ayato, Barbara, Candace, Kokomi, Tartaglia, Xingqiu, Yelan

**Hyperbloom/Burgeon Teams**

Although not as a crucial slot, Yaoyao serves as a perfectly viable healer for Hyperbloom and Burgeon teams. Her main advantages (aside from healing) are Dendro Resonance and the ability to open up space for other characters, increasing options and flexibility when choosing teams. Something to note when fitting Yaoyao into these teams is that her Dendro application will likely not be enough for Burgeon teams, as Burning may interfere with Dendro Core generation. As such, slotting in another Dendro character with a strong Hydro applier will help solve this problem.

Character Options
Hydro: Ayato, Candace, Kokomi, Tartaglia, Xingqiu, Yelan
Electro/Pyro: Dori (C6), Fischl, Kuki, Raiden, Yae, Amber, Thoma, Yanfei
(Fischl will need an Anemo trigger)
Flex: Alhaitham, Collei, DMC, Nahida, Sucrose, Heizou

lilac urchinBOT
#
Mika FAQ
A young knight born to an ordinary family. He serves as a Front-Line Surveyor in his Company. He is a low-key and cautious character.
Mika Mastersheet by KB#1111 and Luna#0188:
#
__CREDITS__
Lead:

@stuck rover

Authors:

@stuck rover, @oblique jackal, @brave bough

Calculations:

@stuck rover, @oblique jackal

Consultation:

@wise carbon

Resources:
DISCLAIMER:

Pre-TC is volatile and, as always, perpetually subject to change until release (and sometimes later!). Please note that these are theoretical suggestions. Everything described in this FAQ is a good faith analysis based on the little information about the character’s kit that we know. Team calcs, additionally, are not established yet, and as with everything in TC, the content in this FAQ should be taken with a grain of salt.

__OVERVIEW__

Mika is a Polearm support unit that focuses on increasing his team’s Attack Speed and Physical DMG while also offering healing. One of the most notable things about Mika is even without Constellations, he currently has the highest Attack Speed buff in the game; unfortunately, his Physical DMG buffs are quite lacking until C6 unless in a multi-target situation. That said, he is not resource-demanding to build, as he only requires ER and minor amounts of HP% to do his job.

#
__TALENT__ **Leveling Priority: Skill >= Burst >> Normal ATK**
__ANALYSIS__

Typically, it is recommended to level HP-scaling characters to 90. However, in Mika's case, this only improves his healing — therefore, it is not as high of a priority if a player is comfortable playing without the added survivability.

Starfrost Swirl [E] - 4 Particles, 15s CD: Has Tap and Hold versions. Mika does a ranged attack with his crossbow: the Tap version shoots an arrow that pierces through enemies, while the Hold version shoots a Fragmentation Arrow, which explodes on the first enemy hit and launches Shards targeted towards other enemies.
Both uses also grant the Soulwind Effect for all party members, increasing their Attack Speed based on Talent level.

With his Ascension 1, Soulwind [E] also grants the Detector effect, providing on-field characters 10% Physical DMG Bonus per stack, up to a maximum of 3. Detector stacks can be obtained via these means:
- Tap Version: Grants one Detector stack per enemy pierced (Except the first target)
- Hold Version: Grants one Detector stack per enemy hit by the Fragmented Shards. Note that the Shards can’t target the same enemy nor the one hit by the main arrow attack.

  • It is recommended to use his Hold Skill in multi-target situations since landing piercing hits with Tap Skill is much more difficult.
  • With his Ascension 4, if the active character crits and has both the Soulwind [E] and the Skyfeather Song [Q] effects, they gain one Detector stack. Only one Detector stack can be gained in this manner per Soulwind [E] effect. A4 also increases the maximum Detector stacks from 3 to 4.

It’s worth noting that at C0, Mika can only grant one Detector stack from his A4 in total in single-target scenarios. One extra single-target Detector stack can be gained upon his arrow hitting with either Tap or Hold version via his C2.

Skyfeather Song [Q] - 70 Energy, 18s CD: Mika heals all party members and grants on-field characters Eagleplume for 15 seconds, which heals on-field characters by a small portion when they deal Normal Attacks, with a CD of 2.5 seconds for each healing instance.

  • His Elemental Burst neither deals damage nor has Elemental application, so it is mainly used for healing and gaining 1 Detector stack via his A4 for Physical characters.
  • When Mika is not used in Physical-focused teams and the healing is not needed, Skyfeather Song [Q] can be skipped.
#
__CONSTELLATIONS__ **C1 - Factor Confluence**

The Soulwind state of Starfrost Swirl can decrease the healing interval between instances caused by Skyfeather Song's Eagleplume state. This decrease percentage is equal to the ATK SPD increase provided by Soulwind.

Provides a minor increase in his healing. Although the interval reduction is appreciated, this Constellation only improves the single-target healing portion of his Burst, which is not too significant. Players who struggle with survivability may enjoy this Constellation, though it is definitely not a necessity to stay alive.

*Rating:*

1/5

**C2 - Companion's Ingress**

When Starfrost Swirl's Flowfrost Arrow first hits an opponent, or its Rimestar Flare hits opponents, 1 Detector stack from Passive Talent "Suppressive Barrage" will be generated.
You must have unlocked the Passive Talent "Suppressive Barrage" first.

Functionally gives one more Detector stack in situations with three or fewer enemies. Although an additional Detector stack is appreciated, the amount of Physical DMG a Detector stack gives is minor.

*Rating:*

2/5

**C3 - Reconnaissance Experience**

Increases the Level of Skyfeather Song by 3.
Maximum upgrade level is 15.

Increases the healing from his Burst marginally, which can help players with comfort.

*Rating:*

1/5

**C4 - Sunfrost Encomium**

When Mika's own Skyfeather Song's Eagleplume state heals party members, this will restore 3 Energy to Mika. This form of Energy restoration can occur 5 times during the Eagleplume state created by 1 use of Skyfeather Song.

Reduces the amount of Energy he needs from 70 to 55, which makes building Mika much easier. Since in Eula teams Mika is forced to funnel his own particles to Eula, lowering his Energy needs is important.

*Rating:*

2/5

**C5 - Signal Arrow**

Increases the Level of Starfrost Swirl by 3.
Maximum upgrade level is 15.

Increases his Attack Speed buff by 3%. For Eula players, this is not enough to garner an extra stack for Lightfall Sword.

*Rating:*

1/5

**C6 - Companion’s Counsel**

The maximum number of Detector stacks that Starfrost Swirl's Soulwind can gain is increased by 1. You need to have unlocked the Passive Talent "Suppressive Barrage" first.
Additionally, active characters affected by Soulwind will deal 60% more Physical CRIT DMG.

A significant Constellation for Mika, as this bonus is much more valuable than all other buffs that his base kit provides. This solidifies his identity as a Physical DMG support.

*Rating:*

4/5

#
__ER Requirements__

In Eula teams, Mika will typically donate his particles to Eula, which increases his Energy needs significantly. You can expect roughly 150-200% ER on him depending on the amount of Favonius weapons in the team, or if Raiden is also used.

__ARTIFACTS__

IconSands Sands of Eon:
HP% / ER%

IconGoblet Goblet of Eonothem:
HP%

IconCirclet Circlet of Logos:
Healing Bonus > HP%
If using Favonius Lance: CRIT Rate%

Substat Priority:
ER% (if Bursting every rotation for ‘Detector stacks’, healing or 4pc Noblesse Oblige) > CRIT Rate% (with Favonius Lance) > HP% > Flat HP

Mika doesn’t offer great Elemental application or damage with his Elemental Skill and Burst, making artifact substats and sets that focus on buffing or healing teammates more useful overall.

__NOTABLE SETS__ **4pc Noblesse Oblige:**

An excellent support set in most teams. As both the Soulwind effect and 4pc Noblesse Oblige’s buff last 12s, they synergize well when activated right before swapping into your on-field DPS.

**4pc Scholar:**

Niche artifact set that can be used in Wanderer teams to help with Energy requirements, if someone (usually Bennett) already holds 4pc Noblesse. Artifact quality is not important, as Mika would only use his Elemental Skill in those teams, which doesn’t scale with stats, and his damage contribution is negligible.

**4pc The Exile:**

When his Elemental Burst is needed or if the rotation length enables it, 4pc Exile serves as a more universal choice compared to Scholar, as the latter only restores Energy for Bow and Catalyst users while 4pc Exile restores more Energy overall, and for everyone on the team besides the set holder.

**4pc Ocean-Hued Clam (4OHC):**

If someone already holds a 4pc Noblesse Oblige, 4OHC provides a big burst of Physical DMG with the initial healing from Mika’s Burst, along with smaller procs after. It is worth noting that 4OHC’s damage is enhanced by shredding enemies’ Physical Resistance with Superconduct, but is not increased by Physical DMG% Bonuses.

__WEAPONS__ **Favonius Lance:**

His Best-in-Slot weapon as it can provide more Energy for the whole team. In multi-target scenarios, his Skill can hit multiple targets by piercing them or with the Fragmentation Shards targeting other enemies, making it easier to proc the passive. However, Mika cannot reliably trigger the passive in single-target scenarios since his Skill only has one instance of damage. Performing extra Normal Attacks lengthens his field time for minimal reward; thus, players can choose to treat the extra Favonius particles as quality of life instead of building around it.

**Prototype Starglitter/”The Catch”/Skyward Spine:**

Energy Recharge stat sticks. If not in possession of a spare Favonius Lance, the three weapons provide more ER% for Mika himself, easing his Energy needs. It’s worth noting that “The Catch” should be used on any other Polearm character who benefits better from its stats before slotting it into Mika, and that Skyward Spine has a lower ER% stat compared to the other two options.

**Black Tassel:**

With its HP% stat, Black Tassel provides more healing from his Burst. Only use this weapon if ER% needs are already met from artifact substats and CRIT Rate is too low to proc Favonius Lance reliably.

#
**__Eula Specific Information__** **Attack Speed Buff:**

Mika has one of the strongest Attack SPD buffs in the game, which can make Eula feel better to play by increasing the fluidity of her attacks. However, due to her being a Claymore character, hitlag can diminish the actual effects of Attack SPD buffs. This results in her only being able to fit in two more Normal Attacks in her combo; unfortunately, only one of these Normal Attacks will land in time before her Lightfall Sword locks in the stack count. In practice, without Song of Broken Pines, Eula can increase her stack count from 13 -> 15 rather comfortably. For Pines users, the stack increase is only 14 -> 15 stacks.

**Eula Can Not Swap Early**

Mika’s buffs only apply to the on-field unit. This can be detrimental for players who are swapping out early on Eula to:

  • apply Cryo for Cryo Resonance with Rosaria for 15% CRIT Rate
  • detonate Eula’s Burst slightly early so Rosaria’s A4 CRIT Rate buff does not expire
  • detonate Burst manually when weak enemies are grouped up
  • shorten their rotations if they have overkill damage; especially in the case of C6 Eula players
  • detonate Burst manually before an enemy goes into an invincibility phase

This additional layer of restriction can add gameplay grief for Eula players on top of existing conditions that she has to contend with.

**Particle Generation:**

Even though four Cryo particles is a hefty amount of Energy, it has a 15 second cooldown, which means that you cannot fit two Skills in a typical Eula rotation. This means that Mika effectively generates less Energy than Eula’s classic supports such as Rosaria, Diona, or Shenhe.

This problem is also exacerbated by the fact that Mika does not have as many hits as Diona or Rosaria to activate Favonius comfortably. His Burst does not deal damage, so Mika has to coinflip whether his Skill will proc Favonius without the option to weave in Normal Attacks since he must swap to Eula in time to funnel particles.

**Low Cryo Application**

Mika only applies Cryo once with his Skill, which is not ideal if he is the only Cryo unit supporting Eula. Having consistent, off-field Cryo application is something that is much appreciated.

**Larger Damage Numbers**

Even at C6, Mika is more of a sidegrade option for Eula teams due to all of the factors above impacting either total team DPS or general gameplay comfort. That being said, Mika will enable your Eula to hit larger numbers on her Normal Attacks and Burst due to him enhancing her CRIT Damage and Physical DMG% at the cost of team DPS. So for players that drool over the idea of hitting that THICC, FAT damage number with their Eula Burst, Mika can definitely look appealing even with his downsides.

__TEAM BUILDING__ **Eula Carry**

At C6, Mika can serve as a good alternative to Bennett, since he provides both healing and buffs for Eula. Using C6 Mika as a buffer also means that Eula no longer has to worry about staying within a circle to maximize her damage. As Mika already provides sufficient defensive utility, using an offensive Cryo unit such as Rosaria or Shenhe is recommended in the third slot to compensate for his lack of damage. Running an Electro unit as the last teammate further boosts Physical DMG with Superconduct; while Mika's Skill cooldown is too long to buff 2 units, Raiden is still a premier option for this due to the Energy she generates.

**Crescent Pike Zhongli**

While a very fun comp to play as the ATK SPD buff from Mika makes using Normal Attacks more appealing, this team has the opportunity cost of running a more beneficial support like Bennett or Yun Jin in place of Mika, as his buffs lack the same impact. Since Mika’s poor Cryo application is insufficient in maintaining Superconduct uptime, it would be advised to run a secondary Cryo unit along with him. Ultimately, he brings less to the table than other team members.

**Wanderer**

As Catalyst characters do not have hitlag, Wanderer can make full use of the ATK SPD buffs Mika can offer to increase both his damage and the fluidity of his attacks. If Mika can apply sufficient Cryo to allow Wanderer to come into contact with it when using his Skill, he also provides a hefty 20% CRIT Rate buff due to Wanderer’s A1. However, he suffers stiff competition from both Layla and Rosaria in this role. Both offer more damage and Elemental application than Mika can muster; Rosaria's damage is particularly notable and she can also offer a 15% CRIT Rate buff from her A4, while Layla's strong shield is much more valuable for the interruption-prone Wanderer than Mika’s healing. As such, they are generally better, though Mika still serves as a fun and usable option.

fierce islandBOT
#
__CREDITS__
Lead:

@analog scaffold

Authors:

@analog scaffold, @brave bough, @bright turtle, @cerulean mirage, @gloomy wadi

Calculations:

@analog scaffold, @bright turtle, @cerulean mirage, @rare marsh, @olive spoke

Consultation:

@blissful sage

DISCLAIMER:

Pre-TC is volatile and, as always, perpetually subject to change until release (and sometimes later!). Please note that these are theoretical suggestions. Everything described in this FAQ is a good faith analysis based on the little information about the character’s kit that we know. Team calcs, additionally, are not established yet, and as with everything in TC, the content in this FAQ should be taken with a grain of salt.

__OVERVIEW__

Dehya is a Pyro Claymore wielder who can play two main roles: an on-field DPS alongside Bennett, Kazuha, and Xiangling, or an off-field Burgeon reaction DPS, similar to Thoma.

As an on-field DPS, Dehya’s team compositions are fairly strict, and she needs lots of Energy Recharge — at least 200% ER — in order to deal adequate damage. She is heavily dependent on buffs from teammates in order to deal comparable damage to other Pyro on-field DPSs. Klee is a good comparison, though Dehya also has utility in the form of off-field damage mitigation and Pyro application. Dehya takes between 8 and 11 seconds on-field.

As an off-field reaction DPS, Dehya ignores her Burst completely and instead focuses purely on Elemental Mastery and her Skill in order to deal damage through Burgeon. The Burgeon playstyle deals comparable damage to the on-field DPS alternative, assuming you can trigger at least eight Burgeon reactions across a maximum of seven instances of Pyro application. The benefit of this is that Dehya does not need to level her Talents at all, and she spends very little time on-field (~2 seconds). The drawback, however, is that she is currently outmatched by Thoma, a 4-star character.

The main reason to use on-field Dehya over off-field Dehya is her scaling with Constellations. Off-field Dehya does not benefit nearly as much from them. Regardless of which playstyle you choose, you can expect, in ideal team, buff, and gear arrangements (according to KQM standards), roughly 13,000 damage-per-second from Dehya. For context, an entire team needs to deal at (the very) least 40,000 damage-per-second in order to clear Spiral Abyss. This means your other three characters need to deal the remaining 60-70% of the required damage, and with such restricted compositions, you are limited to supporting teammates that also have exceptional damage output.

Unfortunately, there are many restrictions to Dehya’s kit that leave much to be desired. One reason that other Elemental Reactions such as Vaporize and Melt are not mentioned is because Dehya, during her Burst, cannot trigger Burst waves from characters like Xingqiu, Yelan, or Beidou, and she has no single “nuke” attack that can take advantage of Melt. This confines her to either Burgeon or no reactions at all (Mono-Pyro teams with an Anemo character).

In Dehya’s current state, there are no aspects of her kit that are either unique in effects (Xingqiu and Beidou also have DMG Reduction and Interruption Resistance, and shields are often just better) or the best in effectiveness (strictly outclassed in Burgeon teams thanks to Thoma), with the exception of modest off-field self-healing. In terms of meta, it is ill-advised to spend Primogems on Dehya. However, pulling for Dehya because you like her design, personality, or some other non-meta conditions is perfectly fine.

#
__TALENTS__ Leveling priority (on-field): Burst > Skill > Normal Attack
Leveling priority (off-field): Skill > Burst > Normal Attack

Analysis:

Some, but not much, of Dehya’s scaling includes HP, and since Dehya needs all the stats she can get, it may be advised to level her to 90.

Dehya’s multipliers on her Normal Attacks are lower than Xinyan’s (a 4-star Pyro Claymore wielder), with the same number of hits. Knowing this, it is not advised to use Dehya’s Normal Attacks at all. Instead, decide whether you will play Dehya on-field or off-field, and then level the corresponding Talents as listed above.

Dehya’s Skill has two uses that deal different amounts of damage. The first Skill use deals damage and creates a “Fiery Sanctum,” a field that attacks in coordination with your teammates, similar to Albedo’s Skill. The rate of coordinated attacks is once every 2.5 seconds, and while slow Pyro application is good to ensure you Burgeon instead of trigger Burning, 2.5 seconds is too slow and offers too few instances of Pyro application to be exploitable. The second Skill use deals more damage and can move the Fiery Sanctum to a new location without affecting its total 12s field time. This is what makes Burgeon Dehya viable. While her Skill is active, she also acts as a true bodyguard, taking a portion (from 30-50%) of her teammates’ damage across ten seconds.

Dehya’s Burst lasts about four seconds, though with the initial cast animation and the finishing blow animation, it’s more like eight or nine. Dehya throws aside her Claymore in order to bludgeon enemies with her fists. By mashing the attack button, you can get up to ten punches within the Burst’s duration. The finishing attack is not particularly strong, so in tight rotations, it may be beneficial to swap out of Dehya before the final attack to save two seconds of field time. There are no other special effects on Dehya’s Burst: just damage.

With a 70 Cost Burst and 18s CD, Dehya’s Energy Recharge requirements are massive at 200% or more with a Favonius weapon on the team and multiple Pyro teammates, and without exceptional payoff.

Dehya’s First Ascension Passive reduces the damage she actually takes (which is good!) and offers limited Interruption Resistance to her teammates, ensuring they can use their Talents quickly and swap off without much worry.

For her Fourth Ascension Passive, once Dehya is at 40% HP or lower, she will instantly recover 20% of her HP, and then another 6% of her HP at 2s intervals, up to a maximum of 10 seconds (five 6% HP healing bursts, for a total of 30%). The Passive can activate once every 20 seconds, and it ensures Dehya can continue mitigating her team’s damage in subsequent rotations.

Finally, her Utility Passive grants the team 10% Movement Speed in the overworld during daytime.

__COMBOS__

Dehya’s combos are straightforward, regardless of whether you are playing her on-field or off-field.

On-Field:

  • Use Dehya’s Skill and create a Fiery Sanctum.
  • Swap to teammates to lay down their buffs and activate their Skills/Bursts.
  • Swap back to Dehya and use her Skill again, if not at least to move the Fiery Sanctum somewhere more convenient.
  • Deploy Dehya’s Burst and button mash either until the Burst ends on its own, or swap before the long wind-up for her finishing attack.

Off-Field:

  • Set up Dendro Cores with teammates (Dendro and Hydro teammates required)
  • Use Dehya’s Skill to apply Pyro and set up a Fiery Sanctum.
  • Swap to teammates and use their abilities to ensure Dendro Cores are made between coordinated attacks.
  • Use Dehya’s Skill a second time to reposition the Sanctum as needed and get another instance of Pyro application.

The off-field rotation can be re-arranged according to the team composition; just make sure to get as many Burgeon reactions as possible with her.

#
__**CONSTELLATIONS**__ **C1 - The Flame Incandescent**

*Dehya's Max HP is increased by 20%, and she deals bonus DMG based on her Max HP when using the following attacks:

  • Molten Inferno's DMG will be increased by 3.6% of her Max HP.
  • Leonine Bite's DMG will be increased by 6% of her Max HP.*

This Constellation gives Dehya more HP as well as additional HP scaling to her Skill and Burst, greatly increasing Dehya’s on-field damage output. In addition, the value of HP% becomes similar to ATK%, which allows players to slot in HP% Sands to gain survivability without losing damage. Overall a great stopping point for anyone who plans to use Dehya on-field. The bonus HP is also helpful for Dehya’s tanking ability from Redmane’s Blood.

On-field DPS Increase from C0: 35%
Rating: 4/5

**C2 - The Sand-Blades Glittering**

When Dehya uses Molten Inferno: Raging Flame, the duration of the recreated Fiery Sanctum field will be increased by 6s.
Additionally, when a Fiery Sanctum exists on the field, DMG dealt by its next coordinated attack will be increased by 50% when active character(s) within the Fiery Sanctum field are attacked.

A very situational (iffy) Constellation, encouraging your on-field character to take damage in order to increase Molten Inferno damage. This, however, may put your on-field character in danger even with Dehya’s damage mitigation. Additionally, it may be hard to guarantee that your characters will be attacked constantly to proc the bonus damage without forcefully extending your rotation.

The bonus duration is a decent quality of life bonus that adds 2 more coordinated attacks that deal damage, create more Pyro particles and gives her practically 100% uptime on her damage mitigation if played on-field. Do note that this Constellation does not increase the Interruption Resistance duration from her Ascension 1 Passive.

On-field DPS Increase from C0: 62%
On-field DPS Increase from C1: 20%
Rating: 3/5

**C3 - A Rage Swift as Fire**

Increases the Level of Leonine Bite by 3.
Maximum upgrade level is 15.

A nice bonus if you prefer using Dehya on-field.

On-field DPS Increase from C0: 77%
On-field DPS Increase from C2: 9%
Rating: 3/5

**C4 - An Oath Abiding**

When Flame-Mane's Fist and Incineration Drive attacks unleashed during Leonine Bite hit opponents, they will restore 1.5 Energy for Dehya and 2.5% of her Max HP. This effect can be triggered once every 0.2s.

Decreases Dehya’s Energy requirements by approximately 20% (30% at C6), which allows for more offensive substats. It also keeps Dehya healthy by healing her while she is on-field punching her enemies.

Note: Due to how KQMC works, C4 is a lot less impactful on paper than in actual practice.

On-field DPS Increase from C0: 83%
On-field DPS Increase from C3: 3%
Rating: 2/5

**C5 - The Alpha Unleashed**

Increases the Level of Molten Inferno by 3.
Maximum upgrade level is 15.

Dehya’s weakest Constellation by far. It boosts her Skill Talent levels, which is practically useless since Dehya’s Skill does miniscule damage for on-field Dehya, and her Talent level is irrelevant in Burgeon teams.

On-field DPS Increase from C0: 91%
On-field DPS Increase from C4: 4%
Rating: 1/5

**C6 - The Burning Claws Cleaving**

The CRIT Rate of Leonine Bite is increased by 10%.
Additionally, after a Flame-Mane's Fist attack hits an opponent and deals CRIT Hits during a single Blazing Lioness state, it will cause the CRIT DMG of Leonine Bite to increase by 15% for the rest of Blazing Lioness's duration and extend that duration by 0.5s. This effect can be triggered every 0.2s. The duration can be extended for a maximum of 2s and CRIT DMG can be increased by a maximum of 60% this way.

Her best Constellation by a mile. Even with just a moderate amount of CRIT Rate, you should be able to proc the maximum number (5) of additional Flame-Mane’s Fists. However, this does not justify lowering CRIT Rate for more CRIT Damage, because not only do you want more CRIT Rate for consistency, but also the sooner you get your CRIT Damage procs, the larger your overall damage increase will be. Building more CRIT Rate instead of CRIT Damage till 90% CRIT Rate gives positive returns since the constellation provides a 10% CRIT Rate Buff. Keep in mind that her Burst does not snapshot; therefore, some buffs may run out before she finishes her punch, and a proper setup is recommended. For more in-depth numbers with regards to Dehya’s C6, please refer to the mastersheet.

On-field DPS Increase from C0: 196%
On-field DPS Increase from C5: 55%
Rating 5/5

#
__ARTIFACTS__

ON-FIELD DEHYA

IconSands Sands of Eon:
ER% until at least 200%; if this is met without an ER% Sands, then ATK% Sands is fine. HP% Sands can also be considered if Dehya is at least Constellation 1.

IconGoblet Goblet of Eonothem:
Pyro DMG Bonus

IconCirclet Circlet of Logos:
CRIT Rate / CRIT Damage

Substats: ER% (until 200%) > CR% = CDMG% > ATK% > HP%

*4PC Emblem of Severed Fate*

Her BiS artifact set. The 4pc effect is great for Dehya’s Burst-heavy playstyle, as more than 70% of her on-field damage comes from her Burst. She will have to compete with all other characters who also want this coveted artifact set, but it is by far her best unconditional set.

*4PC Lavawalker*

A strong but slightly polarizing set, due to its reliance on constant Pyro application and the inert Element on some enemies like Slimes negatively affecting uptime. However, in a team with Bennett, Xiangling, and Kazuha, there is plenty of Pyro application to go around, meaning this concern is not as pertinent. 4pc Emblem, however, is still about 5% stronger.

*2PC/2PC Combination Ranking*
  1. 2pc Crimson Witch + 2pc Noblesse Oblige‎ ‎ ‎‎ ‎ ‎‎ ‎ ‎‎ ‎ ‎‎‎ ‎ ‎‎ ‎ ‎‎ ‎ ‎‎ ‎ ‎‎ ‎ ‎‎ ‎ ‎‎ ‎ ‎‎ ‎ ‎‎‎
  2. 2pc Crimson Witch + 2pc 18% ATK
  3. 2pc 18% ATK + 2pc Noblesse Oblige
  4. 2pc 18% ATK + 2pc 18% ATK
**BURGEON DEHYA**

IconSands Sands of Eon: Elemental Mastery‎‎‎ ‎‎ ‎ ‎‎ ‎ ‎‎ ‎ ‎‎ ‎ ‎‎ ‎ ‎‎ ‎ ‎‎ ‎ ‎‎ ‎ ‎‎ ‎ ‎‎ ‎ ‎‎ ‎ ‎‎ ‎ ‎‎ ‎ ‎‎ ‎ ‎‎ ‎ ‎‎ ‎ ‎‎ ‎ ‎‎ ‎ ‎‎ ‎ ‎‎ ‎ ‎‎ ‎ ‎‎ ‎ ‎‎ ‎ ‎‎ ‎ ‎‎ ‎ ‎‎ ‎ ‎‎ ‎ ‎‎ ‎ ‎‎ ‎ ‎‎ ‎ ‎‎ ‎ ‎‎ ‎ ‎‎ ‎ ‎‎
IconGoblet Goblet of Eonothem: Elemental Mastery
IconCirclet Circlet of Logos: Elemental Mastery

Substats: EM > CR% = CDMG% > HP%

NO ENERGY RECHARGE; NO BURST

*4PC Gilded Dreams AND/OR 4PC Flower of Paradise Lost*

Both of these sets are tied for Dehya’s Best-in-Slot artifact set as an off-field Burgeon DPS. The difference between these sets in both of their ideal conditions is less than 1%. Because of this, it’s best to just go with the best substats.

For 4pc Gilded Dreams, Dehya should be the only Pyro member of the team, though luckily, you want her as the only Pyro character anyways, so this is not a drawback.

4pc Paradise Lost is agnostic regarding team composition, but because you want Dehya to be the only Pyro character on the team anyways in Burgeon teams, the agnosticism is not a benefit.

In sum, both deal about the same damage. Just pick whatever’s easiest to farm. This will likely be 4pc Gilded Dreams, as 4pc Deepwood Memories is an important artifact set to farm for other characters.

*2PC 80EM + 2PC 80EM*

Just slap some stuff together and you’ll be fine. As much EM as possible, while building substats for CRIT as well.

*4PC Tenacity of the Millelith*

Dehya’s synchronized Skill attacks trigger just often enough to keep good uptime on Tenacity’s teamwide ATK% boost. If you care more about using Dehya as a support unit, Tenacity is a fine choice.

#
__WEAPONS__

Dehya’s weapons depend on whether she is built for reaction or non-reaction damage. Non-reaction damage (on-field) focuses on ER%, CRIT%, and ATK%, while reaction damage (off-field) focuses instead on pure Elemental Mastery.

Here I will list the main recommendations, from her signature weapon to the most freely accessible weapon. However, for a more complete idea of weapon rankings, please refer to the mastersheet included here, make a copy, and play with the filters to examine the relationships with buffs in more detail.

**ON-FIELD DEHYA** 1. Beacon of the Reed Sea

It gives CRIT Rate, ATK%, and (when not shielded) HP%. It’s basically a stat stick for Dehya meant to appeal to all of her on-field attributes. There are no other special effects to this weapon. Just use your Skill twice for the maximum ATK% buff and play as normal.

2. Redhorn Stonethresher

CRIT DMG% stat stick. Passive is irrelevant.

Other Options

3. Akuoumaru (R5; 270 Energy across team)
Makes Dehya’s Burst stronger. You’ll notice these weapons don’t really have much to say other than “it gives a bunch of stats”

4. Wolf’s Gravestone / The Unforged (or Akuoumaru R3)
Both give lots of ATK%, and the passives are mostly equal. No other weapon affects their placement regardless of whether the passive is active or not.

** 5. Blackcliff Slasher / Serpent Spine (any refinement) / Luxurious Sea-Lord**
Dehya cannot maintain stacks even if shielded, since she takes damage while off-field as well. Pick whichever weapon is easiest to build based on your artifact substats. Serpent Spine still edges out above the other two due to having non-zero uptime on the buff.

6. Favonius Greatsword
Favonius Greatsword is by far the worst Claymore for Dehya’s personal damage out of this ranking, except in a selective number of circumstances. For example, with Ayaka, Rosaria, and Bennett, Dehya needs Favonius Greatsword to function in order to help manage team ER requirements, and this team can deal more damage and provide better Elemental coverage than a Mono Pyro team. It is also useful if you struggle to find an ER Sands. However, it is 5-7% below the next best free-to-play option, making it a “bare-minimum” choice.

**OFF-FIELD (BURGEON) DEHYA** 1. Makhaira Aquamarine (any refinement)

It only barely falls behind the personal damage of the new event weapon, Mailed Flower. However, its teamwide Flat ATK buff based on Dehya’s Elemental Mastery is what makes this weapon stand as the top-choice. It’s not worth breaking the bank, but if you have it, use it.
R5 is of course better, but R3 and R1 do not fall far behind in personal damage.

2. Mailed Flower (R5)

Best for personal damage, but only by 1%. However, it is free and getting R5 of a limited 4-star weapon is usually not free.

Other Options

**3. Rainslasher (any refinement) **
This assumes any amount of uptime on Rainslasher’s passive.

4. Bloodtainted Greatsword
The easiest possible weapon to obtain for Dehya.

5. The Bell (any refinement)
Not recommended, but it functions. You’re better off with an Elemental Mastery weapon.

#
__**TEAMBUILDING**__

For all of the teams listed and more, Dehya can also be used as a general defensive option thanks to the utility she provides, an example of such a team could be VV Hu tao or Melt Ganyu.

Reverse Melt
Dehya/Cryo/Bennett/Flex
Cyro options: Kaeya/Rosaria/Ayaka
Flex options: Anemo/Zhongli

When it comes to Melt teams, due to Dehya’s slow Pyro application, she can be used to Melt off fast Cryo applicators or have them Melt off her coordinated attacks. While this is all fine and dandy, Dehya runs into quite a number of issues in this comp. For starters, her multipliers aren't up to par to be worth Melting, as the slot she takes up could be used for an additional Cryo character for more damage and/or buffing as well as Cryo Resonance. Nahida can also be used for additional Pyro application through the use of Burning and a substantial EM buff for your Cryo carry Zhongli is another unit that comes to mind for not only providing better defensive utility than Dehya, but also buffing all party members due to his RES Shred. Even without considering Zhongli as a potential flex unit, Dehya’s defensive utility is already contested by Bennett, since he is already hard slotted into the team by virtue of his ATK buff, healing, and lack of Energy problems.

Kazuha - Remains the premium support for buffing Dehya and/or Cryo party members with Double Swirl. One thing to note is that Double Swirling for both Cryo and Pyro is extremely hard to do; this more often than not forces players to pick and choose whether or not you will be buffing your Cryo carry (i.e Rosaria or Dehya) for your rotation. Kazuha also provides CC, which helps with team survivability and positioning due to Dehya’s limited range.

Nahida - Provides high Elemental application both on and off-field, as well as enabling Burnmelt for your Cryo character(s), on top of providing good off-field damage and a massive EM buff for the on-fielder. Both Dehya, if she ever gets to use her Burst, and your Cyro carry can make use of this EM buff, resulting in a greater increase in damage.

Rosaria - Deals good damage and provides a teamwide CRIT Rate buff, which alleviates some stat pressure for other carries, as well as being a good Cryo applicator for Dehya to Melt consistently.

Ayaka - Together with Kaeya or Rosaria and Bennett, offers Dehya a chance at performing as an on-field Melt carry. Rosaria and Bennett are both essential for batterying their respective DPS, and with Bennett's buffs, Rosaria's CRIT Rate, Pyro and Cryo Resonance, Dehya can unleash her flurry of flaming punches straight through Ayaka's Blizzard and Rosaria's Burst ticks. One thing to note is that Ayaka is going to be your primary source of damage. With that in mind, Ayaka's ER should be accommodated in order to not have severe issues in DPR downtime when playing this comp.

Bennett - Although he invalidates Dehya’s defensive utility, Bennett remains a must-have with Dehya in teams where she bursts in, because not only does Dehya have significant her Energy issues without him, but also Bennett buffs her damage output considerably — to the point where Dehya suffers tremendous losses without him.

**Regarding Ganyu and Dehya **
Dehya/Bennett/Ganyu/Flex
Flex: Zhongli/Nahida/Sucrose/Kazuha

There is another team that Dehya surprisingly fits well in — Ganyu Melt — due to Dehya’s ability to increase other characters’ Interruption Resistance within her Skill. Units like Ganyu, who are particularly vulnerable to interruption, benefit greatly from this skill. It is important to note that Dehya also runs into a severe issue involving set ups with Ganyu, as Dehya’s Elemental Skill tick doesn't line up well with Ganyu’s Charged Attack charging time. This results in a scenario where Ganyu’s first CA will be Melted, but additional CA’s will end up as cannon fodder for Dehya’s Skill. Adding another Pyro applicator could fix this issue, but that could end up creating more issues with team-building.

Additionally, the slot that Dehya takes up could typically be given to another character with more overall benefit, such as Nahida and her EM buffing, or Kazuha as a 4VV holder and Elemental DMG% buffer.

Sucrose is another alternative to the aforementioned characters, providing both 4VV and EM sharing, but she runs into problems of her own, such as her Burst’s high Energy Cost.

Yet another alternative is Zhongli, who not only has very strong defensive utility, but also can run buffer sets like 4TotM. However, in choosing to run him, Dehya’s main purpose in the team becomes redundant, with the only loss being less Pyro application. For many players after Version 3.5, Dehya may become a more accessible option than Zhongli with her addition to the standard banner.

Ultimately, she provides another unique option to slot in Ganyu Melt teams, but the issues that arise from using her substantially decrease her overall value to the comp.

#

Vaporize
Dehya/Bennett/Hydro/Anemo
Hydro options: Kokomi/Mona/Nilou
Anemo options: Kazuha/Venti

When it comes to Vaporize, Dehya’s Burst is unable to trigger both Yelan and Xingqiu, the current premium Hydro enablers for Vape teams. Because of this, you are left with using Kokomi, Mona, Nilou, or an Anemo character (namely Kazuha or Venti for their absorbed Bursts) in order to Vaporize with Dehya. With each character comes their respective caveats, such as Pyro holding Absorption priority with Anemo characters, and the fact that these characters are all 5☆.

Mona - Provides short off-field Hydro application as well as her Omen buff. Unfortunately, her Elemental Skill duration is slightly shorter than Dehya’s entire Skill duration, so other sources of Hydro may be necessary for consistent Vapes, either from other Hydro characters or Hydro-absorbed Anemo skills.

Kokomi - Although she overshadows Dehya’s defensive utility, Kokomi brings sustained off-field Hydro application as well as on-field driving capabilities to fill any possible downtime.

Nilou - If all you want is Hydro application, Nilou provides enough over a long period of time for Dehya to consistently Vape, provided no other teammates eat up any of her Hydro Gauge. Nilou is a viable option; however, she isn’t recommended if other Hydro characters are available due to her lack of offensive and defensive utility.

Kazuha - Remains the premium support for buffing Dehya and other PECH (Pyro, Electro, Cryo or Hydro) party members with Double Swirl. Kazuha also provides CC which helps with survivability and positioning due to Dehya’s limited range.

Venti - Another Anemo option for his superior CC, access to VV, and Energy refund. Has a larger CC range than Kazuha and can help alleviate Energy problems for teammates. However, absorbing Pyro means that Dehya won’t get any Vaporizes due to Venti’s fast Elemental application.

Bennett - Although he makes Dehya’s defensive utility somewhat redundant, his buffing, healing and battery capability make him the best Pyro support for this team.

Burgeon
Dehya/Dendro/Hydro/Flex
Dendro options: Nahida/Yaoyao/Collei/DMC
Hydro options: Ayato/Xingqiu/Yelan
Flex options: Kazuha/Venti/Any above Hydro or Dendro options.

When it comes to Burgeon, Dehya can be slotted in this archetype due to her Skill-based Pyro application as well as her good defensive utility. However, she is the least cost-effective for this role due to Thoma’s easy accessibility as a 4☆, better Pyro application, stronger defensive utility, and more Burgeon frequency compared to Dehya. Additionally, since her coordinated attacks are very slow, you would proc more Blooms than Burgeons, wasting the EM she's currently building.

Nahida - The go-to option for Dendro teams, providing high Elemental application both on and off-field, as well as good off-field damage and a massive EM buff for the on-fielder. Dehya can make use of this EM buff if she ever gets to use her Burst and has off-field Hydro sources other than Xingqiu / Yelan. However, this generally won’t happen, meaning other Dendro options such as DMC or Collei may be more optimal freeing up Nahida for other teams.

Any Hydro Character - Due to Dehya not using her Elemental Burst, she hardly has to take any field time. This allows for on-fielders such as Ayato to drive the team, or for off-fielders such as Xingqiu and Yelan to be used alongside Dehya with another driver.

Collei/DMC - F2P Dendro options that just apply Dendro to enable Burgeon teams. Their personal damage isn’t anything special, but due to the decent number of Blooms, it may be worth building them for some EM to make sure those Cores aren’t entirely wasted. If all you need is application, these two will be more efficient to use, saving Nahida for another team.

Yaoyao - Another Dendro option who was recently free in the 3.4 Lantern Rite event, Yaoyao provides both healing and Dendro application. She can be very nice to keep players topped up if Dehya’s damage mitigation isn’t enough; however, falling below 70% HP means Yaoyao will now be healing the player and not applying Dendro to enemies, resulting in fewer or no Dendro Cores. On the one hand, her Burst provides ample healing alongside Dendro application, allowing for an emergency top up on health and Dendro if need be. On the other hand, if players can survive using only one of the two’s defensive utility, why bring the other over a more offensive alternative?

Kazuha - High Swirl DMG, DMG% buff, VV holder for PECH teammates, and CC. Simple but effective for providing the team with buffs and grouping, allowing for all enemies to be hit by cores. Additionally, Pyro absorption can allow him to proc more Dendro Cores for some high EM Burgeons. However, this may result in Burning, resulting in no Cores at all.

Venti - Another Anemo option for his wide-ranged CC, VV access and Energy refund. Venti also can proc Burgeons with a Pyro Swirl; however, the same caveats as Kazuha can occur.

#

Mono Pyro
Dehya/Bennett/Pyro DPS/Kazuha

In comparison to her other team options, Mono Pyro alleviates much of Dehya’s Energy needs, which makes it a comfortable and viable option. That's the good news, now here's the bad. Not only are all the members, excluding Dehya, some of the most highly contested characters in terms of usage, but also Dehya does considerably less damage and requires more ER than Klee, another Mono Pyro DPS. While Klee, thanks to her 4th Ascension Passive, decreases the team's Energy requirements, allowing Kazuha, Xiangling, and herself to build more into damage rather than ER, Dehya imposes her high Energy needs on the rest of the team. Her defensive utility is also rendered useless due to Bennett’s healing capabilities, thus slotting her in is a less ideal choice than other Pyro characters.

Kazuha - Remains the premium support for Dehya and other party members due to his DMG% buff, which both Xiangling and Dehya like very much. Kazuha also provides CC, which helps with survivability and overall DPS due to Dehya’s and Xiangling’s limited ranges

Bennett - Although he makes some of Dehya’s defensive utility redundant, because Bennett provides substantial buffs to both her and Xiangling as well as plentiful Energy and healing, he ends up being the best Pyro support for this team.

Xiangling - A strong consistent source of off-field damage, allowing you to gain more benefits from running another unit on-field. One thing to note is that Xiangling will require quite a bit of funneling to consistently use her Burst, and this is more so the case due to Dehya’s high Energy costs.

Hu Tao - A strong on-field carry that can make use of Dehya as a Zhongli replacement. Unlike C4 Yanfei or Thoma, Dehya’s defensive utility isn't tied to her Burst, so she doesn’t suffer from Energy problems. This means Dehya can simply be used as a 4pc ToTM bot in order to supply Hutao with buffs and defensive utility.

Klee - Functions as an on-field DPS in this team thanks to her rather flexible Elemental Skill. Compared to Xiangling, Klee has much more lenient Energy requirements, which is something Dehya would prefer. Using Klee also eases the need for Bennett funnels.

__EXTERNAL LINKS__
Project Amber
Genshin Impact JP Twitter
Genshin Impact EN Twitter
viscid hedgeBOT
#
__CREDITS__
Leads:

@bright turtle

Authors:

@bright turtle, @gloomy wadi, @fleet lodge

Calculations:

@bright turtle, @stuck rover, @high silo, @blissful sage, @olive spoke, @austere charm

Framecounts:

@high silo

Consulting:

@cerulean mirage, @gloomy wadi, @blissful sage, @stuck rover, @drowsy plaza

DISCLAIMER

Pre-TC is volatile and, as always, perpetually subject to change until release (and sometimes later!). Please note that these are theoretical suggestions.
Everything described in this FAQ is a good faith analysis based on the little information about the character’s kit that we know. Team calcs, additionally, are not established yet, and as with everything in TC, the content in this FAQ should be taken with a grain of salt.

__OVERVIEW__

Baizhu is a 5-star defensive character, providing high amounts of healing through both his Elemental Skill and Burst.

On top of this, his Ascension 4 Passive provides a substantial Dendro Reaction DMG buff to characters healed by his Elemental Burst, based on his Max HP. This incentivises players to build him with as much HP as possible, which is made easier by his HP% Ascension stat. His personal damage will be relatively low in exchange for the comfort he provides.

In terms of teams, Baizhu is quite flexible, finding a spot in most teams where his sustained Dendro application and defensive utility is appreciated. Baizhu also has relatively low field time, needing only to cast his Skill, Burst, and then swap off.

#
__TALENTS__

A large portion of Baizhu’s healing, shielding, and buffing scales with his Max HP. Thus, if you wish to utilize his kit to the fullest, leveling him to 90 should be a valid consideration.

Talent Priority

Elemental Burst > Elemental Skill > Normal Attack

__**TALENT OVERVIEW**__ **Normal Attacks: The Classics of Acupuncture**

Baizhu’s Normal Attack multipliers are slightly lower than Nahida’s. That being said, although the latter can be run on-field in certain scenarios, Baizhu prefers stacking HP% and ER% over any other offensive stats. Hence, there is little to no reason to run him on-field if your team does not need the additional Dendro application, unless you specifically wish to build him to do so.

However, be prepared for Baizhu’s extremely small Normal Attack hitboxes, which will require you to essentially facehug your opponents in order to hit them.

**Elemental Skill: Universal Diagnosis**

CD : 10s

Baizhu’s Skill will create a Gossamer Sprite that will either travel in the direction Baizhu is facing (assuming there are no enemies) or attack an enemy, dealing Dendro DMG and hitting them up to three times in single-target or bouncing to different enemies in multi-target scenarios, prioritizing enemies that haven’t been previously hit by Gossamer Sprite.

Upon either reaching the end of its travel path or hitting enemies three times, the Gossamer Sprite will return to the party, healing all nearby party members by a percentage of Baizhu’s Max HP.

**Elemental Burst: Holistic Revivification**

CD : 20s
Energy Cost : 80

Baizhu’s Burst makes him enter the Pulsing Clarity state for 14 seconds, generating a Seamless Shield that absorbs Dendro DMG with 250% effectiveness and reforms every 2.5 seconds after its initial creation.

Although Baizhu’s shielding prowess isn’t his forte, the constant refreshing and healing every 2.5 seconds means that your active character should be well-protected, even in teams that are more dangerous to play in nature (e.g. Nilou Bloom).

Furthermore, thanks to the shields, your active character will also have noticeably increased resistance to interruption, even considering how small the shields are.

#
__Passives__ **Ascension 1 Passive: Five Fortunes Forever**

Baizhu’s Ascension 1 Talent has two components to it, being somewhat similar in nature to a Constellation 0 Bennett. When your active character is below 50% HP, Baizhu will gain an additional 20% Healing Bonus, enabling him to more reliably keep your active character healthy.

On the other hand, when your active character’s HP is equal to or above 50%, Baizhu will gain 25% Dendro DMG Bonus, which can be helpful when the team does not require the excess healing.

**Ascension 4 Passive: All Things Are of the Earth**

Baizhu’s Ascension 4 Talent gives him some much needed team buffing to help set him apart from other defensive characters, providing characters healed by his Burst 2% Bloom Reaction DMG and 0.8% Quicken Reaction DMG for every 1,000 Max HP he has, up to 50,000. This means he can provide up to 100% Bloom and 40% Quicken Reaction DMG at 50,000 HP, incentivising players to stack HP on Baizhu.

Thankfully, Baizhu doesn’t particularly care for stats outside of HP and ER, meaning building for this Passive doesn’t hinder his performance. Unfortunately, this buff only lasts six seconds until it needs to be refreshed again, meaning it doesn’t benefit off-field teammates much, if at all.

**Overworld Passive: Herbal Nourishment**

Baizhu’s Overworld Passive heals the active character slightly when collecting certain harvestable items. A simple yet convenient Passive when exploring.

#
__CONSTELLATIONS__

NOTE: Unless your Baizhu is specifically built to maximize damage, his personal DPS should not be your primary target of optimization. DPS numbers below are calculated with Baizhu optimized for a support build, so performance will vary if you decide to build him for damage.

**C1 - Attentive Observation**

Universal Diagnosis gains 1 additional charge.

This Constellation gives Baizhu’s Elemental Skill an extra charge. This Constellation can help with achieving slightly more Dendro application and healing while also giving his rotations more flexibility and forgiveness. Being able to get in an extra Elemental Skill in a rotation also helps with his Energy issues.

*Team Aggravate DPS Increase from C0:*

1.23%

*Team Bloom DPS Increase from C0:*

0.41%

*Total Team Healing Increase from C0:*

0%

*Single Target Increase from C0:*

0%

*Rating:*

2/5

**C2 - Incisive Discernment**

When your own active character hits a nearby opponent with their attacks, Baizhu will unleash a Gossamer Sprite: Splice.

Gossamer Sprite: Splice will initiate 1 attack before returning, dealing 250% of Baizhu's ATK as Dendro DMG and healing for 20% of Universal Diagnosis's Gossamer Sprite's normal healing.

DMG dealt this way is considered Elemental Skill DMG. This effect can be triggered once every 5s.

This Constellation adds negligible damage and a decent amount of healing. The most important part of this Constellation is that it adds an extra instance of Dendro application every 5s. This extra Dendro application can be very helpful for reaction teams that rely heavily on Baizhu for Dendro application.

This Constellation seems to not have a requirement to trigger besides dealing damage to enemies, and seems to just activate whenever Baizhu is on the team. The ability to apply extra Dendro without taking any extra field time makes this Constellation pretty decent in certain teams with characters that need to stay on-field for longer durations, such as Cyno.

*Team Aggravate DPS Increase from C0:*

2.73%

*Team Aggravate DPS Increase from C1:*

1.48%

*Team Bloom DPS Increase from C0:*

3.80%

*Team Bloom DPS Increase from C1:*

3.37%

*Total Team Healing Increase from C0:*

43%

*Total Team Healing Increase from C1:*

43%

*Single Target Increase from C0:*

13.6%

*Single Target Increase from C1:*

13.6%

*Rating:*

3/5

#
**C3 - All Aspects Stabilized**

Increases the Level of Holistic Revivification by 3.

Adds three levels to his Elemental Burst. A relatively straightforward Constellation, increasing his almost negligible damage on his Burst ever so slightly. It also marginally increases Shield Strength and healing on his Elemental Burst, but his shield will still be relatively weak, and his healing will still be more than enough without this Constellation.

*Team Aggravate DPS Increase from C0:*

3.83%

*Team Aggravate DPS Increase from C2:*

0.10%

*Team Bloom DPS Increase from C0:*

3.87%

*Team Bloom DPS Increase from C2:*

0.07%

*Total Team Healing Increase from C0:*

52.7%

*Total Team Healing Increase from C2:*

6.58%

*Single Target Increase from C0:*

26.2%

*Single Target Increase from C2:*

11.2%

*Rating:*

0/5

**C4 - Ancient Art of Perception**

For 15s after Holistic Revivification is used, Baizhu will increase all nearby party members' Elemental Mastery by 80

When Baizhu uses his Elemental Burst, he gives party members an additional 80 Elemental Mastery. While this may seem like a very good Constellation, since he will mostly be used in Dendro Reaction based teams, 80 Elemental Mastery is not as much as you might think.

If your main focus is Elemental Mastery sharing for Baizhu, just equipping a 4PC Instructor set alone will give 120 Elemental Mastery for the whole team. While adding an extra 80 Elemental Mastery will still be a damage increase for the team, it’s not the biggest.

*Team Aggravate DPS Increase from C0:*

5.43%

*Team Aggravate DPS Increase from C3:*

2.53%

*Team Bloom DPS Increase from C0:*

5.55%

*Team Bloom DPS Increase from C3:*

1.62%

*Total Team Healing Increase from C0:*

52.7%

*Total Team Healing Increase from C3:*

6.58%

*Single Target Increase from C0:*

26.2%

*Single Target Increase from C3:*

11.2%

*Rating:*

2/5

#
**C5 - The Hidden Ebb and Flow**

Increases the Level of Universal Diagnosis by 3

Adds three levels to Baizhu’s Elemental Skill Talent. Another negligible damage increase for Baizhu on this Constellation, but his healing will increase slightly. Despite this, it’s not much of a big deal, since his healing will very likely be more than enough regardless.

*Team Aggravate DPS Increase from C0:*

5.57%

*Team Aggravate DPS Increase from C4:*

0.13%

*Team Bloom DPS Increase from C0:*

5.69%

*Team Bloom DPS Increase from C4:*

0.14%

*Total Team Healing Increase from C0:*

70.7%

*Total Team Healing Increase from C4:*

11.8%

*Single Target Increase from C0:*

35.3%

*Single Target Increase from C4:*

7.2%

*Rating:*

0/5

**C6 - Elimination of Malicious Qi**

Increases the DMG dealt by Holistic Revivification's Spiritveins by 8% of Baizhu's Max HP. Additionally, when Gossamer Sprite or Gossamer Sprite: Splice hit opponents, there is a 100% chance of generating one of Holistic Revivification's Seamless Shields. This effect can only be triggered once by a Gossamer Sprite or Gossamer Sprite: Splice

Adds HP% DMG scaling to his Elemental Burst, which makes its damage more noticeable. When his Elemental Skill or his Constellation 2 hits an opponent, a new shield is created when he uses his Elemental Burst, increasing his Dendro application. This Constellation adds roughly around six more applications of Dendro into a 20s rotation, making it possible to run Baizhu as your solo Dendro character in certain teams where you normally would not be able to. A decent Constellation, but overall underwhelming compared to other limited 5-star C6s.

*Team Aggravate DPS Increase from C0:*

1.26%

*Team Aggravate DPS Increase from C5:*

6.90%

*Team Bloom DPS Increase from C0:*

6.02%

*Team Bloom DPS Increase from C5:*

0.31%

*Total Team Healing Increase from C0:*

109.8%

*Total Team Healing Increase from C5:*

22.9%

*Single Target Increase from C0:*

114.1%

*Single Target Increase from C5:*

58.2%

*Rating:*

3/5

#
__Energy Recharge Requirement__

Baizhu’s Elemental Skill generates three Particles with a 50% chance of four upon first hitting an enemy. Due to having an 80 cost Burst, Baizhu’s Energy requirements are extremely high. Thankfully, both Prototype Amber and his signature weapon, Jadefall’s Splendor, grant Flat Energy. Hence, they are vital in making his requirements manageable.

In quickswap-style teams, Baizhu can fit two Skill casts helping to reduce his Energy requirements by around 30%. All calculations use Prototype Amber R5 and assume he’s off-field when Favonius is triggered, due to Baizhu never wanting to take increased field time.

For a more accurate approximation of his requirements for your rotation, please use the Energy Recharge calculator linked here.

#
__ARTIFACTS__

sandsSands of Eon: HP% or ER%
goblet Goblet of Eonothem: HP%
circlet Circlet of Logos: HP% or HB%

Due to Baizhu contributing very little team damage, it's best to focus strictly on his defensive utility by building mainly for HP%. On top of this, his A4 Passive scales with his Max HP up to 50k, meaning players should try to get as close to 50k HP as possible after meeting his Energy requirements.

Since Baizhu's Burst has a high energy cost and he has low Energy generation, some players may need to run an Energy Recharge% Sands to accommodate his needs. HP% Circlet tends to be better overall than Healing Bonus%, however it is a valid option if players have nothing else.

Substats: ER% (Until ER Reqs are met) > HP% (Until 50k) > EM (If Nilou Bloom)

Baizhu doesn’t need many stats at all, as players are able to cap out his A4 Passive at KQM investment with little to no HP substats. This allows players to focus on his Energy Recharge, the main caveat of his kit. Once both of these stats reach their recommended level, there aren’t really any stats he benefits from, making him quite cheap to build. In Nilou Bloom teams specifically, extra EM substats wouldn’t hurt.

#
__Artifact Sets__ **4PC Deepwood Memories**

If Baizhu is the only Dendro character on your team, in teams revolving around Bloom Reactions, the 30% Dendro Resistance Shred from Deepwood is very valuable. However, Baizhu can struggle to consistently apply this effect to all enemies in bigger AoE scenarios. This is due to his Skill only targeting three enemies per use, and his Burst consisting of primarily single-target projectiles. The 2PC bonus, however, doesn’t do much for him at all due to Baizhu not being built for damage anyways. As the solo Dendro character in Quicken teams, there’s no reason to run this set due to Baizhu being the only one dealing Dendro DMG. If he’s run with other Dendro characters, they can make better use of the 4PC set bonus as they will probably trigger it more consistently than Baizhu.

**4PC Ocean-Hued Clam**

Due to Baizhu’s large amount of healing, he can make consistent Clam bubbles while his Burst is active. Clam can be a decent upgrade to Baizhu’s personal damage, but other artifact sets may be more beneficial to team damage depending on the scenario.

For example, Quicken teams may appreciate other buffs, such as ATK or EM, more than this set’s buff to personal damage. In teams such as Nilou Bloom, Kokomi can cap out Clam bubbles a lot more consistently compared to Baizhu. However, Kokomi likes to build full EM in that setup, which a lot of players may not be able to do with 4PC Clam. Because of this, running Kokomi on triple EM FoPL / GD and Baizhu on 4PC Clam is a viable option.

**4PC Instructor**

If Baizhu is being used mainly for his buffing passive, 4pc Instructor can provide a larger overall Effective EM buff, even if Baizhu’s passive isn’t being maxed out. This is due to his A4 requiring a lot of investment for the amount it actually provides. Although his healing and shielding will suffer due to 4-star artifact stats, his healing scaling is high enough that this shouldn’t be a big hit on survivability for most players.

**4PC Noblesse Oblige**

The increase to Elemental Burst DMG isn’t notable here due to Baizhu’s low personal damage. However, the team-wide ATK% buff can be useful in Quicken teams with more external EM buffs than ATK buffs.

**4PC Maiden Beloved**

If you don’t think Baizhu’s already high healing is enough, a 4PC Maiden set can increase that even more, resulting in very overkill amounts of healing. Generally not recommended, but it can work.

**2PC HP/HB/ER**

If you’re struggling for artifacts, these are some 2pc sets that can work: HP% for his healing, shielding, and A4 Passive; Healing Bonus% for just his healing; and Energy Recharge% for getting his Elemental Burst back more consistently. Running a 2pc mixed set over a 4pc set isn’t much of a difference in team DPS, so if you don’t want to invest hugely in Baizhu, throwing high HP% pieces together can work just fine.

#
__WEAPONS__ **Jadefall’s Splendor**

Baizhu’s Signature weapon, providing a large amount of HP% from its substat, as well as Flat Energy and Elemental DMG Bonus from the passive whenever he casts his Burst or creates shields. This synergises perfectly with his kit, getting him closer to maxing out his A4 Passive. Although he doesn’t make great use of the DMG Bonus, due to his already low personal damage, the flat energy lowers his ER Reqs immensely, providing up to 27 Flat Energy consistently.

**A Thousand Floating Dreams**

Despite being a more offensive catalyst, providing both Elemental Mastery and DMG%, it also provides 40 Elemental Mastery to the party, increasing Baizhu’s buffing potential. Due to not providing any Energy, players will most likely need to run an Energy Recharge% Sands to reliably Burst off cooldown. However, if players do have enough ER, this weapon becomes competitive with Jadefall in terms of team DPS, especially in teams that lack external EM buffs.

**Prototype Amber**

Basically a budget version of Jadefall, providing HP% from the substat, as well as Flat Energy and party-wide healing when casting his Elemental Burst. At R5, this will provide 18 Flat Energy, which still lowers his ER Reqs a lot. Due to Baizhu focusing fully on healing and Energy Recharge, the difference between these weapons isn’t major, meaning Amber is a very good F2P-friendly option for him.

__**Alternatives**__ **Everlasting Moonglow**

An HP% stat stick, providing the same amount of HP% as Jadefall, as well as Healing Bonus. This may help players cap out Baizhu’s A4 Passive easier. However, there is still not much difference between the substats of Moonglow and Prototype Amber, making this weapon not that great.

**Favonius Codex**

The usual universal option for characters who either have high Energy requirements or don’t have a weapon they particularly prefer, providing Energy Recharge from the substat and Clear Particles from the passive. Favonius can help lower team ER Reqs, but Prototype Amber will generally help out more due to the large amount of Flat Energy it provides, assuming you need Energy in the first place. Also bear in mind that because Baizhu typically doesn’t equip CRIT Rate% Circlets, he might not proc Favonius’s passive consistently.

**Hakushin Ring**

A more supportive option, providing Energy Recharge from the substat and a team-wide Elemental DMG Bonus upon triggering an Elemental Reaction. If Baizhu can reliably trigger Quicken, this can be a nice alternative for both Aggravate and Spread teams, assuming Baizhu has enough Energy Recharge to reliably Burst every rotation.

**Thrilling Tales of Dragon Slayers (R5)**

A 3-star weapon, providing HP% from the substat and a large ATK% buff to the next character to take the field. Although the substat can help you max out Baizhu’s A4 easier, he may struggle to easily Burst due to not having enough Energy, requiring you to run an Energy Recharge% Sands as well.

#
__TEAM BUILDING__ **Quicken**

Baizhu | Electro | Electro / Dendro | Flex

For defensive options in Quicken teams, Baizhu competes strongly with characters like Zhongli and Yaoyao. Zhongli generally takes the place of an Anemo character, due to providing Universal Resistance Shred on top of immense comfort.

On the other hand, Yaoyao is able to keep the team healthy while providing enough Dendro application to easily sustain a Quicken aura if players are using their more prominent Dendro characters elsewhere. Baizhu is able to fill the same role of Dendro Applicator and healer while providing up to 40% Quicken Reaction DMG.

Unfortunately, his personal damage is rather poor and he can’t effectively build the CRIT or EM stats needed to provide meaningful Spreads to the team. Although Zhongli doesn’t do this either, his Universal Resistance Shred goes a long way in boosting the output of the team’s main damage dealers. Alongside Nahida, Baizhu can make a strong Double Dendro core, though it won’t be setting any DPS records.

Teammates

electro Electro options: Keqing / Raiden / Fischl / Yae / Sara / Beidou

dendro Dendro options: Nahida / Tighnari / Alhaitham / Collei / Dendro Traveler

flex Flex options: Anemo / Any above Electro / Any above Dendro

**Hyperbloom**

Baizhu | Electro | Hydro | Flex

Baizhu is also able to bring defensive utility to Hyperbloom teams. However, his role is more contested here due to the existence of Kuki, covering the roles of both Hyperbloom trigger and healer. If players find Kuki’s healing to not be enough, both characters can be ran together due to Kuki still being a strong Hyperbloom trigger. Alternatively, she can be replaced for Raiden, due to her frequent off-field Elemental Skill hits.

The main downside to Baizhu in Hyperbloom teams is his A4 Passive being effectively useless, due to only being applied to the on-fielder. It also only lasts 6 seconds at a time, meaning that it generally isn’t worth swapping to your Hyperbloom trigger just for the buff. If running Baizhu, players may also wish to bring a second Dendro character for consistent application, due to Baizhu’s Elemental Burst being single-target and applying a lot slower than Bloom Reactions can hit.

Teammates

electro Electro options: Raiden / Kuki

hydro Hydro options: Xingqiu / Yelan / Kokomi / Ayato

flex Flex options: Anemo / Dendro / Yae / Fischl / Any above Hydro

**Quickbloom**

Baizhu | Electro | Hydro | Flex

A variation on Hyperbloom teams that allows for both Quicken and Hyperbloom Reactions to be triggered simultaneously. For Quickbloom teams specifically, Baizhu’s main standout partner is Cyno, due to him utilizing both the Reaction DMG buffs from Baizhu’s A4 Passive as well as benefiting from the increased Interruption Resistance and more healing than current popular alternatives (such as Kuki). Baizhu’s staggered Dendro application can also be a benefit in multiwave content, due to not expiring once the first wave dies.

In Quickbloom, players have the choice to run a second Dendro for more consistent application, or a second Electro to capitalize on Aggravates and Electro Resonance. However, characters such as Cyno may have Energy issues in Double Dendro scenarios without multiple Favonius weapons.

Teammates

electro Electro (Quickbloom Options): Cyno / Keqing / Raiden / Kuki / Yae / Fischl

hydro Hydro Options: Xingqiu / Yelan / Kokomi

flex Flex options Anemo / Dendro / Any above Electro

#
**Burgeon**

Baizhu | Pyro | Hydro | Flex

Although Baizhu’s Dendro application isn’t great in AoE, he can be used as a defensive option in Burgeon teams, providing more comfort to players who aren’t comfortable playing Thoma on a full EM build as the only defensive option.

Despite this, Burgeon teams will generally still want a second Dendro character for consistent Dendro application, as well as enabling Dendro Resonance, increasing the overall EM of the team. However, like Hyperbloom teams, Burgeon teams also generally rely on an off-field trigger, making Baizhu’s A4 Passive effectively useless again.

Teammates

pyro Pyro options: Thoma

hydro Hydro options: Ayato / Xingqiu / Yelan / Kokomi

flex Flex options: Anemo / Dendro / Bennett / Any above Hydro

**Nilou Bloom**

**Baizhu | Nilou | Hydro | Dendro **

In Nilou Bloom teams, Baizhu has his strength as an alternative to Yaoyao. Although his Burst application is relatively Single-target locked, it’s staggered over the duration of 14 seconds compared to Yaoyao’s Burst, which instead concentrates its AoE Dendro Application into a short period.

On top of large amounts of healing, he also provides shields, which may not be the largest, but still absorb Dendro DMG with 250% effectiveness, adding extra comfort and Interruption Resistance to the team. Finally, Baizhu also provides up to 100% Bloom Reaction DMG to teammates when healing with his Burst.

Due to the quickswap nature of Nilou teams, this buff can quite easily be applied to several party members in a rotation, increasing its usefulness. At the end of the day, he’s another defensive Dendro option that players can slot into Nilou teams over Yaoyao if they’d like.

Teammates

hydro Hydro Options: Kokomi / Xingqiu / Yelan / Ayato / Candace

dendro Dendro Options: Nahida / Collei / Dendro Traveler / Alhaitham

#
__Baizhu or Nahida?__

baizhu Baizhu Pros

dendro Strong, consistent healing from his Elemental Skill and Burst.

dendro Interruption Resistance from his small, refreshing shields.

dendro Quicken and Bloom Reaction DMG% buff, which doesn’t diminish alongside Elemental Mastery.

dendro Very easy to build due to not requiring many stats.

Nahida Nahida Pros

dendro AoE, consistent Skill DMG, providing 1.5U Dendro per application.

dendro Able to drive off-field characters with ranged, on-field Normal Attacks with decent AoE.

dendro Large Elemental Mastery buff, which affects all reactions.

dendro Good, staggered, off-field particle generation.

__Analysis__

Due to both being 5-star Dendro Catalyst characters who also provide an Elemental Reaction buff through their passives, people will be quick to call Baizhu a “Defensive Nahida”. However, they are not interchangeable.

**Burst Particle AoE : **

For starters, Baizhu’s Elemental Burst projectiles are extremely small, hence they’re effectively single-target locked. This means that in AoE scenarios he will not only struggle to apply Dendro, but also not consistently refresh Deepwood’s Resistance Shred. In comparison, Nahida’s Elemental Skill consistently applies Dendro to all enemies marked by her Skill, easily keeping Deepwood’s Resistance Shred active on all targets.

**Dendro Application : **

On top of this, Baizhu’s Elemental application is significantly weaker than Nahida’s. Baizhu’s Elemental Burst application is only 1U, compared to Nahida’s 1.5U, meaning that as a solo Dendro unit, he won’t be enabling nearly as many reactions as Nahida. This is notable for teams such as Quickbloom, where your Quicken aura will not only be wiped out quicker, but fewer Bloom Cores will be created from it as well.

On the other hand, this means his Elemental Burst hits will almost always be applying Dendro onto an Electro-Charged aura, resulting in both a Bloom Core and Quicken aura again. Unfortunately, this interaction isn’t enough for his application to allow for more Elemental Reactions off one Dendro aura compared to Nahida.

**Buffing Teammates : **

Thirdly, although Baizhu and Nahida both boost their teammates’ Reaction DMG through their passives, Baizhu’s buff is Quicken and Bloom Reaction DMG%, while Nahida’s is pure Elemental Mastery. This means that Nahida’s buff will be less effective when there are already other Elemental Mastery sources on the team. In contrast, Baizhu’s A4 does not suffer the same diminishing returns as EM does, making it better in situations where characters would already be building a lot of Elemental Mastery.

**ER Requirements : **

Finally, when being run as a solo Dendro unit, Baizhu’s ER Reqs are much higher than Nahida’s, who doesn’t rely as heavily on her Elemental Burst. This can result in players having to run not only Prototype Amber, but also even an Energy Recharge% Sands in extreme scenarios. Even though it’s not a great hit to his personal damage, it can be harder to build for, on top of all the other differences mentioned.

In the end though, this doesn’t mean Nahida is “just better” than Baizhu. They perform drastically different roles and can’t truly replace one another in a solo Dendro scenario. However, when When they are run together, Nahida and Baizhu cover each other’s weaknesses. Nahida provides strong off-field damage, as well as high Dendro application, and Baizhu provides large amounts of healing and defensive utility. To sweeten the duo, Nahida’s Elemental Mastery buff on top of Dendro Resonance means Baizhu’s Reaction DMG Bonus buff gives more Effective EM to the on-field character. Although they do drastically different things solo, when together, they create a strong Double Dendro core for teams to build around.

hot magnetBOT
#
__CREDITS__
Lead:

@oak axle

Authors:

@oak axle, @steel marten, @worldly helm, @blissful sage

Calculations:

@oak axle, @worldly helm

Consultation:

@blissful sage, @cerulean mirage

Editor:

@gloomy wadi

DISCLAIMER:

Pre-TC is volatile and subject to change. Everything described in this FAQ is a good faith analysis based on the limited information we have. Team calcs are not established yet, and as with everything in TC, the content in this FAQ should be taken with a grain of salt.

#
__OVERVIEW__

Kaveh is a Dendro on-field, supportive driver/enabler that specializes in Bloom teams. His kit gives him the ability to instantly rupture Dendro Cores, buff said Rupture DMG, and heal himself when hit by ensuing explosions.

As indicated by his kit, Kaveh works best in Bloom teams. If not paired with Nilou, Kaveh's teams are not limited to Dendro and Hydro units only, which allows for more team variety. During his Burst duration, he can grant himself valuable Interruption Resistance and respectable self-healing, setting him apart from existing Dendro drivers.

#
__TALENTS__
Talent Priority (Bloom teams):

Elemental Burst > Normal Attack > Elemental Skill

Talent Priority (Non-Bloom teams):

Normal Attack > Elemental Skill > Elemental Burst

__Effective EM Buff__

The Bloom Reaction DMG Bonus that Kaveh provides scales with his Elemental Burst’s Talent level. It’s a miniscule increase for his personal damage, but the team DPS you gain makes his Burst your first talent priority. At Talent Level 9, this translates to 8% more Bloom DMG, assuming the trigger has 800 EM. However, this DMG Bonus does not apply to Hyperbloom, Burgeon, or Spread, so if you plan to play such teams, his Burst can be prioritized last. Here is a look at how much effective EM Kaveh’s buff equates to at Talent Level 9:

__Talent Overview__ Normal Attacks: Schematic Setup

Aside from the funny animations, Kaveh’s Normal and Charged Attacks aren’t particularly impressive. They do gain a Dendro Infusion after using his Burst, though.

Elemental Skill: Artistic Ingenuity

CD: 6s

A Skill cast generates two Dendro Particles and detonates all Dendro Cores in its radius, triggering Bloom instantly. Note that Kaveh does not claim ownership of the Blooms – whoever generated the Dendro Core still retains ownership.

Elemental Burst: Painted Dome

CD: 20s
Energy Cost: 80

The most important part of Kaveh’s kit. Upon cast, all Dendro Cores are ruptured immediately (similar to his Elemental Skill). Kaveh’s Burst grants him two important features: his Normal Attacks gain a Dendro Infusion, and the entire team gains a Bloom Reaction DMG Bonus. Additionally, he gains Interruption Resistance. Bear in mind that these effects are only active while Kaveh is on-field, and will be canceled if you swap out. Though his kit states that these effects have a duration of 12s, it’s possible to extend this via hitlag. The high Energy Cost and the fact that most of Kaveh’s utilities are locked behind his Burst does reduce his flexibility.

__Passives__ Ascension 1 Passive: An Architect’s Undertaking

Kaveh regenerates HP based off 300% of his EM every time he is damaged by Bloom, Burgeon, or Hyperbloom. With 800 EM and C1, Kaveh heals himself for 3000 HP. Each 100 points of EM equals 375 HP worth of healing (at C1). This Passive can be triggered once every 0.5s, which conveniently aligns with Bloom, Burgeon, and Hyperbloom’s self-damage cooldowns, but note that it may be difficult to get hit by your own Hyperblooms due to its small AoE. This Talent is a significant boon to Kaveh’s survivability and makes EM more valuable; unfortunately, it does not heal the rest of the team.

Ascension 4 Passive: A Craftsman’s Curious Conceptions

After using Kaveh’s Elemental Burst, each Normal, Charged, or Plunge Attack increases his EM by 25 for up to a maximum of 4 stacks. An easy boost to healing and Bloom damage. This effect is cleared after Kaveh leaves the field.

Overworld Passive: The Art of Budgeting

Unsurprisingly, our architect’s passive has to do with the Serenitea Pot: Kaveh refunds a portion of your materials when crafting Landscape, Building, and Courtyard-type Furnishings. Yoimiya has a similar passive, but for different Furnishing types. Rejoice, Serenitea Pot players!

#
__CONSTELLATIONS__ C1 - Sublime Salutations

Within 3s after using Artistic Ingenuity, Kaveh's Dendro RES and Incoming Healing Bonus will be increased by 50% and 25% respectively.

On paper, this Constellation is a straightforward yet significant buff to Kaveh’s survivability despite its 50% uptime. The main drawback of Bloom teams is self-inflicted damage, but Kaveh has the ability to shrug off this damage with his healing (as long as his HP isn’t low enough to straight-out die from the Cores first).

However, this Constellation is a hidden gem, when building Ocean-Hued Clam (OHC). With C1, 4pc OHC becomes even better to put on Kaveh. More details are given in the artifact section. With OHC, this Constellation becomes one of Kaveh’s biggest personal damage boosts despite not capping out on each bubble.

*DPS increase from C0:*

3.82% (with OHC, which we will include from here on out)

*Rating:*

2.5/5

C2 - Grace of Royal Roads

Kaveh's Normal Attack SPD increases by 15% during Painted Dome.

The 15% increase provides little for Kaveh. With hitlag, it is possible to sneak in only one extra Normal Attack, which is underwhelming to say the least. Without, you could get three extra Normal Attacks, but Kaveh’s power isn’t really in his Normal Attack damage anyways, making this buff next to non-existent.

*DPS increase from C1:*

0.75%

*DPS increase from C0:*

4.61%

*Rating:*

1/5

C3 - Profferings of Dur Untash

Increases the Level of Painted Dome by 3.

Kaveh’s Burst holds great priority given its boost to Bloom damage, but having higher Talent levels increases that boost marginally. You only get about an extra 2% per Talent level, so you get an extra 8% Bloom DMG Bonus in total going from Talent Level 9 to 12. The bonus is quite small in the grand scheme of things, but it won’t hurt you. It is not recommended to aim for this constellation in particular.

*DPS increase from C2:*

1.07%

*DPS increase from C0:*

5.72%

*Team Bloom DPS increase from C2:*

~1.4%

*Rating:*

2/5

C4 - Feast of Apadana

Dendro Cores created from Bloom reactions Kaveh triggers will deal 60% more DMG when they burst.

This constellation gives a straight bonus to Kaveh’s Bloom DMG, which is helpful if you intend on running him as a main DPS or driver. Unfortunately, he might still struggle to keep up with other Bloom DPS, since his own multipliers are quite low. Kaveh’s bonus will not apply to Burgeon or Hyperblooms, so his choice of teammates is limited if you want to take advantage of this. Kaveh will need a decent amount of ownership in order to do the best with this bonus.

*DPS increase from C3:*

5.84%

*DPS increase from C0:*

11.90%

*Rating:*

2/5

C5 - Treasures of Bonkhanak

Increases the Level of Artistic Ingenuity by 3.

Unfortunately, the damage of the Skill itself is quite low, since most of Kaveh’s damage comes from his Normal Attacks and/or Blooms. This means that you won’t be getting much in terms of extra damage.

*DPS increase from C4:*

0.92%

*DPS increase from C0:*

12.93%

*Rating:*

1/5

C6 - Pairidaeza's Dreams

When Kaveh's Normal, Charged, or Plunging Attacks hit opponents during Painted Dome, it will unleash Pairidaeza's Light upon the opponent's position, dealing 61.8% of Kaveh's ATK as AoE Dendro DMG and causing all Dendro Cores within that AoE to burst. This effect can be triggered once every 3s.

C6 gives Kaveh 3-4 more detonations and Dendro application, making it a fairly valuable constellation on Bloom teams. Because Kaveh forces multiple Blooms to rupture at once, you may get less value than you’re hoping for from his Skill usage if you have more than two Cores from a single owner. His Elemental Skill is on a 6 second cooldown, meaning that Pairidaeza’s Light can sneak in some extra forced Core explosions while waiting. In Bloom comps, this extra frontloaded damage is appreciated, but not so useful in Nilou teams where Blooms instantly explode. Furthermore, C6 procs can prematurely rupture your Hyperblooms and Burgeons, possibly resulting in lower team DPS (although the extra Bloom damage might mitigate this DPS loss). Regardless, you get more AoE Dendro application with this constellation, which is useful on most teams.

The Pairidaeza’s Light damage itself is nothing to write home about in a standard EM-centric build. Even if you reached 2000 ATK, you’d only get about 1200 damage from it, which is pitiful next to even one extra Bloom.

*DPS increase from C5:*

1.22%

*DPS increase from C0:*

14.31%

*Rating:*

3/5

#
__COMBOS__

Kaveh’s general rotation will look like so:

Setup with supports > Kaveh Skill > Finish setup with supports > Kaveh Burst > N3 Dash Spam + 2 Skill Cast (~12s)

General Combo Information

:classical_building: Try to get in three Skill casts to manage Kaveh’s Energy. To do this, cast one Skill around the start of your rotation. Cast the other two during Kaveh’s Burst.

:classical_building: N3 Dash is his best Normal Attack combo as it has the highest MVs and Dendro application.

:classical_building: Avoid casting Burst > Skill or Skill > Burst in quick succession. If you Burst and rupture your Dendro Cores, you won’t have anything to detonate if you use your Skill right away!

:classical_building: Make sure there are Dendro Cores in the radius to make sure your Burst/Skill actually detonates them.

:classical_building: Avoid spending too much time on Kaveh – your Hydro/Electro/Pyro application and buffs will expire eventually.

#
__ER REQUIREMENT__

Kaveh’s Skill generates two Dendro Particles and has a cooldown of 6s. He generally is on-field for most of the rotation and uses his Elemental Skill three times, but due to his 80 Burst Cost, he struggles to Burst every rotation. However, Bursting every other rotation is detrimental to damage, so he’ll likely need to hold an ER Sands or an ER weapon. It is worth noting that you need 34% to 53% CRIT Rate to reliably proc Favonius twice at R5 and R3 respectively. (4s/6s interval to get both proc at R3/R5 with around 6 hits/8 hits during the interval)

The table below outlines his approximate ER Requirements averaged over different teams using safe mode and HP threshold particles (KQM standards) in single target.

For a more accurate approximation of his requirements for your rotation, please use the Energy Recharge calculator linked here.

#
__ARTIFACTS__

sands Sands of Eon: ER or EM
goblet Goblet of Eonothem: EM
circlet Circlet of Logos: EM

ER or ATK/DMG/CRIT also work, although not necessarily recommended.

Kaveh’s damage scales off ATK, whereas his reaction damage and healing depend on EM.
For general purposes, ER or EM/EM/EM are the recommended mainstats. In Bloom teams, an EM build maximizes his healing while not being far off from other main stat combinations. Technically, ER or ATK/DMG/CRIT can be his best main stats in scenarios where he has little to no reaction ownership, but Kaveh’s personal damage outside of Bloom DMG is very minor. Optimizing his damage weakens his survivability in exchange for negligible gains to team DPS. Having better survivability on Kaveh is especially important if there’s no other healer and/or he’s played on a Nilou team. Plus, the gap between the two combinations narrows the more Bloom ownership he gets.

Substats: ER (until ER requirements are met) > CRIT Rate (if using Favonius Greatsword) > EM >= ATK% >= CRIT

ER: Most of Kaveh’s utilities are locked behind his Elemental Burst. Needless to say, having enough ER to Burst every rotation is first priority. Check the above section or use an ER calculator to determine how much ER you’ll need.

EM: EM is helpful for both reaction damage and Kaveh's healing. With C1 active, he needs about 300-400 EM to out-heal Blooms, Bountiful Blooms, or Burgeons triggered by a teammate with 1000 EM. Since C1 only has about 50% uptime, expect to build at least 500-600 EM. In fact, you'll probably even want more EM since enemies will also be damaging you or if Kaveh is C0. If you're already running a healer, EM isn't as necessary. Check the mastersheet for more details on EM thresholds.

ATK%/CRIT: Kaveh tends to be ATK deficient to the point that ATK% rolls can be better than CRIT ones. CRIT can be better once you have enough ATK and if you’re using Favonius Greatsword — use optimizer if you’re unsure.

__Artifact Sets__ 4PC Ocean-hued Clam

Even at C0, OHC competes for Kaveh’s BiS along with 4pc Deepwood Memories, and gets even better at C1. Because his DPS profile isn’t so great, the extra damage OHC brings is much appreciated, along with the additional healing. OHC works best in Bloom teams where Kaveh can easily trigger his A1 Passive, and to a lesser extent, Burgeon teams as well. Based on the wording, Kaveh must be damaged by Dendro Cores to heal himself, so shields will nullify his A1 effect. Hyperblooms have small AoE and don’t always hit the user, meaning Kaveh’s A1 cannot reliably be triggered in such teams. And of course, in pure Quicken comps, there are no Dendro Cores that can proc this Passive, rendering OHC useless.

4PC Deepwood Memories

A generalist support set — it is particularly good if Kaveh is the only Dendro character and no one else can hold it. Because his teams are centered around Dendro, the 30% Dendro RES Shred is invaluable, and the 2pc is also useful. With a 6s CD on his Elemental Skill, it is feasible for him to maintain full uptime on the 4PC effect.

Players should be conscious about their rotations and cast Kaveh’s Skill every 6-8s, otherwise there will be gaps in the 4PC uptime. Even if Kaveh isn’t holding this set, make sure another teammate is — you absolutely want this set for all Dendro teams!

4PC Instructor

Although Instructor is only a 4-star set, its party-wide 120 EM share is highly desired in Kaveh’s teams. Due to its low rarity, artifact stats are lower, but Kaveh’s damage is low to begin with. Sacrificing his DPS output in exchange for increasing his team’s damage is a worthwhile trade (Kaveh also benefits from the 2PC and 4PC effect). What’s problematic is that uptime on the 4PC effect may suffer, because Kaveh typically does not trigger many reactions in his teams.

2PC Mix/Match (18% ATK/20% ER/15% Dendro DMG/80 EM)

Transitionary sets. The best combination depends on the substats and what team you’re playing, but 20% ER is almost always useful.

4PC Flower of Paradise Lost

This set should only be considered if Kaveh is triggering a high to moderate amount of Blooms (e.g teams with high Hydro application and/or low Dendro application or if Kaveh is the only Dendro character). In such scenarios, FoPL is quite strong.

4PC Gilded Dreams

Like 4PC FoPL, this set isn’t particularly noteworthy unless Kaveh has a high to moderate ownership of Blooms. It’s slightly worse than 4PC FoPL, and could have uptime issues.

On the contrary, it does provide better healing, and you’ll likely have a set if you were already farming DW.

#
__WEAPONS__

Weapon rankings depend on how many reactions Kaveh procs. As a general rule, EM-based weapons become better the more Blooms Kaveh can trigger and also provide stronger heals. In low Bloom scenarios, ATK and CRIT weapons tend to overshadow their EM counterparts.

__5 ★ Options__ Skyward Pride

One of Kaveh’s better 5-star options, regardless of what team he plays in. He usually lacks in ATK% and DMG%, making Skyward Pride’s high Base ATK and DMG% passive particularly valuable in addition to its ER substat.

Other 5 ★ Weapons

All other 5-star Claymores act as a fat stat stick and perform similarly to each other. Remember that Kaveh’s DPS output is poor — it is perfectly fine to not optimize his damage and give a much needed DPS Claymore to another character, and instead use a 4-star Greatsword on Kaveh.

__4 ★ Options__ Makhaira Aquamarine

A great 4-star Claymore even at R1 — Kaveh takes advantage of every aspect of this weapon, and it even matches him! The more refinements and Blooms Kaveh gets, the better it becomes. Its party-wide Flat ATK buff is also appreciated, although not that important on Bloom/Burgeon/Hyperbloom comps. On the flipside, Makhaira isn’t all that amazing when Kaveh is driving Burgeon or Hyperbloom teams.

Favonius Greatsword

This Greatsword has considerable synergy with Kaveh, especially if his ER needs are high and he is the only Dendro unit on the team. Because he is on-field for quite a while, he can trigger the weapon passive 2-3 times per rotation, drastically reducing both his own ER requirements and his teammates’. Although Favonius Greatsword lacks offensive capabilities, this is a trivial problem since Kaveh’s base damage isn’t high in the first place.

R5 Mailed Flower

Performs slightly worse than Makhaira Aquamarine and slightly better than Favonius Greatsword, but doesn’t have any of their team utility. Still, it is a good stat stick for a free weapon, providing high EM and some ATK% on the side to boot. You only need to cast your Elemental Skill every 8s to maintain the passive, which is not a problem for Kaveh.

Forest Regalia

A decent F2P weapon, especially when Kaveh has moderate Bloom ownership, otherwise, the EM passive loses value. Even if another teammate can pick up the Leaf to gain the EM bonus, getting Kaveh to trigger it in the first place can be difficult, and you may have to adjust your rotation to do so. Some players also find picking up the Leaf a nuisance, making it even less desirable.

Rainslasher

In most of Kaveh’s teams, Rainslasher’s passive is inactive, making it a worse stat stick than Mailed Flower and Makhaira Aquamarine while not providing any utility like Forest Regalia and Favonius Greatsword. However, if playing Kaveh as solo Dendro in a Bloom team, he appreciates the EM substat and the passive has considerably better uptime.

Katsuragikiri Nagamasa

Like Favonius Greatsword, this Claymore can single-handedly take care of most (if not all) of Kaveh’s ER needs without sacrificing too much damage. While it is the higher DPS option of the two, it lacks the ability to battery the rest of the team. Note that although Kaveh can proc the passive up to two times per rotation (24 Flat Energy at R5, 12 at R1), his E casts will likely not be in perfect 10s intervals, so it’s possible the passive only triggers once per rotation. This is particularly problematic at lower refinements and higher ER requirements, and can disrupt the flow of your rotations.

#
__TEAM BUILDING__

Kaveh is an on-field Dendro unit with self-healing and Interruption Resistance, allowing him to drive virtually any Dendro-based team. In particular, he will shine in Bloom teams, which is what his kit specializes in. There are a few things to keep in mind when choosing teammates for Kaveh:

:classical_building: Because of his long field time, his teammates are off-field units.

:classical_building: He only heals himself, not his teammates. For some people this is more than enough, but for others you might still want an extra healer.

:classical_building: He has high ER needs, which incentivizes bringing a second Dendro unit. He can still play as a solo Dendro, but you’ll have to invest in a lot of ER (check ER Requirement for more details)

__Bloom Team__

Kaveh | Hydro | Hydro | Dendro or Flex

dendro Example Team: Kaveh/Xingqiu/Kokomi/Nahida

dendro Example Team 2: Kaveh/Yelan/Ayato/Kazuha

Kaveh’s utilities are geared towards Bloom teams — he can drive, heal himself, buff Blooms, and instantly detonate Cores, giving him a special spot in such teams. Due to Bloom’s mechanics, it’ll often be the Hydro unit(s) triggering them. As such, they usually favour EM builds, but their base Hydro DMG may be high enough that they still appreciate ATK/CRIT stats. Depending on how much Hydro and Dendro application you have, Kaveh still claims ownership of a few Dendro Cores here and there. The 4th slot can be a Dendro unit to supply extra Elemental application, contribute to Dendro Resonance, and battery Kaveh. Alternatively, you can use a Flex unit such as Kazuha or Sucrose to provide grouping and buffs. Bear in mind that without a second Dendro character, Kaveh becomes Energy-deficient and he becomes the one triggering Blooms. You can choose to play him as a solo Dendro, but he won’t be generating many Blooms anyway due to his mild Dendro application (especially before C6). It is recommended to play Bloom compositions in AoE stages.

__Nilou Bloom Variant__

Kaveh | Nilou | Hydro | Dendro

dendro Example Team: Kaveh/Nilou/Xingqiu/Baizhu

dendro Example Team 2: Kaveh/Nilou/Yelan/Xingqiu

While reading Kaveh’s kit, did you ever think: “Wait, isn’t this just Dendro Nilou?” Well, you’re not entirely wrong — both units buff Blooms and can instantly rupture them, although Kaveh does it worse. Their overlapping utilities make Kaveh redundant; nonetheless, he is still a fine Dendro option to slot into Nilou teams. He is an adequate driver, has strong personal survivability, and can still buff Bountiful Blooms. Building Nilou teams is similar to building a regular Bloom team, except you cannot use any units that aren’t Dendro or Hydro. As usual, Nilou runs full HP and your other Hydro character runs EM. Due to the abundance of Bountiful Blooms exploding, you’ll also want to run EM on Kaveh to improve his healing. You might even want to use a healer if his healing isn’t enough for you. Just like regular Bloom teams, Nilou Bloom excels in AoE chambers.

What about Fridge?
Contrary to what the last week of beta changes said, testing shows that Kaveh’s Normal Attacks still Shatter, and with it our Fridge dreams are also shattered.

__Burgeon & Hyperbloom__

Burgeon: Kaveh | Hydro | Pyro | Flex

dendro Example Team: Kaveh/Xingqiu/Thoma/Bennett

dendro Example Team 2: Kaveh/Xingqiu/Kazuha/Bennett

Hyperbloom: Kaveh | Hydro | Electro | Flex

dendro Example Team: Kaveh/Xingqiu/Raiden/Ayato

dendro Example Team 2: Kaveh/Xingqiu/Kuki/Nahida

Although Kaveh’s Burst only buffs Blooms, his self-healing and Interruption Resistance makes him a comfortable driver for both Burgeon and Hyperbloom teams, especially the former where self-damage is an issue. His detonations can steal Burgeons and Hyperbloom procs, but it may be possible to delay your Skill and Burst casts to minimize this problem. Ideally, you’ll be getting both Bloom and Hyperbloom/Burgeon damage. On the other hand, his C6 procs cannot be controlled unless you literally don’t use his Normal Attacks at all. There’s a chance that C6 is a DPS loss, but in-game testing will have to be done to ascertain this. Even so, the extra Bloom damage may partially compensate for the loss of Hyperblooms/Burgeons.

Teammates

hydro Hydro: Xingqiu, Yelan, Kokomi, Ayato, Nilou, Barbara

dendro Dendro: Nahida, Dendro Traveler, Collei, Yaoyao, Baizhu

pyro Pyro (Burgeon Teams): Thoma, Dehya

electro Electro (Hyperbloom Teams): Raiden, Kuki

flex Flex Slots: Kazuha, Sucrose, Heizou, Venti, Bennett, Zhongli (Based off the wording, Kaveh’s A1 will not trigger with a shield)

ember vineBOT
#
__CREDITS__
Leads:

@bright turtle, @gloomy wadi

Authors:

@bright turtle, @olive spoke

Calculations:

@bright turtle, @wooden lava

Framecounts:

@tardy notch

Consulting:

@gloomy wadi

Verification and Editing:

@cerulean mirage, @blissful sage, @stuck rover, @steady lichen

DISCLAIMER

Pre-TC is volatile and, as always, perpetually subject to change until release (and sometimes later!). Please note that these are theoretical suggestions.
Everything described in this FAQ is a good faith analysis based on the little information about the character’s kit that we know. Team calcs, additionally, are not established yet, and as with everything in TC, the content in this FAQ should be taken with a grain of salt.

__OVERVIEW__

Kirara is a 4-star Dendro Sword shielder, providing shields via her Skill and a tiny bit of extra damage from her Burst. That being said, it is not recommended to build Kirara for damage in spite of her decently high multipliers on her Burst due to her lack of access to amplifying reactions that take advantage of said multipliers, as well as the loss in shield strength.

What’s worth noting is that Kirara’s shield has extra absorption against Dendro DMG. This means that she could be an interesting slot-in in Bloom / Burgeon teams if one wishes to take advantage of the increased absorption. If not, she can very easily be slotted into quickswap teams due to her low cooldown on her Tap Skill.

#
__TALENT PRIORITY__ Elemental Skill > Elemental Burst > NA

Analysis

  • Since Kirara’s shields and a portion of her damage scale off of HP, having high levels on her is nice for primarily more shield absorption, with the added damage being the icing on the cake. Leveling her to 90 is preferred, but is by no means necessary to take full advantage of her kit.

  • It’s worth noting that in her Hold Skill state, Kirara’s movement and climbing speed will be increased, making it possible for her to traverse climbable terrain more quickly in her box state at the cost of increased stamina consumption.

  • Kirara’s shields also have increased Dendro absorption, meaning that she could be an option for certain Bloom-based teams.

__TALENT OVERVIEW__ Normal Attack: Boxcutter

Kirara has attack multipliers that are similar to Shinobu’s throughout her Normal Attack sequence. Unfortunately, with abysmally low base attack and no other added gimmicks to it, there is little to no reason to make use of her attack string unless you specifically wish to build her to do so.

Elemental Skill: Meow-teor Kick

CD (Tap) : 8s
CD (Hold) : 9-12s

There are two variations to Kirara’s Skill — a pressed and a held version. Her Tap Skill initiates a Tail-Flicking Flying Kick, dealing AoE Dendro DMG while briefly applying Dendro to herself. It will also create a Shield of Safe Transport that lasts for 12s, the duration of which will be refreshed if a new shield is applied on top of it.

Her Hold Skill deploys a shield similar to the one that is created from her pressed Skill. On top of this, Kirara will curl up into a box, dealing damage to enemies she crashes into in a fashion similar to Sayu’s Skill. At the end of her Skill, she will unleash a Flipclaw Strike, dealing AoE Dendro DMG. The longer her Skill is held, the longer its cooldown will be at the end.

It’s worth noting that in the held Skill state, Kirara’s movement and climbing speed will be increased, making it possible for her to traverse climbable terrain more quickly in her box state at the cost of increased stamina consumption.

Kirara’s shields also have increased Dendro absorption, meaning that she could be an option for certain bloom-based teams.

Elemental Burst: Secret Art: Surprise Dispatch

CD : 15s
Energy Cost : 60

Kirara smashes enemies with a Special Delivery Package, dealing a large chunk of AoE Dendro DMG to enemies. After the explosion, the package will split up into a total of 6 Cat Grass Cardamoms, little bomblets similar to Klee’s. When enemies come into contact with said bomblets OR if left alone for 12 seconds, they will explode, dealing AoE Dendro DMG to enemies surrounding them. A nice bit of extra damage along with Dendro application, though her primary utility as a shieldbot means that the damage might not be as impactful as the numbers imply.

__Passives__ Ascension 1 Passive: Bewitching, Betwitching Tails

During Kirara’s held Skill state, crashing into enemies grants her a stack of Reinforced Packaging obtainable every 0.5s, up to a maximum of 3 stacks. When her held Skill ends, each stack of Reinforced Packaging will grant Kirara a Shield of Safe Transport, refreshing the duration of her shield and stacking on top of her existing shield up to the maximum that her Skill will allow. A very nice passive that helps with both Kirara’s shield strength and uptime.

Ascension 4 Passive: Pupillary Variance

Increases the damage from Kirara’s Skill and Burst, scaling with her maximum HP. Helps ever so slightly with Kirara’s damage when building her as a shieldbot, but nothing to write home about.

Utility Passive: Cat's Creeping Carriage

Prevents wild animals that produce meat when killed from getting startled when characters in the same active party as Kirara approach them. Helps when gathering ingredients for food, although do note that this will only work for the first enemy in the vicinity.

#
__CONSTELLATIONS__ Constellation 1 - Material Circulation

Every 8,000 Max HP Kirara possesses will cause her to create 1 extra Cat Grass Cardamom when she uses Secret Art: Surprise Dispatch. A maximum of 4 extra can be created this way.

Gives Kirara the ability to create up to 4 extra bomblets depending on her Max HP, which is very likely if you were to build her as a shieldbot. A nice bit of extra Dendro application which could situationally be useful, although her damage is still nothing special.

*Rating:*

1/5

Constellation 2 - Perfectly Packaged

*When Kirara is in the Urgent Neko Parcel state of Meow-teor Kick, she will grant other party members she crashes into Critical Transport Shields.

The DMG absorption of Critical Transport Shield is 40% of the maximum absorption Meow-teor Kick's normal Shields of Safe Transport are capable of, and will absorb Dendro DMG with 250% effectiveness.

Critical Transport Shields last 12s and can be triggered once on each character every 10s.*

A Constellation that is nice in co-op, granting mini-shields to allies who Kirara collides with. That being said, these shields can only be created in co-op, rendering this Constellation worthless in normal play.

*Rating:*

0/5

*Rating for playing with your casual friends that are bad:*

3/5

Constellation 3 - Universal Recognition

Increases the Level of Meow-teor Kick by 3.

Three extra levels to Kirara’s Skill means that she has stronger shields and slightly more damage from her Skill. A solid Constellation for Kirara.

*Rating:*

2/5

Constellation 4 - Steed of Skanda

*After active character(s) protected by Shields of Safe Transport or Critical Transport Shields hit opponents with Normal, Charged, or Plunging Attacks, Kirara will perform a coordinated attack with them using Small Cat Grass Cardamoms, dealing 200% of her ATK as Dendro DMG.

DMG dealt this way is considered Elemental Burst DMG. This effect can be triggered once every 3.8s. This CD is shared between all party members.*

This Constellation is an interesting one. If your active character is protected by any of Kirara’s shields, their Normal / Charged / Plunging Attacks will trigger a coordinated attack, dealing Dendro DMG that scales off of Kirara’s Attack. This effect can be triggered a maximum of once every 3.8 seconds, and its CD is shared between all party members, meaning that it can only be triggered every 3.8 seconds as well in co-op.

Sadly, due to Kirara preferring to be built as a shieldbot, the damage from this is very meagre, and will not contribute a lot. That being said, this gives her off-field Dendro application similar to Collei’s, and theoretically opens up the possibility of running her off-field in Hyperbloom teams.

*Rating:*

2/5

Constellation 5 - A Thousand Miles in a Day

Increases the Level of Secret Art: Surprise Dispatch by 3.

Increases Kirara’s Burst Talent level by 3, giving her more damage on her Burst and the subsequent bomblets. Again, not a particularly good Constellation by merit of Kirara preferring to build HP instead of damage.

*Rating:*

1/5

Constellation 6 - Countless Sights to See

All nearby party members will gain 12% All Elemental DMG Bonus within 15s after Kirara uses her Elemental Skill or Burst.

Provides a nice bit of Elemental DMG Bonus for 15 seconds after Kirara uses her Skill and/or Burst, enabling the party to do more damage all-around.

A solid Constellation, with its main downside being locked behind Constellation 6.

*Rating:*

2/5

#
__Energy Recharge Requirement__

Kirara has two sources of particle generation — the first being the 3 particles generated upon hitting an enemy either with a Tap Skill or at the end of a Hold Skill, and the second when she crashes into enemies in her Hold Skill state, generating at most 1 particle every 4 seconds. Kirara has a 60 Burst Cost, meaning her ER requirements are comfortably met in quickswap teams where she can get 2 short Hold Skills in. Additionly, Kirara is often run with a second Dendro, making her ER requirements even easier to meet.

All values below assume two short Hold Skills. Second Dendro is assumed to be Nahida unless with Tighnari / Alhaitham. Fav particles are caught off-field by Kirara.

Kirara’s Energy requirements will vary based on your team and rotation. For a more accurate estimate, please use the Energy Recharge calculator linked here.

#
__ARTIFACTS__

sands Sands of Eon: HP%
goblet Goblet of Eonothem: HP%
circlet Circlet of Logos: HP%

Due to Kirara having very little damage contribution, maximizing her Skill’s shielding utility by building her purely on HP% as a shieldbot is the best way to make use of her kit. On top of that, Kirara’s Ascension 4 Passive introduces additional HP% scalings to her Meow-teor Kick and Elemental Burst, allowing her to sneak some extra damage even if her build is full HP%.

Unlike Baizhu, Kirara does not require a Burst activation to deploy defensive utility, which she can provide with her Skill instead. This means unless the player is willing to play her purely for her Burst, there is no requirement to build ER% on her.

Substats: ER% (Until ER Reqs are met for Burst Kirara) > HP% > HP > ATK%/ATK/CRIT%/CRIT DMG%

__Artifact Sets__ **2PC HP / 2PC HP**

This option shines brightly with Kirara’s kit, allowing her to maximize HP% and ensure maximum uptime on defensive capabilities in exchange for potential 4pc benefits. This option is also very good for maximizing the value of Kirara’s A4 Passive by stacking a ton of Max HP, allowing her to deal more damage from her Meow-teor Kick and Burst.

**4PC Tenacity of the Millelith**

Tenacity of the Millelith is a stellar option on Kirara if playing her on field using her Hold Skill, which can allow her to maintain the shield bonus fairly consistently and give her teammates an additional 20% ATK. This option, however, does not fare well when Kirara is played as a quickswap shielder and kept off-field most of the time, which brings the uptime of the 4pc buff to near negligible.

**4PC Instructors**

A common choice for support characters. 4pc Instructor’s offers a 120 EM buff to all party members, which can be very valuable in Dendro teams that Kirara might be run in since Dendro reactions scale with EM.

**4PC Deepwood Memories**

As Kirara can be played in Dendro teams as the shielder, she can offer to carry Deepwood if no other party members like Nahida are present to do so. Players must note that Kirara does not maintain good uptime on the 4pc buff if she is off-field.

**2PC HP / 2PC ER**

A combination of HP% and ER% (when playing Kirara as a Burst DPS) is a good option to meet the ER requirements for her burst while still maintaining HP% sands on her.

**4PC Noblesse Oblige**

Another universal support artifact, Noblesse Oblige offers a decent Burst DMG Bonus to Kirara which can be useful if she is being played for her Burst, alongside a teamwide 20% attack boost.

#
__WEAPONS__

Kirara’s weapon choices are all relatively straightforward with a couple of key goals in mind — shield the team as much as possible while contributing other forms of utility and buffs if possible. Sadly, at the time of writing this, there are only two swords in the game that boost HP, both of which would be better utilized on other relevant characters if you have them.
You could also opt for more offensive choices if you wish for Kirara to do more damage, but as has been mentioned previously, this is not recommended as you give up a lot of shielding to do so, which is Kirara’s primary forte.

__Recommended__ **Favonius Sword**

The best all-around weapon for Kirara, decreasing her own as well as her teammates’ Energy Requirements. She can also trigger its passive fairly often, with her own cooldowns lining up very nicely with the cooldown on an R3/4 weapon, depending on whether you use the Tap or Hold version of her Skill. Do keep in mind that without building CRIT Rate, you might find some difficulty in triggering its passive consistently.

**Key of Khaj-Nisut**

Kirara’s premier weapon of choice, boasting a massive HP substat along with a passive that not only further increases her Max HP, but also gives herself more EM based on her max HP, with her teammates getting a small portion of said EM buff with full stacks. This makes it particularly valuable in Dendro teams which can make use of the teamwide EM buff, especially Nilou Bloom. Unless you have two Keys, however, this weapon is best used on Nilou herself, with Kirara holding something else instead.
If possible, it is also recommended to stay in Kirara’s Hold Skill state long enough to gain maximum stacks on Key, triggering the latter portion of its passive once it is fully stacked.

**Sacrificial Sword**

Offers less general batterying than Favonius Sword in exchange for more Dendro particles created. Also theoretically gives Kirara the ability to instantly max out her shielding at the start of every rotation by using two consecutive Tap Skill instances, though this has yet to be tested in game. It is also recommended to have Sac Sword at R3 at minimum in order for it to line up properly with Kirara’s Tap Skill cooldowns, if used almost instantly off cooldown.

__Alternatives__ **Primordial Jade Cutter**

Kirara’s best weapon for damage, giving her a whopping 44% CRIT Rate and an extra bit of HP from its passive, along with extra attack based on her Max HP. This synergizes very well with Kirara’s kit, increasing Kirara’s shielding and A4 damage while giving a ton of raw offensive stats. Once again, unless you really like Kirara and/or you have nobody else to use this weapon on, it is recommended to put this on somebody else who could make better use of it, like Xingqiu or Ayato.

**Sapwood Blade**

Kirara’s best craftable option, giving her a nice chunk of ER from its substat along with a bit of extra EM for whoever picks up its leaf after Kirara triggers a Dendro reaction. Less valuable if Kirara is not being used in Dendro teams though, so adjust accordingly.

**Freedom-Sworn**

Another limited gacha weapon. Kirara can activate Freedom-Sworn’s passive with relative ease in the right team, making her a surprisingly good holder of this weapon. The main drawback to this weapon is that you have to carefully watch your cooldowns, or you might begin your second rotation too early, resulting in Kirara not proccing its passive.

**Festering Desire**

This is an event-limited weapon, so you may not have access to it. If you do, however, it is worth considering if you run Kirara as an on-field Dendro driver, providing a small bit of ER from its substat as well as extra damage on her Skill.

#
__TEAM BUILDING__

Kirara’s entire kit is centered towards maximizing defensive utility by stacking HP% on herself. The two variations of her E can make her centered as a quick-swap shielder when Skill is tapped and a Dendro driver when Skill is held. In the off field role, she does not offer anything besides a strong shield and gives no teamwide buffs. After C4 is unlocked however, Kirara has potential to play in Hyperbloom and Quicken teams as an off-field shielder due to her coordinated attacks, where the player can expect Dendro application similar to Collei’s. However in most scenarios, the amount of Dendro Kirara applies may not be enough even with C4 if she is the solo Dendro character in the team. It is recommended to run Kirara with another Dendro character to ensure enough Dendro application when needed.

Overall, Kirara finds tough competition from shielders like Zhongli, which can offer a universal RES Shred, and Baizhu, who has better off-field Dendro application, though he is more Burst-centric unlike Kirara.

Kirara’s personal damage, like Baizhu’s, is rather poor, and she exists in a team purely for a defensive purpose and a slot-in for enabling Dendro Resonance, hence she does not benefit from any CRIT or EM stats. However, Baizhu and Zhongli both offer a decent buff/debuff of their own to compensate for their lack of personal damage.

**Quicken**

Kirara | Electro | Electro/Dendro | Flex

Kirara provides adequate off-field shielding in Quicken scenarios where she is swapped out after deploying her shield. Since Kirara is off-field, her dendro application is minimal — in this case, running her with a character with sufficient Dendro application to make up for her own would be advantageous.

When C4 is unlocked, Kirara can potentially feel more comfortable in being a solo Dendro character in single target situations because of the additional coordinated attacks applying Dendro on enemies.

Teammates

electro Electro options: Keqing / Raiden / Fischl / Yae / Sara / Beidou

dendro Dendro options: Nahida / Tighnari / Alhaitham / Collei / Dendro Traveler

flex Flex options: Anemo / Any above Electro / Any above Dendro

**Nilou Bloom**

Kirara | Nilou | Hydro | Dendro

Being a Dendro Unit, Kirara can easily slot into Bloom teams as a survivability slot which can play both off and on-field scenarios. However, as stated before, a stronger Dendro applicator like Nahida is recommended to make up for her lacking application.

The possibility of on-field Kirara as a Dendro applicator in her Urgent Neko Parcel state requires further testing.

Teammates

hydro Hydro options: Kokomi / Xingqiu / Yelan / Ayato / Candace

dendro Dendro options: Nahida / Collei / Dendro Traveler / Alhaitham

**Hyperbloom / Burgeon**

Kirara | Pyro/Electro | Hydro | Flex

Aside from Kirara's general utility leaning towards defense, her viability as a Dendro driver for Burgeon/Hyperbloom during the Urgent Neko Parcel state is questionable and requires further testing. Since Kirara is unable to trigger Normal Attacks during this state, any Hydro application using Xingqiu or Yelan is not possible, which limits options for a Hydro applicator in such teams.

It is important to note that unlocking Kirara’s C4 potentially allowing her to function as an off-field Dendro applicator with shield capabilities for hyperbloom teams. More testing is needed on both her C4 and Hold Skill capabilities in this scenario.

Teammates

pyro Pyro (Burgeon) options: Thoma / Dehya

electro Electro (Quickbloom options): Cyno / Raiden / Kuki / Yae / Fischl

hydro Hydro options: Xingqiu / Yelan / Kokomi / Ayato

flex Flex options: Anemo / Dendro / Any above Electro

astral topazBOT
#
__CREDITS__
Lead:

@arctic cliff

Author:

@arctic cliff

Calculations:

@arctic cliff

Framecounts:

@gloomy wadi, @high silo

Consulting:

@gloomy wadi, @fervent mural, @dark sentinel

Content Verification:

Calculations: @little olive
Writing: @steady lichen, @stuck rover, @glad gyro

Transcription:

@glad gyro, @cerulean mirage, @olive spoke

DISCLAIMER

Pre-TC is volatile and, as always, perpetually subject to change until release (and sometimes later!). Please note that these are theoretical suggestions.
Everything described in this FAQ is a good faith analysis based on the little information about the character’s kit that we know. Team calcs, additionally, are not established yet, and as with everything in TC, the content in this FAQ should be taken with a grain of salt.

__OVERVIEW__

Lyney is a Pyro Bow user whose kit revolves around summoning Grin-Malkin Hats with his Charged Attacks or Burst, then subsequently detonating them to trigger high-damage Pyrotechnic Strikes. His damage is primarily single-target, though this can be mitigated by running a powerful grouper or a sub-DPS with AOE damage.

Because he takes up much of his teams’ field time, his teammates are typically characters who buff or supplement his damage in some way while occupying relatively little field time. However, his teams are limited by his Aimed Shot gameplay, making popular options like Xingqiu a hassle to use. Furthermore, his Ascension 4 Talent highly encourages Mono Pyro and other mostly reaction-less teams by greatly rewarding maintaining a Pyro aura on enemies and stacking multiple Pyro teammates.

#
__TALENT PRIORITY__ **Normal Attack > Elemental Skill = Elemental Burst**

Analysis

  • All Pyrotechnic Strike damage scales off of Lyney’s Normal Attack talent, and his Charged Attacks themselves do a significant amount of damage, so maxing Lyney’s Normal Attack talent is first priority.

  • After his NA talent, leveling either of his Skill or Burst talents provide similar returns, so they should be leveled in tandem. Leveling Lyney’s Skill talent is slightly more valuable if Bursting only once every 2 rotations, and leveling his Burst talent pulls ahead slightly if Bursting every rotation.

__TALENT OVERVIEW__ **Normal Attack: Card Force Translocation**

Lyney has a Charged Attack mechanic similar to the likes of Ganyu or Tighnari, where Charged Attacks can be charged past the typical fully-charged state for a unique attack. In Lyney’s case, a Charge Level 2 Attack fires a Prop Arrow, which summons a Grin-Malkin Hat upon hitting anything.

The Grin-Malkin Hat is a taunt much like Amber’s Baron Bunny, and shares many of Baron Bunny’s mechanics. It is detonated at the end of its duration (4s), or if it is destroyed early by an enemy. However, there are a few more methods to detonate Grin-Malkin Hats. Only one Grin-Malkin Hat can exist on the field at C0, and if Lyney summons another Grin-Malkin Hat while one is already on the field, the previous one will detonate. Players can also detonate Grin-Malkin Hats with Lyney’s Skill.

When a Grin-Malkin Hat is detonated by any method other than Lyney’s Skill, it unleashes a Pyrotechnic Strike that targets a nearby enemy. These Pyrotechnic Strikes have a relatively small radius and so are mostly single-target, but can actually hit multiple enemies if they are grouped closely enough.

Additionally, if he is above 60% HP, when Lyney fires a Prop Arrow, he consumes 20% of his own max HP in order to obtain a Prop Surplus stack. These Prop Surplus stacks increase the damage of his Skill, and can stack up to 5 times. Note that even without taking external damage, Lyney will only be able to build 3 stacks without a healer, as he will reach the 60% HP threshold within 3 Charged Attacks. This means it is important to run Lyney with a healer, even when overlooking the obvious question of survivability.

Finally, Lyney’s Prop Arrows summon an instance of Pneuma-aligned damage every 6s, which has negligible damage but crucially, triggers an Annihilation reaction when hitting an Ousia-aligned enemy that may make enemies significantly easier to fight. This will be hugely beneficial in the early patches of Fontaine, during which there are a limited number of characters that can deal Pneuma-aligned damage.

**Elemental Skill: Bewildering Lights**

CD : 15s

Lyney’s Skill heals himself for 20% of his Max HP and deals a single instance of AoE Pyro damage that increases with each Prop Surplus stack he has at cast in a fashion similar to Heizou’s Skill. With stacks, his Skill becomes a potent AoE nuke, but its 15s cooldown means he can only cast it once per rotation.

Lyney’s Skill will additionally detonate any Grin-Malkin Hats that exist on-field upon cast. Grin-Malkin Hats that are detonated by Lyney’s Skill will unleash Pyrotechnic Strikes, but these Pyrotechnic Strikes uniquely have a much larger AoE than usual.

**Elemental Burst: Wondrous Trick: Miracle Parade**

CD : 15s
Energy Cost : 60

Lyney’s Burst turns himself into a giant Grin-Malkin Cat (not to be confused with the Grin-Malkin Hat!) for 3s that can prance around. When the Grin-Malkin Cat gets close to enemies, it deals a maximum of 1 instance of Pyro damage to them.

Lyney’s Skill button will be transformed into a special button while in his Grin-Malkin Cat state, and pressing this special button will end the Grin-Malkin Cat state early. Pressing this special button will not cast his Skill.

When Lyney’s Grin Malkin Cat state ends — whether naturally or through the special button — Lyney will unleash yet another AoE Pyro nuke.

__Passives__ **Ascension 1 Passive: Perilous Performance**

Lyney’s A1 further incentivizes running a healer by increasing his damage and refunding flat Energy if he consumes HP while firing a Prop Arrow, which is only feasible after a point with a healer. The damage increase is minor but appreciated. The flat Energy refund can be quite substantial as Lyney fires about 3-5 Prop Arrows per rotation, netting him about 9-15 flat Energy.

**Ascension 4 Passive: Conclusive Ovation**

Lyney’s A4 is where his kit becomes especially interesting. A4 grants Lyney an absolutely massive buff (60% DMG at base) if he attacks enemies affected by Pyro that increases with every Pyro teammate (20% DMG per teammates, up to a maximum of 100% DMG total). Lyney effectively never runs solo Pyro, so he will always have at least a whopping 80% DMG from this passive.

This passive greatly incentivizes teams that can maintain a constant Pyro aura, especially mono Pyro teams, which tend to have a greater number of Pyro units. It also discourages teams that utilize reactions that may interfere with a Pyro aura, such as Overload or Vaporize.

While Lyney can technically still be played in teams that don’t maintain a constant Pyro aura on enemies, it will come with great loss to his damage and not much in return in most cases.

**Utility Passive: Trivial Observations**

Displays Fontaine-specific resources in the minimap. Useful passive for exploring Fontaine.

#
__CONSTELLATIONS__ **Constellation 1 - Whimsical Wonders**

Lyney can have 2 Grin-Malkin Hats present at once. Additionally, Prop Arrows will summon 2 Grin-Malkin Hats and grant Lyney 1 extra stack of Prop Surplus. This effect can occur once every 15s.

In practice, C1 allows Lyney to detonate one additional Grin-Malkin Hat per rotation. C1 gains little value in teams where Lyney does not max out Prop Surplus stacks naturally, but ultimately is a relatively modest increase in damage.

*DPS Increase from C0:*

6.7%

*Rating:*

1/5

**Constellation 2 - Locquacious Cajoling**

When Lyney is on the field, he will gain a stack of Crisp Focus every 2s. This will increase his CRIT DMG by 20%. Max 3 stacks. This effect will be canceled when Lyney leaves the field.

C2 is a relatively straightforward stacking buff to Lyney’s CRIT DMG. Thanks to buffs from his teammates, his BiS artifact set, and his A4 Talent, among other things, Lyney tends to be oversaturated in all manner of offensive stats. However, Lyney can only obtain CRIT DMG from artifact stats and his weapon, making it a little more difficult to come by than most. As a result, C2 provides a substantial boost to Lyney’s damage.

*DPS Increase from C0:*

18.6%

*DPS Increase from C1:*

11.1%

*Rating:*

2/5

**Constellation 3 - Prestidigitation**

Increases the Level of Normal Attack: Card Force Translocation by 3.
Maximum upgrade level is 15.

The first ever Constellation to increase Normal Attack Talent levels, Lyney’s C3 provides a strong boost to all of his Charged Attack and Pyrotechnic Strike damage. C3 is Lyney’s 2nd strongest Constellation for personal damage, falling behind only C6.

*DPS Increase from C0:*

33.2%

*DPS Increase from C2:*

12.3%

*Rating:*

2/5

**Constellation 4 - Well-Versed, Well-Rehearsed**

After an opponent is hit by Lyney's Pyro Charged Attack, this opponent's Pyro RES will be decreased by 25% for 6s.

C4 is a solid increase to all of Lyney’s damage in all teams, but its value increases further if running a character in Lyney’s team who can additionally take advantage of the Pyro RES shred it provides, most notably Xiangling. With Xiangling in his team, C4 is a 9.4% DPS increase in team damage over C3.

*DPS Increase from C0:*

45.8%

*DPS Increase from C3:*

9.5%

*Rating:*

2.5/5

**Constellation 5 - To Pierce Enigmas**

Increases the Level of Wondrous Trick: Miracle Parade by 3.
Maximum upgrade level is 15.

C5 is a mostly negligible damage increase, especially in teams where Lyney only Bursts once every two rotations.

*DPS Increase from C0:*

48.1%

*DPS Increase from C4:*

1.5%

*Rating:*

0.5/5

**Constellation 6 - Guarded Smile**

When Lyney fires a Prop Arrow, he will fire a Pyrotechnic Strike: Reprised that will deal 80% of a Pyrotechnic Strike's DMG. This DMG is considered Charged Attack DMG.

Lyney’s C6 is his best Constellation, with the additional attack on every Charged Attack being a relatively straightforward but significant boost to Lyney’s damage.

Overall, Lyney’s Constellations increase his damage while changing little about his playstyle. It is worth noting that teams that focus on directly buffing Lyney’s damage benefit the most from his Constellations, since they further increase the damage gain from each Constellation.

*DPS Increase from C0:*

96.9%

*DPS Increase from C5:*

33.0%

*Rating:*

3.5/5

#
__COMBOS__

Lyney’s rotations generally will look like the following:

Zhongli hE if using him > Bennett EQ > Setup with offensive supports e.g. Kazuha tEQ > Setup with shielder or defensive supports e.g. Yanfei EQ > Lyney combo (~15s)

or

Zhongli hE if using him > Bennett EQ > Setup with offensive supports e.g. Xiangling EQ > Setup with shielder or defensive supports e.g. Yanfei EQ > Lyney combo > Bennett E > Supports cast E or Lyney CA (~20s)

**General Lyney Combo Notes:**
  • With the exception of with 4pc Shimenawa’s Reminiscence, Lyney wants to cast his Skill at the very end of his combo to maximize stacks. When running 4pc Shime, Lyney wants to cast his Skill at the beginning of his combo or after one Charged Attack instead of at the end of his combo.

  • Casting Lyney’s Burst at the start of the combo allows Lyney to obtain Energy in the first rotation, while casting Burst at the end allows it to receive the fully stacked 4pc MH bonus. Players may also cast Lyney’s Burst after two Charged Attacks as a compromise, and to ensure that the 4pc VV effect is active during Lyney’s Burst.

  • It is recommended that players cancel Lyney’s Burst early so as to not waste time in his Grin-Malkin Cat state.

  • If Bursting every other rotation, in rotations during which Lyney does not Burst, insert a Charged Attack where he would otherwise Burst.

  • Lyney will usually fire 3-4 Charged Attacks per combo, not including any Charged Attacks he does in place of a Burst. Generally speaking, as long as everything fits into the primary window of buffs, it’s worth slightly extending rotations to get in another Charged Attack.

#
__ENERGY RECHARGE REQUIREMENTS__

Lyney generates 5 particles per Skill, but only casts a single Skill per rotation, which leaves his Energy situation with much room to improve. Thankfully, his A1 grants some much-needed flat Energy everytime he consumes HP through his Charged Attack, an effect that is easily achieved with help from a healer. Lyney also runs alongside at least one other Pyro unit, further lowering his ER requirements.

However, even with all that, Lyney’s 60-cost Burst means he needs a substantial amount of ER to Burst every rotation, except in the most Energy-heavy of teams. As a result, more often than not, Lyney prefers to not build any ER and instead Burst every other rotation.

Energy requirements will vary based on your team and rotation. For a more accurate estimate, please use the Energy Recharge calculator linked here.

#
__ARTIFACTS__

sands Sands of Eon: ATK%
goblet Goblet of Eonothem: Pyro DMG%
circlet Circlet of Logos: CRIT DMG% / (CRIT Rate% only if not using 4pc MH)

Substats: CRIT DMG% >= CRIT Rate% until cap > ATK% >= ER to requirement > Flat ATK

__Artifact Sets__ **4PC Marechaussee Hunter**

4pc MH is Lyney’s BiS artifact set by a sizable margin, as he can easily and quickly stack and maintain its 4pc effect for 36% CRIT Rate, as well as 15% CA DMG Bonus from its 2pc set effect. Combined with his CR ascension stat, Lyney ends up with a whopping 60% CR in practice without any artifact main stats or substats. This makes it very easy for Lyney to overcap on CR assuming a modest number of CR substats, greatly diminishing the value of CR weapons on him. For the same reason, it is not recommended to run a CR circlet with 4pc MH.
It is highly recommended to farm 4pc MH for Lyney, as it is significantly stronger than the next best option.

**4PC Lavawalker**

A solid and very consistent option for Lyney if players happen to have a spare set lying around.

**2PC Pyro / 2PC MH / 2PC ATK**

A similarly solid albeit slightly weaker option, with the added benefits of being easier to obtain. Any combination of 2pc sets performs similarly, so players should use the combination with the best substats.

**4PC Retracing Bolide / Wanderer’s Troupe / Desert Pavilion’s Chronicle**

Other decent, consistent alternatives to 4pc Lavawalker, but only affecting Lyney’s Charged Attacks. Retracing Bolide requires good shield uptime.

**4PC Shimenawa’s Reminiscence**

4pc Shime should only be used in teams where Lyney casts his Burst once per two rotations. Otherwise, Lyney’s ER requirement will increase to the point where 4pc Shime becomes a DPS loss. In the situations where it does work, 4pc Shime is slightly stronger than 4pc Lavawalker, although still markedly weaker than 4pc MH.

**4PC Vermillion Hereafter**

In direct opposition to 4pc Shime, 4pc VH should only be used in teams where Lyney casts his Burst every rotation. In the situations where it works, it can be about on par with 4pc Lavawalker.

#
__WEAPONS__ __Recommended__ **The First Great Magic**

Tailor-made for Lyney, TFGM provides CRIT DMG% and CA DMG%, as well as ATK% that increases with each additional Pyro unit in Lyney’s team. TFGM is his BiS even in teams with only 2 Pyro units (including Lyney himself). It is about 7% better than the next best option when fully stacked, and 3% better with only 2 stacks.

**Aqua Simulacra / Thundering Pulse**

Aqua’s passive is slightly dubious for Lyney given that his Charged Attack playstyle allows him to maintain distance from enemies, and TPulse’s stacking passive is entirely useless, but they are nonetheless his strongest weapons after TFGM just by being 5-star bows with a CRIT DMG% secondary stat. Aqua pulls ahead slightly if its passive is maintained; otherwise, TPulse is slightly stronger.

**Skyward Harp**

Despite Lyney potentially overcapping on CR because of Harp’s CR secondary stat, its 5-star stats and CRIT DMG in its passive allows it to be a strong option nonetheless.

**Song of Stillness**

The recommended F2P weapon of choice. SoS’s ceiling is slightly lower than Prototype Crescent when accounting for refines, but it is more reliable than its craftable counterpart.

**Prototype Crescent**

An alternative to SoS but only if players can reliably trigger its passive. At max refinement and with its passive active, PC has the highest ceiling of any 4-star weapon for Lyney (not by much), but it suffers massively without its passive.

__Alternatives__ **Amos' Bow**

Amos’ Bow is a decent choice for Lyney: stronger than 4-star options, but not exceptionally so.

**Polar Star / Hunter’s Path**

The 5-star CR bows are strong assuming players are not running 4pc MH on Lyney, but that assumes players are, in fact, not running 4pc MH. In the recommended scenario in which Lyney is using 4pc MH, the 5-star CR bows suffer greatly as Lyney quickly overcaps on CR.

**Blackcliff Warbow**

Lyney is unlikely to get stacks on Blackcliff in most situations given that his single-target focus means his best use case is bossing. Without stacks, Blackcliff is a very boring but decent option. Not worth buying for Lyney.

**Scion of the Blazing Sun**

The new BP bow has a useful passive, but suffers the same problem of overcapping CR as 5-star CR bows do. Players might find themselves better off just using Song of Stillness.

#
__TEAM BUILDING__

Lyney | Bennett | Defensive Flex | Offensive Flex

Thanks to his HP consumption mechanics, Lyney wants at least one healer to keep him alive and allow him to build Prop Surplus stacks and activate his A1. Bennett provides this, but additionally provides a massive ATK boost and 4pc Noblesse Oblige to greatly improve Lyney’s damage. Furthermore, as a Pyro unit, Bennett counts towards stacks on Lyney’s A4 and signature weapon. To top it all off, he helps generate Pyro particles to fund Lyney and other energy-hungry Pyro units. Because Bennett is able to provide so much utility in just one slot, it is highly recommended to run him alongside Lyney in every one of Lyney’s teams. Players may opt to replace him with another healer, but will do so to much worse effect.
It is recommended to run a healing-focused build on Bennett (HP%/HB artifacts) in Lyney teams, in order to ensure that Lyney receives sufficient healing to stay above the 60% HP threshold. The damage lost on Bennett from building for healing instead of damage is not significant in Lyney teams.

Bennett aside, because Lyney’s Charged Attack playstyle makes him highly susceptible to interruption as well as his damage suffering greatly from being interrupted, Lyney appreciates a shielder or character who can provide interruption resistance.

Lastly, Lyney wants a more offensively oriented unit in his team to buff and/or supplement his damage. Generally speaking, teams that focus on buffing Lyney’s personal damage are preferred in single-target scenarios, where Lyney excels. Conversely, in multi-target situations, it is more beneficial to bring Venti or a unit who can deal AoE damage to compensate for Lyney’s relatively low amount of AoE damage.

While not recommended, if players feel confident in their ability to play Lyney without a shielder, they can opt to bring a second offensive flex unit instead.

It is essential that Lyney’s teammates do not interfere with maintaining a constant Pyro aura on enemies, and are compatible with his Charged Attack playstyle, which somewhat limits his options.

__Teammates__

flex Defensive Flex Options:

Zhongli: Zhongli is a very strong candidate for the defensive flex position, providing a hefty shield that can maintain full uptime and syncing with Lyney’s 15s cooldowns. He even gains an offensive edge with his universal 20% RES shred. He can hold 4pc Tenacity of the Millelith or 4pc Archaic Petra, although Archaic Petra may be inconvenient to use.

Yanfei: Yanfei’s C4 makes her a strong Pyro shielder that Lyney can make use of. Being Pyro allows Yanfei to contribute to stacks on Lyney’s A4 and signature weapon. Furthermore, if Yanfei can obtain enough ER without Prototype Amber or an ER weapon, and players are willing to sacrifice shield strength for offensive power, she can hold Thrilling Tales of Dragon Slayers to buff Lyney. However, it is worth noting that Yanfei’s C4 shield being tied to her Burst forces rotations to be extended to upwards of 20s.

Dehya: Even though Dehya isn’t a shielder, her A1 talent allows her to provide the interruption resistance Lyney wants, and her damage mitigation similarly increases Lyney’s survivability. She can also hold 4pc Tenacity of the Millelith to buff Lyney. Because she is a Pyro unit, she can also contribute to stacks on Lyney’s A4 and signature weapon. However, she forces rotations to be extended to a minimum of 20s and has poor uptime.

Xinyan: With C2, Xinyan can build high ER (around 230%) to Burst every rotation to fit into 15s rotations, guarantee a Favonius Greatsword proc, and hold 4pc Tenacity of the Millelith. As a Pyro unit, she can also contribute to stacks on Lyney’s A4 and signature weapon.
However, without C2, she loses the ability to guarantee a Level 3 shield and the benefits that come with it, and extends rotations with her 18s Skill cooldown.

Layla / Kirara / Diona / Baizhu: All viable shielders, none of whom are especially notable in Lyney teams. Layla can provide some additional chip damage, while Diona and Baizhu provide a little extra healing, but otherwise all four mostly perform similarly. Note that Baizhu extends rotations.

#

flex Offensive Flex Options:

Kazuha: Kazuha’s ability to buff Lyney’s Pyro DMG% and use 4pc Viridescent Venerer all while syncing up with Lyney’s 15s cooldowns makes him the ideal unit for maximizing Lyney’s personal damage. He additionally provides a considerable amount of personal damage, and some grouping of debatable usefulness.

Venti: Venti’s powerful grouping uniquely allows Lyney to take advantage of the small AoE on his Pyrotechnic Strikes, allowing Lyney to deal with groups of enemies as long as they can be lifted by Venti’s Burst. Venti also does significant damage in his own right in such situations, and he can use 4pc Viridescent Venerer to shred enemy Pyro RES. Additionally, he can refund 15 Flat Energy to Lyney and all other Pyro units in the team, which is hugely beneficial to reducing ER requirements.
However, Venti struggles in single-target situations or against enemies that his Burst cannot lift, so it is not recommended to bring him against those lineups.

Xiangling: Xiangling is a powerful Pyro sub-DPS who provides strong AoE damage from off-field while also allowing Lyney to max out on his A4 and signature weapon passive effects. Bennett is more essential than ever with Xiangling the team, as she greatly appreciates his Pyro particle generation and is able to take full advantage of his ATK buffs.
However, her Burst requires Lyney to play at point-blank range, which players may find unpleasant to play. If players are struggling to pilot Lyney because Xiangling forces them to play at point-black range, causing Lyney to miss out on Charged Attacks, then any damage gained from running Xiangling may be canceled out. In such cases, it is recommended that players opt not to run Xiangling with Lyney.

C2 Klee: An expensive buffing option who can provide DEF shred, Thrilling Tales of Dragon Slayer, and allow Lyney to max out on his A4 and signature weapon passive effects.

Heizou / Sucrose: If Kazuha is otherwise occupied, players can also use Heizou or Sucrose as a generic Anemo support by equipping them with 4pc Viridescent Venerer and Thrilling Tales of Dragon Slayer.
Heizou gains a slight advantage by being able to contribute some extra damage, and Sucrose’s EM share is entirely useless in Lyney teams (unless running double offensive flex with Rosaria), so her talents may be better utilized elsewhere.

Other Anemos: Other Anemo characters such as Lynette, AMC, Jean, and Sayu can all be used to hold 4pc Viridescent Venerer’s. None of them are particularly standout otherwise.

Albedo: Albedo can be run as an easy-to-play sub-DPS. With Zhongli, Lyney and himself can gain some buffs from Geo Resonance; otherwise, Albedo simply provides off-field damage while not interfering much with the Pyro auras Lyney wants.

grave voidBOT
#
__CREDITS__
Leads:

@analog scaffold, @blissful sage

Authors:

@analog scaffold, @blissful sage, @gloomy wadi

Calculations:

@analog scaffold, @blissful sage, @olive spoke

Framecounts:

@high silo

Content Verification:

Calculations: @cerulean mirage
Writing: @glad gyro

Transcription:

@glad gyro, @olive spoke

DISCLAIMER

Pre-TC is volatile and, as always, perpetually subject to change until release (and sometimes later!). Please note that these are theoretical suggestions.
Everything described in this FAQ is a good faith analysis based on the little information about the character’s kit that we know. Team calcs, additionally, are not established yet, and as with everything in TC, the content in this FAQ should be taken with a grain of salt.

__OVERVIEW__

Lynette is a 4-star Anemo Sword character who is the first “Ousia-aligned” character to be released in the Fontaine era of Genshin Impact. While the Ousia alignment on her Skill can help solve puzzles and exploit boss weaknesses, she is a support character who can buff her teammates with a pseudo-Noblesse Oblige set on one of her passives. With all six Constellations, she can infuse her sword with Anemo upon using her Skill and can deal modest damage with the help of Faruzan and Bennett.

At C0, her team options are quite restrictive; National teams may struggle with Lynette due to her Burst application interfering with Xiangling’s reaction triggers, leaving her only able to use her low-power Skill before switching out. Her other potentially viable playstyles are locked behind her C6, which allows her to drive with Anemo infusion. However, with C6, she can be the trigger for Hyperbloom reactions if you have an Electro character who fails to hit Dendro cores like Fischl.

That said, the majority of the time, Lynette will serve as a dedicated support, rather than a DPS.

Compared to other Viridescent Venerer-wielders, Lynette falls behind. While her Burst taunts enemies, her crowd control is severely lacking compared to Sucrose, another 4-star Anemo character. In Hyperbloom teams, Sucrose remains a stronger option due to her being able to share her Elemental Mastery stat, whereas Lynette’s teamwide ATK buff is less relevant, and Sucrose’s Anemo application is not dependent on an infusion like Lynette, offering Sucrose more consistency. For raw damage in An3mo teams, 4-star Heizou is a fierce competition and doesn’t need to rely on an infusion through max Constellations to deal respectable Anemo damage.

To summarize, Lynette is seldom the best choice for any circumstance outside of being an Anemo character with the Ousia alignment. When it comes to support, ATK damage, and reactions, other 4-stars and 5-stars are more efficient at their jobs. Lynette’s true power evaluation, then, depends on exactly how essential Ousia alignment becomes from 4.0 onward.

#
__TALENT PRIORITY__ **C0 / C6 off-field:** Elemental Burst > Elemental Skill >> Normal Attack
**C6 on-field:** Elemental Burst > Normal Attack ≥ Elemental Skill

Analysis

  • At C0, Lynette generally just wants to Skill, Burst and swap out, whilst Absorbing an element into her Elemental Burst to increase its damage output. At C6, Lynette is able to on-field with Anemo-Infused Normal Attacks, giving her some alternative playstyles.
__TALENT OVERVIEW__ **Normal Attack: Rapid Ritesword**

Lynette performs a quick, 4-hit attack string with a multihit on the 3rd attack. At C0, these are underwhelming due to Lynette not being suited for Physical DMG, but her C6 grants a short Anemo Infusion, allowing her to have some on-field presence.

**Elemental Skill: Enigmatic Feint**

CD : 12s

Lynette’s Skill has both a Tap and Hold function. On Tap, Lynette unleashes Enigma Thrust, thrusting forward with her sword. Once Enigma Thrust hits an opponent, Lynette will restore 25% of her Max HP and then proceed to lose 6% of her Max HP every second for 4 seconds.

On Hold, Lynette enters the Pilfering Shadow state, increasing her Movement SPD for 2.5 seconds. During this state, a Shadowsign mark will appear over a nearby enemy, which marks the enemy Lynette will target upon ending her Skill, where she will then perform the same Enigma Thrust as her Tap Skill.

When Lynette unleashes an Enigma Thrust, she will also activate her Arkhe Attack, Surging Blade, dealing Ousia-aligned Anemo DMG to the enemy hit, and has a cooldown of once every 10 seconds. Arkhe Attacks do not apply an element and deal very little damage, however, it will cause an Annihilation reaction when coming into contact with the opposite Arkhe energy. At this point in time, Lynette is our only source of Ousia-aligned attacks, giving her a possible role against Pneuma-aligned enemies or mechanics.

Lynette’s Skill generates 4 Anemo particles on a 12 second cooldown, allowing her to generate a large amount of particles in a short period with C4 or Sacrificial Sword. However, the cooldown on her Skill alongside her high Burst cost results in her having relatively high Energy requirements when played off-field. Unfortunately, as of the time of writing, both Lynette’s Arkhe Attack and her Skill also have a tendency to whiff on enemies, making gaining particles and annihilating against Pneuma-aligned enemies cumbersome.

**Elemental Burst: Magic Trick: Astonishing Shift**

CD : 18s
Energy Cost : 70

Lynette hits around her in an AoE whilst summoning a Bogglecat Box, which taunts enemies and deals Anemo DMG every second. When the Bogglecat Box is hit by a Cryo, Pyro, Hydro or Electro attack, it absorbs the element and starts firing Vivid Shots, one every 2.3 seconds.

Her Burst is her highest source of damage, lasting for 12 seconds on an 18 second cooldown with a 70 Energy Cost. It has similar properties to other abilities in the game, such as Amber’s Baron Bunny, in which it can be pushed around easily by players and enemies. The Bogglecat Box also shares the same absorption rules as Dendro Traveler, absorbing the first Element it comes into contact with. With C2, the Elemental application from her Vivid Shots doubles to once every wave, compared to once every other wave, allowing her to trigger more reactions against enemies. Her Burst is also dynamic, meaning buffs such as Marechaussee Hunter will grant all 3 stacks to her Burst, rather than snapshotting 1 or 2 stacks upon casting.

__Passives__ **Ascension 1 Passive: Sophisticated Energy**

After using her Burst, based on the amount of different elements in the team, Lynette will give a teamwide ATK boost. Pure Anemo offers 8%, whereas a 3 Anemo team gets 12%. The most common distribution (three elements) offers 16%, and in a rainbow team (all different elements), the passive gives 20%. This buff lasts for 10s.

**Ascension 4 Passive: Props Positively Prepped**

Once Lynette's Elemental Burst absorbs an element, it gains a 15% DMG Bonus for the rest of its duration. This helps increase the damage provided by her Burst and scales in usefulness depending on how quickly you can cause it to absorb an element.

**Utility Passive: Loci-Based Mnemonics**

Lynette shows the location of Recovery Orbs on the minimap whilst underwater and increases the HP and stamina gained from these by 25%, letting players explore Fontaine's new underwater areas more easily.

#
__CONSTELLATIONS__ **Constellation 1 - A Cold Blade Like a Shadow**

When Enigmatic Feint's Enigma Thrust hits an opponent with Shadowsign, a vortex will be created at that opponent's position that will pull nearby opponents in.

Grants Lynette some extra utility in the form of grouping. The grouping is about the same size as Sucrose/Faruzan’s Skill grouping whilst having the same pull speed as Kazuha’s Skill. The grouping also lasts long enough to actually pull light enemies together, making it quite reliable. Unfortunately, it only activates upon hitting an opponent with her Hold Skill rather than Tap or Hold, and with her Skill’s relatively easy chance to miss even when locked on, you’ll need to be careful when using it.

*Rating:*

2.5/5

**Constellation 2 - Endless Mysteries**

Whenever the Bogglecat Box summoned by Magic Trick: Astonishing Shift fires a Vivid Shot, it will fire an extra Vivid Shot.

A rather nice Constellation, increasing the Elemental Application from her Vivid Shots to once every wave rather than once every other wave. This effectively doubles the amount of reactions from her Elemental Burst and can be especially useful in Hyperbloom teams upon swirling Electro, allowing for easy off-field Hyperbloom triggers.

*Rating:*

3/5

**Constellation 3 - Cognition-Inverting Gaze**

Increases the Level of Magic Trick: Astonishing Shift by 3.
Maximum upgrade level is 15.

Three extra levels to Lynette’s Skill, granting her slightly more damage. Her damage contribution, however, isn’t massive to begin with.

*Rating:*

1/5

**Constellation 4 - Tacit Coordination**

Increases Enigmatic Feint's charges by 1.

Lynette makes quite good use of an extra Skill charge, allowing her to frontload Anemo Particles, doubles her grouping potential and lets her fit 20-second rotations, where she alternates between 1 and 2 Skill casts per rotation. Keep in mind, her Ousia-aligned Arkhe Attack only triggers once every 10 seconds, meaning she will only send out one Arkhe Attack if you use two Skills back to back. In 20s rotations, she essentially gains one extra skill use every other rotation. In 25s rotations, she can maintain her Anemo infusion for over 10s.

*Rating:*

3/5

**Constellation 5 - Obscuring Ambiguity**

Increases the Level of Enigmatic Feint by 3.
Maximum upgrade level is 15.

Three extra levels to Lynette’s Burst, granting more damage from both the Bogglecat Box and Vivid Shots. However, like her Constellation 3, her damage contribution to the team isn’t massive.

*Rating:*

1/5

**Constellation 6 - Guarded Smile**

When Lynette uses Enigmatic Feint's Enigma Thrust, she will gain an Anemo Infusion and 20% Anemo DMG Bonus for 6s.

Her last Constellation grants a new playstyle to Lynette, allowing her to take the field for a portion of your rotation, whilst also gaining a 20% Anemo DMG Bonus, increasing the damage from the rest of her kit. This Constellation allows her to drive teams such as Hyperbloom, where EM stats can be valuable compared to her traditional ADC build. The increased field time also lowers her Energy requirements, allowing more offensive substats in her gear. Anemo Infusions also allow for Lynette to swirl other infusions off her weapon, allowing for unique double swirl setups with other infusions such as C6 Bennett, Chongyun or Candace.

*Rating:*

3.5/5

#
__ENERGY RECHARGE REQUIREMENTS__

Lynette’s Energy requirements are quite high without a plethora of support through Favonius weapons and Anemo teammates. In 25s rotations and an Energy-rich team, these requirements plummet, though longer rotations will mainly be useful only when Lynette’s infusion at C6 is unlocked. However, even at C0, she has a 12s cooldown on her Skill, which allows her to use it twice per long rotation.

We tested Energy Recharge requirements for teams grouped into three categories: General Use (National, Freeze, etc.), An3mo (C6 Lynette with C6 Faruzan and Kazuha), and Hyperbloom teams (Collei/DMC/Nahida, Xingqiu, and Fischl, C6 Lynette is the trigger).

General Use

National (1 Fav on Team) - 230%
National (1 Fav + Lynette Fav) - 180%
Freeze (1 Fav on Team) - 220%
Freeze (1 Fav + Lynette Fav) - 180%

An3mo (C6 Lynette)

No Fav - 150%
1 Fav - 140%
2 Fav - 135%

Hyperbloom (C6 Lynette)

ER needs will vary slightly depending on how consistently you can keep Oz up (whether you Burst every rotation or slightly desync) and which Dendro character you use between Collei, DMC, and Nahida)

Collei 1E, No Fav - 155-160%
Collei 2E, No Fav - 145%-155%
Collei 1E + Fav - 140%-150%
Collei 2E + Fav - 135%-145%
DMC 1E + Fav - 145%-150%
DMC 2E + Fav - 140%-145%
Nahida, No Fav - 135%-145%

Lynette’s Energy requirements will vary based on your team and rotation. For a more accurate estimate, please use the Energy Recharge calculator linked here.

#
__ARTIFACTS__

sands Sands of Eon: ER/EM/ATK%
goblet Goblet of Eonothem: Anemo DMG%/EM
circlet Circlet of Logos: CRIT/EM

Lynette prefers ATK% or ER / Anemo DMG% / CRIT in general, but it is only marginally better than other combinations of main stats in most cases. In Hyperbloom or reaction-focused teams where she is the trigger, EM or ER / EM / EM should be used instead. Her Burst can be important depending on the team, therefore, enough ER should be built to suit her needs.

Substats: ER (Until ER Reqs) > EM (If Hyperbloom) > CRIT > ATK

__Artifact Sets__ **4PC Viridescent Venerer**

Like most other Anemo supports / Sub-DPSes, Viridescent Venerer is Lynette’s Best-in-Slot set, performing extremely well when compared to other sets. When comparing sets for her solo DPS, 4pc VV is only outperformed marginally <0-4%> in certain niche team comps. When comparing it to other sets for her team’s overall DPS, 4pc VV easily beats all other sets due to the excellent debuff it inflicts, allowing her swirls to reduce the enemy’s resistance based on the element swirled by 40%.

**4PC Emblem of Severed Fate**

Due to Lynette’s relatively high ER Requirements at C0, as well as most of her damage coming from her Burst, 4pc Emblem of Severed Fate is her highest personal damage Artifact set. This set can be an option for off-field playstyles or before C6 in teams that don’t gain a lot from Viridescent Venerer.

**4PC Gilded Dreams**

An option not too far behind for personal damage whilst giving a mix of ATK% and EM. This set excels when using Lynette as a driver for Hyperbloom when built with 3 EM main stats.

**4PC Flower of Paradise Lost**

An option over Gilded Dreams that grants slightly more Hyperbloom damage in exchange for lower Swirl and Aggravate damage.

**4PC Marechaussee Hunter**

Due to Lynette’s Skill healing and then slowly draining her HP, she is able to activate the 4pc effect of Marechaussee Hunter, granting her large amounts of CRIT Rate. However, as the set only procs on-field, the stacks will not stay for her Burst’s whole duration unless she is played on-field at C6.

**4PC Desert Pavilion Chronicle**

A set only recommended at C6, due to providing 40% Normal, Charged and Plunging Attack DMG after hitting an enemy with a Charged Attack. With the 2pc effect granting extra DMG%, it is another option Lynette can use to further boost her personal damage.

**4PC Noblesse Oblige**

If there is not already a Noblesse user on the team, Lynette doesn’t lose too much from running it, as her personal damage isn’t high in most teams. However, it is recommended to use 4pc VV instead for team buffs if there is no other 4pc VV user on the team.

**2PC Anemo / ATK / ER / EM**

General 2pc options that Lynette can use to boost her personal damage or reach ER requirements.

#
__WEAPONS__

Due to Lynette’s three potential playstyles, it’s important to clarify that the rankings will be vastly different depending on your ideal playstyle.

General-Use playstyles require Energy Recharge weapons in order to meet Energy requirements. CRIT weapons cannot reach 220+% in KQMC standards, which severely limits your options.

An3mo playstyles as an on-field DPS prefer CRIT weapons, due to her much lower Energy requirements.

Hyperbloom playstyles prefer Energy Recharge or Elemental Mastery weapons, since she will be triggering the Hyperbloom reactions. Keep in mind that Favonius Sword overshoots her energy needs in this team.

__Recommended for General Use (C0+; National, Freeze, etc.)__ **Favonius Sword**

The best all-around weapon for Lynette, decreasing her own as well as her teammates’ Energy requirements. Do keep in mind that without building CRIT Rate, you might find some difficulty in triggering its passive consistently.

**Sapwood Blade**

A solid craftable option that can boost a character’s Elemental Mastery for a short time. Only opt for this over Favonius Sword when energy needs are quite comfortable across the team, but this is still a potent option in some circumstances.

**Sacrificial Sword**

Offers less general batterying than Favonius Sword in exchange for more Anemo particles created. If the trigger on the passive occurs, it solves 100% of Lynette’s Energy Recharge requirements, but since it maxes out at an 80% chance at R5, this is not guaranteed. It can also situationally add time to Lynette’s rotation.

**Fleuve Cendre Ferryman**

This weapon is almost purely an Energy Recharge stick, but it solves almost all of Lynette’s Energy requirements.

**Amenoma Kageuchi**

Another sword that mainly exists to provide Energy. It has no other special uses.

**Festering Desire R5**

Energy Recharge stick. The extra CRIT Rate on Skill uses and Skill DMG isn’t much of a boon.

**Skyrider Sword R5**

Not to be confused with the 5-Star Skyward Blade, though the two perform similarly. This is the barebones 3-star option.

#
__Recommended for An3mo__ **Mistsplitter Reforged (N1 after E)**

The best-in-slot for Lynette’s damage by far, assuming full stacks and an infused N1 immediately after her Skill use. When buffed by C6 Faruzan and C5 or below Bennett, she can almost scratch 15k DPS within her 6-7s field time. About 10% greater than the next best option in terms of damage.

**Primordial Jade Cutter**

A generically good CRIT weapon for almost anyone, giving her a whopping 44% CRIT Rate and an extra bit of HP from its passive, along with extra attack based on her Max HP. Lynette doesn’t care as much about her HP stat, but it’s useful for the CRIT Rate regardless.

**Haran Geppaku Futsu**

Another solid option. Lynette can use the passive quite well with her infusion.

**Light of Foliar Incision (N1 after E)**

Another CRIT stick. The passive is nice to have but doesn't provide a meaningful increase due to Lynette generally building for ATK and CRIT rather than EM.

**Wolf-Fang R5**

The dynamic-buffing CRIT Rate is useful on both her Skill and Burst, and offers surprising damage potential as a 4-star weapon.

**The Black Sword R5**

A solid CRIT Rate weapon obtainable through Battle Pass. The Normal and Charged Attack damage buff is very much appreciated when Lynette is attacking in An3mo teams. The lifegain is a nice bonus but inessential. Many players already have a few of these already if they’re a regular Battle-Pass renewer.

**Other 5-Star Swords besides Aquila and Key**

There isn’t much to say about other weapons other than “they do decent damage.” This includes Freedom Sworn, Summit Shaper, and Skyward Blade.

**Amenoma Kageuchi R5**

The best craftable option for damage, lessening Lynette’s Energy needs in An3mo teams even further. This allows Lynette to invest almost purely into damage. Lion’s Roar R5 can tie if you can maintain 100% passive uptime.

#
__Recommended for Hyperbloom Trigger__ **Freedom-Sworn**

The obvious 5-star choice for an EM sword-wielder. It provides a ton of Elemental Mastery while also buffing the team. The bonus to her Normal, Charged, and Plunging Attack damage isn’t a significant boost, but it is well-appreciated.

**Xiphos Moonlight R3+**

If you want something that performs similarly to Freedom Sworn but don’t want to wish for a 5-star weapon, Xiphos Moonlight is a great choice. It also acts as a pseudo-Favonius weapon by increasing the team’s’ Energy Recharge. R5 has no impact on personal damage performance compared to R3, but the Energy Recharge buff to the party will be greater at higher refinements.

**Iron Sting R5**

Best craftable for her personal damage while also outranking other options, including other 5-star weapons. There’s not much to say about this, other than it is a solid stat stick.

**Sapwood Blade R5**

This craftable does less damage, but can offer a leaf that buffs Elemental Mastery. This is probably better on support builds, but is still worth mentioning.

#
__TEAM BUILDING__

At C0, Lynette leans much more to a general Anemo slot in for teams, especially against Pneuma-aligned enemies and mechanics. Her Skill gives short but fast mobility whilst her Burst gives fast, off-field Anemo DMG. With constellations, she gains grouping, increased Absorption application, an extra Skill charge and an Anemo Infusion, granting her more utility and flexibility.

However, due to her skill being Single-Target and having a tendency to miss both the initial hit and Ousia follow-up, she may struggle to actually annihilate Arkhe mechanics.

Lynette’s field time varies depending on your build and team:

  • General Use: 2-4s
  • An3mo: 6-7s; when Normal Attacking with infusion, N2C is best for damage.
  • Hyperbloom: 6-7s+6-7s or 12-13s (whether you infuse two separate times, or use all your field time at once); when Normal Attacking with infusion, N3D is best for Swirl count.
**An3mo**

Lynette | Faruzan | Anemo | Flex

Due to Lynette being an Anemo character that generally builds for ATK and CRIT over EM stats, she finds a nice place in An3mo. Bennett is highly recommended for the flex slot of this team due to the large attack buff he brings on top of general survivability. However, he must be C5 or lower, due to Lynette’s infusion being swirled away by the Pyro Infusion granted by his Burst. C6 Faruzan is also another large increase, lowering her and the team's ER requirements whilst also dealing good off-field damage, allowing C6 Lynette or another Anemo character to take the field.

Teammates

anemo Anemo options: Kazuha / Venti / Heizou / Sucrose

flex Flex options: Bennett C5 / Zhongli

**Hyperbloom**

Lynette C6 | Electro | Hydro | Dendro

With Lynette’s C6 granting an Anemo Infusion, she is able to drive on-field in Hyperbloom teams, constantly swirling Electro with her Elemental Burst and Normal Attacks to trigger Aggravate and Hyperblooms. Although Electro is last in her Burst Absorption priority, it grants more Hyperblooms than a Hydro Absorption due to characters like Xingqiu and Yelan having high enough Hydro Application to wipe Quicken Auras. Nahida and Baizhu are options, but both come with their own detriments that make them worth reconsidering. First, Nahida’s 1.5U Dendro application on her Skill, whilst also applying on the triggering of reactions can remove Electro Auras from enemies. This interferes with Swirl reactions to consistently trigger Hyperblooms. Second, Baizhu’s application may be good enough for Quicken teams, but cannot generate sufficient Dendro Cores as the sole Dendro applicator in Hyperbloom. Yaoyao is an alternative if players need a Dendro healer but performs better in AoE scenarios compared to Single-Target due to the random targeting on her Skill. Kuki is another viable option due to consolidating both healing and great Hyperbloom triggers, but leads to Lynette feeling out of place, not getting many Swirls or Hyperblooms.

Teammates

electro Electro options: Fischl / Beidou / Yae / Kuki

hydro Hydro options: Kokomi / Xingqiu / Yelan

dendro Dendro options: Nahida / Baizhu / Collei / Dendro Traveler / Yaoyao

strange magnetBOT
#
__CREDITS__
Leads:

@cerulean mirage, @olive spoke

Authors:

@cerulean mirage, @olive spoke, @wicked yew

Calculations:

@cerulean mirage, @olive spoke, @wicked yew

Framecounts:

@high silo

Consulting:

@stuck rover, @gloomy wadi, @blissful sage

Content Verification:

Calculations: @bright turtle
Writing: @glad gyro

Transcription:

@glad gyro, @cerulean mirage

DISCLAIMER

Pre-TC is volatile and, as always, perpetually subject to change until release (and sometimes later!). Please note that these are theoretical suggestions.
Everything described in this FAQ is a good faith analysis based on the little information about the character’s kit that we know. Team calcs, additionally, are not established yet, and as with everything in TC, the content in this FAQ should be taken with a grain of salt.

__OVERVIEW__

Freminet is a 4-star Cryo, Pneuma-aligned, on-field Claymore DPS whose unique A4 passive allows him to amplify his Skill’s Cryo and Physical damage with the help of the Shatter reaction. His kit opens up novel and viable team compositions that were once considered suboptimal due to Claymores’ heavy attacks dismissing most of the benefits of Freeze teams. Freminet can be played to maximize either his Physical or his Cryo damage, with each playstyle changing his preferred equipment, teams, and combos, all of which will be discussed in the following sections.

#
__TALENT PRIORITY__ **Elemental Skill > Normal Attacks > Elemental Burst**

Analysis

  • Freminet’s Skill comprises the majority of his damage, and should be the first leveling priority. Normal Attacks are mostly used to increase his Skill’s Shattering Pressure damage, but because they are interwoven so often between Skill uses, they end up comprising a significant amount of his damage. Freminet’s Burst is solely used for its Subnautical Hunter status, which does not improve with Talent levels.
__TALENT OVERVIEW__ **Normal Attack: Flowing Eddies**

A standard set of Normal Attacks that are mainly used in conjunction with his Skill to boost the damage of Shattering Pressure.

**Elemental Skill: Pressurized Floe**

CD : 10s

The star of Freminet’s kit. Pressurized Floe deals coordinated Cryo attacks and increases the Pressure level of Pers Time to boost the damage of his final attack, Shattering Pressure.

Casting Freminet’s Skill will cause a pressure bar to appear over his right shoulder, and his next four Normal Attacks will each be followed by a single coordinated Cryo attack. After first casting his Skill, the Pressure level of Pers Time will be at zero. For each Normal Attack he performs, the Pressure level increases by one.

Shattering Pressure is one of the biggest aspects of Freminet’s kit, and is tied closely to Pers Time’s Pressure level. It can be triggered either by completing four Normal Attacks or by activating his Skill again, which will end his Skill state early. When Shattering Pressure is triggered, it will deal Cryo damage, Physical damage, or a combination of the two. At Level 0, Shattering Pressure deals exclusively Cryo damage. As the Pressure level of Pers Timer increases, the amount of Cryo damage dealt decreases while the amount of Physical damage dealt increases. When it reaches Level 4 Shattering Pressure, the highest level, it deals purely Physical damage and ends his Skill state.

Freminet’s Skill also introduces the new Arkhe alignment type, Pneuma, in the form of Spiritbreath Thorns. The intermittent Thorn damage will deal Cryo damage and release Pneuma energy to induce mekas’ emergency states. Freminet can also use his Skill to interact with the other Arkhe alignment type, Ousia, to solve overworld puzzles in Fontaine.

**Elemental Burst: Shadowhunter’s Ambush**

CD : 15s
Energy Cost : 60

Casting Freminet’s Burst will reset his Skill’s cooldown, and for the Burst’s 10s duration, will send him into the Subnautical Hunter mode. During this state, Freminet’s Skill cooldown time is reduced by 70% and the damage of his Skill’s Cryo coordinated attacks is doubled. For every Normal Attack performed under both his Skill and Burst states, the Pressure level will increase by 2, allowing Freminet to reach Level 4 Shattering Pressure with only two Normal Attacks instead of the usual four. Paired with his Burst’s Skill CD reduction, Freminet will be able to reach Level 4 Shattering Pressure more frequently.

__Passives__ **Ascension 1 Passive: Saturation Deep Dive**

Freminet’s A1 passive further shortens his Skill cooldown so long as he performs a Shattering Pressure lower than Level 4. This allows Freminet to churn out more instances of Shattering Pressure, and is a crucial boost to his Cryo playstyle.

**Ascension 4 Passive: Parallel Condensers**

Freminet’s A4 is what makes his kit and playstyle completely different from any other in the game. It actively encourages players to pair him with an off-field Hydro applicator to make the most of the Shatter reaction, which has formerly been seen as a downside to having Claymore characters in Freeze teams. Now, Shatter provides a sizable DMG boost to Freminet’s Skill and introduces new, viable team compositions.

**Utility Passive: Deepwater Navigation**

A helpful Stamina passive to make Fontaine’s underwater exploration more enjoyable.

#
__CONSTELLATIONS__ **Constellation 1 - Dreams of the Seething Deep**

The CRIT Rate of Pressurized Floe: Shattering Pressure will be increased by 15%.

Although most of Freminet’s damage comes from his Skill, his C1’s CRIT buff only affects Shattering Pressure specifically, and doesn’t affect other parts of his kit such as his Normal Attack damage, Shatter damage, and other Skill damage. Still, the extra CRIT is appreciated.

*Physical Team DPS Increase from C0:*

3.97%

*Cryo Team DPS Increase from C0:*

3.50%

*Rating:*

2/5

**Constellation 2 - Penguins and the Land of Plenty**

Unleashing Pressurized Floe: Shattering Pressure will restore 2 Energy to Freminet. If a Pressure Level 4 Shattering Pressure is unleashed, this will restore 3 Energy.

Alleviates Freminet’s ER requirements and allows him to be built more offensively. This Constellation is slightly more beneficial for his Physical playstyle, since his Burst combos include more instances of Level 4 Shattering Pressure. His Cryo playstyle, however, can fit more Skill casts, which makes the Energy generation difference between the two playstyles nearly negligible.

*Physical Team DPS Increase from C0:*

9.92%

*Physical Team DPS Increase from C1:*

5.72%

*Cryo Team DPS Increase from C0:*

8.73%

*Cryo Team DPS Increase from C1:*

5.05%

*Rating:*

2/5

**Constellation 3 - Song of the Eddies and Bleached Sands**

Increases the Level of Normal Attack: Flowing Eddies by 3.
Maximum upgrade level is 15.

This is the first time a 4-star character’s Constellation 3 increases the level of their Normal Attacks — which says something about how integral they are to Freminet’s kit. Normal Attacks are frequently and prominently used to build his Pressure levels, and so this Constellation provides a welcome boost to his damage. Freminet’s C3 benefits his Physical playstyle more than his Cryo one since he interweaves more Normal Attacks in his Burst combos.

*Physical Team DPS Increase from C0:*

17.78%

*Physical Team DPS Increase from C2:*

7.15%

*Cryo Team DPS Increase from C0:*

10.15%

*Cryo Team DPS Increase from C2:*

1.31%

*Rating:*

2.5/5 (Physical)
1/5 (Cryo)

**Constellation 4 - Dance of the Snowy Moon and Flute**

When Freminet triggers Frozen, Shatter, or Superconduct against opponents, his ATK will be increased by 9% for 6s. Max 2 stacks. This can be triggered once every 0.3s.

As most of Freminet’s teams allows him to trigger any or all of these reactions consistently, his C4 essentially provides him with an additional 18% ATK with a high uptime.

*Physical Team DPS Increase from C0:*

24.38%

*Physical Team DPS Increase from C3:*

5.61%

*Cryo Team DPS Increase from C0:*

14.89%

*Cryo Team DPS Increase from C3:*

4.30%

*Rating:*

2/5

**Constellation 5 - Nights of Hearth and Happiness**

Increases the Level of Pressurized Floe by 3.
Maximum upgrade level is 15.

A very strong and valuable upgrade to his Skill, Freminet’s C5 is one of his better Constellations. In comparison to his C3, Freminet’s Cryo playstyle benefits much more from this Skill boost rather than his Physical playstyle since his Cryo Burst combo is more focused on dishing out multiple Level 0 Shattering Pressures.

*Physical Team DPS Increase from C0:*

34.00%

*Physical Team DPS Increase from C4:*

7.73%

*Cryo Team DPS Increase from C0:*

27.74%

*Cryo Team DPS Increase from C4:*

11.18%

*Rating:*

3/5 (Physical)
3.5/5 (Cryo)

**Constellation 6 - Moment of Waking and Resolve**

When Freminet triggers Frozen, Shatter, or Superconduct against opponents, his CRIT DMG will be increased by 12% for 6s. Max 3 stacks. This can be triggered once every 0.3s.

Freminet’s best Constellation. Freminet’s C6 basically gives him a very consistent and powerful 36% CRIT DMG increase, except this time, the CRIT buff provides a much more significant boost to Freminet’s damage.

*Physical Team DPS Increase from C0:*

49.28%

*Physical Team DPS Increase from C5:*

11.41%

*Cryo Team DPS Increase from C0:*

37.95%

*Cryo Team DPS Increase from C5:*

8.00%

*Rating:*

3.5/5

#
__COMBOS__

Freminet’s kit opens up the possibility for different playstyles. With this, the amount of combo variations that can be executed also increases. For this FAQ, however, only the combos that are performed during Freminet’s Burst state will be discussed. Note that more testing is needed to determine specific optimal combos for Freminet, but they all aim to maximize the Physical/Cryo MVs.

For his Physical playstyle, EN2E is by far the most optimal combo to reach Level 4 Shattering Pressure while maximizing the Physical MVs. You can weave a N1 in between the combos to fill the downtime of his Skill and continue to deal Physical damage.

As for his Cryo playstyle, N1EE will suffice to dish out as much Cryo DMG as possible without having too much cooldown time between his Skill casts by interweaving Normal Attacks in between.

Note that upon casting Freminet’s Skill, it is recommended to cast his Burst immediately after so as to maximize its CD reset.

#
__ENERGY RECHARGE REQUIREMENTS__

All values below assume a 21-second rotation with one Favonius proc.

Each additional Favonius proc lowers the ER requirement by ~10 – 20%. Freminet’s C2 reduces ER by ~ 20% for the Cryo playstyle and ~25% for the Physical playstyle

Energy requirements will vary based on your team and rotation. For a more accurate estimate, please use the Energy Recharge calculator linked here.

#
__ARTIFACTS__

sands Sands of Eon: ATK%
goblet Goblet of Eonothem: Physical/Cryo DMG%
circlet Circlet of Logos: CRIT%

Freminet can be built for either Physical or Cryo damage, which will affect both his playstyle and teams. He prefers an ADC build. Building Freminet with full EM artifacts is not recommended since he does not boost Shatter damage, nor does Shatter deal significant damage. Freminet simply uses Shatter as a means to amplify his Cryo and/or Physical damage.

For Freminet's Physical build, 4pc Pale Flame pulls far ahead of its competition. Freminet has good uptime on its set effect because of his frequent Skill usages. For Freminet's Cryo build, 4pc Blizzard Strayer is similarly far better than other options due to its set effect's CRIT increase. However, the 2-piece sets listed in this section perform decently enough, especially if they have great substats, and can serve as good transitional pieces until a full 4-piece set is acquired.

It is not recommended to farm the 4.0 Fontaine artifact domain specifically for Freminet, as he does not perform spectacularly on those sets. Only consider using the new artifact sets on Freminet if you obtain them while farming for other characters who utilize those sets much better. Otherwise, it is much more efficient to farm the Pale Flame and Blizzard Strayer domain for him.

Substats: ER (until requirement) > CRIT%> ATK%

__Artifact Sets__ __**Physical**__ **4PC Pale Flame**

4pc Pale Flame is by far the best set for Physical Freminet. With his Burst combo’s frequent Skill casts, Freminet is able to maintain uptime on PF’s 4pc set effect and retain its ATK% and Physical DMG% buffs.

**2PC Physical + 2PC ER/Physical/ATK**

Any of these 2pc combos perform slightly worse than 4pc Pale Flame, but are much easier to obtain and farm than a full PF set. These should serve as decent transitional artifacts should you wish to farm for a full PF set. 2pc EoSF is only a viable option over 2pc PF if there is a lack of ER substats and if it provides him with decent CRIT substats. Although building Freminet with 2pc EM has some potential should the pieces have decent substats, it is not recommended to build him with EM artifacts as his kit does not buff Shatter damage and only relies on it to boost his Cryo and Physical damage.

__**Cryo**__ **4PC Blizzard Strayer**

4pc Blizzard Strayer outmatches other sets for Cryo Freminet because of its valuable 20% CRIT increase when fighting against enemies affected by Cryo. Unfortunately, due to his Shatter-based kit, he cannot make use of the additional 20% CRIT Rate buff against Frozen enemies.

**2PC Cryo + 2PC ER/ATK**

Should a 4pc BS set be unavailable, combinations of 2pc Cryo with ER and ATK-based sets works as adequate substitutes. Similar to his Physical build, pairing 2pc Cryo with 2pc ER is only recommended if the other options lack ER substats and if it provides decent CRIT substats. That being said, 2pc ER’s value still diminishes as Cryo Freminet usually needs less ER to begin with.

**4PC Golden Troupe**

Since Freminet casts his Skill more often in his Cryo playstyle, 4pc Golden Troupe becomes a viable option for its massive 45% Elemental Skill DMG boost. However, as Freminet has no off-field damage potential, he cannot make full use of the 4pc set effect’s additional 25% Skill DMG.

As Freminet can only use Golden Troupe on his Cryo build and cannot make good use of Marechaussee Hunter, it is not recommended to farm 4pc GT specifically for Freminet, since Blizzard Strayer performs better for his Cryo build anyway. 4pc GT only becomes a resin-efficient pick for Freminet if you are already farming the domain for other characters who can fully maximize its set’s effects.

#
__WEAPONS__ __**Recommended**__ **Skyward Pride**

General BiS for Physical Freminet before C2 — provides ER, DMG% increase, and 8 Physical damage instances that also get buffed by Superconduct.

**Serpent Spine**

A Battle Pass-locked weapon that is the general BiS for the Cryo playstyle, and serves as a CRIT stat stick for both Physical and Cryo playstyles. If you can maintain stacks even with the long field time, the damage output can even outclass some 5* options.

__**Alternatives**__ **Song of Broken Pines**

Amazing weapon when on a Physical build. Its ATK buff and Normal ATK SPD increase boost his Normal Attack damage and allows him to gain Pressure levels slightly quicker. However, with the Skill CD reduction only available in Burst form, the Bonus ATK SPD hardly increases the combo speed by a large amount.

**Beacon of the Reed Sea**

Mainly a CRIT stat stick as Freminet cannot make good use of its passive.

**Snow-Tombed Starsilver**

A good free-to-play option. The Dragonspine claymore is mainly a stat stick for its Physical DMG Bonus secondary stat. Though Freminet does make great use of its passive, Starsilver’s passive isn’t very amazing to begin with.

**Prototype Archaic**

Another craftable option. Can be utilized by both Physical and Cryo playstyles.

**Skyrider Greatsword**

Minimum requirement. Can be obtained from Liyue’s chests.

#
__TEAM BUILDING__ **Physical**

Freminet | Hydro | Electro | Cryo/Flex

Freminet’s standard team. He wants an off-field Hydro unit to trigger the Frozen reaction for him to Shatter for his A4 passive, and an off-field Electro unit to trigger Superconduct and decrease enemies’ Physical RES. A Cryo battery is usually recommended to make sure Freminet can consistently cast his Burst without having to build too much Energy Recharge; however, you can also slot in a non-Cryo flex unit if your team has sufficient Energy generation.

Teammates

hydro Hydro options: Xingqiu / Yelan / Kokomi / Barbara

electro Electro options: Fischl / Yae / Raiden / Beidou / Shinobu

cryo Cryo options: Mika / Shenhe / Layla / Rosaria / Kaeya

flex Flex options: Bennett (pre-C6) / Zhongli / Any Electro or Hydro

**Cryo**

Freminet | Shenhe | Hydro | Anemo

A unique way to play Freminet, this archetype makes use of his Burst’s Skill CD reduction to spam Pressurized Floe and deal multiple instances of Level 0 Shattering Pressure. Usually you want to play up to 3 Cryo characters, but with how Freminet’s kit interacts with Frozen and Shatter, an off-field Hydro applicator is much appreciated to boost Freminet’s personal damage. The last slot should still be an Anemo character to make full use of the 4pc VV effect.

Freminet only benefits from his A4 passive if he himself triggers Shatter, so make sure to place any abilities that can Shatter (i.e. Zhongli’s pillar) away from enemies so as to avoid other units stealing Freminet’s Shatters.

Teammates

anemo Anemo options: Kazuha / Jean / Sayu

hydro Hydro options: Xingqiu / Yelan / Kokomi / Barbara

cryo Cryo options: Layla / Rosaria / Kaeya / Chongyun

**Reverse Melt**

Freminet | Bennett | Xiangling/Anemo | Flex

At the time of writing, Freminet as a Reverse Melt carry is lackluster compared to the two other playstyles due to the shared ICD within his Elemental Skill. It is also hard to keep a consistent Pyro Aura on the enemies to Reverse Melt as many hits as possible, therefore it will not be discussed thoroughly in this FAQ.

__**Freminet vs Eula**__

Both Freminet and Eula are Cryo Claymore units and have kits that lean towards Physical damage; despite that, they still have some key differences you may want to consider.

eula Eula:

  • Being a 5-star unit, Eula has higher base stats and a higher potential damage output. However, she is more difficult to obtain due to her being a limited 5-star character.
  • Most of Eula’s DPS comes from her powerful, backloaded Burst.
  • Eula only has a single viable build that focuses on maximizing her Physical damage.
  • Eula’s optimal combos may be harder to remember and execute, especially if you want to maximize her Burst damage.
  • Eula’s teams mainly need an Electro unit to trigger Superconduct and Cryo batteries/buffers.

freminet Freminet:

  • Freminet has lower base stats as a 4-star unit, so although he is easier to obtain, his potential damage output is lower than Eula’s.
  • Freminet deals more stable, consistent damage throughout a rotation.
  • Freminet has some playstyle versatility, as he can be built for either Cryo or Physical damage.
  • Freminet has comparably easier combos where he either repeatedly uses his Normal Attacks or his Skill.
  • Freminet wants an off-field Hydro applicator for Shatter, and either needs an Electro unit to trigger Superconduct and/or an Anemo unit to enable the 4pc VV set effect.
wide plumeBOT
#
__CREDITS__
Lead:

@arctic cliff

Authors:

@arctic cliff, @gloomy wadi

Calculations:

@arctic cliff

Framecounts:

@tardy notch

Consulting:

@gloomy wadi, @stuck rover, @dark sentinel, @bitter slate, @bright turtle, @marble token

Content Verification:

Calculations: mien
Writing: @bitter slate

Transcription:

@glad gyro, @olive spoke, @twin moth

DISCLAIMER

Pre-TC is volatile and, as always, perpetually subject to change until release (and sometimes later!). Please note that these are theoretical suggestions.
Everything described in this FAQ is a good faith analysis based on the little information about the character’s kit that we know. Team calcs, additionally, are not established yet, and as with everything in TC, the content in this FAQ should be taken with a grain of salt.

__OVERVIEW__

Neuvillette is a 5-star Pneuma-aligned Hydro Catalyst whose kit revolves around unleashing high-powered, long-ranged Charged Attacks. His Skill and Burst can create Sourcewater Droplets, which heal him and decrease his Charged Attacks’ wind-up time. Neuvillette’s attacks all have a large AoE, and his Charged Attack can pierce through enemies, allowing him to hit multiple enemies at once.

As an on-field Hydro DPS, Neuvillette has a large variety of teams. Since Neuvillette’s Charged Attacks can be interrupted, which leads to huge losses in damage, he has a high reliance on shielders at C0. High field time requirements, a long Skill cooldown, and an expensive Burst also tend to make his rotations rather long. Due to this and the fact he scales off of HP, as of 4.1, Neuvillette lacks strong buffers outside of Kazuha — thus, many of his teams feature off-field damage dealers.

#
__TALENT PRIORITY__ **Normal Attack > Elemental Burst = Elemental Skill**

Analysis

  • Neuvillette's Charged Attacks are his main source of damage, so his Normal Attack Talent should be leveled first. Neither his Skill nor his Burst contribute significant amounts of damage, but are still used to generate Sourcewater Droplets, so they can be leveled afterwards in tandem.
__TALENT OVERVIEW__ **Normal Attack: As Water Seeks Equilibrium**

Neuvillette's Charged Attacks are the main attraction of his kit, boasting continuous, HP-scaling, AoE damage that pierces enemies in its range. He relies on absorbing 3 Sourcewater Droplets for every CA, which are primarily generated through his own Skill and Burst. These Droplets reduce the initial wind-up of his CA from 4s to 1s, and heal off the massive HP penalty incurred while casting it.

Neuvillette can absorb any Sourcewater Droplets, including those not generated by himself. However, as of 4.1, the only other character who can generate Droplets is Hydro Traveler, and it is not recommended to use Hydro Traveler with Neuvillette, as they provide too little else, and Neuvillette already generates sufficient Droplets on his own.

**Elemental Skill: O Tears, I Shall Repay**

CD: 12s

Neuvillette's Skill is not a significant portion of his damage; it is primarily used for Energy and to generate Sourcewater Droplets.

**Elemental Burst: O Tides, I Have Returned**

CD: 18s
Energy Cost: 70

Similar to his Skill, Neuvillette's Burst is more notable for its Sourcewater Droplet generation than its damage. However, the sheer quantity of Droplets generated by his Burst make it necessary in the vast majority of his rotations.

__Passives__ **Ascension 1 Passive: Heir to the Ancient Sea's Authority**

A1 is a multiplicative DMG bonus (like Yoimiya's or Wanderer's Skills) for Neuvillette's CA that stacks up to 3 times for every unique reaction involving Hydro.

The difference between different numbers of stacks is substantial, but not necessarily worth forcing team comps that maximize the number of stacks.

**Ascension 4 Passive: Discipline of the Supreme Arbitration**

Since absorbed Sourcewater Droplets heal Neuvillette at the beginning of his CA (and not during), Neuvillette will lose this bonus over the course of his CA without external healing. Nonetheless, it is an appreciated albeit minor increase to his damage.

**Utility Passive: Gather Like the Tide**

Neuvillette increases the underwater sprinting speed of the party by 15%, giving players an easier time when exploring Fontaine’s new underwater areas.

#
__CONSTELLATIONS__ **Constellation 1 - Venerable Institution**

When Neuvillette takes the field, he will obtain 1 stack of Past Draconic Glories from the Passive Talent "Heir to the Ancient Sea's Authority." You must first unlock the Passive Talent "Heir to the Ancient Sea's Authority."
Additionally, his interruption resistance will be increased while using the Charged Attack Empowerment: Legal Evaluation and the Charged Attack: Equitable Judgment.

C1 offers both a respectable DPS increase and a valuable QoL improvement. The damage increase C1 provides may be even greater if it allows you to swap a defensive unit for a buffer or sub-DPS.

However, his C1 may not provide any bonus damage if run in teams where his A1 Passive is already maximized. Further, the QoL it brings can also be unnecessary if getting staggered is not a concern; for example, when he is paired with units that already provide ample crowd control or interruption resistance.

*DPS% Increase vs. C0:*

11% (1 ⇾ 2 stack) - 24% (2 ⇾ 3 stack)

*Rating:*

4/5

**Constellation 2 - Juridical Exhortation**

The Passive Talent "Heir to the Ancient Sea's Authority" will be enhanced: Each stack of Past Draconic Glories will increase the CRIT DMG of Charged Attack: Equitable Judgment by 14%. The maximum increase that can be achieved this way is 42%.
You must first unlock the Passive Talent "Heir to the Ancient Sea's Authority."

C2 increases the value of C1's additional A1 stack by offering CRIT DMG per stack of A1. Otherwise, it's a relatively straightforward damage increase.

*DPS% Increase vs. C1:*

11%

*DPS% Increase vs. C0:*

38%

*Rating:*

2.5/5

**Constellation 3 - Ancient Postulation**

Increases the Level of Normal Attack: As Water Seeks Equilibrium by 3.
Maximum upgrade level is 15.

C3 increases the levels of Neuvi's most important Talent. A decent damage increase.

*DPS% Increase vs. C2:*

20%

*DPS% Increase vs. C0:*

66%

*Rating:*

3/5

**Constellation 4 - Crown of Commiseration**

When Neuvillette is on the field and is healed, 1 Sourcewater Droplet will be generated. This effect can occur once every 4s.

Neuvillette already has enough Sourcewater Droplets in his rotations at C0, so this Constellation is useless—at least until C6. Therefore, don't pull C4 unless you're planning on going to C6.

*DPS% Increase vs. C3:*

0%

*DPS% Increase vs. C0:*

66%

*Rating:*

1/5

**Constellation 5 - Axiomatic Judgment**

Increases the Level of O Tides, I Have Returned by 3.
Maximum upgrade level is 15.

Neuvillette's Burst is a small portion of his total damage, so this Constellation doesn't increase his damage much.

*DPS% Increase vs. C4:*

1%

*DPS% Increase vs. C0:*

67%

*Rating:*

1/5

**Constellation 6 - Wrathful Recompense**

When using Charged Attack: Equitable Judgment, Neuvillette can absorb nearby Sourcewater Droplets in an AoE. Each absorbed Droplet will increase the duration of Charged Attack: Equitable Judgment by 1s.
Additionally, when Equitable Judgment hits opponents, it will fire off 2 additional currents every 2s, each of which will deal 10% of Neuvillette's Max HP as Hydro DMG. DMG dealt this way will count as DMG dealt by Equitable Judgment.

With C6, if a Charged Attack nears the end of its duration and there are available Sourcewater Droplets nearby, Neuvillette will absorb another Droplet to extend the Charged Attack’s duration by 1s.

The damage improvements from this Constellation can be difficult to evaluate due to how it intrinsically changes his rotations, ranging from a minimum of 15% to well over 36% improvement over C5. However, the additional currents mean that there will always be an improvement to his DPS. His C6 also makes his C4 useful, with the additional Droplets extending the duration of his CAs by about 2-3s total — equivalent to an entire standard Charged Attack.

While the changes in his rotation can cause extensions or worsen buff uptime. Neuvillete does so much damage at C6 that its boosts are almost always worth capitalizing on.
However, this means that C6's value also depends on what team Neuvillette is in: teams featuring short skill/buff durations (such as Kazuha teams) will be worse off than those featuring long off-field skill/buff durations (such as Raiden and Nahida in Hyperbloom).

*DPS% Increase vs. C5:*

Minimum 15%

*DPS% Increase vs. C0:*

Minimum 86%

*Rating:*

4/5

#
__ENERGY RECHARGE REQUIREMENTS__

2 Electro w/ Fischl: 120 - 140%
1 Electro w/ Fischl: 130 - 150%
Everything else: 140 - 160%

Every Favonius proc lowers his ER requirements by ~10 – 20%
If using R1 Tome of the Eternal Flow, reduce each ER requirement by 30-40%. If using R5 Prototype Amber, reduce them by about 35-45%. .

Except in teams where Neuvillette only does 2 CAs per rotation (which are very rare), it is absolutely essential that Neuvillette have enough ER to Burst consistently every rotation; otherwise, he will not have enough Sourcewater Droplets to lower all his CA charging times.

Neuvillette’s Energy requirements will vary based on your team and rotation. For a more accurate estimate, please use the Energy Recharge calculator linked here.

#
__ARTIFACTS__

sands Sands of Eon: HP%
goblet Goblet of Eonothem: Hydro DMG% / HP%
circlet Circlet of Logos: CRIT / HP%

Depending on the weapon and artifact set Neuvillette is using, HP/Hydro DMG/CRIT, HP/Hydro DMG/HP, and HP/HP/CRIT are all viable options.
HP/HP/HP with good enough substats is also an option, but it is notably worse in every situation.

HP/Hydro DMG/CRIT is almost always the best option, but more often than not by a very small margin.

HP/Hydro DMG/HP is always highly competitive with HP/Hydro DMG/CRIT, except when Neuvillette is using a non-CRIT weapon while also not running 4pc Marechaussee Hunter.

HP/HP/CRIT is competitive only when Neuvillette is using a weapon that provides significantly more CRIT and/or DMG% than HP% e.g. Rite of the Eternal Flow or Blackcliff Agate.

Substats: ER until requirement > CRIT DMG = CRIT Rate = HP% > Flat HP

__Artifact Sets__ **4PC Marechaussee Hunter**

4pc MH is Neuvillette’s BiS by a sizable margin; it is over 12% better than the next best option. Neuvillette can fully stack the 4pc MH effect very quickly because of the HP loss during his Charged Attack. It is highly recommended to farm this set for Neuvillette.

**4PC Heart of Depth**

4pc HoD is Neuvillette’s best option after 4pc MH, providing Hydro DMG% and Charged Attack DMG%.

**2PC MH/Hydro/HP + 2PC Hydro/HP**

Any combination of 2pc Marechaussee Hunter, 2pc Heart of Depth, 2pc Nymph’s Dream, 2pc Tenacity of the Millelith, and 2pc Vourukasha's Glow performs similarly to 4pc HoD.

**4PC Retracing Bolide / Wanderer’s Troupe / Nymph’s Dream**

More alternatives to 4pc HoD that perform similarly.

#
__WEAPONS__ **Tome of the Eternal Flow**

Tome of the Eternal Flow is Neuvillette’s BiS and signature weapon, providing a little of everything that Neuvillette could want: high CRIT DMG%, HP%, CA DMG%, and enough Energy to lower his ER reqs to 100% in most teams. TotEF is significantly better (30-40%) than all other options except Sacrificial Jade (TotEF is 20% better than R1 Sac Jade, and only 7% better than R5 Sac Jade).

**Sacrificial Jade**

Sacrificial Jade is Neuvillette’s second-best weapon, providing both CRIT Rate and HP%. At R1, It is about 10% better than the next best option, so it may be a worthwhile purchase for players who do not have TotEF. Sac Jade scales well with refines, which increase the amount of HP% it provides to Neuvillette. Players using Sacrificial Jade should be mindful of keeping Neuvillette on the field for no longer than 10s at a time, to ensure that he does not lose its passive effect (EQ CAx2, for example, would be too long).

**Cashflow Supervision / Lost Prayer to the Sacred Winds / Jadefall Splendor / Everlasting Moonglow / Kagura’s Verity**

All of these 5-star weapons perform similarly on Neuvillette, providing some amount of CRIT Rate or HP%, as well as small bonuses from their passives.

**Prototype Amber**

Prototype Amber performs similarly or slightly better than the 5-star weapons listed directly above, provided that Neuvillette can use the energy its passive provides. Otherwise, it still offers Neuvillette a hefty amount of HP%, as well as some passive healing. Though this healing is too miniscule and infrequent to be of much use to Neuvillette himself, it can be helpful to heal chip damage on teammates as Neuvillette’s teams tend to lack healers.

#
__TEAM BUILDING__

Being an on-field Hydro character opens Neuvillette up to a wide variety of team compositions that take advantage of various reactions.

Because Neuvillette heals himself (and also because trying to heal someone who constantly loses over 4000 HP per second is a futile endeavor), most of his teams can forgo a healer in place of a more offensively-oriented unit. However, because Neuvillette is easily knocked over while charging and casting his Charged Attacks — causing you to lose all the damage from that Charged Attack — he often wants a shielder or another character who can provide interruption resistance. This problem is mostly mitigated by C1.

It is recommended for Neuvillette to do 3 or 4 Charged Attacks per rotation in almost all of his teams, by doing 2 Charged Attacks the first time he enters the field, swapping out to his teammates, and then doing either 1 or 2 Charged Attacks when he next returns to field. Most teams will use some variation of: Neuvillette Burst > Team > Neuvillette CA Skill CA > Team > Neuvillette CA Skill (Optional CA) > Loop.

**Hypercarry**

Neuvillette | Kazuha | Offensive Flex | Offensive or Defensive Flex

Due to Neuvillette's high personal damage, teams that focus on buffing his personal damage can be quite potent. Hypercarry teams scale well with Constellations and investment into Neuvi, but he currently lacks many options to buff his damage outside of Kazuha, providing both DMG Bonus as well as RES Shred from 4 VV. Other Hydro characters such as Xingqiu or Yelan can provide DMG Bonus or Hydro RES Shred but aren’t ideal due to requiring Normal Attack weaving to make full use of their Elemental Bursts. Mona can also provide a similar amount of DMG Bonus to Yelan without weaving in Normal Attacks for extra damage. Currently, it is recommended to slot him with other Sub DPS characters due to his lack of self-buffing options.

Teammates

flex Offensive options: Fischl, Yae Miko, Mona/Xingqiu/Yelan

flex Defensive options: Zhongli

**Hyperbloom**

Neuvillette | Dendro | Electro | Flex

Neuvillette Hyperbloom teams utilize his on-field Hydro application in tandem with off-field Dendro application to trigger Blooms and subsequently Hyperblooms with an Electro unit for a good mix of AoE and single-target damage.

Teammates

dendro Dendro options: Nahida, Collei, Dendro Traveler

electro Electro options: Raiden, Kuki Shinobu

flex Flex options: Zhongli, Fischl/Yae Miko, Mona/Xingqiu/Yelan, any above Dendro

**Nilou Bloom**

Neuvillette | Nilou | Core Dendro | 2nd Dendro

Neuvillette can provide on-field AoE Hydro application for Nilou Bloom teams, which excel in multi-target. Because Bloom does a fair amount of damage to characters themselves, players may want a healer to supplement Neuvillette's own healing. Neuvillette's build does not change in Nilou Bloom teams, even if he is triggering Blooms (although EM becomes a decent stat to have).

Teammates

dendro Core Dendro options: Nahida, Collei, Dendro Traveler

dendro 2nd Dendro options: Baizhu, Kirara, Yaoyao, any above Dendro

**Taser**

Neuvillette | Fischl | Yae Miko or Beidou | Flex

Neuvillette Taser teams feature Yae or Beidou as an off-field DPS, with Neuvillette to deal damage on-field and Fischl as a battery.

Beidou excels in multi-target situations, providing off-field damage with her Burst. Neuvillette can trigger her Burst procs decently well with his Charged Attacks. She also provides interruption resistance and a shield (albeit a weak one) with her C1, potentially allowing C0 Neuvillette to comfortably run without a shielder.

Yae Miko also provides off-field damage, although she lacks the utilities Beidou has.

Teammates

flex Flex options: Kazuha, Venti, Zhongli, any Anemo with 4pc VV, Mona/Xingqiu/Yelan

**Xiangling**

Neuvillette | Xiangling | Bennett | Flex

It can be difficult to control who ends up Vaporizing out of Neuvillette and Xiangling — once an aura is established, neither of them can overtake the other — but it actually doesn't matter because the team ends up doing the same damage anyways! A decent option with AoE on both its main damage dealers, although Xiangling's Burst requiring Neuvillette to play in melee range negates the benefits of his range and makes some form of interruption resistance much more valuable.

Teammates

flex Flex options: Zhongli, Kazuha, any Anemo with 4pc VV, Mona/Xingqiu/Yelan

**Freeze**

Neuvillette | Cryo | Flex | Flex

Neuvillette can make sure of Freeze in scenarios against freezable enemies, giving extra CC to his teams that may allow some players to run him shielderless at C0. However, players still have access to shielders such as Diona and Layla for Cryo resonance and defensive utility. Keep in mind, quite a few recent enemies, as well as bosses, can’t be frozen, making this playstyle limited in uses. On top of this, there are few Cryo off-field characters who work well with Neuvillette’s range, resulting in quite limited team options.

Teammates

cryo Cryo options: Ganyu, Rosaria

flex Defensive options: Diona, Layla, Kirara, Zhongli

flex Flex options: Kazuha, Venti, any Anemo with 4pc VV, Shenhe, Fischl, Yae Miko, Mona/Xingqiu/Yelan

earnest sinewBOT
#
__CREDITS__
Lead:

@cerulean mirage

Authors:

@cerulean mirage, @gloomy wadi

Calculations:

@cerulean mirage

Framecounts:

@high silo

Consulting:

@dark sentinel, @stuck rover

Content Verification:

Calculations: @bright turtle
Writing: @glad gyro

Transcription:

@glad gyro, @olive spoke, @twin moth

DISCLAIMER

Pre-TC is volatile and, as always, perpetually subject to change until release (and sometimes later!). Please note that these are theoretical suggestions.
Everything described in this FAQ is a good faith analysis based on the little information about the character’s kit that we know. Team calcs, additionally, are not established yet, and as with everything in TC, the content in this FAQ should be taken with a grain of salt.

__OVERVIEW__

Wriothesley is a Cryo catalyst that focuses on enhancing and dealing damage with his Normal and Charged Attacks, and takes up the majority of the team’s field time in order to dish out high amounts of damage. He can either be played in a Cryo team (Mono Cryo or Freeze) that emphasize on buffing him, or in a Reverse Melt team where he can melt his Cryo Attacks. In either of those, Wriothesley teams will focus on having teammates that increase Wriothesley’s damage values while taking little field time.

#
__TALENT PRIORITY__ **Normal Attack >> Elemental Skill > Elemental Burst**
__TALENT OVERVIEW__ **Normal Attack: Forceful Fists of Frost**

Wriothesley performs a 5-hit combo that cannot be reset by dashing or using his Elemental Skill. This talent should be prioritized, since this is his main source of damage, which further gets buffed by his Elemental Skill – which provides additional NA DMG Bonus (same as Yoimiya/Wanderer’s Skill). It's important to note that even though he is a Catalyst user, his punches have hitlag like Heizou, which may make his combo feel slower than expected. Note that his enhanced Charged Attacks also follow the scaling of his Normal Attacks.

**Elemental Skill: Icefang Rush**

CD: 16s

After using his Skill, he enters the Chilling Penalty state, increasing his interruption resistance (on par with Hu Tao) and enhancing his Normal Attacks. Additionally, it comes with a penalty that makes him lose 4.5% of his Max HP per hit. His Energy generation also comes with his Skill, generating one Cryo particle if his NA/CA hits per two seconds. Hitlag from his Normal Attacks may extend the Chilling Penalty state, however it depends on the scenario to conclude if that would favor him or not.

Note that when he gets lower than 50% of max HP, the Chilling Penalty state will stop working, therefore it is important for him to keep his HP high to not lose out on buff uptime.

**Elemental Burst: Darkgold Wolfbite**

CD: 15s
Energy Cost: 60

Wriothesley hits five times in quick succession, dealing decent damage. It is usually not worth building enough Energy Recharge to Burst every rotation, but rather focus on other offensive stats to buff his Normal and Charged Attacks even further. However, this should still be considered for leveling since he will generally get buffed and contribute most of the team’s damage.

__Passives__ **Ascension 1 Passive: There Shall Be a Plea for Justice**

This is what makes Wriothesley stand out from Yoimiya and Wanderer. When Wriothesley's HP is less than 60%, his next Charged Attack will become Rebuke: Vaulting Fist, which deals additional damage, costs no stamina, and heals for 30% of his max HP with a 5-second cooldown.

The long cooldown between enhanced Charged Attacks makes it difficult to get more than two Charged Attacks per rotations for C0 Wriothesley, even with ATK SPD. Note that means after attacking and/or getting lower than 50% Max HP, the remaining Normal Attacks will not get enhanced until he gets healed back up, but on the other hand, adding a healer may keep him too healthy to the point that he cannot get lower than 60% of his max HP meaning that you cannot reliably proc his empowered CA at all.

**Ascension 4: There Shall Be a Reckoning for Sin**

When Wriothesley’s current HP changes, he gets 6% ATK, up to five times. A simple yet effective buff for him.

**Utility Passive: The Duke's Grace**

When Wriothesley crafts Weapon Ascension Materials, he has a 10% chance to receive double the product.

#
__CONSTELLATIONS__ **Constellation 1 - Terror for the Evildoers**

*The Gracious Rebuke from the Passive Talent "There Shall Be a Plea for Justice" is changed to this:
When Wriothesley's HP is less than 60% or while he is in the Chilling Penalty state caused by Icefang Rush, when the fifth attack of Repelling Fists hits, it will create a Gracious Rebuke. 1 Gracious Rebuke effect can be obtained every 2.5s.

Additionally, Rebuke: Vaulting Fist will obtain the following enhancement:

  • The DMG Bonus gained will be further increased to 200%.
  • When it hits while Wriothesley is in the Chilling Penalty state, that state's duration is extended by 4s. 1 such extension can occur per 1 Chilling Penalty duration.

You must first unlock the Passive Talent "There Shall Be a Plea for Justice."*

Arguably one of Wriothesley’s best Constellations. This shortens the long 5-second cooldown of his Ascension 1 passive to 2.5 seconds, ensuring he gets healed through his enhanced Charged Attacks more frequently, while also giving it a massive buff.

After Wriothesley’s Vaulting Fist hits an enemy, the duration of the Chilling Penalty state will be extended by another 4 seconds, totaling its duration to 14 seconds (and can even get extended up to 16 seconds with hitlag extension). Nevertheless, it is usually not worth extending his field time since most buffs, such as VV, will run out before the Chilling Penalty state ends.

Unbuffed Cryo DPS Increase from C0: 18.25%

Buffed Cryo DPS Increase from C0: 10.41%

Reverse Melt DPS Increase from C0: 14.21%

***Rating:***

3.5/5

**Constellation 2 - Shackles for the Arrogant**

When using Darkgold Wolfbite, each Prosecution Edict stack from the Passive Talent "There Shall Be a Reckoning for Sin'' will increase said ability's DMG dealt by 40%.
You must first unlock the Passive Talent "There Shall Be a Reckoning for Sin."

This turns Wriothesley’s Burst into a nuke after finishing his combo. However, it is still not worth building Energy Recharge to burst every rotation. Still a decent constellation nonetheless.

Unbuffed Cryo DPS Increase from C1: 13.84%

Buffed Cryo DPS Increase from C1: 7.66%

Reverse Melt DPS Increase from C1: 13.91%

Unbuffed Cryo DPS Increase from C0: 34.60%

Buffed Cryo DPS Increase from C0: 18.86%

Reverse Melt DPS Increase from C0: 30.09%

***Rating:***

2/5

**Constellation 3 - Punishment for the Frauds**

Increases the Level of Normal Attack: Forceful Fists of Frost by 3.
Maximum upgrade level is 15.

Wriothesley’s C3 provides a great boost to his Normal and Charged Attacks by increasing his Normal Attack’s Talent level.

Unbuffed Cryo DPS Increase from C2: 16.69%

Buffed Cryo DPS Increase from C2: 16.15%

Reverse Melt DPS Increase from C2: 16.36%

Unbuffed Cryo DPS Increase from C0: 57.06%

Buffed Cryo DPS Increase from C0: 38.05%

Reverse Melt DPS Increase from C0: 51.38%

***Rating:***

2.5/5

**Constellation 4 - Redemption for the Suffering**

The HP restored to Wriothesley through Rebuke: Vaulting Fist will be increased to 50% of his Max HP. You must first unlock the Passive Talent "There Shall Be a Plea for Justice."
Additionally, when Wriothesley is healed, if the amount of healing overflows, the following effects will occur depending on whether he is on the field or not. If he is on the field, his ATK SPD will be increased by 20% for 4s. If he is off-field, all party members' ATK SPD will be increased by 10% for 6s. These two methods of increasing ATK SPD cannot stack.

C4 will further ensure Wriothesley’s survivability by giving him even more healing through the Vaulting Fist. Additionally, overheal will increase Wriothesley’s ATK SPD when he is on-field, which shortens his combo. He can easily maintain this just by using his Vaulting Fist off cooldown. When he is off-field, overheal increases other character’s ATK SPD instead.

Unbuffed Cryo DPS Increase from C2: 9.02%

Buffed Cryo DPS Increase from C2: 8.13%

Reverse Melt DPS Increase from C2: 10.83%

Unbuffed Cryo DPS Increase from C0: 71.22%

Buffed Cryo DPS Increase from C0: 49.28%

Reverse Melt DPS Increase from C0: 67.78%

***Rating:***

2/5

**Constellation 5 - Mercy for the Wronged**

Increases the Level of Darkgold Wolfbite by 3.
Maximum upgrade level is 15.

C5 increases his nuke potential. Nonetheless, it remains negligible when he doesn't Burst every rotation.

Unbuffed Cryo DPS Increase from C2: 3.19%

Buffed Cryo DPS Increase from C2: 2.04%

Reverse Melt DPS Increase from C2: 3.21%

Unbuffed Cryo DPS Increase from C0: 76.67%

Buffed Cryo DPS Increase from C0: 52.33%

Reverse Melt DPS Increase from C0: 73.16%

***Rating:***

1/5

**Constellation 6 - Esteem for the Innocent**

The CRIT Rate of Rebuke: Vaulting Fist will be increased by 10%, and its CRIT DMG by 80%. When unleashed, it will also create an additional icicle that deals 100% of Rebuke: Vaulting Fist's Base DMG as Cryo DMG. DMG dealt this way is regarded as Charged Attack DMG.
You must first unlock the Passive Talent "There Shall Be a Plea for Justice."

Grants additional CRIT Rate and CRIT DMG for Wriothesley’s Vaulting Fist, as well as creates an additional hit that scales just like his enhanced Charged Attacks and does not share ICD with his initial CA.

Unbuffed Cryo DPS Increase from C2: 52.62%

Buffed Cryo DPS Increase from C2: 32.96%

Reverse Melt DPS Increase from C2: 29.41%

Unbuffed Cryo DPS Increase from C0: 169.63%

Buffed Cryo DPS Increase from C0: 102.53%

Reverse Melt DPS Increase from C0: 124.09%

***Rating:***

3.5/5

#
__COMBOS__

Generally, you want to use Wriothesley’s Vaulting Fist (indicated by the red Aura around him) as soon as it is available to make use of all existing buffs before they run out.

For C0, it is a bit tricky since you may need to do up to 8 consecutive Normal Attacks before getting his HP low enough for the enhanced Charged Attack to take effect. Even when you get his HP lower than 60% for the second time, the cooldown might not be finished, in which you either want to Burst while waiting for the Vaulting Fist, or accept that some Normal Attacks will not be getting the buff from his Skill.

With C1+, not only is the empowered CA cooldown cut down by half, but you also just need to reach the fifth Normal Attack for the Vaulting Fist rather than wait for either the cooldown or HP reduction. This makes N5C his best combo after C1.

#
__ENERGY RECHARGE REQUIREMENTS__

Wriothesley’s long field time makes it hard to maintain buffs after he is done with his combo .When combined with his long Burst animation, it lessens the value of building ER on him.

He also only generates particles while he is still in his Chilling Penalty state, which also means he would not generate particles when his HP is lower than 50%. Note that for most cases, instead of funneling particles to him, it's usually worth more for other support characters to catch their own particles instead to cast their Burst and further support him while also dealing damage.

Assuming a 20-second rotation, Wriothesley will generate 5 Cryo particles.

Each Favonius proc will approximately reduce his ER Requirement by ~20 – 25%.

Energy requirements will vary based on your team and rotation. For a more accurate estimate, please use the Energy Recharge calculator linked here.

#
__ARTIFACTS__

sands Sands of Eon: ATK% / EM (only for Reverse Melt)
goblet Goblet of Eonothem: Cryo DMG%
circlet Circlet of Logos: CRIT DMG > CRIT Rate (unless you are not using 4pc MH or 4pc BS)

Substats: CRIT% > ATK% = EM (for Reverse Melt) > ER

__Artifact Sets__ **4PC Marechaussee Hunter**

4pc MH synergizes really well with Wriothesley’s kit when he’s in the Chilling Penalty state. Each hit in this state will reduce Wriothesley’s current HP, thus he can easily maintain its 4pc effects for up to 36% CRIT Rate. When using this set with his Signature (or any weapon with CRIT Rate as a secondary stat), he can easily overcap his CRIT Rate, hence, a CR Circlet is not recommended with 4pc MH.

**4PC Shimenawa’s Reminiscence**

4pc SR will drain Wriothesley’s energy in exchange for 50% NA/CA DMG Bonus, making Bursting frequently even harder (up to once every four rotations rather than two). It also has anti synergy with his C2 that buffs his Burst.

**4PC Blizzard Strayer**

4pc BS is only useful for Wriothesley when there’s a consistent Cryo Aura (i.e Freeze/Mono Cryo). It has the potential to outperform 4pc MH when the enemy can be frozen for an extended period and not get affected by Shatter coming from his empowered CA. Similar to 4pc MH, a CR Circlet is not recommended for this set due to overcapping CRIT Rate.

**2PC ATK% / Cryo DMG% / NA CA DMG%**

They are weaker options compared to 4pc sets, but still usable if the pieces have good substats.

#
__WEAPONS__ __5★ Options__ **Cashflow Supervision**

Wriothesley’s BiS, providing him NA and CA DMG% per stack when his current HP changes, as well as ATK SPD after 3 stacks, allowing for faster combos, shorter field time, and potentially a shorter rotation. Note that with its secondary stat (CRIT Rate) and either 4pc MH or BS, you can easily overcap his overall CRIT Rate, thus using a CRIT DMG Circlet is recommended.

**Tulaytullah's Remembrance**

Performs similarly to Cashflow Supervision, but without the CA DMG%. The CRIT DMG secondary stat is appreciated, especially when using 4pc MH or BS.

**Other 5★ Options**

All of them perform very similarly. Depending on the scenario, you may choose your weapon accordingly. Please check out the mastersheet for more info.

__4★ Options__ **Flowing Purity**

The new Craftable from Fontaine works extremely well with Wriothesley, providing tons of additional Elemental DMG% after he clears the Bond of Life passive, either through his Vaulting Fist or heals from teammates. Please note that when running this weapon, Wriothesley will be unable to sustain himself at all with just Charged Attacks due to the Bond of Life passive preventing healing, making a healer mandatory.

**Ballad of the Boundless Blue**

The 4.1 event weapon is another excellent F2P choice for Wriothesley that provides NA and CA DMG% for him. An ER secondary stat is occasionally useful if it is enough for him to Burst every rotation.

**The Widsith**

Widsith really shines when he gets ATK% or DMG% and can clear the content in one rotation. Nonetheless, it is still a decent option for longer battles due to the nice CRIT DMG secondary stat. EM is only useful when played in a Reverse Melt team.

#
__TEAM BUILDING__

Due to Wriothesley’s long field time, he wants to be paired with characters that either buff his personal damage or sub DPS characters who can deal their damage whilst taking minimal field time. At C0, Wriothesley is unable to self-sustain himself with his A1 Passive, meaning he will eventually reach 50% HP or below, even if he doesn’t get hit. Because of this, it is recommended to run a healer with him in all teams and ignore his special Charged Attacks unless he ends up proccing one. At C1+, Wriothesley’s special Charged Attack is not only easier to proc, but also gains increased healing, allowing his teams to use more offensive options over dedicated healers.

**Mono Cryo**

Wriothesley | Shenhe | Cryo | Anemo

Thanks to the existence of Shenhe, Mono Cryo teams can be a strong option. Wriothesley can use all of Shenhe’s quills quickly whilst making use of both the Normal and Charged Attack DMG% and Cryo RES Shred provided by her Hold Skill and Burst respectively. Characters such as Kazuha can further increase the team’s damage output, although any Anemo holding 4pc Viridescent Venerer also works just to shred Cryo RES. Diona not only fills the required role of a healer, but also provides interruption resistance through shields and large amounts of Cryo particles, lowering the amount of Energy Recharge Wriothesley needs to consistently use his Burst.

Teammates

cryo Cryo options: Ganyu, Rosaria, Ayaka, Kaeya, Diona, Mika, Layla

anemo Anemo options: Kazuha, Sayu, Jean, any Anemo with 4pc VV

**Freeze**

Wriothesley | Hydro | Anemo | Flex

Freeze teams follow many of the same conventions as Mono Cryo, but have the addition of increased safety through freezing enemies. Unfortunately this doesn’t prevent Wriothesley constantly reducing his own HP but it can help players by stopping enemies from attacking, removing the risk of taking any additional damage. Due to his fast Normal Attacks, Wriothesley can drive Xingqiu and Yelan particularly well.

Teammates

hydro Hydro options: Xingqiu, Yelan, Kokomi, Barbara

anemo Anemo options: Kazuha, Sayu, Jean, any Anemo with 4pc VV

flex Flex options: Zhongli, Diona, Mika, Layla, Yun Jin, any above Hydro or Anemo

**Reverse Melt**

Wriothesley | Pyro | Flex | Flex

Another team Wriothesley can take advantage of is Reverse Melt teams due to characters like Xiangling, or mechanics such as Burning or Sunfire, providing a consistent Pyro Aura for Wriothesley to melt his attacks. Characters such as Bennett provide both healing and large Attack buffs, which Wriothesley really appreciates, alongside large amounts of Energy for Xiangling. Given that Sunfire consists of both Bennett and Jean, it may be more comfy for players to use this due to the large amounts of healing, with the downside of being very Circle Impact (effects are limited to a certain area).

Teammates

pyro Pyro options: Xiangling, Bennett

Flex Options
anemo Anemo options: Kazuha, Jean, Sayu, any Anemo with 4pc VV
cryo Cryo options: Shenhe, Rosaria, Diona, Mika, Layla
flex Other Flex options: Zhongli, Nahida, Yun Jin, any above Pyro, any above Anemo

sonic starBOT
#
__CREDITS__
Lead:

@gloomy wadi

Authors:

@gloomy wadi

Calculations:

@gloomy wadi, @wooden mason, @dark sentinel

Consulting:

@bright turtle

Content Verification

Calculations: @high silo
Writing: @glad gyro

Transcription:

@glad gyro, @cerulean mirage, @olive spoke

Resources:
DISCLAIMER

Pre-TC is volatile and, as always, perpetually subject to change until release (and sometimes later!). Please note that these are theoretical suggestions.
Everything described in this FAQ is a good faith analysis based on the little information about the character’s kit that we know. Team calcs, additionally, are not established yet, and as with everything in TC, the content in this FAQ should be taken with a grain of salt.

__OVERVIEW__

Furina is a 5-star Hydro Sword character whose kit revolves around summoning the guests of the Salon Solitaire to deal damage and manipulate the team’s HP. Her Charged Attack can be used to change her Arkhe alignment between Ousia and Pneuma, changing the effects her guests provide. Her Elemental Burst causes the team to enter the Universal Revelry state, increasing their DMG Bonus and Incoming Healing Bonus based on how much their current HP changes during its duration.

Furina will primarily be played off-field, dealing significant damage with minimal field time, whilst providing substantial buffs to the team. Because of this, she can fit into a large variety of teams. However, players may want to invest in characters that provide large amounts of healing, such as Baizhu or Kokomi, in order to offset Furina’s HP drains and increase the amount of Fanfare stacks gained during her Burst state.

#
__TALENT PRIORITY__ **Elemental Skill = Elemental Burst > Normal Attack**

Analysis

  • Furina’s Elemental Skill is her main source of damage, whilst her Elemental Burst provides large amounts of DMG Bonus and Incoming Healing Bonus. Because of this, players will want to level both talents equally. Her Normal Attack talents can be ignored, unless players are using her on-field at C6, in which case her Normal Attack talent levels become slightly less negligible.
__TALENT OVERVIEW__ **Normal Attack: Soloist's Solicitation**

Furina performs a 4-hit attack string. At C0, she has almost no reason to use these. However, at C6, she gains a Hydro Infusion and increased scalings based on her Max HP. Her Charged Attack may be used often to change her Arkhe alignment between Ousia and Pneuma, changing the effects of her Elemental Skill and helping with overworld puzzles. Both Arkhe Attacks have a 6s CD each, making her excel at any content involving Arkhe mechanics compared to previous Fontainian characters.

**Elemental Skill: Salon Solitaire**

CD: 20s

Furina’s Elemental Skill summons the Salon Solitaire to aid the team in battle. She will summon either the Salon Members or the Singers of Many Waters, based on her current Arkhe alignment. It has a long duration of 30 seconds and a cooldown of 20 seconds, allowing for 100% uptime, even in teams with longer rotations, such as Neuvillette teams.

When aligned with Ousia, Furina will summon three Salon Members, who will each attack enemies at different intervals (prioritizing the target of the active character), dealing Hydro DMG based on Furina’s Max HP. If there are party members with more than 50% HP, they will drain their HP upon attacking, while also increasing the damage of the Salon Members by 110%/120%/130%/140%, based on the number of characters who had their HP consumed. Each Salon Member deals a different amount of damage and drains a different amount of HP from all teammates upon attacking. Furina’s Salon Members will drain around 2.5% HP per second from all of her teammates, making healers a requirement when playing her in order to maximize her damage, as characters at/below 50% HP won’t have sufficient HP available to drain to acquire the damage increase for her Salon Members.

When aligned with Pneuma, Furina will summon the Singers of Many Waters, who will heal nearby active characters based on her Max HP. While this means that she will provide AoE healing in co-op, in singleplayer, only the current active character will be healed, meaning that she won’t be able to reliably solo-sustain the whole team against her own HP draining mechanics.

The currently active Salon Solitaire guests can be swapped at will by using her Charged Attack to change her Arkhe alignment, meaning players can easily swap from damage to healing if their HP gets too low. However, since both guests can’t be active at the same time, she will lose out on generating Energy and applying Hydro whilst the Singers of Many Waters are active.

Currently, Furina’s Elemental Skill DOES NOT snapshot, meaning that any buffs she currently has will affect her guest’s damage or healing dynamically throughout their duration.

**Elemental Burst: Let the People Rejoice**

CD: 15s
Energy Cost: 60

Furina’s Elemental Burst deals AoE Hydro DMG and causes all party members to enter the Universal Revelry state. During this state, when nearby party members’ HP changes, they will grant Furina one Fanfare for each percentage point that their Max HP changed (For example, a 40% reduction in a nearby character’s HP would grant Furina 40 Fanfare). Based on the amount of Fanfare Furina has (up to a maximum of 300 Fanfare), she will grant all nearby party members DMG Bonus and Incoming Healing Bonus. At max Fanfare, Furina is granting the team 69% DMG Bonus and 27% Incoming Healing Bonus, a large amount of stats that almost no character would hate to have. Fanfare is based on the percentage of HP changed, meaning that teams with AoE healers such as on-field Kokomi, Jean, or Baizhu, or characters with fast HP manipulation, such as Neuvillette and Wriothesley, will gain Fanfare much quicker than teams with single-target healers. Due to Fanfare being a stacking effect, gaining Fanfare earlier in a rotation is going to be much more impactful than near the end. Her Elemental Burst can have 100% uptime in some teams, being a 60 cost Burst with an 18 second duration and a 15 second cooldown. Once the duration of her Burst ends or is recast, all Fanfare points will be cleared.

__Passives__ **Ascension 1 Passive: Endless Waltz**

If the currently active character is overhealed by someone that isn’t Furina, Furina will heal all nearby party members for 2% of their Max HP once every 2 seconds within the next 4 seconds. This Passive will help to gain some extra Fanfare for her Burst, and, if activated frequently, acts like a pseudo Prototype Amber.

**Ascension 4 Passive: Unheard Confession**

Furina will grant buffs to her Salon Solitaire guests based on her Max HP. For every 1,000 points of HP she has, the Salon Members will gain 0.7% DMG Bonus, up to a maximum of 28%, and the healing interval of the Singers of Many Waters will be decreased by 0.4%, up to a maximum of 16%. These effects will be maxed out at 40,000 HP, meaning players may want to run a secondary HP main stat piece to help reach this.

**Utility Passive: The Sea is My Stage**

Furina decreases the ability cooldown of Xenochromatic Fontemer Aberrants by 30%, allowing players to use the abilities granted by underwater sea creatures much faster.

#
__CONSTELLATIONS__ **Constellation 1 - "Love Is a Rebellious Bird That None Can Tame"**

When using Let the People Rejoice, Furina will gain 150 Fanfare.
Additionally, Furina's Fanfare limit is increased by 100.

Immediately grants 34.5% DMG Bonus and 13.5% Incoming Healing Bonus to the whole team upon casting Furina’s Burst, helping to gain even more frontloaded Fanfare. It also raises the maximum amount of Fanfare that Furina can obtain, increasing the max buffs to 92% DMG Bonus and 36% Incoming Healing Bonus at Talent level 9, making it an amazing Constellation for any team she’s used in. The personal gain of this Constellation is representative of its value for the whole team.

***DPS% Increase vs. C0:***

11.75%

***Rating***

4/5

**Constellation 2 - "A Woman Adapts Like Duckweed in Water"**

While Let the People Rejoice lasts, Furina's Fanfare gain from increases or decreases in nearby characters' HP is increased by 250%. Each point of Fanfare above the limit will increase Furina's Max HP by 0.35%. Her maximum Max HP increase is 140%.

Another amazing Constellation for any Furina team. C2 increases her Fanfare gain by 3.5x, allowing her to rapidly gain and cap Fanfare. Additionally, Furina converts any overcapped Fanfare into large amounts of HP% for herself, massively increasing her personal damage output.

***DPS% Increase vs. C1:***

42.16%

***DPS% Increase vs. C0:***

58.86%

***Rating:***

5/5

**Constellation 3 - "My Secret Is Hidden Within Me, No One Will Know My Name"**

Increases the Level of Let the People Rejoice by 3.
Maximum upgrade level is 15.

C3 increases the levels of Furina’s Elemental Burst, granting the party even more DMG Bonus and Healing Bonus per Fanfare stack. At Talent level 12, she’s now able to grant up to 116% DMG Bonus and 48% Incoming Healing Bonus to the party. C1’s frontloaded Fanfare stacks now also grant 43.5% DMG Bonus and 18% Incoming Healing bonus immediately, increasing the value of an already great Constellation.

***DPS% Increase vs. C2:***

7.47%

***DPS% Increase vs. C0:***

70.73%

***Rating:***

3/5

**Constellation 4 - "They Know Not Life, Who Dwelt in the Netherworld Not!"**

When the Salon Members from Salon Solitaire hit an opponent, or the Singer of Many Waters restores HP to the active character, Furina will restore 4 Energy. This effect triggers once every 5s.

A nice Constellation to help with Furina’s Energy requirements in high ER scenarios, granting her 16 Energy in 20 second rotations. This helps to lower her Energy requirements by ~45%, allowing for more offensive stats to be built on her.

***DPS% Increase vs. C3:***

11.99%

***DPS% Increase vs. C0:***

91.2%

***Rating:***

3/5

**Constellation 5 - "His Name I Now Know, It Is...!"**

Increases the Level of Salon Solitaire by 3.
Maximum upgrade level is 15.

C3 increases the levels of Furina’s Elemental Skill, providing a decent damage increase.

***DPS% Increase vs. C4:***

17.66%

***DPS% Increase vs. C0:***

124.96%

***Rating:***

3/5

#
**Constellation 6 - "Hear Me — Let Us Raise the Chalice of Love!"**

*When using Salon Solitaire, Furina gains "Center of Attention" for 10s.
Throughout the duration, Furina's Normal Attacks, Charged Attacks, and Plunging Attacks are converted into Hydro DMG which cannot be overridden by any other elemental infusion. DMG is also increased by an amount equivalent to 18% of Furina's max HP.
Throughout the duration, Furina's Normal Attacks (not including Arkhe: Seats Sacred and Secular Attacks), Charged Attacks, and the impact of Plunging Attacks will cause different effects up to every 0.1s after hitting opponents depending on her current Arkhe alignment:

Arkhe: Ousia
Every 1s, all nearby characters in the party will be healed by 4% of Furina's max HP, for a duration of 2.9s. Triggering this effect again will extend its duration.
Arkhe: Pneuma
This Normal Attack (not including Arkhe: Seats Sacred and Secular Attacks), Charged Attack, or Plunging Attack ground impact DMG will be further increased by an amount equivalent to 25% of Furina's max HP. When any of the attacks mentioned previously hit an opponent, all nearby characters in the party will consume 1% of their current HP.

During the duration of each instance of "Center of Attention," the above effects can be triggered up to 6 times. "Center of Attention" will end when its effects have triggered 6 times or when the duration expires.*

After casting Furina’s Skill, she gains a Hydro infusion, dealing an extra 18% of her Max HP, as well as special effects on her next 6 Normal Attacks based on her Arkhe alignment. This Constellation is similar in function to Nahida and Yelan’s C6, taking a small amount of field time in exchange for some extra personal damage. When Furina is aligned with Ousia, her Normal Attacks will heal the party over time. However, when she’s aligned with Pneuma, her Normal Attacks will gain an additional scaling of 25% of her Max HP and will also drain 1% of all party member’s current HP.

These offensive and defensive forms are inverted from her Elemental Skill, which deals damage when aligned with Ousia, but heals when aligned with Pneuma. Because of this, Furina is unable to generate Particles whilst in her Pneuma stance and sacrifices her Salon Member’s damage for extra HP scalings on her Normal Attacks. She can still swap her alignment freely during this state though, allowing players to mix and match the effects from both Arkhe alignments. After 6 hits or 10 seconds, this effect will be cleared.

Due to the high damage output provided by her Pneuma stance, 4pc Marechaussee Hunter becomes competitive and can beat out 4pc Golden Troupe, allowing players to frontload more damage due to the large amounts of CRIT Rate. Furina’s extremely high damage output at C6 allows players to dispense of enemies very quickly, even without her Salon Members being active.

***DPS% Increase vs. C5:***

20.85% (Ousia) / 31.42% (Pneuma)

***DPS% Increase vs. C0:***

171.87% (Ousia) / 195.65% (Pneuma)

***Rating:***

4.5/5

#
__ENERGY RECHARGE REQUIREMENTS__

Due to Furina’s wide variety of teams, her Energy requirements can vary drastically. In scenarios with few Hydro particles, her Energy requirements can reach well above 200%, compared to scenarios with an abundance of Hydro particles going as low as 130%. Neuvillette teams also have relatively low Energy requirements due to the longer rotation length, allowing for 2 uses of Neuvillette’s Skill.

Furina’s Energy requirements will vary based on your team and rotation. For a more accurate estimate, please use the Energy Recharge Calculator linked here.

For more detail on how Favonius weapons will affect your team, please use Ac1d’s Favonius Mastersheet linked here.

#
__ARTIFACTS__

sands Sands of Eon: HP% / ER%
goblet Goblet of Eonothem: HP% / Hydro DMG%
circlet Circlet of Logos: CRIT

Depending on Furina’s weapon, artifact set, and the team she’s in, HP/HP/CRIT, and HP/Hydro DMG/CRIT perform very similarly to each other. Generally, accounting for Fanfare and team buffs, HP/HP/Crit will perform better, but the difference is not substantial. In some scenarios, Furina may need to run an Energy Recharge Sands, due to her high Energy requirements. In these scenarios, a HP Goblet will be much more beneficial compared to a DMG Bonus one for most builds.

Substats: ER until requirement > CRIT DMG = CRIT Rate = HP% > Flat HP

__Artifact Sets__ **4PC Golden Troupe**

4pc Golden Troupe is Furina’s prime artifact set, providing her Elemental Skill 70% DMG Bonus. Alongside all the other DMG Bonus buffs she gains, she will generally prefer to run a HP goblet on this set.

**4PC Tenacity of the Millelith**

4pc Tenacity provides a 20% ATK buff to the team as well as 20% HP to Furina. A possible option for teams with multiple ATK scaling damage dealers, although Furina’s personal damage drops a lot.

**2PC Skill/Hydro/HP/ER Combos**

Any combination of 2pc Golden Troupe, 2pc Heart of Depth, 2pc Nymph’s Dream, 2pc Tenacity of the Millelith, 2pc Vourukasha's Glow and 2pc Emblem of Severed Fate can work before acquiring a 4pc Golden Troupe set for Furina.

#
__WEAPONS__ **Splendor of Tranquil Waters**

Her signature weapon and current best in slot option, providing a large amount of CRIT DMG from its substat, as well as both Skill DMG Bonus and HP% when the user and teammates’ current HP changes respectively. Although this is a standout weapon on her, it is currently not an improvement by a huge margin compared to even F2P weapons, so players may wish to hold off on wishing for this compared to her Constellations.

**Primordial Jade Cutter**

Another 5-star option that performs well on Furina, granting a large amount of CRIT Rate, as well as HP% from its Passive. Furina will almost always prefer to run a CRIT DMG circlet when using this weapon, due to her also having CRIT Rate as her ascension stat. Despite this, it's her next best option at lower ER requirements for personal damage.

**Key of Khaj-Nisut**

The Key grants Furina more supportive abilities, giving a teamwide EM buff upon hitting enemies with her Skill, which scales off of her Max HP. It also provides a massive amount of HP%, perfect for increasing the amount of EM she provides, as well as easily letting her run an Energy Recharge sands without much downside in scenarios with high ER requirements. Although she already gets a lot of DMG% from other sources, Hydro DMG goblets gain in value due to the large amounts of HP she has when running this weapon.

**Festering Desire**

An outstanding F2P option for Furina, providing a mix of utility and offense with its ER% substat, Skill CRIT Rate, and DMG Bonus Passive. This weapon provides almost everything Furina needs to shine, competing with Jade Cutter for her 2nd best option in higher ER scenarios. However, this weapon was only available back in 1.2, meaning many players may not have it. Regardless, for those who do, it is an amazing choice.

**Fleuve Cendre Ferryman**

Another F2P sword for helping Furina’s ER requirements, whilst also providing extra Skill CRIT Rate and a variable Energy Recharge buff after using an Elemental Skill. Due to Furina generating Particles over the course of a rotation, this extra ER isn’t too useful, unless players can funnel a large amount of Particles into her quickly from another Hydro teammate. On the other hand, it is free from Fontaine’s Fishing Association, meaning players can slowly farm for it and its refinements over time.

**Favonius Sword**

In scenarios with high ER requirements, Favonius soars up the ranks compared to other options, granting large amounts of Energy Recharge and even more Energy to the party through its Passive. Although it moderately reduces her damage potential when compared to other weapons, it’s a good option to consider if she needs a lot of Energy for the team you’d like to play her in.

#
__TEAM BUILDING__

Furina’s main condition requires either a healer or teammate with large amounts of HP manipulation in order to get a decent amount of Fanfare every rotation. Because of this, the best suited roles for the job are AoE healers and current Fontainian DPS. If players can fulfill these conditions, she can be run with almost any other characters, due to providing both large amounts of off-field damage and buffing.
Due to her wide variety of teams, some standout teammates will be listed rather than set archetypes, whilst also providing a few sample teams instead of an exhaustive list. For more info on a specific character, please check out their respective FAQs or KQM Guides.

__**Fontainian Teammates**__

Most Fontainian characters have access to HP manipulation, helping to speed up Fanfare gain for the team. Although our current roster is slim, future characters with these mechanics will fit with her very similarly.

**Neuvillette**

Neuvillette is able to gain large amounts of Fanfare due to him both draining and healing constantly between 60% and 100% HP when using his Charged Attacks. His HP manipulation is so great, he can be played without a healer and still get a good amount of Fanfare, allowing for more offensive teammates to be used, at the cost of Furina’s personal damage. Neuvillette also greatly benefits from his Constellation 1 when being run with Furina, granting him an extra stack for his A1 Passive and 100% Interruption Resistance, further amplifying the offensive pressure of his teams. Neuvillette also tends to overcap his HP when healing from a Charged Attack, activating Furina’s A1 Passive to provide extra healing to the party.

Neuvillette / Furina / Kazuha / Charlotte

ER Reqs: 150%

Neuvillette / Furina / Fischl / Jean

ER Reqs: 130%

Neuvillette / Furina / Nahida / Raiden

ER Reqs: 125%

**Wriothesley**

Wriothesley also drains large amounts of his HP when he attacks during the Chilling Penalty state, further increasing Fanfare gain for the team. However, his total HP loss is further increased when paired with Furina, making a healer a requirement in order to keep Wriothesley above 50% HP to avoid disabling the Chilling Penalty state. This large amount of HP drain further incentivises healers, who will now change more amounts of HP, resulting in more Fanfare gained. Although Wriothesley’s C1 increases his survivability, it is still recommended to run him with a healer due to the extra Fanfare gained whilst keeping his off-field teammates healthy.

Wriothesley / Furina / Yelan / Mika

ER Reqs: 185%

Wriothesley / Furina / Xiangling / Baizhu

ER Reqs: 240% / 200% (21s vs 25s rotation)

Wriothesley / Furina / Shenhe / Jean

ER Reqs: 225%

__**Non-Fontanian Teammates**__

Currently, Furina’s standout non-Fontanian teammates are ones who specialize in AoE healing. These come in two categories: sustained healers, who will slowly heal the entire team over time, and burst healers, who grant a large amount of healing to the entire team immediately.

__****Sustained Healers****__

Sustained healers specialize in consistently healing the team over the course of a rotation. This provides less frontloaded stacks compared to burst healing, but comes with the added benefit of keeping teammates consistently healthy, never letting them get close to the cut off of 50% HP. This also comes with the benefit of consistently activating Furina’s A1 Passive, which helps to keep the team at high amounts of HP. Currently, our only sustained healers require to be on-field to do their job, which can limit the options available for teams. Characters that fall into this category include: Qiqi, Kokomi, Noelle, Barbara, Dori and Yaoyao.

**Kokomi**

Kokomi is a perfect candidate for an on-field healer for Furina, providing more than enough healing to keep the team healthy whilst helping to lower Furina’s Energy requirements. One standout team with her is Mono Hydro, a team with very low Energy requirements that makes great use of Furina’s Fanfare buff. Unfortunately, the Incoming Healing Bonus provided by Furina’s Burst does not interact with Kokomi’s A4 Passive, but the DMG Bonus gained is still a large increase for her. Mono Hydro is not Kokomi’s only team however, as she’s able to run other playstyles (such as Taser and Hyperbloom) with ease.

Kokomi / Furina / Yelan / Kazuha

ER Reqs: 130%

Kokomi / Furina / Fischl / Lynette

ER Reqs: 135% / 115% (21s vs 25s rotation)

Kokomi / Furina / Nahida / Kuki

ER Reqs: 150%

**Noelle**

Noelle also fits the role for an on-field healer, providing both healing and shielding to the team with the ability to switch off-field if needs be, allowing other teammates to use their Skills without losing Noelle’s Burst effect. Being a Geo character, Noelle is able to hold 4pc Archaic Petra to further increase the damage of her off-field teammates. This set also incentivises running more Hydro characters alongside Furina, as they can not only take advantage of the buffs provided by Petra, but also help to lower Furina’s Energy requirements. To further help with the team’s Energy, Noelle can wield the Favonius Greatsword, helping to gain her own Burst back due to not generating Particles with her Elemental Skill.

Noelle / Furina / Yelan / Kazuha

ER Reqs: 205% / 165% (Yelan 1E vs 2E)

Noelle / Furina / Xingqiu / Zhongli

ER Reqs: 205% / 160% (Xingqiu 1E vs 2E)

Noelle / Furina / Gorou / Albedo

ER Reqs: 220% / 195% (Without vs with 4pc Exile)

#
__**Burst Healers**__

Burst healers specialize in providing a large, immediate amount of healing to the entire team. This can help with gaining a large amount of Fanfare immediately once Furina has already drained your team’s HP. Characters that fall into this category include: Jean, Baizhu, Barbara, Sayu, Yaoyao, Mika and Charlotte.

**Baizhu**

Compared to our other burst healers, Baizhu doesn’t need to use his Elemental Burst to heal the entire team, instead only needing to cast his Skill, which can be used once every 10 seconds. He also provides extra comfort through his Burst, periodically healing the active character whilst refreshing his shields and applying Dendro to the enemy. This periodic healing helps to consistently activate Furina’s A1 Passive, keeping the team even healthier and generating more Fanfare.

**Jean**

Jean is a great slot in for teams that need to consolidate both 4pc Viridescent Venerer and healing. Her Burst not only provides extra continuous healing to characters inside her Field, but also cleanses, Swirling the element cleansed onto nearby enemies. Her A4 Passive also helps to lower her Energy requirements, alongside a low cooldown Skill to refresh 4pc VV if needed.

**Charlotte**

A new 4-star Cryo Catalyst healer who will be available on Furina’s banner. Although her Energy requirements can be very high, she can make great use of Prototype Amber despite her healing scaling off her ATK. Her healing is already high at C0, but when factoring in both Constellations and Prototype Amber, her total healing skyrockets to the point of needing no extra healing substats to sustain the team. This allows her to focus fully on the Energy Recharge she needs to consistently cast her Elemental Burst.

**Mika**

A 4-star Cryo Polearm healer with both a strong AoE Burst heal and sustained single-target healing. Compared to Charlotte, Mika has access to the new Fontaine craftable polearm, Rightful Reward, granting him HP% and large amounts of Energy when he receives healing. In a Furina team, he is able to trigger this passive twice, thanks to Furinas A1 Passive, allowing him to run next to no Energy Recharge in his teams. He also provides an Attack Speed and Physical DMG Bonus buff, allowing him to fit nicely into Wriothesley, Wanderer and Eula teams, alongside Furina for even more team buffs.

**Prototype Amber**

Prototype Amber at R5 provides healing to all party members equal to 18% of their Max HP. which can be used for extra comfort, and more immediate Fanfare gain in teams. Alongside Furina’s Fanfare, and a Healing Bonus Circlet, this can be increased to ~30% Max HP or ~36% Max HP with 4pc Maiden Beloved. Although this generally won’t sustain a team by itself, it can make teams with single-target healing much easier to play, especially if your Catalyst teammate doesn’t require any other gear to benefit the team. In longer rotations, characters with lower cost Elemental Bursts such as Ninggaung or Heizou can activate Prototype Amber’s Passive twice to heal 60% of the party’s Max HP. They are also able to run supportive artifact sets such as 4pc Archaic Petra or Viridescent Venerer with little to no Energy Recharge substats due to the large amounts of Energy granted by this weapon.

#
__**Other Possible Teams**__

Here are some other possible teams Furina can be slotted into.

**Hu Tao / Furina / Hydro / Jean**

ER Reqs: 210%

This team replaces either Xingqiu or Yelan for Furina, playing similarly to original Hu Tao double Hydro teams. Although Hu Tao has innate HP loss mechanics, she gains an extra 33% Pyro DMG Bonus whilst under 50% HP from her A4 Passive. This is counteractive with Furina’s HP drain, requiring teammates to be above 50% HP in order to have their HP drained. On top of this, Hu Tao teams generally don’t run a healer because of her A4 Passive, making the 4th slot now a requirement to be a healer to keep Furina’s extra Skill damage active and Fanfare stacking up. Like other teams with burst healers, they can frontload a large amount of Fanfare from the 2nd rotation onwards, overcoming the loss of Hu Tao’s A4 Passive whilst buffing the rest of the team at the same time. However, the Energy requirements in this team are quite high, so don’t hesitate to run Favonius weapons if need be.

**Cyno / Furina / Nahida / Baizhu**

ER Reqs: 175%

Another team that replaces Xingqiu or Yelan for Furina to provide Cyno with large amounts of DMG Bonus, alongside Furina’s high personal damage. Although Cyno has access to weapons such as the Kitain Cross Spear, the Energy requirements for this team can be very high without extra help from weapons like Favonius. Baizhu can also carry Prototype Amber to help with his own Energy requirements and provide some extra immediate Fanfare upon using his Elemental Burst.

**Ayaka / Furina / Shenhe / Charlotte**

ER Reqs: 205%

Due to Furina’s Salon Members attacking as they wish, she can be a great slot in for Freeze teams, granting even more buffs to Ayaka to further boost the benefit added from Shenhe’s Icy Quill effect. Charlotte can also wield the Thrilling Tales of Dragon Slayers to provide Ayaka with a large amount of ATK%, whilst providing a lot of immediate Fanfare. If players require additional grouping, Shenhe can be replaced for an Anemo character, such as Kazuha. However, this team will still perform strong against unfreezable enemies due to the raw damage output from Ayaka.

**Eula / Furina / Fischl / Mika**

ER Reqs: 190%

Although Furina’s Energy requirements may be high, she can actually be an increase to Eula teams, given you can gain a large amount of Fanfare. Mika works excellently for this role, providing a large AoE heal and then extra, off-field healing to the active character, which helps to trigger Furina’s A1 Passive consistently. With constellations, he becomes on par or better than Bennett in terms of buffs for Eula, whilst Fischl helps to trigger Superconduct and provide extra Energy to the team. Raiden can be a viable option over Fischl for double carry teams, where she is able to catch the tail end of Furina’s Fanfare on most of her Burst and further lower Energy requirements.

**Raiden / Furina / Jean / Bennett**

ER Reqs: 145%

Another general Raiden team containing the sunfire duo of Jean and Bennett, helping to both buff, heal and apply large amounts of Pyro for the team. Jean’s Burst helps to gain a lot of Fanfare very quickly whilst consistently activating Furinas A1 Passive for even more healing. The extreme Pyro application also allows for many Overloaded and Vaporize reactions to be triggered, however, the lack of grouping may not be for everyone.

**Furina / Yelan / Xiangling / Bennett**

ER Reqs: 150%

One of the few teams that can safely run a single-target healer. Due to the team having no dedicated on-field character, players can swap freely between their party members when they need healing, and then swap back to Bennett to repeatedly use his Skill to funnel Particles into Xiangling. Yelan is able to freely use her Skill twice per rotation in this team, helping to lower Furina’s Energy Requirements further. Xingqiu can be a viable alternative with higher Energy Requirements in exchange for defensive utility and Hydro RES Shred from his Constellation 2.

**Alhaitham / Furina / Nilou / Baizhu**

ER Reqs: 200%

An alternative style of Nilou Bloom that doesn’t require Nahida, instead preferring to use Alhaitham on-field whilst Furina provides both Hydro application and off-field damage. Nilou’s Tranquility Aura provides additional Hydro application for Bountiful Blooms and Baizhu provides large amounts of healing to generate Fanfare and to help offset the team’s self damage. Baizhu can also run Prototype Amber for additional healing and Energy whilst having the freedom to use two Skills quite safely. Furina’s Fanfare buff is utilized effectively by Alhaitham, providing large amounts of Dendro DMG and application for Blooms. Although Baizhu’s shields will help mitigate it somewhat, this team is adding Furina’s teamwide HP drain on top of the Bountiful Bloom’s self damage, which may be uncomfortable for some players.

Please note this is not an exhaustive list of teams and is only meant to give an example of some teams Furina fits in. Feel free to experiment with characters you enjoy and see what works best for you.

opal nexusBOT
#
__CREDITS__
Lead:

@bright turtle

Authors:

@bright turtle, @analog scaffold

Calculations:

@bright turtle, @analog scaffold, Avocado

Consulting:

Avocado

Content Verification:

Calculations: @cerulean mirage
Writing: @glad gyro

Transcription:

@twin moth, @glad gyro, @olive spoke, @cerulean mirage

DISCLAIMER

Pre-TC is volatile and, as always, perpetually subject to change until release (and sometimes later!). Please note that these are theoretical suggestions.
Everything described in this FAQ is a good faith analysis based on the little information about the character’s kit that we know. Team calcs, additionally, are not established yet, and as with everything in TC, the content in this FAQ should be taken with a grain of salt.

__OVERVIEW__

Charlotte is a 4-star Cryo, Pneuma-aligned Catalyst user. She has a decent amount of off-field Cryo Application, but where she truly shines is in her healing, which, before Constellation 6, comes primarily from her Burst. As such, it is essential that one builds Charlotte with sufficient Energy to Burst every rotation, especially if she is not being used in a Perma Freeze team composition.

#
__TALENT PRIORITY__ **Elemental Burst > Elemental Skill**

Analysis

  • As mentioned in the previous segment, all of Charlotte’s healing at lower Constellations comes from her Burst. Hence, in order to make the most out of her, her Burst should be prioritized heavily for leveling. Her Skill, on the other hand, only serves to apply Cryo off-field while outputting minute amounts of damage, making it much less important to level.
__TALENT OVERVIEW__ **Normal Attack: Cool-Color Capture**

With her camera, Charlotte attacks the enemy by snapping shots (not to be confused with snapshotting!) of them up to three times in a row. While aesthetically pleasing to look at, Charlotte’s Normal Attacks are not very useful in her overall kit, being a non-factor in most cases outside of the Pneuma Thorn on her Charged Attack.

**Elemental Skill: Framing: Freezing Point Composition**

CD: 12s

Charlotte’s Skill functions similarly to how Nahida’s skill works. If tapped, it applies Snappy Silhouette on up to five enemies in front of her, dealing damage every 1.5s for 6s at a time. Her held Skill is a slightly longer variation of her tapped Skill, applying Focused Impression on up to five enemies and dealing damage every 1.5s lasting for 12s.
Do note that there is a slight caveat to using her held Skill, being that Charlotte must have her skill Held for roughly two seconds before the viewfinder expands to its maximum size for it to count as ‘Focused Impression’ instead of ‘Snappy Silhouette’.

**Elemental Burst: Still Photo: Comprehensive Confirmation**

CD: 20s
Energy cost: 80

The highlight of Charlotte’s kit, her Burst creates a Newsflash Field that heals the entire party upon cast. It also does up to eight instances of damage to enemies within the field while healing active character(s) with every attack. Although the Burst damage by itself is nothing to write home about, both the cast as well as the continuous healing from her Burst are pretty good at baseline, and will only be improved with Constellations.

__Passives__ **Ascension 1 Passive: Moment of Impact**

When enemies marked by Charlotte’s held Skill are defeated, it reduces the cooldown of her Skill by 2s, up to four times for a total of 8s. While on paper this may seem to be a good thing, it also means that you would have to take the time to use her held Skill, which might be a bit of a bad thing if your aim is to clear chambers as quickly as possible.
On the other hand, this Constellation also means that Charlotte will have the ability to recast her Skill on a subsequent wave in multi-wave content, granting the party more healing along with helping out with her own Energy. Weigh the pros and cons of this carefully.

**Ascension 4 Passive: Diversified Investigation**

This passive increases Charlotte’s healing for every Fontainian party member other than herself, while non-Fontainian party members increase her Cyro DMG% instead.
The first part of this passive is pretty useful for Charlotte, especially considering that most Fontainian characters have some sort of HP-manipulation ability, helping her keep them alive with more ease. On the other hand, while niche, people who would like to experiment with Charlotte as a carry might like the second part, especially considering that most of her best buffers (eg. Kazuha, Shenhe) are non-Fontainian.

**Utility Passive: First-Person Shutter**

A neat little passive with a gadget that is exclusive to Charlotte, obtainable from the 4.2 event “Graph Adversarial Technology Experiment Log”. Below is a transcript from the 4.2 livestream on how to use it:

To use it, just equip the Kamera and activate the Zoom Lens in your inventory. The Zoom Lens can be attached to all Kameras obtained in the game up to this point. When equipped with other characters, the Zoom Lens won’t be able to be used in combat. But… If you switch to Charlotte and hold her Elemental Skill, you’ll be able to snap pics with Zoom Lens even while fighting! You can even use it in Domains!

#
__CONSTELLATIONS__ **Constellation 1 - A Need to Verify Facts**

After Still Photo: Comprehensive Confirmation heals a character, it will mark them with Verification, which will heal them once every 2s for 80% of Charlotte's ATK. This effect lasts 6s.

Further heals party members that were healed by Charlotte’s Burst with an effect similar to Prototype Amber’s. A pretty noticeable increase in healing for a Constellation 1, which should be relatively accessible, particularly for people who wish to roll for Furina’s Constellations as well. This Constellation is also very useful for continued triggering of effects that proc on HP change / healing, such as Furina’s Burst stacks or Ocean-Hued Clam’s damage. A solid Constellation all-around.

***Healing increase from C0:***

27.13%

***Rating:***

4/5

**Constellation 2 - A Duty to Pursue Truth**

When using Framing: Freezing Point Composition, when Monsieur Verite hits 1/2/3 (or more) opponents, Charlotte's own ATK will be increased by 10%/20%/30% for 12s.

When Charlotte’s Skill instances hit enemies, she will be buffed up to 30% ATK depending on the number of enemies hit by her Skill, increasing her overall damage and personal healing.

Note: Further Constellation increases are based on the highest possible increase.

***Healing increase from C1:***

3.75% - 11.25%

***Healing increase from C0:***

31.90% - 41.43%

***Rating:***

2/5

**Constellation 3 - An Imperative to Independence**

Increases the Level of Still Photo: Comprehensive Confirmation by 3.
Maximum upgrade level is 15.

This Constellation increases her Burst levels, which, being the source of all her healing, is a very welcome increase.

***Healing increase from C2:***

15.86%

***Healing increase from C0:***

63.86%

***Rating:***

2/5

**Constellation 4 - A Responsibility to Oversee**

When Still Photo: Comprehensive Confirmation hits an opponent marked by Snappy Silhouette or Focused Impression, it will deal 10% more DMG and restore 2 Energy to Charlotte. This restoration can be triggered 5 times every 20s.

Enemies marked by Charlotte’s Skill receive increased damage from her Burst. Additionally, every time they do so, Charlotte gets a bit of her Energy back, up to 10 every Skill use. A solid Constellation, helping alleviate Charlotte’s Energy issues, being especially noticeable if Charlotte is used as a solo Cryo.

***Healing increase from C3:***

10.41%

***Healing increase from C0:***

80.91%

***Rating:***

2/5

**Constellation 5 - A Principle of Conscience**

Increases the Level of Framing: Freezing Point Composition by 3.
Maximum upgrade level is 15.

Sadly, this Constellation only benefits Charlotte’s Skill damage, which is not at all a major part of her kit if played as a healbot.

***Healing increase from C4:***

0%

***Healing increase from C0:***

80.91%

***Rating:***

0/5

**Constellation 6 - A Summation of Interest**

When the active character's Normal and Charged Attacks hit an opponent marked by Framing: Freezing Point Composition's Focused Impression, Monsieur Verite will initiate a follow-up attack that deals 180% of Charlotte's ATK as AoE Cryo DMG and heals active character(s) within the AoE for 42% of Charlotte's ATK. This effect can be triggered once every 6s, and both DMG and healing done this way will be considered as having been done by Charlotte's Elemental Burst.

This Constellation allows Charlotte to trigger up to two follow-up attacks per Skill whenever active characters hit enemies marked by ‘Focused Impression’, dealing Cryo damage while healing the active character for a portion of Charlotte’s ATK. This gives Charlotte the ability to heal outside of her Burst, while also adding on a bit more damage to the team, further incentivizing people to use her held Skill. That being said, whether it’s worth to use held Skill for said reason is still up for debate, and being locked behind a Constellation 6 does not help its case either.

***Healing increase from C5:***

6.96%

***Healing increase from C0:***

93.49%

***Rating:***

1/5

#
__ENERGY RECHARGE REQUIREMENTS__

Solo Cryo assumes a 25-second rotation, with Charlotte doing 2 tapped Skills per Burst every rotation.
Double and Triple Cryo assume a 21-second rotation, with Charlotte doing one fully held Skill per Burst every rotation.

Each Favonius proc lowers Charlotte’s ER requirements by ~13%.
Charlotte’s C4 helps to further reduce her ER Requirements by up to ~25%.

Energy requirements will vary based on your team and rotation. For a more accurate estimate, please use the Energy Recharge calculator linked here.

#
__ARTIFACTS__

sands Sands of Eon: ER% or ATK%
goblet Goblet of Eonothem: ATK%
circlet Circlet of Logos: ATK% or HB%

To make full use of Charlotte’s healing capabilities, you will want to stack as much ATK as possible on Charlotte while meeting ER requirements, while equipping an HB circlet. While this build means that Charlotte’s personal damage will be completely irrelevant, it maximizes the potency of her healing, keeping the party safe and healthy.

If you are interested in playing Charlotte as a DPS, please consider the final section authored by Emiliabyss.

Substats: ER (until requirement) > CRIT% (if holding Favonius) > ATK%

__Artifact Sets__ __**Support**__ **2PC Mix of ATK / ER / HB**

Easiest means of giving Charlotte quick boosts to her healing while helping to ease her often ridiculously high ER requirements. If Charlotte’s teammates do not make use of ATK, this is the recommended approach to take for building her.

**4PC Ocean-Hued Clam**

At C0, Charlotte will more than easily cap out a bubble, but that’s all the output you’re getting out of her aside from Prototype Amber’s healing. Constellations give her a bit more sustained healing, which makes it easier for subsequent bubbles to do more damage.

**4PC Noblesse Oblige**

Partywide ATK on Burst, which not only benefits her ATK-scaling teammates, but Charlotte herself too in terms of both damage and healing.

**4PC Tenacity of the Millelith**

Although HP doesn’t do anything for Charlotte’s healing, the ATK from having her skill damage opponents from off-field could be a good consistent source of partywide ATK. That being said, this would mean that her held Skill is almost always a necessity to use, or this is a dead set.

**4PC Maiden Beloved**

Boosting Charlotte’s already enormous healing numbers, this set might be overkill for her, and you might prefer having something else that will give her more utility to aid the team in other ways. Would not recommend specifically farming / strongboxing for this set, so only use it if you have excess pieces saved from farming Viridescent Venerer.

#
__WEAPONS__ __Recommended__ **Prototype Amber**

Easily Charlotte’s most recommended weapon, giving her additional healing to help keep the team alive and well while also contributing to other buffs that come with HP change and / or healing, such as OHC. Furthermore, it also refunds her 18 Energy every burst at R5, helping her cut into what may seem like extremely daunting ER requirements for herself.

**Favonius Codex**

An alternative for Charlotte if you still find yourself struggling with Energy even after Prototype Amber and / or your team is struggling with Energy. With a Burst hitting up to 8 times, Charlotte should have no issues proccing this weapon even with minimal CRIT Rate, although more CRIT Rate from substats would still help.

__Alternatives__

It is highly recommended that you go with one of the two weapons above, since they are easily accessible, with Prototype Amber being a craftable weapon and helping significantly even at lower refinements. If, however, you insist on going for something else, here are a few suggestions.

**A Thousand Floating Dreams**

A very expensive option for Charlotte, one may opt to use this on her in a team that could appreciate the EM, like a Reverse Melt team. Not recommended for most teams.

**Sacrificial Fragments**

Although the substat does not help Charlotte in most of her teams, the extra skill charge could go a long way to helping her resolve her Energy issues, although once again, you would rather go with one of the recommended weapons instead.

**Thrilling Tales of Dragon Slayers**

Still everybody’s favorite 3★ Catalyst, TTDS makes its return. Do note though that this would mean that Charlotte would need to be played in an environment that can support her high ER requirements while ensuring that she goes before the main carry in the team.

#
__TEAM BUILDING__ **General Healer**

Charlotte | Flex | Flex | Flex

Being a healer means that Charlotte can be slotted into virtually any team that would appreciate the sustain that she provides, bringing to the table a large chunk of healing from her Burst that only gets better with Constellations. That being said, there are a few teams that particularly appreciate her, such as...

**Furina Teams**

Charlotte | Furina | Flex | Flex

With Furina’s buffs proportional to the amount of HP change in the party, it should come to no surprise that Charlotte’s immense teamwide healing makes her one of Furina’s best friends, synergizing with her extremely well, with Charlotte being able to heal back most, if not all, of the HP that Furina drains with her Ousia Skill. This makes the two of them an extremely potent duo, boasting both immense buffing and survivability, allowing the player to fill in their teams with more offensive DPSs / Supports.

While there are too many possible team compositions to discuss in detail here, the possibility of running the two of them may exist in the compositions that will be discussed in the succeeding sections.

**Freeze**

Charlotte | Hydro | Cryo | Anemo

Practically a staple consideration for any off-field Cryo support, Freeze teams really appreciate Charlotte’s off-field Cryo application and healing, especially if the Hydro option in the team is Furina. Even without considering Furina though, having Charlotte in the healer slot means that players can afford to run more offensive Hydro options such as Ayato and / or Mona, although if one is already comfortable with Kokomi, then Charlotte’s personal value drops a lot.

Teammates

hydro Hydro options: Furina / Mona / Ayato

cryo Cryo options: Ayaka / Ganyu / Wriothesley / Rosaria / Kaeya

anemo Anemo options: Kazuha / Venti / Sucrose / Lynette

**Mono Cryo**

Charlotte | Shenhe | Cryo | Anemo

Another Cryo-centric team composition, this team trades a bit of the safety that comes from perma-freeze for damage courtesy of Shenhe’s buffs to Cryo teams. Running 3 Cryo characters also means that the team will have very high Cryo particle generation, helping with Charlotte’s ER issues rather noticeably.

Teammates

cryo Cryo options: Ayaka / Ganyu / Wriothesley / Rosaria / Kaeya

anemo Anemo options: Kazuha / Venti / Sucrose / Lynette

**Physical**

Charlotte | Physical Carry | Electro Flex | Flex

Physical teams revolve around supporting a physical carry via means of Superconduct and other buffs being stacked onto a physical carry taking the field to do damage. Though most characters outside of catalysts can technically be built for physical damage, this slot is typically filled by either Eula or Freminet, and, to a certain degree, Razor.
As such, unless the primary carry in question is Razor, one flex slot is often reserved for an off-field Electro character like Fischl, while the final flex slot can be changed depending on what you want / need.

Teammates

flex Physical options: Eula / Freminet / Razor

electro Electro Flex options: Fischl / Raiden / Lisa

flex Flex options: Kaeya / Rosaria / Shenhe / Bennett

#
__EPILOGUE...?__

In the deepest canals of the Genshin TC community, there have been whimpers, complaints, cries for a savior. “But I want Charlotte to be my DPS! I want to see her cool animations and use my favorite character more than simply a backline character. Is there any way she could deal damage?”

Well, if you think “marginally more DPS than Dehya” is good, I have good news for you!

Now, sure you might say “well basically anyone can get more,” but Charlotte was always meant to be a dedicated healer. She has extremely low multipliers and most of her kit enhances her healing. Dehya was meant to be some kind of DPS. What makes Charlotte able to function as a dedicated DPS? A Cryo Catalyst weapon.

This build is hyperspecific, and to some, may come off as uninteresting, but the work originally done for a meme has led to surprising results.

Assumes Charlotte is Constellation 6
Team: Bennett C5+, Lynette, Xiangling (Kazuha cannot swirl Cryo in this team consistently)
Artifact Set: 4pc Shimenawa’s Reminiscence (Gilded Dreams is a decent substitute)
Artifact Stats: EM, DMG%, CRIT
5-Star Weapon: A Thousand Floating Dreams (ATK% Sands) or Cashflow Supervision (EM Sands)
4-Star Weapon: The Widsith R5 or Solar Pearl R5
**Rotation (Charlotte): N2C, swap, hE, 3x(N2C)
Best Cons: 6, 3, 2

With all the Pyro application from Bennett, Kazuha, and Xiangling, it is easy to reach the maximum possible Reverse-Melts (13). This, combined with cramming loads of buffs into Charlotte, makes her stronger than a lot of characters you would force into Xiangling teams just to be able to play them in the first place.

Is Charlotte the best choice for a Cryo user? Absolutely not. Kaeya and Rosaria are both superior, and one is even totally free. Any other Cryo or Hydro Catalyst character will probably outperform Charlotte. But she’s cute, so it’s okay.

It is not recommended to use Shenhe and go Mono-Cryo. It is also not recommended to use Shenhe + Kazuha + Bennett. This is because most of Charlotte’s damage comes from her many reactions spread across her kit, and she needs as much Pyro application from teammates as humanly possible. Additionally, Mono-Cryo teams currently do not have the same buffing potential that Bennett + 13 Melts has.

Keep in mind that assumptions are fairly optimistic, as sim and sheets can’t properly account for the application in practice. It’d be safe to expect somewhat less in gameplay.

snow dockBOT
#
__CREDITS__
Leads:

@analog scaffold, @rare marsh

Authors:

@gloomy wadi, @analog scaffold, @wooden mason, @ancient karma, @alpine thorn

Calculations:

@rare marsh, @analog scaffold, @wooden mason, @ancient karma

Framecounts:

@high silo

Consulting:

@rare marsh

Content Verification:

Calculations: @bright turtle
Writing: @glad gyro

Transcription:

@glad gyro, @cerulean mirage, @drowsy plaza

DISCLAIMER

Pre-TC is volatile and, as always, perpetually subject to change until release (and sometimes later!). Please note that these are theoretical suggestions.
Everything described in this FAQ is a good faith analysis based on the little information about the character’s kit that we know. Team calcs, additionally, are not established yet, and as with everything in TC, the content in this FAQ should be taken with a grain of salt.

__OVERVIEW__

Navia is a 5-star Geo Claymore character aligned with Ousia whose kit revolves around gaining Crystal Shrapnel charges to strengthen her Elemental Skill. Crystal Shrapnel charges can be gained from collecting Crystallize Shards or periodically from her Elemental Burst, dealing damage frequently from off-field. After using her Elemental Skill, Navia will gain a short Geo Infusion in order to deal some extra damage whilst on-field.

Navia can be played both as an on-field DPS or as an off-field DPS. If used on-field, players can use Navia’s infused Normal Attacks and treat her as a main carry. She can also be played as an off-field DPS, where she ignores the infusion and relies solely on her Skill and Burst to deal her damage with minimal field time. Preferably, she will be played alongside Pyro, Electro, Cryo and Hydro teammates, due to her A4 Passive granting an extra 20% ATK for each teammate of those elements, which can stack up to two times.

#
__TALENT PRIORITY__ **On-field: Elemental Skill > Normal Attack > Elemental Burst**
**Quickswap: Elemental Skill > Elemental Burst >> Normal Attack**

Analysis

  • Navia’s kit revolves around using her Burst and Normal Attacks to maximize the damage output of her Skill, which is a powerful shotgun blast to the face of enemies. Her kit is overall synergistic with many ways to buff her own damage. She is also one of the few Geo characters to effectively utilize Crystallize reactions even when shielded by someone else like Zhongli, setting a new precedent for Geo DPS characters.
__TALENT OVERVIEW__ **Normal Attack: Blunt Refusal**
  • Four consecutive strikes; spinning Charged Attack

Navia’s Normal and Charged Attacks are buffed by her First Ascension Passive, offering an absolute Geo infusion that cannot be overwritten and a large boost to her damage.

That said, since Navia will need to utilize her Normal Attack Talent to maximize her kit’s damage output, it’s recommended to level this Talent as high as possible, but not before Navia’s Skill.

**Elemental Skill: Ceremonial Crystalshot**

CD: 9s

  • Gains a stack (6 max) whenever anyone obtains a Crystallize shard. On Skill use, she consumes all her stacks to hit the enemy a number of times (5-11) based on her stacks (0-3). Each stack beyond the third that’s consumed will each buff her Skill DMG by 15%, up to 45% max. Has two uses per rotation.

The bread-and-butter of Navia’s kit. It’s easy to both acquire max stacks for each Skill use and hit the enemy with every hit. As a Claymore-wielder using Normal Attacks, you’re going to be in point-blank range with your enemy anyways.

Navia’s Skill is more than half of her damage output, which makes this talent a top priority to maximize.

**Elemental Burst: As the Sunlit Sky's Singing Salute**

CD: 15s
Energy cost: 60

  • One initial hit, 17 smaller hits over time. Hits from Burst generate one Crystal Shrapnel stack every 2.4 seconds.

One of Navia’s primary ways to gain stacks and generate Crystallize shards, which is especially valuable on her Best-in-Slot artifact set, Nighttime Whispers in the Echoing Woods.

While it offers plenty of utility, it is not an exceptional source of damage output, so this talent can be leveled last.

__Passives__ **Ascension 1 Passive: Undisclosed Distribution Channels**
  • For four seconds after using her Skill, the Normal Attack Talent is infused with Geo and cannot be overridden. Additionally, attacks using her Normal Attack Talent gain a 40% DMG Bonus

This is the main reason to use Navia’s Normal Attacks. Without it, she would have the same boring Normal Attacks as a typical 4-Star Claymore wielder. Most of the time, you’ll be using Normal Attacks.

**Ascension 4 Passive: Mutual Assistance Network**
  • For each Pyro, Electro, Hydro, Or Cryo character in your party, Navia gains 20% ATK, maxing out at 40% (two different elements).

Another incentive to pair Navia with other non-Geo characters, which is recommended in order to maximize Crystallize generation.

**Utility Passive: Painstaking Transaction**
  • 20% more rewards on Fontaine expeditions.

You should probably just mine for ore instead, but there may be a non-zero number of cases where this comes in handy.

#
__CONSTELLATIONS__ **Constellation 1 - A Lady's Rules for Keeping a Courteous Distance**

Each stack of Crystal Shrapnel consumed when Navia uses Ceremonial Crystalshot will restore 3 Energy to her and decrease the CD of As the Sunlit Sky's Singing Salute by 1s. Up to 9 Energy can be gained this way, and the CD of "As the Sunlit Sky's Singing Salute" can be decreased by up to 3s.

Completely fixes any ER issues she might have in any possible team by effectively making her Burst a 42 energy cost from the original 60. Power depends on her original Energy Recharge needs at c0. More information about this Constellation can be found in the Energy Recharge section. It is worth noting that this Constellation will not be a damage improvement if she can run 100% ER, but that requires abundant enemy particles or running more than 1 extra geo character, which is not recommended.

***DPS% Increase vs. C0:***

~13%

***Rating:***

4/5

**Constellation 2 - The President's Pursuit of Victory**

Each stack of Crystal Shrapnel consumed will increase the CRIT Rate of this Ceremonial Crystalshot instance by 12%. CRIT Rate can be increased by up to 36% in this way.
In addition, when Ceremonial Crystalshot hits an opponent, one Cannon Fire Support shot from As the Sunlit Sky's Singing Salute will strike near the location of the hit. Up to one instance of Cannon Fire Support can be triggered each time Ceremonial Crystalshot is used, and DMG dealt by said Cannon Fire Support this way is considered Elemental Burst DMG.

Provides 36% CRIT Rate for her Skill damage. However, players will need to adjust her CRIT Rate to around 64% in order to not surpass 100% CRIT Rate. It also adds 2 extra hits to her Burst, which will be a minor increase to her damage and may generate an extra stack of Crystal Shrapnel.

***DPS% Increase vs. C1:***

14%

***DPS% Increase vs. C0:***

~29%

***Rating:***

4/5

**Constellation 3 - Businesswoman's Broad Vision**

Increases the Level of Ceremonial Crystalshot by 3.
Maximum upgrade level is 15.

Additional damage on Skill, which is her main source of damage.

***DPS% Increase vs. C2:***

10%

***DPS% Increase vs. C0:***

~42%

***Rating:***

3/5

**Constellation 4 - The Oathsworn Never Capitulate**

When As the Sunlit Sky's Singing Salute hits an opponent, that opponent's Geo RES will be decreased by 20% for 8s.

Buffs all her abilities. Combined with Geo Resonance’s effect, it simulates having Viridescent Venerer active but for Geo.

***DPS% Increase vs. C3:***

9.5%

***DPS% Increase vs. C0:***

~55%

***Rating:***

3/5

**Constellation 5 - Negotiator's Resolute Negotiations**

Increases the Level of As the Sunlit Sky's Singing Salute by 3.
Maximum upgrade level is 15.

This Constellation does not provide a sizable benefit due to Navia’s Burst being only a minor portion to her overall damage.

***DPS% Increase vs. C4:***

2.8%

***DPS% Increase vs. C0:***

~60%

***Rating:***

1/5

**Constellation 6 - The Flexible Finesse of the Spina's President**

If more than 3 stacks of Crystal Shrapnel are consumed when using Ceremonial Crystalshot, each stack consumed beyond the first 3 increases the CRIT DMG of that Ceremonial Crystalshot by 45%, and any stacks consumed beyond the first 3 are returned to Navia.

Navia’s strongest Constellation by far. It increases her Skill damage by about 40% if she has all 6 stacks of Crystal Shrapnel, which enables her to deal massive amounts of damage in an instant, increasing her already substantial frontload.

***DPS% Increase vs. C5:***

26%

***DPS% Increase vs. C0:***

~93-100%

***Rating:***

5/5

#
__ENERGY RECHARGE REQUIREMENTS__

In teams lacking Favonius weapons, Navia finds herself needing upwards of 190% ER. Additionally, due to Navia’s curse of being Geo, she has limited options when it comes to generating Geo particles, and her best options rely on Geo constructs to create particles, which can break very easily.

It is strongly recommended to use Zhongli as a Favonius holder and funnel the particles to Navia. This is easily achieved and ties into her playstyle as it is typical on rotations to use Zhongli’s Hold Skill then swap to Navia to activate her Burst. Doing this will reduce her ER requirements by 20% to 30%, which is immensely valuable.

By playing in a way that Zhongli’s pillar is not destroyed, you can further reduce her ER by another 30%, bringing her to a comfortable ER need of 130%. Nonetheless, there are alternatives like using Ningguang or Itto as particle generators, who can reliably provide similar levels of Energy as Zhongli’s pillar.

Navia’s ER requirements will vary based on your team and rotation. For a more accurate estimate, please use the Energy Recharge Calculator linked here.
For more details on how Favonius weapons will affect your team, please use Ac1d’s Favonius Mastersheet linked here.

#
__ARTIFACTS__

sands Sands of Eon: ATK%
goblet Goblet of Eonothem: Geo DMG%
circlet Circlet of Logos: CRIT

ER sands can be considered, especially if Navia is played as a quickswap unit.

Substats: ER until requirement > CRIT DMG = CRIT Rate > ATK%

__Artifact Sets__ **4PC Nighttime Whispers in the Echoing Woods**

BiS in practically every team except in a Mono Element team when Navia is a sub DPS. It gives a decent amount of Geo DMG Bonus with the condition of being shielded by a Crystallize reaction. However, it might not be easy to maintain the shield against aggressive enemies because it is somewhat weak, and having another shielder in the team doesn’t help since two shields cannot stack on top of another (both shields will each take 100% of damage). Although, even if you lose the effect for the last few Normal Attacks, this set is still Best-in-Slot.

**4PC Marechaussee Hunter**

Very competitive option with Nighttime Whispers set but Furina is required in the team as the only reliable way to drain HP is through Furina’s Skill. However, it is not as good as it looks, since you will likely have 0 or 1 stack of this set for Navia’s first Skill (since stacks can only be gained while on-field, and stacks cannot be gained during a Burst animation due to i-frames). This is still a very good option, just slightly behind the signature set even if we consider this issue, especially if you don’t want to farm the other set.

It is recommended to build less than 64% CRIT Rate to avoid overcapping, but it’s better to have more than 55-60% CRIT Rate, because it would be a shame if the first E has only 40% CRIT Rate after all.

**4PC Golden Troupe**

Good option which is only slightly better than 2pc combos, because it buffs the Elemental Skill, which is about 50% of her total DPS (on rotation n°2). It is recommended to switch out between the 2 Skills to make sure both get the 70% Damage Bonus. If you don’t, it’s only equal or below the 2pc combos. Furthermore, make sure to switch out between Burst and Skill to guarantee the 70% Damage Bonus. The set is a bit more competitive if you play Navia as a sub DPS, since a significant portion of her damage comes from her Skill.

**2PC Skill/Geo/ATK/ER combos**

2pc combos are still a great option if you have good substats and don’t want to farm Navia’s signature set. It is about 11-12% weaker than her best set. The 2pc combos effects are also unconditional, unlike most 4pc sets. With Bennett, 2pc Geo becomes better than 2pc ATK. Without Bennett, the 2pc ATK is better overall.

**4PC Archaic Petra**

This option is very competitive (sometimes Best-in-Slot) if you play Navia as sub DPS in a Mono Element team. Although Navia loses about 20% of her personal damage compared to her best set, it is still usually a gain in overall team DPS in teams where Navia’s DPS contribution isn’t high.

**4PC Gladiator's Finale / 4PC Husk of Opulent Dreams / 4PC Vermillion Hereafter**

These options are viable, but there is less than 1% difference between them and a 2pc combo. They can still be considered if the substats are very good. Keep in mind that the Vermillion set is only viable with Furina in the team because her drain mechanic is required.

For more details with numbers for the artifacts sets, check the sheet made by Duckfero here.

#
__WEAPONS__ **Verdict**

Navia’s signature weapon and Best-in-Slot. Most signature weapons have about a 10-15% advantage over other options, but for Navia, there are three competitors within about 5% of this weapon. There’s nothing particularly interesting about this weapon that will change your playstyle, so just consider it to be a good stat stick.

**Serpent Spine (R5)**

Assumes max stacks, which is easy to accomplish in Spiral Abyss. Just make Navia the party lead and wait for all the stacks to accumulate before hitting start on the floor. Time and time again, Serpent Spine has shown itself to be of impeccable value to Claymore-wielders, and even with the new Battle Pass options, this reigns supreme over all other 4-star and 5-star options.

Make sure to use a CRIT Rate hat, and not a CRIT DMG hat, since Navia’s CRIT DMG Ascension stat compensates for the lack of CRIT DMG Hat. On most other characters, Serpent Spine wants a CRIT DMG hat.

**Redhorn Stonethresher**

A massive CRIT DMG stat stick with the added bonus of buffing her Normal Attacks a small amount. There isn’t much else to say here. 88% CRIT DMG is hard to ignore, and the numbers show. This weapon becomes better if you’re using the Husk of Opulent Dreams artifact set.

**Beacon of the Reed Sea (One Passive Trigger)**

Good due to its CRIT Rate stat and, at minimum, 20% ATK boost. It’s important to note that the first Skill does not grant stacks. It has the potential to surpass other weapons if she gets hit, but if you’re not perpetually shielded with Navia, you have probably done something wrong in your gameplay to drop your DPS in other ways.

**Wolf’s Gravestone / The Unforged**

Both weapons are more than 10% less than Navia’s signature weapon, and both have similar effects. Unforged assumes a shield at all times because Navia also wants a shield at all times. If you end up not using Bennett on your team, these weapons become much more valuable. Keep in mind that Wolf’s Gravestone can buff teammates as well, even if that buff is not reliable.

**Sacrificial Greatsword / "Ultimate Overlord’s Mega Magic Sword"**

These perform slightly better than craftable options, and the event weapon is very easy to acquire. If you help all of the Melusines, the 48% ATK boost is much appreciated.

As for Sacrificial Greatsword, its value skyrockets if you can somehow get 18 stacks (6 for each Skill) per rotation, but without any stacks active, the extra damage is insignificant, as it’s half the motion value and can lengthen rotations. Current calculations assume no stacks on the 3rd Skill use.

__Craftable Choices__ **Katsuragikiri Nagamasa / Tidal Shadow**

Tidal Shadow outshines Katsuragikiri if she starts her rotations at less than full health, but this is hard to manage on the first floor of Spiral Abyss and with Zhongli’s shield. Katsuragiri Nagamasa satisfies most of her Energy Recharge requirements while being a more selfish version of a Favonius weapon; she gains more energy, but only for herself. Katsuragikiri also buffs Navia’s Skill damage, which is much-desired.

#
__TEAM BUILDING__ **On-field DPS**

Navia | Geo | Flex | Flex

Navia’s team building strategy focuses on having 2 Pyro/Electro/Cryo/Hydro units with her to activate her A4 passive which gives her up to 40 ATK%. In addition to the previous units, Navia heavily favors a second Geo unit to activate Geo Resonance, help with off-field Crystallize generation, and provide Energy.

Teammates

geo Geo options:

  • Zhongli - Zhongli is a very strong candidate for the Geo slot, as he brings a strong shield for Geo resonance and universal 20% RES Shred. He can hold 4pc Tenacity of the Millielith or simply 2pc combinations of HP for better Shield Strength.
  • Albedo - Albedo is another option for the Geo slot, with solid personal damage and consistent Crystallize and Energy generation. He can be built with 4pc Husk of Opulent Dreams or 4pc Golden Troupe.
  • Geo MC - Geo MC is a strong option as a 4*, with high particle generation, a CRIT Rate buff, and solid personal DPS. However, their constructs, especially from skill, can prevent Navia from hitting enemies, whether by covering them in front or raising them up.

flex The two remaining slots can be any combination of buffers or off-field DPS:

  • Furina - provides a strong buff, but requires a teamwide healer to consistently take advantage of it. She also has some Hydro application which helps generate Crystallize shards, and decent off-field DPS, but she does lengthen rotations. She wants 4pc Golden Troupe.
  • Kokomi - serves well as a healer in teams with Furina, brings strong AoE Hydro application for Crystallize, and can carry Thrilling Tales of Dragon Slayers to help buff Navia. She can hold 4pc Tenacity of the Millielith.
  • Bennett - is another option for the healer slot, and brings a large ATK buff of his own, but has very little Pyro application. He can hold 4pc Noblesse Oblige.
  • Fischl, Yae Miko, Xiangling, Xingqiu, Yelan, Ganyu, and Rosaria all provide good off-field damage with strong application of their respective elements, which is valuable for Crystallize shields. Fischl and Yae Miko want 4pc Golden Troupe, Yae in part due to her Burst being a DPS loss. Xiangling, Xingqiu, Yelan, and Ganyu want 4pc Emblem of Severed Fate. Rosaria wants 4pc Noblesse Oblige.

Recommended combinations include Bennett-Fischl, Furina-Kokomi, Xingqiu-Yelan, Bennett-Furina, Bennett-Yelan, Fischl-Yelan, FIschl-Yae, Ganyu-Rosaria, and Bennett-Xiangling.

**Quickswap**

Quickswap Navia is not recommended because her damage is greatly reduced when played as a quickswap DPS, making her not worth running over other potential options.

Noelle | Navia | Xingqiu | Furina

Neuvillette | Furina | Navia | Kazuha

sharp galleonBOT
#
__CREDITS__
Lead:

@gloomy wadi

Authors:

@gloomy wadi, @alpine thorn

Calculations:

@gloomy wadi

Framecounts:

@high silo

Consulting:

Acacia, @cold tartan

Content Verification:

Calculations: @high silo
Writing: @digital bluff

Transcription:

@glad gyro, @cerulean mirage, @drowsy plaza

DISCLAIMER

Pre-TC is volatile and, as always, perpetually subject to change until release (and sometimes later!). Please note that these are theoretical suggestions.
Everything described in this FAQ is a good faith analysis based on the little information about the character’s kit that we know. Team calcs, additionally, are not established yet, and as with everything in TC, the content in this FAQ should be taken with a grain of salt.

__OVERVIEW__

Chevreuse is a 4-star Pyro Polearm character aligned with Ousia whose kit involves providing large amounts of buffs to teams centered on the Overloaded reaction. Chevreuse’s A1 Passive reduces the Pyro and Electro RES of enemies, with the restriction of using only Pyro and Electro teammates. Her Elemental Skill fires a shot from her gun, dealing damage to an enemy and providing a slow healing effect to the on-field character. After a teammate triggers an Overloaded reaction, this shot becomes empowered, dealing increased damage and activating her A4 Passive to grant a teamwide ATK buff based on her Max HP. At C6, any characters healed by Chevreuse will gain a Pyro and Electro DMG Bonus buff, increasing the potency of her supportive capabilities.

Chevreuse will be played primarily as a supportive teammate, swapping on-field to use her Elemental Skill and Burst quickly, then leaving to let her teammates utilize the buffs she provides. Although her A4 Passive and C6 don't require Pyro and Electro teammates to activate, she is unable to reduce the Resistance of enemies with her A1 without these team restrictions.

#
__TALENT PRIORITY__ **Elemental Skill > Elemental Burst >> Normal Attack**

Analysis

  • Chevreuse’s buffs are unrelated to her Talent levels, however her healing scales with her Elemental Skill, making that the first priority for some extra comfort. Her Normal Attacks are unused, making her Elemental Burst next in line for leveling. Although her Burst Talent levels are extra damage, Chevreuse is not dealing a large amount of damage in a majority of teams and sometimes does not cast her Elemental Burst at all, meaning this can also be ignored if players aren't using it.
__TALENT OVERVIEW__ **Normal Attack: Line Bayonet Thrust EX**

Chevreuse performs a 4-hit attack string. However, her kit doesn’t require using them at all, meaning they can be safely ignored.

**Elemental Skill: Short-Range Rapid Interdiction Fire**

CD: 15s

When tapped, Chevreuse’s Elemental Skill fires a quick shot from her musket, dealing AoE Pyro DMG. When held, Chevreuse enters an Aiming Mode, locking onto a target in her crosshair to fire a more precise shot, dealing increased Pyro DMG with a slight increase to her interruption resistance. If an Overloaded reaction has been recently triggered, her Hold Skill will become enhanced, firing an Overcharged Ball for even higher DMG upon its next use. After casting her Skill, the current active character will receive a healing over time effect for 12 seconds, triggering once every two seconds and scaling off of her Max HP. This healing typically ranges from around 3,000 - 4,000 per tick when using her Burst, and around 5,000 when not, making her a good defensive slot in for teams. Chevreuse’s Skill generates 4 particles with a cooldown of 15 seconds, meaning she will generally only get one set of particles per rotation. Because of the extra benefits granted by her enhanced Hold Skill, there is little reason to use her Tap Skill in combat.

**Elemental Burst: Ring of Bursting Grenades**

CD: 15s
Energy cost: 60

Chevreuse’s Elemental Burst fires an explosive grenade, dealing AoE Pyro DMG and exploding into 8 smaller cluster shells, which detonate after a short period. These cluster shells have inward knockback, meaning enemies will be hit towards the center of her Elemental Burst’s explosion. However, these cluster shells will only apply Pyro on the 1st and 4th hits and explode relatively quickly compared to other bomblets, such as Klee or Kirara’s, which stick around after being created, making it unreliable as a form of off-field Pyro application. Although her Burst costs 60 Energy to cast, it’s not required to activate any of her buffs, meaning players will generally prefer to stack HP / Healing Bonus for healing and buffs rather than ER / ATK% / CRIT for Burst damage.

__Passives__ **Ascension 1 Passive: Vanguard's Coordinated Tactics**

When the team is only composed of Pyro and Electro characters, Chevreuse reduces the Pyro and Electro RES of opponents hit by Overloaded by 40% for 6 seconds. Although this means her teams are unable to run teammates of a different Element, such as an Anemo character for grouping, she is able to reliably shred the Resistances of two Elements at once and from off-field, compared to 4pc Viridescent Venerer which requires an on-field Swirl Reaction. This also allows her to shred the Resistance of enemies in scenarios where 4pc VV can not, such as on enemies with innate auras.

**Ascension 4 Passive: Vertical Force Coordination**

Upon firing an Overcharged Ball, Chevreuse increases the ATK of Pyro and Electro teammates by 1% for every 1,000 Max HP she has, maxing out at 40% ATK. These effects will be maxed out at 40,000 HP, meaning players generally want to build her fully on HP rather than damage stats.

**Utility Passive: Double Time March**

Chevreuse decreases the sprinting Stamina consumption of party members by 20%, allowing for more dashes before Stamina is fully depleted, helping with both survivability and convenience.

#
__CONSTELLATIONS__

DPS% increases assume an average of her personal damage increases between both damage and healing-oriented builds. Although their increases are similar, please check the Chevreuse Mastersheet for specifics.

**Constellation 1 - Stable Front Line's Resolve**

When the active character with the "Coordinated Tactics" status (not including Chevreuse herself) triggers the Overloaded reaction, they will recover 6 Energy. This effect can be triggered once every 10s.
You must first unlock the Passive Talent "Vanguard's Coordinated Tactics."

Although this Constellation may look good on paper, in reality it’s difficult to control which characters trigger Overloaded and when, requiring near-perfect timing to proc this effect twice for a typical 20-second rotation. Although it may help some characters, the Energy provided from this Constellation is not to be relied on, but treated as an extra bonus for the on-field character that receives this effect.

***DPS% Increase vs. C0:***

0%

***Healing% Increase vs. C0:***

0%

***Rating:***

1/5

**Constellation 2 - Sniper Induced Explosion**

After Holding Short-Range Rapid Interdiction Fire and hitting a target, 2 chain explosions will be triggered near the location where said target is hit. Each explosion deals Pyro DMG equal to 120% of Chevreuse's ATK. This effect can be triggered up to once every 10s, and DMG dealt this way is considered Elemental Skill DMG.

After Chevreuse uses her Hold Skill, her bullet will explode into two smaller explosions with inward knockback, applying an extra instance of Pyro and dealing Pyro DMG. Unfortunately, her personal damage isn’t particularly high, leading to this Constellation being quite underwhelming. However, the two extra hits can be useful to trigger effects such as Favonius Lance’s passive.

***DPS% Increase vs. C1:***

17.08%

***DPS% Increase vs. C0:***

17.08%

***Healing% Increase vs. C1:***

0%

***Healing% Increase vs. C0:***

0%

***Rating:***

1/5

**Constellation 3 - Practiced Field Stripping Technique**

Increases the Level of Short-Range Rapid Interdiction Fire by 3.
Maximum upgrade level is 15.

C3 increases the levels of Chevreuse’s Elemental Skill, increasing her healing and slightly increasing her damage.

***DPS% Increase vs. C2:***

5.67%

***DPS% Increase vs. C0:***

23.73%

***Healing% Increase vs. C2:***

19.43%

***Healing% Increase vs. C0:***

19.43%

***Rating:***

2.5/5

**Constellation 4 - The Secret to Rapid-Fire Multishots**

After using Ring of Bursting Grenades, the Hold mode of Short-Range Rapid Interdiction Fire will not go on cooldown when Chevreuse uses it. This effect is removed after Short-Range Rapid Interdiction Fire has been fired twice using Hold or after 6s.

After casting her Elemental Burst, Chevreuse is granted the ability to use her Hold Skill an extra two times, allowing up to three quick and consecutive Skill casts. Unfortunately, these extra Skill uses don’t generate particles due to her 10-second cooldown on particle generation. Additionally, this Constellation doesn’t reset her Skill’s cooldown, meaning Chevreuse will be unable to use her C4 if she uses her Skill before her Burst. In a 25-second rotation, it is possible for Chevreuse to cast her Burst and 1 Skill early on, then come back 10 seconds later for another Skill cast, allowing her to generate up to 8 particles per rotation. While only a few rotations can actually accommodate this, those that can may find it helpful to funnel the extra particles to another teammate.

***DPS% Increase vs. C3:***

35.18%

***DPS% Increase vs. C0:***

67.25%

***Healing% Increase vs. C3:***

0%

***Healing% Increase vs. C0:***

19.43%

***Rating:***

1/5

***DMG Build Rating:***

3/5

**Constellation 5 - Enhanced Incendiary Firepower**

Increases the Level of Ring of Bursting Grenades by 3.
Maximum upgrade level is 15.

C5 increases the levels of Chevreuse’s Elemental Burst, slightly increasing her personal damage.

***DPS% Increase vs. C4:***

6.57%

***DPS% Increase vs. C0:***

78.23%

***Healing% Increase vs. C4:***

0%

***Healing% Increase vs. C0:***

19.43%

***Rating:***

0/5

**Constellation 6 - In Pursuit of Ending Evil**

After 12s of the healing effect from Short-Range Rapid Interdiction Fire, all nearby party members recover HP equivalent to 10% of Chevreuse's Max HP once.
After a party member is healed by Short-Range Rapid Interdiction Fire, they gain a 20% Pyro DMG Bonus and Electro DMG Bonus for 8s. Max 3 stacks. Each stack's duration is counted independently.

Chevreuse’s C6 provides a 20% DMG Bonus to any characters she heals, stacking up to 3 times for a maximum of 60% Pyro and Electro DMG Bonus. This effect can take some time to stack up due to her slow healing intervals but is a potent buff for any Chevreuse team. Additionally, after 12 seconds of healing from her Skill, Chevreuse heals the entire party, helping for extra survivability and granting them a stack of her DMG Bonus buff, increasing the team’s overall damage output further. Keep in mind, the results here are for personal damage, the teamwide damage increase is ~10% overall.

***DPS% Increase vs. C5:***

0%

***DPS% Increase vs. C0:***

78.23%

***Healing% Increase vs. C5:***

96.66%

***Healing% Increase vs. C0:***

134.87%

***Rating:***

4/5

#
__ENERGY RECHARGE REQUIREMENTS__

In general, Chevreuse’s ER Requirements are quite high, ranging from 175% - 205%. Thankfully, she is able to run weapons such as Favonius Lance to benefit the team’s Energy or the Fontaine craftable Polearm, Rightful Reward. Rightful Reward can lower her ER Requirements by ~25% - 50% depending on refinements, and even further if she’s able to trigger its passive twice per rotation. However, Chevreuse’s Burst isn’t required to activate any of her buffs, meaning players can choose to ignore ER% stats and focus on offensive or supportive stats if they aren’t interested in its inward knockback, or don’t need to activate artifact set bonuses such as Noblesse Oblige.
When run with Raiden, her ER Requirements plummet to around 105% - 135%, allowing her to further focus on offensive or supportive stats depending on how players want to build her, whilst easily Bursting every rotation.

Chevreuse’s ER Requirements will vary based on your team and rotation. For a more accurate estimate, please use the Energy Recharge Calculator linked here.
For more details on how Favonius weapons will affect your team, please use Ac1d’s Favonius Mastersheet linked here.

#
__ARTIFACTS__

sands Sands of Eon: HP%
goblet Goblet of Eonothem: HP%
circlet Circlet of Logos: HP% / HB%

If players require the use of Chevreuse’s Elemental Burst, her ER Requirements should be met first before looking for other stats. Chevreuse prefers to stack as much HP% as possible, helping her to reach 40,000 HP to maximize her A4 Passive. After that, she is able to focus on other stats that benefit her healing, such as a Healing Bonus Circlet. In Raiden teams, Chevreuse’s ER Requirements are low enough that she can aim for more offensive substats, such as CRIT and ATK%.

Substats: ER% until requirement (if Bursting) > HP until ~40,000 > HB% > HP% > Flat HP

__Artifact Sets__ **4PC Song of Days Past**

4pc Song of Days Past is a new artifact set releasing in 4.3, granting five instances of Flat DMG Bonus to the on-field character based on the total healing recorded after 6 seconds. This effect works the same way as Shenhe’s Icy Quill effect, resulting in the additive stacks being used up quicker in AoE compared to single-target. On top of this, other characters may accidentally use up these stacks during a rotation if it triggers during their field time. However, Chevreuse is able to max out the set’s effect with her C6 and can be a viable alternative in some teams already running other supportive sets. For players ignoring her Elemental Burst, Chevreuse can max out this set’s effect twice in a rotation, due to the increased healing from additional HP and Healing Bonus stats.

**4PC Noblesse Oblige**

4pc Noblesse Oblige further increases the buffs Chevreuse grants, providing a 20% ATK buff to the party, although it requires building ER% for her Elemental Burst.

**4PC Maiden Beloved**

4pc Maiden Beloved Further increases Chevreuse’s healing, granting the team an extra 20% Incoming Healing Bonus after she casts her Elemental Skill or Burst.

**4PC Ocean-Hued Clam**

4pc Ocean-Hued Clam can be considered for some extra damage when building for Chevreuse’s healing. Although she doesn’t max out the Sea-Dyed Foam, it deals an equal amount of damage in AoE, compared to Song of Days Past being more single-target oriented.

**4PC Tenacity of the Millelith**

4pc Tenacity of the Millelith increases Chevreuse’s healing with its 20% HP (2pc effect), whilst also granting a short teamwide 20% ATK buff upon hitting an enemy with her Skill. TotM can be considered when running Chevreuse with teammates who are able to quickly snapshot the 4pc effect.

**2pc HB/HP/ER combos**

2pc combinations of Maiden Beloved, Ocean-Hued Clam, Song of Days Past, Tenacity of the Millelith, Vourukasha’s Glow and Emblem of Severed Fate will generally provide higher healing than the aforementioned 4pc set bonuses (outside of 4pc Maiden Beloved), but lack the extra team utility.

#
__WEAPONS__ **Black Tassel**

Chevreuse’s weapon of choice for maximizing both her healing and her buffing, allowing her to run both a Healing Bonus Circlet and Energy Recharge Sands if players want to consistently use her Burst. Being a 3-star weapon also makes it extremely affordable for all players.

**Favonius Lance**

Favonius weapons are generally a good choice on any supportive teammate, helping to lower all party member’s ER Requirements. This can also help Chevreuse to Burst more frequently whilst focusing fully on HP substats to improve her healing.

**Rightful Reward**

A craftable weapon from Fontaine, providing HP% from its substat and flat Energy upon being healed. With C6’s teamwide healing, Chevreuse is guaranteed to trigger this once per rotation, due to the weapon passive working off-field, lowering her ER Requirements and allowing her to run a Healing Bonus Circlet. However, a C0 Chevreuse may struggle to trigger this without a secondary healer, due to her Elemental Skill’s healing being slightly delayed after casting. For players who don’t care for Chevreuse’s Burst, this weapon provides much less HP% than Black Tassel, making it weaker across the board.

**Any other HP or ER Polearm**

Any weapon that provides Chevreuse with HP% or Energy Recharge can be useful to help her reach ~40,000 HP to maximize her buff, whilst being able to Burst every rotation. However, ER% weapons outside of Favonius Lance become useless when not utilizing Chevreuse’s Burst, shrinking her total number of available weapons.

**Staff of Homa**

An offensive weapon choice that provides a small amount of HP% to help with Chevreuse’s healing and buffing. Its passive also converts HP into ATK for the wielder, increasing Chevreuse’s damage on a support-oriented build, or increasing her supportive capabilities when built for damage. Keep in mind, this weapon doesn’t provide any Energy Recharge, meaning players will need to gain ER% elsewhere for her to consistently Burst in an offensive scenario.

#
__TEAM BUILDING__

Although Chevreuse teams utilize the Overloaded reaction, this is only as a catalyst to activating her buffs, meaning characters will prefer to be built for raw damage rather than solely on Elemental Mastery. These periodic Overloaded triggers are required to keep up her A1 Passive, meaning either off-field Elemental application or quickly swapping between characters is recommended for maximum uptime. In solo Pyro scenarios or teams with no off-field Pyro Application (such as Chevreuse and Bennett), a Pyro Skill can be used before your Electro DPS’s field time, in order to maximize the uptime on her A1. In a lot of teams, Chevreuse will be replacing an Anemo character, due to her teambuilding restriction of only Pyro and Electro teammates, whilst providing Resistance Shred on par with 4pc Viridescent Venerer. If players are struggling with Chevreuse as their only healer, characters like Beidou or Dehya can be used for extra defensive utility.

Most teams will not have much use for Chevreuse’s Elemental Burst, instead preferring to funnel her Skill into another Pyro teammate. Its unique inward knockback may be useful in AoE scenarios to help group enemies without an Anemo character; however, its strength compared to other forms of grouping is questionable.

Currently, Chevreuse does not have many teams that can satisfy her team constraints without giving up some form of extra utility. For example, pairing Chevreuse with Bennett gives a strong buffing duo, but leaves limited options for making the most of her kit. If Xiangling is chosen to consolidate off-field Pyro Application, the last slot is forced to be an Electro character, preferably one with on-field presence, in order to activate Chevreuse’s buffs effectively. If players choose a character like Fischl, the 4th team slot is open for choice, but may struggle with uptime on Chevreuse’s A1 RES Shred due to no off-field Pyro if an Electro on-fielder is chosen. On top of this, Chevreuse is unable to make use of grouping provided by Anemo characters without deactivating her A1 Passive. Despite these teambuilding restrictions, she has some use in teams without utilizing all of her buffs, being able to provide up to 60% DMG Bonus to Pyro and Electro teammate at C6 unconditionally, and 40% ATK if used with at least one Electro teammate.

**Raiden**

Chevreuse | Raiden | Pyro | Pyro/Electro

Raiden Overloaded teams have a mix of high damage and great flexibility, allowing for a great selection of off-fielders in the 4th slot. Xiangling will generally be used alongside Bennett in this team thanks to her consistent off-field Pyro application and high damage, but Electro off-fielders such as Fischl, Sara and Yae can be used instead, at the sacrifice of some uptime on Chevreuse’s A1 Passive. Compared to an Anemo character, Chevreuse can apply her RES Shred on multiple waves, allowing for 100% RES Shred uptime during Raiden’s field time. Due to the low ER Requirements in Raiden teams, Chevreuse can be built for some damage rather than pure utility without sacrificing much overall team damage.

Teammates

pyro Pyro options: Xiangling, Bennett

flex Flex options: Bennett, Yae, Sara, Fischl

**Yoimiya**

Chevreuse | Yoimiya | Fischl | Bennett/Raiden

Yoimiya Overloaded teams are a viable alternative to her current options whilst being less reliant on shields. In Vaporize teams, Yoimiya wants to Vaporize both her N3 and N5, resulting in her being unable to dodge easily. In Overloaded teams, which hits apply Pyro aren’t as important, meaning she can reliably dodge without sacrificing much damage. On top of this, the knockback provided by Overloaded can help reduce pressure against lighter enemies, further reducing Yoimiya’s shield reliance. Raiden and Yoimiya can also be used together in longer rotations, due to both providing on-field and off-field application via Raiden’s Skill and Yoimiya’s Burst.

**Lyney**

Chevreuse | Lyney | Fischl | Dehya/Bennett

Lyney Overloaded teams prefer to play shorter rotations compared to other teams and are able to keep a consistent Pyro aura for his A4 Passive, whilst also getting consistent Overloaded reactions to trigger Chevreuse’s A1. Dehya is also a viable alternative to Bennett, providing interruption resistance, utility that is greatly appreciated on Bow characters.

**Other Options**

Chevreuse | Pyro / Electro | Flex | Flex

Most other on-fielders do not benefit greatly from Chevreuse’s buffs compared to their original teams, but can be played if you so choose. Please note that Razor should be played with C6 Bennett if there is no other off-field Pyro application, allowing Razor to trigger Overloaded by himself on-field.

Teammates

pyro Pyro options: Xiangling, Bennett, Yanfei, Klee, Hu Tao

electro Electro Options: Fischl, Beidou, Razor, Keqing, Yae, Cyno

**Hu Tao VV Vape**

Chevreuse | Hu Tao | Xingqiu | Anemo

In Hu Tao VV Vape teams, there isn’t much competition for the 2nd Pyro slot, namely Amber with Elegy for buffs or Thoma and Yanfei for shielding. As Chevreuse isn’t reliant on a 5-star weapon to perform well in this team, she works as an offensive buffer with slight healing for defensive utility. However, C6 is required for this due to not having an Electro teammate to trigger her Overcharged Ball. Although Bennett works as a 2nd Pyro for this team, Chevreuse’s lower healing benefits Hu Tao’s A4 Passive, which wants Hu Tao to stay below 50% HP. Chevreuse’s lower healing also allows Hu Tao to equip 4pc Marechaussee Hunter for a large 36% CRIT Rate when her HP changes. For more consistent uptime on this passive, players can ignore HP% on Chevreuse entirely, instead aiming for either Energy Recharge or offensive stats. This will allow Chevreuse to provide further buffs from artifact set bonuses, such as 4pc Noblesse Oblige or 4pc Instructor.

#
**Lyney Mono Pyro**

Chevreuse | Lyney | Dehya / Bennett | Flex

An alternative to Lyney’s Overloaded team with Chevreuse, allowing for a flex teammate, such as an Anemo character or Zhongli. As Lyney teams tend to use shorter rotations than most teams, Chevreuse can continue to ignore her Burst, allowing her to focus on her healing. Ignoring ER% can allow Chevreuse to equip 4pc Song of Days Past, maxing out the set’s buff twice. Because of Lyney’s large amounts of DMG Bonus and CRIT, the effects of 4pc Song of Days Past are greatly amplified when compared to other characters. Players can further buff this damage with Kazuha for his A4 DMG Bonus buff, or Zhongli for his shielding and 4pc Archaic Petra’s DMG Bonus buffs.

lilac urchinBOT
#
__CREDITS__
Lead:

@analog scaffold

Authors:

@gloomy wadi, @glad gyro, @ancient karma, @subtle finch, @fervent mural, @alpine thorn

Calculations:

@glad gyro, @fervent mural, @subtle finch

Consulting:

@gloomy wadi

Content Verification:

Calculations: @little olive
Writing: @gloomy wadi

Transcription:

@glad gyro, @cerulean mirage

Resources:
DISCLAIMER

Pre-TC is volatile and, as always, perpetually subject to change until release (and sometimes later!). Please note that these are theoretical suggestions.
Everything described in this FAQ is a good faith analysis based on the little information about the character’s kit that we know. Team calcs, additionally, are not established yet, and as with everything in TC, the content in this FAQ should be taken with a grain of salt.

__OVERVIEW__

Gaming is a 4-star Pyro Claymore character who uses his Elemental Skill’s Wushou arts to jump off enemies and retaliate with an enhanced Plunging Attack. Upon hitting an enemy with his enhanced Plunging Attack, Gaming will consume a fixed amount of HP, whilst gaining some back over a short period. His Elemental Burst causes him to enter the Wushou Stance, recovering a fixed amount of HP and throwing his companion, the Suanni Man Chai, at enemies. Once Man Chai hits an enemy, it will return to Gaming, resetting the CD of his Elemental Skill. If Gaming has over 50% HP when using his Elemental Skill or enhanced Plunging Attack, Man Chai will be resummoned and bounce randomly nearby before returning to Gaming.

Gaming will primarily be played as an on-field DPS, repeatedly dashing at enemies and Plunging with his Elemental Skill. As a Liuye character, Gaming will be obtainable in this year’s Friends at the Doorstep event as part of the upcoming Lantern Rite Festival, allowing players to access him for free.

#
__TALENT PRIORITY__ **Elemental Skill > Elemental Burst > Normal Attack**
**With C6 Bennett and Xianyun: Elemental Skill > Normal Attack > Elemental Burst**

Analysis

  • Gaming’s kit revolves around his Charmed Cloudstrider Plunging Attacks; hence, his Elemental Skill should be prioritized in leveling. The Wushou Stance granted by his Burst helps him perform these enhanced Plunging Attacks in rapid succession. These enhanced Plunging Attacks cannot deal Collision Plunge Damage.
  • With C6 Bennett and Xianyun, Gaming’s Normal Attacks and regular Plunging Attacks contribute notably to his damage output due to Xianyun’s Plunging Attack buffs and C6 Bennett’s Pyro infusion, along with a 15% Pyro DMG Bonus. Therefore, in such teams, it is recommended to level his Normal Attack Talent as well.
  • Gaming has a HP fluctuation mechanic similar to Fontaine characters, consuming and recovering his own HP upon using his Skill. It is recommended to keep him above 50% HP as much as possible to fully maximize his self-buffs and Man Chai’s Elemental Skill CD reset.
__TALENT OVERVIEW__ **Normal Attack: Stellar Rend**

Gaming’s Normal and Plunging Attacks are often used in between his Charmed Cloudstrider Plunging Attacks. Regular Plunging Attacks are used when Xianyun is in the team to maximize her A4 Passive. Hence, it is not recommended to fully ignore this Talent.

**Elemental Skill: Bestial Ascent**

CD: 6s

The crème de la crème of Gaming’s kit and the source of most of his damage. Gaming lunges forward and launches himself upwards after colliding with an enemy. Upon going down, he performs his special Charmed Cloudstrider Plunging Attack, which is a Pyro-converted Plunging Attack that cannot be overridden by other infusions. Gaming also consumes 15% of his Max HP upon landing a Charmed Cloudstrider Plunging Attack. This consumption stops when only 10% of his Max HP remains. Charmed Cloudstrider Plunging Attacks cannot deal Collision Plunge Damage.

**Elemental Burst: Suanni's Gilded Dance**

CD: 15s
Energy cost: 60

Gaming enters Wushou Stance upon using his Burst. During its initial cast, Gaming regains 30% of his Max HP, briefly applies Pyro to himself, and summons his companion, Suanni Man Chai, who smashes into the enemy and deals damage. Man Chai then rolls to a nearby location and collides with Gaming. After colliding, Gaming’s Elemental Skill CD resets.

If Gaming performs a Charmed Cloudstrider Plunging Attack whilst above 50% HP during the Wushou Stance, he summons Man Chai again, who rolls and collides with Gaming once more. This resets his Skill CD again and allows him to do Charmed Cloudstrider Plunges 4–5 times within Wushou Stance’s duration.

__Passives__ **Ascension 1 Passive: Dance of Amity**

This Passive allows Gaming to heal himself outside of his Burst’s initial cast. For 0.8s, he recovers 1.5% of his HP per 0.2s, which means he heals 6% of his HP total for 0.8s after hitting an opponent with his Charmed Cloudstrider Plunging Attack.

**Ascension 4 Passive: Air of Prosperity**

Depending on the amount of HP Gaming has, he receives different buffs from this Passive. He gains 20% Healing Bonus if his HP is below 50%, and a 20% increase on the damage dealt by his Charmed Cloudstrider Plunges if his HP is above 50% instead.

**Utility Passive: The Striding Beast**

Gaming gives Movement SPD to the whole party, but only during the daytime in the overworld.

#
__CONSTELLATIONS__ **Constellation 1 - Bringer of Blessing**

When the Suanni Man Chai from Suanni's Gilded Dance meets back up with Gaming, it will heal 15% of Gaming's HP.

Gaming gains even more self-healing outside of his Burst’s initial cast and his A1 Passive, which aids in keeping him above 50% HP. Unfortunately, this Constellation doesn’t really do anything to directly increase his own damage.

***DPS% Increase vs. C0:***

0.00%

***Rating:***

1.5/5

**Constellation 2 - Plum Blossoms Underfoot**

When Gaming receives healing and this instance of healing overflows, his ATK will be increased by 20% for 5s.

Gaming buffs himself for any instance of overhealing he receives, adding a little more value to his self-healing and other healers.

***DPS% Increase vs. C1:***

3.87%

***DPS% Increase vs. C0:***

3.87%

***Rating:***

1/5

**Constellation 3 - Awakening Spirit**

Increases the Level of Bestial Ascent by 3.
Maximum upgrade level is 15.

An increase on Gaming’s Elemental Skill level, which in turn, is a welcome increase on his Charmed Cloudstrider Plunging Attack’s damage.

***DPS% Increase vs. C2:***

6.41%

***DPS% Increase vs. C0:***

10.53%

***Rating:***

2.5/5

**Constellation 4 - Soar Across Mountains**

When Bestial Ascent's Plunging Attack: Charmed Cloudstrider hits an opponent, it will restore 2 Energy to Gaming. This effect can be triggered once every 0.2s.

Notably lowers Gaming’s ER Requirements (to be discussed further in the next section), allowing more leeway for offensive substats to increase his damage output.

***DPS% Increase vs. C3:***

5.46%

***DPS% Increase vs. C0:***

16.56%

***Rating:***

2/5

**Constellation 5 - Evil-Daunting Roar**

Increases the Level of Suanni's Gilded Dance by 3.
Maximum upgrade level is 15.

An increase on Gaming’s Burst level. His Burst is not a significant portion of his overall damage output, but an increase is still welcome nonetheless.

***DPS% Increase vs. C4:***

1.85%

***DPS% Increase vs. C0:***

18.72%

***Rating:***

1/5

**Constellation 6 - To Tame All Beasts**

Bestial Ascent's Plunging Attack: Charmed Cloudstrider CRIT Rate increased by 20% and CRIT DMG increased by 40%, and its attack radius will be increased.

Gaming’s strongest Constellation. His Charmed Cloudstrider Plunging Attacks gain a notable CRIT buff, which increases its damage by roughly 31%. Charmed Cloudstrider Plunging Attacks also gain an attack radius increase from 4m to 6m, which makes its AoE the same size as Bennett’s Burst radius.

***DPS% Increase vs. C5:***

19.29%

***DPS% Increase vs. C0:***

41.62%

***Rating:***

4/5

lilac urchinBOT
#
__COMBOS__

Gaming's combos can vary between several factors such as Xianyun, Xingqiu, or Yelan's inclusion in the team, Bennett's Constellation level, and the moment Man Chai collides to reset Gaming's Skill CD.

Please note that if you want to Swirl Pyro, you will have to switch to Xianyun or Kazuha AFTER using Bennett’s Burst, meaning funneling from Bennett to Gaming during setup is not possible. Nevertheless, this can still happen at the end of the rotation by doing an Elemental Skill on Bennett then switching back to Gaming to do a final Elemental Skill.

For the discussion of in-depth gameplay details, please check the Teambuilding section of this FAQ.

**If Xianyun: EP focus, JP or NA in between EP**

With Xianyun in the team, Gaming would want to maximize her A4 Passive's Flat DMG Bonus with his Charmed Cloudstrider Plunges. Regular Plunging Attacks or Normal Attacks can be used in between Charmed Cloudstrider Plunges.

**If Xianyun AND C6 Bennett: Alternate between EP and JP**

With C6 Bennett's ATK buff and 15% Pyro DMG Bonus, use Charmed Cloudstrider Plunges with regular Plunging Attacks to fully utilize Xianyun's A4 Passive and maximize Gaming's damage output.

Keep in mind that if you are using regular Plunging Attacks, it makes it harder to meet up with Man Chai to reset Gaming's Skill CD, which means that there would be 1 less Skill per rotation most of the time.

**If Xingqiu or Yelan: Weave NAs before any PA**

Weaving Normal Attacks in between Plunging Attacks triggers Xingqiu's Rain Swords or Yelan's Exquisite Throw to ensure Gaming's Plunging Attacks trigger Vaporize.

**If Melt with C6 Bennett: Dash towards Man Chai and only EP**

Dashing to meet Man Chai would maximize the amount of Charmed Cloudstrider Plunges Gaming is able to use. Due to the insufficient amount of Cryo application, focusing on Charmed Cloudstrider Plunge's Melt damage would be more optimal instead of weaving in any regular Plunging Attacks or Normal Attacks.

**Else: NA between EP until E CD resets**

To deal as much damage as possible while waiting for Gaming's Elemental Skill CD, weave Normal Attacks in between Charmed Cloudstrider Plunges.

#
__ENERGY RECHARGE REQUIREMENTS__

Gaming generates 2 particles per Elemental Skill with an ICD of 3s. Depending on your rotation, you will either do 4, 5 or 6 Skills per rotation, with only 3 or 4 of them generating particles.

Gaming’s ER Requirements depend a lot on the team, their gear, and the rotation: whether Bennett is present or not, whether you feed Bennett's particles to Gaming, the number of Favonius weapons in the team, and whether your Gaming is C0 or C4+.

Gaming’s C4 generates 2 Flat Energy per Skill. As mentioned previously, you will do 4, 5 or 6 Elemental Skills per rotation, which corresponds to 8/10/12 Flat Energy per rotation.

Also, keep in mind that if you play Gaming with Bennett C6 and Xianyun, you will likely do some normal Plunging Attacks. This makes it harder to pick up Man Chai to reset your Elemental Skill CD, which means that you will do 1 less Skill per rotation most of the time.

Moreover, if you want to Swirl Pyro, you will have to switch to Xianyun or Kazuha AFTER using Bennett’s Burst, meaning you won’t be able to funnel from Bennett to Gaming during setup. Nevertheless, this can still happen at the end of the rotation by doing an Elemental Skill on Bennett then switching back to Gaming to do a final Elemental Skill.

Gaming’s ER Requirements vary based on your team and rotation. For a more accurate estimate, please use the Energy Recharge Calculator linked here.
For more details on how Favonius weapons will affect your team, please use Ac1d’s Favonius Mastersheet linked here.

#
__ARTIFACTS__

sands Sands of Eon: EM/ATK%
goblet Goblet of Eonothem: Pyro DMG%
circlet Circlet of Logos: CRIT

EM Sands is preferred due to Gaming’s reliance on Vaporize/Melt. Nevertheless, ATK% Sands can be viable with better substats or within Overload/Mono teams.

Substats: ER until requirement > CRIT DMG = CRIT Rate > EM > ATK%

__Artifact Sets__ **4PC Marechaussee Hunter**

This is Gaming’s BiS set both with and without Furina. Whilst he does not get the most usage out of the 2pc effect, he is able to consistently obtain all 3 stacks of the 4pc effect quickly. This allows Gaming wider weapon options and less reliance on a lot of CRIT substats. It is highly recommended to not build above 64% CRIT Rate to avoid overcapping.

**4PC Crimson Witch of Flames**

Crimson Witch of Flames is tied with Marechaussee Hunter for Gaming’s BiS set within Vaporize/Melt teams due to the reaction bonus the set provides. Gaming is able to build stacks of the 4pc effect over a rotation as a result of his Elemental Burst resetting the cooldown of his Elemental Skill. However, it is recommended to farm Marechaussee Hunter due to it not being reliant on reactions to get value.

**4PC Gilded Dreams**

Gilded Dreams is a viable set to run on Gaming as it is only ~5% worse than both Crimson Witch and Marechaussee Hunter. Similar to Crimson Witch, Gilded Dreams benefits more from being used in a Vaporize/Melt team due to the EM that the set gives. Outside of reaction-heavy teams, Marechaussee Hunter becomes much more consistent.

**2PC ATK% / EM / DMG%**

2pc combinations are usable as an alternative to the above sets if you are still farming for a 4pc set. Simply aim for enough ER along with as much CRIT and EM as you can muster.

**4PC Vermillion Hereafter**

Vermillion Hereafter may seem to be a viable alternative to use on Gaming due to his HP drain, however due to Gaming’s synergy with Bennett, this set actually performs considerably worse than other 4pc sets. Furthermore, Vermillion Hereafter only performs slightly better than 2pc combinations for Gaming. Generally only use this set if you have really favorable substats; otherwise, use the aforementioned 4pc sets or a 2pc/2pc combination.

#
__WEAPONS__ **Serpent Spine**

Gaming’s self HP drain does not affect Serpent Spine’s Passive.
Serpent Spine’s CRIT Rate substat and massive DMG% passive makes it Gaming’s BiS weapon across all refinements assuming you can maintain the passive. The only thing holding Serpent Spine back is its lower Base ATK, which is remedied by the inclusion of Bennett or Xianyun in most Gaming teams. While R5 Serpent Spine is by far Gaming’s BiS, if you have a lower refinement Serpent Spine, it may be worth considering other options if you aren’t running a shielder, due to Serpent Spine losing value if Gaming takes damage. It also loses some value if Gaming is used with units that give high amounts of DMG% such as Furina.

If you have C6 Gaming, it's recommended to use 4pc Crimson Witch with Serpent Spine as it is easy to overcap his CRIT Rate.

**5-star CRIT Weapons**

These include Verdict, Redhorn Stonethresher, and Beacon of the Reed Sea. All these weapons are viable options as more consistent alternatives to a lower refinement Serpent Spine. Although none of their passives are extremely noteworthy, their 5-star stats allow them to be quite decent on Gaming. It should be noted that Gaming cannot trigger the passive of Beacon of the Reed Sea with his Skill as it is considered Plunging Attack damage.

**Rainslasher**

Rainslasher’s EM substat and increased DMG% against Hydro-affected enemies make it a strong unconditional weapon for Gaming in Vaporize teams. It scales heavily with refinements; being competitive with the 5-star CRIT weapons at R5 for personal damage. It is not worth using Rainslasher outside of Vaporize teams, and the weapon loses some value if Gaming is used with units that give high amounts of DMG% such as Furina.

**Wolf’s Gravestone and The Unforged**

Both these weapons provide large amounts of ATK% in various forms. However, since Bennett and Xianyun are common teammates in Gaming teams, the value of these ATK buffs is diminished. Without these two, they have the potential to surpass some of the above weapons, but optimal teams usually include either Bennett or Xianyun. This being said, Wolf’s Gravestone can also provide an ATK% team buff, which allows teammates to deal more damage. The Unforged does not, which leads to it being slightly worse than Wolf's Gravestone.

**Song of Broken Pines**

Despite its Physical DMG% substat, Song of Broken Pines is still a decent option on Gaming for its high Base ATK and ATK% passive. It also provides an ATK% team buff if Gaming uses at least four Normal Attacks, which may allow teammates to deal more damage. It loses value if you use Gaming with a unit that can infuse his Normal Attacks. It also loses value in Xianyun teams if Gaming uses Plunging Attacks instead of Normal Attacks during his downtime.

**Talking Stick**

Talking Stick is always a downgrade to Serpent Spine, so it’s not recommended to get Talking Stick from the Battle Pass. That said, if you already have Talking Stick, it’s a decent option for Gaming because he can at least guarantee half of the passive by imbuing himself with Pyro. Even if you can somehow guarantee the other half of the passive, it still performs worse than Serpent Spine.

**Skyward Pride**

Skyward Pride’s value largely depends on Gaming’s ER Requirements. In teams with Bennett, they’re often low enough for Skyward to lose some value. Gaming’s C4 also reduces his ER Requirements, which subsequently makes this weapon lose even more value. That said, even with lower ER needs, it’s still a weapon with high Base ATK, unconditional DMG%, and some mild Physical damage procs from the passive.

**Mailed Flower**

An event exclusive weapon that gives high amounts of EM and ATK%. It does lose the buff on one of Gaming’s Plunging Attacks which causes it to lose a small amount of value, but it’s still a great weapon for those who obtained it.

**Lithic Blade**

Since Gaming is a Liyue character, this weapon is guaranteed to have at least one stack. The average assumption for Lithic Blade is that you have at least two stacks, otherwise it's not recommended to use this weapon. The ATK% is decent, but pales in comparison to the CRIT Rate% it gives. This weapon scales well with refinements, which can be seen as a downside because of Lithic Blade’s exclusivity to the weapon banner.

#
**Tidal Shadow**

A F2P craftable weapon that requires being healed in exchange for a massive ATK% buff. Gaming heals himself upon using a Plunging Attack, so he can easily maintain the passive. However, since Bennett and Xianyun are common teammates for Gaming teams, the value of this ATK% buff is diminished. Tidal Shadow sees higher value if used in teams that give Gaming large amounts of DMG%.

**"Ultimate Overlord’s Mega Magic Sword"**

A decent alternative to Tidal Shadow for those who obtained it in the recent 4.3 event. Ultimate Overlord’s Mega Magic Sword’s value largely depends on Gaming’s ER Requirements. In teams with Bennett, these are typically low enough for this weapon to lose some value. Gaming’s C4 also reduces his ER Requirements, which subsequently makes this weapon lose value.

#
__TEAM BUILDING__ **Bennett**

Bennett is a particularly important teammate for Gaming for multiple reasons. Not only are the ATK buff and healing from Bennett’s Burst useful — the former for obvious reasons and the latter to help Gaming maintain his DMG Bonus from his A4 Passive — but with C6 Bennett, Gaming gains a Pyro infusion on his Plunging Attacks, allowing him to trigger more reactions, increasing his damage significantly. Bennett’s Burst does have the issue of being tied to a fixed area, which can be limiting with regards to Gaming’s gameplay, which involves dashing towards enemies before doing Plunging Attacks. This is, however, less of an issue in fights with heavy enemies in single-target scenarios, or if Xianyun is on the team since you can opt to execute normal Plunging Attacks instead. Generally, it’s highly preferred to have Benentt on Gaming teams.

**Vaporize**

Gaming | Bennett | Hydro | Anemo

The most recommended team for Gaming, in which for Gaming can trigger Vaporize on his Plunging Attacks, alongside other buffs to increase his damage. The Hydro and Anemo slots are flexible, as their primary roles are to allow Gaming to Vaporize his Plunging Attacks and provide RES Shred from 4pc Viridescent Venerer respectively, and neither function is fixed to one unit.

Teammates

hydro Hydro options: Furina, Yelan, Xingqiu

anemo Anemo options: Kazuha, Xianyun, Sucrose

**Mono Pyro**

Gaming | Bennett | Xiangling | Anemo

Mono Pyro teams take advantage of shared Elemental Particles to reduce ER Requirements and VV shred for multiple members in order to boost damage without other reactions. Gaming, with his strong synergy with Bennett, fits well into Mono Pyro teams. Kazuha provides a large amount of Pyro DMG Bonus to both Gaming and Xiangling, while Xianyun is able to buff Gaming’s Plunging Attack damage; other Anemo characters do not differ significantly.

Teammates

anemo Anemo options: Xianyun, Kazuha

**Overloaded**

Gaming | Chevreuse | Electro | Pyro/Electro

Overloaded teams have seen an increase in viability due to the introduction of Chevreuse. While the playstyle certainly still has issues with knocking enemies away from Bennett’s Burst circle, it can be a decent option against heavy enemies in single-target scenarios. Note that units such as Beidou and Xiangling may have very high ER Requirements.

Teammates

electro Electro options: Fischl, Yae Miko, Beidou

pyro Pyro options: Bennett, Xiangling

**Melt**

Gaming | Cryo | Flex | Flex

While Melt teams have high potential for damage, they do have issues that make them more difficult to play than other teams. In Melt teams, C6 Bennett can cause an enemy’s Cryo Aura to be lost for Plunging Attacks if Normal Attacks are weaved into Gaming’s on-field combos. If C6 Bennett is in the team, it is recommended to dash towards Man Chai for faster Skill-Plunging Attack combos. The greater risk of losing reactions on key hits, in conjunction with the high ER Requirements for many teammates, makes the team hard to play and not highly recommended.

Only C6 Kaeya can enable Gaming to consistently Melt as solo Cryo; other Cryo teammates (including Kaeya without C6) require being paired with another Cryo character or an Anemo character who can absorb Cryo on their Burst to do the same. After the Cryo character(s) have been slotted in, Bennett and/or an Anemo character can be added to the team; double Anemo may be viable in select situations.

Teammates

cryo Cryo options: Kaeya, Rosaria, Layla

anemo Anemo options: Xianyun, Kazuha, Sucrose

flex Other Flex options: Bennett

fierce islandBOT
#
__CREDITS__
Lead:

@analog scaffold

Authors:

@gloomy wadi, @glad gyro, @olive spoke, @bright turtle, @ancient karma

Calculations:

@olive spoke, @ancient karma, @static nexus, @gloomy wadi

Framecounts:

@marble token

Consulting:

@gloomy wadi

Content Verification:

Calculations: @blissful sage, @cerulean mirage, @deft grotto
Writing: @gloomy wadi, @rare marsh

Transcription:

@glad gyro, @olive spoke, @cerulean mirage

DISCLAIMER

Pre-TC is volatile and, as always, perpetually subject to change until release (and sometimes later!). Please note that these are theoretical suggestions.
Everything described in this FAQ is a good faith analysis based on the little information about the character’s kit that we know. Team calcs, additionally, are not established yet, and as with everything in TC, the content in this FAQ should be taken with a grain of salt.

__OVERVIEW__

Xianyun is a 5-star Anemo Catalyst character who provides strong teamwide healing and buffs to Plunging Attacks. Her Elemental Skill causes her to enter the Cloud Transmogrification state and leap into the air. If Xianyun uses a Plunging Attack during this state, she will make a fast descent to the ground, homing in on a nearby opponent to deal AoE Anemo DMG. This Skill can be used up to 3 times before performing a Plunging Attack, increasing Xianyun’s height and the damage dealt by her Plunging Attack. Depending on the amount of enemies hit, Xianyun will slightly increase the CRIT Rate of Plunging Attacks for all nearby party members.

Her Elemental Burst heals all party members over time whilst increasing their jump height and providing Adeptal Assistance stacks. When the active character performs a Plunging Attack, Xianyun will deal a coordinated attack and consume an Adeptal Assistance stack. Whilst having Adeptal Assistance stacks, Xianyun will provide a Flat DMG Bonus to Plunging Attacks based on her ATK.

Xianyun will primarily be played as an off-field supportive teammate, providing large AoE healing to the party and greatly buffing the damage dealt by Plunging Attacks, whilst enabling all characters to perform Plunging Attacks due to the increased jump height.

#
__TALENT PRIORITY__ **Elemental Burst > Elemental Skill > Normal Attack**

Analysis

  • The essential parts of Xianyun’s kit are her Burst and Passive Talents. Her kit revolves around enabling and greatly buffing Plunging Attacks while healing. Her buffs are tied only to Passive Talents, however her healing is tied to her Elemental Burst, making it a recommended Talent to prioritize.
__TALENT OVERVIEW__ **Normal Attack: Word of Wind and Flower**

Xianyun performs a 4-hit Anemo attack string. This Talent is not essential to her kit, although with her being an Anemo Catalyst character, her Normal Attacks allow her to be a driver for various teams.

**Elemental Skill: White Clouds at Dawn**

CD: 12s

Xianyun’s Skill causes her to enter the Cloud Transmogrification state. During this state, her Skill can be pressed three times, with each press making her leap higher into the air. She gains an enhanced Plunging Attack during this state called Driftcloud Wave, where she transforms into a crane, dealing more damage in a wider area depending on how many times her Skill is pressed. If her enhanced Plunging Attack isn’t cast during the Cloud Transmogrification state, the cooldown for the next Skill cast will be reduced by 3s. Her Skill can be used three times quickly to ascend higher, or after touching the ground to gain horizontal distance, helping with exploration.

Xianyun generates five Anemo Particles regardless of how many times her Skill is pressed, which means there is no actual need to do three presses for more Particles unless a higher damage output of her Skill is desired. The particles will only spawn when her enhanced Plunging Attack lands.

**Elemental Burst: Stars Gather at Dusk**

CD: 18s
Energy cost: 70

The main attraction of Xianyun’s kit. Xianyun heals the team and summons a Starwicker upon the initial cast of her Burst. Starwicker mainly does three things: heal, increase active characters’ jumping height, and deal damage. Its healing is Xianyun’s only source of healing pre-C4 but is completely teamwide and heals once every 2.5 seconds. The Healing provided by Xianyun’s Elemental Burst is strong enough to sustain a majority of teams for players, without the need for additional defensive characters, such as another healer or shielder.

A Starwicker has 8 stacks of Adeptal Assistance upon summoning. Adeptal Assistance allows the character to have an increased jumping height. Upon hitting an enemy with a Plunging Attack, Starwicker will unleash a coordinated attack, dealing Anemo DMG and consuming one stack of Adeptal Assistance. Adeptal Assistance stacks cannot be regained, hence only a maximum of 8 Starwicker hits can be triggered throughout Xianyun’s Burst duration.

Xianyun’s Burst allows basically everyone to spam Plunging Attacks, which opens up possibilities for new teams and combos. These will be discussed in the Teambuilding section of this FAQ.

__Passives__ **Ascension 1 Passive: Galefeather Pursuit**

All party members will gain additional CRIT Rate to their Plunging Attacks for 20s based on how many enemies are hit by Xianyun’s Driftcloud Wave Plunging Attack. It increases the party’s Plunging Attack CRIT Rate by 4/6/8/10% depending on how many enemies are hit, which is a quite miniscule increase for single-target scenarios, while for multi-target scenarios it is an alright increase. Each stack of CRIT Rate is calculated independently, allowing Xianyun to gain additional stacks if her Skill is used multiple times per rotation.

**Ascension 4 Passive: Consider, the Adeptus in Her Realm**

When Xianyun has Adeptal Assistance stacks from her Burst, she grants an Additive DMG Bonus of 200% of her ATK for Plunging Attacks. This Flat DMG Bonus caps at 9,000 and can only be applied once per Plunging Attack.

**Utility Passive: Crane Form**

Xianyun gives a 15% gliding SPD boost to aid in your exploration.

#
__CONSTELLATIONS__ **Constellation 1 - Purifying Wind**

White Clouds at Dawn gains 1 additional charge.

Xianyun gains an additional charge on her Elemental Skill, which allows her to perform two single leaps to gain Anemo Particles. However, this can only be performed every other rotation because of the Elemental Skill's CD. If paired with her signature weapon, it makes a dent in her ER Requirements since it allows Xianyun to perform two extra Plunging Attacks. Overall, this Constellation does not increase her personal damage or team DPS by any significant margin.

***Healing% Increase vs. C0:***

10.51%

***Team DPS% Increase vs. C0:***

0.10%

***Rating:***

1/5

**Constellation 2 - Aloof From the World**

After using a Skyladder from White Clouds at Dawn, Xianyun's ATK will be increased by 20% for 15s.
Additionally, the effects of the Passive Talent "Consider, the Adeptus in Her Realm" will be enhanced: When the Starwicker created by Stars Gather at Dusk has Adeptal Assistance stacks, nearby active characters' Plunging Attack shockwave DMG will be increased by 400% of Xianyun's ATK. The maximum DMG increase that can be achieved this way is 18,000.
Each Plunging Attack shockwave DMG instance can only apply this increased DMG effect to a single opponent. Each character can trigger this effect once every 0.4s.
You must first unlock the Passive Talent "Consider, the Adeptus in Her Realm."

By far Xianyun's best Constellation. Her C2 amplifies the effects of Xianyun's A4 Passive by doubling the Flat Plunge DMG Bonus cap and the Plunge DMG Bonus MV. Given how Flat DMG bonus scales with the active character's stats and reactions, stacking very high ATK on Xianyun may see good turnover on resin investment.

***Healing% Increase vs. C1:***

0%

***Healing% Increase vs. C0:***

10.51%

***Team DPS% Increase vs. C1:***

11.06%

***Team DPS% Increase vs. C0:***

11.15%

***Rating:***

4.5/5

**Constellation 3 - Creations of Star and Moon**

Increases the Level of Stars Gather at Dusk by 3.
Maximum upgrade level is 15.

Increases the Talent Level of Xianyun's Elemental Burst by 3, buffing both her healing and Starwicker DMG. Overall, this Constellation does not greatly increase her personal damage - and Xianyun is already a proficient healer at C0.

***Healing% Increase vs. C2:***

19.84%

***Healing% Increase vs. C0:***

32.44%

***Team DPS% Increase vs. C2:***

0.15%

***Team DPS% Increase vs. C0:***

11.31%

***Rating:***

2/5

**Constellation 4 - Mystery Millet Gourmet**

After using Skyladder 1/2/3 times during one White Clouds at Dawn Cloud Transmogrification state, when a Driftcloud Wave unleashed during that instance hits an opponent, it will heal all nearby party members for 50%/80%/150% of Xianyun's ATK. This effect can be triggered once every 5s.

Xianyun's 4th Constellation offers a significant boost to her healing capabilities, allowing her to heal all party members with her Elemental Skill’s enhanced Plunging Attack. But again, Xianyun's healing output is already quite high and C4 will make the majority of her healing count as overheals.

***Healing% Increase vs. C3:***

20.92%

***Healing% Increase vs. C0:***

60.15%

***Team DPS% Increase vs. C3:***

0%

***Team DPS% Increase vs. C0:***

11.31%

***Rating:***

1/5

**Constellation 5 - Astride Rose-Colored Clouds**

Increases the Level of White Clouds at Dawn by 3.
Maximum upgrade level is 15.

Increases the Talent Level of Xianyun’s Elemental Skill by 3. This Constellation is quite underwhelming due to only increasing the damage her Skill deals, which is already very minor. It should only be seen as a stepping stone towards getting her C6, at which this Constellation becomes relevant.

***Healing% Increase vs. C4:***

0%

***Healing% Increase vs. C0:***

60.15%

***Team DPS% Increase vs. C4:***

0.10%

***Team DPS% Increase vs. C0:***

11.43%

***Rating:***

1/5

**Constellation 6 - They Call Her Cloud Retainer**

After Xianyun uses 1/2/3 Skyladders within one Cloud Transmogrification caused by White Clouds at Dawn, the CRIT DMG of a Driftcloud Wave created in this instance of Cloud Transmogrification will be increased by 15%/35%/70%.
Within 16s after Xianyun has used Stars Gather at Dusk, White Clouds at Dawn will not enter CD. This effect will be canceled once she has used White Clouds at Dawn 8 times.

Xianyun’s C6 transforms her from a support into a DPS by removing her Elemental Skill CD after casting her Elemental Burst, whilst greatly increasing the CRIT DMG of her enhanced Plunging Attack. Since she can only produce Elemental Particles outside of her Burst’s duration - she needs to utilize the first instance of her Skill before her Burst, and second one after its duration. It is advisable to run her with an Anemo character like Faruzan - who can also provide buffs to her Anemo DMG. Please note, this effect will end once Xianyun has used her Elemental Skill 8 times, meaning it can not be used infinitely for long distance travel in the overworld.

***Healing% Increase vs. C5:***

17.30%

***Healing% Increase vs. C0:***

87.85%

***Rating:***

3/5

#
__ENERGY RECHARGE REQUIREMENTS__

Xianyun wants to cast her Burst every rotation, and with a 70 Energy cost, it makes her ER Requirements quite high. She generates 5 Anemo Particles regardless of how many times her Skill is pressed. At C1, she gains 1 additional charge on her Skill. However, in a typical 20s rotation, those additional charges can only be triggered once every other rotation due to her Skill’s 12s CD. Regarding these, C1 reduces her ER Requirements by around 15%–50% depending on the team.

Her C6 however doesn’t really aid, and in some cases, hinders her Energy problems despite her Skill not entering CD for 16s after casting Burst due to it not generating Particles during those 16s. Since Xianyun’s ER Requirements can be very high, they may vary drastically when played as a solo Anemo, depending on how many Particles her teammates generate overall. For specific ER Requirements in some teams, please refer to the Teambuilding section of this FAQ.

Her signature weapon, Crane’s Echoing Call, gives her 2.5 Flat Energy per Plunging Attack at R1, reducing her ER Requirements by 5%–10% per Plunge depending on the team. One of her recommended F2P weapons, Oathsworn Eye, also aids in Xianyun’s ER Requirements, granting her 24% ER for 10s at R1. The ER increase doubles if players have managed to R5 the weapon during the Version 2.5 event where Oathsworn Eye was obtainable.

If these weapons aren’t available, Xianyun can also hold Favonius Codex to not only aid in her own Energy problems, but also the entire team’s. Refer to the table below to find out how much ER is saved per trigger of Favonius’ Passive.

Xianyun’s ER Requirements will vary based on your team and rotation. For a more accurate estimate, please use the Energy Recharge Calculator linked here.
For more details on how Favonius weapons will affect your team, please use Ac1d’s Favonius Mastersheet linked here.

#
__ARTIFACTS__

sands Sands of Eon: ER% / ATK%
goblet Goblet of Eonothem: ATK%
circlet Circlet of Logos: ATK% / HB%

As Xianyun’s Starwicker, Healing and A4 Passive scale with her Attack stat, the primary goal of Xianyun’s artifact stats will be to maximize her Attack stat while meeting the relevant ER Requirements to reliably Burst every rotation. If players find it challenging to survive on Xianyun’s healing alone though, a Healing Bonus Circlet can be used to supplement her healing.

Substats: ER until requirement > ATK% > CR (if using Fav) >= Flat ATK

As previously mentioned, players will want to focus on Bursting with Xianyun every rotation before throwing as many substats as possible into ATK%. CRIT Rate is a decent substat if Xianyun is holding Favonius Codex, as it increases her chances of proccing the weapon’s passive.

__Artifact Sets__ __Recommended Sets__ **4PC Viridescent Venerer**

The bread and butter of any Anemo support featuring in PECH reaction-centric teams, Viridescent Venerer synergizes perfectly with Xianyun, enabling her to reduce enemy Resistances by 40%, increasing her teammates’ damage. This should be her go-to set in most cases unless being run with characters who don’t need the RES Shred, such as Xiao.

**4PC Noblesse Oblige**

Should your primary DPS(s) not make good use of 4pc VV, 4pc Noblesse Oblige is another fantastic option for ATK-scaling DPS(s). One particularly notable scenario where this may work would be in Xiao teams, since Xiao appreciates the ATK buff from Noblesse quite a fair bit. 4pc Noblesse also increases the Flat DMG Buff provided by Xianyun’s A4, further increasing your on-fielders damage output.

**4PC Ocean-Hued Clam**

In teams where 4pc VV and / or NO is already being held by someone else or are just not needed entirely, Xianyun can also opt to hold 4pc OHC for more personal damage. With a rather sizable initial heal and several smaller but consistent sustained heals, Xianyun easily heals about 2/3s of the Sea-Dyed Foam with every tick, making her a very potent carrier of the set.

**2PC ER / ATK / HB**

In teams that do not require Xianyun to hold either 4pc VV or NO, she can run mixed sets for a much easier time in building her. With how popular a set Emblem is to farm, along with the plethora of ATK% sets out there, running mixed sets on her makes gearing her a piece of cake, allowing you to turn your attention to farming for your other characters.

__Other Sets__ **4PC Maiden’s Beloved**

A nice boost to Xianyun’s healing, but offers nothing else beside that.

**4PC Song of Days Past**

A direct downgrade to Ocean-Hued Clam, since its buff is weaker than the potential damage that OHC can output. Only use it if you have a decent set from farming for Navia.

**4PC Emblem of Severed Fate**

This set helps Xianyun reach her ER Requirements whilst buffing her Burst damage ever so slightly. That being said, Xianyun’s Burst doesn’t have a lot of damage contribution compared to the rest of her team, so this set is slightly lackluster.

#
__WEAPONS__

Xianyun mostly needs ER and ATK stats, so any weapon that gives a good amount of either is beneficial.

However, her ER requirement as a solo Anemo is usually very high , so you will likely not be able to use a weapon that doesn’t give ER or Flat Energy in those teams. The only teams where weapons that don't give ER or Flat Energy are viable is when there are 2 or 3 Anemo characters in the team, with the most obvious candidate being in a team with Xiao.

**Crane's Echoing Call**

Crane’s Echoing Call is Xianyun’s Best-In-Slot weapon in any team where the main carry uses Plunging Attacks. Everything is perfect for Xianyun’s kit. It has a high Base ATK and gives ATK%, both important stats for her A4. It also gives a decent amount of Flat Energy which is really welcomed to help her reach her ER requirement, especially when she is solo Anemo. Moreover, it buffs Plunging Attack DMG for teammates, which helps her for her role as a Plunging Attack buffer. It increases your main carry’s DPS by about 10–12% compared to a F2P weapon like Oathsworn Eye, which is a great boost, but the damage gained to the carry can be compared to low priority signature weapons like Raiden’s signature or Navia’s signature, and it’s only useful on Xianyun.

**Skyward Atlas / Memory of Dust / Cashflow Supervision**

These weapons are great because they give a lot of attack through a high Base ATK and some ATK%. They are the 2nd, 3rd and 4th best options respectively in teams with multiple Anemo characters. However, these weapons don’t give any ER or Flat Energy, so they are not viable if your Xianyun is the only Anemo in the team due to her high ER requirement (unless you manage to get 70%–80% ER through substats).

**Favonius Codex**

Favonius Codex is a strong option, being the 2nd best option in teams where Xianyun is the only Anemo character (assuming you proc the passive once), but it falls behind other options in a team with Xiao. However, building CRIT Rate is necessary to use this weapon, which is not as easy as it seems since an ATK% Circlet is recommended. Xianyun only does 2 or 3 hits (with the 3rd hit being unreliable), and it’s not easy to have more than 40% CRIT Rate with only substats. By building only 40% CRIT Rate, you will have 64% chance to CRIT with 2 hits and 78% chance to CRIT with 3 hits, which make this weapon not extremely reliable. Don’t hesitate to use 1 or 2 Normal Attacks to have more chances to proc the passive.

**Oathsworn Eye**

Oathsworn is a great F2P weapon from an event in 2.5. The high Base ATK, ATK% secondary stat, and ER passive make it a strong and versatile option for Xianyun. The ER from the passive lasts for only 10 seconds, but it includes the moment where she receives 5 Particles from her Skill. This weapon is viable in any team, including when she is the only Anemo character or with multiple Anemo.

**Thrilling Tales of Dragon Slayers**

This weapon is a great F2P option because it can grant a teammate 48% ATK at R5. However, it is only really relevant if you play with Xiao, because there isn’t any other team that needs ATK% buff, where Xianyun can afford a weapon without any ER or Flat Energy, and where the rotation allows her to give the buff to the carry. Moreover, you need to make sure to only switch to Xianyun right before switching to your carry, otherwise you won’t give the buff to the right teammate. Furthermore, the low Base ATK will reduce the Plunging Attack buff from Xianyun’s A4 Passive significantly, making this weapon only on par with Oathsworn Eye or Flowing Purity with Xiao. Finally, having less attack means that her healing will be lower, which not only reduces survivability but also reduces Fanfare gain from Furina. If you play Xiao with 4pc Vermillion, the bonus from this weapon will have less value due to the high amount of ATK%.

#
**Tulaytullah’s Remembrance / Lost Prayer to the Sacred Winds / Kagura’s Verity**

Good 5-star weapons with high Base ATK. However, the secondary stats and the passives only buff Xianyun’s own damage, which is not very relevant in the first place. Even then, these weapons are good enough to make them on par with Oathsworn Eye and TTDS. However, these weapons don’t give any ER or Flat Energy, so they are not viable if your Xianyun is the only Anemo in the team due to her high ER requirement (unless you manage to get 70%–80% ER through substats).

**Flowing Purity / Frostbearer / Eye of Perception / Dodoco Tales**

Great F2P weapons with ATK% secondary stat. Amongst them, Flowing Purity is slightly better thanks to its high Base ATK and not completely useless passive. However, these weapons don’t give any ER or Flat Energy, so they are not viable if your Xianyun is the only Anemo in the team due to her high ER requirement (unless you manage to get 70%–80% ER through substats).

**Ballad of the Boundless Blue**

Great F2P weapon from 4.1 which gives high Base ATK and ER secondary stat. It’s a weapon that can be used in any team but it’s not the greatest.

**Prototype Amber**

An interesting F2P weapon that gives some teamwide healing and Flat Energy, making it viable in teams where Xianyun is the only Anemo character. The extra healing can help to receive more Fanfare from Furina. However, it only gives about an extra 1% average DMG%, which is not enough to surpass other F2P options and compensate for the lack of high Base ATK or ATK%. This is due to the fact that Xianyun’s teamwide healing is large enough that your team’s HP will not go lower than 90–95%, and also because Prototype Amber healing ticks happen almost at the same time as the healing ticks from Xianyun’s Burst.

#
__TEAM BUILDING__

Xianyun’s ability to allow any team to utilize Plunging Attacks opens up a large number of possibilities for current and future teambuilding. Although not all characters will make use of Xianyun to her full effect, she can be slotted into almost any team, providing AoE damage through Plunging Attacks, alongside strong Healing over Time to all teammates, helping to keep characters healthy.
Due to her universality, some standout teammates will be listed rather than set archetypes, whilst also providing a few sample teams instead of an exhaustive list. For more info on a specific character, please check out their respective FAQs or KQM Guides. Please keep in mind that the ER Requirements shown are for Xianyun with no additional support from weapons providing Energy, such as Favonius or Crane’s Echoing Call.

**Plunging Weapon Type Differences**

Not all Plunging Attacks are made equal, although they’re generally similar overall, there are some minor differences between each weapon type:

  • Sword - Standard Plunging Attack with the Collision hitbox positioned at the center of the attack. Can be dash-canceled immediately and flows into N1.
  • Alternative Sword - Considerably faster startup lag than the traditional Sword Plunging Attack. Only applicable to Albedo and Bennett.
  • Polearm - Very similar to Sword Plunging Attacks. They cannot be dash-canceled but have a slightly faster N1 cancellation.
  • Catalyst - Very similar to Sword Plunging Attacks. They will always deal Elemental DMG based on the character’s Element.
  • Claymore - Slightly faster startup lag with the Collision hitbox positioned in front of the character.
  • Bow - Slightly slower startup lag. Can be buffered into Aiming Mode with R and are unaffected by Elemental Infusion effects from other characters.
**Elemental Weapon Infusers**

Currently, our Elemental Infusers consist of Bennett C6, Candace and Chongyun, each providing a Pyro, Hydro and Cryo Infusion respectively to Sword, Claymore and Polearm characters. Characters can make use of these Infusions alongside Xianyun in order to make use of both Elemental Goblets on their Plunging Attacks, as well as Amplifying reactions to heavily increase the damage dealt from Xianyun’s A4 Passive. However, unless using one of these three as your dedicated Plunging on-fielder, it may be hard to have enough team slots available. For consistent Vaporize or Melt, Xiangling is mandatory, but may struggle from harsh ER Requirements when using Candace or Chongyun, due to not having space to fit Bennett in the team alongside your preferred on-fielder. Bennett not only doubles as an Elemental Infuser but also provides a large ATK buff, allowing him to fit nicely into teams whilst still having space for a Hydro character, such as Furina or Xingqiu to trigger consistent Vaporize reactions on your on-fielder’s Plunging Attacks.

#
__Plunge-Oriented Teammates__

Although limited in number, characters already designed around Plunging Attacks can make use of Xianyun’s A1 and A4 Passives to boost their damage output. Since Xianyun’s A4 Passive is considered Additive Flat DMG, DMG Bonus and CRIT stats will be preferred, due to affecting both the character’s Base DMG and Xianyun’s Flat DMG Bonus. In Vaporize and Melt focused teams, Xianyun’s buff also benefits heavily from EM stats, due to being affected by Amplifying reactions.

**Xiao**

Xiao makes excellent use of Xianyun’s A4 due to the large amounts of DMG Bonus he gains after casting his Elemental Burst, granting him some extra help when dealing with single-target scenarios. The increased want for DMG Bonus stats alongside Xianyun’s high teamwide Healing over Time also allows Xiao to be played with Furina without being confined to the area of Bennett’s Elemental Burst, an issue Xiao has struggled with for a long time due to gaining too much DMG Bonus compared to other stats at the time. Not being confined to Bennett’s Burst frees up his movement, allowing him to chase after enemies being knocked away by his Plunging Attack’s high Poise damage. Although Bennett can still be used if players wish, Faruzan is a given for her potent Anemo-related buffs, providing DMG Bonus, Anemo RES Shred, as well as Anemo CRIT DMG and off-field Anemo Particles at C6. Despite Faruzans A4 Passive being a rather small Flat DMG buff, it still contributes to preferring DMG Bonus and CRIT compared to ATK stats. Finally, Xianyun’s 5 Anemo Particles can greatly help lower both Xiao and Faruzan’s egregious ER Requirements, helping non-C6 Faruzan to reliably Burst every rotation.
Depending on the content, Xiao can play both a shorter or a longer rotation, varying the amount of Plunging Attacks he uses without sacrificing on overall team damage. A longer rotation will help to lower the team’s overall ER Requirements, whereas a shorter rotation may be helpful for sustaining buff uptime across multiple waves of enemies or for granting Xiao more Plunging Attacks with Xianyuns A4 Passive to help with tankier single-target fights.

Xiao / Xianyun / Faruzan / Furina

ER Reqs: 185–190% / 120–130% (C0 vs C6 Faruzan, ranging from 22s to 26s rotations)

**Gaming**

Gaming is a new 4-star Pyro Claymore character focused on Plunging Attacks, who will be obtainable for free from the Friends at the Doorstep event as part of the upcoming Lantern Rite Festival. Although Gaming doesn’t have access to the large amounts of DMG Bonus Xiao gets, he is able to trigger Vaporize and Melt on his Plunging Attacks, allowing him to greatly amplify his damage with EM stats when under the effects of Xianyun’s A4 Passive. Vaporize teams tend to make use of C6 Bennett’s Pyro Infusion, allowing Gaming to Vaporize more buffed Plunging Attacks, whereas Melt teams prefer to guarantee he triggers Melt on his Skill Plunging Attacks. For more details on Gaming’s teams, please check out the Gaming FAQ.

Gaming / Xianyun / Xingqiu / Bennett

ER Reqs: 250%

Gaming / Xianyun / Rosaria / Layla

ER Reqs: 265%

Gaming / Xianyun / Kaeya C6 / Furina

ER Reqs: 265%

#
__**Non Plunge-Oriented Teammates**__

Despite not being designed around Plunging Attacks, some current characters can make use of Plunging Attacks for higher damage combos, granting their team AoE or for the buffs provided by Xianyun’s A4. Generally, these mainly consist of characters with access to Vaporize or Melt, due to the large damage boost provided to her A4. However, there are characters outside of Amplifying reactions that can also make use of Xianyun for the same benefits listed previously.

**Hu Tao**

Alongside Xianyun, Hu Tao gains access to a new combo, weaving in Plunging Attacks with her typical N2C combo. This new combo gives Hu Tao teams some AoE coverage, something her teams have lacked for a while. With Xianyun, Hu Tao is able to do up to 5(N2CJP) + N2C, although 5N2CJP may be preferred by most players due to being easier to execute, allowing for some leniency in how early you Plunge. Due to using less Charged Attacks than before, this cuts Hu Tao’s stamina usage in half, meaning C0 is punished less from dodging enemy attacks. Finally, Xianyun’s Healing over Time allows Hu Tao to stick with Furina as one of her two Hydro options, granting large amounts of DMG Bonus to the party. However, due to the long duration of Xianyun’s healing, teammates tend to have more HP than when played with Jean, leading to lower Fanfare averages throughout a rotation.
Xianyun is also playable in VV Vape setups, being able to shred the resistances of both Pyro and Hydro with 4pc Viridescent Venerer. However, compared to other Anemos such as Sucrose or Kazuha, she does not provide any extra Elemental application through an absorption, meaning players may struggle to consistently Vaporize off only Yelan, instead preferring to use Xingqiu. Although Bennett is preferred in this team for his large ATK buff and extra Pyro DMG Bonus from his C6, other Pyro alternatives include C6 Chevreuse for large DMG Bonus buffs and C4 Yanfei or Thoma for their defensive utility.

Hu Tao / Xianyun / Furina / Yelan

ER Reqs: 235–255% (2E vs 1E from Yelan)

Hu Tao / Xianyun / Xingqiu / Bennett

ER Reqs: 285%

**Diluc**

Even though his kit wasn’t designed around it, Diluc already utilized Plunging Attacks through the use of Dragonstriking, a technique involving using the hitlag from hitting an enemy to increase a character’s jump height. This was due to Diluc having an above average Plunging Attack Multiplier compared to the rest of his Multipliers, resulting in tight execution combos for a majority of players that utilized Plunging Attacks. With Xianyun’s release, this is no longer an issue, due to her granting an increased jump height to perform Plunging Attacks with ease. Additionally, Diluc gains a significant buff from Xianyun’s A4 Passive, which is further enhanced by triggering Amplifying reactions on his Plunging Attacks. Players can opt for slower Plunges, weaving in N1s to keep Diluc targeting the nearest enemy, whilst triggering off-fielders such as Xingqiu or Yelan. Alternatively, Sword, Claymore, and Catalyst characters are able to immediately dash and jump upon landing with a Plunging Attack, resulting in faster Plunging Attacks at the cost of Stamina. Additionally, Plunging Attacks do not auto target onto enemies, resulting in the possibility of missing Diluc’s Plunging Attacks if players are carelessly Dash Plunging. Diluc also greatly benefits from Bennett’s C6 in this team, granting a Pyro Infusion and large ATK buff. Bennett’s Pyro Infusion also allows Diluc to ignore his own Elemental Burst, meaning he has no need for Energy Recharge stats and can focus fully on damage.

Diluc / Xianyun / Furina / Yelan

ER Reqs: 265%

Diluc / Xianyun / Xingqiu / Bennett

ER Reqs: 275–300% (24.5s rot using Diluc EEEQ vs 21s rot without his E or Q)

**Bennett**

Whilst many characters utilizing Plunging Attacks use Bennett for his large ATK buff and Pyro Infusion, Bennett can make use of these himself, freeing up a team slot for another buffer or off-fielder. Bennett also has an unusually fast Plunging Attack animation, allowing him to perform more Plunging Attacks compared to other characters. When utilizing his Infusion, he will usually be played with Hydro characters, including Xingqiu, Yelan and Furina, in order to keep a consistent Hydro Aura to trigger Reverse Vaporize.
Because of his fast Plunges and large buffs, he can make use of other Elemental Infusions, in order to trigger other Amplifying reactions, such as Candace for Forward Vaporize and Chongyun for Reverse Melt. In these teams, Bennett will use the corresponding Elemental Goblet to match his Infusion, whilst generally being paired with Xiangling for both high off-field damage and Pyro Application. Please note that Chongyun’s Cryo Infusion will be overwritten by Bennett’s C6 Pyro Infusion due to Melting the Infusion. However, Candace does not have this issue, due to Vaporizing away Bennett’s Pyro Infusion.

Bennett / Xianyun / Furina / Yelan

ER Reqs: 235%

Bennett / Xianyun / Candace / Xiangling

ER Reqs: 265%

#
**Raiden**

Unfortunately, due to Raiden’s Burst stance being considered Burst DMG, she is unable to receive the Flat DMG buff provided by Xianyun’s A4. Despite this, she still has access to a new combo, being 4(N1CJP). Although this combo was previously possible via Dragonstriking, it was very hard to execute and only worked under specific scenarios. The execution can still be tight to get the 4th Plunging Attack in whilst getting both hits of her Charged Attack before jumping, however, Xianyun’s release makes this combo more accessible, whilst allowing the use of a wider variety of teammates. Characters such as Sara and Bennett can be used for a Hyper-style team, Nahida for an Aggravate team or teammates such as Xiangling for high off-field damage or Furina for both off-field damage and buffing. Raiden also helps to significantly lower Xianyun’s ER Requirements, granting ~20–25 Flat Energy to all teammates depending on her Energy Recharge.

Raiden / Xianyun / Sara / Bennett

ER Reqs: 175%

Raiden / Xianyun / Xingqiu / Bennett

ER Reqs: 165%

**Wriothesley**

All Catalyst characters deal entirely Elemental DMG, meaning they can be played with Xianyun to apply large amounts of their respective element in AoE. Catalyst users such as Wriothesley can make great use of this to trigger consistent Reverse Melts with Xiangling. Although Wriothesley’s Plunging Attacks aren’t buffed by his Skill, this means he also won’t drain his HP as fast whilst doing Plunging Attack combos. To allow for both Particle generation and the use of 4pc Marechaussee Hunter, Wriothesley starts his combo with N3C, before transitioning into N1JP to keep up stacks on 4pc MH. If players manage to trigger his A1 Passive during gameplay, they can instead use N1CJP for an extra Melt, due to Wriothesley being able to jump cancel his Charged Attack very quickly. Alternatively, players can choose to spend some extra stamina on Dash Plunging for faster Plunging Attacks. Additionally, Catalyst users can’t be affected by other Elemental Infusions, meaning it does not matter if Bennett is C6 to utilize them.

Wriothesley / Xianyun / Xiangling / Bennett

ER Reqs: 270%

#
**Freminet**

Despite also not being intended for Plunging Attacks, at C3, Freminet gains +3 levels to his Normal Attack Talent, increasing the damage dealt by his Plunging Attacks. Despite having significantly lower Base ATK than Diluc, the MVs are quite similar, making Freminet a viable option for Xianyun teams. Additionally, Freminet has several options for team archetypes, including Pyro, Cryo and Physical. For each archetype, the corresponding Elemental Goblet will be used based on Freminet’s Infusion.

Pyro Freminet

On a team with C6 Bennett, Pyro Freminet can utilize the Pyro Infusion in order to Vaporize his Plunging Attacks while ignoring his Skill and Burst. Bennett also provides a strong Flat ATK buff from his Burst, helping to make up for Freminet's low Base ATK. The last teammate should be a Hydro off-fielder who can apply enough Hydro for Freminet to consistently trigger Vaporize.

Freminet / Xianyun / Xingqiu / Bennett C6

ER Reqs: 275%

Cryo Freminet

Alongside his Level 0 Skill, Cryo Freminet utilizes Chongyun's Skill to infuse his Plunging Attacks with Cryo. There are a few choices for the fourth team slot: Bennett provides a large ATK buff, but cannot be used at C6; Furina brings solid off-field damage and a large DMG% buff; and Xiangling allows Freminet to Melt his Plunging Attacks, but has extremely high ER Requirements. For the duration of his Elemental Burst, Freminet will repeatedly use his Skill for Level 0 Shattering Pressure hits, followed up by a Plunging Attack during the short downtime between Skill activations.

Freminet / Xianyun / Chongyun / Furina

ER Reqs: 250%

Physical Freminet

With an Electro teammate like Fischl or Yae Miko, Physical Freminet can be played, using his Skill before performing Plunging Attacks in order to trigger Superconduct. The fourth team slot can be various units with off-field utility, including defensive options such as Zhongli or Layla, who provide comfort at the cost of damage; damage dealers such as Furina, Xingqiu, or Rosaria; or buffers such as pre-C6 Bennett or Mika, whose C6 is pivotal to him being useful in the team. Depending on your 4th teammate, Xianyun can optionally change her Artifact set from 4pc Viridescent Venerer to any of 4pc Noblesse Oblige, 4pc Ocean-Hued Clam or 4pc Song of Days Past. However, 4pc VV will generally be preferred if being paired with another off-field damage dealer.

Freminet / Xianyun / Fischl / Mika C6

ER Reqs: 265%

viscid hedgeBOT
#
__CREDITS__
Leads:

@deft grotto, @analog scaffold

Authors:

@deft grotto, @analog scaffold, @bright turtle, @wooden mason

Calculations:

@deft grotto, @analog scaffold, @bright turtle, @wooden mason

Content Verification:

Calculations: @old glen
Writing: @glad gyro

Transcription:

@glad gyro, @drowsy plaza

Resources:
DISCLAIMER

Pre-TC is volatile and, as always, perpetually subject to change until release (and sometimes later!). Please note that these are theoretical suggestions.
Everything described in this FAQ is a good faith analysis based on the little information about the character’s kit that we know. Team calcs, additionally, are not established yet, and as with everything in TC, the content in this FAQ should be taken with a grain of salt.

__OVERVIEW__

Chiori is a 5-star sword-wielding Geo unit who focuses on dealing off-field damage with doll-shaped turrets generated from her Skill. Her kit is similar to Fischl, Albedo, and Yae Miko in terms of team function and gameplay in their dependence on their Elemental Skill. While her field time is modest, she exhibits strong performance in her role.

Filling the same role as Albedo, she excels in Geo-focused teams, but playing her alongside other elements isn’t a problem as long as she has another unit of the same element as her in the party. At C0, she will prefer at least one Geo teammate who creates Geo Constructs, like Zhongli’s pillar, Albedo’s elevator, and Ningguang’s Jade Gate.

#
__TALENT PRIORITY__ **Elemental Skill > Elemental Burst > Normal Attack**

Analysis

  • Chiori’s kit is centered around her Elemental Skill, making it her highest-priority Talent to level. Her Burst is not to be completely neglected, especially at higher Constellations, although it is still not recommended to build Energy Recharge unless you have Constellation 2 unlocked. Lastly, Normal Attacks are disappointing. Despite having a Geo infusion, the numbers aren’t gratifying, and it is inadvisable to use them unless Constellation 6 is active.
__TALENT OVERVIEW__ **Normal Attack: Weaving Blade**

As mentioned previously, Chiori’s Normal Attacks aren’t anything spectacular. Even with the Geo infusion, the damage dealt by this Talent is insignificant compared to other areas of her kit, making it unworthy of use.

The story is completely different at Constellation 6. With the DEF scaling added to Normal Attack multipliers, this becomes a viable Talent for incentivizing on-field gameplay. The damage increase is noticeable and provides interesting gameplay due to the quick combos you have to perform.

**Elemental Skill: Fluttering Hasode**

CD: 16s

The core of her kit is unique and a bit more complex than expected.

At base, Chiori will have an animation hit, after which she will summon a Tamoto doll. This Tamoto spawns roughly 0.6s after the initial hit and will deal 5 instances of damage across 3.6s intervals. Unlike other units, particles are not generated on the initial hit, but instead on every Tamoto hit, even when Chiori is not on the field. There is a 20% chance to generate 2 particles and an 80% chance to generate 1 particle per hit.

If a construct is already present when Chiori casts her Skill, the two Tamoto turrets will spawn simultaneously, with the second doll dealing damage 1s after the first doll’s hit. If a construct isn’t already present, the second Tamoto will spawn when a construct is created. Each Tamoto doll has independent durations and counters. The second Tamoto, however, does not generate particles. It is also worth noting the dolls cannot be broken by enemies.

**Elemental Burst: Hiyoku: Twin Blades**

CD: 13.5s
Energy cost: 50

Chiori’s Burst is occasionally worth using, but undeserving of any special focus. The damage is decent, but nothing groundbreaking. Building Energy Recharge to ensure Burst consistency on every rotation can lead to a DPS loss even in teams where Chiori has low ER needs. Ideally, her Burst should only be used when the Energy gauge fills up naturally.

__Passives__ **Ascension 1 Passive: Tailor-Made**

This Passive allows for Chiori to activate one of two modes after casting her Elemental Skill: Tapestry or Tailoring.

Tapestry can be activated by triggering the Skill again after cast. This will swap Chiori to the next unit in your roster, but won’t ignore the 1s swap cooldown, so be careful with your timing. For the next 8s after activating Tapestry, Normal, Charged and Plunging Attacks done by the on-field unit will trigger additional coordinated attacks from Chiori’s dolls, which are considered Elemental Skill damage. Only 2 hits can be dealt during this period, and there is a 2s cooldown between each hit.

Tailoring can be activated by using Chiori’s Normal Attack. This will give her Geo infusion, and for the next 5s, all of Chiori’s Normal, Charged and Plunging Attacks will deal Geo damage. Unfortunately, this option is usually weak and is only recommended to be utilized if Constellation 6 is unlocked.

If none of the two modes is voluntarily triggered, Tailoring will be enabled by default.

**Ascension 4 Passive: The Finishing Touch**

Chiori will receive a 20% Geo DMG Bonus for 20s when a party member creates a Geo Construct. This is a nice buff to have on her and can easily be sustained for all of her attacks.

**Utility Passive: Brocaded Collar's Beauteous Silhouette**

Increases party Movement SPD by 10% if you have a non-default skin or glider on any of your team members. This does not work in domains.

#
__CONSTELLATIONS__ **Constellation 1 - Six Paths of Sage Silkcraft**

*The AoE of the automaton doll "Tamoto" summoned by Fluttering Hasode is increased by 50%.
Additionally, if there is a Geo party member other than Chiori, Fluttering Hasode will trigger the following after the dash is completed:

  • Summon an additional Tamoto. Only one additional Tamoto can exist at the same time, whether summoned by Chiori this way or through the presence of a Geo Construct.
  • Triggers the Passive Talent "The Finishing Touch." This effect requires you to first unlock the Passive Talent "The Finishing Touch."*

Noticeably increases the attack range of the Tamoto dolls. Additionally, a Geo Construct from another party member is no longer required to create the second Tamoto doll or to trigger her Ascension 4 Passive. This Constellation is a good addition only if you play Chiori in teams without constructs.

***DPS% Increase vs. C0 - No Geo Construct team:***

59%

***DPS% Increase vs. C0 - Geo Construct team:***

0%

***Rating:***

2/5

**Constellation 2 - In Five Colors Dyed**

For 10s after using Hiyoku: Twin Blades, a simplified automaton doll, "Kinu," will be summoned next to your active character every 3s. Kinu will attack nearby opponents, dealing AoE Geo DMG equivalent to 170% of Sode's DMG. DMG dealt this way is considered Elemental Skill DMG.
Kinu will leave the field after 1 attack or after lasting 3s.

A strong Constellation which introduces a new type of doll called Kinu. After casting Chiori’s Burst, Kinu will be summoned at a 3s interval for a total of 3 hits. This Constellation adds more value to her Burst. Henceforth, it is recommended to build Energy Recharge and aim for consistently using Burst every rotation. In cases where the requirements are too high, casting the Burst once every other rotation is also viable.

***DPS% Increase vs. C1:***

33%

***DPS% Increase vs. C0 - No Geo Construct team:***

111%

***DPS% Increase vs. C0 - Geo Construct team:***

33%

***Rating:***

4/5

**Constellation 3 - Four Brocade Embellishments**

Increases the Level of Fluttering Hasode by 3.
Maximum upgrade level is 15.

Increases Elemental Skill Talent Level by 3. This is the better of the two Talent Level Constellations, as the vast majority of Chiori’s damage comes from her Skill.

***DPS% Increase vs. C2:***

16%

***DPS% Increase vs. C0 - No Geo Construct team:***

145%

***DPS% Increase vs. C0 - Geo Construct team:***

54%

***Rating:***

2/5

**Constellation 4 - A Tailor's Three Courtesies**

For 8s after triggering either follow-up effect of the Passive Talent "Tailor-Made," when your current active character's Normal, Charged, or Plunging Attacks hit a nearby opponent, a simplified automaton doll, "Kinu," will be summoned near this opponent. You can summon 1 Kinu every 1s in this way, and up to 3 Kinu may be summoned this way during each instance of "Tailor-Made"'s Seize the Moment or Tailoring effect. The above effect can be triggered up to once every 15s.
Must unlock the Passive Talent "Tailor-Made" first.

Introduces a new set of Kinu dolls which can be triggered in the same way Tapestry coordinated attacks are triggered. Only 3 Kinu can be summoned at a 1s interval, which disappear after dealing damage.

***DPS% Increase vs. C3:***

23%

***DPS% Increase vs. C0 - No Geo Construct team:***

202%

***DPS% Increase vs. C0 - Geo Construct team:***

90%

***Rating:***

3/5

**Constellation 5 - Two Silken Plumules**

Increases the Level of Hiyoku: Twin Blades by 3.
Maximum upgrade level is 15.

Increases Elemental Burst Talent Level by 3. This is not as useful since Chiori’s Burst is not an important component of her damage. Nevertheless, since Constellation 2 is activated at this point, you’ll be incentivized to use her Burst more.

***DPS% Increase vs. C4:***

1%

***DPS% Increase vs. C0 - No Geo Construct team:***

205%

***DPS% Increase vs. C0 - Geo Construct team:***

92%

***Rating:***

1/5

**Constellation 6 - Sole Principle Pursuit**

After triggering a follow-up effect of the Passive Talent "Tailor-Made," Chiori's own Fluttering Hasode's CD is decreased by 12s. Must unlock the Passive "Tailor-Made" first.
In addition, the DMG dealt by Chiori's own Normal Attacks is increased by an amount equal to 235% of her own DEF.

Allows Chiori to change her playstyle and become an on-field DPS. With the newly received buffs, her Normal Attacks become significantly more relevant, allowing for a more noticeable presence in both damage and field time. Additionally, the cooldown reduction on the Skill allows Chiori to cast her Skill twice consecutively at a 4s interval which can be efficiently filled by using Normal Attacks.

***DPS% Increase vs. C5:***

22%

***DPS% Increase vs. C0 - No Geo Construct team:***

273%

***DPS% Increase vs. C0 - Geo Construct team:***

135%

***Rating:***

4/5

#
__ENERGY RECHARGE REQUIREMENTS__

Chiori’s Energy Recharge requirements can vary significantly depending on her team. However, her Elemental Burst is neither an essential part of her kit nor worth building ER for until Constellation 2. Additionally, some of her teams have massive ER needs, especially in the case of Double Geo with Zhongli if his pillar breaks. In general, it is not recommended to build any ER and to just use her Burst whenever it is charged, as building ER will lead to a decline in total damage.

It is worth noting that even if her Burst gains value with C2, it is still not recommended to build ER if her needs are too high (see Constellations section of FAQ).

Chiori's ER requirements will vary based on your team and rotation. For a more accurate estimate, please use the Energy Recharge Calculator linked here.
For more details on how Favonius weapons will affect your team, please use Ac1d’s Favonius Mastersheet linked here.

#
__ARTIFACTS__

sands Sands of Eon: DEF%
goblet Goblet of Eonothem: Geo DMG% / DEF%
circlet Circlet of Logos: CRIT / DEF%

Although Chiori is a character that scales with both ATK% and DEF%, the scaling on her DEF% is more important than her ATK%. Hence, it is recommended to avoid going for artifacts with ATK% main stat unless you have no better options.

DEF% is Chiori’s most valuable stat behind CRIT, to the point where going DEF / DEF / CRIT is only 3% worse than going DEF / Geo DMG% / CRIT.

Substats: CRIT > DEF% > ATK% >= Flat DEF

As mentioned in previous sections, building Energy Recharge on Chiori is not worth it in nearly all situations, giving her the freedom to focus on offensive substats such as CRIT and DEF%.

__Artifact Sets__ **4pc Golden Troupe**

With Chiori’s Elemental Skill being her bread and butter, it should come as no surprise that 4pc Golden Troupe is one of, if not her best, artifact set. Providing up to a whopping 70% Skill DMG when the wearer is off-field, the 4pc set bonus has basically 100% uptime on Chiori’s doll hits, making this set stand out from the rest of its alternatives.

It is also worth considering that the Golden Troupe / Marechausse Hunter domain is resin-efficient, since plenty of other characters’ (e.g., Furina, Fischl, Neuvillette, etc.) Best-in-Slot artifact sets can also be found here.

**4pc Husk of Opulent Dreams**

Another great set for Chiori. The 4pc set bonus provides up to 24% bonus Geo DMG and DEF when fully stacked on top of a base 30% DEF on the 2pc set, both stats that are extremely useful for Chiori. This puts the 4pc Husk set just ever so slightly behind 4pc GT assuming equal substat distribution, with 4pc Husk actually pulling ahead should Chiori have the freedom to Burst every rotation in either Energy-rich environments or in Mono Geo teams where there is a high rate of Geo Particle generation.

Another notable use case for 4pc Husk would be in teams where Chiori is used as a quickswap damage dealer with her infusion, most notably at C6. With her damage split skewing more towards her on-field damage and lower Golden Troupe uptime, 4pc Husk should theoretically pull much further ahead than any other set combination for Chiori, since it benefits all aspects of her damage.

**2pc Golden Troupe / Husk / Archaic Petra / ATK% combos**

If you have yet to farm for Chiori and want to give her a temporary set to make do with, flexing 2pc set bonuses gives her decent options to work with. It is recommended to eventually pivot to a proper 4pc set when given the opportunity. With Chiori’s damage coming from multiple avenues, she has plenty of options to work with, although Chiori does prefer GT, Husk, and AP noticeably more than ATK% sets.

#
__WEAPONS__ **Uraku Misugiri**

Signature weapon and Best-in-Slot for Chiori, about 15% superior to her next best option. It offers an enormous amount of CRIT DMG while buffing DEF, Skill, and Normal Attack damage. Chiori’s ideal teams also allow her to easily maintain full uptime on the passive.

**Primordial Jade Cutter**

A sword from early-game that has somehow resisted years of power creep. Even though Chiori does not build HP, the massive CRIT Rate stat is highly desirable, and the ATK bonus based on Max HP is simply a pleasant bonus. At R5, Jade Cutter surpasses Cinnabar Spindle.

**Wolf-Fang**

A Battle Pass-only weapon that offers a gratifying amount of CRIT Rate when using the equipped character’s Skill and a pleasant ATK boost.

**Cinnabar Spindle R5**

An event-only weapon that serves as Albedo’s signature weapon. If you don’t have this weapon now, it’s unlikely you’ll get another chance. Its DEF-scaling passive and DEF% stat are an enormous boon to Chiori’s performance.

**Harbinger of Dawn R5**

This 3-star weapon is a safe choice for off-field sword-wielding DPS characters, as they don’t often get hit. Without its passive, the weapon falls far behind in damage, but you’re still getting a good deal out of a freely accessible weapon. Harbinger of Dawn is comparable with (and sometimes better than) Cinnabar Spindle assuming you can maintain the passive's uptime.

Be careful with this weapon when using Furina and/or Bennett, as it will be difficult to keep Chiori’s HP topped off unless you have a dedicated healer (that heals beyond 70% HP).

**Honorable Mentions**

Light of Foliar Incision and Haran Geppaku Futsu are great weapons for Chiori and keep up with the weapons mentioned above, although it is preferred to use them on other units as Chiori herself cannot take full advantage of their passives.

#
__TEAM BUILDING__

Chiori’s teams are straightforward and dependent on having at least another Geo unit present. While the most obvious choice focuses on having all the party members of the same element, thankfully there are a couple of units which allow players to reliably play Chiori with units of different Elements.

**Mono Geo**

Chiori | Itto/Noelle | Zhongli/Albedo | Gorou

Itto is the best on-field unit to have in a Mono Geo team with Chiori. He matches her kit perfectly, uses the field time efficiently and deals high amounts of damage. This is a very simple team which can’t go wrong.

An alternative on-field unit is Noelle. Filling the same role, Noelle allows for a better transition to the Chiori-Albedo duo. Having a shield herself and some healing, the presence of Zhongli is no longer necessary. Additionally, with Gorou present, especially at high Constellations, this team will perform well despite not being the ideal Mono Geo team.

**Ningguang Teams**

Chiori | Ningguang | Flex | Flex

This team allows for a short 17s rotation, thanks to the short cooldowns of team members. It is also the first team to feature Ningguang in a competitive light in recent memory. Ningguang acts as the on-field DPS, while Chiori deals damage from the backline. The flex slots are used for characters that either amplify team damage or deal respectable damage on their own.

It’s worth noting that Chiori’s DPS in this team is roughly equal to Mono Geo, making this option one of Chiori’s better teams.

Teammates

flex Flex options: Furina, Fischl, Bennett, Xiangling, Yelan, Xingqiu, Zhongli

**Navia Teams**

Chiori | Navia | PECH Flex | PECH Flex

Navia, at first glance, is a strange choice to pair with Chiori, as Navia is one of the few Geo characters who cannot create constructs to enable Chiori’s second Tamoto doll. Nevertheless, so long as there are two other Pyro, Electro, Cryo, or Hydro teammates, Navia will be able to maximize her own damage. Chiori’s off-field performance contributes to Elemental Shard generation and still-respectable damage to the team. Perhaps the most important benefit Chiori provides to Navia is her reliable Geo Particle generation, which helps with Navia’s high ER needs.

Teammates

flex Flex options: Fischl, Furina, Bennett, Xiangling, Yelan, Xingqiu

hot magnetBOT
#
__CREDITS__
Leads:

@gloomy wadi, @analog scaffold

Authors:

@gloomy wadi, @analog scaffold, @wooden mason, @arctic cliff

Calculations:

@analog scaffold, @dark sentinel, @subtle finch, @olive spoke, @wooden mason

Framecounts:

@high silo

Rotation Mapping:

@gloomy wadi

Content Verification:

Calculations: @high silo
Writing: @glad gyro

Transcription:

@glad gyro, @olive spoke, @zinc olive

DISCLAIMER

Pre-TC is volatile and, as always, perpetually subject to change until release (and sometimes later!). Please note that these are theoretical suggestions.
Everything described in this FAQ is a good faith analysis based on the little information about the character’s kit that we know. Team calcs, additionally, are not established yet, and as with everything in TC, the content in this FAQ should be taken with a grain of salt.

__OVERVIEW__

Arlecchino is a 5-star Pyro Polearm character whose kit relies on stacking large amounts of Bond of Life to deal damage. Her Elemental Skill applies a Blood-Debt Directive to enemies, which can be absorbed by using her Charged Attack to gain Bond of Life. Blood-Debt Directives will upgrade after 5s, allowing Arlecchino to gain extra Bond of Life upon absorbing them. Her Elemental Burst absorbs any Blood-Debt Directives nearby, and heals Arlecchino based on both her current Bond of Life and ATK, cleansing any Bond of Life in the process. When Arlecchino has 30% or more Bond of Life, her Normal attacks will be converted to Pyro DMG, whilst dealing increased damage based on the Bond of Life's value.

Arlecchino will primarily be played as an on-field DPS, using her Skill to apply Blood-Debt Directive to enemies, swapping out briefly, then absorbing any Directives with her Charged Attack in order to gain Bond of Life. Arlecchino’s Utility Passive blocks any incoming healing other than her own, meaning she will be extremely fragile if played without a shielder due to her only healing after cleansing her Bond of Life with her Elemental Burst.

#
__TALENT PRIORITY__ **Normal Attack >> Elemental Burst = Elemental Skill**

Analysis

  • Arlecchino’s extra Bond of Life scaling increases with her Normal Attack Talent, making it the main priority to level for her personal damage. Her Elemental Burst and Skill have rather low scalings overall, with two Skills being about equal to her Burst in terms of multipliers. Additionally, Arlecchino’s healing does not increase with Elemental Burst Talent levels. Because of their low damage contribution, they can be leveled later if players wish. Even with Constellations, most of Arlecchino’s damage comes from additional scalings added from her C1, C2 and C6 rather than the Talent levels themselves.
__TALENT OVERVIEW__ **Normal Attack: Invitation to a Beheading**

Arlecchino’s Normal Attacks have a bit more to them than other characters. Upon obtaining a Bond of Life equal or greater than 30% of her Max HP, she will enter the Masque of the Red Death state, converting her attacks to Pyro and enhancing her Normal Attack’s damage based on her current Bond of Life. When hitting enemies with Normal Attacks, she will consume 7.5% of her current Bond of Life. Additionally, each Normal Attack hit will reduce her Elemental Skill’s cooldown by 0.8s, allowing her to reliably use her Skill every rotation without relying on her Burst to reset its cooldown.

Additionally, holding her Charged Attack for longer allows her to glide swiftly along the ground for 5s at the cost of Stamina. With this, Arlecchino can float across water and up mountains with ease, aiding in exploration.

**Elemental Skill: All is Ash**

CD: 30s

Her Elemental Skill sends out spikes in front of her before dashing to an enemy with a cleave, dealing AoE Pyro DMG. Enemies hit by her Elemental Skill will be marked by a Blood-Debt Directive, dealing damage up to 2 times every 5s. Upon using her Charged Attack or Elemental Burst, Arlecchino will absorb any nearby Blood-Debts from enemies, gaining 65% Bond of Life for each Blood-Debt absorbed, up to a maximum of 145% per Skill cast. Although her Skill doesn’t do much damage by itself, it is the crux of Arlecchino’s kit, allowing her to gain massive amounts of Bond of Life. It also generates 5 Pyro Particles with a 30s cooldown, although this cooldown will be a lot shorter in reality with her Normal Attack’s ability to reduce her Skill cooldown.

**Elemental Burst: Balemoon Rising**

CD: 15s
Energy cost: 60

Arlecchino’s Elemental Burst deals damage in an AoE in front of her, whilst absorbing any nearby Blood-Debts to heal her based on her current Bond of Life and ATK. Although her Burst absorbs nearby Blood-Debts to grant her Bond of Life, her healing first cleanses her current Bond of Life before actually healing her, meaning it can not be used as an alternative to her Charged Attack. Thankfully, her Burst also resets her Elemental Skill’s cooldown, allowing her to still gain Bond of Life in a rotation, alongside an additional 5 Pyro Particles. Although it contains her only source of survivability, its long cast time and low damage result in it not being a meaningful ability for damage, and it should generally only be cast when needing to heal. For players that can ignore her Elemental Burst, this will result in pre-existing Bond of Life being carried through to her next rotation, increasing the damage dealt by her Normal Attacks.

__Passives__ **Ascension 1 Passive: Agony Alone May Be Repaid**

5s after a Blood-Debt Directive is applied to an enemy, it will upgrade to a Blood-Debt Due. Upon absorbing a Blood-Debt Due, it will instead grant Arlecchino 130% Bond of Life. Additionally, once an enemy with a Blood-Debt dies, Arlecchino will immediately gain 130% Bond of Life. As a result of this, Arlecchino’s rotations will generally involve her using her Skill to apply her Blood-Debts, then swapping out until it has upgraded, where she will then swap back in to absorb it with a Charged Attack. Thankfully, enemies dying whilst Arlecchino is off-field will still grant her Bond of Life due to this Passive’s secondary effect, however, it is still bound by the 145% maximum Bond of Life instated by her Skill.

**Ascension 4 Passive: Strength Alone Can Defend**

For every 100 ATK over 1000, Arlecchino will gain 1% Resistance to both Elemental and Physical DMG, up to a maximum of 20%. Despite helping with her survivability, this Passive generally won’t help considerably in keeping players alive. Furthermore, she is unable to realistically cap out this Passive without the help of Bennett, which allows her to easily reach over 3000 ATK.

**Utility Passive: The Balemoon Alone May Know**

Rather than a general Utility Passive, Arlecchino instead sacrifices her ability to receive healing from teammates in exchange for an extra 40% Pyro DMG Bonus. This allows her to be used alongside healers without losing any Bond of Life which would decrease her overall damage. This Passive also only works during combat, allowing players in the Overworld to heal her freely if they dislike not being at full HP.

#
__CONSTELLATIONS__ **Constellation 1 - "All Reprisals and Arrears Are Mine to Bear..."**

Masque of the Red Death is further enhanced, the value of the increase is 100%. Additionally, Arlecchino's interruption resistance is increased when she performs Normal or Charged Attacks while affected by the Masque of the Red Death.

A humongous buff to Arlecchino’s damage, outperforming the difference between her signature weapon and the next best option. C1 is a high priority regardless of what team composition Arlecchino is used in. She also gains full interruption resistance for her Normal and Charged attacks, meaning they cannot be interrupted. Keep in mind that this effect is only active while she is attacking and leaves her vulnerable while moving.

***Overloaded DPS% Increase vs. C0:***

26.7%

***Vaporize DPS% Increase vs. C0:***

27.3%

***Rating:***

4.5/5

**Constellation 2 - "All Reward and Retribution, Mine to Bestow..."**

Blood-Debt Directives are now already Blood-Debt Due when first applied.
When Arlecchino absorbs such a Due, she unleashes Balemoon Bloodfire in front of her, dealing 900% of her ATK as AoE Pyro DMG and increasing her All Elemental RES and Physical RES by 20% for 15s. This effect can trigger once every 10s.
You must first unlock the Passive Talent "Agony Alone May Be Repaid."

A minor DPS increase. Roughly 8% is still potent, but it feels a bit underwhelming compared to R1. Can reduce the DPS loss of having to urgently heal during her rotation since Burst is no longer locked to specific windows. The additional 20% Resistance on top of her A4 Passive also helps to make Arlecchino quite tanky, reducing the impact of taking damage during her rotations.

***Overloaded DPS% Increase vs. C1:***

8.9%

***Overloaded DPS% Increase vs. C0:***

38.0%

***Vaporize DPS% Increase vs. C1:***

8.2%

***Vaporize DPS% Increase vs. C0:***

37.8%

***Rating:***

2/5

**Constellation 3 - "You Shall Become a New Member of Our Family..."**

Increases the Level of Normal Attack: Invitation to a Beheading by 3.
Maximum upgrade level is 15.

Arlecchino loves using her Normal Attacks, so this is a potent Constellation for her. The DPS increase that results from this is about what would be expected of a typical Constellation.

***Overloaded DPS% Increase vs. C2:***

17.6%

***Overloaded DPS% Increase vs. C0:***

62.3%

***Vaporize DPS% Increase vs. C2:***

15.5%

***Vaporize DPS% Increase vs. C0:***

59.1%

***Rating:***

3/5

**Constellation 4 - "You Shall Love and Protect Each Other Henceforth..."**

When Arlecchino successfully absorbs a Blood-Debt Directive, Balemoon Rising's CD will decrease by 2s and 15 Elemental Energy will be restored to her. This effect can occur once every 10s.

Purely a quality-of-life Constellation. This makes it more feasible to Burst every rotation when you need the extra healing. There is no actual damage increase from this, and even if using her Burst every rotation becomes viable, her Burst does not contribute significantly to her damage profile.

If you choose to Burst every rotation, this is actually a roughly 0.2% decrease in DPS, but this decrease is so insignificant that the extra survivability is still useful.

***Overloaded DPS% Increase vs. C3:***

0%

***Overloaded DPS% Increase vs. C0:***

62.3%

***Vaporize DPS% Increase vs. C3:***

0%

***Vaporize DPS% Increase vs. C0:***

59.1%

***Rating:***

1/5

**Constellation 5 - "For Alone, We Are as Good as Dead..."**

Increases the Level of Balemoon Rising by 3.
Maximum upgrade level is 15.

Arlecchino’s Burst is not especially important for her damage, so the increase here is negligible; almost non-existent. This is because Arlecchino only uses her Burst once every other rotation anyways. With C4 in-hand, maybe an once-per-rotation Burst can be squeezed in, but even then, this is probably her weakest Constellation.

***Overloaded DPS% Increase vs. C4:***

0.1%

***Overloaded DPS% Increase vs. C0:***

62.5%

***Vaporize DPS% Increase vs. C4:***

0.2%

***Vaporize DPS% Increase vs. C0:***

59.4%

***Rating:***

1/5

**Constellation 6 - "From This Day On, We Shall Delight in New Life Together."**

The DMG of Balemoon Rising is increased by Arlecchino's ATK multiplied by 700% of Arlecchino's current Bond of Life percentage.
For 20s after Arlecchino uses All Is Ash, both her Normal Attacks and Elemental Burst gain 10% increased CRIT Rate and 70% increased CRIT DMG. This effect can be triggered up to once every 15s.

A massive 90 CV added onto Arlecchino plus a greater multiplier based on Bond of Life is nothing to sneeze at. It’s unfortunate that you have to go through C4 and C5 to get this Constellation. Skill → Burst now becomes a powerful tool to instantly clear a wave in certain Abyss layouts.

***Overloaded DPS% Increase vs. C5:***

25.3%

***Overloaded DPS% Increase vs. C0:***

103.7%

***Vaporize DPS% Increase vs. C5:***

24.9%

***Vaporize DPS% Increase vs. C0:***

99.1%

***Rating:***

4/5

#
__ENERGY RECHARGE REQUIREMENTS__

Arlecchino has a Burst that is detrimental to her damage output. However, it is needed to stay alive when used without a shielder like Zhongli since she can only be healed by her Burst while in combat. In general, it is advised to delay using her Burst as much as possible in order to avoid losing damage, although certain situations might call for it to be used more frequently. In those situations where she needs to use her Burst in every rotation, she can require up to 160% ER, but for general play she is perfectly fine with 100% ER.

Arlecchino’s ER requirements will vary based on your team and rotation. For a more accurate estimate, please use the Energy Recharge Calculator linked here.
For more details on how Favonius weapons will affect your team, please use Ac1d’s Favonius Mastersheet linked here.

#
__ARTIFACTS__

sands Sands of Eon: ATK% / EM
goblet Goblet of Eonothem: Pyro DMG%
circlet Circlet of Logos: CRIT

Arlecchino’s build style is straightforward. Simply build as much CRIT as possible while maintaining a 1:2 ratio between CRIT Rate and CRIT DMG, then build ATK% if you don’t intend to use Amplifying Reactions for damage, otherwise use EM.

Even in Vaporize playstyles, ATK% and EM are comparable, though EM remains the better choice overall until you exceed 150 EM. Between ATK% and EM, in these cases, go for the best substats if you don’t want to keep farming.

Substats: CRIT% > ATK%

__Artifact Sets__ **4pc Fragment of Harmonic Whimsy**

A hyper-specific artifact set, meaning the main character you’re going to be farming this for is Arlecchino. It is roughly 5%+ better than 4pc Gladiator’s Finale.

**4pc Gladiator’s Finale**

If you’ve been playing Genshin Impact for a long time, you are bound to have a good number of strong Gladiator pieces laying around, since they drop from nearly every Boss fight in the game. Its emphasis on buffing Normal Attacks is particularly good for Arlecchino.

2pc Pyro DMG%/ATK%/EM (Vaporize) Combinations

Pyro DMG% will go further for Arlecchino than ATK% and EM 2pc bonuses will, but the differences between these sets are so small that you should probably just go with the 2pc combinations with the best substats. These combinations are roughly 10%+ less effective than Harmonic Whimsy.

#
__WEAPONS__ **Crimson Moon’s Semblance**

One of the best signature weapons for its designated character we’ve seen in a while, being more than 15% above the next best option at the same refinement, whether you use her in Vaporize teams or Overloaded teams. It’s disappointing that the weapon will rarely be the best choice for a non-Arlecchino character. Not recommended as a general-use pull, but certainly recommended for Arlecchino if you can spare the Primogems, as it also grants more healing due to high ATK and extra Bond of Life. All other R5 5-star weapons are worse than Crimson Moon’s R1 performance, though C1 provides the greater damage boost if you had to choose only one.

**Primordial Jade-Winged Spear / Staff of Homa (Below 50% Max HP)**

Jade Spear is great for Arlecchino due to its synergy with rapid Normal Attacks and a generically strong standard banner 5-star weapon thanks to its CRIT Rate stat and high Base ATK, the latter of which allows greater healing for comfort.

R1 Homa surpasses this weapon only when you can keep Arlecchino below 50% Max HP. It’s assumed here that Arlecchino will not consistently be under 50% HP. When Above 50% HP, R1 Homa is comparable to R5 Deathmatch.

**Staff of the Scarlet Sands (Vaporize)**

A comfortable choice when building CRIT Rate on artifacts proves to be challenging. In Overloaded teams, it is within 1% of Primordial Jade-Winged Spear, but just under 3% better than it in Vaporize teams when using EM Sands.

**Deathmatch R5 (General Single-Target) / Ballad of the Fjords R5 (Where EM Matters)**

Deathmatch (at any refinement), in Overloaded teams, is the only legitimate 4-star weapon option for Arlecchino and surpasses some 5-star options as well. Ballad of the Fjords excels in teams where EM matters, so long as you can maintain its 3-element requirement. Deathmatch assumes single-target scenarios in all calcs.

**Calamity Queller**

Arlecchino is off-field for just long enough to gain the full stacks she needs from Calamity Queller to compete with other options. It will rarely be the best choice for your account to use Calamity Queller over lower refinements of Deathmatch or R5 White Tassel, since the CRIT stats on Deathmatch and White Tassel make artifact farming much easier.

Vortex Vanquisher is slightly worse than this when constantly shielded, but when unshielded, even White Tassel is a better option.

**White Tassel R5 or Deathmatch R1**

White Tassel, a 3-star weapon, is stronger than every 4-star weapon besides Deathmatch and, in Vaporize teams, Ballad of the Fjords. White Tassel’s damage is 2% (Vaporize) and 4% (Overloaded) lower than R1 Deathmatch in single-target scenarios, and Deathmatch requires swiping for Battle Pass. White Tassel’s effects are straightforward, give CRIT Rate to make artifact farming easier, and synergizes with Arlecchino’s Normal Attack-heavy playstyle. White Tassel, however, falls off significantly if you are not within Bennett’s Burst circle.

#
__TEAM BUILDING__ **Bennett**

Bennett is a particularly notable teammate for Arlecchino, providing an incredibly powerful ATK buff for Arlecchino and other teammates who can snapshot, which greatly increases the damage output of Arlecchino and her team. The difference in damage between having and not having Bennett’s buff cannot be understated; while Arlecchino teams can be effective even without him, the majority of her strongest teams — in every team archetype — feature him. His one major drawback is that his buff is limited to the stationary circle of his Burst’s range.

**Overloaded**

Arlecchino | Chevreuse | Electro | Flex

Chevreuse’s potent buffs — enabled exclusively by compositions of only Pyro and Electro characters — allow Arlecchino’s Overloaded teams to deal high amounts of primarily raw damage. Players can choose a high-risk, high-reward playstyle by exchanging defensive units for significantly higher damage, although safer team compositions can be fairly strong as well. As Overloaded may knock lighter enemies out of Bennett’s circle, Overloaded teams are most effective against heavy enemies.

Teammates

electro Electro options:

  • Fischl: Fischl offers significant single-target damage, high particle generation, and consistent Electro application to trigger Chevreuse’s buffs, all while requiring little field time. She is a strong candidate for Arlecchino’s Overloaded teams.
  • Yae: Yae can be run by herself in a similar role as Fischl, although she generates fewer particles and occupies more field time than Fischl. Alternatively, she can be run alongside Fischl in the Flex position to provide additional off-field damage. It is typically not worth the setup and field time to cast Yae’s Burst in Arlecchino teams.

flex Flex options:

  • Bennett: As described in his section above, Bennett provides a powerful ATK buff for Arlecchino, as well as Fischl and/or Beidou if they are on the team.
  • Thoma/C4 Yanfei/Dehya: Thoma, C4 Yanfei, and Dehya provide shields or damage mitigation, and interruption resistance. Running a defensive unit can make playing Arlecchino a more comfortable experience.
  • Xiangling/Beidou: Xiangling and Beidou both can take advantage of Chevreuse’s buffs and offer significant off-field damage. Beidou also provides substantial damage reduction and interruption resistance — as well as a small shield at C1 — that makes her an effective defensive option. Due to the nature of her Burst, Beidou’s effectiveness is reduced greatly in single-target scenarios.
**Vaporize**

Arlecchino | Hydro | Flex | Flex

Arlecchino’s Vaporize teams typically focus on amplifying her damage through Vaporize and other buffs. Only Yelan and Xingqiu provide the Hydro application necessary for Arlecchino to consistently Vaporize her attacks. The other two slots are more flexible, offering an assortment of buffs, personal damage, and/or defensive utility depending on the characters.

Teammates

hydro Hydro options:

  • Yelan: Yelan provides consistent off-field Hydro application, excellent single-target personal damage, and a ramping DMG% buff.
  • Xingqiu: Xingqiu plays the same role as Yelan, but he offers a substantial amount of interruption resistance instead of a buff. He can also be run alongside Yelan in one of the Flex slots, where he and Yelan will provide Hydro Particles for each other.

flex Flex options:

  • Bennett: As described in his section above, Bennett’s powerful ATK buff increases Arlecchino’s damage significantly.
  • Sucrose/Kazuha: Sucrose and Kazuha can both hold 4pc Viridescent Venerer to reduce enemy Pyro RES, and provide grouping and their own potent buffs, with Sucrose buffing team EM and holding Thrilling Tales of Dragon Slayers, and Kazuha buffing Elemental DMG%.
  • Fischl/Yae: Fischl and Yae both provide significant personal damage, high particle generation, and off-field Electro application, allowing Arlecchino to trigger Overloaded. Note that Yae does not typically Burst in Arlecchino teams.
  • Zhongli/Layla/Diona: Zhongli, Layla, and Diona are all viable shielders for Arlecchino’s Vaporize teams who can increase her survivability and comfort of gameplay. Zhongli additionally provides universal RES Shred, while Diona and especially Layla can allow Arlecchino to occasionally Melt her attacks on Freezable enemies. Note that Diona and Layla can actually reduce Arlecchino’s Vaporize count on enemies that are not Freezable.
  • Xianyun: Xianyun enables a Plunging Attack playstyle wherein Arlecchino weaves Plunging Attacks that are amplified by Vaporize and Xianyun’s buffs into her attack sequence, creating the potential for significant AoE damage. Although Furina is typically not recommended for Arlecchino teams due to her inability to provide consistent Hydro application and anti-synergistic mechanics, she can be worth running in Xianyun teams, alongside either Yelan or Xingqiu.
  • Chiori: Without C1, Chiori needs a Geo Construct to maximize her Skill damage, so she is best paired with Zhongli, where she can take advantage of his Skill’s Stone Stele and Geo Resonance to deal substantial off-field damage. Said Geo Resonance also provides Arlecchino a 15% DMG Bonus.
  • Yun Jin: Arlecchino’s reliance on Normal Attacks to deal much of her damage allows her to take advantage of Yun Jin’s Normal Attack-specific buffs.
#
**Mono Pyro**

Arlecchino | Bennett | Anemo/Flex | Flex

Mono Pyro compositions focus on increasing non-reaction damage, by taking advantage of increasing Pyro particle generation across the team to lower ER requirements and Pyro RES Shred from 4pc Viridescent Venerer. Bennett is a staple in the team, as he provides Pyro particles and substantially boosts Arlecchino’s damage through his powerful ATK buff.

Teammates

anemo Anemo options:

  • Kazuha: On top of holding 4pc Viridescent Venerer, Kazuha provides grouping and a Pyro DMG% Bonus.
  • Sucrose/Heizou: As Catalyst users, both Sucrose and Heizou can equip Thrilling Tales of Dragon Slayers to provide an ATK% buff for Arlecchino, as well as the Pyro RES Shred from 4pc Viridescent Venerer.
  • Lynette: Lynette can provide a small ATK% buff in addition to holding 4pc Viridescent Venerer.

flex Flex options:

  • Zhongli: Zhongli’s hefty shield provides universal RES Shred, and creates for a more comfortable and safe gameplay experience. He can also hold 4pc Archaic Petra to buff Arlecchino’s Pyro DMG%, although collecting the Crystallize Shards necessary to obtain the buff can be difficult.
  • Chiori: Without C1, Chiori needs a Geo Construct to maximize her Skill damage, so she is best paired with Zhongli, where she can take advantage of his Skill’s Stone Stele and Geo Resonance to deal substantial off-field damage. Said Geo Resonance also provides Arlecchino a 15% DMG Bonus.
  • Xiangling: Xiangling snapshots Bennett’s ATK buff onto her Burst to deal substantial off-field damage. She benefits both from Pyro RES Shred from an Anemo unit holding 4pc Viridescent Venerer, and from reduced ER requirements thanks to the combined Pyro particle generation of 3 Pyro units.
  • Yun Jin: Arlecchino’s reliance on Normal Attacks to deal much of her damage allows her to take advantage of Yun Jin’s Normal Attack-specific buffs.
ember vineBOT
#
__CREDITS__
Lead:

@stuck rover

Authors:

@gloomy wadi, @glad gyro, @stuck rover

Calculations:

@stuck rover

Consultation:

Acacia

Content Verification:

Calculations: @cerulean mirage, @fallow mica
Writing: Avocado

Transcription:

@glad gyro, @cerulean mirage

DISCLAIMER

Pre-TC is volatile and, as always, perpetually subject to change until release (and sometimes later!). Please note that these are theoretical suggestions.
Everything described in this FAQ is a good faith analysis based on the little information about the character’s kit that we know. Team calcs, additionally, are not established yet, and as with everything in TC, the content in this FAQ should be taken with a grain of salt.

__OVERVIEW__

Clorinde is a 5-star Electro Sword character aligned with Ousia whose kit revolves around building up Bond of Life with her Normal Attacks to unleash fast lunges with her Skill. Her Elemental Skill causes her to enter the "Night Vigil" state, replacing her Normal Attacks with ranged pistolet attacks, as well as replacing her Skill with a lunging attack, dealing Electro DMG. During the "Night Vigil" state, Clorinde's attacks can pierce enemies, allowing her to hit multiple enemies at once.

Clorinde is played on-field, providing both damage and large amounts of Electro application for the team. Due to having fast, ranged Normal Attacks, she has strong innate synergy with current off-field characters, such as Fischl and Xingqiu.

__WFP SUBJECTIVE ANALYSIS__

Clorinde’s kit puts a high emphasis on the value of mobility, utility, and healing instead of focusing on damage. The easiest way to conceptualize her power budget is imagining if Alhaitham did ~30% less damage, but in exchange got the ability to self-heal, dash around with no stamina cost, and retained his larger than usual AoE for a melee unit. For most players this is a pretty good package for a unit, considering that if a unit like Arlecchino wanted to tech into defensive options, they would have to give up a valuable team slot.

It can’t be understated how smooth of a driver she is for other sub DPS units. Her mobility isn’t quite like Neuvillette where he can freely glide, but it comes pretty darn close once you get used to how her skill works (for the love of god learn that her lunge can be controlled with movement inputs). Her AoE is surprisingly decent for a melee character and if you play her with Furina you will not die ever.

There will be players that will be disappointed with her personal damage, especially considering Arlecchino was released right before her. Which is fine, Arlecchino and Clorinde are targeting different kinds of players. People who praise Arlecchino generally are okay with things such as no external healing if it means they can do high amounts of front-loaded damage. They are fine with building a team around giga-boosting a unit’s performance. Clorinde, on the other hand, feels like the polar opposite. She wants her allies to contribute damage. Her damage profile is more sustained instead of bursty, and of course she does less damage than a selfish unit. After all, it wouldn’t be fair for her to do everything well (looking at you Neuv).

__Clorinde vs Alhaitham Banner__

We recommend Alhaitham slightly more for most players.

To keep it short, if you already have a defensive unit like Kuki, Kirara, Xingqiu, Baizhu, or even Yaoyao, Alhaitham becomes a very comfortable unit to use while maintaining good damage. Alhaitham also has the option to push for higher damage at C0 with a full offensive team at the cost of comfort.

In general Alhaitham teams have more damage than Clorinde at the C0 level. Clorinde does have significantly better constellations which allows her to close the gap. If you don’t have many defensive options Clorinde could be much easier to play than Alhaitham. At the end of the day both units are quite good so it’s not a big deal if you prefer one over the other.

#
__TALENT PRIORITY__ **Elemental Skill > Elemental Burst >> Normal Attack**

Analysis

  • Level 90 is beneficial for Clorinde since she is triggering incidental Hyperblooms or Aggravate.
  • Clorinde’s Electro-infused Normal Attacks, which are her main source of damage, scale from her Elemental Skill Talent and not her Normal Attack Talent, therefore it is recommended to prioritize leveling her Skill. There is no need to level her Normal Attack Talent.
  • It is also recommended to level her Burst after her Skill, not only for additional damage, but also due to the Bond of Life Clorinde grants herself scaling with the Burst Talent Level.
__TALENT OVERVIEW__ **Normal Attack: Oath of Hunting Shadows**

Clorinde’s regular Normal Attacks are nothing special to look at. Instead, Clorinde’s Electro-infused pistolet attacks during her special state on her Skill are her main source of damage and will be further discussed in the Elemental Skill section.

**Elemental Skill: Hunter's Vigil**

CD: 16s

Clorinde enters a special state called Night Vigil state. In this state, her Normal Attacks become Electro-infused pistolet attacks and her Skill becomes a lunging attack that is considered as Normal Attack DMG. Clorinde summons a single Ousia blade along with her infused Normal Attacks. During this state, Clorinde does not receive healing from external sources, instead the external healing is converted to Bond of Life. The percentage of healing that converts to her Bond of Life is 80%. This state lasts for 7.5s and automatically ends when Clorinde leaves the field.

Clorinde gains different effects depending on her Bond of Life value when performing the infused Normal Attacks and lunging attack. Upon using her infused Normal Attacks, if her Bond of Life value is less than 100% of her Max HP, her infused Normal Attacks deal increased damage,pierce through enemies, and grant Clorinde a 35% BoL . Otherwise, when her Bond of Life value is equal to or greater than 100%, she just performs her weaker infused Normal Attacks.

Upon using her lunging attack, if she has a Bond of Life less than 100% of her Max HP, Clorinde is healed based on her Bond of Life value, while her lunging attack gains an AoE and DMG increase. If her Bond of Life value is equal to or greater than 100%, the healing she gains and her lunging attack’s AoE and DMG is increased even further. Otherwise, when she has no Bond of Life value, she just performs her lunging attack.

It is recommended to always use her lunging attack whenever she has at least 100% in Bond of Life value. Your total health bar represents 200% Bond of Life, so this 100% would be at the halfway point.

**Elemental Burst: Last Lightfall**

CD: 15s
Energy cost: 60

Clorinde’s Burst is fairly straightforward. It is an AoE multi-hit attack that hits 5 times and also grants herself a large amount of Bond of Life based on her Burst Talent level. At Talent Level 7+, it grants enough Bond of Life to use her strongest lunging attack immediately.

__Passives__ **Ascension 1 Passive: Dark-Shattering Flame**

When a party member triggers an Electro reaction, Clorinde’s infused Normal Attacks and Burst gain an Additive DMG Bonus based on 20% of her ATK. This Additive DMG Bonus caps at 1800, stacks up 3 times and lasts 15s, with each stack having an independent duration.

This means that any ATK above 3000 will not increase her damage significantly, since this Passive accounts for roughly half of her non-reaction damage.

**Ascension 4 Passive: Lawful Remuneration**

Clorinde gains 10% CRIT Rate for 15s after each fully-enhanced lunging attack, stacking up to 2 times, with each stack’s duration being independent from each other. Clorinde’s healing conversion to Bond of Life during her Night Vigil state increases as well, from 80% to 100% conversion.

This passive can make it difficult to fit in a CRIT Rate weapon without overcapping since she also gains CRIT from her ascension levels.

**Utility Passive: Night Vigil's Harvest**

Clorinde’s Utility Passive displays the location of Fontaine’s local specialties on the mini-map, aiding in material farming for Fontaine characters.

#
__CONSTELLATIONS__

On paper, many of Clorinde’s core Constellations (C1/C2/C4/C6) are actually pretty substantial increases to her damage. However, C0 Clorinde does not have the same ceiling of damage as her DPS peers such as Arlecchino, Neuvillette, or Alhaitham. In addition, one of her strongest teams usually involves her doing a smaller share of the team’s total DPS. This ends up diminishing the gains from her Constellations compared to getting upgrades on a different DPS unit such as Arlecchino, who owns the lion's share of her team’s total DPS. This is our reasoning for the lower scores on the Constellations since we believe Clorinde’s value is already built into C0 and is more about her utility, mobility, and self-sustain, rather than her personal damage.

For players more interested in playing Aggravate or even Hypercarry Clorinde teams, these Constellations will be more influential than our listed ratings.

Sims done with R1 Absolution in a Fischl Sucrose Kirara team. Please check the WFP Clorinde Mastersheet for more details

**Constellation 1 - "From This Day, I Pass the Candle's Shadow-Veil"**

While Hunter's Vigil's Night Vigil state is active, when Electro DMG from Clorinde's Normal Attacks hit opponents, they will trigger 2 coordinated attacks from a Nightvigil Shade summoned near the hit opponent, each dealing 30% of Clorinde's ATK as Electro DMG.
This effect can occur once every 1.2s. DMG dealt this way is considered Normal Attack DMG.

Clorinde gains some additional damage during her infused Normal Attacks through her summon’s coordinated attacks.

***DPS% Increase vs. C0:***

25.5%

***Rating:***

3/5

**Constellation 2 - "Now, As We Face the Perils of the Long Night"**

Enhance the Passive Talent "Dark-Shattering Flame": After a nearby party member triggers a Electro-related reaction against an opponent, Electro DMG dealt by Clorinde's Normal Attacks and Last Lightfall will be increased by 30% of Clorinde's ATK for 15s. Max 3 stacks. Each stack is counted independently. When you have 3 stacks, Clorinde's interruption resistance will be increased. The Maximum DMG increase achievable this way for the above attacks is 2,700.
You must first unlock the Passive Talent "Dark-Shattering Flame."

The Additive DMG Bonus from Clorinde’s A1 Passive and its cap is increased, further boosting Clorinde’s damage output. The absolute damage gain from C1 to C2 is the same as going from C0 to C1. You can think of C2 as getting C1 again, but with a bonus of interruption resistance. The interruption resistance granted from C2 is the same as Xingqiu’s orbital Rain Swords.

***DPS% Increase vs. C1:***

18.0%

***DPS% Increase vs. C0:***

48.1%

***Rating:***

3/5

**Constellation 3 - "I Pledge to Remember the Oath of Daylight"**

Increases the Level of Hunter's Vigil by 3.
Maximum upgrade level is 15.

An increase in Clorinde's Elemental Skill level. Unfortunately, a large portion of her damage also comes from her A1 Passive, so this increase is less than a typical C3.

***DPS% Increase vs. C2:***

4.6%

***DPS% Increase vs. C0:***

54.8%

***Rating:***

0/5

**Constellation 4 - "To Enshrine Tears, Life, and Love"**

When Last Lightfall deals DMG to opponent(s), DMG dealt is increased based on Clorinde's Bond of Life percentage. Every 1% of her current Bond of Life will increase Last Lightfall DMG by 2%. The maximum Last Lightfall DMG increase achievable this way is 200%.

Although this Constellation doesn’t seem like a large upgrade on sheets/sims, it does open the option to frontload her damage for quickly clearing a wave. At this level she has the option to go for one-shot nuke builds although our recommendation is still leaning towards Quickbloom teams due to how versatile they are.

***DPS% Increase vs. C3:***

9.9%

***DPS% Increase vs. C0:***

70.1%

***Rating:***

3/5

**Constellation 5 - "Holding Dawn's Coming as My Votive"**

Increases the Level of Last Lightfall by 3.
Maximum upgrade level is 15.

Yeah, this is really only a stepping stone to get to C6. Never go for C5 only.

***DPS% Increase vs. C4:***

2.1%

***DPS% Increase vs. C0:***

73.7%

***Rating:***

0/5

**Constellation 6 - "And So Shall I Never Despair"**

*For 12s after Hunter's Vigil is used, Clorinde's CRIT Rate will be increased by 10%, and her CRIT DMG by 70%.
Additionally, while Night Vigil is active, a Glimbright Shade will appear under specific circumstances, attacking opponents and dealing 200% of Clorinde's ATK as Electro DMG. DMG dealt this way is considered Normal Attack DMG.
The Glimbright Shade will appear under the following circumstances:

  • When Clorinde is about to be attacked by an opponent.
  • When Clorinde uses Impale the Night: Pact.
    1 Glimbright Shade can be summoned in the aforementioned ways every 1s. 6 Shades can be summoned per single Night Vigil duration.
    In addition, while Night Vigil is active, the DMG Clorinde receives is decreased by 80% and her interruption resistance is increased. This effect will disappear after the Night Vigil state ends or 1s after she summons 6 Glimbright Shades.*

Here we go, Clorinde is now a mobile, utility, self healing driver that also does an absurd amount of damage. In addition, Clorinde at C6 is impossible to kill with how much damage reduction and healing she has. This Constellation really does ascend her to a DPS unit that does almost everything well.

***DPS% Increase vs. C5:***

41.7%

***DPS% Increase vs. C0:***

146.1%

***Rating:***

4/5

#
__ENERGY RECHARGE REQUIREMENTS__

Clorinde does not really need to build ER since bursting isn’t that much of a DPS gain. You should still Burst when it is up of course, but it is usually not worth building ER over more CRIT. The one exception is C4+ Clorinde, which at that point it is important to calculate your specific ER needs with the tools below.

Clorinde’s ER requirements will vary based on your team and rotation. For a more accurate estimate, please use the Energy Recharge Calculator linked here.
For more details on how Favonius weapons will affect your team, please use Ac1d’s Favonius Mastersheet linked here.

#
__ARTIFACTS__

sands Sands of Eon: ATK% / EM
goblet Goblet of Eonothem: Electro DMG%
circlet Circlet of Logos: CRIT Rate / CRIT DMG

At C0, ATK% and EM sands perform about the same if Clorinde is triggering Hyperbloom. Without Hyperbloom ATK% sands is slightly preferable. Any Constellation above C0 will prefer ATK% sands over EM.

Substats: CRIT > ATK% > EM/ER

__Artifact Sets__ **4pc Fragment of Harmonic Whimsy**

Generally Clorinde’s highest personal damage set, especially at higher Constellations.

**4pc Thundering Fury**

This set is used when shortening Clorinde’s cooldowns is more beneficial than increasing her personal damage. An example of an ideal 4pc TF team is Clorinde-Furina-Nahida-Fischl, where Nahida and Furina have long-lasting deployable Skills/Bursts. Clorinde can swap off once to refresh Oz and then go back to being on-field. 4pc TF is not recommended for pure Electro-Charged teams.

**4pc Gladiator's Finale**

A fine budget option to use before farming for 4pc FHW. Roughly 10% less personal damage compared to FHW which is not too bad considering Quickbloom teams do not need her to do outstanding damage.

#
__WEAPONS__

Sims are done for both 4pc TF Quickbloom and 4pc FHW Aggravate teams. Please read the WFP Clorinde Mastersheet for more details.

**Absolution (5-star)**

Her signature and best weapon. It is a significant personal damage increase that is comparable to her C1.

**Light of Foliar Incision (5-star)**

On the same launch banner as her signature weapon. It is one of the stronger 5-star options for her so it’s pretty hard to be upset about losing in the banner. Foliar is also a bit more versatile than her signature which is nice if you have multiple sword DPS units.

**The Black Sword (Battle Pass)**

Despite having a healing Passive which works with her BoL generation, the main reason this weapon is good on her is that it’s a good statstick that also grants high Normal Attack DMG%. At R1 it performs as well as Finale of the Deep R5. Once refined to R5 it starts creeping close to Foiliar’s DPS.

**Finale of the Deep (Free Craftable)**

Clorinde is the perfect user of this weapon, since the passive gives her a massive amount of ATK. While this weapon does not trump many of the 5-star swords it gets pretty darn close, which is very impressive considering it is craftable! Most people will be perfectly satisfied with sitting on this weapon instead of going for upgrades. If you are worried about missing out on damage, please look at the mastersheet for her weapon calcs to see how much of a difference in team DPS it is to sit on a free weapon; it is surprisingly low for a 5-star unit.

#
__TEAM BUILDING__ **Furina**

Furina has a pretty nice interaction with how Clorinde heals from her Skill. Healing Bonus applies to the huge 110% Max HP healing from her lunging attacks before the Bond of Life reduces the healing. This means that even having only 150 Fanfare stacks on Furina will make Clorinde heal more than double her normal amount. For players with access to C1/C2 Furina, they can increase the healing to roughly half of Clorinde’s Max HP!

**Furina Quickbloom (Meta)**

Clorinde | Furina | Dendro | Dendro/Electro

4pc Thundering Fury recommended
Ideal Setup: Clorinde | Furina | Nahida | Fischl

Generally considered her strongest team archetype. Furina is one of the most important units for Clorinde teams due to how well she interacts with Clorinde’s healing in addition to buffing several sub DPS units. Clorinde’s mobility is also unrestricted in this team with Oz’s range being the only real concern for positioning.

Teammates

dendro Dendro options:

  • Nahida: One of the best Dendro options for Clorinde since she is able to provide a hefty EM buff while maintaining a strong Dendro aura off-field.
  • Dendro Traveler (DMC): A fine budget option if Nahida is not available. DMC is able to provide sufficient off-field Dendro but with lower uptime compared to Nahida.
  • Baizhu: Grants decent interruption resistance to deal with more troublesome enemies. His Dendro application is very single-target compared to the other options. Can be used as the sole Dendro applier in single-target content. Otherwise in AoE, it’s recommended to pair another Dendro unit with him.

electro Electro options:

  • Fischl: A very strong option for this archetype. Fischl’s cooldowns line up pretty well with 4pc TF Clorinde and allow for short rotations. Her damage contribution at C6 is close to the same as C0 Clorinde in this team when Clorinde is using 4TF.
  • Yae Miko: Not as strong of an option as Fischl but still serviceable. It is recommended to use 4pc FHW on Clorinde when playing with Yae since the rotation length is longer. Both Yae and Clorinde do not need to worry about building ER since their Bursts are minor in DPS gains.
  • Beidou: Not recommended in single-target, but is a good option when fighting multiple enemies. Her interruption resistance is much appreciated by Clorinde and the additional damage reduction will make her close to immortal. Clorinde’s pistol and lunge attacks both proc Beidou’s Burst effectively, making her a decent driver.
**Aggravate (Meta)**

Clorinde | Electro | Dendro | Flex

Ideal Setup: Clorinde | Fischl | Kirara/Nahida | Kazuha/Sucrose

Clorinde’s Skill has fantastic synergy with Fischl in Aggravate teams since her application and attack rate are faster than most Electro characters. Clorinde’s Aggravate teams are similar to Keqing’s Aggravate except Clorinde brings much more mobility and has self-healing. Usually other Aggravate teams have to sacrifice a decent amount of damage or grouping for survivability since the defensive options are not great (Kuki/Kirara/Jean).

Teammates

electro Electro options:

  • Fischl: One of the most important units for this archetype. Like the Quickbloom teams, Fischl also contributes a significant amount of damage in Aggravate as well.
  • Yae Miko: Not as strong of an option as Fischl but still serviceable. It is recommended to use 4pc FHW on Clorinde when playing with Yae since the rotation length is longer. Both Yae and Clorinde do not need to worry about building ER since their Bursts are minor in DPS gains.

dendro Dendro options:

  • Nahida: Offers the highest amount of team DPS compared to any other Dendro unit. Be aware that swirling Electro with Nahida requires careful planning since she applies so much Dendro.
  • Kirara: She offers less damage than Nahida but in exchange grants Clorinde interruption resistance and makes Swirling Electro much easier.
  • Baizhu: Fills a similar role as Kirara although with more issues. His Burst cooldown is too long for shorter rotations and the shield from Kirara is much better at granting interruption resistance. His Dendro application also suffers in AoE.
  • Dendro Traveler: Offers a pretty easy-to-access Dendro application for players that can’t use Nahida.

flex Flex options:

  • Sucrose: Used for VV and her EM buff for allies.
  • Kazuha: Similar to Sucrose but also allows for better grouping.
  • Zhongli: Provides easy RES Shred to both Electro and Dendro. The interruption resistance provided by his shield makes Clorinde easy to play. Only loses about 10% team DPS compared to the options above.
  • Beidou: Can be a decent option vs 2+ targets while also granting damage reduction and interruption resistance.
#
**Taser**

Clorinde | Electro | Hydro | Anemo/Hydro

Ideal Setup: Clorinde | Furina | Yelan/Fischl| Kazuha

Although Clorinde is the first “good” Electro Taser driver character to come out, her Quickbloom and Aggravate teams usually utilizes her kit better. That being said, her function as a Taser unit is perfectly fine and the Hydro units that can pair with her are rather strong (Xingqiu/Yelan/Furina).

Teammates

hydro Hydro options:

  • Xingqiu/Yelan: Function pretty similarly with Xingqiu being better defensively and Yelan offering more damage. They tend to prefer pairing up with a 2nd Hydro unit to reduce Energy costs.
  • Furina: Makes Clorinde much more durable while being able to buff all DPS characters in the party.

electro Electro options:

  • Fischl: A classic unit for Taser teams, always try to deploy Oz in between Clorinde’s gaps of field time.
  • Beidou: Good in 2+ target situations and provides interruption resistance and damage reduction.

anemo Anemo options:

  • Kazuha: Provides grouping and buffs.
  • Sucrose: Similar to Kazuha but with weaker grouping and smaller buffs.
  • Jean/Sayu: Can be used in Furina teams for faster Fanfare generation.
**Hypercarry/Overload Clorinde (Not Recommended)**

Clorinde | Buffer | Buffer | Buffer or Anemo if no Chevreuse

Ideal Setup (For higher invest players only):
Clorinde | Sara | Chevreuse | Xiangling

This playstyle only really makes sense for people who are at least C2R1 on Clorinde since at her C0 base she is not doing enough personal damage even with buffers to shine. Even at this level of investment the other teams above generally perform better and have even higher ceilings for upgrades such as using C2 Nahida or Furina.

Teammates

flex Buffer options:

  • Sara C6: Is able to buff Clorinde while not restricting her to a circle.
  • Kazuha: Offers grouping and Elemental DMG Bonus%.
  • Chevreuse C6: One of the few options for Electro and Pyro RES Shred that is not locked to Anemo units. Does have the restriction of forcing your whole team to be Pyro/Electro.
  • Bennett: His ATK buff can cap out Clorinde’s A1 Passive which is not ideal. A larger problem is that he forces Clorinde, a hyper-mobile character, to be constrained to a circle. His healing also does not really work with her since Clorinde’s self-healing usually keeps her healthy, so you can’t cheese out N2E’s with him.

flex Flex options:

  • Xiangling: Mainly only used with Chevreuse variants.
  • Thoma: Decent for interruption resistance and can slot into Chevreuse teams.
grave voidBOT
#
__CREDITS__
Leads:

@glad gyro, @fervent mural, @bright turtle

Authors:

@glad gyro, @fervent mural, @bright turtle

Calculations:

@fervent mural, @bright turtle

Content Verification:

Calculations: @cerulean mirage, @bright turtle
Writing: @bright turtle, @glad gyro

Transcription:

@glad gyro

Resources:
DISCLAIMER

Pre-TC is volatile and, as always, perpetually subject to change until release (and sometimes later!). Please note that these are theoretical suggestions.
Everything described in this FAQ is a good faith analysis based on the little information about the character’s kit that we know. Team calcs, additionally, are not established yet, and as with everything in TC, the content in this FAQ should be taken with a grain of salt.

__OVERVIEW__

Sethos is a 4-star Quickswap Electro Bow damage dealer that utilizes both Normal Attack and Aimed Shot playstyles along with a unique mechanic involving Energy manipulation. Sethos’ Skill provides Flat Energy to aid in both playstyles. His Aimed Shot playstyle involves Electro-infused Charged Attacks that pierces through enemies at the cost of his Energy and mobility. His Normal Attack playstyle, on the other hand, involves using his Burst to enter a special state that buffs and infuses his Normal Attacks with Electro, as well as being counted as Charged Attacks, at the cost of his ability to enter Aim Mode.

#
__TALENT PRIORITY__ **Aimed Shot DPS: Normal Attack > Elemental Burst > Elemental Skill**
**Normal Attack DPS: Elemental Burst > Normal Attack > Elemental Skill**

Analysis

  • Since Sethos is mainly played in Quicken teams, leveling him to 90 should be prioritized. His Normal Attack Talent multipliers are involved in both playstyles, therefore it is recommended to prioritize leveling this Talent.
  • Sethos’ Burst is only used in tandem with his Normal Attack playstyle. His Burst provides a significant DMG increase to his Normal Attacks, therefore it should be leveled up along with his Normal Attack Talent. If the Aimed Shot playstyle is preferred, this Talent is optional.
  • Sethos’ Skill does not contribute to his damage much and the Flat Energy his Skill provides is a fixed value regardless of Talent Level, therefore leveling it is optional.
__TALENT OVERVIEW__ **Normal Attack: Royal Reed Archery**

Sethos’ infused Normal Attacks and Level 2 Charged Attack are what enables him to have 2 different playstyles. As mentioned, Sethos has 2 Charge Levels for his CA. The first level is the usual infused Aimed Shot Bow characters have, while the second level is an ATK and EM scaling Electro-infused shot that can pierce through enemies. While fully charged, however, the Level 2 CA disables Sethos’ mobility. His infused Normal Attacks will be further discussed in the Elemental Burst section.

**Elemental Skill: Ancient Rite: The Thundering Sands**

CD: 8s

Sethos’ Skill is an AoE attack that also gives himself 12 Flat Energy when the Skill triggers an Electro-related reaction. This is quite important to both of Sethos’ playstyles as it lowers the ER requirement for his infused Normal Attacks that are locked behind his Burst, while his A1 Passive requires Energy to lessen his Aimed Shot charge time.

**Elemental Burst: Secret Rite: Twilight Shadowpiercer**

CD: 15s
Energy cost: 60

Sethos enters the Twilight Meditation state, lasting up to 8s. During this state, Sethos’ Normal Attacks are infused with Electro and gain Additive DMG Bonus based on his EM, along with the ability to pierce enemies. These infused Normal Attacks are considered Charged Attack DMG. Sethos, however, loses the ability to enter Aim Mode during his Burst, effectively removing the possibility to do Aim Mode animation cancels (RR cancel) with him.

__Passives__ **Ascension 1 Passive: Black Kite's Enigma**

Sethos’ Level 2 Charged Attack normally takes a whopping 6s to be fully charged. This is where his A1 Passive comes in, reducing the charge time at the cost of his Energy. For each Energy point Sethos has, it reduces his charge time by 0.285s. The charge time can be reduced until it’s only 0.3s long and the maximum amount of Energy that can be consumed is 20, which effectively removes his ability to use his Burst when using his Aimed Shot playstyle.

**Ascension 4 Passive: The Sand King's Boon**

Within 5s, 4 of Sethos’ Level 2 Charged Attacks gains an Additive DMG Bonus based on 700% of his EM, significantly increasing the damage output for his Aimed Shot playstyle. This DMG increase has a CD of 15s.

**Utility Passive: Thoth's Revelation**

Sethos’ Utility Passive displays the location of local specialties from Sumeru on the mini-map, aiding in material farming for Sumeru characters.

#
__CONSTELLATIONS__ **Constellation 1 - Sealed Shrine's Spiritsong**

The CRIT Rate of Shadowpiercing Shot is increased by 15%.

This Constellation provides a simple CRIT Rate buff for Sethos’ Level 2 Charge Attack in his Aimed Shot playstyle but nothing for his Normal Attack playstyle.

***Aimed Shot DPS% Increase vs. C0:***

9.9%

***Normal Attack DPS% Increase vs. C0:***

0.0%

***Rating:***

3/5

**Constellation 2 - Papyrus Scripture of Silent Secrets**

*When any of the following conditions are met, Sethos gains a 15% Electro DMG Bonus for 10s that may stack twice, with each stack duration counted independently:

  • Consuming Elemental Energy through Aimed Shots; you must first unlock the Passive Talent "Black Kite's Enigma" to trigger this condition.
  • Regaining Elemental Energy by triggering Elemental Reactions using Ancient Rite: The Thundering Sands.
  • Using Secret Rite: Twilight Shadowpiercer.*

Sethos gains a significant buff with a maximum of 30% Electro DMG Bonus through his Energy manipulation mechanics found in his Aimed Shots and Elemental Skill.

***Aimed Shot DPS% Increase vs. C1:***

12.2%

***Aimed Shot DPS% Increase vs. C0:***

23.4%

***Normal Attack DPS% Increase vs. C1:***

11.8%

***Normal Attack DPS% Increase vs. C0:***

11.8%

***Rating:***

3/5

**Constellation 3 - Ode to the Moonrise Sage**

Increases the Level of Normal Attack: Royal Reed Archery by 3.
Maximum upgrade level is 15.

An increase in Sethos’ Normal Attack Talent, providing a damage increase to both of his playstyles. Most of his damage output, however, is reliant on his A4 Passive buff, Additive DMG Bonus on his Burst, and Aggravate, lowering the value of this Constellation.

***Aimed Shot DPS% Increase vs. C2:***

4.7%

***Aimed Shot DPS% Increase vs. C0:***

29.1%

***Normal Attack DPS% Increase vs. C2:***

1.3%

***Normal Attack DPS% Increase vs. C0:***

13.2%

***Rating:***

2/5

**Constellation 4 - Beneficent Plumage**

When a Shadowpiercing Shot or Dusk Bolt strikes 2 or more opponents, all nearby party members gain 80 Elemental Mastery for 10s.

Sethos provides a teamwide EM buff upon hitting multiple enemies with his Level 2 Charged Attacks or his infused Normal Attacks, rendering this Constellation useless in single-target scenarios.

***Aimed Shot DPS% Increase vs. C3:***

6.3%

***Aimed Shot DPS% Increase vs. C0:***

37.2%

***Normal Attack DPS% Increase vs. C3:***

6.7%

***Normal Attack DPS% Increase vs. C0:***

20.8%

***Rating:***

2/5

**Constellation 5 - Record of the Desolate God's Burning Sands**

Increases the Level of Secret Rite: Twilight Shadowpiercer by 3.
Maximum upgrade level is 15.

An increase in Sethos’ Burst Level, boosting the Additive DMG Bonus his infused Normal Attacks gain. This Constellation, however, provides nothing for his Aimed Shot playstyle.

***Aimed Shot DPS% Increase vs. C4:***

0.0%

***Aimed Shot DPS% Increase vs. C0:***

37.2%

***Normal Attack DPS% Increase vs. C4:***

8.8%

***Normal Attack DPS% Increase vs. C0:***

31.5%

***Rating:***

3/5

**Constellation 6 - Pylon of the Sojourning Sun Temple**

After Shadowpiercing Shot strikes an opponent, the Elemental Energy consumed by the Passive Talent "Black Kite's Enigma" will be returned. This effect can be triggered up to once every 15s. You must first unlock the Passive Talent "Black Kite's Enigma."

Regains the Energy consumed by Sethos’ A1 Passive once every rotation, which can open up the possibility of doing an additional Level 2 Charged Attack, however, his A4 Passive only gives Additive DMG Bonus to 4 Level 2 CAs. Players can choose to keep doing only 4 CAs so the regained Energy aids in his ER requirements instead.

***Aimed Shot DPS% Increase vs. C5:***

13.2%

***Aimed Shot DPS% Increase vs. C0:***

55.3%

***Normal Attack DPS% Increase vs. C5:***

15.8%

***Normal Attack DPS% Increase vs. C0:***

52.5%

***Rating:***

3.5/5

#
__ENERGY RECHARGE REQUIREMENTS__

Generally, Sethos’ ER requirements are too high to be usable in teams where he is the only Electro unit.
Favonius weapons decrease Sethos’ ER requirements by ~10–20% per proc.

If you choose to not modify rotations and use Sethos’ C6 as a means to decrease ER requirements rather than fire additional Level 2 Charged Shots, his ER requirements are lowered by ~40–80% for his Aimed Shot playstyle only. This also applies to rotations pre-C6 where Sethos fires only 3 Aimed Shots.

Sethos’s ER requirements will vary based on your team and rotation. For a more accurate estimate, please use the Energy Recharge Calculator linked here.
For more details on how Favonius weapons will affect your team, please use Ac1d’s Favonius Mastersheet linked here.

#
__ARTIFACTS__

sands Sands of Eon: ER% or EM
goblet Goblet of Eonothem: Electro DMG%
circlet Circlet of Logos: CRIT Rate or CRIT DMG

Sethos will only use an ER Sands in teams where his ER needs are notably high. Otherwise an EM Sands is preferred.

Substats: ER until requirement > CRIT Rate/DMG > EM > ATK%

__Artifact Sets__ **4pc Wanderer’s Troupe**

Wanderer’s Troupe is Sethos’ best set, providing both EM and an unconditional CA DMG Bonus. This is especially useful as Charged Attacks make up the vast majority of Sethos’ damage.

**4pc Gilded Dreams**

Sethos cares mostly for the high EM it provides, as he scales on EM in multiple areas. The ATK% is still helpful but less noteworthy.

**2pc EM/ATK%/ER%/Electro DMG% combos**

Unconditional mixed set options. They are not much worse than 4pc Gilded Dreams. Players with a good mixed set do not necessarily need to farm for the aforementioned 4pc sets.

**4pc Desert Pavilion Chronicle**

Only used for Sethos’ Burst-NA playstyle, this weapon has more CA DMG Bonus than Wanderer’s Troupe, but lacks the EM. This being said, the ATK SPD increase can lead to Sethos being able to hit more times during his Burst, which can make it roughly equal to Wanderer’s Troupe.

#
__WEAPONS__ **Hunter’s Path**

Sethos’ premium weapon of choice and best weapon, though not by much at R1. Hunter’s Path synergizes perfectly with Sethos, providing him plenty of desirable stats - CRIT Value, Elemental DMG Bonus, and a passive that works similarly to his Ascension 4 Passive / Elemental Burst, depending on which playstyle you decide to go with.

**Slingshot**

Do not be fooled by this weapon’s rarity; Slingshot is most definitely Sethos’ 2nd best weapon. Since this weapon is easily obtainable from gacha, one should have no issue getting it to R5, where they get a whopping 60% DMG Bonus to their Charged Shots, complimenting Sethos’ kit amazingly. If you do not wish to get Hunter’s Path for Sethos / you don’t have it at the moment, this is what you should aim for.

**The First Great Magic / Aqua Simulacra**

At R1, these weapons’ performances are similar, if not straight up worse, than R5 Slingshot. Not worth pulling these weapons specifically for Sethos.

#
__TEAM BUILDING__ **Quicken**

Sethos | Electro | Dendro | Flex

The most effective team for Sethos regardless of playstyle as other options are either not recommended or are niche. Sethos needs an Electro battery to aid his not insignificant ER requirements, along with a Dendro character required to trigger Quicken reactions. Buffers, healers, and shielders can take up the last slot in this team. Sethos generally does not take up a lot of field time with him being a Quickswap DPS, therefore making the rotations quite short.

Teammates

electro Electro options:

  • Fischl: Generates massive amounts of Energy for Sethos along with significant off-field damage.
  • Yae: Fulfills a similar role as Fischl, albeit generating less Energy than her.
  • Kuki: Provides healing along with a decent amount of Energy. The range on her Skill, however, requires Sethos to be closer to the enemy when fighting.
  • C6 Sara: A buffer who, at C6, gives Sethos a 60% CRIT DMG increase. Sethos’ short field time does not make the 6s duration of the buff much of an issue. However, Sara does not have good Energy generation and her Flat ATK buff is not as effective due to Sethos’ EM scalings.

dendro Dendro options:

  • Baizhu: Provides healing and shielding along with a DMG Bonus buff for Aggravate from his A4 Passive. However, his Burst can only be used once every other rotation due to its CD being quite long compared to the shorter rotation length of this team.
  • Nahida: Provides a massive EM buff for Sethos along with significant off-field damage, although keep in mind that since she applies so much Dendro, it makes Swirling Electro quite difficult.
  • Kirara: Provides a shield with stronger interruption resistance than Baizhu’s, along with just enough Dendro application to comfortably Swirl Electro.
  • Yaoyao: Provides healing for the on-field character and Dendro application, although party-wide healing requires her to take fieldtime.

flex Flex options:

  • Sucrose: Holds 4pc VV and provides a massive amount of EM for Sethos. Can also equip Hakushin Ring to provide Elemental DMG Bonus.
  • Kazuha: Plays a similar role as Sucrose, although his buff is for Elemental DMG% instead of EM and he cannot equip Hakushin Ring.
  • Zhongli: Provides a very strong shield along with 20% Elemental RES Shred.
**Overloaded (Not Recommended)**

Overloaded teams, even with Chevreuse, are generally not recommended due to various reasons. Sethos’ damage depends mostly on his EM scalings, rendering Bennett’s ATK buff mostly ineffective. The inconsistent triggering of reactions means that Sethos’ EM scaling cannot contribute as much, and he cannot reliably gain the 12 Flat Energy from his Skill every rotation, which is very much needed for both of his playstyles.

sonic starBOT
#
__CREDITS__
Lead:

@cerulean mirage

Authors:

@cerulean mirage, @static nexus, @bright turtle

Calculations:

@static nexus, @bright turtle

Content Verification:

Calculations: @cerulean mirage
Writing: @glad gyro

Transcription:

@glad gyro

Resources:
DISCLAIMER

Pre-TC is volatile and, as always, perpetually subject to change until release (and sometimes later!). Please note that these are theoretical suggestions.
Everything described in this FAQ is a good faith analysis based on the little information about the character’s kit that we know. Team calcs, additionally, are not established yet, and as with everything in TC, the content in this FAQ should be taken with a grain of salt.

__OVERVIEW__

Mualani is the first 5-star character from Natlan. She is a Hydro Catalyst whose kit revolves around managing Nightsoul points – a new mechanic from Natlan – to stack Wave Momentum and deal large Normal Attack damage that scales with her HP. Mualani’s Elemental Skill makes her enter the Nightsoul's Blessing state, where she mounts her Sharky Surfboard and, upon making contact with enemies, gains Wave Momentum stacks up to 3 times. She then uses her Normal Attack to deal damage. Mualani’s Elemental Burst is simply one large instance of Burst DMG.

Mualani will mainly be played as an on-field DPS in a Forward Vaporize team due to her slow yet strong damage output, or a Mono Hydro team where she can synergize with other Hydro teammates.

__WFP SUBJECTIVE ANALYSIS__

Being Natlan’s first 5-star character, Mualani does not disappoint the player by having a simple, straightforward, yet powerful kit. As an on-field, HP-scaling unit with interruption resistance, she is more comfortable facing enemies and tanking more hits, compared to other ATK-scaling characters.

However, at the current writing time, Mualani does not have many options for a Pyro applier/enabler, since she wants to Forward Vaporize all of her powerful hits. Some of the Pyro options are Xiangling, Dehya, Thoma, and Xinyan, which on their own, may not apply Pyro fast enough if there are other Elements reacting with Pyro, which means Mualani may not be Vaping her damage. This leads to her team needing another character that applies additional Pyro onto the enemies, mainly Dendro characters and/or Kazuha. Overall, this makes her team building very restricted.

Is she a replacement for Neuvillette?

The short answer is, no. Neuvi is still generally better with his AoE, range, sustainability, and team flexibility. However, Mualani does provide powerful nukes that some players might find more appealing.

Who should I pull, Kazuha or Mualani?

Kazuha usually has a stronger pull value based on the utilities he provides to almost every Pyro/Hydro/Electro/Cryo character: VV, DMG% buff, and grouping. Nevertheless, if you desperately need an on-field DPS that is not Dendro/Geo/Anemo, Mualani can be considered.
Overall, it depends on the account.

Should I pull Mualani?

If you like her, yes.
If you want to play a Forward Vaporize team but do not want to play around with the current Pyro roster, it would not be a bad idea to wait for her rerun down the road to see how other characters will interact with her, especially the Pyro Archon; so far, the Archons have been proven as good units overall.

Should I get C1 or R1?

With the new update from both the character and weapon banner, getting her Signature weapon is potentially going to cost less than getting another character copy. Both C1 and R1 increase her damage by ~20% (in the Vape scenario). However, it is still not advised to pull on the weapon banner if you cannot guarantee the weapon, because unlike the character banner, you will lose the Fate Point when the banner goes away.

#
__TALENT PRIORITY__ **Character Level = Elemental Skill > Elemental Burst**

Analysis

  • Mualani’s Sharky’s Bite, despite dealing Normal Attack DMG, does not scale with her Normal Attack MV but her Elemental Skill, therefore, it is recommended to prioritize leveling her Skill. There is no need to level her Normal Attack Talent.
  • Both her Skill and Burst scale with HP, therefore leveling her up is also important.
__TALENT OVERVIEW__ **Normal Attack: Cooling Treatment**

This Talent is irrelevant to her kit, despite her Sharky’s Bite being considered as Normal Attack DMG, since Sharky’s Bite is upgraded through leveling up her Elemental Skill. Her Normal Attack should only be used to set up the rotation through applying Hydro.

**Elemental Skill: Surfshark Wavebreaker**

CD: 6s

Mualani gains 60 Nightsoul points and enters Nightsoul's Blessing state, which consumes Nightsoul points until they are depleted or when the Skill is used again. In this state, she moves around on her Surfboard, and upon hitting an enemy, it will not deal damage, but instead mark that enemy as Prey and give Mualani 1 Wave Momentum stack, up to 3 stacks. 1 stack can be gained from the same enemy every 0.7s.

Each Wave Momentum stack will increase the damage of her Enhanced Normal Attack – Sharky’s Bite. At 3 stacks, the Sharky Bite’s MV will be further increased and become Sharky’s Surging Bite. After performing a Normal Attack, the mark will be removed, and Mualani will fire Shark Missiles at up to 5 nearby Prey, dealing Sharky's Bite Nightsoul-aligned DMG and clearing the stack. If there is more than one target for either the Sharky’s Bite or Shark Missiles, the damage will be reduced, by 14% at 2 targets, up to 28% at 3+ targets.

It is recommended to always use Sharky’s Bite at full stacks (indicated by a bar on the screen), not only for the larger damage, but it also extends the Nightsoul's Blessing through her Ascension 1 Passive, which will be explained in its own section.

**Elemental Burst: Boomsharka-laka**

CD: 15s
Energy cost: 60

Mualani’s Elemental Burst simply deals a strong Nightsoul-aligned hit that scales with her HP.

__Passives__ **Ascension 1 Passive: Heat-Resistant Freshwater Floater**

When Sharky's Surging Bite (3 stacks Sharky’s Bite) hits an enemy, a Puffer will be generated nearby, generating up to 2 Puffers per instance of Nightsoul's Blessing. Each Puffer, when picked up, will restore 20 Nightsoul points to Mualani. This will ensure Mualani can consistently get up to 3 Sharky’s Surging Bites per Skill in a single-target scenario.

**Ascension 4 Passive: Natlan's Greatest Guide**

When a nearby party member triggers a Nightsoul Burst (a mechanic wherein a Nightsoul Burst will be triggered if your party contains a character from Natlan and a character deals Elemental DMG to an opponent), Mualani will store 1 stack of Wavechaser's Exploits for 20 seconds, max 3 stacks. The stacks will be consumed when Mualani uses her Burst, increasing its DMG.

At the current time of writing, it is not recommended to stack multiple Natlan characters in the team for the shorter cooldowns of Nightsoul Burst (Kinich, Kachina) due to the lack of synergy between them.

**Night Realm's Gift: Crests and Troughs**

This is a special passive for Natlan characters, including Mualani, when they are exploring in Natlan. After her Nightsoul points are depleted, to maintain her Nightsoul's Blessing, Mualani will switch to consume Phlogiston, a special stamina bar that appears above the character’s HP bar exclusive to Natlan characters. Switching to Mualani while the active character is sprinting, swimming, moving due to certain Talents, or at a certain height within an area with Phlogiston Mechanics will cause her to enter in her Nightsoul’s Blessing state, gaining 40 Nightsoul points alongside it. This effect can be triggered once every 10s.

When Mualani surfs across water or Liquid Phlogiston in Natlan in her Nightsoul’s Blessing state, her Nightsoul point or Phlogiston consumption decreases by 75%. Outside of Natlan, her Nightsoul point consumption decreases by 35% instead.

**Utility Passive: The Trick Is to Keep Smiling!**

Mualani’s Utility Passive displays the location of Natlan’s local specialties on the mini-map, aiding in material farming for Natlan characters. Aside from that, whenever Mualani picks harvestable items in an area with Phlogiston Mechanics within Natlan, she restores 15 Phlogiston.

#
__CONSTELLATIONS__ **Constellation 1 - The Leisurely "Meztli"...**

The DMG dealt by the first Sharky's Surging Bite after Mualani enters Nightsoul's Blessing and the Shark Missiles it triggers is increased by 66% of Mualani's Max HP. This instance of increased DMG is subject to the diminishing DMG rules of Surfshark Wavebreaker.
In addition, while out of combat, Mualani's Nightsoul's Blessing state consumes 30% less Phlogiston and Nightsoul points.

Mualani’s first Constellation increases the damage of her first enhanced Normal Attack with 3 Wave Momentum stacks and Missiles, resulting in a noticeable damage increase. This is a valuable early Constellation and a good stopping point for F2P or low spenders. C1 will also aid Mualani in exploring Natlan by decreasing her Phlogiston consumption, allowing her to swim over liquid longer.

***DPS% Increase vs. C0:***

26.47%

***Rating:***

4/5

**Constellation 2 - Mualani, Going All Out!**

Mualani gains 2 of Surfshark Wavebreaker's Wave Momentum stacks when she enters Nightsoul's Blessing state. She will gain 1 stack when obtaining a Puffer.
In addition, whenever Mualani obtains 2 Puffers within a single instance of the Nightsoul's Blessing state, she will recover an additional 12 Nightsoul points over 2s. This effect requires the Passive Talent "Heat-Resistant Freshwater Floater" to be unlocked first.

Another good Constellation that allows Mualani to perform 4 instances of Sharky's Surging Bites per Skill use.

***DPS% Increase vs. C1:***

22.13%

***DPS% Increase vs. C0:***

54.47%

***Rating:***

3.5/5

**Constellation 3 - Surfing Atop Joyous Seas**

Increases the Level of Surfshark Wavebreaker by 3.
Maximum upgrade level is 15.

A straightforward damage increase. This Constellation increases the Talent Level of her Skill resulting in higher buff multipliers for her Sharky’s Surging Bites.

***DPS% Increase vs. C2:***

12.97%

***DPS% Increase vs. C0:***

74.51%

***Rating:***

2/5

**Constellation 4 - Sharky Eats Puffies**

Mualani regenerates 8 Energy when obtaining a Puffer. Must first unlock the Passive Talent "Heat-Resistant Freshwater Floater."
Additionally, Boomsharka-laka deals 75% increased DMG.

Mualani doesn’t require building a lot of Energy Recharge since her Burst overall is minor in damage contribution compared to her buffed Normal Attacks. Not recommended to pull for this Constellation specifically.

***DPS% Increase vs. C3:***

5.75%

***DPS% Increase vs. C0:***

84.55%

***Rating:***

1/5

**Constellation 5 - Same Style of Surfboard on Sale!**

Increases the Level of Boomsharka-laka by 3.
Maximum upgrade level is 15.

A Talent Level increase for her Burst resulting in a minor damage increase. Only recommended if going for C6, otherwise the first 3 Constellations are all a good stopping point.

***DPS% Increase vs. C4:***

1.78%

***DPS% Increase vs. C0:***

87.84%

***Rating:***

1/5

**Constellation 6 - Spirit of the Springs' People**

The DMG increase from the Constellation "The Leisurely 'Meztli'..." is no longer limited to being triggered once every Nightsoul's Blessing.

C6 gives all of Mualani’s hits buffs from her C1, compared to C1 buffing only the first hit with all 3 Wave Momentum stacks. A considerable damage increase over previous Constellations and C0 on paper but might prove to be less useful in actual combat due to Mualani being able to oneshot most enemies on this level of investment. The value of her C6 could slightly increase in multiwave but even then it’s unlikely to reach full potential.

***DPS% Increase vs. C5:***

39.99%

***DPS% Increase vs. C0:***

162.96%

***Rating:***

3/5

#
__ENERGY RECHARGE REQUIREMENTS__

Mualani does not want to build ER since it’s better to focus on offensive stats, as it is not really worth Bursting every rotation, especially at the current time of writing where Mualani cannot utilize her Ascension 4 Passive well. At C4, she already has enough ER within KQMS to Burst every rotation by picking up her Puffer. For the players that do want to Burst every rotation, the tools below will help calculate the ER requirement based on the situation.

Mualani’s ER requirements will vary based on your team and rotation. For a more accurate estimate, please use the Energy Recharge Calculator linked here.
For more details on how Favonius weapons will affect your team, please use Ac1d’s Favonius Mastersheet linked here.

#
__ARTIFACTS__

sands Sands of Eon: HP% / EM
goblet Goblet of Eonothem: Hydro DMG% > HP%
circlet Circlet of Logos: CRIT > HP%

With the new artifact set, 4pc Obsidian Codex, Mualani gains 40% CRIT Rate by just consuming Nightsoul points. Combined with her CRIT Rate Ascension Passive, she already effectively has more than 60% CRIT Rate, therefore it is very easy to overcap it.

Substats: CRIT > HP% > EM

__Artifact Sets__ **4pc Obsidian Codex**

The new Natlan artifact set is definitely the Best-in-Slot set for Mualani, providing her with 40% CRIT Rate for basically the full uptime of her Skill and Burst. Note that for this set, you generally want to use a CRIT DMG Circlet to avoid overcapping your CRIT Rate.

**4pc Unfinished Reverie**

Only viable in a Burning-Vaporize team, and it still underperforms compared to 4pc Obsidian Codex.

**4pc Heart of Depth**

Mualani can make use of the Hydro and Normal Attack DMG% Bonus. A bit better than 2pc combos.

**2pc HP/EM/Hydro DMG% combos**

The minimum baseline until you can get a good Obsidian Codex set.

#
__WEAPONS__ **Surf’s Up**

Mualani’s Signature Weapon. Surf’s Up is a fantastic weapon that offers Mualani everything she needs. Aside from a whopping 88.2% CDMG from leveling it to Level 90, it also gives her 20% HP passively, as well as up to 48% Normal Attack DMG at 4 stacks of Scorching Summer, which helps boost her damage even further. If Mualani is being played in a Forward Vaporize team, she will easily maintain her maximum stacks on the weapon, since the loss in stacks after an Normal Attack is counteracted by the gain in a stack from triggering a Vaporize reaction. Hence, if you wish to pull for her weapon, it is advised that you build a team focused around the Forward Vaporize reaction to get maximum yield from it.

**Sacrificial Jade**

A very powerful option even at R1, this Battle Pass weapon also provides plenty of stats desirable to Mualani, giving her up to 64% HP and 80 EM for 10s after taking the field on top of a very noticeable 36.8% CR. If you don’t intend to go for her sig, this is her second best option at R5, and is better than every other 4-star option even at R1. The main caveat here is that with this weapon, you might find it difficult to optimally gear her up when factoring in 4pc Obsidian Codex as well as her CR% ascension, which puts her at an effective 101% CR before factoring in anything else. Hence, when it comes to Mualani’s best artifact set with this weapon, CR% is essentially a dead stat, meaning that Mualani only has CDMG%, HP%, EM and HP as desirable stats now.

**A Thousand Floating Dreams**

Nahida’s Signature Weapon. Since Mualani’s team is likely going to comprise at least 2 team members that have differing elements, she will get 2 DMG stacks from this weapon, which is a helpful contributing factor to her damage. Furthermore, since her favored playstyle is Forward Vaporize, having such a huge burst of EM from the weapon really boosts her damage, making this weapon a surprisingly good option if you have it on hand and are not using it on anybody else. Would not recommend pulling this weapon specifically for Mualani though.

**Tome of the Eternal Flow**

Neuvillette’s Signature Weapon. Another massive CRITstick while providing a bit of HP, but the secondary passive is non-existent for Mualani. Not recommended to pull specifically for her, but is still better than The Widsith if you have it.

**The Widsith / Ring of Yaxche R5**

The first of the non-premium / BP options, The Widsith along with the Ring of Yaxche both fare decently on paper for Mualani, with The Widsith coming out on top ever so slightly. One thing to note though is that with The Widsith, only two of the three buffs are actually useful for Mualani, with the Recitative buff providing ATK% being completely useless for her damage. Hence, if you wish for her damage to be more consistent, you might want to consider favoring the Ring of Yaxche, which is not only craftable, but you can also obtain it immediately after logging into the game in Version 5.0 as a collective reward from a Web Event.

**Ash-Graven Drinking Horn R5**

The 5.0 flagship event weapon. On paper, this weapon performs similarly to Ring of Yaxche R1, so if you have no billets to spare for refining the Ring of Yaxche and need a weapon for Mualani, you can run with the Ash-Graven Drinking Horn, which you should be able to max out by playing the 5.0 event.

#
__TEAM BUILDING__

Mualani is designed for a Forward Vaporize team (even emphasized in her Signature Weapon passive), due to her slow, no ICD, powerful Sharky’s Bites. Other team archetypes are usually a DPS loss compared to this.
Do note that the other new Artifact set, Scroll of the Hero of Cinder City, will give Mualani a 12% Hydro DMG buff when the wearer creates a reaction with Hydro, up to an additional 28% if the wearer is a Natlan character, therefore any support character can equip this artifact to further increase Mualani’s DMG.

**Forward Vaporize**

Mualani | Pyro | Dendro/Kazuha | Flex

As mentioned above, this is the primary team that Mualani wants to play in, in order to Vape her Sharky’s Bites. A Pyro character is required to provide Pyro aura (no way!!!). You want to have another character to support the Pyro aura (mainly Dendro, with Burning, and Kazuha with his Pyro-infused Burst). The last slot can be any character that can support Mualani, as long as the character does not interfere with the Pyro aura that Mualani needs to Vape all of her hits.

Teammates

pyro Pyro options: Xiangling, Dehya, Xinyan, Thoma

dendro Dendro options: Nahida, Emilie, Baizhu

flex Flex options: Pyro/Dendro mentioned, Zhongli, Chiori, Kachina, Furina, Candace, Mona

**Mono Hydro**

Mualani | Anemo | Hydro | Flex

Mualani does not have direct synergy with other Hydro units except for the Hydro Resonance. However, Mono Hydro is still a comfortable archetype to play where the Hydro character usually does not care about ER requirements as much. An Anemo teammate is usually needed to shred Hydro RES for Mualani and her teammates.

Teammates

hydro Hydro options: Yelan, Furina, Candace, Sigewinne, Mona

anemo Anemo options: Kazuha, any other Anemo

flex Flex options: Hydro mentioned, Zhongli, Chiori, Kachina

opal nexusBOT
#
Xilonen FAQ
A Name Engraver of the Nanatzcayan, she is especially skilled at finding a good balance between the heavy responsibilities of her job and living well.
Xilonen Mastersheet by _acid, Acacia, and angel_on_fire.
#
__CREDITS__
Lead:

@wooden mason

Authors:

@wooden mason, @static nexus, @rare marsh, @olive spoke

Calculations:

@wooden mason, @static nexus, Acacia

Content Verification:

Calculations: @stray hornet, @bright turtle
Writing: @bright turtle

Transcription:

@bright turtle

Resources:
DISCLAIMER

Pre-TC is volatile and, as always, perpetually subject to change until release (and sometimes later!). Please note that these are theoretical suggestions.
Everything described in this FAQ is a good faith analysis based on the little information about the character’s kit that we know. Team calcs, additionally, are not established yet, and as with everything in TC, the content in this FAQ should be taken with a grain of salt.

__OVERVIEW__

Xilonen is a 5-star Geo Sword character from Natlan whose kit revolves around activating her samples, which are based on her teammates’ elements. These samples provide Geo, Pyro, Electro, Cryo or Hydro RES Shred. Xilonen’s Elemental Skill makes her enter the Nightsoul's Blessing state, during which, if there are at least 2 Pyro, Electro, Cryo or Hydro characters in the team, she can use her Normal Attacks to activate her samples and thus her RES Shred. In that team, Xilonen’s Elemental Burst heals the active character for an amount based on her DEF.

Xilonen is mainly a support for characters of the aforementioned element. That being said, when using her in a team where there is only one or less Pyro, Electro, Cryo or Hydro characters, she can be used as a damage dealer, using her Geo-infused Normal Attacks or Plunges and Elemental Burst to deal damage.

__WFP SUBJECTIVE ANALYSIS__

As far as Geo units go, Xilonen surpasses all the expectations set for her. She provides about as much as Kazuha, who is widely regarded as one of the best and most universal buffers in the game. Additionally, she also comes with healing and access to easy multi-Element RES Shred. She is also extraordinarily easy to build, requiring only a 4-piece set of the Scroll of the Hero of Cinder City artifact set, with no real need to level any of the pieces at base, except for perhaps the Sands of Eon piece for the increased Energy Recharge as well as a CRIT Rate Circlet if paired with the Favonius Sword. Her weapon options are also extremely simplistic, where aside from her Best-in-Slot(BiS)as well as Favonius Sword in teams where more ER is needed, running any other weapon (yes even Dull Blade) will not noticeably alter her performance.

Is she a replacement for Kazuha?

As with everything, it depends. While she provides almost the same magnitude of buffs along with healing, she lacks the AOE damage of Kazuha, which cannot be overlooked. Additionally, she possesses no CC capabilities, giving Kazuha a huge edge in AOE scenarios.

Should I pull for Xilonen?

If you like her, absolutely.
If you don’t like her but feel like you need a buffer like her, yes.
If you only play Mono Anemo, Dendro-based, or Mono Geo teams, she will be of little use to you and you can afford to skip her easily.

Should I get C1 or R1?

Since the Weapon banner is now less costly on average than the Character banner, pulling for a Character’s Signature Weapon is now easier than ever. In Xilonen’s case especially, her C1 provides marginal to no benefits at all aside from lengthening her fast movement state for exploration and slightly increasing the active character’s interruption resistance, while her Signature Weapon provides a solid buff for her team. Hence, pulling for her C1 should only be done if one wishes to pull for her C2 as well. However, it is still not advised to pull on the weapon banner if you cannot guarantee the weapon, because unlike the character banner, you will lose the Fate Point when the banner goes away.

Should I try to get C2?

C2 is generally a larger buff to the team than R1, but is also way more costly. Something else to consider is that spending a significant number of wishes this close to Natlan’s Archon release may not be a wise choice, especially if you do not have a surplus of Primogems. Additionally, Xilonen’s C2 provides no gameplay changes aside from larger damage numbers, making it “functionally boring” compared to other constellations.

#
__TALENT PRIORITY__ **Elemental Skill > Elemental Burst**

Analysis

The most important part of Xilonen's kit, the multi-Element RES Shred, is applied via her Elemental Skill, while the RES Shred scales off the Skill’s talent level, which should be prioritized over all her other talents. Next up are her healing capabilities, which is provided by her Burst. That being said, leveling her Burst is only a necessity if you desire more healing and / or want to improve her synergy with Furina. Leveling her Normal Attack is only a notable benefit if you are looking to build her to be an on-field DPS.

__TALENT OVERVIEW__ **Normal Attack: Ehecatl's Roar**

Outside of her Nightsoul’s Blessing state, Xilonen's Normal Attacks are lackluster. Additionally, while her Normal and Plunging Attacks are infused with Geo while she is in the Nightsoul’s Blessing state, her damage does not warrant investing in it when she is not used as an on-field DPS. This however, changes when her C6 is unlocked, which greatly improves her personal DMG.

**Elemental Skill: Yohual's Scratch**

Xilonen’s Elemental Skill is the highlight of her character kit, providing multi-Element RES Shred based on her team's Elemental composition. Xilonen's Elemental Skill gives her 3 Samplers which can sample the Element of her teammates. Initially, these samplers start as Geo, and when activated, reduce the Elemental RES of nearby enemies by 33% for the sampled Elements (at Talent Level 9, C0).

After her Elemental Skill is used, she will gain 45 Nightsoul Points and enter the Nightsoul's Blessing state, which starts her samplers as Geo. When her team has at least 2 Pyro/Cryo/Electro/Hydro characters, her Ascension 1 Passive Talent allows her to gain 35 Nightsoul points after performing a Normal or Plunging Attack during her Nightsoul's Blessing state, with a maximum of 90 points. When her Nightsoul points reach 90 after two Normal/Plunging Attacks, she will consume all her Nightsoul points and activate her 3 Source Samplers, which decrease the Elemental RES shred of her enemies by 33% for each element from Pyro/Cryo/Electro/Hydro/Geo in her party. It is important to note that two Samplers of the same Element will not stack buffs.

**Elemental Burst: Ocelotlicue Point!**

The functionality of Xilonen's Elemental Burst is based on the state of her Source Samplers. Xilonen deals an initial instance of Nightsoul Aligned Geo DMG that scales off of her DEF. If at least 2 Source Samplers are sampling an Element from Pyro/Cryo/Electro/Hydro, Xilonen will heal the active character over time, the amount of healing increasing with her DEF. However, if less than 2 of the Samplers have their Elements changed from Geo, she will deal an additional instance of Nightsoul-aligned Geo DMG. Overall, this skill is good for ensuring survivability in multi-Element team compositions and for some additional Geo DMG in Geo teams.

__Passives__ **Ascension 1 Passive: Netotiliztli's Echoes**

Her A1 Passive allows her to consistently activate her Source Samplers to sample Elements outside Geo. Similar to her Elemental Burst, Xilonen's A1 Passive has two outcomes based on the state of her samplers. When Xilonen is in her Nightsoul's Blessing state with at least 2 samplers being Pyro/Cryo/Electro/Hydro, her Normal and Plunging Attacks give her 35 Nightsoul Points. If she has less than 2 samplers that have not switched Elements from Geo, she will gain a 30% Normal Attack Bonus.

**Ascension 4 Passive: Portable Armored Sheath**

Her Ascension 4 Passive Talent allows her to trigger an additional Nightsoul Burst, which increases her DEF by 20% and can also trigger any Nightsoul Burst-related effects, such as the 2pc effect of the Scroll of the Hero of Cinder City artifact set.

**Night Realm's Gift: Blessing of Forge-Fire**

This talent allows Xilonen to consume Phlogiston to extend her Nightsoul’s Blessing state for longer while exploring Natlan. Similar to Kachina, this talent also allows an active character that is sprinting/climbing to switch to Xilonen, which grants her 20 Nightsoul points and activates her Nightsoul’s Blessing state.

**Utility Passive: Tour of Tepeilhuitl**

This talent restores 15 Phlogiston when an active character switches to Xilonen based on the Night Realm’s Gift Talent.

#
__CONSTELLATIONS__ **Constellation 1 - Sabbatical Phrase**

Xilonen's Nightsoul point and Phlogiston consumption in her Nightsoul's Blessing state is decreased by 30%, and her Nightsoul point time limit is extended by 45%. Additionally, when Xilonen's Source Samples are active, she can also increase nearby active characters' interruption resistance.

Xilonen’s first Constellation is a QoL constellation for both exploration and combat. The decreased Phlogiston consumption and increased Nightsoul limit helps her while exploring with her Skill. The Constellation also provides the active character 0.5 IR, which is as much as Hu Tao during her Elemental Skill infusion or Beidou during the duration of her Elemental Burst, when her Source Samples are active.

***Team DPS% Increase vs. C0:***

0%

***Rating:***

2/5

**Constellation 2 - Chiucue Mix**

*Xilonen's Geo Source Sample will always remain active. Additionally, when her Source Samples activate, all nearby party members will gain effects corresponding to the active Source Sample that matches their Elemental Type:

· Geo: DMG +50%.
· Pyro: ATK +45%.
· Hydro: Max HP +45%.
· Cryo: CRIT DMG +60%.
· Electro: Restore 25 Energy, decrease Elemental Burst CD by 6s.*

Xilonen’s C2 is one of the best Constellations in the game. Considering how universal she is, increasing her buffing capabilities significantly makes the Constellation hold high value. In addition to the increased buffs, it enables her to shred Geo without the use of her Skill.

***Team DPS% Increase vs. C1:***

13-16%

***Team DPS% Increase vs. C0:***

13-16%

***Rating:***

4/5

**Constellation 3 - Tonalpohualli's Loop**

Increases the Level of Yohual's Scratch by 3.
Maximum upgrade level is 15.

Increases the level of Xilonen’s Elemental Skill by 3, which increases her maximum RES Shred from 36% at TL 10 to 45% at TL13.

***Team DPS% Increase vs. C2:***

3.5-4%

***Team DPS% Increase vs. C0:***

17-21%

***Rating:***

2/5

**Constellation 4 - Suchitl's Trances**

After Xilonen uses Yohual's Scratch, she will grant all nearby party members the Blooming Blessing effect for 15s.
Characters with Blooming Blessing deal 65% of Xilonen's DEF as increased Normal, Charged, and Plunging Attack DMG. This effect will be removed after triggering 6 times or when the duration ends.
When you hit more than one opponent, trigger counts will be consumed based on the number of opponents hit. The counts for each party member with Blooming Blessing are counted independently.

Provides the team with 6 instances of added damage, similar to Shenhe and Yun Jin’s buffs, on their Normal, Charged and Plunging Attacks.

***Team DPS% Increase vs. C3:***

7-13%

***Team DPS% Increase vs. C0:***

27-37%

***Rating:***

3/5

**Constellation 5 - Tlaltecuhtli's Crossfade**

Increases the Level of Ocelotlicue Point! by 3.
Maximum upgrade level is 15.

The added healing from this constellation is not very useful. The Constellation should only be pulled if going for C6.

***Team DPS% Increase vs. C4:***

0%

***Team DPS% Increase vs. C0:***

25-37%

***Rating:***

1/5

**Constellation 6 - Imperishable Night Carnival**

*When Xilonen is in the Nightsoul's Blessing state, when she sprints, leaps, or uses Normal or Plunging Attacks, she will gain Imperishable Night's Blessing, ignoring the limitations of her Nightsoul's Blessing state and increasing the DMG dealt by her Normal and Plunging Attacks for 5s.

During this time:
· Her Nightsoul's Blessing time limit countdown will be paused. Xilonen's Nightsoul points, Phlogiston, and Stamina will not decrease, and when her Nightsoul points reach the maximum, her Nightsoul's Blessing state will not end either.
· Xilonen deals 300% of her DEF as increased Normal and Plunging Attack DMG while in the Nightsoul's Blessing state.
· She heals nearby party members for 120% of her DEF every 1.5s.
She can gain 1 Imperishable Night's Blessing once every 15s.*

This Constellation greatly enhances Xilonen’s personal damage in a frontloaded manner by giving her added damage on her Normal and Plunging attacks while also providing teamwide healing, enabling Furina much better compared to a lower Constellation Xilonen.

***Team DPS% Increase vs. C5:***

2-6%

***Team DPS% Increase vs. C0:***

27-45%

***Rating:***

3/5

#
__ENERGY RECHARGE REQUIREMENTS__

Xilonen’s ER requirements in order to Burst every rotation depend largely on her team, with teams which have additional Geo characters needing very little ER, while the opposite means her ER needs can shoot up to 230% ER, and that’s only if she catches her own particles.

Her Burst does not contribute much damage and can be safely disregarded unless needed for every rotation for survivability and/or to provide healing for Furina’s drain to work.

It is worth noting that using her Burst every other rotation instead reduces her ER requirements by roughly half.

Xilonen’s ER requirements will vary based on your team and rotation. For a more accurate estimate, please use the Energy Recharge Calculator linked here.
For more details on how Favonius weapons will affect your team, please use Ac1d’s Favonius Mastersheet linked here.

#
__ARTIFACTS__

sands Sands of Eon: DEF% or ER
goblet Goblet of Eonothem: DEF%
circlet Circlet of Logos: Healing Bonus% or DEF% or CR (If Fav)

Substats: ER% (until requirement) > CR (If Fav) > DEF%

__Artifact Sets__ **4pc Scroll of the Hero of Cinder City**

Xilonen’s undisputed BiS Artifact set. The 2pc lowers her ER requirements and the 4pc grants all party members a 40% Geo DMG bonus and an additional Elemental DMG Bonus depending on the Element with which Crystallize is generated.

**4pc Archaic Petra**

Practically wasted 2pc effect because of Xilonen’s low multipliers. The 4pc effect provides a 35% dmg bonus, but it requires that a Crystallize shard be picked up, making it harder to utilize compared to Scroll while providing a lower buff, on top of not buffing Geo.

**4pc Instructor**

Being a 4 Star Artifact Set, Xilonen holding Instructor will likely result in her overall stats being lower compared to other 5 star artifact sets, which in turn will lead to lower healing and buffing if she is holding her Signature Weapon. The buff provided is also worth less compared to Scroll and is only useful if her team members rely on Elemental Mastery.

**4pc Obsidian Codex**

Xilonen’s best set for her personal damage because of the amount of buffs it provides for Natlanian characters. However, using Xilonen as a damage dealer at low Constellations is not recommended, with her supportive builds very much preferred.

#
__WEAPONS__ **Peak Patrol Song**

Xilonen’s Best-in-Slot weapon increases both her personal and the entire team’s damage through its strong passive. While it is a guaranteed damage increase for the entire team over Favonius Sword, due to the nature of teams often appreciating the added help with their ER needs, the mileage you get out of this weapon will vary based on the ER needs of her teams, meaning that its effect will be most noticeable in teams that aren’t energy hungry.

**Favonius Sword**

Her second best option overall, and definitely her best 4* Weapon, Favonius Sword is so beneficial to her teams overall that it is worth using over any weapon that focuses on increasing Xilonen’s pitifully low personal damage. It is recommended that players build enough CRIT Rate to consistently trigger its passive. Naturally, Favonius will perform best on higher refinements, but for players that don’t have her Signature Weapon, there is no reason not to use Favonius Sword even on lower refinements.

**Key of Khaj-Nisut**

Key requires 3 Skill uses to activate its teamwide EM buff. With how her rotations line up, the Weapon can only have the buff active in the second rotation at the earliest, with some teams potentially taking three rotations for the Weapon passive to activate. In either case, the mediocre buff the weapon provides along with it encouraging Xilonen to build high HP, a stat she doesn’t normally favor, makes it hard to justify using this weapon over her other options, even for teams that favor EM buffs.

**Freedom-Sworn**

In most of Xilonen’s teams, it will perform similarly, if not worse, than all options not listed here. While the buff might look good at first glance, Xilonen can have a hard time triggering the passive. Hence, even for teams that benefit fully from the buff it provides, it will not be consistent enough or last long enough to justify using Freedom-Sworn over her other options. In teams that heavily favor ATK buffs, such as Arlecchino or Navia teams, while equipping Freedom-Sworn on Xilonen theoretically results in very high damage for the on-field carries, the lack of team utility and adjusted rotations to accommodate its buff means that it might at times negatively affect uptime of other buffs and Bursts, making it fall behind her other options.

**Xiphos' Moonlight**

In most of her teams, Xiphos will be a downgrade compared to her other options despite the ER it provides to the entire team. Xilonen herself doesn’t value the EM this weapon requires building in order to benefit from the passive, and even then ER it provides is significantly lower than what Favonius Sword can offer. This weapon should only be considered if you do not have an available Favonius Sword and your team really needs help with the Energy.

**Wolf-Fang / Uraku Misugiri / Cinnabar Spindle / Dull Blade**

Xilonen’s personal damage is low even when she is built for damage, so all weapons that are focused on her personal damage over team buffs will perform similarly, with less than a 1% difference between them. If the team doesn’t require the help with ER and you don’t own her Signature Weapon, Dull Blade would unironically be a great option for her considering how close it is to other weapons, limited 5*s included, that could benefit other characters way more.

#
__TEAM BUILDING__

In short, Xilonen’s role in teams is almost identical to that of Kazuha, minus the AOE damage and Crowd Control, but with the addition of strong healing and the ability to buff the Geo element. She can also be used as a Zhongli replacement when his Shielding capabilities aren’t needed for the interruption resistance since she provides more RES Shred as well as healing to sustain the team. Xilonen is also able to be used as an on-field DPS even at low Constellations, but that will often result in less damage than if she were to be used to buff another carry.

**Arlecchino Vaporize**

Arlecchino | Hydro | Bennett | Xilonen

As mentioned above, this team replaces Kazuha with Xilonen. However, since her healing doesn’t benefit Arlecchino and Kazuha can also easily provide RES Shred and DMG% for both Hydro and Pyro, she is not an upgrade unless dealing with multi-wave content where Kazuha cannot easily refresh his Res Shred.

Teammates

hydro Hydro options: Yelan, Xingqiu

**Neuvillette Hypercarry**

Neuvilette | Furina | Kazuha | Xilonen

Neuvillette doesn’t have many decent options for his fourth slot in this team, and Xilonen fits perfectly here, providing almost a second Kazuha’s worth of buffs, with the addition of healing which offers more survivability and which Furina is able to utilize to gain more stacks for her Elemental Burst’s buff.

**Navia**

Navia | Furina/Fischl | Bennett | Xilonen

Navia benefits immensely from Xilonen since her other options for a second Geo slot were either Zhongli, who has lackluster particle generation and thus hinders Navia, or Chiori who while providing an excellent amount of particles, is not fully utilized in this team at Constellation 0 due to Navia’s lack of Geo Constructs. In addition to solving both issues while buffing Navia, Xilonen also provides a large amount of healing, enabling greater synergy with Furina.

snow dockBOT
#
__CREDITS__
Lead:
Authors:

@analog scaffold
@wooden mason

Calculations:

Acacia

Content Verification:

Calculations: @stray hornet
Writing: @rare marsh

Transcription:

@bright turtle

Resources:
DISCLAIMER

Pre-TC is volatile and, as always, perpetually subject to change until release (and sometimes later!). Please note that these are theoretical suggestions.
Everything described in this FAQ is a good faith analysis based on the little information about the character’s kit that we know. Team calcs, additionally, are not established yet, and as with everything in TC, the content in this FAQ should be taken with a grain of salt.

__OVERVIEW__

Mavuika is damage. Whether on-field or off-field, Mavuika is a high-end DPS with her best teams outdamaging most others compared on similar standards.. Even as a support, while wielding the 4pc Cinder City set, she offers a series of massive buffs alongside her Burst. The Pyro Archon requires no Energy Recharge. This is because her Burst is fueled by Fighting Spirit instead of energy, which is built up through the consumption of Nightsoul Points across the party. Since energy is not a factor for Mavuika, she can build entirely offensive-focused stats.

While Mavuika appears exceptional as an on-field DPS, her off-field capabilities should not be ignored. She is superior (some may argue ‘comparable’) to Xiangling in terms of damage, though she doesn’t have the relentless Pyro application that Xiangling does. However, Xiangling needs to build a truly difficult amount of Energy Recharge, which many players sometimes struggle with in order for Xiangling to function. Off-field, Mavuika is Xiangling on easy mode (as if Xiangling needed an easy mode).

Where Mavuika struggles is team restrictions and weapon affordability. The best options for these teammates are limited 5-star characters like Xilonen and Citlali. Her weapons are also not budget friendly, and her best 4-star option, Serpent Spine, requires a shielder to maintain its stacks. Citlali is the only worthwhile Natlan character at time of writing that offers this while also improving Mavuika’s damage, though the shield isn’t very durable. If you don’t have loose 5-star CRIT Claymores laying around, you’re basically choosing between her signature weapon, Serpent Spine (Battle Pass), Talking Stick (Battle Pass), or an R5 Tidal Shadow (Craftable).

As with all other archons, Mavuika is designed to be a highly flexible unit with applications as wide as there are reactions… as long as you have another Natlan teammate. Thanks to her high motion values, she can ignore the mechanic and at least function on any team. However, since her forte is ‘damage,’ it’s hard to give a clearer overview than “big numbers good, but needing pricy characters and weapons less good.” You will, however, be rewarded handsomely for your investment.

__WFP SUBJECTIVE ANALYSIS__

Mavuika being the Pyro Archon certainly sets high expectations, considering the land of Pyro is also called the Nation of war, and she certainly delivers. Taking the crown of the most powerful DPS in the game by a significant margin while also having use as an off-field character or buffer, she is an extremely versatile unit. These roles can be achieved by using either the Obsidian Codex or Scroll of the Hero of Cinder City artifact sets for each role respectively.

Is my Arlecchino useless now?

While it is true that Mavuika is stronger than her, it is not to the point where you should try to pull her just because of that fact. Arlecchino remains a competent DPS, albeit a slightly worse option than Mavuika. Mavuika also prefers and sometimes needs Natlan characters like Citlali or Xilonen to function, which might require further investment that should be considered when pulling.

Should I pull for Mavuika?

If you like her, yes.
If your dream is speeding around Teyvat on a motorcycle, yes.
If you don’t like her but feel like you need a Pyro damage dealer like her, yes.
If you don't have and are never planning on pulling on any Natlan unit other than her then she might not be a great option to pull.

Should I get C1 or R1?

It depends on your goals. If your goal is higher damage, her C1 offers minimal levels compared to her R1 while other weapon options are significantly behind it in damage, especially F2P options. Her weapon is also very good on other Claymore users if you don’t mind sharing weapons between characters. If on the other hand your goal is to have her motorcycle last for 50% longer, then C1 will serve you well. It is worth noting that this increase will not affect her flying, climbing or water driving modes maximum continuous use time limit.

Should I try to get C2?

C2 is a frankly ludicrous buff to her damage, so if you can afford it and aren’t thinking of pulling any of the other characters releasing soon, it might be a great pull.

#
__TALENT PRIORITY__ **Elemental Burst > Elemental Skill**

Analysis

The Normal Attack talent is irrelevant, due to the Skill talent multipliers overriding the Normal Attack multipliers when she uses Normal Attack inputs. Mavuika’s Burst provides an enormous multiplier bonus when you are well-stocked on Fighting Spirit, incentivizing having at least one additional Natlan teammate, and contributes the most to her damage profile, while the Skill is almost as valuable for her damage.

__TALENT OVERVIEW__ **Normal Attack: Flames Weave Life**

As said earlier, there is no reason to level her Normal Attack talent, since they will be overridden by her Skill anyways.

**Elemental Skill: The Named Moment**

The tap version deals damage in two-second intervals and allows Mavuika to apply enough Pyro to help trigger forward vapes. The hold version of the Skill not only is great for overworld exploration, but also turns Mavuika into a formidable on-field DPS. Its Pyro-infusion allows Mavuika to forward-Melt or reverse-Vaporize her Normal, Charged, and Plunging attacks.

Generally, when using Mavuika as an on-field DPS, it is prudent to use her tap Skill at the beginning of the rotation to consume enough Nightsoul Points to enable her Burst.

**Elemental Burst: Hour of Burning Skies**

For 7s, Mavuika gains interruption resistance and a multiplier bonus to the Normal, Charged, and Plunging attacks on her motorcycle based on the amount of Fighting Spirit gathered. Her attacks will also not consume Nightsoul Points.

The Burst really helps take Mavuika’s damage over-the-top, allowing her DPS in teams to soar past many of the strongest previous teams in history, hence the emphasis on levelling this talent first.

__Passives__ **Ascension 1 Passive: Gift of Flaming Flowers**

Any party member triggering a Nightsoul Burst grants Mavuika 30% ATK for 10s. Since her damage window is about 7s, this will almost always be active when it matters.

**Ascension 4 Passive: “Kiongozi”**

A decaying buff on the active party with a maximum of 40% DMG Bonus based on the Fighting Spirit present when using Mavuika’s Burst. It further incentivizes growing Fighting Spirit to its maximum capacity.

**Night Realm's Gift: Exhaust Mode**

This talent allows Mavuika to consume Phlogiston to extend her Nightsoul’s Blessing state for longer while exploring Natlan. In Natlan, this significantly positively impacts the duration of the motorcycle state and by extension Natlan exploration.

**Utility Passive: Night-Shattering Radiance**

Nightsoul Transmission CD is reduced by 20% across the party.

#
__CONSTELLATIONS__ **Constellation 1 - The Night-Lord’s Explication**

Mavuika's maximum Nightsoul points are increased to 120, and she gains Fighting Spirit 25% more efficiently. Additionally, she gains 40% ATK for 8s after gaining Fighting Spirit.

A nice quality-of-life upgrade to Mavuika, and reasonable, but not essential, for a C1. It also extends the bike form by 50% for exploration.

***Team DPS% Increase vs. C0:***

10.7%

***Rating:***

2.5/5

**Constellation 2 - The Ashen Price**

When in the Nightsoul's Blessing State, Mavuika's Base ATK is increased by 200, and she obtains the following effects based on All-Fire Armaments' form:
· Ring of Searing Radiance: Nearby opponents' DEF decreased by 20%.
· Flamestrider: Mavuika's Normal Attacks, Charged Attacks, and her Sunfell Slice from the Elemental Burst Hour of Burning Skies deal 60%, 90%, and 120% of her ATK as increased DMG respectively.

Most of the time, you are spinning donuts with her Charged Attack while she is on-field, and 90% increased damage is massive. It’s basically just raw damage, no matter which form it takes, and not revolutionary like the C2 of other Archons. The DEF-shred is certainly welcome, but Mavuika may be strongest as an on-field DPS anyways. Nevertheless, it is one of the best Constellations to aim for if you intend to bring Mavuika up in constellations, and a fine stopping point as well.

***Team DPS% Increase vs. C1:***

31.2%

***Team DPS% Increase vs. C0:***

45.3%

***Rating:***

4.5/5

**Constellation 3 - The Burning Sun**

Increases the Level of Hour of Burning Skies by 3.
Maximum upgrade level is 15.

It’s just more damage. There’s not much to say here. It’s worse than C1 due to lack of quality-of-life, but comparable damage increase.

***Team DPS% Increase vs. C2:***

11.5%

***Team DPS% Increase vs. C0:***

62%

***Rating:***

2/5

**Constellation 4 - The Leader’s Resolve**

Enhances the effects of the Passive Talent "Kiongozi":
The DMG increase gained after using the Elemental Burst Hour of Burning Skies will not decay over time, and an additional 10% DMG Bonus will be gained.
You must first unlock the Passive Talent "Kiongozi."

It looks much stronger than it actually is. When factoring in the decay rate compensation plus the additional 10%, you’re probably gaining about 30-35% dmg bonus, which is underwhelming for a fourth constellation on an archon.

***Team DPS% Increase vs. C3:***

4.9%

***Team DPS% Increase vs. C0:***

70%

***Rating:***

1/5

**Constellation 5 - The Meaning of Truth**

Increases the Level of The Named Moment by 3.
Maximum upgrade level is 15.

A humble damage boost. It doesn’t really do anything but add more damage.

***Team DPS% Increase vs. C4:***

5.2%

***Team DPS% Increase vs. C0:***

78.9%

***Rating:***

1/5

**Constellation 6 - “Humanity’s Name” Unfettered**

The All-Fire Armaments from the Elemental Skill The Named Moment receive all-round improvements:
· Ring of Searing Radiance: When the Ring's attacks hit opponents, a Flamestrider will crash into the struck opponent, dealing 200% of ATK as Nightsoul-aligned AoE Pyro DMG.
· Flamestrider: When Mavuika is riding the Flamestrider, she will also summon a Scorching Ring of Searing Radiance to follow her, which will decrease nearby opponents' DEF by 20% and deal 500% of ATK as Nightsoul-aligned AoE Pyro DMG to nearby opponents once every 3s. Mavuika's terrain-crossing abilities will also be further improved.

Additionally, when Mavuika is riding her Flamestrider and is not in combat, when her Nightsoul points drop to 5, she will gain 80 Nightsoul points. This effect can trigger once every 15s.

This constellation simply makes Mavuika better at everything she does while on-field. She deals more damage. She shreds DEF (a very rare debuff) and deals additional instances of Pyro damage. Even in overworld exploration, her motorcycle mode lasts twice as long.

***Team DPS% Increase vs. C5:***

23.5%

***Team DPS% Increase vs. C0:***

120.8%

***Rating:***

4/5

#
__ENERGY RECHARGE REQUIREMENTS__

To sum this section up, Mavuika has zero Energy Recharge requirements. While this statement usually comes with caveats for other characters, such as using an Elemental Burst every other rotation, it surprisingly holds true for Mavuika, who simply does not need energy to use her Elemental Burst and is currently the only character in the game with this mechanic. She instead uses Fighting Spirit stacks to activate her burst, a mechanic unaffected by the Energy Recharge stat, which also enables her to use her Burst at half of its maximum capacity of 200 stacks, albeit resulting in less damage dealt.

She gains fighting spirit when any character in the team consumes Nightsoul Points while in combat, including herself, as well as a tiny amount when any character lands Normal Attacks.

That being said, her Elemental Skill still produces 5 Pyro particles on activation, so your teams will not suffer from lack of energy when she is part of them.

Your team’s ER requirements will vary based on your team and rotation. For a more accurate estimate, please use the Energy Recharge Calculator linked here.
For more details on how Favonius weapons will affect your team, please use Ac1d’s Favonius Mastersheet linked here.

#
__ARTIFACTS__

sands Sands of Eon: EM > ATK%
goblet Goblet of Eonothem: Pyro DMG
circlet Circlet of Logos: CRIT Rate / Dmg

Substats: CRIT > EM > ATK

__Artifact Sets__ **4pc Obsidian Codex**

Every other artifact set is significantly worse than this one’s damage output by more than 10%. 4pc Crimson Witch is the next alternative, but it’s nearly 15% worse. It’s worth the resin to farm Obsidian Codex for Mavuika.

However, if you use Furina, it’ll be within 5% damage to use 4pc Marechaussee Hunter. No matter what, though, Codex wins every time.

**4pc Scroll of the Hero of Cinder City**

This option is for off-field, non-dps focused Mavuika builds. This, coupled with her Burst, adds tons of firepower to her team while still dealing non-negligible damage.

**2pc Mixes**

You’ll want Pyro DMG% most if you intend to resort to 2pc mix-and-match sets, followed by EM, followed by ATK%. Pyro + EM is still nearly 17% below the best option, so it is not recommended to utilize 2pc sets unless the substats are exceptional.

#
__WEAPONS__ **A Thousand Blazing Suns**

Basically gives Mavuika +20% CRIT DMG and +28% ATK bonus for as long as Mavuika is active on the field. In Nightsoul stance, both of these are raised by 75%, making it a 35% CRIT DMG Bonus and 49% ATK bonus. This beats the next unconditional weapon by 20% and pre-stacked R5 Serpent Spine by roughly 17%.

**Serpent Spine R5 (Pre-Stacked)**

The overall best 4-star Claymore for most wielders of the weapon. Citlali provides a shield, so it won’t be too difficult to prevent the stacks from being lost, but shielding options might be limited outside of her without taking some major hit to team dps.

**Redhorn Stonethresher // Verdict // Beacon of the Reed Sea (without taking damage)**

These are mostly just good CRIT stat sticks with situationally useful passives. They’re all within a percent or so of each other, so it’s appropriate to put them all in one place here.

**Serpent Spine R1 (Pre-Stacked) // Talking Stick R5 **

The Battle Pass weapon, even at R1, surpasses all other 4-star weapons and all unnamed R1 5-star weapons. For those who want something less conditional, R5 Talking Stick is great when your character has Pyro applied to them, like in Bennett’s Burst circle. The damage output between these two weapons is roughly the same.

**The Other R1 5-Stars (Besides Skyward Pride) // Mailed Flower R5 // Talking Stick R1**

Skyward Pride is useless on Mavuika since she doesn’t need Energy Recharge at all. Other 5-star weapons are between 4-7% better than R5 Tidal Shadow, but 1-4% worse than R5 Talking Stick.

**Tidal Shadow R5**

The craftable baseline. You’ll be married to the Bennett circle in most cases with Mavuika, so she will usually be healing, and you’ll usually have secondary healing from characters like Xilonen or Chevreuse. If neither of them are on the team, Furina also tugs Mavuika’s HP below 70%, allowing her to get healed by Bennett again while on-field.

#
__TEAM BUILDING__

Mavuika is pretty demanding in terms of teammates. Bennett is a highly contested support, and will be used on most team compositions who truly wish to maximize team DPS. Xilonen is a recent limited 5-star and a highly contested support already, and then Furina or Citlali are the next best choices. Essentially, you’re expected to have pulled all the good 5-star Natlan supports or otherwise meta units, but the reward is probably the highest team DPS at the same standards.

**(Forward) Melt**

Mavuika | Bennett | Xilonen | Citlali

Citlali is both a Natlan character plus a Pyro buffer, ontop of generating enough Cryo to forward-Melt with Mavuika, though the timing is somewhat strict for this. Mavuika in general wants as many Natlan characters as possible in order to maximize her Fighting Spirit and reliably Burst. Xilonen provides multi-elemental RES-shred and additional healing, as well as particles if wielding Favonius Sword. Bennett is Bennett. Cryo substitutes for Citlali fall off very hard due to not contributing Fighting Spirit and fewer buffs brought to Mavuika.

Alternatively, Mavuika can be the off-field DPS and instead, your Cryo unit can be a Cryo on-field DPS like Ganyu or Wriothesley. Mavuika’s Burst can still Forward Melt the initial hit in these comps.

**Reverse Vaporize**

Mavuika | Bennett | Xilonen | Furina

Utilizing three limited 5-star Natlanians is hard on the wallet, so some might opt for Furina instead for comparable damage numbers. Furina provides Hydro application, a universal team buff based on healing (Bennett + Xilonen are plenty healing), and good off-field damage. Xilonen of course shreds, heals, and buffs, and Bennett heals and buffs ATK. Most Hydro substitutes won’t work as well since Mavuika does best with using Charged Attacks, not Normal Attacks, which makes Yelan and Xingqiu less viable.

**Forward Vaporize**

Mavuika | Xilonen | Mualani | Flex

Mavuika as an off-field DPS provides Xiangling levels of damage and still applies Pyro enough for Mualani to Forward Vaporize her attacks, including her Burst. Even if off-field Mavuika is less damage than on-field, the lack of energy requirements is hard to overlook. With three Natlanians, it will also be easy to maximize her Fighting Spirit. The flex slot can go to whatever suits your team needs, whether it be healing, shielding, or more offense.

**Overloaded**

Mavuika | Bennett | Chevreuse | Flex

Mavuika replaces Xiangling as the Pyro damage dealer in this team, regardless of whether Mavuika is on-field or off-field DPS. This allows your Electro option to be fairly flexible, since you can use either an on-field or off-field DPS. Chevreuse provides buffs, unconditional healing, and Pyro + Electro RES-shred. Clorinde is a great on-field DPS choice if Mavuika opts for off-field play, and Fischl is like reliable 4-star off-fieldchoice for damage and simplicity of play. Ororon is the current Natlan option to raise Fighting Spirit.

**Navia**

Mavuika | Bennett | Navia | Xilonen

Mavuika replaces Xiangling as the Pyro damage dealer in this team as an off-field DPS. Xilonen is the natural fit for this team, being a Natlanian who can shred Geo and Pyro resistance. In a pinch, Xilonen can be replaced with Kachina, but this isn’t really recommended; the two aren’t comparable in performance, but Kachina can wear the same Artifact set and is Natlanian. Other options besides Xilonen fall off pretty hard.

**Burning (Kinich)**

Mavuika | Bennett | Kinich | Emilie/Flex

An on-field Dendro DPS is preferred in this team composition to provide ample fuel for Burning. Kinich is the most likely choice due to being Natlanian, having inherent synergy with Mavuika. Emilie is a great choice for the fourth teammate due to her Burning damage reduction, which allows you to require less care in gameplay while also providing worthwhile damage.

ember vineBOT
#
__CREDITS__
Lead:

@analog scaffold

Author:

@analog scaffold

Calculations:

@rare marsh, @wooden mason

Consultation:

@marble token (Writing)

Content Verification:

Calculations: @bright turtle
Writing: @stuck rover

Transcription:

@glad gyro

Resources:
DISCLAIMER

Pre-TC is volatile and, as always, perpetually subject to change until release (and sometimes later!). Please note that these are theoretical suggestions.
Everything described in this FAQ is a good faith analysis based on the little information about the character’s kit that we know. Team calcs, additionally, are not established yet, and as with everything in TC, the content in this FAQ should be taken with a grain of salt.

__OVERVIEW__

Mizuki is a 5-star Anemo Catalyst wielder whose method for dealing damage is buffing and creating Swirl reactions while on-field. In addition to this, she can heal the active party and heal herself twice as effectively.

Most of her damage is dealt during her Skill state that she enters on input, allowing her to float around and periodically hit enemies while swirling elements and healing. Since many of her abilities scale with Elemental mastery, it will be essential to not only equip her with the 4pc Viridescent Venerer artifact set, but also getting EM mainstats and substats.

This leaves Mizuki with limited, but budget-friendly weapon and artifact options; VV has been around since the beginning of the game, and since EM is the only stat that matters to Mizuki, throwing nearly any Elemental Mastery catalyst on Mizuki will get the job done in terms of personal damage. However, one of her biggest drawbacks is her team restrictions, synergizing only with Pyro, Hydro, Electro, or Cryo characters that automatically attack from off field on their own. This leaves options for teammates pretty limited.

Alternatively, Mizuki can be played as an off-field DPS with a buffing weapon like Hakushin Ring so another character can play the role of the on-field DPS, but Mizuki’s abilities are pretty constrained like this; her only job would be to Swirl and then leave the battlefield. Considering the Skill only grants particles while she is on the field, this is unwise unless you have lots of ER and energy-supportive teammates.

Her Burst is mostly used for healing, but is also used for incremental damage when the healing isn’t used. It’s advised to make sure she can Burst, but you’ll likely want a teammate like Fischl to ensure Burst ability without hampering Mizuki’s potential Elemental Mastery.

__WFP SUBJECTIVE ANALYSIS__

Mizuki is a bit of a letdown; as a 5-star, she does nothing importantly different than Jean, another standard-banner 5-star. Mizuki also falls behind in crowd-control, damage potential, and team flexibility compared to 4-stars like Sucrose, Heizou, or even Sayu, without any of these 4-stars having constellations. Lynette and Anemo Traveler, two free characters, also have greater flexibility than Mizuki.

Should I pull for Mizuki?

If you like her design, lore, or personality, and think she’s neat, sure.
If you have absolutely no Anemo characters on your account, and your Traveler is occupied with another element, sure. However, at time of release, it’s more so recommended to just grab Anemo shielder Lan Yan as the free 4-star character from Lantern Rite.
If you want an Anemo on-field DPS, no. Just pick Chasca or Wanderer.
If you want an EM based Anemo support for your team, no. Just pick Sucrose.

Should I pull for her signature weapon?

If the intent is to make Mizuki as strong as possible, maybe, but only if personal damage on her is the only thing that matters for you. If you want the best team DPS, the craftable Hakushin Ring or Nahida’s signature weapon, A Thousand Floating Dreams, are both better.
If the intent is to put it on some other character, it could be useful on Sucrose, but is it worth the primos? Probably not.

I really like Mizuki! Should I get her Constellations?

C2 grants a buff similar to Kazuha’s A4 for as long as she’s on the field, which is quite useful. Otherwise, it is not advised to shoot for specific constellations before C6. However, since she is now a standard banner unit, you will probably lose a 50/50 to her a few times anyways.

#
__TALENT PRIORITY__ **Level 90 > Elemental Skill > Elemental Burst**

Analysis

Being so focused on Elemental Mastery, the only thing she needs to maximize her damage is just a ton of EM and being at Max level for the best base damage on reactions. Her Skill buffs her Swirls and her Burst buffs her healing, but these are not nearly as important as just a ton of EM.

__TALENT OVERVIEW__ **Normal Attack: Pure Heart, Pure Dreams**

Don’t use it! The only reason you should is if you want to get one Swirl hit as fast as possible and are switching off immediately. Don’t level this either.

**Elemental Skill: Aisa Utamakura Pilgrimage**

CD: 15s

The only purpose of levelling this talent is the EM-based Swirl bonus damage. Her ability to float and periodically attack enemies with Anemo is unaffected by Talent level. Remember that during the time Mizuki is floating, she cannot use Normal or Charged Attacks.

**Elemental Burst: Anraku Secret Spring Therapy**

CD: 15s
Energy cost: 60

For 12 seconds, Mizuki will occasionally drop treats that heal the active character if their HP is below 70%, or will detonate and deal Anemo damage. The initial cast of the Burst will also group enemies. The main reason to level this talent will be to enhance the healing efficacy.

__Passives__ **Ascension 1 Passive: Bright Moon's Restless Voice**

Mizuki’s floating state from her Skill can be extended by up to 5s by triggering Swirls during her floating Skill state.

**Ascension 4 Passive: Thoughts by Day Bring Dreams by Night**

Teammates hitting enemies with Pyro, Electro, Cryo, and Hydro will increase Mizuki’s EM in her floating state by 100.

**Utility Passive: All Ailments Banished**

Based on friendship level, eating food will occasionally restore 30% more health.

#
__CONSTELLATIONS__ **Constellation 1 - In Mist-Like Waters**

When Yumemizuki Mizuki is in the Dreamdrifter state, she will continuously apply the "Twenty-Three Nights' Awaiting" effect to nearby opponents for 3s every 3.5s. When an opponent is affected by Anemo DMG-triggered Swirl reactions while the aforementioned effect is active, the effect will be canceled and this Swirl instance has its DMG against this opponent increased by 900% of Mizuki's Elemental Mastery.

Mostly an occasional buff to her Swirl hits, but only one at a time. This can only trigger up to four times per Skill use. It’s a huge boost to her personal DPS, but her C2 remains superior for team DPS.

***Personal DPS% Increase vs. C0:***

47.16%

***Rating:***

3/5

**Constellation 2 - Your Echo I Meet in Dreams**

When entering the Dreamdrifter state, every Elemental Mastery point Yumemizuki Mizuki has will increase all nearby party members' Pyro, Hydro, Cryo, and Electro DMG Bonuses by 0.04% until the Dreamdrifter state ends.

Basically Kazuha’s Fourth Ascension Passive, but only active while Mizuki is in her Skill state and on-field. This is quite a powerful buff and is a solid place to stop if one isn’t aiming for C6.

***Personal DPS% Increase vs. C1:***

1.49%

***Personal DPS% Increase vs. C0:***

49.35%

***Rating:***

3.5/5

**Constellation 3 - Till Dawn's Moon Ends Night**

Increases the Level of Aisa Utamakura Pilgrimage by 3.
Maximum upgrade level is 15.

It’s just more damage. There’s not much to say here. It’s worse than C1 due to lack of quality-of-life, but comparable damage increase.

***Personal DPS% Increase vs. C2:***

3.9%

***Personal DPS% Increase vs. C0:***

55.17%

***Rating:***

1/5

**Constellation 4 - Buds Warm Lucid Springs**

Picking up a Yumemi Style Special Snack from the Elemental Burst Anraku Secret Spring Therapy will both deal DMG and heal, and will restore 5 Energy to Yumemizuki Mizuki. Energy can be restored this way 4 times per Anraku Secret Spring Therapy duration.

This is more of a quality-of-life upgrade than anything. It puts a huge dent in any ER requirements she might have, but maybe not good enough for a fourth constellation.

***Personal DPS% Increase vs. C3:***

0%

***Personal DPS% Increase vs. C0:***

55.17%

***Rating:***

2/5

**Constellation 5 - As Setting Moon Brings Year's End**

Increases the Level of Anraku Secret Spring Therapy by 3.
Maximum upgrade level is 15.

Just better healing. Not much to say here.

***Personal DPS% Increase vs. C4:***

0.9%

***Personal DPS% Increase vs. C0:***

56.55%

***Rating:***

1/5

**Constellation 6 - The Heart Lingers Long**

While Yumemizuki Mizuki is in the Dreamdrifter state, Swirl DMG dealt by nearby party members can Crit, with CRIT Rate fixed at 30%, and CRIT DMG fixed at 100%.

Swirls can CRIT now! Having these ratios set in stone means you won’t be incentivized to build CRIT. This will also affect all other party members, in the occasion you’re paired with an off-field Anemo applicator.

***Personal DPS% Increase vs. C5:***

26.4%

***Personal DPS% Increase vs. C0:***

97.87%

***Rating:***

3/5

#
__ENERGY RECHARGE REQUIREMENTS__

It’s not reasonable to expect Mizuki to Burst reliably in Xiangling teams or Overvape teams, as the recharge needs go beyond 200%. Mizuki struggles maintaining a serviceable DPS even on 100% Energy Recharge, so building to Burst in these teams is not worth it.

Essentially, Mizuki is married to C6 Fischl for energy to be manageable.

Your team’s ER requirements will vary based on your team and rotation. For a more accurate estimate, please use the Energy Recharge Calculator linked here.
For more details on how Favonius weapons will affect your team, please use Ac1d’s Favonius Mastersheet linked here.

#
__ARTIFACTS__

sands Sands of Eon: EM or ER, depending on needs
goblet Goblet of Eonothem: EM
circlet Circlet of Logos: EM

Substats: ER (until requirement) > EM

__Artifact Sets__ **4pc Viridescent Venerer**

The ability to shred resistances to Pyro, Electro, Cryo, and Hydro damage by 40% is the hallmark trait that nearly every Anemo unit cherishes. There are simply no comparable options, since there are so few other sources of RES shred besides Xilonen, Zhongli and Chevreuse (which disallows Anemo units in her teams anyways).

#
__WEAPONS__ **Hakushin Ring (R5)**

If you team up with an Electro character, which is highly likely due to scarce teammate compatibility outside of Fischl, Yae Miko, and some Archons, this is the best option for team DPS. Since the weapon buff applies to multiple elements at once and needs to be triggered on-field, not only does this feel made for Mizuki, but it also packs quite a punch for a craftable weapon, allowing Mizuki to buff nearly the entire team.

**Favonius Codex**

More particles are always welcome, and this weapon will also help solve any energy requirements Mizuki might have. Since she’s spending 10s+ on-field, she has many opportunities to CRIT, even with a low CRIT Rate stat.

**A Thousand Floating Dreams**

Nahida’s signature weapon that provides a minor amount of EM to the party. Only use if Hakushin doesn’t work for your Mizuki teams.

**Wandering Evenstar**

Offers a negligible flat ATK buff based on Mizuki’s EM. Like A Thousand Floating Dreams, this buff is not enough to outvalue Hakushin Ring

**Sunny Morning Sleep-In**

Just a ton of EM. Mizuki’s signature weapon. Good for personal DPS, but team dps arguably matters more, and this requiring pulling on the weapon banner makes this an unappealing choice.

**EM Catalysts / TTDS**

Even a 3-star will do. If you’re using Mizuki off-field, she can at least wield Thrilling Tales to buff the actual on-field DPS, worst-case scenario.

#
__TEAM BUILDING__

There are really only a few viable teammates for Mizuki, since she requires off-field DPS’s who attack automatically, and not ones that trigger based on Normal or Charged Attacks (since Mizuki can’t use these attacks in her Skill state).

**Aggravate**

Mizuki | Fischl | Yae Miko/Ororon | Nahida

All of the teammates here deal damage over time without manual input besides setting the abilities up. Mizuki plays two roles as a healer and an Anemo support, and her taking the field can keep everyone else safe from harm. Ororon can deal decent damage from the backline, and Fischl will be the carry of the team.

**Electro-Charged**

Mizuki | Fischl | Yae Miko/Ororon | Furina

A slightly more awkward rendition of the taser team. Mizuki’s healing synergizes with Furina in order to help Furina maximize her buffs she gives to the rest of the team. Ororon is also a great 4-star for this team due to the presence of Hydro, which enables some of his kit to be more effective.

**Overvape**

Mizuki | Mavuika | Furina | Ororon

Ororon applies Electro and buffs elements with 4pc Cinder City, Furina buffs the whole team while dealing respectable Hydro damage off-field, and Mavuika stays off-field to use her Skill, then when her Burst is available, she can drop her powerful Burst and swap off again. Mostly a “good stuff” team that doesn’t have any particularly unique or valuable synergies.

**Xiangling**

Mizuki | Bennett | Xiangling | Citlali

Of course, a huge amount of characters are compatible with the Bennett and Xiangling duo, and Mizuki can do the same job any other Anemo unit in this team can do; just on-field. Citlali is here mainly to buff Xiangling.

astral topazBOT
#
__CREDITS__
Lead(s):

@ancient karma

Author(s):

@ancient karma

Calculations:

Acacia
@wooden mason

Content Verification:

Calculations:
Writing: @analog scaffold, @rare marsh

Transcription:

@bright turtle

Resources:
DISCLAIMER

Pre-TC is volatile and, as always, perpetually subject to change until release (and sometimes later!). Please note that these are theoretical suggestions.
Everything described in this FAQ is a good faith analysis based on the little information about the character’s kit that we know. Team calcs, additionally, are not established yet, and as with everything in TC, the content in this FAQ should be taken with a grain of salt.

__OVERVIEW__

Escoffier does a lot of things: off-field damage, buffs and debuffs, Cryo application, and teamwide healing. Unlike other recent off-field dps like Chiori or Emilie, she does a similar amount of damage to them while also providing a plethora of utility akin to a strong support.

Her buffing capability is tied to playing teams composed exclusively of Hydro and Cryo characters, gaining up to 55% RES Shred for Cryo and Hydro. This is the highest RES Shred from a c0 5 Star yet. Even VV is only 40% RES Shred. She is playable outside of this archetype, as indicated in the teams section, but she loses a lot of value. Although she does retain 10% RES Shred in double Cryo Melt teams which is better than nothing.

Her healing is great, similar to that provided by Jean or Xianyun. The first tick is teamwide, and each following tick heals the active character. She has strong synergy with Furina because she can heal back Furina’s drain while enhancing Furina’s off-field damage.

Her off-field Cryo application is decent. Her burst, having 2U of Cryo application, can remove the Pyro aura on an enemy, and her turret applies Cryo every 2 hits (so every 2 seconds). It might not be comfortable to have her as the only Cryo unit in Melt teams, so it might be wise to pair her with Citlali or another Cryo unit to make sure every hit Melts properly. It is also important to keep in mind that Escoffier’s Cryo application is single target, unlike other Cryo units like Kaeya or Rosaria.

__WFP SUBJECTIVE ANALYSIS__

As of version 5.6, even with all the utility that she brings to the table, the teams that she upgrades are mostly Freeze teams that weren’t truly meta before her release, but she brings those teams to a level similar to the current bests. Though, it is very likely for her to be the best-in-slot teammate of a future meta defining Cryo carry like Skirk.

Is Escoffier a niche unit?

Escoffier may look like a niche unit because she only truly upgrades a few teams that aren’t relatively strong, but she buffs them massively. For example, some Ayaka team gain more than 30-40% in team DPS.
Moreover, she is a competitive unit in most Melt teams, like with Mavuika, Arlecchino or Gaming, as well as Neuvillette teams. She is not a clear upgrade to those teams, but she can replace other units there without losing DPS at lower investment.

Should I pull for Escoffier?

Firstly, if you like Escoffier, pull her. You won’t regret it. Even if you don’t play Freeze teams, she is still an efficient and versatile off-field dps.
Now if you only care about the meta, she is only a must pull if you like to play Freeze teams, or if you plan to pull upcoming Cryo carries like Skirk.

Should I get C1 or R1?

This is not an easy choice because both of them bring between 10 and 15% difference to team DPS (when comparing with best 4-star weapons).
If you don’t plan to play with a Cryo carry, then the C1 loses a lot of value, making the weapon much better.
If you plan to play her with a Cryo carry, it mostly depends which weapons you use in case you choose C1. If you have another 5 star weapon, it is probably better to pull C1, but if you don’t, both bring similar gains.
It is important to keep in mind that her signature weapon can buff the team when the holder heals, so it is a fantastic weapon (and arguably best-in-slot) for other characters like Iansan or Chevreuse.

#
__TALENT PRIORITY__ **Elemental Skill > Elemental Burst**

Analysis

Her skill is where most of her damage comes from, while her burst does only a little bit of damage and it’s where the team-wide healing comes from. Her normal attack doesn’t need to be leveled up.

__TALENT OVERVIEW__ **Normal Attack: Kitchen Skills**

Her Normal Attack deals physical damage. As said earlier, there is no reason to level her Normal Attack talent.

**Elemental Skill: Low-Temperature Cooking**

Her elemental skill has 2 modes: Tap and Hold.
With Tap, she creates a turret that deals off-field Cryo damage every 1s and applies Cryo every 2 hits for 20s.
With Hold, she creates a Cooking Mek (from her utility passive) that creates food when dealing Elemental damage. It has no purpose in battle and shouldn’t be used while fighting.

**Elemental Burst: Scoring Cuts**

Escoffier deals AoE Cryo damage and restores HP to all nearby party members based on her ATK.
It also triggers the A1 passive that further heals the active character for the following 9s.
It makes Escoffier synergise well with Furina because her healing helps with Fanfare generation.

__Passives__ **Ascension 1 Passive: Better to Salivate Than Medicate**

After using her Elemental Burst, Escoffier will obtain the Rehab Diet effect for 9s which restores HP for nearby active characters every 1s based on her ATK.
It provides a sustainable form of healing and it helps with Furina’s Fanfare stacks. Her healing ticks are around 3k which is similar to what Kuki or Bennett can provide.

**Ascension 4 Passive: Inspiration-Immersed Seasoning**

When there are 1/2/3/4 Hydro or Cryo characters in the party, Escoffier will decrease the Hydro and Cryo RES of any opponents hit by her Elemental Skill, Low-Temperature Cooking, or her Elemental Burst, Scoring Cuts, by 5%/10%/15%/55% for 12s.

This passive defines which team Escoffier should be played on, because there is a huge difference between having all characters being Cryo/Hydro and only 3 of them.

**Utility Passive: Constant Off-the-Cuff Cookery**

When holding the Elemental Skill, this passive activates and creates a Cooking Mek that creates food when dealing elemental damage (in a similar way to the parametric transformer).
It can create legendary food without using materials.

#
__CONSTELLATIONS__ **Constellation 1 - Pre-Dinner Dance for Your Taste Buds**

_When 4 party members are Hydro or Cryo, all nearby party members will have their Cryo DMG CRIT DMG increased by 60% for 15s after Escoffier uses her Elemental Skill Low-Temperature Cooking or Elemental Burst Scoring Cuts.
You must first unlock the Passive Talent "Inspiration-Immersed Seasoning." _

A great constellation that significantly buffs not only her personal damage but also that of other Cryo teammates. Keep in mind that it is only useful if there are four Cryo or Hydro in the team, and it doesn’t buff Hydro characters.

***Team DPS% Increase vs. C0:***

12.5%

***Rating:***

4/5

**Constellation 2 - Fresh, Fragrant Stew Is an Art**

When Escoffier activates her Cooking Mek in its Cold Storage Mode, she will gain the "Freshly-Prepped Delicacy" effect for 15s. During this time, Escoffier will gain 5 Cold Dish stacks. When nearby active characters apart from Escoffier deal Cryo DMG with a Normal, Charged, or Plunging Attack, or an Elemental Skill or Elemental Burst, they will expend 1 Cold Dish stack to increase their DMG dealt by 240% of Escoffier's ATK.
If you hit multiple opponents with a single instance of Cryo DMG, Cold Dish stacks will be consumed based on the number of opponents hit.

Offers a team buff similar to how Shenhe’s Icy Quills work. However, unlike Shenhe, it is not shared between team members. It scales with Escoffier's ATK, but the damage is increased depending on how much CRIT DMG and DMG Bonus the teammate has. The damage it brings depends on the teammate’s build, but it is not as strong as it looks. Moreover, the buffs work only if there is a Cryo teammate in the team that deals 5 instances of damage.

***Team DPS% Increase vs. C1:***

6%

***Team DPS% Increase vs. C0:***

20%

***Rating:***

3/5

**Constellation 3 - The Bakery Magic of Caramel Browning**

Increases the Level of Low-Temperature Cooking by 3.
Maximum upgrade level is 15.

It increases the level of the elemental skill by 3, which is Escoffier’s main source of damage. However, being an off-field DPS, her damage contribution is only at around 20-25%, so while it is a great personal DPS gain, it isn’t a very high team DPS gain.

***Team DPS% Increase vs. C2:***

4%

***Team DPS% Increase vs. C0:***

24%

***Rating:***

2/5

**Constellation 4 - Secret Rosemary Recipe**

Rehab Diet lasts 6 more seconds. While it is active, you have a chance of healing 100% extra HP and restoring 2 Energy to Escoffier when you trigger healing through Rehab Diet. This chance corresponds to Escoffier's CRIT Rate. You can trigger this effect 7 times during any one Rehab Diet's duration.
You must first unlock the Passive Talent "Better to Salivate Than Medicate.".

It offers extra healing and energy to Escoffier, which is great but not really impactful. The energy restoration allows Escoffier to build more CRIT and/or ATK instead of ER, and the healing can slightly impact Furina’s buff. In some teams where ER requirement is low, it isn’t really needed, but it can have a higher value for your build.

***Team DPS% Increase vs. C3:***

2%

***Team DPS% Increase vs. C0:***

27%

***Rating:***

1.5/5

**Constellation 5 - Symphony of a Thousand Sauces**

Increases the Level of Scoring Cuts by 3.
Maximum upgrade level is 15.

Increases Burst level, but it isn’t the main source of damage.

***Team DPS% Increase vs. C4:***

0.5%

***Team DPS% Increase vs. C0:***

28%

***Rating:***

1/5

**Constellation 6 - Tea Parties Bursting With Color**

Cooking Mek: Cold Storage Mode is enhanced:
· When your party's active character's Normal, Charged, or Plunging Attacks hit opponents, Cooking Mek: Cold Storage Mode will fire off another Special-Grade Frosty Parfait, dealing 500% of Escoffier's ATK as AoE Cryo DMG. This DMG is considered Elemental Skill DMG.
This effect can be triggered once every 0.5s, and this effect can be triggered 6 times within the duration of one Cooking Mek: Cold Storage Mode.

Provides a lot of extra AoE damage for Escoffier, increasing her personal DPS by around 57% and her AoE potential. However, being an off-field DPS, her damage contribution in the team is quite low, so the team DPS gain is much lower. It is still a significant gain and one of her best constellations.

***Team DPS% Increase vs. C5:***

17.5%

***Team DPS% Increase vs. C0:***

50%

***Rating:***

4/5

#
__ENERGY RECHARGE REQUIREMENTS__

Escoffier’s ER requirements in order to Burst every rotation depend largely on her team. Even in double or triple Cryo, there are a lot of variations depending on the exact team and the rotation. For example, in an Ayaka team, the ER will vary a lot depending if we manage to cast 2 Elemental Skills with Ayaka (it requires precise timing). It also depends on how many Favonius weapons are used in a given team.

When looking solely at DPS, Escoffier’s Elemental Burst damage is not worth casting due to its lengthy animation time. The healing that it provides can make it worth it with Furina. However, If you either don’t play with Furina or if you already have a healer, using Elemental Burst is a DPS loss, so building ER is not needed. This is especially the case in Melt teams.

The following table shows how much ER is needed depending on your team, while accounting for the number of Favonius weapons.

Escoffier’s ER requirements will vary based on your team and rotation. For a more accurate estimate, please use the Energy Recharge Calculator linked here.
For more details on how Favonius weapons will affect your team, please use Ac1d’s Favonius Mastersheet linked here.

#
__ARTIFACTS__

sands Sands of Eon: ATK% / ER
goblet Goblet of Eonothem: Cryo DMG > ATK%
circlet Circlet of Logos: CRIT Rate / Dmg

Substats: ER until requirement > CRIT > ATK% > Flat ATK

__Artifact Sets__ **4pc Golden Troupe**

Best overall set for her personal damage, and in most cases the best for the team dps as well, because most of her damage comes from Elemental Skill while off-field and she is a great damage contributor in the team. Though against Freezable enemies, 4pc Blizzard can be slightly better.
This set is great for every team, so you won’t have to switch sets for each team you play.

**4pc Blizzard Strayer**

This set is quite inconsistent because it is 2% better than 4pc Golden Troupe against frozen enemies. However, when the enemy isn’t frozen but has Cryo aura, it loses about 12% of personal damage. Moreover, against an enemy who cannot have Cryo aura, it is even worse.
It is also important to keep in mind that it is hard not to overcap CRIT Rate with this set, especially when played with a CRIT Rate weapon on top of her CRIT Rate ascension.

**4pc Tenacity of the Millelith**

This set should only be considered when played with a strong ATK scaling character and where we don’t rely on Escoffier’s personal damage, such as Melt teams. It is the overall best in slot set in Melt teams, but not by far. It can still be played in a Freeze team, but a more offensive set is a bit better.
It is better to put this set on Furina when they are played together, because she can benefit from the 2pc HP% effect unlike Escoffier.

**4pc Scroll of the Hero of Cinder City**

Even though Escoffier isn’t a Natlan character and will only be able to buff the team by 12%, it still has good results in calculations. However, there are some teams where triggering the 4pc effect on the right element isn’t easy, such as Freeze teams with three Cryo, and Melt teams.

**2pc Mixes**

From our calculation, the best 2pc/2pc combo (Cryo% + Skill%) is around 9% worse in personal damage compared to 4pc Golden Troupe.

#
**Symphonist of Scents**

Escoffier’s signature weapon and Best in Slot in every situation. Not only is it better than the 2nd best option by around 10% for her personal damage, but it also provides a powerful buff to the team. Though the buff only works if her Burst is used every rotation, which might not be the case in some teams. This weapon is also great for other healers like Iansan or Chevreuse.

**Calamity Queller**

The overall second best option even though it doesn’t provide crit, because she benefits from the entirety of its passive unlike most other 5 star options. It provides a massive amount of ATK, which not only increases her damage, but also her healing.

**Staff of Homa // Lumidouce Elegy // Staff of the Scarlet Sands**

These weapons are stat sticks and are good for Escoffier, even though she cannot benefit from most of the passives. Some of these weapons give CRIT Rate, so be careful not to overcap, especially when played with CRIT Rate set or circlet.

**Engulfing Lightning // Skyward Spine**

These weapons help with ER while still providing some damage. They are only good when played in teams with higher ER requirements, such as double Cryo teams or solo Cryo teams. They should not be considered in triple Cryo teams.

**Deathmatch**

The best 4 star weapon by far, which can compete with most 5 star options at R5, and it is still the best 4 star even at R1 because it provides a fair amount of CRIT Rate and ATK%. Keep in mind that the massive amount of CRIT Rate provided won’t let you play a CRIT Rate set or circlet.

**Vortex Vanquisher // Primordial Jade Winged-Spear // Crimson Moon’s Semblance**

Decent 5 star options that should only be considered when you don’t have any of the above options. They are still better than most 4 stars, other than Deathmatch R5.

**Mountain-Bracing Bolt**

The overall 2nd best 4 star for Escoffier, and is on par with the lower ranked 5 star weapons such as Primordial Jade Winged-Spear, but it is a weapon banner limited weapon. It gives a very good amount of Skill DMG% bonus, which is Escoffier’s main source of damage. The given ER can be overkill in triple Cryo teams, but otherwise it helps to build enough ER without having to use an ER sands.

**Tamayuratei no Ohanashi**

Very good 4 star and F2P option for Escoffier, but the ER provided may be overkill in triple Cryo teams. It is overall the 3rd best 4 star weapon, after the ones mentioned above, in teams where the ER is needed. Though it can be surpassed by Favonius in a very high ER dependent team.

**Favonius Lance**

Good weapon for Escoffier because it gives energy to the team and allows them to build more offensive stats, but at the cost of Escoffier’s personal damage, which is quite high. In some situations, it may surpass Deathmatch as a 4 star weapon, especially in teams with Furina and Yelan.

#
__TEAM BUILDING__ **Freeze with Cryo Carry**

Ayaka | Furina | Shenhe/Yelan | Escoffier

Ayaka receives a huge team DPS gain of around 30-40% thanks to Escoffier. Among the teams available, the two best teams are with Shenhe or Yelan, but other characters like Citlali, Rosaria, Kaeya, and Xingqiu can also bring decent results.
If 2 Ayaka Skills and 2 Shenhe/Yelan Skills are used, the team’s ER requirements are very low for each character (around 110-120% for both Ayaka and Escoffier with 1 Favonius) and the damage skyrockets. However, this requires precise timing and may be difficult to achieve.
Keep in mind that Kazuha can’t be used with Escoffier, because of her Elemental restrictions, which might make it harder to land Ayaka’s Burst.

Wriothesley | Furina | Shenhe/Yelan | Escoffier

Wriothesley Freeze team receive a huge DPS gain thanks to Escoffier. However, Wriothesley can also use Melt teams. While these new Freeze teams have higher team DPS compared to his Melt teams at low investment, it may not be the case at very high investment, because Wriothesley’s damage share becomes lower.
Both Yelan and Shenhe can use their Elemental Skill twice to improve the team DPS, but it requires precise timing. If you can execute such 2 Skill rotation well, the Yelan team ends up with more DPS than the Shenhe one.

Ganyu | Furina | Shenhe/Citlali | Escoffier

Ganyu is another Cryo carry who receives a huge buff on her Freeze team. However, just like Wriothesley, she also has a Melt team that can perform better at very high investment.
The Shenhe team is better than the Citlali one, but Citlali is still useful if you want a shield to avoid being interrupted while charging Ganyu’s Charged Attack. When an enemy is Frozen, they cannot attack to interrupt you, but not all enemies can be Frozen.

**Freeze with Hydro Carry**

Neuvillette | Furina | Citlali/Xilonen/Kazuha | Escoffier

With Escoffier, Neuvillette now has access to a powerful Freeze team competitive with his other best team. The team with Citlali is better than with Xilonen or Kazuha.
Compared to his traditional team (Neuvillette/Furina/Kazuha/Xilonen), this new team has a higher team DPS at C0R0. However, at higher investment, especially with Neuvillette C1, the old one is better because the C1 offers more damage if we already have 2 elements other than hydro than if we have 1 element. Neuvillette has less personal damage in this team, and Escoffier’s damage is mostly single target, so the Freeze team will lose value in AoE situations.

Kokomi/Ayato/Mualani/Nilou | Furina | Yelan | Escoffier

Escoffier introduces a new powerful core with 3 characters: Escoffier, Furina, and Yelan. This core is so powerful that you can put any Cryo or Hydro on the 4th slot and you will have great results.
Kokomi, Ayato, Mualani, Crit-Nilou, Ayaka, and Wriothesley benefit especially from this core.

**Melt**

Mavuika/Arlecchino/Gaming | Bennett | Citlali | Escoffier

Mavuika, Arlecchino, and Gaming can have great results with Escoffier. Even though they cannot benefit from Escoffier’s passive buff, she can still bring decent off-field Cryo damage and application. Although those characters are fine with Citlali as the only Cryo, being able to Melt all hits requires very precise timing, and there are many cases where mistakes are made and Pyro aura overtakes Cryo. Escoffier helps to maintain the Cryo aura more consistently.
However, the more investment you have on your Pyro carry, the more Escoffier loses value in the team.

**Vapemelt**

Hu Tao | Furina | Yelan | Escoffier

With Hu Tao, it is impossible to sustain enough cryo application to let her Melt every hit, even with 2 Cryo. Thus, Escoffier here is placed on the usual healer spot.
Her Cryo application will sometimes Freeze the enemy and allow Hu Tao to Melt a hit for more damage. However, sometimes, Hu Tao will apply Pyro too fast after a Melt and end up neither Melting nor Vaping her hit, which significantly decreases the overall team DPS. Moreover, Melt is impossible against unfreezable enemies. Thus, Xilonen ends up being better than Escoffier here, but Escoffier is still a decent alternative.

**Shatter**

Eula/Freminet | Furina | Yelan | Escoffier

Escoffier buffs significantly weaker characters like Eula or Freminet, and since they are claymore it ends up being a Shatter team. However, this is not enough to make them meta by any means, but it should still be their new best theoretical team, even better than hyperbloom.
Here Yelan can be replaced by Shenhe or Rosaria.

brave nymph
#

Raiden FAQ (last updated 7/27)

Q: What is Raiden's best weapon?

A: Raiden's best weapon is likely going to be her signature weapon, Grasscutter's Light. At high ER values and with the right rotation, Grasscutter's light can outdamage the Staff of Homa (with low HP on). Even though the Staff of Homa will outdamage Grasscutter's Light in many situations, Grasscutter is still likely going to be a better choice because of the team utility (flat energy for the team) that Raiden provides, which scales with her Energy Recharge.
Using Grasscutter will make it easier to hit higher ER thresholds than using the Staff of Homa, since Grasscutter has an ER substat while the Staff of Homa does not.

However, at equal ER values (i.e. Homa with an ER sands, Grasscutter with an ATK sands), the Staff of Homa with its low HP modifier can out-damage Grasscutter's Light in certain situations, like if Raiden is receiving a significant ATK bonus or at lower energy requirements. In these cases, since both weapons are aiming for the same Energy Recharge value (which takes away Grasscutter's advantage of being easier to stack ER with), the Staff of Homa is better.

Right now, we haven't done full team damage calculations to see whether it's more worth it to stack ER on Raiden and sacrifice her personal damage, or if it's better to have a balanced amount of ER on Raiden to preserve her personal damage at the cost of some team utility. If the former is true, then Grasscutter will be her BiS weapon, while if the latter is true, then Raiden's best weapon will vary based on the situation.

Q: What is Raiden's best 4 star weapon?

A: Raiden's best 4 star weapon is Deathmatch. While The Catch R5 is theoretically more damage in some situations if sword normals are counted as burst damage, it is only marginally better in some situations, and the likelihood that sword normals will be counted as burst damage is low.

Q: Is it more worth it to invest in Raiden's personal damage, or to simply stack as much ER as possible on her?

A: We don't know yet.

Q: What are some potential Raiden teams?

A: Raiden works well with energy-hungry units; one prime example is Beidou. Raiden/Beidou is a strong core, and can slot into many teams. Here are some examples:

Mono Electro: Beidou/Raiden/Sara/Flex

In this team, Raiden can gain a large amount of resolve since Beidou and Sara both have 80-cost bursts, while Sara and Raiden can both buff Beidou and allow her to deal more damage. Raiden provides flat energy to the party, allowing Beidou and Sara to run less ER and use more damaging stats. Some options for the flex unit include Xingqiu, Zhongli, Jean, Bennett, Venti, and Kazuha.

Yoimiya Overload: Yoimiya/Beidou/Raiden/Flex

In this team, Yoimiya functions as an on-field attacker who constantly triggers overload with the help of the electro aura applied by Raiden and Beidou. It's uncertain at the moment whether Raiden is a better choice for this slot than Fischl/Electro MC.

Raiden/Childe Fireworks: Childe/Beidou/Raiden/Bennett

Childe Fireworks is a very strong team, and Raiden can potentially take Fischl's place in it. Raiden can use her burst during Childe's downtime on his melee form, which negates the issue of Raiden taking away field time from on-field carry units. Raiden can also buff all of her teammates, since Childe and Beidou both deal a significant portion of damage with their elemental bursts. Lastly, in the "typical" fireworks team, Beidou's burst isn't constantly being triggered, since Childe only wants to be on field for around 7-9 seconds, while Beidou's burst lasts for 15. Using Raiden's burst right after swapping off Childe will allow Beidou to proc more discharges, increasing her personal damage.

brave nymph
#

Raiden FAQ Pt. 2

Q: How good is Raiden's energy generation/What is the ICD on Raiden's burst/skill?

A: We don't know how good/bad Raiden's energy generation is. Her ICD likely follows standard ICD rules (i.e. new electro application every 3 hits or 2.5 seconds) although she could have weird ICDs on her attacks.

Q: What is Raiden's best artifact set?

A: The Emblem of Severed Fate artifact set is Raiden's best artifact set. 4TS is a possible alternative.

brave nymph
#

Raiden FAQ Pt. 3

Q: What is Raiden's best combo?

We don't know yet.

Q: What mainstats should I use on Raiden's Artifacts?

A: Raiden will probably want to use an ER% sands (slightly less damage than an ATK sands but more team utility, with the damage gap possibly closed by Grasscutter's Light if you manage to get it), an Electro% or ATK% goblet (depends on both situation and whether certain parts of Raiden's kit work in the ways that we think they do), and a Crit circlet (either CR% or CDMG%; whichever brings you closer to a 2:1 ratio.)

Q: How much ER does Raiden need to use her burst off cooldown?

A: We don't know yet, since we don't know her energy generation.

Q: How good are Raiden's constellations?

A: Her first constellation will allow her to charge her resolve to full more easily (at C0, she will probably get around 40-ish resolve stacks in a team with other units that have decently high energy costs). This is a decent damage increase; calculations need to be done to see how large of a damage increase it is.

Her second constellation is pretty good, as it allows Raiden to both provide a Burst DMG% buff and a decently large ATK% buff to her teammates. While it's certainly not as strong as something like Bennett's buff (or even Sara's buff), it's still quite a lot of free damage that she provides to her team.

Her third constellation, which increases the talent level on her burst, is interesting - it's good if characters are investing in Raiden's damage, but it's unknown at this point whether it's more worth it to invest in Raiden's damage or just to stack ER on her.

Her fourth constellation is a bit of a mystery. If it works like a 60% DEF shred, it will increase Raiden's sword damage by 44.44% (assuming level 90 Raiden and level 100 enemy), which is a tremendous amount. However, the wording (ignore 60% of opponents' DEF) implies that this buff is only applicable to Raiden, so Raiden's fourth constellation is a bit similar to her third constellation in that its strength is dependent on whether players are investing in Raiden's personal damage or not.

Her fifth constellation is less stellar than her third constellation, as Raiden's burst makes up a large portion of her damage than her elemental burst (skill is probably around 1/3rd or less of Raiden's overall damage).

Her sixth constellation is interesting. Having an, at minimum, 25% lower cooldown on character elemental bursts seems super powerful. It still needs to be determined just how strong this constellation is, but given that it decreases the burst cooldowns of every member of the team, and many of Raiden's strongest teammates are burst-reliant, this constellation could have the potential to be devastating.

#

Raiden FAQ Pt. 4

Q: Should I pull for Raiden?

A: If you want.

Q: How strong is Raiden?

A: It's hard to say. Raiden is a super complicated unit, and while her personal damage doesn't look great, the utility that she provides to her team is pretty significant. It's currently too difficult to "rank" Raiden.

brave nymph
#

Raiden FAQ Last Updated: 7/27/2021 (CURRENTLY OUTDATED)
Sara FAQ Last Updated:
Kokomi FAQ Last Updated:
Aloy FAQ Last Updated:
Yoimiya FAQ Last Updated:

brave nymph
brave nymph
#

Yoimiya FAQ Pt. 1: (Last Updated 8/2/2021, by xTuki)

Q: What is Yoimiya's best 5 star weapon?

Thundering Pulse: Best in slot bow for Yoimiya in any traditional playstyle. Has a high base atk and scales greatly with refinements, with stacks it beats every weapon.

Amos’ Bow: Solid pick for Yoimiya, pretty easy to keep the passive active, comes close to Thundering Pulse.

Skyward Harp: Really close to Amos, passive is great for some amount of AOE damage. When artifacts are optimized it loses to Thundering pulse and Amos, but still a great choice.

Elegy for the End: Very bad for ADC Yoimiya, but might be good for OL Yoimiya because it both boosts EM and offers a team-wide attack bonus that can boost the damage of Yoimiya's supports, such as Beidou and Fischl. More calculations need to be done to determine how viable this bow is for OL Yoimiya.

Q: What is Yoimiya's best 4 star weapon?

Rust: Absolute beast in 4* category, at R5 it beats Harp and Amos, not as good as fully stacked Thundering Pulse. If you have this weapon, you don’t really need to read the rest of this list.

Prototype Crescent: Requires you to get the passive off, greatly scales with refines. If players are willing to consistently hit weakpoints in order to trigger its passive, it can be a decent F2P alternative to Rust, but is still worse than Rust even with its passive up. Without its passive, worse than Slingshot.

Demon-Slayer Bow: Passive doesn't play well with the Shimenawa's Reminiscence artifact set, and maintaining passive uptime can be difficult. Worse than Slingshot without the passive, so it should only be crafted if players can keep the passive up (which requires not using the Shimenawa's Reminiscence artifact set).

The Viridescent Hunt: Having a crit rate substat makes building Yoimiya a bit easier, passive is really situational but can be useful at certain scenarios. Refines are not really worth it. Generally not recommended unless you need gathering for overload damage. Generally, one of the worse 4 star options for Yoimiya. Worse than slingshot.

Blackcliff Warbow: Not recommended. There are better F2P choices. Worse than slingshot at R1 with 1 stack.

Windblume Ode: Not an good choice most of the time since its passive is shorter than Yoimiya’s uptime. Can be used in triple EM Overload Yoimiya, where its EM substat has an impact. For ADC Yoimiya, generally not worth - worse than Slingshot if not used in Vaporize team.

The Stringless: Semi-viable in overload damage-centered comps only (Rust is still better), refines are not worth it.

Slingshot: Yoimiya’s best 3 star option. With its passive up, it can outcompete a decent portion of the 4 star bows on the list.

#

Yoimiya FAQ Pt. 2

Q: What is Yoimiya's best artifact set?

4-Piece Shimenawa’s Reminiscence: Theoretical highest damage but needs either more ER or lower burst uptime to compensate, which pushes the damage dealt to be more in-line with other choices. Does play well with Yoimiya if players stack buffs only for the duration of her normal attacks, as losing burst uptime will matter less if Yoimiya's normal attacks are doing comparatively more damage. Ranking varies depending on how many buffs players stack on Yoimiya for her normal attack string, but is generally a decent option.

4 Piece Retracing Bolide: Requires a shielder in the team, provides 10% less CA & NA damage then Shimenawa’s, and does not boost burst damage. However, in exchange, Bolide does not have an energy drain mechanic, allowing Yoimiya to maintain high burst uptime without needing to build more ER. Does limit team comp availability, since maintaining 100% uptime on Bolide essentially requires Zhongli. Generally, only recommended if players have Zhongli and already have a good Retracing Bolide set.

4 Piece Lavawalkers: Good option for Mono Pyro comps (can match Shimenawa's Reminisce if accounting for lower burst uptime on Shimenawa’s Reminiscence), doesn’t work in other teams.

2 Crimson Witch 2 Shimenawa’s: If you have good substats, it's not a bad choice. Ranks lower than Lavawalkers for Mono Pyro teams, lower than Crimson Witch for reaction-based teams.

4 Piece Crimson Witch: Yoimiya’s best set for Vaporize and Overload playstyles. If players aren’t playing either of those teams, it falls behind other sets.

Q: What are the best mainstats and substats for Yoimiya's artifacts?

Main Stats: ATK%/Pyro DMG%/Crit is Yoimiya's best general option. EM/EM/EM may be better for pure overload teams, but more in-game testing is required to determine Yoimiya's Overload proc rate.

Substats: Yoimiya should aim for Crit and ATK; she only needs around 110% to 130% ER to use her burst off cooldown (although this will vary based on her team), so ER doesn't need to be a huge priority. EM is also a good option if played in Overload or Vaporize teams, with the value of EM substats depending on what reaction she triggers.

brave nymph
#

Yoimiya FAQ Pt. 3

Q: What are some possible team compositions?

Firecrackers: Yoimiya | Beidou | Fischl | Flex

In this team comp, Yoimiya acts as the on-field enabler for Beidou. Her fast auto-attacks allow Beidou to trigger her burst discharges very often, and Beidou helps alleviate Yoimiya’s lack of AOE damage. EMC/Fischl are both options for batterying Beidou, as they both generate energy and provide electro resonance, allowing Yoimiya to generate a decent amount of electro energy with Overloads; Fischl will likely be the higher-damage option. Sara and Raiden may also function as good substitutes for EMC/Fischl.

Mono-Pyro Yoimiya: Yoimiya | Bennett | Anemo | Flex

Pure Pyro is a solid team option. Bennett is extremely important for providing team buffs, and there are multiple options for the Anemo and Flex unit. One example team is Yoimiya, Kazuha, Venti, and Bennett. While Yoimiya won’t be triggering any reactions, the buffs that she gains from Kazuha and Bennett allow her to output a tremendous amount of non-reaction damage.

Geo: Yoimiya | Bennett | Zhongli | Geo

Another alternative to the “no-reaction Yoimiya” comp. In this team, Yoimiya gets buffed by Zhongli, Geo Resonance, Bennett, and Pyro Resonance, which allows her to deal a tremendous amount of damage. Albedo is a good choice for the last unit in this team, but Geo MC and Ningguang are both functional alternatives.

Vaporize: Yoimiya | Xingqiu | Bennett | Flex

The good ol’ vaporize comp. Sadly, Yoimiya can’t utilize Xingqiu as well as other pyro units like Hu Tao because of the ICD on her normal attacks. Alright single target damage, but lacking in AOE damage. About equal damage to Diluc Vape (slightly higher according to preliminary calcs), but no AOE, making the team inferior.

Q: How does Yoimiya's ICD function?

Yoimiya's ICD follows normal ICD rules. Link to video explaining how ICD works: https://www.youtube.com/watch?v=wGab6lW2BfI&ab_channel=AidanSan

Made by Muakasan
After the Hutao's first attack which applies pyro (which causes a reaction), there will be a hit counter and a timer.

Every third hit, Hutao will apply pyro to the enemies.
Additionally, if the timer reaches 2.5 seconds, the next hit will do 3 things:

  1. Apply pyro regardless of the hit counter.
  2. Reset the timer back to 0
    3...
▶ Play video
brave nymph
#

Yoimiya FAQ Pt. 4:

Q: How good are Yoimiya's constellations?

C1: C1 is alright. Yoimiya’s burst lasting 4 more seconds is more damage, and the 20% ATK bonus provided upon killing an enemy is alright as well. Not the greatest constellation (20% ATK is not a huge amount, and Yoimiya’s burst doesn’t deal a lot of damage), but free damage is free damage.

C2: 25% Pyro damage is pretty impactful. While it’s certainly not going to be a 25% damage increase given Yoimiya’s multitude of other additive DMG% bonuses, especially with bows like Rust and Thundering Pulse, it’s still a decent boost to Yoimiya’s damage.

C4: Generally, Yoimiya’s teams will operate on a set rotation determined by Yoimiya’s teammates, not Yoimiya’s own skill CD. For example, Beidou’s elemental burst has a 20s cooldown, which locks the firecrackers team to a 20s rotation. There are teams where Yoimiya’s skill cooldown is the limiting factor (such as in a Kazuha/Venti/Yoimiya/Bennett team, where Yoimiya’s 18s cooldown is longer than the 15s cooldown of the bursts of the other characters in the team), but generally this constellation isn’t that widely useful.

C6: Offers a decent increase to Yoimiya’s own damage. It’s still unknown how this constellation will affect Yoimiya’s elemental application; i.e. what ICD system the additional arrows fired operate on, or if the additional arrows even apply pyro. More testing will need to be done, but it’s possible that this constellation will have some impact on Yoimiya’s teams.

Q: Should I pull for Yoimiya?

If you want.

Q: How strong is Yoimiya?

Honestly, Yoimiya isn't a fantastic unit. She's another addition to the pyro DPS roster, but doesn't really offer anything particularly unique. Her teams with Beidou show promise, and these teams could be pretty strong. The issue is that there's little reason to use Yoimiya specifically for this role when other units who can perform the same thing (such as Yanfei exist. She's still a fine pull, though, and players can pull her if they like her.

brave nymph
#

Raiden FAQ Last Updated: 7/27/2021 (CURRENTLY OUTDATED, Ayzel is on vacation)
Yoimiya FAQ Last Updated: 8/2/2021
Sara FAQ Last Updated: 8/8/2021
Kokomi FAQ Last Updated: 8/25/2021
Aloy FAQ Last Updated:

vital hemlock
#

Sayu FAQ Pt.1 (Updated by Palmieᓚᘏᗢ#9012 8/8/21)

Q: What is Sayu’s best 5-star weapon

Wolfs Gravestone: When played correctly, this is a competitor for Sayu’s** BiS** weapon. The passive requires Sayu to be in a specific scenario but overall not hard to proc. The passive boosts her healing and party damage and allows you to stack full EM on artifacts without any real takeaway on healing regardless of constellation level. Makes her into somewhat of an Anemo Bennett.

Skyward Pride: In a party where Sayu is the only Anemo unit Skyward Pride is a solid pick. Sayu’s burst cost 80 energy, so the energy recharge sub stat is very useful in the right circumstances. The passive is not half bad either with a normal attack or two and the base ATK is high which is good for her stat management especially pre C6.

Q: What is Sayu’s Best 4-star Weapon

Rainslasher: Hands down her best 4-star option and BiS. Becomes a lot more valuable at C6+lvl90 and in Super-Charged and generally hydro/electro centric parties.

Honorable Mention-Bloodstained Greatsword: This 3-star weapon has a high EM scaling but overall less ATK. For a Sayu build that is purely about swirls and less about personal damage as support, Bloodstained can be a solid pick over any other 4-star weapon and better than Rainslasher for pyro/OL teams.

Katsuragikiri Nagamasa: One of the new Inazuma recipes with an ER sub stat and a passive that might not be too useful past C3. The passive can be triggered off-field which is convenient for Sayu as a battery that likely won't use much field time.

Favonious Greatsword: The Energy recharge sub stat is useful in solo Anemo parties but otherwise requires you to invest in CR which is wasteful on Sayu support since Sayu already has to split her stats between EM, ER, and ATK%.

Sacrificial Greatsword: This weapon is by far the most fun choice for perma-roll Sayu builds. The ER is great overall for having good uptime on ult and refinements will allow for some crazy rolling! (Take this with a grain of salt since it is not confirmed if it will work. Not recommended until high refines)

Prototype Archaic: The budget build. Not recommended. The passive is not ideal for support Sayu and only boosts healing which can become redundant after C6.

#

Sayu FAQ Pt.2

Q: What is Sayu’s best artifact set?

4-Piece Viridescent Venerer: This artifact set is solid for Anemo and is generally the go-to. The res shred on the 4-piece is the main attraction and the Anemo dmg bonus is always appreciated.

4-Piece Maiden Beloved: Not recommended unless co-op only builds. The heals from Maidens Beloved can become redundant so unless you prefer to use her in co-op only or just want a full-on healer do not use this set.

2-Piece VV 2-Piece Gladiator/EOSF The go-to artifact combination for running her with another Anemo unit, the 18% ATK buff is good for her healing and swirls and is the basic go-to combo.

2-Piece-VV 2-Piece Wanderers Troupe: A EM-centric combo for if you want less personal damage and for c6 benefit or if you don’t have any good glad or enough VV pieces. This set can hold ground decently well.

2-Piece VV 2-Piece Maidens Beloved: This artifact combo is much more co-op and healing centric Sayu’s passives do give her very nice co-op benefits so if you are planning to run her as a hyper healer or just for pure co-op this is a set with less investment.

Q: What are Sayu's Best Main-stats and Sub-stats on Artifacts?

Main-stats: EM/EM/EM is the best option that continuously gains value with constellations and LVL 90. If those two requirements are not desired then ER/EM/EM for energy recharge management as a solo Anemo unit. Overall as much EM as possible is preferred.

Sub-stats: Sayu does best going for EM, Energy recharge, and some ATK%. CR and CDMG are not necessary for her support build.

Q: How Does Sayu’s ICD Function?

Assumed to be standard until Q and E can be tested in-game.

#

Sayu FAQ Pt.3

Q: What are Some Possible Team Compositions?

For starters, as an Anemo healer and swirl bot, Sayu can fit into any team as a flex, especially in elemental teams and sub-DPS-centric teams. Some examples:

Firecrackers Yoimiya / Beidou / Fischl / Sayu: Sayu fits in as a flex sub DPS and healer for this OL comp, especially if you do not own Jean or just do not prefer her. She can provide healing and extra utility/particle generation to further battery the team. EMC/Fischl could eventually be replaced with Sara for a more synergistic team.

Childe Fireworks Childe/ Beidou/ Electro/ Sayu: Similar to firecrackers Sayu is one of the many sub DPS accompanying Childe in this comp with the bonus of providing heals and an additional turret. Sayu can be switched into swirl during Childe's E downtime. EMC, Fischl, or Sara could fill a space in this comp.

Ayaka / Xinqiu / Cryo / Sayu: This team is still experimental since it is not yet confirmed if Sayu’s E (tap and hold) will be able to trigger shatter. The good news is as a claymore user her Normal Attacks will. Ayaka will mainly be used as a burst bot and setting up freezes. I would recommend 2-piece glad for Ayaka. Rosaria or kaeya would make decent cryo batteries.

Honorable Mention Xiangling Hot wheels Sayu/ Xiangling / Hydro / Bennett: Definitely a more fun build than practical build but the idea is to hydro infuse Sayu then roll around the enemy with Pyronado active to backhand + vape. -ZΛNTO#4984

Sayu works in any elemental team although, keep in mind that her lack of cc can be inferior to other Anemo units. The sky's the limit with building teams for this small tanuki.

Sayu can in some ways fill in for Bennett in teams where he is not preferred or for 2nd abyss teams, especially once Sara (FAQ coming soon) is released they will work very well together.

#

Sayu FAQ Pt.4

Q: How Good are Sayu’s Constellations?

C1: C1 is a must for Sayu to become 100x better. Her burst can now ATK and heal at the same time instead of being based on the hp of the current party member which is more consistent dmg and healing. Sayu’s passive heals for every swirl so more swirls=more healing.

C2: Adds a 3.3% dmg buff to her e(press), and 3.3% dmg buff to her e (hold) that increases every .5s capping out at 66%. More useful in Rolling Builds and DPS builds but overall good.

C4: Significantly ups her energy recharge which is extremely good since she has a high-cost burst. Having this constellation can help her as a solo Anemo unit in terms of burst uptime.

C6: Sayu’s C6 makes her scale with EM allowing her to not really have to invest in any Atk% stats.

Q: Should I Pull for Sayu?

If you want. She's a very flexible unit with a fun vibe and thought-out kit. She is very in line with Jean yet has a very different playstyle. Her C1 is very important to doing well with her so if that's not something you want to invest then you are welcome to skip her.

Q: How Strong is Sayu?

Sayu is very similar to Jean except she's not as quick-swap friendly and her burst does not apply Anemo aura making her somewhat inferior. Sayu as a unit opens the door for better f2p teams and elemental teams that like to stack sub DPS units. She is a potent support and sub DPS.

brave nymph
#

Replacing Sayu and Yoimiya FAQs with Sayu and Yoimiya guides whenever they are up. After guides are done, current FAQs and guides will be available in #844971976878719016

astral topazBOT
#

Q&A by @solid epoch, @trail sand and @royal pike

**Yun Jin** - Her Role

Q: What kind of role does Yun Jin fill?

A: Yun Jin looks to be best used as a buffer/Sub-DPS hybrid. She provides a parry and low-field time damage on her skill, and a Burst that is a buff that scales both off of her stats and the main carry’s stats. The crux of her kit seems to be her burst.

Yun Jin - Elemental Skill

Q: How does her elemental Skill work?

A: Yun Jin creates a shield ONLY while you are holding her elemental Skill, similar to Beidou. As a result, her “shield” is unreliable and more like a parry. We do not recommend building HP% on her.

Yun Jin - Elemental Burst

Q: How does her elemental Burst work?

A: Based on wording from the beta, it gives a special buff to all party members - upon dealing Normal Attack Damage, that instance of Normal Attack Damage will be increased based off of Yun Jin’s DEF. This lasts for 10 seconds or until 30 stacks are consumed.

This is similar to Beidou in some ways. The damage increase scales off of Yun Jin’s own DEF, and also works well with normal attacking drivers. There are unique parts as well - first, the wording seems to imply that the damage scales off of your driver’s crit and dmg bonus%, allowing you to primarily build defense on Yun Jin herself. In addition to that, it procs on each instance of damage, so attacks like Zhongli’s 5th normal attack will consume 4 stacks.

Yun Jin - Ideal Compositions

Q: What are ideal compositions that use Yun Jin?

A: Building team comps with Yun Jin is very exciting, and we’re still not sure what her best comp might be. She rewards characters that have fast attack strings with multiple hits (like Crescent Pike Zhong Li). Feel free to join us in #theorycrafting in TCing various possible comps here.

Some drivers we have looked at that look promising are Yoimiya, Xiangling, and Fischl.

Yun Jin - Should you Roll?

Q: Should I roll for Yun Jin?

A: As always, you should never decide whether to roll based solely off of pre-TC.

As a 4-star character, it is likely that you will pull her given time in future banners, and while her constellations seem okay at the moment, they are by no means necessary. I would first and foremost make sure that you would be happy with the 5-star banner character (likely Shenhe) before rolling for Yun Jin.

#
Yun Jin - How strong is she?

Q: How strong is Yun Jin?

A: Only time will tell. There are many variables in play - we are speculating on how her Burst works, for example. Second, she has one of the most unique kits to optimize in the game.

One caveat that we have found while theorycrafting is that her comps often requires large ER stats across the entire team - the long normal attacking strings gimp energy generation and you might need to run favonius weapons on your other supports.

Yun Jin - Best Weapons

Q: What are Yun Jin’s best weapons?

A: She doesn’t have a perfect weapon at the moment. Deathmatch seems like a strong option for Yun Jin, as it is the only polearm in the game that can increase defense, although the crit is somewhat wasted. Favonious Lance should work well if she or her team needs the energy, but you will need to run enough crit rate in your artifacts to proc the passive, which doesn’t benefit her damage contribution much.

Since she cares only about DEF and ER, only weapons that add that or have other supportive capabilities are useful to her. Since we have none of the last type, that reduces the number of usable weapons to Deathmatch, Favonius Lance, The Catch, Prototype Starglitter, Skyward Spine, and Engulfing Lightning. Many of these weapons are better used by other characters, and all of them help her a similar amount, so just giving her your best leftover polearm is fine.

Yun Jin - Best Artifacts

Q: What are Yun Jin’s best artifact sets?

A: To get the most out of her Elemental Burst buff, 4 piece Husk of Opulent Dreams is usually the best option. Depending on the comp, Archaic Petra can outperform it.

Yun Jin - Ideal Stats

Q: What kind of stats does Yun Jin want?

A: Yunjin wants to run as much defense as she can; the buff from her Elemental Burst scales from her DEF and is her largest contribution to the team. Her Skill also scales with it.

She also wants enough energy recharge to consistently use her Elemental Burst every rotation, which will vary depending on the team and her particle generation. Thanks to her ascension stat being ER%, and her lack of need on other stats, it looks like you won’t need to run ER% outside of substats.

It is notable that, as her damage contribution outside of her buff is low, crit does not work well. Don’t worry too much about her crit stats (unless you are running Favonius Lance).

Because she cares about DEF and not ATK, you should prioritize leveling her to 90 over leveling her weapons. Leveling her from 80/90 to 90/90 is a 7.4% increase to her damage output.

Yun Jin - Constellations

Q: How worthwhile are Yun Jin constellations?

A:

C1: Lowers her elemental skill’s cooldown. This only matters if you’re able to swap back to her before her skill would have recharged. Without building Geo% or Crit, using her skill more often won’t contribute much to the team. In addition, her elemental burst often rewards staying on your driver for the full 10 second duration, which is long enough for her skill to recharge without this constellation already. There can be specific team comps where it may be ideal to use her skill on this reduced cooldown, but overall this constellation seems very weak. 1/5

C2: Provides more normal attack damage bonus to your team. This extends how much Yun Jin wants a fast normal attacker, and is a solid constellation if you have one. 3/5

C3: Increases her burst level, which increases the DEF scaling. As the core part of her kit, this is an excellent constellation. 4/5

C4: Grants 20% DEF for 12 seconds upon triggering a crystallize reaction. This conveniently lasts for the entire duration of her burst. Unfortunately the numbers are not as strong as her C3, with diminishing returns on the DEF% you will be stacking in your artifacts. 2/5

C5: Her skill is not likely the core of her kit. Without stacking Geo% or Crit, extra levels in her skill is irrelevant. 1/5

C6: Provides 12% Normal Attack speed to your party during your burst. The value of this constellation will vary drastically depending on the carry - hitlag may cause this constellation to lose value on certain characters, but on characters like Yoimiya without any hitlag, this is looking to be an extremely valuable constellation. It is better than it sounds since it will help both Yun Jin’s damage contribution through her burst as well as your driver’s own damage. 3-5/5

grave voidBOT
#

Yae Miko Pre-TC FAQ by @analog scaffold (author and calcs), @dark sentinel (co-author and calcs) and @tardy notch (frame counting).
For all Yae calcs, you can reference: Yae Mastersheet

Disclaimer: as always, until release, numbers are subject to change and I will do my due diligence in keeping everyone updated whenever major changes occur

That said, it is imperative that these should be taken with a grain of salt, functioning only to give a general direction of how the character should be geared and played.

Yae - Character Overview

Yae is an Electro Sub-DPS who uses her Elemental Skill to constantly deal electro damage, while also having an exceptionally powerful Elemental Burst. At the time of writing this, her Burst cooldown is 22 seconds – a major weak point for any team composition that wants to use their bursts off cooldown. Broadly speaking, the longer a rotation, the lower the team DPS tends to be. If this is not changed before release, understand going in that your Yae team will have to put in more work to compare to 20-second and 18-second rotation teams.

When looking at Yae’s skill, she may appear to function similarly to Fischl. This is misleading. Yae deals good off-field damage, but in order to utilize her powerful 90-cost Burst (which constitutes a major chunk of her damage: ~40% if Sub DPS), Yae herself needs a battery, and a powerful one at that.

This will be the main shaping factor of your Yae team; it cannot be over-emphasized how important a battery is for her. This unfortunately restricts her possible team compositions: Yae requires Raiden or Fischl.

Leveling to 80 is fine, as she’s a traditional ATK-scaling unit, using traditional artifact mainstats (ATK% / Elemental% / Crit%).

Many passionate Yae fans are eager to try and use Yae as a Main DPS. We have provided in the mastersheet some calcs relevant to such an audience. We make no claims about which role is objectively “better” at this moment in research, but will endeavor to release information for both roles regardless.

Yae - Talent analysis

Leveling priority:

Skill >= Burst > Normal Attack

Analysis:

Yae’s Burst and Skill go hand-in-hand, and should be leveled in tandem. Even as a main DPS, she’ll only be on the field a maximum of 10 seconds. 3.5 of those seconds are allocated to using her Burst and deploying three skill charges immediately afterwards. The first ascension talent allows Yae’s Burst to reset all of her skill cooldowns, giving her easy 100% uptime on her skill damage.

Yae’s skill allows you to place up to three fox-shaped turrets on the battlefield. They get stronger the more that exist within a certain proximity of each other. Level 3 (not to be confused with “talent level”) is the maximum level these totems can reach until you break into constellations, which then allows for Level 4. Reaching Level 3 on her Skill is easy; very little work needs to go into making sure three fox totems are on the field at all times.

Her signature weapon, Kagura’s Verity, also adds lots of power to her skill (36% Skill DMG + 12% Electro DMG), suggesting that this is where Yae’s kit shines. One issue that people may find is that Yae’s skill does not snapshot. This means if you want her to continue doing off-field damage, buffs need to be reapplied consistently.

On ascension four, Yae gains an elemental DMG boost based on 0.15% of her Elemental Mastery. At this point of research, we’ve yet to find a way to truly abuse this talent in a way that outdamages traditional ATK/Electro/Crit builds. It’s a nice consolation prize for when you roll EM, and can make some budget weapons like Mappa Mare more palatable, but generally this is nothing close to a game-changer for her playstyle. Further research may overturn this.

We’ve made calculations that allow a forced Main Carry option, but current research suggests she is best as a SubDPS. However, I sympathize with those who truly want to main Tamamo-no-Mae Yae Miko. Some numbers in the mastersheet give the impression that Yae is stronger as a MainDPS, but this is misleading, since we are only calculating Yae’s own damage. If Yae is, for lack of vocabulary, doing more stuff on the field, the total damage will obviously be higher.

A way to test if her attack strings are viable are to calc her damage in isolation (see combos section of mastersheet) and compare to another character who can use normal/charged attacks in the same duration (while still fitting on her team).

#
Yae - Combos

Here’s what we have so far for a 22-second Yae rotation that also allows flexibility for whatever teammates you want to include. Early FAQ means this is very likely to be updated/corrected.

EEE > switch to teammates, Yae Q, EEE > (for Mains: N2CJ x3) > switch to teammates

  1. EEE - Deploy three charges of Yae’s Elemental Skill. Factoring in human error, this takes 1.5 seconds.

  2. Swap out Yae for ~4 seconds - This gives time for party members to buff Yae or set skills/bursts before Yae’s own Burst, and will allow three EL3 attacks in the meantime (which means more DPS from her skills, capping at 18* instead of 15).

In exceptionally tight play, squeezing 21 EL3’s in is feasible, but for now, we’re not recommending it to the average player until we have more information.

  1. Swap to Yae, Q, EEE - Self-explanatory; Yae’s Burst does lots of damage once it detonates all three fox totems and resets Yae’s cooldown on all three charges of her E, so the natural strategy is to place them down as soon as possible again. This takes approximately 3.5 seconds.

  2. Auto/Charged Attacks OR swap to your other teammates, depending on your role.

If you pair Yae with the Raiden Shogun, Raiden will require all that open field time in your rotation. About 10 seconds to refill Yae’s energy and make the most of the Shogun.

Raiden should switch in immediately after Q EEE to take advantage of any on-field buffs, such as Bennett’s Burst, Viridescent Venerer, etc.

If you pair Yae with Fischl, there’s an opening for auto-attack strings with Yae if you’d like to use her as your Main DPS. Our calcs were done with [N2CJ x3] and [N2CJ N1CJ] x2, as this is the time it’ll take for most buffs to end. This will take around 7 seconds.

  1. With Raiden, we’ve taken up 19 seconds out of our 22-second rotation. With Fischl, We take on average 16 seconds out of 22. With the rest of your time, you can reapply buffs, keep attacking with Yae, or let your teammates take care of the rotation.

  2. Repeat until everyone’s dead.

Yae - Artifact

**0. 4pc Thundersoother (ONLY IF 100% UPTIME)

  1. 4pc Emblem of Severed Fate
  2. 2pc Severed Fate, 2pc Thundering Fury
  3. 2pc Glad, 2pc Thundering Fury
  4. 2pc Noblesse, 2pc Thundering Fury
  5. 2pc Gladiator, 2pc Shimenawa**

Yae needs a lot of energy recharge, but running an Energy Recharge sands significantly lowers DPS, to the point she underperforms significantly. Unless you are testing an EM build, we recommend [ATK% / Electro% / Crit%].

Yae needs at least 150% energy recharge, factoring in Raiden and/or Fischl with 100% Oz uptime (this is especially important if your Fischl is not C6). The 2pc Energy Recharge bonus actually adds more to Yae than Gladiator’s. This is because almost half of her substats need to go into Energy recharge, so the set bonus gives much more leeway with building towards damaging substats.

At C1, Yae mitigates most of her energy requirements. More on this later. The emblem set is no longer useful (and ends up contributing 0% to your damage) at C1. From this point, we recommend either [4pc Emblem of Severed Fate] or [2pc Glad/Shim + 2pc Thundering Fury], whichever has better substats and depending on whether you want to lean into Sub DPS or Main DPS. The difference is not significant between them besides that.

Because the results between sets are so close, there isn’t really a hierarchy as to which is the “best.” Any combination of the three above sets should work well. Just make sure you know to skip 2pc Emblem if you get C1; commit to 4pc or find another set.

Addendum 1/17/2022:

  1. If Yae holds an Energy Recharge weapon, she benefit as much from a [2pc Emblem + Glad/Shim/Thundering Fury] set; the 2pc Emblem set may be excessive.
  2. If Yae is at C1 and you are running less Energy Recharge to rely on offensive stats and Yae's battery, less ER% = worse 4pc Emblem.
  3. While 4pc Thundersoother provides the most DPS on paper, it assumes 100% uptime, which is not likely to be the average in-game scenario. The caveat is likely not worth the extra 2.5% DPS
Yae - Weapon

**Weapons rankings:

  1. Kagura's Verity R1 (Limited 5-star choice)
  2. The Widsith R5 || Solar Pearl R5 (NA before Q)
  3. Lost Prayer > Memory of Dust > Skyward Atlas (all three are very close)
  4. Oathsworn Eye R5
  5. Widsith/Solar Pearl R1, Hakushin Ring, Mappa Mare**

?. Blackcliff Agate is competitive depending on how reliably you can continue killing things.

Kagura’s Verity is made for her, and naturally does the most damage and synergizes the most with her kit.

Any 5-star weapon is good. Except the donut.

The Widsith is extremely strong in single rotations and has the same main stat as Kagura’s Verity. It is the best pick for SubDPS and has been in the gacha since the beginning of the game. Nearly everyone has picked one up at some point.

Solar Pearl is disproportionately good on a MainDPS catalyst-user. At R5, this battle pass weapon has 40% damage buffs at all times, so long as you’re using your whole kit. It approaches Serpent Spine levels of efficiency without requiring a shielder.

Oathsworn Eye mitigates the vast majority of Yae’s energy requirement at C0, giving 48% ER when using a skill (which Yae is always using anyways). Once you hit C1, though, this weapon loses much of its value for Yae.

Blackcliff Agate has the highest raw potential of any F2P weapon, but with a heavy caveat of constantly killing enemies with her. In boss battles, or abyss floors with very few enemies, it’s simply a Crit DMG weapon with nothing special. Low floor, high ceiling.

Hakushin Ring is the most stable and requires the least caveats to use, but both this and Mappa Marre depend on Yae creating elemental reactions. It’s also craftable (and fashionable). Energy Recharge on Hakushin Ring is usually more beneficial than the Elemental Mastery on Mappa Marre.

Check out the comprehensive weapon calculation list down here:

#
Yae - Team Comps

This needs the most in-game testing for DPS comparisons.

Yae MUST have someone to generate energy for her:

Raiden - The goddess of Energy Recharge and Yae’s canon partner-in-crime.
Fischl - Budget option OR allows Main DPS Yae

Sara, Beidou, and Lisa all need their own batteries. Not recommended for the role of battery.

After that, Yae benefits from buffers and elemental applicators:

Bennett - Poor guy never gets a break. Stacks raw attack and holds Noblesse.
Kazuha - VV-holder and damage buffer depending on constellation/weapons
Sucrose - Depending on Yae’s release, not only can Sucrose hold VV, but she may also be able to pass on her Elemental Mastery to Yae in a way that increases Yae’s damage from her A4 - the damage boost scaling off elemental mastery.
Sara (C6 recommended) - Another strong buffer for electro teams. With enough finaggling, she can buff herself and two other electro units. This may require some changes in rotations.
Kokomi - Kokomi has the benefit of doubling as a healer and a great long-term, off-field hydro applicator. Can benefit electrocharged comps.
Jean - Especially useful in a full Electro team, due to the fact she can heal and proc Viridescent Venerer. Combined with Bennet, she open up the possibility for Sunfire teams. Constant Pyro application in this way (similar to Kazuha) can open up overload strategies, depending on how the math works out.
Mona - Provides hydro application and is an exceptional buffer with Mona’s Burst and the ability to hold Thrilling Tales of Dragon Slayers (TTDS). Can also hold Prototype Amber if you’re really struggling for a healer.
Lisa - Not my first recommendation, but she holds TTDS or Prototype Amber and can reduce enemy DEF.
Venti - The god of crowd control; can buff your team depending on gear, group, and proc Viridescent Venerer with Swirl reactions.

Yae - Constellations

C1: Chronicles of the Kitsune Cohort : Expected reduction of 40-60% energy, granting 3-5% DPS for every 10% ER no longer needed. Can reduce reliance on Raiden and Fischl (more research needed)
Effect: Yae generates 8 energy for herself for every fox totem destroyed by her Elemental Burst
DPS Increase: Up to 20%

C2: Hanagasa Manuscript : Damage and QoL. Value falls significantly in AoE situations.
Effect: Increases minimum level of her Sesshou Sakura to 2 and the maximum level to 4, while also increasing their targeting range by 60%.
DPS increase: 25% Skill / 12-15% Total
DPS increase from C0: 35-40%

C3: The Seven Glamours
Effect: Increases Yae’s Elemental Skill Talent Level by 3.
DPS increase: 8-12%
DPS increase from C0: 50-55%

**C4: Sakura Channeling : ** Permanent buff in regular rotations. Also buffs the Electro teammates Yae may rely on.
Effect: Increases the entire Teams Electro Damage Bonus by 20% for 5s, whenever Yae’s Sesshou Sakura hit an opponent.
DPS increase: 8-12%
DPS increase from C0: 65-70%

C5: Mischievous Teasing :
Effect: Increases Yae’s Elemental Burst Talent Level by 3.
DPS increase: 5-7%
DPS increase from C0: 75-80%

C6: Forbidden Art: Daisesshou : 60% DEF ignore equals 42-44% more Elemental Skill damage, ranging from 25-30% more damage in single target situations.
Effect: Yae’s Sesshou Sakura attacks ignore 60% of the enemies DEF.
DPS increase: 25-30%
DPS increase from C0: 125-135%

strange magnetBOT
#

Ayato Pre-TC FAQ by @tawny heath (author and calcs)

For all Ayato calcs you can reference: Ayato Mastersheet by @tawny heath and Ayato Frames Mastersheet by @tardy notch

Disclaimer: Units listed are merely grouped by element, and the order of elements and units within those groups are listed randomly. The following suggested unit pairs have not fully been evaluated via sheets for DPS potential, and are merely theoretical suggestions of which units may work well in teams with Ayato. I am not suggesting which units or which teams are superior/inferior to one another, and such content will not come until well after Ayato's release upon proper playtesting.

Character Overview

Kamisato Ayato is a 5 star Hydro Burst DPS that specializes in Normal Attack damage with a short rotational uptime/downtime cycle. While Kamisato Ayato is a unit that will require field time to shine, he can also support the team with off field Hydro application, damage and Normal Attack DMG% buffs during his burst window’s downtime.

Kamisato Ayato’s role in a team is somewhat flexible relative to other units. Most current TC work has found places for him as a main on field carry, however teams using Ayato as downtime filler for another rotational DPS (ie. Raiden) are also being investigated. As a Hydro unit Kamisato Ayato can enable and or/trigger some of the most valuable reactions in the game, such as Vaporize, Freeze, and Electrocharge, and has strong synergy with most off field DPS characters and buffing units. Ayato’s personal DPS potential is decent on its own, but scales fantastically, particularly from DMG% buffs and RES shred from teammates, allowing Ayato to take the role of a short uptime Hypercarry in his own right.

Talents

Leveling Priority: E>Q>>AA

Kamisato Ayato’s main source of damage is his Hydro infused normal attacks during his Elemental Skill, as such this talent should be leveled first. Ayato’s Elemental Skill converts his Normal Attacks to a 3 slash hit chain with a broad AoE (roughly similar in range to Raiden’s AoE auto attacks in her Elemental Burst). These Hydro infused Normal Attacks scale with Ayato’s Elemental Skill talent Multipliers and not his Normal Attack multipliers, as such, Ayato’s Normal Attacks do not need to be leveled whatsoever. The Elemental Skill also summons a clone that taunts enemies and can explode to deal a small burst of damage, and also provides additional HP scaling as flat damage to Ayato’s Hydro infused Normal Attacks, referred to as Namisen stacks. Namisen starts at 0, and each Normal Attack will grant a stack of Namisen, which caps at 4 stacks at C0, and each subsequent Normal Attack will proc 4 Namisen stacks each. Ayato’s A1 passive talent also allows him to start his Elemental Skill with 2 stacks, and automatically gain max stacks if his clone is killed by an enemy, allowing him to reach max Namisen stacks a little bit faster.

Kamisato Ayato’s Elemental Skill has a 12 second cooldown and lasts for 6 seconds after the casting frames for the clone, so with hit lag extension, the total downtime before the next Elemental Skill cast is ready is only about 5 seconds. In most cases, Kamisato Ayato will be able to get in 15 slashes during his Elemental Skill window, but a 16th may be possible with hitlag extension. Despite hitlag, attack speed buffs may be effective for Ayato, pre-release footage shows that 20% extra attack speed from supports can get him up to 18 slashes per Elemental Skill window. The Hydro infused normal attacks have a standard ICD, so the first slash will apply Hydro to enable or trigger elemental reactions. Ayato’s generates 1.5 particles per slash during his Elemental Skill with a 1.9 second cooldown, allowing him to generate on average 4.5 particles each Elemental Skill window, but an extra particle trigger may be possible with hit lag extension (which would raise his generation rate to 6 seconds per Elemental Skill).

Kamisato Ayato’s Elemental Burst is his secondary source of damage and should be leveled after his Elemental Skill, but is still worth leveling. In terms of mechanics it seems to operate very similarly to Ganyu’s elemental burst, allowing Hydro rain blossoms to spawn on top of enemies with a small AoE that can hit other enemies tightly grouped with that enemy. As such we think it is very likely that Ayato’s Elemental Burst has quadratic scaling like Ganyu’s (ie. it can hit more total times per enemy against multiple enemies that are on top of eachother), however some mechanics regarding the rain blossom spawn rate properties will need to be tested in game to fully understand their properties. Active characters standing in the radius of the Elemental Burst, including Ayato, gain a 20% Normal Attack DMG% bonus, which over the course of its 18 second duration can buff around 80% of Ayato’s normal attacks before it expires. The rain blossom procs have normal ICD, as such it is not clear which elemental reaction synergies Ayato will be able to enable from off-field until we can do proper playtesting.

Combos and Rotations

During Ayato’s Elemental Skill, all you’ll need to do is press E and hold down the Normal Attack button. That’s it! Ayato’s charged and plunged attacks are disabled during his Elemental Skill, so he only has Normal Attacks available as an option during his Elemental Skill.

In order to boost Ayato’s damage from the Elemental Burst’s Normal Attack DMG% bonus, it is recommended to use it before the first Elemental Skill cast, so you don’t waste Elemental Skill uptime by casting during its duration.

In most cases you will: Use supports/buffers, Ayato Q->Ayato E->NA spam, swap to refresh support abilities->Ayato E->NA spam->repeat.

There is also the option to change his rotation start with his skill instead of the burst, which gives up the opportunity for him to take advantage of the 20% Normal Attack DMG% bonus in exchange for better usage of his energy regen passive, which will have lower damage potential but may be comfier to use in regards to energy cycling.

#
Artifacts

For main stats ATK % sands, Crit Rate/Damage Circlet, and Hydro DMG% Goblet are best in slot. While Ayato has a lot of HP scaling on his damage, the ATK scaling damage is currently more impactful, and ATK% sands are roughly 10% better than HP% sands assuming equal substats. If you wish to use Ayato as a support primarily for his Elemental Burst, and give him less field time to generate particles with his Elemental Skill, ER% sands may also be viable.

Kamisato Ayato has many strong options available for artifact sets, and notably some weapons appear to work better with specific sets from pre-release calcs. In general the best 2 sets are 4-PC Echoes of an Offering and 4-PC Heart of Depth for all purpose use, but there are a few other sets that are useful as well as some sets that may enable specific niche teams to perform well.

Quantification of General Use Sets between different weapons

4-PC Echoes of an Offering - this new set is overall Kamisato Ayato’s best in slot on average, though it only significantly shines above his other options with his signature weapon. The RNG nature of the flat damage procs may make this set less reliable, but on average, but Ayato does enough normal attacks per rotation to reduce the likelihood of being RNG-skewed.

IMPORTANT: Currently Echoes is bugged due to ping based server feedback causing this set’s proc chance to be significantly reduced at less than optimal ping. If you have more than 20ms of ping consistently, you should avoid using this set until Hoyoverse issues a fix.

4-PC Heart of Depth - this set is Kamisato Ayato’s next best in slot for most other weapons, and for many weapons the difference is very minor. It provides up to 45% total DMG% bonus, which amplifies both the ATK and HP scaling components of his normal attacks and the 15% Hydro DMG bonus will also boost Ayato’s Elemental Burst significantly.

4-PC Glad - this set is another decent option and is similar to 4-PC Heart of Depth overall but can be better on some weapons, offering 35% Normal Attack DMG bonus and 18% ATK%. If you’ve been playing for a while you might already have strong pieces from this set lying around, and you can easily get more from the strongbox, making this one of Ayato’s most easy to farm sets.

2 PC HoD/Glad - a cheap mix and match set that can perform well, but not as well as the above 4 set options.

4-PC EOSF - This set is nice for those focusing on using Ayato as a burst support trying to use his Elemental Burst as much as possible due to the ER% and Elemental Burst DMG bonus it provides. It is not recommended for typical on field carry Ayato’s.

4-PC Shimenewa - This set is not recommended overall. It will either raise ER% costs prohibitively high to obtain it’s 45% Normal Attack DMG% bonus, or force you to run no ER% and drop the Elemental Burst altogether, which does too much damage to be compensated by this set’s Normal Attack DMG % bonus.

4-PC Thundering Fury - An experimental set that may allow Ayato to reset his E cooldown to zero in an EC team with supports such as Fischl or Beidou. While it doesn't boost Ayato’s damage on his individual normal attacks, it allows him to stay on field longer, driving Beidou for longer and generating more energy to reduce ER% costs to almost nothing. This set does trade a short/high damage burst window for a longer uptime/lower damage window that may still come on top in terms of DPS in some teams, although rotation times may become extended as a result.

4-PC Blizzard Strayer - Ayato’s BiS in freeze teams, where he takes the field while other teammates such as Ganyu, Kaeya, or Ayaka enable freeze for him off-field. This set allows Ayato to build little Crit Rate, and focus on building more Crit Damage with the free Crit Rate offered by this set and Cryo resonance, however the set lacks viability against enemies that cannot be frozen, such as bosses. In these cases Ayato’s Hydro will remove Cryo on unfreezable bosses, leaving you with a sad melted water boy that crits as infrequently as Kokomi on a good day.

#
Recommended Weapons

Ayato has many strong weapon options, although they vary a bit based on which artifact set you opt to use:

Haran Geppaku Futsu: Ayato’s signature weapon and his overall best in the slot, though it only significantly outperforms Primordial Jade Cutter using the new Embrace of Offering artifact set. This weapon has good base ATK, pretty good crit value, and can offer a 40% Normal Attack DMG % bonus if 2 teammate’s use their elemental skill before Ayato takes the field. Refines are worth about 5% more damage each.

Primordial Jade Cutter: Overall the second best option for Ayato, and can perform better than Haran Geppaku Futsu if both weapons are paired with 4PC Heart of Depth. It is a strong stat stick with the highest possible crit value, and it’s passive provides both HP% and flat ATK based on HP, which synergizes very well with Ayato as his Elemental Skill makes his Normal Attacks scale with both ATK and HP. Refines are comparable to Haran Refines for the leviathans out there.

Mistsplitter Reforged: Consistently Ayato’s 3rd best choice. While Mistplitter has very high base ATK and decent crit value, Ayato cannot maintain all 3 stacks of it’s passive on all of his damage. At best, he can snapshot 1-2 stacks to his Elemental Burst, and have 3 stacks for one Elemental Skill, but only 2 for the next Elemental skill until his Burst can be recast. Despite this limitation, Mistsplitter is still very powerful on Ayato.

Lion’s Roar: Ayato’s overall best 4 star sword if you’re running an electro-charged or taser team with units such as Fischl. It provides high ATK%, as well as a lot of DMG % bonus to enemies affected with either Electro, which is maintained as an aura during electrocharged reaction procs, or against enemies affected by Pyro. This weapon may also be useful against enemies with a Pyro aura if comps are discovered that allow Ayato to forward vaporize 1/3rd of his Normal Attacks.

Black Sword: Another powerful 4 star option, it is generally weaker than Lion’s Roar by about 2% at R1, and 7% at R5, but doesn’t require a specific elemental aura to use its passive, so it may be more flexible. It is a good stat stick, offering a nice amount of crit value, Normal Attack DMG % bonus, and a passive that provides self-healing and sustain.

Skyward Blade: A weaker 5 star option than the more powerful 4 star choices, Skyward Blade is a decent choice if you want free ER% to more easily meet the ER% needs for Ayato in your particular team comp. It’s passive attack speed and damage proc will only be active every other Elemental Skill rotation, but it is a nice bonus when it is active.

Amenoma Kageuchi: The only recommended craftable 4 star sword, this katana provides high ATK% and a passive that helps reduce Ayato’s ER% costs. If you use it, it is recommended to use a different rotation, but holding the Elemental Burst until after the first Elemental Skill to gain stacks of its passive to reduce energy costs.

ER% Requirements

Generally around 140-150% ER% is recommended for most teams with Ayato as a solo Hydro unit, and he can get away with 110-120% with a Hydro battery. More ER% will be needed if you only use Ayato for his ult and give him less chances to use his E.

#
Teammate Synergies

Xingqiu - Powerful unit that can serve as a battery to Ayato if needed while providing very high single target damage in his own right. Can shred Hydro RES with constellations and while Hydro Resonance is usually lacking in impact, his rain swords may allow him to function better as a solo healer with Hydro Resonance. Can function in both taser and hypercarry teams.

Kokomi - A good choice if you want a battery for Ayato that offers very strong healing and ATK% buffs through 4PC-ToM and the TTDS catalyst.

Mona - Lower battery potential than other Hydro supports, but can offer a lot of DMG% bonus with her Burst which works exceptionally well on teams that have Ayato do a burst of concentrated damage. Also has the ability to stack the TTDS buff on Ayato for even more damage.

Fischl - One of Ayato’s best sub-DPS options and a borderline must have for taser and hotpot teams. Becomes very powerful at C6, as Ayato’s fast attack speed allows him to drive C6 procs with more frequency than other units.

Beidou - A strong sub-DPS with good synergy with Fischl and an especially useful niche against 2-3 enemies. Ayato may prefer to use 4 PC TF in Beidou teams to drive her with a Hydro infusion for her full Burst duration, although it isn’t necessary. Can provide high damage reduction along with Xingqiu.

Yae Miko - An alternative Electro sub-DPS if you’re already using Fischl and want more single target or nuke damage. Yae requires a lot of field time, which allows her to slot nicely into Ayato teams during his downtime.

Raiden - Bordering on double DPS territory, Ayato and Raiden could have synergy with each other, but without Ayato’s C4, the synergy is mostly one sided, with Raiden providing energy and Elemental Burst DMG% bonus to Ayato and not getting much back in return besides resolve stacks.Most teams will find that Fischl slots in more nicely as a general Electro sub-DPS than Raiden.

Kujou Sara - Most on field DPS units do not work well with Sara due to the 6 second duration of her ATK buff, however Ayato needs around 7 seconds of field time for his Elemental Skill, meaning that Sara can buff most of Ayato’s damage window. She can also buff another sub-DPS and can work as an alternative to Bennett, or even with Bennett for more ATK.

Kazuha - One of the best buffing units in the game, Kazuha can provide high DMG% bonus, grouping and VV shred to Ayato. Notably, Ayato’s Elemental Skill uptime fits perfectly within the duration of Kazuha’s A4 buff and VV’s 8 second duration, making him one of the most efficient users of Kazuha’s utility, as it Ayato can easily have 100% uptime on Kazuha’s full utility. However keep in mind that Ayato will need to either pop his ult or use a second Hydro unit to get Kazuha to swirl Hydro, meaning you won’t be able to snapshot the Hydro DMG% bonus to Ayato’s elemental burst unless he has another Hydro unit on his team.

Venti - A powerful grouping unit against smaller enemies as well as a supplemental battery, Venti is another good Anemo support choice for Ayato. Notably, Ayato’s Hydro infused Normal Attacks can hit enemies lifted off the ground in Venit’s burst. Venti’s grouping may also enable the semi-quadratic scaling of Ayato’s ult to come online very easily. Overall a powerful support for Ayato if Venti excels against the enemies you’re fighting.

Jean - A great option if you want both healing and VV shred. Jean notably becomes able to provide 15% attack speed at C2, which is a nice bonus for Ayato, allowing him to get an extra Normal Attack of two per Elemental Skill window.

Sayu - Another option for a healer that provides VV shred and good off field Swirl damage with an EM build.

#

Bennett -Another powerful buffing unit and healer, Bennett is pretty strong with Ayato as he can snapshot the ATK buff for his Elemental Burst. Ayato’s ATK multipliers on his Elemental Skill Normal Attacks are lower than other units due to his partial HP scaling, but ATK buffs can still be powerful on him. Bennett will not be able to provide full uptime to every of Ayato’s Elemental Skill windows unless you elongate his rotations by at least 3 seconds to account for cooldown desync.

Xiangling - A strong Pyro sub-DPS, Ayato can be a competitive enabler for Xiangling, allowing her to vaporize most hits of her Pyronado when Ayato’s Ult and Skill are active. While Childe technically enables Xiangling better than Ayato, he still applies enough Hydro to be competitive in this role.

Thoma - A comfort option that also provides the ever useful lore synergy. Thoma’s shield is strong and he can provide Normal Attack DMG% bonus at C6, but beyond that he provides little value to Ayato due to a very low rate of Pyro application and low damage.

Yunjin - As a unit that specializes in amplifying Normal Attackers, Yunjin is very at home on Ayato teams, especially with the DMG% bonus and attack speed buffs provided by C2 and C6 respectively. The main caveat of using Yunjin with Ayato is cooldown desync, so she will only be able to buff every other of Ayato’s Elemental Skill windows in practice. Despite this, she still seems to be one of the strongest choices for a hypercarry Ayato composition.

Zhongli- Comfort unit that provides some RES shred and can give Geo resonance when paired with Yunjin or other Geo units.

Ganyu - A good choice if playing Ayato in a freeze team. Their ults overlap pretty nicely for potentially double quadratic scaling, and who wouldn’t want that? Good if using Ganyu for just her burst but using Ganyu as an on field carry will result in her preferring Mona or Kokomi in most cases for more buffs.

Ayaka- Also a possible choice for a freeze team, and has good lore synergy and massive frontloaded burst damage, though similar to Ganyu, Ayaka will prefer Hydro enablers that can give her more buffs for her Elemental Burst.

Kaeya/Rosaria - Other good budget choices for freeze teams that provide off field Cryo application and damage, which is very nice when Ayato mainly uses his Elemental Skill to provide Hydro.

Diona - You’ve decided that you wanted to run a freeze comp with Ayato and you need a healer that also provides Cryo resonance, as there are no other possible options for this.

Some Recommended Teams

Note these comps will have to be tested upon release and are merely suggestions.

Hotpot (aka Soup): Fischl, Kazuha, Bennett: A powerful team focusing on transformative reactions, this team appears to be one of Ayato’s best. Ayato is difficult to replace in this team due to his large AoE, long duration, off field Hydro application in his elemental burst, and better scaling with buffs than many other Hydro units. The team focuses on using Kazuha’s elemental Burst with Bennett and Ayato’s Burst and Fischl’s Oz active to get massive EM boosted Swirl, Electrocharge and Overload reactions, and then Ayato takes the field to take advantage of Bennett and Kazuha’s buffs to drive Fischl’s A4 procs and also proc some vaporize hits. Venti is a possible replacement for Kazuha and works very well, and Bennett can be replaced by Thoma, albeit for less damage potential, if you desperately need Bennett for your second abyss team.

Ayato Hypercarry: Kazuha, Xingqiu, Yunjin: A team that focuses on giving Ayato as many buffs and field time as possible. Xingqiu applies Hydro for Kazuha to swirl and can also benefit from Kazuha’s buffs as a powerful single target sub-DPS, while providing enough healing/sustain to get by. Ayato is a great driver for Yunjin and can get the highest possible autoattack damage per screenshot using her. Bennett can also be used on this team but isn’t mandatory.

Ayato National: Xiangling, Bennett, Sucrose/Fischl: Ayato applies enough Hydro to enable Xiangling to vaporize most of her Pyronado hits when Ayato’s Elemental Burst and Skill are active, and his teams perform overall similarly to Childe’s. Unlike Childe, Ayato doesn’t gain as much value from Kazuha as it is difficult to double buff/double VV both Pyro and Hydro with Ayato as Ayato cannot overcome Kazuha’s ult applying Pyro the way Childe can. Because of this Sucrose works a lot better with this team to swirl Pyro for VV and to give Xiangling EM. Another option is Fischl, turning the team into an overvape team (similar to Raiden national) that has a much higher single target damage potential than other Ayato national variations.

Taser: Fischl, 2 of Xingqiu/Kazuha/Beidou/Jean/Bennett: A type of team that runs Ayato with some of the strongest sub-DPS units available. Can work well with 4PC Thundering Fury to extend Ayato’s field time and has a lot of flexibility in the types of units that can be used.

Freeze: Ganyu/Ayaka/Kaeya/Rosaria, Venti/Kazuha, Diona: Ganyu and Venti allow Ayato to abuse quadratic scaling, making this a strong comp for high target count content. Ayaka over Ganyu is another option for more low target burst damage. It isn’t certain yet if Ayato will prefer field time over Ganyu or Ayaka, or if he’d only be used for his Elemental Burst.

Geo-Comfort: Xingqiu, Yunjin, Zhongli: A comfortable comp focused on survivability and high Hydro damage. Recommended to use Archaic Petra on Zhongli for 35% Hydro DMG% bonus for both Ayato and Xingqiu while having up to 35% Hydro RES shred from Zhongli’s shield and Xingqiu’s C2.

#
Constellations

DPS increase % for an unbuffed Ayato by constellation, typically external buffs lower the value of some constellations (C1/C2)

C1 - Kamisato Ayato essentially gains 30% Normal Attack DMG% bonus for his Hydro Normal Attacks in his Elemental Skill to enemies below 50% health. This constellation is a minor DPS increase, but is held back by being inactive for the first half of an enemy’s health bar. DPS increase is 14% if the enemy is below 50%, but 7% on average. Rating: 2/5.

C2 - Kamisato Ayato’s waveflash stack limit increases to 5 stacks per hit, and he gains 50% HP% at max stacks. In general this constellation can increase Ayato’s DPS by around 12-13% from C1. Rating: 3/5.

C3 - Kamisato Ayato’s Elemental Skill multipliers are increased by 3 Talent Levels. This is actually Ayato’s biggest DPS increase because so much of his damage comes from his Elemental Skill multipliers for both ATK and HP scaling. Recommended to stop here unless you are a giga whale. DPS increase is 18-19% from C2. Rating: 4/5.

C4 - Kamisato Ayato’s Elemental Burst gives an attack speed bonus to allies standing in the field (including Ayato himself). This constellation provides a small boost to Ayato’s own DPS potential, but may also provide supportive utility to future Normal Attack DPS characters, as current options (Yoimiya) due to not fitting nicely into Ayato’s rotations without massive rotation duration extension. Rating: 2/5

C5 - Kamisato Ayato’s Elemental Burst gains 3 Talent Levels. DPS increase is around 4-5% from C4, though it could be more or less impactful depending on how many enemies are hit with overlapping rain blossoms. Rating: 1/5.

C6 - Kamisato Ayato’s Elemental Skill summons 2 extra clones upon cast, that each contribute a slash with 450% ATK scaling upon Ayato’s first normal attack during his Elemental Skill window. This constellation looks really cool, and can add a bit of front loaded burst, but it only procs once per Elemental Skill duration, adding 900% in ATK scaling to an ability that has around 1800% total ATK scaling and 58% total HP scaling over its duration, so the amount of extra damage can be a sizable uplift. It has a separate ICD from Ayato’s normal attacks and can be vaporized. It is around a 11-12% DPS increase over C5. Rating: 4/5.

Should I go for a C1 or R1 weapon as a low spender?

This depends on a number of factors. Ayato’s kit is looking to be pretty self sufficient and functional in many teams at C0. His early constellations only offer more damage, rather than utility (found in his C4) or quality of life, so if you don’t need more damage output, the constellations will not change your experience with Ayato that drastically. If you already have another 5 star sword, such as Primordial Jade Cutter or Mistsplitter Reforged, the boost you’d get from Ayato’s weapon is very minor overall. The weapon will be a better investment than constellations if you’re upgrading from a 4 star weapon like The Black Sword or Amenoma Kageuchi. You can also use it on other units, but it's very specific passive will keep it from being more than a stat stick on most sword characters, except for perhaps Keqing or C6 Kazuha, but if you have a C6 Kazuha then you probably shouldn’t be asking this question, now should you?

tall fractalBOT
#

Kuki Pre-TC FAQ by @old glen (author and calcs) and @analog scaffold (co-author, editor and calcs)

For all Kuki Shinobu calcs you can reference: Kuki Mastersheet by @old glen, @analog scaffold and @austere charm, and Kuki Frames Mastersheet by @tardy notch

Disclaimer: Pre-TC is volatile and, as always, perpetually subject to change until release (and sometimes later!). Please note that these are theoretical suggestions. We do not have access to the beta, and we cannot play the character ourselves. Everything described in this FAQ is a good faith analysis based on the little information about the character’s kit that we know. Team calcs, additionally, are not established yet, and as with everything in TC, the content in this FAQ should be taken with a grain of salt.

__***Character Overview***__

Kuki Shinobu is a 4* Electro Support unit that specializes in off-field healing and consistent Electro application at close range. She is a character that provides sustain, buffing w/ ToTM, and decent Electro application. With her Elemental Skill, she can deal DMG and heal allies. With her Elemental Burst, she can deal multiple instances of Electro DMG in a small area that scales with her HP.

Shinobu can also carry the Tenacity of the Millelith artifact and Favonius Sword, which makes her a buffer and a battery at the same time. Her DMG capabilities are low as her scalings are split between HP% and ATK%, along with ascension passives that do little to no increase on her kit as her A1 isn’t achievable on certain team compositions and her A4 being mediocre. Her constellations are currently lackluster, and it’s recommended to stop at C4 to maximize her DMG. However, since most will be playing her as a support unit, these constellations aren’t necessary, except maybe C2 for 100% uptime on Shinobu’s Skill. Her current team compositions are flexible since many teams need or want a healer, especially teams featuring a physical DPS that need regular Superconduct reactions.

Indications of her kit may developed in the future with the Dendro Reaction: Intensify. Will need further theorycrafting about it.

__***The Really Short Version***__

Roles: Healing Support (recommended); on-field Physical DPS / off-field Reaction DPS (tertiary, only for die-hards and experimentalists)

Talents: E > Q > AA (Healing) // AA > E > Q

Weapons (Healing support or Reaction DPS): Freedom-Sworn // Favonius Sword // Jade Cutter // Iron Sting // Dark Iron Sword.

Weapons (Physical DPS): Aquila Favonia (w/o Yunjin) or Haran Geppaku (w/ Yunjin) // Jade Cutter // Black Sword // Rancour // Lion’s Roar

Weapons (Reaction DPS): Freedom-Sworn // Favonius Sword // Iron Sting // Dark Iron Sword.

Artifacts (Healing Support): 4pc Tenacity // 4pc Instructor // 4pc Exile // 4pc Noblesse // 4pc Clam or Maiden’s

Artifacts (Reaction DPS): 4pc Thundering Fury // 2pc TF 2pc Wanderer // 4pc Tenacity // 4pc Lavawalker // 4pc Thundersoother

Artifacts (Physical DPS): 4pc Pale Flame // 4pc Shimenawa // 4pc Gladiator // 2pc Bloodstain 2pc Pale Flame // 2pc Phys 2pc ATK

Constellations: C2 for 100% healing uptime, C4 for extra damage.

Teams:

  1. [Bennett / Xiangling / Anemo flex] for Reaction DPS
  2. [Eula / flex / flex] for Superconduct Support
  3. [Raiden / Yae / Anemo flex] for Mono-Electro
  4. [Childe / Electro flex / Flex] for Electro-Charged
  5. [Yunjin / Rosaria / Fischl or Bennett] for Physical DPS
__***Talents***__

Leveling Priority:
E > Q > AA

Kuki Shinobu’s kit entirely relies on her healing via her Elemental Skill, which is why it is likely to be prioritized. Her Elemental Burst and Auto Attack scalings are quite low and aren’t worth investment except for die-hard Shinobu fans. For a DPS Based Kuki, you have 2 options to go to: Physical Based DPS and Reaction-based DPS.

Physical DPS Kuki focuses more on her Normal and Charged Attacks while playing as a Reaction DPS focuses more on her building EM. If you choose to play her this way, her Normal Attack talent deserves priority.

Reaction-based DPS essentially does not need to level up her talents as you just need to focus on getting a high EM baseline.

Her Elemental Skill summons a ring of Electro Naku Weed around the character, dealing DMG on the initial casting of it based on her ATK. Furthermore, the elemental skill will tick DMG whether Kuki is on the field or not, dealing Electro DMG based on her ATK and healing the active character based on Kuki’s Max HP. Her Elemental Burst is quite similar to Amber’s Elemental Burst. If she is above 50% of her Max HP, her Elemental Burst ticks 7 times. Below 50% of her Max HP, her Elemental Burst ticks 13 times.

Normal Attack: Shinobu’s Shadowsword
Talent 9:
1st Hit - 89.6%
2nd Hit - 81.8%
3rd Hit - 109%
4th Hit - 139.8%
Charged Hit - 224.9%
Plunge Hit - 117.5%
Low/High Plunge Hit - 234.86%/293.36%

Elemental Skill: Sanctifying Ring
Talent 9:
Skill DMG - 128.71%
Healing - 5.1% Max HP + 587
DoT DMG - 42.9%

Talent 12:
Skill DMG - 151.42%
Healing - 6% Max HP + 739
DoT DMG - 50.5%

Gauge: 1U
ICD: Standard (3 hits/2.5s)
Frames: 52
Snapshot: No

Elemental Burst: Goei Narukami Kariyama Rite
Talent 9:
Skill DMG - 6.10%

Talent 12:
Skill DMG - 7.20%

Gauge: 1U
ICD: Standard (3 hits/2.5s)
Frames: 63
Snapshot: Yes

Her A1 and A4 basically are just boost to her healing apart from the A4 increasing her Elemental Skill DMG via her EM. Her A1 increases her Healing Bonus by 15% if she is below 50% of her Max HP. Plain and simple to understand. Her A4 is a flat boost to her healing and DMG. The added healing amount of her Elemental Skill w/ A4 scales with her EM at 75% of it and the added DMG dealt to enemies of her Elemental Skill w/ A4 also scales with her EM at 25% instead. Assuming this is a flat values buff rather than additive values, this passive is currently one of her unnecessary traits, due to its low impact on damage and healing.

__***ER Requirements***__

Her Energy Requirement falls around 170%-180%. This is due to the fact that her particle generation is not that great and when she wants to get ownership on certain reactions, she will mostly be running as a solo Electro unit. Generally, Support Kuki needs to burst only if you need to extend your rotation time to fit CDs. For Physical, its optional to proc Superconduct or get a bit of DMG from it and for Reaction-based comps, you need to have the optimal ER as given above.

In non-EM DPS scenarios, it is better to ignore the use of Shinobu’s burst entirely, allowing these stats to instead be allocated to much-needed offensive stats like CRIT, DMG%, and ATK%.

#
__***Combos/Rotation***__

Kuki Shinobu, as a support and/or reaction DPS, will most often be casting her Skill, occasionally casting her Burst, and switching out. As an on-field physical DPS, her rotation depends on whether you use Yunjin as a teammate and/or Haran Geppaku Futsu as a weapon. Normally, her best Normal Attack combo is N1C spam. However, with Yunjin and/or Haran, her best Normal Attack combo is N4D spam.

__***Artifacts***__

For a Healing Support Kuki, we recommend the 4pc Tenacity of the Millelith artifact set, as her skill can consistently maintain the set’s 20% ATK bonus for her team. The Healing Support build follows these mainstats and substats prioritization

***Sands - HP%
Goblet - HP%
Circlet - HB%

Substats:
HP%>CR%>ER%>EM***

CR% being on secondary priority as Favonius Sword is her BiS on the 4* sword options that Kuki can use as a Healing Support. Rotations with Favonius Sword will force Kuki to Elemental Burst to trigger a 1/7 chance to proc Favonius Passive.

For a Physical DPS Kuki, we recommend the 4pc Pale Flame artifact set, as it adds the most total relevant stats. Physical Kuki heavily relies on her long physical field time along with weapons that correspond to this type of DMG. She uses her auto attack combos all the way until the buffs that she receives expire and force her to rotate out.

The build follows these mainstat and substat priorities:

***Sands - ATK%
Goblet -Physical DMG%
Circlet - CR%

Substats Priority:
CR%=CDMG%>ATK%***

“Deviant” builds utilizing either Chongyun or C6 Bennett will require an appropriate goblet and artifact set change (Gladiator/Shime 4pc sets), but these are generally ill-advised on characters anyways.

Reaction DPS Kuki will need a full triple-EM investment, and these artifacts are very difficult to find in order to have comparable (or even less!) damage than other builds. For the most personal damage, 4pc Thundering Fury will work fine. However, it’s possible that 4pc Tenacity of the Millelith will add more Team DPS at the cost of her personal damage.

Reaction-based Kuki relies on her procing the reactions due to her Elemental Skill ticking at 1.5 seconds on a 12 second duration. This reaction-based reactions mostly consist of Overload comps and sometimes Electro-Charged comps.

**This build will require Kuki to have a ER Weapon. Running ER/EM/EM with a EM weapon is the same balance as triple EM with ER weapon,

Substats Priority:
EM>>ER%>HP%>ATK%(Triple EM Build with ER Weapon)
ER%>EM>ATK%>HP% (ER/EM/EM with EM Weapon)**

DISCLAIMER: Please keep in mind that the most you are likely to see with Overload reactions is about 20k damage per reaction. With standard ICD, Shinobu would max out at ~80k damage on a Elemental Burst if Shinobu can claim ownership on every reaction, she has the best artifacts and weapons possible, and there is adequate pyro application to last through Shinobu’s Burst.

Regarding Intensify, will still need further testing on the reaction itself before doing update on this specific build for Kuki. Please take note that the information we have got is not complete and will be changed in the future depending on what Mihoyo takes it.

Her Artifact options also depend on what you will run Kuki as. Here are some options on the artifacts for Kuki whether you are playing her as a Support or DPS.

#

For Support Kuki, her options are:

4PC Tenacity of the Millelith - Her BiS artifact. It gives HP% on its 2PC and gives an ATK and Shield Strength Buff if Elemental Skill deals DMG to an enemy on its 4PC. Kuki can easily trigger the 4PC passive as her Elemental Skill ticks enough to keep the buff uptime at 100% at C2.

4PC Noblesse Oblige - An artifact set that any support unit can carry due to its team-wide ATK% buff. Not the best option, but not a bad one either. The 20% ATK Buff helps the whole party in exchange to Kuki Bursting to get the buff.

4PC Ocean-Hued Clam - This set allows Kuki to deal DMG while also maintaining her role as a support. The only caveat that this artifact set has is that Kuki can not reach the maximum healing threshold that this set has, meaning she deals less DMG compared to other healers that use this set overall. In niche situations, such as in a Eula team where there is already a Tenacity-holder, this could, in theory, put in some work.

4PC Maiden’s Beloved - This set maximizes her healing potential as its 4PC ties down to her healing capabilities. Only downside this set has is there is no buff on the party compared to Tenacity of the Millelith and Ocean-Hued Clam. It is a comfort set for her to boost her healing in certain situations.

4PC The Exile - A good 4* option to help batterying certain units when using Kuki Shinobu. Only downside for this set is that her healing will be a little lower since the HP% ratio between a 4* vs a 5* is a huge difference. When using 4pc Exile, use a 5* flower as the off-set piece.

4PC Instructor - Another good 4* option and an underrated artifact set in general. She must be the one triggering reactions for the 4PC of this set to be proc, but the 180 EM buff applies to all characters on your team. Provides good EM on 2PC and can be used for reaction-based comps.

For DPS Kuki, we split the categories based on what type of DPS Kuki people will be running. This is done so everyone can know what her BiS in certain sections of DPS are.

Physical DPS Kuki’s options on artifacts are the following:

4PC Pale Flame - Her BiS in the Physical DPS Role. She can easily proc the 4PC Passive just like Tenacity of the Millelith. This set generally will be available at anyones disposal as if both are dedicated to farm for both Support Kuki and Physical DPS Kuki on one domain, making this option particularly resin-efficient.

4PC Gladiator’s Finale - This set generally is an easy access set due to the strongbox being available to everyone. Along with any artifacts you are trying to farm for Kuki, you can recycle them into Gladiator’s Finale if you did not get the right mainstats or substats for your artifacts for her. In deviant builds, this can substitute for Pale Flame for similar damage without drawback.

4PC Shimenawa Reminiscence - Provides a huge boost of NA and CA DMG%. The 4PC Elemental Burst Energy loss does not generally affect her overall DMG on a Physical Kuki as the Elemental Burst is not triggered due to Kuki building No HP% for this type of DPS. In deviant builds, this can substitute for Pale Flame for the same damage, as long as you can pay the energy cost.

2PC Pale Flame 2PC Bloodstained Chivalry - the 50% Physical DMG Bonus provides Kuki a huge amount of DMG Bonus with just two 2PC sets, easy to farm as you can get 2PC Bloodstained Chivalry on the strongbox while farming 2PC Pale Flame.

2PC ATK% x2 - Either Gladiator’s Finale, Shimenawa Reminiscence, Echoes of an Offering, Vermillion Hereafter. Any 2PC 2PC of these sets are fine. This provides her enough ATK% if running a Physical DMG Sword such as Prototype Rancour or Aquilla Favonia.

2PC Physical DMG% 2PC ATK% - A mix-mix set between all the artifacts mentioned above. Viable in most cases but getting 4PC’s is highly recommended. This set most likely will be least functional than the other artifacts given since Shinobu’s gear must not be neglected to make her usable

Reaction-based Kuki artifacts are:

4PC Thundering Fury - Her BiS in reaction-based comps. 4PC passive allows her Elemental Skill CD go from 15 seconds to 10 seconds with reaction procing 5 times due to her ICD. Along with this, Overload and Electro-charged DMG are increased with the 4PC set active.

4PC Tenacity of the Millelith - Due to its 4PC ATK% Buff, it generally helps the party gain more buff, along with a slight DMG increase on Kuki Shinobu’s Elemental Burst DMG due to the HP% that Tenacity of the Millelith gives.

4PC Lavawalker - Just like Thundersoother, this set gives her a good amount of DMG in Overload Comps. Farming Lavawalker can be a pain, but using Lavawalker on Kuki and Crimson Witch of Flames on your Pyro Sub-DPS is generally a good idea but there are always better options.

4PC Thundersoother - Alongside farming Thunderfury, this set’s 4PC provides a good amount of DMG for Kuki in Electro-Charged Comps specifically. Really good option if all the farmed Thundering Fury are trash and you got good Thundersoother pieces to use.

2PC Wanderer Troupe, 2PC Thundering Fury - A good half and half sets that can be used by her. 80+ EM generally is good below <= 490 EM, but Kuki will be running triple EM as well as in the substats for the Flower and Feather. This artifact option is on the low side as farming 4PC’s tends to bring much more outcome in terms of DMG, but this option is easier to farm as Wanderers Troupe is in the strongbox.

#
__***Weapons***__

Kuki’s Weapon choices are plain and simple for her support capabilities. Five-star weapons are by no means necessary for performance, but we will still list them for the people who are interested in it. Reason being is that those 5* Weapons can be put on another support or DPS such as Bennett, Kazuha, or Ayato. As for DPS Kuki, it will also vary into Physical Kuki and Reaction-based Kuki.

For her Support Weapons, here are her options:

Favonius Sword - Her BiS for a 4* option. Provides enough ER for her ER Requirement and gives particles for the entire party. This weapon's passive is super easy to proc with her Elemental Burst having 7 or 13 hits depending on her current HP. Keep in mind that while using a Favonius weapon, Crit Rate is an important substat to look out for.

Freedom Sworn - Her BiS for a 5* option. A really outstanding weapon on her. Being able to buff Normal, Charged, Plunging attacks, and ATK% plus with the Tenacity of the Millelith can benefit a Normal, Charged, or Plunging based DPS quite a lot. Due to her ICD being standard, she can proc the passive really fast as well.

Primordial Jade Cutter - Her standard 5* weapon due to it having a HP% passive that benefits her ATK% as well. This weapon makes her dual scalings really easier to build as her HP gets turned into ATK%. Great option if you have no character that currently holds this weapon.

Sacrificial Sword - Secondary to Favonius Sword, this weapon allows Kuki Shinobu to reach below 50% HP really fast, triggering her A1 passive that can benefit artifact sets like Ocean-Hued Clam. It also allows her Elemental Burst to hit 13 times for 3.5 second duration due to her being under 50% HP.

For her Physical DPS Weapon, here are her options:

Aquila Favonia - Provides Physical DMG Bonus as well as ATK%. When spamming N1C, this is Kuki’s BiS sword. The healing from the passive can be used with Ocean-Hued Clam’s DMG, which benefits both weapon and artifact debuffing the enemy as both are physically based in DMG.

Primordial Jade Cutter - Her standard 5* weapon due to it having a HP% passive that benefits her ATK% as well. This weapon makes her dual scalings really easier to build as her HP gets turned into ATK%. Great option if you have no character that currently holds this weapon.

Haran Geppaku Futsu - When N4D spamming, as well as when teaming up with Yunjin, Haran becomes Kuki’s BiS sword for damage. It is pretty easy to stack as the supports the Kuki will use primarily will use their Elemental Skill to battery themselves or other party members, which mean its easy to get the Normal ATK DMG% Buff. In deviant builds, or when using Yunjin, Haran beats out Aquila Favonia for BiS in terms of personal damage.

Summit Shaper - This weapon is generally associated with a shielder, which Kuki does not need as she provides enough comfort through her heals. If you have Zhongli on your party, highly recommend him to be paired with Kuki when using this weapon on her. He also provides Physical and Elemental Shred for the entire party, which Kuki Shinobu can use to further increase her DMG. Without a shielder, however, this weapon falls below 4* options.

Prototype Rancour - Her F2P Sword to use. Really simple to build around with as well as its passive buffing her ATK% to further up her DMG. Really straightforward weapon for Physical DPS Kuki and will do about as good with refinements as other gacha options.

The Black Sword - Same as Aquilla Favonia’s Passive, the healing from this weapon counts into Ocean-Hued Clam’s DMG. Not only that, the Normal and Charged ATK% Buff along with it helps her DMG and being a 4* Crit stat stick helps the healing passive more often to proc. The Black Sword is the easiest 4-star weapon to build with, due to it’s CRIT Rate secondary stat, and outperforms all other 4-stars when max-refined.

For Reaction-Based Weapon, here are her options:

Freedom Sworn - Her BiS for reaction damage, due to having the most amount of EM that Kuki could use to deal a ton of Transformative Reactions. It also brings a teamwide ATK% Buff and DMG% bonus for Normal, Charged, and Plunging Attacks. It is also the 5-star BiS for Support builds.

Iron Sting - Her 4* F2P option. The EM on this weapon is really good to use and its passive really compliments Kuki’ Shinobu's lack of DMG% with triple EM. With refinements, her DMG really ups a lot.

Favonius Sword - The Favonius Sword is her best support weapon, yes, but also takes care of all of the Energy Recharge requirements for Shinobu, allowing her to run a full EM build. It is 2% less damage than an R1 Iron Sting, but also serves to battery the party. A solid option.

Lion’s Roar - A conditional weapon. This weapon can compete DMG if the passive uptime is 100%. The stat that goes along with it is not necessary but can amp up her Elemental Skill DMG. Generally, this underperforms even at high refinements compared to the 3-star Dark Iron Sword

Festering Desire - Another F2P option that you can use. Provides a good ER amount, passive is really good in terms of Kuki’s source of DMG, and everyone gets R5 for free (unless you played after 1.2). Generally, this weapon focuses more on her Elemental Skill than her Elemental Burst, which in an triple EM Kuki, will lack on the Elemental Burst side of DMG.

Dark Iron Sword - 3* option. The EM on this weapon surpasses The Alley Flash’s EM and provides an ATK% Buff which Kuki can use to further up her DMG. For reactions, the sword’s passive is rarely relevant. It is the bare minimum option when you have no crafting materials to spare and there is no Favonius Sword to speak of.

#
__***Team Synergies and Composition***__

Yae - Kuki is the Electro Healer everyone asked for to accompany their Electro DPS so she pairs well with Yae as a healer. Yae still needs Raiden to battery her as Kuki does not produce that much particle for Yae to keep her Elemental Burst energy uptime.

Raiden Shogun - Basically the same as Yae. Kuki benefits them both as they are synergetic with each other. With this in mind, Mono Electro Compositions that tends to run Yae Sara Jean can be replaced by Yae Kuki Kazuha.

Itto - The One and Oni. Her leader and the Deputy Commander of the Arataki Gang. Kuki can provide healing to Itto’s general team as he currently does not have a dedicated healer outside of C4 Gorou, as Bennett frankly takes space in other compositions.

Eula - Kuki opens up Raiden to go to another team and be Eula’s overall Electro support. Kuki can also use Ocean-Hued Clam with Eula as they both benefit from the physical shred with Clam Kuki.

Tartaglia - Kuki replacing Fischl and Bennett and bringing in Kazuha seems to work well for Electro-Charged Tartaglia. There is still the downside of which one is procing the Electro-Charged since the reaction itself is hard to find whose owner its basing its DMG off. Opening up Bennett to be put on another team really helps some teams a lot if you own Tartaglia and Bennett.

Ayato - Kuki w/ C4 can utilize TF (Thundering Fury) Ayato but it needs another Electro unit for Ayato to consistently proc Electro-Charged and since Kuki’s A4 has a 5 second cooldown before it procs again, Ayato can proc it 2 times in 1 Elemental Skill.

Bennett - For DPS Kuki, Bennett will always be the buffer that DPS will need (unless he is C6 which Physical Kuki can not use). He provides an insane amount of ATK Buff as well as healing and can hold 4PC Noblesse Oblige to increase Kuki’s DMG.

Xiangling - Since Bennett is here, Xiangling will also be here. She provides Kuki with Pyro Aura uptime since her Pyronado has no ICD, which mean Kuki can trigger Overload with her ownership of DMG on it.

Kazuha - A Anemo unit that can hold VV. It is a straightforward explanation. Kazuha provides Elemental DMG Bonus that Kuki will lack on a triple EM gear or a supportive gear. With VV, he can shred Electro RES for Kuki to amp her DMG up.

Sucrose - Another Anemo Unit that greatly helps Kuki. Her EM Buff transfer really ups Kuki’s DMG in Reaction-based comps and along with C6, provides her with Elemental DMG if Sucrose Burst manages to absorb Electro.

Jean - Anemo mom with Bennett can provide Pyro for Kuki to Overload along with Xiangling, or so it is called “Sunfire” setup. Really versatile support to bring along with Kuki as she can hold Favonius instead of Kuki while bringing a much stronger heals to keep whoever is on the field alive.

Venti - The Anemo Archon. Great for grouping up enemies that are needed for a Overload Comp. Can suffice for batterying hard Pyro applicator such as Xiangling by absorbing Pyro in his Elemental Burst.

Rosaria - Kuki can utilize Rosaria Crit Rate Buff as well as her C6 Physical Shred on Physical DPS Kuki. She can also provide decent energy for the team if being used with Favonius Lance.

Yunjin - Another support that Kuki can utilize. Her flat DMG increase via her DEF greatly increases Kuki’s Normal ATK DMG and with her A4 passive on a Rainbow comp, her being on C6, can boost it further. It cannot be understated how important Yunjin is for Kuki’s personal damage, due to Kuki’s naturally low multipliers. Any teammates that give flat DMG increase will help Kuki substantially.

#

Mono-Electro Teams (ex. Yae, Raiden, Kuki Shinobu, Kazuha) - removing Sara and Jean to make way for Kuki and Kazuha actually helps the rotation timing and DMG a lot. You do not need to manage Sara spreading her ATK Buff to both Yae and Raiden simultaneously. This team provides enough sustain to keep both Yae and Raiden alive with Kuki’s healing and has 100% healing (at C2+) and buffing uptime with Tenacity of the Millelith.

Support for Superconduct Team (ex. Eula, Kuki Shinobu, Flex, Flex) - She is good as a substitute to other Electro units who need to be on another team. With her healing, she can sustain the DPS on-field time doing Physical DMG while buffing with Tenacity of the Millelith or dealing DMG with Ocean-Hued Clam.

Overload Team (ex. Kuki Shinobu, Bennett, Xiangling, Anemo) - This team composition usually makes Kuki Shinobu trigger the reaction and every party member sets it up for her. There is no one stealing ownership as Kuki will be running solo Electro. Her only flaw in this composition is her ER Requirement as she will be running solo electro to maintain the ownership. Additionally, Bennett/Xiangling/Anemo has many, many characters that can fill this slot better than Shinobu can. When using Kuki in this comp, it’s important to wait to use her skill until after her Burst finishes, in order to maximize application.

Electro-Charged Team (ex. Tartaglia, Kuki Shinobu, Electro, Flex) - This team usually will force Kuki Shinobu with another Electro to maintain the Electro-Charged Reaction. While the ownership for this reaction is quite hard to manage, Kuki provides a lot of sustain but lessens the DMG compared to say, like Beidou or Fischl.

Mono-Geo Comp (ex. Itto, Gorou, Zhongli, Kuki Shinobu) - Primarily, her role here is a dedicated healer and buffer. Opens up Bennett or another healer to be in a different team and she performs really well as Itto moves a lot during his time on the field.

Physical Team (ex. Kuki Shinobu, Rosaria, Yunjin, Fischl/Bennett) - Rather than use Rosaria or Fischl as Physical DPS units, we use them here as DPS’s in their respective element to facilitate Superconduct while dealing satisfying damage individually. The healing comes from Kuki and Yunjin’s Burst can double her DPS. Fischl can be swapped with Bennett according to team needs. In order to reach DPS thresholds, however, your supports should also be especially well-invested here.

__***Constellations***__

Many of Kuki Shinobu’s Constellations have requirements to take effect. C4 needs Normal, Charged, and Plunging attacks while off-field, while C6 requires her to be at low health.With that in mind, her constellation focuses more on her Elemental Skill as it is her bread and butter of her entire kit.

C1 - This constellation increases the AOE of her Elemental Burst, Currently, there is no footage of how big the AOE is as of now but assuming we hit 2 or more enemies with C1 Elemental Burst, it is a small DMG increase.

DMG Increase from C0: 0%

C2 - Extending the duration of her Elemental Skill from 12 seconds to 15 seconds aligns with the Elemental Skill CD. This boosts her support capabilities quite a lot as she can give Tenacity of the Millelith Buff 100% uptime.

DMG Increase from C0: 5%
DMG Increase from previous cons: 5%

C3 - Increases her Elemental Skill Talent LVL by 3. Ups her healing and DMG potential. Good stopping point if you are rolling for her.

DMG Increase from C0: 10%
DMG Increase from previous cons: 5%

C4 - Basically, its like Fischl A4 but has a longer CD and its triggering pattern relies on Normal, Charged, Plunging ATK. Really good on team comps that relies on this type of attack patterns such as Itto Comps or Xiao Comps.

DMG Increase from C0: 60%
DMG Increase from previous cons: 45%

C5 - Increases her Elemental Burst Talent LVL by 3. Generally is good if you are using her burst on a team composition like Overload or Electro-Charged comps.

DMG Increase from C0: 75%
DMG Increase from previous cons: 8%-8.5%

C6 - This constellation is like Hu Tao’s very own C6. When her health drops to 25% or she takes a lethal DMG, this constellation will be triggered. She will gain 150 EM and she will not fall in battle. Somewhat a good constellation on reaction-based composition without a shielder and lowering Kuki’s healing potential.

DMG Increase from C0: 150%-155%
DMG Increase from previous cons: 45%

wide plumeBOT
#

Heizou Pre-TC FAQ by @old glen (author and calcs)

For all Heizou calcs you can reference: Heizou Mastersheet by @old glen and Heizou Frames Mastersheet by @tardy notch

Disclamer: Everything in here is Pre-TC, which means it is not guaranteed that some of this will be facts or not. All the numbers shown are only restricted by certain assumptions so take everything with a grain of salt.

For the combo of Heizou, no calculations has been done on what is the best combo to use due to the fact that he is really versatile on his playstyle and his most valuable constellation, C1, makes him change his combination completely. Therefore is not included in the mastersheet.

Aside from this, 4PC Thundering Fury or 4TF has been made into a special mention for now due to lack of knowledge if it works with Heizou completely. Will need prior live-testing for it to be considered as one of his options but for now will go to special mention.

Team Calcs also need further testing in live to determine possible assumption answers that we might not therefore is not include in the mastersheet.

__***Character Overview***__

Shikanoin Heizou is a 4* Anemo Catalyst that specializes in on-field damage and driving off-field damage such as Xingqiu’s Rainsword, Yelan’s Exquisite Throw, etc. With his ability to drive this type of damage, it is clear that he will replace Sucrose in some teams due to his high Elemental Skill MV’s but the lack of supportive capabilities for his party members like Sucrose’s A4 and C6.

Carrying 4PC Viridescent Venerer as its BiS in Solo Anemo teams, he already is a good unit with this set. On top of that, his high MV Elemental Skill provides a lot of damage to his overall kit as his Elemental Burst gives a decent grouping mechanism. He has a stacking mechanic on his Elemental Skill, where the max stacks you have on him, the stronger his Elemental Skill damage is. 4 stacks can be obtained and you can get these stacks by triggering Swirls which the A1 passive contains. His A4 is just like Sucrose A1. C1 helps with this as it provides 1 stack for when swapping Heizou on-field and ATK SPD for him. Good stop point in constellation.

__***The Really Short Version***__

Roles: On-field Driver (ADC, EDC, Triple EM)

Talents: E = NA > Q

Weapons. Memory of Dust, Skyward Atlas, Kagura Verity, Lost Prayer to the Sacred Winds, Solar Pearl, Widsith, Mappa Mare, Hakushin Ring, Eye of Perception, Sacrificial Fragment

Artifacts 4PC Viridescent Venerer, 2PC Viridescent Venerer 2PC ATK%, 2PC ATK% 2PC ATK%, 2PC Wanderer’s Troupe 2PC Viridescent Venerer, 2PC Wanderer’s Troupe 2PC ATK%

Constellations: C1 to change his entire combo + added DMG overall to other constellation.C3 adds more damage to his Elemental Skill C6 gives him 64 CV on it.

Teams:
1.[Heizou, Hydro, Electro, Flex]
2.[Heizou, Xiangling, Bennett, Xingqiu]
3.[Heizou, Yunjin, Flex, Flex]

__***Talents***__

Leveling Priority
E = NA > Q

This leveling priority specializes in him being a driver for a team composition. With his Elemental Skill having the highest amount of damage in his kit, it will be prioritized first. Leveling up his Normal Attacks is optional due to the fact his main damage source from it is by triggering Swirls, which scales off the Character Level and Elemental Mastery.

Normal Attack: Fudou Style Martial Art
Talent 9:
1st Hit - 63.70%
2nd Hit - 62.6%
3rd Hit - 86.8%
4th Hit - 25.1%+27.6%+32.7%
5th Hit - 104.5%
Charged Hit - 124.10%
Plunge Hit - 104.4%
Low/High Plunge Hit - 208.77%/260.76

Elemental Skill: Heartstopper Strike
Talent 9:
Skill DMG - 386.80%
Declusion DMG Bonus - 96.70%
Conviction DMG Bonus - 193.40%

Talent 12:
Skill DMG - 455%
Declension DMG Bonus - 113.80%
Conviction DMG Bonus - 227.50%

Tap or Hold Gauge: 2U
4 Stack Gauge: 1U
ICD: Standard (3 hits/2.5s)
Tap Frames: 37
Hold Frames: 54 (1 Stack), 98 (2 Stacks), 143 (3 Stacks), 189 (4 Stacks), 47 (Release)
Snapshot: -

Elemental Burst: Goei Narukami Kariyama Rite
Talent 9:
Skill DMG - 535%
Windmuster Iris DMG - 36.50%

Talent 12:
Skill DMG - 629.40%
Windmuster Iris DMG - 42.90%

Skill DMG Gauge: 1U
Windmuster Iris: 1U
ICD: Standard (3 hits/2.5s)
Frames: 68
Snapshot: -

His Elemental Skill is pretty straightforward. More stacks means more damage and getting those stacks will rely on what combo you use on him to utilize his A1 Passive, in which if he Swirls, he will get 1 Stack of Declension. His Elemental Burst is as simple as a little grouping mechanism in his kit, with the knockback of Windmuster Iris supporting said CC. Windmuster Iris is an Elemental Absorption Type of damage which means it will depend on the absorb Element DMG Bonus for its damage. His A4 Passive is just the same as Sucrose A1 but instead of Swirls, he needs to cast his Elemental Skill to proc it.

__***ER Requirements***__

Generally, he would want to cast 2 Elemental Skill in one rotation due to him running as a solo Anemo most of the time, which makes his ER Requirement quite low and his particle generation is based on how many stacks he has before casting his Elemental Skill. Typically, 130-140% is his ER Requirement on 0-1 stack, 120-130% on 2-3 stack, and 110-120% on 4 stacks. Please note that ER Requirement will be based on how long the rotation will be so this are just an estimated assumption ER Requirements.

#
__***Combos/Rotation***__

For his combos, it will highly depends on what rotation you will put him. The longer the rotation, the longer the combo that he needs to perform in order to meet the time criteria for his team composition. There is also the fact that his C1 will shorten or provide the same time but with more NA due to how it functions with its ATK SPD Buff and 1 Free Declension Stacks.

Combos would want to meet this categories in order to perform well in terms of damage that he will provide in said team compositions:

1. The amount of Swirls
2. Elemental Skill Cast and 4 Stacks of Declension
3. 14-16s of on-field time for driving

__***Artifacts***__

There are many build options on Heizou as he is an Anemo unit and his MV scale of ATK%. These builds will depend on what type of rotation you will be running on him as some team compositions will need him on Triple EM and some in ADC but all of these are relatively close.

ADC Build:

Timepiece: ATK%
Goblet: Anemo DMG%
Circlet: CRIT

Substat Priority
CR%=CD% > ATK% > EM

EDC Build:

Timepiece: EM
Goblet: Anemo DMG%
Circlet: CRIT

Substat Priority
ATK% > CR% = CD% > EM

Triple EM:

Timepiece: EM
Goblet: EM
Circlet: EM

Substat Priority
EM > ATK% > CR%=CD%

4PC Viridescent Venerer - His BiS option as it provides a 60% Swirl DMG and 40% Resistance Shred for the party and his Swirls, and its 2PC providing 15% Anemo DMG on top that generally fits his driving style.

2PC Viridescent Venerer 2PC ATK% - Good substitute for 4PC VV. Provides 18% ATK and 15% Anemo DMG Bonus. If no 4PC VV of said main stat choices are available, this is a good option.

2PC ATK% 2PC ATK% - Gives out 36% ATK. EDC prefers this as a secondary option due to the lack of ATK% on that build.

2PC Wanderer’s Troupe 2PC Viridescent Venerer - 80 EM helps with his Swirl capabilities and the added 15% Anemo DMG Bonus for his Elemental Skill but still gets outperformed by the other options due to the lack of ATK%

2PC Wanderer’s Troupe 2PC ATK% - 80 EM for his Swirls and 18% ATK for everything else. Decent option but still gets outclassed by other easily farmed options

Special Mention

4PC Thundering Fury - A questionable option as of now since it needs live-testing to see if it would work on him. Able to reduce his Elemental Skill CD to give a shorter rotation time needed to cast his 2nd Elemental Skill. Theoretically, would need another Anemo unit for this artifact set to function, strict team composition that allows Heizou to spread Electro-based reactions, works best with a Electro-Charged team composition, and 2 or more targets for said reaction for Heizou to spread in that team composition.

__**Placeholder Artifact Sets**__

2PC Viridescent Venerer 2PC ATK% - Provides 18% ATK and 15% Anemo DMG Bonus. If no 4PC VV of said main stat choices are available, this is a good option.

2PC ATK% 2PC ATK% - Gives out 36% ATK. EDC prefers this as a secondary option due to the lack of ATK% on that build.

2PC Wanderer’s Troupe 2PC Viridescent Venerer - 80 EM helps with his Swirl capabilities and the added 15% Anemo DMG Bonus for his Elemental Skill but still gets outperformed by the other options due to the lack of ATK%

2PC Wanderer’s Troupe 2PC ATK% - 80 EM for his Swirls and 18% ATK for everything else. Decent option but still gets outclassed by other easily farmed options

__***Weapons***__

These weapon options are calculated with 3 of his potential builds and are the most recommended to run based on the team composition that he is in.

Memory of Dust - Surprisingly, the best 5 star option for him. Provides a huge amount of ATK% that really fits Heizou’s driving style as the stacking ATK% passive relies on hits to be triggered to get said stacks and Heizou’s N4 has 3 hits so it would make the stacking of this weapon faster. Needs a shield to get the maximum amount of ATK% buff so a shielder is mandatory.

Skyward Atlas - Good 5 star option as it is on the Standard Banner. Provides Elemental DMG Bonus as well as a damage proc when hitting an enemy with a Normal or Charged Attack but caveat is that it only will proc once per rotation depending on the timing of Heizou’s combo.

Kagura's Verity - Exclusive 5 star option. Good stat stick for him as it provides CD% along with the passive of increasing his Elemental Skill DMG but he can only maximize it to 2 stacks so the half of the passive is not being triggered.

Lost Prayer to the Sacred Wind - Another good 5 star option as it is a CR% Weapon. Provides Elemental DMG Bonus but needs to be on the field longer to get said bonuses due to its passive relying on the holder being on-field for 16s to get the maximum amount of buff. This weapon will highly depend on the combo time for Heizou.

Solar Pearl - Good 4 star option but it is locked via the Battlepass. Its passive fits well with Heizou as getting the Declension stacks will get this passive up for his Elemental Burst and Elemental Skill as well as casting those after will increase his driving potential more.

Widsith - 4 star RNG Weapon and its RNG Buffs that only applies in the first half of his combo. All of the buffs in this weapon benefit his entire damage as ATK% and Elemental DMG% buffs his entire kit while the EM buffs his Swirls damage. All of these buffs are almost the same in terms of damage. Only caveat is that the buff can only be active every other rotation so the next rotation after the buff has been placed, it would not receive it.

#

Mappa Mare - F2P 4* option. Provides EM for his Swirls and Elemental DMG Bonus for his entire kit. Solid option for those F2P Players when running Heizou and without Widsith.

Eye of Perception - Gacha 4*. At high refinement, this weapon can get at least 2 procs in the whole rotation for Heizou but generally, it only provides ATK% on him.

Hakushin Ring - Another F2P 4* option. Gives ER% but generally is not needed due to Heizou driving and getting all the particles to himself. The passive is really good with driving Electro Reactions such as Electro-Charged so that he can buff Anemo, Hydro, and Electro at the same time.

Sacrificial Fragments - Gacha 4* option. Provides EM and at high refinement, is able to give him another cast of Elemental Skill on half of the combo but will need his timing to be perfect in order to align the Elemental Skill CD on the next on-field time for him.

Dodoco Tale - Exclusive event weapon back in 1.6. Able to buff his Charged ATK that gives off Swirls and gives ATK% to his Elemental Burst or Elemental Skill based on his combo rotation.

Wine and Song - An weapon banner exclusive weapon. Generally would make his rotation time much longer due to the fact he needs to dash in order to get the buff.

Blackcliff Agate - A good F2P option that is on the Starglitter Shop. In theory on a 2 or more target, this would be on the top near Widsith and Solar Pearl but its passive really is not in favor of what Heizou achieves as his kit really excels in Single Target due to his kit not having AoE except his Elemental Burst.

Oathsworn Eye - Exclusive event weapon back in 2.5. Provides ER% on its passive but is not needed on Heizou so the small ATK% that it provides really is luck-lastered compared to other options.

*Thrilling Tales of Dragon Slayer - Typical supportive weapon that helps other party members with their damage when swapping Heizou out of the field. Really valuable with how long rotations are going for Heizou and the fact that he has 2 parts of on-field time during those.

wide plumeBOT
#
__***Team Synergies and Composition***__

Fischl - General unit for Electro-Charged team composition. Provides off-field damage and with her A4, able to sustain Electro-Charged if the Hydro application is fast enough to be sustained. At C6, Oz should be able to be on the field 100% depending on the rotation time.

Xingqiu - Has the fastest Hydro application amongst all Hydro units. Able to provide good DMG Reduction and a little bit of healing with his Rainswords.

Yelan - Substitute if Xingqiu is not available. Able to give a DMG buff for Heizou when he is driving and consistent Hydro application.

Beidou - Works well with Fischl as her battery. Able to bounce off Electro-Charged to multiple enemy. Her C1 ables to give Heizou a decent shield and her C2 and C6 generally helps Electro-Charged team compositions better.

Kuki Shinobu - A dedicated healer for Electro-Charged. Good substitute to either Fischl or Beidou depending on who to replace. Running her as a Solo Electro though would make the Electro-Charged proc slower but consistent ownership on her.

Bennett - Able to give out a huge flat ATK buff that most units would want. He also has a heal that will suffice on surviving and able to cleanse auras off the character.

Xiangling - Good Pyro unit with a powerful off-field DMG. Only caveat for Xiangling and Heizou is that he cannot Guoba Swirl, which makes him not work well with her for some team compositions that need Guoba swirling.

Zhongli - Currently provides the strongest shield in the game with a Triple HP build. His kit also allows him to shred off Physical and Elemental RES which helps most team compositions Heizou can run.

Electro-Charged (Heizou, Hydro, Electro, Flex)- A team composition that is really flexible with its option and Heizou as the Main Driver. Usually will need a Hydro and Electro unit to work but the numbers of said Element units will be placed depends on your option.

National - A team composition composing of Xiangling, Bennett, and Xingqiu. Heizou in this team composition fits in well as a VV carrier to buff all off-field damage that is being cast. Pretty strong team to say at least.

Hyper (Heizou, Yunjin, Flex, Flex) - Focuses on improving Heizou’s NA DMG while also providing enough buff to give into his Elemental Skill and Elemental Burst. Would not recommend running this as there are better options.

__***Constellations***__

Constellation Priority
C1 > C3 > C6 > C4 > C5 > C2

C1 - The biggest change in his entire combo section. Provides 1 free Declension stack and 15% ATK SPD for 5s that allows him to shorten his time with the same combo or make the same rotation time but with more damage provided with his kit.

DMG Increase from C0: 8%

C2 - Provides a stronger pull for his Elemental Burst. Self-explanatory but generally is not needed due to his Elemental Burst already providing a pull.

DMG Increase from C0: 8% || DMG Increase from Previous Cons: 0%

C3 - Increases his Elemental Skill Talent LVL by 3. Provides more damage to his main damage source and is a good stop point for his constellations

DMG Increase from C0: 15% || DMG Increase from Previous Cons: 7%

C4 - Generally a good constellation. Provides 13.5 flat energy for his Elemental Burst, which makes his ER Requirement lower but due to him needing to cast his Elemental Skill 2 times in 1 rotation makes this constellation on the weaker increase side.

DMG Increase from C0: 15% || DMG Increase from Previous Cons: 0%

C5 - Increases his Elemental Burst Talent LVL by 3. Increase its damage nonetheless.

DMG Increase from C0: 17% || DMG Increase from Previous Cons: 2%
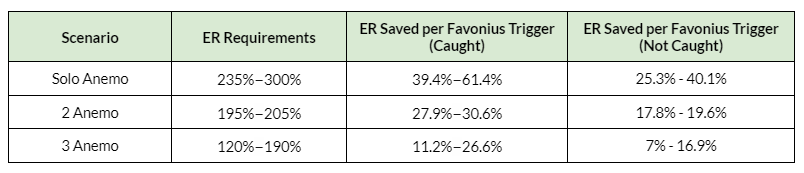
C6 - Gives Heizou 64 CV on his Elemental Skill, which makes this constellation really powerful for all the builds he can run on, and with him casting 2 of his Elemental Skill gives out more damage overall and is a nice constellation to get.

DMG Increase from C0: 29% || DMG Increase from Previous Cons: 10%