#Stencil Mask HDRP
1 messages · Page 1 of 1 (latest)
I've done some more digging and still couldn't find a way to make it work as I want. Even after scouring online resources and Unity's documentation, I can't seem to find the right setup to create this effect. I reached out to someone who specializes in shaders and works extensively with the stencil buffer in Unity's Universal Render Pipeline (URP), but they were also stumped, even after experimenting in the editor to try and make it work in the High Definition Render Pipeline. If anyone has any insights on this, please let me know. Based on discussions in online forums, it seems I'm not the only one struggling to achieve this effect. If we could collaborate on creating a sample case and share it with the community, that would be greatly appreciated. Thanks!
Here is how it can be done (still with some limitations, but kind of works) without any code :
-
Add a "mask" and "masked" layers to the layers list of the project
-
Assign the portal "surface" to the "mask" layer
-
Assign the object that should be visible behind the portal to the "masked" layer
-
On the camera (game camera, or editor camera layers in top right of the window) disable the "masked" layer : now the objects behind the portal should not be visible anymore.
-
Create a new custom pass volume, set the Injection Point to "Before Post Process" so all visible "normal" geometry has already been drawn.
-
Add a first DrawRenderersCustomPass, name it "Mask Stencil"
- Target Color Buffer to None : We don't want to write to the screen yet
- Target Depth Buffer to Camera
- Clear Flags to "None"
- Filter : All queue and only "Mask" layer
- Override Mode "None"
- Override Depth "None"
- Override Stencil :
- ref : user bit 0
- read/write mask : everything
- Comparison : Always
- Pass : Replace
- Fail / Depth Fail : keep
-
Create a simple HDRP/Unlit shadergraph, where you take the ScreenPosition, set the .z value to something close to 0 like 0.0001, transform it from screen to Object, and pass it to the vertex position. This shader will be used to clear the depth only where the mask is visible
-
Add a second DrawRenderersCustomPass, name it "Mask Depth Clear"
- Target cOlor Buffer : None
- Target Depth Buffer : Camera
- Clear Flags : None
- Filter : Queue = All, Layer = "Mask"
- Override Mode : Material
- Material : Assign a material with the shader created before
- Pass Name : ForwardOnly
- Override Depth : true
- Depth Test : Always
- Write Depth : true
- Override Stencil : true
- Ref : bit 0
- Read/write mask : everything
- Comparison: Equal
- Pass/Fails : keep
- Add a third and last DrawRenderersCustomPass, name it "Masked"
- Target Color and Depth Buffers : Camera
- Clear Flags : None
- Filters : Queue = All, Layers Mask = "Masked"
- Override Mode : None
- Override Depth : true
- Depth Test : Less Equal
- Write Depth : true
- Override Stencil : true
- Ref : bit 0
- Read / Write mask : Everything
- Comparison : Equal
- Pass / Fails : Keep


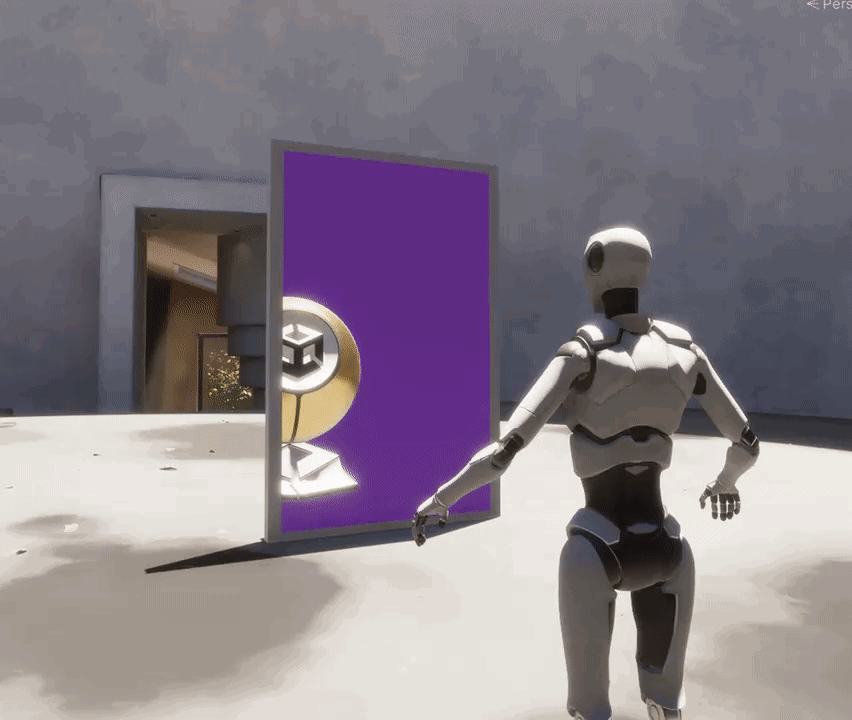
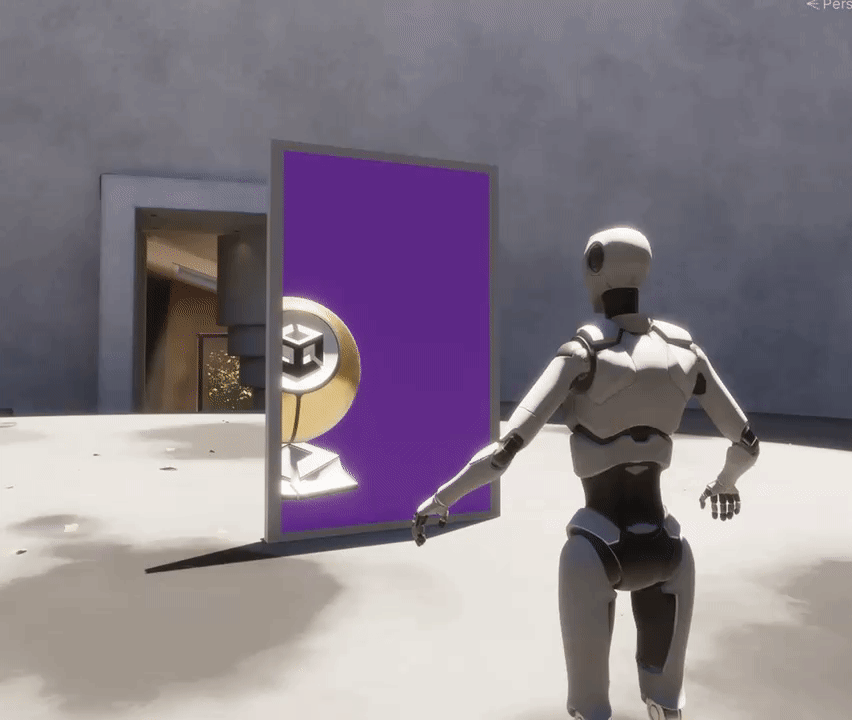
In my setup, the purple quad is in the "mask" layer, and the unity material sphere in the "masked" layer.
And to explain the logic behind this setup :
- All objects except the masked ones are rendered before the custom pass
- The "Mask Stencil" pass only renders the portal. The depth test makes sure to not render pixels that are behind other objects, and the stencil comparison "always" + Pass "Replace" makes sure to always write 1 to the "User Bit 0" in the stencil
- The "Mask Depth Clear" re-renders the portal object, and the shader enforces it to be in the far plane of the camera. The depth test "always" makes sure to always write the pixels, but only where the stencil test passes. This effectively "clears" the depth buffer where the portal is visible.
- The last "Masked" pass renders the masked objects only where the portal is visible, and thanks to having cleared the depth at those pixels before, they can be properly sorted from front to back.
This works for opaque objects, in you wanted to also have transparent objects visible in the portal, you'll have to add an other pass for transparent object and use the transparent sorting mode (back to front)
Note that with this method you will probably hit some limitations, in particular in terms of lighting, like AO for example that doesn't mixe well in that case.
You can work around for direct lighting by doubling your lights and using light layers, but screen space effects like SSAO and SSGI will not work.
To have a fully perfectly rendered portal, it would involve using a secondary camera with an oblique matrix and render texture, but rendring multiple cameras in HDRP has a non negligible cost.
@candid nimbus Thank you so much for this! I haven't tried it out yet, but just for the effort of putting all of this together, I'm grateful. Do you have a link where I can buy you coffee? You deserve it! Thanks!
I don't have this kind of thing, but thank you for the intention 🙂
@candid nimbus
I've tried things out, and it works as expected! I can already see some limitations which I can find workarounds for with scripting, but I'm very thankful for your help!
I wish I could understand how everything works together. If you have any recommendations on where I should start, what resources, courses to use, concept to lab out? I would like all the concepts here to be clear in my mind so I can create new behaviors based on shaders and custom passes.
If you yourself propose some kind of course or private calls, I would be glad to pay to participate, even a quick overview of what's going here would be amazing. Anyway, thank you; I'm very motivated to learn more about all of this.

I have no ideas of where to find ressources like this, you could start by googling "how does a game engine render a frame" or something like that. And even here there is no universal answer, depending on the engine and the techniques used it can vary a lot, but there is in general some common points...
A nice example would be this GTAV graphic study from Adrian Courreges : http://www.adriancourreges.com/blog/2015/11/02/gta-v-graphics-study/
I didn't follow any courses myself in particular, being at Unity I had the privilege of working side by side with our graphic engineers (HDRP team) and gathered their knowledge over the years.

Adrian Courrèges
The Grand Theft Auto series has come a long way since
the first opus came out back in 1997.
About 2 years ago, Rockstar released GTA V.
The …