#archived-shaders
1 messages · Page 150 of 1
That's just a float2 you define in the v2f struct
v2f stands for vertex-to-fragment shader
It doesn't have to be called uv_Splat0. You can call it whatever you'd like.
Can I define things in the v2f by default? It keeps giving trouble even when I change it's name?
Show me the v2f struct
Yep
You can probably replace uv with the first splat UV, unless you want access to the unmodified UV in the fragment shader for some other thing.
And you can use TEXCOORD0 to TEXCOORD3 for each splat UV.
Something really odd happens when I add that:
How it looks before adding the line:
Now, After Adding this line:
And it's animated too in really odd ways
Why would just adding the variable make it all weird when rendering?
It's spazzing in a really weird way after adding that line ^^'
@willow timber Don't define two variables with : TEXCOORD0
Use TEXCOORD1, then TEXCOORD2. Whatever isn't in use.
There's a limit which depends on what the hardware you're using supports.
But it seems these are optional. Someone smarter than me can correct me.
They're called semantics.
Okay, thanks!
Eyy, it works now!!
Thank you so much, @low lichen ! I have access to them now!
I really appreciate your help!
so, it turns out using a combination of Fresnel + Fresnel Pulse, Tron Grid + Hypnotize and Dissolve creates some serious disco vibes....

hey everyone. is it possible to have a single object or mesh with a gradient alpha value?
i want the red frame around the camera veiw to fade to 0 alpha on the inside.
I think you just need to add a gradient transparency to the red frame, if it's an image?
its a mesh
and object, in the way of the camera. it will flash when dmg is recieved
ah, erm, possibly you need a shader then....i'm not sure about that..
yeah, thats why i asked in #archived-shaders
😛
Just use a Vignette Image Effect
Post Processing Stack V2 as well as the SRPs PP both have it. or use any existing Vignette Post Process you can find or write
i do the damage flash exactly like that for full screen and its quite convenient
@grand jolt
so i dont need a mesh rendered object positioned in front of the camera?
nope. you essential want a vignette
only an image?
GitHub
Natural vignetting effect for Unity. Contribute to keijiro/KinoVignette development by creating an account on GitHub.
you are on Built In Pipeline?
i have no idea what built in pipeline means, sorry
you can do Overlay Mesh based too but thats just putting extra work for whats just Vignette Image Effect.
are you using URP/LWRP/HDRP ?
if not then by default you are using Built-In Pipeline
i dont know what any of those are
ok then that effect i shared will work for you
alright great thankyou ill try it out
i modified the effect i shared to use a custom color in case you need it. it also takes in a shape texture for custom shape around screen.
if im using an image for this do you recommend it to be 1080x1920?
Hi! I want to render a semi-transparent unlit shader, but when i input something like 0.2 in the alpha master, and 0 in the alpha treshold, its completely opaque
you dont need to bother with resolution. since its a post process filter , it will always render on top of your native resolution based imag @grand jolt
oh okay. so it is going to create its own image? maybe i should just try it and have a play
yea just try. Add the VignetteImageEffect.cs on your Camera
modify this path to say wherever you will put the .shader file. in case you use the version i uploaded.
nvm , it should work out of the box
i just notice i have define shader to be in hidden fixed path
@grand jolt Vignette is commonly used if your playing an FPS and your character "blinks" or gets kicked in the face and can't see very well, it's a very useful effect tbh 😛
i imagine its much like the zelda OoT effect when you move the camera left or right. the top and bottom of the screen blink slightly
ive got the script on the camera but now i dont know what to do lol
i thought it might have options or settings
Hi! I want to render a semi-transparent unlit shader, but when i input something like 0.2 in the alpha master, and 0 in the alpha treshold, its completely opaque
@jovial onyx you are probably using a cutout shader. alpha-threshold/cutoff comes is used to define cutout behavior. unless am missing something
@grand jolt wait let me check what all is in there. have been while since i tinkered with it.
@mystic geyser Thanks, i don`t know how do i switch to a transparent shader, i'm using URP with a standard unlit Shader Graph
hey bot this vignette code doesnt include anything to activate it. is there a way to have it turned on always so that i can see if its even working?
i made an image and added it into the public Texture2D shape; value
seems i dont know enough about coding to use the vignette script you provided. thankyou anyway
you dont need to make this texture
what should i be adding into this value?
that will take an alpha texture to mask the vignette
oh i see. so how do you change the vignette shape? it seems like im completely missing the point of how this works haha
ah see yeah its not doing that to my camera. its not effecting my camera at all no matter what is in there
generally vignette shapes are calculated in code which are radial in nature. since i needed custom shape vignette , pretty much like you , i made it texture based
do you have other post process filters on camera?
the order of component on camera also matters , athough if you set it correctly , it should manifest in game view in some form
Doh
the transparency is controlled with alpha of color value
yeah its effecting the camera view now
@mystic geyser found the problem, you can change the surface type here
yea was about to point. good that you found out.
you can also set it in material inspector
thanks tou you, i was thinking that the problem were the values i submitting
@grand jolt now you should be able to make your desired blink shape in PS. keep it grayscale and that should do it
that is when it is a standard shader, but not one from a graph
maybe it appears because i dont have graph defined ,just defaults on master unlit node
yeah
yes, thank you
no problem. you helped yourself!
@grand jolt to animate it , you can use any Tweening Library to animate the Color property on VignetteImageEffect.cs
alright thankyou bot. one last question. i now have to add in the code to make it blink, correct? and ill add that code onto this vignette script?
yea you can modify the script or use an external script to reference this one and just update the Color property in runtime
alright sweet. i just looked up tweening and found tween asset. is that it? honestly got no idea how i would use that or what it is. maybe its good practice for me to write the code myself anyway
you can use external Tween library. its one of the best use case of using an extension to make your life easier
you can do simple transition of values all by yourself in code with little bit of maths but dont have to because of great tween libraries out there
i appreciate the recommendation. i read the description of it and it meant nothing to me. i dont really get how it will help. ill grab the asset anyway i guess 🙂
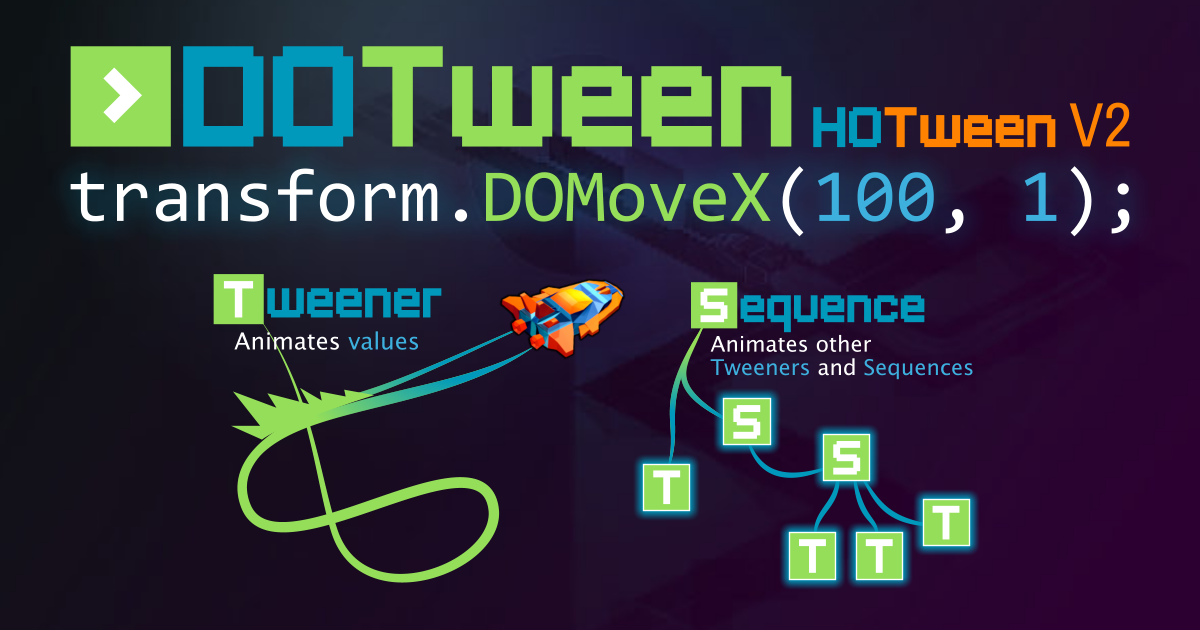
Get the DOTween (HOTween v2) package from Demigiant and speed up your game development process. Find this & other Animation options on the Unity Asset Store.
this is one of the best Tween system out there. tween are just simple transition of properties ( colors in our case ) from one value to another over fixed duration
curious. that makes sense and seems useful. i dont get how its used though. i think that im so new to coding that i still need practical examples to understand how something works. ill get the asset and maybe do some research on it tonight
i can dig my codebase to find the flash effect i did with vignette but its not plug and play since there some dependencies from my project. nonetheless if you are unware of tweening , i would suggest just try it out. its fairly simple and very much needed in day to day simple transition effects of any kind. do read it up. you will figure it out. if not you can always reach out to community or ping me if needed
and i believe the asset i shared does come with samples.
thanks bot! ill study the samples 😄
So im using universal render pipeline and the terrain shader supports a maximum of 4 layers before the height based blending turns off
Im trying to find a way to resolve this. Is this a limitation of the pipeline? Can I edit the shader to allow height blending for the first 4, then regular blending for the last 4? Im trying to figure it out
Currently if i disable the maximum of 4 in the shader, the next layers will be at height 0 and arent drawn or something, just their specular and stuff is
I don't know if i'm not using the enums the way it should be used, but i'm trying to divide behaviour by an enum property. It just renders the default even uf in my material i set it the other enum
Can anyone help me on this ?
@grand jolt In order to have includes you need to use the File type instead of String (as they need to be outside of the function itself I think). See here for more info : https://docs.unity3d.com/Packages/com.unity.shadergraph@8.1/manual/Custom-Function-Node.html
@regal stag,
ok ... and i want to use Object Space as input of my function ... so, how to do that?
Uh, what do you want in object space, the Position node? Just drag it into the input on the function.
@jovial onyx I believe you have the correct setup, but I've also had quite glitchy behaviour with enums so I tend to avoid them (especially when removing or adding entries, and renaming them). If you only need 2 entries you could use a Boolean keyword instead.
@regal stag Thanks for the response! Okay, i was feeling the same, i reported a bug to Unity
I'll set with booleans for now, i'm still learning/discovering
Something to bare in mind is the boolean keyword needs an "_ON" suffix in the Reference, in order to be exposed properly.
i'm downloading the beta to check if this error has been fixed
okay, i didn't know, thanks!!
@regal stag finally, it's working fine on the Beta
is there an equivalent to GetMainLight() in HDRP?
@regal stag you don't happen to know this? I know you mostly do URP
I might have to set the properties through a script
No
speaking of HDRP equivalents, is there any news on a material property blocks equivalent for HDRP?
You mean, something more compatible with the SRP batcher ?
I mean the ability to create multiple instances of a material with different properties
What's stopping you from doing that in HDRP?
AFAIK, they still work with HDRP, but don't batch well with SRP batcher
the most recent post I could find on the forum said they were still working on bringing the feature over to HDRP but that was a while back so maybe they finally did?
@amber saffron Do you know anything more about that, whether the SRP Batcher will get better support for material property blocks?
They've been very useful for getting functionality similar to replacement shaders in URP, in that you can use a custom render pass with an override material, but have properties on the renderer overriding the properties in the override material.
It works, it just breaks all batching
Using a material instance instead isn't possible in this specific case
@low lichen seems to be a pretty low priority if the more recent posts in this are to be believed https://forum.unity.com/threads/using-materialpropertyblocks-with-shadergraph-shaders-help-wanted.651547/#post-4366240
Unity Forum
Hello!
I'm trying to use material instancing with a shader created with ShaderGraph. I don't seem to find the way to set any property to be used in a...
This is specifically about GPU instancing support with Shader Graph using material property blocks. That's not what I'm talking about.
Material property blocks are supported by SRP and Shader Graph
But Shader Graph doesn't support defining its properties in a GPU instancing friendly way.
You can still use GPU instancing with material property blocks on both SRPs with a custom shader.
Just not Shader Graph.
I want SRP Batcher to be able to handle Material Property Blocks as if they're material instances.
Not sure if this will happend in the future
how do i edit this?
is there any way to overlay a sprite image into another but only affecting the non-alpha pixels? so for example take this character and overlay a striped pattern to get this
damn nice
howd you do this here tree layout
Look for Unity Shader Graphs
is that a plugin or something
damn im using unity 2017, probably wont work for me <:/
Can't you upgrade to 2019 ?
i would but its too much of a change for me to get into right now
Maybe there is a way to do it in 2017 with a standard or a custom shader, or there is one in the asset store, i really don't know, i started using unity just a weeks ago
well thanks anyway for the help!
anyone know how i'd set this thing via code
if you go to the shader (right click and choose select shader) it should tell you the name of the property, you can then use that to set the value on the material
you use that to get the property ID using Shader.PropertyToID
then you set the value using SetTexture on the material
the Property ID is an int that works globally so the standard way to do it is up by your property block make a static int that you assign it to
sweeet thanks
here is the SetTexture doc: https://docs.unity3d.com/ScriptReference/Material.SetTexture.html

hmm actually looks like you can do it without an ID but if you are doing it on update you are gonna want to use a static int
im having too much troubles with that
is there no way to just have a sprite that only shows over non transparent pixels?
like not feeding 2 textures into the shader, just one texture and it just does that to all the sprites it intersects with in the scene
I mean if you want something that applies to everything just use a shader set to transparent and set it's blend mode to multiply, but I suspect what you want is for it to only apply to certain sprites
you might be better off doing it with a light
how you mean?
create a light with a cookie on it, set it's culling mask to only the objects you want
well the object layer you want
damn didnt even know that was a thing
eh that doesnt work, i need it to be colored <:/
oh well, im gonna move on to something else, but if anyone can help me create something like this that'd be neat
@sour crow Maybe look at 2017.x compatible visual shader editors ? Like Amplify (paid) or ShaderForge (free) ?
Having like spawning & despawning animation through shaders, would you swap out the shaders or build it all in one? 🤔 Using DOTS w' HDRP if that would matter.
does it need to be a shader... why not just swap artwork on the fly
if you use hybrid, pretty sure hybridv2 gives you way more control over materials
@hushed urchin
@fervent tinsel I know I can use instanced properties, but do you mean something else?
@hushed urchin changes I remembered were only for adjusting the material property overrides, so I dunno how usable they are on your case
but basically if you drive your animations from some baked texturedata, you could just swap the source texture for it
but I doubt it's that trivial in practise
I'm basically driving my animations by sending in startTime,sortof; if time < startTime + animTime => branch start animationl, if time > despawnStartTime => branch end animation, else normal render. But I'm wondering if it would be better to simply swap out the material for perf then doing these branching in shader. 🤔
@fervent tinsel
does anyone know how to make a grass shader in the pbr graph tab?
guys, I just tried to build and run my game:
Shader error in 'ContrastAdaptiveSharpen': failed to open source file: 'ffx_a.h' at kernel KInitialize at ContrastAdaptiveSharpen.compute(10) (on d3d11)

Calling Deallocate on pointer, that can not be deallocated by allocator ALLOC_TEMP_THREAD
UnityEditor.BuildPlayerWindow:BuildPlayerAndRun()

Shader error in 'DepthOfFieldGather': failed to open source file: 'DepthOfFieldCommon.hlsl' at kernel KMainFar at DepthOfFieldGather.compute(3) (on d3d11)
.......wut?
I'm try to make a volumetric effect, with how bright it is influencing the alpha, so the darker it is, the more transparent it is, but that's not working. anyone know what i'm doing wrong? https://hatebin.com/ivzsqsvuld
it's just returning blankness
a better question, can you access the lighting info like you can with o.albedo.r or whatever
wierd, throws those errors on first build, completes successfully on the second lol.....
Is there a default node that does everything e.g. Default Lit shader does?
unfortunately not, I had to watch tutorials just to add some of the maps
and even then, i havent got vertex displacement, height map, mask map..
@hushed urchin
You mean, like, you input the surface data to the node, and it will do the lighting ?
just effectively recreating a lit shader identically to a default lit one, then you can add any effects on top
and stack them, like mine does
Hi I have a question related to dynamic batching and I assumed this was the best channel to ask. Is the zwrite property of the standard shader set to 1 when blend mode is fade ?
And is it possible to dynamic batch object with fade blend shader ?
@teal pilot I generally use the GPU Instancing
@grand jolt No, ZWrite is usually off for transparent objects.
@grand jolt So, a bit like the final color modifier of the surface shaders ?
@low lichen yeah was about to say unless it doesnt work in your situation 😛
I believe dynamic batching can still occur with transparent objects, it's just a lot less likely because the order in which transparent objects are drawn matters a lot.
@low lichen isnt there some sort of depth priority with trancparency to solve that?
transparency*
Unity will draw transparent objects back-to-front, so transparent objects in front can blend on top of transparent objects behind.
You can override it by changing the render queue of the material
The order that opaque objects are drawn in doesn't matter as much, because they write to depth.
But it will still try to draw them front-to-back to reduce the amount of pixels the GPU ends up writing to
@amber saffron What I had in mind was more like you have the subgraph node where you input the proeprties for normal Lit lightning, and it will sample/scale textures, normals, multiply colors togeather, then output the colors you could in practice directly connect to Mater Lit Node. For 1; Just slightly modifying, or 2; taking chunks from the node and modifying the aprts you need.
Like, instead of drawing the whole screen with the skybox first, it will draw the skybox last because there might only be a few pixels visible of it after drawing everything else.
ahhhh cool, good to know how things work, I havent tried batching anything yet, i need to wait until Unity replaces Realtime GI, would love to be able to see the effect in realtime in the editor, until then I have to use soft point lights lol
@hushed urchin But then, the output of this node should be connected to an unlit master, not a lit one ?
@amber saffron No, it's just doing the grunt work of sampling, multiplying color*texture. I mean, for doing something simple as a dissolve shader to work with how you setup a normal material, it is a 5 hour hassle or something.
@amber saffron I think @hushed urchin means he wants to avoid having to re-create everything in the lit shader. For example I did a "team color" overlay, I had to re-create all the emission functionality etc. which would have been nice to avoid.
if anyone knows a shader graph that literally copies a standard lit material, let me know, would love it lol
Let me subscribe to that request as well 😛
should be first thing you create with shader graph... a right of passage, testing skills and understanding 😉
I'm still not sure I have it correct either 😄
I did a graph for HDRP lit

GitHub
Shadergraph version of the HDRP/Lit shader. Contribute to RemyUnity/SG-HDRP-Lit development by creating an account on GitHub.
omg, if that works thats awesome
Should still work with current versions I think, didn't take time to finish it 100% and update it, but covers a lot of functionallity of the "basic" HDRP/Lit setup
@grand jolt @low lichen thanks I had guessed it but wanted to have feedback as rendering and shader are not my stuff
what did you miss out @amber saffron ?
I didn't implement triplanar mapping iirc 😄
And could not handle the "Surface Type" that exists in the HDRP/Lit shader, as this is something that ties directly to the master node settings
Some for more specific toggles, like refraction
I think I didn't do parallax mapping either
But all the basic inputs + detail map + uv selection are there
Also, I did this before shadergraph implemented keyword inputs, so UV selection is done using a float input and branching
@amber saffron This might be useful, mine actually has more of the basic functionality but yours has quite a bit mine doesnt have, Detail Map, Mask Map, I might rip out the nodes and merge them to my shader, then share the result and see if anyone can add the last bits missing
then share the entire thing on GitHub or something
I should go back tot his one day 😄
do I just need a copy of the .shadergraph file to share it?
You'll also need the .shadersubgraph and the .meta to be able to share
i've got the .meta and .shadergraph, but theres no .shadersubgraph? is that because I havent used any sub graphs?
Oh, ok, I thought you were talking of my repo. Indeed, if you don't use subgraph, you don't need this.
The .meta should even be unecessary then.
@amber saffron heres my current one, i'll add your mask and detail map nodes to it:
I'm on HDRP 2020.1.0b6, if that matters...
smoothness maps go in the roughness map slot and automatically works, if it's an actual roughness map just check "Is Roughness Map".
all the effects will stack if they are toggled on, except the dissolve one, just check "Stack Dissolve" if you want to add that on top.
Tip : for AO, proper maths for the strength is : AO = lerp( 1, AO, strength);
i'll be honest, I havent a clue, if you can fix it and send back I would appreciate 😛
this thing is the result of like 20 tutorials LOL
But nice work
Note that your dissolve effect is ignoring the alpha of the main texture when toggled on, this is maybe not what you want.
erm, ill try fix all this, i'll need a few mins, but yeah this is my first ever shader, quite impressed with myself considering 2 months ago this all looked like "WTF?"
I know for a fact theres a better dissolve shader, he literally shows a 2 second clip of it on the brackeys tutorial but I can't find the damn tutorial anywhere
@amber saffron yep, im lost, any chance you can rearrange that and the alpha thing and screenshot it so I can mimic? knowing me i'll f this up royally...
Well, it should only (I think, I don't really have time to dig in deep and experiment) to add a minimum node to the true input of the disolve branch, and input alpha and dissolve alpha to it.
how do I go about combining a shadergraph and a script shader?
im not entirely sure its possible without some 3rd party stuff someone may have made, the point of the graph is to generate the code from visual, i'm not entirely sure the process can be reversed
you may want to confirm with a moderator for that
i mean I have adapted them preivously by extensing relevant variables
but only as part of instruction or etc
i wanna know how to do it
oh, yeah thats way over my head then, hopefully someone here can help
without copy pastig
if I had a shader provided by an addon and I want to adapt it for work in combintion my shader graph but they didnt supply instruction for adaption
You can do some frankenstein stuff by using custom function nodes
@teal pilot Dynamic branching is a bit of a different thing (I know you said 'related').
But like was explained above, you don't normally z-write with transparent blending. BUT...you can fake transparency in the opaque queue and "fade" with a dither, and or some other form of dissolve, and that WILL allow you to take advantage of early-z testing, and reduce any overdraw too.
Hi! I have a question regarding the shader graph
I need to alter the vertex positions of some vertices, and my understanding is that the vertex position is in object space
@oak ore I'm fair sure you can change from object to world in the graph cant you?
There's a Transform node for converting between spaces
oh my gosh
Where can I see .hlsl compilation errors in Unity console? I can type any bullshit in .hlsl file and no errors in console
thank you so much!!!!
@fickle crypt .hlsl files aren't compiled by themselves. A shader file has to include it for it to get compiled.
@meager pelican A bit of explanation what we try to achieve. We work with CAD models and we would like to show them on mobile device (see through) display. For a showcase we want to show a model on top of the real object, so we though about Fade material. The problem we face is that there is too many object in our model and this create some 600 draw calls which are way too much and devices lags a bit then.
We tried to optimize the models with some 3D tools to reduce the number of parts in the model but without successfully reducing it enough.
So we also tried mesh combining to reduce draw calls but then we got weird behavior.
Do you have advices on how to tackle the problem ?
Here is the expected result but with too many draw calls
and this is with mesh combining
Note alpha is not the problem here, more the strange floor "shadow"
it could be the shadow map on your directional light
try disabling it, if your not bothered about no shadows
assuming it is even a shadow lol
@teal pilot
@grand jolt Worth the try your right
@teal pilot What pipeline are you in? "Regular/standard?" or one of the SRP's?
@meager pelican regulard/standard
@teal pilot in fact, if you disable the directional light altogether you might get an identical look to your original
OK, it's going to batch draw calls by material/shader. So some of the things you can try:
Instancing
Static batching.
Dynamic batching
using "smart" shader that works in multi-situations.
We can't static batching cause the object is moving (lol, now you don't understand why a house is moving), because we do drift correction on top of ARCore
If you think "transparency" isn't the main problem.
@teal pilot select whatever materials you are using, and "Enable GPU Instancing" at the bottom for instancing
in the inspector
Are you sure it's the draw calls that is the issue? That looks like more of an overdraw issue.
I tried dynamic batching, but could make it work (i guess it is more because of my try of implementing it) as batching works with opaque. But I think as fade/transparent are rendered differently (back to front) this may not work
use the GPU thing
@low lichen yes the mesh combining seems like an overdraw problem. the draw call problem is when we have all the part of the house in different meshes
GPU instancing won't do anything unless it's all the same mesh
Yes, they're different queues and different "passes". But all the transparent stuff might batch.
Yeah, he did say that I think.
But then GPU instancing won't help either, if it's already combined.
MS is right on that I think.
@low lichen your are right, either i don't combine them and then I have too much draw call, or I combine them and have some overdraw issue
Yeah, the overdraw thing makes sense.
@teal pilot So you mean even with an opaque material, it's still lagging on the device?
no with opaque batching works
You confirmed that it's batching?
Yeah, and it's 1/3rd the pixels. lol
Or guessing based on the performance?
@low lichen yes stats in editor say some 500 save per batch
while when using fade it says 0
Is there any reason why that house can't all be one mesh?
It depends on "how transparent is transparent". I've gone as far as binning pixels and then displaying the "top 3 levels". But it's a PITA and requires multiple passes, and ability to accumulate into either render textures and/or compute buffer type of stuff.
No there is no reason thats why I tried to combine them but then have some overdraw issue I guess from the pictures
You can combine it manually through script if you have to.
Isn't what meshcombining is doing ? that's how I combined them
@teal pilot you could combine them all in Blender, can talk you through it in DMs if you needed
or do what @low lichen is suggesting through code
not sure why I pinged you there...sorry LOL
@teal pilot You mean you're using the Mesh.CombineMeshes API?
yes
He's still going to have an overdraw problem though.
You can lookup OIT (Order independent Transparency) if you want, to accumulate pixels and get a "more correct" view, but all that is expensive too.
Then there's "fake" transparency with dithering, like I mentioned.
But Overdraw is a *B
@grand jolt How hard is it to combine them in blender ? cause my skills in blender are really bad ahah
easy, im a novice and can walk you through it, that way youll know how
@teal pilot Another question, are you sure you don't want it something similar to the second image here? Yours looks more like the first image.
https://forum.unity.com/proxy.php?image=http%3A%2F%2Fi.imgur.com%2FvA3BB.png&hash=8cb5ec91e441fc15d514eb68c33593db
https://forum.unity.com/proxy.php?image=http%3A%2F%2Fi.imgur.com%2FJvkE8.png&hash=3ef1dd8add7448b8306df331cedfbb70


I don't know what the difference are even if they look different, but the second would do the trick if working I guess
He wants an X-Ray I think, showing structural elements.
The difference is you wouldn't be able to see anything inside the house
It would just fade it out as if you took an image of it and reduced the transparency
not necessery, the idea is just that we see the real object behind as it is mobile display and opaque hide the real object
that would be good for me yes
And you don't need any other opaque game object behind the transparent house?
Just the real camera view?
lol
Oh! That might help A LOT
Then I would just render the house opaque to a render texture and blend that on top of the camera view with transparency.
sorry guys for not having been clear about what I wanted X)
👍 thanks for the hint I'll look into it then !
If I want to do triplanar in parent space in shadergraph, I'll have to manually supply the ToParen matrix right?
Thanks again guys, first time I received an answer in Unity discord, so you made my day 🙂
@teal pilot One thing you might want to try is to put it in it's own layer or maybe opaque+1 render queue, but render it with z-write and alpha blending both enabled. Then you might be able to get away with no other render texture. I'd have to think about that one.
That would still lead to more of an x-ray transparency rather than "image transparency"
You might end up with extra front-faces.
Yeah, I wasn't done typing. Sorry.
Triangle sorting would be an issue, but depth testing would clip some of the "behind" stuff.
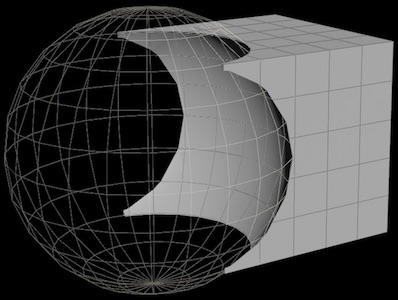
Anyone knows how can I use a sphere/cube and use it to cut out like a stencil effect on another mesh using shader graph?
What I want to do is cut holes on a piece of plane
Since Shader Graph doesn't let you define stencil state, if you're using URP you can use custom renderer features instead.
I;m on urp yes
Then you'd probably define a layer that the hole meshes are on and a layer the plane is on, draw the hole meshes first where you override the stencil settings to write some value. Then draw the plane layer where you override the stencil setting to read that value.
So I have a land. A plane. I want to add water to it. But water is a lower level than the land. So I want to hide the land with cube so that the water can be seen
Is there a tutorial somewhere on what you just said @low lichen ?
Not specifically what I just said that I know of, but there are tutorials about URP custom renderer features
And specifically the Render Objects feature
Here's an official tutorial on it
https://learn.unity.com/tutorial/custom-render-passes-with-urp

Unity Learn
In this tutorial, you will learn how to use custom render passes to render a toon outline post processing effect on selected objects
Thanks!!
@amber saffron thanks
@low lichen I don't the tutorial
But... I'm not sure how I can apply it for my situation mentioned above
Hello, is there a way to convert a custom shader into lwrp?
Not automatically
how do I do it manually?
Recreate the shader in shadergraph
ah...
My 2D Shader makes my object hide behind every object in the scene, how do i fix this?
URP / HDRP / Built-In ? ShaderGraph / ShaderLab / Amplify ... ?
@vital nacelle change the render order, just make your sprite render in the foreground
Uhhh Im using the default unlit shader for my pixelart game
and @grand jolt that isnt the issue
ah ok, it's the shader not the sprite, nvm
Why does my shader show transparency as black?
@vital nacelle Did you set a proper blend mode ?
how do I do that? @amber saffron
I think its a similar issue like mine @dreamy vigil
@dreamy vigil Yes, maybe same as @vital nacelle 🙂
also thanks for the link!
With just this information, I can only say : "Should work"
Did you notice that you never specify a value for alpha ?
See surface shaders doc here : https://docs.unity3d.com/Manual/SL-SurfaceShaders.html
You're missing o.Alpha output
You probably want to change your lay* variable to fixed4 instead of fixed3, add them together, so the addition of it is .rgb for albedo and .a for alpha
why adding works :
This splat system uses a splat control map where the sum of the channels (r+g+b+a) is =1 .
To mix the value of the different splats, you sample the splat and multiply by the controll map.
Then add all of the together to gain back this "1" coverage
some for rgb and alpha, and any other maps that you'd want to use
except normal, that you will need to normalize after, but you get the idea

The Book of Shaders
Gentle step-by-step guide through the abstract and complex universe of Fragment Shaders.
A collection of tutorials that cover how to write your own shaders in Unity.
rip, I upgraded my project to 2020 but shadergraph is horribly buggy 😦
no more beta versions for me haha
what package version were you trying to use?
yup haha
nodes were getting stuck to my mouse when dragging them haha
that happens when a null ref is hit while trying to load the graph
do you happen to keep your master preview disabled while working typically?
I almost never open my master preview yeah
I also notice this trick of changing the 3D to 2D
in SubGraphNode.cs
returned some errors
I really hope that functionality is coming soon 🙂 I think I saw it on the product board
I really need a 2D preview for some workflows
we had a known issue where the master preview being disabled would try to create a render window with size null, which of course errors
and then the null ref soft locks the graph
it should be fixed by now 😄
with 8.1 at least
HDRP+DXR, Shader Graph with Normal from height produces error with ray traced reflection on, happens in both 7.1.8 and 9.0.0. Didn't test versions in between
if I had a shader provided by an addon and I want to adapt it for work in combintion my shader graph but they didnt supply instruction for adaption
how would I go about that
erm, is there a type of node like a branch that will toggle true/false depending on whether a texture is assigned in a texture2D field in the inspector?
Can you access the lighting info like you can the Albedo? I'm trying to make a shader that's get's more transparent the more in shade it is
whats the texture called
mmm i dunno
you gotta make an int variable and set it to equal EnableKeyword("_Control")
and then set that int as the first parameter of the set texture
or something like thatt
Hey if there is anyone who can help, I am having a lot of trouble just visualizing the depth buffer on a post processing camera shader
I just want to see the depth, black to white
what is a NPR shader ?
Non photorealistic
@grand jolt is this standard pipe, URP / HDRP ? if latter two depth texture is enabled in settings?
Just checking basics first 😉
not with standard, it's on by default
thank you ^^
ah I'm not familiar with it, maybe someone on amplify forums can help?
I asked an hour ago
they're pretty slow with their support usually, especially at night
yea timezones can be problematic
apparently you can access a camera's depth texture with _CameraDepthTexture
just dropping screen depth node into emission gives you nothing?
Well it's a post processsing shader
frag shader, w.e it's called
Sec
I dug through the Amplify discord and someone had the exact same issue I have
This is what someone mentioned:
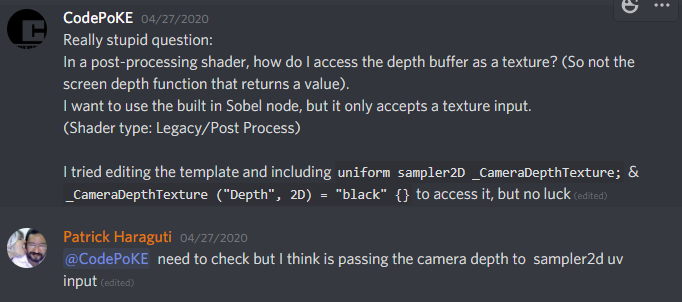
which I also tried but it didn't work, and I scrolled down and found some more stuff
This is an easier to see image of what he said apparently works: https://cdn.discordapp.com/attachments/564772871004487680/704414242509684896/unknown.png

Yet for some reason it does absolutely nothing for me, so I am wondering if it's just an amplify issue
or maybe something to do with my Unity settings
looks correct
but your color has no input...
just UV
oh nvm that's amplify stuff

the texture is a unity predefined one so should be accessible I would have thought
guess you will need to wait on the amplify guys
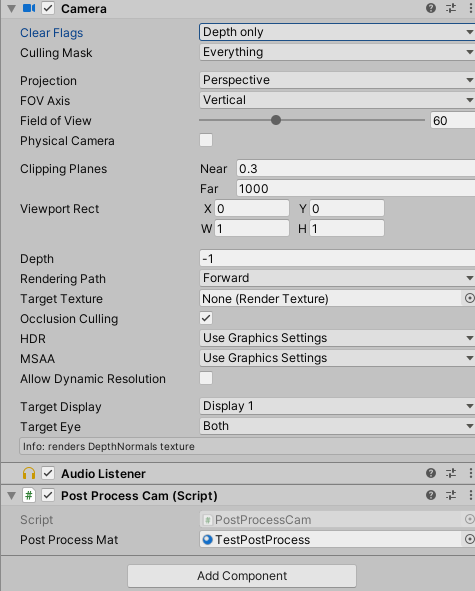
Are you rendering forward? If so, are you telling the camera to generate the depth texture?
using UnityEngine;
using System.Collections;

[ExecuteInEditMode]
public class RenderDepth : MonoBehaviour
{
    void OnEnable()
    {
        GetComponent<Camera>().depthTextureMode = DepthTextureMode.DepthNormals;
    }
}
Lemme re-open Unity
You can find more information on that here: https://docs.unity3d.com/Manual/SL-CameraDepthTexture.html
Good god... my visual studio is just awful
Adding that to my script didn't change anything but hold on
let me double check stuff
i have tried forward rendering before
The script needs to be attached to the camera, sorry didn't mention that
It is
and yeah, no bueno :S
I just added your code to my script, and changed the rendering path to forward
I think it might be an amplify issue tbh
Hm dang it, but just to be sure, you get this information on your camera script, right?
Depth wasn't -1
Ah, no I'm talkig about the small info box at the very bottom
Yep, okay. seems to be set up correctly, seems like its really an amplify problem :S
i'll probably have to wait until tomorrow for a reply
oh well
How experienced are you with shaders? if you don't mind me asking
Programming built-in one's: A lot. Doing stuff with Shader Graph: not so much, but I guess I can easily transfer knowledge
Are you familiar with Sea of Thieves by chance?
Haven't played it, why? Oh, is it even out yet? ^^
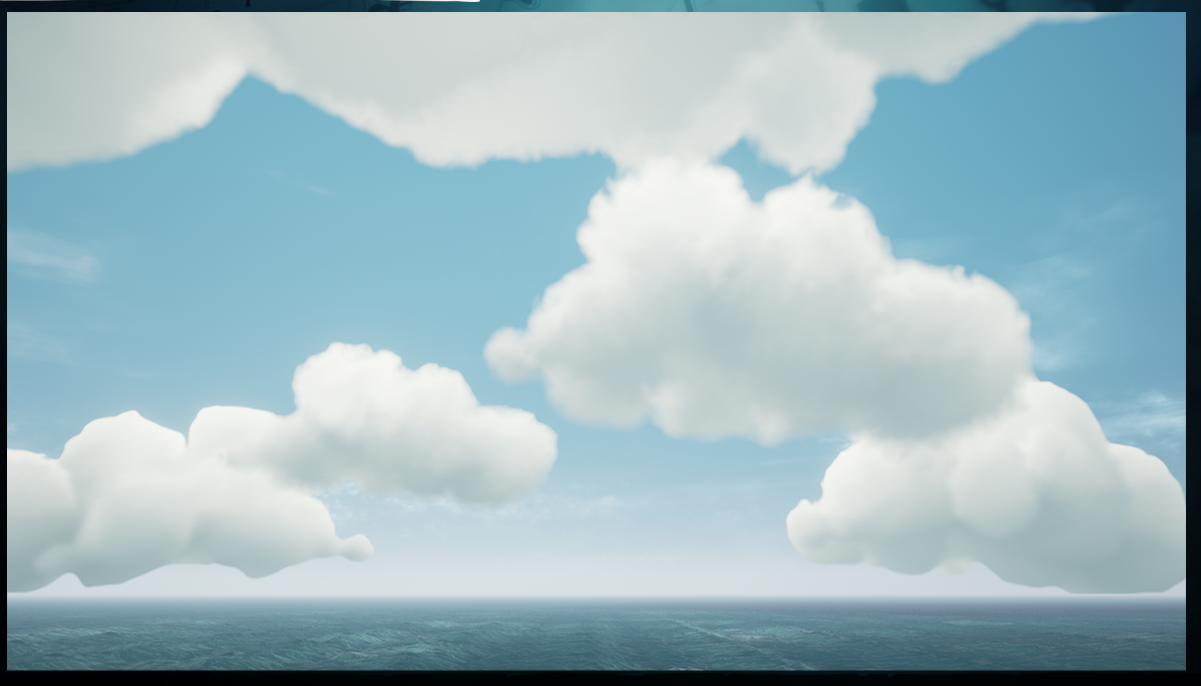
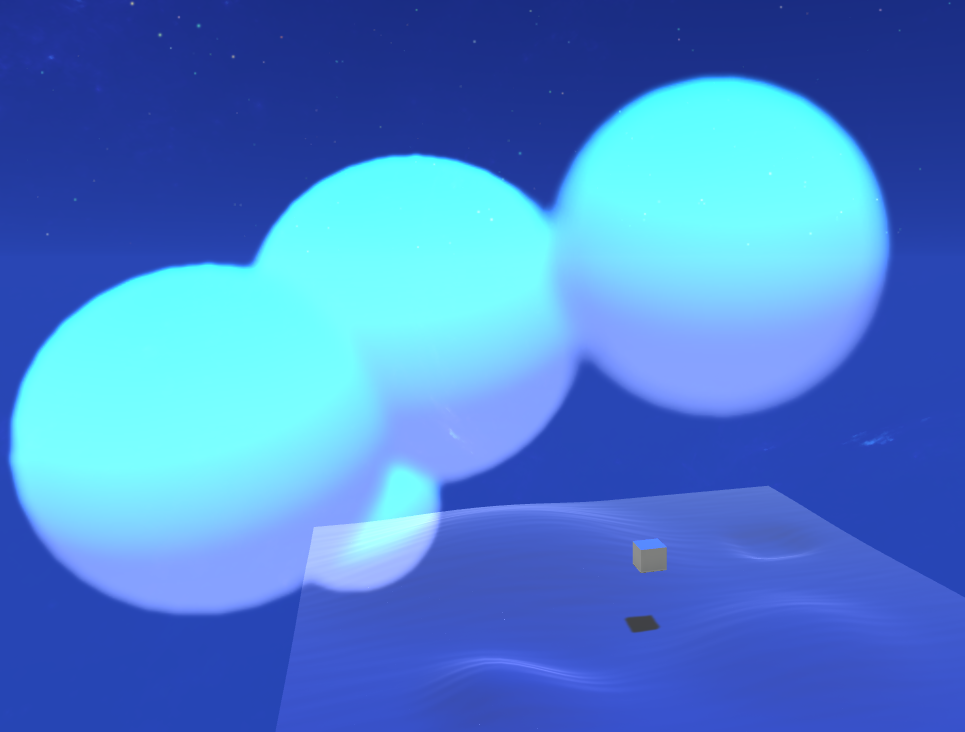
Ah, well I am looking to recreate their cloud shader implementation. It's a bit ambitious for me, but I am persistent with things until I get it looking the way I want.
They had a GDC talk from their lead technical artist talking about their implementation, and I was wondering if I could ask you a couple of questions about it - to someone who is more experienced
I am still very new to shaders
I have all of the slides downloaded, and a high level writing on how they did their implementation
Valentine gives a comprehensive look at the adoption of Houdini by Tech Art while working on Sea of Thieves. "Although we only began to learn and apply Houdini…
The timestamp is 28:00 when they start talking about it.
I love the aesthetic and hopefully wish to achieve something similar
From what it looks like, to me, is they have a camera rendering only vertex lit clouds, combined with the depth buffer.
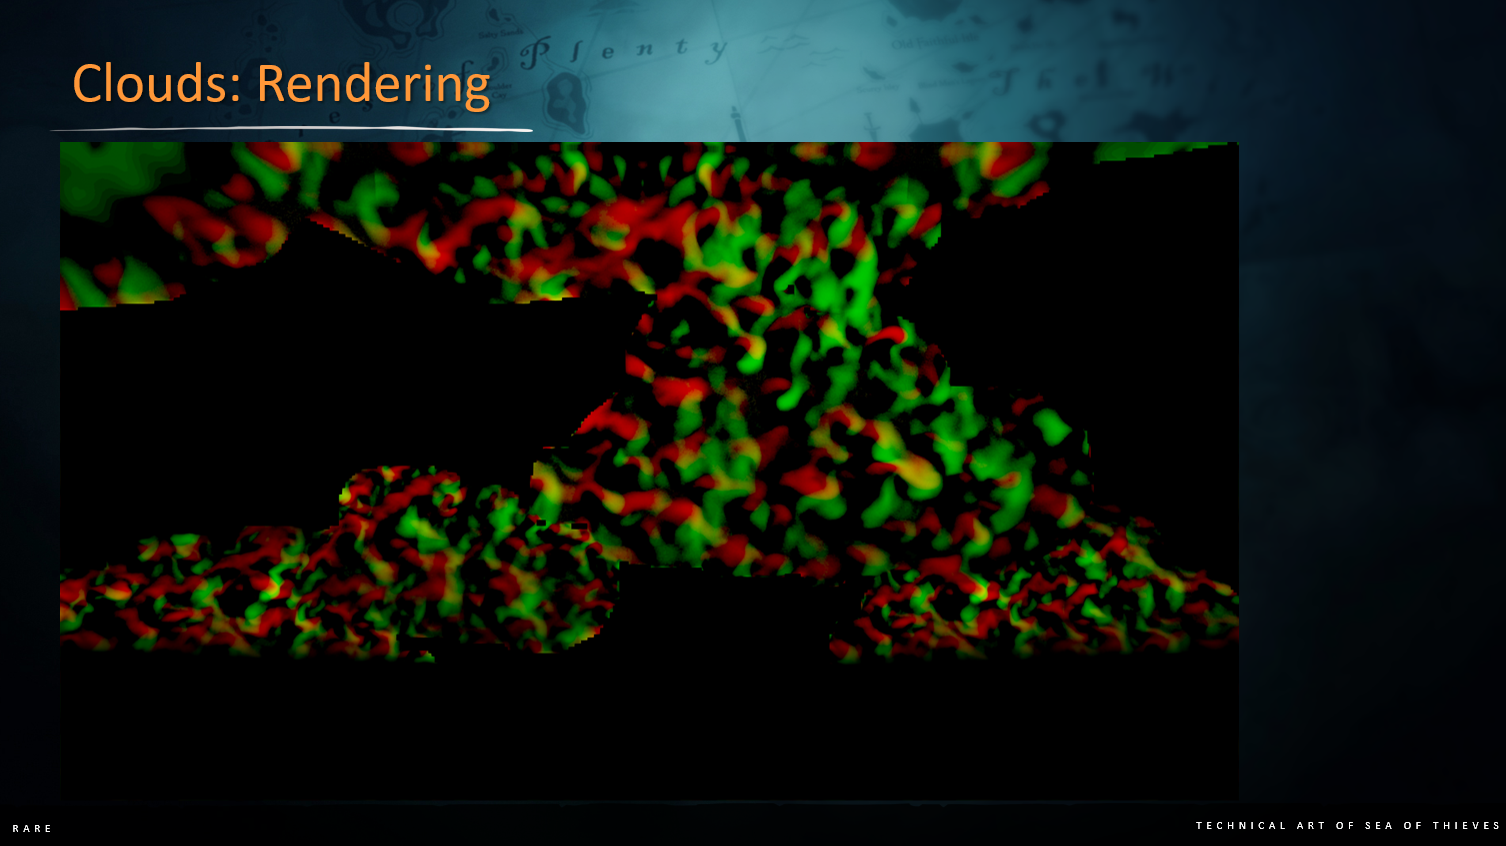
Then it looks like they are taking that image and processing it, applying a gaussian blur to the RGB channels, and a box blur to the alpha channel (which is also the depth)
There's a lot of shenanigans I am not certain on though
I also hope I didnt just overwhelm you with stuff
As for the depth, keijiro did something similar (with calculating the world position back from the depth buffer): https://github.com/keijiro/DepthInverseProjection
GitHub
An example showing how to inverse-project depth samples into the view/world space in Unity. - keijiro/DepthInverseProjection
The Red Green Textures are screenspace distortions, quite common thing to do.
@grand jolt have you looked at how Unity did the boat attack demo clouds? see https://blogs.unity3d.com/2020/02/10/achieve-beautiful-scalable-and-performant-graphics-with-the-universal-render-pipeline/

Unity Technologies Blog
Universal Render Pipeline is a powerful, ready-to-use solution with a full suite of artist tools for content creation. You should use this rendering pipeli...
So are they scrolling the red channel one way, and the green channel another way
and distorting with that?
Those clouds are pretty af too
I have not seen that @thick fulcrum
Might be intersting for you as well: https://youtu.be/RdN06E6Xn9E?t=3018 (Starting at 50:18)
In this 2016 GDC Europe session, PlayDead's Mikkel Gjoel and Mikkel Svendsen detail the techniques used to achieve high visual fidelity in the context of the uncompromisingly simplistic aesthetic of INSIDE, Playdead's follow-up to the critically acclaimed LIMBO.
GDC talks ...
Those clouds are a lot more simple in implementation it looks like as well
but correct me if I am wrong, they are just basically static images with a normal map that gets lighting from the environment
They look good, but feel less dynamic and interesting
@dry grotto Yea that looks good
One thing that confuses me though, why are they using a cubemap?
Not the devs of INSIDE, but for Sea of Thieves

yea they are just images, but due to how they are animated it looks effective.. they are also looking to improve it.
volumetric clouds are expensive to get right and you will be limiting yourself to high end machines, just a thought 😉
It's not volumetric though
The clouds in SoT I mean
it just looks volumetric because it's executed so well 😛
looking at it... perhaps it's just a projected dome? which will create a layered effect with skybox etc.
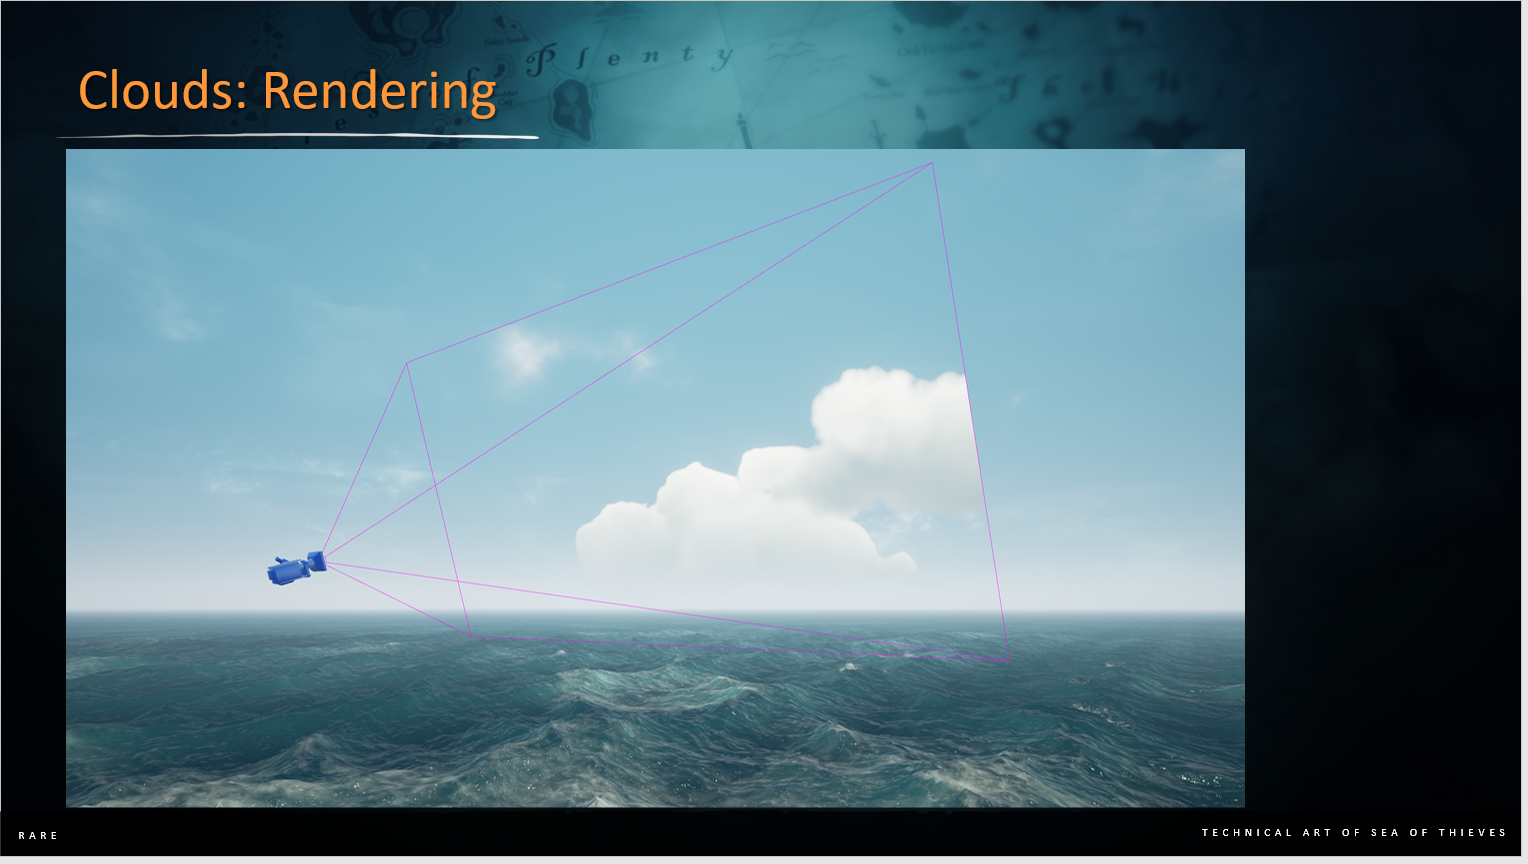
Here's how I think they're basically doing it, and @dry grotto can correct me if I am wrong. They scatter a bunch of low-poly cloud meshes throughout the game world
They have a camera that can ONLY see those cloud meshes
they post process it, apply blurs, etc.
then use a render target in combination of a quad parented to the player camera
yea I just hit up that point in video, polygon clouds so they can shape em like ships etc
They also use UV distortion on the clouds
that gives it that effect that INSIDE also achieved
seems simple enough, would need some custom tooling in editor perhaps to streamline process. I don't fancy manually placing clouds ^^
after all of this stuff they'll eventually multiply it with the environment lighting
Oh yeah the clouds would have to be all handled in a script
but I love the result
It should be do-able
but honestly, the first step for me is literally getting the depth buffer to work lol
which I cant figure out in Amplify
if I can get this working though, I will be super happy
as they are using a quad aligned to camera, is it really postprocessing or just a surface shader that you need depth for?
Well I was going to ask some of these questions
@grand jolt yep, I would see it the same way. The quad for the camera is a bit strange
I assumed most of this was post processing
I wonder if the quad is a performance boost?
Couldn't you also just have this camera rendering to the skybox
well your skybox is still needed for the time of day effects, sunrise etc. I assume
You can composite the clouds over it
Maybe they want to be able to let clouds occlude mountains or something similar?
that's where depth buffer comes in handy
if they projected this to the skybox, there would never be occlussion with objects in the world
or depth w/e
but by projecting the camera's view to a quad with a render target, it's almost like a magic window
that lets you see these clouds only through the quad
idk if that's a dumb way of thinking about it
Yeah, I guess the quad is there to resample the clouds to make sure they are in the correct world space position to make sure they will be occluded or not. The alphatest will be a performance boost, since they can quickly discard pixels (not a boost on every platform though). And I guess the rendering of the quad includes all steps he's talking afterwards about
"they use it to process the offscreen buffer grab" not sure why it needs to be done on a quad. But it makes it a surface shader, which may get you around the current problem, with not getting depth
vertex lit rather than pixel, limited 4 channels... it's all about speed
I'm going to try my hand at this tomorrow, hopefully the amplify guys reply
try doing it as a surface shader to a quad, see if that makes the depth texture work as you can just use the built in amplify node then.
How does that work exactly?
Do I have a render target of the cloud camera, and have the surface shader on the quad with the render target?
you could stack a camera which is just getting the cloud layer, which writes to a texture. Your surface shader on the quad takes this as input, which you can then get the depth in that shader to do processing on for blurring.
I'm presuming the clouds have their own shader doing the vertex lighting
I didn't even know you could get depth from a render target
I thought the render target was simply just a texture
The clouds wouldnt even need a shader would they?
Well I mean
just unity's standard shader would work, no?
yea it would, but believe it's pixel lighting which should give better results
See this is where I'm noob, as I'm not sure which way is faster or what is fully achivable
I've been at it for months on and off (hobby) in that time I've completed 2 shaders 😆
failed at a lot of other experiments, but mainly due to shadergraph limitations
can't complain about my water though, refractions (using depth), reflections (planar), depth color, fog, etc. it's full on
i'd love to try my hands at a water shader but it really doesnt have a place in my project
at least not for now
funny enough I'd like to do cloud shader... but a simple skybox is enough as it's a TBS game so mostly top-down but it's 3D so needs some just not main focus
Hey guys, Ive got an issue right now
Im attempting to create a ceiling light like in the offices
I got this in result....
Is there any way of probably fixing that?
Oh my, Ill first fix the way it looks, looks like a sewer vent
Alright fixed it up, but still, why would it give that type of lighting
Does anyone know how or the way I could prob fix it?
does anyone know how to make a grass shader in pbr graph
so I've had an issue for a while now where the textures on my terrain mesh have been shifting with the camera, and thanks to the help of a few of you fine people I've narrowed it down to the mesh UV being in the wrong space
however, I'm using texture2d arrays and I can't find any way to switch to the correct space
I tried looking at the generated code to see if that might give me a clue but I couldn't find anything
glow shader is not working on android does anyone know why?
@maiden stag plenty of tutorials out there, just do a search... first up https://www.youtube.com/watch?v=L_Bzcw9tqTc

Let's learn how to make realistic grass with Unity Shader Graph!
This video is sponsored by Unity
● Download grass assets: https://ole.unity.com/grasssway
● Art That Moves: https://bit.ly/2VW85He
● More realistic vegetation: https://bit.ly/2EAxC5d
● Mesh Generation: https...
Anyone got clues on what my issue could be?
How did you set up this lighting ?
@wintry mauve what do you currently have, something like o.Albedo = tex2D (_MainTex, worlduv).rgb; ? and you need in in absolute world due to HDRP?
@thick fulcrum This is what I'm currently doing, its in a custom function
float4 weight = SAMPLE_TEXTURE2D_ARRAY(Weights, ss, myUV, i / 3);
how is myUV defined?
it just comes from a UV input node
@thick fulcrum
well technically its the UV input node then modified to get the center of each pixel
float2 myUV = float2((floor(uv.x * TexSize) + 0.5) / TexSize , (floor(uv.y * TexSize) + 0.5) / TexSize);
nothing that should cause the texture shifting I don't think
🤔
@wintry mauve I believe you need worldPos.x and .z as the uv.x and uv.y values
although I'm not sure if that is absolute position... which is needed for HDRP
well I'm applying textures based on pre-calculated weight values, so I don't think I need the world position
but something is causing it to move with camera, if it's not UV...
well thats what I'm saying, with the texture 2d sample node you get to choose the space, with 2d arrays you don't have that option
I don't know much about shaders or shader graph but I think thats my best lead
or maybe theres some issue where im choosing absolute world position and its just not saving
well @amber saffron is expert here, so I take his word over anything I think ^^ so object space should be fine.
I don't get what "space" you're refering to. Texture sample takes a 2D vector input to sample, and that's all
so long as the uv he's referencing is the objects I presume it should be all good
Oh, that one !
this is when you output normal maps
it should (and will) be hidden when the type is set to default, and visible when set to normal
it has nothing to do with the UV input
well then I'm completely lost
I can't find any possible cause for the textures shifting with the camera
I'm using absolute world
and I don't know enough about shader graph to know what other potential issues there are
is it possible for you to take a screenshot of the full graph ?
ok, so everything is done in the custom function
@ocean mural : apparently @wintry mauve got muted when he tried to post his shader code, can you fix that ?
Ah, that's likely down to Dyno catching it as spam - the automute only lasts for a couple of minutes
As a reminder, use backticks when pasting code
Info on code formatting
    uint remainder = i % 3;
    float2 myUV = float2((floor(uv.x * TexSize) + 0.5) / TexSize , (floor(uv.y * TexSize) + 0.5) / TexSize);
    float4 weight = SAMPLE_TEXTURE2D_ARRAY(Weights, ss, myUV, i / 3);

    float4 xProjection = SAMPLE_TEXTURE2D_ARRAY(Textures, ss, float2(scaledWorldPos.y, scaledWorldPos.z), i) * blendAxes.x;
    float4 yProjection = SAMPLE_TEXTURE2D_ARRAY(Textures, ss, float2(scaledWorldPos.x, scaledWorldPos.z), i) * blendAxes.y;
    float4 zProjection = SAMPLE_TEXTURE2D_ARRAY(Textures, ss, float2(scaledWorldPos.x, scaledWorldPos.y), i) * blendAxes.z;

    baseColor += (xProjection + yProjection + zProjection) * weight[remainder];
```@amber saffron this is it
well theres a for loop but that shouldn't have anything to do with the texture shifting problem
indeed
To be clear, it's the textures from the array that are shifting, not the "weight", right ?
Maybe there is an issue with the "Absolute World" position then.
Could you try using "World" position, add the camera position (check camera node), and input this as "worldPos" input of the function ?
yeah I can try that
Tip : you don't have to construct float2 for the uvs, you could just use scaledWorldPos.yz for example 🙂
Also for readability :
float2 myUV = float2((floor(uv.x * TexSize) + 0.5) / TexSize , (floor(uv.y * TexSize) + 0.5) / TexSize);
can be converted to
float2 myUV = (floor(uv.xy * TexSize) + 0.5)/TexSize;
I can change that real quick
And ... without adding the camera position to the world position ?
just using world position?
yes
Oo
this problem has stumped me for days, I genuinely have no clue whats causing it
Do you mind sharing the graph with me so I can have a look ? Maybe a .zip with the textures and material set up ?
Can send through PM if you don't want to share publicly.
yeah I can send it over
though I'm setting the properties via material property blocks so I don't know if that means I'll have to send you the script too
probably
So, hum, when I use absolute world position with the data you sent, I have no issues
The texture are glued to the terrain
what HDRP / unity version are you using ?
almost same here (2019.3.11, but shouldn't matter)
so were using the exact same versions? of HDRP and Unity
yep
what the hell
I guess the only thing thats left is for me to create a brand new project and see if its just some weird corruption issue
worth trying
@amber saffron even in a brand new project with absolute world position its still shifting with the camera
I'm going to just put it on the backburner for now and see if I can figure it out later
thanks for helping me though
im looking for a way to clip part of a mesh when the player is behind a wall from the camera pov, whats that called again? cant find the right term to google 😦
something similar to a circlecast from the camera to the player that culls everything in between, but Im having a hard time finding the right terminology
culling? you can achieve the effect using camera-distance-based-dither-fade shader on your wall. or use Stencil shader on your player to see through when behind it.
some insight into stencil effect : https://gamedev.stackexchange.com/questions/152824/how-can-i-create-a-see-behind-walls-effect

Game Development Stack Exchange
Divinity: Original Sin 2 has a beautiful see-through system. When I go behind walls, a splash mask will appear, and when I move around the game, it changes. It's like a dissolve shader, and has a
thats what i was looking for , thx!
@thick fulcrum sry for late respond but i mean in pbr shader i can't seem dubble side to word in pbr graph in the video he uses lit shader but im in urp what doesn't have lit shader
@maiden stag sry I don't remember context of this discussion, but URP has a lit and unlit shader which you can do in shader graph.
anyone know how I can do this with stencil buffers? I've been changing things on the render passes for a couple of hours but I just can't get it to be like this
I'm on urp
hello can somebody help me with anti aliasing? Because my unity looks terrible
do anyone knows where i can get some information on applying a normal/bump map to a 2d texture using a fragment shader? (hlsl/cg)
google is only returning results about surface shaders
@tall chasm Do you know if that screenshot was made using stencils?
It looks more like it's just a sphere position and radius passed to the shaders of the cubes and it's clipping itself
Stencils are for more screen-based effects, not world-based
So there is no difference between a sphere and a circle as far as stencils are concerned.
Erm...
I'm looking to this effect
So I can't do it using stencils?
I'm really lost man. I watch tutorials and the link you sent but I can't figure this out. Is it no way possible to do this clipping effect?
The stencil buffer is like an extra channel in the screen texture. You have red, green, blue, alpha, depth and stencil. So each pixel has some stencil value. With custom shaders, you can make some shaders write a certain stencil value on every pixel the mesh is visible in, and you can make some shaders only draw where the stencil value is a certain value.
With that knowledge, there is no setup that could possibly make the effect in that screenshot

Quick tutorial on how to see through walls using shaders and masks in unity. Hope this can help you!
This guy did something very similar but it's not urp
Is that a sphere or a circle?
Sphere
It could be either, because when using stencils, there is no difference
That's a screen-space effect. The world position of that sphere makes no difference in the effect, except maybe the size of it on screen.
It doesn't look like a spherical hole cut into the cube
Which is what you want.
So you can't use stencils for the effect you want.

reddit
2 votes and 6 comments so far on Reddit
Instead, you'd pass a sphere position and radius to the shader that's supposed to be cut and calculate which pixels are inside this sphere and discard them
This guy used projector. But even that I read somewhere projector don't work well in urp yet. And all these are old tuts not applicable for urp
Ok if you say that
How do I go about if there are multiple holes to cutout?
There's a difference between these two

I assume you want the second effect, you want to be able to see the inside
No I just want a simple.... Hang on
You can see in the first screenshot you posted, the person just has some abstract blue texture on the inside
https://forum.unity.com/proxy.php?image=http%3A%2F%2Fi.imgur.com%2FSm5Hyhj.png&hash=baedb1ad7bc3dcd7430f40b814970874

Doesn't look mapped to the surface either, probably just screen-space
This is in c4d
What I want is this. Cut out on a plane so that I can see the things below it
Unlike the pic I showed above, the plane has no thickness
It's just for visual. There is no actual hole
Okay, you can do that with stencils
What's the high level concept of what you wanted to do? Which mesh is writing what stencil value? Which is reading it? etc?
just chiming in a very handy stencil post : https://gamedev.stackexchange.com/questions/152824/how-can-i-create-a-see-behind-walls-effect
Game Development Stack Exchange
Divinity: Original Sin 2 has a beautiful see-through system. When I go behind walls, a splash mask will appear, and when I move around the game, it changes. It's like a dissolve shader, and has a
There's more than one way to do this with stencils
the red thing is cuting a hole in the white plane
To do something with stencils, you have one object writing to the stencil buffer and another reading the stencil buffer
When you were trying to set this up, which is which?
red is hole mask
plane is hole
So the thing that is cutting a hole, shouldn't be seen and is just use to visually cut a hole
For stencils, instead of a cube extending that far up and down, you'd just want a thin plane right above the bigger plane.
But I'm going to replicate your setup and see if I can fix that.
Ok
Hey boys anyone got the solution to vertex lighting on top of light mapped scene? Trying to keep things mobile friendly but I need dynamic lights on top.
Hmu if you know how to get vertex lighting working on top of lightmaps
Because if I can get a mesh to cut a hole on a plane, I can create a 3d tunnel and place it under it. Which can be moved about the plane
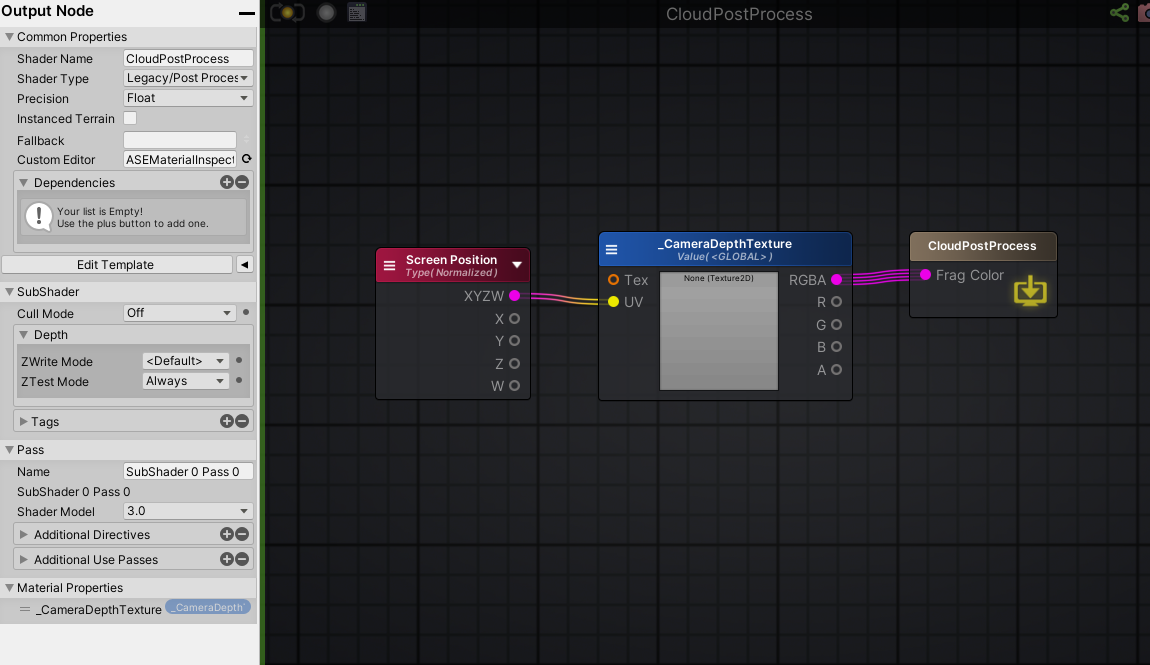
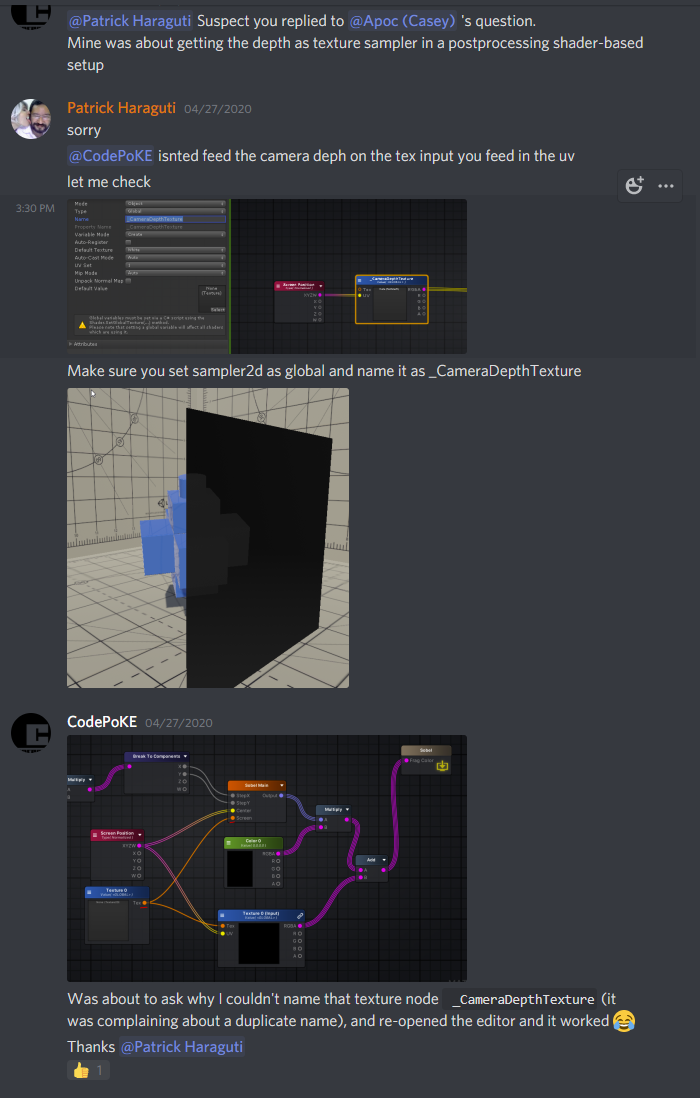
@thick fulcrum I'm sort of on the track to figuring it out, apparently the camera had to be in deferred mode and my texture sample2d had to be global and named _CameraDepthTexture
but im still running into weird BS and i'm waiting for the amplify guys to reply as of right now
How would I go about creating a stencil/X-ray shader for 2D? ie rendering sprites on a lower sorting order 'through' those on a higher, with an effect on them?
@tall chasm You don't have any realtime shadows to worry about, right?
It's just sprites, right?
Oh okay, it looked a little like sprites in that one screenshot you posted
You sure there's not a shadow in there? In the top left corner?
Yes that has shadow. But I'm thinking of maybe going with blobs or fake shadows. No real time shadow because there won't be any lights. But some meshes are static baked
But even in the pic, the shadow from the wall is not affected on the pool
@tall chasm I got something working:
That's just for the plane, only need a layer for that
And then this custom shader for the mask object
https://hatebin.com/nhuzzqztoi
And the mask is just a quad on the plane with that custom shader that is writing 1
That's the material on the quad mask.
And it's just on the Default layer.
Make sure you deselect the Hole Plane layer in the Forward Renderer Opaque layer mask:
Ahh ok you sent
Was about to ask
Hang on let me try on my side
the mask object
is a thin cube?
I'm getting this
@low lichen
It's just a quad.
how are 2d objects 'ordered' can you still use the z buffer to test occlusion of sprites?
Like I said, stencils is a screen-space effect. The 3D geometry of the mesh doesn't matter, only the pixels they end up on screen
@tall chasm And since you only want it to affect a small flat rectangle on the plane, you should use a small flat rectangle.
I see. Still wrapping my head around it but this is working like how I want it!
Thank you so much man 🙂
I couldn't have figured this out myself. I really appreciate your help
No problem. The custom shader isn't completely necessary. You could have defined a second layer for the mask and have it write to the stencil buffer using the Render Objects feature, but then the mask object would have to use a transparent shader to not be visible.
This custom shader is just a very simple "transparent" shader, basically doing nothing except writing the stencil value.
I see. I think I'm gonna stick with your first approach. It's working now I don't want to fiddle with it for now 😆
I might be missing something fundamental but is it actually possible to convert this shader from unlit to lit?
Shader "Retro3D/Unlit"
{
    Properties
    {
        _MainTex("Base", 2D) = "white" {}
        _Color("Color", Color) = (0.5, 0.5, 0.5, 1)
        _GeoRes("Geometric Resolution", Float) = 40
    }
    SubShader
    {
        Pass
        {
            CGPROGRAM

            #include "UnityCG.cginc"

            #pragma vertex vert
            #pragma fragment frag

            struct v2f
            {
                float4 position : SV_POSITION;
                float3 texcoord : TEXCOORD;
            };

            sampler2D _MainTex;
            float4 _MainTex_ST;
            float4 _Color;
            float _GeoRes;

            v2f vert(appdata_base v)
            {
                v2f o;

                float4 wp = mul(UNITY_MATRIX_MV, v.vertex);
                wp.xyz = floor(wp.xyz * _GeoRes) / _GeoRes;

                float4 sp = mul(UNITY_MATRIX_P, wp);
                o.position = sp;

                float2 uv = TRANSFORM_TEX(v.texcoord, _MainTex);
                o.texcoord = float3(uv * sp.w, sp.w);

                return o;
            }

            fixed4 frag(v2f i) : SV_Target
            {
                float2 uv = i.texcoord.xy / i.texcoord.z;
                return tex2D(_MainTex, uv) * _Color * 2;
            }

            ENDCG
        }
    }
}
This shader is currently unlit and all it does is add a PSX unstable polygon wobble to the added object
I am trying to convert a shader from what i believe to be unity 5 to unity 2019 (i am new to shader writing) the shader i found on GitHub at this address https://github.com/Lallassu/voxelengine_unity. I have fixed a few compatibility issues the error i get is "Shader error in 'Standard (Vertex Color)': invalid subscript 'oneMinusRoughness' at Assets/Assets/Shaders/UnityVC/UnityVC.cginc(126) (on d3d11)" i dont know if oneminusroughness was removed or if it is something else. I can post my modified code but it is about 250 lines. Does anyone know what this error means?
@flint vapor The important part of your shader is the vertex shader to do the PS style glitch.
Look at https://docs.unity3d.com/Manual/SL-SurfaceShaderExamples.html at "Normal Extrusion with Vertex Modifier" example do see how vertex deformation is done in surface shader, and you should be able to port this
thats a good start, thank you
@grand jolt this project is from 2017.1
Apparently s in that case is the surface struct FragmentCommonData declared in UnityStandardCore.cginc .
I don't see any oneminusroughness value, but maybe you can replace it by smoothness ?
is it possible to get the sortorder from a tilemap in a shader?
@amber saffron thank you I will try that.
this line UnityLight mainLight = MainLight(s.normalWorld); causes the error. Shader error in 'Standard Specular (Vertex Color)': 'MainLight': no matching 1 parameter function at Assets/Assets/Shaders/UnityVC/UnityVC.cginc(121) (on d3d11) Is there a unity 2019 equivalent? Thank you.
@grand jolt if i search for MainLight in the current version of the build in shders i can only find a version of it that does not take any parameters , could it be that this is what you are searching? (found in UnityStandardCore.cginc)
@grand jolt <Unity Install Folder>\Editor\Data\CGIncludes
@fervent tinsel Thank you.
Shot in the dark, but can a float (R,G,B,A from texture2D) be converted into a Sampler2D somehow?
or a hypothetical question on top of this, could you take the red channel from a texture and convert into another Sampler2D?
@grand jolt perhaps I'm missing something here, but why would you want to sample it again? it is already sampled and you are just splitting out the channel, pass it into a preview node to visualize it. It's still a texture, just the red parts 😉
The reason is because I have a gaussian blur shader that takes in a sampler2d input
but my camera depth buffer texture outputs as RGBA
i want to apply my gauss blur to my depth texture
@thick fulcrum sorry for the late reply i was showering
so i'm making a 2d game centered around music. And my plan is to use a vertex displacement relevant to the music being played. My question is how I could achieve this on a 2d square?

@grand jolt this was amplify wasn't it... ok if I remember rightly the vid was adjusting the amount of blur based on depth. Which means it's strength, you want to enter what your blurring as the sampler2d input, question is do you have a strength input? which you can plut the camera depth in
ah well done! 😄
if it's imported from say blender, the damn material sometimes get's set to transparent while decreasing the opacity resolves it in part. Shadows with transparencies is fubar at moment
well
its imported from blender and that's the only part of the model thats uv unwrapped (the wall)
@solemn granite try applying a new material to the model, you can override it in the imported model
use the standard unity shader and make sure it's set to opaque
https://gyazo.com/182a868c07e9571e8a3709bc64bfc8c0 does anyone know of a smarter way to do this object mask? The annoying part is that you have to define a range for each instance of the material for it to work

use screen depth perhaps, depends on what your hoping to achieve 😉
https://gyazo.com/b5b06bdeadca0073907535034f035fea this is what I have
the effect works, but the dissolve range 0-1 is dictated by the upper and lower limit, that can be either local or world space
but I'd like to hardcode so it works on any mesh size
otherwise you need to set it manually based on the mesh size, which is less than ideal
Have you tried using the object scale?
I'm a complete noob at shaders! Never done it before, but when I tried creating a shader graph, it keeps telling me my current render pipeline isn't supported. I'm using the LWRP (moved to universal apparently), but it's not supported..?
You can get the y scale by itself
Do you have a pipeline assigned under Graphics settings @ionic juniper?
nope, and there aren't any to choose from
You need to make a profile asset then
(hei btw 🇳🇴)
Aiai
if you take the object's world position and set the min and max to position +/- Y scale/2 it should adapt to your meshes @little dew
Literally never done this before 😬
@shadow kraken thank you, gonna try!
@little dew as Ole says I'd be tempted to use object space, then either animate it via an animator or use time and a bool to trigger.
Pipeline asset yeah
ah, everything is now pink! xd
I guess I need to re-import everything?
just need to upgrade the materials to now use URP shaders
Edit>Render pipeline>Upgrade materials
Something along those lines
There are videos on youtube on how to migrate projects to LWRP/URP so you might wanna check that out
Just upgraded the project. My character is fine, but the actual map objects are still pink 😐
What shaders do those objects use?
If it's a custom one it would need to be upgraded manually
ProBuilder 🙂
You might need to set those shaders to URP standard
yeah it's grayed out
Greyed out where?
when I select a map object and go to where it shows which shader it uses
I can't choose, the shader-selection box is grayed out
That should be because it's the imported material
You can make a new material and drag it in place in the scene
https://gyazo.com/de4cfb0a7fc77054546e33d5297a338a hm doesn't seem to work like this
Close though! Can you adjust if you change the number you're dividing the scale by?
It's not a prefab I drag-dropped into the scene, it's a generated object which I can modify with tools. I don't get why I can't just switch this object's shader 😐
Might be somewhere in progrid's settings. I haven't worked with it so I don't know
@shadow kraken unfortunately that doesn't seem to be the issue
Try multiplying the y position by 2 before you add an subtract? @little dew
can somebody help me with anti aliasing because my unity looks terrible
@ionic juniper apparently "in latest package versions there are optional downloads to support URP and others. " which means pop-into the package manager and go to probuilder section. There should be some buttons to click on to add URP stuff
@shadow kraken nope T_T I think there's something in the logic that's escaping me
uh, there's something weird going on with my custom meshes I think
ahhh
I'd need to play around a bit I think, sorry
Ah!
so the calculations are different
Yes yes
interesting
lol I still can't get it right with the pivot at the bottom 😛 think I need to learn more about shaders and math
https://www.youtube.com/watch?v=7amJpGQYEsc
Need this kind of decal shader paid or free ib for more details

@queen narwhal there are plenty on the asset store, for standard renderer there is more choice and having exclusion masking support will help you achieve what you want.
HDRP has a decal system built in and there are some you can buy for URP and even a free one on GIT. But they are not as feature rich as some of the asset store versions.
@thick fulcrum Thanks for reply , but this is different , it uses just one decal texture for different types of cars & that one texture is splitted for top left & right direction where needed
i can share more details if you are intrested in making
I suggest you go and do some research into the various decal methods available, you can use screen space or deferred decals to manage this but they have some drawbacks. Mesh based decals will give best results but you will need to ensure they can be baked during runtime. Both of these systems already exist on the asset store
Is there any way to figure out how old shaders work with the LWRP/URP?
There are some good resources on YT to learn some basic shader things without using shadergraph but most if not all of them dont work with the URP
even unitys own documentation on how to extrude vertices doesnt work with the URP lol
@flint vapor Writing code shaders for URP isn't hugely different from the built-in pipeline but there's not really any documentation on it as far as I know. The biggest problem is that the built-in "surface" type shaders aren't supported in URP. You need to write vert/frag shaders instead. You can look at the source for the URP shaders to track down some of the differences. https://github.com/Unity-Technologies/Graphics/tree/master/com.unity.render-pipelines.universal/Shaders

GitHub
Unity Graphics - Including Scriptable Render Pipeline - Unity-Technologies/Graphics
In short, CGPROGRAM/ENDCG is replaced with HLSLPROGRAM/ENDHLSL, and instead of the UnityCG.cginc type includes, it's better to use the URP ShaderLibrary. You can view it's source in the above githhub too.
o o f
It's not a simple task, so if you can use shadergraph instead that's probably the better option.
it probably is, I actually just wanted to use a pixelate shader that works in normal 3d projects, but unfortunately not in URP projects
that one is a super simple ImageEffectShader
If it's a vert/frag shader it technically might still work in URP, even with the CG stuff instead.
You'll probably need something like the Blit render feature here to actually apply it to the camera though. https://github.com/Unity-Technologies/UniversalRenderingExamples/tree/master/Assets/Scripts/Runtime/RenderPasses

GitHub
This project contains a collection of Custom Renderer examples. This will be updated as we refine the feature and add more options. - Unity-Technologies/UniversalRenderingExamples
Quick question. Last time installing LWRP it came with both Shader graph and Post processing.
Is Post processing included in URP too or I have to separately install the v2 from package manager?
@flint vapor One thing that might help you a tad is to think of Shader Graph as a code generator for URP/HDRP because that's basically what it is.
So if you want to use it as a base or a learning tool, start out with, say, a simple lit node, and then a very simple texturing shader. Generate the code, view it, and then MODIFY IT FROM THERE and don't go back to SG. So it will generate most of the lighting crap for you in vert/frags.
:2c:
@tall chasm URP has it's own post processing (v3 I guess?), but certain versions also support ppv2.
Ok let me have a look
aye I will start playing around with it, thats all some good stuff to read through
if I find a solution I will post it here later, thank you all
Hi!
Is there a way to disable shader compiler optimizations?
Unity wont fill constant-buffers data for variables that aren't used by the code and I would like to know if it's possible to change this behaviour
Can you use normal unlit/lit master nodes with a 2D renderer in URP?
or like what's the deal with the 2D renderer?
how would I go about recreating this
https://www.youtube.com/watch?v=maxGoDOmpPU
I found some code in the comments but ive never done anything with shaders
// Offset the main texture coordinates.
    float2 texCoord2 = texCoord + DisplacementScroll;
    float2 texCoord3 = texCoord - DisplacementScroll;

    float4 color1 = tex2D(TextureSampler, texCoord);
    float4 color2 = tex2D(TextureSampler, texCoord2);
    float4 color3 = tex2D(TextureSampler, texCoord3);

    // Look up into the main texture.
    return float4 (color1.r,color2.g,color3.b,color1.a);
Do opaque textures work properly in Unity 2019.3.7f1? I've followed this tutorial video 10 times but all I get is a solid grey sprite that never changes. Even the point in the video it is supposed to turn invisible, it doesn't: https://www.youtube.com/watch?v=XCWRH4FIdKg
You learn how to create Distortion Shader using Shader Graph in Unity 2019.3 beta which depends on Universal Rendering Pipeline.
We have used the concept disclosed in the following unity video:
https://www.youtube.com/watch?v=atPTr29vXUk
Then we optimized that to work with 2D...
Gave up on that, and just used a render-texture instead with the screen position.
Aye so I actually figured out how to add shadows to my vertex shader and also how to make it lit (thanks to the documentation)
but now I just dont understand why is the material only interacting with one light source
so the point light still casts a shadow which is really nice
but the object itself is not interacting with the light unless its a directional light
still looking for a way to combine lightmapping with vertex lighting. Target is mobile. Found a frag shader online that appears to work but its too expensive for mobile. Fixed Function version would be great. Or at least something that performs well on mobile.
@ me if you know a solution
Anyone know what is the equivalent of Simple Lit done in Shader Graph?
fixed my own problem, if anyone encounters this:
Just duplicate your current pass and add the other lightmode Tags { "LightMode" = "ForwardAdd" } to it
There. Using a render texture to get the screen colors, and built out a sprite-based lighting and shadowing system. Image just shows various different lighting settings.
(Namely needed something that performed far better than Unity's Light 2D system. Too many testers experiencing performance issues.)
Also added support for animated dust effects (can be used for a bunch of other animated visuals as well), bloom, brightness, etc.
Hey wondering a better way to go. I've got an outline shader which I'm using to highlight selected object. Is it better to swap shaders during runtime or adjust the size of outline itself?
Either would work fine I believe, though if you don't need to highlight anything and everything probably just swap the material to and from.
thanks ;D
Anyone knows if it's possible to disable shader optimizations via #pragma's on Unity when compiling them?
shaderlab?
Well, yes
@grand jolt don’t think so, but you can throw the “precise” keyword on a line to prevent optimizations there
Nope TIL
Only a single Unity update mentions it:
Shaders: Add shader "#pragma skip_optimizations gles" that can be used as a workaround for OpenGL ES 2.0 shader compiler problems (1187094)
This has been backported and will not be mentioned in final notes.
It accepts passing d3d11 instead of gles, but it doesn't seems to disable optmizations at all
Same disassembly?
Yup
There was one for 360, and enable_d3d11_debug_symbols for dx11/xbone, makes the asm dense, not sure it explicitly removes optimizations tho, but means you can easily edit the asm in a build tho
Anyway when compile is being spooky the precise keyword is my go to, has fixed a few pickles
Well
I'm trying to find a way to ensure Unity will fill every builtin variable it finds in the shader on the D3D11 constant-buffers
Unity currently uses reflection or shader parsing to get a list of used variables and build the constant-buffers structure
So, if a variable isn't used, its value wont be added to the constant-buffer
Does Anyone know why the shading looks weird? All the sides of this box should be the same green (Except the bottom which is dark black). But when im moving the camera around i get these weird dark green areas. Its un unlit texture so im not sure whats up
Can you separate the RGB channels from a texture and do UV scrolling on each channel?
@grand jolt why don't you sample the texture three times using three different UVs and join the colors later?
That's what I am doing right now, I'm using references to the original texture
I guess that's the only way
@grand jolt What? It's a constant buffer, set on the C# side, filled in on the C# side, right? What's "not used" in the code? IDK what you mean.
AFAIK, _Time (etc) is set in the constant buffer. But to get the offset, you'd have to USE IT. So...
If you dont use it, it wont be added to the constant buffer by Unity at all @meager pelican
If you mention it on the code but it does nothing to the output target, it wont be added to the buffer
But, as far as I know, thats an optimization
Thats what I wonder that could be changed
By not used I mean only declared
Like the “float4 unityDeltaTime” is declared