#🔀┃art-asset-workflow
1 messages · Page 36 of 1
You can see they are the same size
I think it has something to do with the canvas UI I added to the scene but I removing the canvas doesn't reset it.
What I pointed here is that if you zoomed in the game view, it is expected that it looks pixelated, it's just magnifying the output, not actually dooing a zoom
@willow nebula even at 1 it looks rougher then usual
Dynamic resolution ? https://docs.unity3d.com/Manual/DynamicResolution.html

Didn't seem to make a difference. It doesn't seem to affect anything I just find it mildly annoying
Does it affect your build?
no
That's really cool, Wolf 🙂

Mini castle, just practicing some misc commands in blender.
I think I've got a pretty good grip on it and might do something a little better soon 😄
THX! 🙂 So is yours!
I made the art in light of recent impeachment hearings
Its basically a representation of Donald Trump melting down under the pressure and heat
smart
nice. id suggest working more on adding detail and texturing.
give more time on every single piece.
I have been trying to work on that
for me i might sometimes even take a couple days on something as simple as a fire hydrant
xD
Been trying to figure out how to make the letters stick out more
ambient occlusion. and when making lamps and stuff like that. text isnt usually 3d. its a texture
not exactly what sort of texture would be fitting for a melted orange blob
for the words I basically used the text tool and then mapped it to a curve
i see that. i wont really give you much info on procedural texturing software that will clear all of this up for you and what i said would make sense. just because i think it will confuse you
unless you incist
might get rid of the mapping and gradient for the ambient occlusion
texturing isnt only tiled is what im trying to show with this.
so you can actually paint textures. and thats how you can get text with a texture
for ambient occlusion there are many ways. i still think you should think of texturing the text not modeling the text
would be very easy. make proper UV for the lamp
and you dont even need to install substance painter. or photoshop. just go on paint and create a image with the same UV ratio (usually 1024 x 1024)
and draw the text where you would have the lamp UV
works too
nice. but as i said. tip. after you feel more detailed when modeling then look into procedural texturing.
cause then you dont really need tiles
what is procedural texturing
4th time il be explaining it.
oh wait I get it now
its texturing but with out all those tiles and stuff. its what alows you to do stuff like text on textures,etc.....
you make the texture in paint or any other program than draw it in is that right
kinda yea
basically you UV the model. and you can add a texture map that you can make any where (personally i use substance painter)
so I basically would make a texture with the words IMPEACHMENT than put that on a texture map
hmmm...... well you make a texture map with the text drawn on to it
forgive me if I am little slow but I am not sure how exactly you make Texture maps
its fine man. lots of tutorials
I am that sorta person who can understand things better if I see a visual example
i tried. il try again with another visual example
lets say these tea pots for example.
this is how my texture for that pot looks like
its not a tile. its a UV.
btw for any one else here who is a UV critic xD. i didnt do this for anything official. just for a quick competetion lol. got 3rd
yea. now just make a texture map for it\
yes
on where the UV shows those circle looking objects
its complicated. just look up a video
im kinda working on a multi person view camera script and trying to make standard unity look as good as HDRP xD
@whole fog Google some "UV basics" videos.
yea
okay I think I am starting to get it
not sure though why I am not seeing the text
did I miss something?
oh wait I think I need to set it as a material
looks about right
the uv you made isnt perfect thats why its going to stretch but good for the first time
I am also considering getting the book Blender 2.8 for beginners for additional reference
I have also been thinking about trying my hand at making my own retro styled 3D platform game and was thinking of how I could replicate accurate N64 style textures and graphics
Hello everybody! Thanks for being here!
I am quite new to Unity, 3d modeling, and to texturing, so please be gentle 😛
I am just not sure how to begin Googling this problem. I have a material whose texture is this tiled grass. What can be done to a texture, to my mesh, or to the shader mathematically to fix the tessellation here? I should mention that this is an HDRP project.
@kindred estuary you need to lay out your UVs so that they only use one part of the atlas. You might also be lucky and get it to work by decreasing the UV tiling on the material in Unity
@whole fog dont waste money on book at the mommenth. you're at the level where you can learn a huge amount of knowledge just from youtube or the internet in general.
I've been doing blender for years now and i never bought a book. experimenting, practice, youtube in the begining and community members who i became friends with and taught me something while i taught them something.
but about the UV part.
its fairly complex in the beginig. it takes alot of practice so you can imagine the 3d model unwrapped properly in your head and now where to add seams to the model so that it unwraps properly. plus the topology of the actuall model has to be good or the UV will suck.
play around with modeling first and then get into UV unwraping
Books quickly tend to get outdated and you might end up having to google the end method of solving your problem anyways.
And now working with someone to make models of my game's proposed protagonist for Rareware-ass promo art.
More practice, just working on keeping topology clean for unwrapping.
@limber meteor tip. dont colab on the same model. dont colan on the same work in general. unless you litualry have months of talk with the other artist so you're on the same page and have the same pipelines or nothing will fit in
im a 3d env artist. me and the other env artist spent weeks just negotiating pipelines,etc.... until we even started working
@gritty reef good job man. great job practicing.

Hey @glacial elm, do you have an art station or other public portfolio I can check out to see some of your env design? That's kind of what I'd like to focus on when I get better, scenes/settings with all of the assets involved therein.
lol im trying to do yeti 😂
@gritty reef sure

@gritty reef not done with it. but its what i got so far on my port. got more private that i cant show yet.
Awesome, thanks!
starting the yeti with a big foot i see 🤔
Those look awesome!
thx

My first stylized asset for a game company, this will not be sold since it’s property of that company now :) But if anyone is interested I can do some more of course. - Stylized Diorama - 3D model by Nohiro (@nohiro)
Created taht little diorama as a test for a company. (won't disclose which one ) the render is under unity , and there is a link for the sketchfab version to looks at it if you want.
first time i was doing stylized tho.
The only rule was no alpha.
So the leaves and grass are all modeled out?
Yeah, simple geometry just a couple of triangles here and there. I think thatthe big plants are around 240 tris or something
Not my idea but since the target is mobile I can clearly see why they dont want an alpha test on the render process
I mean, it looks really good and I guess the triangles must be cheaper in the long run.
For big plants definitly yeah. for grass i'm not quite sure tho... will depend on the amount because everytime there is an alpha the z buffer needs to take the alpha into account and that can extend the results of that buffer.
Nohiro this is looking great : )
Unity keeps telling me I have overlapping UVs no matter how much I space out my unfolded UVs. I also have them laid out in two UV sets. Is there something else I'm missing here? Or is Unity just overly sensitive?
I don't want to use automatic 'generate lightmap UVs' cause it creates horrible seams.
It doesn't seem to actually have any negative effects on the results of the final lightmap as far as I can tell, so it almost seems like a bugged error message.
What for exactly?
i ment screenshot
@simple sonnet
the error you're getting and the model you made xD
@glacial elm Oh I see 😛 I would, but have to wait a bit as I'm currently running a bake. But it's just a yellow warning showing up in the inspector, not the console, under the "Lightmap" section.
Here's one. I did fix the spacing on some of the shells after this screenshot was taken. Still same message. I also have a copy of these UV's shifted over in another set
I have to pump out tons of assets before December, so I can't bother with perfect topology. It's not that weird to me. What do you find most weird about it?
well as i said not too bad. just thati kinda felt like you could have had some part more unified
instead of completly cut out. but nice
The unevenness?
Ye. It's 'cause of how I've shifted verts quickly around to get crooked shapes. Instead of perfectly straight post etc.
yea man its fine i get it. im a 3d guy too xD
if you want im working too atm. we can hop in a chill work call. usually helps focus since you get to discuss stuff and meanwhile that boosts your focus on getting stuff done. or at least thats how it is for me
Thanks, but that has completely the opposite effect on me. I just get distracted.
Same with these in Unity. Says I've got overlapping UVs. Even though Maya tells me at the bottom there that there is 0 overlapping >< My Unity is high I think
"I have spoken to one of Unity's engineer about this. He basically told me the warnings can be safely ignored unless I noticed an artifact on mesh". Well, never mind then :p
There's an option for that for fbx?
should be
or im sorry might be import settings on unity
yea its in the mesh import settings in unity
So, since it is no longer possible to subscribe to substance and earn a permanent license after 12 months, but you can buy a permanent license on Steam.... what would be the better option for a solo developer.... Substance Painter or Substance Designer?
the steam one only gives you 12 months of updates
This is true.... and you don't get access to the other versions. 😦
Maybe it would be best to just subscribe for a year until I get a better idea of what I need.
Other programs I should say.
fucking adobe
Yep.
Well, you can buy a years worth of updates for perpetual licenses.
BUT, it is $75 a year and $50 if you buy it on sale.
BUT, if I end up needing both suites, I pay $100 a year anyway. And if I end up needing B2M, I pay another $50. Yay.
yay
@glacial elm There's no 'Unity UV' option in the import settings. At least not in my older Unity version
But anyway, it's all fine
They are very different programs @vast sage. It depends entirely on what you need it for
Hello. 🙂 I have a methodology question. I want to make a retro FPS that uses sprites for weapons, like from Doom. I'm trying to figure out the best way to do this. And, I'm still new to Unity, so while I have some ideas of what I could do, I can't quite see the pitfalls in the future of picking one strategy over another. Does anyone have any suggestions?
I don't really get the question here, if you want sprites for weapons, just use sprites
Ah, sorry.
Eventually, if you want to be able to light them, sprites with normal maps in the UniversalRenderPipeline
The problem is I don't know how exactly to put the sprites on the screen in this context, though I'm sure the answer is obvious.
I can put a physical thing in the world that follows the player around
Just attach it to the camera 😄
Sure. 🙂 But ... won't that lead to intersections with walls?
Indeed, it can, but then you have the option to use specific shaders (with different ztest) or custom renderer to get over this issue
URP has a tutorial for fps : https://www.youtube.com/watch?v=5AmI2yOx0Nc

Learn how to create a first person shooter style camera in Unity that will not clip through walls, without using multiple cameras. This FPS camera is created...
Hm. Okay, so it seems then that I need to understand shaders better. I understand them in the abstract -- they're essentially the code used to translate game data into glowy glowy pixels.
Aah, ok, I will watch that. 🙂
Thanks. 🙂
Yeah, I need to understand this pipeline better.
Thanks @nocturne field
yw
Anyone know how this clone button in blender works like I thinks is broken but I feel I am being really dumb rn
@noble field awsome stuff ma man.
I need a tad bit of help
I'm trying to upload my new OC to VRC but it keeps stretching the ears to the sky when I start uploading
How to use python in unity and where to see documentation @noble field
You cant
oof
@noble field yea hdrp is awsome but its so limited for me. Its a tight desd line and stuff so i couldnt take time making windshaders and stuff like that. And speedtrees dont work really. So my team switched to normal rp.
This is the progress i had in hdrp
But i stoped it all and now started trying to make some progress on normal rp
Not great but not too bad
Btw. This is a old image. So placeholder grass
Basically placeholder everything till j got the main assets done xD
Yeah HDRP and URP have their problems xd URP doesn't even have AO at the moment
Your forest looks nice though
Hi everyone. Is there a way to load the lod (the lod0) from the hard disk instead of having them in memory from scene start?
Hello, somebody know if its possible to create an game with voxel (from magica voxel) instead of the mesh have a lots of triangles (because have multiple colors) ?
A voxel is basically a cube, so it has triangles ....
ok i have just found an solution because my friend its just can't use VoxEdit, but if i use voxedit for export its optimized
@noble field
Why wouldn't URP have AO textures? They are in one of the mask map channels
I was talking about generating AO
I did not look into it much, but from what I've seen URP doesn't support AO, SSR or Subsurface Scattering
At least for now
Ah
👍
@glacial elm I know there are plenty of tutorials online. I just thought of getting the book for use as a quick reference
Your decision.
@noble field @glacial elm
Yeah HDRP improves the graphics and has lots of good features, but how's the performance?
I've heard from some people that it's difficult to get smooth stable 60 FPS with some more complex environments.
Even on 1080Ti
@broken edge yea. but if your a optimization nazi like me then you can run a smooth 70 to 90 fps with out tryinf xD
tahts how much i ran. but as i said. speed tree and terran wind didnt work. kinda ruins everything
I can't really speak for performance because this is my first scene in unity :p
And I have no comparison
But I'll post it with fps counter when I finish
Is anyone here familiar with Blender and could help me for a sec? =3
Is anyone here familiar with Blender and could help me for a sec? =3
I want to know how I can see the size of parts in my UVMap
so I can make all parts the same size
You can hit Average Islands Scale
wdym
I know but where do I see my size
like the x and y
so I can make all the same size
@near lotus D:
If you hover over the UV Island and press L, you will select that specific island.
Then press 'N' and scroll down to 'scale' to see the info.
However if you're not really sure, you should watch some detailed videos about UV Mapping
Why do you need to see the size?
Is the object a perfect cube?
If you were to scale / move one of the faces you'll end up having texture stretching
but I still want the texture perfect cubish
ik
but I want just the texture
but I can change the texture size
I already did
The UV Map represents the faces as if they were laid flat
but Idk by how many
there is still the scale tool 😂
inside the UVMAP
and it didnt changed the other parts
If you've applied some textures you can just scale the UV Island to scale the texture appearance
Ik how it works already 😄 watched some vids 😄
Im putting the thing on the right size thing and scale it the same now
@lethal phoenix UV space doesn't directly map to world space.
wdym
It goes from 0-1 and the actual 'size' changes based on the resolution of the texture you put in it.
You can only ever have relative sizes.
ik but the size to each other wont change
thts my problem
I want tht all have the same size
idc how big it is
then its ok aight? @fluid oak
btw I love ur profile pic 😄
et Voila
How can I get a Image of my UV Map with the outlines?
is there a way in blender?
so I can insta draw on it 😄
and the size is right @fluid oak
thts my UV Map
I want it like this in the same size etc
Image editor > Header > UVs, select Export UV layout
where is Image Editor? @simple sonnet
Idk. I don't use blender. Do you have a button at the bottom left you can click to get a menu up? Left of 'view'
i think so
and the lines white or gray?
its clean
the fill opacity you can, thats pretty much it.
should I put Fill Opacity to 0?
Blender #1 😉
no its the faces
I mean fill opacity*
just try it 😛 and bring into photo editor
Maya #1 - Blender #1 Free ;p
I have it at 0.25 is tht good?
it wont break anything @lethal phoenix all depends on what you're doing. you can always go and change it
lol
its a bit strange
2 parts r highlighted
wht is a good free program for texturing this?
Im mac
I cant use photoshop rn 😐
Gimp maybe? Idk if there's some new and upcoming
vector program for pixel work?
is krita on mac? thats a decent one
krita is free. and i dont think its the same as that image but maybe its similar?
No I mean, you can design as vector of course. But if you mean to use it as a texture, it'll be pixels anyway
right, sorry
like illustrator, inkscape etc
yes but I have 1024x1024
so is there a vector program except those 2?
that image is affinity Designer i think
AlternativeTo
Popular Alternatives to Inkscape for Windows, Mac, Web, Linux, iPad and more. Explore 25+ apps like Inkscape, all suggested and ranked by the AlternativeTo user community.
omg thanks ❤️
Is something like this possible for generated UV's ?
atm doing spherical projection which doesn't preserve the area at all
https://cdn.discordapp.com/attachments/635742034015158283/649999434800693249/unknown.png

I found the paper about the this, but i don't have a spare week to implement it
https://www.researchgate.net/publication/276834169_A_compromise_aspect-adaptive_cylindrical_projection_for_world_maps

ResearchGate
PDF | There are two problems with current cylindrical projections for world maps. First, existing cylindrical map projections have a static... | Find, read and cite all the research you need on ResearchGate
@thorny phoenix Are you trying to do Equirectangular mapping (how our world map is distorted)?
yea lol
since im going to paint directly on the texture
and i would like to a void distortions
Why not just cut seams along the side of the car (around the doors etc.) so they each become their own UV shell/island
great idea, but in the future i will need to generate many UV maps for lots of cars
was hoping there is something more robust
There's no real shortcut to great UV maps. It's work.
Thinking ahead on how you want to texture your mesh, and cutting seams accordingly
well ... there is this asset - Paint in 3D which seems to use some math to inverse the distortion process ... but i don't have the time to dive into the source code and look how it is done
Right. But in a game engine, you'll still have distortion in the sense of detail/pixel density
yea i guess that;s what he is doing ... didn't look deep enough tho
Ye. Like, I could take a flat, square plane, make it V shaped in the UV map, and towards the top, squish my texture manually so that it compensates for the stretching. But the texture itself will still get stretched even if the proportion of the details on it look right. You'd also need higher resolution texture to not get pixelation because of that stretching. In extreme cases anyway.
So, better to avoid as much of it as possible by making good UV maps
Took me years to get a hang of it. I still struggle sometimes to find the right seams ><
sounds time demanding and complicated
It depends on your 3D shape complexity really.
yea i get it
^-^
there are hinges, side mirrors and stuff
all drives the uv map * towards more complication
I would UV map those separately
fair enough
i guess ill ask my friend to split those UV's , never done it myself manually before
Imagine if the side of the car was like a balloon, with the mirror being an extrusion of the balloon sticking out. There is no way to squish that perfectly flat. It will overlap
hopefully its not a week long process
There is no way to squish that perfectly flat
yes
specially when the i paint on this balloon
it will leak to other regions
Yes. You don't want overlaps
well but i will , since im using UV maps as reference to paint on the main texture
Unless it's on purpose for repeated textures that is
do you know where I can find a good "movement playground" level for test the speed and jumps of my character?
@pine trellis something like that ? https://assetstore.unity.com/packages/tools/level-design/blockout-lite-110375

Whiteboxing Asset Kit For Unity & accompanying tool
Website | WebGL Demo | Tutorials
Blockout Lite is a collection of prototyping tools for Unity that speeds up the creation of level design mock-ups. Tried and tested by various industry developers, everyone who has...
there is a cool demo scene to test character movement
yeah thanks ^^
@pine trellis np
@glacial elm nice
@thorny phoenix 👌
I have a treasure chest in blender 2.8. I added a bone and animated the lid opening. it works fine in blender, but in unity the animation moves the entire mesh
Did you export the bone weights?
I believe so, in the export options the "Armat" option was selected, I see no specific bone weight option
hmm, I am getting this warning which sounds like the cause: Mesh 'SmallChest' has 48 (out of 88) vertices with no weight and bone assigned (they will be assigned to bone #0 with weight 1). The list of vertices: 0, 1, 2, 3, 4, 5, 6, 7, 8, 9 and so on...
I guess that's not a prob in blender
yet when I click on the bone vertex group, they're all seem assigned
must just be noob me doing noob things. not sure how to fix it. I'll keep messing
I don't use blender so I dunno. This is an fbx export, or...?
so i made a 3d model of an ice spike in paint and want to use it in a game
i have it saved as a 3d model
how can i use it
yes ik paint is crude but i cant use blender to save my life
but still, how do i import it
paint does 3d?
Enjoy the videos and music you love, upload original content, and share it all with friends, family, and the world on YouTube.
google had that
Trying new things with Blender. This is some sculpt work with 2.81. Thank you for checking it.
https://twitter.com/FarrukhAbdur/status/1200978015829864448?s=20

Completed this Ponyta theme art ✨🦄
Using new sculpting updates with #Blender :)
Artstation: https://t.co/JNtGRtlj5j
#Blender3d #b3d #blenderart #eevee #reatlime #gamedev #indiedev #Pokemon #PokemonSwordShield #fanart #ponyta https://t.co/iHwmilgL4p
guys I have an issue regarding 3D jumps
in my game the character can jump multiple times so for regulate them I made a condition for the jump input that verifies the available jumps and confront with the jump limit
basically I reset to 0 the jump counter when the character is grounded so he has a raycast long it's lower Y axis (the exact size)
the problem is that when he jumps the jumpCounter should be incremented but the game still detect that the raycast is colliding to the ground and keep it on 0 for the fist jump
@pine trellis i know what the problem is. there are two solutions
one involves changing the entire script to the one i took time and made that is very optimized. or add about 6 lines of code to the one you got and fix the issue
@ me when you decide
Expect Rare-ware ass promo art starring this armless Sheila.
@glacial elm sorry I came back home now, would be really glad if you show me these solutions
maybe the second is simple enough
well its easy. your problem is that when you jump once it keeps on jumping multiple times and not only on the ground if you hold the button right?
@pine trellis
go ahead
my character should make 2 jumps, so I mate a jumpCounter that everytime I press the jump button check if it's ok compared to the jumpLimit (wich in this case is 2)
now for reset the number of jumps available I made a raycast that starts from the center of the player and goes down to the ground along all the lenght of the lower half parte of the character, nothing more
can we get in a call. i think you might be able to explain it better with talking
@noble field you're using assets from the store right
No
100% myself
Except for the water, I roughly followed some tutorial on yt
🙂
I've used ZBrush, Blender, Substance Painter and Designer, Unity and Marmoset Toolbag
@noble field ok cause those rocks in the back could have been better. but i love the statue i really do
i can see the ZBRUSH magic in it
xD
Yeah those those rocks could use some work
But I tried to put it together relatively quickly, working first time both in ZBrush and Unity xd
@noble field I see so many people using Marmoset, but I'm not 100% sure why - It's only a rendering tool right? I have never used it, but I'd gladly like to know what people use it for.
Baking
Mamroset toolbag is absolutely amazing for baking high-to-low poly
You have great control over it, and it bakes real time
I really recommend trying it out 😉
hi quick question, does anyone here have snowball material? because i can't seem to find any on the store
@noble field substance painter can bake well too
xD
What are you using it for?
well mostly armour. the game im working on requires armour and some times we need test cloth for peasents,etc....
not much of a marmoset guy tbh
Hi. I have a mesh in blender, it’s actually made up of multiple objects. Each object has a displacement modifier which uses a cloud texture to control the amount of displacement. The texture coordinates are animated by having them attached to an object which follows a circular path using a follow path constraint. The animation plays as expected in the blender timeline. How would I go about exporting this out and into Unity?
Also, is it possible to export an animated material created in blender using the shader editor?
If by 'export' you mean bake it to textures, sure. Otherwise no.
Or a point cache of some sort for the deformation
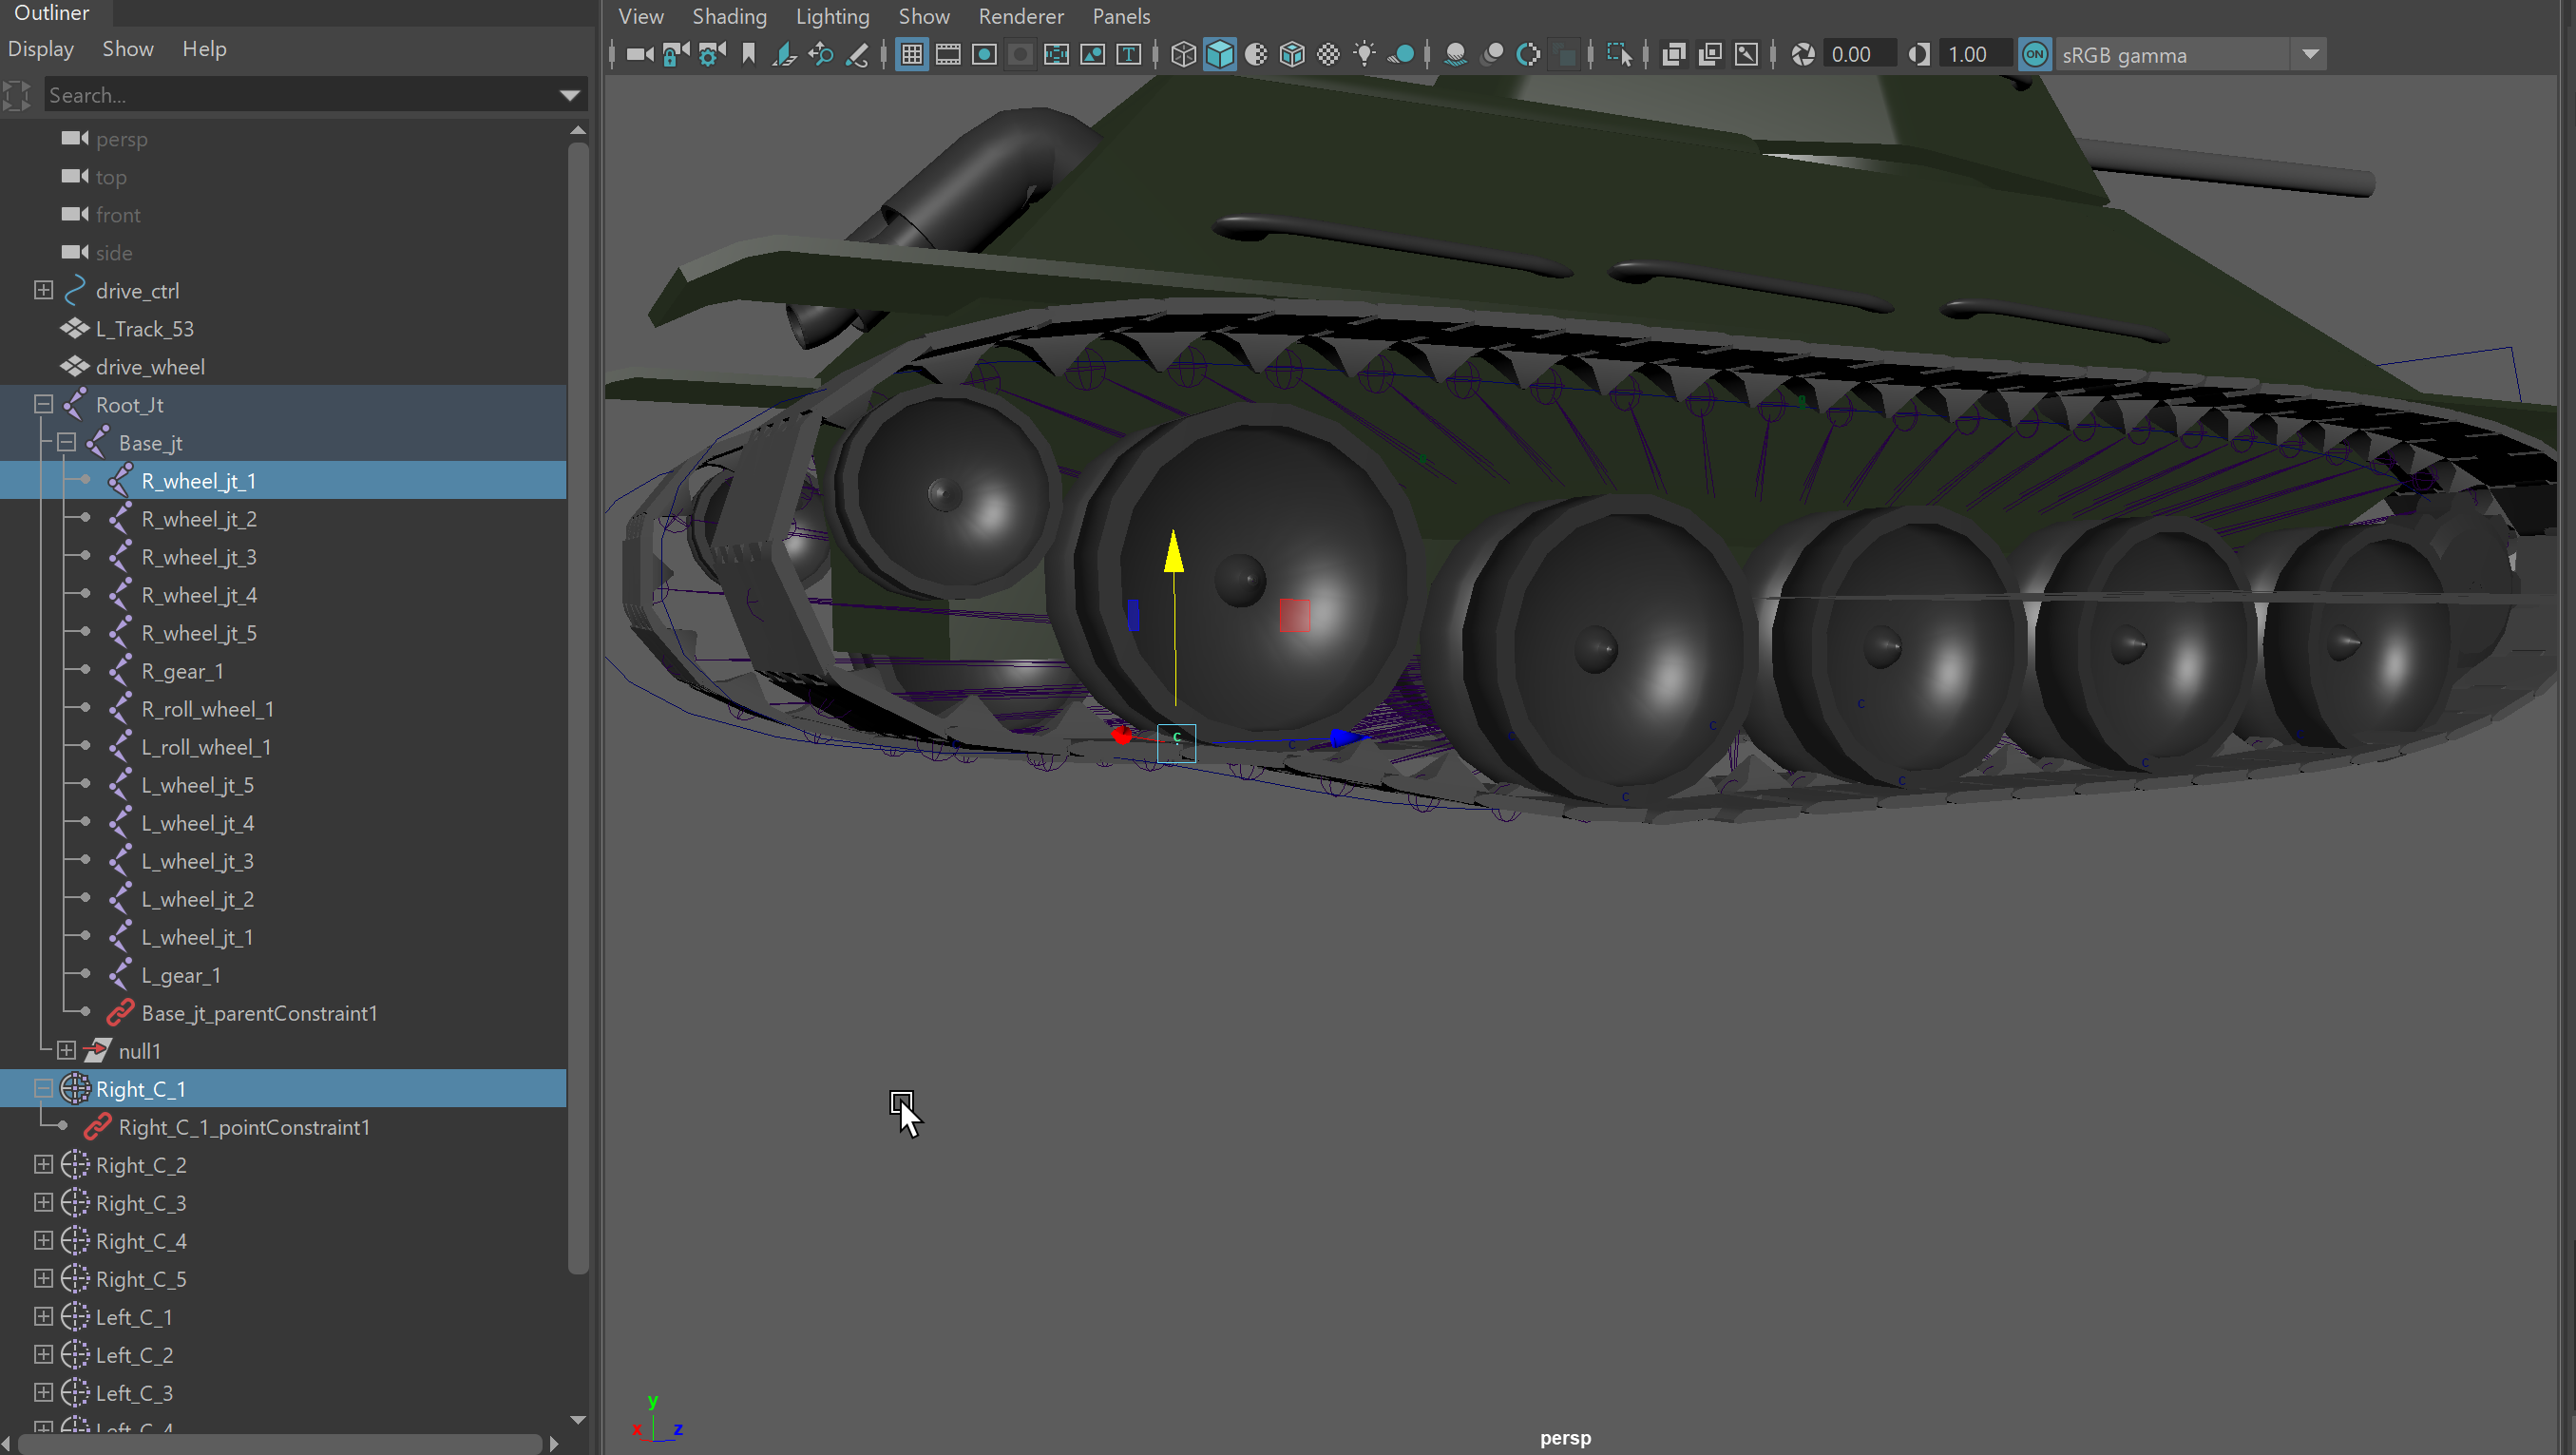
so ive made the rig for a tank and the tracks, i made a curve and then i used clusters on the vertex points then connected it to the wheel joints for each side so just changing the curve on the vertex position. Now the track works fine in maya when i move the wheel a portion of the track follows, but when i import it into unity with the animation it loses the joint connection between the wheel joint and the cluster, any ide why this is? https://i.imgur.com/wDZhPzy.png
so how do i make a basic character to move?
like W, A, S, D controls
for now its just a block
@humble arch Only bone/rig animation or blend shapes can be exported by default to realtime animation
Custom vertex animation (like what you are doing) can be done using alembic format for example, but it is very computational heavy
ah okay thanks 🙂
Hey anyone got some good experience doing some nice character modeling/rigging?
I just got some concept art done for a character and itching to see what it might run me to get it modeled so I can plan for that soon.
Guildwars 2 / Overwatch level detail but maybe slightly lower poly
i know a better concept artist
if you want il get you in contact with them and you could set a price
@near grotto
they are litulary specialized in more lowpoly stylized concept art
Looking more for 3d modeling now but glad to checkout their artstation if they have one or whatever site they use
@near grotto 3d modeling xD. im a 3d env artist. what are you looking for to be made?
Making that character into a model
any payment in mind?
Yea mostly scoping out a ballpark for pricing at the moment, wont actually be getting into it until the near year
hmmm... yea im sorry man. im already working and getting paid,etc... so i kinda only do work for money. im sure there are many people out there up to do it for free
good luck.
oh ok. well for characters most people would go under a 100. and thats almost a rip off if they're using zbrush xD
No way, seems cheap
thats what im saying. thats the cheapest you can ever find
I didn't say i was cheaping out for it 😛
ok. nice. you seem like the guy i work for right now. proffesional. ok so for the character with armour it could go up to 1200 on standard price.
with out armour you might be able to get it for like 800-900.
When i did freelance i did 20/hr most jobs.
Get a time estimate depending on the character
when it comes to sculpting. i never do it per hour personally.
neither does my friend who also does sculpting. because if you're experienced. you can get a good sculpt done in around 7 hours even if it's very complex. now count in texturing, retopology,etc..... sure might be fair
then you're hourly should just go up eh?
but most of the time people i've worked for only wanted the model its self not retopologized cause they cheap out. not too often you find proper people that know the value of such work
yea. but who would hire you for 50$/hour
kinda hard
thats why i do per work. so i see what i need to do. and i make a fair price for me and the person im working for.
Nice, thats about what I was thinking 600-1000 depending how high poly i decided to go
i hear ya. Freelance sucked for me. Glad i don't have to do that anymore.
where do you work atm? @cyan stirrup
But that sounds like a decent budget to me @near grotto
Dope, il just have to work a bit extra this month then heh
I'm a unity dev at a visualization company in the mid west US.
I don't do too much 3D modeling anymore
either of you got ArtStation pages? just like looking at everyones cool shit haha
nice. im a 3d environment artist at a start up game company. not as good pay as you most likely xD
i cant do sculpting atm. been doing too much 3d env and programming. dont have much time to sculpt. but i can get you with a friend of mine that might be free if you really need some one. il send my art station any ways
Yea no worries im just bookmarking stuff i like for now
most of the stuff here are kinda oldish
same ^^
awesome stuff man
You too 🙂
ty
Nice, liking the styles. Wish i could do modeling but im not patient enough moving all those points around heh
xD
I just develop apps and websites and pay for it haha
xD. ik i do 3d env and stuff. but im a programmer by degree technically xD. so im doing both jobs at the company. i work with the programmers when they need me. im the only one who works on the website cause thats what they wanted. then im also on the 3d env team. start ups 101 xD as long as you're good at it, you get to do it xD
here's the website im still working on for them lol
Nice, are you working on your own internal games or developing stuff for clients?
btw you main image tiles on a wide screen 🙂
I do custom software for clients at my job 😛
how big of a screen are you on
2k
and are you using edge?
wierd.
its in development. thanks for letting me know about that bug
kinda wierd cause one of the programmers on my team had a 2k monitor. worked fine there.
can you scroll down and show me the bottom where i have the wave thing
xD
wave thing looks good
thanks. but id like to see how it looks like on your screen
i stress on responsitivity.

Check your website at different screen resolutions.
just kill the background-image on your .SlideShow_Bar, the image is already there and scales itself somehow haha
i kinda stick to chrome dev tools. but this should be helpfull. thanks
i know why its fine. xD
thats how i made the wave effect. the bg is the image technically
oh i see haha
alright passing out cause i stayed up all night messing around in unity haha
thanks for the links guys
np
Some practice 🙂
Still having trouble getting the hang of these more complex curved bits that lead to points.
Done and done. Not too happy with the more complex areas on it but I'm out of time.
Looks good.
Thanks!
Hi, I'm a 2D 3D Artist, if you have a job, write to me. my portfolio https://art-rau.wixsite.com/gallery
Thanks you.
gallery
Some beautiful work in your portfolio, Art.
Does anyone know why this doesnt makes my texture on my object transparent? :
its still black
Does your texture have the appropriate alpha channel?
wdym
@simple sonnet
I want to make a cape and want diff shapes on the same blocky part so I need a transparent background on parts which r invisible in the art program
but idk wht you meant sry
Your texture needs to have an alpha channel which defines what's transparent and what isn't. That's the "alpha" part of the shader
oh in Blender or art program?
Which should be added in your art program
Depends on your program
I don't, no. Google it along with alpha channel. Might not even do them. Idk
the whiteish part is alpha
is no texture*
isnt tht automatically alpha?
it is named alpha channel?
@simple sonnet ?D:
I mean its transparent everywhere else
so I assume it is right?
I mean when you open it with other texture programs or other things
shouldnt the thing I did with the nodes fix the black error?
Alpha channel is an extra piece of texture you include within your png basically. It's in grayscale where black is opaque and white completely transparent.
You should have a "Channels" panel in your program
I don't know if your program allows you when saving a png to convert transparent pixels to alpha
on the wiki it says something 'bout grayscale and alpha channel
but idk how to get there
Yeah, I don't know your software, so I can't really help there
This is what it looks like in Photoshop. Even though my entire texture is opaque and a square image, you see the "Alpha 1" channel in the upper right box lets me mask that so that only the white circle would show up, and the rest would be transparent as a texture.
ty
@lethal phoenix its your node set up and your texture. look up tutorials to understand how nodes work and how texturing works
so you know RWBY
those background characters in pitch black?
does anyone have an idea on how to set up things so that a character looks like that?
no shading
nothing
just a 100% black sillouette without details
Just use a black unlit shader @jagged sluice?
Yes, an unlit material will not receive any light information
Low Poly Modeling https://twitch.tv/titoonet_arts 😉 🔴

Whatcha making today @wary eagle ?
Low Poly Roads/city Props !
Nice! I look forward to seeing the finished product! Wish I could watch from work hahah
Anyone with Blender experience, is there a way to quickly align vertices along an axis?
Without snapping to grid
I'm not a blender user, but maybe if you select the 6 vert' then reduce the Y size to 0 ?
@gritty reef I don't know about Blender, but can you select the verts you want aligned and scale them down? In this case Y like Simon said.
@wary eagle @simple sonnet That worked like a charm, thanks guys!
In 3ds it was just a button in a context menu hahah
There's probably a snap to verts as well. But that's not very useful with multiple verts usually
I could snap them all (or one at a time then move) to the vert on the axis I want and then move them into place manually. That might be okay for a few verts but I think selecting and scaling will probably be better for a larger scale.
Yeah. It's usually just a two action process. Drag select and scale
I do it all the time in Maya anyway
👍 Either way, works for what I need. Thanks for the help and the super fast reply 😄
usually I have to wait a day to get a comment on a question hahah
@glacial elm ?
@lethal phoenix ?
oh wait
yea. about that. your node set up wasent completly clear for the texture you have. but that wasent the bigest problem. the main one was the texture its self. and my tip is to invest some time into tutorials specific for those actions
wht kind of tutorials
idk wht to search
can u gimme a link or so? ❤️
btw I had sent a pic of the node setup on top
@glacial elm
@lethal phoenix ik. thats how i knew that you might need some help. the set up is fine. but with the image you have you could have made a complex work around. but as i said. the texture its self was messed up. and thats why i said that maybe you should invest some time in such tutorials. cause they wotn only help you in this situation but they're good skills to have for the future too
well i could give you some links but just go on youtube and look up some tutorials. a good channel is CGcookie
@lethal phoenix nodes in blender
and texturing in blender
texturing should have both
hello i need help, ım using unity latest version but in scene window my 3d models are in low resoulition, some unity icons are in low resolution, models edges are radged. how can ı fix it?
Hello everyone, wanted to ask a general question! In regard to level design, do many of you utilize software such as Blender/Maya when creating the levels themselves frequently?
I'm not talking about models when polishing, I mean as a part of the work flow.
I'm starting to believe that I may need to look into working through the fundamentals of Blender in order to move forward with my designs.
You can graybox with Probuilder. I found it to be quite good.
It's a package and everything.
I love ProBuilder. I have been using that to gray box all of my designs up to this point.
Things are looking rather blocky at now with no natural contours or edges, something that I'm looking to remedy.
ie. a hole in the ground either looks like a large donut or a square pit created in minecraft.
Hey, I am fairly new to using Blender and I keep having an issue pop up that I would like a permanent solution for.
Right now, when I import a .blend file into Unity (2020.1) using Blender (2.8.1) I have to manually adjust the rotations in Unity to make everything aligned properly. No biggie, but I don't like having to have a bunch of manual corrections if I can help it.
I would like to apply these rotational changes in Blender, so that Unity doesn't have to be adjusted. Only problem is that no matter what rotation I give my object in Blender, it will always reset the model rotation back to 0,0,0 once it gets to Unity.
I am sure that it is updating the file in Unity by grabbing some vertices and yanking them about. Whatever changes I make to the model are being updated, just not rotation.
Low Poly Modelling! https://twitch.tv/titoonet_arts 🔴 😃
What is the neutral value for detail maps in HDRP? I've tried purely 0.5 targa files from photoshop, as well as splitting a Normal node in Substance Designer into separate channels and put those in Unity. They still have a significant effect on the overall normal map.
Oh wait, I got it. Had to uncheck SRGB on the image file in the inspector.
Another fantasy sword in the works, about 40 min in because I'm slo af. 25 min to do the hilt ;-;
Made it this far rip
Sure hope the hilt aint got the same shape as the sword, never gonna get that out of it.
looking for artist to add detail and polish to existing maps for VR military themed First Person Shooter game. Please DM me if interested.
anyone know any where to get child rigged character models? I have been using Fuse for my project for years but cannot find a single source on how to make them or really find any base OBJs online without spending $50 on a single model
Question about materials! Should I apply the materials for an object in Blender or do it in Unity?
I have a very basic item that I created in Blender that I need importer for Unity. I don't know when the materials should be added though.
@tawdry tangle Is it UV'd?
I'm really sure what that is 😫
U should really use something outside of blender to texture it
Substance painter, Photoshop, Heard Quixel is a good thing, havent tried it tho
and you need to UV map the object so that the textures u apply are not stretched out
I have the Photoshop suite. I recently learned how to create seamless textures and such. Also able to generate bump, height maps.
I understand how to do it via Unity, but I wasn't aware that I could transfer items into photoshop
What format would it be in to transfer a 3d object from Blender to Photoshop?
@tawdry tangle https://www.youtube.com/watch?v=ypTHkOF07Qw
Enjoy the videos and music you love, upload original content, and share it all with friends, family, and the world on YouTube.
theres a guide on how to export the UV Map so u can go in and texture it on photoshop
@eager mist is there any way to export a model such as this without it coming out all fragmented?
I'll post an example
This
Comes out like this
I'm sure it's a simple fix
So I highlight all of the vertices, and then I click on "Smart UV Project" with "Live Unwrap" checked.
u dont really need live unwrap on when u Smart UV unwrap thats more for hand unwraping
but yeah u just have to pack the UV
so it uses the whole UV map to fit everything
u can do that by hand or use plugins
Packmaster is a really good plugin
theres a paid version but also a free version that should allow u to do the basics and make ur UV map more compact so u get better quality
How much is this software? I don't mind purchasing some plug in for the sake of streamlining my work.
And this may seem like an elementary question, but how would a model such as a gun be textured/painted? Given that it doesn't really have flat surfaces due to round barrels etc.
hard to tell
the software i think was like 20$
it the model is more high poly and made proper could go for a decent amount
ur best bet is to check the stores and compare and contrast what u have and what others are selling at
most 3D modeling work that is higher tier is all made from request, bigger studios tend to brand new assets made for them and not buy from asset stores
not all but most
http://www.dekogon.com/shop this is a reputable company, u can see what they charge
DEKOGON
on unreal for like a 4k weapon its like 50 but thats just the asset alone
Hey guys, I'm using the LWRP and using an atlas for the textures of my plants. I want my material to be double-sided since my plants are made using planes, but I'm getting this render-path problem
Any lead on how to fix this?
(The texture on the back in rendered in front, and this happens on only half of the material. Viewed from the other side the material looks fine)
We are hiring
https://connect.unity.com/jobs/5de9ad10edbc2a1876739c42

Unity Connect
Your primary role will be that of environment artist, responsible for creating 3D environment art from concept to completion. You will create high-quality, photo-realistic environment textures and lighting. Beyond this, you will also occasionally work on promotional materials...
@eager mist good use of substance painter. but. id suggest not just normal mapping the "Cups" that are on the left "wall". try using tesselation with it instead. works much better. could seperate the material and just teselate that part cause atm i can notice that its just flat
@celest lantern how much
and how often. and whats the project.
?
@glacial elm Did you even click the link?
Says what the project is at least. Hehe
@simple sonnet yea i read that xD. but i like to talk to some one and get more details then just read a premade "article"
@glacial elm https://i.imgur.com/Coagu6p.png with normal maps https://i.imgur.com/xUCgHN9.png without normal map
do u think it looks better without?
@eager mist i dont think you under stoof what i ment
keep normal maps
add a height map
and in unity make the material tesselate
oh
in a game rn, ill try to figure it out after
im pretty sure they dont need to be tessellated tho cause they have depth to them but ill see
kk
help me, when i click an image button, my unity goes not responding. how do i fix it?
@primal scaffold in unity?
yes @glacial elm
i made a toaster but it keeps falling apart
would you like a picture?
yes
someone suggested Fixed Joints
so i tried that but it didnt work
probably because i did it wrong
the thing is you're not making sense atm.
Game
but what about the physics
i need the physics
i want the VR players to be able to pick the toaster up
no i made it with cubes
lol
ok.
im new so
make a empty object
add all of those cubes into that empty object
get rid of their rigidbody
and only add the rigid body to the empty gameobject
oH
@glacial elm how does that do the trick? like by hierarchy all of them should get the RB component right?
it wont let me remove the RigidBody from the cubes because the "The FixedJoints depend on it"
@kindred needle no. technically speaking it should group them into one object and act as a cube around them
if not. then il make a toaster for him in blender cause that would litulary be the only way
its a toaster
legit takes me 5 minutes
im waiting for my material to render out anyways so why not
@glacial elm allright, thanks!
its fine
whats up
it worked
my way?
yes
i added RigidBody to the empty object
and fixed joints were still in the cubes along with a rigid body
but it stopped falling apart
wierd.
oh wait
the empty object acts like a limit then
like a invisible boandary
thats why it worked.
awsome
np
no i need to do it with the fork
now*
are you supposed to electrify your self
easy too
add a colider to the fork. when ever the collider touch the game object toaster. send a message to the player script to destroy
which part
killing the player in VR
no thats general code
i guess since some one is online, i can get some opinions on this material im working on
im working on a redwood tree bark texture. this is what i got so far
@glacial elm do u import those textures to SP?
@eager mist ?
the tree. nah i made it in substance designer. then took it to alchemist to add some minor adjustments. then take it straight to speed tree. later into unity
ohh i didnt even look at the top it looked like quixel mixer
@eager mist xD
@eager mist quixel mixer is fine i guess too. but i like to do stuff in mutliple steps atm
@eager mist quixel mixer is fine i guess too. but i like to do stuff in mutliple steps atm
So i tried to import my .obj 3d voxel model (from magica voxel) to blender and when i import it nothing happens
i did it before like 10 times
But it just doesn't appear
So now i can see it in Scene Collection but it;s invisible
And i have no idea why
All right there was a problem with the file
I opened the magicaVoxel project, exported it again and it's working
kk. nice
How do I import .c4d file into blender?
@ember fox u dont
.c4d is a project file for c4d
you gota export the model from c4d as a fbx or obj or somethin like that. and then import it in to blender
but why would you want that
just model with blender and stop making stuff hard for your self
It's not mine @glacial elm
If you have blender installed then Unity can import them directly. But generally you'd export to fbx
I have made a 3d car what software should i use to texture interior?
@woven venture you can do everything in blender. There are more specialized software for texturing, but all of them are payed, like substance painter.
@small kettle google for blender tuts. There are plenty.
Ohh okay thanks i am asking because i didnt find any tutorial about interior texturing
That would be the same as exterior textuering
You'd need your mesh to have proper triangles inside though.
@potent wraith thanks
Full-feature 3D apps
- Blender
- 3DS Max
- Maya
- MODO
3D Sculpting app
- Zbrush
Texturing software
- Substance Designer (create substances with nodes procedurally)
- Substance Painter (Paint in 3D and apply substances)
- Quixel Suite / Mixer
Concept art / Image editing
- Photoshop
- Krita
- Gimp
- Affinity Photo
- Etc.
There are shadow settings on your light source.
@potent wraith I know but some reasons that settings not affecting the mobile build it still same , I set the quality extreme but still same
@white karma not sure about mobile builds.
@white karma
Check:
- light settings
- quality settings
and their dependencies
When I export anything with an armature from Blender, it always has a -90 degree X rotation, regardless of fbx export settings. Is there a way around this?
The armature has a rotation I mean, not the rest of the model
Rendering the AO for my model
Max seems to think this is normal
Black rectangles making it look like it just didn't try to render what was there
@primal canyon @potent wraith thanks guys
Does someone know a unity asset/tool to take pictures using denoiser and raytracing ?
A tool which support actual unity materials and shader
Hello! I am having an issue In blender, I need to export my materials but I have nodes in them such as scaling the texture to .5 and adjusting the specular to be slightly low. I am porting to a game engine so I cant have them. I need it all to be baked into the texture even if it loses detail.
https://cdn.discordapp.com/attachments/355930159498395648/653767240755445792/unknown.png

Quick question.
Why do you texture props in Blender to then export to a game engine?
You are definitely run into this kind of issues often
That's why we use Substance Designer / Substance Painter for this.
Which... I know and understand, they aren't free.
Still, I recommend you to use those instead for next times
hey, so I have a question, I have a 3D scanned character, cleaned up and rigged in maya, whenever I bring it into unity, my capsule collider is just huuuuuge, and I can't bring it down to make it smaller/bound the character
anyone know of anyway this can be addressed?
@eager mist Why do you keep ignoring Photoshop in that texturing list of yours? ;p It's the OG man.
A Discord post doesn't cover enough
http://skilljutsu.com/views/gamedev-general-software.html
@eager mist That post says nothing about it other than "PS doesn't allow you to paint in 3D". Which is quite irrelevant in many projects.
Of course, if you lack hand painting skills, then smart materials and masking in painter is probably a top choice for many. More often than not (depending on your project obv.), there's no need for highly detailed textures as your assets wont need it. Exporting an occlusion map to PS and texturing by hand is more than good enough in many cases as long as you have some painting experience.
@simple sonnet it does allow you to paint 3d btw
I know. But it's not great for it :p
Many artists, for hand painted, preferred to use 3DCoat.
Also...
Substance Designer is the industry's reference Material Creation and Scan Processing Tool. More than 95% of AAA game projects currently in development use Substance as well as the most prestigious visual effects and animation studios.
I have not used Photoshop for game texturing since 2013.
And you can do hand painted in Substance Designer or Substance Painter.
You are old school? You like Photoshop? Good for you. Use it.
But it's 2019.
Substance Designer came out in 2010 and it tooks it 4 years to take off because of people saying the same stuff you are doing now @simple sonnet
🍺 🕵️ 🍿
Substance Designer and painter is now the lead texturing software for BOTH films and games.
FACT
Right. AAA. Obviously that's another thing entirely. You'd still need to know both of course. Although, I wasn't aware we were talking about the 1% of artists wanting to become professional artists for AAA production teams.
It's much faster for me to quickly paint a texture which won't be seen much up close on a 2D surface, than having to deal with 3D manipulation on top of it.
Have you ever used Substance Designer or Substance Painter to begin with?
Countless benefits
From being about to use a nodal-workflow, that makes the workflow both non destructive and it's also much easier to re-use data.
Or use masks and a procedural workflow.
I really don't see anyone dealing with large amount of UVislands with photoshop and on multiple layers.
That's kind of stupid really.
That's the whole point of SD and SP
Photoshop was never created for game texturing
It shows
We use it for concept arts, icons, text editing to complement SD and SP from time to time.
Game designers use it for image editing.
It is still use in some game studios, because many are still using PS instead of SD and SP and dont want to adapt
Again, I'm not talking about studio standards. I'm saying what my preference is for quick and dirty projects. I'm sure the majority here isn't aspiring to do this professionally, but rather, are doing it mostly as a hobby or for small to no budget projects. Which PS is fine for. Not everything needs amazing looking textures. That's all I'm saying.
Again, you can still do just that in SD and SP.
Yes, obviously. It's up to you whichever you choose.
Textured with SD
Can achieve the same with PS. So that doesn't really say much. Although, for that kind of detailing, I'd go with it as well.

I own and use them. I am aware. Do you work for them or something? lol
Would you be surprised if I tell you that I current do not use either Photoshop, SD or SP for my Indie FPS Game?
🤣
Lol. What do you use
Just a Color Palette, flat materials assigned to geometry.
Less saturated colors for the environment.
More saturated for gameplay-related elements.
And custom shaders/post processing.
Simplicity
I let Unity do the rest.
Exactly. It's really just about how can I do more with less.
Looks great. A good contrast to the cluttered, over processed AAA titles of late.
Been playing the new MW lately and it's so concerned with looking "real" that it ruins the gameplay.
yeah
several AAA games recently released feature a very contrasted lighting making it super difficult to see anything, enemies
gameplay elements dont stand out
nothing does
We are losing our understanding of gameplay and visual clarity.
Games need to look great in motion.
How far along are you in your game? I'd love to join in the beta testing whenever it opens up 🙂
still super early in pre prod
more focused on job hunting than making games at the moment
life
Fair nuff. Life is a bit more important hahah
speaking of all this I'm trying to figure out a workflow with making levels and environments quickly without over using kit bashing or assets
mainly for a platform game
the biggest issue is honestly texturing and makig things look right within texturing
@bold scroll start with a blockout. go from there
with platforms texturing should be the easy part
most platformers use plain colors as far as i've noticed
you can use substance painter and substances made by others
personally would say make your own with substance designer but yea
you can use source but personally i dont advise it. ive noticed many viruses and suspeciouse files with materials from source
substance designer is for re usability and mass production
not necessarily speed
it is for iteration
are you suggesting that speed for one project is better than speed for later projects
?
Im saying there are pros and cons to everything
i agree
if you make a procedural personal material in substance designer. which i do understand that if you're a beginner you might not be as fast as some one who has used it for a while. but once you make a procedural material in substance designer you can add parameters,etc... to later use it for many other projects. some times i just make materials just incase i need them some time in the future.
yeah you can create some fast materials with SD
depends on what you want and how far you want to go with detailing
well. i dont think neither me or you are daniel thiger xD
so i work with details as much as is needed. i dont like to play god like daniel thiger xD
For my workflow im focusing more on props placement and well paced geo since Im only using flat colors
no high poly or normal maps
no baking
I would probably use Substance designer for terrain
but not for many things
trees as well. a flat brown looking tree is weird
oh. yea im kinda wishing i kind find some one that has my experience or better. i've been working on a very complex project with a company for a while now and it's so annoying and hard to get anything done properly since first of all its unity normal RP and they're expting photorealisim (pfft), second im the only env artist. so my workflow most of the time is do anything to get shit done
trees are annoying tbh. i use speed tree most of the time so less annoying. but for example, atm im working on a red wood tree and it's the biggest pain in the ass to make look good. the workflow is straight forward but i have no acces to real redwood tree forest so i can get some branches and photoscan or something like that. so its hard to optimize too since most stuff have to be 3d and not just textures
you know when we watch a Japanese Anime like Naruto and all of a sudden it is a quite intense fight scene, x times more work and the visual quality suddenly drops...
yea
That is indie game dev lmao
😂
yea i get that. but as i said. the expectations are almost AAA in my team. pain in the neck.
but hey we can do like all animes and just put a shit tone of wierd flash effects
hides the shit quality
My suggestion would be find a generic procedural workflow that allows you to quickly texture props. Like an advanced base layer.
Do you game with that.
Once you are done, do a second pass if needed on the most important props.
oh, the prioritize the big assets work flow