
#colosseum-guide
1 messages · Page 1 of 1 (latest)
 spice yew


Introduction - #colosseum-guide message
FAQ - #colosseum-guide message
Levels, Gear, & Preparation
Levels - #colosseum-guide message
Setups - #colosseum-guide message
Setup notes - #colosseum-guide message
Preparation - #colosseum-guide message
Tile markers - #colosseum-guide message
Useful Plugins and Settings - #colosseum-guide message
Tools - #colosseum-guide message
Essential Skills - #colosseum-guide message
Invocation Guide - #colosseum-guide message
Monster Breakdown - #colosseum-guide message
Weapon Usage - #colosseum-guide message

Waves - #colosseum-guide message
Part 1: Wave start - #colosseum-guide message
1a: Wave Start Tile and Run Timing - #colosseum-guide message
1b: Fremenniks and South Spawns -#colosseum-guide message
1c: Double South - #colosseum-guide message
Part 2: Reinforcements - #colosseum-guide message
2a: Positioning Before Reinforcements - #colosseum-guide message
2b: Safespotting the Meleer - #colosseum-guide message
2c: Shaman First Reinforcements - #colosseum-guide message
Part 3: Pillar Stacks - #colosseum-guide message
3a: Common Pillar Stacks - #colosseum-guide message
3b: T-Shaped Pillar Stacks - #colosseum-guide message
3c: Shaman Stacks - #colosseum-guide message
3d: Cursed Stacks - #colosseum-guide message
3e: Destacking - #colosseum-guide message
3f: Pillar Running - #colosseum-guide message
Sol Heredit - #colosseum-guide message
Other Resources - #colosseum-guide message
Combat Achievements - #colosseum-guide message
Speedrunning - #colosseum-guide message
Credits - #colosseum-guide message


The Fortis Colosseum is OSRS’s spiritual successor to the Inferno. You will face 11 increasingly difficult waves of powerful monsters, culminating in a face-off against the final boss, Sol Heredit. If you succeed, you will be rewarded with Glory, riches, and of course, Dizana's quiver.
This is a very hard piece of content. You will be pushed to your limit. Be prepared to fail, a lot. However, as with the Inferno, anyone can get a quiver. You don't need to click a million times a second, or process a million things at once. What you do need is a willingness to reflect on your mistakes, learn from them, and to not give up - in other words, a good attitude.
What's more, the Colosseum is a terrific piece of content to repeat after your first quiver. Not only is it one of, if not the best money-makers in the game, getting proficient at the Colosseum is incredible practice for advanced PvM in OSRS.
This guide aims for anyone looking to get their first quiver, but Combat Achievements and some speedrunning techniques will be detailed under “Other Resources” for anyone looking to learn.
With that out of the way, I hope you like reading. Let’s begin.


Should I do the Inferno or Colosseum first?
It’s entirely up to your preference. Both pieces of content can be done reasonably on a budget, both are difficult, and the rewards of both are useful for one other. Let's make a few comparisons…
Type of encounter
The Colosseum is a short-distance sprint consisting of many high-pressure, punishing encounters over several waves. Misclicks are heavily punished and a single mistake in the waves can quickly end your run.
On the other hand, the Inferno is a marathon of many simple waves interspersed with a few difficult waves as a gauntlet, culminating in a battle to keep your nerves steady as you face multiple bosses at the end, all of which can one-shot you.
Dependency on megarares
Both pieces of content can be comfortably cleared with little more than a basic bowfa setup. However, having a twisted bow, shadow, or scythe, called “megarares,” have a greater impact in the Colosseum, as all megarares perform well against the monsters in the waves, as opposed to only a few in the Inferno. Colosseum monsters have high Defence and Hitpoints, unlike the majority of Inferno monsters, which can be quickly dispatched with lower-tier gear.
Expense of learning
The Colosseum has death fees (reduced by 75% until you complete 100 waves); the Inferno does not. However, Inferno runs take a lot of time and encourage using blood spells when making mistakes, which can add up in terms of rune costs. One long run can cost as much, if not more than a Colosseum run’s supply and gravestone costs.
Thus, before learning either piece of content, you should have a decent GP cushion. For the Colosseum, it can be very nice to pad Death's Coffer with overpriced items to get a discount on your death fees.
We do not recommend learning in rags just to minimise death fees; you will save time and GP in the long run by using every tool you have at your disposal.

What spellbook do I use?
You can get your first KC on either Ancients or Arceuus. We recommend Arceuus because:
- Ice barraging the Fremennik Trio requires a magic attack bonus of +104 to guarantee a freeze, which requires many magic switches. A shadow setup which would easily hit this is worse damage output in comparison to a twisted bow setup.
- Blood barraging the Fremennik Trio loses you precious time in the hardest part of the waves as opposed to using a trident/sang, and only saves you a bit of potential damage which you would heal anyway using a Saradomin godsword special.
- Blood Barrage saves you from brewing between waves, but supplies are rarely an issue with how short Colosseum runs are.
- Blood Barrage won't save you from mistakes in the waves.
If you find yourself struggling with supplies, or if you're an ironman with a Shadow and decent mage gear, you can use Ancients for your first KC. Death Charge gives great value for added DPS specs and is very cheap to cast, so you shouldn't use Ancients unless you feel like you have to. We suggest giving Death Charge a try for your first attempts. If you do use Ancients, never barrage the non-melee Fremenniks!

Can I use melee only?
There's an important distinction to make here. Melee gear in the Colosseum is great! Melee only is absolutely terrible. Here's why.
You screw yourself on invocations
Reentry, Solarflare, and Volatility all become harder to deal with if you don't have a proper ranged option. You want to be able to take these invocations! Cases will pop up where you'll be forced to choose between these or even worse invocations, like Red Flag or Doom 3.
You screw yourself for wave solves
You will regularly find yourself in places where having a ranged switch is a lifesaver. These are not rare situations. Don't resign yourself to the RNG disaster of repeatedly pillar running or tanking hits to solve avoidable situations. Bring a ranged switch.

I heard SW pillar is good…
South spawns, or spawns that aren’t immediately blocked by the pillar, are the hardest part of the waves for a learner. At the Southwestern pillar, you have four times the chances of running into a double spawn. Regardless of the small benefits, this isn’t worth the cost. Don’t use SW for your first quiver.


While the Colosseum can be completed with lower stats, it is recommended to have the following:
 95+ strength
 95+ range
 90+ attack
 90+ defence
 80+ magic (99 if using shadow)
 77+ prayer (rigour and augury unlocked)


Prices are accurate as of November 1st, 2025
Max + 3 way magic
Price: 4.96b
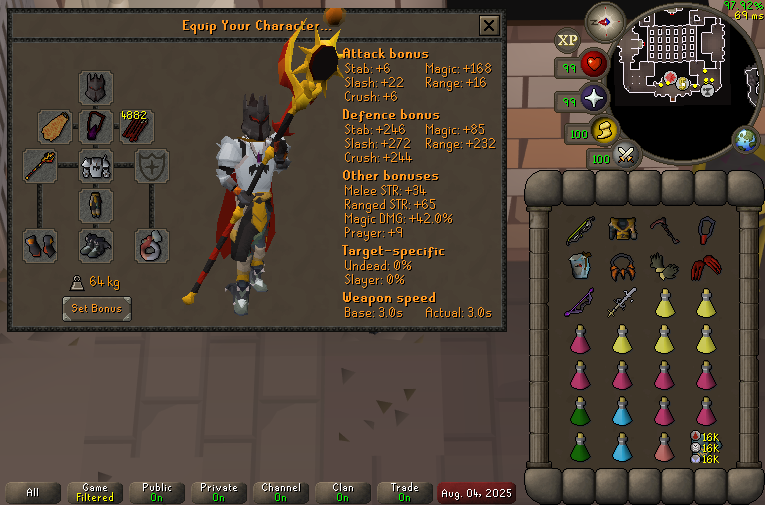
Max + 1 way magic
Price: 4.09b
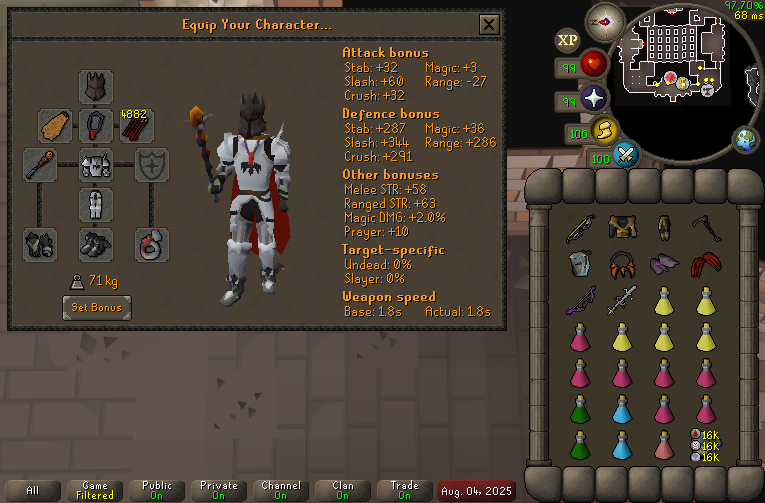
Budget Tbow
Price: 1.65b
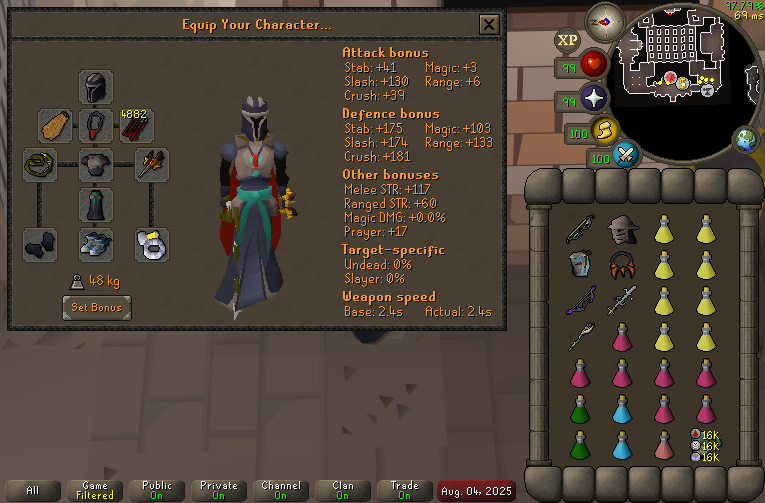
Shadow
Price: 3.84b
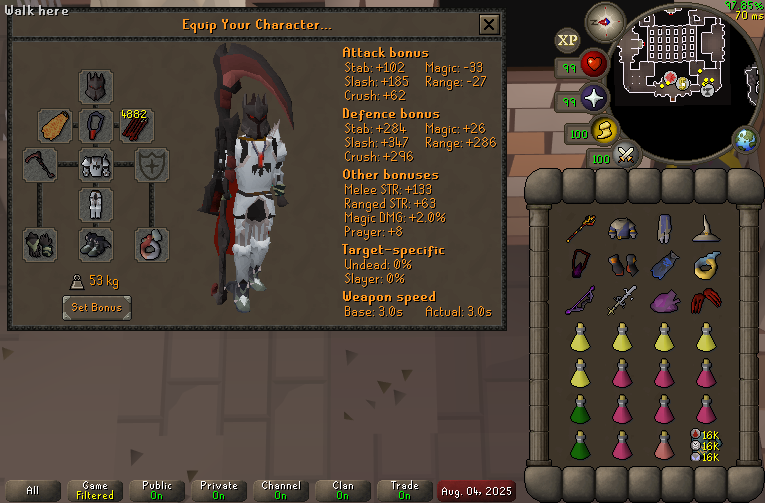
This setup is more expensive than the one above but has less non-melee damage output. Only use this if you are unable to swap gear.
Max bowfa
Price: 739m
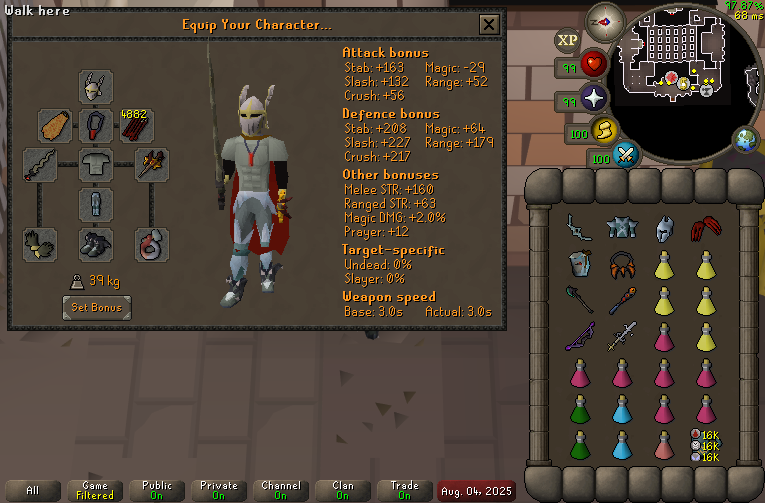
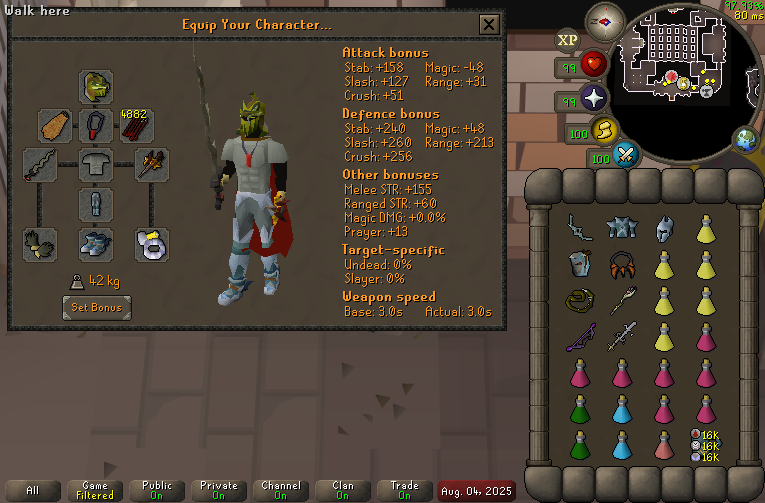
Budget bowfa
Price: 352m
Absolute minimum
Price: 103m
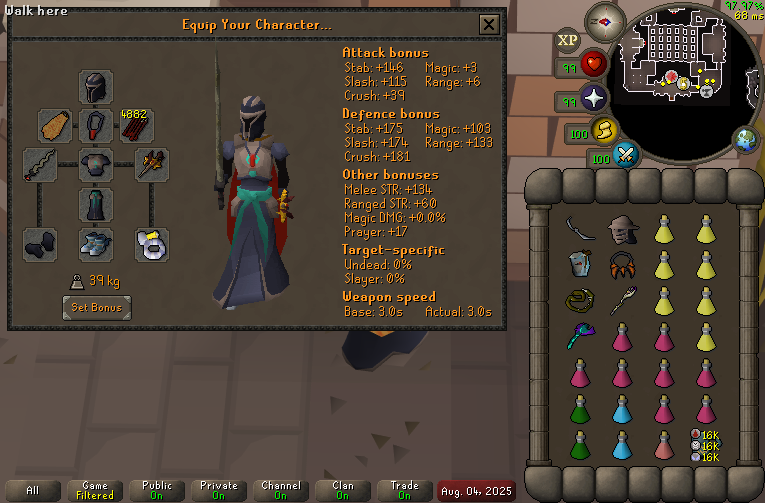
This setup is worse than what we'd recommend using for a first quiver. The blowpipe is used as a mini venator bow to quickly dispatch the Mage fremennik. Not having a venator bow or saradomin godsword are a big blow to your survivability. It’s recommended to save up until then before attempting.


 Brew and restore amounts can be adjusted slightly depending on personal preference. Take note of what supplies you have left when you die, especially after running out of one type of potion. Some players are able to conserve prayer better and can afford to take more brews, and vice versa.
 Make sure you always take at least one sanfew serum in case you pick Mantimayhem 2 and make a mistake.
You do not need max gear to start attempts! It is recommended to start attempts once you own both bowfa and crystal armor, following the ‘Budget bowfa’ setup. The biggest single upgrade is a megarare, so if you are close to affording that, do so before attempting.
You can apply ornament kits to specific items to save on gravestone retrieval costs, notably the  "Anguish ornament kit",
  "Saradomin godsword ornament kit", and
  "Echo venator bow ornament kit".
If you have spare money to invest in upgrades, this is the optimal order starting from one of the above ‘budget setups.’ It’s perfectly fine to skip over an upgrade due to a lack of funds. Make the best use of your GP!
 Noxious Halberd
 Burning claws*
 Ferocious gloves*

 Masori (f) chest/legs
 Zaryte vambraces
 Eye of ayak
 Ultor ring
 Dragon claws
 Neitiznot faceguard
 Avernic treads (maxed)


 Torva helm + Oathplate chest/legs
*Note that bringing this takes up an extra inventory space, but the upgrade is generally worthwhile.

The following section will discuss a few equipment slots and common questions:
Mage Weapon
- Eye is the fastest inventory efficient way of killing the melee fremennik.
- As long as you have 99 magic, any powered staff is capable of two-shotting the melee fremennik, including a Warped sceptre.
- With a Shadow setup you will always one-shot the melee fremennik, but you sacrifice extra slots of gear or supplies.
- In order to one-shot, you need to have 99 magic and Augury on, alongside hitting 42% magic damage (with the shadow equipped). This means that if you don't have Maxed avernic treads and
 Confliction gauntlets you will need an extra mage switch.
- In order to one-shot, you need to have 99 magic and Augury on, alongside hitting 42% magic damage (with the shadow equipped). This means that if you don't have
 If you have a shadow, ensure it is on long range.
 A Voidwaker special can be used in place of a mage switch to quickly one-shot the Melee fremennik. Keep in mind you will be using 100% spec at the start of every wave, so you will want to have a Lightbearer and death charge with you.
Melee Weapon

 Bring an Abyssal tentacle alongside Osmumten’s fang. Both are brought because the fang does high damage output to the point of beating bowfa setups on everything except Sol, who is only weak to slash.
 If you have a twisted bow, you can bank the fang.
 If you have a scythe, this replaces both.
- If you have a Noxious halberd, it replaces the abyssal tentacle, but you need myopia to avoid being dragged awkwardly at Sol. If you have a scythe, do not bring a Noxious halberd.
Spec Weapon
- The Saradomin godsword’s spec should only be used on the Range fremennik. Due to high defense on other monsters, you will likely not get much, if any value out of it on anything besides the fremennik.
- If you have extra spec, you can spend it on claws or fang whenever possible. Make sure to have at least 50% for an SGS on the next wave.
- One common question is why dragon claws are used when burning claws are better. This is because you go through your spec quicker to get out of life or death situations, which can and will save you. Yes, burning claws are better damage for the same spec, but it takes time to land the extra specs and even more time for the burn damage to take effect, time that you likely won’t have.
Range Armour
- Masori (f) is best in slot. If you do not have the money for it, downgrade directly to Blessed D’hide and use the gp on other upgrades - Armadyl or Hueycoatl are not worth the price. One Masori piece instead of the set is fine to use as well.
 Void Range outperforms Blessed D'hide in terms of ranged damage, but you lose out on melee damage since you'd use Void Melee, which is a downgrade from the base melee gear.
 If you are using a Bowfa, do NOT use any ranged armour other than Crystal top/bottom.
Amulet Slot
- Always use an anguish while ranging.

 Blood fury versus rancour are down to preference. If you are not using a scythe you will consume very few charges throughout your runs.
Helmet Slot
- A melee helmet should be worn at all times.
 If you have a Bowfa, bring a crystal helm.
Cape Slot

 Your best melee strength cape and Ava's assembler are the only switches you need.
 However, if you have a Bowfa, Ava's can be dropped IF you have at least 96 ranged, which is required to one shot the Mage Fremennik without any switches.
Boot Slot:
- Maxed avernic treads are your best bet, but are quite expensive.
 Echo boots are a very strong and relatively cheap tank option that also provide melee bonuses. It should be noted that the recoil effect is not useful in the Colosseum, so keeping it on is optional.
 If you are an ironman and have access to neither pair, use your best melee boots.
Ring Slot:
- With how little you melee, there might be some reasoning to bring a lightbearer or ring of suffering. You want to end the Sol Heredit fight as quickly as possible, so bringing out every worthwhile piece of melee gear is in your best interest. No switches or other rings besides a berserker or ultor should be considered, unless you are using a Voidwaker to one-shot the melee frem - in that case, you can bring a lightbearer.


Assuming you are using Runelite, you can import the following tiles via the link below or type the following command in #colosseum.
!colosseumtiles - Contains wave start, A/B, Sol solarflare, and several other utility tiles that will be detailed below.
Colosseum tiles
Alternate Colosseum tiles - Same tiles, but labelled and all one colour
Northwest pillar tiles and breakdown:

Black = wave start
Red = removes minotaur from pillar stacks if stuck
Grey = Solarflare patrol tiles during Wave 12
Yellow + Cyan = A/B offticks for double south spawns
Orange = jaguar warrior safespot
Purple = offticking shaman first reinforcements
Green = destacking large pillar stacks
Blue = south shaman front offtick
These tiles will come up again in more detail in future sections.
While tile markers are handy, they can be counterproductive in excess, so try to mark reasonably. If you mark a tile, you can label it or preferably have its function memorised.


Ctrl+click to invert run mode set to “always”
In-game setting. Holding control and clicking with run on makes you walk, prevents accidentally stepping under a monster with Myopia 3 in certain scenarios.
Menu Entry Swapper
Under NPC swaps, check “Shift-click walk here”. This is extremely useful in the event you have a Fremennik bothering you at Sol.
Custom Menu Swaps
Creates a priority of enemies as left click when you have several enemies under your cursor, used to prevent misclicks with Fremenniks. Paste this list under "Custom swaps".
attack, fremennik warband seer*
attack, fremennik warband berserker*
Note that the plugins reads lines back to front, so this is in the correct order.
Ground Markers
Tile marker import can be found in the section above, or type !colosseumtiles in #colosseum.
NPC Indicators
Tick “highlight true tile” option, copy and paste the following into “NPC list” Fremennik warband*, Serpent shaman, Jaguar warrior, Javelin colossus, Manticore, Shockwave colossus, Minotaur, Sol Heredit
Better NPC Highlight
Serves as a more customizable NPC Indicator, but notably allows you to mark the tile of Solarflares with ID “12826”.
Metronome and/or Visual Metronome
Set tick count to 1. Helps you get familiar and comfortable on tick timings. Visual metronome can also be used with it set to 5, but relies on you needing to pay attention to it on screen while solving waves.
Fortis Colosseum
All-in-one plugin for the Colosseum. Among other things, it provides a precise wave timer. Very useful for knowing exactly when reinforcements are going to show up.
- It is recommended to turn on the "LoS Links Panel" section in this plugin, as the tab takes you to the Line of Sight tool which takes a snapshot when the wave starts and when reinforcements spawn. You can also take one of the current wave as is. See here for more detailed instructions.
GPU
Increases render distance, allowing you to see across the arena.
Anti drag
Set Drag Delay to 10, untick “On Shift Only.” This prevents you dragging your gear when switching, ensuring your inventory stays organized. Changing the number away from this makes intentionally moving items or switching more difficult.
Spell reminder
Useful for Arceuus runs as there is no indicator when you activate death charge and it comes off cooldown.


LoS Tool
https://los.colosim.com/
How to use Colosseum LoS Tool:
Grey tiles: Possible spawn locations
Black tiles: Pillars
Red tile: Player (click to move around)
Red boxes around NPCs/Player are the range of monsters. Player’s default range is 10, or Tbow/barrage range.
Step 1: Select NPCs and click “Place NPC” to place them
Step 2: Use arrow key up or scroll wheel down to step forward a tick. Monster attack ticks will be displayed on the right side
Step 3: Use arrow key down or scroll wheel up to reset to initial monster placement.
Each alternating row constitutes a tick.
Blue is mage, Green is range, Orange/Red is melee.
Video guide: https://youtu.be/WYOgw4ucIU4
Credits to Supalosa for making the tool and Sunfish for its guide

https://los.colosim.com/
Made by Supalosa, who also made the Sol sim, 3D inferno sims, and Verzik P3 sim. What a legend.
OST: MapleStory - Flight to Orbis
Sol Simulator
While nothing can quite replicate the real game, this simulator is an accurate representation of how the fight works in game. Use this to practice and increase your confidence before the real fight.
https://colosim.com/
Credits to Supalosa and Tesla Owner for creating the simulator


There are a few skills you should master on the road to earning your quiver - notably less than what is required of the inferno, as there are lesser supply constraints.
- Regardless, not learning them is going to cost you an unearthly amount of wasted time and GP.
While these can be practised outside the Colosseum, you will get a lot of experience by simply doing these things inside.
You are expected to know what a game tick is and have some form of experience with tick manipulation, whether it be in skilling, prayer, or movement. If you do not understand how they work in OSRS, do some research and apply it elsewhere before attempting.


The first few seconds of each wave have the Fremennik warband trio run towards you. Slow kills on the Fremenniks leads to more damage taken overall and a higher chance of dying to shaman first reinforcements.
To kill them as fast as possible, organise your inventory before the wave starts, attack the melee Fremmenik on the earliest possible tick, and stand still so you can focus on your weapon and prayer switches. Assuming you do not get a double south spawn, the trio should be dead around the 12-14 second mark. Your fast switches give you more leniency to kill any monsters that pose a threat before reinforcements come.


Almost every monster in the Colosseum is capable of dealing devastating amounts of damage. With how spawns and reinforcements are set up, you’re guaranteed to have to deal with 2 or more at the same time at some point in your run. You need to be able to identify the tick each monster attacks on, allowing you to separate their attacks and comfortably swap prayers against them.
Just like the majority of monsters in game, damage is calculated and your prayer is checked the tick the monster’s animation begins. This means you need to click to activate your prayer before this animation starts. This can be difficult with offticks or monsters like the Manticore forcing you to change prayer several ticks in a row.
Fortunately, the Colosseum monsters have obvious tells of when their attack animation starts. A lot of them flail their arms around or in the air before launching a projectile or slapping you across the face. You can use this timing to orient yourself after peeking around a pillar and get into a prayer alternating cycle.


Prayer is a notoriously hard resource to work around. The faster you go, the less prayer you will use up.
A few things to keep in mind:
- With Blasphemy 3 being almost guaranteed, every mistake will drain a lot of prayer.
- Using an SGS on the Range Fremennik will restore about 15 prayer points per spec.
- Brewing several times in a row requires several restore doses in return, which can waste prayer points.
The recommendation for learners who are not proficient at prayer flicking is to keep overheads always on while in combat, swapping it as necessary. Offensive prayers should be on for Fremenniks, south spawns, and at Sol; you can conserve prayer elsewhere.


Modifiers, also called handicaps or invocations, are a required pick after every wave. Each one has a different effect, either debuffing the player or buffing the monsters. Some will stack up to 3 times, while others can only be picked once.
The first wave will always consist of a selection of Relentless, Blasphemy and Frailty. Red Flag and Dynamic Duo can start being offered after clearing wave 6.
The invocations offered are random with a preference towards upgrades to previously picked Tier 1 and Tier 2 invocations. Picking multiple, manageable T1 invocations as soon as possible will reduce the chance of being forced to pick a bad modifier in the later waves.
Note that while a few invocations are generally agreed on as very bad picks, the choices you make will also depend on your existing invocations, current wave, gear, skill level, and personal preference. Learning a wide range of invocations will help you reach the late waves much faster than resetting for "perfect" invocations.

Take


 Blasphemy
Completely free and should be your first pick on wave 1. Don’t camp low prayer.


 Myopia
Any 10-tile weapon can hit across a 3 tile gap with Myopia 3. Easy pick, just be careful.


 Solarflare
Annoying, but does little damage and easy to avoid. Troublesome at Sol.


 Frailty
Manageable until Frailty 2. Avoid Frailty 3 if possible, since it's a big decrease in survivability and makes Sol lasers one-shot you.
Sad take


 Doom
Doom
Quite free at Doom 1, but avoid Doom 3 since it only lets you make 5 mistakes.


 Relentless
Everything already hits hard and often. Can make things very rough when you have a messy wave, but not a huge deal if you’re not in tanky armour or don’t miss too many prayers.


 Reentry
Rags tiles - one of the biggest reasons why you want a ranged switch. Avoid Reentry 2 before wave 11 because tiles will be permanently ragged. Avoid Reentry 2 if Volatility 3 is taken, because this makes the Volatility puddles permanent. Prioritise killing rangers where possible.


 Volatility
Extremely annoying and easy to forget about. Avoid Volatility 3 if Reentry 2 is taken, since the puddles will become permanent. Sol will also blow up on death, which can kill you and end the run.
Avoid


 Mantimayhem
Doubles manticore damage. One misflick and you are probably dead. Harmless until you mess up, but try to take other more forgiving invocations over this. Avoid Mantimayhem 3 at all costs, as melee not being last will make some stacks impossible to solve without taking damage.
 Quartet
Robs you of time in the hardest part of the wave, but not the worst invocation. Very likely to damage you at Sol from forgetting to shift-click to move (expect to click the frem by accident) and panicking. Avoid.
 Totemic
Massive time sink and annoyance, makes it difficult to kill a south spawn before reinforcements. Fairly easy pick at Sol - spawns once at Sol's SW tile once he reaches 50% Hitpoints, then again after 2 minutes, which is more than enough time to kill him.
 Dynamic Duo
The secondary shockwave spawns within a few tiles of the original and ignores spawning rules. Quite likely to mess up your spawn or make really bad pillar stacks. Better than Red Flag or Bees.
 Red Flag
Minotaurs gain smart pathing, meaning they walk through monsters, around pillars, and lose collision, causing other monsters to walk inside it. You will die if any south spawns are still alive as reinforcements spawn. Avoid at all costs.


 Bees!
Bees!
Bees have unpredictable behavior. You have to babysit them while managing everything else, especially if there are multiple. This makes it extremely hard to kill even just one south spawn before reinforcements. Avoid at all costs.


Keep in mind that as you pick Relentless, the max hits of these monsters will all increase by 1, 3, and 6 respectively.

- Each attacks with a different style. Protect from melee if nothing else is attacking.
- Max hit of mage is a 12, range is a 14, and melee is a 29.
- They run towards you and only attack if you stop moving on a 6 tick cycle.
- You always max hit using the combat style a Fremennik is weak to.

 Protect from mage.
- Max hit of 28.
- Attacks on a 5 tick cycle and has an attack range of 10 tiles.
- Spawns as a reinforcement on waves 4-6 and 10-11.

 Protect from melee.
- Max hit of 47 repeated over 3 hitsplats.
- Attacks on a 5 tick cycle and can only hit you if you’re adjacent to it.
- Only spawns as a reinforcement on waves 1-6.

 Protect from range.
- Max hit of 48.
- Attacks on a 5 tick cycle and has an attack range of 15 tiles.
- Every 5th attack, throws a javelin in the air that targets your current tile, damaging regardless of prayer.
- With Reentry picked, thrown javelins leave behind molten sand, with duration and area of effect aspects depending on tier.

- Protect from all 3 styles.
- Max hit of 36 repeated over 3 hitsplats.
- Attacks on a 10 tick cycle and has an attack range of 15 tiles.
- The first time it sees you, it will charge up, then attack with a different style for 3 ticks if it has line of sight. It will then recharge over 7 ticks.
- It can either attack with range first or mage first. Melee will always be last.
- If two manticores are alive, they will match each other's attack pattern.
- With Mantimayhem picked, mistakes are significantly more deadly. Mantimayhem 3 prevents the melee attack from always being last.

- Protect from mage.
- Max hit of 56.
- Attacks on a 5 tick cycle and has an attack range of 15 tiles.
- With Dynamic Duo picked, a second shockwave colossus spawns a few tiles away from the initial. It does not respect the spawning mechanics of each wave.

- Protect from melee.
- Max hit of 74.
- Attacks on a 5 tick cycle and can only hit you if you’re adjacent to it.
- Spawns as a reinforcement on waves 7-11.
- Fully heals other monsters within a 6 tile radius if it has line of sight of them.
- If Red Flag is picked, it will gain “smart pathing,” preventing it from ever being safespotted.


Here’s where your hard earned money and gear is put to use.
- Mage the Melee Fremennik.
- Venator bow the Mage Fremennik, otherwise range it.
- Saradomin godsword spec the Range Fremennik, otherwise melee it.
- Use your highest damage output weapon on every monster as they are all equally weak to Range and Melee. Shadow also works but is slightly worse.
- An exception is the Jaguar warrior, whose low magic level causes Twisted Bows to underperform. Melee him if you are using one.
- Melee Sol Heredit. Do not use a fang.


The Colosseum consists of 12 total waves, with wave 12 being the boss fight against Sol. The first 11 waves will put you up against several monsters from which you can only safespot using the 4 different pillars.
List of all waves 1-11, from Sm Dog on the OSRS Wiki:


The most useful pillar is the northwestern one. When utilizing the wave start tile, only 2 possible spawns are able to see you from behind the pillar. All waves and their combinations can be solved using this pillar alone.
Organize your inventory. Know where your weapons are to deal with each Fremennik. Start with your mage gear already on to deal with the Melee Fremennik first.

1a: Wave Start Tile and Run Timing
Before every wave, you will be locked in place and be greeted with an interface detailing your current progress. To start the next wave, you must select an invocation and click Continue.
- For the very first wave, position yourself at the start tile, then speak to Minimus to bring up the interface.
- If you are not already on the “wave start” tile, you will have to run to it after clicking continue.
5 ticks after the interface disappears and a sound plays, click the “B” tile. If timed correctly, this does two things:
- It prevents 3 spawns on the north side from being eligible to spawn monsters.
- Anything that already has line of sight of the “start” tile will not be able to attack you due to having a small attack delay on wave start.
A metronome is useful for mastering this timing. Repeat the beginning of Wave 1 to make sure you have this strategy mastered, but keep in mind you might not get great feedback from the game since it only has one monster to spawn.

1b: Fremenniks and South Spawns
You’re at the Northwest pillar, the wave is beginning to settle, and the Fremennik trio is fast approaching.
- If no monsters spawn on the south side, change to melee prayer. As the Melee Fremennik is right about to wrap around the pillar, click it. You will need to hit it twice unless you are using a shadow or a Voidwaker special attack.
- From there, turn on rigour, put on your venator bow and range switch, and attack the Mage Fremennik. This will one shot it. If you don’t have a venator bow, a twisted bow will one shot it, otherwise you’ll need to hit it twice. If you have at least 97 ranged, the venator bow will one shot it without any range switches.
- Finally, turn on piety and Saradomin godsword spec the Range Fremennik. Don’t worry about melee switches, as you’ll want to be in range gear to deal with the rest of the wave.
- If you are using Ancients, target the ranged fremennik instead as it moves next to you. Only use two barrages, then kill the remaining fremenniks with the proper weapons.
Something you might see from more advanced colosseum players or other guides is movement between attacks on the Fremennik trio to avoid taking damage. This is not recommended for those learning to get a quiver. You will burn valuable time not attacking instantly off cooldown, and the SGS spec will still outheal any additional damage you may take.
- If you are using Ancients, target the ranged fremennik instead as it moves next to you. Only use two barrages, then kill the remaining fremenniks with the proper weapons.
After the Fremenniks are dead, the rest of the wave should be hugging the pillar on the east, or attacking you from the south. If there are any south spawns, you can step to the “A” tile to drag them closer, then kill them. If you have no south spawns, you can start to deal with monsters east of the pillar if it is simple and manageable. If not, wait for reinforcements on the “A” tile as they will interrupt you, particularly past wave 7.
Proper Fremennik procedure

1c: Double South
Having one monster spawn on the south side is a pretty frequent occurrence, and is not difficult to manage alongside Fremenniks. However, there are two possible spawns, and both of them will spawn a monster on occasion. When these “double south” spawns occur, the wave is now significantly harder.
There are two methods of dealing with a double south spawn.
1) Rotating to the north side of the pillar.
- You don’t have to bother with an offtick or flicking manticores still managing the fremenniks. Reinforcements will kill you if you are not in a secure spot when they come out, so you can’t stay here forever.
- You cannot offtick monsters to the east of the pillar in any way by running north, so you will always tank damage if monsters need to be offticked.
- To offtick a shaman and ranger from the north side, use the blue and purple “shaman” tiles.
This method can come in handy on waves 5 and 6 as the Serpent shaman’s small size allows him to path around the south side of the pillar, which can cause the double south and the shaman to see you at once.
2) A/B offticks.
- This is where the aptly labeled tiles come into play. Each south spawn is labeled A and B respectively, and is used to figure out which tile you need to stand on.
- The majority of the time, you will be on B. You run here anyway to start the wave, and any basic combination will be offticked from here. Always make sure to pray against the front monster first.
- If you have a manticore spawn on A, run to A. Remember to pray against the back monster as the manticore is charging.
- If two manticores spawn south, you must same tick them by going one south of B early, or one west of B early. If you fail to do this before they start charging up, quickly rotate north and return west when they are both fully charged.
⚠️ If you have Myopia 3, in most scenarios the monster from B will not be close enough to attack from behind the pillar. You will have to wrap around the north side or run out from the pillar's safety to hit it.
Both of these have their advantages and disadvantages, but the rotation method is generally considered the better method as it allows you to focus on one action at a time instead of being pressured by everything at once on wave start. Additionally, the prayer flick patterns involved are the same as what you would practice in common basic X+X or X+Y stacks, letting you use your muscle memory better.
If you have two Javelins/Shockwaves spawn south, you do not need to do anything special, treat them as if they are just one.


You’ve made it past the hardest part of the wave. Congratulations! The Colosseum has one more curveball to throw at you.
40 seconds after the wave begins, Reinforcements spawn from the north or south gate, whichever you are closest to. There is always a meleer, and on waves 4-6 and 10-11, it will be supported by a Shaman. Taking care of reinforcements is now your highest priority.
You will have about 25 seconds of downtime between finishing off the Fremenniks and when the reinforcements appear. Your next decision should always factor in their imminent spawn. Simply waiting on the west side is a valid option.
Recall that the minotaur fully heals any monster it has line of sight of. If you are not sure that you can kill one on the east side before it spawns, don’t. The minotaur will end up healing it and then likely be in a worse spot than if you waited west.

2a: Positioning Before Reinforcements
Since you are already set up to be comfortable on the west side of the pillar, the reinforcements won’t be an issue, as it will get stuck on the north or east side every time.
- It’s best to avoid letting it get stuck east, as it will become unstuck when you step out north. If you are on the “A” tile as reinforcements spawn, any stack of monsters on the east side will block them from getting stuck there.
- If you decided to rotate north, you will quickly die if there are any other monsters alive that can see you when it spawns. Thus, you either need to:
- Rotate back west.
- Kill all monsters east before reinforcements spawn.
- Safespot it on the north side (ONLY WORKS ON 1-6), detailed under 2b.
Note that whichever method you decide to use needs to be completed before reinforcements spawn, otherwise you will meet a quick death.
- If you decide to kill all monsters east, you can only do this if there is 1 monster. No setup has the damage output to kill 2 in under 25 seconds. Even just 1 can be a gamble.

2b: Safespotting the Meleer
There are two spots you can safespot the jaguar. The recommended spot is anywhere hugging the west side of the pillar. However, if you are on these specific tiles before it spawns, it will get stuck.
- This is effectively a gamble on waves 4-6 as you cannot predict when the shaman will see you in comparison to a javelin or manticore.
Solarflare can be troublesome before you hit wave 7, as you need to hug the pillar or the jaguar will become unstuck. You will have to walk through the solarflare or you will take damage every pass until the jaguar is dead. After the minotaur begins spawning, you can stand 1 tile away from the pillar and it will still be safespotted.
- The timing is the same for 1 and 2, but it moves twice as fast at 3.
Correct and incorrect timings for skipping both speeds of solarflare

2c: Shaman First Reinforcements
Reinforcements do not spawn on a specific tile but randomly in an area near the gate. When the shaman starts appearing, it’s a coinflip whether it’ll be in front or behind the meleer.
- This can be a serious problem if a south spawn is still alive, as you’ll have to fit a mage prayer into your flicking pattern or tank damage from the shaman.
At the bare minimum, one south spawn should be dead by the time reinforcements spawn. If not, it’s a sign you aren’t doing enough damage. - Be range potted or hearted, use your offensive prayer, and be fully switched in the correct gear. It could also indicate you are killing the Fremenniks too slowly.
If a second south spawn is alive, you will have to prepare for the shaman being first and think of what to do. There are several options:
- Offtick the shaman. While standing on the “shaman” tile west of the pillar, a shaman first will see you before it gets to the pillar, so you can choose what time you want to start praying mage by walking to it at your discretion.
Generally, this offtick will be much simpler.
- DPS race the shaman. If the shaman makes it all the way west and is unable to be offticked, you can try to dump your special attacks and kill it before it kills you. This will not work if the minotaur is able to heal it.
- Run south. This is a last ditch effort of survival. Equip your melee gear, pray an offensive prayer, and flick against any monsters you can while running. You will tank 2 attacks worth of damage while on the way. Don’t expect to succeed doing this.

If the minotaur is north of the shaman, you will have to kill the minotaur first.
If the minotaur is east of the shaman, you can stand in melee distance of the shaman, which will cause the shaman to stop being healed. Kill the shaman from here.


You’ve solved everything that poses an immediate threat to you on the west side of the pillar. Everything left is now to the east. There are a large variety of stacks, so the most common stacks that a learner will face will be in here.
- No stacks with a minotaur/jaguar or second shockwave will be present. If your stack isn’t in here, don’t hesitate to ask in #colosseum.
With each stack, there are a lot of factors that influence how you solve it. Some of the most common factors and their outcomes in this checklist are:
** Are the manticores activated?**
- If not, this leaves the possibility of running pillars (more details in 3f) to simplify the stack before they attack for the first time.
** Is a minotaur or jaguar trapped in the stack?** - You can lure them out using the “drag” tile (more details in 3b). Be cautious of what monsters may see you while doing this, as there is no way to offtick them.
** Is a shaman somewhere in the stack?** - Shamans are different than other enemies (more details in 3c) and thus need to be solved differently.
** Is there a monster trapped behind the northeastern pillar?** - It will remain trapped there unless you step out north or too far south. As this will simplify stacks, you want to prefer any offticks on the south side to keep the northeastern monster stuck as long as possible.
Most stacks require offticking, then flicking whatever monsters that have line of sight. Be cautious of where you want to move, since javelins will force you to move around as you flick and kill the stack.
- Always try to kill the furthest back monster, since if a front monster has one adjacent to it, that monster will slide in its place after the first dies, forcing you to duck behind the pillar and do another offtick.
There are some alternative strategies that will be mentioned that work best with specific stack types, but offticking should be your bread and butter.

Handy reference sheet for almost every kind of stack. Click on the image and open in browser to zoom in.

3a: Common Pillar Stacks
For clarity, pillar stacks are described with X and Ys to indicate what attack style is used and how many monsters are in a row, followed by a - sign to denote the next row, with letters to the right being further away from the pillar. For example, X-Y is a stack with one monster hugging the pillar and one behind it, with differing attack styles. XX-Y-X is a stack with two monsters in the front, one behind with a different attack style, and another behind that, making a T shape.
In most of the following stacks, you can substitute any javelin, shockwave, or shaman with a manticore that starts with the matching style. For example, any ranger can be substituted with a range first manticore. This assumes you do not have Mantimayhem 3 enabled.


When all monsters in the stack start with the same attack style, you want them all to attack on the same tick so praying against them is conventional.
- Walk 1 tile out from the edge of the pillar. Click your next prayer (if necessary) once the NPC’s attack animation begins.
- You should always use the south side:
- Monsters will only offtick when running to the south or west.
- Even when not offticking, going north will release anything stuck on the northeast pillar.
This works no matter how many monsters there are in the stack, as long as they all start with the same style. It also works if the front monster is protruding from the pillar, as in a triangle or T stack.
When two manticores see you at the same time, they will stagger attacks on you exactly 5 ticks apart. Generally, you always want to same tick manticores.

To offtick pillar stacks, we abuse line of sight mechanics to make monsters see us on different ticks. With proper positioning, monsters right up against the pillar need to walk out to attack, while monsters further from the pillar can already see you.
For any stack that needs offticking but isn't in the same orientation, you can move either south or west to get the same result.


- Hug the pillar on the centre tile.
- Turn on your protective prayer against the back monster.
- Click to run two tiles south.
- The rear monster sees you before the front monster.
The same offticks, but with manticores in different positions


As long as the back two monsters start attacking with the same style, an X-Y-Y stack is solved the exact same way as a X-Y stack.


If it's a stack of three monsters and the back monster starts attacking with a different style than the rest, you'll need to stand in a different spot so the middle monster doesn't see you on the first tick.
- Start one tile away from the pillar in the centre.
- Turn on your protective prayer against the back monster.
- Click to run two tiles south.
- The rear monster sees you before the two front monsters.

3b: T-shaped Pillar Stacks
If you forget to stand on A as reinforcements spawn, they can get stuck on these triangle and T stacks. This is a problem because the back monster cannot move to the centre, making it impossible to offtick. To solve this, you need to pull the reinforcement off the stack using the drag tile. Both the Minotaur and Shaman can be destacked this way.
- Stand 3 tiles south of the drag tile in the pillar’s safe zone.
- Turn on your protective prayer against the front monster. A shaman caught on the stack will not be able to hit you as it is out of range.
- Click to walk one tile north. Change your prayer to the 3x3 back monsters.
- Once the front monster finishes attacking you, move to the drag tile. Stay there for at least 2 ticks. This will free the trapped reinforcement.
- Run back into the pillar safe zone. Make sure to pray against the freed reinforcement.


XX-Y, or “triangular” stacks require you to delay the back monster as opposed to the front. If the northern front monster starts attacking with the same style as the back (YX-Y), you can solve it from the north side, avoiding an offtick.
- Start one tile away from the pillar in the centre.
- Turn on your protective prayer against the front monster.
- Click to run two tiles south.
- The front monster sees you before the back monster.
- Note that this stack is prayed in reverse to traditional stacks.

T stacks
On waves 8, 10, and 11, It is possible to get stacks of four monsters on the pillar. They will usually arrange themselves into a T shape.
Depending on whether the monsters can be offticked easily and whether manticores are uncharged, running to the SE pillar may offer an easy solve. However, this will not always be the case.
There are three possible iterations of the T stack. No matter what, you want to kill the middle monster first to avoid potential cursed stacks! Running in melee distance of the front monster will hit the middle monster with a 10-tile weapon and Myopia 3.
⚠️ Do not carelessly destack T stacks! See section 3e. ⚠️


"Different middle"
When the south front and back monster start with a different style from the middle monster, you can offtick the stack in the exact same way as a triangle stack.
⚠️ If you have Myopia 3, hold control before clicking to attack the middle monster.


"Different front"
When the south front monster starts with a different style from the middle and back monsters, you can offtick the stack in the same way as a triangle stack, but you need to do it from further back.
- Start five tiles away from the pillar in the centre.
- Turn on your protective prayer against the front monster.
- Click to run two tiles south.
- The front monster sees you before the middle and back monsters.
⚠️ If you have Myopia 3, hold control before clicking to attack the middle monster. - Kill the middle monster first.


"Different back"
When the south front and middle monsters start with a different style from the back monster, you use a different method to exploit the 15-tile range of the back monster.
- Start six tiles away from the pillar on the south edge.
- Turn on your protective prayer against the front monster.
- Click to walk one tile south, then immediately run slightly to the east.
- If neither the south front nor middle monster is a manticore, you can take your time to move east safely.
- The front monster and middle monsters see you before the back monster.
⚠️ If you have Myopia 3, hold control before clicking to attack the middle monster. - Kill the middle monster first.

3c: Shaman stacks
Recall that the shaman is a 1x1 and has an attack range of 10 tiles, while every other monster is 3x3 and has an attack range of 15. This can be abused to make some unique solves.
By moving back and forth behind the pillar, or “wiggling”, the shaman will sometimes give way to other monsters and stand beside them rather than in front or behind. You should always try to simplify a stack this way before attempting an offtick.
Keep in mind you will not always be able to wiggle a shaman off of another monster. If it doesn’t move after a few tries, it’s probably not going anywhere.
By wiggling, this stack is entirely solved without the need to do any offticks.


This is a common situation on waves 3, 5, and 6 due to how the shaman easily slides down the pillar. The best way to deal with this is to rotate to the north side, then offtick the ranger and shaman using the special shaman tiles.
- Start on the blue “shaman” tile north of the pillar.
- Turn on your protective prayer against the back monster.
- Click on the purple “shaman” tile west of the pillar.
- The javelin will attack first, followed by the shaman.
- This offtick also works if the shaman is behind the ranger. The shaman will attack first, followed by the ranger.


- Start one tile away from the pillar, on the edge.
- Walk out south to same tick the two big monsters. You are outside of the shaman’s range and it cannot attack you.
- Kill the closest NPC, then duck back behind the pillar.
- Solve the remaining stack as normal.


- Hug the pillar on the centre tile.
- Manually run two tiles south. You will tank a shaman hit.
- Flick the two front monsters, then move west, moving you out of the shaman's range.
- Kill the closest NPC, then duck back behind the pillar.
- Solve the remaining stack as normal.


⚠️ If you have Myopia 3 and can't safely hit the front monster, you should destack the shaman.
- Same tick or offtick the two front monsters as usual.
- Step one more tile south. The shaman will be pulled off the stack and you will tank a hit.
- Return to 1 tile south of B, which will let the shaman slide down to you.

3d: Cursed stacks

"Box stack"
This is a stack that only appears if you picked Dynamic Duo or you tried to destack a T stack without thinking ahead. If the monsters on each side are not matching styles, there is no safe way to offtick this stack.
If the south or north side can be safely same ticked, you can solve the stack safely. If you cannot safely same tick anything, you have two options:
- Run to the SW pillar.
- Force an offtick using any manticores in the stack.
Running pillars is generally the easier solution, but if you only have two points of Doom remaining, you may wish to force the offtick.
To force an offtick using a manticore:
- You will have to tank one hit. Start by praying against mage, as the magic attacks deal more damage and are much more likely to hit you.
- Step out on the side with the charged manticore. Flick the remaining manticore orbs, then hide back behind the pillar.
- When you see the second or third manticore orb light up, click to move back into their line of sight, praying against the regular monster. This offticks the two monsters.
⚠️ Kill the front monster. If you attempt to melee the front monster, or hit the back monster with Myopia 3, the back monster on the other side will see you. - Once the front monster is dead, duck back behind the pillar.


"Olen stack"
From wave 9 onwards, it is possible to get a stack with two manticores sandwiching an NPC in the middle.
If the manticores are not charged, you can destack or pillar run safely, depending on whether something is on the NE pillar.
- Jump to section 3f and 3g.
If the manticores are charged with the same style as the middle monster, it is a same tick stack.
- Same tick the stack as shown in section 3a. Remember you need to pray against both manticores, every 5 ticks.
If the manticores are charged with the opposite style of the middle monster, it is an Olen stack. This solve works because of the way manticores delay each other when fully charged.
- Start one tile away from the pillar in the centre.
- Pray against the manticores’ starting style.
- Click to run two tiles south.
- Pray against the manticores one after the other. The middle monster’s attack lines up with the second manticore orb.


"Z stack"
⚠️ These solves are quite difficult for most learners. For a first quiver, we recommend destacking or pillar running instead. Read section 3e and 3f and make sure to plan ahead. ⚠️
This stack can occur rarely with two javelins and a shockwave on wave 8. However, you are more likely to encounter this from carelessly revealing a manticore early, or doing a destack without considering a monster on the NE pillar.
There are two ways you can flick a Z stack while taking no damage. The first is the Z step, named for the shape you have to move in to safely offtick.
- Stand one tile away from the pillar in the centre.
- Turn on your protective prayer against the back monster.
If there is no manticore in the front or back of the stack:
- Click to run two tiles south. Immediately run back and hug the pillar on the centre tile, then immediately run out south again without losing ticks.
- The rear monster will attack first. The middle monster will attack two ticks later, and the front monster will attack three ticks later.
If there is a manticore in the front or back of the stack:
- Click to run two tiles south, immediately run back to the centre of the pillar, and wait 3 ticks in the centre. Immediately run back out south from the centre to the corner of the pillar.
- You can time this by moving back to the centre, stepping 1 tile west, 1 tile east, then 2 tiles south without losing any ticks.
- If the rear monster is a manticore, you should wait for 8 ticks instead. The timing to click to run out is when the third orb lights up.
- The middle monster will attack first, followed by the front and back monsters.
The second option involves a slightly more unusual movement method, but may be easier than the standard Z step as it never requires you to wait around. This method works for every type of Z stack.
- Start on the magenta “shaman” tile.
- Turn on your protective prayer against the middle monster.
- Run four tiles to the southwest (two tiles south of “1”). Immediately after, run towards the east.
- The middle monster will attack first, followed by the front and back monsters.

3e: Destacking
If you have a line of 3 or more monsters back to back, you can perform a “destack” which will remove the 3rd monster from this line. The main benefit to this is that, if executed well, you only ever need to tank 1 hit, as opposed to pillar runs which can get very messy if executed poorly.
⚠️This can easily be dangerous if you are careless. If the front two monsters need to be offticked, destacking will force you to tank hits. Additionally, you will release any monsters caught on the NE pillar, which can create unsolvable stacks where you have to run pillars and tank damage along the way! Plan ahead using the LOS tool, and consider whether a pillar run or attempting a flick is the better option. Bad destacks are frequent run enders!⚠️
- Go to the tile labeled “1”, and turn on your protection prayer against the most dangerous monster in the front or middle.
- Run to “2”, praying against any remaining manticore orbs. The back monster will move south, removing itself from the line in an attempt to get in attack range. Remember to pray against the back monster immediately after the front two attack; this will be immediately after any front or middle manticores finish firing.
- After the monster has stopped moving to attack, return back to “1” and run east toward the pillar, which will prevent it from getting stuck on the pillar again.
- By only standing on “2” for two ticks, you only have to tank 1 hit from the front two monsters. If you stall for too long, you will take another hit from them.
Note that if you are doing this with a T stack, you cannot drag the 3rd monster to the pillar, it will get caught behind the first monster and make a box stack.
If you move off the south edge of the pillar’s safe zone, you will mess up the destack as this will allow the front monster to move and catch the destacked monster on the pillar.
Failed destack

3f: Pillar Running
This is just running to a south pillar. This works exceptionally well if the manticores are not yet activated, since you can make it all the way there before they attack for the first time. You should always offtick any monsters that need it before you start running, **this is not a tank test.
**
⚠️ Pillar runs can be very safe when done properly, but can be very dangerous if done poorly. You may not be able to offtick all monsters as you run, and you will release any monsters caught on NE. Plan ahead using the LOS tool, and consider whether a destack or attempting a flick is the better option. Bad pillar runs are frequent run enders! ⚠️
Pillar run with a bad stack forces me to tank a hit from the javelin, due to a mistake while having to perform an on-the-fly offtick I tank a second
- In general, a line of three monsters can be safely broken up on the southwest pillar, while a T stack can be broken up on the southeast. After arriving at the pillar, make sure you wrap back around as needed to avoid getting hit by two monsters as they slide into close range.
- Pillar runs are an excellent way to avoid dealing with potential Z stacks when you have a manticore, javelin, and shockwave in a line. Offtick them as needed while you run to SW. Beware of anything released from NE!
*** Repeatedly running pillars for the simplest stacks is a waste of time and deprives you of the practice you need to survive hard situations.**


Wave 12
Sol Heredit is the final boss of the Colosseum.
Sol’s max hit is 45, with 100% accuracy. Sol’s attacks cannot be tick eaten.
At the beginning of the wave, a cutscene will play, and you will be teleported to the centre of the arena. Gladiators barricade the centre, bringing the arena down to a 14 by 14 space.
Sol can be beaten with very minimal supplies. Do not be discouraged, even if you’re down to a single sip of brew/restore!
By Ralos, we finally have a worthy challenger. Now let’s see how you handle a real foe…


Final Preparation
Before beginning wave 12, you should do a few things:
- Enable both sound effects and area sounds.
- Make sure both the prayer and equipment tabs have a hotkey bound, and you know where it is.
- Organize your inventory. Equip your melee gear, move brews and restores near the top, and your other gear towards the bottom. Claws should be in an easy to reach place.
- If Quartet is enabled, be prepared to pick out a Fremennik weapon.
- Brew to full, restore, then super combat.

Mechanics
Overview
- Sol has 1500 hitpoints.
- Sol has 2 standard and 2 special attacks. Standard attacks require movement to avoid damage. Each special can only start happening after a certain phase.
- After specific phase transitions, crystal boxes spawn that patrol and emit a beam of light across a row or column. If you are standing on that beam after a few ticks you will take 70+ damage.
- After falling under certain hitpoint thresholds, Sol will stop and say something, followed by molten sand falling both on your current tile and nearby. This sand is permanent and does 6-8 damage.
- This marks a phase transition. Certain mechanics will be introduced or changed at different phases.
- Phase transitions happen at:
- 1350 (90%)
- 1125 (75%)
- 750 (50%)
- 375 (25%)
- 150 (10%)
- The final transition marks his enrage phase, where beams fire significantly faster and puddles of molten sand will constantly fall one at a time.

Standard Attacks
Sol’s standard attacks require you to step back to avoid temporarily dangerous tiles.
- They cannot be prayed against and deal up to 45 typeless damage.
- You have two ticks to react and click back onto the correct tile.
- Staying in melee distance will always damage you.
- Knowing which tile to move toward depends on which attack occurs, indicated by animation and sound.
- To prevent him from moving after the attack, immediately click Sol after stepping back.
- If Sol repeats the same standard attack back to back, an alternate pattern with a different safe tile will occur.
- This persists between phase transitions, but does not if he does a special attack or the other standard attack.

There are two types of attack, Spear and Shield.
Spear
Sol holds his spear back and a “charging” sound plays. A line of dangerous tiles extends forward in the direction he is facing, including diagonals. Sol will always start the fight and every phase with this attack.
Spear 1
A “Two-pronged fork.” Step back on his middle or edge tiles, either 1 or 2 tiles back.

Spear 2
A “Three-pronged fork.” Step back 1 tile inward from the edge tiles, either 1 or 2 tiles back.
- Only happens if the last attack was Spear 1.

Shield
Sol lifts his shield up and a “wind whooshing” sound plays. The entire arena, with exception of a square surrounding Sol 1 or 2 tiles away will become a dangerous tile.
Shield 1
Step back 1 tile.

Shield 2
Step back 2 tiles.
- Only happens if the last attack was Shield 1.

Special Attacks
Sol’s special attacks do not require you to move around. Both of these are harder to deal with and are more punishing if you make a mistake. Sol will always do a standard attack after either of these.

Triple Attack
Particles appear around the spear and a higher pitched spear sound plays. Sol directly attacks you 3 times. You need to protect from melee at a specific time or take heavy damage.
- Protection timing is to click 3 ticks after the first charge up, then 2 ticks afterward for the second and third charge ups.
- If Sol is under 750 (50%) AND the phase transition has happened already, the last attack is delayed a tick, clicking 3 ticks after the second attack.
- Cannot occur until Sol is below 1350 (90%).
- Protect from Melee must be on at the exact time the attack goes through. If it is on beforehand Sol will disable your prayer and hit you anyway.
- Always disable your overhead immediately after protecting from each attack.
Triple attacks both before and after 50%.

Grapple Attack
Sol displays a message that appears both above his head and in the chatbox in all caps, with the word in white indicating what gear slot he’s targeting. He then drops his shield and a shield sound that shifts upward in pitch plays.
[2;31mI'LL BREAK YOUR [2;37mBACK[0m[2;31m
Beams
After every phase transition except for the final one, a new crystal box will spawn. These patrol the very edge of the arena on one side and will occasionally stop, emit a beam of light for 3 ticks, and then fire on the 4th, dealing 70+ damage.
- These are separate from Sol and will go off at random intervals.
- This can be quite troublesome as they can go off in the middle of a Triple Attack.
- Always try to avoid standing in a beam, even if it means you tank a hit from Sol.
- After Sol goes under 150 (10%), beams are emitted significantly more often and will fire a tick faster.
- If you get hit by 2 beams at once at an intersection, you will take damage from both. This will instantly kill you.

Strategy
The majority of the fight boils down to your reflexes and memory, as well as consistency when the game tries to intimidate you during enrage. However, there are a few extra things to consider that might help out.

Standard Attacks
Click to attack Sol the moment he lands, giving you more working room.
The fight always begins with a Spear attack.
- Thus, you can hover your mouse over where you’d want to dodge, also called the “Hover method.”
After dodging and attacking Sol again, expect Spear 2 - hover your mouse over the appropriate tile. - React whether it’s a Shield, Spear, or special attack.
- Rinse and repeat for the following attacks.
This takes some practice and will require you to pay attention to any lasers and pools nearby.

A secondary dodging method exists, but only works for Spear attacks: L movements.
From an edge tile, you step back 2 tiles and outward 1 to make an L shape.
- No matter what Spear attack Sol does, you will always dodge it if done successfully.
- This works great if you just did a phase transition and you do not remember what Spear attack Sol just did.
Once Sol does a Shield or special attack, it’s recommended to go back to normal dodging. - The simplicity of this method might be appealing, but you have very limited tiles you can use this for.
- If you try to dodge as Sol does a phase transition, molten sand will cover your L tile on one side, requiring you to quickly change positions.
- Random sand or beams of light might cover your L tile and put you in a bad position, especially if you aren’t keeping track of Sol’s attacks.
- You still have to react to Shield attacks.

Space Management
Molten sand, beams of light, and solar flares, if present, will all force you to plan, react, and move accordingly. Attempting to do the fight all in one spot will not work out well. However, you want to be cautious with where you’re at, since ragging the entire arena with sand will not make the enrage phase sustainable.
- Generally, you want to try and keep Sol on the edge of the arena and rotate clockwise as the fight progresses.
- This will leave you a lot of room to the west to work with during enrage.
- Being backed into a corner or edge can be lethal. Always try to leave 3 tiles of space between yourself and a wall to account for both Shield 2 and any beams that might force you backward.
- Moving Sol one tile backward during phase transitions can be a great way to conserve space. Be aware of cornering yourself.
There’s not enough room to stay on the starting side the entire fight, you will have to rotate around Sol.
- Start the fight by rotating to the east after getting your first hit in.
- You will corner yourself if you stay here for more than two phases, so you will need to rotate back west.
- Phase transitions are the best time to rotate.
- Always rotate between attacks if you have to do it in the middle of a phase.
A lot of this will fall onto your intuition. Due to the random nature of molten sand and beams, there is no single space management technique that will work every time. Generally, making a mistake with placement is not a run ender.
An example of bad space management at the end of the fight. There is little room to work with during this enrage, and unfortunately placed beams make me panic into a pool, which nearly kills me. While this is an extreme situation, it can happen. Move to a more open area.

Fight Progression
The most complex part of this fight is Sol’s mechanics. After mastering that, the flow of the fight is simple:
- After you’ve settled in and rotated east, claw spec once.
- Fight him, dragging him along the eastern edge, rotating as necessary.
- As Sol approaches 150 (10%), prepare yourself to claw spec and move to an open area.
- The moment he falls below, send all your claw specs and switch back to your regular weapon. This should very quickly close out the fight.
- Beams fire almost immediately after emitting light. It is critical you do not get hit by them at this point, as recovery is very difficult.
- After he hits 0 Hitpoints, ALWAYS run away. Do not stop and celebrate, assume you have Volatility!

Invocations at Sol
Some invocations that you picked early on will have an impact on the Sol fight that aren’t in the base descriptions.
Relentless
- Sol already has 100% accuracy. A lot of his hits have a damage minimum or a set value, making the increased max hit more noticeable.
Quartet
- One random Fremennik will spawn. Pray against it, use shift-click to dodge while setting up Sol, then kill it. Ensure your overhead is off after it dies to not cause issues with the Triple Attack.
Solarflare
- Solarflares move at the same speed, but position themselves within the new arena. With tile markers indicating their path, they’re not a big threat.
Reentry
- With Reentry 2 or higher, any javelin puddles that landed in the middle of the arena during the waves will act as Molten Sand during Sol.
Totemic
- After Sol falls below 750 (50%) one totem will spawn, which will heal him for 75 every few ticks if not hit. It takes 2 minutes to respawn which is more than enough to kill him.
Volatility
- Sol explodes when he dies after a long death animation. If you have Volatility 3 and are somehow on his middle tile, you will get hit twice due to the puddle left behind.
Bees!
- Bees now roam the new, smaller arena, otherwise acting exactly the same.


If you prefer video guides, I would highly recommend you check out Sunfish's guide:
https://www.youtube.com/watch?v=M7sIf6mx4vw
Max gear full run: https://youtu.be/PlpWlCrouss
Budget gear full run: https://youtu.be/ZpJonk7JaeI
Sol example (with commentary): https://www.youtube.com/watch?v=voHFVi6dnOA


This section will provide a brief summary on how to complete the more challenging Colosseum Combat Achievements. If you have a solid baseline and some experience, these will provide an excellent challenge and learning opportunity. You can always attempt several combat achievements at once and block out certain ones depending on the invocations handed to you.


Avoid doom.
Wave 12 preparation:
- You can pretype ::fortissalute for one salute without needing to open the tab, but this still requires you to press enter.
- Set a keybind for the emote tab.
- Prepare the emote tab for saluting by scrolling to the bottom.
Brew up liberally. Make sure you only do this in cardinal directions by pathing in a straight line before emoting. Diagonals work, but the crowd only cheers from one direction, which can throw off your balance. Check your chatbox and verify that the crowd cheered from all 4 directions before finishing off Sol. - Be aware of the stall this emote has, you will likely take a hit while performing.


Pick myopia during the run.
- Use a noxious halberd on Sol.
Lower DPS weapons like Zamorakian spear and Crystal halberd also work. Make sure they are on slash.


- Never AFK behind pillars.
- Always be divine range and divine super combat potted. Prepot a dose of each so one potion will last the whole run. The remaining super combat is useful if you brew down before divining again.
- Always use an offensive prayer.
This time is considered very easy, you just need to make sure you’re always doing something. It’s doable even without megarares, but you will need to push yourself.
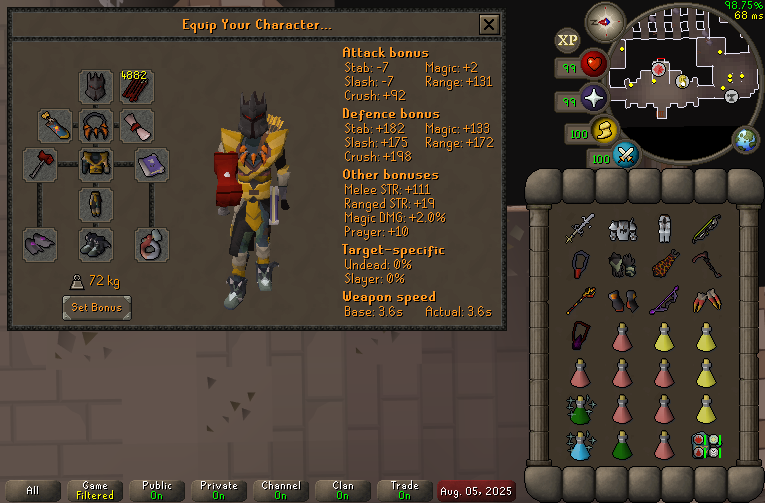


The Dragon Warhammer is used to spec Sol once to make your scythe much more potent.


Avoid solarflare and doom.
- Check that your run is off before starting wave 12.
Immediately following a shield bash, prepare to walk backward 2 tiles. Sol will always move following this attack. Don’t corner yourself as you cannot run away!


- Reset wave 1, looking for bees/solarflare/quartet to begin wave 2 with. Consider saving bees for later, as they are the most annoying.
Avoid myopia and doom. - Optionally, bring a few Chins, a webweaver, or a hunter’s crossbow to tag bees at range.
- Consider bringing a Dinh’s bulwark to nuke the bees that spawn at the start of Sol.
- Prepare yourself for a messy Sol.
Considered the hardest CA due to RNG (and bees). To make the most of your picks, never try to diversify into multiple T1 invocations - always level up the same one if Bees/Quartet/Solar flare are not present. Additionally, if you have the choice between Quartet and another invocation, pick Quartet, as it does not have a levelling system to increase the odds of it showing up.


Avoid solar flare. Even though it doesn't fail the CA, it might trip you up and cause you to fail.
- Pools from phase transitions do not fail this CA.
Expect this to take a few attempts. The DPS boost from perfectly parrying grapples will kill Sol faster, which prevents potential mistakes.


Some very barebones strategies are listed here for sub 24 and faster, with emphasis on you figuring out how they work.
Note that these strategies are not limited to the timeframe they should be mastered by. However, the strategies down the list are significantly harder. You should be prepared to die when attempting difficult or unfamiliar techniques.
https://youtu.be/qpVLcBSYEXo - Speedrun guide/example by Deer with outlines of how each wave should go.

Commentated run for going zoomies on the NW pillar!
NOTE: This walkthrough is geared towards players who are already experienced with Colosseum. If you're looking for content aimed at newer players, check out my guides playlist:
➼ https://www.youtube.com/watch?v=8nuvhSz2gI8&list=PLNJRBSR4SGj9bFPG0Do-PppQcxpxqoNgJ
Join our Discord community wh...
Sub 24 | learning the basics:
- Quick wave solutions. Always do something. Memorize stack solutions to not have to spend time thinking about what to do. More gear switches, less supplies.
- Do your best to kill something before reinforcements.
Sub 18 | refining basics, learning speed tech:
- Good wave procedure. Always kill something before reinforcements. Minimise downtime and lost ticks. Know what to do and execute without waiting around. No more destacking or pillar running outside of the dreaded four-in-a-row stack.
- Good kill order. Attack the pillar stack before the south spawn to minimise AFK time. Force south spawns by standing south of B if needed.
- Venator bow abuse. 6-8 way ranged switch (venator ring). Learn venator bow triple bounce setups (~30% more DPS than scything).
- Sol mastery. Manage your space well enough to 5-tick scythe throughout the fight.
- Get comfortable with Frailty 3 and Doom 3.
Sub 16 | mastery of basics, pushing limits
- Excellent wave procedure. No time lost on frems, switches, or solves. Full knowledge of venator bow possibilities and ability to execute them.
- Step-under offtick. Force offticks by stepping under and red-xing. Use this to venator bow the shaman on wave start from waves 1-4 off the non-melee frems, attack the pillar stack safely, and instantly solve Z stacks.
- Unblock west spawn for more south spawns. Start two tiles north of the regular start tile. Instantly shadow the melee frem.
- Catch the minotaur. After killing two monsters on wave start on wave 7 or 9, continue to DPS the last monster. Intercept the minotaur right as he spawns to force him to attack you and prevent a heal.
Sub 15 | think big
- Hit big. Hit really big, especially on wave 3 for the reinforcement skip. Don't stop hitting big.

This is your grind now.
There is always something to improve from. Every failure, every mistake has something to take away from. It might seem impossible with attempt after attempt. It’s demotivating. It’s stressful. But you’ll see progress. And then you’ll falter and die several times without any. After you break through and place that quiver on your back, every second will have been worth it. We’ve been there, and now we’re with you. And at the end of the day, we’re all playing a video game together. With time, hopefully the rush and all the pain become as fun and memorable for you as it was for me.

Good luck!


@low folio - being my co-writer, providing clips, and shaping this concept from the ground up on the OSRS Wiki
@austere quartz - making the original Inferno guide, which this strived to match in quality
@knotty solar - heavily inspiring the cool WDR banner at the top
@hallow spire @lethal pollen @alpine slate - final draft reviews and feedback

If you have ANY questions, do not hesitate to ask away in #colosseum!

Or click this link to go the the top directly: #colosseum-guide message
You can also use the pinned messages to quickly jump to a specific section.