
#show-and-tell
1 messages · Page 24 of 1
 lucid bloom
 solar yew
how do you know who is behind who and their depth ?
lucid bloom
Doesn't matter as much at nerf ranges as much as longer range situations
solar yew
Yeah but what if someone use someone else body as cover and you have to apply more force to reach them or switch to and penetrate the body with AP nerf ammo ?
lucid bloom
Usually when I use my old one it's all vs me cuz I'm basically cheating. I have my single shot pistol and I can take on a much larger force with better arms.
The opposition strategy is to bumrush me
solar yew
Also noticed you don't have thermal / flir so how do you know a target has been destroyed without the body heat? (I assume this is for some kind of automatic track and engage turret?)
lucid bloom
My strategy is usually to create distance, ambush and repeat, it works well
This is version is for nerf, my last version was airsoft with a noir camera, IR illuminator and laser range finder. I also had a situational awareness web app that I could laser targets into
https://youtube.com/shorts/kpVqX2uIrHw?feature=share
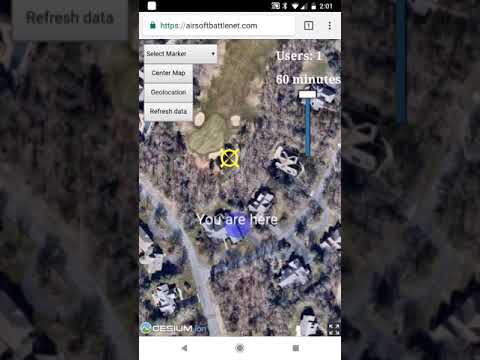
The airsoft field near me closed down a while ago so I'm on a nerf kick because it's a more friendly experience and people don't get as mad when they think you are cheating
 rough root
I feel like nerf is way harder to take too seriously. Both games should be for fun
lucid bloom
Have you ever had grown people yell at you over a game that you outclass them in?
solar yew
happens to me in tennis, probably the worst dunning-krueger I witness for me
rough root
Not outclass them in, but I have had grownups yell at me over a game, I was after all a player on a 1st grade baseball team.
lucid bloom
See that's what's wrong, people get angry too fast
solar yew
can't play with my friends anymore because I outclass them for playing for 3 years and just can't turn off hitting good shots back... Not sure if that is what you meant but I'm familiar with that
lucid bloom
What I mean is people get angry over nothing, I can deal with people 1 on 1 just fine, the larger the group the faster things go wrong.
That's why I stick to myself most of the time lol
I like people but at the same time I would rather be by myself or with a few friends than with a group of people I don't know. When I'm surrounded by a known commodity my anxiety goes way down because I generally know what's going to happen
solar yew
the macropads ive made in the past few months


im currently working on (yet another) macropad but with a round display and white ANO encoder

https://cdn.discordapp.com/attachments/771054985915269151/972542563414323260/2022-05-07_17-54-21.mp4 different animation when you press the different buttons
 gloomy ember
My home made "weather indicator" iot device. Based on api calls to openweather, it indicates current temperature and wind speeds on the bottom row, max heat index and wind speeds on the left, and chances for rain on the right for the next 4 hours. RGB values are customized for how I perceive heat and cold. It's based on the ESP32-S2 QT Py running circuit python, and the 3d printed case from them that I've mod'd in tinkercad to snap together the acrylic cover and LED strip holder. It was fun working on an interface that didn't use word or numbers to convey information.

 solar yew
Very nice. Where did you get the plexiglass mounting? cut yourself? would you mind sharing your code?
 hard oriole
I designed an octopus that makes use of: a distance sensor, 2 LED rings, a QTPY RP2040, and a 1w speaker. I saw mark's insect bot last week on show and tell, and realized I may have been inspired by his use of a distance sensor for eyes. I printed the base in TPU with channels in the legs to insert some brass wire. So the legs are posable. A simpleio.tone uses the distance sensor for note pitch and duration, except for the “close up” sounds where I'm mixing 2 sine waves. https://youtu.be/3FeENYyghFc


I designed an octopus that makes use of: a distance sensor, 2 LED rings, a QTPY RP2040, and a 1w speaker. I printed the base in TPU with channels in the legs to insert some brass wire. So the legs are posable.
 surreal oracle
aint much but my first non breadboard project, it’s a controllable sine wave visualizer built with a neopixel and an esp32
seizure warning?
solar yew
today: the above tomorrow: Monty's brand oscilloscope 🙂
 scarlet pelican
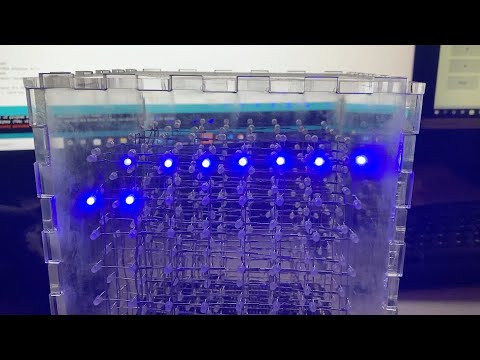
My students built this 8x8x8 JelliCube kit, laser cut an acrylic case for it, wrote a software library to PWM individual pixels (the hardware PWM could only control groups of pixels), and then wrote a snake game for it: https://youtu.be/6Z5fO2p2npI
Support this channel via a special purpose donation to the Georgia Tech Foundation (GTF210000920), earmarked for my work: https://youtu.be/VBu-LST1p9c
GitHub link: https://github.com/jparkerjones/LEDCube
Here's the GitHub for the PWM library, snake game, and case design files for the 8x8x8 cube: https://github.com/jparkerjones/LEDCube

GitHub
Repo for Arduino Nano control of LED Cube. Contribute to jparkerjones/LEDCube development by creating an account on GitHub.
 subtle delta
PCB prototype boards came in for my "CircuitPythonukiah"!


 scenic siren
subtle delta
PCB prototype boards came in for my "CircuitPythonukiah"!
scenic siren
subtle delta
PCB prototype boards came in for my "CircuitPythonukiah"!
Neat!
 civic vale
Cool idea!
scenic siren
solar yew
I made something pretty cool, wanna see?
Welcome to the server! 🙂 You don't have to ask. You can simply post you project so folks can see it.
We always want to see pretty cool projects.

 scenic siren
Nice! I still struggle with perf board soldering.
scenic siren
That's not bad in general, but it's pretty excellent for getting started. Have you tested the functionality yet?
scenic siren
Amazing! Great job!
solar yew
This is actually my 3rd project though
scenic siren
That's still really new. My statement stands 🙂
scenic siren
Sure!
solar yew
My first perf board prototype


 long solstice
Looks great the second pic is very blurry though 😄
solar yew
What's a MCU?
long solstice
Microcontroller
long solstice
Oh great
 junior barn
solar yew
yep
junior barn
solar yew
yep
First design and no smoke? Fabulous! 🤘
long solstice
He means you didn't mess it up 😄
solar yew
Here's my 2nd one. I made it because I wanted a relay module but didn't want to buy one online.


it like the ones you find online but with no leds
rough root
What are you switching with that relay?
solar yew
uh well I was planning on switching a night light
rough root
so mains power?
solar yew
but I'm to scared to mess with power outlets
solar yew
rough root
so mains power?
what
rough root
Yeah so, I hate to be a curmudgeon, but what you've got there is likely not safe
solar yew
what
rough root
Someone can chime in if I'm wrong, but...high voltage design is not easy and is easy to make dangerous mistakes with
rough root
ahh
just raised my alert level for a moment, I thought I should say something.
neat, well done work, btw
solar yew
y'know I'm really scared when it comes to live power
rough root
Just gotta be careful about dangerous power sources!
rough root
Have fun!
solar yew
yep thanks!
and in case your wondering about my safety around my workspace I have a eye protection, a fan, and some helping hands!
rough root
glad to hear!
scarlet pelican
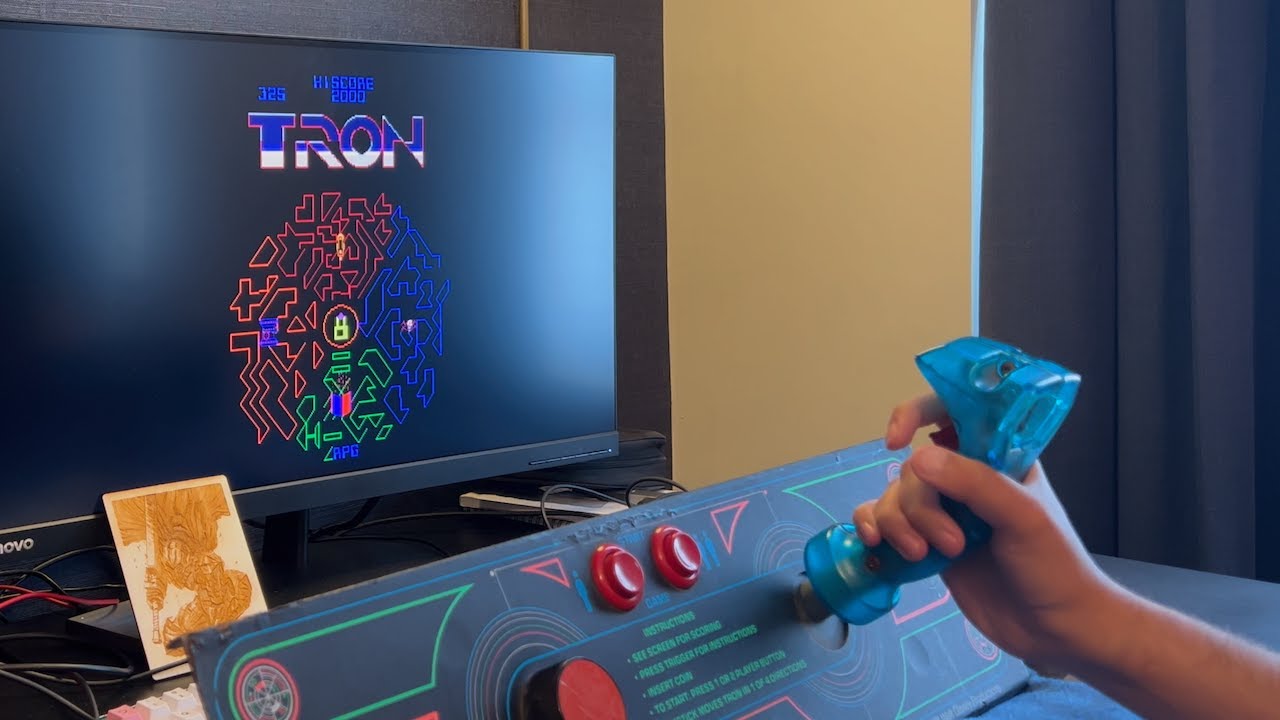
I spent an absurd amount of money on ebay for this original Tron arcade control panel (joystick + rotary encoder) and had my students create a USB interface for it using a Raspberry Pi Pico RP2040: https://youtu.be/SHs1i-BqnDA
Support this channel via a special purpose donation to the Georgia Tech Foundation (GTF210000920), earmarked for my work: https://youtu.be/VBu-LST1p9c
GitHub with wiring diagram & source code: https://github.com/ArmaanLala/Tron
RP2040 from Adafruit: https://www.adafruit.com/product/4864
 solemn vector
pretty cool!
solar yew
alright guys I just finished soldering my buzzer wanna see?
 vernal vigil
Op amp tester, for those times when your circuit doesn't work the way you expect. 🔥😕


GitHub
Op amp testing circuit. Contribute to Len42/OpAmpTester development by creating an account on GitHub.
 burnt wyvern
solar yew
alright guys I just finished soldering my buzzer wanna see?
burnt wyvern
solar yew
alright guys I just finished soldering my buzzer wanna see?
Let's see it! I actually ordered some parts to make something out of a buzzer recently.
solar yew
burnt wyvern
Let's see it! I actually ordered some parts to make something out of a buzzer re...
cool
Here it is!

 burnt wyvern
Nice, have you tested it yet?
 brittle whale
Very WIP still but making some headway on my silly RGB macropad/eventually USB hub combo learning exercise. The cutouts for the backmounted RGB LEDs are wrong, need to figure out how to get KiCad to play nice with that
 lucid bloom
I was able to get everything I thought would work working for the performa 6400/200. The performa's power button is now controlled by home assistant via mqtt. It does a shutdown sequence which coincidentally works to turn it on.
https://youtu.be/LYu-qlFKYk4

Home assistant mqtt controlled performa, power on and power off. additional key sequences will be added to launch programs/games or open/type into text editor or something. We will be making a tutorial for this project. The way it works is the wombat transforms usb into adb. it turns printscreen into a power button event, the metro sends the hid...
lucid bloom
and the shutdown
https://youtu.be/3xIWq2oqYvw

hit left shift
wait 2 seconds
press power button (printscreen)
wait 3 seconds
press enter
solemn vector
cool!
 gusty shard
How about a weather station?
 polar crag
1-bit "memory" module built with only transistors, resistors, and wires. (And LEDs to show the state of the bit but they aren't actually needed to store the bit)

It's pretty much just 2 xor gates attached to each other
 dawn bane
Designed a tiny rp2040 board, waiting JLC to produce it.


 frosty topaz
dawn bane
Designed a tiny rp2040 board, waiting JLC to produce it.
frosty topaz
dawn bane
Designed a tiny rp2040 board, waiting JLC to produce it.
Oooh, nice! What's the J3 connector designed to connect to?
dawn bane
SWD port
sorry
It's designed to connect sensors

I was trying to make two banks in 180 degree mirrored, but not feasible without blind via
solemn vector
dawn bane
Designed a tiny rp2040 board, waiting JLC to produce it.
nice! did you order just the pcb or did you order assembled components?
 quiet totem
How I made my own "Video port" of my Bmc64 I been working on

 dawn bane
solemn vector
nice! did you order just the pcb or did you order assembled components?
dawn bane
solemn vector
nice! did you order just the pcb or did you order assembled components?
I ordered just PCB this time, usually something goes wrong with first version and hand soldering it for debugging
solemn vector
makes sense... I was wondering if it was worth it
 heavy shoal
One of the people with a Tiny Memex I made ported Smalltalk to it! https://twitter.com/codefrau/status/1506869806691102723


Flipping the MX and MY bits fixed it, and now I could work on replacing the existing single-display overlay code with my custom code that displays each half of a larger frame buffer on a different display. That way we get a virtual 480x320 screen, with full GPU acceleration.
12/
 Twitter
·
Twitter
·
 torn pelican
smart glasses type thing, still wip

 whole brook
Just got done assembling these two beautiful kits that Adafruit’s carrying! Was a nice, meditative way to relax at a difficult time. So glad makers are making these things and that Adafruit can help get them in people’s hands. ❤️

Create a 3D Art Deco-like Cat Lamp with this beautifully designed soldering kit from our maker friends down under, Elkei Education. When assembled and powered on, the ...
Create a mini 3D version of the Space Shuttle STS Discovery with this beautifully designed soldering kit from Phyx, our maker friends in Belgium. This small card-style ...
solemn vector
nice!
scarlet pelican
This semester I advised a senior design team at Georgia Tech that made a DSP-based guitar pedal using the WeAct Studio STM32H750 from Adafruit: https://youtu.be/UXm6mMOrlcg
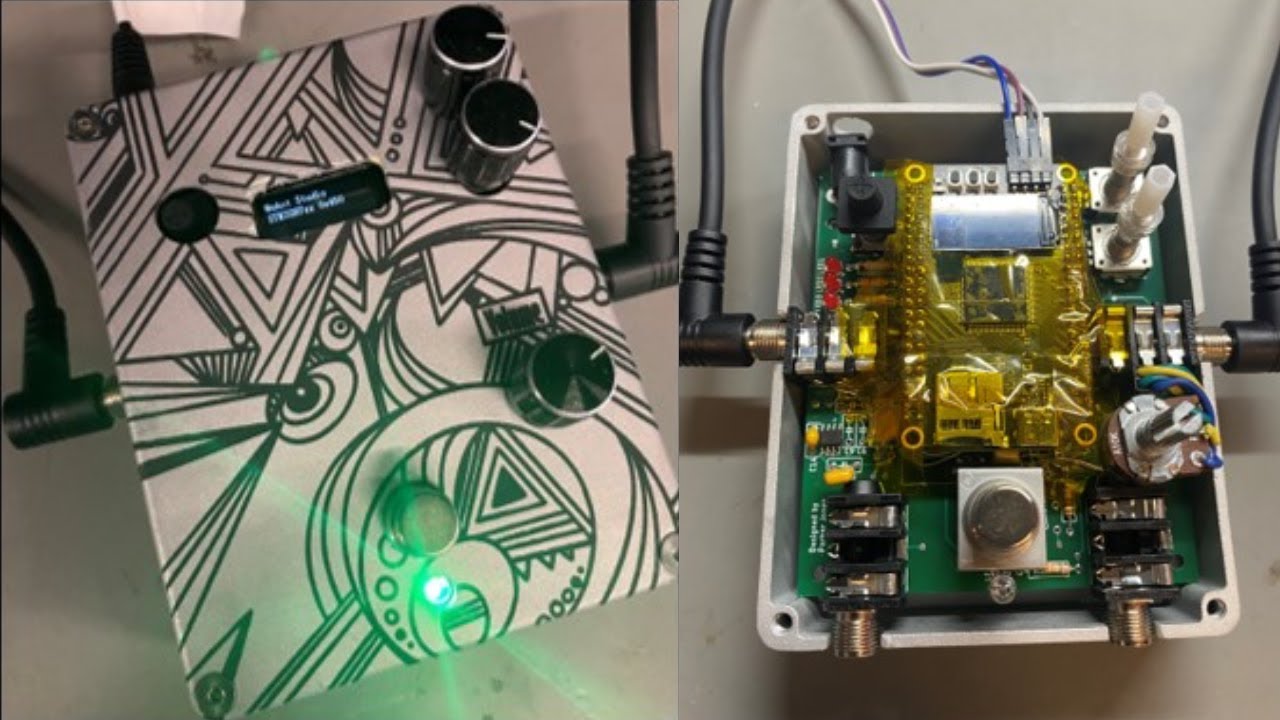
Here's the GitHub with Eagle PCB files and source code if you want to try building your own: https://github.com/jparkerjones/digitalEffectPedal
Support this channel via a special purpose donation to the Georgia Tech Foundation (GTF210000920), earmarked for my work: https://youtu.be/VBu-LST1p9c
Here's the GitHub with the Eagle PCB files & code for the WeAct Studio STM32H750 pedal prototype: https://github.com/jparkerjones/digitalEffectPedal

GitHub
Contribute to jparkerjones/digitalEffectPedal development by creating an account on GitHub.
 hallow trail

Instructables
Upgrade CNC Control Box: In this project, I am upgrading the CNC control Box with the new feature. As I use both Laser and Spindle so it makes hard to change function, that's why here I am adding DPDT Switch to change function from Spindle to Laser. There are two momentary …

Instructables
3018 CNC Machine Upgrade to 5050 CNC Machine: Want to Upgrade 3018/1610 CNC Machine to 5050 CNC Machine!! Here You Will Get All Instructions.As I was a beginner in CNC Machine I chose to buy a cheap 1610 CNC Machine so that I can learn and do my experiment on it. I always prefer to buy a small …

Instructables
Motion Galaxy Lamp : Galaxy Lamp one of the better choices for a grand piece on your Desk, in Living Room or in Bedroom. In Night it looks more attractive when LED glow. The front face rotates and look like planets are moving . This Lamp adds a nice look and texture in …
gusty shard
Experimental UART ring network for connecting multiple microcontroller boards. https://github.com/rsbohn/waffle-ring

GitHub
Experimental UART networking for microcontrollers. - GitHub - rsbohn/waffle-ring: Experimental UART networking for microcontrollers.
Works pretty well for a two-node network.
gusty shard
waffle ring zero -- all RP2040
 hallow trail

Instructables
Build CPU for 3D Printer: Mostly all majors’ upgrades have been done by the 3d Printer community so I was thinking that what is left to make a new upgrade. Here I am upgrading the Creality Ender3 3D Printer. All 3D Printer owners are bored of their 3D Printer, the reason is …
 red pebble
It's my trolling motor control system in progress. A few more parts are trickling in but I'm going to use it to add a digital anchor and gps path tracking to my fishing boat's trolling motor.


 grand roost
Oh boy, finally figured out a solution to what I need. This is an RP2040 running CircuitPython using I2C to read output from an RP2040 running C/C++ which is importing Arduino's Wire.h library using pico-arduino-compat. This is a first step of many after so many hours of troubleshooting, all because I require usage of an Airlift ESP32, TinyUSB host mode, and stubbornly not buying the Arduino RP2040 Connect after it came back in stock 2 days into the project.
 burnt wyvern
I made a Sonos Port alternative out of just a Raspberry Pi Zero W and a USB ADC/DAC. It can stream an audio input from a turntable, cassette deck, etc. to a Sonos system. I mainly did this because I don't have $450 to spare on a box that is basically just an adapter, and because I thought it was way overpriced.
 vernal vigil
Sunday Morning Prototyping!
 gusty shard
UART ring network https://github.com/rsbohn/waffle-ring

GitHub
Experimental UART networking for microcontrollers. - GitHub - rsbohn/waffle-ring: Experimental UART networking for microcontrollers.
vernal vigil
gusty shard
UART ring network https://github.com/rsbohn/waffle-ring
So, if a Feather RP2040 isn't strong enough for the module I'm planning, I could use two of them together...? 🧇
 candid crescent
That'd depend on the details of the design. Often it's more complicated to coordinate and make efficient use of multiple chips versus just upgrading to a single more powerful processor.
vernal vigil
I'm already using both cores on the RP2040, so that's not such a big deal for me. (I "chose" to use the Feather RP2040 because Adafruit sent me one on Black Friday. 🙂)
gusty shard
Yeah, the two feathers (or other boards) would communicate over a simple UART based ring network. I'm still at the "hello world" stage, but it works pretty well on a three node network.
whole brook
Remixed the awesome Raspberry Pi HQ Camera Case to slap a Hyperpixel 4.0 display on the back, and it worked out pretty dang great!
https://www.printables.com/model/216960-raspberry-pi-hq-camera-case-hyperpixel-style


 solar yew
whole brook
Remixed the awesome Raspberry Pi HQ Camera Case to slap a Hyperpixel 4.0 display...
solar yew
whole brook
Remixed the awesome Raspberry Pi HQ Camera Case to slap a Hyperpixel 4.0 display...
??? isn't the black thing pro photography lenses ?
whole brook
solar yew
??? isn't the black thing pro photography lenses ?
Nah, just a C-mount lens from Arducam that I got on Amazon for about $65. It's not a very good lens - massive distortion - but most C mount lenses are built for use on CCTV cameras where it'd be fine.
https://www.amazon.com/gp/product/B088GQHVY3
Either way its fun to play with! tbh though the lenses on Adafruit are a lot easier to work with and are a lot smaller. In retrospect I should've just stuck with this one. 🙂
Nice thing about the HQ cam is that it works with all kinds of lenses and adapters, although the small sensor size means it'll "crop in" on a just about any sensor not built for C-mount or small sensors (like 1/2.4" or 1/3")
I have a bunch of Nikon pro lenses for instance that "work" on the HQ cam with a simple mechanical adapter and some shims, like these from Fotodiox: https://fotodioxpro.com/collections/lens-mount-adapters/camera-mount_c-mount
solar yew
nice to know, I thought those were much expensive (couple 100$) and saw similar posts on reddit electronics recently
whole brook
Its fun to strap the HQ cam to my trusty old 70-200 f/2.8 😂 The equivalent "zoom" is something crazy long
 lusty siren
whole brook
Its fun to strap the HQ cam to my trusty old 70-200 f/2.8 😂 The equivalent "zoo...
lusty siren
whole brook
Its fun to strap the HQ cam to my trusty old 70-200 f/2.8 😂 The equivalent "zoo...
I did the math a bit ago (Since I'm building a camera based on the HQ camera). The Pi HQ camera has a "crop factor" of something around 5.5
whole brook
Arducam is one of the few companies marketing a wide range of C/CS-mount lenses, which is nice. Mostly they're just rebadging stuff from dozens of manufacturers of inexpensive CCTV gear, which is cheaper to get direct on Aliexpress/Alibaba if you're into that kind of thing. Either way, Arducam's product listing offers a nice overview of what's available out there.
https://www.arducam.com/product-category/lenses/c-mount-lens-arducam/
Arducam
 candid bough
Looks like a (nice) CCTV lens to me.
...although I do have a couple of "X-to-Y" adapters which work well for adapting old photo lenses to C or CS mounts. Now that the majority of cameras are auto-everything, you can find some really nice old glass for peanuts. I've picked up old Nikon zooms that I drooled over as a kid, for less than $10, and they work great when coupled with modern electronic imaging elements.
lusty siren
Which means, well. A 100mm lens is effectively a 550mm lens
whole brook
lusty siren
I did the math a bit ago (Since I'm building a camera based on the HQ camera). T...
Oh cool, thanks for that! Is that vs FX/full-frame?
lusty siren
Yep, crop factor's vs full frame!
solar yew
And my 1stt impression was that they use pro lens and I try to keep the limit of a project to 100$ of materials
lusty siren
Most ASP-C cameras have a 1.5-1.6 crop factor
solar yew
So I didn't look at them, but good to know adafruit sell a basic lens
there are IR lens I think as well ?
whole brook
Yeah, tons of options for C/CS-mount, plenty out there with IR capability too I think.
One thing about working with the HQ cam that I noticed though is that lens focal distance is a bit weird, depending on the lens/adapter, so its always good to have a set of shims of various lengths (2mm/2mm/4mm/5mm/etc) ready to go.
lusty siren
whole brook
One thing about working with the HQ cam that I noticed though is that lens focal...
The back focus adjustment helps with this. I'm going a bit further (Since I'm designing around an M42 mount) and the original mount won't be there, but I fully expect to have to shim some things.
solar yew
What often stop me for a camera project unless it's one with long-exposure or under things I can't see because of where my eyes is - is often that it is expensive to see what my eyes can already see
that's why I favor IR/FLIR since I can't see those at all
lusty siren
The Pi camera project I have is specifically for IR/UV stuff, because the HQ camera can have that filter removed fairly easily
whole brook
Just for kicks I figured I’d try my old 70-200 with this. So much fun! The building I focused on is about one mile away. 😂

 lusty siren
The biggest issue with such long range stuff ends up with heat distortion. It's pretty neat when physics starts getting in the way
solar yew
what about using a rifle scope as a lens ? would that work ?
Mostly because of the range indicator printed on the lens
so you know how far things are
whole brook
lusty siren
The biggest issue with such long range stuff ends up with heat distortion. It's ...
Oof, yeah, I bet. The longest I ever went during my pro years was the occasional 400/500mm lens rental but it was almost always indoors.
whole brook
solar yew
what about using a rifle scope as a lens ? would that work ?
Yeah those work fine from what I hear, some actually C mount I guess?
lusty siren
solar yew
so you know how far things are
Well. those are calibrated to your eye. Camera sensors can end up differently?
But yeah, you'd have to figure out how to mount them, which. Might be easy, might not
whole brook
Ahh yeah, the focal plane would definitely be different. Retinas aren't very flat like sensors 😂
solar yew
I don't know about the mounting etc, I'm Canadian, so I can use a scope without a firearm I guess 😄
Never seen a mounting from a scope in person obviously except at a canadian army stand when they show their gear
but they didn't detach the scopes, so no idea how they mount and if civilian even have the same mounting
lusty siren
Well, you'd want to put a camera where your eye goes, and eyes notably don't have screw mounts.
solar yew
why? Like a scope show the view from a couple of inches under it ?
I always thought that with a scope you have to adjust the height in your head or something
since it's mounted a few inches above the barrel
lusty siren
oh
solar yew
so it actually point a couple of inches above where the bullet will actually go
lusty siren
I thought you meant use the scope with the lens
not use the scope as a separate thing.
solar yew
From what I can see it's not that simple because these are for an eye to use, not for a camera
lucid bloom
it's always a good feeling when people like and use something that I made to be helpful. I live in a touristy area and the bridge traffic is the literal tourist trap which is why I made this. I used to go over the bridges and back every weekend for quite a few years to visit my grandmother so I made something to help myself avoid the traffic. It's like the weather radar apps but for bridge traffic, it really helps being able to see the last hour of traffic to determine if I should stay or if I should go, my original version was not shareable so I made one that is. I use some R code to capture google maps images with the traffic layer, then I use ffmpeg every 5 minutes to redo the gif. I had more than 1000 users over memorial day weekend.
Portrait mode: normal view
Landscape: wide view
tap screen: live view
https://sisosig.info/
 brittle whale
Just got some boards in for my super overkill USB-PD/macro pad project. My plan with these is to shake out any issues (of which there are probably many!), get some basic firmware going based around some previous prototyping I had down, and then scale it up to a 65 key design


 brittle gulch
https://twitter.com/dragon_wick/status/1533627159951970304?t=wc_h9-5SsV1Hov8AAVq2JQ&s=19
most of the parts for this I got from adafruit


Working out the bugs with LEDragon, need to resize the gears slightly and make a lil glove to controll it so I cna stop hitting my face lol
#furry #protogen
Twitter
·
 exotic sierra
brittle gulch
https://twitter.com/dragon_wick/status/1533627159951970304?t=wc_h9-5SsV1Hov8AAVq...
exotic sierra
brittle gulch
https://twitter.com/dragon_wick/status/1533627159951970304?t=wc_h9-5SsV1Hov8AAVq...
That’s pretty sweet!
brittle gulch
exotic sierra
That’s pretty sweet!
Thx! gona fix some bugs, make a blender pluggin to control/animate it and then try to make some music videos
brittle gulch

 solar yew

Here you can learn how to make / create your own 1:1 Christmas tree with LED effects - use your skills with a jigsaw and a soldering iron and you can enjoy this piece of Christmas decoration.
Links to items in the video:
https://www.freepatternsarea.com/designs/stylized-christmas-xmas-tree-silhouette-vector-art-free/
Links to GitHub folder:
ht...
 pulsar mortar
So, I dont have many flashy photos for this but I completed something that Ive always wanted to do: A Buck Converter based Lithium battery charger! I failed once before at this years ago, when I did a first rev of a buck smps that used a synchronous fet. It just never worked correctly. I shelved it until I started up a few months ago and made a boost SMPS based on a few app notes. Then from there, it was easy since I got that running :). This is part of a larger project. Lithium battery SMPS's are a tad expensive, and micro controllers are cheaper. The best thing is, I can also use this for LiFePO4 batteries as well!
code and schematics
https://github.com/chrissavage2300/Microcontroller-based-buck-SMPS-lithium-charger


GitHub
PIC18F13K22 Based lithium buck coverter. Contribute to chrissavage2300/Microcontroller-based-buck-SMPS-lithium-charger development by creating an account on GitHub.
 north mural

Feather M4 nrf52840 Sense with 3.5” TFT featherwing and 3x 18650 battery. Just tested it for battery longevity, made it about 30 hours before cutting off . Values only update every 60 seconds.
Might be able to squeeze out a little more battery by removing the background image and updating labels every 5 minutes?
I’ve recently learned if I add an airlift featherwing this is basically a PyPortal. The bluefruit sense has a few more onboard sensors which can easily be added to a PyPortal with STEMMA connectors. The 3.5” TFT featherwing and bluefruit sense board continue to be out of stock while there are plenty of PyPortals.
If you want to make something like this just go with a PyPortal. The PyPortal costs much less because it’s all in one board vs multiple parts used in my project and the specs of the parts are practically identical.
PyPortal is in the $50 range while my project cost over $100 to make. The choice is simple right now, you get a much better value with a PyPortal out of the box. However, the major benefit of using modular components is you can upgrade in the future to more powerful feather boards.
 eternal maple
north mural
Feather M4 nrf52840 Sense with 3.5” TFT featherwing and 3x 18650 battery. Just t...
eternal maple
north mural
Feather M4 nrf52840 Sense with 3.5” TFT featherwing and 3x 18650 battery. Just t...
Controlling TFT display backlight brightness can help to manage power consumption, particularly for larger displays.
north mural
Didn’t think of that until it was too late. I lost power during a storm and the brown out surges fried my pc motherboard. Had no way of changing it once it went to battery power. Typing this from a tablet. My pc is currently dead. 😥
I appreciate the advice and will 100% implement it once I rebuild my pc. Thank you.
gusty shard
Use an ESP32 feather and you don't need the airlift.
north mural
I’d like to go with one that has 8mb of flash but out of stock. Yeah I looked. I’d like to get another 3.5” tft featherwing too but again out of stock. Figured an airlift module should work, hopefully.
I really don’t understand all the different version of the esp32 feathers. So many to choose from. Since I’m on a Bluefruit sense figured the esp32 with 8mb of flash would be closest equivalent? S2 or S3 I don’t think would matter.
 round horizon
Watch where you put your solder equipment on sunny days 🙂

 restive forum
Harsh. lol
solar yew
round horizon
Watch where you put your solder equipment on sunny days 🙂
free soldering whats the problem? 🤣
gusty shard
FunHouse NeoPixel Ring
brittle gulch

 exotic sierra
Blinky counter program on my fpga board 🙂
north mural
figured out how to use tilegrid and spritesheet to create a slideshow. i'm super happy with the result.
usually have it set to update every 60 seconds, changed to 5 seconds for the demo
gusty shard
Three node cluster.

 quick solar
Wanted to control four robot arms at once and see what I could do - built these with mostly adafruit components! https://youtu.be/gbBe4iyC1gA

FOUR ARMS and TWENTY CHALLENGES!!! (With 3 Surprise Twists)
Here are the challenges...
stirring coffee
playing soccer
arm wrestling
pushing paperweight
scrolling reddit
can't play basketball yet
can use a phone
can stack blocks
can't play chess
can play jenga well
can use a sharpie
can draw a smiley face
can throw a small object but not as wel...
Already want to print more arms haha
 grand jay
custom logic analyzer sketch on Arduino Micro, 4096 samples at 1MHz, hardcoded I2C START trigger, interactively captured with sigrok PulseView (capturing I2C bus from a demo on an Adafruit Clue)
 north mural
that's cool. what about using something more powerful than an arduino.
grand jay
i think the most powerful MCU i have at the moment is in the Clue that i was trying to snoop
grand jay
grand jay
custom logic analyzer sketch on Arduino Micro, 4096 samples at 1MHz, hardcoded I...
update: now able to capture 4096 samples at 2MHz
 rugged oar
I designed a Raspberry Pi Zero 2 W controlled Zumo Robot
https://imgur.com/a/1Vwob1H


 hearty lagoon
very cool! What power source are you using? How long does it run on that (w.o. driving)?
@rugged oar
rugged oar
The Zumo chassis I'm using fits a 2000mAh 3.3v lipo perfectly. I haven't tested it enough but I did test the motors @ 50% speed with the Pi on for 1+ hour and the battery never dropped below 3.7v from a full charge of 4.2v

 sharp comet
Tinkering with CircuitPython web workflow some more. Edit page is now integrated with Ace code editor (https://ace.c9.io/) for syntax highlighting, line numbers, and other coding QoL features.

 ionic helm
Bread boarded a charlieplex array.
exotic sierra
Neat!
 crimson egret
If anyone has a Raspberry Pi 4 doing nothing (I know, its a cruel thing to say). There is this project called BirdNetPi that using a usb-mic, listens to birds, identifies the species, and counts them.
I'm only had it running for 4h with 2 of them in downtime because of a bad electrical outlet, and so far the results are amazing.

Here is my station sharing things live for all of you.
https://app.birdweather.com/stations/311
(I've started to port it to RISCV boards, because of the pi shortage. Wish me luck...)
exotic sierra
crimson egret
(I've started to port it to RISCV boards, because of the pi shortage. Wish me lu...
Good to see you sharing again! This is pretty neat! 🙂
solemn vector
crimson egret
If anyone has a Raspberry Pi 4 doing nothing (I know, its a cruel thing to say)....
Super cool!
 slim finch
crimson egret
If anyone has a Raspberry Pi 4 doing nothing (I know, its a cruel thing to say)....
slim finch
crimson egret
If anyone has a Raspberry Pi 4 doing nothing (I know, its a cruel thing to say)....
Thank you for sharing this! this is almost point for point a project I've been hoping to stumble across!
 uneven dove
Current clutter...


 uneven dove
I started making a temporary control for a space heater in my room here because it's internal thermostat oscillated pretty not well...
After I got almost into not being happy with a board design, I switched my attention (that's what I do best) to something more better with an esp32-s2-tft that I will post about later. This is as far as I got on the basic thermostat.


 peak marlin
With the school holidays fast approaching and having learned from 2 years of home working, I made a status box for the g/f, so that when the kids run in - the colour will tell them what they can / cannot do in the room (talk/not talk to her, make/not make noise, etc)
After experimenting with project boxes - I eventually settled on an iPhone 11 box. I got 10 for £5 on eBay and they are great - although built like tanks! Drilled into reasonably neatly and I offered to paint it but she likes the "shabby chic" of it!
Running an Arduino Nano clone (Buttons2 & Neopixel libraries), 4 buttons and a Flora RGB Smart Neopixel under a cut down ping-pong ball as the diffuser
Red = stay away as I cannot be disturbed
Yellow/Amber = ask me quietly but be quiet
Green = come and chat
Off (Black Button) = do what you like

Challenges - cutting and sandpapering a ping pong ball took waaay longer than expected. The internals of the iPhone boxes are pretty structural but nothing a craft knife cant sort. Still very solid even with the internal structure taken away
 novel vector
My wife and I recently completed this project: https://www.instructables.com/Color-Changing-Prom-Dress-With-Wand/

Instructables
Color-Changing Prom Dress With Magic Wand: I wanted to sew my daughter a prom dress, but not just any prom dress--one that had a wand that could scan the color off of any object and light up the dress that same color, kinda like a chameleon.I had never sewed clothing before and still conside…
 craggy parrot
crimson egret
If anyone has a Raspberry Pi 4 doing nothing (I know, its a cruel thing to say)....
craggy parrot
crimson egret
If anyone has a Raspberry Pi 4 doing nothing (I know, its a cruel thing to say)....
Thanks for posting this -- I've had one running for a few days and it has been great fun to see what it captures!


 versed lava
Had to have surgery on my right arm recently. Its my mousing arm and computing has been hard while I have a splint and sling (only a few more weeks!). Over the weekend I added a trackball to the right side of my trackpad to make only using my left hand easier. I also added macros for mouse related things (clicking, shift-click, copy/paste, scrolling). Holding down the trackball mouse button brings up a menu that lets you lock the press until you click again to make dragging easier.
I'm working on adding t9 support to it. Had a few failed attempts due to memory constraints but found this great project by Guy Dupont that puts the data structure on disk: https://t9-library-generator.uk.r.appspot.com/ He has a full implementation that already works on rp2040 pads but I need to refactor it to work as a mode with my existing code and UI/UX. I'm planning on creating a python and c++ word list for it as well so that I can code a bit easier with 1 hand.
Once I have the ergonomics of the case where I want it I'll throw the case and instructions to my printables and thingiverse pages. https://www.printables.com/social/222745-nlapenn/models


 north mural
a wild mouseropad appears
solemn vector
craggy parrot
Thanks for posting this -- I've had one running for a few days and it has been g...
Hi! Do you have the link to the documentation on how to setup? Couldn't find it...
craggy parrot
solemn vector
Hi! Do you have the link to the documentation on how to setup? Couldn't find it....
see https://birdnetpi.com and https://github.com/mcguirepr89/BirdNET-Pi for the github repository and full instructions.
Have fun!
 mild blade
versed lava
Had to have surgery on my right arm recently. Its my mousing arm and computing ...
mild blade
versed lava
Had to have surgery on my right arm recently. Its my mousing arm and computing ...
what buttons are you using for that? looks like they are rgb maybe neopixel?
versed lava
mild blade
what buttons are you using for that? looks like they are rgb maybe neopixel?
This is based on the adafruit macropad - i think theyre neopixels
mild blade
work in progress: building a Pico Midi controller with LED Arcade Buttons. Its a mashup of a couple Adafruit Learn projects. For now I used an image from the product page as my cover pic on Hackaday.io The git also includes the lib folder which has all the adafruit files for Pico. Hope thats ok! https://hackaday.io/project/186082/details/
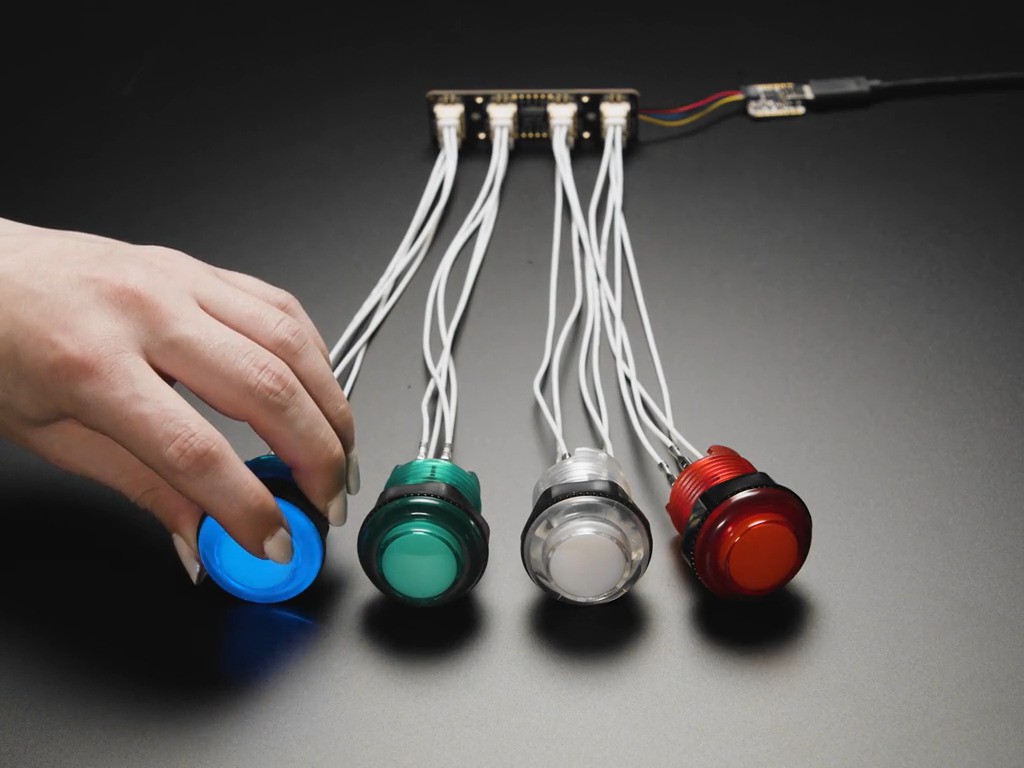
MIDI control boxes are a popular product, although they can be expensive. We wanted to build one with a custom box, and perhaps reconfigure. We found two Adafruit Learn articles describing something close using the rather cool CircuitPythonsystem:
Raspberry Pi Pico and LED Arcade Button MIDI Controller : a 4x4 array of buttons with fancy lit...
versed lava
The keycaps are those square relegendable caps from amazon but i 3d printed the insides in black and added a window which is what gives them that look
versed lava
mild blade
work in progress: building a Pico Midi controller with LED Arcade Buttons. Its ...
Nice. I have a bunch of extra arcade buttons that i need a project for
mild blade
nice job. I have one of the 4x4 trellis to play with but since we were going for BIG custom keyboard for the art install the arcade buttons work. Really like the i2c board for this - greatly simplifies soldering/wiring. I have other project where I hacked neopixels inside the buttons. It was only moderately successful so I need to revisit that.
frosty topaz
mild blade
nice job. I have one of the 4x4 trellis to play with but since we were going f...
https://www.adafruit.com/product/1734 might be good for inserting into an arcade button. It's a bit bigger than the 3mm LEDs typically used, but with a modification like https://www.instructables.com/Arcade-Button-RGB-LED-Conversion/ you could get it to work nicely...

LOLwut? NeoPixels in through-hole variety? Oh yes, we haz them! If you like NeoPixel strips you'll luv these 8mm diffused through-hole NeoPixels. All the ...
solemn vector
craggy parrot
see <https://birdnetpi.com> and <https://github.com/mcguirepr89/BirdNET-Pi> for ...
Thank you!
frosty topaz
Or https://www.adafruit.com/product/302 with https://www.adafruit.com/product/1378, if 8mm is too big...

Diffused 5mm tri-color LEDs with separate red, green and blue LED chips inside! Nice indicator, and fun to color-swirl. 60 degree viewing angle. We like diffused RGB LEDs because they color ...
mild blade
i think those might fit in the 60-100mm buttons. I hacked ring neopixel into those for a Game Show podium.
 junior barn
versed lava
The keycaps are those square relegendable caps from amazon but i 3d printed the ...
junior barn
versed lava
The keycaps are those square relegendable caps from amazon but i 3d printed the ...
hi nlapenn, is the stl file available for those keycap inserts?
versed lava
junior barn
hi nlapenn, is the stl file available for those keycap inserts?
Just threw it here: https://www.printables.com/model/138045-adafruit-macropad-case/files
 drifting crater
modified bodmer's openweather example to my liking, this is what i have so far!
https://github.com/UnsignedArduino/ESP32-Weather-Station/tree/modifications


GitHub
https://github.com/Bodmer/OpenWeather/tree/master/examples/TFT_eSPI_OpenWeather but on PlatformIO! - GitHub - UnsignedArduino/ESP32-Weather-Station at modifications
if you look at the diffs, you can clearly tell that i just shoved in code and rearranged stuff around to just work instead of making the code look good 🤣
north mural
looks great!
nice cable management for the pic too. oh lala so tidy. 🙂
the finished output is all that matters, most people aren't going to go diving through your code or care if it's messy unless they actually use the example code. 😉
drifting crater
north mural
nice cable management for the pic too. oh lala so tidy. 🙂
i aspire to have my wiring as neat as ben eater's 😆
solar yew
Hi guys! The Call For Papers for Hardwear.io NL 2022 is now open, please feel free to show and share your projects this October: https://hardwear.io/netherlands-2022/cfp.php
Deadline for submission: 15 August 2022
 stark latch
I've been writing an OpenSCAD module that will construct a enclosure based on a list of specs. You specify the size of the box, how the top and bottom connect, and the location and type of any addons or cutouts. It takes that, creates a model, then lays it out for printing. This one's a custom case designed to hold a set of earphones and a USB dongle. The contours in the bottom of the case are created by taking an SVG image and extruding it upward from the bottom.
Right now, I'm seeing if I can used the same module to generate, say, a custom Raspberry Pi case.


 stark latch
Attempt at a Raspberry Pi enclosure...
 drifting crater
modified bodmer's openweather example to my liking, this is what i have so far!
...
drifting crater
drifting crater
modified bodmer's openweather example to my liking, this is what i have so far!
...
Added more stuff 😄
https://cdn.discordapp.com/attachments/762347683133259786/992459325706612876/unknown.png
https://cdn.discordapp.com/attachments/762347683133259786/992459372867371099/unknown.png
First one is me changing stuff around the "at a glance" frame, and the other one is an hourly overview that goes for 12 hours!
I'm going to try to implement a forecast similar to the hourly overview but goes much farther into the future


Eventually, I want to wire up the touch screen so you can tap the left or right of the screen to move between the frames
north mural
that looks great. i think FoamyGuy on show and tell was working on a tab layout menu that goes across the top. might be worth looking into. https://youtu.be/w1cZ3WZLCmw?t=1317

SHOW and TELL 4/13/2022
Jeff @0:40 - archived apple software
Melissa @4:45 - raspberry pi display drivers fbcp
Noe and Pedro @6:46 - connection machine, 3D printed foot pedal, ESP32V2, six panel cube globe demo
Phil B @10:03 - connection machine code, music visualizer
Liz...
 dreamy talon
Made this self balancing robot a while ago, controlled with a nunchuck controller ^^
 topaz flicker
gusty shard
topaz flicker
gusty shard
Prototype three node RP2040 cluster.

 north mural
What are the nodes going to be used for? Looks like remote LED stick display with 4 key input?
gusty shard
I'm building a multi-processing system. This is just to figure out the inter-processor protocols, based roughly on token ring networking.
The TFT panels track individual frames as they move through the system. The LED stick shows which nodes are in the cache. Each node has a three byte MAC address, so I use that to set the color on the LED. The bottom two track the last node heard and the current receive status.
My next task is to distribute code to each node over the UART link, so I don't have to switch to each node to update the software.
vernal vigil
Token ring! There's a blast from the past. 🙂
versed lava
Spent a long time trying out different ways to make masks for my macropad keys... 2 sided laser printing won but i think 3d printing would have worked better if I had resin. Its in T9 mode but it fast switches between that and mouse mode and can still use regular macros via the knob.

 dapper wagon
This just made sense to make this morning... sending in my JLC order as soon as they fix their website. Guess I'll design a couple extra boards real quick in the mean time.

And a Universal Stemma Adapter board, just solder the jumpers you need in the 4x4 jumper grid. Little bigger than I wanted, and routing was a pain, but I'm going to enjoy using these.

 drifting crater
Added more stuff 😄
https://cdn.discordapp.com/attachments/762347683133259786/99...
drifting crater
drifting crater
Added more stuff 😄
https://cdn.discordapp.com/attachments/762347683133259786/99...
https://cdn.discordapp.com/attachments/762347683133259786/995841921404633139/unknown.png
https://cdn.discordapp.com/attachments/762347683133259786/995841921719222282/unknown.png
https://cdn.discordapp.com/attachments/762347683133259786/995841922105094164/unknown.png
https://cdn.discordapp.com/attachments/762347683133259786/995841922453209158/unknown.png
Probably my final iteration of my weather station (code wise)
Four frames in a carousel, which can be switched by touching the yellow wires below (using the touch hardware of the ESP32) which could be hooked up to something metal to act as buttons (I think these are cooler then tactile buttons 🙂)
Unfortunately, I was unable to get the resistive touchscreen to work while also using WiFi (I didn't have enough analog pins)
First frame: Weather today plus 4 days into the future
Second frame: Hourly forecast, 11 hours into the future
Third frame: Daily forecast, 7 days into the future
Fourth frame: Miscellaneous stuff like sunrise/sunset, moon phase, etc. Plus system stats for me to monitor


 north mural
Looks amazing. 👍 Can tell you put a lot of work into that. Congrats!
sharp comet
drifting crater
https://cdn.discordapp.com/attachments/762347683133259786/995841921404633139/unk...
Really nice job! Love how much useful info you've managed to show, yet still organized enough to not be overwhelming and still be useful with quicker glances.
north mural
You know those plastic LED candles online that come with the plastic remote? Well I've had some on my back porch for years and the internals rusted out. So I got a Gemma M0 in today and went looking for a basic 2-pin candle flicker example and came up empty. Jon Park has an example that uses an RGB led which I don't have and Becky Stern has a hair bow example that uses a special flickering LED which I also don't have. So I created an example with a plain old single color LED using random() functions and no external libraries. I think something this basic should be included in a learn guide somewhere.... if one exists I didn't find it. The Gemma and an 18650 battery pack with an on/off switch will get stuffed into the bottom of the candle.

GitHub
Projects running on Circuit Python code base. Contribute to DJDevon3/CircuitPython development by creating an account on GitHub.
 broken rain
drifting crater
https://cdn.discordapp.com/attachments/762347683133259786/995841921404633139/unk...
broken rain
drifting crater
https://cdn.discordapp.com/attachments/762347683133259786/995841921404633139/unk...
This is really cool. Did you post your code on github or anywhere?
drifting crater
broken rain
This is really cool. Did you post your code on github or anywhere?
Thanks! Here it is: https://github.com/UnsignedArduino/ESP32-Weather-Station/tree/modifications
GitHub
https://github.com/Bodmer/OpenWeather/tree/master/examples/TFT_eSPI_OpenWeather but on PlatformIO! - GitHub - UnsignedArduino/ESP32-Weather-Station at modifications
broken rain
drifting crater
Thanks! Here it is: https://github.com/UnsignedArduino/ESP32-Weather-Station/tre...
saved! thanks for posting
 wise bluff
This is the Peaucellier–Lipkin linkage. It moves the end effector in a mechanically perfect straight line perpendicular to the support arm. You can attach a servo horn to the shorter dark grey arm. Great for moving things in straight lines.
wise bluff
 versed lava
Started playing around with printing keycaps in translucent black filament. I want to do my own design so I can control the thickness and make the light go where I want it but they look pretty cool. I'm going to make some masks that let me paint them to reveal glyphs when the LEDs are on.


 mild blade
My friend Markus had grand idea for a party here on Maui last weekend. We built a large rear projection 'TV' with a big remote control that switched different video clips. The remote was a Midi keypad built using 30mm Arcade buttons, a raspberry Pi Pico and 5 Adafruit LED Arcade Button 1x4 - STEMMA QT I2C Breakout boards. There's a hackaday write up at https://hackaday.io/project/186082-raspberry-pi-pico-4xn-midi-arcade-button-box

Friend asked if we could make something like the Midi Fighter box to control an art project. We found two Adafruit Learn projects - one using the rPi Pico that directly wires to the 30mm Arcade Buttons with LED to send MIDI, and one using the Adafruit LED Arcade Button 1x4 StemmaQT breakout. The former has extra features (mini screen, joystick,...


 silver sapphire
Too funny... I get a box of these from China, then a few days later, new Adafruit product that's very similar (and kind of niche).
For anyone else looking at these for musical applications, I found this: https://github.com/tttapa/Control-Surface-Motor-Fader

GitHub
Arduino motorized fader controller, and example code for integration with the Control Surface library. - GitHub - tttapa/Control-Surface-Motor-Fader: Arduino motorized fader controller, and example...
versed lava
silver sapphire
Too funny... I get a box of these from China, then a few days later, new Adafrui...
One thing I was wondering about - do one of the connections work for capacitive touch on the fader? There was a question during show and tell about if you could move it while it was powered - and the way actual consoles deal with this is by disabling the motor when you're touching the slider
 dark cairn
yes, this is circuitpython
yes, this is within ljinux
yes, it will very soon work
I will basically recycle "less" and manipulate jcurses a bit
 versed lava
dark cairn
yes, this is circuitpython
yes, this is within ljinux
yes, it will very soon wor...
versed lava
dark cairn
yes, this is circuitpython
yes, this is within ljinux
yes, it will very soon wor...
Not sure I understand what it is? Is that Nano actually running in circuitpython?
dark cairn
yes
versed lava
Awesome
dark cairn
an implementation of nano that is
versed lava
How small a footprint does this all run on? Think it could work on a pico?
dark cairn
uhh, its on a pico
versed lava
Thats sweet - would be fun to try to make it work on my macropad
dark cairn
yea, it depends on jcurses (an ncurses implementation on circuitpython) which is a ljinux package
solemn vector
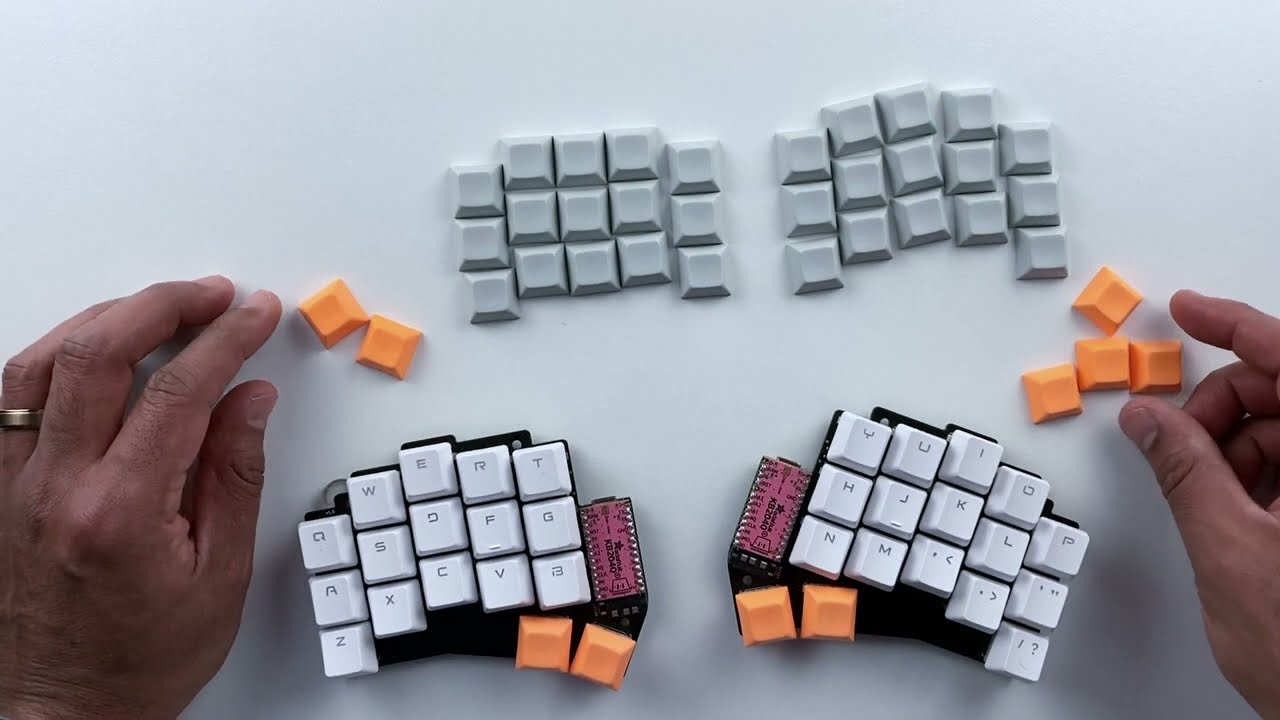
I recently built this split keyboard with 2 KB2040s that I am using to type right now! First split kb I ever tried, first kb with only 34 keys I ever tried, and first time (still) trying to switch to the colemak layout!
Just sharing here this video of the keyboard where I replaced the keycaps! 🙂
 silver sapphire
Hey, I have a keyboard like that! Mine is just the Ferris Sweep.
Used choc switches.
 solemn vector
Cool! This one is also based on the ferris, except that I modified a bit the shape, and I used CircuitPython!
silver sapphire
That's awesome! Was it difficult at all making "layers" work?
solemn vector
No, it was not. I used the kmk firmware, and it has everything I needed. As I said before though, this is my first 34 key, so I am still experimenting 🙂
restive forum
I really fancy building a keyboard, but I can't use ikky mech keys.
exotic sierra
I’ve been working on functionality for the RP Watchy and this is where I’m at right now:
Video uploading slowly
vernal vigil
Soon-to-be Eurorack VCF module
 wise bluff
looks awesome but it kinda annoys me that there are 4 different styles of potentiometers.
 west zinc
wise bluff
looks awesome but it kinda annoys me that there are 4 different styles of potent...
west zinc
wise bluff
looks awesome but it kinda annoys me that there are 4 different styles of potent...
 open vale
I wrote a ray tracer in C by following a book, and I ported it to the Adafruit PyGame
 rough root
Neat!
burnt wyvern
I'm currently trying to make an as-accurate-as-possible Nintendo Game Boy cartridge shell in Fusion 360. So far the back part was printed successfully, I'm also printing what is hopefully the final revision on my new resin printer. https://cdn.discordapp.com/attachments/565026552207900702/998320098722988172/20220717_130255.jpg

 exotic sierra
burnt wyvern
I'm currently trying to make an as-accurate-as-possible Nintendo Game Boy cartri...
exotic sierra
burnt wyvern
I'm currently trying to make an as-accurate-as-possible Nintendo Game Boy cartri...
Nice! Are you going to publish the files at all?
burnt wyvern
Yes, probably to GitHub or Thingiverse
wise bluff
I understand on a better level how capacitors work now! One LED is attached to 5V through a button and ground through a 2kohm resistor. The other LED is attached to an RC circuit with another button. That makes it get dimmer over time unlike the other one that turns off as soon as the button is released. Also on a scale of 1 to serotonin, how clicky are my buttons!
exotic sierra
wise bluff
I understand on a better level how capacitors work now! One LED is attached to 5...
Capacitors are a ton of fun to experiment with in understanding how they work with resistors and in LC circuits, inductors to filter out signals. All based on the simple behavior you demonstrated with the RC circuit. 🙂 nice work!
 serene juniper
Hi everyone! Thought I’d share my prop project. Used an ItsyBitsy M4 and capacitive touch breakout, all coded in MakeCode. Went in with zero soldering and coding experience, but I think it went well!
A big thanks to the lovely people in this community who helped answer my (many) questions!
uneven dove
This is a project I have been growing for 3 years or so. We call it the piSwitch. The Christmas tree has 20 different 100 led strings. This has a web server gui. This year I am adding the float switch. It has a little cut out in the box for the camera to see the water level. Danger don't touch those two wires...
 north mural
That looks mildly terrifying, like a portable electric chair. I think it's the vertical ac switches in a box that does it.
eternal maple
uneven dove
This is a project I have been growing for 3 years or so. We call it the piSwitch...
Sparky Griswold looks on with envy.
 cunning lava
I finally wrote the code for my robot's crawl gait, still a lot of work to do, but it's a progress: https://www.youtube.com/watch?v=hW6EStdQtWU

The Fluffbug robot programmed in CircuitPython to walk.
subtle delta
Prototype V2 of the CircuitPythonukiah! Running on a QT Py ESP32-S2 using CircuitPython 8.0.0 alpha, and now plays music when it's time to light candles. Only need to prototype the stand before designing the final cost optimized V3 so I can send these to friends and family before the holidays!
 mild blade
I wrote up my explorations of the Adafruit Neotrellis 4x4 keypad with neopixels over on Hackaday.io https://hackaday.io/project/186327-neotrellis-explorations The basic examples in the adafruit_neotrellis library dont go very far. An incompatibility between the seesaw.neopixel and adafruit_neopixel precluded the use of the rather nice adafruit_led_animation library. @solar wadi made a fix to the seesaw library and now its NeoPixel derives from the PixelBuf class, same as regular NeoPixel and DotStar. Using his branch, I was able to get things working. Then I modularized the code a bit, and added MIDI NoteOn NoteOff sending. See the project logs for those enhancements.

The Adafruit NeoTrellis is a 4x4 button/NeoPixel array on an i2c connected board. It is also sold as kit with acrylic case, elastomer keypad and Feather M4 processor board. There is also a kit that uses 4 boards to make an 8x8 button array. Similar devices are sold as expensive midi or video control boxes. This product lets us build a custom ...
mild blade
mild blade
I wrote up my explorations of the Adafruit Neotrellis 4x4 keypad with neopixels ...
there are still some questions about how well the seesaw.Neopixel branch will work across multiple neotrellis boards (like the 8x8 keypad kit). I have a 2nd 4x4 kit with acrylic, pad, etc. I might put an i2c extension on them so one Feather M4 Express could access both neotrellis. Or now that it works as a midi device, I might leave it for a while and work some other projects.
 ruby ledge


8-bit parallel ST7789 240x320 LCD paired with a RP2040 MCU
time to parallel "everything" 🙂
exotic sierra
Does it run faster on the 8-bit bus than SPI?
exotic sierra
I thought about using the 8 bit bus but I wasn’t 100% sure if it made a difference in terms of speed.
How did you wire it up?
ruby ledge
DMA hardware driving it. Adafruit PyPortal has the same capability
This is a Pimoroni product - premade that way
exotic sierra
Ah
ruby ledge
They only have a MicroPython lib to talk to the display, so I wrote a native code one. Actually added support for that combo to my bb_spi_lcd library
exotic sierra
I’m making a watch with a small 1.3” st7789 display so the 8 bit bus seems like it would be a cool way to make it faster
ruby ledge
definitely - if you have the spare IO
exotic sierra
I’ve got plenty of IO on my RP2040
ruby ledge
240x240 can be driven pretty fast with SPI, but more speed = less time waiting for the data to transmit
exotic sierra
 ruby ledge
max possible framerate for full screen 240x240 w/40Mhz SPI = 43fps
parallel bus running at 20Mhz = 4x faster
Does your board turn off the enable on the LDO to save power during sleep?
because the RP2040 sleep current is a bit high for battery powered devices
exotic sierra
No, but I’ve considered it
ruby ledge
The Pimoroni RP2040 boards use the user buttons to toggle a bit which turns on the power supply
exotic sierra
I added a load switch for the display to turn off power to it when not in use
ruby ledge
ST7789 doesn't draw much while asleep
UnexpectedMaker (Seon) usually has 2 LDOs on his boards to allow selective shutdown of devices
exotic sierra
I’m just basically doing everything to disable power draw like pwm’ing the back light, disabling the power ti the TFT, etc..
ruby ledge
that's a good start. The RP2040 draws a bit over 1mA when in deep sleep. It's a shame because it could be great for low power/low cost projects.
exotic sierra
Currently the design is a 2 layer board with only the FPC connector in the back
ruby ledge
it's a nice looking board
exotic sierra
I could make a separate LDO for the RTC to keep it alive. It uses 350uA during time keeping operations
ruby ledge
that sounds like a lot
exotic sierra
Then disable the LDO for the RP2040
ruby ledge
which RTC?
ruby ledge
is that easier to get than the ones from Maxim?
ruby ledge
I've only played with the DS3231 and PFC8563
exotic sierra
It’s weird to work with. I’ve been trying to get it to send back seconds accurately but it jumps around a lot
ruby ledge
another option for just seconds is a 32768hz crystal
exotic sierra
It has one integrated and delivers a clock output
I’m counting roughly 28900 clock edges for a second. I haven’t quite figured out the frequency compensation yet
 lime storm
Because I'm a psycho and my wife is gone I made a magtag progress bar to keep track of how until she's back. Also includes an open weather map temperature for our apartment, and the time since I last ran on Strava 🙂
 gusty shard
Too soon? #CircuitPythonDay2022
north mural
not too soon, but unsure how to notify kattni without tagging her, she doesn't like to be tagged unless it's an admin/moderator emergency. hmm maybe post a notice in the weekly meeting github thingy.
GitHub
Community newsletter for Python on Microcontrollers. Please feel free to put your current news, projects, etc. as a PR or Issue. - circuitpython-weekly-newsletter/2022-07-26-draft.md at gh-pages · ...
she'll earmark it to be saved for the circuit python day stuff and will probably mention that contributions for circuit python day are starting to roll in this week
cool glasses btw. 🙂
gusty shard
Thanks!
north mural
https://blog.adafruit.com/2022/07/20/announcing-circuitpython-day-2022-on-august-19th-circuitpythonday2022-circuitpython-python-copy/ Have you events you’d like to have folks attend or have projects in the works? Email your thoughts to circuitpythonday(at)adafruit(dot)com.

Adafruit Industries - Makers, hackers, artists, designers and engineers!
Friday August 19 (8/19/2022) is CircuitPython Day 2022, being designated the snakiest day this year! The day highlights all things CircuitPython and Python on Hardware. Below is the latest on event…