#3D Print Gulag
1 messages · Page 8 of 1
6x6x1 inches... na that is too big
I dont think you can get real tritium cells from wish and if you can then someone is breaking the law
Might be
they did glow tho (and I think they still do behind my bed 😂)
LTO battery...
I'm fairly sure Wish, AliExpress and the like break laws all the time
wow, these things have insane max charge cycles
30k
I am shopping the battery recycler store I got my 21700 cells from. they always have crazy stuff
I was going to go in and make a JOKE about, well, clearly you need some kind of nuclear reaction, and then here you go
Battery Hookup
Here are full cases of 128x batteries. These were left over from a larger battery project and all cells we checked were still at nominal voltage. They have tabs spot welded on them as you can see in the photos but you can always trim or pull off the tabs with a pair of wire cutters. Takes a few seconds per battery to d


$2 per cell, that is a fairly good price and lifepo4 18650s are kinda hard to find
These seem to be legit (and apparently made in switzerland (home of trigalight legal tritium capsules lol))
https://de.aliexpress.com/item/1005008150842882.html
https://de.aliexpress.com/item/1005006568207809.html
Do not expect much brightness tho
1x3mm... 5 bucks each +2 bucks in shipping
literally the size of a grain of rice
7 bucks
Second link should have coupon for 1€/stick
they are not really an option when used en masse tbf
Have a small section be assimilated
I was considering using RGBW LEDs in it and running it all on WLED. then I could change the colors of any of the lights when I want or making it animate. have a button that assimilates the ship
turn the enterprise D into a disco ball with the flick of a switch
but RGBW LED strips use much more power then just having a few small efficent LEDs in the right places
You can order a lot of sketchy things on AliExpress tbf, like.... 'oil-filters'
RGBW LEDs are vastly bigger than single-color LEDs.
Also you would need to run about 4 times the cable (and have probably like 600 GPIO pins for controlling them)
you should see if there are tiny ARGB LED Bulbs you can wire in series (they only need a single cable more than regular LEDs and are chained
this model is HUGE, I have lots of space for running LEDs. as for GPIO that isnt a problem with WLED. I can run all the LEDs off a single pin
that is how the warpcore works
the type of LED strips you use with WLED have controllers for each LED and a common data pin.
so it is all run in series
you set the length of each strip in the series so each section can be controlled individually
its really cool

that is the ESP controlling my warpcore
Technically the LED type is Adressable RGB then
WLED is the library that controls them, right?
yeah
Cause iirc the LEDs are usually listed as something like WS2811B
Aight, glad you already know them xD
the ones I like are RGBW as in they have a dedicated white LED, without the dedicated white it looks kinda meh
Yeah true
you can get these strips in fairly small sizes. friend over on the WLED discord made a cool flux capacitor using 3mm strips. I want to make one but I dont stand a snowballs chance in hell of soldering 3 wires to a 3mm strip
Absolutely valid
I had enough trouble with the 10mm strip I used in the warpcore and my moon clock
How about these:
only allows for limited space between the bulbs
https://www.amazon.de/dp/B01AG923GI

Name: ALITOVE WS2811 5V LED Pixel Lichterketten
Lichtquelle: F8 RGB
IC-Modell: WS2811 IC
Menge: 50 LEDs / string
LED-Form: Kugelform
Farbe: Vollfarbe, 24-Bit
Graustufe: 256 Stufen
Lampenabstand: 8cm
Bohrlochdurchmesser: 12mm
Länge: 4m pro Saite
Betriebsspannung: DC 5V
Lei...
Even comes in bulk quantities haha
https://www.amazon.de/dp/B01NCAG8KV

Name: ALITOVE WS2811 5V LED Pixel Lichterketten
Lichtquelle: F8 RGB
IC-Modell: WS2811 IC
Menge: 50 LEDs pro string, 500 LEDs In Summe
LED-Form: Kugelform
Farbe: Vollfarbe, 24-Bit
Graustufe: 256 Stufen
Lampenabstand: 8cm
Bohrlochdurchmesser: 12mm
Länge: 4m pro string, 40m In S...
the only part that would be a problem for using the normal strips is the nav lights. those need to be tiny. I dont think I am going to find any 2.5mm pixel addressable LEDs. I would have to do those with fiber optics
or just leave them as normal LEDs. but really not sure its worth the effort to go full WLED setup for this, I cant imaging my self changing the colors on it often if at all so its probably best to keep it standard
Yeah these type of LEDs come in way smaller packages.
They also come in different colors if needed, or you could just apply a thin coat of paint
https://de.aliexpress.com/item/1005002123423134
I already have 2.5-3-5mm LEDs that I can use for this project... if I can find the right resistance value to get them dim enough without flickering. not sure that will work so I might end up doing fibers for the nav lights anway to dim them with distance
I find it funny and cool that all ST ships have accurate nav lights
its a nice little bit of attention to detail I am sure almost no one notices
well I say accurate, they are mostly accurate, I noticed the D has rear facing green and red nav lights instead of a white. that isnt right but oh well
it does have the rear white but your not suposed to be able to see the forward arc green and red

not quite right but we can just assume nav light regulations have changed in 300 years
is there actual indents / holes for LEDs at the window locations or does it need post processing i.E. drilling?
about half of the windows are open so light from inside will light them the other half are closed so they will seem to be off as long as they are painted black. looks to be setup to match the TV show fairly well
thankfully dont have to drill them
but for some reason it dosnt have holes for the saucer section nav lights only the rear ones. I am going to have to drill those out but that isnt a big deal
it also has wiring channels
Ohhhh so it's kinda gonna be hollow?
Thought the lights would alls be individual LEDs haha
nope, its totally hollow. lots of space inside, only problem is the access door to that space onces its put together is kinda tiny so its a problem if I want to put a very large removable battery in there and I dont want to have to take it down and plug it in to charge it
would be crazy to try and light all the windows up individually but that is how some people have done stuff like this, with fiber optics. kinda crazy
How big we talkin?
the model? its 1:700 scale so its almost 1m long
or did you meen the battery?
the battery door on the bottom (I dont know what saucer section is like yet) is sized to fit something like a 2s AA or 3s AAA battery holder. its very small. cant fit a lithium battery pack in there unless I go lipo and I hate lipo
Yea meant the maintanance hatch
Do you know LiFePo4 batteries?
They might be a good fit and they come in blocks aswell so you can maximize the capacity.
To be fair, they are less energy dense than regular lipo but they are far less finacky. They're what's used in EVs and house-boats and the like afaik
More or less a glorified lead-acid battery haha
Lifepo4 batteries are way better then lead-acid. they are great batteries, but they are super hard to find in small sizes. its rare you can even find 18650 cells
that big box of 18650s I linked above are lifepo4 batteries
Look for companies that sell car EV convertion kits, and you can find a lot of them😅
LiFePO4 specifically?
I dont need giant as in car battery sized batteries. they sure as hell are not going to fit through this 20mm by 40mm door
They will fit if you try hard enough
Yeah, some EV batteries are LiFePO4.
I think BYD also uses those batteries
They're a lot safer then li-ion but their capacity is slightly less
Hmmm I'm seeing 71mm "block" cells, those seem to be about the smallest...
lol, kinda shows just how useless those little shields around the laser are at protecting your eyes
Yea
the insanity starts. studio model https://cdn.discordapp.com/attachments/818257911699734538/1358867015103942656/image.png?ex=67f56706&is=67f41586&hm=1bd7e658c058908b90784dbad23f18bf2121524a11b554b617a9f2081eb8d66a&


print model
nope. I cant leave that be

fixed
I finally caved and bought a laser.
ordered the 10w with air assist from Elegoo. $190 is really cheap for a 10w unit with air. only problem is its out of stock so wont ship until next month
I am toying with the idea of getting my first 3D Printer this year.
I figured size wise I'd like the Bambu Lab A1 both from outer dimensions and Print Area but...
I heard concerns that Bambu Lab has forced firmware updates and since I also want to adopt a cat I would guess a closed case printer would be better.
Also what would be best for for printer? and also would it be better to get a kit to self assemble or a pre assembled one? I see benefits of both.
I have a Bambu P1S Combo and I'm absolutely thrilled with it.
However, if the Elegoo Centauri Carbon or maybe even just the Elegoo Centauri was available when I purchased the P1S, I probably would have bought one of Elegoo's printers. If they end up living up to the hype, they're going to be an incredible value.
love me some ABS shenanigans https://cdn.discordapp.com/attachments/746536772627988501/1359882625992364182/IMG_20250411_012734.jpg?ex=67f9c1a3&is=67f87023&hm=ca653816a62bd264166469067f2d819ffd0b5c403a3c6bb3ee81e56e5df082cf&

No UV needed, it prints cracks included?
I have since jammed a cardboard box over the printer, and will be attempting a reprint on sunday
despite the cracks that one is probably actually still good. its a foot, so the layer lines are under compression anyway
wish I still had some of the red PLA I used in other places... alas that ran dry many moons ago
Little thin CA glue, stick a weight on it, GTG. Send it.
Is there still any reason to use ABS? I've been told (truly or falsely, don't know) that ASA is pretty much superior in every way.
Sure, obviously the filament you have is better than the filament you have to buy
especially when you have zero moneys

or an f/g clamp, that would work too

Sequential print from a new 5-axis 3D printer sliced with a brand new 5-axis slicer. The video is a combination of regular video and timelapse.
Some print specs:
- Overhang up to 90 degrees
- 0.9 mm wall thickness (2 layers with 0.4 mm nozzle)
- No infill
- Filament: Roffelsen Dark Green PLA
For more information on this project, check out our...
Whelp, first actual issue with my P1S combo: system erroneously (I believe) reporting a failure to retract one of the filament spools in the AMS unit. Looks like I have to pull it apart and inspect the internal AMS hub.
It ALMOST sounds like it just needs a good whack in the proper location.
I stand corrected. There was indeed a broken off chunk of filament inside.
Task failed successfully
lol my first physical failure of this flash forge adventurer 5m pro was a bit of filament stuck in the runout sensor and the rest of the guide tube.
anyone here know a good program for "repairing" thinker cad 3d models for successful printing? I have a model that's got a lot of slightly attached parts.
if you got that as STL I would simly import to BambuStudio installed on Windows. There is repair model geometry option.
Other way there are MeshMixer and NetFabb.
Asking Google AI got that as answer:
Here are several options, including both software you can install and online services:
Desktop Software:
MeshMixer (Free - Autodesk): This is a powerful and free tool specifically designed for working with 3D meshes. It has robust repair capabilities, including:
Inspector, Make Solid.
Netfabb Basic (Free - Autodesk): While the more advanced Netfabb is a paid software, a free version called Netfabb Basic used to be available and offered good repair tools. It's worth checking if you can still find a download for it, though Autodesk might be pushing users towards Fusion 360 or their online service now.
Blender (Free and Open Source): You can use its edit mode to identify and fix issues manually, and it has features like "Remesh" that can help create a clean, manifold mesh.
MeshLab (Free and Open Source): This is another powerful tool for processing and editing 3D meshes. It's often used by professionals and has a wide range of filters and tools for cleaning up STL files, including detecting and fixing topological errors.
FreeCAD (Free and Open Source): Primarily a CAD software, FreeCAD also has capabilities for working with mesh data and can be used for repairing STL files, although its mesh editing tools might be less user-friendly than dedicated mesh repair software.
Microsoft 3D Builder (Pre-installed on Windows 10/11 or available in the Microsoft Store): This user-friendly application has built-in repair functionality that can automatically fix many common STL issues. Simply open the file and it will often prompt you to repair it. It's very easy to use for basic repairs.
PrusaSlicer (Free): Primarily a slicing software for 3D printing, PrusaSlicer also includes a "Repair" function for fixing common mesh errors.
Slic3r (Free and Open Source): Similar to PrusaSlicer, Slic3r is a slicing tool that also offers basic STL repair capabilities.
Online Services:
Formware.co Online STL Repair (Free): This is a simple and free online tool where you can upload your STL file, and it will attempt to repair it automatically. Files are deleted after download or after 6 hours.
MakePrintable: This is a more advanced online service that offers mesh analysis, automatic repair, and optimization for 3D printing. It might have free and paid options depending on the complexity and volume of repairs.
Netfabb Online Service (Autodesk): Similar to their desktop software, Autodesk offers an online STL repair service. It's likely reliable, given their expertise in the field.
Aspose 3D Repair: This online tool allows you to upload your STL file and repair it. They claim it's secure and easy to use, working on all platforms.
Nano3Dtech Online STL Repair: This free tool allows you to upload an STL file (up to 200MB) and repair common issues. They state that the file is processed in the browser and not transferred to any server.
3DPrinterOS - Magic Fix: If you use the 3DPrinterOS platform, they offer a "Magic Fix" tool for repairing 3D models.
anyone have experience tuning accleration on a none input shaping machine?
I have some annoying problems I need to fix that I think adjusting accleration might help with. I keep struggling with under extrusion any time something happens that requires a quick increase in flow. changing extrusion width, printing overhangs or bridges (it slows down for those) and in general any sharp corner that causes the print head to have to slow down then speed back up. the rapid changes in flow and the lack of pressure advance on my printer keep leading to under extrusion
well under and over depending on what direction its going. its giving me allot of unevenness in walls just after corners and I am really sick of it.
so I wanted to try lower accleration values for external parimeters to see if that helps. if I can get the x/y accleration for external parmimeters to match more closely to what the extruder can actually keep up with it should get rid of this problem
and while I am at it I would like to boost accleration for stuff that isnt going to be visible a bit to compensate so I am still printing at about the same speeds. so solid infil and infill, will probably leave internal walls default
but I have never messed with accleration before


a comparison of 2 parts. the only difference between them is the one on the left I slowed down my overhange printing speed and you can see how much worse the problem gets
this was going from 15mm/s overhange printing speed to 10
each and every one of those lines of uneven extrusion that looks a bit like z-wobble line up with large flow changes in the slicer

the default accleration values for my machine are x1100 y900 z100 e1500. I am wondering if I can safely increase E or not. as I think that might fix this as well if i can do so without skipping steps or stripping filament...
getting really frustrated. I have asked for advice about this in every discord I am in with a 3d printing channel and am getting nothing. I have spend all morning searching for answers on reddit and google as well
Awesome information, thanks!
First 1.2 0.12 fine print guess will see if it finishes.


It did finish but sadly due to model issues I still haven’t sorted it need some resin and superglue.
1.2 or do you mean 0.12?
printing stuff that tiny can be tricky for sure. I had to print a bunch of tiny little clip things with my current Enterprise D project. (2 more print jobs and everything will be done printing)
looks like my laser is going to be here earlier then expected. UPS says it will be here on friday... so probably more like wensday of next week because UPS

This figs are one of smallest things printed on P1S. They are ca 8-10 mm high but do not remember with or without base.
I did mean 0.12mm, thought I edited that when I added the pictures but guess it didn't take. Other then parts not staying connected, after the supports where removed, it printed quite well.
hard to get supports to work at that scale
Yeah
I want to get into printing and was thinking of getting the Elegoo centarui do you think the carbon upgrade would be worth it?
if you want to print things like ABS/ASA or nylon then yes, if not... its still such a good price or was last I checked it might be worth it
having a full enclosure is also nice if you have cats... printers cant be very enticing for some cats
they make all the right noises, produce heat and having fillament wiggling around. all things a kitty might be attracted too
and cat hair is not very good for printer operations
I count myself pretty lucky with a cat that's scared of the printer
I want to make some Item for my car so I will probably want to use the better plastics
yeah you dont want pla inside your car, it'll warp when it gets hot
figgurs and I know that some of the stronger plastics need enclosres
better to have it and not need it then the other way round
how much of the bundl item are useful they have anti vibration feat and additional build plates PEI glue and a .4mm print head kit and some glue IDK how useful that stuff will be
it looks like it is a starter kit to me
The centauri / carbon just looks so good. If it meets the advertised specs, and the prices don't go up too much, it's a category killer.
It's basically 1/3 to 1/2 the price of comparable models
I cant find anyway to get the materials I need to make a table for my laser. I cant come up with any alternatives either. even if I had the money to buy something premade for this no one makes a damn table in the size I need either!
as it stands I basically wasted my money buying this damn thing because I cant use it
I even redesigned it so that it could be made with materials that I could walk home with from the hardware store but the local hardware store dosnt even have basic construction lumber!
how the hell do I do this? I mean I could make this out of scraps of any wood if i could just get my hands on it. I dont care what it looks like but I cant get my hands on anything
cant even get an old pallet
actually 2 old pallets would be perfect but no chance
craigslist and/or facebook marketplace, look for scrap wood?
some problem really. nothing is ever in walking distance and this stuff is to heavy to carry even if it is, at least for me (my health is kinda fucked right now)
all comes down to me not having a car
Bike and bike trailer?
thought about getting one but I am in a very hilly area and most days I have a hard time just walking down to the grocery store half a block away
the combination of being sick and not having a car or anyone to help me is making it very hard for me to do any of the things I enjoy
If you need, say, 2x4's, bundle a couple together and tie one end to a skateboard / dolly, whatever.
Hell, hold one end and drag them.
Can apply to bike as well
Yes, Dutchman, cargo bikes are awesome.
😛
the store selling the lumber probably sells dollies
even though we have more bikes than people over here, don't see a lot of cargo bikes
I can get 2x4 and 2x2s at the local hardware store and while its a pain I think I can get them home from there. but that is all they have and the price on them is INSANE. paying 8 bucks for a warpped to shit lowest quality possible 2x2 and 10 for a 2x4 is messed up. its literally 4x the price of the real hardware stores but those are all 15 miles away or so
and worse, they have no plywood or OSB or hardboard, anything like that and that is the part I really needed to get. I need at least one 4x8food sheet of any of those
lumber got really expensive during covid and it never really came back down again over here
Huh. I actually thought that was a big deal over there. TIL.
you see some, it's mainly used by young moms transporting kids
As in a complete sheet, or just approximately that much of it? Because scraps are a thing.
I have checked the prices at places like HomeDepo and Menards and a local lumber yard. this little crappy TrueValue (there name is one hell of a lie) in my town is selling the stuff and 4x the price or more
No actual lumber yards?
i'm guessing they don't do delivery?
nearest lumber yard is 12 miles away
they do... for 90 bucks
having $20-30 worth of wood delivered for $90 is a bit insane and totally out of my price range
Ah!
Here's a thought.
Find a construction crew, offer to print off something useful for them in exchange for them picking up some bits like that for you. Example, tool battery holders:
https://www.printables.com/model/53684-milwaukee-m18-battery-holder-with-lock

Printables.com
Milwaukee M18 Battery Holder With Lock. So yit can be used inside van etc...
Easy to print. | Download free 3D printable STL models
I have been keeping an eye out for anything like that going on in the area but nothing has come up. its still to early in the season for construction in my area. also been looking for people giving away old furnature that I could use or scrap down. no luck yet
my computer desk in a big L shaped one and I only have half of it setup because I dont have space for the full L. the only idea I have right now is to cut up the top for the other side of my desk but I really hate doing that.
its only barely big enough, if I screw up the cuts I am shit out of luck and have wasted my desk top
well I just got lucky I guess. some asshole dumped a bunch of wood trash in our dumpster instead of disposing of it legaly. there were a bunch of long bit of what was either a wooden fence or something. its horrible and old but its good enough I can make it work
dumpster diving for the win
going to be fun pulling out all the nails and trying to clean this stuff up then cutting it into useable shapes. allot of it is broken.
You can always replace it at a later date
my laser is here... but I dont have anywhere to put the giant box
this thing really is all together too big.
"I'm sure it'll be fine" <- past me thinking PLA will hold up in the sun

yeah, and black doesn't absorb heat or anything either 😛

In other news, my mars pro is back out of hibernation. Rails and/ror screw was a bit sticky, but after a quick emergency application of PTFE spray, good to go.
Though apparently I'm supposed to use grease, so might have to get a touch of wheel bearing grease out of the garage.
Anybody aware of any decent relatively automated ways to remove internal features of a model to simplify printing? I've got a relatively complicated model with a ton of internal features. I don't think it's viable for me to manually remove them all. Thoughts?
from what I understand lithium grease is the preferred option due to the proximity to electronics and plastics. it's not really expensive either.
what slicer do you use?
In this case it would likely be chitubox, but I'm okay with other slicers or external programs to do the edit.
Eventually to be printed on the Mars Pro.
what kind of internal features? you mean like its a hollow part with a bunch of stuff inside you just want to get rid of or does it have internal faces like you see on some bad models?
internal faces tend to need to be cleaned up manually and its horrible. I had to do that with my ship exported from SE. but if its just a hollow object with a bunch of junk inside, I would try to select all the outside faces and then invert the selection and delete. you will probably have to patch some holes after. I work in blender and that is how I would do it there anyway
or maybe with a boolean cutter if the shape is simple enough. kinda depends on the model
"Simple" is definitely not what I'd use to describe it. Something like "exported from SE" is pretty close though. Really hoping I don't have to clean it all up myself.
And manually selecting all outside faces isn't possible: something like 2 million triangles total, IIRC.
Hence the ask for "relatively automated"
I just don't have any real experience with modelling stuff to even know what's possible.
ah, is this a game model? those are often a mess like that as well. nothing manifold, internal faces and crap all over. I dont know any easy way to clean them up. I keep getting told Meshmixer can fix stuff but every time I tried use that I got nowhere with it, generally just crashes on the models I give it
sometimes the MS/windows model editor works okay for it, but I have had it distort external geometry
(tried to use it to clean up the SE small grid battery model to little avail)
the nightmare I had to go through to get a version of the SE large ion and hydro thrusters that would actually print was not something iwould wish on anyone
the ion was REALLY bad
The few SE things I printed I largely remade from scratch
When a LG cube is only going to be a cm across it doesn't need the full lod0 detail anyway
This was... 4mm? per cube iirc

its a sad fact that often times it is just faster to remake a model then try to fix it
And the Atmos/hydros were all rebuilt from scratch using the game ones as a base for dimensions
I need to revisit that model, needs all the guns 😆
And I was working on adapting the interior too
it was rather funny that my own SE guns were by far the easiest parts I had to print.
Hah. hahhahaaha.
12.7M vertices, 21.7M triangles.
In case anyone missed it, This is a pretty cool idea, thought you need a 4 Axis printer to make best use of it. https://www.youtube.com/watch?v=M51bMMVWbC8
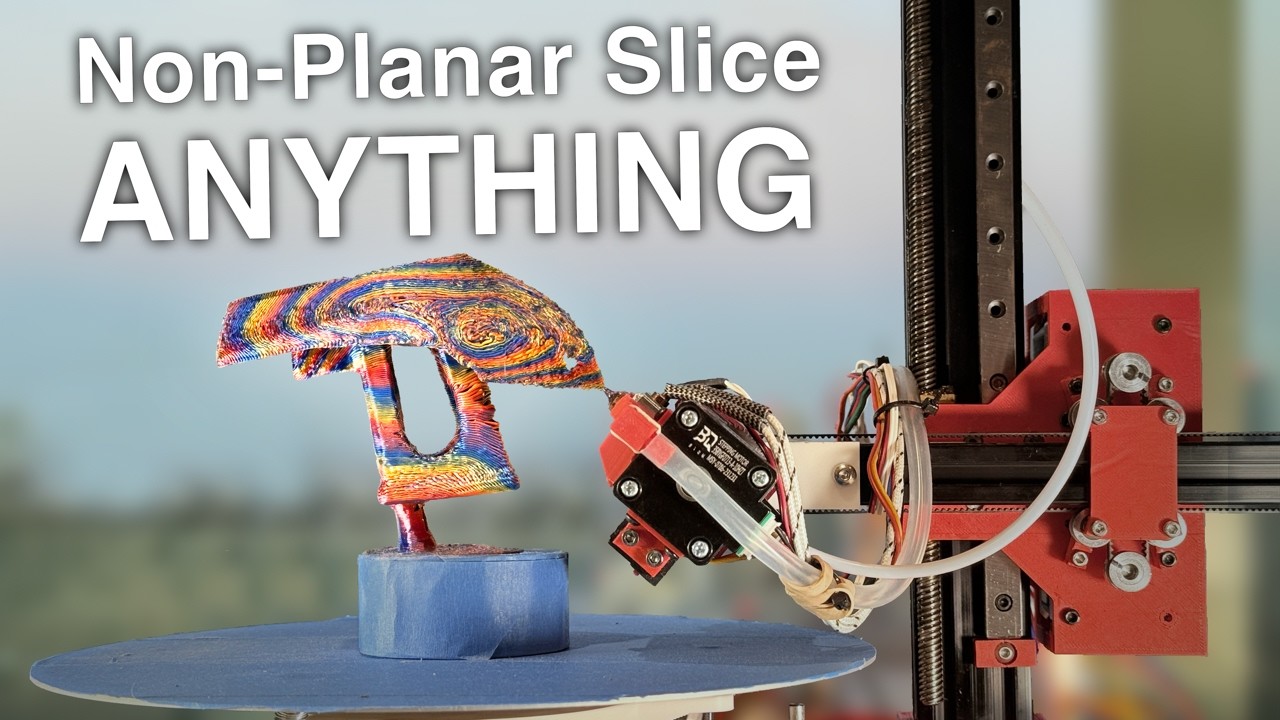
Starting at just $1, click here to get the $60 coupon at JLCCNC : https://jlccnc.com/?from=cncjb
Check out the code, and try it yourself! https://github.com/jyjblrd/S4_Slicer
More details on my Core R-Theta Printer are given in my last video: https://youtu.be/VEgwnhLHy3g
Chapters:
00:00 Introduction
00:52 Showcase
01:56 JLCCNC
02:51 The Algori...
Import it into prusa, fill it with solid cubes or cylinders or whatever(rt-click->add part) then re-export as stl and slice as normal
Stls only really care about triangles, you can fill the inside with solid cubes and it will be homogenous as far as a slicer is concerned. Overlapping parts or intersecting parts all get treated as a single solid when slicing.
Ok, I have a fairly complicated situation here that I’d like y’all’s advice on. I have a Elegoo Mars 5 Ultra resin printer, a 660 sq apartment, and a cat. I got a Mars Mate filter to go with the printer-it features about an eight-inch cube of activated carbon filter hooked directly up to the case. (Online reviews seem to be mixed-to-negative, but many also don’t seem to actually understand what’s being discussed, hence why I’m asking here.) I’m primarily worried about my cat- if I start getting a headache I can always stop the printer, lock down the resin, open up the apartment, and leave for a few hours, but I can’t exactly do that with a cat, and by the time I start showing symptoms he’ll have taken a much greater dose than I will (and may continue getting more in through cleaning his fur).
I had two ideas on how to mitigate this. One, which I’ll probably do regardless, is to line up as many prints as I care to do, print them as fast as possible, and then immediately deal with the leftover resin to minimize fumes. The other is to move the print out onto my balcony, which may not be ideal but should keep the fumes out pretty much completely.
Do y’all have any thoughts/advice? Is my quest to print resin in a small apartment doomed? Did I manage to keep this wall of text to under a screen?
I am not a resin printing expert, never used one but I know a little about resin its self.
first off your on the right path about doing as many prints together as you can I think. resin printers are different from FDM in that the layer time is always the same so number of layers determins print time. if you have a tinly little part on the build plate that is 500 layers thick, it will take the same amount of time as if the build plate was totally full of prints 500 layers thick. so fill that build plate up!
personally I wouldnt run a resin printer without ventilation. can you put it next to a window with a window fan running?
my understanding is resin prints best when its warm so printing outside might not be ideal
depending on time of year
working with stuff that generates nasty fumes can be done in a small appartment. I am setting up a laser cutter in my TINY efficency appartment. I am using a fume extractor setup designed for grow tents. those are actually fairly cheap and might be an option for you as well
Usually Resin printers are more often used away from living environments, but it's smart to also put a big air cleaner beside the resin printer and keep the window open when printing
On speed, I’m thinking more of trying to give the printer as much uptime as possible, so having all my plates queued up ahead of time and running them through in sequence to minimize the amount of time I have resin out of the bottle.
If heat is ideal for printing I’m in luck, my balcony is a concrete box with enough temperature to kill a healthy plant inside of a day in the heat of summer
I’ve seen recommendations for grow tents, but honestly if they work outside it might be easier just to do that. Would have to find a way to get power out there though.
Resin printers don't really need heat, they need a place mostly away from UV.
I assume the heavily tinted cover isn’t enough
Maybe I’ll throw a blanket over it
It is enough in most situations, but not enough in direct sunlight
its not so much that they need heat, its that they need not-cold
sunlight has allot of higher freqency UV in it that the cover on the printer might not block
Related questions. 1) is my paranoia about resin just sitting in the printer when inactive justified? Most things I’ve seen say fumes are worst when printing. 2) what percentage of resin needs to be left in the printer to do an effective print? Ideally I’d measure it out and have as little left over as possible.
personally I think the paranoia is justified. I use UV craft resin some times and just opening the bottle I can smell it and it smells like bad for you
like you can just tell that stuff is not doing you any favors
I have made that mistake twice which got 2 prints ruined.
I had my Mars near the window, on a hot summer day, full sunlight 🤣
A friend of mine has build a small wooden enclose with a flexible vent tube and a computer fan directly outside through a window to get rid of his resin fumes. Not sure if this is doable in your situation but it might give some ideas
I did the same
I plan to do the same with my planned enclosure when i start printing weird plastics
friend of mine did as well, but he uses a HEPA and activated carbon filter and went overkill on his fan
The problem I’m realizing with all of these possibilities is that something needs to go outside, which means I either need to lock my cat someplace for twelve hours at a time while I run prints or I need to build something interesting
A board to block the window with just a hole for the vent, that way your cat can't escape
For containing resin Fumes and Drips, Grow tents on Amazon are cheap, with a 4in inline blower fan, some 4in ducting and a board with a hole in it in the window. I printed in my one bedroom apartment for several years that way. The 4in blower is enough to maintain low pressure in the tent and it just needs to be nearish a window to run the ductwork. I hung the flexi-duct up with some nails and picture wire. Got a piece of xps foam and a dryer vent to block the window. You can cut the foam with a sharp knife, no special tools. If your worried about the cat knocking it out aluminum duct work tape can be added around the sides, but if you wedge the foam block in the window good you won’t even need that, I had a dowel on the far side to keep pressure. The foam distorts easily enough
probably one of the best cheap ways to control temp and humidity as well honestly
if so inclined


Green and black box in the back is the grow tent, black ductwork to the window, Ignore the mess

The cat who also had to live with the printer
I have a similer window vent thing and use a larger inline blower (I needed a big one because mine is for a spray booth as well and that needs allot of static pressure)

window vent thingy I printed
For a single tent the 4in is overkill, but for a spray booth it would be needed
lol, its so over kill I can use the 4in line as a vacuum cleaner if I am not careful
I have a quick attach setup for the hose end so I can put it on the spray booth or on the laser encloser I am currently building
With the 4in running the sides of the tent all bow inwards heavily. You can’t see it here but the blower is zip tied to the roof framework of the tent. Then ducted out the built in tent holes
my blower weighs like 15lbs so cant zip tie it. has to be bolted to the table
Hahaha if I ever get my airbrush booth I may need something more like that
this is the one I have https://www.amazon.com/dp/B0B5ZTMB7V?ref_=ppx_hzsearch_conn_dt_b_fed_asin_title_2

iPower 4 Inch 190 CFM Duct Inline Fan Upgrade Wind Pressure 490 Pa HVAC Exhaust Blower for Hydroponics/Grow Tent Ventilation, Black
its not avalible anymore, older model
Oh! Teaching tech on YouTube has his setup in a plastic garden shed if you Don’t have any counter space that’s an option. Though you will need a saw to cut the vent holes
https://youtu.be/UU6tWhV010M here it is
I often hear the same statement: ‘I’m interested in resin printing, but I’m not sure of all the steps and whether it’s for me’. This video aims to respond to that situation. There are multiple ways to approach resin printing, but hopefully my methodology provides some food for thought for others setting up.
Thanks to my patrons for sh...
I read the first 6 words and had to check that I wasn’t in a Schedule 1 server/channel 😂
It makes it cheaper for us resin printers
Yeah, that’s a creative solution I hadn’t considered before. I might have to use it when I get one
Sounds like a problem that can be fixed with more zipties
I'll just stick with bolts...
I just got my Ender 3 V3 SE as a starter printer and see how FDM printers work
This 200.- costing printer is fairly rich packed, heated bed, automatic bed levelling, 22x22cm bed
Can do an awful lot on an Ender 3, nothing at all wrong with starting there.
I've still used it a couple times despite having my Bambu P1S Combo. In particular, I've used it for a few TPU prints, which doesn't play nice with the P1S's multi filament changer.
I want to start with this, and when I am more used to it maybe get the K2
This Ender 3 has a cute pokie pin for the bed levelling
I started with the 3v2, pretty decent machine.
Have only used it once since i got my saturn 4, but i plan to use it again
probably gonna change the hotend
I want to use the Ender 3 for prototyping and the Saturn 4 or K2 for final product
Nylon, don't you print that on an FDM printer?
CF is Carbon Fibre. as in the filament has chopped carbon fibres in it
it gives the print a "rough" finish, but can help with warping at the cost of some strength properties, and gains of other
usually CF fills are stiffer than their unfilled counterpart. which for a flexible plastic like nylon may be desirable
If done well it can be as strong as aluminium
its complicated. strength is complicated in general 😆
True, i don't claim to have even a basic understanding of it
I am looking into doing another degree which will require me to get some knowledge on it
What type of printer do you need for that?
just the small problem that exposed carbon or glass fibers like you get in those filaments is fairly nasty.
for printing nylon you need an enclosure and a high temp hotend. ideally you also want a heated chamber, that is part of why people print the fiber reenforced kind, it prevents warping if you dont have a good heated chamber
you also need to dry the shit out of it and print it from a dry box
I would love a printer that could do nylon
Aint a heated chamber basically an air temp sensor and a $10 indoor grow tent? XD
A heated chamber is usually actively heated, it's what separates it from just an enclosure.
ahhh so a pwm hair dryer AND a grow tent xD
Meshmixer's looking like it might work. But I think I need to test on a much smaller subset of the model first. (one op took basically half a day redlining one CPU core...)
May try the suggested Prusa trick, but I really want this to be something I can script/automate.
meshmixer just crashed on me when I tried anything like that
I know some people swear by it but I couldnt get it working
mistakes might have been made

Is it still trying or did it give up?
I think it's still going.
Free space heater
if the cpu useages is stuck at a mid range value and not changing then it aint coming back
a mid-range figure coudl correspond with a pegged core. or it waiting for disk swap to happen
It's got one more or less pegged core. It's still doing stuff. UI actually occasionally goes back responsive. I'm on vacation coming up tomorrow, so I'll let it cook for a few days
Might need to see if I've got any more distilled water to top off my coolant tank first though...
I remember during Covid they had this project where you could lend your processing power to do like protein folding calculations. You need that but for this project, crowdsource raw computing power!
protein folding
thats an even older project. I remember setting up folding@home back around 2010 or so
Well they used it for something during covid, don't remember the details
oh, I dont doubt there was something during covid. likely focused on the covid virus family
Didn't really put a lot of effort into looking into it at the time. I was pretty busy figuring out how to finish my thesis while in lockdown
Oof
You can change task manager detail view to show individual cores
Thats still going haha it's "folding at home"
There's other crowd-computing now tho
not always. a single thread can still get distributed over multiple cores depending on how annoying the task scheduler is being
to figure out if its pegging a core I mean. or the equivalent thereof
True that, mostly windows moves around a single thread from core to core
really seems like a bad idea to leave a program doing something like that.
I've run folding at home on that pc more or less since it was built. It can handle a couple days of one program using one core
I don't want to be too specific but I'm a top 1% contributor IIRC.
? The operating system moves the threads (depending on CPU model differently)
What was the outcome tho?
I pulled my bottle of resin out of its box and my cat INSTANTLY made it his life’s mission to break into it and find the golden treasure within
I'll let you know when/if it finishes
Damn you waited this long?
Well he did say he would give it a few days, it's only been one
Is it done yet?
Listen you...
thing is this isnt a render or a complex simulation that is expected to take hours or days, this is the program doing something weird and you dont know if its actually working or just stuck in a loop or crash.
even if it does finish the job its probably going to result in a file that is now so laggy because it did something insane that you wont be able to do it.
It's trying to combine 694 or so sub-meshes into one mesh so I can do a subsequent wrap operation to produce a shell.
wait, are you working with vertex models in fusion?
if so that is why its trying to explode your computer
I personally only had that issue on Fusion, but not Maya3D
well yeah, Maya is a vertex modeling program, its ment to work with vertex models. CAD programs are horribly optimized for vertex models and lag to hell with them. remember a friend trying to work with a 3d scan in solidworks and his computer trying to melt down because of it
I actually did not know this, I thought it was a standard feature
Maybe interesting for y'all:
Nebula Mouse: The 6-DOF You Build Yourself
Source: Hackaday
https://search.app/9zK5Z

Let’s say your CAD workflow is starving for spatial awareness. Your fingers yearn to push, twist, and orbit – not just click. Enter the Nebula Mouse. A 6-DOF DIY marvel, blending 3D pri…
Oh hey now
well that's a rabbit hole, apparently teachingtech did one - happens to be based off of one of the commenters in that article - that links in with 3DConnexion software while having the rest of the software be opensource.
Nice, and I was planning on taking a Spacemouse apart😅
Looks like the DIY ones are getting smaller too. The one teachingtech did was kinda chunky relative to the off the shelf one.
Might make a downgrade of that as a pointing device for diy car infotainment
Like those BMW air-strike "mice" xD
Yeah his v2 is a little more refined as is some of the remixes, the code is more of the useful bit.
Side note discord as drm is a little odd -from the article that is… “you’ll get compiled code only, unlocked per build via Discord”


Being completely unfamiliar with laser cutters, I have to assume that's some kind of calibration test cut?
yep, speed and passes for cutting at a set power. that was 200mm/s increments and 1-4 passes
then I tried again but this time starting at 180mm/s and it cut through the hardboard in a single pass (3mm or 1/8in masonite/hardboard)
the 2nd one was cutting out one of the side panels for the enclosure I am building, was 3mm basswood
lol, because I dont have an enclosure for it yet I am having to manually hold my fume extractor hose above the laser as it go's so I dont fill my appartment with smoke. but now I have all the parts to finish the enclosure
really impressed with how well this cuts through 3mm wood. wish I had some 6mm or 1/4 inch to try. I bet it can do it just fine
the cuts are much cleaner then I was expecting. with the basswood there wasnt enough enough charring on the edges to make my fingers dirty
single pass cut on the 3mm hardboard https://cdn.discordapp.com/attachments/818257911699734538/1370235274969485383/IMG_20250508_220414321.jpg?ex=681ec28b&is=681d710b&hm=af9bd3f58511580b86737e7dca703f81618fd238b0c3480eb14ce4cd40957846& https://cdn.discordapp.com/attachments/818257911699734538/1370235274528952461/IMG_20250508_220425178.jpg?ex=681ec28b&is=681d710b&hm=75bab2e3e2c40fbd8849d3649996911f36bd753770bd86a38fbff3c698a5bda7&


you might find this interesting https://www.youtube.com/shorts/bfRF6JQNru4

seems like using ironing is easier...
if it could smooth complex shapes then that would be something
ironing gives a different kind of finish
just thought it was interesting tbh, and you were using a laser 😛

3D printed in-place mechanisms and flexures, such as living hinges, are really neat when you can get them to print correctly. But how do you actually do that? YouTuber [Slant 3D] is here with a hel…

duct fan upgrade. replacing the crappy stamped aluminum fan blade that is noisy and has too big of a side gap
If you swoop(?) the blade more it'll be more quiet while keeping the flow speed intact
its already way quieter then the original. this is a duct fan so I need to optimize for pressure more then flow
Swept blades still can create more pressure 😅
As long the blades are big, scoopy and slightly on top of each other they should be fine I believe
Swept blades reduce turbulence at the tip of the blades, that's why the blades on Noctua fans are swept so far forward.
there are limits to how much you can sweet the blades back. the more sweeped back the large the blade area. this isnt a 4w PC fan its a 40w inline duct fan but has about the same diameter as a 140mm PC fan.

I really cant give them much more angle then they already have. not unless I want to make the fan thinner and that will compromise the flow too much.
trying to move 250cfm of air through a flexible duct. I dont know much about fan design other then the basics but this seems to be resonable to me. its about the same angle and depth of blade as the stock fan
I just dont think this would be super effective

its entirelly possible that I dont have it steep enough but I dont have any way to tell. the fan is much quieter so if there is any stalling going on I cant hear it

shallower angle, narrower fan and 9 blades instead of 7

really not sure
wish I had a better way to test then "how does the wind feel against my hand"
what cad program are you using
More blades actually doesn't equal more pressure, I seen 3 bladed fans have a higher pressure than a 9 bladed 1😅
But if you want pressure over anything, the blades have to overlap each other
they do, and everything I have read says more blades for static pressure. of course its not as simple as just adding more there are rapidly diminishing returns and it increases torque cost
looked at from above there are no gaps
that is part of the problem, there are SO many veriables in fan and impeller design its not funny
my understanding is if you have a lower torque motor your better off with fewer blades if you have a higher torque motor you might be better off with more. its all trade offs. I think with the motor and side of fan I am working with I have an exsess of torque avalible so I am best off trying to take advantage of that. I cant make the motor spin faster so I need to try and use as much of its torque as I can before it starts loosing speed. I think it spins around 2k-3k rpm.
at least it did with the aluminum fan blade. these printed ones are heavier
about 2x as heavy and clearly are going to have more drag
top view

also printing this ring to go with it to prevent backflow

should make it harder for air to sneak around the edges of the fan, forcing it to draw from the duct.
I cant just make the fight tighter because the aluminum housing isnt all that round and its riveted (that is why the ring has a cutout) I also dont trust the PLA to not creep over time and get a little larger.
so the overhange of this ring will hopefully help
there's this yt series called fan showdown or something, that guy tests community designed 3-D printed Fan rotors in terms of throughput, (sometimes pressure?) and noise.
have a look, take one of them ;)
https://www.youtube.com/watch?v=ndCd_EHj4zI
example vid

The fan showdown is about having fun and trying out crazy fan designs. Currently the fan topping the board is the cheater. At times it seems unbeatable however today that might change, if any fan had a chance of taking down the Cheater its this one.
My Twitch
https://twitch.tv/majorhardware
Fan Showdown Instructions
https://youtu.be/A81jPoWNL...
like there's WILD designs in there xD

Anybody here run a 0.2mm nozzle on a P1S?
Unrelated note, just printed 6 C to D battery adapters to load into my old Nerf Vucan EBF-25, and proceeded to get all my kids with it.
I have a bunch of rechargeable C's that we don't have the corresponding devices for anymore. So, yeah
seems like a good use for some old nerf guns
you might also consider some siege warfare https://www.printables.com/model/1283139-working-28mm-trebuchet-functional-fantasy-siege-en

Printables.com
Functional trebuchet that actually fires — perfect for 28mm wargames and fantasy dioramas. | Download free 3D printable STL models
it says it scales up fairly well... upping the size to be able to throw water balloons seems like a good option
So… I had a print fail today, and it left pieces on the screen. I’m operating under the assumption that I need to empty out the resin to properly clean it, and I figured I might as well get rid of the resin-polluted water I’ve been using to clean the prints at the same time. My thinking is that I’ll put them in ziplock bags, lay them out nice and flat, and expose them to UV light until the resin cures out. Is this the proper approach? Is there a better way for me to do this?
The resin emptied from the build vat can be filtered and reused unless you have some specific reason to believe it can't be reused.
I think most people pour it into a flat dish and let the water evap and the resin cure in sunlight. but its best to do that somewhere you wont be breathing it
and somewhere that critters wont acidently drink it
(for the washing water)
But yeah, sunlight will help clear out the resin polluted water.
I think people use paint filters when recovering the resin from the vat?
those filter funnels you use when prepping paint for a spray gun
Yep. My old Mars Pro came with a few.
Ah, that should work, thanks.
I’ve got a couple filters
While the thing’s stripped down, is there any regular maintenance I should be doing to parts?
basic movement parts maintenance should be done ever few months. clean and grease the z screw basically. at least I assume that is the same as on an FDM printer
Z screw and guide on my Mars were both VERY unhappy after a year or more of non-use. Quick lube job on the fly cured that.
Checking a manual for the printer wouldn't hurt. Big thing, use your eyeballs. See if anything looks wrong while you're in there.
sigh found my next totally unreasonable project. https://www.printables.com/model/187017-one-meter-long-omega-class-destroyer

Printables.com
Here it is, my biggest model, the gigantic, kick-ass, 1 meter long Omega Class Destroyer from Babylon 5. (thats about… | Download free 3D printable STL models
I mean there is no way in hell I can resist printing and building this
I dont know if anyone will be able to help me with this or not as its a rather specialized question. I need to be able to cure UV resin through tape. I am going to be doing resin windows on the ship model I am building and I cant put the UV light on the open side, there just isnt enough room. so the UV light will have to pass through the resin tape to cure the part. so my question is will resin tape block the UV light enough to make curing a problem? if so is there another tape I could use that will let the UV light through but wont damage the paint or resin when I remove the tape?
Sounds like a case for experimentation?
Couple dabs of resin on a disposable non-porous surface, cover one dab with tape, expose to UV. Sunlight if necessary.
Compare
If I had to bet, I'd say the tap probably absorbs some but not all of the UV
well its not cheap, I dont want to have to order 5 different kinds of tape for 10 bucks a roll and hope that one of them works
Maaaaybe I shouldn't be running this at 50% speed
This is the 50% scaled version. The 100% version, at 100% speed, slicer was estimating around a week.
yeah but... what is it?
Not so much.
And they definitely are garbage
I let the computer spend literal weeks attempting various clean up / make manifold / simplify / make solid / etc type things from a large handful of different programs, none had any luck. At this point I'm just sending it. Slicer handles it okay-ish. If I get some invisible internal details, so be it. I already printed one at this scale, but with a 0.4mm nozzle, this is at the same scale but with my new 0.2mm nozzle to see how much more detail it picks up. Following that, I'll probably print a few smaller subsets of the model at full scale to see how they turn out.
It's big enough that I'm definitely not going to attempt cleaning it up vertex by vertex.
Though I AM considering going back in game in creative mode and stripping all the internals that way if something doesn't work out.
Unsurprisingly, I eventually gave up
Yeah when I tried printing one of my ships I just filled the internals with armor blocks in game so there weren’t any gaps
I tried that and it didnt help. I had a nightmare cleaning up my ship
I did it manually in blender
when I tried slicing mine without clean up I got lots of missing layers anywhere there was internal geo
I really need to finish painting mine
I think you need tool like OutherShell in SketchUp or something similar was in FreeCAD. But do not remember its name.
I assume there are some plugins at Blender with such functionality.
some types of mesh errors are just really hard to automate a fix for.
esspecially edge case errors caused by exporting block based models from a game
most cleanup tools are ment to fix the kind of errors you get in 3d scans and stuff like that
and that is before you even get to the other kind of errors you run into from these exported models. the ones from the game assets them selves. game assets dont worry about things like none manifold geo or over lapping faces (from all the decals) or any of that.
lol, I wonder if you would be better off exporting a ship from SE using photogramatry. setup a script to move the camera around to all the angles needed to take screenshots for photogramatry
thats an interesting thought
you would also be able to capture modded blocks in a way that wont piss off the modders
I might go mention this idea to Klime... he likes insane projects
you might be able to abuse shrinkwrap in blender to get a manifold, exterior-geometry only mesh
That sounds like a pretty neat idea, interesting take at this problem
I only had that idea because.. I abused shrinkwrap to generate a collider for something the other day
using photogrammetry is a neat trick as well
yeah i meant the photogrammetry, i have no idea what shrinkwrap does, other what then the name implies😝
the way I settled on for cleaning up my geo was to go around selecting everything visible from the outside with the area select tool until I had the entire outer skin selected. then invert selection. after that I would have to fly around inspecting all the tight spots where things might have been missed on the outside selection and manually select/deselect as needed until I only had the interior geo then delete. this worked fairly well after I got used to where the problem areas would be and sped things up
it was still allot of manual work
That...is actually really clever.
if that works it's genius
since this is kinda on topic:
i wanna do some cfd simulation on a model but the model needs to be a solid shape.
anyone might have some pointers how to fix this fairly accurate model I got from BeamNG so it is usable as a solid body and/or 3D-printable?
it's all separate parts...
They also sometimes overlap


and they are all unclosed
you might need to double check the terminology, if the cfd program your looking at using is saying it needs to be a solid it might not mean a manifold mesh it might mean an actual solid like where solid works gets its name, not a mesh at all. as in this https://en.wikipedia.org/wiki/Solid_modeling

Solid modeling (or solid modelling) is a consistent set of principles for mathematical and computer modeling of three-dimensional shapes (solids). Solid modeling is distinguished within the broader related areas of geometric modeling and computer graphics, such as 3D modeling, by its emphasis on physical fidelity. Together, the principles of geo...
yes exactly - programs like fusion360 are able to convert closed meshes into solds tho
ah ok, was unsure if that was possible, I know next to nothing about it other then they exist
well that is from a game and like all game models... its going to be a mess as far as 3d printing and all that is conserned
the basic idea would be to close all the meshes and then bool them together. deleting anything that isnt needed for a printed or simulated model.
I only know how to do it manually and its just allot of work, closing the open sections in edit mode
honestly sometimes easier to manually remesh it using the original as a guide. build it from the ground up basically
hmm yeah thats what I thought :/
there's not much inside so I guess a shrinkwrap would be enough for the CFD
I just scored three free printers. Mars 2 pro, and two Saturns.
"slightly used" of course
My congratulatory condolences
If you're near Troy, MI, there might be some left.
How does something like that even happen?
Well you see, when a prusa and an ultimaker love each other every much...
I don't think i was taught this part during biology lessons
I think it’s in AP mecha-biology
I am very much not near MI but also couldn’t fit a resin printer in this apartment anyways lol.
Only 36days by foot.
Better start walking then
I imagine the reason is they've upgraded to newer and better things. These are rather dated at this point. To the point where parts availability is starting to look problematic, especially on the main consumable, the screen.
Probably going to be close to a week before I can give them a once-over / test / deep clean.
Distance through hikes are great exercise!
wish I could get a free resin printer...
They're a pain in the ass to work with though
I know but for some things they are the only option. I wouldnt use one often enough to want to spend much money on one but I would like to have one for those small parts that you just cant get right with fdm
mostly for model making projects
I use Resin primarily for accuracy and strength
Ivan and Jon going absolutely insane once again https://www.youtube.com/watch?v=QuZW259aIn0
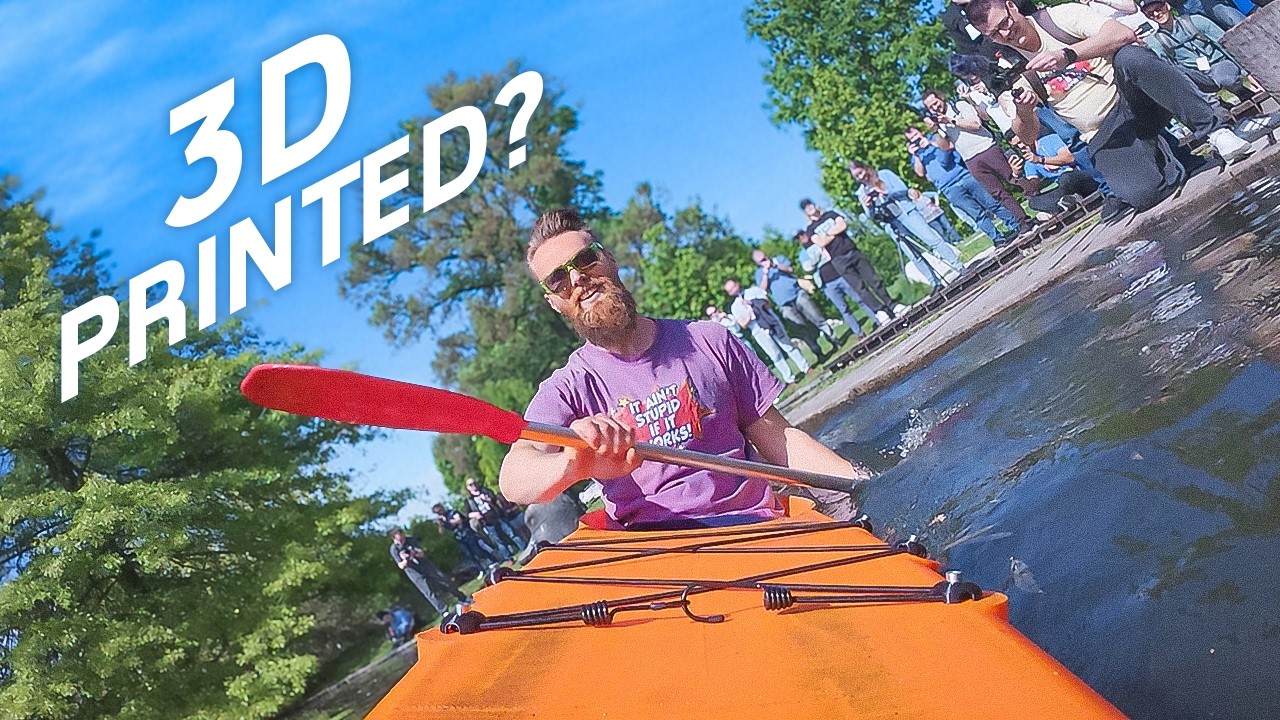
Check out the Odoo Project app here: https://www.odoo.com/r/UsG
We did it! @ivanmirandawastaken and I 3D printed a kayak out of one piece on the treadmill printer we built earlier. This was one of the biggest adventures of my life and I'm really happy that I can share this with you!
You can get the STL file of the kayak here https://properprin...
they are very silly people
Treadmill printing is super interesting to me
like it's brilliant and cheap :D
Yeah... Except it wrecks your treadmill
Bed adhesion can be a little too good
But with a belt designed for it, it's a pretty neat thing
Ahhh I see
I'd guess there's temporary modifications you'd need to do to it to make it work well
Question: I am currently struggling with too little plate adhesion. Anything that can be quickly done to help fix it? I tried glue stick, and it helped a little but it still un-adhears
My go-to strategy when I have build plate adhesion issues has just been "wash with dish soap, rinse with clean water, dry, retry". That's with a textured PEI plate on a Bambu P1S.
Previously, on an Ender 3 Pro with PEI over glass, I'd either wash it or wet sand it with I think 600 grit.
That's all mostly PLA.
I use what we call painters tape, basically that paper like tape😅
👍
Any recommendations for a metal build plate?
<snark>Buy a better build plate</snark>
I've never used a plain metal build plate, but painter's tape / masking tape is probably a good bet.
Alternatively, and/or in addition, use a brim?
👍
Tks… I’m still a beginner, but once I use my printer more, I definitely will upgrade
I used painters tape as well on my previous printer, it was textured glass, it sucked. The tape works pretty well, to the point of ripping the tape and having to spend time to replace it. Got a textured PEI sheet now. Works great, if things start to get loose, just wash it and it'll be great again
its also worth considering using a brim any time you are printing something with a small contact area on the build plate or if the part has sharp corners or is very large. (large flat parts and sharp corners tend to warp and lift at the corners so you want extra help keeping them stuck to the plate)
brims make clean up a bit more annoying but its better then having a print fail
I would also second the recommendation of a good textured PEI build plate if you can get one for your printer. they work very well compared to the spring steel ones. I know a few people that insist on printing on glass but that seems like a pain in the butt as well
Textured PEI is just fucking amazing.
I can't oversell it. Pop it off the magnetic base, and whatever didn't pop off during that, just wait 10s-15s for it to cool, and they come right off. I think I've only had two adhesion failures since getting the printer.
I get adhesion problems on mine some times but its almost always because either I didnt clean the plate well enough or I tried to print something that needed a brim without one
I have wondered about giving mine a slight scuffing up with some steel wool or sand paper but afraid to do that
After talming about gettin one for ages - I think this is the appropriate time...
does anyone have a written comparison between these options?
Looking to spend about 500 but may be less OR more expensive if reasonable :)
obviously I'm on the open-source kind of side so I'm not having that software lockdown shit (not sure about the current status)
but I think bambulabs are pretty much plug and play, yet moddable

Def wont go over 1k tho
Despite all the recent ecosystem concerns, I'm quite happy with my P1S combo.
This morning, printed some Coleman cooler replacement hinges in PETG because I'm a slacker and forgot to do them, and we were heading somewhere with the cooler today. Took around an hour and change to print a pair, and, funny, one of the first things the host tells me when we get there and they're showing me where the beer is, to be careful because the cooler's hinges are broken. Same hinges. Re-queued the same print right then and there.
I think the Elegoo Centuary Carbon is still the best deal around. I have yet to hear anything really bad about them other then the small problem that you have to wait a while for them to ship because of the weird way Elegoo does there stock
I would not consider any of the bambu printers to be moddable, like at all. what mods and addons people have made for them are getting blocked in newer firmware
okay so thats the thing - I thought that firmware mumbo jumbo did not go through
would I be giving up anything if I were to choose the elegoo?
Filament compatibility? ease of use? anything like that?
or potentially, would I gain anything??
I am gonna be honest, I couldn't care less if they lock the firmware, as long the printer works well
It's a slippery slope though
So far 3D printing was known for being very open source where you had freedom of changing whatever you wanted
except for literally everything outside of the hobbiest space
and by that I mean 3d printers as a hobby, not 3d printing
That's the only relevant part for me. We've seen too many companies lock basic functions behind a paywall just so they can squeeze a few more bucks from consumers.
I know it is.
But if I buy a 3D printer, I want it to 3D print well enough for me to be satisfied.
Not deal with oh this software is better or that nozzle is better.
I just want it to work.
At least make it optional, give people the choice. Also maintenance will still be needed every once in a while, can't be 100% hands off
I agree, but the advantages of BambooLab gear is there's always replacement parts.
I've never had trouble finding parts for my ender and elegoo
Wait till you have an Ender V3 SE or KE, finding a replacement extruder is a pain.
In fact, I haven't found any yet
Elegoo CC looks to be good as well. I can't speak to personal experience on it though. I will say if it was available and with a filament switcher, I very well may have gone with it instead of my P1S combo.
I am only going on what I have heard from reviewers and a handful of people who have them. so take this with some salt. from what I have heard the Elegoo printers are quite nice, easy to use plug and play and it has features that put it somewhere between a P1s and the X1 if built to a cheaper standard. the big thing is Elegoo dosnt currently have an AMS type system. they say they are working on one but I dont know for sure it will be compatible with these printers.
it is a high temp enclosed printer so you can print abs and nylon and all that
last I heard there fillament changer is suposed to come out in 3rd quarter of this year
the stupid thing is you have to "preorder" there printers and lasers. they take orders for a few months then ship, its weird, its like they refuse to have printers in stock and I dont get it
they have to be loosing a ton of biz because of that. people will be like "well I want this printer but I dont want to wait 1-2 months for it so I will just get this other brand instead"
I think they're selling them as fast as they can manufacture them. The centauri (carbon) is an amazing deal for the price if it's HALF as good as the specs suggest/
I had to deal with it when I got my Neptune 3 and my laser from them. but both of those actually did ship faster then they said, my laser got here in 2 weeks instead of the month it said it would take
I really need to finish setting things up for my laser and get some projects going with it
Honestly, the 2 month model might be just right for me - Haven't decided where to put it yet and probably should clean up lol
So what I'm gathering:
- Bambulabs not great for having the ability to turn it into a hobby
- elegoo about same performance and features BUT a little cheaper and still great for hobby
Correct?
IMO the hate for Bambu going somewhat "closed' seems a little overblown.
Can't make that overall call for you though.
Elegoo's generally highly reputable. If I have to guess, I'd say that the CC is probably not going to be quite as nice a printer as the P1S, but it's also around half the price.
and with "quite as nice" you mean "production quality" or "result quality"? :P
cause that's a bargain then
maybe a little of both?
The CC is an amazing deal if it meets the stated specs.
I am waiting for that damn Elegoo Carbon to be on sale directly and not waiting for 10 years.
you will be waiting a long time, that is just how they do things
I wish I could upgrade to one but my slow "old" printer works just fine so cant justify it
I know, sad me, I guess I just but my Ender 3 in a closet with a fan.
I am gonna be honest, I don't see the point in very fast printing
as I have to keep my printing time under 16hrs because I sleep in the same room as the printer a faster printer would be real nice. but I also want the ability to print nylon
Put it in a box with a fan, that exhausts air, but also put sound dampening in the box.
Sometimes you want things in a hurry?
Not what I was saying at all. It was a response to Dutchman's comment directly above (#1058874733610946581 message).
I was also trying to make the distinction between printing and printers as the hobby.
The Bambu printers are great if you want to make stuff, one of the best options out there
I never want things in a hurry 😅
Prints that take less time cause less anxiety. Especially when it goes from overnight to same-day
That's partially true for me, especially with printers where the bed moves back and forth.
Like my Ender 3, I prefer it moving slower because the bed moves back and forth, and the faster the printer runs, the more the bed moves, causing more errors.
Although with a K2 I can understand why printing fast is feasible, there only the print-head moves back and forth.
I know, but parts are less stable.
I had parts fall over so I was forced to slow it down.
Then your bed adhesion sucks and needs to be worked on. Or you are printing in a bad orientation. Or it's a badly designed part. Or all of the above
The latter, although bed adhesion also can be a thing.
I just have the basic bed but I think I need like painters tape or something.
Most things print fine though
basic bed
That could be any one of about four different things
And when properly maintained all have excellent bed adhesion
I've seen pictures of people pulling chunks of glass from their bed because the adhesion was too good
Typically petg. It actually chemically bonds with the glass because they are similar enough. Same with petg and smooth pei
The dude I'm following on YouTube who is trying to achieve a sub 1 min benchy is doing it on a bedslinger
Properly maintained and cleaned since the beginning
Completely self build and very different from regular printers, but still a bedslinger
Benchy is rather low though
It's a roughly standardized measure of printer speed
My prints surpass 10cm tall
Thanks for y'all's help so far, ordering tonight.
I wish Elegoo was a bit faster, like Creality takes the cake on that 1 for me.
Although my ever 1st 3D printer was an Elegoo Mars 2 printer.
Fun while it lasted.
I am thinking on going with 2 K2 and 1 CR-30 set-up, with 1 Saturn for highly detailed prints.
It's 1 thing I love about resin printers, they make way way less mistakes than FDM printers.
But their build volume is tiny
my elegoo goes up to 500 mm/s, plenty fast for me
If I wanted true speed I'll use a resin printer
No surprises there
Ever used 1?
Not personally, but i have friends who have some
All I can say, without th proper equipment, they are the Seppuku of printers😅
Sounds to me like you lose the speed of printing in post processing then
Not really, for the same details the FDM can take longer than a day with a 0.2mm nozzle, where the resin takes 2 hours to print and 30 minutes to clean and cure.
Still way faster.
Just way more messy.
btw, there's no need to tag me on every message. I'll read it
Aye
I don't like messy stuff and since i mostly print functional stuff, there's no need for perfect details, I'll stick to my bedslinger
I only do stuff that don't need perfect details on my bedslinger
Just sometimes getting annoyed when people buy my filaments that need to be freaking super heated to work properly 
My dad once bought me filament from 123-3D print, the specs say 230°C max, but that shit works best at 250°C
It's not my printer that's the problem as Sunlu, Creality and Polymaker PLA works well.
yeah that site doesnt offer the best filaments tbh
i need to order some more elegoo filament, print pretty well for it's price
a lot of colours are often out of stock, but i mostly use black anyway
Sunlu makes a lot of different colours and work really well, although for sturdiness, I prefer Polymaker
i think i have one roll from polymaker, it's some sort of matte blue, it prints horribe
it stays sort of flexible, so things tend to sag
Me: tries to fix prints going constantly wrong on 1 printer
Me 8 hours later: tries new nozzle and problem solved
2 completely failed prints probably damaged the nozzle
I think I really need an enclosed printer
Temps in the room are too erratic
And I think that keeps causing the clogging
Definitely plausible
Curiosity, what does the "ironing" function do on a 3D printer, I found the option but never tested it
I had to clean the entire bottom of the print head twice🤣
Like the entire bottom of the print head was gold
See, I think most of my "clogs" in PLA have been because the enclosure it was in probably got too hot, and I got heat creep.
Kind of wipes the nozzle over the top surfaces of a print, smoothing them out.
Elaborating, I've found I need the prop the enclosure open for long prints in PLA.
Long being anything much more than 2h
Well, that's what I mean, when the room was ±24c all prints went fine, but as soon the sun came to my side of the room, the room was 29c and 2 clogs happened, but this seem to have also damaged my nozzle, as I put in a new 1 and everything was fine again.
Don't know about the damage, could just still be clogged
There are enclosed printers like the K2 that keep the temp in the enclosure consistent
Correct. Mine don't. One is an Ender 3 pro in a big metal cabinet, one's the Bambu P1S.
Really?
Even after pushing PLA through it till I said "stop"?
Assuming you've had the nozzle at proper temperature, and you're running the extruder or manually pushing it in?
If it comes STRAIGHT out, probably no clogs. If it goes all squiggly and curls, or goes out sideways, probably a partial clog.
Sidetracked: I love when a printer does honeycomb patterns, it's almost like it has a spasm.
I've personally never figured out the supposed "cold pull" clog clearing strategy. On the ender I've just pulled the nozzles and swapped, and then cooked the clogged ones with a heat gun.
The "Extrude" function as its called on my Ender 3 V3 SE set the nozzle temp at 240c and I can't change it, it pushes the filament through it no problem, but then during printing the prints kept going wrong.
Does the extruded filament come straight out, or curl?
Straight out till it curls because it hits the bed🤣
Although old nozzle was thick thin thick thin
As far as I know that means it's probably not clogged.
While new nozzle is nice and thick
Does anyone have any advice in printing TPU?
Take it slow.
No, slower than that.
Cant find my settings, but, slow.
Disable part cooling I think?
Disable retraction??? less sure on that.
I already print between 60% and 40% speed, do I need to go slower?
Aye
(inland 95a TPU)
This is running from Cura.
Part cooling 10%
Retraction disabled.
Print speed 20mm/s
Nozzle 235.0C
Build plate 50.0C
That was for an Ender 3 Pro
running standard bowden, NOT a direct drive extruder. If you're direct drive, you can probably run it harder
I haven't tried TPU yet on the P1S, because it does not play nice with the AMS.
I did recently buy some 60D TPU which will supposedly work with the AMS, but haven't tried it yet.
How do I know which 1 I have, I assume a direct drive, but I could be wrong
If the extruder moves around with the hotend (and is thus directly connected to it) - direct drive.
If it doesn't, and has a long tube connecting the extruder to the hotend then it's bowden
So lets say a bowden is like the Creality K2 and direct drive like majority of bed slingers?
Bowden. See the red extruder on the end of the gantry and how it has a tube going to the hotend? That tube is a bowden tube

Direct drive. See how the extruder (also red) is mounted on the toolhead above the hotend

Oh, so the K2 is a Direct Drive with a tube?
Because I seen those as well
I have a direct drive for sure
Some direct drives have what is known as a reverse-bowden, where they have a bowden tube coming out the input of the extruder. This.. can do useful things.
I see more and more of these "reverse" bowden printers, 1 of the mods of my printer is such a thing
It's a lot more common on enclosed printers. Can massively help with loading filament, let alone that most of them these days support multi filament systems (prusa mmu, etc), and those need a constrained path from the filament all the way to the hotend
Aye
so it's gonna be the P1S tbh.
looked at all the features and low-effort upgrades is needs to have even MORE features and sadly they outweigh the firmware fuckery
I'll see and hope for the best
I'm thrilled with my P1S combo. And they're on sale right now. Only advice is see if you want to get the AMS as well, and if you do, might be cheaper to buy the combo to get them both.
yeah the sale is my main driver for pulling the trigger.
i'll see about the ams, thanks!
Any idea why resin would turn from grey to black? Temperature changes?
Probably too much UV
And gets burned
what's a good filament starter set for mainly function/mechanical applications?
looking at black ABS, a spool of neutral colored PLA, some TPU and preferably some support-material that's easily removable
should I stick to bambulabs filaments for the first couple spools since there's a sale or go third party right away?
I know I need an airtight container and preferably some re-usable dessicant packets, that's for sure.
Elegoo is quite cheap and pretty durable, i use it almost exclusively
well ok but which filaments are used the most by you
or which were your first ones to run out when yall got a printer?
will get 4 spools for the beginning, just need to know which ones.
and since I'll get the AMS1 alongside the P1S, should I pick a support material for one of them?
PLA for me, but you can experiment and see what you like best
It isn't the best for outside
I got some petg for that
I'll often be printing stuff for inside a car which will get pretty warm in the summer so ABS and higher temp resistance materials would probably get used often... right?
Yeah, wouldn't recommend pla then
@viscid violet what did you use for inside your Miata?
I'm also seeing ASA - higher temp and UV resistance ABS...
sounds good but probably more difficult to get good results with 🤔
maybe some translucent one?
so:
I'm currently looking at:
- 1kg ABS Black + 1kg White - cheap-ish for generic purpose
- 1kg ASA gray - automotive (interior), good base for painting if needed
- 0,5kg ABS Support Interface material so I get good finishes on most of my builds
- 1kg PLA high-translucent blue-ish - fancy stuff and covers for Lights/button-type stuff?
does any of that sound unreasonable?
Sounds good to me, but I'd wait for a second opinion 😝
yea, got time until about... checks store page uhhh in 16h there's new deals..
ahh yea "flash deals", don't think I need anything from that
regular sale is until 07/14
I could pick up a spool of super soft TPU but not sure what I'd use it for 🤔
carbon reinforced nylon
kinda... not something I'd suggest for everyone
Honestly my favorite is glass filled polypryopylene which is horrendously expensive but has sickeningly strong layer adhesion with minimal warping and easy printing
but you need some special bed adhesive
unfilled nylon and PP are terrible to print with though
From what I've heard, there's not much reason to get ABS when ASA exists.
my understanding is for unfilled nylon you really need an actively heated chamber, not just kept warm by the bed but a real active heat control?
I really want to be able to print unfilled nylon. I dont want anything to do with fiber filled filaments if I can help it because of cost and safety.
would also love to be able to print PP
(get your minds out of the gutter)
I dont recommend gray for stuff you plan to paint. the gray most filament comes in happens to be exactly the shade of gray that most filler primers are. it makes it kinda hard to tell where you have painted.
Cost i get but safety? The only thing that's an issue is getting a diamond tip nozzle and send it.
handling safety for things printed in fiber filled filaments. even worse if you have to do some sanding on the printed part, better have a good dust handling system and I dont
Oh no, my 5kg spool of grey 😢
lol it works fine its just hard to tell where you have painted
kinda gets annoying
I have been wondering about upgrading my spool holder to support giant spools. wonder if it saves much in money to buy those instead
saves swap time 😆
I printed a big roller pair
uhhh. lemme see if I can find the link

Printables.com
Spool roller for Zyltech 5Kg filament spools | Download free 3D printable STL models
I would have to find a way to mount a big roller above my printer, that might be tricky. also have to make sure the roller is very low friction as I dont know if my extruder would be happy with the extra pull str needed
i think at 5kg it might be worth looking into lightly springloading a bearing lol
that one takes a pair of skateboard bearings per roller. but pulling that much mass is definitely a potential concern
could maybe even set up a cheap filament buffer involving a simple dc motor and an old endstop (or two endstops?)
Get a 0.6mm hardened nozzle and fiber filled ASA or nylon. Both will benefit hugely from a filament dryer before going to print or into the AMS. Fiber fill on plastic dramatically cuts down on the warping when cooling, and the P1S does great with intermediate temperature filaments like nylon & ASA. The 0.6mm nozzle will let you go faster if you want, not worry about fiber clogs from cheaper filament, and you really won't notice the loss in detail unless you were aiming to print under ~0.15mm layer height.
so you're saying, directly go with cf or gf asa instead of keeping it "safe"?
will not need speed much, rather have smoother finish
is CF asa expected to warp way less once cool or is it minimal?
currently not planning on anything that needs to be SUPER precise so I'd rather save a couple bucks and get the hang of it.
in reality I will probably have a couple design iterations until the stuff I wanna do has the quality I want it to have
like the price difference is nearly double of regular ASA and I'm just getting started
I haven't printed a ton of ASA personally but I understand it's similar to ABS, and I've printed a lot of that. Even if you don't care that much about dimensional accuracy, the warp reduction from fiber fill massively helps with printing large parts - keeps the residual stress down to help keep it on the build plate and prevent it from cracking during prints of big thin-walled structures
https://www.osti.gov/biblio/1185467/ - FYI from back in the day, if you want some technical details. The funny thing is that for a lot of parts, the extra strength wasn't necessary, but the CTE reduction was still important. Wood fiber got used a lot as well, since it's a great additive for cost reduction, improving environmental friendliness (as much as you can when using oil-plastics...) and still getting the warp reduction.
Additive Manufacturing (AM) enables the creation of complex structures directly from a computer-aided design (CAD). There are limitations that prevent the technology from realizing its full potential. AM has been criticized for being slow and expensive with limited build size. Oak Ridge National Laboratory (ORNL) has developed a large scale AM s...
yeah ASA is basically ABS but more UV and temp resistant.
I planned on getting fiber or nylon in the future anyways but imma start easy (also regarding any fumes etc)
recommendations for fume-filters and reusable dessicant packs?
Not really, sorry. I have a low-humidity environment + filament drier and don't do any fume mitigation on my Bambus. I'd suggest looking at rechargeable (i.e. in an oven or filament drier) toolbox desiccant packs. You can reuse regular 'disposable' silica desiccant packs, but without a humidity sensor (which are notoriously bad at maintaining calibration) you won't know when they need recharging
For what it's worth, despite the fact that I use a lot of CF nylon & TPU for functional printing, PLA is still what I buy and use the most of. It's cheap, easy to print, relatively environment-friendly, and more than strong enough for lots of things.
yea I was planning on doing the rechargables and keep it in an airtight container.
so basically periodically swapping by feel. tho an IOT (Home Assistant) humidity sensor would be a great idea
thanks for your insight!
Reinforced materials print easier and warp far less. They arent really any stronger unless you're injection molding them but that's just a flaw of 3d printing
Cf or gf nylon needs a good dryer. PP can just raw dog the air but its still recommended to dry for at least a little bit to drive off surface moisture
I have many very strong opinions about the piss poor state of drying in the 3d printing community but that stems from drying plastics professionally with the right equipment.
fiber filled filaments shed glass or carbon fibers as do anything printed with them. personally would not use them unless they are functional parts that wont be handled or your planning on coating with with paint or something. if you have to sand the parts it gets even more scary. micro plastics are bad enough, add in glass or carbon fibers, that is just nasty
glass - yeah hell naww.
carbon - i'm made of that bruh how can it be harmful /s
So does fiberglass and synthetic carpets. Wet sand and paint it. I'll die of something else long before fiberglass and CF gets me.
I dont know about you but I avoid handling raw fiberglass as much as possible or sanding fiberglass composits.
Yeah I don't lol
I'll wear a mask, gloves, and wet sand but otherwise I'm not going to worry about it.
Printing any plastic is going to load you up with microplastics to a way higher degree than the larger and heavier fibers.
And if you're worried about that id assume you'd ruin ventilation which takes care of all of that stuff
Everyone is filled with microplastics already
Rechargeable desiccants typically change color, so you don't need to guess at when to swap them, just look at them occasionally. Desiccant packs are not a replacement for actively drying filament though, they're just a maintenance item for sealed(ish) containers of dry filament.
got a transparent airtight bucket set and the color changing ones
I'm curious what the current state of the art is - is it more forced convection and dehumidifying than just lowering RH with heat like most home dryers? What sort of moisture content do you target? I don't work professionally with plastics pretty much at all any more, and in metal printing we just use so much shield gas that the environment ends up around 500ppm H20 or less.
RH is not used. Dee point of -40 degrees or lower and motor desiccant beds or a desiccant wheel.
Dew point*
Some of our logs report dew point as well and I dislike that as much or more than RH%... at least RH% tells you something directly useful, with dew point I have to go look up what that is in terms of concentration, and lots of the sensors are measuring RH% under the hood anyways, so it's not like it's really a more accurate absolute measurement.
Sorry for the random rant - sounds like it's mostly still the same. Not too long ago I got to work on an old jet engine that used a recuperator that works almost exactly like a desiccant wheel.
Dew point is the actual reference of moisture in the air. If the air is 50c or -50c the dew point remains unchanged. For the context of drying that is the metric that matters. How much moisture is physically present. RH is utterly meaningless for this context without knowing temperature and checking a chart or doing math.
aint it exactly the other way around?
When your drying temperature changes depending on the material its nonsense to have a moisture reference that changes with it
No
Relative humidity changes with temperature even when the moisture content stays the same
dew point was the temperature at which water condenses on cold objects, right?
RH is a human relative metric that has a very indirect correlation to the intended result which is dry air.
Yep
Not to mention it becomes less and less useful even as a human scale measurement as you start approaching dryness that's well beyond anything you'd find in any places humans commonly live
ahh I think I see
Like what's the relative humidity of a -20c day with a -30c dew point?
A hell of a lot higher than the relative humidity of that same air heated up to 100C
But the dew point stays the same
RH on the cold day is 40.34% in that example.
That same air heated to 100C is 0.05%.
This is useless. The plastic doesn't care how much more moisture the air can hold it only cares that the moisture in the air is so much lower than the moisture in the plastic that a large moisture gradient exists who's name is cant recall.
yeah now I get it
I like this topic lol
it think their relations are commonly plotted in a 3D graph
Combine a massive moisture delta with enough heat to jiggle the moisture molecules enough to break the bonds from the plastic and you get dry
And considering plastic holds very little moisture compared to the air you need to be (it doesn't take much to wreck the plastic) then you need the air to be super dry.
And this is where I talk at length about hydrolysis for an hour.
didnt answer what a dessicant wheel for filament would cost tho :D
Last one I quoted is a small unit and was a few thousand bucks
uhhh yeah no lol, not gonna consider it haha
especially bc everyone already has an oven but letting it run for like 2 hours at 200 kinda sucks
I have two segmented wheel dryers, like 6 dual bed dryers and a triple bed thoreson mccosh
There's honeycomb wheels too that are big bucks and can't be serviced
Segmented wheels can have the desiccant replaced
They also require regeneration. 3d printer nerds use the oven for that
My work systems self regen the beds that are not actively in use or the half of the wheel opposite the process air side
And the cool part of the wheel is its constant and stable. The 2 or 3 bed ones follow a sine wave on dew point as the beds swap every so often. Most of the time you never see it though as the sensor can't read before -40 anyways.
Below
Y'all got him monologueing😝
wth do you actually do as a job xD
I enjoy the technical aspects of my job lol
I run a plastic injection molding department and have a boat load of education on processing plastics
13 years so far
well, no wonder then xD
ggs, sounds like a hell of a job knowledge
Id say I'm well above average for practical knowledge in this field but way below a dedicated plastics engineer would be but that's mostly because I don't do component or mold design. They make em, I break em.
heh
After having an FDM printer for a while and noticing how freaking sensitive they are to temp changes.
I think on the cheaper side I stay with resin printers and for "large volume" I am gonna use enclosed printers.
And yes I set the temp accordingly for my open bedslinger.
But I constantly have to adjust the nozzle temp between 190c and 220c, and if I am too late I basically can redo the print.
Right, but the problem with dew point is it's still pretty meaningless and needs a conversion chart (eg to find ppm) to do any calculations with it. Additionally, most dew point sensors that can read live and arent damaged in typical indoor conditions are actually only sensing RH and temperature, then doing the conversion and spitting it out as dew point.
I dont have a filament drier but I have been tempted a few times to use my vacuum chamber along with my printers heated bed. like set the bed to 50c and put the chamber on it with a spool or 2 of filament in it then empty the chamber of air. seems like that would be fairly effective
but I dont know if the combination of vacuum and heat would damage some types of filament or not. some might have volitiles in them that would get drawn out and weaken the plastic, maybe some kind of plastisizers?
I know only some types of plastic are actually rated for vacuum
I bet Masta_Squidge knows
Filament dryer seems to be more and more required these days.
Although I don't know what is good.
its rare I print anything but PLA
For a half year I have been trying with PLA, but due to constant temp changes I can throw out 40% of my prints.
So I either need a heated printer chamber or go back to resin.
the last thing you want for PLA is a heated chamber. PLA likes it cool other then the bed to keep it stuck down
what kind of problems are you running into with PLA?
I mean heated chamber like on let say the Creality K2😅
Which is more or less a temperature controlled chamber😅
Begin goes well, and then my room cools down or heats up because of the wind from outside(PC cooler is in the window opening so I can't fully close my window)
And then the print either goes weird and stringy, clumps on the nozzle or entire layers go weird.
I never had these issues on my old Mars 2(Resin)
I really doubt its the temp doing that. that sounds like maybe your retractions are not set right or some other setting problem.
what kind of printer is it?
Creality Ender 3 V3 SE
I haven't changed the settings other than offset because I had to change the nozzle which came from Creality themselves but aren't the same height.
The average temp it's set to is 200c
It's my 1st FDM printer
Room temp is on average 19c
what slicer are you using?
From Creality themselves
I would grab Orca or Prusa slicer and try printing something with there profiles for your printer. they are probably 100x better tuned then what ever junk creality ships with. the default profiles in Elegoo's rebranded slicer for my printer were horrible
its really common for the default profiles to be bad for many of these printers. that is really where Bambu shines is the profiles that come with there printers are actually good
both Orca and Prusa slicers ship with resonably good community made and tested profiles for nearly every printer. at least as long as the printer has been out for a little while
I might try that, because it's doing my head in that I lose 40% of my prints currently.
Like there was 1 update where my prints were near flawless, like support was incredibly easy to remove, even without the snips.
And the version after it was just simply junk.
might take a little bit to get used to the different slicer. I dont know what Creality uses
Orca is probably the better choice, they have allot of really nice features. I have been meaning to switch but I dont like the UI very much so have been putting it off
Dew point is not meaningless at all? RH is the meaningless metric for this application. You must be HVAC, though that's quite an assumption on my part. In drying plastics you don't need to do anything with it. Its a single reference measurement.
My plan to build a drier that can achieve professional results was to use a vacuum dry method as well. Its the lowest cost option for a home user.
vacuum by its self wont dry things very well unless you wait a very long time but adding a bit of heat and your basically doing like freeze drying food so it seemed like a reasonable way to me
A commercial vacuum system for what I do heats the batch, pulls vacuum, and repeats with the next batch. Heating is easy.
seeing as my vacuum chamber is literally a cooking pot, heating it would be very easy
Desiccant regen is annoying and expensive to automate. So the best home solution is a steel vacuum chamber with a heating pad inside it.
Or just... an oven and a cheap vacuum chamber kit
I think setting it on a heating pad or a hot plate would be more then enough
Need to be able to get it up to like 80-110c depending on the material
Without a hot spot melting it
I would think with the addition of vacuum that the drying temp would probably drop a fair bit?
Not as much as you'd think
Water molecules bound into a polymer chain aren't quite as mobile as say a cup of water
are there any printing plastics that might not handle being subjected to vacuum? I was thinking TPU might have a problem with it, I have read that TPU is sometimes softened with mineral oil and was wondering if that might get drawn out of the plastic
A single molecule doesn't just poof out as easily
I wouldn't suspect tpu of having an issue. Oils tend to hold up in vacuum
That's why freeze drying oily food doesn't work well
It stays
be fun to try it out. sadly I dont have a hydrometer
Can't imagine you'd need one. Use a decent scale
Loss on drying method
Vacuum will pull out some volatiles but ideally you only need to dry the roll like 2 or 3 times max
ah yeah thats better. but I also dont have a scale that would work. my gram scale only go's up to like 250g I think and I am fairly sure my bathroom scale wouldnt work
F in chat lads
its a mg scale really
You don't really need to verify it but you could do some home science with leftover lengths
Dew point is nonlinear, and loses its human scale context meaning with super low H2O concentrations anyways. I know that absolute humidity is more relevant in many cases than relative humidity, my rant is just that dew point is a dumb way to represent absolute humidity when it's not a weather forecast. Parts per million or molarity are absolute measurements that can actually be used to calculate things.
how long do you think TPU would need to dry in a vacuum?
Yeah i get that but this is drying plastics so those details are irrelevant
only plastics I can print that need drying are TPU and PETG. but its quite rare that I print those. I have not found many uses for TPU and I hate the way PETG breaks
You can anecdotally assume 10 minutes for every hour of desiccant drying and the vast majority of plastics are like 3 or 4 hours.
So vacuum it for half an hour and you'll have dryer plastic than any hot air chamber ever could
do you think the pump would need to run for the entire time or maybe just pulse it if the pressure increases? my chamber holds a vacuum quite well but the water needs somewhere to go after its drawn out
Id leave the pump on to extract anything that comes off it
hate leaving it on. not a fan of oil vapor in the air
would probably work best with one of those oilless pumps. I wanted one of those but they were too exspensive so I had to go with a rotary vane pump, basically your standard HVAC servicing pump
I use it for degassing silicone and epoxy
Those are mad pricey. I dropped a bunch of money on my freeze dryer and looked at the oilless pump and said hard no
I would assume a freeze dryer needs a beefy pump
Not as much as you'd think
It's a medium size unit as far as something you'd carry around goes
think my pump is 3.5cfm. I dont know what that is in sensible units
The one that I got with mine is apparently 7.2 cfm
It'll pull down to 25 microns or less guaranteed apparently
3/4 hp so yeah I guess this is a beefy one lol
I need to print an oil filter/trap for mine. seen a few designs for them around
right now I just stick my air extractor hose over the vent when I run it
sounds optimistic
Nah they will literally replace it if it doesn't do that
mine does -29 inches of mercury... again I dont know what that is in sensible units
I think that is standard for all rotary vane pumps. you need something like a turbo molecular to go lower
Its hard when you talk about vacuum because "-29 inches" Could be a little bit of vacuum or a hell of a lot depending on the decimal place lol
It'll boil water like a champ but don't do too much or the pressure might just overwhelm the 3.x cfm
Oh geez this pump is $800 to replace i better not break it
Was like 425 a few years ago lol
my entire setup was $140
pump, lid, guage, "chamber" (its a cheap 2gallon stainless steel cooking pot)
and fittings
You can definitely do some production quality drying with that
There's a matter hackers article on drying that really pissed me off. They vacuum dried samples and had pristine prints
Then they're like "yeah bro so just toss it in the oven" at the end of the article
but that's not the same ffs
They didn't even test it
also ignores that many ovens cant even go down to the recommended drying temps and if its a gas oven it wont work at all!
my oven dosnt go down low enough to even dry PETG and its gas
Yeah my electric one is like 250f minimum
Are they though? If you're calculating drying times or the like based on the humidity measurement, you'll almost certainly end up calculating it as a mass fraction. I've also had personal experience with other engineers who used a dew point sensor on LPBF machines thinking it gave an actual absolute measurement, when it didn't, it's just a relative sensor, temperature sensor, and a lookup table, which doesn't work when, say, theres a new gas mix introduced that has different physical properties and they had the machine lasing when they thought the water content was low enough, but it wasn't, because the sensor wasnt calibrated for that gas. That whole ordeal was actually the straw that broke that shop's back for keeping their AS9100 cert in good standing.
mine claims it will go to f175/80c but that is still too high for PETG or TPU even if it wasnt gas
We don't calculate dry times. The manufacturer says 4 hours bro so we run it at 4 hours and call it a day.
All we need to know is that the desiccant is working well enough to maintain less than -30c dew point and that's it.
Anything above that tells us we have a problem to resolve
I know someone that was trying to print PVB and trying to figure out how the hell to actually get it dry enough to print. they never managed to make that stuff work
they would dry it for days at the recommended temp and get nothing put hissing a popping
I think i calculated that stuff like one time in school and then the teacher went "cool you'll never do it again here's a material spec sheet"
PVB but why
You have to use vacuum or professional stuff there
I cant remember what they were trying to do with the stuff. but I have heard its the only thing worse then PA when it comes to moisture
that is probably what they were doing. like me they do mold making
Resin is where its at there
All day every day
Especially if you're already fighting an alcohol tank
resin has its own problems. its incompatible with platinum cure silicone so you have to seal it
Ah yeah I remember talking to you about that ages ago
If we print a cavity it's getting hot plastic so I forget about that
I generally do either sand/fill/paint or I do epoxy coating. epoxy is the easiest but can smother details
I recently tried to do PVA (poly vinyl alcohol not acetate) solution coating to see if I could smooth molds that way but the coating it produces is far to thin. figured it would be considering what they is generally used for but was worth a try. had though I might be able to just use more PVA powder and make a thicker solution but I guess it just dosnt work that way
always on the look out for better ways to smooth prints. esspecailly harder to smooth stuff like 3d printed molds
I just want something that works good and is less of a headache 😅
I was thinking about vacuum drying some more. in a vacuum your more limited to radiant and conductive heat transfer, dont have the air transfering heat for you. so heating the plastic will be harder. you would be relying on the heat to be transfered from the chamber, to the spool and from the spool to the filament. do you think that would be a problem?
I had a horrible idea to get around this. first thought IR heat lamp but most vacuum chamber lids would block that too well then though microwaves! the glass or acrylic lid of a vacuum chamber wouldnt block microwaves hardly at all but the rest of the chamber would. just need a microwave door style mesh over the rest of the lid with a hole for the magnatron to see through and you have a vacuum microwave oven!
this is my horribly unsafe do not try this at home bad idea for the day.
but I bet it would dry filament real fast
Good thing, because you use those for measuring densities of liquids. 😛
Hygrometer for measuring humidity.
to confusing, lets call the humidity one a moistometer
because everyone loves the word moist
shudder
how about a dankometer?
...trying to recreate a broken Hingepart of my kinda old oscillating fan...
I hate it here.


Nothing in this b* is anywhere close to symmetric 😭
I suspect the part has been designed and the material for it chosen by a 5 year old with a pencil and a plastics list
It's the only yellowed part on the bloody thing
I'm convinced this thing can't be designed using actual CAD with constraints
Yeah actually my drawing was wrong.
I assumed the rounded parts had the same radius and origin.
... not getting better.
Think, I'm going to put that part on the scanner and go from that.
Its not an issue. Commercial systems just heat the plastic first, then pull vacuum.
They just blow hot air through the pellets
yeah, someone I was talking to mentioned that idea and I realized the plastic just needs to be preheated, as long as the chamber is kept hot it wont loose heat from conduction and with the glass or acrylic lid it wont be able to loose much from radiation so the filament will stat warm
...maybe I need to get a rubber matted platform... The cabinet below is seemingly not as robust as it felt like before lmao
It's aliiiveeee 

Zoooooom!
hell yea
If it didn't come with the vibration isolating feet (I remember hearing something about them maybe switching to those as standard) I highly recommend getting those, they're cheap from Bambu and work pretty well
I'm hearing "excuse to try some TPU"
Yeah it has rubber feet already but it does seem to still rattle the cabinet pretty good.
Afaik it's not good to make the thing completely rigid, right?
I'ts better to have it practically swing freely so it's calculatable vibrations, is it?
Right, and there's a big difference between the standard rubber feet and the vibration isolation feet, you can tell if you lift it up and they look like accordion bellows, those are the vibration isolation feet.
It's not so much about calculating vibrations in this case as it is just letting the rigid frame move around a bit more so as not to couple into the underlying surface as much
didnt people on youtube do a bunch of tests with that idea already? found that vibration damping feet dont help at all and your better off sticking your printer on something really heavy and stiff like a block of concrete
none of it probably matters with input shaper anyway. just keep the printer from walking off your desk
Given the two vastly different opinions, I'll wait for a tie braker i guess xD
Did some reading myself: if there are multiple printers on the same surface - or the surface is shaken by something else - absolutely - put the feet on.
If not - it just helps eliminate noise etc.
Apparently might actually make the quality worse if just single printer?
most of the test I know of where done before input shapper was common so I dont know if that makes a difference.
Wait input shaper is the process of compensating for overshoot / vibration without any accelerometers, right?
... wonder if bambu studio uses that...
it does or at least can use an accelerometer and yeah bambu uses it or at least something just like it. fairly sure the bambu printers have accelerometers. that just lets it be done automatically instead of having to do a bunch of tests
basically all modern high speed printers use input shaper or something very much like it
Well it did do a test at the beginning so i guess it has one lol
Their marketing is fairly non-technical - kinda just "it'll be gooood, man"
when you see it doing the wiggle dance, that is it calibrating with input shaper
or what ever bambu calls there proprietary totally not stolen but no one can check, version of it
Ooof haha
Rigidity is good in the system. Lots of printer designs (esp. bed slingers) are sorely lacking in rigidity. A good attachment to a heavy surface can help dampen vibrations in a poor rigidity frame. The Bambu systems are very rigid for their price, so the solid rubber feet aren't really adding too much to the system.
looks over to his printing setup on some wobbly shelves
I finally came around to following a tutorial on learning Fusion360, love not being dependant on other for designs anymore
Aight, thx!!
If the printer is rigid, the surface it's on doesn't need to be, IIRC theres a good demo video on youtube of someone printing with their machine hung from a couple strings. The machine wobbles all over but because the printing system (connection path between nozzle and bed/part) itself is stiff enough, it's fine.
Expect some wonkyness tho.it's not all clouds and rainbows xD
Good luck then haha
Last week I spent about 3 hours getting the program to even start
I have a decent pc, should be able to handle it
Had It installed ages ago.
It prompted me for an update.
Used it. Pressed ctrl+s for the first time in half an hour. Program crashes and doesn't start anymore
Tried to re-install - the installer won't do it cause it's already installed.
The UNinstaller also crashes on launch.
No useful log messages.
Even after completely nuking as much of the program as I could find - still no luck. Installer did not fix the launch issue
So if you ever have that - give me a call lol
Haha, i hope i never have to
sounds about right for a Autodick software
sorry, autodesk... totally a typo
but yeah the freedom when you get to start designing your own parts is a wonderful thing
walks away from printer. comes back to find spaghetti
welp.. problem solving time'
Dinnertime!
I once was gone for 5 minutes, only for my printer to make spaghetti and sauce
it sucks cause its a 5 hour long print if it goes right
its not even the largest print for this project either
but im pivoting back to just printing off tiles for a 40k board for the rest of today
I had 4 hour prints fail 4 times in a row because of the room temp being 32c
.......im honestly pretty sure its just this specefic corner not being supported correctly because its not the first time the print failed in taht specefic area
its actually almost the exact same results each time (ive made minor modifications). i probably have to redo the supports again
the spool just had a moment
aaaaa why today
Painters tape works wonders
the printer is soon to begin working overtime
depending on how the next few prints go
okay i think i know the problem
every print i have had that failed has used tree supports
Do you potentially have a timelapse? Because I'm fairly certain it's not really the trees
A picture would also help hehe
one sec
okay i appear to have yeeted the last one of the major failures somewhere into the abyss and currently have a print going
tree supports fail all the damn time for some people. they suffer from tip currling quite badly, I think the cooling on some printers makes this worse then others but not sure. my printer hates tree supports and they fail often if they are tall
tips curl up, get hit by the nozzle over and over and soon they break off or come loose from the bed. often leads to a print failure