#avatar-optimization
1 messages · Page 41 of 1
 hoary juniper
I would say that you should never disable mipmaps or texture filtering. If you want sharper textures, there are more intelligent ways of doing it in the shader that I'd be happy to go over with anyone who is interested.
 amber hemlock
Don't mipmaps make texture size bigger?
my avatar is a single 4k by 4k texture, so mipmaps have a ton of overhead
 marsh trail
From what i've read, mipmaps increase the filesize by 33%
marsh trail
Essentially, mipmaps are lower resolution images that are switched between at varying distances, mipmaps however, can literally be completely different images, as each "mip" is simply an image at a lower resolution that gets blended into the farther you are
Technically, you could have a disappearing model by using a single fully transparent mip, without the use of any specific shader
Mips display textures far better than if you were not to use them, since rendering a high res image at a very far distance will make details barely notaceable, whereas mips can give you a far more reliable view of such, at the cost of a slight overhead based on texture size
amber hemlock
Idk personally I think my model looks better at a distance without automatic mips
marsh trail
Very large texture atlas' will of course suffer far more, as it renders every power of 2 under it
amber hemlock
I’ve done lots of comparisons and decided it looks better without them
It makes everything blurry
Small details just blur away
marsh trail
Haven't done any tests as of yet, trying to get good results with DDS DXT1A encoding
Since unity makes DDS's look so washed out
Also i think the blur is related to the filtering mode
 distant forge
Being washed out might also be something to do with gamma or sRGB. For textures imported as DDS unity doesn't give you the option to set sRGB
 patent leaf
I convert my DDS textures because of that washed out look :\
 heady smelt
protip compress your textures when you're in unity ... very little quality loss but it will improve your load times
you can use the compression on a 4k or 8k tattoo texture and not have much quality loss
heady smelt
I recommend using UnityChan Toon Shader 2 and one entire atlas texture for the whole avatar. UTS2 offers lots of stuff like 3 layers, highlight, rimlight, ap rimlight, matcap, emission texture and other awesome fidelities, and its quite optimised for a change.
In my opinion, with that shader you get the most visual fidelities at a lower cost.
For comparison, the front avatar is UTS2, behind that flat lit toon and standart shader
Also, its free.
another example of the same shader
distant forge
@heady smelt Is there an example material or a good explanation somewhere of how to set up UCTS2? I got overwhelmed trying to figure out how to even configure it and it made my avatar black when I naively changed the shader to one of the UTS variants
(A screenshot of how you configured your material might be helpful)
marsh trail
Pretty sure you can compile a sRGB ready dds file
BC7 iirc (DX10)
Pixels and polygons and shaders, oh my!
heady smelt
@distant forge If you mean by a clean setup then you:
① Download the Zip here http://unity-chan.com/download/releaseNote.php?id=UTS2_0&lang=en
② Extract it somewhere
③ Drag UTS2_ShaderOnly_v2.0.6_Release.unitypackage into your Asset folder or simply drag it into the Unity window and a import message should appear
④ Once youve done that I have a quick sort of tutorial here, but I have done it in one take since I am not really "calm" at explaining but I hope it helps https://www.youtube.com/watch?v=7W-7ZQR3MsQ

Shader used: UnityChan Toon Shader 2 Model used: TDA Vocaloid Software used: Unity 2017, Photoshop CC 2018, Blender http://unity-chan.com/download/releaseNot...
Under "Body" of your avatar you should be able to select the shader, your choice will be "Toon_DoubleShaderWithFeather" under "UnityChanToonShader/"
Once you place your atlas texture or material texture into all 3 shader layers and remove the outline, you should be able to create magic
But, I really recommend it rather to use on Avatars with an atlas, because editing single materials with it is tedious
Since there are quite a few options, also looks best IMO and feels quite smooth when you do the first.
Also I recommend you to generate a (3 Blur, 100% detail, day lights) normal map in photoshop for said atlas and set it to base, you will be amazed how differently the directional light will react to your avatar
marsh trail
Online NormalMap Generator FREE! Create a Normalmap directly inside your browser! No Uploads required, completely client-based
 polar bolt
ugh, multiple samplers for the "shades" when the same effect can be way more customizable with a ramp
marsh trail
Kinda wondering if that increases the shaders' performance hit, and do the multiple (yet the same) images also account as a single one simply sampled through the different layers, or does each one get added to the total sum (imagine 3 8k uncompressed textures)
polar bolt
No, textures are indexed so its still the same one in memory. Just not sure if(or how much) such case of same coordinate sampling benefits from optimizations.
(Since its uniform parameters and not dynamic offsets like parallax)
marsh trail
Hmm, so if actual different textures were used for the different required regions (in that case) it'd use them individualy, whilst any of the same textures would just get called out from a single source
amber hemlock
So I found out why mipmaps were exploding my file size. My atlas is not power of two, which is fine for compression if there are no mipmaps, but if I enable mipmaps, they apply to the u compressed texture and compression becomes disabled, that’s why I go from 12mb to 68 mb
If I have unity convert my atlas to a power of two however it destroys it and makes my pixels detail blury. Can I just extend the texture to 4k with empty texture space? Ironically it would give me a smaller overall file size with mipmaps and be clearer
 surreal topaz
@amber hemlock it shouldn't make anything blurry if you set non-power of two mode to "To Larger".
It's probably scaling to the nearest power of two which could be lower than the actual resolution
amber hemlock
It does indeed make it blurry with to larger. Maybe I’ll investigate and see why
surreal topaz
That's weird, it shouldn't
Although the automatic atlas tool has padding to the next power of two if desired
I don't bother and just manually atlas
Too many problems with wasted space and non-POT
Mipmapping is essential and 60 MB textures are unacceptable
amber hemlock
I think I’m just seeing pixel interpolation from a small texture stretch my textures have detail right down to the pixel level
marsh trail
The endless cycle of trial and error
amber hemlock
Because my texture is like 3800 x 3800
surreal topaz
Yeah, that might be it. Still sucks though
Padding the texture out might solve it.
But then you also have to fix the UV's.
amber hemlock
Or whatever 1024 * 3 by 1024 * 3 is too lazy to math
I would hope blender can just understand resolution change but I guess not?
marsh trail
It'll try to adapt to the new res, increasing or decreasing uv bounds
amber hemlock
My automatic atlas already has a lot of wasted space
polar bolt
Best to scale the texture manually to 4k or 2k
Can inspect the details and control scaling properties
surreal topaz
UV coordinates are defined between 0 and 1 on both the X and the Y axis
So changing the image size requires UV adjustment
polar bolt
Adding padding requires, not full scale
amber hemlock
I know how to manipulate uvs and move things around but one thing I can’t do is generate the new texture representing what I’ve moved around I’ve never gotten it to work
surreal topaz
If you pad it out you'll have to manually set the 2D cursor to the right point, scale, press F6 to finely adjust scale
Make sure origin point is at 2D cursor
marsh trail
Padding to 4096 will require some uv fixin', if you were to upscale it however, it'd lose some tex quality but keep the uv consistent (correct me if i'm wrong)
amber hemlock
That’s why I have not manually atlases yet, I can’t figure out what I’m doing wrong with texture bake
Upscaling does not break uvs but the result is blurry due to interpolation. I have noisy detailed textures
marsh trail
Here's something that may work then
polar bolt
Use different scaling algorithms then
marsh trail
Try using waifu2x to upscale the texture by 1.6x and then downscale it to 4096
amber hemlock
My problem is it’s just pixel detail
marsh trail
Bicubic resizing then?
surreal topaz
What problems are you running into during texture baking, then?
It might be related to using the wrong engine
polar bolt
Or XBR and similar pixel art scaling algo families usually found in emulators
surreal topaz
Make sure you're set to Blender Render and not cycles
amber hemlock
I think I just need learn to texture bake. I could easily fit everything in a 2048 x2048 if I moved everything closer together
marsh trail
I had some problems baking vertex colors to a model before untill i used a specific bake...
amber hemlock
Whenever I try to bake the new repositioned uvs it errors out saying circular reference
surreal topaz
That's weird
This happens on any model?
There may be some settings set wrongly
And you're using Blender Render right?
If you follow the texture atlas tutorial it should be rendering to a new texture altogether, from your description it seems it may be trying to use an already existing texture as render target
marsh trail
Renders between cycles and blender be vastly different
amber hemlock
Blender render yes, and I’ve not tried it on any other model this is really my only project it’s largely all me
Not a mmd model
marsh trail
Can you screencap your baking section?
amber hemlock
Sure, will need to pause all this and continue when I’m off work
marsh trail
Bakin' can be such a mess, i think the only thing that worked for me was baking diffuse (iirc)
surreal topaz
Baking always worked fine for me, the only quirk is that if you use alpha, you have to bake twice to get a good result
marsh trail

Blender Stack Exchange
I have an object with 2 materials. Rather than describe them ,here are the nodes:
Material 1:
Material 2:
The reason for the two materials is because the second is more of a decal and should app...
surreal topaz
Since the alpha channel only gets turned on whenever it first sees transparency
That seems like a Cycles thing
In Blender Render you can just set the bake type to "Textures" and this will always work
Will only bake the diffuse texture, the top one
marsh trail
Was usin' blender render meself
surreal topaz
Never tried baking normal maps
I really hope it's as easy as setting it to "Normals" but I doubt it.
I think that's just to bake a higher poly model
marsh trail
Mostly everything i stumbled accross was telling me to use cycles for baking vertex colors
It was a pain to find the plausible alternative
And aye, normally ya bake from a higher poly model to use on a lower one, but baking normals should (theoretically) function even on low poly models
Setting up nodes might be necessary for good results however
surreal topaz
I'm not quite sure how that works though
Normally you UV unwrap the lower poly version
Unless you're planning on re-subdividing the lower poly one and then baking?
I don't think you can unwrap the higher poly sculpt and then unwrap the retopologized version the same way
At least not easily
marsh trail
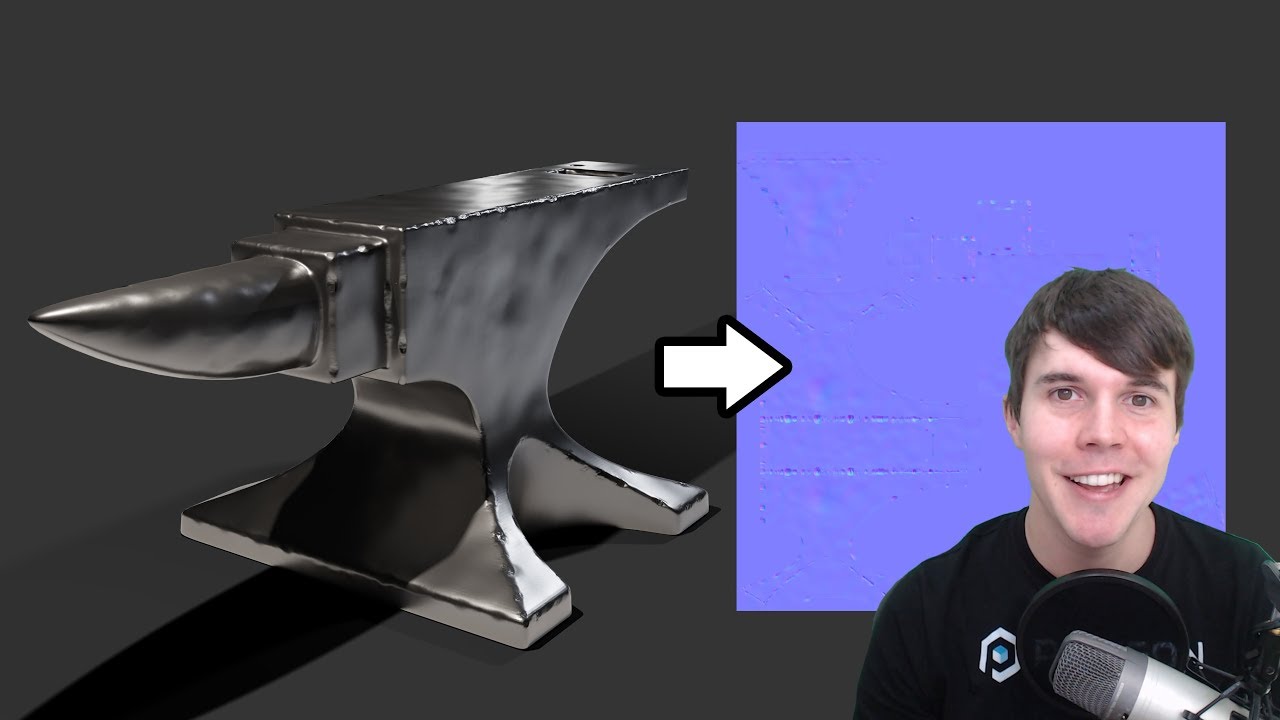
Blender tutorial showing you how to bake a normal map from a high poly model, to a low poly model. Download starter file: https://drive.google.com/open?id=0B...
amber hemlock
Good to know baking diffuse is easier, as it’s all I have. All my detail has already been baked to diffuse before the atlas. Now that it’s atlased baking no longer works due to circular reference
marsh trail
Blender Stack Exchange
I'm getting this error when I try to bake textures on my model. It says "Circular reference in texture stack". I found some info on the net. It says I should disable a texture in the texture stack so
Is it possible that one of your mesh faces has n-gons? It means unconnected vertices are along an edge. These often cause this error…
@amber hemlock
amber hemlock
Yeah my eyeballs are still quad spheres. I’ll triangulate them and see if that fixes it, thanks
Didn’t know that messes with baking
surreal topaz
Never had issues baking quads though.
Only ngons
But you can triangulate everything anyway
marsh trail
When in doubt
Google
ProgramName+Action+Error
Only very rare cases return with nothing useful (and computer issue posts dating back to 2009 with "found solution" with no solution mentioned or "here's the fix <urlgoeshere> :]" - the url expired)
 ivory night
been having my matcombiner atlas poop out like this

unatlased then when i combine
 surreal topaz
@ivory night what happens if you uncheck the combined_material already present?
Have you tried converting all the textures to PNG first in Cats?
ivory night
tried em both, was able to fix it but just had to kinda go around the problem
ty tho
 sweet mason
you could at an extent to to put all the texture side to side in photoshop and rescale the uv in blender to match it
 clever niche
can some one set this up for me im confused af withe the blender and unity ive tried alot the one i want most is qoute or in terms of what its called in the folder quart
 shut sequoia
just closely follow a video guide
This tutorial will go over installation of all needed plugins and the SDK. After that it will go over how to get a model ready in Blender, fix a few things t...
(also not an optimization question)
 open comet
@shut sequoia Thanks for that video, that answered a few of my questions
 lyric pollen
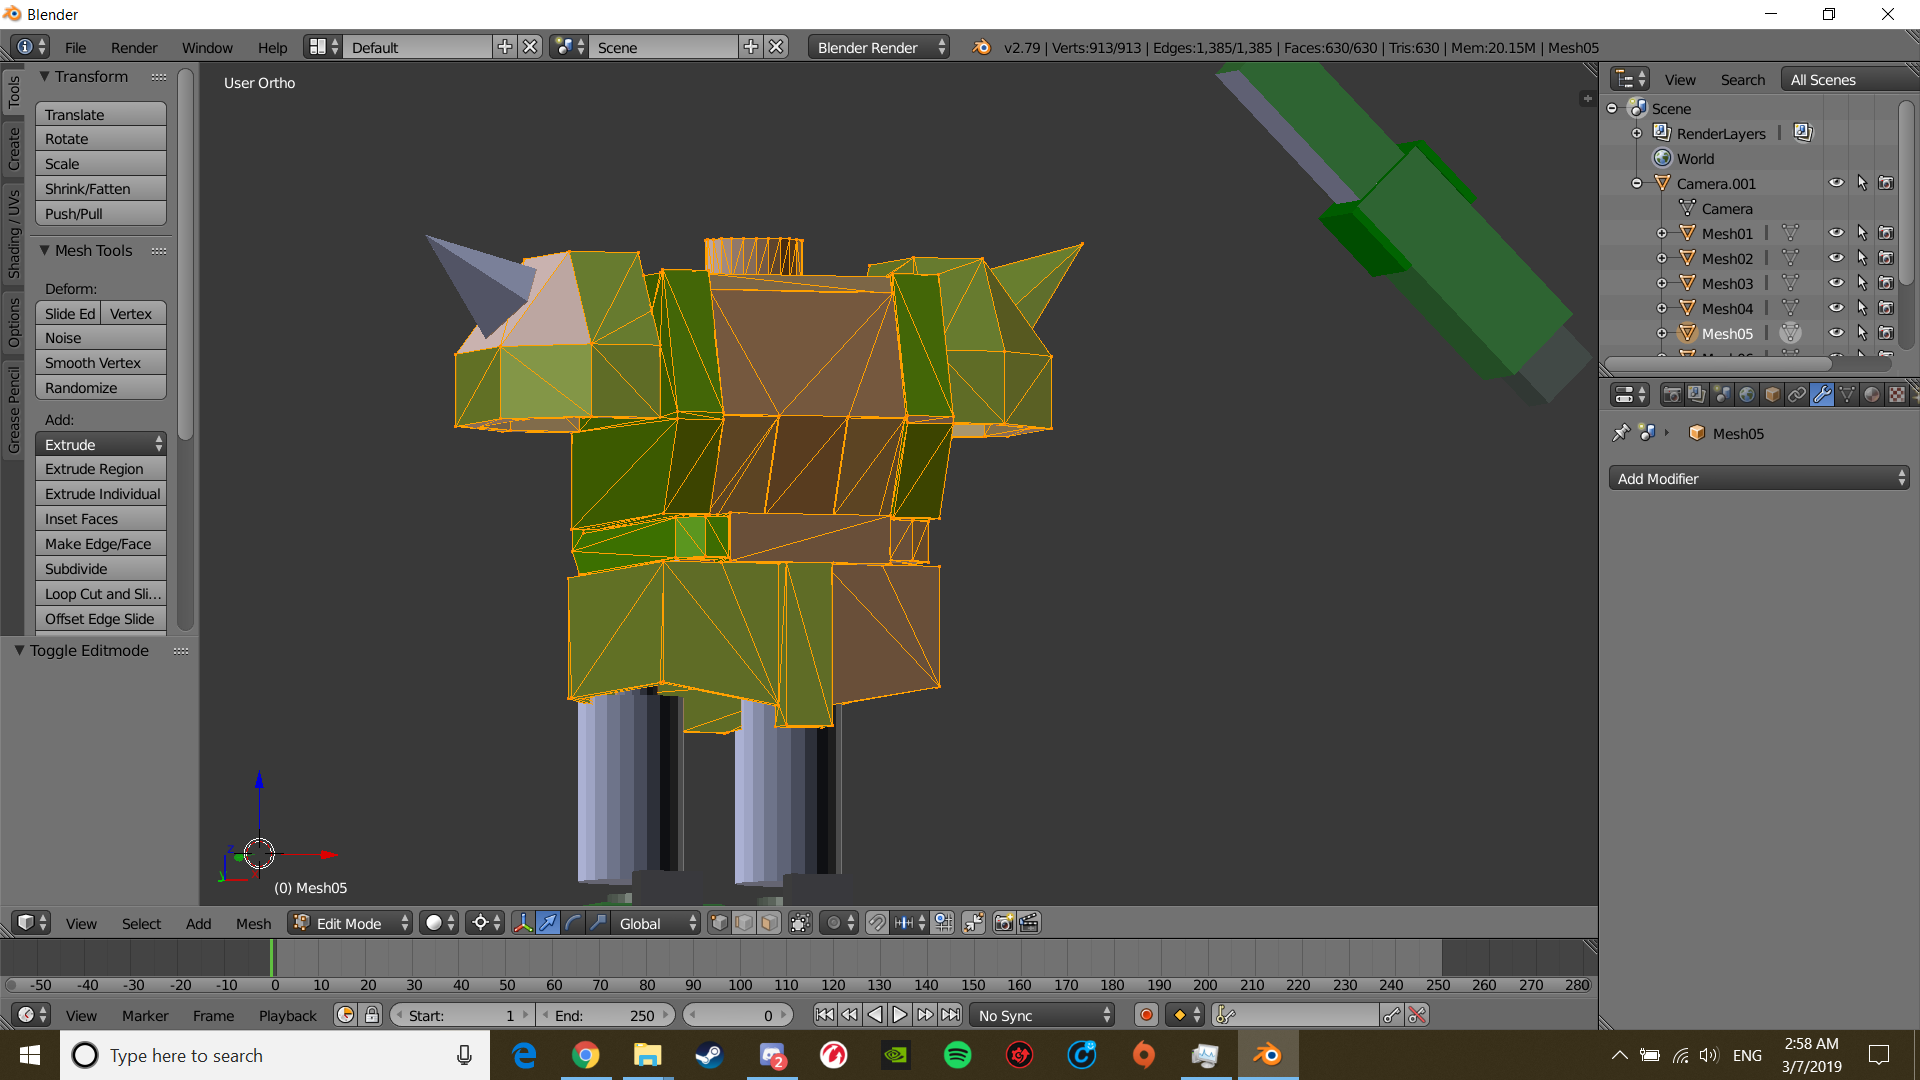
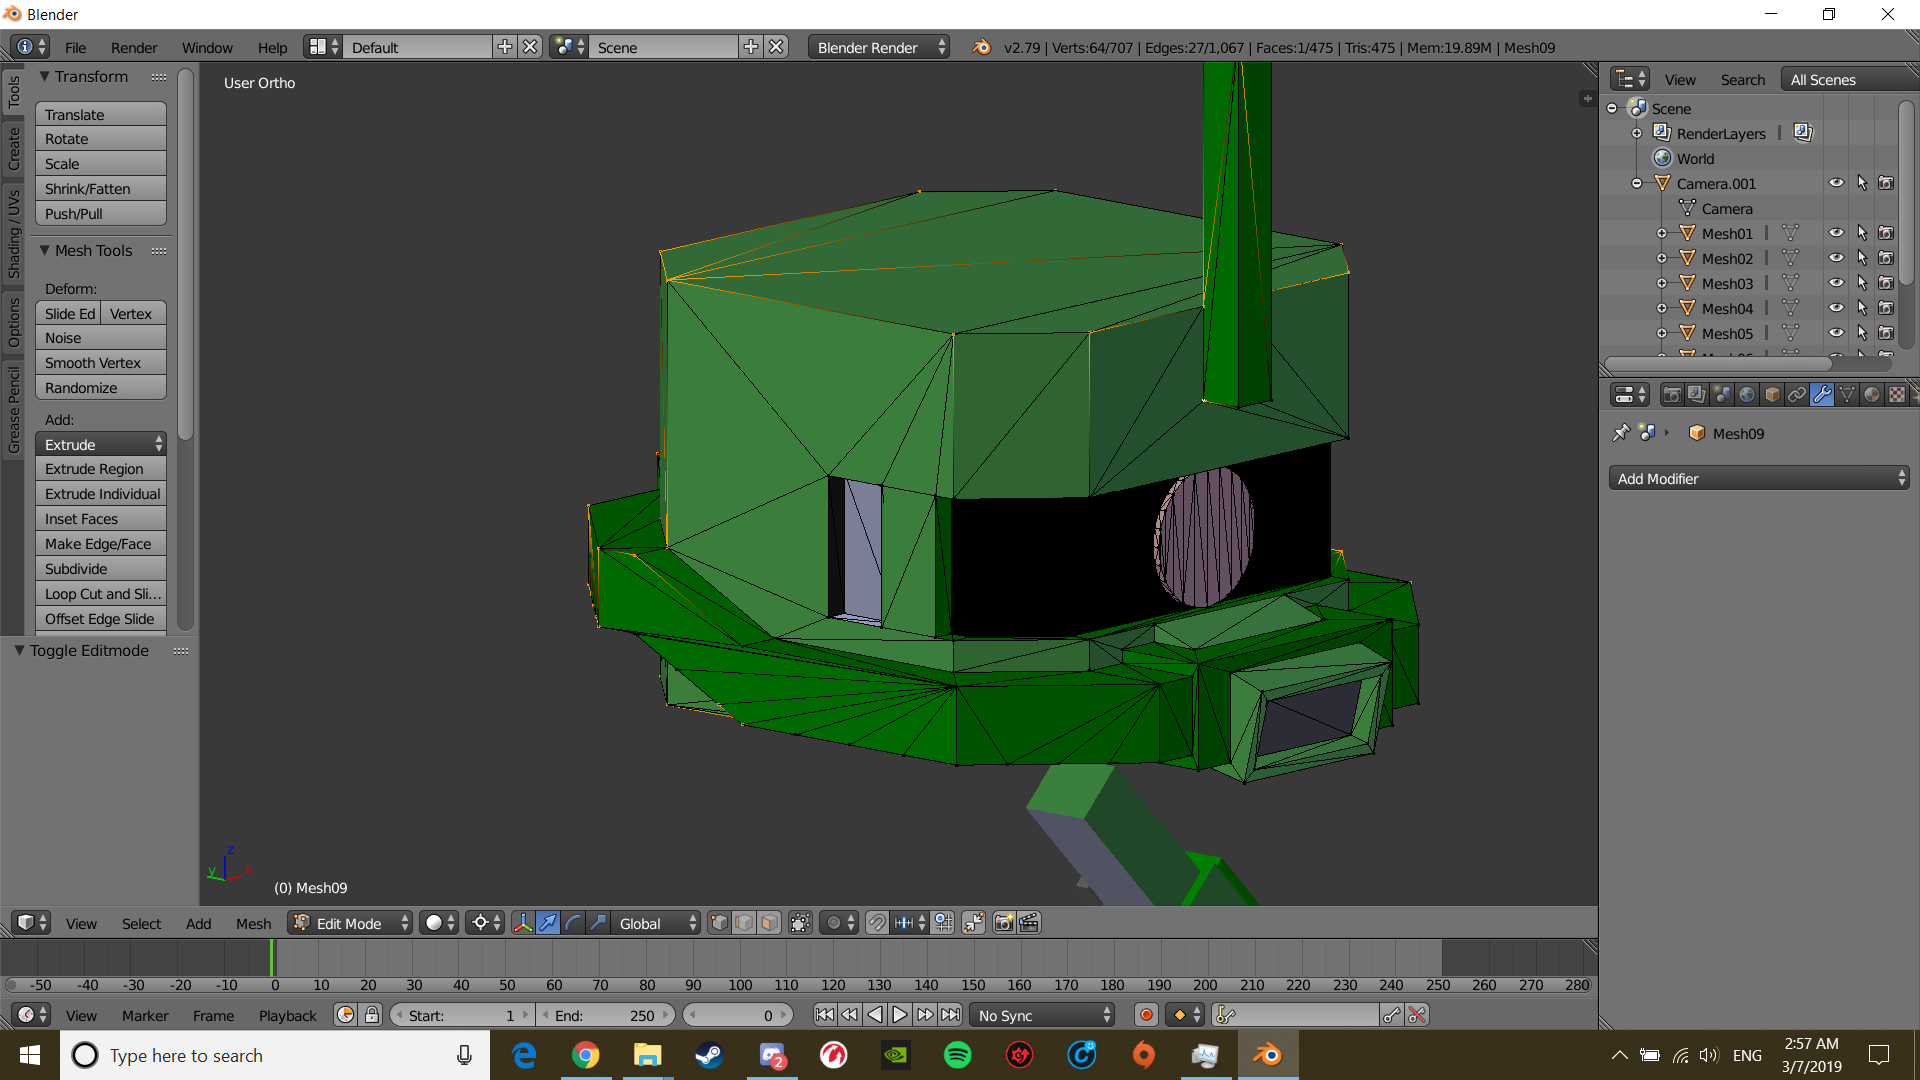
Hey so I made my avatar in sketchup and imported it to blender but despite being a blocky, low poly model it has like 2,000 triangles
Is this normal?
 lyric pollen
oh, so the triangles in the head and torso are just normal?
lyric pollen
delete+w?
sweet mason
press W with all the vertex selected in edit mode et click on remove double
lyric pollen
ah ok
 calm spade
Zakus are the best, this looks really nice !
 outer portal
How come vrchat doesn't look at the distance dynamic bones are registered when it comes to performance? Like listing off that hey you got Dynamic bones set at 20 yards, You should lower it to be more user friendly to the performance to other users. The default on dynamic bones is 20 yards and it's never considered in the performance stats.
 gleaming yacht
surreal topaz
gleaming yacht
surreal topaz
@outer portal pretty sure the default is 15 meters
And you cannot change that yourself
It's enforced on load
calm spade
imperial system 
outer portal
Is it? But when if you change it to 5 yards? Does that make it pointless?
Cause alot of bones on certain areas could be 5 yards for small detail stuff
surreal topaz
Everything in unity is in meters
I don't think lowering it will matter because it's always set to 15
Or something like that
outer portal
I never said they didn't @gleaming yacht I just said that there is a option to have them turn off at a certain distance.
surreal topaz
The way the current system is set up, it wouldn't make sense to take distance into account for performance ranks at all
outer portal
That gets rid of the option to optimize further if that is true Rokk
surreal topaz
Yeah
 ancient crystal
theyre really glitchy when disabled no idea why
like if u look at someones hair for example and then turn away and repeat the process
surreal topaz
I do wish they were limited to 15 and not hard-set
ancient crystal
every time u look back at their hair it will explode into place
outer portal
so you think it doesn't matter if we take distance into account? Are you serious?
ancient crystal
it matters
kinda like bounding box matters
its just not manually set 4 some reason
outer portal
I'll do some testing
surreal topaz
I never said it "didn't matter"
The system doesn't concern itself with distance at all because it's not something we can change on our end. I would imagine that with the current implementation, that wouldn't end well anyway.
We would have a separate stat for "dynamic bone distance" which would probably rank you as "poor" for wanting to show like 2 bones from 15 meters away
outer portal
You'd think they would allow us to lower it on our own end..
It limits you as poor just for having a single bone transforming.. so yeah
ancient crystal
no it doesnt
ancient crystal
its on the docs
The Avatar Performance Ranking System allows you to see how much a user's avatar is affecting performance via analysis of the components on that user's avatar. You can also use it on yourself to see how performant your avatar is. **This system is purely informational at this...
collision checks are on a per transform basis
so a total of all those
and transforms is just for each individual bone in the dynamic bone chain(s)
so a total count of those
surreal topaz
I think you're only poor when you're over 32 transforms
The problem is the vast gap between poor and very poor
9 collision checks = poor and 256 is "very poor"
And mesh particle polys are IMO penalized a little too heavily
amber hemlock
VRChat replaces your dynbone script with their own. Their disable distance could very well be hardcoded and ignore your parameter. I don’t know if that’s the case but it’s entirely possible.
 potent robin
hi guys
amber hemlock
Helo
potent robin
.-.
outer portal
they should allow us to lower it for performance shake, leave the 15 meter limit but allow us to lower it.
amber hemlock
There seems to have been an extra step in the middle of very poor, below which was labeled as “horrible”, as it’s been left in the SDK code. That’s why “very poor”’s range is much larger than the others
Just a hunch
shut sequoia
I may be remembering wrong but I somewhat recall the disable distance bring different the two times I tested it. I can try it again later though. Once in the box and once in another world. It seemed bigger in the box.
 uncut yarrow
can someone send an image of what the Unity bone map looks like?
for VRChat whole avatar bone rigs
 woeful stag
Something like this but delete upper chest and toes
shut sequoia
Removing oes will make it so you can't tiptoe. Most people don't mind but just a heads up
 karmic condor
It’s toe tapping or tippy toes, you get one or the other
uncut yarrow
shoulders are required?
ancient crystal
yea
all of arms
all of legs (toes optional but recommended)
all of torso, but no upper chest
neck, head, and eyes (if have eyes), no jaw
as for hands, the minimal u need for gestures and IK are bones for the first 3 fingers
amber hemlock
warning about NOT deleting toes: Currently the IK will make your head float above your toe bones, if you have them, so your avatar will lean forward. (view position won't change relative to your head, your feet will just IK in back of you and may look like you're leaning forward, depending on how far forward your toe bones are)
Unmapping toe bones will remove this weirdness.
Toe bones are only needed for normal VR, Desktop and fullbody VR don't need/use them.
surreal topaz
Regular VR doesn't need toes either
amber hemlock
I mean it as toe bones do nothing in fullbody/desktop where as they have an effect in regular vr
surreal topaz
It makes the IK look a little better but it's too much of a tendency to tiptoe all the time
amber hemlock
I've never seen a IK difference
but yeah i can imagine it would make the walk cycle a bit smoother (less head bob?) but I've never actually seen it help
 safe swift
regular VR is better with toes in my opinion, as you can reach a little higher, though needs playspace mover to adjust yourself so there's no issues
surreal topaz
Problem is that it's pretty much impossible to not have your knees bend or stand on your toes
Especially when you literally just look up/down and that is perceived as a headset height change
heady smelt
Is there a way to texture alast in unity?
marsh trail
Probably via plugins
 junior brook
hey guys, how bad would be to have 19 materials? I tried optimizing on cats but ended up bugging the model
distant forge
19 materials is too high. You're going to want to cut that down a bit
what did you try and what happened when you did?
junior brook
When I merged materials on cats the lipsync stopped working, but yeah I'm gonna try to see if I can fix it, don't wanna lag myself and others
surreal topaz
That's weird, material combining shouldn't cause that
@junior brook did you reimport the FBX back into Blender by any chance?
junior brook
yep
surreal topaz
You should always reuse the original blend file
If you have it
Anyway, just regenerate visemes @junior brook
The sil and pp shape keys are probably not being exported or imported.
If you're missing even one of them lipsync will break
junior brook
yeah I thought as much, someone made the avatar for me so I don't have the original blender file, only the fbx, but yeah just gonna regenerate the lipsync and eyetracking
Thanks again rokk!
amber hemlock
If looking up and down creates a height change, the pivot point of your head is not correct relative to view position, fix by changing view position rather than pivot point.
surreal topaz
It happens on any view position
It's because the headset itself pivots up/down on your physical head
The headset is moving up/down and therefore the game detects a height change
It's very slight but it's noticeable enough to, for example
Look down and adjust playspace until knees are no longer bent
Look forward in the mirror and suddenly your viewpoint is actually slightly higher than it should be.
Adjust playspace again, and now your legs bend when you look down.
amber hemlock
Ah I see what you are saying. This doesn't happen in FBT when you look down because it knows that your hip is not moving
surreal topaz
Yeah
 amber blaze
Hello.
heady smelt
i never managed to fix that 'your knees bend a little when looking down' thing
also, if i walk around while looking at my feet, my avatar tip toe
but when i stop is the other way around, my knees are bent
ik is weird XD (normal vr no fbt)
sweet mason
Change you high
surreal topaz
Pretty much impossible to get right
The margin between bent knees and standing on your toes is tiny
 arctic vortex
Blender is telling me my model is around 16,000 poly yet Unity is warning me about a large amount of polys once i try and upload it. I'm not sure if i have double the model or what. Unity tells me it's way over 70,000 polys
Decimating the model with CATS in blender tells me the model is also 16,000 thus way under the amount.
woeful stag
hmm, lets see a screenshot
 vague hearth
click apply on decimation modifiers before exporting, also alt+h to be sure there's nothing hidden
arctic vortex
I'll check everything then post a screenshot!
heady smelt
surreal topaz
You probably either have a lot of tris (which is what counts), you forgot to apply the decimation modifier, or you have the wrong file in your assets
Such as importing an older FBX by accident
amber hemlock
It’s pretty much impossible to fix the squatting squatting when you look up and down unless you have a hip tracker. It’s just due to non-fbt having no concept of hip bending. Hip will always want to be a fixed distance below you your view position
You can eliminate shifting forward and backward when you look up and down, but you are always going to squat a little.
Normal and unavoidable as of current player Ik
 versed swan
What is the max number if polygons you can have on an avatar?
karmic condor
70k
lyric pollen
I was able to upload my model to vrchat BUT it goes into this 3rd person view looking at the front of my avatar...
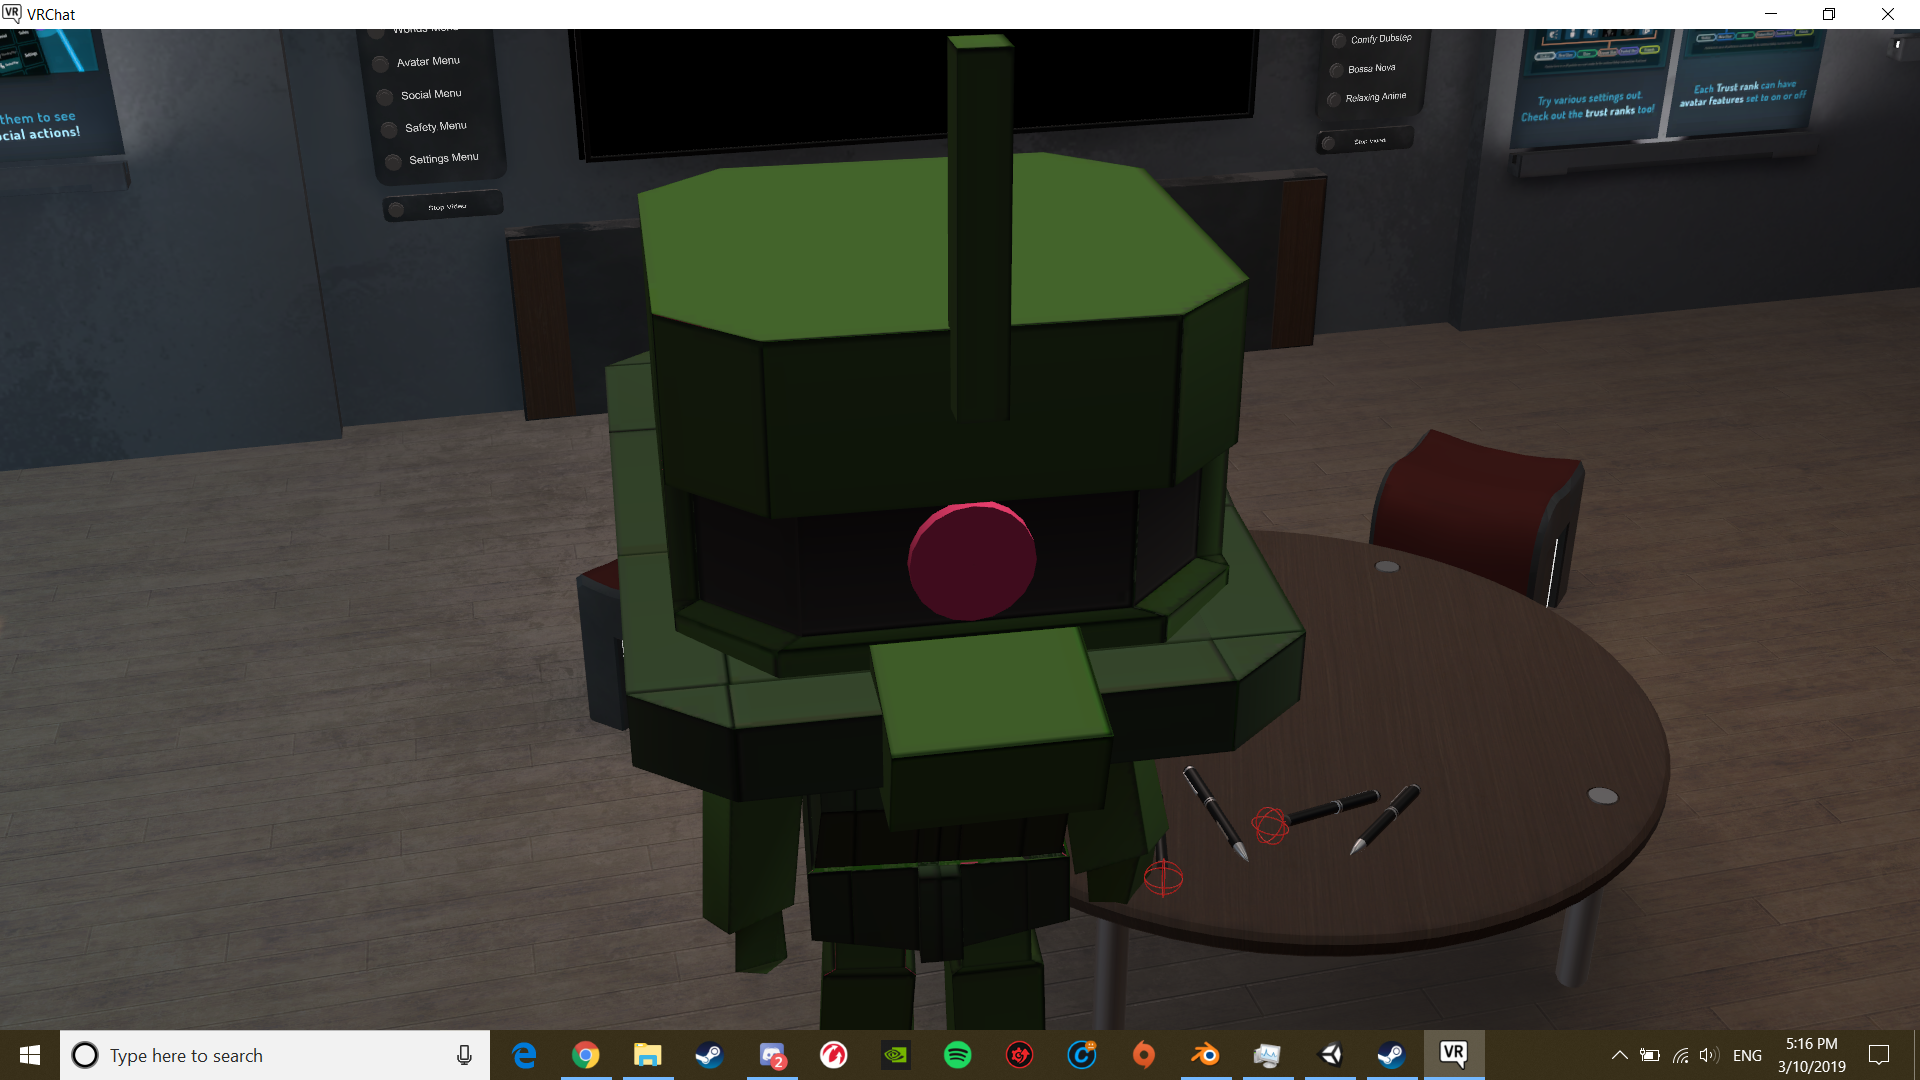
this is just normal view
 sand oak
did you adjust the camera thingy position?
sand oak
in Unity there's this ball (I forget what it's properly called) that you have to adjust to your avatars body, which determines where your eyes will be when you're using the avatar
lyric pollen
Yeah the descriptor
surreal topaz
I'm getting the feeling your model is also all turned around
Or maybe you left a camera on it by accident
lyric pollen
Would I delete the camera?
amber hemlock
I wouldn’t expect a camera to effect view position
distant forge
Cameras can override the default viewpoint if you don't assign a render texture (for example, maybe you dragged the default Main Camera into your avatar). Vrchat does some cleanup of cameras for friends, but any cameras on your own avatar are actually left exactly as configured in unity
 weak lichen
hi so i had a problem that i could not upload my map due some of my avatars where badly optimized and i fixed em so im checking the rest as well
and i notice some of em have 8 animators out of 1 how can i fix this
hello?
distant forge
The 8 animators isn't the problem, but those show up for a few reasons: either because of custom blinking/tailwag/eartwitch animations, or because you are using some vrc inventory system type setups where you can toggle props on/off/in between
however in your case, there are for the moment specific rules for public world submission that include specific things unrelated to performance stats...specifically number of dynamic bone transforms, number of dynamic bone colliders, skinned mesh renderers and material slot count. That's what you need to fix. Find the exact rules on the docs page
so you're going to have to give more detail about what your avatar does. If you think you should be using no inventory systems, and you do not use a custom blink, tailwag, etc, then you can find where the animators are by going to the Unity search bar in the heirarchy panel and typing in t:animator @weak lichen
amber hemlock
Wow the camera component worked perfectly, though it was glitchy if more than one person wore the avatar, only the first person to load it had the custom camera
surreal topaz
It's very odd that it just randomly works but that explains quite a bit.
Can you toggle that on/off you think?
So you can switch viewpoint
distant forge
This part of the SDK happens to be open source - it's not particularly complicated and you can read the function in AvatarValidation.cs. The stuff that's not obvious is how mutating or destroying the Camera on one avatar interacts with others sharing the same avatar prefab
and of course the fact that Render Texture instances are shared between users with the same avatar makes things confusing, especially if you first encounter it as a non-friend
amber hemlock
As long as it’s a private avatar it works correctly all the time. Have not tried disabling the camera. You can move/animate it though
Put it on a fixed joint to my head it’s pretty much exactly like a third person game
surreal topaz
That is odd but very cool
There are several methods to switch which bone an object is attached to. I'm sure that could be really interesting when combined with these cameras.
amber hemlock
Menus render in front of the avatar so I had to have a gesture to pull it back to first person
surreal topaz
Could take off your head
amber hemlock
Well even the default camera is not a child of the armature it’s just at the view position so a camera at the same location is indistinguishable
Expect custom FoV slider
It’s nice, though I wish I could decouple head rotation from avatar rotation for use in vr
For now if you turn to the side, the avatar looks to the side and your position sweeps to stay in back of the avatar
surreal topaz
Oh yeah
distant forge
You can lock your rotation by opening the big system menu
And set this camera to not see UI layer
 robust epoch
Is anyone having trouble uploading avatars as the "Processing File keeps getting paused thanks to unity and i cannot upload
distant forge
Unpause unity. Turn off error pause on the console panel at bottom 4th button. Check for the first red error if still broken @robust epoch
distant forge
If you want help Ask a more specific question about animations in #animation
amber hemlock
I feel like it might have a few unncessesary verts b
safe swift
just a couple
heady smelt
Nah it’s pretty optimized
safe swift
poly is red though
surreal topaz
"Tone it back a little fam" is not something I expect to see in a regular SDK lol
safe swift
oh, missed that part
surreal topaz
Pretty sure a model with that many polys won't even load
It would just make you a blue man forever
safe swift
do it for science
amber hemlock
Reading SDK source is fun lots of little things
My favorite being “Very Poor” having the variable name “Horrible”
Never noticed that bit in the pic. no idea if it’s modified. Would be funny if it only triggered for insane polycounts
shut sequoia
nah the rolex was a meme people did a while back, it loads
heady smelt
animator component 👌
amber hemlock
baking 24/7 animations into idle pose so you don't need a custom animator 👌
shut sequoia
[heavy breathing in avatarnese]
marsh trail
Ay single animator component for everything that moves in an idle format in different layers 
ancient crystal
^^
surreal topaz
3 animators seems like it could cover most use cases. One on the root for the "main" one, one on your body for custom toggle-able blinking (some people also use this for breathing), and one on the Armature for everything else
It would be neat if we had our own controllers and could condense it all down into one animator
ancient crystal
i mean toggle blink not usually necessary (it looks somewat fine w/o it)
and u can also use a breathing bone instead of blend shape
so i could just do everytin in 1 extra animator only
safe swift
what is swing bone?
 supple reef
It's an asset like the dynamic bone but cheaper.
safe swift
not whitelisted
supple reef
Oh...
safe swift
so no it will not work
Here is a list of the components you are allowed on avatars VRChat - VRC_AvatarDescriptor - VRC_IKFollower - PipelineManager Unity - Transform - [Animator](ht...
amber hemlock
Also it may obvious to some but editor scripts of many kinds still work and don’t need to be white listed. I use parametric primitives for making stuff in unity instead of blender, works fine in vrchat since they just output static meshes at runtime. Helper script gets stripped off but aren’t needed for the model to be rendered.
heady smelt
Hey everyone~ so I see in VRC that my bounds size is "very poor" and wanted to know how to fix this. ty.
surreal topaz
bounds size is buggy
Make sure your mesh bounds fit your model
And dont have far away objects
amber hemlock
Yeah I have a fully excellent avatar that says excellent in unity but is medium or sometimes just good in-game due to bounds saying I’m bad. Basically pray to the polygon gods that you get your star
 storm ingot
I dont use the whole ranking system for performance check ... just get a whole bunch of friends in the box ,load your avatar and ask if they experience lag/fps drops)
surreal topaz
That's not a good way to do it tbh
storm ingot
if even the best system gets lag on your avatar loading you know it needs optimization a bit more
surreal topaz
A single avatar will generally not drop frames and frames are too unreliable anyway
Use the Unity Profiler for more accurate results
Or just go off the optimization stats because they're usually right
Bounds size is very iffy right now and particle systems without emission are counted unfairly, that's about it
storm ingot
stats never tell real time experience though ( just look at the richest countries against happiness scale)
surreal topaz
That's not really a good comparison
The stats aren't perfect but a lot of them have solid grounds
storm ingot
hmm hmm
shut sequoia
Yeah, typically one avatar is never the issue. It's when everyone is using an unoptimized avatar that it becomes a problem.
That's like saying "Hey guys. I just farted, anyone smell it?" just because no one smells it doesn't mean it doesn't stink. Now imagine everyone farts.
But getting friends together to test one avatar is basically a huge waste of time because it likely won't even budge FPS on its own unless it's shader based lag
surreal topaz
Also I hate how meme shaders use so many keywords lol
Keep getting log spam and weird looking avatars just because some guy came in with a bad shader
marsh trail
Getting a room full of multiple variations of the same model (same hierarchy and setup, but different materials) would be a decent way to test such, lag will only occur when one has a lack of resources to follow through with what is being displayed, there's no feasible 100% certain way of accurately representing how much a model would lag, as it depends on so many different variables, it can lag in one system and not lag at all in another (talking about a full room of them, also again, they're different, so they wouldn't even try to re-use things if possible), you can get an idea of the general impact of a single one via the profiler, but you'd need to take into account, systems being used, the world that's being used, how many materials, meshes and/or different models are being used or batched together in some way...
I wish it was fairly straightforward myself, but it sadly isn't, "don't use X or Y" isn't a good metric either
marsh trail
I think so, probably just a heap of garbage text produced by them
Stumbled upon a few before
shut sequoia
Yeah, I figured there would be no issue no matter how many thousands of errors you got
surreal topaz
Well there are in this case
If you run out of shader keywords, subsequent keywords are ignored.
shut sequoia
My friend made an avatar that accidentally just kept making lines and lines of errors due to it producing one every time he moved because IK bug or something, lemme see if I can find it...
surreal topaz
There's a shader that supports MMD .sph textures but it uses keywords to turn that feature on
So it just looks solid white when the keyword limit is exceeded
shut sequoia
Oh, yeah Syns goofs with my rainbow keyword the most and it messes me up
surreal topaz
Yep
The worst part is
Those "checkboxes" in shaders all generate a keyword by default
The [Toggle] things
Even though most people don't even use the keywords
You can apparently fix that by turning it into [Toggle(_)] instead but that isn't documented.
shut sequoia
I always wondered what caused that. It would make others see my entire skin as rainbow even when my Skin atlas isn't what had the keyword applied to it
surreal topaz
That was a big criticism of Poiyomi Master
It could use like 32 keywords on its own
Out of the 200-ish limit
shut sequoia
Or my eyes and nails would only be solid color, not rainbow.
surreal topaz
Sounds like Syns actually uses the keywords then at least
My noenoe edits don't, so I optimized them out
0 keywords added by the shader itself as far as I know
 muted path
any ideas how to fix eye blinking my left eye blinks but my right stays the same in blender the left and right eye shape keys aka wink and wink 2 are linked to the left only how do i asigne the wink 2 to the right eye.
 sudden zodiac
@muted path There should be a shapekeys that blinks the right eye, use that one instead
 umbral talon
can someone help or give me some advice?? Im trying to decimate this model cause its over the 70k poly limit, but the bones keep getting fucked up when i save it and reload it. and then for some reason when i try decimating with the custom option my shape keys fuck up.
 woeful ember
selectively decimate clothing and avoid the skin/face if possible
dunno how your bones are getting messed up
maybe i should elaborate a bit you can select the mesh and go into edit mode and select clothing and decimate only the selected verts
shut sequoia
What do the bones look like when you try and decimate? I haven't seen that happen before
 steel osprey
only thing i can think of is over decimating the joints
umbral talon
this is what the bones do but i think its cause the parents are screwed
shut sequoia
Wow, yikes.
 obtuse raptor
I would recommend weight mixing some of the bones on the hair and skirt; the effects you would get from Dynamic Bones - if you use it - should hardly be noticeable if you do so. That'll cut down some bones a smidgen.
As for the decimation, I would use CATS and separate the meshes, and decimate individually one by one, the most biggest culprits; I find that shoes tend to be a culprit or pants. Depends on the model though. Also, try not to decimate the hands or face, since those are important.
Regarding the Shape Keys, if you wanted to decimate, say, the pants, you would have to delete the Shape Key first, if there is one. That might be why you're having issues.
heady smelt
VRChat complained the bounding box on my model was too big (It was) so I adjusted it.. now the lighting is strange. How do I fix this?
 winged zodiac
Maybe you should had made a copy of that model next time to go back and re-edit it. I never have a problem with the lighting of my model tbh.
 crystal sonnet
@heady smelt did you delete the scenes light?
oouf 450 bones, this doesn't look fun
winged zodiac
I feel your pain
I tried deleting some bones once. The whole model melting. Literally.
heady smelt
@crystal sonnet It's ingame, not in unity itself. Everyone else looks fine but my avatar is typically off color
In Murder for example she's blue when everyone else is orange-y
crystal sonnet
That'd be your shader
ancient crystal
is ur trust rank new user
heady smelt
I'm using Silent
no I'm trusted
All my other silent shader models aren't like this so idk whats up
I also changed it to cubed and reuploaded, same result
According to my friends it's a local issue but still really weird :?
surreal topaz
@heady smelt set the anchor override to the hips on the mesh renderer component
heady smelt
I'll try that, thank you
marsh trail
Pretty sure it's broken shapekeys given the fact that your bounding box was large, if left unfixed and one just rescales the bounding box, they'll suffer lighting issues as the broken parts still exist
@heady smelt
heady smelt
Maybe? Though I don't think I did much to the shapekeys. I did smooth out the shirt polygons a bit, maybe it was that
surreal topaz
Check all your shape keys in blender
There may be one that makes the entire model explode
ancient crystal
changes to verts sometimes mess up shapekeys
amber hemlock
@winged zodiac you. Can’t just delete bones or that part of the model will stop moving. Need to transfer the vert weights the of the bone to its parent then delete it
ancient crystal
or merge weights tool
amber hemlock
Yeah that’s there but I guess I always use it wrong the stuff I want to merge is never on the list
So I’ve just started doing it the blender way
ancient crystal
u dont need a list lol
u just select the bones and click Merge Weights [To Parent|To Active] whichever is applicable
amber hemlock
Ah thanks.
I’ve just been creating vertex mix modifiers every time
And applying them
I feel like I’m messing up the curves a bit too doing so
 main lance
you can not decimate stuff that has shape keys.
I would recommend separating model meshes by material and then decimate part by part. Start with the hair as thats where there is usually the most geometry.
oops. replying to an old msg XD
ancient crystal
its always great if ur a modeller and u can decimate by retopologizing tho
cuz then it doesnt turn into a disgusting mess of randomly placed verts
main lance
yes. Thats the cleanest route.
Im always grossed out at how the mesh ends up looking behind the scenes. but alas, it works.
ancient crystal
yee
its really bad for weighted meshes in specific sometimes
cuz it tends to favor optimization of flat areas
so stuff like arms and legs gets decimated more and it will ruin skinning
cuz one of my somewhat sculpted characters for example
it had like 120k triangles
cuz was meant for renders also
and i tested decimation to < 65k
and the arms became basically cylinders and had terrible skinning
main lance
eeek
is it safe to delete controllers? for example, I have a project that i keep adding changes here and there and im piling up
filename_v2.controller
filename_v2_(1).controller
filename_v2_(2).controller
filename_v2_(3).controller
and im wanting to clean it up....
ancient crystal
yea
theyre not necessary really but
u can help fix that by just deleting the newest one after ur done with it
or just putting all animations in their own folder 2 reduce clutter
main lance
Gotcha.
polar bolt
you can use single controller for all of model animations
just switch to the target anim in animation tab
main lance
how would I update my project with a newer sdk version?
I clicked VRChat SDK menu, it prompted me to download... Do i just over-write it all? or ... is there a preferred method?
ancient crystal
u dont need to
delete the SDK
install the new SDK
restart unity if necessary
main lance
i wont have to reconfigure character?
ancient crystal
no
main lance
cool
ancient crystal
thats the cool thing bout unity
if u delete assets or dont have them it has some temporary fake asset
that keeps ur properties and etc saved
so u load another version of it and it fills it in again
main lance
thats handy.
amber hemlock
If you have controllers piling up it usually means you are dragging animations directly into the avatar. Chances are all but one of them aren’t even in the scene and they can be deleted. Right click one and pick “find in scene” if it shows no results it’s safe to delete
It’s better to put the existing controller on an animator component instead of dragging an animation to a bone
Otherwise you need to add the animations to the controller one by one every time
Took me a while to realize the intended workflow. Animations go in controllers, controllers go in animators, animators go on gameobjects.
The “Animator” tab should be renamed “Controller” since that’s what it edits
main lance
noted.
hey i have a character that the blush is showing gray/black but i also have another blush that is working fine.
Not sure what happened that made one stop working.
They seem to have the same settings in unity, in fact in unity, i can see them both as pink blush but in game, its different
surreal topaz
Which shader are you using on them? @main lance
And are you using Unity 5.6.3p1 or 2017.4.15f1 to upload the avatar?
distant forge
Are both blush atlases/textures imported as sRGB and same alpha is transparency.
open comet
I have an avatar with polys over the limit and it won’t upload. How do I fix this issue
amber hemlock
Reduce polys using blender
 patent vault
I'm curious what is considered an optimized avatar in vrchat? How many tris/bones/materials? (if we exclude dynamic bones, colliders , fancy shaders etc lets pretend we dont use that) I feel that as a beginner its kinda easy to upload an avatar but hard to make one that is optimized!
distant forge
@patent vault See here for some good guidelines: https://docs.vrchat.com/docs/avatar-performance-ranking-system
The Avatar Performance Ranking System allows you to see how much a user's avatar is affecting performance via analysis of the components on that user's avatar. You can also use it on yourself to see how performant your avatar is. **This system is purely informational at this...
the biggest gains are going to be combining your meshes (ctrl-j in blender) and atlasing your materials (you can use CATS/material combiner addon in Blender to do this)
and of course keeping dynamic bones and colliders down. if you want Excellent you have to have no dynamic bones
shut sequoia
There's some good optimization guides her too. https://www.youtube.com/user/TheKareeda/videos

YouTube
Decimation, lowering bone count, atlasing, emission mapping, etc
patent vault
a bot should be spamming those here ^ just saying!
calm spade
That's what pinned items are for
shut sequoia
yeah some of them are pinned actually, forgot about that
marsh trail
Got any other models in the scene?
 elder gull
yes
marsh trail
Disable the red error ones
elder gull
what?
marsh trail
Every model with a descriptor is accounted for, if even one has a red error (not the performance one), nothing can be uploaded
marsh trail
No worries
elder gull
also does Pumpkin's auto visemes work?
marsh trail
I personally use the one provided by Hotox so i'm unsure
elder gull
how's that one
marsh trail
Think it's this iirc https://vrcat.club/threads/vrcsdk-patch-visemefix-v3-2-autofill-visemes-in-unity.76/

VRCat: Community-Run VRChat Forums
VisemeFix
A patch for the VRCSDK to fix the automatic detection of visemes.
Compatible with Unity 2017
Overview:
The current automatic viseme...
marsh trail
There's a gif there displaying how it works i think
elder gull

when i do the thing in the gif
it just comes up like this
doesnt actually apply the visemes
marsh trail
Odd... do you have more than a single mesh?
elder gull
oh nvm my visemes arent named correctly
I have no idea how to go about this
my visemes are in Japanese
marsh trail
mmd i assume?
elder gull
Yessir
marsh trail
You got blender?
elder gull
Yes
but its too late to go back to blender
ive been working on this avatar for 2 years
in Unity almost exclusively
marsh trail
Oh boy
elder gull
Yeah I joined VRC a long long time ago
marsh trail
You'll have to check each shapekey manually then, and it can't repeat in the visemes
And the Sil shapekey is Silent, so it's essentially an empty shapekey
Not seeing how this'll go through properly without going through blender honestly, you could scrap the viseme idea, but since you've been working on it for 2 years, i doubt that will be desirable
Running the model through blender at this stage is risky depending on what was done, otherwise i would just tell you to shove it back into blender and get it properly fixed up, losing 2 years of work would be daunting to say the least, so i hope you're keeping backups
ancient crystal
u also need 2 fix like
many more things on ur avatar (the warning messages)
and also should spend some time optimizing stuff like bone count
before u actually upload it
but i dont see y u wouldnt have a blender save of it already if thats the prgrm u used
elder gull
i have no way of getting my character in his current state
into blender
I added many things to him
through unity
ancient crystal
well adding things through unity means nothing
elder gull
what do you mean
ancient crystal
u can fairly easily replace meshes and rigs without breaking a lot of stuff u already did
marsh trail
They said they've been working on it mostly exclusively in unity this whole time
elder gull
yeah
ancient crystal
o if u mean u literally used nothing but unity thats not the best idea
elder gull
well that was 2 years ago
ancient crystal
unitys not designed for all that lol
ancient crystal
its not a mesh editor, rigger, texture painter, sculpting tool, modelling tool, etc etc
elder gull
It's enough
ancient crystal
which is kinda why u do all that stuff somewhere else
and then u import a near finished product instead
elder gull
tell that to 13 year old me haha
ancient crystal
i mean no offense but its never 2 late 2 redo it
in case u wanna get it done the right way instead
cuz then it should be a lot easier 2 fix stuff and optimize it
and also 2 edit in things that u didnt have before
so more of a 'future me problem' or 'now me problem'
heady smelt
does anyone have a beard for avatars that i can have?
...
patent vault
hmm....trying to create eyetracking using CATS but the Iris is clipping thru the eyewhite. Have been trying to move around the eyebone and it makes it better but not usable. Any advice?
heady smelt
Separate the materials in cats, go through the objects until you find the back of the eye (the white part) Go into edit mode and select the viseses in the back scale them bigger or move them back. @patent vault
patent vault
OK I will try to find the wites and move them back a bit! Hope it works~
surreal topaz
@heady smelt have you tried not spamming every single channel?
 rough tangle
hello everyone, could I ask for some help with my custom avatar?
I'm a super beginner, so I have no idea how any of this works
I made a 3D model of my OC, and rigged it with Mixamo
but when I walk, for some reason, the character starts floating
it goes back to the ground when I stay still
surreal topaz
It seems your avatar may not have all finger bones rigged, like thumb, index and middle finger on each hand
rough tangle
That's plausible, since the character has only 2 main fingers
there are no individual fingers to control, so I didn't bother rigging more
but I'll try asking there, thanks a lot
 ashen basin
anybody know what the maximum amount of tris are considered still in the "green" zone?
ashen basin
thank
surreal topaz
Between 32k and 70k you'll still be "Good" though
Just not "excellent", but excellent rank is already broken by adding anything extra to your avatar, such as an animator
ashen basin
ew
 tepid river
I can't find avatars to use
ancient crystal
kool
karmic condor
He got his answer in #avatars-2-general
 glass sapphire
HI
 mystic galleon
HELLO
patent vault
How is everyone atlasing materials together? Like, all clothes in on, skin meches in another? How about eyes?
heady smelt
Through the optimization tab in cats
It's everything together into one material and texture
You maybe have to do more than one if one of the materials/object needs to be translated
amber hemlock
In cats atlas you check only the ones you want to combine each time. Each time it fuses everything you had checked
 velvet spoke
@patent vault Everything opaque / cutout in one material and everything that needs to be transparent in one material is how i do it.
steel osprey
i tend to do it manually via gimp and blender. I usually have to do it this way due mutiple textures for things like normals, specularmap, emission, etc
surreal topaz
@patent vault I manually atlas everything. I then manually separate the transparent stuff from the opaque stuff.
And sometimes I'll separate further if I need a different shader on some part of the body, although this is rare.
I end up with 2-4 materials that all use the same atlas texture
Mostly if you're into "advanced" toon shading, I would recommend separating the skin from everything else, so you can apply a different toon ramp on it (or rimlight with poiyomi, which is vastly under-used!)
amber hemlock
I usually have 3, opague&cutout, blended, and cutout doublesided
Some hair looks bad doublesided, some hair looks bad singlesided
patent vault
Thank you guys! I knew people were doing it different , I guess I have to experiment a bit to see what fits my models. I'm like a total beginner and have no experience with shaders! but seems to be a fun part to learn more about ^^
 zealous spire
mmmmmm..... UV optimmization. one materinal node. _mmmm yes_😊 😚 👌
 fleet steppe
Is there a hard limit on triangles?
marsh trail
70k is the max allowed polycount on a per-avatar basis
amber hemlock
Basically without the aid of animations the max is 70K. Having more with animations is allowed but unnecessary, unwanted, and abusing it is looked down on but not specifically against the rules
surreal topaz
And will break your model if people have shaders blocked
marsh trail
I'd say it's more-so overlooked due to the vast amount of users that do such, it was being done even back in 2017, it is indeed a bypass of sorts, but tolerated the same way porting MMD is tolerated, even though it is ripping at its core
surreal topaz
MMD is far from ripping
ancient crystal
its active polygon count
surreal topaz
The MMD license permits this stuff
ancient crystal
not total polygon count
surreal topaz
You just can't sell it, which many people still do
In particular scums like subcom
ancient crystal
if u duplicate ur model like 20x
and all are inactive
should stay uploadable
but if activate in game the polycount skyrocket
unless activate one at a time
amber hemlock
I see it as the rule of cool. If you really do need more than 70k do something impressive that other people will enjoy, go for it. But if it’s just to look pretty then it’s selfish and wasteful. And of course, don’t do anything against ToS like modding SDK or clients.
ancient crystal
i accidentally had liek 120k poly model before
surreal topaz
What also helps is putting as many polys on static meshes as possible. I have a model that's 25k by itself, but it has an oculus rift model on its head that's 40k.
ancient crystal
my original character was ~50k polygons
surreal topaz
So instead of putting that on the main mesh, I separated the mesh and put the rift as a regular Mesh Renderer on the head
ancient crystal
and i had a mesh that was 70k that u would activate with gestre
but it was inactive so it didnt show in poly count
and i didnt notice till i activate it on accident when upload
i think i 4got 2 check it poly before export
amber hemlock
My original avatar before vrchat was 120K tris and 40 materials. Then 64K for vrchat. Then I got it down to 32K with 3 materials and 2 textures. No visual change, just optimization.
marsh trail
Ripping is in essence, the act of decompiling/assembling a model into a readable format for 3d programs that can then use for alternative purposes, is it not?
ancient crystal
no but like the uploaded one has 120k tri
well no ripping is taking it from a source instead of an asset
surreal topaz
Yeah
ancient crystal
i.e. instead of downloading from sketchfab, ripping from WebGL
or instead of buying a character asset, taking it from a game
surreal topaz
If decompiling a model is ripping, then Blender itself is ripping because they had to reverse-engineer the FBX format to export to it.
This is just using the MMD Tools PMX importer to edit a model in Blender and not just PMX Editor
amber hemlock
Isn’t fbx format publicly documented
marsh trail
And the act of re-purposing a source model is?
surreal topaz
Dunno, it's proprietary for sure
ancient crystal
yea but its dcoumentation is shit
i tried looking it up so i could write parsers
and almost nothing and nothing as detailed as for .midi files
even blender article of some sort of documentation on it
but ripping is more stealing
marsh trail
If the act of decompiling a model is not in essence ripping, then repurposing models provided you have the assets for such is, infact, also not ripping correct?
ancient crystal
no decompiling has nothing 2 do with it
ripping is illegally obtaining assets
instead of legally
so yea decompiling is used for some assets
marsh trail
And porting i assume is legally doing such
ancient crystal
but its not ripping
and yes somewhat
fan models are fine tho if copyright shown
marsh trail
So porting assets that were made into mods per se, or other kinds of assets that are physically available to decompile and modify are fine
marsh trail
Unless they breach copyright law
marsh trail
Pfft
ancient crystal
"use O N L Y in sfm pls"
and if they don't then u can if u rlly wanted 2 4 whatever reason
take legal action or request takedowns etc
u can even do drastic things such as taking down channels
some people use other peoples assets from gmod and mmd etc in their streams or utube
marsh trail
What if they don't own the rights to said model?
ancient crystal
and they might do a takedown for usage of copyrighted assets
well if they don't own it they don't own it
also i don't think the claimant has to be the actual company
some people who port assets will also copyright flag content
just to prevent it from being spreaded
its stupid but
its y some gmod models say "use only here or i will issue dmca takedown"
and such
marsh trail
So no actual legal action can be taken by a third party even if they state rules not imposed by the creator per se
marsh trail
Person ports model from place X, place X has no rules set in stone, person states that it can only be used in place Y, person can then take legal action if their rules are breached?
Just a simple yes or no to finish this convo here really
This did establish quite a few things though, if decompiling is not ripping, guess i can actually help people in other areas on the basis of porting
amber hemlock
They can’t take legal action for IP you do not own. Actual copyright holder must initiate the DMCA.
marsh trail
I wish i could find an exact definition of ripping in it of itself, since based on earlier uses, was used to imply copying video or audio from a DVD per se, digital extraction as they called it
But i guess it has many branching definitions based on the area
amber hemlock
In the case of your example, the original creator’s wishes supersede your own. They don’t care what is done with the model, so it does not matter that you want limits on it, it isn’t your call.
marsh trail
That's what i thought should be the case, yeah
It gets pretty iffy when it comes to derivative works i can imagine, eh, but that's enough legal situations, i've got my answers
amber hemlock
Derivative work is subject to the terms of use of the source material. It’s binding if stated otherwise you can be more restrictive with use but if someone can separate your work from the original you have no grounds for preventing it.
distant forge
Guys this is the optimization channel
amber hemlock
I’m not sure what the specific case is here is but I would not consider converting mmd models into Unity prefabs, even with atlasing and etc, to be derivative work.
distant forge
amber hemlock
I’m just answering a question.
 torn schooner
Which shaders DON'T glow in the dark?
I just realized there was a shaders tab, my b
distant forge
Shaders with proper PBR rendering modes should look correct in properly lit worlds. Standard of course, and Xiexe XSToon is designed as a toon shader with the same lighting as standard and has a PBR mode too
torn schooner
Thanks
 storm hearth
Any good tips on decreasing load times? A lot of my avatars with gestures take a long time to load. i've crunched textures, used OGG files as they are smaller than mp3 and wav, and most of the models have polygon counts less than 20k, and usually less than 10 materials including those on gestures.
surreal topaz
Decrease the amount of game objects
@storm hearth if you have humanoid models below your own model (for dances, for example), try ticking "Optimize Game Objects" in the rig configuration for them
It's below where you select Generic/Humanoid
This won't work for your "main" model though
storm hearth
The models in specific are persona based, with all the personas being generic.
surreal topaz
Hmm
Well if the animations are on the FBX, the animations might still work
But it'll be dicey
Reducing the number of game objects is the main way to reduce loading times
So remove zero weight bones or merge bones that aren't actually animated
storm hearth
Alright
 ashen flower
is there a way to uncombine materials... shits annoying to have to re-edit stuffs.
also, i think the material combiner should be in the unity side of uploading so you don't have to worry about that later. >.>
shut sequoia
select the verts and separate them
ashen flower
;_;
ashen flower
at this point im ok with 14 materials.
 fast merlin
oh boy
ashen flower
screw the lower 4
fast merlin
just an fyi, current gen AAA games work with a limit of 30 materials
ashen flower
i doubt that
steel osprey
depends on teh game and the engine
ashen flower
^
fast merlin
Horizon Zero Dawn, Aloy had 30 mat IDs
or 28 or something
I suggest staying on the lower end of the material count and try to use texture maps instead
ashen flower
find that hard to believe considering you have dense vegitation, not to mention different gear, and other factors in play.
steel osprey
at least atlassing is easier if you have a basic model that doesnt need speculars or normals
shut sequoia
you can have all that and be atlased
shut sequoia
You could have 10 different guns, gear, belts, buckles, everything and be 1 material if you wanted to
ashen flower
alright, so easiest way is no.
fast merlin
my character modelling teacher has her model and files
I would look into substance painter, they might have a free trial thingy
substance is hyper helpful for texturing a model
steel osprey
30 day trial but still very nice to fiddle with
fast merlin
ah yes
amber hemlock
Just as an aside, games tend to lose about 90% of their polycount and draw calls when ported to the Quest.. but they barely look any different. This is because most of the optimization was actually wasteful in the first place but they had little need to be efficient on the PC.
Game designers, even AAA ones, are lazy and have bad practice.
karmic condor
Where did you hear that?
surreal topaz
This isn't about that "this gun is 14 polygons and 1 texture on the Oculus Quest" meme right?
Because that is N64 levels of "optimization", not an ideal we should be aiming for
They're abusing cutout and ngons to put forward an "ideal" scenario even though the gun geometry is actually incredibly messy
I can guarantee that it'll look a lot worse when you actually see it in action and not just in a promo image
 turbid ore
When using CATS to make a texture atlas, is there an easy way to do the same for normal/specular maps at the same time?
At the moment it's a choice between using cats and no other maps, or spending a while fiddling around
or not doing anything and having a better looking but very unoptimised avatar
vague hearth
@turbid ore this addon has multicombining option in MatCombiner panel (or what a name), and currently it works only for materials that has textures (materials with just a color not takes into account) and also it bugged in mean it's not copy image by size of UV (if uv otside of the bounds) but just resizing image )
you select image in selector and add something like "layers" for each, and then each layer combines together as different atlases (for example 1st layer for each image - normal map, 2nd layer - specular, hm)
zealous spire
working on my newest avatar. Only 2 material nodes baby!!! 😚 👌
surreal topaz
Why 2 and not 1? :^)
zealous spire
I need the lights to blink on and off
safe swift
make emission map for them?
surreal topaz
Yeah, that's what I thought as well
 quaint willow
I've done all shape keys I need for my model, now it has only one mesh. Do I need two meshes (1 body, 1 head) for VRChat to be able to hide the head in first person?
quaint willow
In this case it's going to be the one of those running along the neck? https://i.gyazo.com/2823940a9440c01a4f223fa6d57e76d4.png
 quaint willow
That's what I needed to know. Thanks.
patent vault
Got a problem! When atlasing my textures in blender and saving the .blend file it seems like my mats don't get saved? Beacuse when I try to open up that same blender file later my textures are all gone or "pink". How do I save the mats so I can work with the .blend later? ....I don't really know the basics of Blender yet just started out ^^'
surreal topaz
@patent vault did you also save the atlas texture externally?
"Save as image" so it's a png file somewhere
patent vault
@surreal topaz Yeah! Or I think so? I keep the atlas (yes its a .png) in a folder next to my .fbx so that I easily can drag it into Unity when I need it.
But seems like Blender can't find it....or its not inluded in the .blend file? how do I make blender read the png?
amber hemlock
In image/UV editor, is there a way to mark a bunch of unconnected, but overlapping tris as a single island so that pack UVs doesn’t separate them all and have floating triangles everywhere?
It does this ridiculousness
They're supposed to be on top of each other but the packer separates them
 ionic mango
I dont have a VR set as yet and Full body trackers will be a bit later still. That said:
I did a tutorial done by Fruitpex on YT and I cant figure out a couple of things even though in blender it said I was under the new 70k limit ;
a) how do I change the hip angle to 180 as suggested by the SDK as a warning.
b) I have a green dot for Polys but says 45093 (recommended 32000) How do I drop the 13k polys? Do I need to send it back to blender?
surreal topaz
Yes, you'll have to go back to Blender if you really want to get under 32k
Keep around the original .blend file if you can
The hips angle doesn't really matter. Perform the cats fullbody fix if it ends up giving you issues ingame
ionic mango
I saved the project after the end of that part of the tutorial incase I need to go back into blender
surreal topaz
Yeah, you generally save .blend files within blender. You can just reopen those again
ionic mango
so I have the blender
surreal topaz
Don't re-import the FBX if you can help it
woeful ember
just to give clarity you don't "need" to reduce it down to 32k
heady smelt
How can I copy a skin of another user ingame?
I am new, on PC and without VR
Please help
calm spade
You click on them through the quick menu and chose Clone Avatar, if that avatar is public and have the option turned on, it'll copy it
safe swift
you can clone only if they have cloning enabled and it's set to public
heady smelt
And where does it say "clone avatar"?
 wooden trail
esc > click on the user > see if cloning is allowed > clone
heady smelt
Okay it seems to be a big buggy for me
safe swift
it's not bugged, if people do not allow avatar cloning, then you can't clone it
and if it's private, then you can't clone it either
heady smelt
but it does not always show the "clone avatar" optinion as soon as I click on a user after opening the menu
safe swift
read what I wrote
distant forge
That user may be wearing a private avatar. If that user turned off Allow Avatar Cloning in their settings then you cannot clone
safe swift
also you can't do that through selecting them through Social menu
u need to select them in your game screen (idk how else to say it)
heady smelt
the menu that pops up when pressing ESC, right?
 onyx widget
Yes
heady smelt
Well then I did use the right menu
its just that the new options do not always appear for me when I click on a user after having opened the menu
distant forge
Your framerate must be above 20
Try to look away a bit and use some tricks. It's a really silly bug
 turbid tendon
hey guys
ive got this model with 40 materials that Im trying to optimize using Atlas generator by shotaryia
keep getting this error, any tips?
sudden zodiac
@vague hearth 🤔
vague hearth
@turbid tendon you have model as one mesh? also try to click update materials list then combine, if it still occur open that script by the path with notepad and write instead i.ob.data.materials.pop(mat_idx, update_data=True) this print('lol') but then after combining you'll still have all materials (but they'll not be parented to model) and need to remove them by hand
and, i'm not sure how that bug happen (and after fixing that model need to get script original code back) ¯_(ツ)_/¯
turbid tendon
thanks for responding! Ill try that now
ah, the issue was that I had bones that didnt have anything on them
 barren jungle
@safe swift Re "cloning avatars only if they're public" -- I've actually had issues trying to clone avatars off a friend even though it's a public avatar and my friend has cloning allowed. It feels more like a case of the UI being incredibly unresponsive to clicking on the other player's profile because of weird hitboxes or something
has taken us several minutes of standing around to successfully manage it at times
distant forge
your framerate must be above 20, otherwise it won't open. that seems really reliable for me
Canny here @heady smelt @barren jungle This doesn't have nearly enough votes: https://vrchat.canny.io/bug-reports/p/unable-to-select-player-when-having-less-than-20fps
heady smelt
Thanks, kitten
barren jungle
ah, thaaaat explains that weirdness -- many thanks for the canny link to upvote 😛
 pine flame
So, if you have FPS too low you can’t select the person lagging you to turn off their avatar essentially oof
pine flame
Yeah that’s pretty bad, I was wondering why in the worst times of need that menu wasn’t there for me
surreal topaz
Well at least the dynamic bone limiter will hopefully put a stop to all those larens models lagging up my CPU
Their "private world" is still up with all the unoptimized shit and it still gets cloned
pine flame
Yeah the larens models are the first ones I block
 woeful basin
That's why I have all ranks with maximum block aside from friends where everything is shown.
pine flame
Most of the people I see using those are friends unfortunately
 frosty shale
how to reduce bones?
 dark jackal
you can combine them? If thats what you're after
such as if you have a cape with 36 bones, but realistically you just need like 6
frosty shale
I want to reduce 5 more bones
shut sequoia
can you yeet your toe bones, mouth bone, and the two extra eyebones
dark jackal
you have CATS?
frosty shale
yes
dark jackal
alright, hang on
pine flame
If you’re not using dynamics you can get rid of hair bones
dark jackal
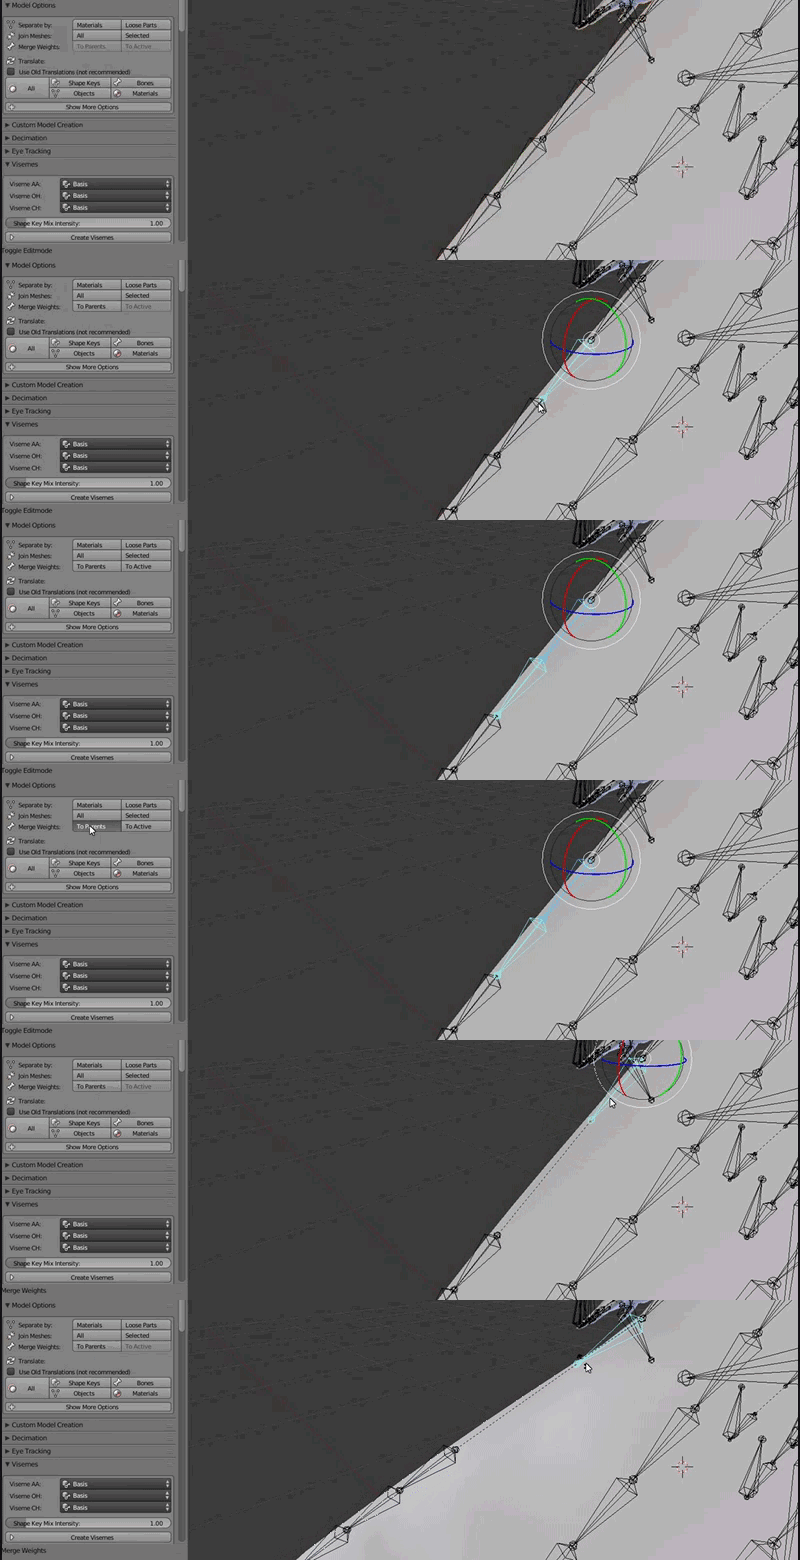
just did this to one of my capes
but you can use parent, or active etc
find 3 bones and just yeet the middle out, try the hair
frosty shale
thanks! will try that now, btw where to see my bone count in blender?
frosty shale
thanks! what to press to click on bones? can't select bones sob
dark jackal
so, in object mode, right click a bone (press alt -h if you cant see them)
this is from V2.79 bare in mind, i think the newer versions are left click now 🤷
frosty shale
I can see them but can't select https://i.imgur.com/qh3rh6H.gif
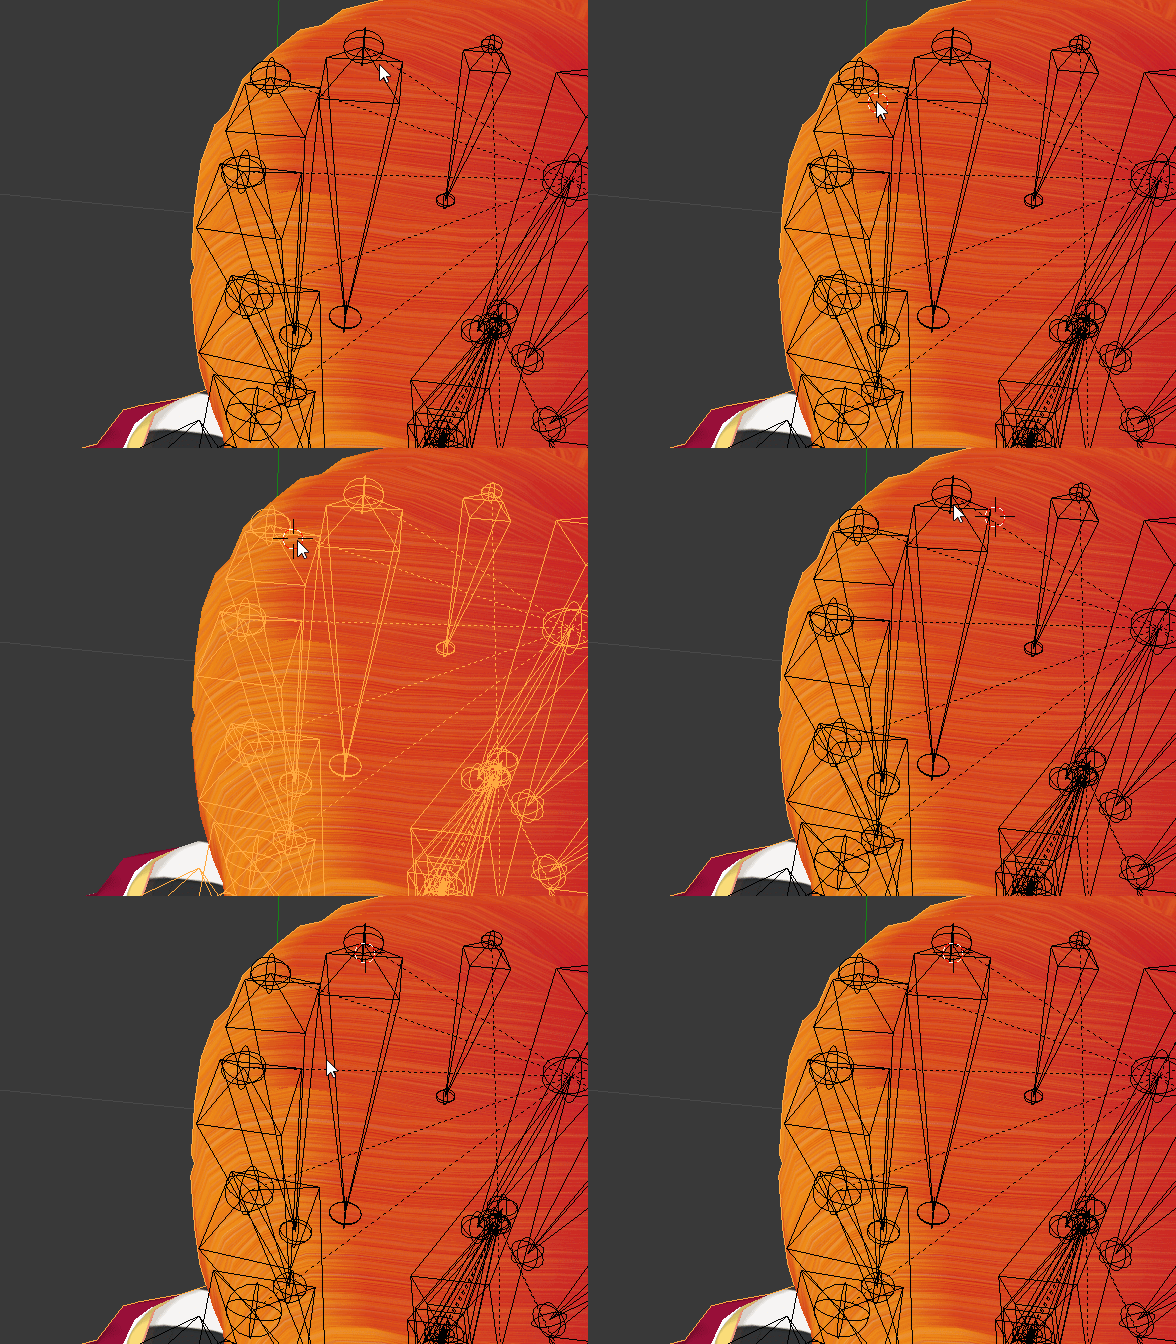 dark jackal
yeah highlight them all, and press tab
then you can go through them induvial by holding shift as you click
frosty shale
yay I think I selected them now, but unlike yours, not blue
dark jackal
oh, mine are in something called 'pose mode'
if you have cats, its like right at the top
it just allows you to move them, make sure you stop pose mode when you're done
in edit mode, is it not at the top? (when in bones)
frosty shale
merged them now, I'll try to move them to unity! thank you so much!
dark jackal
No worries, I hope it works fine 😃 any issue just holla
frosty shale
❤
dark jackal
could of at least used the VRC one 😉 
surreal topaz
Edit mode or pose mode both work
frosty shale
oh theres an emote of it now
surreal topaz
You can merge the "original" eye bones like Eye_L and Eye_R
If you're already using LeftEye and RightEye
As well as any other random twist bones you may have
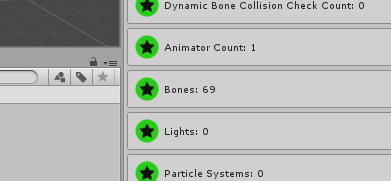


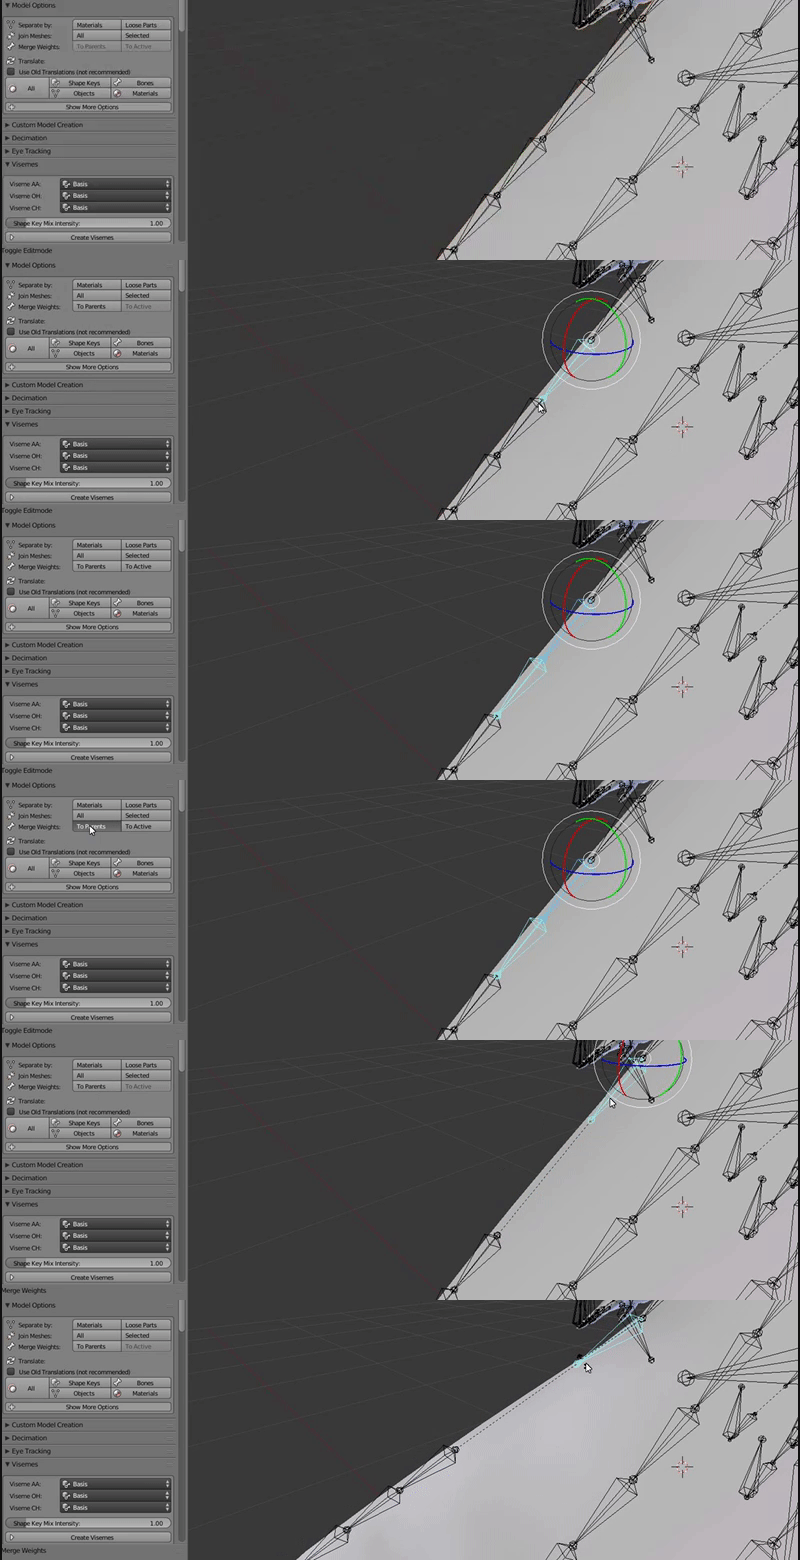

 dark jackal
Fantastic! just make sure the dynamic bones and such still look/feel to how you want them!
frosty shale
that avatar has no dynamic bones, now I gonna relearn how to add facial animation overrides, the last time I put avatar to vrc was January 2018
dark jackal
oh, perfect! adding the visemes to override the animations? like hand gesture to poke your tongue our etc
frosty shale
yeah
dark jackal
or Blend shapes rather, but yeah, If you get stuck just ask
frosty shale
copy that, following this tutorial so I hope I will have no problem https://www.youtube.com/watch?v=vrY3FgpzLRY

Subscribe if you haven't and click Like if you enjoyed the video! Helps me out a lot! Hello VRChat, welcome to my very first Tutorial Video for VRChat! I am ...
dark jackal
looking at the like ratio, I'd say that's a sound tutorial 😄 all the best
amber hemlock
yeeting the extra eye bones ones will cause eyes to rotate twice the normal distance which can look broken
surreal topaz
No
That's why you merge them into the head
It's functionally identical
You don't just delete them outright
amber hemlock
Oh you are right I didn’t think about WHY they were halving the rotation
dark jackal
it'll be a sharp bend rather than 3 bends
it just transfers and appends the verts weight paints to the new bone
surreal topaz
Whether the weight is on another bone attached to the head or directly on the head won't matter
We're talking about the "original" Eye_L bones here, the ones before Cats generates LeftEye
They're not parented to each other so it doesn't work that way
dark jackal
ohh, I'm talking about bones in general in reference the their weight paints
amber hemlock
But yes it’s not exactly the same. The verts are being split between two bones with the same position, and only one is rotating in place. This causes the verts to rotate half as much, but also shrink a little due to candyweap effect (blenders conserve volume on the armature modifier does not apply to vrchat and should be Unchecked for an accurate preview)
Merging the set of eye bones should give them half weight which should have the same effect
sudden zodiac
Oh?
dark jackal
it wont change their weight, just just collaborates the two bones into one
amber hemlock
Deleting the extra eye bones just gives eyes full weight which is why they suddenly rotate a ton more
sudden zodiac
Is Conserve Volume checked by default?
amber hemlock
I’m not sure
surreal topaz
No
I have never had my eyes shrink any in pose mode even when rotating them very far.
sudden zodiac
I experienced it already
amber hemlock
Ok I have a question for you @sudden zodiac is does left leg 2 and right leg 2 have anything weighted to them after a full body fix?
surreal topaz
Oh interesting
amber hemlock
Ok. Just making sure they are safe to yeet
surreal topaz
The eye bones do shrink when rotated up/down
That seems like unwanted behavior to be honest
Probably want to divide the weight a little between the generated eye bones and the originals
amber hemlock
Yes it’s due to split weights
surreal topaz
Rather than copying them and ending up with non-normalized weights
Probably 50/50 will give the same movement range without shrinking.
That's what I always do when manually doing it anyway.
sudden zodiac
True that, I should look into that sometime
surreal topaz
Maybe it should be a checkbox when generating eye tracking?
amber hemlock
Ideally you just want eye bones with 100% weight, but that means the pupils will 100% point at their look at target (if within a set range), which for 2D eyes looks broken. If you have a model with 3D eyes (like actual spheres) you usually WANT to delete the extra eye bones and have them rotate 1:1 as then they don’t shrink in their sockets
surreal topaz
I don't think it looks broken for 2D eyes
It may just need tweaking
If you divide the weights 50/50 you'll get the same effect without shrinking.
Just have to normalize the weights
amber hemlock
It can look good on 2D but you need a well made pivot point and deep inverted eye sockets (or a good shader)
But yeah in my opinion those two extra leg bones from fbf should be yeeted by default it’s two extra transforms for performance rank, can encourage people not to use it
dark jackal
I don't think bones will have a performance issue though unless used to influence things?
amber hemlock
No performance issue as nothing is weighted to them
dark jackal
exactly
amber hemlock
Rank still suffers
dark jackal
yeah :C
amber hemlock
So yeet em
dark jackal
bones shouldnt be counted, should just been dynamic bones
dark jackal
Global Defence Initiative
amber hemlock
It’s not just Dynamic bones
Any bone with some vertex group weighting has some performance impact
dark jackal
actually, doesnt Cats remove any bones without weighting anyway
amber hemlock
It has an option to, but the spare eyes and extra legs seem exempt and it won’t delete them
surreal topaz
Or they might be, I dunno
It doesn't delete unused breast bones either
Nor the toes
Even if the toes are unweighted
amber hemlock
I can confirm the spare “leg 2” transforms ARE counted
As bones
As are the spare eyes
My guess is it only deletes zero weight non-mmd bones. I guess @sudden zodiac Hotox could confirm?
surreal topaz
It leaves alone the "standard" humanoid rig bones. That way if you have fake legs it won't delete those for example.
I don't think that standard list should include toes or breasts to be honest
amber hemlock
Breasts aren’t standard though
pine flame
So that snake analogy about the eye bones, where it was 3 bones merging to two, well on the snake one bone is locked to the other anyways so it makes zero difference whether to merge them or not, since the extra eye bones are never actually manipulated
amber hemlock
It’s still calculated separately so it does make a difference
It’s faster to merge and not need a useless calculation
pine flame
Appearance wise though no different
amber hemlock
True. I think the discussion was merging vs deletion without merge. Which is correct depends on the situation, but it’s usually merge.
It’s only better to delete in the case of eye bones on avatars with whole sphere rotating eyes
 slow siren
Outside of tossing a model into blender is there a way through unity to lower the poly count? If I try to do the former the materials come back all wonky
 lusty ermine
Not in an automatic way.
How are you reducing polycount in blender?
slow siren
I'm using the automated method with the cats plugin. I could do it manually as well. Honestly maybe something is wrong with the model in general because when I turn on MMD shading in blender the materials aren't right either.
calm spade
There isn't a way through unity, or at least not a good/free one
slow siren
Fair.
lusty ermine
Odd...
I cant take a look now, but Id be interested to see what is going on with it.
slow siren
I can PM you an image of what the model looks like in unity vs blender before I've done anything to it?
lusty ermine
Sure
 opal pecan
@distant forge merging skinned meshes would be helpful for vroid users, but the concern I've heard from some of them is that they want to keep the meshes as they are to allow for easily updating them from the vroid editor - is it possible to do the merge in game mode just before the VRCSDK packages up the avatar's asset bundle?
distant forge
It replaces the mesh slot. Simply right click revert to prefab, update what you want and rerun the mesh merger when done
It's not perfect and better is to improve the importers or get people to go through blender
That's why I haven't ever been too public about working on in unity tooling
opal pecan
trying to get people to go through blender is a losing battle I think... it's better for their education, but if you want to make people do the right thing, the best way is to make it super easy to do so (which is why ideally this should be in the VRCSDK itself)
distant forge
I use it for a few shader effects here or there: one of my scripts makes a clone of all faces from all materials but sharing verts so there is no skinning performance impact, and to be used for a shadow or stencil effect at less overhead than an extra pass per material
Of course I get punished by the sdk because it counts faces not verts but oh well... most of my models are below 35k so doubling faces is ok
opal pecan
marsh trail
Interesting idea, unsure of how such would be done specifically, or how difficult it would even be, out of curiosity, do you have any ideas regarding how to go about doing such?
And, if such is possible, will the model be merged on upload and permanentely modified in said way, or would it sort of make a prefab of such not touching the original model per se?
opal pecan
it would be best to avoid modifying the model, some people are specifically avoiding mesh merging to keep things easy to edit
a simple implementation would just duplicate the model assets and process the copy
it shouldn't be too difficult, lyuma already has a big chunk of it implemented. what's missing is converting mesh renderers to skinned mesh renderers (adding bone weight data), excluding animation-controlled meshes, and automating the process on upload
but the devil is in the details of course
heck if you want to go one step further, using a special renderer for merged non-skinned meshes that optimizes for the single-bone-weight case (and maybe pushes the skinning to the vertex shader) might not be a bad idea