#3d-modeling
1 messages · Page 68 of 1
 glad steeple
 dull canyon
also, I started out with sculpting and I still prefer it to box modeling
but I guess with the next iteration of my avatar I'll try starting with box modeling. maybe.
but that's just me I guess
I find the sculpting workflow a lot more natural and free than box modeling
 azure rain
was just mentioning the Box modeling so skip retopology
and also so folks would get familiar with the tools
dull canyon
yeah, that's of course an upside if you do a clean model to begin with and then just multires sculpt on that
azure rain
and you know it's good to learn about what Edge loops and stuff are
dull canyon
yeah
azure rain
jumping straight into sculpting can make that stuff not noticeable
considering how often folks just take the decimate button to delete stuff even though Edge Loop selection dissolving would make cleaner results
dull canyon
well you gotta learn about it one way or another, either via box modeling or retopo
azure rain
even though if I was teaching folks I would start with the Box modeling and then retopo so they're jumping into what do all these scary buttons do and having no idea what good apology looks like good topology looks like
dull canyon
yeah
I haven't been doing this long but I still know that good topology is important and there aren't really any shortcuts you can take to get good topology
azure rain
if there was the AAA video game industry would it be using it by now
dull canyon
unfortunately I only very recently learned about the multires sculpt workflow, if I knew about that earlier it probably would've saved me a lot of headache and despair
I only saw people like yansculpts using sculpting with dyntopo and always assumed the usual workflow is sculpt high res model > retopo > bake highres onto lowres, and I was always wondering why my dyntopo sculpts looked so bad and had so many artifacts
turns out he apparently usually does rough dyntopo sculpt > retopo > multires sculpt
 potent pond
i sometimes check this modeler
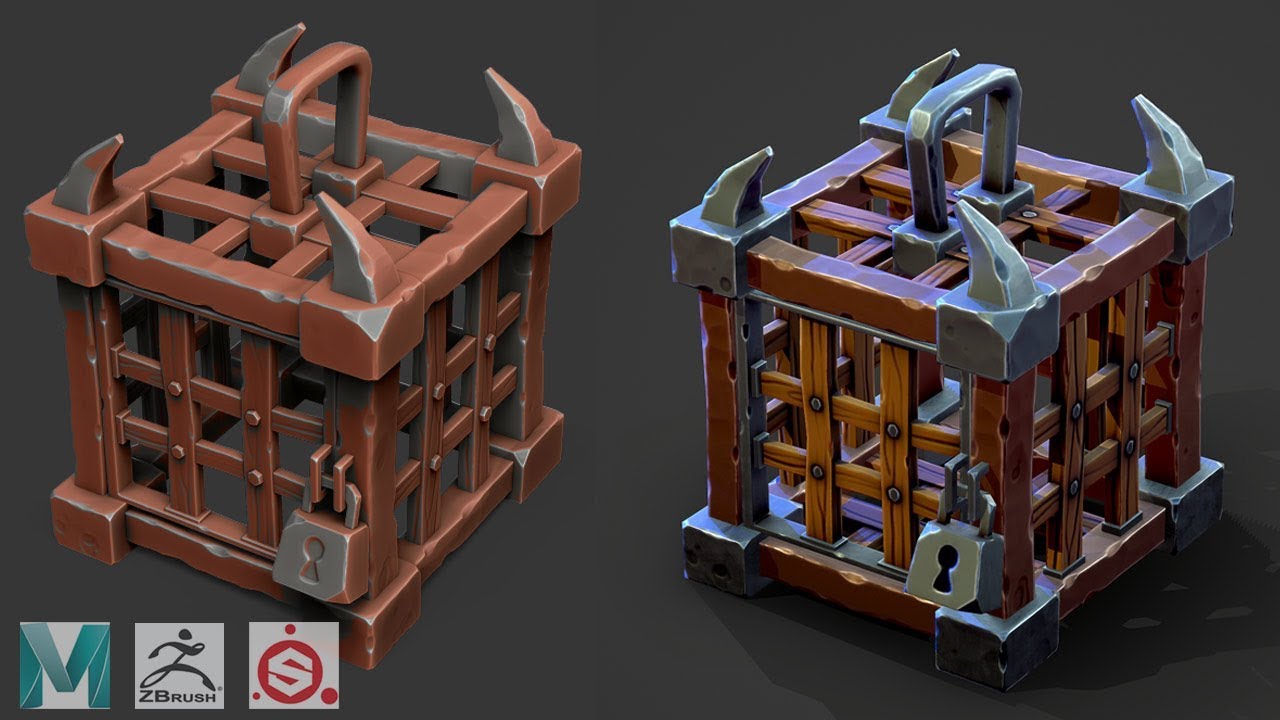
Autodesk Maya 2019 - Stylized Modeling, UV mapping, and Texturing in Substance Painter , and Maya 2019. Learn how to Make an Outdoor Environment: https://gum...
Since i'm a Maya guy lol
and i love this artist too
https://www.youtube.com/watch?v=WfIhVZ7TQeY&t=2s
Did a Rapthalia for Vrchat ♥

Modeling the clothes and design. Almost made a mistake and immediately fixed using Outliner. It's always trial and error here. See you on Part 3! Note: The m...
 sage grail
Heyyyyy all you wonderful awesome AMAZING people who know what you're doing... anyone know where I can find a free rigged human model for Blender? Or do any of ya happen to have one on you? I need to make poses for 2D animation and while designdoll DOES work for that exactly, I can't get all the right camera angles on it. (I hate adding "free" in there, but I can't buy things that are digital yet. 🙃 and sorry if I'm not allowed/supposed to ask this kind of thing here, I swear I had no idea.)
 quaint jasper
search for free rigged human fbx in google @sage grail
sage grail
Huh..... the first time I googled for some, I didn't find what I was looking for, but it worked this time. Thanks there. ;w;
 silent junco
if you press Ctrl Alt 0(keypad) you move your camera to you viewpoint
 untold schooner
didnt know that. I usually use an addon that has add camera to viewpoint in it
 stable edge
@sage grail might help https://cdn.discordapp.com/attachments/250592787446104064/440128092963602432/unknown.png
 sage grail
👀
stable edge
Old ui but it lets you use numpad
stable edge
By using the numberkeys you got
Three button mouse is good for moving too
No prob.
 olive orbit
Well, I feel kinda accomplished. I made this thing: https://1drv.ms/u/s!Auo-fxXs3x0uphTCTEagk9oAO1eC

PNG Image
Struggling to give it a more human shape lol
quaint jasper
use reference sheets !!!
In blender you can apply images to 3D views, it helps a ton
Are you modeling something random or do you have something in mind ?
olive orbit
I have something in mind. A friend is drawing the sketches but I don't have them yet. Was trying to make sure I could actually do something here first
quaint jasper
cool, then i guess you can keep working on smoothing down the general shape
be as basic as you can at first, don't get trapped in useless details
go down a step once you're satisfied with what you have, but don't be too hard on yourself !
olive orbit
Thanks for the encouragement. I'll keep messing with it to see what I can do and hopefully I'll have something more impressive to show next time
quaint jasper
personal suggestion would be to familiarize yourself with Grab and Draw as the main tools
they're the easiest one to get accustomed to, and have the most satisfying result you can see imo
size/strength of brush is also important
olive orbit
Oh! Grab feels great! Thanks for that. Was using snake hook before, but this is much better
quaint jasper
Can't really teach weight painting, it's a complex process of you want to do it correctly
But there's a lot of very good video tutorials on YouTube
Also weight painting can only be as good as your topology
 runic nymph
get better at it

 mortal slate
||i wanna make something, does anyone help with making something||
olive orbit
I'm not at that step yet but I'm now curious as to how much of a roadblock this is going to be. What is weight painting?
 haughty needle
Its where you attach the specific parts of the mesh to the bones of the armature, it controls how much bone movements will affect the visible model
say you have a hand, the palm will be weight painted to correspond to the main hand bone, each part of a finger will be weight painted to follow the bone inside it
there are a lot of tutorials about it but it can certainly be annoying to get to grips with in the beginning
this gives a 5 minute overview https://www.youtube.com/watch?v=Tl4qTgwQwYw

Quick intro and guide to skinning/weight painting. this video is meant for those with a basic understanding of Blender
glad steeple
Yikes 😬
 spiral sigil
So I just fired up blender for teh first time in a few months and it updated....all my addons are gone. In preferences it says "Upgrade to 2.8x required" on them.
haughty needle
So they addons have been updated for use with 2.8
spiral sigil
when i try to install them it keeps saying module not found
haughty needle
You can have multiple installations of blender btw, ive got both 2.79 and 2.8 side by side
spiral sigil
im using the steam version
haughty needle
its a bit confusing at first due to the changed UI
sorry, no idea what that means
i highly recommend following a basic 2.8 tutorial for getting to know the updated UI, i went with the blender donut tutorial
spiral sigil
think im gonna jsut standaloen install 2.79, I hate the new look. took me long enough just to get used to navigating it
haughty needle
even though ive managed to sculpt, texture and rig avatars in 2.79
hehe, yeah i thought the same initially
downgraded to 2.79 when i decided to get back into it
but then decided to learn the 2.8 ui since its more been updated to be more in line with standar stuff for other programs
and tbh after getting over the initial hurdle i prefer 2.8 to 2.7x
spiral sigil
except i cant edit source or xps models in 2.8
haughty needle
a quick search turns up that "XPS tools 2.0.0 only work in Blender 2.80"
so the one you autoupdated might not have followed along correctly
looks like your screenshot says 1.8
spiral sigil
haughty needle
yeah but the shot with the plugins and error says 1.8
for the plugin itself
so that would explain it not working, likely the pre 2.0.0 version will not update itself to the version for blender 2.8 as to not break older installations
so you would need to manually install the newer major version of xps tools
spiral sigil
guess ill see if i can find updated versions
the one I really neede was blender source tools
haughty needle
i wouldnt be suprised if this break between versions would affect multiple plugins
spiral sigil
the only one I have that does update and work is the cats plugin
haughty needle
thats odd, for me cats did not follow when steam updated from 2.79 to 2.8
spiral sigil
i had to re enable it and manmually update it in teh preferences window but it doesnt give me the error. looks like htere are 2.80 versions of all my plugins after all
haughty needle
cool 🙂
potent pond

And i finally finished the Maestro Gato ~ (OC of @Paulinaapc_art)
♥ it was a nice character ♥
Full poster on Artstation ( ° 3°)
For more
https://t.co/7ZPoNgGHCC
https://t.co/4jsfDNVkM3
#3d #maestrogato #paulinaapc #nyann #art #character #design #figure #model #gat...

 Twitter
Maestro gato ~
♥
Work is killing me lately
cant even do the stuff i want properly and with the time i want ;_ ;
 vivid crater
oh, i love that persons art, their style is so cute
potent pond
Yes
Paulinaapc
is amazing
i requested her a Comissions when she used to be free long ago
lol
me with the character i luv the most
vivid crater
Was gonna make a joke where you're Rem and your favorite character is the cool guy, but I don't know where it would go
 queen nimbus
hello, I've been trying to make my own models with mmd parts for a while now but I always end up with a broken model. So i have to stick with retexturing my base model without changing anything.
This time for example I made a halloween version of my main avatar and I just changed the shoes.When I uploaded it to test it in VRC her hips bulged forward.
i haven't touched her armature in blender and I did the required fix.
someone had suggested me to do a full body fix on blender but it did nothing. Her hips bulge out when I move normally in game and when i play her emotes her hips get back to normal until it finishes playing.
glad steeple
looks like the ass is on backwards
Full body fix no longer works, and breaks avatars more
queen nimbus
yeah
it was broken even before the " fix"
the thing is her ass in the back is in place so she has two asses
glad steeple
sounds like a win
queen nimbus
I have no idea how this could happen
 marble grotto
potent pond
marble grotto
potent pond
@quaint jasper
can i share a thing a friend is working on here?
It's not related to Vrchat
but he is doing an AMAZING job for just been 1 person doing everything
i feel facing myself doing the things i do was a challenge but.. near to my friend... that's something i would like to aim for
It's related to 3D for sure
quaint jasper
sure
potent pond
This is the Shortfilm he is making, it has all the process, in the middle the composition starts, he is in the middle of it, half way to finish it
at the end the programs he is using
Welcome back to Instagram. Sign in to check out what your friends, family & interests have been capturing & sharing around the world.
quaint jasper
impreessive !
potent pond
When i'm streaming and modeling he is doing the same but he is generalist and he knows LOT, i go sleep 3 am, he goes 5 am
And like that sinc elike .. 3 months
it's amazing what he could achieve by himself
quaint jasper
have you seen the Astartes series ?
potent pond
nop o.o
quaint jasper

Part One of Astartes, a Warhammer 40,000 fan film project. If anyone would like to support me in this project please consider the links below. I work as a co...
It's also one guy
but i'm still not convinced that's true lol
glad steeple
clearly
 surreal ridge
So here's a question I'm completely stumped on
This belt only appears in Dev view
quaint jasper
what's dev view
surreal ridge
Probably using the wrong term
This one
but when in solid mode, the belt disappears
silent junco
look under shader
silent junco
surreal ridge
Whoah
silent junco
in the top
surreal ridge
yeah. This is a window I've never used before
silent junco
click on the character
surreal ridge
Yep. Now in the Solid view the belt is showing
silent junco
and assign it a material
surreal ridge
... yeh I don't know how to do that. Thanks though, this'll help me narrow down my google search
Ah, found it. I had flipped normals
just selected all the faces and recalculated the outsides
Thanks!
 small cloud
perfection for public worlds
olive orbit
The fact you can make something like that in just a day is impressive to me.
 onyx bloom
is there a way to fix vertex order after editing a mesh with preexisting shape keys to prevent an issue that looks like this:

here is basis:
 olive orbit
Um, I hate to ask but can I screen share with someone? I got a reference image in place to sculpt to but the thing I made is off. I thought I could grab the vertices to try and get it roughly into shape before I start using the grab tools and such but I can't for whatever reason. Thought I could still make it work by just forcing everything into place by sculpting but in distorts in such a way I'm not sure that'll work. I'll send a screenshot in a moment to give an idea of what I'm talking about

Imma keep trying to manhandle it into shape if I can, but I think I need help 😓
olive orbit
So this is what I ended up with. What did I do wrong? XD

 quaint jasper
@onyx bloom shape propagate !
to fix blendshapes in all shapekeys: Alternatively, go to the Basis Shape, select the vertices that should never change for any of the blend shapes. The go to options: Mesh -> Vertices -> Shape Propagate. This will propagate and overwrite those vertex positions into all blend shapes. Easy, done, all in one simple step
@olive orbit you need to find a tutorial for non destructive modeling edits
spiral sigil
Damn you just destroyed a whole mans career
olive orbit
@quaint jasper I'll look for that, thanks a million
onyx bloom
@quaint jasper OH MY GOD THANK YOU so much! I have been trying to fix this for three days! Now that the shape keys work I can give you a big ol smile!
quaint jasper
you're welcome, it saved my ass a lot of times !
 timid quiver
Hey @quaint jasper
quaint jasper
@timid quiver supp
timid quiver
If I like the face of a model can I put my own clothes on it?
For example I want to get a male avatar, remove the clothes and just put the clothes I wear for more immersion but idk how to do it
I can’t for the life of me find a male avatar with a T-shirt and shorts so I’m just trying to edit one in if it’s possible
silent junco
@olive orbit try to smooth it out
onyx bloom
@timid quiver you could download meshes for the avatar you want and the clothes that you want and then merge them together within blender (free program) although it is pretty complicated because you have to weight paint the clothing on. I can tell you a shortcut for weight painting if/when you get to that step
timid quiver
I've got no idea how to do any of that lol
I've only used blender like twice and that was to make a donut @onyx bloom
onyx bloom
oh... well I have no clue about any easier ways to do it. For the past 3 days I a was adding clothes and armor to my avatar and I just now am about to finish up after running into a bunch of problems
if you want more detailed advice feel free to dm me tho
quaint jasper
It's not really relevant to 3D modeling, since it's kitbashing
spiral sigil

My meme I am gonna upload soon when I get trusted user
It plays the despacito song
 coarse kestrel
silent junco
coarse kestrel
silent junco
normal maps are bs
i have been trying to do this for 3 hours
and it still isn't good enough
now it just works
making normal maps is like a bethesda game
it just works
 ashen forge
So this is a weird thing that's been bugging me for awhile, I've been downloading a lot of game models and I've noticed one consistent aspect. A lot of them use split/ripped verts, I don't need any help on "fixing" it but I just wanna know why.
Like this
untold schooner
it happens when you extract stuff from games. also it says in the rules to not mention game ripping
ashen forge
Well, I haven't actually been doing that exactly I've just been finding them.
quaint jasper
that's due to sharp edges
ashen forge
I always kind of assumed it was mainly for lighting reasons
quaint jasper
Well, yes, sharp edges show shadows differently
olive orbit
I think I need to try a new method than the tutorial I've been watching, because my second attempt is no better lol. It started better, but I seem to struggle most with trying to shape the mesh to match my reference. @quaint jasper I tried looking up non destructive modeling edits, but I can't figure out how to apply it to a human mesh.
quaint jasper
you might need to enable the LoopTools addon in blender, then use it to relax the mesh, and make your edge loops circles, then you can subdivide those faces correctly and have less destructive edits
coarse kestrel
<3 big thankies
spiral sigil
We should become friends
spiral sigil
And then I can invit you to his server
 dull canyon
does anyone have a good resource for retopologizing the human body properly?
https://cdnb.artstation.com/p/assets/images/images/010/154/759/large/danny-mac-front-back.jpg?1522861767 like, would this qualify as good topology?
 haughty needle
that looks really good to me
but im no pro or even all that good at this
its even, not any stretched faces, good loops around joints
so with my limited experience it looks like it should work well
coarse kestrel
it's more about flow
and even faces
and more geometry where it's needed
that's about it
haughty needle
back when i was trying my hand at sculpting an avatar and ending up with messy super high poly models i went through and learned how to retopologize by hand using the shrinkwrap modifier mainly
later i found this tool that did as good or a better job than i could by hand https://github.com/wjakob/instant-meshes at least for the time i was interested in putting into it 😛

GitHub
Interactive field-aligned mesh generator. Contribute to wjakob/instant-meshes development by creating an account on GitHub.
heres a vid showing the basics of the that program https://www.youtube.com/watch?v=hu4NavAy5f4&feature=youtu.be&t=225

Instant Meshes is a free and open source automatic retopology tool, enabling you to quickly take your high resolution meshes and create low polygon versions ...
 tepid wagon
Pretty awesome
dull canyon
I wish retopoflow was finally released for blender 2.8
or that we would finally get the retopo branch merged
haughty needle
couldnt you run two installations of blender and just drop back to 2.7x to do that one thing? Ive got both 2.79 and 2.8 installed
mostly because i initially didnt want to learn 2.8 since i had managed to make avatars back in 2017 using 2.79
but when i tried to get back into it i didnt remember enough that sticking with 2.79 would have been worth it, went and did some 2.8 tutorials and now i prefer it
tepid wagon
Yes you can but you would need to install them on different drives or use one version from Steam
I'm using both versions myself
 latent charm
Install blender from the .zip download from the site. You literally extract it and run it from wherever.
The best way to do this is make a folder for your blender installs, and extract into there, then add the blender.exe to your start menu/taskbar.
Also I really suggest against using blender from steam as it's likely to update on its own and that's fucked people over, especially with the 2.8 upgrade.
tepid wagon
Really? I was using just Steam version, it updated on its own so I downloaded 2.79 from Blender website and opened my "Steam Blender 2.80" project that I haven't overwrite yet in regular Blender 2.79 and continued working from there, only issue was having to download new Blender file
latent charm
At my peak I think I had every blender version from 2.49 to 2.64 installed.
tepid wagon
Wow, I started from 2.78
latent charm
I started with 2.42, ahh good times.
 stray kiln

 subtle jackal
instant meshes does not generate topology suitable for animating, especially in more complex areas like the face. It's really more for taking crazy high poly meshes the likes you'd get from e.g. Zbrush or Blender dyntopo down to a more reasonable count to have in a real-time environment with baked normals etc. Like for statues and such.
 slender holly
@coarse kestrel it looks so goood!
dull canyon
@latent charm do you know anything about cloth simulation in blender, 2.8?
latent charm
@dull canyon Yup, it's generally similar to in previous versions but they've improved how the springs system works so cloth behaves much more naturally.
dull canyon
okay, cause I'm having an issue with mine

for some reason the cloth won't collide properly with the sphere
latent charm
Are you dropping the sphere down onto the cloth?
dull canyon
no, the cloth onto the sphere
dull canyon
wait... wtf is going on...
I'm using the exact same settings I tried yesterday
and now it's working...
latent charm
Letting it simulate also makes a cache of said sim, so usually after changing settings you want to clear the bake/cache
untold schooner
smarter every day
dull canyon
I am so confused
dull canyon
hmm, now how to best make a ghostly sheet without it looking artificial...
and without using 10s of thousands of tris
dull canyon
guess I could use transparency for the texture
@latent charm you think that'd be viable? I basically wanna make a cliche sheet ghost avatar and I wanna make the sheet look torn up and stuff. instead of using geometry could I use transparent textures for that?
slender holly
its still going to need a massive amount of tris to simulate cloth though
dull canyon
I mean, a plane with 2000 tris looked okay
latent charm
@dull canyon https://i.pinimg.com/originals/c6/3d/e4/c63de41bdfc4e35ce5946eb39a5dfa2f.jpg
For something like this yeah, cutout transparency would do just fine.
 untold schooner
get the shape you want then you can use optiloops to make it more optimized
dull canyon
is that a default addon?
untold schooner
uh no but I can get it and post real quick

GitHub
Contribute to vilemduha/optiloops development by creating an account on GitHub.
it's to remove loops while still maintaining the same shape
dull canyon
okay, thanks
latent charm
Oh that looks super useful. Damn.
untold schooner
it really is
used it to very very scuffly optimize nikei for quest
it's way better than the unsubdivide decimate
untold schooner
how do you mean destructive
dull canyon
I assume it's not a modifier, it's actually altering the geometry
so yeah, it's destructive
 solar fossil
All decimation is destructive 
dull canyon
yea
untold schooner
do you mean destructive like blendshapes or what
slender holly
yeah i was asking about the addon you were talking about
not the unsubdivide decimate
solar fossil
Tha angle limit one?
dull canyon
hmm, I just found a flaw in my plan tho...
I also want to give the sheet at least some thickness
so how would I make some holes in the sheet then
untold schooner
just make holes and have it double sided
dull canyon
well I mean when I use a transparent texture
like, to make not too artificially looking holes I'd need a lot of geometry I would think
untold schooner
you're planning on using a texture that has holes on it?
dull canyon
that would've been my plan, to save on geometry
I mean, I guess I could just make it a simple plane, but then I'd need a shader in unity that can also render the backfaces of meshes right?
untold schooner
yah that's what I meant by double sided
I'd use either poiyomi toon or rero standard
they both have the ability to turn cull off (double sided)
dull canyon
okay
so
I'd want to make it so on the outside it looks like a normal white or whatever sheet with some holes in it
and from the other side I'd want maybe something like these "space" shaders you see often
that look like you're staring into space
I'd assume I'd need to use two materials for teh sheet then right?
one for the outside and one for the inside
untold schooner
yes
dull canyon
and if I wanted to make the holes visible from both sides... is there something like a transparency map or so?
silent junco
Just make a hole in the model
Also the regular decimation is better if you ask me
Than planar
Also holes that look good don’t require a lot
dull canyon
care to show me an example?
silent junco
Not on pc atm
dull canyon
yeah whenever you find the time
silent junco
But like 16 verts is a pretty good circle
silent junco
So more square ones then
dull canyon
guess I could just split up some edges
silent junco
The torn part can be done via a fur shader and map to show where it should be
silent junco
Good luck
dull canyon
guess I'll try box modeling + multires sculpting for some details
should at least give me cleaner topology too
or rather more efficient
silent junco
You can use a plane and subsurface along with cloth to make it
silent junco
That’s why you make the plane round with subsurface
silent junco
the problem is that if you have self collision and it too high the edges will break
dull canyon
so you're saying I shouldn't manually subdivide the plane but just add a subsurf?
dull canyon
https://gfycat.com/FrayedFrequentBlesbok well this is what I got so far with box modeling and multires sculpting
 runic nymph
👁
silent junco
Nice
dull canyon
so right now this is just a plane that I pushed and sculpted a bit. if I wanted to have a different texture for the outside and the inside, I assume I'd need a slightly scaled down duplicated of that plane with the normals inverted on the inside?
dull canyon
well wouldn't I get z-fighting?
silent junco
no
dull canyon
if they're in the exact same space
silent junco
thats only when they face the same way
dull canyon
contemplating how I should make the edges look torn up now...
transparent map or modeling
 ashen stag
Depends on complexity, if it would result in quite a bit of extra polys it would be best to use alpha instead
dull canyon
yeah, that's what I'm thinking
silent junco
Make a general shape of the torn and for more detailed parts use textures
 hollow radish
marvelous designer, retopo, solidify 👀
dull canyon
ain't got no money
dull canyon
https://i.imgur.com/Lr2hVTU.png so would something like this be considered "good topology" for something like defining the belly button or similar?
 ashen stag
I would think so, you can try comparing it to high quality human meshes scattered around on sketchfab and what not
subtle jackal
that's pretty standard yeah
quaint jasper

This base mesh was built with deformation in mind and is based on the three curves principle. You can read more about the theory behind it here. It is distributed under the Creative Commons…
Good topology is a very large gray area it seems, it range from acceptable to very good, but then there's professional topology, and that's a bit more difficult to achieve
So don't beat yourself down with your own topology unless you need to do very specific things with your model
untold schooner
topology doesnt matter to things only you use, unless its very bad and really high poly
people do proper topology just to make it nicer to look at in the modeling program even sometimes
quaint jasper
It definitely feels great to look at a retopologized model !
latent charm
topology does matter, even for things only you use because there's cases where bad topology is just going to cause problems.
For example, extremely long thin triangles are gonna cause shading issues, and not having enough support loops in a face won't do you any favours for properly defining the parts of the face and will make it look weird when deforming and again, shading issues.
Some of these you can hide with a toon shader, but at that point 
dull canyon
okay, thanks for the input everyone
untold schooner
I mean it like, if the model looks good and the topology doesnt then it doesnt matter unless you wanna do something it will matter to
dull canyon
https://www.youtube.com/watch?v=BwRbQZ-flzk I want stable 2.81 so badly :T

There are great new Sculpting features added to Blender 2.81 mainly by Pablo Dobarro which I show in this video. First of all there is the new Voxel Remesher...
untold schooner
I dont even sculpt and that looks super cool
quaint jasper
1M triangle cube !
dull canyon
I mean, I just tried sculpting on a 12 million tris cube and even in 2.80 it's very smooth
untold schooner
1 million poly cube technically wont lag your vrchat
unless its rigged and/or has visemes
azure rain
but still that's probably Overkill having a 1 million poly cube
untold schooner
rig probably wont be as bad as visemes but yeah
azure rain
considering you could probably fit a full map in 1 million
quaint jasper
High poly is fine, but then you got to retopo lol
potent pond
interesting
video
Yeah of course you will go retopo, but what you can do also is do a auto retopo (in case it needs to be fast and not so accurated) and the proyect the high in the low and boom headshot
Blender is really trying to catch me
👀 (Shaking eyes)
quaint jasper
 Join us
potent pond
i would Ruuubick sama
D:
When i finish my Kinro
i have planned another figure of an artist
and then after that
i have 2 options
Build my last map or focus on blender until i move
but oh boi this Muscle stuff in a boi it's very interesting and it's taking a while
lol
Funy fact is that i saw that there is people testing "walking on walls" stuff
but i was planning to do something like with a visual effect for a map
so many stuff to do
 slow zealot
https://gyazo.com/57ee3db3a8343f2fd362d3c61a02524f this model is going decent ... no shapekeys , eye bones yet but everything else is looking ok thusfar ( 67k poly)

someone knows how i can fix the black eyes ?
 haughty pawn
So I am having a terrible issue in blender 2.79 that any time I try to join anything it instantly crashes my blender. Anybody know a fix.
quaint jasper
switch to 2.8 ?
 untold schooner
2.8 masterrace
 gentle raptor
I finally 3d Modeled💖
silent junco
Nice textures
potent pond
The new model i'm working on
Probably tomorrow i gonna finish the hands / helmet / spear
4am
💃🏼
night night
vivid crater
Nice butt 😳
 quick thunder
 dusk turret
1 million poly cube technically wont lag your vrchat
unless its rigged and/or has visemes
@untold schooner Shaders are also a factor
oh cool thanks Discord
silent junco
I’m pretty sure one bone doesn’t change much
Unless some of it has no weight and other parts max weight
untold schooner
oh yeah
 meager verge
alright. so im trying to weight paint for the first time in blender 2.8, and all i get is this weird shading that i cannot stand. any ideas as to what setting is causing this?
(also please @ me so i know that someone responded)
slow zealot
@meager verge looks normal to me ... the hotter the color the higher the value of the weightpaing (the more that area is being pulled towards your selected bone)
meager verge
yes i know, but i have never seen the lines before, i understand weight painting, i have done it plenty before
this is what others see when doing it
slow zealot
think the lines are something new in blender 2.8
blender 2.8does some optimization for the 3D view ... the grid on the model might be that
slow zealot
👌
gentle raptor
Working on a throwback 💖
potent pond
Super cute
slender holly
@potent pond have you been messing with blenders sculpting tools yet?
potent pond
I have been wanting to and I already investigated few tools that would be worth this to use there, but since I'm with some bigger plans doom involving me moving from Argentina to Spain, I have been focusing on sharpen my eyes and increasing my portfolio gallery otherwise I will be screwed up lol so when I finish my stuff and be there probably gonna dedicate lot of time to be friends with blender, because as far as I can see, it's wonderful 💋
potent pond
👀 Shaking
quaint jasper
@slow zealot rule 13 pls
quaint jasper
It creates an cut in the mesh to allow for correct lighting/shadow
Oh sorry no that's sharp
Seam tells the mesh that when creating UVs, there should be a cut there
It's useful to distinguish parts of the model when unwrapping
dull canyon
now I just wish Blender would also get a feature like in zbrush where you can just cut part of the sculpt off
that's like one critical feature it's still missing
and it should be doable now that we have the remesher
vivid crater
you wouldnt just be able to boolean a piece off?
haughty needle
Another option is to duplicate and use edit mode to delete one part in one copy and the rest in the other.
dull canyon
that's still very disruptive for a sculpting workflow
I hope they'll manage to add the same thing zbrush has either with 2.81 or the next version
vivid crater
It's not too inconvenient if you're just using dynatopo anyway
but if you aren't, then that isn't really ideal
untold schooner
even medium has a knife tool for sculpting
 gentle osprey
 mild trellis
anyone got any good advice for modelling hair?
gentle osprey
haughty needle
@mild trellis take half a sphere and place it above the ears with a slight backwards tilt 😉
mild trellis
got something that works thanks
mortal slate
||i did a thing||
 primal narwhal
Very modern look, very 👌
potent pond
<3
Imma trying to get some energy to finish the posing of my Character grrr so much work it's ripping my energy away
😱
slender holly
You can do this!
quaint jasper
yep press v
 hardy agate
Got to love those random bits of inspiration
 rancid notch
poly limit?
dull canyon
anyone here using the 2.81 beta of Blender? I'm having a weird issue with positioning my camera. I added a camera object, aligned my view to how I want it but when I hit ctrl + alt + numpad 0 it instead moves the head mesh from my model to where the camera should be
it does the same when I manually select the action "align camera to view"
https://i.imgur.com/1DVUpba.png this is what happens

neeevermind, found the issue
apparently hitting ctrl+0 marks any object as camera...
 craggy charm
I still don't understand how modeling works.. But it's cool :)
untold schooner
thanks for your input
dull canyon
so if I wanted to give my characters ears and maybe tail a fur like appearance, would I do this via modeling and texturing or is there some kind of shader in unity for that?
and if there is, how bad is it for performance on such a small scale?
quaint jasper
You can do it through low poly or with Xiexie's fur shader
 hardy agate
They look pretty good to me
dull canyon
thanks. I'm not sure how I should do the tip though, should everything merge to one vertex resulting in a bunch of tris, or should I keep it like this with a bunch of vertices in the exact same place
quaint jasper
References !
dull canyon
I am using references
potent pond
PureRef, the simple reference image viewer.
dull canyon
yeah, I am using pureref
potent pond
perfect 👌🏼
That's the wae
funny thing is
that i used to place the images edit them in Photoshop to place it there
but then reading in some websites. kinda ... you can edit the pics there
like
Scale, rotate, flip
etc etc
dull canyon
yeah
subtle jackal
the point of an ear can have triangles, it shouldn't cause issues. People go a little crazy at first with the "ONLY QUADS ALWAYS" mentality but eventually you learn it really doesn't matter that much, they're just preferable when it can be done without much effort.
like when you're trying to decide "Do I make a bunch of weird topo and 200 tris worth of edge loops to keep it all quad, or just add this one triangle?" The answer is add the damn triangle 😛
azure rain
and pretty much the main advantage of just keeping it quads only is subdivision modifiers which is basically not applicable on here
subtle jackal
yep
an example from one of my recent projects. I had to add a triangle under the arm to keep everything else nice and clean and even, oh no~
and of course as you can see, many triangles were used to merge the conflicting topologies of the blazer and sailor collar
untold schooner
primal narwhal
That's beautiful I salute you for your service soldier
 cedar urchin
making a protogen.. dont know if it looks right https://cdn.discordapp.com/attachments/559624972742688769/632751249254514750/unknown.png
 slender holly
Paws look good, the body itself is looking a little boxy
mortal slate
playstation||12|| lol
dull canyon
https://i.imgur.com/ZW9OBBA.png
https://i.imgur.com/ssHak03.png
guess that looks okay, and no tris


 little inlet
Does anyone know why the edges of my model are doing this in Unity?
haughty needle
@little inlet it might be because of the painted parts of the textures dont go outside of the UVs islands, when the textures are downscaled the black outside of the painted parts can bleed in.
 upbeat bluff
Hey guys, i need to create my one avatar with myself and I’m a very beginner to doing that can someone give me the advice to start creat it ?! 🤔
@here
hollow radish
its going to take a lot of motivation
quaint jasper
Start with the basics of blender, the try out the tools, then follow tutorials
and use references
 gentle forum
are there any tutorials that teach you how to get textures looking like this and how to organize it? i don't really understand the workflow
quaint jasper
That's UV Unwrapping and atlasing, tons of tutorials on YouTube
The main gist is learning how to unwrap, and then give those pieces the correct scale depending on how much detail they need
gentle forum
guess im feeling a little discouraged since i have to make textures from scratch for a halloween model, it doesn't need a lot of detail but i'd like to add shading, is it all painted in blender?
quaint jasper
You can do it in blender, Photoshop/gimp
The actual texture baking is done in blender though, but that isn't needed either
gentle forum
im just confused, am i supposed to be using the UV layout to know what im painting if i take it over to photoshop
i don't know what baking is
upbeat bluff
Can you give me some of your work @hollow radish @quaint jasper 🤔
quaint jasper
You can export your UV layout as a PNG image
In UV mode, click UV and export as
That way you can paint on top of that, and import the texture in blender directly on top of it when you're done
After that you can bake AO onto it
hollow radish

I saw a fanart of doctor from arknights. I wanted to make an excuse to make a male that’s a lot better than some of my attempts. This is a bit jacket but it works so will have to live with it. Model will be paid later, just check my twitter.
https://twitter.com/Bladewild_
D...
gentle forum
oh so like..
hollow radish

Gumroad
Quick links: demo version download (no login needed), the standard edition, editions comparison table, add-on video presentation. UVPackmaster 2 is a second release of a popular UV packing solution for Blender 3D. Its robustness comes from the fact that the core of its algori...
gentle forum
atlasing is optimization putting it all on one material, and baking is uhh
upbeat bluff
Woooww amazing 😍😍😱❤️ @hollow radish
gentle forum
moving the uv's and textures
hollow radish
depends what workflow you want
quaint jasper
Baking is imprinting detail onto the texture
Moving the UVs and texture is Unwrapping
gentle forum
i've always been confused how that works with moving the uv's into one material because you're moving it out of place with the original texture
quaint jasper
Texturing is the last part
gentle forum
i want to learn more than anything
quaint jasper
So you're not supposed to move the UVs around when you start texturing
gentle forum
so, unwrapping, atlasing, then baking?
hollow radish
unless you have substance painter and then you can just reimport the model again and fix the texture problems
quaint jasper
Unwrapping and atlasing can be a single step
hollow radish
you need to atlas first
then unwrap
figure out what materials you need
if its all unlit
just put it in one texture
meaning one mat
quaint jasper
Atlasing is usually what people refer to when the model didn't have all their UVs in one place, but people who make models professionally do that in the beginning
hollow radish
basically
hollow radish
I still don't know how to rebake my textures in 2.8 compared to 2.79
so its a pain
gentle forum
even if it's from models i find off deviantart or something as practice
hollow radish
for certain thigns
quaint jasper
Yeah I've been fighting with 2.8 and AO
@gentle forum look into shotariya's material combiner first
With cats plugin for blender
gentle forum
oh yeah i have that
hollow radish
I would say, you could manually atlas it, but I can't do that in 2.8 anymore
gentle forum
i don't like it that much because of how it places things..
quaint jasper
Piece of software that tries to do it automatically, it might not work at all, but it will give you some insight
gentle forum
and it adds little pixel artefacts onto the texture
hollow radish
I can't bake my mats to one next texture
gentle forum
thanks for explaining a bit more, i think i understand
 fringe rock
idk how to do atlas thing in 2.8 ether
hollow radish
well I can still do it, it just bakes it in its original texture, then I just have to combine the textures manually in another program
fringe rock
so what I end up doing it placing all the texture in gimp and black the area not used and move the uv back where they should be in blender using the snap tool so it snap right where it should be
hollow radish
that is uhhh... 👀
too manual
when you have textures like these

it aint possible
hollow radish
how long did that take
fringe rock
under 10 min probably including moving the uv in blender
here a more packed one
those are quest avatar so I try to opti as I can
vivid crater
in 2.8 it bakes onto the active node, you can go onto each material and set it to the same new texture
the new texture image has to be saved/exist tho, if you just make a new image in blender and bake without saving the blank new image it gives you a message that it has to be done externally still gives you that message tho
hmm, actually it works fine too without saving it
cedar urchin
Making an avatar wondering if its looking good. Needing an outside opinion
havent done the hhead yet
quaint jasper
difficult to say without a reference, but it looks very clean !
hollow radish
where's the ref
 hallow bough
What would be the best way to model a robot head with floating led eyes, so no inset eyes or anything. Like Eve from Wall-E. I'm not sure if i can use any transparency for optimization sake. Perhaps model some flat eyes floating slightly infront of the face?
A better description would probably be a screen face XD?
ashen stag
Best thing to do is what you already said, have two planes, one for each eye, slightly in front of the face (which will probably be black to be the screen). You can then have these planes be attached to the eye bones, connected to shape keys ect.
Unless your screen is spherical or cylindrical in some way the normal vrchat eye tracking will not work, which then it would be best to either not use it or fake it in the idle
upbeat bluff
How much time you take to create this character ?! @hollow radish
glad steeple
alot
hallow bough
Woa
azure rain
alot and that would be copyright infringement
upbeat bluff
copyright infringement ?! @azure rain
It would be copyright infringement if i do what ?!
azure rain
trying to replicate someone else's character model
upbeat bluff
Okk calm dawn i didn’t use it just i asked him how much time ...
Is it take weeks or months ?! @azure rain
azure rain
depends on how skilled the artist and if they're taking any other projects at the same time
and also whether they have a copy of Marvelous Designer to speed up clothing making
gentle forum
another question, so once i've unwrapped the model, i'm supposed to organize the uv map islands, then paint inside the uv's.. but, what is this other workflow where it looks like everything is baked into place since there's a lot of dithering around the edges of the textures?
guess im a little confused
quaint jasper
that's texture baking in blender
gentle forum
yeah but what did they do to it before they baked it?
im missing the beginning steps
while i watch people streaming they are just painting the uv's in blender and using nodes, but there's no tutorials on that workflow for vrchat models?
quaint jasper
@gentle forum vrchat doesn't have a workflow for that, it's the same as any 3D asset
azure rain
yeah there's nothing modeling special about vrchat just a list of requirements for running well on vrchat
 tardy tulip
so i adjusted this one end of my jacket and im trying to symmetry it to the other side so i dont have to manually do it it works but when i click fix model it deletes some bones even though they are still parented right any ideas?
spiral sigil
CATS deletes bones that have no weight to them. Make sure your bones are weighted
quaint jasper
that's an option, it can be disabled
azure rain
unity unlit Shader would do that
you're not going to see any Shadows on you if you use unlit but the Avatar can still cast Shadows in mixed or realtime lighting
cedar urchin
had ti redo some of this model how does it look now (refrence in back not made by me, nor is it my OC)
azure rain
mine's posting the screenshots so we can evaluate
cedar urchin
azure rain
mind showing the wireframe and triangle count
cedar urchin
discord blocked the first photo I tried to share as it thought it was explisit
azure rain
lol
cedar urchin
ye
i still need to learn substance painter and unity
also need to know how to rig fingers
azure rain
then you might want to play around with lightmap baking and messing around with the settings so it makes very hard Shadows
cedar urchin
cant find the exact triangle count
azure rain
just take a screenshot of your whole UI
and wire frame picture is also important
@spiral sigil the lighting section might be a good place to ask about how to accomplish the look you're going for and if you have any screenshots of something similar that would be helpful
azure rain
nevermind then I don't know Maya
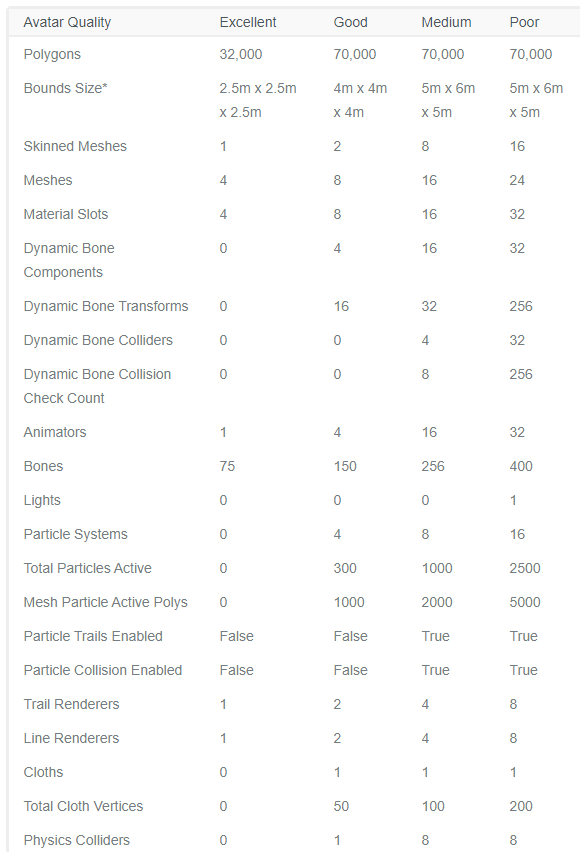 cedar urchin
with flat faces its like this much
azure rain
okay that triangle count is much more reasonable
cedar urchin
im assuming this is to much
azure rain
it's acceptable but a bit heavy
basically you shouldn't be using any subdivide modifiers except to make a normal map
cedar urchin
hm some things need to be high tri others dont need to be as high
ima do some fittling with sellect areas of the mesh to try and reduce it withought droping the overall quality
like I dont need that many edges on the arms right
azure rain
that's way too many loops
cedar urchin
i know
azure rain
basically manually add Loops where you needed don't try to use the subdivide modifier to add them
cedar urchin
im using a command that makes faces curvy then I have annother comand that adds edges to make thoose curvy faces flat but with the same definition
I also have one that does the oppisiot that im using on select regions after I smooth everything
before
after
azure rain
do you know how to add edge Loops in Maya at this point as that's going to make it have too many geometry just applying a modifier on top
and you need to fix your thumbs not being attached to the hand
cedar urchin
I know how to add edge loops, extrude, fill hole, Multi-cut tool, merdge, edit edge flow, ect
azure rain
okie dokie so add those extra Loops using that instead of the command
cedar urchin
its attached
azure rain
okay got confused a little bit because of the shading
cedar urchin
I usually do the bulk comand then reduce selected patches
azure rain
that's going to make a mess
primal narwhal
What shader do you plan on using on the model after all is said and done?
azure rain
because you're expecting the modeling software is topology reduction to do the work and also going to result in too much geometry in the areas where a couple of Loops would have done the trick
quaint jasper
once textured you can't see the difference
azure rain
basically you're just wasting triangles is mostly my complaint
and you're sidestepping learning how to do stuff properly
cedar urchin
ill take your word for it and try it in a min got to brb
your probobly right with the side steping thing ive done that allot in the past
brb
azure rain
see you later and it also makes making your quest version quite tricky if you're senselessly doubling or quadrupling your triangle count
cedar urchin
how many triangles should I strive for

 ripe lotus
hollow radish
ripe lotus
hollow radish

In order to make good and clean 3D models, it's really important that you don't model with subdivisions active in the viewport. This will create trouble late...
polygon isn't as drastic of a performance compared to material count and meshes
but you really should not need to go have hundreds of thousands
 mighty adder
also bake normal maps of your high poly onto the lower poly model if you want nice curvature with lower polys
if you are using an unlit shader though you can't see polys anyway unless it deforms a lot
hollow radish
that's weird phrasing
azure rain
pretty much all you see is silhouette with the unlit Shader
hollow radish
yeah, there's no point to normal maps and ao unless you use them in substance painter for generators and such
azure rain
there's plenty of point to normal Maps you just have to have the standard Shader
not throwing away all the lightning
as most places are probably going to have one lighting source that would provide the normal map the lighting to do its stuff
silent junco
work in progress bug
dull canyon
it's not a bug, it's a feature
potent pond
Finally I could start doing stuff on the model still thanks to posing it lost detail, still lot of work for the pose and the detail but this is what I have so far
I need to close hands, re draw wrinkles on clothes, fix arms, fix feet, etc etc
This character pose its super "fantasy" because you cannot twist like what it suppose to be lol, unless you have another twist on the chest and a snake neck hahaha
Still wip so nvm for now 👀 shaking
And I just noticed I break the weapon tip
:sad_dab:
potent pond

Tired of Exporting & Re-importing 3d models from one App to another? well there is a quick solution for you. Easily copying and pasting of geometry and commo...
@quaint jasper look at this!
Copy paste between 3d apps
quaint jasper
i only know how to use one app lol
potent pond

potent pond
Right in the feelz
 clear cloak
anyone have Better fbx importer/exporter addon for blender?
hardy agate
What's wrong with the built in one?
potent pond
Ther3 is absolutely nothing wrong about it
I was just happy to bring this tool I found that could be useful for multi program users hahaha
💋
 fallen snow
In blender 2.80, I'm getting this error when trying to bake an object onto an atlas texture
render mode appears to be enabled in the scene hierarchy for this object however
what else could cause this error?
 deep cairn
Blender is shit. It's a waste of fucking time and won't even save your textures made in blender when you save blender files & obj for your models. Uninstall and hang yourself is the only option.
slender holly
Yeah dont listen to this person
dusk turret
So dramatic. lol
small cloud

latent charm
Images are counted as external data and blender has no responsibility to save them automtically.
That said, at least in 2.7x there's a Save All menu item in the image editor. Probably also there in 2.8x too.
vivid crater
They left the server, but we talked about it in #vrchat-general-2
fallen snow
... back to my question, even the data api view shows these objects as being enabled in renders:
the same material works for baking on other objects - only difference is I appended this particular object from an older backup (and then switched it to use the same materials as everything else)
clear cloak
how can I make to see the textures in blender pls help?
subtle jackal
@fallen snow if the project was started in 2.79 there's a weird thing where you have to right click on any collections that weren't active in the saved file and go to Visibility and "Enable in Viewports" and also "Enable in Render" even though they appear to be technically enabled. If that's not the issue then no idea lol
fringe rock
@clear cloak you can hit shadeless in the mist tab so you have your texture flat in the solid view port
stable edge

Too lazy to remake this, but where it says material change it to texture
@clear cloak
clear cloak
thx
stable edge
Np!
fringe rock
Just above cats on the right
 candid copper
question...
I've stumbled upon this tutorial for an experiment to see if I can make my character's textures/materials a little improved... and found one that shows how to make 'hair particles'
if I applied these hair particles to my avatar, would that effect my avatar's performance quality by any chance?
like negatively
fringe rock
One way to know. Try it and upload
candid copper
sure but first I have to regroup the materials in to separate atlas
I wasnt sure if there was a possible way to 'ungroup' atlas so I had to manually overwrite the materials in to separate files
after this progress I saved a separate blender file whilst the materials havent been turned in to atlas, just in case I want to do any experiment to the materials or whatnot
I wasnt sure how to edit individual materials... tried Google but only pointed towards the UV/Image editor and that confuses me a lot
I wouldnt call myself an expert with Blender so I guess that situation made me nervous or something
spiral sigil
Hey people does anyone know how to help me...im a bit new to blender and i just wanna know how to add accessories and tails...that kinda thing and add physics
 faint zenith
i love your DR stone character ❤ it's so well made @potent pond
potent pond
Thanks Sewo, I'm still working on it, I was supposed to stream it, but I did a few vids and my internet service died
So I'm doing it offline now T. T
In these days I gonna be doing the final part
With a nice render
faint zenith
nooooo rip your internet , i can't wait to see the final render 👌
 tame vale
ye it looks great
potent pond
idk if it gonan end so well as the Spinel Diorama or the Komi san Diorama
but i will try my best
i'm not so good with guys anatomy
fallen snow
@subtle jackal that was it, looks like it went into some random collection that had render disabled
thanks for the pointer
gentle forum
is there a way to select every other loop automatically or do i have to do it all manually?
quaint jasper
shift ,ctrl, numpad+
@gentle forum

We cover our top tips in Blender 2.8 which will speed up your work a lot, such as clever selection tips, connecting nodes together, resetting values, using t...
quaint jasper
do it in edge mode ?
quaint jasper
maybe it's not meant to work this way then
how are you selecting your edges ?
@gentle forum
quaint jasper
yeah then that's the other fastest method
vivid crater
select one loop then go to select ring
@gentle forum
or in 2.79 its just edge rings
gentle forum
i want to select every other edge loop, if its possible :o
like this but continuing around the mesh
im only asking if it's possible in case i want to speed up the manual decimation process ^^
vivid crater
ohh, i see
you can do that thing ruuuubick said with ctrl shift + but then hit select loops afterwards
so something like that @gentle forum
small cloud
you can hit and edge so it selects all with ctrl+alt+rclick> "Checker deselect">multi select loops(select>edge loops), idk if it has changed in 2.8 or not
slender holly
@quaint jasper Flipped normals is by far my favorite 3d modeling youtube channel
his content is a god send
vivid crater
They're op, I like that it's usually those 2 guys so it's combined knowledge and they can conversate in the videos
dull canyon
but they're a bit... quirky
sometimes it's kinda cringe to listen to them, but since they apparently have some experience in the industry they provide some decent knowledge
slender holly
yeah both of them have industry experience
their podcasts were mindblowingly helpful to me
cedar urchin
Contenuing to work on this model does it look presentable?
cedar urchin
almost forgot the tail
quaint jasper
i think the snout could be smaller
cedar urchin
ok ill keep that in mine when I work on it tomjarrow
dull canyon
dull canyon
https://www.reddit.com/r/blender/comments/djwink/decided_to_take_a_dive_into_drivers_i_have_now/ huh, this is pretty neat

reddit
Posted in r/blender by u/mikequeen123 • 111 points and 17 comments
but I guess you wouldn't be able to use that for vrchat
 turbid portal
clear cloak
turbid portal
clear cloak
Guys help me always the same my model is pink and I have all the textures help me pls
nvm
cedar urchin
finished polishing the shape of this avatar how does it look
ah yes the perfect UV map
 old field

haughty needle
slaps top of @cedar urchin 's UV map
"This bad boy can fit so many seams in it"
cedar urchin
did alot of progress this is all I have left to do
clear cloak
weight painting is killing me...
glad steeple
The way the legs are pointed way forward will cause problems
 lime hornet
i have a question
how much vrchat can handle in terms of polygons? 🤔
specifically for a world
quaint jasper
vrchat can handle a extremely high amount, but players can't
lime hornet
any specific numbers?
quaint jasper
those numbers don't exist
lime hornet
lol
quaint jasper
you need to try and see what performance you get in VR
lime hornet
hmm okay thnx for info
 rotund viper
painter said i should use the both-side-equal tool... little does he know...
 small valve
@lime hornet im gonna steal oculus's numbers here since its the only value ive found for that question; 1-2 million tris per scene total is a safe bet
glad steeple
just optimise everything else.
small valve
that includes avatars and objects obviously, so dont make your world so high in tri count that it leaves no room for avatars
plan anything and everything accordingly to emphasize the important shit and optimize anything else
azure rain
no you still want to optimize the important stuff so you're not wasting resources
just it's okay do a higher budget to the hero props
lime hornet
@small valve @azure rain thanks for the tips will work on it.
potent pond
hihi
wanted to share this artist i follow that makes tutorials for modeling
and they look super fun to do and quick
https://www.youtube.com/watch?v=MlgBE6Wap7c
https://www.youtube.com/watch?v=Nf3SLRODa9A&list=PLSUtzVs5X8UTfncIZhCf4Sj41r1PuuAQg&index=22

Autodesk Maya 2019 - Stylized Modeling, UV mapping, and Texturing in Substance Painter , Zbrush 2019, and Maya 2019. Learn how to Make an Outdoor Environment...
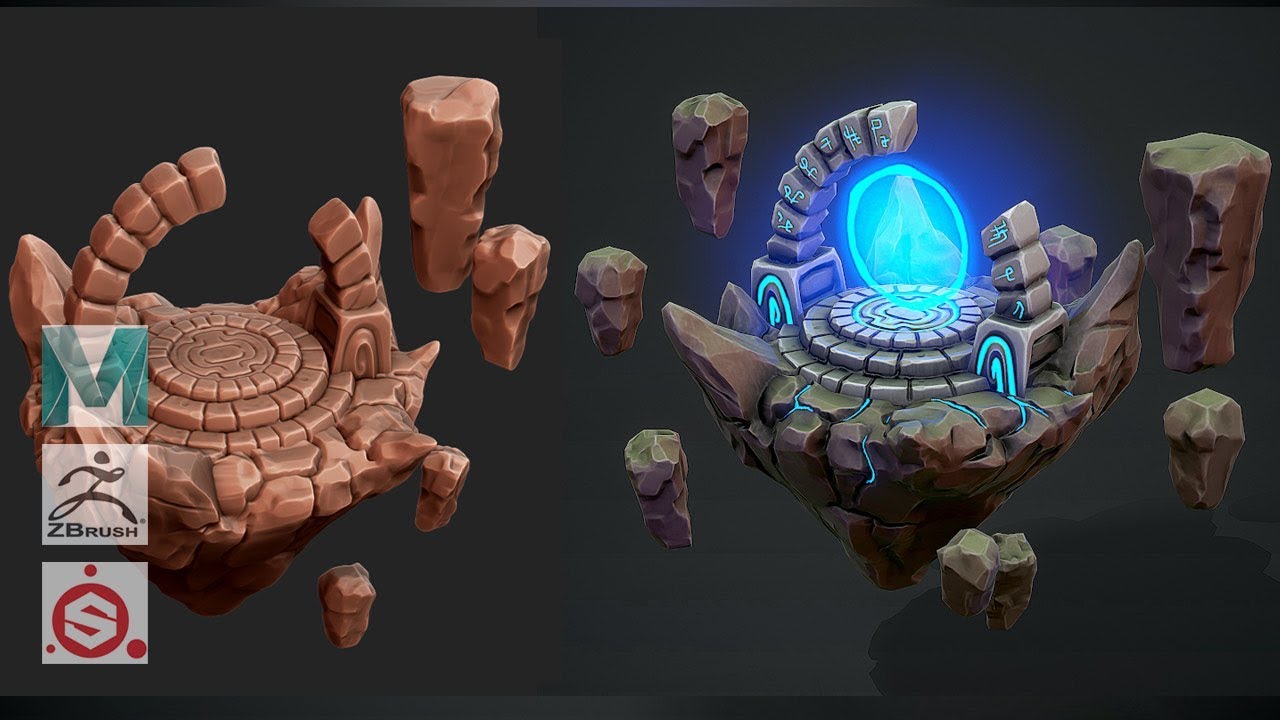
Autodesk Maya 2019 - Stylized Portal Modeling, UV mapping, and Texturing in Substance Painter, Zbrush , and Maya 2019. This video is sponsored by Marma Music...
He has LOT of tutorials there, i mean basically you can achieve the Maya + Zbrush in Blender sicne blender has everything now basically lol
and now since there is bundle pack in Steam of Substance painter it's super nice for trying it out

so idk maybe you like those tuts! Gaw gaw
 thorny fractal
fyi substance has a student liceanse if you are a student, you have to provide student ID but some friends of mine have said that they just provided whatever and it got accepted anyway. although you cannot use it for comerical reasons, but when it comes to substance liceansening when you buy a liceanse its only valid for a year, so you only get updates for a a year and once your liceanse experies youre stuck on the latest version before your liceanse experied. you can keep using that version but you wont get updates unless you buy it again or do the subsription service
althought i guess you could always pirate it..
and yea i follow him on artstation and youtube his stuff is pretty neat
 copper moss
I cant recommend Painter enough. I dont think theres a better program at the price for the entire 3D pipeline that comes close to touching its capabilities. Well, well worth the $150
azure rain
yes substance painter is very very helpful at texture painting
 rose geyser
Have a question for anyone. Started getting into learning UV mapping as a beginner, on an MMD model I've been attempting to remap on Blender, I notice that whenever I attempt to map a picture onto a the front section of this shirt(i.e a graphic) I get the image mirroring and being wonky right in the center, like a seam, instead of mapping how I want it to. this occurs even when selecting only those faces and attempting to map it there. Is this just an issue related to it being already mapped for MMD or something? Or is there some small thing I'm overlooking
 median pike
@rose geyser do you have a mirror modifier on the object?
IF yes, apply it and that should fix the issue
 lament pond
small valve
lament pond
small valve
nice.
upbeat bluff
I’m so excited to make my one avatar 😍
vivid crater
vrart is alive still? 💦
wait i think i said that last time too and ill probably continue saying it every time
hollow radish
I guess someone asked for a shorty model
lament pond
Yeah
thorny fractal
spaint is well worth the $150 if your serious about 3d art, more specifically the pbr workflow. but as i said you dont exactly get it for that $150 which can really turn people off since if they want an updated version a year later they have to re buy it
ashen stag
updates are never really mandatory for these types of programs though is it? As long as it works like it used to
thorny fractal
it depends on what you want out of it as a user and some times the updates have more then others. im still using my 2018 liceanse since 2019 didnt add much except for more procuderal textures and rtx for baking
azure rain
yep it's going to continue the work you just won't have the newest toys with the $150 option as it gets you a year of updates
thorny fractal
but the steam liceanse is also really weird msot peopel recomend merging your account with an algorithmic account after buying it on steam then not using the steam version
the day Spainter introduces a half decent brush engine and better painting tools for hand painting stuff is the day i throw all my money at it. because despite the name the program is shit at painting
ashen stag
pbr workflow is the best workflow imo
copper moss
Curious what you prefer in 3Dcoat over Sub Painter? I've used both in various titles, but these days PBR is just standard unless your working on something a little more dated.
hollow radish
I tried 3dcoat, cause it's simple and works for handpainted. Though after figuring out substance painter, rather prefer using that.
There's a lot more tools if you just figure out a workflow.
copper moss
Sounds about right was just curious. You can also get that hand painted charm in painter, though its def not as straightforward.
hollow radish
gotta turn off all the layers except base colour, cause I sample colours just like how I colour my drawings
copper moss
In that workflow, id much rather get just a rough basis in painter and kick it out to photoshop at that point. Export your mask layers and what not, generate some base scratches and wear. Cause I dont think youre gonna beat photoshop with that approach.
then come back and do clean up/effects in painter and what not. The painter/photoshop bridge is fairly decent.
hollow radish
was thinking about that, but I think more concerned with not having obvious seams
copper moss
Yea that takes some serious practice to make that nill in photoshop. still tho, as long as your UV seams arent super abundant, base colors in painter, first pass in photoshop, and 2nd pass/clean up in painter covering up those seams may work for ya
https://www.youtube.com/watch?v=Z7nwuTkvnQc This vids prob been passed around here at some point, but theres great ways to make a material do a very strong start using curvature and World space normal maps and all that

How to Make a Stylized Smart Material with Substance Painter Watch it here : https://gum.co/paintertut Learn how to easily create a stylized material within ...
hollow radish
its basically too annoying to switch programs back and forth
that's basically the gist
copper moss
oh for sure, no arguing there.
hollow radish
well for now at least, I'm mostly going pbr and letting the shader handle stylizing it
the hair and skin are stylized though
copper moss
Good luck on the model!
hollow radish
already did this anyway, gave me a lot of good insight 👀 https://gyazo.com/021f429ae4d6476a6bf8d6b02e8502bb
 copper moss
Oh sweet, was this from scratch?
hollow radish
yeah
copper moss
The jackets got some really good normals there, good sculpt
hollow radish
I tried handpainting before for 3dcoat but I didn't understand how to colour properly though I think recently I've understood how to do it
after practicing some stuff

really just hair
I still need to test out
copper moss
Yea that hand painted touch is a bitch. I havnt given it too much of a go, I tend to lean towards a more mixture of realism that PBR offers with a stylized model.
hollow radish
I still think the toony stylized is too simple
copper moss
Same, it tends to feel lacking imo
if you push the aspects of that it can really pop
hollow radish
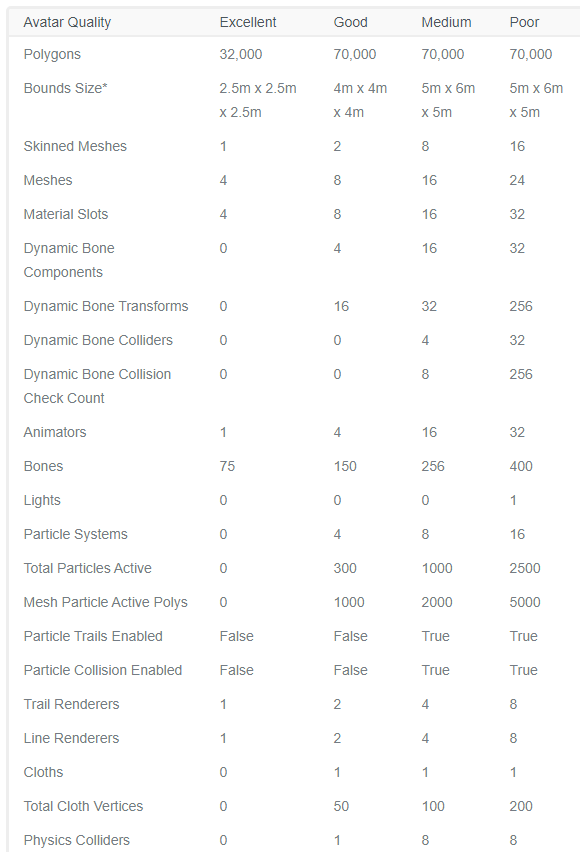
this and another are models so far I've seen that imitate the concept feel https://twitter.com/JUNJUN_CG/status/1111608450549612546


 copper moss
Ah I see. Yea that has a certain look to it for sure. I think your hitting it in the jacket specifically. But theres also a level of fidelity that the model has just due to polycount being fairly high it looks like
hollow radish
its 45k
copper moss
quads or tris?
hollow radish
tris
copper moss
no shit huh
copper moss
they did a damn good job then allocating that. The skirt in particular looks incredibly high poly.
hollow radish
wait
🤔
oh
your talking about those models
thought mine
no idea about the others
copper moss
OH yea ok no that makes sense
yea sorry def talking about the examples
I'm still in the early proxy model stages of my personal piece. fairly happy with where its at currently tho
based off of this piece.
hollow radish
does take time I guess
but I would put more polish in if I was making a portfolio
for me its mainly just exploring stuff
copper moss
oh 100% these are just proxy models for sculpting.
hollow radish
proxy models?
copper moss
guess is depends on who you talk to, but for me, proxy models are block ins for the overall silhouette that you then bring into zbrush to sculpt, then do the LOD0 pipeline and texturing.
im not one to start sculpting from a ball, that seems too tedious.
copper moss
Yea exactly. Speed is everything when you need to churn these out like I do lol
hollow radish
👀 yeah, I sometimes don't understand how I can wake up, work on a model, sleep, repeat for 5 days
haven't modelled in a few weeks
cause i'm like a jack of all trades
I'm just waiting for an excuse to make music or sounds
copper moss
Envious of that, being able to dabble in everything is so nice. I work as a 3D character artist, so modeling is my life, in work and out.
hollow radish
I only started modelling last year
copper moss
Wow really?