#3d-modeling
1 messages · Page 65 of 1
 glad steeple
 daring roost
oh yeah that's definitely not what i need
i need to shape the mesh to be snugly around the line that the texture is on, not where it is
glad steeple
select the mesh on the eye and hit e, to extrude inwards that should inset the eye
youll want to texture it all white, then make a plane inside the hole for the actual eye if you are setting it up like other anime style avatars
daring roost
modifying the texture isn't a viable option for the time being.
would cause more issues in the long run
what i NEED is to be abe to re-shape the mesh to suit the texture
changing it to be something like on the left example (mspaint ftw)
rather than what it currently is on the right example
 quaint jasper
Subdivide edges, move vertices around and create new faces from there
daring roost
hm, that sounds ideal in theory, but how do i get it to actually lock into place as the new mesh face
glad steeple
Why is editing the texture not an option?
glad steeple
Does the eye use all 10 textures?
daring roost
no, all 10 textures have an eye
glad steeple
So dont change the texture, change the UV
daring roost
eh??
glad steeple
Keep everything in the same place and use the available textures
daring roost
right thats what i'm trying to do
glad steeple
So do that
daring roost
yeah cool, i'm asking questions to enable me to do that
glad steeple
The UV editor
daring roost
i think you're missing the problem
glad steeple
if you want to get the edges like you have drawn above
hit K to use the knife tool and cut them out
 void shoal
so i had to fix the arms on this model (i removed a piece of clothing and there was no geometry underneath)
i did one side then duplicated mirrored it
now i have this
not sure how to fix that
i didn't use a modifier because that didn't work i guess
 spiral sigil
Double check any shape keys and weight painting.
Adding things tends to mess those up.
daring roost
Is there any way to restore a UV map from an older save of your project in Blender
glad steeple
Not specifically just a uv map, no
 vivid crater
pizza pasta put it in a box
daring roost
😂 ah well, I should be able to just import the old one and hopefully it wasn't too long ago and has very few edits
daring roost
@glad steeple thanks for the solution
K for the win
glad steeple
🔪
 next ravine
My first try 3d modeling and rigging an avatar
next ravine
lmfaoooooo tyty 
glad steeple
HMMM
16. No emoji, icons or pictures/memes that are widely associated with hate speech, or are highly inappropriate (such as Pepe)
Be careful cam
glad steeple
Pepe is used commonly on 4chan so its associated with that stuff.
I also disagree with the rule, but thats its reason.
daring roost
bit of a stretch but i guess i can see that
I've only seen it used in humor myself (BDO player)
but i'm not gonna start challenging rules over a joke 😂
anyway, i guess i should be making eye meshes before i weight paint, correct?
glad steeple
doesnt matter what order you do anything in as long as everything is weight painted ¯_(ツ)_/¯
daring roost
that would include the eye meshes themselves right?
glad steeple
Ofcourse
daring roost
and i just realized i need to do some face rig either way
okay so at least i know what's sitting ahead of me
ty 👌🏻
next ravine
Thats wild, i didn't realize pepe was hate speech 😭
 red hemlock
i mean, its not. it was around a hell of a long time before that one white supremacist group picked it up
spiral sigil
Weight painting
daring roost
Does anybody have some spherical eyes i would be able to make use of?
 robust niche
sculpting for hours
this thing....is gonna be insane when i retopo it
muscle mass is for later deform through high poly to low poly bake....it wont look so muscular later of course, because Im going to utilize the AO channel for just giving definition to shadows around muscles (but not too much)
robust niche
hahahah, should I retopoflow , or should I spend the next 65 hours retopologizing 🤔
robust niche
hahah, nah, 65 hours should do fine
spiral sigil
and then another 31 days of weigh painting
robust niche
took me about 4 hours to sculpt this
robust niche
thanks for the link, should work great actually, ill do my best to get it, but im a broke boi
spiral sigil
its student discount
robust niche
lol even then, im so broke, i couldnt rub two pennies together
spiral sigil
it went from 33 eur to 16 eur for me
robust niche
its 18 for me ;))
robust niche
United States
spiral sigil
it was 20 total with purchase cus vat
robust niche
surprisingly not a big difference
robust niche
spiral sigil
cant wait for the time to get out out of this
robust niche
yeah for sure
spiral sigil
if you want best safety from poison animals etc etc, Estonia is best country for it
no tornadoes, very VERY rare waterspouts, very rare floods, very rare extreme winds
mostly quiet and empty
lots of forestry
and people are distant
and ofc, the best part, no Black Friday store raids
spiral sigil
we raid online stores to the point some products go out of stock
that's only 5% of entire e-store
you will only see lots of people at clothing shops and booths in BF
but we dont raid like primitive animals
we just find the best clothing with discount and chill-ily take it
the only people that would raid would be little kids who want candy, chips and energy drinks if they are aware of what BF is
 blazing hill
Having some issues with a collar of some clothes, its hard for me to check if its a simple vertices-depth issue or a texture-material issue
the front part doesnt show in solid view
 subtle jackal
Looks like you have inverted normals, or definitely some normal-related shading error
blazing hill
How would I resolve that @subtle jackal
subtle jackal
well, you can try Blender's built-in "recalculate normals" function. If you're using 2.8 it should be Shift+N, if you're using 2.79 it is Ctrl+N. If that doesn't work you may want to activate the show-normals functionality and see what is going on more precisely.
blazing hill
gotcha, so how do i use the material's blackish texture onto the recalculated normals?
subtle jackal
well, make sure it's assigned the same material, and if it is and should be textured black, make sure it is in the correct spot on the UV map.
blazing hill
hell yeah! thx @subtle jackal
subtle jackal
no prob
 dull canyon
so, probably a dumb question, but say if I have my model all set up with materials and lighting in Blender, can you like bake all that information into a texture to use in vrchat?
 small cloud
bake texture
dull canyon
nice
so basically I can setup a completely procedurally generated texture and then just bake it and use it for a vrchat model
small cloud
yeah, it should bake all the detail in texture and everything
dull canyon
yeah I see it right now, that's pretty neat
small cloud
there's one thing that it bakes hidden mesh as it's active, so if you don't want shadows from clothing, then you need to move it to a different layer and have just skin on layer
from what I remember
quaint jasper
check the vertex that isn't moving for weight paint from other bones
spiral sigil
i dont get what you mean
quaint jasper
remove the vertex group that are affecting this thumb vertex
spiral sigil
then the thumb is dead
actually
i got it fixed somehow
not on left thumb
doesnt fix it
right side
help?
 quaint bronze
@spiral sigil This could be an issue where the vertexes are weight painted to another bone somewhere in your model. It might be worth the time to go through each bone's weight paints and paint out anything that may accidentally be affecting the thumbs
quaint bronze
It might also be just a plain 'ol weight paint issue. Have you tried redoing the weight paints on the thumbs?
spiral sigil
yes
quaint bronze
What about the bone directly above the one you have selected in the image - is it influencing the vertexes?
quaint bronze
Worth a shot checking the weights on that bone in the middle. If it's red (heavily influencing) it might be pulling the mesh a lot - but also the inverse may be true as well.
quaint bronze
Maybe try throwing it in pose mode and moving the arms around - that might show you where the vertexes are pulling to
quaint bronze
It wouldnt really help fix but might help clue you into where the problem is.
quaint bronze
Which loops?
 tepid wagon
Try isolating the hands -> make them their own object -> Delete verticies of the left hand -> use mirror modifier to get the left hand back -> delete all shape keys from object that contains hands -> apply mirror modifier ->select object with hands than object containing rest of your avatar and press ctrl J to join objects together. Mirror modifier should transfer the weights over. Don't forget to save before doing this just in case
spiral sigil
i cant
im stuck at object mode/pose mode/edit strokes
i cant get to edit mode
nvm
got back
you didnt tell me to make all vertex groups again
im gonna redo the hand bones too
thanks
....smh
wait
i cant even copy armature at the same time..
fuxking kidding me
spiral sigil
i deleted both
tepid wagon
Leave the bones alone
spiral sigil
left elbow with fingers
tepid wagon
Don't touch the armature
tepid wagon
yup
spiral sigil
now what
tepid wagon
Should have mentioned I was talking about the mesh just in case I guess
tepid wagon
Use C select to select all the faces for your hand or box select if you fancy
spiral sigil
what part of hand
tepid wagon
Doesnt matter too much as long as you get all that is "broken"
The mesh is symetrical isn't it?
tepid wagon
Yeah that will do I guess, select the other hand as well and make it its own object
tepid wagon
Try isolating the hands -> make them their own object -> Delete verticies of the left hand -> use mirror modifier to get the left hand back -> delete all shape keys from object that contains hands -> apply mirror modifier ->select object with hands than object containing rest of your avatar and press ctrl J to join objects together. Mirror modifier should transfer the weights over. Don't forget to save before doing this just in case
I said delete verts of the left hand
or whatever hand that is broken
not both
spiral sigil
armature is required for vertex group
and mirror modifier doesnt do anything but assign both on right hand
because oops, i didnt duplicate armature to have it there instead
and i cant find a way to select certain bones and part of mesh AT the same time
to do CTRL D + S + X+ -1
tepid wagon
I said leave the armature alone
spiral sigil
VERTEX GROUPS
whats so hard
i need that
unless you want my fingers to NOT work at all
both vertex are currently duplicates
but right hand is magically fixed
so it must BE duplicated
tepid wagon
Sure, do as you think will fix it
spiral sigil
cant do it
if blender doesnt seem to allow certain bone and mesh selection at the same time
ill do some ghetto stuff. ill save current file in random name
remove everything but left hand part and needed bones
delete any shape key
any useless vertex group
CTRL C
CTRL V on the main blend
if this will work
ill let you know that you wanted to waste my time doing useless mirroring
 limber belfry
👏
spiral sigil
https://cdn.discordapp.com/attachments/521112661841149952/612165922861613066/unknown.png
i have a cylinder going into a mesh and i wanna cut out the shape of the cylinder into the mesh, how would i do that?
 vivid crater
@spiral sigil look up the boolean modifier
spiral sigil
yeah i got it, thanks
small cloud
any1 got a clue from which game these swords could be? https://cdn.discordapp.com/attachments/599978772539899905/612262503753449483/unknown.png

 coarse kestrel
coarse kestrel
coarse kestrel

 broken hornet
ok
dull canyon
nice booty
spiral sigil
that waist is unrealistic
glad steeple
And the fur on the arms is not
coarse kestrel
It used a have a much more realistic body shape but it just kinda looked disgusting
glad steeple

 hazy swallow
It’s virtual reality, let people be unrealistic.
glad steeple
that why im big box man
 silent acorn
honestly, a realistic avatar with an inhuman head would look a lot weirder than one with stylized proportions
besides, 90% of MMD bases have legs about a kilometer long :p
spiral sigil
ok guys serious question. Iam since around 7 weeks now into this whole VR Stuff and iam rly interesting to start making my own VRChat Avatars. I know i have to learn a lot, but since iam atm cause of health reasons not allowed to work i have enough times. So can anyone give me some good tutorial stuff for blender & unity? If its possible pls via DM that i dont miss it. Websites, YouTube Videos, everything is welcome!
 small valve
@spiral sigil start here: https://tinyurl.com/y6jykx47

Google Docs
So, you want to make a VRChat avatar? (2 min read) Content creation for VRChat demands that you have the right tools. First and foremost, go to the VRChat website and login, then go to the Download tab. You will want to download both Unity and the VRC SDK since these are req...
id personally reccommend importing the miko ouka mmd as a first avatar just to get used to the whole process: https://www.deviantart.com/saryta-chan/art/Ooka-Miko-DL-569892672

DeviantArt is the world's largest online social community for artists and art enthusiasts, allowing people to connect through the creation and sharing of art.
spiral sigil
ya, u dont understand what i mean. I want to create my own model from 0! i dont want to download a MMD Model and edit it. i want to create a own one
small valve
ahhh, you shouldve said so...
spiral sigil
thats why i posted it here and not in #avatars-2-general or #avatars-mmd 😄
small valve
take like 12 months off to learn thats a complete lie, but in all seriousness thats a lot of stuff to take in
especially depending on what level of detail youre aiming for and the kind of things you want to make
spiral sigil
yeah but like i say, cause of health issues iam not allowed to work for the next 3 years...so i have a lot of time and cant leave the house...so gimma dat shit 😄
small valve
im personally just getting started, but there's like a handful of good tutorials for incredible fundamentals, and theyre usually just for learning the software. everythong else, from what ive seen, is a lot of personal practice, trial and error, which means a lot of the time youll be asking questions and for advice and looking theu documentation more than tutorials.
that being said, a good start is to watch any of the "blender for dummies" tuts just to get a more intimate idea of what blender's workflow is like
spiral sigil
https://www.youtube.com/playlist?list=PLFt_AvWsXl0fEx02iXR8uhDsVGhmM9Pse&disable_polymer=1
I've been told this is a good tutorial to get you started. You shouldn't need the walk/run cycle videos

YouTube
A series on modeling, texturing, rigging and animating a simple character in Blender.
thats why i say, websites, videos and everything. Everything important and what is good as recommandation. if i google it, i found 100000 sites but it not means that everything is good or "beginner friendly"
thats why iam asking here
small valve
next go and check out any video tuts on modeling what you want. for characters there's a number of these including a complete one on modeling that one chick from SAO from complete scratch
spiral sigil
https://www.youtube.com/playlist?list=PLvgIVNDU-Dxjb3eukDF5W0l0-6ShO9OiM
Here's the penultimate one that s0lar mentioned.
 small valve
i believe that one is really good and also starts you from.scratch but it could also be a bit out of scope. modeling low poly shit is also fun, and theres a good deal of easy tutorials on that if you want to start there
afterwards, it becomes more of a challenge of your own artistic ability and getting used to your tools, (software) and the more you practice means you not only develop your skills, but also just your own workflow
spiral sigil
oh i saw i favorite this in my browser already when i search stuff few days ago 😄
what PandaDara sends
small valve
at that point it really depends on you to actively seek documentation, questions, and advice. Less tutorials and guides, and what not.
dont be afraid of investing a little bit of time into 2d art as well, since being able to draw up concept sketches and plan out all the little details on paper to full blown character sheets can be incredibly useful
spiral sigil
i draw already a bit as "hobby" and iam a photographer as well, i think/hope this will help me a lot with creativity
small valve
that part mostly depends on you, though - generally, the more complex the content you want and the seriousness of how much you want to do this means that you should consider some 2d art more
but thats about it. id link more rn but im in bed >n< good luck!
spiral sigil
thx so far for the help 🙂
small valve
np~
spiral sigil
Oh yeah. This was also a helpful resource for me, despite the quality of the model they showed off.
https://learnmmd.com/Make-Your-First-Model-Using-Blender-by-Mae-Blythe/
thx i saved everything in my favorites 🙂
https://www.youtube.com/playlist?list=PLyelx0TsmSpf-8xZfjZveokSsIwj0F3lo&disable_polymer=1
Another helpful one with introductory blender stuff
 spiral sigil
So if you follow the sculpt -> retopology workflow.
When you're at the normal baking stage, how do you make sure that the normals from the sculpted model match up with the uvs from the retopo'd model?
 cold plank
@spiral sigil I actually bake from the HQ mesh to the LQ mesh
using cycles. It provides a much higher quality looking end result
where it can look smooth even though it's not
I reccomend going into your blender settings and enabling your gpu
like this:
and you select the hQ object first, then shift+click the LQ one
then bake, and it'll create an awesome setup
subtle jackal
@spiral sigil If you're starting from completely no modelling knowledge, I'd check out CGCookie's beginner course. https://cgcookie.com/course/learn-the-blender-basics Get a handle on the controls and build a few small simple things. I'd really recommend not diving straight in to a full rigged character but hey some people learn best that way so if you feel that's how you learn things go for it. Just don't be afraid to screw up pretty bad your first few times lol.

CG Cookie
In less than 1 hour, learn everything you need to know to start using Blender like a boss. This tutorial series will give you the right foundation for creating your own projects in 3D.
spiral sigil
@subtle jackal that my first character will not be perfect is for sure, but iam a person who keep pushing myself to get better and better and better to get my own goals by myself 😄 thx for the link, will have a look into it when iam back on PC
subtle jackal
@spiral sigil The way to think of it is basically that your low poly model (which should be UV unwrapped) has rays projected inwards along the normals for each pixel in your texture, and once that ray hits your high-poly, it records the direction that part of the high poly is facing as a color. It's actually a bit more complex than that but if you approach it that way you should be able to get a good result.
 potent edge
if i post a model here does it need to be an avatar?
potent edge
i made this model a short while back and i need feedback and criticism, please keep in mind that I'm not using a proper shader at all, and the textures aren't done
quaint jasper
that's not good enough ? damn
quaint jasper
Well, if you can make that you're definitely good enough !
glad steeple
yeah only the best of the best are allowed to make vrchat avatars, thats why the game is filled with copy paste mmd's 🤠
glad steeple
No, im joking
potent edge
No I meant copy paste mmd bit
glad steeple
Oh yea
thats all the game is really
99% of the time
There are a handful of scratch creators in non japan vrc
small valve
copypaste mmd is the vrc way 👈 😂 👈
in all seriousness @potent edge id love to see any work you create in the future in general, not just for vrc. i dig that cthulu statue shit you got goin on
quaint jasper
I assume you mean why and the answer would be skill, time and taste
glad steeple
From scratch means from nothing
as in, blank file to end product
with the exception of using your own files constructed previously
glad steeple
I look forward to your work
potent edge
😀
quaint jasper
yeah, please post updates of your work !
 barren quiver
If you can rig and optimise it, you're good to go!
 thick crane
Do you guys have a recommended version of blender that you use?
potent edge
I like 2.7 over 2.8
Like a lot of people
Basically the latest non beta version
2.79 I think it is
That I like
dull canyon
well you'll have to get used to 2.8 sometime
there won't be much support for 2.79 and it'll be better for the whole community to just move on
or we get a Python 2.7 vs Python 3 situation
@thick crane Blender 2.80
especially if you never touched Blender before
stop recommending old outdated versions to new modelers
dull canyon
if you need an introduction to the very basics of blender you can check out their official youtube channel https://www.youtube.com/user/BlenderFoundation/videos

they're doing a big series about everything you need to know in Blender 2.8
thick crane
That’s actually what I have been needing to look for 👍
glad steeple
at the very least use 2.8 and use the 2.7 keymap settings @potent edge
@ember dragon Yes, but read rule 13
 ember dragon
cheers lad
potent edge
@dull canyon nobody I've ever spoke to likes the new update, I'll recommend whatever version I want since they where asking for opinions
glad steeple
I love the new update 😅
The software actually looks like it was made this century
If someone is getting into blender or any software for that matter, unless something is inherently broken; do not reccomend old versions
They will only become dependant on it like yourself (which is a bad thing)
quaint jasper
People working with blender as professionals seem to love blender 2.8
potent edge
Agh noo, its nasty and I've tried it and I don't like it
quaint jasper
If I had a choice to learn today, I'd go with that
potent edge
But like I said they wanted opinions so I gave mine
quaint jasper
Yeah but gotta provide more objective feedback than "it's nasty" lol
potent edge
Yh
quaint jasper

spiral sigil
never mind then you two are busy sorry
potent edge
No
quaint jasper
@spiral sigil Ask your question instead of asking if you can ask
potent edge
What if his question was just the question of if he could ask one? 🤔
quaint jasper
Then my job is done
glad steeple
They asked for help, so your theory does not check out
dull canyon
@potent edge I love version 2.80 too. 2.79 has such an ugly and unintuitive interface
and lacks stuff like Eevee
or support for RTX cards
it's just dumb recommending a version that's not going to be supported anymore to newcomers
just because you like staying behind
potent edge
Personal preference my guy, like I said I was giving my opinion
glad steeple
at the very least, use 2.8 with the 2.7 keymap, please! youll be doing yourself a favour
dull canyon
and your opinion is objectively wrong so you're better off just not recommending anything
quaint jasper
Yeah if the interface is your only gripe, might as well make the switch
@dull canyon there's no wrong opinions though, that's the point
potent edge
That's your opinion szena
 reef lotus
2.8 has so many improvements, interface is different but it's not that hard to get used to
glad steeple
im a recent learner of blender, picked it up a couple months before 2.8 and ive already relearned everything that i had learned on 2.7
with the notable exception of weight painting, that seems to be harder as you seemingly cant select bones while in paint mode, having to select them manually at the side
glad steeple
Good luck.
glad steeple
Congrats you are working for less than minimum wage
glad steeple
Rule 3 says i cant respond 😅
potent edge
why would you be mean?
glad steeple
About you significantly undercharging and undervaluing your own work?
I can think of several reasons
glad steeple
Rule 3 says i cant respond
potent edge

nothing i can do to change it now 
im probably not old enough to charge loads anyway
glad steeple
Thats not how it works
potent edge
hey im new to this ):
tepid wagon
It is how competent you are at doing work that is important, not when you started to do something and from what show you seem rather good at modeling
That figure you have done was made by sculpting though, wasn't it?
 hallow bough
Scratch that read it wrong. I'd say you could ask more than that. You can still change your prices at any time.
That's your decision really.
hallow bough
Because you think you would be charging too much or you just don't know what to charge for the work hours you put in?
potent edge
hmm
tepid wagon
Did you make any avatars so far?
tepid wagon
Human models?
potent edge
i dont think ive ever done a human model before
i do want to do some practice first before i attempt avatars
tepid wagon
Oh, so the avatar won't be a humanoid then?
potent edge
it will 😐
tepid wagon
Welp, wish you good luck then
potent edge
lol
glad steeple
Can we see portfolio
potent edge
um sure
i will post most of my models that i have made public
from newest to oldest (keep in mind all of the models after the cthulhu one are considerably older
glad steeple
👍
thick crane
i like that
glad steeple
Sketchfab link?
potent edge
because i haven't rendered most of it yet so all of this is screenshotted from my sf

there isnt to much on there
and most of the stuff is very old on it
thick crane
was that all done on blender?
glad steeple
Some great work :)
potent edge
thanks
thick crane
That stuff looks really nice
glad steeple
The materials could use work, but theyre old and clearly youve improved - judging by the bust of Cthulhu
glad steeple
No, dont charge per hour
tepid wagon
Some shaders support normal maps
glad steeple
The answer is yes, typically.
 thorny fractal
It's dependant on the shader. The cubed paradox shader does
spiral sigil
Silent shader also supports normal maps iirc
 ripe lotus
If you can shell 25USD Real Toon has a ton of options
 sleek crater
nah there are alot of good shaders that r free, wouldnt really buy any unless u have to.
glad steeple
You should probably stick to shaders that were designed around vrchat
 worn fjord
uh i have a problem, for some reason blender 2.80 is not saving my shape keys in the mesh when i export in FBX, somewone knows whats going on?
quaint jasper
Did you look at the export settings ?
dull canyon
so, if I wanted certain parts of my avatar to be shiny/glossy like the eyes, do they have to have a separate material assigned to them which I can then use a different shiny shader on in Unity? or how does this work
or are there shaders that also support roughness maps
barren quiver
What do you mean by "like the eyes"?
It really depends on what shader you're using
dull canyon
well, eyes are shiny/glossy, but the skin for instance isn't as much, and from what I understood you can use different shaders for different material slots or something?
barren quiver
For example, my shader does specular and roughness and with a metallic map you can have some things shiny and others not
Using multiple materials for that is bad, because it causes a lot more rendering load than having a map texture for it.
dull canyon
yeah, so I heard
so there are shaders that can do it all in one
but it would also be possible to use different shaders for different parts
barren quiver
Essentially yes
barren quiver

GitLab
A surface shader for Unity providing cel-shading. (Forward rendering only)
Take a look at my Standard guide
dull canyon
okay, thanks
barren quiver
You don't need multiple materials most of the time
dull canyon
kay, good to know
was wondering about that the whole night 😄
I should really finally finish a model so I can go through the whole pipeline of making an avatar...
barren quiver
You can see in the examples I've got there that you can go really far with just the one material
dull canyon
mhm
how did you do all these maps/textures? in Blender or something like Substance Painter?
barren quiver
Depends on where you feel most confident
dull canyon
well I know it's all possible in Blender, question is how efficient it is
barren quiver
Substance Painter is the best, in my experience, it lets you use nodes and layers in ways that allow you to do complex stuff really easily and their presets can allow you to get a high quality result very quickly
However...
dull canyon
and it's also not super expensive
compared to other "professional" software out there
looking at you, zbrush and maya
barren quiver
If you want to just paint it on, Blender is good, especially with 2.8.
dull canyon
mhm
barren quiver
There are more complicated addons for Blender that let you do the same things as Substance for free
And more, too
dull canyon
neat
barren quiver
But they need specialised setup
However, the results for someone making an original model can be pretty fantastic, and save you tons of time.
dull canyon
mhm
 nimble pier
yo
tepid wagon
@barren quiver How consistent is the looks of your avatars in different worlds while using standard shaders? I used standard (roughness setup) shader for my avatar and it turned out it looked quite different depending on world I was in.
I made my texture sets in Substance Painter which I assume you use as well and there is relatively small percentage of worlds that my avatar look similar to what I could see in SP, it is especially true for metal parts.
While on this small percentage of maps I can see world being reflected on metal surfaces on most worlds I am just getting my metal parts look darker with some brighter reflections. There are also worlds that make metal look completely black and normal map details are not visible.
Non metal parts look different as well mostly regarding how soft/harsh the shadows are. I think there is some setup done in Unity that changes this, I never made a world so I am not familiar.
Do you think some of the standard shaders are better than the others for VRChat or all standard shaders are very dependent on how lights are set up in each world and there isn’t much or any difference between them regarding how they make an avatar look like?
barren quiver
The latter. The different setups for Standard are just passing the parameters in different ways.
tepid wagon
That is quite unfortunate
barren quiver
There's not much you can do about worlds with bad lighting
Aside from asking the author to improve them, that is!
tepid wagon
Ha! I lack audacity to do this but I may just use avatar with toon shader that neglegts all lights and looks perfect all the time.
barren quiver
I really wish people wouldn't!
It only takes a few simple things to make avatars look decent in worlds.
tepid wagon
If I ever make one I will make sure I find out how to make it well lit
 fringe rock
No light 
glad steeple
Good light*
fringe rock
I like it flat
glad steeple
We dont have a cure for that, sorry.
vivid crater
Also for metallic bits and anything else, check out rero's edit of standard shader
He added fallback cubemaps for worlds without reflection probes
 meager locust
Hello people. Im new in vr chat. My name is Luis Alberto
 vocal canyon
im trying to bake the meterials but i keep getting this pop up
https://cdn.discordapp.com/attachments/355930159498395648/614209152813891594/2019.08.22-16.25_01.png
https://cdn.discordapp.com/attachments/355930159498395648/614209331369607264/2019.08.22-16.25_01.png


idk if this is really the place to aks this but idk where else i could
vivid crater
in blender 2.8, the textures get baked onto the active node
@vocal canyon
here's an example, you just have to make a node and select it so its active
https://youtu.be/mdcodiuIwXM?t=51
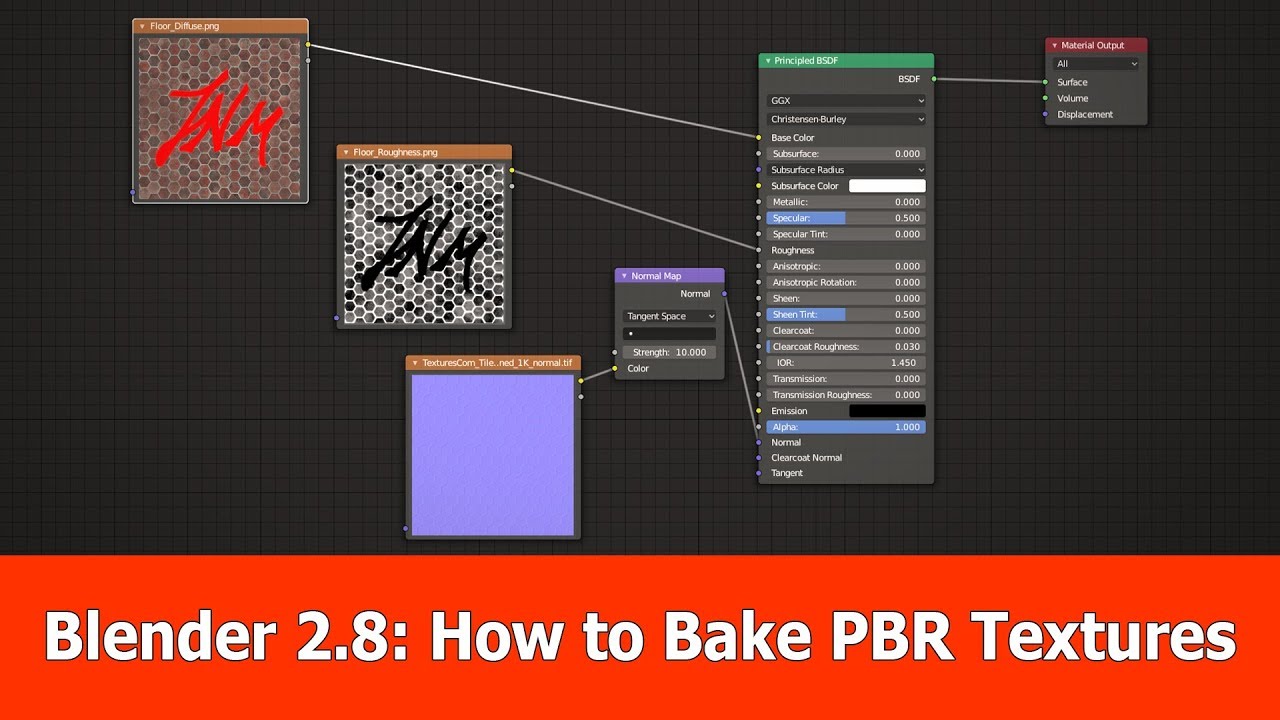
Many guys asked me how to bake the PBR textures from Blender 2.8 PBR materials which is shown in this video. I use Cycles for baking and basically the proced...
if you have multiple materials, you have to do that for each of them, but just set it to the same image so they all bake on the same one
 bronze jasper
anybody have some sculpts they need Retopo'ed? I need practice and it takes so long for me to sculpt my original ones
 quaint jasper
Nice, how's blender 2.8 treating you Junos ?
 onyx juniper
Sexy architecture
 visual vigil
@quaint jasper iim liking it a lot
i got over the learning curve of all the shit being changed from 2.79
now i can use both fluidly


Unity PBR Pog
 dull canyon
nice
hope there's not too many dynamic bones in there
would be a shame if it got blocked or had it's DBs disabled because there's too many
 wheat delta
Anyone know how to make multiple UV sets for the same mesh?
So I can use a trim sheet but also have a set of UVs for lightmap baking later
in Blender 2.8
vivid crater
@wheat delta you can hit the + button in the object data tab to add another UV map
wheat delta
ah, hadn't looked there, thanks
 cinder wraith
Can anyone help me with this? My normals are facing the same way as the other ones but it is darker here for some odd reason and when I apply the shader that specific spot is facing the wrong direction. The little blue lines indicate its facing outwards. https://gyazo.com/f739763732daaf07717b7f38056f9797
 wheat delta
tried flipping or recalculating the normals?
cinder wraith
Have tried that
quaint jasper
Smooth faces ? Shade smooth ?
vivid crater
Hmm, you could try "set normals from faces"
cinder wraith
Thank you @vivid crater That was the solution
 full cape
Which shader is good to put a picture in?
vocal canyon
i tried the video that was suggested but the map bake turns out like this
bronze jasper
alright guys I need to figure out a good way to model this person's very stylized shoes, could anyone help?
dull canyon
dear avatar creators: please stop using open hand gestures. thanks.
-every Index user
glad steeple
@dull canyon elaborate?
dull canyon
you know the Index controllers?
barren quiver
Wrong channel for that
 untold schooner
 blissful sleet
@bronze jasper post pics
bronze jasper
@blissful sleet not necessary, I just need suggestions on where to start modelling Maka from the anime Soul Eater's shoes, they're a little complicated and not just a pair of sneakers (as a game asset, not so much a sculpt or anything)
 glossy tangle
blissful sleet
glossy tangle
blissful sleet
@bronze jasper just paint white lines on existing boots. If you want geometry for each strap, use and arrange loop cuts (or knife tool if necessary) while modeling so that they line up with the white straps (so that weight painting lines up between straps/boot vertices, and for ease of modeling), then duplicate those strips and extrude+alt+s. you can also just shrinkwrap straps onto the boots but the straps might clip through the boot during ankle movement
bronze jasper
I thought about just utilizing textures, but I wanted her to have become a really high quality asset, I tried modelling the thing by hand and I couldn't get the shape right, thought about sculpting it and retopo'ing it, might reconsider that option as well
small valve
i dont know what im lookinng at >~<
i was told to "add some nodes and ur shit will bake right onto them"
but, ive never done this shit before
glad steeple
what you trying to achieve
small valve
i already have the custom texture atlas UV set up and ready to go
if i have to ill use material combiner but id like to do it this way, so i need to figure out how to get it to bake properly
im jus ttrying to manually tex atlas in 2.8
glad steeple
Is not just a case of moving the uv islands around?
small valve
what do you mean? im trying to make my own tex atlas
back then it was just "use tex atlas addon lul" and all of tha tshit
ive allready moved around the islands:
glad steeple
So now make the material match the UV
small valve
the problem is that i just need to figure out how to use nodes to get it to bake the textures properly
i dont get it. how would i go about making it match the UV?
glad steeple
I assume you have textures
small valve
mhm, the textures are ready to go
glad steeple
So the parts that you moved on the UV, now need to be moved on the material too?
small valve
mhm. i think i mightve figured it out though, i think...
does it have som,ething to do with this?
can i just set it to the new UV and then make it take the place of the MMD UV?
glad steeple
I have never used nodes to atlas things
I legitimately dont know the method you're doing
small valve
i was told that id have to for 2.8 , how do you usually do it? 0 0
glad steeple
Manually
I never retroactively atlas though, i always design with it in mind from the get go
small valve
i figured. >~< i used to use mat combiner a lot but then switched to doing it manually, but then again im just kitbashing here
bronze jasper
holy wow, that UV map was beautiful @small valve mine never look that good lol
small valve
thx ^ ^ sadly im just using material combiner for now
at some point imma be doing a lot more 3d modeling than kitbashing, so i might as well learn 2.8 now before its too late. i may not make another kitbash for a while after this tho
which may be a complete lie since thats what i said before this avatar
 velvet jay
Hi I’m looking for a model maker that can make a somewhat custom looking licker monster from resident evil I can pay of course
small valve
@velvet jay #community-servers-old , vrc traders
 fathom heron
anyone have the right sdk/ version of unity i can have to download
i havent played vrc i n a while and moved to a new pc and lost all my old files
quaint jasper
you can find both on the download section of the vrchat website
fathom heron
yeah youre right, thanks
barren quiver
@small valve I can help you in 7 hours from now
 long compass
hello
 vestal condor
What do i do? I only have Clear cache and PlayerPref
Unity is last version, SDK is last version
reinstalled it like 3 times
small valve
7 hours from now (aka rn) is when i have to show up in school, rip
 slender holly
SLEEP
 gritty bridge
Made some teeth in Maya,
 oblique token
@vestal condor try to reimport the SDK, if that doesn't work you'll need to start a new project file. You can still open your Scene from your current project, just make sure the Avatar/Scene descriptor is the same before publishing if you've already published before.
 pastel pilot
Hi guys! How is it going? Answer please, how can I fix it? I will appreciate if you will give some good tutors for 3d modelling.... Thanks!!
I'm just newbie here
quaint jasper
@pastel pilot Ask in #avatar-rigging and be more specific about your issue
pastel pilot
okay! Thank you and sorry
quaint jasper
no problem !
coarse kestrel
 quaint jasper
Clean !
glad steeple
big fan of the default cube to make it suitable for the server 😆
 void narwhal
the cube is obviously for measuring the thigh gap
 pseudo harbor
hello,i modelled this in blender,it looked fine until exported to unity,in unity some of the object normals were flipped,i fixed the problem but now in unity they don't catch the same lights,any way to fix this?
pseudo harbor
ok i got cats to fix it,still don't know why it happened
 keen delta
I'm currently trying to get started on a model retexture with Substance Painter. Is anyone able to assist me with getting started with the program?
 pliant jackal
LOL
quaint jasper
@keen delta I'd suggest looking up tutorials first, and ask specific questions here
keen delta
It's really difficult to find tutorials for the specific problem you're having given how little the substance painter community is
small cloud
@keen delta "substance painter basics" on youtube
keen delta
All tutorials go on about making completely new textures for models from scratch, I've not found any on editing existing textures on models
The model I have has nicely layered textures
 daring karma
To be fair, it's meant to texture from scratch! Import the textures into your project shelf, create a new fill layer, drag the textures onto the applicable slots in the properties panel. If your scale is 1x1 and the UVs haven't changed, it should just work.
small cloud
yeah.. that's exactly what Substance painter is for.. textures from scratch, if you want to do simple edits - PS or Gimp or paint.net are good for it
keen delta
Neither have symmetry editing.
Neither can have different alphas and on the fly normal editing
I got help from a friend, what he does is make a fill layer for every layer that you want to edit, add a black mask and under that black mask add paint
then you paint on that fill layer

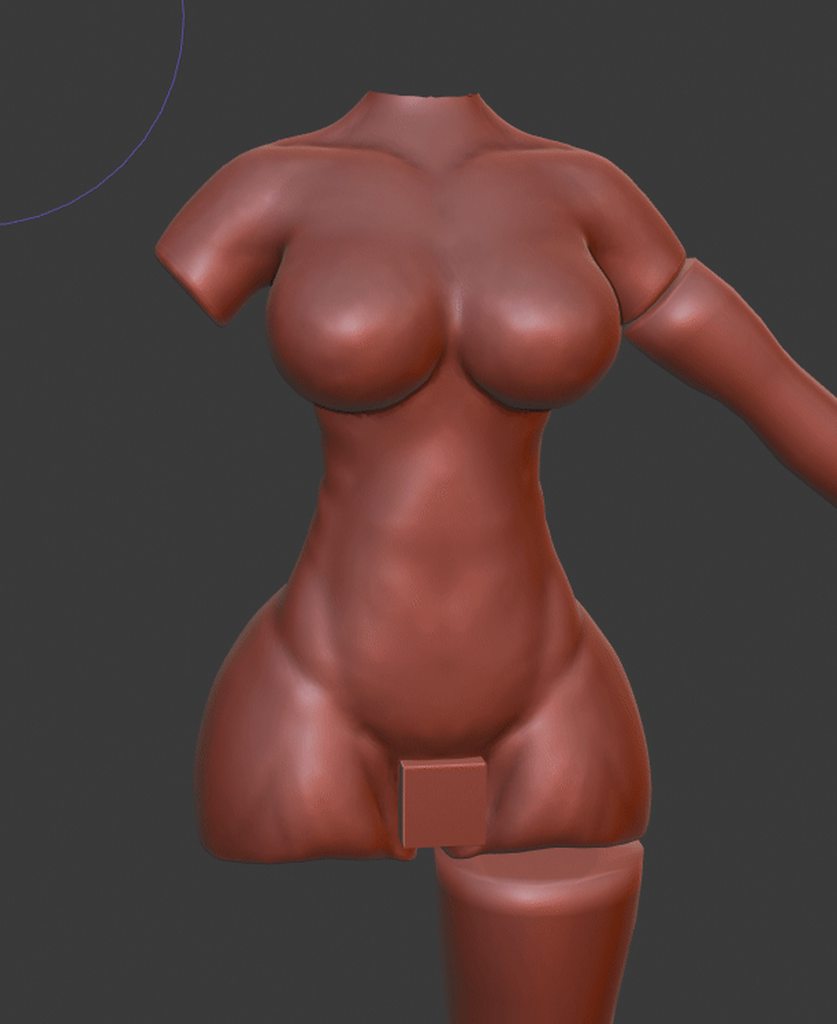
 quick thunder
found the erper
coarse kestrel
ya got me
quick thunder

slender holly
Looks lovely, Lex! any tips on beginner sculpting?
coarse kestrel
I haven't actually been doing it myself all that long, this might be my fourth time doing it now actually. if you're aiming for"realistic anatomy" I'd recommend looking at stuff like this for a general guide. or similar models https://sketchfab.com/3d-models/female-anatomy-2-423ab35b97f14f3ba179e3625e9e6945
Otherwise, dynotopo, clay strips, crease and smooth have gotten me pretty far.

all muscules listed here
http://imgur.com/EyBkkLo
http://imgur.com/6LjP4jD
http://imgur.com/qlfMwuY
http://i.imgur.com/CiqMzqL.jpg - female anatomy_2 - Download Free 3D model by graft (@graft)
of course if you're still new I'd recommend starting small and working your way up from there. you ain't gonna create a whole character on your first go but you should still try to have fun with it at the same time
It's just a matter of doing your best to improve in anyway you can and the best way to do that is to keep trying :3 @slender holly
spiral sigil
I'm running into an odd problem while porting over a model. Unity is refusing to render the armor correctly. This also happens in blender if I hit the "Fix" button with CATS.
It's easier to tell when I delete the body, but it seems the armor can only be seen from some angles. I thought it was Backface Culling, but that didn't help. Anyone have an idea on what's wrong?
Front view - can't see the kneecap armor
Side view - now you can?
coarse kestrel
looks like your normals are facing the wrong way @spiral sigil
spiral sigil
Thanks, that worked. 😁 @coarse kestrel
coarse kestrel
<3
ripe lotus
that butt looks super weird
coarse kestrel
yeah hehe i wasn't trying to make it realistic, just as big as I can get away with
so it looks a little wrong with such a thin waist
spiral sigil
I have a new problem. In Unity, I can see through the back of the armor, as if backface culling was on. This can't be seen in Blender, even after clicking "Fix Model". @coarse kestrel
coarse kestrel
picture?
coarse kestrel
yup that's working as intended unless you use a shader that shows backfaces you wont be able to see them
typically you should have a leg behind the armour so you wouldn't be able to see the back side of the armour anyways
spiral sigil
Yea, lol. Just did that to make it easier to see. The armor does kind of extrude from the body, so it's pretty easy to notice. The Double Sided shader seems to work fine. Thanks again!
coarse kestrel
pliant jackal
Nice Digi grade @coarse kestrel
silent acorn
Looks smooth. Is this model going to be made into a VRchat avatar, or is it just a personal thing?
coarse kestrel
I'm making a renamon and a delphox for my patreon and might release a low poly version of them for free
but ye they're gonna be avatars
and the full body on these is 🔥
by low poly I mean 15k tris
pliant jackal
wow
silent acorn
dang, 15k's really respectable with that level of detail. Nice!
coarse kestrel
normal maps baaayybbeeee
silent acorn
ooooh
coarse kestrel
 vivid crater
well, they said might release low poly version, so theyre probably showing us the sculpts
coarse kestrel
yeye this is the sculpt
coarse kestrel
I honestly might move over to zbrush as blender gets real fucky sometimes
vivid crater
😔 very understandable
sometimes mine straight up closes when switching between modes
but ye, on the site they have a thing that shows their work on sculpt from normal like zbrush does
https://code.blender.org/2019/06/sculpt-mode-features-branch-status-report/
Overview of features added to the sculpt-mode-features branch, and how to merge them into master.
coarse kestrel
ooh
pliant jackal
nice
visual vigil

Redoing an old model #Warhammer40k
Old one looks like a mess. New textures, new mesh work, new rigging, new effects. Hell yeah.

 Twitter
vocal canyon
Twitter
vocal canyon
i tried to bake this but it ends up like this
glad steeple
What are you trying to achieve @vocal canyon
vocal canyon
bake a texture for the model, so i can import it
Beacuse right now hes made of just a bunch of meterials
glad steeple

The final step in this character model series, texturing the model, with commentary explaining what I'm done :) Videos made possible by my amazing Patrons ht...
Here's a tut for something similar, it's not baking but will get the same result
glad steeple
And you get to learn how to UV (kinda) so that's fun 😉
Let me know how it goes, good luck
vocal canyon
thx 😃
 noble apex
HEy, does anone have any advise for modeling hands specifically for VRchat?
I usually try to give them a natural, relaxed shape in the base model, but these dont deform so well. They usually get squished and broken when posing in game. Also Unity tells me most times that the avatar is not in T-Pose when I dont change their pose in the import window
Like, is it better to keep them flat?
 tawdry goblet
Got this while trying to import a 2.8 blend file into unity
anyone know a work around?
noble apex
Export as .fbx from blender?
tawdry goblet
Yeah, i mean I could, but with stuff like animations, i've just become accustomed with taking it out of the blend directly
I was wondering if there was just a way to preserve my methods that i've used before
noble apex
oh, ok yeah
I mean the .fbx export settings also include some for Animation... Looks like they would at leat be included. Maybe you can still pull them from the fbx
(I havent exported animations in sny way so far, I am just guessing)
wheat delta
Also, when exporting fbx, remember to check "selected objects" and "use fbx units scale". Can save you some headaches
tawdry goblet
Well i was just using animations as an example. I can always learn it a different way but tbh i dont want to unless I have to
coarse kestrel

 ashen forge
Anyone know if bendy bones in Blender transfer over to Unity?
 latent charm
No, that's a blender specific feature.
Not much beyond bone heirachy and weights are going to transfer across in that regard.
ashen forge
Ooft
glad steeple
Shame, bendy bones sound cool
latent charm
They're fantastic. Like a weird midpoint of a spline and a bone with benefits of both.
ashen forge
Yeah I wanted to use em for this model I finished making in Blender and I was hoping I could put bendy bones on the arms to have a kind of curving effect
glad steeple
Cute af
latent charm
So what bendy bones do is use a bone and the ones around it to make a virtual set of smaller bones that arrange themselves in a curve-like manner. You could replicate this functionality and have it transfer across by subdividing the bones in question a few times and weighting them appropriately.
ashen forge
I pride myself in making super optimized avatars so its like 3k polys and only one mesh and material too
Probably at most of 4 dynamic bone transforms by time I'm done too
 fallen snow
hmm, in blender 2.80, is there a setting which would cause alt-b to not actually cull geometry outside of the selected box?
specifically this happens in look dev and rendered mode, in solid mode it properly clips
vocal canyon
help, it's transparents and also i don't know how to add the textures onto it
spiral sigil
@vocal canyon looks like broken normals to me..
But uh, lets give it the benefit of the doubt. So, extract your material from the model (or assign one to the skinned mesh renderer, either one.)
Then assign it a shader like poiyomi, or Xiexe and turn off the culling setting. It should appear complete afterwards.
 livid storm
if that does fix it then it is indeed broken normals
in my shader you can also visualize the normals and other mesh data
spiral sigil
Yiis o/
spiral sigil
Tried to get eye tracking to work, but I accidently deleted the vertex group for an eye. After recreating it, the eye is mostly left behind when I move the head around. Is there something I'm missing? Do I just assign the vertices to the head group?
fringe rock
Create a vertex group with. The same name as the bone
Select the eye mesh and apply @spiral sigil
spiral sigil
The vertex group has the same name. When I click select, it correctly selects the vertices for that eye. @fringe rock
dull canyon
I'd feed that charlotte all the cheese she wants
as long as she doesn't bite my head off
spiral sigil
Nevermind. Somehow I applied the eye vertices to one of the tail bones 🤦
coarse kestrel
 azure rain
cool a bunny
coarse kestrel
it's renamon :x
azure rain
oh sorry a little hard to tell with madcap and since you stylize the face a little bit differently
coarse kestrel
it's no worries <3 still a while to go
 tough relic
 hollow radish
 royal saddle
Does anyone know where can i found or buy this sword mod?
glad steeple
Wrong server
 desert crown
anyone here uses the new blender 2.8? its still confusing the shit out of me.
like wheres all those other panels for outliners, armatures
how do you find them again
vivid crater
looks like youre in some kind of full screen mode
at the top try clicking that back to previous button
because thats usually where all the different layouts are supposed to be
desert crown
okay got that, but hm...
@vivid crater okay yeah it sort of works now, but how do i make it so i can open more tabs
like this guy
see how i don't have those on the right side
vivid crater
you can always create new tabs by dragging a corner on something in blender
2.8 lets you drag on any of the corners to make a new tab thing
vivid crater
kinda, 2.79 you could only do that with the top right
desert crown
whew i was getting frustrated cuz everything is new
vivid crater
some stuff is same and some stuff is a lil different so its fine
vivid crater
but ye, you can like, make new layouts and switch between them easier with that top bar thingy
gud luck 🙏
desert crown
thanks i appreciate the help!
desert crown
@vivid crater do you know the shortcut keys to turn the camera angles?
like from before F would make the camera move to infront of your model
and B to backside
nvm found all the shortcut keys
stupid ui misleading me on where to find them
vivid crater
@desert crown it's the numpad
1 is front, 3 side, 7 front
5 is to change between perspective and ortho
desert crown
oh yeah just tried it
 formal wave
Anyone know how to use the Unity engine to create simple models from scratch?
quaint jasper
That would be Blender
formal wave
I know, but I'd rather not pay $10 a month to make an avatar for a Binding of Isaac character, which is pretty simple.
quaint jasper
Blender is free
 stable edge
What a conversation
 potent pond
DIIVES Mouse girl by Me ♥
Nowi need to start doign the retopo and everything else

i wanted jsut to at least present it
 lament pond
quaint jasper
lament pond
quaint jasper
@potent pond That's fantastic !
vivid crater
VRArt is still alive?
desert crown
apparently
lament pond
Yeah I just don't post on here as often
formal wave
Oh okay. I'm trying to make an Isaac avatar for VRChat (Binding of Isaac).
potent pond
VrArt Never dies
I could post the worlds i builded sec 👌🏼

With a Friend we owned a community of dancing and... i wanted to provide kinda a unique event each time so what we did
each 2 weeks i builded a new map themed for the event (Some of them i saved up time finding character models or maybe a texture, but depending on the map was all from scratch or 10/30% a downloeable model), optimized for dancing, each map could be dropped to 6 / 10 drawcalls (normally 55), each map was 3 parts, Entrance, DanceFloor and avatar room 👌🏼.
With a teaser on youtube, also Discord logo change, Art, and a video of the event (Discord logo later was been made by a Amazing Artist called Bodmaniac and later another amazing user helped me with avatars for the events called Landwhale, Also 2 videos later were edited by other 2 awesome people, Orels1 and Alex/Bignesh ♥)
also an nice avatars themed (medium) in case someone didnt brought any skin you know.. the more people the more lag
was lot of work every 2 weeks, i remember from a map going straight 34 hs
Last event we had was around 115/ 121 peeps on 3 instances since managing more than 40 in one was a lag fest.
With live DJs that were super lit ♥
So now i went back to my origin of modeling stuff and cute characters!
Maps were never public, all private. But now since we dont organize parties anymore the KMK Elysium Club is public. (From there you can you use the normal one or click in the entrance the pic of the event you want and go to that map)
But lately i've been having a problem with that, map was approved but everytime i do an update it goes community labs again 👀 shaking
formal wave
Glad to know that Blender's mirror modifier won't let me mirror ANY shape.
formal wave
If anyone could help me, I would love that.
Because other people can magically create two of the same shape when using a mirror modifier but I can't.
formal wave
Nevermind, I figured it out.
potent pond
Now posed ~
vivid crater
aw that would make for a cute figure
formal wave
#2kyoot4me
Meanwhile this character is what I'm trying to use Blender to make an avatar for.
It be Isaac (Binding of Isaac).
potent pond
Indeed @vivid crater i thought about that
and @formal wave Isaac it's a very nice character to work on
i love ISaac
glad steeple
Great work! do you plan to put it in vrchat?
glad steeple
Do you have any content in VRChat already?
potent pond
I do, but jsut maps and few avatars, but i never did the rig for it
i payed someone to rig my oc

ArtStation
My avatar VrChat.
Still lot work must be done so.. this is a super preview of the WIP with some ideas.
(Rig made by Cookieflips)
That's my OC in Vrchat
and the maps i just posted them above
glad steeple
Wow, i assume this is all scratch stuff?
potent pond
90%
glad steeple
Great work regardless!
potent pond
Was my first video game character
so
i was afraid i didnt know the proper workflow
so i used a base of a mmd but then i did a retopology and rebuild like 90% of it
Sso it's almost from scratch
Took me weeks to udnerstand lol
glad steeple
Looks fantastic either way, look forward to seeing more of your content in game 😄 ping me if/when you get that one above in id love to see how it turns out
glad steeple
Looks good
formal wave
I'm on the coloring!
But I do have a problem that I feel other blender users can answer.
coarse kestrel
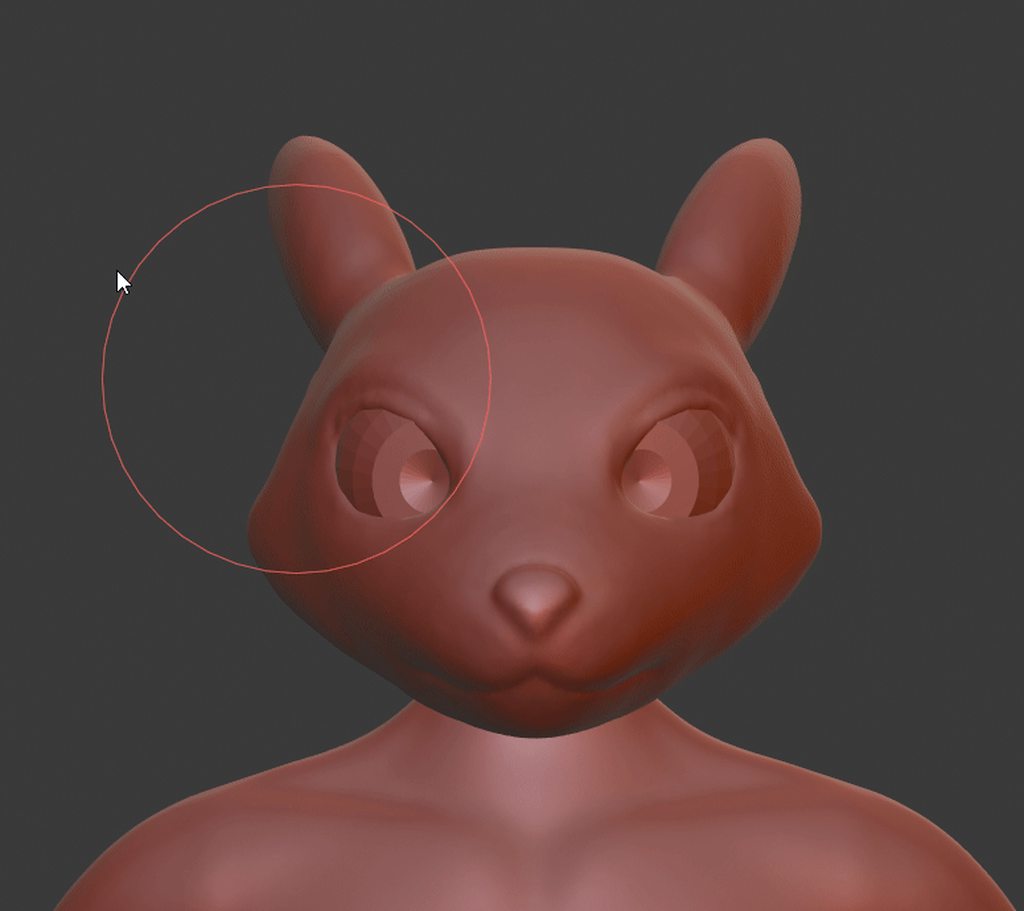 formal wave
Is that my hint? .3.
formal wave
I figured it out all by myself! 😄
 nova monolith
hi, can anyone out there make (what should be) a super simple sword model for me?
it should only be like 3 shapes put together and shouldnt take long at all to do
nova monolith
if you're interested pm me because i guarantee this will get lost as more people post
 old field
 quaint jasper
If it's that simple then downloading Blender and doing it yourself would be much more rewarding
nova monolith
i also have to scale it
and i have no idea how to use blender and dont wanna break anything
quaint jasper
can't break anything if you don't make anything
coarse kestrel
teach a man to fish and he'll eat for the rest of his life.
learning blender is easier and a lot cheaper than getting other people to do it for you
nova monolith
yeah but im lazy and literally only want this https://vignette.wikia.nocookie.net/hollowknight/images/0/0e/Nail_2_Sharpened_Nail.png/revision/latest/scale-to-width-down/36?cb=20170717212321
 formal wave
Is that a Hollow Knight nail? ._.
nova monolith
yes
nova monolith
yes
the guy who made it made it custom so it could have fingers and be 1:1 to regular sizes but he made it smaller for me
 slender laurel
a nail like this? http://prntscr.com/p082a9
 nova monolith
ye
my model is scaled down to 0.06 size so if you can make it match that it'd be awesome
slender laurel
you know you can scale down objects
nova monolith
but i dont know if that will match properly
slender laurel
Then place your avatar in your blender and check if it matches ¯_(ツ)_/¯
nova monolith
i suck at navigating blender let alone using it
slender laurel
same I had 0 knowledge last week lmao
nova monolith
i mean what i could probably do is just take that and mess with the scaling in unity until it looks right
slender laurel
2.8 is much more beginner friendly, if there's any time to begin using blender it would be now
slender laurel
I would but i'm "too lazy" to send it ¯_(ツ)_/¯
nova monolith
how difficult was it to make
nova monolith
i will give you a dollar
slender laurel
lol dude, I'm just messing with you
it's just like the others said, if it's simple you should make them
give it some thought and try it out
nova monolith
i can do the making stuff some other time, i just needed the model so i could work on the animation
with work and classes coming up i dont have a lot of time to learn blender
slender laurel
I'm sending it, dw
Just give me some time, as I said it's not as simple
the shape isn't everything
nova monolith
ye, just pm me whenever ur ready. discord hates bigger files so i'd use dropbox
formal wave
So I'm having a problem with making my avatar's eyes blink with shape keys.
Regardless if any of the values are from 0 to 1, the eyes won't move at all and stay how they're currently scaled.
Any way to fix this?
slender laurel
Are you following the correct steps to do it?
Make sure you're in edit mode and have the shapekey selected when scaling
Switch to Object mode when testing the shapekey
formal wave
But I can't select the whole shape when I'm in edit mode.
If I try to do scaling when I'm in edit mode, I only select one of the vertices that make up the eye.
vivid crater
you only have one shapekey in that screenshot
the top shapekey should always be "Basis"
hit the plus (+) to the right to add more
slender laurel
he does have a basis, else it wouldn't say "relative to basis"
slender laurel
It can't be relative to basis if basis isn't there lol. If a shapekey is the only shapekey, it has no "relative to"
it's just scrolled down
vivid crater
there is no scroll bar
if theres only 2 shapekeys you wouldnt be able to scroll at that size
slender laurel
Chlory try pressing L with your mouse hovering over the eye
vivid crater
you do you tho 👌

 formal wave
So I have both whole eye shape selected and blink is with basis (I hid the head shape).
So now what do I do?
formal wave
Does it matter what value blink is right now?
slender laurel
don't think so
formal wave
Oh my god, thank you so much for help...
Now to hopefully get started on skeletal rigging, probably get stuck on that, and have to ask for help AGAIN. XD
slender laurel
you're welcome
Plenty of help on the internet, google and youtube help a lot. Ask here if you're stuck
formal wave
I will.
slender laurel
Good luck 👍
nova monolith
hi, i legitimately tried to do this myself but apparently i suck dick, so i just need this made: https://vignette.wikia.nocookie.net/hollowknight/images/0/0e/Nail_2_Sharpened_Nail.png/revision/latest/scale-to-width-down/36?cb=20170717212321 in blender. supposedly it shouldnt be hard, but blender absolutely hates me and refuses to cooperate
if you're nice enough to do this for me, please pm me so i dont lose you in posts ahead
nova monolith
bless
 warm jetty


 small cloud
no
 willow skiff
Oh
formal wave
So about my avatar, I'm about to start weight painting it, but the avatar's parts (head, arms, etc) are not one shape.
Do these parts actually have to come together as one in order to start weight painting?
willow skiff
nice
 wild kite
hey does anyone know how to get .xsi files into blender?
fringe rock
Some script
wild kite
how
glad steeple
@formal wave Yes, youll need to hit A, to select all. Then hit CTRL + J to merge
 fresh dragon
it would probably help attaching the meshes together for a smother connection and better look on the model rather then having it as a bunch of shapes placed together @formal wave
formal wave
I really need help with coloring this...
I try to paint a single vertex on the head and the color change appears on the black square instead...
hallow bough
You need those shapes unwrapped properly by marking seams. Did you unwrap automatically?
formal wave
I have no idea how to do that...