#avatar-rigging
1 messages · Page 138 of 1
 fading verge
 opal aurora
Since it's a source model, you probably have VTF files
opal aurora
Those need to be converted into a standard image format with VTFEdit
fading verge
to make textures actually png's
 loud fjord
I have the textures in png and tga
opal aurora
Oh then just apply them normally
 median thunder
https://gyazo.com/7b32b4dc5cbd957e5abf435b20e4a3f7 sorry for delay
 fading verge
That's weird
median thunder
ikr
fading verge
when you press play in Unity does it do that @median thunder
fading verge
have you asked other people if they can see that as well?
fading verge
ok so it's not a local problem
median thunder
when she sit on a chair it stop tho
opal aurora
Apparently somebody had the same issue and the cause was an animation...
loud fjord
Where do I put the textures?
opal aurora
This is what they said caused the issue "its the snail marker animation that mess up my hair"
median thunder
hmm i'll see
opal aurora
I mean, if it's on the material then it's properly applied
 dark pollen
Anyone know good dynamic bone settings for long sleeves, that includes gravity/force?
 brisk rampart
You gotta try and see for yourself. A tutorial video said 0.5 damping 0.1 elasticity and 0.9 inert is the reccommended setting for things like clothing and skirts
dark pollen
Now I'm having this really weird issue with gravity https://gyazo.com/94231f8163fdd8ad326f477113156103

I've checked and it's not a weightpainting issue
 gritty nest
Is this on cloth or dynamic bone? @dark pollen
dark pollen
Dynamic
gritty nest
Use "Force" and not "Gravity".
Force behaves as you would expect it to, gravity is weird.
dark pollen
What force settings do you suggest?
gritty nest
Very small negative Y force
Start with -0.02 and go up or down from there
You can edit the value in play mode too
If force makes it "stretch", apply a stiffness curve so the first bone in each chain doesn't move and only rotates.
dark pollen
I'll give it a shot
 stark musk
How can I tell if everything is weight painted correctly?
 wind osprey
Test it. Put the armature into pose mode amd bend it around.
 glossy brook
hey can anyone help me out? I rigged my model, but the mesh isnt moving with the armature
and im really not sure what I'm messing up haha
okay so apparently the parent bone is attached to the mesh, but everything else moves independently
fading verge
@glossy brook Simplest question to be asking first is; is the mesh weight painted to the armature?
Setting up a rig is all kewl and dandy, but it doesn't know what to do with the mesh that its been attached to, which is where you have to weight paint the bones in order to tell it what to do!
glossy brook
I'm not sure i understand
@fading verge I got into the weight painting menu and the model is all red, not really sure where to go? I made the weighting automatic when i parented it with the armature
fading verge
Have you checked each individual bone?

Quick intro and guide to skinning/weight painting. this video is meant for those with a basic understanding of Blender
COnsider watching this tutorial on weight painting, it explains it far better than I could here
 floral shell
How to make so the breast physics on the shirt don't clip through the actual breast? I tried weight painted under the shirt too but it doesn"t really fix it
like, when moving the shirt mesh goes through her breast...
@fading verge if you have time, any idea?
fading verge
delete the breast vertices, would be the simplest solution
floral shell
I think there's another way... I have this avatar that doesn't have the vertices deleted but everything is moving together, I don't get where's the difference tho
 tawny mural
Hello ! I Have a request to make since I'm basically a noob with Unity and everytime something unexpected happens I'm just lost
So basically I have the model I need to rig but random bones appears when I try to rig it and I'm just struggling to get things straight u.u'
 unique tartan
So i'm doing the weight painting however whenever i select or go to select a different Armature to paint, i will instead select the entire model.
Is there any settings i may have that may cause this? Or have i not properly set up the weight paint?
 crisp tendon
Your rig is in pose mode or edit mode ?
 high nova
You need to separate the materials
Else you're just editing the whole model
space bar > separate by materials
stark musk
Bone Heat Weighting Failed: Failed to find solution for one or more bones.
Keep getting this error when trying to weight paint single bones that I just added in.
high nova
@stark musk try remove any modifiers on the mesh
try remove any doubles (w)
Hmm did you leave mirror mode on?
 brisk terrace
Hello , im pretty new to avatr creation and i ran into a weird issue where the Visemes move parts of my wrist when i adjust them , anyone can help me with that ?
gritty nest
Go back to Blender, select the wrists in edit mode and do "shape propagate" in the spacebar menu
gritty nest
Press spacebar and find out
brisk terrace
i dont have shape propagate in that menu
could it be named something else ?
oh wait ... by select the wrist, did you mean the bone "wrist" or the vertices affected by my issue
gritty nest
The vertices
Select the wrist vertices that are incorrectly moving, and do "shape propagate" in the spacebar menu.
That should fix it
That will make those vertices unaffected by the shape keys though
brisk terrace
is there an easy way to see witch one are the ones affected
gritty nest
Yes. In edit mode, if you select a shape key, you will view the model as it would be in those shape keys
So it'll stick out like a sore thumb when you select the lipsync shape keys
brisk terrace
would you mind coming into a screen share call with me , im very unfamiliar with blender so i dont really know how to find all those
gritty nest
I don't really do that, sorry. The shape keys menu can be found in the right sidebar under the Data tab
With the mesh selected (your Body most likely), go into edit mode with tab and select the wrists with B or C
Then in the spacebar menu, type shape propagate
brisk terrace
Allright , seems to work , Thank you so much !
brisk terrace
well it appeared to have fixed it in blender but the issue is still there in unity
@gritty nest do you know why it would remain in untiy and not blender ?
gritty nest
Maybe you exported the model but forgot to actually put the exported result in your Unity assets
brisk terrace
i think i have the right model unfortunatly
did i miss a step before exporting all out of blender ?
brisk terrace
It'sonly occuring in unity now ...
 naive tree
then you didn't propagate, enter edit mode , select the area with C or B, hit W > shape propagate http://prntscr.com/n5kk9f

export, import, can ever overwrite the fbx
 gentle totem
Question, anyone have any idea how I should go about rigging this?
like at all?
😰
Maybe just give it a default skeleton with no weight painting?
Er... other than like the feet spine and head
Is there a tutorial to create a skeleton?
 shut yarrow
I’m having a lot of issues with weight painting on a model, if anybody can fix it for me, I’ll give them $35 USD dm me if u are interested
unique tartan
I have correctly done these steps, 1 ensured the heiarchy was set to Unity standards, 2. Named eacharmature appropiately, 3 seperated materials, 4 used pose mode for a Armature then edited it's weight paint on the model. WHen i try to test if the weight paint has worked however, i rotate the armature and the model refuses to move with it, did i forgot to parent the model to the armature? Or do i need to do something entirely different?
 misty mesa
Would someone be willing to fix my weird messed up Krieg hands? Blender and I don't get along
 crystal vector
@unique tartan Make sure that the mesh has the armature modifier with the correct armature selected. Or press join meshes in cats, that fixes it as well
@gentle totem Well just give it a standard vrchat rig and then weight paint maybe 2-3 bones if you want it to move
 ashen river
so mixamo.com doesn't like the new model I was working on apperently, anyone have advice for what I should do to manually do it then?
high nova
@ashen river Rig it yourself :P
 worthy tendon
so found this avatar without any fingers and no fingers is gonna be a problem, not being able to crouch n stuff. any sugestions? like should I just rig the fingers in there or is there some other way?
naive tree
extrude 3 bones from wrist and assign them for thumb index and middle proximals
dont need to weightpaint
worthy tendon
ah thank you : )
high nova
Easy way is to just copy hand and forearm from a model and copy it onto where the hands should be
 valid dune
You could make dummy bones that arent weighted in blender and do that if you dont know how to weight paint
 hollow pebble
could someone help me rig my motel
 sleek isle
Your motel move in what way?
fading verge
How do I merge 2 armatures
I'm trying to use cats for it
but it's removing my shoulder bones
crisp tendon
Have you tried removing the shoulders on one of the two armature before the merge ?
crystal vector
@fading verge Then they probably don't have any weight on them or are not named Left/Right shoulder
 stray zenith
Any good tips for fixing Knee rotation?
crystal vector
@stray zenith Bend the knees in
Blender slightly
stray zenith
Ahh okay, I notice they tend to bend to the inside and when in full body they go just a bit further.
fading verge
does anyone know how to fix blenders Bone Heat Weighting?
crisp tendon
Remove doubles
fading verge
I've tried that
crisp tendon
What else have you tried ?
 compact laurel
Does anybody have some time to explain to me why my model is bending? And how to fix the bone properly in blender?
gritty nest
Just forcibly bend it into the right place
 violet orbit
hey.
 finite ice
so im having one of the wierdest problems rn. Basically, whenever full body is off the character works perfectly normal. But once full body is turned on, the character's legs and arms twist 180 degrees. The only warnings I get in Unity are the one telling me that my sound might get adjusted(for animation) and that my pelvis is a few degrees off from 180. Any clue what's going on?
specifically, it's telling me that my pelvis should be 180 degrees from my thigh bones, but mine is 170 degrees. I don't necessarily see how a 10 degree difference would twist my limbs entirely, but it might be important to know
naive tree
@finite ice http://prntscr.com/n6muvx

make sure your legs aren't straight
bend the knee and remake full body fix
finite ice
in blender or unity?
sorry it took so long to respond i was playing robo recall lol
nvm got it, now I just gotta deal with a problem that existed before too: my view keeps being higher than normal and whenever I calibrate(put the white circles in the right place), my character ends up crouching. None of the other avatars do this, and Unity says that my eyes are in the right place
 celest bridge
question, is there any way to mirror a pose down the X axis? im messing with hands, and it'd be nice to just mirror one hand's pose to the other side before applying as rest pose, but the typical blender ways of doing it dont seem to work due to naming convention differences
unique tartan
My model is not MMD it is SFM. @crystal vector
crystal vector
Lol but it's called Cats Blender Plugin
crystal vector
Cats can import sfm models via the source blender tools
if you have a .smd, qc, .vta or .dmx file, you can import it
unique tartan
Alright so i ran through my files and fdor some reason CATS (Though i downloaded it and placed it there) was not in the tools file location. That would explain why it was being difficult. Im glad you told me that or I would've never double checked
finite ice
anyone know how to fix my character half crouching and my view being above where I set it in Unity?
This only really happens with full-body, when it’s turned off the character works fine
wind osprey
@finite ice The hip tracker gets shoved to the root of the next bone in the chain in FBT for some reason. The instant but nasty fix is squat the exact amount your avatar squats when calibrating. The slightly better one is shrink the hip bone quite a lot and pull it down to where the tracker is on you.
 fleet echo


🎙Sneak Peek Behind The Scenes! Masterpiece Motion is the fastest way to Rig any 3D Model
Coming Soon
Video: Martin Nebelong
#masterpiecemotion #vr #gamechanger #animation #rigging https://t.co/9Ay909EhVh
 Twitter
coming soon be able rigged in vr
 meager turtle
Just wondering, I'm working on rigging my character, and I've got spherical eyes for the character. Do they need to be separate objects like the example model VRChat distributes, or do they need to be parented/joined to the character model?
fleet echo
@meager turtle they can be one mesh
meager turtle
Ah ok
fleet echo
but rigged eye make easier have separate first and weight to the bone
then merge mesh
meager turtle
Right, I've tried to do that but I'm having trouble doing so... x-x
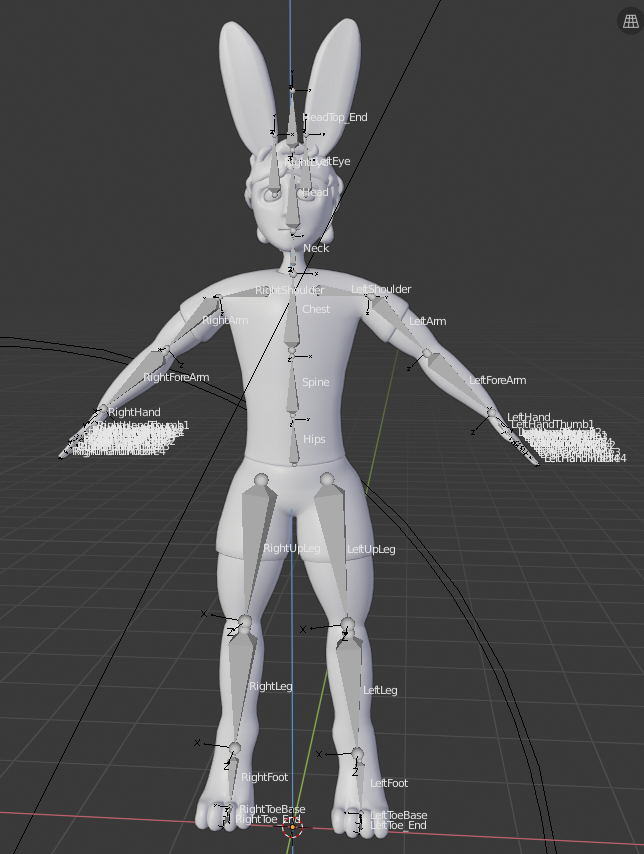
I've brought the VRChat example rig and character and used it's rig here, moving it around to fit my character properly https://i.imgur.com/6V9ixCn.png
 meager turtle
Gotcha
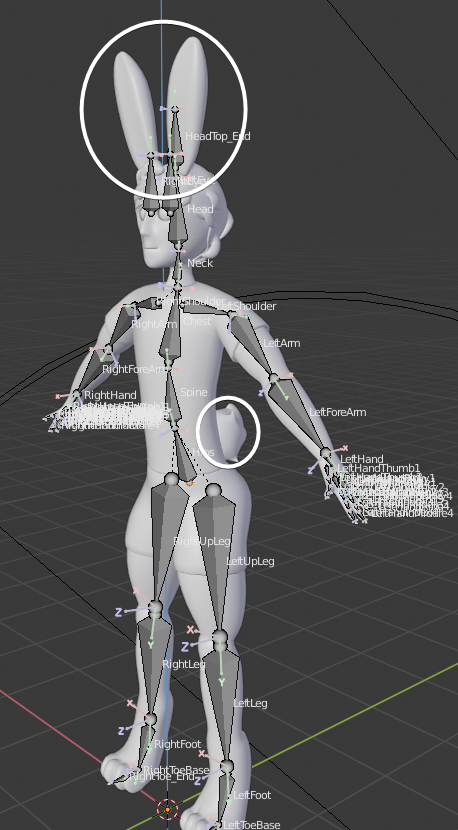
Is there way to assign bones to the ears and tail so they flop or move around when I move? Or is that done in Unity when importing the model? https://i.imgur.com/0hvFcT6.png
 gentle totem
ah there's an auto generated sil viseme from cats
fleet echo
yea
meager turtle
The paid addon you mean, @fleet echo ?
fleet echo
@meager turtle yea
meager turtle
Question: for modeling out the visemes, should it be vrc.v_ee or vrc.v_e ?
 pulsar rain
so i have a amature for the chest area and half of the neck and the atmature with the head and they both use different shape keys and the neck changes with each different one so how should i fix this?
fading verge
@meager turtle e
meager turtle
gotcha, thanks
 arctic lichen
@finite ice Make sure you are in the correct view mode eg seated or standing play
and ensure your feet arent in the ground
if they are then adjust your foot bone so its level with the ground below it
had an issue similar to this last night
@pulsar rain CATS plugin for blender
fix model
meager turtle
Can someone help me out with this now? I've imported my model and told it to create an avatar definition from the model, but for some reason it's got this.. https://i.imgur.com/C0Q0VkP.png
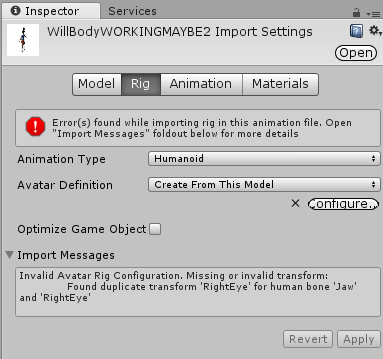
Yet, I don't even have a "Jaw" bone on my model... the heck?
fading verge
hit configure and fix the problems in the head rigging
fading verge
yep!
meager turtle
Ok so now I've got two more problems
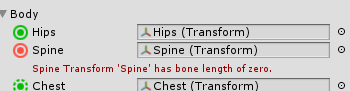
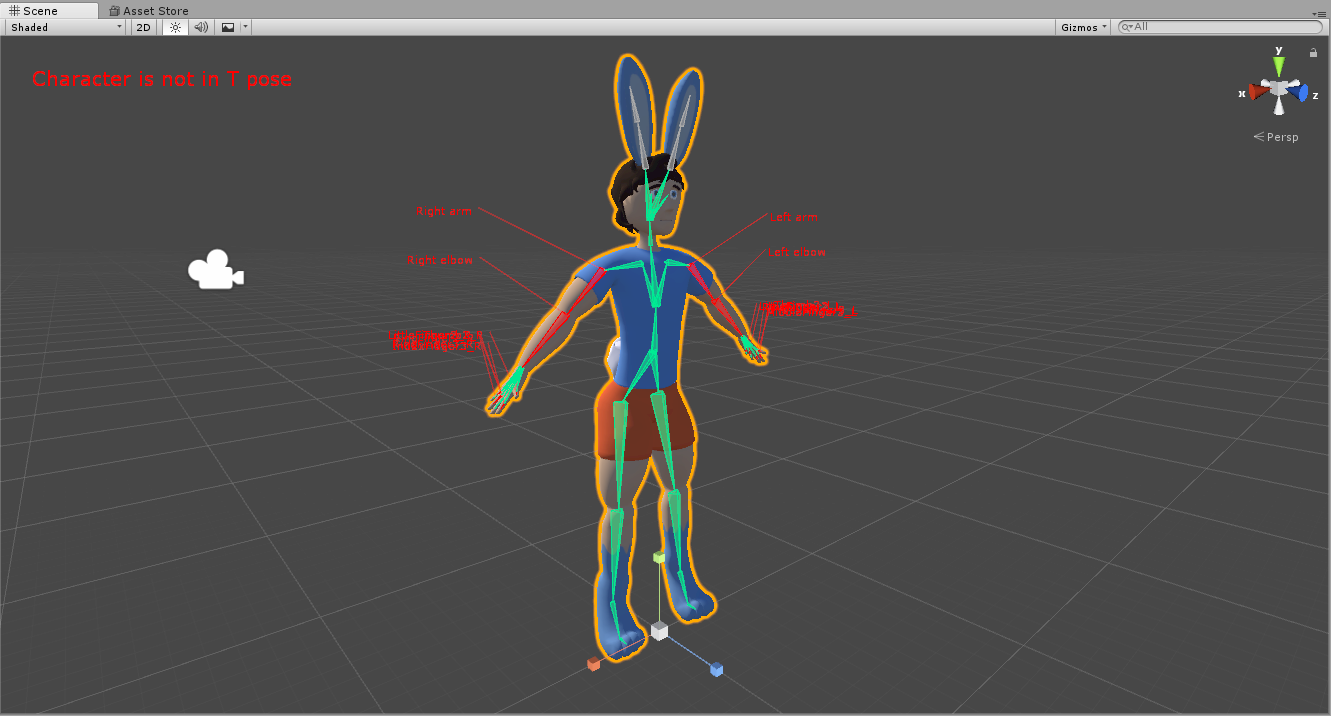
"Spine transform 'Spine' has bone length of zero." https://i.imgur.com/JPGlLxW.png
And secondly, https://i.imgur.com/cs9AspG.png
 gritty nest
The first thing is not a problem
For the second problem, do Pose->Enforce T-pose at the bottom
Which Unity version are you using, anyway?
meager turtle
Ahh, there we go, thank you! https://i.imgur.com/2KxDQKs.png

I'm using the one recommended by VRChat, 2017.4.15f1
gritty nest
The legs still look a little too wide
Could manually change that or only tweak it later if it actually becomes a problem ingame
meager turtle
I think it'll be okay, I kinda want him to have a wide stance https://i.imgur.com/SsFuXNB.png

Ok well there's that, thank you!
meager turtle
I DID IT!!! https://cdn.discordapp.com/attachments/306803524216422401/563098587190525952/20190403153100_1.jpg https://cdn.discordapp.com/attachments/306803524216422401/563098621168320522/20190403153107_1.jpg https://cdn.discordapp.com/attachments/306803524216422401/563098638369292328/20190403153114_1.jpg https://cdn.discordapp.com/attachments/306803524216422401/563098673362239509/20190403153123_1.jpg


The thumbs still look a bit iffy but you know what? I'm proud of it
 heavy needle
That's awesome man, good job!
 merry brook
So my model has no feet in blender, (mesh wise) but has bones there.
i put it into unity and attatch shoes to the ankles in unity, i then configure the model as a hunamoid and enforce tpose and stuff.
but the rig is just broken cause it says there are no feed and it is A pose when its in game, even with an animator overide controler and everything.
any solution?
guessing id put the shoes on in blender but it says they dont have a mesh for some reason in blender but unity it obv does
 grave mantle
Did you try manually mapping the feet in the rig menu?
merry brook
In unity?
if so i tried that and it wouldnt count the shoes i added as bones so it wouldnt.


Nothing there for foot eventho in blender on export the model has feet bones

see? feet bones but in unity it dosnt see that
 timid horizon
@merry brook You have to set them yourself
gritty nest
@merry brook you need to manually assign them then
merry brook
I dont see the names of the bones in unity.
Is there a way i can select them in blender to find the names of the bones?
gritty nest
Yeah, go into edit mode with tab and right-click on the foot bone
It should be left/right ankle by the Cats naming
timid horizon
Feet are generally name ankles
timid horizon
Are they parented right?
merry brook
in armature yes

 lyric mountain
Okay, so I've been messing around with an avatar for the past few days, and I've gotten everything working the way I want it to, except for one: There are no breast-bones to add dynamic bones to. How does one go about adding those in blender?
fading verge
How to prevent this?
opal aurora
@fading verge blend the weights between the two bones, if it's all red then the other bone doesn't control it (or atleast properly if it goes over 100% weight between them)
 turbid sapphire
"Transform "chest" not found in HumanDescription" I don't know what that means but everything so far that I know is that there is a chest, it's named chest, and it's in the chest section. Here's a picture. Any help?
 pseudo sedge
@turbid sapphire click on Pose>Enforce T-Pose on the right side of window under mapping section
turbid sapphire
Thank you so much.
opal aurora
Revised eyetracking compatible bone hierarchy layout
//CodeBlockType is fix
Armature Naming Scheme Layout
|>Parent
|-----Child
&
Parent
    Child
=
|>Hips
|    Spine
|        |>Chest
|        |    Neck
|        |        |>Head
|        |        |-----RightEye
|        |        |-----LeftEye
|        |
|        |-----Right shoulder
|        |        Right arm
|        |            Right elbow
|        |                Right wrist
|        |
|        |-----Left shoulder
|                Left arm
|                    Left elbow
|                        Left wrist
|
|-----Right leg
|        Right knee
|            Right ankle
|                Right toe
|
|-----Left leg
        Left knee
            Left ankle
                Left toe
if im making a piece of clothing that does not have as many polys as a body, when weight painting it might clip through so to fix this would you normally just delete the body under the shirt or is there another way?
 charred sentinel
ya you can transfer the weight from the body to the cloth overtop and it should follow the same weighting
if you do it this way you can keep your model complete so for future changes add new stuff or change the clothing
high nova
@fading verge you can hide (split) the mesh underneath the clothes to further reduce clipping
 barren olive
trying to make it move when i walk
sleek isle
select the band and the band bone.P separate it. Then auto Wight paint it with the armature .select the mesh and after the rig
rejoint it
fading verge
how do i transfer the weight from the body to the cloth overtop so they follow the same weighting?
nvm
 untold star
how do i put a delay on a particle effect in the animation tab for example i would like my particle effect to start 24 seconds into my song
fading verge
@untold star Think of the timeline for animations as sequences. Everytime you put something in the timeline at a certain frame is a specific time which that event will happen. So if you want something to happen at 24 seconds, then you will put the keyframe for it at the 24 second mark of the animation.
In this case, you can do what @sleek isle suggested and enable the particle through an empty game object, OR enable the particle system itself at 24 seconds
untold star
i have it like this now but whenever it gets to the 24 sec mark nothing happens
high nova
@untold star set it to 1 second and see if it even works
idk how you've set it up but have the gameobject deactivated
With the particles in that activated
Then the keyframe activates the gameobject with the particles
untold star
fading verge
Hm, weird
If you want to do a different method you can instead just have it turn on at the start of the animation
BUT
Put a 24 second delay into the particle system component, that'd be a much easier method of doing it I guess
in the first section of the particle system you'll see a "Start Delay"
Just set it to 24
lyric mountain
Well, this is getting frustrating
I thought I'd painted the breasts, but apparently not
lyric mountain
Okay, so, I've extruded the bones. I've placed them where I want them. The only thing that seems to be available to paint is the body, which apparently maps to mmd_vertex_order, which I did last time. That didn't work. There's also something else that highlights the whole body, called mmd_edge_scale, which I could paint - is that likely to be any better? I'm having a real tough time doing this thing. >_<;
lyric mountain
I guess? I'm kind of running at this blind.
I guess? I'm kind of running at this blind.
I'm about to go to sleep, but tomorrow I can screenshot what I've got to work with
I've spent an embarrassing amount of time trying to get this to work, and I just want it finished already
high nova
Join your meshes with cats tool
go weight paint mode, then weight paint the body

I haven't found a video with this particular method so I made my own. Also I'm calling it the Syncopated Booty Shake. Timestamps 0:00 Intro 1:04 Removing obs...
lyric mountain
I thought for sure they were already joined, but I'll find it a shot
high nova
Follow this tutorial to add weight painting to the area
lyric mountain
And yeah, I've watched that video about five times
high nova
So what was the issue?
lyric mountain
Despite painting the model, with appropriate bones highlighted, there is no effect from adding dynamic bones with either appropriate or exaggerated settings
I dont know why, I dont know what I'm doing wrong, and if I did, I would fix it. Lol
high nova
To test if the weights applied in blender
Click pose mode
Then rotate the bones to see if it works
lyric mountain
I'll keep that in mind. But it's almost 2am. I'm gonna get some sleep.
Thanks tho
high nova

opal aurora
mmd_vertex_order and mmd_edgescale are MMD specific and can be removed without issues (if i recall correctly), if your issue is regarding dynamic bones not being applied, then you either forgot to set the root for the script or you're trying to apply it onto a single bone, which dynamic bones can't work with unless an endlength is defined, remember to remove weights from other bones that shouldn't be affecting an area, or use auto normalize as you weightpaint to avoid situations in which the mesh acts erratically
opal aurora
I didn't tag anyone .-.
fading verge
https://cdn.discordapp.com/attachments/402349592244649996/564132556962791442/unknown.png should this spine bone be altering the vertices near the hips this much? it looks like a little to much to me but im not quite sure. should i fix the weight paint over the pants to fit over the body or should i just reduce the weight paint around the hips for this bone altogether?

 civic solstice
i'd say no
you should soften the weights for that bone on the hips
best thing you can do is lean over and understand how your skin bends in
or lack thereof
 solemn junco
Out of curiosity, when you guys are doing from-scratch models, do you weight paint manually or use automatic weights?
gritty nest
Automatic weights
You can always fix it up later after that
Auto weights just helps get the basics
solemn junco
Ok, thanks!
One other thing, is there any way to mirror weights from one side to the other?
solemn junco
oh, dang, really? I didn't know that worked. Thank you!
 amber thunder
Anyone here know any tutorials or can help regarding IK Rigging a weapon on a model?
sleek isle
in blender make sure its in A pose ot T
aply as rest pose in the cats tab
So in that case. go in pose mode and select bow elbow bones and align them so its a strait line with the rest of the arm
like that should work https://gyazo.com/6ba0dbd8a355c00cd5e4d3009795b352
but your rig kind of look weird too
idk
 sudden sundial
Last thing, I cant seem to get these bones to connect, and I have no idea how. If anyone has any videos they can share about the topic it would help a lot!
Last part of the avatar too!
fading verge
@sleek isle there were no finger bones so I added them and am now painting them myself
sleek isle
do automatic weightpaint. If you place the bone in the correct place it should be good to go
gritty nest
There was a technique for weight painting using either 2 or 3 loops but I forgot
Something like 3 loops, the first one weighted 100% to bone 1, the second one 50/50, and the third one weighted 100% to the next bone in the chain
sleek isle
if you have low poly do that i guess. have fun
sudden sundial
wow i feel dumb, thanks. I thought I could only join meshes like that
gritty nest
Well even high poly meshes will have loops like those I think
sleek isle
automatic painting work good
sudden sundial
are you rigging every bone?
sudden sundial
Is it a human-like model?
sleek isle
you dont really need to be red if no other bone affect that area
you mostly only need 3 loops in general yeah

 tough oriole
How do I make the edited model in Pose Mode the new standard? It keeps resetting when I switch to edit mode.

It's the same in Pose and Object mode
but Edit mode brings it back to its original state
I'm trying to do shape keys and it's adding the difference in location as a translation
making his head slide off his body and into the distance
@here
opal aurora
Eh, if that worked you would've pinged everyone currently online, but that aside, press space and type rest pose, find the one that says something like, apply pose as rest pose
opal aurora
Oh right, i forgot it's a weird setup... do you perhaps have CATS installed on blender?
Also, ctrl+z that
fading verge
Ok I think I got my fingers OK
won't know until I see animations on them
But now I have a diff problem
tough oriole
oof
opal aurora
Do you know where the modifiers tab is wimdy?
tough oriole
ye
opal aurora
Go there, duplicate the armature, apply pose as rest pose and remove the original armature
I think that's the setup
Armature modifier that is
It's confusing so i can't recall for sure, if it screws up ctrl+z it again
fading verge
Found my problem knew what the problem was a diff bone was selected at some point when I was painting my fingers
opal aurora
Yeah really can't recall how to set it up atm, i'd recommend getting CATS and applying the pose from there, it's a tool developed to ease avatar creation overall
tough oriole
Applying pose to rest?
opal aurora
Also got a pinned message on this channel that should work to pose any model
Ah wait a second
You need to apply the original modifier not remove it
That's where i was confused on then
But you'd need to not have shapekeys to apply it, or applying it as a shapekey with varying results...
opal aurora
So CATS is probably still your best bet since i haven't figured out the manual setup for it yet
Nice braixen
opal aurora
First one, do not hit fix model
tough oriole
Start Pose mode???
opal aurora
Don't touch that either
It resets the pose when you do
Go into pose mode first and new things will show up
opal aurora
Applying the pose there should get it set
fading verge
@opal aurora Yea been working on it for a few days I'm super proud of it
opal aurora
But not so much on those with them
fading verge
I cut out the 2d eyes and added some 3d ones
And then I didn't feel like making visemese for the 3d mouth as it would be to painful for me
so I added the mask and made some muffled movement for it instead
Also shrunk the ear fluff was too big for my tastes
Next will be making earbones and painting those for ear physics
opal aurora
So far i've rigged a glaceon and a mega lopunny, wondering what i could rig next actually
fading verge
Oh yea and I rigged the tail as well
opal aurora
I think i rigged a lucario for someone ages ago actually...
Got any ideas on what i could sorta rig? :o
Oh i actually found an old pic of it
tough oriole
is there a way to combine duplicate armatures and meshes?
I've got a samus model on the backburner that i'm trying to make have both arms
remove the gun arm
I've got 2 versions of the mesh, one is mirrored
now I just need to combine them to make one, dual armed samus
opal aurora
You can rename the bones to match that of the base and simply merge the meshes to said base, the mesh will follow the new bones due to the same naming scheme
tough oriole
will that not mess up the mesh weighting?
opal aurora
The weights will be the same as they previously were, but using different bones
Vertex groups rename themselves to match the bones' new name
Unless you rename vertex groups manually yourself that is
But weight data is unchanged
Needless to say, making backups is a good idea
tough oriole
gotcha
 distant raptor
Anyway to parent the hair to the head in blender? (default is the hair bones name)
 leaden ruin
cute
 robust crescent
edit mode, select hair bone , select head > ctrl+p , keep offset should do it
 fiery cosmos
any idea as to why the legs bend inwards at almost a 45 degree angle? theres nothing in blender or unity indicating this would happen
 solid adder
@fiery cosmos rotate bone rolls in Blender? Select armature, go to edit mode, press alt+R.
fiery cosmos
ive tried rolling bones before, unfortunatly gives no difference
 forest igloo
@fiery cosmos Can you take a picture of the bones in a side on view?
leg/hips/etc bones
fiery cosmos
blender or unity?
forest igloo
Blender preferably.
fiery cosmos
like so?
forest igloo
More side on, I think you can hit numpad 1 and then numpad + some other number
You also might want to hit numpad + 5 too
opal aurora
Leg bones are probably too straight if it's not a rolls issue
 orchid aurora
Hello all, I can not for the life of me seem to get Eye Tracking and Blinking to work! I Work in 3d studio max, I created shape keys (morphs) for blinking etc. I also created the visemes (those work fine) I also created and weighted the eyes to Eye_L, Eye_R, LeftEye, and RightEye (50% for each) Any help would be hugely helpful!
orchid aurora
@foggy bough that looks like it's a waiting issue, you may have to look in whatever modeling program you're using, whether it's blender, or 3D Studio Max, and edit the weight painting for that shoulder, I bet you it's waited to the wrong spot
 lofty topaz
is there any quick way of fixing this instead of going bone by bone? The automatic assign isn't covering some of the vertices
naive tree
1 by 1
lofty topaz
please kill me
gritty nest
It seems auto weights is also taking the hips into account
Even if unselected
You could use auto weights on another armature that has only the hand part of the armature. @lofty topaz
orchid aurora
Anyone know how to correct the avatar so that their shoes are not in the floor? dO I need to lower the toe location? Or do I need to raise the hips in Unity?
 foggy bough
raise the hip level in unity @orchid aurora click on the asset, rig, then configure
orchid aurora
Ok thank you, I think I am going to lower the foot bones also in 3ds max
fading verge
@foggy bough Any emissions specified in a material in blender gets copied into the settings for a material in unity. This is honestly quite useful to use due to the fact that it saves a lot of setting up with materials again (if we made our own in unity.)
This also means that its easy to reverse a setting setup by blender. Simply by going into the material under the body of your avatar, you should find that your will have an emission tab. Simply just turn it off using one of the methods below
- Turning the color setting to Black
- Turning the Emission strength to 0
- Unchecking the emission button if there is one present
Also, should probably move this to #avatars-2-general
 reef hound
Is there a way to attach two separate sets of heads AND shapekeys/visemes together on the same model, so they work at the same time?
robust crescent
Guess you could set both shapekeys to 100 on both heads ( when merged ) then create a new shape from mix, rename back to one you want delete the old ones
 pure valley
Hi, I'm coming back to vrchat, and intend to use a 3d model I've found. Is blender capable of rigging a four-legged model?
wind osprey
Blender can rig just about anything, it's more of a case of unity & vrchat accepting the rig. It's gonna be a bit more work than just a regular humanoid. I've never done a non-humanoid rig for vrchat so I couldn't help you at that stage, but in blender I'd just rig it as you'd expect to. Root in the box part, bone joints where the actual pivot points are, etc.
 paper osprey
You could always find a 4 leged avatar and look at the rig. and see. of course making a rig hardest part is gonna be weights imo
wind osprey
For mechanical things weighting is much much easier since you don't have the smooth blends to manage. 99% of it is either one weight or another.
paper osprey
Thats true. im used to humanoid weights which makes me want to just throw everything out the window at times lmao
Though Maya and mud box atleast makes it easier for me then blender. friends tell me blender is easier but i just cant adapt to blender
crystal vector
@orchid aurora
VRChat won’t enable eye tracking at all unless three requirements are met:
1- The bone hierarchy Hips->Spine->Chest->Neck->Head->{LeftEye,RightEye} must exist! Those bones are also the ones you use in the mapping.
Exact names are required, there can be no in-between bones.
The bones don’t need any vertices skinned to them. They can be “empty”.
The Head bone and both Eye bones have to point straight up.
2- The blend shapes vrc.blink_left, vrc.blink_right, vrc.lowerlid_left, vrc.lowerlid_right must exist as the first four blend shapes in Unity. (index 0 through 3).
Exact order is required, names are actually unimportant though.
They can be the same as the basis shape. They can be “empty”, but blender won’t export empty blendshapes.
3- The mesh containing the blinking blend shapes must be named “Body” and the armature must be named "Armature"
orchid aurora
@crystal vector This is EXTREMELY helpful info I could not find anywhere else. Thank you so VERY much!!! 
crystal vector
No problem 😄
orchid aurora
When you say the eye bones and Head bones need to point strait up, which local axis do you mean hun?
orchid aurora
Ok thank you, I believe Z is up for me in 3D studio max as well
orchid aurora
@crystal vector That was it! Thank you very much, that was extremely helpful!
 frail junco
Does anyone know how to fix the issue when you try to parent with automatic weights and it says it can't find a solution?
or does that mean i need to go ahead and do manual weight painting?
 worldly willow
it indeed means you have to manually weightpaint (this seems to happen mostly with layered meshes)
opal aurora
There's a few possible causes actually
Layered meshes, doubles, too complex for autoweights
frail junco
fantastic screenshot
opal aurora
I have a feeling in your case it is possibly doubles, which can be cleared out by going into edit mode on the mesh, pressing W and selecting remove doubles
After doing such try autoweights again
opal aurora
There ye go
worldly willow
removing doubles always gives me tons of holes in the avatars :/
opal aurora
Maybe your setting is a tad too high? :o
Removing doubles does have a range you can set iirc
worldly willow
last time i used it (the one in Cats ) it literally removed every other face
of the whole model
opal aurora
Ouch
It supposedly only removes very close vertices, or merges them
Unsure of which atm
The usual cause for autoweights going out if whack tends to be doubles, then after comes complexity and then layered meshes in terms of occurrences
As far as i've seen so far
I feel like i just wrote something redundant
opal aurora
If separated into sections to then weight blender definitively wouldn't complain, it tends to be merged entire complex meshes that... well... tilt it
That's what i've noticed from testing atleast
opal aurora
Not really, not literally atleast
worldly willow
parent (keep offset)
frail junco
parent both to the bone itself or?
opal aurora
Stick bone layouts always felt off for me, can never tell what's the head or tail personally
frail junco
yes
opal aurora
You can only use a single hip bone on a humanoid setup
frail junco
i attempted this a year ago and couldn't figure out why it wasn't working
and that's why?
oi vey
opal aurora
Lemme see if i can find the setup i wrote down
frail junco
oh shoot i found my original from a year ago
it was more complex because i worked on the hands
opal aurora
//CodeBlockType is fix
Armature Naming Scheme Layout
|>Parent
|-----Child
&
Parent
    Child
=
|>Hips
|    Spine
|        |>Chest
|        |    Neck
|        |        |>Head
|        |        |-----RightEye
|        |        |-----LeftEye
|        |
|        |-----Right shoulder
|        |        Right arm
|        |            Right elbow
|        |                Right wrist
|        |
|        |-----Left shoulder
|                Left arm
|                    Left elbow
|                        Left wrist
|
|-----Right leg
|        Right knee
|            Right ankle
|                Right toe
|
|-----Left leg
        Left knee
            Left ankle
                Left toe
but same issue, so any help to fix that is appreciated
opal aurora
Wrote that down a few days ago, see if that helps you out a tad
You can ignore the toe and eyebones if you don't use them
But the rest is pretty much mandatory
frail junco
well i followed that video from the Pins
so i'm a tad confused on what you mean by just one hip bone
opal aurora
The last screenshot you sent has 1 hip bone
frail junco
but i thought it needed to be connected to the bottom, and not the top?
I don't think i wrote enough information
opal aurora
The tail is what the parented line will aim to, which is what you see happening
worldly willow
only for full body a rotated hip bone is added which may be what is confusing you
opal aurora
The bulky points on a bone will aim at the skinny point of what they parent to
frail junco
You know what would help me
Actually parenting the old model to its armature
oh wait, it already was
but i do see what you guys mean now
since i just now realized that he added a second bone to the model and never spoke about it
nevermind then, i think i'm all set
it was just confusing how i followed the video step by step, but when he posed the hip, it actually moved, unlike mine in which the whole model gets stretched
Thanks for the help btw
worldly willow

frail junco
cough on actual review, that extra piece is just the arm and I'm dumb. But that video has a different result than I did with posing
So 🤷
 pine iron
Is it possible to mirror one side of the bones to the other side? Or do I have to do them one by one aswell?
naive tree
select first bone in chain, shift or ctrl+G > children, then W> symmetrize
you might need to xmirror blur weights at 0.00001 values tho
for them to be properly named they need to start with Left/Right or end with .l or .r
pine iron
Thanks, will give that a try in a bit. Ijust noticed I forgot a hipbone.. Can I just make a new one and somehow add it to the spine?
Also, does the direction of the bones matter? Else Id just pull one out of the spine
 granite epoch
Need help with fullbody track rigging issue, well.. I guess tippy toeing also work in normal VR but still
 solemn kelp
anyone know why some models in fullbody sink into the ground? bones are right length and made for full body tracking.
pine iron
Just finished all of the bones for my model (.obj). All named and connected correctly ( I think) . If I export as .obj and I try to use it in Unity all the bones seem to be gone. If I export as .fbx it doesnt work at all. Any Idea whats going on? The model is quite messy but it should still work?
 wet linden
.obj files don't hold bone info
pine iron
Okay, I feel like I could need some advanced help, does anyone have the time to go on a call or sth.? Would help a lot.
crisp tendon
that's very basic avatar creation stuff, you should try to watch a tutorial
pine iron
I did, plenty acutally. It's just that the model that Im trying to use is quite messy
crisp tendon
messy how ?
pine iron
The structure of this thing. when I try to change textures for example, its just not doing what i think it should do. But thats probably me doing mistakes since im fairly new to blender
above I just have the armature with the bones that I made.
 queen mural
work within the properties section
crisp tendon
You should use the material tab in blender for that
queen mural
pine iron
yesterday i spent an hour in both texture and material tab, changing the image and texture files without any result Now it worked with the material tab MMD Texture. Could you explain the differences maybe? what does the texture tab do, if its acutally the material, changing the texture of the model
queen mural
to begin with you need to make sure whatever you're applying it to has UVs and is assigned properly within the texture section
i'm not too familiar with blender render internal though
besides that make sure you enable textures within viewport
 final summit
I think in the middle of the top bar area in blender there is a drop down menu, it should say "Cycles Render" if I remember correctly, I might be wrong though im also really new to this
and what rappy said
queen mural
Cycles is only for rendering really
pine iron
The model itsself has a working texture, found that out by pressing alt Z
I just wanted to exchange it with a higher resolution one
queen mural
for porting to vrchat you wanna be in blender render
refer to what i directed you to before
final summit
ok, good to know
 pine iron
wait yea, i remember reading about that earlier today, forgot over the day tho so didnt try..
Anyway, back to channel topic
I made all my bones and wanted to give it a quick try if it works. Had all bones connected to the right things in unity and uploaded to vrchat. Not a single thing on the model was moving. Do the bones need to be connected to the model in a way?
queen mural
Ah you gotta understand that you need weights
pine iron
cause right now in my scene i have the armature and the model in the same "level" of the hirachy
queen mural
and the bone names need to correspond to the respective vertex group it is utilizing
assuming whatever you're using has vertex groups to begin with
pine iron
doubt that tbh
queen mural
queen mural
Yeah so either learn weight painting or move on to something else
can be rather confusing especially when going in without any experience
pine iron
I have a model that somewhat worked made with mixamo
queen mural
then use that instead
pine iron
but the leg animations were messing with rest of the model a bit, so I wanted make one from complete scratch
queen mural
redoing the armature wouldn't fix that
sounds like a weighting issue hence you gotta either fix the weights on the mixamo one
or choose to weight paint it from scratch
pine iron
alright, i ll look up some vids and then decide
queen mural
i recommend understanding how weights work to begin with then look up techniques
basically weights are values assigned to vertices between the value of 0 to 1
but they are defined on a per bone basis and they all influence each other
so bone #1 could define Vert #1 by .5 and the bone #2 could define the weight by .5 for Vert#1 to add up to a total of 1
when bone #1 is moved/scaled/rotated the Vert #1 is influenced by .5 (Imagine50%) based upon the location of bone #1
pine iron
This seems to be exactly what I was looking for, thanks a lot!
queen mural
great
pine iron
I get some weird clipping on the face and on the robe now, but I assume thats still a weighting issue? I'll put some more time into it tomorrow.
queen mural
yeah probably
 echo inlet
This might be a faq but does anyone know why my models lose their dynamic bones when uploading for full body? 😞
queen mural
you sure it isn't dynamic bone limiter at fault?
fading verge
im a little confused with this rigging im trying to do. Im trying to weight paint a helmet to the head bone, i have the helmet mesh parented to the armature with an armature modifier on it and then fully weight painted the helmet but it does not move when i rotate the head bone. any suggestions on what the problem could be?
im doing the same thing on another helmet and its working normally so im not sure what the problem is
the helmet that is having the problem is from a different model if that matters
queen mural
perhaps this is your issue

 solid crypt
Hi, I'm having this problem, could I get some help please?
It says "no mesh inside the armature found!"
well, Everything was alright till I merged all the parts together using alt + j
crystal vector
@solid crypt make the armature the parent of the mesh e.g. by dragging the mesh onto the armature
opal aurora
You merge parts together with ctrl+j, not alt+j
crystal vector
Now I wonder, what does alt+J do 🤔
solid crypt
It doesn't work, @opal aurora
I'm sorry, could you explain more @crystal vector
I mean where I can select the mesh
opal aurora
Deselect everything by right clicking on an empty spot, select a single part by right clicking, press A to deselect all and then A to reselect all and then ctrl+j
Blender fails to understand what is selected to merge at times for whatever reason
Alt+J seems to be related to faces so i assume mesh edit mode shortcut
solid crypt
It's all one part right now @opal aurora
opal aurora
Then it's merged
solid crypt
When I clicked ctrl + j I got "no mesh data to join" @opal aurora \
and when I click fix module I get "no mesh inside the armature found!"
opal aurora
Take a screenshot of your hierarchy
solid crypt
crystal vector
As I said, drag the mesh onto the armature
opal aurora
Ah, you literally have the mesh outside of the armature... now i wonder if alt+j detatches objects from their parent...
opal aurora
Armature deform
opal aurora
Think you can literally just select armature deform
queen mural
yeah but i prefer empty
 pine harbor
@crystal vector apparently, Alt+J can merge triangles together into quads when you're editing the mesh -- although i've got no idea if it does anything in Object mode
https://docs.blender.org/manual/en/latest/modeling/meshes/editing/faces.html
echo inlet
Does anyone know why the SDK performance details doesnt detect my bones/colliders?
granite epoch
Still trying to find a person who knows how to rig a digitgrade leg so it can tippy toe
queen mural
would this not work?
gritty nest
Just rig it as normal with the toe bones and everything
Then configure the T-pose in Unity to have it stand on its toes by default
Or just have a foot bone where the mesh is actually just standing on its toes already
pine iron
I think I made it worse lol
Does the neck group need to at least have some weight painted somewhere?
queen mural
you're better off looking up a tutorial for weight painting
weights are values assigned to vertices between the value of 0 to 1
and they are bound to bones or in this case vertex groups
they are essentially what defines the amount a vert is moved based upon the pivot of the bone being rotated that is influencing them
you wanna work on the chest and shoulder bone/vertex group
Not all of it no
Not really no but that isn't the issue at hand
you want a gradient falloff around the shoulder
this is why i advise you follow a tutorial
median thunder
Hey guys, does anyone know how to fix my arms so my avatar elbow dont stay on that position, even when my irl elbow are right next to my body?
 wet hollow
That's because the arm doesn't have the correct proportions
The lower arm looks to be a bit too long and the upper slightly too short
naive tree
yep, upper bone is shorter than lower
pure valley
Does anyone know where I can request for a simple rig for a quadruped? Pretty much stuck mirroring a single leg to use for the other 3.
median thunder
@naive tree @wet hollow That was the problem, thank you very much!!
wet hollow
Yay!
pine iron
Checked the weight paint of child bones?
fading verge
https://cdn.discordapp.com/attachments/402349592244649996/566156157127884801/unknown.png how do i fix these problems? ive done it once but dont remember the solution
 gritty nest
Reorder the bones in Unity
You have
- Left Arm
-- Sleeve_L
-- Left Elbow
Swap the last two
The next bone down should be the first one in the chain
fading verge
https://cdn.discordapp.com/attachments/402349592244649996/566511657933602827/unknown.png https://cdn.discordapp.com/attachments/478941902276788224/566429588884815873/unknown.png im confused on how to fix this problem. the thigh bones should be rotated a little right? but im not sure on which axis or by how much.

 sleek isle
Am confuse. What problem?
fading verge
The angle between pelvis and thigh bones should be close to 180 degrees (this avatar's angle is 173.6). Your avatar may not work well with full-body IK and Tracking
fading verge
so i think i found a problem, the right calf bone is mapped and rotated properly with the red and green axis lines in front of it right, but on the left calf bone the axis are blue and green so something is messed up about the bone i think
fading verge
not sure what to do about it
pine iron
174 is so close to 180, I wouldn't bother tbh
But to me it looks like the left leg bone is longer than the right
fading verge
i think thats just the angle of the photo, cause something about the legs are not the same which is making the angles of the leg, shin, foot all different
fading verge
i tried rotating the leg bones inward thinking that would fix the legs but they are still bending outward for some reason
opal aurora
You'll want the knees to be pointing a bit forward in terms of the bones, and have them completely straight when viewed from the front
Something of the sorts of this
Mine might be a bit crooked though as i just makeshifted it
fading verge
it sorta is already rigged like that, should i just push the angle slightly more then?
opal aurora
Slightly more i'd say then, make sure the bone rolls are at 0 (you can reset every selected bone's rolls in edit mode by pressing alt+r) and make sure to re-apply the humanoid config after making the changes, or else it'll use the old configuration and screw it up even more
fading verge
what exactly do the bone rolls do? cause on some of my other avatars there is just a little bit of bone roll but it works out fine in vr
opal aurora
Well, kinda like the name states, it's how the bones are "rolled" on their own axis, and i'm not entirely sure of how they can screw up, but i assume it's unity trying to set their rolls to 0, which would twist that specific bone to accomodate for it
But that is of course speculation
fading verge
ok ill try setting the roll to 0 then and adjusting the angle of the bones a little
opal aurora
You can also open up a menu with N on the right that will show you information and give you some options, i think you'll want the bones as straight as possible, so getting the X axis aligned between them all should go well
Also, funfact, you can press Ctrl+C and Ctrl+V without selecting the values and blender will still copy and paste between them just by hovering over them
fading verge
now thats a game changer right there
opal aurora
I couldn't stop using it after i found that out, and this works virtually anywhere in blender, i particularly use it most when copy-pasting paths for models
Atleast, works on fields you can input things into, not sure about other kinds of fields
queen mural
actually didn't know that wow
 quartz cliff
Hello. I'd need to know if it's possible to import into Blender a already rigged model and keep the bones. I tried and so far I couldn't find the way nor a tutorial. Thanks!
 slender cloud
 thick verge
on the aspect of custom characters, could I use IK in vrchat or is that not supported/ not advised
gritty nest
You can use your own IK, yes.
If you have Final IK
However, currently there is no way of obtaining the hand/head/hip/foot tracking points for yourself. I think it would be pretty cool if we had the ability to do so
 gloomy pollen
so I just spent a ton of time on this model then realized there is two upper body/neck/heads u_u
and half of the stuff is parented and weight painted to one
is there a quick way to merge head bones/weight paint/etc. ?
 humble lake
@slender cloud i can see from that image that the shoulders aren't mapped
gloomy pollen
yeah any quick way in blender? lol
humble lake
@gloomy pollen delsounds odd, but if somehow the chest weight painting is shared between two chest bones, just parent one chest to the other chest and use the bone merging button on cats tools
humble lake
Makes no difference actually. Just merge upper body C to B then B to A then extend A to where C started/ended
If you're description is correct, I'd think that should fix it
gloomy pollen
oooh, which section of cats is that under?
 fair epoch
http://prntscr.com/nbkw8n http://prntscr.com/nbkwp5 i cant for the life of me figure out why im floating in game when everything is set to "ground"

 gloomy pollen
xanex check point of origin in blender
fair epoch
0,0,0
gloomy pollen
or, dirty fix, in rigging grab your hips and move your model down and save 😛

 gloomy pollen
lol
@humble lake I've squashed the parents, how would I merge the two necks together?
since they are on the same parent
fair epoch
making 2 bones 1?
humble lake
Select one neck, then the other, then hit ctrl + p then keep offset
Sorry for slow reply, got me supper
gloomy pollen
squizma I got it, did "To Parent" to merge down the tree
then did "to active" with both heads selected
and it merged them
and it looks like its worked to fix it 😮
humble lake
Awesome! I'm glad it worked~
humble lake
yep no problem~
humble lake
Uh ooh
gloomy pollen
lol i tried to overwrite the other fbx, let me try a fresh one xD
humble lake
oh god yeah that doesn't work if you did heavy rig modifications hahaha
gloomy pollen
i didnt but the bone parenting changed so ... xD
I just didnt want to remap the viseme list ;_;
humble lake
If you hot the gear on the top right and copy component and paste it to the new one you actually dont have to
You just have to link the body back again and thats it
gloomy pollen
you still have to fill exclusions
and the body mesh is different so
it would be mapped to the other models mesh I think
humble lake
You shouldnt actually, as long as they share the same name visemes. If you used cats tools to make em it should carry over just fine
gloomy pollen
oooh ok
humble lake
Trust me, I also hate doing those visemes hehe
gloomy pollen
xD
wish they could make an auto-detect button
ive seen some /modded/ sdk's do it
on youtube
humble lake
Honestly it wouldn't hurt, I'd say 90% of models use the same visemes anyhow
humble lake
@gloomy pollen lemme see a pic
gloomy pollen
humble lake
oh dear
 coarse pulsar
Did anyone worked on avatars that walk on all fours?
fair epoch
thats easy
coarse pulsar
Really?
humble lake
Del try looking at the weight painting for the neck
@coarse pulsar The biggest issue you're gonna have is finding/making a custom animation for the leg movements
fair epoch
ill make a quick sketch for an example if your using the default animation.
gloomy pollen
coarse pulsar
Well I'm going to work on this
humble lake
It certainly wouldn't hurt, but it won't fix any of your issues right now I would think
The humanoid rig is only using what you designated, so upperbodyA isnt being used (hopefully there's no weird weight painting there you need)
The problem if your neck weight painting
This is my head here
neck
And chest
gloomy pollen
looks like my neck just needs a repaint
humble lake
Yup, shouldn't be too too difficult
gloomy pollen
cool ill give that a whirl real quick
humble lake
good luck~!
gloomy pollen
thanks 😄
humble lake
no problem~
gloomy pollen
dang hair getting in my way
humble lake
I know that feel
gloomy pollen
lets try this
ooh that
made it worse? xD
I think I see the issue
uppderbodyA is in the neck position next to neck
think I fixed it... hmm
merged a few more bones and it seems ok
humble lake
Make sure you look at the weight painting on the chest and head if it persists, and merging more bones so its the same as a base humanoid rig sometime would certainly help too
but yaknow, dynamics, so dont try tooo hard haha
 torn elk
I dont know why but I suck at doing visemes
 low coral
has anyone had the problem where if they move left to right their eyes clip into the head?
frail junco
So i originally set the bones to parent with automatic weight, but now i want to weight paint them manually
But when i paint just the head, my Vertex Groups are showing a completely different thing
anyone know why?
crisp tendon
You should probably remove weight paint on everything else but the head
frail junco
how exactly?
 covert beacon
there are many tools in blender that help in this endeavor but my favorite is normalize that basically equalizes all weight values when they miss match
 vocal pier
can someone do a basic rig for my model for me?
pine iron
Trying to learn it is kinda fun @vocal pier
 slow gyro
😮
fading verge
@vocal pier just mixamo it
 median pasture
trying to weight paint this hand to look a little more like the second pic
anyone have any tips
using the smooth tool hasn't been much help
it seems that any sort of gradient i try to achieve doesn't really do anything either
it feels like as soon as i set even the smallest amount of weight to a vert it acts as if its full
case in point
to which editing weight or strength does not change it
side by side comparison of one weighted to 1 in red and .005 in blue
 crisp spear
So I managed to separate all the weapons that come with my model, however whenever I try to fix it, the system just combines her and the objects into one.
 naive matrix
maybe imagine legs there? like put the bones in the place where legs would be?
naive matrix
not sure, im not good at rigging, just kind of gave a suggestion.
oh slide. ok
thats cool
 proven vigil
I'm practicing importing of mmd models with full body support in mind, with some success
However I've encountered this issue where hand bones are twisted at shoulders and elbows. Anyone knows what could be causing this? Armature setup in blender looks normal.
crisp tendon
Reset rolls and apply rotations in blender
proven vigil
Do you mind elaborating on that please?
crisp tendon
On bones, you have an option to reset the rolls, do that first, then in object mode, apply rotation/position on everything
proven vigil
I figured the reset rolls part, thank you for the tip
Is there supposed to be an Apply button somewhere around here? Sorry for these elementary questions, am noob
crisp tendon
ctrl + a i believe
crisp tendon
yep those three
sleek isle
give up on the little witch academia model. I try myself and it was just a pain
opal aurora
@crisp spear not sure if you'll be able to animate it as you intend,but you can simply have dummy bones for legs that don't move anything
pine iron
If that doesn't work, maybe custom walking animation that doesn't do anything
opal aurora
@fading verge go into edit mode on the mesh and press W, and select remove doubles, then try autoweight again
 chilly oriole
idek (i dont even know) how to use blender
fading verge
i seem to get an issue with shin rotations occurring on their own while in game just on one foot
only happens with full body
 near kite
@crisp spear make some fake leg bones in blnder without any weightpaint
it should work
gritty nest
Could you be more specific than "some" issues? @fading verge
 obtuse cedar
@crisp spear A good idea for your model, if you're still up to it, is add dynamic bones for the legs (which it appears you've already done) and make your avatar have legs that aren't attached to any mesh. That way you can walk and still have her "slide" and animate
I did something similar to a mr. game and watch model where it wouldn't process its fullbody IK without it having all its fingers, so I extended some fingers out for the Ik and managed to bypass it. Though, with legs it might be a little different as you have to get the right values for them, so I suggest copying them off of an avatar and merging armature where needed.
 hot hornet
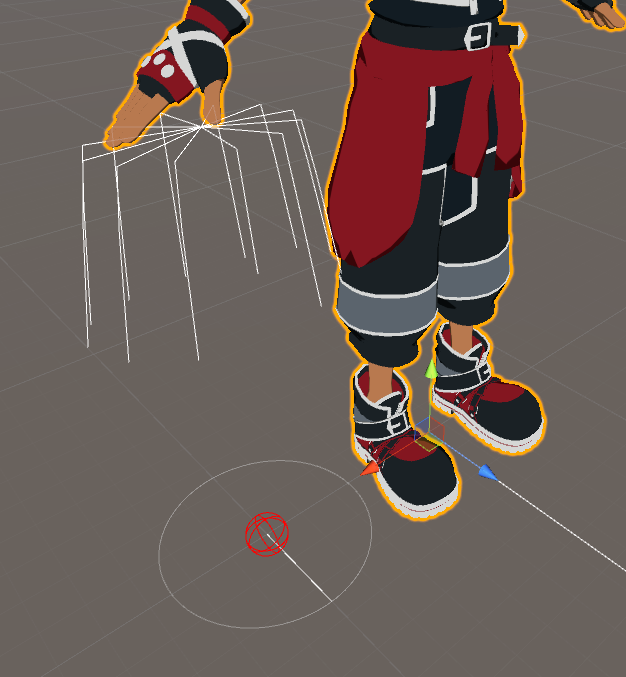
my dynamic bones aren't moving with my avatar.. anyone else have this issue? https://i.imgur.com/Aiuqp0x.png
 gritty nest
@hot hornet you probably duplicated your avatar or copied the script, but the dynamic bone component is still referring to the original rather than the duplicate.
Assign the correct model's root bone
hot hornet
i removed my avatar from the scene and dropped a fresh one in and it still won't stick with my mesh 😮 @gritty nest
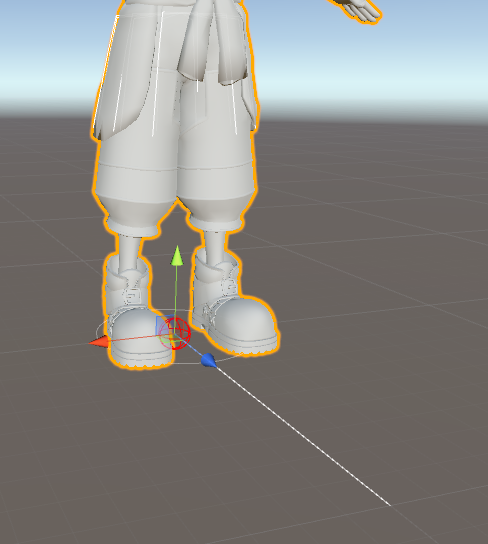
one thing i've noticed is that all the other avatars i upload with dynamic bones don't seem to have this red gyro with a white line on them https://i.imgur.com/SZ0nRV4.png


 opal aurora
Probably the dynamic bone limiter in vrchat, you're not in play mode, or the dynamic bone setup is incorrect, the white lines are the dynamic bones by the way
gritty nest
Probably not
stark musk
Ty
Do I need this "root" bone as well, or should I just delete it and use only the hip bone?
does this look okay? @gritty nest
gritty nest
For what exactly?
stark musk
I made the hips the parent of the two leg bones
and got rid of the "root" bone that was there by default
made the hips the root bone
gritty nest
Yeah that's how it should be
stark musk
alright, only asking because when I did "keep offset" for the leg bones it went to the top of the hip bone and not the bottom
 fringe jewel
any idea what would cause legs to do this?
its fine when in motion but when its standing still the legs bow in and sort of flop around
gritty nest
It's hard to tell @fringe jewel
Do the left and right foot switch places when you stop walking?
Or do only the knees bend inward like that?
It seems the legs are too straight so the IK gets confused.
Bend the legs just a little in pose mode in Blender, then apply as rest pose.
Or in edit mode but the results of that aren't quite as great
fringe jewel
yeah the knees are just bending that far when resting, ill give that a try
adjusting the knees helped a bit, i just need to adjust more now ty
 wind lynx
can someone help me out with this? 😄
gritty nest
Do you have full body tracking? @wind lynx
wind lynx
a friend of mine was testing it and the avatar just sunk down in the ground
I plan on getting one soon so was trying to fix it :3
gritty nest
Only in fullbody?
wind lynx
yeah
 lucid orbit
Depending on the model and it's armature, sometimes you have to adjust the knees a lot. It can get annoying uploading it again and again, but just keep trying until it works!
 autumn socket
Hey, so I noticed on my newer models that the mouth started out open as if it was the default Viseme...The pic below shows what it should be aka the default viseme (top) but once uploaded or I click the muscles & settings, the mouth opens a bit and stays open as default (bottom)...Wondering if anyone knows what cause this/how to close it...Again didn't happen until my last 2 models, so I may have just clicked something on accident too...
queen mural
if you view the muscle&settings section with a jaw bone set it will open it
there shouldn't be any issues ingame unless you don't want a jaw flap bone
in that case just unbind it from the mapping
autumn socket
Thank you! Yah the jaw bone was causing the mouth to open ingame too, disabled it and it works perfectly again!
median thunder
Does anyone know why when I look up/down with fullbody I can see my avatar neck or the back of my av head? https://cdn.discordapp.com/attachments/568443135139512320/568482600189034497/20190418130402_1.jpg

 gritty nest
That's a bug in the game.
@median thunder
Apparently this workaround "works" a little to mitigate it:
median thunder
ooh i'll try that ty vm
 glass panther
Does anyone have a list of the correct names for all of the bones of a rig? I had some wrong with the last model and kept getting warnings ^_^
opal aurora
//CodeBlockType is fix
Armature Naming Scheme Layout
|>Parent
|-----Child
&
Parent
    Child
=
|>Hips
|    Spine
|        |>Chest
|        |    Neck
|        |        |>Head
|        |        |-----RightEye
|        |        |-----LeftEye
|        |
|        |-----Right shoulder
|        |        Right arm
|        |            Right elbow
|        |                Right wrist
|        |
|        |-----Left shoulder
|                Left arm
|                    Left elbow
|                        Left wrist
|
|-----Right leg
|        Right knee
|            Right ankle
|                Right toe
|
|-----Left leg
        Left knee
            Left ankle
                Left toe
@glass panther
 south marten
Yeah, at the moment I'm just trying to figure out how to rig stuff in Unity. All of this is just going over my head D:
glass panther
Is there a way to test vrchat animations in unity to check if everything looks okay? Like the idle ones etc. It seems to tedious having to re-upload a model each time to check if the rigging works correctly.
slow gyro
@glass panther I set the animation I want to test in the idle slot and place the override into the avatars Animator component and press play
 lament jay
Does anyone know what to do when you only have 1 spine?.. (i've not made the rigging)
 calm needle
as in you only have the spine, no hips or chest?
 neat grail
Can i get help cause i cant move forward auto walking backwards
And im playing on desktop
calm needle
do you have a colider on your avatar?
neat grail
Whats that?
calm needle
then that probably isnt the issue. Stupid question, do you have a controller connected to the computer and is it just laying on the ground upside down?
neat grail
i have the controller connected
calm needle
i had a similar issue a while back where i had a slight drift to the left, ended up being the controller on the ground with the stick being slightly pushed. Wasnt sure if that was the same thing happening to you
neat grail
No it wasent cause im trying to play with it but it dosent work so im playing with keyboard and mouse
Are you gonna help me or not?
lament jay
@calm needle there is chest etc.. but not another spine